J_
Use _ Care
Bu-ilt-ln Wall
Guide
Oven
Finding information
MAKEA RECORDFORFUTUREUSE
[] [] [] [] [] [] [] [] [] [] [] [] [] [] [] [] [] [] [] [] [] []
Brand
Purchase Date
Model Number
Serial Number
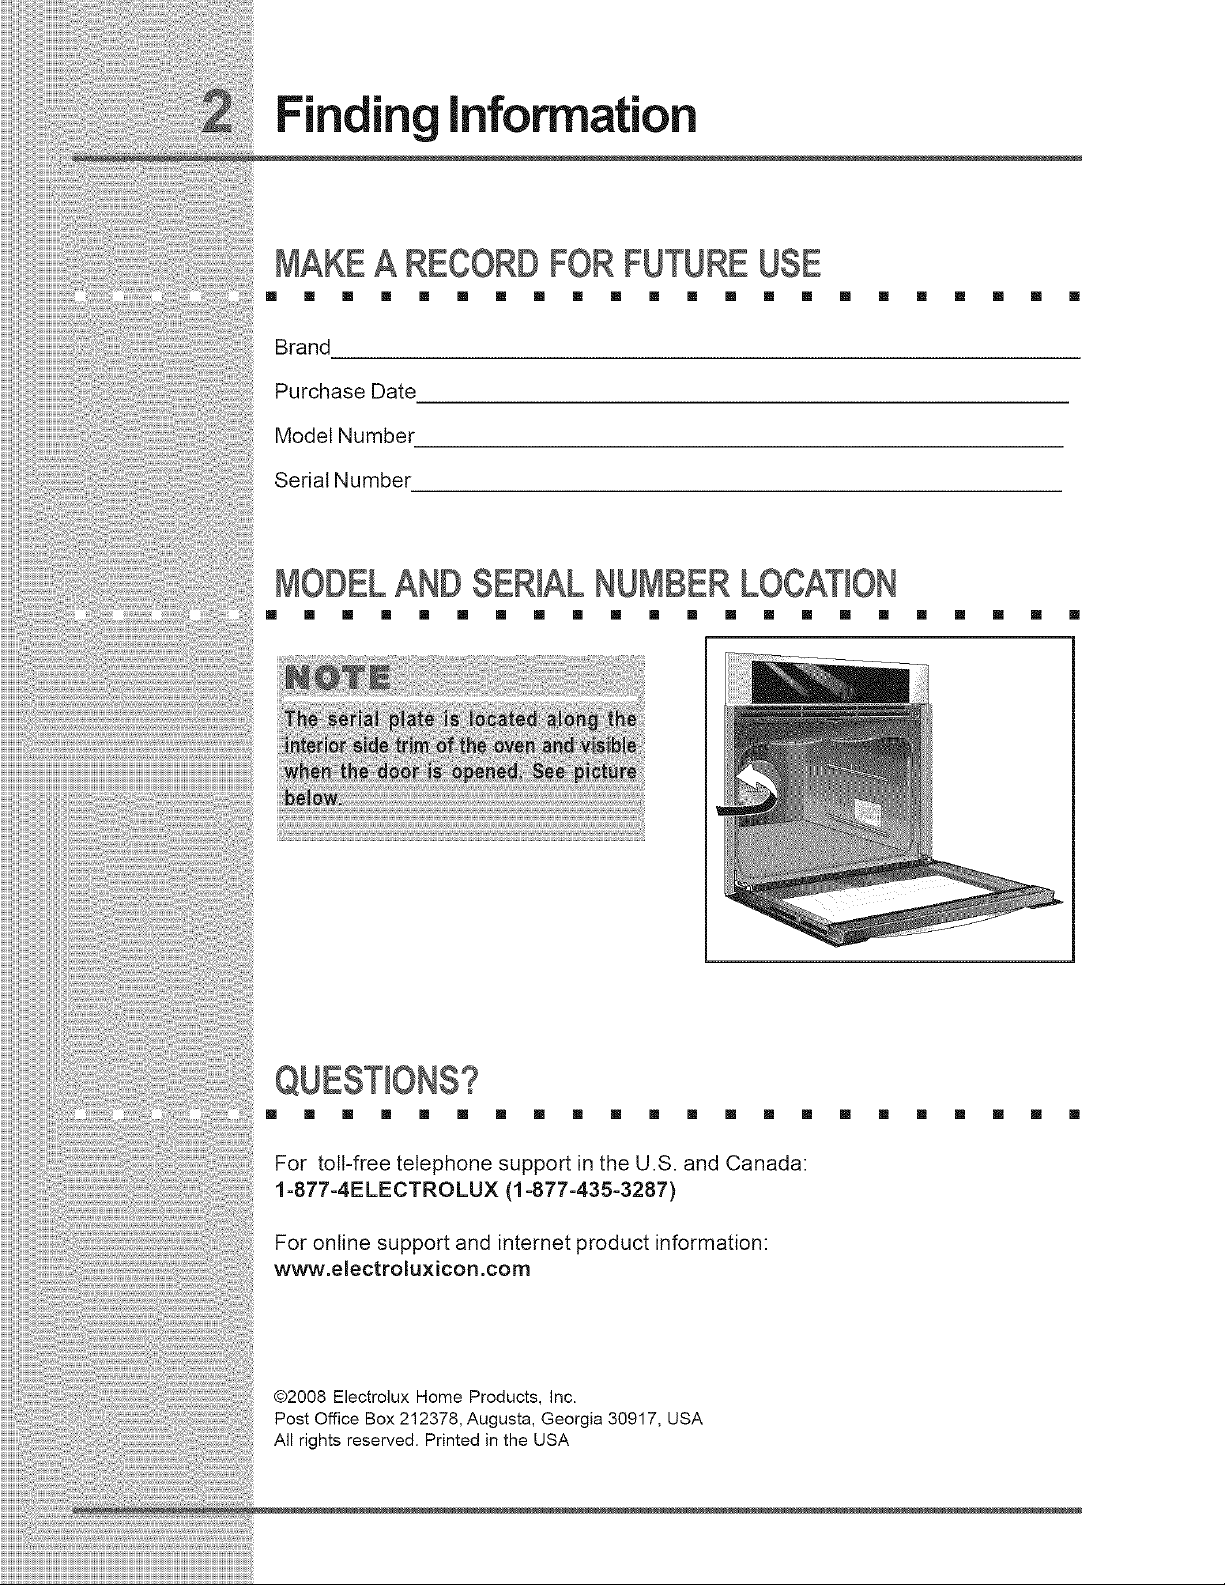
MODELAND SERIALNUMBERLOCATION
[] [] [] [] [] [] [] [] [] [] [] [] [] [] [] [] [] [] [] [] [] []
[] [] [] [] II [] [] [] [] [] II [] [] [] II [] [] II [] [] [] II
For toll-free telephone support in the U.S. and Canada:
1-877-4ELECTROLUX (1-877-435-3287)
For online support and internet product information:
www.electroluxicon.corn
@2008 Electrolux Home Products, inc.
Post Office Box 212378, Augusta, Georgia 30917, USA
All rights reserved. Printed in the USA
ControlPanelDisplayModes..........................14
TemperatureVisualDisplay.............................I4
OvenLight ......................................................15
ControlLock....................................................15
SettingtheKitchenTimer.................................15
Cooking Modes.................................................16
Baking.............................................................16
CookDuration.................................................17
EndTime.........................................................17
Broiling............................................................18
ConvectionBaking..........................................19
ConvectionConvert........................................20
RapidPreheat.................................................20
ConvectionRoasting.......................................21
ConvectionBroiling.........................................22
WarmOven.....................................................23
SlowCook ......................................................24
Dehydrating....................................................25
Defrosting........................................................25
BreadProofing................................................26
TemperatureProbe.........................................27
MultiStage.................................................28-29
GeneralCleaning............................................38
CareandCleaningofStainlessSteel...............39
ToRemoveandReplaceOvenDoor..............39
SpecialDoorCareInstructions........................39
OvenLight ......................................................40
BroilerPanCleaningTips ...............................40
Solutions to Common Problems.....................41
BakingProblems.............................................41
Solutions....................................................42-43
Warrantyinformation.......................................44
(MPORTANTSAFE (NSTRUCT)ONS
[] [] [] [] [] [] [] [] [] [] [] [] [] [] [] [] [] [] []
Please read all safety instructions before using your new Electrolux wall oven.
[] []
• Remove all tape and packaging wrap before using the appliance. Destroy the carton and
plastic bags after unpacking the appliance. Never allow children to play with packaging
material. Do not remove the wiring label and other literature attached to the back of the
wall oven. Do not remove model/serial number plate.
• Proper Installation--Be sure yourappliance is properly installed and grounded by a qualified
electrician or installer in accordance with the National Electrical Code ANSI/NFPA No. 70
(U.S.A.) or CSA C22.1, PART 1 (Canada)--latest editions and local code requirements.
Install only per installation instructions provided in the literature package for this appliance.
Ask your dealer to recommend a qualified technician and an authorized repair service. Know
how to disconnect the electrical power to the appliance at the circuit breaker or fuse box in case
of an emergency.
Electronic controllers can be damaged by cold temperatures. When you use
your appliance for the first time, or if it has not been used for a long period of time, make sure
that it has been exposed to a temperature above 0°C/32°F for at least 3 hours before
connecting it to the power supply.
• User Servicing--Do not repair or replace any part of the appliance unless specifically
recommended in the manuals. All other servicing should be done only by a qualified
technician to reduce the risk of personal injury and damage to the appliance.
• Never modify or alter the construction of the appliance by removing panels, wire covers, or
any other part of the product.
• Remove the oven door from any unused appliance if it is to be stored or discarded.
Stepping, leaning, sitting or pulling down on the door of this appliance can
result in serious injuries and may also cause damage to the appliance. Do not allow children
to climb or play around the appliance.
• Storage in or on Appliance--Flammable materials should not be stored in an oven.
This includes paper, plastic and cloth items, such as cookbooks, plasticware and towels, as
well as flammable liquids. Do not store explosives, such as aerosol cans, in or near the
appliance.
Do not use the oven for storage.
Do not store items of interest to children in the cabinets above an
appliance. Children climbing on the oven can be seriously injured.
Safety
To reduce the risk of tipping of the appliance. The appliance must be
secured by properly installed anti tip device, To check if devices are installed properly open
the oven door and verify that the anti-tip devices are engaged, See installation instructions,
Do not leave children alone--Children should not be left alone or unattended in the area
where an appliance is in use. They should never be allowed to sit or stand on any part of
the appliance.
• DO NOT TOUCH INTERIOR OVEN ELEMENTS OR INTERIOR SURFACES OF THE
WALL OVEN UNTIL THEY HAVE COOLED. The oven heating elements may be hot even
though the elements are dark in color. Areas near the elements may become hot enough to
cause burns. During and after use, do not touch, or let clothing or other flammable materials
touch these areas until they have had sufficient time to cool. Among these areas are the oven
vent openings, the surfaces near these openings, oven door and window.
• Wear ProperAppareI--Loose-fitting or hanging garments should never be worn while using
the appliance. Do not let clothing or other flammable materials contact hot surfaces.
Never use your appliance for warming or heating the room.
• Do Not Use Water or Flour on Grease Fires--Smother the fire with a pan lid, or use baking
soda, a dry chemical or foam-type extinguisher.
• When heating fat or grease, watch it closely. Fat or grease may catch fire if allowed to
become too hot.
• Use Only Dry Pot holders--Moist or damp pot holders on hot surfaces may result in burns
from steam. Do not let the pot holders touch the hot heating elements. Do not use a towel
or other bulky cloth instead of a pot holder.
• Do Not Heat Unopened Food Containers--Build-up of pressure may cause the container to
burst and result in injury.
IMPORTANTINSTRUCTIONSFORUSINGYOUROVEN
• Use Care When Opening an Oven Door--Stand to the side of the appliance when opening
the door of a hot oven, Let hot air or steam escape before you remove or replace food in
the oven,
• Keep Oven Vent Ducts Unobstructed. The wall oven is vented at the upper control panel or
at the center trim depending on the model. Touching the surfaces in this area when the wall
oven is operating may cause severe burns. Also, do not place plastic or heat-sensitive items
near the oven vent. These items could melt or ignite.
• Placement of Oven Racks. Always place oven racks in desired location while oven is cool.
Remove all utensils from the rack before removing rack. If rack must be moved while oven
is hot, use extreme caution. Use pot holders and grasp the rackwith both hands to reposition.
Do not let pot holders contact the hot oven element or interior of the oven.
• Do not use the broiler pan without its insert. The broiler pan and grid allow dripping fat
to drain and be kept away from the high heat of the broiler.
Safety
IMPORTANTSAFE INSTRUCTIONS
II [] [] [] II! [] [] [] [] [] II! [] [] [] II! [] [] II! [] [] [] II!
• Do not cover the broiler grid oroven bottom with aluminum foil. Exposed fat and grease
could ignite.
• Do not touch a hot oven light bulb with a damp cloth. Doing so could cause the bulb to
break. Disconnect the appliance or shut off the power to the appliance before removing and
replacing the bulb.
iMPORTANTiNSTRUCTiONSFOR CLEANING YOUR
OVEN
• Clean the appliance regularly to keep all parts free of grease that could catch fire. Exhaust
fan ventilation hoods and grease filters should be kept clean. Do not allow grease to
accumulate. Greasy deposits in the fan could catch fire. Refer to the hood manufacturer's
instructions for cleaning.
SELF CLEANING OVENS
• Clean in the self-cleaning cycle only the parts of the appliance listed in this Owner's Guide.
Before using the self-cleaning cycle of the appliance, remove the broiler pan, oven racks and
any utensils stored in the appliance. Also the side rails of the oven racks must be removed
for the self-clean function to operate.
• Do not clean the oven door gasket. The door gasket is essential form good seal. Care should
be taken not to rub, damage or move the gasket.
• Do net use oven cleaners. No oven cleaner oreven liner protective coating of any kind should
be used in or around any part of the appliance
_The health of birds is sensitive to the fumes off
some
extremely given during
the self-clean cycle of any wall oven. Move birds to another well ventilated room.
Feature Overview
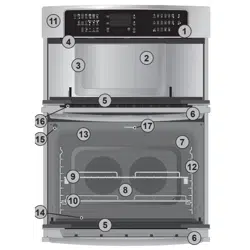
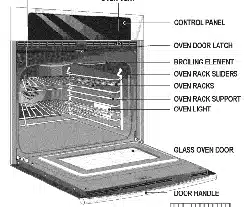
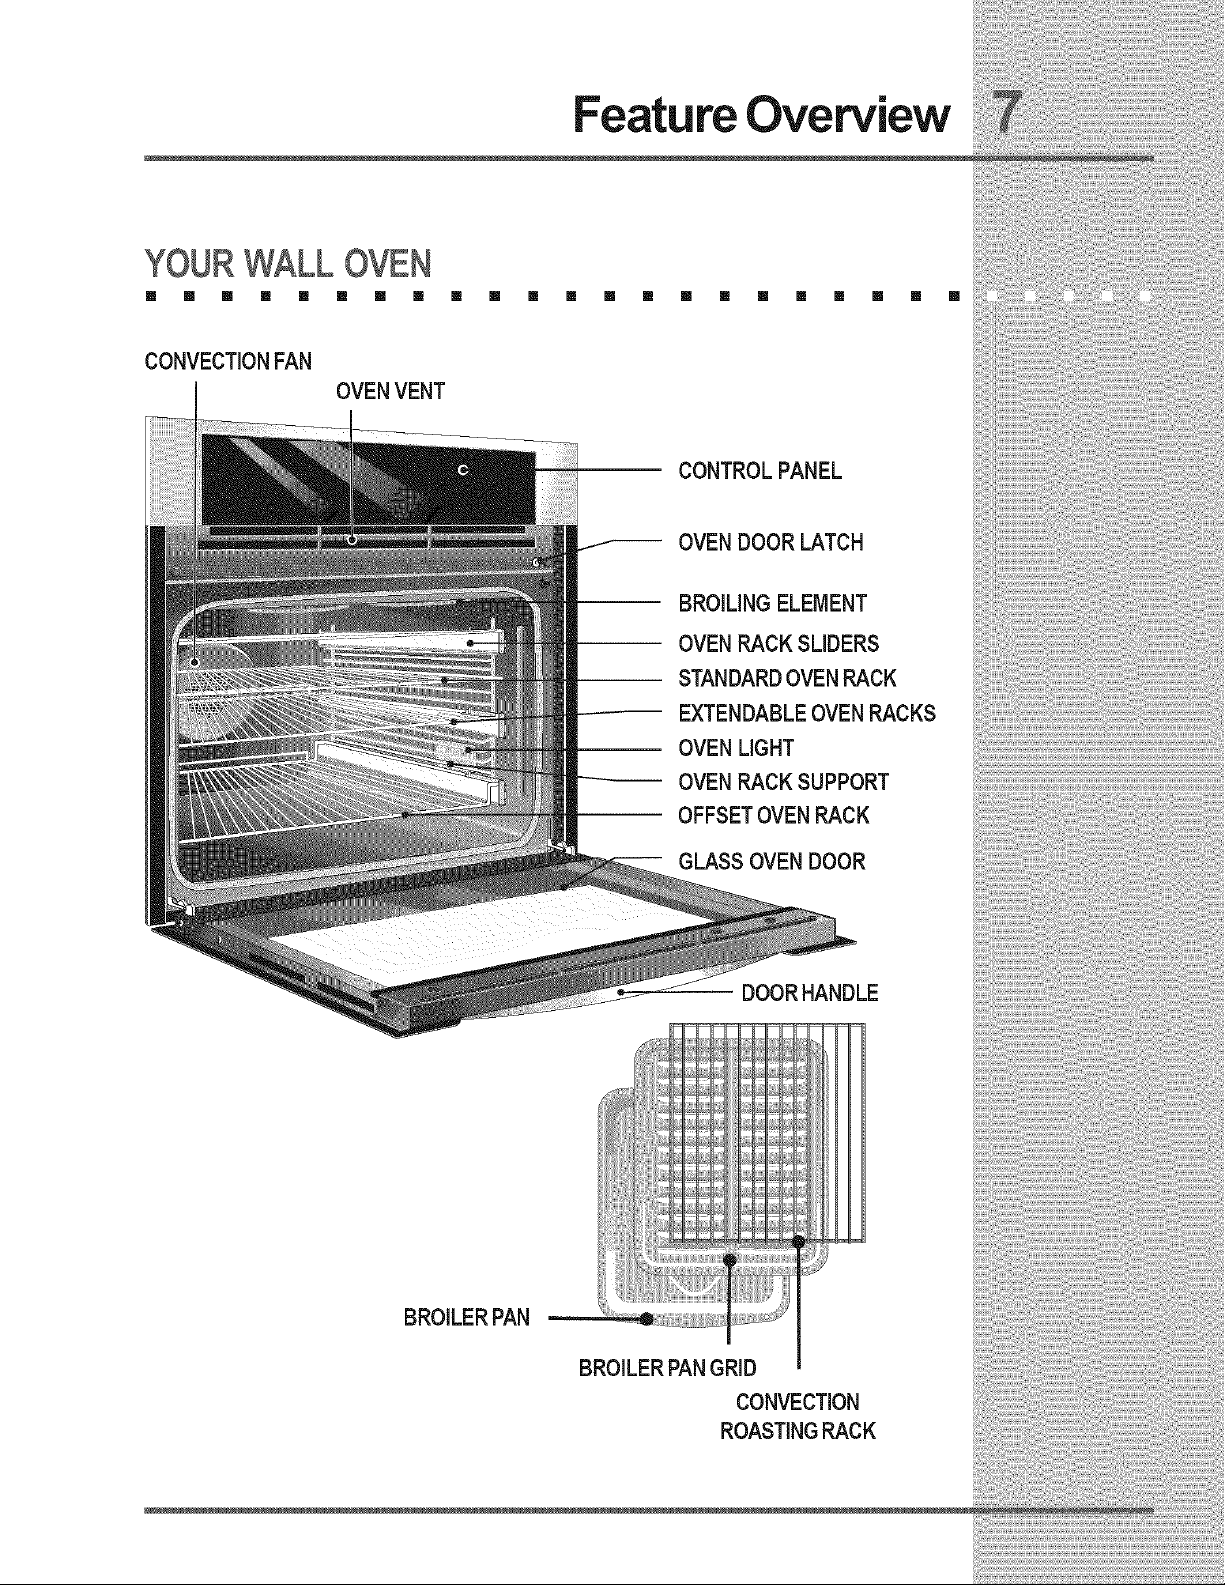
YOURWALLOVE.N • • • • • • • • • • • • •
CONVECTIONFAN
OVENVENT
i _ CONTROLPANEL
= OVENDOOR LATCH
i _ BRO L NO ELEMENTi J
OVENRACK SLIDERS : ::
STANDARDOVENRACK
OVENRACK SUPPORT
OFFSETOVENRACK
GLASS OVEN DOOR
-- DOORHANDLE
BROILERPAN
BROILERPAN GRID
CONVECTION
ROASTING RACK
Feature Overview
OVEN SUPPORTS& OVENVENTS
[] [] [] [] [] [] [] [] [] [] [] [] [] [] [] [] [] [] [] [] [] []
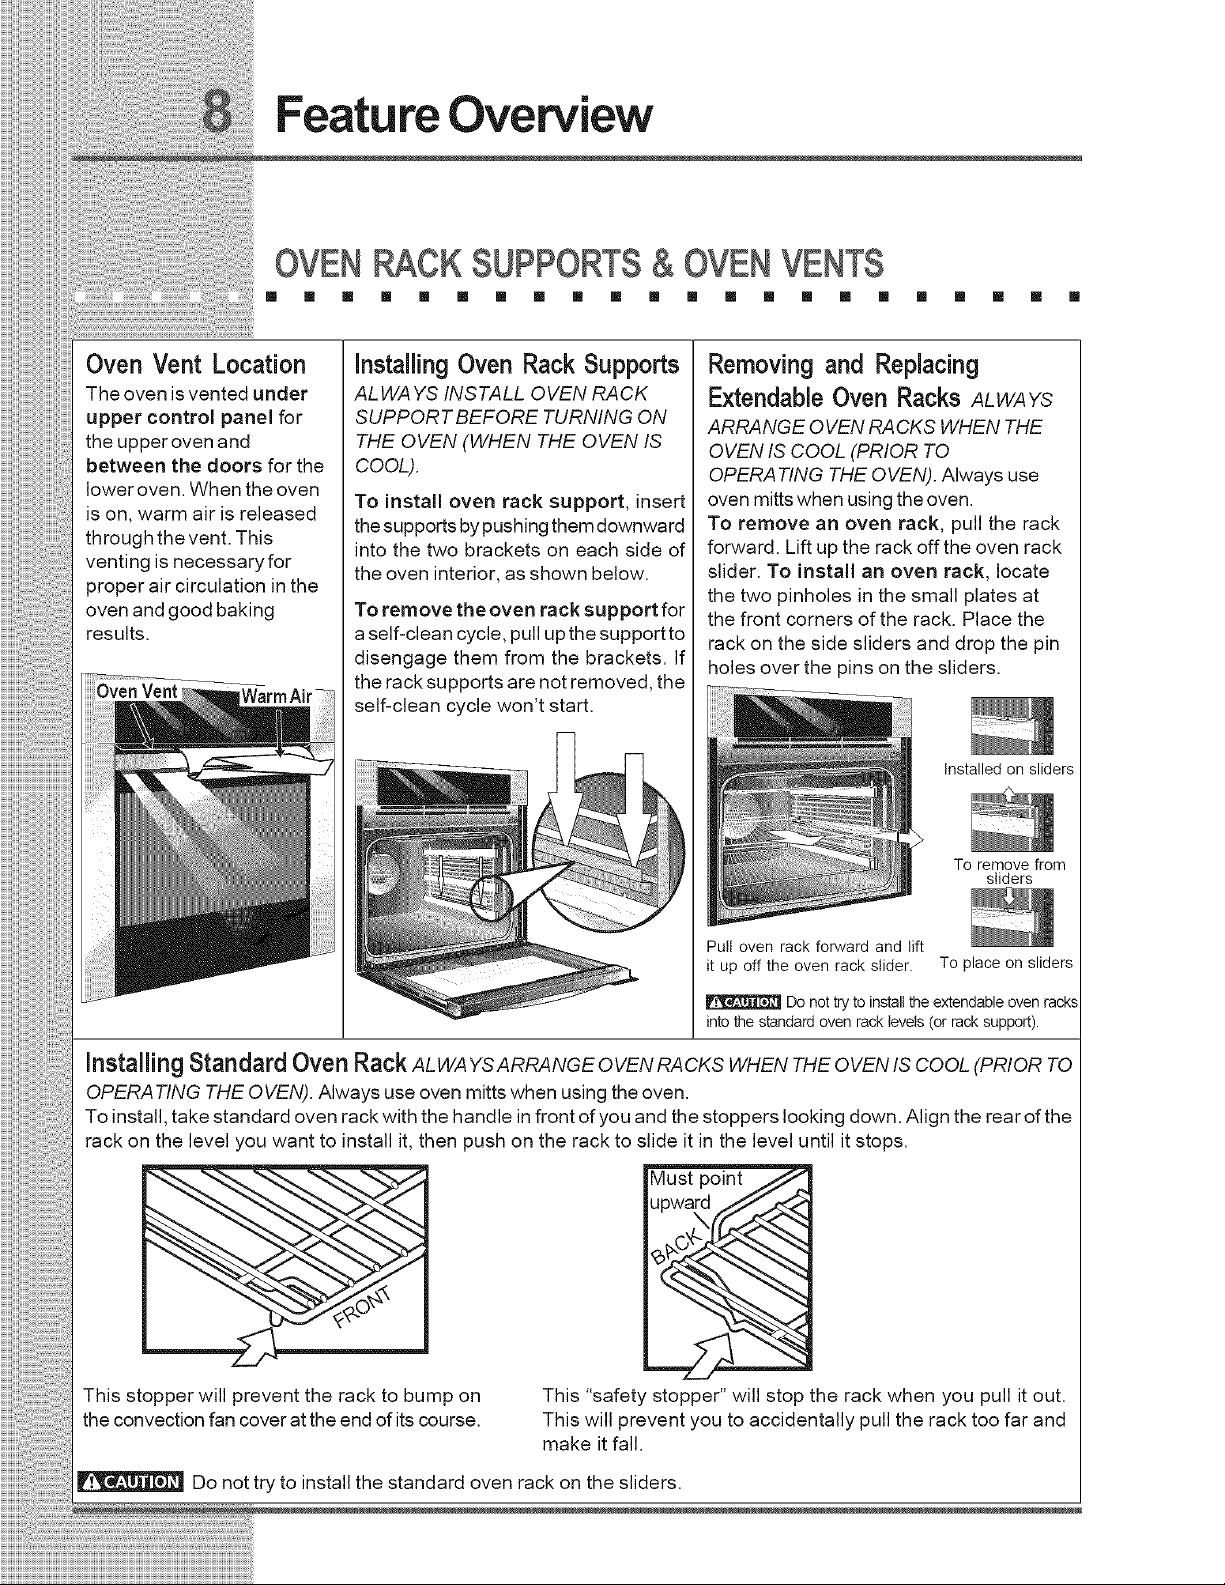
Oven Vent Location
The oven is vented under
upper control panel for
the upper oven and
between the doors for the
lower oven. When the oven
is on, warm air is released
through the vent. This
venting is necessary for
proper air circulation in the
oven and good baking
results.
OvenVent
Installing Oven Rack Supports
ALWAYS INSTALL OVEN RACK
SUPPOR T BEFORE TURNING ON
THE OVEN (WHEN THE OVEN IS
COOL).
To install oven rack support, insert
the supports by pushing them downward
into the two brackets on each side of
the oven interior, as shown below.
To remove the oven rack support for
a self-clean cycle, pull up the support to
disengage them from the brackets. If
the rack supports are not removed, the
self-clean cycle won't start.
Removing and Replacing
Extendable Oven Racks ALWAYS
ARRANGE OVEN RACKS WHEN THE
OVEN IS COOL (PRIOR TO
OPERA TING THE OVEN). Always use
oven mitts when using the oven.
To remove an oven rack, pull the rack
forward. Lift up the rack offthe oven rack
slider. To install an oven rack, locate
the two pinholes in the small plates at
the front corners of the rack. Place the
rack on the side sliders and drop the pin
holes over the pins on the sliders.
Installed on sliders
>
To remove from
sliders
Pull oven rack forward and lift
it up off the oven rack slider. To place on sliders
Do not try to install the extendable oven racks
into the standard oven rack levels (or rack support).
Installing Standard Oven Rack ALWA YS ARRANGE OVEN RACKS WHEN THE OVEN IS COOL (PRIOR TO
OPERA TING THE OVEN). Always use oven mitts when using the oven.
To install, take standard oven rack with the handle in front of you and the stoppers looking down. Align the rear of the
rack on the level you want to install it, then push on the rack to slide it in the level until it stops.
upward
This stopper will prevent the rack to bump on This "safety stopper" will stop the rack when you pull it out.
the convection fan cover at the end of its course. This will prevent you to accidentally pull the rack too far and
make it fall.
Do not try to install the standard oven rack on the sliders.
FeatureOverview
OVEN CKS
[] [] [] [] [] [] [] [] [] [] [] [] [] [] [] [] [] [] [] [] [] []
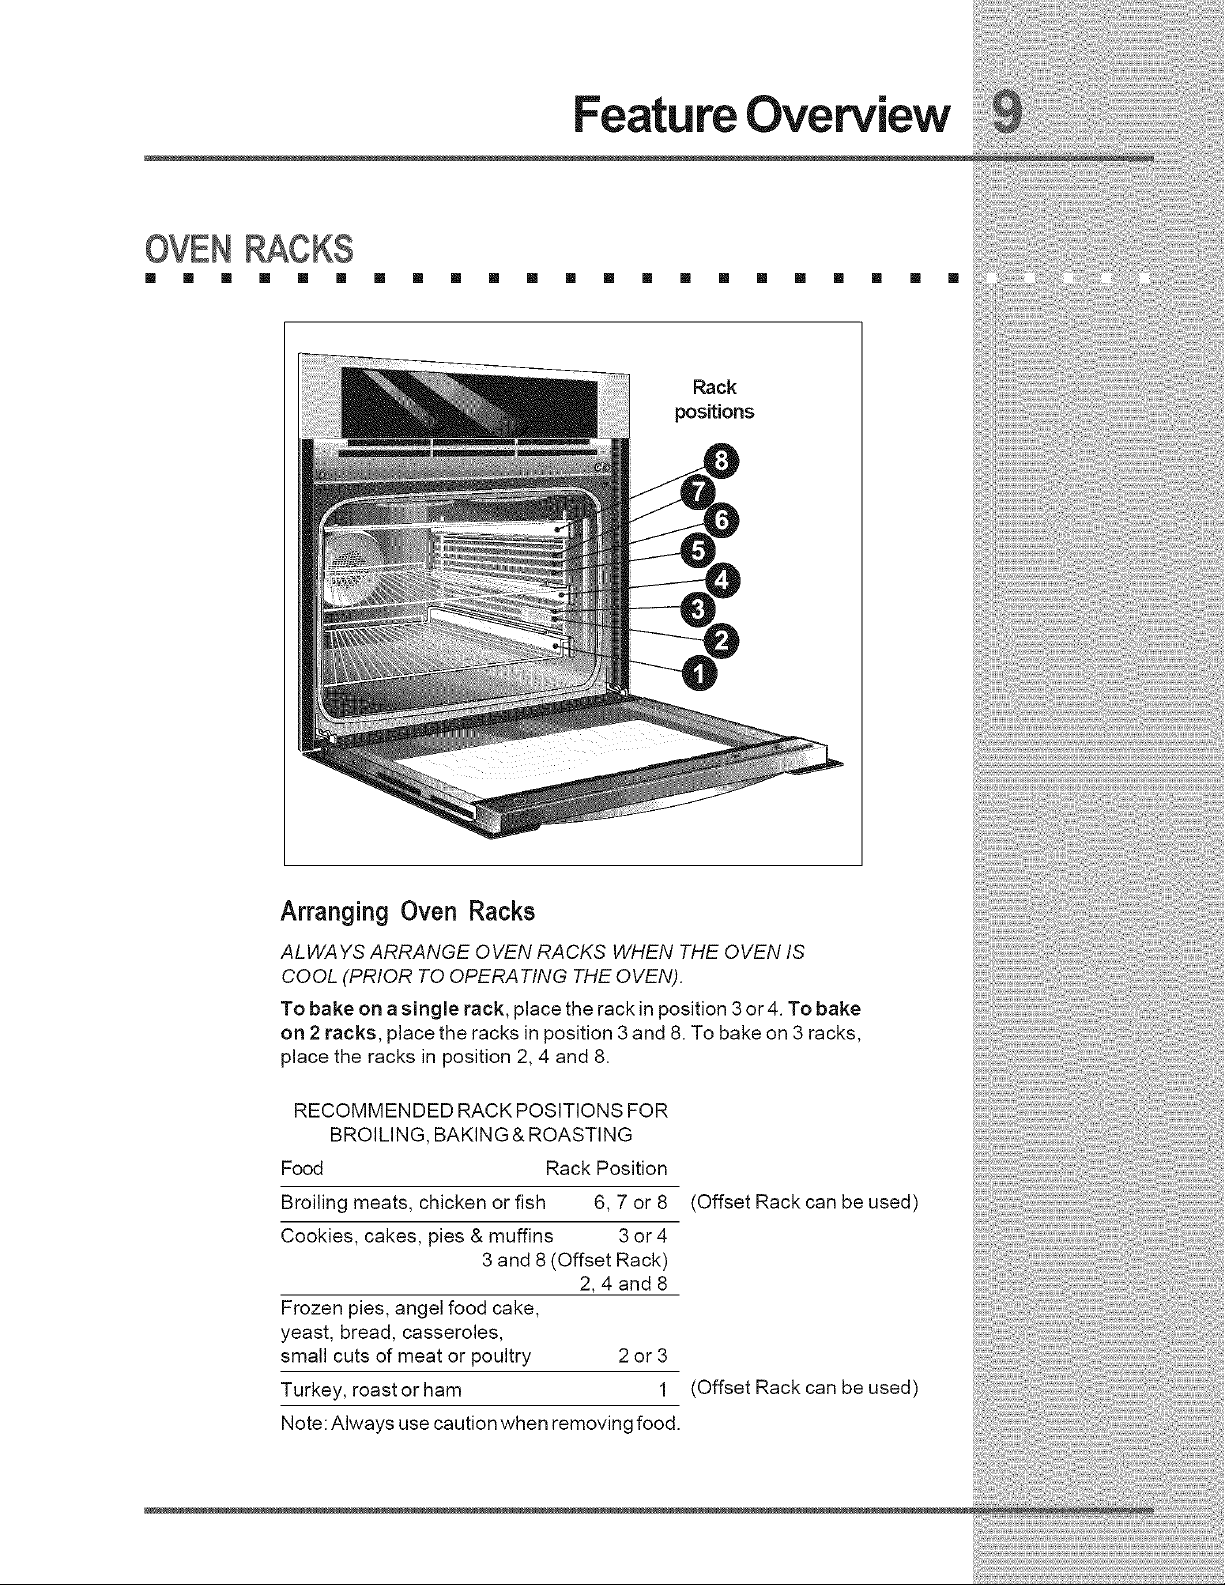
Rack
positions
Arranging Oven Racks
ALWAYS ARRANGE OVEN RACKS WHEN THE OVEN IS
COOL (PRIOR TO OPERA TING THE OVEN).
To bake on a single rack, place the rack in position 3 or4. To bake
on 2 racks, place the racks in position 3 and 8. To bake on 3 racks,
place the racks in position 2, 4 and 8.
RECOMMENDED RACK POSITIONS FOR
BROILING, BAKING & ROASTING
Food Rack Position
Broiling meats, chicken or fish 6, 7 or 8
Cookies, cakes, pies & muffins 3 or4
3 and 8 (Offset Rack)
2,4and 8
Frozen pies, angel food cake,
yeast, bread, casseroles,
small cuts of meat or poultry 2 or 3
Turkey, roast or ham 1
Note: Always use caution when removing food.
(Offset Rack can be used)
(Offset Rack can be used)
Feature Overview
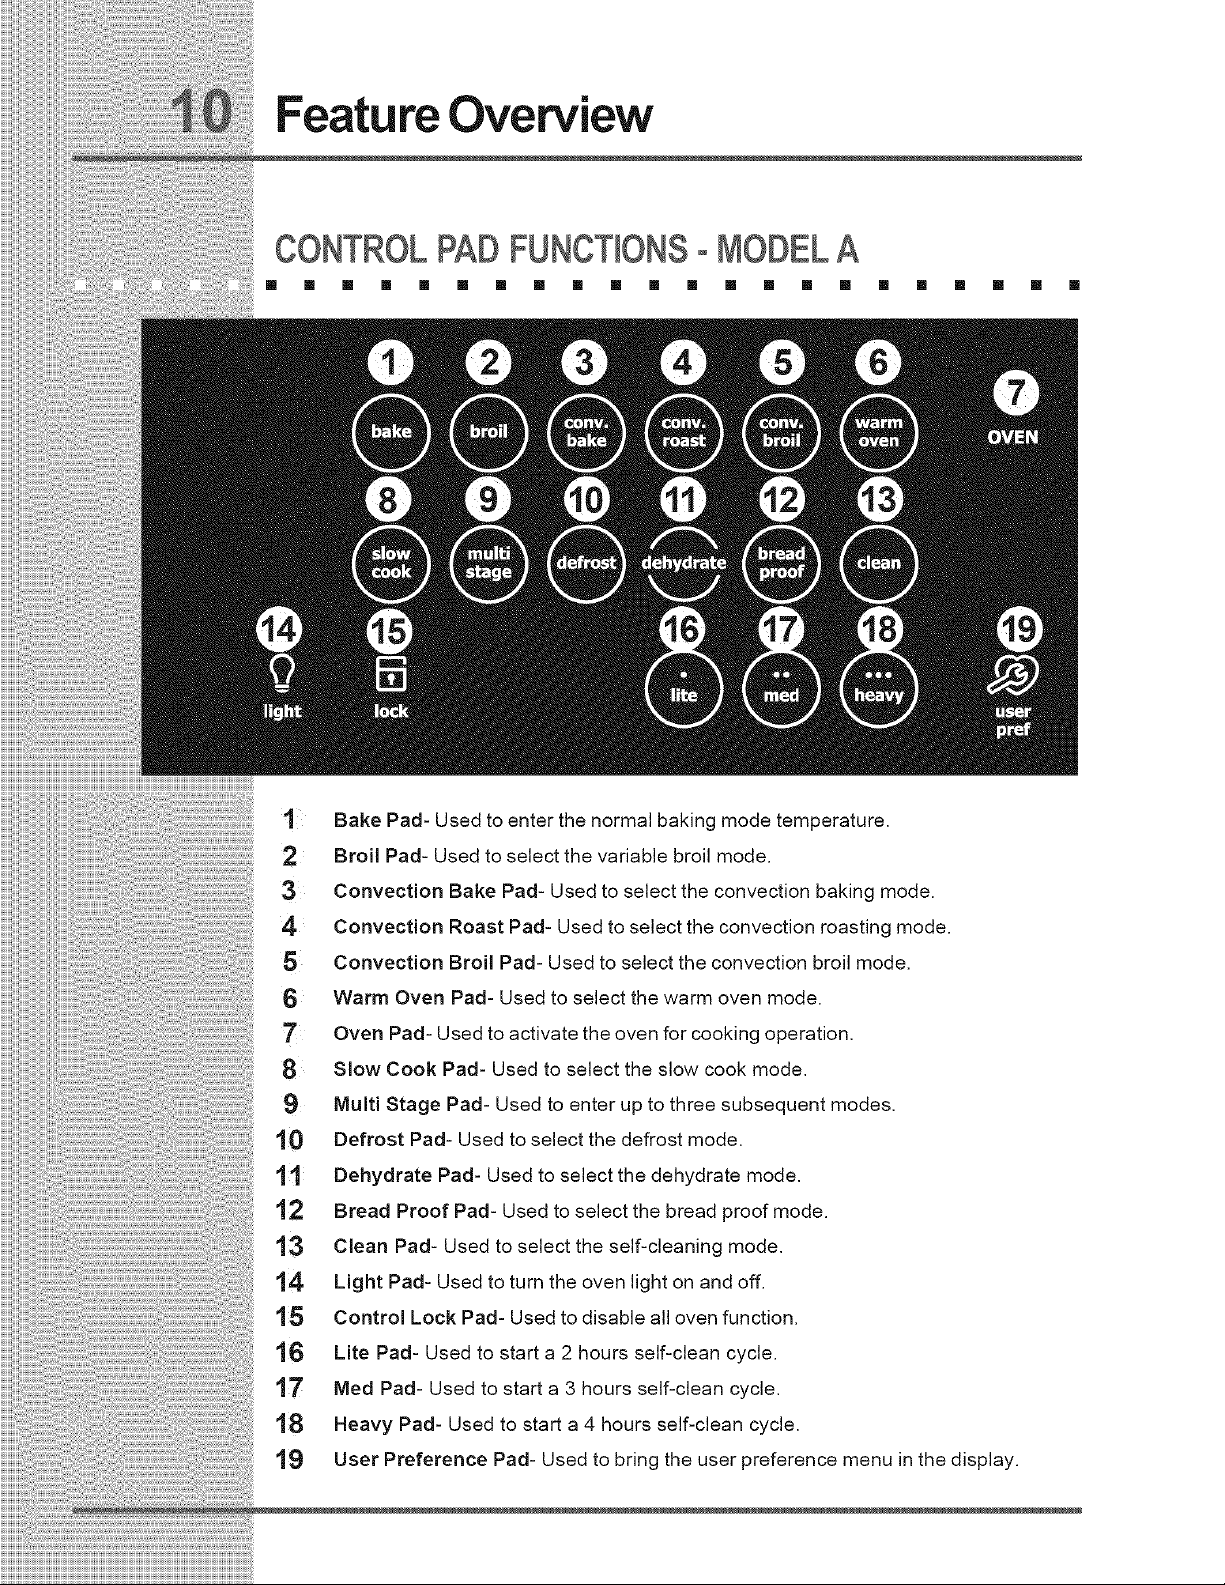
CONTROLPADFUNCTIONSoMODELA
[] [] [] [] [] [] [] [] [] [] [] [] [] [] [] [] [] [] [] [] [] []
Bake Pad- Used to enter the normal baking mode temperature.
2 Broil Pad- Used to select the variable broil mode.
3 Convection Bake Pad- Used to select the convection baking mode.
4 Convection Roast Pad- Used to select the convection roasting mode.
5 Convection Broil Pad- Used to select the convection broil mode.
6 Warm Oven Pad- Used to select the warm oven mode.
7' Oven Pad- Used to activate the oven for cooking operation.
8 Slow Cook Pad- Used to select the slow cook mode.
9 Multi Stage Pad- Used to enter up to three subsequent modes.
10 Defrost Pad- Used to select the defrost mode.
11 Dehydrate Pad- Used to select the dehydrate mode.
12 Bread Proof Pad- Used to select the bread proof mode.
13 Clean Pad- Used to select the self-cleaning mode.
14 Light Pad- Used to turn the oven light on and off.
15 Control Lock Pad- Used to disable all oven function.
16 Lite Pad- Used to start a 2 hours self-clean cycle.
t7 Med Pad- Used to start a 3 hours self-clean cycle.
18 Heavy Pad- Used to start a 4 hours self-clean cycle.
19 User Preference Pad- Used to bring the user preference menu in the display.
FeatureOverview
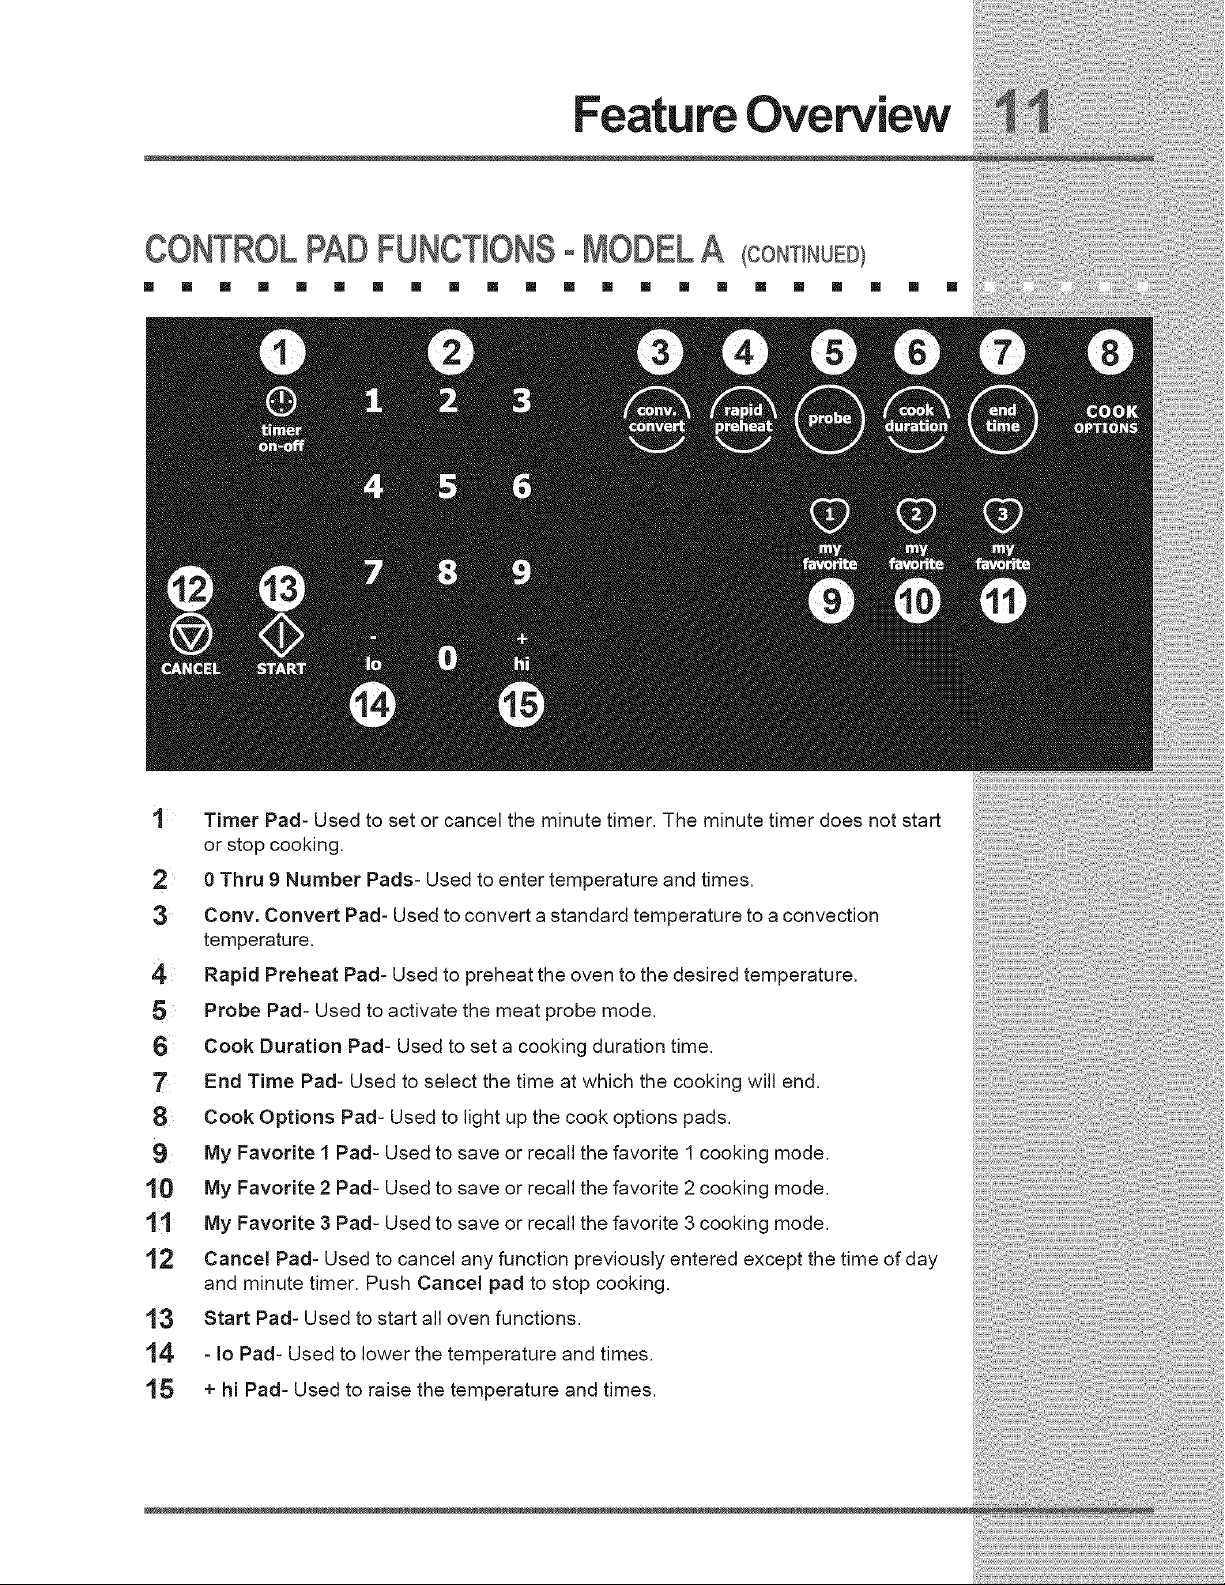
CONTROLPADFUNCTIONSoMODELA (CONTINUED/
[] [] [] [] [] [] [] [] [] [] [] [] [] [] [] [] [] [] [] [] [] []
1 Timer Pad- Used to set or cancel the minute timer. The minute timer does not start
or stop cooking.
2 0 Thru 9 Number Pads- Used to enter temperature and times.
3 Cony. Convert Pad- Used to convert a standard temperature to a convection
temperature.
4 Rapid Preheat Pad- Used to preheat the oven to the desired temperature.
,5 Probe Pad- Used to activate the meat probe mode.
6 Cook Duration Pad- Used to set a cooking duration time.
End Time Pad- Used to select the time at which the cooking will end.
8 Cook Options Pad- Used to light up the cook options pads.
9 My Favorite 1 Pad- Used to save or recall the favorite 1 cooking mode.
10 My Favorite 2 Pad- Used to save or recall the favorite 2 cooking mode.
1t My Favorite 3 Pad- Used to save or recall the favorite 3 cooking mode.
12 Cancel Pad- Used to cancel any function previously entered except the time of day
and minute timer. Push Cancel pad to stop cooking.
13 Start Pad- Used to start all oven functions.
14 - Io Pad- Used to lower the temperature and times.
15 + hi Pad- Used to raise the temperature and times.
Feature Overview
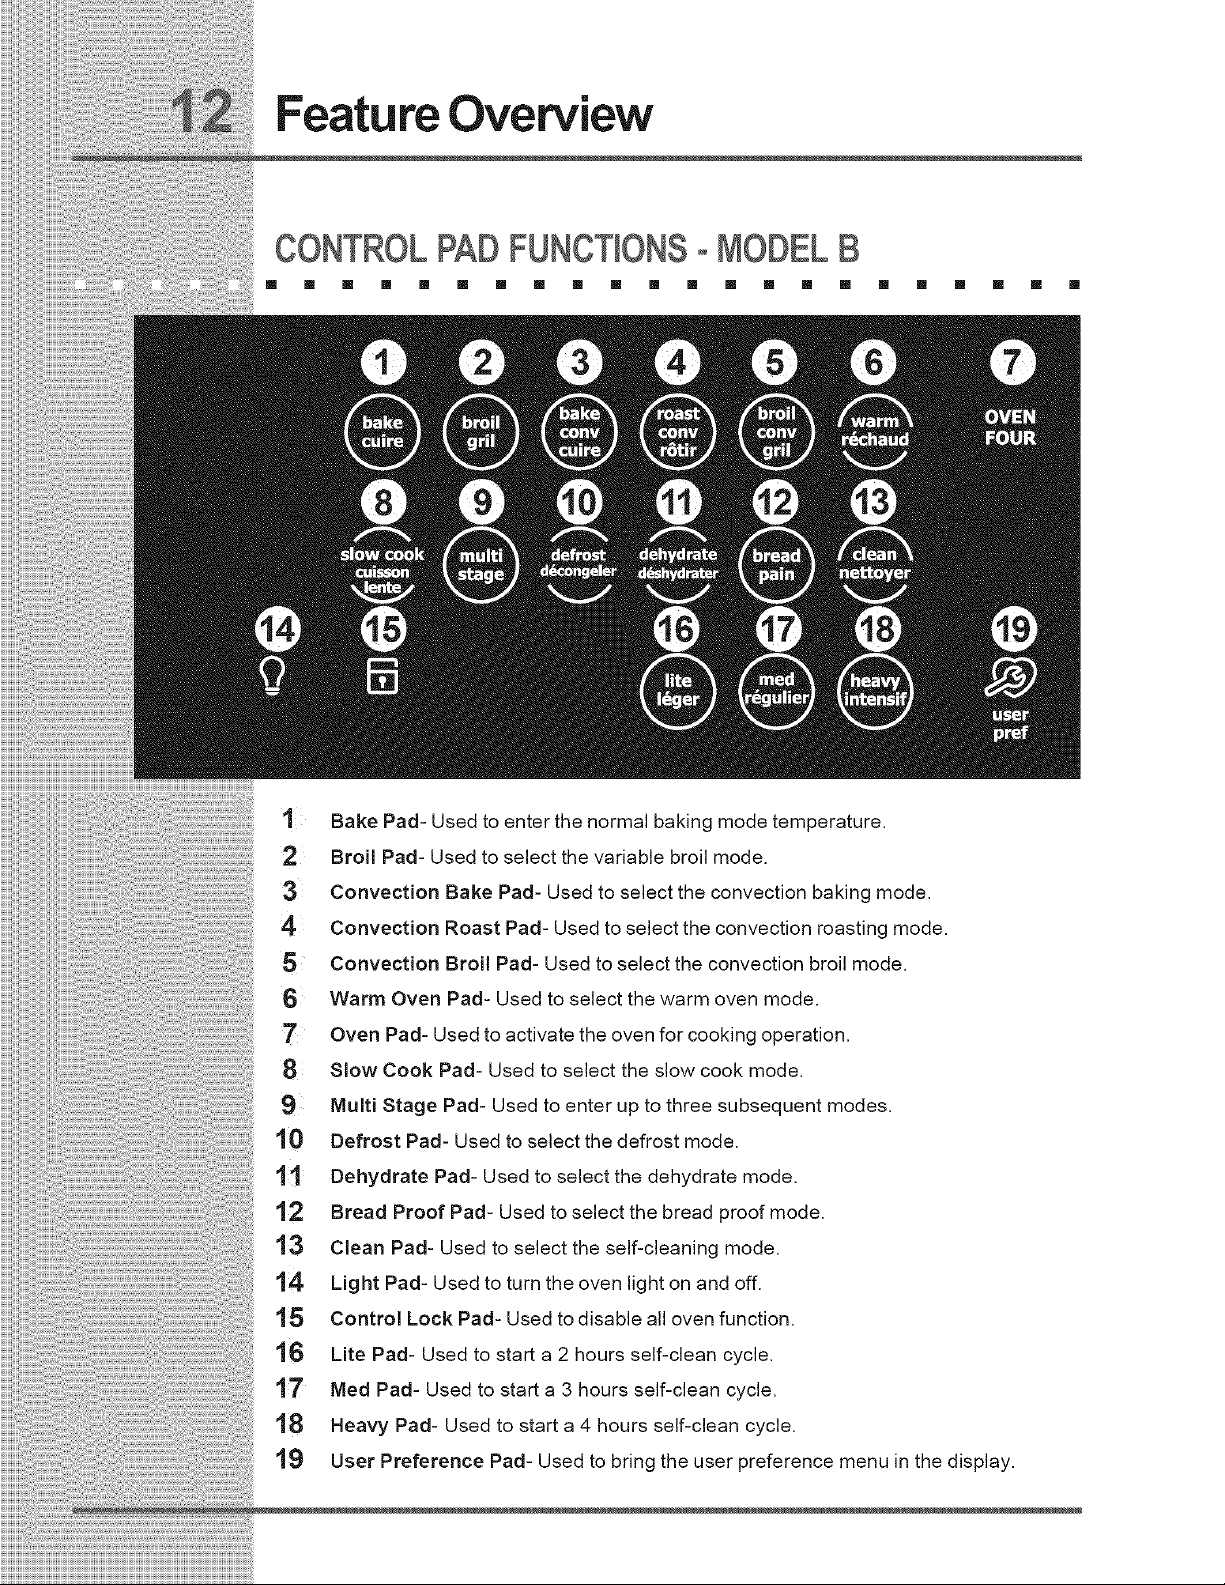
CONTROLPADFUNCTIONSoMODELB
[] [] [] [] [] [] [] [] [] [] [] [] [] [] [] [] [] [] [] [] [] []
1 Bake Pad- Used to enter the normal baking mode temperature.
2 Broil Pad- Used to select the variable broil mode.
3 Convection Bake Pad- Used to select the convection baking mode.
4 Convection Roast Pad- Used to select the convection roasting mode.
5 Convection Broil Pad- Used to select the convection broil mode.
6 Warm Oven Pad- Used to select the warm oven mode.
Oven Pad- Used to activate the oven for cooking operation.
8 Slow Cook Pad- Used to select the slow cook mode.
Multi Stage Pad- Used to enter up to three subsequent modes.
10 Defrost Pad- Used to select the defrost mode.
11 Dehydrate Pad- Used to select the dehydrate mode.
12 Bread Proof Pad- Used to select the bread proof mode.
13 Clean Pad- Used to select the self-cleaning mode.
"!4 Light Pad- Used to turn the oven light on and off.
15 Control Lock Pad- Used to disable all oven function.
16 Lite Pad- Used to start a 2 hours self-clean cycle.
t7 Med Pad- Used to start a 3 hours self-clean cycle.
18 Heavy Pad- Used to start a 4 hours self-clean cycle.
19 User Preference Pad- Used to bring the user preference menu in the display.
Feature Overview
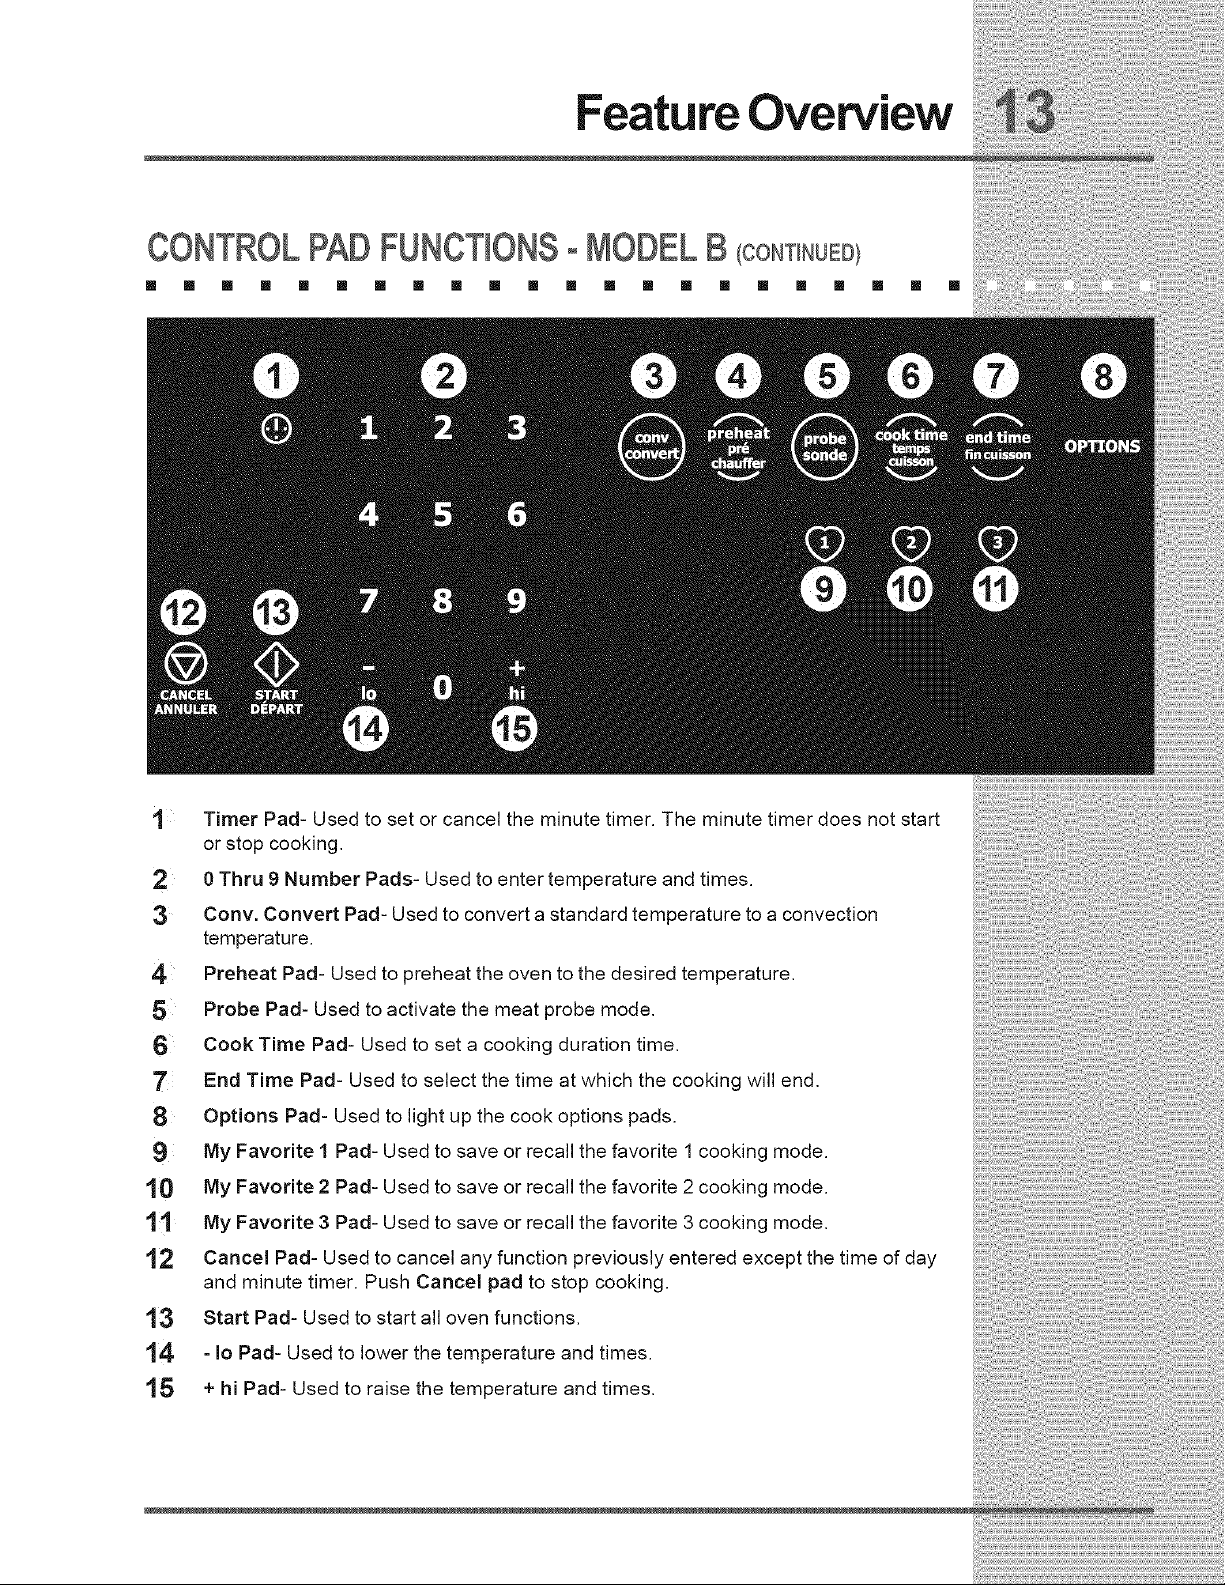
CONTROLPADFUNCTIONSoMODELB (co.TI.uED)
[] [] [] [] [] [] [] [] [] [] [] [] [] [] [] [] [] [] [] [] [] []
Timer Pad- Used to set or cancel the minute timer. The minute timer does not start
or stop cooking.
2 0 Thru 9 Number Pads- Used to enter temperature and times.
3 Cony. Convert Pad- Used to convert a standard temperature to a convection
temperature.
4 Preheat Pad- Used to preheat the oven to the desired temperature.
(5 Probe Pad- Used to activate the meat probe mode.
6 Cook Time Pad- Used to set a cooking duration time.
End Time Pad- Used to select the time at which the cooking will end.
8 Options Pad- Used to light up the cook options pads.
9 My Favorite 1 Pad- Used to save or recall the favorite 1 cooking mode.
10 My Favorite 2 Pad- Used to save or recall the favorite 2 cooking mode.
11 My Favorite 3 Pad- Used to save or recall the favorite 3 cooking mode.
12 Cancel Pad- Used to cancel any function previously entered except the time of day
and minute timer. Push Cancel pad to stop cooking.
13 Start Pad- Used to start all oven functions.
14 - Io Pad- Used to lower the temperature and times.
15 + hi Pad- Used to raise the temperature and times.
Getting Started
SETTINGCLOCKAT POWERUP
[] [] [] [] [] [] [] [] [] [] [] [] [] [] [] [] [] [] [] [] [] []
When the unit is first plugged in, or when the power supply to the range has been interrupted,
the timer in the display will flash with "12:00". The clock cannot be set when the oven is on. If
an invalid time of day is entered, the control will triple beep to prompt you to re-enter a valid time
of day.
To set the clock (example for 1:30):
1. Press,.J._}\,.l/\Ui padstosetthetimeofdayto 1:30.Thepads.. hi+ or Io can also be pressed
to raise or lower the actual time displayed.
2. Press START 4_ to accept the changes or CANCEL @ to start with a time of 12:00.
CONTROLPANELDISPLAYMODES
[] [] [] [] [] [] [] [] [] [] [] [] [] [] [] [] [] [] [] [] [] []
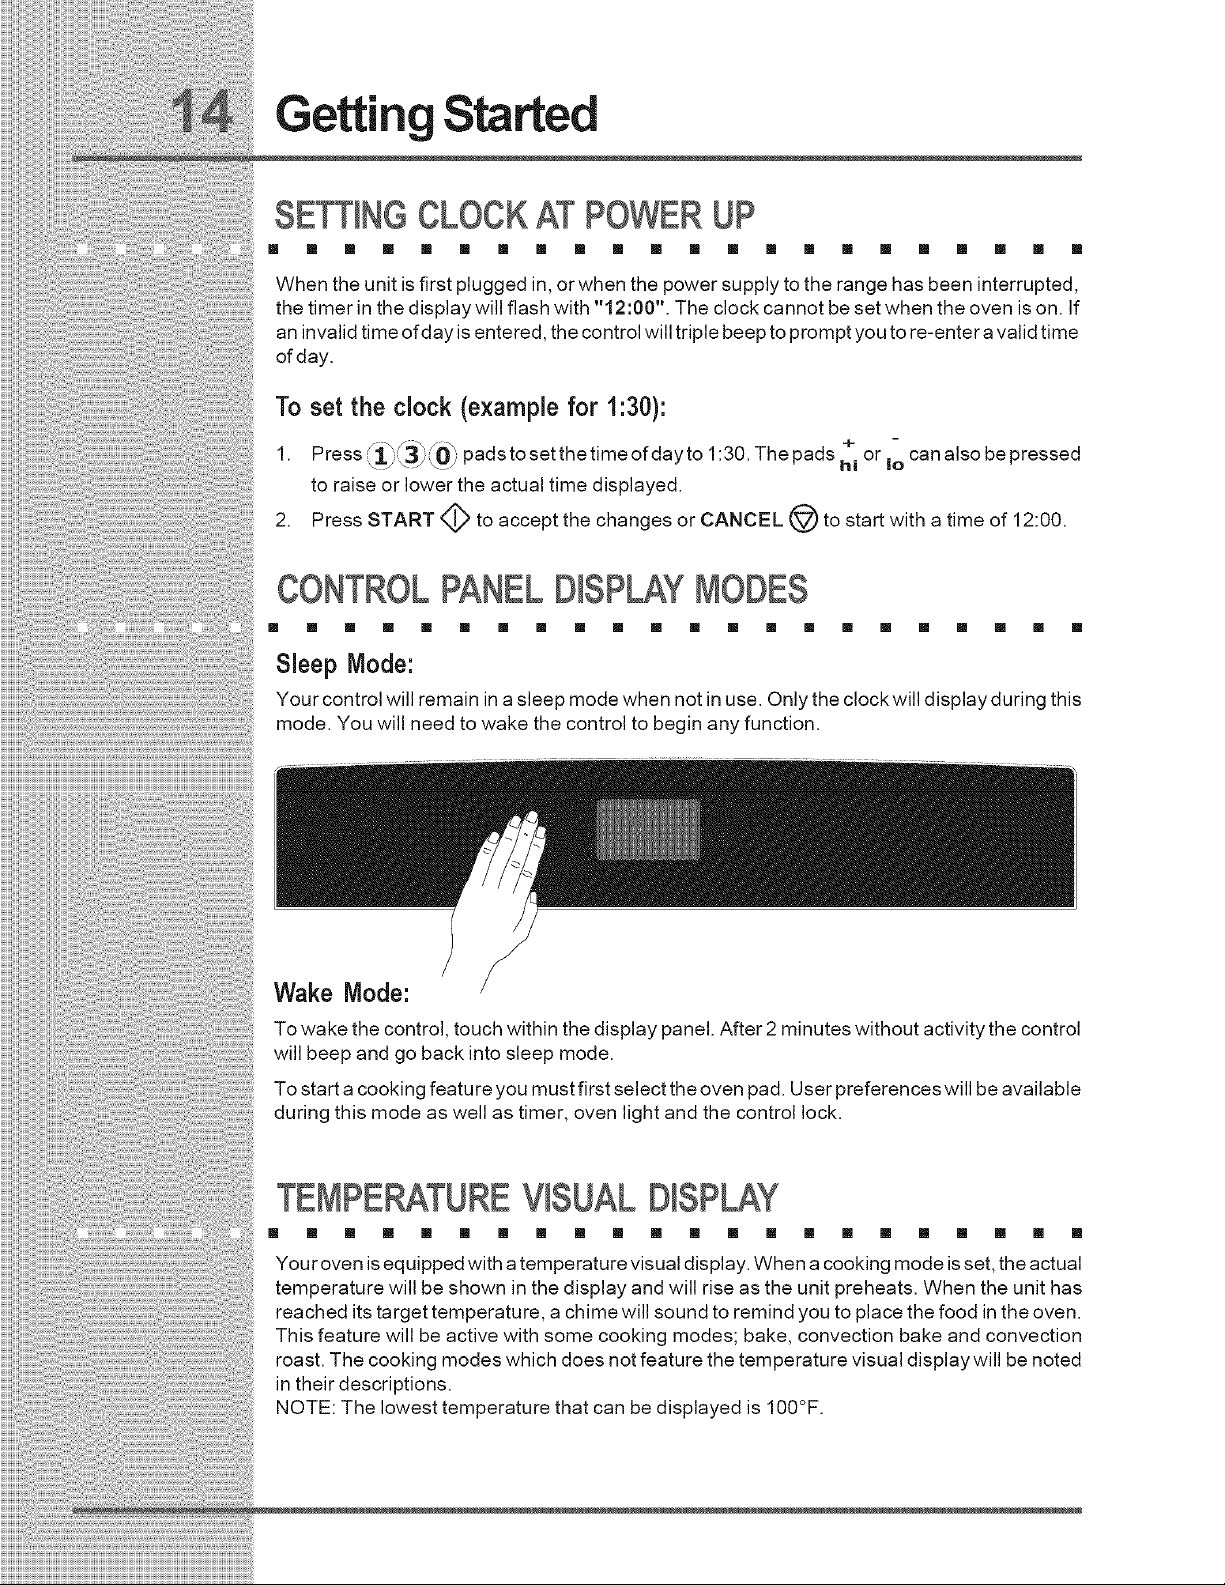
Sleep Mode:
Your control will remain in a sleep mode when not in use. Only the clock will display during this
mode. You will need to wake the control to begin any function.
Wake Mode:
To wake the control, touch within the display panel. After 2 minutes without activity the control
will beep and go back into sleep mode.
To start a cooking feature you must first select the oven pad. User preferences will be available
during this mode as well as timer, oven light and the control lock.
TEMPE TURE VISUAL DISP Y
[] [] [] [] [] [] [] [] [] [] [] [] [] [] [] [] [] [] [] [] [] []
Your oven is equipped with a temperature visual display. When a cooking mode is set, the actual
temperature will be shown in the display and will rise as the unit preheats. When the unit has
reached its target temperature, a chime will sound to remind you to place the food in the oven.
This feature will be active with some cooking modes; bake, convection bake and convection
roast. The cooking modes which does not feature the temperature visual display will be noted
in their descriptions.
NOTE: The lowest temperature that can be displayed is 100°F.
Getting Started 11_ !
ovEN.__°-_!G_.L ................
Your appliance includes "theater" style oven lighting feature that gradually lights the oven :
interiors to full brightness. The oven is equipped with 2 halogen lights. The oven lights will turn
on automatically, when the oven dooris opened. The oven light may be turned on when the door _{......
is closed by using the oven light pad located on the control panel. The oven light keywill toggle-
the lights at full intensity.
To toggle the Oven Lights ON and OFF:
1. Press OVEN LIGHT ("_ .
The Control Lock feature automatically locks the oven door and the control panel. The Control
Lock is only allowed when t he oven is turned O FF (not active). UOO R LOC K will flash i n the
display for 20 seconds or until the door has finished locking. Once the door has been locked,
Loc message will appear in the upper display. Do not attempt to open the oven doorwhile DOOR H
LOCK is flashing. W
1. Keep CONTROL LOCK _ pressed for 3 seconds.
SETTINGTHE KITCHENTIMER
[] [] [] [] [] [] [] [] [] [] [] [] [] [] [] [] [] [] [] [] [] []
This unit is equipped with a kitchen timer which serve as an extra timer in the kitchen that will
beep when the set time has run out. It does not start or stop cooking. The Timer feature can be
used during any of the other oven control functions and cooking modes.
To set the Timer (example for 5 minutes):
1. Press TIMER (_. "0O:OO"will appear in the display.
2. Press \5_ pad to set the timer to 5 minutes The pads or can also be pressed to raise
hi 1o
or lower the actual time displayed.
3. Press again TIMER C) to accept and start the countdown.
4. When the set time has run out, "00:00" will be displayed and the TIMER (_ pad will flash.
The clock will sound a chime that will be repeated at regular intervals until the TIMER (_)
pad is pressed.
To cancel the Timer before the set time has run out:
Press TIMER (_). The display will return to the time of day.

Cooki Modes
[] [] [] [] [] [] [] [] [] [] [] [] [] [] [] [] [] [] [] [] [] []
This mode is best used for your standard recipes. The hidden bake element and the broil element
are used to heat the air and maintain temperature. The temperature probe can be used in this
cooking mode. The oven can be programmed to bake at any temperature from 170°F to 550°F
with a default temperature of 350°F.
Baking Tips:
=Always preheat your oven before using the bake mode.
= During preheat, the 3 elements and the convection fan are used in cycle to quickly heat the oven.
, Use only one rack and center the pans as much as possible.
, If using two racks, place the oven racks in positions 3 and 8 (offset rack).
, Allow 2" to 4" (5,1 to 10,2cm) around the utensil(s) for proper air circulation.
• Be sure the pans do not touch each other, the door, sides or back of the oven.
If using multiple pans or racks, stagger as shown.
To set a Bake Temperature of 350°F:
1. Arrange interior oven racks.
2. Press OVEN V OVEN to light up the available cooking modes pads.
3. Press BAKE _.
4. Press START <_. The oven display shows PRE-HEATING.
5. Place food in the oven when the chime signals and temperature displayshows that the oven
has reached the set target temperature and the PRE-HEATiNG message disappear.
6. The Temperature Probe, Cook Duration, Timer, End Time and Rapid Preheat features can
be set to control your cooking time (read their sections for directions).
7. Remove food. Always use oven mitts when removing hot pans from the oven.
8. Press CANCEL @ to stop or cancel the Bake feature at any time.
To change to a Bake Temperature of 425°F:
1. Press OVEN _ OVEN to light up the available cooking modes pads.
2. Press BAKE _.
3. Press the HI + o
hi or LO ! pads to get to the desired temperature.
4. Press START <_.
Baking Problems
Refer to the Baking Problems Table in the Solutions to Common Problems section of this
manual.
Cooking Modes
COOK DU T(ON
[] [] [] [] [] [] [] [] [] [] [] [] [] [] [] [] [] [] [] [] [] []
Cook Du rationallowstheoventobe settocookfora setlengthoftimeand shutoffautomatically.
The timeremainingwilla(waysbe shown inthetimersectionofthedisplay.The oven wH(shut
offandwH(beepwhen thecountdown isfinished.Thisfeaturecanbe used withBake,Convection
Bake, Convection Roast, Slow Cook, Keep Warm, Defrost, Bread Proof and Dehydrate cooking
modes. It can also be part of a Multi-Stage sequence.
To set a timed cooking (example is a 450°F Bake for 30 minutes):
1. Press OVEN 1_ OVEN to light up the available cooking modes pads.
2. Press BAKE _. The temperature numbers will blink in the
display.
v
3. Enter temperature needed; i_4._'.,_5_,"\0_J.
COOK
4. Press COOK OPTIONS ....... to bring up the cook options items.
5. Press COOKDURATION _.
/, -_ /--\
6. Entertime needed;t,3,_0_.
7. Press START/_1.1._.The oven will start heating. The cook time will start counting down for
the set time.
8. Press CANCEL _ to stop the audible alarm or to cancel the cook time at anytime.
ENDTIME
[] [] [] [] [] [] [] [] [] [] [] [] [] [] [] [] [] [] [] [] [] []
End Time allows the oven to be set to shut offa utomatically at a set time of day. The oven control
will calculate the remaining time by itself. The time remaining will always be shown in the timer
section of the display. The oven will shut offand will beep when the countdown is finished. This
feature can be used with Bake, Convection Bake, Convection Roast, Slow Cook, Keep Warm,
Defrost, Dehydrate, Clean and Bread Proof cooking modes. This oven can be programmed with
Cook Duration and End Time to start and stop by itself at the right time.
To set a delayed treed cook(ng (example is a 450°F Bake for 30 minutes which will
end at 6:00PM):
1. Press OVEN _, OVEN to light up the available cooking modes pads.
2. Press BAKE _. The temperature numbers will blink in the
display.
v
3. Entertemperature needed/4_/_'_n _,
• y \=oj \v /
4. Press COOK OPTIONS o,,,o,,C°OKto bring up the cook options items.
5. Press COOK DURATION _.
6. Entertime needed _3_0_).
7. Press END TIME_.
v
8. Enter time of day needed; '\oj:'_.uj'\u_.
9. Press START _,,_. The time remaining will be shown in the display.
10. Press CANCEL O to stop the audible alarm or to cancel the cook time at anytime.
Use caution with the COOK DURATION or END TIME features. Use the automatic timer when
cooking cured or frozen meats and most fruits and vegetables. Foods that can easily spoil such as milk, eggs,
fish, meat or poultry, should be chilled in the refrigerator first. Even when chilled, they should not stand in the
oven for more than 1 hour before cooking begins, and should be removed promptly when cooking is completed.
Eating spoiled food can result in sickness from food poisoning.
Cooki Modes
[] [] [] [] [] [] [] [] [] [] [] [] [] [] [] [] [] [] [] [] [] []
This mode is best for meats, fish and poultry up to 1" thick. Broiling is a method of cooking
tender cuts of meat by direct heat under the broil element of the oven. The high heat cooks
quickly and gives a rich, brown outer appearance. The temperature probe cannot be used with
this mode. The oven can be programmed to broil at any temperature from 300°F to 550°F with
a default temperature of 550°R
Broiling Tips:
• For optimum browning, preheat the broil element for 2 minutes.
• Broil one side until the food is browned; turn and cook on the second side. Season and serve.
• Always pull the rack out to the "stop" position before turning or removing food.
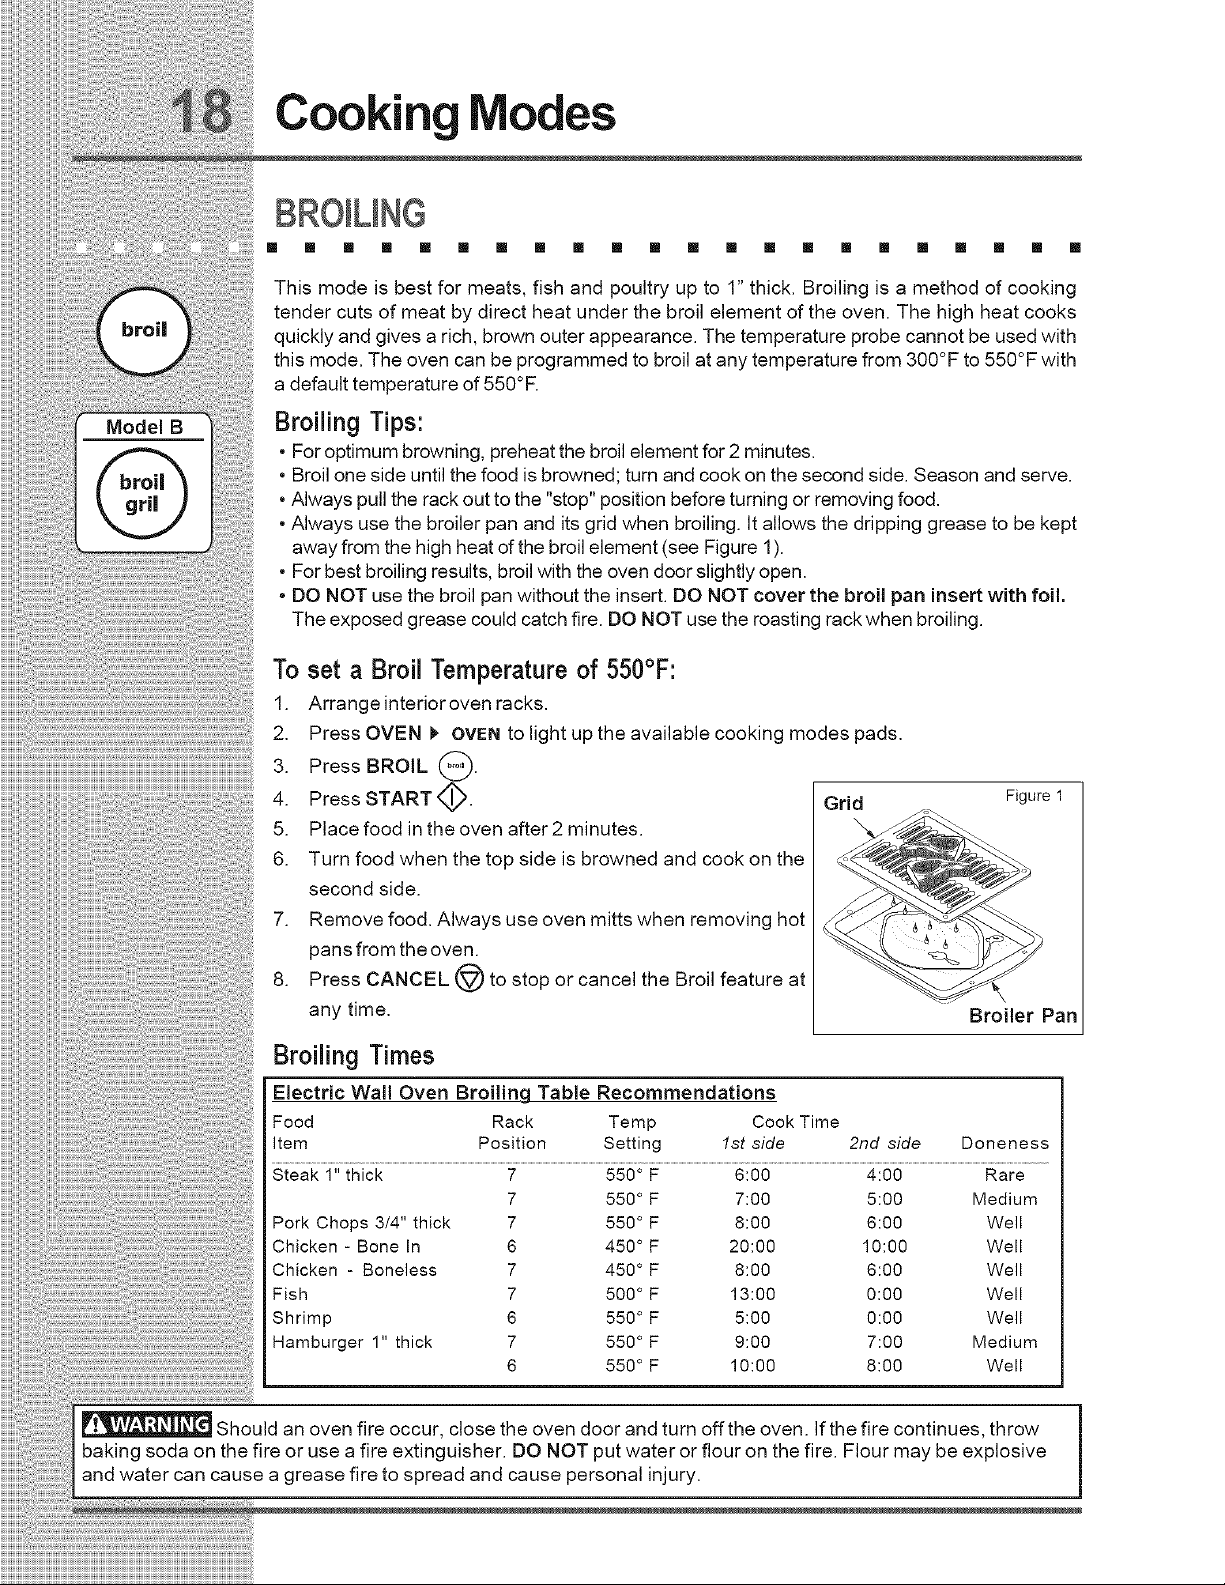
• Always use the broiler pan and its grid when broiling. It allows the dripping grease to be kept
away from the high heat of the broil element (see Figure 1).
• For best broiling results, broil with the oven door slightly open.
o DO NOT use the broil pan without the insert. DO NOT cover the broil pan insert with foil.
The exposed grease could catch fire, DO NOT use the roasting rackwhen broiling,
To
1.
2.
3.
4.
5.
6.
.
.
set a Broil Temperature of 550°F:
Arrange interior oven racks,
Press OVEN 1_OVEN to light up the available cooking modes pads,
Press BROIL @.
Press START @. Grid
Place food in the oven after 2 minutes,
Turn food when the top side is browned and cook on the
second side,
Remove food, Always use oven mitts when removing hot
pans from the oven.
Press CANCEL @ to stop or cancel the Broil feature at
any time,
Figure 1
Broiler Pan
Broiling Times
Electric Wall Oven Broiling Table Recommendations
Food Rack Temp Cook Time
Item Position Setting 1st side 2nd side Doneness
Steak 1" thick 7 550 ° F 6:00 4:00 Rare
7 550 ° F 7:00 5:00 Medium
Pork Chops 3/4" thick 7 550 ° F 8:00 6:00 Well
Chicken - Bone In 6 450 ° F 20:00 10:00 Well
Chicken - Boneless 7 450 ° F 8:00 6:00 Well
Fish 7 500 ° F 13:00 0:00 Well
Shrimp 6 550 ° F 5:00 0:00 Well
Hamburger 1" thick 7 550 ° F 9:00 7:00 Medium
6 550 ° F 10:00 8:00 Well
Should an oven fire occur, close the oven door and turn off the oven. If the fire continues, throw
baking soda on the fire or use a fire extinguisher. DO NOT put water or flour on the fire. Flour may be explosive
and water can cause a grease fire to spread and cause personal injury.
Cooking Modes
CONVECTIONBAKING
[] [] [] [] [] [] [] [] [] [] [] [] [] [] [] [] [] [] [] [] [] []
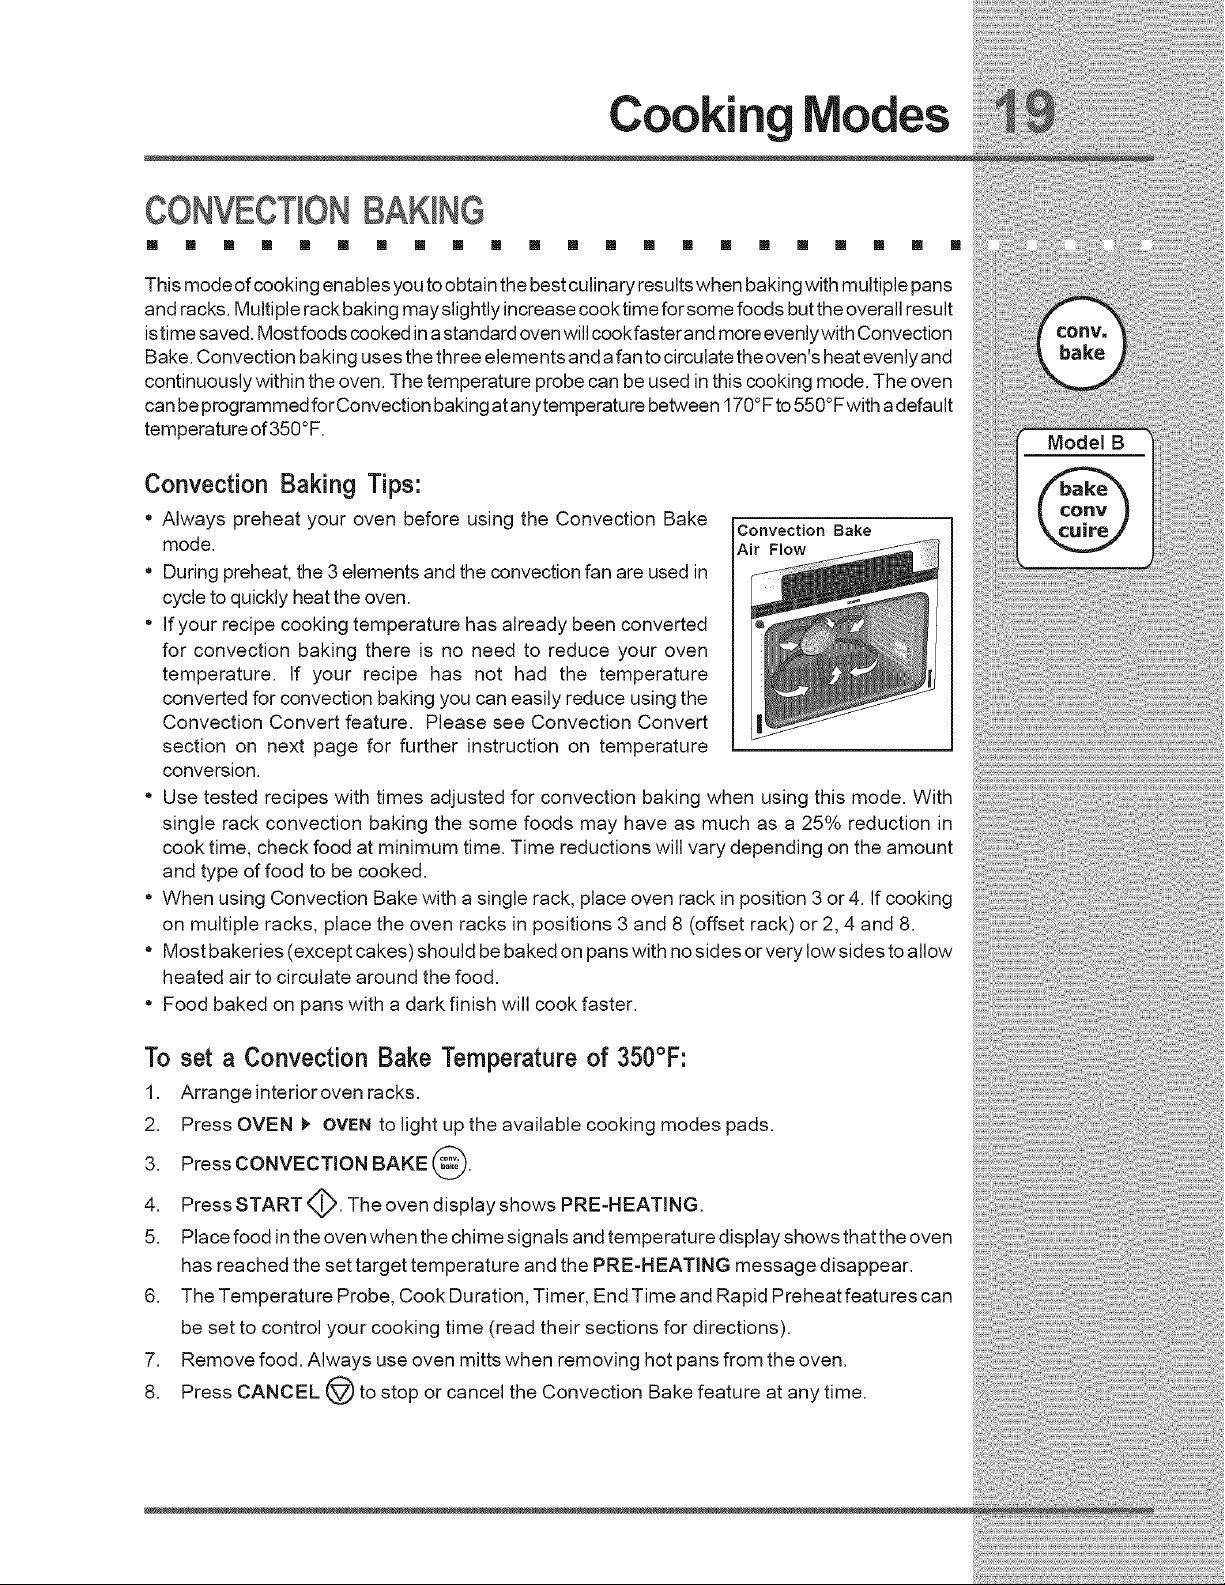
This mode of cooking enables you to obtain the best culinary results when baking with multiple pans
and racks. Multiple rack baking mayslightly increase cooktime forsome foods but the overall result
is time saved. Most foods cooked in astandard oven will cookfasterand more evenlywith Convection
Bake. Convection ba king uses the three elements and afan to circulate the oven's heat evenly and
continuously within the oven. The temperature probe can be used in this cooking mode. The oven
can be programmed forConvection baking at anytemperature between 170°F to 550°Fwith a default
temperature of 350°F.
Convection Baking Tips:
• Always preheat your oven before using the Convection Bake
Convection Bake
mode, Air Flow
• During preheat, the 3 elements and the convection fan are used in
cycle to quickly heat the oven.
• If your recipe cooking temperature has already been converted
for convection baking there is no need to reduce your oven
temperature. If your recipe has not had the temperature
converted for convection baking you can easily reduce using the
Convection Convert feature. Please see Convection Convert
section on next page for further instruction on temperature
conversion.
• Use tested recipes with times adjusted for convection baking when using this mode. With
single rack convection baking the some foods may have as much as a 25% reduction in
cook time, check food at minimum time. Time reductions will vary depending on the amount
and type of food to be cooked.
• When using Convection Bake with a single rack, place oven rack in position 3 or4. If cooking
on multiple racks, place the oven racks in positions 3 and 8 (offset rack) or 2, 4 and 8.
• Most bakeries (except cakes) should be baked on pans with no sides or very low sides to allow
heated air to circulate around the food.
• Food baked on pans with a dark finish will cook faster.
To set a Convection Bake Temperature of 350°F:
1. Arrangeinteriorovenracks.
2. Press OVEN 1_ OVEN to light up the available cooking modes pads.
3. Press CONVECTION BAKE_.
4. Press START _. The oven display shows PRE-HEATING.
5. Place food in the oven when the chime signals and temperature display shows that the oven
has reached the set target temperature and the PRE-HEATING message disappear.
6. The Temperature Probe, Cook Duration, Timer, End Time and Rapid Preheat features can
be set to control your cooking time (read their sections for directions).
7. Remove food. Always use oven mitts when removing hot pans from the oven.
8. Press CANCEL @ to stop or cancel the Convection Bake feature at any time.
Cooki Modes
CONVECTIONCONVERT
[] [] [] [] [] [] [] [] [] [] [] [] [] [] [] [] [] [] [] [] [] []
The Convection Convert pad isused to automatically convert a standard baking recipe for convection
baking. When set properly, this feature is designed to display the actual converted (reduced)
temperature in the display. Convection Convert may ON LY be used with a Convection Bake cooking
mode. It can be used with thefeatures End Time and Cook Duration (see their sections fordirections).
Ifconvection conversion is used with the cook duration and end time features, "C F" (check food) will
be displayed when 75% of the bake time complete. At this time the oven control will sound 3 long
beeps at regular intervals until baking had finished. When the bake time has completelyfi nished the
control will beep at regular interval until the CANCEL @ pad is pressed.
i
NOTE: To use this feature with the COOK DURATION @ option, the COOK DURATION @ pad
must be pressed before the CONVECTION CONVERT _ pad.
Changing from a normal bake temperature to a convection bake temperature:
1. Press OVEN _ OVEN to light up the available cooking modes pads.
2. Press CONVECTION BAKE @.
3. Press COOK OPTIONS oC#&_.The cook options items will light up.
4. Press CONVECTION CONVERT _. The temperature displayed will be 25°F lower than
what it used to be.
5. Press START <_ to begin the convection baking (see Convection Baking section for more
informations).
PID PREHEAT
[] [] [] [] [] [] [] [] [] [] [] [] [] [] [] [] [] [] [] [] [] []
The Preheat featurewill bring the oven up to temperature faster than a regular preheat and then
indicate when to place the food in the oven. Preheating is not necessarywhen roasting or cooking
casseroles. The oven can be programmed to preheat at anytemperature between 170°F to 550°F
with some of the cooking modes; Bake, Convection Bake and Convection Roast.
IMPORTANT: The rapid preheat feature is for single rack ONLY. The heat distribution with
multiple rack will be uneven.
To set a rapid preheat (exampleis for a 350°F Bake):
1. Press OVEN b. OVEN to light up the available cooking modes pads.
2. Press BAKE _.
3. Press COOK OPTIONS o,T,o,,COOK.The cook options items will light up.
4. Press RAPID PREHEAT
5. Press START _ to begin the baking with the rapid preheat feature enabled.
6. Place food in the oven when the chime signals and PRE-HEATING message disappears
indicating that the oven has reached the set target temperature.

Cooking Modes
CONVECTIONROASTING
[] [] [] [] [] [] [] [] [] [] [] [] [] [] [] [] [] [] [] [] [] []
This mode is best for cooking tender cuts of beef, lamb, park and poultry. Use this mode when
cooking speed is desired. The Convection Roasting gently browns the exterior and seals in the
juices. Convection roasting uses the hidden bake element, the hidden convection element, the
broil element and a fan to circulate the oven's heat evenly and continuouslywithin the oven. The
temperature probe can be used in this cooking mode. The oven can be programmed for Convection
Roasting at any temperature between 170°F to 550°F with a default temperature of 350°F.
Convection Roasting Tips:
• Use the broiler pan and grid, and the roasting rack (Figure 1). The broiler pan will catch
grease spills and the grid will help prevent spatters. The roasting rack will hold the meat.
• Place an oven rack on rack position 2 (next-bottom).
• Make sure the roasting rack is securely seated on the grid in the broiler pan. The roasting rack
fits on the grid allowing the heated air to circulate under the food for even cooking and helps
to increase browning on the underside.
• ThereisnoneedtoreducetheconvectiontemperatureortousetheConvectionConvertfeature
with this cooking mode.
• DO NOT use the broiler pan without the grid or cover the grid with aluminum foil.
• Always pull the rack out to the stop position before removing food.
• Position food (fat side up) on the roasting rack.
To set a Convection Roast Temperature of 350°F:
1. Arrangeinteriorovenracks.
2. Press OVEN : OVENto light up the available cooking modes pads.
3. Press CONVECTION ROAST_.
4. Press START _,L_.
5. The Temperature Probe, Cook Duration, Timer, End Time and Rapid Preheat
features can be set to control your cooking time (read their sections for
directions).
6. Remove food. Always use oven mitts when removing hot pans from the oven.
7. Press CANCEL @ to stop or cancel the Convection Roast feature at any time.
Roastim
Rack \
Rib eye roast 4 to 6 Ibs. 350 ° F * 25-30
Tenderloin roast 2 to 3 Ibs. 400 ° F * 15-25
Turkey, whole** 12 to 16 Ibs. 325 ° F 180 ° F 8-10
Turkey, whole** 16 to 20 Ibs. 325 ° F 180 ° F 10-15
Turkey, whole** 20 to 24 Ibs. 325 ° F 180 ° F 12-16
Chicken 3 to 4 Ibs. 350-375 ° F 180 ° F 12-16
Ham roast, fresh 4 to 6 Ibs. 325 ° F 160 ° F 30-40
Shoulder blade roast 4 to 6 Ibs. 325 ° F 160 ° F 20-30
Loin 3 to 4 Ibs. 325 ° F 160 ° F 20-25
Pre-cooked ham 5 to 7 Ibs. 325 ° F 160 ° F 30-40
Poultry
Pork
For beef: med rare 145°F, med 160°F, well done 170°F
** Stuffed turkey requires additional roasting time. Shield legs and breast with foil to
prevent overbrowning and dying of the skin.
Figure 1
Broiler Pan
Cooki Modes
CONVECT)ONBRO(L(NG
m [] [] [] [] [] [] [] [] [] [] [] [] [] [] [] [] [] [] [] [] []
Use this mode for thicker cuts of meat, fish and poultry. The Convection Broiling gently browns
the exterior and seals in the juices. Convection broiling uses the broil element and a fan to
circulate the oven's heat evenly and continuouslywithin the oven. The temperature probe cannot
be used in this cooking mode. The oven can be programmed for Convection Broiling at any
temperature between 300°F to 550°F with a default temperature of 550°F.
Convection Broiling Tips:
, For optimum browning, preheat the broil element for 2 minutes.
, Broil one side until the food is browned; turn and cook on the second side. Season and serve.
, Always pull the rack out to the "stop" position before turning or removing food.
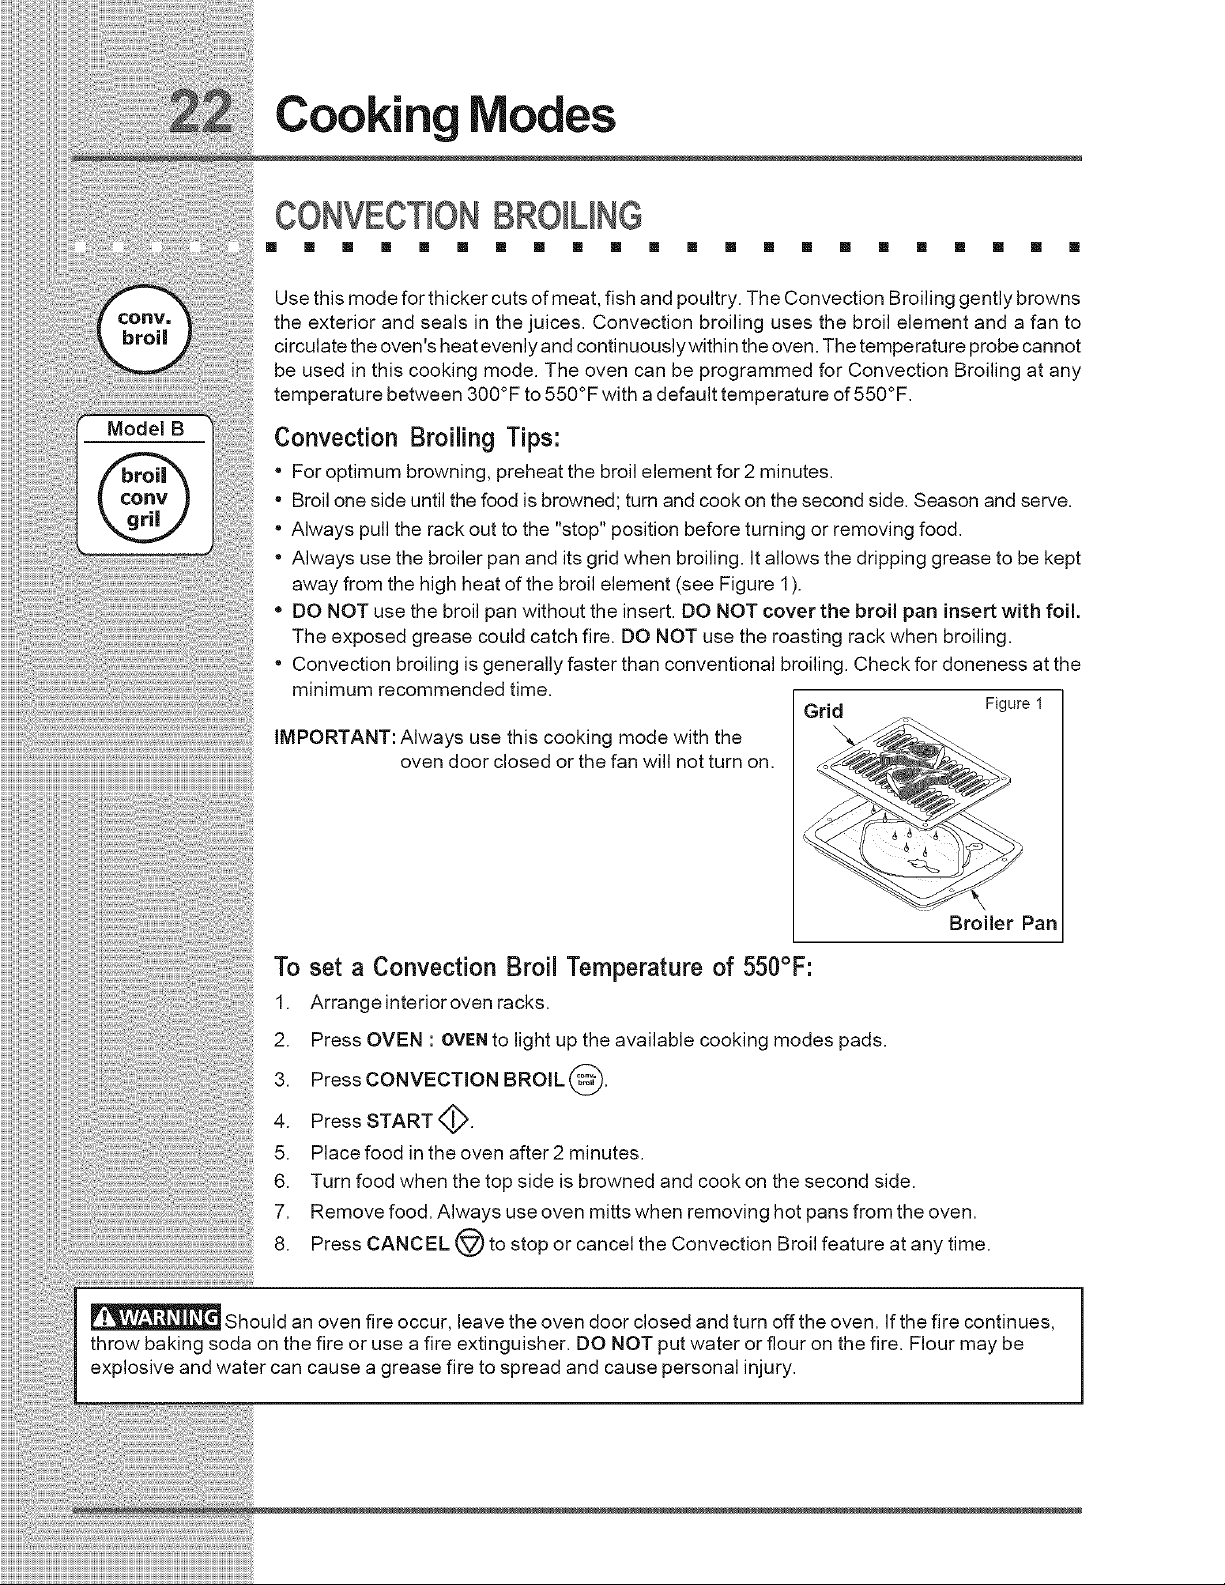
• Always use the broiler pan and its grid when broiling. (t allows the dripping grease to be kept
away from the high heat of the broil element (see Figure 1).
• DO NOT use the broil pan without the insert. DO NOT cover the broil pan insert with foil.
The exposed grease could catch fire. DO NOT use the roasting rack when broiling.
, Convection broiling is generally faster than conventional broiling. Check for doneness at the
minimum recommended time.
iMPORTANT: Always use this cooking mode with the
oven door closed or the fan will not turn on.
Grid
Figure I
Broiler Pan
To set a Convection Broil Temperature of 550°F:
1. Arrangeinteriorovenracks.
2. Press OVEN : OVENto light up the available cooking modes pads.
3. Press CONVECTiON BROILS.
4. Press START <_.
5. Place food in the oven after 2 minutes.
6. Turn food when the top side is browned and cook on the second side.
7. Removefood. Alwaysuseovenmittswhenremovinghotpansfromtheoven.
8. Press CANCEL (_) to stop or cancel the Convection Broil feature at any time.
Should an oven fire occur, leave the oven door closed and turn off the oven. If the fire continues,
throw baking soda on the fire or use a fire extinguisher. DO NOT put water or flour on the fire. Flour may be
explosive and water can cause a grease fire to spread and cause personal injury.
Cooking Modes
WARMOVEN
[] [] [] [] [] [] [] [] [] [] [] [] [] [] [] [] [] [] [] [] [] []
This mode is best for keeping oven baked foods warm for serving after cooking has finished. The
Warm Oven feature uses the hidden bake element to maintain the temperature within the oven.
The Warm Oven feature may be used with Multi-Stage (refer to its section for directions) if you
wish to have the Warm Oven feature turn ON automaticallywhen cooking has finished. The oven
can be programmed for Warm Oven at any temperature between 150°F to 190°F with a default
temperature of 170°F.
Warm Oven Tips:
* Always start with hot food.
. Do not use the Warm Oven feature to heat cold food.
. Food in heat-safe glass and glass ceramic containers may need higher temperature
settings compared to food in regular containers.
. Avoid repeated openings of the oven, it will allow hot air to escape and the food to cool.
. Aluminum foil may be used to cover food to increase moisture content.
To set a Warm Oven Temperature of 170°F:
1. Arrangeinteriorovenracks.
2. Press OVEN : OVENto light up the available cooking modes pads.
3. PressWARM OVEN @.
4. Press START <_.
5. The Multi-Stage, Cook Duration, Timer and End Time features can be set to control your
warming time (read their sections for directions).
6. Remove food. Always use oven mitts when removing hot pans from the oven.
7. Press CANCEL @ to stop or cancel the Warm Oven feature at any time.
Cooki Modes
SLOWCOOK
[] [] [] [] [] [] [] [] [] [] [] [] [] [] [] [] [] [] [] [] [] []
This mode may be used to cook foods more slowly, at lower oven temperatures and provide
cooking results much the same way as a Slow Cooker or Crock-Pot. The Slow Cook feature is
ideal for roasting beef, pork & poultry. Slow Cooking meats may result in the exterior of meats
becoming dark but not burnt. This is normal. The Slow Cook mode uses the hidden bake element
to maintain a low temperature in the oven. The temperature probe cannot be used in this cooking
mode. There are 2 settings available, high (H I) or low (LO). The maximum cook duration for the
Slow Cook feature is 12 hours unless the oven control has been changed to the Continuous Bake
mode or the Sabbath mode has been activated.
Slow Cook Tips:
• Completely thaw all frozen foods before cooking with the Slow Cook feature.
• When using a single rack, position it in the center of the oven.
• Position multiple racks to accommodate size of cooking utensilswhen cooking multiple food
items.
• Do not open the oven door often or leave the door open when checking foods. Ifthe oven heat
escapes often, the Slow Cook time may need to be extended.
• Cover the foods to keep them moist or use a loose orvented type cover to allow foods to turn
crisp or brown.
• Cook times will vary; depending on the weight, fat content, bone & the shape of the meat.
• Use the recipe's recommended food temperature and a food thermometer to determine when
the food is done.
• Preheating the oven will not be necessary when using the Slow Cook feature.
• Add any cream or cheese sauces during the last hour of cooking.
To set a Slow Cook:
1. Arrange interior oven racks and place food in the oven.
2. Press OVEN : OVENto light up the available cooking modes pads.
3. Press SLOW COOK@.
4. Press + for high (HI) setting or Io low (Lo) setting.
hi
5. Press START _,_.
6. The Cook Duration, Timerand End Time features can be set to control your Slow Cooktime
(read their sections for directions).
7. Remove food. Always use oven mitts when removing hot pans from the oven.
8. Press CANCEL @ to stop or cancel the Slow Cook feature at any time.
Cooking Modes
[] [] [] [] [] [] [] [] [] [] [] [] [] [] [] [] [] [] [] [] [] []
This mode dries foods with heat from the bake and the convection element. The heat is circulated
throughout the oven by the convection fan. Dehydrating is used to dry and/or preserve foods such
as fruits, meats, vegetables and herbs. This mode holds an optimum low temperature while
circulating the heated airto slowly remove moisture. The oven can be programmed for Dehydrating
at any temperature between 100°F to 225°F with a default temperature of 120°F.
Dehydrating Tips:
* Do not preheat the oven.
, Multiple racks can be used simultaneously.
, Drying times vary depending on the moisture and sugar content of the food, the size of the
pieces, the amount being dried and the humidity in the air.
, Check food at the minimum drying time.
* Treat fruits with antioxidants to avoid discoloration.
* Consult a food preservation book or a library for additional information.
To set a Dehydrate Temperature of 120°F:
1. Arrange interior oven racks and place food.
2. Press OVEN : OVENto light up the available cooking modes pads.
3. Press DEHYDRATE .........
4. Press START <,_.
5. Remove food. Always use oven mitts when removing hot pans from the oven.
6. Press CANCEL @ to stop or cancel the Dehydrate feature at any time.
[] [] [] [] [] [] [] [] [] [] [] [] [] [] [] [] [] [] [] [] []
Use the defrost feature to thaw small portions of delicate items such as cream cakes,
frozen cream pies and cheesecake, at room temperature. While in the defrost mode, the
convection fan will operate to circulate room temperature air around the food slowly,
accelerating the natural defrosting of the food without heat.
To set a Defrost:
1. Arrange interior oven racks and place food in the oven.
2. Press OVEN : OVENto light up the available cooking modes pads.
3. Press DEFROST _.
4. Press START _,_ to start the defrosting. A "dEF" message is displayed when active.
5. The Cook Duration, End Time and Timer features can be set to control your Defrost time
(read their sections for directions).
6. Press CANCEL (_) to stop or cancel the Defrost feature at any time.
Note: This feature is not meant for thawing frozen meats, poultry, seafood or other foods
that need to be cooked before serving. Follow US DA recommendations for thawing foods.
Only frozen foods that can be defrosted and served without cooking should be used with this
feature.
Cooki
BREAD PROOFING
[] [] [] [] [] [] [] [] [] [] [] [] [] [] [] [] [] [] [] [] [] []
Proofing bread prepares the dough for baking by activating the yeast. This feature is ideal for
proofing, or rising bread dough. The oven can be programmed for Bread Proofing at any
temperature between 85°F to 100°F with adefault temperature of 100°F. The temperature visual
display is not avalaible for this function.
Bread Proofing Tips:
• No need to preheat for this feature.
• Proof bread until dough has doubled in bulk.
• For best results, place a shallow pan with 1 to 3 cups of boiling hot water on the lowest
rack position to keep the air moist inside the oven cavity.
• Allow at least 1" between edge of pan and walls of the oven.
• Limit frequent door openings to prevent losing heat and lengthening proofing time.
To set a Bread Proof temperature of lOg°F:
1. Arrange interior oven racks and place bread dough in the oven.
2. Press OVEN : OVENto light up the available cooking modes pads.
3. Press BREAD PROOF
l
4. Press START 4_ to begin the bread proofing.
5. The Cook Duration, Timer and End Time features can be set to control your Bread Prooftime
(read their sections for directions).
6. Remove food.
7. Press CANCEL @ to stop or cancel the Bread Proof feature at any time.
To
1.
2.
3.
change a Bread Proof temperature while the function is active:
Press OVEN _" OVEN to light up the available cooking modes pads.
Press the HI +
hi or LO |o pads to get to the desired temperature.
Press START 4_ to continue the bread proofing with the new setting.

Cooking Modes
TEMPE TURE PROBE
[] [] [] [] [] [] [] [] [] [] [] [] [] [] [] [] [] [] [] [] [] []
For many foods, especially roasts and poultry, testing the internal temperature is the best method
to insure properly cooked food. The Temperature Probe gets the exact temperature you desire
without having to guess. This feature can be used with Bake, Convection Bake and Convection Roast
cooking modes. The oven can be programmed for Probe atanytemperature between 130°Fto 210°F
with a default temperature of 170°F.
IMPORTANT:
1. Use only the probe supplied with your appliance; any other may result in damage to the probe
orthe appliance.
2. Handle the Temperature Probe carefullywhen inserting and removing itfrom the food and outlet.
3. DonotusetongstopullthecablewheninsertingorremovingtheProbe. ItcoulddamagetheProbe.
4. Defrost yourfood completely before inserting the Probe to avoid breaking it.
5. Never leave or store the Temperature Probe inside the oven when not in use.
6. To prevent the possibility of burns, carefully unplug the Temperature Probe using hot pads.
Proper Temperature Probe Placement:
1. Always insert the probe so that the tip rests in the center of the
thickest part of the meat. Do not allow probe to touch bone, fat,
gristle or pan.
2. For bone-in ham or lamb, insert the Probe into the centerofthe
lowest large muscle or joint. For dishes such as meat loaf or
casseroles, insert the Probe into the center of the food. When
cooking fish, insert the Probe from just above the gill into the
meatiest area, parallel to the backbone.
,
Figure 1
Forwhole poultry (chicken, turkey, etc.), insert the probe into the thickest part of the inner thigh
from below and parallel to the leg (see figure 1).
Setting the Oven when usingthe TemperatureProbe:
1. InserttheTemperature Probe intothe food (see ProperTemperature Probe Placementabove).
2. Plugthe Temperature Probe into itsoutlet in the oven. (The outlet is located on the top left hand
side of the cavitywall, near front of the oven). Always insert the probe into a cool oven. Make
sure it is pushed all the way into the outlet. Close the oven door.
3. Press OVEN I_ OVEN to light up the available cooking modes pads.
4. Select a cooking mode. A target temperature must be set to trigger the buzzer when the food
COOK
reaches the set temperature. Press COOK OPTIONS ....... to bring up the cook options items
and press PROBE (',_,o')pad to enter the temperature. Adjust temperature to the desired setti
ng
using the numeric pads or just press START _,_ to use the default target temperature of 170°F.
+
The pads hi or Io can also be pressed to raiseorlowerthetemperature.A The target temperature
setting will be accepted after the START _,_ pad is pressed.
5. At any time during the cooking, the PROBE @ pad can be pressed once to display the actual
meat temperature or pressed twice to display the target temperature. When on the target
temperature display, a new temperature can be entered. After 5-8 seconds, the display will go
back to showing the oven temperature.
6. When the food reach the target temperature, the oven will go into a WARM OVEN mode until
you press CANCEL Q.
The probecanbedamaged byvery high temperature. To protectthe probeagainstthis
damage,theoven controlwill not allow you to starta self-clean,broil or convectionbroil while
the probe is connected.
Cooki Modes
MULTISTAGE
[] [] [] [] [] [] [] [] [] [] [] [] [] [] [] [] [] [] [] [] [] []
This feature enables you to perform sequential cooking at the touch of a button. Its purpose is to
program a queue of up to three cooking modes with individual cooking time and temperatures in a
sequence. This feature can be used with most cooking modes; Baking, Broiling, Convection Baking,
Convection Roasting, Convection Broiling, Warm Oven and Bread Proof. A Cook Time can be
programmed with your cooking mode and then queued. An auto-suggested set temperature
outputs in the display as a default value during the set temperature programming. Any stage
programmed with Broil or Convection Broil cannot last longer than 10 minutes. A proper cook time
and a set temperature are required for every stage programming. At least two stages must be
programmed before aMulti-Stage cooking operation starts. During stage 1 cooking the electronic
control provides temperature visual output in the display. During stage 2 and 3, the electronic
control displays the set temperature only.
To set a Multi Stage sequence (Timed Convection Bake, Timed Broil, Warm Oven):
1. Arrange interior oven racks and place food.
2. Press OVEN : OVENto activate the oven.
3. Press MULTI STAGE @.
Stage 1
4. Press CONVECTION BAKE @. "350"willflash in the display prompting to entera temperature.
5. Enter a temperature using the numeric pads _0_ to _9_.
6. Press START <_. "00:00" will start flashing in the display prompting to enter a cook time.
7. Enter a cook time using the numeric pads ,,/0_ to _9_'.
8. Press START <_. The Multi-Stage indicator will now display the 2nd stage.
Stage 2
9. Press BROILS. "550"will startflashing in the display prompting to enter a temperature.
10. Enter a temperature using the numeric pads _0_ to _g_.
11. Press START <_. "00:00" will start flashing in the display prompting to enter a cook time.
12. Enter a cook time using the numeric pads _0_' to :_9_'.
13. Press START 4_. The Multi-Stage indicatorwill now display the 3rd stage. Ifa third stage
is not needed, press START <_ a second time. This will start the cooking sequence.
Read next page for stage 3 and cancefing details

Cooking Modes
MULTISTAGE(CONTINUED)
[] [] [] [] [] [] [] [] [] [] [] [] [] [] [] [] [] [] [] [] [] []
Stage 3
14. PressWARM OVEN@. "170"will start flashing inthe display prompting to entera temperature.
15. Enter a temperature using the numeric pads _0_ to '_9_.
16. Press START <_. "00:00" will start flashing in the display prompting to enter a cook time.
17. Enter a cook time using the numeric pads _0] to #9_.
18. Press START 4_ twice, The cooking sequence will begin.
Canceling
19. At the end of the sequence, the display will show "End" and a chime will sound.
20. Remove food.
21. Press CANCEL @ to stop or cancel the Multi-Stage sequence at any time.
To cancel a Multi Stage sequence:
A multi stage cooking can be canceled any time while it is in progress (or during its programming)
by the Cancel @ key.
If the key is pressed during a multi-stage programming, the electronic control returns to Idle
mode.
Electronic Control
S
USER PREFERENCES
[] [] [] [] [] [] [] [] [] [] [] [] [] [] [] [] [] [] [] [] [] []
The user preferences menu includes all user defined options. This feature enables you to control
the various options of the electronic controls. This menu features the Time of Day, Celsius or
Fahrenheit display mode, Continuous Bake or 12 Hour Energy Saving modes, Clock display or
No-Clock display, 12 Hours Time of Day or 24 Hours Time of Day, Audio Control and Adjusting
the oven temperature. The User Preferences menu is only available when the oven is not being
used (not cooking).
To browse through the User Preferences menu:
1. Press USER PREF _ to bring up the User Preferences menu.
2. Press USER PREF _ again to browse through the menu pages.
3. Press hl or Io to toggle between the available options.
4. Press START <_> while the chosen option is on display to change.
5. Press CANCEL @ when finished to get back to the standard oven display.
User Preferences menu items:
. CLO 12:00; Setting the clock.
. CLO on; Clock on/off.
. CLO 12hr; 12/24 hour time of day display.
. UPO;Adjusting oven temperature.
• F-C F; Fahrenheit / Celcius display.
• AUd; Audio on/offand volume.
• E S on; 12 hour Energy Saving on/off.
• rSt ; Reset to default factory settings,
SE )NG THECLOCK-TiMEOFDAY:
The clock may be set for 12or 24 hour time of day operation (see advanced settings section). The
clock has been preset at the factory for the 12 hour operation. When the range is first plugged in,
or when the power supply to the range has been interrupted, the display will show "CLO 12:00".
The clock must be set before the oven can be used.
When power to the unit has been interrupted, to set the Clock, skip step 1in the example below
and follow steps 2 and 3.
To set the clock (example for 1:30):
1. Press USER PREF _--_ until you get to the CLO 12:00 menu page.
/. _, /, ,_ 4-
2. Press_\1_''`_3_i':_:'padst_setthetime_fdayt_1:3_.Thepads _i _r l_cana_s_bepressed
to raise or lower the actual time displayed.
3. Press START <_ to accept the changes and go back to user preferences menu display.
ElectronicControl Settings
USERPREFERENCES(coNTINuE0)
[] [] [] [] [] [] [] [] [] [] [] [] [] [] [] [] [] [] [] [] [] []
SE_(NG CLOCKD[SP_Yw ONOROFF
The oven control can be programmed to display the time of day or not. The oven has been
preset at the factory to display the time of day.
Changing clock display between ON and OFF:
1. Press USER PREF _ until you get to the CLO on menu page.
2. Press - or + to toggle between displaying or hiding the clock.
Io hi
3. Press START <_ to accept the changes and go back to user preferences menu display.
SE_JNGTiMEOF DAYDISPLAYw 12OR24HOURS
The oven control can be programmed to display time of day in 12 hours or 24 hours mode.
The oven has been preset at the factory to display in 12 hours mode.
Changing between 12 or 24 hour time of day display:
1. Press USER PREF _ until you get to the CLO 12hr menu page.
2 Press - or + to toggle the display of the clock in 12 or 24 hours.
io hi
3. Press START <_ to accept the changes and go back to user preferences menu display.
4. Remember to set your clock after changing the time of day display mode.
The temperature in the oven has been pre-set at the factory. When first using the oven, be sure
to follow recipe times and temperatures. If you think the oven is too hot or too cool, the
temperature in the oven can be adjusted. Before adjusting, test a recipe by using a temperature
setting that is higher or lower than the recommended temperature. The baking results should
help you to decide how much of an adjustment is needed. Each oven can be individually adjusted.
To adjust the oven temperature:
1. Press USER PREFERENCES _ until you get to the [] UPO menu page.
2. Enter the temperature by pressing the h+ or Io pads. The temperature can only be
adjusted by _+35°F.
3. Press START <_> to accept the changes and go back to user preferences menu display.
Electronic Control
S
USERPREFERENCES(CONTINUED)
[] [] [] [] [] [] [] [] [] [] [] [] [] [] [] [] [] [] [] [] [] []
SE_(NG TEMPE_TURE D(SP_Y w FAHRENHEITORCELSIUS
The oven control can be programmed to displaytemperatures in Fahrenheit or Celsius. The oven
has been preset at the factory to display in Fahrenheit.
To change dispJay from Fahrenheit to Celsius or Celsius to Fahrenheit:
1. Press USER PREF _-_ until you get to the F-C F menu page.
+ o to toggle between the °C and °F display options.
2. Press hi or I
3. Press START <_ to accept the changes and go back to user preferences menu display.
The Audio Control feature allows the oven control to be operated without sounds or beeps
whenever necessary. If desired the control can be programmed for silent operation and later
returned to operating with all the default sounds and beeps. The volume of the beeps can also
be adjusted.
To change the audio mode or audio volume:
1. Press USER PREF _ until you get to the AUd menu page.
+
2. Press hi or io to toggle between the available volume settings, AUd 5 for the highest volume
setting to AUd 1 for the lowest volume, AUd OFF to disable the beeps,
3. Press START <_> to accept the changes and go back to user preferences menu display,
SETT(NGCONT)NUOUSHAKEOR 12HOURENERGYSAVING
The oven control has a factory preset built-in 12 Hour Energy Saving feature that will shut off
the oven if the oven control is left on for more than 11 hours and 59 minutes, The oven can
be programmed to override this feature for Continuous Baking,
Changing between 12 hour energy saving and continuous bake:
1. Press USER PREF _ until you get to the E S menu page,
2. Press hi or I to toggle the energy saving setting on and off.
3. Press START <_ to accept the changes and go back to user preferences menu display,
RESETTINGTODEFAULTFACTORYSETTINGS
The oven control can be set to return to its original factory settings. This includes: Setting the
Clock ON/OFF to ON, Setting the clock display mode to 12h, Display mode to Fahrenheit,
Setting the oven temperature adjustment to zero, Setting audio level to 5 and Enabling the 12h
energy saving mode. Reseting the control also erase the My Favorite recipes.
To reset the oven control to its original settings:
1. Press USER PREF _ until you get to the rSt no menu page.
+
2. Press hi or Io to select YES.
3. Press START <_ to reset to default factory settings.

Oven Controls
MY FAVOR)TES
[] [] [] [] I! [] [] [] I! [] [] I! [] [] [] [] [] [] I! [] [] []
The Favorites settings allows you to save your most frequently used or most complex cooking
sequences. This feature will save the cooking mode, the target temperature and the cooktime
(if any). The oven can recall up to three cooking sequences from its internal memory, which are
easily accessible from a one touch button. These functions can be used with all cooking modes
and features.
To save a Favorite (example is a 450°F Bake for 30 minutes):
- Saving a Favorite can only be done for an oven which is currently in operation.
1. Press OVEN : OVENto light up the available cooking modes pads.
2. Press BAKE _"_. The default temperature will appear in the
display.
3. Entertemperature neeaea; ,\,._/,'.\_\u/'.
COOK
4. Press COOK OPTIONS ....... to bring up the cook options items.
5. Press COOK DU RATION _. The time numbers will blink in the display.
6. Entertime needed;'.\3_ _Ui.
7. Press START _,,_.
8. Press and hold for 3 seconds any MY FAVORITE (_ pad. Notice that the red indicatorabove
the key will light up.
To recall a Favorite:
- Recalling a Favorite can only be done for an oven which is not currently in operation.
1. Select oven by pressing either UPPER OVEN ovE,u.... or LOWER OVEN .....ow,.
2. Press any MY FAVORITE (_) pad which is currently lighted up.
3. Press START _,_.
To overwrite a Favorite:
1. To overwrite a My Favorite simply start a new cooking sequence and save it into the same
My Favorite location (1,2 or 3) for the selected oven as shown in example above. The new
My Favorite settings will overwrite the old ones.
To delete a Favorite:
1. Press OVEN : OVEN.
2. Press the currently lighted up MY FAVORITE _ pad you wish to delete for 3 seconds,
Oven Controls
SABBATH FEATURE
(FORUSEON THEJEWISHSABBATH& HOLDAYS}
[] [] [] [] [] [] [] [] [] [] [] [] [] [] [] [] [] [] [] [] [] []
+ and LO I: pads are used to set the Sabbath feature. The Sabbath feature may only
The HI hi
be used with the BAKE _b pad. The oven temperature may be set higher or lower after
setting
the Sabbath feature (the oven temperature adjustment feature should be used only during Jewish
Holidays), however the display will not visibly show or provide any audible tones indicating
whether the change occurred correctly. Once the oven is properly set using Bake with the
Sabbath feature active, the oven will remain continuously ON until cancelled. This will override
the factory preset 12-Hour Energy Saving feature.
If the oven light will be needed during the Sabbath, press OVEN LIGHT _=before activating the
Sabbath feature. Once the oven light is turned ON and the Sabbath feature is active, the oven
light will remain ON until the Sabbath feature is turned OFF. If the oven light needs to be OFF,
be sure to turn the oven light OFF before activating the Sabbath feature.
IMPORTANT NOTES: It is not advised to attempt to activate any other program feature other than
BAKE while the Sabbath feature is active. O NLY the following key pads will function after setting
j,_ r., (_ ,(_ + and LOthe Sabbath feature; _0_ to _9), BAKE , START , CANCEL @, HI hi Io
ALL OTHER KEYPADS will not function once the Sabbath feature is properly activated.
To Program the Upper Oven to Begin Baking Immediately & Activate the
Sabbath feature (example: baking at 350°F)
1. Place the food in the oven.
2. Press OVEN : OVENto light up the available cooking modes pads.
3. Press BAKE (_.
4. If you desire to set the oven control for a COOK DURATION _ do so at this time. If not,
skip this step and continue to step 5. Refer to their section for complete instructions.
Remember the oven will shut down after using COOK DU RATION _ and therefore may
only be used once during the Sabbath/Jewish Holidays.
5. Press START <_.
6. The oven will turn ON and begin heating immediately.
+ and LO - pads for at least 3 seconds. SAb will appear in
7. Press and hold both the HI hi Io
the oven display. Once SAb appears in the display the oven control will no longer beep or
display any further changes and the oven is properly set for the Sabbath feature.

Oven Controls
SABBATHFEATURE(CONTINUED/
[] [] [] [] [] [] [] [] [] [] [] [] [] [] [] [] [] [] [] [] [] []
Note: You may change the oven temperature once baking has started. Press OVEN : OVEN,
BAKE _, the numeric key pads for the temperature you want (example for 425°F press ,_4_:',
t2_i _5_) and then press START <_ TWICE (for Jewish Holidays only). Remember that the
oven control will no longer beep or display any further changes once the oven is set for
the Sabbath feature.
8. The oven may be turned OFF at any time by pressing CANCEL @ pad (this will turn the
oven OFF only). To turn OFF the Sabbath feature press and hold both the HI h+iand LO Io pads
for at least 3 seconds. SAb will disappear from the display.
Should you experience a power failure or interruption, the oven will shut off. When power is
returned the oven will not turn back on automatically. SF (Sabbath Failure) will be displayed in
the oven control display. The oven will remember that it is set for the Sabbath and the food may
be safely removed from the oven while still in the Sabbath feature, however the oven cannot be
turned back on until after the Sabbath. After the Sabbath observance turn OFF the Sabbath
feature. Press and hold both the HI hi and LO |o pads for at least 3 seconds. SAb will disappear
from the display and the oven may be used with all normal functions. For further assistance,
guidelines for proper usage, and a complete list of models with the Sabbath feature, please visit
the web at http:\\www.star-k.org.
iiiiiiiiiiiiiiiiiiiiiiiiiiiiiiiiiiiiiiiiiiiiiiiiiiiiiiiiiiiiiiiiiiiiiiiiiiiiii
Care & Cleaning
USINGTHESELF-CLEANFEATURE
[] [] [] [] [] [] [] [] [] [] [] [] [] [] [] [] [] [] [] [] [] []
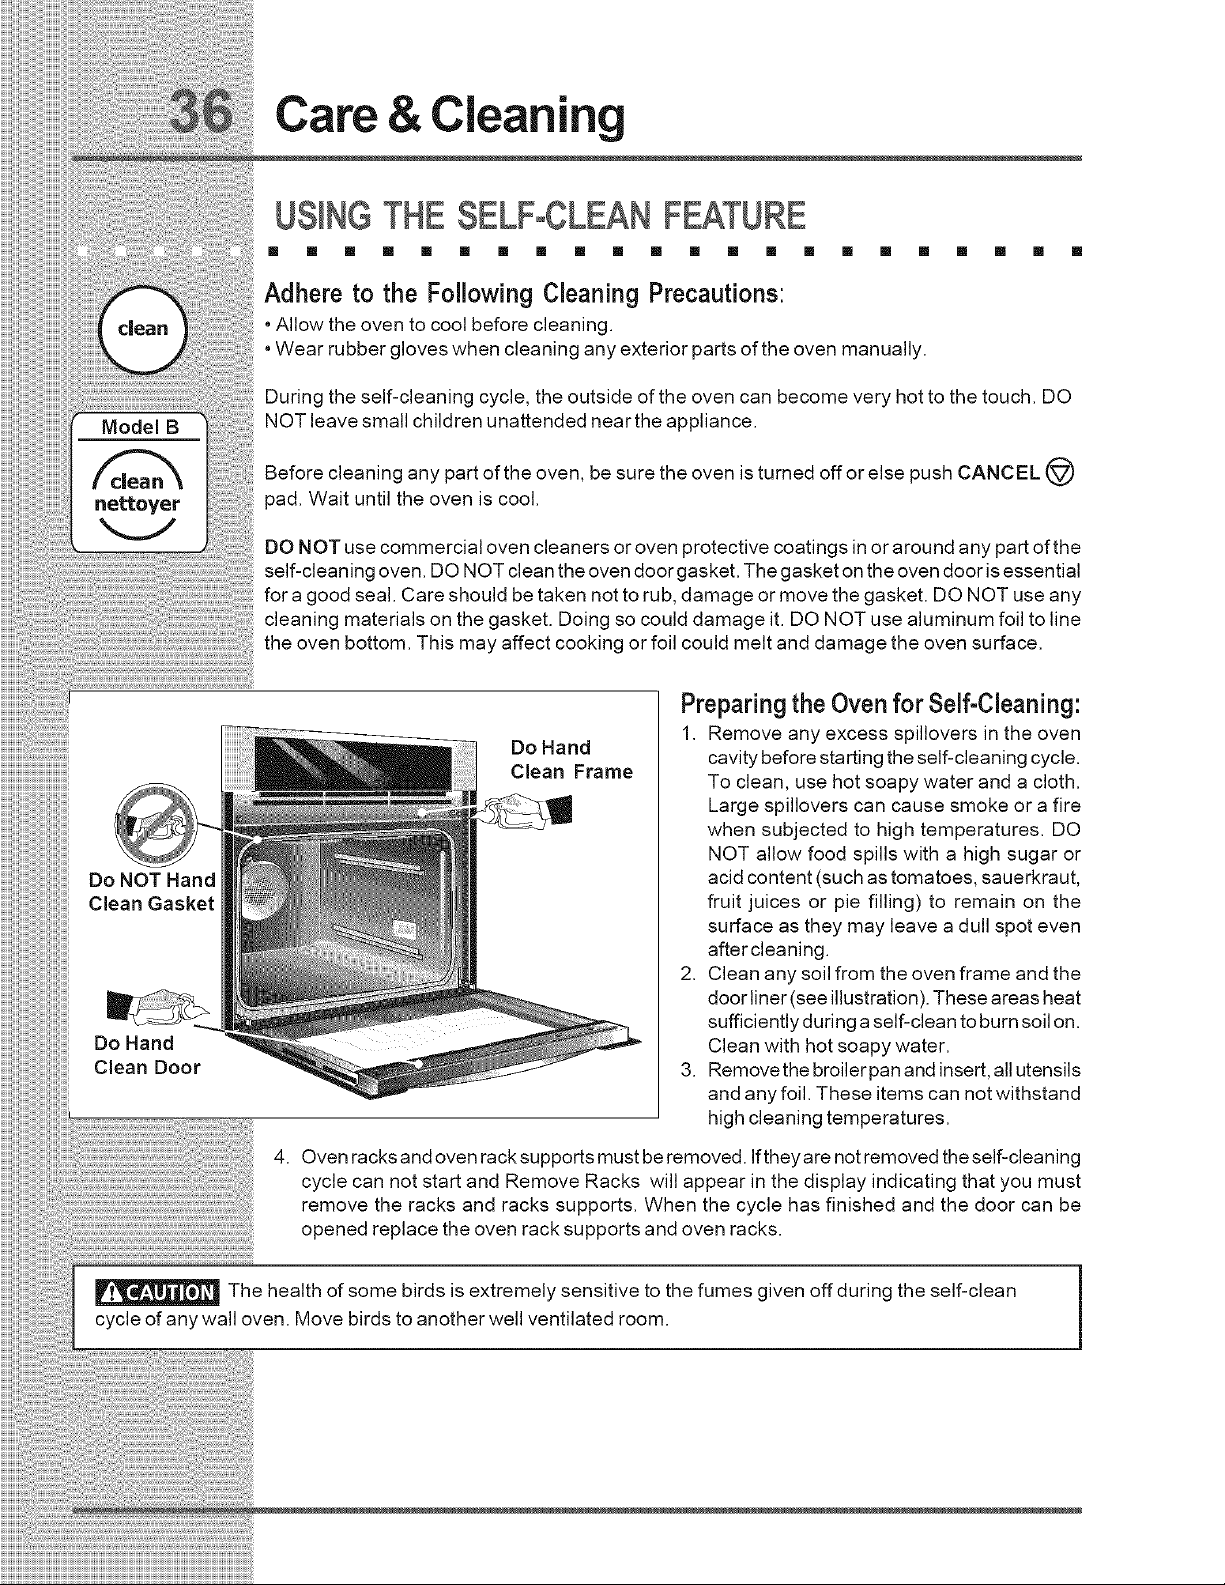
Adhere to the Following Cleaning Precautions:
• Allow the oven to cool before cleaning.
• Wear rubber gloves when cleaning any exterior parts of the oven manually.
During the self-cleaning cycle, the outside of the oven can become very hot to the touch. DO
NOT leave small children unattended near the appliance.
Before cleaning any part of the oven, be sure the oven is turned offor else push CANCEL
pad. Wait until the oven is cool.
DO NOT use commercial oven cleaners or oven protective coatings in or around any part of the
self-cleaning oven. DO NOT clean the oven door gasket. The gasket on the oven door is essential
for a good seal. Care should be taken not to rub, damage or move the gasket. DO NOT use any
cleaning materials on the gasket. Doing so could damage it. DO NOT use aluminum foil to line
the oven bottom. This may affect cooking or foil could melt and damage the oven surface.
Do Hand
Clean Frame
Preparing the Oven for Self-Cleaning:
1. Remove any excess spillovers in the oven
cavity before starting the self-cleaning cycle.
To clean, use hot soapy water and a cloth.
Large spillovers can cause smoke or a fire
when subjected to high temperatures. DO
NOT allow food spills with a high sugar or
acid content (such as tomatoes, sauerkraut,
fruit juices or pie filling) to remain on the
surface as they may leave a dull spot even
after cleaning.
2. Clean any soil from the oven frame and the
door liner (see illustration). These areas heat
sufficiently during a self-clean to burn soil on.
Clean with hot soapy water.
3. Remove the broiler pan and insert, all utensils
and any foil. These items can not withstand
high cleaning temperatures.
4. Oven racks and oven rack supports must be removed. Iftheyare not removed the self-cleaning
cycle can not start and Remove Racks will appear in the display indicating that you must
remove the racks and racks supports. When the cycle has finished and the door can be
opened replace the oven rack supports and oven racks.
The health of some birds is extremely sensitive to the fumes given off during the self-clean
cycle of anywall oven. Move birds to another well ventilated room.
i
Care & Cleaning
STARTINGSELF-CLEANCYCLE
[] [] [] [] [] [] [] [] [] [] [] [] [] [] [] [] [] [] [] [] [] []
A self-cleaning oven cleans itself with high temperatures (well above cooking temperatures)
which eliminate soil completely or reduce it to a fine powdered ash you can whisk away with
damp cloth. Ifyou are planning to use the oven directly after a self-clean cycle remember to allow
time for the oven to cool down and the oven door to unlock. This normally takes about one hour.
To set the controls for a Self-Cleaning cycle:
1. Remove the oven racks and the racks supports.
2. Be sure the clock is set with the correct time of day and the oven door is closed.
3. Press OVEN : OVENto light up the available cooking modes pads.
4. PressCLEAN _.
5. Press LITE e for a 2 hour self-clean, or press MEDIUM • • for 3 hours, or press HEAVY
e= • for 4 hours.
6. Press START <_. The "DOOR [] "icon will flash.
7. As soon as the control is set, the motor driven oven door lock will begin to close
automatically. Once the door has been locked the "DOOR [] "indicator light will stop
flashing and remain on.
Note: Allow about 15 seconds for the oven door lock to close.
To set the controls for a delayed Self-Cleaning cycle:
1. Followtheinstructionsabove.
2. Press END TiME _. The time of day numbers will blink in the
display.
3. Entertimeofdayneededfortheendofthecycle(examplefor'6:00 ;%,/_\vi',\v/,.
4. Press START <_.
When the Self-Clean Cycle is Completed:
1. Thetimeofdayand"DOOR [] "willremainON.
2. The display will show an "Hot" message while the oven is still too hot to open door.
3. Once the oven has cooled down for 1 HOUR, and the "DOOR [] "icon is no longer
displayed, the oven door can then be opened.
Stopping or Interrupting a Self-Cleaning Cycle:
If it becomes necessary to stop or interrupt a self-cleaning cycle due to excessive smoke or
fire in the oven:
1. Press CANCEL @.
2. Once the oven has cooled down for approximately 1 HOUR and the "DOOR [] "icon is
no longer displayed,the oven door can then be opened.
During the self-cleaning cycle, the outside of the wall oven can become very hot to the touch. DO
NOTleave small children unattended nearthe appliance; they may be burned ifthey touch the hot oven door surfaces.
DO NOT force the oven door open. This can damage the automatic door locking system. Use care
when opening the oven door after the self-cleaning cycle. Stand to the side of the oven when opening the door to
allow hot air or steam to escape. The oven may still be VERY HOT.

Care & ¢(eaning
GENE L CLEAN)NG
[] [] [] [] [] [] [] [] [] [] [] [] [] [] [] [] [] [] [] [] [] []
Cleaning Various Parts of Your appliance
Before cleaning any part of the appliance, be sure all controls are turned OFF and the appliance
is COOL. REMOVE SPILLOVERS AND HEAVY SOILING AS SOON AS POSSIBLE,
REGULAR CLEANINGS WILL REDUCE THE NUMBER OF MAJOR CLEANINGS LATER
Surfaces How to Clean
Glass, Painted and P(astic Body Forgeneral cleaning, use hot, soapy water and a cloth. For more difficult soils and built-
Parts and Decorative Trim up grease, apply a liquid detergent directly onto the soil. Leave on soil for 30 to 60
minutes. Rinse with a damp cloth and dry. DO NOT use abrasive cleaners on any of
these materials; they can scratch.
Before cleaning the control panel, turn all controls to OFF. Lightly spray the control
Control Panel
panel with a liquid cleaner. Wipe with a soft cloth or paper towel. DO NOT use abrasive
cleaners or scoudng pads. These can permanently damage the control panel surface.
Porcelain Enamel
BroUer Pan and Grid
Stainless Steel, Chrome
Decorative Trim, Oven Racks,
Oven Racks Support
Oven Racks
Gentle scouring with a soapy scouring pad will remove most spots. Rinse with a 1:1
solution of clear water and ammonia. If necessary, cover difficult spots with an
ammonia-soaked paper towel for 30 to 40 minutes. Rinse with clean water and a damp
cloth, and then scrub with a soap-filled scouring pad. Rinse and wipe dry with a clean
cloth. Remove all cleaners or the porcelain may become damaged during future
heating.
Clean with hot, soapy water and a dishcloth. Rinse with clean water and a cloth. Cover
stubborn spots with an ammonia-soaked paper towel for 30 to 40 minutes. Rinse.
Cleaners made especially for stainless steel are recommended. Be sure to rinse the
cleaners as bluish stains may occur during heating and cannot be removed.
Oven racks and oven rack supports must be removed from the oven during the self-
clean cycle for cleaning. If they are not removed, the self-clean cycle will not start. Clean
them as described above.
Oven Door To clean oven door, wash with hot, soapy water and a clean cloth. DO NOT immerse
the door in water or clean the oven door gasket.
Oven DoorGasket The oven gasket located on the inner frame of the door and visible when the door is
opened is essential for a good seal. Care should be taken not to rub, damage or
remove the gasket.
Care & Cleaning
CAREAND CLEANINGOF STAINLESSSTEEL
[] [] [] [] [] [] [] [] [] [] [] [] [] [] [] [] [] [] [] [] [] []
Special care and cleaning are required for maintaining the appearance of stainless parts.
Please refer to the table provided at the beginning of the General Care & Cleaning section
in this Use & Care Manual.
TO REMOVEAND REP CE OVENDOOR
[] [] [] [] [] [] [] [] [] [] [] [] [] [] [] [] [] [] [] [] [] []
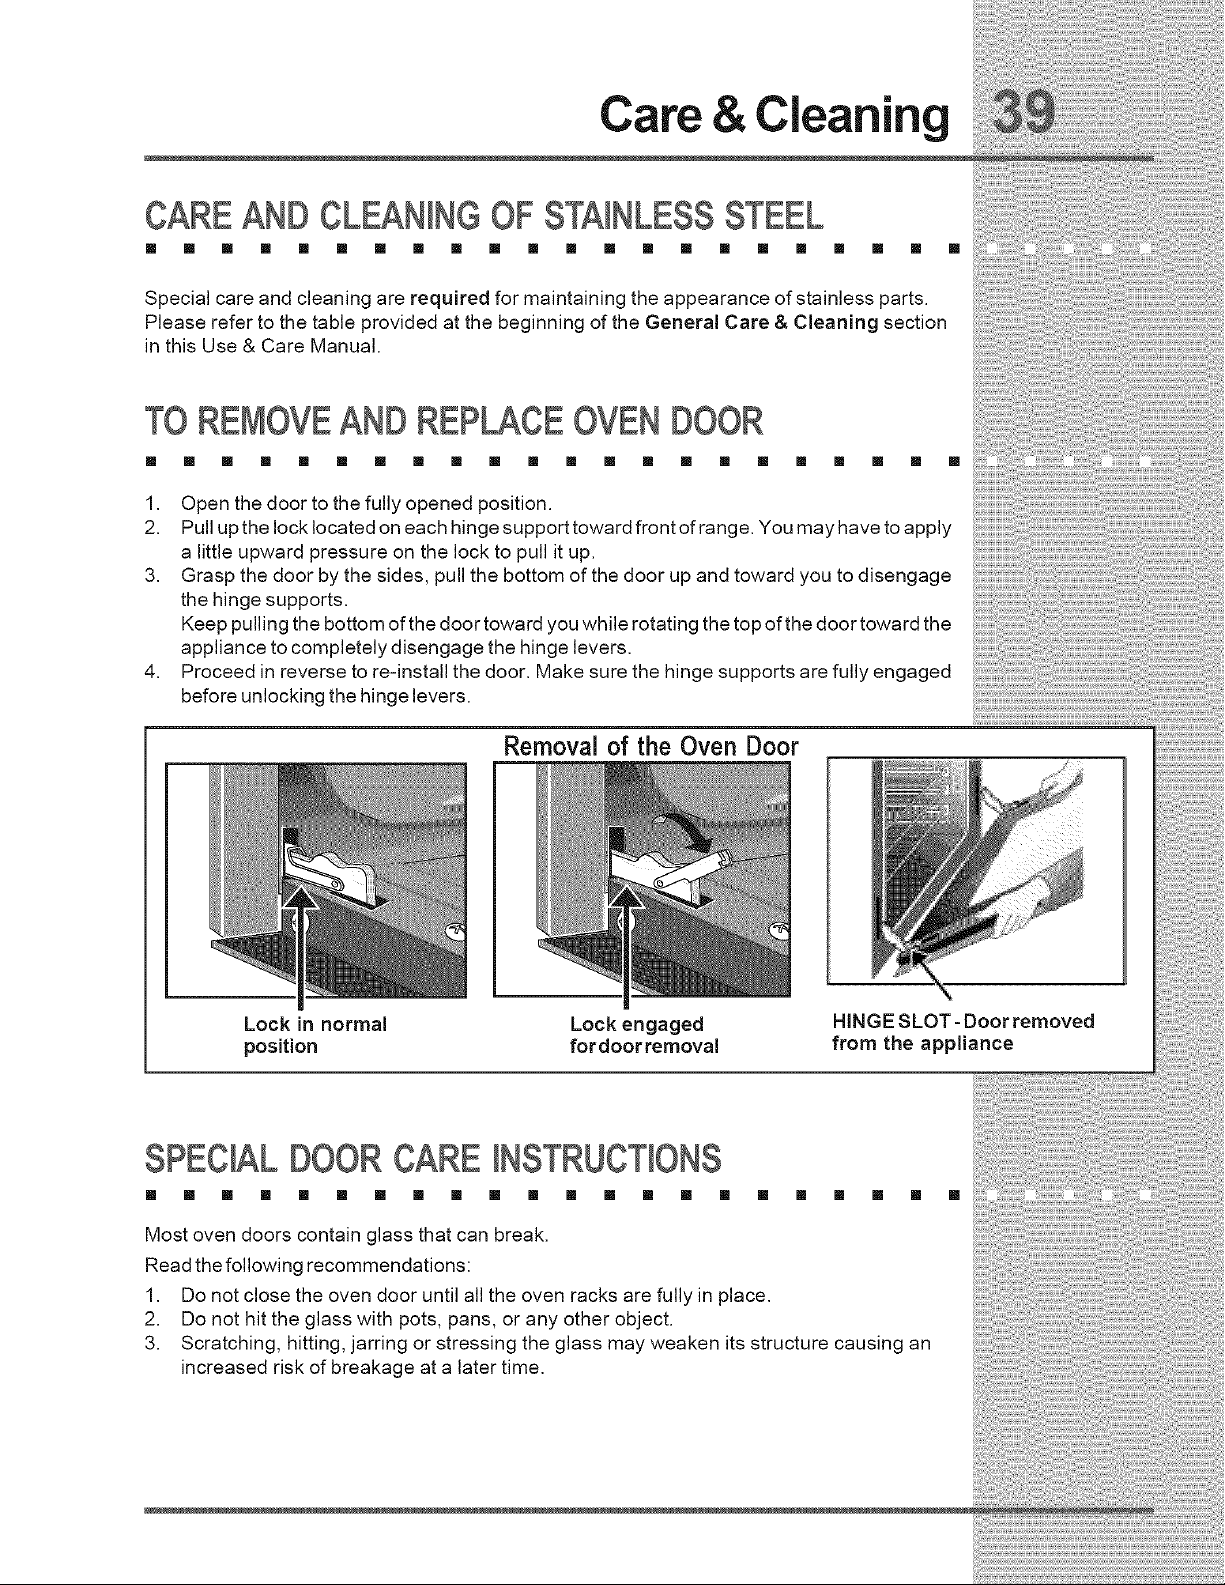
1. Open the door to the fully opened position.
2. Pull up the lock located on each hinge support toward front of range. You may have to apply
a little upward pressure on the lock to pull it up.
3. Grasp the door by the sides, pull the bottom of the door up and toward you to disengage
the hinge supports.
Keep pulling the bottom of the door toward you while rotating the top of the door toward the
appliance to completely disengage the hinge levers.
4. Proceed in reverse to re-install the door. Make sure the hinge supports are fully engaged
before unlocking the hinge levers.
Lock in normal
position
Removal of the Oven Door
Lock engaged
for door removal
HINGE SLOT- Door removed
from the appliance
SPECIALDOORCARE INSTRUCTIONS
[] [] [] [] [] [] [] [] [] [] [] [] [] [] [] [] [] [] [] [] [] []
Most oven doors contain glass that can break.
Read the following recommendations:
1. Do not close the oven door until all the oven racks are fully in place.
2. Do not hit the glass with pots, pans, or any other object.
3. Scratching, hitting, jarring or stressing the glass may weaken its structure causing an
increased risk of breakage at a later time.
_;_!_i_i_i!ii_i!ii_i!ii_i!ii_i!ii_i!ii_i!ii_i!ii_i!ii_i!ii_i!ii_i!ii_i!ii_i!ii_i!ii_i!ii_i_i_i_!
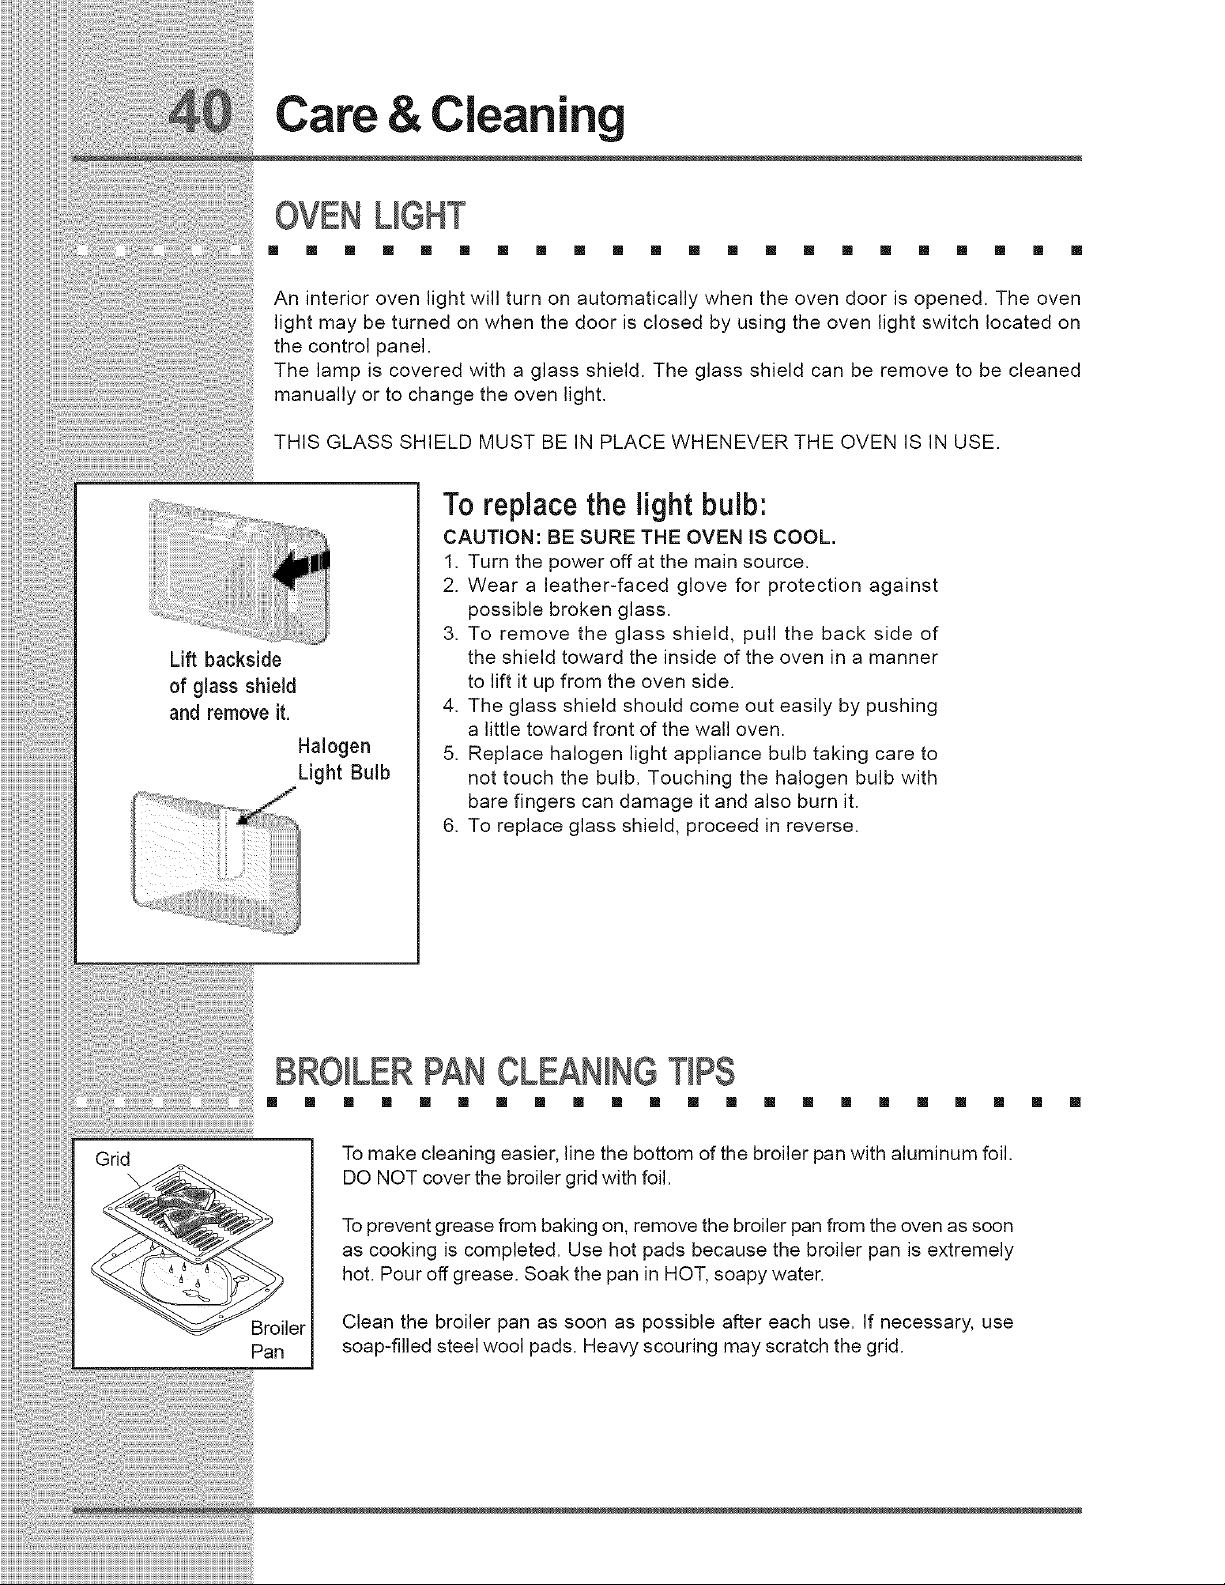
Care & Cleaning
OVENLIGHT
[] [] [] [] [] [] [] [] [] [] [] [] [] [] [] [] [] [] [] [] [] []
An interior oven light will turn on automatically when the oven door is opened. The oven
light may be turned on when the door is closed by using the oven light switch located on
the control panel.
The lamp is covered with a glass shield. The glass shield can be remove to be cleaned
manually or to change the oven light.
THIS GLASS SHIELD MUST BE IN PLACE WHENEVER THE OVEN IS IN USE.
Lift backside
of glass shield
and remove it.
Halogen
Light Bulb
To replace the light bulb:
CAUTION: BE SURE THE OVEN IS COOL.
1. Turn the power off at the main source.
2. Wear a leather-faced glove for protection against
possible broken glass.
3. To remove the glass shield, pull the back side of
the shield toward the inside of the oven in a manner
to lift it up from the oven side.
4. The glass shield should come out easily by pushing
a little toward front of the wall oven.
5. Replace halogen light appliance bulb taking care to
not touch the bulb. Touching the halogen bulb with
bare fingers can damage it and also burn it.
6. To replace glass shield, proceed in reverse.
BROILERPANCLEANINGTIPS
[] [] [] [] [] [] [] [] [] [] [] [] [] [] [] [] [] [] [] []
Grid
To make cleaning easier, line the bottom of the broiler pan with aluminum foil.
DO NOT cover the broiler grid with foil.
To prevent grease from baking on, remove the broiler pan from the oven as soon
as cooking is completed. Use hot pads because the broiler pan is extremely
hot. Pour off grease. Soak the pan in HOT, soapy water.
[] []
Broiler Clean the broiler pan as soon as possible after each use. If necessary, use
Pan soap-filled steel wool pads. Heavy scouring may scratch the grid.
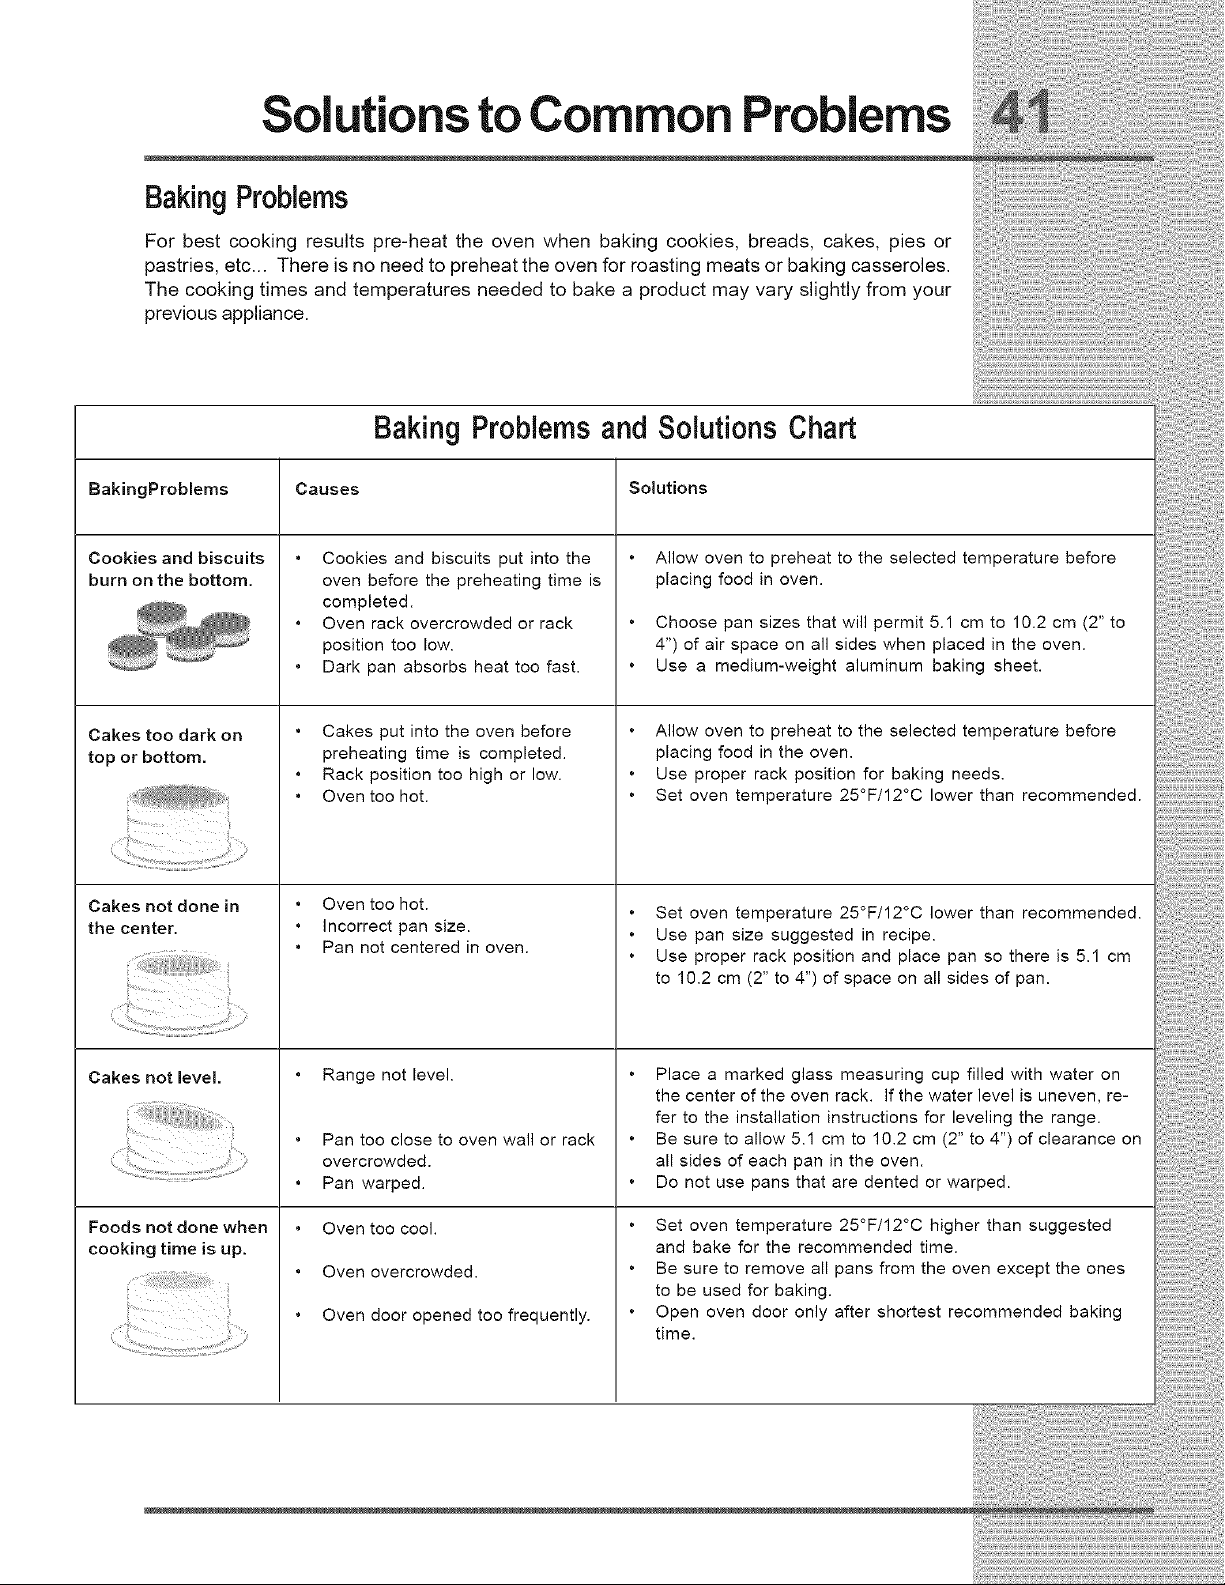
Solutionsto Common Problems
Baking Problems
For best cooking results pre-heat the oven when baking cookies, breads, cakes, pies or
pastries, etc... There is no need to preheat the oven for roasting meats or baking casseroles.
The cooking times and temperatures needed to bake a product may vary slightly from your
previous appliance.
Baking Problems and Solutions Chart
BakingProblems Causes Solutions
Cookies and biscuits Cookies and biscuits put into the Allow oven to preheat to the selected temperature before
burn on the bottom, oven before the preheating time is placing food in oven.
_ _ completed.
Oven rack overcrowded or rack Choose pan sizes that will permit 5.1 cm to 10.2 cm (2" to
position too low. 4") of air space on all sides when placed in the oven.
................ Dark pan absorbs heat too fast. Use a medium-weight aluminum baking sheet.
Cakes too dark on Cakes put into the oven before Allow oven to preheat to the selected temperature before
top or bottom, preheating time is completed, placing food in the oven.
Rack position too high or low. Use proper rack position for baking needs.
Cakes not done in
the center.
i
Cakes not level.
Foods not done when
cooking time is up.
Oven too hot.
Oven too hot.
Incorrect pan size.
Pan not centered in oven.
Range not level.
Pan too close to oven wall or rack
overcrowded.
Pan warped.
Oven too cool.
Oven overcrowded.
Oven door opened too frequently.
Set oven temperature 25°F/12°C lower than recommended.
Set oven temperature 25°F/12°C lower than recommended.
Use pan size suggested in recipe.
Use proper rack position and place pan so there is 5.1 cm
to 10.2 cm (2" to 4") of space on all sides of pan.
Place a marked glass measuring cup filled with water on
the center of the oven rack. If the water level is uneven, re-
fer to the installation instructions for leveling the range.
Be sure to allow 5.1 cm to 10.2 cm (2" to 4") of clearance on
all sides of each pan in the oven.
Do not use pans that are dented or warped.
Set oven temperature 25°F/12°C higher than suggested
and bake for the recommended time.
Be sure to remove all pans from the oven except the ones
to be used for baking.
Open oven door only after shortest recommended baking
time.
Solutions to Common Problems
OVENCONTROLBEEPSANDDJSP YSAN "F" ERRORCODE
[]
®
[] [] [] [] [] [] [] [] [] [] [] [] [] [] [] [] [] [] []
Electronic control has detected a fault condition. Push CANCEL pad to clear the
display and stop the display from beeping. Reprogram the oven. If a fault reoccurs,
record the fault number, push the CANCEL pad and contact an authorized servicer.
[] [] [] [] [] [] [] [] [] [] [] [] [] [] [] [] [] [] [] [] []
° Place oven rack in center of oven. Place a level on the oven rack. Contact installing
agent if rack and cabinet cutout flooring are not level.
• Kitchen cabinet misalignment may make oven appear to be not level. Be sure cabinets
are square and level. Contact cabinet maker to correct problem.
ENTIREOVENDOESNOTOPERATE
[] [] [] [] [] [] [] [] [] [] [] [] [] [] [] [] [] [] [] [] [] []
• When the oven is first plugged in, or when the power supply to the oven has been
interrupted, the display will flash. The oven cannot be programmed until the clock is
set.
• Be sure electrical cord is securely connected into the electrical junction box.
• Cord/plug is not installed and/or connected. Cord is not supplied with oven. Contact
your dealer, installing agent or authorized servicer.
• Service wiring not complete. Contact your dealer, installing agent or authorized
servicer.
• Power outage. Check house lights to be sure. Call your local electric company.
• Short in cord/plug. Replace cord/plug.
• Controls are not set properly. See instructions to set the controls.
• House fuse has blown or circuit breaker has tripped immediately following installation.
• House fuse may not be fully engaged. Check fuse and screw or engage circuit breaker
securely.
OVENL(GNTDOESNOTWORK
[] [] [] [] [] [] [] [] [] [] [] [] [] [] [] [] [] [] [] [] []
• Burned-out or loose bulb. Follow the instructions under Oven Light to replace or
tighten the bulb.
necessarywhenbroilingfrequently.Greaseorfoodspatterscauseexcessivesmoking.
SO_LNOTCOMPLETELYREMOVEDAFTERSELF-CLEANING
CYCLEiS COMPLETED
[] [] [] [] [] [] [] [] [] [] [] [] [] [] [] [] [] [] [] [] [] []
• Failure to clean bottom, from top of oven, frame of oven or door area outside oven seal.
These areas are not in the self-cleaning area, but get hot enough to burn on residue.
Clean these areas before the self-cleaning cycle is started. Burned on residue can be
cleaned with a stiff nylon brush and water or a nylon scrubber. Be careful not to
damage the oven gasket.
• Excessive spillovers in oven. Set the self-clean cycle for longer cleaning time.
POORBAKINGRESULTS
[] [] [] [] [] [] [] [] [] [] [] [] [] [] [] [] [] [] [] [] [] []
• Many factors affect baking results. See Baking for hints, causes and corrections. See
Adjusting Oven Temperature.
FLAMESINS_DEOVENORSMOKEFROMVENT
[] [] [] [] [] [] [] [] [] [] [] [] [] [] [] [] [] [] [] [] [] []
• Excessive spillovers in oven. This is normal, especially for high oven temperatures, pie
spillovers orfor large amounts of grease on bottom of oven. Wipe up excessive
spillovers.
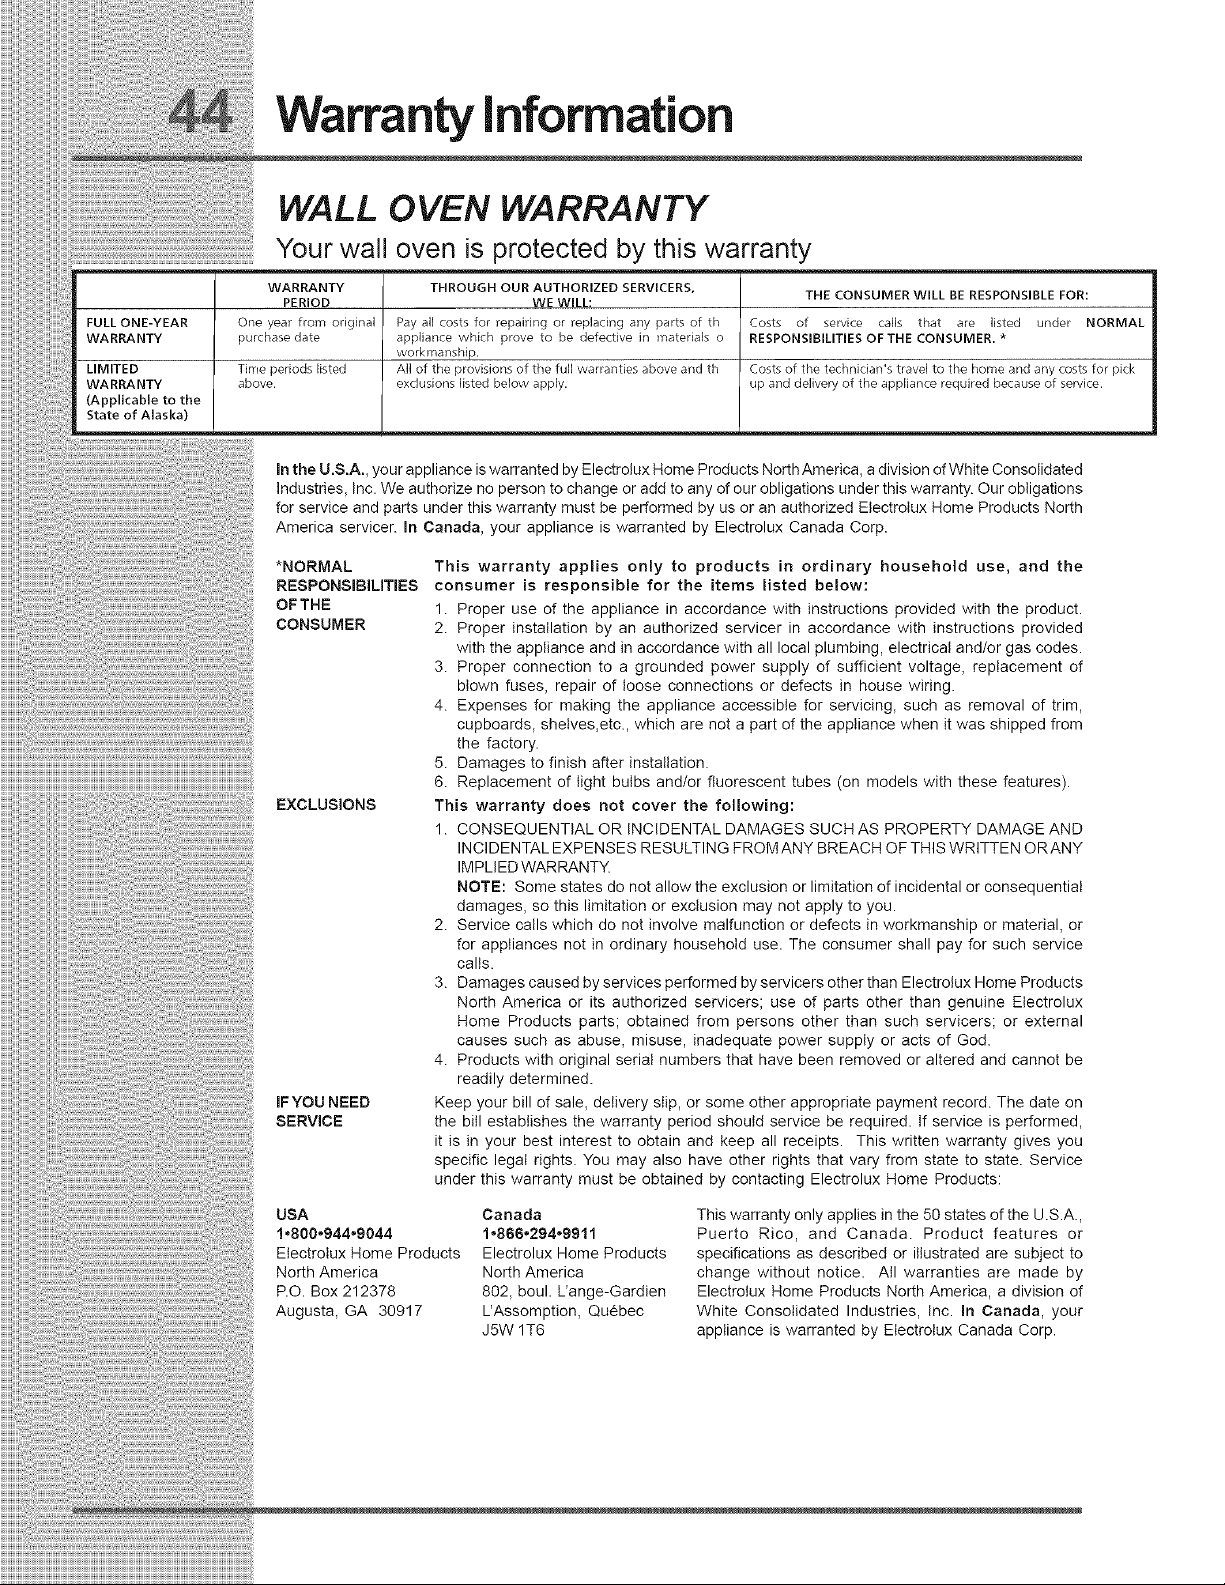
Warranty information
WALL OVEN WARRANTY
FULL ONE-YEAR
WARRANTY
LIMITED
WARRANTY
(Applicable to the
State of Alaska)
Your wall oven is protected by this warranty
WARRANTY THROUGH OUR AUTHORIZED SERVICERS, THE CONSUMER WILL BE RESPONSIBLE FOR:
PERIOD WE WILL:
One yea_ from original Pay all costs for _epaMng or _eplacing any parts of th Costs of service calls that are listed under NORMAL
purchase date appliance which prove to be defective in materials o RESPONSIBILITIES OF THE CONSUMER. *
workmanship.
Time periods listed All of the provisions of the full warranties above and th Costs of the technician's travel to the home and any costs for pick
above, exclusions listed below apply, up and delivery of the appliance required because of service.
In the U.S.A., your appliance is warranted by Electrolux Home Products North America, a division of White Consolidated
Industries, Inc. We authorize no person to change or add to any of our obligations under this warranty. Our obligations
for service and parts under this warranty must be performed by us or an authorized Etectrolux Home Products North
America servicer, in Canada, your appliance is warranted by Electrolux Canada Corp.
*NORMAL
RESPONSIBILITIES
OFTHE
CONSUMER
EXCLUSIONS
IFYOU NEED
SERVICE
This warranty applies only to products in ordinary household use, and the
consumer is responsible for the items listed below:
1. Proper use of the appliance in accordance with instructions provided with the product.
2. Proper installation by an authorized servicer in accordance with instructions provided
with the appliance and in accordance with all local plumbing, electrical and/or gas codes.
3. Proper connection to a grounded power supply of sufficient voltage, replacement of
blown fuses, repair of loose connections or defects in house wiring.
4. Expenses for making the appliance accessible for servicing, such as removal of trim,
cupboards, shelves,etc., which are not a part of the appliance when it was shipped from
the factory.
5. Damages to finish after installation.
6. Replacement of light bulbs and/or fluorescent tubes (on models with these features).
This warranty does not cover the following:
1. CONSEQUENTIAL OR INCIDENTAL DAMAGES SUCH AS PROPERTY DAMAGE AND
INCIDENTAL EXPENSES RESULTING FROM ANY BREACH OF THIS WRITTEN OR ANY
IMPLIED WARRANTY.
NOTE: Some states do not allow the exclusion or limitation of incidental or consequential
damages, so this limitation or exclusion may not apply to you.
2. Service calls which do not involve malfunction or defects in workmanship or material, or
for appliances not in ordinary household use. The consumer shall pay for such service
calls.
3. Damages caused by services performed by servicers other than Electrolux Home Products
North America or its authorized servicers; use of parts other than genuine Etectrolux
Home Products parts; obtained from persons other than such servicers; or external
causes such as abuse, misuse, inadequate power supply or acts of God.
4. Products with original serial numbers that have been removed or altered and cannot be
readily determined.
Keep your bill of sale, delivery slip, or some other appropriate payment record. The date on
the bill establishes the warranty period should service be required. If service is performed,
it is in your best interest to obtain and keep all receipts. This written warranty gives you
specific legal rights. You may also have other rights that vary from state to state. Service
under this warranty must be obtained by contacting Electrolux Home Products:
USA
!.800.944,9044
Etectrotux Home Products
North America
P.O. Box 212378
Augusta, GA 30917
Canada
1.866,294o9911
Electrolux Home Products
North America
802, boul. Uange-Gardien
L'Assomption, Quebec
J5W 1T6
This warranty only applies in the 50 states of the U.S.A.,
Puerto Rico, and Canada. Product features or
specifications as described or illustrated are subject to
change without notice. All warranties are made by
Electrolux Home Products North America, a division of
White Consolidated Industries, Inc. In Canada, your
appliance is warranted by Electrolux Canada Corp.