Installation instructions
Do This First
(for existing sleeve)
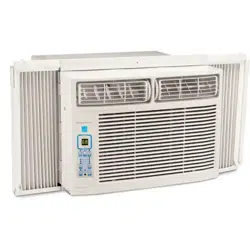
Note that the air conditioner dimensions are: 24.wide,
14½.high, and 18½. deep (without front). Install Air
Conditioner according to these installation instructions
to achieve the best performance. Save these installation
instructions for future reference.
Items in Kit
You may not need all parts in the kit. Discard unused
pans. Qty.
Tapered Spacer Blocks 17,,Long 2
Centering/Support Blocks 4½.x 3½.x 1½. 4
Plastic Divider 1/8" x 4½.x 14½,, 2
Stuffer Seal 1. x 1½"x 84,, 1
Seal 1½.x 1½.x 25,, 3
Seal 1½,,x 1½.x 14,, 2
Seal 1½.x 3/8.x 25. 3
Seal 1½.x 3/8.x 14,, 2
Seal 1" x 3/4.x 14,, 2
Trim Frame (side legs) 2
Trim Frame (top & bottom legs) 2
Ground Wire (green) 1
Nut for grounding screw 1
Grounding Screw 1
Grille (plastic) 1
Grille Aluminum 1
Nuts (plastic) 4
Screw w/washer 4
How to Install
1. identifythe wall-sleeve brandfor your installation,
fromthechart below.
Brand
White-Westinghouee
Frigidaire
Carrier (52F Series)
General Electric/
Hotpoint
Whirlpool
Wall Sleeve Dimensions
(inches)
Width Height Depth
}25½ 15¼ 17½
16,
or 22
26 15%
25¼ 16½
Fedders/Emerson 27 16¾
16'/,
17½
or 23
16¾
or 19¾
18%
15
18%
16¾
Sears/Kenmore 25¾ 16½
Emerson/Fedders 26¾ 15¾
Carrier (51S Series) 25¾ 167/,
Friedrich 27 16¾
NOTE: All wall sleeves used to mount the new Air
Conditioner must be in sound structural condition and
have a rear grille that securely attaches to sleeve, or
rear flange that serves as a stop for the Air Conditioner.
CAUTION: When installation is complete, replacement
unit MUST have a rearward
slope as shown.
1/4" 1o 5/16"
81eeve
REAR
L
2. Remove old Air Conditioner from wall sleeve and
prepare wall sleeve as follows:
-- Clean interior (do not disturb seals).
-- Wall sleeve must be securely fastened in wall before
installing Air Conditioner. Drive more nails or screws
through sleeve, into wall, if needed.
-- Repair paint if needed.
3. If not existing, drill a 3/16.clearance hole for ground-
ing screw through left side of wall sleeve, in a clear area
about 3 inches maximum (to suit) back from front edge
of sleeve as shown below. Next attach ground wire inside
sleeve, using grounding screw, nut washer pull loose
end of ground wire out front of sleeve, and temporarily
bend it down and around lower edge of sleeve.
Wall sleeve to unit
sleeve grounding
J
3/16"
F Hole
4. Prepare the wall sleeve for installation of the new unit
per the following Brand instructions.
#1 Emerson
#2 Fedders
#3 Fedders or Friedrich
#4 General Electric/Hotpoint
#5 Sears or Carrier (51S Series)
#6 Whirlpool
#7 Whirlpool
#8 White-Westinghouse/Frigidaire/
Carrier (52F Series)
#9 White-Westinghouse/Frigidaire
15"Deep
l_A,,Deep
16¾,,Deep
16¼,,Deep
18%,,Deep
17'_,,Deep
23.Deep
16,,+ 17½.Deep
22"Deep
5. Install new unit into wall sleeve.
6. To attach ground wire to the new unit, remove the
screw from the left side front.
7.Assemble and installthe
Trim Frame (see instruction).
P/N 66129901165
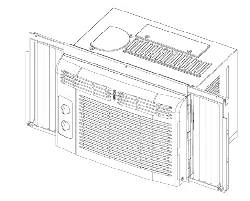
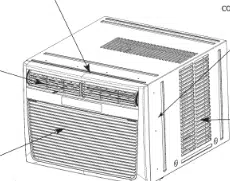
This unit's increased performance characteristics result from having two rear air intakes,
it is very important that these installation instructions are followed so your unit can operate at maximum
efficiency,
if this is an existing sleeve, and there is an existing rear grille, it needs to be replaced by the ones
shipped with the unit in the accessory kit.
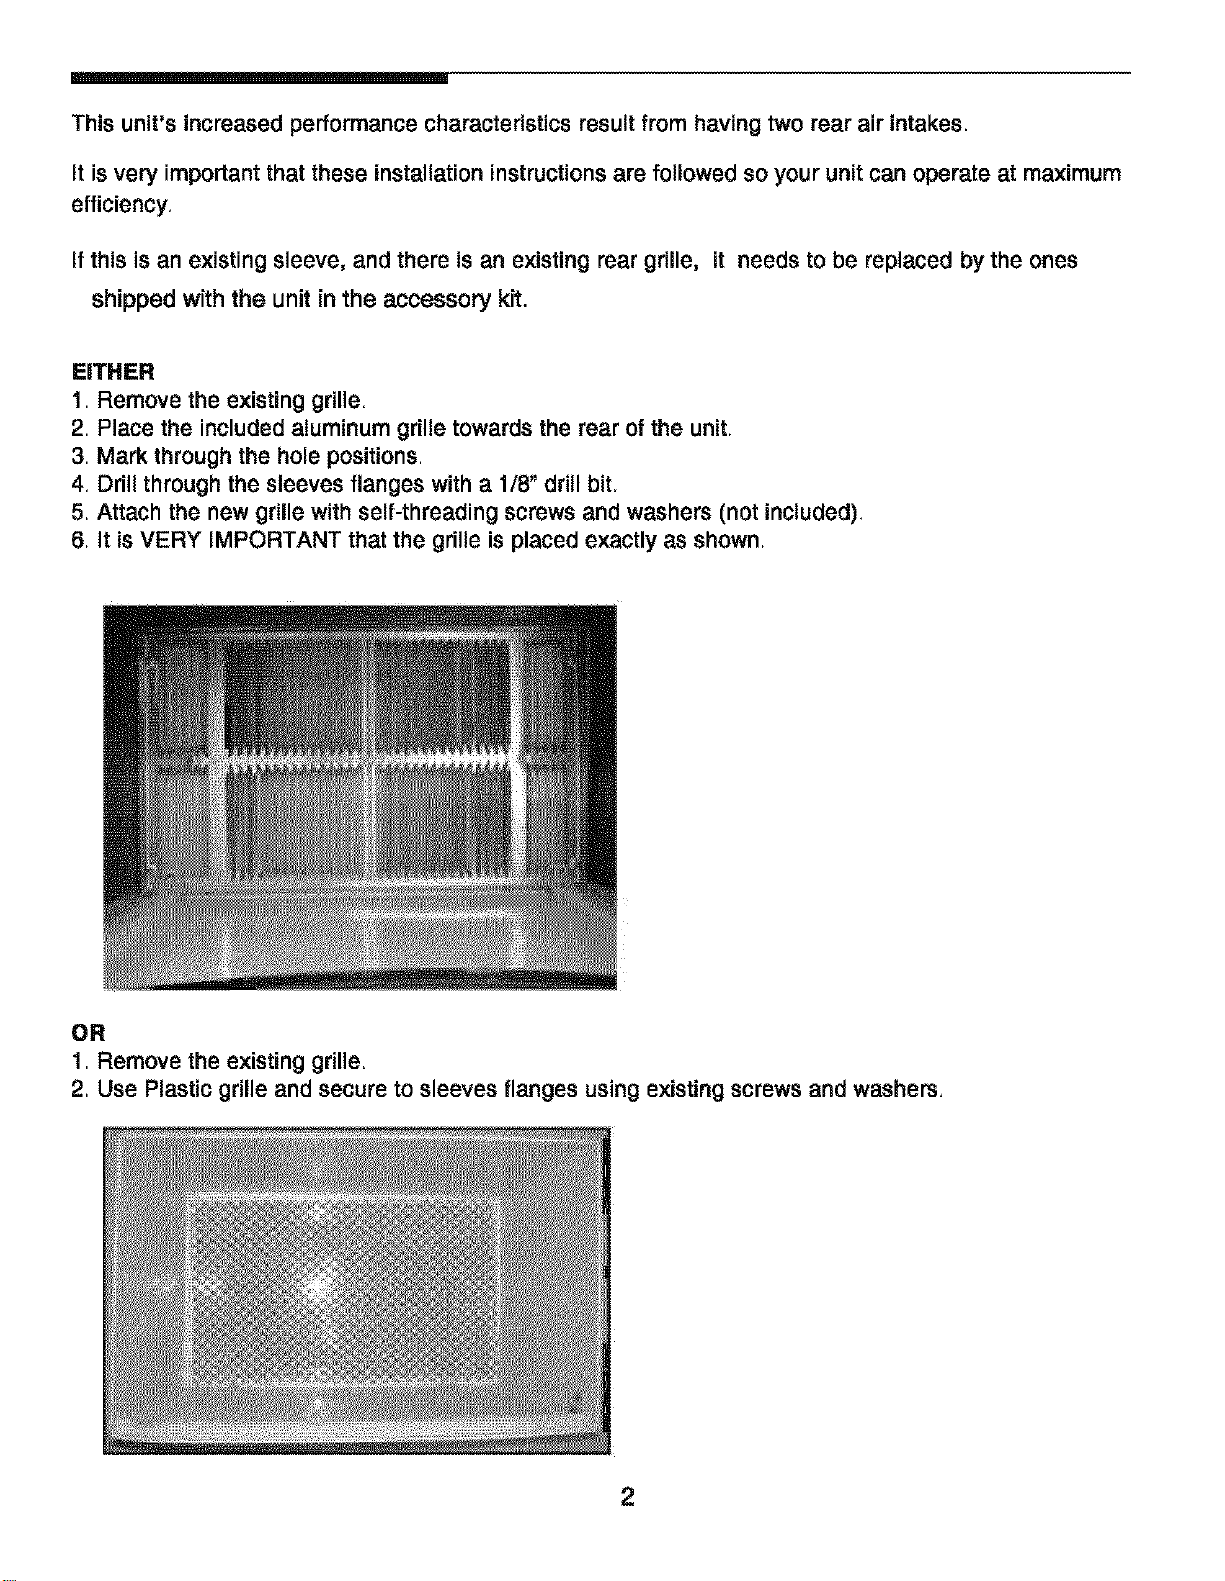
EITHER
1. Remove the existing grille.
2. Place the included aluminum grille towards the rear of the unit.
3. Mark through the hole positions.
4, Drill through the sleeves flanges with a 1/8" drill bit,
5, Attach the new grille with self-threading screws and washers (not included),
6, It is VERY iMPORTANT that the grille is placed exactly as shown,
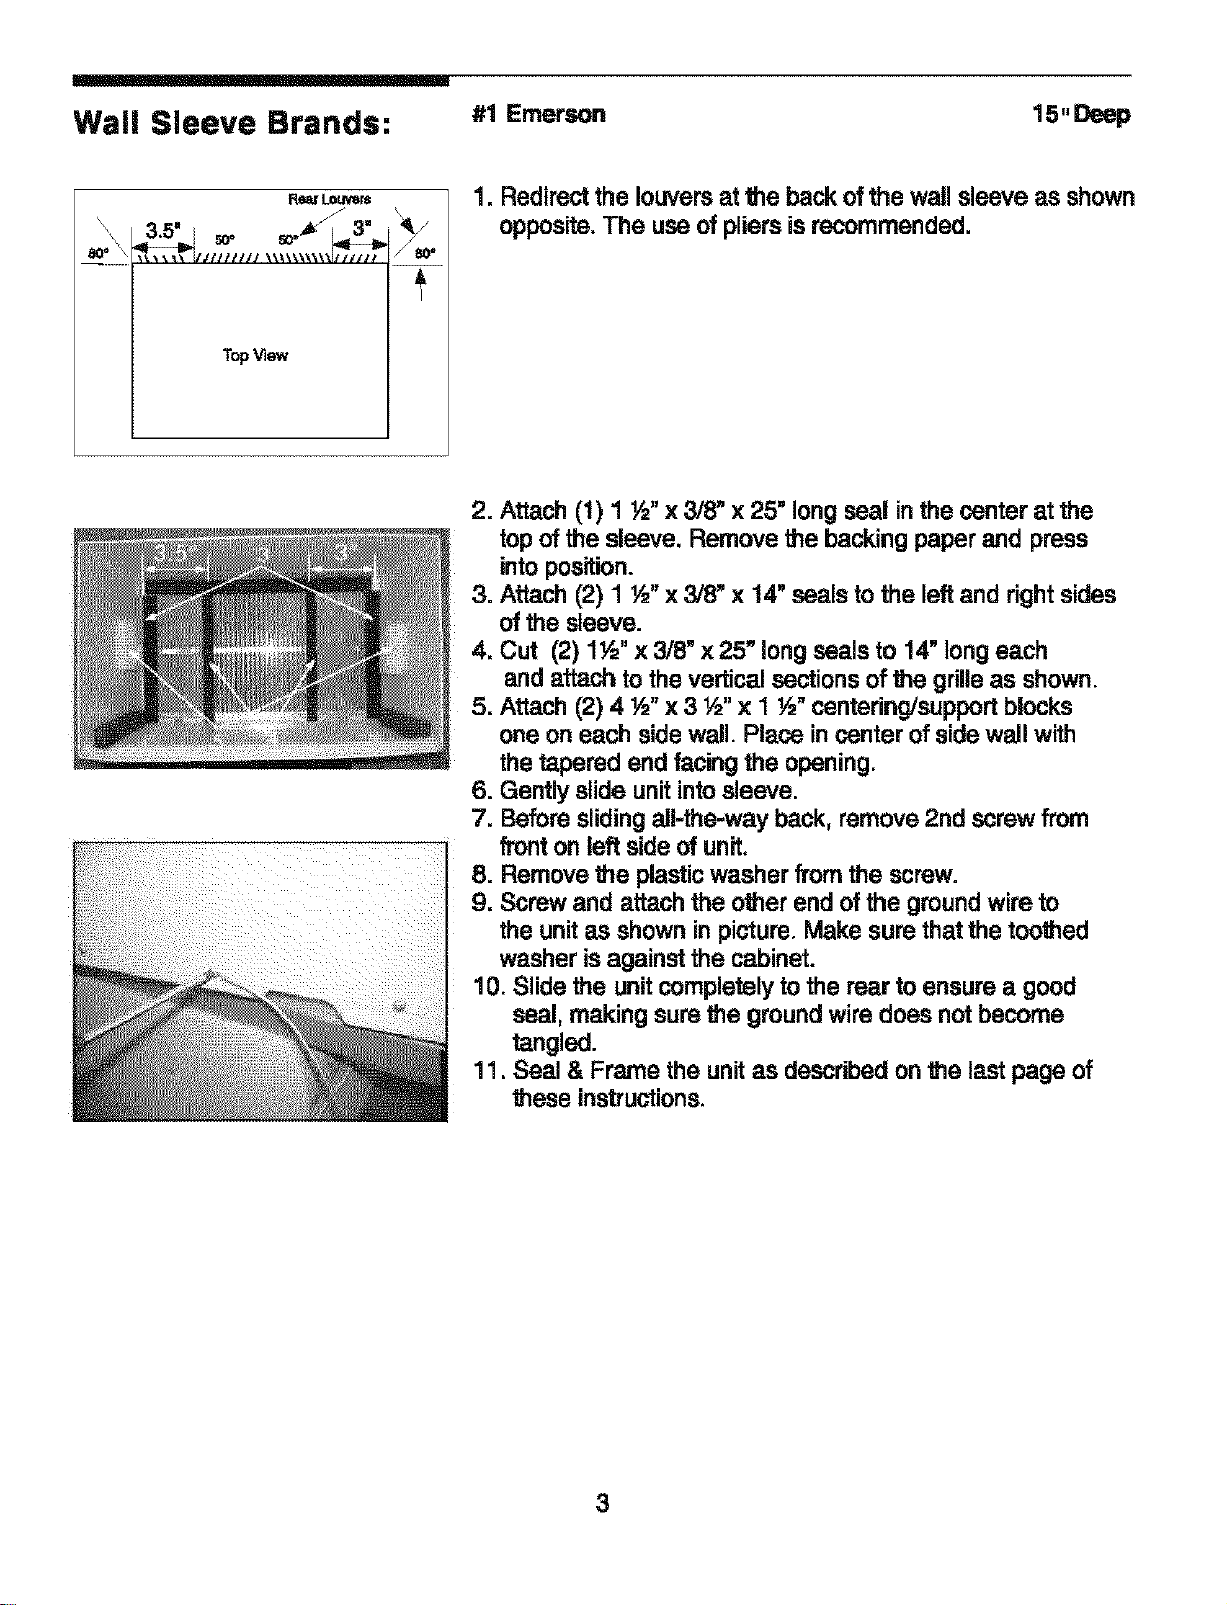
OR
1, Remove the existing grille.
2, Use Plastic grille and secure to sleeves flanges using existing screws and washers,
2
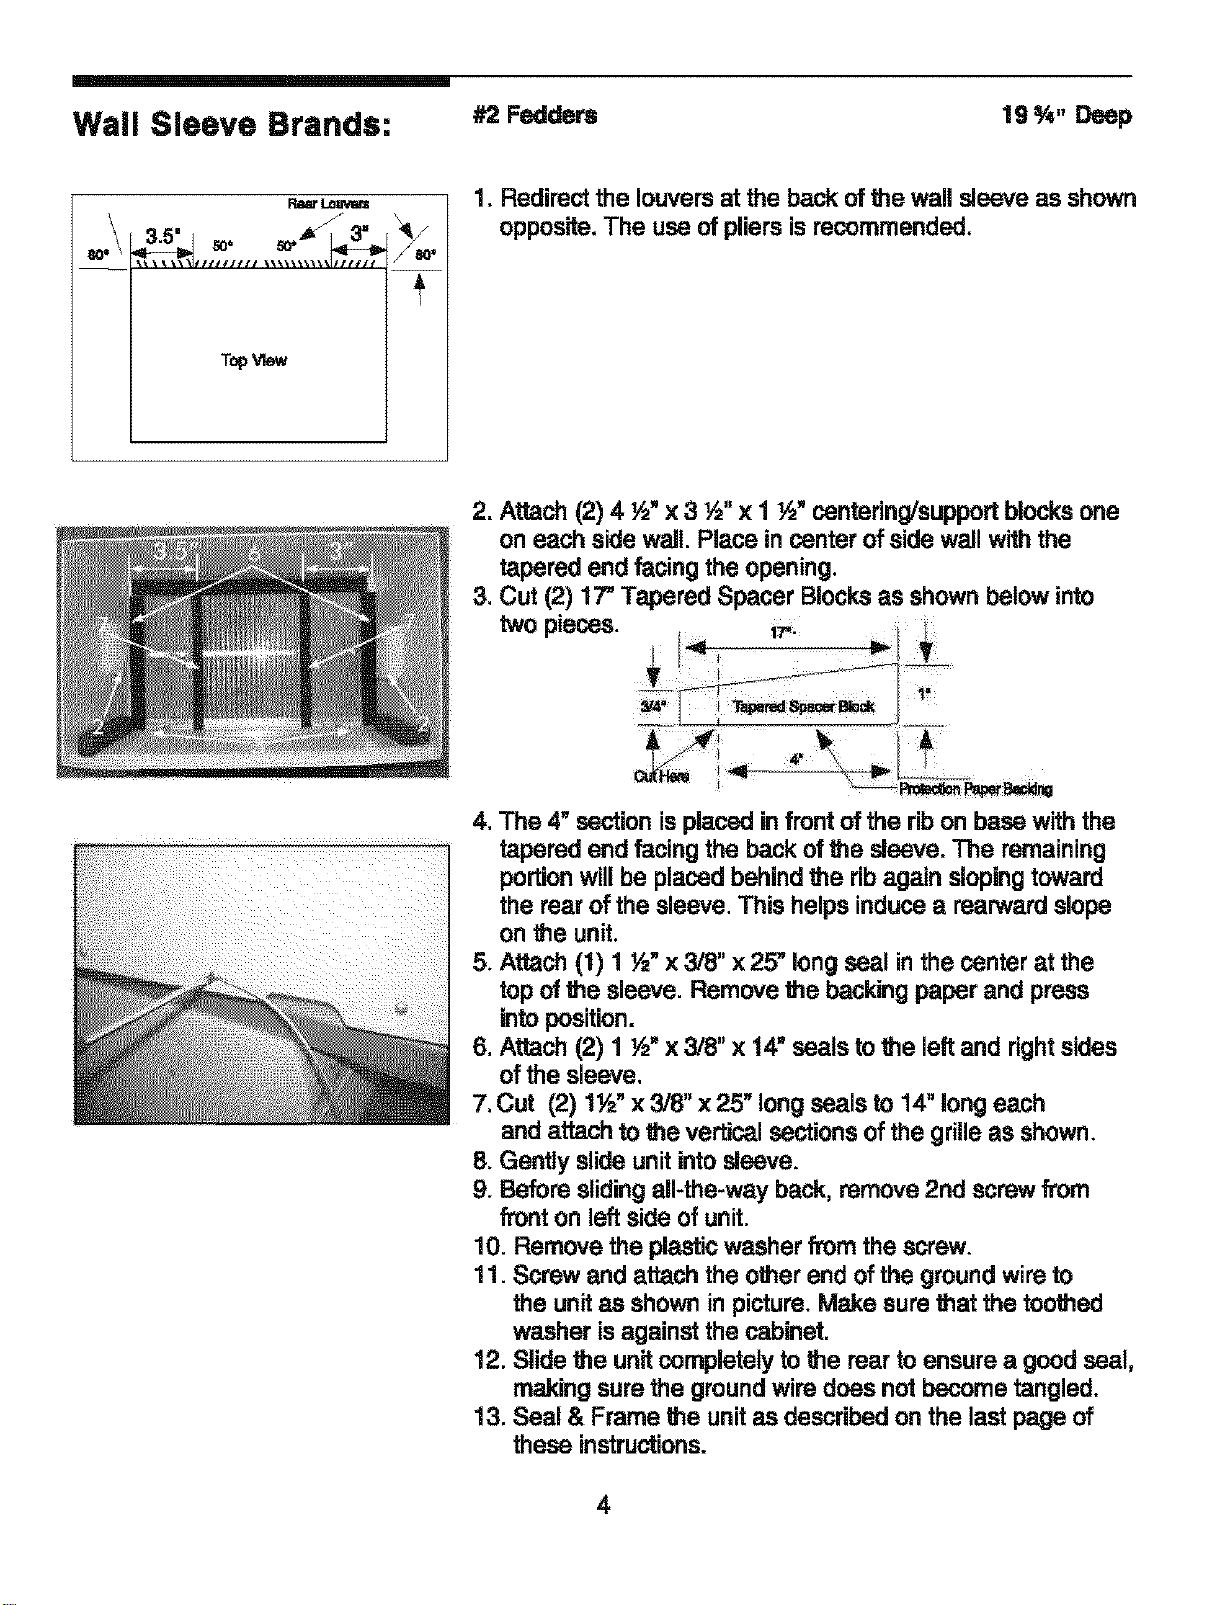
Wall Sleeve Brands: #1 Emerson
15"Deep
TopView
4/
1. Redirectthelouversatthebackofthewallsleeveas shown
opposite.The useofpliersisrecommended.
2. Attach (1) 1 ½" x 3/8" x 25" longseal inthe center at the
top of the sleeve. Remove _e backing paper and press
into position.
3, Attach (2) 1 ½" x 3/8" x 14" seals to the left and rightsides
of the sleeve.
4. Cut (2) 1½" x 3/8" x 25_long seals to 14"long each
and attach to the vertical sections of the grilleas shown.
5. Attach (2) 4 ½" x 3 ½" x I !/2"centering/support blocks
one on each side wall. Place incenter of side wall with
the tapered end facing the opening.
6. Gently slide unitintosleeve.
7. Before slidingall-the-way back, remove 2rid screw from
fronton left side of unit.
8. Remove the plasticwasher from the screw.
9. Screw and attach the other end of the groundwire to
the unitas shown in picture. Make sure that the toothed
washer is against the cabinet.
10. Slide the unitcompletely to the rear to ensure a good
seal, making sure the ground wire does not become
tangled.
11. Seal & Frame the unitas described on the last page of
these instructions.
3
Wall Sleeve Brands: #2Fedders
19 _" Deep
RearLoavam
ao_\ 3.5 eo. _ 3
TopView
/ I_O*
1. Redirect the louvers atthe back of the wall sleeve as shown
opposite. The use of pliers is recommended.
2. Attach (2) 4 ½" x 3 ½" x 1 ½" centering/supportblocks one
on each side wall. Place in center of side wall with the
tapered end facing the opening,
3, Cut (2) 17"Tapered Spacer Blocksas shown below into
two pieces.
4, The 4" section is pieced in frontof the ribon base with the
tapered end facing the back of the sleeve. The remaining
portionwill be placed behindthe rib again slopingtoward
the rear of the sleeve. This helps induce a rearward elope
on bheunit,
5oAttach (1) 1 _" x 3/8" x 25" longseal in the center at the
top of the sleeve. Remove the backing paper and press
into position.
6, Attach (2) 1 ½" x 3/8" x 14" seals to the left and rightsides
of the sleeve,
7, Cut (2) 1½" x 3/8" x 25" long seals to 14" long each
and attach to the vertical sections of the grilleas shown.
8. Gently slide unitinto sleeve.
9. Before slidingall-the-way back, remove 2nd screw fl'om
front on leftside of unit.
10. Remove the plasticwasher from the screw.
11. Screw and attach the other end of the ground wire to
the unitas shown in picture. Make sure that the toothed
washer is against the cabinet.
12, Slide the unit completely to the rear to ensure a good seal,
making sure the ground wire does not become tangled.
13, Seal & Frame the unitas described on the last page of
these instructions.
4
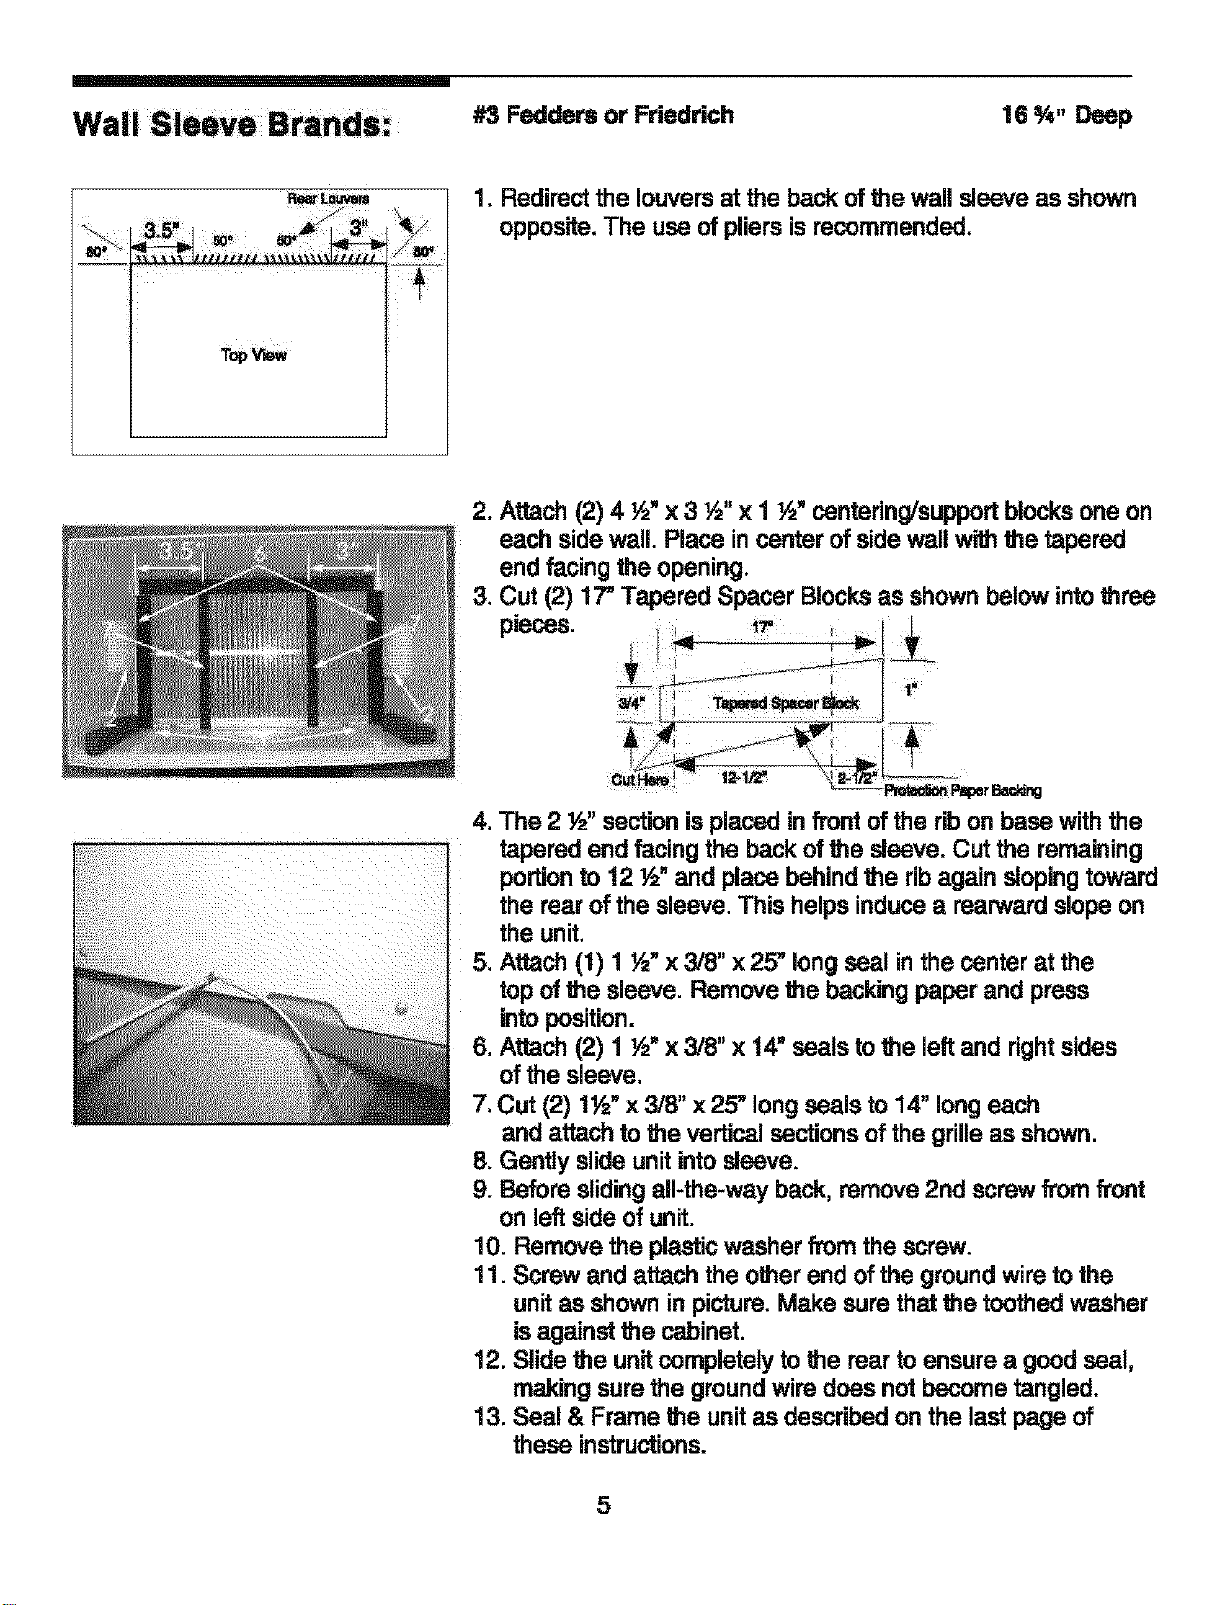
#3 Fedders or Friedrich 16 %" Deep
1. Redirect the louvers atthe back of the wall sleeve as shown
opposite. The use of pliers is recommended.
2. Attach (2) 4 ½" x 3 ½" x 1 ½" centering/supportblocks one on
each side wall. Place in center of side wall withthe tapered
end facing the opening.
3. Cut (2) 17" Tapered Spacer Blocksas shown below intothree
pieces.
4, The 2 ½" section is placed in front of the rib on base with the
tapered end facing the back of the sleeve. Cut the remaining
portionto 12 ½" and place behind the rib again sloping toward
the tear of the sleeve. This helps induce a rearward slope on
the unit,
5. Attach (1) 1 ½" x 3/8" x 25" longseal in the center at the
top of the sleeve. Remove the backing paper and press
into position.
6, Attach (2) 1 ½" x 3/8" x 14" seals to the left and rightsides
of the sleeve,
7, Cut (2) 1½" x 3/8" x 25" long seals to 14" longeach
and attach to the vertical sections of the grille as shown.
8. Gently slide unitinto sleeve.
9. Before slidingall-the-way back, remove 2nd screw from front
on left side of unit.
10. Remove the plasticwasher from the screw.
11. Screw and attach the other end of the ground wire to the
unit as shown in picture. Make sure that the toothed washer
is against the cabinet,
12, Slide the unit completely to the rear to ensure a good seal,
making sure the ground wire does not become tangled.
13, Seal & Frame the unitas described on the last page of
these instructions.
5
L
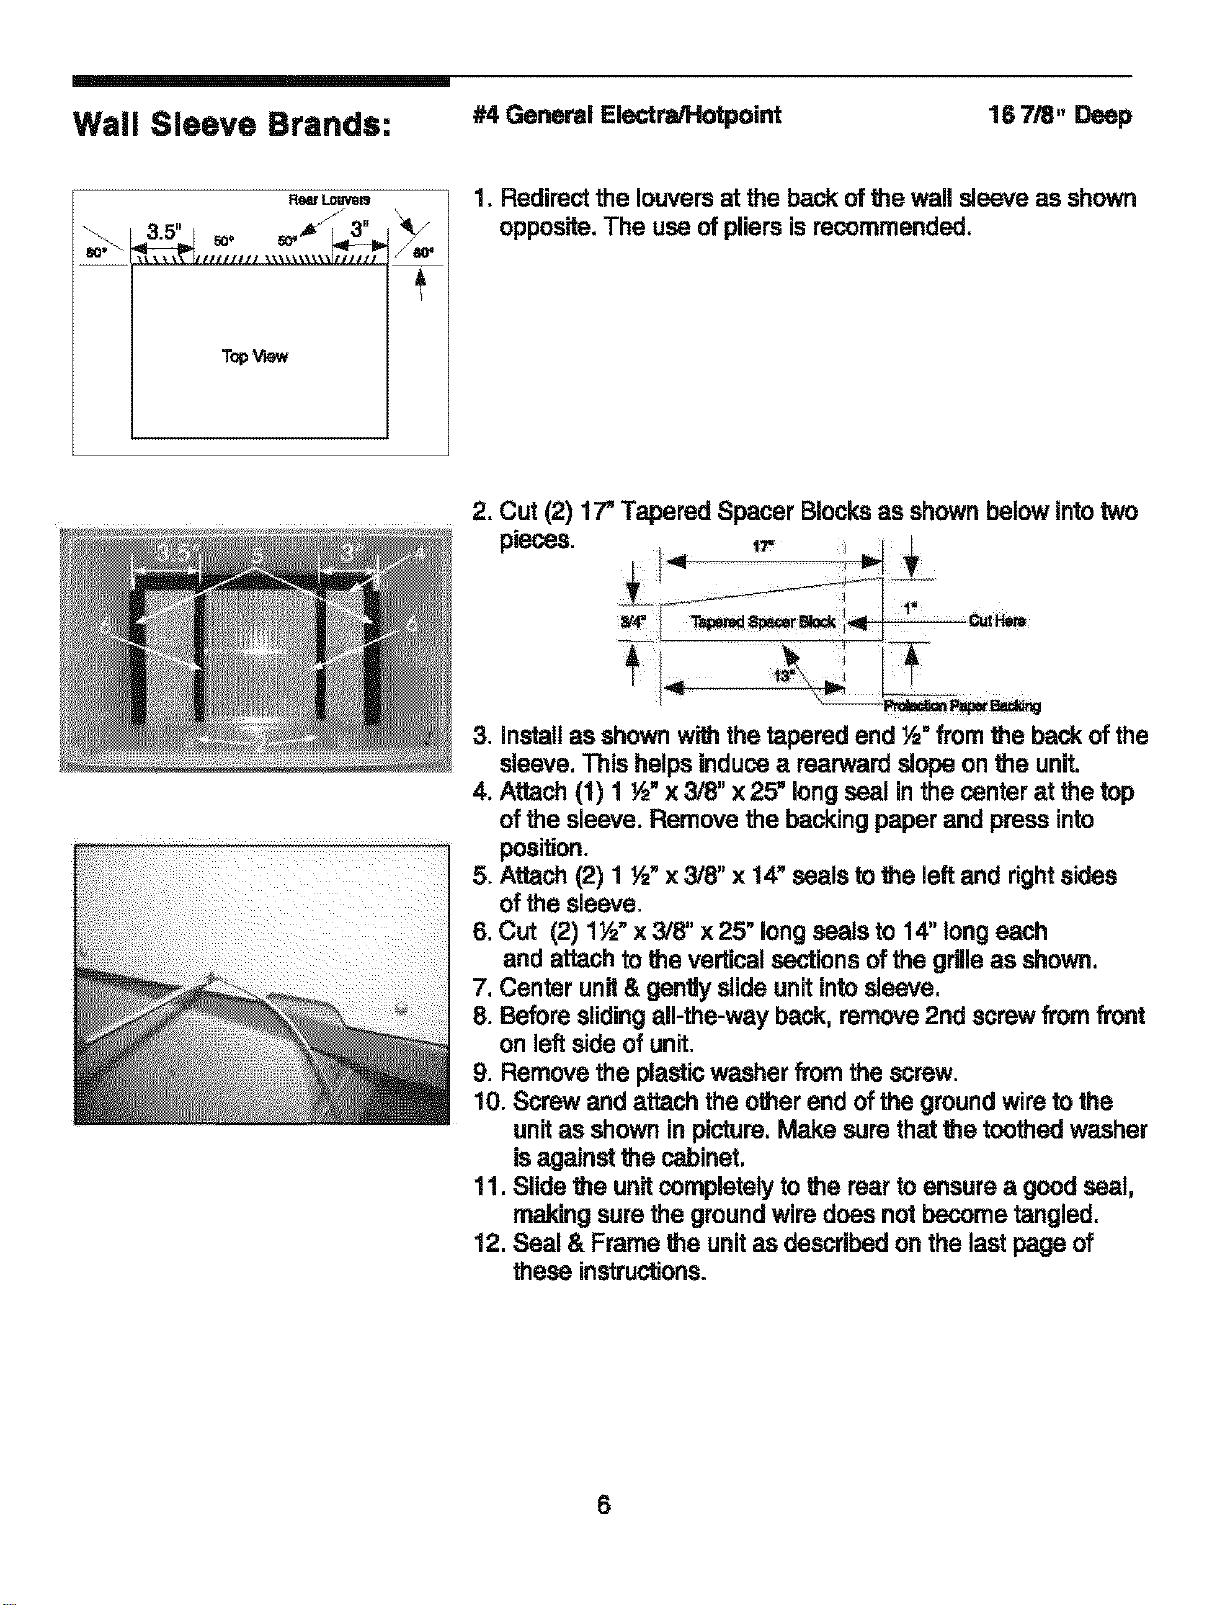
Wall Sleeve Brands: #4 General El ,-tra/Hotpoint
16 7/8" Deep
Louvom
T{_V_w
1. Redirect the louvers atthe back of the wall sleeve as shown
opposite. The use of pliers is recommended.
2. Cut (2) 17"Tapered Spacer Blocksas shown below intotwo
pieces. 1_- ,
3. Install as shown withthe tapered end ½" from the back of the
sleeve, This helps induce a rearward slope on the unit.
4. Attach (1) 1 ½" x 3/8" x 25" longseal in the center at the top
of the sleeve. Remove the backing paper and press into
position.
5. Attach (2) 1 ½" x 3/8" x 14" seals to the left and rightsides
of the sleeve.
6, Cut (2) 1½_x 3/8" x 25" long seals to 14" long each
and attach to the vertical sections of the grille as shown,
7, Center unit& gently slide unit into sleeve.
8. Before slidingall-the-way back, remove 2rid screw from front
on left side of unit.
9. Remove the plasticwasher from the screw.
10. Screw and attach the other end of the ground wire to the
unitas shown in picture. Make sure that the toothed washer
is against the cabinet,
11, Slide the unit completely to the rear to ensure a good seal,
making sure the ground wire does not become tangled.
12. Seal & Frame the unitas described on the last page of
these instructions.
6
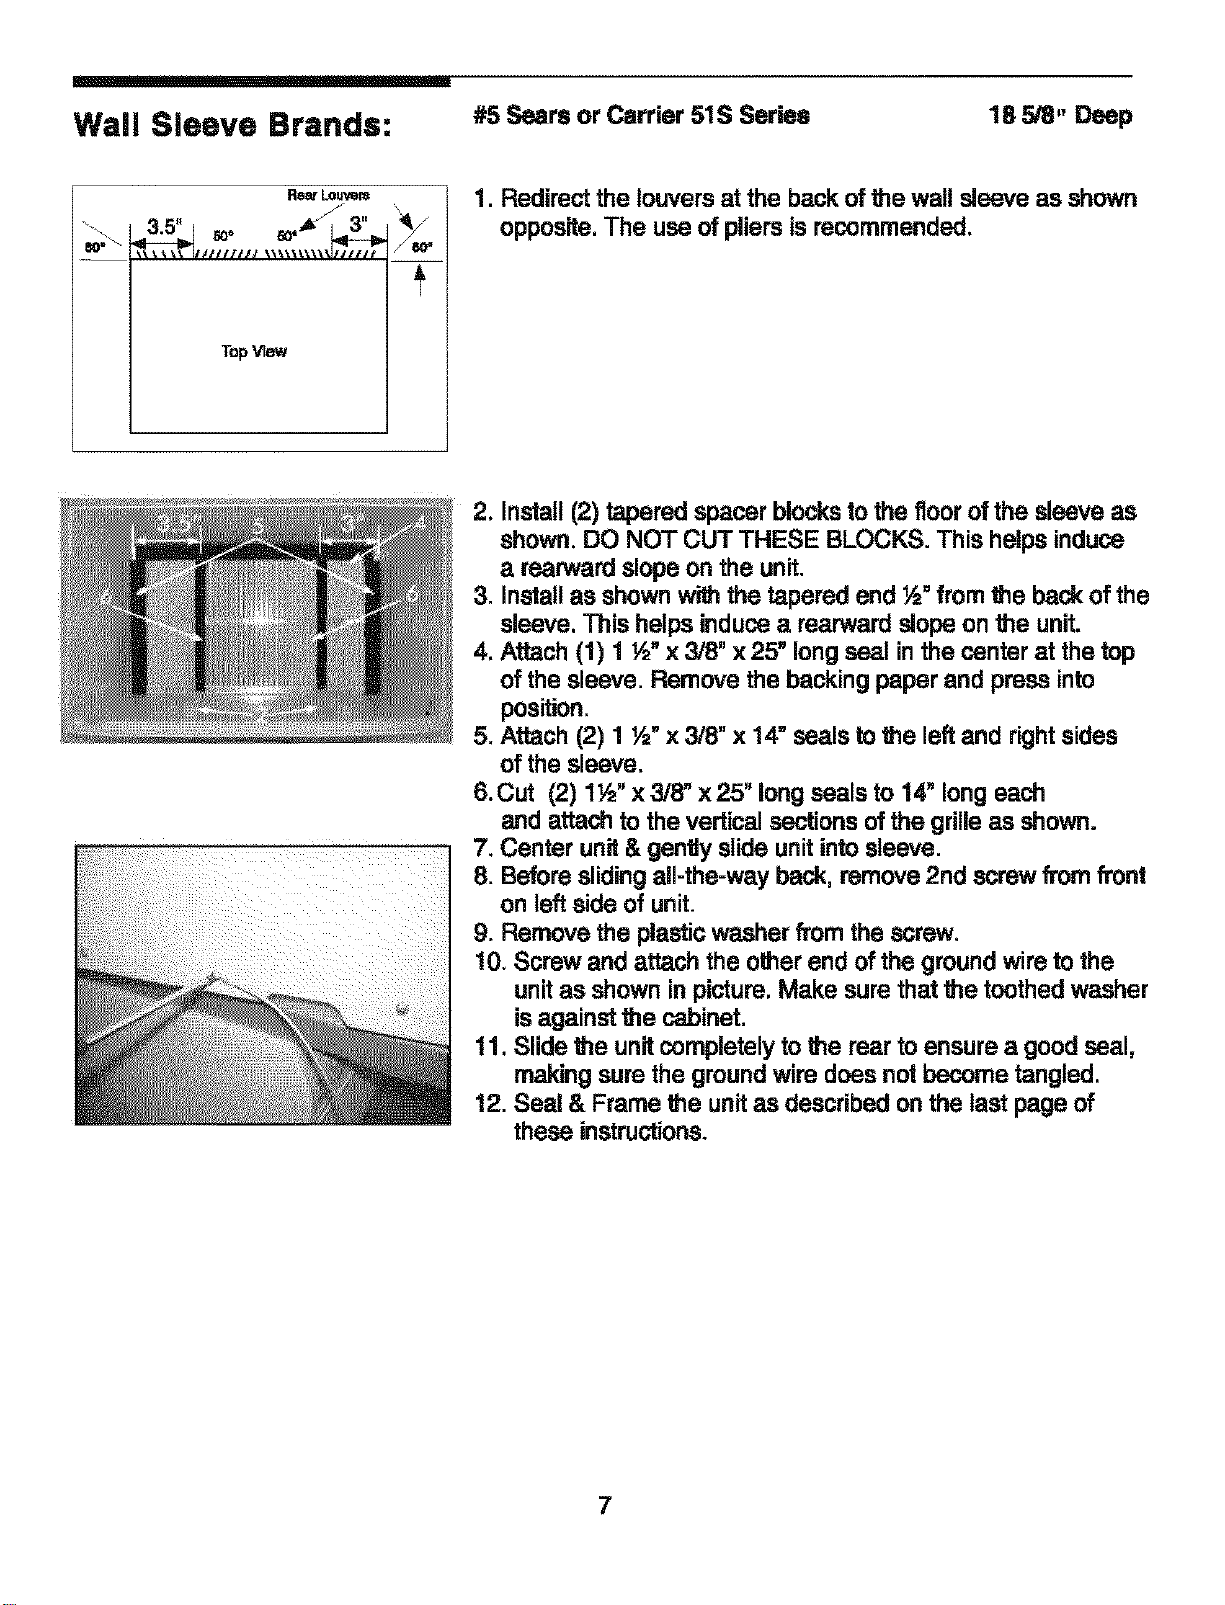
WaJJ SJeeve Brands: #5 Sears or Carrier 51S Series
185/8. Deep
TopView
\
1. Redirect the louvers at the back of the wall sleeve as shown
opposite. The use of pliers is recommended.
2. Install (2) tapered spacer blocksto the floor of the sleeve as
shown. DO NOT CUT THESE BLOCKS. This helps induce
a rearward slope on the unit.
3. Install as shown with the tapered end ½" from the back of the
sleeve, This helps induce a rearward slope on the unit.
4. Attach (1) 1 ½" x 3/8" x 25" long seal inthe center at the top
of the sleeve. Remove the backing paper and press into
position.
5. Attach (2) 1 ½" x 3/8" x 14" seals to the left and rightsides
of the sleeve.
6.Cut (2) 1½" x3/8" x25" long seals to 14" long each
and attach to the vertical sections ofthe grilleas shown.
7. Center unit & gently slide unitinto sleeve.
8. Before sliding all-the=way back, remove 2nd screw from fi'ont
on leftside of unit.
9. Remove the plasticwasher _'om the screw,
!0. Screw and attach the other end of the ground wire to the
unitas shown in picture, Make sure that the toothed washer
isagainst the cabinet.
11, Slide the unitcompletely to the rear to ensure a good seal,
making sure the groundwire does not become tangled,
12. Seal & Frame the unitas described on the last page of
these instructions.
7
m
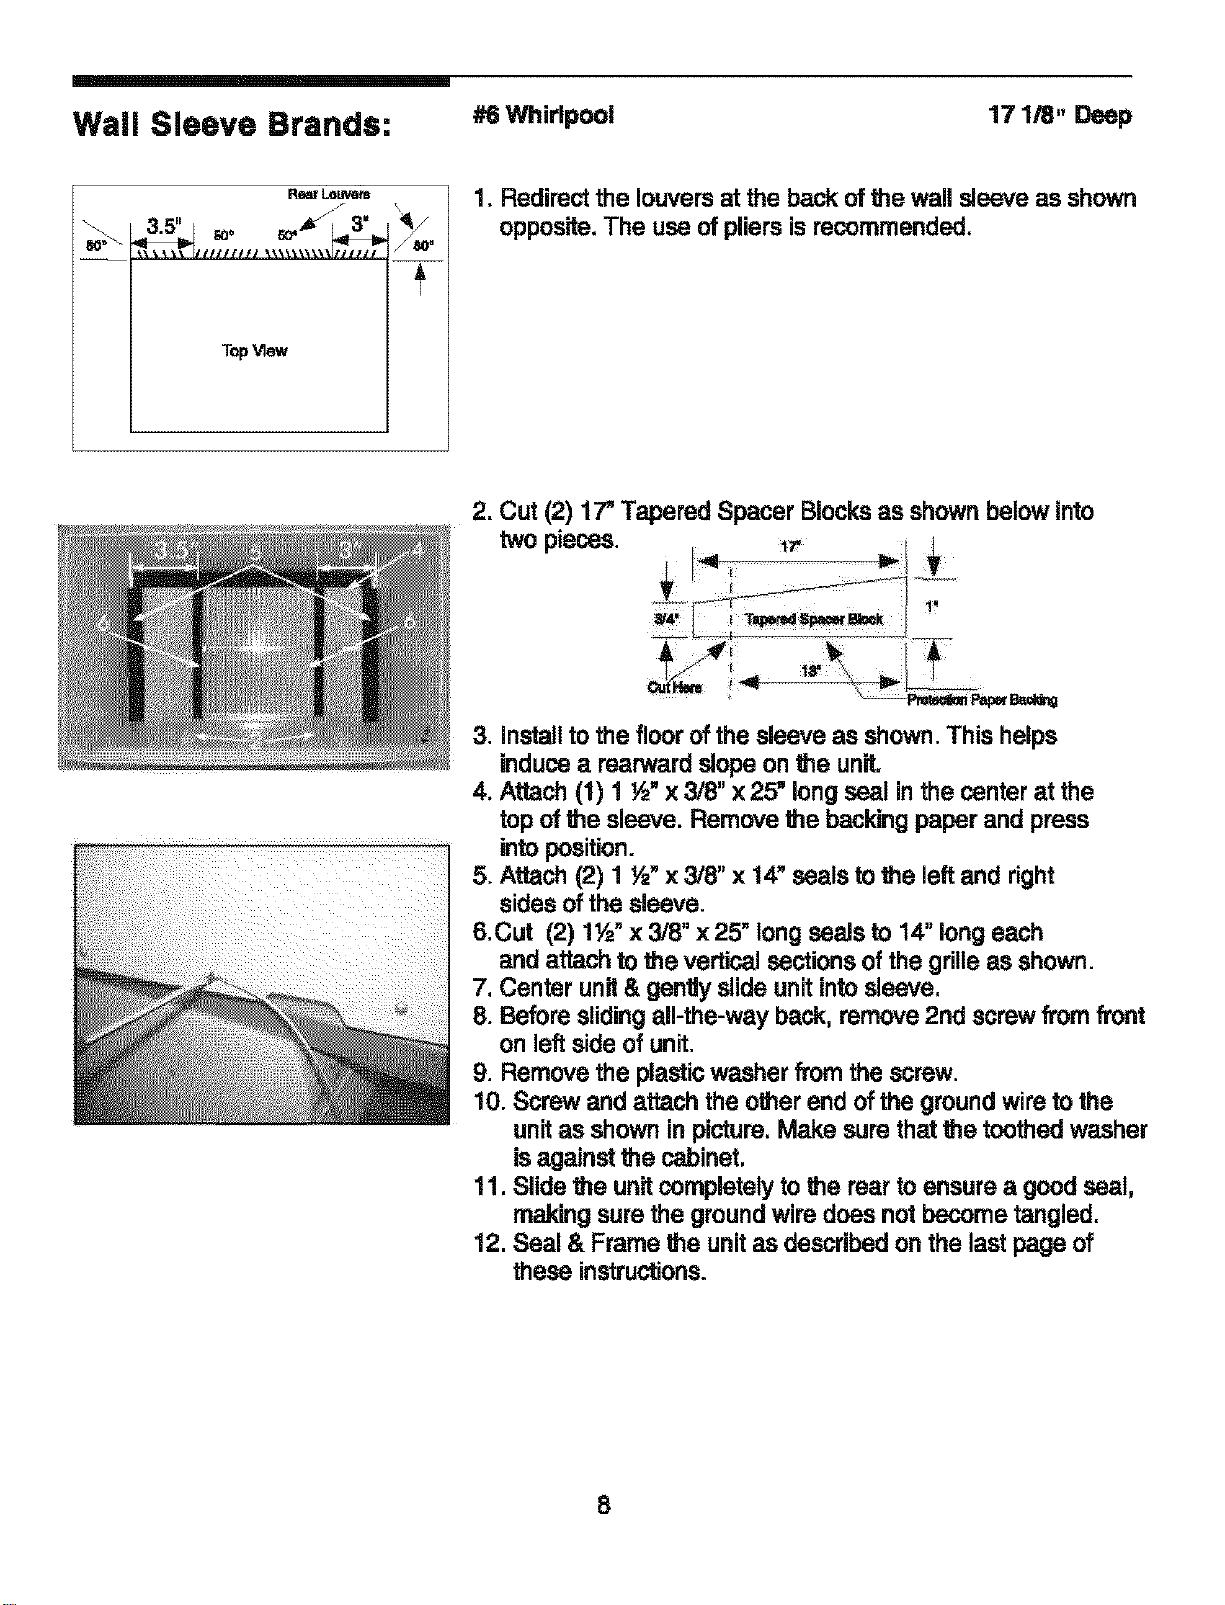
Wall Sleeve Brands: #6Whirlpool
17 1/8" Deep
Lou_am
_1_ 3"5'_I _o _
Top_ew
F4_O=
1. Redirect the louvers atthe back of the wall sleeve as shown
opposite. The use of pliers is recommended.
2. Cut (2) 17"Tapered Spacer Blocksas shown below into
two pieces. _
3. install to the floor of the sleeve as shown.This helps
induce a rearward slope on the unit,
4. Attach (1) 1 ½" x 3/8" x 25" longseal in the center at the
top of the sleeve. Remove the backing paper and press
into position.
5. Attach (2) 1 ½" x 3/8" x 14" seals to the left and right
sides of the sleeve.
6.Cut (2) 1½" x 3/8" x 25" longseals to 14" long each
and attach to the vertical sections of the grilleas shown.
7. Center unit& gently slide unit into sleeve.
8. Before slidingall-the-way back, remove 2rid screw from front
on left side of unit.
9. Remove the plasticwasher from the screw.
10. Screw and attach the other end of the ground wire to the
unitas shown in picture. Make sure that the toothed washer
is against the cabinet.
11. Slide the unit completely to bherear to ensure a good seal,
making sure the ground wire does not become tangled.
12. Seal & Frame the unitas described on the last page of
these instructions.
8
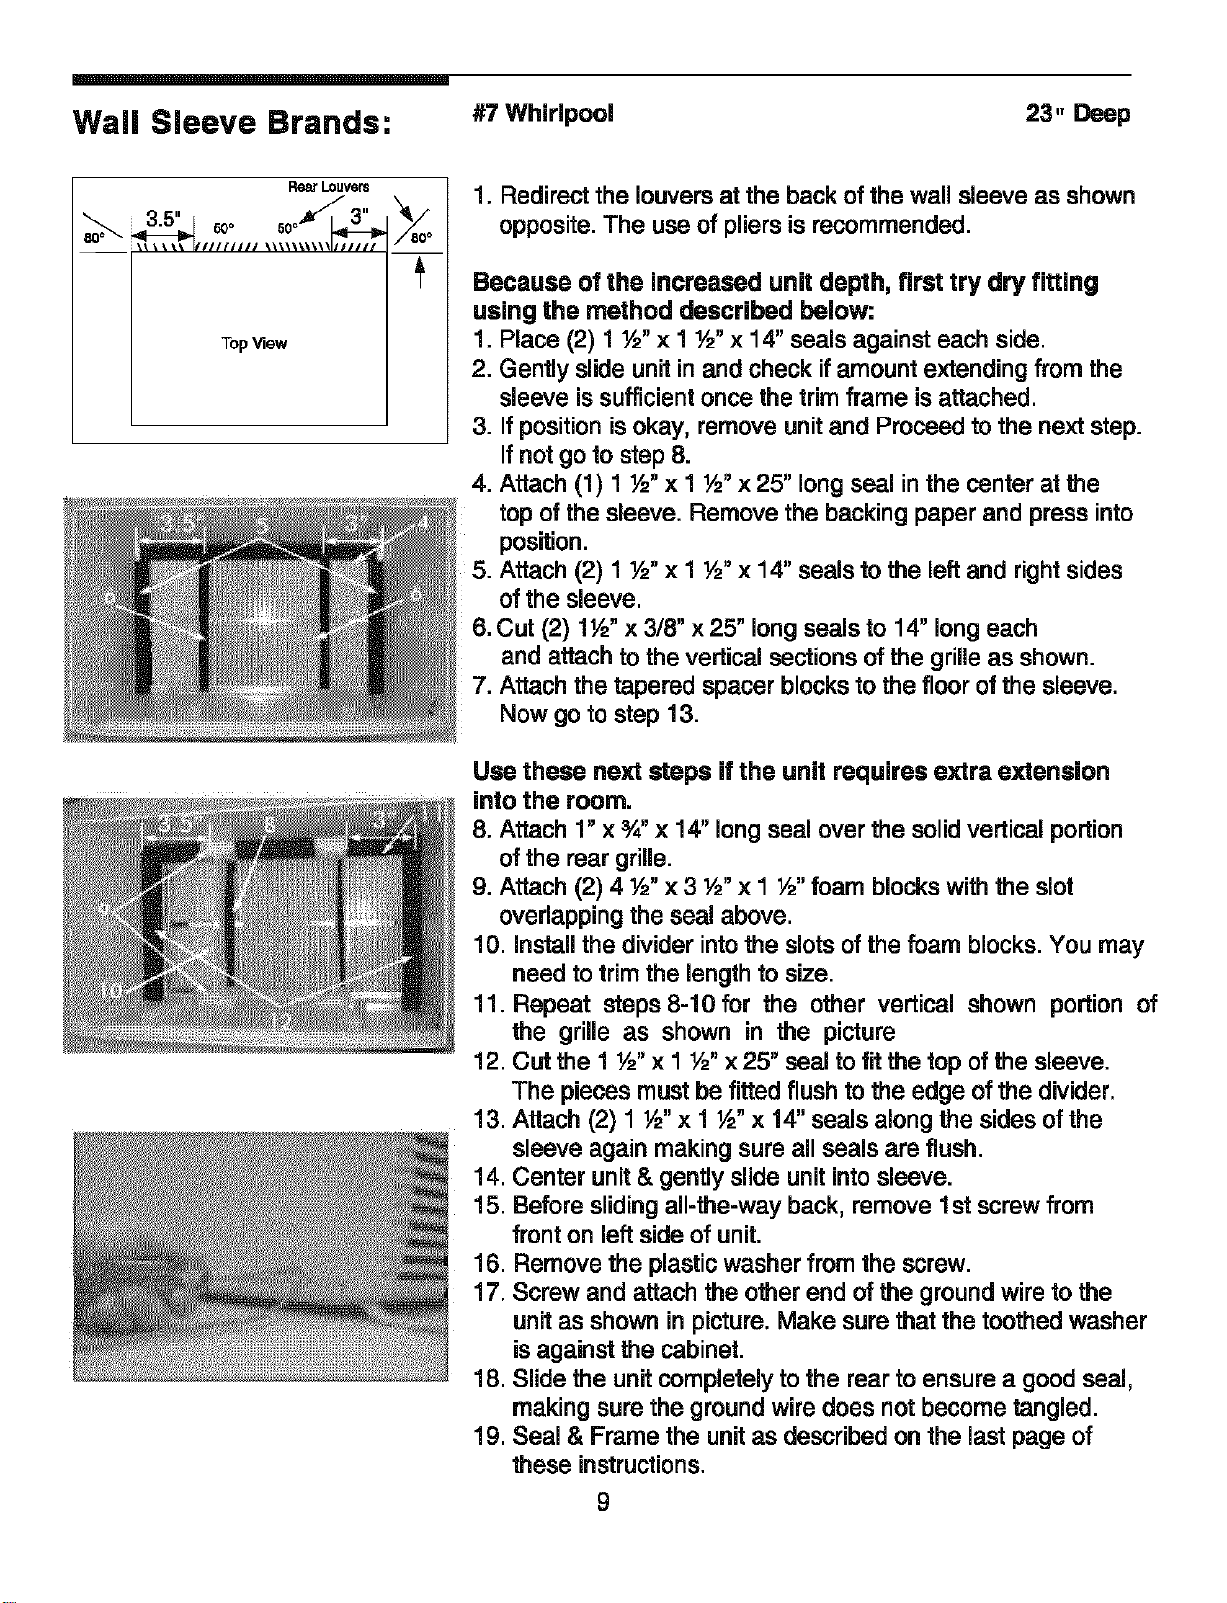
Wall Sleeve Brands: #TWhirlpool
23. Deep
I_ LOgVeI_
GOo GOo
\\ \ \ \_ _////JJ/J \\_\\_\_\\I/111//
TopView
f 80°
1. Redirect the louvers at the back of the wall sleeve as shown
opposite. The use of pliersis recommended.
Because of the increased unit depth, first try dry fitting
using the method described below:
1. Place (2) 1 ½" x 1 ½" x 14" seals against each side.
2. Gently slide unitin and check if amount extending from the
sleeve issufficientonce the trimframe is attached.
3. If position is okay, remove unitand Proceed to the next step.
If not go to step 8.
4. Attach (1) 1 ½" x 1 _'2"x 25" long seal in the center at the
top of the sleeve. Remove the backing paper and press into
position.
5. Attach (2) 1 ½" x 1 _'2"x 14" seals to the left and rightsides
of the sleeve.
6. Cut (2) 1½" x 3/8" x 25" long seals to 14" longeach
and attach to the vertical sections of the grilleas shown.
7. Attach the tapered spacer blocksto the floor of the sleeve.
Now go to step 13.
Use these next steps if the unit requires extra extension
into the room.
8. Attach 1"x %"x 14" long seal over the solid vertical portion
of the rear grille.
9. Attach (2) 4 ½" x 3 ½" x 1 ½" foam blockswith the slot
overlapping the seal above.
10. installthe divider intothe slots of the foam blocks. You may
need to trim the lengthto size.
11. Repeat steps 8-10 for the other vertical shown portion of
the grille as shown in the picture
12. Cut the 1 ½" x 1 !/2"x 25" seal to fit the top of the sleeve.
The pieces must be fitted flush to the edge of the divider.
13. Attach (2) 1 V2"x 1 ½" x 14" seals along the sides of the
sleeve again making sure all seals are flush.
14. Center unit & gently slide unit intosleeve.
15. Before sliding all-the-way back, remove 1st screw from
front on left side of unit.
16. Remove the plasticwasher from the screw.
17. Screw and attach the other end of the ground wire to the
unit as shown inpicture. Make sure that the toothed washer
is against the cabinet.
18. Slide the unit completely to the rear to ensure a good seal,
making sure the ground wire does not become tangled.
19. Seal & Frame the unitas described on the last page of
these instructions.
9
Wall Sleeve Brands:
#8 White Westinghouse/Frigidaire/
Carrier 52FSeries
16" + 17 ½" Deep
=
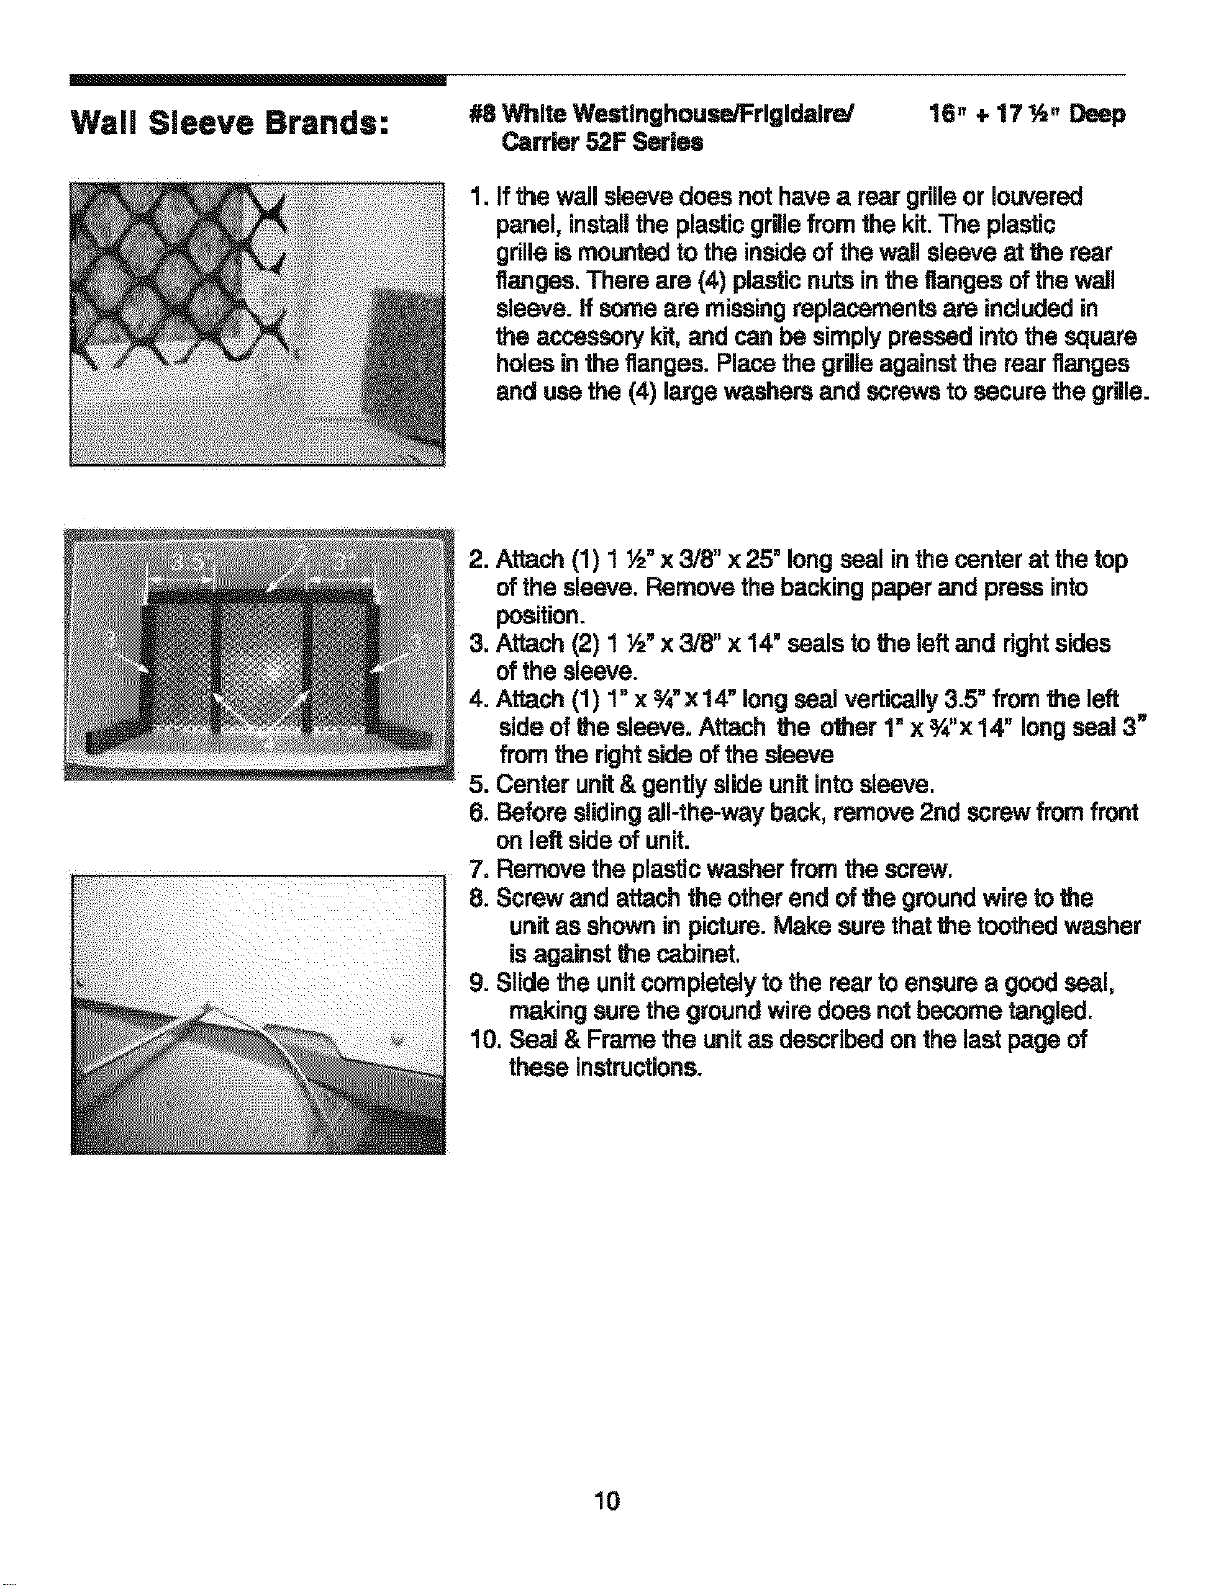
If the wall sleeve does not have a rear grilleor Iouvered
panel, installthe plastic grillefrom the kit.The plastic
grille is mounted to the inside of the wall sleeve at the rear
flanges. There are (4) plastic nuts in the tlanges ofthe wail
sleeve. Ifsome are missingreplacements are included in
the accessory kit, and can be simply pressed intothe square
holes in the flanges. Place the grUieagainst the rear flanges
and use the (4) large washers and screws to secure the grille.
2. Attach (1) 1 ½" x 3/8" x 25" long seal inthe center at the top
of the sleeve. Remove the backing paper and press into
position.
3. Attach (2) 1 ½" x 3/8" x 14" seals to the left and rightsides
of the sleeve.
4. Attach (1) 1"x _'x 14" long seal vertically3.5" from the left
side of the sleeve. Attach the other 1_x %"x 14" longseal 3"
from the right side of the sleeve
5. Center unit& gently slideunit into sleeve.
6. Before sliding all-the-way back, remove 2nd screw from front
on left side of unit.
7. Remove the plasticwasher from the screw,
8. Screw and attach the other end of the ground wire to the
unit as shown in picture. Make sure thatthe toothed washer
is against the cabinet.
9. Slide the unitcompletely to the rear to ensure a good seal,
making sure the ground wire does not become tangled.
10. Seal & Frame the unitas described on the last page of
these instructions.
10
Wall Sleeve Brands:
#9 White Westinghouse or Frigidaire 22. Deep
,
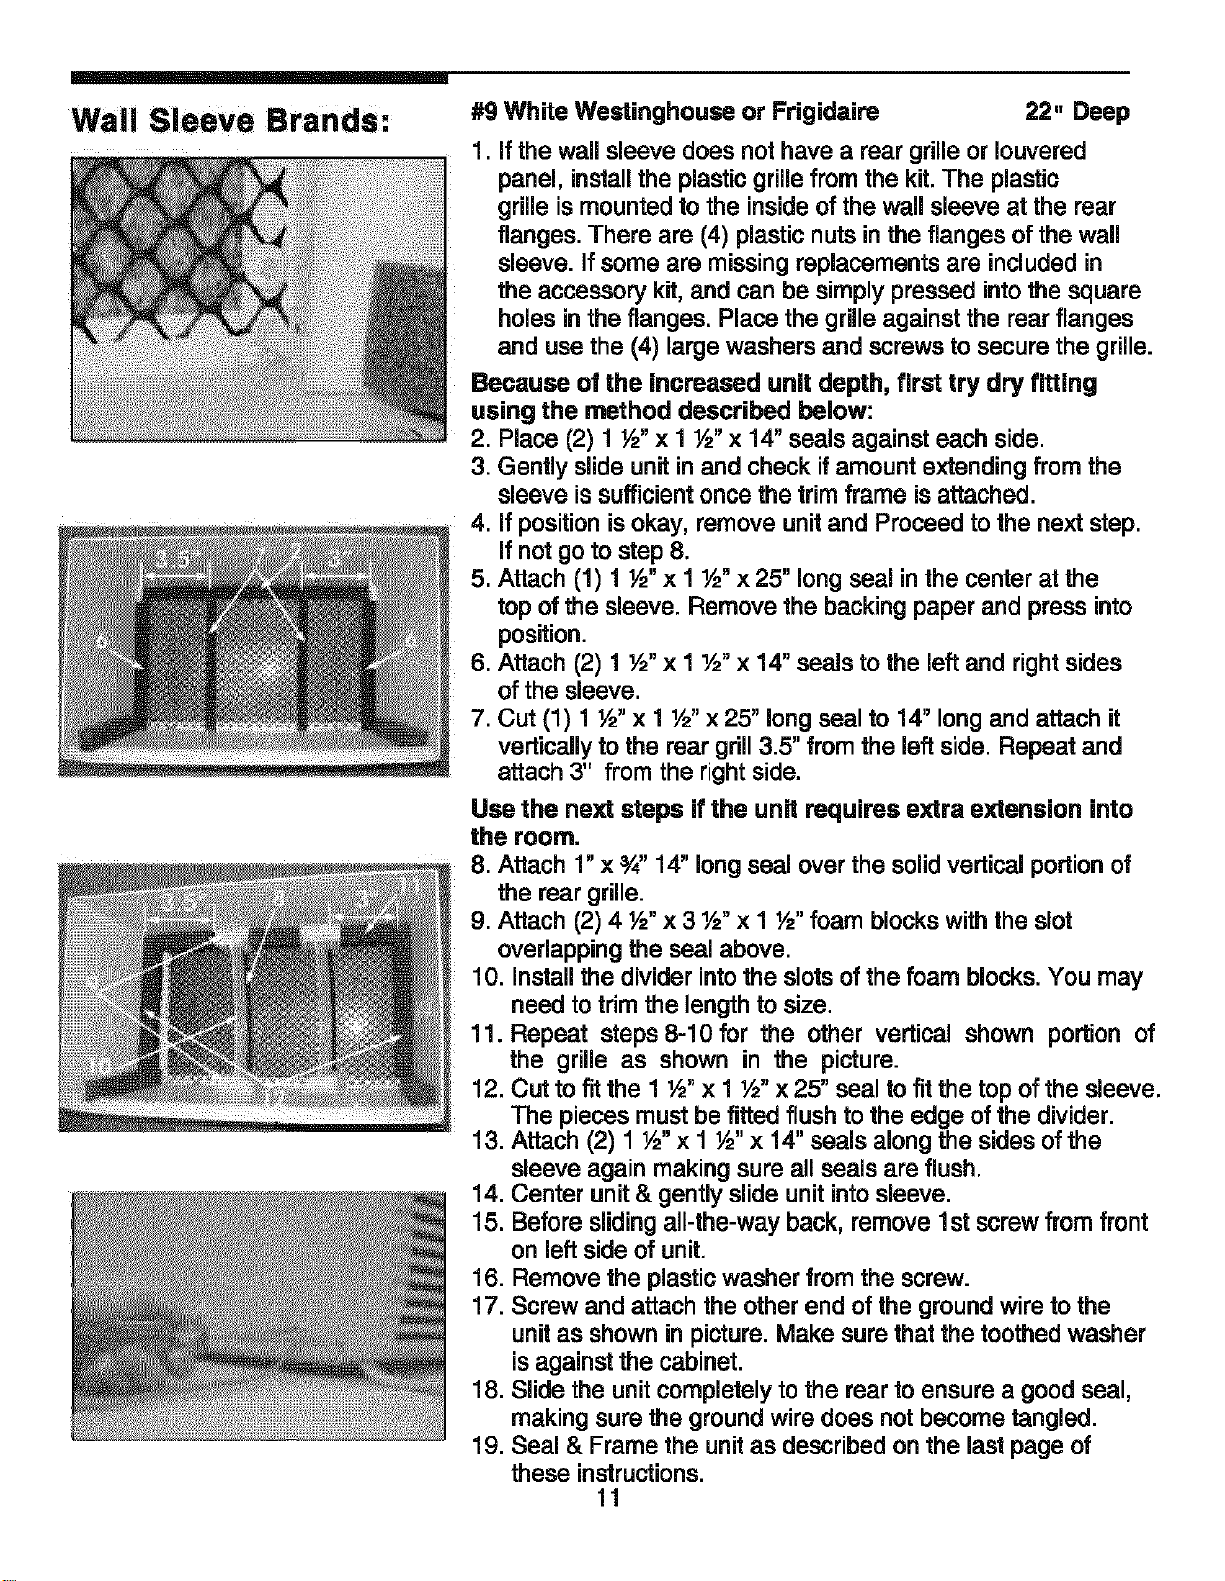
if the wall sleeve does nothave a rear grille or Iouvered
panel, installthe plasticgrillefrom the kit. The plastic
grille ismounted to the inside of the wall sleeve at the rear
flanges. There are (4) plastic nuts inthe flanges of the wall
sleeve. If some are missing replacements are included in
the accessory kit, and can be simply pressed intothe square
holes in the flanges. Place the grille against the rear flanges
and use the (4) large washers and screws to secure the grille.
Because of the increased unit depth, first try dry fitting
using the method described below:
2. Place (2) 1 ½" x 1 ½" x 14" seals against each side.
3. Gently slide unit inand check ifamount extending from the
sleeve issufficientonce the trimframe is attached.
4. if positionis okay, remove unitand Proceed to the next step.
if not go to step 8.
5. Attach (1) 1 ½" x 1 ½" x 25" long seal inthe center at the
top of the sleeve. Remove the backing paper and press into
position.
6. Attach (2) 1 ½" x 1 ½" x 14" seals to the left and right sides
of the sleeve.
7. Cut (1) t ½" x 1 ½" x 25" longseal to 14" long and attach it
vertically to the rear grill3.5" from the left side. Repeat and
attach 3" from the rightside.
Use the next steps if the unit requires extra extension into
the room.
8. Attach 1"x _" 14" long seal over the solid vertical portion of
the rear grille.
9. Attach (2) 4 ½" x 3 ½° x 1 ½" foam blocks withthe slot
overlapping the seal above.
10. install the divider intothe slots of the foam blocks.You may
need to trim the length to size.
11. Repeat steps 8-10 for the other vertical shown portion of
the grille as shown in the picture.
12. Cut to fit the 1 ½" x 1 ½" x 25" seal to fit the top of the sleeve.
The pieces must be fitted flush to the edge of the divider.
13. Attach (2) 1 V2"x 1 ½"x 14" seals along the sides of the
sleeve again making sure all seals are flush,
14. Center unit& gently slide unit intosleeve.
15. Before slidingall-the-way back, remove 1st screw from front
on left side of unit.
16. Remove the plasticwasher from the screw.
17. Screw and attach the other end of the groundwire to the
unit as shown in picture. Make sure that the toothed washer
is against the cabinet.
18. Slide the unit completely to the rear to ensure a good seal,
making sure the ground wire does not become tangled.
19. Seal & Frame the unitas described on the last page of
these instructions.
11
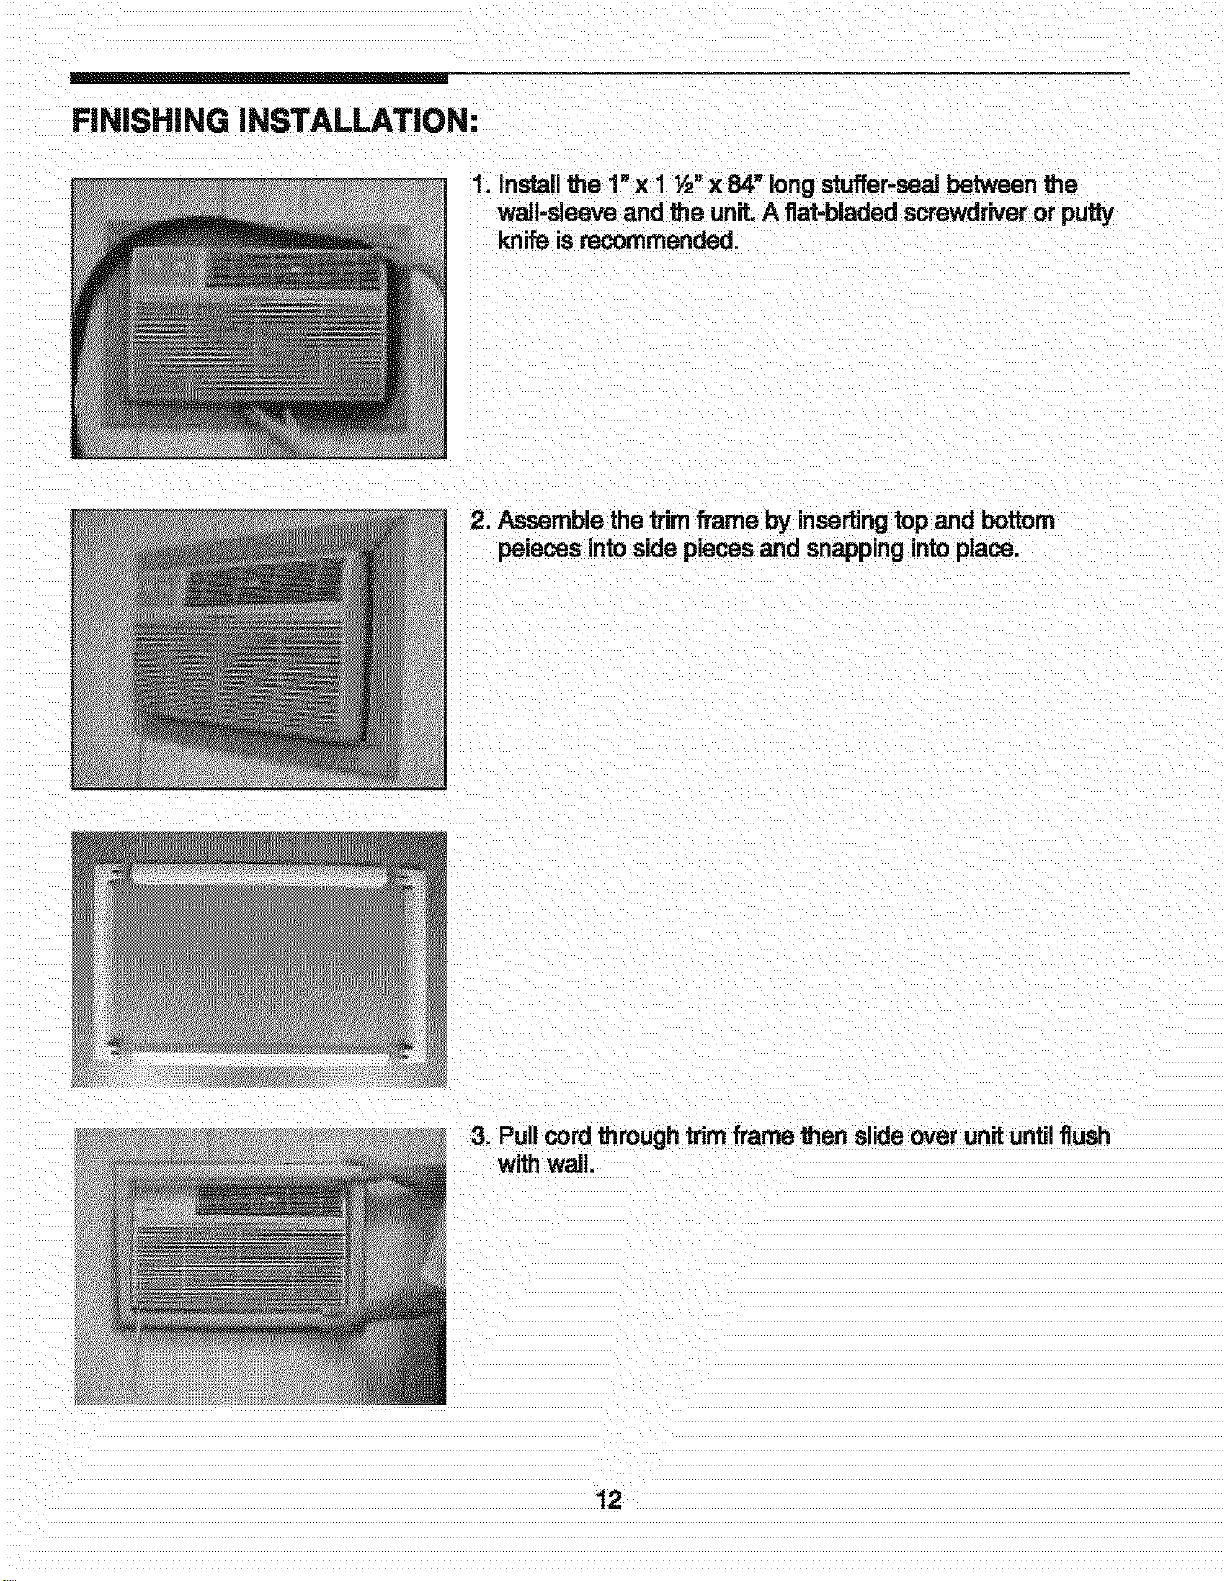
FINISHING INSTALLATION:
1. Install the 1"x 1 ½" x 84" long stuffer-seaJbetween the
wall-sleeve and the unit. A flat-bladed screwdriver or putty
knife is recommended.
2. Assemble the trimfTame by insertingtop and bottom
peieces intoside pieces and snapping intoplace.
3. Pull cordthrough trim frame then slide over unit untilflush
with wall.
12