Loading ...
Loading ...
Loading ...

-7-
-8-
HOW TO USE:
Charge it
1. Fully charge the control unit by connecting charger cord into the charger port and
plugging into AC wall jack. (see figure 2 for port locations)
Note: Charge in the ambient temperature between 5°C and 35°C.
2. Control unit battery light will flash during charging state. (see figure 4 below for light
locations on control unit)
3. Once battery light is solid green, the unit is fully charged. Charging may take up to
approximately 5.5 hours.
Apply Patches
1. Clean skin with a soft wet washcloth. Mild soap may be used but skin will need to be
rinsed thoroughly prior to drying. Ensure skin is
completely dry before applying patch.
2. Plug the connector cords into the control unit and
patches. (see figure 2 and 3)
3. Remove initial plastic film from patch and throw
away.
4. Place patches onto body with the gel side facing
skin.
5. Attach belt clip to control unit and clip to pants or
place into pocket.
6. Wrap the connector cords around the control unit
to remove slack.
Select Heat Setting
1. There are three heat settings, Low, Medium, and
High.
2. The High setting is a 20-minute cycle of High
Level Heat. After 20 minutes on High, the unit
automatically switches to medium.
3. Do not use High setting more than once in a
2-hour period.
i. Note: When skin is exposed to heat, it leads to
COMPONENTS INCLUDED:
1. Control Unit
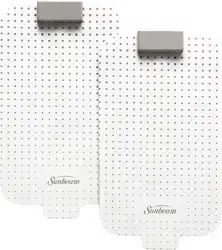
2. 2 Standard Patches for Model 804-STR2P and 805
4 Standard Patches for Model 805-STR4P (REFILL MODEL 804-RFL2P)
1 Deluxe patch (For Model 805 only) (REFILL MODEL 804-RFL3P)
3. 2 Connector cords
4. Plastic films for storage for each patch
5. Belt Clip
6. Charger (CHARGER MODEL F06US0950050A)
7. Heat Setting “LED” Lights
8. Control Unit Button
9. Battery Light
Low Med Hi
STORE PATCH HERE
AFTER USE
Heat Setting “LED” Lights
1
Control Unit
2
Standard Patches
4
Plastic Films for
Patch Storage
2
Deluxe Patch
(For Model
805-STR3P only)
6
Charger
3
Connector
cords
7
Control Unit Button
8
5
Belt Clip
9
Battery Light
Figure 1
Patch Connector Port
Patch Connector Port
Charger Port
Figure 2
Figure 3
Patches Starter Kit_804-STR2P_805-STR3P_18EM4.indd 7-8 11/14/18 1:42 PM
Loading ...
Loading ...
Loading ...