Loading ...
Loading ...
Loading ...
19
Filling the Chain Oil Reservoir
1. Set the unit on a flat, level surface. Position the unit with the
chain oil cap facing up (Fig. 9).
2. To prevent debris from entering the chain oil reservoir, use a damp
cloth to clean the chain oil cap and surrounding area.
3. Unscrew the chain oil cap (Fig. 9).
4. Carefully pour the oil into the chain oil reservoir. DO NOT overfill.
NOTE: The chain oil reservoir may be filled to the lip of the fill
opening without damaging the unit.
5. Reinstall the chain oil cap. Tighten the chain oil cap firmly.
6. Wipe up any oil that may have spilled.
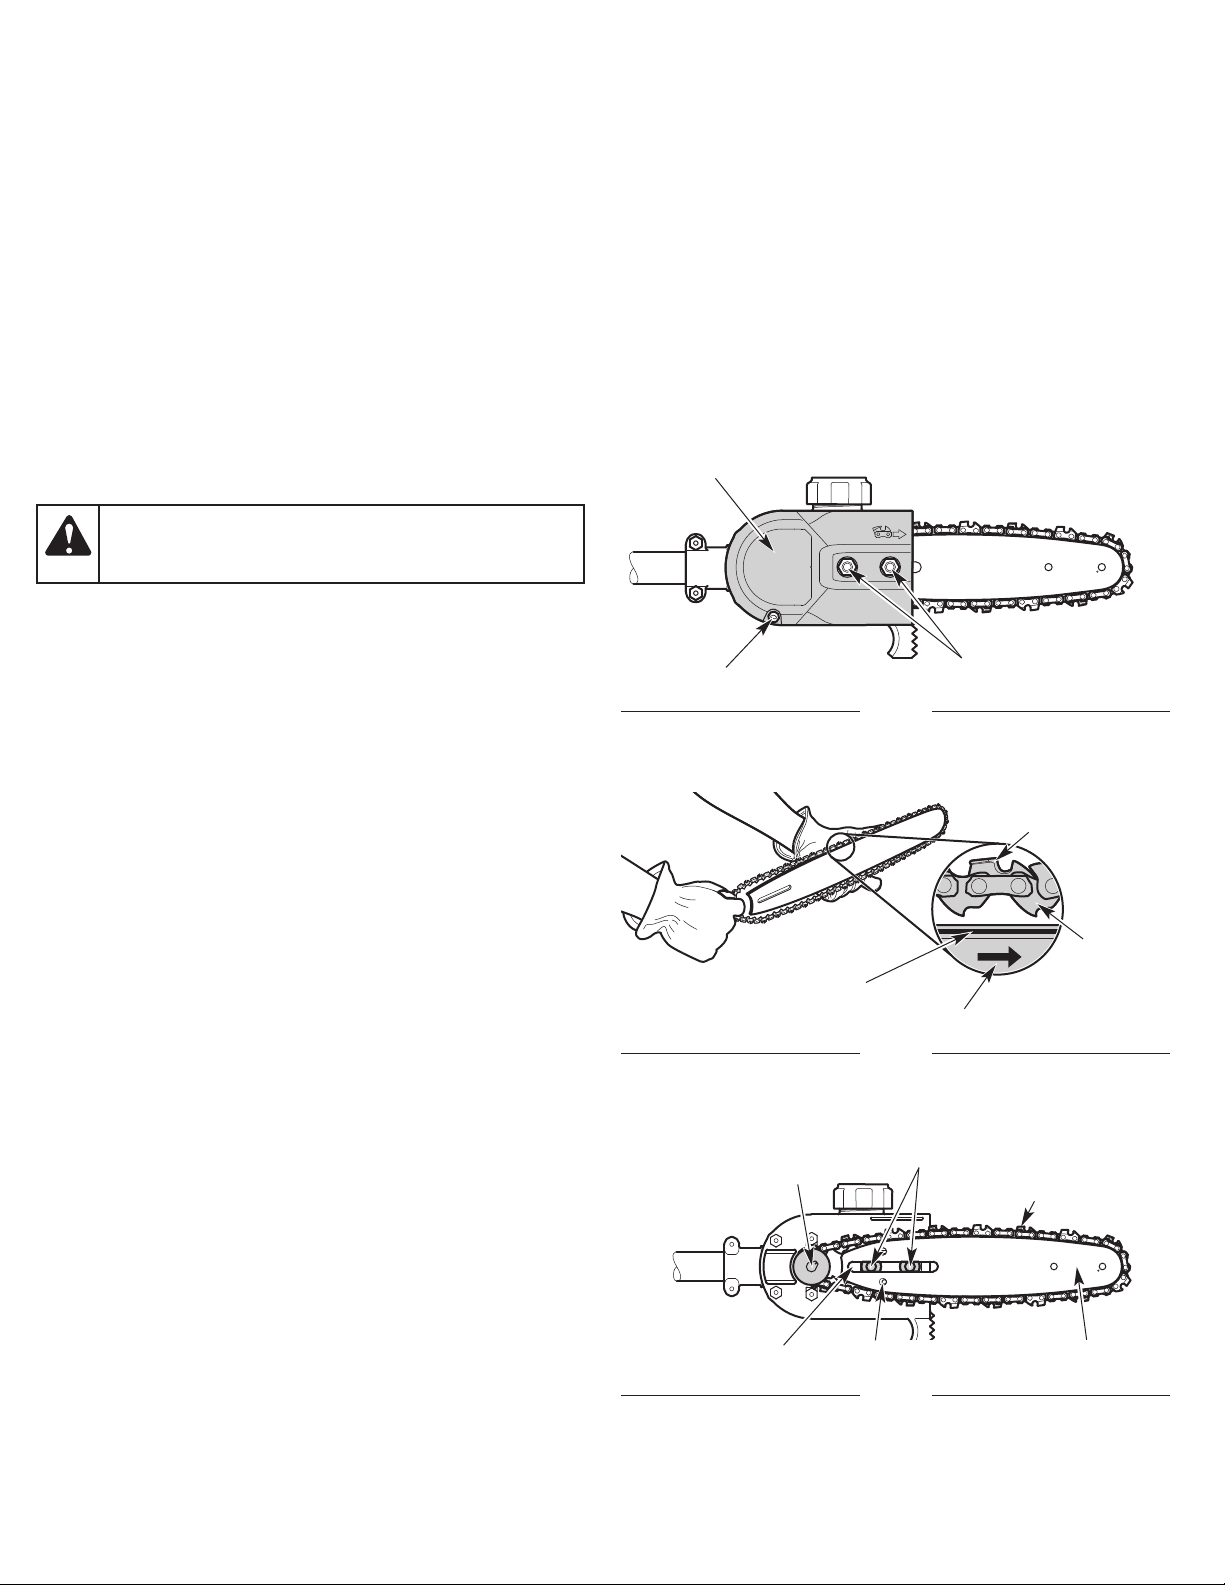
Fig. 10
Screw
Bar Cover
Bar-Retaining Nuts
Fig. 12
Drive Sprocket
Slot
Bar-Retaining Studs
Guide Bar
REMOVING AND INSTALLING THE GUIDE BAR AND SAW
CHAIN
The guide bar and saw chain need to be removed when certain
maintenance procedures are performed, such as when rotating the
guide bar. When replacing old guide bars and saw chains with new
parts, always use the manufacturer’s specified replacement parts.
Refer to Replacing the Guide Bar and Saw Chain.
Removing the Guide Bar and Saw Chain
1. Remove the screw and two (2) bar-retaining nuts (1/2 inch) (Fig. 10).
2. Remove the bar cover (Fig. 10).
3. Loosen the saw chain. Refer to Adjusting the Chain Tension.
4. Carefully remove the saw chain and guide bar.
5. Remove the saw chain from the guide bar.
Installing the Guide Bar and Saw Chain
1. To allow room for installation, loosen the chain tension. Refer to
Adjusting the Chain Tension.
2. Set the saw chain on a clean, flat surface and straighten out any
kinks.
3. Fit the saw chain into the guide bar groove (Fig. 11). Make sure
the cutters point in the correct direction of rotation (Fig. 11). Keep
a loop of saw chain at the back end of the guide bar (Fig. 11).
4. Hold the saw chain and guide bar together in position over the
unit. Loop the saw chain around the drive sprocket and install
the guide bar onto the bar-retaining studs (Fig. 12). Make sure
the guide bar is flush against the mounting surface. Make sure
the flats on the saw chain are in the grooves on the drive
sprocket (Fig. 11 & Fig. 12). Make sure the chain-tensioning pin
is in the pin hole on the guide bar (Fig. 12).
5. Make sure the saw chain is still in the guide bar groove. Adjust
the chain tension. Refer to Adjusting the Chain Tension.
6. Install the bar cover. Tighten the screw and two (2) bar-retaining
nuts.
WARNING:
The saw chain is very sharp. Always wear
heavy-duty protective gloves when handling or performing
maintenance on the saw chain.
Fig. 11
Guide Bar Groove
Direction of Rotation
Saw
Chain
Flat
Cutter
Saw Chain
Chain-Tensioning Pin
and Pin Hole
Loading ...
Loading ...
Loading ...