THANK YOU for purchasing this high-quality product. Register your built-in oven at www.kitchenaid.com. In Canada, register your
built-in oven at www.kitchenaid.ca.
For future reference, please make a note of your product model and serial numbers. They can be found on the label located on the
bottom edge of the control panel, right hand side.
Model Number _________________________________________ Serial Number __________________________________________
Para una versión de estas instrucciones en español, visite www.kitchenaid.com.
Deberá tener a mano el número de modelo y de serie, que están ubicados en el marco del horno, detrás del lado derecho superior
de la puerta del horno.
Table of Contents
BUILT-IN ELECTRIC OVENS
USER INSTRUCTIONS
W10903389C
BUILT-IN OVEN SAFETY ................................................................2
PARTS AND FEATURES ................................................................3
Control Panel ................................................................................4
Welcome Guide ............................................................................5
Display Screens ............................................................................5
Cooking Modes ............................................................................7
Kitchen Timer ...............................................................................8
Tones/Sounds ..............................................................................8
Control Lock .................................................................................8
Settings ........................................................................................9
OVEN USE .....................................................................................10
Wi-Fi Connectivity ......................................................................10
Sabbath Bake .............................................................................10
Aluminum Foil .............................................................................11
Oven Racks ................................................................................11
Rack and Bakeware Positions ...................................................11
SatinGlide™ Roll-Out Extension Racks.....................................12
Bakeware ....................................................................................12
Oven Vent(s) ...............................................................................13
Preheating and Oven Temperature ............................................13
Baking and Roasting ..................................................................13
Broiling........................................................................................13
Cook’s Assistant Option.............................................................14
Convection .................................................................................14
Proong Bread ...........................................................................14
Temperature Probe ..................................................................... 14
Recipe Guide Mode ...................................................................15
Smart Oven+ Powered Attachments .........................................15
Favorites .....................................................................................15
Cook Time ..................................................................................15
OVEN CARE ..................................................................................17
Self-Cleaning Cycle ....................................................................17
General Cleaning ........................................................................18
Oven Lights ................................................................................18
Oven Door ..................................................................................19
TROUBLESHOOTING ..................................................................21
ACCESSORIES .............................................................................22
WARRANTY ..................................................................................23
2
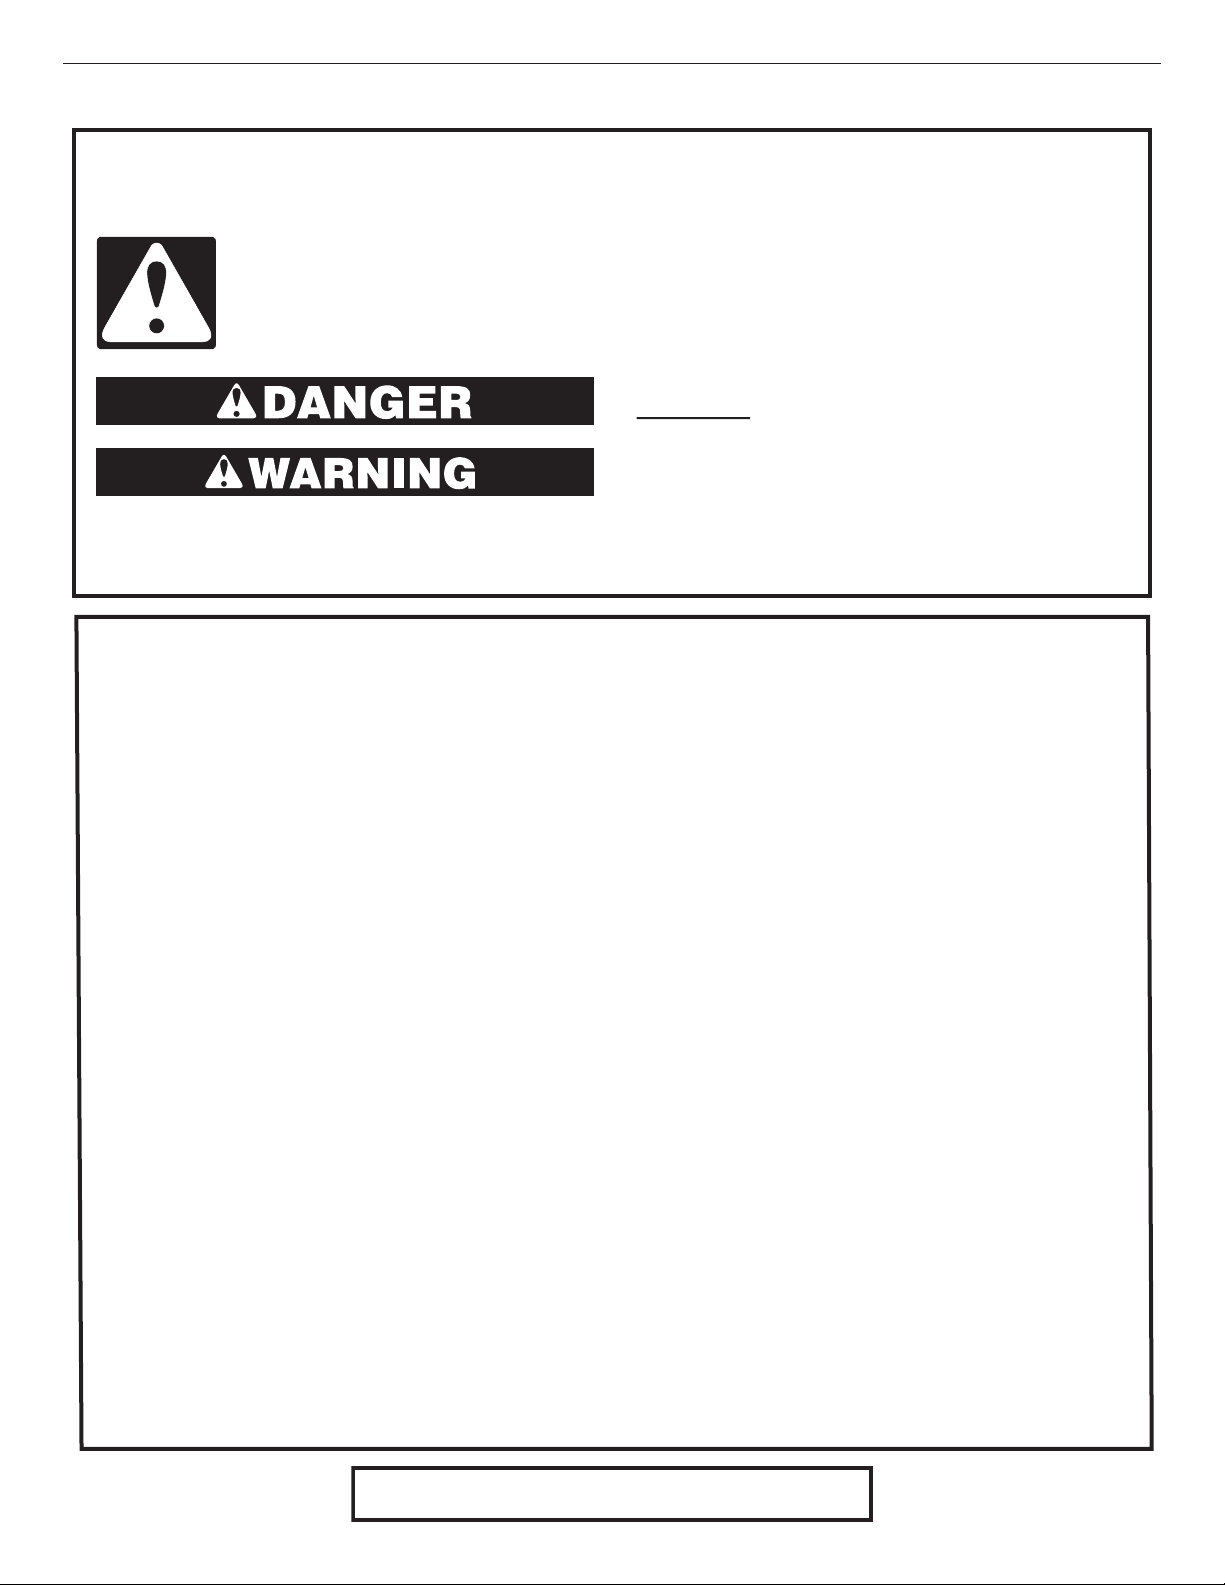
BUILT-IN OVEN SAFETY
You can be killed or seriously injured if you don't
immediately follow instructions.
You can be killed or seriously injured if you don't
follow instructions.
All safety messages will tell you what the potential hazard is, tell you how to reduce the chance of injury, and tell you
what can
happen if the instructions are not followed.
Your safety and the safety of others are very important.
We have provided many important safety messages in this manual and on your appliance. Always read and obey all
safety messages.
This is the safety alert symbol.
This symbol alerts you to potential hazards that can kill or hurt you and others.
All safety messages will follow the safety alert symbol and either the word “DANGER” or
“WARNING.” These words mean:
SAVE THESE INSTRUCTIONS
IMPORTANT SAFETY INSTRUCTIONS
WARNING: To reduce the risk of fire, electrical shock,
injury to persons, or damage when using the oven, follow
basic precautions, including the following:
■ Proper Installation – Be sure the oven is properly installed
and grounded by a qualified technician.
■ Never Use the Oven for Warming or Heating the Room.
■ Do Not Leave Children Alone – Children should not be left
alone or unattended in area where oven is in use. They
should never be allowed to sit or stand on any part of the
oven.
■ Wear Proper Apparel – Loose-fitting or hanging garments
should never be worn while using the oven.
■
User Servicing – Do not repair or replace any part of the
oven unless specifically recommended in the manual. All
other servicing should be referred to a qualified technician.
■ Storage in Oven – Flammable materials should not be
stored in an oven.
■ Do Not Use Water on Grease Fires – Smother fire or flame
or use dry chemical or foam-type extinguisher.
■ Use Only Dry Potholders – Moist or damp potholders on
hot surfaces may result in burns from steam. Do not let
potholder touch hot heating elements. Do not use a towel
or other bulky cloth.
■ Use Care When Opening Door – Let hot air or steam
escape before removing or replacing food.
■ Do Not Heat Unopened Food Containers – Build-up of
pressure may cause container to burst and result in injury.
■
Keep Oven Vent Ducts Unobstructed.
■ Placement of Oven Racks – Always place oven racks in
desired location while oven is cool. If rack must be moved
while oven is hot, do not let potholder contact hot heating
element in oven.
■ DO NOT TOUCH HEATING ELEMENTS OR INTERIOR
SURFACES OF OVEN – Heating elements may be hot
even though they are dark in color. Interior surfaces of an
oven become hot enough to cause burns. During and after
use, do not touch, or let clothing or other flammable
materials contact heating elements or interior surfaces of
oven until they have had sufficient time to cool. Other
surfaces of the oven may become hot enough to cause
burns – among these surfaces are oven vent openings and
surfaces near these openings,
oven doors, and windows of
oven doors.
For self-cleaning ovens:
■ Do Not Clean Gasket – The gasket is essential for a good
seal. Care should be taken not to rub, damage, or move
the gasket.
■ Do Not Use Oven Cleaners – No commercial oven cleaner
or oven liner protective coating of any kind should be used
in or around any part of the oven.
■ Clean Only Parts Listed in Manual.
■ Before Self-Cleaning the Oven – Remove broiler pan and
other utensils.
For smart enabled ovens:
■ Remote Operation – This appliance is configurable to allow
remote operation at any time. Do not store any flammable
materials or temperature sensitive items inside of the
appliance.
This device complies with Part 18 of the FCC Rules.
3
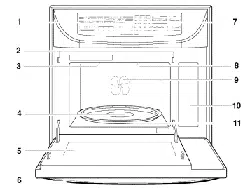
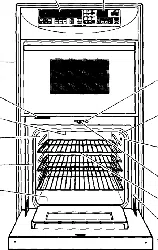
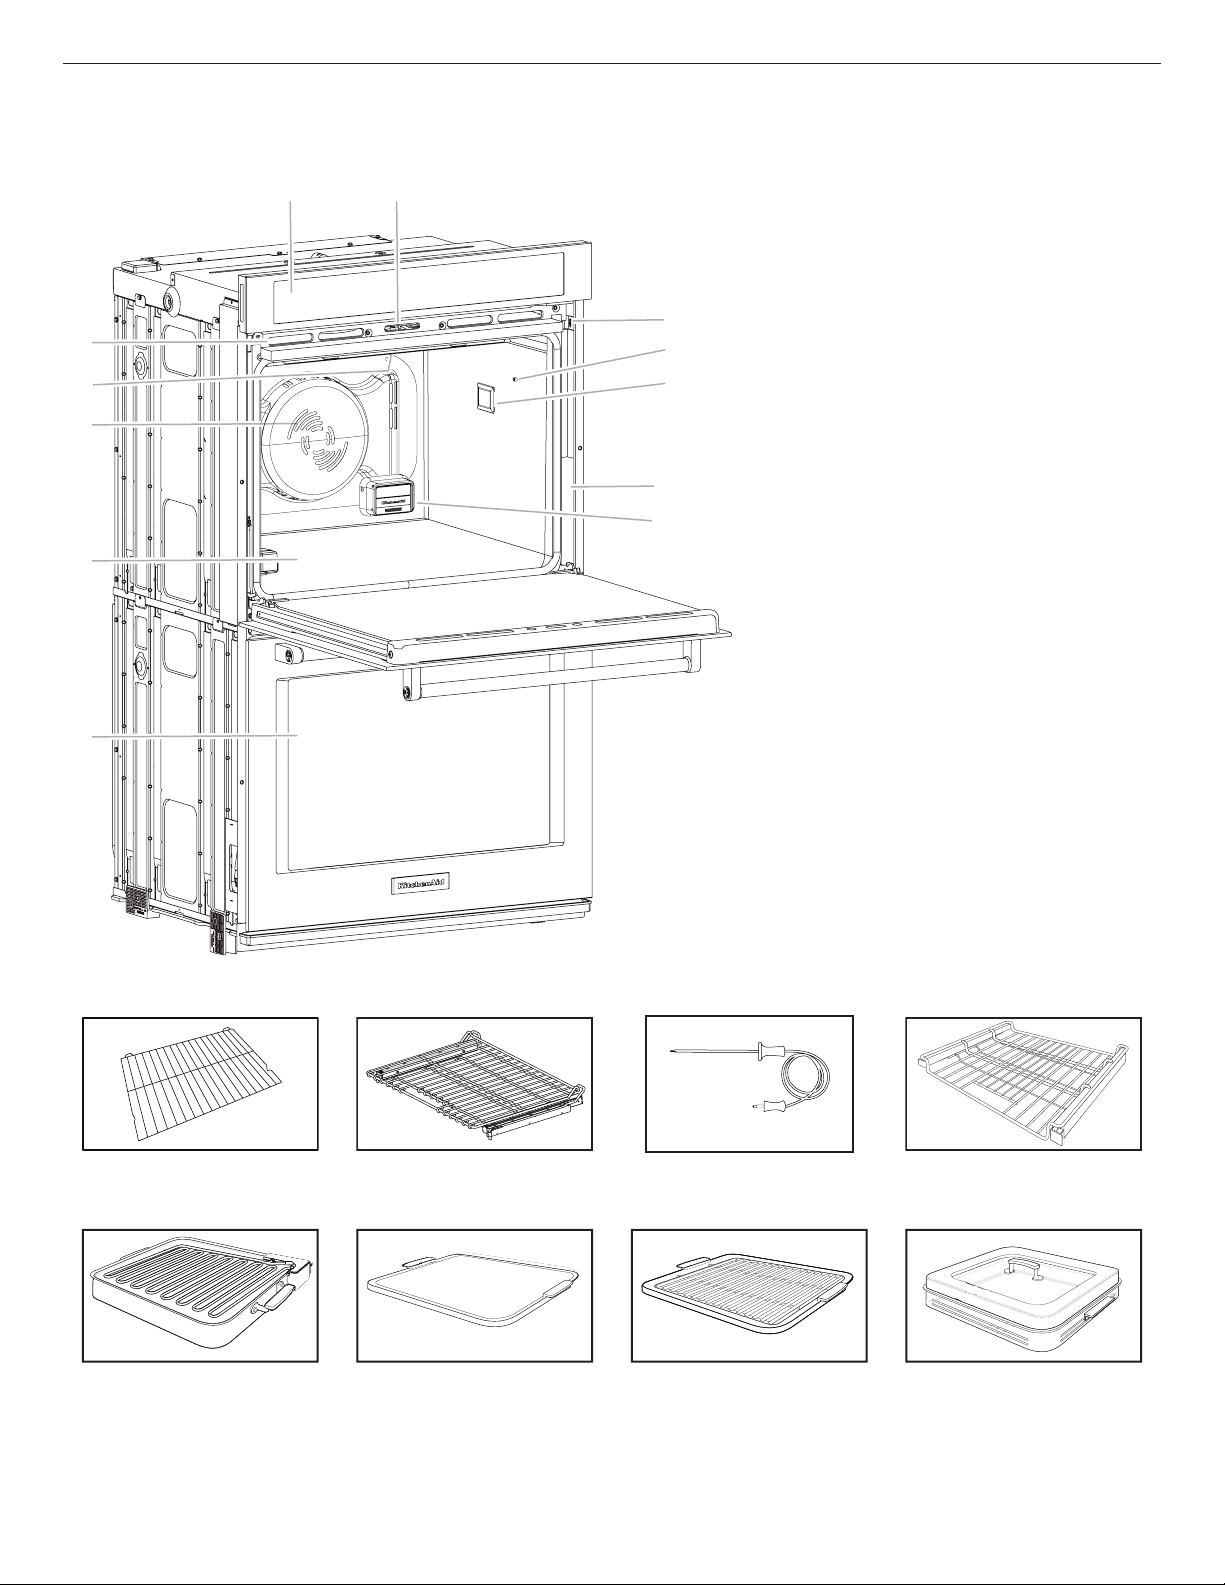
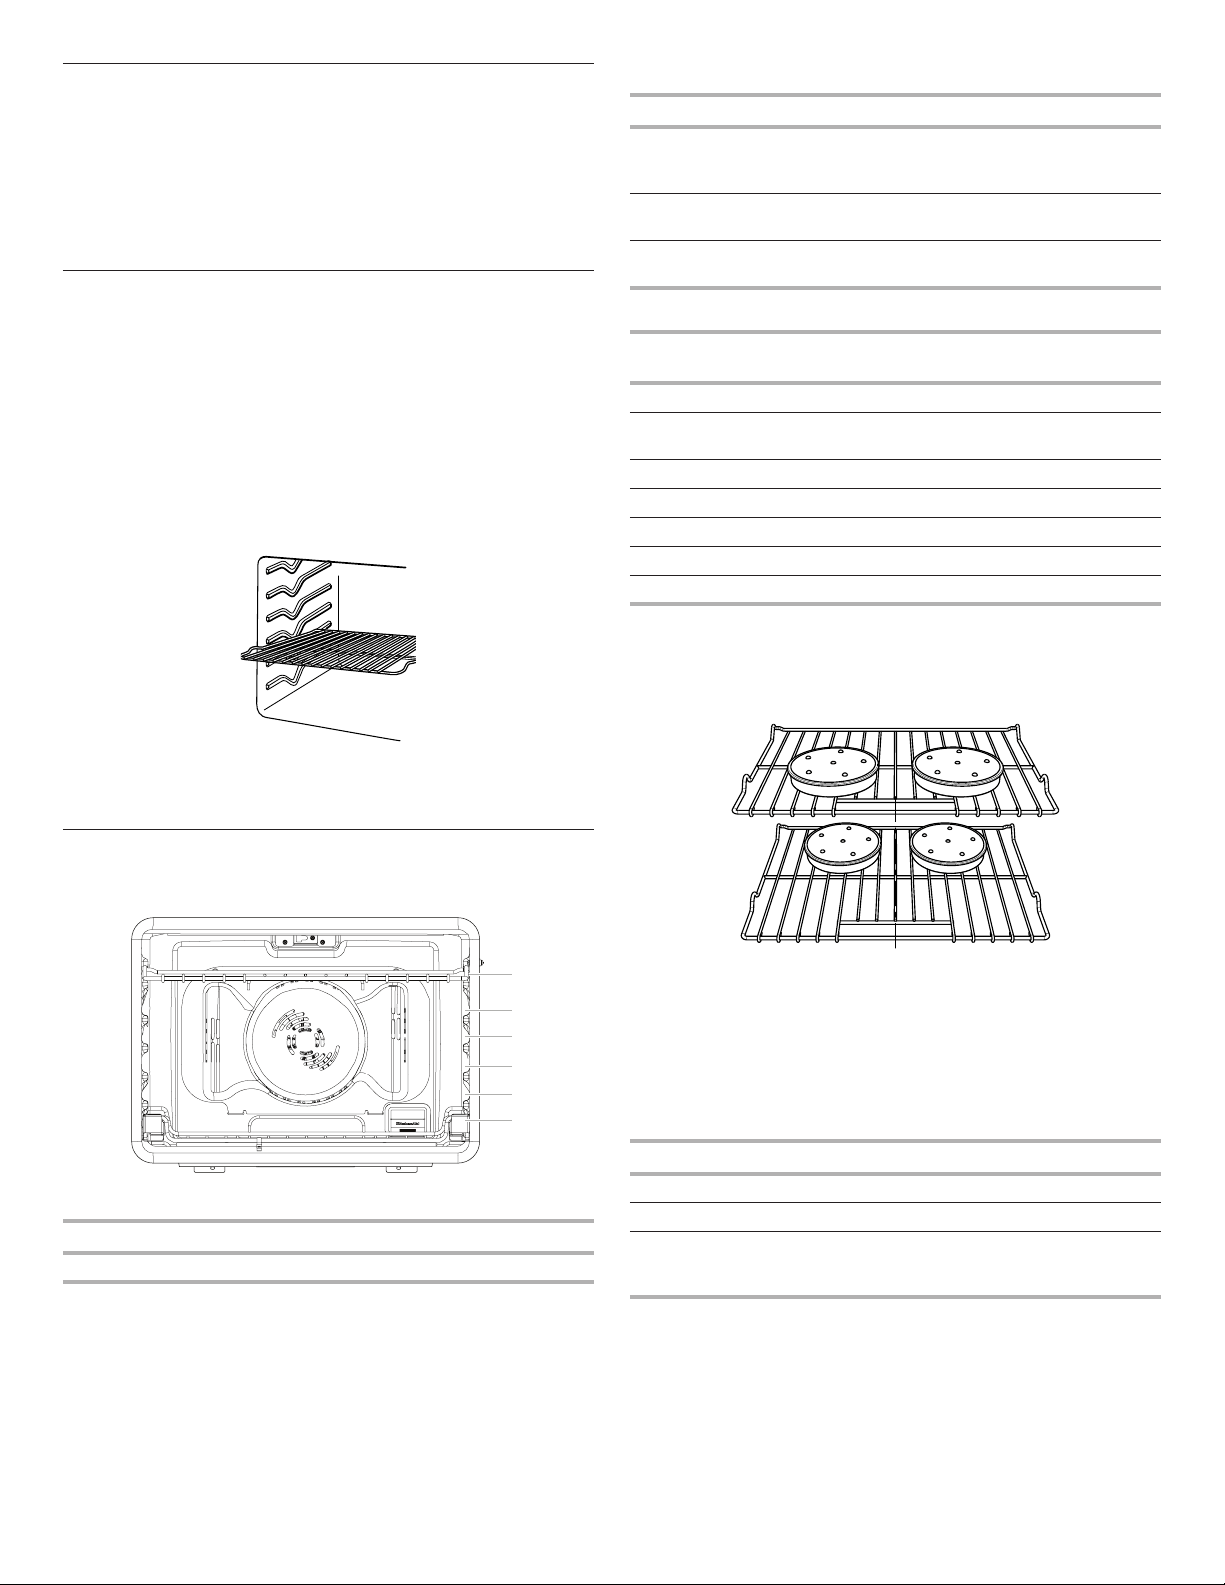
PARTS AND FEATURES
This manual covers different models. The oven you have purchased may have some or all of the items listed. The locations and
appearances of the features shown here may not match those of your model.
A
D
E
F
G
H
K
M
J
I
L
B,C
A. Electronic oven control
B. Automatic oven light switch
C. Oven door lock latch
D. Model and serial number plate (on bottom edge of
control panel, right hand side)
E. Temperature probe jack (oven with convection
element and fan only)
F. Oven lights
G. Gasket
H. Powered Attachment Hub
I. Lower oven (on double oven models)
J. Hidden bake element (hiddenbeneath oor panel)
K. Convection element and fan (in back panel)
L. Broil elements (not shown)
M. Oven vent
Parts and Features not shown
Temperature probe
Condensation tray
Oven racks
NOTE: The upper cavity of the double oven shown is
the same for single oven models and the lower oven on
combo oven models.
Racks and Accessories
Standard Flat Rack
SatinGlide™ Roll-out
ExtensionRack
Temperature Probe
SatinGlide™ Roll-Out Extension
Rack for Smart Oven+
Attachments
+Powered Attachment Base Pan
and Heating Element
Smart Oven+ Powered Baking
Stone Attachment*
Smart Oven+ Powered Grill
Attachment
Smart Oven+ Powered Steamer
Attachment*
* NOTE: The +Steamer Attachment and the +Baking Stone Attachment are not shipped with the product. Please register your oven online
at www.kitchenaid.com in the U.S.A. or www.kitchenaid.ca in Canada to receive your +Steamer Attachment and +Baking Stone
Attachment included in your purchase.
4
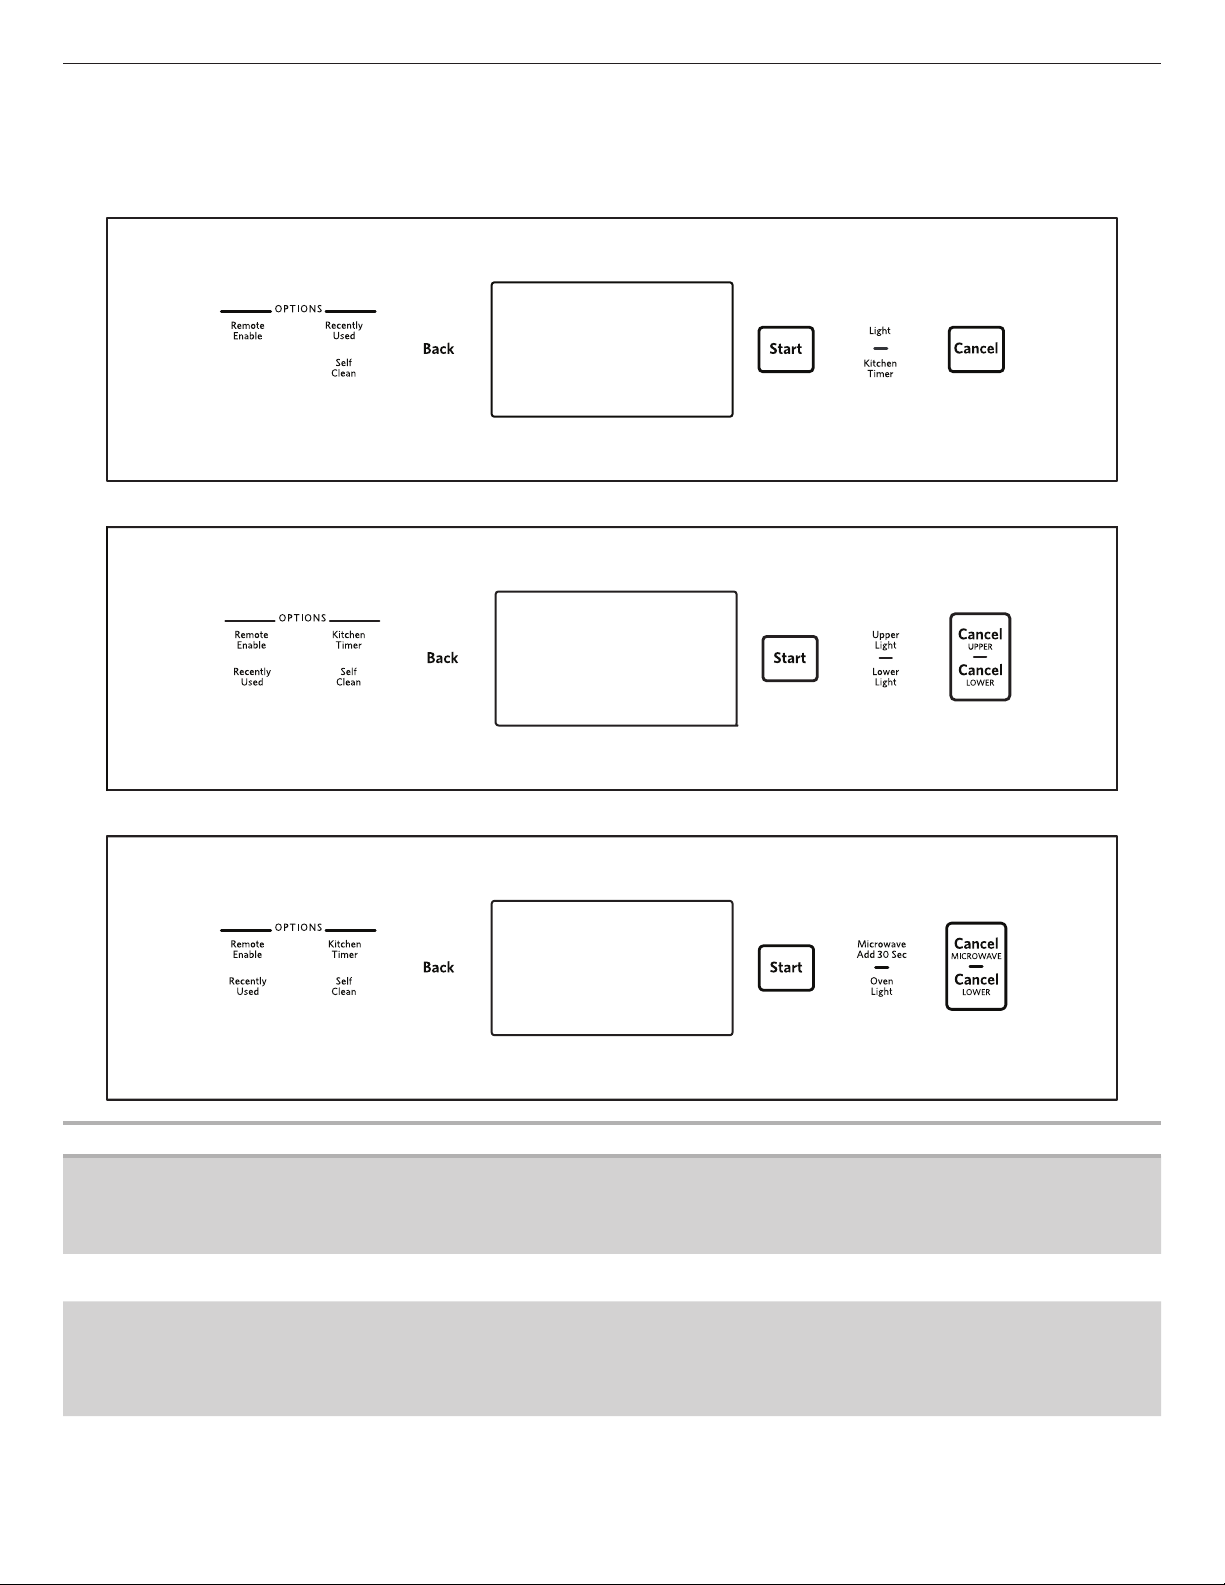
Control Panel
This manual covers several models. Your model may have some or all of the items listed. Refer to this manual or the Frequently Asked
Questions (FAQs) section of our website at www.kitchenaid.com for more detailed instructions. In Canada, refer to the Service and
Support section at www.kitchenaid.ca.
Single Oven
Double Oven
Combo Oven
Keypad Feature Instructions
LIGHT
UPPER LIGHT
LOWER LIGHT
OVEN LIGHT
Oven cavity light The Light keypads control their respective oven light. While the oven door is closed, touch
UPPER LIGHT or LOWER LIGHT to turn the desired light on and off. When the oven door
is opened, the oven light will automatically come on.
START Function start The Start keypad begins any oven function. If Start is not touched within 5 minutes after
touching a keypad, the function is canceled and the time of day is displayed.
CANCEL
CANCEL UPPER
CANCEL LOWER
CANCEL
MICROWAVE
Function cancel The Cancel keypads stop any function for the appropriate oven except the Clock and
Timer.
BACK Go back a screen The Back keypad will cancel current changes and go back one screen every time it is
pressed.

5
Keypad Feature Instructions
KITCHEN TIMER Kitchen timer The Kitchen Timer keypad will set a timer that is independent of oven functions. The
kitchen timer can be set in hours, minutes, and seconds, up to 99 hours.
NOTE: The kitchen timer does not start or stop the oven.
RECENTLY
USED
Recall function The Recently Used keypad allows you to quickly select a recent cycle.
1. Touch RECENTLY USED.
2. Select the desired oven cavity.
3. Select the desired recent cooking mode from the available list.
NOTE: If no cooking modes have been used, there will not be any options.
REMOTE
ENABLE
Enable remote
appcontrol
Press REMOTE ENABLE to enable the ability to use the KitchenAid
®
app. If Wi-Fi is not
already enabled, the oven will attempt to connect to a local network.
SELF CLEAN Self-Cleaning Touch SELF CLEAN and follow the on-screen prompts to set the self-cleaning cycle. See
the “Self-Cleaning Cycle” section for more information.
Welcome Guide
The Welcome Guide allows you to set up your new oven. This
appears on your display the rst time the oven is powered up or
after resetting the oven to factory defaults.
After every selection, a tone will sound. Touch BACK at any time
toreturn to the previous screen.
1. Select your language and touch OK.
2. To connect the oven to the mobile app, touch YES
OR
touch NOT NOW to skip this step and complete setup. Go to
Step 7.
3. Select CONNECT to automatically connect the oven to the
mobile app. Download the KitchenAid app, signup and select
“Add Appliance” in the app. Follow the instructions in the app
to scan the QR code from the appliance screen.
4. To manually connect the oven to the KitchenAid app, select
your home network from the list, touch ADD A NETWORK to
manually enter your home network, or touch CONNECT WITH
WPS to connect to your network via WPS.
If prompted, enter your Wi-Fi password.
5. A message will appear when the oven has successfully
connected to the Wi-Fi network. Touch OK.
6. Touch OFF and then touch OK to set the time and date
manually
OR
touch ON and then touch OK to set the clock automatically via
the Wi-Fi network. Go to Step 9.
7. Touch the number keypads to set the time of day. Select AM,
PM, or 24-HOUR. Touch OK.
8. Select if Daylight Savings Time is active. Touch OK.
9. Select the format for displaying the date. Touch OK.
10. Touch the number keypads to set the current date. Touch OK.
11. Select if you want to show the clock when the oven is idle.
12. Touch DONE.
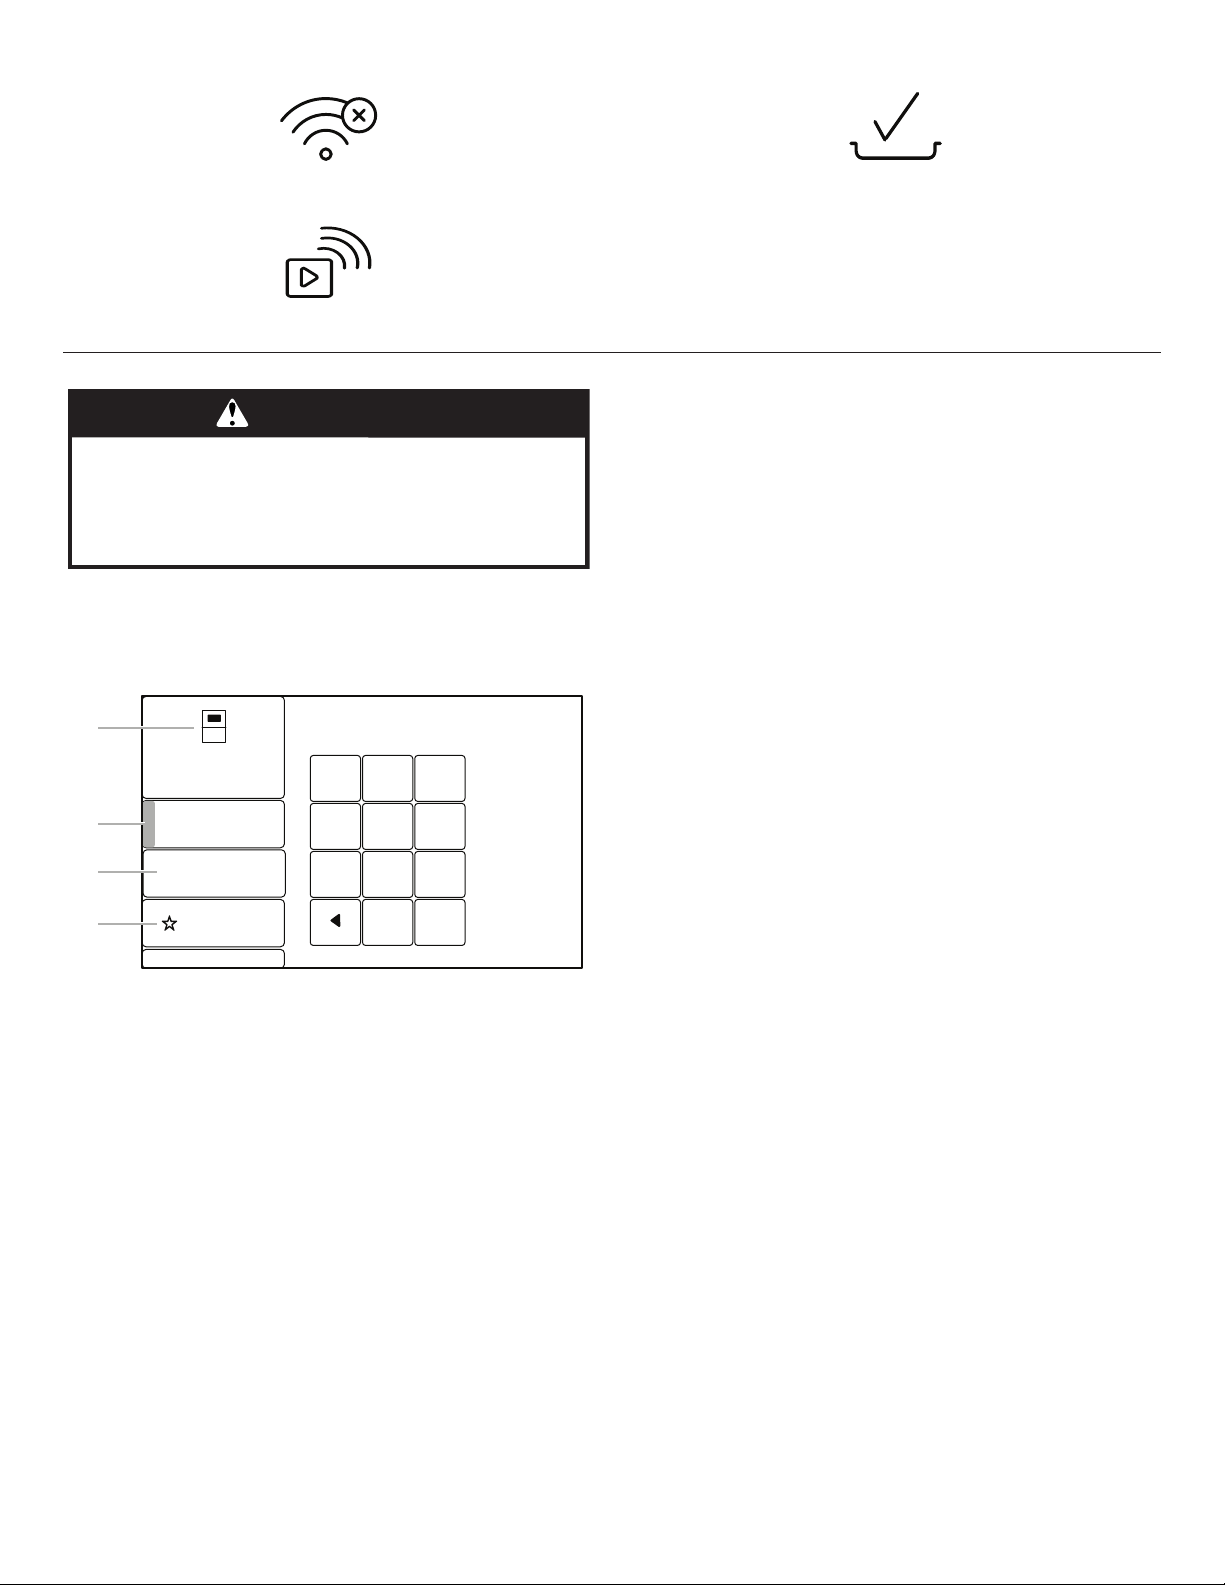
Display Screens
Clock Screen
The Clock screen displays the time and date when the oven is not
in use.
Control Lock
Touch and hold to lock the control. Only the Control Lock icon will
respond when the control is locked.
Home Menu
Touch to set an oven function or access Recipe Guide mode.
Kitchen Timer
Shows the current kitchen timer. Touch to set or modify the
kitchen timer.
Settings Menu
Touch to access oven settings and information.
Status Bar
Displays current oven status, such as Demo mode or Locked.
1 :30:00
12:00
Oven is cooling down...
TUES, AUG 28
A B C
DEF
A. Status icons
B. Status bar
C. Kitchen timer
D. Control lock
E. Home menu
F. Settings menu
6
Status Icons
Indicates a problem with the wireless connection.
Indicates Remote Enable is active.
Indicates +Powered Attachments are connected to the oven.
Function Set Screen
After selecting an oven function, the Function Set screens have a
variety of options to customize the cycle. Not all options are
available on all oven functions. Options may change with oven
updates. Touch the option in the menu on the left to change the
setting.
Function
Shows the current oven function and selected oven cavity.
Cook’s Assistant Mode
Set to Auto to use the Cook’s Assistant. Set to Manual to set the
time and temperature manually.
Oven temperature set
Touch to set the oven temperature. The allowed range will be
displayed.
Rapid Preheat
Touch to select Rapid Preheat. This feature should be used only
with one oven rack.
Target temperature set
For Temperature Probe cooking: Touch to set a target temperature
for the temperature probe. The oven will turn off when the set
temperature is reached.
Mode Selection
For Temperature Probe cooking: Touch to select which cooking
method will be used.
Cook Time Set (optional)
Touch to set a length of time for the function to run.
When Timer Ends (optional)
Available if a Cook Time is set. Touch to change what the oven
does when the set cook time ends.
■ Hold Temperature: The oven temperature stays at the set
temperature after the cook time ends.
■ Turn Off: The oven turns off when the set cook time ends.
■ Keep Warm: The oven temperature is reduced to 170°F (77°C)
after the set cook time ends.
Add Delay (optional)
Available if a Cook Time is set. Touch to set what time of day the
oven begins to preheat. Requires the Clock to be set correctly.
Favorite (optional)
Touch to set the selected settings as a Favorite function. Touch
again to unfavorite. Favorite oven settings can be accessed from
the Home menu.
Doneness
Touch to set the desired doneness of the food type.
Flip Reminder
Touch to set the ip reminder on or off.
Grill Temperature Set
Touch to select the heat level of the grill.
WARNING
Food Poisoning Hazard
Do not let food sit in oven more than one hour before
or after cooking.
Doing so can result in food poisoning or sickness.
B AKE
TEMPERATURE
HR:MIN
FAVORITE
E
--:--
350
SET RECIPE TEMP
(170 - 550 )
1
45
8
0
6
9
CLEAR
7
23
o
o
o
A
B
C
D
A. Function
B. Oven temperature set
C. Cook time set
D. Favorite
Not shown:
Cook’s Assistant Mode
Doneness
Flip Reminder
When Timer Ends
Add Delay
Rapid Preheat
Mode Selection
Target temperature set
Grill temperature set
7
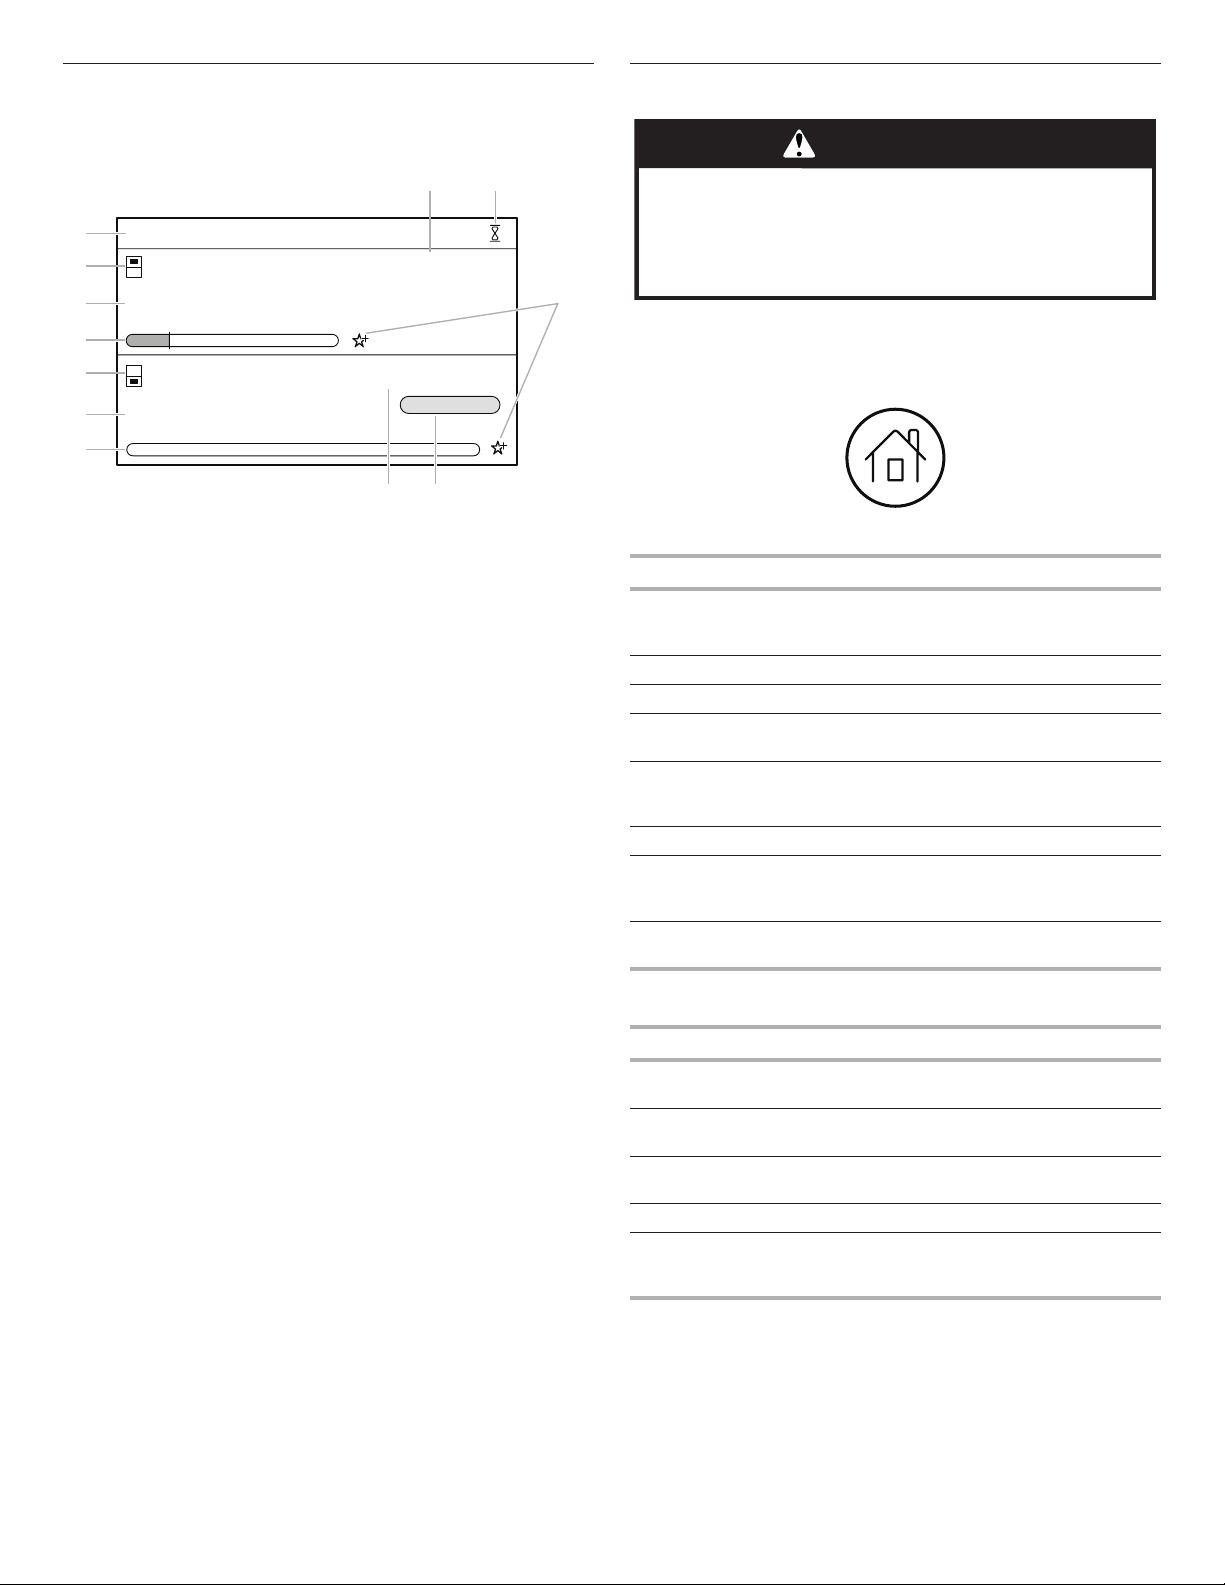
Status Screen
While the oven is in use, the display will show a timeline with
information about the current oven function(s). If one of the
cavities is not in use, a button to use that cavity will appear.
Favorite
Tap the star to add the current cook settings as a favorite.
Kitchen timer
Touch to set a kitchen timer or modify an existing one.
Oven function
Shows the current oven function for the indicated cavity.
Oven temperature
Shows the current oven temperature for the indicated cavity.
Oven timeline
Shows where the oven is in the cooking process and when it will
nish. If a cook time has not been set, Set Timer appears to set a
cook time if desired.
Oven timer
Shows the remaining cook time (if set).
Start timer
If a delay has been set, this appears. Touch START TIMER to
immediately begin the set cook time.
Time of day
Shows the current time of day.
Cooking Modes
The oven has a variety of cooking modes to achieve the best
results every time. The cooking modes can be accessed by
touching the Home icon and then selecting the desired oven or a
previously saved Favorite recipe.
All Ovens
Cooking Mode Best for
Bake Foods that start out wet or not-solid (like
batter), then rm up and gain structure or rise
as they cook (like cakes or casseroles)
Broil Thin or small cuts of meats or poultry
Proof Dough that needs to rise
Convect Bake Foods with aky and dry crusts with moist
interiors (like pastries, pies, or breads)
Convect Roast Large foods that should be browned on the
outside but moist inside (like whole poultry or
roasts)
Convect Broil Tender or uneven cuts of meats or poultry
Probe Cook Foods that need to be cooked to a specic
internal temperature (like meats, poultry, or
casseroles with liquid)
Keep Warm Allows hot cooked foods to stay at serving
temperature.
Powered Attachments Oven Only
Cooking Mode Best for
Grill Foods that can be cooked on a grill (like
hamburger patties or steaks)
Stone Bake Foods that should have a crisp crust (like
pizza or bread)
Steam Concentrated steaming of food (like sh or
vegetables)
Steam Assist Whole-oven steaming for crustier breads
Recipe Guide
Mode
Specic cooking programs for best results.
See the “Recipe Guide Mode” section for
more information.
11:00
AM
G
F
E
D
C
B
A
H I
350 01:15:00
C ONVECT ROAST
Cooking
START TIMER
E
E
O
340 /350 00:30:00
B AKE
Preheating
OO
Ready at 12:15 PM
J
KL
A. Oven timeline - lower
B. Oven function - lower
C. Oven temperature - lower
D. Oven timeline - upper
E. Oven function - upper
F. Oven temperature - upper
G. Time of day
H. Oven timer - upper
I. Kitchen timer
J. Favorite
K. Start timer - lower
L. Oven timer - lower
WARNING
Food Poisoning Hazard
Do not let food sit in oven more than one hour before
or after cooking.
Doing so can result in food poisoning or sickness.

8
Kitchen Timer
The Kitchen Timer keypad will set a timer that is independent of
oven functions. The Kitchen Timer can be set in hours, minutes,
and seconds, up to 99 hours.
NOTE: The Kitchen Timer does not start or stop the oven.
1. Touch KITCHEN TIMER.
2. Touch HR:MIN or MIN:SEC.
3. Touch the number keypads to set the length of time.
NOTE: Touching HR:MIN or MIN:SEC after the time has been
entered will clear the timer.
4. Touch the Start button on the display to start the kitchen timer.
5. To change the Kitchen Timer while it is running, touch
KITCHEN TIMER or touch the timer countdown in the status
bar, touch the number keypads to set the new length of time,
and then touch UPDATE.
6. A sound will play when the set time ends, and a drop-down
notication will appear. Touch OK to dismiss the notication.
7. Touch BACK while setting the kitchen timer to cancel the
kitchen timer.
To cancel a running timer, touch KITCHEN TIMER and then the
Cancel button on the display. If a Cancel keypad is touched,
the respective oven will turn off.
Tones/Sounds
Tones are audible signals, indicating the following:
■ Valid keypad touch
■ Function has been entered.
■ Oven is preheated.
■ Invalid keypad touch
■ End of a cooking cycle
■ When timer reaches zero
Includes using the Kitchen Timer for functions other
thancooking.
■ +Powered attachments connected
■ +Powered attachments disconnected
■ Control is locked
■ Control is unlocked
Control Lock
The Control Lock shuts down the control panel keypads to avoid
unintended use of the oven(s). The Control Lock will remain set
after a power failure if it was set before the power failure occurs.
When the control is locked, only the Control Lock keypad will
function.
The Control Lock is preset unlocked but can be locked.
To Activate the Control Lock:
1. Touch and hold the Control Lock icon.
2. A countdown will appear in the gray Status bar at the top of
the screen. The Control Lock icon will turn red and the Status
bar will display “LOCKED” when the control is locked.
To Deactivate the Control Lock:
1. Touch and hold the Control Lock icon.
2. A countdown will appear in the gray Status bar at the top of
the screen. The Control Lock icon will no longer be red and the
Status bar will be blank when the control is unlocked

9
Settings
The Settings icon allows you access to functions and
customization options for your oven. These options allow you to
set the clock, change the oven temperature between Fahrenheit
and Celsius, turn the audible signals and prompts on and off,
adjust the oven calibration, change the language, and more. Many
of these options are set during the Welcome Guide.
The Sabbath mode is also set using the Settings menu.
Setting Available Selections
Date & Time ■ Auto (Off/On)*
■ Time (AM/PM/24-Hour)*
■ Daylight Savings (Off/On)*
■ Date Format (MM/DD/YYYY,
DD/MM/YYYY, YYYY/MM/DD)*
■ Set Date*
■ Show Clock (No & Turn Off Screen/Yes &
Dim Screen)*
Background ■ Set Background Picture
Wi-Fi ■ Network*
■ SAID/MAC Address
■ Wireless Icon (Show [default]/Hide)
■ Wireless (On/Off)*
Sounds ■ Timers (High [default]/Medium/Low/Off)
■ Notications (High [default]/Medium/Low/
Off)
■ Accessory In/Out (High/Medium [default]/
Low/Off)
■ Keypress (High [default]/Medium/Low/Off)
■ Mute (Sounds On [default]/Sounds Off)
Setting Available Selections
Temperature ■ Temperature (Fahrenheit [default]/Celsius)
Display ■ Brightness (Low/Medium/High/Maximum
[default])
Language ■ Language (English/Français)*
Attachment
Registration
■ View/Register +Powered Attachments
Manage
Favorites
■ Clear All Favorites
Calibrate ■ Instructions
■ Upper Oven
(0/+10°F/+20°F/+30°F/-10°F/-20°F/-30°F)
(0/+6°C/+12°C/+18°C/-6°C/-12°C/-18°C)
■ Lower Oven
(0/+10°F/+20°F/+30°F/-10°F/-20°F/-30°F)
(0/+6°C/+12°C/+18°C/-6°C/-12°C/-18°C)
Sabbath Mode ■ Disables all oven functions, lights, clock,
and messages. Press any Cancel keypad
to end Sabbath Mode.
Sabbath Bake ■ Instructions
■ Upper/Single Oven Temperature
■ Upper/Single Oven Timer
■ Lower Oven Temperature
■ Lower Oven Timer
■ Conrm (No/Yes)
Demo ■ Demo (Off [default]/On)
General ■ About (Model/Serial numbers, Software
Version, SAID/MAC Address)
■ Update (Software update)
Factory Reset ■ Reset
* The default for these settings is set during the Welcome Guide.
10
OVEN USE
Odors and smoke are normal when the oven is used the rst
fewtimes, or when it is heavily soiled.
During oven use, the heating elements will not remain on, but
willcycle on and off throughout oven operation.
IMPORTANT: The health of some birds is extremely sensitive
to the fumes given off. Exposure to the fumes may result in
death to certain birds. Always move birds to another closed
andwell-ventilated room.
Wi-Fi Connectivity
Your oven has built-in Wi-Fi connectivity, but for it to work, you will
have to help it join your home wireless network. For information
about setting up the connectivity, turning it on and off, receiving
important notications, and taking advantage of available features,
refer to the Oven Wi-Fi Connected Quick Start Guide that came
with your appliance.
Once the setup process has been completed for the Wi-Fi, you will
have access to features that will give you new freedom in cooking.
Your available features may vary depending on rmware updates.
Viewing
■ Cooking Timers
■ Control Lock
■ Kitchen Timers
■ Temperature Probe Status
■ Remote Start Status
Control
■ Turn Oven Off
■ Adjust Oven Light
■ Oven Control Lock
■ Start Oven Controls
■ Adjust Cooking Settings
Remote Notifications
Once the Wi-Fi connectivity has been established, you have
theability to receive status notications via push notication. The
notications that can be received are:
■ Oven Cycle Interruptions
■ Preheat Complete
■ Cook Timer Completion
■ Cooking Temperature Change
■ Preheat Cooking Temperature Progress
■ Temperature Probe Temperature Change
■ Temperature Probe Temperature Reached
■ Cooking Mode Change
■ Control Lock Status Change
■ Kitchen Timer Complete
■ Kitchen Timer Change
■ Self-Clean Complete
NOTE: Requires Wi-Fi and an account creation. App features
and functionality subject to change. Subject to Terms of Service
available at www.kitchenaid.com/connect. Data rates may apply.
Sabbath Bake
The Sabbath Bake sets the oven(s) to remain on in a bake setting
until turned off. A timed Sabbath Bake can also be set to keep the
oven on for only part of the Sabbath.
When the Sabbath Bake is set, only the Cancel keypads will work.
For Combo ovens, the microwave will be disabled. When the oven
door is opened or closed, the oven light will not turn on or off, and
the heating elements will not turn on or off immediately.
If a power failure occurs when the Sabbath Bake is set, the oven(s)
will return to Sabbath Mode (no heating elements) when power is
restored.
To Set:
1. Touch the Settings icon.
2. Touch SABBATH BAKE.
3. Touch the appropriate oven button on the display.
4. Use the number keypads to set the temperature for the
selected oven other than the default temperature shown.
5. (Optional: For Timed Sabbath Bake) Use the number keypads
to set the length of time for the selected oven to remain on, up
to 72 hours.
6. (On some models) To set the other oven, touch the button for
the other oven on the display.
7. Use the number keypads to set the temperature for the
selected oven.
8. (Optional: For Timed Sabbath Bake) Use the number keypads
to set the length of time for the selected oven to remain on, up
to 72 hours.
9. Review the oven settings. The oven temperature can be
adjusted after Sabbath Bake has begun. On double oven
models, both ovens must be programed before you start the
Sabbath Bake. If everything is correct, touch CONFIRM or
START and then YES.
10. To change the temperature while Sabbath Bake is running,
touch the -25° (-5°) or +25° (+5°) button for the appropriate
oven for every 25°F (5°C) change. The display will not show
any change.
When the stop time is reached or CANCEL is touched, the heating
elements will automatically turn off. The oven will switch from
Sabbath Bake to Sabbath Mode, with all oven functions, lights,
clock, and messages disabled. Touch CANCEL again to end
Sabbath Mode.
NOTE: The oven can be set to Sabbath Mode without running a
Bake cycle. See the “Settings” section for more information.
WARNING
Food Poisoning Hazard
Do not let food sit in oven more than one hour before
or after cooking.
Doing so can result in food poisoning or sickness.
WARNING
Food Poisoning Hazard
Do not let food sit in oven more than one hour before
or after cooking.
Doing so can result in food poisoning or sickness.
11
Aluminum Foil
IMPORTANT: To avoid permanent damage to the oven bottom
nish, do not line the oven bottom with any type of foil or liner.
■ For best cooking results, do not cover entire rack with foil
because air must be able to move freely.
■ To catch spills, place foil on rack below dish. Make sure foil is
at least 1/2" (1.3 cm) larger than the dish and that it is turned
up at the edges.
Oven Racks
IMPORTANT: To avoid permanent damage to the porcelain
nish, do not place food or bakeware directly on the oven door or
bottom.
Racks
■ Position racks before turning on the oven.
■ Do not position racks with bakeware on them.
■ Make sure racks are level.
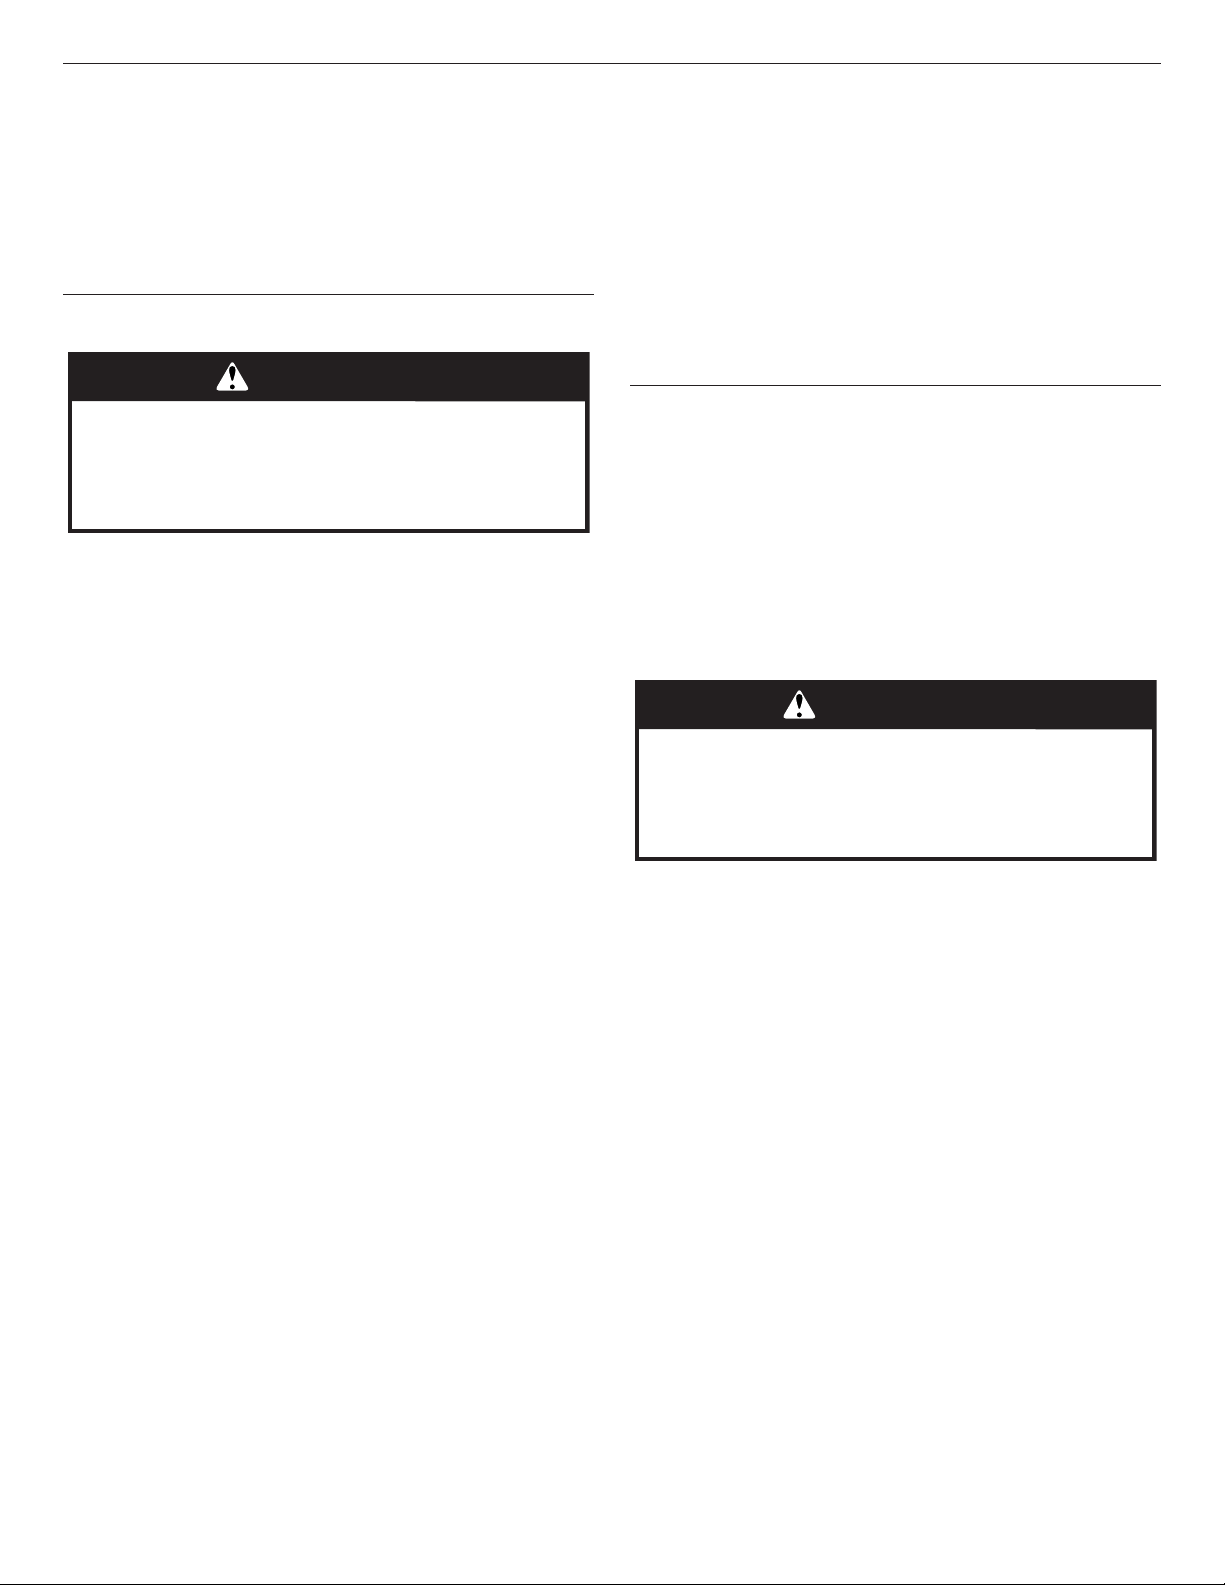
To move a rack, pull it out to the stop position, raise the front
edge, then lift it out. Use the following illustration and charts
asguides.
NOTE: The SatinGlide™ Roll-Out Extension Rack for Smart Oven+
Attachments is inserted and removed the same way as a standard
rack, however, more force is needed.
Rack and Bakeware Positions
Rack Positions - Upper And Lower Oven
Broiling
Food Rack Position
Most broiling 6
For hamburger patties to have a well-seared exterior and a rare
interior, use a at rack in position 6. Side 1 should cook for
approximately 3 minutes. Side 2 should cook for approximately 3
to 4 minutes. Expect a moderate degree of smoke when broiling.
Traditional Cooking
Food Rack Position
Large roasts, turkeys, angel
food, bundt cakes, quick
breads, pies
1 or 2
Yeast breads, casseroles,
meat and poultry
2
Cookies, biscuits, mufns,
cakes
2 or 3 when single-rack baking;
2 and 5 when multi-rack baking
Convection Cooking
Oven Setting
Number of
Racks Used
Rack Position(s)
Rapid Preheat Bake 1 3
Rapid Preheat
Convection Bake
1 3
Convection Bake 1 1, 2, or 3
Convection Bake 2 2 and 5
Convection Bake 3 1, 3, and 5
Convection Roast 1 1 or 2
Convection Broil 1 4, 5, or 6
Baking Cakes on 2 Racks
For best results when baking cakes on 2 racks, use the Bake
function and at racks in positions 2 and 5. Place the cakes on the
racks as shown. Keep at least 2 inches of space between the front
of the racks and the front of the cakes.
Baking Cookies on 2 Racks
For best results when baking cookies on 2 racks, use the
Convect Bake function and place at racks in positions 2 and 5.
Bakeware
To cook food evenly, hot air must be able to circulate. For best
results, allow 2" (5 cm) of space around bakeware and oven walls.
Use the following chart as a guide.
Number of Pan(s) Position on Rack
1 Center of rack
2 Side by side or slightly staggered
3 or 4 See the rack position graphics
in this section for pan placement
recommendations.
6
5
4
3
2
1
12
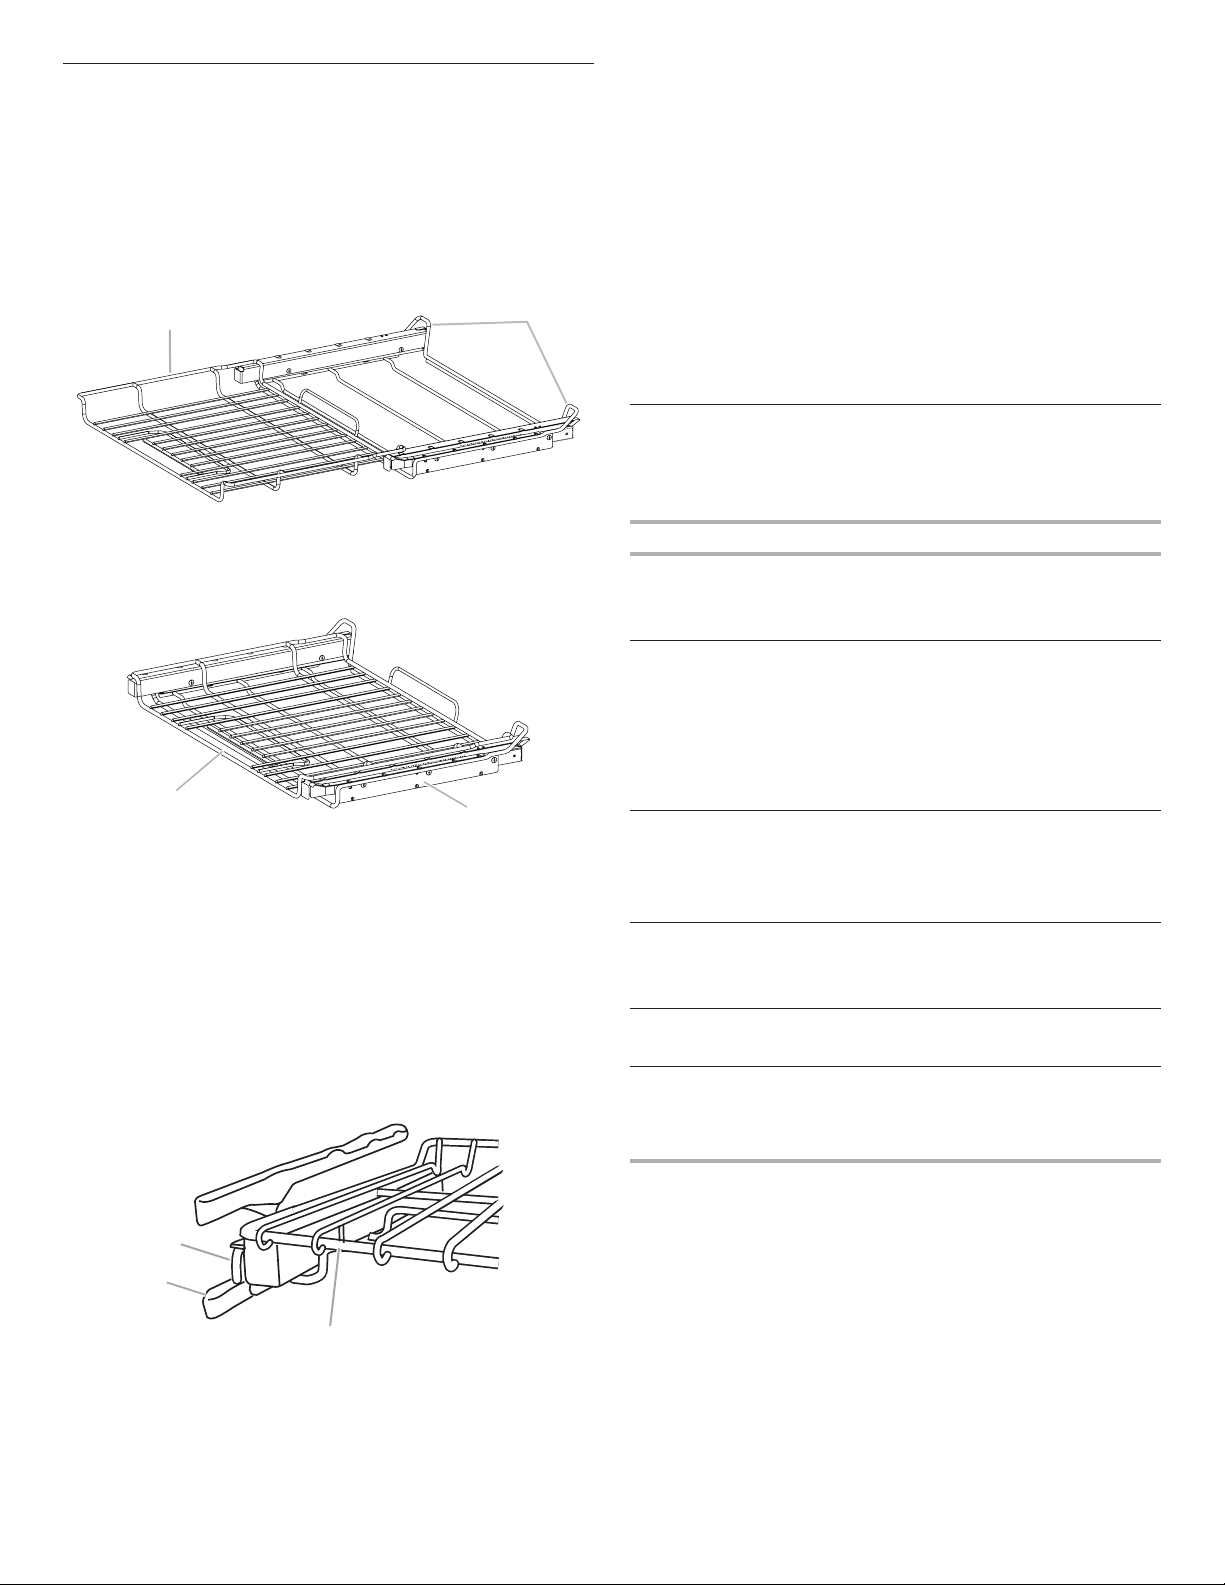
SatinGlide™ Roll-Out Extension Racks
The SatinGlide™ roll-out extension rack allows easy access
toposition and remove food in the oven. It can be used in
rackpositions 1 through 6.
The SatinGlide™ Roll-Out Extension Rack for Smart Oven+
Attachments has a curve to support the +Powered Attachments
and allowing easy access to position and remove food in the oven
and on the +Powered Attachments. It can be used in rack
position 1.
Open Position
Closed and Engaged Position
To Remove SatinGlide™ Roll-Out Extension Racks:
1. Remove all objects from the roll-out extension rack before
removing the rack.
2. Slide the rack in completely so that it is closed and engaged
with the sliding shelf.
3. Using 2 hands, lift up on the front edge of the rack and push
the sliding shelf to the back wall of the oven so that the front
edge of the sliding shelf sits on the rack guides. The front
edgeof the rack and the sliding shelf should be higher than
the back edge.
4. Pull the rack and the sliding shelf out.
To Replace SatinGlide™ Roll-Out Extension Racks:
1. Using 2 hands, grasp the front of the closed rack and the
sliding shelf. Place the closed rack and the sliding shelf on
therack guide.
2. Using 2 hands, lift up on the front edge of the rack and the
sliding shelf together.
3. Slowly push the rack and the sliding shelf to the back of the
oven until the back edge of the rack pulls over the end of the
rack guide.
To avoid damage to the sliding shelves, do not place more than
25lbs (11.4 kg) on the SatinGlide™ roll-out extension rack or
35 lbs (15.9 kg) on the roll-out rack for powered attachments.
Do not clean the SatinGlide™ roll-out extension racks in a
dishwasher. It may remove the racks’ lubricant and affect their
ability to slide.
See the “General Cleaning” section for more information.
Bakeware
The bakeware material affects cooking results. Follow
manufacturer’s recommendations and use the bakeware size
recommended in the recipe. Use the following chart as a guide.
Bakeware/Results Recommendations
Light colored aluminum
■ Light golden crusts
■ Even browning
■ Use temperature and time
recommended in recipe.
Dark aluminum and
other bakeware with
dark, dull and/or
nonstick nish
■ Brown, crisp crusts
■ May need to reduce baking
temperatures slightly.
■ Use suggested baking time.
■ For pies, breads and casseroles,
use temperature recommended
in recipe.
■ Place rack in center of oven.
Insulated cookie sheets
or baking pans
■ Little or no bottom
browning
■ Follow rack recommendations
in the “Rack and Bakeware
Positions” section.
■ May need to increase baking
time.
Stainless steel
■ Light, golden crusts
■ Uneven browning
■ May need to increase baking
time.
Stoneware/Baking stone
■ Crisp crusts
■ Follow manufacturer’s
instructions.
Ovenproof glassware,
ceramic glass, or
ceramic
■ Brown, crisp crusts
■ May need to reduce baking
temperatures slightly.
B
A
A. SatinGlide™ roll-out extension rack
for Smart Oven+ Attachments
B. Sliding shelf
A
B
A. SatinGlide™ roll-out extension rack
for Smart Oven+ Attachments
B. Sliding shelf
B
A
C
A. Sliding shelf
B. Rack guide
C. SatinGlide™ roll-out extension rack
13
Oven Vent(s)
The oven vent(s) should not be blocked or covered since they
allow the inlet of fresh air into the cooling system. Also, the
bottom vent should not be blocked or covered since it allows
theinlet of fresh air into the cooling system and the outlet of
hotairfrom the cooling system. Blocking or covering vents
willcause poor air circulation, affecting cooking, cleaning,
andcooling results.
Preheating and Oven Temperature
Preheating
When beginning a Bake or Convect Bake cycle, the oven begins
preheating after Start is touched. The oven will take approximately
12 to 17 minutes to reach 350°F (177°C) with all of the oven
racks provided with your oven inside the oven cavity. Higher
temperatures will take longer to preheat. Factors that impact
preheat times include room temperature, oven temperature, and
the number of racks. Unused oven racks can be removed prior
to preheating your oven to help reduce preheat time. The preheat
cycle rapidly increases the oven temperature. The actual oven
temperature will go above your set temperature to offset the heat
lost when your oven door is opened to insert food. This ensures
that when you place your food in the oven, the oven will begin
at the proper temperature. Insert your food when the preheat
tone sounds. Do not open the door during preheat until the tone
sounds.
Oven Temperature
While in use, the oven elements will cycle on and off as needed
to maintain a consistent temperature. They may run slightly
hot or cool at any point in time due to this cycling. Opening the
oven door while in use will release the hot air and cool the oven
which could impact the cooking time and performance. It is
recommended to use the oven light to monitor cooking progress.
Baking and Roasting
IMPORTANT: The convection fan and convection element may
operate during the Bake function to enhance performance and
heat distribution.
During baking or roasting, the bake and broil elements will cycle
on and off in intervals to maintain the oven temperature.
If the oven door is opened during baking or roasting, the heating
elements (bake and broil) will turn off approximately 30 seconds
after the door is opened. They will turn on again approximately 30
seconds after the door is closed.
Broiling
Broiling uses direct radiant heat to cook food.
The element cycles on and off in intervals to maintain the oven
temperature.
IMPORTANT: Close the door to ensure proper broiling
temperature.
If the oven door is opened during broiling, the broil element will
turn off in approximately 30 seconds. When the oven door is
closed, the element will come back on approximately 30 seconds
later.
■ For best results, use a broiler pan and grid. It is designed to
drain juices and help avoid spatter and smoke.
If you would like to purchase a Broiler Pan Kit, it may be
ordered. See the “Accessories” section to order.
■ For proper draining, do not cover the grid with foil. The bottom
of the broiler pan may be lined with aluminum foil for easier
cleaning.
■ Trim excess fat to reduce spattering. Slit the remaining fat on
the edges to avoid curling.
■ Pull out oven rack to stop position before turning or removing
food. Use tongs to turn food to avoid the loss of juices. Very
thin cuts of sh, poultry or meat may not need to be turned.
■ After broiling, remove the pan from the oven when removing
the food. Drippings will bake on the pan if left in the heated
oven, making cleaning more difcult.
A
B
C
D
E
F
G
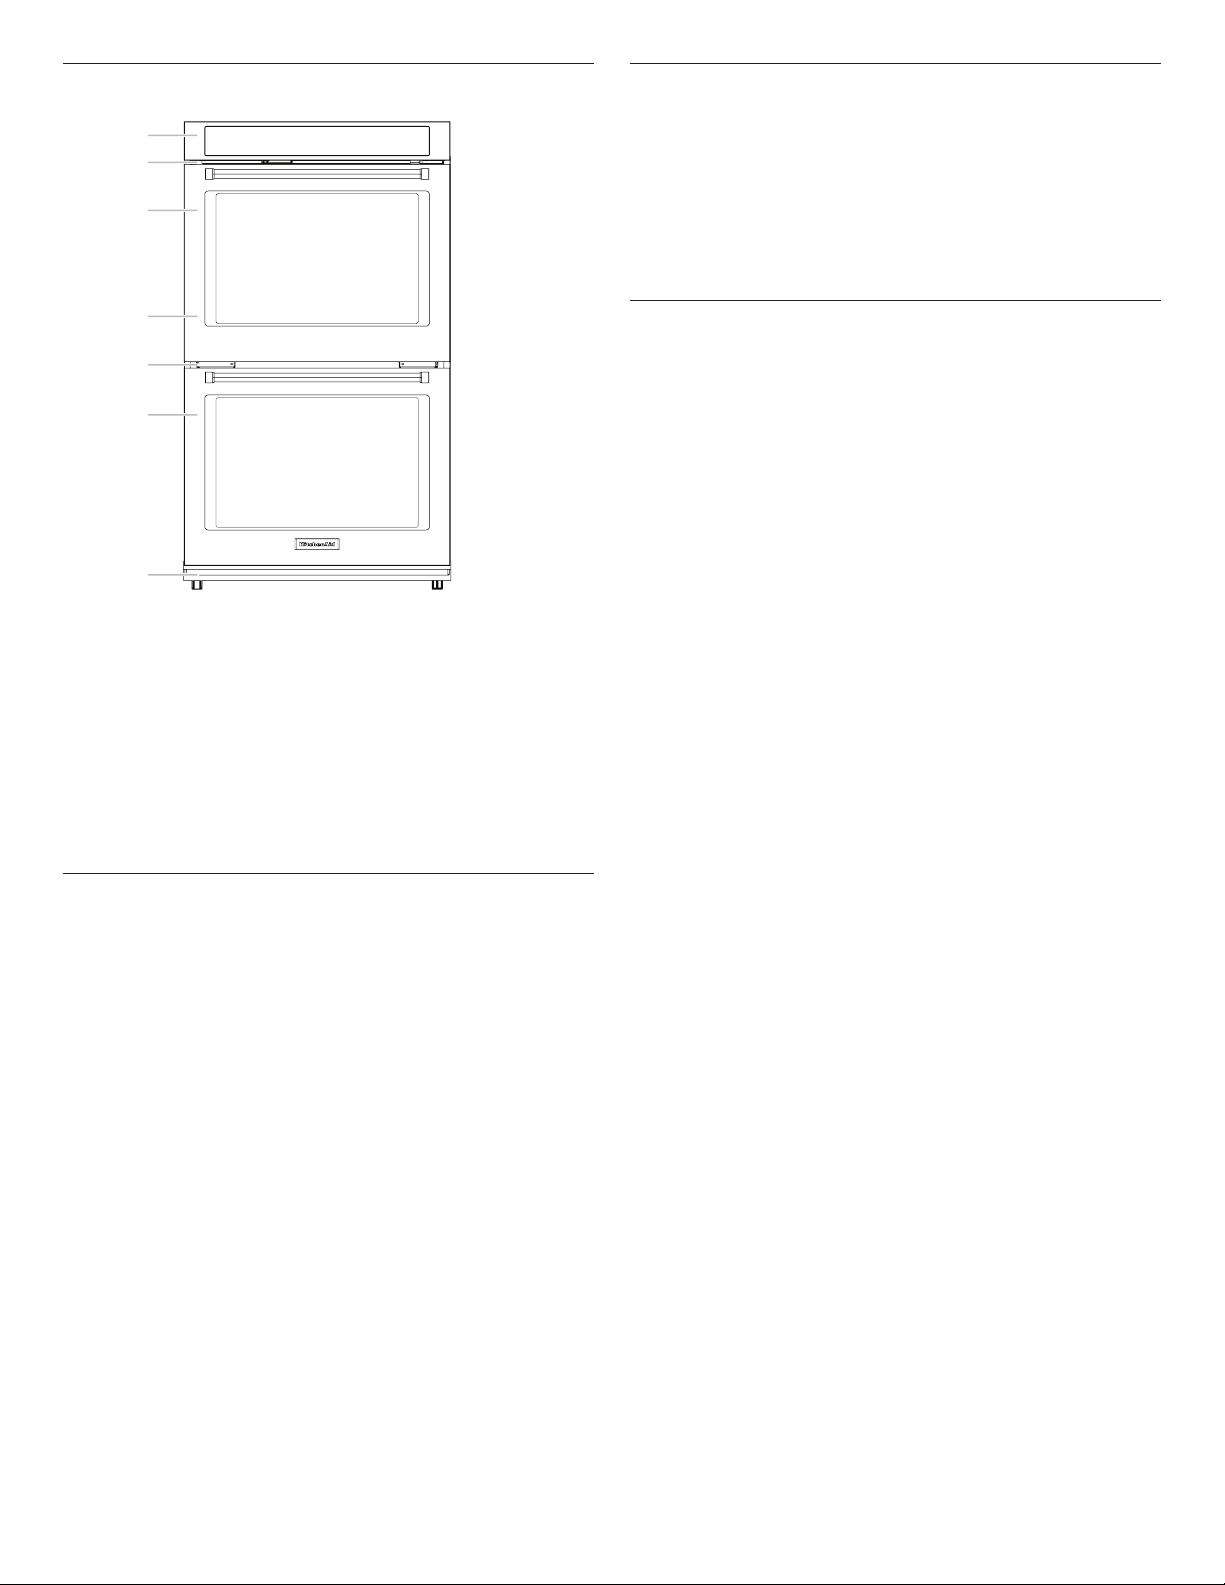
Single and Double Oven
A. Control panel
B. Oven vent
C. Single oven or
upperdouble oven
G. Bottom vent
Double Oven
D. Upper oven
E. Oven vent
F. Lower oven
G. Bottom vent

14
Cook’s Assistant Option
The Cook’s Assistant Option is an automated cooking option that
invites you to explore the many capabilities of the oven, including
the attachments, convection baking, and sensor cooking with
the temperature probe. When used with attachments, this option
automatically controls the oven system for foods commonly
prepared on each one, including a wide selection of steaks and
chops, chicken and sh, pizza and vegetable items.
When selecting a cooking mode with the Cook’s Assistant option
for the rst time, the Cook’s Assistant Option will automatically
optimize the time and temperature of the recipe for the desired
results.
To manually enter the set time and temperature, touch COOK’S
ASSISTANT and then select Manual. The oven will not change the
set time or temperature and will default to manual cooking mode
for all cooking modes.
To return to Cook’s Assistant Option conversions, touch COOK’S
ASSISTANT OPTIONS and then select Auto. The oven will
automatically adjust the set time and/or temperature for better
cooking results and will default to Cook’s Assistant Option for all
cooking modes with this option.
Convection
In a convection oven, the fan-circulated hot air distributes heat
more evenly. This movement of hot air helps maintain a consistent
temperature throughout the oven, cooking foods more evenly,
while sealing in moisture.
During convection baking or roasting, the bake, broil, and
convection elements cycle on and off in intervals while the fan
circulates the hot air. During convection broiling, the broil and
convection elements cycle on and off.
If the oven door is opened during convection cooking, the fan
willturn off immediately. It will come back on when the oven
dooris closed.
The convection cooking modes take advantage of the Cook’s
Assistant Option. See the “Cook’s Assistant Option” section
for more information. If manually setting the oven, most foods,
using convect baking mode, can be cooked by lowering cooking
temperatures 25°F (14°C). The cooking time, canbe shortened
signicantly when using Convect Roast, especially for large
turkeys and roasts.
■ It is important not to cover foods with lids or aluminum foil
so that surface areas remain exposed to the circulating air,
allowing browning and crisping.
■ Keep heat loss to a minimum by opening the oven door only
when necessary. It is recommended to use the oven light to
monitor progress.
■ Choose cookie sheets without sides and roasting pans with
lower sides to allow air to move freely around the food.
■ Test baked goods for doneness a few minutes before the
minimum cooking time using a method such as a toothpick.
■ Use a meat thermometer or the temperature probe to
determine the doneness of meats and poultry. Check the
temperature of pork and poultry in 2 or 3 places.
Proofing Bread
Proong bread prepares dough for baking by activating the
yeast. Proong twice is recommended unless the recipe
directsotherwise.
To Proof
Before rst proong, place dough in a lightly greased bowl
and cover loosely with waxed paper or plastic wrap coated
with shortening. Place on rack 2. See the “Rack and Bakeware
Positions” section for diagram. Close door.
1. Touch the Home icon. Select the desired oven.
2. Touch PROOF.
3. The oven temperature is set at 100°F (°C). The cook time can
be set, if desired.
4. Touch START.
Let dough rise until nearly doubled in size, and then check
at 20 to 25 minutes. Proong time may vary depending on
doughtype and quantity.
5. Touch CANCEL for the selected oven when nished proong.
Before second proong, shape dough, place in baking pan(s) and
cover loosely. Follow same placement, and control steps above.
Before baking, remove waxed paper or plastic wrap.
Temperature Probe
The temperature probe accurately measures the internal
temperature of meat, poultry and casseroles with liquid and should
be used in determining the doneness of meat and poultry.
Always unplug and remove the temperature probe from the oven
when removing food.
The temperature probe cooking mode takes advantage of the
Cook’s Assistant Option. See the “Cook’s Assistant Option”
section for more information.
To Use Cook’s Assistant with Temperature Probe Cook:
Before using, insert the temperature probe into the food item. (For
meats, the temperature probe tip should be located in the center
of the thickest part of the meat and not into the fat or touching a
bone). Place food in oven and connect the temperature probe to
the jack. Keep temperature probe as far away from heat source as
possible. Close oven door.
1. The oven will ask if you want to use Probe Cook. Touch
YES and go to Step 2. If you want to set up the cycle before
attaching the temperature probe, touch the Home icon, select
the desired oven, and then touch PROBE.
2. If Auto is not already displayed, touch MANUAL for the Cook’s
Assistant option and select Auto.
3. Select the desired food category.
4. Touch DONENESS or CUT OF MEAT and select the food type.
5. Touch TEMPERATURE to change the oven temperature.
6. Touch WHEN TIMER ENDS and select what the oven should
do at the end of the cook time.
■ Turn Off (default): The oven turns off when the set cook
time ends.
■ Keep Warm: The oven temperature is reduced to 170°F
(77°C) after the set cook time ends.
7. Touch START.
When the set temperature probe temperature is reached, the
When Timer Ends behavior will begin.
8. Touch CANCEL for the selected oven or open the oven door to
clear the display and/or stop reminder tones.
9. Always unplug and remove the temperature probe from the
oven when removing food. The temperature probe symbol
will remain lit inthe display until the temperature probe is
unplugged.

15
To Use Temperature Probe Cook:
Before using, insert the temperature probe into the food item. (For
meats, the temperature probe tip should be located in the center
of the thickest part of the meat and not into the fat or touching a
bone). Place food in oven and connect the temperature probe to
the jack. Keep temperature probe as far away from heat source as
possible. Close oven door.
NOTE: The temperature probe must be inserted into the food item
before the mode is selected.
1. The oven will ask if you want to use Probe Cook. Touch
YES and go to Step 2. If you want to set up the cycle before
attaching the temperature probe, touch the Home icon, select
the desired oven, and then touch PROBE.
2. If Manual is not already displayed, touch AUTO and select
Manual.
3. Touch PROBE TEMP to set the target temperature for the
temperature probe.
4. Touch MODE SELECTION and select Bake, Convect Bake,
Convect Roast, or Grill.
■ Bake: Run a standard baking cycle until the food item
reaches the target temperature.
■ Convect Bake: Run a convection baking cycle until the
food item reaches the target temperature.
■ Convect Roast: Run a convection roast cycle until the
food item reaches the target temperature (best for large
cuts of meat or whole poultry).
■ Grill: Run a grill cycle on the +Powered Grill Attachment
until the food item reaches the target temperature.
5. Touch TEMPERATURE to change the oven temperature.
6. Touch WHEN TIMER ENDS and select what the oven should
do at the end of the cook time.
■ Turn Off (default): The oven turns off when the set cook
time ends.
■ Keep Warm: The oven temperature is reduced to 170°F
(77°C) after the set cook time ends.
7. Touch START.
When the set temperature probe temperature is reached, the
When Timer Ends behavior will begin.
8. Touch CANCEL for the selected oven or open the oven door to
clear the display and/or stop reminder tones.
9. Always unplug and remove the temperature probe from the
oven when removing food. The temperature probe symbol
will remain lit inthe display until the temperature probe is
unplugged.
Recipe Guide Mode
The Recipe Guide mode is designed to instruct and inspire your
culinary creations. It provides a variety of recipes which work well
with your +Powered Attachments as well as optimizes the oven
settings for perfect results.
Each recipe has step-by-step instructions on how to prepare and
cook the food. Additional recipes may be added with software
updates or optional +Powered Attachment purchases.
Following the advice in Recipe Guide mode can take the
uncertainty out of new recipes.
Smart Oven+ Powered Attachments
The +Powered Attachments are designed to introduce new ways
of using your oven. See the “Cook’s Assistant Option” section for
more information. Each attachment ts in to the SatinGlide™
Roll-Out Extension Rack for Smart Oven+ Attachments and plugs
into the hub at the rear of the oven. See the Smart Oven+ Powered
Attachments User Instructions for more detailed information on
these tools.
Favorites
Any customized cooking mode can be starred as a favorite by
selecting Favorite on the Function Set Menu. The oven will prompt
you to create a name for your settings. Starred Favorites will be
displayed on the Home menu. To use a Favorite, select the desired
Favorite and then touch START.
To remove a starred Favorite, select the Favorite, then touch
FAVORITE. The oven will ask if you want to delete this favorite.
Touch YES to remove the star. This favorite will be removed from
the Home menu.
Cook Time
Cook Time allows the oven(s) to be set to cook for a set length of
time and turn off, hold warm, or maintain the oven temperature
automatically. A Delayed Cook Time allows the oven(s) to be set to
turn on at a certain time of day, cook for a set length of time, and/
or shut off automatically. Delayed Cook Time should not be used
for food such as breads and cakes because they may not bake
properly.
To Set a Cook Time
1. Select a cooking function.
Touch the number keypads to enter a temperature other than
the one displayed.
Timed Cooking may also be used with the Bread Proof
function, but the temperature is not adjustable.
2. Touch “--:--”.
3. Touch the number keypads to enter the length of time to cook.
Choose HR:MIN or MIN:SEC.
4. Touch WHEN TIMER ENDS and select what the oven should
do at the end of the cook time.
■ Hold Temperature: The oven temperature stays at the set
temperature after the set cook time ends.
■ Turn Off: The oven turns off when the set cook time ends.
■ Keep Warm: The oven temperature is reduced to 170°F
(77°C) after the set cook time ends.
5. Touch START.
The cook time countdown will appear on the oven display. The
timer will not begin counting down until the oven is nished
preheating. The start time and stop time will be displayed on
the oven timeline after the oven has nished preheating.
When the stop time is reached, the When Timer Ends behavior
will begin.
6. Touch CANCEL for the selected oven, or open and close the
oven door to clear the display and/or stop reminder tones.
WARNING
Food Poisoning Hazard
Do not let food sit in oven more than one hour before
or after cooking.
Doing so can result in food poisoning or sickness.

16
To Set a Delayed Cook Time
Before setting, make sure the clock is set to the correct time of
day. See the “Settings” section.
1. Select a cooking function. Delayed Cook Time cannot be used
with the Powered Attachments or Keep Warm function.
Touch the number keypads to enter a temperature other than
the one displayed.
Timed Cooking may also be used with the Bread Proof
function, but the temperature is not adjustable.
2. Touch “--:--”.
3. Touch the number keypads to enter the length of time to cook.
Choose HR:MIN or MIN:SEC.
4. Touch WHEN TIMER ENDS and select what the oven should
do at the end of the cook time.
■ Hold Temperature: The oven temperature stays at the set
temperature after the set cook time ends.
■ Turn Off (default): The oven turns off when the set cook
time ends.
■ Keep Warm: The oven temperature is reduced to 170°F
(77°C) after the set cook time ends.
5. Touch DELAY START and set the time of day the oven should
turn on. Touch SUMMARY to see when the oven will turn on
and off.
6. Touch START.
The timeline will appear in the display, and the oven will begin
preheating at the appropriate time. The cook time countdown
will appear on the oven display. The timer will not begin
counting down until the oven is nished preheating. The start
time and stop time will be displayed on the oven timeline after
the oven has nished preheating.
When the stop time is reached, the When Timer Ends behavior
will begin.
7. Touch CANCEL for the selected oven, or open and close the
oven door to clear the display and/or stop reminder tones.
17
OVEN CARE
Self-Cleaning Cycle
IMPORTANT: The health of some birds is extremely sensitive to
the fumes given off during the Self-Cleaning cycle. Exposure to the
fumes may result in death to certain birds. Always move birds to
another closed and well-ventilated room.
Self-clean the oven before it becomes heavily soiled. Heavy soil
results in longer cleaning and more smoke.
Keep the kitchen well-ventilated during the Self-Cleaning cycle to
help get rid of heat, odors, and smoke.
Do not block the oven vent(s) during the Self-Cleaning cycle. Air
must be able to move freely. See the “Oven Vents” section.
Do not clean, rub, damage or move the oven door gasket. The
door gasket is essential for a good seal.
Prepare Oven:
■ Remove the +Powered Attachments, broiler pan, grid,
cookware and bakeware and, on some models, the
temperature probe from the oven.
■ Remove oven racks to keep them shiny and easy to slide. See
the “General Cleaning” section for more information.
■ Remove any foil from the oven because it may burn or melt,
damaging the oven.
■ Hand clean inside door edge and the 1
1
/
2
" (3.8 cm) area
around the inside oven cavity frame, being certain not to
move or bend the gasket. This area does not get hot enough
during high temp self-cleaning to remove soil. Do not let water,
cleaner, etc., enter slots on door frame. Use a damp cloth to
clean this area.
■ Wipe out any loose soil to reduce smoke and avoid damage.
At high temperatures, foods react with porcelain. Staining,
etching, pitting, or faint white spots can result. This is normal
and will not affect cooking performance.
How the Cycle Works
IMPORTANT: The heating and cooling of porcelain on steel in the
oven may result in discoloring, loss of gloss, hairline cracks, and
popping sounds.
The Self-Cleaning Cycle uses very high temperatures, burning soil
to a powdery ash.
Use the following chart as a guide to determine the desired
cleaning level.
Cleaning Level
Total Cleaning Time
(includesa30-minute cool-down time)
Light 4 hours
Normal 5 hours
Heavy 6 hours
Once the oven has completely cooled, remove ash with a damp
cloth. To avoid breaking the glass, do not apply a cool damp cloth
to the inner door glass before it has completely cooled.
The oven lights will not work during the Self-Cleaning cycle.
On double-oven models, only one oven can self-clean at a time.
Ifone oven is self-cleaning, the other oven cannot be set or
turnedon.
NOTE: The oven has a 2-speed cooling fan motor. During
self-clean, the fan(s) will operate at its highest speed to increase
airow to better exhaust the hotter air through the oven vent(s). An
increase in noise may be noticeable during and after the self-clean
cycle until the oven cools.
To Start Self-Cleaning
Before self-cleaning, make sure the door is closed completely
oritwill not lock and the cycle will not begin.
1. Touch SELF CLEAN. Select the oven to self-clean.
2. Touch SOIL LEVEL. Select the length of time to self-clean.
3. Touch START.
The oven will start locking the door. Opening the door at this
point will cancel the self-clean cycle. The start time and stop
time will appear in the oven display.
The stop time includes an additional cool-down period after
the Self-Cleaning cycle is complete.
The door will not unlock until the oven is cool.
4. Touch CANCEL for the selected oven or open and close the
oven door to clear the oven display and/or stop reminder
tones.
To Stop Self-Cleaning anytime:
Touch CANCEL for the selected oven. If the oven temperature is
too high, the door will remain locked. It will not unlock until the
oven cools.
WARNING
Burn Hazard
Do not touch the oven during the Self-Cleaning cycle.
Keep children away from oven during
Self-Cleaning cycle.
Failure to follow these instructions can result in burns.
18
General Cleaning
IMPORTANT: Before cleaning, make sure all controls are
off andthe oven is cool. Always follow label instructions on
cleaningproducts.
Soap, water, and a soft cloth or sponge are suggested rst unless
otherwise noted.
STAINLESS STEEL AND BLACK STAINLESS STEEL
(on some models)
To avoid damage to stainless steel or black stainless steel
surfaces, do not use soap-lled scouring pads, abrasive cleaners,
cooktop cleaner, steel-wool pads, gritty washcloths, or abrasive
paper towels.
Cleaning Method:
Rub in direction of grain to avoid damaging.
■ Affresh
®
Stainless Steel Cleaner Part Number W10355016
(not included) or affresh
®
Stainless Steel Cleaning Wipes
PartNumber W10355049 (not included):
See the “Accessories” section to order.
OVEN DOOR EXTERIOR
Cleaning Method:
■ Glass cleaner and a soft cloth or sponge:
Apply glass cleaner to soft cloth or sponge, not directly on
panel.
■ Affresh
®
Kitchen and Appliance Cleaner Part Number
W10355010 (not included):
See the “Accessories” section to order.
NOTE: To clean the trough, the oven door must be removed rst.
See the “Oven Door” section.
OVEN DOOR INTERIOR
Cleaning Method:
■ Self-Cleaning cycle:
For optimal door cleaning result, wipe away any deposits with
a damp sponge before running cycle.
CONTROL PANEL
To avoid damage to the control panel, do not use abrasive
cleaners, steel-wool pads, gritty washcloths, or abrasive
papertowels.
Cleaning Method:
■ Glass cleaner and soft cloth or sponge:
Apply glass cleaner to soft cloth or sponge, not directly
onpanel.
■ Affresh
®
Kitchen and Appliance Cleaner Part Number
W10355010 (not included):
See the “Accessories” section to order.
OVEN CAVITY
Do not use oven cleaners.
Food spills should be cleaned when oven cools. At high
temperatures, foods react with porcelain. Staining, etching,
pitting,or faint white spots can result.
Cleaning Method:
■ Self-Cleaning cycle:
See the “Self-Cleaning Cycle” section rst. Remove racks or
they will discolor and become harder to slide. If this happens,
a light coating of vegetable oil applied to the rack guides will
help them slide.
OVEN RACKS
Cleaning Method:
■ Steel-wool pad
+POWERED ATTACHMENTS
To avoid damage to the nonstick surfaces, do not use abrasive
cleaners, steel-wool pads, gritty washcloths, or abrasive
papertowels. Food spills should be cleaned when the +Powered
Attachment cools.
Do not soak or immerse the Heating Element.
Cleaning Method:
■ Soap, water, and a soft cloth or sponge:
Wipe the Heating Element when it is cool. All attachments can
be cleaned with soap, water, and a soft cloth or sponge.
■ Dishwasher:
The Base Pan, +Grill Attachment, +Baking Stone Attachment,
and +Steamer Attachment are dishwasher-safe.
■ Affresh
®
Cooktop Cleaner:
Stubborn soils on the +Baking Stone Attachment can be
cleaned with baking soda and a non scratch heavy duty scrub
sponge. Rub cream into surface with a damp paper towel or
soft cloth. Continue rubbing until white lm disappears.
See the Smart Oven+ Powered Attachments User Instructions for
more detailed instructions.
Oven Lights
The oven lights are 120 V, 40 W maximum halogen bulbs. They
will come on when the oven door is opened. On double oven
models, both upper and lower lights will come on when either door
is opened. The oven lights will not work during the Self-Cleaning
cycle. When the oven door is closed, touch the appropriate Light
keypad to turn the selected oven light on or off.
To Replace:
Before replacing the bulb, make sure the oven is off and cool.
1. Disconnect power.
2. Remove glass light cover by grasping the front edge and
pulling away from oven.
3. Remove bulb from socket.
4. Replace bulb, using tissue or wearing cotton gloves to handle
bulb. To avoid damage to or decreasing the life of the new
bulb, do not touch bulb with bare ngers.
5. Replace bulb cover by snapping back into wall.
6. Reconnect power.
IMPORTANT: Do not use lamps rated higher than 40 W.
WARNING
Electrical Shock Hazard
Do not immerse heating element in water or place in
dishwasher.
Doing so can result in death or electrical shock.
19
Oven Door
IMPORTANT:
To avoid oven door glass breakage:
■ Do not close the oven door if the racks are not fully inserted
into the oven cavity or when bakeware extends past the front
edge of an oven rack.
■ Do not set objects on the glass surface of the oven door.
■ Do not hit glass surfaces with bakeware or other objects.
■ Do not wipe down glass surfaces until the oven has
completelycooled.
For normal oven use, it is not suggested to remove the oven door.
However, if removal is necessary, make sure the oven is off and
cool. Then, follow these instructions. The oven door is heavy.
To Remove:
IMPORTANT: Use 2 hands to remove oven door. For double
ovens, repeat the process for each door.
1. Prior to removing the oven door, prepare a surface where
youwill place it. This surface should be at and covered witha
soft blanket, or use the corner posts from your packaging
material.
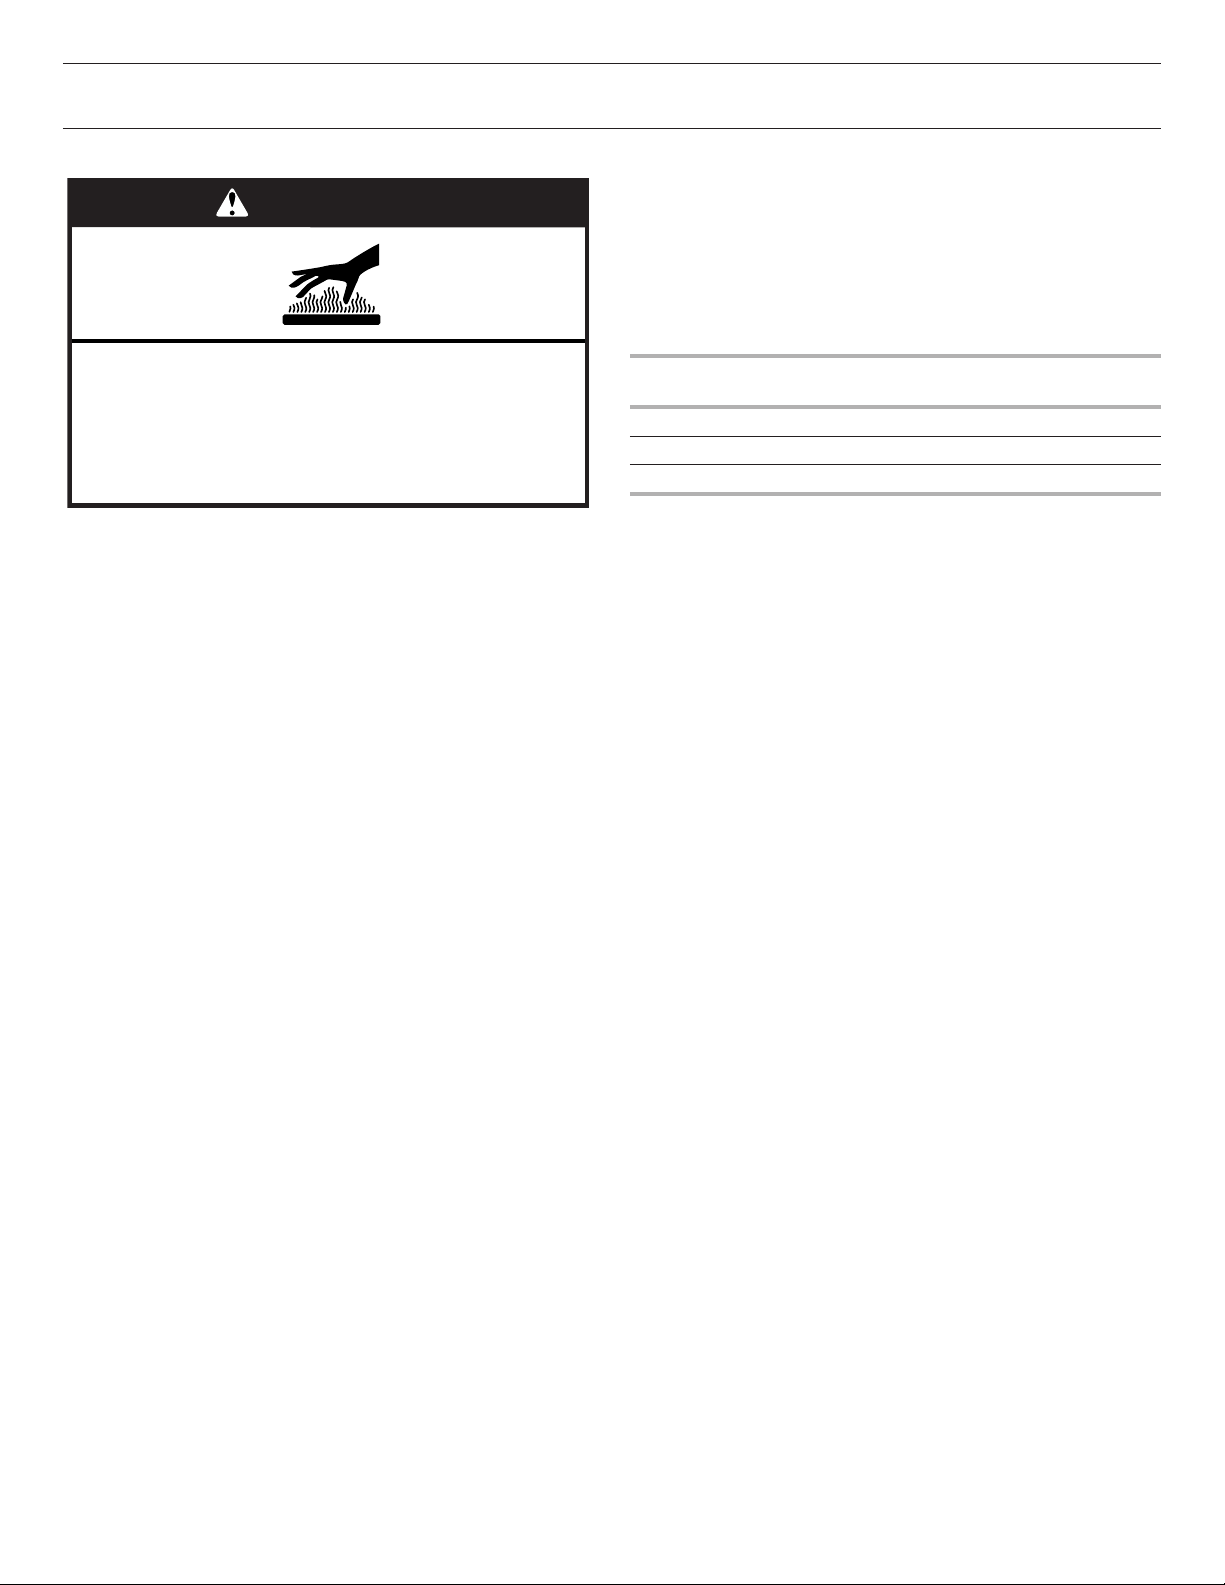
2. Fully open the oven door.
3. Locate the oven door hinge locks in both corners of the
ovendoor, and rotate the hinge locks toward the oven door to
the unlocked position. If the door hinge lock is not rotated fully
(see illustration B), the door will not remove properly.
Locked
position
Grip here
to rotate.
Unlocked
position
A. Oven door hinge lock in
lockedposition
B. Oven door hinge lock in
partially unlocked position
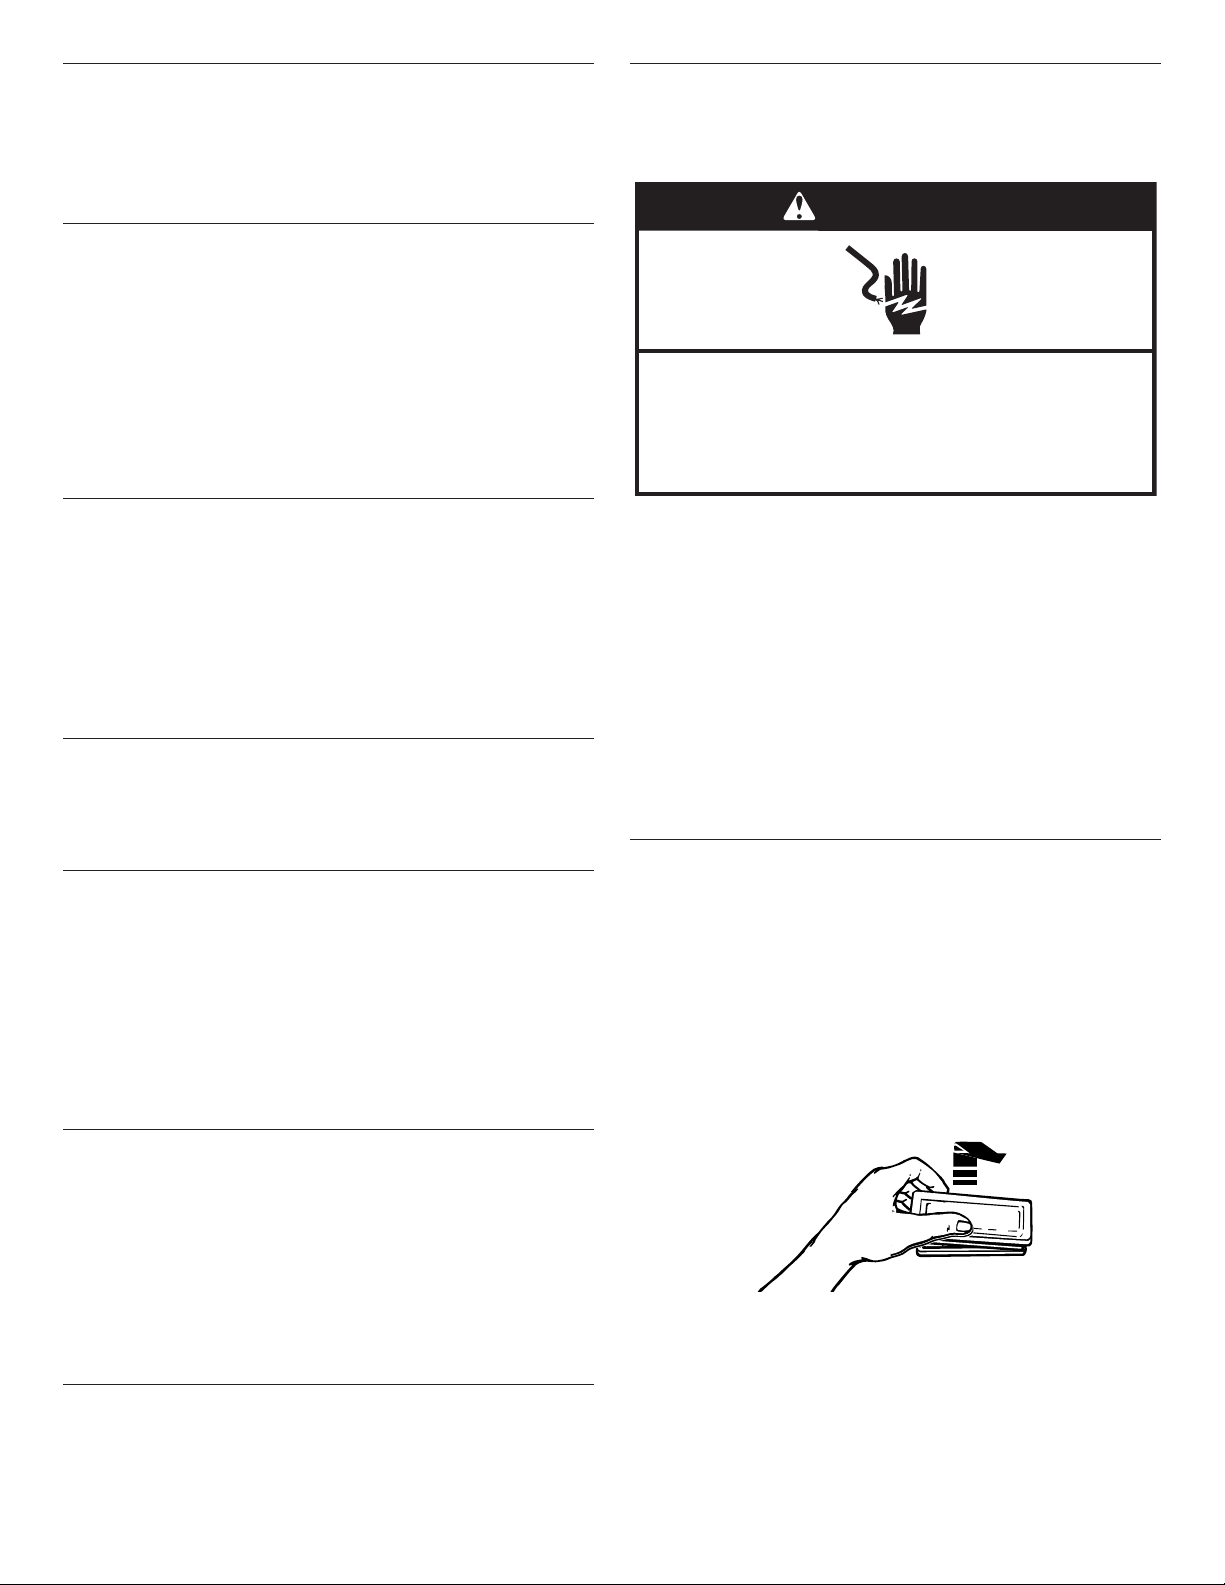
4. Gently start to close the door. The door will stop at a partially
closed position.
5. Using 2 hands, grasp the edges of the oven door. Close the
oven door slightly past the stop position to take the weight off
of the door hinges, and then pull the oven door up.
6. Pull the oven door toward you, and then remove. You may
need to gently shift door from side to side as you pull.
7. Set the oven door aside on the prepared covered work surface
with the oven door resting on its handle.
Door
hinges

20
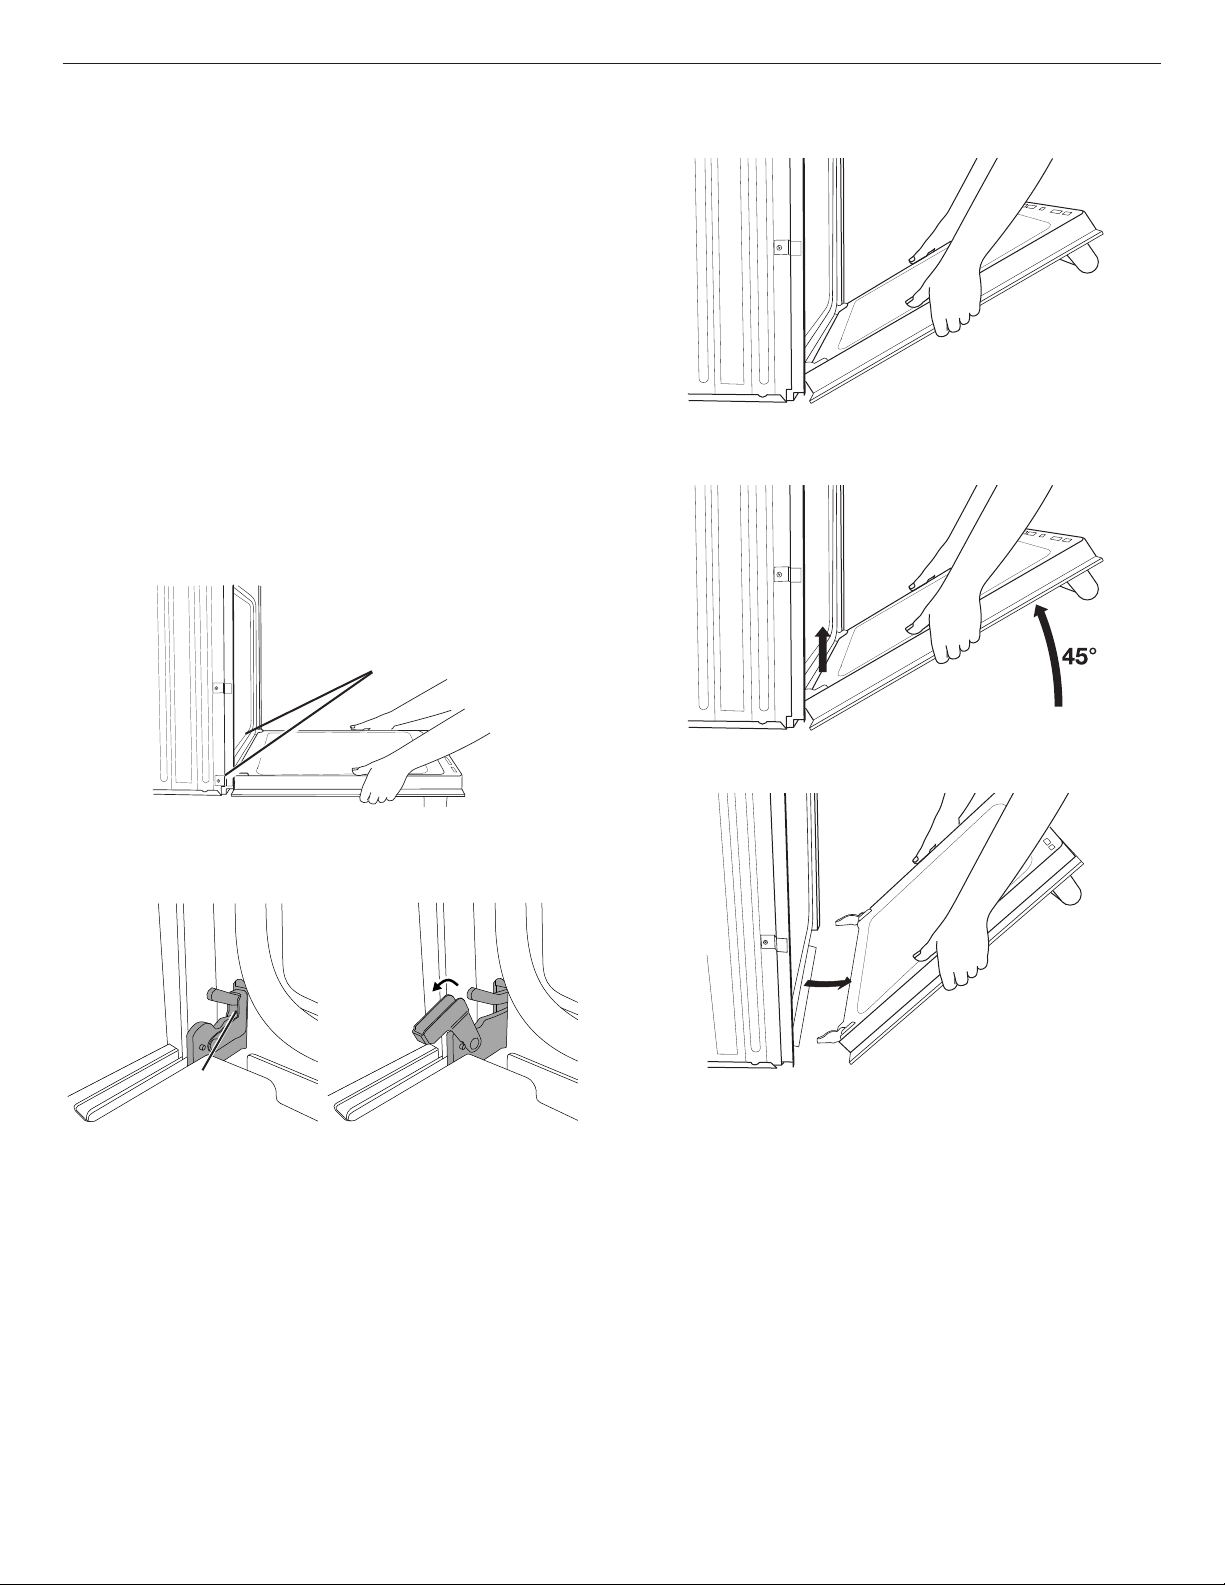
To Replace:
1. Using 2 hands, grasp side edges of door at the midpoint. Face
the oven cavity.
2. Locate the slots on each side of the oven front frame for
thedoor hinge locks.
3. Using 2 hands, grasp the edges of the oven door. At a 45°
angle, insert the hinges at the same time, and push the oven
door into the oven cavity slot to replace. You may need to
gently shift the door from side to side as you push.
4. Make sure the door hinge notch is engaged on the bottom
ofthe oven cavity slot.
IMPORTANT: Do not close the door at this step or damage
may occur to the door hinge.
5. Lower the oven door to the fully open position. If the oven door
does not open to a full 90°, repeat steps 1 through 3.
6. Locate the oven door hinge locks in the corners of the oven
door, and rotate the hinge locks toward the oven cavity to the
locked position.
Unlocked
position
Locked
position
7. After the door hinges have been locked, gently swing the door
upward to close. The door should not be forced closed.
8. When the hinges are properly installed and the door is closed,
there should be an even gap between the door and the control
panel. If one side of the oven door is lower than the other, the
hinge on that side is not properly installed.
A
A. Slot in the oven cavity for door hinge lock

21
TROUBLESHOOTING
First try the solutions suggested here. If you need further assistance or more recommendations that may help you avoid a service call,
refer to the warranty page in this manual, or visit http://www.kitchenaid.com/customer-service. In Canada, visit
http://www.kitchenaid.ca.
Contact us by mail with any questions or concerns at the address below:
In the U.S.A.:
KitchenAid Brand Home Appliances
Customer eXperience Center
553 Benson Road
Benton Harbor, MI 49022-2692
In Canada:
KitchenAid Brand Home Appliances
Customer eXperience Centre
200 - 6750 Century Ave.
Mississauga, Ontario L5N 0B7
Please include a daytime phone number in your correspondence.
Problem Possible Causes and/or Solutions
Nothing will operate Household fuse is blown or a circuit breaker is tripped: Replace the fuse or reset the circuit breaker.
Ifthe problem continues, call an electrician.
Appliance was miswired: See the Installation Instructions.
Cannot connect to
router
New router installed: Erase the old router information and connect to the new router. Go to “Wi-Fi” in the
Settings menu.
Wi-Fi signal strength low: Reposition router closer to the appliance. Call the Connected customer service
center to conrm signal strength. See the “Warranty” section for contact information.
Appliance not
connected
Loss of power to router: Restore power to router.
Remote app isn’t
working and/or
not receiving push
notications
Router not working: Ensure router is connected to the internet and the Wi-Fi indicator is on.
Push notications are disabled: Ensure that push notications are enabled on your remote app.
User account not set up: Set up a user account and register the appliance on the remote app.
Oven will not operate Electronic oven control set incorrectly: See the “Settings” section.
Delay Start is set: See the “Cook Time” section.
Control is locked: Press and hold the Control Lock icon for 3 seconds to unlock.
Sabbath mode is set: See the “Sabbath Mode” section.
On double-oven models, one oven is self-cleaning: When one oven is self-cleaning, the other oven
cannot be set or turned on.
Oven temperature too
high or too low
Oven temperature needs adjustment: See “Calibrate Oven” in the Settings menu.
Warm air coming from
oven vent
Warm air coming from the oven vent is normal. During a Self-Cleaning cycle, the air stream is increased.
Thecooling fan may operate both during an oven’s cycle and after the cycle has ended, causing warm air
toexit from the oven vent.
Display shows
messages
Display shows a letter followed by a number: Clear the display. If a letter followed by a number reappears,
call for service. See the “Warranty” section.
Display shows “This mode does not use...”: Disconnect the accessory indicated in the message.
Display shows “Make sure the...”: Connect the accessory indicated in the message. You should hear a
tone when the attachment or temperature probe is connected.
Fan runs during Bake
function
It is normal for the convection fan and element to operate during Bake mode to enhance performance and
heat distribution.
Long preheat times Not all cycles require preheating. See cycle instructions for preheat recommendations. Most cycles preheat
to 350°F (177°C) in 12 to 17 minutes. Higher temperatures will take more time. Removing unused oven racks
prior to preheating can help reduce preheat time.
Self-Cleaning cycle will
not operate
The oven door is open: Close the oven door all the way.
Function has been set incorrectly: See the “Self-Cleaning Cycle” section.
A delayed Self-Cleaning cycle has been set: See the “Self-Cleaning Cycle” section.
A Delay Start has been set: See the “Cook Time” section.
On double-oven models, one oven is self-cleaning: When one oven is self-cleaning, the other oven
cannot be set or turned on.

22
Problem Possible Causes and/or Solutions
Oven cooking results
not what expected
The set temperature was incorrect: Double-check the recipe in a reliable cookbook.
Oven temperature needs adjustment: See “Calibrate Oven” in the Settings menu.
Oven was not preheated: See the “Baking and Roasting” section.
Improper bakeware being used: See the “Bakeware” section.
Racks were positioned improperly: See the “Racks and Bakeware Positions” section.
Not enough air circulation around bakeware: See the “Racks and Bakeware Positions” section.
Batter distributed unevenly in pan: Check that batter is level in the pan.
Incorrect length of cooking time was used: Adjust cooking time.
Oven door was opened during cooking: Oven peeking releases oven heat and can result in longercooking
times.
Rack is too close to bake burner, making baked items too brown on bottom: Move rack to higher
position in the oven.
Pie crusts browning too quickly: Use aluminum foil to cover the edge of the crust and/or reduce baking
temperature.
Uneven browning of
baked items
See the “Rack and Bakeware Positions” section.
Darker browning of food caused by dull or dark bakeware: Lower oven temperature 25°F (15°C) ormove
rack to a higher position in the oven.
Lighter browning of food caused by shiny or light-colored bakeware: Move rack to a lower position
inthe oven.
ACCESSORIES
For accessories in the U.S.A., you can visit our website at www.kitchenaid.com or call us at 1-800-422-1230.
In Canada, visit our website at www.kitchenaid.ca or call us at 1-800-807-6777.
Affresh
®
Stainless Steel Cleaner
(stainless steel models)
Order Part Number W10355016
Affresh
®
Stainless Steel Cleaning Wipes
(stainless steel models)
Order Part Number W10355049
Affresh
®
Kitchen and Appliance Cleaner
Order Part Number W10355010
Porcelain Broiler Pan and Grid
Order Part Number 4396923
Premium Broiler Pan and Roasting Rack
Order Part Number W10123240
Base Pan
Order Part Number W10862025
Heating Unit
Order Part Number W10866323
+Powered Grill Attachment
Order Part Number W10862027
+Powered Baking Stone Attachment
Order Part Number W10862028
+Powered Steamer Attachment
(Water Pan, Perforated Tray, and Steamer Lid)
Order Part Number W10862029
Steamer Water Pan
Order Part Number W10862030
Steamer Perforated Tray
Order Part Number W10862031
Steamer Lid
Order Part Number W10862032
NOTE: Please register your oven online at www.kitchenaid.com in the U.S.A. or www.kitchenaid.ca in Canada to receive your
+Steamer Attachment and +Baking Stone Attachment included in your purchase.

23
IF YOU NEED SERVICE:
1. Before contacting us to arrange service, please determine whether your product requires repair. Some questions can be addressed without
service. Please take a few minutes to review the Troubleshooting or Problem Solver section of the Use and Care Guide, or visit
http://www.kitchenaid.com/customer-service.
2. All warranty service is provided exclusively by our authorized KitchenAid Service Providers. In the U.S. and Canada, direct all requests for
warranty service to:
KitchenAid Customer eXperience Center
In the U.S.A., call 1-800-422-1230. In Canada, call 1-800-807-6777.
If outside the 50 United States or Canada, contact your authorized KitchenAid dealer to determine whether another warranty applies.
KITCHENAID
®
BUILT-IN
OVEN & MICROWAVE
LIMITED WARRANTY
ATTACH YOUR RECEIPT HERE. PROOF OF PURCHASE IS REQUIRED
TO OBTAIN WARRANTY SERVICE.
Please have the following information available when you call the
Customer eXperience Center:
■ Name, address and telephone number
■ Model number and serial number
■ A clear, detailed description of the problem
■ Proof of purchase including dealer or retailer name and address
TEN YEAR LIMITED WARRANTY
WHAT IS COVERED WHAT IS NOT COVERED
FIRST YEAR LIMITED WARRANTY (PARTS AND LABOR)
For one year from the date of purchase, when this major appliance is
installed, operated and maintained according to instructions attached to
or furnished with the product, KitchenAid brand of Whirlpool Corporation
or Whirlpool Canada, LP (hereafter “KitchenAid”) will pay for factory
specied replacement parts and repair labor to correct defects in
materials or workmanship that existed when this major appliance was
purchased or, at its sole discretion replace the product. In the event of
product replacement, your appliance will be warranted for the remaining
term of the original unit’s warranty period.
SECOND THROUGH FIFTH YEAR LIMITED WARRANTY (CERTAIN
COMPONENT PARTS ONLY - LABOR NOT INCLUDED)
In the second through fth years from the date of original purchase, when
this major appliance is installed, operated and maintained according to
instructions attached to or furnished with the product, KitchenAid will
pay for factory specied parts for the following components to correct
non-cosmetic defects in materials or workmanship in these parts that
prevent function of this major appliance and that existed when this major
appliance was purchased. This is a limited 5-year warranty on the below
named parts only and does not include repair labor.
■ Electric element
■ Solid state touch control system parts
SECOND THROUGH TENTH YEAR LIMITED WARRANTY
(MICROWAVE OVENS ONLY)
In the second through tenth years from the date of original purchase,
when this major appliance is installed, operated and maintained
according to instructions attached to or furnished with the product,
KitchenAid will pay for factory specied parts for the stainless steel oven
cavity/inner door if the part rusts through due to defects in materials or
workmanship.
YOUR SOLE AND EXCLUSIVE REMEDY UNDER THIS LIMITED
WARRANTY SHALL BE PRODUCT REPAIR AS PROVIDED HEREIN.
Service must be provided by a KitchenAid designated service company.
This limited warranty is valid only in the United States or Canada and
applies only when the major appliance is used in the country in which it
was purchased. This limited warranty is effective from the date of original
consumer purchase. Proof of original purchase date is required to obtain
service under this limited warranty.
1. Commercial, non-residential, multiple-family use, or use inconsistent
with published user, operator or installation instructions.
2. In-home instruction on how to use your product.
3. Service to correct improper product maintenance or installation,
installation not in accordance with electrical or plumbing codes or
correction of household electrical or plumbing (i.e. house wiring, fuses
or water inlet hoses).
4. Consumable parts (i.e. light bulbs, batteries, air or water lters,
preservation solutions, etc.).
5. Defects or damage caused by the use of non-genuine KitchenAid
parts or accessories.
6. Conversion of products from natural gas or propane gas.
7. Damage from accident, misuse, abuse, re, oods, acts of God or
use with products not approved by KitchenAid.
8. Repairs to parts or systems to correct product damage or defects
caused by unauthorized service, alteration or modication of the
appliance.
9. Cosmetic damage including scratches, dents, chips, and other
damage to the appliance nishes unless such damage results from
defects in materials and workmanship and is reported to KitchenAid
within 30 days.
10. Discoloration, rust or oxidation of surfaces resulting from caustic
or corrosive environments including but not limited to high salt
concentrations, high moisture or humidity or exposure to chemicals.
11. Food or medicine loss due to product failure.
12. Pick-up or delivery. This product is intended for in-home repair.
13. Travel or transportation expenses for service in remote locations
where an authorized KitchenAid servicer is not available.
14. Removal or reinstallation of inaccessible appliances or built-in xtures
(i.e. trim, decorative panels, ooring, cabinetry, islands, countertops,
drywall, etc.) that interfere with servicing, removal or replacement of
theproduct.
15. Service or parts for appliances with original model/serial numbers
removed, altered or not easily determined.
The cost of repair or replacement under these excluded
circumstances shall be borne by the customer.
DISCLAIMER OF IMPLIED WARRANTIES
IMPLIED WARRANTIES, INCLUDING ANY IMPLIED WARRANTY OF MERCHANTABILITY OR IMPLIED WARRANTY OF FITNESS FOR A
PARTICULAR PURPOSE, ARE LIMITED TO ONE YEAR OR THE SHORTEST PERIOD ALLOWED BY LAW. Some states and provinces do not allow
limitations on the duration of implied warranties of merchantability or tness, so this limitation may not apply to you. This warranty gives you specic
legal rights, and you also may have other rights that vary from state to state or province to province.
DISCLAIMER OF REPRESENTATIONS OUTSIDE OF WARRANTY
KitchenAid makes no representations about the quality, durability, or need for service or repair of this major appliance other than the representations
contained in this warranty. If you want a longer or more comprehensive warranty than the limited warranty that comes with this major appliance, you
should ask KitchenAid or your retailer about buying an extended warranty.
LIMITATION OF REMEDIES; EXCLUSION OF INCIDENTAL AND CONSEQUENTIAL DAMAGES
YOUR SOLE AND EXCLUSIVE REMEDY UNDER THIS LIMITED WARRANTY SHALL BE PRODUCT REPAIR AS PROVIDED HEREIN. KITCHENAID
SHALL NOT BE LIABLE FOR INCIDENTAL OR CONSEQUENTIAL DAMAGES. Some states and provinces do not allow the exclusion or limitation of
incidental or consequential damages, so these limitations and exclusions may not apply to you. This warranty gives you specic legal rights, and you
also may have other rights that vary from state to state or province to province.
11/14

CLAUSE D’EXONÉRATION DE RESPONSABILITÉ AU TITRE DES GARANTIES IMPLICITES
LES GARANTIES IMPLICITES, Y COMPRIS LES GARANTIES APPLICABLES DE QUALITÉ MARCHANDE OU D’APTITUDE À UN USAGE
PARTICULIER, SONT LIMITÉES À UN AN OU À LA PLUS COURTE PÉRIODE AUTORISÉE PAR LA LOI. Certains États et certaines provinces ne
permettent pas de limitation sur la durée des garanties implicites de qualité marchande ou d’aptitude à un usage particulier, de sorte que la limitation
ci-dessus peut ne pas être applicable dans votre cas. Cette garantie vous confère des droits juridiques spéciques et vous pouvez également jouir
d’autres droits qui peuvent varier d’une juridiction à l’autre.
EXONÉRATION DE RESPONSABILITÉ DANS LES DOMAINES NON COUVERTS PAR LA GARANTIE
KitchenAid décline toute responsabilité au titre de la qualité, de la durabilité ou en cas de dépannage ou de réparation nécessaire sur ce gros appareil
ménager autre que les responsabilités énoncées dans la présente garantie. Si vous souhaitez une garantie plus étendue ou plus complète que la garantie
limitée fournie avec ce gros appareil ménager, adressez-vous à KitchenAid ou à votre détaillant pour obtenir les modalités d’achat d’une garantie étendue.
LIMITATION DES RECOURS; EXCLUSION DES DOMMAGES FORTUITS OU INDIRECTS
VOTRE SEUL ET EXCLUSIF RECOURS DANS LE CADRE DE LA PRÉSENTE GARANTIE LIMITÉE CONSISTE EN LA RÉPARATION PRÉVUE CI-
DESSUS. KITCHENAID N’ASSUME AUCUNE RESPONSABILITÉ POUR LES DOMMAGES FORTUITS OU INDIRECTS. Certains États et certaines
provinces ne permettent pas l’exclusion ou la limitation des dommages fortuits ou indirects de sorte que ces limitations et exclusions peuvent ne
pas être applicables dans votre cas. Cette garantie vous confère des droits juridiques spéciques et vous pouvez également jouir d’autres droits qui
peuvent varier d’une juridiction à l’autre.
11/14
W10903389C
®
/™ ©2018 All rights reserved. Used under license in Canada.
Tous droits réservés. Utilisé sous licence au Canada.
07/18