
DPG 16B1
EN
English
Operating instructions
DISHWASHER - Contents
Operating instructions,1
Precautions and advice, 3-4
Product Data, 10
Assistance, 13
Installation, 24-25
Description of the appliance, 26
Refined salt and rinse aid, 27
Loading the racks, 28-29
Detergent and dishwasher use, 30
Wash cycles, 31
Care and maintenance, 32
Troubleshooting, 33
FR
Français
Mode d’emploi
LAVE-VAISSELLE - Sommaire
Mode d’emploi, 1
Précautions et conseils, 4-5
Fiche produit, 11
Service, 13
Installation, 34-35
Description de l’appareil, 36
Sel régénérant et Produit de rinçage, 37
Charger les paniers, 38-39
Produit de lavage et utilisation du lave-vaisselle,40
Programmes, 41
Entretien et soin, 42
Anomalies et remèdes, 43
IT
Italiano
Istruzioni per l’uso
LAVASTOVIGLIE - Sommario
Istruzioni per l’uso, 1
Precauzioni e Consigli, 2-3
Scheda prodotto, 10
Assistenza, 13
Installazione, 14-15
Descrizione dell’apparecchio,16
Sale Rigenerante e Brillantante, 17
Caricare i cesti, 18-19
Detersivo e uso della lavastoviglie, 20
Programmi, 21
Manutenzione e cura, 22
Anomalie e rimedi, 23
NL
Nederlands
Gebruiksaanwijzing
AFWASAUTOMAAT - Inhoud
Gebruiksaanwijzingen, 1
Voorzorgsmaatregelen en advies, 5-6-7
Productkaart, 11
Service, 13
Installatie, 44-45
Beschrijving van het apparaat, 46
Onthardingszout en glansmiddel, 47
Het laden van de rekken, 48 - 49
Vaatwasmiddel
en gebruik van de afwasautomaat, 50
Programma’s, 51
Onderhoud en verzorging, 52
Storingen en oplossingen, 53
CS
Česky
Návod k použití
MYČKA NÁDOBÍ -Obsah
Návod k použití, 1
Opatření a rady, 8-9
Informační list výrobku, 12
Servisní služba, 13
Instalace, 64-65
Popis zařízení, 66
Regenerační sůl a Leštidlo, 67
Plnění košů, 68-69
Mycí prostředek a použití myčky, 70
Programy, 71
Údržba a péče, 72
Poruchy a způsob jejich odstranění, 73
PT
Português
Instruções de uso
MÁQUINA DE LAVAR LOUÇA - Índice
Instruções de uso, 1
Precauções e conselhos, 7-8
Ficha do produto, 12
Assistência, 13
Instalação, 54-55
Descrição do aparelho, 56
Sal, regenerador e abrilhantador, 57
Carregar os cestos, 58-59
Detergente e uso da máquina de lavar louça, 60
Programas, 61
Manutenção e cuidados, 62
Anomalias e soluções, 63

2
IT
Precauzioni e consigli
L’apparecchio è stato progettato e costruito
in conformità alle norme internazionali di
sicurezza. Queste avvertenze sono fornite per
ragioni di sicurezza e devono essere lette
attentamente.
È importante conservare questo libretto per
poterlo consultare in ogni momento. In caso di
vendita, di cessione o di trasloco, assicurarsi
che resti insieme all’apparecchio.
Leggere attentamente le istruzioni: ci sono
importanti informazioni sull’installazione, sull’uso
e sulla sicurezza.
Questo apparecchio è progettato per l’uso
domestico o per applicazioni simili, ad esempio:
- case coloniche;
- utilizzo da parte di clienti in hotel, motel ed altri
ambienti di tipo residenziale;
- bed and breakfast.
Disimballare l’apparecchio e controllare che
non abbia subìto danni durante il trasporto. Se
fosse danneggiato non collegarlo e contattare
il rivenditore.
Sicurezza generale
•Questoelettrodomesticopuòessereutilizzato
da bambini di età non inferiore a 8 anni e
da persone con ridotte capacità fisiche,
sensoriali o mentali, o prive di esperienza
o della necessaria conoscenza, purché
sotto stretta sorveglianza di una persona
responsabile oppure dopo che le stesse
abbiano ricevuto istruzioni relative all’uso
sicuro dell’apparecchio e alla comprensione
dei pericoli ad esso inerenti.
•I bambini non devono giocare con
l’apparecchio.
•Lapuliziaelamanutenzionedell’apparecchio
deve essere effettuata dall’utilizzatore. Non
deve essere effettuata da bambini senza
sorveglianza.
• L’apparecchioèstatoconcepitoperun
uso di tipo non professionale all’interno
dell’abitazione.
• L’apparecchio deve essere usato peril
lavaggio delle stoviglie a uso domestico
e secondo le istruzioni riportate in questo
libretto.
• L’apparecchio non va installato all’aperto,
nemmeno se lo spazio è riparato, perché è
molto pericoloso lasciarlo esposto a pioggia
e temporali.
• Nontoccarelalavastoviglieapiedinudi.
• Nonstaccarelaspinadallapresadella
corrente tirando il cavo, bensì afferrando la
spina.
• Ènecessariochiudereilrubinettodell’acqua
e staccare la spina dalla presa della corrente
alla fine di ogni ciclo e prima di effettuare
operazioni di pulizia e manutenzione.
• Ilnumeromassimodicopertièindicatonella
scheda prodotto.
• Incasodiguasto,innessuncasoaccedere
ai meccanismi interni per tentare una
riparazione.
• Nonappoggiarsiosedersisullaportaaperta:
l’apparecchio potrebbe ribaltarsi.
•Laportanondeveesseretenutanella
posizioneapertaperchèpuòrappresentare
il pericolo di inciampare.
• Tenereildetersivoeilbrillantantefuoridalla
portata dei bambini.
• Gliimballagginonsonogiocattoliperbambini.
•Icoltelliegliutensiliconbordiaffilatidevono
essere sistemati con le punte/lame rivolte
verso il basso nel cestino posate o posti
in posizione orizzontale sulle ribaltine o
nel vassoio/terzo cesto nei modelli in cui è
presente.
•L’apparecchiodeveessereconnessoalla
rete idrica collegando il nuovo tubo di carico
e il vecchio tubo di carico non deve essere
riutilizzato
Se la lavastoviglie è a libera installazione, il
lato posteriore della stessa deve essere posto
contro un muro.
Smaltimento
• Smaltimento del materiale di imballaggio:
attenersi alle norme locali, così gli imballaggi
potranno essere riutilizzati.
• LadirettivaEuropea2012/19/EUsuirifiutidi
apparecchiature elettriche ed elettroniche
(RAEE), prevede che gli elettrodomestici non
debbano essere smaltiti nel normale flusso
dei rifiuti solidi urbani. Gli apparecchi dismessi
devono essere raccolti separatamente per
ottimizzare il tasso di recupero e riciclaggio
dei materiali che li compongono e impedire
potenziali danni per la salute e l’ambiente. Il
simbolo del cestino barrato è riportato su tutti
i prodotti per ricordare gli obblighi di raccolta
separata.
Per ulteriori informazioni, sulla corretta
dismissione degli elettrodomestici, i detentori
potranno rivolgersi al servizio pubblico
preposto o ai rivenditori.

3
Risparmiare e rispettare l’ambiente
Risparmiare acqua ed energia
• Avviarelalavastovigliesoloapienocarico.In
attesa che la macchina sia piena, prevenire i
cattivi odori con il ciclo Ammollo
(dove disponibile
- vedi Programmi)
.
• Selezionareunprogrammaadattoaltipodi
stoviglie e al grado di sporco consultando la
Tabella dei programmi:
- per stoviglie normalmente sporche utilizzare
il programma Eco, che garantisce bassi
consumi energetici e di acqua.
- se il carico è ridotto attivare l’opzione Mezzo
carico
(dove disponibile vedi Programmi Speciali ed
Opzioni).
•Se il proprio contratto di erogazione
dell’energia elettrica prevede fasce orarie
di risparmio energetico, effettuare i lavaggi
negli orari a tariffa ridotta. L’opzione Partenza
Ritardatapuòaiutareaorganizzareilavaggi
in tal senso
(
dove disponibile vedi Programmi Speciali
ed Opzioni).
who are not familiar with the product,
unless they are given close supervision
or instructions on how to use it safely and
are made aware by a responsible person
of the dangers its use might entail.
•Childrenmustnotplaywiththeappliance.
•Itistheuser'sresponsibilitytocleanand
maintain the appliance. Children should
never clean or maintain it unless they are
given supervision.
•Theappliancewasdesignedfordomestic
use inside the home and is not intended for
commercial or industrial use.
•Theappliance must be used to wash
domestic crockery in accordance with the
instructions in this manual.
•The appliance must not be installed
outdoors, even in covered areas. It is
extremely dangerous to leave the machine
exposed to rain and storms.
•Donottouchtheappliancewhenbarefoot.
•Whenunplugging the appliance always
pull the plug from the mains socket. Do not
pull on the cable.
•The water supply tap must be shut off
and the plug should be removed from
the electrical socket at the end of every
cycle and before cleaning the appliance
or carrying out any maintenance work.
•Themaximumnumberofplacesettingsis
shown in the product sheet.
•Iftheappliancebreaksdown,donotunder
any circumstances touch the internal parts
in an attempt to perform the repair work
yourself.
•Donotleanorsitontheopendoor:this
may cause the appliance to overturn.
•Thedoorshouldnotbeleftopenasitmay
create a dangerous obstacle.
•Keepdetergentandrinseaidoutofreach
of children.
• Thepackagingmaterialshouldnotbeused
as a toy.
•Knivesandotherutensilswithsharp
edges must be placed either with the
points/blades facing downwards in the
cutlery basket or horizontally on the tip-up
compartments or in the tray/third basket,
if available.
•Connecttheappliancetothewatermains
using the new supply hose provided with
the appliance. Do not re-use the old hose.
Install the back side of a free-standing
dishwasher against a wall.
EN
Precautions and advice
This appliance was designed and
manufactured in compliance with international
safety standards. The following information
has been provided for safety reasons and
should be read carefully.
Keepthisinstructionmanualinasafeplace
for future reference. If the appliance is sold,
given away or moved, make sure the manual
is kept with the machine.
Read the instructions carefully, as they
include important information on safe
installation, use and maintenance.
This appliance was designed for domestic
use or similar applications, for example:
- farmhouses;
- use by guests in hotels, motels and other
residential settings;
- bed & breakfasts.
Remove the appliance from all packaging
and make sure it was not damaged during
transportation. If it was damaged, contact the
retailer and do not proceed any further with
the installation process.
General safety
•Thisappliance should not be operated
by children younger than 8 years, people
with reduced physical, sensory or mental
capacities, or inexperienced people

4
FR
Précautions et conseils
CET appareil a été conçu et fabriqué
conformément aux normes internationales de
sécurité. Ces consignes sont fournies pour
des raisons de sécurité, il faut les lire
attentivement.
Conserver ce mode d’emploi pour pouvoir
le consulter à tout moment. En cas de vente,
de cession ou de déménagement, s’assurer
qu’il accompagne bien l’appareil.
Lire attentivement les instructions : elles
fournissent des conseils importants sur
l’installation, l’utilisation et la sécurité de
l’appareil.
Cet appareil est conçu pour un usage
domestique ou autres applications similaires,
telles que :
- fermes ;
- utilisation par les clients d’hôtels, de motels
ou autres locaux de type résidentiel ;
- chambres d’hôtes.
Déballer l’appareil et s’assurer qu’il n’a pas
été endommagé pendant le transport. S’il
est abîmé, ne pas le raccorder et contacter
le revendeur.
Sécurité générale
•Cetappareilélectroménagerpeutêtreutilisé
par des enfants âgés de plus de 8 ans
et par des personnes dont les capacités
physiques, sensorielles ou mentales sont
réduites,ouencoresansl'expérience
ou la connaissance nécessaire, mais
sousl'étroitesurveillanced'unadulte
responsable ou après que ces personnes
aient reçu des instructions relatives à une
utilisationentoutesécuritédel'appareilet
compris les dangers qui lui sont inhérents.
•Les enfants nedoiventpasjouer avec
l'appareil.
•Lenettoyageetl'entretiendel'appareil
doiventêtreeffectuésparl'utilisateur.Ilsne
doivent pas être effectués par des enfants
sans surveillance.
•Cetappareilestconçupourunusagede
typenon professionnel àl'intérieurd'une
habitation.
•Cetappareil est destiné au lavage de
vaisselle à usage domestique et selon les
instructions reportées dans cette notice.
•Ne pas installer l’appareil à l’extérieur,
même dans un endroit protégé, car il est
extrêmement dangereux de l’exposer à la
pluie et aux orages.
• Nepastoucheraulave-vaissellepiedsnus.
• Nejamaistirersurlecâblepourdébrancher
la fiche de la prise de courant.
•Fermerlerobinetdel’eauetdébrancherla
fiche de la prise de courant après chaque
utilisation et avant d’effectuer tous travaux
de nettoyage et d’entretien.
• Lenombremaximaldecouvertsestindiqué
Disposal
•To dispose of any packaging materials,
follow local legislation so that the
packagings may be reused.
•TheEuropean Directive 2012/19/EU
relating to Waste Electrical and Electronic
Equipment (WEEE) states that household
appliances should not be disposed of
using the normal solid urban waste cycle.
Exhausted appliances should be collected
separately in order to optimise the cost of
reusing and recycling the materials inside
the machine, while preventing potential
damage to the atmosphere and public
health. The crossed-out dustbin symbol
shown on all products reminds the owners
of their obligations regarding separated
waste collection.
For further information relating to the correct
disposal of household appliances, owners
may contact the relevant public authority or
the local appliance dealer.
Saving energy and respecting the
environment
Saving water and energy
•Only begin a wash cycle when the
dishwasher is full. While waiting for the
dishwasher to be filled, prevent unpleasant
odours with the Soak cycle
(if available, see
Wash Cycles).
• Selectawashcyclethatissuitedtothetype
of crockery and to the soil level using the
Table of Wash Cycles:
- For dishes with a normal soil level, use
the Eco wash cycle, which guarantees low
energy and water consumption levels.
- If the load is smaller than usual activate
the Half Load option
(see Special wash cycles
and options, if available).
•If your electricity supply contract gives
details of electricity-saving time bands, run
the wash cycles when electricity prices are
lower. The Delayed Start option can help
you organise the wash cycles accordingly
(see Special wash cycles and options, if available).

5
dans la fiche produit.
• Encasdepanne,éviteràtoutprixd’accéder
aux mécanismes internes pour tenter une
réparation.
•Nepass’appuyeràlaporteouverteous’y
asseoir : l’appareil pourrait basculer.
•Nepasgarderlaporteouvertepouréviter
de buter contre elle en risquant de se faire
mal.
• Garderlesproduitsdelavageetderinçage
hors de la portée des enfants.
•Les emballagesnesont pas des jouets
pour enfants.
•Lescouteaux et ustensilesde cuisine à
bords tranchants doivent être disposés,
pointes et lames tournées vers le bas,
dans le panier à couverts ou, à plat, sur les
clayettes rabattables du panier supérieur
ou bien encore, si le modèle en est équipé,
dans le plateau ou troisième panier.
•L’appareildoitêtreraccordéàl’arrivée
d’eau en le reliant avec le nouveau tuyau
d’arrivée. L’ancien tuyau d’arrivée ne doit
pas être réutilisé.
Si le lave-vaisselle est en libre pose, le côté
arrière de ce dernier doit être placé contre
le mur.
Mise au rebut
•Miseaurebutdumatérield’emballage:se
conformer aux réglementations locales de
manière à ce que les emballages puissent
être recyclés.
•La directiveeuropéenne2012/19/EU sur
les déchets d’équipements électriques
et électroniques (DEEE), prévoit que les
électroménagers ne peuvent pas être
traités comme des déchets solides urbains
normaux. Les appareils usagés doivent
être collectés séparément afin d’optimiser
le taux de récupération et le recyclage
des matériaux qui les composent et
réduire l’impact sur la santé humaine et
l’environnement Le symbole de la poubelle
barrée est appliqué sur tous les produits
pour rappeler qu’ils font l’objet d’une
collecte sélective.
Pour tout autre renseignement sur la
collecte des électroménagers usés, prière
de s’adresser au service public préposé
ou au vendeur.
Economies et respect de
l’environnement
Faire des économies d’eau et d’électricité
•Ne faire fonctionner le lave-vaisselle
que quand il est rempli au maximum de
sa capacité. Dans l’attente de remplir
l’appareil, lancer le cycle de Trempage
pour éviter la formation de mauvaises
odeurs
(si disponible - voir Programmes).
•Sélectionner un programme adapté
au type de vaisselle et à son degré de
salissure, consulter pour cela le Tableau
des programmes :
- pour de la vaisselle normalement sale,
choisir le programme Eco (économique),
il limite la quantité d’eau et d’électricité
utilisée.
- pour une quantité réduite de vaisselle,
choisir l’option Demi-charge
(si disponible voir
Programmes Spéciaux et Options).
•Si le contrat de fourniture d’électricité
prévoit des tranches horaires à prix réduit,
effectuer les lavages pendant ces heures
creuses. L’option Départ différé peut aider
à organiser les lavages dans ce sens
(
si
disponible voir Programmes Spéciaux et Options).
NL
Voorzorgsmaatregelen en
advies
HET apparaat is ontworpen en gebouwd
overeenkomstig de internationale
veiligheidsnormen. Deze aanwijzingen zijn
geschreven om veiligheidsredenen en
moeten zorgvuldig worden doorgenomen.
Bewaar dit boekje zorgvuldig voor eventuele
toekomstige raadpleging. Wanneer u het
product weggeeft, verkoopt of wanneer u
verhuist, dient u dit boekje bij het apparaat
te bewaren.
Lees de aanwijzingen zorgvuldig door: er
staat belangrijke informatie in over installatie,
gebruik en veiligheid.
Dit apparaat is ontworpen voor huishoudelijk
gebruik of gelijksoortige toepassingen,
bijvoorbeeld:
- boerderijen;
- gebruik door klanten in hotels, motels en
andersoortige verblijfsmogelijkheden;
- bed and breakfasts.
Haal het apparaat uit de verpakking en
controleer dat het geen schade heeft
geleden tijdens het transport. Als het
apparaat beschadigd is, moet u het niet
aansluiten maar de dealer inschakelen.

6
Algemene veiligheid
•Ditapparaatmagwordengebruiktdoor
kinderen van 8 jaar en ouder en door
personen met een beperkt lichamelijk,
sensorisch of mentaal vermogen, ofwel
personen die geen ervaring hebben of de
nodige kennis, mits zij onder strikt toezicht
staan van een persoon die verantwoordelijk
is voor hen, ofwel nadat zij de nodige
instructies hebben gekregen betreffende
het veilig gebruik van het apparaat en zij
begrijpen wat de gevaren zijn die ermee
verbonden zijn.
•Kinderenmogennietmethetapparaat
spelen.
•De reiniging en het onderhoud van het
apparaat moeten door de gebruiker worden
uitgevoerd. Deze twee handelingen dienen
niet te worden uitgevoerd door kinderen
zonder toezicht.
•Ditapparaat is ontwikkeld voor niet-
professioneel gebruik binnenshuis.
• Ditapparaatmoetwordengebruiktvoorhet
wassen van huishoudelijke vaat en volgens
de aanwijzingen die terug zijn te vinden in
dit boekje.
•De afwasautomaat mag niet buitenshuis
worden geïnstalleerd, ook niet in overdekte
toestand. Het is zeer gevaarlijk hem bloot
te stellen aan regen en onweer.
•Raakdeafwasautomaatnietblootsvoets
aan.
•Haal de stekker niet uit het stopcontact
door eraan te trekken, maar door hem beet
te pakken.
•Aanheteindvaniederecyclusenvoordat
u de afwasautomaat reinigt of onderhoud
uitvoert, moet u de waterkraan afsluiten en
de stekker uit het stopcontact halen.
•Het maximale aantal couverts wordt
aangegeven in de productfiche.
•Bijeenstoringmaguingeengevalaan
de interne mechanismen sleutelen om een
reparatie trachten uit te voeren.
•Leunniettegendeopendeuraanenga
er niet op zitten. Het apparaat zou om
kunnenvallen.
•Dedeurdientnietinopenstaandestand
gelaten te worden omdat men erover zou
kunnen struikelen.
•Houdhetwas-englansmiddelbuitenhet
bereik van kinderen.
•Het verpakkingsmateriaal is geen
speelgoed voor kinderen.
•Messen en gebruiksvoorwerpen met
scherpe randen moeten in de bestekkorf
worden geplaatst met de punt/het
lemmet naar beneden toe gericht of in
horizontale stand op de opklaprekjes of in
de besteklade/het derde rek bij modellen
waar dit voorkomt.
•Hetapparaatdientopdewaterleidingte
worden aangesloten m.b.v. de nieuwe
toevoerbuis. De oude toevoerbuis mag niet
meer worden gebruikt.
Als de vaatwasser vrijstaand is, moet
de achterzijde tegen een muur worden
geplaatst.
Afvalverwijdering
•Houd u aan de lokale normen, zodat
het verpakkingsmateriaal kan worden
hergebruikt.
•De Europese richtlijn 2012/19/EU
betreffende afgedankte elektrische
en elektronische apparatuur (AEEA)
voorziet dat elektrische apparaten niet
met het gewone huisvuil mogen worden
meegegeven. Afgedankte apparaten
moeten gescheiden worden ingezameld
om het recyclen en herwinnen van de
gebruikte materialen te optimaliseren en
potentiële schade voor de gezondheid
en het milieu te voorkomen. Het symbool
van de afvalemmer met een kruis staat op
alle producten om de consument eraan te
herinneren dit product gescheiden in te
zamelen.
Voor meer informatie betreffende het
verwijderen van elektronische apparatuur
kan de consument zich wenden tot de
gemeentelijke reinigingsdienst of de
verkoper.
Energiebesparing en respect voor
het milieu
Water en energie besparen
•Start de afwasautomaat alleen als hij
volgeladen is. Als u moet wachten totdat de
afwasautomaat gevuld is, kunt u vervelende luchtjes
vermijden door het programma
Inweken te
gebruiken
(waar beschikbaar - zie Programma’s)
.
•Selecteereen geschiktprogrammavoor
het type vaat en het soort vuil door de
Programmatabel te raadplegen:
- voor een gemiddeld vuile vaat gebruikt u
het programma Eco, dat een laag energie-
en waterverbruik garandeert;
- als u een kleine vaat heeft, activeert u
de optie Halve lading
(waar beschikbaar - zie
Speciale programma’s en opties).

IT
7
•Als uw elektriciteitsbedrijf op bepaalde
tijden of dagen goedkopere tarieven heeft,
kunt u de afwasautomaat op deze tijden
gebruiken.DeoptieUitgesteldestartkan
helpen om het wassen op deze wijze te
organiseren
(
waar beschikbaar - zie Speciale
programma’s en opties).
PT
Precauções e conselhos
O aparelho foi projetado e construído
conforme as normas internacionais de
segurança. Estas advertências são
fornecidas por razões de segurança e
devem ser lidas com atenção.
É importante conservar este manual para
poder consultá-lo em qualquer momento.
Em caso de venda, cessão ou mudança,
certifique-se que o mesmo fique junto ao
aparelho.
Ler atentamente as instruções: nelas estão
presentes informações importantes sobre a
instalação, o uso e a segurança.
Este aparelho foi projetado para o uso
doméstico ou para aplicações simples,
como por exemplo:
- casas de férias;
- uso por parte de clientes em hotéis, motéis
e outros ambientes de tipo residencial;
- bed and breakfast.
Desembale o aparelho e controle que não
tenha sofrido danos durante o transporte. Se
estiver danificado, não o acenda e contacte
o revendedor.
Segurança geral
• Esteeletrodomésticopodeserutilizadopor
crianças com mais de 8 anos e pessoas
com capacidades físicas, sensoriais ou
mentais reduzidas, ou sem experiência e
conhecimentos necessários, desde que
sob rigorosa vigilância de uma pessoa
responsável ou após terem recebido
instruções relativas ao uso seguro do
aparelho e à compreensão dos perigos
associados ao uso.
•Ascrianças não devem brincar com o
aparelho.
•A limpeza e manutenção do aparelho
devem ser efetuadas pelo utilizador.
Não deve ser efetuada por crianças sem
vigilância.
•Oaparelhofoiconcebidoparaumusode
tipo não profissional dentro do ambiente
doméstico.
•Oaparelho deve ser utilizado para a
lavagem de louças de utilização doméstica,
conforme as instruções escritas neste
manual.
•Estamáquinadelavarlouçanãopodeser
instalada ao ar livre, nem mesmo num lugar
protegido por um telhado: é muito perigoso
deixá-la exposta à chuva e aos temporais.
•Nãotoque na máquina com os pés
descalços.
•Nãoretireafichadatomadadecorrente
puxando o cabo, mas segure a ficha.
•Énecessáriofecharatorneiradaáguae
tirar a ficha da tomada da corrente elétrica
no final de cada ciclo, antes de efetuar
operações de limpeza e manutenção.
•Onúmeromáximodelouçaséindicado
na ficha do produto.
•Em caso de avarias, jamais aceda aos
mecanismos internos para tentar reparar
sozinho.
•Nãoseapoienemsesentesobreaporta
aberta: o aparelho pode voltar-se.
•Aportanãopodeficarabertaparaevitar
o perigo de tropeçar.
•Mantenhaodetergenteeoabrilhantador
fora do alcance das crianças.
•Asembalagensnãosãobrinquedospara
crianças.
•Asfacaseutensílioscomrebordosafiados
devem ser colocados com as pontas/
lâminas viradas para baixo no cesto
dos talheres ou em posição horizontal
nas peças basculantes no tabuleiro/
terceiro cesto, nos modelos em que esteja
presente.
•Oaparelhodeveserligadoàredehídrica
através do novo tubo de carga e o tubo
de carga antigo não deve ser reutilizado.
Se a máquina de lavar louça for de
instalação livre, o lado traseiro da mesma
deve ser colocado contra uma parede.
Eliminação
•Eliminaçãodo material de embalagem:
respeite a normas locais, assim as
embalagens poderão ser reaproveitadas.
•Adiretiva Europeia 2012/19/EU relativa
aos resíduos de equipamentos elétricos
e eletrónicos (REEE) prevê que
os eletrodomésticos não devem ser
eliminados no normal fluxo dos resíduos
sólidos urbanos. Os aparelhos em fim de
vida devem ser recolhidos separadamente

8
para otimizar a taxa de recuperação e
reciclagem dos materiais que os compõem
eimpedirpotenciaisdanosàsaúdeeao
meio ambiente. O símbolo do cesto do
lixo cancelado está indicado em todos os
produtos para lembrar o dever de coleta
seletiva. Para mais informações sobre a
correta eliminação dos eletrodomésticos,
os proprietários poderão contactar o serviço
decoletapúblicoouosrevendedores.
Economizar e respeitar o ambiente
Economizar água e energia
•Use a máquina de lavar louça somente
com carga plena. Enquanto espera que
a máquina fique cheia, previna os maus
cheiros com o ciclo de Amolecimento
(se
disponível - ver Programas)
.
•Selecione um programa adequado ao
tipo de louças e ao grau de sujidade
consultando a tabela dos programas:
- para louças normalmente sujas, utilize
o programa Eco, que garante baixos
consumos energéticos e de água.
- se a carga for reduzida, utilize a opção
Meia carga
(se disponível - ver Programas especiais
e opções).
•Seoseucontratodefornecimentode
energia elétrica previr faixas horárias de
economia energética, efetue as lavagens
nos horários com tarifa reduzida. A opção
Início Posterior pode ajudar a organizar
as lavagens nesse sentido
(
se disponível - ver
Programas especiais e opções).
CS
Opatření a rady
Zařízení bylo navrženo a vyrobeno
v souladu s platnými mezinárodními
bezpečnostními předpisy. Tato upozornění
jsou uváděna z bezpečnostních důvodů a
je třeba si je pozorně přečíst.
Je velmi důležité tento návod uschovat,
aby jej bylo možné kdykoli dle potřeby
konzultovat. V případě prodeje, darování
nebo přestěhování zařízení se ujistěte, že
návod zůstane uložen v jeho blízkosti.
Pozorně si přečtěte uvedené pokyny:
Obsahují důležité informace o instalaci,
použití a bezpečnosti.
Toto zařízení bylo navrženo pro použití v
domácnosti nebo pro podobné aplikace,
jako například:
- hospodářská stavení;
- použití zákazníky v hotelu, motelu nebo
jiných prostředích rezidenčního typu;
- penziony typu „bed and breakfast“.
Po rozbalení zařízení zkontroluje, zda
během přepravy nedošlo k jeho poškození.
V případě, že je poškozeno, je nezapojujte
a obraťte se na prodejce.
Základní bezpečnostní pokyny
• Tento elektrospotřebič mohou používat
děti ve věku od 8 let a osoby se sníženými
fyzickými, senzorickými nebo duševními
schopnostmi nebo osoby bez zkušeností
nebo potřebné znalosti, když jsou pod
dozorem odpovědné osoby, případně
poté, co jim byly poskytnuty pokyny
týkající se bezpečného použití zařízení
a pochopení souvisejících nebezpečí.
• Děti si nesmí hrát se zařízením.
• Čištění a údržbu zařízení musí provádět
uživatel. Nesmí je provádět děti bez
dozoru.
• Toto zařízení bylo navrženo výhradně pro
neprofesionální použití v domácnosti.
• Zařízení musí být používání na mytí
nádobí v domácnosti podle pokynů
uvedených v tomto návodu.
• Zařízení nesmí být nainstalováno venku,
a to ani v případě, že by se jednalo o
místo chráněné před nepřízní počasí,
protože je velmi nebezpečné vystavit jej
působení deště a bouří.
• Nedotýkejte se myčky nádobí bosýma
nohama.
• Nevytahujte zástrčku ze zásuvky
elektrického rozvodu tahem za kabel,
ale uchopením za zástrčku.
• Na konci každého cyklu a před
provedením operací čištění a údržby
je třeba zavřít kohoutek přívodu vody a
odpojit zástrčku ze zásuvky elektrického
rozvodu.
• Maximální počet jídelních souprav je
uveden v technickém listu výrobku.
• Při výskytu poruchy se v žádném případě
nepokoušejte o opravu vnitřních částí
zařízení.
• Neopírejte se o otevřená dvířka a
nesedejte si na ně: zařízení by se mohlo
převrátit.
• Dvířka nesmí zůstat v otevřené poloze,
protože by mohla představovat nebezpečí
zakopnutí.

9
• Udržujte mycí prostředek a leštidlo mimo
dosah dětí.
• Obaly nejsou hračky pro děti!
• Nože a nástroje s ostrými hroty musí být
umístěny do košíku na příbory s hroty/
ostřími obrácenými směrem dolů nebo
do vodorovné polohy na sklopné držáky
nebo na tác/do třetího koše u modelů,
jejichž je součástí.
Likvidace
• Likvidace obalových materiálů: Při jejich
odstraňování postupujte v souladu
s místním předpisy a dbejte na možnou
recyklaci.
• Evropská směrnice 2012/19/EU o odpadu
tvořeném elektrickými a elektronickými
zařízeními (RAEE) předpokládá, že
elektrospotřebiče nesmí být likvidovány
v rámci běžného pevného městského
odpadu. Vyřazená zařízení musí být
sesbírána zvlášť za účelem zvýšení
počtu recyklovaných a znovu použitých
materiálů, ze kterých jsou složena, a za
účelem zabránění možným ublížením na
zdraví a škodám na životním prostředí.
Symbolem je přeškrtnutý koš, který je
uveden na všech výrobcích s cílem
připomenout povinnosti spojené se
separovaným sběrem.
Podrobnější informace týkající
se správného způsobu vyřazení
elektrospotřebičů z provozu mohou
jejich držitelé získat tak, že se obrátí na
navrženou veřejnou instituci nebo na
prodejce.
Jak ušetřit a brát ohled na životní
prostředí
Šetření vodou a energií
• Uvádějte myčku nádobí do chodu pouze
tehdy, když je naplněna. Během čekání
na naplnění zařízení zabraňte vzniku
nepříjemného zápachu použitím cyklu
Namáčení
(je-li součástí - viz Programy)
.
• Zvolte program vhodný pro druh nádobí
a stupeň znečištění; podívejte se do
Tabulky programů:
- pro běžně znečištěné nádobí použijte
program Eko, který zaručuje nízkou
spotřebu energie a vody.
- při menším množství nádobí použijte
volitelnou funkci Poloviční náplň
(je-li
součástí - viz Speciální programy a Volitelné funkce).
• V případě, že vaše smlouva na dodávku
elektrické energie předpokládá používání
časových pásem pro šetření elektrickou
energií, provádějte mytí v časových
pásmech se sníženou sazbou. Volitelná
funkce Odložený start může napomoci
organizaci mycích cyklů uvedeným
způsobem
(
je-li součástí - viz Speciální programy
a Volitelné funkce).
10
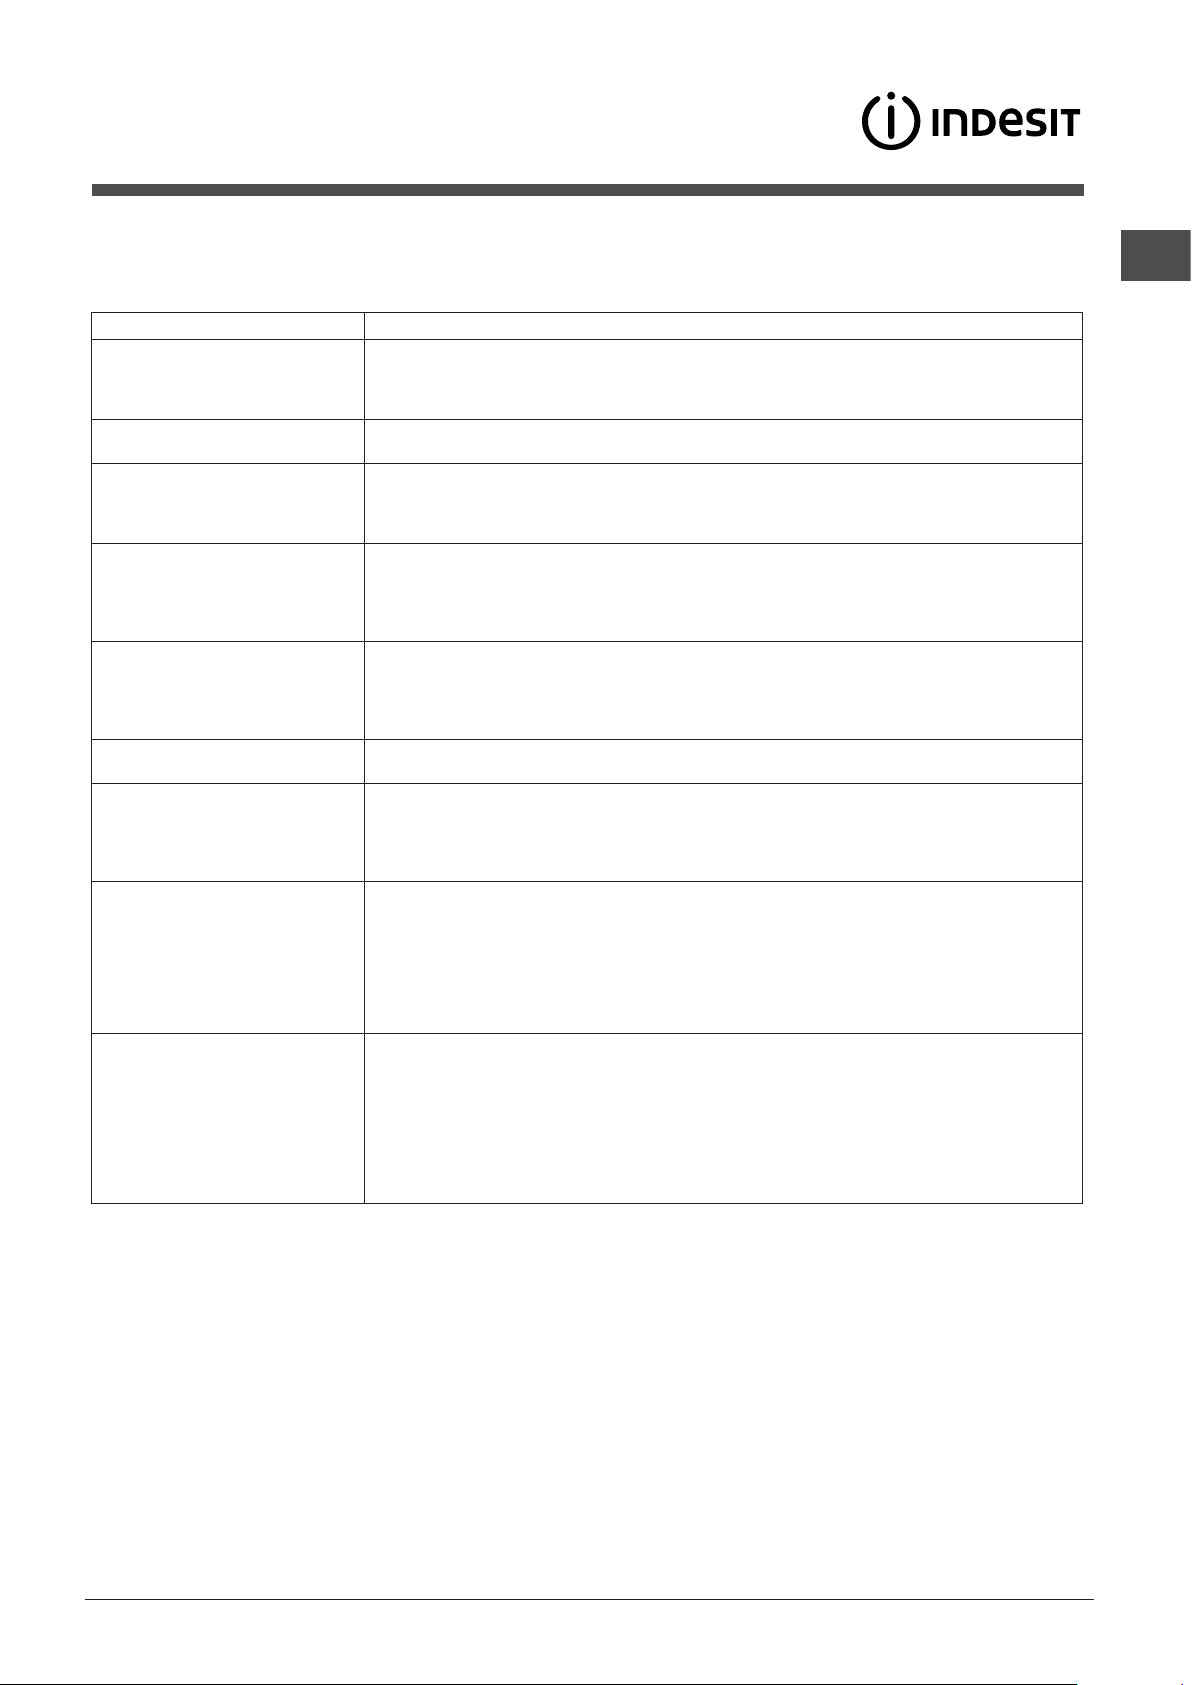
Scheda prodotto
Marchio
INDESIT
Modello
DPG 16B1
Capacità nominale in numero di coperti standard (1)
13
Classe di efcienza energetica su una scala da A+++ (bassi consumi) a D (alti consumi)
A+
Consumo energetico annuo in kWh (2)
295
Consumo energetico del ciclo di lavaggio standard in kWh
1.04
Consumo di potenza nel modo spento in W
0.5
Consumo di potenza nel modo lasciato acceso in W
5.0
Consumo di acqua annuo in litri (3)
3080
Classe di efcacia di asciugatura su una scala da G (efcacia minima) ad A (efcacia massima)
A
Durata del programma per il ciclo di lavaggio standard in minuti
138’
Durata del modo lasciato acceso in minuti
12
Rumore in dB(A) re 1 pW
49
Prodotto da incasso
SI
NOTE
1) L’informazione sull’etichetta e sulla scheda fanno riferimento al programma standard di lavaggio, questo programma è adatto per
lavare stoviglie che presentano un grado di sporco normale ed è il programma più efciente in termini di consumo combinato di energia
ed acqua. Il ciclo standard corrisponde al ciclo ECO.
2) Consumo di energia basato su 280 cicli annui standard con acqua caricata fredda e sui consumi in modo di spento o di lasciato
acceso dopo la ne ciclo. Il consumo effettivo dipende da come viene usato l’elettrodomestico.
3) Basato su 280 cicli di lavaggio standard. Il consumo effettivo dipende dalle modalità di utilizzo dell’apparecchio.
Product Fiche
Brand
INDESIT
Model
DPG 16B1
Rated capacity in standard place settings (1)
13
Energy efciency class on a scale from A+++ (low consumption) to D (high consumption)
A+
Energy consumption per year in kWh (2)
295
Energy consumption of the standard cleaning cycle in kWh
1.04
Power consumption of the off-mode in W
0.5
Power consumption of the left-on mode in W
5.0
Water consumption per year in litres (3)
3080
Drying efcacy class on a scale from G (low efcacy) to A (high efcacy)
A
Programme time for standard cleaning cycle in minutes
138’
The duration of the left-on mode in minutes
12
Noise in dB(A) Re 1pW
49
Built-in model
Yes
NOTES
1) The information on the label and che relates to the standard cleaning cycle, this programme is suitable to clean normally soiled
tableware and it is the most efcient programme in terms of combined energy and water consumption. The standard cleaning cycle
corresponds to the Eco cycle.
2) Based on 280 standard cleaning cycles using cold water ll and the consumption of the low power modes. Actual energy consumption
depends on how the appliance is used.
3) Based on 280 standard cleaning cycles. Actual water consumption depends on how the appliance is used.
EN
Product Data (product fiche)
IT
Scheda Prodotto

11
Fiche de produit
Marque
INDESIT
Modèle
DPG 16B1
Capacité nominale dans un environnement standard (1)
13
Classe énergétique sur une échelle de A+++ (faible consommation) à D (consommation élevée)
A+
Consommation d''énergie par année en kWh (2)
295
Consommation d''énergie du cycle de lavage standard en kWh
1.04
Consommation d''energie en mode "off" en W
0.5
Consommation d''energie en mode "on" en W
5.0
Consommation d''eau par an en litres (3)
3080
Classe d’efcacité du séchage sur une échelle de G (efcacité minimum) à A (efcacité maximum)
A
Durée du programme pour un cycle de lavage standard en minutes
138’
Durée du mode "on" en minutes
12
Émissions acoustiques dans l’air, exprimées en dB(A) re 1 pW
49
Encastrable
Oui
1) Les informations sur l’étiquette et sur la che se rapportent au cycle de lavage standard. Ce programme convient pour laver
une vaisselle normalement sale, et il s’agit des programmes les plus efcaces en termes de consommation combinée d’eau et
d’énergie. Le cycle de lavage standard correspond au cycle éco.
2) Sur la base de 280 cycles de lavage standard avec une alimentation en eau froide et une consommation en modes à faible
puissance. La consommation réelle d’énergie dépend des conditions d’utilisation de l’appareil
3) Sur la base de 280 cycles de lavage standard. La consommation réelle d’énergie dépend des conditions d’utilisation de
l’appareil.
FR
Fiche de produit
NL
Productkaart
Productkaart
Merk
INDESIT
Model
DPG 16B1
Beladingscapaciteit in standaard couverts (1)
13
Energie-efciëntieklasse op een schaal van A+++ (laag gebruik) tot D (hoog gebruik)
A+
Jaarlijks energieverbruik in kWh (2)
295
Energieverbruik van de standaard wascyclus in kWh
1.04
Energieverbruik in de off-modus in W
0.5
Energieverbruik in de aan-modus in W
5.0
Jaarlijks waterverbruik in liters (3)
3080
Droogeffectiviteit op een schaal van G (minimale effectiviteit) tot A (maximale effectiviteit).
A
Tijdsduur van het standaardprogramma in minuten
138’
Tijdsduur van de aan-modus in minuten
12
Geluidsniveau in dB(A) re 1 pW
49
Inbouwmodel
Ja
1) De informatie op het energielabel en de productkaart is gebaseerd op de standaardwascyclus. Dit programma is geschikt om normaal
vervuild vaatwerk te wassen en is het meest efciënte programma wat betreft water- en energieverbruik. De standaardwascyclus
correspondeert met de Eco-cyclus.
2) Gebaseerd op 280 standaard wascycli met gebruik van koud water en het energieverbruik in de aan- en uit-modus. Het werkelijke
energieverbruik is afhankelijk van de manier waarop het apparaat wordt gebruikt.
3) Gebaseerd op 280 standaard wascycli. Het werkelijke waterverbruik is afhankelijk van de manier waarop het apparaat wordt gebruikt.
12
PT
Ficha de produto
Ficha de produto
Marca
INDESIT
Modelo
DPG 16B1
Capacidade nominal, em serviços de louça-padrão (1)
13
Classe de eciência energética numa escala de A+++ (baixos consumos) a D (altos consumos)
A+
Consumo de energia anual em kWh (2)
295
Consumo de energia do ciclo de lavagem normal em kWh
1.04
Consumo, em termos de potência, em estado de desactivação em (W)
0.5
Consumo, em termos de potência, em estado inactivo em (W)
5.0
Consumo de água anual em litros (3)
3080
Classe de ecácia de secagem numa escala da G (ecácia miníma) a A (ecácia máxima)
A
Duração do programa para o ciclo de lavagem normal, em minutos 5)
138’
Duração do estado inactivo expressa em minutos 6)
12
Emissão de ruído aéreo expressa em dB(A) re 1 pW7)
49
Produto de encastre
Sim
1) A informação constante na etiqueta e na tabela de características fazem referência ao programa normal de lavagem, este
programa é adequado a lavar louça com um grau de sugidade normal e é o programa mais efeciente em termos de consumo
combianado de energia e água.
2) Baseado em 280 ciclos de lavagem normal com enchimento a água fria e no consumo dos modos de baixo consumo de
energia. O consumo real de energia dependerá das condições de utilização do aparelho.
3) Baseado em 280 ciclos de lavagem normal. O valor real do consumo de água dependerá do modo de utilização do aparelho.
CS
Informační list výrobku
Informační list výrobku
Značka
INDESIT
Model
DPG 16B1
Kapacita počtu standardních sad nádobí (1)
13
Třída energetické účinnosti na stupnici A+++ (nejnižší spotřeba) až D (vysoká spotřeba)
A+
Roční spotřeba energie v kWh (2)
295
Spotřeba energie standardního mycího cyklu v kWh
1.04
Spotřeba energie ve vypnutém stavu ve W
0.5
Spotřeba energie v režimu ponechání v zapnutém stavu ve W
5.0
Roční spotřeba vody v litrech za rok (3)
3080
Třída účinnosti sušení na stupnici od G (minimální účinnost) až po A (maximální účinnost)
A
Délka programu při standardním mycím cyklu v minutách
138’
Délka režimu ponechání v zapnutém stavu v minutách
12
Emise hluku v dB(A) re 1 pW
49
Vestavný spotřebič
Ano
1) Informace uvedené na štítku a v informačním listu se vztahují na standardní mycí cyklus. Tento program je vhodný pro mytí
běžně znečištěného nádobí. Jedná se o nejúčinnější program z hlediska kombinované spotřeby energie a vody. Standardní mycí
cyklus koresponduje s cyklem Eco.
2) Na základě 280 standardních mycích cyklů při použití studené vody a spotřeby v režimu nízké spotřeby energie. Skutečná
spotřeba energie závisí na tom, jak je spotřebič používán.
3) Na základě 280 standardních mycích cyklů. Skutečná spotřeba vody závisí na tom, jak je spotřebič používán.

13
EN
Assistance
Before contacting Assistance:
• Checkwhether the problemcan be resolved using the
Troubleshooting guide
(see Troubleshooting).
• Restart the programmeto check whetherthe problem has
ceased to exist.
• If theproblem persists, contactthe Authorised Technical
Assistance Service.
Never use the services of unauthorised technicians.
Please have the following information to hand:
• Thetypeofmalfunction.
• Theappliancemodel(Mod.).
• Theserialnumber(S/N).
This information can be found on the appliance data plate
(see
Description of the appliance)
.
IT
Assistenza
Prima di contattare l’Assistenza:
• Verificaresel’anomaliapuòessererisoltadasoli
(vedi Anomalie
e Rimedi)
.
• Riavviareilprogrammapercontrollaresel’inconvenienteèstato
ovviato.
• In caso negativo, contattareil Servizio AssistenzaTecnica
Autorizzato.
Non ricorrere mai a tecnici non autorizzati.
Comunicare:
• iltipodianomalia;
• ilmodellodellamacchina(Mod.);
• ilnumerodiserie(S/N).
Queste informazioni si trovano sulla targhetta caratteristiche posta
sull’apparecchio
(vedi Descrizione dell’apparecchio).
FR
Service
Avant d’appeler le service d’assistance technique:
• Vérifiers’ilestpossiblederésoudrel’anomaliesoi-même
(voir
Anomalies et remèdes).
• Fairerepartirleprogrammepours’assurerquel’inconvénient
a été résolu.
• Si ce n’est pas le cas,contacter un Serviced’Assistance
Technique agréé.
Ne jamais faire appel à des techniciens non agréés.
Communiquer:
• letyped’anomalie;
• lemodèledel’appareil(Mod.);
• lenumérodesérie(S/N).
Ces informations figurent sur la plaque signalétique apposée sur
l’appareil
(voir Description de l’appareil).
NL
Service
Voordat u de Servicedienst inschakelt:
• Dientutecontrolerenofudestoringzelfkuntoplossen
(zie
Storingen en Oplossingen).
• Starthetprogrammaopnieuwomtecontrolerenofhet
probleem is opgelost.
• AlsditniethetgevalisdientudeerkendeTechnische
Servicedienst in te schakelen.
Wendt u nooit tot niet erkende technici.
U dient door te geven:
• hettypestoring;
• hetmodelvanhetapparaat(Mod.);
• hetserienummer(S/N).
Deze informatie bevindt zich op het typeplaatje op het
apparaat
(zie Beschrijving van het apparaat).
PT
Assistência
Antes de contactar a Assistência:
• Verifiquesepoderesolversozinhoaanomalia
(veja Anomalias
e Soluções).
• Reinicie o programapara controlar se o inconveniente foi
resolvido.
• Emcasonegativo,contacteoServiçodeAssistênciaTécnica
Autorizado.
Nunca recorra a técnicos não autorizados.
Comunique:
• otipodedefeito;
• omodelodamáquina(Mod.);
• onúmerodesérie(S/N).
Estas informações encontram-se na placa de identificação
situada no aparelho
(veja Descrição do Aparelho)
.
CS
Servisní služba
Před přivoláním servisní služby:
• Zkontrolujte, zda nejste schopni poruchu odstranit sami (viz
Poruchy a způsob jejich odstranění).
• Znovu uveďte do chodu mycí program s cílem ověřit, zda byla
porucha odstraněna.
• V případě negativního výsledku se obraťte na Autorizovanou
servisní službu.
Nikdy se neobracejte s žádostí o pomoc na neautorizované
techniky.
Při hlášení poruchy uveďte:
• druh poruchy;
• model zařízení (Mod.);
• výrobní číslo (S/N).
Tyto informace jsou uvedeny na štítku s jmenovitými údaji,
umístěném na zařízení. (viz Popis zařízení).
14
IT
* Presente solo su alcuni modelli.
In caso di trasloco tenere l’apparecchio in posizione
verticale; se fosse necessario, inclinarlo sul lato posteriore.
Collegamenti idraulici
L’adattamento degli impianti idraulici per l’installazione
deve essere eseguito solo da personale qualificato.
I tubi di carico e di scarico dell’acqua possono essere orientati
verso destra o sinistra per consentire la migliore installazione.
I tubi non devono essere piegati o schiacciati dalla lavasto-
viglie.
Collegamento del tubo di carico dell’acqua
• Adunapresad’acquada3/4”gasfreddaocalda(max.
60°C).
• Farscorrerel’acquafinchénondiventilimpida.
• Avvitarebeneiltubodicaricoedaprireilrubinetto.
Se la lunghezza del tubo di carico non è sufficiente,
rivolgersi a un negozio specializzato o ad un tecnico
autorizzato
(vedi Assistenza)
.
La pressione dell’acqua deve essere compresa nei valori
riportati dalla tabella Dati tecnici, diversamente la lavastoviglie
potrebbe non funzionare correttamente.
Fare attenzione che nel tubo non si formino pieghe o
strozzature.
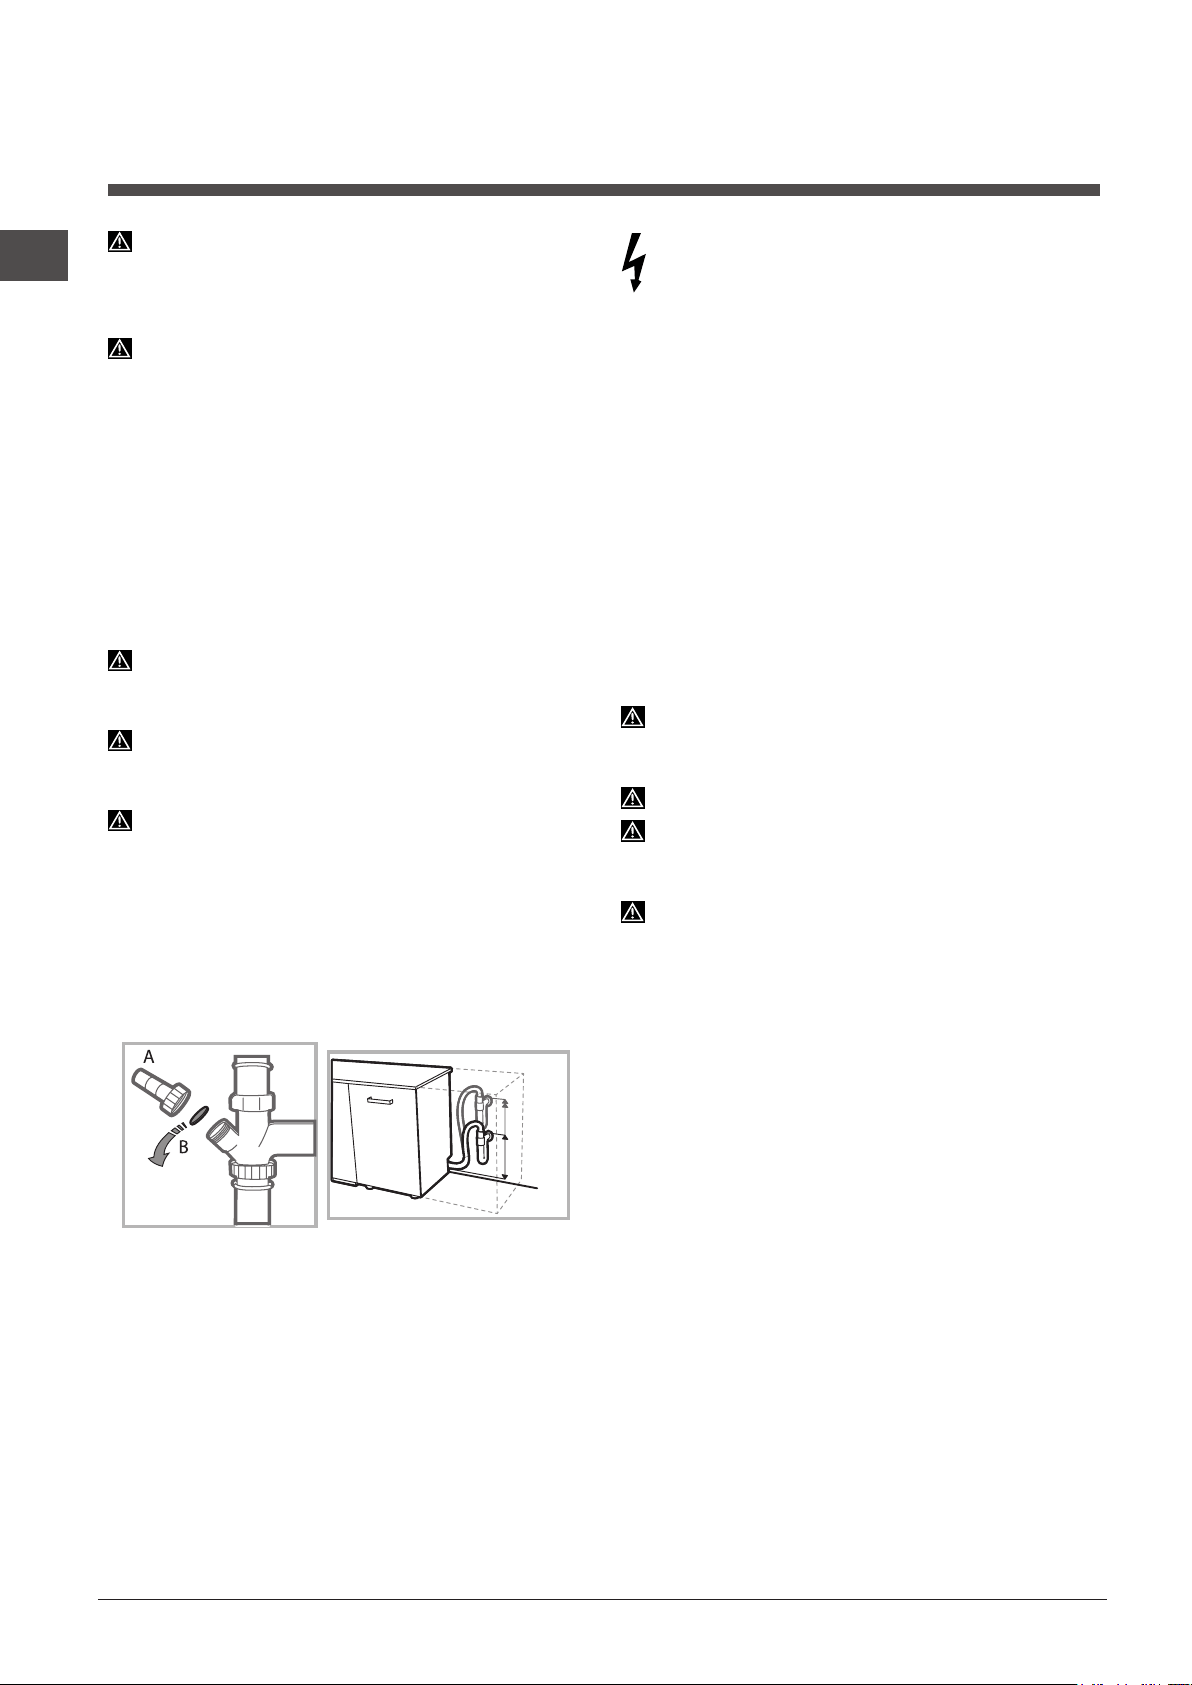
Collegamento del tubo di scarico dell’acqua
Collegare il tubo di scarico a una conduttura di scarico con
diametro minimo di 2 cm. (A)
L’attacco del tubo di scarico deve essere ad un’altezza
compresa tra 40 e 80 cm. dal pavimento o dal piano
d’appoggio della lavastoviglie.
Prima di collegare il tubo di scarico dell’acqua al sifone del
lavandino, rimuovere il tappo di plastica (B).
Sicurezza antiallagamento
Per garantire che non si generino allagamenti, la lavastoviglie:
- è dotata di un sistema che interrompe l’ingresso dell’acqua
nel caso di anomalie o di perdite dall’interno.
Alcuni modelli sono dotati anche di un dispositivo
supplementare di sicurezza New Acqua Stop*, che
garantisce l’antiallagamento anche in caso di rottura del tubo
di alimentazione.
ATTENZIONE: TENSIONE PERICOLOSA!
Il tubo di carico dell’acqua, non deve in nessun caso, essere
tagliato in quanto contiene parti sotto tensione.
Collegamento elettrico
Prima di inserire la spina nella presa della corrente, accertarsi
che:
• lapresaabbia la messa a terra
e sia a norma di legge;
• lapresasiain grado di sopportare il carico massimo
di potenza della macchina, indicato nella targhetta
caratteristiche sulla controporta
(vedi capitolo Descrizione della lavastoviglie);
• latensionedialimentazionesiacompresaneivaloriindicati
nella targhetta caratteristiche sulla controporta;
• lapresasiacompatibileconlaspinadell’apparecchio.In
caso contrario richiedere la sostituzione della spina a un
tecnico autorizzato
(vedi Assistenza)
; non usare prolunghe
o prese multiple.
Ad apparecchio installato, il cavo di alimentazione
elettrica e la presa della corrente devono essere facilmente
raggiungibili.
Il cavo non deve subire piegature o compressioni.
Se il cavo di alimentazione è danneggiato, deve essere
sostituito dal costruttore o dal suo Servizio di Assistenza
Tecnica, in modo da prevenire ogni rischio.
(Vedi Assistenza)
L’Azienda declina ogni responsabilità qualora queste
norme non vengano rispettate.
Posizionamento e livellamento
1. Posizionare la lavastoviglie su un pavimento piano e rigido.
Compensare le irregolarità svitando o avvitando i piedini
anteriorifinchél’apparecchiononsiaorizzontale.Unaccurato
livellamento dà stabilità ed evita vibrazioni e rumori.
2. Prima di aver incassato la lavastoviglie incollare la striscia
adesiva trasparente
* sotto al ripiano in legno per proteggerlo
dall’ eventuale condensa.
3. Sistemare la lavastoviglie facendo aderire i fianchi o lo
schienaleaimobiliadiacentioallaparete.L’apparecchiopuò
anche essere incassato sotto a un piano di lavoro continuo
*
(vedi foglio di Montaggio)
.
4
*. Per regolare l’altezza del piedino posteriore, agire sulla
boccola esagonale di colore rosso presente nella parte
inferiore, frontale, centrale della lavastoviglie, con una chiave a
bocca esagonale apertura 8 mm., girando in senso orario per
aumentare l’altezza e in senso antiorario per diminuirla.
(vedere
foglio istruzioni incasso allegato alla documentazione)
Installazione
MIN 40 cm
MAX 80 cm
IT
15
Avvertenze per il primo lavaggio
Dopo l’installazione, rimuovere i tamponi posizionati sui cesti e
gli elastici di trattenimento sul cesto superiore
(dove presenti).
Impostazioni addolcitore acqua
Prima di avviare il primo lavaggio, impostare il livello di
durezza
dell’acqua di rete.
(vedi capitolo Brillantante e sale
rigenerante)
Il primo caricamento del serbatoio dell’addolcitore deve avve-
nireconacqua,poiintrodurrecirca1Kg.disale;ènormale
che l’acqua fuoriesca.
Far partire un ciclo di lavaggio subito dopo.
Usaresolosalespecificoperlavastoviglie.
Dopo il caricamento la spia MANCANZA SALE
* si spegne.
Ilmancatoriempimentodel contenitore del sale, può
provocare il danneggiamento del dolcificatore dell’acqua e
dell’elemento riscaldante.
Dati Tecnici
Dimensioni
Larghezza cm. 59,6
Altezza cm. 82
Profondità cm. 57
Capacità 13 coperti standard
Pressione acqua
alimentazione
0,05 ÷ 1MPa (0.5 ÷ 10 bar)
7,25 – 145 psi
Tensione di
alimentazione
vedi targhetta caratteristiche
Potenza totale assorbita vedi targhetta caratteristiche
Fusibile vedi targhetta caratteristiche
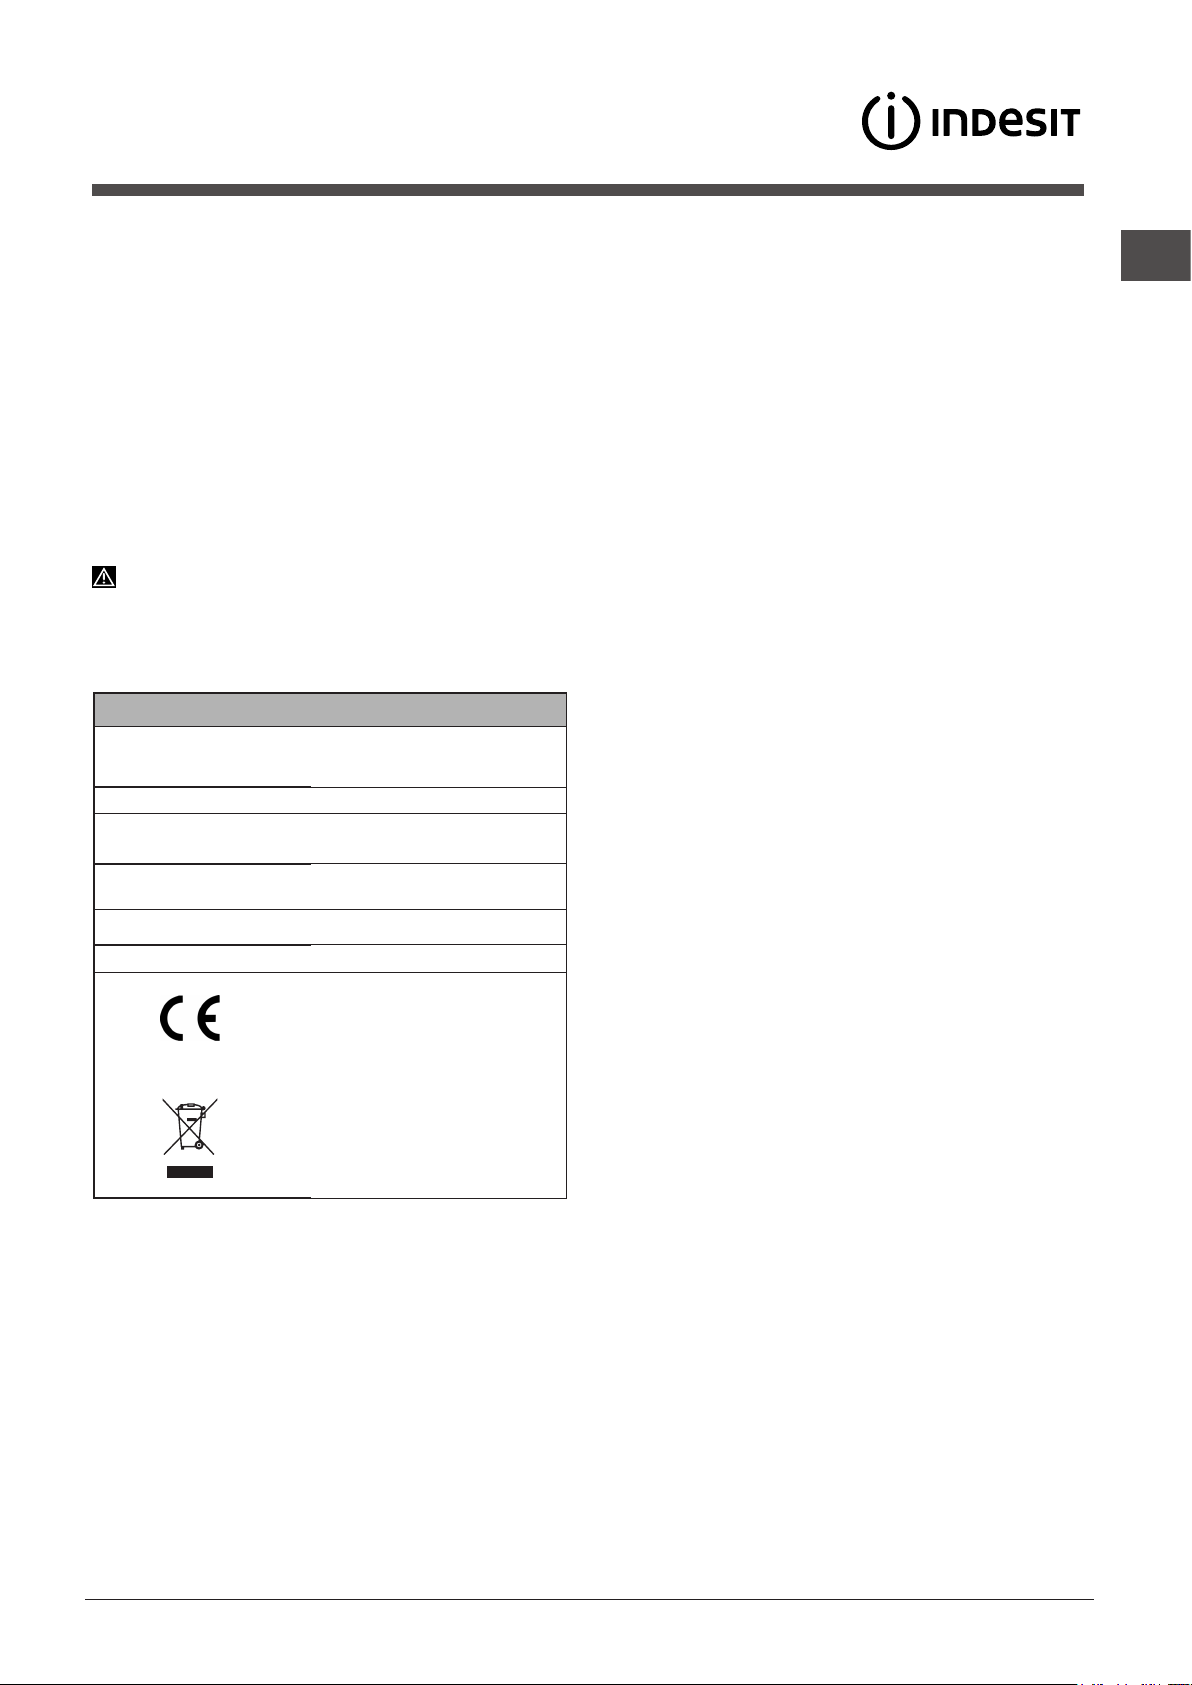
Questa apparecchiatura è
conforme alle seguenti
Direttive Comunitarie:
-2006/95/EC (Bassa Tensione)
-2004/108/EC (Compatibilità
Elettromagnetica)
-2009/125/EC (Comm. Reg.
1016/2010) (Ecodesign)
-97/17/EC (Etichettatura)
-2012/19/EU (RAEE)
La macchina, è dotata di segnali acustici/toni
(secondo il
modello d lavastoviglie
) che avvisano dell’avvenuto comando:
accensione, fine ciclo ecc..
I simboli/spie/led luminosi presenti sul pannello comandi/
display, possono variare di colore, pulsare o essere a luce
fissa.
(secondo il modello di lavastoviglie)
.
Il display
*, visualizza informazioni utili relative al tipo di ciclo
impostato, alla fase di lavaggio/asciugatura, al tempo residuo,
alla temperatura ecc... ecc...
* Presente solo su alcuni modelli.
16
IT
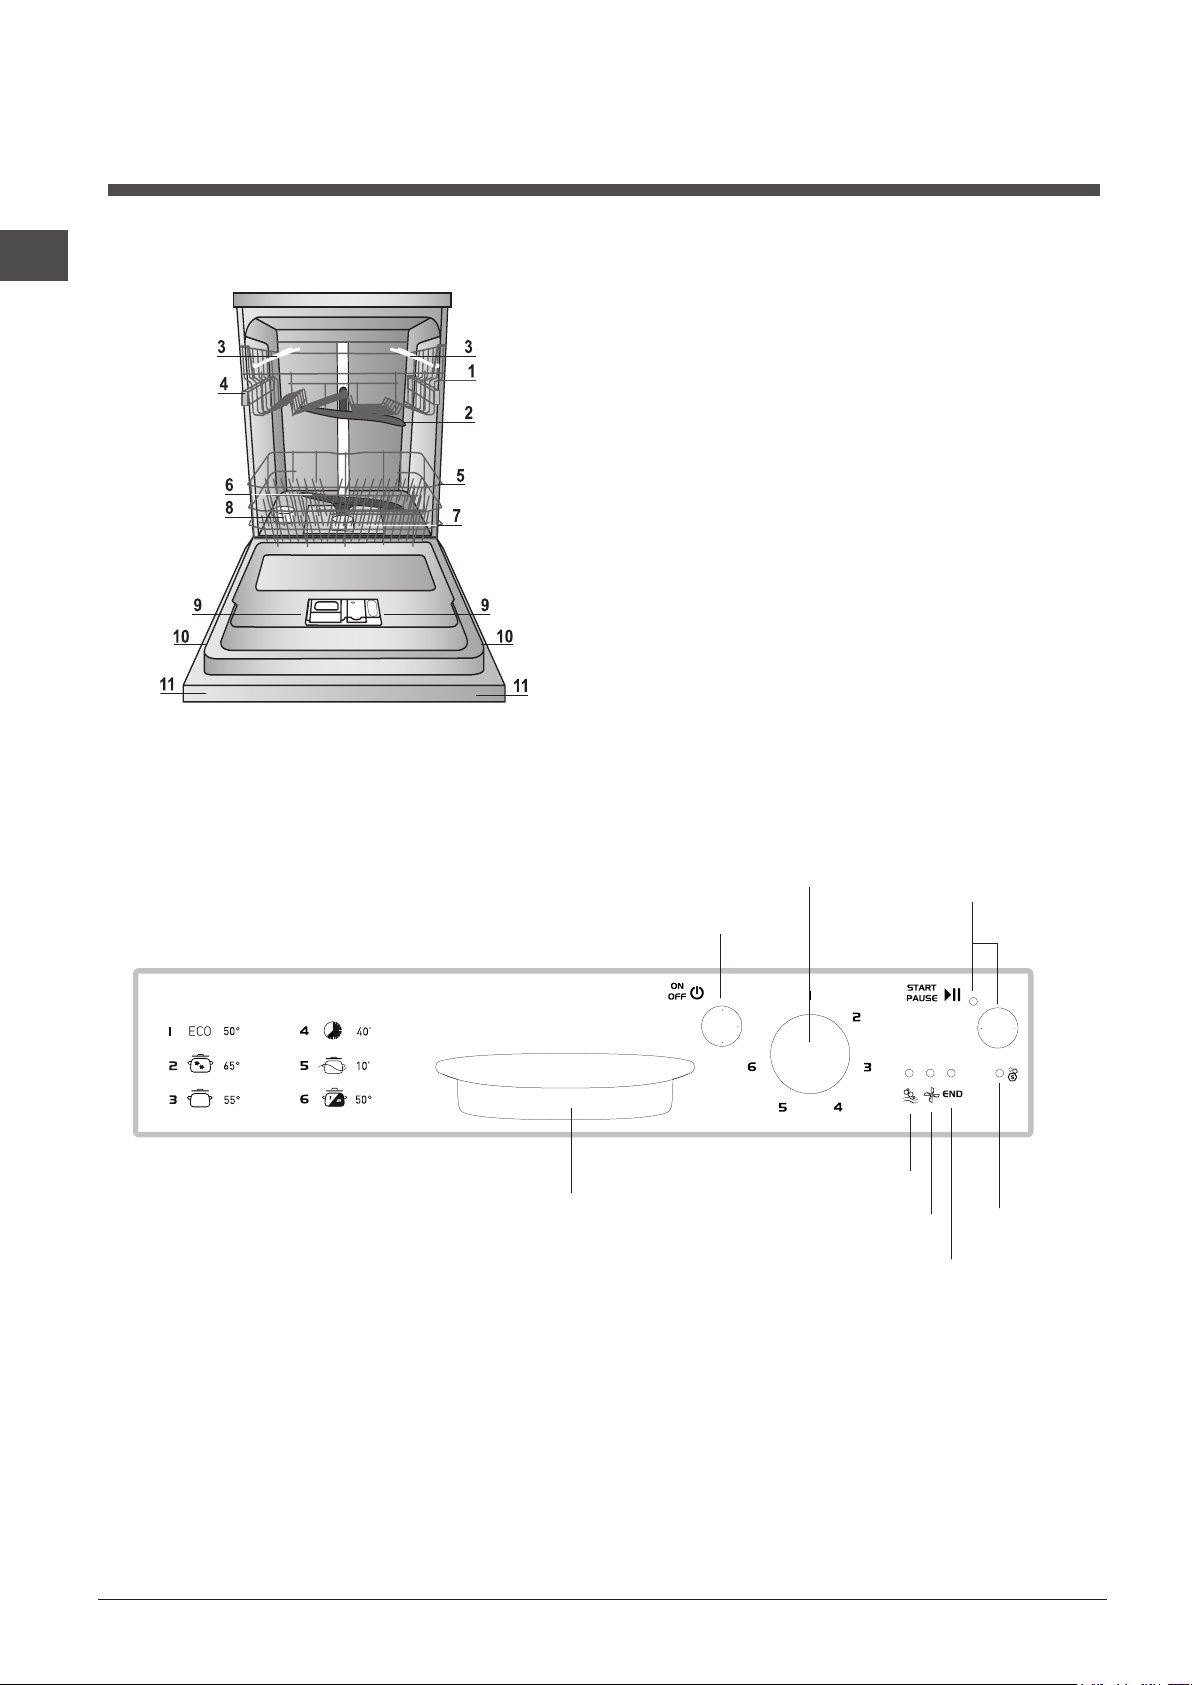
Vista d’insieme
Descrizione
dell’apparecchio
*** Solo sui modelli ad incasso totale * Presente solo su alcuni modelli.
Il numero e il tipo di programmi ed opzioni variano in base al modello di lavastoviglie.
1. Cestello superiore
2. Irroratore superiore
3. Ribaltine
4. Regolatore altezza cestello
5. Cestello inferiore
6. Irroratore inferiore
7. Filtro lavaggio
8. Serbatoio sale
9. Vaschetta detersivo, serbatoio brillantante e
dispositivo Active Oxygen*
10. Targhetta caratteristiche
11. Pannello comandi***
Pannello comandi
tasto e spia
Avvio/Pausa
tasto On-Off/Reset
manopola Selezione Programma
spia
mancanza
sale
spia Lavaggio
spia Asciugatura
spia Fine programma
maniglia apertura porta
IT
17
Tabella Durezze Acqua
Autonomia media
contenitore sale con 1
lavaggio al giorno
livello °dH °fH mmol/l mesi
1 0 - 6 0 - 10 0 - 1 7 mesi
2 6 - 11 11 - 20 1,1 - 2 5 mesi
3 12 - 17 21 - 30 2,1 - 3 3 mesi
4 17 - 34 31 - 60 3,1 - 6 2 mesi
5
*
34 - 50 61 - 90 6,1 - 9 2/3 settimane
Da 0°f a 10°f si consiglia di non utilizzare sale.
Con imposta-
zione 5 la durata può prolungarsi.
Usare solo prodotti specifici per lavastoviglie. Non usare
sale alimentare o industriale.
Seguire le indicazioni riportate sulla confezione.
Se si usa un prodotto multifunzione, si consiglia comunque
di aggiungere il sale, specie se l’acqua è dura o molto dura.
(Seguire le indicazioni riportate sulla confezione).
Non aggiungendo né sale né brillantante è normale che le
spie MANCANZA SALE* e MANCANZA BRILLANTANTE*
rimangano accese.
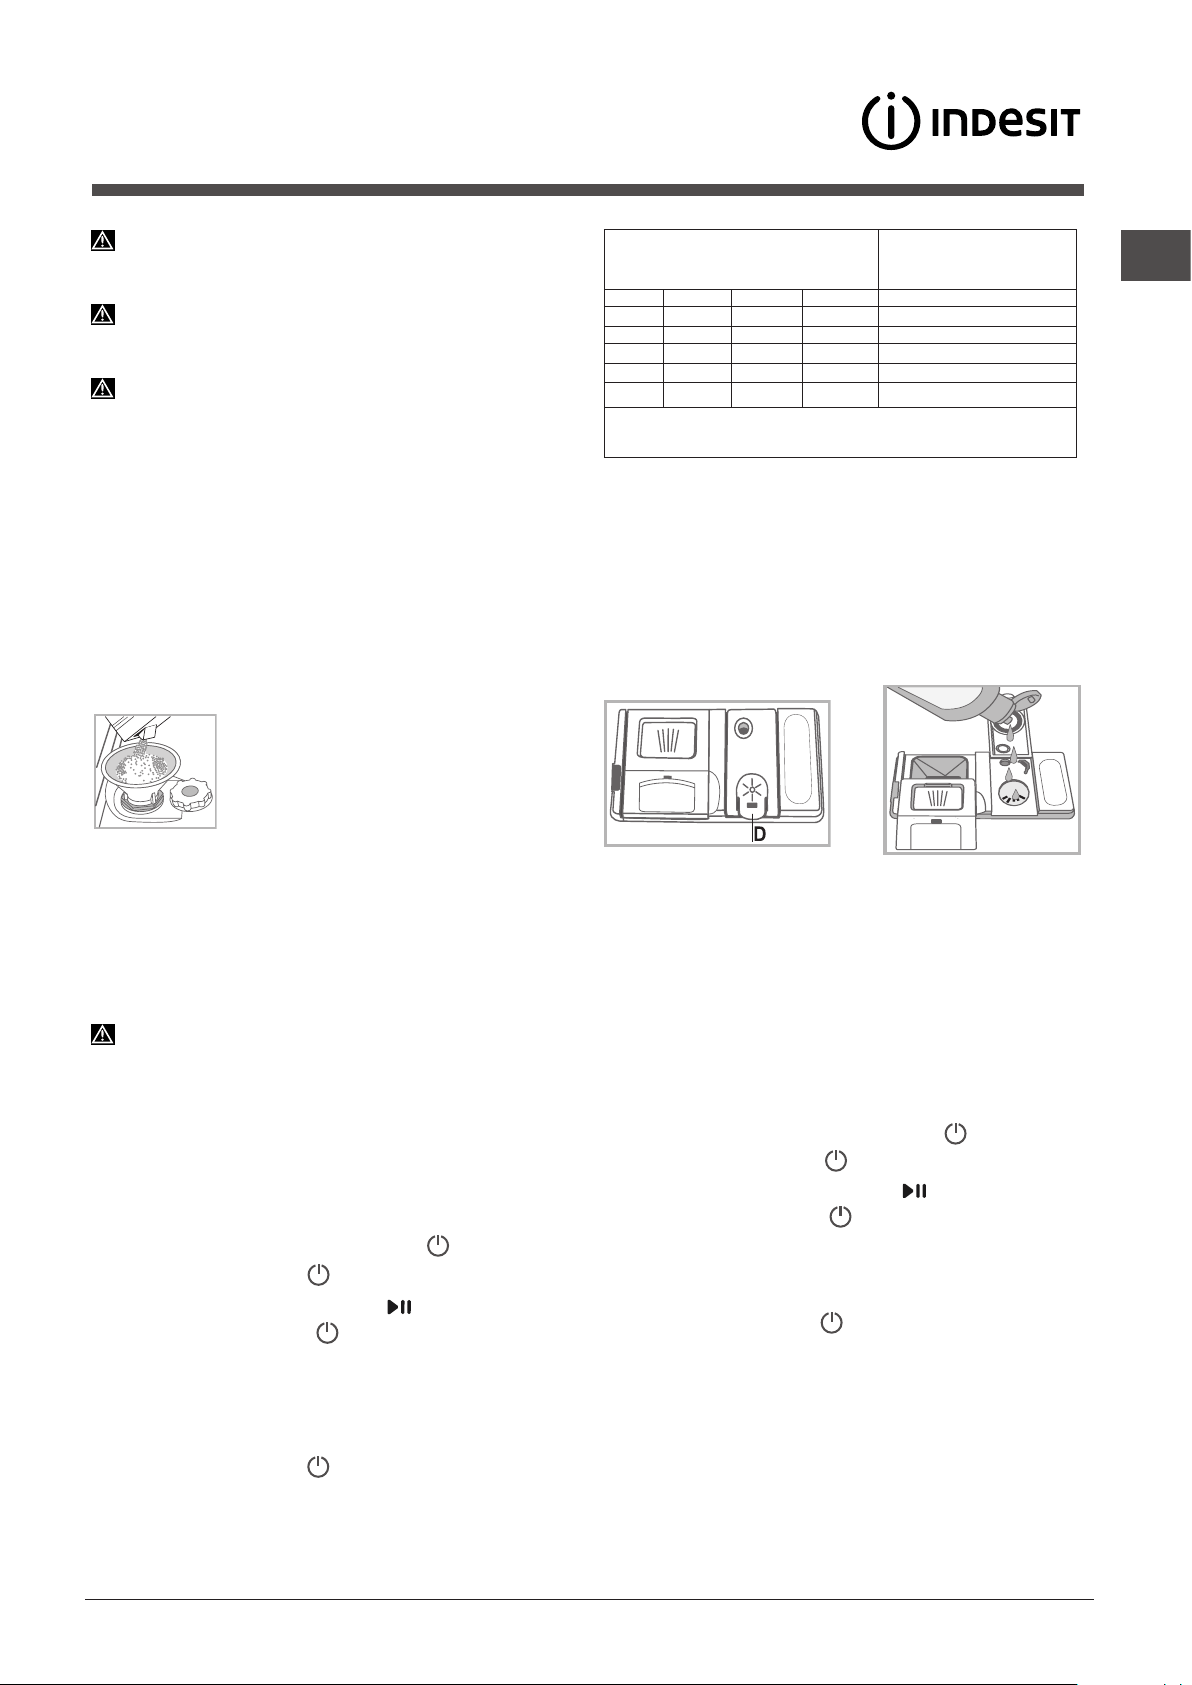
Caricare il sale rigenerante
L’utilizzo del sale evita la formazione di CALCARE sulle stoviglie e
su componenti funzionali della lavastoviglie.
•E’importantecheilserbatoiodelsalenonsiamaivuoto.
•E’importanteeffettuarel’impostazionedelladurezzadell’acqua.
Il serbatoio del sale è posto nella parte inferiore della lavastoviglie
(vedi Descrizione)
e va riempito:
•quandosulpannellosiaccendelaspiaMANCANZASALE
*;
•quandoilgalleggianteverde
* presente sul tappo sale, non è più
visibile.
•vediautonomiaintabelladurezzaacqua.
1. Estrarre il cesto inferiore e svitare il tappo del
serbatoio in senso antiorario.
2. Solo per il primo utilizzo: riempire il serbatoio
di acqua fino al bordo.
3. Posizionare l’imbuto
(vedi figura)
e riempire
il serbatoio di sale fino al bordo (circa 1 kg); è
normale che trabocchi un po’ d’acqua.
4. Togliere l’imbuto, eliminare i residui di sale dall’imbocco;
sciacquare il tappo sotto l’acqua corrente prima di avvitarlo.
E’ consigliabile effettuare questa operazione ad ogni caricamento
del sale.
Chiudere bene il tappo, affinché nel serbatoio non entri detersivo
durante il lavaggio (potrebbe danneggiarsi irrimediabilmente il
dolcificatore).
Quando è necessario caricare il sale, si consiglia di effettuare
l’operazione prima dell’avvio del lavaggio.
Impostazione durezza dell’acqua
Per ottenere un perfetto funzionamento dell’addolcitore anticalcare,
è indispensabile effettuare una regolazione in funzione della
durezza dell’acqua dell’appartamento. il dato è reperibile presso
l’Ente erogatore acqua potabile. Il valore impostato è pari ad una
durezza media.
•AccenderelalavastovigliedatastoON/OFF
•SpegneredatastoON/OFF
•TenerepremutoiltastoSTART/PAUSA 5 secondi.
•AccenderedatastoON/OFF
•Lampeggialaspiasale(ilnumerodeilampeggicorrispondealla
selezione corrente).
•Posizionare la manopola sul numero del livellodi durezza
desiderato
(vedi tabella durezza).
•SpegneredatastoON/OFF
•Impostazionecompletata!
Se si utilizzano le pastiglie multifunzione, riempire comunque il
serbatoio del sale.
Sale rigenerante e
Brillantante
Caricare il brillantante
Ilbrillantantefacilital’ASCIUGATURAdellestoviglie.Ilserbatoiodel
brillantante va riempito:
• quando sul pannello/displaysi accende laspia MANCANZA
BRILLANTANTE*
• quando l’indicatore ottico presente sullo sportellinodel
contenitore “D”, passa da scuro a trasparente.
1. Aprire il contenitore
“D” premendo e sollevando la linguetta
sul coperchio;
2. Introdurre con precauzione il brillantante fino al riferimento
massimo dell’apertura di riempimento evitando che fuoriesca.
Se accade, pulire subito con un panno asciutto.
3. Chiudere il coperchio fino allo scatto.
Non versare MAI il brillantante direttamente all’interno della
vasca.
Regolare la dose di brillantante
Se non si è soddisfatti del risultato dell’asciugatura, è possibile
regolare la dose di brillantante.
•AccenderelalavastovigliedatastoON/OFF
•SpegneredatastoON/OFF
•Premere3volteiltastoSTART/PAUSA
•AccenderedatastoON/OFF
•Tuttospento
•Posizionare la manopola sul numero del livellodi quantità di
brillantante da erogare.
•SpegneredatastoON/OFF
•Impostazionecompletata!
IllivellodibrillantantepuòessereimpostatoaZERO(ECO),intal
caso il brillantante non verrà erogato e non verrà accesa la spia di
mancanza brillantante in caso di esaurimento dello stesso.
Si possono impostare fino ad un max. di 4 livelli in base al modello
di lavastoviglie. Il valore impostato è pari ad un livello medio.
• sesullestovigliecisonostriaturebluastre,impostareversoi
numeri bassi (1-2).
• secisonogocced’acquaomacchiedicalcareimpostare
verso i numeri alti (3-4).
(°dH = durezza in gradi tedeschi - °fH = durezza in gradi francesi
- mmol/l = millimol/litro)
M
A
X
* Presente solo su alcuni modelli.
18
IT
Caricare i cesti
Suggerimenti
Prima di caricare i cesti, eliminare dalle stoviglie i residui di
cibo e vuotare bicchieri e i contenitori dei liquidi rimasti. Non è
necessario un risciacquo preventivo sotto acqua corrente.
Sistemare le stoviglie in modo che siano ben ferme e non si
ribaltino, i contenitori siano disposti con l’apertura rivolta in
basso e le parti concave o convesse in posizione obliqua, per
permettere all’acqua di raggiungere tutte le superfici e di defluire.
Fate attenzione che coperchi, manici, padelle e vassoi non
impediscano la rotazione degli irroratori. Disporre gli oggetti
piccoli nel cestino delle posate.
Le stoviglie in plastica e le padelle in antiaderente, tendono
a trattenere maggiormente le gocce d’ acqua e quindi il loro
grado di asciugatura risulterà inferiore a quello delle stoviglie in
ceramica o acciaio.
Gli oggetti leggeri (come i recipienti in plastica) devono essere
preferibilmente posizionati sul cesto superiore e disposti in modo
da non potersi muovere.
Dopo aver caricato, assicurarsi che gli irroratori ruotino
liberamente.
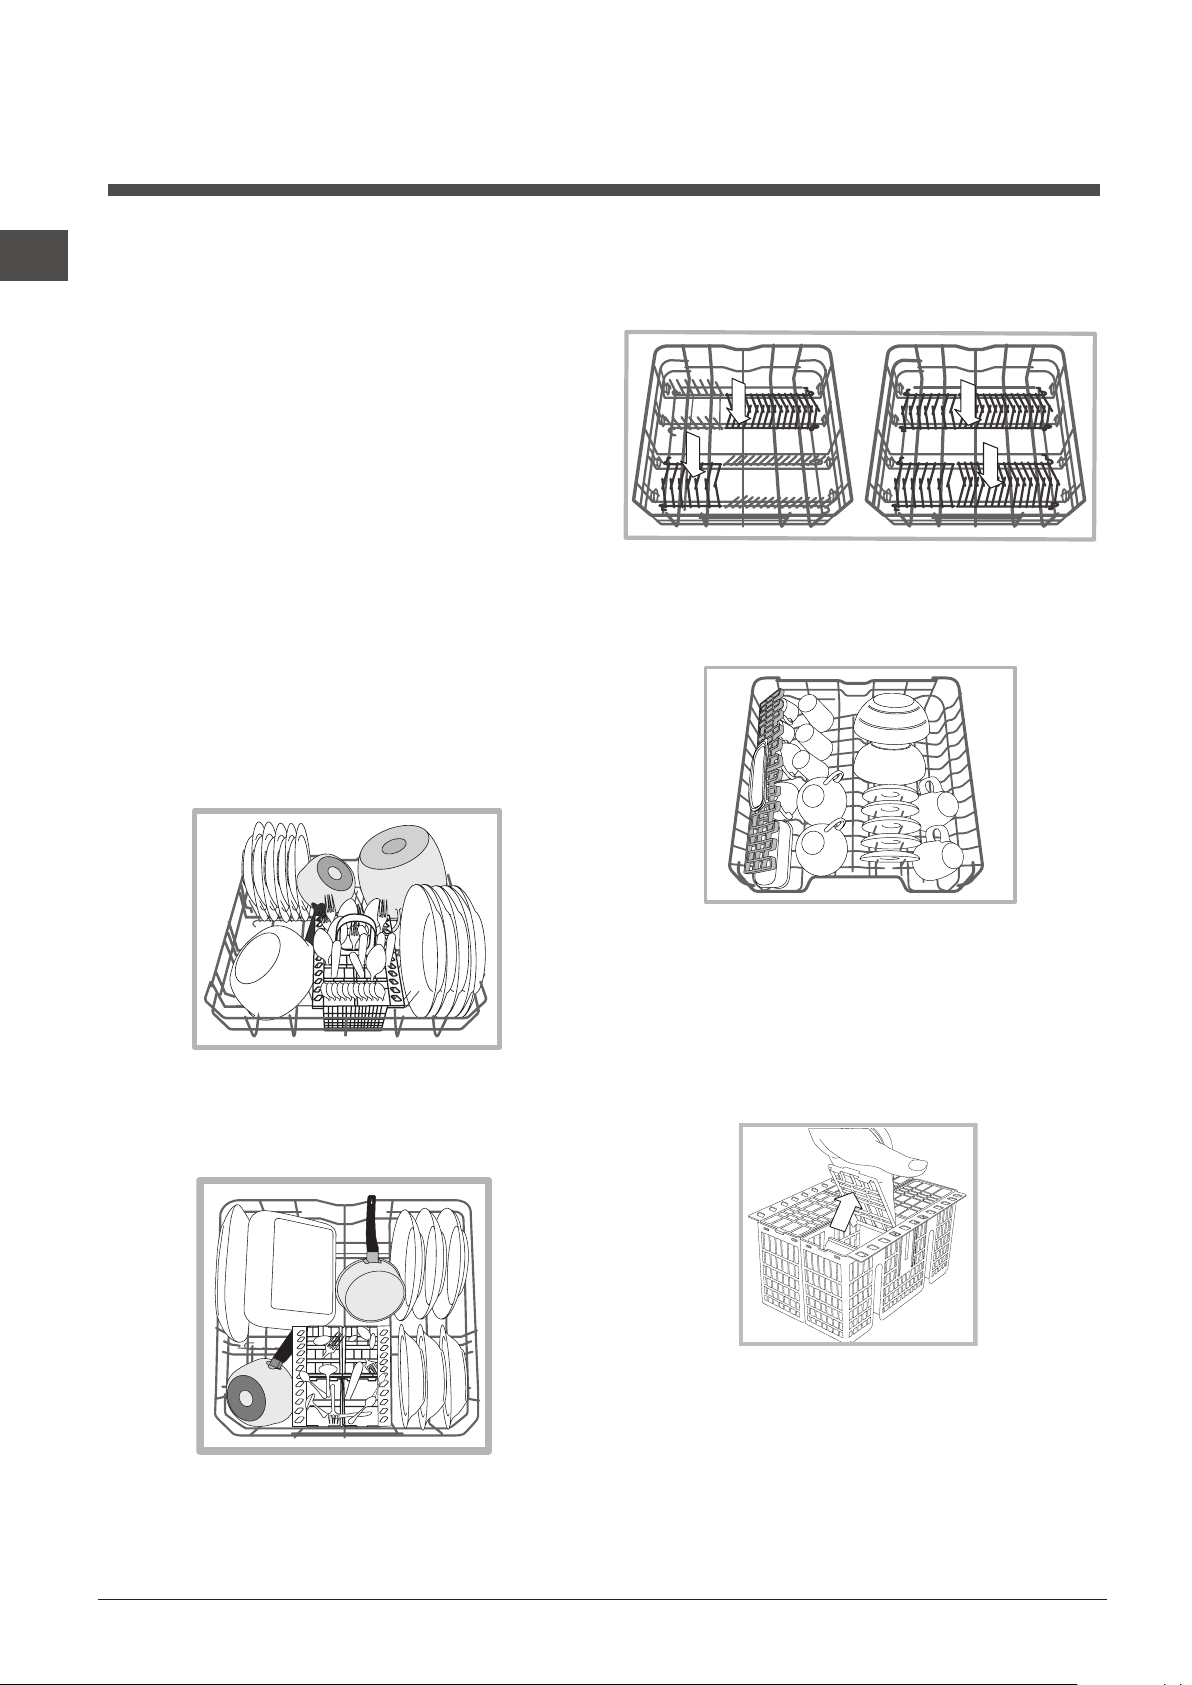
Cesto inferiore
Ilcesto inferiore può contenere pentole, coperchi, piatti,
insalatiere, posate ecc... Piatti e coperchi grandi vanno sistemati
di preferenza ai lati del cesto.
E’ consigliabile disporre le stoviglie molto sporche nel cesto
inferiore poichè in questo settore i getti d’acqua sono più energici
e permettono di ottenere migliori prestazioni di lavaggio.
Alcuni modelli di lavastoviglie, dispongono di settori reclinabili
*,
gli stessi si possono usare in posizione verticale per la
sistemazione dei piatti oppure in posizione orizzontale
(abbassati) per poter caricare più agevolmente pentole e
insalatiere.
Cesto superiore
Caricare stoviglie delicate e leggere: bicchieri, tazze, piattini,
insalatiere basse.
Alcuni modelli di lavastoviglie, dispongono di settori reclinabili
*,
utilizzabili in posizione verticale per sistemare piattini da thè o
dessert o abbassati per caricare ciotole e contenitori per alimenti.
Cestino delle posate
Il cestino delle posate è munito di griglie superiori per una migliore
disposizione delle stesse. Deve essere posizionato solo nella
parte anteriore del cesto inferiore.

IT
19
*Presente solo in alcuni modelli e variabili per numero e posizione.
Regolare l’altezza del cesto superiore
Per agevolare la sistemazione delle stoviglie, è possibile
sistemare il cesto superiore in posizione alta o bassa.
E’ preferibile regolare l’altezza del cesto superiore a CESTO
VUOTO.
Non sollevare o abbassare MAI il cesto su un solo lato.
Se il cesto è dotato di Lift-Up
*
(vedi figura)
, sollevare il
cesto afferrandolo ai lati e muovere verso l’alto. Per tornare
nella posizione bassa, premere le leve (A) ai lati del cesto ed
accompagnare la discesa verso il basso.
Stoviglie non idonee
• Posateestovigliedilegno.
• Bicchieridecoratidelicati,stovigliediartigianatoartisticoedi
antiquariato. Le loro decorazioni non sono resistenti.
• Partiinmaterialesinteticononresistentiallatemperatura.
• Stovigliedirameestagno.
• Stoviglie sporche dicenere, cera, grassolubrificante o
inchiostro.
Le decorazioni su vetro, i pezzi di alluminio e argento durante il
lavaggio possono tendere a cambiare colore ed a sbiancarsi.
Anche alcuni tipi di vetro (per es. oggetti di cristallo) dopo molti
lavaggi possono diventare opachi.
Danni al vetro ed alle stoviglie
Cause:
•Tipodivetroeprocedimentodiproduzionedelvetro.
•Composizionechimicadeldetersivo.
•Temperaturadell’acquadelprogrammadirisciacquo.
Consiglio:
•Utilizzaresolobicchierieporcellanagarantitidalproduttore
come resistenti al lavaggio in lavastoviglie.
•Usaredetersivodelicatoperstoviglie.
• Estrarre bicchierie posatedallalavastoviglie alpiù presto
possibile dopo la fine del programma.
Ribaltine a posizione variabile*
Le ribaltine laterali sono posizionabili su tre altezze differenti per
ottimizzare la disposizione delle stoviglie nello spazio del cesto.
I calici possono essere posizionati
stabilmente sulle ribaltine inserendo lo
stelo del bicchiere nelle apposite asole.
Per ottimizzare l’asciugatura, posizionare
le ribaltine con l’inclinazione maggiore.
Per variare l’inclinazione, sollevare la
ribaltina, farla scorrere leggermente e
posizionarla come desiderata.
Il cesto superiore è regolabile in altezza a seconda della
necessità: in posizione alta quando nel cesto inferiore si vogliono
sistemare stoviglie ingombranti; in posizione bassa, in modo
da sfruttare gli spazi delle ribaltine o dei reclinabili creando più
spazio verso l’alto.
20
IT
* Presente solo su alcuni modelli.
Avviare la lavastoviglie
1. Premere il tasto ON-OFF:
2. Aprire la porta e dosare il detersivo.
(vedi caricare il detersivo).
3. Caricare i cesti
(vedi Caricare i cesti)
e chiudere la porta.
4.
Selezionare il programma ruotando la manopola
SELEZIONE PROGRAMMA in senso orario: far coincidere
la tacca sulla manopola con il numero o il simbolo del
programma desiderato. La spia relativa al tasto AVVIO/
PAUSAsiillumina.
5. Selezionare le opzioni di lavaggio*
(vedi programmi Speciali
ed opzioni).
6. Avviare premendo il tasto Avvio/Pausa: l’accensione della
spia relativa al lavaggio avvisa dell’inizio del programma.
7. Alla fine alcuni segnali acustici* segnalano la fine del
programma e si illumina la spia END. Spegnere l’apparecchio
premendo il tasto ON-OFF.
8. Aspettare alcuni minuti prima di togliere le stoviglie, per evitare
di scottarsi. Scaricare i cesti iniziando da quello inferiore.
Per ridurre il consumo di energia elettrica, in alcune
condizioni di NON utilizzo prolungato, la macchina si
spegne automaticamente.
Modificare un programma in corso
Se si è selezionato un programma sbagliato è possibile
modificarlo, purché appena iniziato: a lavaggio avviato, per
cambiare ciclo di lavaggio spegnere la macchina con una
pressione prolungata del tasto ON/OFF/Reset, riaccenderla
con lo stesso tasto e selezionare nuovamente programma e
opzioni desiderati.
Aggiungere altre stoviglie
Premere il tasto Avvio/Pausa, (la luce del tasto pulsa) Aprire la
porta facendo attenzione alla fuoriuscita di vapore e inserire
le stoviglie. Premere il tasto Avvio/Pausa (luce fissa): il ciclo
riprende.
Premendo il tasto Avvio/Pausa per mettere in pausa la
macchina, si interrompe sia il programma sia la Partenza
Ritardata se impostato.
Inquestafasenonsipuòcambiareilprogramma.
Interruzioni accidentali
Se durante il lavaggio si apre la porta o si verifica
un’interruzione di corrente, il programma si interrompe.
Riprende dal punto in cui si era interrotto quando si chiude
la porta o torna la luce.
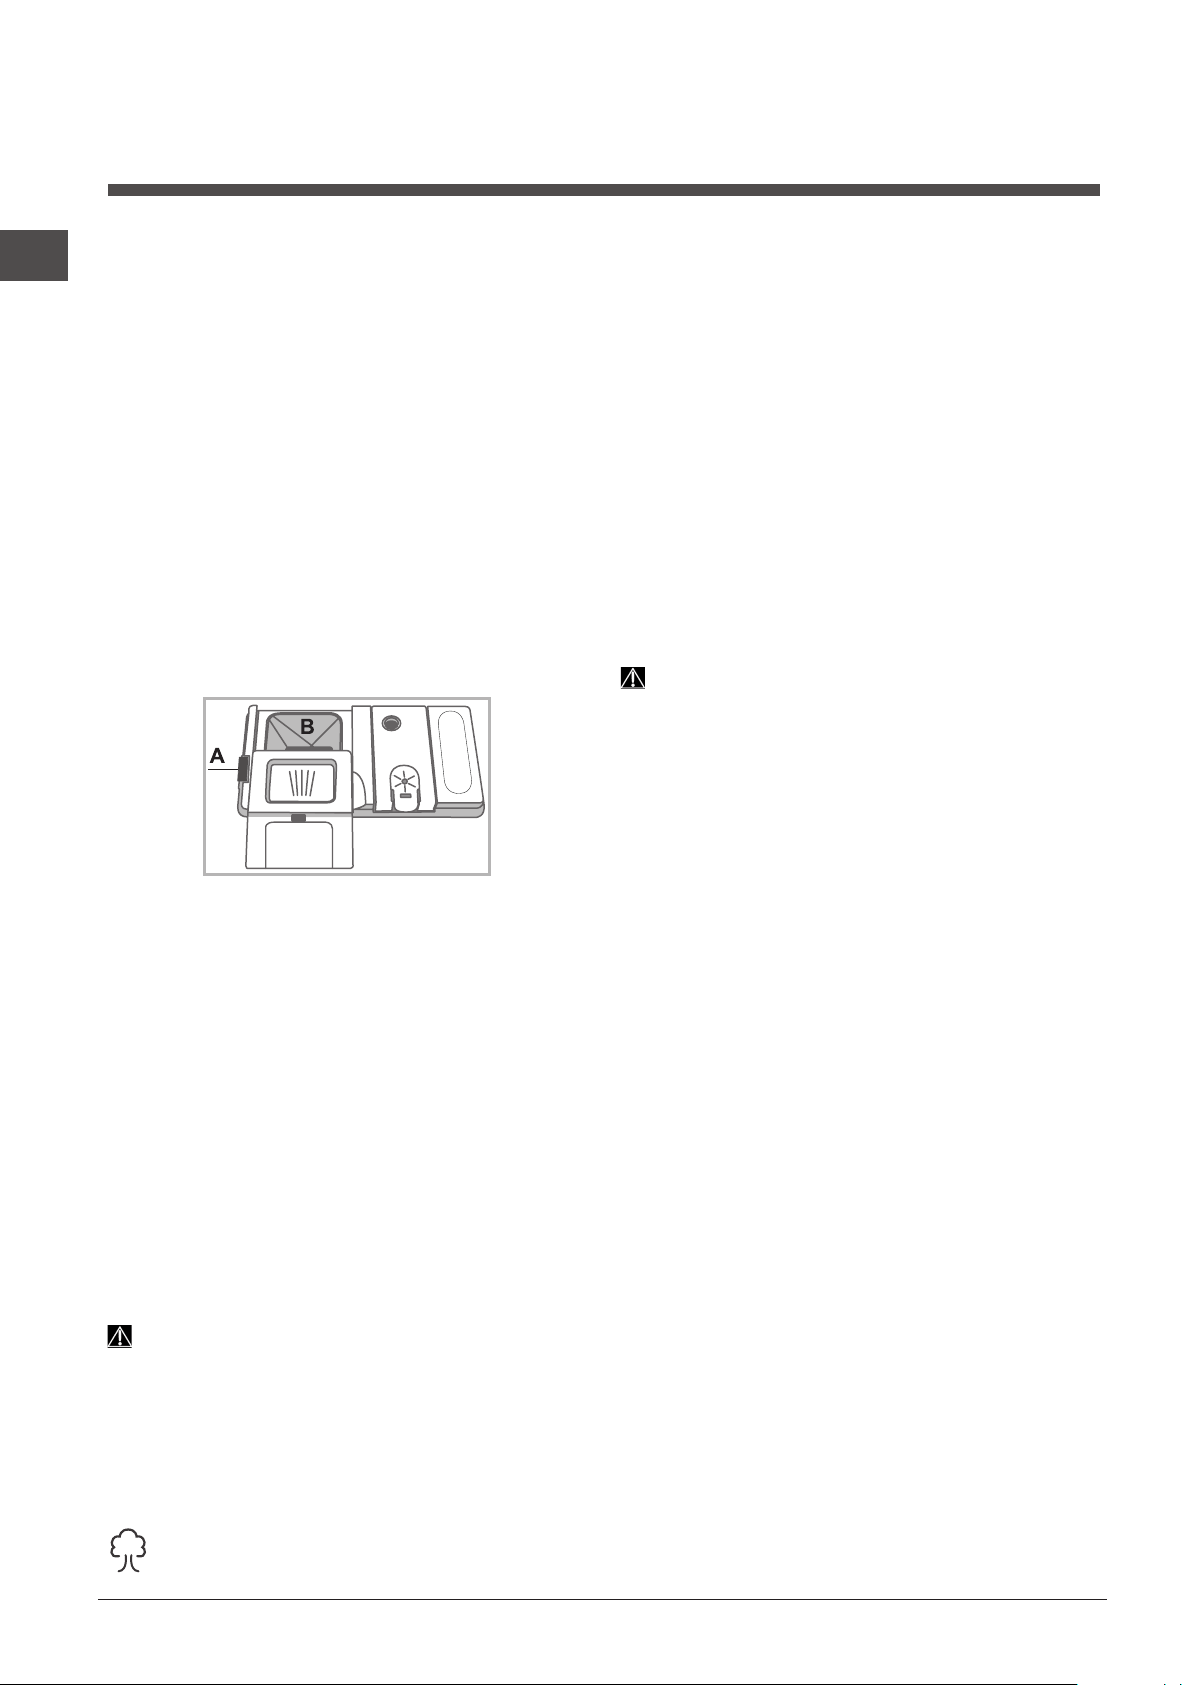
Caricare il detersivo
Il buon risultato del lavaggio dipende anche dal corretto
dosaggio del detersivo, eccedendo non si lava in modo più
efficace e si inquina l’ambiente.
A seconda del grado di sporco, il dosaggio può essere
adattato al singolo caso con un detersivo in polvere o liquido.
Solitamente per uno sporco normale, utilizzare circa 35
gr. (detersivo in polvere), o 35ml (detersivo liquido). Se si
impiegano le pastiglie ne basta una.
Se le stoviglie sono poco sporche o sono state sciacquate
precedentemente sotto l’acqua, ridurre sensibilmente la dose
del detersivo.
Per un buon risultato di lavaggio osservare anche le istruzioni
riportate sulle confezioni del detersivo.
In caso di ulteriori domande consigliamo di rivolgersi agli
uffici di consulenza dei produttori di detersivi.
Per aprire il contenitore del detersivo, azionare il dispositivo
di apertura “A”
Introdurre il detersivo solo nella vaschetta “B” asciutta. La
quantità di detersivo adibita al prelavaggio, deve essere
posizionata direttamente in vasca.
1. Dosare il detersivo consultando la
Tabella dei programmi
per
introdurne la quantità corretta.
Nella vaschetta B è presente un livello che indica la quantità
massima di detersivo liquido o in polvere inseribile per ogni ciclo.
2. Eliminare i residui di detersivo dai bordi della vaschetta e
chiudere il coperchio fino allo scatto.
3. Chiudere il coperchio del contenitore detersivo spingendolo in
alto, fino al corretto innesto del dispositivo di chiusura.
Il contenitore detersivo si apre automaticamente in funzione del
programma, al momento opportuno.
Se vengono utilizzati detersivi combinati, è consigliato utilizzare
l’opzione TABS, che adegua il programma di lavaggio, in modo
da raggiungere sempre il migliore risultato di lavaggio e di
asciugatura possibile.
Utilizzare solo detersivo per lavastoviglie.
NON UTILIZZARE detersivi per lavaggio a mano.
Un utilizzo eccessivo di detersivo può lasciare residui di
schiuma a fine ciclo.
Le migliori prestazioni di lavaggio ed asciugatura, si ottengono
solo con l’utilizzo combinato di detersivo, brillantante liquido
e sale rigenerante.
Si consiglia di usare detersivi senza fosfati e senza
cloro che sono i più indicati per la tutela dell’ambiente.
Detersivo e uso della lavastoviglie
IT
21
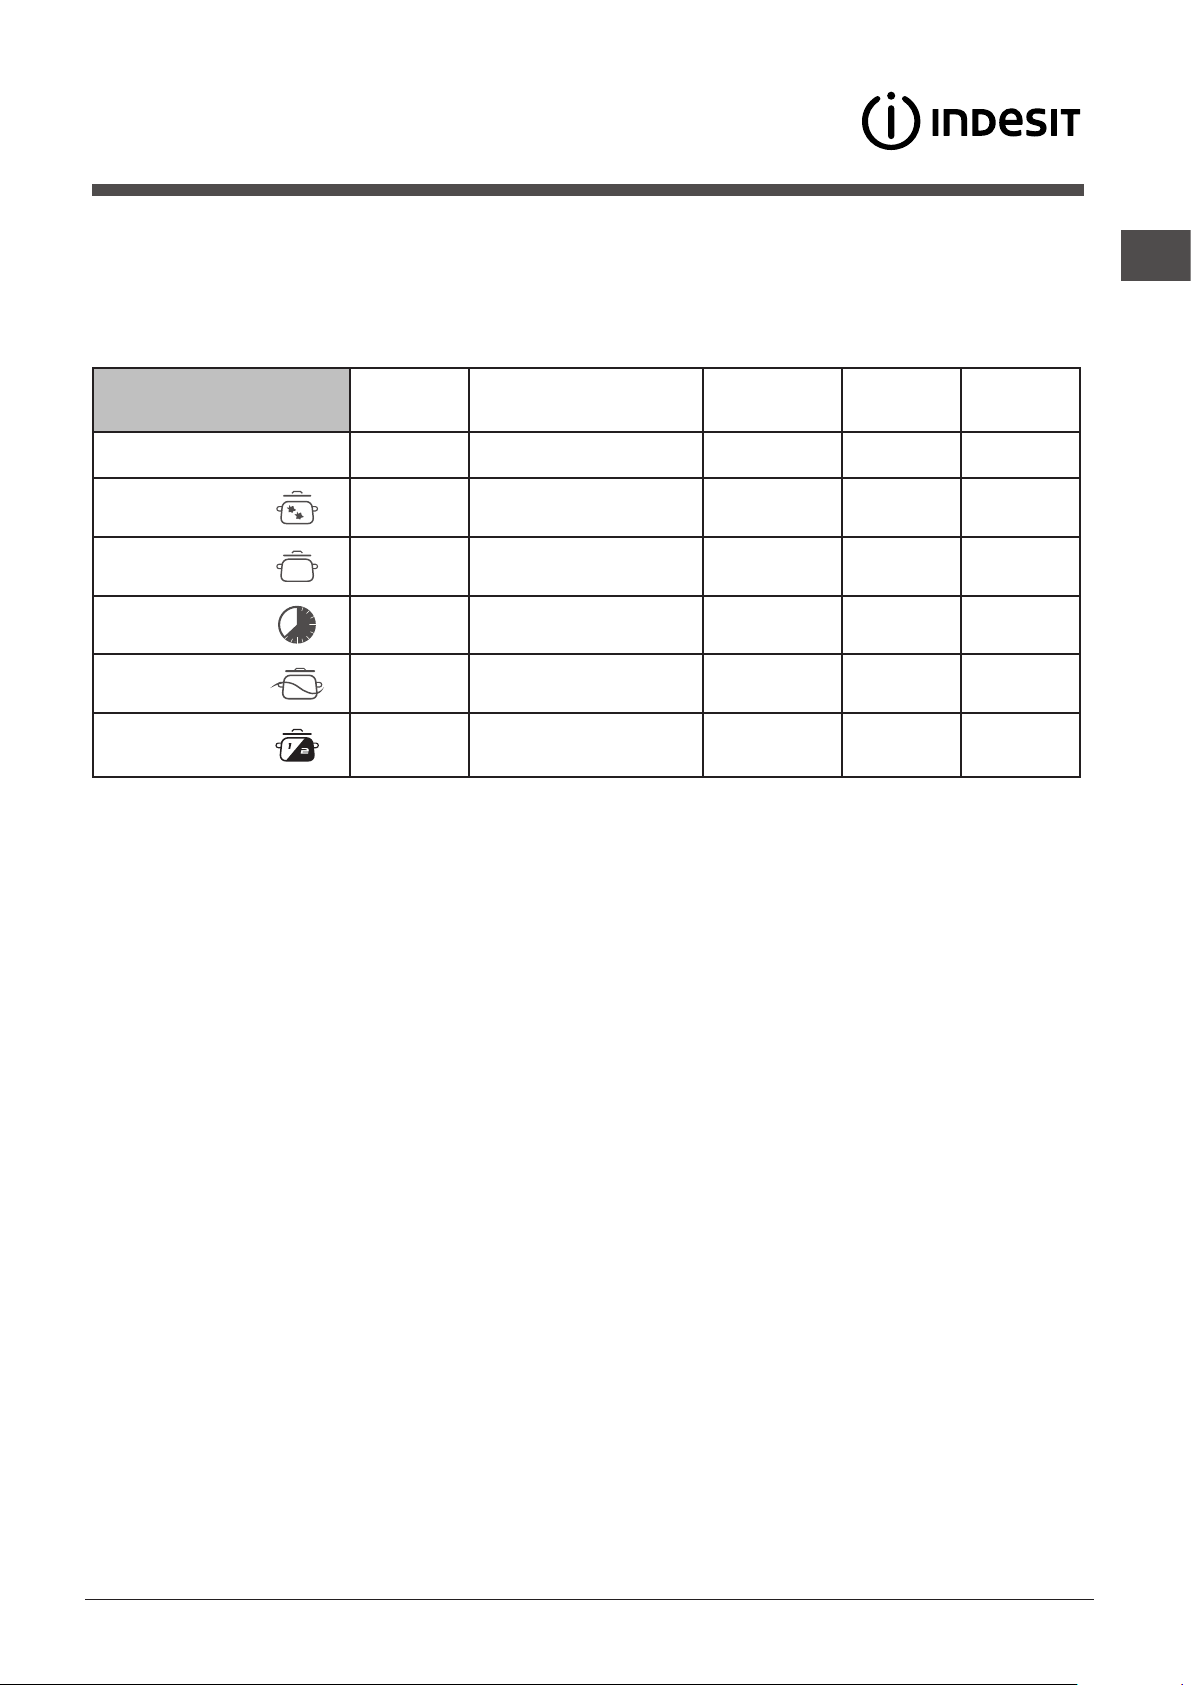
Programmi
I dati dei programmi sono misurati in condizioni di laboratorio secondo Norma europea EN 50242.
A seconda delle diverse condizioni di utilizzo, la durata e i dati dei programmi possono variare.
Il numero e il tipo di programmi ed opzioni variano in base al modello di lavastoviglie.
Note:
lemiglioriprestazionidelprogramma“Rapido40’”,siottengonopreferibilmenterispettandoilnumerodicopertispecificati.
Per consumare di meno usa la lavastoviglie a pieno carico.
Nota per i laboratori di Prove: per informazioni sulle condizioni della prova comparativa EN, farne richiesta all’indirizzo:
Programma Asciugatura Opzioni
Durata del
programma
ore:min.
Consumo
acqua
(l/ciclo)
Consumo
Energia
(kWh/ciclo)
1. Eco
Si
No 02:18’ 11,0 1,04
2. Intensivo
Si
No 02:30’ 16,5 1,70
3. Normale
Si
No 02:00’ 16 1,40
4. Rapido 40’
No
No 00:40’ 9,0 0,95
5. Ammollo
No
No 00:10’ 4,0 0,01
6. Mezzo carico
Si
No 01:20’ 12,0 1,15
Indicazioni per la scelta dei programmi e dosaggio del detersivo
1. Il ciclo di lavaggio ECO è il programma standard a cui si riferiscono i dati dell’etichetta energetica; questo ciclo è adatto a
lavare stoviglie normalmente sporche ed è il programma più efficiente in termini di consumo energetico e di acqua per questo tipo
di stoviglie. 27 gr/ml + 6 gr/ml** – 1 Tab
(**Quatità di detersivo del prelavaggio)
2. Stoviglie e pentole molto sporche (non usare per pezzi delicati). 30 gr/ml – 1 Tab
3. Stoviglie e pentole normalmente sporche. 27 gr/ml + 6 gr/ml
** – 1 Tab
4. Ciclo veloce da utilizzare per stoviglie poco sporche. (ideale per 2 coperti) 25 gr/ml – 1 Tab
5. Lavaggio preliminare in attesa di completare il carico al pasto successivo. No detersivo
6. Ciclo ideale per un carico ridotto di stoviglie con sporco normale. 25 gr/ml – 1 Tab
Consumi di stand-by: Consumo di left-on mode: 5,0 W - consumo di off mode: 0,5 W

22
IT
Manutenzione e cura
Escludere acqua e corrente elettrica
• Chiudere il rubinetto dell’acquadopo ogni lavaggioper
eliminare il pericolo di perdite.
• Staccarelaspinadallapresadicorrentequandosipulisce
la macchina e durante i lavori di manutenzione.
Pulire la lavastoviglie
• Lasuperficieesternaeilpannellodicontrollopossonoessere
puliti con un panno inumidito con acqua non abrasivo. Non
usare solventi o detersivi
abrasivi.
• Lavascainternapuòesserepulitadaeventualimacchiecon
un panno imbevuto di acqua e poco aceto.
Evitare i cattivi odori
• Lasciaresempresocchiusalaportaperevitareilristagnodi
umidità.
• Pulireregolarmenteleguarnizioniperimetraliditenutadella
porta e delle vaschette detersivo con una spugnetta umida.
Si eviteranno così ristagni di cibo, principali responsabili del
cattivo odore.
Pulire gli irroratori
Puòsuccederecheresiduidicibosiattacchinoagliirroratorie
ostruiscano i fori da cui esce l’acqua: di tanto in tanto è bene
controllarli e pulirli con uno spazzolino non metallico.
I due irroratori, sono entrambi smontabili.
Per smontare l’irroratore
superiore, occorre svitare girando
in senso antiorario la ghiera di
plastica.L’irroratore superiore, va
rimontato con la parte con il maggior
numero di fori rivolta verso l’alto.
L’irroratore inferiore si smonta
facendo pressione sulle linguette
poste ai lati e tirandolo verso l’alto.
Pulizia del filtro entrata
acqua*
Se i tubi dellacqua sono nuovi o sono rimasti per lungo tempo
inattivi, prima di fare l’allacciamento, far scorrere l’acqua fino
a che diventi limpida e sia priva di impurità. Senza questa
precauzione, c’è il rischio che il punto dove entra l’acqua si
intasi, danneggiando la lavastoviglie.
Periodicamente, pulire il filtro entrata acqua posizionato
all’uscita del rubinetto.
- Chiudere il rubinetto dell’acqua.
- Svitare l’estremità del tubo di carico acqua, togliere il filtro e
pulirlo delicatamente sotto un getto di acqua corrente.
- Inserire nuovamente il filtro e avvitare il tubo.
Pulire i filtri
Il gruppo filtrante è formato da tre filtri che puliscono l’acqua di
lavaggio dai residui di cibo e la rimettono in circolo: per avere
buoni risultati di lavaggio è necessario pulirli.
Pulire i filtri con regolarità.
La lavastoviglie non deve essere usata senza filtri o con filtro
sganciato.
•Dopo alcuni lavaggi, controllare il gruppo filtrantee se
necessario pulirlo accuratamente sotto acqua corrente,
aiutandosi con uno spazzolino non metallico, seguendo le
istruzioni sotto riportate:
1. ruotare in senso antiorario il filtro cilindrico C ed estrarlo
(fig. 1).
2. Estrarre il bicchiere filtro B facendo una leggera pressione
sulle alette laterali
(Fig. 2);
3. Sfilare il piatto filtro inox A.
(fig. 3).
4. Ispezionare il pozzetto ed eliminare eventuali residui di cibo.
NON RIMUOVERE MAI la protezione della pompa di lavaggio
(particolare di colore nero) (fig.4).
Dopo la pulizia dei filtri, rimontare il gruppo filtrante e ricollocarlo
correttamente nella sua sede; è fondamentale per un buon
funzionamento della lavastoviglie.
Se ci si assenta per lunghi periodi
• Staccarei collegamenti elettricie chiudere ilrubinetto
dell’acqua.
• Lasciaresocchiusalaporta.
•Alrientro,fareunlavaggioavuoto.
* Presente solo su alcuni modelli.
IT
23
Anomalie e rimedi
Qualora l’apparecchio presenti delle anomalie di funzionamento, controllare i seguenti punti prima di rivolgersi all’Assistenza.
* Presente solo su alcuni modelli.
Anomalie: Possibili cause / Soluzione:
La lavastoviglie non parte o
non risponde ai comandi
• Spegnere la macchina con il tasto ON/OFF, riaccendere dopo un minuto circa e reimpostare
il programma.
• La spina non è ben inserita nella presa di corrente.
• La porta della lavastoviglie non è ben chiusa.
La porta non si chiude • Verica che i cesti siano inseriti no in fondo.
• La serratura è scattata; spingere energicamente la porta no a sentire il “clack”.
La lavastoviglie non scarica
acqua.
• Il programma di lavaggio non è ancora terminato.
• Il tubo di scarico dell’acqua è piegato (vedi Installazione).
• Lo scarico del lavello è ostruito.
• Il ltro è intasato da residui di cibo.
La lavastoviglie fa rumore. • Le stoviglie sbattono tra loro o contro gli irroratori. Posizionare le stoviglie
correttamente
• Eccessiva presenza di schiuma: il detersivo non è dosato adeguatamente o non è
idoneo al lavaggio in lavastoviglie. (vedi Avvio e utilizzo). Non prelavare a mano le
stoviglie.
Su stoviglie e bicchieri ci sono
depositi calcarei o una patina
biancastra.
• Manca il sale rigenerante.
• La regolazione della durezza dell’acqua non è adeguata; aumentare i valori. (vedi
Brillantante e sale).
• Il tappo del serbatoio del sale non è chiuso bene.
• Il brillantante è esaurito o il dosaggio è insufciente.
Su stoviglie e bicchieri ci sono
striature o sfumature bluastre.
• Il dosaggio del brillantante è eccessivo.
Le stoviglie sono poco asciutte. • È stato selezionato un programma senza asciugatura.
• Il brillantante è esaurito. (vedi Brillantante e sale).
• La regolazione del brillantante non è adeguata.
• Le stoviglie sono in materiale antiaderente o in plastica; è normale la presenza di gocce
d’acqua.
Le stoviglie non sono pulite. • Le stoviglie non sono sistemate correttamente.
• Gli irroratori non sono liberi di ruotare, bloccati da stoviglie.
• Il programma di lavaggio è troppo blando (vedi Programmi).
• Eccessiva presenza di schiuma: il detersivo non è dosato adeguatamente o non
è idoneo al lavaggio in lavastoviglie. (vedi Avvio e utilizzo).
• Il tappo del brillantante non è stato chiuso correttamente.
• Il ltro è sporco o intasato (vedi Manutenzione e cura).
• Manca il sale rigenerante (vedi Brillantante e sale).
La lavastoviglie non carica
acqua
è bloccata con spie
lampeggianti
• Manca l’acqua nella rete idrica o il rubinetto è chiuso.
• Il tubo di carico dell’acqua è piegato (vedi Installazione). Riprogrammare la macchina e
riavviare.
• I ltri sono intasati; è necessario pulirli.
• Lo scarico è intasato; è necessario pulirlo.
• Dopo aver effettuato le operazioni di verica e pulizia, spegnere ed accendere la lavastovi
glie e far ripartire un nuovo ciclo di lavaggio.
• Se il probblema persiste, chiudere il rubinetto dell’acqua, staccare la spina e contattare il
centro assistenza.

EN
24
Installation
* Only available in selected models.
If the appliance must be moved at any time, keep it in an
upright position; if absolutely necessary, it may be tilted onto
its back.
Connecting the water supply
Adaptation of the water supply for installation should only
be performed by a qualified technician.
The water inlet and outlet hoses may be positioned towards
the right or the left in order to achieve the best possible
installation.
Make sure the dishwasher does not bend or squash the hoses.
Connecting the water inlet hose
• Toa3/4”gascoldor hotwaterconnectionpoint(max.
60°C).
• Runthewateruntilitisperfectlyclear.
• Screwtheinlethosetightlyintopositionandturnoffthe
tap.
If the inlet hose is not long enough, contact a specialist
store or an authorised technician
(seeAssistance)
.
The water pressure must be within the values indicated
in the Technical Data table - otherwise the dishwasher may
be function properly.
Make sure the hose is not bent or compressed.
Connecting the water outlet hose
Connect the outlet hose to a drain duct with a minimum
diameterof2cm.(A)
The outlet hose connection must be at a height ranging from
40to80cmfromthefloororsurfacewherethedishwasher
rests.
Before connecting the water outlet hose to the sink drain,
removetheplasticplug(B).
Anti-flooding protection
To ensure floods do not occur, the dishwasher:
- is provided with a special system which blocks the water
supply in the event of anomalies or leaks from inside the
appliance.
Somemodelsarealso equipped with the supplementary
safety device New Acqua Stop*, which guarantees anti-
flooding protection even in the event of a supply hose rupture.
WARNING: HAZARDOUS VOLTAGE!
Under no circumstances should the water inlet hose be cut
as it contains live electrical parts.
Electrical connection
Before inserting the plug into the electrical socket, make
sure that:
• Thesocketis earthed
and complies with current
regulations;
• the socketcanwithstand the maximum load of the
appliance as shown on the data plate located on the inside
of the door
(seechapterDescriptionoftheappliance);
• Thepowersupplyvoltagefallswithinthevaluesindicated
on the data plate on the inside of the door.
• Thesocketiscompatiblewiththeplugoftheappliance.If
this is not the case, ask an authorised technician to replace
theplug(
see Assistance
).Donotuseextensioncablesor
multiple sockets.
Once the appliance has been installed, the power supply
cable and the electrical socket should be easily accessible.
The cable should not be bent or compressed.
If the power supply cable is damaged, have it replaced
by the manufacturer or its authorised Technical Assistance
Serviceinorder to prevent all potential hazards.
(See
Assistance)
The Company shall not be held responsible for any
incidents, if these regulations are not observed.
Positioning and levelling
1. Position the dishwasher on a level sturdy floor. If the floor is
uneven, the front feet of the appliance may be adjusted until
itreachesahorizontalposition.Iftheapplianceislevelled
correctly, it will be more stable and much less likely to move
or cause vibrations and noise while it is operating.
2. Before recessing the dishwasher, stick the adhesive
transparent strip
* under the wooden shelf in order to protect
it from any condensation which may form.
3.Placethedishwashersothatitssidesorbackpanelarein
contact with the adjacent cabinets or the wall. This appliance
can also be recessed under a single worktop
*
(seethe
Assembly instruction sheet)
.
4
*.Toadjusttheheightoftherearfoot,turntheredhexagonal
bushing on the lower central part at the front of the dishwasher
usingahexagonalspannerwithanopeningof8mm.Turnthe
spanner in a clockwise direction to increase the height and
in an anticlockwise direction to decrease it.
(seeBuilding-in
instruction sheet attached to the documentation)
MIN 40 cm
MAX 80 cm
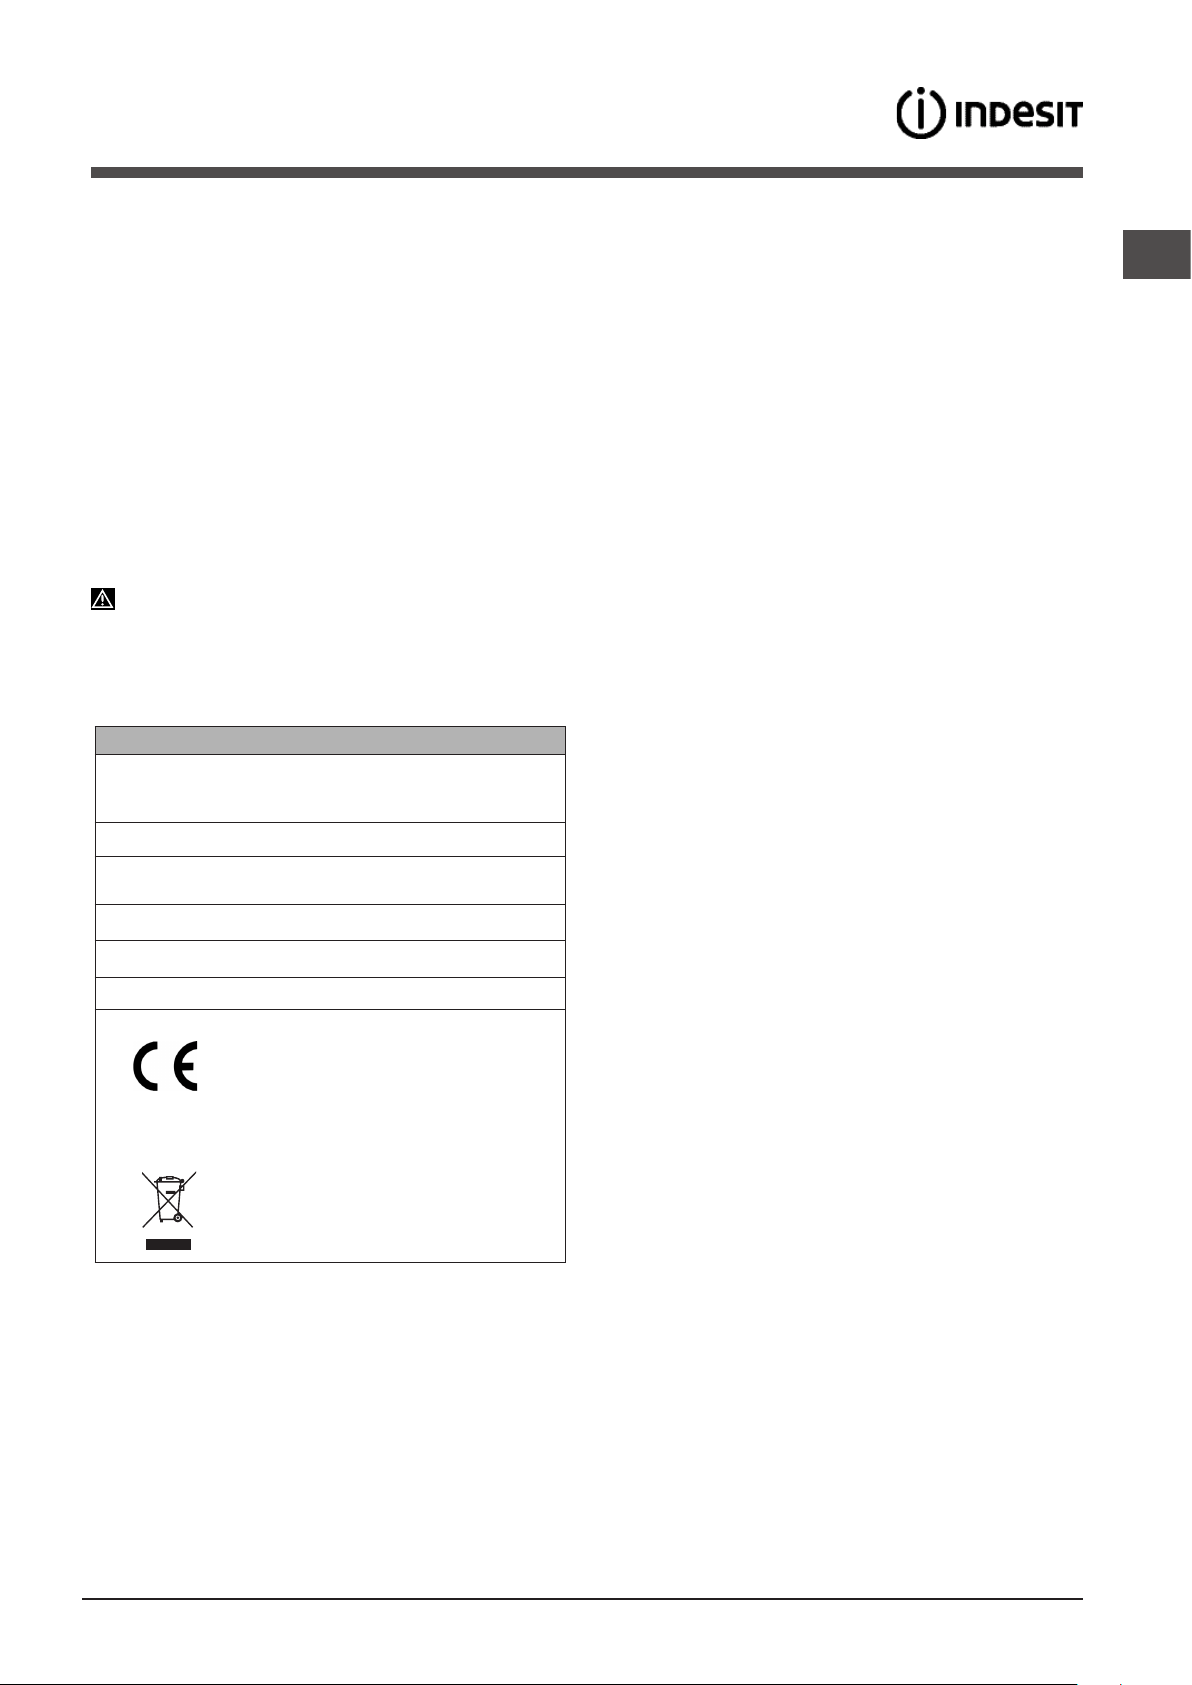
EN
25
Technical data
Dimensions
width 59,6 cm
height 82 cm
depth 57 cm
Capacity 13 standard place-settings
Water supply pressure
0,05 ÷ 1MPa (0.5 ÷ 10 bar)
7,25 – 145 psi
Power supply voltage See appliance data plate
Total absorbed power See appliance data plate
Fuse See appliance data plate
This dishwasher conforms to the
following European Community
Directives:
-2006/95/EC (Low Voltage)
-2004/108/EC (Electromagnetic
Compatibility)
-2009/125/EC (Comm. Reg.
1016/2010) (Ecodesign)
-97/17/EC (Labelling)
-2012/19/EU Waste Electrical
and Electronic Equipment
(WEEE)
Advice regarding the first wash cycle
After the installation, remove the stoppers from the racks and
the retaining elastic elements from the upper rack
(ifany).
Water softener settings
Before starting the first wash cycle, set the hardness lev-
el of
the water from the mains supply.
(seechapterRinse
aid and refined salt).
First load the softener tank with water, then introduce about
1 kg of salt. It is perfectly normal for water to flow out.
As soon as this procedure is complete, run a wash cycle.
Only use salt that has been specifically designed for dish-
washers.
After the salt has been poured into the machine, the LOW
SALTindicatorlight* switches off.
If the salt container is not filled, the water softener and the
heating element may be damaged as a result.
The machine has a buzzer/set of tones
(dependingonthe
dishwasher model
) to inform the user that a command has
been implemented: power on, cycle end etc.
The symbols/indicator lights/LEDs on the control panel/
display may vary in colour and may have a flashing or fixed
light
(dependingonthedishwashermodel)
.
The display provides useful information concerning the type
of wash cycle, drying/wash-cycle phase, remaining time,
temperature etc etc.
* Only available in selected models.
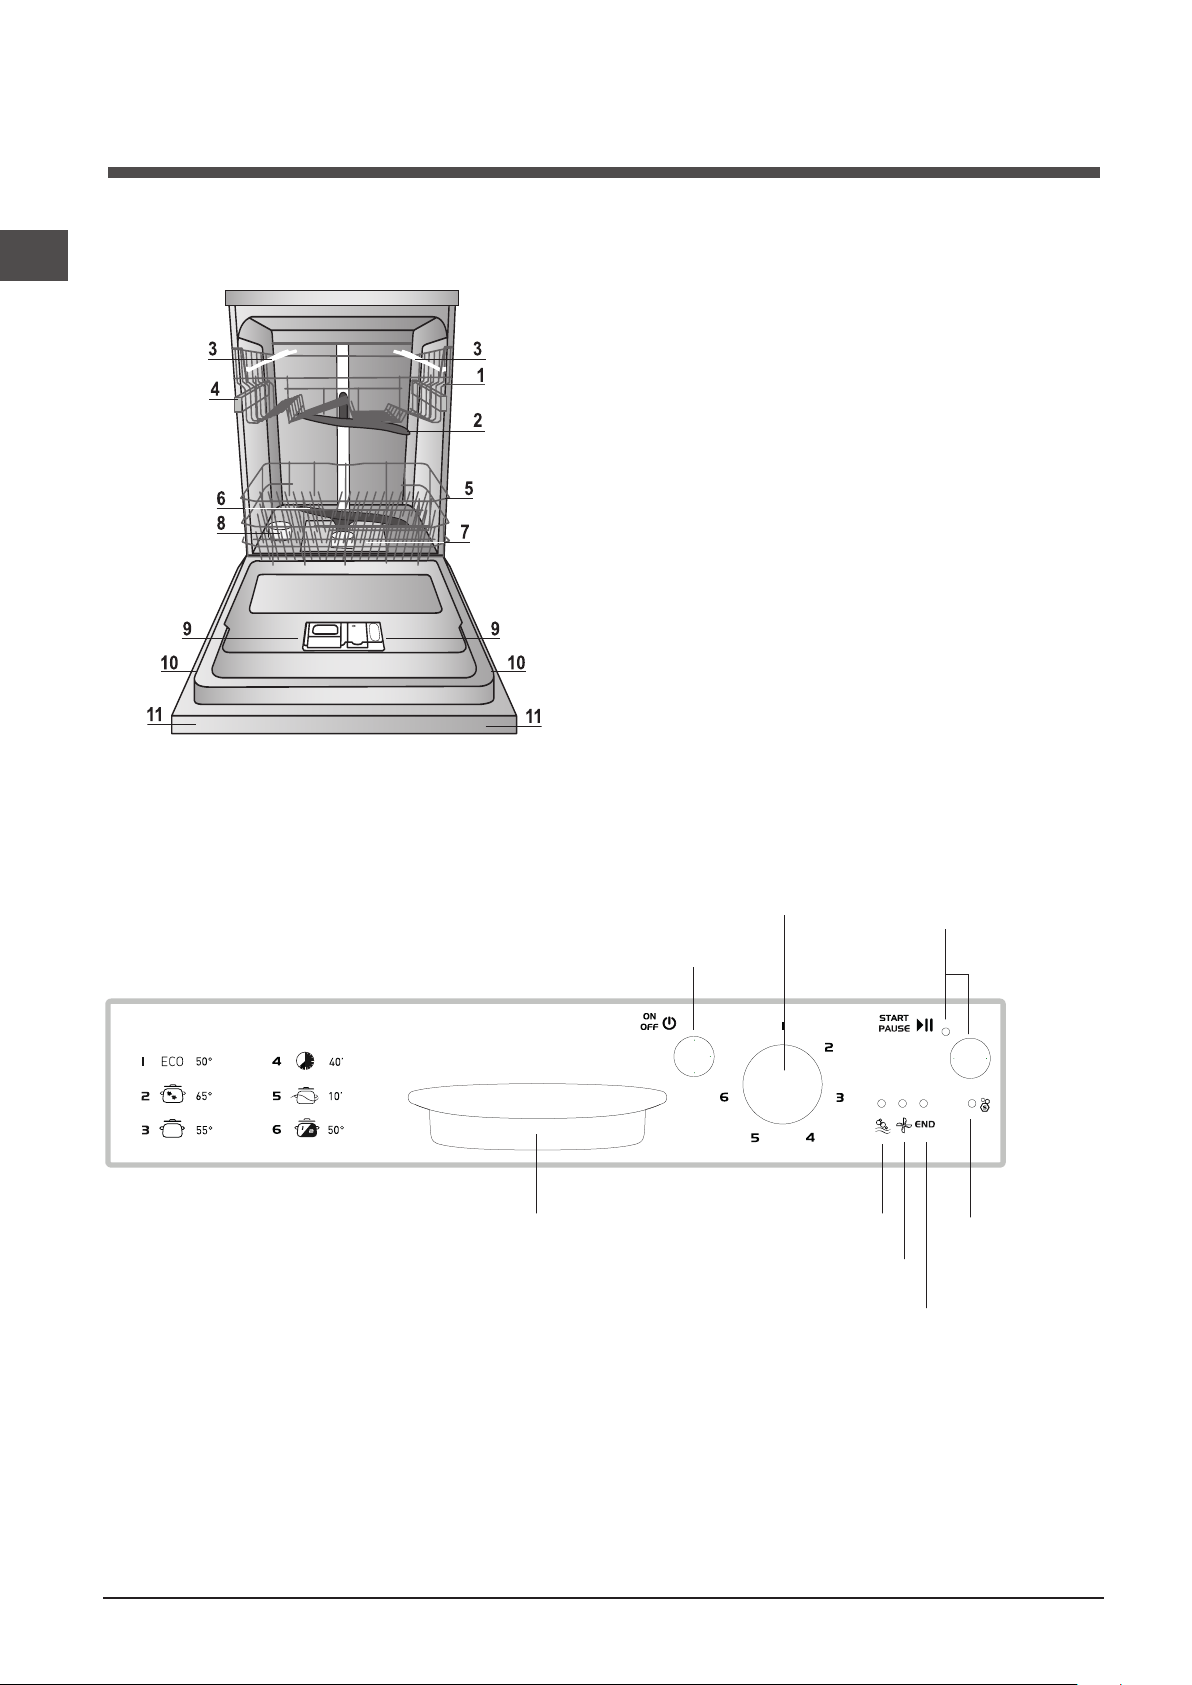
EN
26
Overall view
Description of the
appliance
***Only in completely built-in models.
* Only available in selected models.
The number and type of wash cycles and options may vary depending on the dishwasher model.
Control panel
1. Upper rack
2. Upper spray arm
3. Tip-up dispensers
4. Rackheightadjuster
5. Lower rack
6. Lower spray arm
7. Washing filter
8. Saltdispenser
9. Detergent dispenser, rinse-aid dispenser and
ActiveOxygendevice*
10. Data plate
11. Control panel***
Salt
indicator light
Wash cycle select knob
On-Off/Reset button
Door handle
Start/Pause button
and indicator light
Wash Cycle End indicator light
Drying indicator light
Washing indicator light
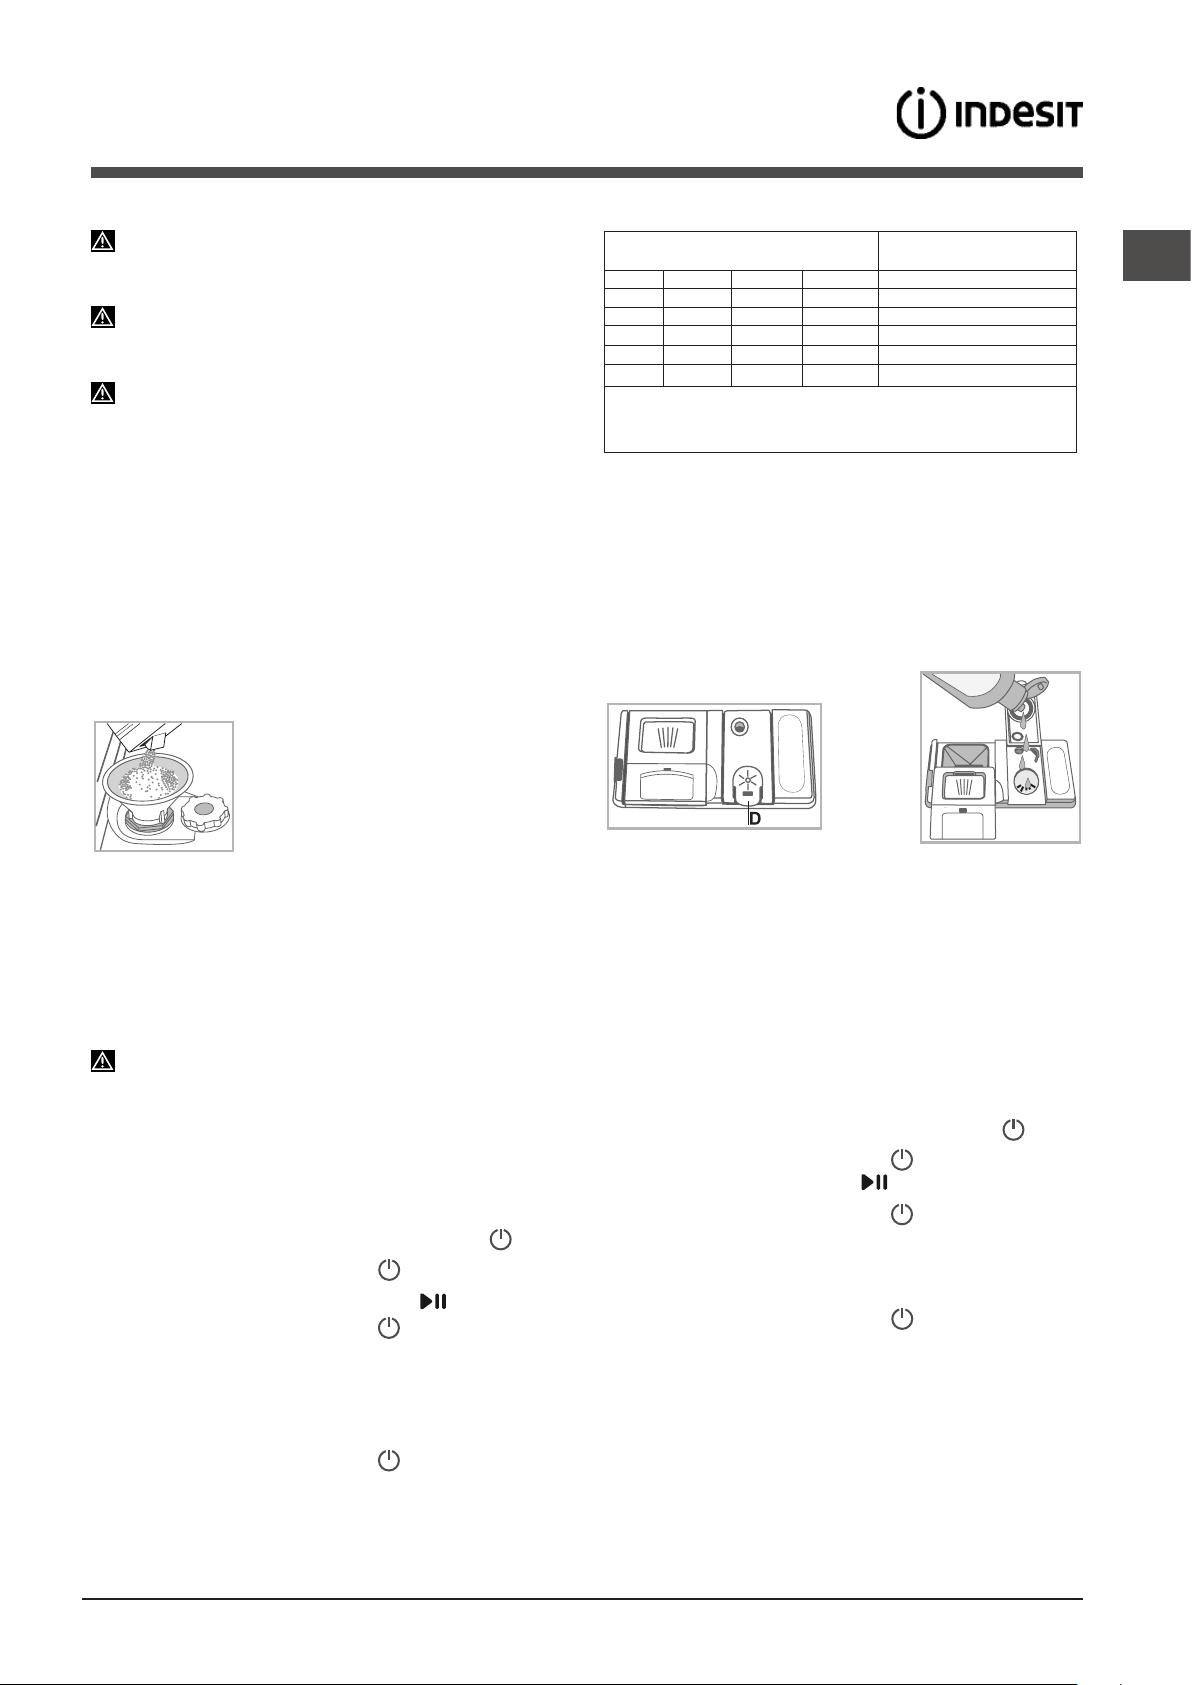
EN
27
Refined Salt and Rinse Aid
Only use products which have been specifically designed
for dishwashers. Do not use table salt or industrial salt.
Follow the instructions given on the packaging.
If you are using a multi-function product, we recommend
that you add salt in any case, especially if the water is hard or
very hard.
(Followtheinstructionsgivenonthepackaging.)
If you do not add salt or rinse aid, the LOW SALT* and
LOW RINSE AID
* indicator lights will remain lit.
Measuring out the refined salt
TheuseofsaltpreventstheformationofLIMESCALEonthedishes
and on the machine’s functional components.
•Itisimportantthatthesaltdispenserbeneverempty.
•Itisimportanttosetthewaterhardness.
The salt dispenser is located in the lower part of the dishwasher
(seeDescription)
and should be filled:
• WhentheLOWRINSEAIDindicatorlightinthecontrolpanel
is lit *;
• Whenthegreenfloat* on the cap of the salt dispenser is no
longer visible.
• Seeautonomyinthewaterhardnesstable.
1.Removethelowerrackandunscrewthe
containercap(anticlockwise).
2. Only the first time you do this: fill the water
dispenser up to the edge.
3.Position the funnel
(seefigure)
and
fill the salt container right up to its edge
(approximately1kg);itisnotunusualfora
little water to leak out.
4.Removethefunnelandwipeanysaltresidueawayfromthe
opening; rinse the cap under running water and then screw it on.
It is advisable to perform this procedure every time you add salt
to the container.
Make sure the cap is screwed on tightly, so that no detergent can
getintothecontainerduringthewashcycle(thiscoulddamage
the water softener beyond repair).
Whenever you need to add salt, we recommend carrying out
the procedure before the washing cycle is started.
Setting the water hardness
For perfect water softener operation, it is essential that the
adjustment be based on the water hardness in your house. Ask
your local water supplier for this information. The factory setting
is for medium water hardness.
•SwitchthedishwasheronusingtheOn/Offbutton.
•SwitchitoffusingtheOn/Offbutton
•PressandholdtheSTART/PAUSEbutton for 5 seconds.
•SwitchitonusingtheOn/Offbutton
•Thesaltindicatorlightflashes(asmanytimesasthecurrent
selection.)
•Settheknobtothedesiredhardnesslevelnumber
(seeTable
on water hardness.)
•SwitchitoffusingtheOn/Offbutton
•Settingiscomplete!
Even if using multi-functional tablets, the salt dispenser should
still be filled.
Measuring out the rinse aid
Rinseaidmakesdish DRYING easier.Therinseaiddispenser
should be filled:
• WhentheLOWRINSEAIDindicatorlightonthepanel/display
is lit *;
• Whenthedarkopticalindicator* on the dispenser door “D”
becomes transparent.
1. Open the dispenser
“D” by pressing and pulling up the tab
on the lid;
2.Carefullyintroducetherinseaidasfarasthemaximumreference
notch of the filling space - avoid spilling it. If this happens, clean
the spill immediately with a dry cloth.
3.Presstheliddownuntilyouhearaclicktocloseit.
NEVER pour the rinse aid directly into the appliance tub.
Rinse-aid dispenser setting
If you are not completely satisfied with the drying results, you can
adjust the quantity of rinse aid.
•SwitchthedishwasheronusingtheOn/Offbutton.
•SwitchitoffusingtheOn/Offbutton
•PresstheSTART/PAUSEbutton three times
•SwitchitonusingtheOn/Offbutton
•Everythingisoff
•Settheknobtothelevelnumberofrinseaidquantitytobe
supplied.
•SwitchitoffusingtheOn/Offbutton
•Settingiscomplete!
IftherinseaidlevelissettoZERO(ECO),norinseaidwillbe
supplied.TheLOWRINSEAIDindicatorlightwillnotbelitifyou
run out of rinse aid.
Amaximumof4levelscanbesetaccordingtothedishwasher
model. The factory setting is for a medium level.
•Ifyouseebluishstreaksonthedishes,setalownumber(1-2).
•Iftherearedropsofwaterorlimescalemarksonthedishes,
setahighnumber(3-4).
Water Hardness Table
Average salt dispenser
capacity duration**
level °dH °fH mmol/l months
1 0 - 6 0 - 10 0 - 1 7 months
2 6 - 11 11 - 20 1,1 - 2 5 months
3 12 - 17 21 - 30 2,1 - 3 3 months
4 17 - 34 31 - 60 3,1 - 6 2 months
5
*
34 - 50 61 - 90 6,1 - 9 2/3 weeks
For values between 0°f and 10°f, we do not recommend the use of salt.
* a setting of 5 may increase cycle duration.
** 1 wash cycle per day.
(°dH = hardness measured in German degrees - °f = hardness
measuredinFrenchdegrees–mmol/l=millimolesperlitre)
* Only available in selected models.
M
A
X
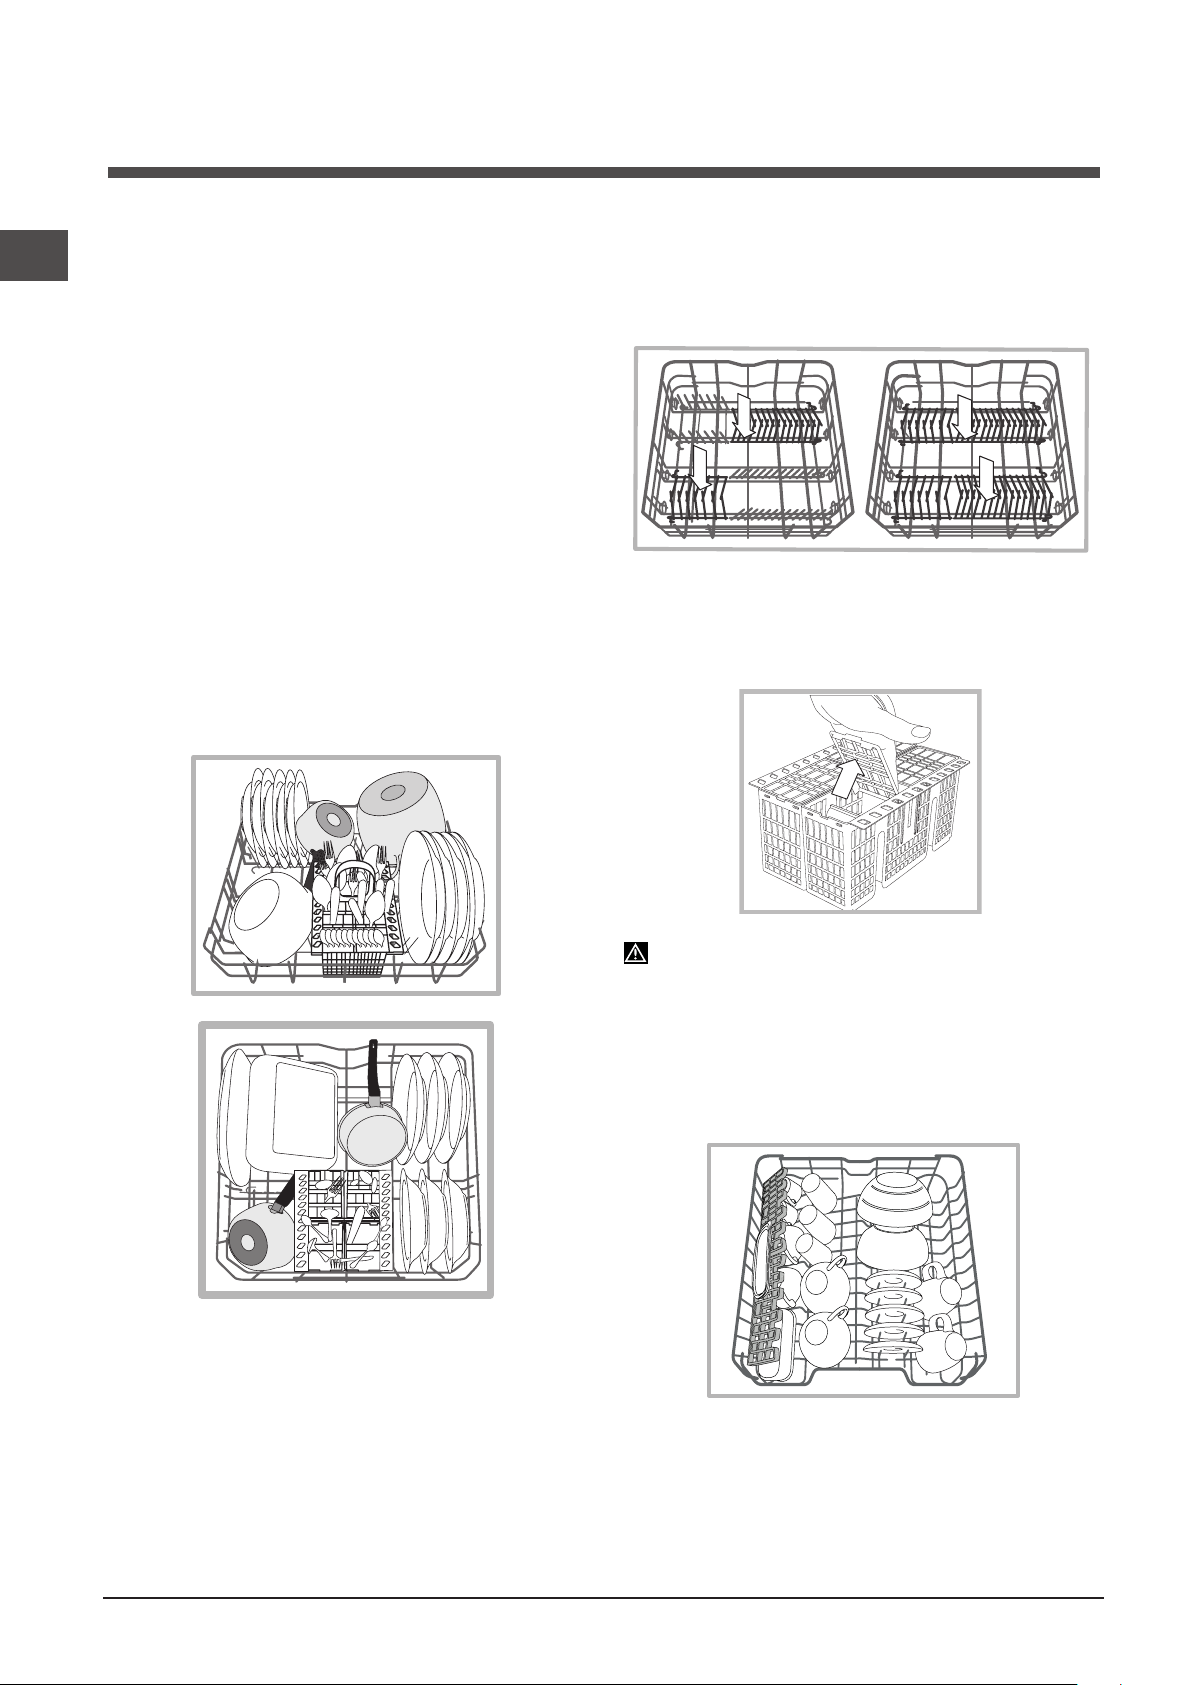
EN
28
Loading the racks
Tips
Before loading the racks, remove all food residues from the
crockery and empty liquids from glasses and containers. No
preventive rinsing is needed under running water.
Arrange the crockery so that it is held in place firmly and does
not tip over; and arrange the containers with the openings facing
downwards and the concave/convex parts placed obliquely,
thus allowing the water to reach every surface and flow freely.
Make sure that the lids, handles, trays and frying pans do not
prevent the sprayer arms from rotating. Place any small items
in the cutlery basket.
Sinceplasticdishesandnon-stickfryingpansusuallyretainmore
water drops, their drying will be not so good as that of ceramic
or stainless-steel dishes.
Lightweight items such as plastic containers should be placed
in the upper rack and arranged so that they cannot move.
After loading the appliance, make sure that the sprayer arms
can rotate freely.
Lower rack
The lower rack can hold pans, lids, dishes, salad bowls, cutlery
etc. Large plates and lids should ideally be placed at the sides.
Very soiled dishes and pans should be placed in the lower rack
because in this sector the water sprays are stronger and allow
a higher washing performance.
Severaldishwashermodelsarefittedwithtip-upsectors*.
They can be used in a vertical position when arranging dishes
orinahorizontalposition(lower)toloadpansandsaladbowls
easily.
Cutlery basket
The modular basket is equipped with top grilles for improved
cutlery arrangement. The cutlery basket should be positioned
only at the front of the lower rack
Knives and other utensils with sharp edges must be placed
in the cutlery basket with the points facing downwards or they
mustbepositionedhorizontallyinthetip-upcompartmentson
the upper rack
Upper rack
Load this rack with delicate and lightweight crockery such as
glasses, cups, saucers and shallow salad bowls.
Severaldishwashermodelsarefittedwithtip-upsectors*.
Theycan be used ina vertical position when arranging tea/
dessert saucers or in a lower position to load bowls and food
containers.
*Only available in selected models with different numbers and
positions.
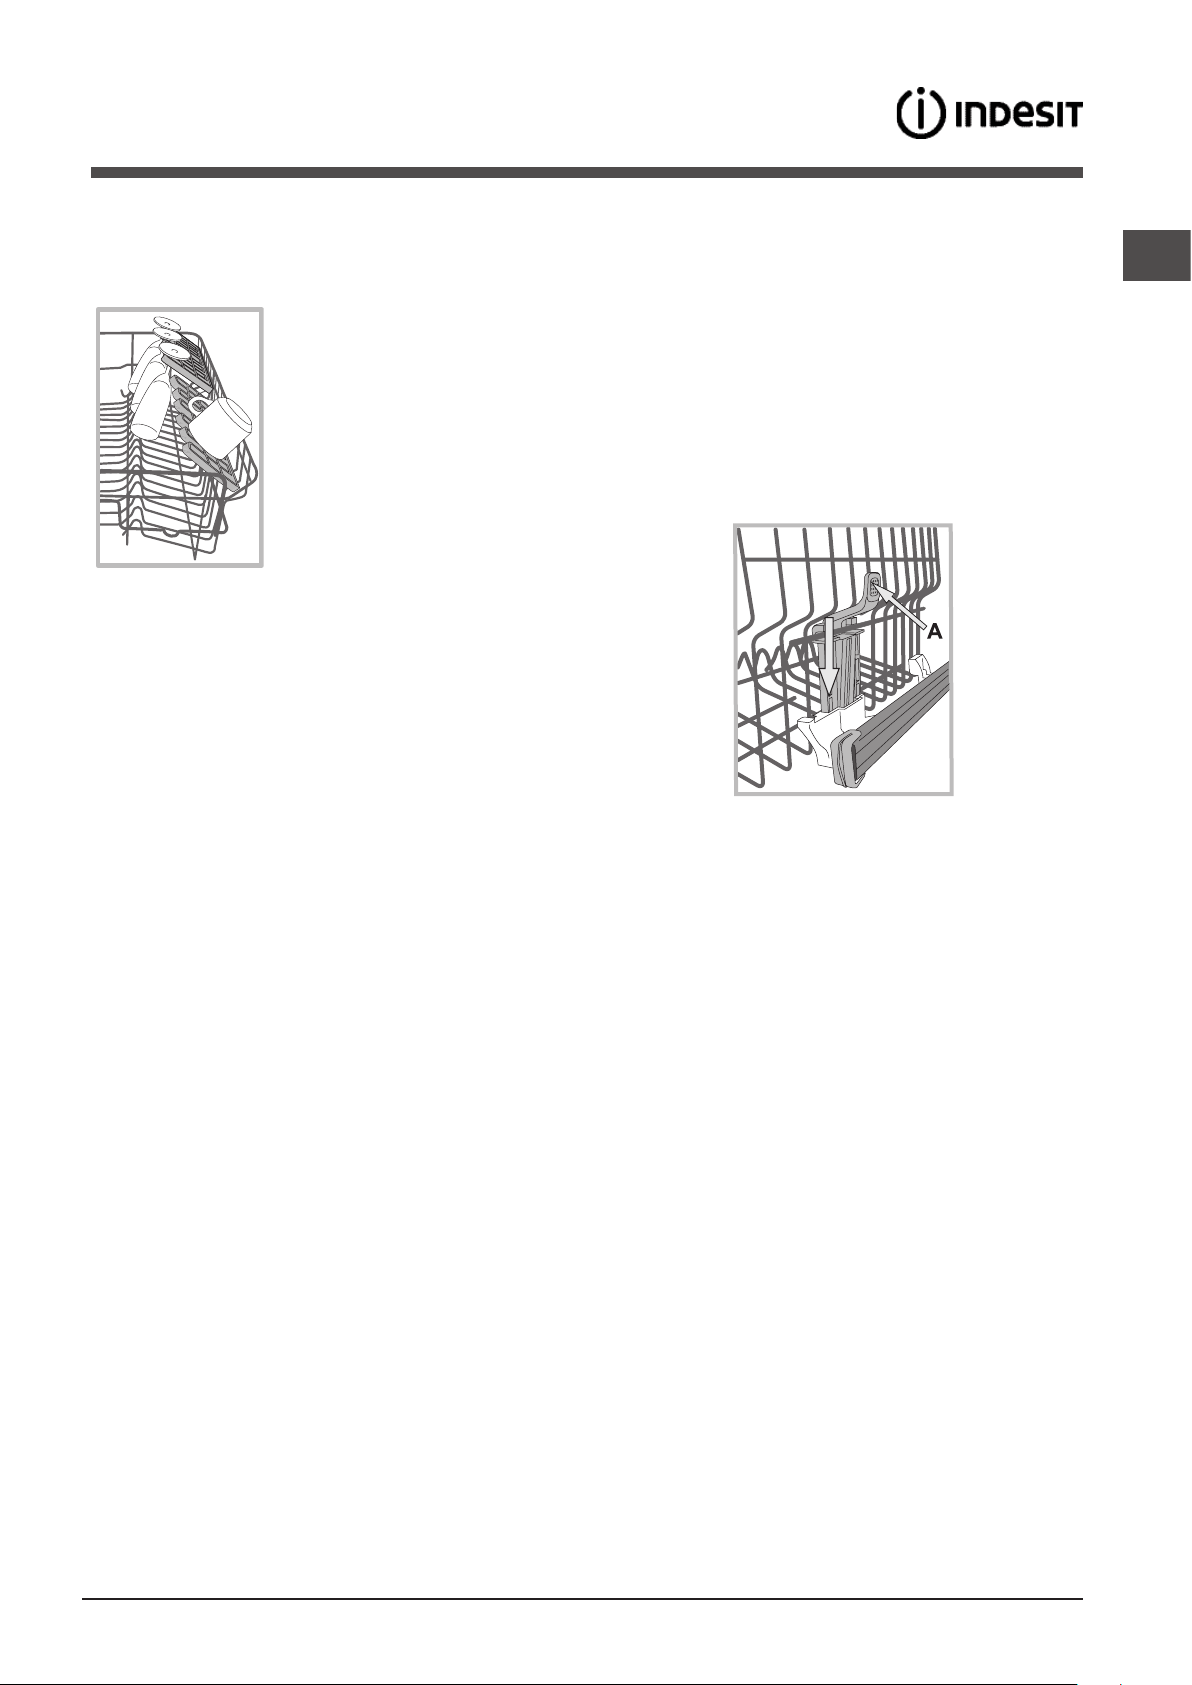
EN
29
* Only available in selected models.
Adjusting the height of the upper rack
In order to make it easier to arrange the crockery, the upper rack
may be moved to a higher or lower position.
The height of the upper rack should be adjusted WHEN THE
RACK IS EMPTY.
NEVER raise or lower the rack on one side only.
If the rack is equipped with a Lift-Up
device*
(seefigure)
, lift
it up by holding its sides. To restore the lower position, press
thelevers(A) at the sides of the rack and follow the rack down.
Unsuitable crockery
• Woodencrockeryandcutlery.
• Delicate decoratedglasses,artistichandicraftandantique
crockery. Their decorations are not resistant.
• Parts insynthetic material whichdo not withstandhigh
temperatures.
• Copperandtincrockery.
• Crockerysoiledwithash,wax,lubricatinggreaseorink.
Thecolours ofglassdecorations andaluminium/silver pieces
canchangeandfadeduringthewashingprocess.Sometypes
ofglass(e.g.crystalobjects)canbecomeopaqueafteranumber
of wash cycles too.
Damage to glass and crockery
Caused by:
• Typeofglassandglassproductionprocess.
• Chemicalcompositionofdetergent.
• Watertemperatureofrinsecycle.
Tips:
• Only useglasses and porcelainguaranteed by the
manufacturer as dishwasher safe.
• Useadelicatedetergentsuitableforcrockery.
• Collectglassesandcutleryfromthedishwasherassoonas
the wash cycle is over.
The upper rack can be adjusted for height based on requirements:
high position to place bulky crockery in the lower rack and low
positiontomakethemostofthetip-upcompartments/sectors
by creating more space upwards.
Tip-up compartments with adjustable position
The side tip-up compartments can be positioned at three different
heightstooptimizethearrangementofcrockeryinsidetherack.
Wine glasses can be placed safely in
the tip-up compartments by inserting
the stem of each glass into the
corresponding slots. For optimum drying
results incline the tip-up compartments
more. To change the inclination, pull up
the tip-up compartment, slide it slightly
and position it as you wish.
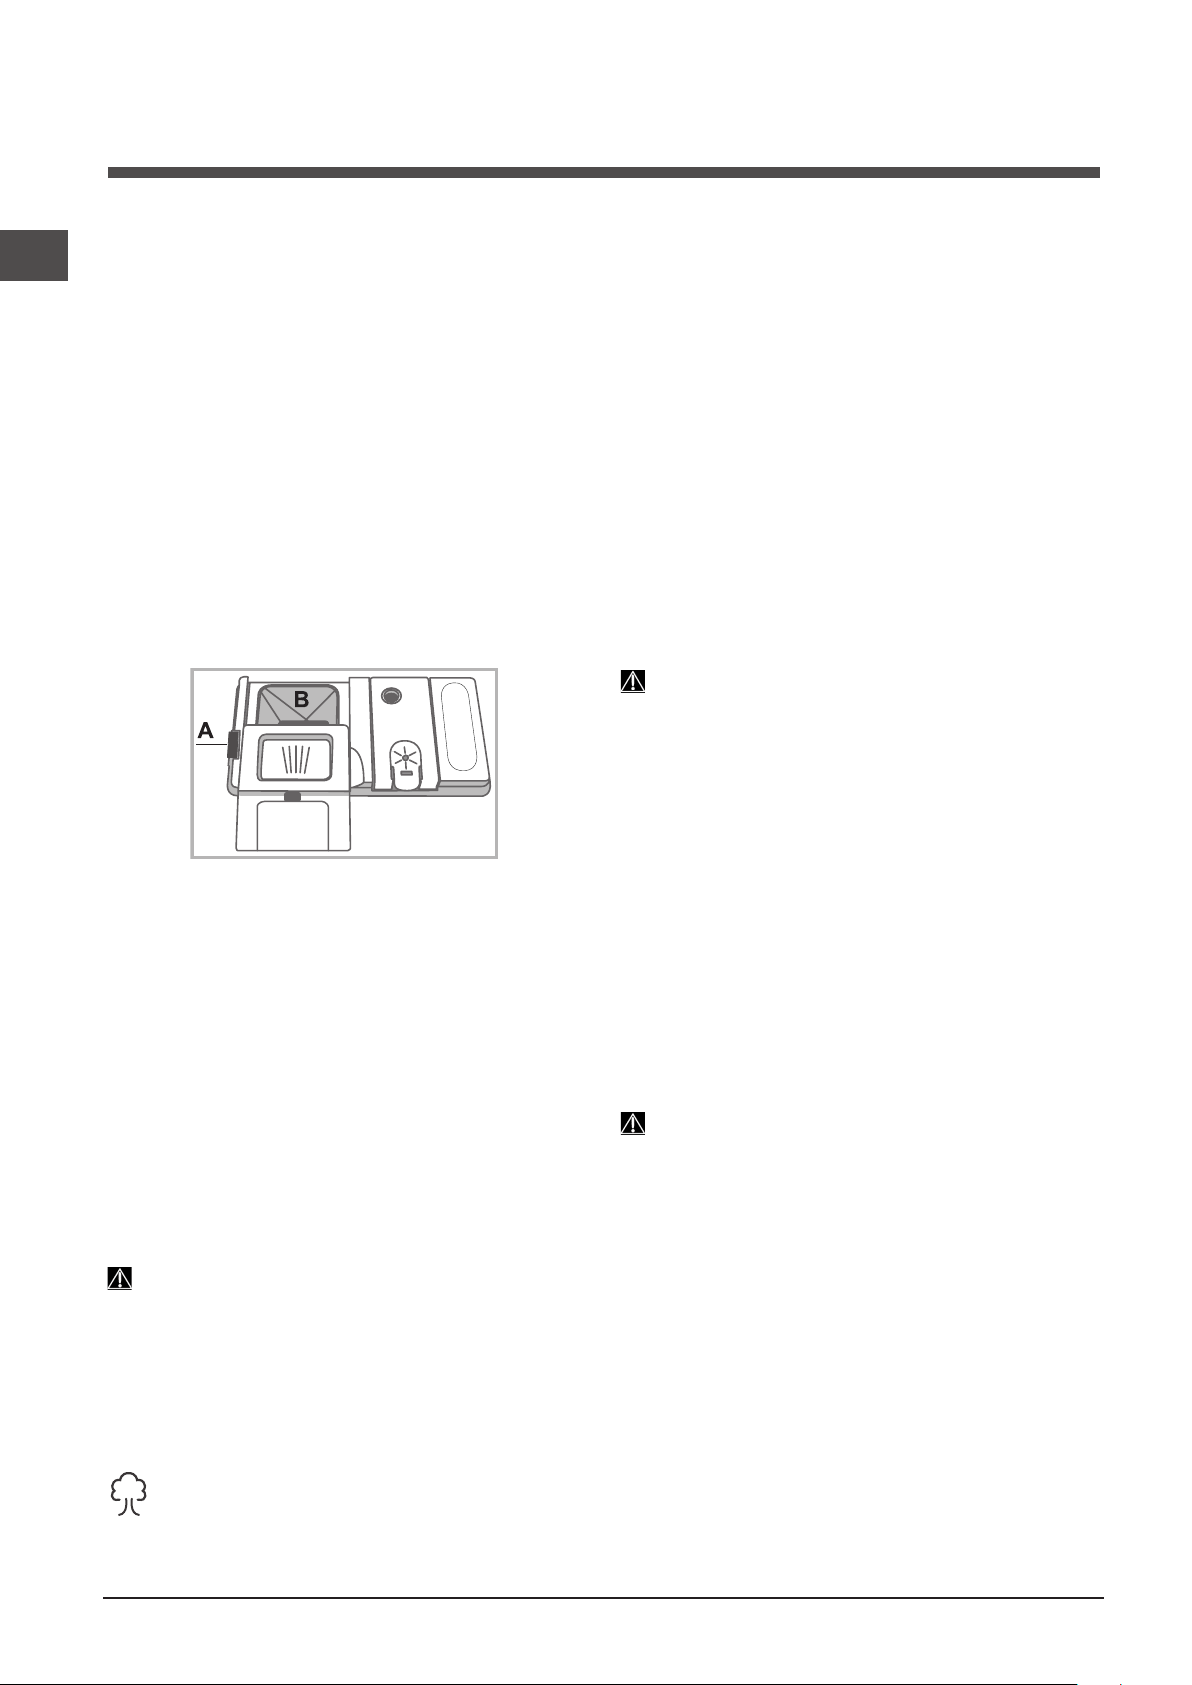
EN
30
* Only available in selected models.
Starting the dishwasher
1.PresstheON/OFFbutton:
2. Open the door and pour in a suitable amount of detergent.
3.Loadtheracks
(seeLoadingtheracks)
and shut the door.
4.Select the wash cyclebyturning the WASH CYCLE
SELECT knob clockwise: align the notch in the knob with
thenumber/symbolrepresentingthedesiredwashcycle.The
START/PAUSEindicatorlightwillgoon.
5.Select the washoptions*
(seeSpecial wash cycles and
options.)
6.StartthecyclebypressingtheStart/Pausebutton:abeepwill
sound* and the indicator light corresponding to the wash
phase will go on to signal that the cycle has begun.
7. At the end a few beeps * will signal the end of the wash cycle
and the ENDindicatorlightwillgoon.Switchofftheappliance
bypressingtheON/OFFbutton.
8.Wait a few minutes before removing thecrockery to avoid
getting burnt. Unload the racks, beginning with the lower level.
The machine will switch off automatically during
certain periods of inactivity in order to minimise
electricity consumption.
Changing a wash cycle in progress
If a mistake was made in the wash cycle selection process, it
is possible to change the cycle provided that it has only just
begun: once the wash cycle has started, in order to change
the wash cycle switch off the machine by pressing and holding
theON/OFF/Resetbutton.Switchitbackonusingthesame
button and select the desired wash cycle and options.
Adding extra crockery
PresstheStart/Pausebutton-thecorrespondingindicator
light will flash. Open the door, taking care to avoid the
escaping steam, and place the crockery inside the appliance.
PresstheStart/Pause button (fixed light): the cyclestarts
again.
IftheStart/Pausebuttonispressedsoastopausethe
machine,boththewashcycleandtheDelayedStartfunction
(ifselected)areinterrupted.
At this stage the wash cycle cannot be changed.
Accidental interruptions
If the door is opened during the wash cycle or there is a
power cut, the cycle stops. It starts again from the point at
which it was interrupted once the door has been shut or the
electricity supply restored.
Detergent and
dishwasher use
Measuring out the detergent
Good washing results also depend on the correct amount of
detergent being used. Exceeding the stated amount does not
result in a more effective wash and increases environmental
pollution.
The amount can be adjusted to the soil level.
In the case of normally soiled items, use approximately either
35g (powder detergent) or 35ml (liquid detergent). If tablets
are used, one tablet will be enough.
If the crockery is only lightly soiled or if it has been rinsed
with water before being placed in the dishwasher, reduce the
amount of detergent used accordingly.
For good washing results also follow the instructions shown
on the detergent box.
For further questions please ask the detergent producers.
To open the detergent dispenser use the opening device “A”.
Introduce the detergent into the dry dispenser “B” only.
Place the amount of detergent for pre-washing directly inside
the tub.
1. When measuring out the detergent refer to the Table of wash
cycles to add the proper quantity. Compartment B comprises a
levelshowingthemaximumquantityofliquidorpowderdetergent
that can be added to each cycle.
2.
Removedetergentresiduesfromtheedgesofthedispenser
and close the cover until it clicks.
3. Close the lid of the detergent dispenser by pulling it up until
the closing device is secured in place.
The detergent dispenser automatically opens up at the right time
according to the wash cycle.
Ifall-in-onedetergentsareused,werecommendusingtheTABS
option, because it adjusts the cycle so that the best washing and
drying results are always achieved.
Only use detergent which has been specifically designed
for dishwashers.
DO NOT USE washing up liquid.
Using excessive detergent may result in foam residues
remaining in the machine after the cycle has ended.
To achieve the best washing and drying results, the combined
use of detergent, rinse aid liquid and refined salt is required.
We recommend using detergents that do not contain
phosphates or chlorine, as these products are harmful
to the environment.
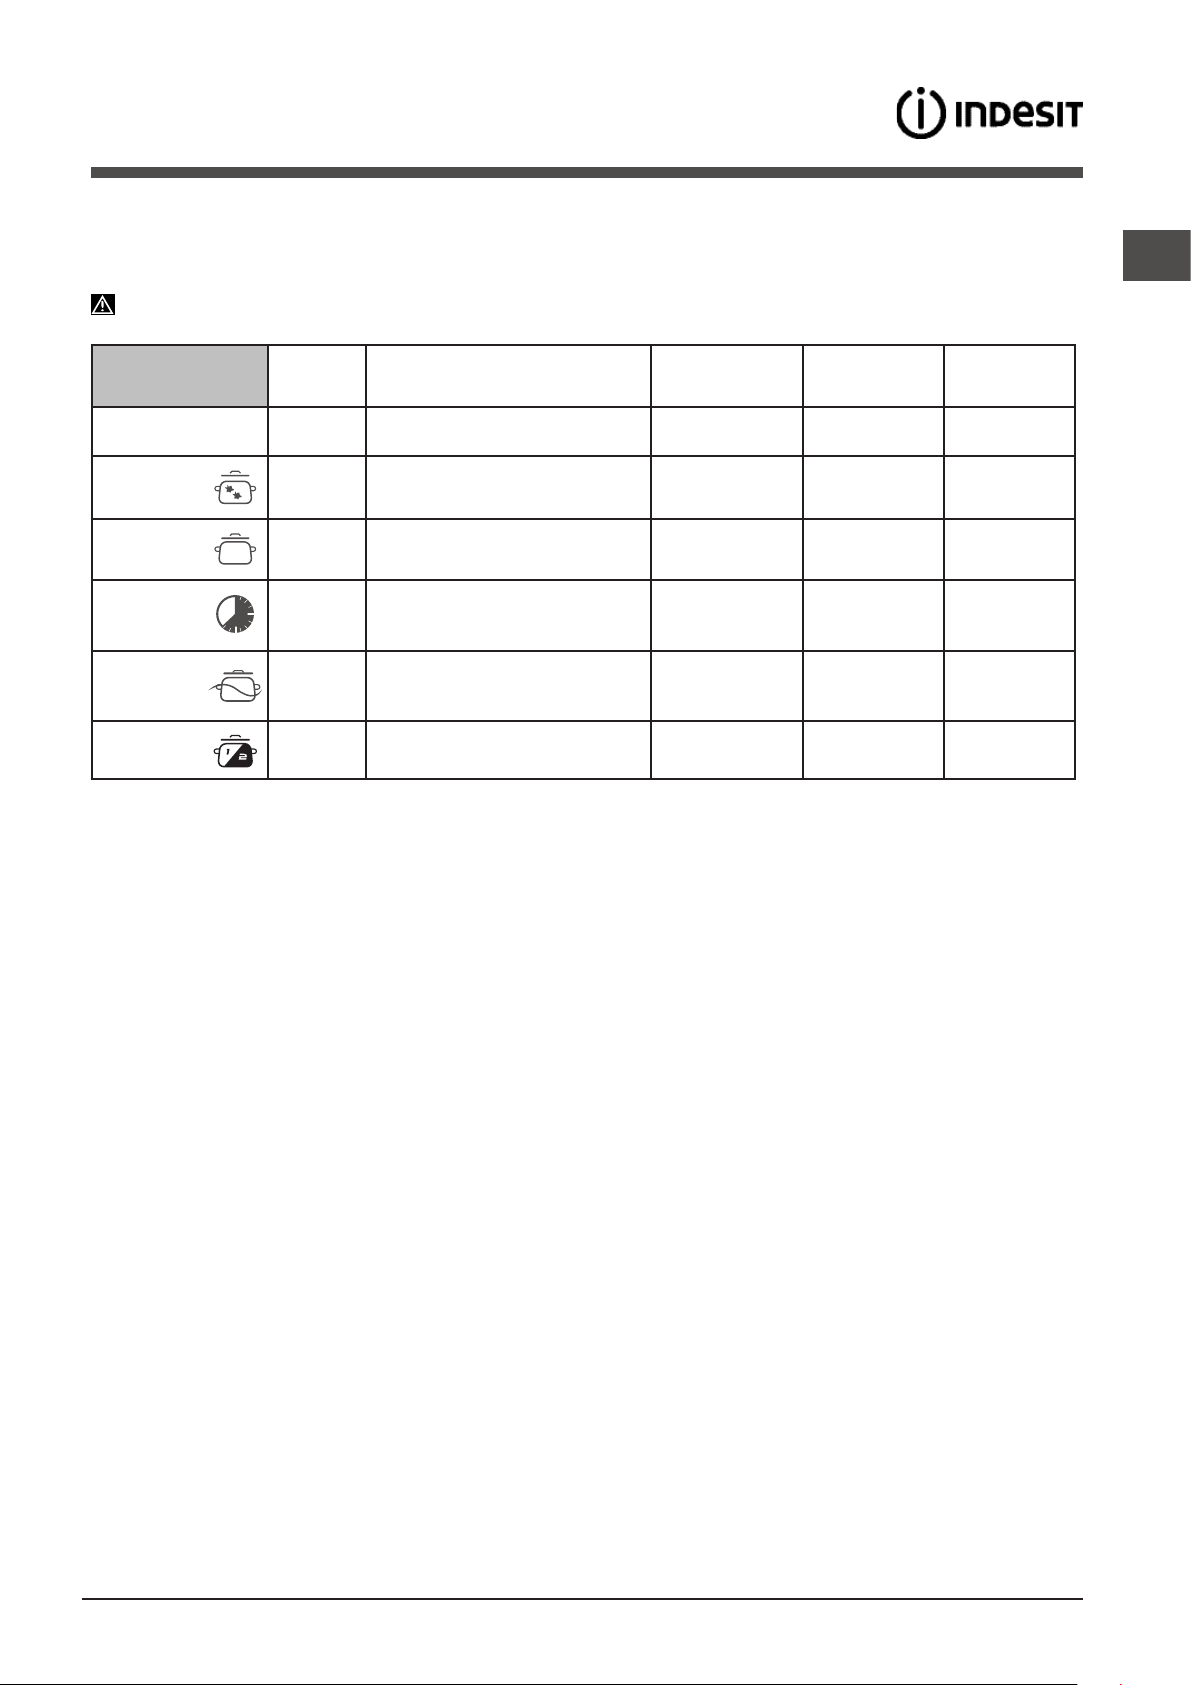
EN
31
Wash cycles
The number and type of wash cycles and options may vary depending on the dishwasher model.
Wash-cycledataismeasuredunderlaboratoryconditionsaccordingtoEuropeanStandardEN50242.
Based on the different conditions of use, the wash-cycle duration and data can change.
Wash Cycle Drying Options
Wash Cycle
Duration
H:min.
Water
Consumption
(l/cycle)
Energy
Consumption
(kWh/cycle)
1. Eco Yes No 02:18’ 11,0 1,04
2. Intensive Yes No 02:30’ 16,5 1,70
3. Normal Yes No 02:00’ 16 1,40
4. Rapid 40’ No No 00:40’ 9,0 0,95
5. Prewash No No 00:10’ 4,0 0,01
6. Half Load Yes No 01:20’ 12,0 1,15
Instructions on wash-cycle selection and detergent dosage
1. The ECO wash cycle is the standard cycle to which the energy label data refers. It can be used to wash crockery with a normal
soil level and is the most efficient cycle in terms of energy and water consumption for this type of crockery.
27gr/ml+6gr/ml**–1Tab
(**Quantityofpre-washingdetergent)
2. Heavilysoileddishesandpans(nottobeusedfordelicateitems).30gr/ml–1Tab
3.Normallysoiledpansanddishes.27gr/ml+6gr/ml**–1Tab
4.Fastcycletobeusedforslightlydirtydishes(idealfor2placesettings)25gr/ml–1Tab
5.Pre-washwhileawaitingcompletionoftheloadwiththedishesfromthenextmeal.Nodetergent.
6. Idealcycleforsmallloadsofcrockerywithanormalsoillevel.25gr/ml–1Tab
Standbyconsumption:Left-onmodeconsumption:5,0W-Offmodeconsumption:0.5W
Notes:
Optimumperformancelevelswhenusingthe“Rapid40’”cyclecanbeachievedbyrespectingthespecifiednumberofplaceset-
tings.
To reduce consumption, only run the dishwasher when it is full.
Note for Test Laboratories: forinformationoncomparativeENtestingconditions,pleasesendanemailtothefollowingaddress:
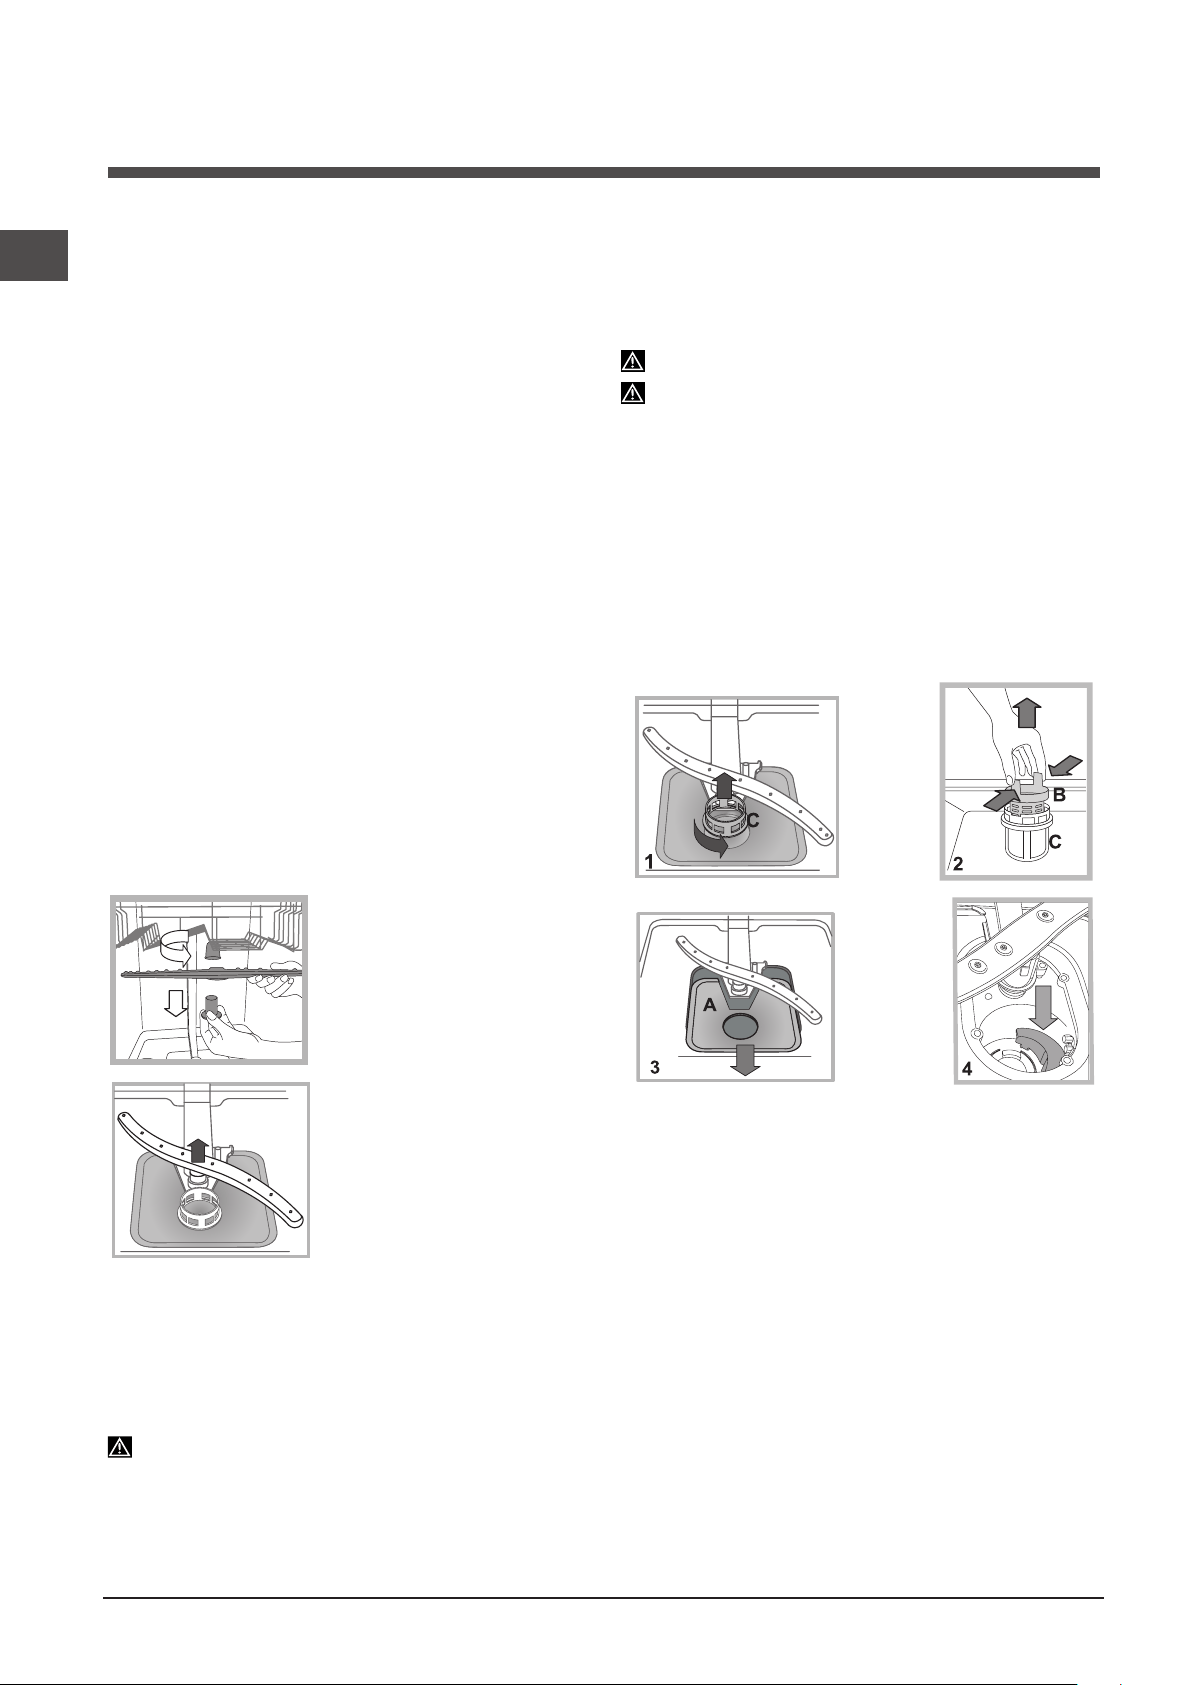
EN
32
Care and maintenance
* Only available in selected models.
Shutting off the water and electricity
supplies
• Turnoffthewatertapaftereverywashcycletoavoidleaks.
• Always unplugthe appliance when cleaningit and when
performing maintenance work.
Cleaning the dishwasher
• Theexternalsurfacesofthemachineandthecontrolpanel
can be cleaned using a non-abrasive cloth which has been
dampened with water. Do not use solvents or abrasive
products.
• Anymarksontheinsideoftheappliancemayberemoved
using a cloth dampened with water and a little vinegar.
Preventing unpleasant odours
• Alwayskeepthedooroftheapplianceajarinordertoavoid
moisture from forming and being trapped inside the machine.
• Cleanthesealsaroundthedooranddetergentdispensers
regularly using a damp sponge. This will avoid food becoming
trapped in the seals, which is the main cause behind the
formation of unpleasant odours.
Cleaning the spray arms
Food residue may become encrusted onto the sprayer arms
and block the holes used to spray the water. It is therefore
recommended that you check the arms from time to time and
clean them with a small non-metallic brush.
The two spray arms may both be removed.
To remove the upper spray arm,
turn the plastic locking ring in an
anti-clockwise direction. The upper
sprayer arm should be replaced so
that the side with the greater number
of holes is facing upwards.
The lower spray arm can be
removed by pressing on the side
tabs and pulling it upwards.
Cleaning the water inlet hose*
Ifthewaterhosesareneworhavenotbeenusedforanextended
period of time, let the water run to make sure it is clear and free
of impurities before performing the necessary connections. If this
precaution is not taken, the water inlet could become blocked
and damage the dishwasher.
Clean the water inlet filter at the tap outlet regularly.
- Turn off the water tap.
- Unscrew the end of the water inlet hose, remove the filter and
clean it carefully under running water.
-Re-placethefilterandscrewthewaterhosebackintoposition.
Cleaning the filters
The filter assembly consists of three filters which remove food
residues from the washing water and then recirculate the water.
They must be cleaned if you wish to achieve the best results in
every wash.
Clean the filters regularly.
The dishwasher must not be used without filters or if the filter
is loose.
•Afterseveralwashes,checkthefilterassemblyandifnecessary
clean it thoroughly under running water, using a non-metallic
brush and following the instructions below:
1. Turn the cylindrical filter C in an anti-clockwise direction and
pull it out
(fig.1).
2.RemovethecupfilterBbyexertingaslightpressureonthe
side flaps
(fig.2);
3.Slideoutthestainless-steelplatefilterA.
(fig.3).
4. Inspect the trap and remove any food residues. NEVER
REMOVE the wash-cycle pump protection
(blackdetail)(fig.4).
Aftercleaningthefilters,re-placethefilterassemblyandfixit
in position correctly; this is essential for maintaining the efficient
operation of the dishwasher.
Leaving the machine unused for extended
periods
• Disconnecttheappliancefromtheelectricitysupplyandshut
off the water tap.
• Leavethedooroftheapplianceajar.
• Whenyoureturn,runawashcyclewhenthedishwasheris
empty.
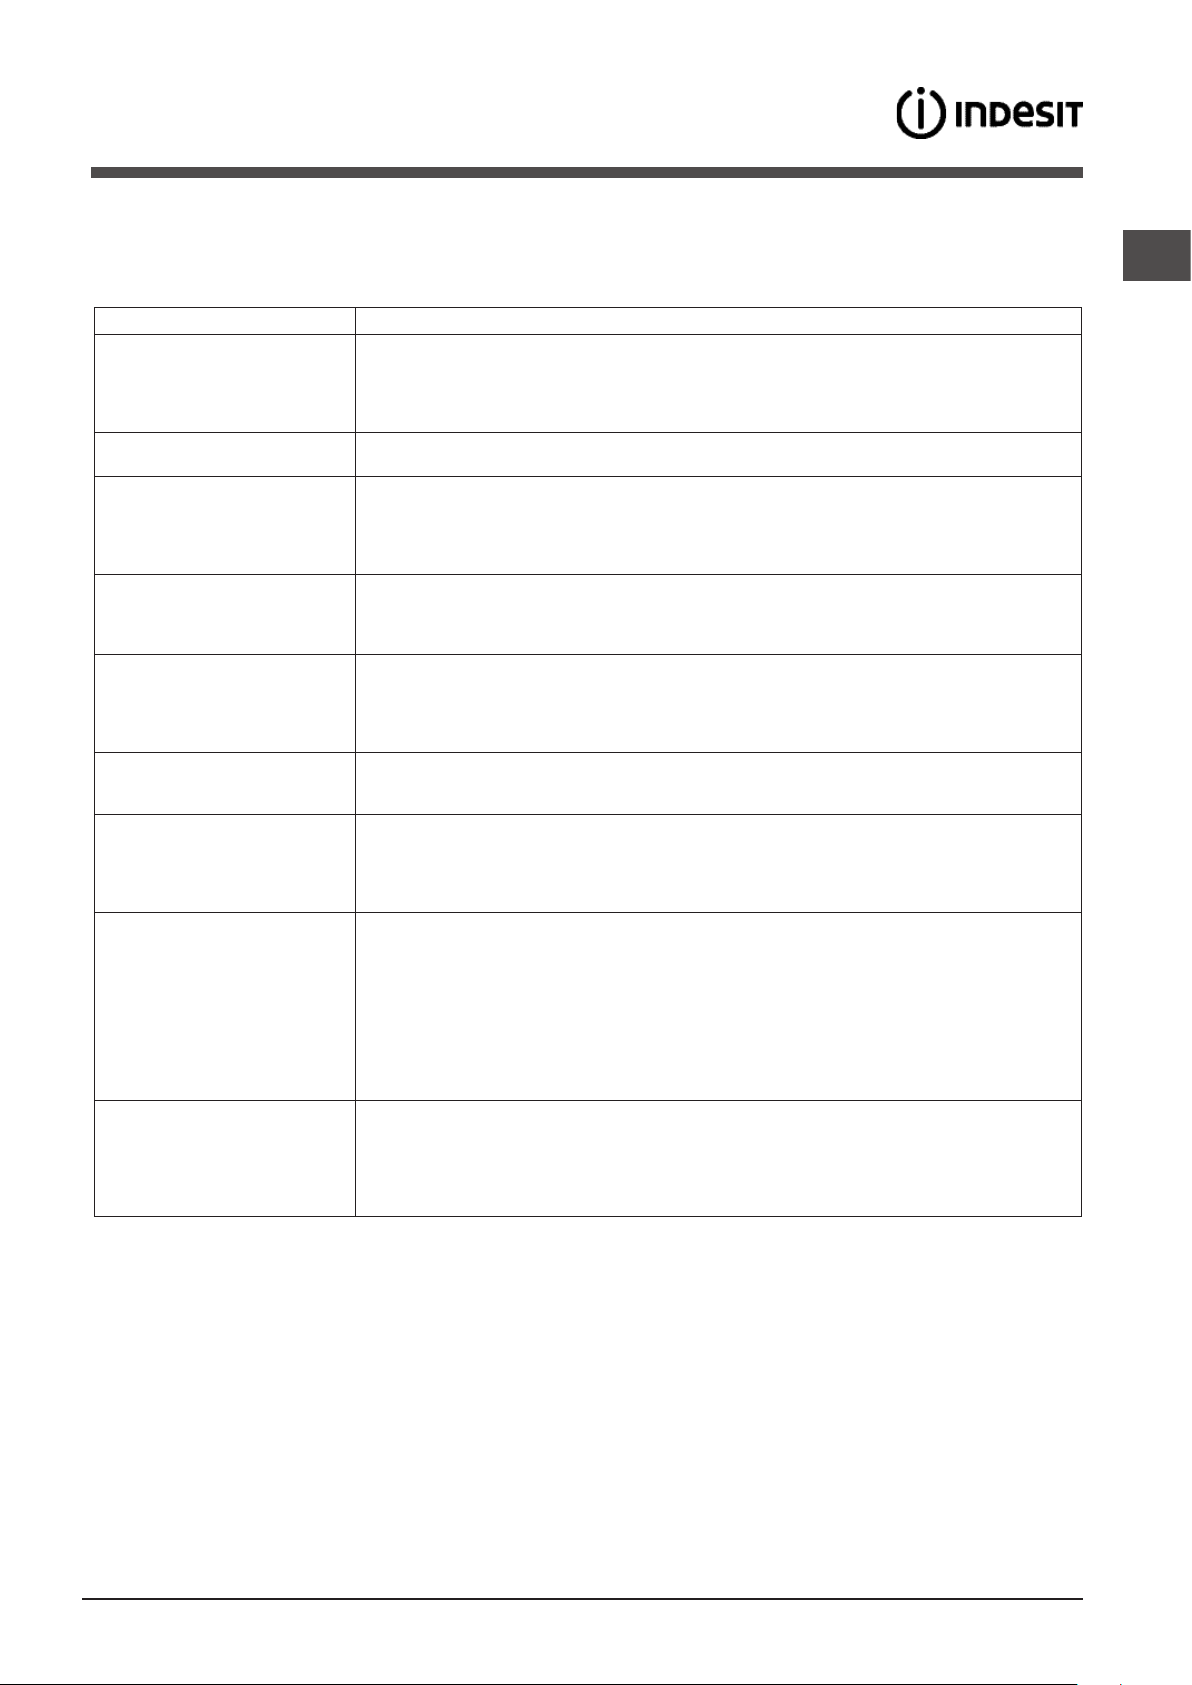
EN
33
Troubleshooting
Whenever the appliance fails to work, check for a solution from the following list before calling for Assistance.
* Only available in selected models.
Problem: Possible causes / Solutions:
The dishwasher does not start
or cannot be controlled.
• The water supply tap is not turned on.
• Switch off the appliance by pressing the ON/OFF button, switch it back on after approximately
one minute and reset the wash cycle.
• The appliance has not been plugged in properly or another electricity socket should be used.
• The dishwasher door has not been closed properly.
The door won’t close.
• Make sure that the racks were inserted all the way.
• The lock was released. Strongly push the door until a “clacking” noise is heard.
No water drain out of the
dishwasher.
• The wash cycle has not nished yet.
• The water drain hose is bent
(see Installation).
• The drain duct is clogged up.
• The lter is clogged up with food residues.
• Check the height of the drain hose.
The dishwasher makes
excessive noise.
• The dishes are rattling against each other or against the spray arms. Place the dishes
properly and make sure the spray arms can rotate freely.
• Too much foam: the detergent has not been measured out correctly or it is not suitable for use
in dishwashers.
(See Detergent and dishwasher use.)
Do not prewash the dishes by hand.
The dishes and glasses are
covered in a white lm or
limescale deposits.
• No rened salt.
• Water hardness adjustment is not suitable: increase the relevant values.
(See Rened Salt
and Rinse Aid.)
• The salt and rinse-aid dispenser cap has not been closed properly.
• The rinse aid has been used up or the dosage is too low.
The dishes and glasses are
streaked or have a bluish
tinge.
• The rinse aid dosage is too high.
The crockery has not been
dried properly.
• A wash cycle without a drying programme has been selected.
• The rinse aid has been used up.
(See Rened Salt and Rinse Aid.)
• The rinse aid dispenser setting is not suitable.
• The crockery is made from non-stick material or plastic; the presence of water drops is
normal.
The dishes are not clean. • The crockery has not been arranged properly.
• The spray arms cannot rotate freely, being hindered by the dishes.
• The wash cycle is too gentle
(see Wash Cycles).
• Too much foam: the detergent has not been measured out correctly or it is not suitable for use
in dishwashers.
(See Detergent and dishwasher use.)
• The lid on the rinse aid compartment has not been closed correctly.
• The lter is dirty or clogged up
(see Care and maintenance.)
• The rened salt level is low
(See Rened Salt and Rinse Aid.)
• Make sure that the height of the dishes is compatible with the rack adjustment.
• The holes in the spray arms are clogged up.
(See Care and maintenance.)
The dishwasher won’t load
any water.
It is blocked with ashing lights.
• There is no water in the mains supply or the tap is shut off.
• The water inlet hose is bent
(see Installation).
• The lters are clogged up: they need cleaning.
(See Care and maintenance.)
• The drain duct is clogged up: it needs cleaning.
• After checking and cleaning, switch the dishwasher on and off and start a new wash cycle.
• If the problem persists, turn off the water tap, remove the plug and call the Service Centre.
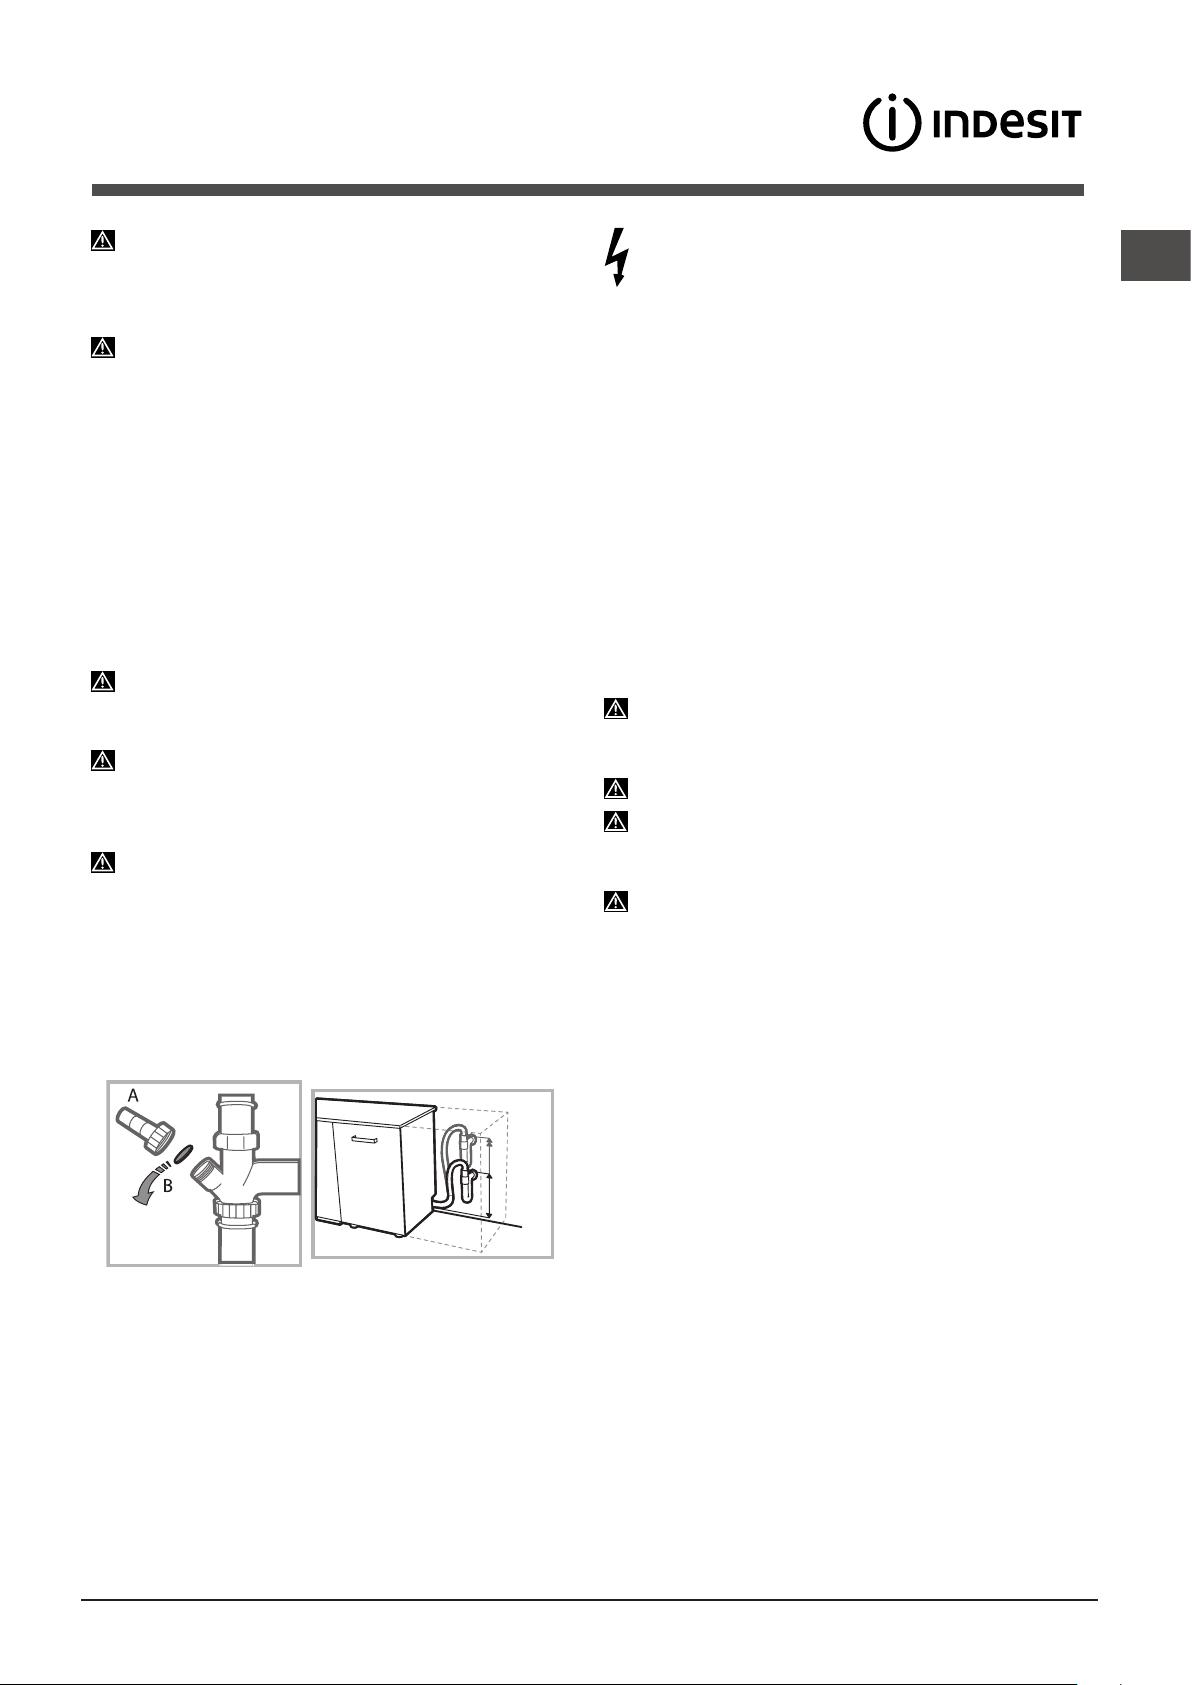
FR
33
Installation
* Présent uniquement sur certains modèles.
En cas de déménagement, transporter l’appareil
verticalement ; si besoin est, l’incliner sur le dos.
Raccordements hydrauliques
L’adaptation des installations de plomberie de l’installation
doit être effectuée par du personnel qualifié
Les tuyaux d’amenée et d’évacuation de l’eau peuvent être
orientés vers la droite ou vers la gauche pour simplifier
l’installation.
Attention à ce que les tuyaux d’arrivée et d’évacuation ne
soient pas pliés ou écrasés par le lave-vaisselle.
Raccord du tuyau d’amenée de l’eau
• Auneprised'eaufiletée3/4”gazfroideouchaude(max.
60°C).
• Fairecoulerl'eaujusqu'àcequ'ellesoitlimpide.
• Bienvisserletuyaud'évacuationetouvrirlerobinet.
Si la longueur du tuyau d’amenée ne suffit pas, s’adresser
à un magasin spécialisé ou à un technicien agréé
(voir
Assistance)
.
La pression de l’eau doit être comprise entre les valeurs
citées dans le tableau des Caractéristiques techniques,
autrement le lave-vaisselle risque de ne pas fonctionner
correctement.
Faireattentionàcequ'iln'yaitnipliuresniétranglements
au niveau du tuyau.
Raccordement du tuyau d’évacuation de
l’eau
Raccorder le tuyau d’évacuation à une conduite d’évacuation
ayantaumoins2cmdediamètre.(A)
Leraccorddutuyaud’évacuationdoitêtreplacéentre40et
80 cm au-dessus du sol ou du plan d’appui du lave-vaisselle.
Avant de raccorder le tuyau d’évacuation de l’eau au siphon
del’évier,retirerlebouchonenplastique(B).
Sécurité anti-fuite
Pour éviter tout risque d’inondation, le lave-vaisselle :
- est équipé d’un dispositif qui coupe l’arrivée de l’eau en cas
d’anomalie ou de fuite à l’intérieur de l’appareil.
Quelques modèles sont aussi équipés d’un dispositif de
sécurité supplémentaire New Acqua Stop*, qui garantit
contretoutrisqued'inondationmêmeencasderupturedu
tuyau d’amenée de l’eau.
ATTENTION : TENSION DANGEREUSE !
Il ne faut en aucun cas couper le tuyau d’amenée de l’eau
car il contient des parties sous tension.
Raccordement électrique
Avantdebrancherlafichedanslaprisedecourant,s'assurer
que :
• la prise est bien reliée à la terre
et est conforme aux
réglementations en vigueur ;
• lapriseestbienapteàsupporterlapuissancemaximale
de la machine reportée sur la plaquette signalétique fixée
à la contre-porte
(voirchapitreDescriptiondulave-vaisselle);
• latensiond’alimentationestbiencompriseentrelesvaleurs
figurant sur la plaque signalétique de la contre-porte ;
• lapriseestbiencompatibleaveclafichedel’appareil.
Autrement, faire remplacer la fiche par un technicien agréé
(voirAssistance)
; n’utiliser ni rallonges ni prises multiples.
Après installation de l’appareil, le cordon d’alimentation
électrique et la prise de courant doivent être facilement
accessibles.
Le câble ne doit être ni plié ni trop écrasé.
Afin d’éviter tout danger, faire changer le cordon
d’alimentation abîmé, par le fabricant ou par son service
après-vente.
(VoirAssistance)
Nous déclinons toute responsabilité en cas de non-
respect des normes énumérées ci-dessus.
Mise en place et mise à niveau
1. Installer le lave-vaisselle sur un sol plat et rigide. Compenser
les irrégularités en vissant ou en dévissant les pieds avant
jusqu'à cequel'horizontalitédel’appareilsoitparfaite.
Unebonnehorizontalitégarantitlastabilitédel’appareilet
supprime tout risque de bruits et de vibrations.
2.Avantd'encastrerlelave-vaisselle,collerlerubanadhésif
transparent* sous le plan en bois pour le protéger contre le
risque de formation de condensation.
3.Installerlelave-vaisselledemanièreàcequelescôtéset
laparoiarrièretouchentauxmeublesadjacentsouaumur.
L’appareil peut être encastré sous un plan de travail continu*
(voirfeuilledemontage)
.
4
*. Pour régler la hauteur du pied arrière, agir sur la douille
rouge à six pans située dans la partie avant du lave-
vaisselle, en bas et au milieu, à l’aide d’une clé mâle à six
pans, ouverture 8 mm. Tourner dans le sens des aiguilles
d’une montre pour augmenter la hauteur et dans le sens
inverse pour la diminuer.
(voirfeuilled’instructionsjointeà
la documentation)
MIN 40 cm
MAX 80 cm
34
FR
Caractéristiques techniques
Dimensions
largeur 59,5 cm
hauteur 82 cm
profondeur 57 cm
Capacité 13 couverts standard
Pression eau
d’alimentation
0,05 ÷ 1 MPa (0,5 ÷ 10 bar)
7,25 – 145 psi
Tension
d’alimentation
Voir étiquette des caractéristiques
Puissance totale
absorbée
Voir étiquette des caractéristiques
Fusible Voir étiquette des caractéristiques
Cet appareil est conforme aux
Directives Communautaires suivantes:
- 2006/95/EC (Basse Tension)
- 2004/108/EC (Compatibilité
Electromagnétique)
-2009/125/EC (Comm. Reg.
1016/2010) (Ecodesign)
-97/17/EC (Etiquetage)
-2012/19/EU (DEEE)
* Présent uniquement sur certains modèles.
Cet électroménager dispose de signaux sonores/bips
(selon
le modèle de lave-vaisselle
) qui signalent que la commande a
été activée: allumage, fin de cycle etc..
Tous les symboles/voyants/led lumineux du bandeau de
commande/afficheur peuvent avoir des couleurs différentes,
flasher ou être en fixe.
(selonlemodèledelave-vaisselle)
.
Affichage d'informations utiles concernant le type de cycle
sélectionné, la phase de lavage/séchage, le temps résiduel,
la température etc.... etc...
Conseils pour le premier lavage
Aprèsl'installation,retirerlescalesplacéessouslespaniers
ainsi que les élastiques de fixation du panier supérieur
(si
prévus).
Réglages de l'adoucisseur d'eau
Avant de lancer le premier lavage, sélectionner le niveau
de dureté
del'eauduréseau.
(voirchapitreProduitderin-
çage et sel régénérant))
Lors de son premier chargement, il faut d'abord remplir
l'adoucisseurd'eaupuisintroduireenviron1kgdesel.Ilest
normalquedel'eaudéborde..
Fairedémarreruncycledelavagetoutdesuiteaprès.
N’utiliser que du sel spécial lave-vaisselle.
Après remplissage du réservoir, le voyant SEL*s'éteint.
L'absencederemplissage du réservoir à sel peut
endommager l’adoucisseur d’eau et l’élément chauffant.
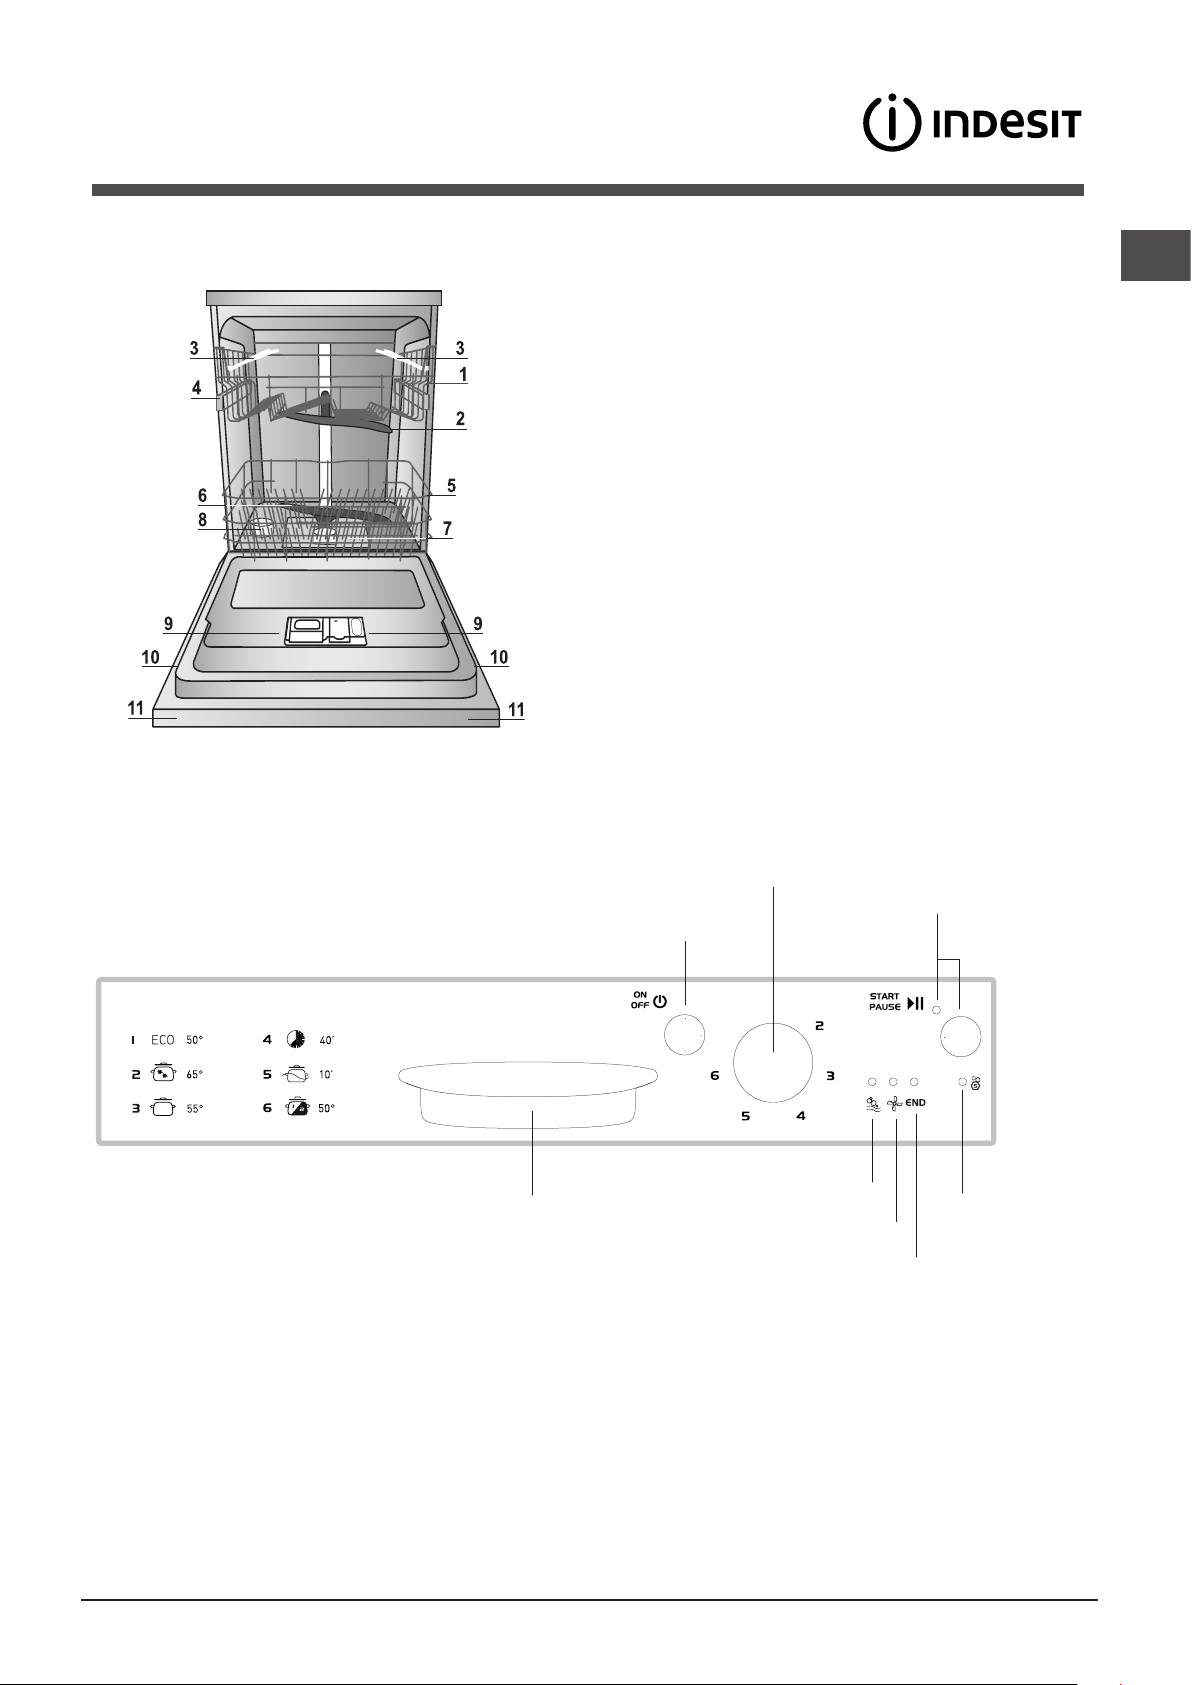
FR
35
Vue d’ensemble
Description de l’appareil
*** Uniquement pour modèles « tout intégrable » * Présent uniquement sur certains modèles.
Tableau de bord
Le nombre et les types de programmes varient selon le modèle de lave-vaisselle.
1. Panier supérieur
2. Brasdelavagesupérieur
3. Clayettes rabattables
4. Réglage hauteur du panier
5. Panier inférieur
6. Brasdelavageinférieur
7. Filtrelavage
8. Réservoir à sel
9. Bacsàproduitdelavage,réservoiràproduit
de rinçage et dispositif Oxygène Actif*
10. Plaque signalétique
11. Bandeaudecommandes***
touche et voyant
Départ/Pause
touche On-Off/Reset
bouton Sélection Programmes
voyant
manque de Sel
voyant Lavage
voyant Séchage
voyant Fin de Programme
poignée Ouverture Porte
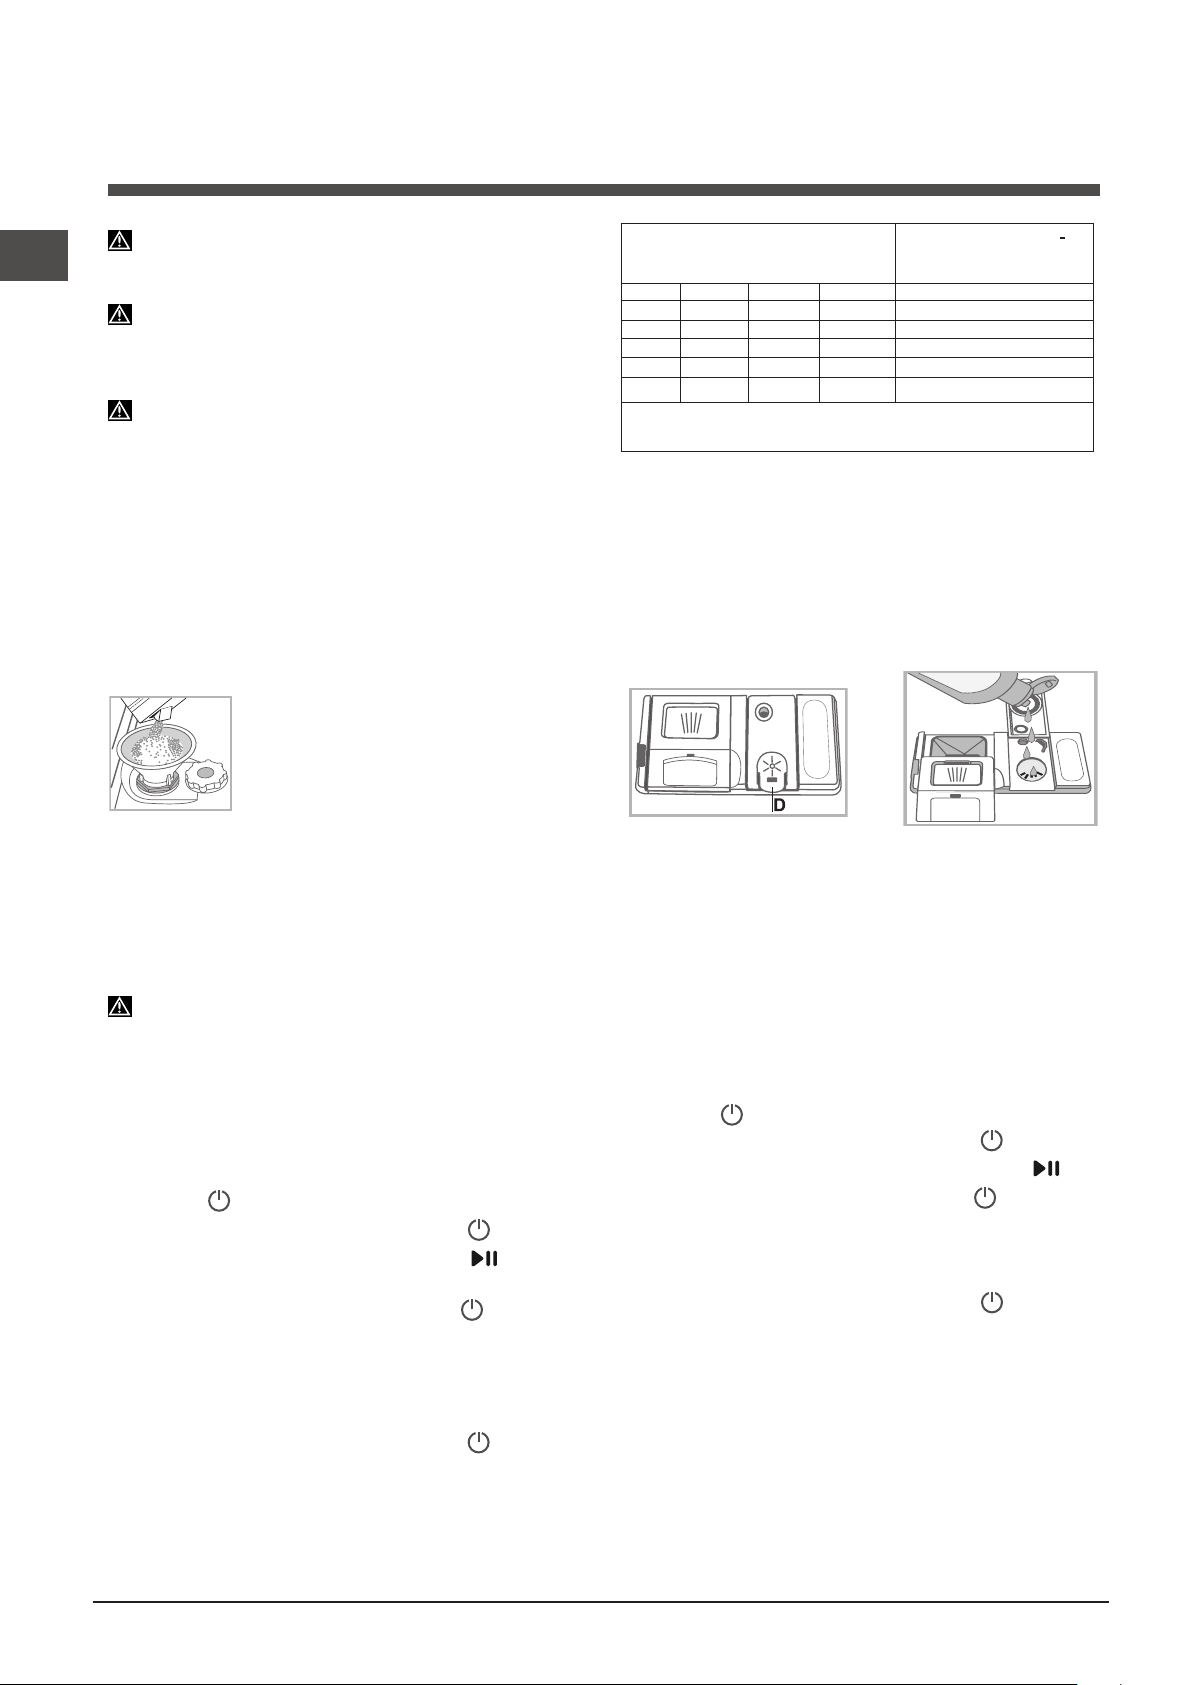
36
FR
M
A
X
N’utiliser que des produits de lavage spéciaux lave-vaisselle.
N’utilisez pas de sel alimentaire ou industriel.
Se conformer aux instructions reportées sur l’emballage.
En cas d’utilisation d’un produit multifonction, nous
conseillons malgré tout d’ajouter du sel, surtout en cas d’eau
dure ou très dure.
(Seconformeraux instructionsreportéessur
l’emballage).
Faute d’ajouter du sel ou du produit de rinçage, il est normal
que les voyants SEL* et PRODUIT DE RINCAGE* restent allumés.
Charger le sel régénérant
L'utilisationdeselévitelaformationdeCALCAIREsurlavaisselleet
sur les composants fonctionnels du lave-vaisselle.
•Ilestimportantqueleréservoiràselnesoitjamaisvide.
•Ilestimportantdeprocéderauréglagedeladuretédel'eau.
Le réservoir à sel qui se trouve dans la partie inférieure du lave-
vaisselle
(voirDescription)
doit être rempli :
•quandlevoyantSEL* du bandeau s’allume ;
•quandleflotteurvert*quisetrouvesurlecouvercleduseln'est
plus visible.
•voirautonomiedansletableaudeduretédel'eau.
1. Sortir le panier inférieur et dévisser le
couvercle du réservoir dans le sens inverse des
aiguilles d’une montre.
2. Lors de la première mise en service : remplir
le réservoir d’eau à ras bord.
3.Utiliserl’entonnoir
(voirfigure)
pour remplir le
réservoirdeseljusqu’aubord(1kgenviron);il
esttoutàfaitnormalquedel'eaudéborde.
4.Enleverl’entonnoir,éliminerlesrésidusdeselsurlefiletage.Avant
de revisser le couvercle, il faut le rincer à l’eau courante.
Nous conseillons d’effectuer cette opération à chaque chargement
de sel.
Fermersoigneusementlecouverclepouréviterqueduproduitde
lavagepénètre à l’intérieurdu réservoir pendantle lavage (cela
pourraitendommagerirrémédiablementl'adoucisseur).
Encas de rajoutde sel, nousconseillons d'effectuer cette
opération avant de démarrer le lavage.
Réglage dureté de l’eau
Pourobtenirunfonctionnementparfaitdel'adoucisseuranti-calcaire,
ilfautabsolumentprocéderàunréglageselonladuretédel'eau
del'appartement.Serenseignerauprèsdel’organismedistributeur
de l’eau. La valeur sélectionnée correspond à une dureté moyenne.
•AppuyersurlatoucheON/OFFpourmettrelelave-vaisselle
sous tension
•AppuyersurlatoucheON/OFFpouréteindre
•Garder la toucheSTART/PAUSE enfoncée pendant 5
secondes.
•AppuyersurlatoucheON/OFFpourallumer
•Levoyantselclignote(lenombredeclignotementscorrespond
à la sélection courante).
•Tournerleboutonsurlenumérocorrespondauniveaudedureté
désiré
(voirtableaudureté).
•AppuyersurlatoucheON/OFFpouréteindre
•Réglageeffectué!
En cas d’utilisation de tablettes de lavage multifonction, remplir
tout de même le réservoir à sel.
Sel régénérant et
Produit de rinçage
(°dH=duretéendegrésallemands-°fH=duretéendegrésfrançais
-mmol/l=millimole/litre)
Charger le produit de rinçage
LeproduitderinçageaideauSÉCHAGEdelavaisselle.Ilfautremplir
le réservoir à produit de rinçage :
• quand le voyant PRODUITDE RINÇAGE*s'allume sur le
bandeau/écran.
• quandl'indicateuroptique* situé sur le couvercle du réservoir «
D », passe de foncé à transparent.
1. Ouvrir le réservoir « D » en poussant et en soulevant la languette
sur le couvercle ;
2.Introduireleproduitderinçageavecprécautionjusqu'auniveau
maximaldel'ouverturederemplissageenévitanttoutdébordement.
Sicelaseproduit,nettoyeraussitôtavecunchiffonsec.
3.Fermerlecouverclejusqu'audéclic.
Ne JAMAIS verser le liquide de rinçage directement à l'intérieur
de la cuve.
Régler la dose de produit de rinçage
Si le résultat du séchage n’est pas satisfaisant, le dosage du produit
de rinçage peut être réglé.
•AppuyersurlatoucheON/OFFpourmettrelelave-vaisselle
sous tension
•AppuyersurlatoucheON/OFFpouréteindre
•Appuyer3foisdesuitesurlatoucheSTART/PAUSE
•AppuyersurlatoucheON/OFFpourallumer
•Toutéteint
•Tournerleboutonsurlenumérocorrespondàlaquantitéde
produit de rinçage devant être débitée.
•AppuyersurlatoucheON/OFFpouréteindre
•Réglageeffectué!
LeniveauduproduitderinçagepeutêtreréglésurZÉRO(ECO),
dans ce cas le produit de rinçage ne sera pas débité et le voyant
produit de rinçage ne s’allumera pas quand ce dernier sera fini.
Possibilitéde sélectionner jusqu'à4 niveauxmaximum selon le
modèle de lave-vaisselle. La valeur sélectionnée correspond à un
niveau moyen.
• silavaisselleprésentedestracesbleuâtres,réglersurdeschiffres
plusbas(1-2).
• s’ilyadesgouttesd’eauoudestachesdecalcairesurlavaisselle,
réglersurdeschiffresplusélevés(3-4).
Tableau de dureté de l’eau
Autonomie moyenne
réservoir à sel avec 1
lavage par jour
niveau
°dH °fH mmol/l mois
1 0 - 6 0 - 10 0 - 1 7 mois
2 6 - 11 11 - 20 1,1 - 2 5 mois
3 12 - 17 21 - 30 2,1 - 3 3 mois
4 17 - 34 31 - 60 3,1 - 6 2 mois
5
*
34 - 50 61 - 90 6,1 - 9 2/3 semaines
De 0°f à 10°f nous vous conseillons de ne pas utiliser de sel.
* La sélection 5 peut prolonger la durée.
* Présent uniquement sur certains modèles.
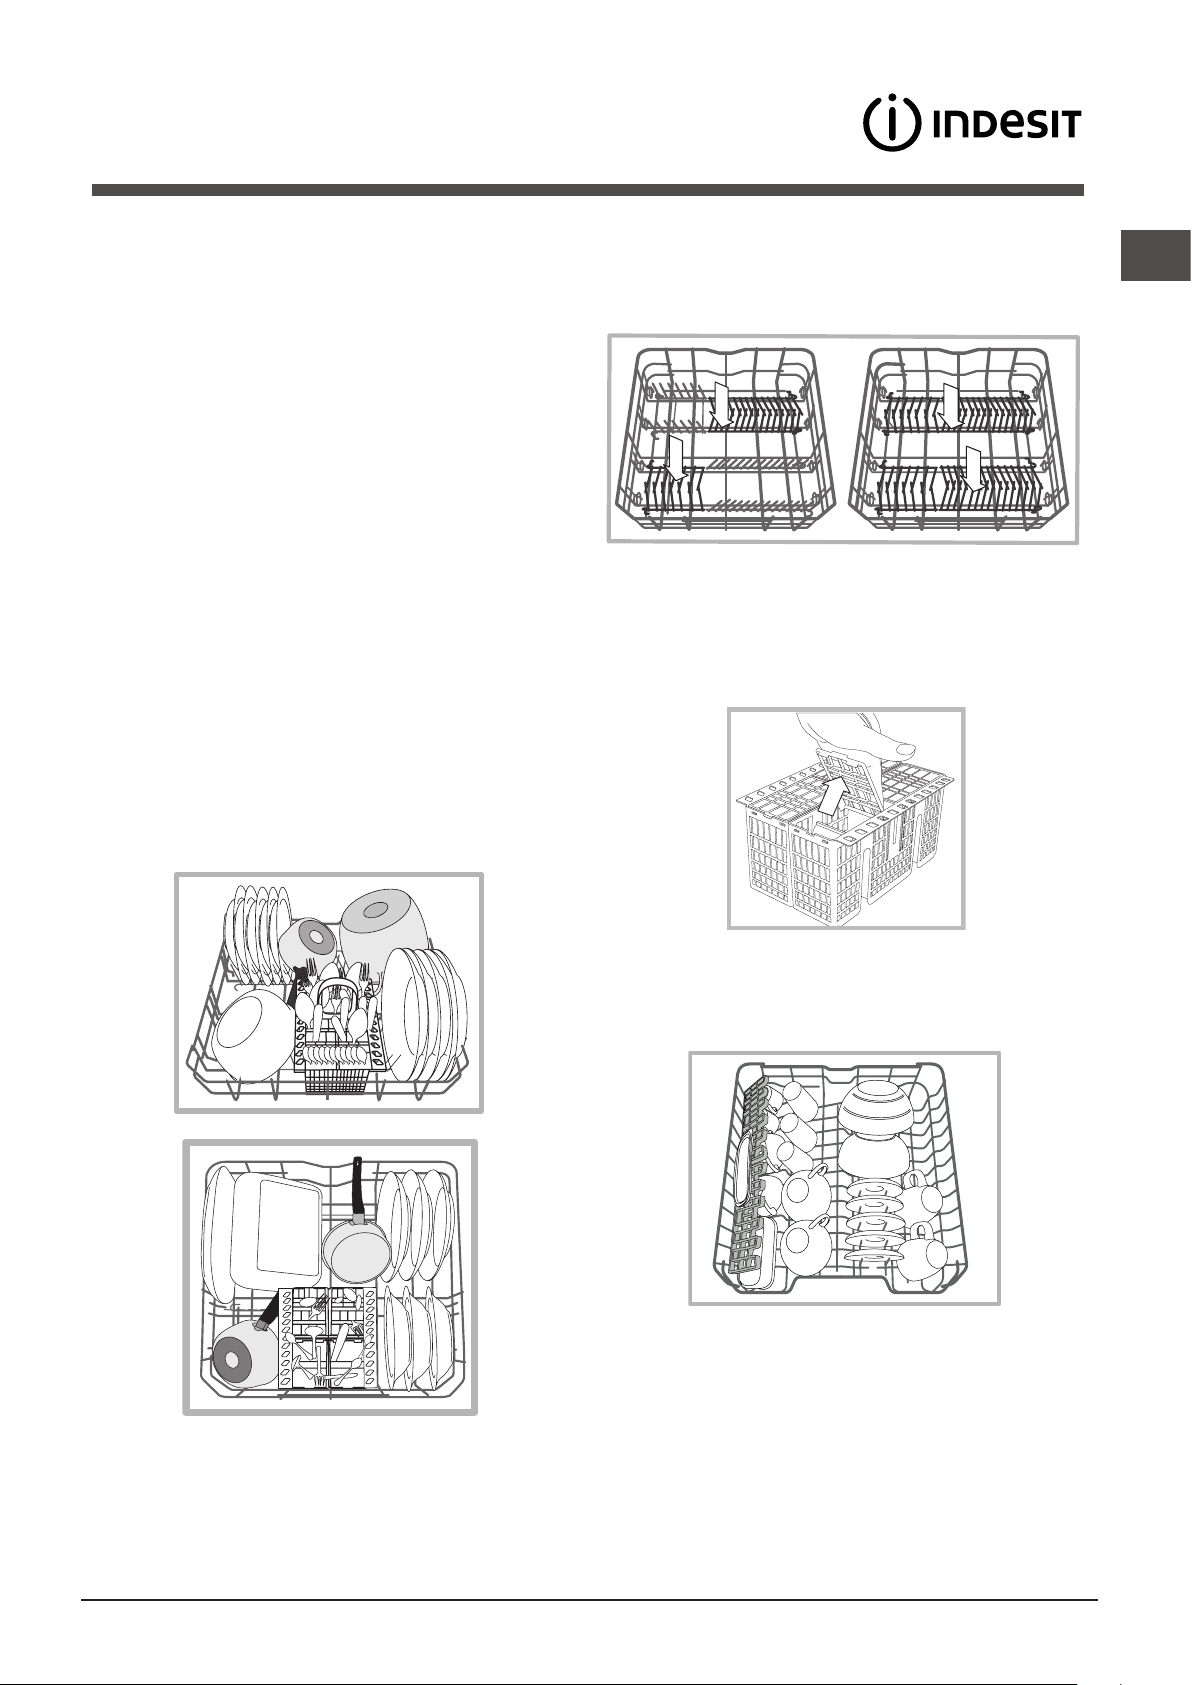
FR
37
Charger les paniers
Conseils
Avant de charger les paniers, débarrasser la vaisselle des
déchets plus importants et vider les verres et autres récipients.
Pas besoin de rincer préalablement à l'eau courante.
Ranger la vaisselle de manière à ce qu’elle ne bouge pas
pour éviter tout risque de renversement, ranger les saladiers
et les casseroles ouverture tournée vers le bas et les parties
concavesouconvexesenpositionobliquepourpermettreàl'eau
d'atteindretouteslessurfacesetdes'écoulercomplètement.
Veilleràcequelescouvercles,manches,poêlesetplateaux
ne gênent pas la rotation des bras de lavage. Placer les petits
objetsdanslepanieràcouverts.
La vaisselle en plastique et les poêles anti-adhésives ont
tendanceàretenirlesgouttesd'eauetleurdegrédeséchage
sera par conséquent inférieur à celui de la vaisselle en céramique
ou en acier.
Lesobjetslégers(telsquelesrécipientsenplastique)doivent
être rangés, de préférence. dans le panier supérieur et placés
demanièreàcequ'ilsnerisquentpasdesedéplacer.
Après avoir chargé le lave-vaisselle, s’assurer que les bras de
lavage tournent librement.
Panier inférieur
Le panier inférieur peut contenir des casseroles, des couvercles,
des assiettes, des saladiers, des couverts etc. Les assiettes et
les couvercles de grandes dimensions doivent être rangés, de
préférence,surlescôtésdupanier.
Il est conseillé de ranger la vaisselle très sale dans le panier
inférieurcardanscettepartiedulave-vaisselle,lesjetsd'eau
sontplus énergiques et permettent d'obtenir de meilleures
performances de lavage.
Certains modèles de lave-vaisselle sont pourvus de secteurs
rabattables
*, qui peuvent être utilisés en position verticale pour
accueillirlesassiettesouenpositionhorizontale(abaissés)pour
pouvoir charger plus facilement les casseroles et les saladiers.
Panier à couverts
Le panier à couverts est équipé de grilles supérieures permettant
de mieux ranger les couverts. Le panier à couverts non séparable
doit être placé obligatoirement dans la partie avant du panier
inférieur.
Panier supérieur
Réservé au chargement de la vaisselle fragile et légère : verres,
tasses, soucoupes, saladiers bas.
Certains modèles de lave-vaisselle sont pourvus de secteurs
rabattables
*, qui peuvent être placés à la verticale pour ranger
des assiettes à thé ou à dessert ou abaissés pour ranger des
coupes et autres récipients pour aliments.
* Présent uniquement sur certains modèles.
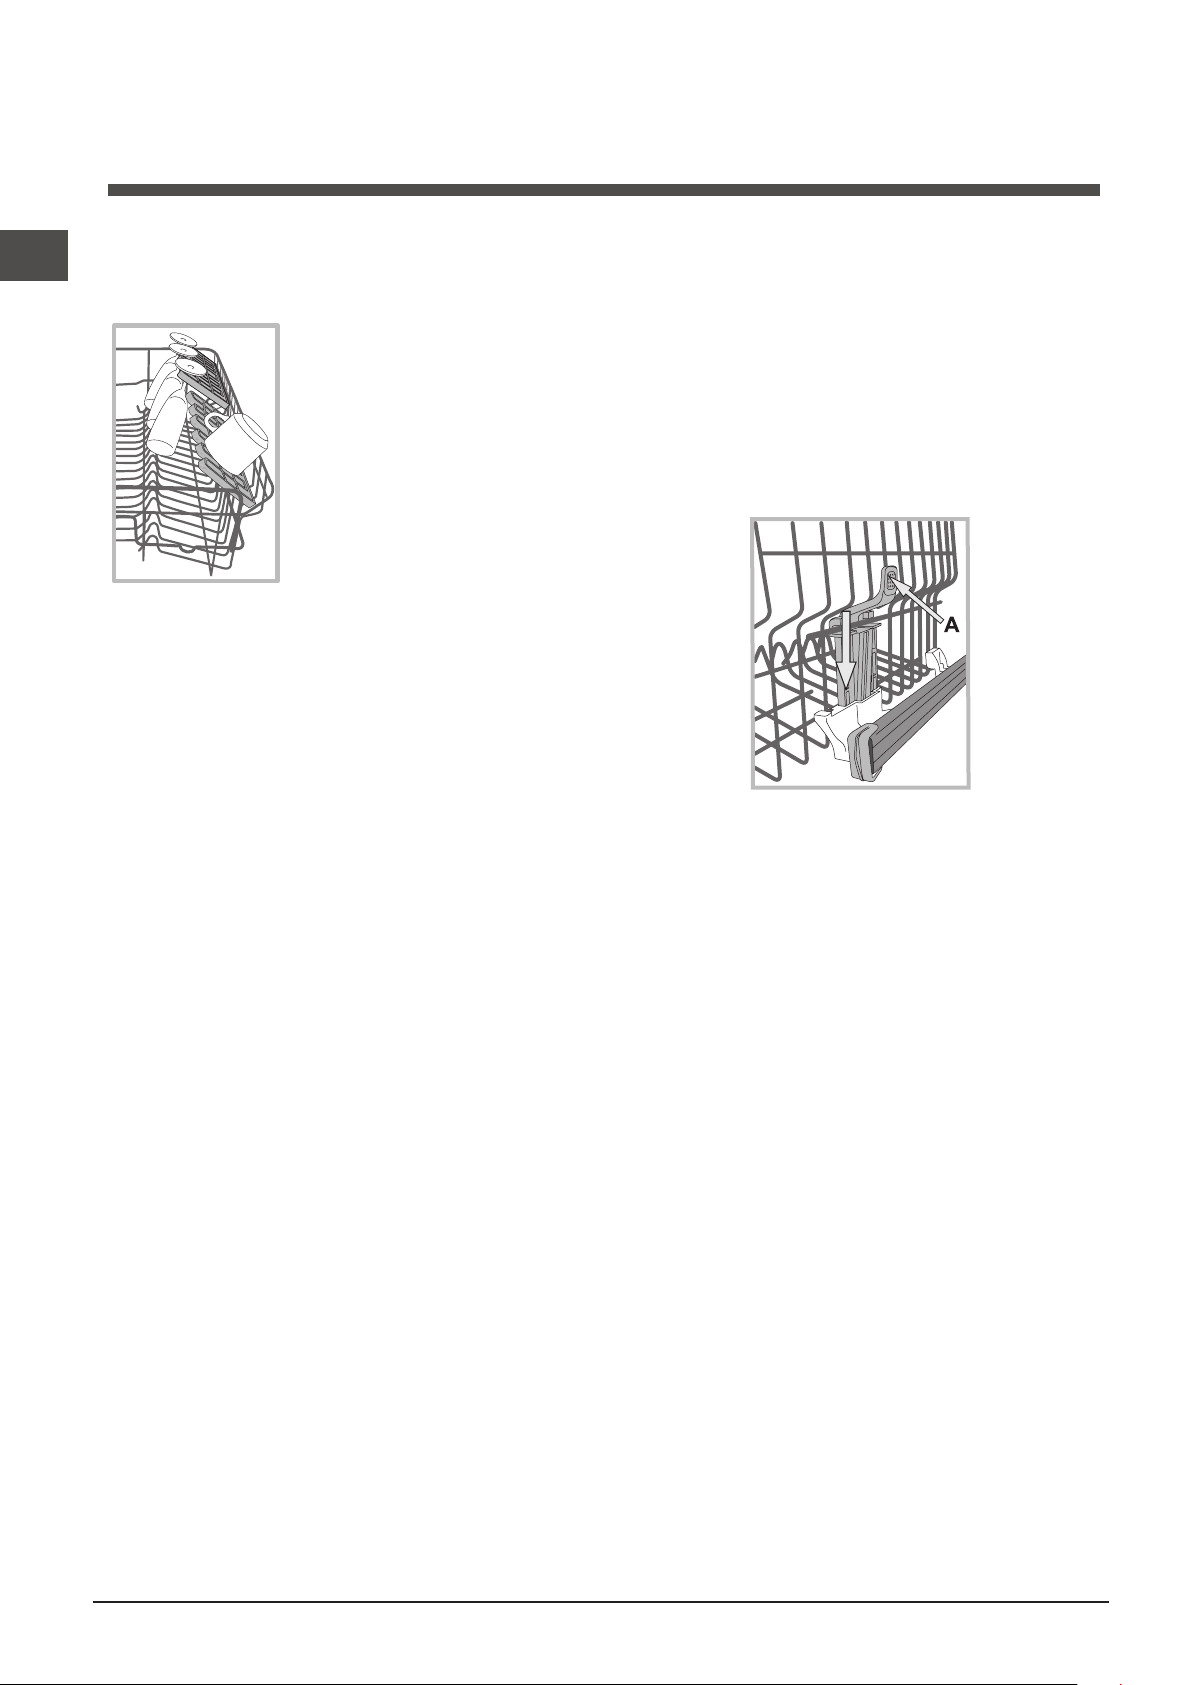
38
FR
*Présents uniquement sur certains modèles, ils peuvent varier
au point de vue nombre et emplacement.
Régler la hauteur du panier supérieur
Pour faciliter le rangement de la vaisselle, il est possible de régler
le panier supérieur en position haute ou basse.
Régler de préférence la hauteur du panier quand ce dernier
est VIDE.
Ne JAMAIS soulever ou abaisser le panier d’un seul côté.
Si le panier est équipé de Lift-Up
*
(voirfigure)
, soulever le panier
enlesaisissantparlescôtésetledéplacerverslehaut.Pour
reveniràlapositionbasse,appuyersurlesleviers(A) sur les
côtésdupanieretl'aideràdescendreverslebas.
Vaisselle non appropriée
• Couvertsetvaisselleenbois.
• Verresdécorésetfragiles,vaisselleartisanaleartistiqueou
ancienne. Leurs décors ne sont pas résistants.
• Parties en matièresynthétique nerésistant pas àla
température.
• Vaisselleencuivreouenétain.
• Vaissellesaledecendre,cire,graisselubrifianteouencre.
Les décors sur verre, les pièces en aluminium ou argent risquent
de changer de couleur et de blanchir en cours de lavage.
Certainstypes de verre(les objets encristal par exemple)
deviennent opaques après de nombreux lavages.
Endommagement du verre et de la vaisselle
Causes :
• Typedeverreetprocédédefabricationduverre.
• Compositionchimiqueduproduitdelavage.
• Températuredel'eauduprogrammederinçage.
Conseils :
• N'utiliserquedesverresetdelaporcelainegarantisparle
fabricant comme résistants au lavage en lave-vaisselle.
• Utiliserunproduitdelavagedélicatpourvaisselle.
• Sortirles verreset les couvertsdu lave-vaissellele plus
rapidement possible après la fin du programme.
Le panier supérieur est réglable en hauteur selon les besoins : en
position haute, il permet de ranger de la vaisselle encombrante
danslepanierinférieur;enpositionbasse,ilpermetd'exploiter
aumieuxl'espacedesclayettesetdessecteursrabattablesen
créant plus de place de rangement vers le haut.
Clayettes rabattables à inclinaison variable*
Les clayettes latérales peuvent être placées à trois hauteurs
différentes afin d’optimiser la disposition de la vaisselle dans
le panier.
Les verres à pied peuvent être placés
en position stable sur les clayettes
rabattables en insérant la tige de leurs
pieds dans les fentes prévues à cet
effet.
Pour optimiser le séchage, choisir la
plus forte inclinaison des clayettes
rabattables. Pour modifier l’inclinaison
de la clayette rabattable, la soulever et
la faire glisser légèrement avant de la
placer comme voulu.
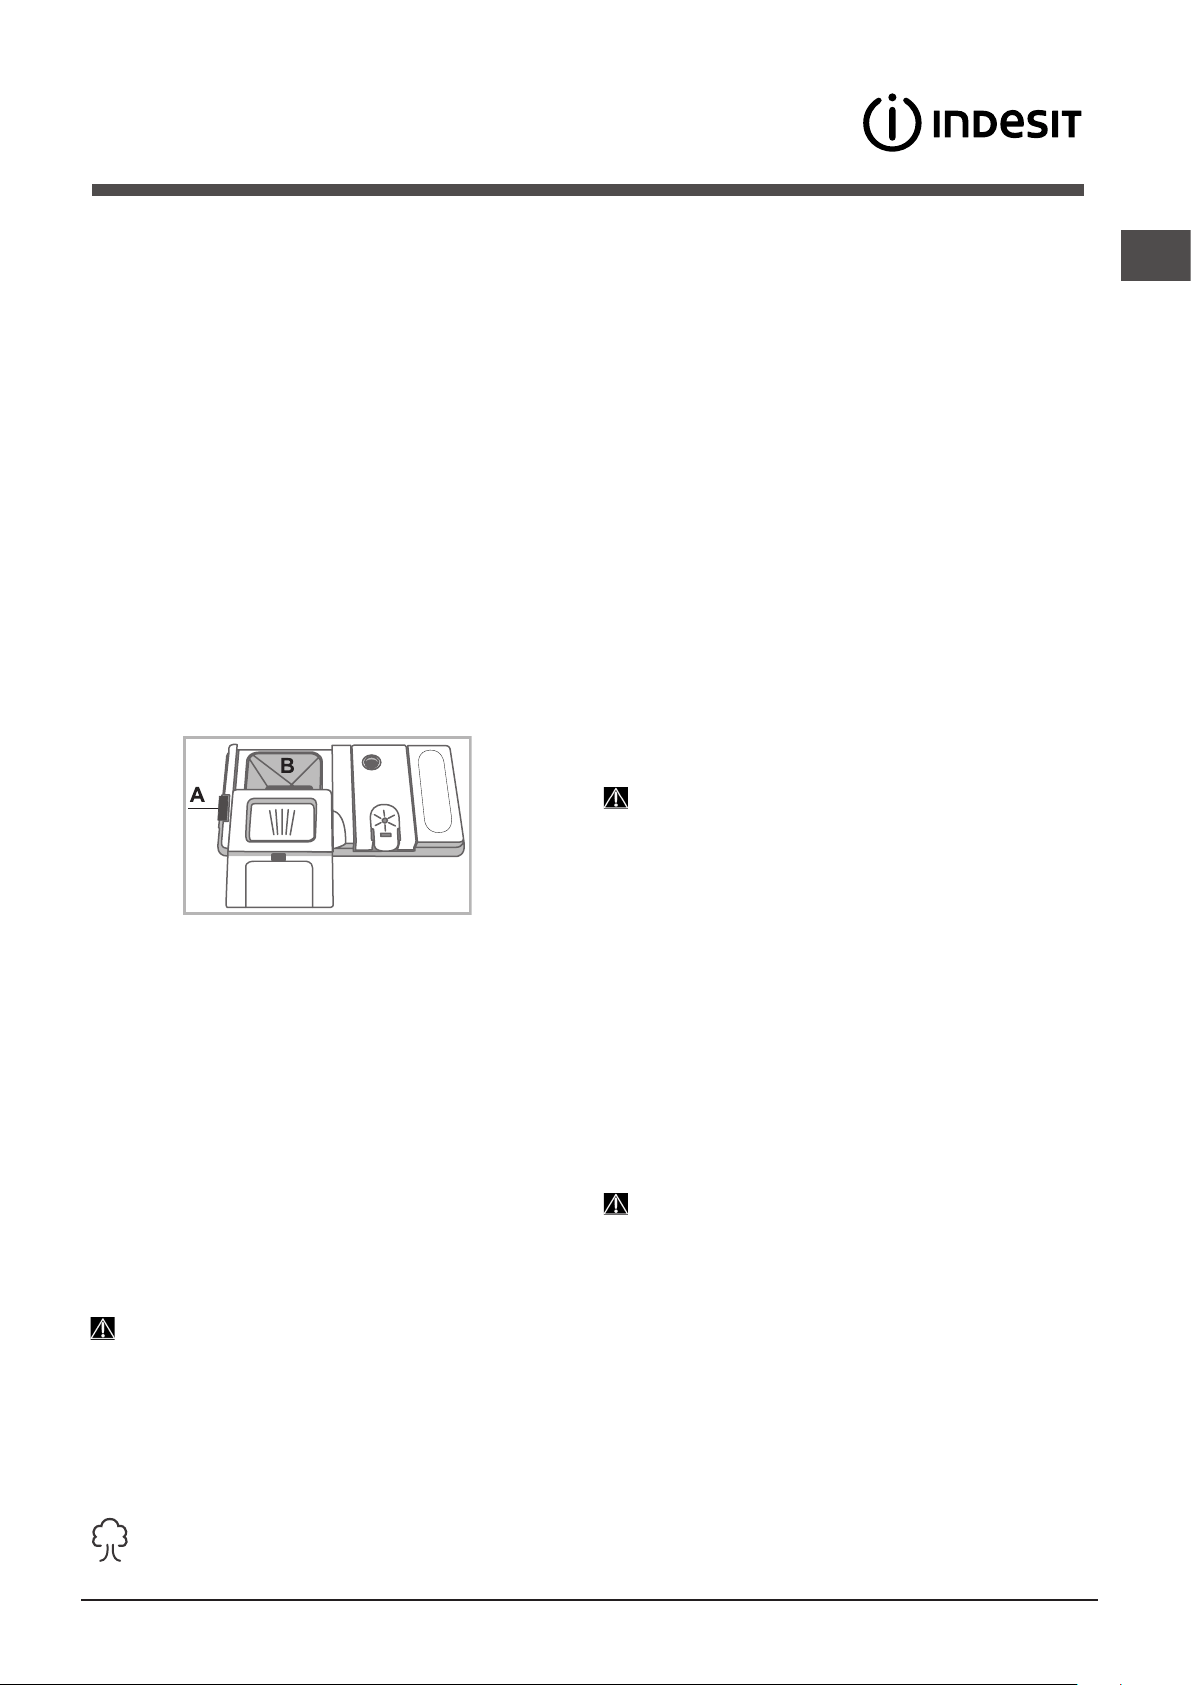
FR
39
* Présent uniquement sur certains modèles.
Mettre en marche le lave-vaisselle
1. Ouvrir l’arrivée d’eau.
2.AppuyersurlatoucheON-OFF:
3.Ouvrirlaporteetdoserleproduitdelavage.
4.Chargerlespaniers
(voirChargerles paniers)
et fermer la
porte.
5.
Sélectionner le programme désiré en tournant le bouton
SÉLECTIONPROGRAMMEdanslesensdesaiguillesd’une
montrejusqu’àamenerlerepèresurleboutonenfacedu
numéro ou du symbole du programme désiré. Le voyant de
latoucheDEPART/PAUSEs'allume.
6. Sélectionner les options de lavage*
(voir programmes
spéciaux et options).
7.AppuyersurlatoucheDépart/Pausepourdémarrer:unsignal
sonore* et l’allumage du voyant correspondant au lavage
signale le démarrage du programme.
8. A la fin, des signaux sonores* signalent la fin du programme
et le voyant ENDs'allume.Eteindrel’appareilenappuyantsurla
toucheON-OFF,fermerlerobinetdel’eauetdébrancherlafiche
de la prise de courant.
9. Attendre quelques minutes avant de sortir la vaisselle pour
éviterdesebrûler.Déchargerlespaniersencommençantpar
celui du bas.
Pour réduire sa consommation d'énergie, la
machine s'éteint automatiquement dans certaines
conditions de NON-utilisation.
Modifier un programme en cours
En cas d’erreur de sélection d’un programme, il est possible
delemodifier,àconditionqu’ilviennetoutjustededémarrer
: pour changer un cycle de lavage en cours, éteindre puis
rallumer l’appareil par une pression prolongée sur la touche
ON/OFF/Reset,sélectionnerensuitelenouveauprogramme
et les options désirées.
Introduire de la vaisselle en cours de lavage
Appuyersur la touche Départ/Pause, (latouchese met à
flasher). Ouvrir la porte en faisant attention à la vapeur chaude
qui s’échappe et introduire la vaisselle. Appuyer sur la touche
Départ/Pause(lumièrefixe):lecycleredémarre.
AppuyersurlatoucheDépart/Pausepourmettrel’appareil
en pause, le programme et le départ différé éventuellement
sélectionné sont stoppés.
Pendant cette phase, aucun changement de programme
n’est possible.
Interruptions accidentelles
En cas d’ouverture de la porte en cours de lavage ou de
coupure de courant, le programme s’arrête. Il redémarre du
point où il a été interrompu dès que le courant revient ou que
la porte est refermée.
Charger le produit de lavage
Un bon résultat de lavage dépend aussi d’un bon dosage du
produit de lavage. Un excès de produit de lavage ne lave pas
mieux et pollue l’environnement.
Selon le degré de salissure, le dosage peut être adapté au cas
par cas en utilisant un produit de lavage en poudre ou liquide.
En cas de vaisselle normalement sale, utiliser environ 35 g
(produit de lavage en poudre) ou 35ml (produit liquide). En
cas d'utilisation de tablettes, une seule suffit.
En cas de vaisselle peu sale ou précédemment rincée à l’eau,
réduire considérablement la quantité de produit de lavage.
Pour un bon résultat de lavage, suivre également les
instructions reportées sur l’emballage.
Pour toute autre demande de renseignements, s’adresser
aux fabricants de produits de lavage.
Pour ouvrir le distributeur de produit de lavage, actionner le
dispositif d'ouverture « A »
Introduire le produit de lavage dans le bac « B » bien sec. La
quantité de produit de lavage consacrée au prélavage doit
être placée directement dans la cuve.
1.
Doser le produitde lavage enconsultant le Tableaudes
programmes pour introduire une quantité appropriée.
Dansle bacB, un indicateur de niveau indique quelle est la
quantité maximale de de lavage, liquide ou en poudre, pouvant
être utilisée pour chaque cycle.
2. Eliminer les résidus de produit de lavage sur les bords du bac
etfermerlecouverclejusqu’audéclic.
3.Fermerlecouvercledudistributeurdeproduitdelavageen
lepoussant vers lehaut jusqu'à enclenchementdu dispositif
de fermeture.
Ledistributeuràproduitsdelavages'ouvreautomatiquement
selon le programme, au moment voulu.
Encas d'utilisation deproduits de lavagetout en un, utiliser
l'option TABLETTES qui adapte leprogramme de lavage de
manièreàtoujoursobtenirlesmeilleursrésultatsdelavageet
de séchage possibles.
N’utiliser que du produit de lavage spécial lave-vaisselle.
NE PAS UTILISER de produits pour laver la vaisselle à la main.
Une utilisation excessive de produit de lavage peut laisser
des résidus de mousse en fin de cycle.
Pour obtenir des performances de lavage et de séchage
optimales, il faut opter pour une utilisation combinée de
produit de lavage, produit de rinçage et sel régénérant.
Il est conseillé d’utiliser des produits de lavage sans
phosphates et sans chlore, plus indiqués pour la
protection de l’environnement.
Produit de lavage et
utilisation du lave-vaisselle
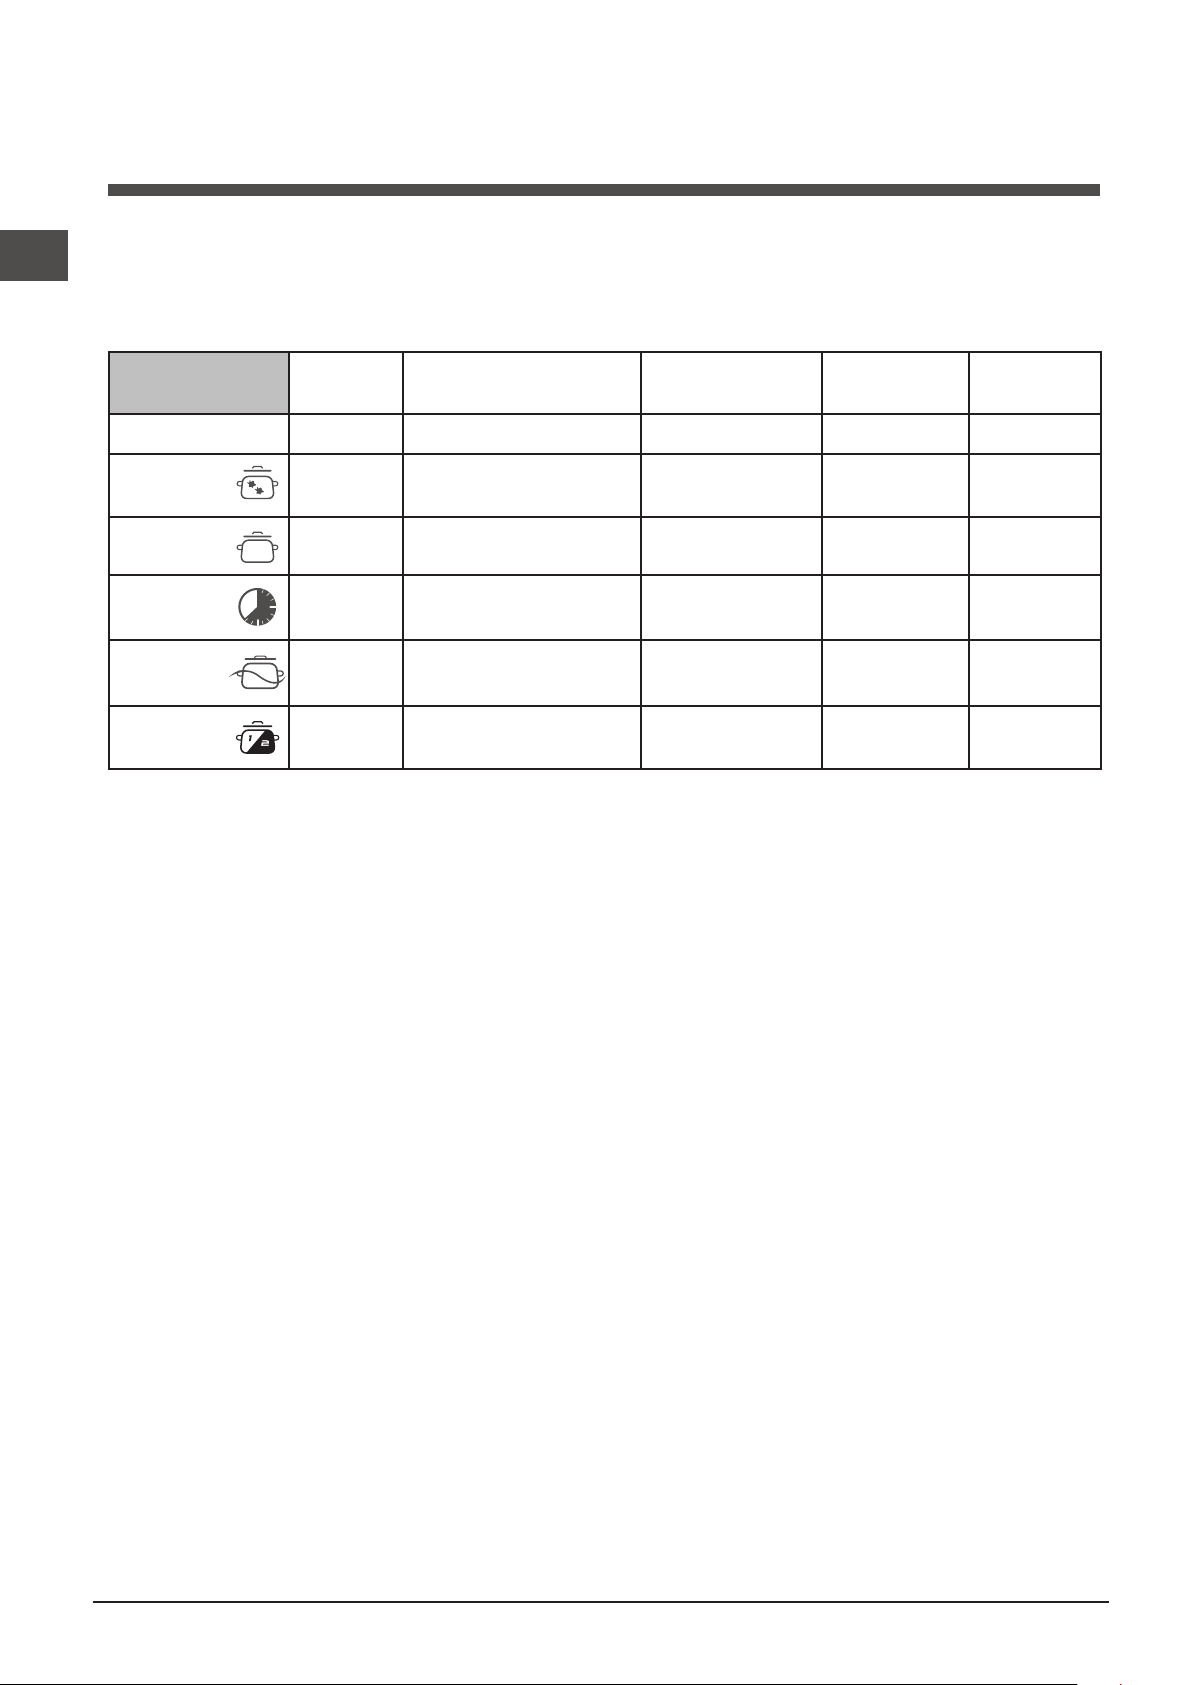
40
FR
Programmes
LesdonnéesdesprogrammessontmesuréesdansdesconditionsdelaboratoireselonlanormeeuropéenneEN50242.
Selon les différentes conditions d’utilisation, la durée et les données des programmes peuvent être différentes.
Le nombre et les types de programmes et des options, varient selon le modele de lave-vaisselle.
Programme Séchage Options
Durée du programme
H:min.
Consommation
d’eau (litre/cycle)
Consomation
d’énergie
(kWh/cycle)
1. Eco Oui Non 02:18’ 11,0 1,04
2. Intensif Oui Non 02:30’ 16,5 1,70
3. Normal Oui Non 02:00’ 16 1,40
4. Rapide Non Non 00:40’ 9,0 0,95
5. Prélavage Non Non 00:10’ 4,0 0,01
6. Demi-Charge Oui Non 01:20’ 12,0 1,15
Indications sur le choix des programmes et dosage du produit de lavage
1. Le cycle de lavage ECO est le programme standard auquel se référent les données de l’étiquette-énergie. Ce cycle est prévu
pour le lavage de la vaisselle normalement sale et est le programme le plus efficace en termes de consommation d’énergie et d’eau
pourcetypedevaisselle.27gr/ml+6gr/ml**–1tablette
(**Quantitédeproduitduprélavage)
.
2.
Vaisselleetcasserolestrèssales(déconseillépourlavaissellefragile)30gr/ml–1tablette.
3.Vaisselleetcasserolesnormalementsales.27gr/ml+6gr/ml**–1tablette.
4.Cyclerapideconseilléencasdevaissellepeusale(idéalpour2couverts)25gr/ml–1tablette.
5. Lavage préalable dans l’attente de compléter le chargement au repas suivant. Pas de produit de lavage.
6. Cycle idéal pour le lavage d’une charge réduite de vaisselle normalement sale.
25gr/ml–1tablette.
Consommations en stand-by: Consommation en left-on mode: 5,0 W - Consommation en off-mode: 0,5 W.
Remarque :
pourobtenirdesperformancesoptimalesavecleprogramme«Rapide40'»ilestconseilléderespecterlenombredecouvertsindiqué.
Pour consommer moins, utiliser le lave-vaisselle à pleine charge.
Note pour les laboratoires d’essai : pour toutes informations sur les conditions d’essai comparatif EN, s’adresser à :
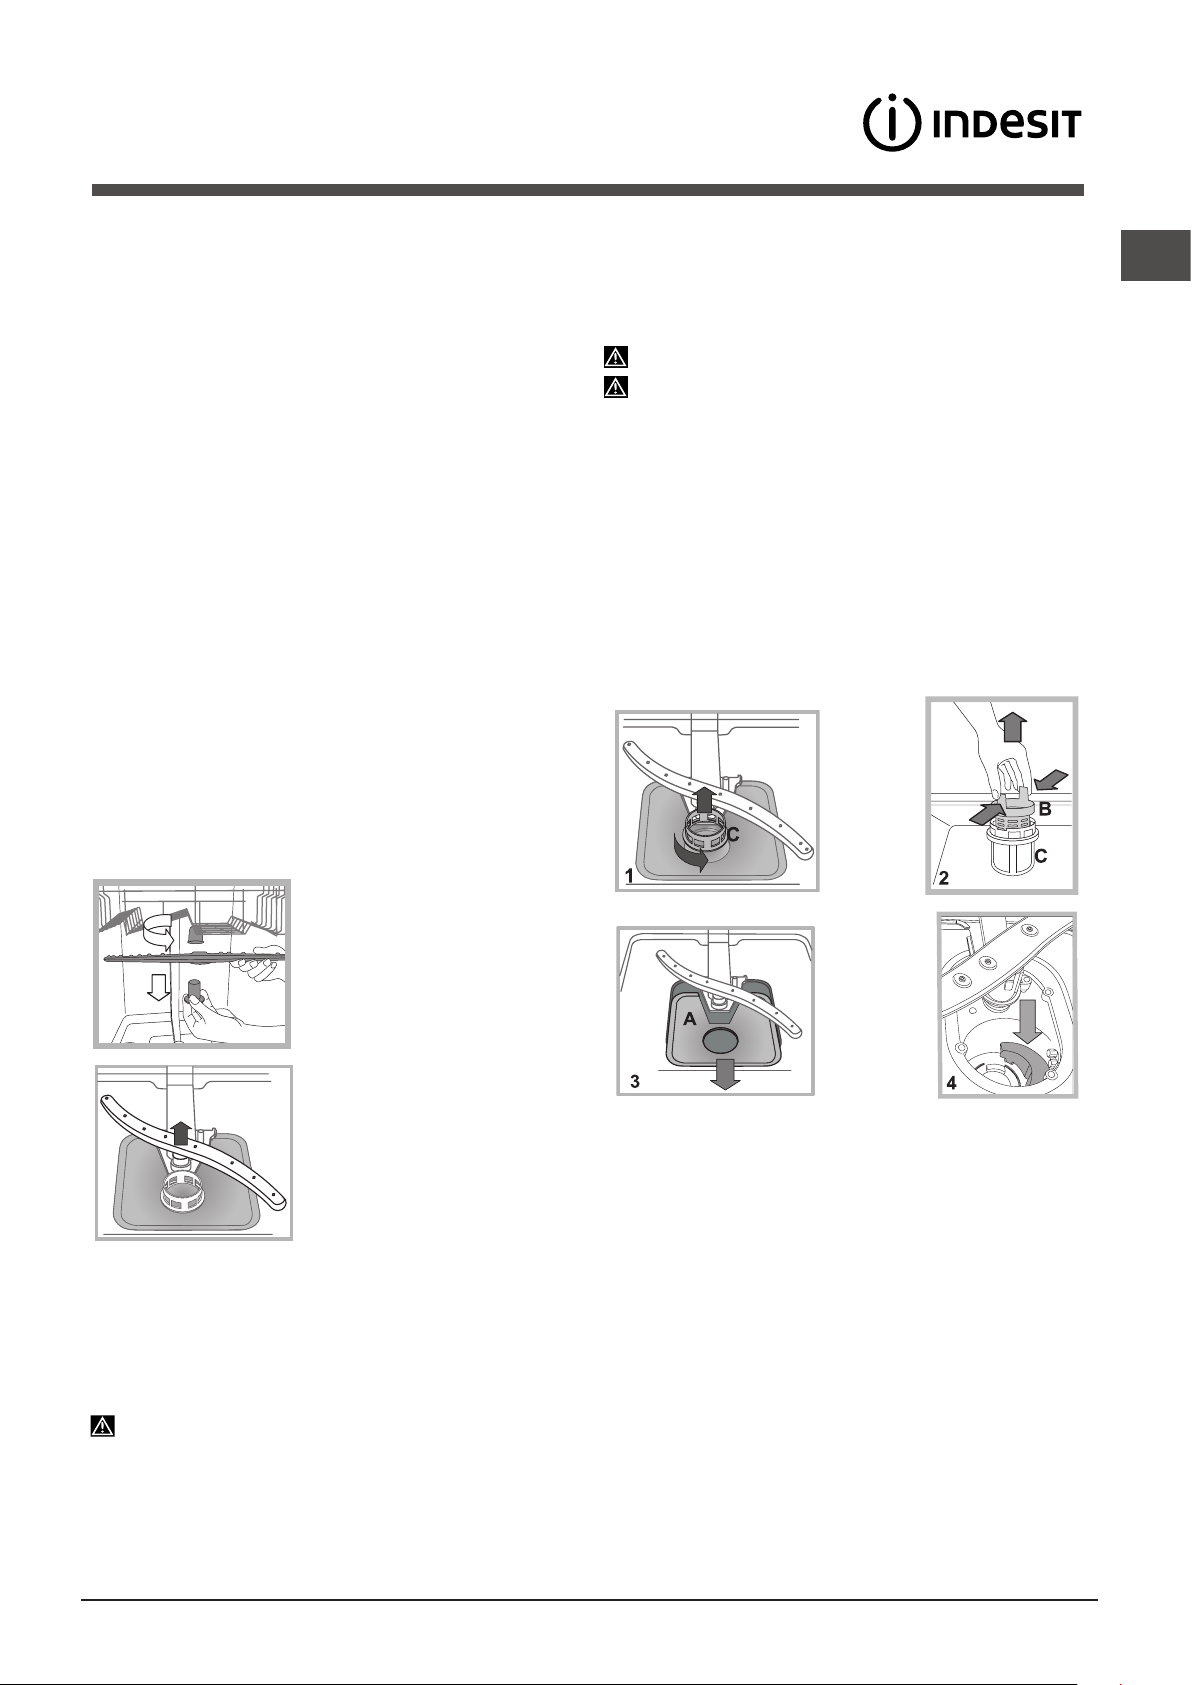
FR
41
Entretien et soin
Coupure de l’arrivée d’eau et du courant
• Fermerlerobinetdel'eauaprèschaquelavagepouréviter
tout risque de fuites.
• Débrancherlafichedelaprisedecourantlorsdunettoyage
de l’appareil et pendant tous travaux d’entretien.
Nettoyer le lave-vaisselle
• Pournettoyer l’extérieuret le bandeau de commande,
utiliser un chiffon humide non abrasif. N’utiliser ni solvants ni
détergents abrasifs.
• Pournettoyerlacuveintérieureetenlevertoutetache,utiliser
un chiffon imbibé d’eau additionnée d’un peu de vinaigre.
Eviter les mauvaises odeurs
• Laisser toujours la porte entrouverte pour évitertoute
stagnation d’humidité.
• Nettoyerrégulièrementlesjointsd’étanchéitédelaporteet
des bacs à produits de lavage avec une éponge humide. On
évitera ainsi les incrustations de déchets d’aliment qui sont
les principaux responsables de la formation de mauvaises
odeurs.
Nettoyer les bras de lavage
Il peut arriver que des déchets restent collés aux bras de lavage
etbouchentlestrousdesortiedel’eau:mieuxvautlescontrôler
de temps en temps et les nettoyer avec une petite brosse non
métallique.
Les deux bras de lavage sont tous deux démontables.
Pour démonter le bras supérieur, il
faut dévisser sa bague en plastique
en tournant dans le sens inverse des
aiguilles d’une montre. Remonter le
bras gicleur supérieur en veillant à
ce que la face percée du plus grand
nombre d’orifices soit bien orientée
vers le haut.
Pour démonter le bras de lavage
inférieur, pousser sur les languettes
situées sur les côtés ettirer vers
le haut.
Nettoyage du filtre d’entrée d’eau*
Si les tuyaux de l’eau sont neufs ou s’ils sont restés longtemps
inutilisés, avant d’effectuer le raccordement, faire couler l’eau
jusqu’àcequ’elledeviennelimpideetdépourvued’impuretés.
Fautedequoi,unengorgementpourraitseproduireaupoint
d’arrivée de l’eau et endommager le lave-vaisselle .
Nettoyer, périodiquement le filtre d’entrée de l’eau situé à la
sortie du robinet.
-Fermerlerobinetdel’eau.
-Dévisserl’extrémitédutuyaud’arrivéedel'eau,retirerlefiltre
et le laver soigneusement à l’eau courante.
- Remettre le filtre en place et visser le tuyau.
Nettoyer les filtres
Les trois filtres qui composent le groupe filtrant débarrassent
l’eau de lavage des résidus d’aliments avant de la remettre en
circulation : pour obtenir de bons résultats de lavage, il faut les
nettoyer.
Nettoyer les filtres régulièrement.
Ne pas utiliser le lave-vaisselle sans filtres ou avec filtre mal
fixé.
•Après quelques lavages, contrôler legroupe filtrantet, si
nécessaire, le laver soigneusement à l’eau courante avec une
petite brosse non métallique en procédant comme suit :
1. tourner le filtre cylindrique C dans le sens inverse des aiguilles
d’une montre pour le sortir de son emplacement
(fig.1).
2. Exercer une légère pression sur les ailettes latérales du gobelet
filtre B pour le faire sortir
(Fig.2);
3.DégagerlefiltreinoxA.
(fig.3).
4. Examiner la cavité et éliminer tout résidu de nourriture.
NE JAMAIS RETIRER la protection de la pompe de lavage
(piècenoire)(fig.4).
Après avoir nettoyé les filtres, remettre soigneusement le groupe
filtrant à sa place, cette opération est fondamentale pour un bon
fonctionnement du lave-vaisselle.
En cas d’absence pendant de longues
périodes
• Débrancherlesraccordementsélectriquesetfermerlerobinet
de l’eau.
• Laisserlaporteentrouverte.
•Auretour,effectuerunlavageàvide.
* Présent uniquement sur certains modèles.

42
FR
Anomalies et remèdes
Sil’appareilprésentedesanomaliesdefonctionnement,procéderauxcontrôlessuivantsavantdeprendrecontact
avec le service d’assistance technique.
* Présent uniquement sur certains modèles.
Anomalies : Causes / Solutions possibles :
Le lave-vaisselle ne démarre
pas ou n’obéit pas aux
commandes
• Le robinet de l’eau n’est pas ouvert.
• Eteindre l’appareil à l'aide de la touche ON-OFF, rallumer au bout d’une minute environ et
sélectionner à nouveau le programme.
• La che n’est pas bien branchée dans la prise de courant ou il faut changer la prise de
courant.
• La porte du lave-vaisselle n’est pas bien fermée.
La porte ne ferme pas
• S'assurer que les paniers sont bien poussés jusqu'au fond.
• La serrure est déclenchée ; pousser énergiquement sur la porte jusqu’au « clic ».
Le lave-vaisselle ne vidange
pas.
• Le programme de lavage n'est pas encore terminé.
• Le tuyau de vidange de l’eau est plié
(voir Installation).
• L’évacuation de l’évier est bouchée.
• Le ltre est bouché par des déchets de nourriture.
• Contrôler la hauteur du tuyau d'évacuation.
Le lave-vaisselle est bruyant. • La vaisselle s’entrechoque ou butte contre les bras de lavage. Ranger la vaisselle
correctement et s'assurer que les bras de lavage tournent librement.
• Excès de mousse : le produit de lavage n’est pas bien dosé ou n’est pas approprié.
(voir
Produit de lavage et utilisation du lave-vaisselle).
Ne pas prélaver la vaisselle à la main.
La vaisselle et les verres
présentent des dépôts de
calcaire ou une couche
blanchâtre.
• Absence de sel régénérant.
• Le réglage de la dureté de l'eau n'est pas adéquat ; il faut augmenter les valeurs.
(voir Sel
régénérant et Produit de rinçage).
• Le couvercle du réservoir à sel et à produit de rinçage n'est pas bien fermé.
• Il n’y a plus de produit de rinçage ou son dosage est insufsant.
La vaisselle et les verres
présentent des traces blanches
ou des reets bleuâtres.
• Le dosage du produit de rinçage est excessif.
La vaisselle n’est pas sèche. • ll y a eu sélection d’un programme sans séchage.
• Il n'y a plus de produit de rinçage.
(voir Sel régénérant et Produit de rinçage).
• Le réglage du produit de rinçage n’est pas approprié.
• La vaisselle est en matériau anti-adhésif ou en plastique ; la présence de gouttelettes d'eau
est normale.
La vaisselle n’est pas propre. • La vaisselle n’est pas rangée correctement.
• Les bras de lavage ne tournent pas librement car ils sont gênés par la vaisselle.
• Le programme de lavage n’est pas assez puissant
(voir Programmes).
• Excès de mousse : le produit de lavage n’est pas bien dosé ou n’est pas approprié.
(voir
Produit de lavage et utilisation du lave-vaisselle).
• Le couvercle du réservoir à produit de rinçage n'est pas bien fermé.
• Le ltre est sale ou bouché
(voir Entretien et soin).
• Il manque du sel régénérant
(voir Sel régénérant et produit de rinçage).
• S'assurer que la hauteur des assiettes est compatible avec le réglage du panier.
• Les orices des bras de lavage sont bouchés.
(voir Entretien et soin).
Il n’y a pas d’arrivée d’eau
il est bloqué et ses voyants cli-
gnotent
• Il y a une coupure d'eau du réseau ou le robinet est fermé.
• Le tuyau d’arrivée de l’eau est plié
(voir Installation).
• Les ltres sont bouchés ; il faut les nettoyer.
(voir Entretien et soin).
• L'évacuation est bouchée ; il faut la nettoyer.
• Après avoir effectué les opérations de contrôle et de nettoyage, éteindre puis rallumer le
lave-vaisselle et faire démarrer un nouveau cycle de lavage.
• Si le problème persiste, fermer le robinet de l'eau, débrancher la che de la prise de courant
et contacter le centre d'assistance technique.

NL
44
MIN 40 cm
MAX 80 cm
Als u het apparaat verplaatst, moet u het verticaal houden;
is dit niet mogelijk, dan moet u het naar achteren kantelen.
Hydraulische aansluitingen
Aanpassingen aan het hydraulisch systeem met het oog
op de installatie mogen alleen door erkende technici worden
uitgevoerd.
De buizen voor de toevoer en afvoer van het water kunnen
zowel naar rechts als naar links worden gericht om een op-
timale installatie te bekomen.
De buizen mogen niet gekneld of gebogen zitten door de
afwasautomaat.
Aansluiting van de buis voor de watertoevoer
• Aansluitingopeenkoud-ofwarmwaterkraanvan3/4”gas
(max. 60°C).
• Laathetwaterlopentothetcompleethelderis.
• Draaidetoevoerbuisgoedvastenopendekraan.
Als de toevoerbuis niet lang genoeg is, dient u zich te
wenden tot een speciaalzaak of tot een erkende monteur
(zie
Service)
.
De waarde van de waterdruk moet in de tabel met de
technische gegevens vermeld staan; is dat niet zo, dan werkt
de afwasautomaat mogelijk niet correct.
Zorg ervoor dat de buis niet gebogen of samengedrukt
wordt.
Aansluiting van de buis op de waterafvoer
Sluit de afvoerbuis aan op een afvoerleiding met een minimale
doorsnede van 2 cm. (A)
Het aanhechtingspunt van de afvoerbuis moet zich op een
hoogtetussen40en80cmvandevloerofhetsteunvlakvan
de afwasautomaat bevinden.
Voordat u de waterafvoerbuis aansluit op de sifon van de
wasbak, moet u de plastic dop (B) verwijderen.
Lekkagebeveiliging
Om lekkages te voorkomen, is de afwasautomaat:
- voorzien van een systeem dat de watertoevoer onderbreekt
in geval van storingen of lekkages van binnenuit.
Enkele modellen zijn verder voorzien van een aanvullend
beveiligingsmechanisme New Acqua Stop*, dat lekkages
ook voorkomt in geval van breuk in de toevoerbuis.
BELANGRIJK: GEVAARLIJKE SPANNING!
De toevoerbuis mag in geen geval worden doorgesneden:
hij bevat onderdelen die onder spanning staan.
Elektrische aansluiting
Voordat u de stekker in het stopcontact steekt, moet u zich
ervan verzekeren dat:
• hetstopcontactgeaard is
en voldoet aan de geldende
normen;
• hetstopcontactgeschiktisvoorhetmaximalevermogen
van het apparaat. Dit vermogen wordt aangegeven op het
typeplaatje aan de binnenkant van de deur
(zie hoofdstuk Beschrijving van de afwasautomaat);
• de spanningswaarden tussen de waardenliggendie
aangegeven worden op het typeplaatje aan de binnenkant
van de deur;
• destekker van het apparaat en het stopcontact
overeenkomen. Als dit niet het geval is, moet u een
bevoegde monteur inschakelen om de stekker te laten
vervangen
(zie Service)
; gebruik geen verlengsnoeren of
meervoudige stopcontacten.
Wanneer het apparaat geïnstalleerd is, moeten de
elektrische voedingskabel en het stopcontact makkelijk te
bereiken zijn.
De kabel mag niet gebogen of samengedrukt worden.
Indien de voedingskabel beschadigd is, dient deze door
de fabrikant of door uw Technische Servicedienst vervangen
te worden, zodat elk risico vermeden wordt
(zie Service).
De fabrikant kan niet verantwoordelijk worden gesteld als
deze normen niet worden nageleefd.
Plaatsing en waterpas zetten
1. Plaats de afwasautomaat op een effen en stevige vloer.
Compenseer eventuele onregelmatigheden door de voorste
stelvoetjes los of vast te draaien, totdat het apparaat
horizontaal staat. Een correcte nivellering geeft stabiliteit en
voorkomt trillingen en geluiden.
2. Nadat u de afwasautomaat hebt ingebouwd, kleeft u de
doorzichtige kleefstrip
* onder het houten werkvlak om het te
beschermen tegen eventuele condens.
3.Deafwasautomaatmoetmetdezijkantofdeachterkant
tegen de aangrenzende kastjes of de wand worden
geïnstalleerd. Het apparaat kan ook onder het aanrecht
worden ingebouwd
*
(zie Montageblad)
.
4
*. Om de hoogte van het achterste stelvoetje te regelen,
moet u draaien aan de zeshoekige rode beslagring aan
deonder-/voorzijdeinhetmiddenvande afwasautomaat.
Gebruik hiervoor een zeshoekige sleutel met een opening
van8mm.Draairechtsomomdehoogtetevermeerderen,
linksom om de hoogte te verminderen
(zie instructieblad voor
de inbouw dat bij de documentatie is gevoegd).
Installatie
* Alleen op bepaalde modellen aanwezig
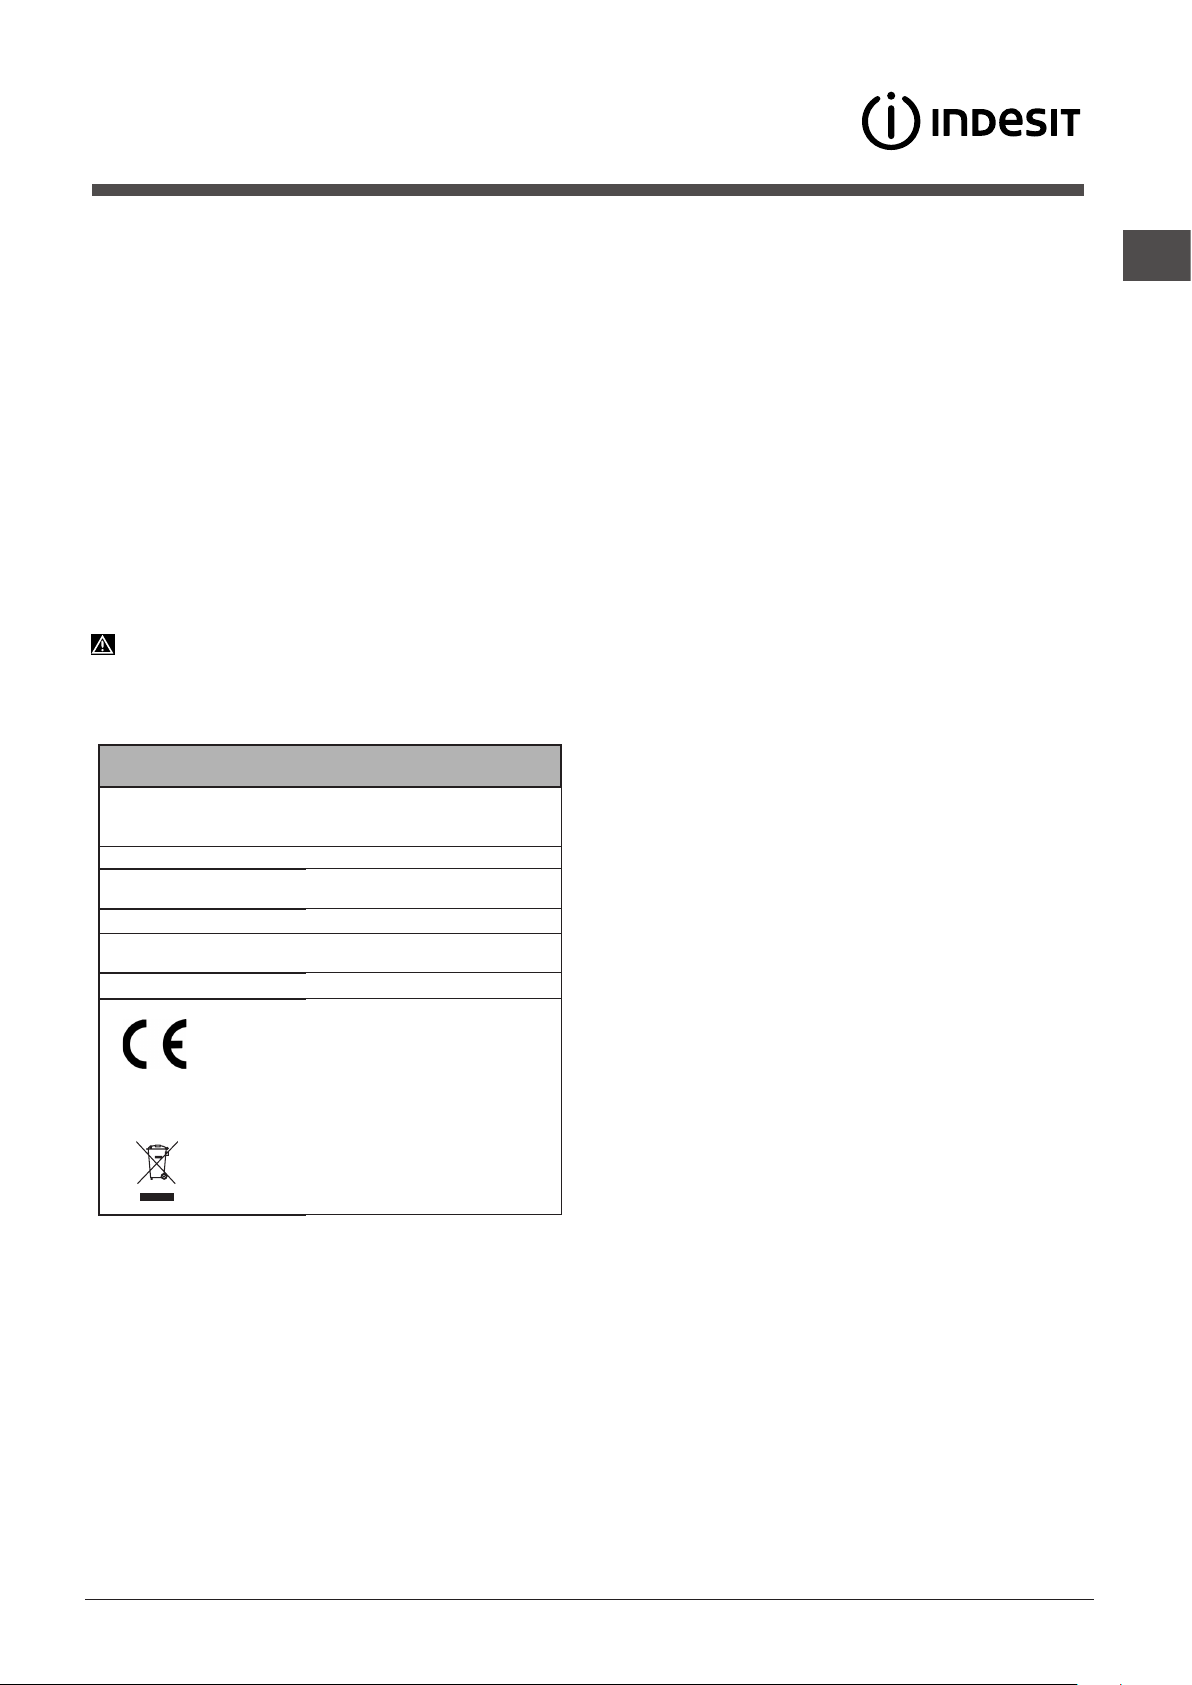
NL
45
Technische gegevens
Afmetingen
breedte cm 59,6
hoogte cm 82
diepte cm 57
Capaciteit 13 bordensets
Waterdruk toevoer
0,05 ÷ 1 MPa (0,5 ÷ 10 bar)
7,25 – 145 psi
Netspanning Zie typeplaatje
Totaal
opnemingsvermogen
Zie typeplaatje
Zekering Zie typeplaatje
Deze afwasautomaat voldoet
aan de volgende EU richtlijnen:
- 2006/95/EEG (Laagspanning)
- 2004/108/EEG
(Elektromagnetische
Compatibiliteit)
- 2009/125/EG (Comm. Reg.
1016/2010) (Ecodesign)
-97/17/EC (Etikettering)
- 2012/19/EU (AEEA)
* Alleen aanwezig op bepaalde modellen.
Het apparaat beschikt over een aantal geluidssignalen/tonen
(aan de hand van het model vaatwasser
) die waarschuwen
dat de betreffende functie van start is gegaan: inschakeling,
einde cyclus, etc.
De symbolen/controlelampjes/leds op het bedieningspaneel/
display kunnen van kleur veranderen, knipperen of vast
aanstaan.
(aan de hand van het model vaatwasser)
.
Het display
* toont nuttige informatie betreffende het type
ingestelde cyclus, de was- of droogfase, de resterende tijd,
de temperatuur, enz... enz…
Aanwijzingen voor de eerste afwascyclus
Na de installatie moet u de beschermelementen op de rekken
verwijderen, evenals de elastieken op het bovenrek
(waar
aanwezig).
Instellingen waterontharder
Voordat u met de eerste wasbeurt begint, moet u het
waterhardheidsniveau
van de waterleiding instellen
(zie
hoofdstuk Glansmiddel en onthardingszout).
Vul het reservoir van de waterontharder de eerste keer met
water, daarna met ongeveer 1 kg zout; het is normaal dat er
water uitstroomt.
Laatonmiddellijkdaarnaeeneerstewascyclusdraaien.
Gebruik uitsluitend zout dat speciaal voor afwasautomaten
bestemd is.
Na het vullen gaat het controlelampje ZOUT TOEVOEGEN
*
uit.
Als u geen onthardingszout toevoegt, kunnen de
waterontharder en het verwarmingselement schade oplopen.
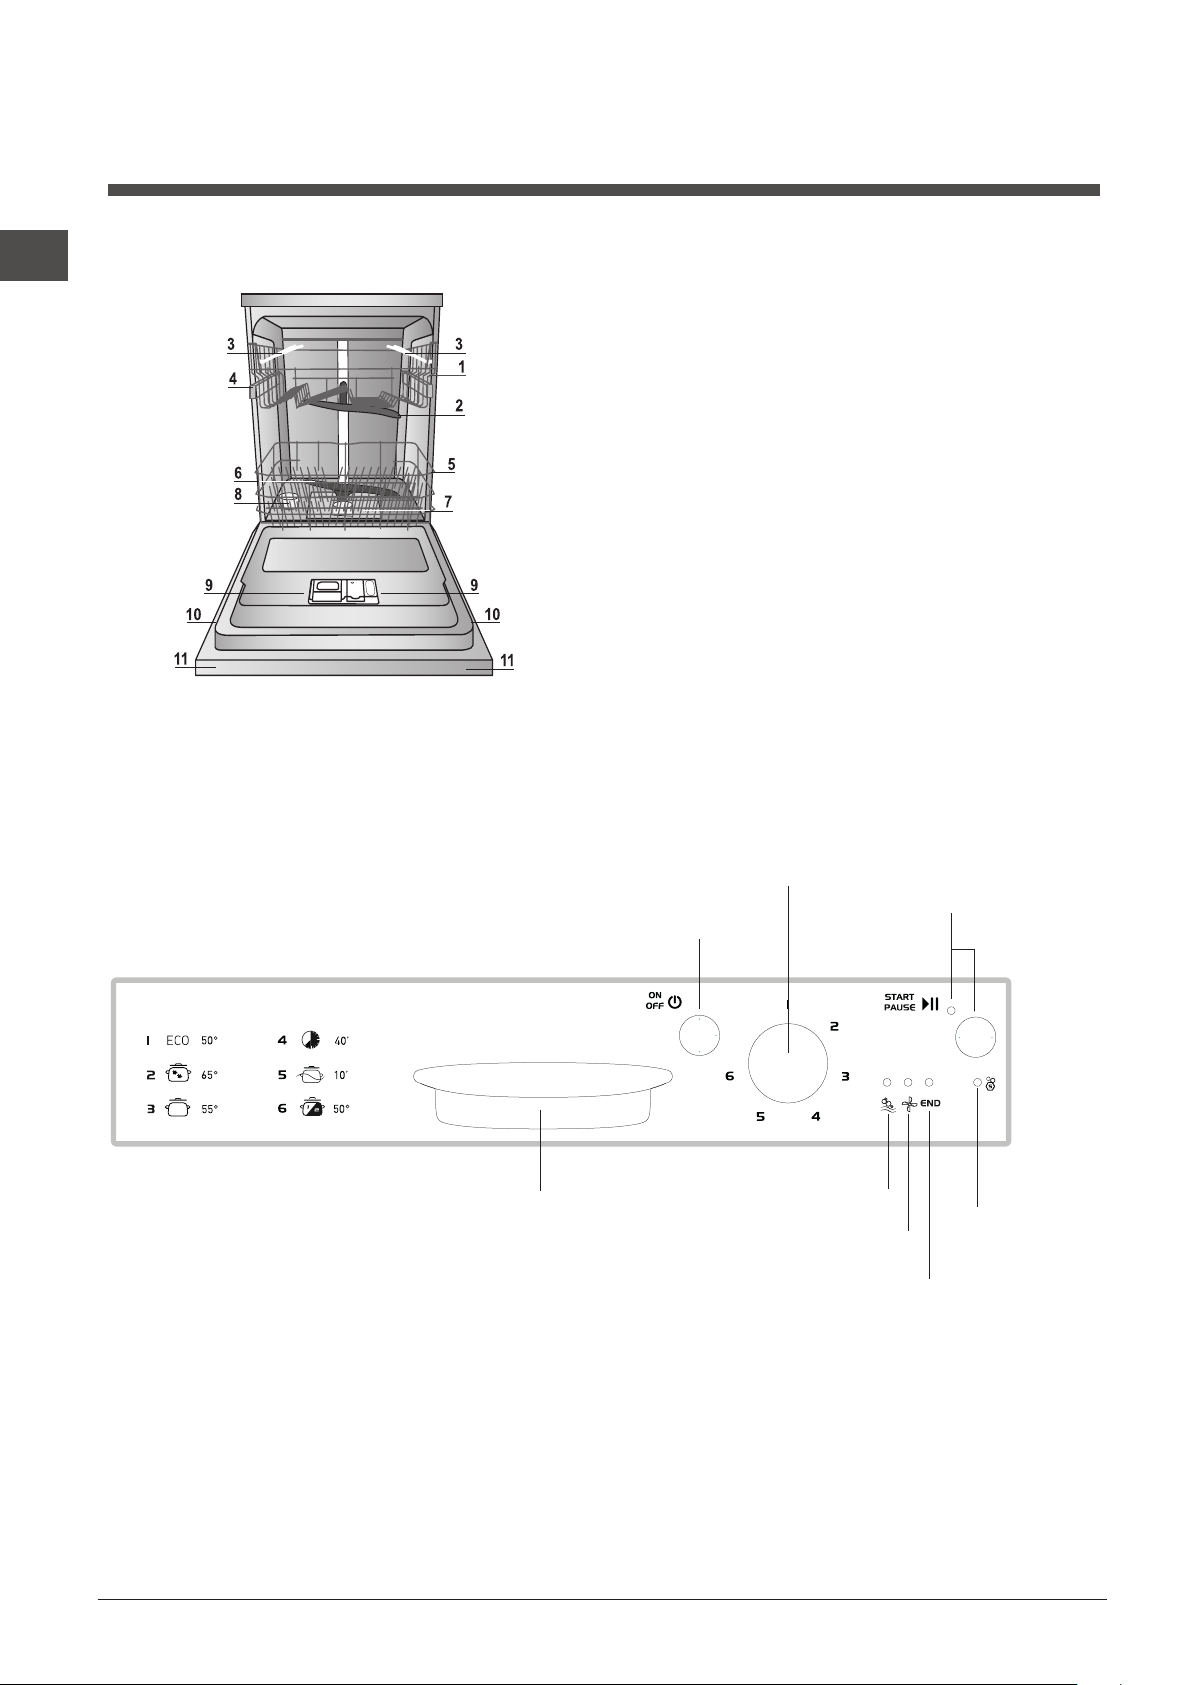
NL
46
Aanzichttekening
Beschrijving van het
apparaat
***Alleen op modellen voor volledige inbouw.
* Alleen aanwezig op bepaalde modellen.
Het aantal en het soort programma’s en opties verschilt aan de hand van het model afwasautomaat.
1. Bovenrek
2. Bovenste sproeiarmen
3. Opklaprekjes
4. Regeling hoogte bovenrek
5. Onderrek
6. Onderste sproeiarmen
7. Filter
8. Zoutreservoir
9. Wasmiddelbakje, reservoir glansspoelmiddel
en Active Oxigen mechanisme*
10. Typeplaatje
11. Bedieningspaneel***
Bedieningspaneel
toets en controlelampje
Start/Pauze
controlelampje
Onthardingszout
controlelampje Einde programma
controlelampje Drogen
controlelampje Wassen
knop
Selecteren Programma
toets On-Off/Reset
handvat Openen Deur
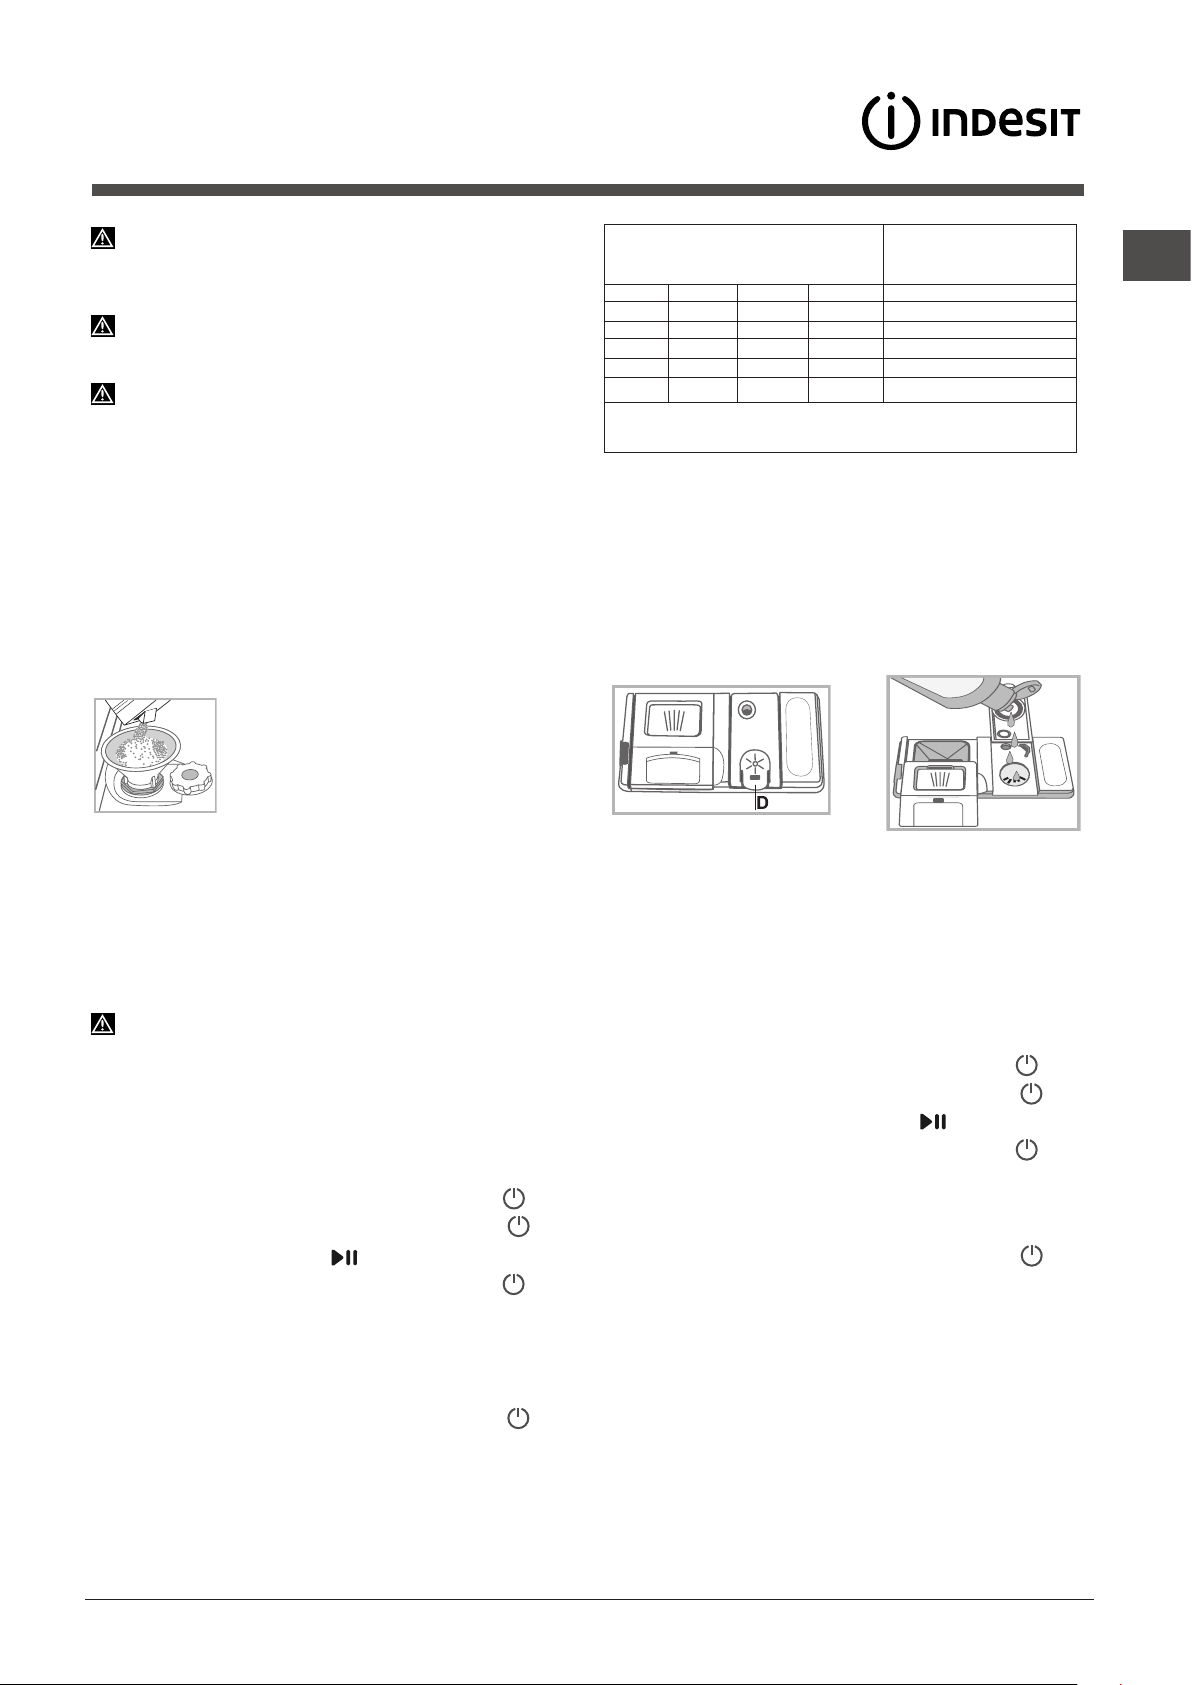
NL
47
Onthardingszout
en glansmiddel
M
A
X
Gebruik uitsluitend producten die speciaal voor
afwasautomaten bestemd zijn. Gebruik geen keuken- of
industrieel zout.
Volg de aanwijzingen op de verpakking.
Als u een multifunctieproduct gebruikt, raden we toch
aan onthardingszout toe te voegen, vooral als het water hard
of zeer hard is.
(Volg de aanwijzingen op de verpakking)
Als u geen zout of glansmiddel toevoegt, is het normaal
dat de controlelampjes ZOUT TOEVOEGEN* en GLANSMIDDEL
TOEVOEGEN
* aanblijven.
Het onthardingszout toevoegen
Doorditzouttegebruiken,vermijdtudaterzichKALKvormtopde
vaat en op de functionele componenten van de afwasautomaat.
•Hetisbelangrijkdathetzoutreservoirnooitleegis.
•Hetisbelangrijkomdewaterhardheidintestellen.
Het zoutreservoir bevindt zich aan de onderzijde van de
afwasautomaat
(zie Beschrijving)
en moet worden gevuld:
•als op het bedieningspaneelhet controlelampje ZOUT
TOEVOEGEN*aangaat;
•alsdegroenedrijver* op de zoutdop niet langer zichtbaar is.
•zieduurintabelWaterhardheid.
1. Haal het onderrek naar voren en draai de
dop van het zoutreservoir tegen de klok in.
2. Alleen voor het eerste gebruik: vul het
reservoir tot aan de rand met water.
3.Plaats de trechter opde opening
(zie
afbeelding)
en vul het zoutreservoir tot aan de
rand met zout (ongeveer 1 kg); het is normaal
dat er wat water overloopt.
4.Verwijderde trechterenreinigeventuele zoutrestenopde
opening; spoel de dop onder lopend water af voor u hem weer
opschroeft.
We raden u aan bovenstaande handeling elke keer uit te voeren
als u onthardingszout bijvult.
Schroef de dop weer op zijn plaats, zodat tijdens het wassen
geen wasmiddel in het reservoir kan komen (de waterontharder
zou onherstelbaar kunnen worden beschadigd).
Wanneer het noodzakelijk is om zout bij te vullen, raden we
aan dit te doen voordat u een nieuwe wascyclus start.
Instellen waterhardheid
Voor een perfecte werking van de waterontharder moet deze
ingesteld worden in functie van de waterhardheid van de woning.
Deze gegevens kunt u bij uw plaatselijk waterbedrijf opvragen. De
ingestelde waarde komt overeen met een gemiddelde hardheid.
•SchakeldeafwasautomaatinmetdetoetsON/OFF.
•SchakeldeafwasautomaatuitmetdetoetsON/OFF.
•HouddetoetsSTART/PAUZE 5 seconden lang ingedrukt.
•SchakeldeafwasautomaatinmetdetoetsON/OFF.
•Hetcontrolelampjevanhetonthardingszoutknippert(hetaantal
knipperingen komt overeen met de actuele selectie).
•Plaatsdeknopophetnummervanhetgewenstehardheidsniveau
(zie hardheidstabel).
•SchakeldeafwasautomaatuitmetdetoetsON/OFF.
•Instellingvoltooid!
Als u multifunctie tabletten gebruikt moet u toch het zoutreservoir
vullen.
(°dH = waterhardheid in Duitse graden - °fH = waterhardheid in
Fransegraden-mmol/l=millimol/liter)
Het glansmiddel toevoegen
Het glansmiddel bevordert het DROGEN van de vaat. Het
glansmiddelreservoir moet worden gevuld:
• als op het bedieningspaneel/display het controlelampje
GLANSMIDDELTOEVOEGEN*aangaat;
• wanneerhetcontrolevenstertje* op het deksel van het reservoir
“D” van donker naar transparant overgaat.
1. Open de houder “D” door het lipje op het deksel in te drukken
en omhoog te halen.
2. Doe het glansmiddel voorzichtig in het bakje tot aan het
“Maximum”-streepje.Zorgervoordatunietmorst.Alsuwelmorst,
moet u het product meteen met een droge doek verwijderen.
3.Sluithetdekselmeteenklik.
Giet het glansmiddel NOOIT direct in de machine.
Het regelen van de dosis glansmiddel
Als u niet tevreden bent over het droogresultaat, kunt u de dosis
glansmiddel regelen.
•SchakeldeafwasautomaatinmetdetoetsON/OFF.
•SchakeldeafwasautomaatuitmetdetoetsON/OFF.
•Druk3maalopdetoetsSTART/PAUZE .
•SchakeldeafwasautomaatinmetdetoetsON/OFF.
•Allesuitgeschakeld.
•Plaatsdeknopophetnummervandehoeveelheidbijtevullen
glansmiddel.
•SchakeldeafwasautomaatuitmetdetoetsON/OFF.
•Instellingvoltooid!
HetglansmiddelniveaukanwordeningesteldopNUL(ECO).In
dat geval zal er geen glansmiddel worden toegevoegd en zal
hetcontrolelampjeGLANSMIDDELTOEVOEGENnietaangaan
als het product op is.
Ukuntmaximaal4niveausinstellen,opbasisvanhetmodelvan
de afwasautomaat. De ingestelde waarde komt overeen met een
gemiddeld niveau.
• Alsuopdevaat
blauwachtige strepen aantreft, moet u een
lagere stand instellen (1-2).
• Alsuopdevaatwaterdruppelsofkalkaanslagaantreft,moet
ueenhogerestandinstellen(3-4).
Tabel Waterhardheid
Gemiddelde duur
zoutreservoir met 1
wascyclus per dag
niveau
°dH °fH mmol/l maanden
1 0 - 6 0 - 10 0 - 1 7 maanden
2 6 - 11 11 - 20 1,1 - 2 5 maanden
3 12 - 17 21 - 30 2,1 - 3 3 maanden
4 17 - 34 31 - 60 3,1 - 6 2 maanden
5
*
34 - 50 61 - 90 6,1 - 9 2/3 weken
Van 0°f tot 10°f raden wij u aan geen onthardingszout te
gebruiken. *Als u 5 instelt, kan de duur iets langer zijn.
* Alleen op bepaalde modellen aanwezig
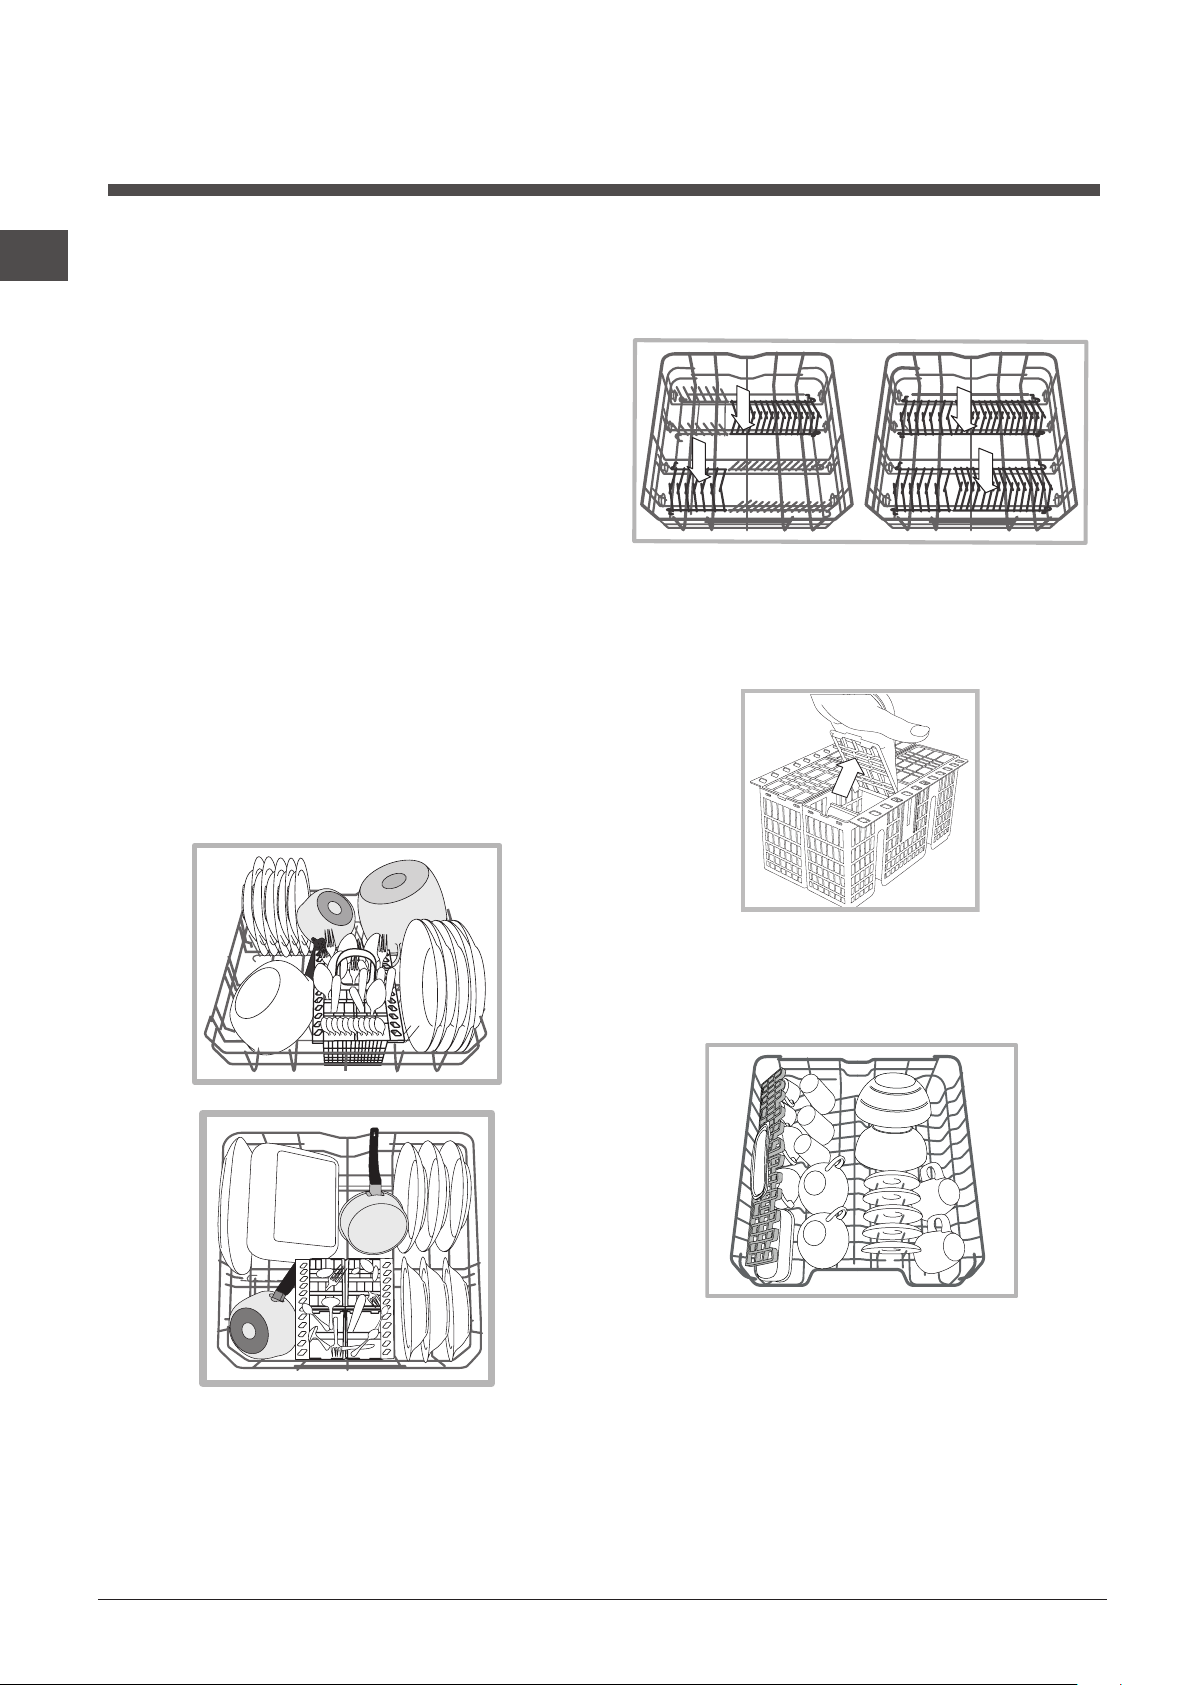
NL
48
Het laden van de rekken
Advies
Voordat u de vaat inlaadt moet u overtollige etensresten
verwijderen en glazen en bekers legen. Het is niet noodzakelijk
de vaat met water af te spoelen voor u hem in de vaatwasser
laadt.
Plaats de vaat dusdanig zodat hij stevig vaststaat en niet om
kan vallen. Pannen, bakken en glazen moeten met de opening
naar onder worden geplaatst en holle of bolle elementen moeten
schuin worden geplaatst zodat het water alle oppervlakken kan
bereiken en daarna vrijuit kan wegspoelen.
Zorg er voor dat deksels, handvatten, koekenpannen en schalen
het draaien van de sproeiarmen niet beletten. Plaats kleine
voorwerpen in de bestekkorf.
Plastic voorwerpen en pannen met antiaanbaklaag houden
waterdruppels langer vast. Hun droogtegraad zal lager zijn dan
die van voorwerpen van aardewerk of staal.
Lichtevoorwerpen(zoalsplasticbakken)moetenbijvoorkeurop
het bovenrek worden geplaatst, en zodanig dat zij niet kunnen
bewegen.
Nadat u alles heeft ingeladen moet u controleren of de
sproeiarmen vrij kunnen ronddraaien.
Onderrek
In het onderrek kunt u pannen, deksels, borden, slakommen,
bestek, etc. plaatsen. Grote borden en deksels moeten bij
voorkeur aan de zijkant van het rek worden geplaatst.
Het is aan te raden zeer vuile vaat in het onderrek te plaatsen,
aangezien in dit deel van de vaatwasser de kracht van de
waterstroom groter is waardoor de wasprestaties verbeteren.
Enkele modellen vaatwasser beschikken over uitklapbare delen
*,
deze kunnen in verticale positie worden gezet voor het plaatsen
van borden, of in horizontale positie (neer), om pannen en
slakommen beter te plaatsen.
Bestekkorf
De bestekkorf is voorzien van roosters aan de bovenkant
waarmee u het bestek beter kunt neerzetten. De korf mag alleen
aan de voorzijde van het onderrek worden geplaatst.
Bovenrek
Laadlichteenbreekbarevaatzoalsglazen,kopjes,bordjes,lage
slakommen, in het bovenrek.
Enkele modellen vaatwasser beschikken over uitklapbare delen
*,
die in verticale stand kunnen worden gebruikt om bordjes te
rangschikken, of die kunnen worden neergelegd om bakjes of
houders op te plaatsen
* Alleen aanwezig op bepaalde modellen.
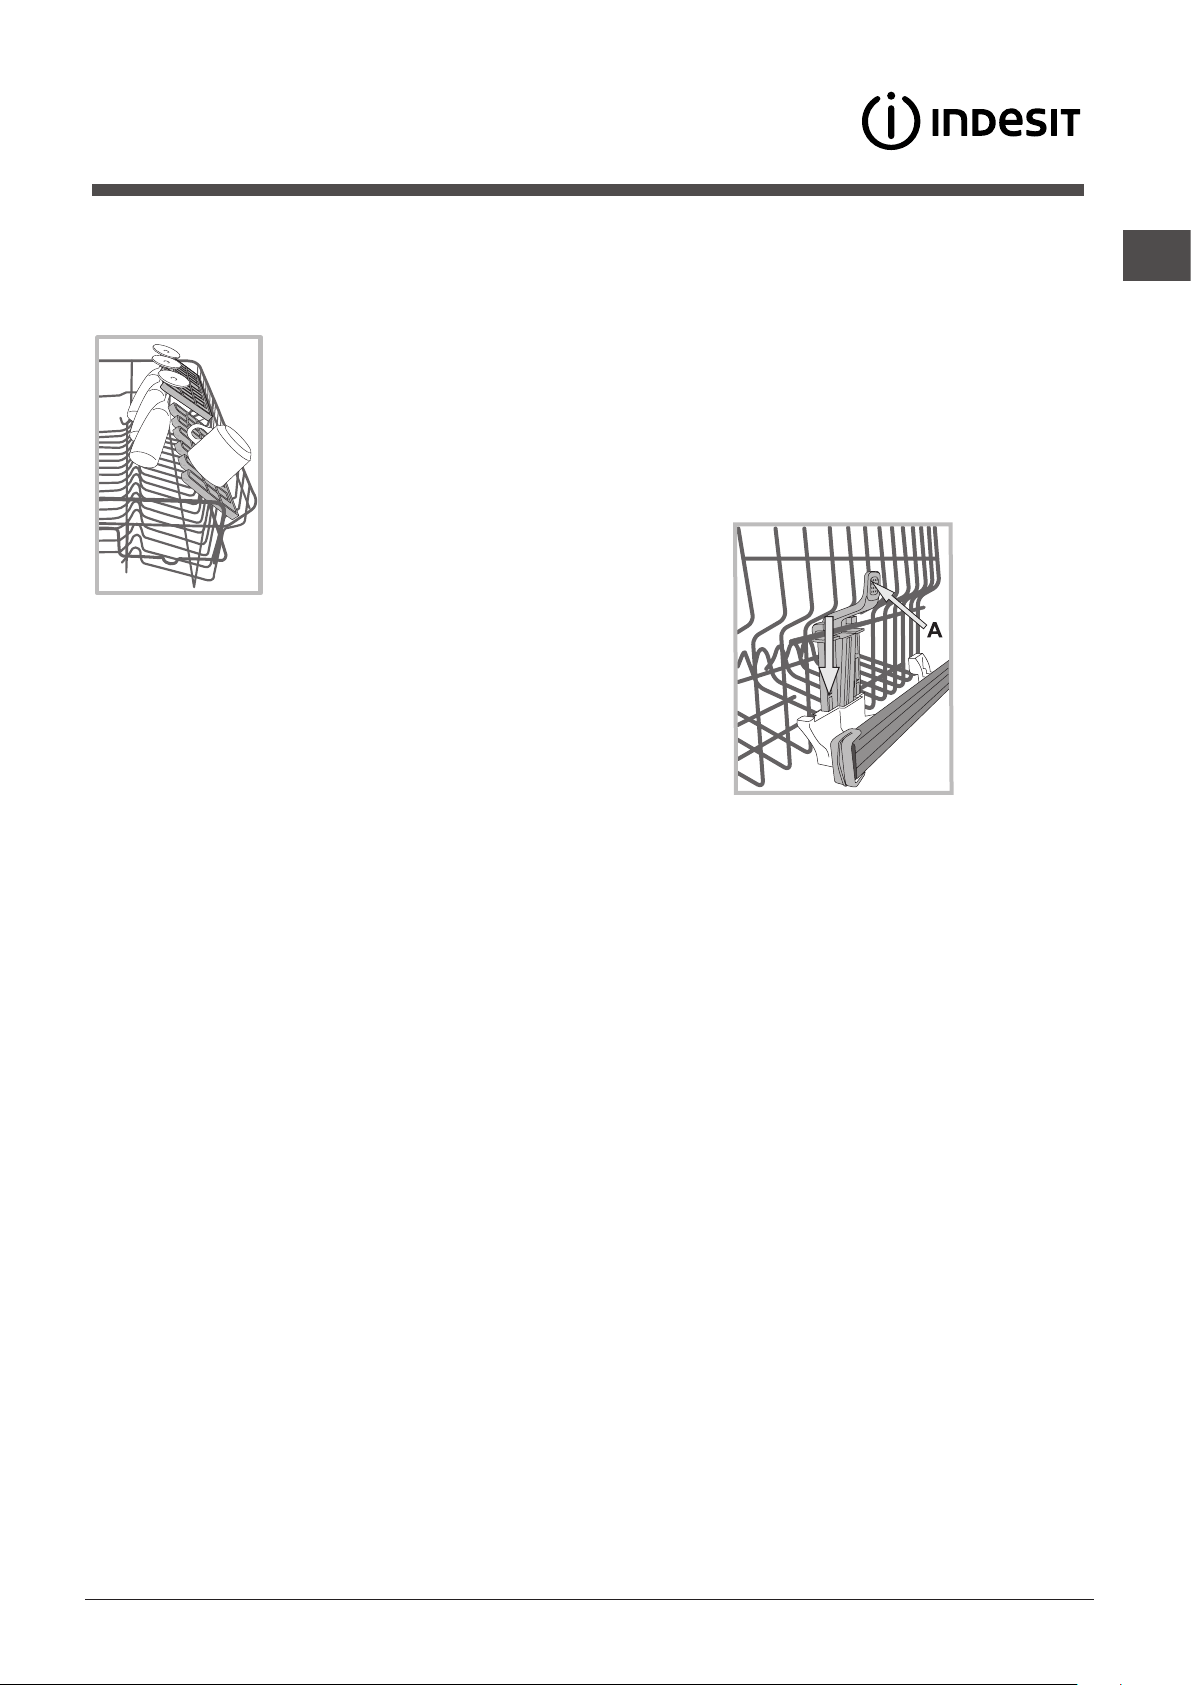
NL
49
Het regelen van de hoogte van het bovenrek
Om de vaat beter te kunnen verdelen, kunt u het bovenrek hoger
of lager zetten.
We raden u aan de hoogte van het bovenrek te regelen als
het REK LEEG IS.
Verplaats het rek NOOIT aan een enkele kant.
Als het rek beschikt over een Lift-Up
*
(zie afbeelding)
, tilt u het
rek op door het aan de zijkanten vast te houden. Til hem dan
naar boven op. Om naar de lagere stand terug te keren, drukt
u op de handels (A) aan de zijkanten van het rek en helpt u het
rek weer naar beneden te gaan.
Niet geschikte vaat
• Houtenbestekofvaat.
• Breekbare, versierde glazen, met de handvervaardigd
vaatwerk en antiek vaatwerk. Deze decoraties zijn niet
vaatwasserbestendig.
• Dedeleninsynthetischmateriaalzijnniethittebestendig.
• Vaatwerkvankoperoftin.
• Vaatwerkdatvuilismetas,was,smeerolieofinkt.
De decoraties op glas en aluminium en zilveren delen kunnen
tijdens het wassen verkleuren of witter worden. Ook enkele
soorten glas (bv. kristallen voorwerpen) kunnen na vele
wasbeurten mat worden.
Schade aan glas en vaatwerk
Oorzaken:
• Typeglasenproceduresvoorhetmakenvanglas.
• Chemischesamenstellingvanhetwasmiddel.
• Watertemperatuurvanhetspoelprogramma.
Advies:
• Gebruikalleenglazenenporseleinwaarvandoordeproducent
wordt gegarandeerd dat het vaatwasserbestendig is.
• Gebruik alleen wasmiddeldat geschikt is voor breekbaar
vaatwerk.
• Verwijder glazen en bestekz.s.m. na het einde van het
programma uit de vaatwasser.
Het bovenrek kan naar believen in hoogte worden aangepast:
naar boven toe als men in het onderrek volumineuze vaat wil
plaatsen, naar beneden toe om goed te kunnen profiteren van
alle plek in de opklaprekjes of de uitklapbare delen, zodat er
naar boven toe meer plaats is.
Opklaprekjes met verschillende standen*
De opklaprekjes aan de zijkant kunnen op drie verschillende
hoogten worden gezet om de plaatsing van de vaat in het rek
te optimaliseren.
Wijnglazen kunnen op een stabiele
wijze op de opklaprekjes worden
geplaatst door de voet van het glas
in de speciale gaten te steken.
Voor een optimaal droogresultaat
dient u de opklaprekjes zo schuin
mogelijk te positioneren. Om de
inclinatie te wijzigen, tilt u het rekje
op, u verschuift het een beetje en
positioneert het naar wens.
*Alleen op bepaalde modellen beschikbaar en variërend in
aantal en positie.

NL
50
* Alleen aanwezig op bepaalde modellen.
De vaatwasser starten
1. Druk op de ON-OFF toets:
2. Open de deur en doseer het afwasmiddel.
3.Laadderekken
(zie De rekken laden)
en sluit de deur.
4.Selecteer het programma door rechtsom aan de knop
SELECTEREN PROGRAMMA te draaien. De streep op de
knop moet overeenkomen met het nummer of het symbool
van het gewenste programma. Het controlelampje van de
toetsSTART/PAUZEgaataan.
5. Selecteer de wasopties*
(zie Speciale programma's en opties).
6.Start met deStart/Pauze toets: eengeluidssignaal* en
het aangaan van het controlelampje van de wascyclus
waarschuwen u dat het programma gestart is.
7. Aan het einde geven enkele geluidssignalen aan* dat het
programma is afgelopen en het controlelampje END gaat aan.
Schakel het apparaat uit met de ON-OFF toets.
8.Wacht enkele minuten voordat u de vaat eruit haalt om te
voorkomendatuzichverbrandt.Laaddevaatuit,beginnend
met het onderrek.
Om het energieverbruik te verminderen, wordt de
machine onder bepaalde omstandigheden van NIET
gebruik automatisch uitgezet.
Het wijzigen van een reeds gestart programma
Als het wassen net is gestart en u wilt de wascyclus wijzigen
dient u de vaatwasser uit te schakelen door langere tijd op
deON/OFF/Resettoetstedrukken.Schakelhetapparaatmet
dezelfde toets weer in en selecteer opnieuw de gewenste
programma's en opties.
Overige vaat toevoegen
Drukopdetoets Start/Pauze (het licht op de toets gaat
knipperen), open de deur, pas op de vrijkomende hete stoom,
endoedevaatindevaatwasser.DrukopdeStart/Pauzetoets
(licht vast aan). De cyclus wordt hervat.
DooropdetoetsStart/Pauzetedrukkenomdeautomaat
te pauzeren wordt zowel het programma onderbroken
alsmede de Uitgestelde Start als die is ingesteld.
In deze fase kunt u het programma niet wijzigen.
Onvoorziene onderbrekingen
Als tijdens het wassen de deur wordt geopend of er een
stroomonderbreking plaatsvindt, wordt het programma
onderbroken. Het zal worden hervat op het punt waar het
werd onderbroken als de deur weer dichtgaat of wanneer
de stroom terugkeert.
Het vaatwasmiddel toevoegen
Een goed wasresultaat hangt ook af van een correcte dosering
van het vaatwasmiddel. Teveel vaatwasmiddel betekent niet
automatisch een efficiëntere reiniging. Bovendien is dit niet
goed voor het milieu.
Aan de hand van de hoeveelheid vuil kan de dosering worden
aangepast m.b.v. een vaatwasmiddel in poeder- of in vloeibare
vorm.
Normaal gebruikt men voor een gemiddeld vuile was ca. 35 g.
(poeder), of 35 ml (vloeibaar). Als u wastabletten gebruikt, is
één voldoende.
Als de vaat niet zo vuil is of reeds is afgespoeld, dient u de dosis
vaatwasmiddel aanzienlijk te beperken.
Voor een juist wasresultaat dient u de instructies te volgen die
op de verpakking van het vaatwasmiddel staan.
Bij verdere vragen raden wij u aan de fabrikanten van
vaatwasmiddel te contacteren.
Om het wasmiddelbakje te openen, drukt u op het
openingsmechanisme "A"
Doe het vaatwasmiddel alleen in het droge bakje "B". Het
vaatwasmiddel dat nodig is voor de voorwas moet direct in de
vaatwasmachine worden geplaatst.
1.Doseer het vaatwasmiddel met behulp van de Programmatabel
om de juiste hoeveelheid te gebruiken.
In het kuipje B staat een niveau vermeld waar de maximum
hoeveelheid vloeibaar- of poedervaatwasmiddel voor elke cyclus
kan worden gegoten.
2. Verwijder de eventuele wasmiddelresten van de rand van het
bakje en sluit het deksel met een klik.
3. Sluit het deksel van het wasmiddelbakje door het naar boven
toe te drukken, totdat het afsluitmechanisme op zijn plaats is.
Het wasmiddelbakje gaat automatisch op het juiste moment open,
aan de hand van het type programma.
Als u gecombineerde vaatwasmiddelen gebruikt, raden we u aan
de functie TABS te gebruiken, waarmee u het afwasprogramma
juist afstemt. Zo zult u altijd het beste was- en droogresultaat
bereiken.
Gebruik alleen een specifiek vaatwasmiddel.
GEBRUIK NOOIT vaatwasmiddel voor handmatig afwassen.
Bij overmatig gebruik van vaatwasmiddel kunnen aan het einde
van de wascyclus schuimresten achterblijven.
De beste was- en droogprestaties bereikt u alleen een combinatie
van vaatwasmiddel, vloeibaar glansmiddel en onthardingszout
te gebruiken.
We raden aan vaatwasmiddelen zonder fosfaten of chloor
te gebruiken, omdat deze geschikter zijn voor het behoud
van het milieu.
Vaatwasmiddel en gebruik
van de afwasautomaat
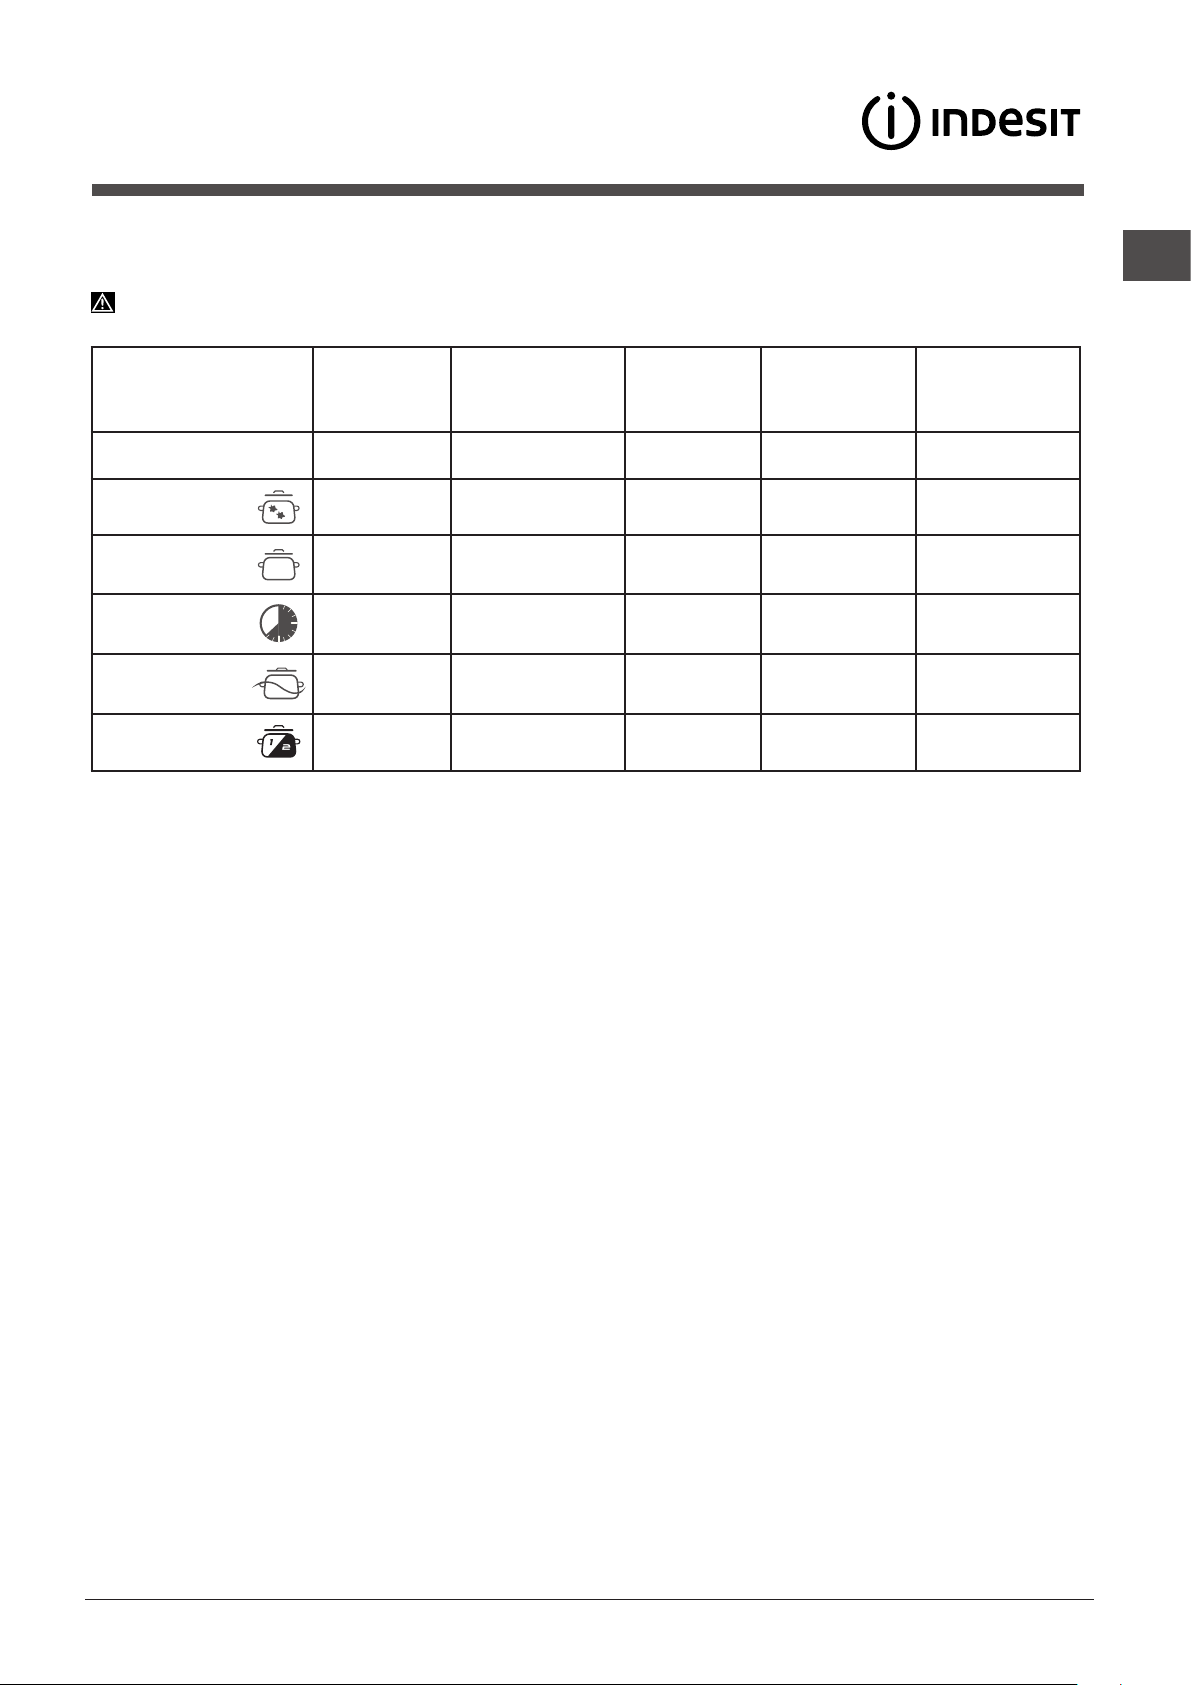
NL
51
Programma’s
Het aantal en het soort programma’s en opties verschilt aan de hand van het model afwasautomaat.
Programma
Programma’s
met
droogfunctie
Opties
Duur van het
programma
u:min
Waterverbruik
(l/cyclus)
Energieverbruik
(kWh/cyclus)
1. Eco Ja Nee 02:18’ 11,0 1,04
2. Intensief Ja Nee 02:30’ 16,5 1,70
3. Normaal Ja Nee 02:00’ 16 1,40
4. Express 40’ Nee Nee 00:40’ 9,0 0,95
5. Weken Nee Nee 00:10’ 4,0 0,01
6. Halve lading Ja Nee 01:20’ 12,0 1,15
Degegevensvandeprogramma’szijngemeteninlaboratoriumomstandighedenvolgensdeEuropesevormEN50242.
Aan de hand van de verschillende gebruiksmogelijkheden kunnen de duur en de programmagegevens verschillen.
Aanwijzingen voor het kiezen van het programma en de dosering van het afwasmiddel
1. Het ECO wasprogramma is het standaardprogramma waarop de gegevens op het energielabel betrekking hebben: deze
cyclus is geschikt voor het reinigen van normaal vuile afwas en is het meest efficiënte programma voor wat betreft energie- en
waterverbruikvoorditsoortvaat.27gr/ml+6gr/ml**–1Tab(**Hoeveelheidvaatwasmiddelvanvoorwas)
2.Zeervuilevaatenpannen(niettegebruikenvoorteervaatwerk).30gr/ml–1Tab
3.Normaalvuilevaatenpannen.27gr/ml+6gr/ml**–1Tab
4.Snellecyclusvoornietzovuilevaat.(ideaalvoor2couverts)25gr/ml–1Tab
5. Voorwas in afwachting van de lading van de volgende maaltijd. Geen afwasmiddel
6.
Idealecyclusvoorhetwassenvaneenkleine,middelmatigvuilevaat.25gr/ml–1Tab
Verbruik in stand-by: Verbruik in left-on modus: 5 W - verbruik in off modus: 0,5 W.
N.B.:
de beste prestaties van de programma's "Snel
*enExpress40'"wordenbereiktalsuhetaantalaangegevencouvertsnietoverschrijdt.
Voor een zuiniger verbruik de afwasmachine volgeladen laten draaien.
Aanwijzing voor de Proeflaboratoria: voor gedetailleerde informatie over de omstandigheden van de EN-vergelijkingsproef kunt
u contact opnemen met:
* Alleen aanwezig op bepaalde modellen.
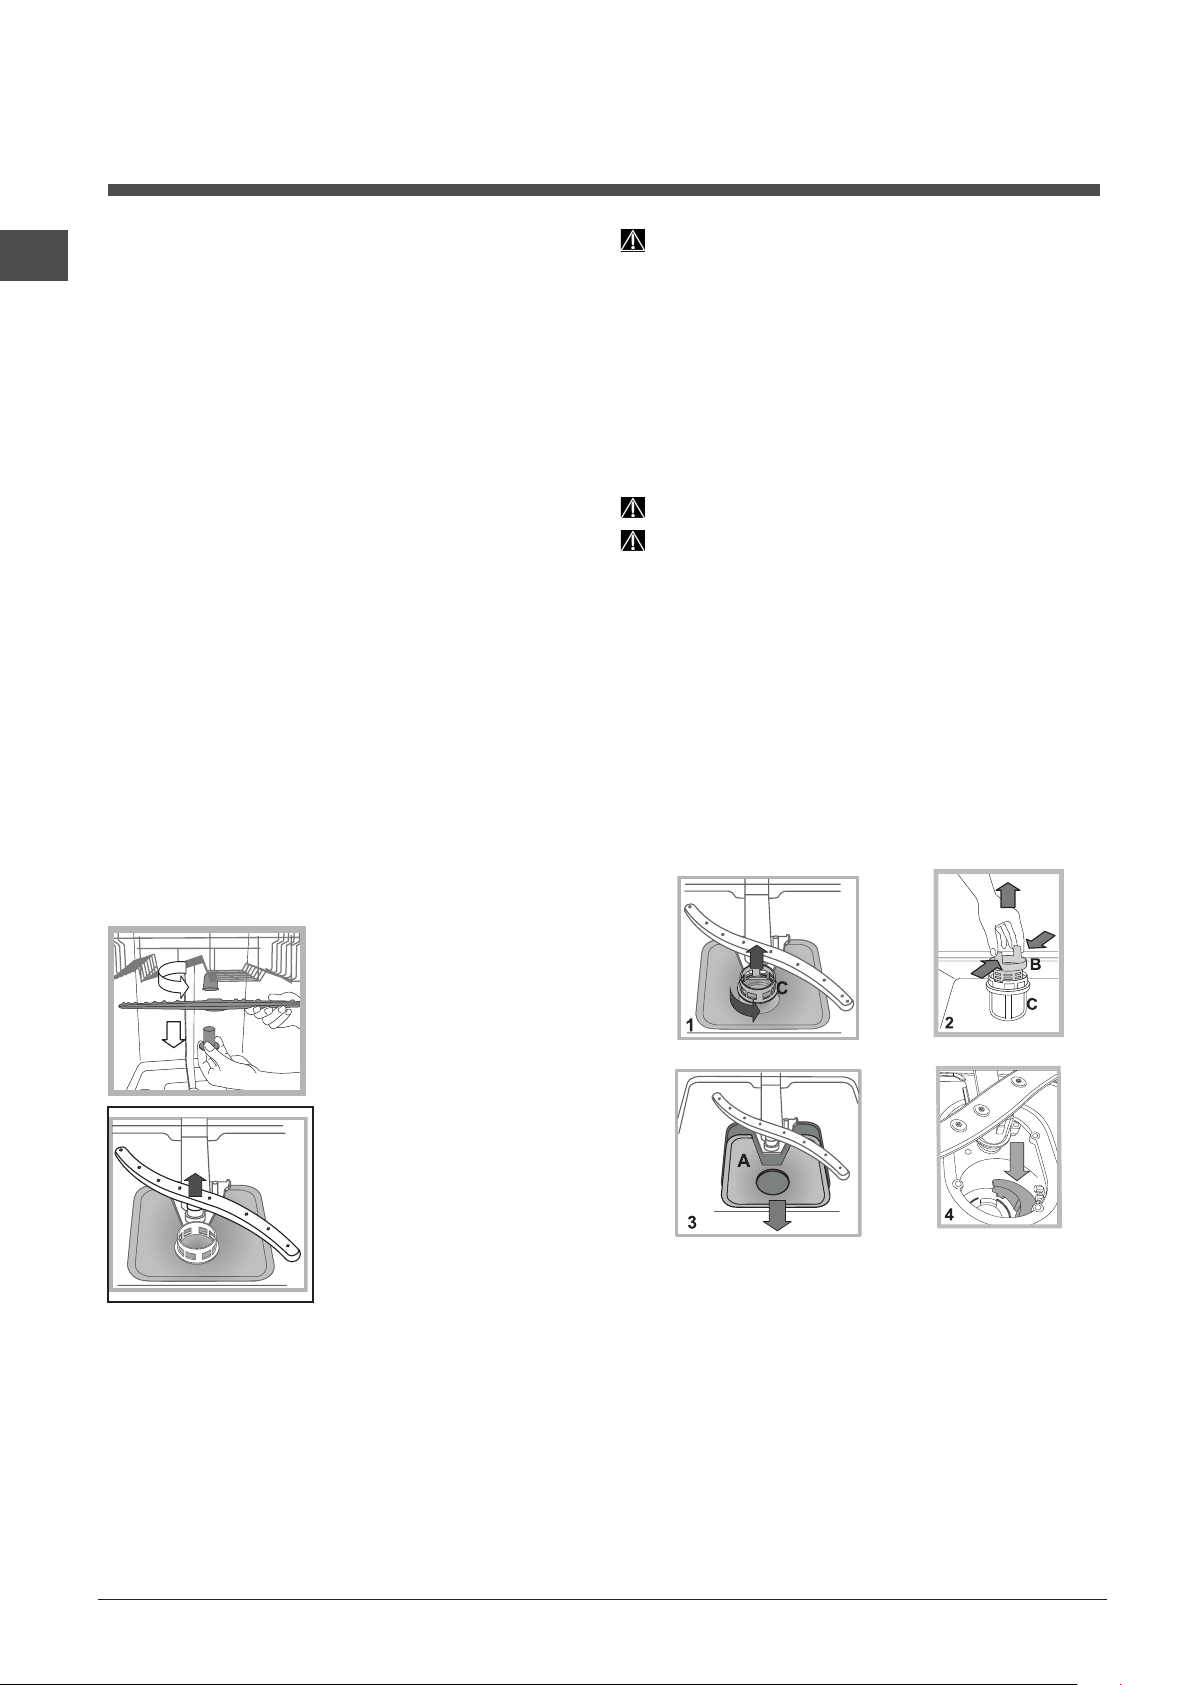
NL
52
Onderhoud en
verzorging
Water en elektrische stroom afsluiten
• Sluitnaelkeafwasbeurtdewaterkraanafomlekkagete
voorkomen.
• Haal destekker uithetstopcontacttijdensreinigingen
onderhoud.
Reinigen van de afwasautomaat
• Debuitenkantenhetbedieningspaneelkunnenworden
gereinigd met een natte, niet schurende doek. Gebruik
geen oplosmiddelen of schuurmiddelen.
• De vlekken aan de binnenkant van de afwasautomaat
kunnen worden verwijderd met een natte doek en wat azijn.
Vermijden van vervelende luchtjes
• Laatdedeuraltijdopeenkieromhetophopenvanvocht
te voorkomen.
• Reiniggeregelddeafdichtingenrondomdedeurende
wasmiddelbakjes met een vochtige spons. Zo vermijdt u
het ophopen van etensresten die de hoofdoorzaak zijn van
vervelende luchtjes.
Reinigen van de sproeiarmen
Het kan gebeuren dat er etensresten aan de sproeiarmen
blijven kleven en de gaatjes waar water uit komt verstoppen:
u doet er goed aan ze regelmatig te controleren en te reinigen
met een niet-metalen borsteltje.
De twee sproeiarmen kunnen beide uit elkaar worden
gehaald.
Om de bovenste sproeiarm uit
elkaar te halen dient u de plastic
dop linksom los te schroeven.
De bovenste sproeiarm moet
worden gemonteerd met de
gaten naar boven gericht.
De onderste sproeiarm haalt
u uit elkaar door druk uit te
oefenen op de lipjes aan de
zijkant en door hem daarna naar
boven te trekken.
Reinigen van het watertoevoerfilter*
Als de waterleiding nieuw is of lange tijd niet gebruikt, laat
dan voordat u de aansluiting tot stand brengt het water lopen
totdat het helder is en vrij van vuildeeltjes. Als u dit niet doet
loopt u het risico dat het punt waar het water binnenkomt
verstopt raakt en uw afwasautomaat beschadigt.
Reinig geregeld het watertoevoerfilter bij de kraan.
- Doe de waterkraan dicht.
- Schroef het uiteinde van de watertoevoerbuis los, verwijder
het filter en reinig het voorzichtig onder stromend water.
- Doe het filter op zijn plaats en schroef de buis vast.
Reinigen van de filters
De filtergroep wordt gevormd door drie filters die etensresten
uit het waswater verwijderen en zorgen dat het weer schoon
in het watercircuit terechtkomt: voor een optimaal resultaat
moeten de filters regelmatig worden schoongemaakt.
Reinig de filters regelmatig.
De afwasautomaat mag niet zonder filters of met een los
filter worden gebruikt.
•Controleerna enkele wasbeurten defiltergroep.Reinig
hem indien noodzakelijk grondig onder stromend water met
behulp van een niet-metalen borsteltje. Volg onderstaande
aanwijzingen:
1. draai het cilindrische filter C linksom en trek hem naar
buiten
(afb. 1).
2.Verwijder het glasfilter B door een lichte druk uit te
oefenen op de lipjes aan de zijkant
(Afb. 2);
3.Haal het roestvrijstalen bordfilter A van zijn plek
(afb.3).
4. Controleer het afvoerputje en verwijder eventuele
etensresten. VERWIJDER NOOIT de bescherming van de
waspomp
(zwartelement)(afb.4).
Na het reinigen van de filters dient u de filtergroep weer op
zijn plaats te zetten. Dit is fundamenteel voor een goede
werking van de afwasautomaat.
Als u langere tijd geen gebruik maakt van
de afwasautomaat
• Schakeldestroomuitensluitdewaterkraanaf.
• Laatdedeuropeenkierstaan.
•Laatalsuterugkeertdeafwasautomaateenkeerleeg
draaien.
* Alleen aanwezig op bepaalde modellen.

NL
53
*Alleen aanwezig op bepaalde modellen.
Storingen en
oplossingen
Het kan gebeuren dat de vaatwasser niet werkt. Voor u de Servicedienst opbelt moet u controleren of u het euvel niet
gemakkelijk zelf kunt oplossen m.b.v. volgende lijst.
Storingen: Mogelijke oorzaken / Oplossingen:
De vaatwasser start niet of
volgt de bedieningen niet op
• De waterkraan is niet opengedraaid.
• Schakel het apparaat uit door op de toets ON/OFF te drukken, schakel het na een minuut
weer in en stel het programma opnieuw in.
• De stekker zit niet goed in het stopcontact of kies een ander stopcontact.
• De deur van de vaatwasser is niet goed dicht.
De deur gaat niet dicht
• Controleer of de rekken helemaal in het apparaat zijn geduwd.
• Het slot zit niet goed vast. Druk stevig tegen de deur totdat u een klik hoort.
De afwasautomaat pompt het
water niet af.
• Het wasprogramma is nog niet beëindigd.
• De waterafvoerbuis zit gebogen
(zie Installatie).
• De afvoer van de wasbak is verstopt.
• De lter is verstopt met etensresten.
• Controleer de hoogte van de afvoerbuis.
De afwasautomaat maakt
lawaai.
• De vaat stoot tegen elkaar of tegen de sproeiarmen. Positioneer de vaat correct en controleer
of de sproeiarmen vrij kunnen draaien.
• Overtollige aanwezigheid van schuim: u heeft teveel vaatwasmiddel gebruikt of
vaatwasmiddel dat niet geschikt is voor afwasautomaten.
(zie Vaatwasmiddel en gebruik van
de afwasautomaat).
Was de vaat niet vooraf met de hand.
Er blijven op vaat en glazen
kalkafzettingen of een witte
aanslag achter.
• Er zit niet genoeg onthardingszout in het reservoir.
• De regeling van de waterhardheid is niet correct; verhoog de waarden.
(zie Onthardingszout
en glansmiddel)
• Het deksel van het reservoir voor zout en glansmiddel is niet goed gesloten.
• Het glansmiddel is op of de dosering is ontoereikend.
Er blijven op vaat en glazen
strepen of blauwe kringen
achter.
• Er wordt teveel glansmiddel gebruikt.
De vaat is niet droog genoeg. • U heeft een programma zonder drogen ingesteld.
• Het glansmiddel is op.
(zie Onthardingszout en glansmiddel)
• De regeling van het glansmiddel is niet correct.
• Het vaatwerk is voorzien van een antiaanbaklaag of is van plastic; de aanwezigheid van
waterdruppels is normaal.
De vaat is niet schoon. • De vaat is niet correct verdeeld.
• De sproeiarmen kunnen niet vrijuit draaien, ze worden geblokkeerd door de vaat.
• Het wasprogramma is niet energiek genoeg
(zie Programma’s).
• Overtollige aanwezigheid van schuim: u heeft teveel vaatwasmiddel gebruikt of
vaatwasmiddel dat niet geschikt is voor afwasautomaten.
(zie Vaatwasmiddel en gebruik van
de afwasautomaat).
• Het deksel van het glansmiddelreservoir is niet correct afgesloten.
• De lter is vuil of verstopt
(zie Onderhoud en verzorging).
• Er zit geen onthardingszout meer in het reservoir
(zie Onthardingszout en glansmiddel).
• Zorg ervoor dat de hoogte van de borden compatibel is met de hoogteregeling van het rek.
• De openingen van de sproeiarmen zijn verstopt.
(zie Onderhoud en verzorging)
De afwasautomaat vult niet
met water.
is geblokkeerd met knipperende
controlelampjes
• Er zit geen water in de centrale waterleiding of de kraan is niet opengedraaid.
• De watertoevoerbuis zit gebogen
(zie Installatie).
• De lters zitten verstopt; ze moeten schoongemaakt worden.
(zie Onderhoud en verzorging)
• De afvoer zit verstopt; hij moet schoongemaakt worden.
• Na de controle- en schoonmaakwerkzaamheden dient u de afwasautomaat uit en opnieuw in
te schakelen en een nieuwe wascyclus te starten.
• Als het probleem aanhoudt, sluit u de waterkraan af, u haalt de stekker uit het stopcontact en
neemt contact op met de servicedienst.
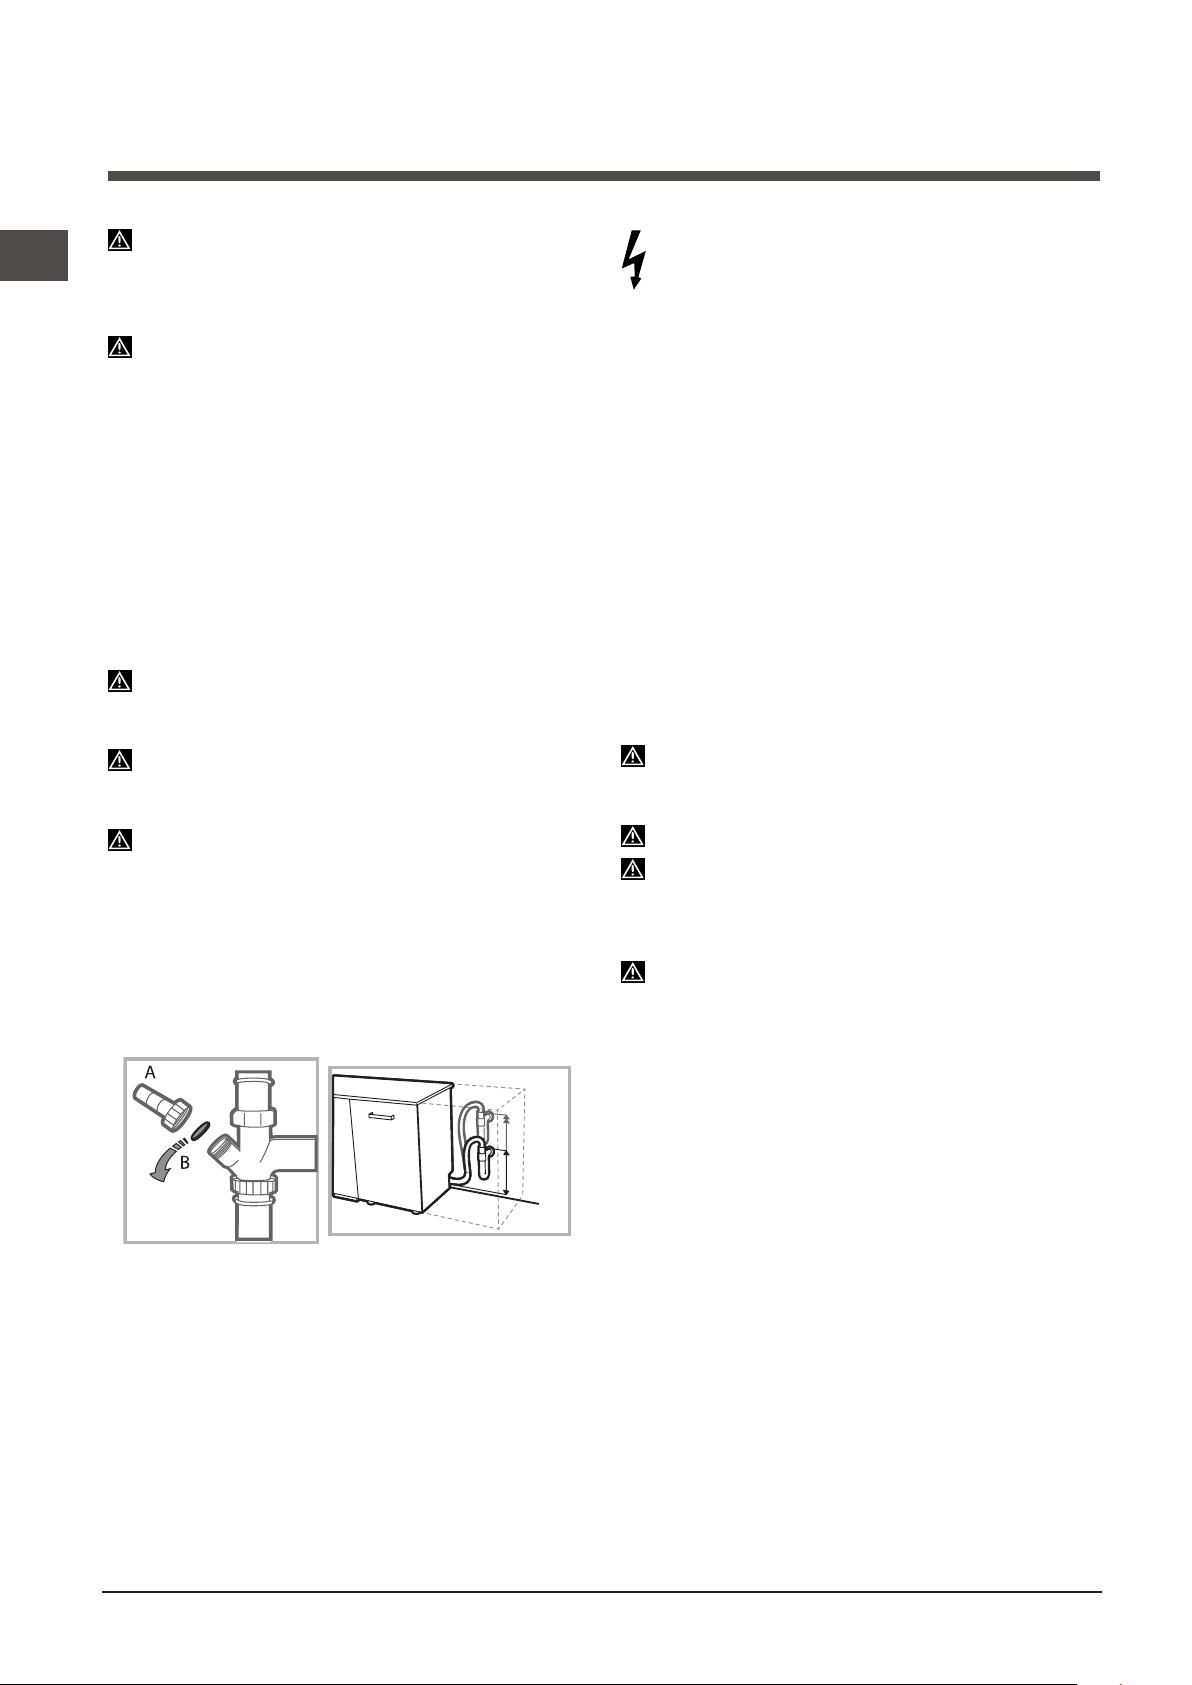
PT
54
MIN 40 cm
MAX 80 cm
Em caso de mudança mantenha o aparelho em posição
vertical; se for necessário, deite-o para trás.
Ligações hidráulicas
A adaptação das instalações hidráulicas para a instalação
deve ser efetuada somente por pessoal qualificado.
Os tubos de carregamento e de descarregamento da água
podem ser virados para a direita ou para a esquerda para
consentir uma melhor instalação.
Os tubos nunca devem ser dobrados ou esmagados pela
máquina de lavar louça.
Ligação do tubo de carregamento da água
• Aumatorneiradeáguade3/4”gásfriaouquente(máx.
60 °C).
• Abraaáguaatéquesaiaágualimpa.
• Apertebemotubodecargaeabriratorneira.
Se o comprimento do tubo de carregamento não for
suficiente,contacteumalojaespecializadaouumtécnico
autorizado
(consulteAssistência)
.
A pressão da água deve estar incluída entre os valores
indicadosnatabeladosDadostécnicos,casocontrário,a
máquina de lavar louça pode não funcionar corretamente.
Verifique se o tubo não está dobrado ou amassado.
Ligação do tubo de descarregamento da
água
Ligar o tubo de descarregamento a um conduto de descarga
comdiâmetromínimode2cm.(A)
Aconexão dotubo de descargadeve estara umaaltura
entre40e80cmdochãooudoplanodeapoiodamáquina
de lavar louça.
Antes de conectar o tubo de descarregamento da água ao
sifãodolavabo,removaatampadeplástico(B).
Segurança contra alagamentos
Para garantir que não se verifiquem alagamentos, a máquina
de lavar louça:
-éequipadacomumsistemaqueinterrompeaentradada
água no caso de anomalias ou vazamentos no interior.
Alguns modelos dispõem também deumdispositivode
segurança suplementar New Acqua Stop*, que garante a
proteção contra alagamentos mesmo em caso de quebra do
tubo de alimentação.
ATENÇÃO: TENSÃO PERIGOSA!
O tubo de alimentação da água não deve ser cortado em
nenhumcaso:contémpartessobtensão.
Ligação elétrica
Antesdecolocaraficha elétricana tomada,certifique-se
de que:
• a tomadatenha ligação de terra e que esteja em
conformidade com as normas legais;
• atomadapossasuportaracargamáximadepotênciada
máquina, indicada na placa das características colocada
na contra porta
(consulteocapítuloDescriçãodamáquinadelavarlouça);
• atensãode alimentação esteja incluída nos valores
indicados na placa das características colocada na contra
porta;
• atomadasejacompatívelcomafichadoaparelho.Caso
contrário,peça a substituição da ficha a umtécnico
autorizado
(consulteAssistência)
;nãouseextensõesou
tomadas múltiplas.
Depois de a máquina estar instalada, o cabo de
alimentaçãoelétricae a tomada deverão ser facilmente
alcançáveis.
O cabo não deve ficar dobrado ou compresso.
Caso o cabo de alimentação resultar danificado, a sua
substituição terá de ser efetuada pelo fabricante ou pelo
ServiçodeAssistênciaTécnicaparaevitarqualquertipode
risco.
(VejaaAssistência).
A Empresa declina qualquer responsabilidade caso estas
normas não sejam respeitadas.
Posicionamento e nivelamento
1. Posicione a máquina de lavar louça sobre um pavimento
plano e rígido. Compense as irregularidades desparafusando
ouaparafusandoospésanterioresatéqueoaparelhose
encontre em posição horizontal. Um nivelamento cuidadoso
dá estabilidade e evita vibrações e ruídos.
2.Antesdeencaixaramáquinadelavarlouça,colocarafaixa
adesiva transparente*porbaixodaprateleirademadeira
para proteção contra a eventual condensação.
3.Posicioneamáquinadelavarlouçafazendo aderir as
laterais ou o fundo aos móveis adjacentes ou a uma parede.
Oaparelhopodeserencaixadoporbaixodeumplanode
trabalho contínuo*
(consulteafolhadeMontagem)
.
4
*.Pararegularaalturadopétraseiro,atuenocasquilho
hexagonalvermelho presente na parte inferior, dianteira,
centraldamáquinadelavarlouça,comumachavehexagonal
de8mmdeabertura, girando no sentido horário para
aumentar a altura e anti-horário para diminui-la.
(vejaafolha
deinstruçõesdoencaixeemanexoàdocumentação)
Instalação
* Presente somente em alguns modelos.
PT
55
Dados técnicos
Dimensões
largura 59,6 cm.
altura 82 cm.
profundidade 57 cm.
Capacidade 13 pessoas padrão
Pressão da água na
alimentação
0,05 ÷ 1 MPa (0,5 ÷ 10 bar)
7,25 – 145 psi
Tensão de alimentação Veja a placa das características
Potência total
absorvida
Veja a placa das características
Fusível Veja a placa das características
Esta aparelhagem é em
conformidade com as seguintes
Directivas Comunitárias:
-2006/95/EC (Baixa Tensão)
-2004/108/EC (Compatibilidade
Electromagnética)
-2009/125/EC (Comm. Reg.
1016/2010) (Ecodesign)
-97/17/EC (Aplicação de
rótulos)
-2012/19/CE (REEE)
* Presente somente em alguns modelos.
Advertências para a primeira lavagem
Depois da instalação, remova os tampões posicionados
nos cestos e os elásticos de retenção no cesto superior
(se
presentes).
Configuração do amaciador da água
Antes de efetuar a primeira lavagem, configure o nível de
dureza
da água de rede.
(consulteocapítuloAbrilhantador
e sal regenerante)
O primeiro carregamento do depósito de amaciador deve
ser feito com água. Em seguida, introduza cerca de 1 kg de
sal;énormalqueaáguatransborde.
Inicie imediatamente um ciclo de lavagem.
Use apenas sal específico para máquinas de lavar louça.
Depoisdeterdeitadoosal,oindicadorluminosoFALTADE
SAL* * irá desligar-se.
O não enchimento do recipiente do sal, pode danificar o
amaciador de água e o elemento aquecedor.
A máquina emite sinais acústicos/tons
(conforme o modelo
de máquina de lavar louça
) que avisam que o comando foi
efectuado: ligação, fim de ciclo, etc.
Os símbolos/indicadores luminosos/leds presentes no
painel de comandos/ecrã podem ser uma cor diferente,
intermitentes ou de luz fixa.
(conforme o modelo de máquina
de lavar louça)
.
O ecrã* mostra informações úteis relativas ao tipo de ciclo
configurado, fase de lavagem/secagem, tempo restante,
temperatura, etc.
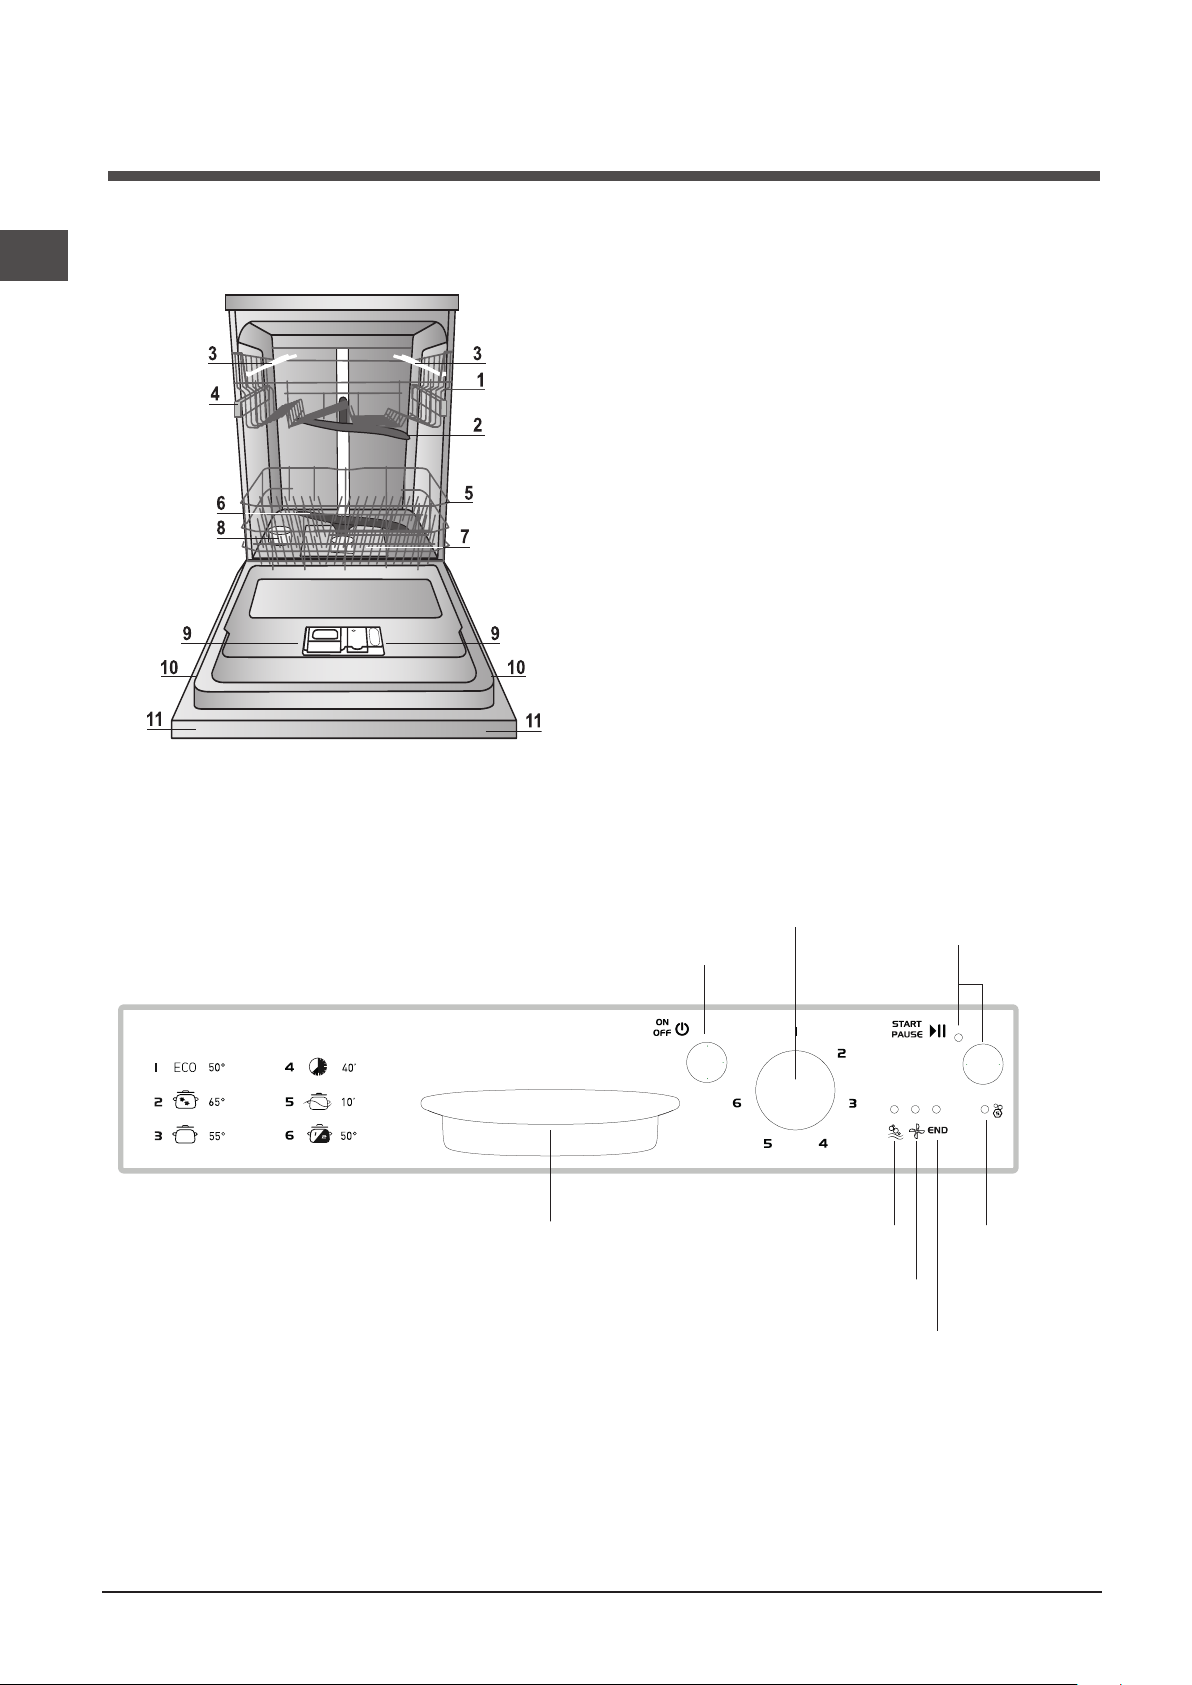
PT
56
Visão de conjunto
Descrição do aparelho
Painel de controlo
*** Somentenosmodelostotalmenteencaixáveis.
* Presente somente em alguns modelos.
O número e o tipo de programas e as opções variam conforme o modelo de máquina de lavar louça.
1. Cesto superior
2. Braçoaspersorsuperior
3. Peças basculantes
4. Regulação da altura do cesto superior
5. Cesto inferior
6. Braçoaspersorinferior
7. Filtro de lavagem
8. Reservatório do sal
9. Recipiente do detergente, reservatório do
abrilhantadoredispositivoActiveOxygen*
10. Placa das características
11. Painel de comandos***
tecla e indicador
Início/Pausa
indicador
luminoso Sal
indicador luminoso
Fim de Programa
indicador luminoso
Secagem
indicador luminoso
Lavagem
botão Selecção de Programa
tecla On-Off/Reset
alça de Abertura da Porta
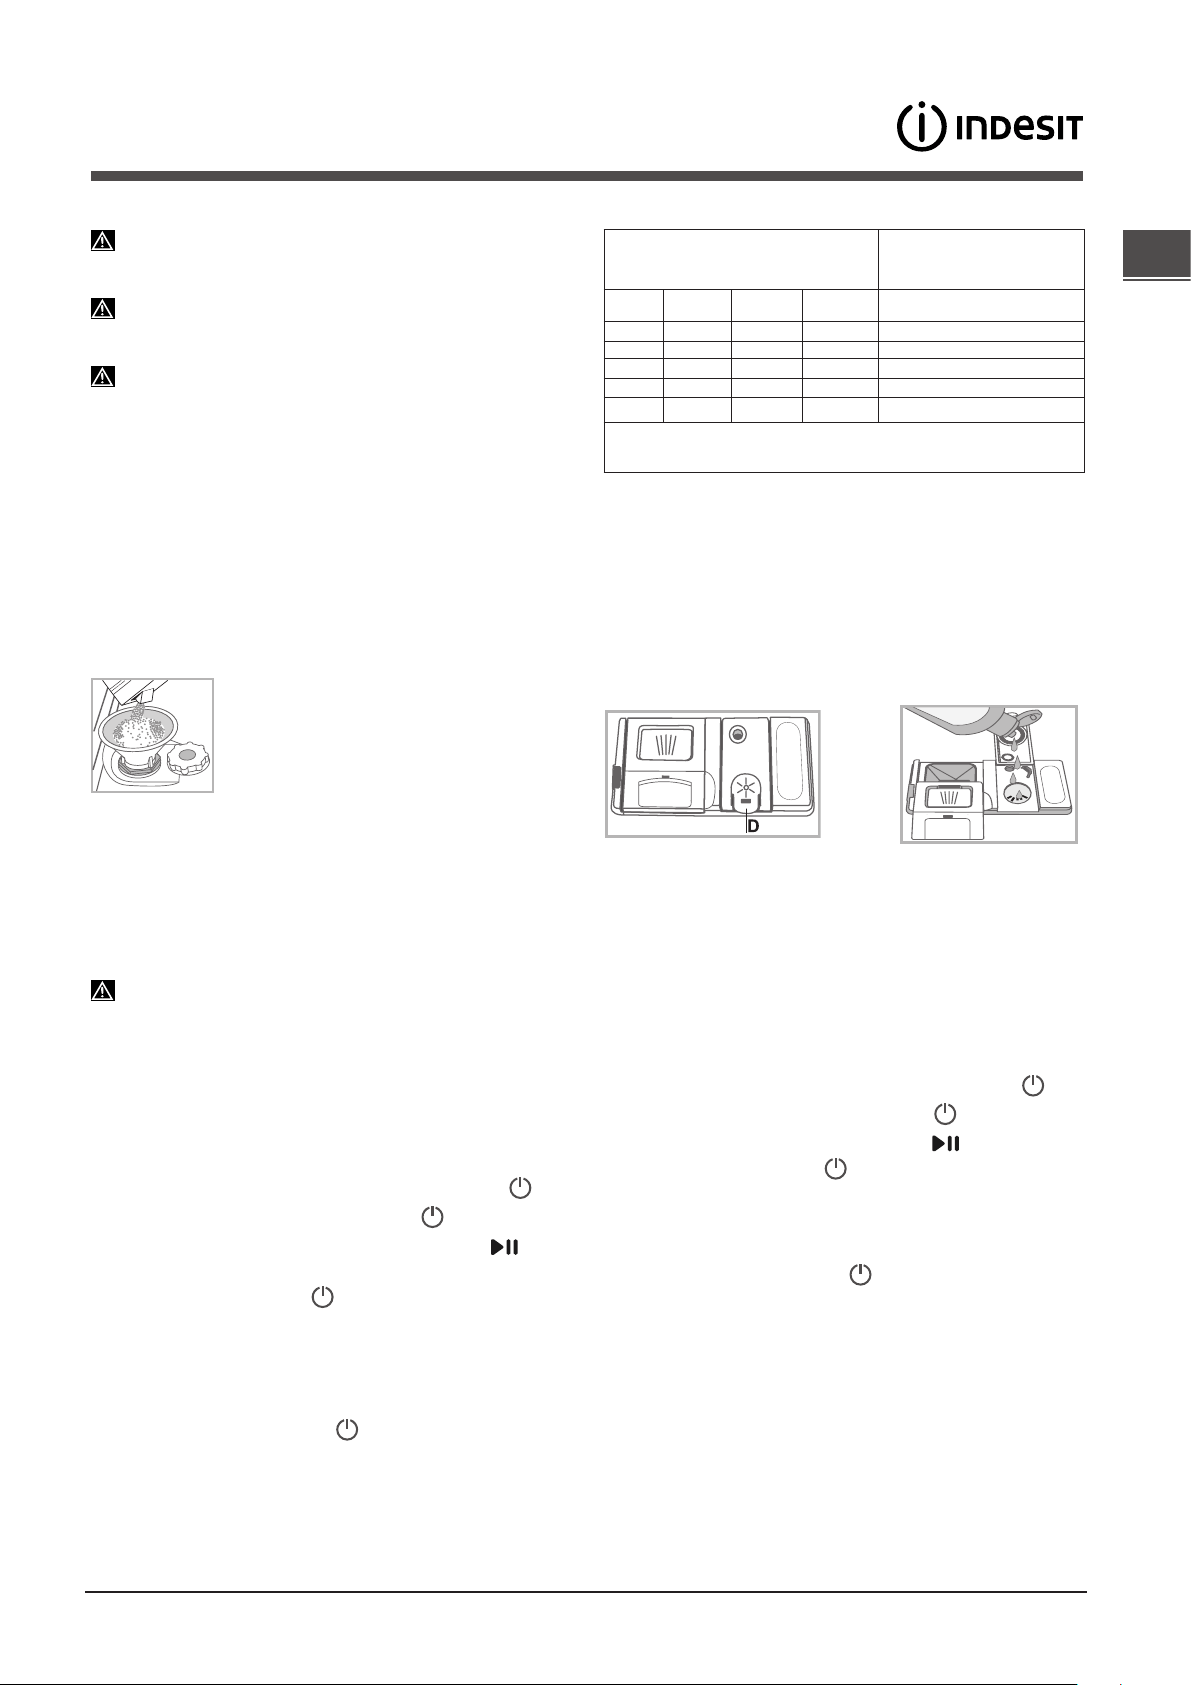
PT
57
Sal regenerante e
abrilhantador
Use somente produtos específicos para máquinas de
lavar louça. Não use sal de cozinha ou industrial.
Siga as indicações escritas na embalagem.
Mesmo que utilize um produto multifunções, aconselha-
se sempre a adição de sal, especialmente se a água for dura
ou muito dura.
(Sigaasindicaçõesescritasnaembalagem).
Se não forem adicionados o sal e o abrilhantador, é
normal que os indicadores luminosos FALTA DE SAL* e
FALTA DE ABRILHANTADOR
* continuem acesos.
Carregar o sal regenerante
O uso do sal evita a formação de CALCÁRIO na loiça e
componentes funcionais da máquina.
•Éimportantequeodepósitodesalnuncaestejavazio.
•Éimportanteefetuaraconfiguraçãodadurezadaágua.
O recipiente do sal está colocado na parte inferior da máquina
de lavar louça
(consulteDescrição)
e deve ser enchido:
•quandonopainelseacendeoindicadorluminosoFALTASAL*;
•quandoaboiaverde*presentenatampadosaldeixadeser
visível.
•consulteaautonomianatabeladadurezadaágua.
1.Extraia o cesto inferiore desatarraxe a
tampa do reservatório no sentido anti-horário.
2. Apenas para a primeira utilização: encha o
reservatóriocomáguaatéaorebordo.
3.Posicioneofunil
(vejaafigura)
e encha o
recipientedesalatéabeira(aproximadamente
1kg);énormalquesaiaumpoucodeágua.
4.Remova o funil,elimine os resíduosde sal daboca do
reservatório; enxague a tampa sobágua corrente antes de
apertá-la.
Recomenda-se realizar esta operação a cada carregamento
de sal.
Atarraxebem a tampa,para que noreservatório não entre
detergentedurantealavagem(odispositivoparadescalcificar
poderia ser danificado irremediavelmente).
Casosejanecessáriocarregarosal,éaconselhávelefetuar
a operação antes de iniciar a lavagem.
Configuração da dureza da água
Para que o amaciador anticalcário funcioneperfeitamente, é
indispensável efetuar uma regulação em função da dureza
da água. Esta informação pode ser fornecida pela entidade
fornecedora de água potável. O valor configurado corresponde
aumadurezamédia.
•LigueamáquinadelavarlouçacomateclaON/OFF
•DesligueamáquinacomateclaON/OFF
•Mantenha pressionada a tecla START/PAUSA por 5
segundos.
•LiguecomateclaON/OFF
•Oindicadorluminosodosalficaintermitente(onúmero de
vezesquepiscacorrespondeàseleçãoatual)
•Posicioneobotãononúmerodoníveldedurezapretendido
(consulteatabeladadureza)
•DesliguecomateclaON/OFF
•Configuraçãoterminada!
•Configuraçãoterminada!
Se utilizar as pastilhas multifunções, encha o recipiente do sal
da mesma forma.
M
A
X
(°dH= dureza em graus alemães - °fH= dureza emgraus
franceses-mmol/l=milimolp/litro)
Carregar o abrilhantador
OabrilhantadorfacilitaaSECAGEMdaloiça.Orecipientedo
abrilhantador deve ser enchido:
•senopainel/ecrãseacenderoindicadorluminosoFALTADE
ABRILHANTADOR*;
• seoindicadorótico* presente na porta do recipiente "D",
passar de escuro a transparente.
1. Abra o recipiente "D" pressionando e levantando a lingueta
na tampa.
2.Introduzacomcuidadooabrilhantadoratéàmarcamáxima
da abertura de enchimento, evitando que transborde. Se vazar,
limpe imediatamente com um pano seco.
3.Fecheatampaatéouvirumclique.
NUNCA deitar abrilhantador diretamente dentro da máquina.
Regule a dose de abrilhantador.
Senãoficarsatisfeitocomoresultadodasecagem,épossível
regular a dose de abrilhantador.
•LigueamáquinadelavarlouçacomateclaON/OFF
•DesligueamáquinacomateclaON/OFF
•Pressione3vezesateclaSTART/PAUSA
•LiguecomateclaON/OFF
•Tudodesligado
•Posicione o botão no númerodo nível dequantidade de
abrilhantador pretendido
•DesliguecomateclaON/OFF
•Configuraçãoterminada!
OníveldeabrilhantadorpodeserconfiguradoparaZERO(ECO);
nesse caso, o abrilhantador não será fornecido e não será acesso
o indicador luminoso de falta de abrilhantador caso este termine.
Podemserconfiguradosaté4níveiscombasenomodelode
máquina de lavar louça. O valor configurado corresponde a um
nívelmédio.
• senalouçalavadahouverlistrasazuladas,configurepara
númerosmaisbaixos(1-2).
• sehouvergotasdeáguaoumanchasdecalcário,configure
paranúmerosmaisaltos(3-4).
Tabela da dureza da água
Autonomia média
Recipiente sal com 1
lavagem por dia
nível °dH °fH
mmol
p/ l.
meses
1 0 - 6 0 - 10 0 - 1 7 meses
2 6 - 11 11 - 20 1,1 - 2 5 meses
3 12 - 17 21 - 30 2,1 - 3 3 meses
4 17 - 34 31 - 60 3,1 - 6 2 meses
5
*
34 - 50 61 - 90 6,1 - 9 2/3 semanas
De 0 °f a 10 °f aconselha-se não utilizar sal.
* Com a conguração 5, a duração pode ser prolongada.
* Presente somente em alguns modelos.
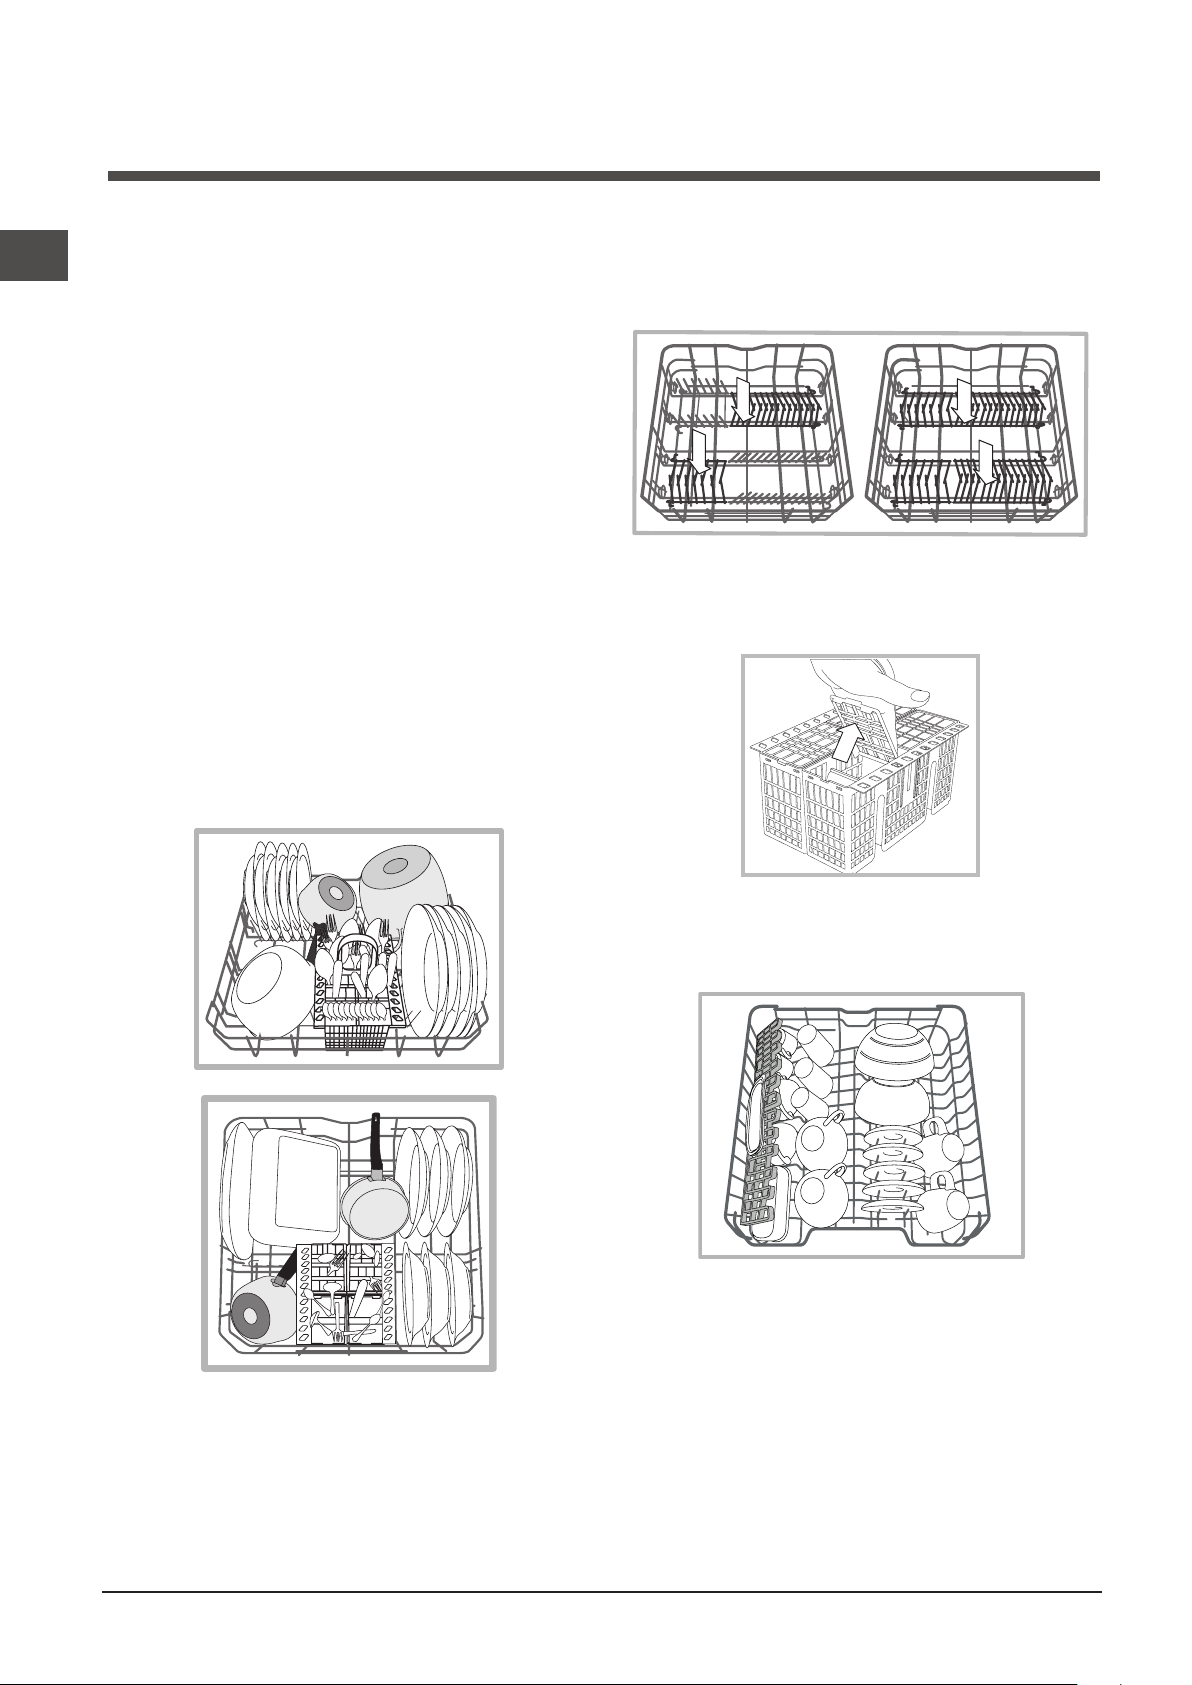
PT
58
Carregar os cestos
Sugestões
Antes de carregar os cestos, elimine os resíduos de comida
das louças e esvazie os líquidos restantes dos copos e dos
recipientes. Não é necessário enxaguar antes sob água
corrente.
Coloquealouçadeformaquefiquebemfixaenãopossatombar.
Os recipientes devem ser colocados com a abertura virada para
baixoeaspartescôncavasouconvexasnaposiçãooblíqua,
para permitir que a água chegue a todas as superfícies e deflua.
Preste atenção para que as tampas, cabos, frigideiras e
tabuleiros não impeçam a rotação dos braços aspersores.
Coloque os objectos pequenos no cesto dos talheres.
Alouçadeplásticoeasfrigideirasanti-aderentestêmtendência
a reter as gotas de água e, como tal, o seu grau de secagem
seráinferioraodalouçaemcerâmicaouinox.
Osobjectosleves(comoosrecipientesdeplástico)devemser
posicionadosdepreferêncianocestosuperioredevemestar
bemfixos.
Depois de ter carregado, verifique se os braços aspersores
rodam livremente.
Cesto inferior
O cesto inferior pode conter panelas, tampas, pratos,
tigelas, talheres, etc. Os pratos e tampas grandes devem ser
posicionadosdepreferênciadoslados.
Éaconselhávelcolocaralouçamuitosujanocestoinferior,uma
vezque,nestesector,osjactosdeáguasãomaisenérgicose
permitem obter melhores resultados de lavagem.
Alguns modelos de máquina de lavar louça dispõem de sectores
reclináveis*, que podem ser usados em posição vertical para
posicionaros pratos ou em posição horizontal (baixos)para
poder carregar mais facilmente os tachos e as tigelas.
Cesto dos talheres
O cesto dos talheres dispõe de grelhas superiores para uma
melhor disposição dos mesmos. Deve ser posicionado somente
na parte dianteira do cesto inferior.
Cesto superior
Carregue as louças delicadas e leves: copos, taças, pratos
pequenos,tigelasbaixas.
Alguns modelos de máquinas de lavar louça dispõem de sectores
reclináveis
*, utilizáveis na posição vertical, para colocar pires
oupratos de sobremesa,ou baixos, paracolocar caixas e
recipientes de alimentos.
* Presente somente em alguns modelos.

PT
59
Regule a altura do cesto superior.
Parafacilitaroposicionamentodaslouças,épossívelcolocaro
cestosuperioremposiçãoaltaoubaixa.
De preferência, regule a altura do cesto superior quando
estiver VAZIO.
Nunca levante ou abaixe o cesto por um só lado.
Se o cesto estiver equipado com Lift-Up
*
(verfigura)
, levante o
cesto segurando-o pelos lados e mova para cima. Para regressar
àposiçãobaixa,pressioneasalavancas(A)nosladosdocesto
e acompanhe a descida.
Louças não adequadas
• Talhereselouçasdemadeira.
• Coposdecoradosedelicados,louçasdeartesanatoartístico
e antiguidades. As decorações não são resistentes.
• Partesemmaterialsintéticonãoresistenteàtemperatura.
• Louçasdecobreeestanho.
• Louçassujasdecinza,cera,lubrificanteoutinta.
As decorações do vidro e as partes em alumínio e prata podem
mudar de cor e embranquecer durante a lavagem. Alguns tipos
devidro(porexemplo,objectosdecristal),apósmuitaslavagens,
podem ficar opacos.
Danos no vidro e louça
Causas:
• Tipodevidroeprocedimentodeproduçãodovidro.
• Composiçãoquímicadodetergente.
• Temperaturadaáguadoprogramadeenxaguamento.
Conselho:
• Utilizarapenascoposeporcelanacomgarantiadofabricante
deresistênciaàlavagememmáquinasdelavarlouça.
• Utilizardetergentedelicadoparamáquinasdelavarlouça.
• Retiraroscoposeostalheresdamáquinaomaisrapidamente
possível após o final do programa.
Ocestosuperioréregulávelemalturaconsoanteasnecessidades:
na posição alta quando pretender colocar louças grandes no
cestoinferior;naposiçãobaixa,paraaproveitartodososespaços
das peças basculantes ou reclináveis, libertando mais espaço
em cima.
Peças basculantes com posição variável
Aspeçasbasculantespodemserposicionadasemtrêsalturas
diferentes para optimizar a disposição das louças no espaço
do cesto.
Os cálices podem ser posicionados de
modo estável nas peças basculantes,
inserindo a haste do copo na específica
abertura.
Para otimizar a secagem, posicione
as peças basculantes com maior
inclinação. Para modificar a inclinação,
levante a peça basculante, faça-a
deslizar ligeiramente e posicione-a
como pretender.
* Presente somente em alguns modelos. Variáveis por número
e posição.
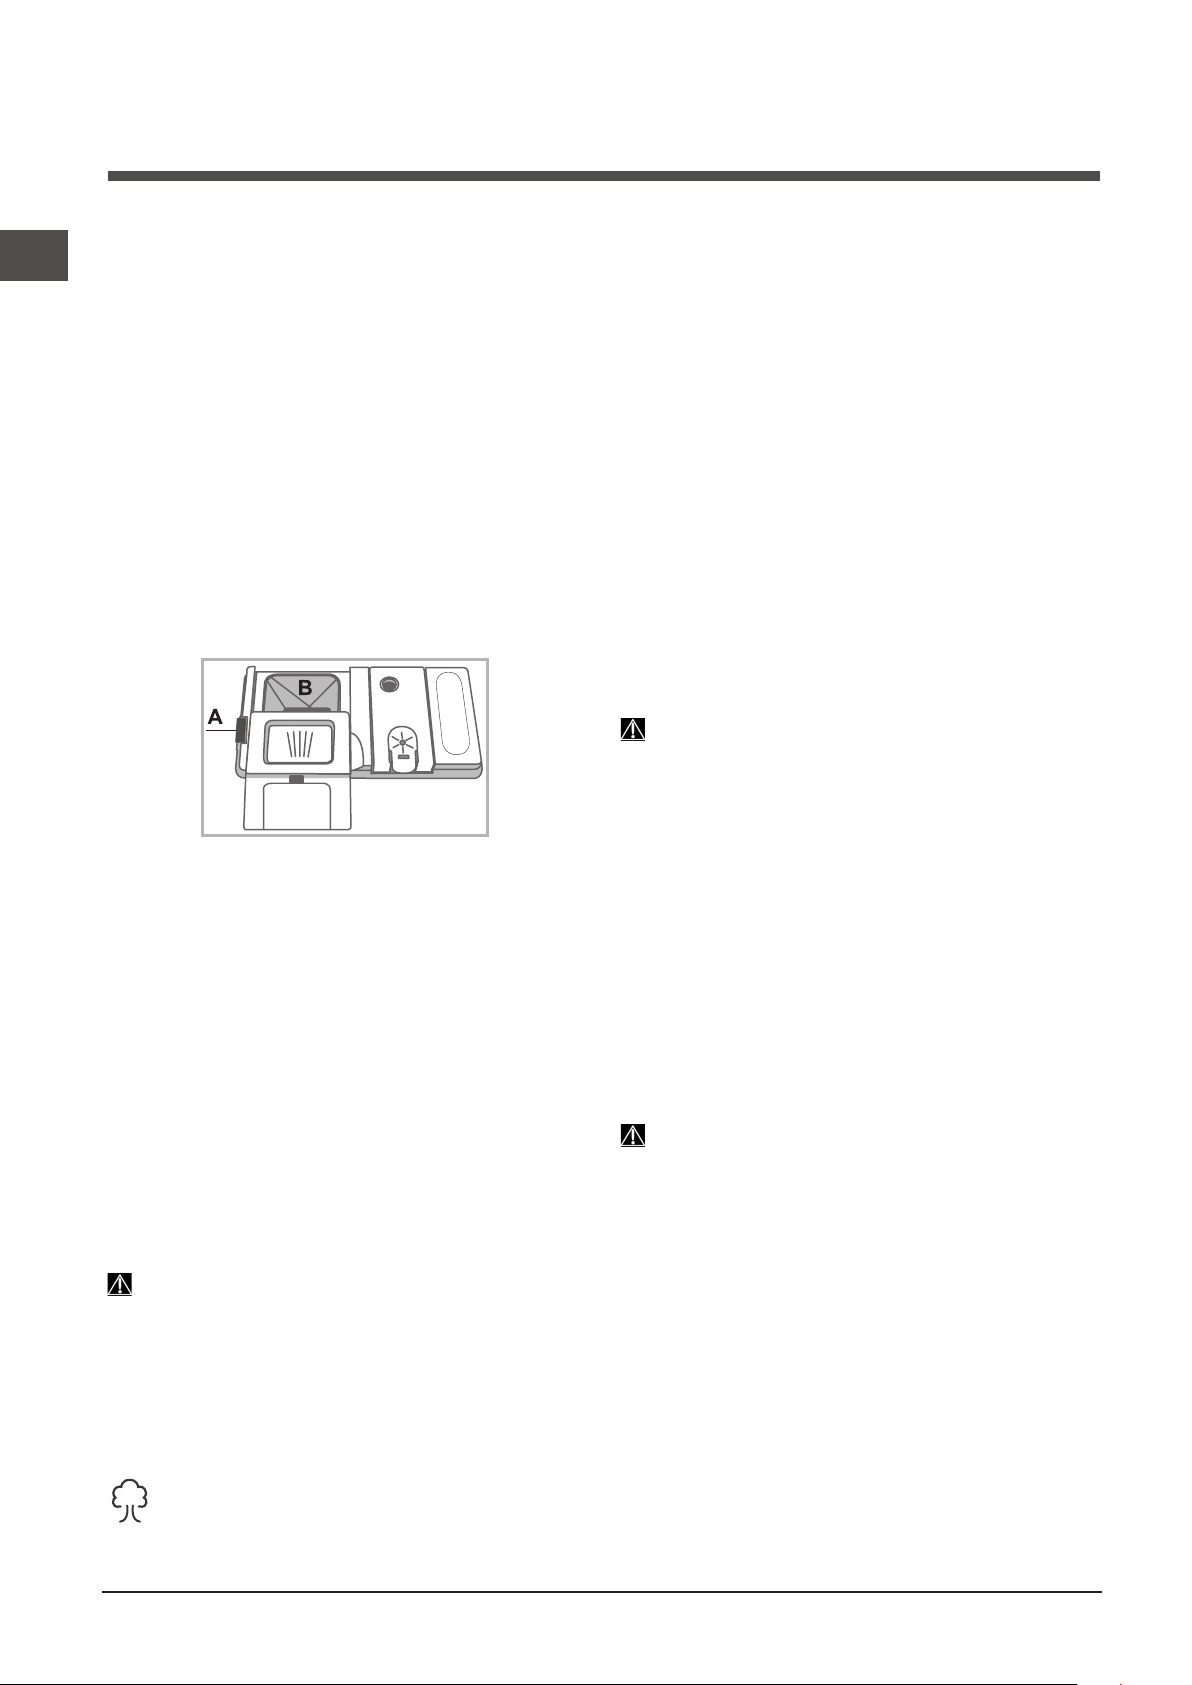
PT
60
* Presente somente em alguns modelos.
Ligar a máquina de lavar louça
1.CarreguenateclaON-OFF:
2. Abra a porta e doseie o detergente.
3.Carregueos cestos
(consulteCarregaros cestos)
e feche
a porta.
4.Seleccione o programa rodando o botão \SELECÇÃO DE
PROGRAMA no sentido dos ponteiros do relógio: a marca
dereferênciadobotãotemdecoincidircomosímbolodo
programapretendido.Oindicadorluminosorelativoàtecla
INÍCIO/PAUSAacende-se.
5. Seleccione as opções de lavagem*
(consulteProgramas
Especiais e Opções).
6.LiguepressionandoateclaInício/Pausa:oiníciodoprograma
éassinalado por um sinal sonoro* e pelo acendimento do
indicadorrelativoàlavagem.
7.Nofinal,algunssinaissonoros* assinalam o final do programa
e acende-se o indicador END. Para desligar o aparelho carregue
nateclaON-OFF.
8.Aguardealgunsminutosantesderetiraraslouças,paraevitar
queimaduras. Descarregue os cestos, começando pelo inferior.
Para reduzir o consumo de energia eléctrica, em
algumas condições de NÃO utilização, a máquina irá
desligar-se automaticamente.
Modificação do programa em curso
Casotenhaseleccionadoo programa errado, é possível
modificá-lo, se tiver iniciado há pouco tempo: uma vez
iniciada a lavagem, para modificar o ciclo deve desligar a
máquinacomuma pressãoprolongadada teclaON/OFF/
Reset, ligue novamente com a mesma tecla e seleccione o
programa e as opções desejados.
Acrescentar mais louça
CarreguenateclaInício/Pausa(aluzdateclapisca),abra
aportaprestandoatençãoàsaídadevaporeintroduzaas
louças. Pressione a tecla Início/Pausa (luz fixa): o ciclo é
retomado.
SepremirateclaInício/Pausaparacolocarempausao
aparelho, interrompe-se o programa, assim como o Início
Retardado, se tiver sido programado.
Nestafasenãoserápossívelmudaroprograma.
Interrupções acidentais
Se durante a lavagem for aberta a porta ou houver uma
interrupçãodacorrenteeléctrica,oprogramairáinterromper-
se. Reiniciará do ponto em que foi interrompido quando a
porta for fechada ou a electricidade voltar.
Detergente e uso da
máquina de lavar louça
Carregar o detergente
O bom resultado da lavagem depende também da dosagem
correta do detergente; uma dose excessiva não lava de modo
mais eficaz e polui o ambiente.
A dosagem pode ser adaptada ao grau de sujidade.
Normalmente, para uma sujidade normal, utilize cerca de 35
g. (detergente em pó) ou 35 ml (detergente líquido). Caso
utilize pastilhas, basta apenas uma.
Se a louça estiver pouco suja ou tiver antes sido enxaguada
com água, diminuir bastante a dose de detergente.
Para um bom resultado de lavagem, seguir também as
instruções na embalagem do detergente.
Em caso de dúvida, é recomendável contactar os fabricantes
de detergentes.
Para abrir a embalagem do detergente, acione o dispositivo
de abertura “A”
Introduza o detergente apenas no recipiente "B" seco. A
quantidade de detergente adequada para a pré-lavagem deve
ser colocada directamente na cuba
1. Doseie o detergente consultando a tabela dos programas para
introduziraquantidadecorrecta.NorecipienteB está presente
umnívelqueindicaaquantidademáximadedetergentelíquido
ou em pó que pode inserir em cada ciclo.
2. Elimine os resíduos de detergente das beiradas do recipiente
efecheatampaatéo“clique”.
3. Feche a tampa do recipiente de detergente empurrando-o
paracima,atéencaixarcorrectamenteodispositivodefecho.
O recipiente do detergente abre automaticamente em função do
programa, no momento adequado.
Casosejamutilizadosdetergentescombinados,éaconselhável
utilizaraopçãoTABS,queadequaoprogramadelavagem,de
forma a obter sempre o melhor resultado de lavagem e secagem
possível.
Utilize apenas detergente para a máquina de lavar louça.
NÃO UTILIZE detergentes para a lavagem à mão.
Um uso excessivo de detergente pode deixar resíduos de
espuma no fim do ciclo.
As melhores performances de lavagem e secagem são
obtidas com a utilização combinada de detergente,
abrilhantador líquido e sal regenerante.
Aconselha-se utilizar os detergentes sem fosfatos e
sem cloro pois são os mais indicados para a tutela do
meio ambiente.
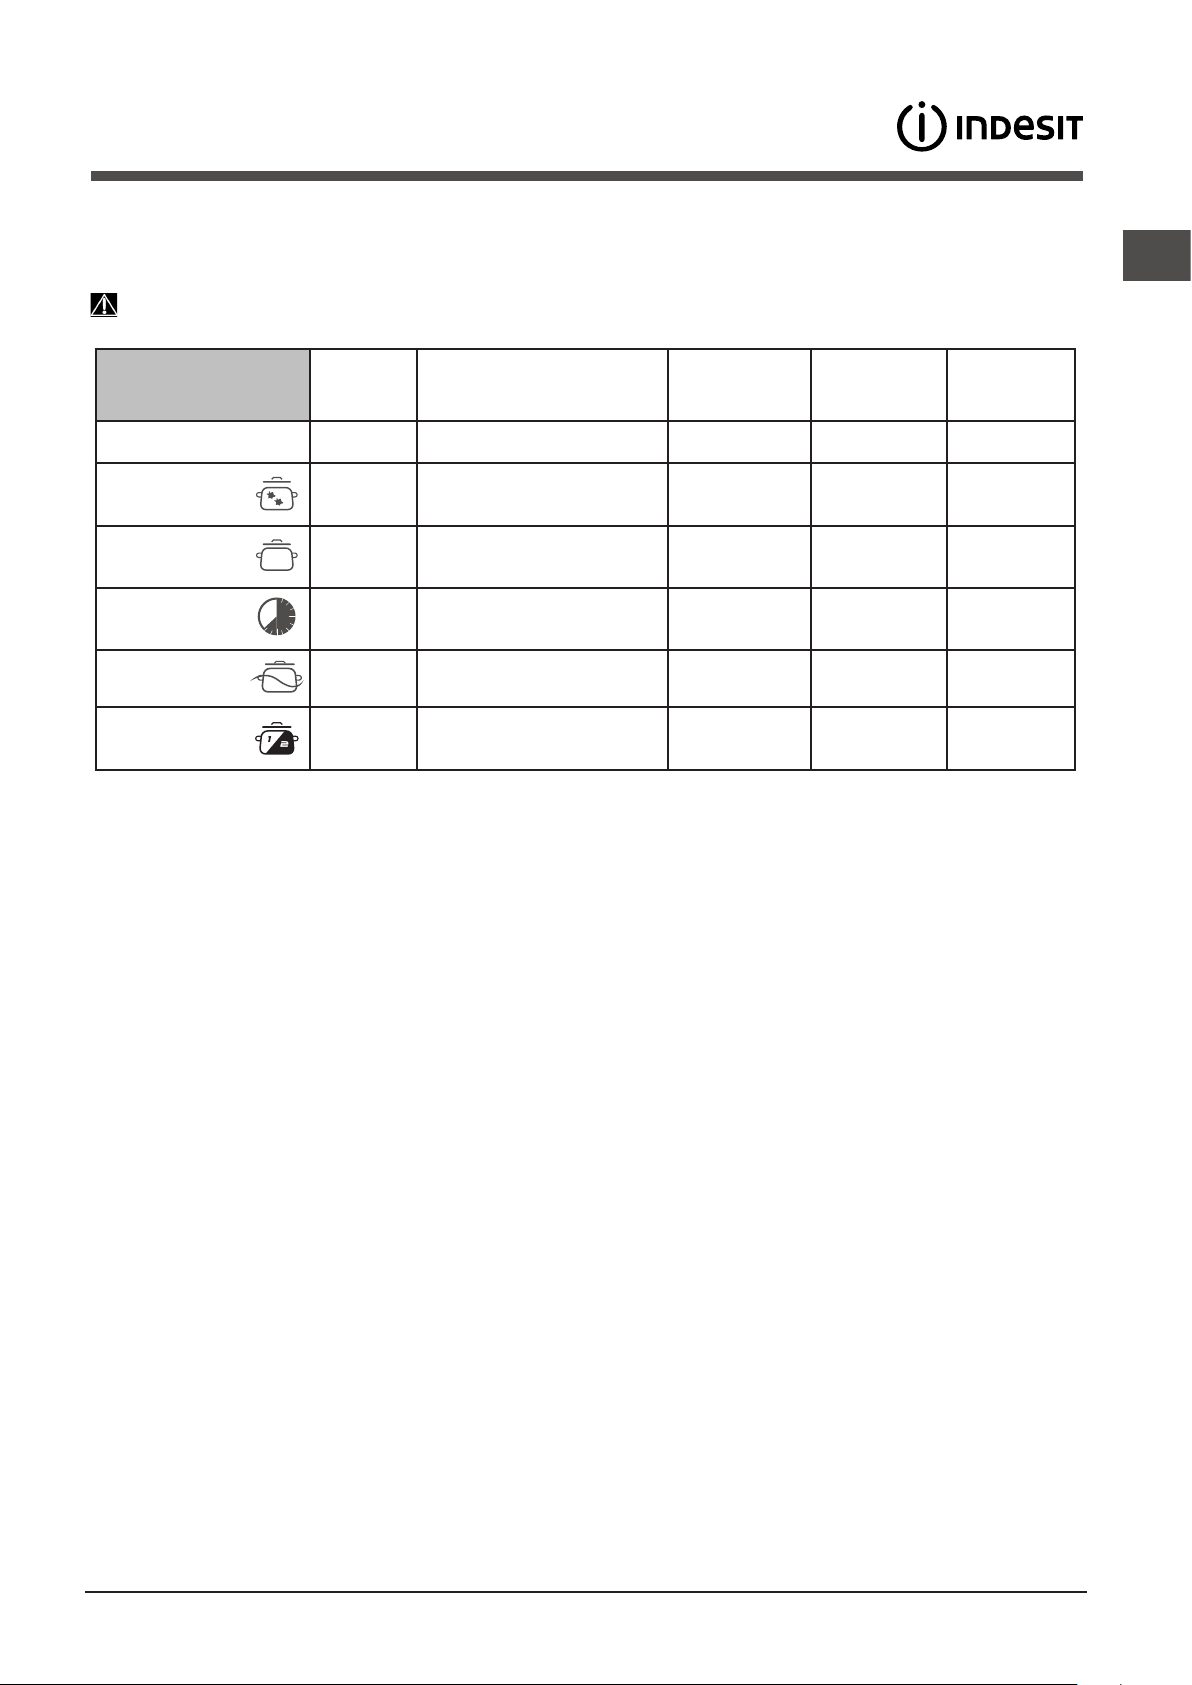
PT
61
Programas
Observações:
omelhor desempenhodosprogramas “Rápido/Fast*eExpress 40'”obtém-se preferencialmente respeitandoo número
máximodelouçasespecificado.
Para consumir menos, utilize a máquina com carga total.
Nota para os Laboratórios de Ensaio:
parainformaçõessobreascondiçõesdoensaiocomparativoEN,solicitaraoendereço:
Programa Secagem Opções
Duração do
programa
horas:min.
Consumo de
água (l/ciclo)
Consumo
Energia
(kWh/ciclo)
1. Eco
Sim
Não 02:18’ 11,0 1,04
2. Intensivo
Sim
Não 02:30’ 16,5 1,70
3. Normal
Sim
Não 02:00’ 16 1,40
4. Express
Não
Não 00:40’ 9,0 0,95
5. Amolecimento
Não
Não 00:10’ 4,0 0,01
6. Meia carga
Sim
Não 01:20’ 12,0 1,15
Indicações para a escolha dos programas e dosagem de detergente
1. OciclodelavagemECOéoprogramapadrãoaquesereferemosdadosdaetiquetaenergética;estecicloéadequadopara
lavarlouçadesujidadenormaleéoprogramamaiseficienteemtermosdeconsumoenergéticoeáguaparaestetipodelouça.
27g/ml+6g/ml**–1Tab
(**Quantidadededetergentedepré-lavagem)
2. Louçaetachosmuitosujos(nãousarcomlouçadelicada).30g/ml–1Tab
3.Louçaetachosnormalmentesujos.27g/ml+6g/ml**–1Tab
4.Ciclorápidoparautilizarcomlouçaspoucosujas.(idealpara2pessoas)25g/ml–1Tab
5.Lavagempreliminaraaguardarqueacargafiquecompletanapróximarefeição.Semdetergente
6. Cicloidealparaalavagemdecargareduzidodeloiçadesujidadenormal.25g/ml–1Tab
Consumoemstand-by:Consumoemmodoleft-on:5,0W-consumoemmodooff:0,5W
OsdadosdosprogramassãomedidosemlaboratóriodeacordocomanormaeuropeiaEN50242.
Consoante as diferentes condições de utilização, a duração e os dados dos programas podem diferir.
O número e o tipo de programas e as opções variam conforme o modelo de máquina de lavar louça.
* Presente somente em alguns modelos.
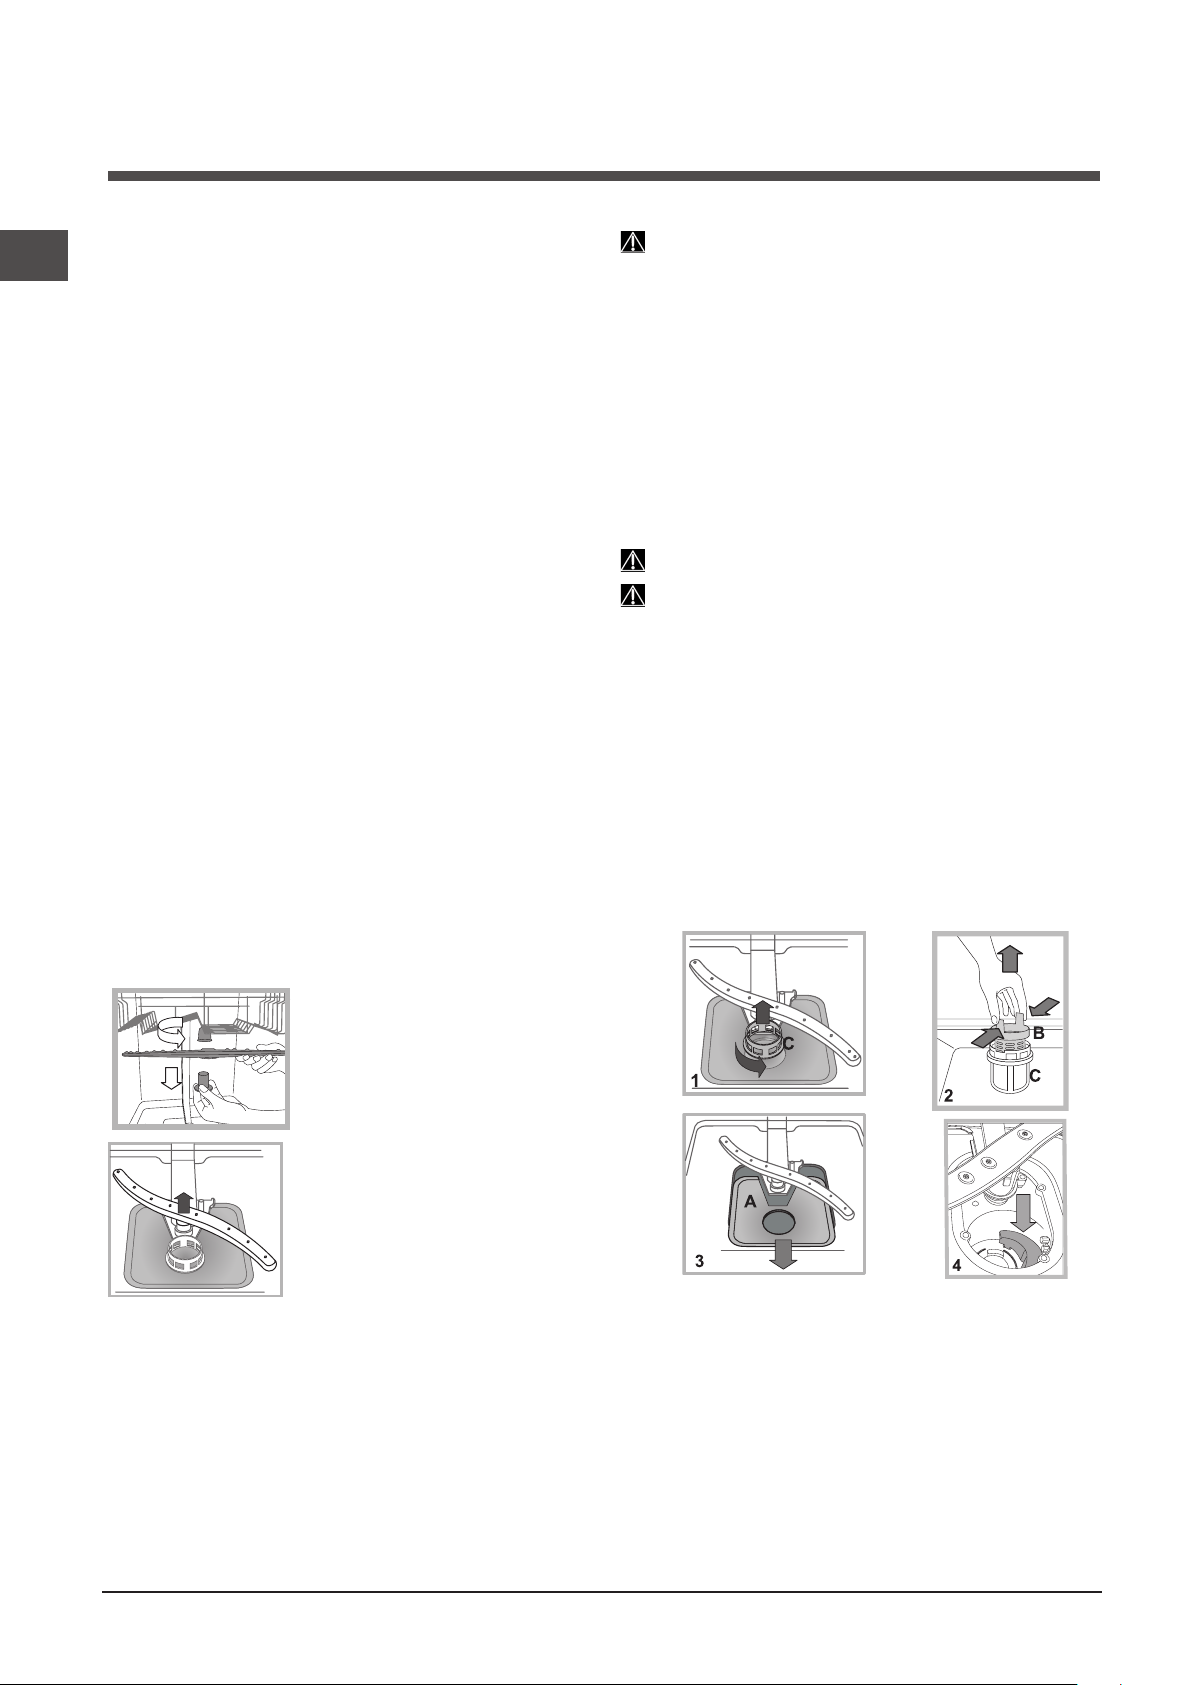
PT
62
Manutenção e cuidados
Excluir a água e a corrente eléctrica
• Fecheatorneiradaáguaapóscadalavagemparaeliminar
o risco de vazamentos.
• Desligueafichadatomadaquandolimparamáquinae
durante os serviços de manutenção.
Limpar a máquina de lavar louça
• Asuperfícieexternaeopaineldecomandospodemser
limpos com um pano não abrasivo embebido de água.
Nãousarsolventesnemabrasivos.
• Otamborinternopodeserlimpodeeventuaismanchas
com um pano embebido de água e um pouco de vinagre.
Evitar cheiros desagradáveis
• Deixeaportasempreentreabertaparaevitarestagnações
de humidade.
• Limperegularmenteasguarniçõesperimetraisdevedação
da porta e dos recipientes de detergente com uma
esponja húmida. Deste modo, se evitarão estagnações
de alimentos, principais responsáveis pelos cheiros
desagradáveis.
Limpar os braços aspersores
Pode acontecer que restos de comida grudem-se nos braços
aspersoresetampemosfurosatravésdosquaisaáguadeve
passar:devezemquandoébomcontrolá-loselimpá-los
com uma escovinha não de metal.
Ambos os aspersores são desmontáveis.
Para desmontar o aspersor
superior deve-se desapertar
girando o aro de plástico na
direcção anti-horária.
O braço
aspersor superior deve ser
remontado com os furos para cima.
Para desmontar o aspersor
inferior faça pressão sobre as
abassituadasnosladosepuxe-o
para cima.
Limpeza do filtro de entrada da água
*
Se os tubos de água forem novos, ou se tiverem permanecido
muitotemponãoutilizados,antesderealizaraligação,deixe
escorrer água para certificar-se que seja límpida e isenta de
impurezas. Sem esta precaução, há riscos de que o ponto
deentradadaáguaseentupa,causandodanosàmáquina
de lavar louça.
Periodicamente, limpe o filtro de entrada da água posi-
cionado na saída da torneira.
- Feche a torneira da água.
-Desparafuseaextremidadedo tubo de alimentação da
água, remova o filtro e limpe-o delicadamente sob um jacto
de água corrente.
- Insira novamente o filtro e parafuse o tubo.
Limpar os filtros
Ogrupofiltranteéformadoportrêsfiltrosquelimpamaágua
de lavagem dos resíduos de comida e a colocam novamente
emcirculação:parater bons resultados de lavagem é
necessário limpá-los.
Limpar os filtros com regularidade.
A máquina de lavar louça não deve ser utilizada sem
filtros nem com o filtro desenganchado.
•Apósalgumas lavagens, controle o grupofiltrantee se
necessário, limpe-o cuidadosamente com água corrente,
com a ajuda de uma escovinha não de metal, seguindo as
instruçõesabaixo:
1. gire no sentido anti-horário o filtro cilíndrico C e remova-o
(fig.1).
2.RemovaocopinhofiltroBfazendoumaligeirapressãonas
abas laterais
(Fig.2)
.
3.
DesfieopratofiltroinoxA
(Fig.3).
4. Inspeccione o depósito e elimine os eventuais resíduos
de comida. NUNCA REMOVA a protecção da bomba de
lavagem
(detalhedecorpreta)(fig.4)
Após a limpeza dos filtros, monte novamente o grupo
filtranteecoloque-ocorrectamentenasuaposição;istoé
fundamental para o bom funcionamento da máquina de
lavar louças.
Longos períodos de ausência
• Desligueasligaçõeseléctricase afecheatorneirada
água.
• Deixeaportaentreaberta.
•Navolta,realizeumalavagemcomamáquinavazia.
* Presente somente em alguns modelos.
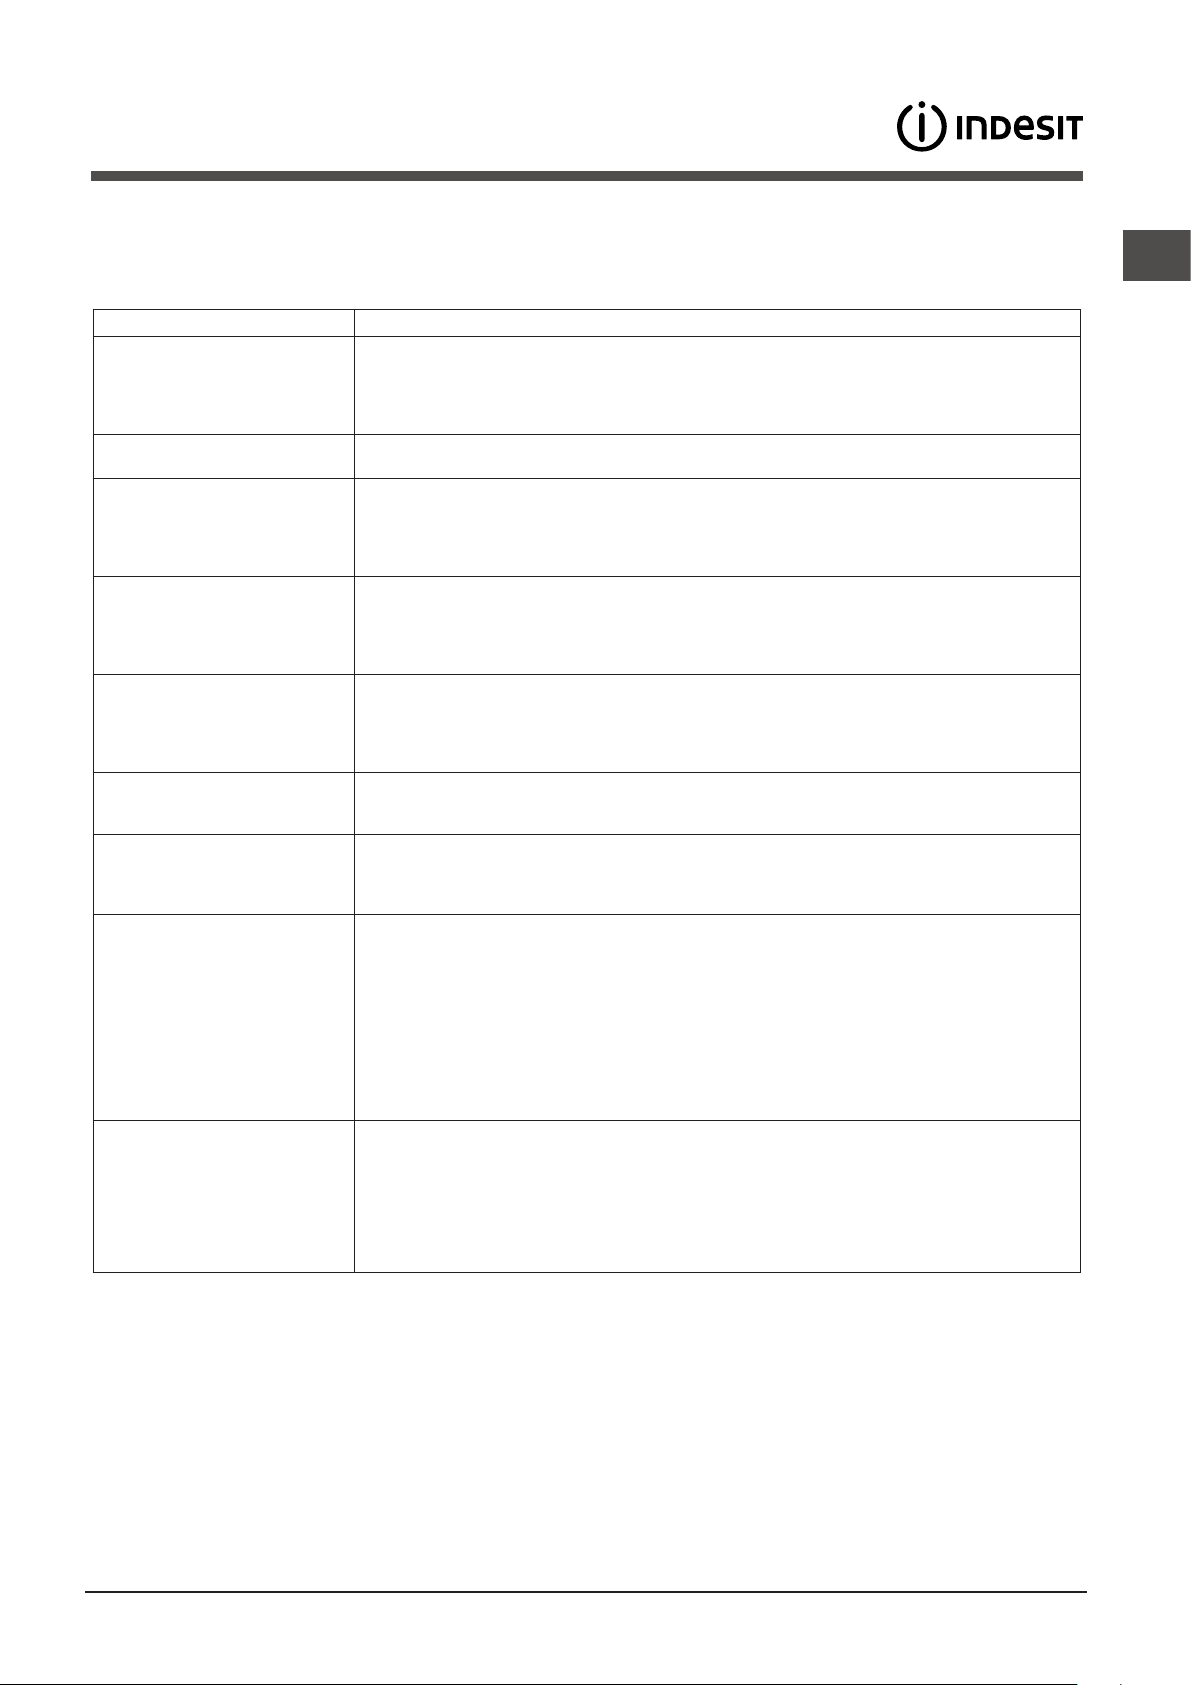
PT
63
Anomalias e soluções
Nocasoemqueoaparelhoapresenteanomaliasdefuncionamento,controleosseguintesitensantesdecontactaraAssistência
Técnica.
* Presente somente em alguns modelos.
Anomalias: Possíveis causas / Solução:
A máquina de lavar louça não
começa a funcionar ou não
responde aos comandos
• A torneira da água não está aberta.
• Desligue a máquina com a tecla ON/OFF, ligue novamente após um minuto e volte a
reprogramar.
• A cha não foi inserida corretamente na tomada de corrente ou mude de cha
• A porta da máquina de lavar louça não está bem fechada.
A porta não se fecha
• Verique se os cestos estão inseridos até ao fundo
• O fecho da porta disparou: empurre com força a porta até ouvir um “clack”.
A máquina de lavar louça não
descarrega a água.
• O programa de lavagem ainda não terminou.
• O tubo de descarga da água está dobrado
(consulte Instalação).
• A descarga do lavabo está obstruída.
• O ltro está obstruído por resíduos de comida.
• Verique a altura do tubo de descarga.
A máquina de lavar louça faz
ruído.
• As louças chocam entre si ou contra os aspersores Posicione as louças corretamente e
verique se os aspersores rodam livremente.
• Presença de espuma em excesso: o detergente não foi doseado corretamente ou não
é adequado para a lavagem na máquina de lavar louça.
(consulte Detergente e uso da
máquina de lavar louça)
Não pré-lavar à mão as louças.
Nas louças e nos copos
permanecem depósitos de
calcário ou uma camada
branca.
• Falta o sal regenerante.
• A regulação da dureza da água não é adequada: aumente os valores.
(consulte Sal,
regenerador e abrilhantador).
• A tampa do recipiente de sal não está bem fechada.
• O abrilhantador acabou ou a dosagem é insuciente.
Nas louças e nos copos há
listras brancas ou manchas
azuis.
• A dosagem do abrilhantador é excessiva.
As louças estão pouco secas. • Foi selecionado um programa sem secagem.
• O abrilhantador acabou.
(consulte Sal, regenerador e abrilhantador).
• A regulação do abrilhantador não é adequada.
• As louças são de material antiaderente ou de plástico; é normal a presença de gotas de água
.
As louças não estão limpas. • As louças não foram posicionadas corretamente.
• Os aspersores não rodam livremente; estão bloqueados pela louça.
• O programa de lavagem é demasiado delicado
(consulte Programas).
• Presença de espuma em excesso: o detergente não foi doseado corretamente ou não
é adequado para a lavagem na máquina de lavar louça.
(consulte Detergente e uso da
máquina de lavar louça)
• A tampa do recipiente para o abrilhantador não foi fechada corretamente.
• O ltro está sujo ou obstruído
(consulte Manutenção e cuidados).
• Falta o sal regenerante
(consulte Sal regenerante e abrilhantador).
• Assegure-se de que a altura dos pratos é compatível com a regulação do cesto.
• Os orifícios dos aspersores estão obstruídos.
(consulte Manutenção e cuidados).
A máquina de lavar louça não
carrega a água
está bloqueada e os indicadores
luminosos estão intermitentes
• Houve um corte de água ou a torneira está fechada.
• O tubo de carregamento da água está dobrado
(consulte Instalação).
• Os ltros estão obstruídos e é necessário limpá-los.
(consulte Manutenção e cuidados).
• A descarga está obstruída e é necessário limpá-la.
• Depois de efetuar as operações de vericação e limpeza, desligue e volte a ligar a máquina
de lavar louça e execute um novo ciclo de lavagem.
• Se o problema persistir, feche a torneira da água, desligue a cha da tomada e contacte o
centro de assistência.
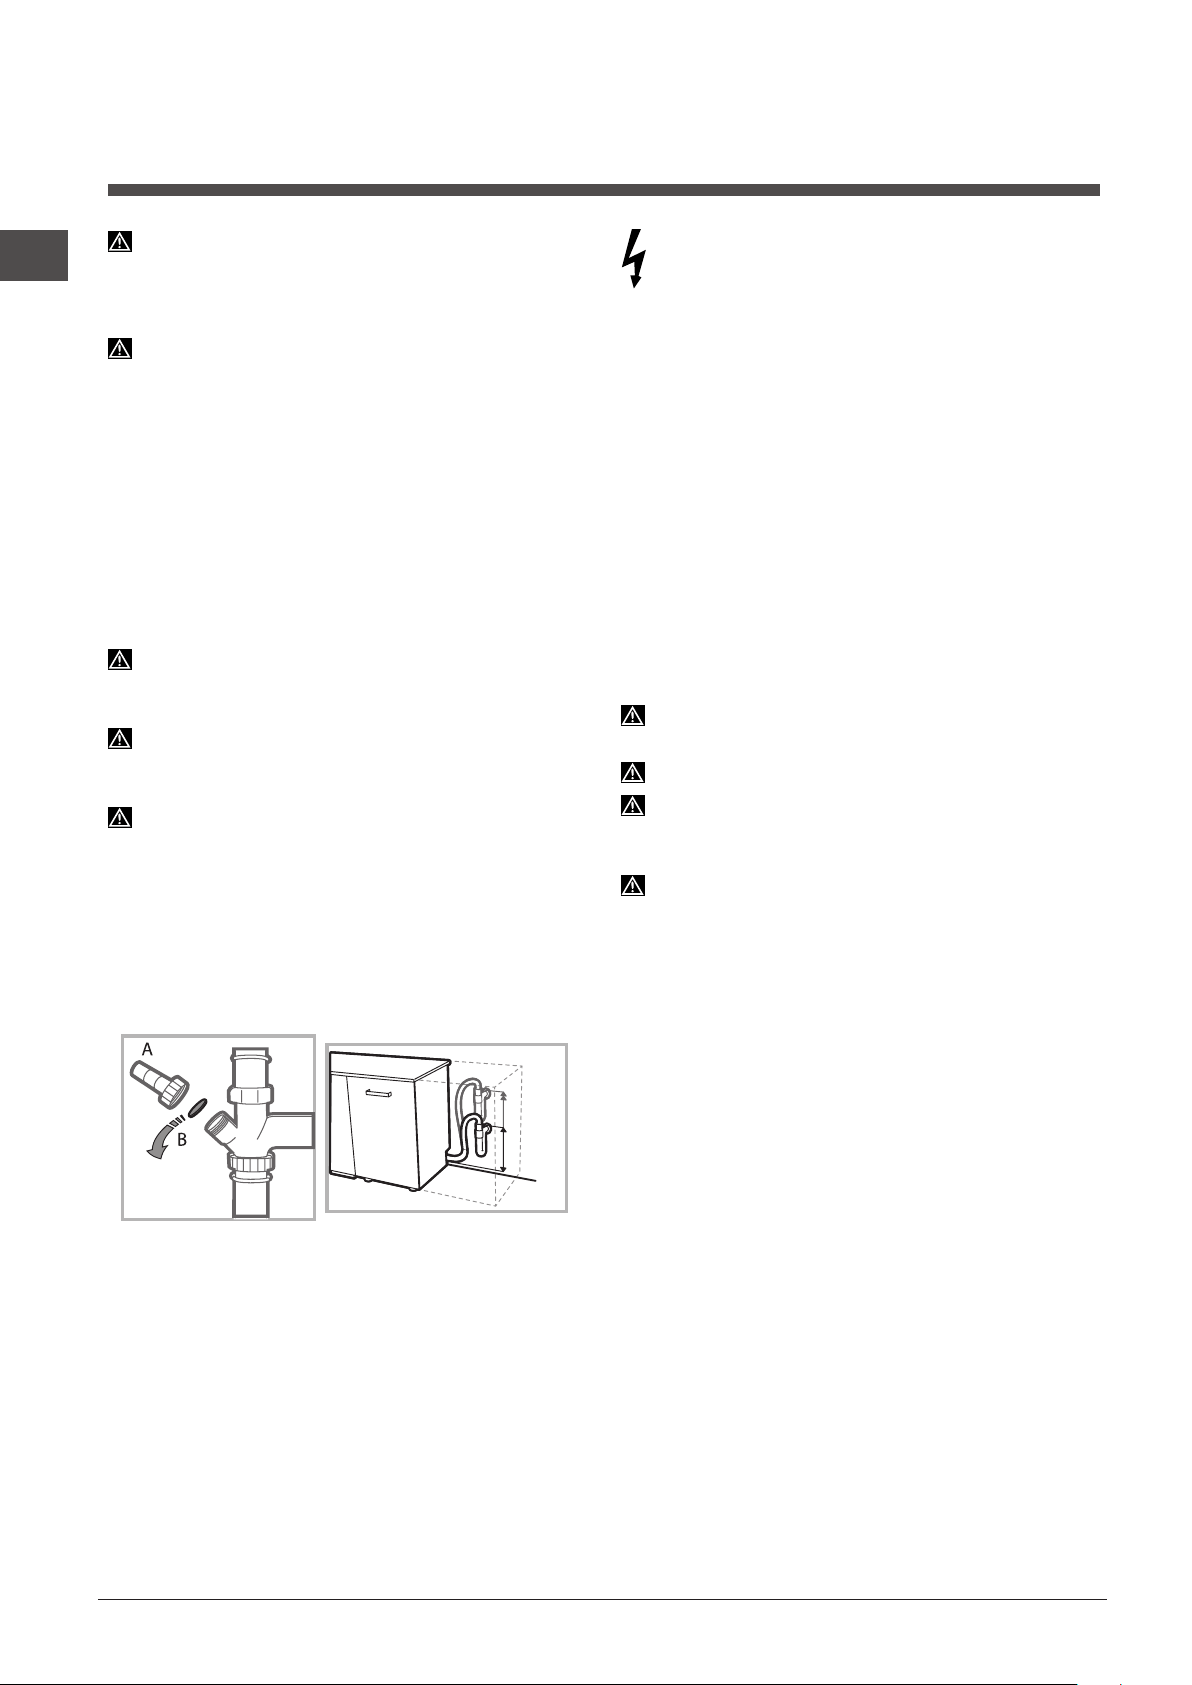
64
CS
Při stěhování udržujte zařízení ve svislé poloze; dle
potřeby je můžete naklonit na zadní stranu.
Připojení k rozvodu vody
Přizpůsobení rozvodu vody pro instalaci musí být
provedeno kvalikovaným personálem.
Přívodní hadice a vypouštěcí hadice vody musí být nasmě-
rovány směrem doprava nebo doleva s cílem umožnit co
nejlepší instalaci.
Hadice nesmí být ohnuté nebo přitlačené myčkou.
Připojení hadice pro přívod vody
• Připojení se provádí k přípojce vody o velikosti 3/4” typu
plyn se studenou nebo teplou vodou (max. 60 °C).
• Nechte vodu odtéct, dokud nebude průzračná.
• Řádně přišroubujte přívodní hadici a otevřete ventil.
V případě, že délka přívodní hadice nebude dostatečná,
se obraťte na specializovanou prodejnu nebo na autorizovaného
technika
(viz Servisní služba)
.
Tlak v rozvodu vody se musí pohybovat v rozmezí hodnot
uvedených v tabulce Technických údajů; v opačném případě
by se mohlo stát, že myčka nebude fungovat správně.
Dbejte na to, aby hadice nebyla příliš ohnutá ani
přiškrcená.
Připojení hadice vypouštění vody
Připojte vypouštěcí hadici do odpadového potrubí s minimálním
průměrem 2 cm. (A)
Přípojka vypouštěcí hadice se musí nacházet ve výšce od
40 do 80 cm od podlahy nebo od plochy, na které je uložena
myčka.
Před připojením vypouštěcí hadice k sifonu umývadla
odstraňte plastový uzávěr (B).
Bezpečnostní opatření proti vytopení
Aby bylo zaručeno, že nedojde k vytopení, je myčka:
- vybavena systémem, který přeruší přívod vody v případě
poruch nebo jejího úniku dovnitř myčky.
Některé modely jsou vybaveny také přídavným bezpečnostním
zařízením New Acqua Stop*, které zaručuje ochranu proti
vytopení i v případě poškození přívodní hadice.
UPOZORNĚNÍ: NEBEZPEČNÉ NAPĚTÍ!
Přívodní hadice vody nesmí být v žádném případě přeřezána,
protože obsahuje součásti pod napětím.
Připojení k elektrickému rozvodu
Před zasunutím zástrčky do zásuvky elektrického rozvodu
se ujistěte, že:
• zásuvka je uzemněnaa že vyhovuje normám;
• je zásuvka schopna snést maximální zátěž odpovídající
jmenovitému příkonu zařízení, uvedenému na štítku
se jmenovitými údaji, umístěném na vnitřní straně dvířek
(viz kapitola Popis myčky);
• napájecí napětí odpovídá hodnotám uvedeným na štítku
se jmenovitými údaji, umístěném na vnitřní straně dvířek;
• zásuvka je kompatibilní se zástrčkou zařízení. V opačném
případě požádejte o výměnu zástrčky autorizovaného
technika
(viz Servisní služba)
; nepoužívejte prodlužovací
šňůry ani rozvodky.
Po instalaci zařízení musí kabel elektrického napájení a
zásuvka elektrického rozvodu zůstat snadno přístupné.
Kabel nesmí být ohnutý ani stlačený.
V případě poškození musí být napájecí kabel vyměněn
výrobcem nebo jeho střediskem Servisní služby, aby se
předešlo jakémukoli riziku.
(Viz Servisní služba)
Firma neponese žádnou odpovědnost za následky
nerespektování uvedených pokynů.
Ustavení a vyrovnání do vodorovné polohy
1. Umístěte myčku na rovnou a pevnou podlahu. Vykompenzujte
nerovnosti odšroubováním nebo zašroubováním předních
nožiček až do dosažení vodorovné polohy zařízení. Dokonalé
vyrovnání do vodorovné polohy zabezpečí stabilitu zařízení a
zamezí vzniku vibrací a hluku.
2. Po vestavění myčky přilepte pod dřevěnou polici průsvitný
samolepicí pás
*, který bude polici chránit před případným
kondenzátem.
3. Umístěte myčku tak, aby se bočními stěnami nebo zadní
stěnou dotýkala přilehlého nábytku nebo stěny. Tento model
myčky lze rovněž vestavět pod dlouhou pracovní plochu
*
(viz
Montážní pokyny)
.
4
*. Seřízení výšky zadní nožičky se provádí prostřednictvím
hexagonálního pouzdra červené barvy, nacházejícího se ve
spodní, čelní, centrální části myčky, klíčem na hexagonální
šrouby o velikosti 8 mm; otáčením ve směru hodinových
ručiček dosáhneme zvětšení výšky a otáčením proti směru
hodinových ručiček jejího snížení.
(viz list s montážními pokyny
pro vestavění, přiložený k dokumentaci)
Instalace
MIN 40 cm
MAX 80 cm
* Pouze u některých modelů.
CS
65
Zařízení je vybaveno akustickými signály/tóny
(v závislosti
na modelu myčky
), které avizují realizovaný ovládací příkaz:
zapnutí, konec cyklu apod.
Symboly/kontrolky/LED přítomné na ovládacím panelu/
displeji se mohou měnit z hlediska barvy a mohou buď blikat,
nebo svítit stálým světlem
(v závislosti na modelu myčky)
.
Na displeji
* jsou zobrazovány užitečné informace, které se
týkají druhu nastaveného cyklu, fáze mytí/sušení, zbývající
doby, teploty apod.
Upozornění pro první mytí
Po instalaci odstraňte tampony umístěné na koších a
přidržovací gumy na horním koši
(jsou-li součástí).
Nastavení dekalcikátoru vody
Před zahájením prvního mytí nastavte úroveň tvrdosti
vody z vodovodní sítě.
(viz kapitola Leštidlo a regenerační
sůl)
Při prvním naplnění nádržky dekalcikátoru je třeba použít
vodu a následně je třeba přidat přibližně 1 kg soli; je zcela
běžné, že vyteče určité množství vody.
Bezprostředně poté zahajte jeden mycí cyklus.
Používejte pouze specickou sůl pro myčky nádobí.
Po doplnění soli zhasne kontrolka CHYBĚJÍCÍ SŮL*
*.
Nenaplnění zásobníku soli může způsobit poškození
dekalcikátoru vody a topného článku.
* Pouze u některých modelů.
Technické údaje
Rozmìry
Šíøka 59,6 cm
Výška 82 cm
Hloubka 57 cm
Kapacita
13 standardních souprav
nádobí
Tlak vody v pøívodním
potrubí
0,05 ÷ 1 MPa (0,5 ÷ 10 bar)
7,25 – 145 psi
Napájecí napìtí
Viz štítek s jmenovitými údaji
Celkový pøíkon Viz štítek s jmenovitými údaji
Pojistka Viz štítek s jmenovitými údaji
Toto zaøízení je ve shodì
s následujícími smìrnicemi
Evropské unie:
-2006/95/EC (Nízké napìtí)
- 2004/108/EC (Elektromagne
tická kompatibilita)
- 2009/125/EC (Comm. Reg.
1016/2010) (Ecodesign)
- 97/17/EC (Energetické
štítkování myèek nádobí)
-2012/19/EC (WEEE)
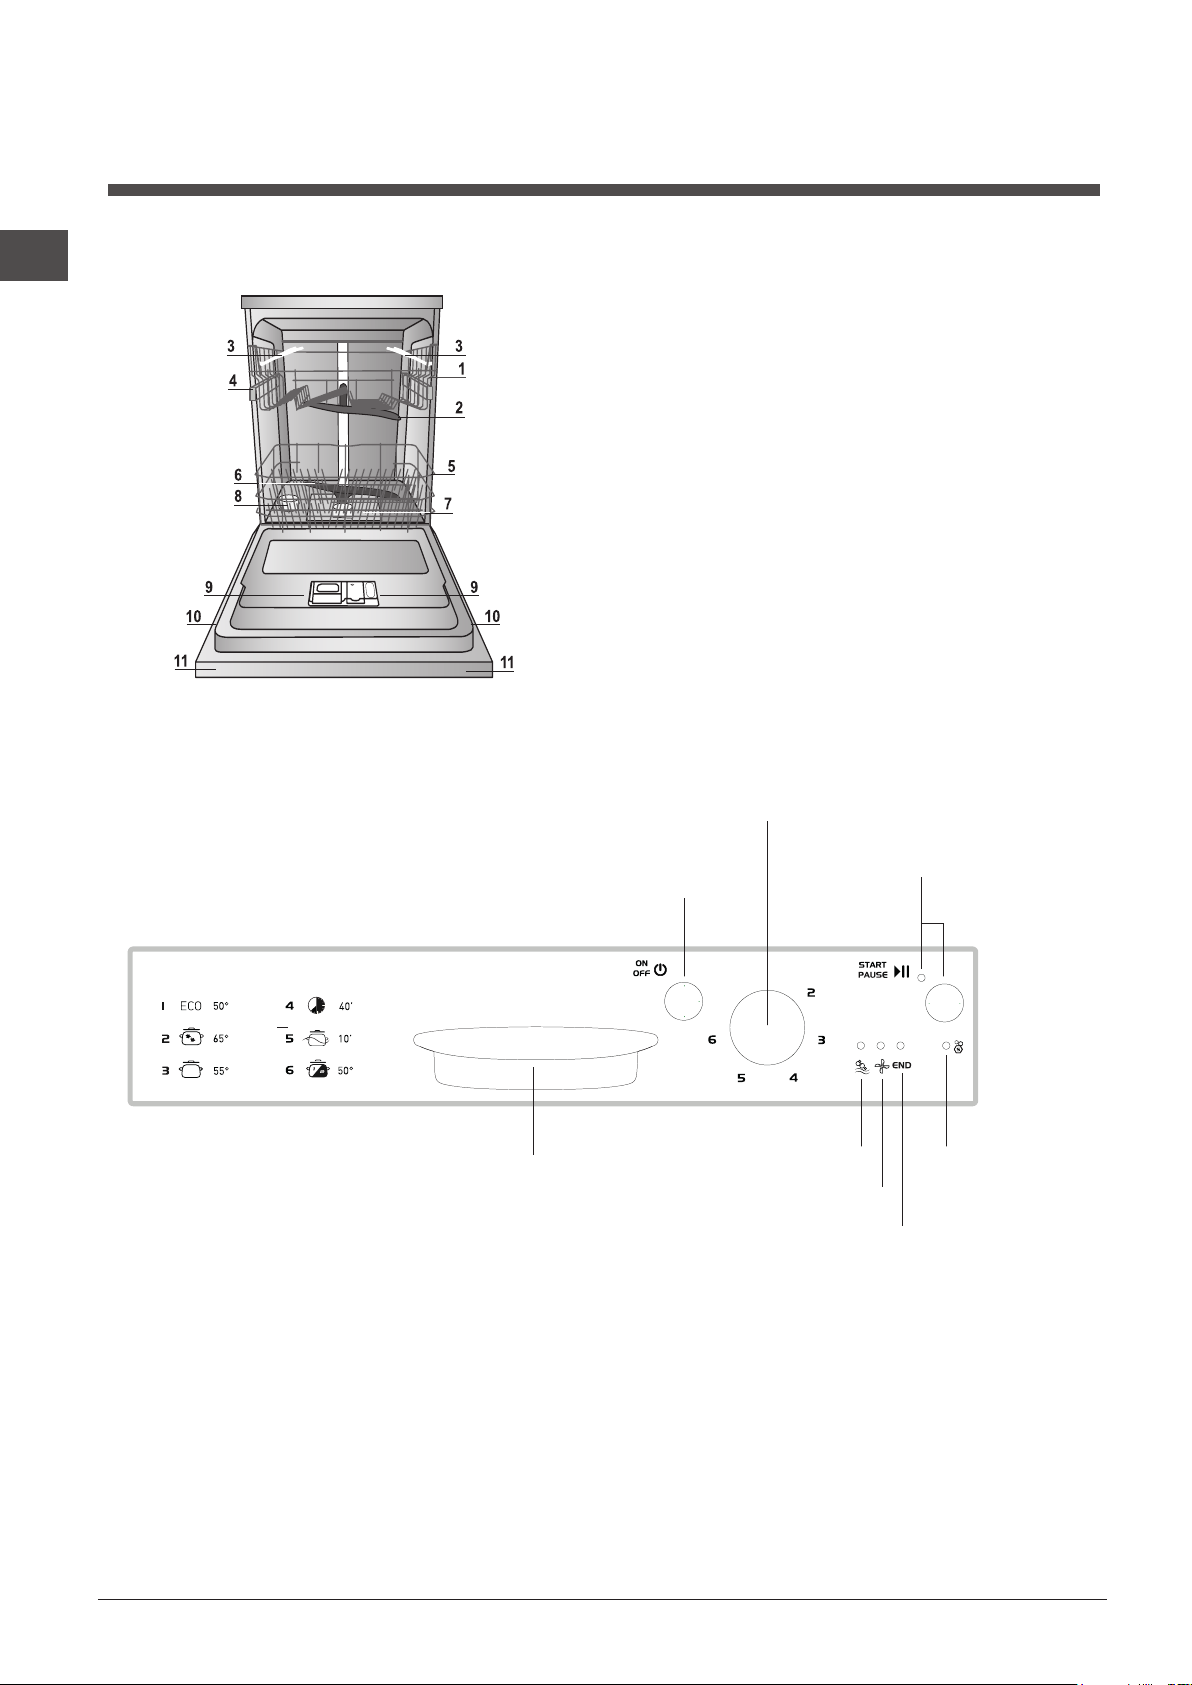
66
CS
*** Pouze u modelů určených pro úplné vestavění. * Pouze u některých modelů.
Počet a druh programů a volitelných funkcí se mění v závislosti na modelu myčky.
Celkový pohled
Popis zařízení
Ovládací panel
1. Horní koš
2. Horní ostřikovací rameno
3. Sklopné držáky
4. Mechanismus nastavení výšky koše
5. Spodní koš
6. Spodní ostřikovací rameno
7. Mycí ltr
8. Nádržka na sůl
9. Vanička na mycí prostředek, nádržka na
leštidlo a zařízení Active Oxigen*
10. Štítek s parametry
11. Ovládací panel***
tlačítko a kontrolka
Start/Pauza
kontrolka Sůl
kontrolka Ukončení programu
kontrolka Sušení
kontrolka Mytí
otočný ovladač
Volba Programu
tlačítko Zapnout-
Vypnout/Vynulovat
madlo Otevírání Dvířek
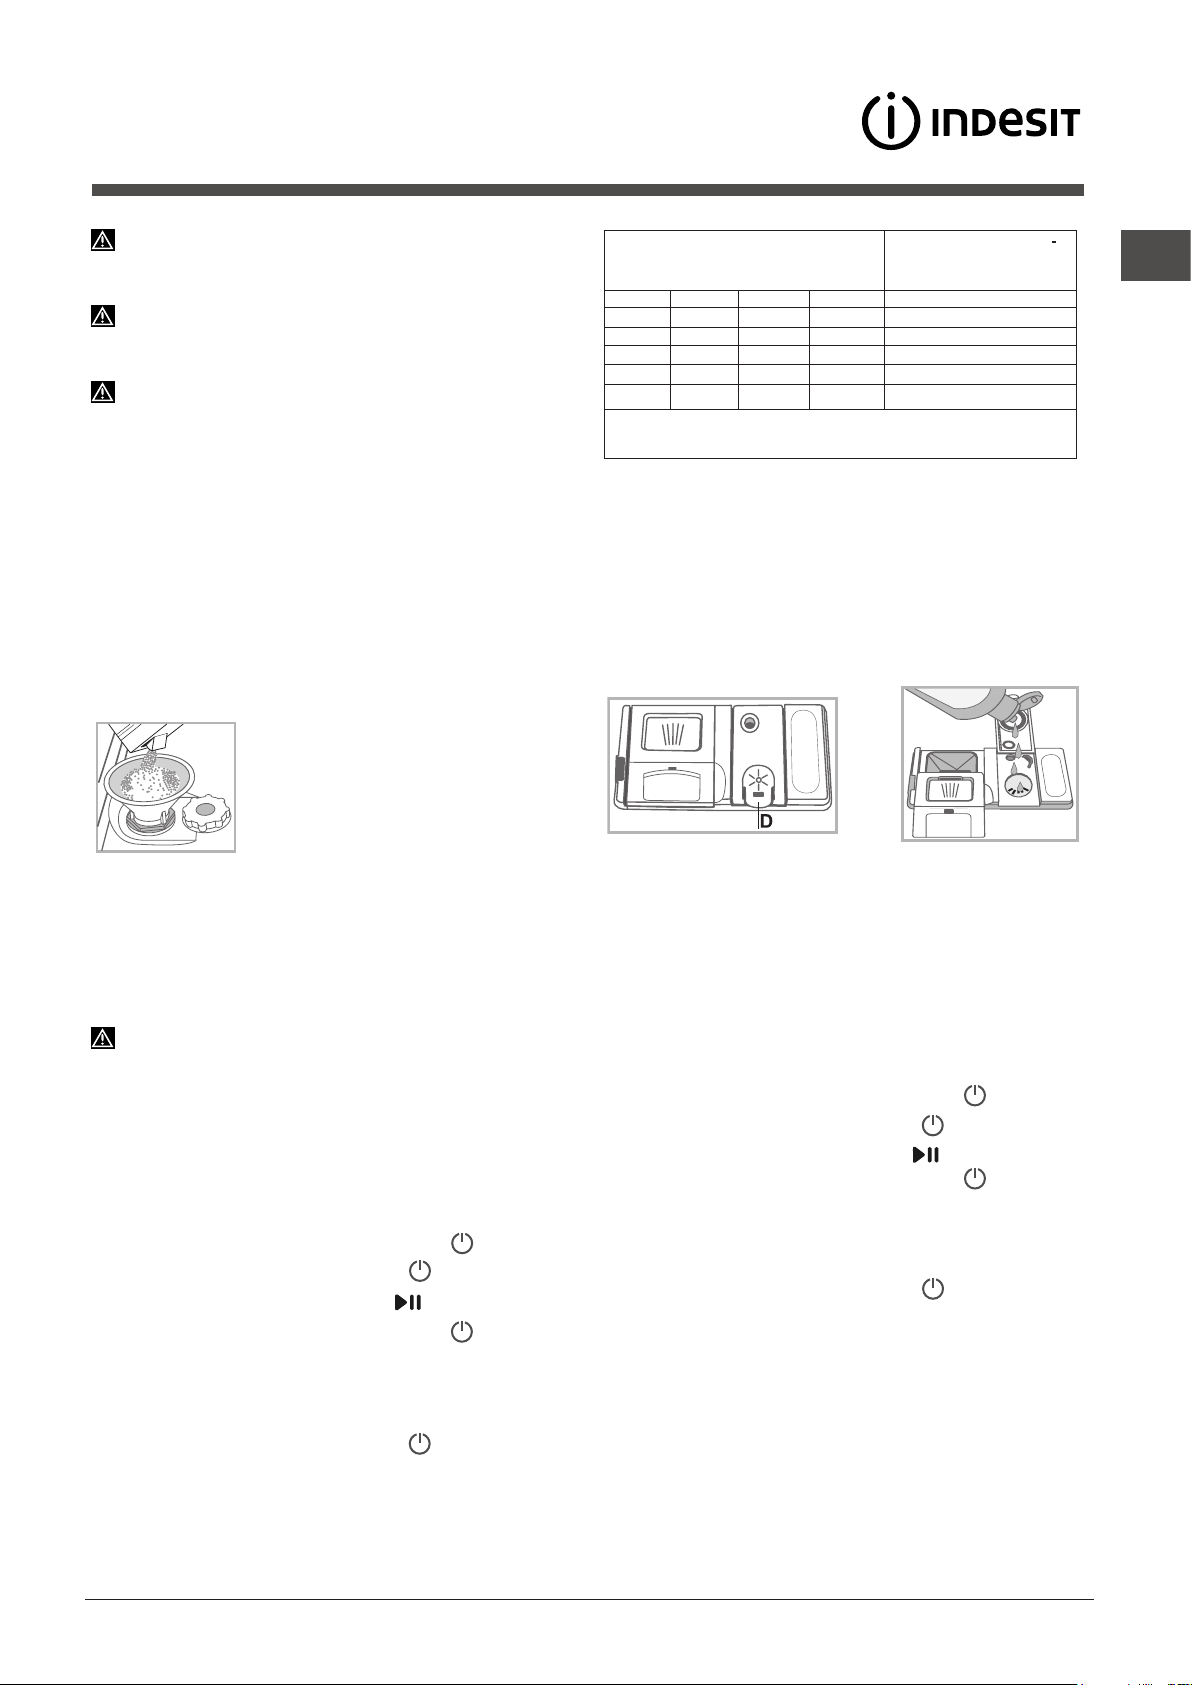
CS
67
Používejte pouze specické mycí prostředky pro myčky
nádobí. Nepoužívejte kuchyňskou ani průmyslovou sůl.
Dodržujte pokyny uvedené na obalu.
Pokud používáte multifunkční produkt, stejně se
doporučuje přidat sůl, zejména v případě, že je voda tvrdá
nebo velmi tvrdá.
(dodržujte pokyny uvedené na obalu).
Když se nepřidá sůl ani leštidlo, je zcela zřejmé, že
kontrolky CHYBĚJÍCÍ SŮL* a CHYBĚJÍCÍ LEŠTIDLO*
zůstanou i nadále rozsvícené.
Dávkování regenerační soli
Použití soli zabrání vytvoření VODNÍHO KAMENE na nádobí a
na funkčních komponentech myčky.
* Je důležité, aby nádobka na sůl nebyla nikdy prázdná.
* Je důležité provést nastavení tvrdosti vody.
Zásobník soli se nachází ve spodní části myčky nádobí
(viz Popis)
a je třeba jej naplnit:
• když na ovládacím panelu bliká kontrolka CHYBĚJÍCÍ SŮL
*;
• když zelený plovák
*, který je součástí uzávěru nádobky na sůl,
již není vidět.
• viz autonomie uvedená v tabulce tvrdosti vody.
1. Vytáhněte spodní koš a odšroubujte
uzávěr nádržky jeho otáčením proti směru
hodinových ručiček.
2. Pouze při prvním použití: naplňte nádržku
vodou až po okraj.
3. Umístěte trychtýř
(viz obrázek)
a naplňte
nádobku na sůl až po okraj (přibližně 1 kg);
vytečení malého množství vody je zcela běžným jevem.
4. Odložte trychtýř, odstraňte zbytky soli z hrdla; před
zašroubováním uzávěru jej opláchněte pod tekoucí vodou.
Doporučuje se provést tento úkon při každém doplňování soli.
Dobře dotáhněte uzávěr, aby se do nádobky na sůl během mytí
nedostal mycí prostředek (mohlo by tak dojít k trvalému poškození
dekalcikátoru).
Když je třeba doplnit sůl, doporučuje se udělat to před
zahájením mytí.
Nastavení podle tvrdosti vody
Pro dosažení dokonalé činnosti změkčujícího dekalcikátoru je
nezbytné provést nastavení v závislosti na tvrdosti vody dostupné
v obydlí. Potřebný údaj lze zjistit u organizace zabývající se
dodávkou pitné vody. Nastavená hodnota odpovídá průměrné
tvrdosti vody.
• Zapněte myčku tlačítkem ZAPNUTÍ/VYPNUTÍ
• Vypněte ji tlačítkem ZAPNUTÍ/VYPNUTÍ
• Držte stisknuté tlačítko START/PAUZA po dobu 5 sekund.
• Zapněte myčku tlačítkem ZAPNUTÍ/VYPNUTÍ
• Bude blikat kontrolka soli (počet bliknutí odpovídá aktuální volbě).
• Nastavte otočný ovladač na číslo odpovídající úrovni tvrdosti,
kterou chcete nastavit
(viz tabulka tvrdosti).
• Vypněte ji tlačítkem ZAPNUTÍ/VYPNUTÍ
• Nastavení bylo dokončeno!
Tabulka tvrdosti vody
Průměrná autonomie
nádobka na sůl při 1
mycím cyklu denně
úroveň
°dH °fH mmol/l měsíce
1 0 - 6 0 - 10 0 - 1 7 měsíce
2 6 - 11 11 - 20 1,1 - 2 5 měsíce
3 12 - 17 21 - 30 2,1 - 3 3 měsíce
4 17 - 34 31 - 60 3,1 - 6 2 měsíce
5
*
34 - 50 61 - 90 6,1 - 9 2/3 týdny
Od 0 °f do 10 °f se doporučuje nepoužívat sůl.
* Při nastavení 5 může dojít k prodloužení doby.
(°dH = tvrdost vody v německých stupních - °fH = tvrdost vody
ve francouzských stupních - mmol/l = milimol/litr)
Dávkování leštidla
Leštidlo usnadňuje SUŠENÍ nádobí. Nádržka na leštidlo se plní:
• když na ovládacím panelu/displeji bliká kontrolka/symbol
NEDOSTATEK LEŠTIDLA*
• když se optický indikátor*, který se nachází na dvířkách
nádobky „D“, změní z tmavého na průsvitný.
1. Otevřete nádobku „D“ stisknutím a nadzvednutím jazýčku
na víku;
2. Opatrně naplňte nádržku na leštidlo až po označení
maximálního otevření a zabraňte přitom jeho úniku. Dojde-li
k tomu, očistěte jej suchým hadrem.
3. Zavřete víko až po cvaknutí.
NIKDY neaplikujte leštidlo přímo dovnitř mycího prostoru.
Nastavte dávku leštidla
V případě, že nejste spokojeni s výsledkem sušení, je možné
provést nastavení množství leštidla.
• Zapněte myčku tlačítkem ZAPNUTÍ/VYPNUTÍ
• Vypněte ji tlačítkem ZAPNUTÍ/VYPNUTÍ
• Stiskněte třikrát tlačítko START/PAUZA
• Zapněte myčku tlačítkem ZAPNUTÍ/VYPNUTÍ
• Vše je vypnuto
• Nastavte otočný ovladač na číslo odpovídající požadované
úrovni množství dávkovaného leštidla.
• Vypněte ji tlačítkem ZAPNUTÍ/VYPNUTÍ
• Nastavení bylo dokončeno!
Úroveň leštidla může být nastavena na NULU (EKO MYTÍ); v
takovém případě dávkování leštidla nebude prováděno a v případě
spotřebování veškerého leštidla nedojde ani k rozsvícení kontrolky
chybějícího leštidla.
Je možné nastavit až do max. 4 základních úrovní v závislosti na
modelu myčky. Nastavená hodnota odpovídá průměrné úrovni.
• Pokud je na nádobí
modravý povlak, nastavte nízké hodnoty
(1-2).
• Pokud jsou na nádobí kapky vody nebo skvrny vodního
kamene, nastavte vysoké hodnoty (3-4).
M
A
X
* Pouze u některých modelů.
Regenerační sůl
a Leštidlo

68
CS
Plnění košů
Doporučení:
Před plněním košů odstraňte z nádobí zbytky jídla a vylijte
ze sklenic a pohárů tekutiny, které v nich zůstaly. Není třeba
provádět předběžné oplachování pod tekoucí vodou.
Umístěte nádobí tak, aby zůstalo bez pohybu a nepřevrátilo se,
aby nádoby zůstaly obráceny otvorem dolů a aby se vypouklé a
vyduté části nacházely v šikmé poloze, což umožní vodě dostat
se ke všem povrchům i odtékat.
Dávejte pozor, aby víka, rukojeti, pánve a tácy nebránily otáčení
ostřikovacích ramen. Malé předměty umístěte do košíku na
příbory.
Plastový příbor a pánve z antiadhezivního materiálu mají tendenci
více zachytávat kapky vody, a proto jejich schopnost sušení bude
menší než u keramického nebo ocelového nádobí.
Lehké předměty (jako např. plastové nádoby) musí být dle
možností umístěny do horního koše a tak, aby se nemohly
pohybovat.
Po naplnění zkontrolujte, zda se ostřikovací ramena mohou
volně otáčet.
Spodní koš
Do spodního košíku lze ukládat hrnce, víka, talíře, salátové mísy,
příbory apod. Talíře a velká víka je třeba dle možnosti umístit po
krajích koše.
Doporučuje se umístit značně znečištěné nádobí do spodního
koše, protože v této části myčky jsou proudy vody nejsilnější a
umožňují dosáhnout nejlepších výsledků mytí.
Některé modely myček nádobí disponují naklonitelnými částmi
*,
které lze použít ve svislé poloze k uložení talířů nebo ve vodorovné
poloze (spuštěné dolů) k uložení hrnců a salátových mís.
Košík na příbory
Košík na příbory je vybaven horními mřížkami pro lepší
uspořádání příborů. Musí být umístěn výhradně v horní přední
části spodního koše.
Horní koš
Naložte do něj choulostivé a lehké nádobí: sklenice, šálky, talířky,
nízké salátové mísy.
Některé modely myček nádobí disponují naklonitelnými částmi
*,
které lze použít ve svislé poloze k uložení čajových nebo
dezertových talířků nebo spuštěné dolů k uložení misek a nádob
na potraviny.
* Pouze u některých modelů.
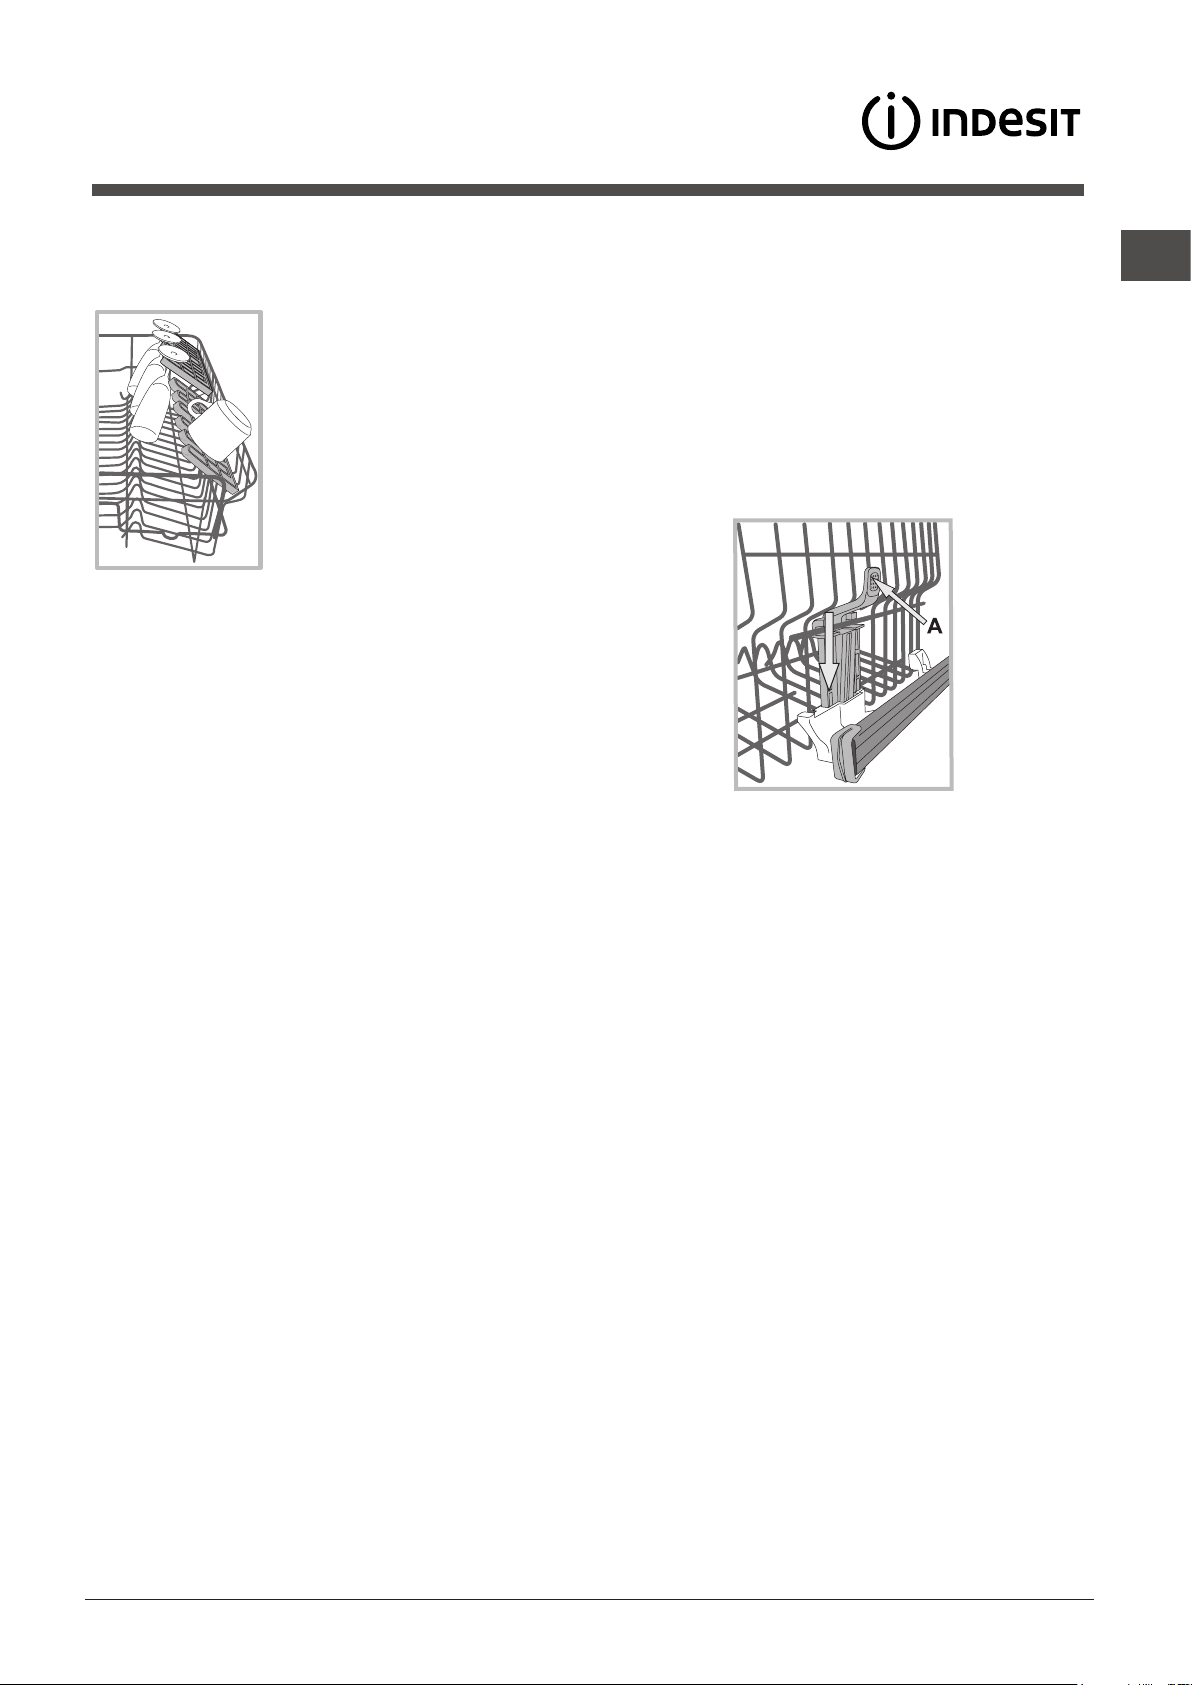
CS
69
Sklopné držáky s proměnlivou polohou*
Boční sklopné držáky lze umístit do tří odlišných výšek kvůli
optimalizaci umístění nádobí v prostoru koše.
Poháry lze umístit stabilně na sklopné
držáky zasunutím stopky poháru do
příslušných podélných otvorů.
Pro optimalizaci sušení umístěte
sklopné držáky s vyšším sklonem. Pro
změnu sklonu nadzvedněte sklopný
držák, mírně jej posuňte a umístěte
požadovaným způsobem.
Nastavení výšky horního koše
Horní koš může být nastaven do spodní nebo do horní polohy
s cílem usnadnit ukládání nádobí.
Je lépe nastavit výšku horního koše při PRÁZDNÉM KOŠI.
NIKDY nezvedejte nebo nespouštějte koš pouze z jedné
strany.
Když je koš vybaven systémem Lift-Up
*
(viz obrázek)
, zvedněte
koš po jeho uchopení na bocích a pohněte jím směrem nahoru.
Pro návrat do spodní polohy stiskněte páky (A) na bocích koše
a doprovoďte jej při sestupu směrem dolů.
Nevhodné nádobí
• Dřevěný příbor a nádobí.
• Choulostivé dekorované sklenice, umělecké řemeslné nádobí
a antikvární prvky. Jejich dekorace nejsou odolné.
• Části syntetického materiálu, které nejsou odolné vůči teplotě.
• Měděné a cínové nádobí.
• Nádobí znečištěné od popela, vosku, maziva nebo inkoustu.
Dekorace na skle, hliníkové a stříbrné kusy mohou mít během
mytí tendenci změnit barvu a vyblednout. Také některé druhy
skla (např. křišťálové předměty) se mohou po mnoha mytích
stát matnými.
Poškození skla a nádobí
Příčiny:
• Druh skla a postup výroby skla.
• Chemické složení mycího prostředku.
• Teplota vody oplachovacího programu.
Rada:
• Používejte pouze sklenice a porcelán, které jsou výrobcem
zaručeny jako vhodné pro mytí v myčce nádobí.
• Používejte jemný mycí prostředek, vhodný pro tento druh
nádobí.
• Po ukončení programu vyjměte sklenice a příbory co nejdříve.
Horní koš je výškově nastavitelný dle potřeby: do horní polohy
kvůli umístění neskladného nádobí; do spodní polohy kvůli využití
prostorů sklopných nebo naklonitelných držáků a vytvoření většího
prostoru směrem nahoru.
*Přít. pouze na některých modelech, v různém počtu a v různých
polohách.
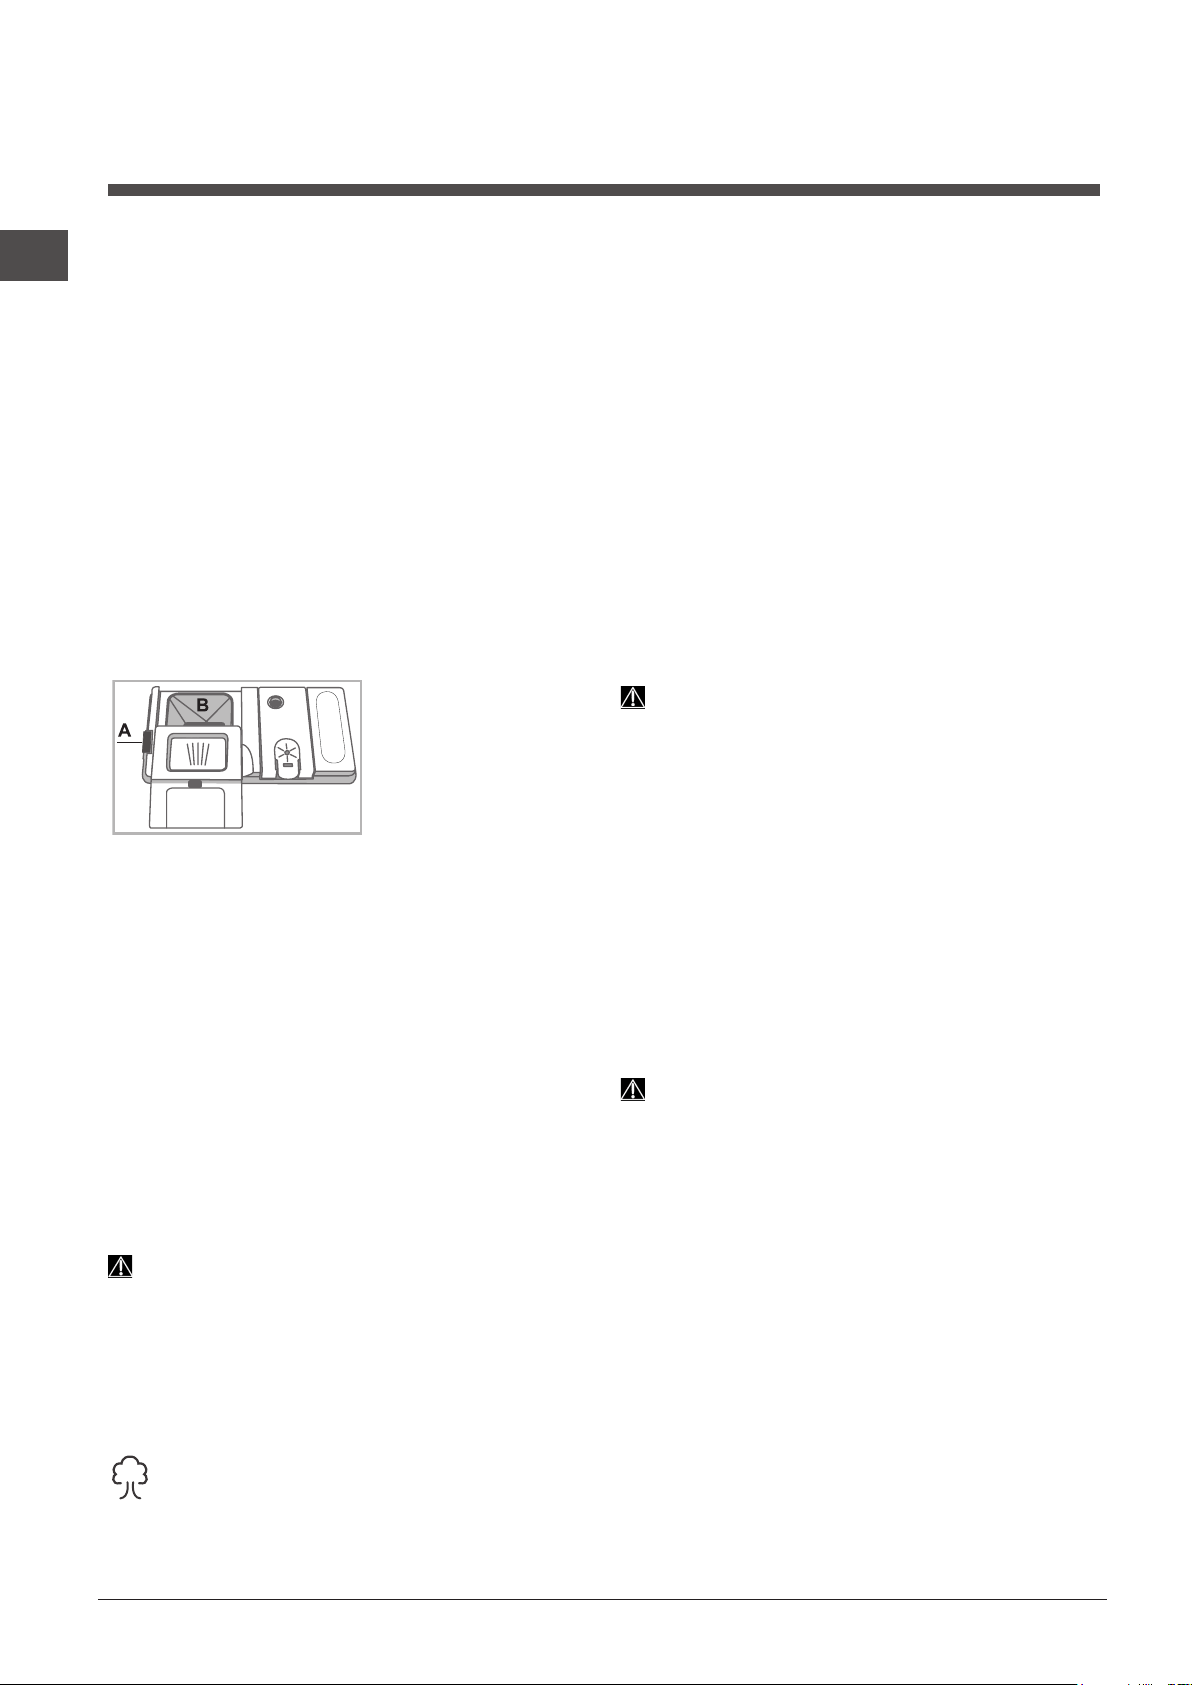
70
CS
* Pouze u některých modelů.
Uvedení myčky do činnosti
1. Stiskněte tlačítko ZAPNOUT-VYPNOUT:
2. Otevřete dvířka a nadávkujte mycí prostředek.
3. Naplňte koše
(viz Plnění košů)
a zavřete dvířka.
4. Zvolte program otáčením otočného ovladače VOLBY
PROGRAMU ve směru hodinových ručiček: Nastavte rysku na
ovladači na číslo nebo symbol zvoleného programu. Kontrolka
tlačítka START/PAUZA se rozsvítí.
5. Zvolte volitelné funkce mytí*
(viz Speciální programy a volitelné
funkce).
6. Uveďte myčku do činnosti stisknutím tlačítka Start/Pauza:
Akustický signál* a rozsvícení kontrolky mytí upozorní na zahájení
programu.
7. Na konci některé akustické signály* signalizují ukončení
programu a rozsvítí se kontrolka END. Vypněte zařízení stisknutím
tlačítka ZAPNOUT-VYPNOUT.
8. Před vyjmutím nádobí vyčkejte několik minut, abyste se vyhnuli
popálení. Vyložte koše počínaje spodním košem.
Pro snížení spotřeby elektrické energie se zařízení
v některých podmínkách NEPOUŽÍVANÍ automaticky vypne.
Změna probíhajícího programu
V případě volby chybného programu je možné provést jeho změnu
za předpokladu, že byl program právě zahájen: Při zahájeném
mytí je pro změnu mycího cyklu potřebné vypnout zařízení delším
stisknutím tlačítka ZAPNOUT/VYPNOUT/Vynulovat, znovu jej
zapnout stejným tlačítkem a znovu zvolit program a požadované
volitelné funkce.
Přidání nádobí
Stiskněte tlačítko Start/Pauza, (podsvětlení tlačítka bude blikat).
Otevřete dvířka; dávejte přitom pozor na unikající páru. Poté
vložte nádobí. Stiskněte tlačítko Start/Pauza (stálé světlo): Dojde
k obnovení cyklu.
Stisknutím tlačítka Start/Pauza pro uvedení zařízení do režimu
pauzy se jednak přeruší program, jednak nastavený Odložený
start – je-li nastaven.
V této fázi není možné provádět změnu programu.
Náhodné přerušení
Když se během mytí otevřou dvířka nebo když dojde k přerušení
dodávky elektrické energie, program bude přerušen. Po zavření
dvířek nebo po obnovení dodávky elektrické energie bude
program pokračovat z bodu, ve kterém byl přerušen.
Mycí prostředek
a použití myčky
Dávkování mycího prostředku
Dobrý výsledek mytí závisí také na správném dávkování mycího
prostředku, přičemž platí, že při překročení doporučeného
množství nedojde ke zvýšení účinnosti mytí, ale pouze
k vyššímu znečištění životního prostředí.
V závislosti na stupni znečištění lze dávkování přizpůsobit
konkrétnímu případu použitím práškového nebo tekutého
mycího prostředku.
V případě běžného znečištění se obvykle používá přibližně 35
g práškového mycího prostředku nebo 35 ml tekutého mycího
prostředku. V případě použití tablet stačí jedna.
Když je nádobí málo znečištěné nebo když bylo předem
opláchnuto pod vodou, výrazně snižte množství mycího
prostředku.
Pro dosažení dobrých výsledků mytí dodržujte pokyny uvedené
na obalu mycího prostředku.
V případě dalších otázek vám doporučujeme obrátit se na
konzultační kanceláře výrobců mycích prostředků.
Pro otevření nádobky na
mycí prostředek aktivujte
otevírací mechanismus „A“.
Naplňte mycím prostředkem
pouze suchou vaničku „B“.
Množství mycího prostředku
určené pro předběžné mytí
musí být aplikováno přímo
do mycího prostoru.
1. Dávkování mycího prostředku provádějte podle
Tabulky programů
,
aby bylo zajištěno použití jeho správného množství. Ve vaničce B
je vyznačena úroveň odpovídající maximálnímu množství tekutého
nebo práškového mycího prostředku, které lze použít pro každý
cyklus.
2. Odstraňte zbytky mycího prostředku z okrajů nádobky a zavřete
kryt až po zacvaknutí.
3. Zavřete víko nádobky na mycí prostředek jeho zatlačením nahoru,
až po správné zasunutí do zavíracího mechanismu.
Nádobka na mycí prostředek se otevře automaticky ve vhodném
okamžiku v závislosti na zvoleném programu.
Při použití kombinovaných mycích prostředků se doporučuje použít
volitelnou funkci TABS, která přizpůsobí mycí program tak, aby bylo
vždy dosaženo nejlepšího výsledku mytí a co nejlepšího možného
sušení.
Používejte výhradně mycí prostředky pro myčky nádobí.
NEPOUŽÍVEJTE mycí prostředky pro mytí v rukou.
Nadměrné použití mycích prostředků může způsobit
přítomnost pěny na konci cyklu.
Nejúčinnějšího mytí a sušení je možné dosáhnout
kombinovaným použitím mycího prostředku, tekutého
leštidla a regenerační soli.
Doporučuje se používat mycí prostředky bez fosfátů
a bez chloru, které jsou vhodnější z hlediska ochrany
životního prostředí.

CS
71
Programy
Poznámky:
Nejlepších výsledků s programy „Rychlé mytí
*“ a „Express 40’“ je možné dosáhnout, když bude dle možností dodržen počet uvedených
souprav.
Kvůli menší spotřebě používejte myčku nádobí s plnou náplní.
Poznámka pro zkušební laboratoře: Pro informace o zkušebních podmínkách srovnávací zkoušky EN napište na adresu:
Program Sušení Volitelné funkce
Doba trvání
programu
hod:min.
Spotřeba vody
(l/cyklus)
Spotřeba energie
(kWh/cyklus)
1. Eko mytí Ano Ne 02:18’ 11,0 1,04
2. Intenzivní Ano Ne 02:30’ 16,5 1,70
3. Běžné mytí Ano Ne 02:00’ 16 1,40
4. Express 40’ Ne Ne 00:40’ 9,0 0,95
5. Namáčení Ne Ne 00:10’ 4,0 0,01
6.
Ano Ne 01:20’ 12,0 1,15
Údaje programů jsou naměřeny v laboratorních podmínkách v souladu s evropskou normou EN 50242.
V závislosti na různých podmínkách použití může docházet ke změnám doby trvání a dat programů.
Počet a druh programů a volitelných funkcí se mění v závislosti na modelu myčky.
Pokyny pro volbu programů a dávkování mycího prostředku
1. Mycí cyklus EKO je standardní program, na který se vztahují údaje uvedené na energetickém štítku; tento cyklus je vhodný pro mytí
běžně znečištěného nádobí a jedná se o nejúčinnější program z hlediska energetické úspory a úspory vody pro tento druh nádobí.
27 g/ml + 6 g/ml** – 1 tableta
(**Množství mycího prostředku pro předmytí)
2. Silně znečištěné nádobí a hrnce (nevhodný pro choulostivé nádobí) 30 g/ml – 1 tableta
3. Běžně znečištěné nádobí a hrnce 27 g/ml + 6 g/ml** – 1 tableta
4.
Rychlý cyklus, který se používá pro mírně znečištěné nádobí (ideální pro 2 soupravy) 25 g/ml – 1 tableta
5. Předběžné mytí, kdy se očekává doplnění náplně po dalším jídle. Bez mycího prostředku
6.
25 g/ml – 1 tableta
Spotřeba v pohotovostním režimu: Spotřeba v režimu left-on: 5,0 W - spotřeba v režimu vypnutí: 0,5 W
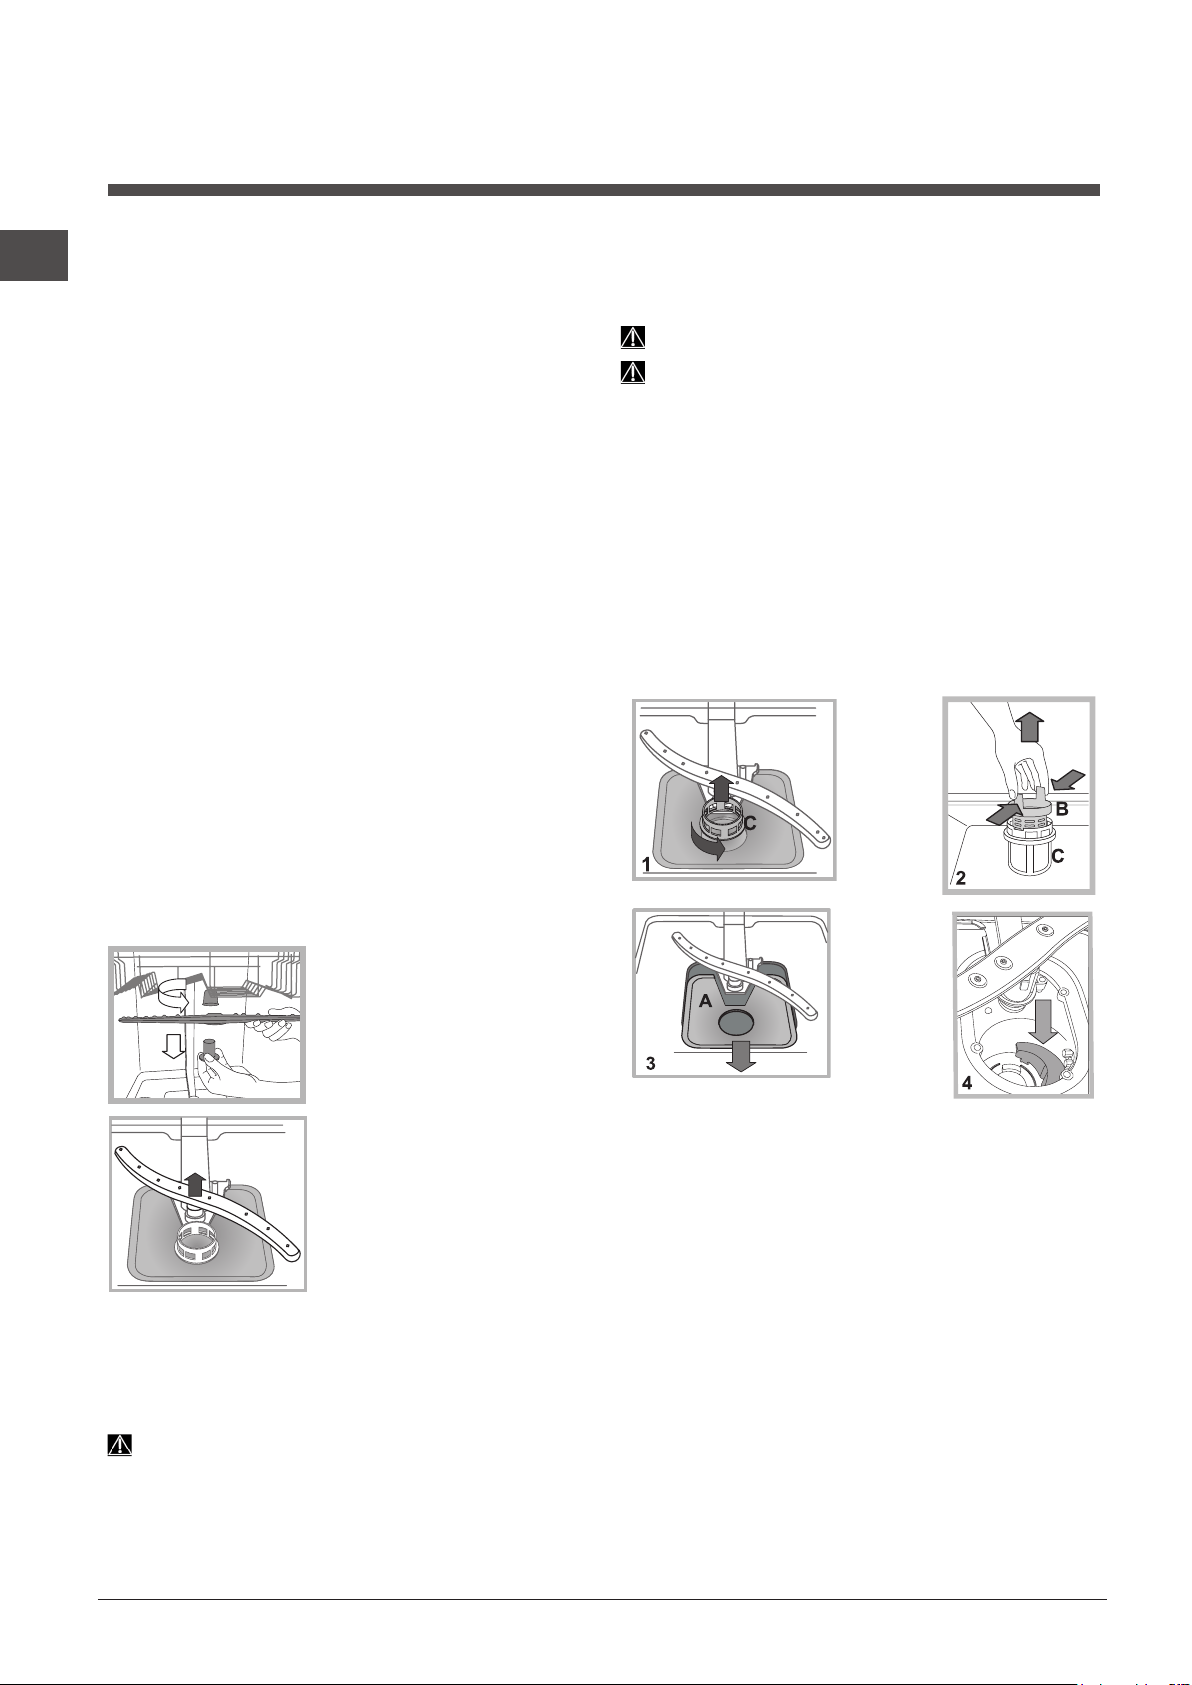
72
CS
Uzavření přívodu vody a vypnutí elektrického
napájení
• Po každém mytí uzavřete kohoutek přívodu vody, abyste se
vyhnuli nebezpečí úniků.
• Při čištění zařízení a během operací údržby odpojte zástrčku
napájecího kabelu ze zásuvky elektrického rozvodu.
Čištění myčky nádobí
• Vnější povrch a ovládací panel se může čistit neabrazivním
hadrem navlhčeným ve vodě. Nepoužívejte rozpouštědla ani
abrazivní prostředky.
• Stěny vnitřního mycího prostoru se dají vyčistit od případných
skvrn hadrem navlhčeným ve vodě s malým množstvím octa.
Zabránění vzniku nepříjemných zápachů
• Dvířka nechte pokaždé pootevřená, aby se zabránilo
hromadění vlhkosti.
• Pravidelně čistěte obvodová těsnění dvířek a nádobek na mycí
prostředek s použitím mokré houby. Zabrání se tak hromadění
zbytků jídla, které jsou hlavními původci nepříjemného
zápachu.
Čištění ostřikovacích ramen
Může se stát, že se na ostřikovacích ramenech zachytí zbytky
jídla a ucpou otvory, kterými vytéká voda: Čas od času je třeba
je zkontrolovat a vyčistit nekovovým kartáčkem.
Obě ostřikovací ramena jsou demontovatelná.
Demontáž horního ostřikovacího
ramena vyžaduje odšroubování
plastové kruhové matice proti
směru hodinových ručiček. Horní
ostřikovací rameno je třeba
namontovat tak, aby bylo obráceno
otvory směrem nahoru.
Demontáž spodního ostřikovacího
ramena se provádí stisknutím
jazýčků, nacházejících se po
stranách, směrem nahoru.
Čištění ltru přívodu vody
*
Jestliže jsou hadice přívodu vody nové nebo pokud zůstaly delší
dobu v nečinnosti, před připojením je třeba nechat odtéci vodu,
dokud nebude průzračná a zbavená nečistot. Bez uvedeného
opatření může dojít k ucpání přívodu vody a poškození myčky.
Pravidelně čistěte vstupní ltr rozvodu vody, umístěný na
výstupu z vodovodního kohoutu.
- Zavřete kohout přívodu vody.
- Odšroubujte koncovou část přívodní hadice vody, sejměte ltr
a opatrně jej vyčistěte pod proudem tekoucí vody.
- Vložte ltr zpět na původní místo a zašroubujte hadici.
Čištění ltrů
Filtrační jednotka je tvořena dvěma filtry, které čistí vodu
použitou k mytí od zbytků jídla a opětovně ji uvádějí do oběhu:
K zabezpečení trvale dobrých výsledků mytí je třeba ltry čistit.
Pravidelně čistěte ltry.
Myčka nádobí se nesmí používat bez ltrů nebo s odpojeným
ltrem.
• Po několika mytích zkontrolujte ltrační jednotku a dle potřeby
ji důkladně umyjte pod tekoucí vodou. Pomozte si přitom
nekovovým kartáčkem a postupujte dle níže uvedených pokynů:
1. Otáčejte válcovým ltrem C proti směru hodinových ručiček a
vytáhněte jej (obr. 1).
2. Vytáhněte nádobku ltru B mírným zatlačením na boční jazýčky
(obr. 2);
3. Vyvlečte nerezový talíř ltru A (obr. 3).
4. Zkontrolujte výstupní otvor a odstraňte případné zbytky jídla.
NIKDY NEODSTRAŇUJTE ochranný kryt mycího čerpadla
(součást černé barvy) (obr. 4).
Po vyčištění ltrů proveďte zpětnou montáž ltrační jednotky a
její správné umístění do jejího uložení; představuje nezbytný
předpoklad správné činnosti myčky.
Opatření v případě dlouhodobé nečinnosti
• Odpojte napájecí kabel zařízení ze zásuvky elektrického
rozvodu a zavřete kohoutek přívodu vody.
• Nechte pootevřená dvířka.
• Po vašem návratu proveďte jeden mycí cyklus naprázdno.
Údržba a péče
* Pouze u některých modelů.
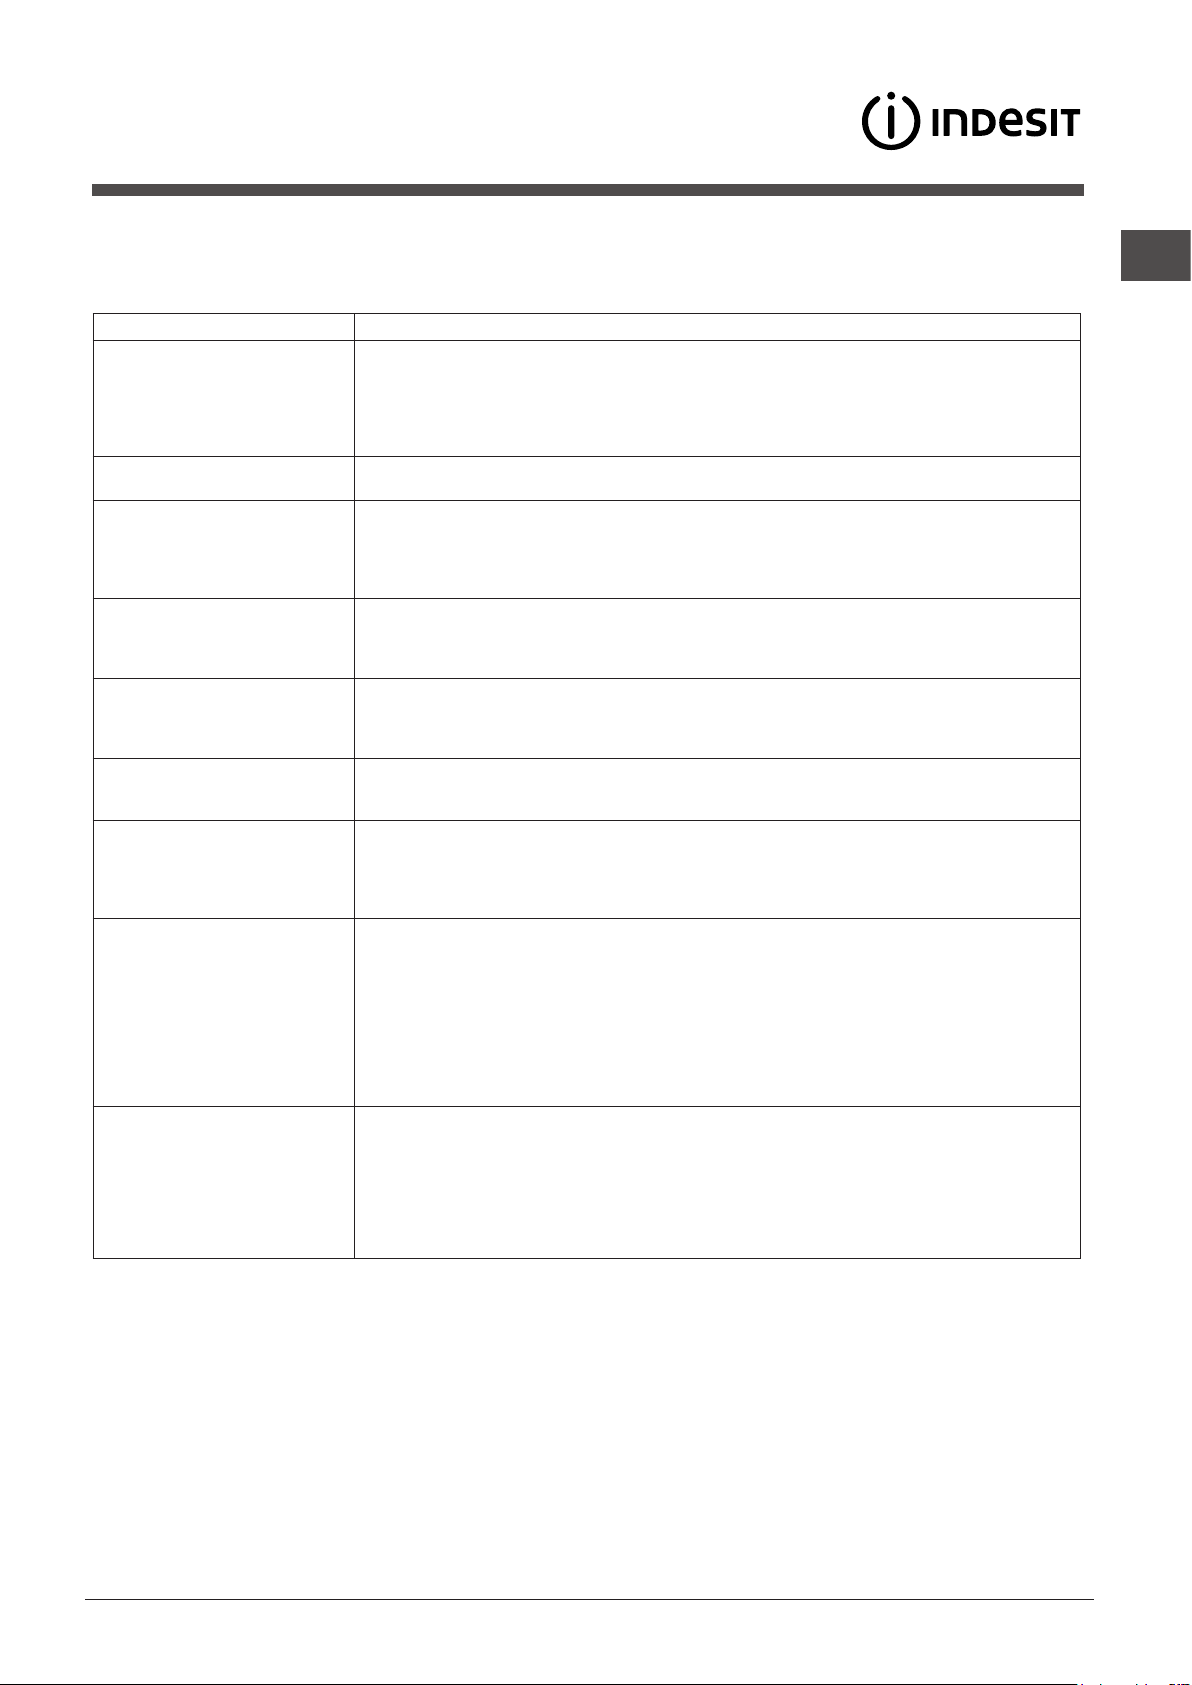
CS
73
* Pouze u některých modelů.
Poruchy a způsob jejich
odstranění
Může se stát, že zařízení nebude fungovat. Dříve, než se obrátíte na Servisní službu, zkontrolujte prostřednictvím
následujícího seznamu, zda se nejedná o snadno odstranitelný problém.
Poruchy: Možné příčiny / Řešení:
Nedochází k uvedení myčky
do chodu nebo myčka
nereaguje na ovládací povely
• Je zavřen kohoutek s vodou.
• Vypněte zařízení tlačítkem ZAPNUTÍ/VYPNUTÍ, opět jej zapněte po uplynutí jedné minuty a
znovu nastavte program.
• Zástrčka není řádně zastrčena v zásuvce elektrického rozvodu nebo je třeba použít jinou
zásuvku.
• Dvířka myčky nejsou řádně zavřená.
Není možné zavřít dvířka
• Zkontrolujte, zda jsou koše zasunuté až na doraz.
• Došlo k zamknutí zámku; energicky zavřete dvířka, dokud neuslyšíte cvaknutí.
Myčka nevypouští vodu. • Mycí program ještě neskončil.
• Vypouštěcí hadice je ohnutá
(viz Instalace).
• Odpadové potrubí umyvadla je ucpáno.
• Filtr je ucpán zbytky jídla.
• Zkontrolujte výšku vypouštěcí hadice.
Myčka je hlučná. • Nádobí naráží vzájemně do sebe nebo do ostřikovacích ramen. Umístěte nádobí správně a
zkontrolujte, zda se ostřikovací ramena otáčejí volně.
• Nadměrná přítomnost pěny: Mycí prostředek není vhodně dávkován nebo není vhodný pro
mytí v myčkách.
(viz Mycí prostředek a Použití myčky).
Nepředmývejte nádobí ručně.
Na nádobí a na sklenicích
jsou viditelné nánosy vodního
kamene nebo bílý povlak.
• Chybí regenerační sůl.
• Nastavení tvrdosti vody není vhodné; zvyšte hodnoty.
(viz Regenerační sůl a Leštidlo),
• Uzávěr nádobky na sůl a na leštidlo není dobře uzavřen.
• Leštidlo bylo spotřebováno nebo jeho dávkování není dostatečné.
Na nádobí a na sklenicích jsou
patrné bílé zbytky nebo modrý
povlak.
• Dávkování leštidla je nadbytečné.
Nádobí je málo suché.
• Byl zvolen program bez sušení.
• Leštidlo bylo spotřebováno.
(viz Regenerační sůl a Leštidlo),
• Regulace leštidla neodpovídá potřebě.
• Nádobí je z antiadhezivního materiálu nebo z plastu; výskyt kapek vody je zcela běžným
jevem.
Nádobí není dostatečně čisté. • Nádobí není rozmístěno správně.
• Ostřikovací ramena se nemohou volně otáčet, protože jsou zablokována nádobím.
• Mycí program je příliš mírný
(viz Programy).
• Nadměrná přítomnost pěny: Mycí prostředek není vhodně dávkován nebo není vhodný pro
mytí v myčkách.
(viz Mycí prostředek a Použití myčky).
• Uzávěr leštidla nebyl správně uzavřen.
• Filtr je znečištěný nebo ucpaný
(viz Údržba a péče).
• Chybí regenerační sůl
(viz Regenerační sůl a Leštidlo).
• Ujistěte se, že je výška talířů kompatibilní s nastavením koše.
• Otvory ostřikovacích ramen jsou ucpané.
(viz Údržba a péče).
Myčka nenapouští vodu
je zablokovaná s rozsvícenými
kontrolkami
• Chybí voda v rozvodu vody nebo je zavřený ventil.
• Přívodní hadice na vodu je ohnutá
(viz Instalace).
• Jsou ucpané ltry; je třeba je očistit.
(viz Údržba a péče).
• Jsou ucpaná odpadová potrubí; je třeba je vyčistit.
• Po provedení kontroly a vyčištění vypněte a znovu zapněte myčku a zahajte nový mycí
cyklus.
• Když problém přetrvává, zavřete přívod vody, odpojte zástrčku a obraťte se na servisní
středisko.

74
CS

CS
75

76
CS
www.indesit.com docs.indesit.eu
400011211756
12/2017 jk - Xerox Fabriano