CS 1640
7084 357-00
Use and
Care Manual
For NoFrost combined
refrigerator-freezers

2
IMPORTANT
All types and models are subject to continuous improvement. The manufacturer reserves the right to
make modifications to the shape, equipment and technology.
Contents Page
Safety ..................................................................... 3
Disposal of old appliance ................................. 3
Disposal of carton ............................................ 3
Important safety information ............................ 4
Electrical safety ................................................ 4
Safety regulations ............................................ 5
Unit dimensions ............................................... 5
Features ................................................................ 6
Description of appliance and equipment ........ 6
Operating and control elements ...................... 7
Operation................................................................ 8
Turning the appliance on and off ..................... 8
Setting the temperature ................................... 8
Temperature display ......................................... 9
Ventilation ......................................................... 9
Audible alarm signal ........................................ 9
Power failure/FrostControl display ................... 9
SuperCool ...................................................... 10
Setup mode ............................................ 10 - 12
Refrigerator compartment .................................... 13
Arranging food................................................ 13
Equipment ...................................................... 13
Interior light .................................................... 15
Freezer compartment ........................................... 16
Freezing ......................................................... 16
Information system ........................................ 16
Freezing with SuperFrost ................................ 16
Freezing and storage ..................................... 17
Ice Maker ............................................................. 17
Safety instructions and warnings ................... 17
Making ice cubes ............................................ 17
Filling the water tank .......................................18
To start the ice maker ..................................... 18
Ice maker at vacations ................................... 19
Cleaning ............................................................... 20
Defrosting/Vacation .............................................. 21
Defrosting ....................................................... 21
Vacation tips ................................................... 21
Troubleshooting .................................................... 22
Ice maker troubleshooting ............................. 23
Customer service ........................................... 23
Appliance information .................................... 23
Liebherr Warranty Plan ........................................ 24
Table of ConTenTs
Additional Benefits
• CFC-free
• Energy-optimizedrefrigerantcircuit
• Energy-efficientinsulation
• Lowenergyconsumption
• User-friendlyelectroniccontrols
• Displayoffunctionsswitchedon
• Temperaturecanbecontrolledwithinclimaterat-
ing range, regardless of room temperature
• Refrigeratorandfreezercompartmentsdefrost
automatically - no need to spend time defrosting
• Bignetrefrigeratorcapacity
• Variableandpracticalfeatures
• Safety-glassstorageshelves
• Bignetfreezercapacity
• Automaticicemaker
• Freezertemperatureincreasealarm
• Audibledooropenalarm
• Powerfailure/FrostControldisplay
• Freshfoodcanbefast-frozenasrequired
• Alldrawerssuitableforfastfreezing
• Integratedtransportgripsonappliancehousing
• Transportcastors
• Easytoclean
• ThisunitiscertifiedasSabbathcompliantbythe
Star-K organization, thus allowing the appliance
to be used during religious holidays. For more
information please visit Star-K on the web at
www.star-k.org.
3
safeTy
Please read and follow these
instructions
These instructions contain Warning and Caution
statements. This information is important for safe
and efficient installation and operation.
Always read and follow all Warning and Caution
statements!
DANGER!
Danger indicates a hazard which
will cause serious injury or death if
precautions are not followed.
WARNING!
Warning indicates a potentially hazardous
situation which, if not avoided, could
result in death or serious injury.
CAUTION!
Caution indicates a potentially hazardous
situation which, if not avoided, may result
in minor or moderate injury.
IMPORTANT
This highlights information that is especially
relevant to a problem-free installation and
operation.
Make sure incoming voltage is the same as the
appliance rating.
To reduce the risk of fire, electric shock or personal
injury, installation work and electrical wiring must
be done by a qualified electrician in accordance
with all applicable codes and standards, including
fire-rated construction.
Disposal of Old Appliance
DANGER!
Risk of child entrapment. Before you
discard your old refrigerator or freezer:
• Besuretofollowyourlocalrequire-
ments for disposal of appliances. Dis-
carded appliances can be dangerous.
• Removethedoors.
• Removethefreezerdrawers.
• Leavetheshelvesinplacesothat
children may not easily climb inside.
• Cutoffthepowercablefromthe
discarded refrigerator. Discard
separately from the refrigerator.
Following these instructions reduces the
possibility of causing personal injury,
especially to children playing.
Contact the trash collection agency in
your area for additional information.
Disposal of Carton
The packaging is designed to protect the appliance
and individual components during moving and is
made of recyclable materials.
WARNING!
Keep packaging materials away from
children. Polythene sheets and bags can
cause suffocation!
• Pleasetakethepackagingmaterialtoyourlocal
recycling facility.
4
safeTy
• Intheeventofapoweroutage,minimize
opening the appliance door(s). Protect the food
either by placing dry ice on top of the packages
or using a local frozen food locker if the power
failure is of a long duration. Do not attempt to
re-freeze any previously frozen food that has
thawed.
• Toavoidpossibleinjury,onlyadjustanempty
shelf. Do not attempt to adjust a shelf with food
on it.
• Toprotecttheappliancefrompossibledamage,
allow the appliance to stand 1/2 to 1 hour in
place before turning the electricity on. This
allows the refrigerant and system lubrication to
reach equilibrium.
Important Safety Information
• Topreventinjurytoyouordamagetotheunit,
the appliance should be unpacked and set up by
two people.
• Iftheapplianceisdamagedondelivery,contact
the supplier immediately before connecting to
the power source.
• Toguaranteesafeoperation,ensurethatthe
appliance is set up and connected as described
in these operating instructions.
• Disconnecttheappliancefromthepowersource
if a fault occurs. Pull out the plug, turn off or
remove the fuse.
• Whendisconnectingtheappliance,usetheplug.
Do not pull on the cable.
• Anyrepairsandworkontheapplianceshould
only be carried out by the customer service
department. Unauthorized work may be
dangerous to the user. Changing the power
source cable should only be done by the
customer service department.
• Donoteaticecream,particularlyicecream
treats, or ice cubes, immediately from the
freezer compartment. There is a risk of “burning”
because of the very cold temperatures.
• Donotconsumefoodwhichhasbeenstoredfor
too long; it could cause food poisoning.
• Theapplianceisdesignedforcooling,freezing
and storage of food, and for making ice. It is
intended for domestic use.
• Donotstoreexplosivesorspraysusing
combustible propellants such as butane,
propane, pentane, etc. in the appliance.
Electrical components might cause leaking gas
to ignite. You may identify such sprays by the
printed contents or a flame symbol.
• Donotuseelectricalappliancesinsidethe
appliance.
• Topreventpossibleinjuryduetoanelectrical
shock, be sure to disconnect the power cord or
turn off the circuit breaker before cleaning the
appliance.
• Toavoidinjuryordamagetotheappliance,do
not use steam cleaning equipment to clean the
appliance.
• Donotoperatetheapplianceinthepresenceof
explosivefumes.
Electrical Safety
Connect this appliance to a 110-120 V AC, 15 amp
circuit that is controlled by a circuit breaker or
fuse. This appliance should have its own separate
groundedcircuit.Donotuseanextensioncord.
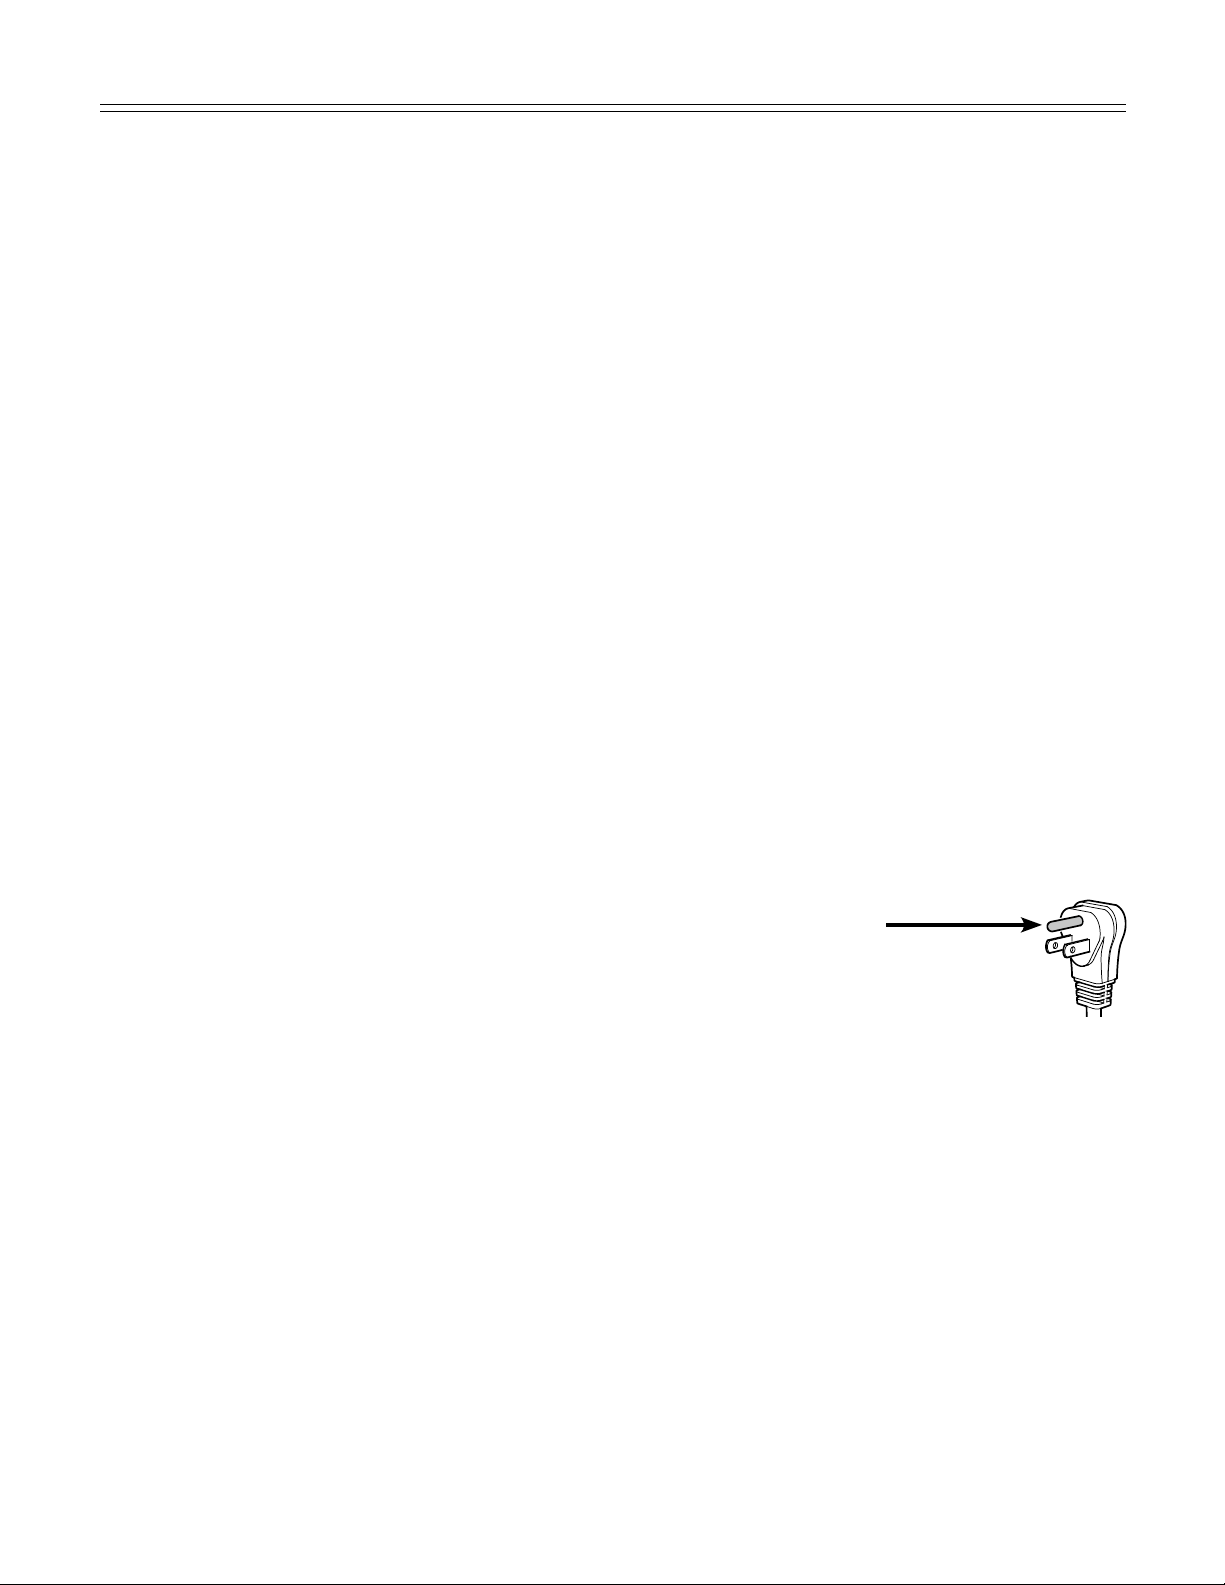
The power cord is equipped with a three-prong
(grounding) plug for your protection against
possible shock hazards. To maintain this protection:
• Donotmodifytheplugbyremovingthe
round grounding prong.
• Donotuseatwo-prongadapter.
Where a two-prong wall receptacle
is encountered, contact a qualified
electrician and have it replaced with a three-
prong receptacle in accordance with all local
codes and ordinances.
• Donotuseapowercordthatisfrayedor
damaged.
5
safeTy
Avoid placing the appliance in direct sunlight or
near the stove, range top, radiators and similar heat
sources. Do not place microwave ovens, toaster
ovens or other heat-emitting appliances on top of
this unit.
Keep the appliance out of the weather.
The ventilation grilles should not be obstructed.
Always ensure there is good ventilation all around
the appliance.
As soon as you uncrate the unit:
• Examinetheunitandpackagingforshipping
damage. Contact the carrier immediately if you
suspect there is any damage.
• Notethetype(modelnumber),index,serial
number, date of purchase and where purchased
on the spaces provided in the back of this
manual.
Safety Regulations
The appliance complies with
UL 250 / CSA C22.2 #63 and is designed to cool,
freeze and store food and to make ice (if equipped).
It is designed as a household appliance.
The appliance is set to operate within specific
ambient temperature limits according to its climate
rating. These temperature limits should not be
exceeded.Thecorrectclimateratingforyour
appliance is indicated on the model plate.
Thisisexplainedasfollows:
Climate
Rating Set for Ambient Temperatures of
SN 50°Fto90°F(10°Cto32°C)
N 61°Fto90°F(16°Cto32°C)
ST 61°Fto100°F(16°Cto38°C)
SN-ST 50°Fto100°F(10°Cto38°C)
SN-T 50°Fto109°F(10°Cto43°C)
T 61°Fto109°F(16°Cto43°C)
We recommend cleaning the appliance before
turning it on for the first time. See Cleaning. Tur n
on the appliance several hours before loading
it with frozen food for the first time. Do not load
with frozen food until the temperature shows
approximately0°F(-18°C).
WARNING!
Do not allow children to play with the
appliance. Children must not climb, sit or
stand on the appliance drawers. Failure
to follow these instructions may result in
death or serious injury.
CAUTION!
To avoid risk of personal injury or property
damage, have two people unpack and
move this appliance into place.
CAUTION!
Protect the finished floor surface before
you uncrate the unit.
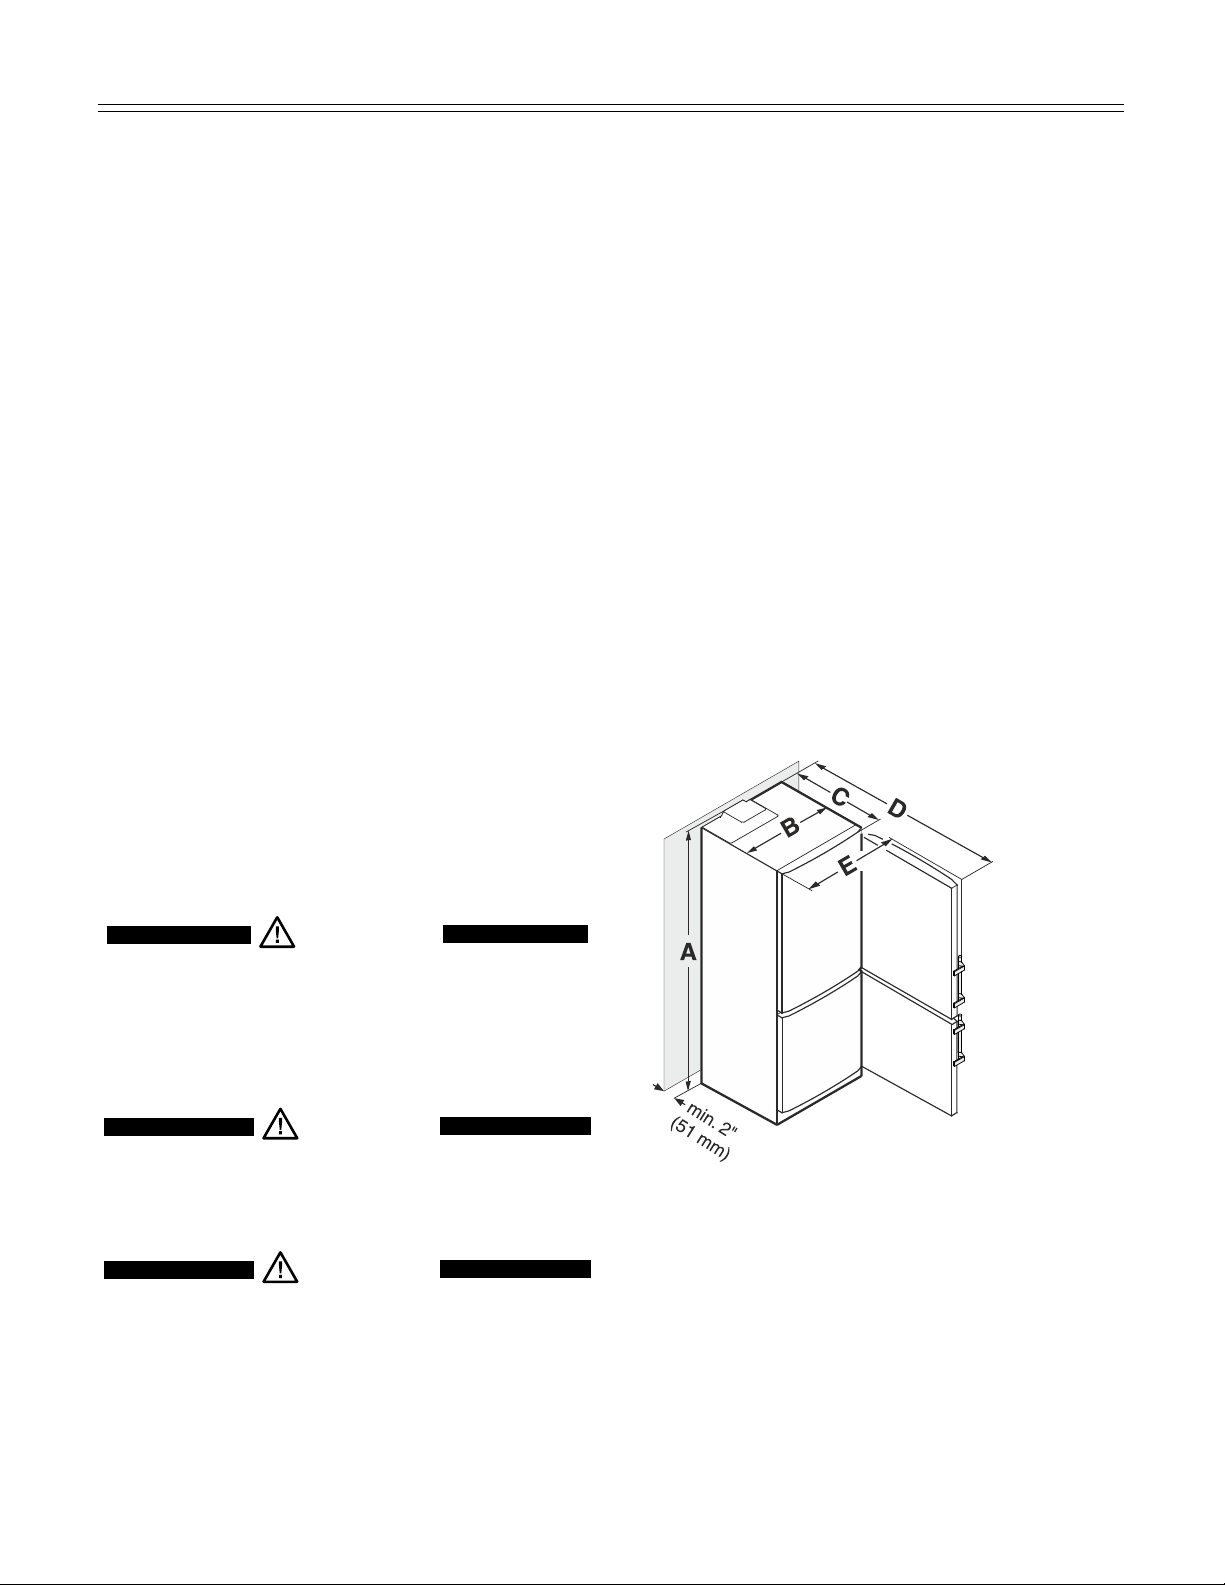
NOTE
If the gap between the rear of the appliance
and the wall is less than 2 inch (51 mm) , the
power consumption level may increase.
Unit Dimensions
A = 79-1/2" (2020 mm)
B=29-3/8"(747mm)
C = 24-13/16" (630 mm)
D = 52-3/8" (1330 mm)
E = 31-3/32" (790 mm)

6
feaTures
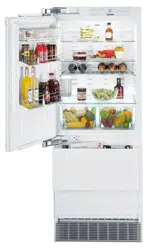
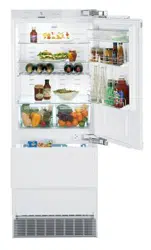
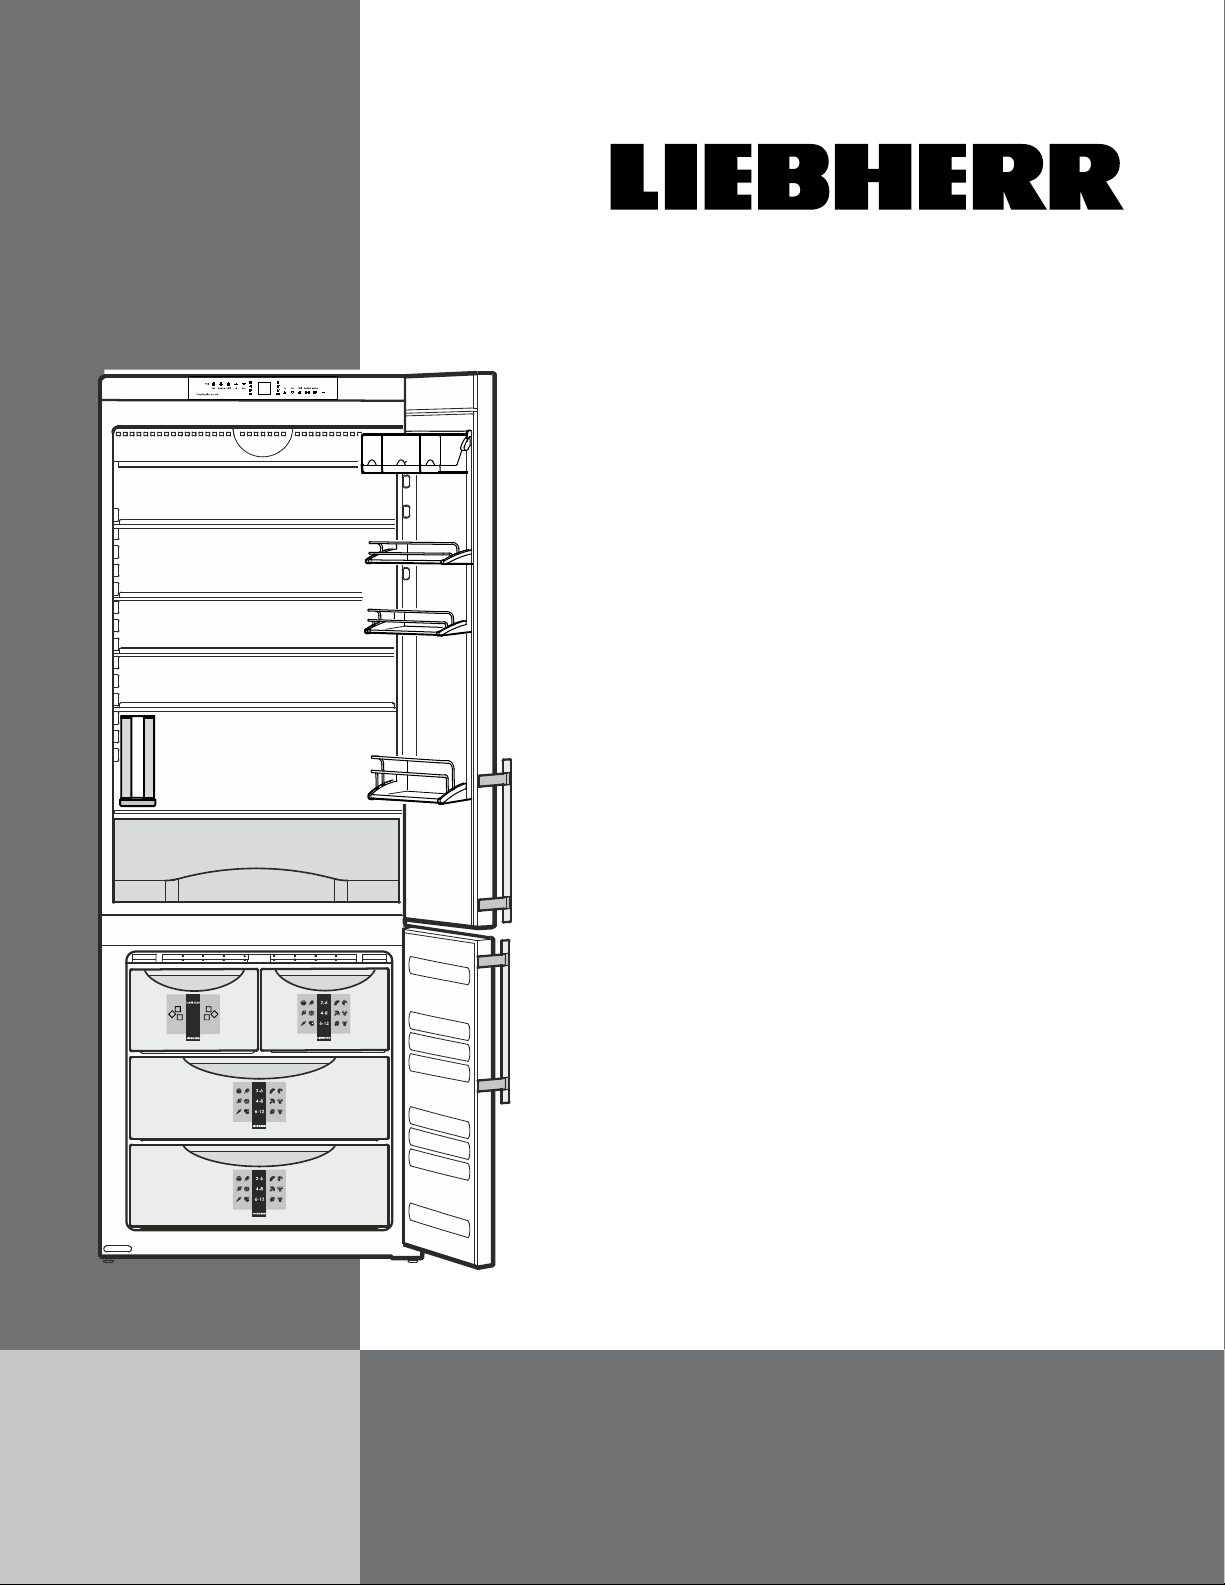
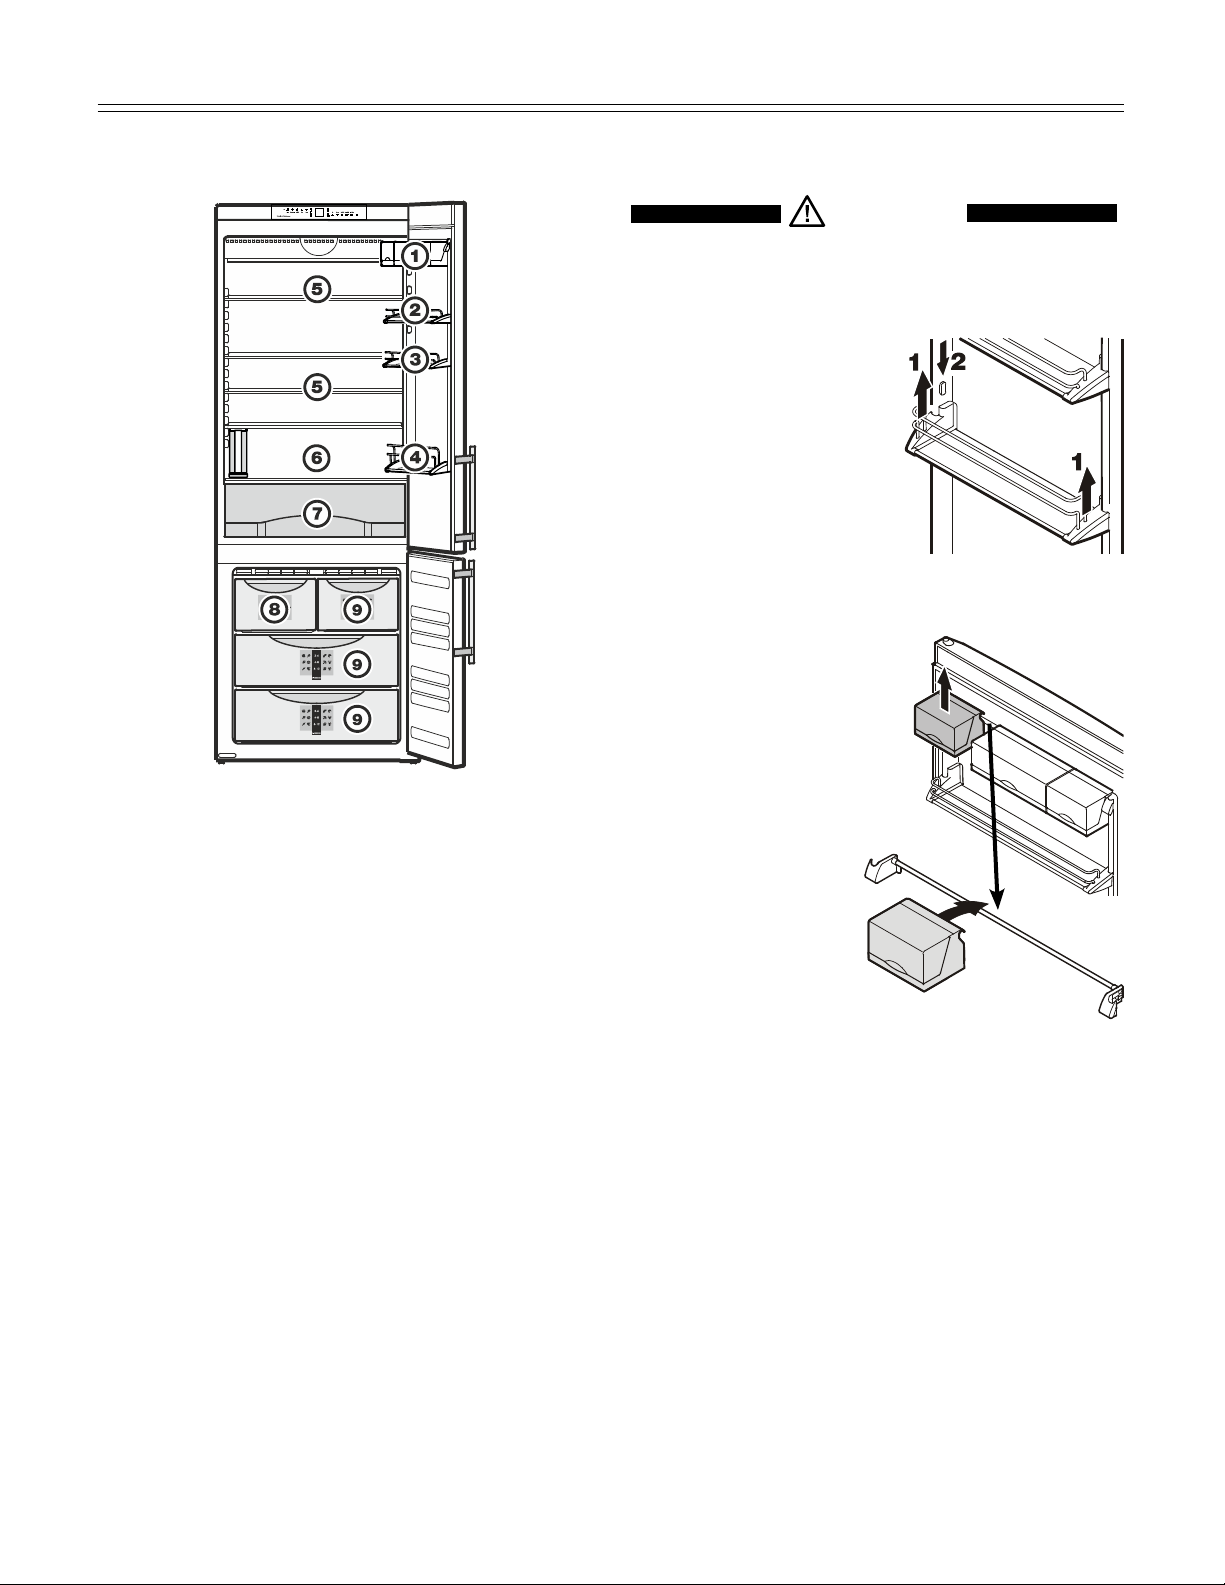
Description of refrigerator
(1) Operating and control elements
(2) Butterandcheesecompartment-VarioBox
(3) Adjustable door racks
(4) Bottlerack
(5) Adjustable shelves
(6) Water tank
(7) Vegetable drawer
(8) Model plate (behind the vegetable drawer on the left hand
side)
Description of freezer
(9) Ice maker (in the interior of the drawer)
(10) Freezer drawers
(11) Information system
(12) Adjustable-height feet
Figure 1
Description of Appliance and Equipment - Figure 1
7
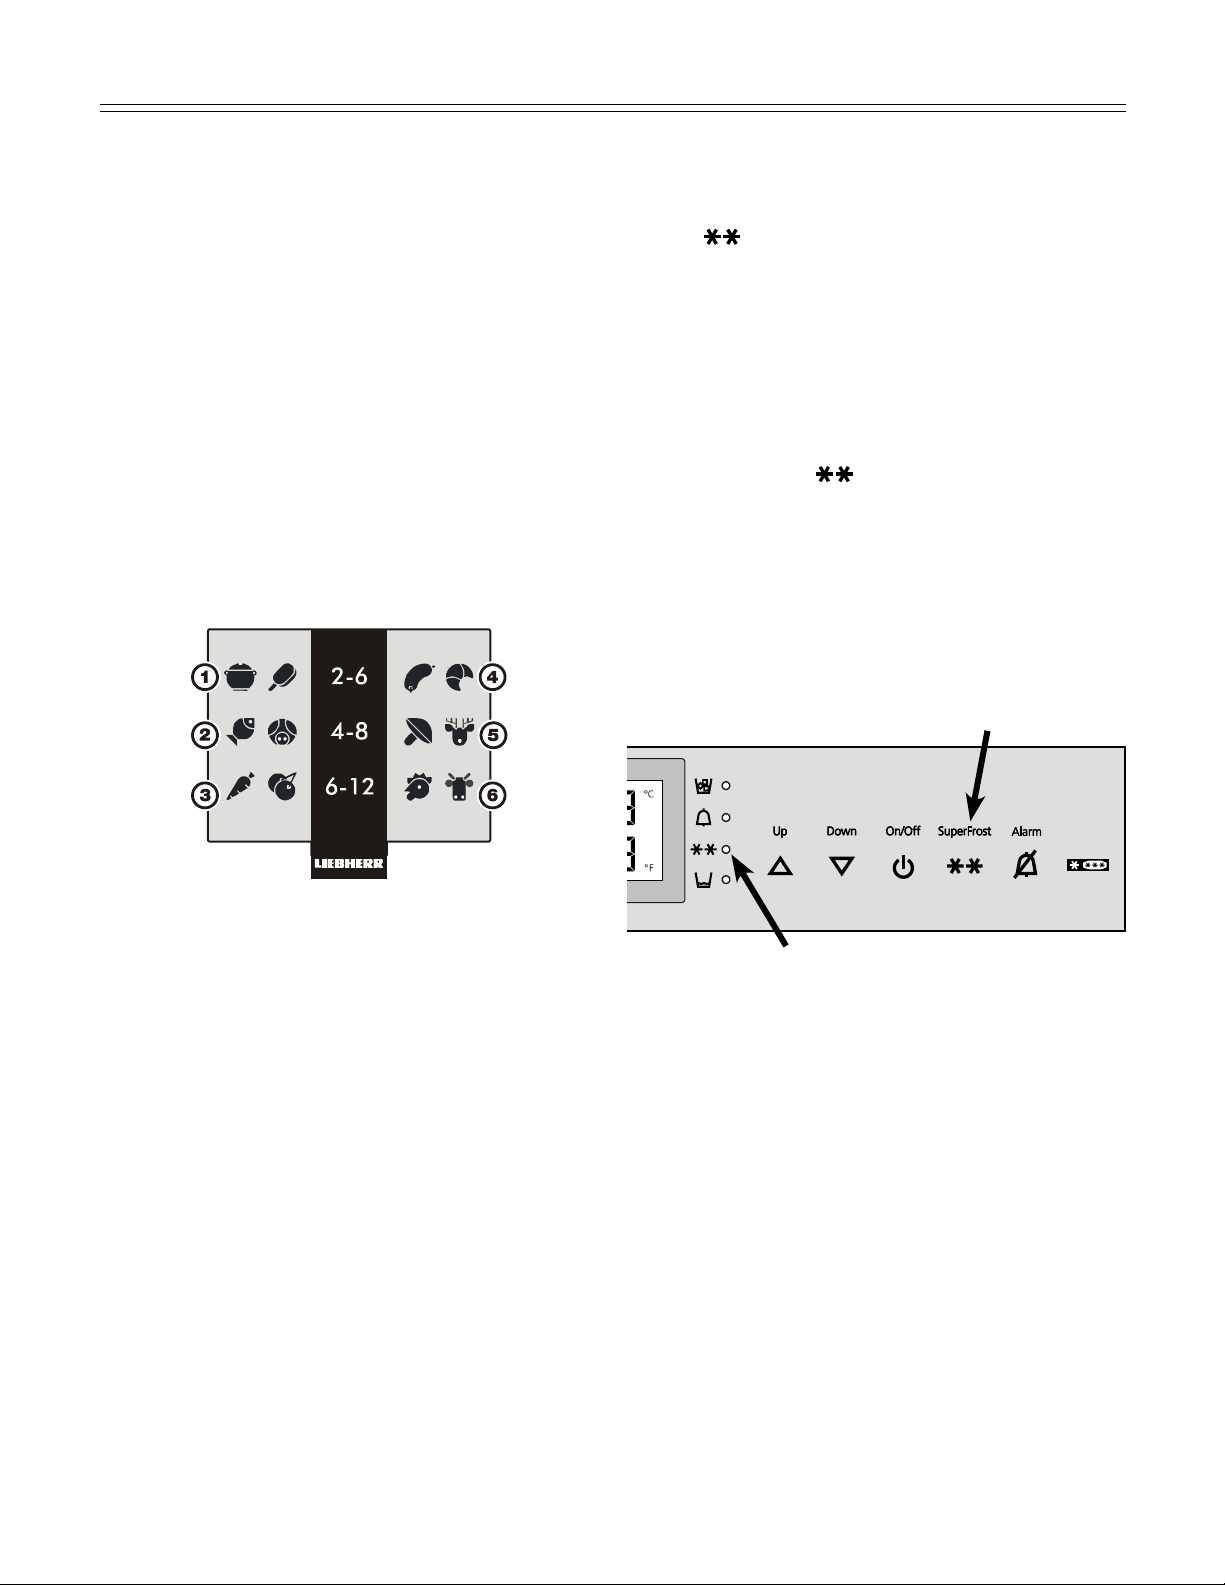
feaTures
Freezer operating icons
Temperature Up control (to
increase the freezer temperature)
Temperature Down control (to
reduce the freezer temperature)
Freezer On/Off
SuperFrost
Alarm mute (refrigerator and freez-
er)
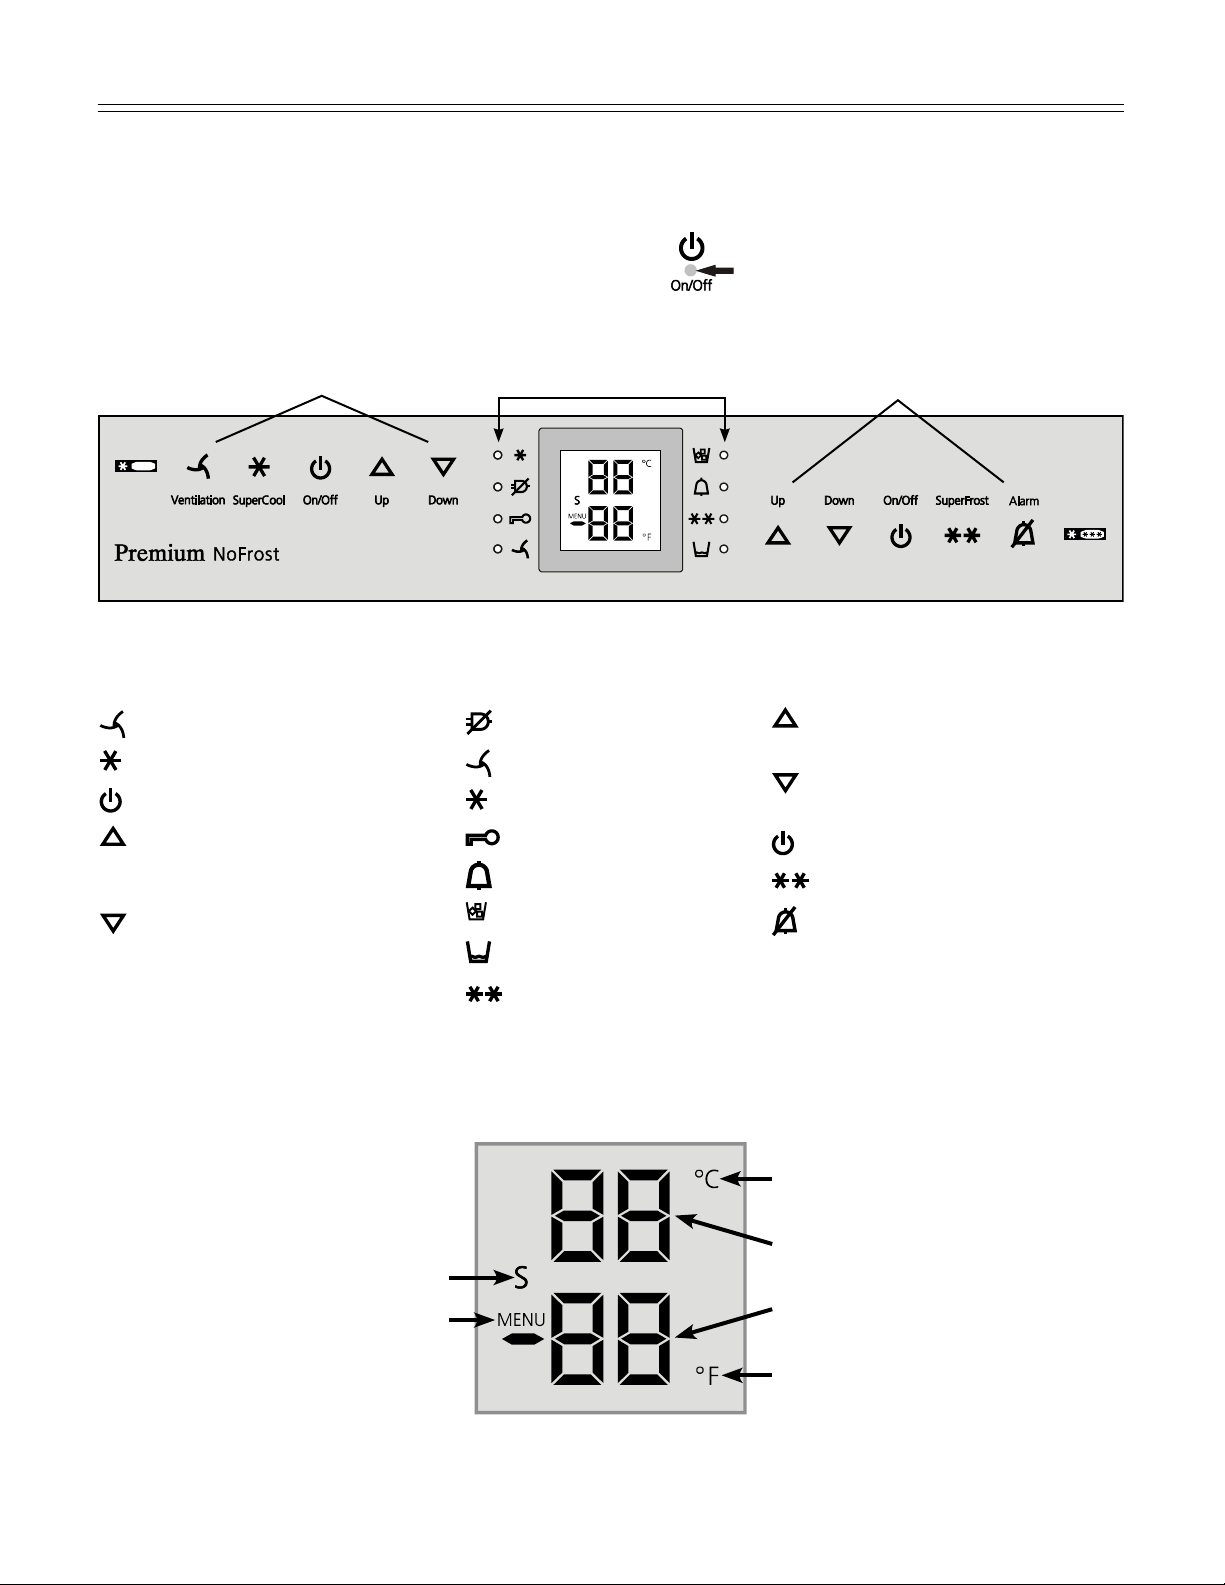
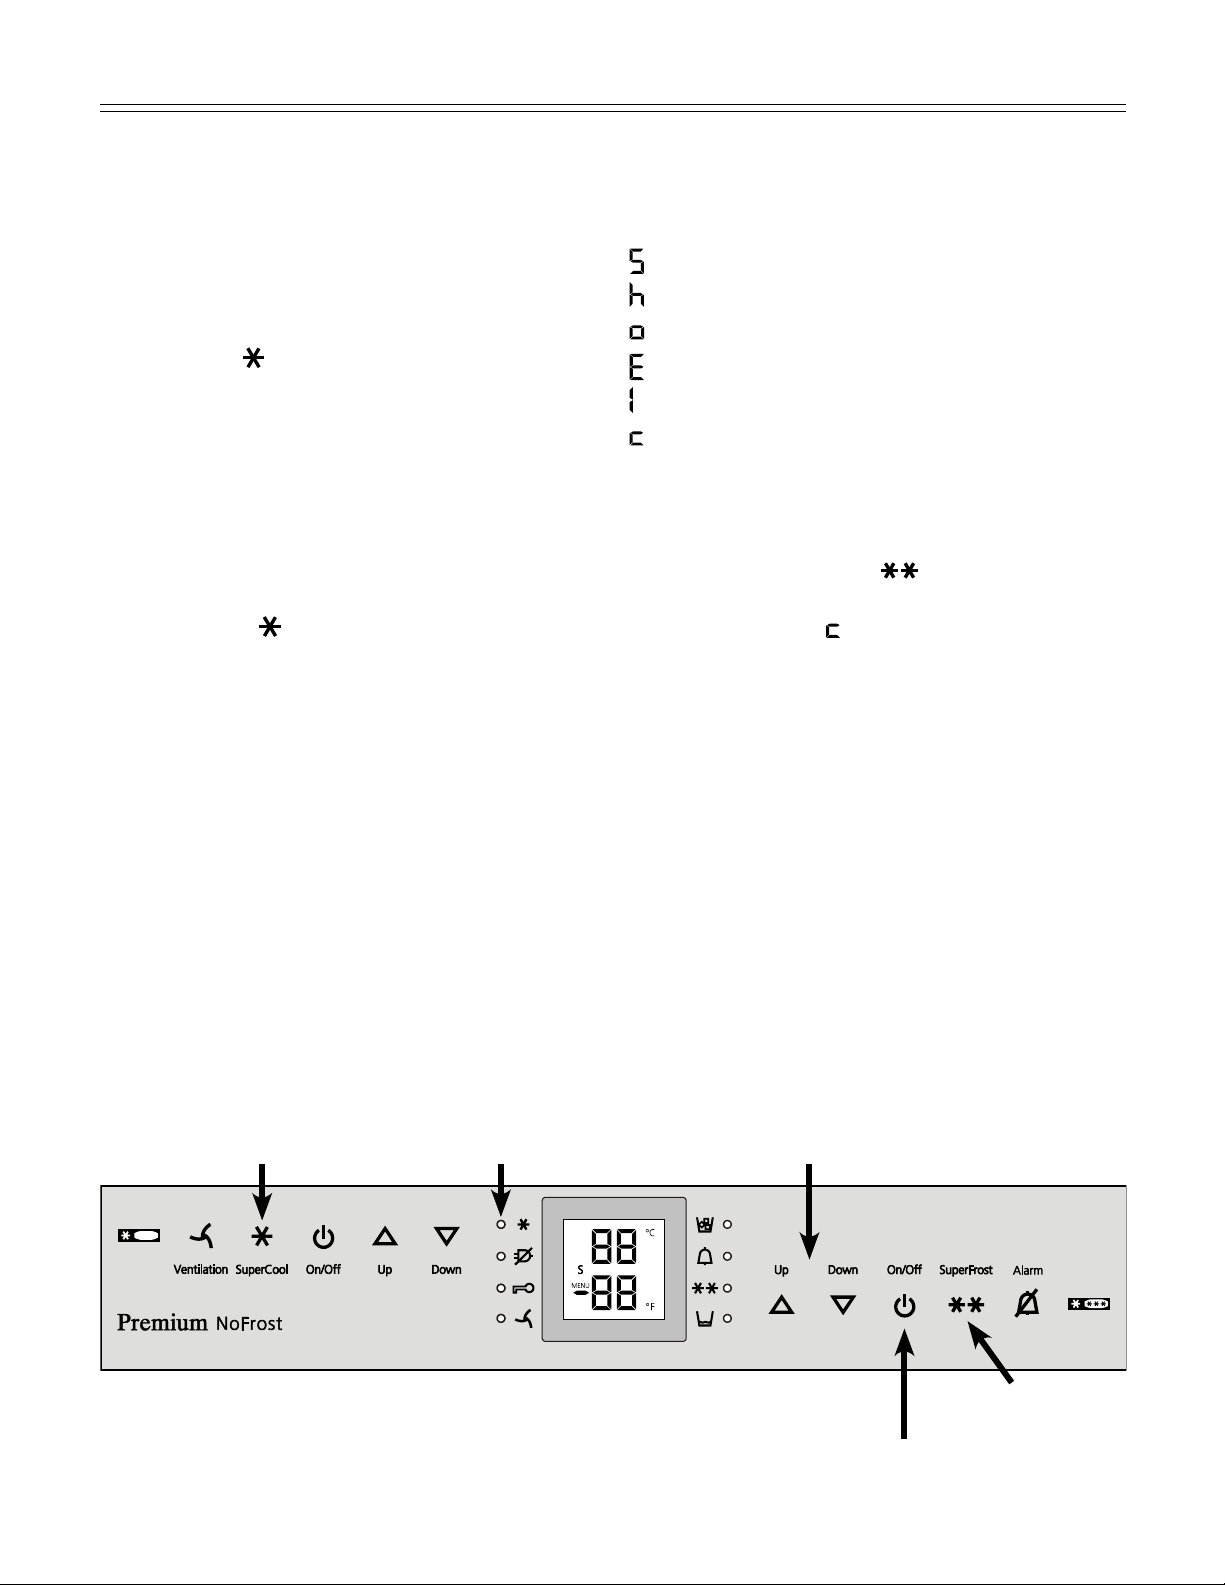
Figure 2
Operating and Control Elements - Figure 2, Figure 3
The electronic control panel uses touch capacitance technology. Any function can be activated by a fin-
gertip on the symbol of the operating icons.
Theexactcontactpointisbetweenthesymbolanditslabel
Refrigerator
operating icons
Appliance
control icons
Refrigerator operating icons
Ventilation (circulation) On/Off
SuperCool
Refrigerator On/Off
Temperature Up control (to
increase the refrigerator tem-
perature)
Temperature Down control (to
reduce the refrigerator tem-
perature)
Freezer
operating icons
Temperature and control display
Figure 3
Display mode degrees Celsius
Display mode degrees Fahrenheit
Refrigerator temperature display
Freezer temperature display
Sabbath mode is activated
Menu mode is activated
(for setting additional functions)
Appliance control icons
Power failure LED
VentilationONLED
SuperCool LED
Child lock LED
Alarm LED
IcemakerONLED
Top up water tank LED
SuperFrost LED
8
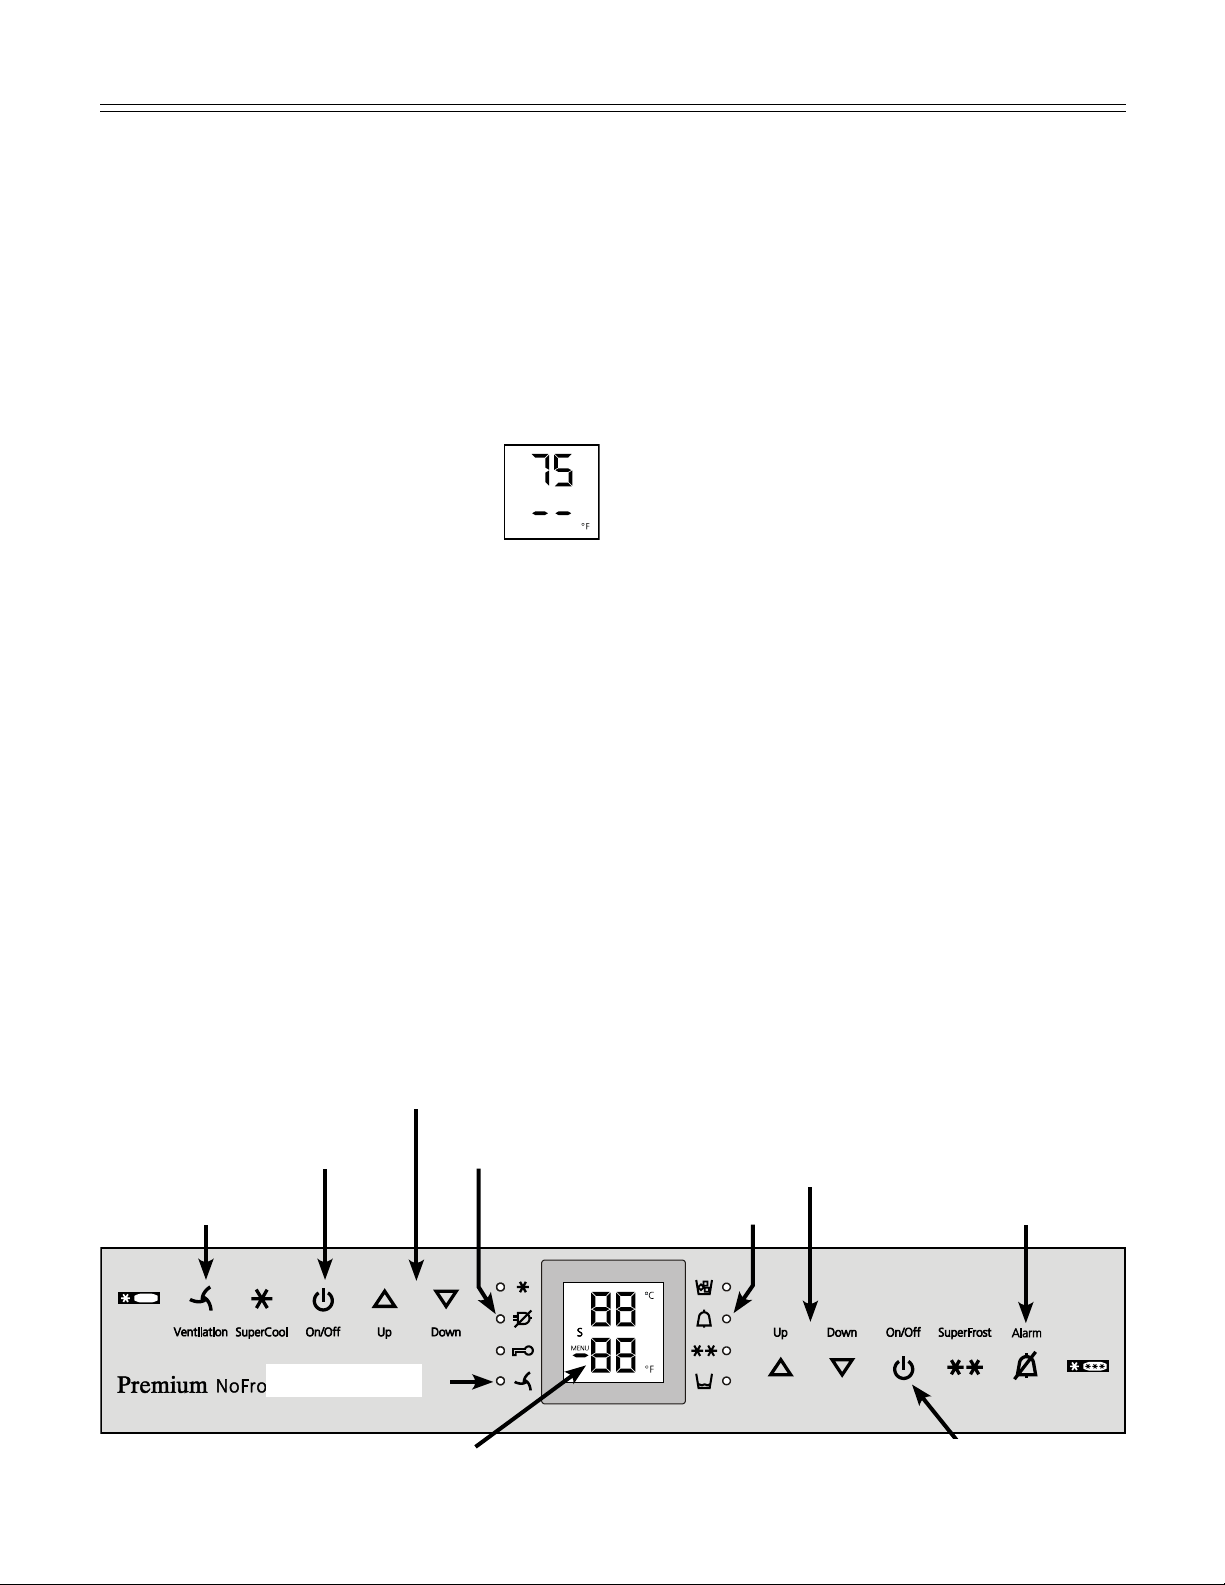
Figure 4
operaTion
Refrigerator On/Off icon
Freezer On/Off icon
Temperature control icons - Refrigerator
Temperature control icons - Freezer
Alarm iconAlarm LED
Freezer temperature display
Power failure LED
Ventilation icon
Ventilation LED
Turning the Appliance On and
Off - Figure 4
Clean the appliance before turning it on for the first
time. See Cleaning.
Do not place frozen food in the freezer until the
temperatureshowsatleast0°F(-18°C).Therefrig-
erator and freezer compartments can be operated
separately.
1. Turning on:
Touch the Refrigerator On/Off icon
and the Freezer On/Off icon
so the temperature displays light up.
The interior light will turn on when the refrigerator
door is open.
2. Turning off: to turn off the refrigerator or
freezer, touch the corresponding On/Off icon for
approximately3secondssothetemperaturedis-
play and interior lights go out.
Setting the Temperature - Figure 4
The appliance is pre-set for normal operation. We
recommendtemperaturesof38°F(3°C)inthe
refrigeratorand0°F(-18°C)inthefreezer.
To reduce the temperature:
TouchtheDOWNiconontheleftto
reduce the refrigerator temperature
andtheDOWNiconontherightto
reduce the freezer temperature.
To increase the temperature:
Touch the UP icon on the left to increase
the refrigerator temperature
and on the right to increase the freezer
temperature.
1. While you are entering the temperature, the set
temperature will flash on the display.
2. When you touch the temperature setting icons
for the first time, the most recent setting is dis-
played.
3. You can change the settings in increments of
1°F(1°C)bybrieflytouchingtheiconsagain.If
the icons are held, the temperature setting will
change faster.
4. Approximatelyfivesecondsaftertheiconhas
been released, the display will automatically
show the actual freezing or cooling temperature.
5. You can change the temperatures:
• in the refrigerator –between36°Fand44°F
(2°Cand7°C)and
• in the freezer–between-15°Fand6°F
(-26°Cand-14°C).
9
operaTion
Temperature Display - Figure 4
In normal operation, the following settings will be
displayed:
• theaveragerefrigeratortemperature
• thewarmestfrozenfoodtemperature.
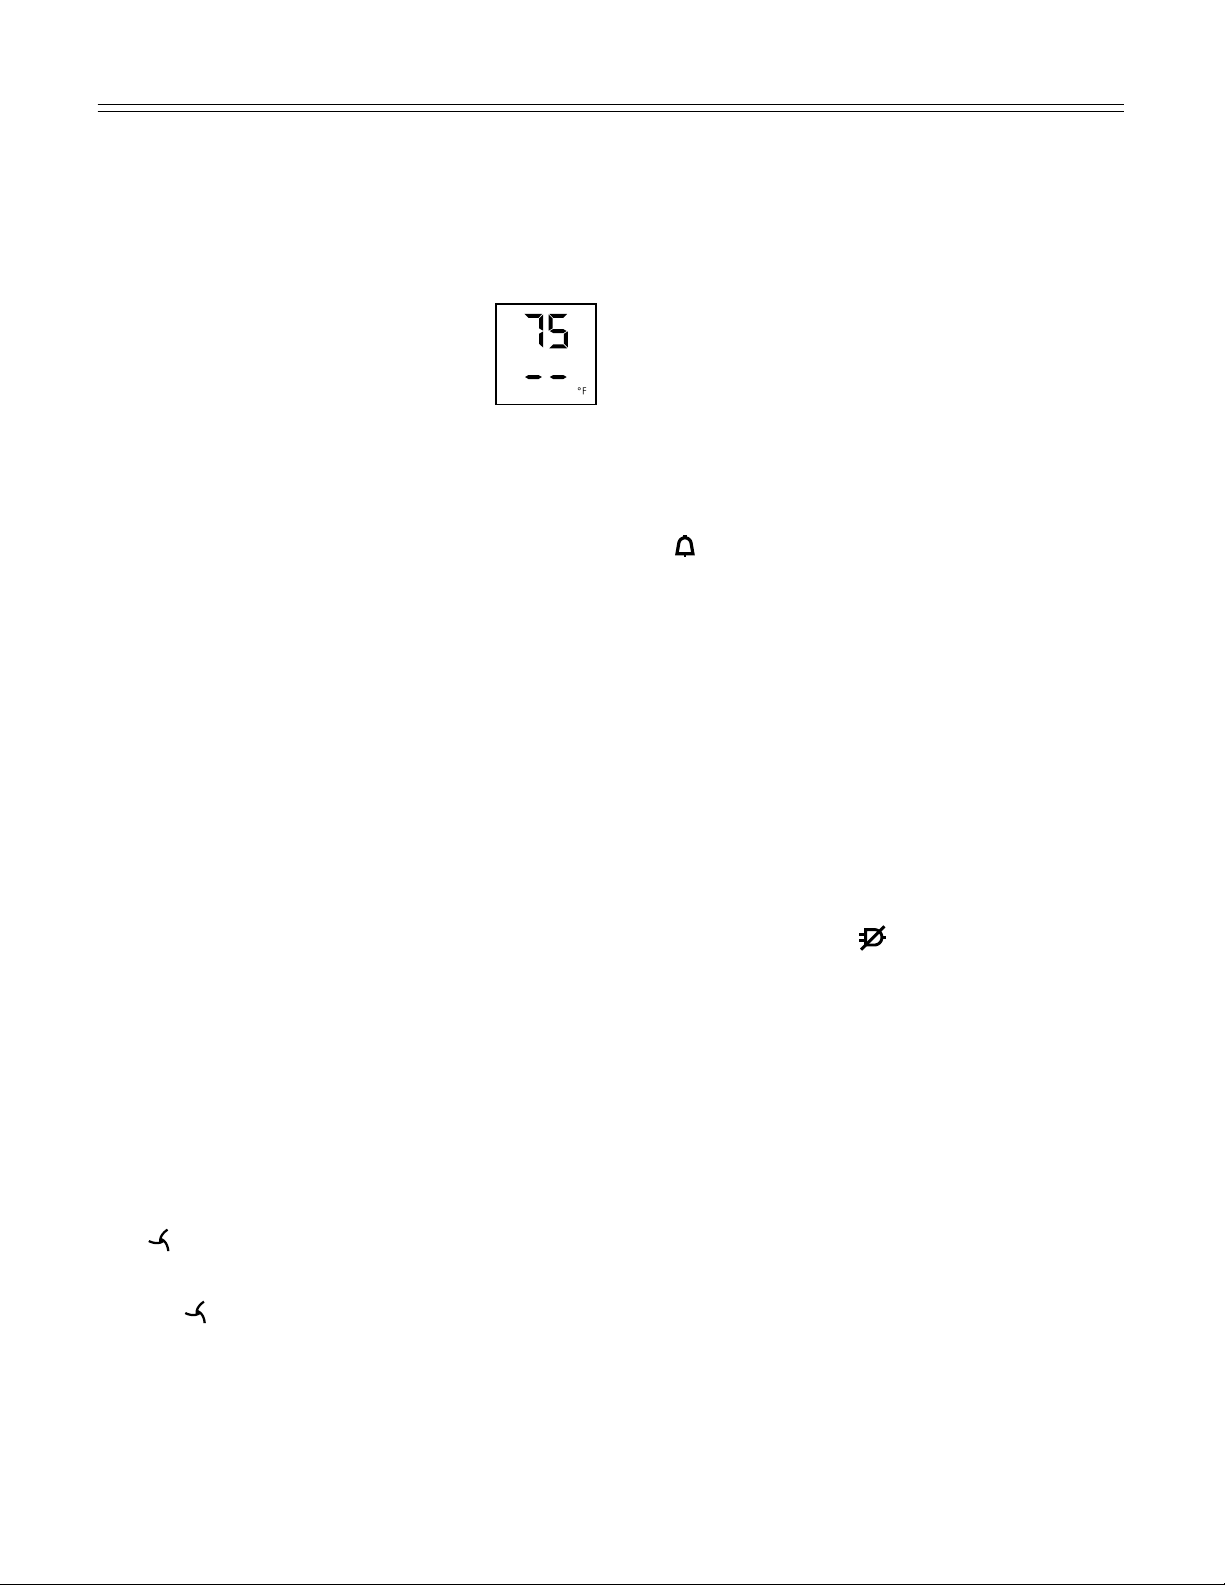
When starting up for the first time or
when the appliance is warm, dashes
will appear in the freezer temperature
display, until the temperature in the
freezercompartmentis32°F(0°C).
The display will flash:
• ifyouchangethetemperatureor
• ifthetemperaturerisesbyseveraldegrees,indi-
cating cold loss, e.g. if you place fresh, “warm”
food in the freezer or if you remove or repack
frozen food, the temperature may rise for a short
time due to warm air flowing into the freezer.
• If“F1” to “F5” appears in the display, the appli-
ance has a fault. Have the fault number available
when you contact the customer service depart-
ment.
Ventilation - Figure 4
The Ventilation switch is used for re-circulated cool
air.
You can use the switch as required to:
• chilllargequantitiesoffreshfoodfast.
• keepthetemperatureevenlydistributedthrough-
out the entire refrigerator compartment. The air
will circulate more intensively, keeping all the
different areas in the compartment at the same
temperature and ensuring all the food inside is
chilled at the same temperature.
We recommend you use the ventilation fan if:
• roomtemperaturesaretoohigh(approximately
95°F[35°C]orhigher).
• theairhumidityishigh,duringhighheatand
humidity.
Turning on: touch the Ventilation icon briefly so the
LED
turns on.
Turning off: touch the Ventilation icon again until
the LED
turns off.
Audible Alarm Signal - Figure 4
The audible alarm signal helps to protect frozen
food and to save energy.
The audible alarm signal is switched off by
touching the alarm icon.
Audible door alarm
This sounds when the door has been left open for
longer than about 180 seconds. The sound switch-
off function is active as long as the door is left open.
The alarm automatically switches back to standby
when the door is shut.
Audible/visual temperature alarm
It always sounds if the freezer temperature is not
low enough. The temperature display and the alarm
LED
flash at the same time.
This can be caused by:
- warm, fresh food being placed in the freezer,
- too much warm air from the outside entering
when re-arranging or removing frozen food,
- a fault in the appliance.
The temperature display will continue to flash until
the cause of the alarm has been rectified. It will then
stop flashing and light up continually. The audible
warning signal is now automatically reset.
Power Failure/FrostControl
Display - Figure 4
If the power failure LED
is lit, this means the
freezer temperature has risen too high during the
last few hours or days due to a power failure. The
freezer temperature display flashes at the same
time.
• IfyoutouchtheAlarm icon now, the highest
temperature registered during the power failure
will be displayed.
• Checkthequalityofthefoodincaseithas
become too warm or even defrosted.
• Thehighesttemperaturewillappearfor
approximatelyoneminute.Afterthat,theactual
temperature in the freezer will reappear.
The display can be turned off by touching the
Alarm icon again.
10
operaTion
SuperCool - Figure 5
Touching the SuperCool icon switches the
refrigeratorcompartmenttomaximumcooling.Itis
recommended particularly if you wish to cool large
quantities of food, drinks, freshly baked goods or
meals rapidly.
• Turning on: touch the SuperCool icon briefly
so the LED
turns on. The refrigerator
temperature will drop to its lowest value.
Note
The SuperCool function uses slightly more
energy. After approximately six hours,
however, the refrigerator switches back
automatically to normal energy-saving
operation. If required, the SuperCool function
can be turned off sooner.
• Turning off: touch the SuperCool icon again
until the LED
turns off.
Figure 5
SuperCool icon
SuperCool LED
SuperFrost icon
Freezer compartment Up/Down icons
Freezer compartment On/Off icon
Setup Mode - Figure 5
In the setup mode, you can activate the following
functions:
= Sabbath mode
= Display brightness
= Temperature display mode
= Water quantity for ice cube tray
= Ice maker vacation state
= Child lock
How to activate the setup mode:
• TouchtheSuperFrosticonforapproximately
five seconds
- the SuperFrostLED
turns on for 5 sec-
onds
- after 5 seconds
will flash in the display.
The appliance is in the setup mode now.
You can select the setup mode functions by
touching the freezer compartment Up/Down icons.
Note
In the setup mode, the display will flash continu-
ously.
Exit setup mode:
• TouchthefreezercompartmentOn/Off icon. The
appliance will change back to normal operation.
11
operaTion
= Display brightness
How to adjust the display brightness
• Activatethesetupmodebytouchingthe
SuperFrost icon for 5 seconds.
• Touch the freezer compartment Down icon until
appears in the freezer temperature display.
• TouchtheSuperFrost icon
- the display shows
• Touchthefreezer compartment
Up/Down icons to select
0 = minimum to
5 =maximumbrightness
• TouchtheSuperFrost icon at the desired value.
• Exitsetupmodebytouchingthefreezer
compartment On/Off icon.
= Temperature display mode
You can choose the unit of temperature for the
display in degrees Fahrenheit or degrees Celsius.
Note
The factory setting is degrees Fahrenheit.
How to change the temperature display to
degrees Celsius
• Activatethesetupmodebytouchingthe
SuperFrost icon for 5 seconds.
• Touchthefreezer compartment Down icon
until
appears in the freezer temperature dis-
play.
• TouchtheSuperFrost icon
- the display shows
• TouchtheSuperFrost icon again
- the temperature reading is now displayed in
degree Celsius.
• Exitsetupmodebytouchingthefreezer
compartment On/Off icon.
Note
To change the temperature display back to degrees
Fahrenheit, follow the steps above.
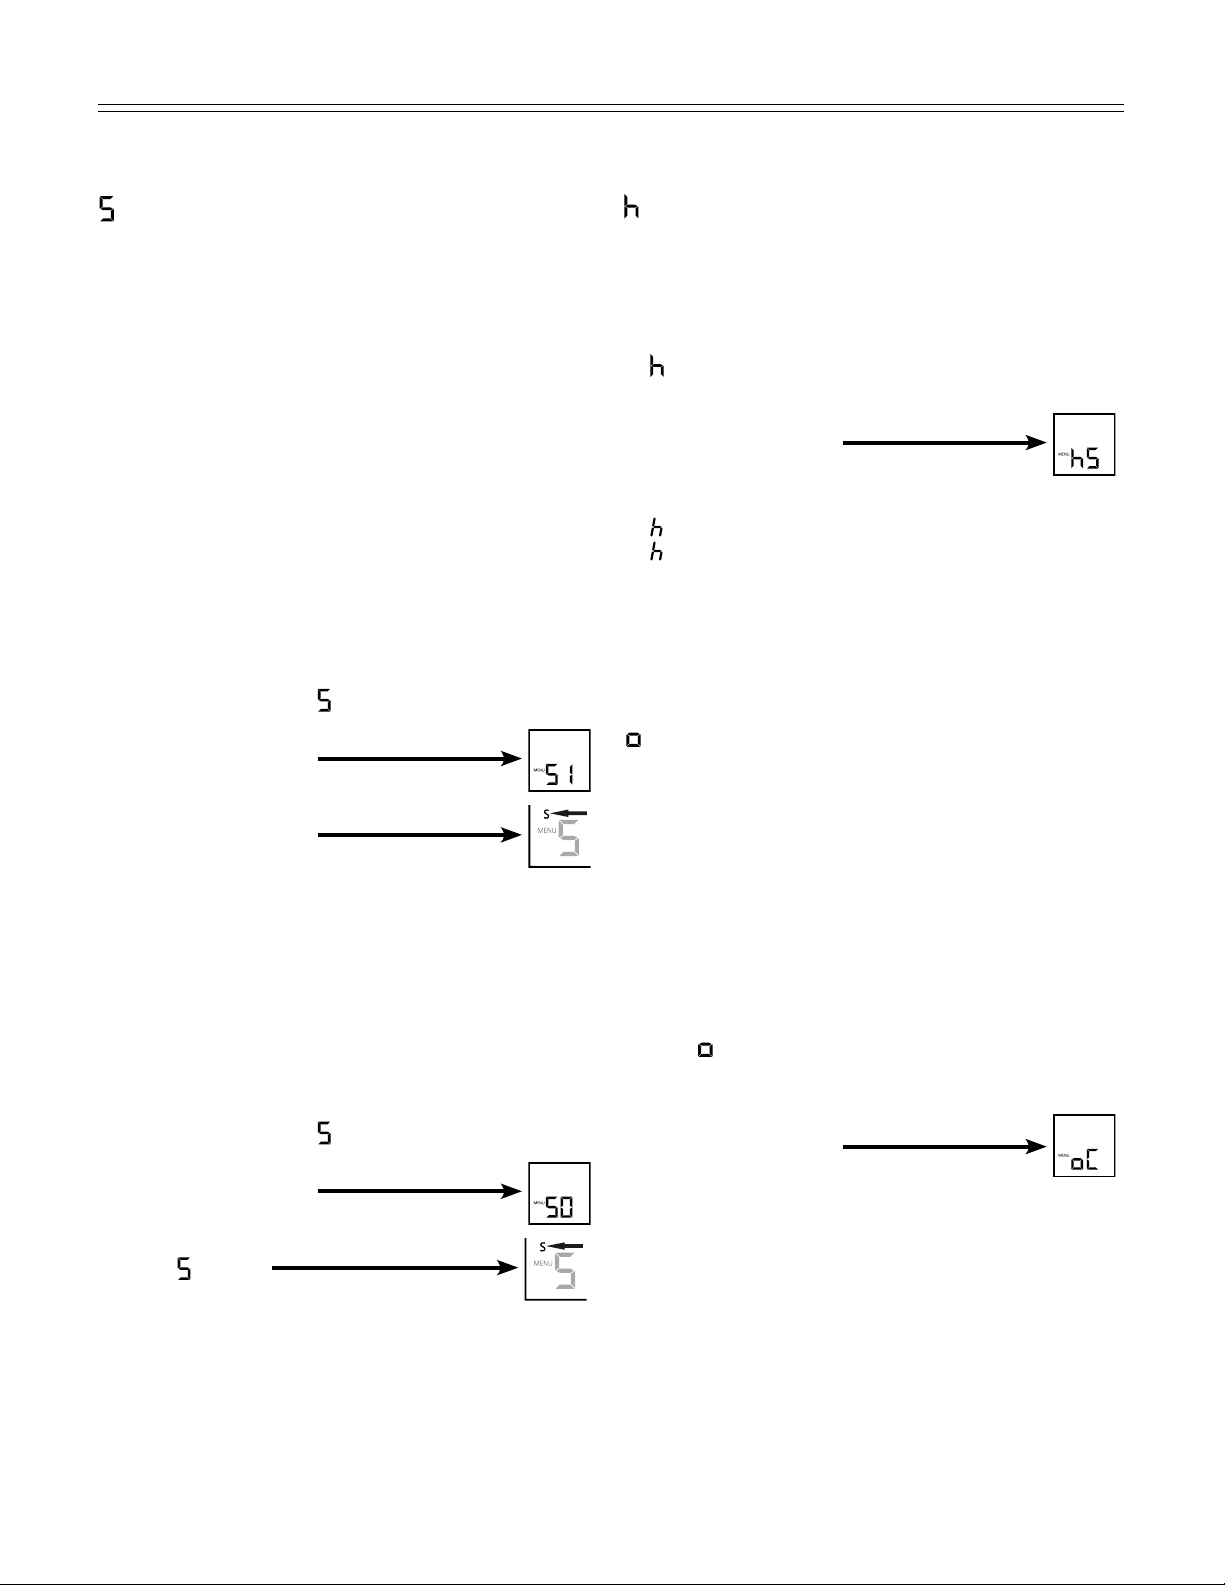
= Sabbath mode
This feature considers the religious requirements
on Sabbath or Holidays. When the Sabbath mode
is active, some functions of the electronic controls
are switched off.
The door can be opened and closed at any time.
• Thelightingremainsoff.
• Thecoolingfanremainsinitsactualstate:Ifitis
on, it remains on; if it is off, it remains off.
• Thereisnodooralarm.
• Thereisnotemperaturealarm.
• Defrostcyclesareindependentofthenumberof
times and length of door openings.
• TheunitwillreturnintoSabbathmodeaftera
power failure.
How to activate the Sabbath mode
• Activatethesetupmodebytouchingthe
SuperFrost icon for 5 seconds.
- the display shows
• TouchtheSuperFrost icon
- the display shows
• TouchtheSuperFrost icon again
- the display shows
- the Sabbath mode is activated.
• Exitsetupmodebytouchingthe
freezer compartment On/Off icon.
Sabbath mode switches off automatically after
120 hours if it is not manually switched off before-
hand.
How to deactivate the Sabbath mode
• Activatethesetupmodebytouchingthe
SuperFrost icon for 5 seconds.
- the display shows
• TouchtheSuperFrost icon
- the display shows
• TouchtheSuperFrost icon again
- the
symbol
in the display disappears,
the Sabbath mode is deactivated.
• Exitsetupmodebytouchingthe
freezer compartment On/Off icon.
12
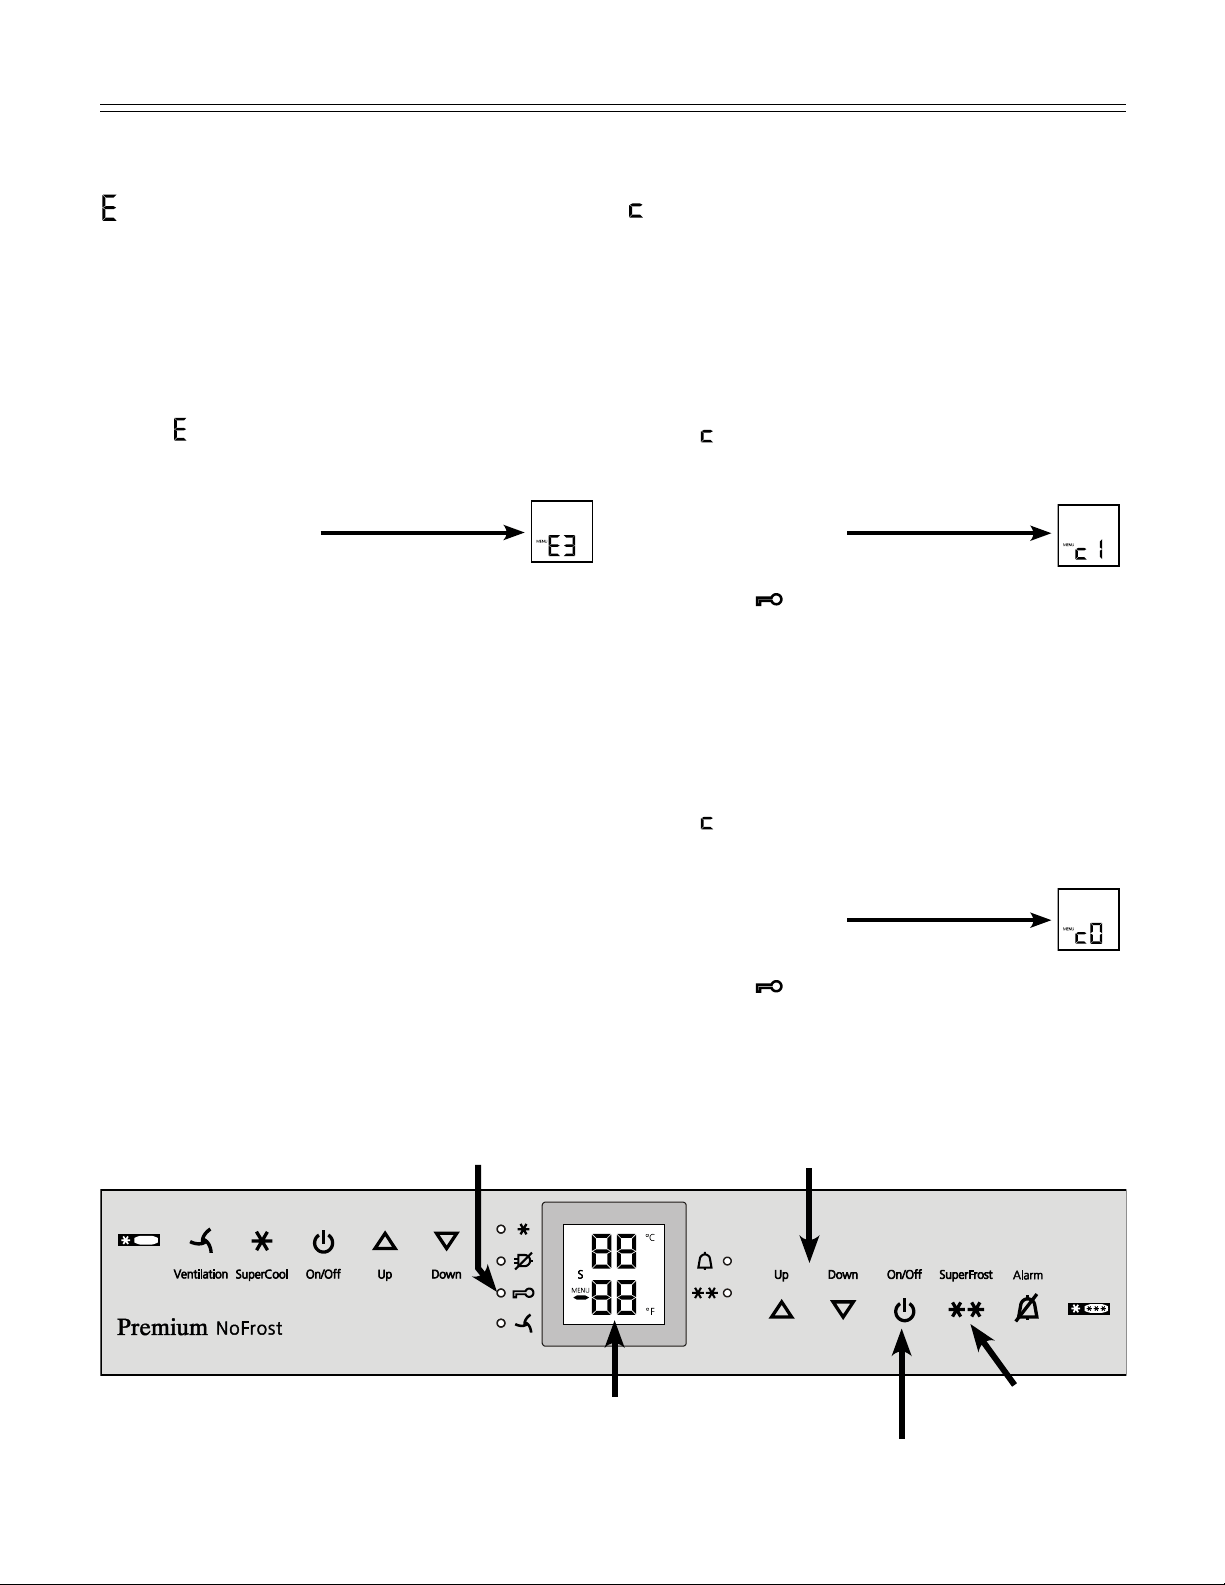
Setup Mode - Figure 6
= Waterquantityforicecubetray
If the produced ice cubes of the ice maker are too
small, the inflowing water quantity can be adjusted.
Howtoadjustthewaterquantity
• Activatethesetupmodebytouchingthe
SuperFrost icon for 5 seconds.
• Touch the freezer compartment Down icon
until
appears in the freezer temperature dis-
play.
• TouchtheSuperFrost icon
- the display shows
• Touchthefreezer compartment Up icon
once only so
E 4 appears in the display.
IMPORTANT
Do not increase for more than one step. If the
adjusted value is too high, the ice cube tray of
the ice maker could overflow.
• TouchtheSuperFrost icon again.
• Exitsetupmodebytouchingthefreezer
compartment On/Off icon.
Checktheicecubesizewithinthenextdays.Ifthe
ice cubes are still smaller than desired, follow the
steps above again.
Figure 6
SuperFrost icon
Freezer compartment Up/Down icons
Freezer compartment On/Off icon
operaTion
Freezer temperature display
Child lock LED
= Child lock
The child lock is designed to protect the appliance
from being turned off accidentally.
How to activate the child lock
• Activatethesetupmodebytouchingthe
SuperFrost icon for 5 seconds.
• Touch the freezer compartment Down icon
until
appears in the freezer temperature dis-
play.
• TouchtheSuperFrost icon
- the display shows
• TouchtheSuperFrost icon again
- the LED
is lit and the child lock is activated.
• Exitsetupmodebytouchingthefreezer
compartment On/Off icon.
How to deactivate the child lock
• Activatethesetupmodebytouchingthe
SuperFrost icon for 5 seconds.
• Touch the freezer compartment Down icon
until
appears in the freezer temperature dis-
play.
• TouchtheSuperFrost icon
- the display shows
• TouchtheSuperFrost icon again
- the LED
goes out. The child lock is deacti-
vated.
• Exitsetupmodebytouchingthefreezer
compartment On/Off icon.
13
refrigeraTor ComparTmenT
Arranging Food - Figure 7
Vario Box - Figure 9
Theboxescanberemoved
and placed on the table as a
single unit.
Repositioningtheboxes:
Lift them for removal and
re-position them as required.
Theboxsupportbar
can be removed by
lifting upwards and
inserted in another
position (e.g. swapped
with a door rack).
Important!Boxlids
must be shut when you
close the door - risk of
damage.
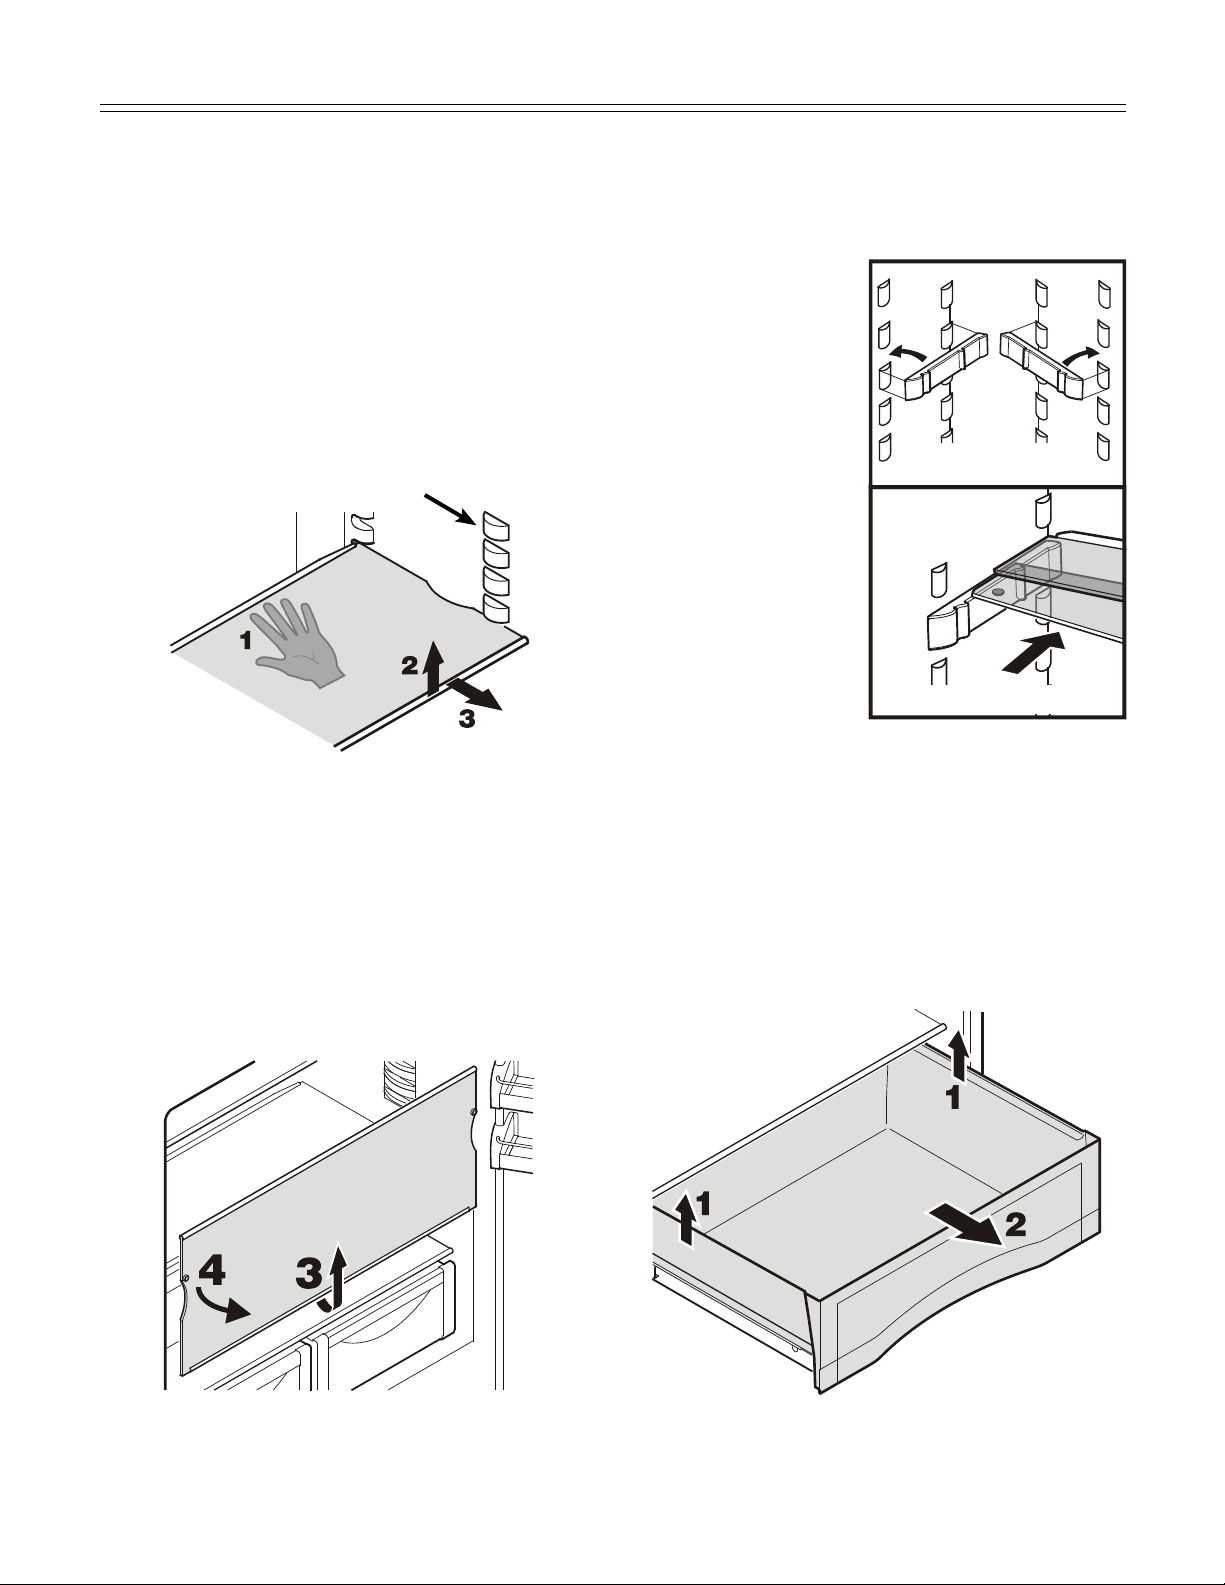
Equipment
CAUTION!
To avoid possible injury, only adjust an
empty shelf or door rack. Do not attempt to
adjust a shelf or door rack with food on it.
You can rearrange the
height of the shelves and
door racks as required.
Repositioning the door
racks - Figure 8
Slide the door rack up, pull
out toward you and replace
in reverse order.
Figure 8
Figure 9
(1) Butter,cheese
(2) Eggs
(3) Cans, drinks
(4) Bottles
(5) Meat and sausage products, dairy products
(6) Bakedgoods,pre-cookedmeals
(7) Fruit, vegetables, salad
(8) Ice cubes
(9) Frozen food
IMPORTANT
• Liquids and food which give off or absorb odors
and flavors should always be stored covered or
in closed containers.
• High-percentage alcohols should be tightly
sealed and stored upright.
• Fruit, vegetables and salad can be stored
unpacked in the bin (7).
Figure 7
14
refrigeraTor ComparTmenT
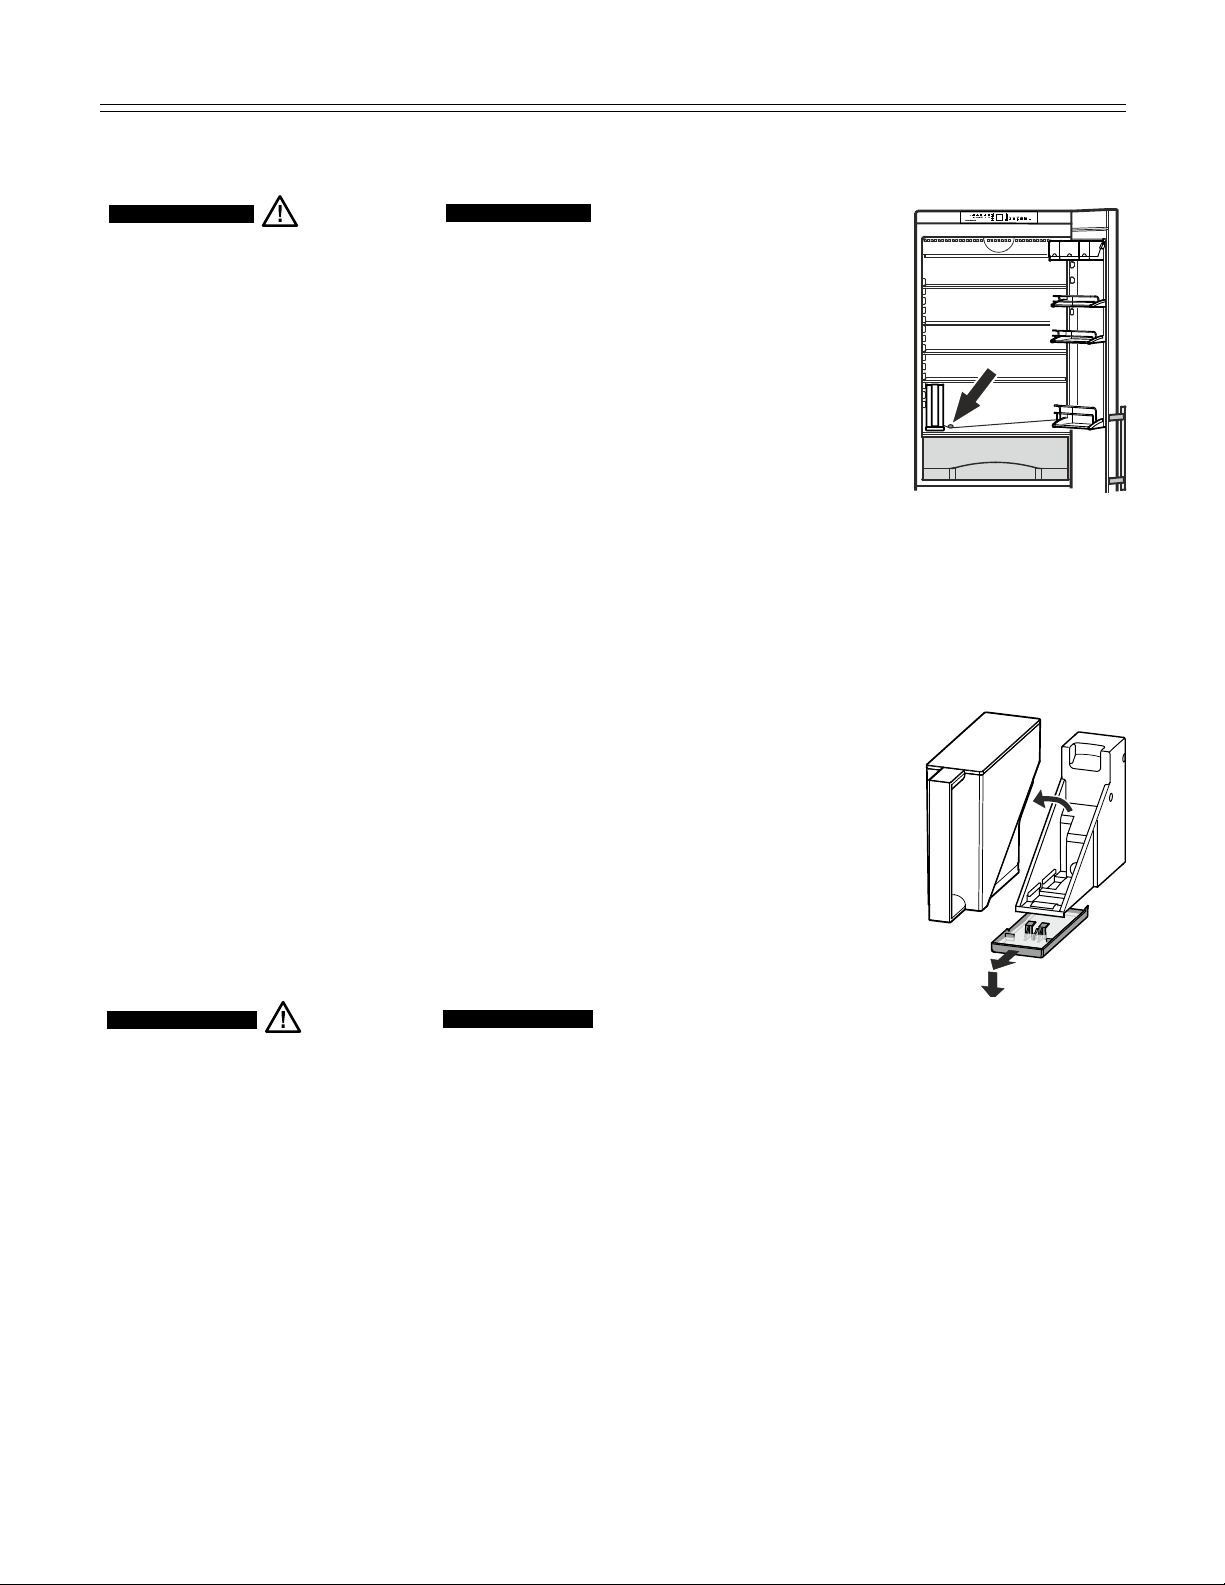
To remove the vegetable drawer
Pull the drawer straight out, grip at the back and lift
out - Figure 14.
To install the vegetable drawer
Place the drawer on the rails. The rails must be fully
extendedandalignedwiththefrontofthedrawer.
Slide the drawer in.
Figure 14
Removing the shelves - Figure 11
1. Follow the first three steps in the chapter above.
2. Lift the shelf down and stop just over the upper
vegetable bin.
3. Move the front of the shelf upwards until the
shelf is in a vertical position.
4. Turn the shelf out at left and remove.
Repositioning the shelves - Figure 10
1. Hold the shelf underneath with your hand
to avoid from tipping down backwards when
removing.
2. Lift the shelf at the front.
3. Remove the shelf forward until the circular cutout
of the shelf is in line with the front supports.
4. Lift the shelf up or down and replace in the
desired position.
Figure 10
Front supports
Figure 11
If you need space for large bottles and con-
tainers
Place the shelf rails
provided on the sup-
ports on the left and
right at the desired
height - Figure 12.
Insert the glass shelves
as shown in fig. 13.
The glass shelf with the
raised edge must go at
the back.
If you need to make
space for tall contain-
ers, simply slide the
front half of the sec-
tioned glass shelf care-
fully underneath the
back half - Figure 13.
Figure 12
Figure 13
refrigeraTor ComparTmenT
15
refrigeraTor ComparTmenT
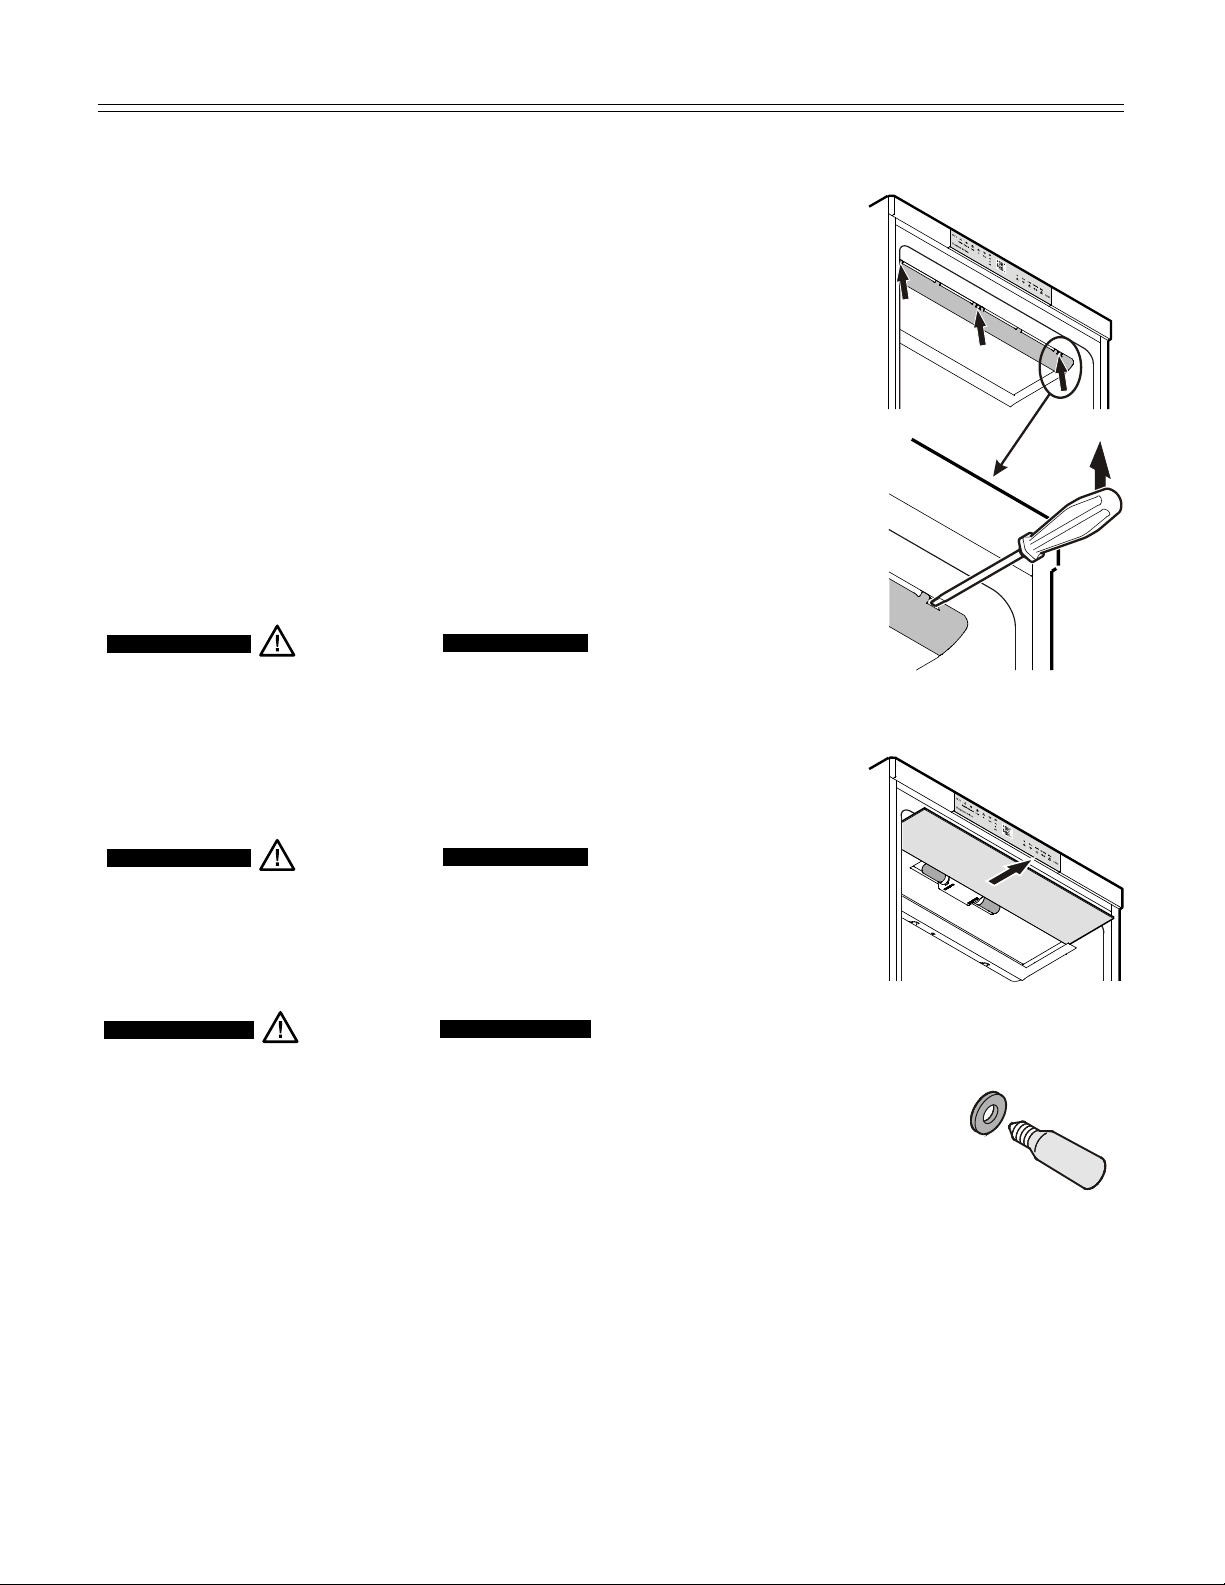
Figure 16
IMPORTANT
The glass plate must be inserted to the back
completely, otherwise it is not possible to click
the cover into place correctly.
Figure 15
Figure 17
Interior Light
This turns off automatically after the door has been
openedforapproximately15minutes.
If it does not turn on when the door is opened
briefly, but the temperature display is working, the
lamp(s) may be defective.
The light is located behind the cover located at the
top of the refrigerator compartment and has two
lamps.
IMPORTANT
Only original LED lamps from the appliance
manufacturer may be used.
The lamp can be purchased from the
customer service department or specialist
dealers.
WARNING!
WhenusingLEDlampsmadeby
other manufacturers, there is a risk of
overheating or fire.
Replacing the lamp:
WARNING!
To prevent possible injury due to an elec-
trical shock, be sure to disconnect the
power cord or turn off the circuit breaker
before replacing the lamp(s).
CAUTION!
To prevent possible injury due to broken
glass, use hand protection when replacing
the lamp(s).
2. Remove the glass
plate - Fig. 16.
1. Unlatch carefully the
cover at left, middle
and right using a
screwdriver - Fig. 15.
Remove the cover.
3. Remove the defective
lamp. Make sure the seal
(Fig. 17) is placed on the
new lamp before installing
it.
4. Install glass plate and
cover.
16
freezer ComparTmenT
Freezing
Fresh food should be frozen completely and as rap-
idly as possible. This is provided by the SuperFrost
feature and ensures that the nutritional value,
appearance and flavor of the food remains intact.
Freezing with SuperFrost - Figure 19
• TouchtheSuperFrost icon briefly so the
LED
turns on.
• Wait24hours.
• Thenplacethefreshfoodinsidethefreezer.
• TheSuperFrostfunctionturnsoffautomatically.
Depending on the quantity of food placed in the
freezer, this will normally be between 30 and a
maximum65hours.
The freezing process is now complete; the
SuperFrost LED
will turn off and the freezer
will change back to normal energy-saving opera-
tion.
IMPORTANT
You should not turn on the SuperFrost function:
• when placing frozen food in the freezer;
• when freezing up to approximately 4-1/2 lbs
(2 kg) fresh food daily.
Figure 19
SuperFrost icon
SuperFrost LED
Information System - Figure 18
Use frozen food within the recommended period.
The numbers between the symbols indicate the
storage period in months for different kinds of
frozen foods. Storage times given are guidelines
for food frozen at home. Whether or not the lower
or upper value is applicable depends on the food
quality and how it was processed prior to freezing.
The lower values always apply to food with a high
fat content.
(1) Pre-cooked meals, ice cream
(2) Fish, pork
(3) Vegetables, fruit
(4) Sausages, bread
(5) Mushrooms, game
(6) Poultry, beef
Figure 18

17
iCe maker
Freezing and Storage
• Packfrozenfoodinstandardfreezerbagsor
reusable plastic, metal or aluminum containers.
• Donotallowfreshfoodwhichistobefrozen
to come into contact with food already frozen.
Always keep packages dry in order to avoid
them sticking together.
• Alwayswritethedateandcontentsonthepack-
ageanddonotexceedthestatedstoragetime
for the food. This prevents spoiling.
• Packfoodwhichyouarefreezingyourselfin
quantities right for your household. To ensure the
food freezes right through quickly, the following
quantitiesshouldnotbeexceededperpackage:
- fruit, vegetables: up to 2-1/4 lbs (1 kg);
- meat: up to 5-1/2 lbs (2.5 kg).
• Donotfreezebottlesandcanswhichcontain
carbonated drinks as they might burst. Drinks
can be cooled down quickly, but take the bottles
out of the freezer compartment after an hour at
the most.
• Onlytakeoutasmuchfoodasneededforthaw-
ing. Cook food which has been thawed as quick-
ly as possible. Frozen food can be thawed in the
following ways:
- in a microwave oven
- in the refrigerator: the safer way to thaw food
because there is less chance of bacteria
growth. Use this method for high density food
such as roasts or poultry.
Safety Instructions and Warnings
for the Automatic Ice Maker
• Theicemakerisdesignedexclusivelytomake
ice cubes in quantities needed by a household.
• Allrepairsandworkontheicemakermayonly
be done by customer service personnel or other
appropriately trained personnel.
• Do not consume or use the first three
batches of ice. This applies both to using the
appliance for the first time and also using it
after it has not been used for a long period of
time.
• The manufacturer cannot accept liability for
damagecausedbyequipmentorwaterlines
between the solenoid valve and the water
supply.
• Theicemakerwillonlyworkifthecombined
refrigerator-freezer is connected to the electrical
outlet. It will only make ice cubes if the freezer
compartment is operating.
• Theicemakercanonlymakeicecubesifthe
drawer is completely closed.
Making Ice Cubes
The ice maker is in the top left drawer in the
freezer compartment of the combined refrigerator-
freezer. You can identify this drawer by its labeling
IceMaker.
18
Filling the Water Tank
Use only filtered, de-carbonated water to fill the
water tank.
The use of filtered, de-carbonated water ensures
the supply of drinking water with top quality flavor
for problem-free ice cube production.
You can achieve this water quality by using a table-
top water filter available from specialist shops.
IMPORTANT
Do not fill with any kind of alcoholic drinks or
sugary liquids. This will damage the ice maker.
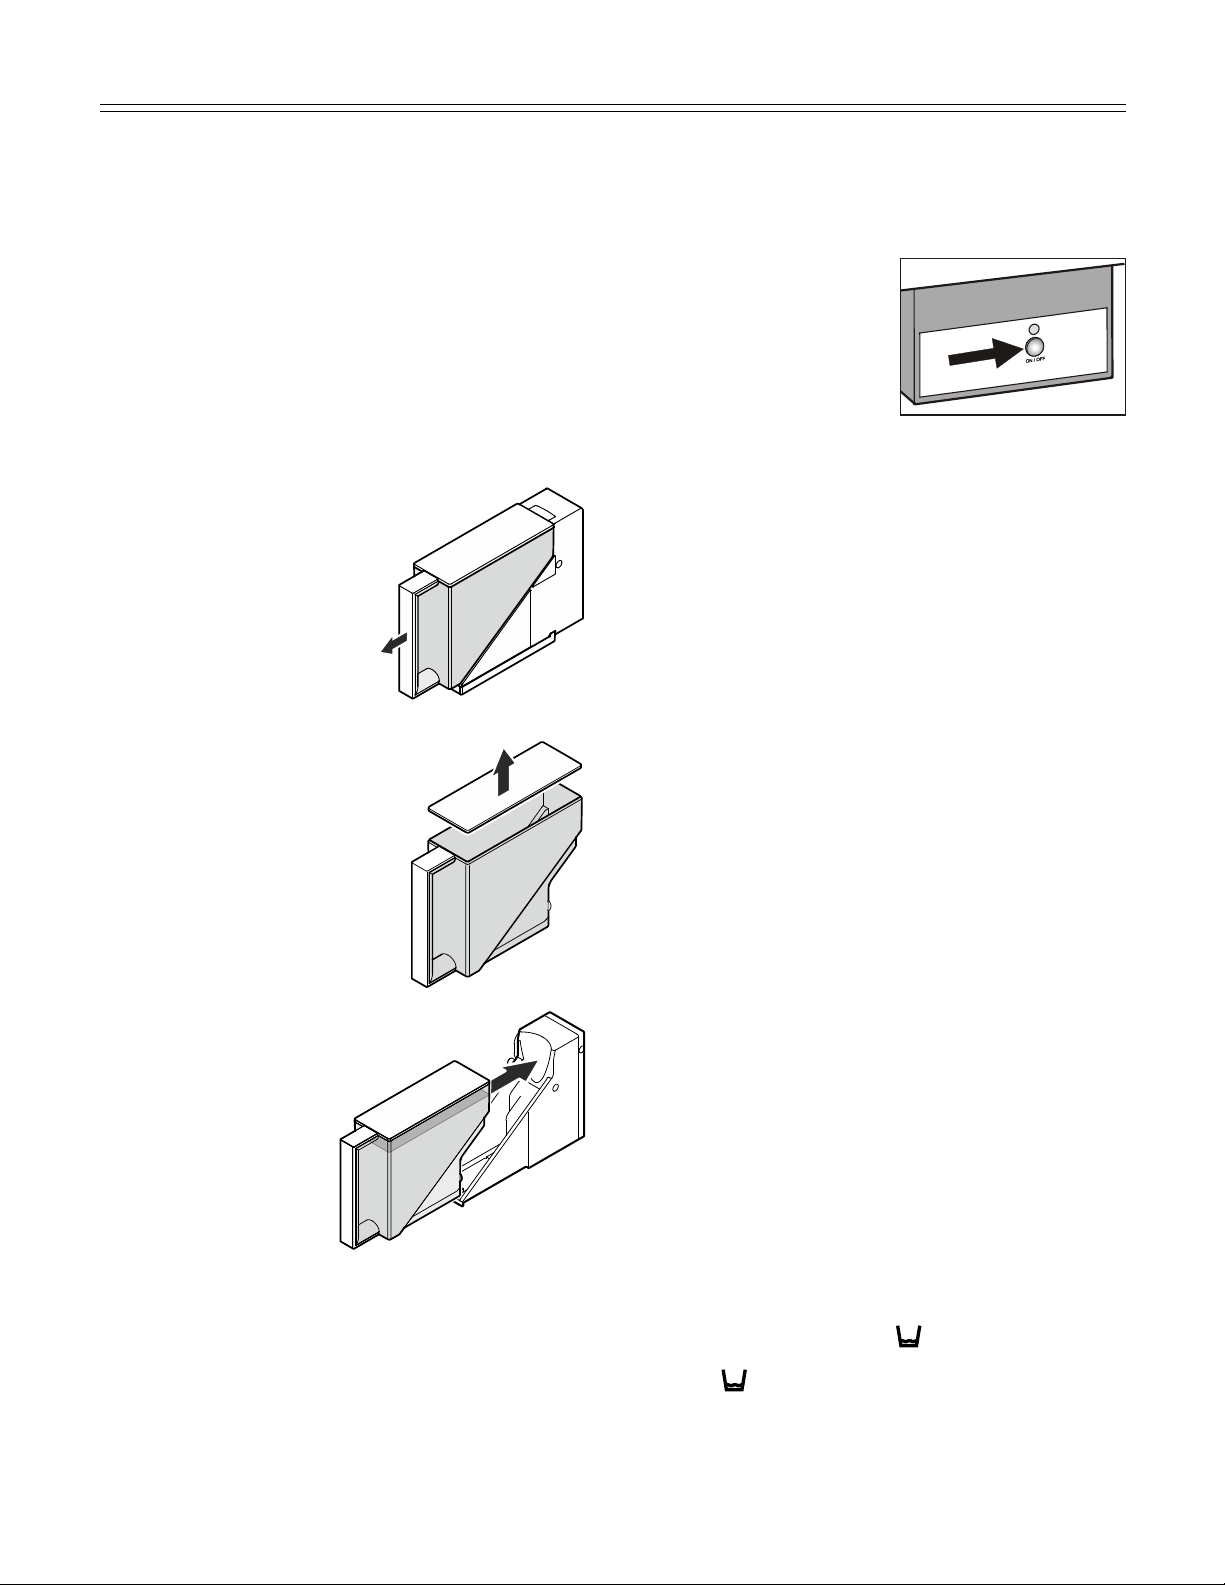
1. Pull out the water tank forwards
(Figure 20).
2. Remove cover and fill tank with
water (Figure 21).
3. Reinsert the water tank and slide
into the holder as far as it
will go (Figure 22).
IMPORTANT
If the water tank has not been slid right to the
back, no ice cubes will be produced.
To Start the Ice Maker
To turn the ice maker on
• Pulloutthedrawer.
• PresstheOn/Off button
so the Ice Maker LED
comes on (Figure 23).
• Closethedrawer.
After you start the ice
maker for the first time, it
may take up to 24 hours
before the first ice cubes
are ready.
Note
The first three batches of ice must not be con-
sumed or used.
The production capacity is 90 - 100 ice cubes in
24hoursatatemperatureof0°F(-18°C)insidethe
freezer compartment.
Tohavethemaximumcapacityofapprox.140ice
cubes in 24 hours, activate the SuperFrost function.
Be aware that this increases the energy con-
sumption because the compressor will run con-
stantly.
The ice cubes fall out of the ice maker into the
drawer. When the ice reaches a certain level in the
drawer, the appliance stops producing ice automati-
cally. The ice maker will not fill the drawer to the
top.
If you need a large quantity of ice, you can change
out the drawer to the right with the complete
IceMaker drawer.
To turn the ice maker off
If you do not need any ice cubes, the ice maker
can be turned off independently of the freezer com-
partment.
• PresstheOn/Offbuttonforapproximately
1 second so the control lamp goes out.
Note
If the ice maker is turned off, the empty draw-
er can also be used to freeze and store food.
Top up water tankLED - Figure 25
The LED lights up when the water tank needs
topping up.
iCe maker
Figure 21
Figure 22
Figure 23
Figure 20
19
iCe maker
Figure 25
SuperFrost icon
Freezer compartment Up/Down icons
Ice Maker LED
Ice Maker at Vacations
In case of longer vacations, the ice maker tray
(arrow in Figure 24) should be emptied.
Bysettingtheicemakerintothevacationstate,the
tray will rotate down and no water remains in the
tray.
Figure 24
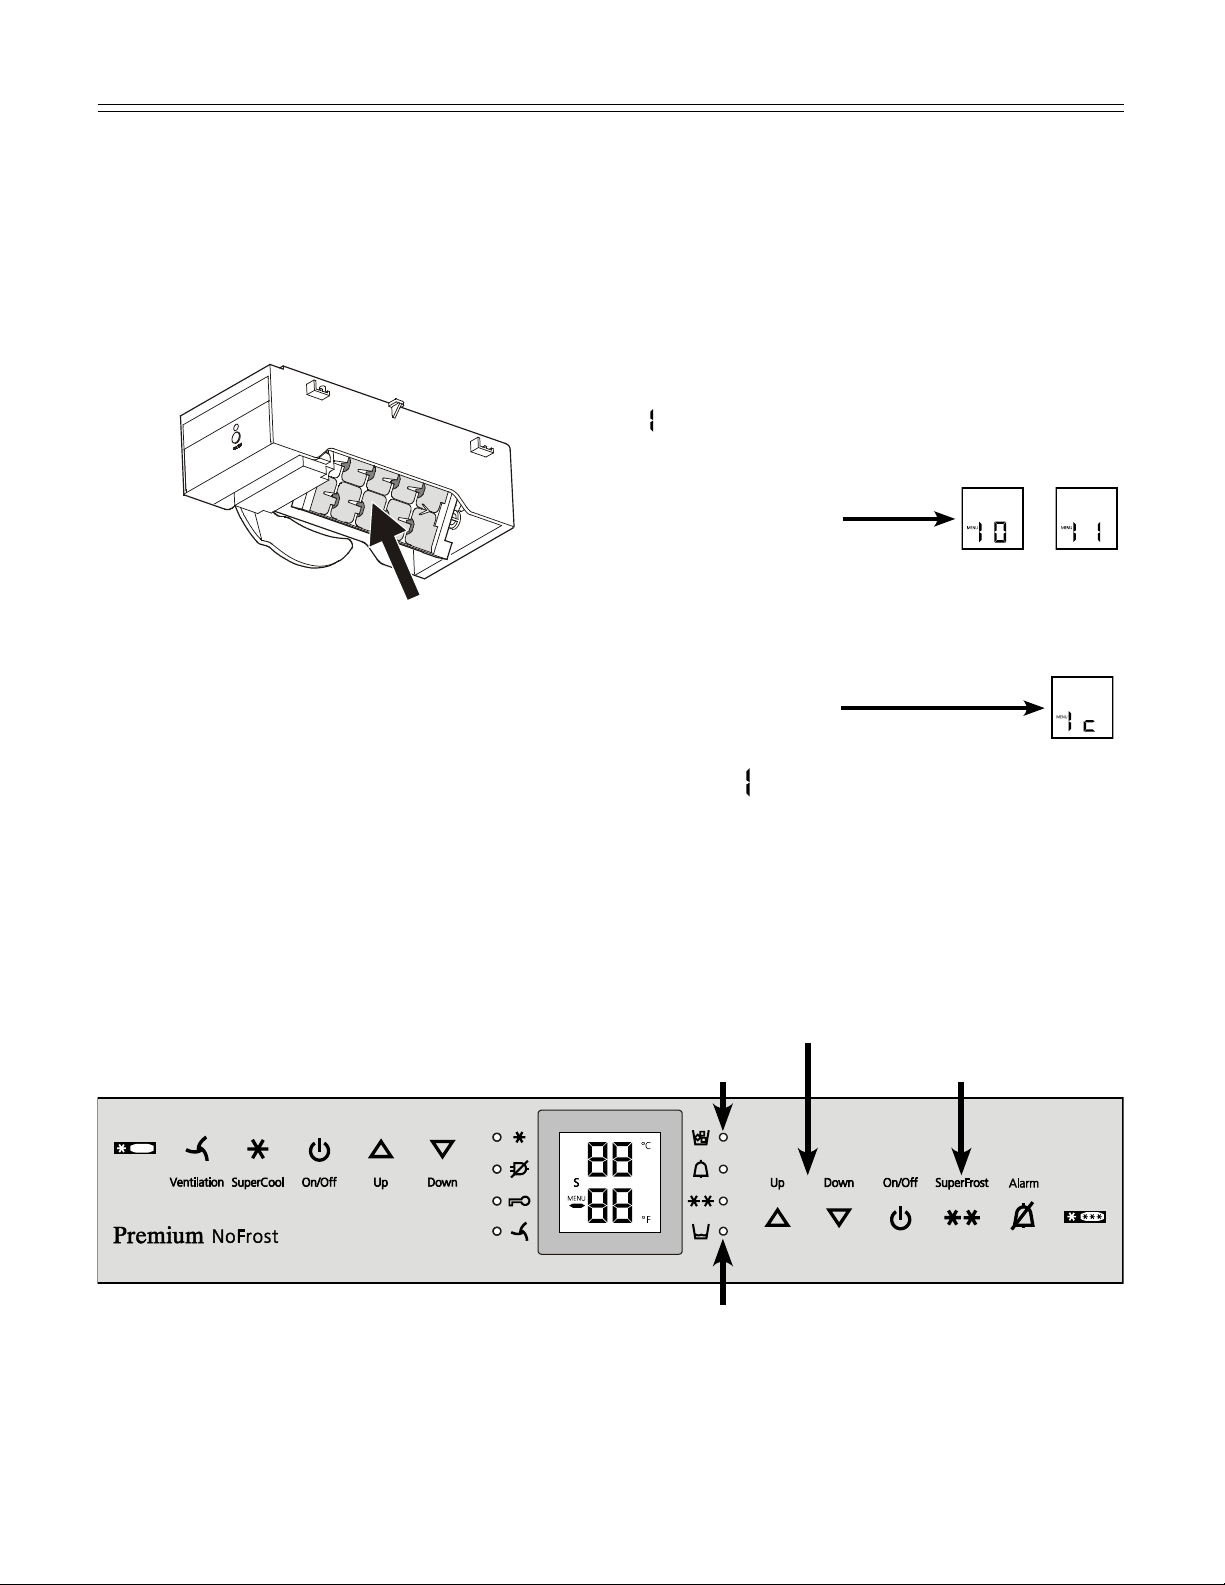
How to activate the Ice Maker Vacation State
- Figure 25
Besurethedraweriscompletelyclosed
(Figure 20).
1. Activate the setup mode by touching the
SuperFrost icon for 5 seconds.
2. Touch the freezer compartment Down icon until
appears in the freezer temperature display.
3. Touch the SuperFrost icon
- the display shows
or
depending on whether the ice maker is turned
on or off.
4. Touch the freezer compartment Down icon
- the display shows
5. Touch the SuperFrost icon
- the digit
flashes.
The ice maker tray rotates down.
When the interior temperature appears in the dis-
play, the tray is in the down position (Figure 24)
and the ice maker is turned off automatically.
The freezer door must be left open, so the surface
of the tray dries up and no mold or unpleasant
odors can occur.
Top up water tank LED
20
• Dryallpartswellwithacloth.
• Do not damage or remove the model plate on
the inside of the appliance. It is very important
for servicing your appliance.
• Toemptythewater
collecting tray: remove
the water tank. Carefully
disengage the tray
forwards and then lower
for removal (Figure 27).
Cleaning
Cleaning
WARNING!
• To prevent possible injury due to an
electrical shock, be sure to disconnect the
power cord or turn off the circuit breaker
before cleaning the appliance.
• To avoid injury or damage, do not use steam
cleaningequipmenttocleantheappliance.
•
To avoid short-circuits, ensure no cleaning
water penetrates into the electrical
components when cleaning the appliance.
Do not use a sponge or cloth that is overly
wet.
• Cleanthesidepanelsanddoorsurfaceswitha
clean and soft cloth. If necessary, use a moist
cloth (water + detergent). Alternatively, use a
microfiber cloth.
Do not use abrasive or scouring sponges. Do not
use concentrated cleaning agents. NEVER use
abrasive or acid cleaners or chemical solvents.
• Removeallfoodfromtherefrigeratorandfreezer
compartments and store in a cool place tempo-
rarily. Store frozen food in other freezers if avail-
able.
• RemovethedoorracksasshowninFigure 8, 9.
• RemoveglassshelvesasshowninFigure 11.
• Removevegetabledrawers.
• Cleantheequipmentpartsbyhandwithluke-
warm water and dishwasher detergent.
CAUTION!
Donotcleantheequipmentpartsina
dishwasher. Strips of these parts could
get loose.
• Cleantherefrigeratorandfreezerdrawers’inte-
rior with lukewarm water and dishwasher deter-
gent.
Figure 26
•
Clean the drain opening.
Remove deposits using
a thin instrument, e. g. a
cotton bud (Figure 26).
IMPORTANT
Water will overflow into
the refrigerator com-
partment if the drain
becomes plugged.
Figure 27

21
DefrosTing/VaCaTion
Defrosting
Refrigerator compartment
The refrigerator compartment defrosts automatical-
ly. The water that forms on the rear wall drains into
a reservoir at the back of the appliance and evapo-
rates automatically through the compressor heat.
Freezer compartment
TheNoFrostsystemautomaticallydefroststhe
freezer compartment. Any moisture will collect on
the evaporator and freeze. It will periodically defrost
and evaporate.
Vacation Tips
Short vacations
It is not necessary to turn off the refrigerator and
freezer if you will be away for less than four weeks.
• Useallperishables.
• Freezeotheritems.
• Turnofftheicemaker.
• Emptythewatertank.
Longvacations
If you will be away for a month or more:
• Settheicemakertothevacationstate.Referto
chapter “Ice Maker at Vacations” - page 19.
• Removeallfoodfromtherefrigeratorandfreezer
compartments.
• Turnofftherefrigeratorandfreezercompart-
ments.
• Cleantheappliance.RefertoCleaning.
• Leavethedooropentopreventunpleasant
odors. This will also keep mold from building up.
• Emptythewatertank.
22
TroubleshooTing
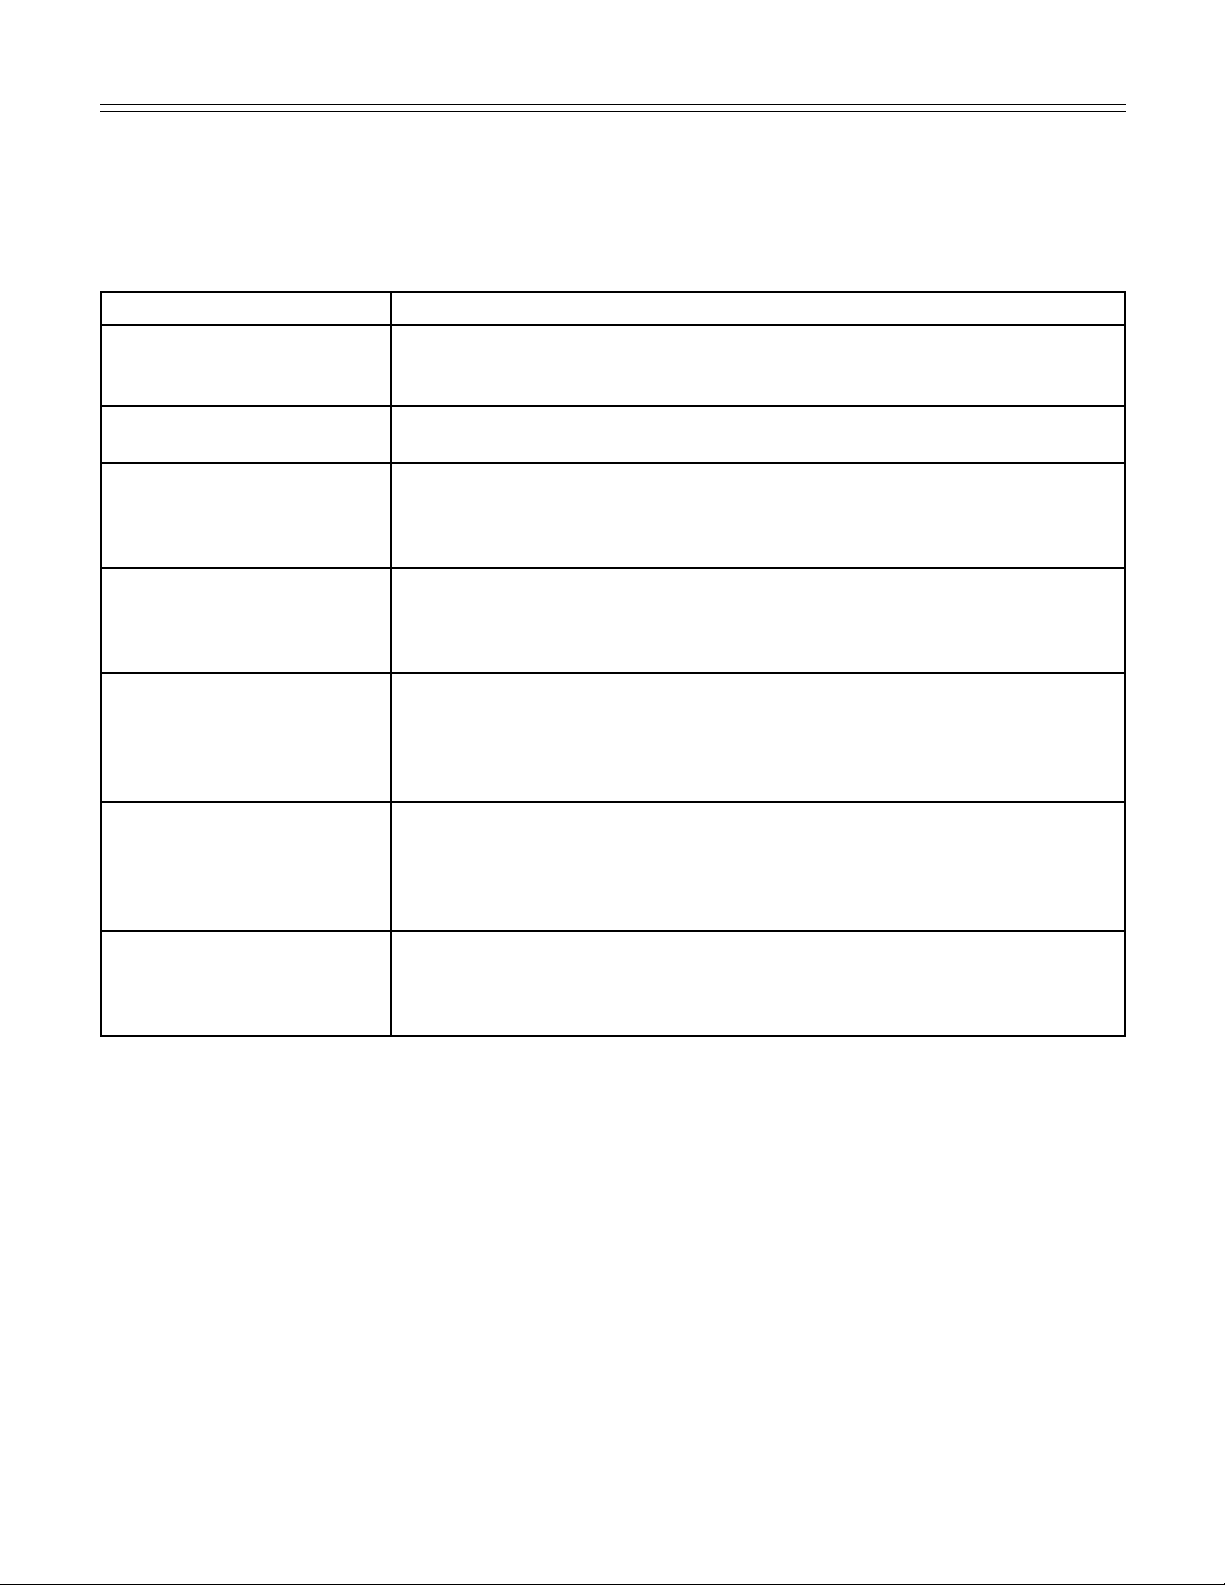
If a problem occurs during operation, check whether it is due to an operating error.
Please note that even during the warranty period, some repair costs may be your responsibility.
You may be able to correct the following faults by checking the possible causes yourself:
Problem Possible Cause and Remedy
Appliance does not work,
display is off
- Is the appliance turned on properly?
- Is the power cord properly inserted in the outlet?
- Is the circuit breaker or fuse in operating condition?
The interior light does
not come on
- Is the refrigerator compartment turned on?
- Has the door been open for more than 15 minutes?
Loud running noise - Is the appliance standing firmly on the floor, or does the compressor
cause nearby items of furniture or objects to vibrate? If necessary, move
the appliance slightly, align by adjusting the adjustable feet, or adjust
bottles and containers.
Motor seems to
run too long
- Is the ambient temperature too hot? See Safety Regulations.
- Has the appliance been opened too often or left open too long?
- A large amount of food has been added.
- Unit is in SuperCool mode. Verify unit is in normal operation mode.
The temperature is
not cold enough
- Is the temperature setting correct? See Setting the Temperature.
- Hasanexcessiveamountoffreshfoodbeenplacedintheappliance?
- Does a separately installed thermometer show the correct reading?
- Is the ventilation system working properly?
- Is the appliance set up too close to a heat source?
Freezer temperature display
shows two dashes - -
The freezer temperature display will only show temperatures that are
below freezing. When initially starting the freezer, it will not be below freez-
ing. It will take three to five hours (depending on ambient conditions) for
freezing temperatures to be achieved and thus displayed numerically.
This may also occur after a power failure.
Ice or water drops appear
on the rear wall in the inte-
rior of the refrigerator com-
partment
This is completely normal. During the cooling process, the humidity in the
refrigerator compartment will condense on the rear wall and freeze. During
the compressor idle period, the ice layer will defrost. The condensate on
the rear wall drains through the defrost water drain for evaporation.

23
Problem Possible Cause and Remedy
Ice maker cannot be Is the combined refrigerator-freezer connected to the electrical outlet?
turned on.
Ice maker is not making - Is the ice maker turned on?
any ice. - Is the IceMaker drawer closed properly?
- Is there enough water in the water tank?
- Has the water tank been inserted correctly?
The control lamp above the - Is there enough water in the water tank?
ON/OFFbuttonflashes. - Hasthewatertankbeeninsertedcorrectly?
Appliance Information
Record this information when the appliance is
installed.
Type Designation: _________________________
ServiceNumber: __________________________
Appliance/SerialNumber: __________________
Date of Purchase: _________________________
Where Purchased: _________________________
Customer Service - Figure 28
If none of the above causes apply and you can-
not correct the fault yourself, this means there is a
fault. Please contact your nearest customer service
department (see enclosed list for addresses).
Give the fault number displayed, together with the
Type Designation
1
,
Service Number
2
and
Appliance / Serial Number
3
as given on the model plate, to ensure prompt,
accurate servicing. The model plate is located
inside the appliance on the left-hand side.
Leave the appliance closed until the customer ser-
vice engineer arrives to prevent any further cold
loss.
Figure 28
Ice Maker Troubleshooting
You may be able to correct the following faults yourself:
TroubleshooTing

24
WarranTy
LIEBHERR WARRANTY PLAN
FULLTWOYEARWARRANTY
For two years from the date of original purchase, your Liebherr warranty covers all parts and labor to
repair or replace any part of the product which proves to be defective in materials or workmanship.
FULLFIVEYEARWARRANTY
For five years from the date of original purchase, your Liebherr warranty covers all parts and labor to repair
or replace any components that prove to be defective in materials or workmanship in the sealed system.
The “Sealed System” means only the compressor, condenser, evaporator, drier and all connecting tubing.
LIMITED6THTHROUGH12THYEARWARRANTY
From the 6th through 12th year from the date of original purchase, your Liebherr warranty covers all parts
that prove to be defective in materials or workmanship in the Sealed System (parts only).
TERMSAPPLICABLETOEACHWARRANTY
All service provided by Liebherr under the warranty must be performed by authorized Liebherr service
representatives, unless otherwise specified by Liebherr. Service will be provided in the home during
normal business hours. This warranty applies only to products installed for normal residential use. Details
regarding a non-residential warranty are available on request.
The warranty applies only to products installed in Canada and any one of the fifty states of the United
States or the District of Columbia.This warranty does not cover any parts or labor to correct any defect
caused by negligence, accident or improper use, maintenance, installation, service or repair, including but
not limited to improper removal and reinstallation of the condensing unit.
THEWARRANTIESDESCRIBEDABOVEAREMADEEXPRESSLYINLIEUOFANYOTHERWARRANTIES,
EXPRESSEDORIMPLIED,INCLUDINGANYIMPLIEDWARRANTYOFMERCHANTABILITYORFITNESS
FORAPARTICULARPURPOSE,ANDOFANYOTHEROBLIGATIONORLIABILITYONTHEPARTOF
LIEBHERR.INNOEVENTSHALLLIEBHERRBELIABLEFORSPECIAL,INCIDENTALORCONSEQUENTIAL
DAMAGESARISINGFROMTHEBREACHOFTHESEWARRANTIESORANYOTHERWARRANTIES,
WHETHEREXPRESS,IMPLIEDORSTATUTORY.
SomeStatesdonotallowtheexclusionorlimitationofincidentalorconsequentialdamagessotheabove
limitationorexclusionmaynotapplytoyou.Thiswarrantygivesyouspecificlegalrightsandyoumayalso
have other rights which vary from State to State.
To receive parts and/or service and the name of the Liebherr authorized service representative nearest
you, contact your Liebherr dealer or distributor or contact the Liebherr designated national service
provider:
intheUS:Service-appliances.us@liebherr.com,orcall1-866-LIEBHERor1-866-543-2437
inCanada:www.euro-parts.ca,orcall1-888-LIEBHER,1-888-543-2437.

For Service in the U.S.
LiebherrServiceCenter
Toll Free: 1-866-LIEBHERor1-866-543-2437
Email: Service-appliances.us@liebherr.com
PlusOne Solutions, Inc.
3501QuadrangleBlvd,Suite120
Orlando, FL 32817
For Service in Canada
LiebherrServiceCenter
Toll Free: 1-888-LIEBHERor1-888-543-2437
www.euro-parts.ca
EURO-PARTS CANADA
39822BelgraveRoad
Belgrave,Ontario,N0G1E0
Phone: (519) 357-3320
Fax:(519)357-1326