Loading ...
Loading ...
Loading ...
[A CAUTION] Risk of pinching hands or fingers. To avoid
a band injury from a collapse of plumbing, support the pipe
above the separation before cutting or disassembly.
4. Lift the primary pump and discharge pipe assembly out
of the sump.
[AWARNINGIRLsk of electrical shock. Do not lift the
pump by the electrical cord; lift pump only by the discharge
pipe, lifting ring or handle on the pump. Lifting by the cord
can damage the cord.
NOTICE: The discharge pipe is filled with water. Drain the
water from the discharge pipe assembly. Keep the work area
dry.
Remove the
hose coupling
or mark the
1st cut here.--_
Support the
Pipe before
cutting.
5. Hold the coupling (Key No. 6, Page 9) with the channel
locks, insert the screwdriver into the tee for leverage and
tighten the tee with the screwdriver. Finish with the tee
in a straight up and down (vertical) position.
6. Clean the pipe ends with the cloth towel.
7. Glue the cut-off piece of discharge pipe into the top of
the tee. If your pipe is 1-1/4", you will need to glue the
reducer bushings into the tee and glue the pipe into the
bushings. Place the assembly on to the primary discharge
pipe. Do not glue the tee onto the Primary Pump dis-
charge pipe.
8.Mount the float switch assembly (Key No. 9, Page 9)
loosely to the discharge pipe with the cable ties (Key Nos.
9A & 9B, Page 9). Approximately 3 "(76ram) of cord length
should be left between the float and the clamp.
Adjustments may be needed, do not tighten the cable ties.
See Figure 3, Page 5.
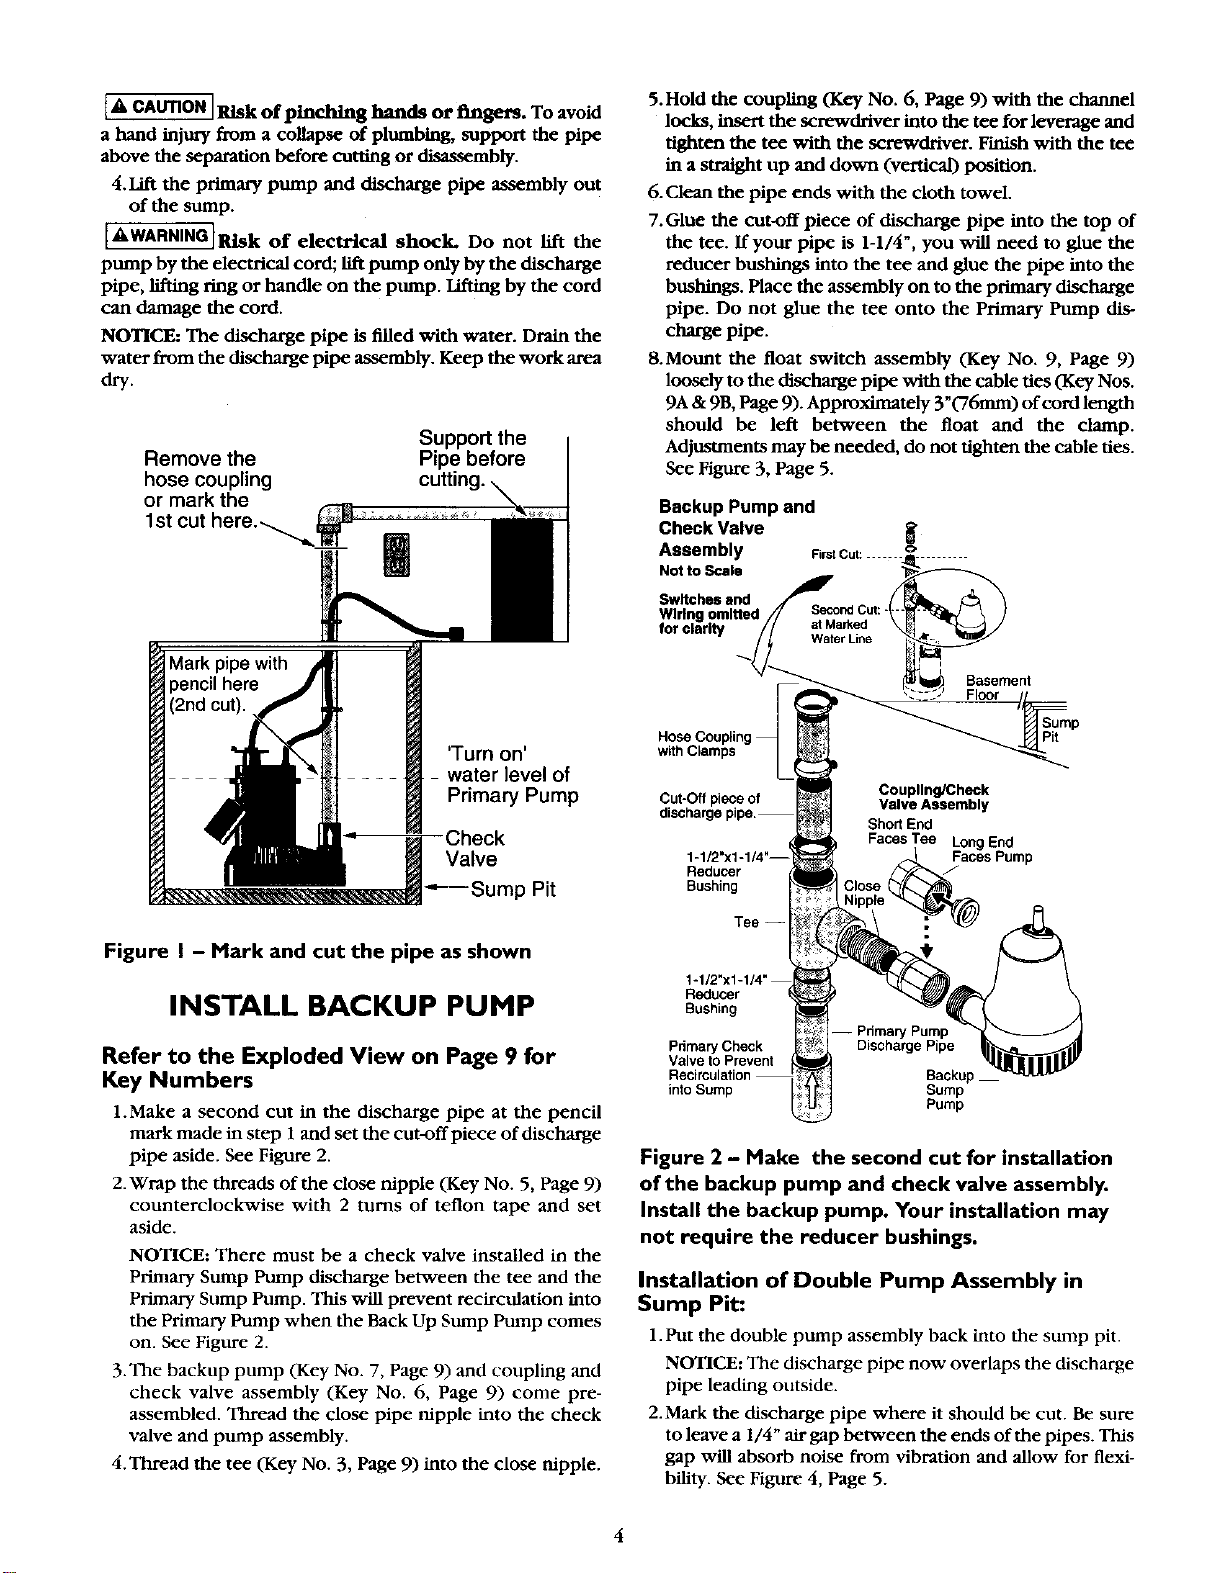
Backup Pump and
Check Valve
Assembly FirstCut: ....... o
NottoScale
Switches and
'Turn on'
water level of
Primary Pump
Valve
•"---Sump Pit
Figure I - Mark and cut the pipe as shown
INSTALL BACKUP PUMP
Refer to the Exploded View on Page 9 for
Key Numbers
1.Make a second cut in the discharge pipe at the pencil
mark made in step 1 and set the cut-off piece of discharge
pipe aside. See Figure 2.
2. Wrap the threads of the close nipple (Key No. 5, Page 9)
counterclockwise with 2 turns of teflon tape and set
aside.
NOTICE: There must be a check valve installed in the
Primary Sump Pump discharge between the tee and the
Primary Sump Pump. This will prevent recirculation into
the Primary Pump when the Back Up Sump Pump comes
on. See Figure 2.
3.The backup pump (Key No. 7, Page 9) and coupling and
check valve assembly (Key No. 6, Page 9) come pre-
assembled. Thread the close pipe nipple into the check
valve and pump assembly.
4. Thread the tee (Key No. 3, Page 9) into the close nipple.
Basement
Sump
Pit
Cut-Off piece of
discharge pipe.
Reducer
Bushing
Tee --
Coupling/Check
Valve Assembly
Short End
FacesTee LongEnd
Faces Pump
Reducer
Bushing
Pdmary Check Discharge Pipe
Valve to Prevent
Backup
into Suing Sump
Pump
Figure 2 - Make the second cut for installation
of the backup pump and check valve assembly.
Install the backup pump. Your installation may
not require the reducer bushings.
Installation of Double Pump Assembly in
Sump Pit:
1. Put the double pump assembly back into the sump pit.
NOTICE: The discharge pipe now overlaps the discharge
pipe leading outside.
2.Mark the discharge pipe where it should be cut. Be sure
to leave a 1/4" air gap between the ends of the pipes. This
gap will absorb noise from vibration and allow for flexi-
I_flity. See Figure 4, Page 5.
4
Loading ...
Loading ...
Loading ...