Owner's Manual
Manual Del Propietario
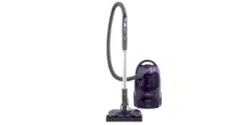
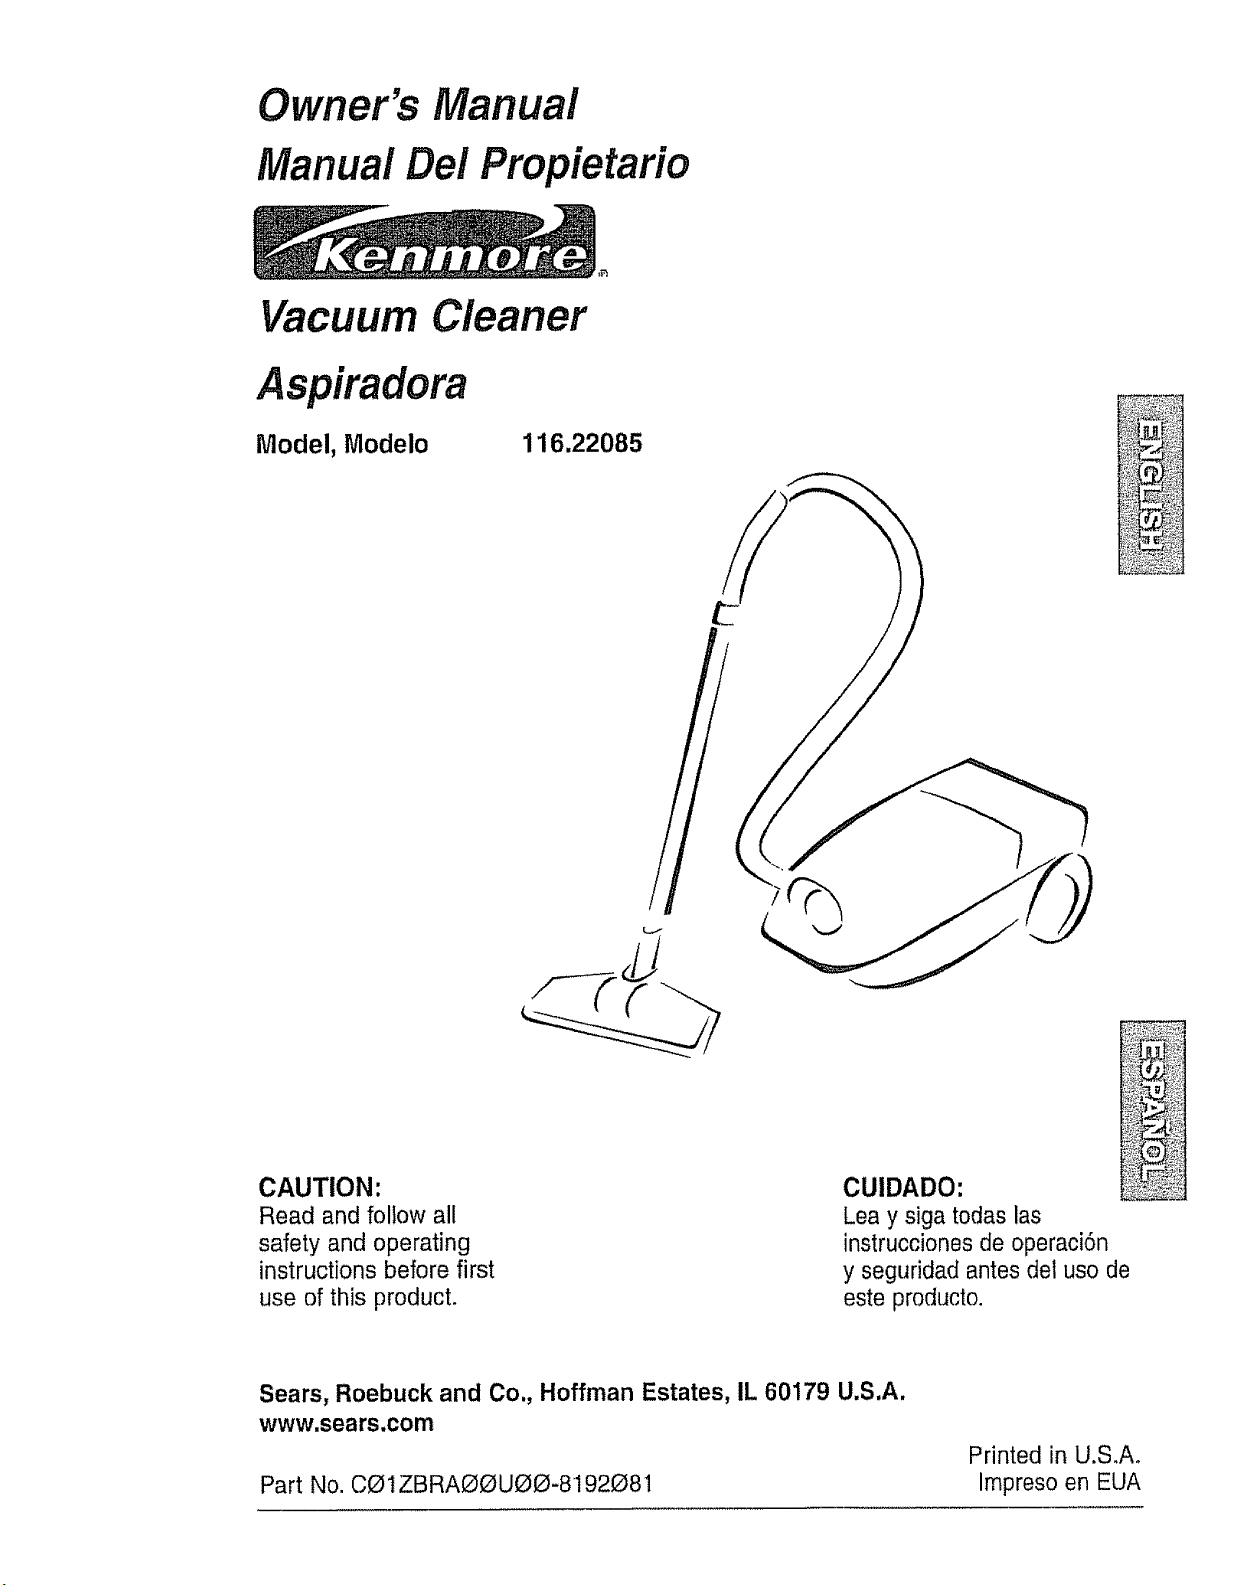
Vacuum Cleaner
Aspiradora
Model, Modelo
116.22085
CAUTION:
Read and follow all
safety and operating
instructions before first
use of this product.
CUlDADO:
Lea y siga todas las
instrucciones de operaciSn
y seguridad antes del uso de
este producto.
Sears, Roebuck and Co., Hoffman Estates, IL 60179 U.S.A.
www.sears.com
Part No. C_1ZBRA_U_-8192_81
Printed in U.S,Ao
Irnpreso en EUA
How Your Vacuum Works .............. 10
Before Using Your New Vacuum ......... 2
Kenmore Vacuum Cleaner Warranty o_ 2
Important Safety Instructions ......... 3
Parts and Features .................... 4
Assembly ............................... 5-6
Use ..................................... 7
How to Start ........................ 7
Attachments ........................ 8
Attachment Use Chart ................. 8
Vacuuming Tips ..................... 9
Performance Features ................ 9
Canister Care ...................... 10
Bag Changing ....................... 10
Motor Safety Filter Cleaning ........... 11
Thermal Protector .................. 11
Cleaning Exterior and Attachments ..... 11
"Troubleshooting ....................... 12
Requesting Assistance
Or Service ................... Back Page
Please read this guide. It will help you assemble and operate your new Kenmore vacuum in
the safest and most effective way.
For more information about the care and operation, cal! your nearest Sears store. You well
need the complete model and serial numbers when requesting information. Your vacuum's
model and serial numbers are located on the Model and Serial Number Platen
Use the space below to record the model number and serial number of your new Kenmore
vacuum.
Model No.
Serial No.
Date of Purchase
Keep this book and your sales check (receipt) in a safe place for future reference.
LIMITED ONE YEAR WARRANTY ON KENMORE VACUUM CLEANER
This warranty is for one year from the date of purchase, and includes only private household
vacuum cleaner use. During the warranty year, when this vacuum cleaner is operated and
maintained according to the owner's manual instructions, Sears will repair any defects in
material or workmanship free of charge.
This warranty excludes vacuum bags, belts, light bulbs, and filters, which are expendable parts
and become worn during normal use.
For warranty service, return this vacuum cleaner to the nearest Sears Service Center in
the United States.
This warranty applies only while this product is in use in the United States. This warranty gives
you specific legal rights, and you may also have other rights which vary from state to state.
Sears, Roebuck and Co., Dt817WA, Hoffman Estates, IL 60179
2
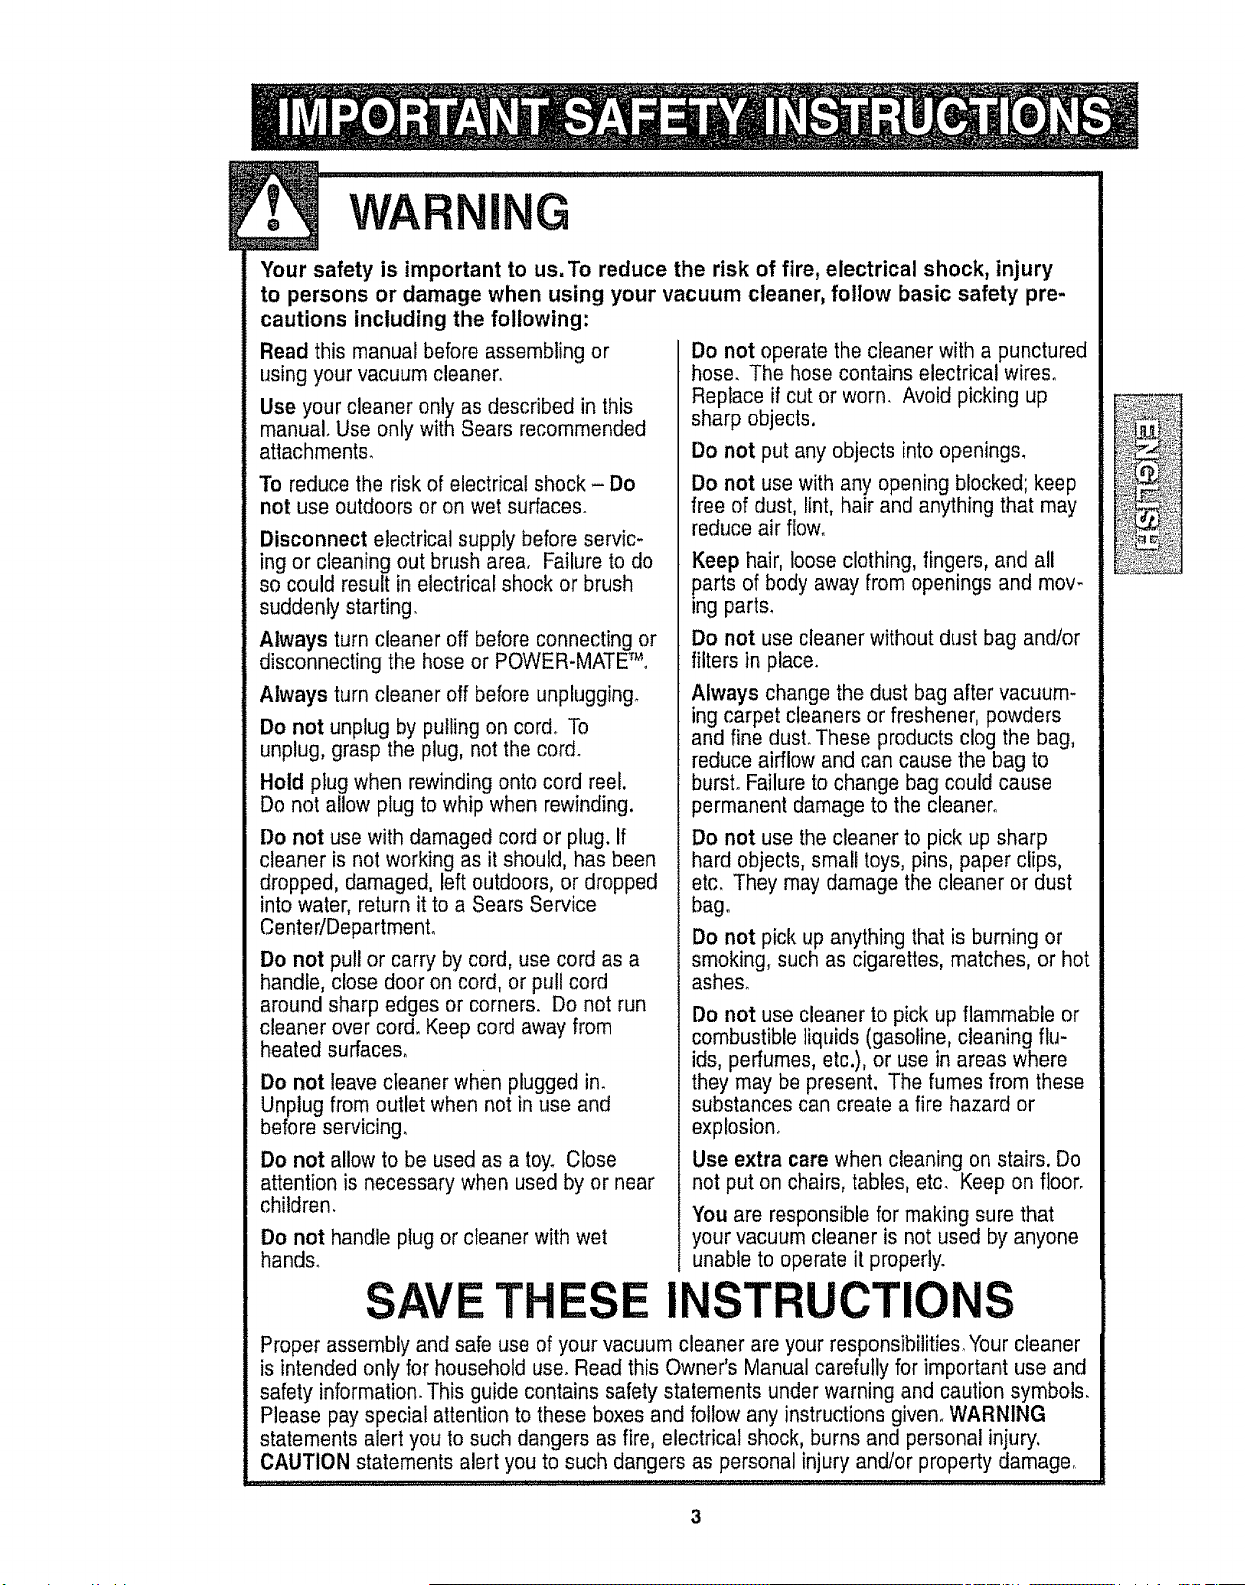
WAR NG
Your safety is important to us,To reduce the risk of fire, electrical shock, injury
to persons or damage when using your vacuum cleaner, follow basic safety pre-
cautions including the following:
Read this manual before assembling or
using your vacuum cleaner.
Use your cleaner only as described in this
manual. Use only with Sears recommended
attachments.
To reduce the risk of electrical shock - Do
not use outdoors or on wet surfaces.
Disconnect electrical supply before servic-
ing or cleaning out brush area. Failure to do
so could result in electrical shock or brush
suddenly starting_
Always turn cleaner off before connecting or
disconnecting the hose or POWER-MATET_
Always turn cleaner off before unplugging°
Do not unplug by pulling on cord. To
unplug, grasp the plug, not the cor&
Hold plug when rewinding onto cord reel.
Do not allow plug to whip when rewinding.
Do not use with damaged cord or plug. If
cleaner is not working as it should, has been
dropped, damaged, left outdoors, or dropped
into water, return it to a Sears Service
CentedDepartmenL
Do not pull or carry by cord, use cord as a
handle, close door on cord, or pull cord
around sharp edges or corners. Do not run
cleaner over cord. Keep cord away from
heated surfaces.
Do not leave cleaner when plugged in_
Unplug from outlet when not in use and
before servicing.
Do not allow to be used as a toy_ Close
attention is necessary when used by or near
children,
Do not handle plugor cleaner with wet
hands_
Do not operate the cleaner with a punctured
hose. The hose contains electrical wires°
Replace if cut or worn. Avoid picking up
sharp objects.
Do not put any objects into openings.
Do not use with any opening blocked; keep
free of dust, lint, hair and anything that may
reduce air flow.
Keep hair, loose clothing, fingers, and all
parts of body away from openings and mov-
ing parts_
Do not use cleaner without dust bag and/or
filters in place.
Always change the dust bag after vacuum-
ing carpet cleaners or freshener, powders
and fine dust. These products clog the bag,
reduce airflow and can cause the bag to
burst° Failure to change bag could cause
permanent damage to the cleaner°
Do not use the cleaner to pick up sharp
hard objects, small toys, pins, paper clips,
etc. They may damage the cleaner or dust
bag.
Do not pick up anything that is burning or
smoking, such as cigarettes, matches, or hot
ashes.
Do not use cleaner to pick up flammable or
combustible liquids (gasoline, cleaning flu-
ids, perfumes, etc.), or use in areas where
they may be present. The fumes from these
substances can create a fire hazard or
explosion.
Use extra care when cleaning on stairs. Do
not put on chairs, tables, etc. Keep on floor.
You are responsible for making sure that
your vacuum cleaner is not used by anyone
unable to operate it properly.
SAVE THESE INSTRUCTIONS
Proper assembly and safe use of your vacuum cleaner are your responsibilities. Your cleaner
is intended only for household use. Read this Owner's Manual carefully for important use and
safety information. This guide contains safety statements under warning and caution symbols.
Please pay special attention to these boxes and follow any instructions given. WARNING
statements alert you to such dangers as fire, electrical shock, burns and personal injury.
CAUTION statements alert you to such dangers as personal injury and/or property damage_
3
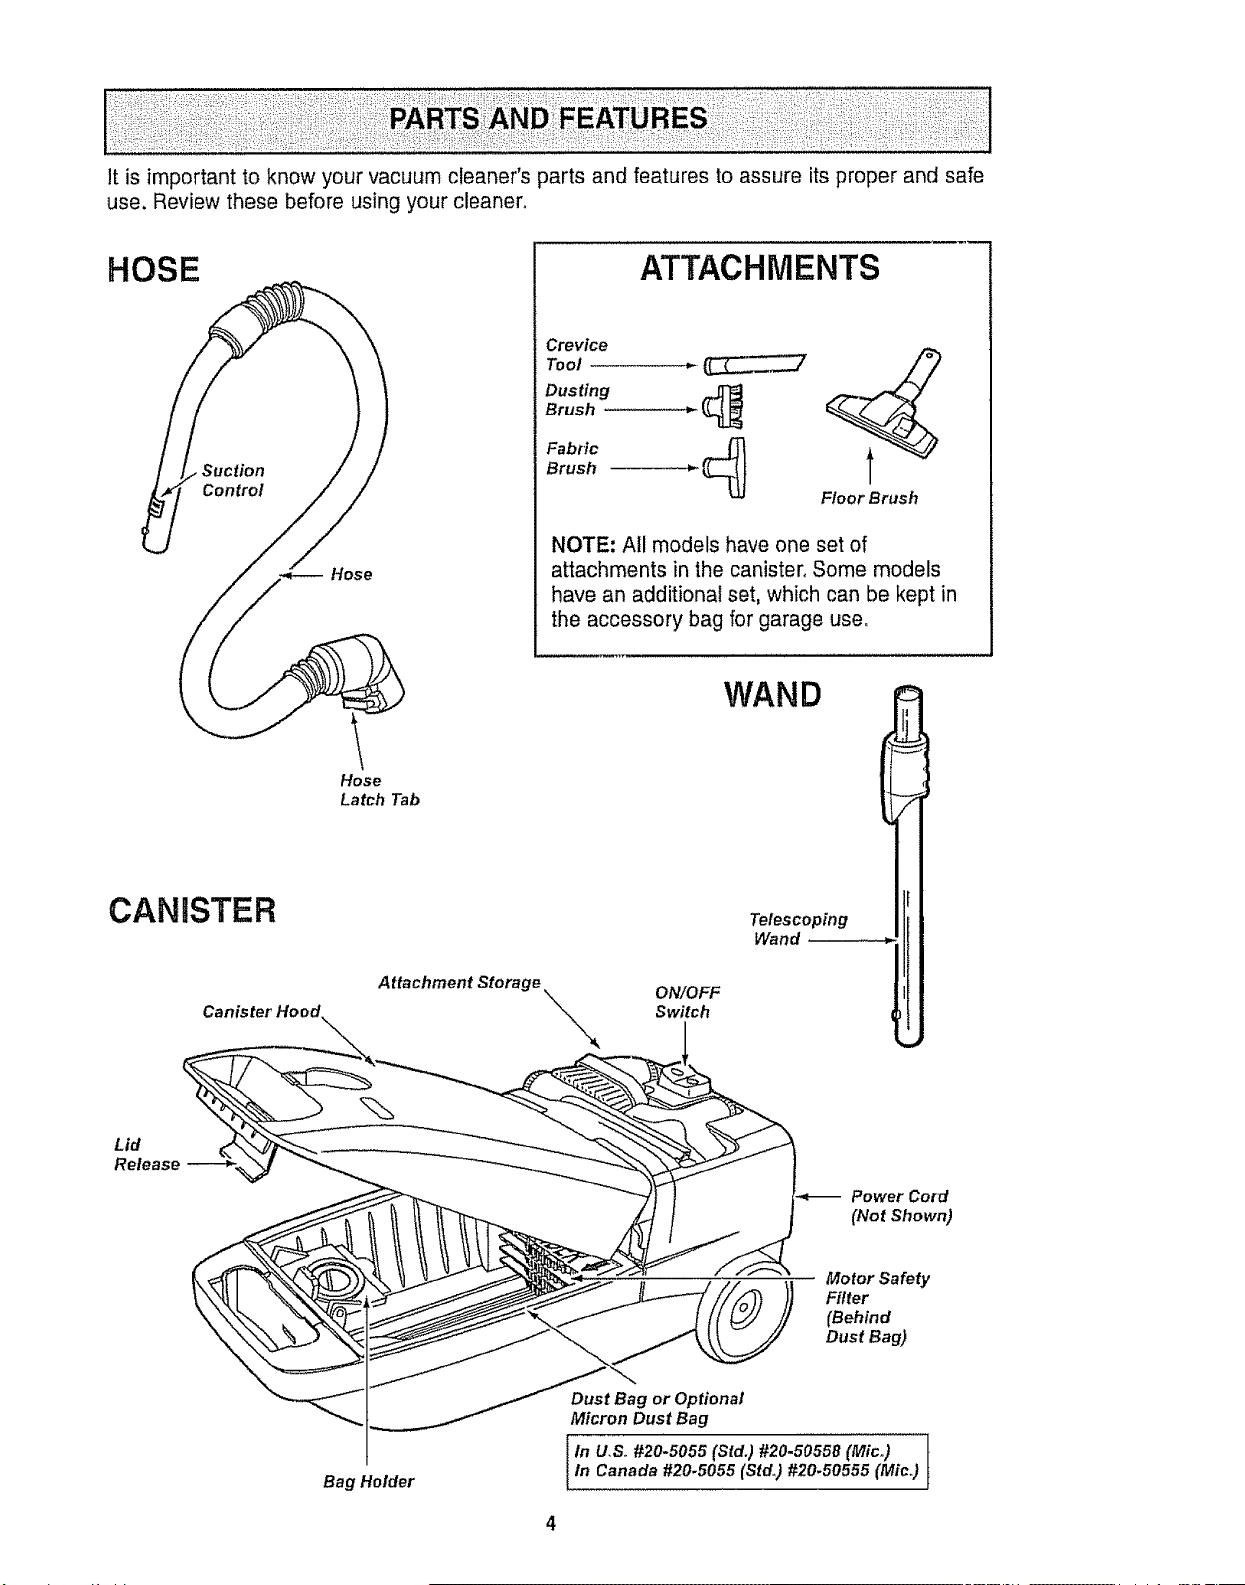
It is important to know your vacuum cleaner's parts and features to assure its proper and safe
use. Review these before using your cleaner°
HOSE
Hose
ATTACHMENTS
Crevice
Dusting
Brush
Fabric
Brush
Floor Brush
NOTE: All models have one set of
attachments in the canister° Some models
have an additional set, which can be kept in
the accessory bag for garage use°
WAND
Hose
Latch Tab
CANISTER
Attachment Storage
ON/OFF
Switch
Telescoping
Wand
Lid
Release
Power Cord
(Not Shown)
Motor Safety
Filter
(Behind
Dust Bag)
Bag Holder
Dust Bag or Optional
Micron Dust Bag
I In U,So#20-5055 (Std.) #20.50558 (Mic,,)In Canada #20.5055 (Std,) #20.50555 (Mic.)

Electrical Shock Hazard
DO NOT plug into electrical supply
until assembly is complete. Failure
to do so could result in electrical
shock or injury.
Before assembling vacuum, check the PACK-
ING LIST on the cover of the separate
Repair Parts List. Use this list to verify that
you have received all the components of your
new Kenmore vacuum.
RUG/FLOOR NOZZLE
1. Insert wand into
the rug/floor nozzle
until the wand but-
ton snaps in place
in the hole of the
tool.
2. Push down on
the tab that will suit
your cleaning
needs, When the
tab is down, that
function is in place.
TELESCOPIC WAND
The wand length
is adjustable and
requires no ===
assembly. To ===
adjust, simply
push down on the
wand handle and
slide the upper _=
wand to the
desired height, '_
Motor
Safety
Filter
CANISTER
1. Open the canister
hood.
2. Check to see that
the dust bag is proper-
ly installed. See BAG
CHANGING for instructions_
3. Check to see that the motor safety filter is
properly installed. See MOTOR SAFETY FIL-
TER CLEANING for instructions,
5
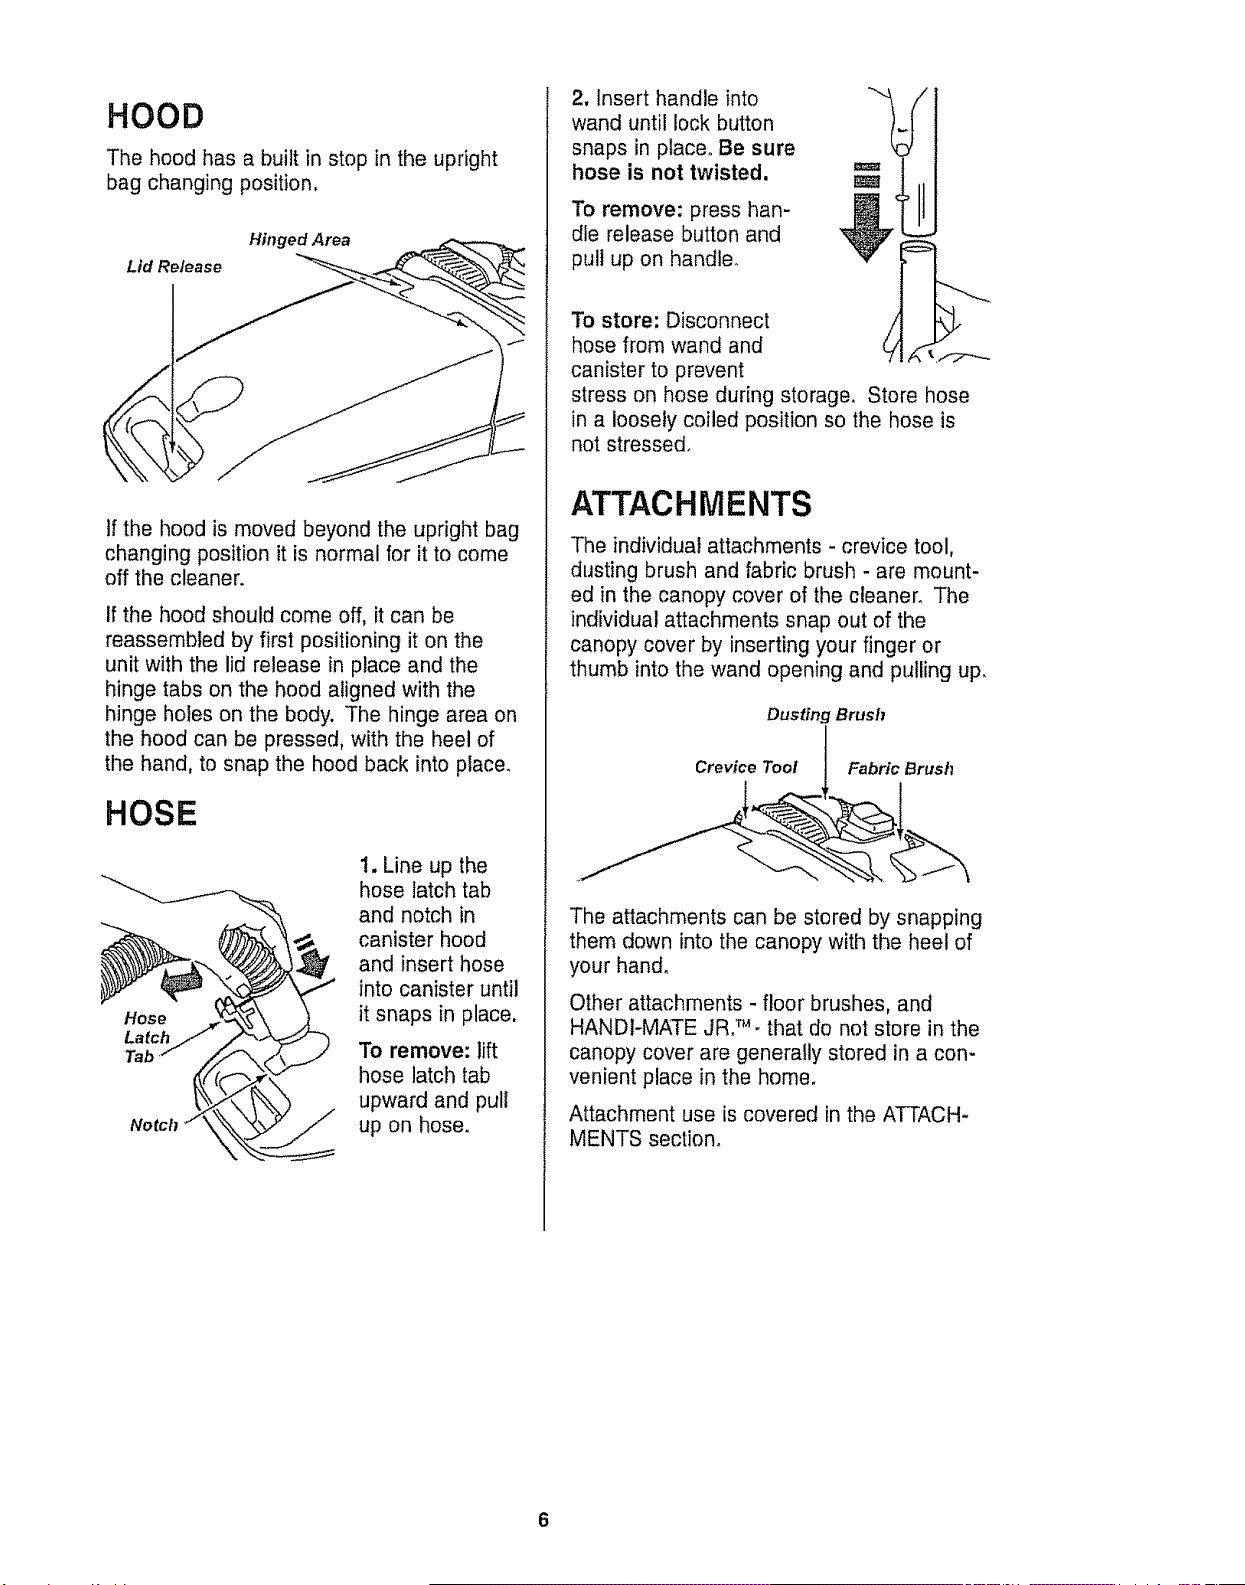
HOOD
The hood has a built in stop in the upright
bag changing position,
Hinged Area
If the hood is moved beyond the upright bag
changing position it is normal for it to come
off the cleaner.
If the hood should come off, it can be
reassembled by first positioning it on the
unit with the lid release in place and the
hinge tabs on the hood aligned with the
hinge holes on the body. The hinge area on
the hood can be pressed, with the heel of
the hand, to snap the hood back into place.
HOSE
Hose
Latch
Tab
Notch
1. Line up the
hose latch tab
and notch in
canister hood
and insert hose
into canister until
it snaps in place.
To remove: lift
hose latch tab
upward and pull
up on hose.
2. Insert handle into
wand until lock button
snaps in place. Be sure
hose is not twisted.
To remove: press han-
dle release button and
pull up on handle_
To store: Disconnect
hose from wand and
canister to prevent
stress on hose during storage, Store hose
in a loosely coiled position so the hose is
not stressed.
ATTACHMENTS
The individual attachments - crevice tool,
dusting brush and fabric brush - are mount-
ed in the canopy cover of the cleaner. The
individual attachments snap out of the
canopy cover by inserting your finger or
thumb into the wand opening and pulling up.
Dusting Brush
Crevice Toot Fabric Brush
The attachments can be stored by snapping
them down into the canopy with the heel of
your hand.
Other attachments - floor brushes, and
HANDI-MATE JR. _- that do not store in the
canopy cover are generally stored in a con-
venient place in the home.
Attachment use is covered in the ATTACH-
MENTS section.
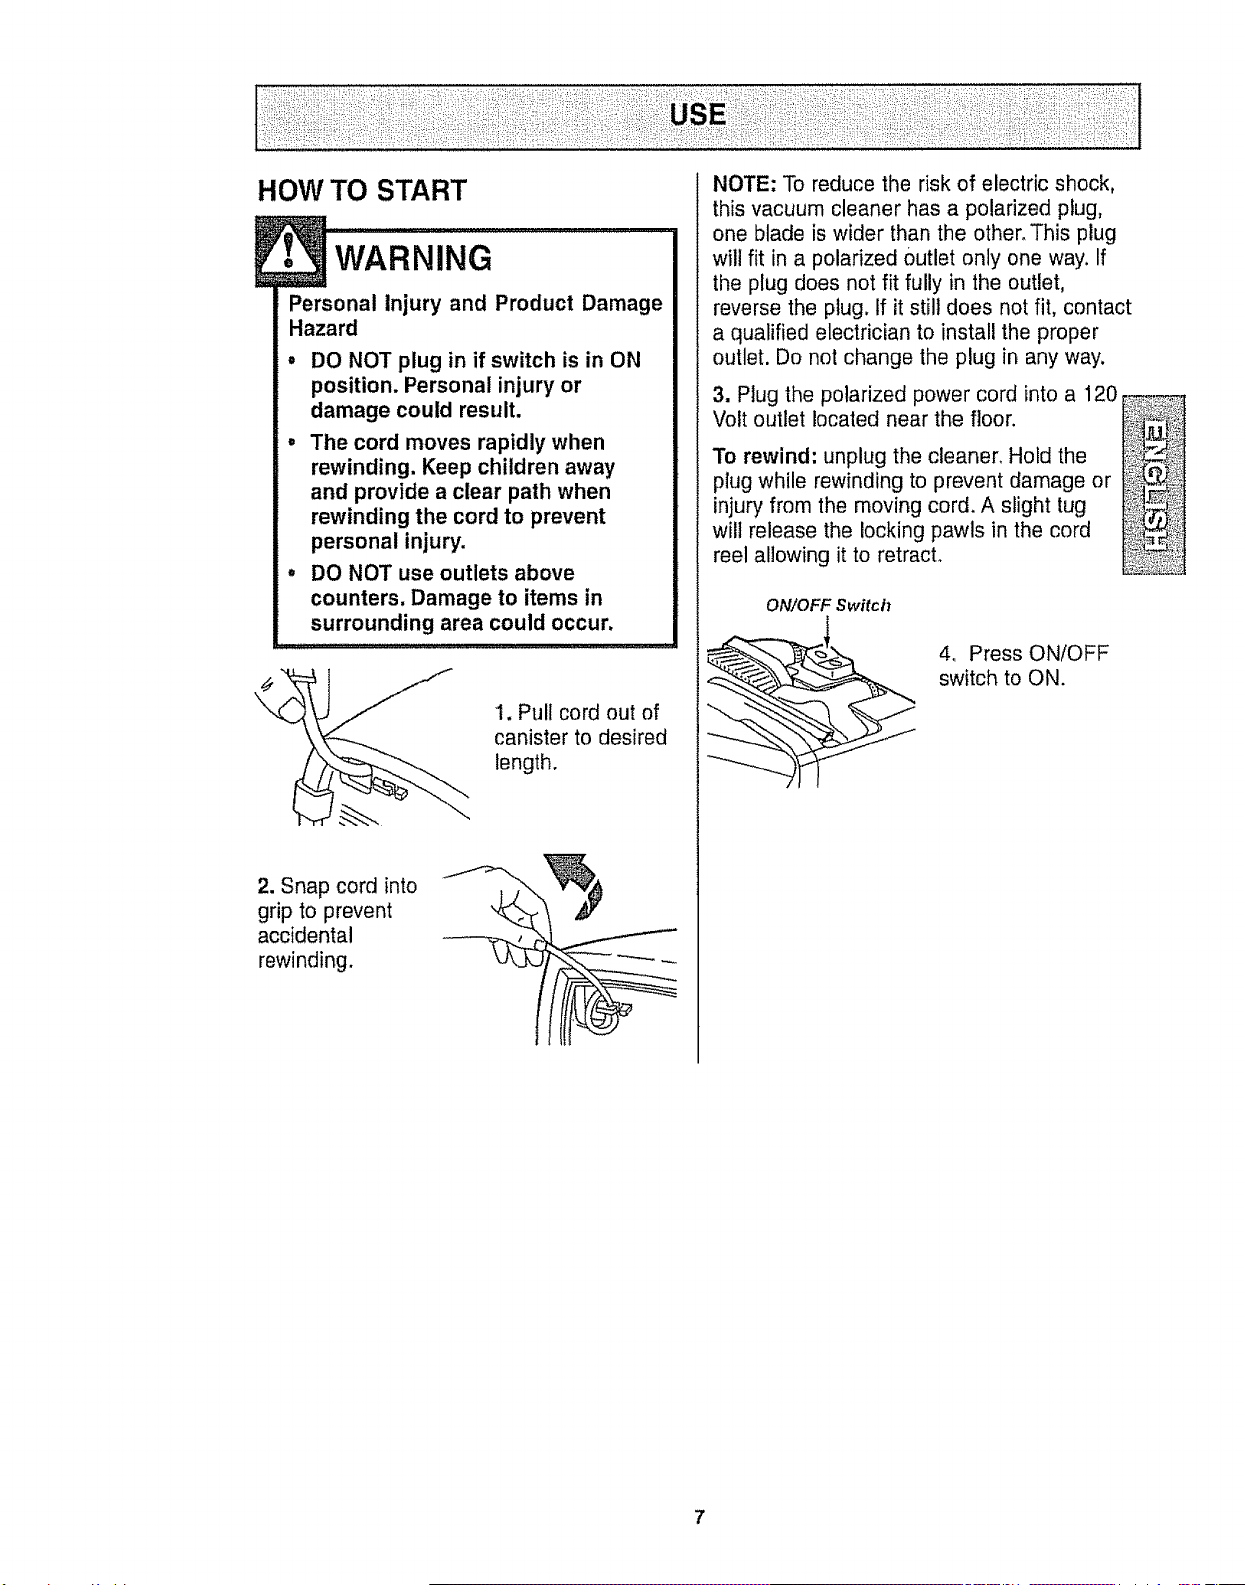
HOW TO START
Personal Injury and Product Damage
Hazard
• DO NOT plug in if switch is in ON
position. Personal injury or
damage could result.
° The cord moves rapidly when
rewinding. Keep children away
and provide a clear path when
rewinding the cord to prevent
personal injury.
• DO NOT use outlets above
counters. Damage to items in
surrounding area could occur.
1. Pull cord out of
canister to desired
length.
2. Snap cord into
grip to prevent
accidental
rewinding.
NOTE: To reduce the risk of electric shock,
this vacuum cleaner has a polarized plug,
one blade is wider than the other. This plug
will fit in a polarized Outlet only one way. If
the plug does not fit fully in the outlet,
reverse the plug. If it still does not fit, contact
a qualified electrician to install the proper
outlet. Do not change the plug in any way.
3. Plug the polarized power cord into a 120
Volt outlet located near the floor.
To rewind: unplug the cleaner. Hold the
plug while rewinding to prevent damage or
injury from the moving cord, A slight tug
will release the locking pawls in the cord
reel allowing it to retracL
ON/OFF Switch
4, Press ONtOFF
switch to ON.
7

ATTACHMENTS ON HANDLE
1. Depress button on
handle or wand and
remove attachment
tool_
2, Push new attachment tool onto handle or
wand until lock button snaps into hole on
the attachment tool, if it has a hole.
The rug/floor
brush and floor
brush have lock-
ing holes. The
crevice tool,
dusting brush
and fabric brush
do not have lock-
ing holes
ATTACHMENTS ON WAND
Put on attachments
as needed. See
chart below.
Put on attach-
ments as need-
ed. See chart
below.
CLEANING AREA
ATTACHMENT
Between
Furniture" Cushions*
DUSTING BRUSH
CREVICE TOOL _._
FABRIc'BRusH
FLOOR BRUSH <
(Some Models)
Drapes'
X x
X x
X x
Stairs
Bare Carpeted
Floors iFIoors.,'Rug._
Walls
X
X X
X ....... I_
* Always clean attachments before using on fabrics.
8
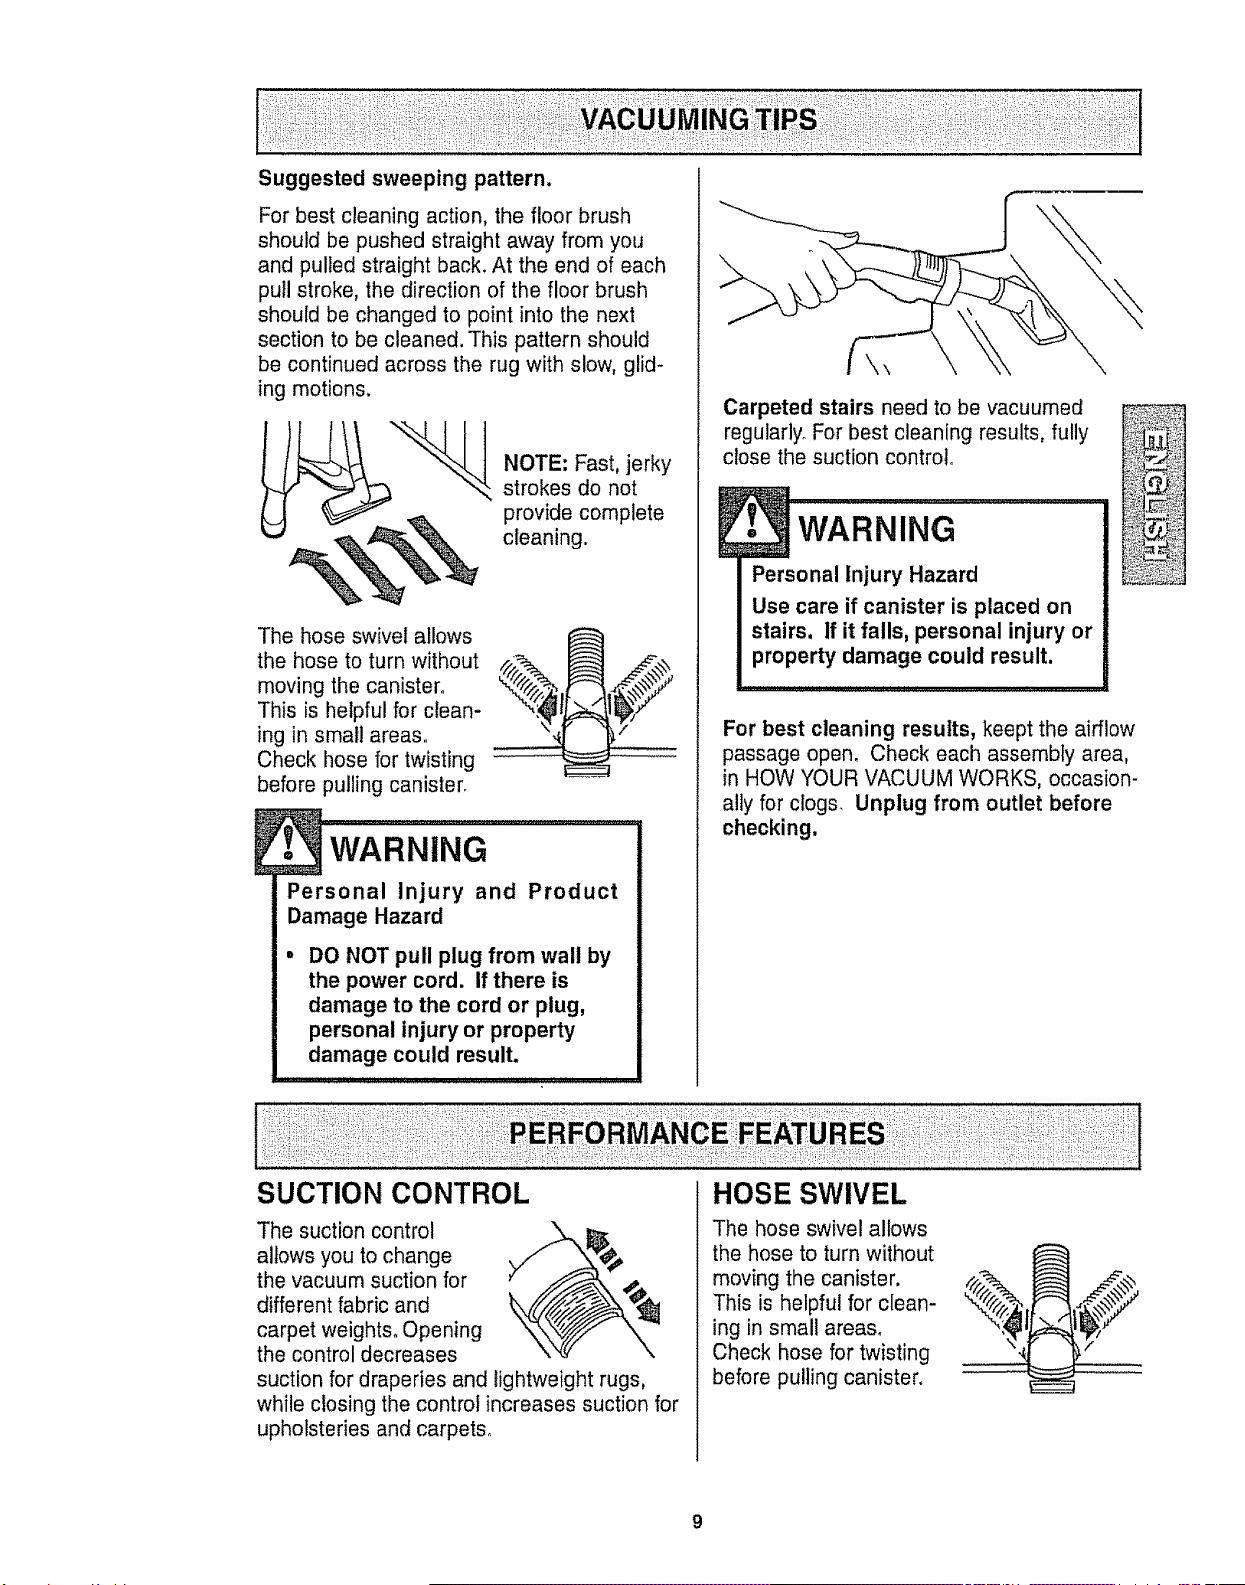
For best cleaning action, the floor brush
should be pushed straight away from you
and pulled straight back. At the end of each
pull stroke, the direction of the floor brush
should be changed to point into the next
section to be cleaned. This pattern should
be continued across the rug with slow, glid-
ing motions.
NOTE: Fast, jerky
strokes do not
provide complete
cleaning.
The hose swivel allows
the hose to turn without
moving the canister°
This is helpful for clean-
ing in small areas°
Check hose for twisting
before pulling canister_
Personal Injury and Product
Damage Hazard
= DO NOT pull plug from wall by
the power cord. If there is
damage to the cord or plug,
personal injury or property
damage could result.
\\
Carpeted stairs need to be vacuumed
regularly° For best cleaning results, fully
close the suction control.
wARNING
Personal Injury Hazard
Use care if canister is placed on
stairs. If it falls, personal injury or
property damage could result.
For best cleaning results, keept the airflow
passage open. Check each assembly area,
in HOW YOUR VACUUM WORKS, occasion-
ally for clogs. Unplug from outlet before
checking.
SUCTION CONTROL HOSE SWIVEL
The suction control
allows you to change
the vacuum suction for
different fabric and
carpet weights. Opening
the control decreases
suction for draperies and lightweight rugs,
while closing the control increases suction for
upholsteries and carpets°
The hose swivel allows
the hose to turn without
moving the canister.
This is helpful for clean-
ing in small areas.
Check hose for twisting
before pulling canister.
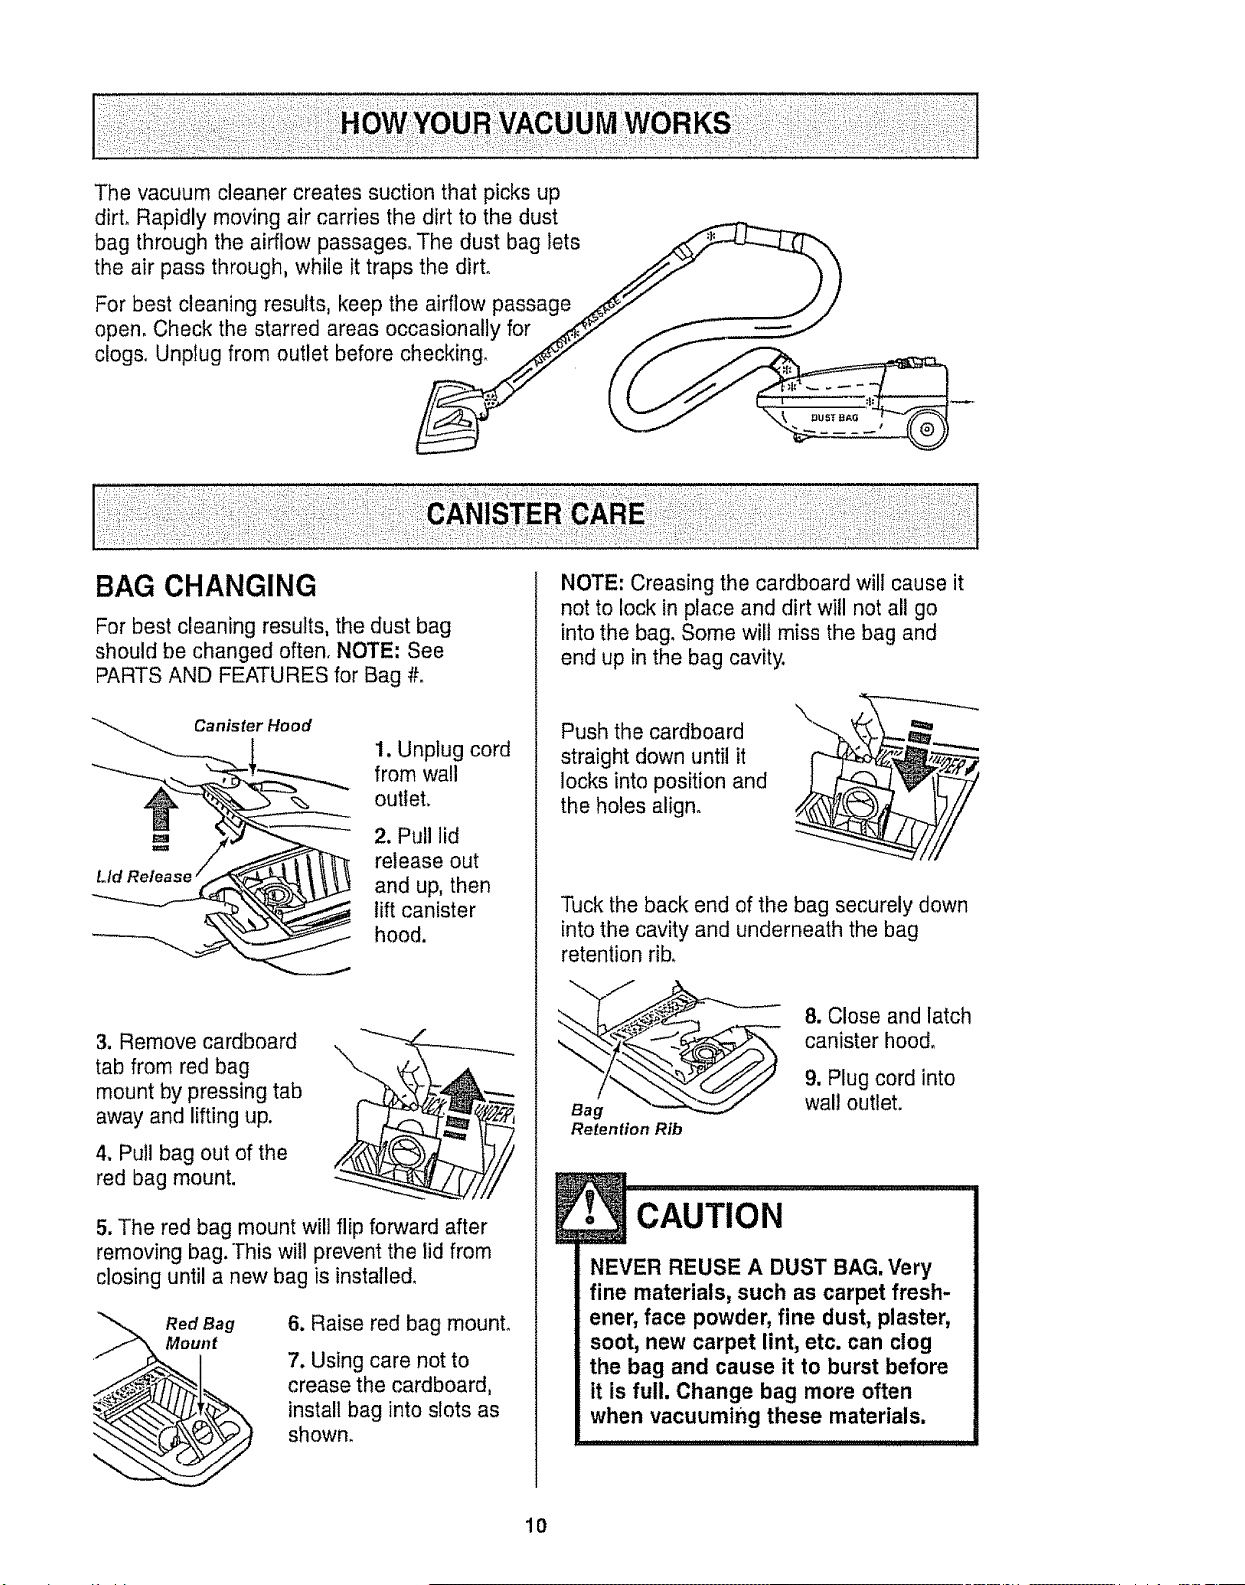
Thevacuumcleanercreatessuctionthatpicksup
dirLRapidlymovingaircarriesthedirttothedust
bagthroughtheairflowpassage&Thedustbaglets
theairpassthrough,whileit trapsthedirt.
Forbestcleaningresults,keeptheairflowpassage
open.Checkthestarredareasoccasionallyfor
clogs°Unplugfromoutletbeforechecking.
BAG CHANGING
For best cleaning results, the dust bag
should be changed often, NOTE= See
PARTS AND FEATURES for Bag #_
Lid
Canister Hood
1. Unplug cord
from wall
outlet,
2. Pull lid
release out
and up, then
lift canister
hood,
3. Remove cardboard
tab from red bag
mount by pressing tab
away and lifting up.
4. Pull bag out of the
red bag mount.
5, The red bag mount will flip forward after
removing bag.]his will prevent the lid from
closing until a new bag is installed,
"_-... Red Bag
_unt
6. Raise red bag mount.
7, Using care not to
crease the cardboard,
install bag into slots as
shown.
NOTE: Creasing the cardboard will cause it
not to lock in place and dirt will not all go
into the bag, Some will miss the bag and
end up in the bag cavity.
Push the cardboard
straight down until it
locks into position and
the holes align,
Tuck the back end of the bag securely down
into the cavity and underneath the bag
retention rib_
Bag
Retention Rib
8. Close and latch
canister hoo&
9. Plug cord into
wall outlet.
! CAUTION
NEVER REUSE A DUST BAG. Very
fine materials, such as carpet fresh-
ener, face powder, fine dust, plaster,
soot, new carpet lint, etc. can clog
the bag and cause it to burst before
it is full. Change bag more often
when vacuuming these materials.
10

Electrical Shock Hazard
Do not operate the cleaner without
the motor safety filter. Be sure the
filter is dry and properly installed to
prevent motor failure and/or
electrical shock.
Check motor safety filter occasionally
and clean when dirty,
1. Unplug cord
from wall out-
let and remove
bag°
2. Pull out
safety filter as
shown.
3. Wash filter in warm soapy water, rinse,
then dry_ Do not clean in dishwasher or
install while damp,
4. Snap filter
back into canis-
ter.
5. Insert bag.
This vacuum has a thermal protector which automatically trips to protect the vacuum from
overheating. The thermal protector turns the motor off automatically to allow the motor to cool
in order to prevent possible damage to the vacuum.
To reset: Turn off and unplug the vacuum from the outlet to allow the vacuum to cool, Check
for and remove any clogs. Also check and replace any clogged filters, Wait
approximately 50 minutes and plug the vacuum in and turn back on to see if the thermal
protector has reset, In some cases, the unit may suddenly restart. DO NOT leave
unattended,
1, Unplug cord from wall outlet. Do not drip
water on cleaner.
2. Clean exterior using a clean, soft cloth
that has been dipped in a solution of mild
liquid detergent and water, then wrung dry.
Wipe dry after cleaning.
3. To reduce static electricity and dust build-
up, wipe outer surface of cleaner and
attachments.
DO NOT USE ATTACHMENTS IF THEY
ARE WET.
!• CAUTION ............................
Attachments used in dirty areas,
such as under a refrigerator, should
not be used on other surfaces until
they are washed.They could leave
marks.
11
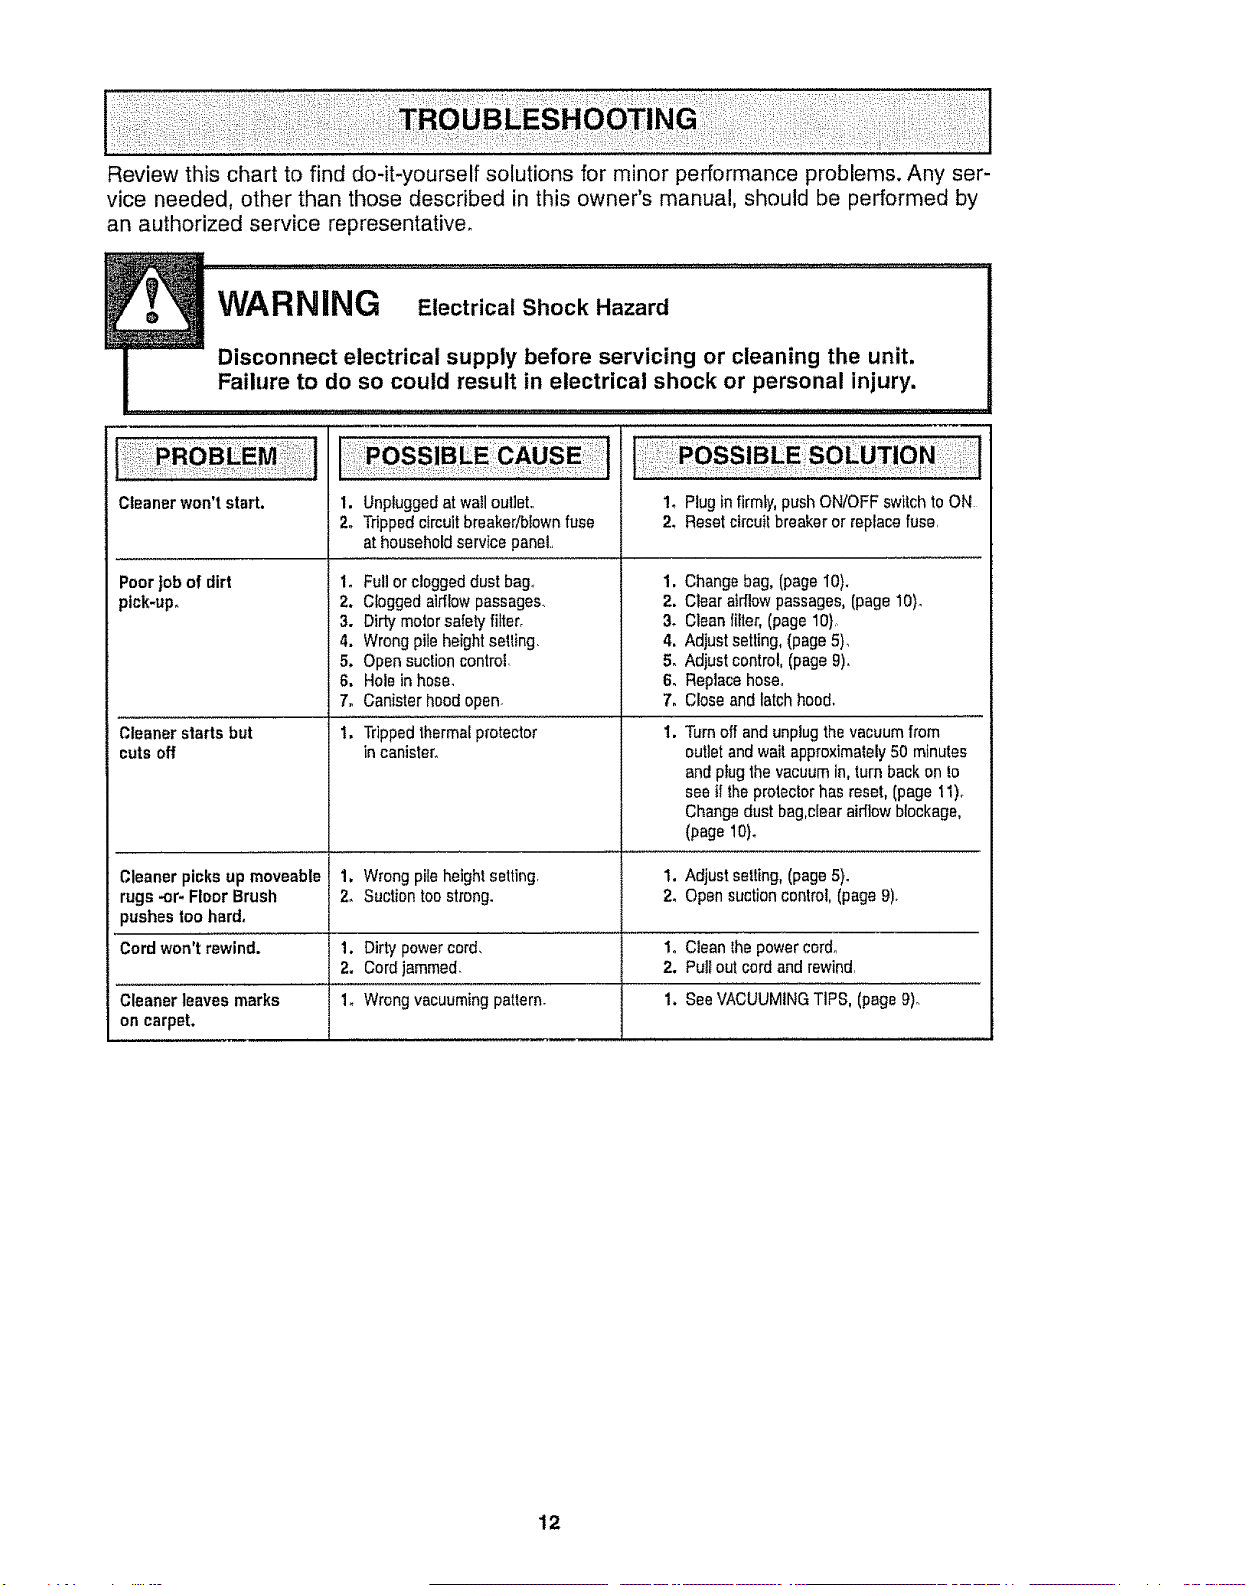
Review this chart to find do-it-yourself solutions for minor performance problems. Any ser-
vice needed, other than those described in this owner's manual, should be performed by
an authorized service representative.
WARNING Electrical Shock Hazard
Disconnect electrical supply before servicing or cleaning the unit,
Failure to do so could result in electrical shock or personal injury.
Cleaner won't start.
Poor job of dirt
pick-up,
Cleaner starts but
cuts off
1. Unpluggedatwallout]eL
2. Trippedctrcultbreakedbfownfuse
at householdservicepanel.,
1. Fullor cloggeddust bag,,
2. Clogged airflowpassages.
3. Dirty motorsafety fifterr
4. Wrongpile heightsoiling.
5. Open suctioncontrol
6. Holein hose.
7. Canister hoodopen.
t. Tdppedthermalprotector
in canister.
!_ Plug in firmly,pushON/OFF switch toON
2. Resetcircuit breakeror replacefuse,
1. Changebag, (pageI0).
2. Clear airflowpassages,(page10)_
3. Clean filter,(page 10),
4, Adjustsetting,(page5),
5. Adjustcontrol, (page9),
6. Replacehose.
7. Closeand latch hood,
I,
Turnoff andunplugthe vacuumfrom
outletand waitapproximately50 minutes
andptugthe vacuum in,turn back on !o
see ifthe protectorhas reset, (page11).
Changedust bag,clearairflow blockage,
(page 10)_
Cleaner picks upmoveable 1, Wrong pileheightsetting. 1. Adjustsetting,(page5).
rugs -or-Floor Brush 2_ Suction too strong. 2. Opensuction contro],(page 9).
pushes toohard.
Cordwon't rewind. 1. Dirtypowercord. 1o Clean thepowercord_
2. Cordjammed_ 2. Pulfout cord andrewind,
Cleaner leaves marks 1_ Wrongvacuumingpattern. 1. See VACUUMINGTIPS, (page9)_
on carpet,
12
Paracomenzar........................ 6
Accesorios(modelosdeaspiraci6ndirecta)o_7
Usodelosaccesorios.................... 7
Sugerenciasparaaspirar............... 8
Caractedsticasderendimiento............ 8
Cuidadodelrecept_culo............... 9
Cambiodelabo{sa..................... 9
Limpiezadelfiltrodeseguridaddelmotoroo10
Protectortermal ......................... 10
Limpieza del exterior y de los accesorios .. o10
Reconocimiento de probtemas ........... 11
lnformaci6n de assistancia
o servicio ................. PosteriorCubierta
Pot favor lea esta guia que le ayudaraa assemblary operar su aspiradora nuevade Kenmoreen una manera
m_s segura y effectiva,
Para mas informaciSnacerca del cuidado y operaci6nde esta aspirador, llame a su tiendaSears mat cercana,
Cuando prequntepor informaci6nusted necisitar_,el n_mero completo de serie y modelo de la aspiradoraque
est&Iocado en la placa de los nSmerosde modelo y serie.
Use el espacio de abajo para registrar el numero de modelo y serie para su nuevaaspiradorade Kenmore,
NQmerode Modelo
N_Jmerode Serie
Fecha de Compra
Matenga este libro y su recibo en u lugar seguro para referenciasfuturas.
=
GARANTiA LIMITADADE UN ANO DE LA ASPIRADORA KENMORE
Esta garantia es por un a5o desde la fecha de compra, e inctuyesolamenteel uso de la aspiradoraen
hogares privados.Duranteel a5o de garantia, cuando la aspiradoraes operada y mantenida de acuerdoal
manual de instrucciones del due5o,Searsreparar&cualquier defectoenmaterialeso fabricaci6nlibre de
cargo.
Esta garanfla excluyelasbolsas de colecci6n,correas, lamparillas,y filtros, lascuales sonpartes
gastables que se deteriorancon el uso normal.
Parael servicio de garantia, retorne esta asplradora al Centro de Servicio Searsm_s cercanoen los
Estados Unidos.
Esta garantia seaplica solamentemientraseste producto est#,en uso en los EstadosUnidos.Esta
garantfa le da a usted derechos legalesespecificos, y usted puede tener tambi_n otros derechos los
cuales var[an de estado a estado.
Sears,Roebuck and Co. D/817WA, HoffmanEstates, IL 60179
ADVERTE ClA
Suseguridad es muy importante para nosotros. Parareducir el riesgo de incendto,choque
eldctrico, lesi6n corporal o daSosal utilizarsu aspiradora, actue de acuerdo con precauciones
bdsicas de seguridad,entre ellas:
Leaeste manualantes de armar o utilizar su aspi-
radora.
Usesu aspiradora L_nicamenteen la forma descrita
en estemanual. Use _nicamentecon accesorios
recomendadosper Sears.
Parareducir el riesgode cheque el_ctrico,no use
su aspiradoraal aire tibreni sobre superficies
mojadas.
Desconecte el cordSnel_ctrico antes de
componer o limpiarel _rea del cepillo. De Io
contrario,elcepillo podr[aarrancar de form
imprevista o podrla producirse un chequeel_ctrico,
Siempre debeapagar la aspiradoraantes de
conectaro desconectar la manguera de la
POWER-MATE_M.
Siempre debe apagar su aspiradoraantes de des-
conectarla_
No desconecte laaspiradoratirando del cordSn
el_ctricooParadesconectarla,hale el enchufe,no
el cordSno
Sujete el enchufecon lamane al enrollarel cordSn
el_ctrico.Paradesconectarla,hafeen enchufe,no
el cordSno
No use la aspiradorasi el cord6n o el enchufe est&
daSado.Si la aspiradora no est&funcionando ade-
cuadamenteo sise ha dejado caer, est_ daSada,
se ha dejado expuesta a la intemperie o so ha
dejado caer en agua, devu_lvala a un Cen-
troiDepartamentodo servicio de Sears.
No hale ni transporte la aspiradoraper el cordSn;
no use el cordSncome mango;no cierre puertas
sobre etcordSn;no hale el cordSnsobre rebordes
agudos ni esquinas.No pasela aspiradorasobre
el cordSn.Mantenga el cordSnalejado de superfi-
cies calienteso
No abandone la aspiradoracuando est_conec-
tada. Descon_ctelacuando no la est_ usandoy
antes de darle servicio,.
No permitaque sea utilizadacome juguete.Se
requiere tenetmayor cuidadocuandosea utilizada
en la proximidadde niSoso per niSos.
No toquetaaspiradora ni el enchufecon fas
manes mojadas.
No use laaspiradora si la mangueraest& rot& La
mangueracontiene atambresel_ctricosoC_mbiela
si est,. rotao desgastada.Evite aspirarobjetos
agudos,
No coloqueobjetos an las aberturas.
No utilice la aspiradora sialguna abertura est#.blo-
queada;mant_ngala libre de polvo, pelusa,cabe-
liesy cualquieracosa que podria disminuir el flujo
deaireo
Mantenga elcabello, ropasuelta, dedosy todas
laspartes del cuerpo alejadosde las aberturasy
piezasmec&nicas.
No use laaspiradora sin tenet instaladala bolsa
para polvoy/o los filtros.
Cambie slempre la bolsa para polvodespu_s de
aspirarlimpiadores de alfombraso desodorantes,
talcos y pelves fines.Estos productosatascan la
bolsa, reducenelflujo de airey pueden causar que
_stase rompa.Si no cambia la bolsa podrfaoca-
sionardaSopermanente a la aspiradora.
No use laaspiradora para levantarobjetos agudos,
juguetes pequefos, alfileres,sujetapapeles, etc.
Poddan dafar la aspiradorao la bofsa parapolvo.
No levanteninguna cosa que se est_quemando o
emitiendohumo, come cigarrillos, cerilloso ceni-
zascalienteso
No use ia aspiradorapara aspirar liquidos inflama-
bleso combustibles (gasolina, liquidospara lim-
pieza, perfumes,etc.) ni fause en lugaresdonde
_stospodr[an estar presentesoLosvapores de
estassustancias puedencrear un peligrode incen-
die oexplosi6no
Tenga cutdado especialal utilizar la aspiradora
en escalonesoNo la coloque sobresillas, mesas,
etcoMant_ngalaen el piso.
Usted es responsablede asegurar quesu asp#a-
dora no sea utilizada per ninguna personaqua no
pueda manejarlacorrectamente_
GUARDE ESTAS INSTRUCClONES
El armadoy useseguro desu aspiradorasonsu responsabilidad.Esta aspiradoraha side diseSada
exclusivamentepara usedom_sticooLaaspiradoradeber#,almacenarseen un lugar seco yen elinterior_
Lea este Manualdel propietariodetenidamente,puescontiene informaciSnimportantesobre seguridady
usooEstaquia contiene informaci6nsobre seguridaddebajo de simbelos de advertienciacuidado. Per
favor ponga atenciSnespecialaestas instruccionesdadas, Advertencta: Este informaciSnle alertar,_con
el poligro de fuego,cheques electricos, quemadasy lesioneso Cuidado: Este informaciSnlealertara a
peligros come lesiones y dares de propiedado
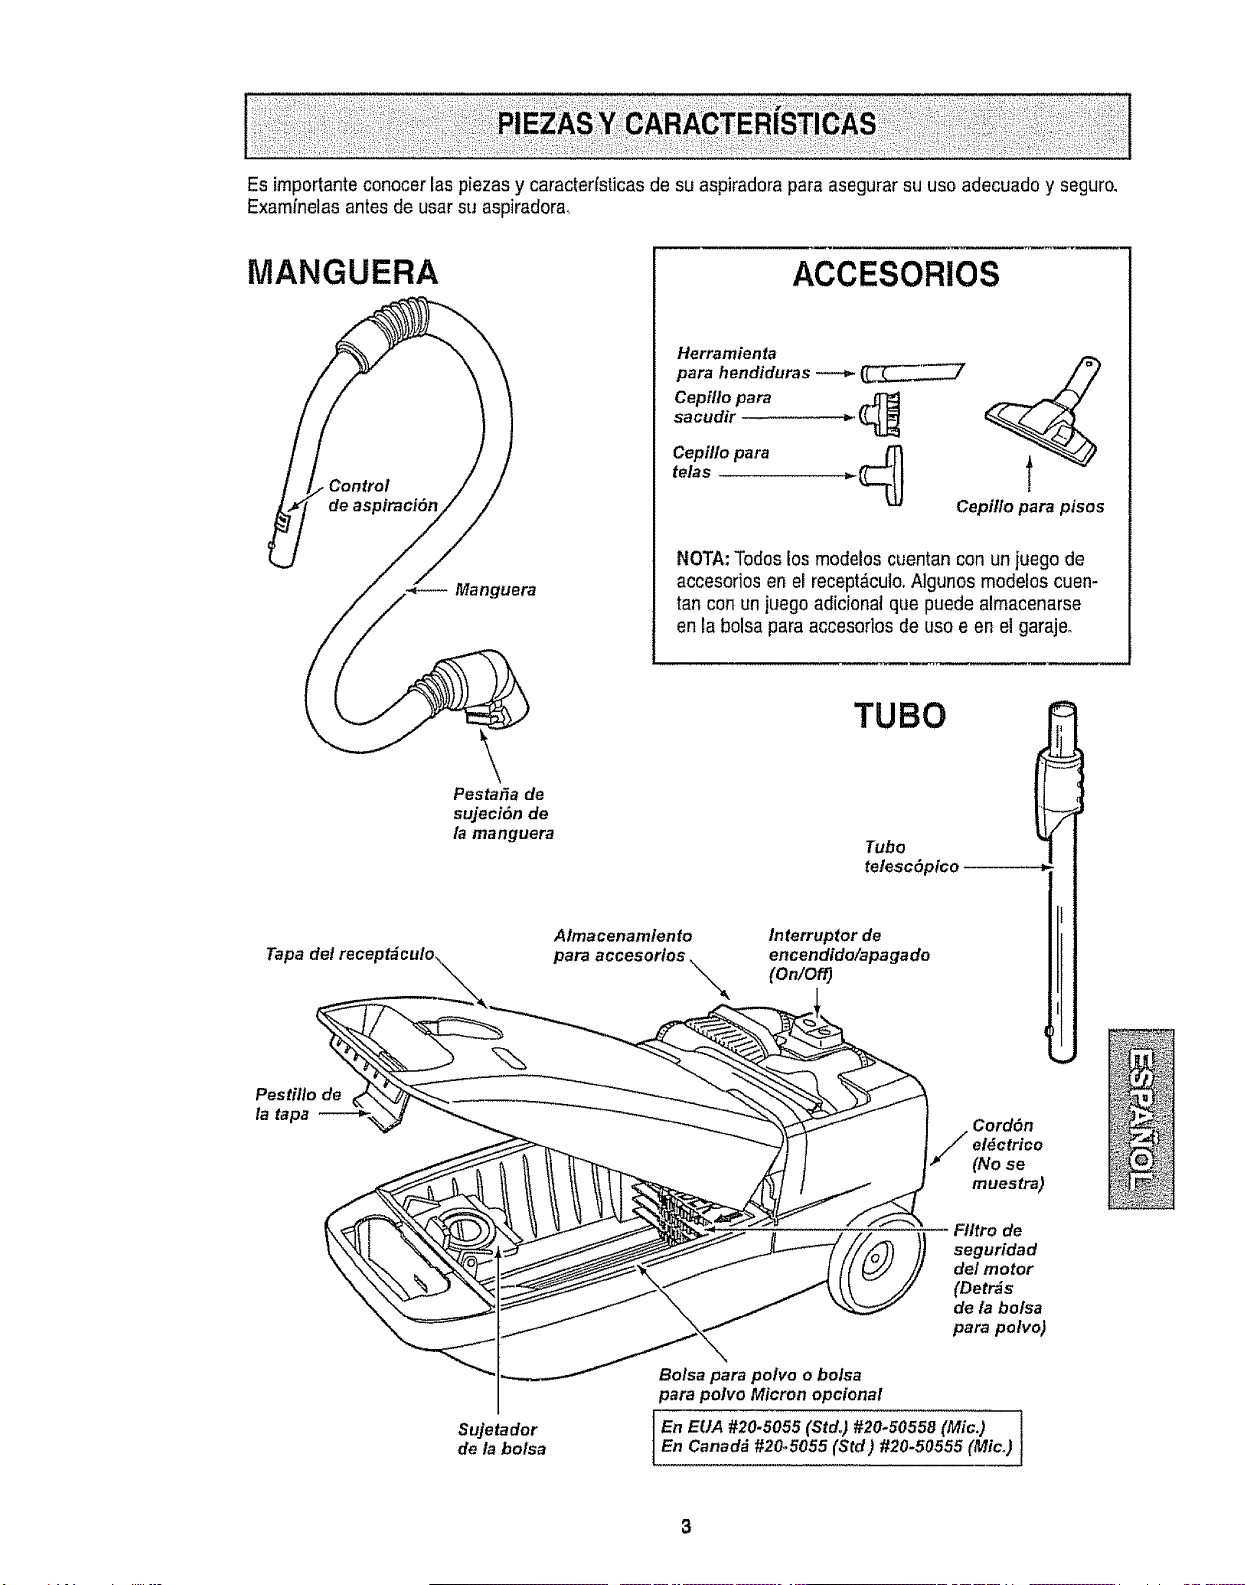
Esimportanteconocerlaspiezasycaracter[sticasdesuaspiradoraparaasegurarsuusoadecuadoyseguro,
Examfnelasantesdeusarsuaspiradora,
MANGUERA
Manguera
ACCESORIOS
Herramienta
para hendiduras _
Cepi!!o para
sacudir
Cepillo para
telas
Cepillo para pisos
NOTA:Todos losmodelos cuentan con un ]uegode
accesorios en el receptdculo.Atgunosmodelos cuen-
tan con un ]uegoadicional qtJepuede almacenarse
en la bolsa para accesorios de uso e en el garaje.
Tapa det
Pestitlo de
la tapa
TUBO
Pestafia de
sujeci6n de
/a manguera
Tubo
telesc6pico
Almacenamiento
para accesorlos
Interruptorde
encendido/apagado
(on/ofo
Cord6n
/ t_ctrtco
(No se
muestra)
Ftltro de
seguridad
de/motor
(Detr_s
de la bolsa
para potvo)
Sujetador
de ta bolsa
Bolsa para polvo o bolsa
para polvo Micron opcional
[ En EUA #20.5055 (Std.) #20.50558 (Mic.) 1En Canadd #20.5055 (Std ) #20-50555 (Mico)
......... ,.o_.
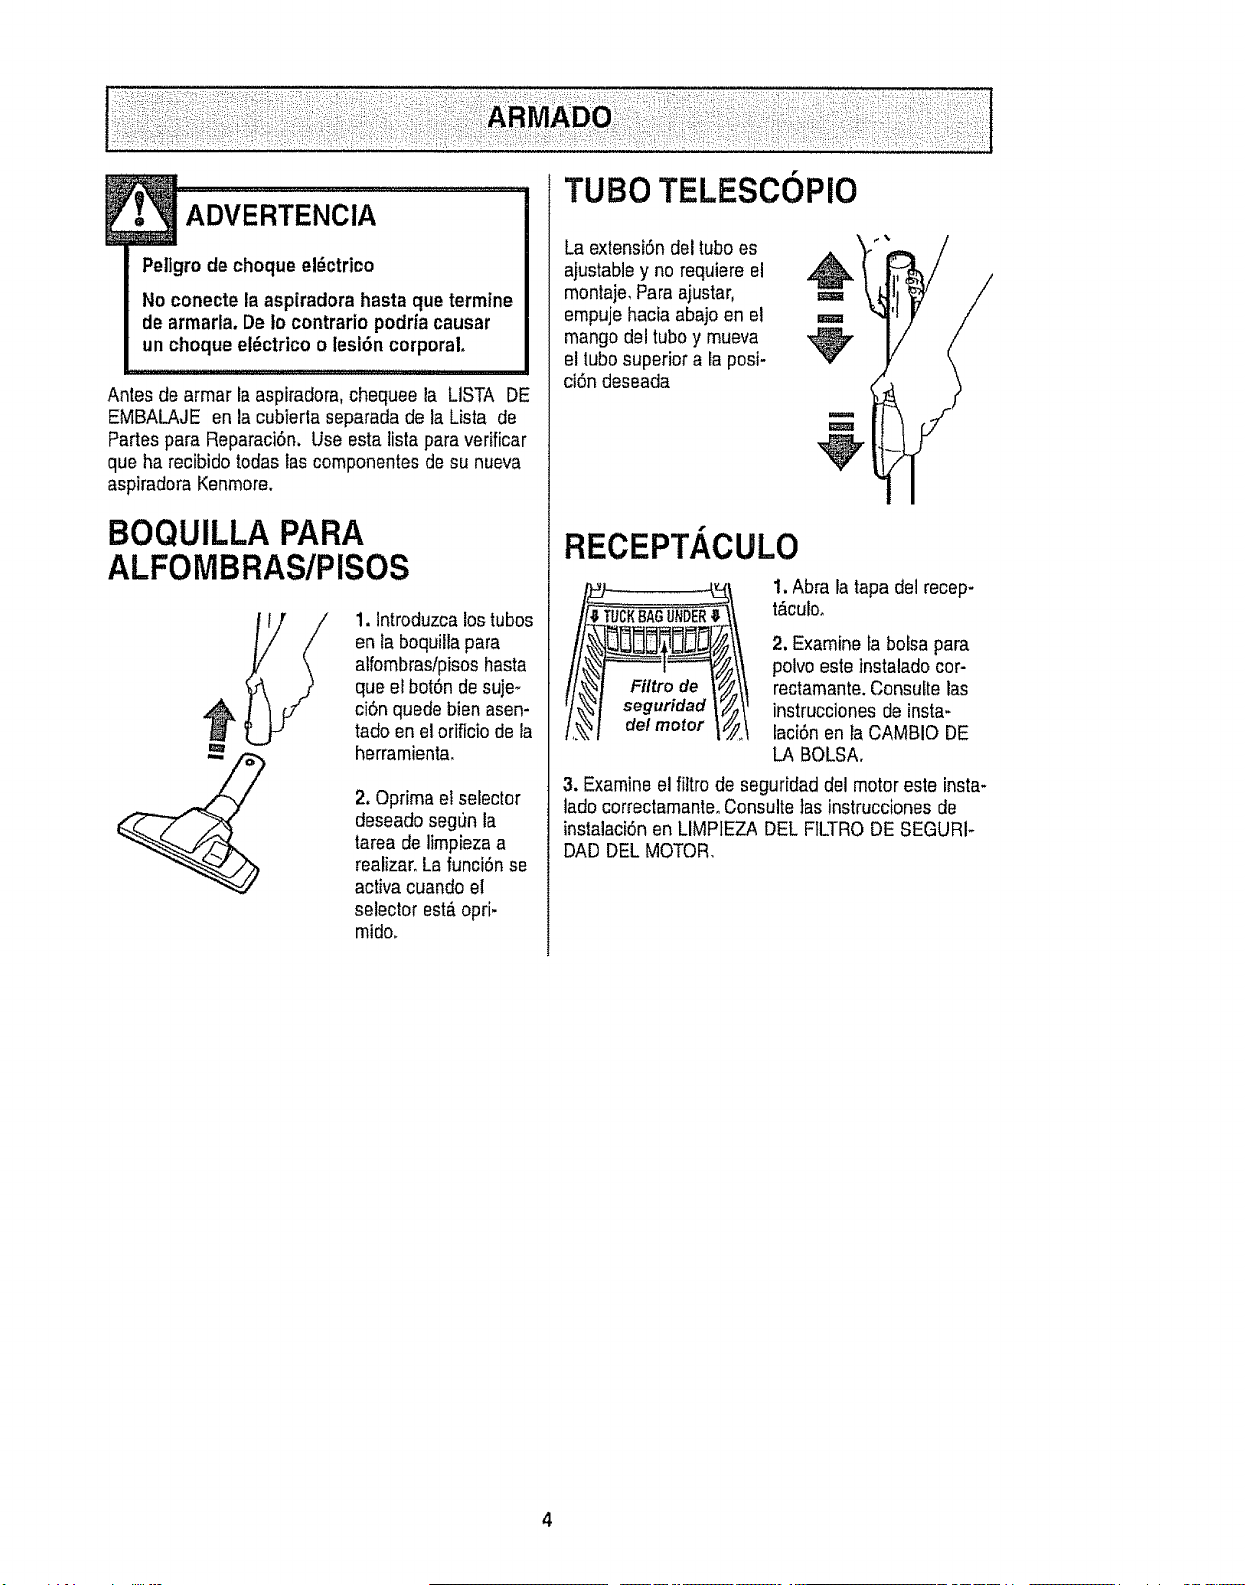
ADVERTENCiA .....................
Peligrode choque el_ctrico
No conecte la aspEradorahasta que termine
de armada. De Io contrario podriacausar
un choque el_ctrico o lesi6n corporal
Antes de armar la aspiradora, chequee la LISTA DE
EMBALAJE en la cubierta separada de laLista de
Partes para ReparaciSn. Use estalista para verificar
que ha recibido todas lascornponentesde su nueva
aspiradoraKenmore.
BOQUILLAPARA
ALFOMBRAS/PISOS
1. Introduzcalos tubos
en la boquilla para
alfombras/pisos hasta
que el botSnde suje-
ciSnquede bien asen-
tado en el orificio de la
herramienta.
2, Optima el selector
deseado segun la
tarea de lirnpiezaa
realizar. La funciSnse
activa cuandoel
selector est6opri-
mido.
TUBO TELESCOPIO
La extensiSndel tuboes .,,
ajustabiey norequiere el ,_
montaje,Para ajustar, ,,,,=,
empujehacia abajo en el =u
mango del tuboy mueva
eltubosuperior a la posi-
ciSndeseada
m
W
RECEPTACULO
1. Abra la tapa del recep-
t_culoo
2, Examine la bolsapara
polvoeste ]nstaladocor-
Filtro de rectamante.Consulte las
seguridad instrucciones deinsta-
de!motor lac[6n en ra CAMBIO DE
LA BOLSA.
3. Examine el fiitro de seguridaddel motor este insta-
]adocorrectarnante.Consulte]asinstrucciones de
instalaciSnen LIMPIEZA DEL FfLTRODE SEGURI-
DAD DELMOTOR.

CUBIERTA
Lacubierta tieneincorporado un tope en la posici6n
vertical paracambio de bolsa.
Area de bisagras
Pestfllo de
la cubierta
Es normal que la cubierta se desprendade la aspi-
radora si se sobrepasa la posici6n vertical de cam-
bio de bolsao
En caso de que se desprenda la cubierta, para
reinstalarla,col6quela primero sobre la unidad,con
el pesli]lo de lacubierta en posici6n normaly las
pestafias de las bisagras de _sta en llnea con los
orificios para bisagradel cuerpo de la aspiradora.
Luego ejerza presiSncon la palma de la mano
sobre el _rea de las bisagras hasta que asienle
bien.
MANGUERA
Pestafa de
sujeci6n
de la
manguerz
1. Introduzca la
mangueraen el
recept&culohasta
que quede fija en
posici6no
Pararetirar:
levanteel pestillo de
la mangueray tire
de la manguera.
2. lntroduzca el mango en
el tubo hasta que el botSn
quedeen posici6n.
Asegurese de que la
manguera NO est_ foric-
da.
Para retirar: oprima el
bot6npara liberar el mango
y tiredel mango hacia arri-
ba.
Para Guardar:Paraprevenir
la presi6n de la manguera
mientrasse guarda,desuna
la mangueradel tubo de la
aspiradora. Guarde la
mangueraenuna posiciSnflojamente enrotfaday de
talmaneraque la manguera no se estire.
ACCESORIOS
Losaccesorios individuales,herramienta para hen-
diduras,cepillo para sacudir y cepillo para tetas, se
guardan en la cubierta de la aspiradoraoLos acce-
sorios se sacan de la cubierta introduciendo un
dedo en la abertura para el tubo y tirando detacce-
sorioo
Cepi/lo para sacudir
Herramienta
para hendiduras Cepil/o para telas
Para guardar los accesorios,col6quetos en su lugar
correspondientey ejerza presi6n con la palrna de la
manohasta que queden en posici6n.
Los demos accesorios, cepillospara pisos, y
HANDI-MATEJRoTM ,que no pueden guardarse
en la cubierta de la aspiradora normalmente se
almacenan en un lugar conveniente de la resi-
dencia.
ConsulteACCESORIOS se habta del uso de los
accesorios,
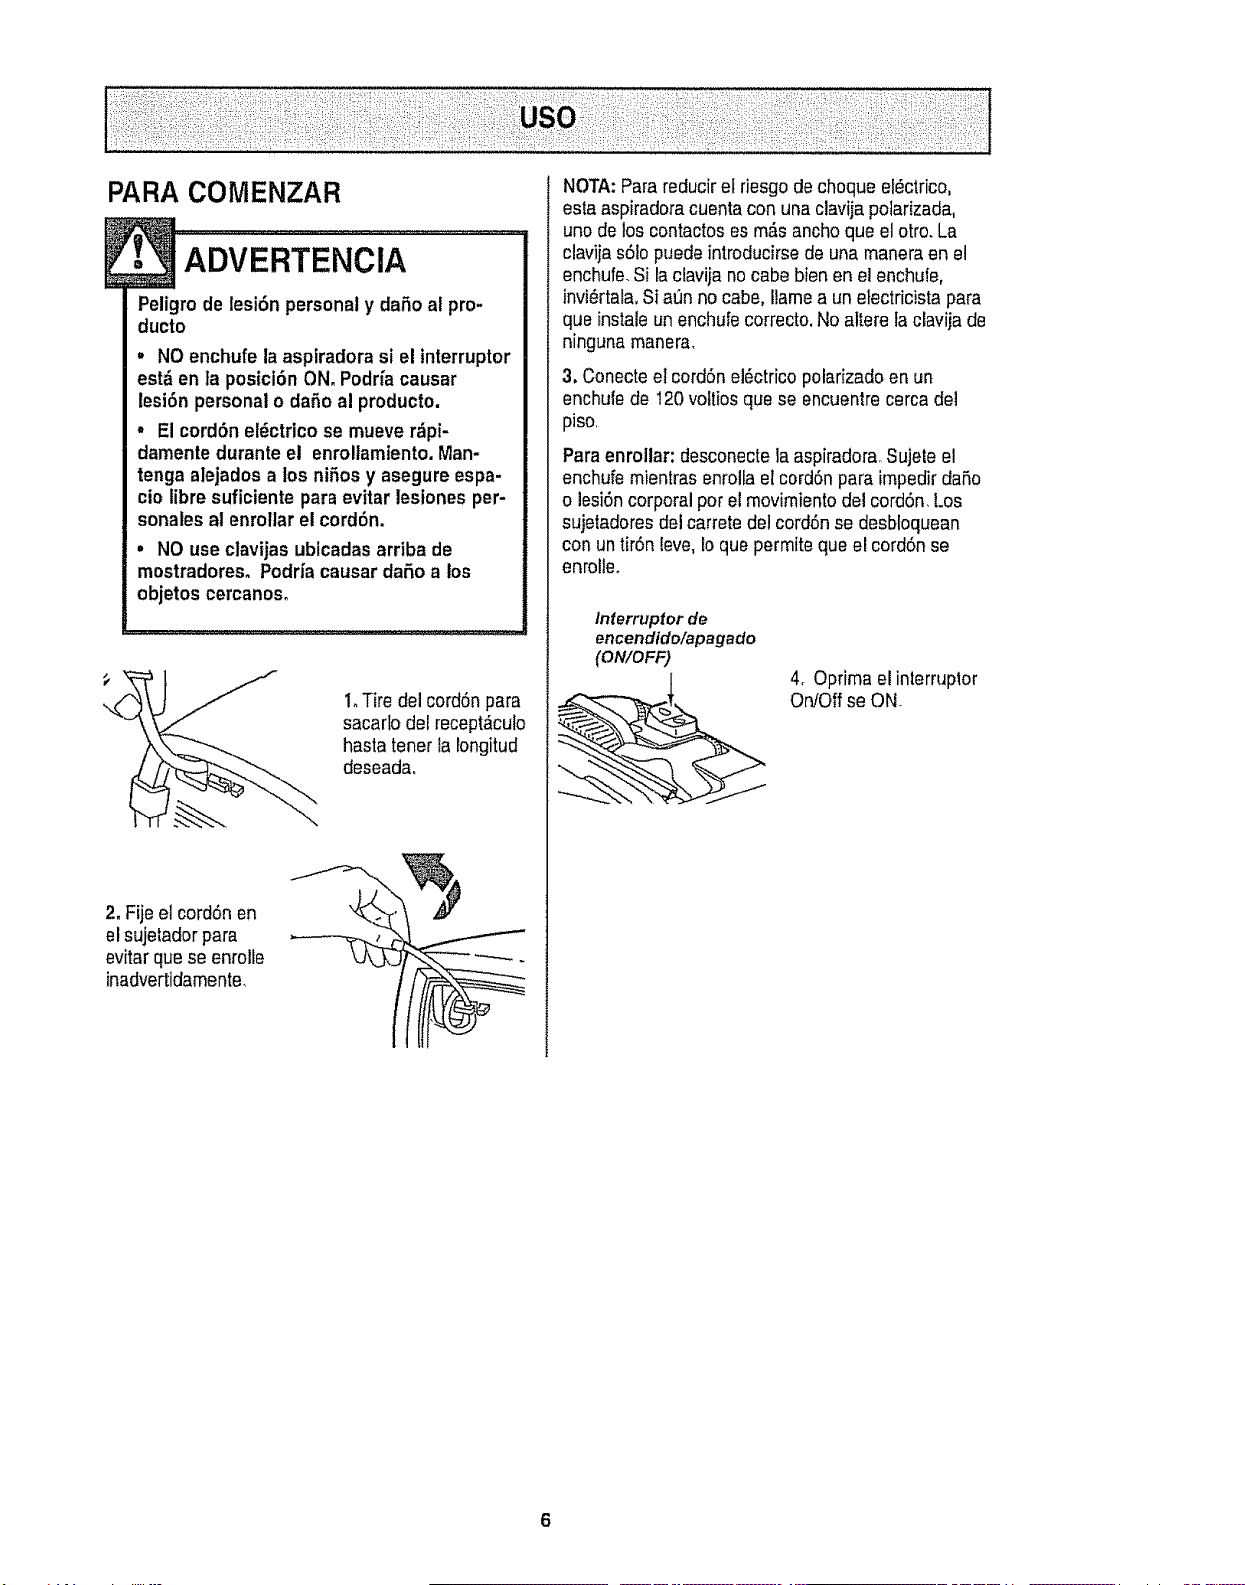
PARA COMENZAR
.......................
Peligro de lesi6n personal y daSoal pro-
ducto
• NOenchufe la asptradorasi el interruptor
est_ en la posici6n ON. Podr_acausar
lesi6n personal o daSo al producto.
° El cord6n el6ctrico se mueve r&pi-
damente durante el enrollamiento.Man-
tenga alejados a los niSosy asegure espa-
cio libre suficiente para evitar lesiones per-
sonalesal enroltarel cord6n.
° NO use clavijas ubicadas arriba de
mostradores° Podrfacausar daSo a los
objetos cercanos,
2, Fije el cord6n en
elsujetador para
evitar quese enrolfe
inadvertidamente_
1oTire del cord6npara
sacarlo del recept,_culo
hasta tenet la longitud
deseada.
NOTA:Para reducirel riesgode choque et_ctrico,
esta aspiradoracuenta con una clavija polarizada,
uno de loscontactos esm&s anchoque el otto. La
clavija sSlopuede introducirse de una maneraen el
enchufe.Si taclavija no cabe bien en el enchufe,
invi_rtala,Si a_n no cabe, Ilamea un etectricista para
que instale un enchufe correeto.No altere taclavija de
ninguna manera.
3. Conecteel corddn el_ctricopolarizado en un
enchufede 120 voltiosque se encuentrecerca dei
piso,
Para enrollar: desconectela aspiradora,_Sujeteel
enchufemientras enrolla el ccrd6n para impedirdaSo
o iesi6ncorporal per el movimientodel cord6n.Los
sujetadoresdel carrete del cord6n se desbloquean
con untir6n teve,Ioque permite que el cord6n se
enrolleo
Inferruptor de
encendtdo/apagado
(ON/OFF)
4_ Oprima elinterruplor
On!Off se ON.
6
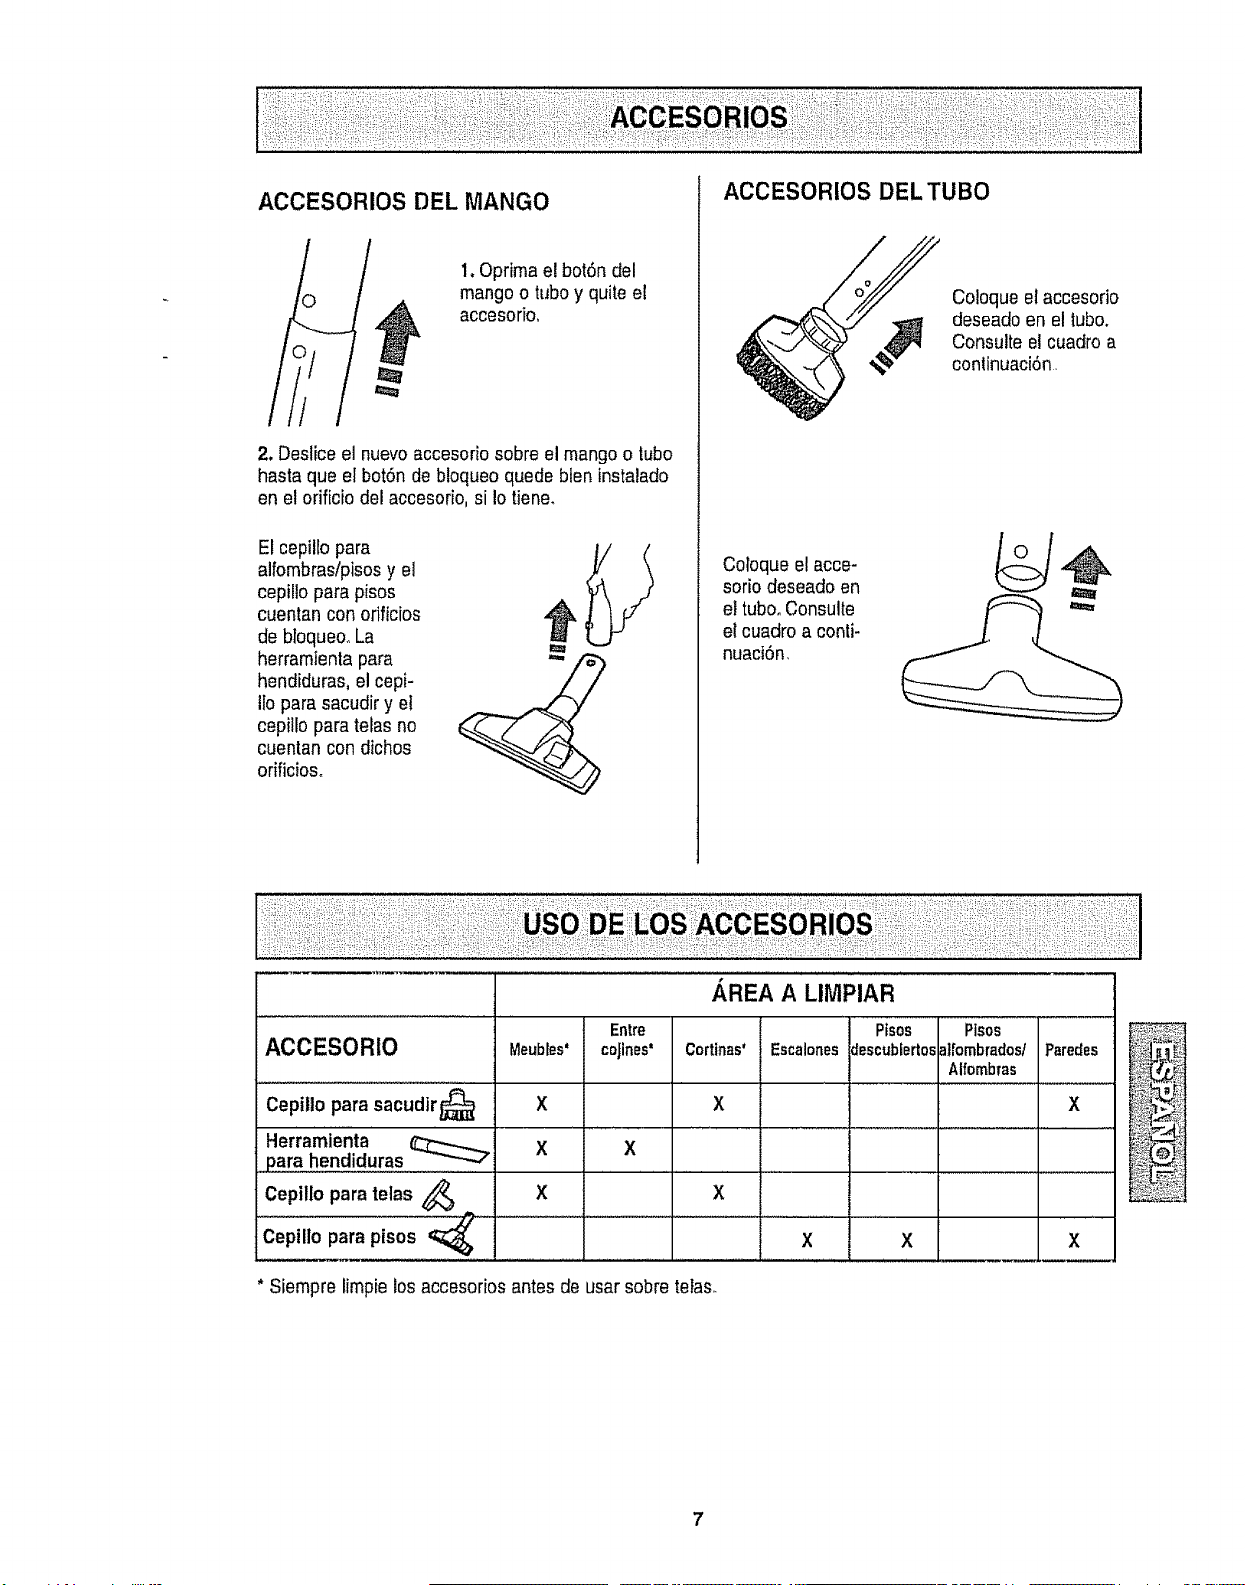
ACCESORIOS DEL MANGO
1.Oprima e! bot6n del
mango o tuboy quite el
accesorio.
2. Desliceel nuevoaccesorio sobre el mango o tubo
hasta que el botSnde bloqueo quede bien instalado
en el orificio del accesorio, si Iotiene.
El cepillo para
alfombraslpisosy el
cepillo para pisos
cuentan con orificios
do bloqueooLa
herramienta para
hendiduras, el cepi-
11opara sacudir y el
cepillo para telas no
cuentan con dichos
orificioso
ACCESORIOS DEL TUBO
Coloqueel accesodo
deseadoen el tubo.
Consulte elcuadro a
conlinuaciSn
Coloque el acce- _ ._
sorio deseado en _r
el tubooConsulte ==_
el cuadro a conti-
nuaciSn,
AREA A LIMPIAR
ACCESORIO
Cepittopara sacudir_
Cepillo para telas _ ,.
Cepillo para pisos
Entre
Meubles* coJines*
X
X X
X
Cortinas'
X
X
pisOs PiSOS
Escalones:lescub[ertoE_][ombrados/Paredes
Alfombras
X
X X X
* Siempre limpielos accesodos antes de usarsobre re)as.

Estilo de limpieza sugerido, Para obtener la mejor
acciOnde limpieza se recorniendaempujar facepilto
para pisos en direcciOndirectamente opuesta a
usted y jalarlaen Ifnearecta,AI final de carla pasa-
da de regreso,cambie ladirecci6n de la cepillo para
pisos hacia la siguiente secci6n a iimpiar.Continoe
asf a trav_,sde toda la alfornbrade una manera
lentay deslizante.
NOTA: las pasadas
r,_pidasy jalonadas
no Iogranuna lirn-
piezacompteta..
El dispositivo giratodo de la
rnanguera perrniteque
_sta gire sin necesidad de
mover el recept_,culo.Esto
es muyOtilpara limpiar en
_.reaspeque_,as.AsegO-
rese de que la manguera
no est_ torcida antes de
jalar el recept_culo.
• ADVERTENC'iA...........
Peligrode iesi6n personaly dafio al pro-
ducto
No tire del cord6n el_ctrico de la pared
para desenchufario. St hay danosen
el cord6n el_ctrico o el enchufe, hay
un peligrode lesion corporal o unos
daOosde posesiones,
\\
Los escalonesalfornbradosrequieren limpieza
peri6dica.Cierre pot completo el control de aspira-
ciOnpara Iograrlos mejores resultadosde limpieza.
,: "ADVERTENoIA I
Peltgro de lesi6n personal
Tenga cufdadosi coloca el recept,_culo
sobre escalones. Si se cae, podria causar
lesi6n personal o dafio a la propiedad.
Mantenga el paso de aire abiertopara lograr los
mejores resuitados de limpieza. Examinede vez
en cuando cada una de las &reasde union, consulte
ARMADO, para asegurarse de que no est_n blo-
queadas. Desconectela aspiradoraantes de revisar.
El control de aspiraci6n le
permite cambiar la potencia
de aspiraciOnde la aspira-
dora dependiendo de! grosor
de ia tela o alfornbra.La as-
piraci6nse disminuye, para
limpiar cortinas y tapetes li_
geros, abriendo el control;para aspirar mueblesy al-
fombras, el control debe cerrarse para aumentar la
aspiraciOno
DISPOSITIVO GIRATORIO DE LA
MANGUERA
El disposifivo giratorio de la
manguerapermite que _sta
gird sin necesidad de mover
e!recept_culo.Esto es muy
_til para limpiaren &reas
pequeRasoAsegOresede
que la manguerano est_ re-
torcida antes de jalar el re-
cept_culoo
Laaspiradoracreasucci6noaspiraci6nquelevantalatierraoLa
tierraesimpuisadaatrav6sdelasviesdeflujoairehastalaboFsa
porunar_,pidacorrientedeaire_Labolsaparepolvopermiteel
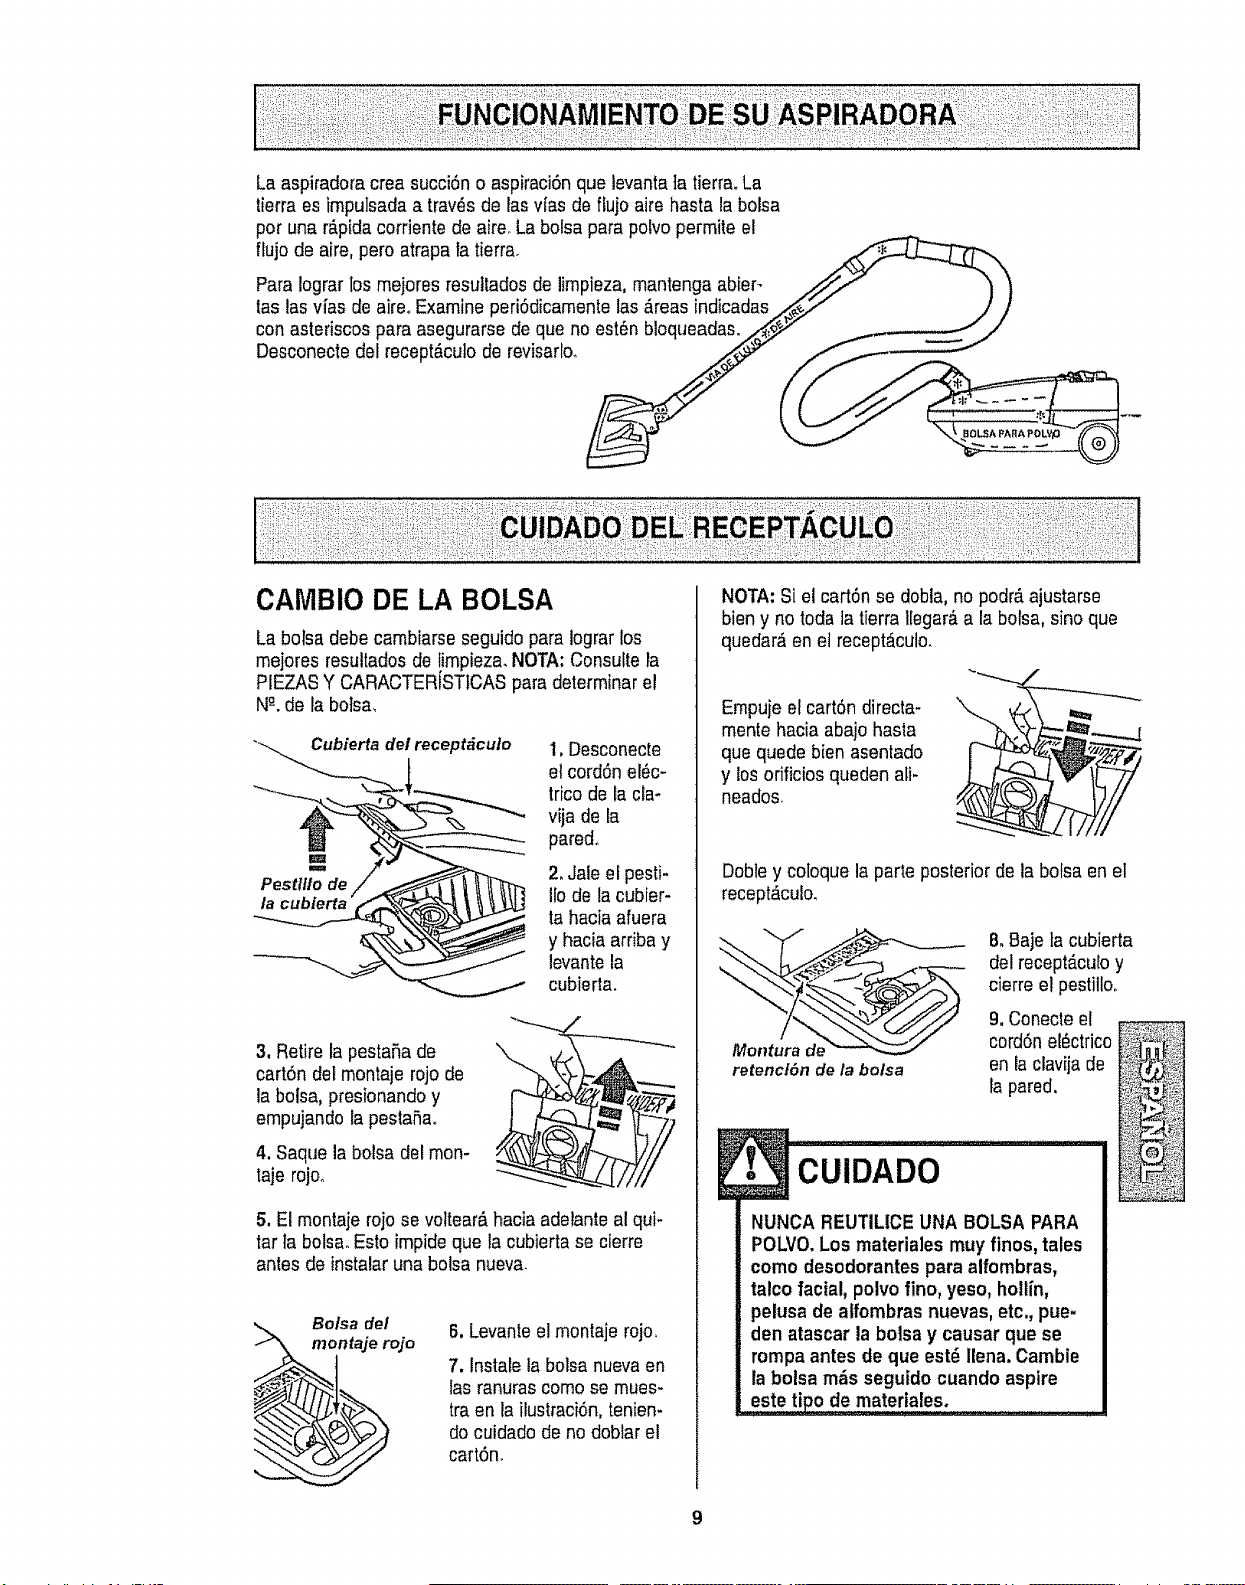
CAMBIO DE LA BOLSA
La bolsa debe cambiarse seguido para iograr los
mejores resultados de !impieza_NOTA: ConsulteFa
PIEZASY CARACTERISTtCASpara determiner el
N_-.de la boise,
Cubierta del recept&culo
l
Pestlllo de
la cublerta '
1, Desconecte
el cord6n el_c-
tricode la cia-
vija de ta
pared°
2,Jale el pesti-
Ilode la cubier-
ta hacia afuera
y hacia arriba y
levantela
cubierta,
3. Retire la pestafia de
cart6n detmontaje rojo de
la boise, presionandoy
empujando la pestaflao
4. Saquela boise delmon-
taje rojoo
5. El montaje rojo se voltear&hacia adebnte al qui-
tar Ia boise, Esto impide que la cubierta so cierre
antes de instalar una bolsa nueva,
Bolsa de/
ntaje ro]o
6. Levante el rnontaje rojo,
7, lnstale la bolsa nuevaen
fas tenures como se mues-
tra en la ilustraci6n, tenien-
do cuidado do no doblar el
cart6n,
NOTA: Si el cart6n se dobla,no podr._ajustarse
bien y no toda latierrallegar&ala botsa, sinoque
quedar_ en et recept_culo,
Empuie el cart6n directa-
mente hacia abajo hasia
que quede bien asentado
y losorificios queden ali-
neados,
Dobley cotoque la parte posterior de ia botsa en el
recept_culo,
Montura d_
retencl6n de la boise
8, Baje ta cubierta
del recept&cu[oy
cierre el pestillo.
9. Conecteel
cord6nel_ctrico
en b clavijade
la pared.
. €o,oAoo I
NUNCA REUTILICE UNA BOLSA PARA
POLVO,Los materiales muy finos, tales
como desodorantes para alfombras,
talco facial, polvo fino, yeso, hollin,
pelusa de alfombras nuevas, etc,, poe-
den atascar ta bolsa y causar que se
rompa antes de que est6 llena. Cambie
la bolsa m_s seguido cuando asptre
este tiPo de rnateria!eS,
h • •
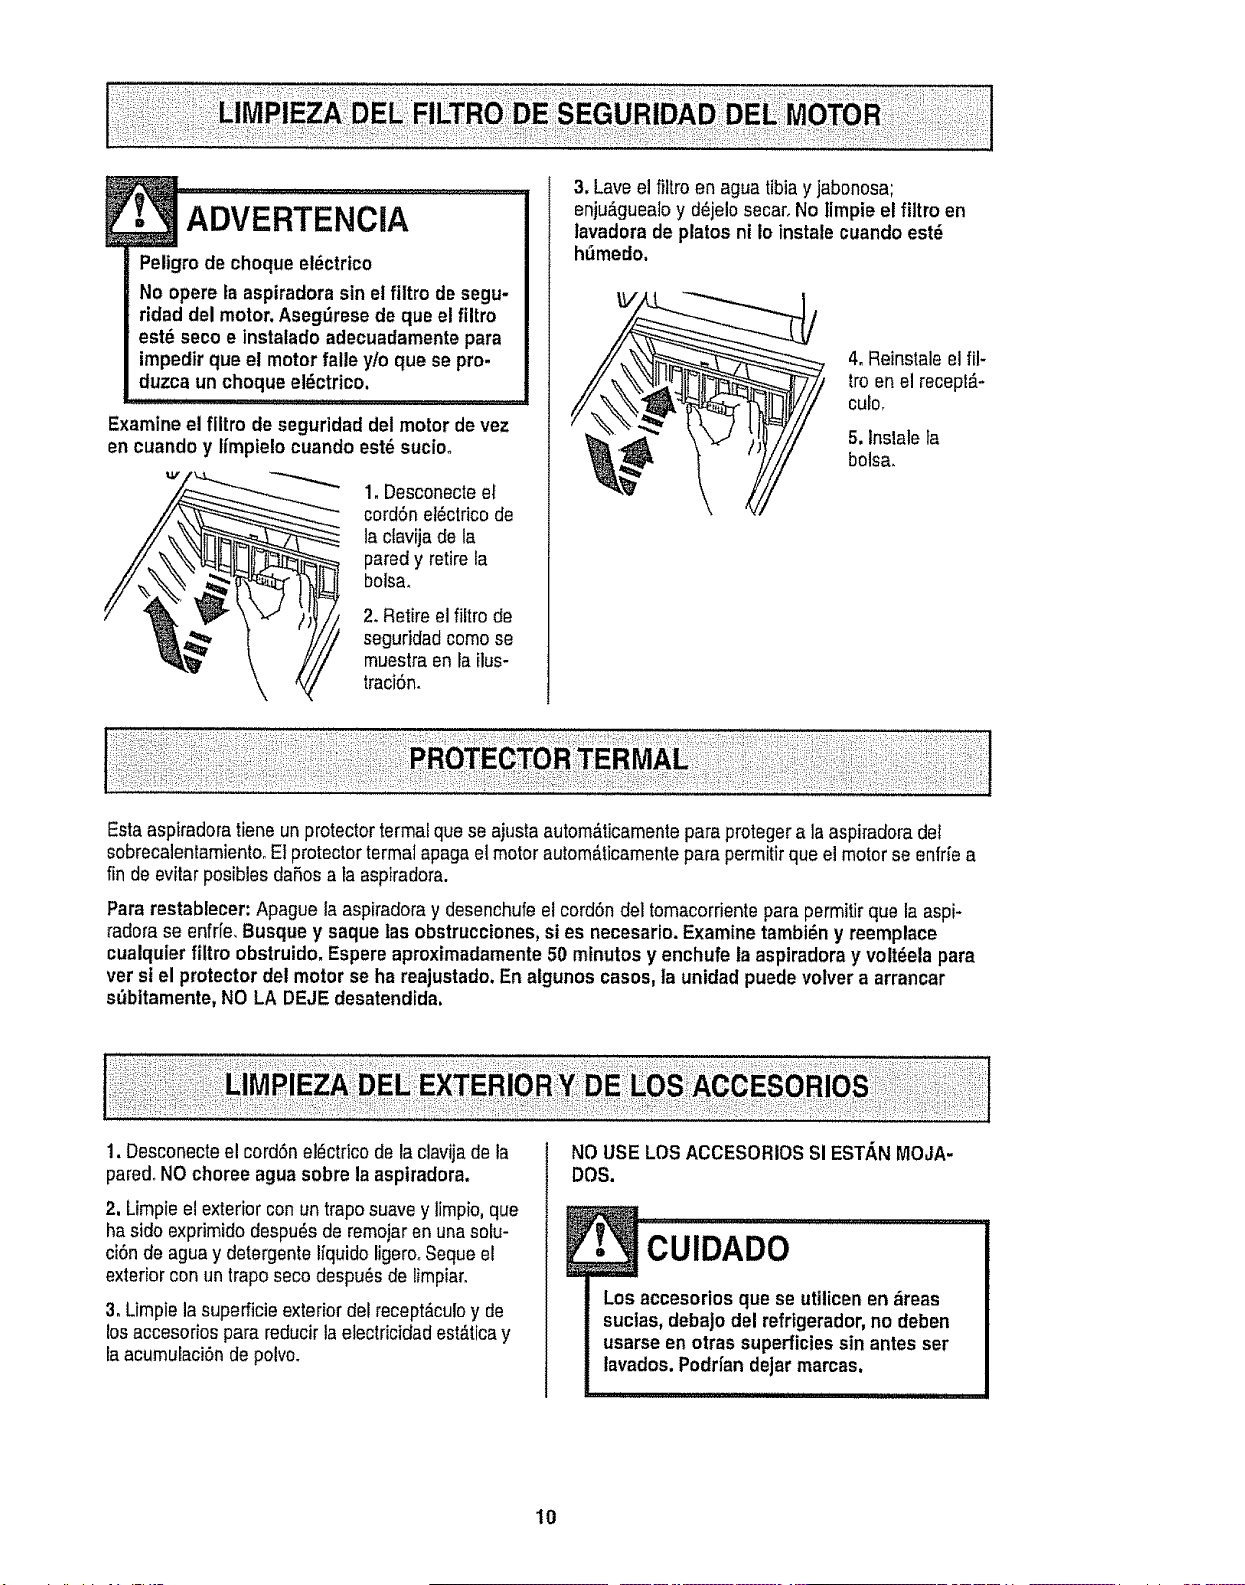
= ADVERTENCiA ..................................
Peltgro de choque el_ctrtco
No opere la aspiradora sin el filtro de segu-
ridad del motor.AsegSresede que el filtro
est_ seco e instaladoadecuadamente para
impedir que el motor faile y/o que se pro-
duzca un choque eiE!ctrico.
Examine el flltro deseguridad del motor de vez
encuando y tfmpielocuando est_ sucio°
1. Desconecteel
cordSnel_ctrico de
la ciavija de la
paredy retire la
bolsa.
2. Retire el filtro de
seguridad come se
muestraen la ilus-
traci6n.
3. Lave el filtro en agua tibia yjabonosa;
enju_guealoy d_jelosecar.No timpie el filtro en
lavadora de platos ni 1oinstalecuando est_
h_medo.
4. Reinstaleel ill-
fro en el recept_.-
culo_
5. Instaleta
bolsa.
Estaaspiradora tiene un protectortermai que seajusta autom,_ticamenteparaprotegera la aspiradoradel
sobrecalentamientooEl protector terma]apaga el motor autom&ticamentepara permitir que el motor se enfrie a
fin de evitar posibles daRosa la aspiradora.
Para restablecer: Apague la aspiradoray desenchufeel cord6ndel tomacorrientepara permitir que la aspi-
radora se enfrie, Busque y saque las obstrucciones, si es necesario. Examinetambi_n y reemplace
cualquier filtro obstruido. Espere aproximadamente 50 mtnutos y enchufe ta aspiradora y volt_ela para
ver st el protectordel motor se ha reajustado, En algunos cases, la unidad puede volver a arrancar
st3bitamente,NO LA DEJE desatendida.
1. Desconecteel cord6n el_ctrico de la clavija de la
pared_NO choreeagua sobre la aspiradora.
2, Limpieel exterior con un traposuave y limpio,que
ha sido exprimido despu6s de remojaren unasolu-
ciOnde agua y detergente liquido ligerooSeque el
exterior con un traposeco despu_s de limpiar.
3. Limpie la superficie exterior del recept_.culoy de
losaccesorios para reducir taelectrbidadest_.ticay
la acumutaci6nde polvo.
NO USE LOSACCESORIOSSI ESTANMOJA-
DOS.
• 'CuIDADO ............... ...........
Los accesorios que se uttlicen en _reas
suctas, debajo del refrigerador,no deben
usarse en otras superficiessin antes ser
lavados. Podrfandejar marcas.
10

Consulteestecuadro pare encontrar solucionesque usled mismo puede realizar cuando tenga problemas
menores de rendimiento, Cualquier servicio que necesiteaparte de otros descritos en este manual tienenque
ser hechosper un represetantede servicio autorizado_
la asplradora no arranca, I. Es_ desconectada.
2.
Cortactrcullosbotadoofusibie quemado
enel tablerodeservictodela restdencIa
No asplra
sallsfactorlamente_
LBt_sp[fr,_doraotranto,
pore sespaga.
1o 8olsaparepolvoIlenao atascada
2_ Vies del]ujo deaidealescadas,
3. Filtrode segu_idaddel motorsucio
4. AJusleIncorreclode n_velde pelode
la alIombra
:= ,.:_:,,;:::=:_=; .=:
5_
6_
10,
1_ Coneclebien, opdma seleclordeencendido!
apagadoa ta poslciSnON
2, Reslablezcael corlacircuilos o c_mbiee{
fusible,
1_ Cambietabolsa,{p_glna9),
2_ Limptelosvies de llujo deaire. (p&gina9).
3_ Limpiee!liltro, (p&gina9)
4o Ajustoel ntvef,(p>na4)
Conlrol de aspiraciSnabierto- 5. Ajustoel control,(p_gina 9),
Manguera[ol_, 6_ Cambiela manguera
Tapedel i'ecept_culoablerta 10,, Cierreblenla lapa,
3. P_oteclm'de sobrecarg,_botado
elrecept_culo..
3, Apaguetaaspiradoray desenchuleElcordSnen
del lomacorrier_ley espereaproximadamonle50
rninulosyenchutela aspiradoray vott_elapare
versi elp_oloclordel motorse ha realust_do,
(p_glna10),Cambie;aboiseparepolvo.
desbloqueelosvies dRltujode aire, (p_gina9).
la asptradoralevantatapetes !, Ajusleincorrectode nivelde petode 1o Ajusleelnive!,(p,_gina4).
-o-es d]ticl!empuJ_r la allombra
a ceplllop_rapisoso 2_ Aspiraciondemasi_dopotente 2. AbraeleoatroldeasptraciSn,(p_gtna8}
ElcordSnno seenrolla. 1. CordSnel_clricosucie 1. LimpIeel cordSne;_cl_ico.
2, CordOnelascado. 2_ Th'edelcordSny despu_senr61Iele
La aspfredoradejamarcas I. Esfilode timpiezaincor[ecta, 1. ConsutleSUGERENCIASPARAASPIRAR,
en Ia_t|ombra,, (p.lgina8)
11

r e or our!!
For repair of major brand appliances in your own home...
no matter who made it, no matter who sold it!
1-800-4-iVIY-HO MEsMAnytime,day or night
(1-800469-4663)
www.sears.oom
To bring in products such as vacuums, lawn equipment and electronics
for repair, call for the location of your nearest Sears Parts & Repair Center.
1-800-488-1222 Anytime,dayornight
www.sears.com
For the replacement parts, accessories and owner's manuals
that you need to do-it-yourself, call Sears PartsDirectSU[
1-800-366-PART 6 a.rn.- 11 p,,rn. CST,
(1-800-366-7278) 7 days a week
www.sears.com/partsdirect
To purchase or inquire about a Sears Service Agreement:
1-800-827-6655
7 aomo- 5 p.rn, CST, Mon. - Sat.
Para pedir servicio de reparaci6n a dornicilio, Au Canada pour service en frant;ais:
y para ordanar plazas con entrega a domicilio: 1-877-LE-FOYER s_,_
1-88B-SU-HOGAR s_ (1,677-533-6937)
(I-888-784-6427)
HomeCentrat
® Regt,_tersd T_adema_k I Tu Trademark ef Sears, Roebuck and Co
@ Sears, Roebuck and Co t_pMa_ca Reglstr_cia t TM M_CB de F_bdca de _ears, Rnebuck i_nd Co