Write the model and serial
numbers here:
Model # _________________
Serial # _________________
You can find them on a label
located on the backside of the
lower drawer front.
49-2000658 Rev. 0 06-19 GEA
GE is a trademark of the General Electric Company. Manufactured under trademark license.
PKW7000
PTW9000
OWNER’S MANUAL &
INSTALLATION
INSTRUCTIONS
WARMING DRAWER
Electric
SAFETY INFORMATION ............ 3
USING THE WARMING DRAWER
Features ................................ 5
Operating Tips .......................... 6
CARE AND CLEANING
Cleaning The Warming Drawer ............ 9
INSTALLATION INSTRUCTIONS . 10
TROUBLESHOOTING TIPS .........16
LIMITED WARRANTY ..............18
ACCESSORIES ......................19
CONSUMER SUPPORT ............20

2 49-2000658 Rev. 0
THANK YOU FOR MAKING GE APPLIANCES A PART OF YOUR HOME.
Whether you grew up with GE Appliances, or this is your first, we’re happy to have you in the family.
We take pride in the craftsmanship, innovation and design that goes into every GE Appliances
product, and we think you will too. Among other things, registration of your appliance ensures that we
can deliver important product information and warranty details when you need them.
Register your GE appliance now online. Helpful websites and phone numbers are available in the
Consumer Support section of this Owner’s Manual. You may also mail in the pre-printed registration
card included in the packing material.
49-2000658 Rev. 0 3
SAFETY INFORMATION
READ AND SAVE THESE INSTRUCTIONS
IMPORTANT SAFETY INFORMATION
READ ALL INSTRUCTIONS BEFORE USING THE APPLIANCE
WARNING
Read all safety instructions before using the product. Failure to follow these instructions may result
in fire, electrical shock, serious injury or death.
WARNING
IMPORTANT SAFETY NOTICE
All warming drawers can tip and injury could result if not properly installed.
To prevent accidental tipping of the warming drawer, attach it to the wall with an anti-tip brace as described in
the Installation Instructions.
WARNING
GENERAL SAFETY INSTRUCTIONS
■ Usethisapplianceonlyforitsintendedpurposeas
described in this Owner’s Manual.
■ Besureyourapplianceisproperlyinstalledand
grounded by a qualified installer in accordance with
the provided installation instructions.
■ Donotattempttorepair,replaceorcleananypart
of your warming drawer unless it is specifically
recommended in this manual. All other servicing
should be transferred to a qualified technician.
■ Beforeperforminganyservice,disconnectthe
power supply at the household distribution panel by
removing the fuse or switching off the circuit breaker.
■ Donotleavechildrenalone—childrenshouldnot
be left alone or unattended in an area where an
appliance is in use. They should never be allowed
to climb, sit or stand on any part of the appliance.
■
CAUTION
Donotstoreitemsofinterest
to children in cabinets above a warming drawer -
children climbing on the warming drawer to reach
items could be seriously injured.
■ Useonlydrypotholders—moistordamppot
holders on hot surfaces may result in burns from
steam.Donotletpotholderstouchhotheating
elements.Donotuseatowelorotherbulkyclothin
place of pot holders.
■ Neveruseyourapplianceforwarmingorheating
the room.
■ Donottouchtheheatingelementsortheinterior
surface of the warming drawer. These surfaces
may be hot enough to burn even though they are
darkincolor.Duringandafteruse,donottouch,
or let clothing or other flammable materials contact
any interior area of the warming drawer; allow
sufficient time for cooling first. Other surfaces of
the appliance may become hot enough to cause
burns. Potentially hot surfaces include the warming
drawer vent opening, surfaces near the opening
and crevices around the warming drawer door.
■ Donotheatunopenedfoodcontainers.Pressure
could build up and the container could burst,
causing an injury.
■ Donotusealuminumfoiltolinethewarmingdrawer
bottom. Foil can trap heat or melt, resulting in
damage to the product and a shock or fire hazard.
■ Avoidscratchingorimpactingglassdoorsorcontrol
panels.Doingsomayleadtoglassbreakage.Do
not cook on a product with broken glass. Shock, fire
or cuts may occur.
■ Thepurposeofthewarmingdraweristohold
hot cooked foods at serving temperature (greater
than140°F).Bacteriawillgrowinfoodwhileit
is below 140°F. Therefore, always start with hot
food; cold food cannot be heated or cooked in the
warming drawer.

4 49-2000658 Rev. 0
SAFETY INFORMATION
READ AND SAVE THESE INSTRUCTIONS
IMPORTANT SAFETY INFORMATION
READ ALL INSTRUCTIONS BEFORE USING THE APPLIANCE
WARNING
KEEP FLAMMABLE MATERIALS AWAY FROM THE WARMING DRAWER
Failure to do so may result in fire or personal injury.
■ Donotstoreoruseflammablematerialsinornear
a warming drawer, including paper, plastic, pot
holders, linens, wall coverings, curtains, drapes and
gasoline or other flammable vapors and liquids.
■ Neverwearloose-fittingorhanginggarmentswhile
using the appliance. These garments may ignite if
they contact hot surfaces, causing severe burns.
■ Donotletcookinggreaseorotherflammable
materials accumulate in or near the warming
drawer. Grease in the warming drawer or near the
warming drawer may ignite.
WARNING
IN THE EVENT OF A FIRE, TAKE THE FOLLOWING
STEPS TO PREVENT INJURY AND FIRE SPREADING
■ Donotusewaterongreasefires.Neverpickupa
flaming pan.
■ Ifthereisafireinthewarmingdrawer,smotherthe
fire by closing the warming drawer door and turning
the warming drawer off or by using a multi-purpose
dry chemical or foam-type fire extinguisher.
WARNING
WARMING DRAWER SAFETY INSTRUCTIONS
■ Standawayfromthewarmingdrawerwhenopening
the warming drawer door. Hot air or steam which
escapes can cause burns to hands, face and/or eyes.
■Keepthewarmingdrawerventunobstructed.
■Keepthewarmingdrawerfreefromgreasebuildup.
Grease in the warming drawer may ignite
■Placewarmingdrawerracksindesiredlocationwhile
warming drawer is cool. If rack must be moved while
warming drawer is hot, do not let pot holder contact
hot heating element in warming drawer.
■Donotleaveitemssuchaspaper,cookingutensils
or food in the warming drawer when not in use.
Items stored in a warming drawer can ignite.
How to Remove Protective Shipping Film and Packaging Tape
Carefully grasp a corner of the protective shipping film
with your fingers and slowly peel it from the appliance
surface.Donotuseanysharpitemstoremovethefilm.
Remove all of the film before using the appliance for the
first time.
To assure no damage is done to the finish of the product,
the safest way to remove the adhesive from packaging
tape on new appliances is an application of a household
liquid dishwashing detergent. Apply with a soft cloth and
allow to soak.
NOTE: The adhesive must be removed from all parts. It
cannot be removed if it is baked on.
49-2000658 Rev. 0 5
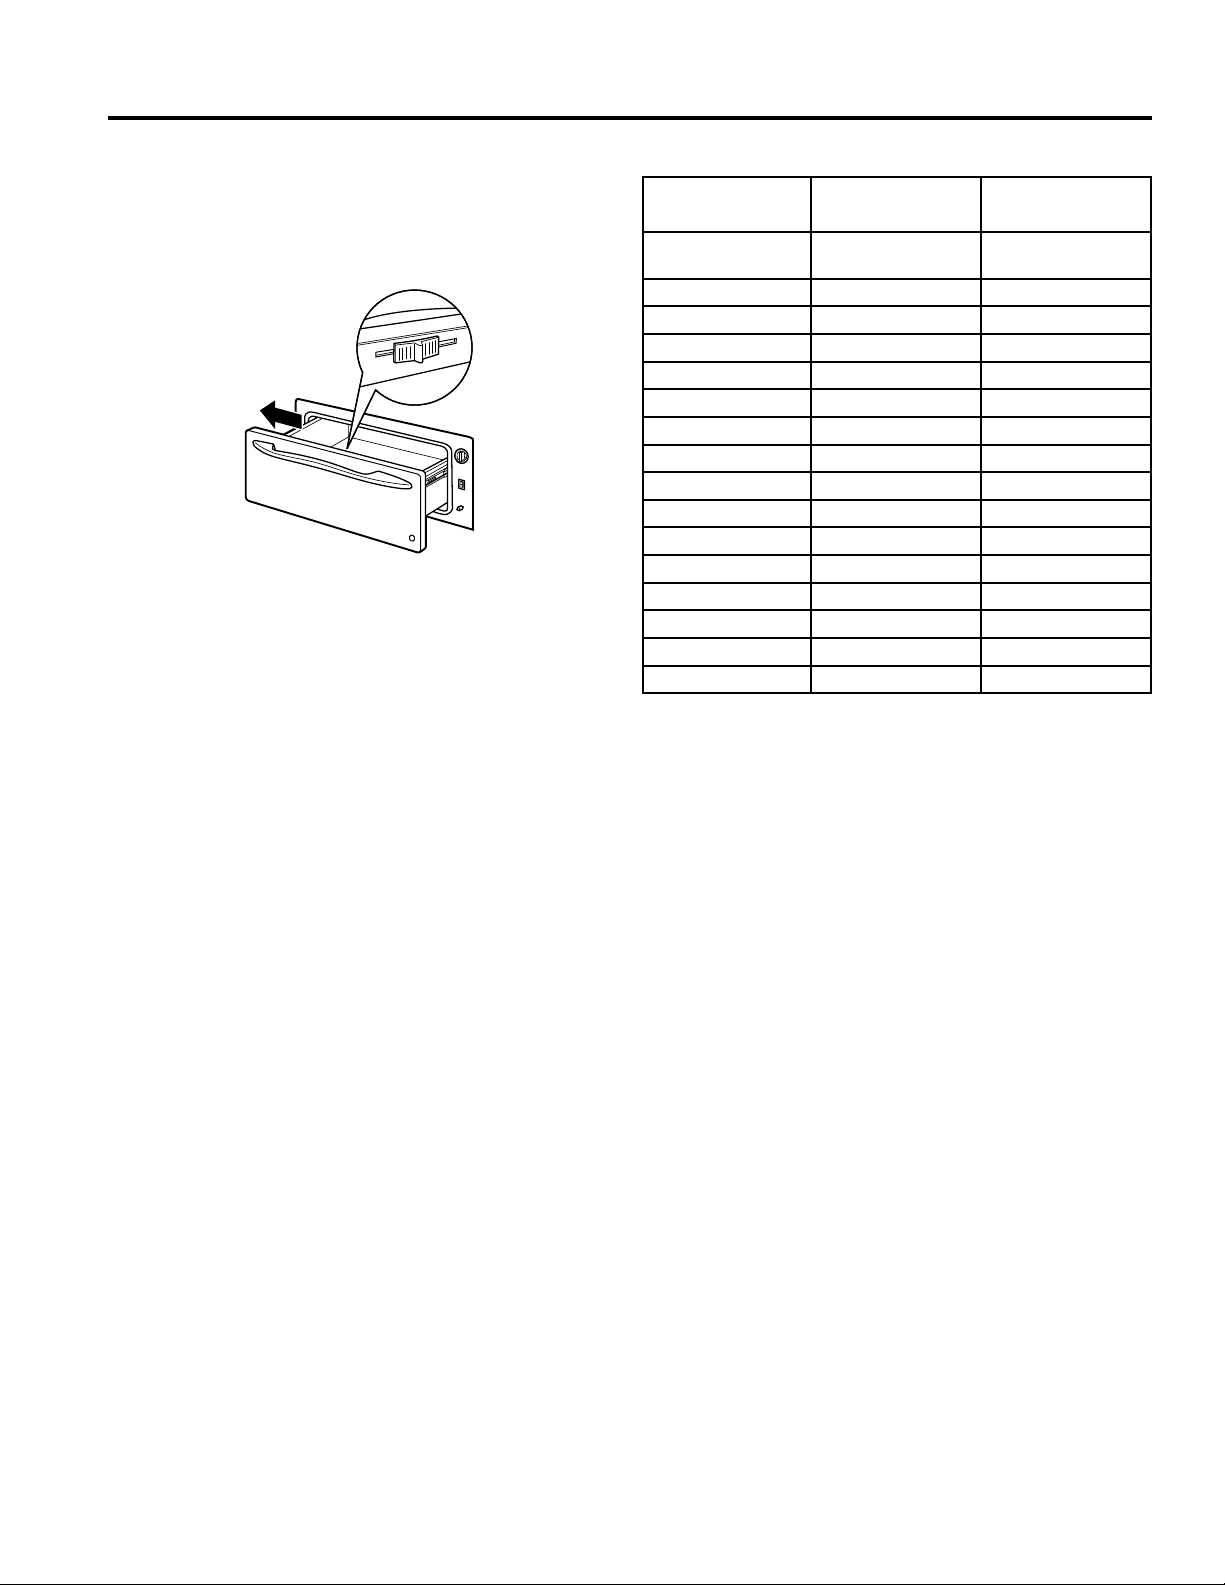
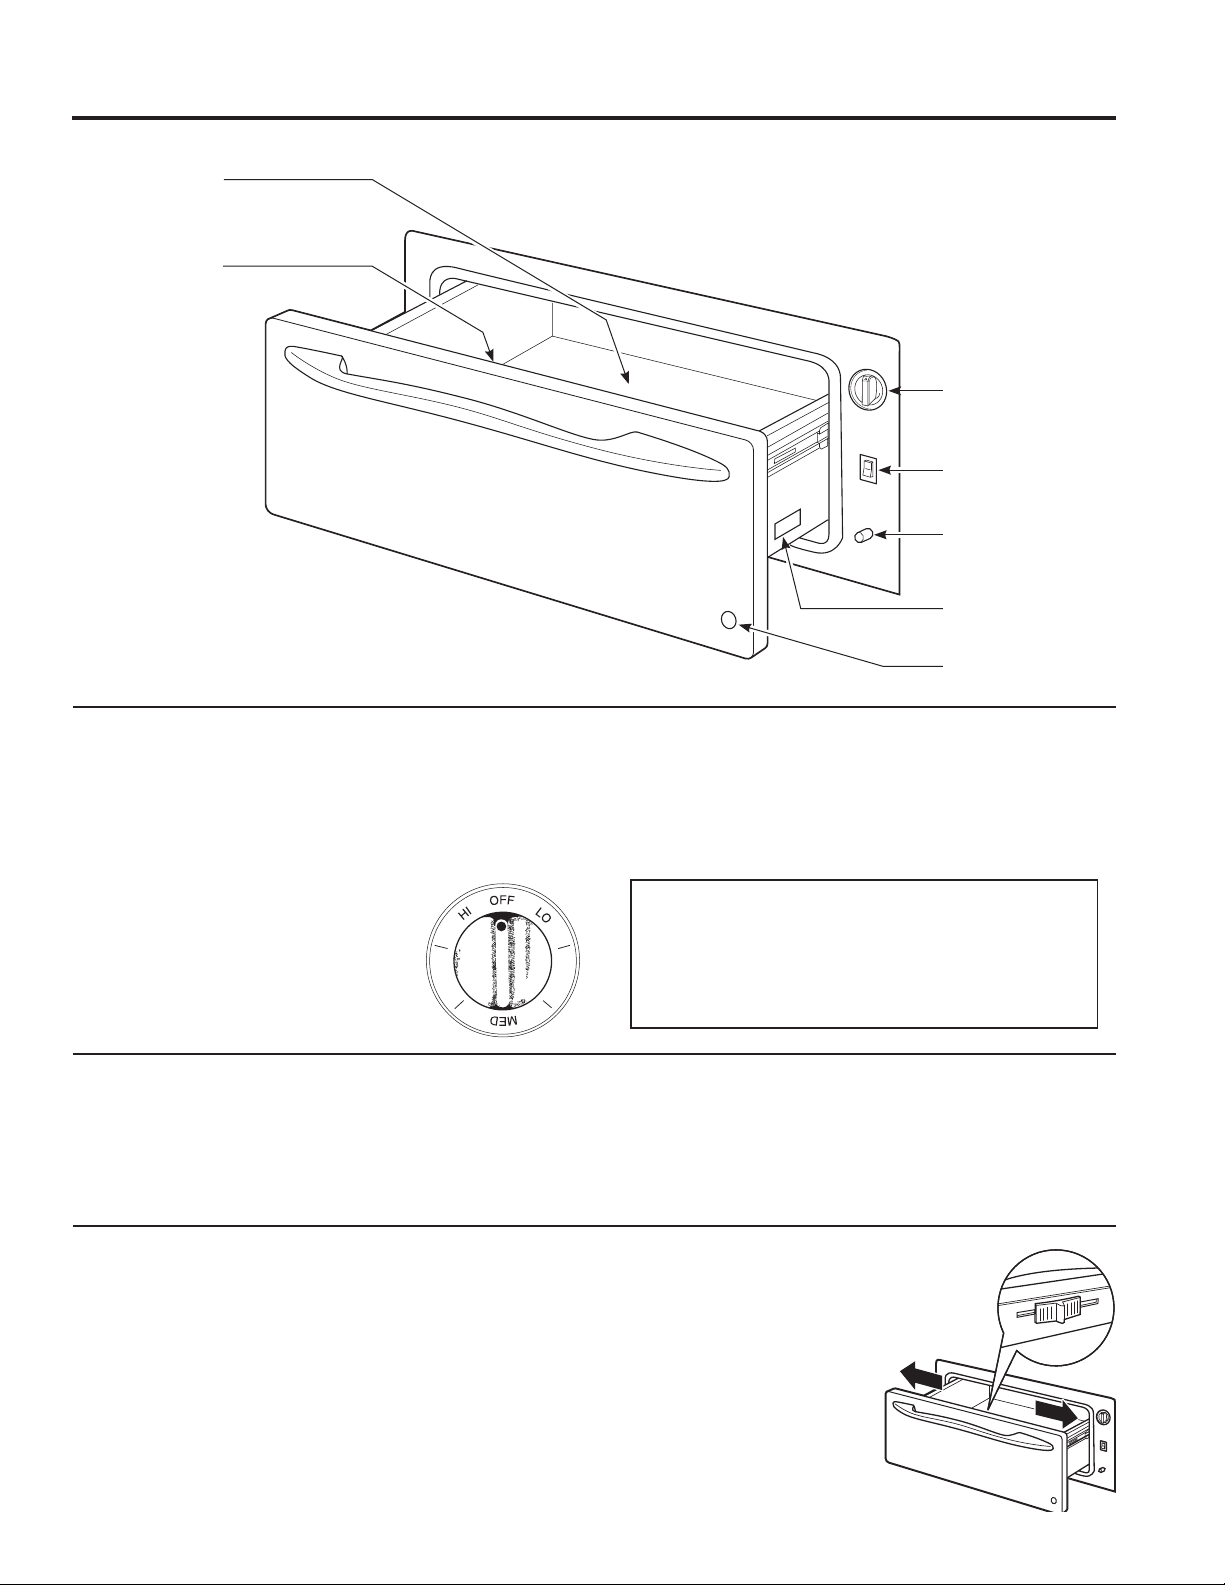
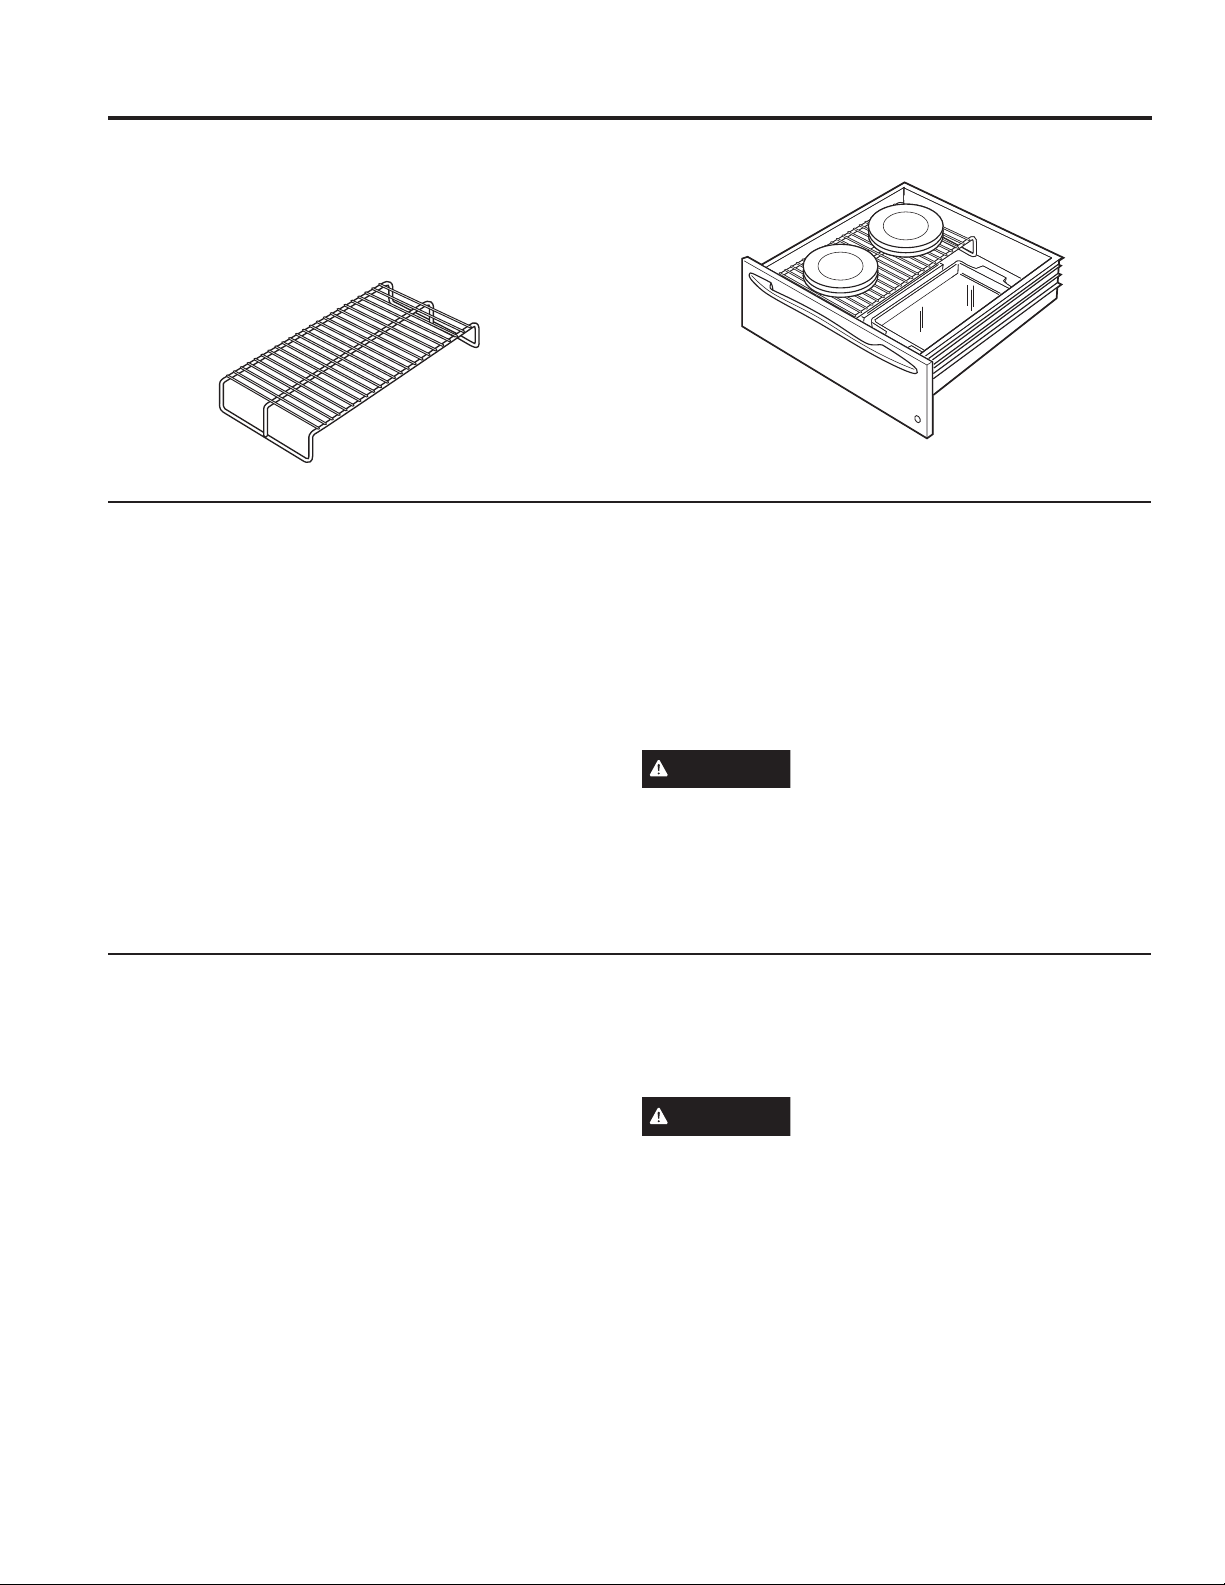
Features
USING THE WARMING DRAWER: Features
Notallfeaturesareonallmodels.Appearancemayvary.
Thewarmingdrawerwillkeephot,cookedfoodsatservingtemperature.Alwaysstartwithhotfood.Donotuseto
heat cold food other than proofing yeast dough, crisping crackers, chips or dry cereal.
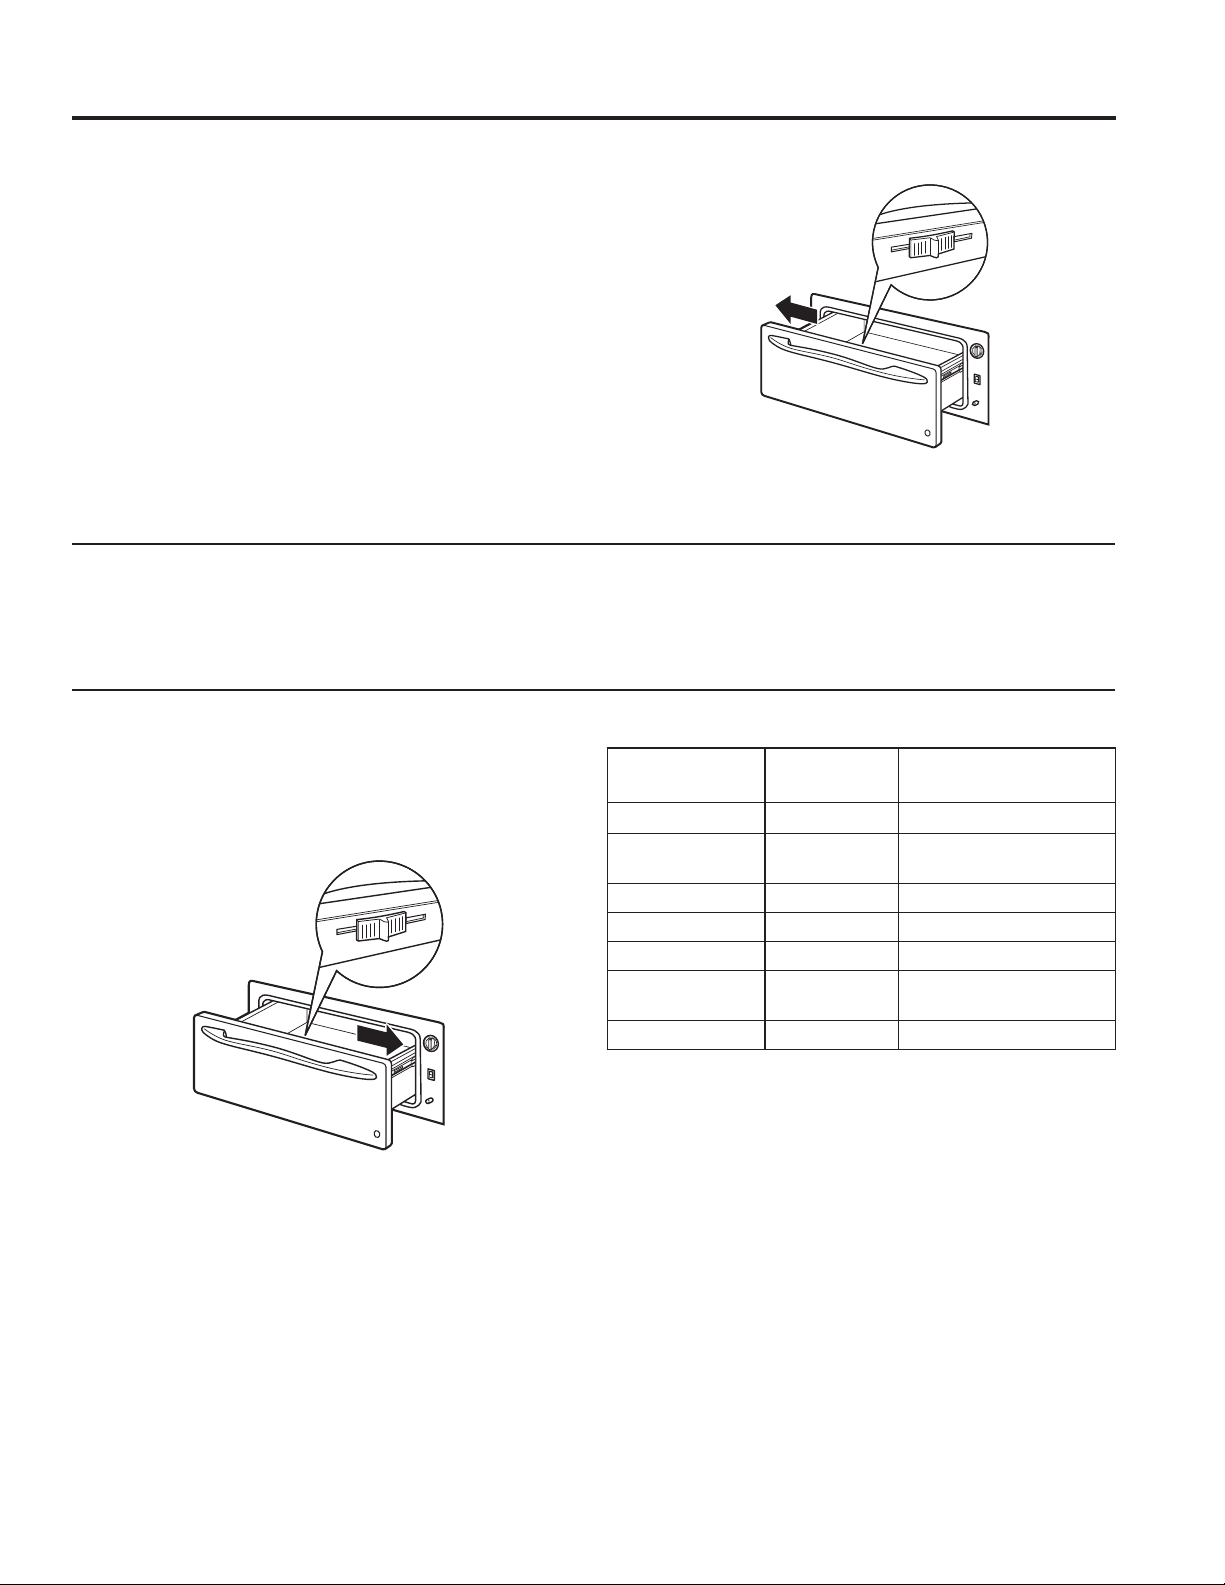
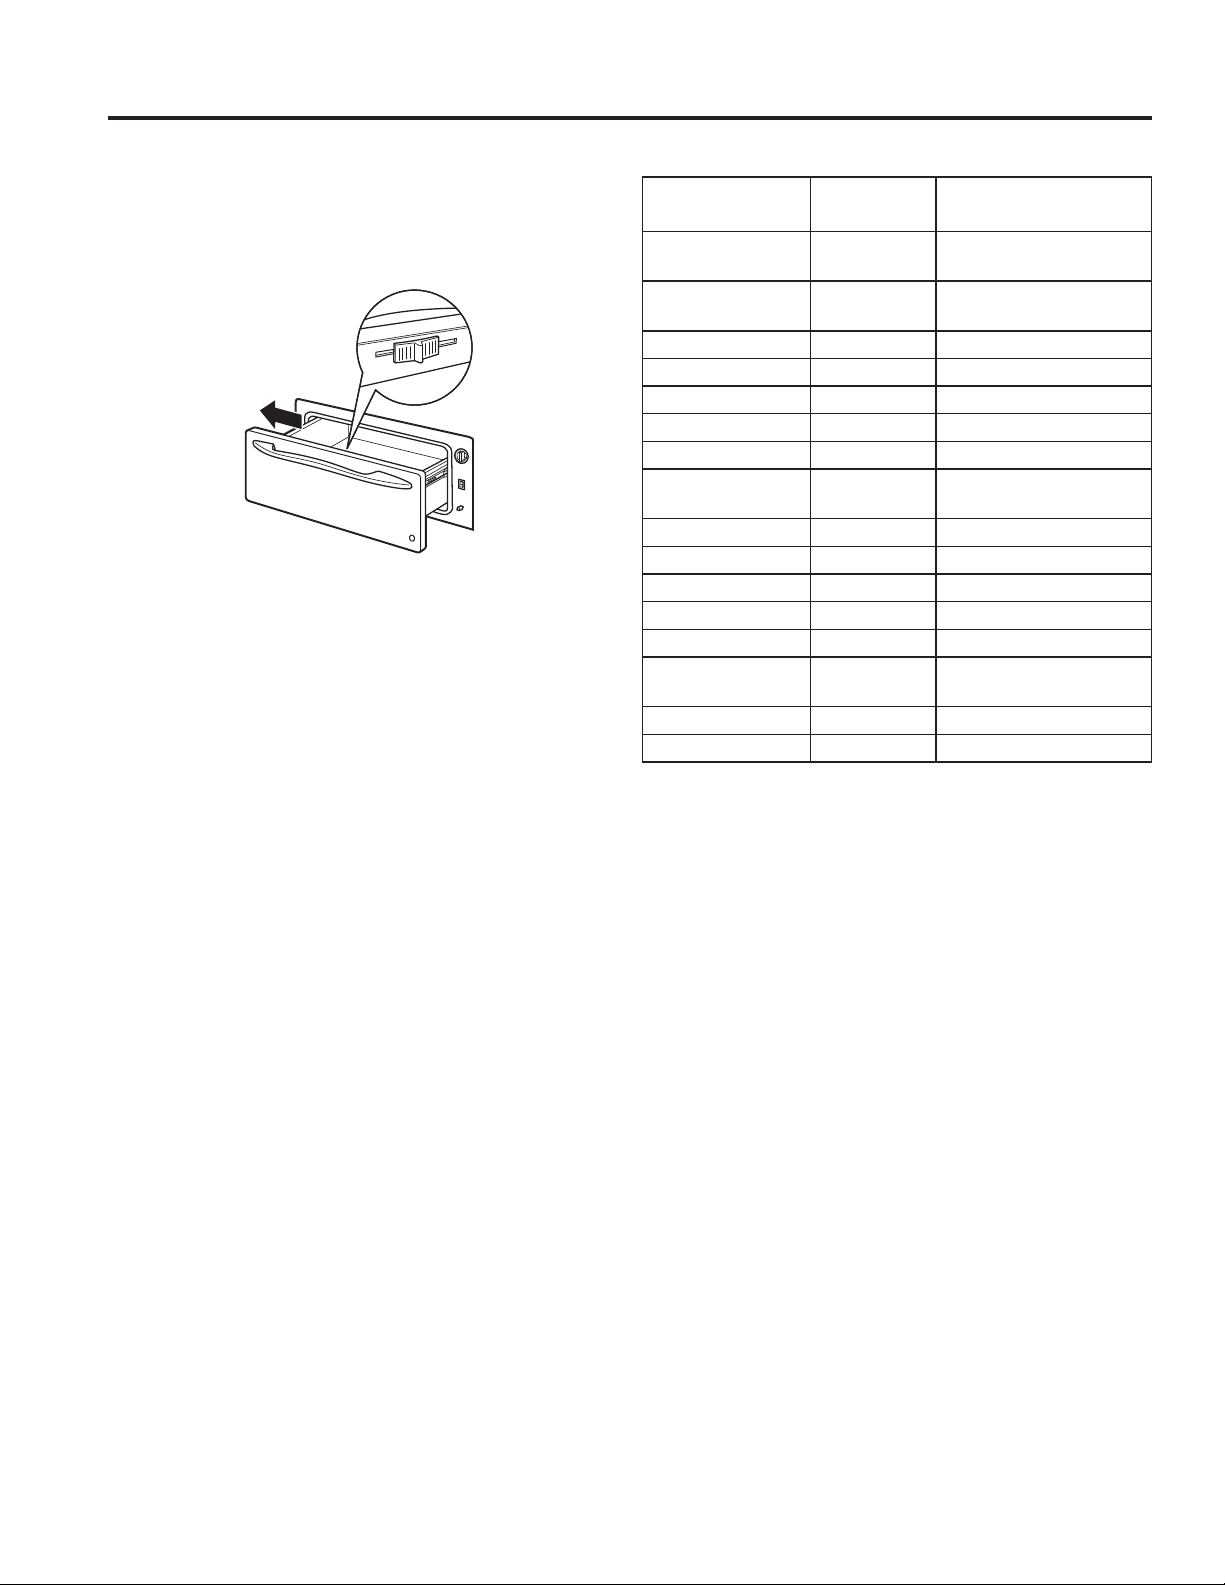
Control Knob
The warming drawer controls are hidden with the drawer
shut. Open the drawer. The controls are on the right side
of the front frame.
To use the warming drawer, press the
ON/OFFswitchtotheONposition.
Slide the moisture selector control to
the open or closed setting (See the
Moisture Selector section).
Turn the control knob to the desired setting.
ON Signal Light
TheONsignallightislocatedbelowtheON/OFF
switchandglowswhentheON/OFFswitchisintheON
position.ItstaysonuntiltheON/OFFswitchismovedto
the OFF position.
TheONsignallightisvisiblethroughthelightviewerin
the drawer front panel when the drawer is closed. This is
a reminder that the heat is on.
Moisture Selector
The moisture selector is located on the inside front of the
drawer.
To keep foods moist, slide the moisture selector control
away from the control knob. This closes the vent and
seals the moisture inside the drawer. With the vent
closed hot foods stay moist and soft.
In this setting condensation may occur around the inside
edge of the drawer.
To keep foods crisp, slide the
moisture selector control to the
right towards the control knob.
This opens the vents and
allows the moisture to escape.
With the vents open, it is
normal for moisture to collect
on surfaces above the
warming drawer.
PROOF ............ 75–95°F
LOW .............. 140–160°F
MED ............... 160–195°F
HIGH .............. 195–230°F
ControlKnob
ON/OFFSwitch
ONSignalLight
Rating Plate
ONSignalLight
ViewerLens
WarmingDrawer
Moisture Selector
(on back of panel)
Moist
Closed
Vent
Crisp
Open
Vent

6 49-2000658 Rev. 0
Operating Tips
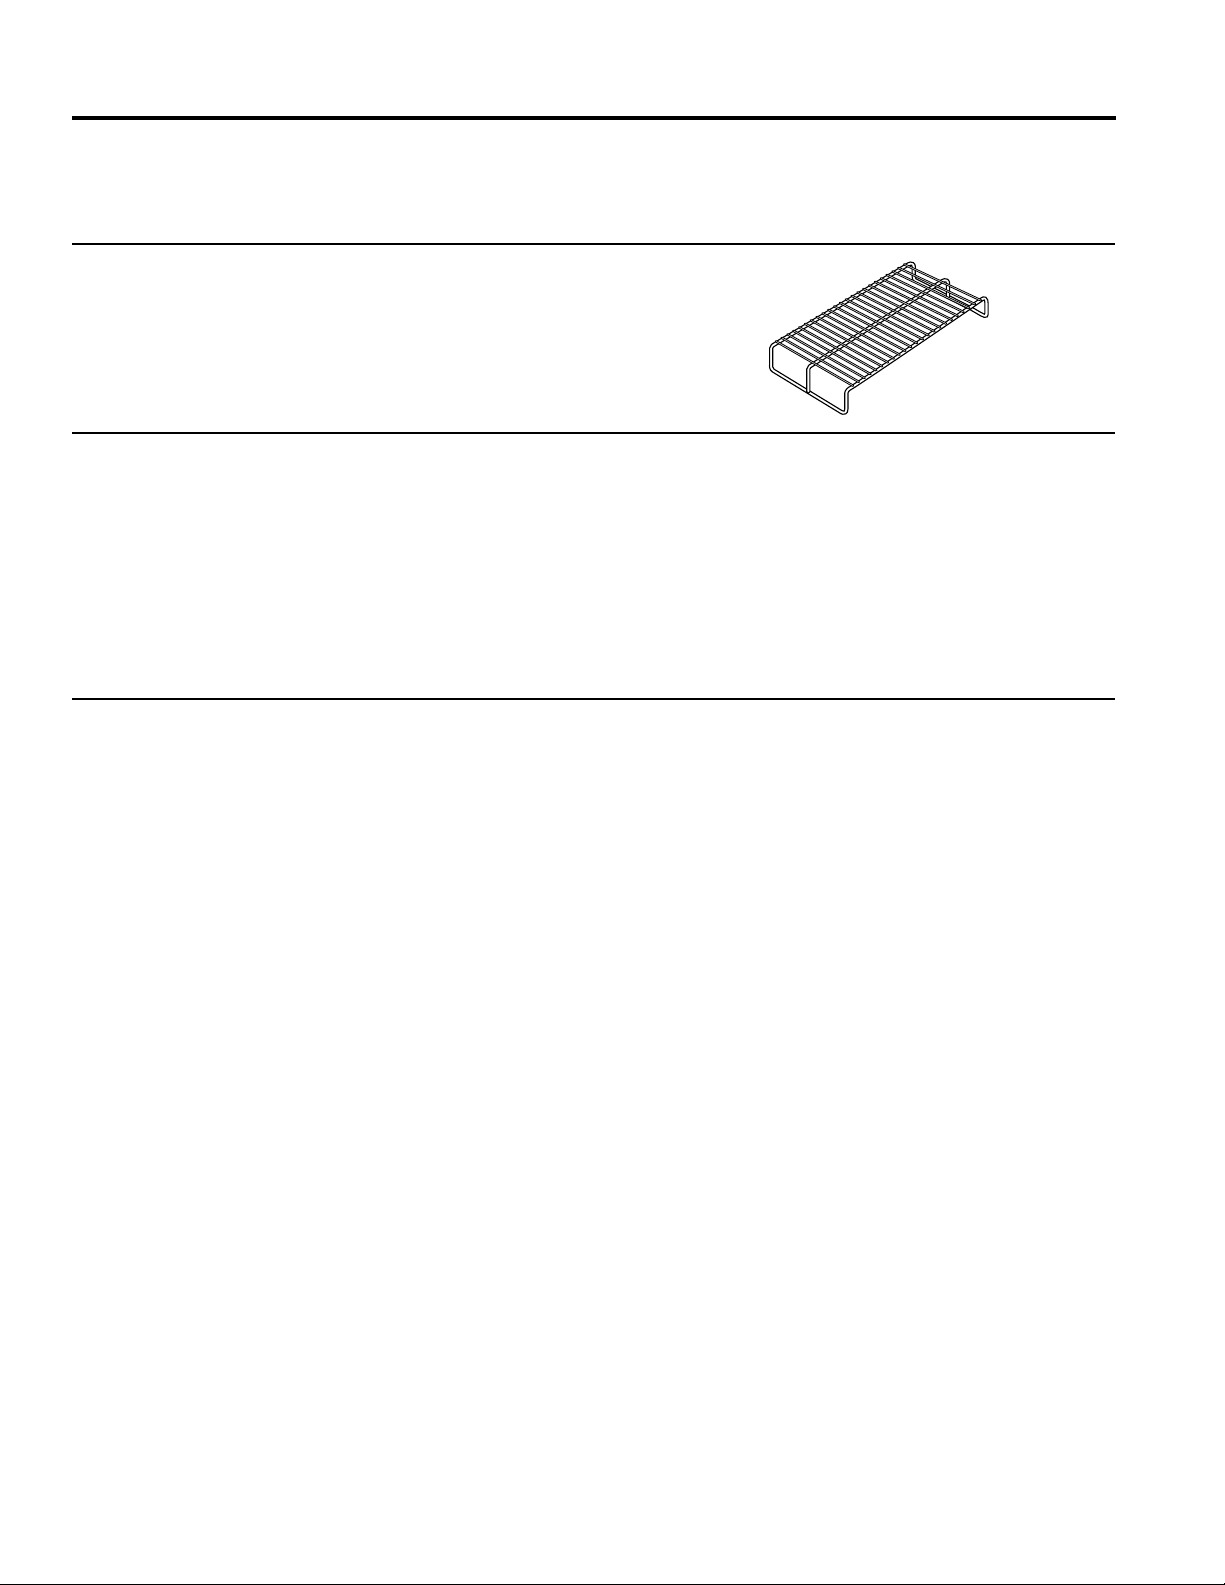
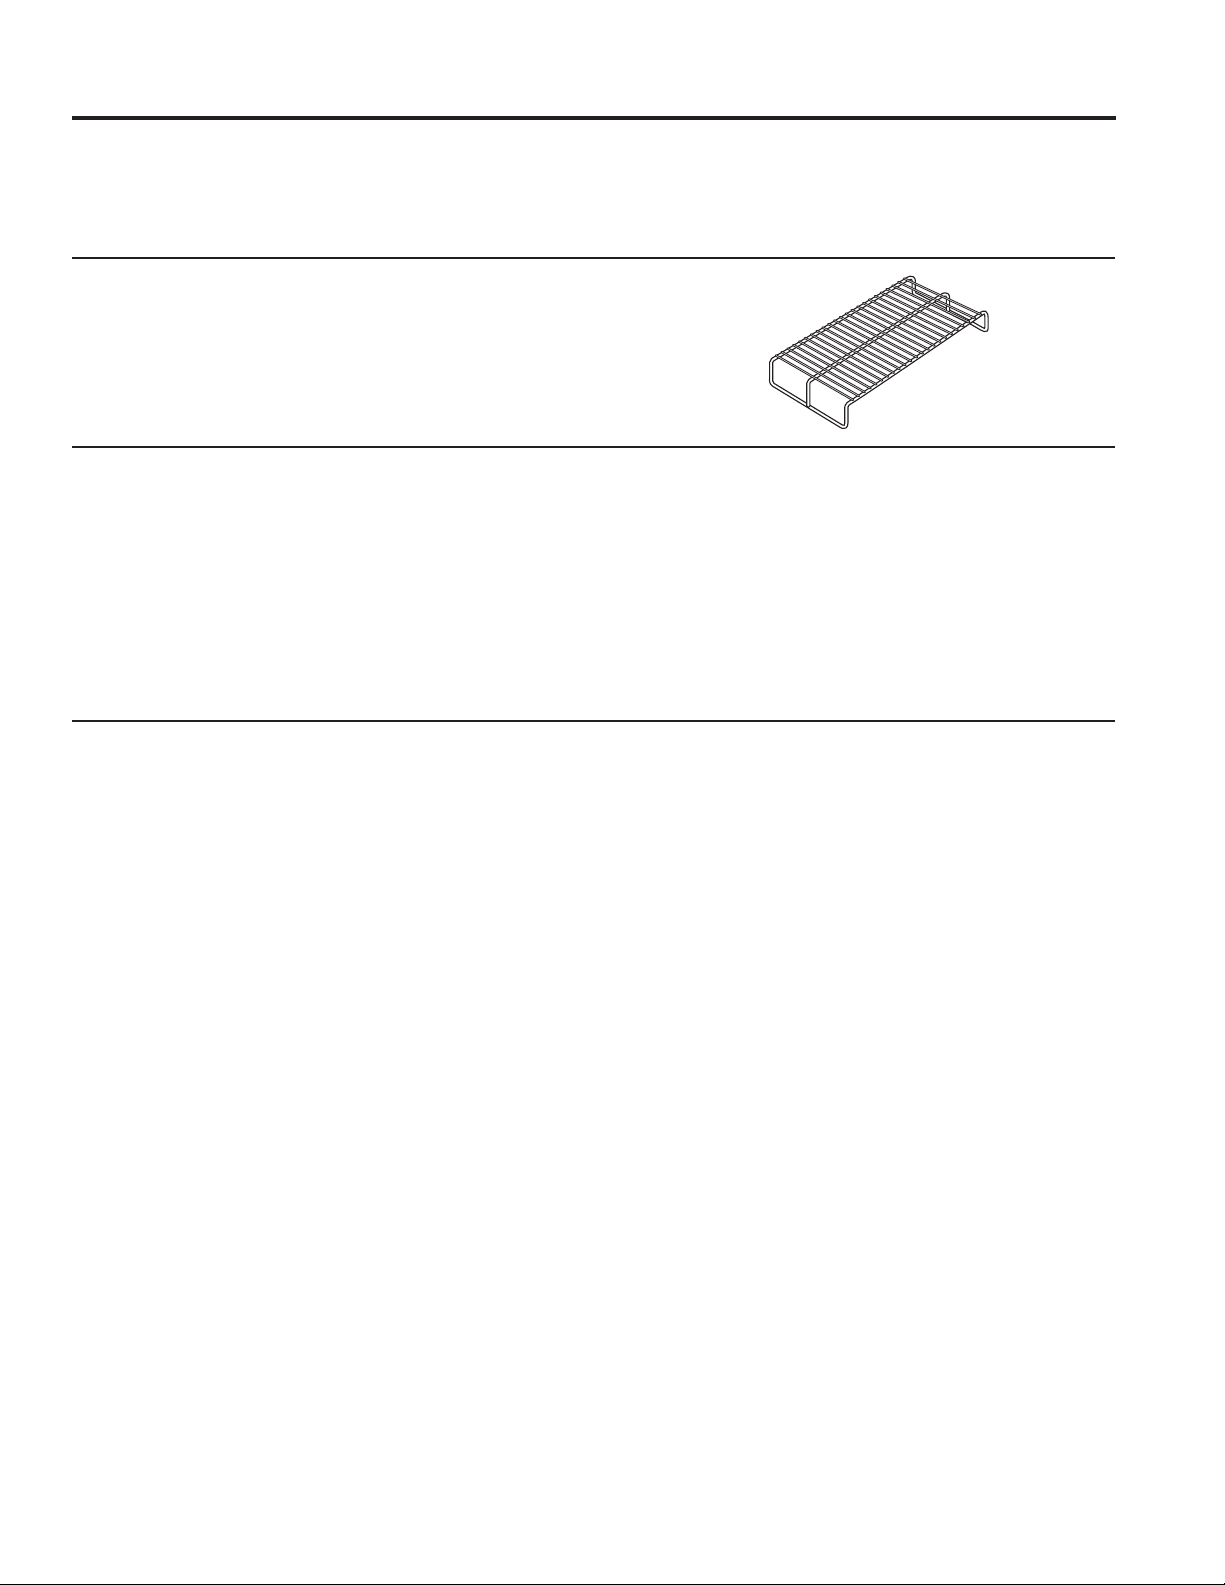
Rack
■ Rackwillfitfromfronttoback.
■ Preheatwiththerackinplace.
■ Usingtherackallowsfordoublestackingofitems.
USING THE WARMING DRAWER: Operating Tips
Doublestackingitemswiththerackinposition.
When Using The Warming Drawer
Donotlinethewarmingdrawerwithaluminumfoil.
■ Allowtimeforthedrawertobepreheated:
LOW 8 minutes
MED 15 minutes
HIGH 20 minutes
NOTE: It is not necessary to preheat the drawer for
proofing.
Food in heat-safe glass and glass ceramic pans may
need higher thermostat setting as compared to food in
metal pans.
■ Repeatedopeningofthedrawerallowsthehotair
to escape and the food to cool. Allow extra time
for temperature inside the drawer to stabilize after
adding items.
■ Withlargeloadsitmaybenecessarytouseahigher
thermostat setting and cover some of the cooked
food items.
■ Foodshouldbekepthotinitscookingcontaineror
transferred to a heat-safe serving dish.
■ Aluminumfoilmaybeusedtocoverfoodtopreventit
from drying out.
CAUTION
Plastic containers or plastic wrap will
melt if in direct contact with the drawer. Melted plastic
may not be removable and is not covered under your
warranty.
■ Removeservingspoons,etc.,beforeplacing
containers in warming drawer.
To Warm Serving Bowl And Plates
TowarmservingbowlsandplatessetthecontrolonLOW.
■ Useonlyheat-safedishes.
■ Placetheemptydishesontheracktoraisethemoffthe
bottom of the drawer. If you want hotter dishes or want
to heat fine china, please check with the manufacturer
of the dishes for their maximum heat tolerance.
■ Preheatemptyservingdishwhilepreheatingthedrawer.
■ Whenholdinghot,cookedfoodsandwarmingempty
serving dishes at the same time, place the serving
dishes on the high rack position and the food on the
bottom of the drawer.
CAUTION
Dishesmaybehot.Usepotholdersor
mitts when removing hot dishes.
49-2000658 Rev. 0 7
Operating Tips
To Proof Yeast Bread Dough
Yeast dough can be proofed in the warming drawer.
■ Placeyourdishonthewarmingdrawerbottom.
■ YoumustalwaysturnthecontrolknobtoLOW then
immediately back to PROOF.
■ Closethevent.
■ Lightlyoilthetopofthedoughinabowllargeenough
to double the dough size. Cover with a cloth.
■ Preheatingnotrequiredforproofing.
■ Checkthedoughheightin40minutes.Addtimeas
needed. The dough should remain in the drawer until
it has doubled in size and a slight depression remains
when the surface is touched gently with a finger.
USING THE WARMING DRAWER: Operating Tips
Crisp
Open
Vent
To Crisp Stale Items
■ Placefoodinlowsideddishesorpans.
■ PreheatonLOWsettingandopenthevent.
■ Checkcrispnessafter45minutes.Addtimeas
needed.
Temperature Selection Chart for Crisp Foods
To keep several different foods hot, set the temperature
to the food needing the highest setting. Place the items
needing the highest setting on the bottom of the drawer
and items needing less heat on the rack.
Tips:
■ Leavefooduncovered.
■ Donotuseplasticcontainersorplasticwrap.
■ Preheatpriortouseaccordingtorecommendedtimes.
Moist
Closed
Vent
Food Type Control Setting
Moisture
Selector Setting
Bacon HIGH OPEN
Bread,hardrolls MED OPEN
Fried foods HIGH OPEN
Pies, two crusts MED OPEN
Pizza HIGH OPEN
Potatoes, baked HIGH OPEN
Tortilla Chips LOW OPEN
8 49-2000658 Rev. 0
Moist
Closed
Vent
Operating Tips
Temperature Selection Chart for Moist Foods
To keep several different foods hot, set the temperature
to the food needing the highest setting. Place the items
needing the highest setting on the bottom of the drawer
and items needing less heat on the rack.
Tips:
■ Coverfoodwithlidoraluminumfoil.
■ Donotputwaterinthewarmingdrawer.
■ Donotuseplasticcontainersorplasticwrap.
■ Preheatpriortouseaccordingtorecommendedtimes.
USING THE WARMING DRAWER: Operating Tips
*USDA/FSISrecommendsaninternaltemperatureof145°F.astheminimum
donenessforbeef.Useaportablemeatthermometertocheckinternal
temperatures.
Food Type Control Setting
Moisture
Selector Setting
Beef,mediumand
well done* MED CLOSED
Bread,softrolls MED CLOSED
Casseroles MED CLOSED
Cooked cereal MED CLOSED
Eggs MED CLOSED
Fish, seafood MED CLOSED
Fruit MED CLOSED
Gravy, cream sauces MED CLOSED
Ham MED CLOSED
Lamb MED CLOSED
Pancakes, waffles HIGH CLOSED
Pies, one crust MED CLOSED
Pork MED CLOSED
Potatoes, mashed MED CLOSED
Poultry HIGH CLOSED
Vegetables MED CLOSED
49-2000658 Rev. 0 9
Cleaning The Warming Drawer
BesurethecontrolsareintheOFFpositionandallsurfacesarecoolbeforecleaninganypartofthewarmingdrawer.
Painted Or Enameled Surfaces
Usesoapandwarmwatertothoroughlyclean.
CARE AND CLEANING:CleaningTheWarmingDrawer
Rack
Clean the rack with detergent and water. After cleaning,
rinse the rack with clean water and dry with a clean cloth.
Control Knob
The control knob may be removed for easier cleaning.
Make sure the knob is in the PROOF position and pull it
straight off the stem for cleaning.
The knob can be cleaned in a dishwasher or it may also
be washed with soap and water. Make sure the inside of
the knob is dry before replacing.
Replace the knob in the PROOF position to ensure
proper placement.
Stainless Steel - Excluding Black Stainless Steel (on some models)
Donotuseasteelwoolpad;itwillscratchthesurface.
To clean the stainless steel surface, use warm sudsy
water or a stainless steel cleaner or polish. Always wipe
the surface in the direction of the grain. Follow the cleaner
instructions for cleaning the stainless steel surface.
CleanerswithoxalicacidsuchasBarKeepersFriendSoft
Cleanser™ will remove surface rust, tarnish and small
blemishes.Useonlyaliquidcleanserfreeofgritandrubin
the direction of the brush lines with a damp, soft sponge.
To inquire about purchasing cleaning products including
stainless steel appliance cleaner or polish, see the
Accessories and Consumer Support sections at the end of
this manual.
10 49-2000658 Rev. 0
Installation
Instructions
If you have questions, call GE Appliances at 800.GE.CARES (800.432.2737)
or visit our website at: GEAppliances.com
In Canada: 800.561.3344 or visit GEAppliances.ca
BEFORE YOU BEGIN
Read these instructions completely and carefully.
■
IMPORTANT – Save these instructions
for local inspector’s use.
■
IMPORTANT – Observe all governing
codes and ordinances.
■
Note to Installer – Besuretoleavethese
instructions with the Consumer.
■
Note to Consume – Keeptheseinstructionsfor
future reference.
■
Product failure due to improper installation is not
covered under the Warranty.
■
WARNING
This appliance must be properly
grounded.
■
WARNING
Insure that the power cord does
not contact the hot surfaces on the bottom of
ovens, cooktops, or any other appliance.
■ ATTENTIONINSTALLER – Proper installation
is the responsibility of the installer and
product failure due to improper installation is
NOT covered under warranty.
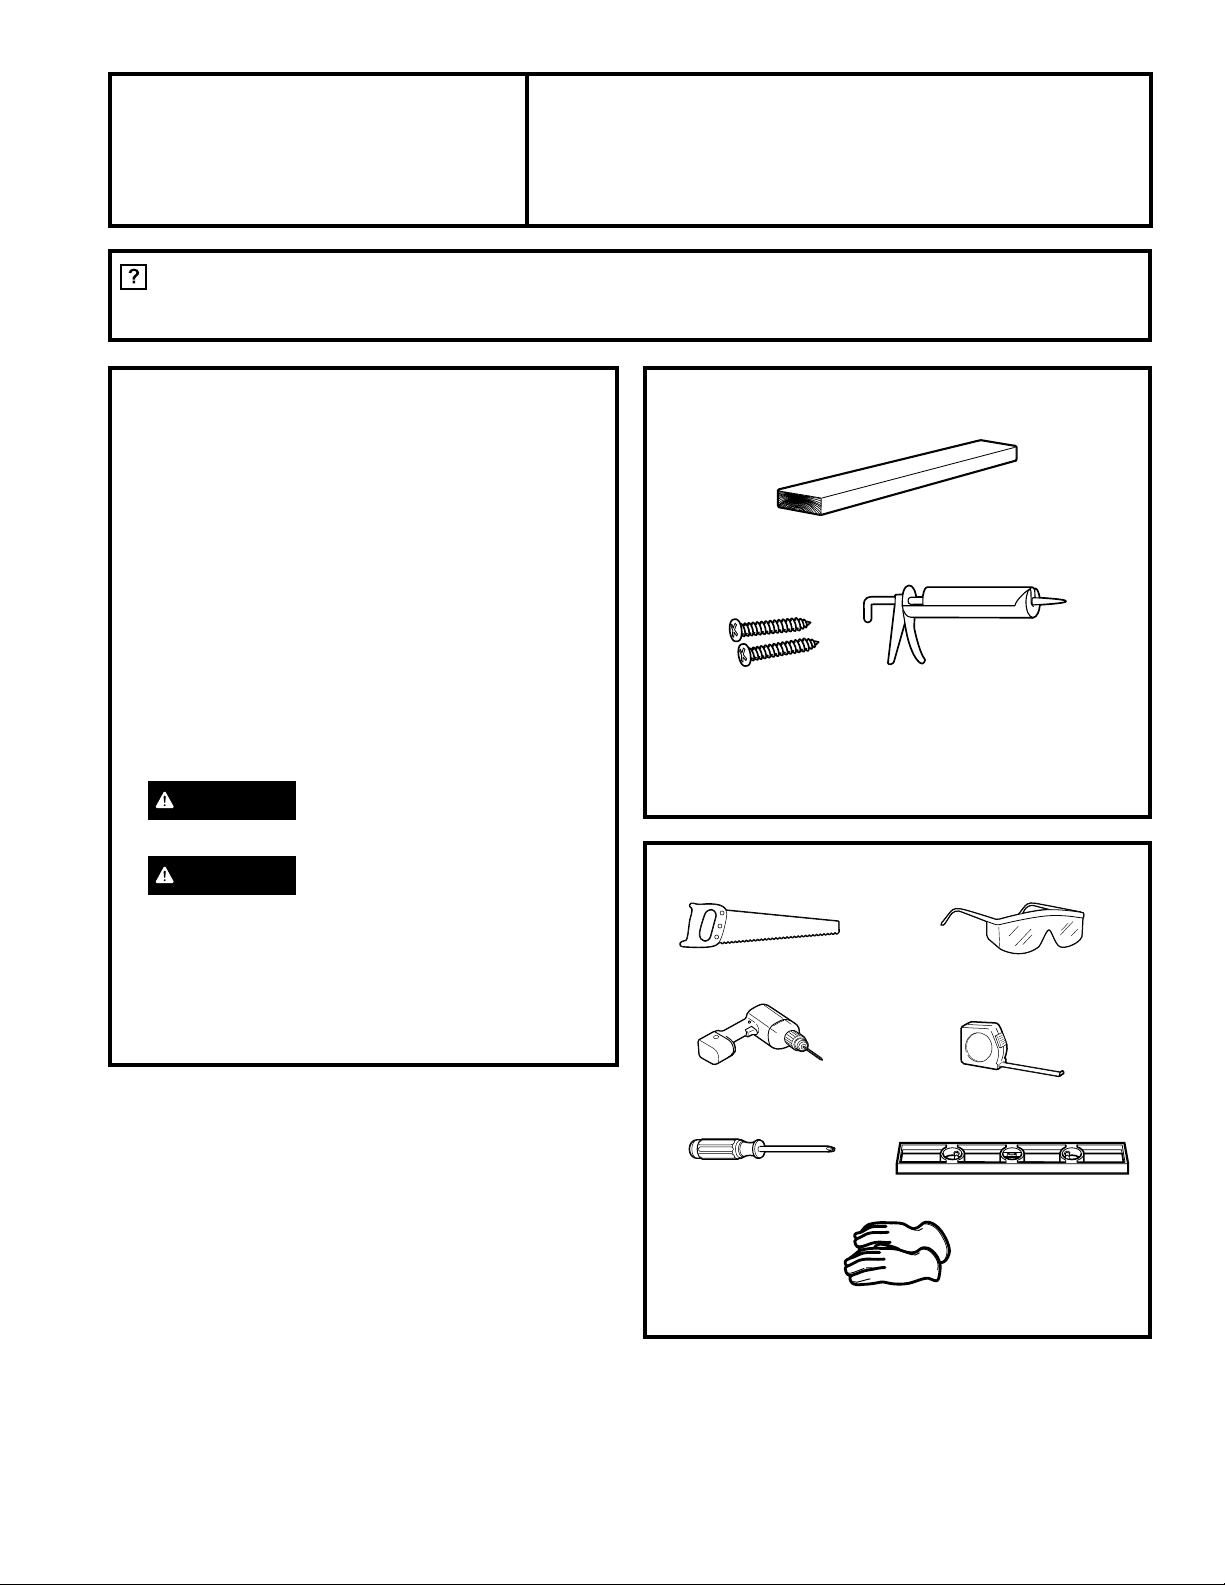
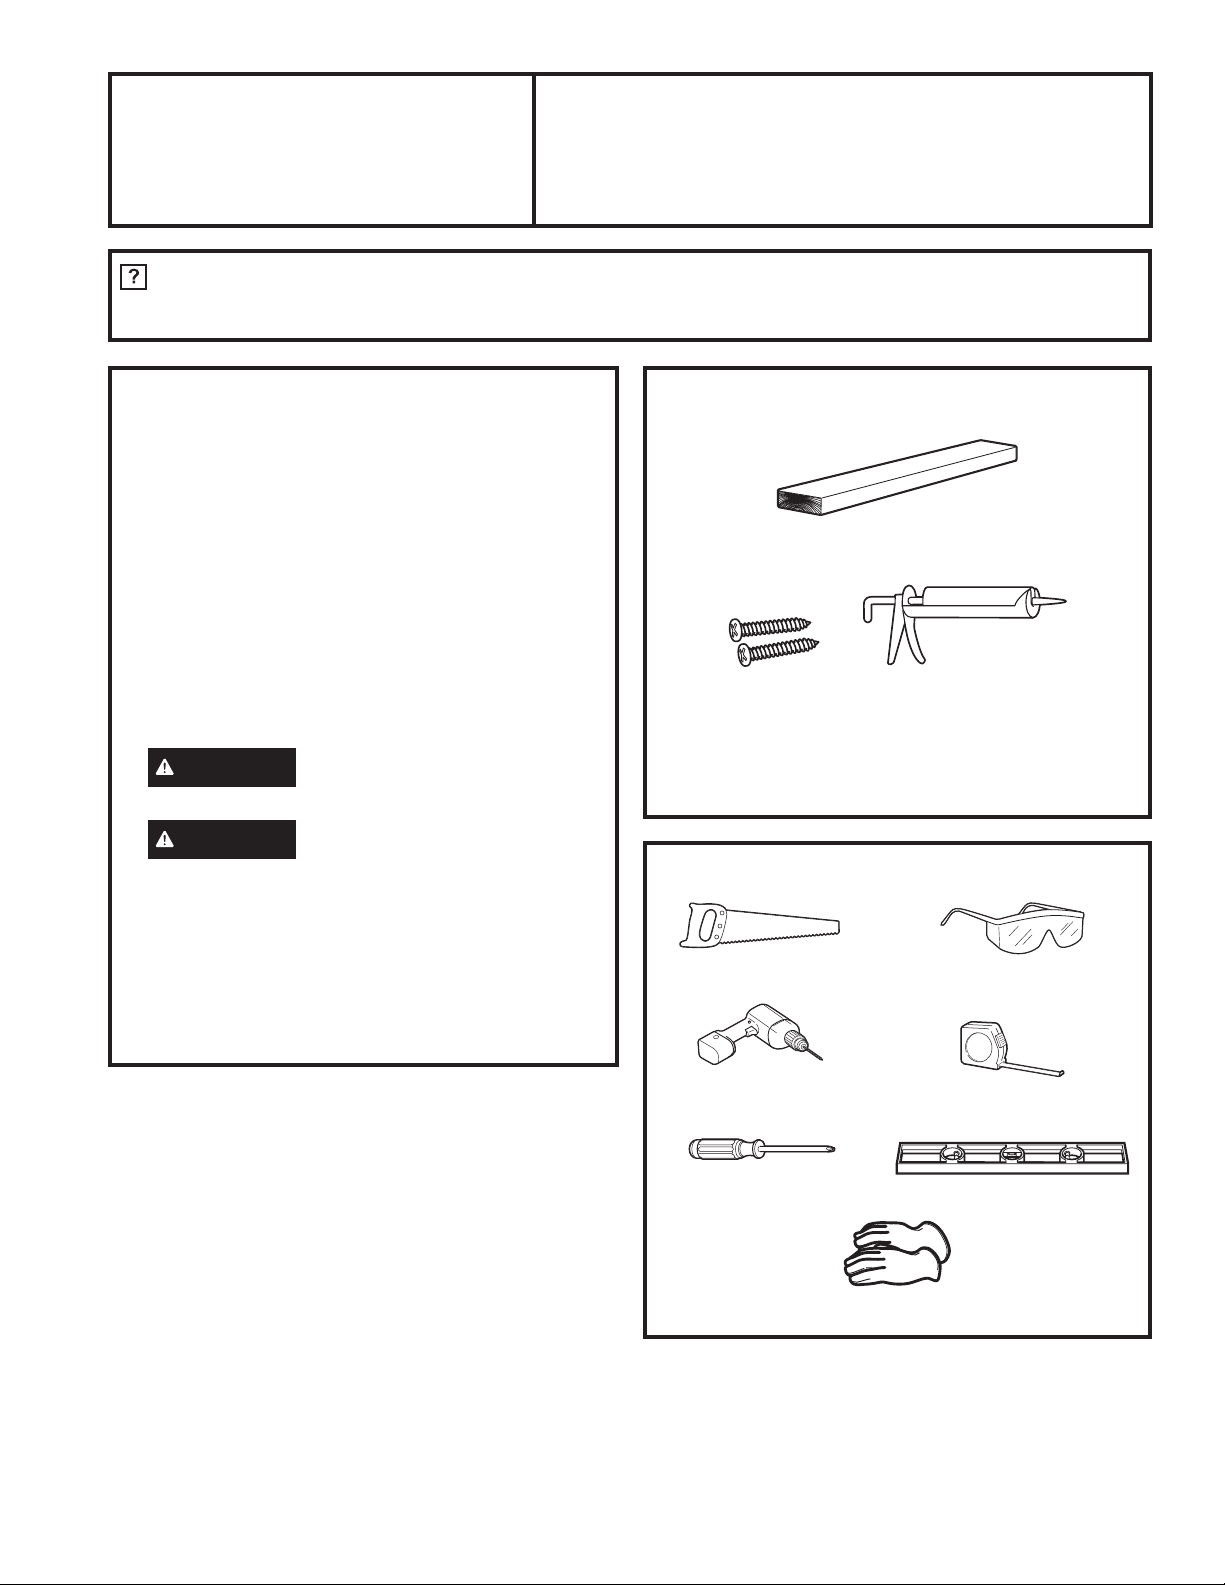
MATERIALS YOU WILL NEED
TOOLS REQUIRED
Warming Drawer
PKW7000 and PTW9000
INSTALLATION INSTRUCTIONS
Cut Resistant Gloves
Drilland
1/16”Bit
Phillips Screwdriver
Hand Saw
Wood screws and adhesive or other hardware for
installing runners or shelf to support warmer drawer.
Runners must be level, rigidly mounted and capable of
supporting 150 pounds.
2 x 4 or 2 x 2 lumber for runners and brace
Safety Glasses
Measuring Tape
Level
49-2000658 Rev. 0 11
INSTALLATION INSTRUCTIONS
Installation Instructions
IMPORTANT SAFETY INSTRUCTIONS
PRE-INSTALLATION CHECKLIST
GROUNDING INSTRUCTIONS
IMPORTANT—(Please read carefully)
FOR PERSONAL SAFETY, THIS APPLIANCE
MUST BE PROPERLY GROUNDED.
This warming drawer must be supplied with 120V,
60Hz, and connected to an individual, properly
grounded branch circuit, and protected by a 15 or
20 amp circuit breaker or time delay fuse.
■ A properly grounded 3-prong receptacle should
be located within reach of the drawer’s 56" long
power cord.
■ Locatethereceptacleinanadjacentcabinet.
— within 42” of the right side or,
— within 16” of the left side or
— A recessed receptacle may be located on
the right side of the cutout, 7” maximum from
the back of the cabinet. In this location, the
excess power cord should be coiled and taped
to the right side of the unit.
IMPORTANT—(Please read carefully)
The power cord of this appliance is equipped with a
3-prong (grounding) plug that mates with a standard
3-prong grounding wall receptacle to minimize the
possibility of electric shock. The customer should
have the wall receptacle and circuit checked by a
qualified electrician to make sure the receptacle is
properly grounded and has the correct polarity.
■ Where a standard 2-prong wall receptacle is
encountered, it is the personal responsibility and
obligation of the customer to have it replaced
with a properly grounded 3-prong wall receptacle.
Donot,underanycircumstances,cutorremovethe
third (ground) prong from the power cord.
DO NOT USE AN EXTENSION CORD OR
ADAPTER PLUG WITH THIS APPLIANCE.
FOLLOW NATIONAL ELECTRICAL CODES AND
ORDINANCES.
A
When preparing warming drawer cabinet, make
sure the inside of the cabinet and the warming
drawer do not interfere with each other. (see
sections on preparing cabinet)
B
REMOVEPACKAGINGMATERIALS:Failureto
remove packaging materials could result in damage
to the appliance. Remove all packing parts from
warming drawer including lifting up the warming
drawer to confirm all packaging is removed.
C
Remove Installation Instructions from literature
pack and read them carefully before you begin.
Besuretoplaceallliterature,Owner’sManual,
Installations, etc in a safe place for future
reference.
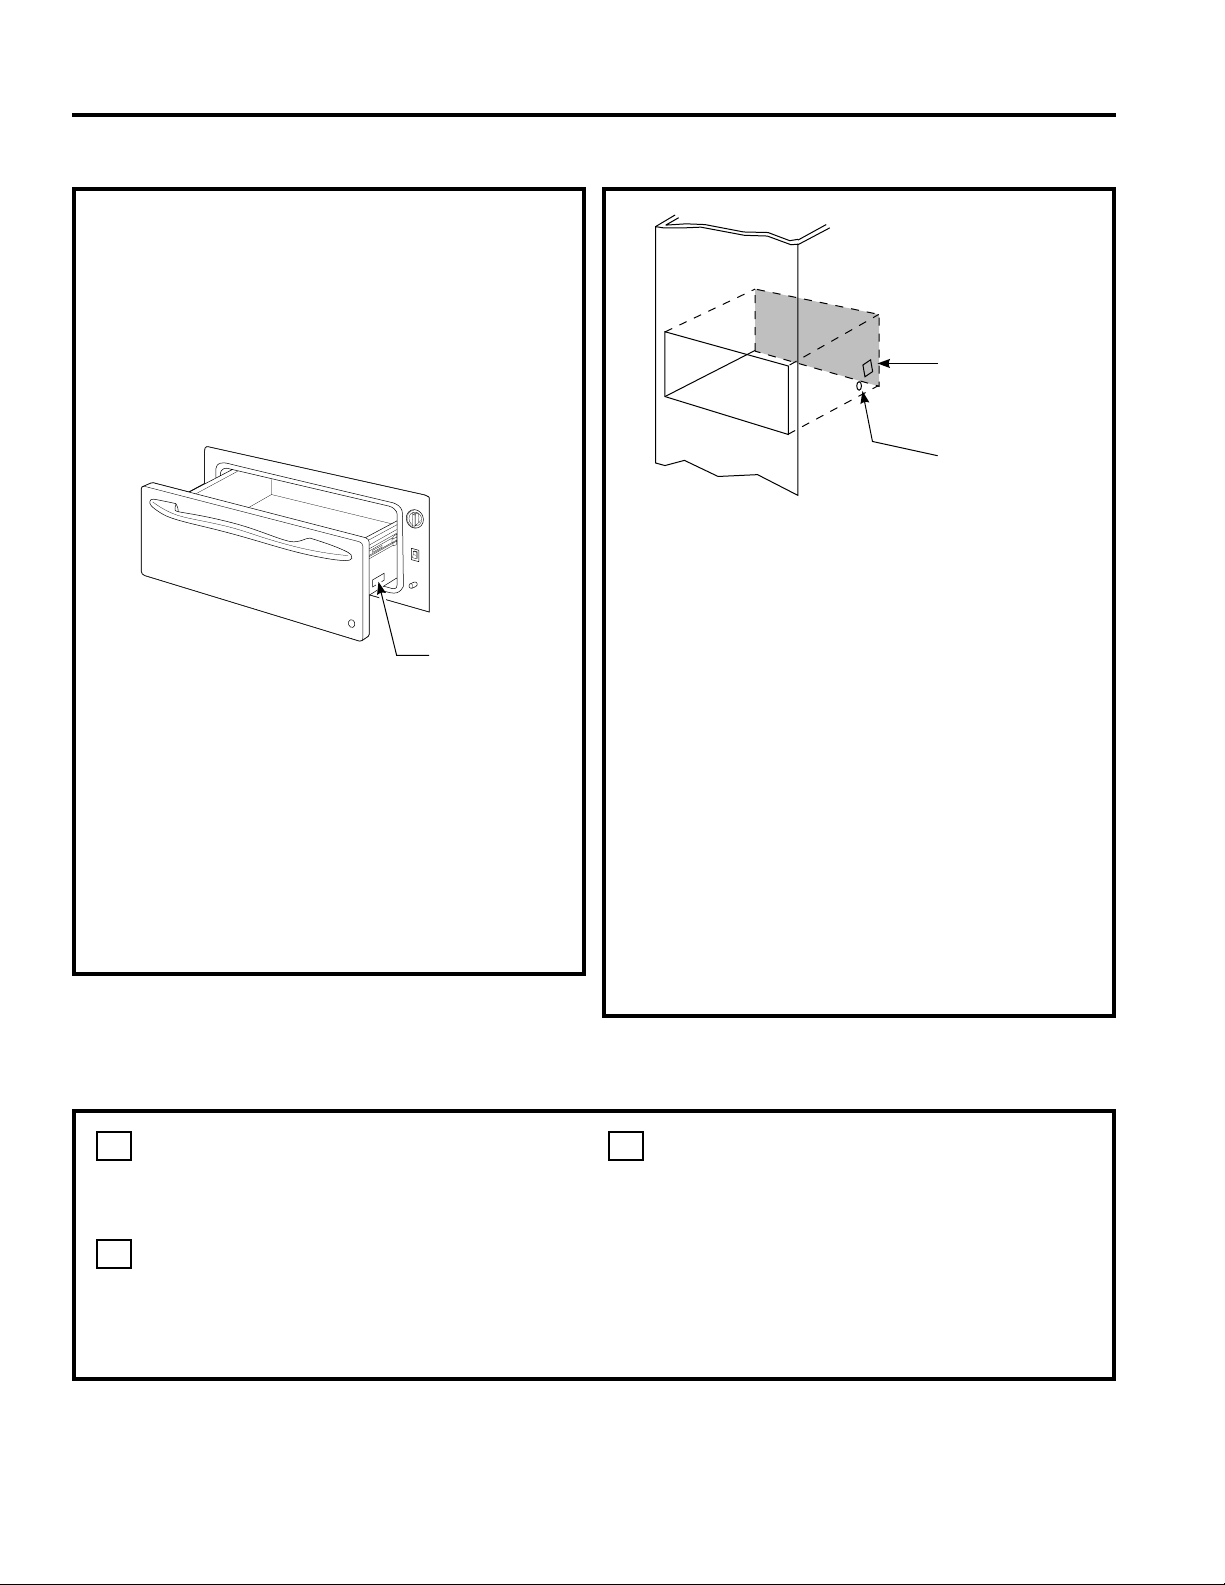
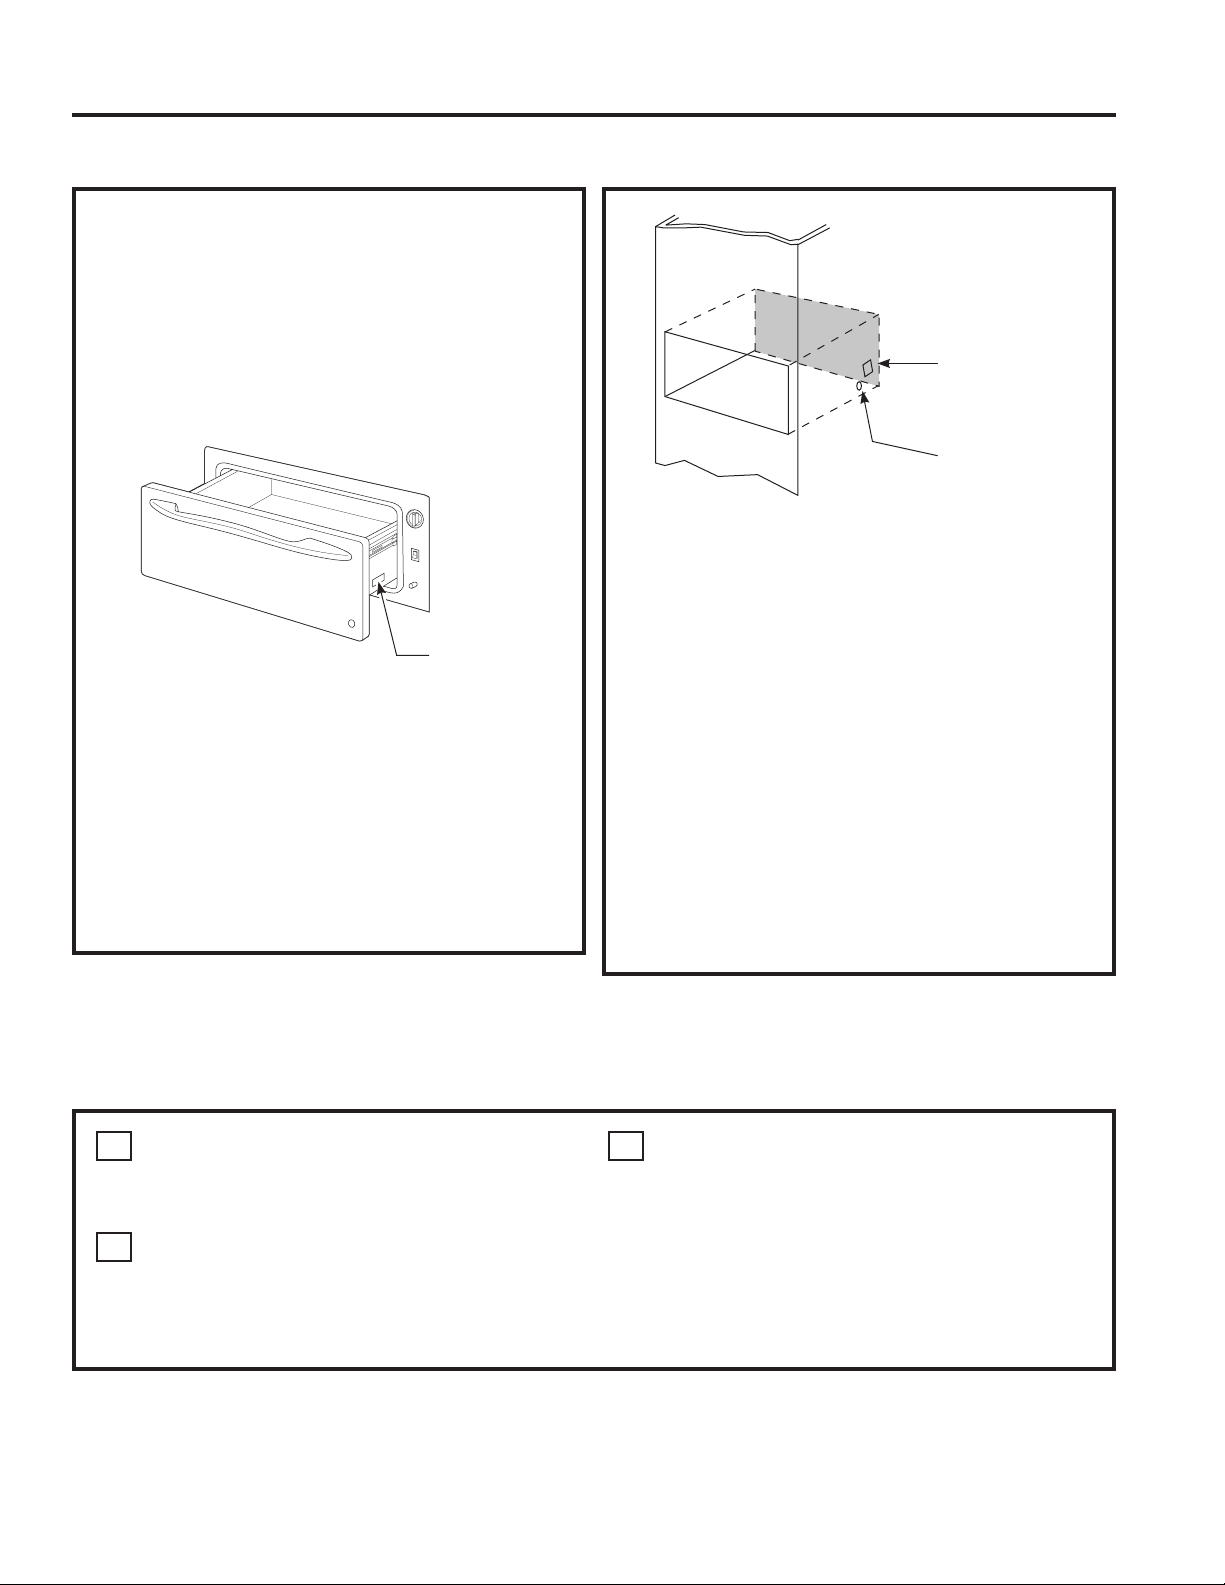
Rating plate
Recessed
receptacle 7"
max. from rear
on right side
Drill1
1
/2” hole for
power cord for
left or right side
outlet location
1" = 2.5 cm; 1' = 0.3 m
12 49-2000658 Rev. 0
Installation Instructions
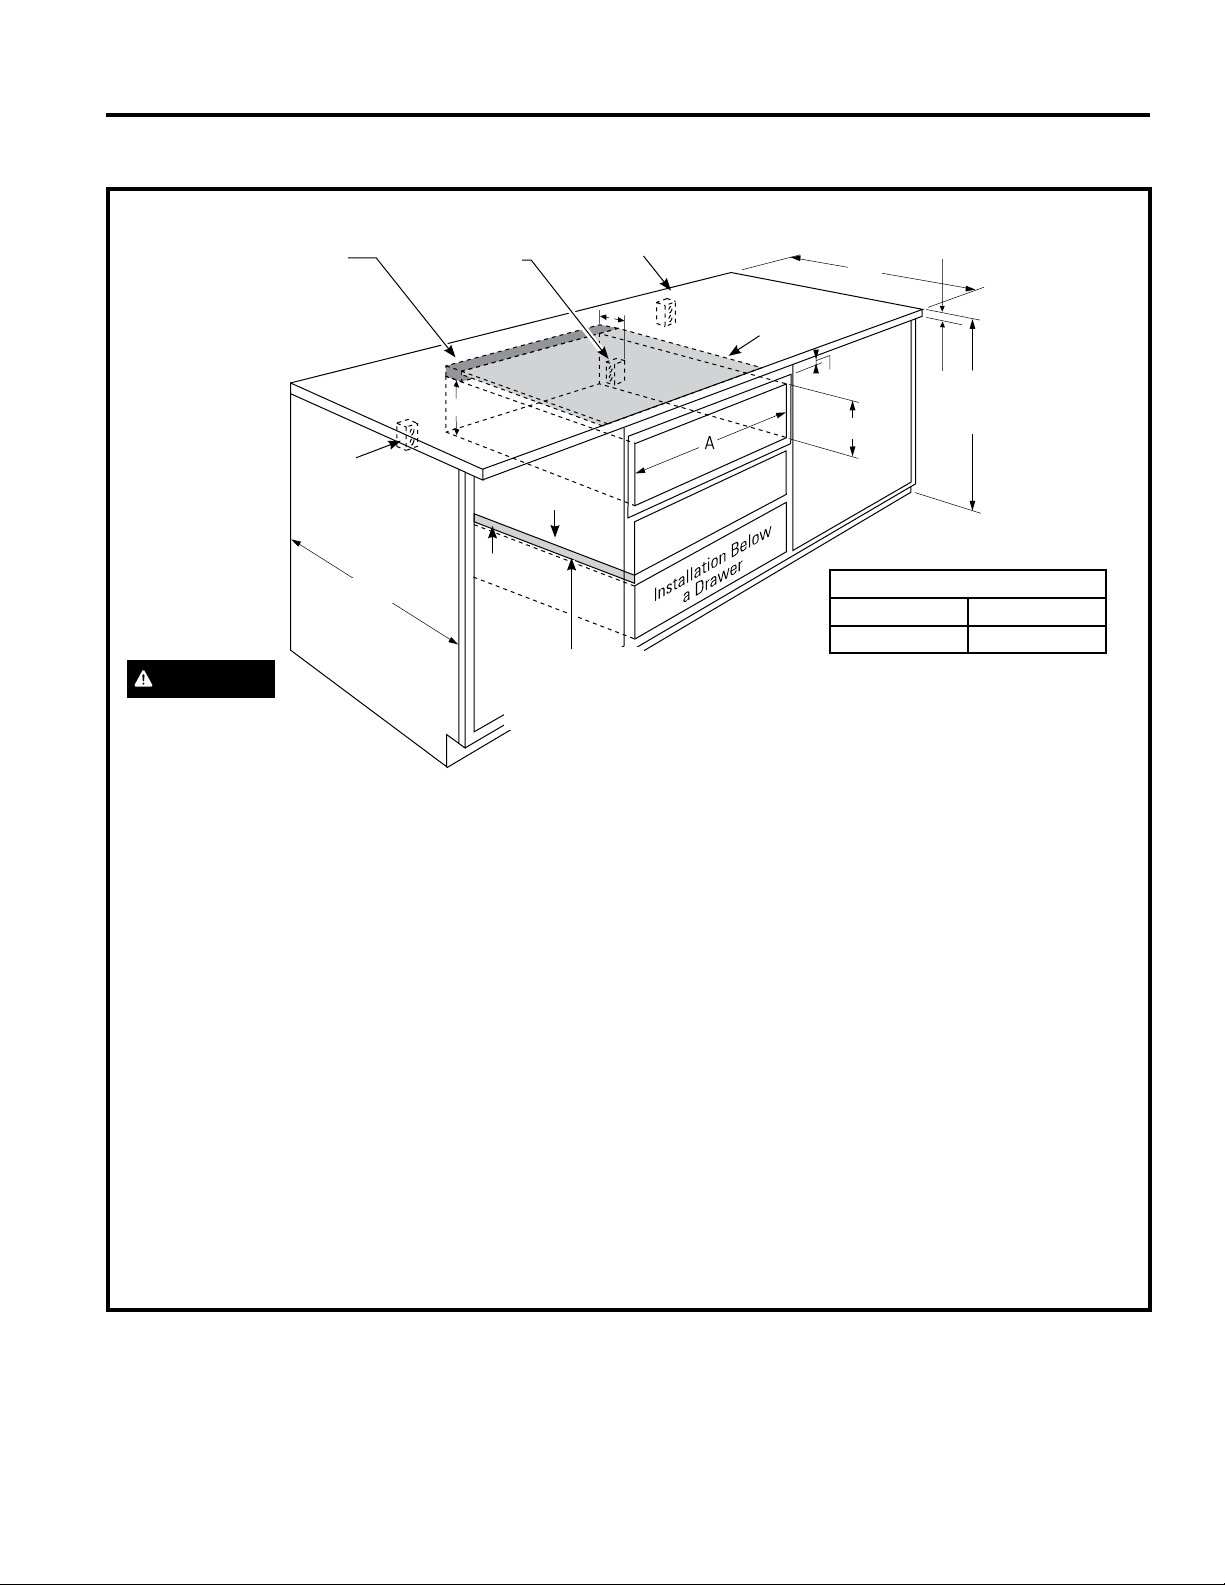
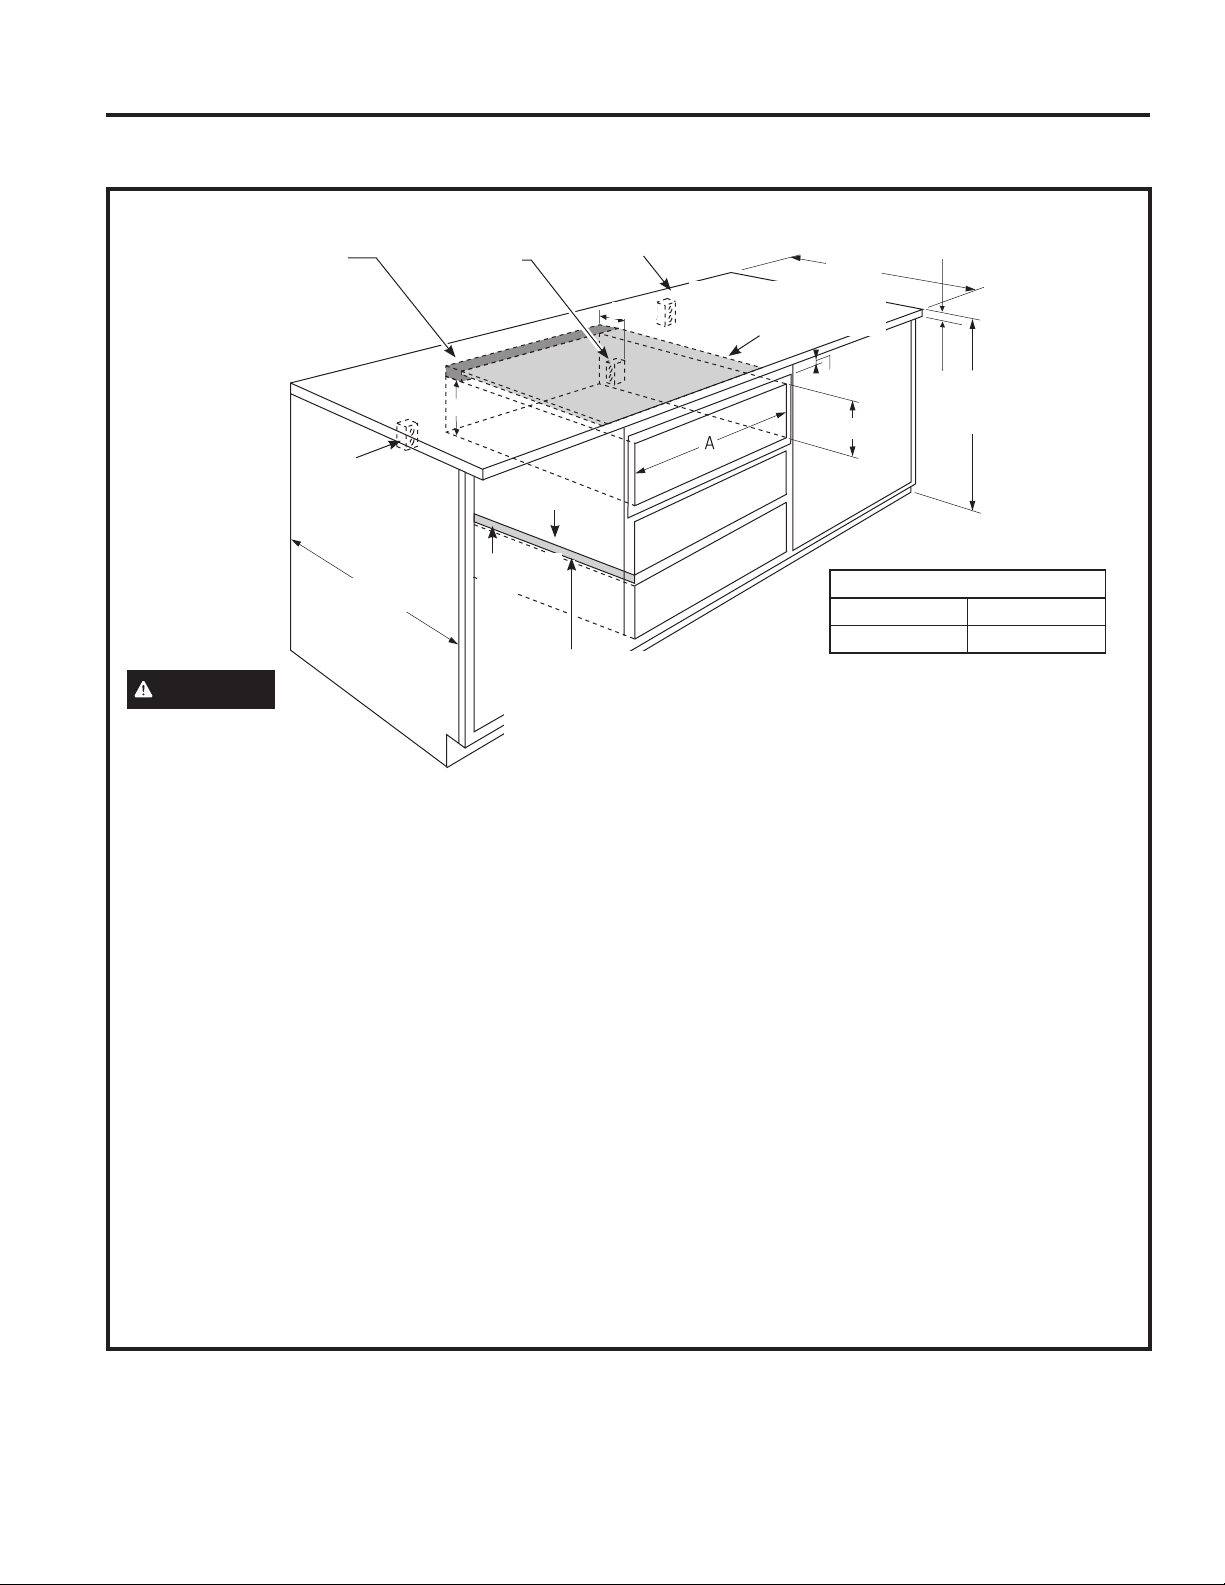
PREPARING CABINET: BELOW A COUNTERTOP
■ When installed, the front face of the warming
drawer will be nearly flush with cabinetry doors or
drawer fronts.
■ Draweroverlapswillconcealcutedgesonallsides
of the opening.
The rough opening for the drawer must be:
—Depth:23
1
/2” minimum from inside back to front
of cabinet frame.
—Width:25
1
/2” for 27” wide models
28
1
/2” for 30” wide models.
—Height:9
1
/4”
■ 5”minimumaboveflooror1"abovetoekick.23
1
/4”
from floor to bottom of cutout is recommended for
under countertop installation.
Installation below a cabinet drawer:
The warming drawer may be installed beneath a
cabinet drawer. In this installation, a solid barrier
should be installed above the warming drawer to
blockaccess.Useanysolidmaterialsuchas1/4”
thick plywood. Allow at least 1/4” air gap between the
barrier and the top of the warming drawer. Observe
the 5” min. above the floor or 1” above the toekick
min. installation height.
NOTE: If you are installing in frameless cabinets, it
may be necessary to install 1/2” wide cleats to accept
drawer mounting screws. See drawer to find exact
locations of mounting screws.
When installed under a cooktop:
Warming drawers are suitable for installation below
only certain specified cooktop models. See the label
attached to the top of the warming drawer for suitable
models. A solid barrier and air gap between cooktop
andwarmingdrawerisrequired.SeeNoteabove.
INSTALLATION INSTRUCTIONS
Electrical outlet 42"
max. from right side
1" Min.*
25"
9"
9
1
/4”
23
1
/2” Min.
36"
Countertop
height
Electrical
outlet 16” max.
from left side
Electrical outlet
flush with side of
cabinet 7" max.
Install 2x4 or
2x2 anti-tip block
against rear cabinet
wall 9” from floor to
bottom of block
7"
1
1
/2” Cabinet top
Install a solid
barrier and a 1/4”
min. air gap above
warming drawer
1/4” Air gap
Solid barrier
Install a solid barrier below
acooktop(seeNote)
CAUTION
IN CANADA THIS DRAWER
IS NOT APPROVED FOR
INSTALLATION UNDER
A COOKTOP.
* NOTE: When installing the warming drawer below a cooktop, a
solid barrier must be installed at least 1" from the lowest point of
thebottom ofcooktop burner box to the top of cutout. Use any
solid material such as 1/4" thick plywood. Allow at least 1/4" air
gap between the barrier and the top of the warming drawer. See
label on top of the warming drawer for approved cooktop models.
Dimension A
27" Drawer 30" Drawer
25 1/2” 28 1/2”
1" = 2.5 cm; 1' = 0.3 m
49-2000658 Rev. 0 13
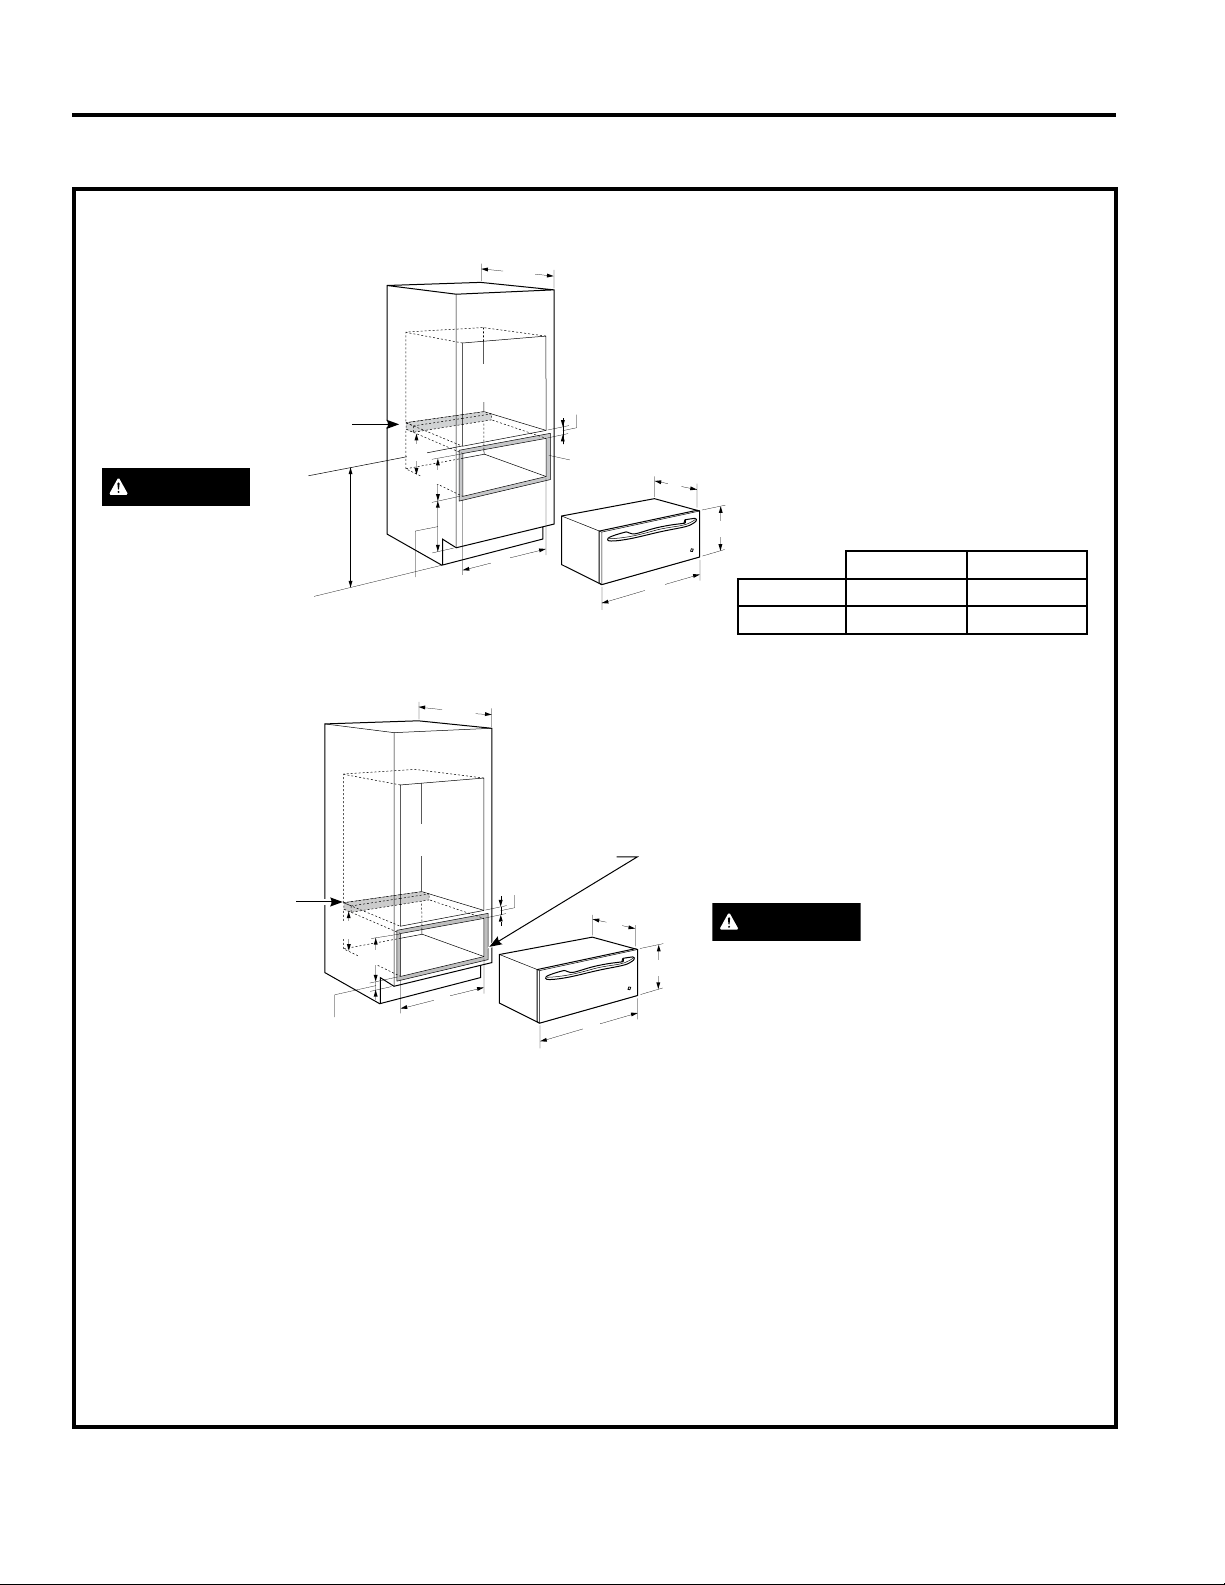
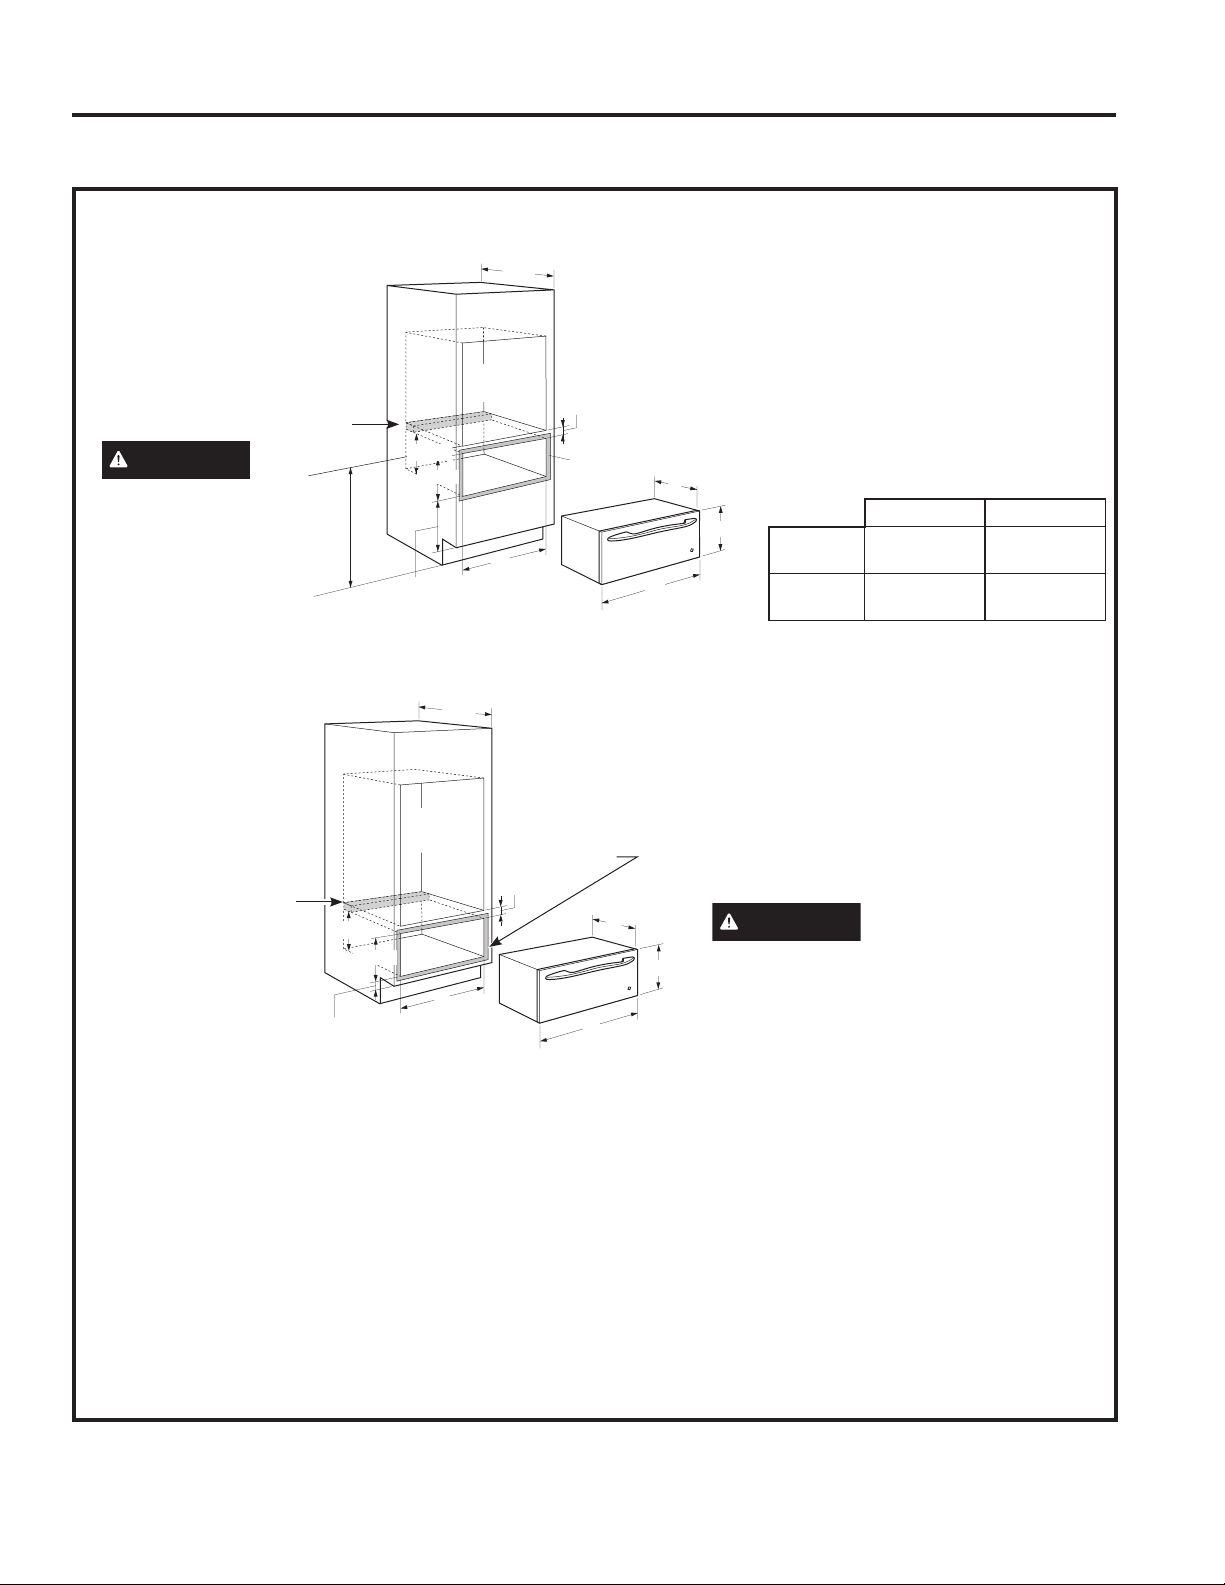
PREPARING CABINET: BELOW WALL OVENS
INSTALLATION BELOW A SINGLE OVEN
INSTALLATION BELOW A DOUBLE OVEN
■ When installed, the front face of the warming
drawer will be nearly flush with cabinetry doors or
drawer fronts.
■ Draweroverlapswillconcealcutedgesonallsides
of the opening.
The rough opening for the drawer must be:
—Depth:23
1
/2” minimum from inside back to front
of cabinet frame.
—Width:25
1
/2” for 27” wide models
28
1
/2” for 30” wide models.
—Height:9
1
/4”
—Allow2”minimumbetweenovenanddrawer
cutouts for clearance of overlaps
NOTE: If you are installing in frameless cabinets, it
may be necessary to install 1/2” wide cleats to accept
drawer mounting screws. See drawer to find exact
locations of mounting screws.
When installed under a wall oven:
Warming drawers are suitable for installation below
only certain specified wall oven models. See the
label attached to the top of the warming drawer for
suitable models.
NOTE: Electrical receptacle can be installed as shown
forcountertopinstallations.Donotinstallreceptacle
above the top of the warming drawer cutout.
INSTALLATION INSTRUCTIONS
Installation Instructions
23
1
/2”
Min.
2x2 or 2x4
anti-tip block
against rear
wall 9” from
floor to bottom
of block
1" Min. above toekick
or adjust to oven
installation height
A
2" Min.
Allow 5/8”
overlap on
all sides
B
Oven
cutout
NOTE: Additional clearance between cutouts may be
required. Check to be sure that oven supports above
the warming drawer location do not obstruct the
required interior 23
1
/2” depth and 9
1
/4” height.
Dimension A Dimension B
27" Drawer 25
1
/2” 26
3
/4”
30" Drawer 28
1
/2” 29
3
/4”
9"
9
1
/4"
10
1
/2"
23
1
/4"
CAUTION
IN CANADA, THE WALL
OVEN IS ONLY APPROVED
FOR INSTALLATION WITH
A BOTTOM CUTOUT AT A
MINIMUM OF 32.5” FROM
THE FLOOR.
NOTE: Additional clearance between
cutouts may be required. Check to be sure
that oven supports above the warming
drawer location do not obstruct the required
interior 23
1
/2” depth and 9
1
/4” height.
CAUTION
IN CANADA, THIS DRAWER
IS NOT APPROVED FOR
INSTALLATION UNDER A
DOUBLE OVEN.
2" Min
1" Min. above
toekick
2x2 or 2x4
anti-tip block
against rear wall
9” from floor to
bottom of block
23
1
/2”
Min.
Allow 5/8” overlap
on all sides
A
9"
9
1
/4"
B
10
1
/2"
23
1
/4"
Oven
cutout
1" = 2.5 cm; 1' = 0.3 m

14 49-2000658 Rev. 0
Installation Instructions
INSTALLING CABINET SUPPORT
INSTALLING ANTI-TIP BRACE
IMPORTANT: When installed below a single or double
oven, check to be sure that any oven supports above
the cutout do not obstruct the 23
1
/2” required depth of
the warming drawer cutout.
■ A 2" minimum clearance between oven and
warming drawer cutouts are required. Additional
clearance may be required if 2 x 4 blocks are used
to support runners or solid floor of the oven above.
■ Thewarmingdrawermaybesupportedbyeithera
solid bottom, 2 x 4 or 2 x 2 runners.
■ Thesupportmustbelevelandrigidlymounted,
flush with the bottom edge of the cutout.
There is no way to level the drawer once it has
been installed. Be sure supports are level.
■ Theentireweightofthedrawerissupportedby
the runners or solid floor and must be capable of
supporting 150 lbs.
WARNING
ANTI-TIP PRECAUTIONS:
The anti-tip brace must be installed to prevent the
drawer from tipping forward when opened and loaded.
Failure to do so could result in personal injury.
INSTALLATION INSTRUCTIONS
2" x 4" or equivalent runners
23
1
/2”23
1
/2”
2" x 4" or equivalent runners
22" 25"
27" 30"
Install 2x4 or 2x2 anti-tip
brace against rear
cabinet wall 9" from floor
to bottom of brace
2x4 or 2x2 runners
or solid bottom
9"
1" = 2.5 cm; 1' = 0.3 m
49-2000658 Rev. 0 15
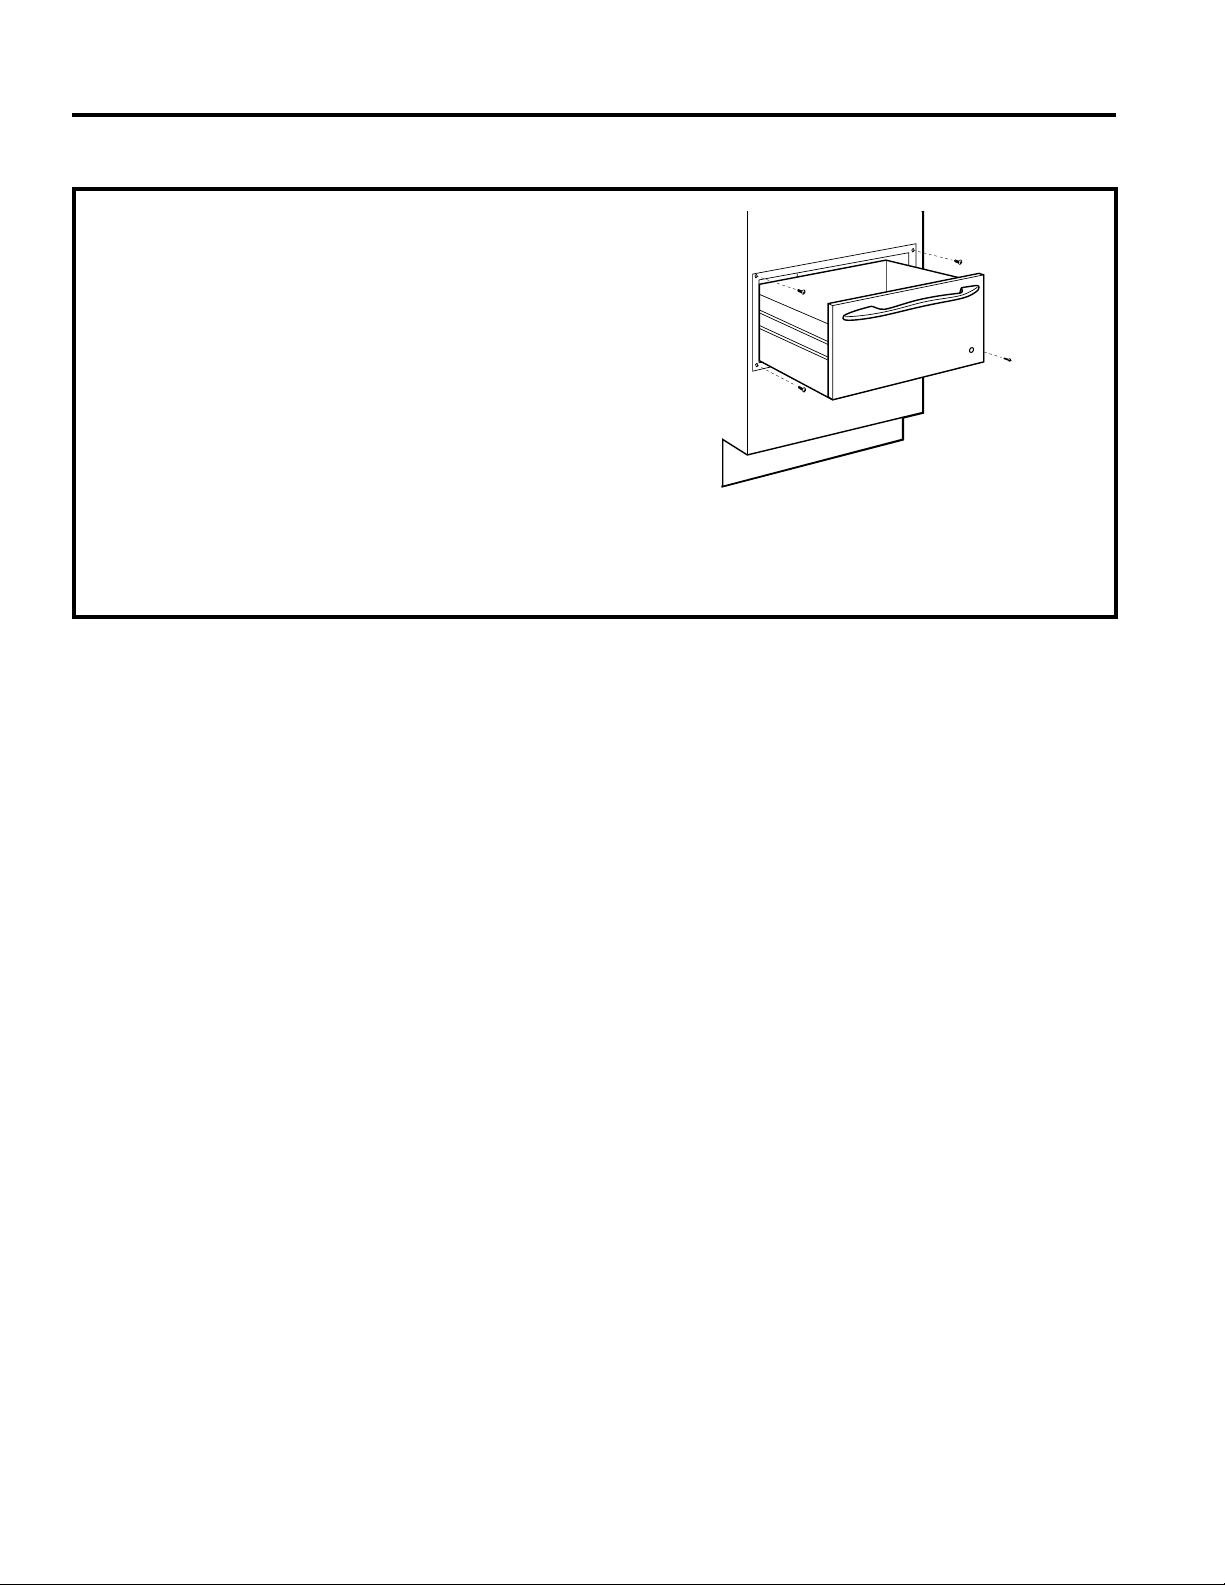
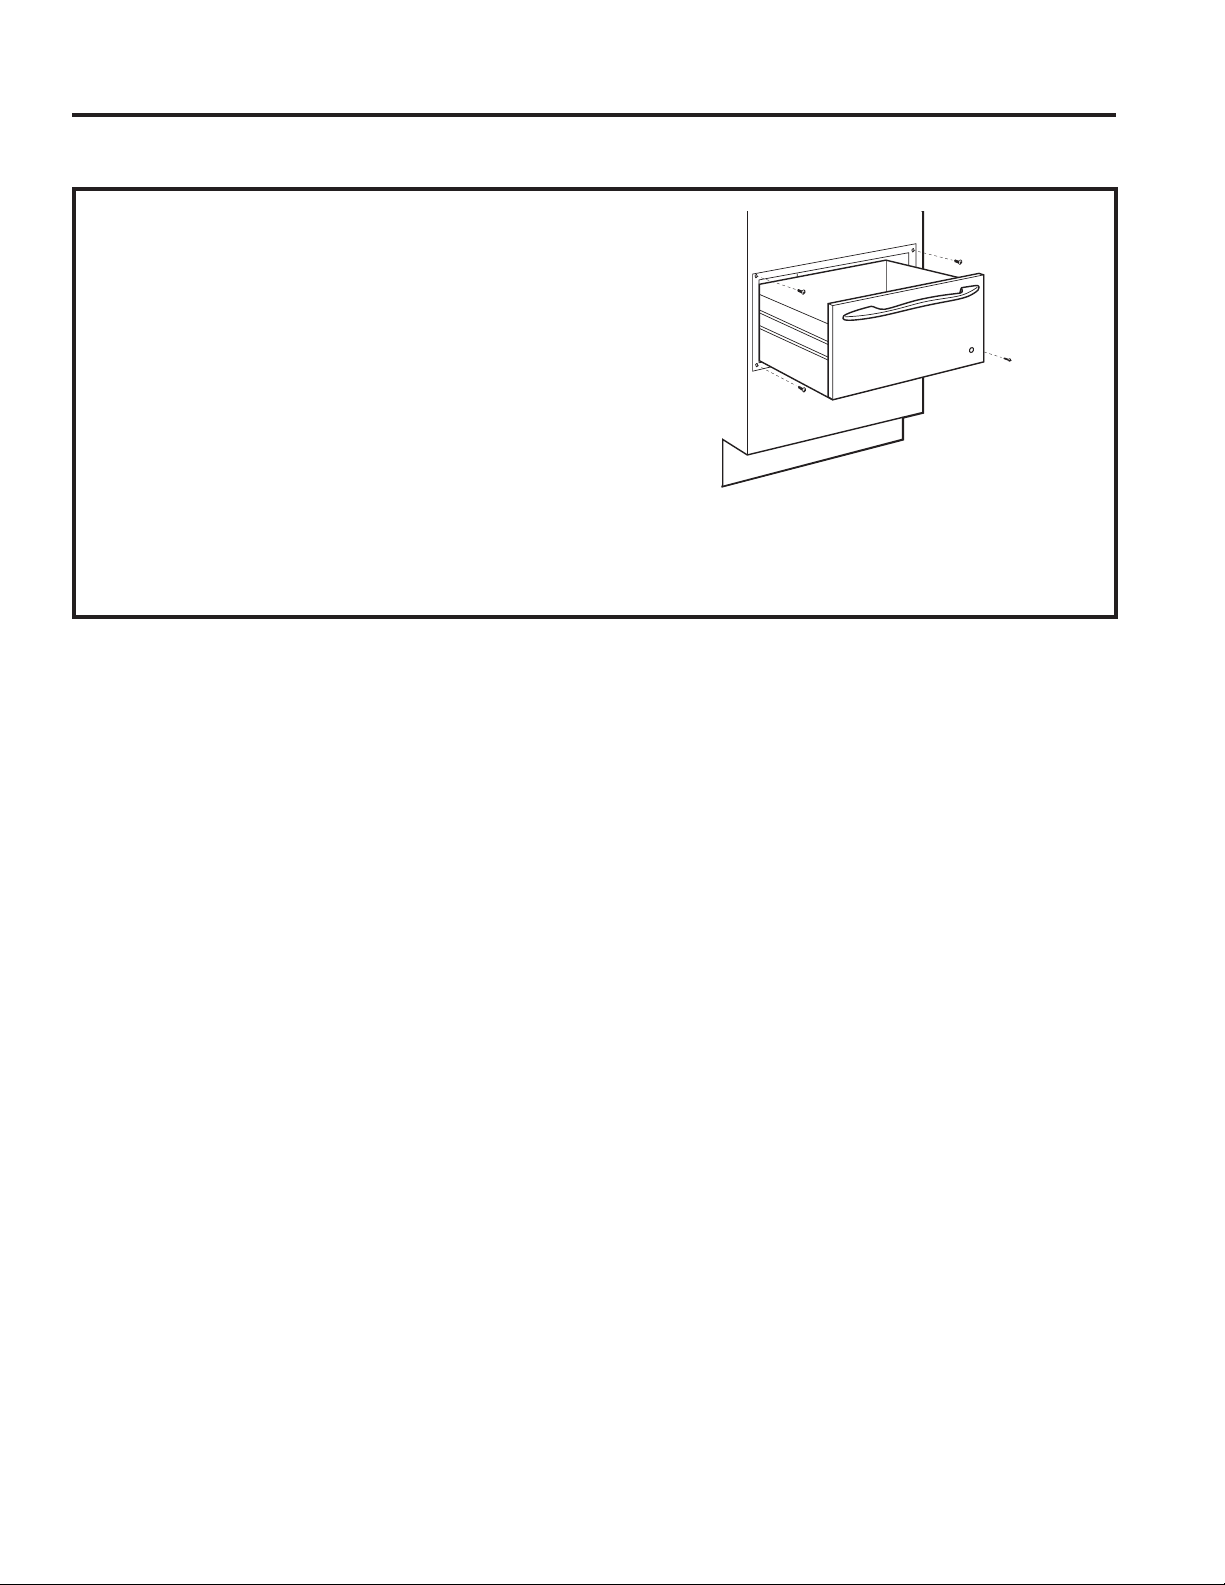
1. Slide the left corner into opening and push power
cord into the hole leading to the outlet location.
Thread the cord through as drawer is being pushed
back into the opening.
If the outlet is installed inside the opening, plug
the cord into the outlet. In this location, the excess
power cord should be coiled and taped to the right
side of the unit. Make sure the cord does not get
trapped by the drawer.
NOTE: Insure that the power cord does not contact
the hot surfaces on the bottom of ovens, cooktops,
or any other appliance.
2. Push the drawer back until the front flange is flush
to the cabinet front.
3. Open the drawer fully.
4. Drillpilotholesthroughtheholesintheoverlapping
frame, one on each corner.
5. Drivewoodscrewsprovidedintoeachcorner.
INSTALLING WARMING DRAWER
INSTALLATION INSTRUCTIONS
Installation Instructions
1" = 2.5 cm; 1' = 0.3 m
16 49-2000658 Rev. 0
Save time and money! Review the charts on the following pages first and you may not need to call for service.
Troubleshooting tips ... Beforeyoucallforservice
Problem Possible Cause What To Do
Warming drawer will
not work
A fuse in your home may be blown or the circuit
breaker tripped.
Replace the fuse or reset the circuit breaker.
Warming drawer not plugged in. Plug in.
Controls improperly set. SeetheUsingthewarmingdrawersection.
Drawer does not slide
smoothly or drags
Ballbearingsoutofalignment. Fully extend the drawer and push it all the way in.
See the Care and cleaning section.
Drawerover-loadedorloadunbalanced. Reduce weight to less than 50 pounds.
Redistribute drawer contents.
Excessive
condensation
Liquidinwarmingdrawer. Remove liquid.
Uncoveredfoods. Cover food with lid or aluminum foil.
Temperature setting too high. Reduce temperature setting.
Incorrect Moisture Selector setting. Set the Moisture Selector to the open vent setting
to allow venting.
No heat in the PROOF
setting
Room temperature may prevent the thermostat
from tripping on.
TurntheknobtoLOWthenbacktoPROOF.
Food dries out Moisture escaping. Cover food with lid or aluminum foil.
TROUBLESHOOTING TIPS

49-2000658 Rev. 0 17
Notes
18 49-2000658 Rev. 0
LIMITED WARRANTY
Electric Warming Drawer Limited Warranty
Staple your receipt here. Proof of the original purchase
date is needed to obtain service under the warranty.
GEAppliances.com
All warranty service is provided by our Factory Service Centers, or an authorized Customer Care
®
technician. To
schedule service online, visit us at GEAppliances.com/service_and_support/, or call GE Appliances at 800.GE.CARES
(800.432.2737).InCanada,pleasevisit:https://service.geappliances.ca/servicio/en_CA/
Please have your serial number and your model number available when calling for service.
Servicing your appliance may require the use of the onboard data port for diagnostics. This gives a GE Appliances factory
service technician the ability to quickly diagnose any issues with your appliance and helps GE Appliances improve its
products by providing GE Appliances with information on your appliance. If you do not want your appliance data to be
sent to GE Appliances, please advise your technician not to submit the data to GE Appliances at the time of service.
What GE Appliances will not cover:
■ Service trips to your home to teach you how to use
the product.
■ Improperinstallation,deliveryormaintenance.
■ Failureoftheproductifitisabused,misused,
modified or used for other than the intended purpose
or used commercially.
■ Replacementofhousefusesorresettingofcircuit
breakers.
■ Damagetotheproductcausedbyaccident,fire,
floods or acts of God.
■ Damagetofinish,suchassurfacerust,tarnish,or
small blemishes not reported within 48 hours of
delivery.
■ Incidentalorconsequentialdamagecausedby
possible defects with this appliance.
■ Damagecausedafterdelivery.
■ Productnotaccessibletoproviderequiredservice.
■ Servicetorepairorreplacelightbulbs,exceptfor
LEDlamps.
EXCLUSION OF IMPLIED WARRANTIES
YoursoleandexclusiveremedyisproductrepairasprovidedinthisLimitedWarranty.Anyimpliedwarranties,
including the implied warranties of merchantability or fitness for a particular purpose, are limited to one year or
the shortest period allowed by law.
This limited warranty is extended to the original purchaser and any succeeding owner for products purchased for
homeusewithintheUSA.IftheproductislocatedinanareawhereservicebyaGEAppliancesAuthorizedServicer
is not available, you may be responsible for a trip charge or you may be required to bring the product to an Authorized
GE Appliances Service location for service. In Alaska, the limited warranty excludes the cost of shipping or service
calls to your home.
Some states do not allow the exclusion or limitation of incidental or consequential damages. This limited warranty
gives you specific legal rights, and you may also have other rights which vary from state to state. To know what your
legal rights are, consult your local or state consumer affairs office or your state’s Attorney General.
Warrantor: GE Appliances, a Haier company
Louisville,KY40225
Warrantor in Canada: MC Commercial, Burlington, ON, L7R 5B6
For the period of GE Appliances will replace
One year
From the date
of the original
purchase
Any partoftheovenwhichfailsduetoadefectinmaterialsorworkmanship.Duringthis
limited one-year warranty, GE Appliances will provide, free of charge, all labor and in-home
service to replace the defective part.

49-2000658 Rev. 0 19
Accessories
27”WideCustomPanelKit
30”WideCustomPanelKit
30”MonogramProPanelKit
Parts
Wire Rack
Cleaning Supplies
CitruShine™ Stainless Steel Wipes
CERAMABRYTE
®
Stainless Steel Appliance Cleaner
ACCESSORIES
Looking For Something More?
GE Appliances offers a variety of accessories to
improve your cooking and maintenance experiences!
Refer to the Consumer Support page for phone numbers
and website information.
Thefollowingproductsandmoreareavailable:
Accessories

20 49-2000658 Rev. 0
Consumer Support
CONSUMER SUPPORT
GE Appliances Website
Have a question or need assistance with your appliance? Try the GE Appliances Website 24 hours a day, any day
of the year! You can also shop for more great GE Appliances products and take advantage of all our on-line support
servicesdesignedforyourconvenience.IntheUS:GEAppliances.com.InCanada:GEAppliances.ca.
Register Your Appliance
Register your new appliance on-line at your convenience! Timely product registration will allow for enhanced
communication and prompt service under the terms of your warranty, should the need arise. You may also mail in the
pre-printed registration card included in the packing material.
IntheUS:GEAppliances.com/register
InCanada:https://service.geappliances.ca/servicio/en_CA/
Schedule Service
Expert GE Appliances repair service is only one step away from your door. Get on-line and schedule your service at
your convenience any day of the year.
IntheUS:GEAppliances.com/service or call 800.432.2737 during normal business hours.
InCanada:https://service.geappliances.ca/servicio/en_CA/ or call 800.561.3344.
Extended Warranties
Purchase a GE Appliances extended warranty and learn about special discounts that are available while your
warranty is still in effect. You can purchase it on-line anytime. GE Appliances Services will still be there after your
warranty expires.
IntheUS:GEAppliances.com/extended-warranty or call 800.626.2224 during normal business hours.
InCanada:GEAppliances.ca/en/support/purchase-extended-warranty or call 800.290.9029.
Remote Connectivity
For assistance with wireless network connectivity (for models with remote enable),
visit our website at GEAppliances.com/connect orcall800.220.6899intheUS.
InCanada:GEAppliances.ca/connect or call 800.220.6899.
Parts and Accessories
Individuals qualified to service their own appliances can have parts or accessories sent directly to their homes
(VISA,MasterCardandDiscovercardsareaccepted).Orderon-linetoday24hourseveryday.
IntheUS:GEApplianceparts.com or by phone at 877.959.8688 during normal business hours.
Instructions contained in this manual cover procedures to be performed by any user. Other servicing
generally should be referred to qualified service personnel. Caution must be exercised, since improper
servicing may cause unsafe operation.
Customers in Canada should consult the yellow pages for the nearest Mabe Service Center, visit our Website at
GEAppliance.ca/en/products/parts-filters-accessories or call 800.661.1616.
Contact Us
If you are not satisfied with the service you receive from GE Appliances, contact us on our Website with all the
detailsincludingyourphonenumber,orwriteto:
IntheUS:GeneralManager,CustomerRelations|GEAppliances,AppliancePark|Louisville,KY40225
GEAppliances.com/contact
InCanada:Director,CustomerRelations,MabeCanadaInc.|Suite310,1FactoryLane|Moncton,N.B.E1C9M3
GEAppliances.ca/en/contact-us

Inscrivez ici les numéros de
modèle et de série:
Nº de modèle ____________
Nº de série ______________
Ces numéros se trouvent sur
une étiquette située à l'arrière
du devant de tiroir, au bas.
49-2000658 Rév.0 06-19 GEA
GE est une marque de commerce de General Electric Company. Fabriqué sous licence d'utilisation de marque de commerce.
PKW7000
PTW9000
MANUEL DE
L'UTILISATEUR ET
INSTRUCTIONS
D'INSTALLATION
ÉLECTROMÉNAGERS GE
SÉCURITÉ ........................... 3
UTILISATION DU TIROIR-RÉCHAUD
Caractéristiques ......................... 5
Conseils sur le fonctionnement ............ 6
ENTRETIEN ET NETTOYAGE
Nettoyage du tiroir-réchaud ...............9
INSTRUCTIONS
D'INSTALLATION .................... 10
CONSEILS DE DÉPANNAGE .......16
GARANTIE LIMITÉE ................18
ACCESSOIRES ......................19
SERVICE À LA CLIENTÈLE .......20
TIROIR-RÉCHAUD
électrique

2 49-2000658 Rév. 0
MERCI DE PERMETTRE À ÉLECTROMÉNAGERS GE
DE FAIRE PARTIE DE VOTRE FOYER.
Que vous ayez grandi avec des électroménagers GE ou qu'il s'agisse de votre premier appareil GE,
nous sommes heureux de vous avoir dans la famille.
Nous sommes fiers du savoir-faire, de l'innovation et du design qui font partie intégrante de tous les
électroménagers GE que nous fabriquons, et nous pensons que vous le serez aussi. À cet égard,
l'enregistrement de votre appareil nous assure que nous pourrons vous fournir des informations
importantes sur votre appareil et des détails sur sa garantie si vous en avez besoin.
Enregistrez votre électroménager GE en ligne dès maintenant. Des sites Web et des numéros
de téléphone utiles sont disponibles dans la section « Service à la clientèle » de ce manuel de
l'utilisateur. Vous pouvez également envoyer par courrier la carte d'enregistrement préimprimée qui
se trouve dans l'emballage de votre appareil.
ÉLECTROMÉNAGERS GE
49-2000658 Rév. 0 3
SÉCURITÉ
LISEZ ET CONSERVEZ CES INSTRUCTIONS
CONSIGNES DE SÉCURITÉ IMPORTANTES
LISEZ TOUTES LES INSTRUCTIONS AVANT D'UTILISER L'APPAREIL
AVERTISSEMENT
Lisez toutes les consignes de sécurité avant d'utiliser le produit. Le non-respect de ces instructions peut
entraîner un incendie, une décharge électrique, des blessures graves ou fatales.
AVERTISSEMENT
AVIS DE SÉCURITÉ IMPORTANT
Tous les tiroirs-réchauds peuvent basculer et causer des blessures s'ils ne sont pas installés correctement.
Pour éviter le basculement accidentel du tiroir-réchaud, fixez-le au mur en installant le dispositif antibasculement comme
décrit dans les instructions d'installation.
AVERTISSEMENT
CONSIGNES DE SÉCURITÉ GÉNÉRALES
■ Cetappareilnedoitêtreutiliséqu'auxfinsprévueset
décrites dans ce manuel.
■Assurez-vousquevotreappareilestcorrectementinstallé
et mis à la terre par un technicien qualifié, conformément
aux instructions d'installation fournies.
■ Netentezpasderéparer,deremplaceroudenettoyer
une pièce du tiroir-réchaud, sauf si cela est spécifiquement
recommandé dans ce manuel. Toutes les autres
réparationsdoiventêtreconfiéesàuntechnicienqualifié.
■ Avantd'effectueruneréparation,coupezl'alimentation
électrique du four au niveau du tableau de distribution de
votre domicile (fusible ou disjoncteur).
■ Nelaissezpaslesenfantsseuls–lesenfantsnedevraient
pasêtrelaissésseulsousanssurveillanceàproximité
d'un appareil électroménager en cours d'utilisation. Ils ne
devraientjamaisêtreautorisésàgrimper,s'asseoirouse
tenir debout sur aucune des parties de l'appareil.
■
ATTENTION
Ne rangez pas d'objets pouvant
intéresser les enfants dans les armoires situées
au-dessus d'un tiroir-réchaud, les enfants s'exposeraient
à de graves blessures s'ils grimpaient sur le tiroir-réchaud
pour les atteindre.
■ Utilisezuniquementdespoignéessèches.Lavapeur
émise par des poignées humides en contact avec une
surface chaude pourrait vous brûler. Ne laissez pas les
poignées entrer en contact avec les éléments chauffants
chauds. N'utilisez pas de torchon ou d'autre tissu épais à
la place de poignées isolantes.
■ N'utilisezjamaisvotreappareilpourchaufferou
réchauffer la pièce.
■ Netouchezpaslesélémentschauffantsoulasurface
intérieure du tiroir-réchaud. Ces surfaces, bien que de
couleurfoncée,peuventêtresuffisammentchaudespour
causer des brûlures. Pendant et après l'utilisation, ne
touchez pas l'intérieur du tiroir-réchaud et ne laissez aucun
tissu ou matériau inflammable entrer en contact avec
celui-ci. Laissez d'abord l'appareil refroidir. D'autres surfaces
de l'appareil peuvent devenir suffisamment chaudes pour
causerdesbrûlures.Lessurfacesquipeuventêtrechaudes
comprennent les ouvertures des évents, les surfaces situées
autourdecesouverturesdemêmequelesintersticessitués
autour de la porte de tiroir-réchaud.
■ Nefaitespaschaufferderécipientsfermés.Lapression
accumulée risquerait de faire éclater le récipient et de
causer des blessures.
■ N'utilisezpasdepapierd'aluminiumpourrecouvrirlefond
du tiroir-réchaud. Le papier d'aluminium peut retenir la
chaleur ou fondre, ce qui pourrait endommager le produit
ou provoquer un choc électrique ou un incendie.
■ Évitezderayeroudeheurterlesportesenverreoules
tableaux de commande. Cela pourrait amener le verre
à se casser. Ne cuisinez pas sur un appareil dont le
verreestbrisé.Unchocélectrique,unincendieoudes
blessures par coupure pourraient en résulter.
■ Letiroir-réchaudestconçupourmaintenirlesaliments
cuits à la température où ils seront servis (supérieure à
140 °F/60 °C). Des bactéries se développeront dans les
aliments si la température est inférieure à 140 °F (60 °C).
Par conséquent, commencez toujours avec des aliments
déjàchauds;desalimentsfroidsnepeuventpasêtre
chauffés ou cuits dans un tiroir-réchaud.
4 49-2000658 Rév. 0
SÉCURITÉ
LISEZ ET CONSERVEZ CES INSTRUCTIONS
CONSIGNES DE SÉCURITÉ IMPORTANTES
LISEZ TOUTES LES INSTRUCTIONS AVANT D'UTILISER L'APPAREIL
AVERTISSEMENT
CONSERVEZ LES MATÉRIAUX INFLAMMABLES À BONNE DISTANCE DU
TIROIR-RÉCHAUD
Le non-respect de cette consigne pourrait causer un incendie ou des blessures.
■ N'entreposezpasetn'utilisezpasdematières
inflammables dans ou à proximité du tiroir-réchaud,
notamment du papier, du plastique, des poignées, du tissu,
desrevêtementsmuraux,desrideaux,desdraperieset
tout type de vapeur ou de liquide inflammable.
■ Neportezjamaisdevêtementsamplesouquipendent
lorsquevousutilisezcetappareil.Cesvêtements
pourraient prendre feu au contact des surfaces chaudes
et causer de graves brûlures.
■ Nelaissezpasdegraissedecuissonoud'autresproduits
inflammables s'accumuler à l'intérieur ou près du tiroir-
réchaud. La graisse dans le tiroir-réchaud ou à proximité
de celui-ci peut s'enflammer.
AVERTISSEMENT
EN CAS D'INCENDIE, SUIVEZ LES ÉTAPES CI-DESSOUS POUR ÉVITER
LES BLESSURES ET EMPÊCHER L'INCENDIE DE SE PROPAGER
■ Neversezpasd'eausurunfeudefriture.N'essayez
jamais de soulever un ustensile de cuisson en feu.
■ Siunfeusedéclenchedansletiroir-réchaudpendantla
cuisson, étouffez les flammes provenant du tiroir-réchaud en
fermantlaporteetenarrêtantletiroir-réchaudouenutilisant
un extincteur chimique ou à mousse, à usages multiples.
AVERTISSEMENT
CONSIGNES DE SÉCURITÉ RELATIVES AU TIROIR-RÉCHAUD
■ Éloignez-vousdutiroir-réchaudlorsquevousouvrezsa
porte. De l'air chaud ou de la vapeur s'échappant du four
pourrait brûler vos mains, votre visage et/ou vos yeux.
■ Assurez-vousquel'éventdutiroir-réchaudn'estpasobstrué.
■ Assurez-vousquedelagraissenes'accumulepasdans
le tiroir-réchaud. La graisse dans le tiroir-réchaud peut
prendre feu.
■ Disposezlesgrillesàl'emplacementdésirélorsque
le tiroir-réchaud est froid. Si vous devez déplacer une
grille lorsque le tiroir-réchaud est chaud, ne laissez pas
la poignée isolante entrer en contact avec l'élément
chauffant du tiroir-réchaud.
■ Nelaissezpasd'articlescommedupapier,desustensiles
de cuisine ou des aliments dans le tiroir-réchaud lorsque
celui-ci n'est pas utilisé. Les articles entreposés dans un
tiroir-réchaud pourraient prendre feu.
Pour retirer la pellicule protectrice et le ruban adhésif d'emballage
Saisissez soigneusement un des coins de la pellicule
protectrice avec vos doigts et décollez-la doucement de la
surface de l'appareil. N'utilisez aucun objet coupant pour
enlever la pellicule. Retirez toute la pellicule avant d'utiliser
l'appareil pour la première fois.
Pour vous assurer de ne pas endommager le fini de l'appareil
lorsque vous enlevez la colle laissée par le ruban adhésif
d'emballage, la méthode la plus sûre consiste à utiliser un
détergentàvaisselle.Appliquezleproduitchoisiavecun
chiffon doux et laissez-le pénétrer.
REMARQUE : Vous devez enlever la colle résiduelle de toutes
les pièces. Vous ne pourrez plus l'enlever après si elle cuit.
49-2000658 Rév. 0 5
Caractéristiques
UTILISATION DU TIROIR-RÉCHAUD : Caractéristiques
Les caractéristiques ne sont pas toutes disponibles pour chaque modèle. L'aspect peut varier.
Letiroir-réchaudconservelesalimentscuitsetchaudsàlatempératureàlaquellevoussouhaitezlesservir.Utiliseztoujoursle
tiroir-réchaud avec des aliments déjà chauds. Ne l'utilisez pas pour chauffer des aliments froids sauf pour faire lever de la pâte à
pain ou chauffer des craquelins, des croustilles ou des céréales sèches que vous souhaitez rendre croustillants.
Bouton de commande
Les commandes du tiroir-réchaud sont dissimulées lorsque le
tiroir est fermé. Ouvrez le tiroir. Les commandes se trouvent du
côté droit du cadre.
Pour utiliser le tiroir-réchaud, appuyez sur
l'interrupteur ON/OFF(marche/arrêt)pourle
mettreenpositiondeMARCHE(ON).
Glissez le sélecteur d'humidité à la position
ouverte ou fermée. (Reportez-vous à la
section « Sélecteur d'humidité ».)
Tournez le bouton de commande au réglage voulu.
Voyant lumineux de MARCHE
LevoyantlumineuxdeMARCHEestsituésousl'interrupteur
ON/OFF(marche/arrêt)ets'allumelorsquel'interrupteurest
enpositiondeMARCHE(ON).Ilrestealluméjusqu'àceque
l'interrupteurON/OFF(marche/arrêt)soitmisenposition
d'ARRÊT(OFF).
LevoyantdeMARCHEestvisibleparlalentillesurlepanneau
avant du tiroir lorsque celui-ci est fermé. Il sert de rappel que le
chauffage est en marche.
Sélecteur d'humidité
Le sélecteur d'humidité se trouve à l'intérieur du devant du tiroir.
Pour garder les aliments tendres, glissez le sélecteur
d'humidité dans le sens opposé au bouton de commande.
Celafermel'éventetl'humiditéresteàl'intérieurdutiroir.Avec
l'évent fermé, les aliments chauds demeurent tendres et mous.
Avecceréglage,delacondensationpeutapparaîtreautourdu
bord intérieur du tiroir.
Pour garder les aliments
croustillants, glissez le sélecteur
d'humidité vers la droite, vers
le bouton de commande.
Cela ouvre l'évent et permet à
l'humidité de s'échapper.
Avecl'éventouvert,ilestnormal
de voir de l'humidité s'accumuler
sur les surfaces au-dessus du
tiroir-réchaud.
PROOF (fermentation) 75-95 °F (24-35 °C)
LO (bas) ........... 140-160 °F (60-71 °C)
MED (moyen) ....... 160-195 °F (71-90 °C)
HI (élevé) ........... 195-230 °F (90-110 °C)
Bouton de
commande
Interrupteur
MARCHE/ARRÊT
Voyant lumineux
deMARCHE
Plaque
signalétique
Lentille du voyant
lumineuxdeMARCHE
Tiroir-réchaud
Sélecteur de
taux d'humidité
(au dos du
panneau)
Tendre
Évent
fermé
Croustillant
Évent
ouvert
6 49-2000658 Rév. 0
Conseils sur le fonctionnement
Grille
■ Lagrilleseplacedanslesensdelalongueur.
■ Préchauffezaveclagrilleàl'intérieur.
■ L'utilisationdelagrillepermetdemettredesalimentssur
deux étages.
UTILISATION DU TIROIR-RÉCHAUD : Conseils sur le fonctionnement
Empilage d'articles avec la grille en place.
Lors de l'utilisation du tiroir-réchaud
Ne recouvrez pas le tiroir-réchaud de papier d'aluminium.
■ Laissezletempsautiroirdepréchauffer:
LO (bas) 8 minutes
MED (moyen) 15 minutes
HI (élevé) 20 minutes
REMARQUE : Il n'est pas nécessaire de préchauffer le tiroir
pour fermenter la pâte.
Les aliments contenus dans des ustensiles en verre ou en
vitrocéramique qui résistent à la chaleur peuvent nécessiter
une température plus élevée par rapport à ceux contenus dans
des ustensiles en métal.
■ L'ouverturerépétéedutiroirpermetàl'airchaudde
s'échapper, ce qui fera refroidir les aliments. Lorsque vous
ajoutez des aliments, laissez plus de temps pour que la
température à l'intérieur du tiroir se stabilise.
■ Lorsquevousmaintenezauchauddegrandesquantités
d'aliments,ilpeutêtrenécessaired'encouvrirunepartieet
d'utiliser un réglage plus élevé.
■ Lesalimentsdoiventêtremaintenusauchauddansleur
récipient ou placés dans un plat de service qui résiste
à la chaleur.
■ Dupapierd'aluminiumpeutêtreutilisépourrecouvrirles
alimentsafindelesempêcherdesécher.
ATTENTION
Les récipients ou pellicules en plastique
fondent s'ils sont en contact avec le tiroir. Vous ne réussirez
peut-êtrepasàenleverleplastiquefonduetcelan'estpas
couvert par votre garantie.
■ Avantdeplacerlesrécipientsdansletiroir-réchaud,retirez
les cuillères à servir et autres ustensiles.
Pour réchauffer des bols et assiettes de service
Pour réchauffer des bols et assiettes de service, réglez le tiroir
sur LO (bas).
■ N'utilisezquedelavaissellequirésisteàlachaleur.
■ Mettezleplatvidesurlagrillepourlesuréleverdefaçon
à ce qu'il ne touche pas le fond du tiroir. Si vous voulez
des plats plus chauds ou faire chauffer de la porcelaine
fine, vérifiez les indications de son fabricant concernant sa
résistance maximum à la chaleur.
■ Vouspouvezpréchaufferunplatdeservicevidetouten
préchauffant le tiroir.
■ Lorsquevousmaintenezdesalimentscuitsauchaudet
quevousréchauffezdesplatsdeservicevidesenmême
temps, placez les plats sur la grille et les aliments sur le
fond du tiroir.
ATTENTION
Lesplatspeuventêtrechauds.Utilisezdes
poignées ou des gants isolants pour sortir les plats chauds.
49-2000658 Rév. 0 7
Conseils sur le fonctionnement
Pour faire lever de la pâte à pain
Lapâteàlalevurepeutêtrefermentéedansletiroir-réchaud.
■ Placezvotreplatsurlefonddutiroir-réchaud.
■ VousdeveztoujourstournerleboutondecommandeàLO
(bas) et puis immédiatement à PROOF (fermentation).
■ Fermezl'évent.
■ Huilezlégèrementledessusdelapâtedansunbolassez
grand pour permettre à la pâte de doubler de volume.
Recouvrez d'un linge.
■ Lepréchauffagen'estpasrequispourlafermentation.
■ Vérifiezlahauteurdelapâteaprès40minutes.Ajoutez
du temps si nécessaire. La pâte doit rester dans le tiroir
jusqu'à ce qu'elle ait doublé de volume et qu'une légère
dépression demeure après avoir touché délicatement la
pâte avec un doigt.
UTILISATION DU TIROIR-RÉCHAUD : Conseils sur le fonctionnement
Croustillant
Évent
ouvert
Pour faire croustiller les aliments rassis
■ Placezlesalimentsdansdesplatsouustensilesdecuisson
peu profonds.
■ PréchauffezauréglageLO(bas)etouvrezl'évent.
■ Vérifiezsil'alimentestcroustillantaprès45minutes.
Ajoutezdutempssinécessaire.
Tableau de sélection des températures pour les aliments croustillants
Pour garder plusieurs types d'aliments au chaud, réglez
la température en fonction des aliments qui nécessitent la
température la plus élevée. Placez les aliments qui nécessitent le
réglage le plus élevé sur le fond du tiroir et les autres sur la grille.
Conseils :
■ Necouvrezpaslesaliments.
■ N'utilisezpasderécipientsenplastiqueoude
pellicule plastique.
■ Préchauffezletiroirselonletempsrecommandéen
fonction du réglage avant de l'utiliser.
Tendre
Évent
fermé
Type d'aliment Réglage
Réglage du
sélecteur d'humidité
Bacon HI(élevé) OUVERT
Pain, petits pains
durs
MED (moyen) OUVERT
Mets frits HI(élevé) OUVERT
Tartes, deux croûtes MED (moyen) OUVERT
Pizza HI(élevé) OUVERT
Pommes de terre
au four
HI(élevé) OUVERT
Chips tortilla LO (bas) OUVERT
8 49-2000658 Rév. 0
Tendre
Évent
fermé
Conseils sur le fonctionnement
Tableau de sélection des températures pour les aliments tendres
Pour garder plusieurs types d'aliments au chaud, réglez
la température en fonction des aliments qui nécessitent la
température la plus élevée. Placez les aliments qui nécessitent le
réglage le plus élevé sur le fond du tiroir et les autres sur la grille.
Conseils :
■ Placezuncouvercleoudupapierd'aluminiumsur
les aliments.
■ Nemettezpasd'eaudansletiroir-réchaud.
■ N'utilisezpasderécipientsenplastiqueoude
pellicule plastique.
■ Préchauffezletiroirselonletempsrecommandé
en fonction du réglage avant de l'utiliser.
UTILISATION DU TIROIR-RÉCHAUD : Conseils sur le fonctionnement
*L'USDA/leFSISrecommandeunetempératureinterneminimumde145°F
(63°C)pourlacuissondubœuf.Utilisezunthermomètreàviandepour
vérifier la température interne.
Type d'aliment Réglage
Réglage du
sélecteur d'humidité
Bœuf, moyen ou bien
cuit* MED (moyen) FERMÉ
Pain, petits pains
moelleux MED (moyen) FERMÉ
Mets mijotés MED (moyen) FERMÉ
Céréales cuites MED (moyen) FERMÉ
Œufs MED (moyen) FERMÉ
Poisson, fruits de mer MED (moyen) FERMÉ
Fruits MED (moyen) FERMÉ
Sauce, sauces à la
crème MED (moyen) FERMÉ
Jambon MED (moyen) FERMÉ
Agneau MED (moyen) FERMÉ
Crêpes,gaufres HI(élevé) FERMÉ
Tartes, une croûte MED (moyen) FERMÉ
Porc MED (moyen) FERMÉ
Purée de pommes
de terre MED (moyen) FERMÉ
Volaille HI(élevé) FERMÉ
Légumes MED (moyen) FERMÉ
49-2000658 Rév. 0 9
Nettoyage du tiroir-réchaud
Assurez-vousquetouteslescommandessontenpositiond'ARRÊTetquetouteslessurfacessontfroidesavantdenettoyerle
tiroir-réchaud.
Surfaces peintes ou émaillées
Utilisezdel'eautièdesavonneusepourbiennettoyer.
ENTRETIEN ET NETTOYAGE : Nettoyage du tiroir-réchaud
Grille
Nettoyezlagrilleavecdudétergentetdel'eau.Aprèsle
nettoyage, rincez la grille à l'eau claire et séchez-la avec
un chiffon propre.
Bouton de commande
Leboutondecommandepeutêtreenlevépourfaciliterle
nettoyage.
Assurez-vousqueleboutonestàlapositionPROOF
(fermentation) et tirez-le directement hors de la tige
pour le nettoyer.
Leboutonpeutêtrenettoyéaulave-vaisselleouavecdel'eau
etdusavon.Assurez-vousquel'intérieurduboutonestsec
avant de le replacer.
Replacez le bouton à la position PROOF (fermentation) pour
assurer un positionnement adéquat.
Acier inoxydable (à l'exception de l'acier inoxydable noir) (certains modèles)
N'utilisez pas de tampon en laine d'acier; il raierait la surface.
Pour nettoyer la surface en acier inoxydable, utilisez de l'eau
tiède savonneuse ou un produit de nettoyage ou à polir pour
acier inoxydable. Essuyez toujours la surface dans le sens
du grain. Suivez les instructions du nettoyant pour surface en
acier inoxydable.
Les nettoyants contenant de l'acide oxalique comme Bar
Keepers Friend Soft Cleanser
MC
permettent d'éliminer la rouille,
le ternissement et les petits défauts de la surface du four.
Utilisezuniquementlesnettoyantsliquidessansgranuleet
frottez dans le sens du grain avec une éponge douce et humide.
Pour en savoir davantage sur l'achat de produits de nettoyage, y
compris les nettoyants pour appareils électroménagers en acier
inoxydable ou les produits de polissage, consultez les sections
«Accessoires»et«Serviceàlaclientèle»àlafindecemanuel.
10 49-2000658 Rév. 0
Instructions
d'installation
Si vous avez des questions, appelez Électroménagers GE au 1-800-GE-CARES (432-2737)
ou consultez notre site Web à : GEAppliances.com.
Au Canada : 1-800-561-3344 ou visitez electromenagersge.ca.
AVANT DE COMMENCER
Lisez attentivement toutes ces instructions.
■ IMPORTANT – Conservez ces instructions
pour l'inspecteur local.
■ IMPORTANT – Respectez tous les codes et
règlements en vigueur.
■ Remarque destinée à l'installateur – Assurez-vousde
laisser ces instructions au consommateur.
■ Remarque destinée au consommateur – Conservez
ces instructions pour vous y reporter ultérieurement.
■ Les défaillances de l'appareil dues à une mauvaise
installation ne sont pas couvertes par la garantie.
■
AVERTISSEMENT
Cetappareildoitêtrecorrectement
mis à la terre.
■
AVERTISSEMENT
Assurez-vousquelecordon
d'alimentation n'entre pas en contact avec les surfaces
chaudes sous les fours, surfaces de cuisson ou autres
électroménagers.
• AVERTISSEMENT DESTINÉ À L'INSTALLATEUR –
L'installateur est responsable de la qualité de
l'installation. Une panne du produit due à une
mauvaise installation n'est PAS couverte par
la garantie.
MATÉRIEL DONT VOUS AUREZ BESOIN
OUTILS NÉCESSAIRES
Tiroir-réchaud
PKW7000 et PTW9000
INSTRUCTIONS D'INSTALLATION
Gants résistants aux coupures
Perceuse et foret de
1/16 po
Tournevis Phillips
Scie à main
Vis à bois et adhésif ou autre quincaillerie pour l'installation de
coulisseaux ou d'une tablette pour supporter le tiroir-réchaud.
Les coulisseaux doivent être de niveau, solidement fixés et
capables de supporter une charge de 150 lb (45,4 kg).
Pièce de bois de 2 x 4 ou 2 x 2 pour installer des
coulisseaux et la bride
Lunettes de sécurité
Ruban à mesurer
Niveau
49-2000658 Rév. 0 11
INSTRUCTIONS D'INSTALLATION
Instructions d'installation
CONSIGNES DE SÉCURITÉ IMPORTANTES
LISTE DE VÉRIFICATION AVANT INSTALLATION
INSTRUCTIONS DE MISE À LA TERRE
IMPORTANT – (veuillez lire attentivement)
POUR VOTRE SÉCURITÉ, CET ÉQUIPEMENT DOIT
ÊTRE CORRECTEMENT MIS À LA TERRE.
Cetiroir-réchaudestconçupourunealimentation
électriquede120Vet60Hz,etdoitêtrebranchéà
un circuit de dérivation individuel correctement mis
à la terre et protégé par un disjoncteur de 15 ou
20 ampères ou par un fusible temporisé.
■ Unepriseà3alvéolescorrectementmiseàlaterre
doitêtreplacéeàportéeducordond'alimentationde
56 po de long du tiroir.
■ Placez la prise dans une armoire adjacente
– à moins de 42 po du côté droit; ou
– à moins de 16 po du côté gauche; ou
– unepriseencastréepeutêtreplacéeducôtédroit
de la découpe, à 7 po de l'arrière de l'armoire.
Dans cette situation, l'excédent de cordon doit
êtreenrouléetfixéaucôtédroitdel'appareil
avec du ruban adhésif.
IMPORTANT – (veuillez lire attentivement)
Pour diminuer les risques d'électrocution, le cordon
d'alimentation de cet appareil est muni d'une fiche
à 3 broches (mise à la terre) qui correspond à une
prise murale à 3 alvéoles (prise mise à la terre). Le
client doit s'adresser à un électricien qualifié qui vérifiera
la prise murale et le circuit électrique pour s'assurer
que la prise murale est correctement mise à la terre
et correctement polarisée.
■ Si la prise murale est du type standard à 2 alvéoles,
il incombe au client de la faire remplacer par une prise
à 3 alvéoles correctement mise à la terre.
Ne coupez et ne retirez en aucun cas la troisième broche
(mise à la terre) de la fiche du cordon d'alimentation.
N'UTILISEZ PAS DE RALLONGE ÉLECTRIQUE NI
DE FICHE D'ADAPTATION AVEC CET APPAREIL.
RESPECTEZ LES CODES NATIONAUX DE
L'ÉLECTRICITÉ ET LES RÈGLEMENTS.
A
Lorsque vous préparez l'armoire pour l'installation du
tiroir-réchaud, assurez-vous que l'intérieur de l'armoire
etdutiroir-réchaudnesegênerontpas.(Reportez-vous
aux sections sur la préparation de l'armoire.)
B
RETIREZLESMATÉRIAUXD'EMBALLAGE:Sivous
n'enlevez pas les matériaux d'emballage, vous pourriez
endommager l'appareil. Retirez l'ensemble de l'emballage
du tiroir-réchaud, y compris en soulevant le tiroir-réchaud
pour vous assurez que tout l'emballage est enlevé.
C
Retirez les instructions d'installation de l'enveloppe de
la documentation et lisez-les attentivement avant de
commencer. Veillez à mettre toute la documentation,
le manuel de l'utilisateur, les instructions
d'installation, etc. dans un lieu sûr afin de
pouvoir vous y reporter ultérieurement.
Plaque
signalétique
Prise encastrée à
7 po max. de l'arrière,
du côté droit
Percez un trou de
1
1
/2 po pour passer
le cordon à la prise
située à gauche ou
à droite
1 po = 2,5 cm; 1 pi = 0,3 m
12 49-2000658 Rév. 0
Instructions d'installation
PRÉPARATION DE L'ARMOIRE : SOUS UN COMPTOIR
■ Unefoisletiroirinstallé,lafaceavantdutiroir-réchaud
doit pratiquement affleurer les portes d'armoires ou les
devants de tiroir.
■ Le chevauchement du tiroir camouflera tous les bords
découpés de l'ouverture.
La découpe grossière pour le tiroir doit mesurer :
–Profondeur:Unminimumde23
1
/2 po du fond à l'avant
du cadre de l'armoire.
–Largeur: 25
1
/2 po pour les modèles de 27 po de
largeur; 28
1
/2 po pour les modèles de
30 po de largeur.
–Hauteur: 9
1
/4 po
■ Minimumde5poau-dessusduplancherou1po
au-dessusdupanneauinférieur.Unehauteurde23
1
/4 po
du plancher au fond de la découpe est recommandée
pour l'installation sous un comptoir.
Installation sous un tiroir d'armoire :
Letiroir-réchaudpeutêtreinstallésousuntiroird'armoire.
Danscetteinstallation,unecloisonpleinedoitêtreinstallée
au-dessusdutiroir-réchaudafind'interdirel'accès.Utilisez
un matériau solide comme du contreplaqué de 1/4 po.
Prévoyez une lame d'air d'au moins 1/4 po entre la cloison
et le dessus du tiroir-réchaud. Respectez une hauteur
minimum de 5 po au-dessus du plancher ou 1 po au-dessus
du panneau inférieur.
REMARQUE : Si vous faites l'installation dans des armoires
sanscadre,ilpeutêtrenécessairedeposerdestaquetsde
1/2 po de largeur afin de pouvoir poser les vis de montage
du tiroir. Reportez-vous au tiroir pour trouver l'emplacement
exact des vis de montage.
Installation sous une surface de cuisson :
Les tiroirs-réchauds sont adéquats pour l'installation
sous certains modèles de surface de cuisson. Consultez
l'étiquette sur le dessus du tiroir-réchaud pour connaître
lesmodèlesadéquats.Unecloisonpleineetunelamed'air
sont requises entre la surface de cuisson et le tiroir-réchaud.
Reportez-vous à la remarque ci-dessus.
INSTRUCTIONS D'INSTALLATION
Installation sous
un tiroir
Sortie électrique de
42 po max. du côté droit
1 po min.*
25 po
9 po
9
1
/4 po
23
1
/2 po min.
Comptoir à
une hauteur
de 36 po
Prise électrique
à 16 po max.
du côté gauche
Prise électrique
affleurante à la
paroi de l'armoire
(7 po max.)
Installez un bloc
antibasculement de 2 x 4 ou
2 x 2 contre la paroi arrière
de l'armoire à une distance
de 9 po entre le fond et le
dessous du bloc.
7 po
Hautdel'armoirede1
1
/2 po
Installez une
cloison pleine
et prévoyez une
lame d'air de
1/4 po au-dessus
du tiroir-réchaud.
Lame d'air
de 1/4 po
Cloison pleine
Installez une cloison pleine
sous une surface de cuisson
(reportez-vous à la remarque).
ATTENTION
AU CANADA, CE TIROIR N'EST
PAS APPROUVÉ POUR UNE
INSTALLATION SOUS UNE
SURFACE DE CUISSON.
* REMARQUE : Lors de l'installation du tiroir-réchaud sous une
surface de cuisson, une cloison pleine doit être installée à au
moins à 1 po du point le plus bas entre le bas du boîtier de brûleur
delasurfacedecuissonetledessusdeladécoupe.Utilisezun
matériau solide comme du contreplaqué de 1/4 po. Prévoyez
une lame d'air d'au moins 1/4 po entre la cloison et le dessus du
tiroir-réchaud. Reportez-vous à l'étiquette située sur le dessus du
tiroir-réchaud pour les modèles de surface de cuisson approuvés.
Dimension A
Tiroir de 27 po Tiroir de 30 po
25-1/2 po 28-1/2 po
1 po = 2,5 cm; 1 pi = 0,3 m
49-2000658 Rév. 0 13
PRÉPARATION DE L'ARMOIRE : SOUS DES FOURS ENCASTRÉS
INSTALLATION SOUS UN FOUR SIMPLE
INSTALLATION SOUS UN FOUR DOUBLE
■ Unefoisletiroirinstallé,lafaceavantdutiroir-réchaud
doit pratiquement affleurer les portes d'armoires ou les
devants de tiroir.
■ Lechevauchementdutiroircamoufleratouslesbords
découpés de l'ouverture.
La découpe grossière pour le tiroir doit mesurer :
–Profondeur:Unminimumde23
1
/2 po du fond à
l'avant du cadre de l'armoire.
–Largeur: 25
1
/2 po pour les modèles de 27 po
de largeur; 28
1
/2 po pour les modèles
de 30 po de largeur.
–Hauteur: 9
1
/4 po
–Prévoyezunminimumde2poentreladécoupedufour
et celle du tiroir pour dégager les chevauchements.
REMARQUE : Si vous faites l'installation dans des armoires
sanscadre,ilpeutêtrenécessairedeposerdestaquetsde
1/2 po de largeur afin de pouvoir poser les vis de montage
du tiroir. Reportez-vous au tiroir pour trouver l'emplacement
exact des vis de montage.
Installation sous un four encastré :
Les tiroirs-réchauds sont adéquats pour l'installation
sous certains modèles de four encastré. Consultez
l'étiquette sur le dessus du tiroir-réchaud pour
connaître les modèles adéquats.
REMARQUE : Il est possible d'installer une prise électrique,
comme illustré pour les installations avec comptoir. N'installez
pas une prise au-dessus de la découpe du tiroir-réchaud.
INSTRUCTIONS D'INSTALLATION
Instructions d'installation
23
1
/2 po
min.
Bloc antibasculement
de 2 x 2 ou 2 x 4
contre le mur arrière,
avec 9 po du
fond au-dessous
du bloc
1 po min. au-dessus du
panneau inférieur ou réglez à
la hauteur d'installation du four.
A
2 po min.
Prévoyez un chevauchement
de 5/8 po sur tous les côtés.
B
Découpe
du four
REMARQUE : Undégagementsupplémentairepeut
êtrerequisentrelesdécoupes.Assurez-vousque
les supports de four au-dessus du tiroir-réchaud
n'obstruent pas les dégagements de profondeur de
23
1
/2 po et de hauteur de 9
1
/4 po requis à l'intérieur.
Dimension A Dimension B
Tiroir de
27 po 25
1
/2 po 26
3
/4 po
Tiroir de
30 po 28
1
/2 po 29
3
/4 po
9 po
9
1
/4 po
10
1
/2 po
23
1
/4 po
ATTENTION
AU CANADA, LE FOUR
ENCASTRÉ EST UNIQUEMENT
APPROUVÉ POUR UNE
INSTALLATION AVEC UNE
DÉCOUPE INFÉRIEURE
À UN MINIMUM DE
32,5 POUCES DU PLANCHER.
REMARQUE :Undégagementsupplémentaire
peutêtrerequisentrelesdécoupes.Assurez-
vous que les supports de four au-dessus du
tiroir-réchaud n'obstruent pas les dégagements
de profondeur de 23-1/2 po et de hauteur de
9-1/4 po requis à l'intérieur.
ATTENTION
AU CANADA, CE TIROIR
N'EST PAS APPROUVÉ
POUR UNE INSTALLATION
SOUS UN FOUR DOUBLE.
2 po min.
1 po min. au-dessus
du panneau inférieur
Bloc antibasculement
de 2 x 2 ou 2 x 4
contre le mur arrière,
avec 9 po
du fond au-dessous
du bloc
23
1
/2 po
min.
Prévoyez un
chevauchement
de 5/8 po sur
tous les côtés.
A
9 po
9
1
/4 po
B
10
1
/2 po
23
1
/4 po
Découpe
du four
1 po = 2,5 cm; 1 pi = 0,3 m

14 49-2000658 Rév. 0
Instructions d'installation
INSTALLATION D'UN SUPPORT POUR L'ARMOIRE
INSTALLATION DU DISPOSITIF ANTIBASCULEMENT
IMPORTANT : Lors de l'installation sous un four simple ou
double, assurez-vous que les supports de four au-dessus du
tiroir-réchaud n'obstruent pas les dégagements de profondeur
de 23
1
/2 po requis dans la découpe du tiroir-réchaud.
■ Undégagementminimalde2poestrequisentreles
découpesdufouretdutiroir-réchaud.Undégagement
supplémentairepeutêtrerequissidesblocsde2x4sont
utilisés pour soutenir les coulisseaux ou le fond plein du four.
■ Letiroir-réchaudpeutêtresupportéparunfondpleinou
des coulisseaux en 2 x 4 ou 2 x 2.
■ Lesupportdoitêtredeniveau,solidementfixéet
affleurant avec le bord inférieur de la découpe.
Il est impossible de niveler le tiroir après son
installation. Les supports doivent être de niveau.
■ Toutlepoidsdutiroirestsupportéparlescoulisseauxoule
fond plein et ils doivent pouvoir supporter 150 lb (68 kg).
AVERTISSEMENT
PRÉCAUTIONS ANTIBASCULEMENT :
Ledispositifantibasculementdoitêtreinstalléafin
d'empêcherletiroirdebasculerversl'avantlorsqu'ilest
ouvert et chargé.
Dans le cas contraire, vous vous exposeriez à des
blessures graves.
INSTRUCTIONS D'INSTALLATION
Coulisseaux de 2 x 4 po ou équivalents
23
1
/2 po23
1
/2 po
Coulisseaux de 2 x 4 po ou équivalents
22 po 25 po
27 po 30 po
Installez un dispositif
antibasculement de 2 x 4 ou 2 x 2
contre la paroi arrière de l'armoire
à une distance de 9 po entre le
fond et le dessous du dispositif
antibasculement.
Coulisseaux de 2 x 4 ou
2 x 2 ou fond solide
9 po
1 po = 2,5 cm; 1 pi = 0,3 m
49-2000658 Rév. 0 15
1. Faites glisser le coin gauche dans l'ouverture et poussez
le cordon alimentation dans le trou menant à la prise
électrique. Enfilez le cordon à mesure que vous poussez
le tiroir dans l'ouverture.
Si la prise est à l'intérieur de l'ouverture, branchez le
cordon à la prise. Dans cette situation, l'excédent de
cordondoitêtreenrouléetfixéaucôtédroitdel'appareil
avecdurubanadhésif.Assurez-vousquelecordonne
se coince pas sur le côté du tiroir.
REMARQUE :Assurez-vousquelecordond'alimentation
n'entre pas en contact avec les surfaces chaudes sous les
fours, surfaces de cuisson ou autres électroménagers.
2. Poussez le tiroir dans l'ouverture jusqu'à ce que le
rebord avant s'appuie contre la paroi avant de l'armoire.
3. Ouvrez le tiroir entièrement.
4. Percez des avant-trous en passant le foret par les trous
dans chaque coin du cadre chevauchant.
5. Posez les vis à bois dans chaque coin.
INSTALLATION DU TIROIR-RÉCHAUD
INSTRUCTIONS D'INSTALLATION
Instructions d'installation
1 po = 2,5 cm; 1 pi = 0,3 m

16 49-2000658 Rév. 0
Économisezdutempsetdel'argent!Reportez-vousautableausuivantpourévitertoutappeldeservicequineseraitpasnécessaire.
Conseils de dépannage... Avantdecontacterleservicededépannage
Problème Causes possibles Solutions
Le tiroir-réchaud ne
fonctionne pas
Unfusibledevotredomicilepeutêtregrilléoule
disjoncteur s'est déclenché.
Remplacez le fusible ou réenclenchez
le disjoncteur.
Le tiroir-réchaud n'est pas branché. Branchez le tiroir-réchaud.
Les commandes sont mal réglées. Reportez-vousàlasection«Utilisationdu
tiroir-réchaud ».
Le tiroir ne glisse pas
bien ou frotte
Les roulements à billes sont désalignés. Ouvrez le tiroir au maximum, puis repoussez-
le complètement. Reportez-vous à la section
« Entretien et nettoyage ».
Le tiroir est trop chargé ou la charge est
déséquilibrée.
Réduisez le poids à moins de 50 lb (23 kg).
Répartissez le contenu du tiroir.
Condensation
excessive
Présence de liquide dans le tiroir-réchaud. Retirez le liquide.
Alimentsnoncouverts. Couvrez les aliments avec un couvercle ou du
papier d'aluminium.
La température est trop élevée. Diminuez la température.
Mauvais réglage du sélecteur d'humidité. Glissez le sélecteur d'humidité en position
ouverte afin de permettre l'évacuation.
Pas de chaleur au
réglage PROOF
(fermentation)
Latempératureambiantepeutempêcherle
thermostat de s'enclencher.
Tournez le bouton de commande à LO (bas) et
puis immédiatement à PROOF (fermentation).
Les aliments se
dessèchent
Il y a perte d'humidité. Couvrez les aliments avec un couvercle ou du
papier d'aluminium.
CONSEILS DE DÉPANNAGE

49-2000658 Rév. 0 17
Notes
18 49-2000658 Rév. 0
GARANTIE LIMITÉE
Garantie limitée du tiroir-réchaud électrique
Agrafezvotrefactureici.Unepreuvedeladated'achat
d'origine est requise pour obtenir des services sous garantie.
GEAppliances.com
Toutes les réparations sous garantie sont effectuées par nos Centres de réparation ou par nos réparateurs agréés Customer
Care
®
. Pour faire la demande d'une réparation en ligne, visitez GEAppliances.com/service_and_support/ ou appelez
ÉlectroménagersGEau1-800-GE-CARES(432-2737).AuCanada,veuillezvisiter:https://service.geappliances.ca/servicio/
fr_CA/.
Veuillez avoir les numéros de série et de modèle de votre appareil à portée de main lorsque vous appelez pour obtenir un service.
La réparation de votre appareil peut nécessiter l'utilisation d'un accès embarqué aux données pour déterminer le diagnostic. Cela
permetàuntechnicienderéparationd'ÉlectroménagersGEdediagnostiquerrapidementtoutproblèmeavecvotreappareil,et
aideÉlectroménagersGEàaméliorersesproduitsenluifournissantdel'informationsurvotreappareil.Sivousnevoulezpasque
lesdonnéesdevotreappareilsoienttransmisesàÉlectroménagersGE,
veuillez aviser le technicien de ne pas transmettre
dedonnéesàÉlectroménagersGEaumomentdelaréparation.
Ce que Électroménagers GE ne couvre pas :
■ Toute visite à votre domicile pour vous expliquer le
fonctionnement de l'appareil.
■ L'installation,lalivraisonoul'entretieninappropriésdel'appareil.
■ Toutedéfectuositéduproduitlorsqu'ilaétéutilisédefaçon
abusive ou inadéquate, employé à toute autre fin que
cellepourlaquelleilaétéconçu,modifiéouutiliséà
des fins commerciales.
■ Leremplacementdesfusiblesouleréenclenchement
des disjoncteurs.
■ Toutdommageauproduitattribuableàunaccident,àun
incendie, à une inondation ou à une catastrophe naturelle.
■ Toutdommageaurevêtement,commedelarouillesurla
surface, le ternissement et les petits défauts non signalés
au cours des 48 heures suivant la livraison de l'appareil.
■ Toutdommageaccessoireouindirect,causépardes
défaillances possibles de l'appareil.
■ Toutdommagecauséaprèslalivraison.
■ Toutproduitauqueliln'estpaspossibled'accéderpour
effectuer les réparations nécessaires.
■ Laréparationouleremplacementd'ampoules,àl'exception
de DEL.
EXCLUSIONS DES GARANTIES IMPLICITES
Votre seul et unique recours est de faire réparer le produit dans le cadre de cette garantie limitée. Toute garantie implicite,
incluant la garantie de qualité marchande ou d'aptitude du produit à un usage particulier, est limitée à un an ou à la période la
plus courte autorisée par la loi.
Cette garantie limitée est offerte à l'acheteur initial, ainsi qu'à tout propriétaire subséquent d'un produit acheté en vue d'une
utilisationdomestiqueauxÉtats-Unis.SileproduitsesituedansunezoneoùaucunréparateuragrééparÉlectroménagersGE
n'estdisponible,vousdevrezpeut-êtreassumerlesfraisdedéplacementdecelui-ciouapporterleproduitàunatelierde
réparationagrééparÉlectroménagersGE.EnAlaska,lagarantielimitéeexclutlescoûtsd'expéditionetlesappelsdeservice
nécessitant une visite à domicile.
DanscertainsÉtats,ilestinterditd'exclureoudelimiterlesdommagesindirectsouaccessoires.Ilestalorspossiblequeles
limitations ou exclusions ci-dessus ne s'appliquent pas dans votre cas. La présente garantie limitée vous confère des droits
juridiquesspécifiques.Vouspouvezbénéficierd'autresdroits,quivarientd'unÉtatoud'uneprovinceàl'autre.Pourconnaîtreles
droitsdontvousbénéficiezdansvotreÉtatouvotreprovince,communiquezaveclebureaudelaprotectionduconsommateurde
votrerégion,devotreÉtatoudevotreprovince,ouleprocureurgénéral.
Garant : Électroménagers GE, une entreprise de Haier
Louisville,KY40225,États-Unis
Garant au Canada : MC Commercial, Burlington, ON, L7R 5B6
Pendant une
période de
Électroménagers GE remplacera
Un an
À compter de la date
d'achat d'origine
Toute piècedufourquiserévèledéfectueuseenraisond'unvicedematériauoudefabrication.Au
cours de cette garantie limitée d'un an,ÉlectroménagersGEfourniraégalement,sans frais, toute la
main-d'œuvre pour le remplacement de la pièce défectueuse à domicile.

49-2000658 Rév. 0 19
Accessoires
Trousse de panneau personnalisé de 27 po (68,6 cm)
Trousse de panneau personnalisé de 30 po (76,2 cm)
Trousse de panneau pro Monogram de 30 po (76,2 cm)
Pièces
Grille
Fournitures de nettoyage
Lingettes CitruShine
MC
pour acier inoxydable
Nettoyant pour électroménager en acier inoxydable
CERAMABRYTE
MD
ACCESSOIRES
Vous manquez de quelque chose?
Électroménagers GE propose une panoplie d'accessoires
qui permettent d'améliorer votre expérience de cuisson et
de nettoyage!
Reportez-vous à la page du service à la clientèle pour obtenir
les numéros de téléphone et des informations sur le site Web.
Lesproduitssuivants,etd'autres,sontofferts:
Accessoires

20 49-2000658 Rév. 0
Service à la clientèle
SERVICE À LA CLIENTÈLE
Site Web des électroménagers GE
Vousavezdesquestionsoubesoind'assistanceconcernantvotreappareil?ConsultezlesiteWebd'ÉlectroménagersGE,
accessible24heuressur24,touslesjoursdel'année!Vouspouvezégalementacheterd'autresexcellentsproduits
d'ÉlectroménagersGEetbénéficierdetousnosservicesdesoutienenligneconçuspourvotrecommodité.
AuxÉtats-Unis:GEAppliances.com.AuCanada:electromenagersge.ca.
Enregistrez votre appareil
Enregistrezvotrenouvelappareilenligneaumomentquivousconvientlemieux!L'enregistrementdevotreproduitdansles
délais prescrits permet une meilleure communication et un service rapide, selon les modalités de votre garantie, si besoin est.
Vous pouvez également envoyer par courrier la carte d'enregistrement préimprimée qui se trouve dans l'emballage de votre appareil.
AuxÉtats-Unis:GEAppliances.com/register
AuCanada:https://service.geappliances.ca/servicio/fr_CA/
Demande de service
Pourbénéficierduservicederéparationd'ÉlectroménagersGE,ilsuffitdenouscontacter.Vouspouvezdemanderuneréparation
en ligne à toute heure du jour, au moment qui vous convient le mieux.
AuxÉtats-Unis:GEAppliances.com/service ou appelez au 1-800-432-2737 pendant les heures normales d'ouverture.
AuCanada:https://service.geappliances.ca/servicio/fr_CA/ ou appelez au 1-800-561-3344.
Garanties prolongées
Procurez-vousunegarantieprolongéeÉlectroménagersGEetinformez-vousausujetdesrabaisspéciauxoffertstoutaulongde
laduréedevotregarantie.Vouspouvezvouslaprocurerenligneentouttemps.Leserviceàlaclientèled'ÉlectroménagersGE
sera toujours disponible après expiration de votre garantie.
AuxÉtats-Unis:GEAppliances.com/extended-warranty ou appelez au 1-800-626-2224 pendant les heures normales d'ouverture.
AuCanada:electromenagersge.ca/fr/soutien/achat-d-une-garantie-prolongee ou appelez au 1-800-290-9029.
Connectivité à distance
Pour de l'assistance concernant la connectivité réseau sans fil (pour les modèles avec activation à distance), visitez notre site
Web à GEAppliances.com/connectouappelezau1-800-220-6899auxÉtats-Unis.
AuCanada:GEAppliances.ca/connect ou téléphonez au 1-800-220-6899.
Pièces et accessoires
Lespersonnesayantlescompétencesrequisespourréparerelles-mêmesleursappareilspeuventrecevoirdirectementà
lamaisondespiècesouaccessoires(lescartesVISA,MasterCardetDiscoversontacceptées).Commandezenlignedès
aujourd'hui, 24 heures sur 24.
AuxÉtats-Unis:GEApplianceparts.com ou téléphonez au 1-877-959-8688 pendant les heures normales d'ouverture.
Les directives fournies dans le présent manuel comportent des procédures que n'importe quel utilisateur peut effectuer.
Les autres types de réparation doivent généralement être confiés à un technicien qualifié. Faites preuve de prudence :
une réparation ou un entretien mal effectué peut rendre l'utilisation de l'appareil dangereuse.
Les clients au Canada doivent consulter les pages jaunes pour connaître le centre de réparation Mabe le plus proche, visiter
notre site Web à electromenagersge.ca/pieces-filtres-et-accessoires ou téléphoner au 1-800-661-1616.
Pour nous joindre
Sivousn'êtespassatisfaitduserviceaprès-vented'ÉlectroménagersGE,communiquezavecnoussurnotresiteWeben
fournissanttouslesdétailsetvotrenumérodetéléphone,ouécrivezà:
AuxÉtats-Unis:GeneralManager,CustomerRelations|GEAppliances,AppliancePark|Louisville,KY40225
GEAppliances.com/contact
AuCanada:Directeur,relationsaveclesconsommateurs,MabeCanadaInc.|1,FactoryLane,bureau310|Moncton,N.-B.E1C9M3
electromenagersge.ca/fr/contactez-nous