/
!
!
/
/
,\
\\\ \\
;;
11
//
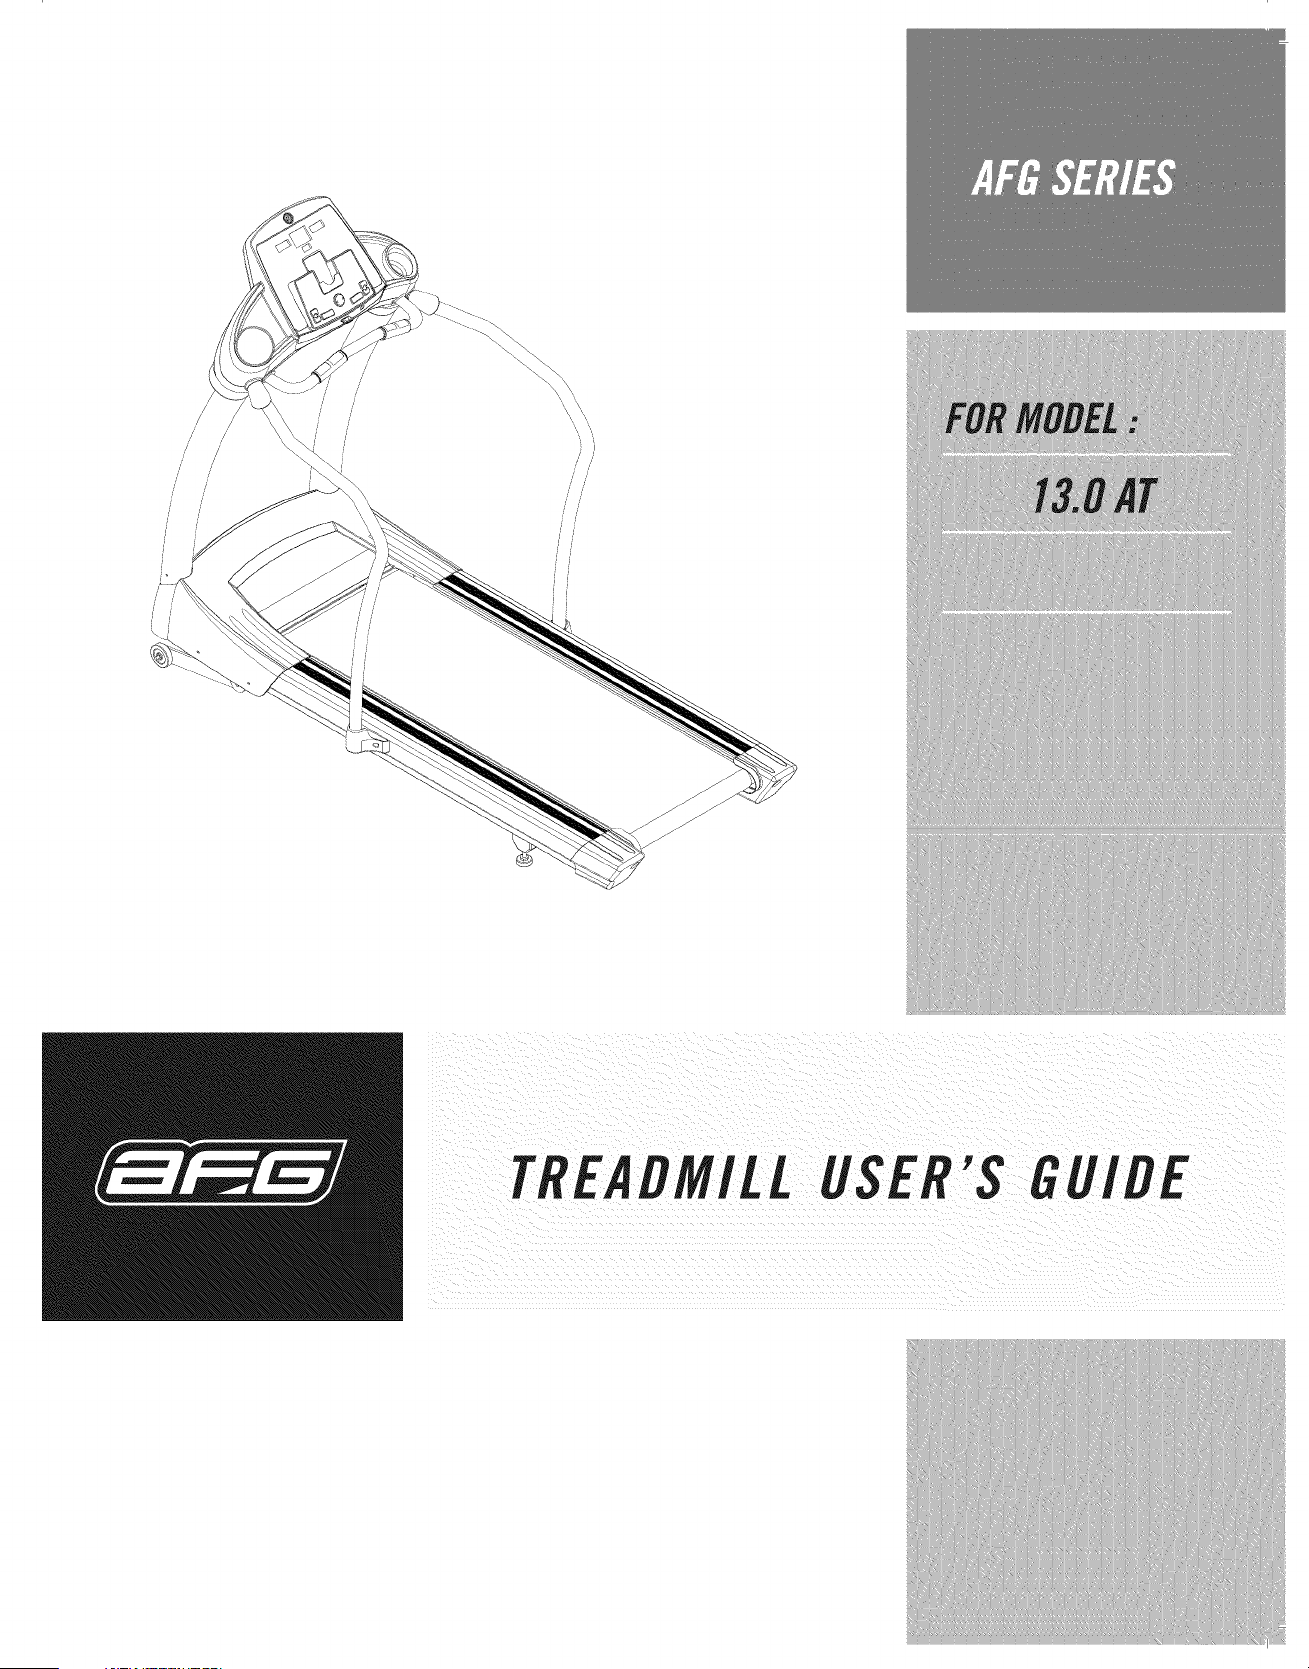
TREADMILL USER'S GUIDE

CONGRATULATIONSand THANKYOUforyour purchaseof this AFGtreadmill!
Whether your goal is to win races or simply enjoy a fuller, healthier fifestyle, an treadmill can help
you attain it - adding club-quafity performance to your at-home workouts, with the ergonomics and
innovative features you need to get stronger and healthier, faster, Because we're committed to designing
fitness equipment from the inside out, we use only the highest quality components, It's a commitment
we back with one of the strongest frame-to-motor warranty packages in the industry,
Youwant exercise equipment that offers the most comfort, the best reliability and quality in its class,
TheAFGderivers.
Important Precautions 4
Assembly 6
Before YouBegin J2
Treadmill Operation J5
Conditioning Guidelines 25
Troubleshooting & Maintenance 3J
Limited Warranty 34
CONTACT INFORMATION Back Panel
ii ¸ _
i¸¸
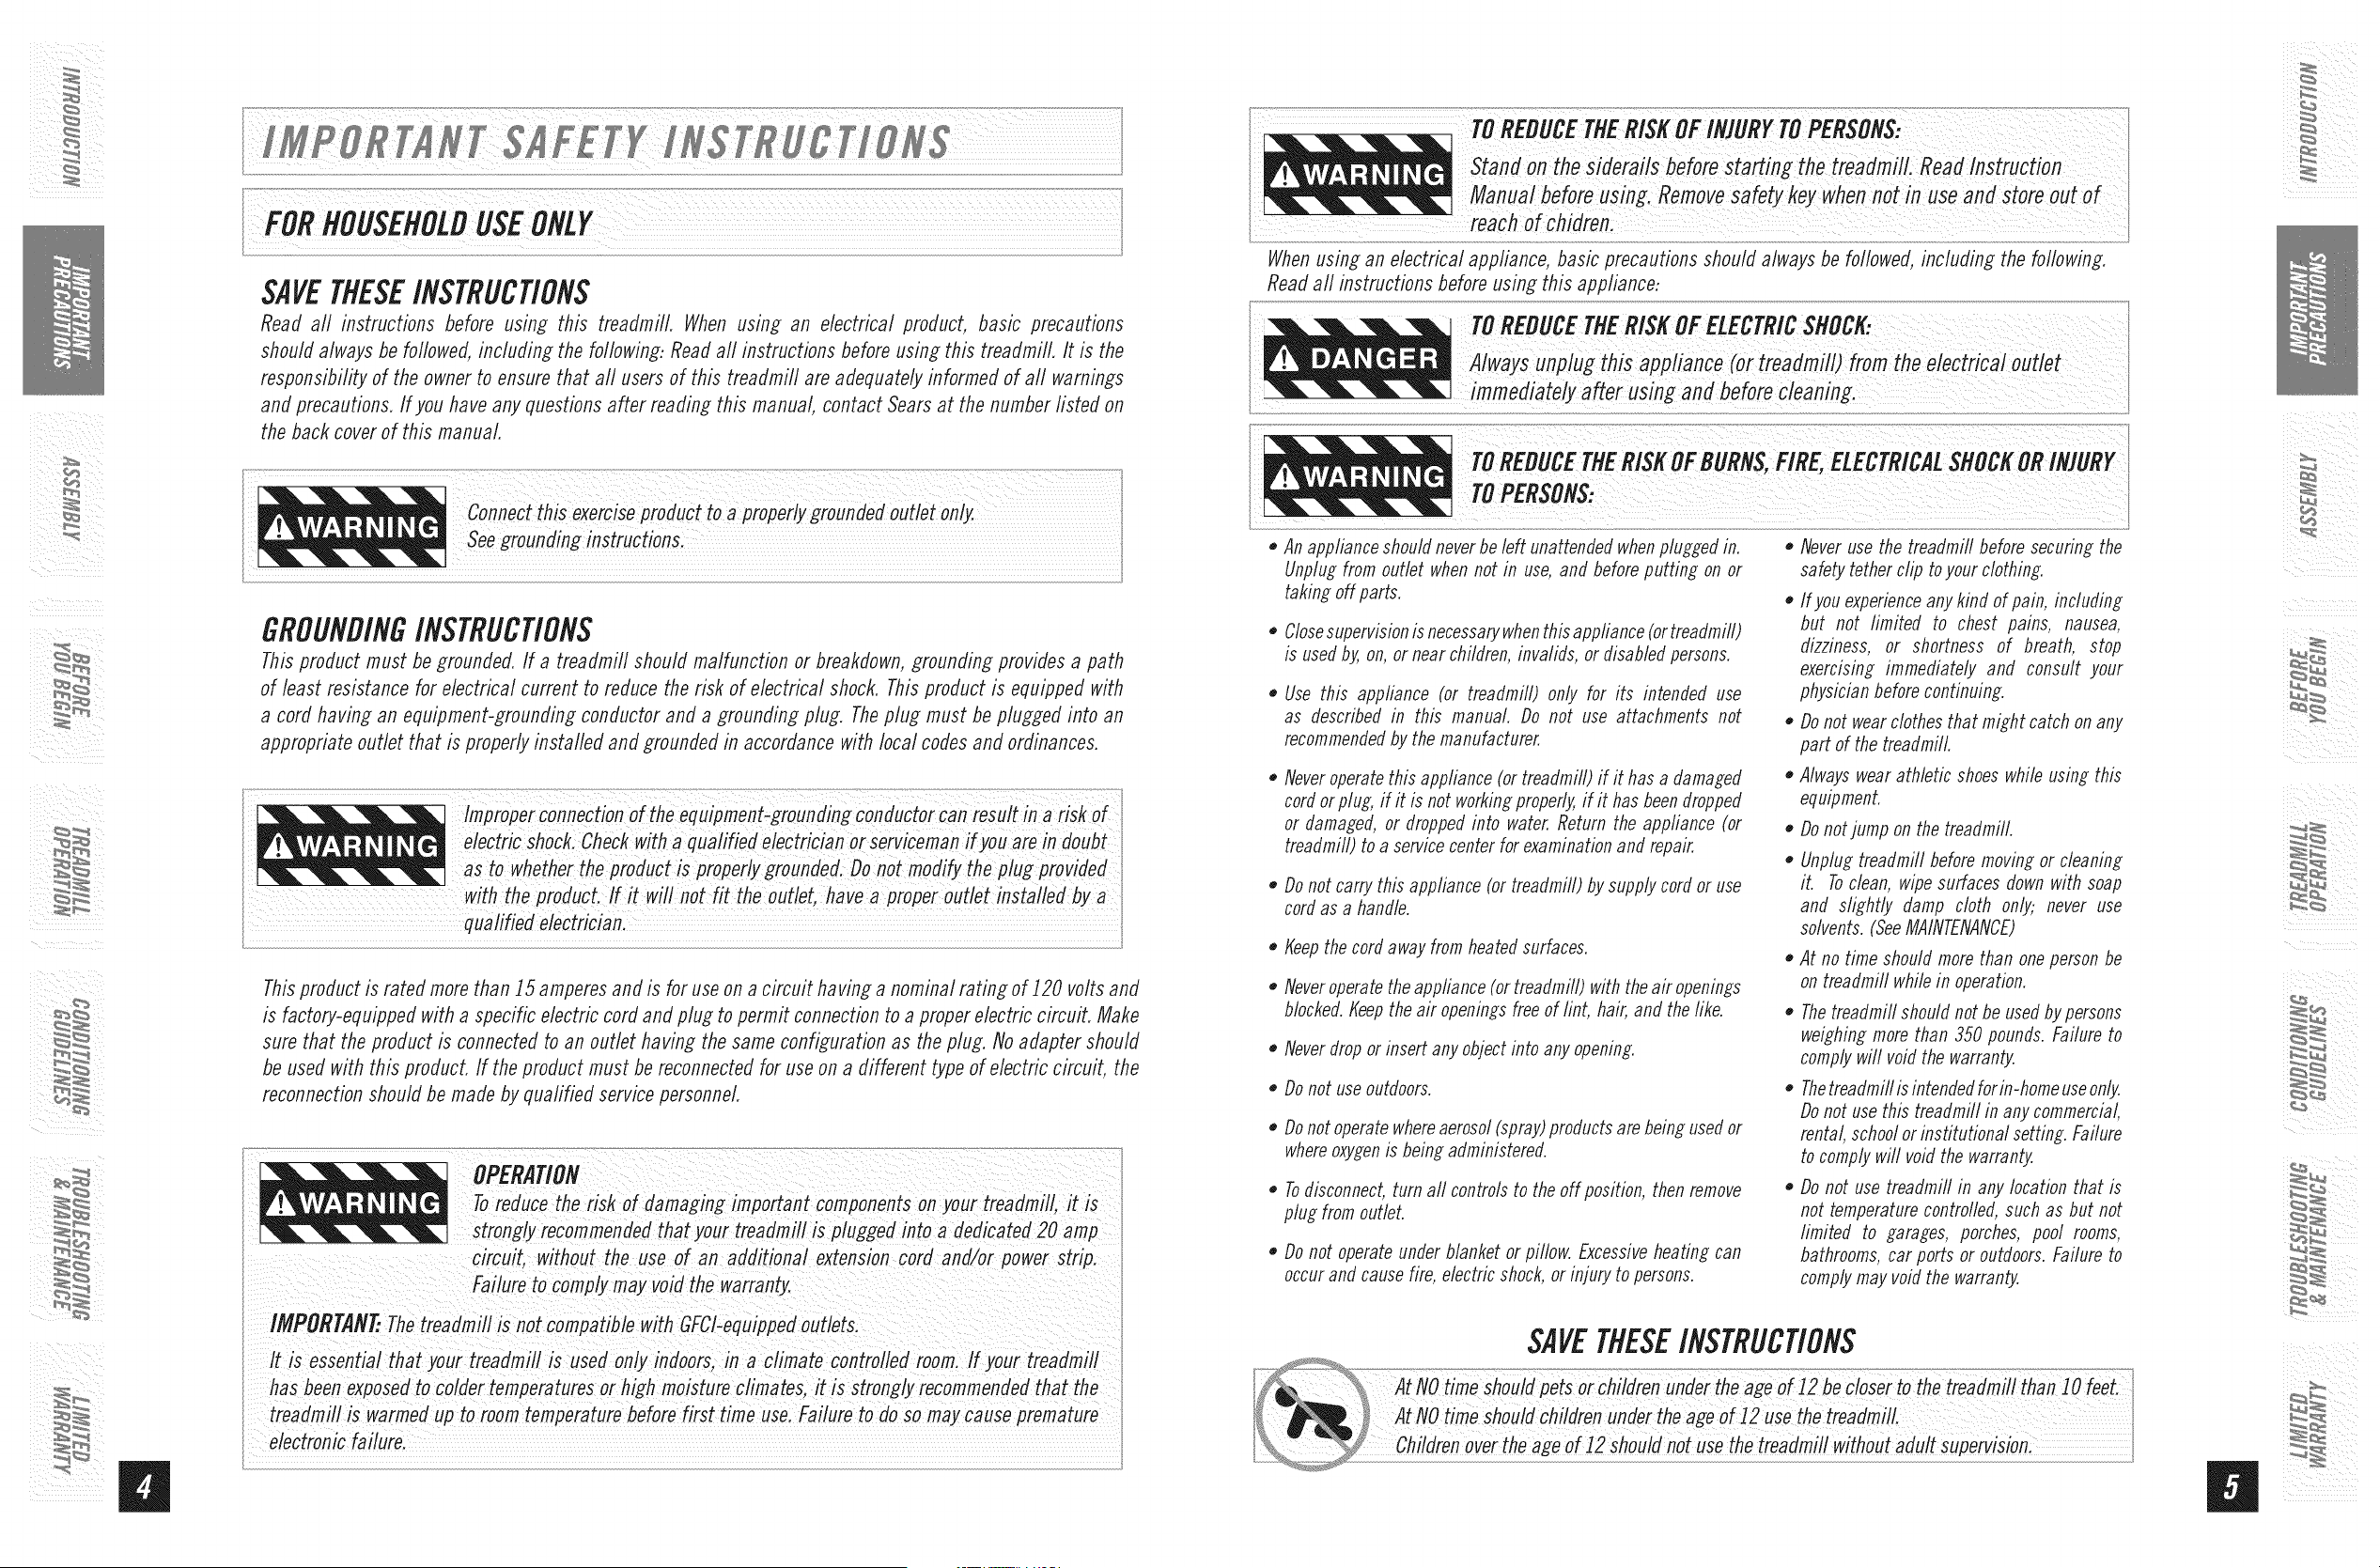
SAVETHESEINSTRUCtiONS
Read all instructions before usin_ this treadmilL When usin_ an electrical product, basic precautions
should always be followed, includin_ the following: Read aft instructions before usin_ this treadmill. It is the
responsibifity of the owner to ensure that aft users of this treadmill are adequately informed of aft warnings
and precautions. If you have any questions after readin_ this manual, contact Sears at the number fisted on
the back cover of this manual
GROUNDINGINSTRUCTIONS
This product must be _rounded. If a treadmill should malfunction or breakdown, _roundin_ provides a path
of least resistance for electrical current to reduce the risk of electrical shock. This product is equipped with
a cord havin_ an equipment-_roundin_ conductor and a _roundin_ plug. The plug must be plugged into an
appropriate outlet that is properly installed and _rounded in accordance with local codes and ordinances.
Improper connection of the equiprnent-_roufidin_ conflucto; _an result in a risk of
electric shock Check with aqualified electricia n o_serviceman if you are in
to whether the Product is proPer/y _roundefl. Do
qualified electrician.
I i
This product is rated more than ]5 amperes and is for use on a circuit havin_ a nominal ratin_ of]20 volts and
is factory-equipped with a specific electric cord and plu_ to permit connection to a proper electric circuit. Make
sure that the product is connected to an outlet havin_ the same configuration as the plu_. No adapter should
be used with this product. If the product must be reconnected for use on a different type of electric circuit, the
reconnection should be made by quafified service personnel
To reduce the r,,sk of dama_!n_ !mportant components on your treadm!!/, !t !S
strongly recommended that your treadmill is plugged into a dedicated20 amp
circuit, without the use of an adfiitiona/ extension cortland/or power strip.
compatib/e with GFCi-equippefl out/ets:
has been exposed to colder temperatures or high moisture climates, it is stron_ly recommended that the
to roOm temperature before first time use: Failure to do So may cause Premature
electronic failurel
i
Manua/beforeusin Removesafetykeywhen usea flstoreout of
reachof chiflreni
When usin_ an electrical appliance, basic precautions should always be followed, includin_ the following.
Read all instructions before usin_ this appliance:
_ A/waysunplu_ this app!iance(or treaflmilt) from the electrical outtet
TOftEDUCETfiEftlSE
TOPEftSONS,:
. An appliance should neverbe left unattendedwhenplu_efl in. . Never use the treadmill before securin_ the
Unplu_ from outlet when not in use, and before puttin_ on or
takin_ off parts.
Closesupervisionis necessarywhenthisappliance (ortreadmill)
is usedby, on, or near children, invalids, or disabled persons.
Use this appliance (or treadmill) only for its intended use
as described in this manual. Do not use attachments not
recommendedby the manufacturer.
safety tether clip toyour clothing.
,, If you experienceany kind of pain, includin_
but not limited to chest pains, nausea,
dizziness, or shortness of breath, stop
exercisin_ immediately and consult your
physician before continuing.
Do not wear clothes that might catch on any
part of the treadmill.
0
0
Neveroperatethis appliance (or treadmill) if it has a damaged
cord or plug, if it is not workin_ properly,if it has beendropped
or damaged, or dropped into water. Return the appliance (or
treadmill) to a service center for examination and repair.
Do not carry this appliance (or treadmill) by supply cord or use
cord as a handle.
Keepthe cord away from heated surfaces.
Neveroperatethe appliance (or treadmill) with the air openings
blocked.Keep the air openings free of lint, hair, and the like.
Neverdrop or insert any object into any opening.
,, Always wear athletic shoes while usin_ this
equipment.
Do not jump on the treadmill.
,, Unplu_ treadmill before movin_ or cleanin_
it. Toclean, wipe surfaces down with soap
and slightly damp cloth only. never use
solvents. (SeeMAINTENANCE)
,, At no time should more than one person be
on treaflmifl while in operation.
Thetreadmifl should not be usedby persons
wei_hin_ more than 350 pounds. Failure to
comply will void the warranty.
,, Do not useoutdoors.
Donot operate whereaerosol(spray)products are bein_ used or
whereoxygenis bein_ administered.
Thetreaflmill is intendedforin-home useonly.
Do not use this treadmill in any commercial,
rental, school orinstitutional setting. Failure
to comply will void the warranty.
Todisconnect, turn all controls to the off position, then remove
plu_ from outlet.
Do not operate under blanket or pillow. Excessiveheatin_ can
occurand causefire, electric shock,or injury to persons.
Do not use treadmill in any location that is
not temperature controlled, such as but not
limited to _ara_es, porches, pool rooms,
bathrooms, car ports or outdoors. Failure to
complymay void the warranty.
SAVETHESEINSTRUCtiONS
ii ¸ _
i¸¸ i_
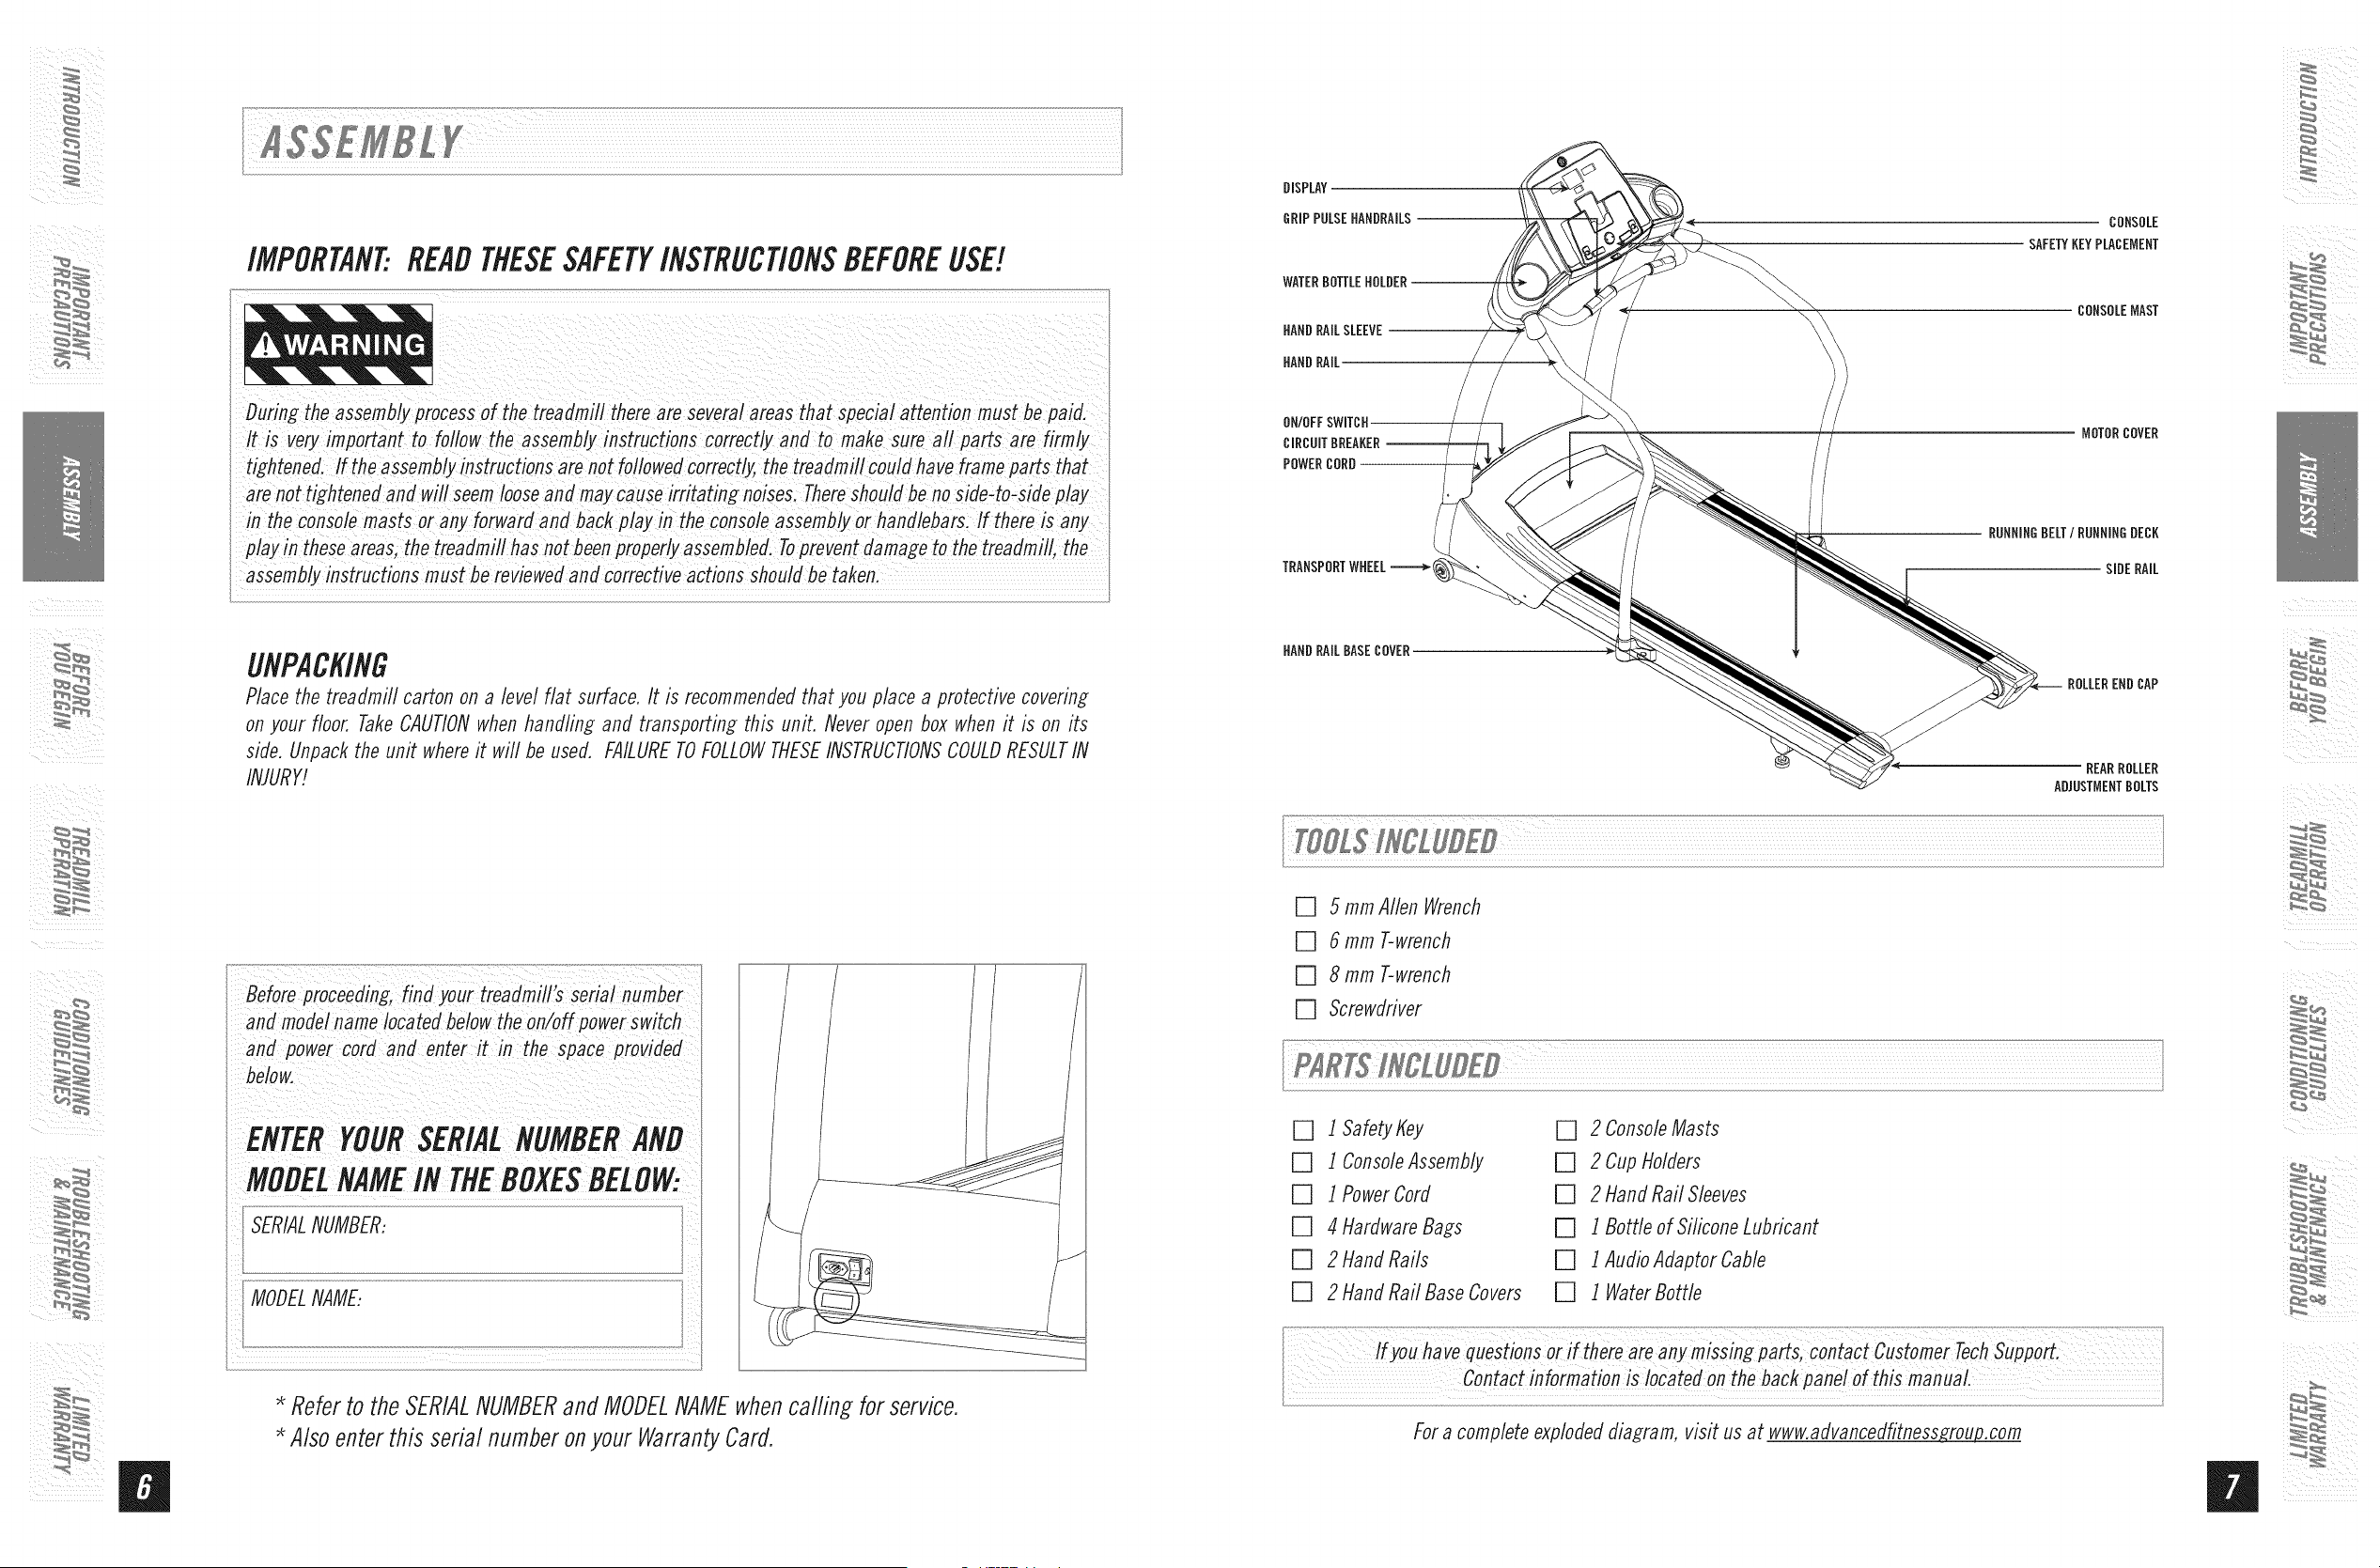
IMPORTANT..READTHESESAFETYINSTRUCTIONSBEFOREUSE!
During assembly process of the treadmill there are several areas that special attention must be paifl.
instructionscorrectlyandtomakesureailparts
are not tightened and w!ll seem loose
the console masts or any forwarfl anfl back play in the Consoleassembly or hanfilebarsl If there is any
play in these areasi the treaflmill has not been Properly assemblefl. Toprevent flamage to the treaflmill, the
t ken
UNPACKING
Place the treadmill carton on a level flat surface. It is recommended that you place a protective covering
on your floor, Take CAUTIONwhen handling and transporting this unit. Never open box when it is on its
side. Unpack the unit where it will be used. FAILURETOFOLLOWTHESEINSTRUCTIONSCOULDRESULTIN
INJURY!
Bifore _roc;iflin£, find'our treadmfli's ;eriai: n_mber_ _
ahd moflel name Iocate_beloW the on/off power switch
corfl anfi ente_ it in the SPace
* Referto the SERIALNUMBERand MODELNAMEwhencalling for service.
Alsoenter this serial numberonyour WarrantyCard.
DISPLAY
GRIPPULSEHANDRAILS
WATERBOTTLEHOLDER
HAND RAILSLEEVE
HAND RAIL
ON/OFFSWITCH
CIRCUITBREAKER--
POWER CORD
CONSOLE
SAFETYKEYPLACEMENT
CONSOLEMAST
MOTOR COVER
RUNNINGBELT/RUNNINGDECK
SIDERAIL
HAND RAILBASECOVER
ROLLEREND CAP
REARROLLER
ADJUSTMENTBOLTS
[] 5 mm Allen Wrench
[] 6 mm T-wrench
[] 8 mm T-wrench
[] Screwdriver
[] ISafetyKey
[] l ConsoleAssembly
[] 1Power Cord
[] 4 Hardware Bags
[] 2 Hand Rails
[] 2 Hand Rail Base Covers
[] 2 ConsoleMasts
[] 2 CupHolders
[] 2 HandRail Sleeves
[] 1 BorNeof SiliconeLubricant
[] 1 AudioAdaptorCable
[] 1 WaterBottle
For a complete exploded diagram, visit us at www.advancedfitness_.com
ii
ii ¸ _/
i¸¸i_
13.0AT Rev.l.7.indd 8-9
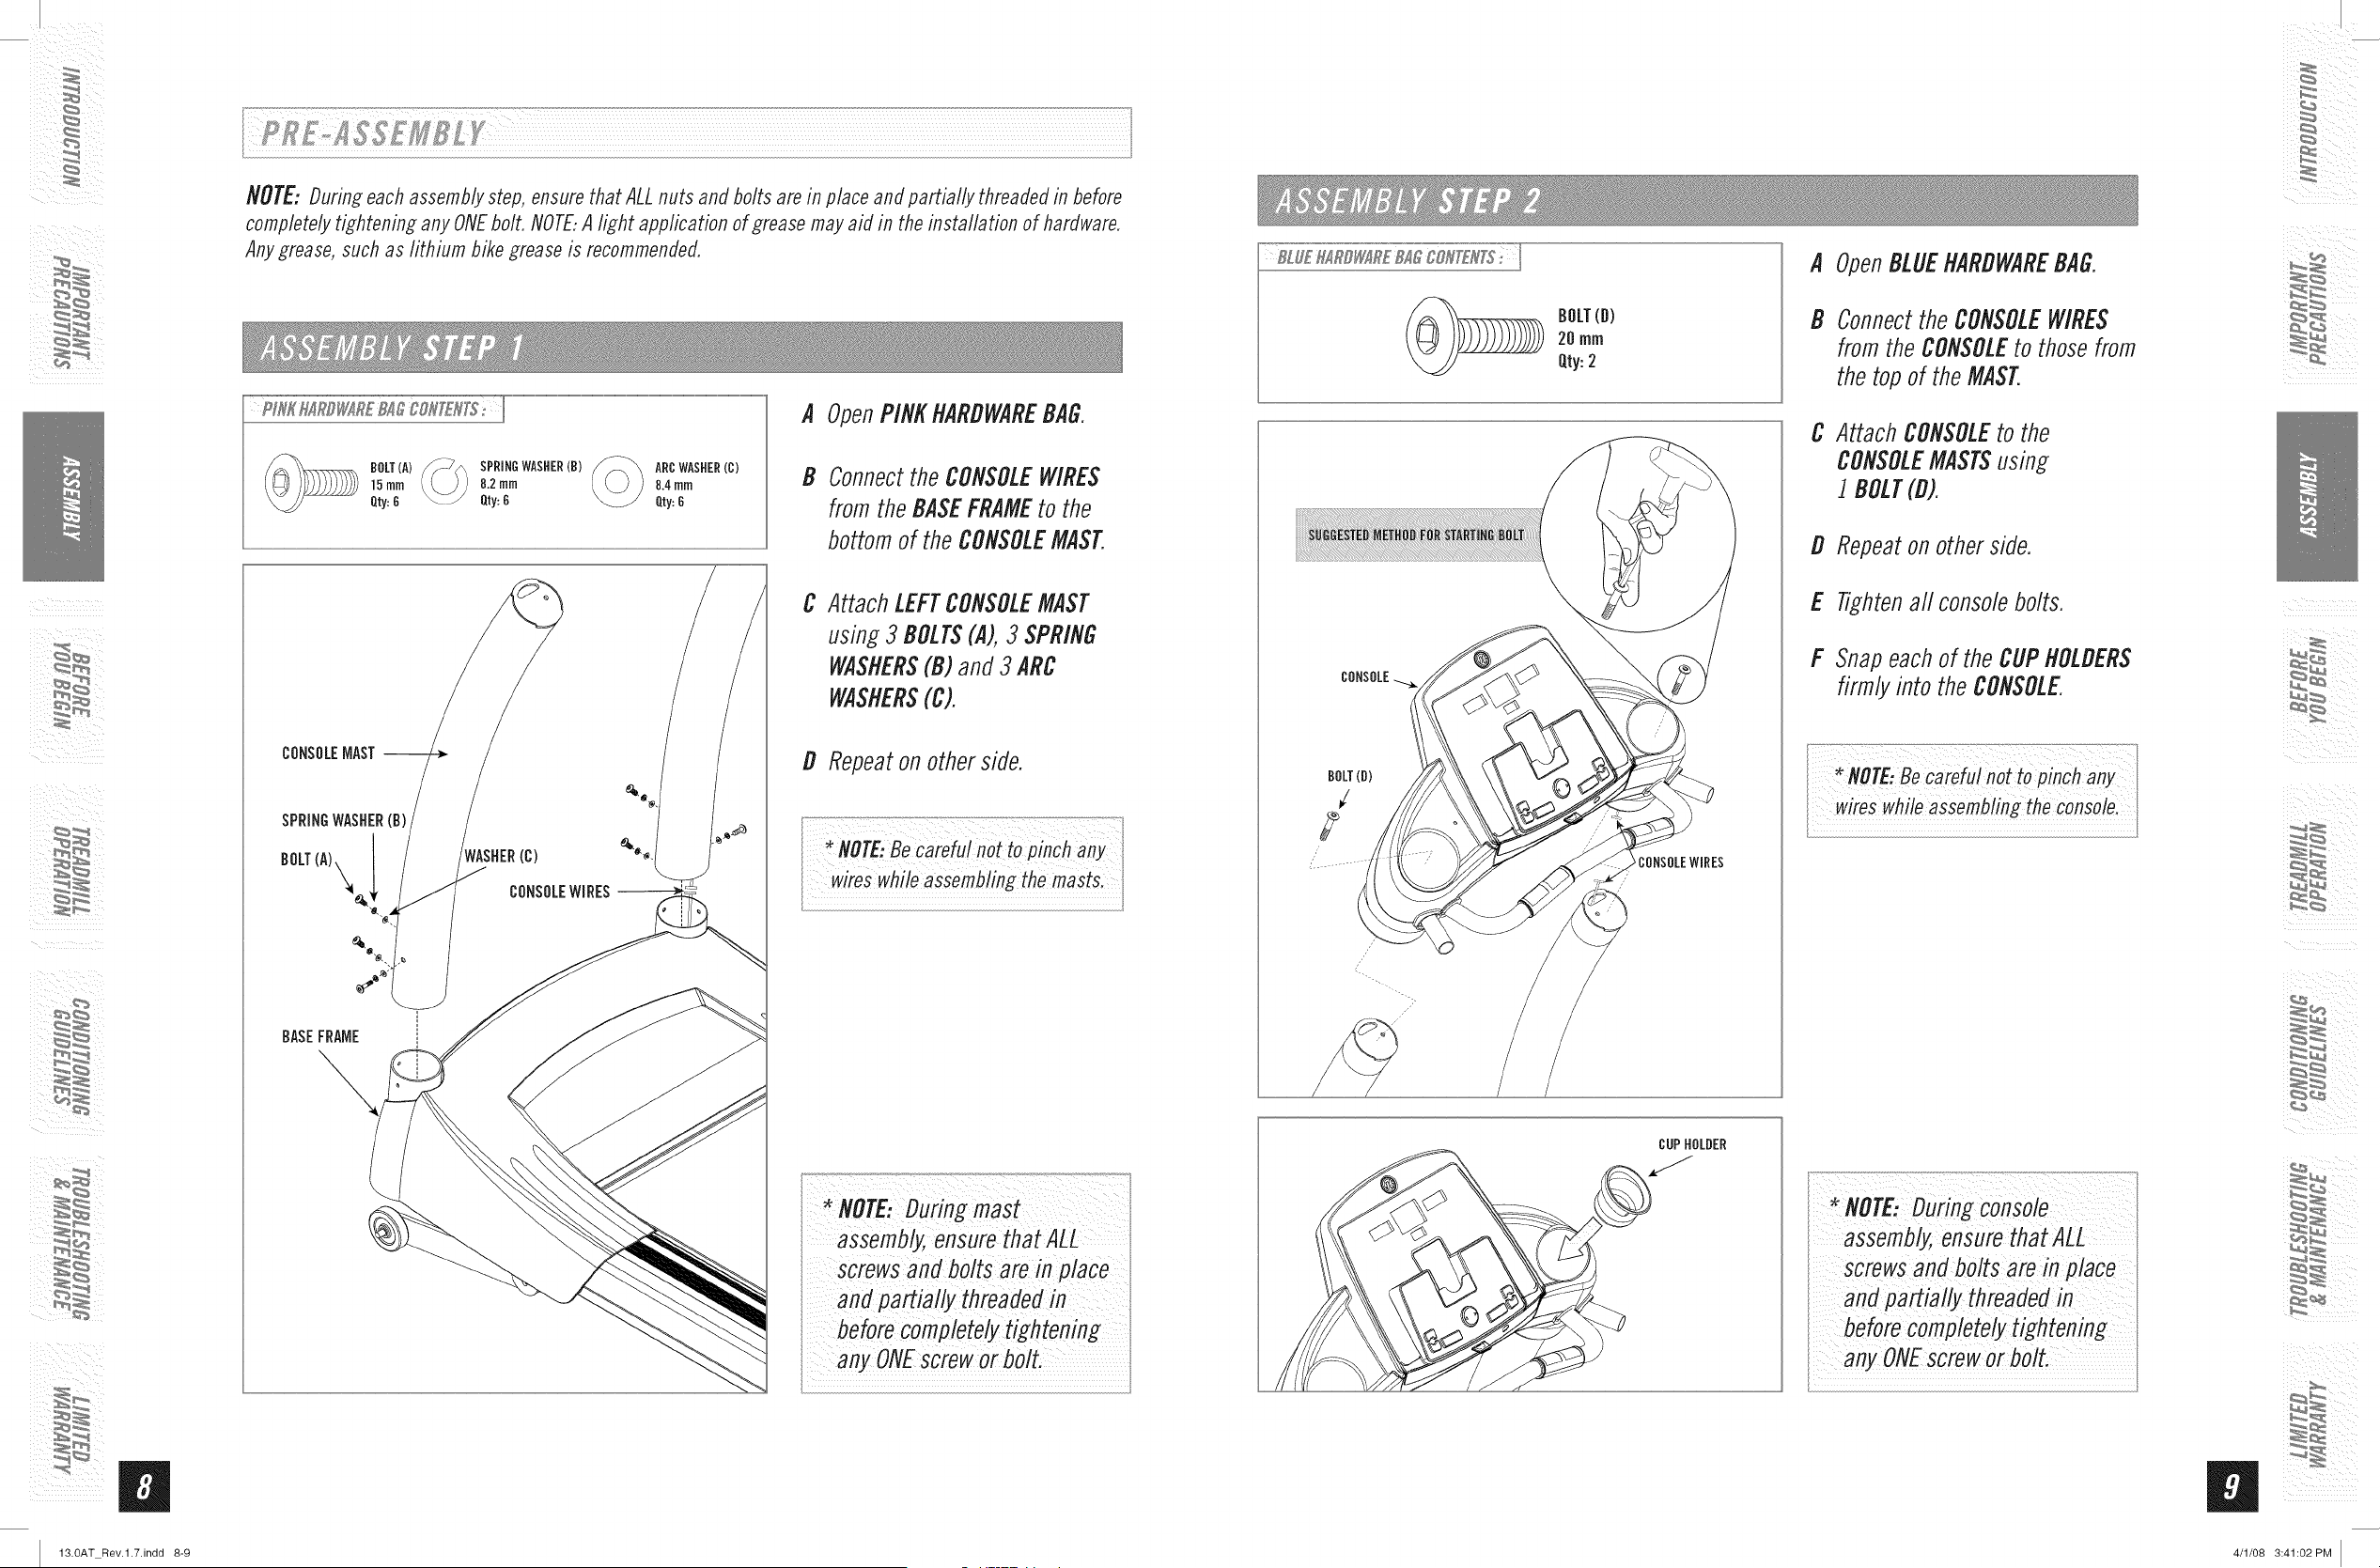
NOTE: During each assembly step, ensure that ALL nuts and bolts are in place and partially threaded in before
completely tightening any ONEbolt. NOTE:A light application of grease may aid in the installation of hardware.
Any grease, such as lithium bike grease is recommended.
BOLT(A)
15turn
Qty:6
SPRINGWASHER(B)
8.2mm
Qty:6
ARCWASHER(C)
8.4mm
Qty:6
BASEFRAME
A OpenPINKHARDWAREBAG.
B Connect the CONSOLEWIRES
from the BASEFRAMEto the
bottom of the CONSOLEMAST.
C Attach LEFTCONSOLEMAST
using 3 BOLTS(A), 3 SPRING
WASHERS(B) and 3 ARC
WASHERS(C).
D Repeat on other side.
...................... ..............................................._,_..._..?...._,,:_
MOTE,ee refu/nottopinchany
wireswhileassemblingthemastsl
Screwsand bolts are in place
and partiafly threa
any ONEsCreworbolt.
BOLT(B)
20 rnrn
Qty:2
BOLT(D)
/
2
CONSOLEWIRES
A OpenBLUEHARDWAREBAG.
B Connect the CONSOLE WIRES
from the CONSOLEto those from
the top of the MAST.
C Attach CONSOLEto the
CONSOLEMASTSusing
1 BOLT(D).
D Repeat on other side.
E Tightenaft console bolts.
F Snap each of the CUPHOLDERS
firmly into the CONSOLE.
NOTE:Be carefu!not topinchany
*NOTE: During console
assernb_ ensure that ALL
screws and bolts are in place
before cornpletely tightening
any ONEscrew or bolt.
B
4/1/08 3:41:02 PM
ii ¸ _/
i¸¸i_
13.0AT Rev.l.7.indd 10-11
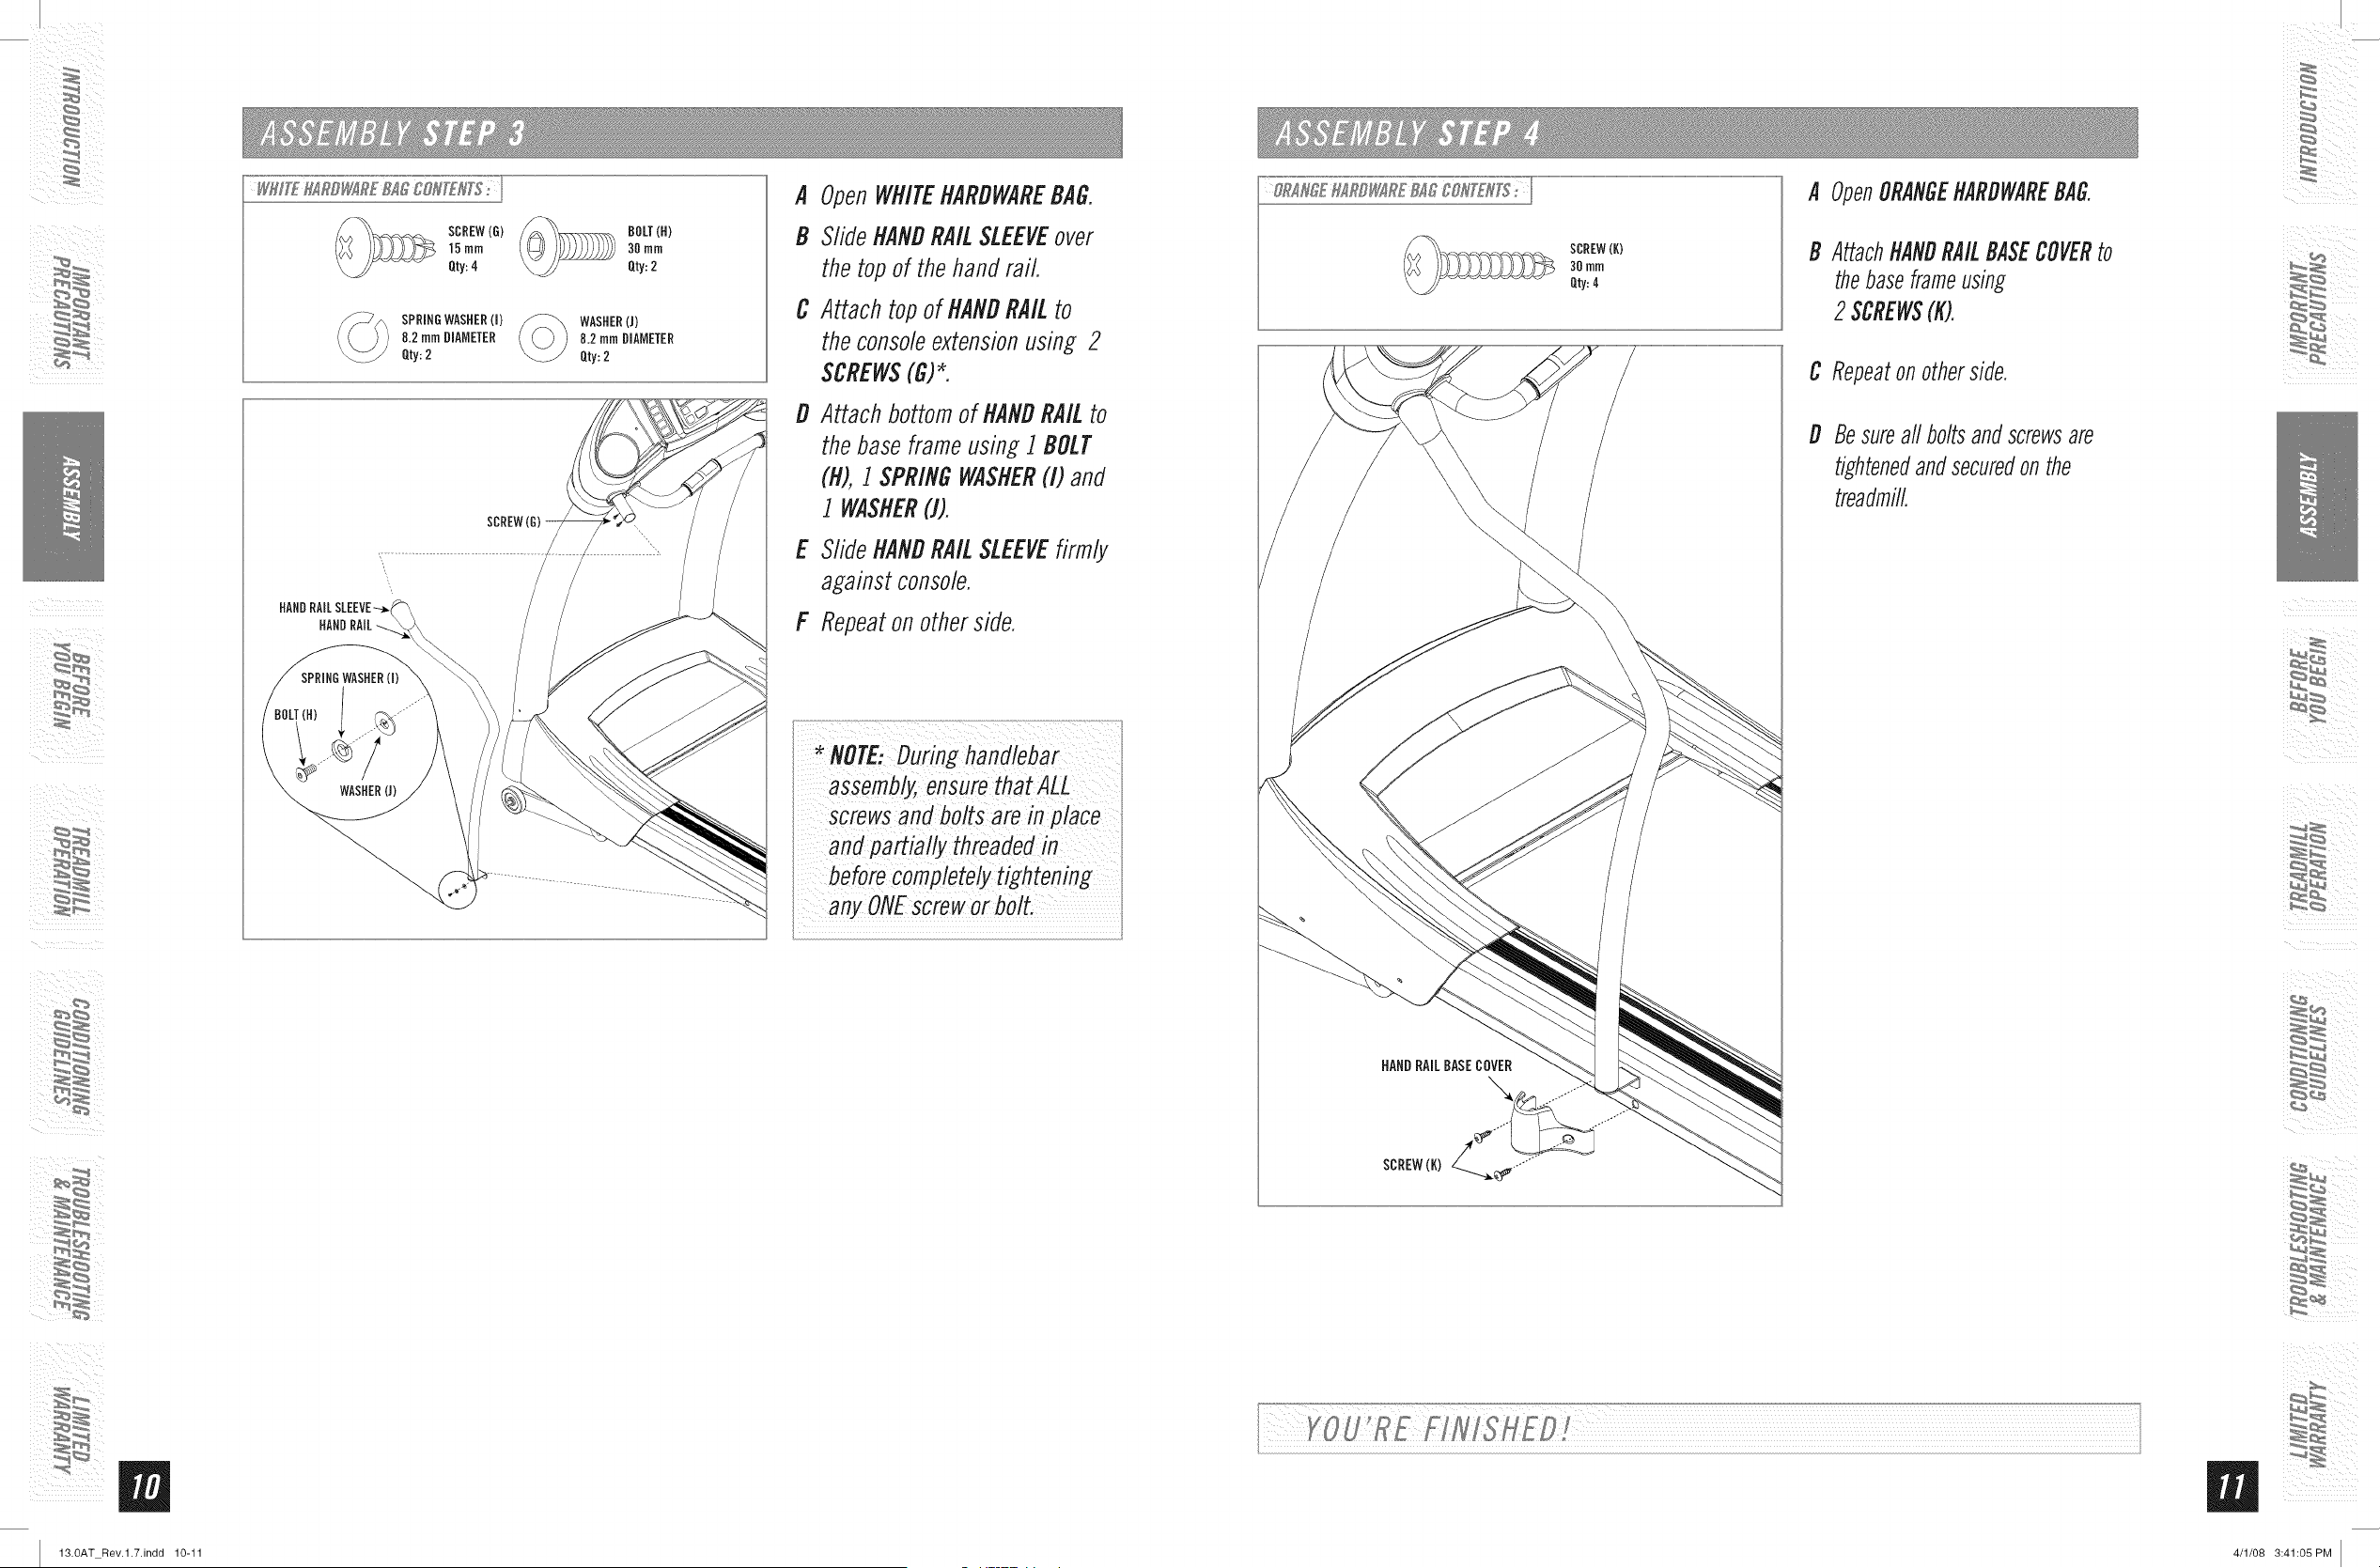
SCREW(G)
15ram
Qty:4
BOLT(H)
30rnrn
Qty:2
SPRINDWASHER(I)
8.2 turnDIAMETER
Qty:2
WASHER(J)
8.2 FnrnDIAMETER
Qty: 2
HANDRAILSLEEVE-
HANDRAIL
A OpenWHITEHARDWAREBAG.
B SlideHANDRAILSLEEVEover
the topof the hand rail
C Attach top of HANDRAILto
the consoleextensionusing 2
SCREWS(G)*.
D
E
Attach bottomof HANDRAILto
the baseframeusing 1 BOLT
(R),1 SPRINGWASHER(I) and
I WASHER(J).
SlideHANDRAILSLEEVEfirmly
againstconsole.
F Repeaton otherside.
i/assemb ensUre atAL ?L/
screwsand bolts are in place
and partially threadedin
orbolt.
SCREW(K)
3Omrn
Qty:4
A OpenORANGEHARDWAREBAG,
B AttachHANDRAILBASECOVERto
thebaseframeusing
2 $CREW$(K).
HANDRAILBASECOVER
C Repeaton otherside,
D Besureall boltsand screwsare
tightenedandsecuredon the
treadmill,
4/1/08 3:41:05 PM
ii ¸ _/
i¸¸i_
13.0AT Rev.l.7.indd 12-13
CONGRATULATIONS!onchoosingyourtreadmill,You'vetakenanimportantstepindevelopingand
sustaining an exercise program] Your treadmill is a tremendously effective tool for achieving your personal
fitness goals. Regular use of your treadmill can improve the quality of your life in so many ways.
HEREAREJUSTAFEWOFTHEHEALTHBENEFITSOFEXERCISE:
" Weight Loss
,, A Healthier Heart
• Improved Muscle Tone
• Increased Daily Energy Levels
The key to reaping these benefits is to develop an exercise habiL Your
new treadmill will help you eliminate obstacles that prevent you from
exercising. Inclement weather and darkness won't interfere with your
workout when you use your treadmill in the comfort of your home. This
guide provides you with basic information for using and enjoying your
new machine.
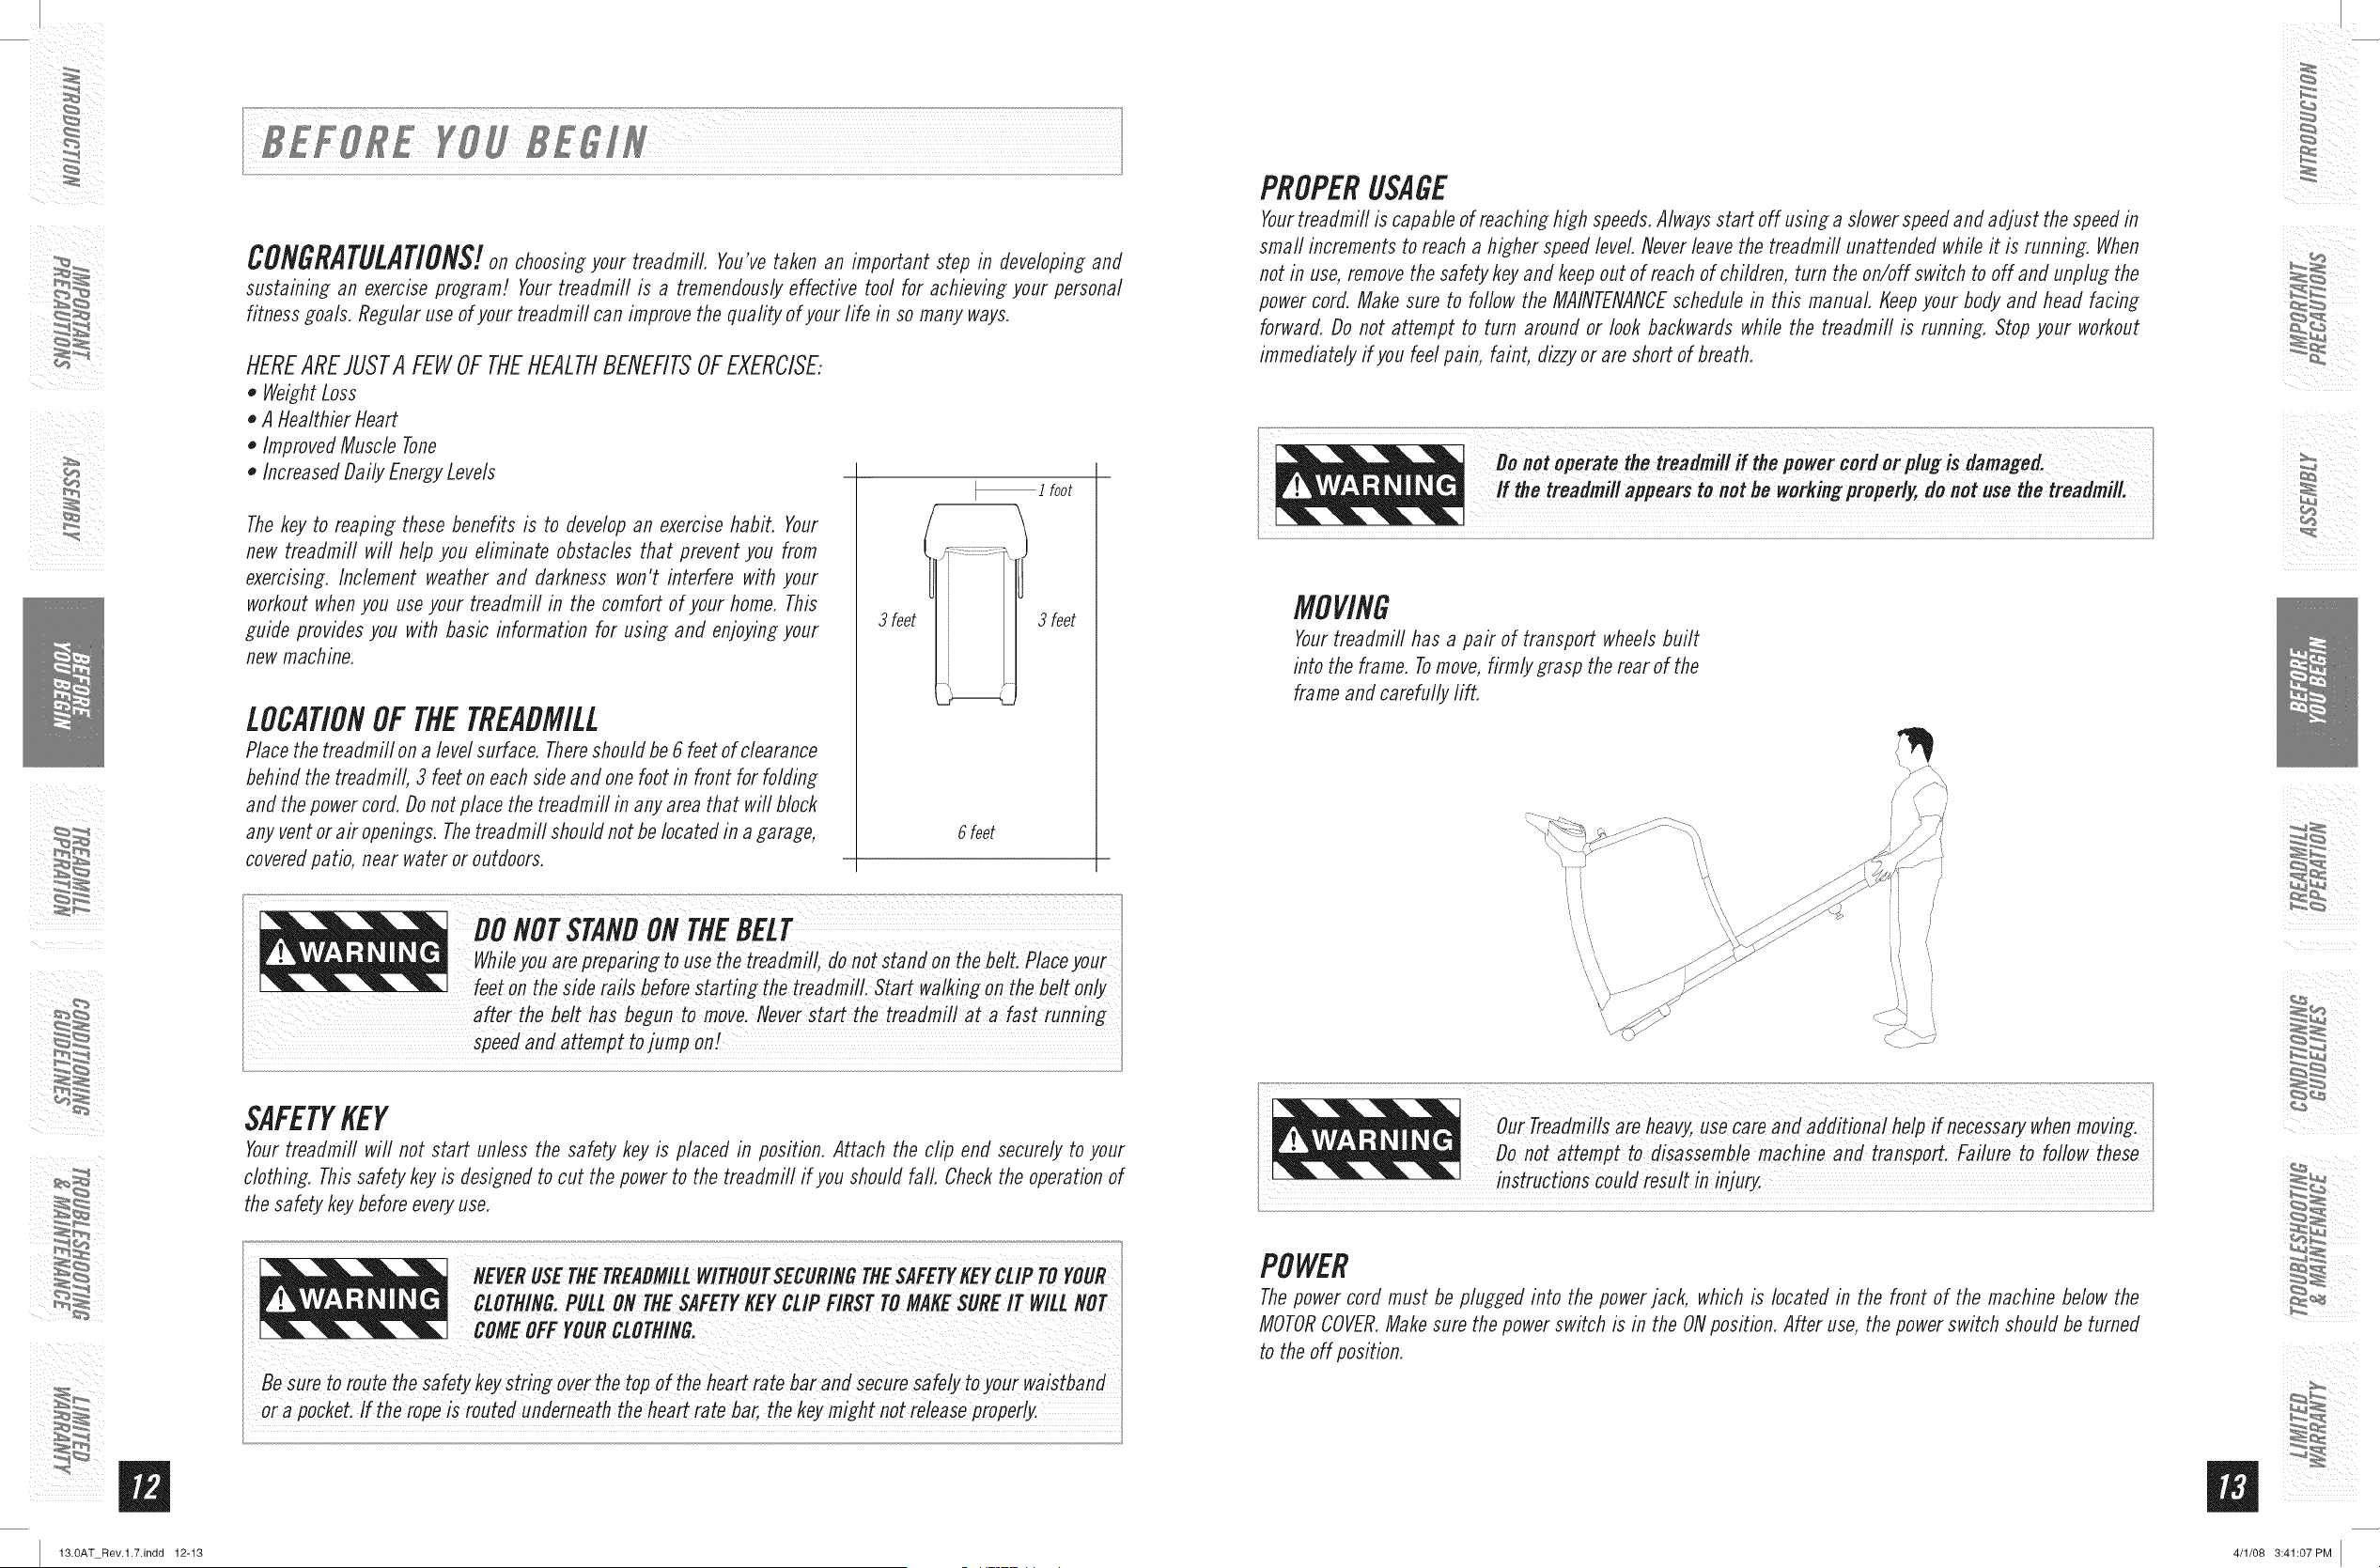
LOCATIONOFTHETREADMILL
Place the treadmill on a level surface. Thereshould be 6 feet of clearance
behind the treadmill, 3 feet on each side and one foot in front for folding
and the power cord. Do not place the treadmill in any area that will block
any vent or air openings. Thetreadmill should not be located in a garage,
covered patio, near water or outdoors.
3 feet
_ ! foot
ti'
3 feet
6 feet
OO
NO
T
S_NO
0_
_JJJJJJJJJ
_J_l_J
_J
_J
_J
_J
_J
uo,ot,t,,,o, beZt. yo,r
feet on the side rails before starting the treadmill. Start walking on the be/t only
speed and attempt to jump onI
i
SAFETYKEY
Your treadmill will not start unless the safety key is placed in position. Attach the clip end securely to your
clothing. This safety key is designed to cut the power to the treadmill if you should fall. Check the operation of
the safety key before every use.
NEVER USE TEETREADMILLWITNOUTSECURINGTNESAFETYgEY CLIP TO YOUR
CLOTNING.PULLONTNESAFETY_EYCLlPmsrToMmsuREn"
heart =to
oi a Pocket. lf the rope is routed underneath the f!eart rate bar, the My might not release voPerly.
PROPERUSAGE
Yourtreadmill is capable of reaching high speeds. Always start off using a slower speed and adjust the speed in
srnafl increments to reach a higher speed level Never leave the treadmill unattended while it is running. When
not in use, remove the safety key and keep out of reach of children, turn the on/off switch to off and unplug the
power cord. Make sure to follow the MAINTENANCEschedule in this manual Keep your body and head facing
forward. Do not attempt to turn around or look backwards while the treadmill is running. Stop your workout
immediately if you feel pain, faint, dizzy or are short of breath.
Do,,oto.e,-,,t,tho th.
lithe treadmill appears to not he workmg properly, do not use the treadmill.
MOVING
Yourtreadmill has a pair of transport wheels built
into the frame. Tomove, firmly grasp the rear of the
frame and carefully lift.
,,,/
_i ¸¸¸¸%¸¸¸¸¸:Ui¸¸¸///://:% _ _ i _i
Our Treadmills are heavy, use care and aflfiitiona/ helP if necessary when moving.
Do not attempt to disassemble machine and transport. Failure to follow these
instructions couldresult
POWER
The power cord must be plugged into the power jack, which is located in the front of the machine below the
MOTORCOVER.Make sure the power switch is in the ONposition. After use, the power switch should be turned
to the off position.
i_ ¸
m
4/1/08 3:41:07 PM
ii ¸ _/
13.0AT Rev.l.7.indd 14-15
TENSIONINGTIlERUNNINGBELT
The running belt has been properly adjusted at the
factory before it was shipped. At times the belt can
move off-center during shipment,
CAUTION:Running belt should NOT be moving during
tensbning. Over-tightening the running belt can
cause excessive wear on the treadmifl as weft as its
components, Never over-tighten the belt,
If you can feel a slipping sensation when running on the
treadmill, the runnfi7g belt must be tightened, In most
cases, the belt has stretched from use, causing the
belt to slip. This is a normal and common adjustment,
To eliminate this slipping, TURN THE TREADMILLOFF
and tension BOTH THE REAR ROLLER BOLTSusing the
supplied Allen wrench, turning them 1/4 TURNto the
right as shown. Turn the treadmill on and check for
slipping. Repeat if necessary, but NEVER TURN the
roller bolts more than 1/4 turn at a time. Belt is properly
tensioned when the slipping sensation is gone,
Belt istoo far to the right side
Beltis too far to the left side
CENTERINGTIlERUNNINGBELT
Therunning belt has been properly adjusted at the
factory before it was shipped. At times the belt can
move off-center during shipment. Before operating the
treadmill, make sure the belt is centered and remains
centered to maintain smooth operation,
CAUTION:Do not run belt faster than 1/2 rnph while
centering, Keep fingers, hair and clothing away from
belt at all times,
If the running tier is too far to the right side:
With the treadmill running at 1/2 mph, turn the right
adjustment bolt clockwise 1/4 TURNat a time (using
the supplied Aden wrench). Check the belt alignment.
Allow belt to run a furl cycle to gauge if more adjustment
is needed, Repeat if necessary, until the belt remains
centered during use,
If the running belt is too far to the left side:
With the treadmill running at 1/2 mph, turn the right
adjustment bolt counter-clockwise 1/4 TURNat a time
(using the supplied Allen wrench). Check the belt
alignment, Allow belt to run a furl cycle to gauge if more
adjustment is needed, Repeat if necessary, until the
belt remains centered during use,
/
/
/
& CAUTION_
,f
aa:aa ::::::::::::::[aa.aaj
"
_)XEAR:RA:E _ (_CALORIES
®..........®
:)
l _,WARNING_
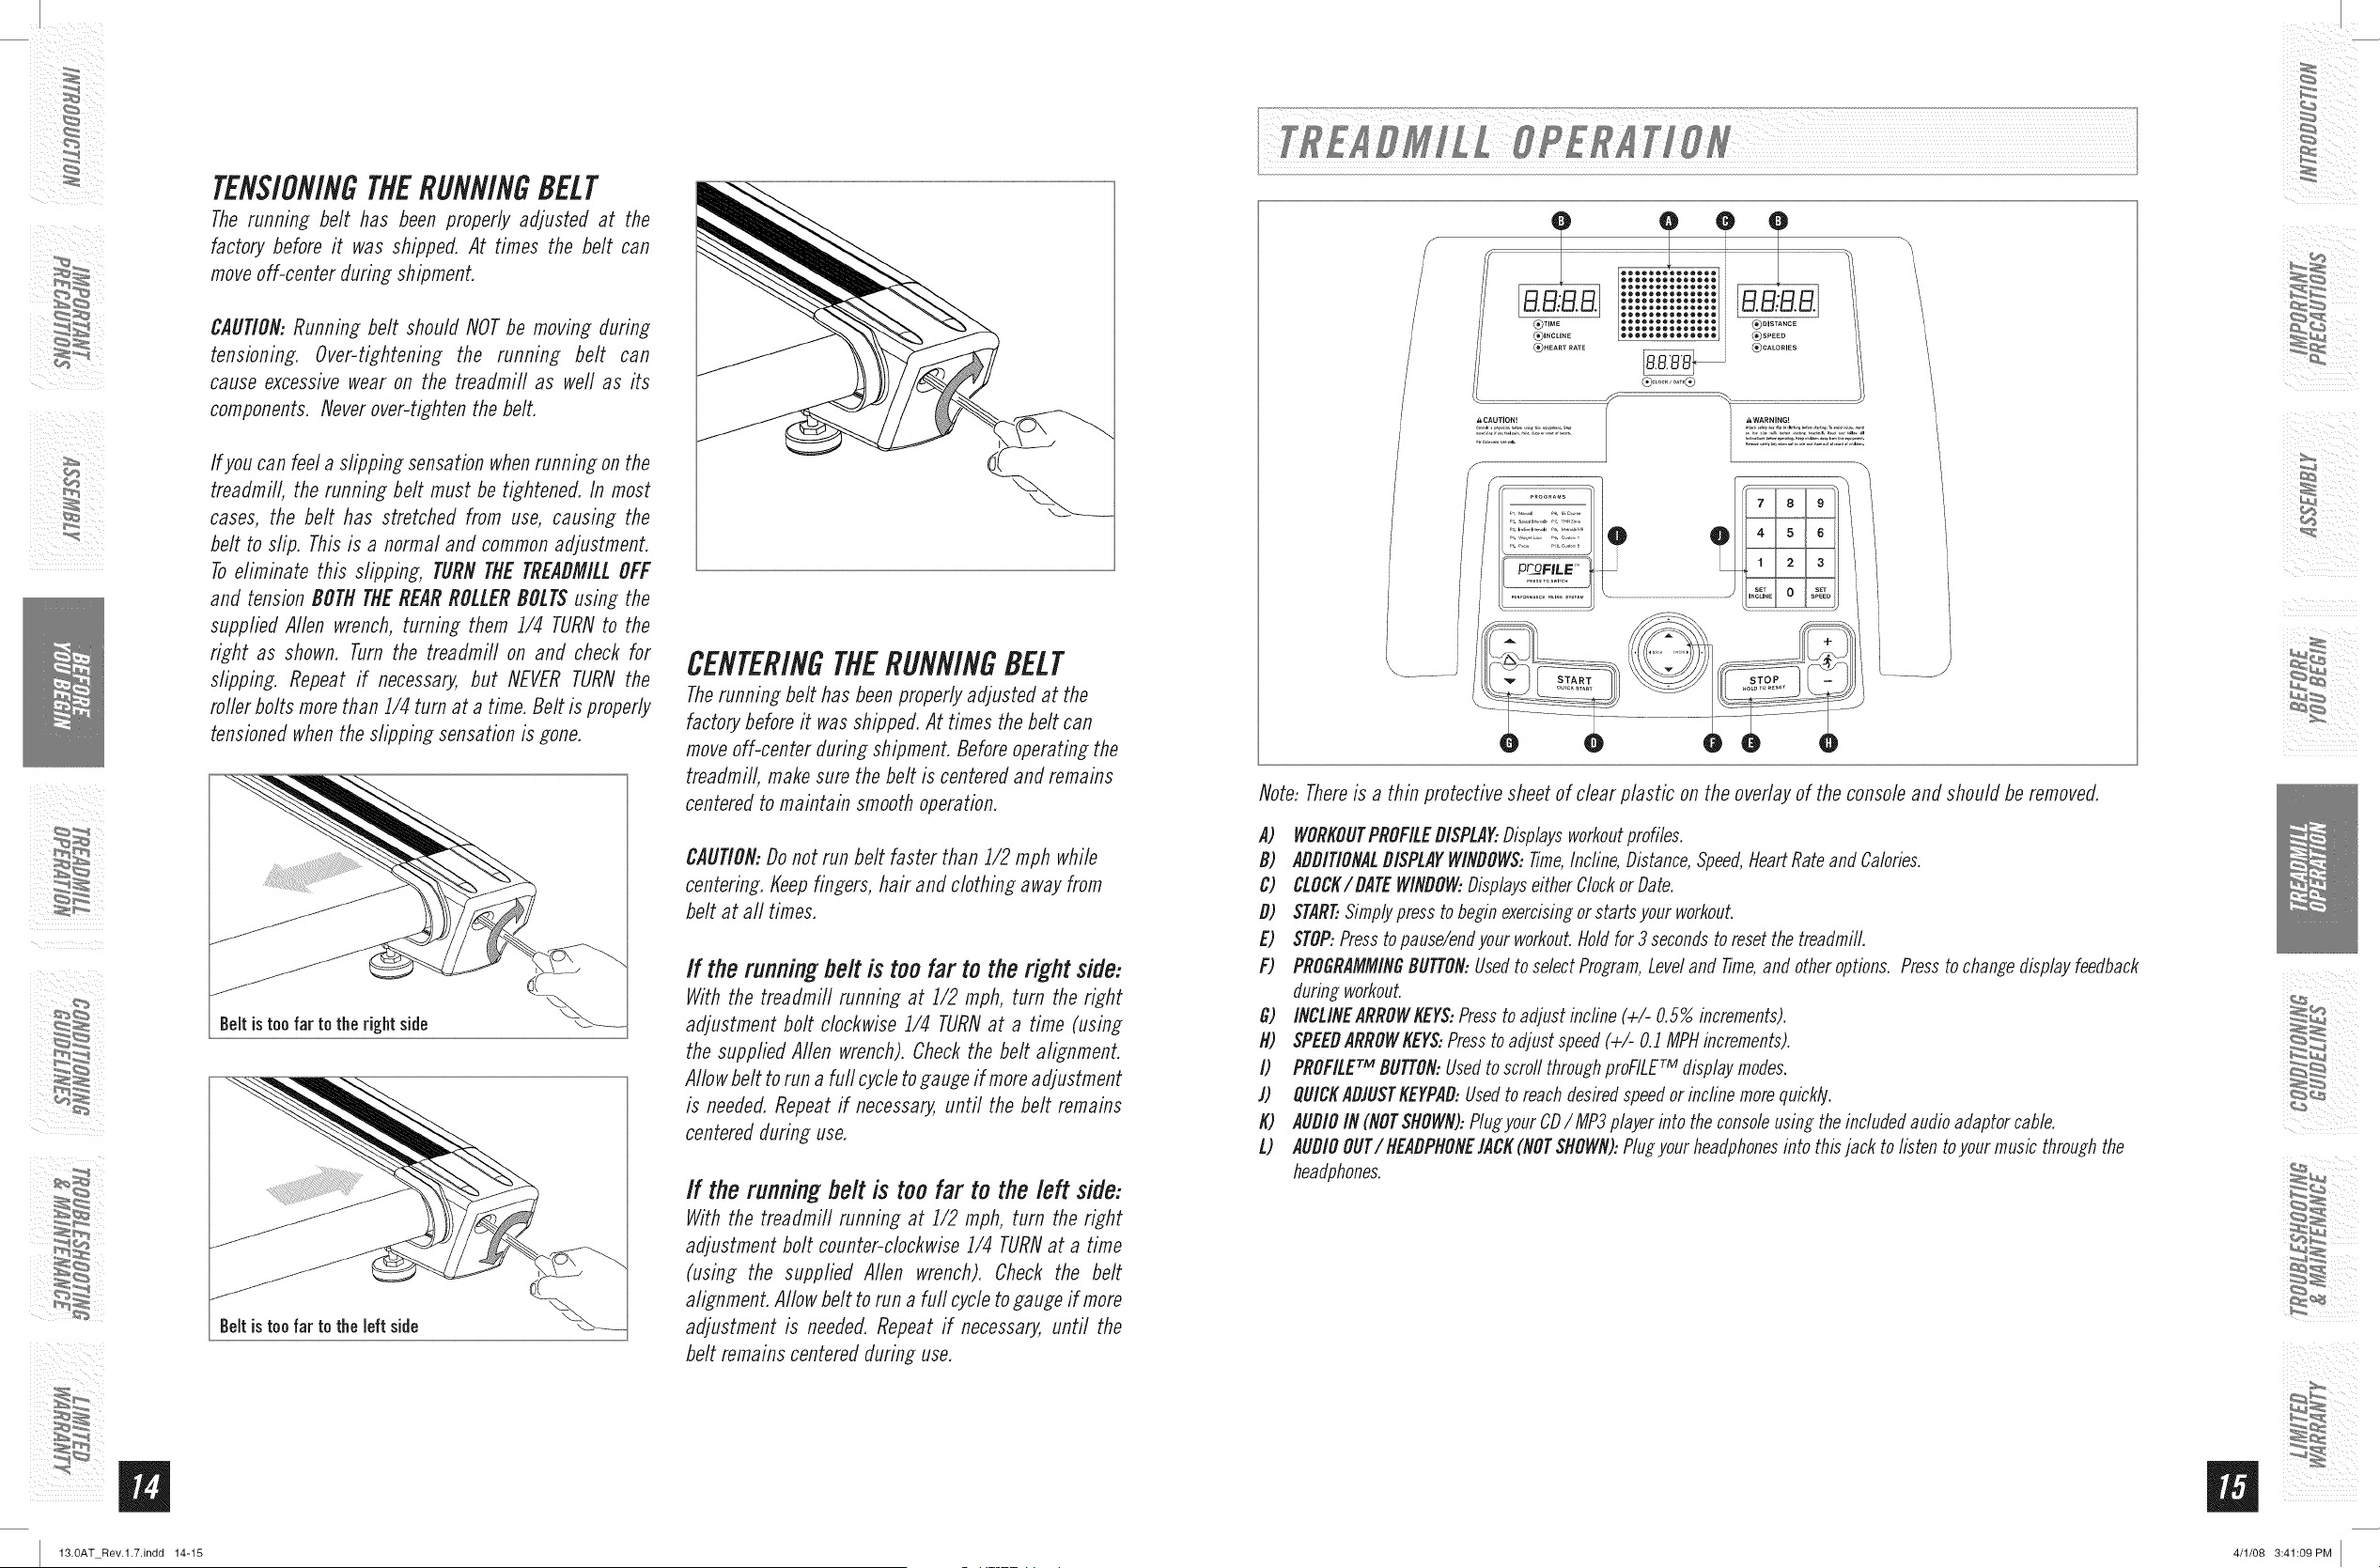
Note: Thereis a thin protective sheet of clear plastic on the overlay of the console and should be removed,
A) WORKOUTPROFILEDISPLAK.Displaysworkoutprofiles.
B) ADDITIONALDISPLAYWINDOWS:Time,Incline,Distance,Speed,HeartRateand Cabries.
C) CLOCK/DATEWINDOW:Displayseither Clockor Date.
D) START..Simplypress to beginexercisingor starts your workout.
E) STOP:Presstopause/endyour workout.Holdfor 3 secondsto resetthe treadmill.
F) PROGRAMMINGBUTTON:Usedto select Program,Leveland Time,and other options. Pressto changedisplay feedback
during workout.
G) INCLINEARROWKEY$:Pressto adjust incline (+/- 0.57/ooincrements).
H) SPEEDARROWKEYS:Pressto adjust speed (+/- O.1MPHincrements).
I) PROFILErM BUTTON:Usedto scrod throughproFILE:M displaymodes.
l) QUICKADIUSTKEYPAD:Usedto reachdesiredspeedor incline morequickly.
K) AUDIOIN (NOTSHOWN):Plugyour CD/ MP3player into the consoleusin_ the included audio adaptor cable.
L) AUDIOOUT/ HEADPHONEIACK(NOTSHOWN):Plugyour headphonesinto this jack to listen toyour music through the
headphones.
4/1/08 3:41:09 PM
ii ¸ _/
i¸¸i_
13.0AT Rev.l.7.indd 16-17
B.B..B.B.
(_TIME
(_INCLINE
(_)H EART RATE
B.B..B.B.
DISTANCE
SPEED
CALORmES
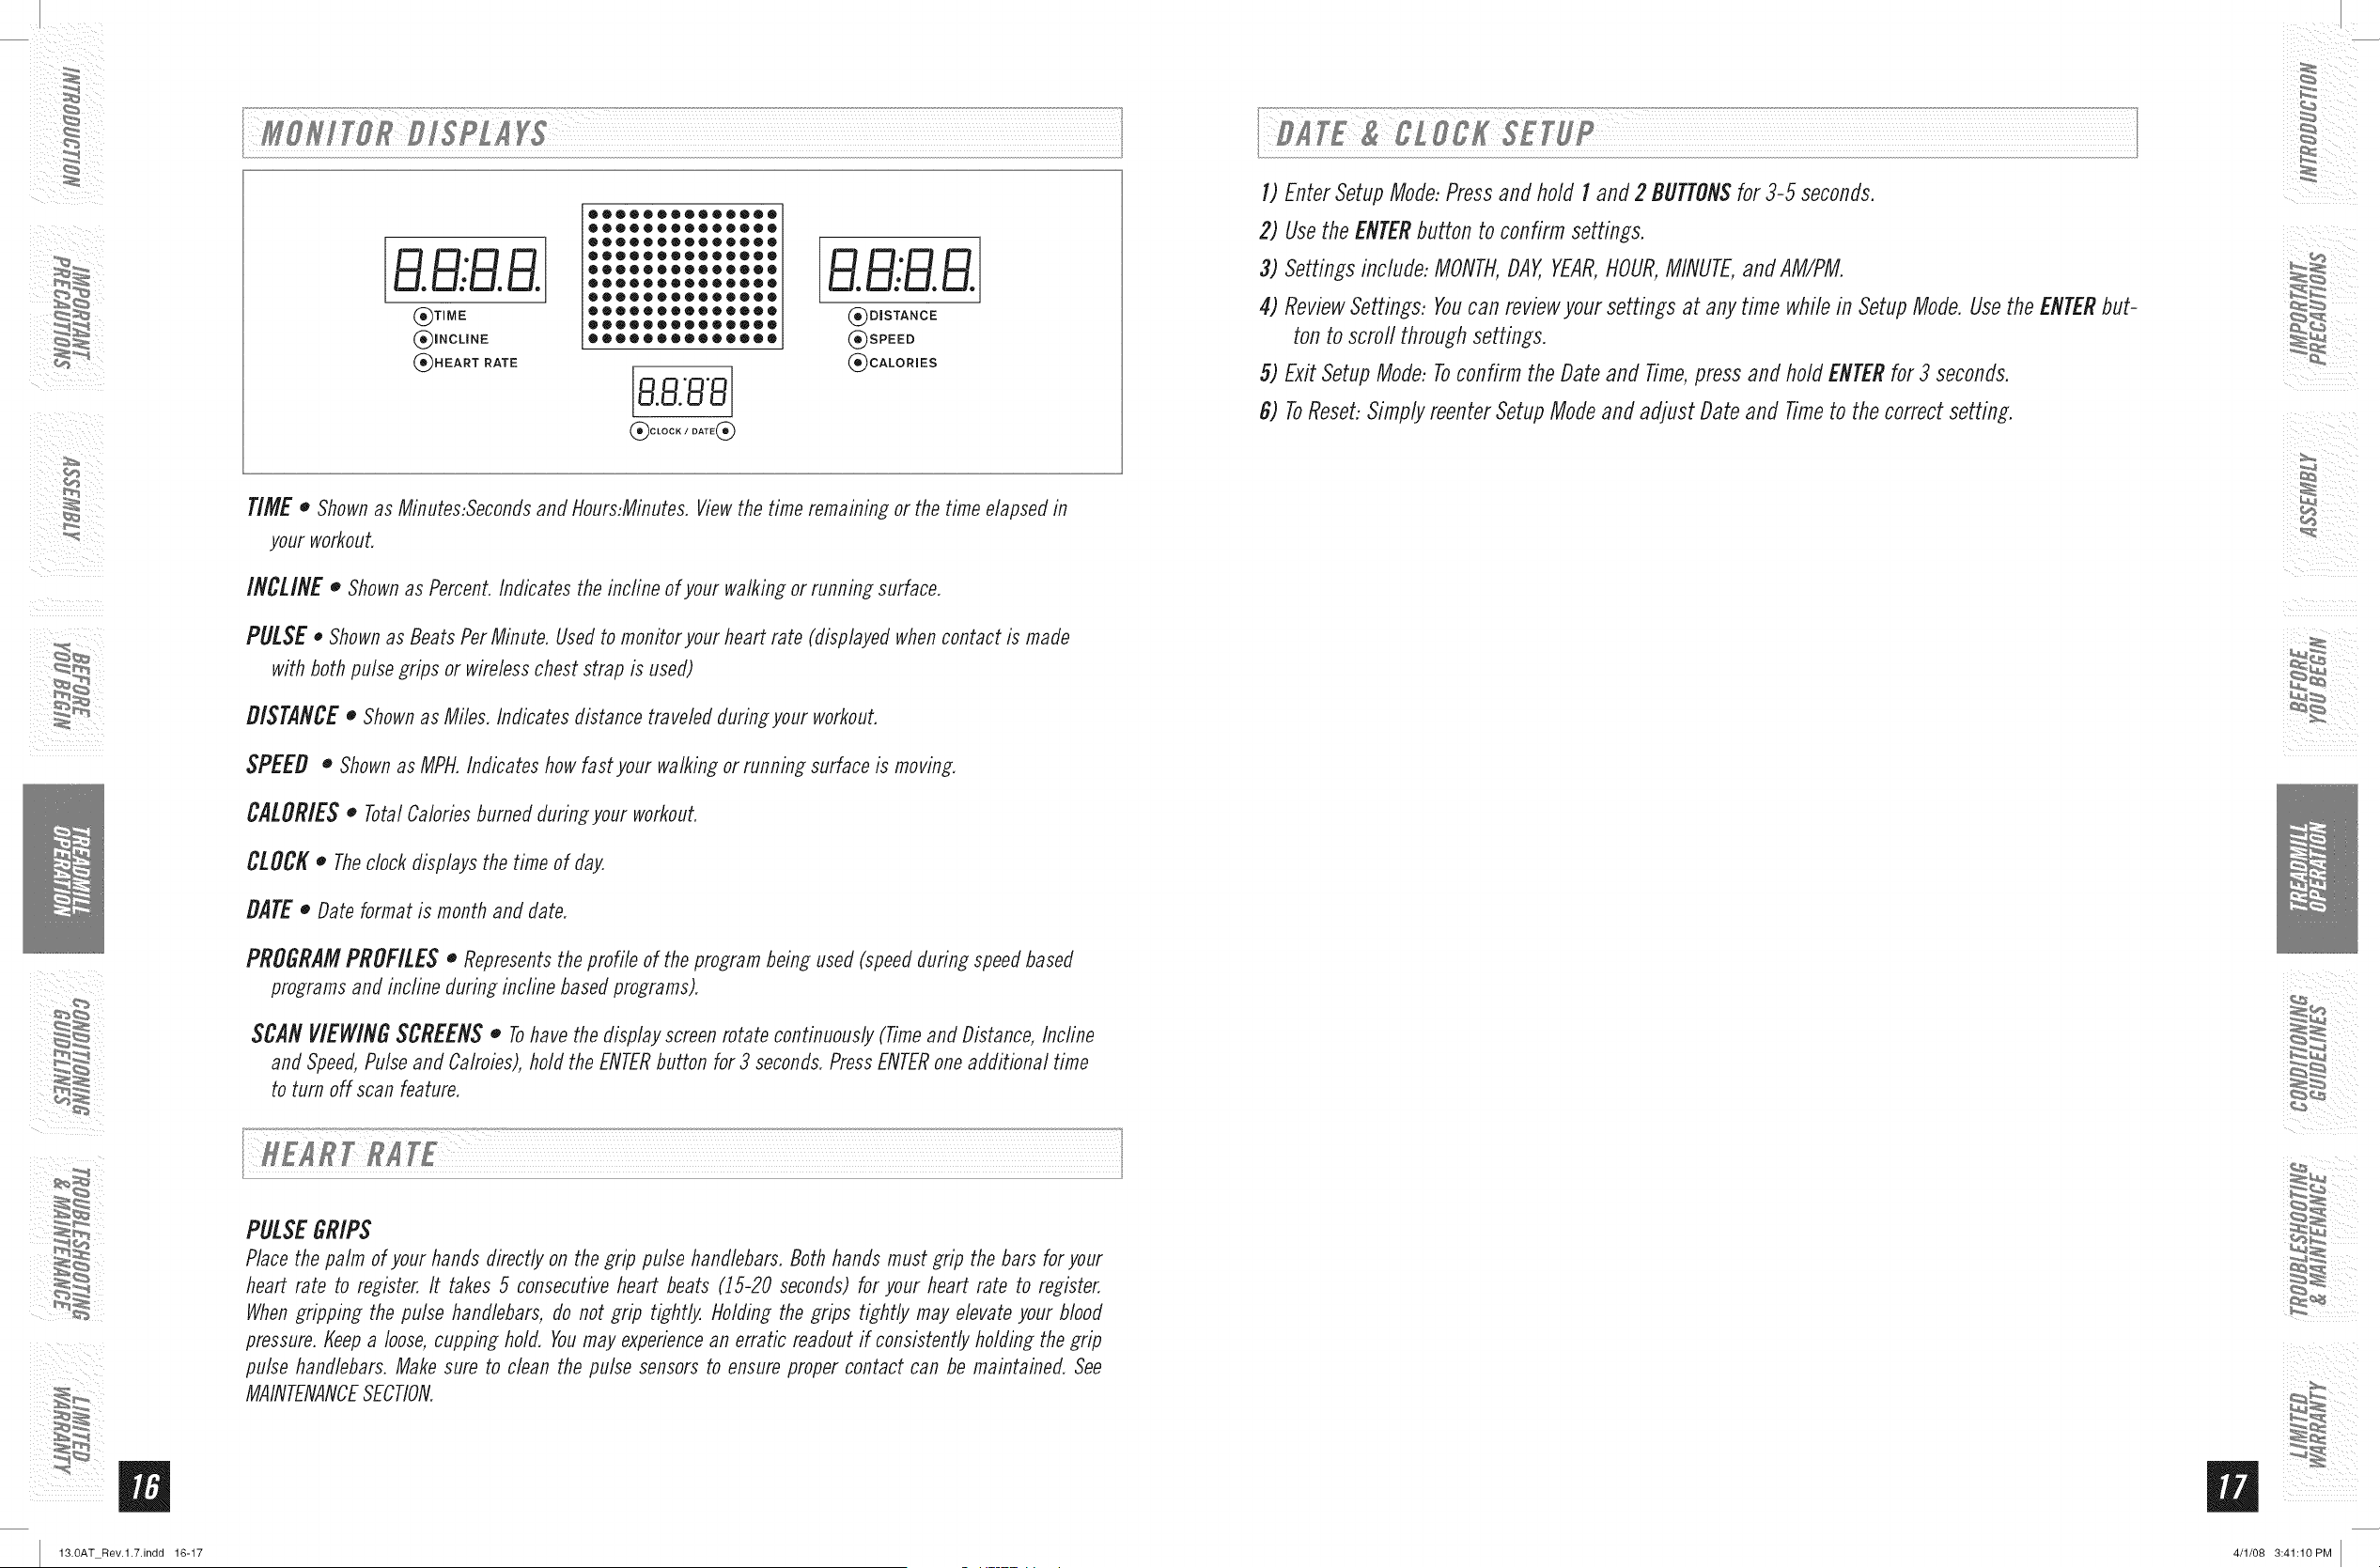
TIMEo Shown as Minutes:Seconds and Hours:Minutes. View the time remambg or the time elapsed b
your workout.
INCLINE o Shown as Percent. Indicates the incfine of your walking or running surface.
PULSE • Shown as Beats Per Minute. Used to monitor your heart rate (displayed when contact is made
with both pulse grips or wireless chest strap is used)
DISTANCEo Shown as Miles. Indicates distance traveled during your workout.
SPEED o Shown as MPI-LIndicates how fast your walking or running surface is moving.
CALORIES o Total Calories burned dufing your workout.
CLOCK o The clock displays the time of day,
DATE o Date format is month and date.
PROGRAM PROFILES o Represents the profile of the program being used (speed during speed based
programs and incfine during incline based programs).
SCAN VIEWING SCREENS o Tohave the display screen rotate continuously (Time and Distance, Incfine
and Speed, Pulse and Calroies), hold the ENTERbutton for 3 seconds. Press ENTERone additional time
to turn off scan feature.
PULSEGRIPS
Place the palm of your hands directly on the wip pulse handlebars. Both hands must wip the bars for your
heart rate to register. It takes 5 consecutive heart beats (15-20 seconds) for your heart rate to register.
When gripping the pulse handlebars, do not grip tightly. Holding the grips tightly may elevate your blood
pressure. Keep a loose, cupping hold. Youmay experience an erratic readout if consistently holding the grip
pulse handlebars. Make sure to clean the pulse sensors to ensure proper contact can be maintained. See
MAINTENANCESECTION.
1) EnterSetupMode:Pressand hold I and 2 BUTTONSfor 3-5 seconds.
2) Usethe ENTERbutton to confirm settings.
3) Settings include:MONTH,DAY,YEAR,HOUR,MINUTE,andAM/PM.
4) ReviewSettings: Youcan reviewyour settings at anytime whilein SetupMode.Usethe ENTERbut-
ton to scrodthroughsettings.
5) Exit SetupMode:Toconfirm the Dateand Time,pressand hold ENTERfor3 seconds.
8) ToReset:SimplyreenterSetupModeand adjust Dateand Timeto the correct setting.
m
4/1/08 3:41:10PM
ii ¸ _
i¸¸i_
13.0AT Rev.l.7.indd 18-19
1) Checkto makesurenothing is on or will hinderthe movementof the treadmill.
2) Plug in the powercorcland turn the treadmill ON.
3) Standon the siclerails of the treadmill.
4) Attach the safetykeyclip to part ofyour clothing.
5) Insert the safety keyinto the safetykeyholein the console.
G) Youhavetwooptions to start your workout:
A) QUICKSTART
Simplypress the STARTkeyto begin workingouL OR...
B) SELECTA USERor GUEST(GUESTWORKOUTSARENOTTRACKEDINproFILE_)
Oncea USERORGUESThas beenchosen,pressENTER.
C) SELECTWEIGHT.
Oncea WEIGHThas beenselected,pressENTER.
D) SELECTA PROGRAM
Selecta PROGRAMusin; the KEYPAD,ARROWKEYSor PROGRAMMINGBUTTON.
Oncea PROGRAMhas beenchosen,pressENTER.
E) SELECTA TIME
Selecta Timeusing the KEYPAD,ARROWKEYS,PROGRAMMINGBUTTONor usethe
defaulttime.
Oncea TIMEhasbeenchosen,press ENTER.
F) SELECTA LEVEL
Selecta Levelusing the KEYPAD,ARROWKEYS,PROGRAMMINGBUTTONor use the
defaulttime.
Oncea LEVELhas beenchosen,press ENTER.
FINISHINGYOURPROGRAM
Whenyour workoutis complete,the CONSOLEwill beep. Yourworkoutinformation will stay displayed
on the consolefor 30 secondsand then reset.
CLEARCURRENTSELECTION
Toclear the current workoutselectionor screen,holdthe STOPbutton for 3 seconds.
Onceyouhavestarteclyourprogramyou can quicklychangeyour speedand
incline level.
1)
2)
Press desired level orspeed.
Press SET SPEED/ INCLINEkey on KEYPAD.
EXAMPLE:Press1,0 and then SETSPEEDKEY,your speedwill be set to
10.0 mph.
7 8 9
4 5 6
1 2 3
SET 0 SET
INCLINE SPEED
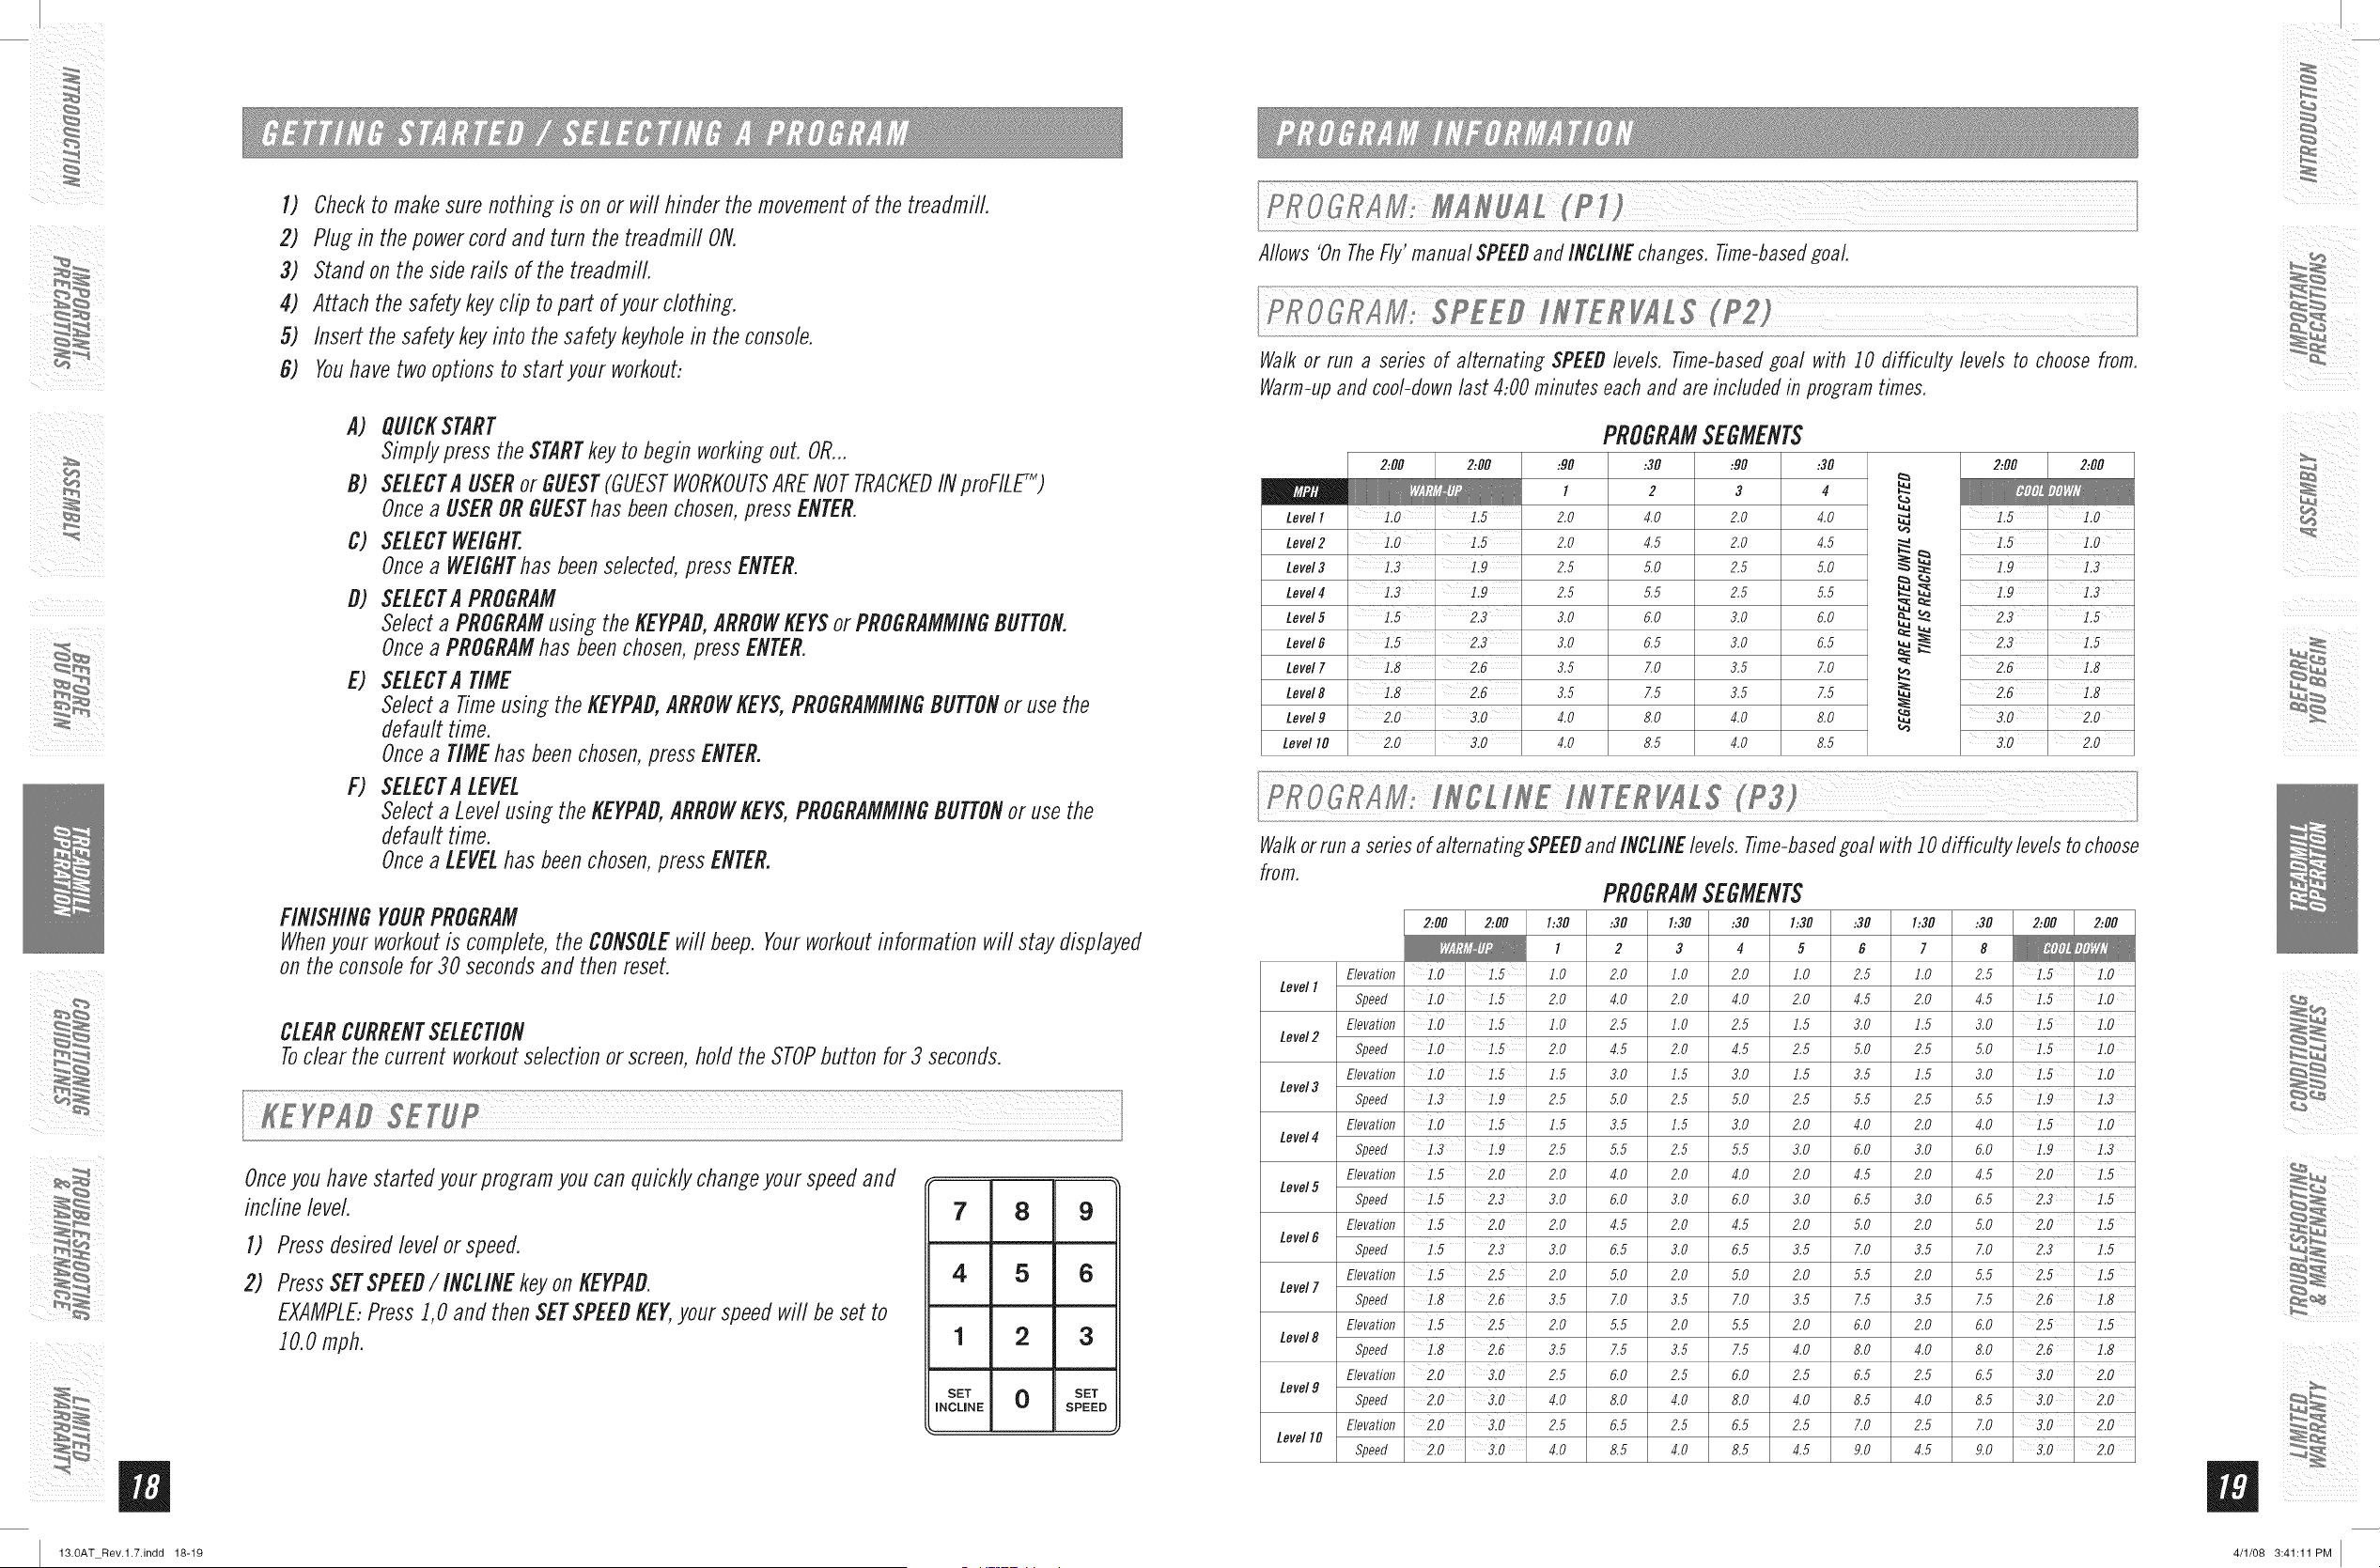
Allows 'On The Fly' manual SPEEDand INCLINE changes, Time-based goal.
Walk or run a series of alternating SPEED levels, Time-based goal with 10 difficulty levels to choose from,
Warm-up and cool-clown last 4:00 minutes each and are included in program times,
Level I
Level2
Level3
Level4
Level5
Level6
Level7
Level8
Level9
Level I0
PROGRAMSEGMENTS
2..OO 2..OO
1.0 1.5
1.3
1.5 2.3
1.8 2.6
1.8 2.6
2.0 3.0
2.0 3.0
:9O
I
2.0
2.0
2.5
2.5
3.0
3.0
3.5
3.5
4.0
4.0
:30
2
4.0
4.5
5.0
5.5
6.0
6.5
7.0
7.5
8.0
8.5
:90
3
2.0
2.0
2.5
2.5
3.0
3.0
3.5
3.5
4.0
4.0
:3O
4
4.0
4.5
5.0
5.5
6.0
6.5
7.0
7.5
8.0
8.5
2:00 2:00
1.5' 1.0
L5
3.0 2.0
2.0
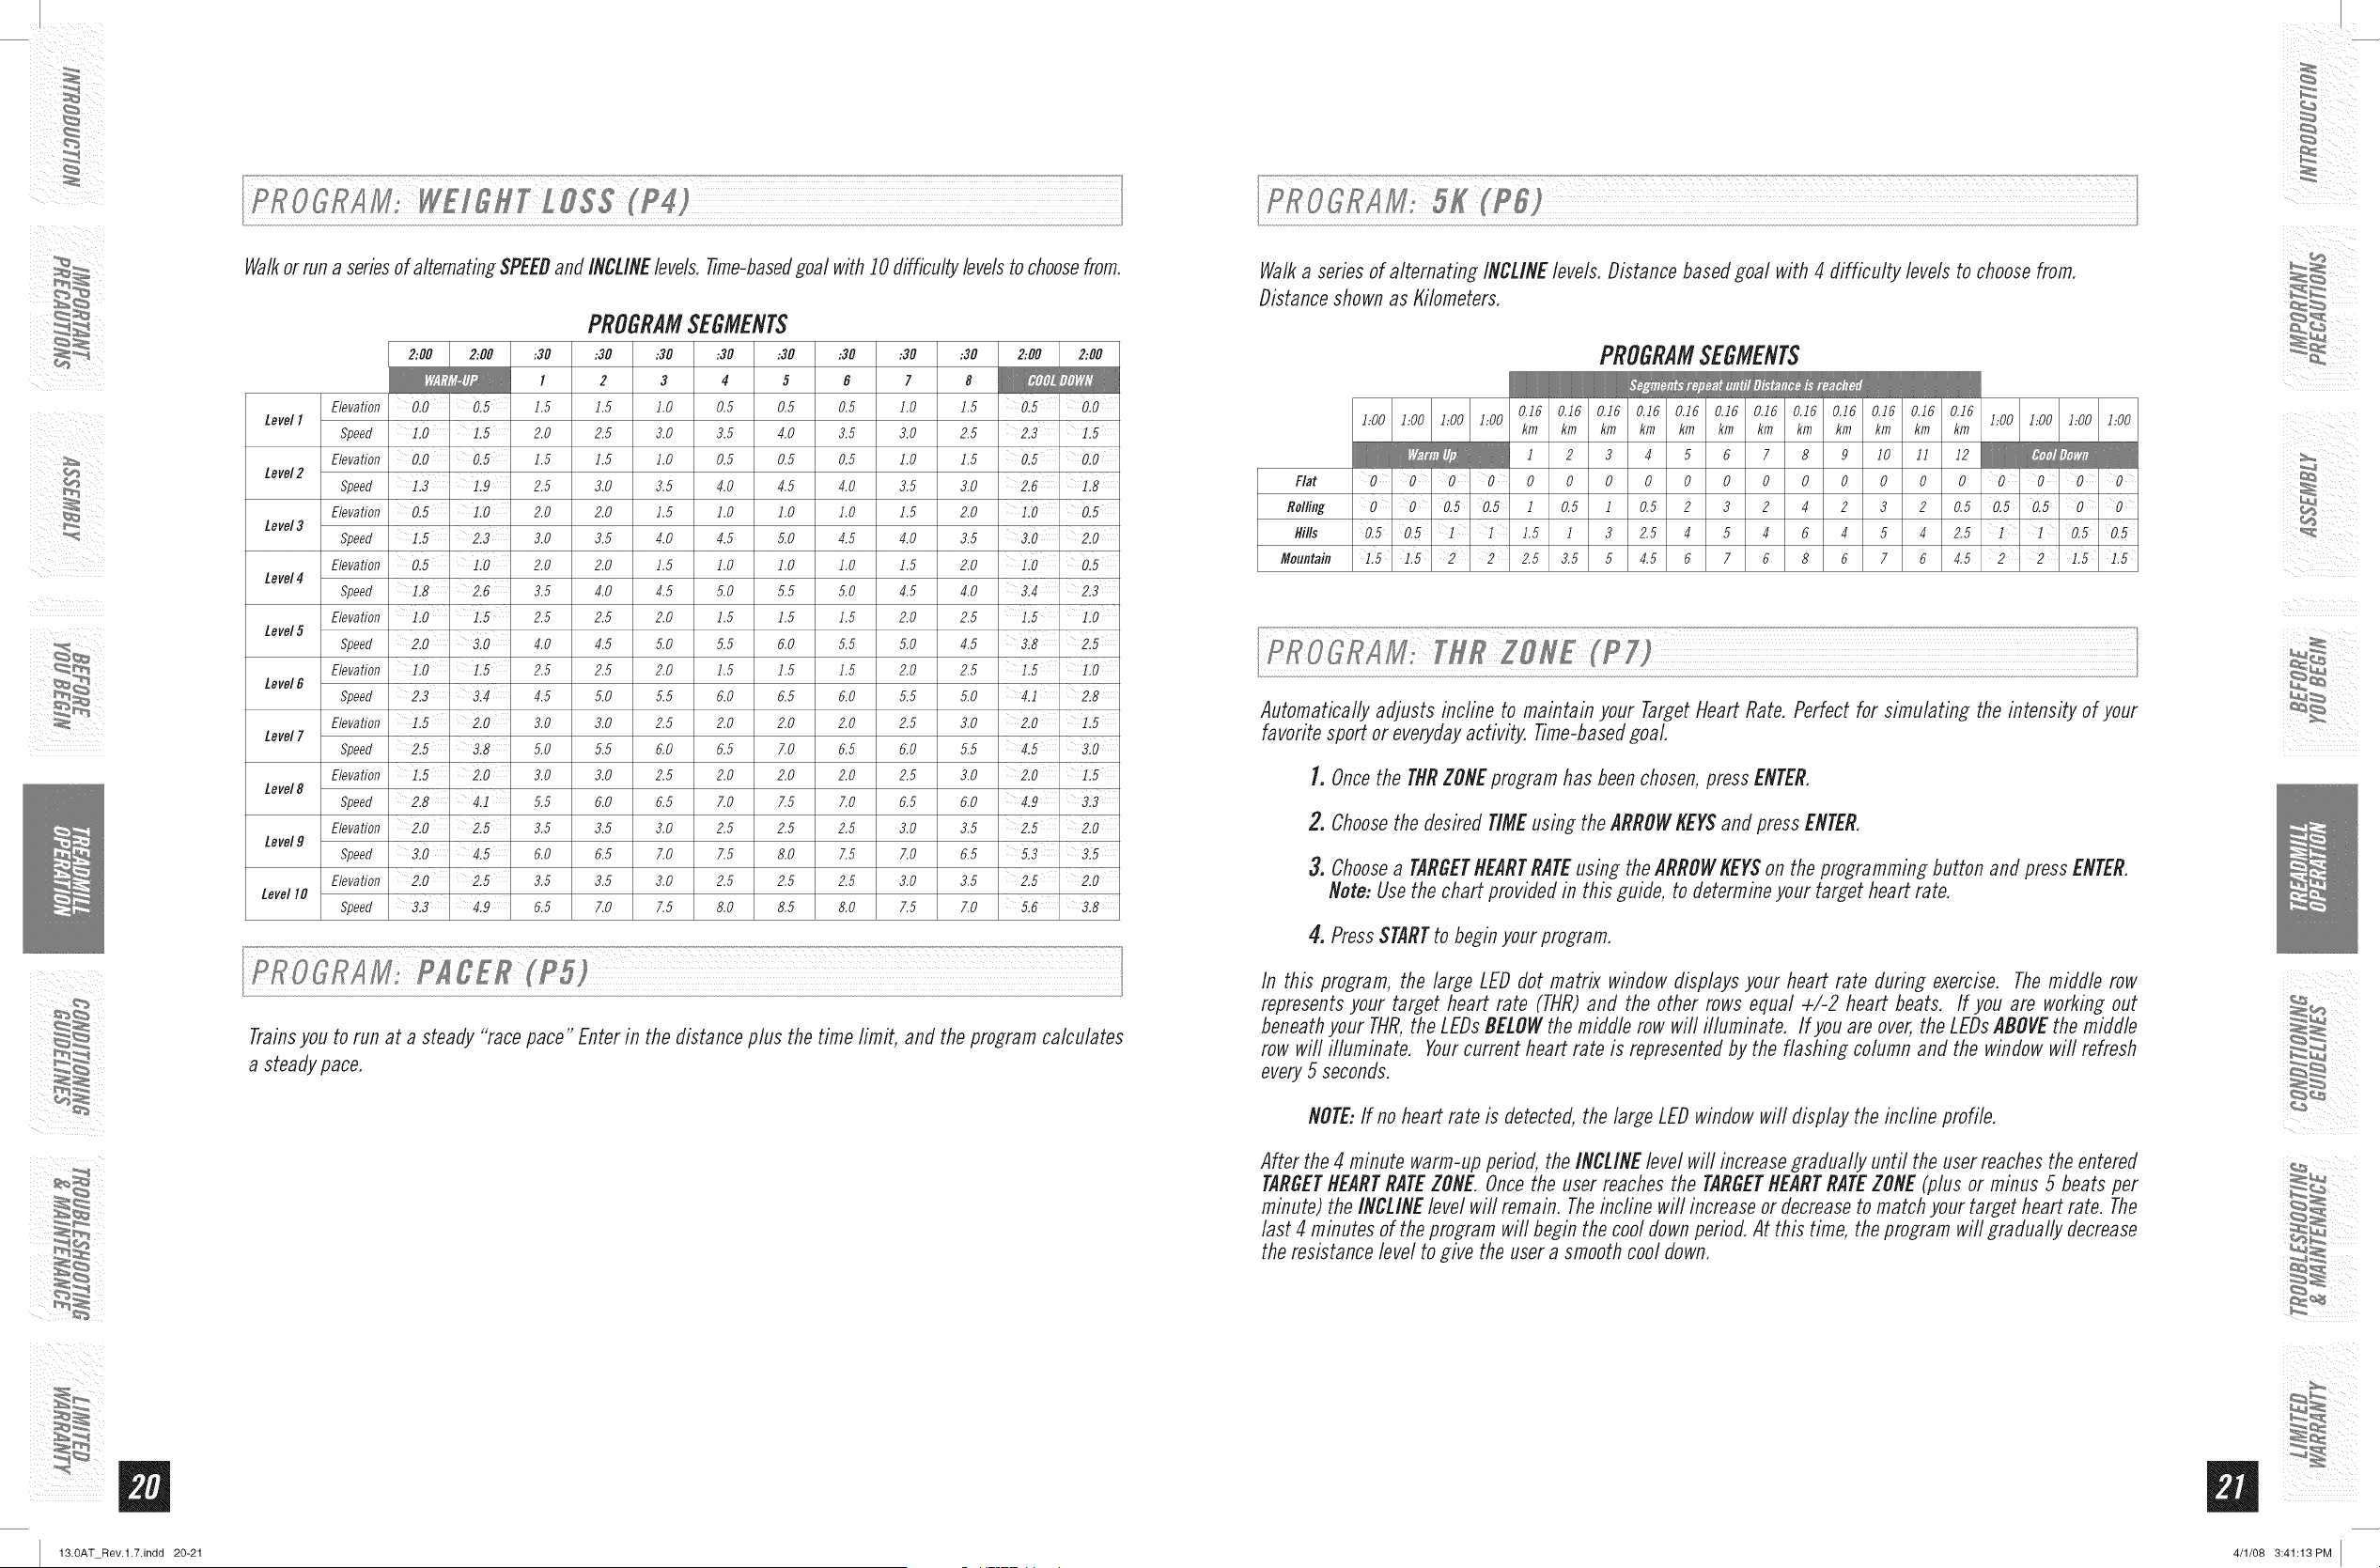
Walk or run a series of alternating SPEEDand INCLINE levels, Time-based goal with I0 difficulty levels to choose
from,
PROGRAMSEGMENTS
2:00 2:00 1:30 :30 1:30 :30 1:30 :30 1:30 :30 2:00 2:00
__ l 2 3 4 5 6 7 8
Elevation 1.0 1.5 l.O 2.0 l.O 2.0 l.O 2.5 l.O 2.5 l.O
LevelI
Speed i.0 1.5 2.0 4.0 2.0 4.0 2.0 4.5 2.0 4.5 i.5 ].0
Elevation ' 1.5 l.O 2.5 1.0 2.5 1.5 3.0 1.5 3.0 ].0
Level2
Speed i.0 1.5 2.0 4.5 2.0 4.5 2.5 5.0 2.5 5.0 i.5 ].0
Elevation ' 1.5 1.5 3.0 1.5 3.0 1.5 3.5 1.5 3.0 ].0
Level3
Speed 1.9 2.5 5.0 2.5 5.0 2.5 5.5 2.5 5.5 i.9
Elevation 1.0 ' 1.5 1.5 3.5 1.5 3.0 2.0 4.0 2.0 4.0 1.5 l.O
Level4
Speed 1.9 2.5 5.5 2.5 5.5 3.0 6.0 3.0 6.0 i.9
Elevation 1.5 2.0 2.0 4.0 2.0 4.0 2.0 4.5 2.0 4.5 2.0 ' 1.5
Level5
Speed 3.0 6.0 3.0 6.0 3.0 6.5 3.0 6.5 ].5
Elevation 1.5 2.0 2.0 4.5 2.0 4.5 2.0 5.0 2.0 5.0 2.0 ' 1.5
Level
Speed 1.5 ' 2.3 3.0 6.5 3.0 6.5 3.5 7.0 3.5 7.0 2.3 1.5
Elevation 1.5 2.5 2.0 5.0 2.0 5.0 2.0 5.5 2.0 5.5 2.5 1.5
Level7
Speed ' 2.6 3.5 7.0 3.5 7.0 3.5 7.5 3.5 7.5 2.6 ].8
Elevation 1.5 2.5 2.0 5.5 2.0 5.5 2.0 6.0 2.0 6.0 2.5 1.5
Level8
Speed ' 2.6 3.5 7.5 3.5 7.5 4.0 8.0 4.0 8.0 2.6 ].8
Elevation 2.0 ' 3.0 2.5 6.0 2.5 6.0 2.5 6.5 2.5 6.5 3!0 ' 2.0
Level9
Speed 2.0 3.0 4.0 8.0 4.0 8.0 4.0 8.5 4.0 8.5 3.0 2.0
Elevation 2.0 ' 3.0 2.5 6.5 2.5 6.5 2.5 7.0 2.5 7.0 3!0 ' 2.0
LevelI0
Speed 2.0 ' 310 4.0 8.5 4.0 8.5 4.5 9.0 4.5 9.0 310 ' 2.0
4/1/08 3:41:11PM
ii ¸ _
i¸¸
13.0AT Rev.l.7.indd 20-21
Walkor run a series of alternating SPEEDand INCLINEbvels. 77me-basedgoal with 10 difficulty bvels to choose from.
PROGRAMSEGMENTS
2:00 2:00 :30 :30 :30 :30 :30 :30 :30 :30 2:00 2:00
I 2 3 4 5 6 7 8
Elevation ' J.5 J.5 J.O 0.5 0.5 0.5 J.O J.5 ' 0.0
LevelI
Speed ' 2.0 2.5 3.0 3.5 4.0 3.5 3.0 2.5 2.3
Elevation 0.0 ' 0.5 1.5 1.5 1.0 0.5 0.5 0.5 1.0 1.5 0.5' 0.0
Level2
Speed 1.3 1.9 2.5 3.0 3.5 4.0 4.5 4.0 3.5 3.0 2.6 1.8
Elevation 0.5 ' 1.0 2.0 2.0 1.5 1.0 1.0 1.0 1.5 2.0 0.5
Level3
Speed 2.3 3.0 3.5 4.0 4.5 5.0 4.5 4.0 3.5 3.0 ' 2.0
Elevation 0.5 ' 1.0 2.0 2.0 J.5 J.O J.O J.O J.5 2.0 0.5
Level4
Speed 2.6 3.5 4.0 4.5 5.0 5.5 5.0 4.5 4.0 3.4 2.3
Elevation i.0 ' i.5 2.5 2.5 2.0 1.5 1.5 1.5 2.0 2.5 1.5 ' 1.0
Level5
Speed 310 4.0 4.5 5.0 5.5 6.0 5.5 5.0 4.5 318
Elevation ' 2.5 2.5 2.0 J.5 J.5 J.5 2.0 2.5 1.5 1.0
Level6
Speed 2.3 314 4.5 5.0 5.5 6.0 6.5 6.0 5.5 5.0 4.1 2.8
Elevation 1.5 2.0 3.0 3.0 2.5 2.0 2.0 2.0 2.5 3.0 2.0' 1.5
Level7
Speed 3.8 5.0 5.5 6.0 6.5 7.0 6.5 6.0 5.5 310
Elevation 1.5 2.0 3.0 3.0 2.5 2.0 2.0 2.0 2.5 3.0 2.0' 1.5
Level8
Speed 5.5 6.0 6.5 7.0 7.5 7.0 6.5 6.0 4.9 '3.3
Elevation 2.0 2.5 3.5 3.5 3.0 2.5 2.5 2.5 3.0 3.5 2.5 2.0
Level9
Speed 3.0 4.5 6.0 6.5 7.0 7.5 8.0 7.5 7.0 6.5 3.5
Elevation 2.0 2.5 3.5 3.5 3.0 2.5 2.5 2.5 3.0 3.5 2.5 2.0
LevelI0
Speed 3.3' 4.9 6.5 7.0 7.5 8.0 8.5 8.0 7.5 7.0 3.8
Trainsyou to run at a steady "race pace" Enter in the distance plus the time limit, and the program calculates
a steady pace.
Walk a series of alternating INCLINElevels. Distance based goal with 4 difficulty levels to choose from.
Distance shown as Kilometers.
PROGRAMSEGMENTS
0.J6 0.J6 0.J6 0.J6 0.J6 0.J6 0.J6 0.J6 0.J6 0.J6 0.J6 0.J6
bOO bOO bOO bOO bOO bOO bOO bOO
km km km km km km km km km km km km
J 2 3 4 5 6 7 8 9 JO JJ J2
Flat 0 0 0 0 0 0 0 0 0 0 0 0 0 0 0 0 0 0 0 0
Rolling 0 0 0.50.5 J 0.5 J 0.5 2 3 2 4 2 3 2 0.5 0.50.50 0
Hills 0.50.5 1 1 1.5 1 3 2.5 4 5 4 6 4 5 4 2.5 1 ' 1 ' 0.50.5
Mountain 1.51.5 2 2 2.5 3.5 5 4.5 6 Z 6 8 6 Z 6 4.5 2 2 i.51.5
Automatically adjusts incline to maintain your Target Heart Rate. Perfect for simulating the intensity of your
favorite sport or everyday activity. Time-based goal.
1. Once the THRZONEprogram has been chosen, press ENTER.
2. Choose the desired TIME using the ARROWKEYSand press ENTER.
3. Choose a TARGETHEARTRATEusing the ARROWKEYSon the programming button and press ENTER.
Note: Use the chart provided in this guide, to determine your target heart rate.
4. PressSTARTto beginyour program.
In this program, the large LEDdot matrix windowdisplays your heart rate during exercise. Themiddle row
representsyour target heart rate (THR)and the other rows equal +/-2 heart beats. If you are working out
beneathyour THR,the LEDsBELOWthe middle row will illuminate. If you are over,the LEDsABOVEthe middle
row will illuminate. Yourcurrent heart rate is representedby the flashing column and the windowwill refresh
every5 seconds.
NOTE:If no heart rate is detected,the large LEDwindowwill display the incline profile.
After the 4 minute warm-up period, the INCLINE level will increase gradually until the user reaches the entered
TARGETHEARTRATEZONE. Once the user reaches the TARGETHEARTRATEZONE (plus or minus 5 beats per
minute) the INCLINE level will remain. The incfine will increase or decrease to match your target heart rate. The
last 4 minutes of the program will begin the cool down period. At this time, the program will gradually decrease
the resistance level to give the user a smooth cool down.
4/1/08 3:41:13PM
ii ¸ _
i¸¸
13.0AT Rev.l.7.indd 22-23
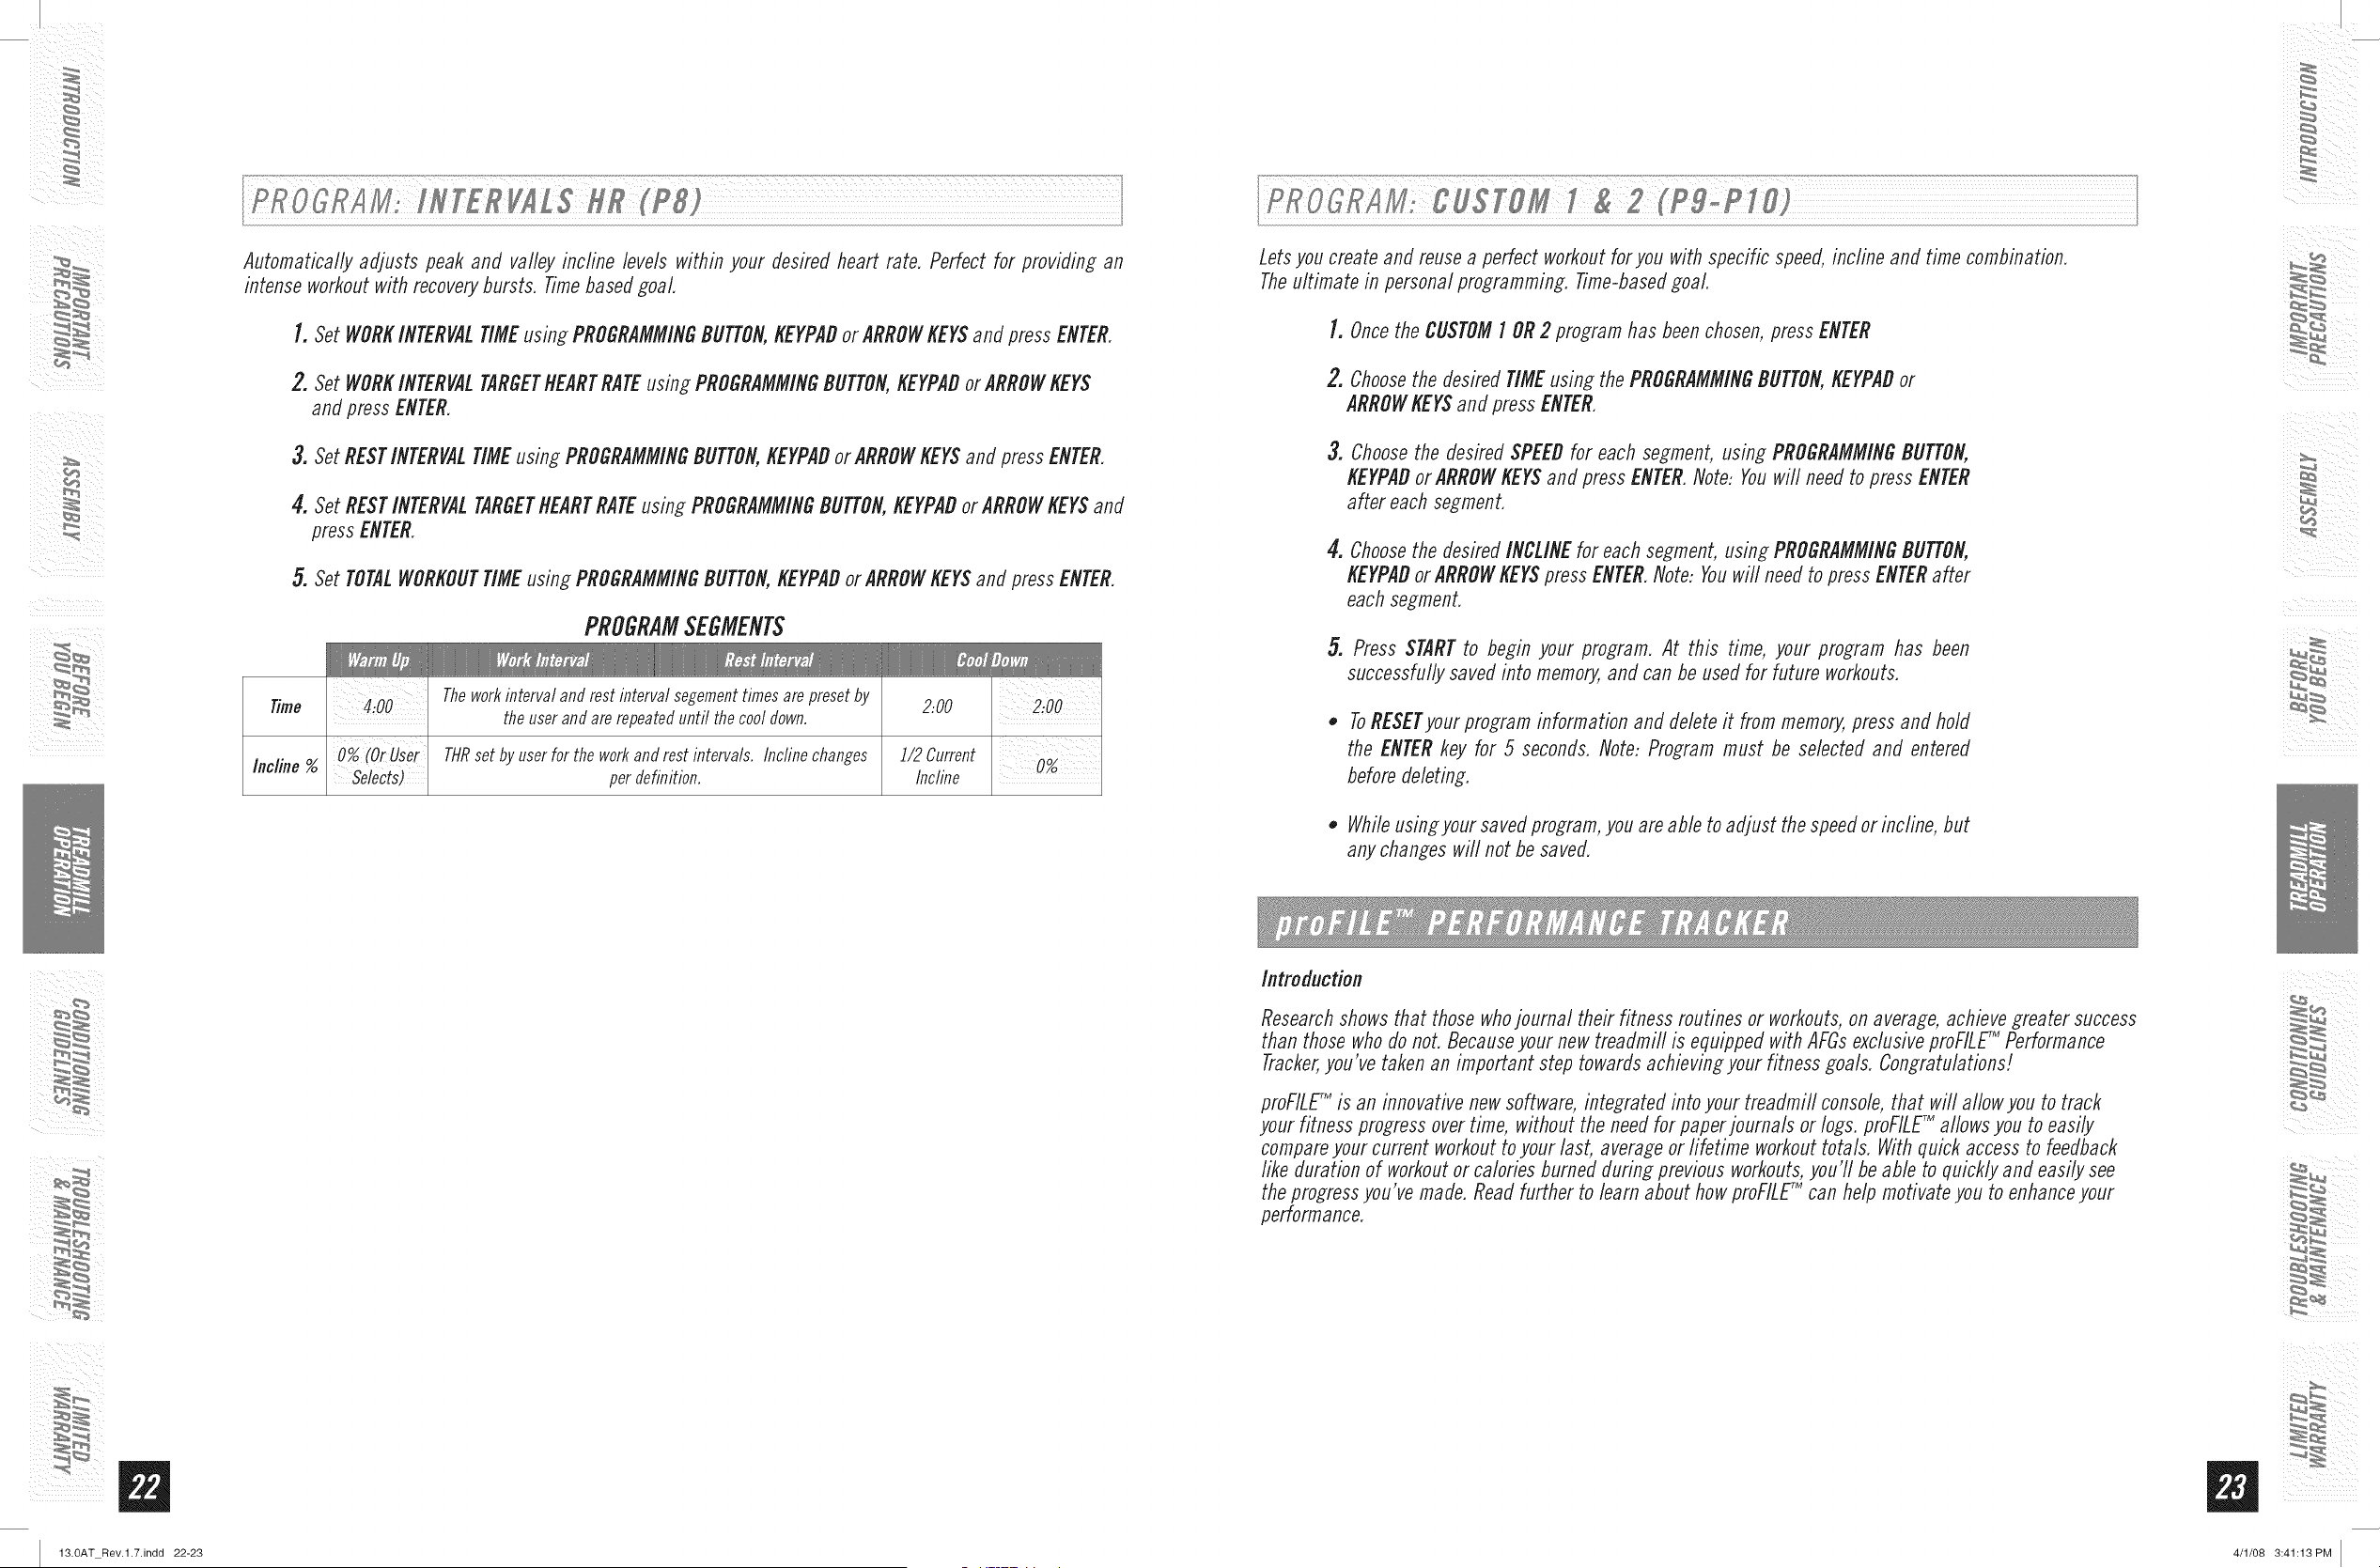
Automatically adjusts peak and valley recline levels within your desired heart rate. Perfect for providing an
intense workout with recovery bursts. Time based goal
1. Set WORKINTERVALTIME using PROGRAMMINGBUTTON,KEYPADor ARROWKEYSand press ENTER,
2. Set WORKINTERVALTARGETHEARTRATEusing PROGRAMMINGBUTTON,KEYPADor ARROWKEYS
and press ENTER,
3. Set RESTINTERVALTIME using PROGRAMMINGBUTTON,KEYPADor ARROWKEYSand press ENTER,
4. Set REST INTERVALTARGETHEARTRATEusing PROGRAMMINGBUTTON,KEYPADor ARROWKEYS and
press ENTER,
5. Set TOTALWORKOUTTIME using PROGRAMMINGBUTTON,KEYPADor ARROWKEYSand press ENTER,
PROGRAMSEGMENTS
Time 4100 Theworkintervalandrestintervalsegementtimesarepresetby
2:00
theuserandarerepeateduntil the cooldown.
Incline %
0% (OrUser
Selects)
THRset by userfor theworkandrest intervals. Inclinechanges
perdefinition.
2:00
i/2 Current
Incline
Lets you create and reuse a perfect workout for you with specific speed, incline and time combination.
Theultimate in personal programming. Time-based goal.
1. Once the CUSTOM1 OR 2 program has been chosen, press ENTER
2. Choosethe desired TIMEusing thePROGRAMMINGBUTTON,KEYPADor
ARROWKEYSand press ENTER.
3.
Choosethe desiredSPEEDfor each segment, using PROGRAMMINGBUTTON,
KEYPADorARROWKEYSand press ENTER.Note: Youwi// need to press ENTER
after each segment.
4. Choosethe desired INCLINEfor eachsegment,using PROGRAMMINGBUTTON,
KEYPADor ARROWKEYSpressENTER.Note: Youwill needto pressENTERafter
each segment.
5. Press STARTto begin your program. At this time, your program has been
successfullysavedinto memory,and can be used for future workouts.
ToRESETyour program information and delete it from memory, press and hold
the ENTER key for 5 seconds. Note: Program must be selected and entered
before deleting.
• While usingyour saved program, you are able to adjust the speed or incline, but
any changes will not be saved.
Introduction
Research shows that those whojournal their fitness routines or workouts, on average, achieve greater success
than those who do not. Because your new treadmill is equipped with AFGs exclusive proFILETM Performance
Tracker,you've taken an important step towards achieving your fitness goals. Congratulations]
proFILETM is an innovative new software, integrated into your treadmifl console, that will allow you to track
your fitness progress over time, without the need for paper journals or logs. proFILETM allows you to easily
compare your current workout to your last, average or fifetime workout totals. With quick access to feedback
like duration of workout or calories burned during previous workouts, you'll be able to quickly and easily see
the progress you've made. Read further to learn about how proFILETM can help motivate you to enhance your
performance.
4/1/08 3:41:13PM
ii ¸ _/
i¸¸
13.0AT Rev.l.7.indd 24-25
SETUP: Toactivate proFILEr_ a user MUST be chosen before the program begins. Toselect a USER1 or 2, use
PROGRAMMINGBUTTONand press ENTERto confirm. All accumulated data specifically relates to the user that
is chosen. Note: If no user is selected and clock and date are not set, no data will be tracked.
RESET..Reset all recorded information for User 1 or User 2 by selecting the user and then holding down the
proFILETM button for 10 seconds. Note: This step is permanent and will delete ALL previously accumulated data
for the chosen user,
ACCUMULATEDDATA:Once proFILEr_ is activated, you can scroll through your accumulated data in multiple
formats by pressing the proFILEr_ button. A workout is saved when: the program ends, the console is paused
and not resumed within 10 minutes, or the STOPbutton is held to reset the console.
1) CURRENTWORKOUT..Theconsole automatically defaults to Current Workout, displaying your progress
in real time.
2)
3)
AVERAGEWORKOU_Thisoption allowsyou to seeyour averageaccumulateddata for the last 30
workouts.Thefollowinginformation will be shownin eachdisplay window:
INCLINE- Averageincline leveL
TIME- Averageworkouttime.
CALORIES- Averagecaloriesburned.
DISTANCE- Averageworkoutdistance.
SPEED- Averagespeedof workout.
LASTWORKOUT..Thisoption allowsyou to viewyour accumulated data fromyour last workout. The
Current Workoutbecomesthe Last Workoutoncea program has endedor theconsolehas beenreset.
Thefollowing information will be shownin eachdisplay window:
INCLINE-Averageincline of last workout.
TIME- Totaltime of last workout.
CALORIES- Totalcaloriesburned during last workout.
DISTANCE- Totaldistance of last workout.
SPEED-Average speedof last workout.
4) WEEKLYTOTAL:Viewyour accumulateddata from the last Sundayto the present day. Note: This
data is basedon weekto date NOTthe previoussevendays. Forinstance,if you have not used the
machinesince Sunday,the consolewill readzeros. Thefollowing information will be shown in each
display window:
INCLINE- Averageincline leveL
TIME- Totaltime of workout.
CALORIES- Averagecaloriesburned.
DISTANCE- Totaldistance of workout.
SPEED- Averagespeedof weeklyworkout.
Note:If the Dateand Clockare not set, WeeklyTotalwill default to the Last Workoutdata.
5) LIFETIMETOTAL:Thisoption allows you to viewthe the total accumulated data. Thefollowing informa-
tion will be shownin each display window:
INCLINE- Averageincfine level
TIME- Totalaccumulatedtime. Note:If time is greater than 59:59,the time will no longer
displayminutes and will display hoursonly`
CALORIES- Averagecaloriesburned.
DISTANCE- Totalaccumulateddistance.
SPEED- Averagespeed.
ALWAYSCONSULTYOURPHYSICIANBEFOREBEGINNINGAN EXERCISEPROGRAM.
flOWOFTEN?(Frequencyof Workouts)
The American Heart Association recommends that you exercise at least 3 to 4 days per week to maintain
cardiovascular fitness. If you have other goals such as weight or fat loss, you will achieve your goal faster with
more frequent exercise. Whether it's 3 flays or 6 days, remember that your ultimate goal should be to make
exercise a fifetime habit. Many people are successful staying with a fitness program if they set aside a specific
time of day to exercise. It doesn't matter whether it's in the morning before breakfast, during lunch hour or while
watching the evening news. What's more important is that it's a time that allows you to keep a schedule, and a
time when you won't be interrupted. Tobe successful with your fitness program, you have to make it a priority in
your fife. So decide on a time, pull out your day planner and pencil in your exercise times for the next month!
flOWLONG?(Durationof Workouts)
For aerobic exercise benefits, it's recommended that you exercise from between 24 and 60 minutes per session.
But start slowly and gradually increase your exercise times. If you've been sedentary during the past year, it may
be a good idea to keep your exercise times to as tittle as five minutes initially` Yourbody will need time to adjust
to the new activity` If your goal is weight loss, a longer exercise session at lower intensities has been found to
be most effective. A workout time of 48 minutes or more is recommended for best weight loss results.
flOWNARD?(Intensityof Workouts)
How hard you workout is also determined by your goals. If you use your treadmill to prepare for a 51(run, you will
probably work out at a higher intensity than if your goal is general fitness. Regardless of your long term goals,
always begin an exercise program at low intensity` Aerobic exercise does not have to be painful to be beneficial!
Thereare two ways to measure your exercise intensity` The first is by monitoring your heart rate (using the grip
pulse handlebars or a wireless chest transmitter - may be sold separately), and the second is by evaluating your
perceived exertion level (this is simpler than it sounds!).
PERCEIVEDEXERTIONLEVEL
A simple way to gauge your exercise intensity is to evaluate your perceived exertion level. While exercising, ifyou
are too winded to maintain a conversation without gasping, you are working out too hard. A good rule of thumb
is to work to the point of exhilaration, not exhaustion. If you cannot catch your breath, it's time to slow down.
Always be aware of these warning signs of overexertion.
ii ¸ _/
i¸¸i_
13.0AT Rev.l.7.indd 26-27
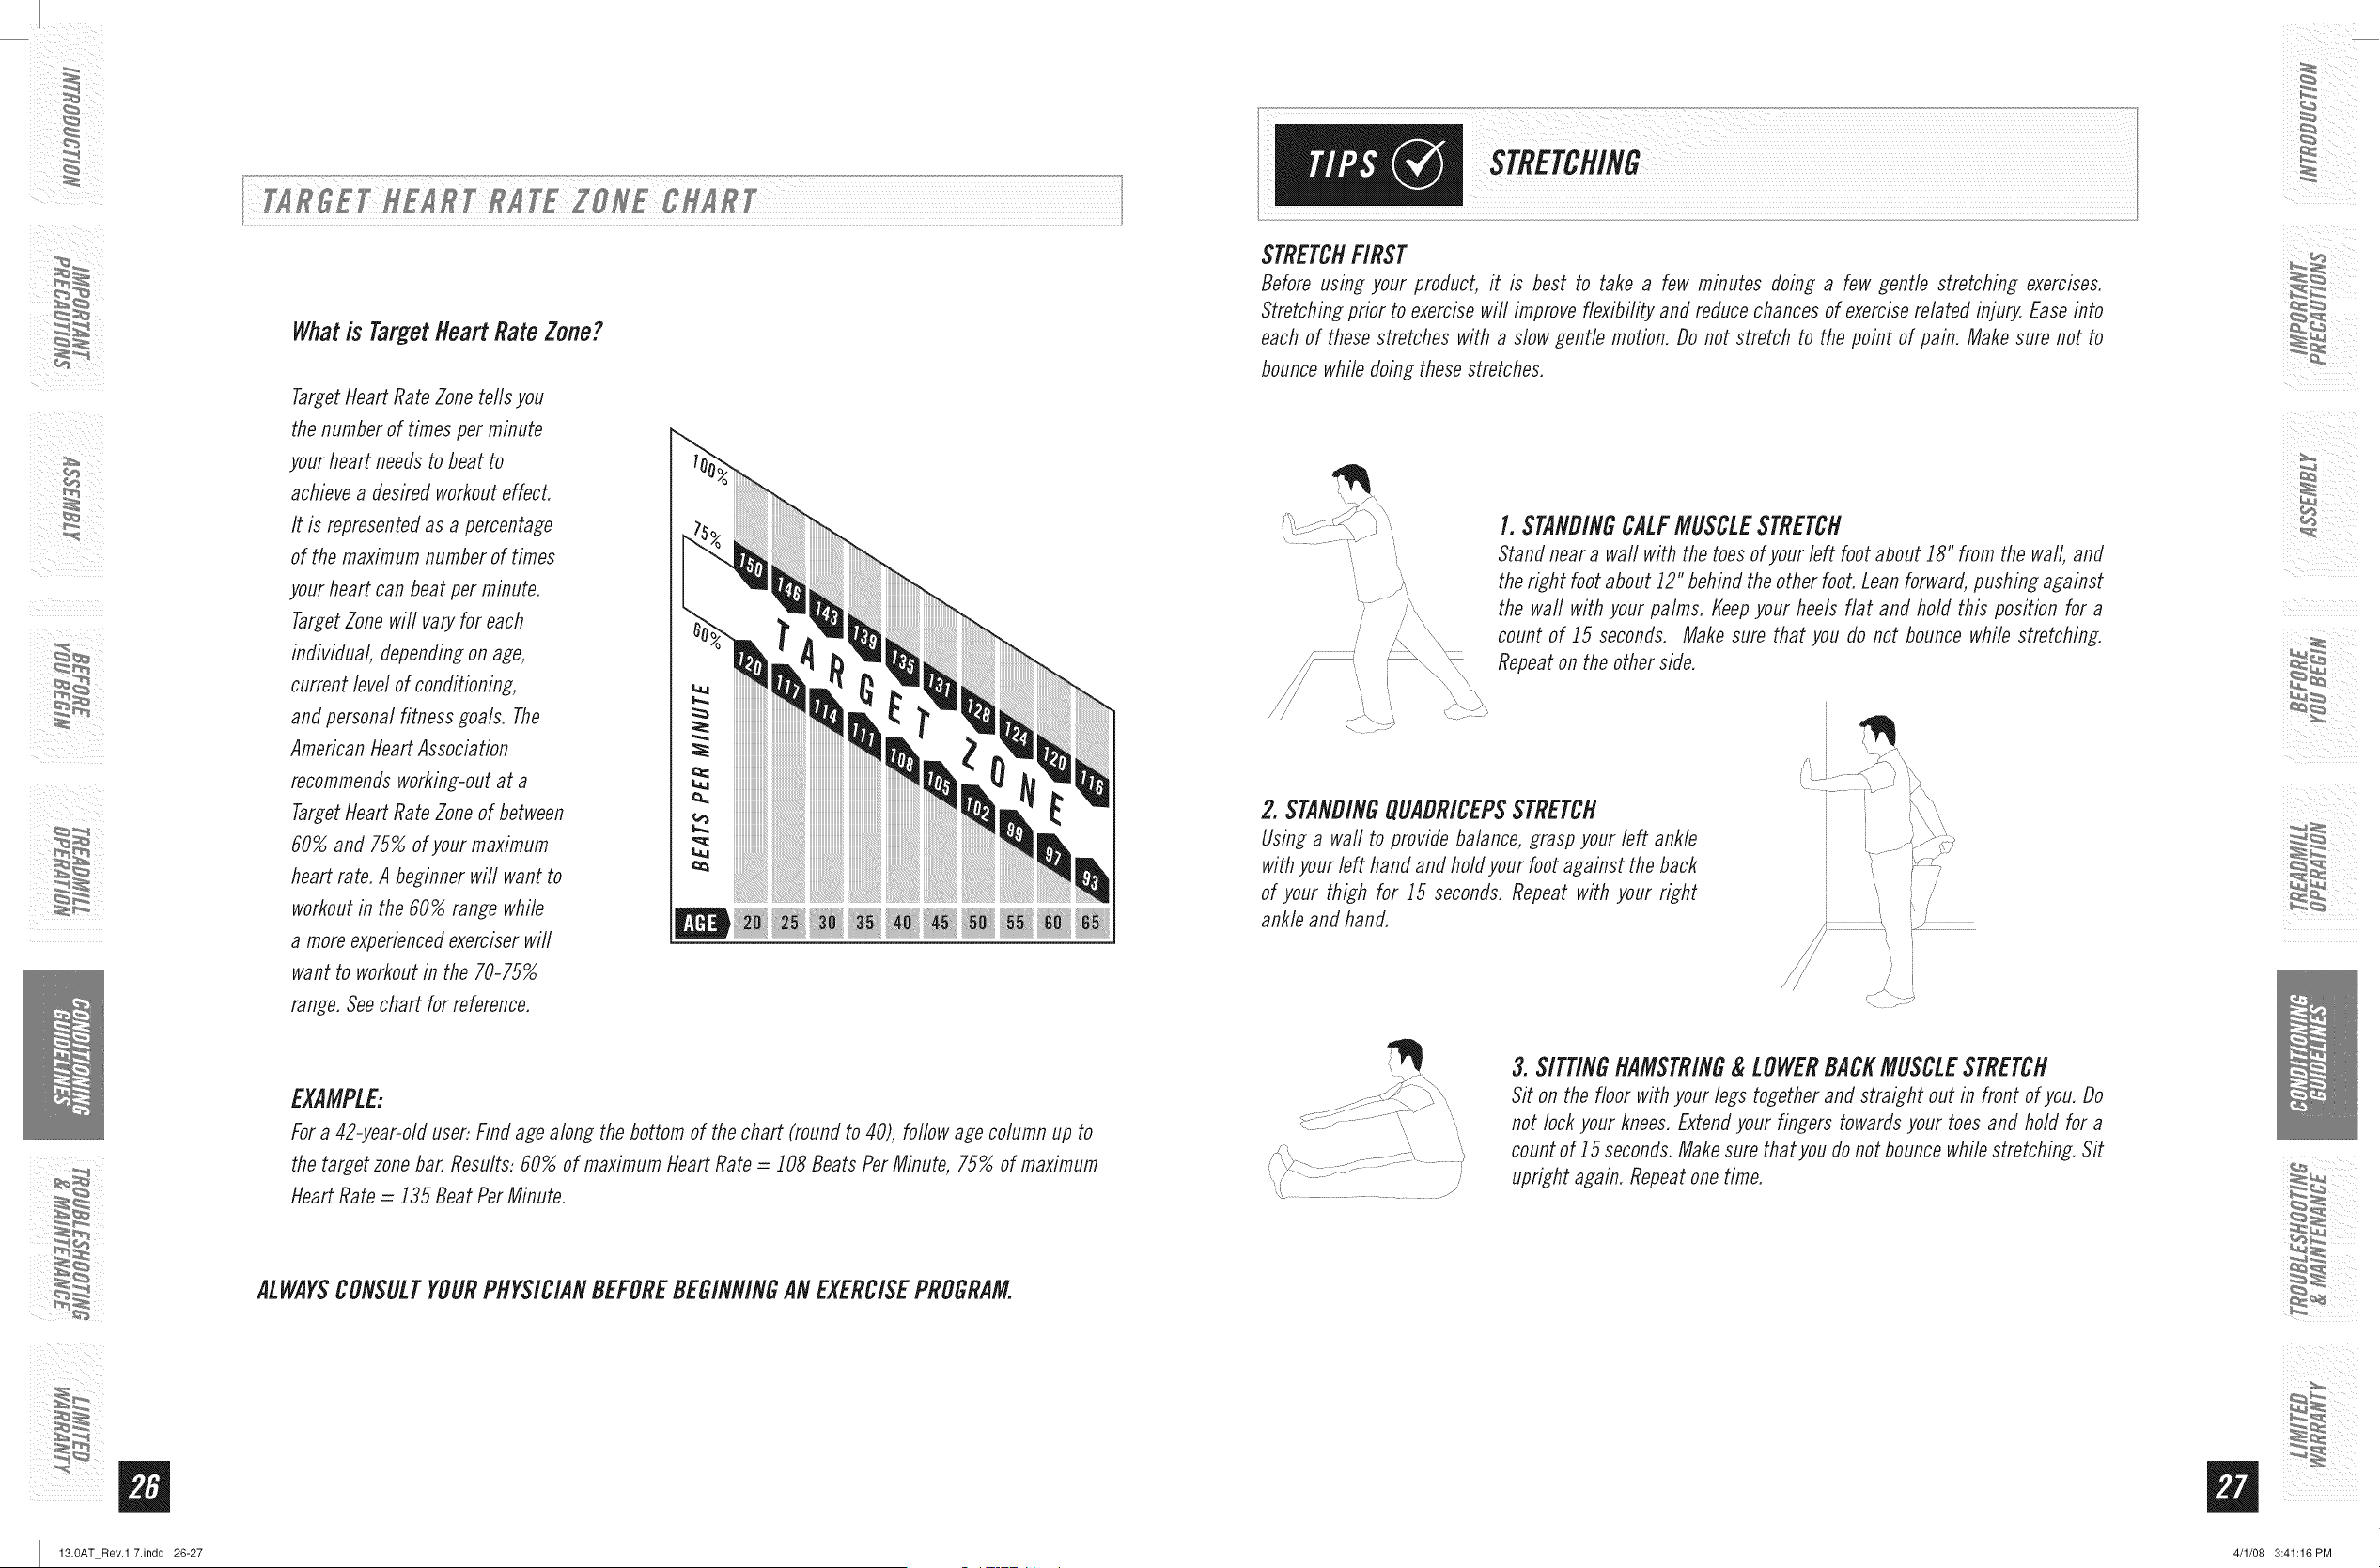
Whatis TargetHeartRateZone?
TargetHeart Rate Zone reds you
the number of times per minute
your heart needs to beat to
achieve a desired workout effect,
It is represented as a percentage
of the maximum number of times
your heart can beat per minute,
TargetZone wifl vary for each
individual, depending on age,
current level of conditioning,
and personal fitness goals, The
American Heart Association
recommends working-out at a
TargetHeart Rate Zone of between
60% and 75% of your maximum
heart rate, A beginner will want to
workout in the 60% range while
a more experienced exerciser will
want to workout in the 70-75%
range, See chart for reference,
EXAMPLE:
For a 42-year-old user: Find age along the bottom of the chart (round to 40), follow age column up to
the target zone bar, Results: 60% of maximum Heart Rate = 108 Beats Per Minute, 75% of maximum
Heart Rate = 135 Beat Per Minute,
ALWAYSCONSULTYOURPHYSICIANBEFOREBEGINNINGAN EXERCISEPROGRAM.
i¸¸¸
STRETCHFIRST
Before using your product, it is best to take a few minutes doing a few gentle stretching exercises.
Stretching prior to exercise will improve flexibility and reduce chances of exercise related injury, Ease into
each of these stretches with a slow gentle motion, Do not stretch to the point of pain, Make sure not to
bounce while doing these stretches,
.............................f
1.STANDINGCALFMUSCLESTRETCH
Stand near a wall with the toes of your left foot about 18" from the wall, and
the right foot about 12" behind the other foot, Lean forward, pushing against
the waft with your palms, Keep your heels flat and hold this position for a
count of 15 seconds, Make sure that you do not bounce while stretching,
Repeat on the other side,
2. STANDINGQUADRICEPSSTRETCH
Using a wall to provide balance, grasp your left ankle
with your left hand and hold your foot against the back
of your thigh for 15 seconds, Repeat with your right
ankle and hand,
/
// I
'_'t ..................................... /
3. SITTINGHAMSTRING& LOWERBACKMUSCLESTRETCH
Sit on the floor with your legs together and straight out in front of you, Do
not lock your knees, Extend your fin_ers towards your toes and hold for a
count of _5 seconds. Make sure that you do not bounce while stretching, Sit
upright again, Repeat one time,
ii ¸ _/
13.0AT Rev.l.7.indd 28-29
WARMUP
The first 2 to 5 minutes of a workout should be devoted to warming up, The warm-up will limber your
muscles and prepare them for more strenuous exercise. Make sure that you warm-up on your product at a
slow pace, The warm up should gradually bfing your heart rate into your Target Heart Rate Zone,
COOLDOWN
Never stop exercising suddenly! A cool-down period of 3-5 minutes allows your heart to readjust to the
decreased demand, Make sure that your cool down period consists of a very slow pace to allow your heart
rate to lower, After the cool-down, repeat the stretching exercises listed above to loosen and relax your
muscles,
An important step in developing a long term fitness program is to determine your goals. Is your primary
goal for exercising to lose weight? Improve muscle? Reduce stress? Prepare for the spring racing schedule?
Knowing what your goals are will help you develop a more successful exercise program, Below are some
common exercise goals-
• Weight Loss - lower intensity, longer duration workouts
• Improve Body Shape and Tone- interval workouts, alternate between high and low intensities
• Increased Energy Level - more frequent daily workouts
• Improved Sports Performance - high intensity workouts
• Improved Cardiovascular Endurance - moderate intensity, longer duration workouts
If possible try to define your personal goals in precise, measurable terms, and then put your goals in writing.
Themore specific you can be, the easier it will be to track your progress, If your goals are long term, divide
them up into monthly and weekly segments. Longer term goals can lose some of the immediate motivation
benefits, Short term goals are easier to achieve, Your console provides you with several readouts that can
be used to record your progress, You can track Distance, Calories or Time,
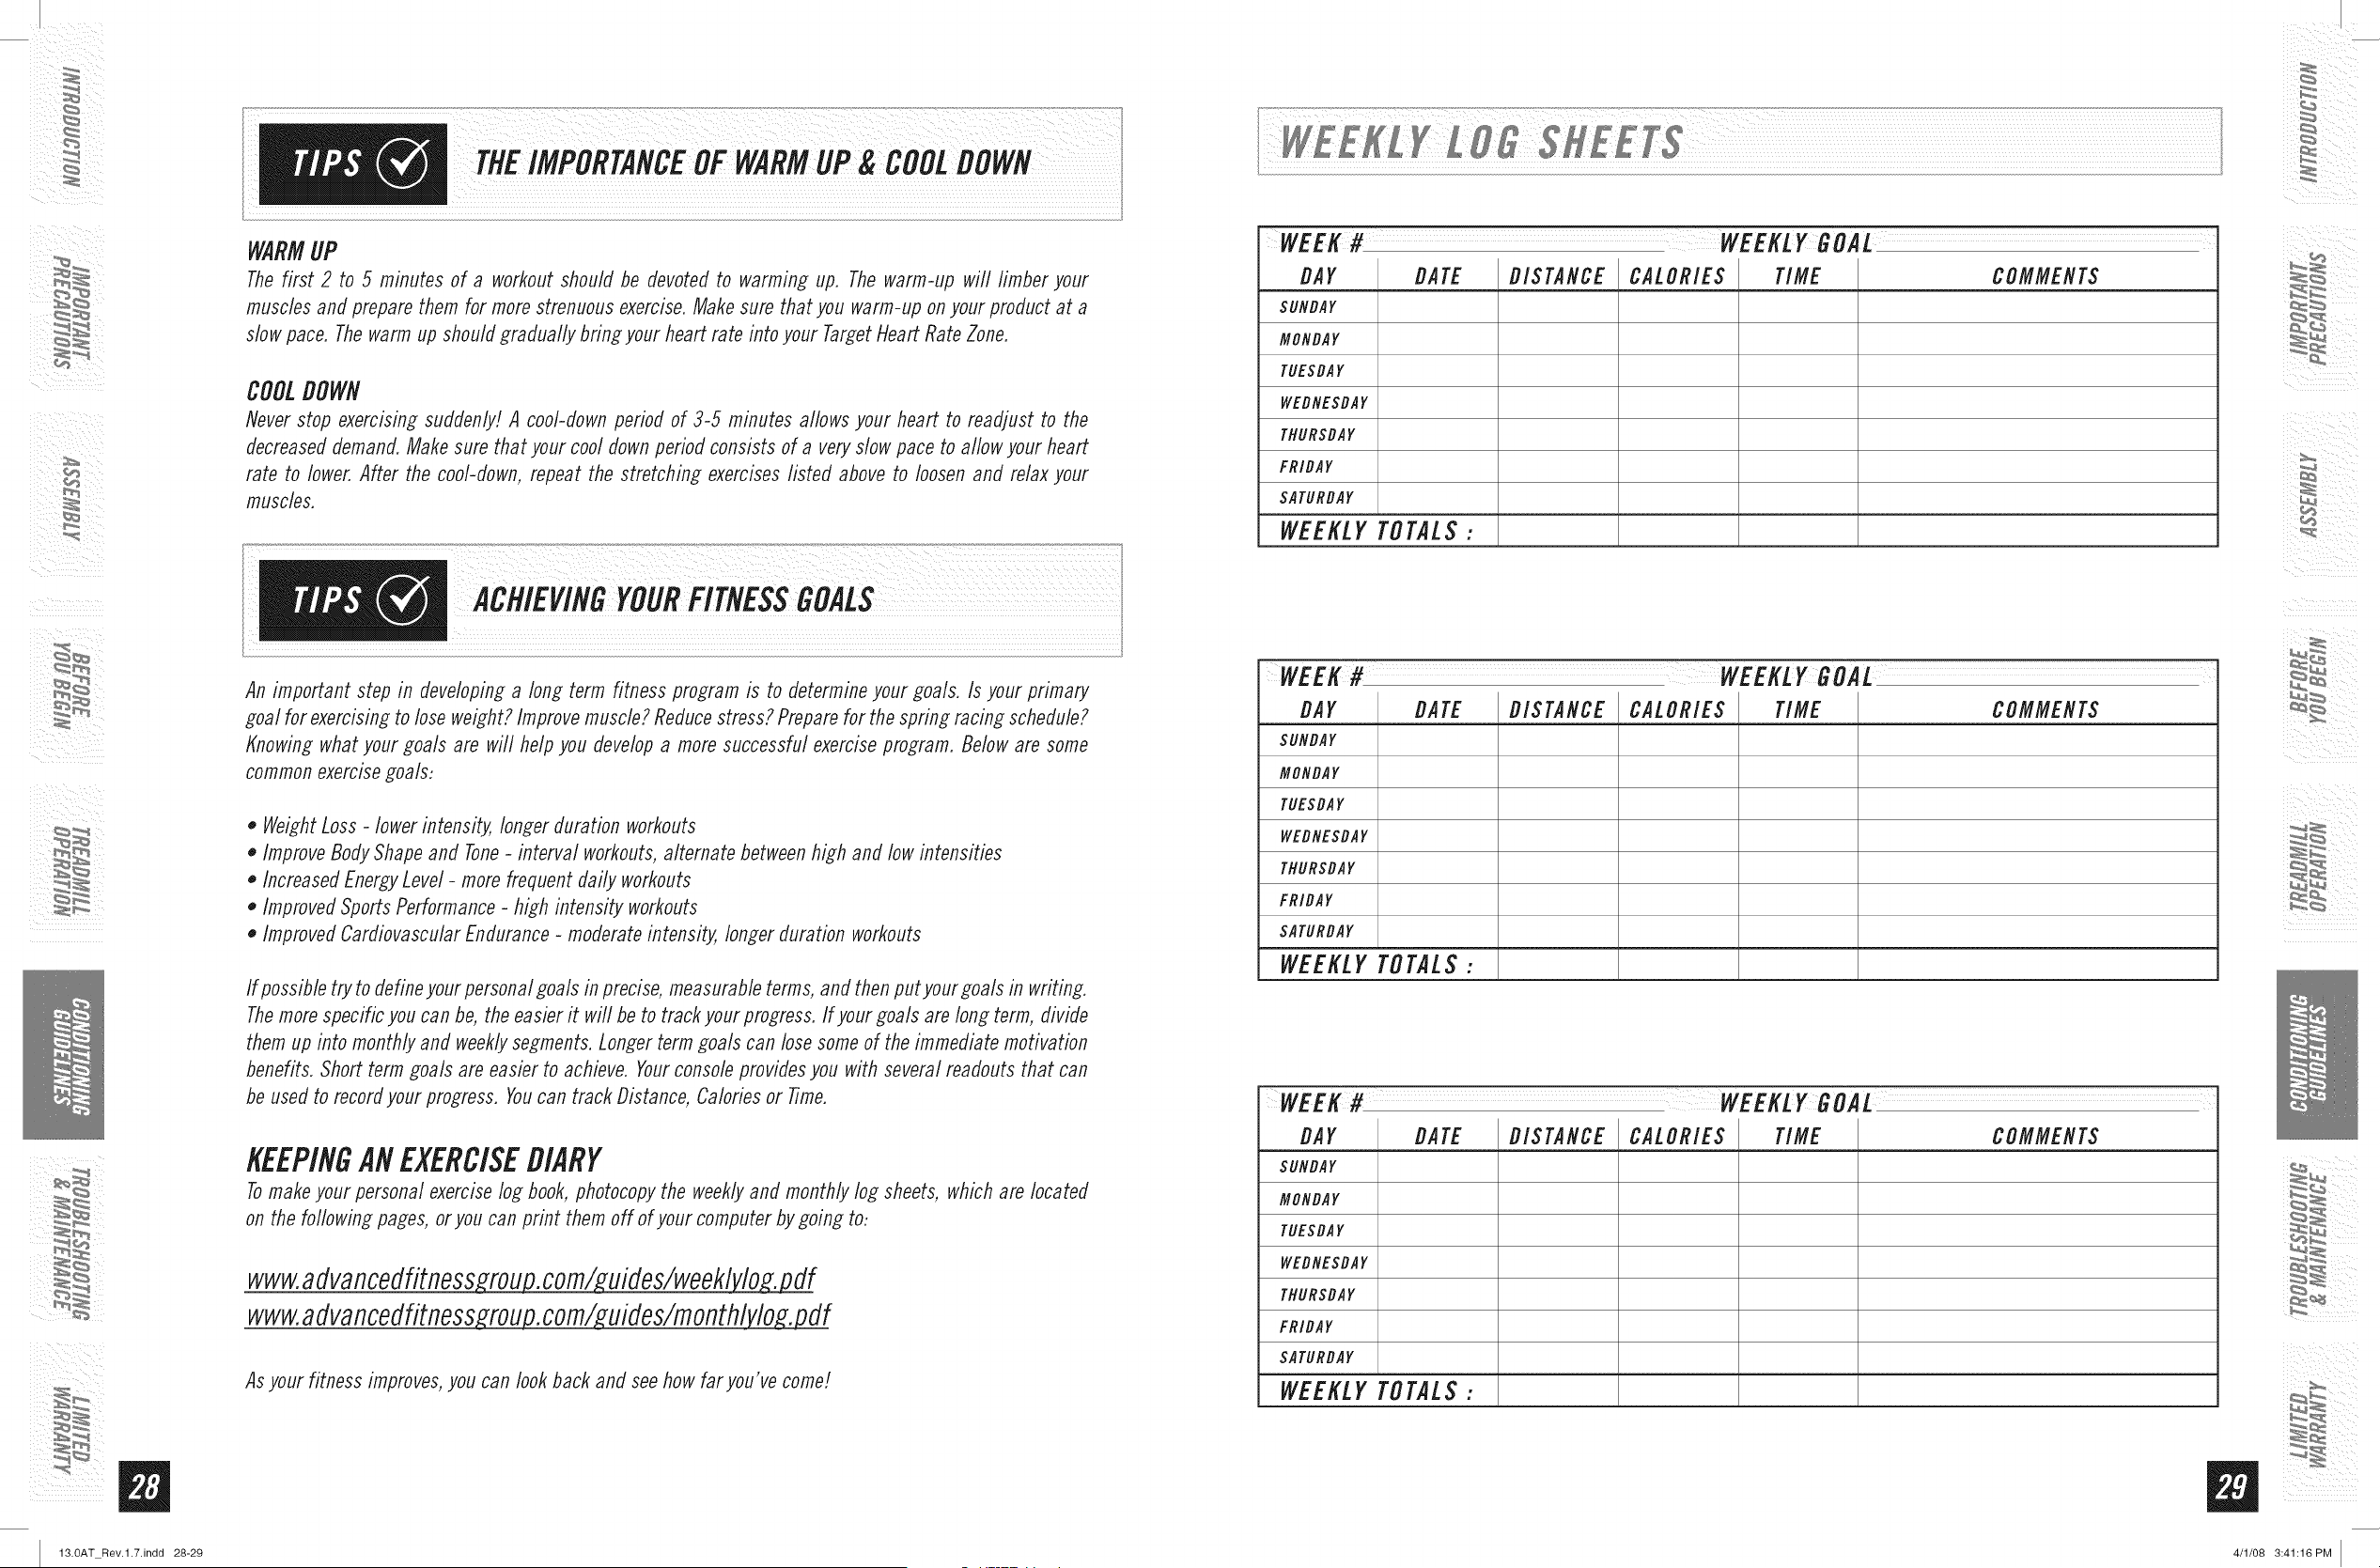
KEEPINGlie EXERCISEDIARY
Tomake your personal exercise log book, photocopy the weekly and monthly log sheets, which are located
on the following pages, or you can print them off of your computer by going to-
www.advancedfitness ryjou uides/weekl lov .pdf
www.advancedfitness ry.rou uides/rnonthl lov .pdf
Asyour fitness improves,you can look back and seehow far you've come!
i!_:iill
WEEK# WEEKLYGOAL
BAY BATE DISTANCE CALORIES TIME COMMENTS
SUNDAY
MONDAY
TUESDAY
WEDNESDAY
THURSDAY
FRIDAY
SATURDAY
WEEKLYTOTALS:
WEEK# WEEKLYGOAL
BAY BATE DISTANCE CALORIES TIME COMMENTS
SUNDAY
MONDAY
TUESDAY
WEDNESDAY
THURSDAY
FRIDAY
SATURDAY
WEEKLYTOTALS:
WEEK# WEEKLYGOAL
BAY BATE DISTANCE CALORIES TIME COMMENTS
SUNDAY
MONDAY
TUESDAY
WEDNESDAY
THURSDAY
FRIDAY
SATURDAY
WEEKLYTOTALS:
4/1/08 3:41:16PM
¸%%¸¸¸
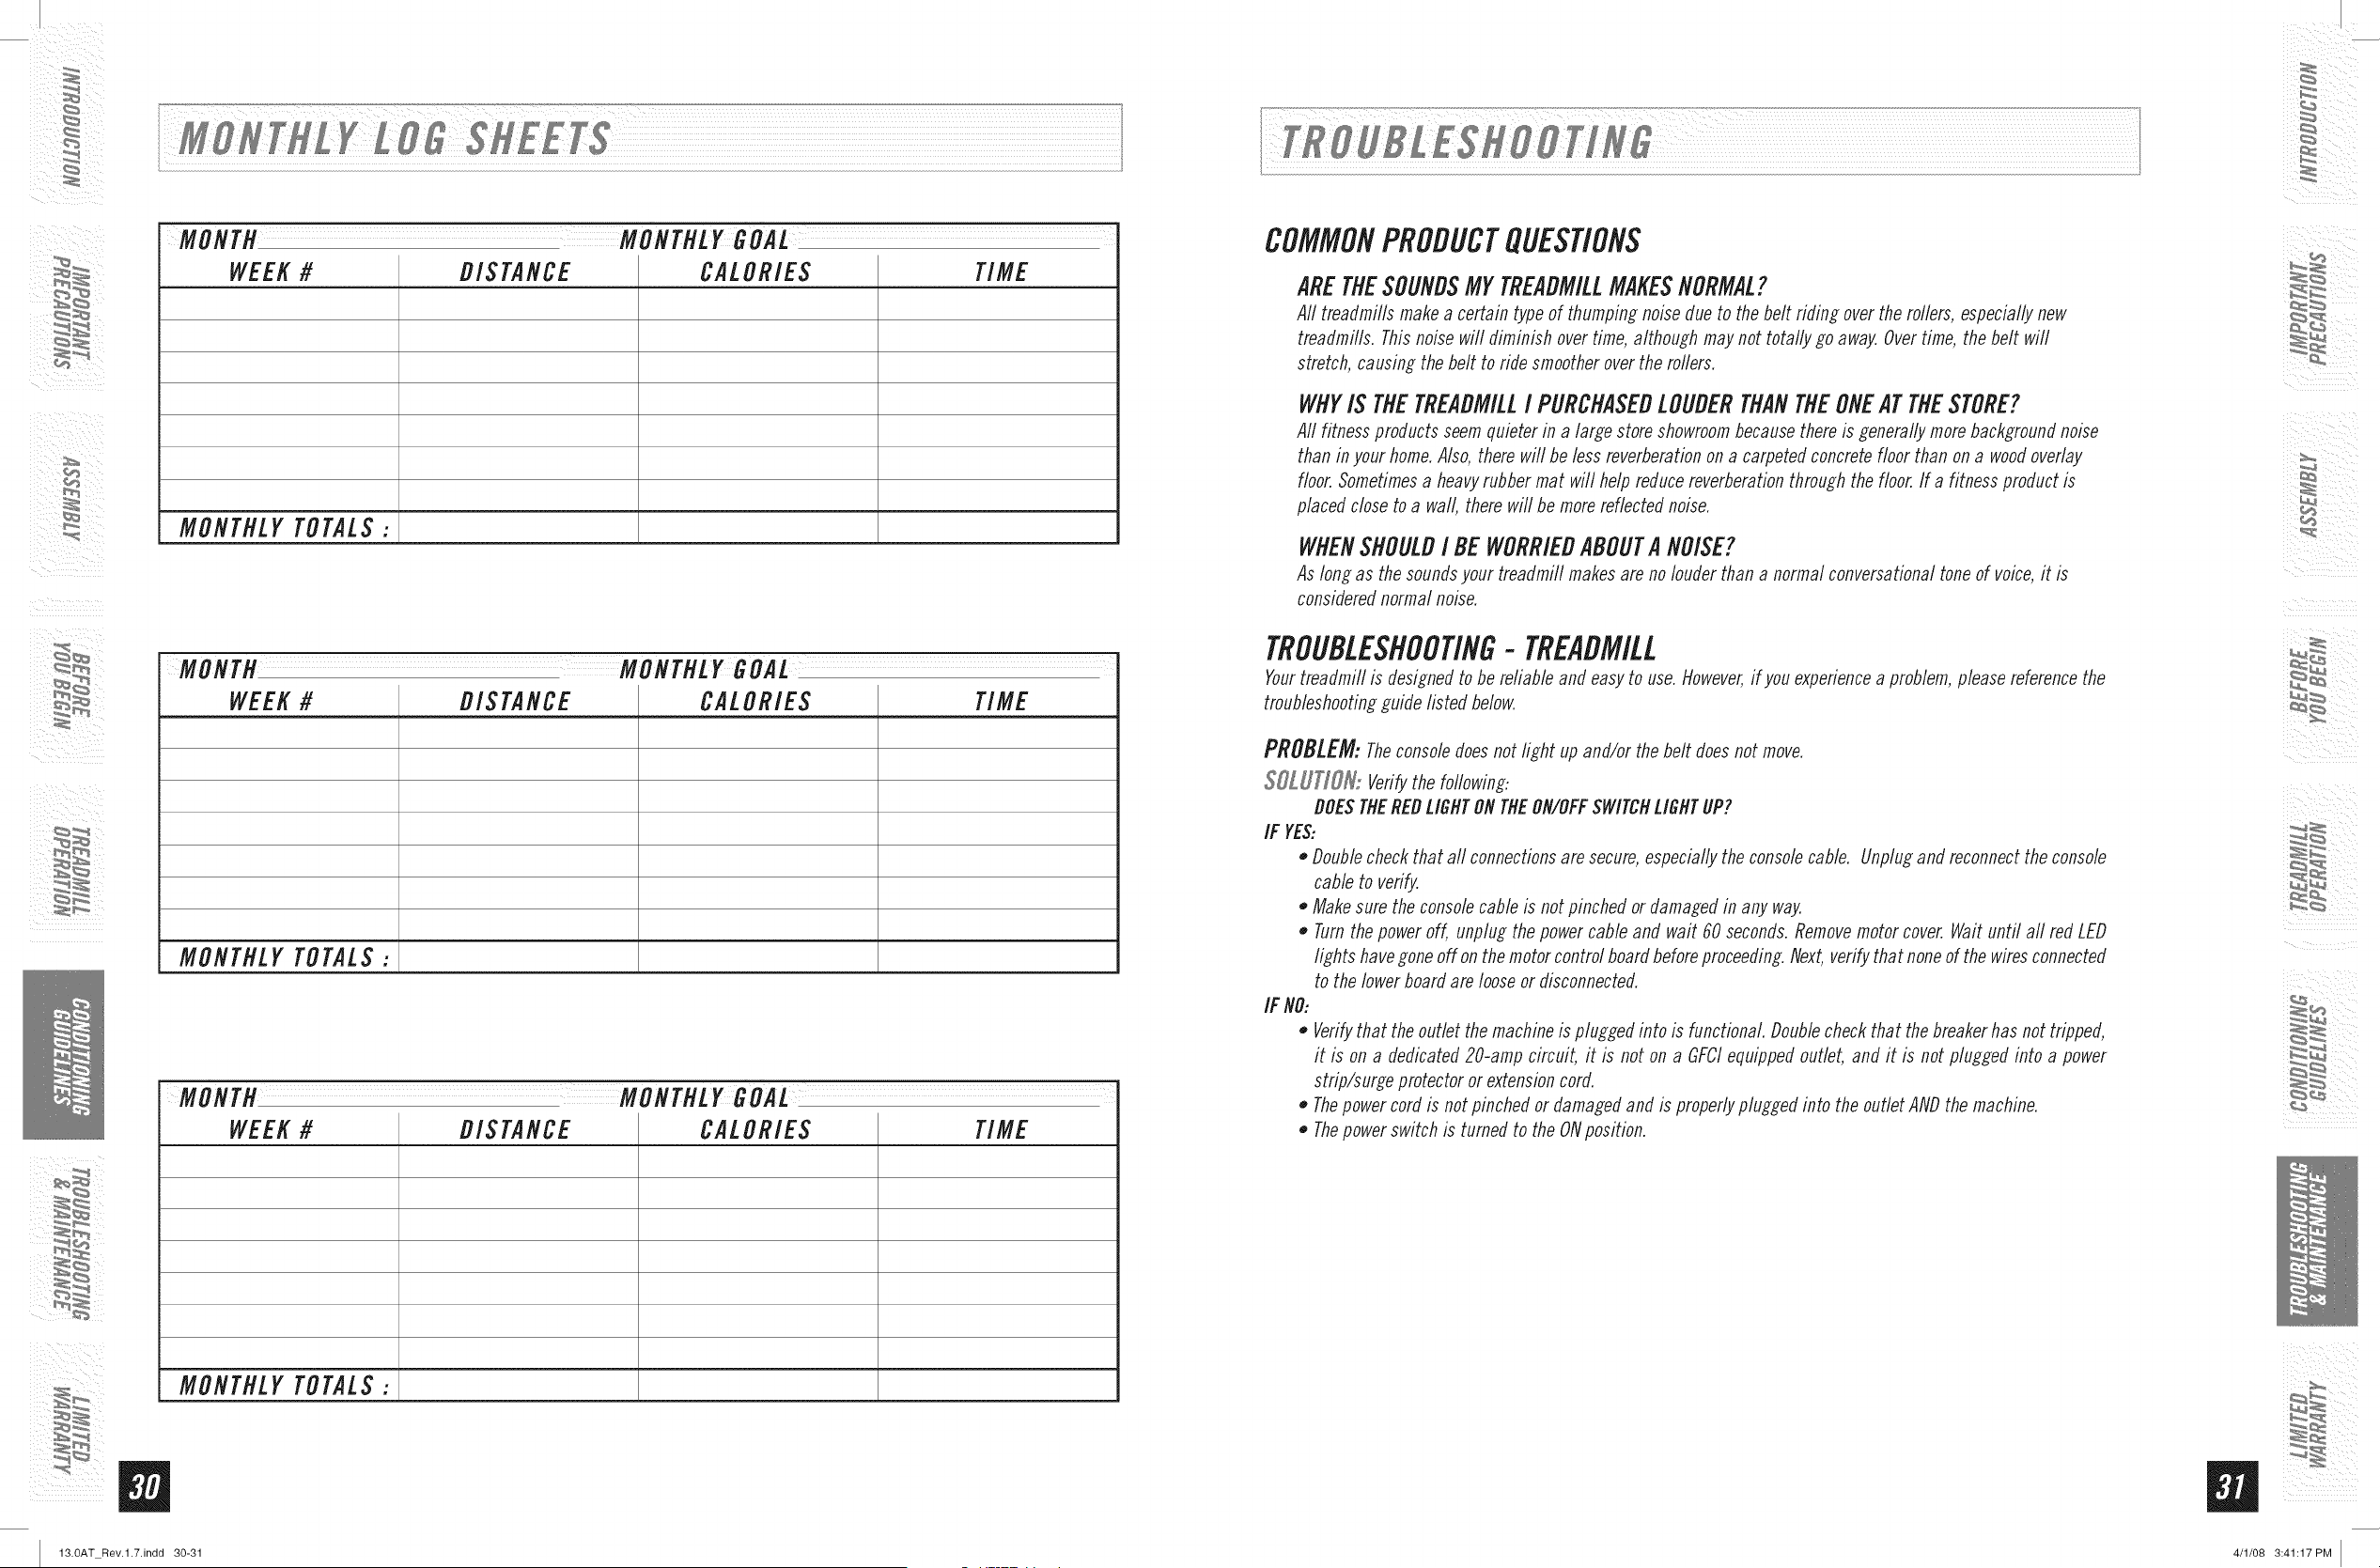
MONTH MONTHLY GOAL
WEEK# DISTANCE CALORIE$ TIME
MONTHLY TOTALS:
MONTH MONTHLY GOAL
WEEK # I DISTANCE I CA/-ORIE$ I TIME
MONTHLY TOTALS:
ii ¸ _ /
i¸¸ i_
ii/iii _iiiiiii
W
MONTH MONTHLY GOAL
WEEK # DISTANCE CALORIE$ TIME
MONTHLY TOTALS:
13.0AT Rev.l.7.indd 30-31
COMMONPRODUCTQUESTIONS
ARETHESOUNDSMYTREADMILLMAKESNORMAL?
All treadmills make a certain typeof thumping noise due to the belt riding over the rollers, especially new
treadmills. Thisnoise will diminish over time, although maynot totally go away. Overtime, the belt wifl
stretch, causing the belt to ride smootherover the rollers.
WHYI$ THETREADMILLI PURCHASEDLOUDERTHANTHEONEATTHESTORE?
All fitness products seemquieter in a large store showroombecausethere is generally more backgroundnoise
than in your home.Also, there will be less reverberationon a carpetedconcretefloor than on a woodoverlay
floor. Sometimesa heavyrubber mat will help reducereverberation through the floor.If a fitness product is
placed close to a wall, there will be more reflected noise.
WHENSHOULDI BE WORRIEDABOUTA NOISE?
As long as the soundsyour treadmill makes are nolouder than a normal conversational tone of voice,it is
considerednormal noise.
TROUBLESHOOTING-TREADMILL
Yourtreadmill is designed to be reliable and easyto use.However,if you experiencea problem, please referencethe
troubleshootingguide listed below.
PROBLEM: Theconsoledoesnot light up and/or the belt doesnot move.
SOLUTION,", Verifythe following:
DOESTilEREDLIGNTONTilE ON/OFFSWITCNLIGNTUP?
IF YES..
,, Doublecheckthat all connectionsare secure,especially the consolecable. Unplugand reconnectthe console
cable to verify.
,, Makesure the consolecable is not pinched ordamaged in any way.
,, Turnthe power off, unplug the power cable and wait 60 seconds.Removemotor cover. Waituntil aft red LED
lights havegone off on the motor controlboardbeforeproceeding.Next,verify that none of the wiresconnected
to the lower boardare loose or disconnected.
IF NO:
0
0
0
Verifythat the outlet the machine is plugged into is functbnal. Doublecheck that the breakerhas not tripped,
it is on a dedicated 20-amp circuit, it is not on a GFCIequipped outlet, and it is not plugged into a power
strip/surge protector or extensioncord.
Thepowercord is not pinched or damagedand is properlyplugged into the outlet ANDthe machine.
Thepowerswitch is turned to the ONposition.
4/1/08 3:41:17PM
ii ¸ _
i¸¸
13.0AT Rev.l.7.indd 32-33
PROBLEM:Thetreadmillcircuitbreaker trips during a workouL
SOLUTIOR: Verifythe following:
• Makesurethetreadmiflis pluggedintoa dedicated20-ampcircuit.
• Verifythatyou do nothavethemachineonanextensioncordorsurgeprotector.
• Confirmthat the machineis not pluggedinto a GFChequippedoutletorona circuit that hasa GFCI-equippedoutlet on it.
PROBLEM: Therunning belt does not stay centered during a workout.
SOLUTIOS{:Verifythe following:
• Makesurethetreadmiflis ona levelsurface.
• Verifythat the beltis properlytightenedandcentered(Referto theAdjustmentsectionfor detaileddirections).
PROBLEM:Operatingspeed appears inaccurate.
SOLUTIOR: Auto-calibrate the treadmill:
• Poweronthe treadmilland havethesafetykeyin positionon the
console.Pressand hold theelevation"4-" andspeed"-" buttonsfor
approximate/ySsecondstoentertheEngineeringMode.Theconsole
will beepand "ENGO"appearsin thedisplay. DO NOTstand onrunning be!t wflile
• Pressthe Speed"+" or "-" buttonuntil"ENG2"appearsinthedisplay, calibrating-standon t,_eguide
• Press,"ENTER"to select.Press,"START"to begin.Thetreadmifl
runningbelt wifl beginto moveautomaticallyand the auto-cafibrafion
sequencewill properlysetandstorethespeedvalues.
• Uponsuccessfulcafibrafion,the treadmiflwiflbeepseveraltimes.The
consolewill automaticallyexitEngineeringModeandreturnto the
start-up screen.
rails. Treadmillwill fluctuate between
lowand high speedsfor several
mi.ut =unt,c=!ib.=tioni= mp!et ,
TROUBLESHOOTING- HEARTRATE
Checkyourexerciseenvironmentfor sourcesof interferencesuchas fluorescentlights, computers,undergroundfencing,home
securitysystemsorappliancescontaininglargemotors.Theseitemsmaycauseerraticheartratereadouts.
Youmayexperienceanerraticreadoutunderthe foflowingconditions:
• Grippingtheheartratehandlebarstootight. Tryto maintainmoderatepressurewhileholdingontothe heartrate handlebars.
• Constantmovementand vibrationdueto constantlyholdingtheheartratehandlebarswhileexercising.Ifyou arereceiving
erraticheartrate readouts,try to onlyholdthegrips longenoughto monitoryourheartrate.
• Whenyouarebreathingheavilyduringa workout.
• Whenyourhandsareconstrictedbywearinga ring.
• Whenyourhandsaredryorcold.Tryto moistenyourpalmsbyrubbingthem togetherto warm.
• Anyonewith heavyarrhythmia.
• Anyonewith arteriosclerosisor peripheralcirculationdisorder.
• Anyonewhoseskinonthe measuringpalmis especiallythick.
!f =bo!=tro=b!l=hooti, di!=,O!re=edyth= u=e==dt,rnth!=owe ,ff.
i PLEASECALLCUSTOMERTECHSUPPORTATTHENUMBERONTHEBACKPANEL
i I
Thefollowing information may be asked of you whenyou call. Pleasehave these items readily available:
• Model Name
• Serial Number
• Date of Purchase (receipt or credit card statement)
In order for Customer TechSupport to serviceyour treadmifl they may need to ask detailed questions about the symptoms that are
occurring. Sometroubleshooting questions that may be asked are:
• flow long has this problem beenoccurring?
• Does this problem occur with everyuse? With every user?
If you are hearing a noise, does it come from the front or the back? Whatkind of noise is it (thumping, grinding, squeaking,
chirping etc.)?
flas the machine been lubricated and maintained per the maintenance schedule?
Answering these and other questions wifl give the technicians the ability to send proper replacement parts and the service necessary
to get you and your AFGtreadmill running again!
ii! il
Cleanliness of your treadmill and its operation environment will keep maintenance problems and service calls to a
minimum. For this reason, werecommendthat the followin_ preventivemaintenance schedulebe followed.
AFTEREACHUSE(DAILY)
Cleanand inspect, followin_ these steps:
Turnoff the treadmill with the on/off switch, then unplug the powercord at the waft outlet.
Wipedown the runnin_ belt, deck, motor cover,and consolecasin_ with a damp cloth. Neveruse solvents, as they
can cause damage to the treadmill.
,, Inspect the power cord. If the powercord is damaged, contact AFG.
Makesure the power cord is not underneaththe treadmill or in any other area whereit can becomepinched or cut.
Checkthe tension and alignment of the runnin_ belt. Make sure that the treadmill belt will not damage any other
componentson the treadmifl by bein_ misali_ned.
EVERYWEEK
Cleanunderneath the treadmill, followin_ these steps:
,, Turnoff the treadmill with the on/off switch, then unplug the powercord at the waft outlet.
,, Move the treadmill to a remote location.
,, Wipeor vacuumany dust particlesor otherobjectsthat mayhaveaccumulatedunderneaththe treadmill.
,, Return the treadmill to its previous position.
.._.o.............:................ ............ .............. ...................
EVERYMONTH_ IMPORTANT!
TurnOff the ireadmill w!th the on/off Switch; then unp!u8 the power cord at the wall oudet
ii Inspect all assemblybolts of the machine for proper dghtness, i
Turnoff the treadmill and wait 60 Secondsl
• Wait un!ilALL
Remove screws holdin_ motor cover to the frame, Remove the lower mastbolts in order to Sfide the motor cover
upwards, Sfiding the motor cove_ masts, be careful not to Scratchthe paint. Prop up the motor cover
Clean the motor anfl lower beard areato eliminate any lint or dust particles that may haveaccumulated. Failure to
may resu!t in
,, Vacuumand wipe down the belt with a damp cloth Vacuum any black/white particles that may accumulate around
the uniL Thesepartbles mayaccumulate from normal treadmill use. ....................
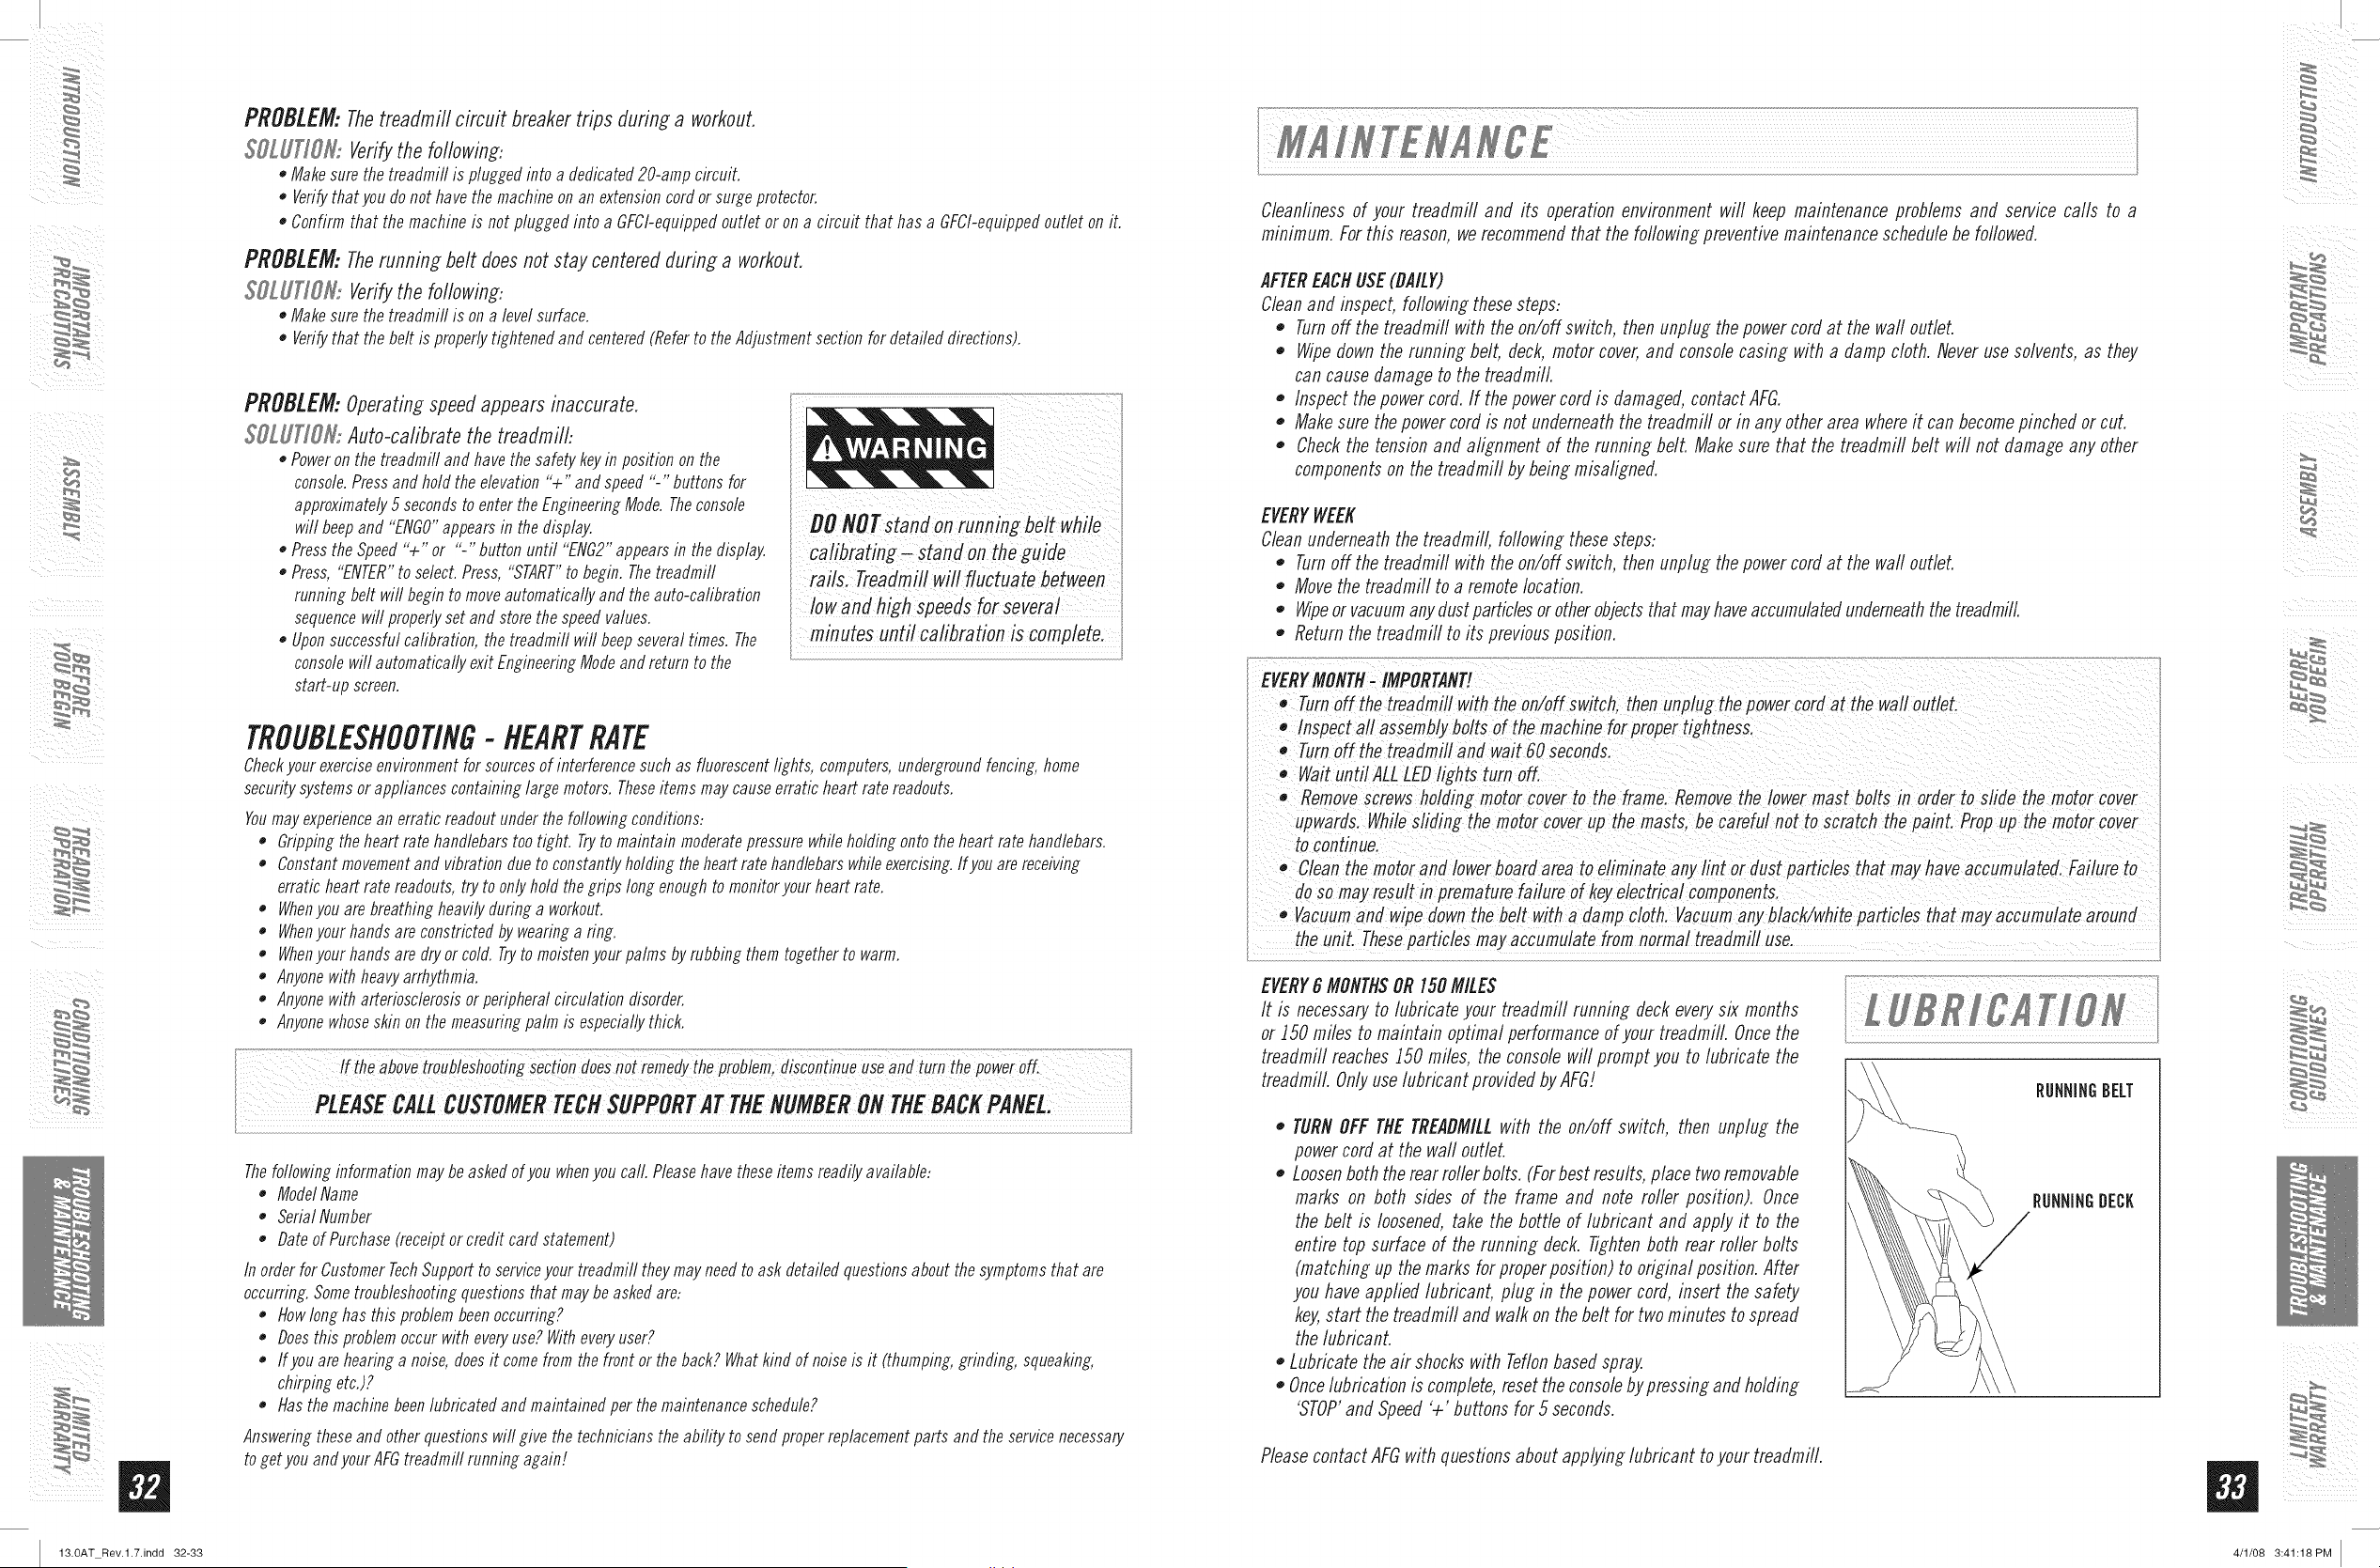
EVERY6 MONTHSOR150MILES
It is necessaryto lubricate your treadmill runnin_ deck everysix months
or _50 miles to maintain optimal performanceof your treadmill. Oncethe
treadmill reaches _50 miles, the console will prompt you to lubricate the
treadmill. Onlyuse lubricant provided byAFG/
,, TURNOFF THETREADMILLwith the on/off switch, then unplug the
power cord at the waft outlet.
Loosenboth the rear rollerbolts. (Forbest results, place two removable
marks on both sides of the frame and note roller position). Once
the belt is loosened,take the bottle of lubricant and apply it to the
entire top surface of the runnin_ deck. Tightenboth rear roller bolts
(matchin_ up the marks for properposition) to original position. After
you have applied lubricant, plu_ in the power cord, insert the safety
key,start the treadmill and walk on the belt for two minutes to spread
the lubricant.
Lubricate the air shocks with Teflonbased spray.
,, Oncelubrication is complete,reset the consolebypressin_ and holdin_
'STOP'and Speed'+' buttons for 5 seconds.
RINNINIBELT
RINNINIIEII
Pleasecontact AFGwith questions about applyin_ lubricant to your treadmill.
s
m
4/1/08 3:41:18PM

WeightCapacity= 350 LBS
FRAME* LIFETIME
AFGwarrants the frame against defects in workmanship
and materials for the lifetime of the original owner.(The
frameis definedas the weldedmetal baseof the unit and
doesnot include any parts that can beremoved.).
MOTOR• LIFETIME
AFGwarrantsthedrive/elevationmotorsagainstdefectsin
workmanshipandmaterialsfor thefifetimeof the
originalowner.
ELECTRONICS& PARTS• 3 YEARS/5 YEARS*
AFGwarrants the electronic components, finish and aft
original parts for a period of threeyears from the date of
original purchase, so long as the device remains in the
possessionof the original owner.
Afreeextendedpartsandelectronicswarrantyis
available.Seeregistrationcard fordetails.
LABOR• I YEAR
AFGshaft cover the labor cost for the repair of the device
for a period of oneyear from the date of the original
purchase, so long as the device remains in the possession
of the original owner.
EXCLUSIONSANDLIMITATIONS
WhoIScovered:
• Theoriginalownerandis not transferable.
WhatIScovered:
* Repairor replacementofa defectivemotor,electroniccomponent,or
defectivepartandis thesoleremedyof thewarranty.
WhatIS NOTcovered:
• Normal wearand tear, improperassemblyormaintenance,or
installation of parts or accessoriesnot oridnafty intended or
compatible with the equipmentas sold.
• Damageor failure due to accident, abuse, corrosion,discolorationof
paint orplastic, neglect, theft, vandalism, fire, flood, wind, ftghtning,
freezing,or othernatural disasters of any kind, power reduction,
fluctuation or failure from whatevercause, unusual atmospheric
conditions,collision, introduction of foreignobjectsinto the covered
unit, or modifications that are unauthorizedornot recommendedby
AFG.
• Incidental orconsequentialdamages.AFGis not responsibleor
liable for indirect, specialor consequentialdamages,economic
loss, loss of prope_ or profits, loss of enjoymentor use,or other
consequentialdamagesof whatsoevernature in connectionwith the
purchase,use, repair ormaintenance of the equipment.
• Equipmentusedfor commercialpurposesor anyuse other than a
single family orHousehold,unlessendorsedbyAFGfor coverage.
• Equipmentownedor operatedoutside the USand Canada.
• Defive_ assembly,installation, setup for oridnal or replacement
units or labor or other costsassociatedwith removalor replacement
of the coveredunit.
• Any attempt to repair this equipmentcreatesa risk ofinju_ AFG
is not responsibleorliable for any damage,loss or liability arising
from anypersonalinjury incurredduring the courseof, or as a result
of any repair or attempted repairof your fitness equipment byother
than an authorizedservicetechnician. Aft repairs attempted byyou
on your fitness equipmentare undertakenATYOUROWN/?IS/(and
AFGshaft haveno liability for any injury to the personor property
arising from such repairs.
SERVICE/RETURNS
• In-homeserviceis availablewithinJ50milesofthenearest
authorizedrepaircenter(MileagebeyondJSOmilesfroman
authorizedservicecenteris theresponsibilityof theconsumer).
• Aft returnsmustbepre-authorizedbyAFG.
• AFG'sobligationunderthiswarrantyislimitedtoreplacingor
repairing,at AFG'soption,thesameor comparablemodelat oneof
its authorizedservicecenters.
• AnAFGauthorizedservicecentermustreceiveaftequipment
for whicha warrantyclaimis made.Thisequipmentmustbe
receivedwithaftfreightandothertransportationchargesprepaid,
accompaniedbysufficientproofofpurchase.
Replacementunits,partsandelectroniccomponentsreconditioned
toAs-newConditionbyAFGorits vendorsmaysometimesbe
suppliedas warrantyreplacementandconstitutefulfillmentof
warrantyterms.
Thiswarrantygivesyouspecificlegalrights,andyourrightsmay
varyfromstatetostate.
m
13.0AT Rev.l.7.indd 34-35 4/1/08 3:41:18PM

DONOTRETURNTOTHERETAILER
if you haveanyproblemsduring
assemblyorif parts aremissing.
For fast and friendly service, please contact one of our
trained customer technicians via phone, email or our website.
CustomerTechSupportHotline-1-S77-GOAFG-55
Ernai!-[email protected]
Website-www.advancedfitnessp_rou_.com
Everyemployeeat AFGtakespride in providingyou with a high quafity product,
Wewant to know if you have a problemand we want to have an opportunityto correct it for you,
NOTE:Please read the TROUBLESHOOTINGsection before contacting Customer TechSupport,
Toreceive additional product information, visit us at www,aflvanceflfitness_,com
13.0Ar Rev.1.71 © 2oo8AFGProductsIDesigned& Engineeredin the U.S.A.I Madem China
13.0AT Rev.l.7.indd 36 4/1/08 3:41:18PM I