

Operator's Manual
IIIII IIII I III
icu.FT M..°i
LAWN TRACTOR
24.0 HP,*42" Mower
Electric Start
6 Speed Transaxle
Model No.
917.28925
• EspaSol, p. 33
This product has a low emission engine which operates
differently from previously built engines. Before you start the
engine, read and understand this Owner's Manual.
IMPORTANT:
Read and foltow atl Safety
Rules and Instructions before
operating this equipment.
For answers to your questions
about this product, Call:
t-800.659-5917
Sears Craftsman Help Line
5 am - 5 pro, Mon - Sat
Gasoline containing up to 10% ethanol (EIO) is acceptable for use in this machine. The
use of any gasoline exceeding 10% ethanol (EIO) will void the product warranty.
Esta maquina puede utilizar gasolina con un contenido de hasta el 10% de etanol (EIO). El
uso de una gasolina que supers el 10% de etanol (EIO) anular_ la garantla del producto.
Sears Brands Management Corporation, Hoffman Estates, IL 60179 U.S.A.
Visit our Craftsman website:www.sears,comicraftsman *As _ated by ti',,eengine mahufacturer
441264 Rev. 1

Warranty ................................................ 2
Safety Rules ..................................... 3
Product Specifications ........................... 6
Assembly/Pre-Operation ....................... 7
Operation ............................................... 9
Maintenance ........................................ 16
Maintenance Schedule ....................... 16
Service and Adjustments ..................... 21
Storage ................................................ 27
Troubleshooting ................................... 28
Sears Service ....................... Back Cover
Craftsman Riding Equipment Warranty
CRAFTSMAN FULL WARRANTY
FOR TWO YEARS from the date of purchase, alt non-expendable parts of this riding equipment are
warranted against any defects _n matenal or workmanship A defective non-expendable part will
recewe free tn-home repair or replacement if repair _simpossible.
FOR FIVE YEARS from the date of purchase, the frame and front axie of this riding equipment are
warranted against any defects in material or workmanship A defective frame or front axle wtfl receive
free in-home repair er replacement ff repair ts _mposs_bte
FOR 90 DAYS from the date of purchase, the battery Can expendable part) of this riding equipment
is warranted against any defects m material or workmanshtp {our testing proves that it wdl not hold a
charge) A defective battery w_li receive free in-home replacement
ADDITIONAL LIFETIME LIMITED WARRANTY on CAST IRON FRONT AXLE (if equipped)
FOR AS LONG AS tT IS USED by the original owner after the fifth year from the date of purchase, the
cast iron fro nt axle (if equipped) of thzs ndmg equtpment ts warranted against any defects in material or
workmanship W_th proof of purchase, a defectwe cast front axle will receive free in-home replacement.
WARRANTY SERVICE
For warranty coverage details to obta=n fre_ repair or replacement, call 1-800-659-5917 or vis=t the
web s_te- www craftsman.corn
In all cases above, _fpart repair or replacement ts impossible, the riding equipment wTll be replaced
free of charge with the same or an equivalent model
All of the above warranty coverage zs void _f th_s nd_ng equipment Js ever used while provtdlng
commerctal services or _frented to another person.
This warranty covers ONLY" defects _n materia_ and workmanship Warranty coverage does NOT
tnclude
• Expendable parts (except battery) that can wear out from normal use within the warranty period,
_ncludtng but not limited to b{ades, spark plugs, air cleaners, belts, and o_1filters
• Standard maintenance serwc_ng, ml changes, or tune-ups
• Tire replacement or repair caused by punctures from outstde objects, such as nails, thorns,
stumps, or glass
• Tire or wheel replacement or repair resuit, ng from normal wear, accident, or improper operatton or
maintenance
- Repairs necessary because of operator abuse, _nclud_ng but not hmited to damage caused by
towing objects beyond the capablhty of the ndtng equipment, impacting objects that bend the
frame, axle assembty or crankshaft, or over-speeding the engine
• Repairs necessary because of operator negligence, mctud_ng but not hm_ted to, electrical and
mechanical damage caused by improper storage, failure to use the proper grade and amount
of engine oil, failure to keep the deck clear of flammable debris, or failure to maintain the riding
equipment according to the instructions contained in the operator's manual.
• Engine (fuel system) cteamng or repairs caused by fuel determined to be contaminated or oxidized
(stale) In general, fuel should be used within 30 days of its purchase date
• Normal deterioration and wear of the exterior ftmshes, or product label replacement.
This warranty gives you specific legal rights, and you may also have other rights which vary from
state to state.
Sears Brands Management Corporation, Hoffman Estates, IL 60179
_DANGER: This cutting machine is capable of amputating hands and feet and
throwing objects. Failure to observe the following safety instructions could result
in serious injury or death,
_I, WARNING: In order to prevent acciden-
tal starting when setting up, transporting,
adiustlng or making repairs, always discon-
nect spark plug wire and place wire where
it cannot contact spark plug.
_kWARNING: Do not coast down a hill in
neutral, you may lose control of the tractor.
_JkWARNING: Tow only the attachments
that are recommended by and comply with
specifications of the manufacturer of your
tractor. Use common sense when towing.
Operate only at the lowest possible speed
when on a slope. Too heavy of a load, while
on a slope, is dangerous. Tires can lose
traction with the ground and cause you to
lose control of your tractor.
,_WARNING: Engine exhaust, some of
its constituents, and certain vehicle compo-
nents contain or emit chemicals known to the
State of California to cause cancer and birth
defects or other reproductwe harm.
_WARNING: Battery posts, terminals and
rela[ed accessories contain lead and lead
compounds, chemicals known to the State of
California to cause cancer and birth defects
or other reproductwe harm. Wash hands
after handling.
!. GENERAL OPERATION
Read, understand, and follow all instruc-
tions on the machine and in the manual
before starting.
Do not put hands or feet near rotating
parts or under the machine. Keep clear
of the discharge opening at all t_mes.
Only allow responsible adults, who are
familiar with the instructions, to operate
the machine.
• Clear the area of obiects such as rocks,
toys, wire, etc., whch could be picked
up and thrown by the blades.
Ensure the area ts clear of bystanders
before operating. Stop machine if anyone
enters the area.
Never carry passengers.
• Do not mow in reverse unless absolutely
necessary, Always took down and behind
before and while backing,
Never direct discharged material toward
anyone. Avoid discharging material
against a wall or obstruction. Material
may ricochet back toward the operator.
Stop the blades when crossing gravel
surfaces.
* Do not operate machine without the en-
tire grass catcher, discharge chute, or
other safety devices in place and working.
Slow down before turning.
, Never leave a running machine unat-
tended. Always turn off blades, set
parking brake, stop engine, and remove
keys before dismounting.
Disengage blades when not mowing.
Shut off engine and wait for all parts to
come to a complete stop before cleaning
the machine, removing the grass catcher,
or unclogging the discharge chute.
Operate machine only in daylight or good
artificial hght.
Do not operate the machine while under
the influence of alcohol or drugs.
Watch for traffic when operating near or
crossing roadways.
Use extra care when loading or unloading
the machine into a trailer or truck.
Always wear eye protection when operat-
ing machine.
Data indicates that operators, age 60
years and above, are involved in a large
percentage of riding mower-related inju-
nes. These operators should evaluate
their ability to operate the riding mower
safely enough to protectthemselves and
others from serious Injury.
, Follow the manufacturer's recommen-
dation for wheel weights or counter-
weights.
Keep machine free of grass, leaves or
other debris build-up which can touch hot
exhaust/engine parts and burn. Do not
allow the mower to plow leaves or other
debris which can cause build-up to oc-
cur. Clean any oil or fuel spillage before
operating or storing the machine. Allow
machine to cool before storage.
3

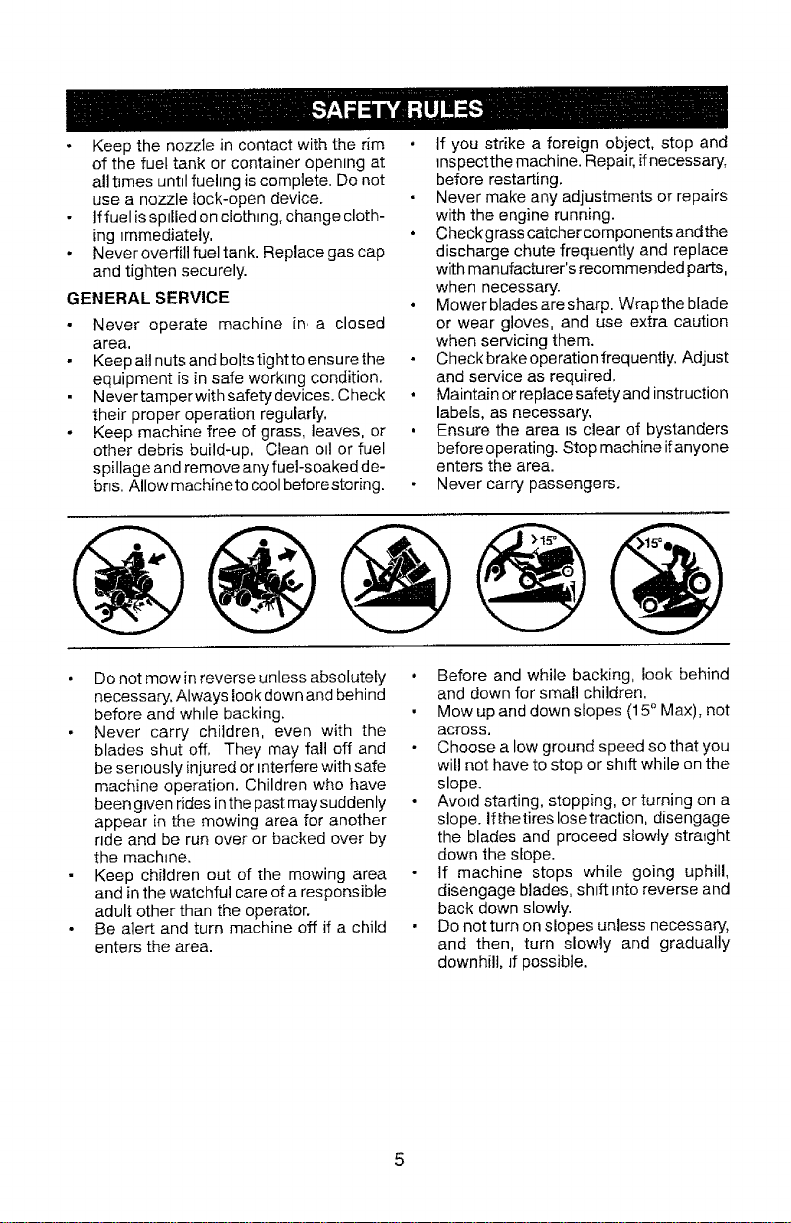
II. SLOPE OPERATION
Slopes are a malor factor related to toss of
control and tip-over accidents, which can
result in severe injury or death. Operation
on all slopes requires extra caution. If you
cannot back up the slope orifyou feel uneasy
on it, do not mow it.
Mow up and down slopes, not across.
* Watch for holes, ruts, bumps, rocks, or
other hidden objects. Uneven terrain
could overturn the machine. Tall grass
can h_de obstacles.
Choose a low ground speed so that you
will not have to stop or shift while on the
slope.
Do not mow on wet grass. T_res may lose
traction.
Always keep the machine in gear when
going down slopes. Do not shift to neutral
and coast downhill.
Avoid starting, stopping, or turning on a
slope. Ifthetlres Iosetract_on, d_sengage
the blades and proceed slowly straEght
down the slope.
Keep all movement on the slopes slow
and gradual. Do not make sudden
changes in speed or direction, which
could cause the machine to roll over,
Use extra care whde operahng machine
w_th grass catchers or other attachments,
they can affect the stability of the ma-
chine, Do no use on steep slopes,
. Do not try to stabilize the machine by
putting your foot on the ground.
• Do not mow near drop-offs, ditches,
or embankments, The machine could
suddenly roll over if a wheel is over the
edge or ff the edge caves in.
II!. CHILDREN
Tragic accidents can occur if the operator
is net alert to the presence of children.
Children are often attracted to the machine
and the mow_ng actMty. Never assume
that children wtll remain where you last
saw them.
Keep children out of the mowing area
and _nthe watchful care of a responsible
adult other than the operator.
Be alert and turn machine off if a child
enters the area,
Before and while backing, look beh{nd
and down for small children.
Never carry children, even w_th the
blades shut off. They may fall off and
be seriously injured or interfere w=thsafe
machine operation. Children who have
been given rides in the past may suddenly
appear in the mowing area for another
nde and be run over or backed over by
the machine.
Never allow children to operate the ma-
chine,
Use extra care when approaching blind
corners, shrubs, trees, or other objects
that may block your view of a child.
IV. TOWING
• Tow only w_th a machine that has a hitch
designed for towing. Do not attach towed
equipment except at the hitch poEnt.
Followthe manufacturer's recommenda-
tion for weight limits for towed equipment
and towing on slopes,
Never allow children or others in or on
towed equipment.
On slopes, the we_giqt of the towed equip-
ment may cause loss of traction and loss
of control.
Travel slowly and allow extra distance to
stop.
V. SERVICE
SAFE HANDLING OF GASOLINE
To avoid personal injury or property dam-
age, use extreme care in handling gasoline.
Gasofine is extremely flammable and the
vapors are explosive.
Extinguish all cigarettes, cigars, pipes,
and other sources of ignition.
Use only approved gasoline container.
Never remove gas cap or add fuel w_th
the engine running. Allow engine to cool
before refueling.
Never fuel the machine _ndoors,
Never store the machine or fuel container
where there _san open flame, spark, or
pilot hght such as on a water heater or
other appliances.
Never flit containers inside a vehicle or
on a truck or trailer bed with plastic liner.
Atways place containers on the ground
away from your vehicle when filling.
• Remove gas-powered equipment from
the truck or trailer and refuel it on the
ground. If th_s is not possible, then refuel
such equipment with a portable container,
rather than from a gasohne dispenser
nozzle.
Keepthenozzleincontactwiththerim
ofthefueltankorcontaineropeningat
alltimesuntilfuelingiscomplete.Donot
useanozzlelock-opendevice.
Iffuelisspilledonclothing,changecloth-
ingimmediately,
Neveroverfillfueltank.Replacegascap
andtightensecurely.
GENERALSERVICE
Never operate machine in a closed
area,
Keep all nuts and bolts tight to ensure the
equipment is in safe working condition.
N ever tamper with safety devices. Check
their proper operation regularly,
Keep machine free of grass, leaves, or
other debris build-up, Clean oil or fuel
spillage and remove any fuel-soaked de-
bris. Allow machine to cool before storing.
• If you strike a foreign object, stop and
inspectthe machine. Repair, ifnecessary,
before restarting.
Never make any adjustments or repairs
with the engine running.
• Checkgrass catchercomponents andthe
discharge chute frequently and replace
with manufacturer's recommended parts,
when necessary.
• Mower blades aresharp. Wrapthe blade
or wear gloves, and use extra caution
when servicing them.
Check brakeoperation frequently. Adjust
and service as required.
• Maintain or replace safety and instruction
labels, as necessary,
• Ensure the area ts clear of bystanders
beforeoperating. Stop machine ifanyone
enters the area.
Never carry passengers.
Do not mow in reverse unless absolutely
necessary, Always look down and behind
before and while backing.
Never carry children, even with the
blades shut off, They may fall off and
be seriously injured or mterfere with safe
machine operation. Children who have
been given rides in the past may suddenly
appear in the mowing area for another
ride and be run over or backed over by
the machine.
Keep children out of the mowing area
and in the watchful care of a responsible
adult other than the operator.
Be alert and turn machine off if a child
enters the area.
Before and while backing, look behind
and down for small children.
Mow up and down slopes (15 ° Max), not
across.
Choose a low ground speed so that you
will not have to stop or sh_ft while on the
slope.
Avoid starting, stopping, or turning on a
slope. Ifthetires Iosetraction, disengage
the blades and proceed slowly straight
down the slope.
If machine stops while going uphill,
disengage blades, shift tnto reverse and
back down slowly.
Do not turn on slopes unless necessary,
and then, turn slowly and gradually
downhill, Jf possible.
5

PRODUCT SPECIFICATIONS
Gasohne Capacity 3.00 Gallons
and Type. Unleaded Regular
Oil Type SAE 30 (above 32°F)
(API-SG-SL) SAE 5W30 (below 32°F)
Oil Capacity: W/Filter" 64 oz.
WiO Filter: 60 oz,
Spark Plug: Champion QC12YC
(Gap..040")
Sround Speed Forward. 1st 1.0
2nd 1.4
3rd 2. l
4th 3.1
5th 4.0
6th 5.1
Reverse: 1.6
Charging System. 3 Amps Battery
5 Amps Headlights
Battery. Amp/Hr. 28
M_n. CCA. 230
Case size' U1R
Blade Bott Torque: 45-55 Ft. Lbs.
CONGRATULATIONS on your purchase of
a new tractor. It has been designed, eng,-
nee red and man ufactured to give you the best
possEble dependab_fity and performance.
Should you expenence any problem you can-
not easily remedy, please contact aSears or
other qualified service center. Wehave com-
petent, well-tra_ned representatives and the
proper tools to servtce or repair thts tractor.
Please read and retain this manual. The
instructions wdl enable you to assemble
and maintain your tractor properly. Always
observe the '_SAFETY RULES".
CUSTOMER RESPONSIBILITIES
• Read and observe the safety rules.
• Follow a regular schedule in maintaining,
caring for and using your tractor.
• Follow the tnstructtons under "'Mainte-
nance" and 'Storage" sections of this
owner's manual.
_WAR NING: This tractor is eq uipped with
an internal combustion engine and should
not be used on or near any unimproved
forest-covered, brush-covered or grass-
covered land unless the engine's exhaust
system is equipped with a spark arrestor
meeting applicable local or state laws (if
any), If a spark arrester ts used, I[ should
be maintained in effective working order by
the operator.
In the state of California the above _srequired
by law (Section 4442 ofthe California Public
Resources Code). Other states may have
srmllar laws. Federal laws apply on federal
lands. A spark arrester for the muffler is
available through your nearest Sears service
center (See REPAIR PARTS manual).
REPAIR PROTECTIONAGREEMENTS
Congratulations on making a smart purchase.
Your new Craltsman_, product is designed
and manufactured for years of dependable
operation. But like all products, it may require
repair from time to time, That's when having
a Repair Protection Agreement can save you
money and aggravation.
Purchase a Repair Protection Agreement
now and protect yourself from unexpected
hassle and expense.
Here's what's included in the Agreement'
• Expertservlce byour12,000profess_onal
repair specialists.
Unhrn_tedservtce and no charge for parts
and labor on all covered repairs
Product replacement if your covered
product can't be fixed.
, Dtscount of 10% from regular price of
service and service-related parts not
covered bythe agreement; also, 10% off
regular price of preventwe maintenance
check.
Fast help by phone - phone support
from a Sears representative on products
requ_nng _n-home repair, plus convenient
repair scheduling,
Once you purchase the Agreement, a simple
phone call Isall that ittakes for you to sched-
ule servtce. You can call anytt me day or night,
or schedule a service appointment online.
Sears has over !2,000 professional repair
specialists, who have access to over 4.5
miltton quahty parts and accessories. That's
the kind of professional:sin you can count on
to help prolong the life ofyour new purchase
for years to come. Purchase your Repair
Protection Agreement today!
Some limitations and exclusions apply,
For prices and additional information call
1-800-827-6655.
SEARS INSTALLATION SERVICE
For Sears professzonal tnstallation of home
appliances, garage door openers, water
heaters, and other major home ttems, in the
U.S.A. call 1-800-4-MY-HOME®
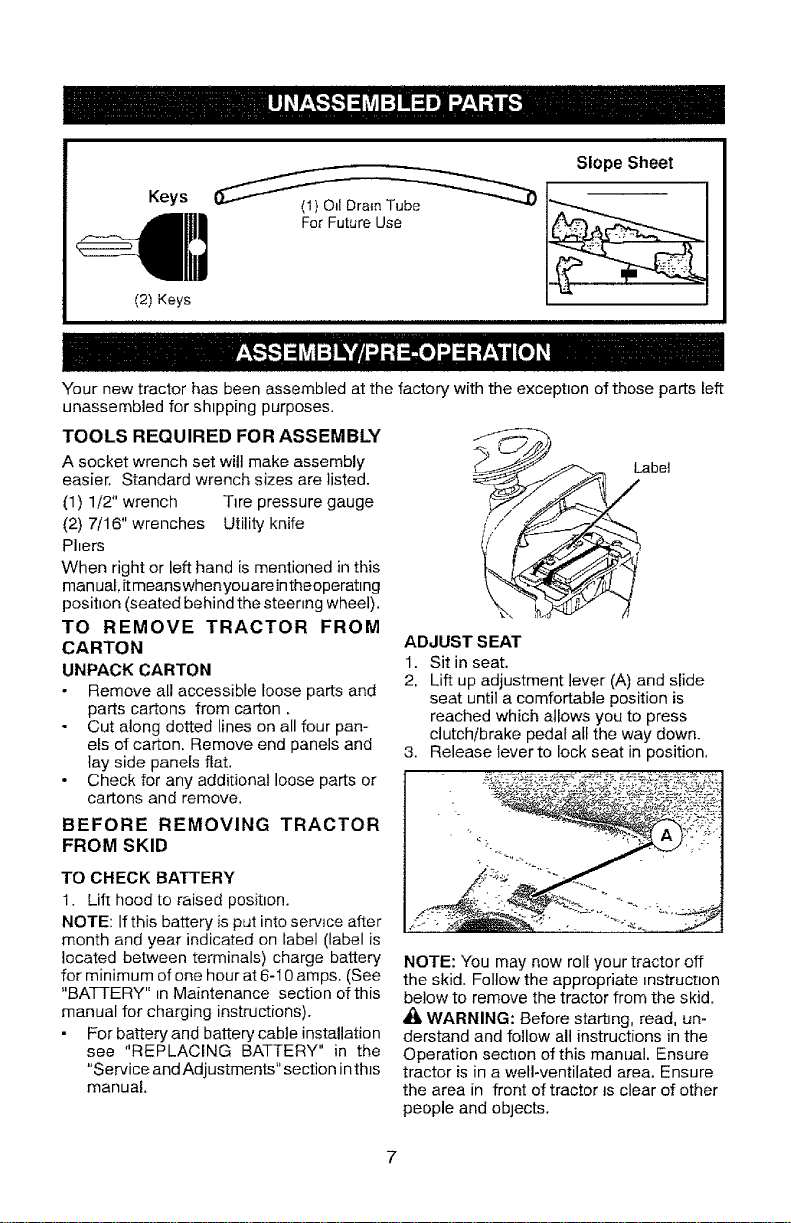
SlopeSheet
Keys (I) Oil Drain Tube
Your new tractor has been assembled at the factory with the exception of those parts left
unassembled for sh_pping purposes.
TOOLS REQUIRED FOR ASSEMBLY
A socket wrench set will make assembly
easier. Standard wrench sizes are listed.
(1) 1/2" wrench Tire pressure gauge
(2) 7/16" wrenches Utility knife
Phers
When right or left hand is mentioned in this
manual, itmeans whenyouarein theeperatlng
position (seated behind the steenng wheel).
TO REMOVE TRACTOR FROM
CARTON
UNPACK CARTON
Remove all accessible loose parts and
parts cartons from carton.
Cut along dotted lines on all four pan-
els of carton. Remove end panels and
lay side panels flat.
Check for any additional loose parts or
cartons and remove.
BEFORE REMOVING TRACTOR
FROM SKID
TO CHECK BATrERY
1. Lift hood to raised position.
NOTE: If this battery is put into service after
month and year indicated on label (label is
located between terminals) charge battery
for minimum of one hour at 6-I 0 amps. (See
"BATTERY" _nMaintenance section of this
manual for charging instructions).
For battery and battery cable installation
see "REPLACING BATTERY" in the
"Service and Adjustments" section in this
manual.
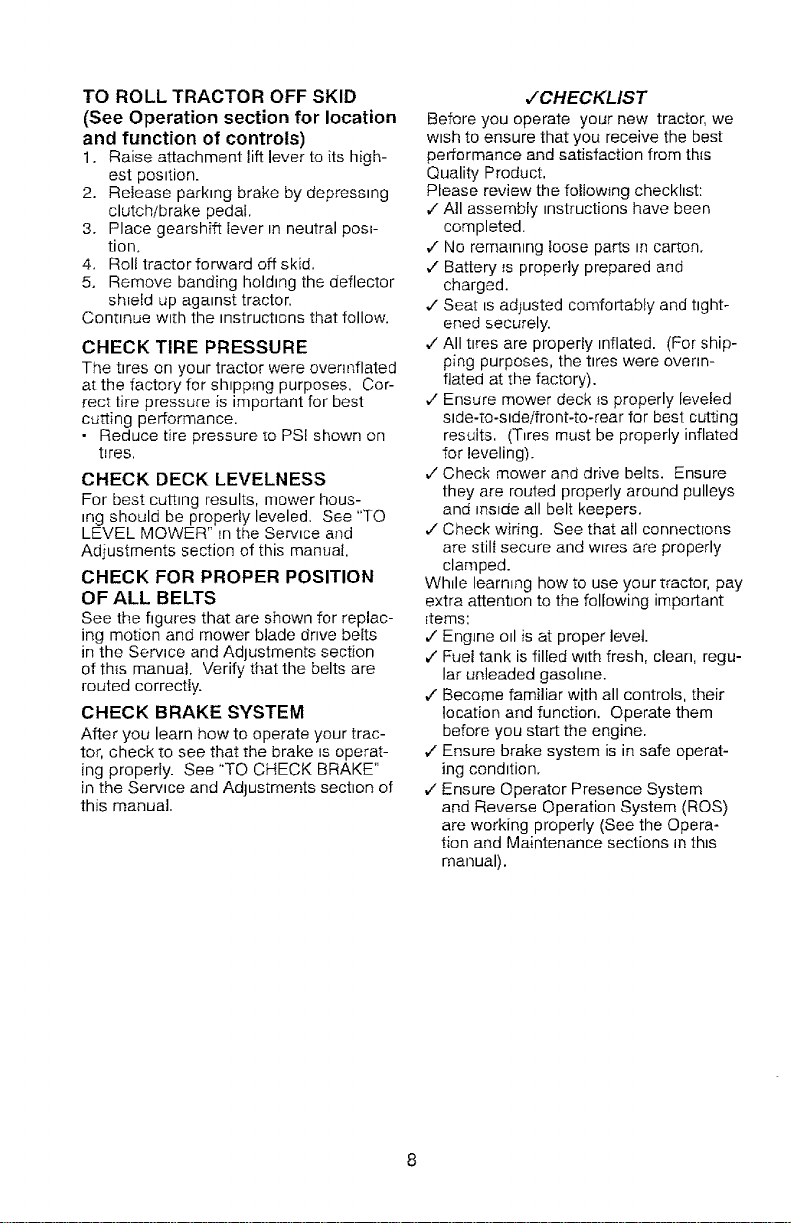
ADJUST SEAT
1. Sit in seat.
2. Lift up adjustment lever (A) and slide
seat until a comfortable position is
reached which allows you to press
clutch/brake pedal all the way down.
3. Release lever to lock seat in position.
NOTE: You may now roll your tractor off
the skid. Follow the appropriate nstructlon
below to remove the tractor from the skid.
_, WARNING: Before starting, read, un-
derstand and follow all instructions in the
Operation section of this manual. Ensure
tractor is in a well-ventilated area. Ensure
the area in front of tractor Jsclear of other
people and objects.
7
TO ROLL TRACTOR OFF SKID
(See Operation section for location
and function of controls)
1. Raise attachment lift lever to its high-
est position.
2. Release parking brake by depressing
clutch/brake pedal.
3. Place gearshift lever in neutral posi-
tion.
4. Roll tractor forward off skid.
5. Remove banding holding the deflector
shield up against tractor.
Continue with the instructions that follow.
CHECK TIRE PRESSURE
The tires on your tractor were ovennflated
at the factory for shipping purposes. Cor-
rect tire pressure is important for best
cutting performance.
• Reduce tire pressure to PSi shown on
tl res.
CHECK DECK LEVELNESS
For best cutting results, mower hous-
ing should be properly leveled. See "TO
LEVEL MOWER" tn the Service and
Adiustments section of this manual.
CHECK FOR PROPER POSITION
OF ALL BELTS
See the figures that are shown for replac-
ing motion and mower blade drive belts
in the Service and Adlustments section
of th_s manual. Verify that the belts are
routed correctly.
CHECK BRAKE SYSTEM
After you learn how to operate your trac-
tor, check to see that the brake _soperat-
ing properly. See "TO CHECK BRAKE"
in the Service and Adjustments section of
this manual.
,/CHECKLIST
Before you operate your new tractor, we
wish to ensure that you receive the best
performance and satisfaction from this
Quality Product.
Please review the foflow_ng checklist:
¢" All assembly _nstructions have been
completed.
,/No remaining loose parts _ncarton.
,/Battery _sproperly prepared and
charged.
J Seat _sadjusted comfortably and tight-
ened securely.
,/All tires are properly inflated. (For ship-
ping purposes, the tires were ovenn-
flated at the factory).
,/Ensure mower deck _sproperly leveled
side-to-sldeifront-to-rear for best cutting
resutts, (Tires must be properly inflated
for leveling).
¢" Check mower and drive belts. Ensure
they are routed properly around pulleys
and inside all belt keepers.
,/Check wiring. See that all connectfons
are still secure and w_res are properly
clamped.
Whde learning how to use your tractor, pay
extra attention to the following important
_tems:
v" Engine oil is at proper level.
¢" Fuel tank is filled with fresh, clean, regu-
lar unleaded gasohne.
,/Become familiar with all controls, their
location and function. Operate them
before you start the engine.
v" Ensure brake system is in safe operat-
ing condition.
v" Ensure Operator Presence System
and Reverse Operation System (ROS)
are working properly (See the Opera-
tion and Maintenance sections in this
manual).
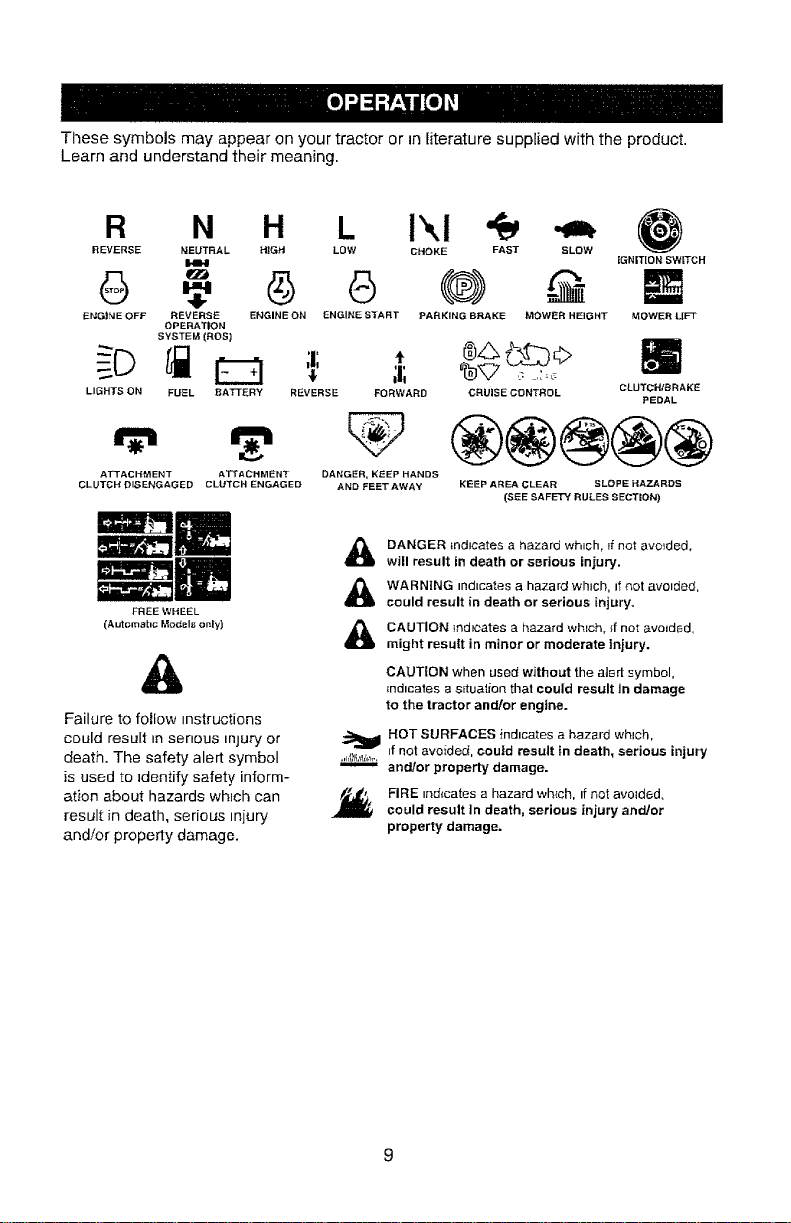
Thesesymbolsmayappearonyourtractororinliteraturesuppliedwiththeproduct.
Learnandunderstandtheirmeaning.
R N H L !\i
REVERSE NEUTRAL HIGH LOW CHOKE FAST SLOW
I.II,!
ENGINE OFF REVERSE ENGINE ON ENGINE S'[ART PARKING BRAKE MOWER HEIGHT
OPERATION
SYSTEM (ROE)
LIGHTS ON FUEL BA3q'ERY REVERSE FORWARD CRUISE CONTROL
ATTACHMENT ATTACHMENT DANGER, KEEP HANDS
CLUTCH DISENGAGED CLUTCH ENGAGED AND FEET AWAY
FREE WHEEL
(Aut_mab_ Model_ only)
Failure to follow _nstructions
could result In senous injury or
death. The safety alert symbol
is used to _dentify safety inform-
ation about hazards which can
result in death, serious injury
and!or property damage.
fGNIT[ON SWWCH
MOWER LIFT
m
CLUTCHIBRAKE
PEDAL
KEEP AREA CLEAR SLOPE HAZARDS
(SEE SAFETY RULES SECTION)
DANGER _ndlcates a hazard which, ff not avoided,
will result in death or serious injury.
WARNING ind=cates a hazard which, if not arc=deal,
could result in death or serious injury.
CAUTION _nd=catesa hazard wh=ch. _fnot avoided,
might result in minor or moderate injury.
CAUTION when used without the uteri symbol,
_ndlcates a SitualioR that could result In damage
to the tractor and[or engine.
HOT SURFACES indicates a hazard which,
.......... if not avoided, could result in death, serious injury
and/or property damage.
FIRE indicates a hazard which, If not avoided,
could result In death, serious injury and/or
property damage.
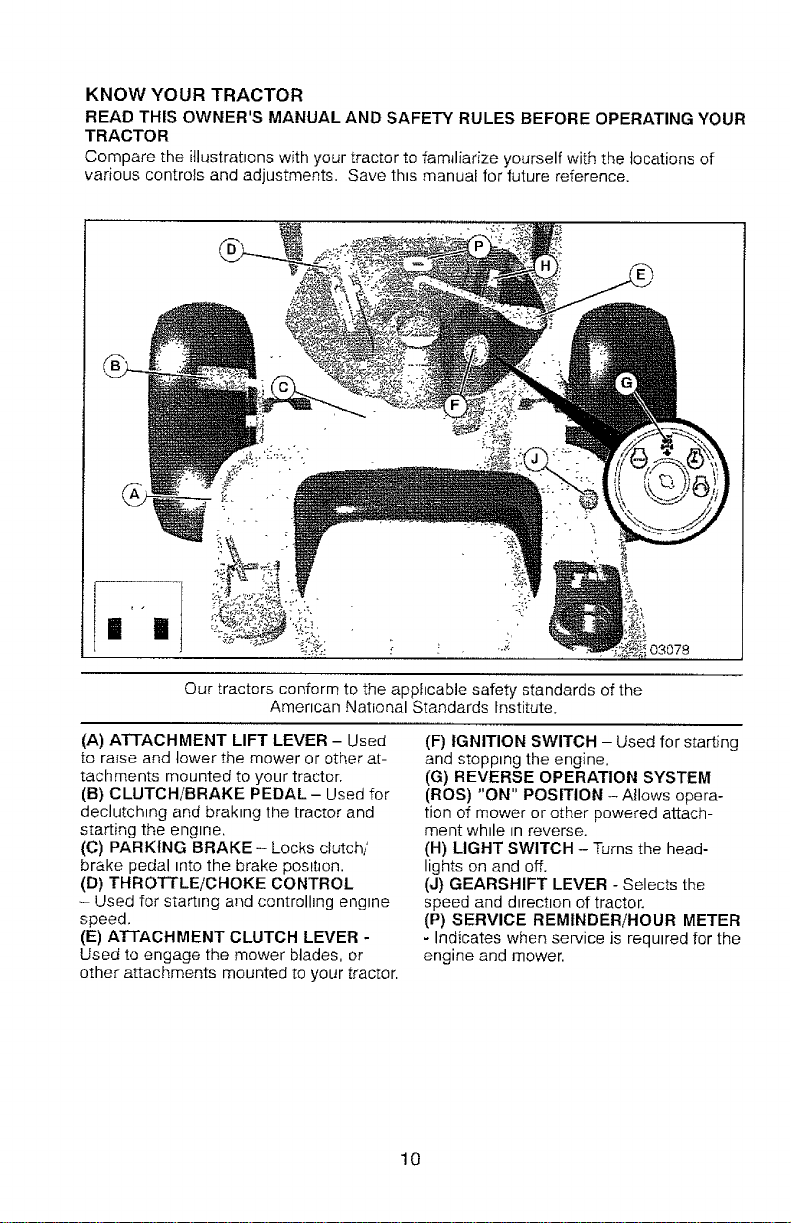
KNOW YOUR TRACTOR
READ THIS OWNER'S MANUAL AND SAFETY RULES BEFORE OPERATING YOUR
TRACTOR
Compare the illustrations with your tractor to familiarize yourself with _he locations of
various controls and adjustments. Save th_s manual for future reference.
ii II
03078
._r..
Our tractors conform to the applicable safety standards of the
American National Standards Institute.
(A) ATTACHMENT LIFT LEVER - Used
to raise and lower the mower or other at-
tachments mounted to your trader.
(B) CLUTCH/BRAKE PEDAL- Used for
declutchlng and braking the tractor and
starting the engine.
(C) PARKING BRAKE - Locks clutch/'
brake pedal into the brake poslt_on.
(D) THROTTLE/CHOKE CONTROL
- Used for starting and controlling engine
speed.
(E) ATTACHMENT CLUTCH LEVER -
Used to engage the mower blades, or
other attachments mounted lo your tractor.
(F) IGNITION SWITCH - Used for starting
and stopping the engine.
(G) REVERSE OPERATION SYSTEM
(ROS) "ON" POSITION - Allows opera-
tion of mower or other powered attach-
ment while =nreverse.
(H) LIGHT SWITCH - Turns the head-
lights on and off.
(J) GEARSHIFT LEVER - Selects the
speed and d=rect=on of tractor.
(P) SERVICE REMINDER/HOUR METER
- Indicates when service is requtred for the
engine and mower.
10
The operation of any tractor can result in foreign objects thrown tnto the
eyes, which can result in severe eye damage. Always wear safety glasses
or eye shtetds while operating your tractor or performing any adjustments
or repairs, We recommend standard safety glasses or a wide vision safety
mask worn over spectacles.
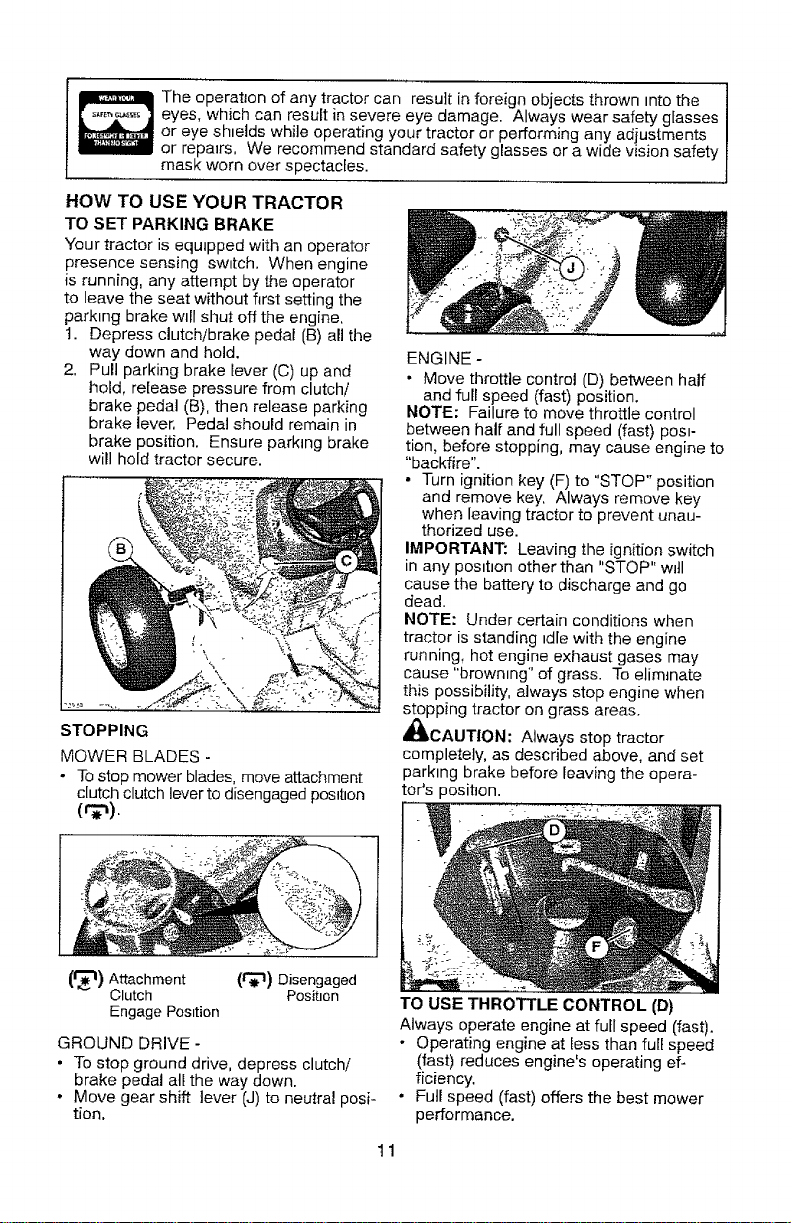
HOW TO USE YOUR TRACTOR
TO SET PARKING BRAKE
Your tractor is equipped with an operator
presence sensing sw_tch. When engine
{s running, any attempt by the operator
to leave the seat without first setting the
parking brake will shut off the engine,
t. Depress clutch/brake pedal (B) all the
way down and hold.
2. Pull parking brake lever (C) up and
hold, release pressure from clutch/
brake pedal (B), then release parking
brake lever, Pedal should remain in
brake position. Ensure parking brake
will hold tractor secure.
STOPPING
MOWER BLADES -
• To stop mower blades, move attachment
clutch clutch lever to disengaged position
(r_).
ENGINE -
• Move throttle control (D) between half
and full speed (fast) position.
NOTE; Failure to move throttle control
between half and full speed (fast) posi-
tion, before stopping, may cause engine to
"backfire".
• Turn ignition key (F) to "STOP" position
and remove key, Always remove key
when leaving tractor to prevent unau-
thorized use.
IMPORTANT: Leaving the ignition switch
in any posttlon other than "STOP" wltl
cause the battery to discharge and go
dead.
NOTE: Under certain conditions when
tractor is standing tdle with the engine
running, hot engine exhaust gases may
cause "browning" of grass. To eliminate
this possibility, always stop engine when
stopping tractor on grass areas.
,8_CAUTION: Always stop tractor
completely, as described above, and set
parktng brake before leaving the opera-
tor's position.
(1_1) Attachment (i'_'1) Disengaged
Clutch Position
Engage Position
GROUND DRIVE-
• To stop ground drive, depress clutch/
brake pedal all the way down.
• Move gear shift lever (J) to neutral posi-
tion.
TO USE THROTTLE CONTROL (D)
Always operate engine at full speed (fast).
• Operating engine at less than full speed
(fast) reduces engine's operating ef-
ficiency.
• Full speed (fast) offers the best mower
performance.
11
TO MOVE FORWARD AND
BACKWARD
The direction and speed of movement is
controlled by the gearshift lever (J).
1. Start tractor with clutch/brake pedai de-
pressed and gearshift lever in neutral
position.
2. Move gearshift lever to desired posi-
tion.
3. Slowly release clutch/brake pedal to
star[ movement.
IMPORTANT: Bnng tractor to a complete
stop before shifting or changing gears.
Falture to do so will shorten the useful life
of your transaxle.
TO ADJUST MOWER CU'I-rlNG HEIGHT
The posttton of the attachment hft lever (A)
de_ermmes the cutting heJght.
• Put attachment_ lift lever in desired cut-
t_ng hetght slot.
The cutting height range is approximate-
ly 1" to 4". The heights are measured
from the ground to the blade tip with the
engtne not running. These heights are ap-
prox4mate and may vary dependtng upon
soil condittons, height of grass and types
of grass being mowed.
• The average lawn should be cut to ap-
proxtmately 2-1/2" dunng the cool sea-
son and to over 3" dunng hot months.
For heakhier and better looking lawns,
mow often and after moderate growth.
• For best cutting performance, grass
over 6" in hetght should be mowed
twice. Make the first cut retatwely high;
the second to desired height.
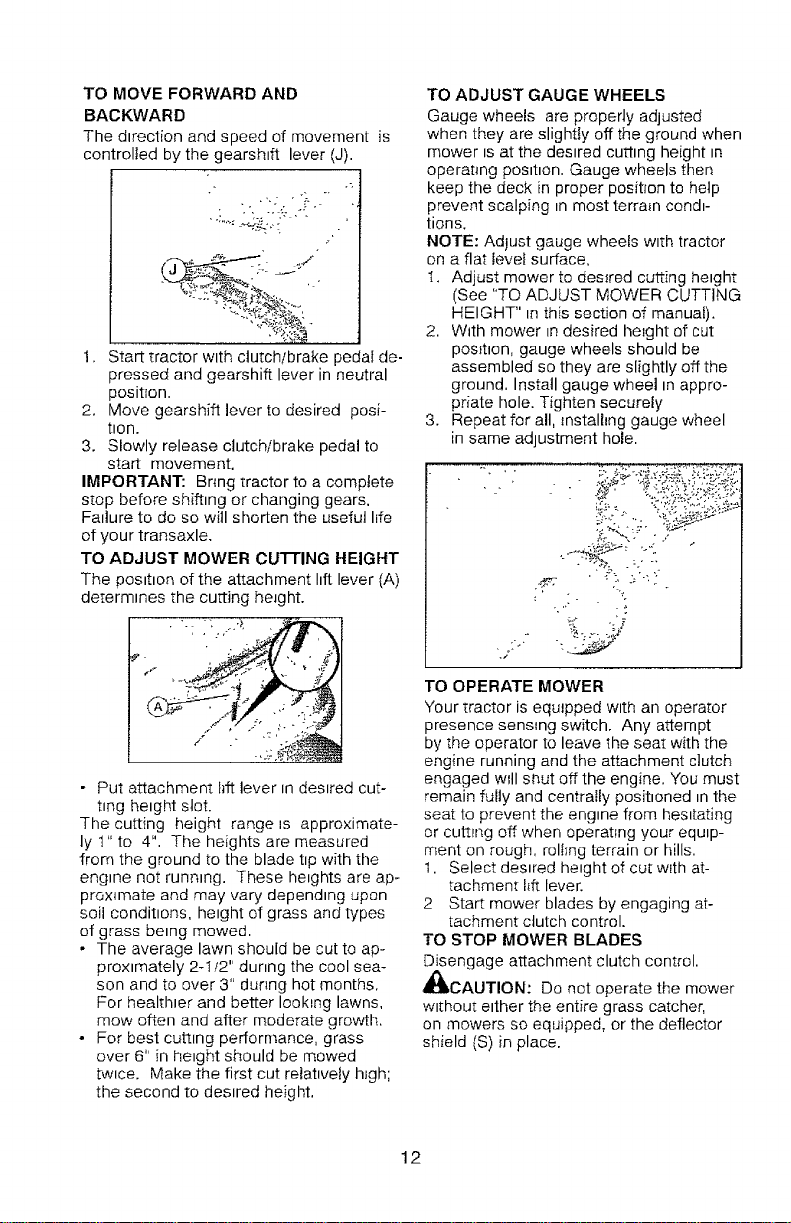
TO ADJUST GAUGE WHEELS
Gauge wheels are properly adjusted
when they are slightly off the ground when
mower is at the desired cutting height in
operating pos_t_on. Gauge wheels then
keep the deck in proper position to help
prevent scalping _nmost terrain condi-
tions.
NOTE: Adjust gauge wheels wt[h tractor
on a flat tevel surface.
1. Adjust mower to desIred cutting hetght
(See "TO ADJUST MOWER CUTTING
HEIGHT" in this section of manual).
2. With mower _ndesired height of cut
position, gauge wheels should be
assembled so they are slightly off the
ground. Install gauge wheel tn appro-
priate hole. Tighten secureiy
3. Repeat for all, _nstallJng gauge wheel
in same adjustment hole.
d,._;-... "-_C_,._-.__''"
.',,' " . ?
-./o-
TO OPERATE MOWER
','our _ractor is equipped wtth an opera_or
presence sensing switch. Any attempt
by [he operator to leave the seat with the
engine running and the attachment clutch
engaged will shut off the engine. You must
remain fully and centrally posiboned _nthe
seat to prevent the engine from hesitating
or cutting off when operating your equip-
ment on rough, rolt_ng terrain or hills.
1. Select desired height of cut w_th at-
tachment f_fflever.
2 Start mower blades by engaging at-
tachment clutch control.
TO STOP MOWER BLADES
Disengage attachment clutch control.
_kCAUTION: Do not operate the mower
w_[hout etther the entire grass catcher,
on mowers so equipped, or the deflector
shield (S) in place.
12
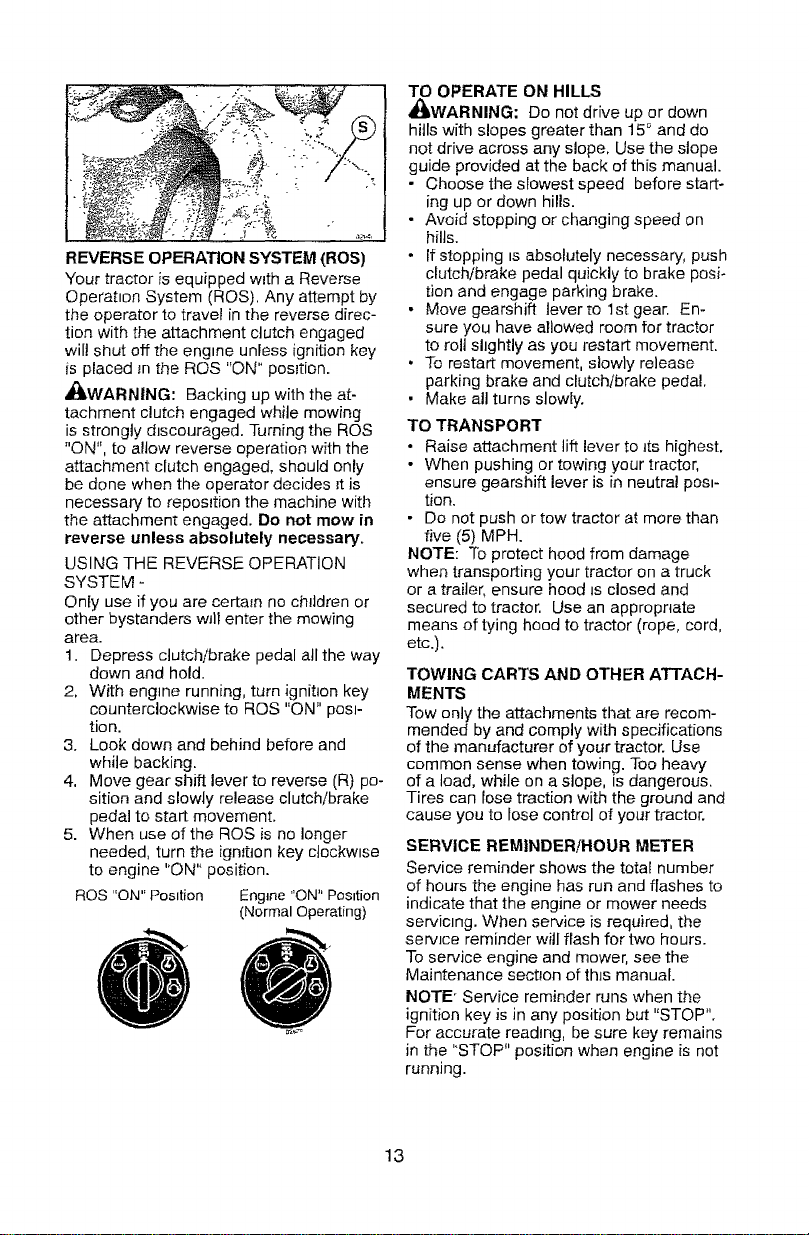
REVERSE OPERATION SYSTEM (ROS)
Your tractor is equipped with a Reverse
Operation System (ROS). Any attempt by
the operator to travel in the reverse direc-
tion with the attachment clutch engaged
wil! shut off the engine unless ignition key
is placed _nthe RQS "ON" position.
_ILWARNING: Backing up with the at-
tachment clutch engaged while mowing
is strongly discouraged. Turning the ROS
"ON", to allow reverse operation with the
attachment clutch engaged, should only
be done when the operator decides it is
necessary to reposltion the machine with
the attachmen_ engaged. Do not mow in
reverse unless absolutely necessary.
USING THE REVERSE OPERATION
SYSTEM -
Only use if you are certain no children or
other bystanders wJll enter the mowing
area.
1. Depress clutch/brake pedal all the way
down and hold.
2. With engine running, turn ignition key
counterclockwise to ROS "ON" posi-
tion.
3. Look down and behind before and
while backing.
4. Move gear shift lever to reverse (R) po-
sition and slowly release clutch/brake
pedal to start movement.
5. When use of the ROS is no longer
needed, turn the ignttton key cJockwlse
to engine "ON" position.
ROS "ON" Position Engine"ON" Position
(Normal Operating)
TO OPERATE ON HILLS
_WARNING: Do not drive up or down
hills with slopes greater than 15 ° and do
not drive across any slope, Use the slope
guide provided at the back of this manual.
• Choose the slowest speed before start-
ing up or down hills.
• Avoid stopping or changing speed on
hills.
• If stopping is absolutely necessary, push
clutch/brake pedal quickly to brake posi-
tion and engage parking brake.
• Move gearshift leverto 1st gear, En-
sure you have allowed room for tractor
to roll slightly as you restart movement.
• To restart movement, slowly release
parking brake and clutch/brake pedal,
• Make a!l turns slowly.
TO TRANSPORT
• Raise attachment lift lever to its highest.
• When pushing or towing your tractor,
ensure gearshift lever is in neutral posi-
tion.
• Do not push or tow tractor at more than
five (5) MPH.
NOTE: To protect hood from damage
when transporting your tractor on a truck
or a trailer, ensure hood is closed and
secured to tractor. Use an appropriate
means of tying hood to tractor (rope, cord,
etc.).
TOWING CARTS AND OTHER ATTACH-
MENTS
Tow only the attachments that are recom-
mended by and comply with specifications
of the manufacturer of your tractor. Use
common sense when towing. Too heavy
of a load, while on a slope, is dangerous.
Tires can lose traction with the ground and
cause you to lose control of your tractor.
SERVICE REMINDER!HOUR METER
Service reminder shows the total number
of hours the engine has run and flashes to
indicate that the engine or mower needs
servicing. When service is required, the
service reminder will flash for two hours.
To service engine and mower, see the
Maintenance section of this manual.
NOTE" Service reminder runs when the
ignition key is in any position but "STOP".
For accurate reading, be sure key remains
in the "STOP" position when engine is not
running.
13
BEFORE STARTING THE ENGINE
CHECK ENGINE OIL LEVEL
The engine in your tractor has been
shipped, from the factory, already filled
with summer weight od,
I. Check engine oil with tractor on level
ground.
2. Remove o{I flit cap/dipstick and wipe
clean, reinsert the dipstick and screw
cap t_ght, wait for a few seconds, re-
move and read oil level. If necessary,
add oil untiI "FULE mark on dipstick is
reached. Do not overfill.
• For cold weather operation you should
change oil for easier starting (See the
od wscos_ty chart in the Maintenance
section of this manual).
• To change engine oil, see the Mainte-
nance section in this manual.
ADD GASOLINE
• Fill fuel tank to bottom of filler neck. Do
not overfill. Use fresh, clean, regular
unleaded gasoline w_th a minimum of
87 octane. (Use of leaded gasoline will
increase carbon and lead oxide deposits
and reduce valve hfe). Do not mix oit
w_th gasoline. Purchase fuel _nquanta-
ties that can be used w_thin 30 days to
ensure fuei freshness.
_CAUTION: W_pe off any spilled oil or
fuel. Do not store, sp_}l or use gasoline
near an open flame.
IMPORTANT: When operating tn temper-
atures below 32CF(OCC), use fresh, clean
win[er grade gasoline to help ensure good
cold weather starting.
CAUTION. Alcohol blended fuels (called
gasohol or using ethanol or methanol) can
a_ract moisture which leads to separation
and formation of acids during storage.
Acidic gas can damage the fuel system
of an engine wh_le in storage. To avoid
engine problems, the fuel system should
be emptied before storage of 30 days
or longer. Drain the gas tank, start the
engine and let it run until the fuel lines
and carburetor are empty. Use fresh fuel
next season. See Storage Instructions for
additional informatJon. Never use engine
or carburetor cleaner products in the fuel
tank or permanent damage may occur,
TO START ENGINE
When starting the engine for the first time
or if the engine has run out of fuel, it will
take extra cranking time to move fuel from
the tank to the engine.
1. Sit on seat in operating positron,
depress clutch/brake pedal and set
parking brake.
2. Place gear shift lever in neutral position.
3. Move attachment clutch to disengaged
posit_on.
4. Move throttle control to choke position.
NOTE: Before starting, read the warm
and cold starting procedures below.
5. Insert key into ignition and turn key
clockwise to start position and release
key as soon as engine starts, Do not
run starter continuously for more than
fifteen seconds per minute. If the
eng=ne does not start after several
attempts, move throttle control to fast
position, wait a few minutes and try
again. If engine still does not start,
move the throttle control back to the
choke position and retry.
WARM WEATHER STARTING
(50 c F/10 r C and above)
6. When engine starts, move the throttle
control to the fast position.
• The attachments and ground drive can
now be used. If the engine does not
accept the load, restart the engtne and
allow it to warm up for one minute using
the choke as described above.
COLD WEATHER STARTING
(50 ° F/10 ° C and below)
7. When engine starts, leave throttle
control In choke position unN engine
warms up and begins to run roughly.
Once rough running begtns, immedi-
ately move the _hrottle control to the
fast position. Engine warm-up may
take from several seconds to several
minutes (the colder the temperature,
the longer the warm-up).
* The attachments can also be used dur-
ing the eng{ne warm-up period.
NOTE: If at a high altitude (above 3000
feet) or in cold temperatures (below 32°F)
the carburetor fuel mixture may need to
be adlusted for best engine performance
(see "TO ADJUST CARBURETOR" in the
Service and Adjustments section of this
manual),
14
MOWING TIPS
• Tire chains cannot be used when the
mower housing is attached to tractor.
• Mower should be properly leveled for
best mowtng performance. See "TO
LEVEL MOWER HOUSING" in the
Service and Adjustments section of thts
manual,
• The left hand stde of mower should be
used for trimming.
• Drwe so that chpp_ngs are discharged
onto the area that has already been
cut, Have the cut area to the right of
the tractor. This will result in a more
even distribution of clippings and more
uniform cutttng,
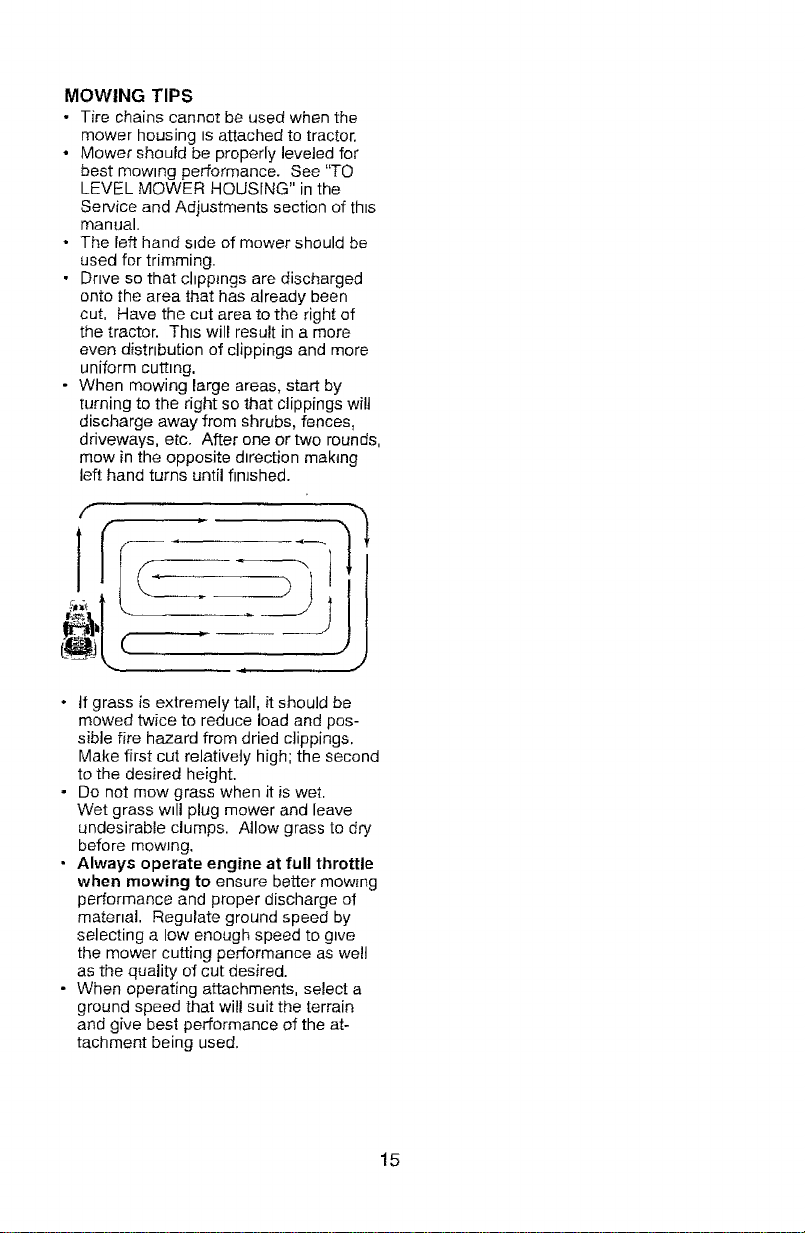
• When mowing large areas, start by
turning to the right so that clippings wi!t
discharge away from shrubs, fences,
driveways, etc. After one or two rounds,
mow in the opposite dtrection making
left hand turns until finished.
,i
• tf grass is extremely tall, it should be
mowed twice to reduce load and pos-
sible fire hazard from dried clippings.
Make first cut relatively high; the second
to the desired height.
• Do not mow grass when it is wet,
Wet grass wtll plug mower and leave
undesirable clumps. Allow grass to dry
before mowing.
• Always operate engine at full throttle
when mowing to ensure better mow_ng
performance and proper discharge of
matenal. Regulate ground speed by
selecting a low enough speed to give
the mower cutting performance as well
as the quality of cut desired.
• When operating attachments, select a
ground speed that will suit the terrain
and give best performance of the at-
tachment being used.
15
MAINTENANCE
SCHEDULE
C,heck er_ke Oper_hon
Tj
cA Cr_eck for Loo_e F_ter_er_
Cn_c_,eplace Mower Blad_s
t LLqDrqcat_Qr_ C_3.rt
0 Cr_eck Bat_erv L_vol
R
Clean Bakery and T_rrmnals
©lea_ Debri_ Off Steenng Pla[e
Gr_¢_. Transaxle Coohng
Cr, eck Mov,_r Lo,'_[ness
C_eck V- Belts
,,, ,,
Check En,q_ne Oil Lev_[
Change Entwine Oil !with oil f_!!er) I
Ch_n_e Enrqlr,_- Og (_vEtt_out OIl [liter 1
Clean Air Fillet
G Clean AFt Screen
I I_Sp_C.l [_uffta_'iS_._rk Arrester
iE Clean En£_ln_ CooJiI'_ClF_ns
Rep£ic¢ _park P_U_
_p_ce _lr F_lter Paper Cart[idge
Replace Fuel F=[ter
...... ,,,,,,L,
_EPOHEEAcH EVERY8 EVERY EVERY
50
USE HOUR_ HOUR5 HOURS
v" v"
v" v'
v'
v"
EVERY EVERY BEFORE
lo0 SEASON STORAGE
HOURS
v"
v'
,_
_,,,'_
v'
w"_.....
............ _/"
w": v"
GENERAL RECOMMENDATIONS
The warranty on this tractor does not cover
items that have been subjected to operator
abuse or negligence. To receive full value
from the warranty, operator must maintain
tractor as instructed in this manual.
Some adjustments wilt need to be made pe-
riodically to properly ma_nta{n your tractor.
At least once a season, check to see ff
you should make any of the adjustments
described in the Service and Ad_ustmems
section of this manual.
• At least once a year you should replace
the spark plug, clean or replace a_r filter,
and check blades and belts for wear. A
new spark plug and clean a_rfilter assure
proper a_r-fuet mixture and heip your en-
gine run better and last longer.
BEFORE EACH USE
1. Check engine oil level.
2, Check brake operation.
3, Checktire pressure.
4. Check operator presence and
ROE systems for proper operation.
5. Check for loose fasteners.
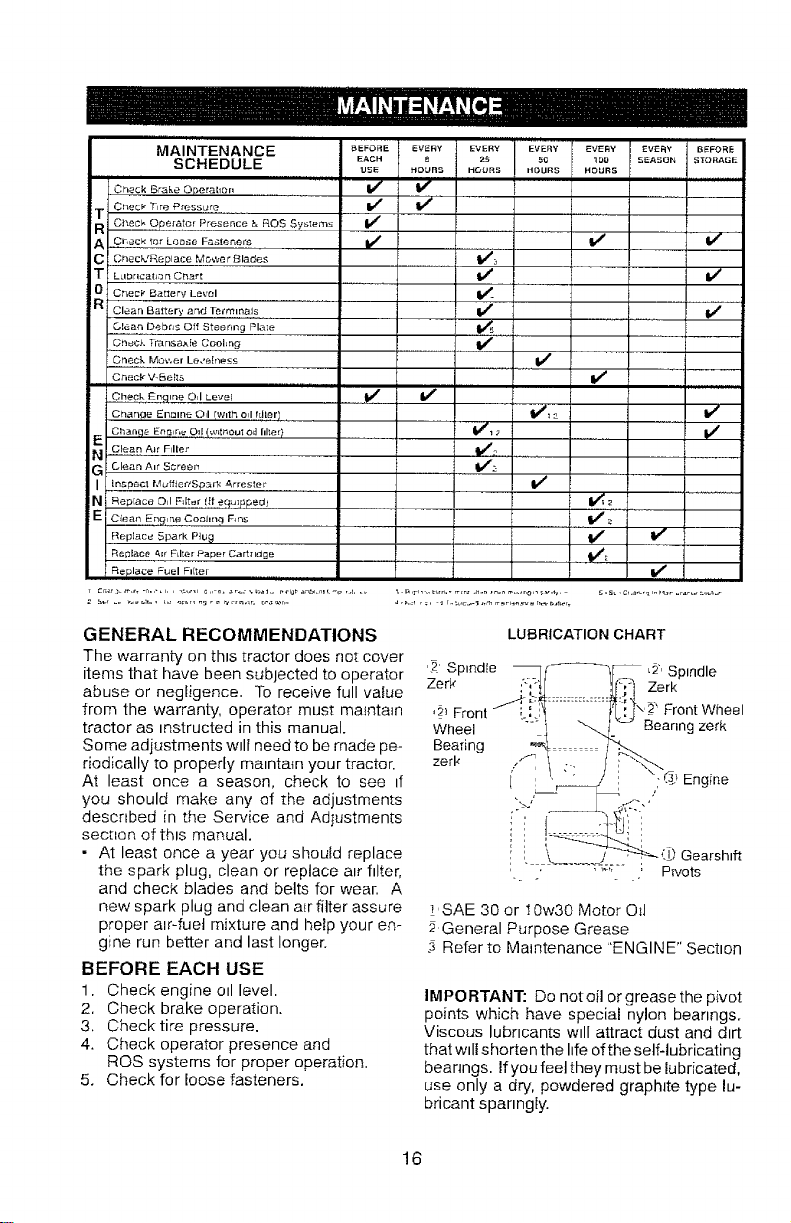
LUBRICATION CHART
_2",Spindle
Zerk
_#" Front Wheel
Beanng zerk
_'SAE 30 or I0w30 Motor Off
# General Purpose Grease
3 Refer to Maintenance "ENGINE" Section
IMPORTANT: Do not oil or grease the pivot
points which have special nylon beanngs.
Viscous lubricants wdl attract dust and dirt
that will shorten the hfe of the self-lubricating
bearings, if you feel they must be lubricated,
use only a dry, powdered graphite type lu-
bricant spanngly.
16
TRACTOR
Always observe safety rules when per-
formrng any maintenance,
BRAKE OPERATION
If tractor requires more than five (5) feet to
stop at highest speed in highest gear on a
ievef, dry concrete or paved surface, then
brake must be serviced. (See "TO CHECK
BRAKE" _nthe Service and Adlustments
section of this manual),
TIRES
• Maintain proper air pressure in afl tires
(See PSI on tires).
• Keep tires free of gasoline, oil, or insect
control chemrcats which can harm rubber.
• Avoid stumps, stones, deep ruts, sharp
obiects and other hazards that may
cause tire damage,
NOTE: To seal tire punctures and prevent
flat tires due to slow leaks, tire sealant
may be purchased from your local parts
dealer, T_re sealant also prevents tire dry
rot and corrosion.
OPERATOR PRESENCE SYSTEM AND
REVERSE OPERATION SYSTEM (ROS)
Ensure operator presence and reverse
operation systems are working properly. If
your tractor does not function as de-
scnbed, repair the problem immediately.
• The engine should not start unless the
brake pedal is fully depressed, and the
attachment clutch control is in the disen-
gaged position.
CHECK OPERATOR PRESENCE
SYSTEM
• When the engine is running, any at-
tempt by the operator to leave,the seat
without first setting the parking brake
should shut off the engine,
- When the engine is running and the
attachment clutch is engaged, any at-
tempt by the operator to leave the seat
should shut off the engine.
• The attachment clutch should never op-
erate unless the operator is in the seat.
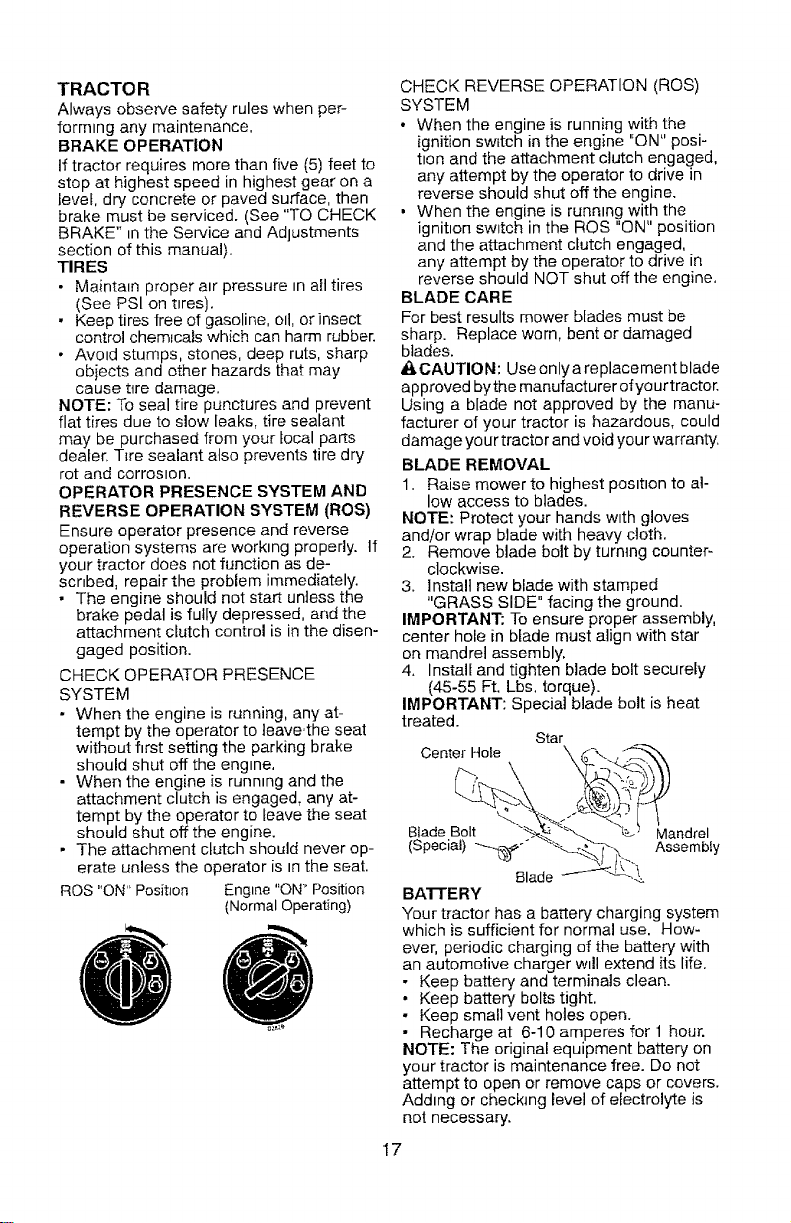
ROS "ON" PositJon Engine "ON" Position
(Normal Operating)
CHECK REVERSE OPERATION (ROS)
SYSTEM
• When the engine is running with the
ignition sw_tch in the engine "ON" posi-
t_on and the attachment clutch engaged,
any attempt by the operator to drive in
reverse should shut off the engine.
• When the engine is running with the
ignition switch in the ROS "ON" position
and the attachment clutch engaged,
any attempt by the operator to drive in
reverse should NOT shut off the engine,
BLADE CARE
For best results mower blades must be
sharp. Replace worn, bent or damaged
blades.
_1_CAUTION: Use only a replacement blade
approved bythe manufacturer of your tractor.
Using a blade not approved by the manu-
facturer of your tractor is hazardous, could
damage your tractor and void you r warranty,
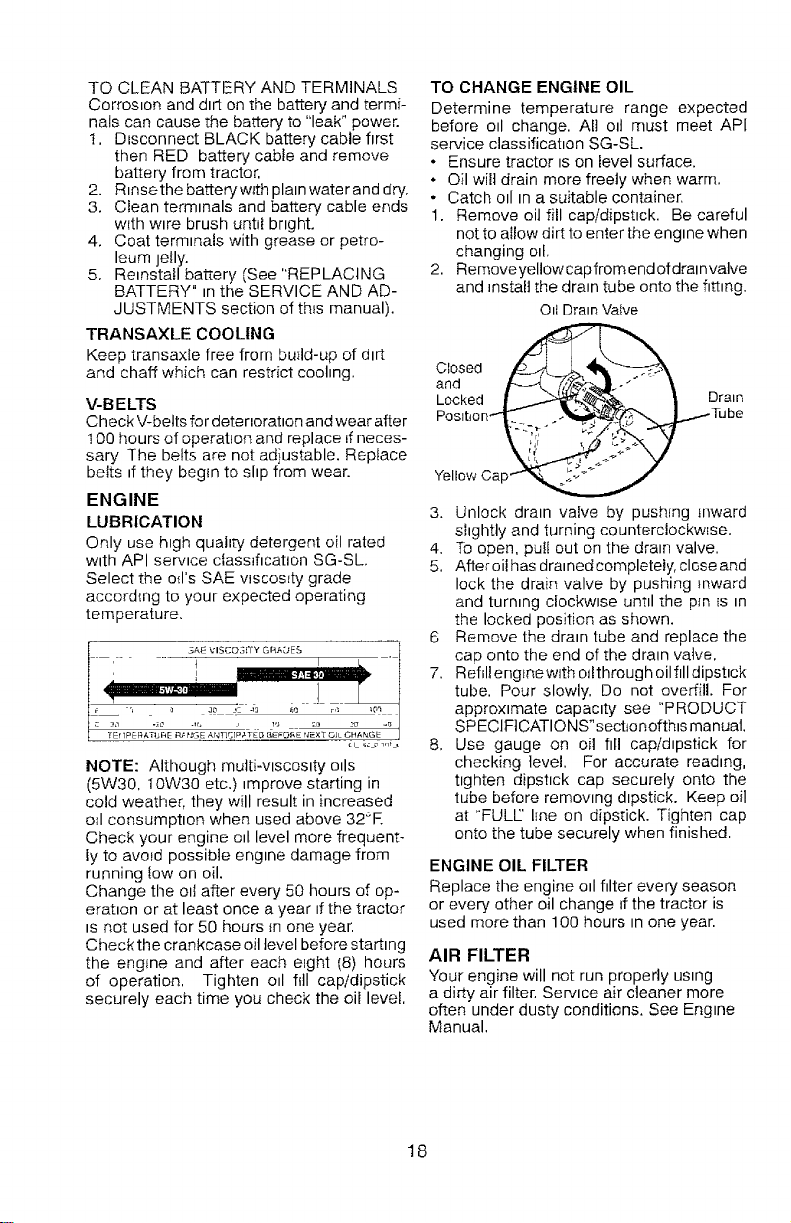
BLADE REMOVAL
1. Raise mower to highest position to al-
low access to blades.
NOTE: Protect your hands with gloves
and/or wrap blade with heavy cloth.
2. Remove blade bolt by turning counter-
clockwise.
3. Install new blade with stamped
"GRASS SIDE" facing the ground.
IMPORTANT: To ensure proper assembly,
center hole in blade must align with star
on mandrel assembly,
4. Install and tighten blade bolt securely
(45-55 Ft. Lbs. torque).
IMPORTANT: Special blade bolt is heat
treated.
Star
Center HoMe \ d'-.. , "_,._-'_
Blade "-_--_
BATTERY
Your tractor has a battery charging system
which is sufficient for normal use. How-
ever, periodic charging of the battery with
an automotive charger w=ll extend its life,
• Keep battery and terminals clean.
• Keep battery bolts tight,
• Keep small vent holes open.
• Recharge at 6-10 amperes for 1 hour.
NOTE: The original equipment battery on
your tractor is maintenance free. Do not
attempt to open or remove caps or covers.
Adding or checking level of electrolyte is
not necessary.
17
TO CLEAN BATTERY AND TERMINALS
Corrosion and dirt on the battery and termi-
nals can cause the battery to "leak" power.
t, Disconnect BLACK battery cable first
then RED battery cable and remove
battery from tractor,
2. R_nsethe batterywith plain water and dry.
3. Clean terminals and battery cable ends
w_th wire brush until bnght.
4. Coat terminals with grease or petro-
leum jelly.
5. Reinstall bakery (See "REPLACING
BATTERY" in the SERVICE AND AD-
JUSTMENTS section of th_s manual).
TRANSAXLE COOLING
Keep transaxle free from build-up of dirt
and chaff which can restrict coohng.
V-BELTS
Check V-belts for deterioration and wear after
100 hours of operation and replace _fneces-
sary The belts are not adjustable. Replace
belts _fthey begin to slip from wear.
ENGINE
LUBRICATION
Only use high quality detergent oil rated
with API service classification SG-SL.
Select the od's SAE viscosity grade
according to your expected operating
temperature.
3AE VISCO3[YY GR_E_
NOTE: Although multi-viscosity o_ls
(5W30, 10W30 etc.)_mprove starting in
cold weather, they will result in increased
od consumption when used above 32°R
Check your engine oil level more frequent-
ly to avoid possible engine damage from
running {ow on oil.
Change the oil after every 50 hours of op-
eration or at least once a year _fthe tractor
_snot used for 50 hours _none year.
Check the crankcase oil level before starting
the engine and after each eight {8) hours
of operation, Tighten oil fill cap/dipstick
securely each time you check the oil level,
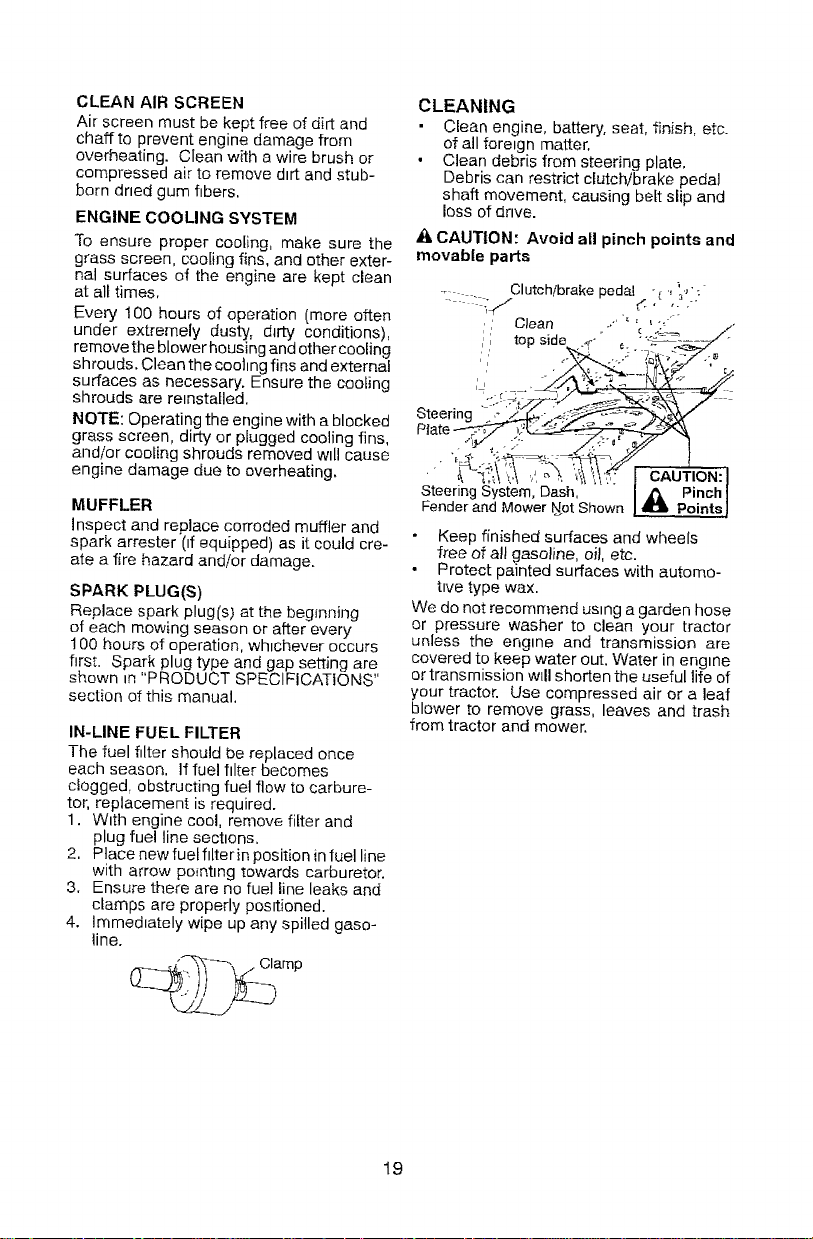
TO CHANGE ENGINE OIL
Determine temperature range expected
before oil change. All od must meet API
service classificahon SG-SL.
• Ensure tractor is on level surface.
÷ Oil will drain mere freely when warm.
• Catch oll In a suitable container.
1. Remove oil fill cap/dipstick. Be careful
not to allow dirt to enter the engine when
changing olf.
2. Removeyellow cap from end of dralnvalve
and _nstaHthe drain tube onto the fitting.
Oil Drain Vaive
Locked ! _""_-L"_'_'. I Dra,n
Yellow Cap_
3. Unlock drain valve by pushing inward
shghtly and turning counterclockwise.
4. To open, put! out on the drain valve.
5, Afleroii has dralnedcompleteiy, close and
lock the drain valve by pushing reward
and turmng clockwise untd the p_n _s _n
the locked position as shown.
6 Remove the drain tube and replace the
cap onto the end of the drain valve.
7. Refill engine with o_Ithrough oilNI dipstick
tube. Pour slowly, Do not overfill. For
approximate capacity see "PRODUCT
SPECIFICATIONS" sect_onofthis manual.
8, Use gauge on oil fill capid_pstick for
checking level. For accurate reading,
tighten dipshck cap securely onto the
tube before remowng dipstick. Keep oil
at "FULl/' hne on dipstick. Tighten cap
onto the tube securely when finished.
ENGINE OIL FILTER
Replace the engine o11filter every season
or every other oil change _fthe tractor is
used more than 1O0 hours In one year,
AIR FILTER
Your engine will not run properly using
a dirty air filter. Service air cleaner more
often under dusty conditions. See Eng=ne
Manual.
18
CLEAN AIR SCREEN
Air screen must be kept free of dirt and
chaff to prevent engine damage from
overheating. Clean with a wire brush or
compressed air to remove dirt and stub-
born dried gum fibers,
ENGINE COOLING SYSTEM
To ensure proper cooling, make sure the
grass screen, cooling fins, and other exter-
nal surfaces of the engine are kept clean
at a}l times,
Every 100 hours o_ operation (more often
under extremely dusty, dirty conditions),
remove the blower housing and other cooling
shrouds. Clean the cooling fins and external
surfaces as necessary. Ensure the ceofing
shrouds are re=nsta[led.
NOTE: Operating the engine with a blocked
grass screen, dirty or plugged cooling fins,
and/or cooling shrouds removed will cause
engine damage due to overheating.
MUFFLER
Inspect and replace corroded muffler and
spark arrester (if equipped) as it could cre-
ate a fire hazard and/or damage.
SPARK PLUG(S)
Replace spark plug[s,_ at the beginning
of each mowing season or after every
100 hours of operation, whichever occurs
first. Spark plug type and gap setting are
shown in "PRODUCT SPECIFICATIONS"
section of this manual.
IN-LINE FUEL FILTER
The fuel filter should be replaced once
each season. If fuel filter becomes
clogged, obstructing fuel flow to carbure-
tor, replacement is required.
1. With engine cool, remove filter and
plug fuel line sections.
2. Place new fuet filter in position in iuel line
with arrow pointing towards carburetor.
3. Ensure there are no fuel line leaks and
clamps are properly positioned.
4. Immediately wipe up any spilled gaso-
line.
CLEANING
Clean engine, battery, seat, finish, etc.
of all forergn matter,
, Clean debris from steering plate,
Debris can restrict clutch/brake pedal
shaft movement, causing belt slip and
loss of dnve.
-_ CAUTION: Avoid all pinch points and
movable parts
_-_ :-'-,_"/Clutch/brake pedal _ .__.,:.:
Clean ' '" °c ' :_' "
,',' top side s' _. '_:__//
• o__4,Z/W_;J .... .',.... ,
Steering System, Dash, I _ Pinch I
Fender and Mower Not Shown I _ PointsJ
Keep finished surfaces and wheels
free of all gasoline, oil, etc.
• Protect painted surfaces with automo-
tive type wax.
We do not recommend using a garden hose
or pressure washer to clean your tractor
unless the engine and transmission are
covered to keep water out. Water in engine
or transmission w_ll shorten the useful tile of
your tractor. Use compressed air or a leaf
blower to remove grass, leaves and trash
from tractor and mower.
19
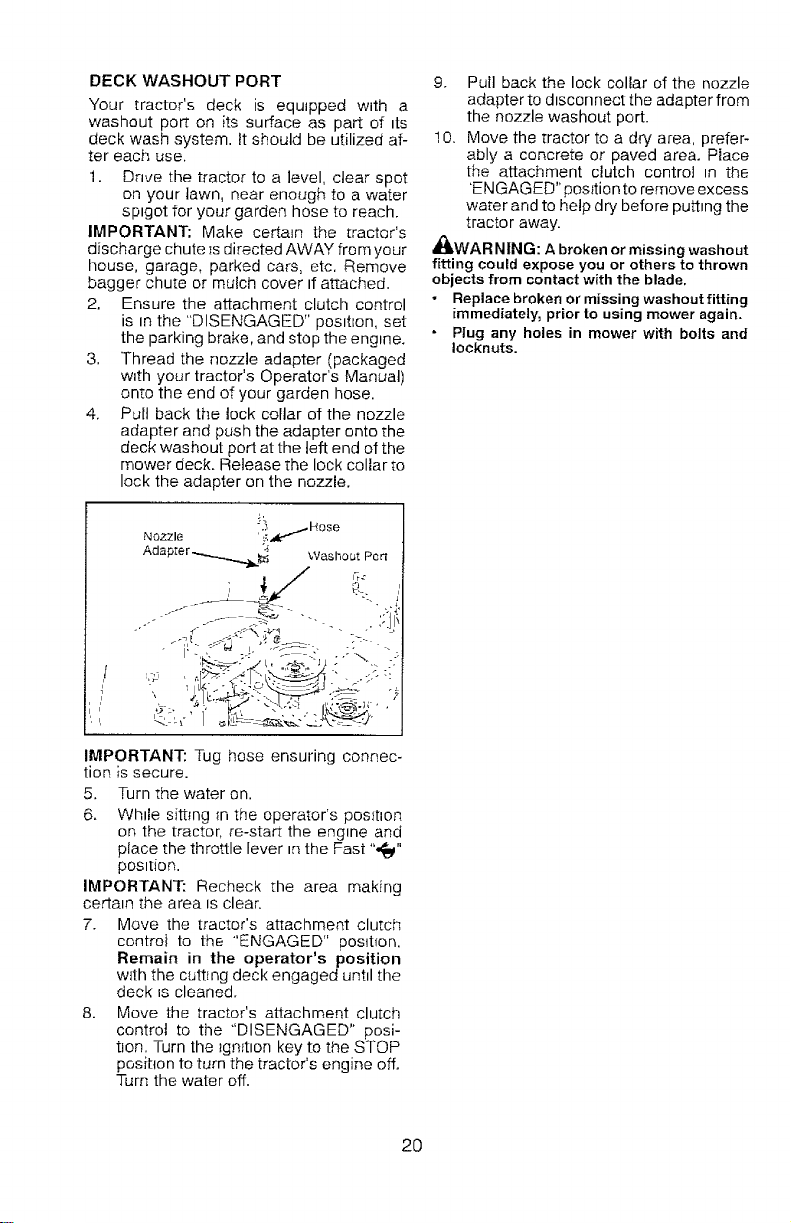
DECK WASHOUT PORT
Your tractor's deck is equipped with a
washout poe on its surface as part of its
deck wash system, tt should be utilized af-
ter each use.
1. Drwe the tractor to a level, clear spot
on your lawn, near enough to a water
spigot for your garden hose to reach.
IMPORTANT: Make certain the tractor's
discharge chute _sdirected AWAY from your
house, garage, parked cars, etc. Remove
bagger chute or mulch cover tf attached.
2. Ensure the attachment clutch control
is in the "DISENGAGED" posttlon, set
the parking brake, and stop the engtne+
3, Thread the nozzle adapter (packaged
with your tractor's Operator's Manual)
onto the end of your garden hose.
4. Pull back the lock collar of the nozzle
adapter arid push the adapter onto the
deck washout port at the left end of the
mower deck. Release the lock collar to
lock the adapter on the nozzle.
IMPORTANT: Tug hose ensuring connec-
tion is secure.
5. Turn the water on.
6. White sitting +nthe operator's pos;tlon
on the tractor, re-start the engine and
place the throttle lever nnthe Fast ",_"
posttion.
IMPORTANT: Recheck the area making
certain the area is clear.
7. Move the tractor's attachment clutch
control to the "ENGAGED" posit+on.
Remain in the operator's position
w_th the cutting deck engaged until the
dock ns cleaned.
8. Move the tractor's attachment clutch
control to the "DISENGAGED" posi-
tron. Turn the _gn_tlon key to the STOP
position to turn the tractor's engine off.
Turn the water off.
9. Pull back the lock collar of the nozzle
adapter to dtsconnect the adapter from
the nozzle washout port.
10. Move the tractor to a dry area, prefer-
ably a concrete or paved area. Place
the attachment clutch control in the
'ENGAGED" position to remove excess
water and to help dry before putting the
tractor away.
_WARNING: A broken or missing washout
fitting could expose you or others to thrown
objects from contact with the blade.
Replace broken or missing washout fitting
immediately, prior to using mower again.
Plug any holes in mower with bolts and
Iocknuts.
2O
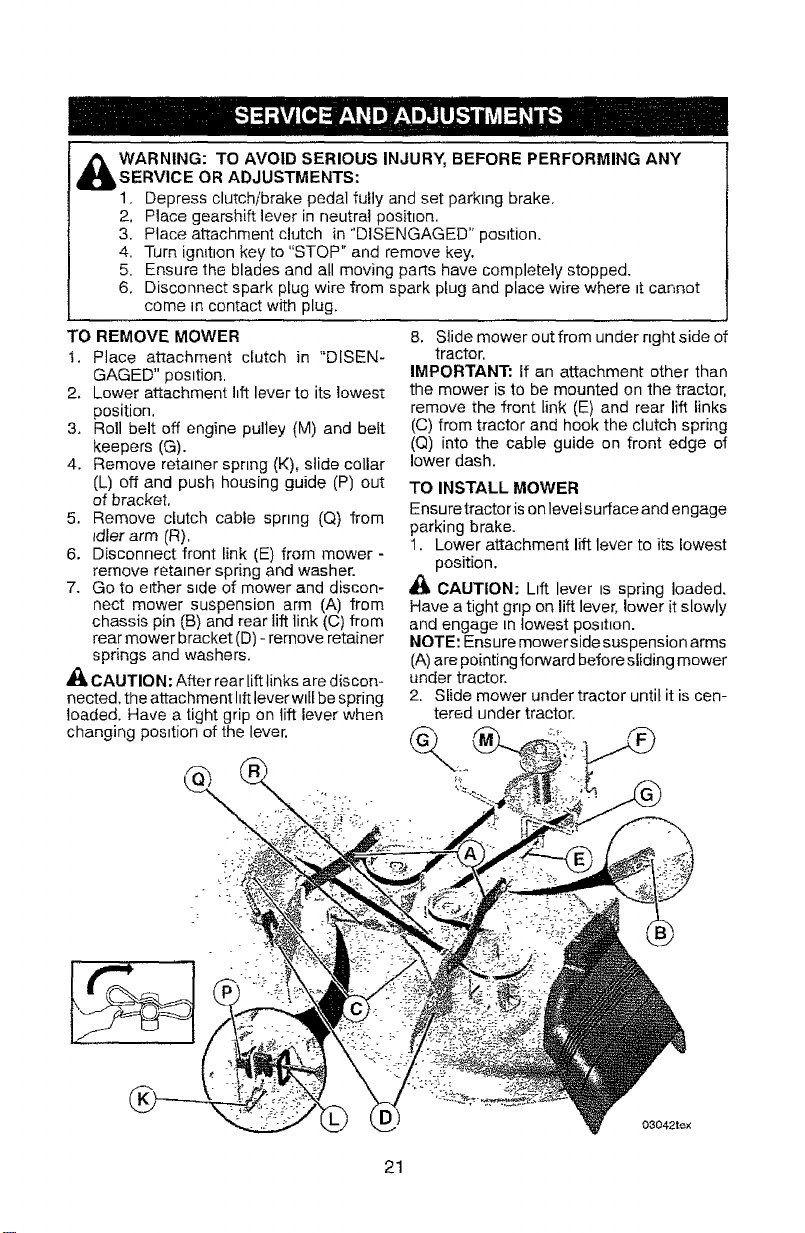
&WARNING: TO AVOID SERIOUS INJURY, BEFORE PERFORMING ANY
SERVICE OR ADJUSTMENTS:
1. Depress clutch/brake pedal fully and set parking brake.
2, Place gearshift lever in neutral position.
3. Place attachment clutch in "DISENGAGED" position.
4. Turn ignition key to "STOP" and remove key.
5. Ensure the blades and all moving parts have completely stopped.
6. Disconnect spark plug wire from spark plug and place wire where it cannot
come in contact with plug.
TO REMOVE MOWER
t. Place attachment clutch in "DISEN-
GAGED" position.
2. Lower attachment hft lever to its lowest
position.
3. Roll belt off engine pulley (M) and belt
keepers (G).
4. Remove retainer spring (K), slide collar
(L) off and push housing guide (P) out
of bracket.
5. Remove clutch cable spring (Q) from
Idler arm (R),
6. Disconnect front link (E) from mower -
remove retainer spring and washer.
7. Go to either side of mower and discon-
nect mower suspension arm (A) from
chassis pin (B) and rear lift link (C) from
rear mower bracket (D) - remove retainer
springs and washers.
CAUTION: After rear lift links are discon-
nected, the attachment hit lever wlif be spring
loaded. Have a tight grip on lift lever when
changing position of the lever,
8. Slide mower out from under right side of
tractor,
IMPORTANT" If an attachment other than
the mower is to be mounted on the tractor,
remove the front link (E) and rear lift links
(C) from tractor and hook the clutch spring
(Q) into the cable guide on front edge of
lower dash.
TO INSTALL MOWER
Ensure tractor is on levelsurface and engage
parking brake.
1. Lower attachment lift lever to its lowest
position.
Al_ CAUTION: Lift lever is spring loaded.
Have a tight grip on lift lever, lower it slowly
and engage in lowest pos_t_on.
NOTE: Ensure mower side suspension arms
(A) are pointing forward before sliding mower
under tractor.
2. Slide mower under tractor untit it is cen-
tered under tractor.
03042tex
21
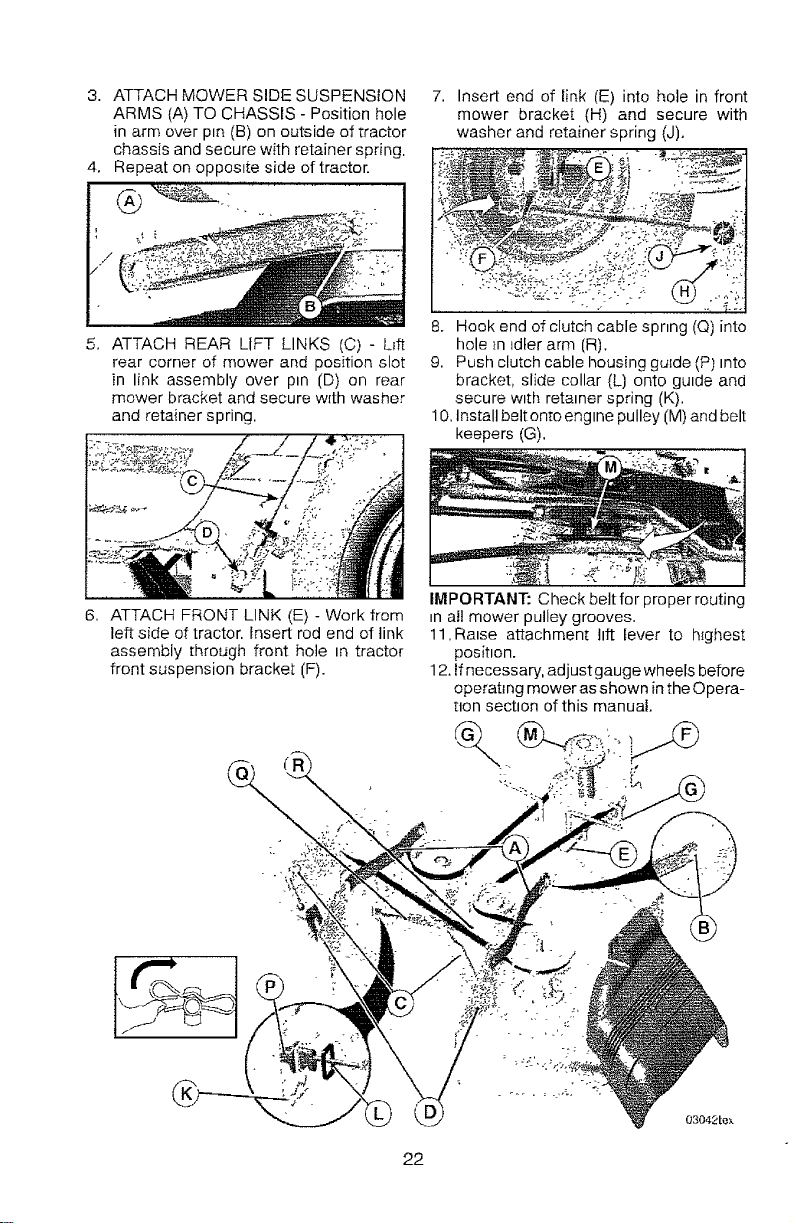
3. ATTACH MOWER SIDE SUSPENSION
ARMS (A} TO CHASSIS - Position hole
in arm over pm (B) on outside of tractor
chassis and secure with retainer spring.
4. Repeat on opposrte side of tractor.
ATTACH REAR LIFT LINKS (C) - L_ft
rear corner of mower and position slot
in link assembly over pin (D) on rear
mower bracket and secure with washer
and retainer spring.
7. Insert end of link (E) into hole in front
mower bracket (H) and secure with
washer and retainer spring (J).
_:a;?_, _,a__ -. i-_._ -_ , , - -_ ->%;@,,-
8. Hook end of clutch cable spnng (Q) into
hole _n_dfer arm (R).
9. Push clutch cable housing guide (P) Into
bracket, slide collar (L) onto guide and
secure with retainer spring (K).
I 0, Install belt onto engine pulley (M) and belt
keepers (G),
6. ATTACH FRONT LINK (E) - Work from
left side of tractor. Insert rod end of link
assembly through front hole In tractor
front suspension bracket (F).
%
IMPORTANT: Check belt for proper routing
=naf! mower pulley grooves.
11.Ra=se attachment lift lever to h_ghest
position.
12. If necessary, adjust gauge wheels before
operating mower as shown in the O pera-
_on section of this manual.
¢
03042rex
22

TO LEVEL MOWER
Make sure tires are properly inflated to the
PSI shown on tires. Iftires are over or under
inflated, it may affectthe appearance of your
lawn and lead you to think the mower is not
adjusted properly,
VISUAL SIDE-TO-SIDE ADJUSTMENT
1. With all tires properly inflated and if your
lawn appears unevenly cut, determine
which sTde of mower is cutting lower.
2. With a 3/4" or adjustable wrench, turn lift
link adjustment nut (A) to the left to lower
LH side of mower, or, to [he right to raise
LH side of mower.
NOTE' Each full turn of adjustment nut will
change mower height about 3/16".
Turn nut rt¢ Turn nut left
to raise mower to lower mower
3. Test your adjustment by mowing some
uncut grass and visually checking the
appearance. Readjust, if necessary, until
you are satisfied wtth the results.
PRECISION SIDE-TO-SIDE ADJUSTMENT
t. With alltires properly =nflated, park tractor
on level ground or driveway.
CAUTION: Blades are sharp. Protect
your hands with gloves and/or wrap blade
with heavy cloth.
2. Raise mower to its highest position.
3. At both sides of mower, position blade at
side and measure the distance (A) from
bottom edge of blade to the ground. The
distance should be the same on both
sides.
4. If adjustment is necessary, see step 2 in
Visual Adjustment _nstruc[ions above.
5. Recheck measurements, adjust if neces-
sary until both sides are equal.
FRONT-TO-BACK ADJUSTMENT
IMPORTANT: Deck must be level side-
to-side.
To obtain the best cutting results, the mower
blades should be adjusted so the front tip is
!/8" to 1/2" lower than the rear tip when the
ower is in its highest position.
CAUTION: Blades are sharp. Protect
your hands with gloves and/or wrap blade
with heavy cloth.
• Raise mower to highest position.
• Position any blade so the tip is pointing
straight forward. Measure distance (B)
to the ground at front and rear tip of the
blade,
• If fronttip of blade _snot 1/8" to !/2" lower
than the rear tip, go to the front of tractor.
• With an 11/16" or adjustable wrench,
loosen jam nut A several turns to clear
adjustment nut B,
\
/. °°/
• With a 3/4" or adjustable wrench, turn
front link adjustment nut (B) clockwise
(tighten) to raise the front of mower, or,
counterclockwise (loosen) to lower the
front mower.
Tighten adjust nut
B to raise mower
k=
Loosen adjust
nut Bto lower
mower
Loosen jam nut A first
NOTE: Each full turn of the adjustment nut
will change mower height about 1/8".
• Recheck measurements, adjust if neces-
sary until front tip of blade is 1/8" to 1/2"
lower than the rear tip.
• Hold adjustment nut in position with wrench
and tighten jam nut securely against ad-
justment nut.
23
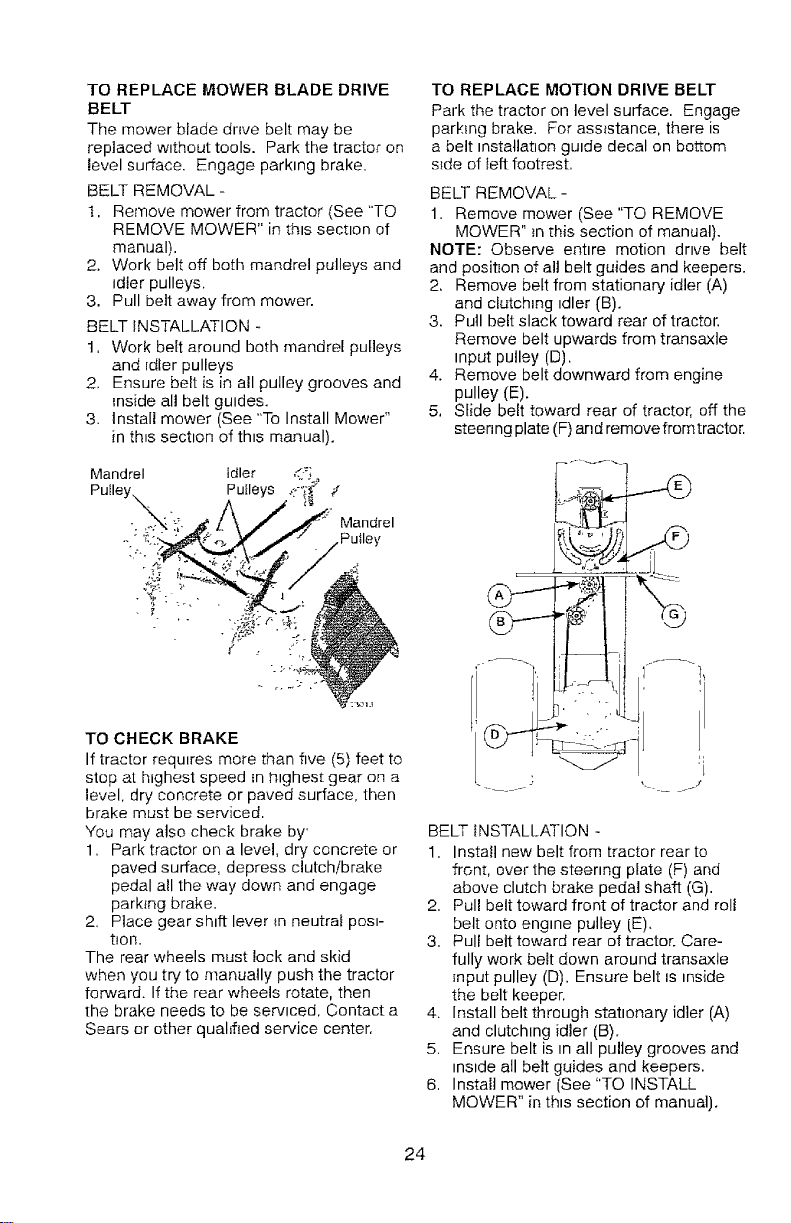
TO REPLACE MOWER BLADE DRIVE
BELT
The mower blade dnve belt may be
replaced without tools. Park the tractor on
level surface. Engage parking brake.
BELT REMOVAL -
1. Remove mower from tractor (See "TO
REMOVE MOWER" in this section of
manual).
2. Work belt off both mandrel pulleys and
idler pulleys.
3. Pull belt away from mower.
BELT INSTALLATION -
1, Work belt around both mandrel pulleys
and 1dfer pulleys
2, Ensure belt is in all pulley grooves and
inside all belt guides.
3. Install mower (See "To Install Mowe¢'
in th_s section of this manual).
Mandrel
Putleyx-_:
Idler "_;
PuIleys #"
Mandrel
TO CHECK BRAKE
If tractor requires more than five (5) feet to
stop at highest speed in fttghes[ gear on a
level, dry concrete or paved surface, then
brake must be serviced.
You may also check brake by'
1. Park tractor on a level, dry concrete or
paved surface, depress clutch/brake
pedal all the way down and engage
parking brake.
2, Place gear shift lever in neutral posl-
tlon.
The rear wheels must lock and skid
when you try to manually push the tractor
forward. If the rear wheels rotate, then
the brake needs to be serviced. Contact a
Sears or other qualified service center.
TO REPLACE MOTION DRIVE BELT
Park the tractor on level surface. Engage
parking brake. For assistance, there is
a belt installation guide decal on bottom
s_de of left footrest,
BELT REMOVAL-
1. Remove mower (See "TO REMOVE
MOWER" _n[his section of manual).
NOTE: Observe enttre motion drive belt
and position of all belt guides and keepers.
2, Remove belt from stationary idler (A)
and clutching tdler (B).
3. Pull belt slack toward rear of tractor.
Remove belt upwards from transaxle
input pulley (D).
4. Remove belt downward from engine
pulley (E).
5, Slide belt toward rear of tractor, off the
steen ng plate (F) an dremove from tractor.
BELT INSTALLATION -
1. Install new belt from tractor rear to
front, over the steenng plate (E) and
above clutch brake pedal shaft (G).
2. Pull belt toward front of tractor and rolt
belt onto engine pulley [E).
3. Pull belt toward rear of tractor. Care-
fully work belt down around transaxle
input pulley (D). Ensure belt is inside
the belt keeper.
4. Install belt through stattonary idler (A)
and clutching idler (B).
5. Ensure belt is in all pulley grooves and
Inside all belt guides and keepers.
6, Install mower lSee "TO INSTALL
MOWER" in thts section of manual).
24
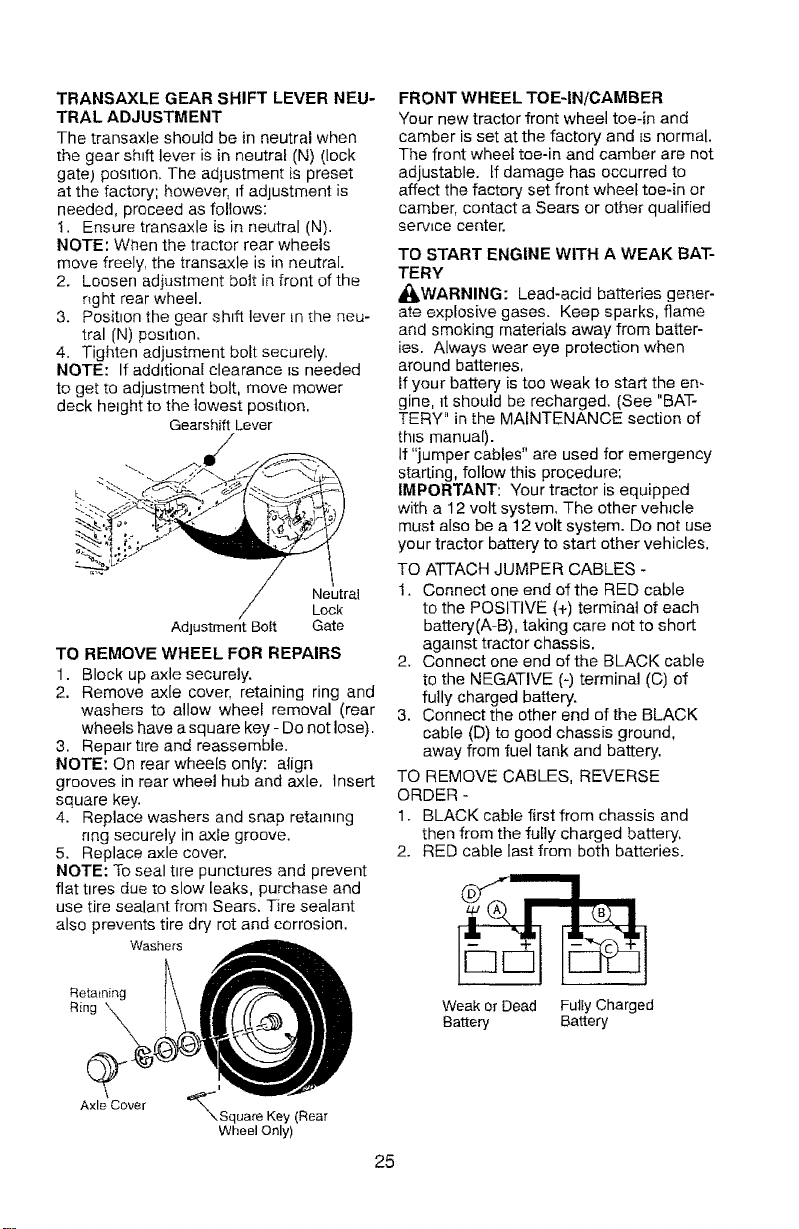
TRANSAXLE GEAR SHIFT LEVER NEU-
TRAL ADJUSTMENT
The transaxle should be in neutral when
the gear shift lever is in neutral (N) (lock
gate) posttion. The adjustment is preset
at the factory; however, tf adjustment is
needed, proceed as follows:
t. Ensure transaxle is in neutral (N).
NOTE: When the tractor rear wheels
move freely, the transaxle is in neutral.
2. Loosen adjustment bott in front of the
right rear wheel.
3. Position the gear shift lever Lnthe neu-
tral (N) posttton.
4. Tighten adjustment bolt securely.
NOTE: If additional clearance is needed
to get to adjustment bolt, move mower
deck height to the lowest position,
Gearshift Lever
/
Neutral
/ Lock
Adjustment Bolt Gate
TO REMOVE WHEEL FOR REPAIRS
1. Block up axle securely.
2. Remove axle cover, retaining ring and
washers to allow wheel removal (rear
wheels have a square key - Do not lose).
3. Repair tire and reassemble.
NOTE: On rear wheeis only: align
grooves in rear wheel hub and axle. Insert
square key.
4. Replace washers and snap retatntng
ring securely in axle groove.
5. Replace axle cover.
NOTE: To seal tire punctures and prevent
flat tires due to slow leaks, purchase and
use tire sealant from Sears. Tire sealant
also prevents tire dry rot and corrosion.
Washers A
Retaining _)
Ring "X
AxleCover -_'Square Key (Rear
WheelOnly)
FRONT WHEEL TOE-IN!CAMBER
Your new tractor ?rontwheel toe-in and
camber is set at the factory and [s normal.
The front wheel toe-in and camber are not
adjustable, tf damage has occurred to
affect the factory set front wheel toe-in or
camber, contact a Sears or other qualified
servLce center.
TO START ENGINE WITH A WEAK BAT-
TERY
A_I=WARNING: Lead-acid batteries gener-
ate explosive gases. Keep sparks, flame
and smoking materials away from batter-
ies. Always wear eye protection when
around battenes,
If your battery is too weak to start the en-
gine, it should be recharged. (See "BAT-
TERY" in the MAINTENANCE section of
thts manual).
tf "jumper cables" are used for emergency
starting, fellow this procedure:
IMPORTANT: Your tractor is equipped
with a 12 volt system, The other vehIcle
must also be a 12 volt system. Do not use
your tractor battery to start other vehicles.
TO ATTACH JUMPER CABLES -
1. Connect one end ol_the RED cable
to the POSITIVE (+) terminal of each
battery(A-B), taking care not to short
agatnst tractor chassis.
2. Connect one end of the BLACK cable
to the NEGATIVE (-) terminal (C) of
fully charged battery.
3. Connect the other end of the BLACK
cable (D) to good chassis ground,
away from fuel tank and battery.
TO REMOVE CABLES, REVERSE
ORDER -
1. BLACK cable first from chassis and
then from the fufly charged battery,
2. RED cable last from both batteries.
, o
Weak or Dead Fully Charged
Battery Battery
25
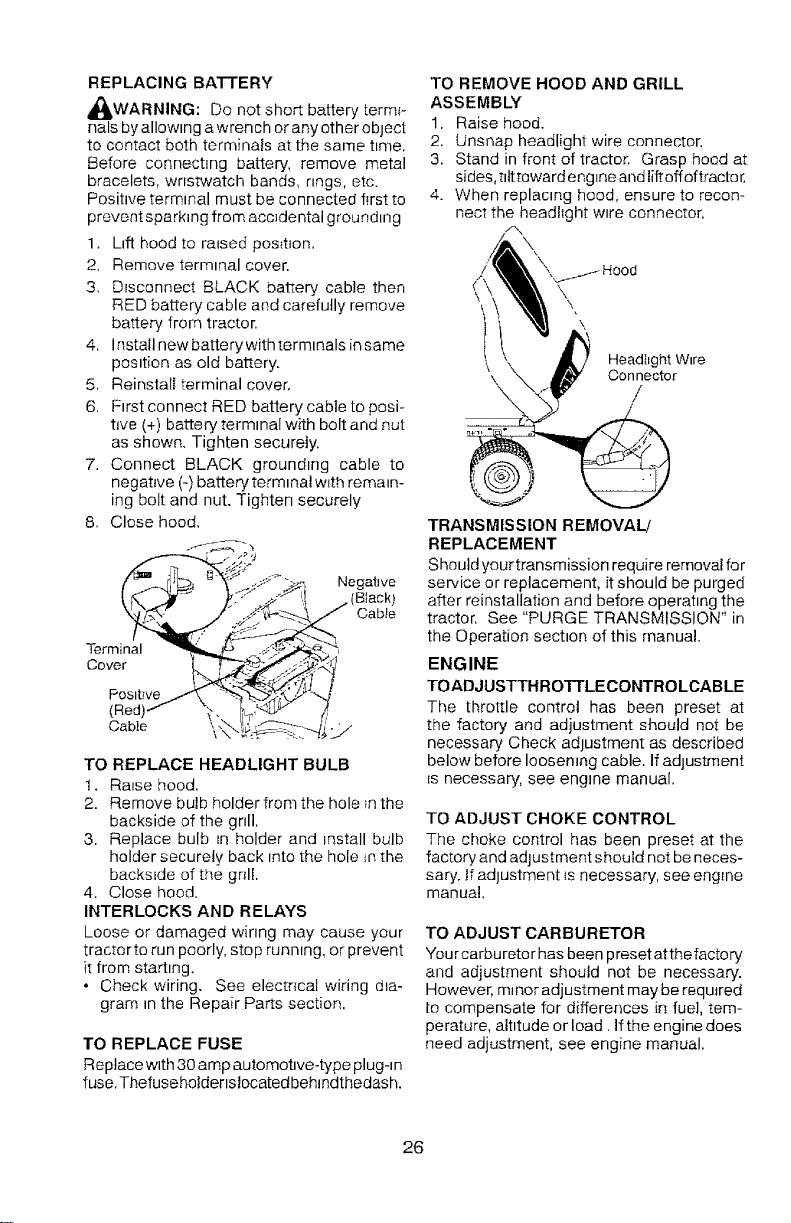
REPLACING BA'I-I'E RY
_WARNING: Do not short battery termi-
nals by allowing a wrench or any other object
to contact both terminafs at the same hme.
Before connecting battery, remove metal
bracelets, wristwatch bands, rings, etc.
Posihve terminal must be connected first to
prevent sparking from accidental grounOng
1. Oft hood to raised pos_t_on.
2. Remove terminal cover•
3. DFsconnect BLACK battery cable then
RED battery cable and carefully remove
battery from tractor.
4. Installnewbatterywithtermmalsinsame
position as old battery.
5. Reinstall terminal cover,
6. First connect RED battery cable to posi-
twe (+) battery terminal with bolt and nut
as shown. Tighten securely.
7. Connect BLACK grounding cable to
negative (-) battery terminal w_th remain-
ing bolt and nut. Tighten securely
8. Close hood.
_2_ _; _, Negatwe
_<Y --Y.I (B ack_
;.s--'_--_ Cable
p__i,:',i
(Red)-/ "_-. I._,_4_-_" /
TO REPLACE HEADLIGHT BULB
1. Raise hood•
2. Remove bulb holder from the hole _nthe
backside of the gnll.
3. Replace bulb tn holder and install bulb
holder securely back into the hole m the
backsEde of the gnll.
4. Close hood.
INTERLOCKS AND RELAYS
Loose or damaged winng may cause your
tractor to run poorly, stop running, or prevent
it from starting.
• Check wiring. See elecmcal wiring dia-
gram in the Repair Parts section.
TO REPLACE FUSE
Replace with 30 amp automotwe-type plug-m
fuse. Thefuseholdenstocatedbehmdthedas h.
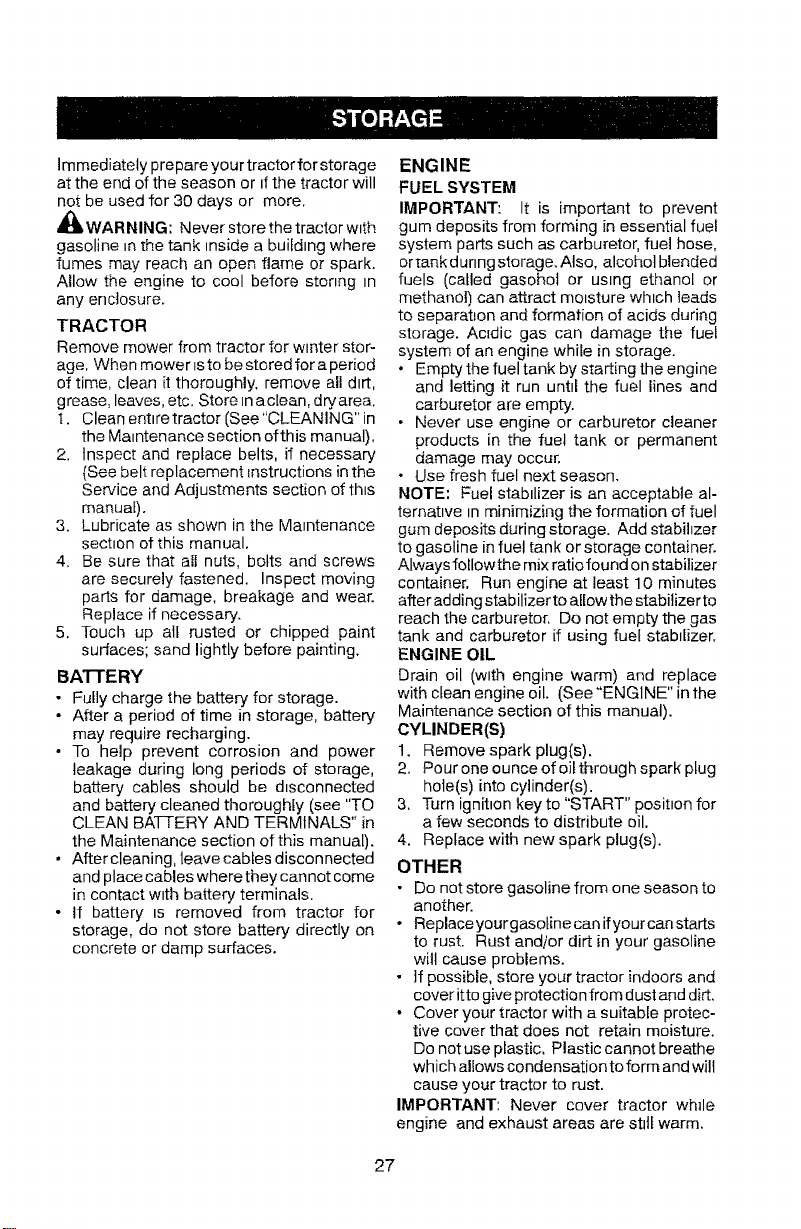
TO REMOVE HOOD AND GRILL
ASSEMBLY
1. Raise hood.
2. Unsnap headlight wire connector•
3. Stand in front of tractor. Grasp hood at
sides, t=tttoward eng =neand lift offof tractor,
4. When replacing hood, ensure to recon-
nect the headhght wire connector,
\
HeadI_ghtW_re
Connector
TRANSMISSION REMOVAL/
REPLACEMENT
Should your transmission require removal for
service or replacement, it should be purged
after reinstallation and before operating the
tractor. See "PURGE TRANSMISSION" in
the Operation sechon of this manual.
ENGINE
TO ADJUSTTHROTTLECONTROLCABLE
The throttle control has been preset at
the factory and adjustment should not be
necessary Check adjustment as described
below before Ioosemng cable. If adjustment
Esnecessary, see engine manual.
TO ADJUST CHOKE CONTROL
The choke control has been preset at the
factory and adjustment should not be neces-
sary. if adjustment _snecessary, see engine
manual.
TO ADJUST CARBURETOR
You rcarburetor has been preset at the factory
and adjustment should not be necessary.
However, m=nor adjustment may be required
to compensate for differences in fuel, tem-
perature, altitude or load. If the engine does
need adjustment, see engine manual•
26
Immediately prepare your tractor for storage
at the end of the season or tfthe tractor will
not be used for 30 days or more.
_WARNING: Never store the tractor with
gasoline _nthe tank inside a building where
fumes may reach an open flame or spark.
Allow the engine to cool before stonng tn
any enclosure.
TRACTOR
Remove mower from tractor for winter stor-
age, When mower is to be stored for a period
of time, clean it thoroughly, remove all dirt,
grease, leaves, etc. Store in aclean, dry area.
1. Clean entlretractor (See"CLEANING" in
the Maintenance section of this manual),
2. Inspect and replace belts, if necessary
(See belt replacement Instructions in the
Service and Adjustments section of th_s
manual).
3. Lubricate as shown in the Maintenance
section of this manual,
4, Be sure that all nuts, bolts and screws
are securely fastened. Inspect moving
parts for damage, breakage and wear.
Replace if necessary.
5. Touch up all rusted or chipped paint
surfaces; sand lightly before painting.
BATTERY
• Fully charge the battery for storage.
• After a period of time in storage, battery
may require recharging.
• To help prevent corrosion and power
leakage during long periods of storage,
battery cables should be d=sconnected
and battery cleaned thoroughly (see "TO
CLEAN BATTERY AND TERMINALS" in
the Maintenance section of this manual).
• Aftercleaning, teavecabtes disconnected
and place cables where they cannot come
in contact with battery terminals.
• If battery is removed from tractor for
storage, do not store battery directly on
concrete or damp surfaces.
ENGINE
FUEL SYSTEM
IMPORTANT'. It is important to prevent
gum deposits from forming in essential fuel
system parts such as carburetor, fuel hose,
or tank dunng storage. Also, alcohol blended
fuels (called gasohol or using ethanol or
methanol) can attract moisture which leads
to separation and formation of acids during
storage. Acidic gas can damage the fuel
system of an engine while in storage.
° Empty the fuel tank by starting the engine
and letting it run until the fuel lines and
carburetor are empty.
• Never use engine or carburetor cleaner
products in the fuel tank or permanent
damage may occur,
• Use fresh fuel next season.
NOTE: Fuel stabilizer is an acceptable al-
ternative In minimizing the formation of fuel
gum deposits duringstorage. Add stabihzer
to gasoline in fuel tank or storage container.
Always foflow the mix ratio found on stabilizer
container, Run engine at least 10 minutes
after adding stab ilizer to allow the stabilizer to
reach the carburetor. Do not empty the gas
tank and carburetor if using fuel stabilizer,
ENGINE OIL
Drain oil (with engine warm) and replace
with clean engine oil. (See "ENGINE" in the
Maintenance section of this manual).
CYLINDER(S)
1. Remove spark plug{s).
2, Pour one ounce of oil through spark plug
hole(s) into cylinder(s).
3. Turn ignition key to "START" posit=on for
a few seconds to distribute oil.
4. Replace with new spark plug(s).
OTHER
• Do not store gasoline from one season to
another.
* Replace your gasoline can ifyour can starts
to rust. Rust and/or dirt in your gasoline
will cause problems.
• Jfpossible, store your tractor indoors and
cover itto give protection from dust and dirt.
• Cover your tractor with a suitable protec-
tive cover that does not retain moisture.
Do not use plastic, Plastic cannot breathe
which allows condensation to form and will
cause your tractor to rust.
IMPORTANT: Never cover tractor while
engine and exhaust areas are stltf warm.
27
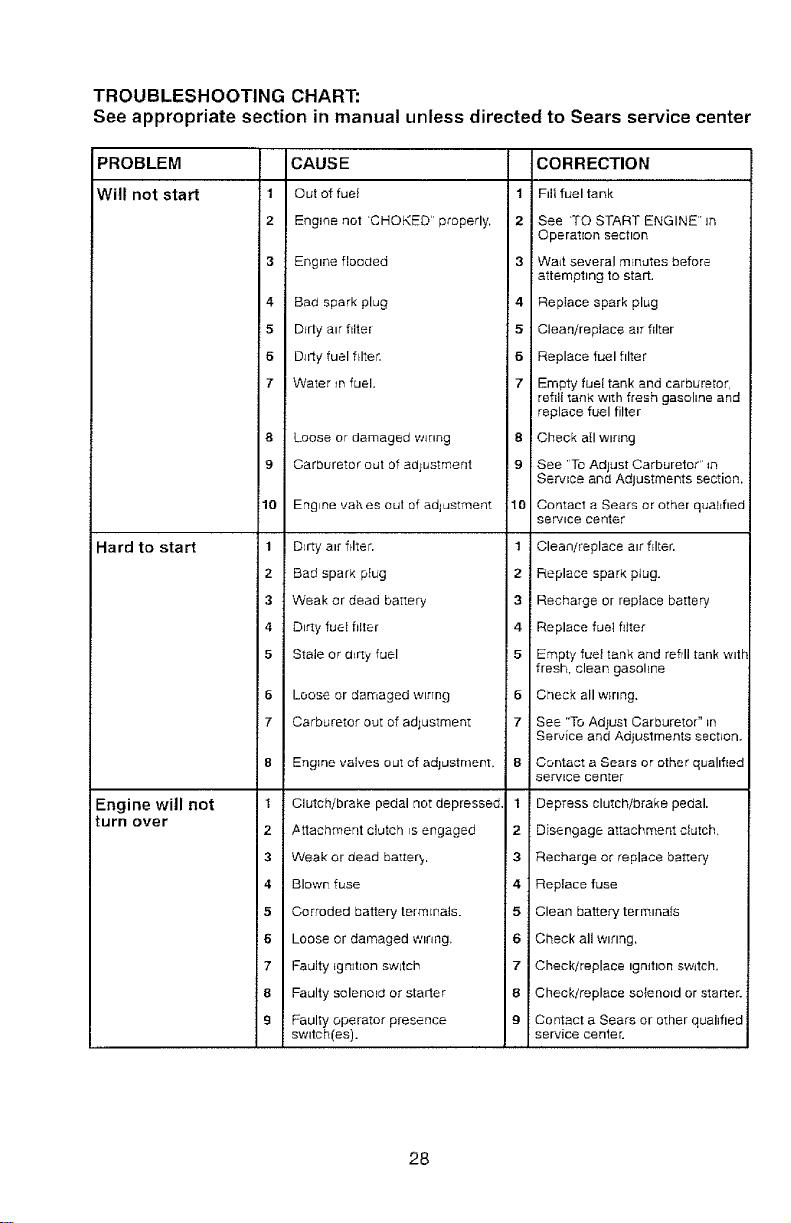
TROUBLESHOOTING CHART:
See appropriate section in manual unless directed to Sears service center
PROBLEM CAUSE
Will not start 1 Out of fuel 1
2 Engne not 'CHOKED"properly. 2
-lard to start
Engine will not
turn over
3 Engtne flooded
4 Bad spark plug
5 DFdy air filter
6 D_rty fuel flltec
7 Water *r fuel.
4
5
6
7
8 Loose or damaged w_nng 8
9 Carburetor out of adjustment ! 9
10 Engine va_\es out of adjustment 10
2
3
4
5
1 D_rty air filter.
2 Bad spark plug
3 Weak or dead battery
4 Dirty fuel filter
5 Stale or aLrty fuel
6 Loose or damaged wlrTng 6
7 Carburetor out of adjustment 7
8 Engine valves out of adjustment, 8
1 Clutch/brake pedal not depressed. 1
2 ,attachment clutch ISengaged 2
3 Weak or dead ba_teq,. 3
4 Blown fuse 4
15 Corroded battery terminals. 5
I 6 Loose or damaged wlnng. 6
7 Faulty ignition switch 7
8 Faulty solenoid or starter 8
9 Faulty operator presence g
switch(as).
CORRECTION
Fill fuel tank
See 'TO START ENGINE" Jn
Operation section
Wa_t several minutes before
altempttng 1o star[.
Replace spark plug
Clean/replace anrfilter
Replace fuel filter
Empty fuel tank and carburetor,
refEiitan_ with fresh gasoline and
replace fuel filter
Check nil w_nng
See "To Adjust Carburetor" _o
Service an_ Adjustments section.
Contact a Sears or other qual,fiad
servtce center
Clean/replace air Nter.
Replace spark plug.
i Recharge or replace battery
i Replace fuel filter
Empty fue_ tank and refill tank will
fresh, clean gasohne
Crleck all wiring.
See "To Adjust CarDuretor" _n
Service and Adjustments section,
Contact a Sears or other qualified
serwce center
Depress clutch/brake pedal.
Disengage attachment clutch.
Recharge or replace battery
Replace fuse
Clean battery terra,oafs
Check all wtring.
Check/replace tgndlon sw_tch.
Check/replace solenoid or starer.
Contact a Sears or other qualffted
service cente r.
28
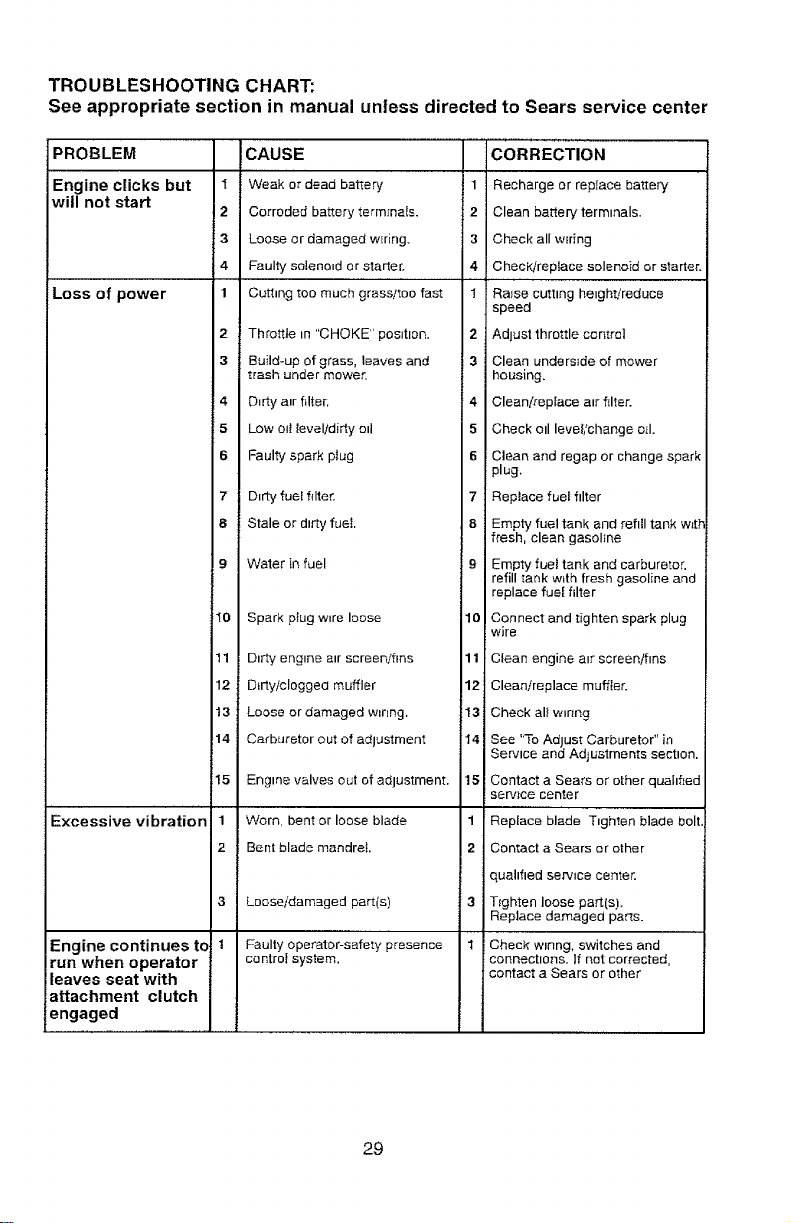
TROUBLESHOOTING CHART:
See appropriate section in manual unless directed to Sears service center
I
2
3
4
1
PROBLEM
Engine clicks but
will not start
Loss of power
Excessive vibration
Engine continues to
run when operator
leaves seat with
attachment clutch
engaged
2
3
CAUSE
Weak or dead battery 1
Corroded battery terminals. 2
Loose or damaged wEring. 3
Faulty solenoid or starter, 4
Cutttng too much grass/too fast 1
Throttle in "CHOKE" position.
Build-up of grass, leaves and
trash under mower.
4 D_rty air filter,
5 Low oil ieveltdirty oil
6 Faulty spark plug
7 Dirty fuel filter.
8 Stale or dirty fuel
9 Waler in fuel
10 Spark ptug wire loose
tl
12
13
14
15
Dirty engine air screen/fins
Dirty/clogged muffler
Loose or damaged wrong.
Carburetor out of adlustment
Engine vsIves out of adjustment,
1 Worn, bent or loose blade
2 Bent blade mandrel,
3 Loose/damaged part(s)
Faulty operator-safety presence
co ntrol system.
2
3
4
5
6
7
8
10
11
12
i13
14
15
1
2
3
1
CORRECTIO.
Recharge or replace battery
Clean battery terminals.
Check all wEring
Check.!reptace solenoid or starter.
Raise cutting hetghtireduce
speed
Adlust throttle control
Clean underside of mower
housing.
Clean/replace atr filter.
Check otl level/change o_1.
Clean and regap or change spark
plug.
Replace fuel filter
Empty fuel tank and refill tank w_t_"
fresh, clean gasoline
Empty fuel tank and carburetor,
refill tank w_th fresh gasoline and
replace fuel filter
Connect and tighten spark plug
wire
Clean engine atr screen/fins
Clean/replace muffler.
Check el! wlnng
See "To Adjust Carburetor" in
Servtce and Adjuslments sectton.
Contact a Sears or other quahfEed
service center
Replace blade Tighten blade bolt,
Contact a Sears or ether
quahfied servtce center.
T_ghten loose pan[s).
Replace damage0 parts.
Check winng, switches and
cortnegtlons. If net corrected,
contact a Sears or other
29
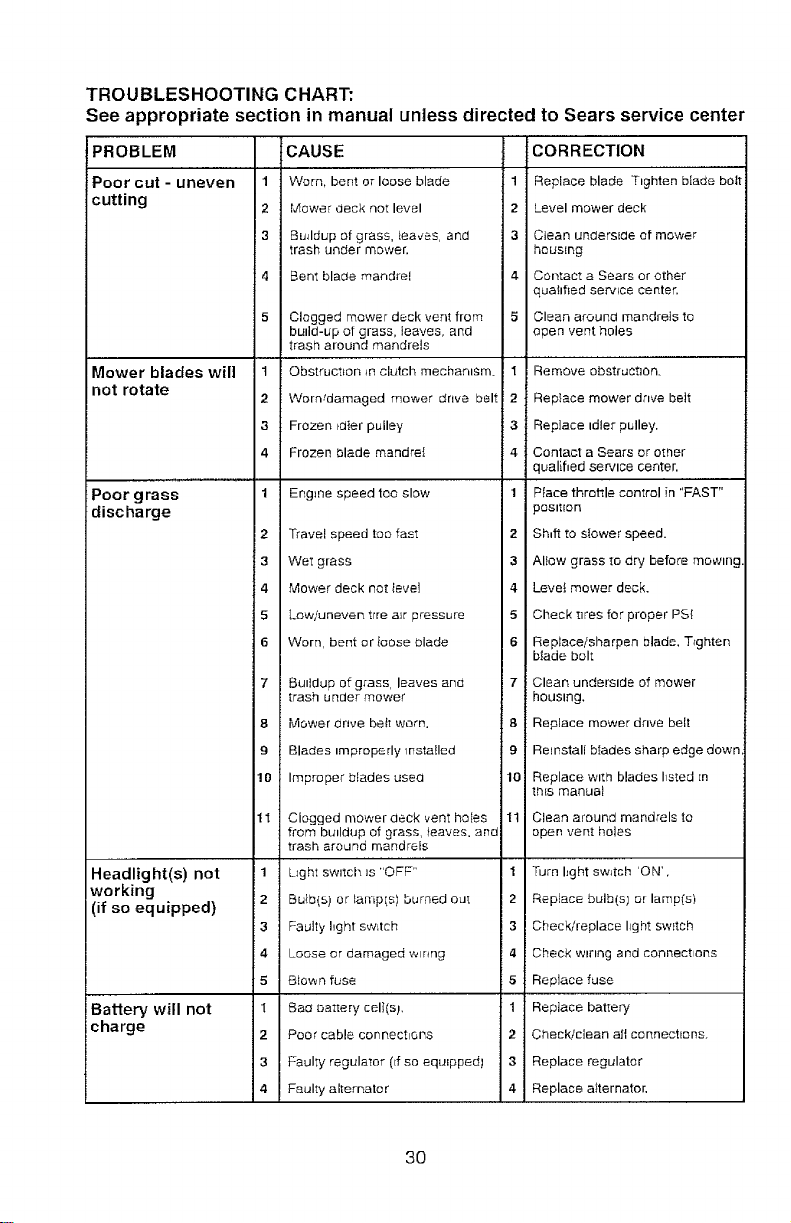
TROUBLESHOOTING CHART:
See appropriate section in manual unless directed to Sears service center
PROBLEM
Poor cut - uneven
cutting
Mower blades will
not rotate
Poor grass
discharge
Headlight(s) not
working
(if so equipped)
Battery will not
charge
CAUSE CORRECTION
1 Worn, bent or loose blade 1 Replace blade T_ghten biada bolt
2 Mower deck not level 2 Level mower deck
3 Bu41dupof grass. _eaves, and 3 Clean underside of mower
trash under mower, heusEng
4 Bent blade mandrel 4 Contact a Sears or other
quahfied service center,
5 Clogged mower deck vent from 5 Clean arouna mandrels to
budd-up of grass, leaves, and open vent holes
trash around mandrels
1 Obstruction _nclutch mechanism. I Remove obstruction_
2 Worn,'damaged mower dnve belt 2 Reptace mower drive belt
3 Frozen _d{erpulley 3 RepJaee tdler pulley,
4 Frozen blade mandrel 4 Contact a Sears or omer
qualified service center.
1 Engine speed too slow 1 Place throttle control in "FAST"
pesmon
2 Travel speed too fast 2 Sh.ft to sfower speed.
3 Wet grass 3 Al$ow grass to dry before mowtng
4 Mower deck not _evel 4 Levei mower deck.
5 Low/uneven trre air pressure 5 Check tires for proper PSI
6 Worn, bent or bose blade 6 Replace/sharpen blade. T_ghten
blade bolt
7 Buildup of grass, leaves and 7 Clean underside of mower
trash unaer mower housing.
8 Mower dnve belt worn. 8 Replace mower dnve belt
9 Blades improperly installed 9 Reinstall btades sharp edge down
10 Improper blades used 10 Replace with blades I_sted [n
thEs manual
t I Clogged mower deck vent holes 11 Clean arouna mandrels to
from buildup of grass, reaves, anr,J open vent holes
trash around mandrels
! 1 L_ght switch is "OFF" 1 Turn bght sw_tch 'ON'.
2 Bu_L_{s)or lamp[s) burned oat 2 Replace bulb(s; or lamp(s)
3 Faulty hght sw_tch 3 Check/replace I_ght switch
{4 Loose or damaged w_nng 4 Check wiring and connections
5 Blown fuse 5 Replace fuse
1 Bad battery cell(s_, 1 Replace battery
2 Poor cable connections 2 Check/clean al{ connections.
3 Faulty regulator Of so equipped I 3 Replace regulator
4 Faulty alternator 4 Replace alternator.
30

TROUBLESHOOTING CHART:
See appropriate section in manual unless directed to Sears service center
PROBLEM
Loss of drive
Engine "backfires"
when turning
engine "OFF"
Engine dies when
tractor is shifted
into reverse
1
CAUSE CORRECTION
Debris on steeang plate (_f 1 See "CLEANING" in the
equipped) i maintenance sectton.
2 Motion drive belt wOrnr damaged, 2 Replace molten drive belt.
or broken.
! 3 Axte key m_ss_ng
Engtne throttle control not sol 1
between half and full speed (fast)
position before stopping engine.
Reverse operation system (ROS)
is not "ON" while mower or other
attachment Jsengaged.
Install axle key at rear wheel. See
"TO REMOVE WHEEL" m the
Servtce and Adjustments section,
Move throttle control between
half and full speed (fast) position
before stopping engtne.
Turn igmt_on key to ROS "ON r
)os_tton, See Operation section.
NEED MORE HELP?
You'lL find the answer and more on managemyhome.com - for free!
- Find this and all your other product manuals onLine.
• Get answers from our team of home experts.
• Get a personabzed maintenance plan for your home.
- Fred reformation and tools to help with home projects.
manage home
_iou_!tt [o yot_ by S_a_s
31
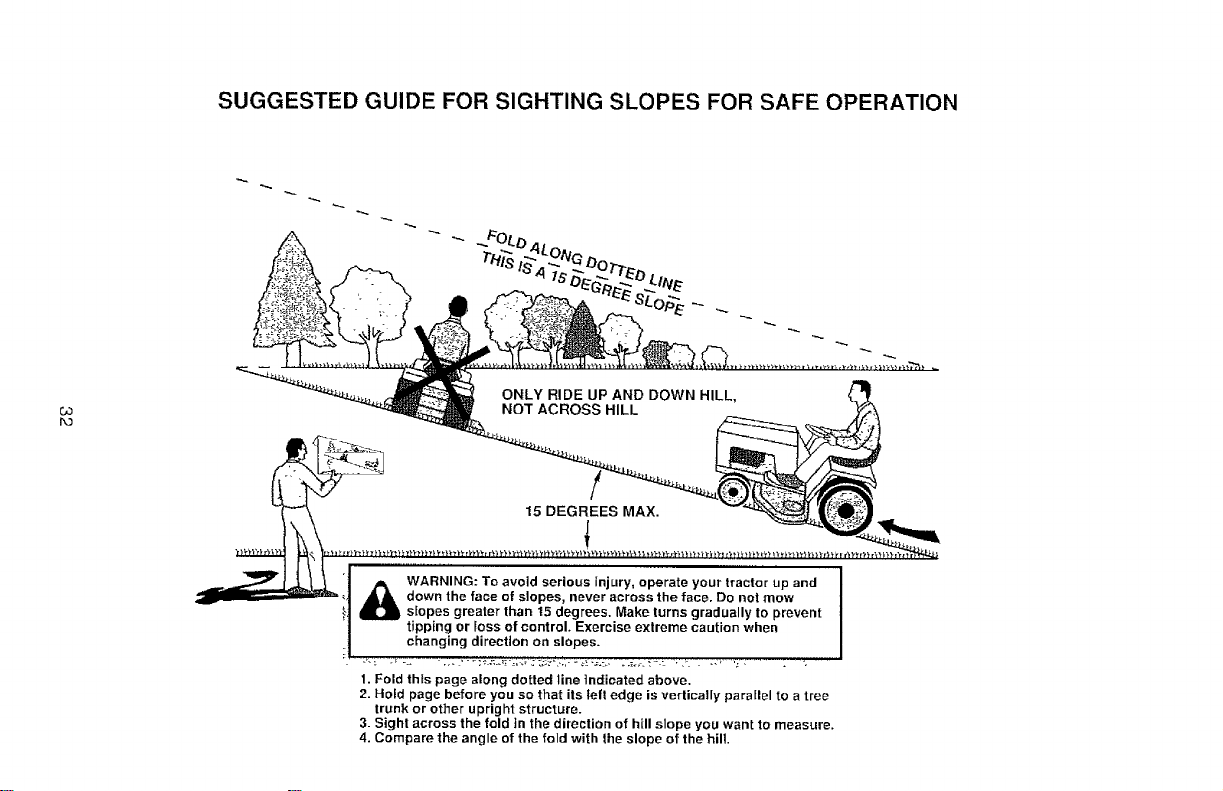
SUGGESTED GUIDE FOR SIGHTING SLOPES FOR SAFE OPERATION
O3
PO
_ ARNING: To avoid serious injury, operate your tractor up and
down the face of slopes, never across the face. Do not mow
sfopes greater than t5 degrees. Make turns gradually to prevent
tipping or Ioss of control. Exercise extreme caution when
changing direction on slopes.
t. Fold this page along dotted line Indicated above.
2. Hold page before you so that ils felt edge is vertically paraElel to a tree
trunk or other upright structure.
3. Sight across the fold in the direction of hill slope you want to measure.
4. Compare the angle of the fold with the slope of the hill.
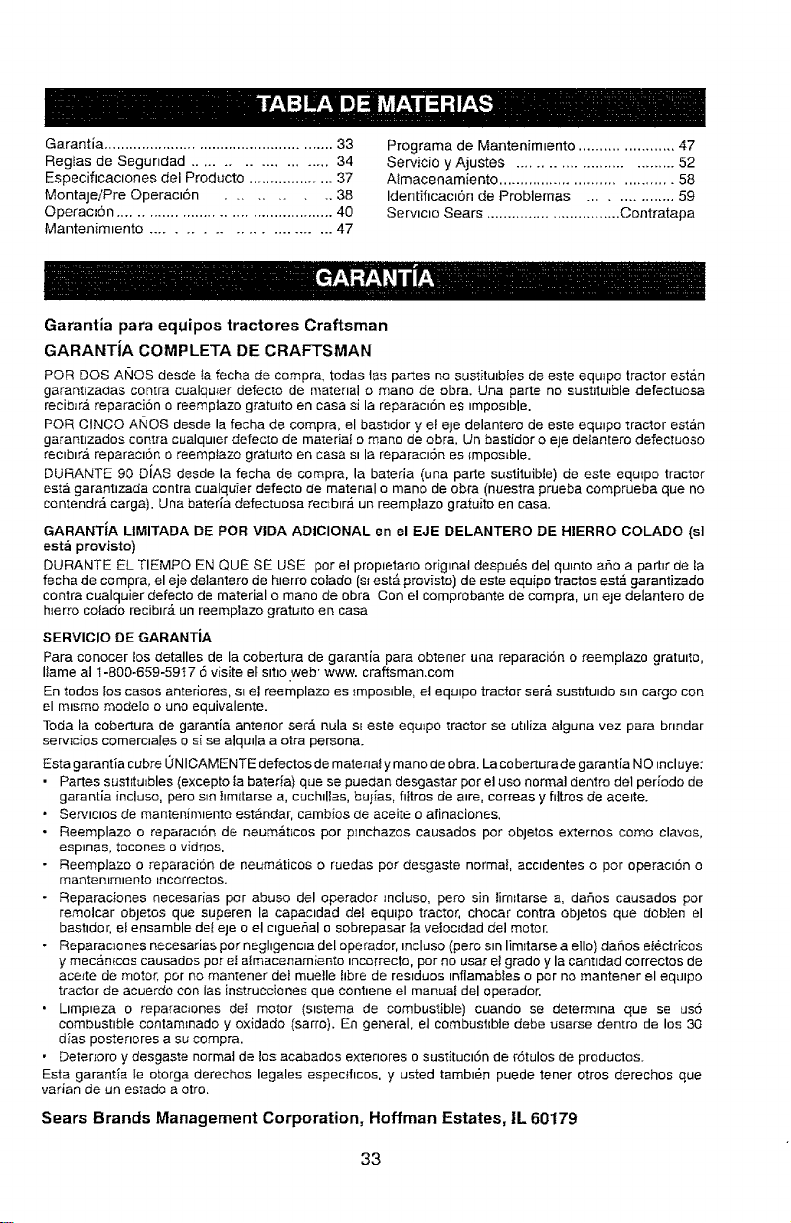
Garantia.....................................................33
RegiasdeSegundad..................... 34
EspeciftcaclonesdeiProducto...................37
Montaje/PreOperact6n ..38
Operac,on ..................... " " ,[i...i[....i ...... 40
Mantenirmento .......................... 47
Programa de Mantenimlento ...................... 47
Servicio y Ajustes ............................... 52
Alrnacenamiento ...................................... 58
Identificacl6n de Problemas ................ 59
Servtc_o Sears ............................... Contratapa
Garantia para equipos tractores Craftsman
GARANTJA COMPLETA DE CRAFTSMAN
PeR DOS ANOS desde la fecha de compra, todas tas panes na sustitutbies de este equ_po tractor est_.n
garantlzadas centre cualqu_er defecto de material o mane de obra, Una parte no sustitulbie defectuosa
reciU_ra reparac]6n o reemptazo gratuito encasa sila reparacl6n es imposlble.
PeR CINCO ANOS desde la fecha de compra, el bast_dor y ef eje delantero de este equlpo tractor est__n
garantizados centre cualquter defecto de materia{ o mane de obra. Un bastidor o eje delantere defectuoso
rec_btra reparacl6n o reempiazo gratulto en case Slla reparacpSn es {mpos{ble.
DURANTE 90 DIAS desde la fecha de compra, la bateria (una parte sustituible) de este equEpo tractor
esta garanttzada centre cualquier defecto de material o mane de obra (nuestra prueba comprueba que no
contendr_ carga). Una bater[a defectuosa rec_blr_ un reemptazo gratuito en case,
GARANTiA LIMITADA DE PeR VIBA ADIClONAL en el EJE DELANTERO DE HIERRO OOLADO (sl
esta provisto)
DURANTE EL TEMPO EN QUE SE USE per el propletano origlnat despu_.s del qulntO argo a parbr de [a
fesha de compra, el eje delantero de hterro colado {s_est#, provisto) de este equipo tractos est_ garantizado
centre cualquier defecto de material o mane do obra Con el comprobante de compra, un eje delantero de
hterro cotado recibtr_ un reemplazo gratulto en casa
SERVlCIO DE GARANTiA
Para conocer los detalles de la cobertura de garantia pare obtener una reparacion o reemplazo gratutto,
liame al 1-800-659-59t 7 6 visite el sttlo web' www. craftsman.corn
En redes los cases anteriares, Sl el reemplaze es _mposlble, el equlpo tractor ser_ sustitupdo sin cargo con
el mtsmo raodelo o uno equivalente.
Toda la cobeftura de garantia anterior ser_. nula sEeste equ_po tractor se utilize alguna vez pare bnndar
servicios comerc_ales o si se alquda aotra persona.
Esta garantia sabre 0NICAMENTE defectas de mateoa{ ymane ae obra. La co bertura de garantia NO incluye:
• Partes sust_tulbles (excepto ia borer[a) que se puedan desgastar per el use normal dentro del per[ode de
garantia incluso, pero stn flmltarse a, cuchlllas, buttes, fittras de alto, cartons y filtros de acelte.
• Servtctos de mantenimlento estandar, cambios de aceite o afinaciones.
• Reemplazo o reparacl6n de neum_ttcos per pInchazos causados per obJetos e×ternos come slaves,
esplnas, tocones e vidrlos.
- Reemp}aze o reparacion de neumaticos o ruedas per desgaste norma!, accldentes o per operaclon o
rnaatenlrntento Incorrectos.
• Reparaciones necesarias par abuse del operador _ncluso, pete sin limltarse a, dories causades par
remolcar objetos que superen la capacldad del equipo tractor, chocar contra objetos que dobIen el
bastldor, et ensemble del ele o el clgueAal o sobrepasar la vetoctded del motor.
• Reparac_o nes necesarias per neghgencta del operador, recluse (pete s_nlimitarse aello) darios electricos
y mecamces causades per el etmacenamiento incarrecto, per no usar el grade y la cantldad correctos de
ace_te de motor, per no mantener det muelle ttbre de remduos tnflamables o per no mantener el equtpo
tractor de acuerdo con los instruccienes que contlene el manual del operador.
• Dmp_eza o reparac_ones dei motor (slstema de combustib}e) cuando se determine que se us6
combustible contam_nado y oxfdado (sarro). En general, el eombus£ble debe usarse dentro de los 30
dias postertores a su compra.
• Detenoro y desgaste normal de los acabados e×tenores o sustituct6n de rStulos de productos.
Esta garanda le otorga derechos legales espectficos, y usted tembl6n puede tener otros derechos que
varian de un es[ado a otro,
Sears Brands Management Corporation, Hoffman Estates, |L 60179
33
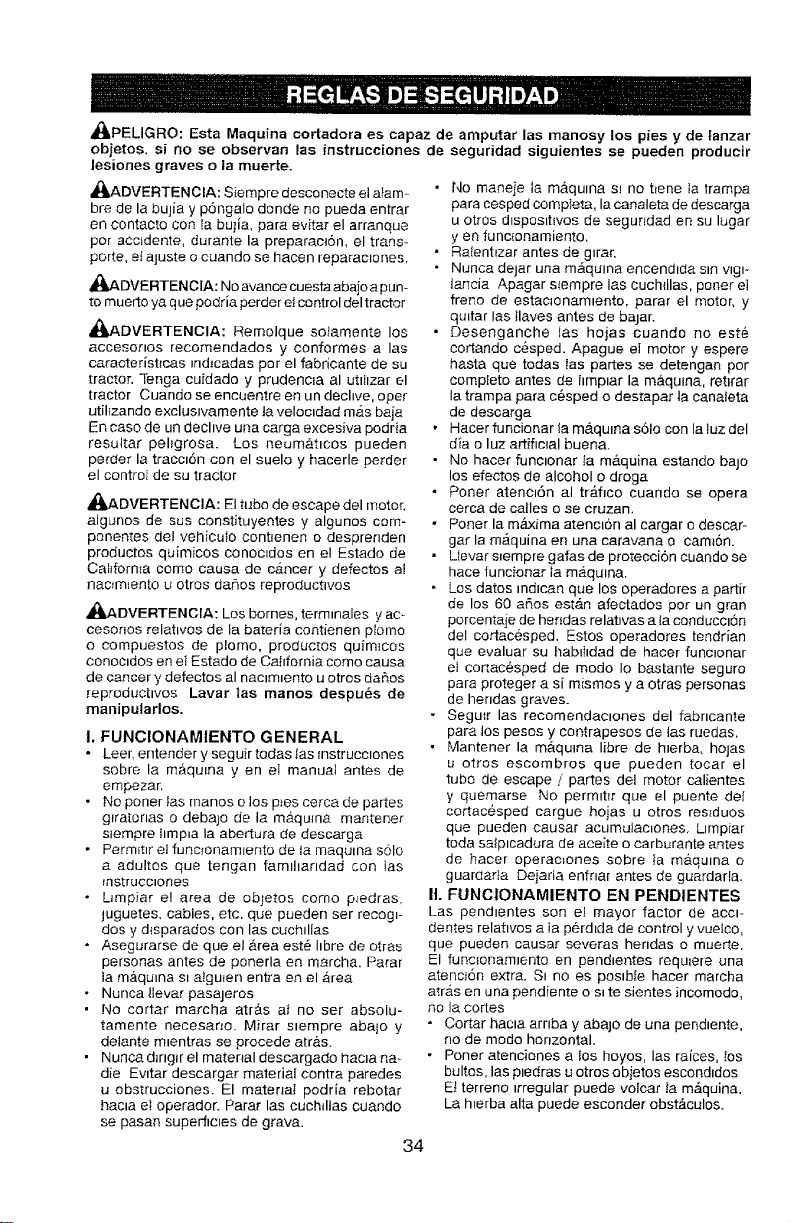
_i_PELIGRO: Esta Maquina cortsdora es capaz de amputar Ins manosy los pies y de lanzar
objetos, si no se observan las instrucciones de seguridad siguientes se pueden producir
lesiones graves o la muerte.
_t, ADVERTENCIA: Siempre desconecte el alam-
bre de la bujia y p6ngalo donde no pueda entrar
en eontacto con Ia butla, para evitar el arranque
per acc_dente, durante la preparac_6n, el trans-
porte, el aluste o cuando se hacen reparac_ones.
_I_ADVERTEN CIA: No avarice cuesta abajo a pun-
to muerto ya que pod[is perder e_control del tractor
_ADVERTENClA: Remolque sotamente los
accesonos recomendados y confermes alas
caracterisbcas tnd_cadas per el fabricante de su
tractor. -Fenga cuidado y prudenc_a al ubhzar el
tractor Cuando se encuentre en un dechve, oper
utilfzando excluswamente la velocidad mas baja
En case de un dechve una carga excesiva podria
resuttar pehgrosa. Los neum2,t_cos pueden
perder la traccl6n con el suelo y hacerle perder
el controJ de su tractor
_ADVERTENClA: El tube de escape del motor,
algunos de sus constituyentes y algunos com-
ponentes del vehicuio conbenen o desprenden
productos quimicos conocrdos en el Estado de
California come causa de cancer y defectos al
nac_m_ento u otros da_os reproductivos
,I_DVERTENCIA: Los berries, terra,hales y ac L
cesonos relatwos de la bateria contienen plomo
o compuestos de plomo, productos quim_cos
conocidos en eI Estado de Catlfornia come causa
de cancer y defectos al nacim_ento u otros da_os
reproducbvos Lava[ |as manes despu_s de
maniputarlos.
I. FUNClONAMIENTO GENERAL
- Leer, entender y seguir todas las _nstrucc_ones
sobre la maquma yen et manual antes de
empezar.
• No poner las manes o los p_es cerca de partes
glra[onas o debajo de la ma_qu_na mantener
slempre hmp_a la abertura de descarga
• Permmr el functonam_ento de la maquma solo
a adultos qua tengan famdlarldad con Ias
_nstrucc_ones
• Dmpiar e! area de obfetos come p,edras,
juguetes, cables, etc. que pueden ser recog_-
dos y disparados con Ins cuchdlas
• Asegurarse de que e! Area est_ hbre de otras
personas antes de ponerla en marcha. Parar
la maqu_na s_alguJen entra en el area
• NuncaIlevar pasajeros
• No cortar marcha atr&s at no ser absoiu-
tamente necesar_o, Mirar slempre abajo y
delante m_entras se precede at[as.
• Nunca dlr@r el material descargado hacia ha-
die Ewtar descargar material contra paredes
u obstrucciones. El matenaI podria rebotar
hac_a el operador. Parar las cuchdlas cuando
se pasan superficies de grays.
• No maneie la maqu_na sJ no bene la trampa
para cesped compIeta, la canaleta de descarga
u otros dlspos_hvos de segundad en su lugar
yen func_onamiento.
• Ralenbzar antes de g_rar.
• Nunca dejar una m&qulna encend_da sm wgi-
lancia Apagar s_empre las cuch{llas, porter el
freno de estac_onam_ento, parar el motor, y
qu_tar las llaves antes de bajar.
• Desenganche las hojas cuando no este
cortando c_sped. Apague el motor y espere
hasta que todas las partes se detengan per
complete antes de hmpiar la m&qulna, retirar
la trampa para c6sped o destapar ta canaleta
de descarga
Hacer funcionar la maqu_na s61o con la luz del
dia o luz artificial buena.
No hacer func_onar Ia m&quina estando bajo
los efectos de alcohol o droga
Poner atenc_6n al trafico cuando se opera
cerca de cailes o se cruzan.
Poner la maxima atenc_6n al cargar e descar-
gar la mAquina en una caravana e cam_6n.
L[evar s_empre galas de protecci6n cuando se
hace funcionar la maqulna.
Los dates red,can que los operadores a partir
de los 60 a6os estb.n afectados per un gran
porcenta]e de her_das re latwas a la cand ucci6n
del cortacesped. Estos operadores tendrian
que evaluar su hab_bdad de hacer func_onar
et cor[ac6sped de mode Io bastante seguro
para protege[ a si mismos y a at[as personas
de hendas graves_
• Segutr las recomendac_ones del fabncante
para los pesos y contrapesos de las ruedas.
• Mantener la m&quma libre de hlerba, hojas
u at[as eseombros que pueden tocar el
tube de escape / partes del motor calientes
y quemarse No perm_br que el puente del
cortacesped cargue hoias u arras residues
que pueden causar acumulac_ones. Limpiar
teda saiplcadura de aceite o carburante antes
de hacer operac_ones sabre Ia m&quma o
guardarla Dejarta enfnar antes de guardarla.
II. FUNCIONAMIENTO EN PENDIENTES
Las pend=entes son e_ mayor factor de acei-
dentes relatwos a ta perd=da de control y vuelco,
que pueden causar save[as hendas o muerte.
El func_onam_ento en pend_entes requ=ere una
_tenc_6n extra. SI no es pos_ble hacer marcha
arras en una pendiente o s=te sientes incomodo,
no la cortes
- Co[tar hac_a arnba y abajo de una pend_ente,
no de mode honzontal.
•Poner atenciones a Ios hoyos, las raices, tos
bultes, las p_edras u otros ebietos escond_dos
E{ terreno _rregular puede volcar ta m&quina.
La h=erba alta puede esconder obst&culos.
34
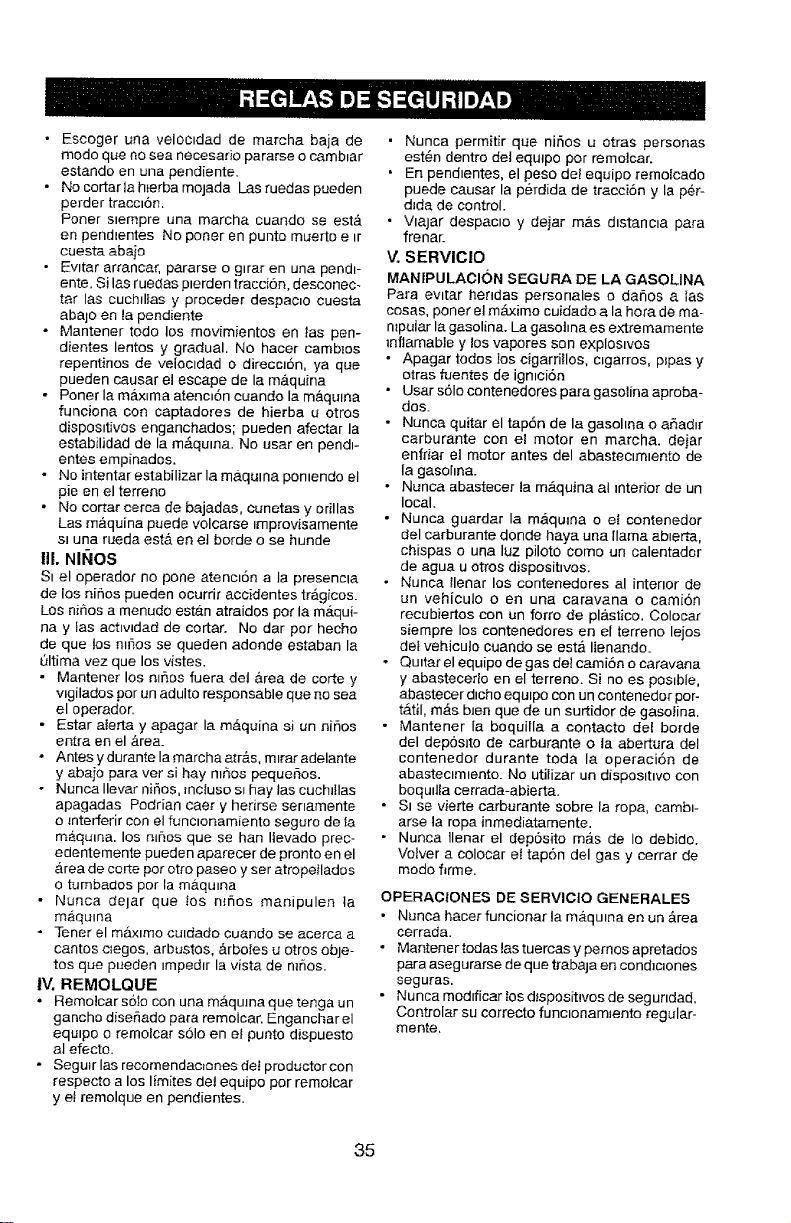
• Escoger una veioc_dad de marcha baja de
mode que no sea necesario pararse o camb_ar
estando en una pendiente.
• No cortar la herba mojada Las ruedas pueden
perder traccl6n.
Poner s_empre una marcha cuando se estgt
en pend_entes No poner en punto muerto e _r
cuesta abaio
• Evltar arrancar, pararse o g_rar en una pend_-
ente. Si las ruedas p_erden tracci6n, desconec-
tar las cuchdlas y preceder despac_o cuesta
abajo en ta pendiente
• Mantener todo los movimientos en tas pen-
dientes lentos y gradual. No hacer carabaos
repentinos de vei{3cldad o direccJSn, ya que
pueden causer el escape do la m_.quina
• Poner la ma_x_maatenct6n cuando la maqulna
funciona con captadores de hierba u otros
dispos_tivos enganchados; pueden afectar la
estabilidad de lamb, quma. No user en pend_-
entes empinades.
• No intentar estabilizar la maquma pon_endo el
pie on el terreno
• No cotter cerca de bajadas, cunetas y orillas
Las m&quina puede volcarse _mprovisamente
sJ una rueda estA en el borde 0 se hunde
!11. NII_iOS
S_ el operad{3r no pone atenc_6n ala presencla
de los nir_os pueden ocurrir accidentes tr_gicos.
Los nir_os a menudo estAn atraidos p{3r la mAqui-
na y las actw_dad de cortar. No dar por hecho
de que los roses se queden adonde estaban la
_ltima vez que los vistes.
• Mantener los nlfios fuera del Area de corte y
vlgilados por un aduito responsable que no sea
el operador.
• Estar aierta y apagar la mAquina si un nir_os
entre en el area_
• Antes y durante la marcha arras, mlrar adelante
y abaio pare ver si hay mr_{3s pequeSos.
•Nunca Ilevar ni6os, ncluso sl hay las cucNlas
apagadas Podrian caer y herirse senamente
o _nterferir con el func_onamiento seguro de Ia
m&qulna, los nll_Os que se ban lievado prec-
edentemente pueden aparecer de pronto en el
Area de corte per otro paseo y ser atropellados
o tumbados per la mb.qulna
•Nunca dejar que Ios ntr_os manipulen la
maqulna
- Tenor el maxlmo culdad{3 cuando se acerca a
cantos c{egos, arbustos, Arbores u otros obje-
tos que pueden impedlr la vista de mr]os.
IV. REMOLQUE
• Remolcarsolo con una maquJnaque tenga un
gancho dise5ado para remolcar. Enganchar el
equlpo o remolcar solo en el punto dispuesto
al efecto.
• Segulr las recomendac_ones det productor con
respect{3 a los Iimites det equipo per remolcar
y el remolque en pendientes.
• Nunca permitir que nJr_os u otras personas
est@n dentro det equlpo per rem{3lcar.
• En pendlentes, el peso deF equipe remoicado
puede causar la p6rdida de tracci6n y la per-
d_da de control.
• Viajar despac_o y dejar mas d_stanc_a pare
frenar.
V. SERVICIO
MAN_PULACION SEGURA DE LA GASOLINA
Pare evltar betides pers{3nales {3 dar_os alas
cosas, poner el maxim{3 cuidado ala hera de ma-
n_pular la gasolina. La gasofina es extremamente
mfiamable y los vapores son exploswos
• Apagar redes los cigarri!los, c_garros, p_pas y
otras fuentes de ign_ci6n
• User s61o contenedores pare gasoline aproba-
dos.
•Nunca quitar el tap6n de la gasohna o a_ad=r
carburante con el motor en marcha, deiar
enfriar el motor antes del abasteclmlento de
la gasohna.
• Nonce abastecer la rn_quina al _nterior de un
local.
• Nunca guardar la mAqu_na o et contenedor
del carburante deride haya una llama ab_erta,
chispas o una luz piloto come un calentador
de ague u etros disp{3sitwos.
• Nunca llenar los contenedores al interior de
un vehiculo o en una caravana o cami6n
recubiert{3s con un forro de plastico. Colocar
siempre los contenedores en el terreno lejos
def vehicute cuando se est,. ltenando_
- Quoter el equipo de gas del cami&n {3caravana
y abastecerfo en el terreno. Si no es pos_ble,
abastecer d_cho equ_po con un contenedor por-
tAtil, mAs b_en que de un surtidor de gasoline.
• Mantener [a boquilla a contacto del borde
del depssito de carburante ota abertura del
contenedor durante teda la operaci6n de
abastec_m_ento. No utilizar un dispos_hvo con
boqu_lla cerrada-abJer[a.
• S_ se vierte carburante s{3bre la rope, camb_-
arse la ropa inmediatamente.
• Nunca llenar el dep6sito mas de Io debido.
Velvet a colocar et tap6n del gas y cerrar de
mode flrme.
OPERAC{ONES DE SERVICIO GENERALES
•Nunca hacer funcionar la m&qu=na en un Area
cerrada.
• Mantener redes {as tuercas y pemos apretados
para asegurarse de que trabaja en cond]c_ones
seguras.
• Nunca modfficar !os d_sposihvos de segundad.
Controlar su correcto func_onam_ent{3 regular-
monte,
35
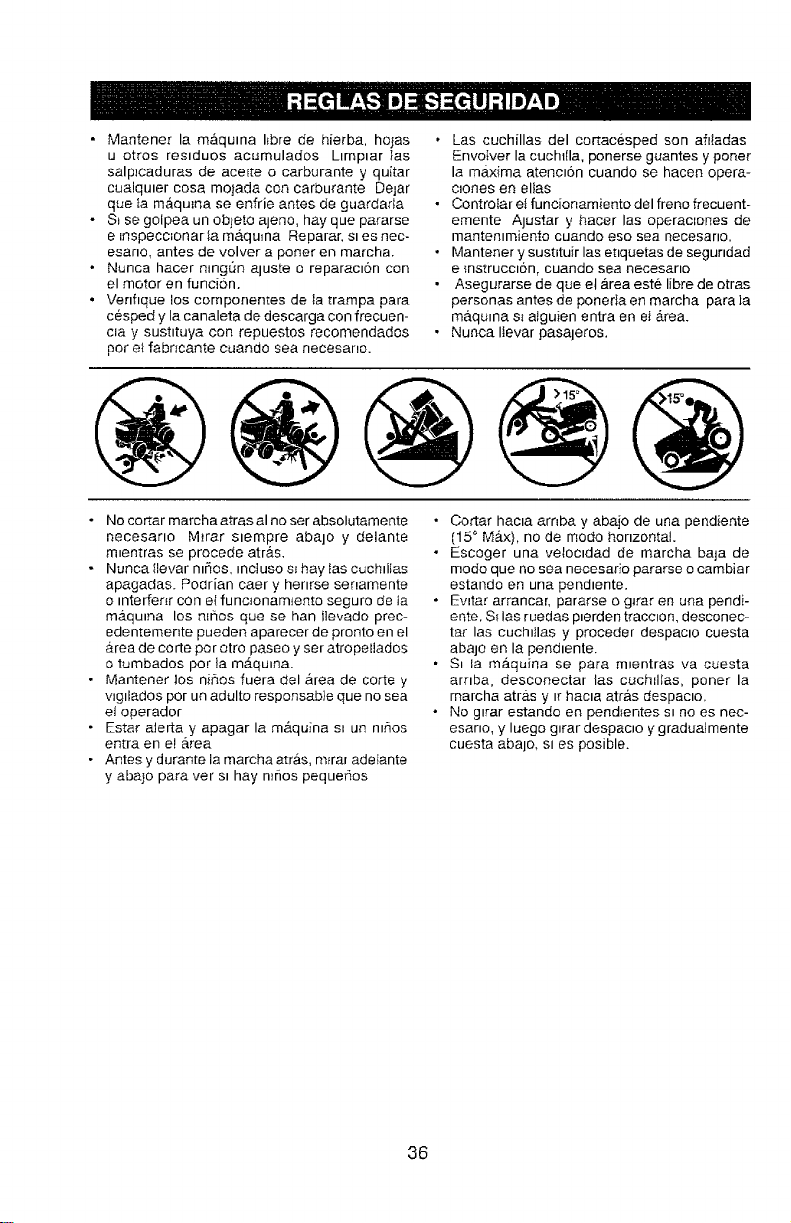
• Mantener la m,_quma hbre de hierba, hojas
u otros residuos acumulados L_mpiar }as
salp]caduras de ace_te o carburante y quitar
cualqu_er cosa mojada con carburante Delar
que ta mAqu_na se enfrie antes de guardada
- S_ se golpea un objeto ajeno, hay que pararse
e _nspecc_onar [e maqu_ne Reparar, si es nec-
esano, antes de volver a porter en marcha,
• Nunca hacer nlngQn eluste o reparecl6n con
el motor en funci6n.
• Venflque los componentes de la trampa para
cesped y la canaleta de descarga con frecuen-
c_a y sust_tuya con repuestos recomendados
per e_ fabncante cuando sea necesano.
• Las cuchillas del cortacesped son afi_adas
Envotver la cuchl{la, ponerse guantes y poner
la maxima atenc_6n cuando se hacen opera-
c_ones en elias
• Controtar e{ funcionamiento del freno frecuent-
emente Ajustar y hacer las operaclones de
mantenlmiento cuando eso sea necesarlo.
• Mantener y sustituir las e[iquetas de segundad
e {nstruccl6n, cuando sea necesarlo
• Asegurarse de que el area este libre de otras
personas antes de poneda en marcha pare ia
m&qu_na s_ alguien entra en et area.
• Nunca lievar pasaleros.
@@@@@
• No cortar marcha atras al no ser absolutamente
necesarlo M_rar slempre aba]o y deiante
m_entras se precede atr#.s.
• Nuncaflevar mr_os, _nciuso s_hay las cuchdlas
apagadas. Podrian caer y hearse senamente
o mterfenr con e{ func_onamlento seguro de ta
m#Lqu_na los ntr_os que se hen llevado prec-
edentemente pueden apareeer de pronto en el
&rea de core per otto paseo y ser atropellados
o tumbados per Ia m__quna.
• Mantener los nihos fuera del _rea de corte y
wgll_dos per un adulto responsabJe que no sea
et operador
• Ester aJerta y apagar la m#.quina sDun mhos
en[ra en eI area
• Antes y durante la marcha arras, m_rar adelante
y aba]o pare ver sl hay n_r_os pequefios
• Cotter hacia arnba y abajo de una pendiente
(15 ° MAx), no de mode honzontal.
• Escoger una veloc_dad de marcha baja de
mode que no sea necesario pararse o cambiar
estando en una pend_ente.
• Ewtar arrancar, pararse o g_rar en una pendi-
ente. S{ las ruedas p_erden tracc_on, desconec-
tar las cueh_Ilas y preceder despacio cuesta
abaje en la pend_ente.
• S_ la maquina se pare m_entras va cuesta
arnba, desconectar las cuchdlas, porter la
marcha atrAs y _rhacia atr,_s despacio.
• No g_rar estando en pend_entes s_ no es nec-
esano, y luege g_rar despac_o y graduetmente
cuesta abajo, s{ es posible.
36
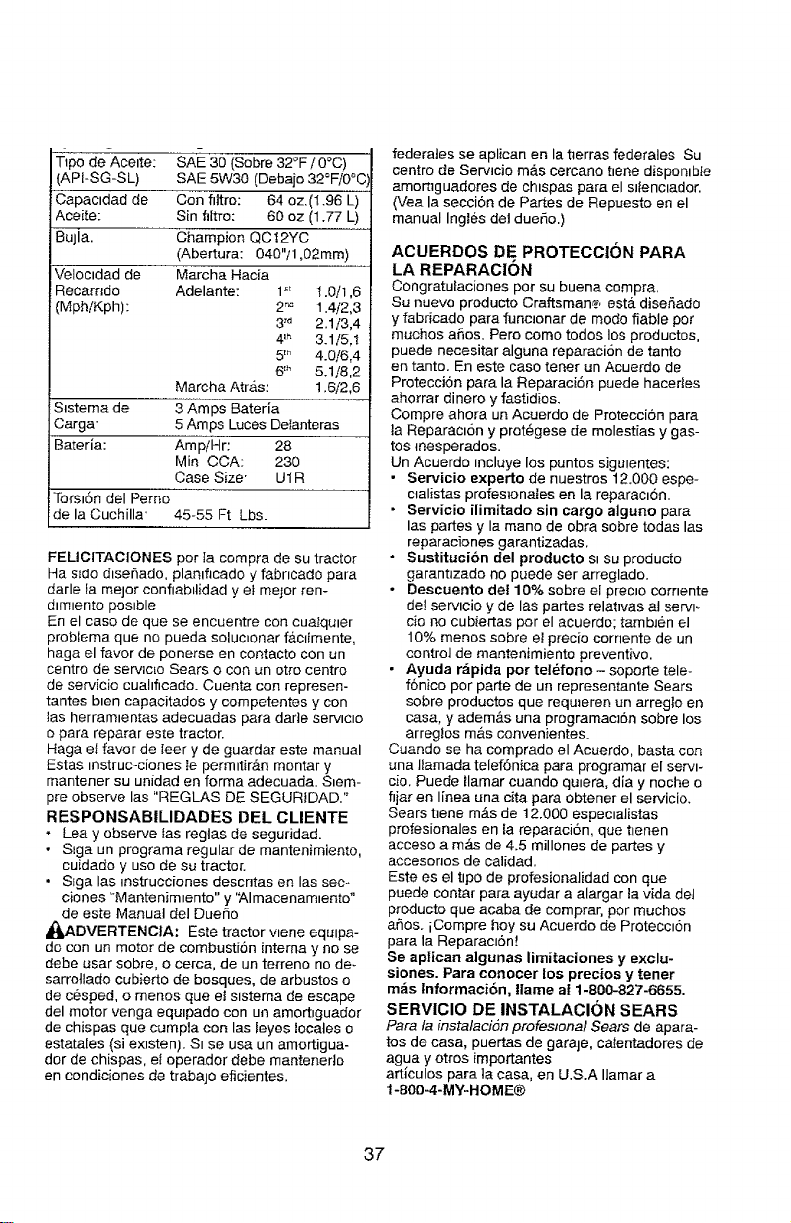
Ttpo de--Aceite: SAt 30 (Sabre 32_F / 0°C)
(API-SG-SL) SAE 5W30 (Debajo 32°Fi0°q
Capacidad de Con filtro: 64 oz.(t .96 L)
Aceite: Sin filtro: 60 oz (1.77 L)
Bujla. Champion QC t 2YC
(Abertura: 040"/1,02mm)
Veloctdad de Marcha Hacia
Recarndo Adelante:
(Mph/Kph):
1"_ 1.0/1,6
2= 1.4/2,3
3'd 2.1/3,4
4'_ 3.1/5,l
5'_ 4.0/6,4
6'" 5.1/8,2
Mareha Arras: 1.6/2,6
Sistema de 3 Amps Bateria
Carga" 5 Amps Luces Detanteras
Bateria: Amp/Hr: 28
Min CCA: 230
Case Size' U1R
Torsl6n del Pemo
de la Cuchilla' 45-55 Ft Lbs.
FELIClTAClONES par la compra de su tractor
Ha s_cio dlser_ado, planificado y fabncado para
darle la meier confiab_lidad y el major ren-
dimiento poslble
En el case de que se encuentre con cualquter
problema que no pueda soluc_onar fb.e{lmente,
haga el favor de ponerse en contacto con un
centre de servlcLo Sears o con un otto centre
de servicio cuahficada. Cuenta con represen-
tantes bten capaeitados y competentes y con
las herramten[as adecuadas para darle servtc_o
a para reparar es[e tractor.
Haga el favor de leer y de guardar este manual
Estas instruc-ciones Ie permltirb.n montar y
mantener su unidad en farina adecuada. S=em-
pre observe las "REGLAS DE SEGURtDAD."
RESPONSABILIDADES DEL CLIENTE
o Lea y observe las regtas de seguridad.
• S_ga un pragrama regular de mantenimiento,
cuidado y usa de su tractor.
• Stga las _nstrucciones descntas en las sec-
ciones "Mantenim_ento" y 'Almacenamtento"
de este Manual del Duello
_,DVERTENCIA: Este tractor wane equlpa-
de con un motor de combustion intema y no se
debe usar sabre, o cerca, de un te_reno no de-
sarrotlado cubierto de basques, de arbustos o
de cesped, o menos que el slstema de escape
del motor venga equtpado con un amorttguador
de chJspas que cumpla con las ieyes locales o
estatales (si extsten}. Sl se usa un amortigua-
der de chispas, et operador debe mantenerto
en condiciones de trabajo eficientes.
federales se aplican en la tterras federales Su
centre de Serv_cio m&s cercano t_ene disponlbie
amort_guadores de chtspas para el s_lenc_ador.
(Vea la seccion de Panes de Repuesto en el
manual Ingles det dueSo.)
ACUERDOS DE PROTECCION PARA
LA REPARAClON
Congratulaciones par su buena compra.
Su nuevo producto Craftsman,, est& dise_,ado
y fabricado para funclonar de mode fiable par
touches arias, Pero coma todos los productos,
puede necesitar alguna reparacion de tanto
en tanto. En este case toner un Acuerdo de
Proteccion para la Reparaci6n puede hacedes
ahorrar dinero y fastidios.
Compre ahora un Acuerdo de Proteccion para
la Reparact6n y prot6gese de molestias y gas-
tos inesperados.
Un Acuerdo _ncluye los puntos sJgulentes:
• Servicio experto de nuestros 12.000 espe-
c_alistas profes_onates en la reparact6n.
• Servicio ilimitado sin cargo alguno para
las partes y la mane de obra sabre todas las
reparaciones garantizadas.
• Sustituci6n del producto st su producto
garantJzado no puede ser arreglado.
• Descuento de! 10% sabre el prec_o eorrtente
do! servicio y de las partes relat_vas at servt-
cio no cubiertas par el acuerdo; tambJ6n el
10% menas sabre el precio cornente de un
control de mantenimiento preventive.
• Ayuda r_pida par tel6fono - soporte tele-
f6nico per parte de un representante Sears
sabre productos qua requ_eren un arreglo en
casa, y adem&s una programacz6n sabre los
arreglos m&s convenientes_
Cuando se ha comprado el Acuerdo, basta con
una llamada telef6nica para programar el servt-
cio. Puede llarnar cuando qu=era, dia y noche o
fijar en I[nea una cita para obtener el servicio.
Sears t]ene m&s de 12.000 especlalistas
profesionales en la reparaci6n, que tlenen
acceso a m&s de 4.5 millones de partes y
accesonos de ealidad.
Este es el tlpo de profesionalidad con qua
puede contar para ayudar a alargar la vida del
producto que acaba de comprar, par muchos
ar_os, iCompre hay su Acuerdo de Protecc=6n
para la Reparacl6n!
Se apltcan algunas lirnitaciones y exclu-
siones. Para concoct los precios y toner
re=is tnformaci6n, tlame a! 1-800-827-6655.
SERVlClO DE INSTALACION SEARS
Para la instalaci(_n profeslonal Sears de apara-
tos de casa, puertas de garaje, calentadores de
agua y otros importantes
articulos para ta casa, en U.S.A Ilamar a
1-800.4-MY-HOME®
37
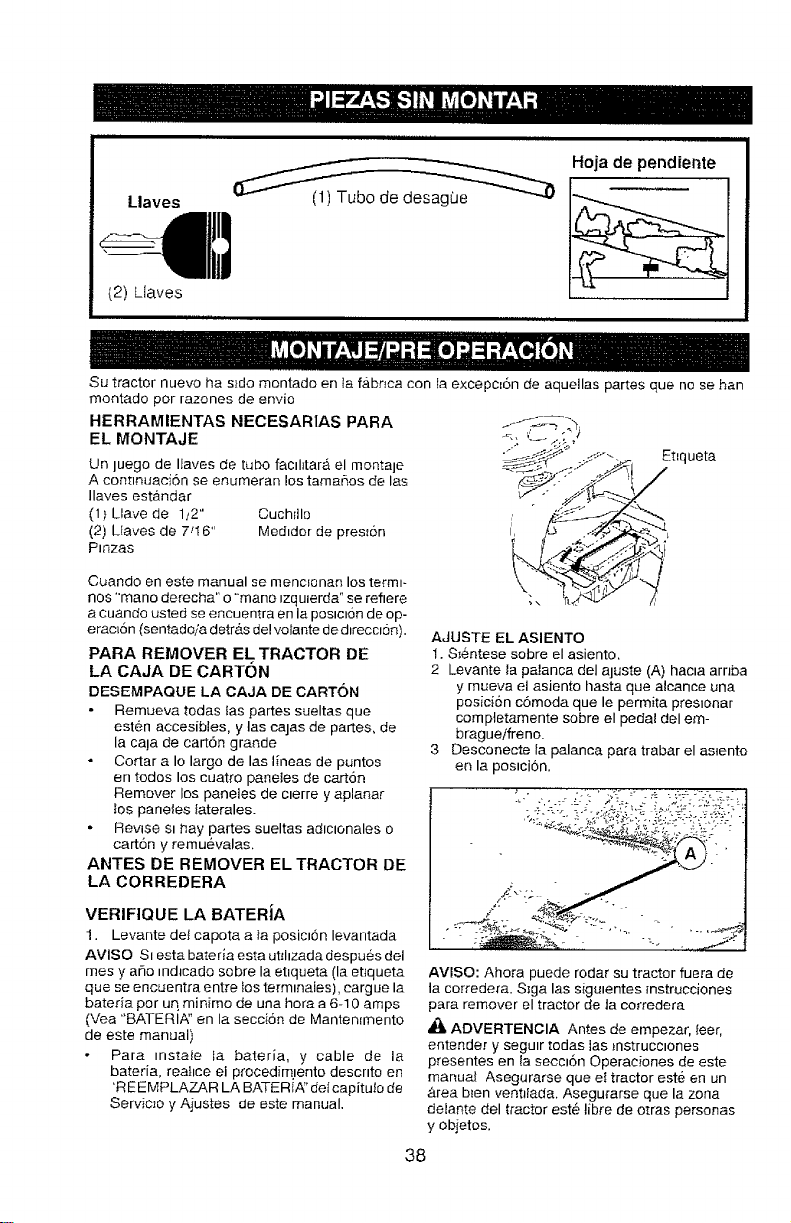
Llaves
{2) Llaves
Hoja de pendiente
Su tractor nuevo ha s_do montado en la fabr_ca con Ia excepc=6n de aquellas pares que no se ban
moatado per razones de envio
HERRAMIENTAS NECESARIAS PARA
EL MONTAJE
Un luego de I_aves de tube faclhtar& el montale
A conttnuaci6n se enumeran los tamales de las
Ilaves estandar
(1,_ Llave de 1,,2" CuchFIlu
(2) L{aves de 7q 6" Medldor de pres_6n
Plazas
Cuando en este manual se menclonan los terml-
nos "mane derecha" o "mane izqulerda" se reflere
a cuando usted se encuemra en la poslcion de op-
erac_6n {sentadoia detras de! vo_ante de dlrecc_on}.
PARA REMOVER EL TRACTOR DE
LA CAJA DE CARTON
DESEMPAQUE LA CAJA DE CARTON
Remueva todas las pares sueltas que
esten accesibles, y las cajas de partes, de
la cala de cart6n grande
Cortar a Io largo de las I_neas de puntos
en redes los cuatro panetes de cart6n
Remover los paneles de cterre y aplanar
los paneles laterales.
Revise st Ray partes sueltas adlcionales o
carton y remuevalas.
ANTES DE REMOVER EL TRACTOR DE
LA CORREDERA
VERIFIQUE LA BATERiA
!. Levante del capota a ia posicl6n levantada
AVISO SIesta bateria esta ut_hzada despues dei
rues y argo _nd_cado sobre la et=queta (la et_queta
que se encuentra entre tos termtnales), cargue la
bateria per un minimo de una hera a 6-10 amps
(Yea "BATERIA" en la seccion de Mantenfmento
de este manual)
Para restate ta bateria, y cable de la
bateria, reat=ce el procedim)ento descnto en
'R EEMPLAZAR LA BATER IA" del capituJo de
Serviczo y Ajustes de este manual.
_--_ ° ......... Etlqueta
AJUSTE EL ASIENTO
1. S_e.ntese sobre el asiento.
2 Levante la patanca del ajuste (A) hacla arnba
y mueva el asiento hasta que alcance una
posiciSn c6moda que le permita pres=onar
completamente sobre el pedal del em-
bragueifreno.
3 Desconecte la palanca para trabar el as_ento
en la poslci6n,
AVlSO: Ahora puede rodar su tractor fuera de
la corredera. S_ga las sigulentes mstrucciones
para remover el tractor de la corredera
4_, ADVERTENCIA Antes de empezar, Ieer,
entender y segu_r todas las _nstrucclones
presentes en la secci6n Operaciones de este
manual Asegurarse que e{ tractor este en un
&rea b_en vent_lada. Asegurarse que la zona
delante del tractor est_ libre de o[ras personas
y ebjetos.
38
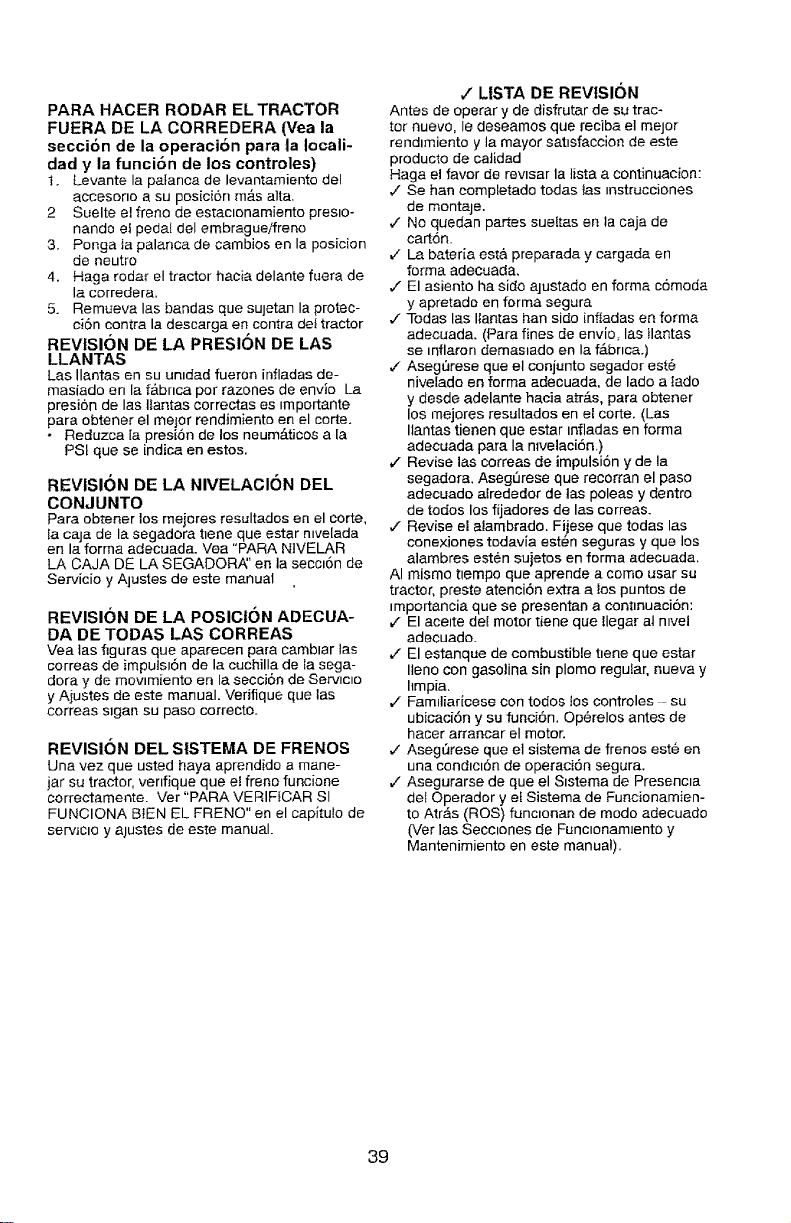
PARA HACER RODAR EL TRACTOR
FUERA DE LA CORREDERA (Vea la
seccion de la operacion para la Iocali-
dad y la funciOn de los controles)
1. Levante la palanca de levantamiento del
accesono a su pesicion m_s aita.
2 Suelte el freno de estac_onamiento pres_o-
nando el pedal del embragueifreno
3. Ponga ia palanca de cambios en la posicion
de neutro
4. Haga radar el tractor hacia delante fuera de
la corredera.
5. Remueva las bandas que sujetan la proteo-
c]6n contra la descarga en contra del tractor
REVISION DE LA PRESION DE LAS
LLANTAS
Las Ilantas en su unldad fueron infladas de-
masiado en la f&bnca per razones de envio La
presion de las llantas correctas es _mportante
para obtener el meier rendimiento en el carte.
o Reduzca [a presiSn de los neum_.ticos a la
PSI que se indica en estos.
REVISION DE LA NIVELACION DEL
CON JUNTO
Para obtener los mejores resultados en el carte,
la caja de la segadora tlene que estar nwelada
en la forma adecuada. Vea "PARA NtVELAR
LA OAJA DE LA SEGADOR,'_' en la secciOn de
Servicio y Alustes de este manual
REVISION DE LA POSICION ADECUA-
DA DE TODAS LAS CORREAS
Yea las flguras que aparecen para camblar las
correas de impulsion de la cuchilla de la sega-
dora y de mowmiento en la secci6n de Serv_c_o
y Ajustes de este manual. Verifique que las
correas s_gan su paso correcto.
REVISION DEL S|STEMA DE FRENOS
Una vez que usted haya aprendido a mane-
jar su tractor, venfique que et freno funcione
correctamente_ Ver "PARA VERIFfCAR Sl
FUNClONA BIEN EL FRENO" en el capitulo de
servJcio y ajustes de este manual.
/ L|STA DE REVISION
Antes de operar y de disfrutar de su trac-
tor nuevo, le deseamos que reciba el rnejor
rendirniento y la mayor sat_sfaccion de este
producto de caJidad
Haga el favor de rewsar la lista a continuacion:
v" Se hart completado tedas las _nstrucciones
de montaje.
J" No quedan partes sueltas en la caja de
carton.
V La bater[a est& preparada y cargada en
forrna adecuada.
v" El asiento ha side ajustado en ferma c6moda
y apretado en farina segura
J Todas las liantas ban side infladas en farina
adecuada. (Para fines de envlo, las llantas
se inflaron demaslado en la f.4bnca.)
,/ Asegt_rese que el conjunto segador est6
nivelado en forma adecuada, de lade a iado
y desde adelante hacia atr#.s, para obtener
los mejores resultados en el carte. (Las
Ilantas tienen que estar infladas en farina
adecuada para la mvelaciOn,)
€ Revise las correas de impulsion y de la
segadora. Aseg,',rese que recorran el paso
adecuado alrededor de tas poleas y dentre
de redes los fijaderes de las carreas.
v" Revise el alambrade. Fijese que todas las
conexiones todavia esten seguras y qua los
alambres esten sujetos en forrna adecuada.
AI mismo tlempo que aprende a come usar su
tractor, presto atenci6n extra a los puntos de
_mportancia que se presentan a cont_nuaci6n:
v" El acelte del motor tiene que llegar at ravel
adecuado_
€" El estanque de combustible tlene que estar
Ileno con gasolina sin plomo regular, nueva y
hmpia.
v" Famdiaricese con todos los controles - su
ubicaci6n y su funci6n. OpOrelos antes de
hacer arrancar el motor.
v" Asegt_rese que el sistema de frenos este en
una condlcl6n de operaciOn segura.
¢" Asegurarse de que el Slstema de Presencla
del Qperador y el Sisterna de Funcionamien-
to Arras (ROS) funclonan de mode adecuado
(Vet las Secc_ones de Func_onarn_ento y
Mantenimiento en este manual).
39
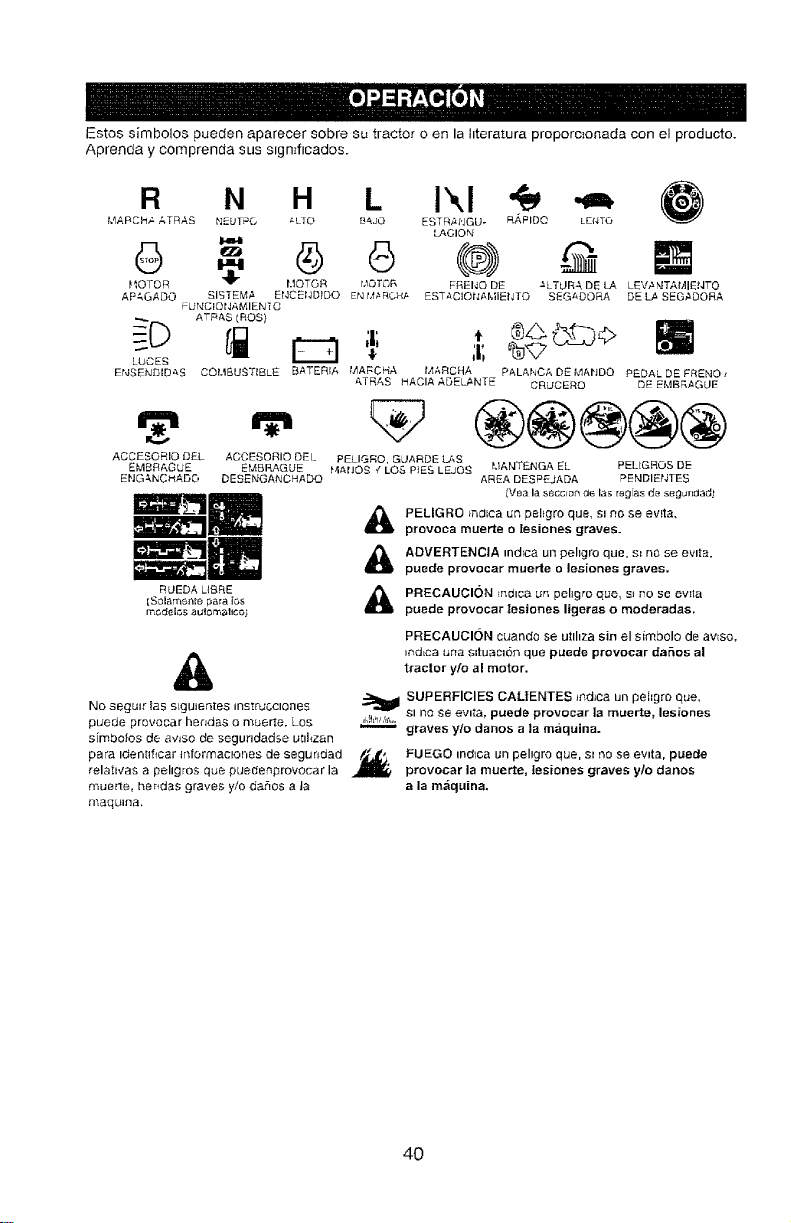
Estos simbo!os pueden aparecer sobre su tractor o en la htera[ura proporc_onada con el producto.
Aprenda y comprenda sus s_gmficados.
R N H L I'.,I
MABCH_, ATRAS ['IF-UTPO _LTO B_JO ESTR#_'JGU- RAFIDO LEf_rTO
Lt_GION
['_.OTQR MOTOR r,IOTGR FREI40 DE _'LTLIRA DE LA LEVANTAMIE._,ITO
AP&QADO £iSTEMg EbJCEND1DO EN M;,RGH/- £STACIOI'_AMIEI_TO SJzGAOORA DE L/. SEGgDORA
FUr_CiQNAMIENI O
_D ATF_AS [ROS)
L_CEs + ;i', '®X7
Er'JSENDID_S COMBUSTIBLE BATERIA MARCHA MARCHA PALANCA DE MAI'JDO PEDAL DE FRENO t
ATRAS HACIA ADEL_NTE CRUCERO DE EMBR,&GLIE
ACCESORIO DEL ACCESORIO DEL PELIGRO, C_UARDE LAS
EMBRAGUE EMBRAGUE HIAIJOS / LOS PiES LEJOS MANT_.NGA EL PELGROS DE
EFJGANC_ADC. DESENGANCHADQ AREA DES PEJADA PENDEtJTES
PELIGRO tn_ca un pehgro que, sl no se ewta.
provoca muerte o [esiones graves.
_E _ ADVERTENCIA _ndrca un pel=gro que, s= no se evlta,
puede provocar muerle o lesiones graves.
RUEDA LtBRE _ PRECAUCION _n_lca un pehgro que. s_ no se ewta
[Solamsnte para los
model,s automattco_ _ puede provocar tesiones ligeras o moderadas.
PRECAUCI(_N cuando se utlhza sin el simbolo de avtso,
_ndLca ur]a SitLlaCi6_ que puede provocar da_os al
traclor y/o al motor.
No segu=r las sLgu_sntes =nstr_cc_ones _ SUPERFICIES CALIENTES Jnd_ca un pehgro que,
,t,[_z,l,,,;_,,,sI no se evlta, puede provocar la muerte, lesiones
puede prevecar hendas a muerte. Los _ graves y/o danes a la m;iquina.
s[mbo_os de av_so de segurldadse ut_hzan
para _den[ff_car mformaclones de segundad _5 FUEGO ind_ca un pehgro que, sl r',o se ewta. puede
relah,fas a pefigros que puedenprovocar la _ provocar la muerte, lesiones graves ylo danes
muerte, hendas graves y/o dahos a la a la maquJna.
maquina,
40
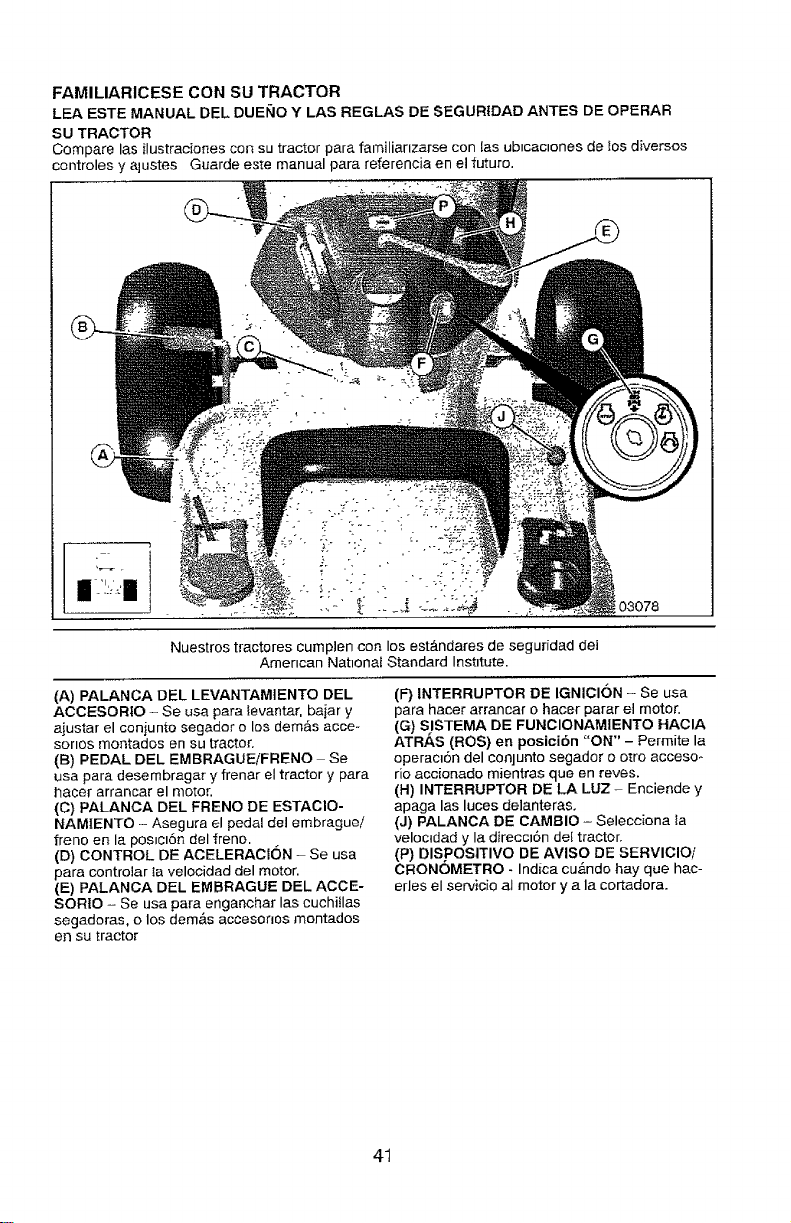
FAMILIARICESE CON SU TRACTOR
LEA ESTE MANUAL DEL DUEI_IOY LAS REGLAS DF SEGURIDAD ANTES DE OPERAR
SU TRACTOR
Compare las ilustraciones con su tractor para familianzarse con las ub_cac_onesde tos diversos
controles yalustes Guarde este manual para referencia en el futuro.
_. i.-:-.,
Nuestros tractores cumplen con los est&ndares de seguridad dei
American Nat_onat Standard Institute.
(A) PALANCA DEL LEVANTAMIENTO DEL
ACCESORIO - Se usa para tevantar, bajar y
ajustar el conjumo segador o los demas acce-
sonos montados en su tractor.
(B) PEDAL DEL EMBRAGUEiFRENO Se
usa para desembragar y ffenar el tractor y para
hacer arrancar el motor.
(C) PALANCA DEL FRENO DE ESTAClO-
NAMIENTO - Asegura el pedal del embraguei
freno en la pospcl6n del freno.
(D) CONTROL DE ACELERAClON - Se usa
para controlar Ia velocidad del motor.
(E) PALANCA DEL EMBRAGUE DEL ACCE-
SORIO - Se usa para enganchar las cuchitlas
segadoras, o los dem&s accesonos montados
en su tractor
(F) INTERRUPTOR DE IGNICION - Se usa
para hacer arrancar o hacer parar el motor.
(G) SISTEMA DE FUNCIONAMIENTO HAClA
ATRAS (ROS) en posiei6n "ON" - Permite la
operac_6n del conjunto segador o otro acceso_
rio accionado mientras queen reves.
(H) INTERRUPTOR DE LA LUZ - Enciende y
apaga las luces delanteras.
{J) PALANCA DE CAMBIO - Selecciona la
veloctdad y la direccl6n del tractor.
{P) DISPOSITIVO DE AVISO DE SERVICIOi
CRONOMETRO - Indica cu_.ndo hay que hac-
erles el servicio aJ motor y a la cortadora,
41
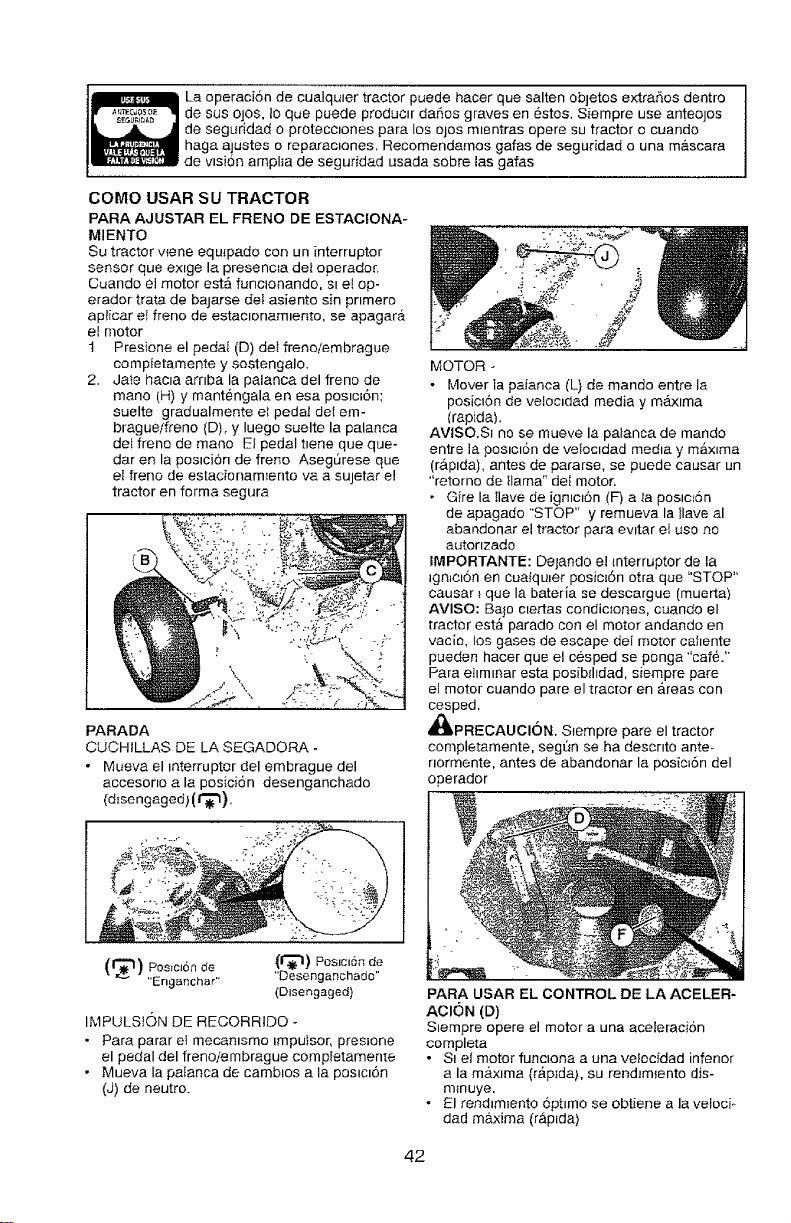
La operaci6n de cualquler tractor puede hacer que salten obletos extraSos dentro
de sus OlOS, to que puede producer daSos graves en #stos. Siempre use anteojos
de seguddad o pretecc_ones para los ojos m_entras opere su tracter o cuande
haga ajustes o reparaclones, Recomendamos galas de seguddad o una m&scara
de vlsi6n ampl_a de seguridad usada sobre tas gafas
COMO USAR SU TRACTOR
PARA AJUSTAR EL FRENO DE ESTAC[ONA-
MIENTO
Su tractor wene equ_pade con un interrupter
sensor que ex_ge la presencm dei operador.
Cuando ei motor est#. funcionando, sl e_ op-
erador trata de bajarse del asiento sin pnmero
ap_icar e/freno de estac_onam_ento, se apagara
el motor
1 Presione el pedal (D) dei freno/embrague
completamente y sostengalo.
2. Jate hac_a arnba la palanca del freno de
mane (H) y mantengala en esa pos_c_6n;
suelte gradualmente el pedal del em-
bragueifreno (D), y luego suelte la palanca
dei frene de mane El pedal t_ene que que-
dar en la poslci6n de freno Asegurese que
ei freno de estacionam_ento va a sujetar e!
tractor en forma segura
PARADA
CUCHILLAS DE LA SEGADORA -
• Mueva el interrupter del embrague del
accesone a la posici6n desenganchado
(disengaged} (t'_l),
MOTOR
• Mover Ia palanca (L) de mando entre la
posict6n de vetoc_dad media y ma_xlma
(rapida).
ArIse.s{ no se mueve la palanca de mando
entre la pomcl6n de velocldad media y m_xlma
(r&pida), antes de pararse, se puede causar un
"retorno de tlama" deI motor.
• Gfre la Ilave de igmcl6n (F) a _a poslc_Sn
de apagado "STOP" y remueva la Ilave al
abandonar el tractor para ewtar el use no
autonzado
IMPORTANTE: Dejando e! {nterruptor de la
_gn_c_6nen cuatqu_er pos/m6n otra que "STOP"
causar _que la bateria se descargue (muerta}
AVISO: Ba_o c_ertas eondictones, cuando el
tractor est& parade con el motor andando en
vacio, los gases de escape del motor cahente
pueden hacer que el cesped se ponga "car6."
Para ellmlnar esta posiblhdad, siempre pare
el motor cuando pare el trac[or en a.reas con
cesped.
_IIPRECAUCI6N. Slempre pare el tractor
completamente, segun se ha descnto ante-
normente, antes de abandenar la pos{m6n del
operador
(1_) Pos,clbrl de (1"_1) Pos,c,6n de
"Enganchar" "Desenganchado"
(Disengaged)
IMPULSION DE RECORRIDO -
• Para parar eI mecamsmo impuisor, presione
el pedal del frenoiembrague compietamente
• Mueva la paianca de camblos a la poslcl6n
(J) de neutro_
PARA USAR EL CONTROL DE LA ACELER-
AClON (D)
S_empre opere el motor a una aceleracion
completa
• Si el motor funclona a una velocidad infenor
a la m&xlma (r&p_da), su rend_m_ento dis-
m_nuye.
• El rend_m_ento @t_mo se ebtiene a la veloci_
dad m&,xima (raplda)
42
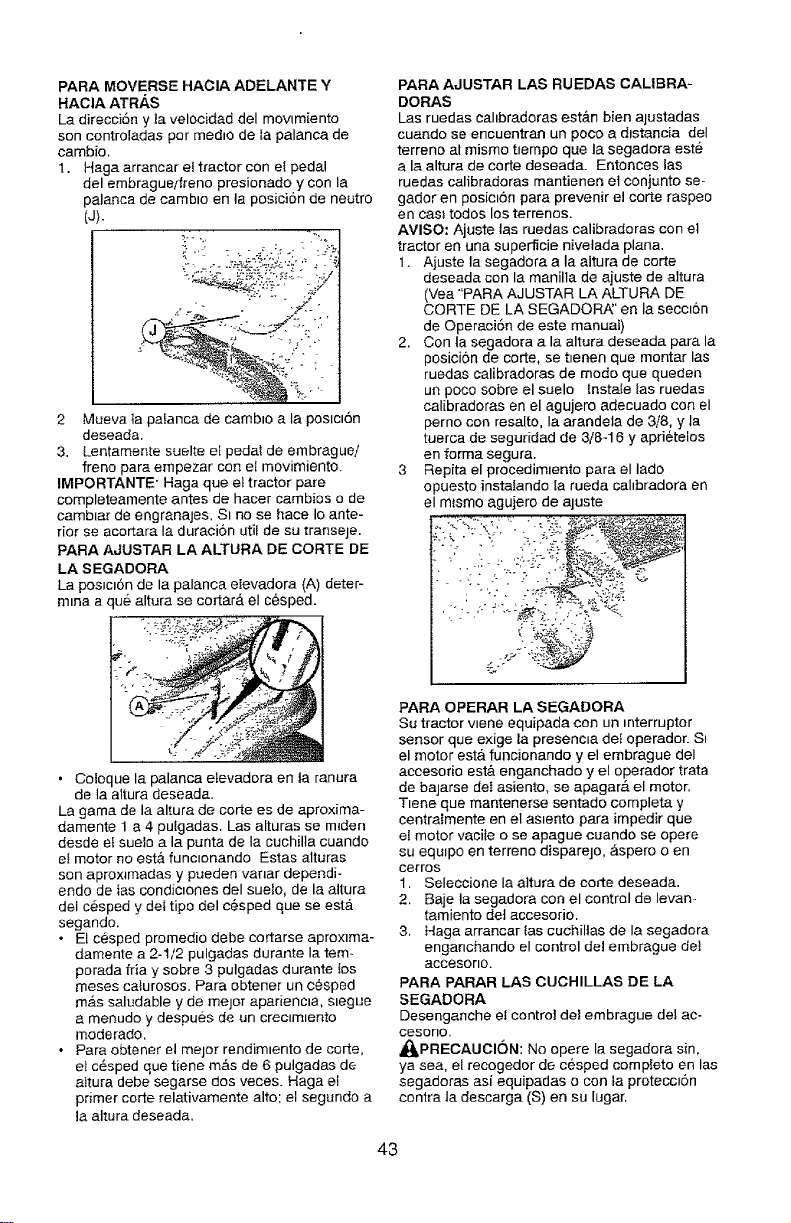
PARA MOVERSE HACIA ADELANTE Y
HACIA ATR/_S
La direcci6n y la velocidad del movimiento
son controladas per medto de Ia palanca de
cambio.
1. Haga arrancar et tractor con et pedal
del embrague/freno presionado y con la
palenca de cambto en la posiciSn de neutro
(J).
2 Mueva ]a paEanca de cambto ala poslct6n
deseada,
3. Lentamente suelte e[ pedal de embrague/
freno para empezar con et movimiento.
IMPORTANTE" Haga que e_ tractor pare
completeamente antes de hacer cambios o de
camb_ar de engranajes, S_ no se hace Io ante-
rior se acortara la duracion uti! de su transeje.
PARA AJUSTAR LA ALTURA DE CORTE DE
LA SEGADORA
La postcl6n de la palanca eIevadora (A) deter-
mtna a qua. altura se co{tar#, el cesped.
• Coloque la palanca eLevadora en ta ranura
de la altura deseada.
La game de la altura de corte es de aproxima-
damente 1 a 4 pulgadas. Las alturas se m_den
desde et sueto ala punta de la cuchilta cuando
et motor no est& funclonando Estas alturas
son aprox_madas y pt_eden verier dependi-
endo de tas condic_ones del suelo, de la eltura
del cesped y dei tipo del c_sped que se esta_
segando.
o El c@sped promedio debe cortarse aproxlma-
damente a 2-1/2 pulgadas durante la tem-
porada fria y sobre 3 pulgadas durante tos
meses ca_urosos. Pare obtener un c@sped
m#.s saludable y de meier apariencla, siegue
a menudo y despu@s de un creclmlento
moderado.
•Para obtener el meier rendimtento de corte,
et c6sped que tiene m&s de 6 pulgadas de
aftura debe segarse dos veces. Haga el
primer code relativamente alto: el segundo a
la altura deseada.
PARA AJUSTAR LAS RUEDAS CAL|BRA-
DORAS
Las ruedas cahbredoras est&n bien ajustadas
cuaado se encuentran un poco a dlstancia del
terreno el mismo t_empo que la segadora este
ala altura de corte deseada. Entonces las
ruedas calibradoras mantienen et conjunto se-
gador en posic_n pare prevenir el corte raspeo
en cas_ todos los terrenes.
ArIse: Ajuste las ruedas calibradoras con el
tractor en una superficie nivelada plane.
1. Ajuste la segadora ala aitura de certe
deseada con la manilia de ajuste de aitura
(Vea "PARA AJUSTAR LA ALTURA DE
CORTE DE LA SEGADOR/_' en la secc_dn
de Operaci6n de este manuai)
2. Con la segadora ala altura deseada para la
posicion de core, se t_enen que mortar las
ruedas calibradoras de mode que queden
un poco sobre el suelo Instate Ias ruedas
calibradoras en el agujero adecuado coa el
perno con resalto, la arandela de 3/8, y la
tuerca de seguridad de 3/8-16 y apri6telos
en forma segura.
3 Repita el procedimiento para el lade
opuesto instafando ia rueda cahbradora en
el mtsmo agujero de ajuste
PARA OPERAR LA SEGADORA
Su tractor wene equipada con un interrupter
sensor que exige la presenc:a de: operador. St
el motor est,4 funcionando y el embrague del
aecesorio est& enganchado y el operador trata
de bajarse det asiento, se apagar#, el motor.
T:ene que mantenerse sentado complete y
centralmente en el as:ento para impedir que
el motor vacite o se apague euando se opere
su equ:po en terreno disparejo, &spero o en
cerros
1. Seleccione la altura de corte deseada.
2. Baje la segadora con el control de levan-
tamiento de{ accesorio.
3. Haga arrancar las cuchillas de la segadora
enganchando el control del embrague de:
accesono.
PARA PARAR LAS CUCHILLAS DE LA
SEGADORA
Desenganche el control def embrague de[ ac-
cesorlo,
_,PRECAUCION: No epere la segadora sin,
ya see, el recogedor de c6sped complete en las
segederas asi equipadas o con la protecc_6n
contra la desearga (S) en su [ugar.
43
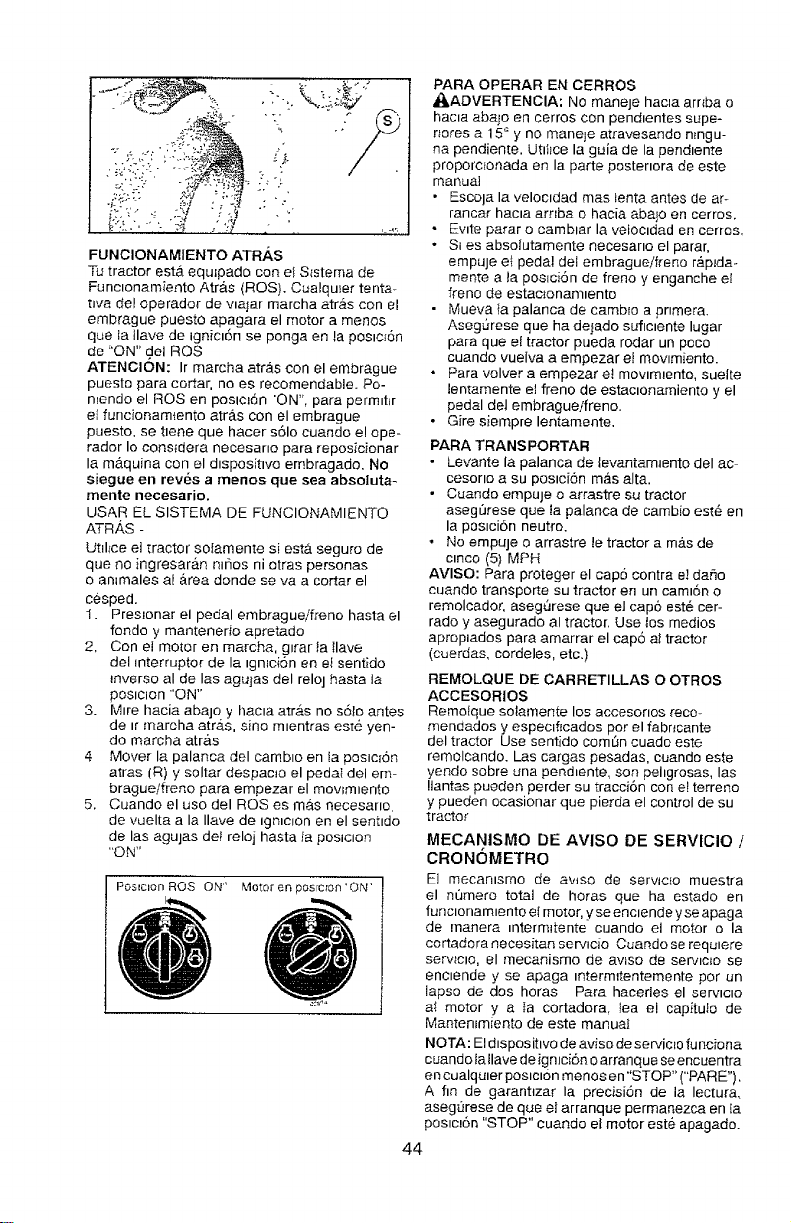
FUNCIONAM|ENTO ATR.&.S
TL_tractor est,_ equ_pado con e_S_stema de
Funclonam;ento Atr&s (ROS). Cualqu_er tenta-
twa de! operador de wa_ar marcha arras con el
embrague puesto apagara el motor a menos
que Ia tiara de ignict6n se ponga en la postc_6n
de "ON" d el ROS
ATENClON: Ir marcha arras con el embrague
puesto para cortar, no es recomendable. Po-
n_endo el ROS en poslcl6n 'ON", para permtt_r
el funcionam{ento atr&s con el embrague
puesto, se tiene que hacer s61o cuando e! ope-
rador Io cons_dera necesano para reposicionar
la ma.quina con el dtspositwo embragado. No
siegue en rev6s a manes que sea absoluta_
mente necesario.
USAR EL SISTEMA DE FUNCIONAMIENTO
ATRAS -
Ut=l_ce el tractor soIamente si est,. seguro de
que no ingresaran n=r_os ni otras personas
o an=males al &tea donde se va a cortar el
cesped.
1. Preslonar el pedal embragueifreno hasta el
fondo y mantenerio apretado
2, Con ei motor en marcha, g_rar _a Ilave
del _nterruptor de la ignEciSn en e_sentido
_nverso al de las agujas del reloj hasta la
poslcion "ON"
3. Mire hacia abajo y hacla arras no s&lo antes
de mrmaroha atr,_s, sine m_entras esre yen-
do marcha atr&s
4 Mover la palanca del camblo en la poslcl&n
atras (R) y soltar despac_o el pedat del em-
bragueifrerto para empezar el mov_mlento
5. Cuando el use del RQSes mas necesano,
de vuelta a la Ilave de _gn=c_onen el senhdo
de las agujas del reloj basra Ia posiclon
"ON"
PosEclon ROS ON" Motor en posrctoo'ON'
PARA OPERAR EN CERROS
_kADVERTENClA: NO maneje hacta arnba o
hac_a abajo eli cerros con pend_entes supe-
rtores a 15" y no maneje atravesando n_ngu-
na pendiente. Uti_tce la guia de la pendiente
proporc_onada an la parte postenora de este
manual
• Escola la veloc_dad mas tenta antes de ar-
rancar hacta arnba o hacia aba_o en cerros.
• Evtte parar o camblar la velocidad en cerros.
• Sl es absolutamente necesano el parar,
empuJe e{ pedal del embragueiffeno rapzda-
mente a la pos_ci6n de freno y enganche et
freno de estactonam_ento
• Mueva {a palanca de carabao a pnmera,
AsegOrese que ha deJado sufictente lugar
para que el tractor pueda rodar un poco
cuando vuelva a empezar el mowmiento.
* Para volver a empezar et movtm_ento, sueite
lentamente el freno de estactonamiento y el
pedal del embragueifreno.
• Gire siempre lentamente.
PARA TRANSPORTAR
• Levante la palanca de {evantam_ento del ac
cesono a su postci&n mas alta.
• Cuando empuje o arrastre su tractor
aseg_rese qoe ta palanca de cambio est6 en
la poslci&n neutro.
, No empuJe o arrastre le tractor a mb.s de
ctnco (5) MPH
AVISO: Para proteger el cap5 contra e] daSo
cuando transporte su tractor en un camt6n o
remolcador, asegQrase qua el cap& est6 cer-
rado y asegurado al tractor. Use tos medios
aprop_ados para amarrar el cap5 al tractor
(cuerdas, cordeles, etc.)
REMOLQUE DE CARRETILLAS O OTROS
ACCESORIOS
Remolque sotamente los accesonos reco-
mendados y espec=flcados per el fabncante
del tractor Use sentido com_n cuado este
remolcando. I_as cargas pesadas, cuande este
yendo sobre una pend_ente, son pehgrosas, las
!lantas pueden perder su tracci6n con el terreno
y pueden ocasionar que pierda el control de su
tractor
MECANISMO DE AVISO DE SERVIClO /
CRONOMETRO
E] mecanlsmo de awso de servlc_o muestra
el numero total de horas qua ha estado en
func=onam=ento el motor, yse enc=ende y se apaga
de rnanera mterm_tente cuando el motor o la
cortadora necesitan serv_cio Cuando se requlere
serv_clO, el mecanismo de avtso de serv_c_o se
enc_ende y se apaga tnterm_tentemente per un
lapse de dos horas Para hacedes el servtc_o
al motor y a ta cortadora, lea el capitu_o de
Manten_miento de este manual
NOTA: El dtspos itwo de arise de servic_o fu nefona
cuando la ilave de ign_ci6n o arranque se encuentra
en cualquter poslcton menos en"STOP" ("PARE").
Afm de garant_zar la precisi6n de la lectura.
aseg_rese de que el arranque permanezca en la
pos_c_6n "STOP" cuando el motor este apagado.
44
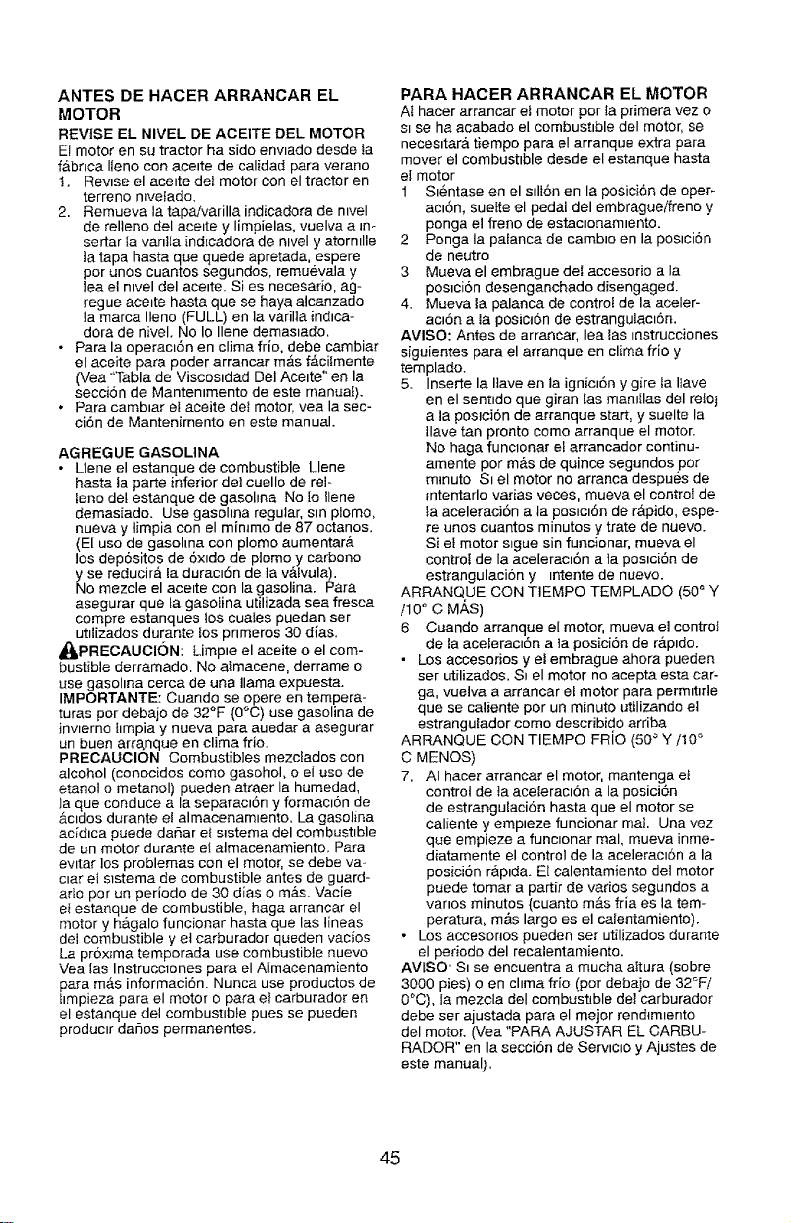
ANTES DE HACER ARRANCAR EL
MOTOR
REVISE EL NIVEL DE ACEITE DEL MOTOR
El motor en su tractor ha side enwado desde ia
fabnca llano con aceite de calidad pare verano
1. Rewse el ace_te del motor con el tractor en
terreno mvetado,
2. Remueva la tapaivarilla indicadora de ravel
de relteno del acelte y limpielas, vuelva a in-
serter la vanlla ind_cadora de nlvel y atormlle
ta tapa haste qua quede apretada, espere
per unos cuantos segundos, remuevala y
lea el ntvel del acette, Si es necesario, ag-
regue ace_te haste qua se haya alcanzado
la marca llano (FULL) en la varilta induce-
dora de nivel. No Io Ilene demas_ado.
•Para la operacl6n en clime frio, debe cambiar
el aceite para poder arrancar mas f#,cilmente
(Vea "'Table de Viscostdad Del Aceite" en la
seceion de Mantentmento de este manua!).
• Pare cambtar el aceite de{ motor, yea la sec-
ei6n de Mantenimento en este manual.
AGREGUE GASOLINA
• Uene el estanque de combustible Liana
hasta fa parte inferior det cuello de rei-
lane del estanque de gasohna No 1ollene
demasiado. Use gasohna regular, sin plomo,
nueva y {impia con el mimmo de 87 octanes.
(El use de gasohna con plomo aumentara.
los depositos de 6xtdo de plomo y carbono
yse reducir_ la duracl6n de la v#,fvula).
No mezcle el ace=te con la gasoline. Pare
asegurar qua ta gasoiina utilizada sea fresca
compre estanques los cuafes puedan ser
ut=lizados durante los pnmeros 30 alias,
_kPREOAUCI6N: Limpte el aceite o el com-
bustible derramado, No aimacene, derrame o
use gasohne cerca de una llama expuesta.
IMPORTANTE: Cuando se opera en tempera-
turns per debajo de 32°F (0°C) use gasoline de
inwerno hmpia y nueva pare aueder a asegurar
un buen arranque en clima frio.
PRECAUCION Combustibles mezclados con
alcohol (conocidos come gasohol, o el use de
etanol o metanol) pueden atraer la humedad,
}a qua conduce ala separact6n y formac=6n de
_.cldos durante el almacenamlento. La gasoline
ac[dtca puede dar_ar ef slstema del combustible
de un motor durante e{ almecenamiento, Para
ewtar los problemas con el motor, se debe va-
c=ar et sistema de combustible antes de guard-
eric per un periodo de 30 dies o m&s. Vaeie
ei estanque de combustible, haga arrancar el
motor y h&galo funcionar hasta qua Ins linens
del combustible y el carburador queden vacios
La pr6x_ma temporada use combustible nuevo
Vea [as Instrucclones pare el Almacenamiento
para mas informaci6n. Nunca use productos de
hmpieza pare el motor o pare et carburador en
el estanque del combustible pues se pueden
producer dafies permanentes.
PARA HACER ARRANCAR EL MOTOR
At hacer arrancar e_ motor per la pdmera vez o
s_se ha acabado el combusttble del motor, se
neces_tar,_ tiempo pare el arranque extra pare
mover el combustible desde el estanque hasta
el motor
1 St_ntase en el sdl6n en la posici6n de eper-
act6n, suette el pedal del embragueifreno y
ponga el franc de estaclonamtento.
2 Ponga la palanca de camblo en la postci6n
de neutro
3 Mueva el embrague del accesorio a la
poslci6n desenganchado disengaged,
4. Mueva ta palanca de control de la aceler-
act6n ala posic_6n de estrangulac_6n.
AVlSO: Antes de arrancar, lea las _nstrucciones
siguientes para el arranque en clima frio y
templado.
5. Inserte la Ilave en ta ignict6n y gire ta Ilave
en el sent_do qua giran [as mamIlas del reio!
ala poslci6n de arranque start, y suelte la
llave tan pronto come arranque el motor.
No haga funclonar el arrancador continu-
amente per m&s de quince segundos per
minute S_ el motor no arranca despues de
ntentarlo varies races, mueva el control de
}a aceleraci6n ate poslct6n de r&pido, espe-
re unos cuantos minutes y trate de nuevo.
Si et motor slgue sin funcionar, mueva el
controi de la acelerect6n ala postci6n de
estrangulaci6n y _ntente de nuevo.
ARRANQUE CON TIEMPO TEMPLADO (50 ° Y
/10 ° C MAS)
6 Cuando arranque el motor, mueva el control
de la aceleracl6n ata posieiSn de ra.p_do.
• Los accesorios yet embrague ahora pueden
ser utilizados. S= el motor no acepta esta car-
ga, vuelva a errancar el motor pare permtttrle
que se caliente per un minute utilizando et
estrangulador come describido arriba
ARRANQUE CON TIEMPO FRIO (50 ° Y it0 °
C MENOS)
7. AI hacer arranear el motor, mantenga el
control de ta aceierac_6n ala posici6n
de estrangulacion hasta qua el motor se
caliente y empteze funcionar mal. Una vez
que empieze a functonar real, mueva inme-
diatamente el control de la acelerac_6n ala
posici6n r&ptda. El calentamiento del motor
puede tomar a partir de varies segundos a
vanes minutes {cuanto m#_s fria es la tem-
perature, m&s largo es el calentamiento).
• Los accesonos pueden set utilizados durante
el periodo del recalentamiento.
AVISO' St se encuentra a touche aItura (sobre
3000 pies) o en china frio (per debajo de 32°F/
0_C), la mezcla del combustible del carburador
debe set ajustada pare el major rend{m_ento
del motor. (Vee "PARA AJUSTAR EL CARBU-
RADOR" en la secci6n de Servtc_o y Ajustes de
este manualL
45
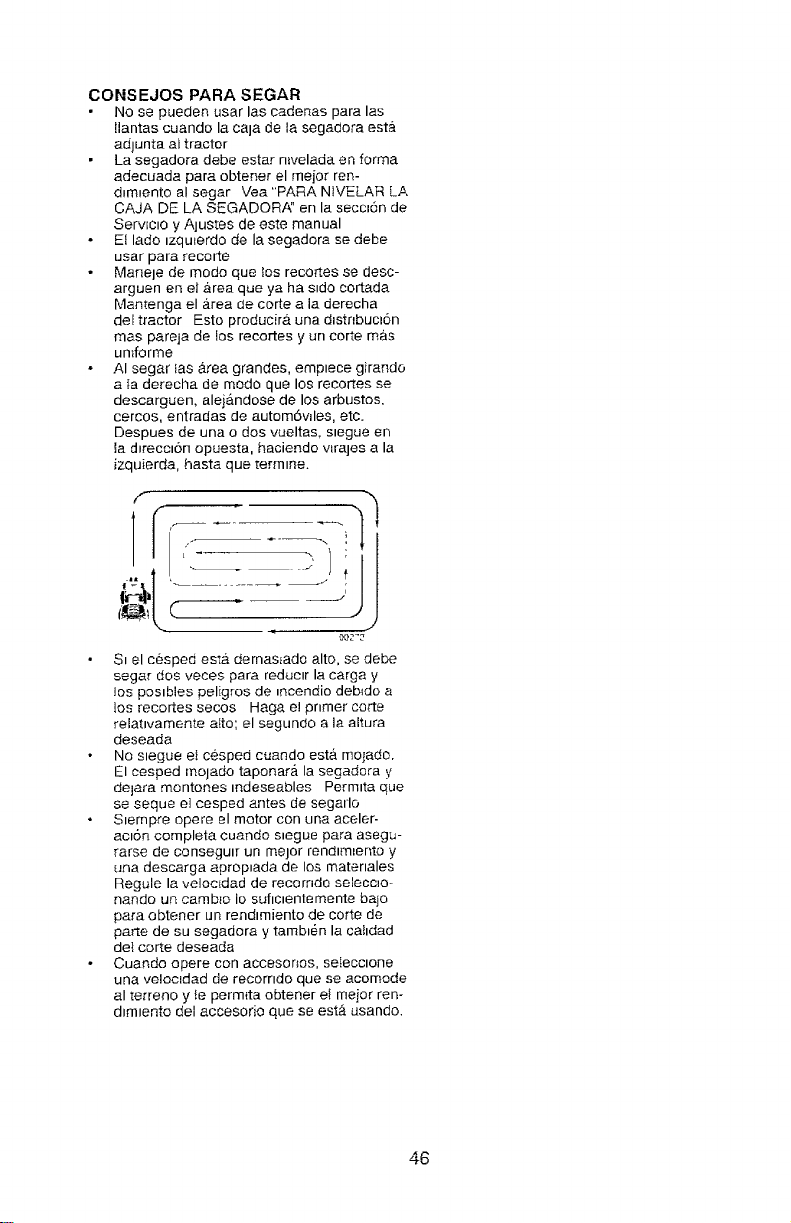
CONSEJOS PARA SEGAR
No se pueden usar las cadenas para las
llantas cuando la cala de la segadora esta
acl}unta at tractor
La segadora debe estar n_velada en forma
adecuada para obtener el mejor ren-
dlmlento al segar Vea"PARA NtVELAR LA
CAJA DE LA SEGADORA" en la seccl_n de
ServFcto y A]ustes de este manual
Et lado tzqu{erdo de la segadora se debe
usar para recorte
Manele de modo que los reco_tes 8e desc-
arguen en el area que ya ha sldO cortada
Mantenga el &rea de corte a ia derecha
de[ tractor Esto producir& una distnbucl6n
mas pareja de los recortes y un corte mas
unfforme
AI segar fas &tea grandes, emp_ece girando
a Ia derecha de modo que los recortes se
descarguen, alej&ndose de los arbustos.
cercos, entraclas de automdwles, etc.
Despues de una o dos vueltas, stegue en
la dtrecci6n opuesta, haciendo vlrajes a la
izquierda, hasta que termlne.
C,C,2-2
Sp el cesped esta demas_ado alto, se debe
segar dos veces para reducer la carga y
Jos posibles peligros de incendio deb_do a
los recortes secos Haga e! pnmer corte
relatlvamente atto; el segundo a la a[tura
deseada
No siegue el cesped cuando est& too]ado.
El cesped mojado taponara_ la segadora y
dejara montones indeseables Permita que
se seque e] cesped antes de segarlo
Slempre opere el motor con una aceler-
acl6n completa cuando snegue para asegu-
rarse de conseguir un mejor rendimlento y
una descarga aproppada de los materiales
Regule la veloc_dad de recorndo selecc_o-
nando un carabao Io sufictentemente bajo
para obtener un rendimiento de corte de
parte de su segadora y tamb_6n la calidad
del corte deseada
Cuando opere con accesonos, seIecclone
una ve!ocldad de recorndo que se acomode
al terreno y _epermita obtener et mejor ren-
d_mlento del accesorio que se est#, usando.
46
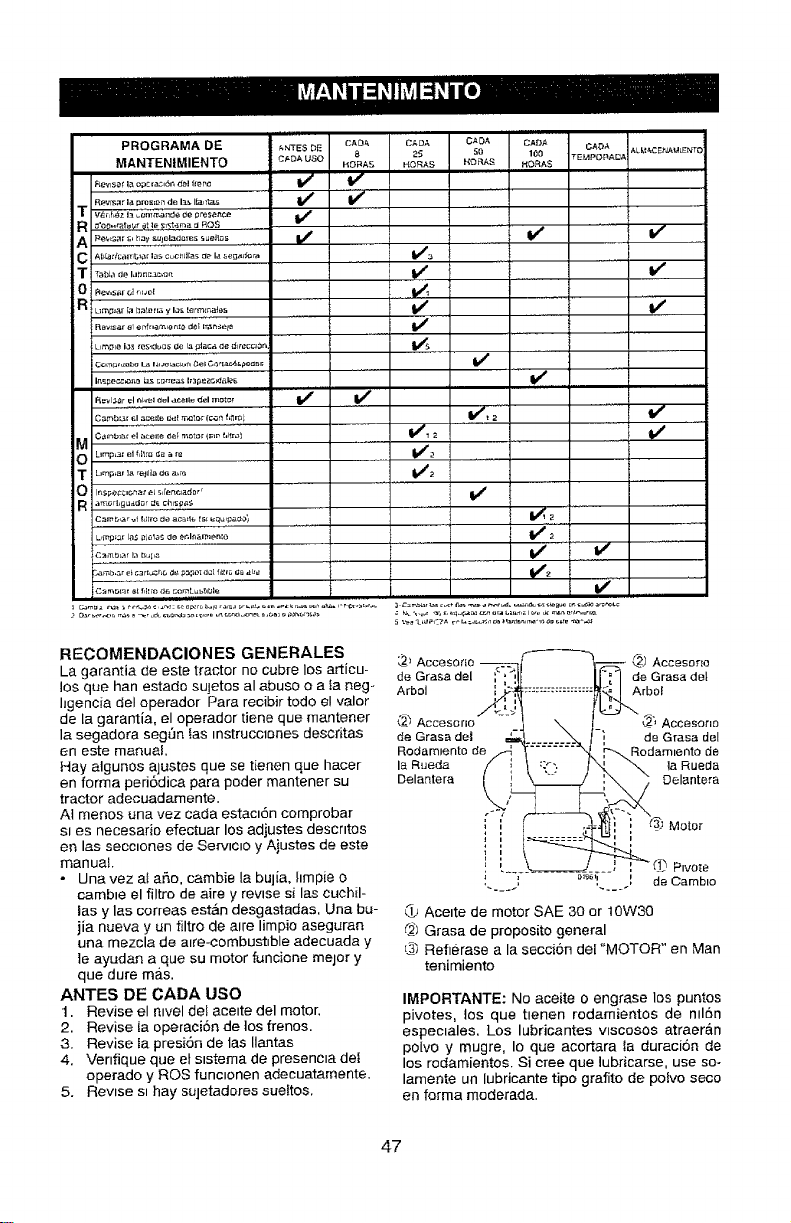
PROGRAMA DE .,:,_TESDE C_D,_ CADA CAD.,', CA_,_ CA_,A ,*,Lt.'.,.CE_-,_U_;rO
25 SO 1_ TEMPORADA
MANTENIMIENTO c_D_use hORAS HORAS HO_S _o;_As
Lim_31e IL_£ _St_*D$ (_3 I_ p_&C_ de {_lreCc_3n,
Revl;ar _I nL,z_ Oel ,_¢-el le del m_t_r
M
m [Jmp_ar la re_ll_a_e a_re
O I_pecclcnar e__,rer_cl_dorr
:C_m_r la _u;,a
!/ v"
v"
i/
i/' v"
v' i/
v" v"
t/_ q
v' v"
v'
v"
if,,
v'
RECOMENDACIONES GENERALES
La garantia de este tractor no cubre los articu-
los que han estado sujetos al abuso o a Ia neg-
hgencia del operador Para recibir todo el valor
de la garantia, el operador tiene qua mantener
la segadora seg=3n Ins _nstrucctones descritas
en este ma_ua!.
Hay algunos ajustes qua se tienen qua hacer
en forma ped6dica para p{)der mantener su
tractor adecuadarnente.
AI menos una vez cada estac_6n comprobar
sles necesade efectuar los adjustes descntos
en Ins secc_ones de Serv_c_o y Aiustes de este
manual,
• Una vez al aho, cambie la bulia, hmpie o
camb_e el filtro de aire y rewse si Ins cuchil-
Ins y las correas est&n desgastadas, Una bu-
jia nueva y un 51tro de alre limpi{) aseguran
una mezcla de a_re-combust_ble adecuada y
te ayudan a qua su motor funcione major y
que dure mas.
ANTES DE CADA USO
1. Revise el nwel del ace_te del motor.
2. Revise ia operacien de los #enos.
3. Revise la presi6n de tas Ilantas
4. Venfique qua et s_stema de presenc_a def
operado y ROS func_onen adecuatamente.
5. Rewse s_ hay sujetadores sueftos.
de Grasa del r:!l[ lr:l de Grasa dot
:2 _ccesono -J \ I-. _" Accesono
de eras& del &_ .... -_- / i de erasa del
Delantera _ ]__;_ Delantera
! ,
[___ (_ P,vo,e
#_sell i
, .... , , .... , de Carabao
_; Ace_te de motor SAE 30 or 10W30
@) Grasa de proposito general
_._)Reflerase a la secci6n de[ "MOTOR" en Man
tenimiento
IMPORTANTE: No aceite o engrase los puntos
pivotes, {os que tlenen rodamientos de nllen
espec=ales. Los lubricantes v=scosos atraer_.n
po[vo y mugre, Io que acortara la duracien de
los rodamientos. Si cree que lubdcarse, use so-
lamente un lubricante tip{) grafito de polvo seco
en forma moderada,
47
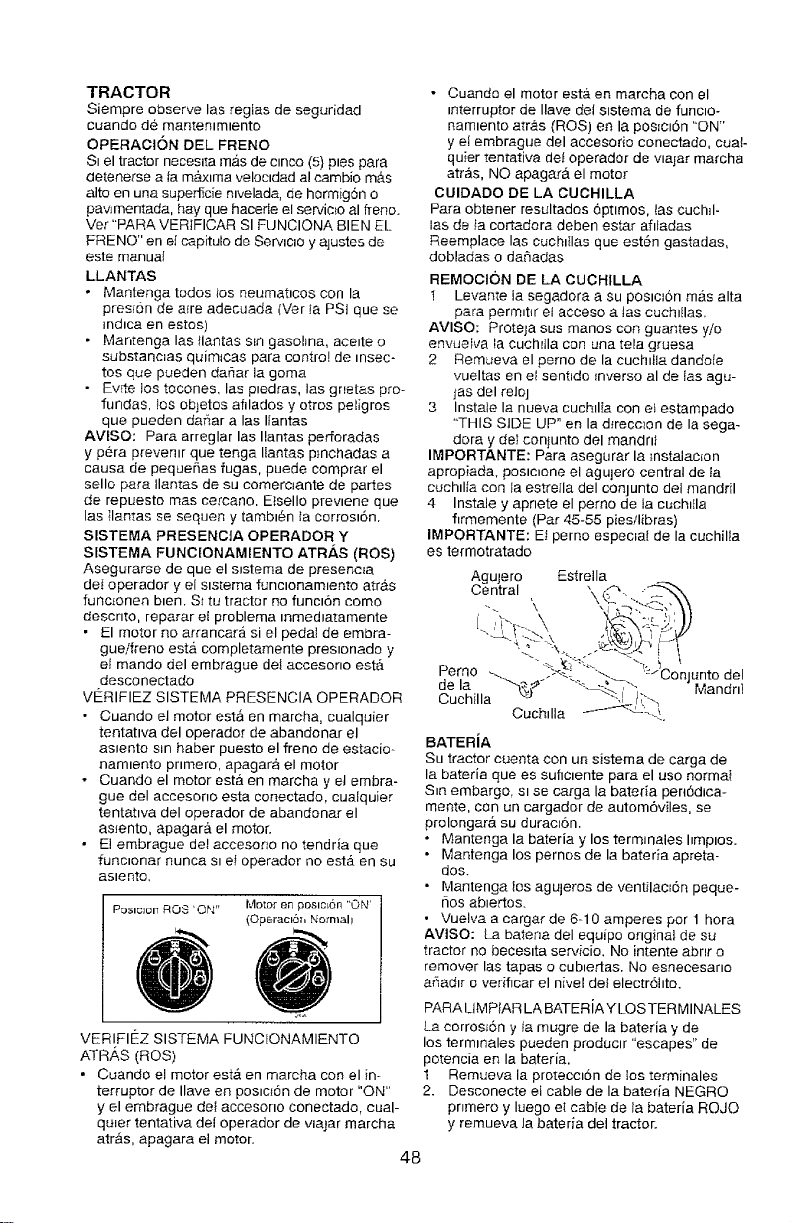
TRACTOR
Siempre observe las reglas de seguridad
cuando de mantentmtento
OPERAC1ON DEL FRENO
S_el tractor neces_ta m&s de ctnco (5) ptes para
detenerse a {a m_xtma veloctdad a! cambio rn&s
alto en una supenScie ntvelada, de hormigon o
pav_mentada, hay que hacede el servicto al fleno.
Vet "PARA VERIFICAR SI FUNCIONA BIEN EL
FRENO" en et capitulo de Servlcio y ajustes de
este manual
LLANTAS
• Mantenga todos los neumat_cos con la
pres_6n de afre adecuada (Ver fa PSi que se
indlca en estos)
• Mantenga las _lantas s_n gasohna, acette o
substane_as quim_cas para contro! de msec-
los qua pueden dar_ar la goma
• Ev_te los tocones, las p_edras, las gNetas pro-
fundas, los objetos afilados y otros peligros
qua puedon daflar alas lfantas
AVISO: Para arreglar las Ilantas per_oradas
y p_ra prevenlr que tenga Ilantas p_nchadas a
causa de pequerhas fugas, puede comprar el
sello para Ilantas de su comere_ante de partes
de repuesto mas cercano, E_sello prevtene que
las Ilantas se sequen y tambt_n la corrost6n.
SISTEMA PRESENC|A OPERADOR Y
S[STEMA FUNCEONAMIENTO ATR.,&S (ROS)
Asegurarse de que el ststema de presenc_a
deI operador y el sts[ema functonam_ento atr&s
func_onen bten, St tu tractor no funct6n como
descnto, reparar el problema inmedlatamente
• El motor no arrancara_ si el pedal de embra-
gue/freno est,, completamente preslonado y
el mando del embrague del accesono est&
desconectado
Vg:RIFIEZ SISTEMA PRE_SENCIA OPERADQR
• Cuando el motor est_ en marcha, cualquier
tentattva del operador de abandonar el
as_ento sin haber puesto el freno de estacio-
namtento pnmero, apagara el motor
- Cuando el motor esta en marcha y et embra-
gue del accesono esta conectado, cualquier
tentatwa del operador de abandonar el
as_ento, apagar& el motor,
• E! embrague del accesono no tendria que
func_onar nunca Sl el operador no esta_ en su
asleflto,
PoslcJol: ROS 'ON" Motor en poslc_6n "ON'
(Operacl6h Normah
VERIFIEZ SISTEMA FUNCIONAMIENTO
ATRAS (ROS)
• Cuando e! motor est& en marcha con el in-
terruptor de Ilave en poslc_Sn de motor "ON"
y el embrague del accesono conectado, cual-
quler tentativa del operador de viajar marcha
atr_s, apagara el motor.
• Cuando el motor est& en mareha con el
_nterruptor de Ilave del Slstema de functo-
namtento arras (ROS) en la pos_cl6n "ON"
y el embrague del accesorio conectado, cuaI-
quier tentativa det operador de walar marcha
atras, NO apagara el motor
CUIDADO DE LA CUOHILLA
Para obtener resultades 6pt_mos, las cuch_l-
las de _acortadora deben estar afiladas
Reemplace las cuchttlas qua est_n gastadas,
dobladas o daSadas
REMOC!ON DE LA CUCHILLA
I Levante la segadora a su postcr6n mas alta
para perm_t_r et acceso atas cuchlIlas,
AVlSO: Proteja sus manos con guantes yio
envuelva la cuch#tla con una tela gruesa
2 Remueva el perno de la cucNla dando{e
vueltas en el sent_do _nverso al de las agu-
jas del reJoj
3 Instate la nueva cuchdIa con et estampado
"'THIS SIDE UP" en la dlrece}on de la sega-
dora y del conjunto del mandrt;
IMPORTANTE: Para asegurar la _nstalac_on
apropiada, postc_one el agujero central de ta
cuchtlla con la estreIla del conjunto del mandril
4 Instale y aprlete el pemo de la cuch_lla
firmemente (Par 45-55 pies,libras)
IMPORTANTE: El perno especial de la euchil_a
es termotratado
Agujero Estrella
Central , "\(_'_...--_
--. \ . _.-, .'--_',' \\
Pemo _ _---_! "_-"---- r_2SConjunto del
de la _#" "-'-- "_--
..... "-_j --_._. _,q. Mandni
uucmla "-,_ r_,'--_
Cuchtlla _f--_\--_,
BATERiA
Su tractor cuenta con un sistema de carga de
la bateria que es suflctente para el uso normal
S_n embargo, s_ se carga la bateda pen6dica-
mente, con un cargador de autom6viles, se
prolongara su durac_6n.
• Mantenga la bateria y los termnales hmptos.
• Mantenga los pernos de la bateria apreta-
dos.
• Mantenga _os agujeros de ventilac_6n peque-
[_os ab_ertos.
• Vuelva a cargar de 6-10 amperes por 1 hora
AVlSO: _a batena del equipo ongina_ de su
tractor no beeestta servicio, No intente abnr o
remover las tapas o cublertas, No esnecesarlo
ar_ad_r o verificar el nivel del electrdhto.
PARA U MPfAR LA BATER iAY LOS TER MINALES
La corros_dn y Ia mugre de la bateria y de
los termmales pueden productr "escapes" de
potencia en la bateria.
1 Remueva la prmecc_6n de los terminales
2. Desconecte et cable de la bateria NEGRO
pnmero y luego el cable de la bateria ROJQ
y remueva Ja bateda del tractor.
48

3 Enjuague la bateria con ague cornente y
s6quela
4, Dmp_e los term_nales y los extremes del
cable de la bateria con un cepil_o de atam-
bre haste que queden bnflantes,
5, Cubra los terminales con grasa o parafina.
6 Reinstale la bateria (Vea"Reemplazar la
Batena" en la secc_6n de Servic_o y ajustes
de este manuat)
ENFRIAMfENTO DEL TRANSEJE
Mantenga el transeje sm acumulacidn de mu-
gre o paja qua puede restnng_r el enfnam_ento.
CORREAS V
Revise las correas V pare verificar si exlste
detenoro y desgaste despu_s de 100 hares de
operaci6n y c&mbielas si es necesano Los car-
teas no son ajustables. Cambie los coffees si
empiezan a deslJzarse debido a! desgaste.
MOTOR
LVBRICACION
Use solamente aceite de detergente de alto
calidad claslflcado con la clas_ficaci6n SG-SL
de servlclo API. Selecclone la calidad de vis-
cos_dad det aceite SAE segOn su temperature
de operac=6n esperada
AVtSO: A pesar de que fes aceites de mul-
tivjscosidad (5W30, t0W30, etc.) mejoran
et arranque en china fr[o, estos ace_tes de
multiwscos_dad van a aumentar el consume de
acelte cuando se usan en temperatures sabre
32 ° F (0 ° C)_ Revise et nivel dei acelte del mo-
tor m&s a menudo, pare evltar un posible dafio
en el motor, deb_do a que ne t_ene sufic_ente
aoelte.
Cambie el acelte despuSs de 50 hares de aper-
aclon o par Io menos una vez a{ aria si el tractor
se utihza menos 50 horas el aria.
Revise ei ravel del ace_te del c&rter antes de
arrancar el motor y despu6s de coda ache {8)
hares de usa contmuade. Apnete le tape del
retlenoivarilla ind{cadora de nivet det acelte en
ferma segura cada vez que revise el nivel del
ace{to.
PARA CAMBIAR ELACEITE DEL MOTOR
Determine la game de fa temperature esperada
antes de cambiar el aceite Tede el ace_te debe
cumphr cen la c}asrflcacl6n de servicto API SG-SL.
Aseg_rese que eltractor este en una superfic_e
mvetada.
Et aceite se drenar_, m4s f&cilmente cuando
este catiente.
Recoja el acelte en un envase adecuado.
I, Remueva la tapa,!vari/la mdicadora de nivei
pare reileno det aceite. Tenga cuidado de no
permitir que la mug re entre en el motor cuando
camble el aceJte,
2 Quite el casquitlo de la guarnicl6n infenor de
la v#dvuta de desag0e e instale ef tuba de
desag[Je sabre la guarnici6n.
3, Abra la valvula de desagLJe empujando hacia
dentro y deride vuelta ala izqu[erda.
V_lvuta tie desa.g0e del acelte
corrode y --.,_7 ,_1_ c[esague
bloqueada 'i'
Casqulifo
4. Pare abnrse, t_re hac_a fuera la v&lvula de
desagDe.
5. Despu/as de que e_aeeite haya drenado totat-
mente, cerrar y bloquee la v&lvu la de desagL_e
empujando hac_a dentro y dando vuelta en
sentido de las agujas de un reloj haste qua ta
clavija est& en la pos_c_6n bloqueada seg6n
to mostrado.
6. Remueva ef tuba de desague y substituya
el casquillo sabre ia guarnicidn inferior de la
v&lvula de desag5e.
7r Vuelva a flenar ei motor con ace_te a trav6--s
de{ tuba de la vadtla _ndicadora de nivel pare
rel]eno del ace_te. Vacielo lentamente. No Io
tlene demasiado. Pare la capacidad aproxi-
madavea fas "Especif_cac_ones del Producto"
secci6n de este manual.
8. Use un medidor en latapaivarilla mdicadoradel
nwel pare relieno del aceite pare reviser el nwel.
Mantenga el ace_te en la linea de llano (FULL)
en la varillaindicadora de ravel. Apriete la tape
en el tuba en farina segura cuando terra,he.
FILTRO DE ACEITE DEL MOTOR
Cambie e! flltro de aceite del motor coda tempo-
radao vez per media que cambie el aceite, si et
tractor se usa m_.s de 100 heros an un ar_o.
FILTRO DEL AIRE
Su me{or puede suffer avedas y func_onar de
manera mcorrecta con un filtro del aire sucre.
Dele servicio al flltro de aire m_ls a menudo si se
usa en condiciones polvorosas Yea la manual
de la motor.
LIMPIEZA DE LA REJILLA DE A|RE
La rejilla de aire debe mantenerse sm mugre
y paja para evitar el dafio al motor debido al
sobrecalentamiento. Limpiela con un cepilio de
aiambre e con a_re comprimido pare remover la
mugre y los fibres de goma secas, pegadas.
49
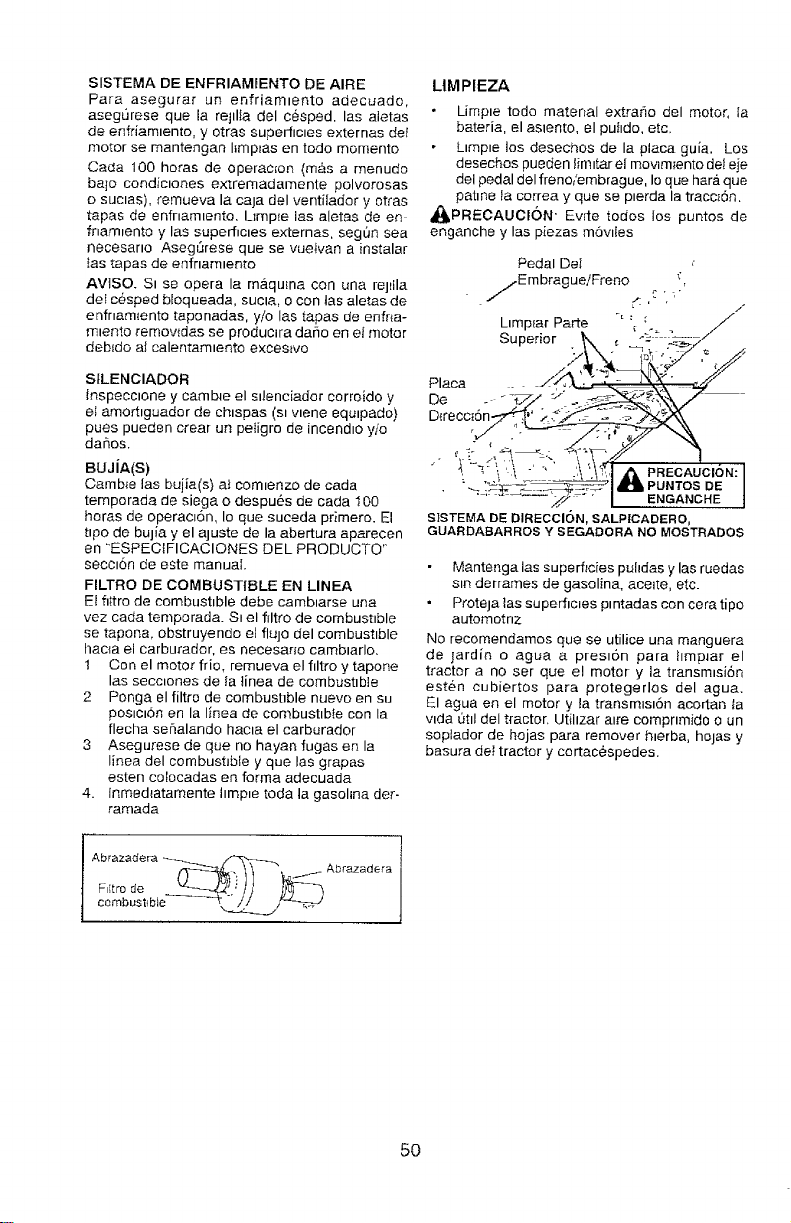
SISTEMA DE ENFRIAMFENTO DE AIRE
Para asegurar un enfriamlento adecuado,
asegSrese que la rejd_a del cesped, las aletas
de enfriam_ento, y otras superficies externas def
motor se mantengan hmp_as en todo memento
Cada 100 horas de operac_on (m&s a menudo
ba]o condic_ones extremadamente polvorosas
o suc_as), remueva la caja del ventiiador y otras
tapas de enfnam_ento. Lzmp_e las aletas de en
fnam_ento y las superficies externas, segun sea
necesano AsegSrese que se vueivan a instalar
[as [apas de enfnam_ento
AVtSO. S_ se opera la m&quma con una rej_lla
del cesped bEoqueada, SUCla, o con tas aletas de
enfnam_ento taponadas, yio las tapas de enfna-
m_ento remov{das se producira daSo en el motor
deb_do a[ calentam_ento exceswo
StLENCIADOR
{nspecclone y camb_e el s_lenciador corroido y
el amort_guador de chmpas (s_wene equ_pado}
pues pueden crear un peIigro de incend_o yio
dar_os.
BUJiA(S)
Camb_e las bujia(s) a{ comlenzo de cada
temporada de siega o despu_s de carla I00
horas de operac_6n, Io que suceda primero. El
ripe de bujia y el ajuste de la abertura aparecen
en "ESPECIFICACIONES DEL PRODUCTO"
secc_6n de este manual,
FILTRO DE COMBUSTIBLE EN LINEA
EEfi_tro de combustible debe cambiarse una
vez cada temporada. Si el flltro de combustible
se tapona, obstruyendo el flujo del combustible
hac{a el carburador, es necesar_o camblarlo.
1 Con el motor frio, remueva el filtro y tapone
las secc_ones de {a iinea de combustible
2 Penga el filtre de combushble nuevo en su
poslcldn en la Enea de combustible con la
flecha seSalando hacla el carburador
3 Asegurese de que no hayan fugas en la
linea del combus£ble y que las grapas
esten colocadas er_ forma adecuada
4. Inmed_atamente hmp_e toda la gasohna der-
ramada
]
Abrazadera _,(,--_, _ Abrazadera I
!
LIMPIEZA
Limp_e todo material extrario del motor, la
bateria, el aslen(o, el pufido, etc.
L_mp_e los desechos de la placa guia. Los
desechos pueden Iim_tar el mowm_ento del eje
del pedal del frenoiembrague, Io que hara que
patme la correa y que se plerda la tracm6n.
,_PREOAUOI6N' Ewte todos los puntos de
enganche y las piezas mowIes
Pedal Del c
i/Embrague!Freno _ • _'_"
Dmplar Parte -L : _ //
Superior . _k ' ._'_ -__.2 "/
A.".; ,o,...j,_ ..4
oe -
D{recc__
• "_ __"_'_I dl_ PUNTOS DE I
S}STEMA DE DIRECCION, SALPICADERO,
GUARDABARROS Y SEGADORA NO MOSTRADOS
Mantenga ias superficies puhdas y las ruedas
s_n derrames de gasolina, acelte, etc.
Proteja las superficies pmtadas con cera tipo
automotnz
No recomendamos que se utilice una manguera
de iardin o agua a pres_6n para hmp_ar el
tractor a no ser que el motor y la transmmi6n
esten cubiertos para protegerlos del agua.
El agua en el motor y _a transmm_6n acortan la
vlda Qt_ldel tractor. Utihzar a_re compnmido o un
soplador de hojas para remover h_erba, hojas y
basura det tractor y cortacespedes.
50
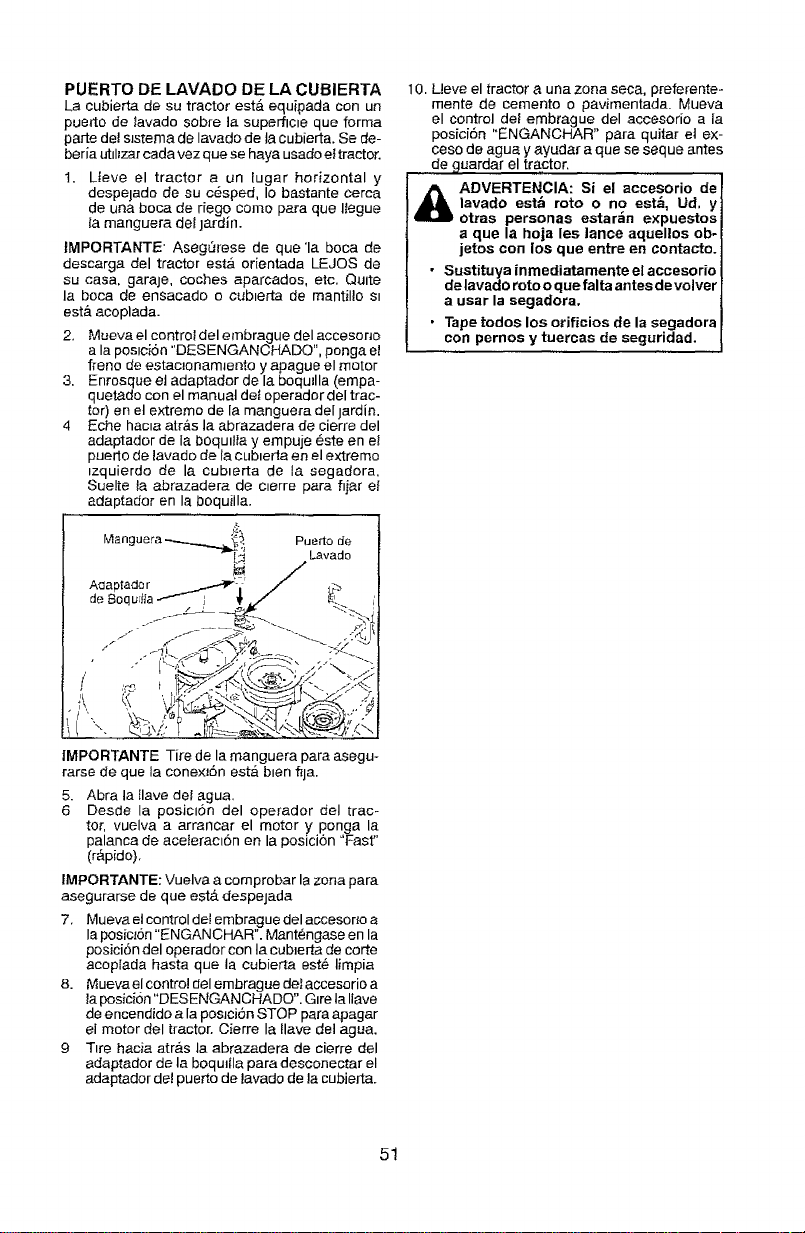
PUERTO DE LAVADO DE LA CUBIERTA
La cubierta de su tractor estb, equipada con un
puerto de Iavado sobre la superflc_e que forms
parle del sJstema de lavado de ta cubierta. Se de-
boris utllizar cads vez que se hays usado el tractor.
1. Lleve el tractor aun fugar horizontal y
despejade de su cesped, Io bastante cerca
de una boca de riego come para que Ilegue
{a manguera del jardin.
tMPORTANTE' AsegLirese de que 'Is boca de
descarga del tractor es_ orientada LEJOS de
su casa, garaje, coches aparcados, etc. Quite
la boca de ensacado o cub_erta de mantillo s_
est& acoplada.
2, Mueva el control del embrague del acceserto
ala poslcion "DESENGANCHADO", ponga el
freno de estac_onamJento y apague el motor
3. Enrosque el adaptador de la boqullla (empa-
quetado con el manual det operador del trac-
tor) en el extreme de la manguera del jardin.
4 Eche hacta atras la abrazadera de cierre del
adaptador de la boqutlla y empuje _ste en et
puerto de lavado de la cubteda en el extreme
_zquierdo de la cubterta de la segadora,
Suelte la abrazadera de c_erro pare fijar el
adaptador en la boquilla.
10. Ueve el tractor a una zona seca, preferente-
mente de cemento o pavimentada. Mueva
el control del embrague del accesorio ala
posiciSn "ENGANCHAR" pare quitar et ex-
ceso de ague y ayudar a que se seque antes
de guarder el tractor.
_k ADVERTENCIA: Si el accesorio de
Isvado est& rote o no est&, Ud. y
otras personas estaran expuestos
a que la hoja les lance aquellos ob-
jetos con los que entre en contacto.
• Sustituya inmediatamente elaccesorio
de lavado rote o que fairs antes de volver
a usar la segadora,
• Tape redes los orificios de la eegadora
con pernos y tuercas de seguridad.
IMPORTANTE Tire de la manguera pare asegu-
rarse de que la conexzSn est#= blen fija.
5. Abra la tlave del agua.
6 Desde la posiclsn del operador del trac-
tor, vuelva a arrancar el motor y ponga la
palanca de aceleracl6n en la posici6n "Fast"
(r&pido).
IMPORTANTE: Vuelva a cornprobar la zona pare
asegurarse de que est& despejada
7, Mueva el control del embrague del accesor_o a
la posiclsn "ENGANCHAR". Mant_ngase en la
posiciSn del operader con la cublerta de corte
acoplada haste queta cubierta est_ limpia
8. Mueva el control del embrague del accesorio a
la posiei0n "DESENGANCHADO". Gire ta Ilave
de enoendide ala poslciSn STOP pare apagar
el motor del tractor. Cierre la llave del ague.
9 T=re hacia atr&s la abrazadera de cierre del
adaptador de la boquJlla pare desconectar el
adaptador de! puerto de lavado de la cubiertar
51
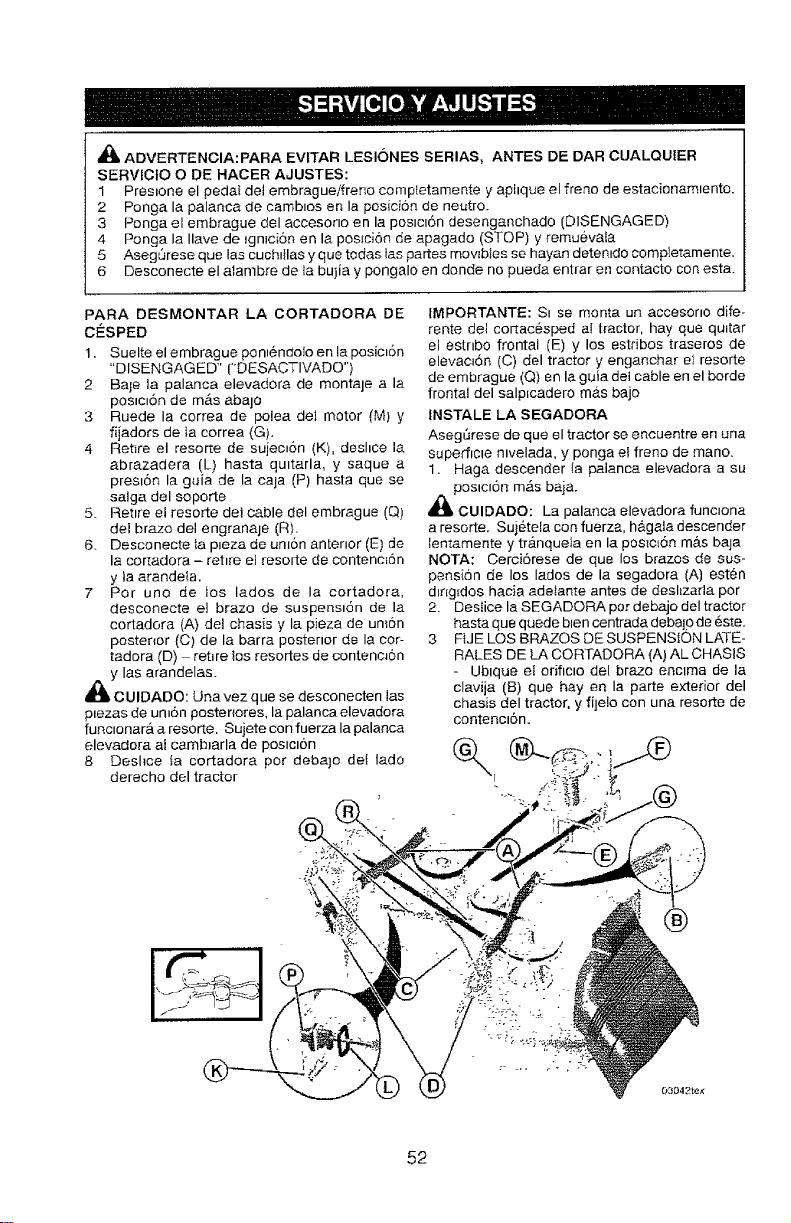
,_ ADVERTENCIA:PARA EVITAR LESI()NES SERIAS, ANTES DE DAR CUALQU|ER
SERVJC|O O DE HACER AJUSTES:
1 Prestone el pedal del embragueifrer_o comp{etamente y aphq_e el freno de estacionam=ento.
2 Ponga la palanca de cambtos en la posicion de neutro.
3 Ponga el embrague del accesono en la poslct6n desenganchado (DISENGAGED)
4 Ponga la Ilave de ignlci6n en la postc]on de apagado (STOP) y remuevala
5 Aseg0rese que las cuchlllas y que todas tas pares movlbtes se hayan detenldo eomp[etamente.
6 Desconecte el alambre de {a bujia y pongalo en donde no pueda entrar en contacto con esta.
PARA DESMONTAR LA CORTADORA DE
CE_SPED
1. Suelte el embrague pon_6ndolo en la posict6n
"DISENGAGED" CDESACTIVADO")
2 Baje la palanca elevadora de montaje ala
posteldn de m_s abajo
3 Ruede la correa de polea deJ motor {M) y
fijadors de Ia correa (G).
4 Retire el resorte de sujectdn (K). deshce la
abrazadera (L) haste qultarla, y saque a
presldn la g_ia de la caja (P) hasta que se
salga del soporte
5. Retire el resorte dei cable del embrague (Q)
del Braze del engranaje (R),
6. Desconecte la pieza de umdn antenor (El de
la cor[adora -rettre el resorte de contenc_dn
y ta arande/a.
7 Per uno de los lades de la cortadora,
desconecte el braze de suspenst&n de la
cortadora {A) del chasis y la pieza de umdn
poster{or (C) de la barra postertor de la cor-
tadora (D) rehre los resortes de contencJdn
y las arandelas.
_ CUIDADO: Una vez que se desconecten las
ptezas de umdn postenores, la palanca elevadora
funclonar& a resorte. Sujete con fuerza la palanca
elevadora at cambJarla de poslct6n
8 Deshce {a cortadora per deba]o det lade
derecho del tractor
IMPORTANTE: S_ se monte un accesono dife-
rente dei cortacesped al tractor, hay que qu_tar
el estnbo frontal (E) y los estribos traseros de
elevac_dn (C) del tractor y enganchar e_ resorte
de embrague (Q) en la gala del cable en el borde
frontal del salpJcadero mb.s bajo
INSTALE LA SEGADORA
Aseg_rese de que el tractor se encuentre en una
superflcte ntvelada, y ponga el freno de mane.
1. Haga descender {a palanca elevadora a su
poslcldn m_.s baja.
_k CUlDADO: La palanca elevadora func_ona
a resorte. Sujdtela con fuerza, h&gala descender
lentamente y tr_tnqueta en la pos_c_{Jn m&s baja
NOTA: Cercidrese de que los brazes de sus-
pens{on de los lades de la segadora (A) esten
d_r@dos haeia adelante antes de desl_zarla per
2. Destice la SEGADORA per debajo del tractor
haste que quede blen centrada deba|o de 6ste.
3 FIJE LOS BRAZES DESUSPENS{QN LATE-
RALES DE LA CORTADORA (A) AL CHASlS
- Ublque et orificto del braze enclma de la
clavija (B) que hay en la parte exterior del
chasis del tractor, y fijelo con una resorte de
contenctdn.
@
®
52
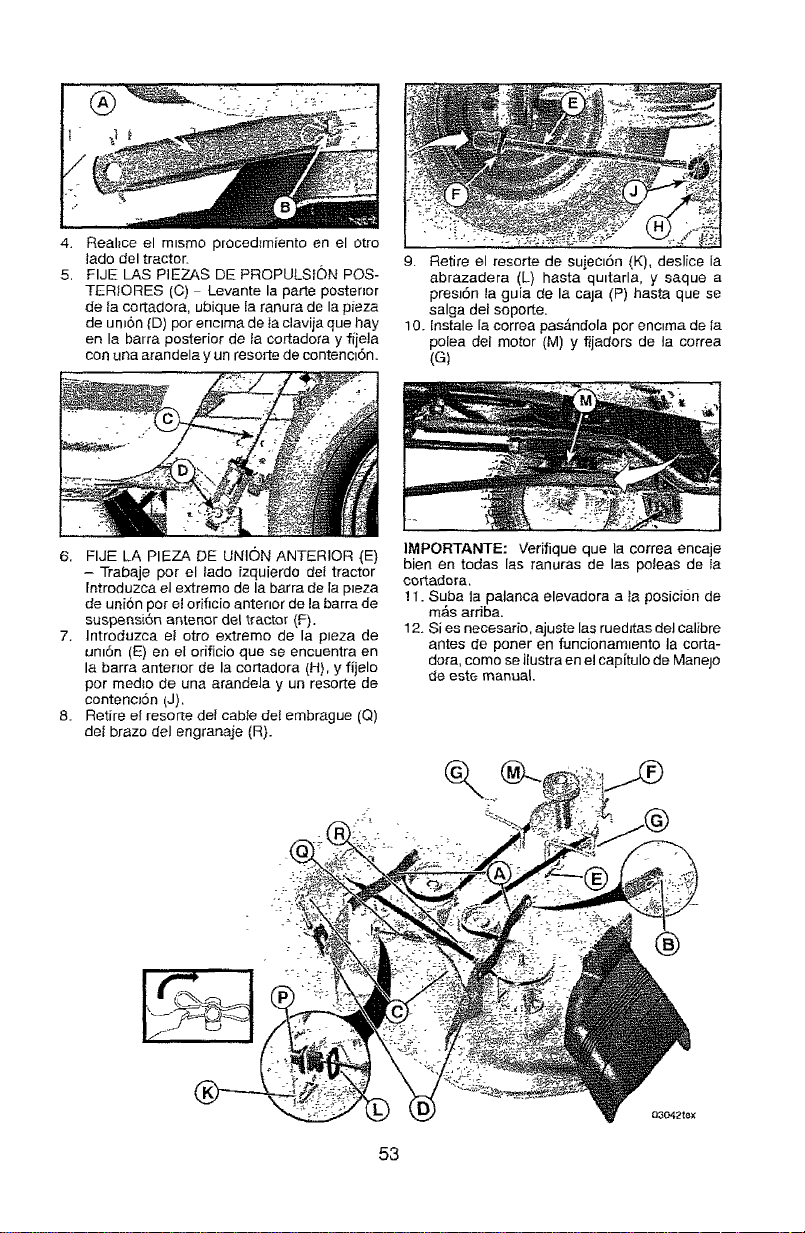
4.
5,
Real_ce el m_smo prooedzmiento en el otro
lade del tractor.
FIJE LAS PIEZAS DE PROPULSI(_)N POS-
TERIORES (C) Levante la parte posterior
de {a cortadora, ubique ta ranura de la pieza
de un_6n {D) per enclma de _aclavija que hay
en la barra posterior de la cortadora y fijeJa
con una arandela y un resorte de contenci6n.
9. Retire el resorte de sujecl6n (K), deslice ia
abrazadera (L) hasta qultarla, y saque a
pres_6n la guia de la cala (P) hasta que se
salga del soporte.
10. [nstale la correa pas#,ndola per enc_made {a
po{ea del motor (M) y fijadors de ta correa
(G)
6. FIJE LA PIEZA DE UNION ANTERIOR (E)
- Trabaje per el lade izquierdo del tractor
fntroduzca el extreme de la barra de la pJeza
de union per et orificio antenor de la barra de
suspensi6n anterior del tractor (F).
7. Introduzea el otro extreme de la pleza de
unl6n (E) en el orificio que se encuentra en
la barra anterior de la eortadora (H), y fijelo
per medto de una arandela y un resorte de
contenclon (J).
8_ Retire e{ resole def cable det embrague (Q)
del braze del engranaje (R).
IMPORTANTE: Verifique que la correa encaje
bien en todas las ranuras de las poteas de fa
oortadora.
11. Suba ta palanca elevadora a ta position de
m&s ardba.
12. Si es necesario, ajuste las ruedJtas del calibre
antes de porter en funcionam_ento la corta-
dora, come se ilustra en el capitulo de Manejo
de este manual.
®
53
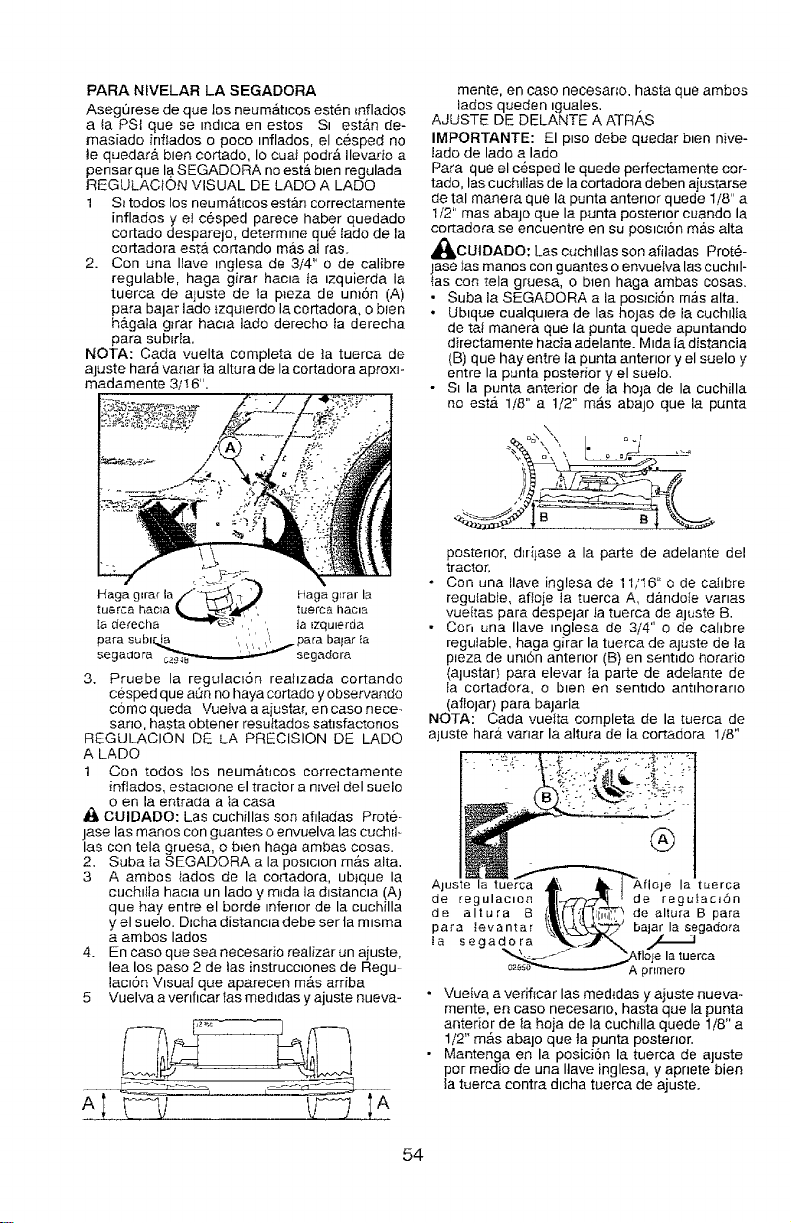
PARA NWELAR LA SEGADORA
Asegurese de que los neum&hcos esten _nflados
a _a PSi que se _nd_ca en estos St estAn de-
masiado fnftados o poco _nflados, el cesped no
te quedar& blen cortado, Io cual pedrO. Ilevarlo a
pensar que la.S EGADQRA no est& bten regulada
REGULAC[ON VISUAL DE LADe A LADe
1 S_ todos los neum&t_cos estan correctamente
inflados y el cesped parece haber quedado
cortado desparelo, determine qu_ fade de la
cortadora est& cortando m6.s al ras.
2. Con une leave _nglesa de 3/4" o de calibre
regulable, haga girar hacla ta tzquierda la
tuerca de ajuste de ia p_eza de un_6n (A)
pare balar lade {zqu_erdo la cortadora, o b{en
h&gata g_rar hac_a lade derecho ta derecha
pare sublda.
NOTA: Cada vuelta complete de ia tuerce de
ajuste har_ vanar la altura de la cortadora aproxl-
madamente 3116".
Haga g,rar la//° _) Haga g,rar la
tuerca hacla • _ _r', tuerca hacla
[a derecha _',-,,v_;,_ ,,, . ta _zqulerda
para subl_.,._ , __para ba_ar{a
segadora __ segadora
3. Pruebe la regulaciSn reahzada cortando
cesped que a0n no haya cortado y observando
come queda Vuelva a aiusta_, en case nece-
sane, haste obtener resultados satlsfactonos
REGULACION DE LA PRECISION DE LADe
A LADe
1 Con redes los neum_t_cos correctamente
inflados, estactone el tractor a n_vel del sueio
o en la entrada a la casa
_1_CUIDADO: Las cuchillas son afiladas Prote-
]ase las manes con guantes o envuelva las cucNo
las con tela gruesa, o bien haga ambas cosas.
2. Suba Ia SEGADORA ala posiclon m&s alta.
3 A ambos _ados de la cortadora, ubtque la
cuchllla hacta un lade y mtda la dlstancta (A)
que hay entre el borde mfenor de la cuchilla
y el suelo. DIcha distancla debe ser ta mlsma
a ambos lades
4. En ease que sea necesario realizar un aiuste,
lea los paso 2 de las instrucctones de Regu-
lacl6n Visual que aparecen m&s arriba
5 Vuelva a venficar Ias medldas y ajuste nueva-
mente, en case necesar;o, hasta que ambos
lades queden tguales. .
AJUSTE DE DELANTE A ATRAS
IMPORTANTE: El p_so debe quedar bten nive-
lade de lade a lade
Pare que el cesped le quede perfectamente cot-
redo, lee cuchtllas de la cortadora deben aiustarse
de tal manera que la punta anterior quede 1/8" a
1/2" mas abajo que la punta postertor cuando la
cortadora se encuentre en su pos_c{6n mas alta
_kCUtDADO; Las cuchtllas sonafiladas Prot6-
]ase Ias manes con guantes o envuelva las cuchtl-
{as con tela gruesa, o b_en haga ambas cosas.
• Suba la SEGADORA ala pos_ci6n mas alta.
• Ublque cualquiera de las hojas de Ia euchliia
de tel manera que la punta quede apuntando
directamente hacia adelante_ M_da Ia distancia
{B) que hay entre la punta anterior y el suelo y
entre la punta posterior y el sueto.
• S_ la punta anterior de la hoIa de la cuchilla
no est.4 1/8" a 1/2" m_s abajo que la punta
\
posterior, d_rijase ala parte de adelante del
tractor.
• Con una Ilave inglesa de 11/t6" o de c&i_bre
regu[abte, afleie la tuerca A, d_ndote vanes
vueftas pare despejar la tuerca de aluste B.
• Con una Ilave _nglesa de 3/4" o de cahbre
regulable, haga girar la tuerca de ajuste de la
p_eza de un_6n antertor (B) en sent_do horatio
{alustar) para elevar la parte de adelante de
Ea cortadora, o blen en senttdo antlhorarlo
(aflolar) pare bajarla
NOTA: Cada vuel[a complete de la [uerca de
ajuste har_4 vanar la altura de ia cortadora 1/8"
AJuste la t la tL_erca
de regulacma de regutac_Sn
de altura B de altura B pare
pare tevant_r lasegadora
ta segadora
• VueIva a vedflcar las reed{des y ajuste nueva-
monte, en case necesano, haste que la punta
anterior de Ia hoja de la cuch_lla quede 1/8" a
1/2" m_s abalo que la punta postertor.
• Mantenga en la posicion la tuerca de aluste
per medio de una Ilave inglesa, y apnete bien
la tuerca centre dlcha tuerca de ajuste.
54
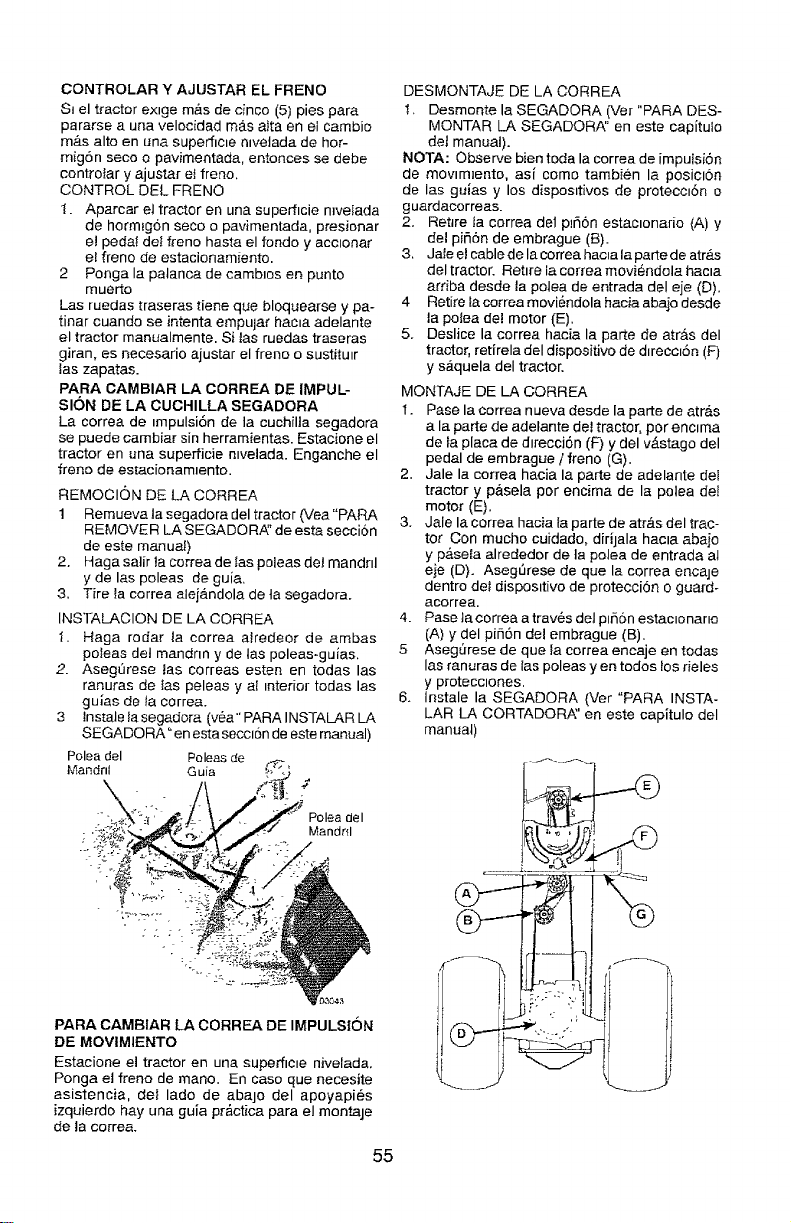
CONTROLAR Y AJUSTAR EL FRENO
SJ el tractor exlge mas de cinco (5) pies para
pararse auna velocidad m&s a_ta en el cambio
m&s alto en una superfic_e awelada de hor-
mig6n seco o pavimentada, entonces se debe
controfar y ajustar e! freno.
CONTROL DEL FRENO
I[. Aparcar el tractor en una superficie mve_ada
de horm_g6n seco o pavimentada, presionar
e! peda! del freno hasta el rondo y acclonar
el freno de estacionamiento.
2 Ponga la patanca de cambtos en punto
muerto
Las ruedas traseras tiene que bloquearse y pa-
tinar cuando se intenta empujar hac_a adelante
el tractor manualmente. Si tas ruedas traseras
giran, es necesario ajustar el freno o sustitu¢
las zapatas.
PARA CAMBIAR LA CORREA DE IMPUL-
SION DE LA CUCHILLA SEGADORA
La correa de tmpulsi6n de la cuchilla segadora
se puede cambiar sin herramientas. Estacione el
tractor en ona supefficie n=velada. Enganche el
freno de es[acionam_ento.
REMOCION DE LA CORREA
1 Remueva la segadora del tractor {Vea"PARA
REMOVER LA SEGADOR_' de esta seccion
de este manuat)
2. Haga salir la correa de las poleas deJ mandril
y de las poleas de guia.
3. Tire _a correa alej&ndola de ta segadora.
INSTALACION DE LA CORREA
l. Haga rodar la correa afredeor de ambas
poleas del mandnn y me tas poleas-guias.
2. AsegSrese tas correas ester en todas las
ranuras de las peleas y al _nterior todas las
gulas de fa correa.
3 lnstale la segadora (v_a" PARA INSTALAR LA
SEGADORA" en esta secclon de este manual)
Polea del Poleas de
Mandril G uia :2
-7
Polea del
Mandr_l
DESMONTAJE DE LA CORREA
"_. Desmonte la SEGADORA (Ver "PARA DES-
MONTAR LA SEGADORA" en este capitulo
det manual).
NOTA: Observe bier toda la correa de impulsi6n
de mowm_ento, asi como tambien la posicl6n
de las guias y los disposltivos de proteccl6n o
guardacorreas.
2. Retire {a correa del p_fi6n estactonado (A) y
del pifi6n de embrague (B).
3. Jate et cable de la correa hac_a la parte de atr__s
del tractor. Rettre la correa moviendola hacta
arriba desde la polea de entrada del eje (D).
4 Retire Lacorrea moviendola hacia aba_o desde
la poIea de! motor (E).
5. Deslice la correa hacia la parte de atr&s del
tractor, retirela del dispositivo de dlreccl6n (F)
y sa_quela del tractor.
MONTAJE DE LA CORREA
1. Pase la correa nueva desde la parte de atra.s
a la parte de adelante deJ tractor, por enc_ma
de la placa de dlrecci6n (F) y del v&stago del
pedal de embrague / freno (G).
2. Jale la correa hacia la parte de adelante del
tractor y p&sela por encima de la potea deI
motor (E).
3. Jale la correa hacia Ia parte de atras del trac-
tor Con mucho cuidado, dirijala hacia abaio
y pasefa alrededor de la polea de entrada at
eie (D). Aseg0rese de que la correa encaje
dentro de_ disposltivo de protecciSn o guard-
acorrea.
4. Pase ta correa a tray, s dei p_fi6n estac_onano
(A) y del pifi6n del embrague (B)_
5 AsegQrese de que la correa encaje en todas
las ranuras de Ias poleas yen todos tos deles
y protecciones.
6. Instale la SEGADORA {Ver "PARA INSTA-
LAR LA CORTADOR_' en este capitulo del
manual
PARA CAMBIAR LA CORREA DE IMPULSION
DE MOVIMIENTO
Estacione el tractor en una superflc_e nivelada.
Ponga eJ freno de mano. En caso que necesite
asistencia, cleI lado de abajo del apoyapi_s
izquierdo hay una guia pr&ctica para el montaje
de ta correa.
55

REGULACION DE LA PALANCA DE VELOCF
DADES NEUTRO DEL CAMBIO MEC,'_NICO
CON DIFERENCIAL Y TRACOION ANTERIOR
EI cambio mec&nlco con diferenc_a{ y tracc_6n an=
tenor t_ene que estar en pos_c_6n neutro cuando
ta relat_va patanca ester e n pos_c_6n (cie rre metAl_-
co La regulac_6n ya esta predefinida per la Casa
constructora, pero s_ es necesario efectuar m#.s
regulac_ones, preceder de la siguiente manera.
1. Asegurarse que el cambio mec&nico con
dfferenc_al y tracc_6n anterior est6 en pos_c_6n
neutro
AVISO: Cuanda las ruedas postenores del trac-
tor se mueven hbremente, el cambio mecanice
esta en neutro.
2 Soltar el perno de regulaci6n en la parte
anterior de fa rueda postenor derecha.
3 Coiocar la palanca de veloc_dades en poslcl6n
neutro
4 Apretar a for]do el pemo de regulacEon.
AVISO: Desplazar el plane de trabajo de la sega-
dora haste la poslcz6n mas baja pare aumentar el
juego al fm de acceder al perno de regulaclon
Palanca cle Vetocldades Neu[ro Olerre
del Camb4o /-Metahco
MecanlcD /
-" -. r' "-- _'7--. J°°-?'' ." - f" r_
dezO_.ldades
PARA REMOVER LAS RUEOAS PARA
HACER REPARACIONES
1 Btoquee el eje en forma segura
2. Remueva la cub_erta dei eje, el anillo de reten-
c_n y Jas arandelas pare perm{t_r la remoc_0n
de las ruedas (la rueda trasera cont_ene una
Ilave cuadrada - no la p_erda)
3 Repare la Ilanta y vuelvala a montar
Arandelas
Aniilo de
Re[encEon
CubEerta \
del eje
"\
-@
Llave Cuadrada (rueda ._,_--_
trasera soIamente)i
AVlSO: En _as ruedas traseras solamente' ahnee
las ranuras en el cube de la rueda trasera en el
eje. Inserte la Ilave cuadrada
4. Vuelva a colocar las arandeias e _nserte el an_ilo
de retenc_bn en forrna segura en la ranura de! eje,
5_ Vuelva a colocar la cub_erta del ele.
AVlSO: Para arreglar {as Ilantas perforadas
y p@a prevenlr que tenga Ilantas pmchadas a
cause de pequeBas fugas, comprar de su com-
merclante Sears y utihzar el sello pare tlantas.
Elsello previene que las llantas se sequen y
tambi6n la corrosion,
56
IMPRESION / INCLtNAC[ON DE LAS RUEDAS
DELANTERAS
La _mpres_6n e mcimac_6n de las ruedas delan-
teras de su nuevo tractor vienen asi de f&brica y
son normales. La fmpres_6n y la inclinac_6n de las
ruedas delanteras no son regulabies En case
que se produzca algL)n dar_o que afecte la im-
presi6n o la mchnaci6n de las ruedas deianteras
tal come vln_eron de fabnca, p6ngase en contacto
con un centre de serv_c_os Sears u otro centre de
servic_os autonzado.
PARA HACER ARRANCAR EL MOTOR CON
UNA BATERIA BAJA
_IADVERTENC|A' Las baterias de acido-plo-
me generan gases explosives. Mantenga las
ch_spas, las _lamas y Ios matenales pare fumar
alejados de las batedas S_empre use una pro-
tecc_6n pare los ojos alrededor de las baterlas.
St su bateria esta demasiado baja come pare
hacer arrancar el motor [_ene que volverse a
cargar (Vea "Batena" en ta secc_6n de Manten-
_m_ento de este manual)
S_ se usan "cables de empalme" pare un ar-
ranque de emergenc_a, s_ga este proced_miento.
IMPORTANTE: Su tractor esta equ_pado con un
s_stema de I2 volts El otro veh_culo tambien t_ene
que tener un sBtema de t2 vo_ts. No use la bateria
de su [ractor para hacer arrancar a otros vehiculos
PARA ADJUNTAR LOS CABLES DE EMPALME
I Conecte cada ex'[remo de_cable ROJO con el
terminal (A-B) POSITIVe (+) de cada bateria,
preocup&ndose de no hacer cortoc_reu_to en
e! chas_s.
2 Conecte un extreme del cable NEGRO con
ei terminal (C) NEGATIVe (9 de una bateria
completamente cargada
3 Conecte el otro extreme d.el cable (D) NEGRO
con un buena CQNEXION A TIERRA DEL
CHASIS, alejado del estanque de combus-
tible y de la bateria
PARA REMOVER LOS CABLES, INVIERTA EL
ORDEN
1. El cable NEGRO pnmero del chas_s y luego de
la bateria completamente cargada.
2 Et cable RQJO al [3{bmo de ambas baterias
Bater_a O_b_l o Ba[ena Completarnenle
Descarg_da Cargada
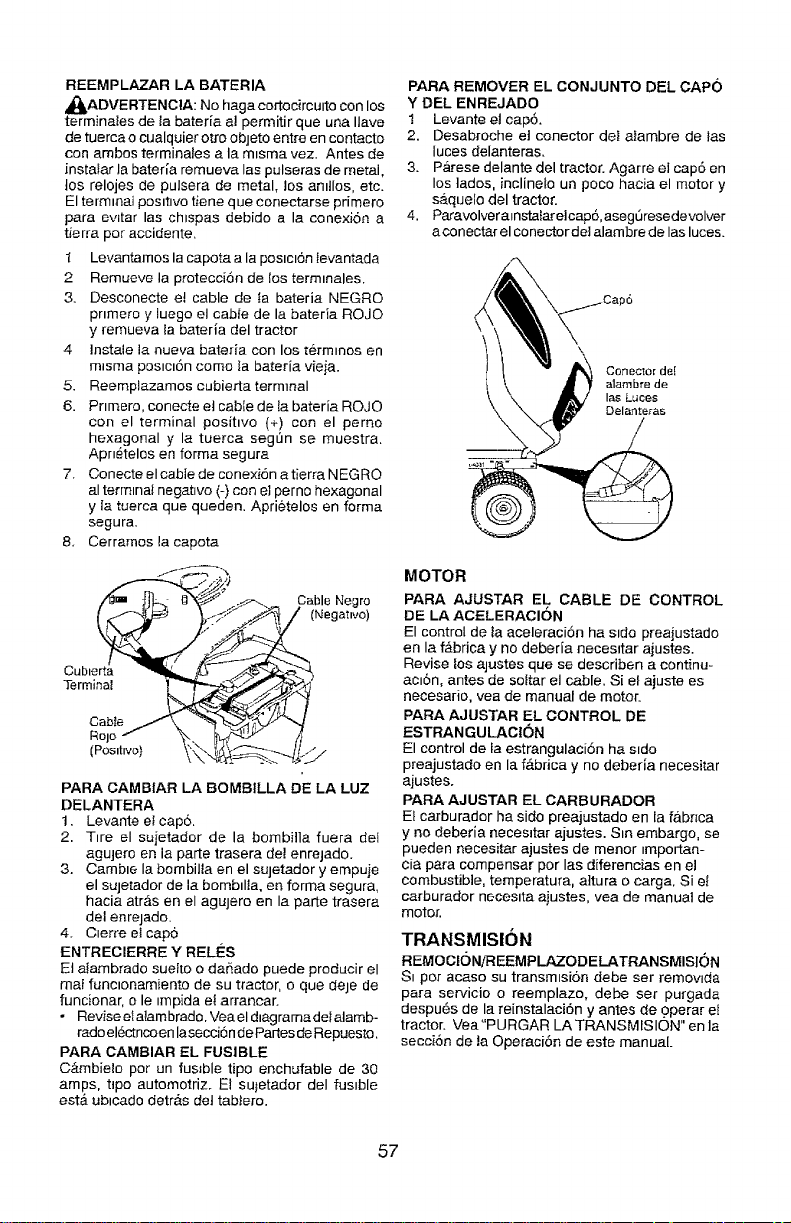
REEMPLAZARLA BATERIA
_ADVERTENCtA: No haga cortecirculto con los
terminales de la bater[a a! permitir que una Ilave
de tuerca o cualquier otro objeto entre en contacto
con ambos terminales a la m_sma vez. Antes de
instalar la bater[a remueva las pulseras de metal,
los relojes de pulsera de metal, los antllos, etc.
El termmat postttvo tiene que conectarse primero
para evltar las ch_spas debido a la eonexion a
tierra per accidente.
i Levantamos la capota a la postc_6n Jevantada
2 Remueve la protecci6n de {os termtnales.
3. Desconecte et cable de la bateria NEGRO
pnmero y luego el cable de la bateria ROJO
y remueva Ia bateria del tractor
4 Instale la nueva bateda con los t6rm_nos en
m=sma poslct6n come ia bateria vieia.
5. Reemplazamos cubiertaterm]nal
6. Primate, conecte et cable de la bateria ROJO
con el terminal posihvo (+) con el perno
hexagonal y la tuerca seg_n se muestra.
Apn6telos en forma segura
7. Conecte el cabie de conexi6n atierra NEGRO
al termtna{ negatwo (-) con el perno hexagonal
y la tuerca que queden. Aprietelos en forma
segura.
8. Cerramos la capota
Terminal _.
cabt_/\ -_"
Rojo-'- _-.. Fr_
(Pos,hvo) _,_-_.
._/--__ Cable Negro
_ (Negative)
I
5_
PARA CAMBIAR LA BOMBILLA DE LA LUZ
DELANTERA
1. Levante ei cap&
2. Ttre el sujetador de la bombil]a fuera del
agujero en ia parte trasera de! enrejado.
3. Cambte la bombilla en el sujetador y empuje
el sujetador de la bombtlta, en forma segura,
hacia atras en el agujero en la parte trasera
del enrejado.
4. C=erre et cap6
ENTRECIERRE Y RELES
Et alambrado suelto o dar_ado puede producir el
mat functonamiento de su tractor, o qua deje de
funcionar, o le tmpida el arrancar.
• Revise et aIambrado. Vea el dtagramadet _amb-
rado el6ctncoen laseccion de Partes de Repuesto.
PARA CAMBIAR EL FUSIBLE
C_mbiele per an fus=ble tipo enchufable de 30
amps, tlpo automotriz. E! sujetador del fusible
esta ubicado detr&s del tabiero.
PARA REMOVER EL CON JUNTO DEL CAPO
Y DEL ENREJADO
! Levante el cap6.
2. Desabroche el conector def aiambre de las
luces delanteras.
3. P&rese delante del tractor. Agarre el cap6 en
los lades, inclineto un poco hacia el motor y
s&quelo del tractor.
4. Paravolver a_nstalar elcap6, asegt3resedevelver
aconectar el conector del alambre de las luces.
Conector de{
alarnbrede
I_ Luees
Delan_:e[as
/
MOTOR
PARA AJUSTAR EL CABLE DE CONTROL
DE LA ACELERACION
El control de la aceleraci6n ha side preajustado
en la fgtbrica y no deberia necesttar aiustes.
Revise los ajustes que se describen a continu-
acl6n, antes de soltar el cable. Si el ajuste es
necesario, yea de manual de motor_
PARA AJUSTAR EL CONTROL DE
ESTRANGULAC1ON
El control de fa estrangulaci6n ha side
preajustade en la fb.brica y no deberia necesitar
ajustes.
PARA AJUSTAR EL CARBURADOR
El carburador ha side preajustado en Ia fabnca
y no deberia neces_tar ajustes. S_n embargo, se
pueden necesitar ajustes de menor _mportan-
cia para compensar per las diferencias en el
combustible, temperatura, altura o carga. Si el
carburader necesita ajustes, vea de manual de
motor.
TRANSMISlON
REMOCK) NiREEMPLAZODELATRANSMISK_)N
St per acaso su transmlsidn debe ser remowda
para servicio o reemplazo, debe set purgada
despu6s de la reinstalaci6n y antes de .Operar el
tractor. Vea"PURGAR LATRANSMISION" en la
secci6n de ta Operaci6n de este manual_
57
Inmed_atamente prepare su [ractor para el
aJmacenamFento al final de la _emporada o sl el
tractor no se va a usar per 30 dias o mb.s
_I, ADVERTENCIA. Nunca almacene el trac-
tor con gasohna en el estanque dentro de un
eaff_cao en donde los gases pueden a;canzar
una llama expuesta o una ch_spa Permtta qua
el motor se enfrie antes de almacenarlo en
cualquter rec_n[o prlvado
TRACTOR
Cuando e{ tractor se va a almacenar per c_erto
periodo de t_empo, {imptela cuzdadosamente,
qutte toda la mugre, la grasa, las hoias, e[c
Guardela en una _rea tfmp_a y seca
1 Limp_e todo el tractor (vea' LIMPIEZ_._' en la
seccton de Mantemmiento en este manuab
2. Inspecc_one y camb_e las correas, szes
necesario (vea las _nstrucciones pare el
cambio de las correas en la secc_6n de
Serv_c_o y Ajustes de esre manual)
3. Lubdquelo, segQn se muestra en la secci6n
de Manton_m_ento de este manual
4 AsegQrose qua todas las tuercas, tos
parries y los tornillos esten sujetados
eri forma segura. Inspecc_one Ias partes
mowbles para veriftcar s_ hay dario, rotura o
desgaste. C&mb_elas s_es necesano
5 Retoque todas superfictes pmtadas ox_da-
das o p_cadas, aphque hja antes de prater.
BATERiA
• Cargue la bateria completamente antes de
g_aroarla.
- Despues de c_erto periodo de ttempo en
aimacenamlento, ia batena puede neces_tar
velvet a cargarse
• Pare ayudar a ewtar la corrosion y las fugas
de po_encta durante largos periodos de
atmacenamiento, se deben desconectar
tos cables de la bateria y se debe hmp_ar
cu_dadosamente (yea "PARA LIMPIAR LA
BATERtA Y LOS TERMINALES" en la sec-
c_6n de Mantemm_emode este manual)
• Despues de hmplarla, deje los cables
desconectados y p6ngalos en donde no
puedan entrar en centaeto con los term_nales
de la batena.
• S_se remueve la ha[erie del tractor para el
almacenam_ento, no la guarde d_rectamente
sobre concrete o sobre superflctes hSmedas
MOTOR
SISTEMA DE COMBUSTIBLE
IMPORTANTE Es _mportant ewtar que se
forman deposltos de goma en partes funda-
mentales del s_stema de combus-ttble tales
come el carburador, eEftltro del combusttbfe,
la manguera del combustpbles mezctados con
alcohol (conoctdo come gasohoJ o que t{enen
etano{ o metanol) pueden atraer humedad, Io
que conduce a la separaci6n y a la formaci,-3n
de acudos durame elalmacer, am_ento La
gasoha aCldioa puede da_ar el ststema de
combustible de un motor durance el pertodo de
a/macenamlento.
• Vaclar el deposlto gel carburante pontendo
en marcha el motor y dejb,ndolo func_onar
hasta que el carburante termine el caroura-
dor est_ vacio
• Nunca use los productos para hmp_eza del
carourador odel motor en el estanque de
combustible pues se pueden productr dar_os
permanentes
• Use combustible nuevo la pr6x_ma
temporada
AVlSO: El estab_hzador de combusttble es dna
alternatwa aceptable para reductr a un rain}me
]a formac_6n de depositos de goma en el com-
bustible durante el penodo de almacenam_ento.
Agregue estabilizador a la gasohna en el
estanque de combustible o en el envase para el
almacenamtento. Sternpre stga la proporct6n de
mezcla que se encuentra en el envase del esta-
b_Iizador. Haga func_onar el motor per Io manes
10 minutes despu6s de agregar el estabdtzador,
pare perm_t_r que este Ilegue al carburador. No
vac_ar ia gasolina del estanque de gasol_na y et
carburador s_ se esta usando estabdizador de
combustible.
ACEITE DEL MOTOR
Drene el aceite (con el motor cal_ente_ y c&m-
b_e!o con acette de meier hmpio. {Vea "MO-
TOR" en Ia secct6n de Mantemm_ento" de este
manual)
ClLINDRO(S)
1 Remuevala(s) bulia(s )
2. Vacie una onza de ace_te a tray,s del
agulero(s ) de la buila en et cdindro(s).
3 G_re la I_ave de tgntc_6n a la pos_c_on de "_p
ranque" (Start), per unos cuamos segundos
pare dtstnbu_r et ace_te.
4 Cambte per bulia(s ) nueva(s)
OTROS
• No guarde la gasohna de una temporada a la
o[ra
• Camb_e el envase de la gasoline s_se emple-
za a oxidar La ox_dac_6n y/o la mugre en su
gasoI_na pruduc_r&n problemas.
• S_ es pos_ble, guarde su umdad en un recm[o
cerrado y ct_brala pare protegerla contra el
pol,_o y la mugre.
• Cubra su un_dad con un forro protector
adecuado que no retenga la humedad. No
use pla.sbco El pl#_stico no puede resp_rar, lo
que permtte la formac_6n de condensacion,
Io qua produetrg la ox_dacton de su un_dad
IMPORTANTE; Nunca cubra el tractor mtentras
eI motor y las areas de escape todavla estan
cal_entes.
58
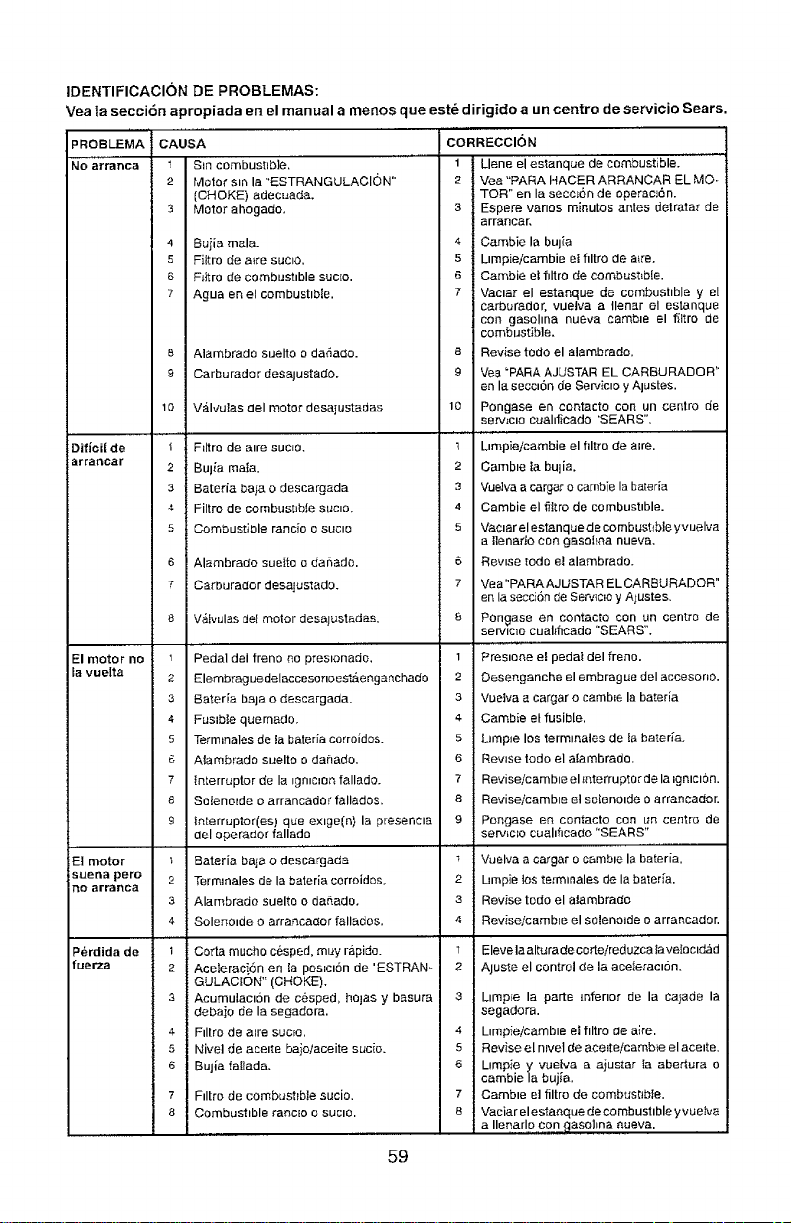
DENTIFICACI()N DE PROBLEMAS:
Pea|a secci6n apropiada en el manual a rnenos que est_ dirigido a un centre de servicio Sears•
PROBLEMA
No arranea
Ditioi{ de
arrancar
El motor no
la vuelta
Et motor
SUel_a pero
no arranea
Perdida de
fuelrza
CAUSA CORRECCI6 N
1 Sin combustible. 1
2 Motor s_n la "ESTRANGULACION" 2
[CHOKE) adecuada.
3 Motor ahogado, 3
4 Buiia mala-
5 Fittro de a_re sucre.
6 F_ftro de combushble sucEo.
7 Agua en el combusbble.
B Alambrado suelto o da6ado.
9 Carburador des_lustado.
1o Valvulas eel motet desajustadas
1 F=ltro de alre suclo.
2 Bulia maIa.
3 Batoria ba)a o descargada
4 Piltro de combust_bie sucre.
5 Combustible rancio o sucre
6 Alambrado sueite o dana, do.
7 Carburador desalustado.
8 V_ivulas del motor desajustadas.
Pedal dei freno no preslonado.
2 Elembraguedelaccesonoes_eng_nchado
3 8ater[a baja o descargada.
4 Fuslbte quem_do.
5 Term_nales de la bateria corroidos.
6 Alambrado suelto o dahado.
7 interrupter de la _gn_c:on fallado.
8 Seienmde o arrancador fallados,
£ tnterruptor(es) que exlge(n) la presencta
clel operador fallada
Bateria baja o descargad_
2 Termmales de la bateria correidos,
3 Alambrado suelto o daSado.
4 Solenotde 0 arrancac{or fallados,
1 Corta touche c6sped, muy rapido.
2 Ace_erac_n en Ea pes_ct6n de 'ESTRAN_
GULACION" (CHOKE).
3 Acumulaclon de c6sped, hojas y b_sur5
debajo de la segadora.
4 FiItro de alre sucFo,
s Nivel de acelte bajo/aceite sucio,
6 Bujia fa{lada,
7 Fdtro de combustible sucio.
8 Combustible rancEo o sucto,
Llene el estanque de combustible.
Vea "PARA HACER ARRANCAR EL MO-
TOR" en la secc_6n de oper_ci6n.
Espere vanes minutes antes detratar de
arrancar,
4 Cambie la bulia
5 Dmpie/cambie ei flltro de a_re.
6 Cambie el filtro de combustible.
7 Vector el estanque do combushble y el
carburader, vuetva a Ilen_r el estanque
con gasol_na nueva eambte el filtro de
combustible.
e Revise redo el alambrado.
9 Vea "PARA AJUSTAR EL CARBURADOR"
en la secc_On de Servic_o y AluSteS.
10 Pongase en contacto con un centre de
serv_cto cuahficado 'SEARS",
1 Ltmpie/cambie el filtre de aire.
2 Camble fa bui{a.
3 Vuelva a carg_r o cambfe la bateria
4 Cambie el _i[ro de combusttble.
5 Vector el estanque de combustfb_e yvuelva
a ilenado con gasol_na nueva,
6 Revise redo e] alambrado.
7 Vea"PARA AJUSTAR EL CARE3U RADOR"
en la seccJ6n de Servic_o y A_ustes,
e Pongase en contacto con un centre de
servic_o cuabflcadc "SEARS".
1 Pres_one et pedai del ffeno.
2 Oesenganche el embrague del accesorlo.
3 Vuetva a cargar o camb=e la bateria
4. Cambie et fusible.
5 L_mp_e los term_nales de Ia bateria,
6 Rewse lode el atambrado,
? Revise/carabao el lnterruptor de la igmc_6n.
8 Reviseicamb_e el satenotde 0 arraneador.
9 Pongase en contacto con un centre de
serv_clo cuehflcado "SEARS"
Vuelva a cargar 0 cambte la bateria.
2 Dmpie los term_nales de la bater[a.
3 Revise tcdo el atambrado
4 Revise!carabao el solenolde 0 arrancador.
Eleve la altura de corteireduzca lavelomd-4.d
2 AJuste el control de la ace_eractsn.
3 Dmp{e la porte inferior de la ca_ade la
segadora.
4 Dmpieicamb_e el flltro Oe alto,
5 Revise el n_vel de ace_teicamb_e el acette.
6 Dmpie y vue[va a aiustar ta aberiura o
cambie la buj_a.
7 Cambte e] filtro de combus[_ble.
8 Vaciar el estanque de combusbble y vueive
a Ilenar[,,o,con _asahna aueva.
59
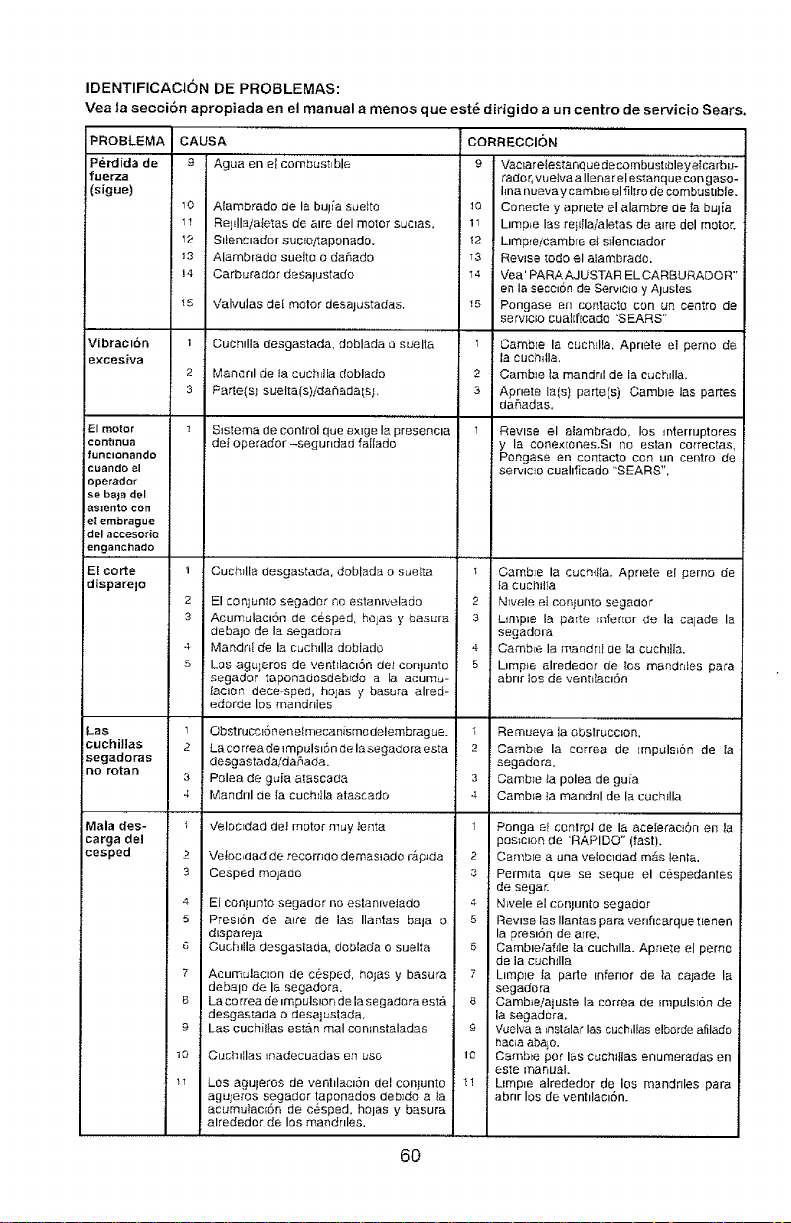
IDENTIFICACI6N DE PROBLEMAS:
Vea la seccibn apropiada en el manual a menos que est6 didgido aun centro de servicio Sears.
PROBLEMA
Perdida de
fuerza
(sigue)
Vibrambn
excesiva
El motor
continua
funclonando
cuando el
opetadar
se baJ_ del
aslento con
e_ embrague
clel accesoria
enganchado
E[ oorte
disparelo
Las
cuchillas
segadoras
no rota n
Mala des-
carga del
cesped
CAUSA CORRECCION
g Agua en el combustible 9 Vaolarelestanqued_combustlt31eye_carbu-
rador, vuelvaa Ilenarel estanque con ga_o-
hna euevay cemble elfihro de combustible.
_0 A_ambrado de la bulfa sueito 10 Conecte y apnete el alambre de ta bujia
11 Re]_llaiatetas de dire del motor suclas. 11 Dmp_e I_s rej_Ila/aletas de dire del motor.
12 Sllenclador suclo/tapon_do. I2 LimpTeicambre el s}lenc=ador
73 Alambrado suelto o daaado _3 Revise rode el alambrade.
!4 Carburador desajustado 14 dee' PARAAJUSTAR EL CARBURADOR"
en la secelen de Services y Ajustes
t5 Valvulas de[ motor desajustadas. 15 Pongase en contacts con un centre de
se rvFclo cual[flcado 'S EARS"
1
2
3
Cuemlla desgastada, deblada a suelta
Mendel de ia cucNia doblado
Parte(si suelta[s)idahada[sb
Slstema de contl-oi que exlge [a presenela
de[ operador-segundad fa[[ado
1 Gamble la cuchElla. Apnete el perno de
la cuch_lla.
2 Cambie la mandnl de la cuch_lla.
3 Apnete la(s) porte[s) Camble las partes
daRadas.
Revise el aiambrado, los mterruptares
y la oo_le,,{[Ol'ies,Si Re estal/ ca_-rectas,
Pongase en contacts con un centre de
servicto cuahficado "SEARS".
1
2
3
4
1
2
3
4
f
2
3
4
3
6
?
8
9
10
Cuehllla desgastada, doblada o suefta
El con.junto segeder no estanivelado
Acumulacien de cesped, hojas y basura
debalo de la segadara
Mandni de la cuchdla doblado
Los agujeros de venhlaelan det conluntc
s_gador taponadosdeb_do a la acumu-
taelort dace-sped, hsjas y basura alred-
edorde los mandnles
Obstrucclen ee e_mecanismodelembrag ue.
La co rrea de impulslan de la segadera esta
desgastada/da5ada.
Polea de guia atascada
Mandril de la cuch_]la atascade
Gamble la cuch_{Ia. Apnete el perno de
ta cuchll_a
2 Nlvele el conlunto segeaor
3 LtR_ple la parte _nfertor de la cajade la
segadora
4 Camb_e la mandril de la cuch_lla.
5 Llmple alrededer de tos mandntes para
abnr los de vent_lacien
t Remueva la ebslruoc=on.
2 Camb_e la cerrea de ;mpuls_en de
segadera.
3 Camble la poled de guia
4 Cambte }a mandril de la cuchiIla
delocfdad de_ motel muy lenta
deioc_dad de recomdo demasiado r_{3_da
Cesped mejade
EI con_unto segador no estanlve_ado
Pres_6n de a_te de los Ilantas bale o
d_spare_a
Cuchdla desgastada, doblada o suelta
Acurrtulaclon de eesped, nojas y basura
debale de la segadora.
La co r_-eade _mpuls_on de la segadora est&
desgastada o desajustada.
Los euchi{_as estan real cenlnstalades
Cuchlllas inadecuadas en uso
LOS agu}eros de ventllac_an del con]unto
agule_os segador taponados deblde a ta
acumu_acten de cesped, holes y basura
alrededer de los maadnles.
t Penga e} centr_31 de la ece[eraeien en _a
30s_c_on de 'RAPIDO" (fast).
2 CE_mbfe a una velocldad m_s lenla.
3 Permute qua se seque el cespedantes
de sager.
4 N_vele el conjunto segador
5 Revise los Ilantas pare verlficarque tfeflen
la pres_en de alto.
5 Carnb_efaNe la eucMla. Apne[e el pemo
de ia cuch_lla
7 L_mp_e {a parle _nfenor de la ca]ade la
segadera
8 Cambte/ajuste la correa de ImpulsI6n de
ia segadera.
9 Vuelva a _nslalar los cuch4las elborde afilado
nacre abajo.
le Camb_e per los c_JChl{Jas enumeradas en
este manual.
tl L_mp_e alrededo_ de los mandnles pare
abnr los de venhlaclen.
60
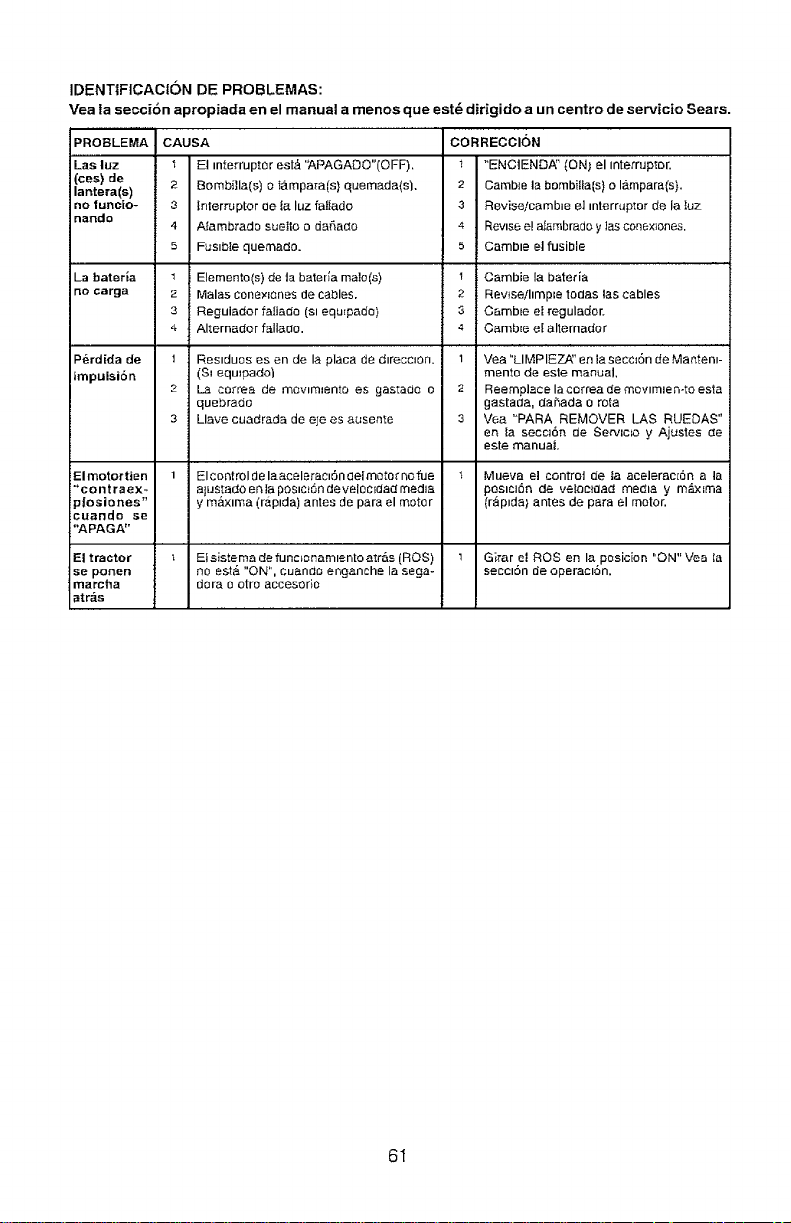
IDENTIFICAC{ON DE PROBLEMAS:
Yea la secci6n apropiada en el manual a menos que est_ dirigido a un centre de servicio Sears.
PROBLEMA CAUSA
Los luz
(ces) de 2
lantera(s)
no tuncio- 3
nando
4
5
La baterla
no carga
1
2
3
4
El interrupter est& 'APAGADO"(OFF).
Bomb[]la(s) o tampara(s) quemada(s).
Interrupter ge [_. luz faiiado
Alambrado suelto o dafia_o
Fusible quemado.
Elemento(s) de ta bateria male(s)
Malas conexJones de cables.
Regulador falla_o (amequlpado)
Alternador fallaao.
CORREGCION
t "ENCtEND,_' tON} el interrupter.
2 Cambie la bombitla{s) o lampara{s).
3 Revise/carabao el tnterruptor de la luz
4 Revtse e! a_ambrado y los conex_ones.
5 Cambte el fusible
I Cambie la baterla
2 Rewse/hmp=e redes las cables
3 Camble ef regulador.
4 Oamb_e el alternador
P&rdida de
impulsi6n
1 Residues es en de la place de d_reccton.
(S! equlpado)
2 La correa de mowmlento es gastacle o
quebrado
3 Llave cuadracla de eje es auseme
1 Vea %IMP IEZ._' ee ia secc=Sn de MantenJ-
monte de este manual,
2 Reemplaee la cerrea de moVlmle e-to esta
gastada, daP,ada o rote
3 Vea "PARA REMOVER LAS RUEDAS"
en la seccl6r_ de Servlc_o y Ajustee r_e
este manuai.
El motor tien
"contraex_
p!osiones"
CL[ando SE
"APAGA"
1 Elcontrol de laacelerac_Sn delmeter no fue
alustado en fa pos_c_e de veleeEdad media
y m_.xtma (raptda) antes de pare el meter
Mueva el control de |a acelerac[6n ala
pes=cl6n de voice{clad med_a y m_ma
(r&ptda} antes de para el motor.
El tractor
se posen
marcha
atr_s
El sistema de functenamten[o atr#,s (ROS)
no est_ "ON", cuendo enganche la sega-
dora o otro aceesorie
Gi[ar el ROSen la posicion "ON" Vea la
secelan de operaclon.
61

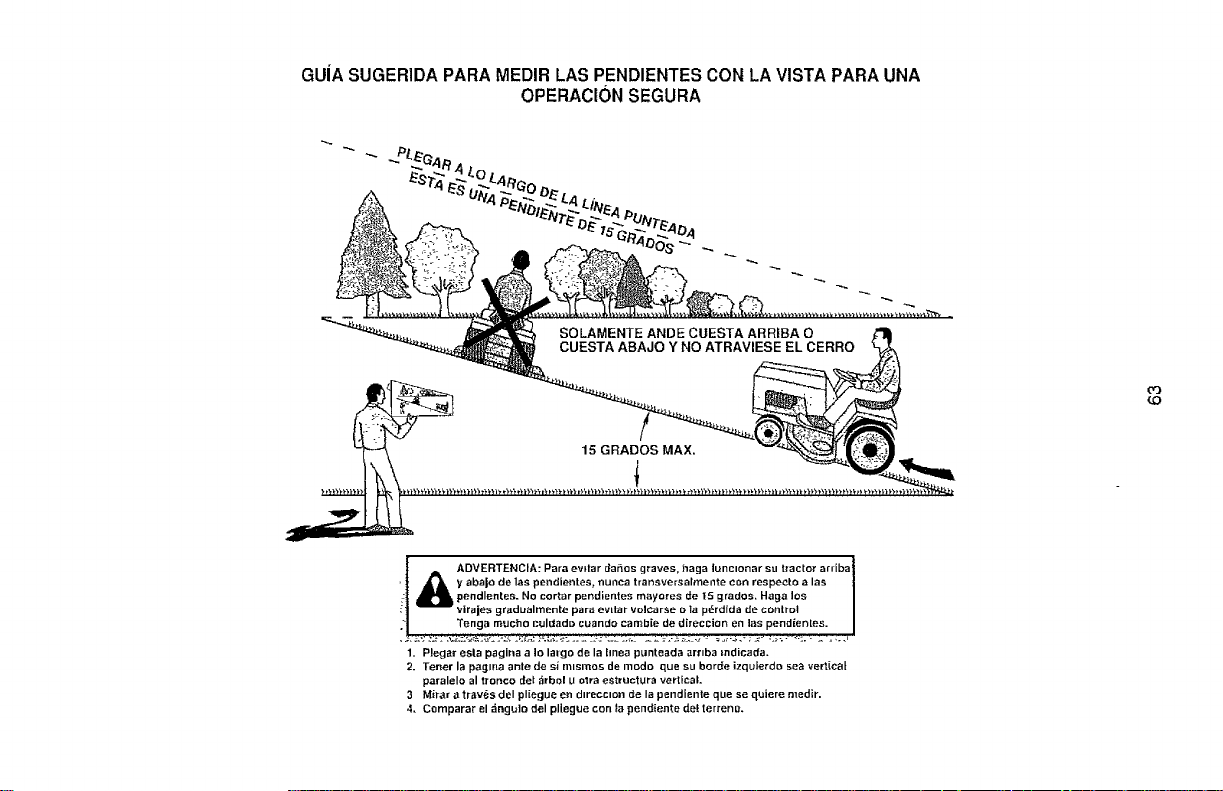
GUiA SUGERIDA PARA MEDIR LAS PENDIENTES CON LA VISTA PARA UNA
OPERACIC)N SEGURA
O3
LO
I .A ADVERTENCtA: Para evttar _ai_os graves, hags lunmonar su tractor arrlba I
' l Jl /J_ y abaJo de las pendientes, nunca transversalmente eon reapeeto a las J
:| n pendlentes. No cortar pendlentes mayores de IS grades. Hags los I
_| viraies grsdealmente pars ev=tar volearse o ta p_rdfda de contro! J
"1 Tenga touche culdado cuando carnb[e de direccion en las pend_entes. J
1. Plegar esla pagina a Io largo de la hnea punteada art=ha rod!cads.
2. Teeer la pagma ante de si mlsmos de mode que su horde izquierdo sea vertical
paralelo al tronco det _rbol U olra estructura vertical
3 Mirar a traves del pliegue en dweccien de la pendlente que se quiere medir.
4, Comparar el _ngulo del pllegue con la pendiente de! terrenm

NEED MORE HELP?
• h_tld _II_s _nd _[L _Ohr Oth_ pfodUL[ IIldl_uaL_ o_Ime
• Get _n;wer._ "_rOrTt our team af aom_ eypertf
• bSL a pcroollJ[1zed maintenance plan for your hoale
• Fred Inform_Oor_ and tools to h_Lp _..lrh ho_e projects
Get it fixed, at your home or ours!
Your Home
For repair - in your home - of all major brand apphanceSr
Iawn and garden equipment or _eatmg and coohng systems
no matter who made it, no matter who sold it!
For the replacemen_ pans accessones an0
owner s manuals !hal you nee0 to do-it-yourself
For Sears professional _nstallat_on of home appliances
and ;[er_hsline garage door openerB and water hearers
1-800-4-MY-HOME _- ;n,,I,me aay ornlgn!
[_-80046946g.2j tUff A a_,dCanadar
www.sears.com www.sea rs.c_
Our Home
i=or repair of carry-in products I*ke vacuums, lawn equipment
and electronms call or go on-he for the nearest
Sears Parts and Repair Center.
1-800-488-1222 _n_t_rne day or n=grit [d S A only)
_'_rw sears.corn
To purchase a protecuon agreement _U.S A )
or ma,ntenance agreement (Canada) on a product serviced by Sears
%800-827-6655 tdSA; %800-36%6665 (Ca_aaa_
Para pedlr serVrCaOde reparac_en
a domlcillo y' para ordenar p_ezas
1-888._Uq-IOGAR '_
0 -888-vS_.ff_t271
Au Canada pour seTvlCeee [ranCzalS
1-800-LE-FOYER uc
d _C0-53,34_93_
w_vw _e&rs c_
G ,Sea,s B,_aOa LLC
& _ =glsterea Tra_lernark -" Tf_,d_l_d,, :" Serv,,:e Mark af Sears Bran_]_ LLC
Marca Reg,_lraCla, ''_ Male& _e F_br_c.a °_ Malaa _e S,_rvlclO _1_ S_atS _randa. LLC
"- Marque d_ c_..merc_ ' _[ Ma_q_e depo_ee _1_ S_d_ _I_IKIS LLC
05.23.11 CL Printed in the U.S.A.