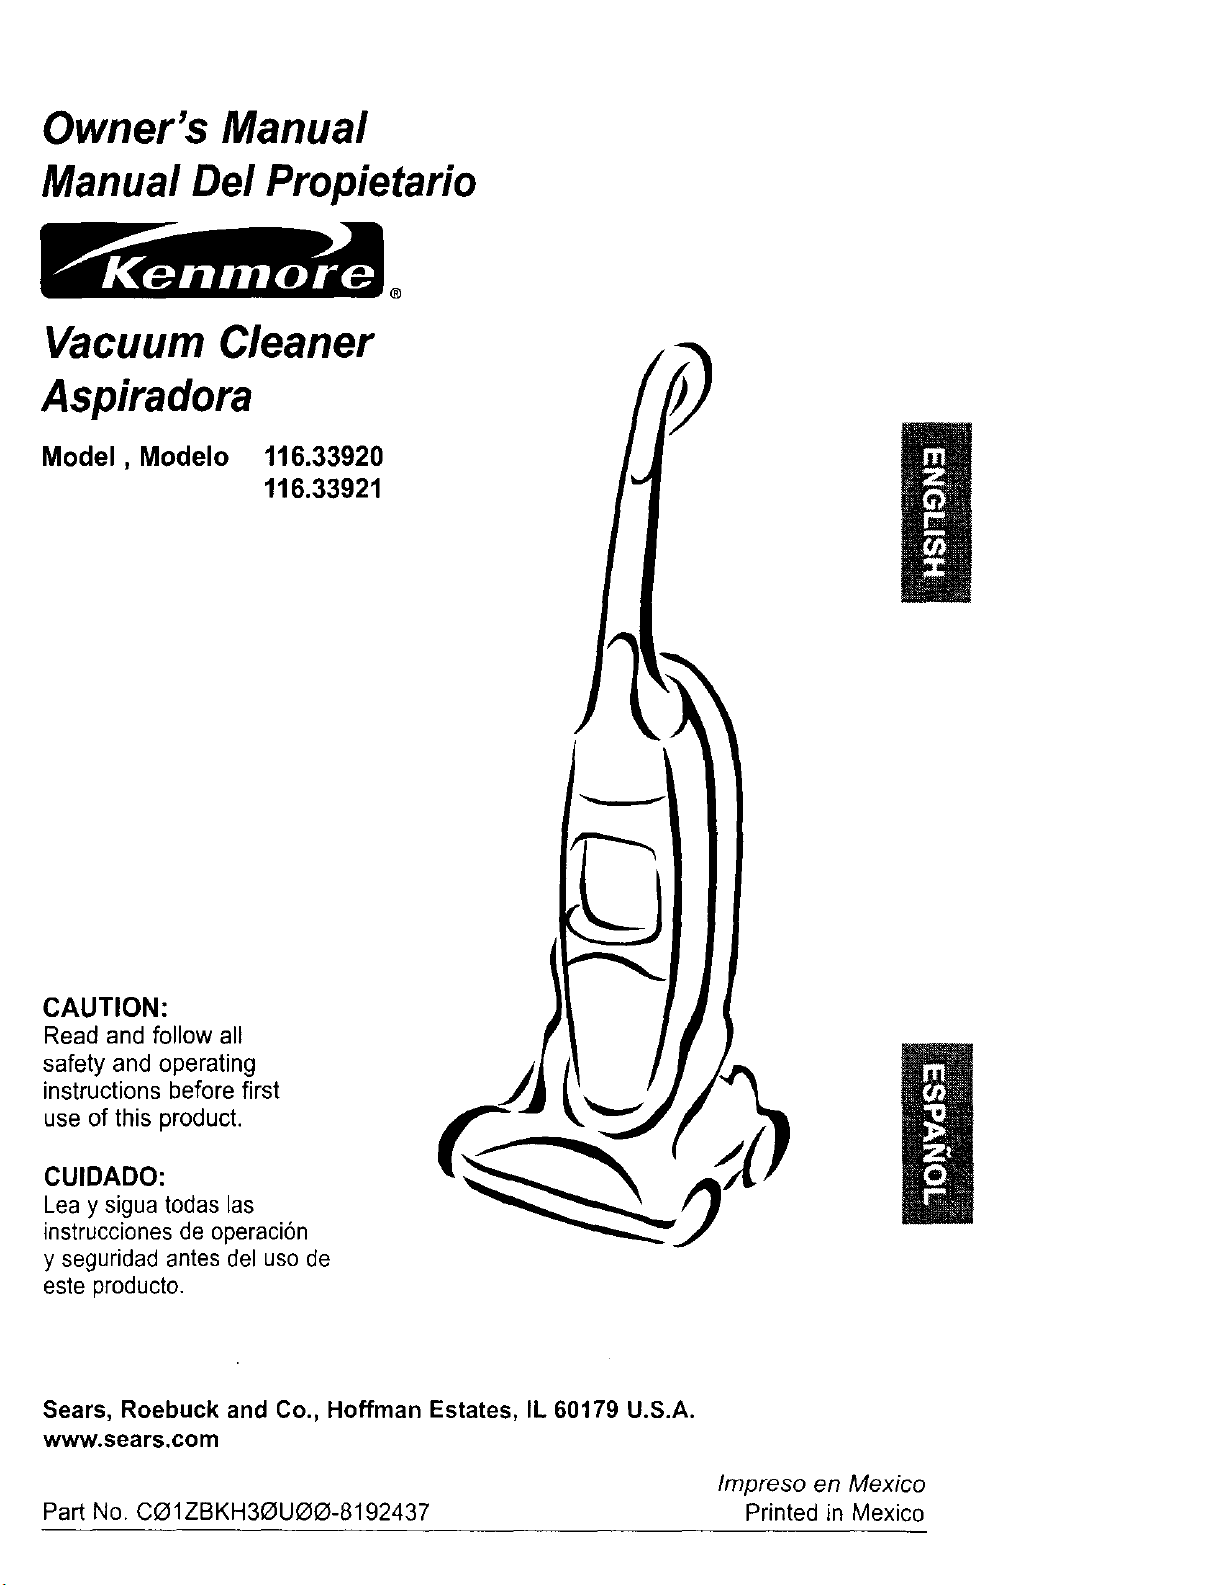
Owner's Manual
Manual Del Propietario
Vacuum Cleaner
Aspiradora
Model, Modelo
116.33920
116.33921
CAUTION:
Read and follow all
safety and operating
instructions before first
use of this product.
CUIDADO:
Lea y sigua todas las
instrucciones de operaci6n
y seguridad antes del uso de
este producto.
Sears, Roebuck and Co., Hoffman Estates, IL 60179 U.S.A.
www.sears.com
Impreso en Mexico
Part No. CO1ZBKH30UOO-8192437 Printed in Mexico
Before Using Your New Vacuum ...... 2
Kenmore Vacuum Cleaner Warranty... 2
Important Safety Instructions ......... 3
Parts and Features .................. 4
Assembly Instructions ............. 5-6
Operating Instructions ............... 7
Getting Started ...................... 7
Pile Height Selection and Setting ........ 7
Off/Floor/Carpet Switch ............... 8
Variable Speed Control ................ 8
Releasing the Handle ................. 8
Auto Reverse ....................... 9
Attachments .................... 10-12
Attachment Use Chart ............... 12
Vacuuming Tips .................... 12
Performance Features ............. 13-14
Vacuum Cleaner Care ............... 15
Vacuum Storage ................... 15
Cleaning Exterior and Attachments ...... 15
Dust Bin Cleaning ................ 16-17
Secondary Screen Cleaning ........... 17
Filter Changing/Cleaning ............. 18
Clog Removal ..................... 19
Light Bulb Changing ................. 20
Agitator Cleaning ................... 21
Valve Cleaning ..................... 21
Troubleshooting .................... 22
Requesting service ....... (back page)
Please read this guide. It will help you assemble and operate your new Kenmore vacuum in
the safest and most effective way.
For more information about vacuum cleaner care and operation, call your nearest Sears
store. You will need the complete model and serial numbers when requesting information.
Your vacuum's model and serial numbers are located on the Model and Serial Number Plate.
Use the space below, to record the model number and serial number of your new Kenmore
vacuum.
Model No.
Serial No.
Date of Purchase
Keep this book and your sales check (receipt) in a safe place for future reference.
LIMITED ONE YEAR WARRANTY ON KENMORE VACUUM CLEANER
This warranty is for one year from the date of purchase, and includes only private household
vacuum cleaner use. During the warranty year, when this vacuum cleaner is operated and
maintained according to the owner's manual instructions, Sears will repair any defects in
material or workmanship free of charge.
This warranty excludes vacuum bags, belts, light bulbs, and filters, which are expendable parts
and become worn during normal use.
For warranty service, return this vacuum cleaner to the nearest Sears Service Center in
the United States.
This warranty applies only while this product is in use in the United States. This warranty gives
you specific legal rights, and you may also have other rights which vary from state to state.
Sears, Roebuck and Co., D/817 WA, Hoffman Estates, IL 60179

Yoursafety isimportantto us.Toreducetherisk of fire, electrical shock, injury
to persons or damage when using your vacuum cleaner, follow basic safety
precautions including the following:
Read this manual before assembling or
using your vacuum cleaner.
Use your cleaner only as described in
this manual. Use only with Sears recom-
mended attachments.
To reduce the risk of electrical shock -
Do not use outdoors or on wet surfaces.
Disconnect electrical supply before any
servicing or cleaning. Failure to do so
could result in electrical shock or person-
al injury.
Always turn cleaner off before unplug-
ging.
Do not unplug by pulling on cord. To
unplug, grasp the plug, not the cord.
Do not use with damaged cord or plug.
tf cleaner is not working as it should, has
been dropped, damaged, left outdoors,
or dropped into water, return it to a
Sears Service Center.
Do not pull or carry by cord, use cord as
a handle, close door on cord, or pull
cord around sharp edges or corners. Do
not run cleaner over cord. Keep cord
away from heated surfaces.
Do not leave cleaner when plugged in.
Unplug from outlet when not in use and
before servicing.
Do not allow to be used as a toy. Close
attention is necessary when used by or
near children.
Do not handle plug or cleaner with wet
hands.
Agitator Brush may suddenly restart,
disconnect from power supply before
servicing.
Do not put any objects into openings.
Do not use with any opening blocked;
keep free of dust, lint, hair and anything
that may reduce air flow.
Keep hair, loose clothing, fingers, and all
parts of body away from openings and
moving parts.
Do not use cleaner without dust bin
and/or filters in place.
Always clean the dust bin after vacuum-
ing carpet cleaners or freshener, pow-
ders and fine dust. These products clog
the filters, reduce airflow and can cause
damage to the cleaner. Failure to clean
the dust bin could cause permanent
damage to the cleaner.
Do not use the cleaner to pick up sharp
hard objects, small toys, pins, paper
clips, etc. They may damage the clean-
er or dust bin.
Do not pick up anything that is burning
or smoking, such as cigarettes, matches,
or hot ashes.
Do not use cleaner to pick up flammable
or combustible liquids (gasoline, clean-
ing fluids, perfumes, etc.), or use in
areas where they may be present. The
fumes from these substances can create
a fire hazard or explosion.
Use extra care when cleaning on stairs.
Do not put on chairs, tables, etc. Keep
on floor.
You are responsible for making sure that
your vacuum cleaner is not used by any-
one unable to operate it properly.
SAVE THESE INSTRUCTIONS
Proper assembly and safe use of your vacuum cleaner are your responsibilities. Your cleaner is
intended only for household use. Read this Owner's Manual carefully for important use and safety
information. This guide contains safety statements under warning and caution symbols. Please
pay spedal attention to these boxes and follow any instructions given. WARNING statements alert
you to such dangers as fire, elec'cical shock, burns and personal injury. CAUTION statements alert
you to such dangers as personal injury and/or property damage.
3
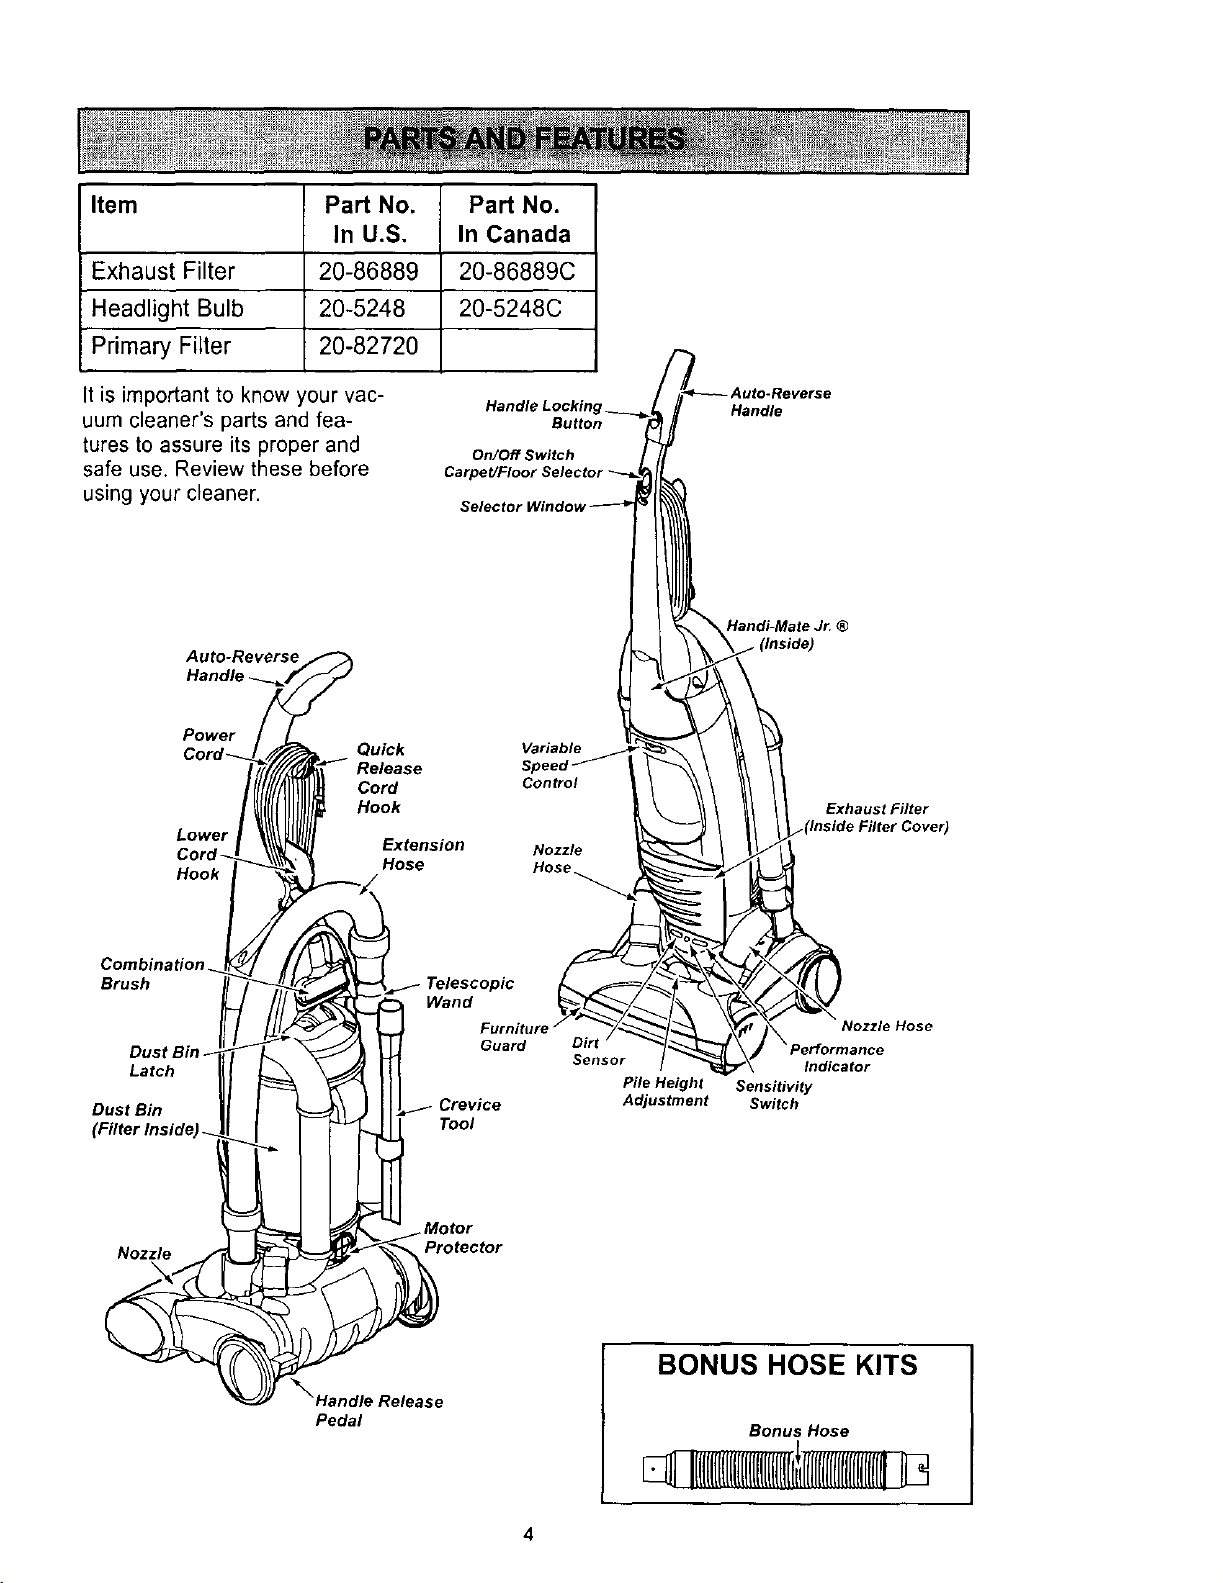
Item Part No. Part No.
In U.S. In Canada
Exhaust Filter 20-86889 20-86889C
Headlight Bulb 20-5248 20-5248C
Primary Filter 20-82720
It is important to know your vac-
uum cleaner's parts and fea-
tures to assure its proper and
safe use. Review these before
using your cleaner.
Handl,
Button
On/Off Switch
Handle
Auto-Reverse
Handle
Handi-Mate Jr. ®
Power
Lower
Hook
Quick
Cord
Hook
Hose
Variable
Sp
Control
Nozzle
Hose
Exhaust Filter
Combination
Brush
Dus
Latch
Dust Bin
Guard
Crevice
Tool
Nozzle Hose
Dirt
Sensor Indicator
Pile Height Sensitivity
Adjustment Switch
Nozzle
Protector
_'_Handle Release
Pedal
BONUS HOSE KITS
Bonus Hose
II(l[l[ll[ll[llltll[lll[l(tL
4
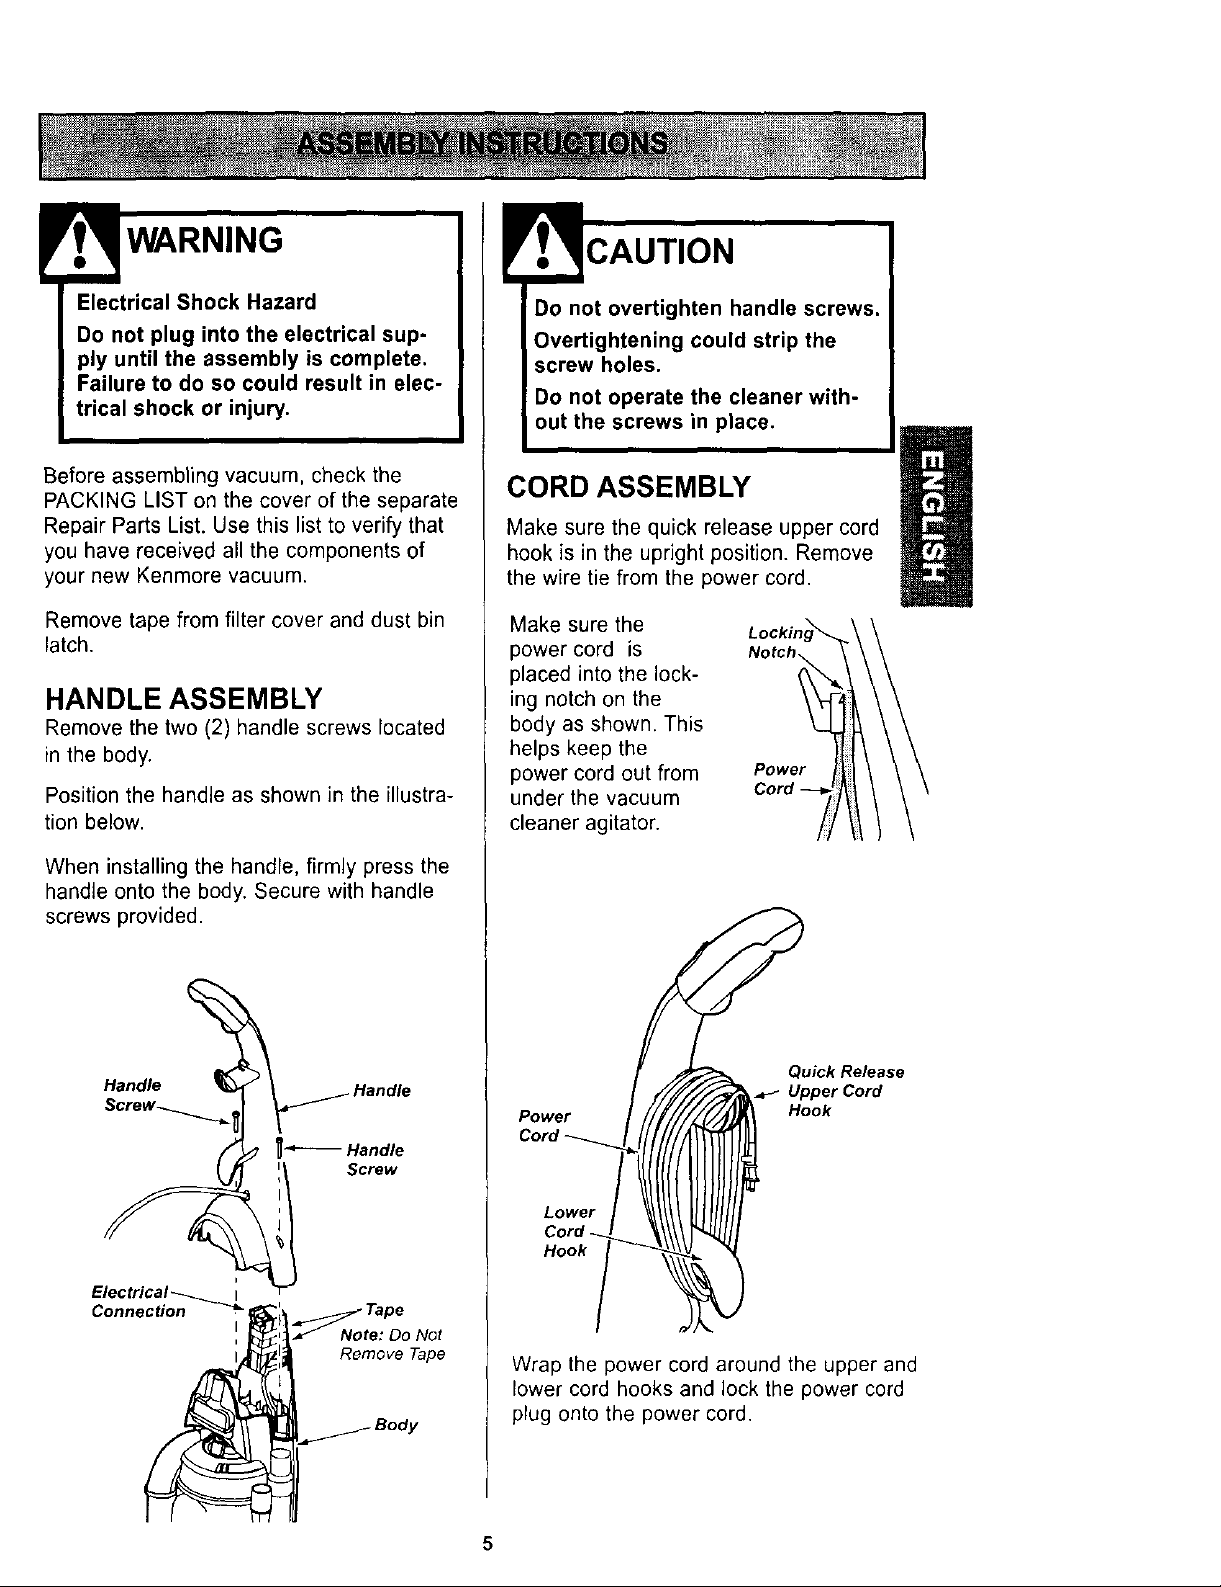
yT, WARNING I
Electrical Shock Hazard
Do not plug into the electrical sup-
ply until the assembly is complete.
Failure to do so could result in elec-
trical shock or injury.
Before assembling vacuum, check the
PACKING LIST on the cover of the separate
Repair Parts List. Use this list to verify that
you have received all the components of
your new Kenmore vacuum.
Remove tape from filter cover and dust bin
latch.
HANDLE ASSEMBLY
Remove the two (2) handle screws located
in the body.
Position the handle as shown in the illustra-
tion below.
When installing the handle, firmly press the
handle onto the body. Secure with handle
screws provided.
Handle
t
Electrical_ I
Connection _ _'1_ _ Tape
! _l_,:_Note: Do Not
Remove Tape
_ Body
Do not overtighten handle screws.
Overtightening could strip the
screw holes.
Do not operate the cleaner with-
out the screws in place.
CORD ASSEMBLY
Make sure the quick release upper cord
hook is in the upright position. Remove
the wire tie from the power cord.
Make sure the
power cord is
placed into the lock-
ing notch on the
body as shown. This
helps keep the
power cord out from
under the vacuum
Power
Cord
cleaner agitator.
H°°k!
Qu_kRe_ase
UpperCord
Hook
Wrap the power cord around the upper and
lower cord hooks and lock the power cord
plug onto the power cord.
5
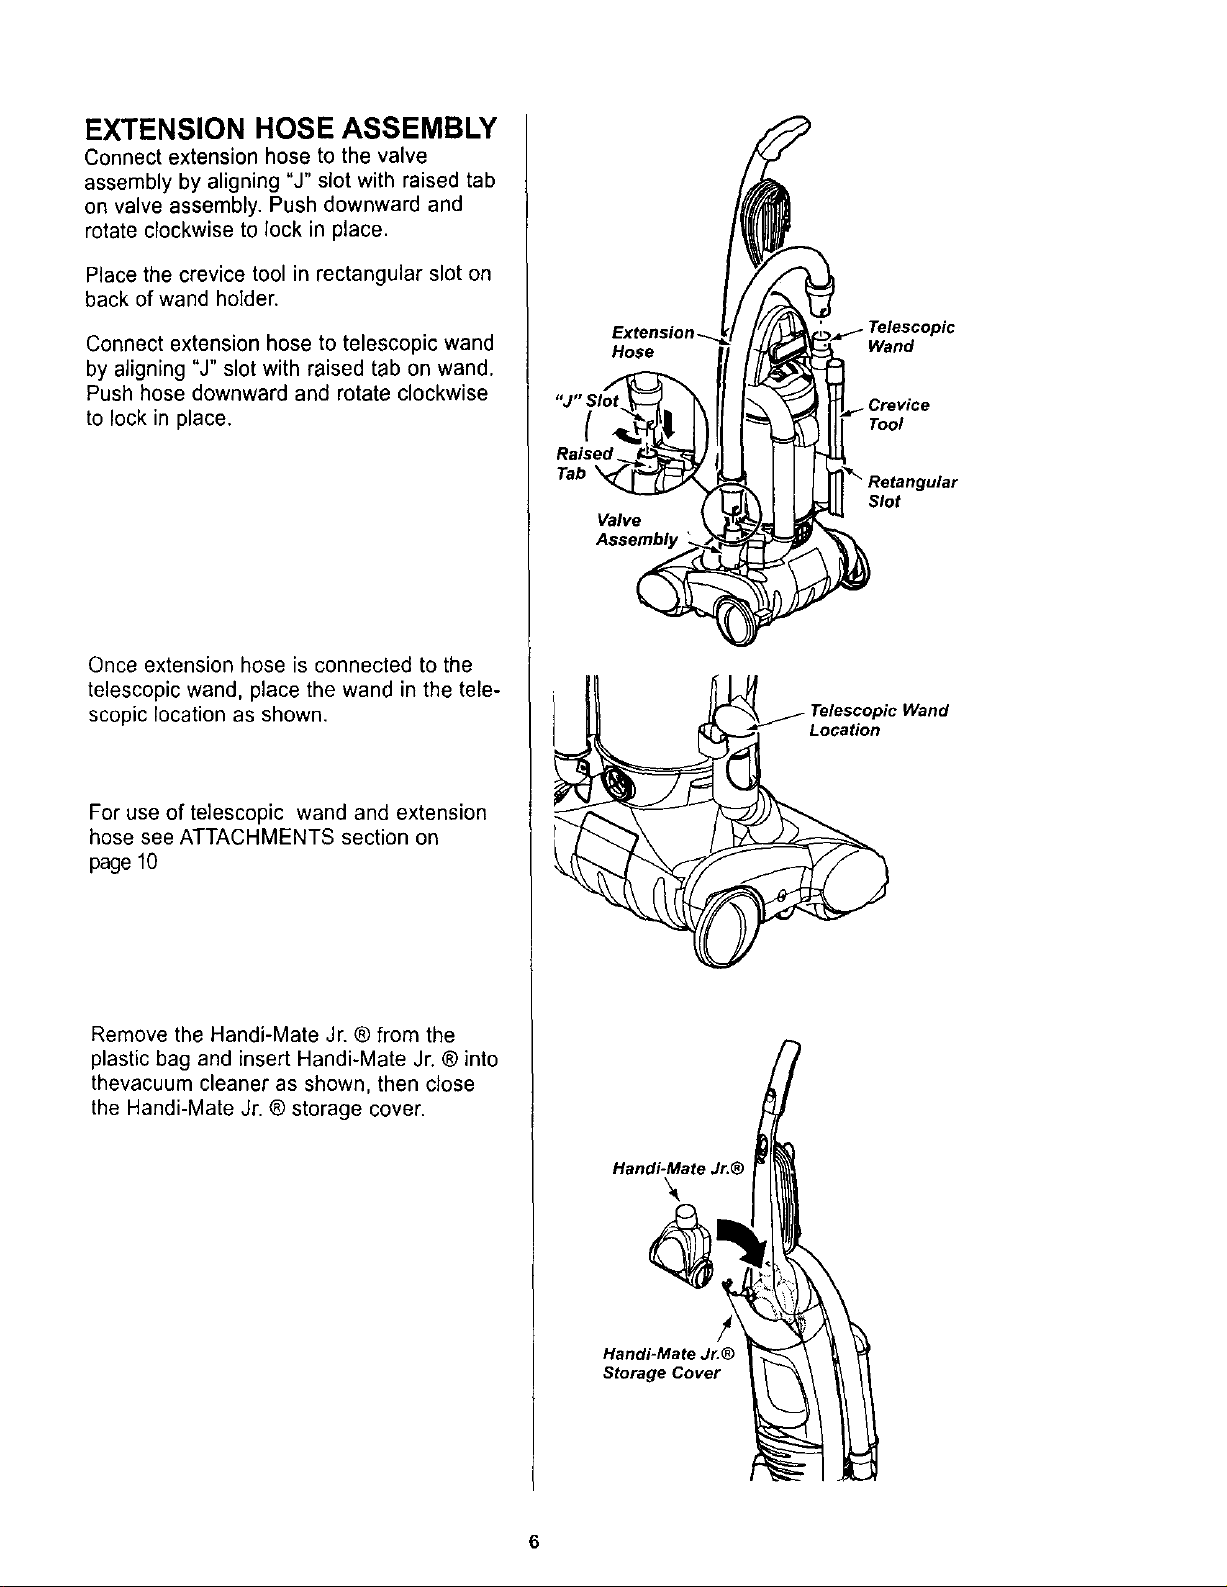
EXTENSION HOSE ASSEMBLY
Connect extension hose to the valve
assembly by aligning "J" slot with raised tab
on valve assembly. Push downward and
rotate clockwise to lock in place.
Place the crevice toolin rectangular slot on
back of wand holder.
Connect extension hose to telescopic wand
by aligning "J" slot with raised tab on wand.
Push hose downward and rotate clockwise
to lock in place.
Once extension hose is connected to the
telescopic wand, place the wand in the tele-
scopic location as shown.
For use of telescopic wand and extension
hose see ATTACHMENTS section on
page 10
Remove the Handi-Mate Jr. ® from the
plastic bag and insert Handi-Mate Jr. ® into
thevacuum cleaner as shown, then close
the Handi-Mate Jr. ® storage cover.
Hose
{
Raised
Tab
Valve
Handi-Mate Jr.®
Handi-Mate Jr.®
Storage Cover
Wand
Tool
Slot
Location
6
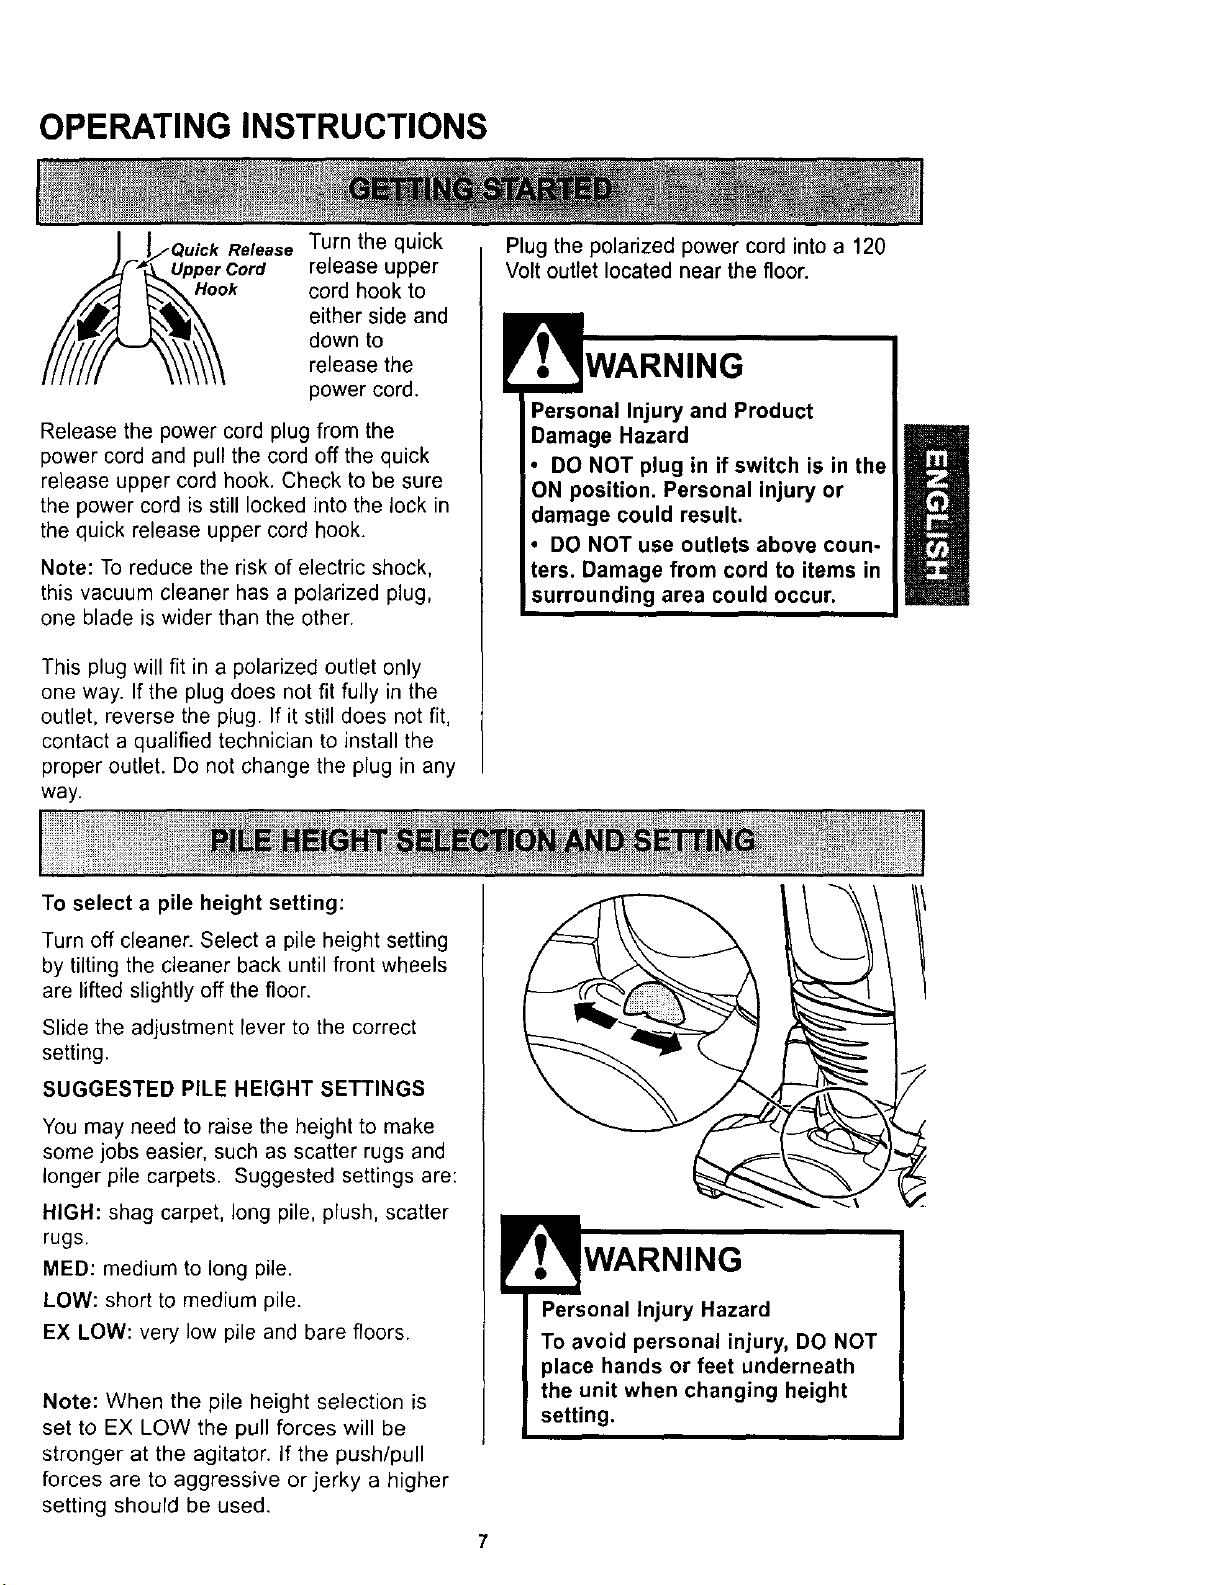
OPERATING INSTRUCTIONS
Release Turn the quick
Upper Cord release upper
Hook cord hook to
either side and
down to
release the
power cord.
Release the power cord plug from the
power cord and pull the cord off the quick
release upper cord hook. Check to be sure
the power cord is still locked into the lock in
the quick release upper cord hook.
Note: To reduce the risk of electric shock,
this vacuum cleaner has a polarized plug,
one blade is wider than the other.
This plug will fit in a polarized outlet only
one way. If the plug does not fit fully in the
outlet, reverse the plug. If it still does not fit,
contact a qualified technician to install the
proper outlet. Do not change the plug in any
way.
Plug the polarized power cord into a 120
Volt outlet located near the floor.
Personal Injury and Product
Damage Hazard
DO NOT plug in if switch is in the
position. Personal injury or
Damage from cord to items in
To select a pile height setting:
Turn off cleaner. Select a pile height setting
by tilting the cleaner back until front wheels
are lifted slightly off the floor.
Slide the adjustment lever to the correct
setting.
SUGGESTED PILE HEIGHT SETTINGS
You may need to raise the height to make
some jobs easier, such as scatter rugs and
longer pile carpets. Suggested settings are:
HIGH: shag carpet, long pile, plush, scatter
rugs.
MED: medium to long pile.
LOW: short to medium pile.
EX LOW: very low pile and bare floors.
Note: When the pile height selection is
set to EX LOW the pull forces will be
stronger at the agitator. If the push/pull
forces are to aggressive or jerky a higher
setting should be used.
!
'o WARNING
Personal Injury Hazard
To avoid personal injury, DO NOT
place hands or feet underneath
the unit when changing height
setting.
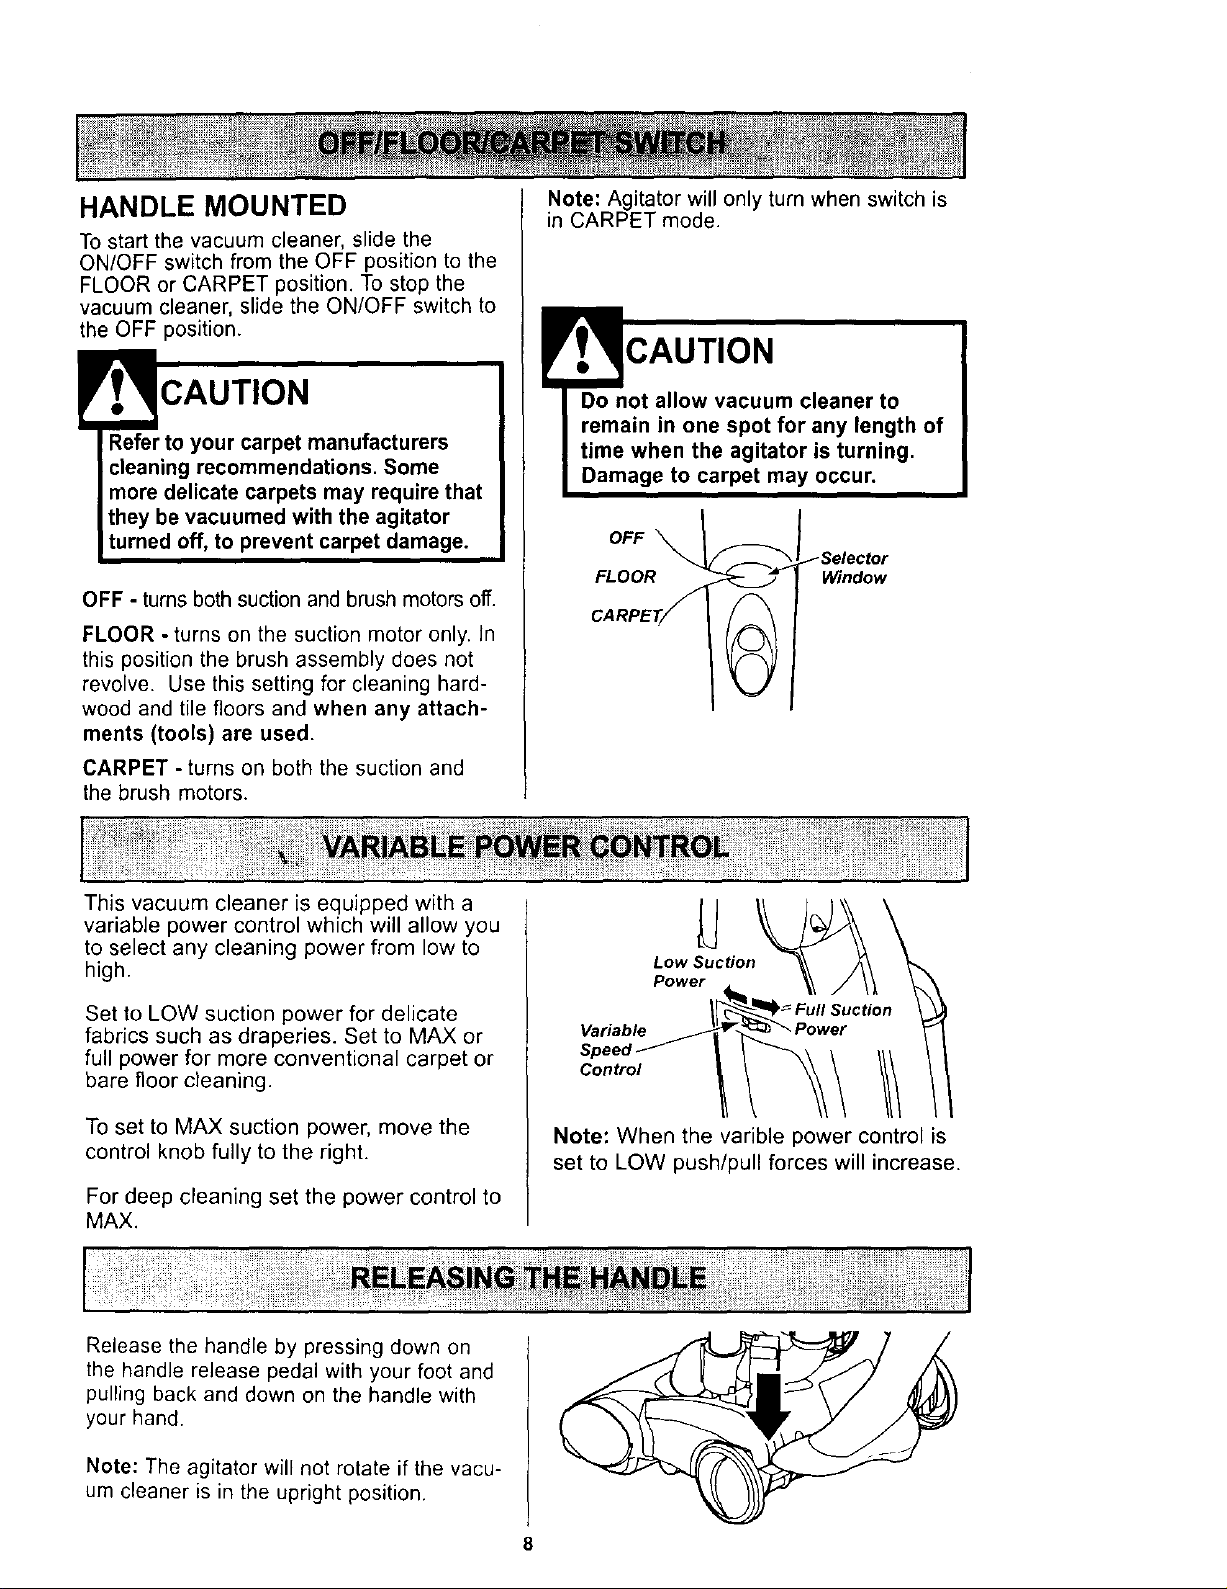
HANDLE MOUNTED
To start the vacuum cleaner, slide the
ON/OFF switch from the OFF position to the
FLOOR or CARPET position. To stop the
vacuum cleaner, slide the ON/OFF switch to
the OFF position.
CAUTION
Refer to your carpet manufacturers
cleaning recommendations. Some
more delicate carpets may require that
they be vacuumed with the agitator
turned off, to prevent carpet damage.
OFF - turns both suction and brush motors off.
FLOOR - turns on the suction motor only. In
this position the brush assembly does not
revolve. Use this setting for cleaning hard-
wood and tile floors and when any attach-
ments (tools) are used.
CARPET - turns on both the suction and
the brush motors.
Note: Agitator will only turn when switch is
in CARPET mode.
CAUTION
Do not allow vacuum cleaner to
remain in one spot for any length of
time when the agitator is turning,
Damage to carpet may occur.
FLOOR Window
This vacuum cleaner is equipped with a
variable power control which will allow you
to select any cleaning power from low to
high.
Set to LOW suction power for delicate
fabrics such as draperies. Set to MAX or
full power for more conventional carpet or
bare floor cleaning.
To set to MAX suction power, move the
control knob fully to the right.
For deep cleaning set the power control to
MAX.
Low Suction
Power
Variable
Speed III
Control
Note: When the varible power control is
set to LOW push/pull forces will increase.
Release the handle by pressing down on
the handle release pedal with your foot and
pulling back and down on the handle with
your hand.
Note: The agitator will not rotate if the vacu-
um cleaner is in the upright position.
8
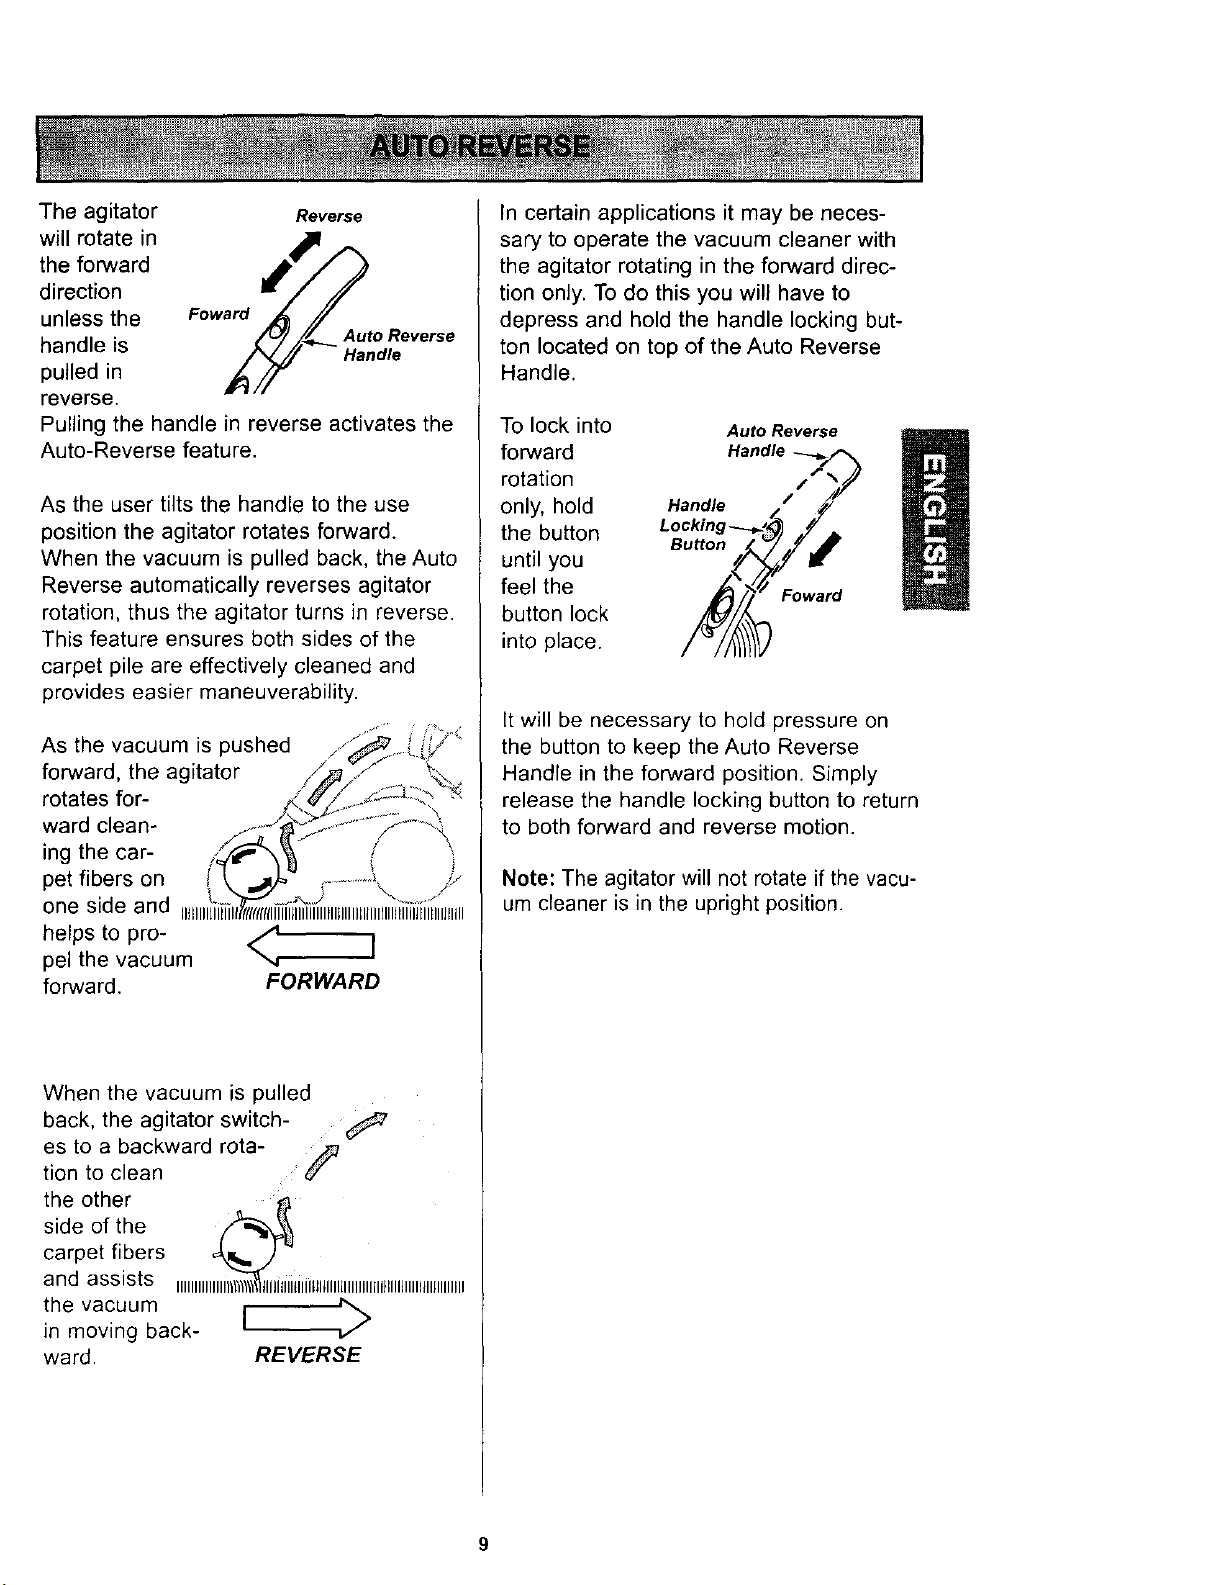
The agitator Reverse
will rotate in
the forward
direction
unless the Foward
handle is Auto Reverse
Handle
pulled in
reverse.
Pulling the handle in reverse activates the
Auto-Reverse feature.
As the user tilts the handle to the use
position the agitator rotates forward.
When the vacuum is pulled back, the Auto
Reverse automatically reverses agitator
rotation, thus the agitator turns in reverse.
This feature ensures both sides of the
carpet pile are effectively cleaned and
provides easier maneuverability.
As the vacuum is pushed
forward, the agitator
rotates for-
ward clean-
ing the car-
pet fibers on
one side and
helps to pro- /4.
]
pel the vacuum
",,r
forward. FORWARD
When the vacuum is pulled
back, the agitator switch-
es to a backward rota- ._
tion to clean
the other
side of the
carpet fibers
and assists IIIIIIIIII IiitililLlltllllllllllllllll}llllJlllll_llllllllill
the vacuum
in moving back-
ward. REVERSE
In certain applications it may be neces-
sary to operate the vacuum cleaner with
the agitator rotating in the forward direc-
tion only. To do this you will have to
depress and hold the handle locking but-
ton located on top of the Auto Reverse
Handle.
To lock into
forward
rotation
only, hold
the button
until you
feel the
button lock
into place.
Auto Reverse
/
Handle /
Button
Foward
It will be necessary to hold pressure on
the button to keep the Auto Reverse
Handle in the forward position. Simply
release the handle locking button to return
to both forward and reverse motion.
Note: The agitator will not rotate if the vacu-
um cleaner is in the upright position.
Handi-Mate Jr.®
Combination Extension
Brush
Wand
Crevice
Identify each of the attachments shown above.
Remove the upper encl of the hose that is
attached to the telescopic wand by grasping
the hose collar, twisting and pulling straight
out. The attachments can now be added to
the hose.
Note: The motor protector may open
when using attachments or when cleaning
new carpet, due to reduced airflow by the
attachments themselves or by new carpet
fuzz filling the dust bin quickly. See the
TROUBLESHOOTING section.
Note: When using attachments make
sure the cleaner is in the upright position
and the selector window indicates
FLOOR.
WARNING
Electrical Shock And Personal Injury
Hazard
Disconnect electrical supply before
servicing or cleaning the unit. Failure
to do so could result in electrical
shock or personal injury from cleaner
suddenly starting.
10
TELESCOPING WAND WITH
SUCTION CONTROL SLIDE
Remove
Telescopic Wand the tele-
scoping
wand from
its storage
position by
Crevice Tool twisting and
pulling out.
On the telescopic wand tum the locking ring
Suction
Wand _ _. Control Slide
Wand
Upper
Wand
clockwise to the UNLOCK position.
Extend the wand to its full length. Turn the
locking ring counter-clockwise to the LOCK
position. Attach the extension wand onto the
open end of the hose.
Remove the crevice tool from its storage
position on the wand holder. Attach crevice
tool to the extension wand.
CAUTION
When using attachments, be careful
not to overextend the stretch hose
when reaching. Trying to reach
hose stretch capability
cause the cleaner to tip over.
Suction
Control
Tab
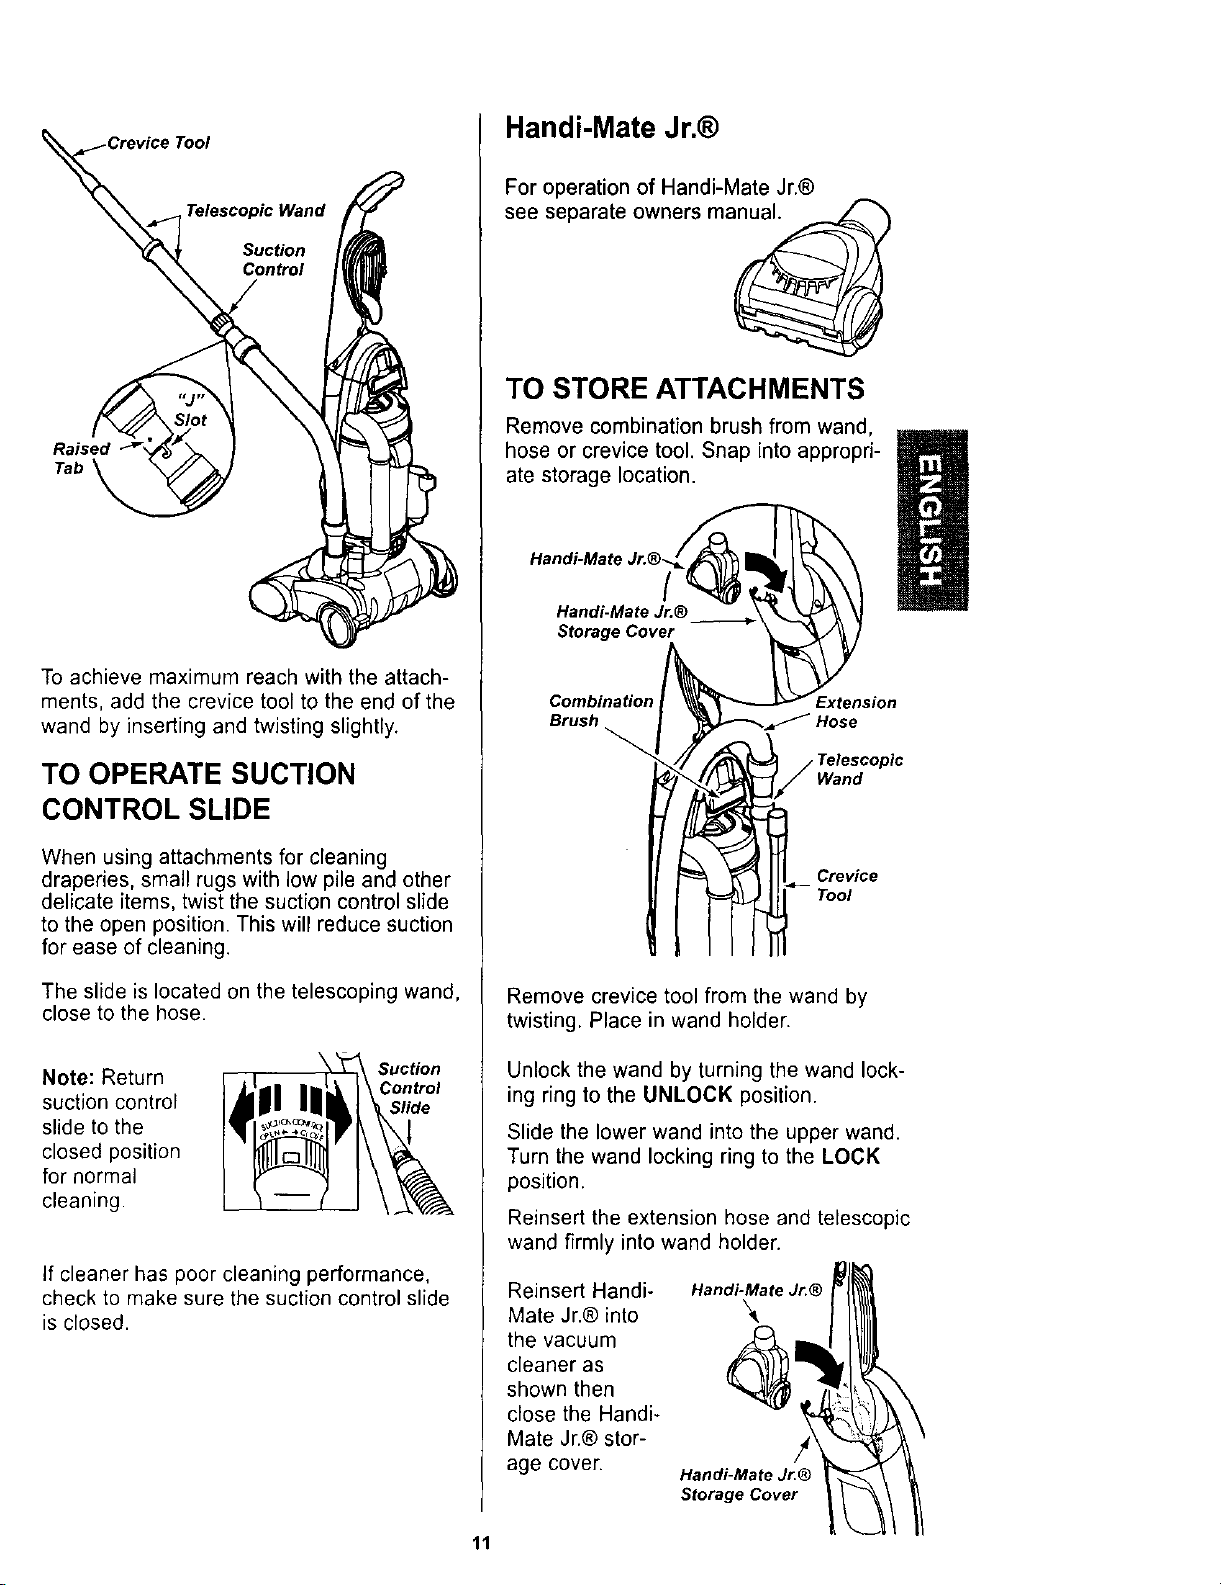
To achieve maximum reach with the attach-
ments, add the crevice tool to the end of the
wand by inserting and twisting slightly.
TO OPERATE SUCTION
CONTROL SLIDE
When using attachments for cleaning
draperies, small rugs with low pile and other
delicate items, twist the suction control slide
to the open position. This will reduce suction
for ease of cleaning.
The slide is located on the telescoping wand,
close to the hose.
Note: Return
suction control
slide to the
closed position
for normal
cleaning.
Suction
If cleaner has poor cleaning performance,
check to make sure the suction control slide
is closed.
Handi-Mate Jr.®
For operation of Handi-Mate Jr.®
manual.see separate owners
TO STORE ATTACHMENTS
Remove combination brush from wand,
hose or crevice tool. Snap into appropri-
ate storage location.
Handi-Mate
Handi-Mate Jr.®
Storage Cover
Combination
Brush
Extension
Wand
Crevice
Tool
Remove crevice tool from the wand by
twisting. Place in wand holder.
Unlock the wand by turning the wand lock-
ing ring to the UNLOCK position.
Slide the lower wand into the upper wand.
Turn the wand locking ring to the LOCK
position.
Reinsert the extension hose and telescopic
wand firmly into wand holder.
Reinsert Handi-
Mate Jr.® into
the vacuum
cleaner as
shown then
close the Handi-
Mate Jr.® stor-
age cover.
Handi-Mate Jr.®
Handi-Mate Jr.®
Storage Cover
11
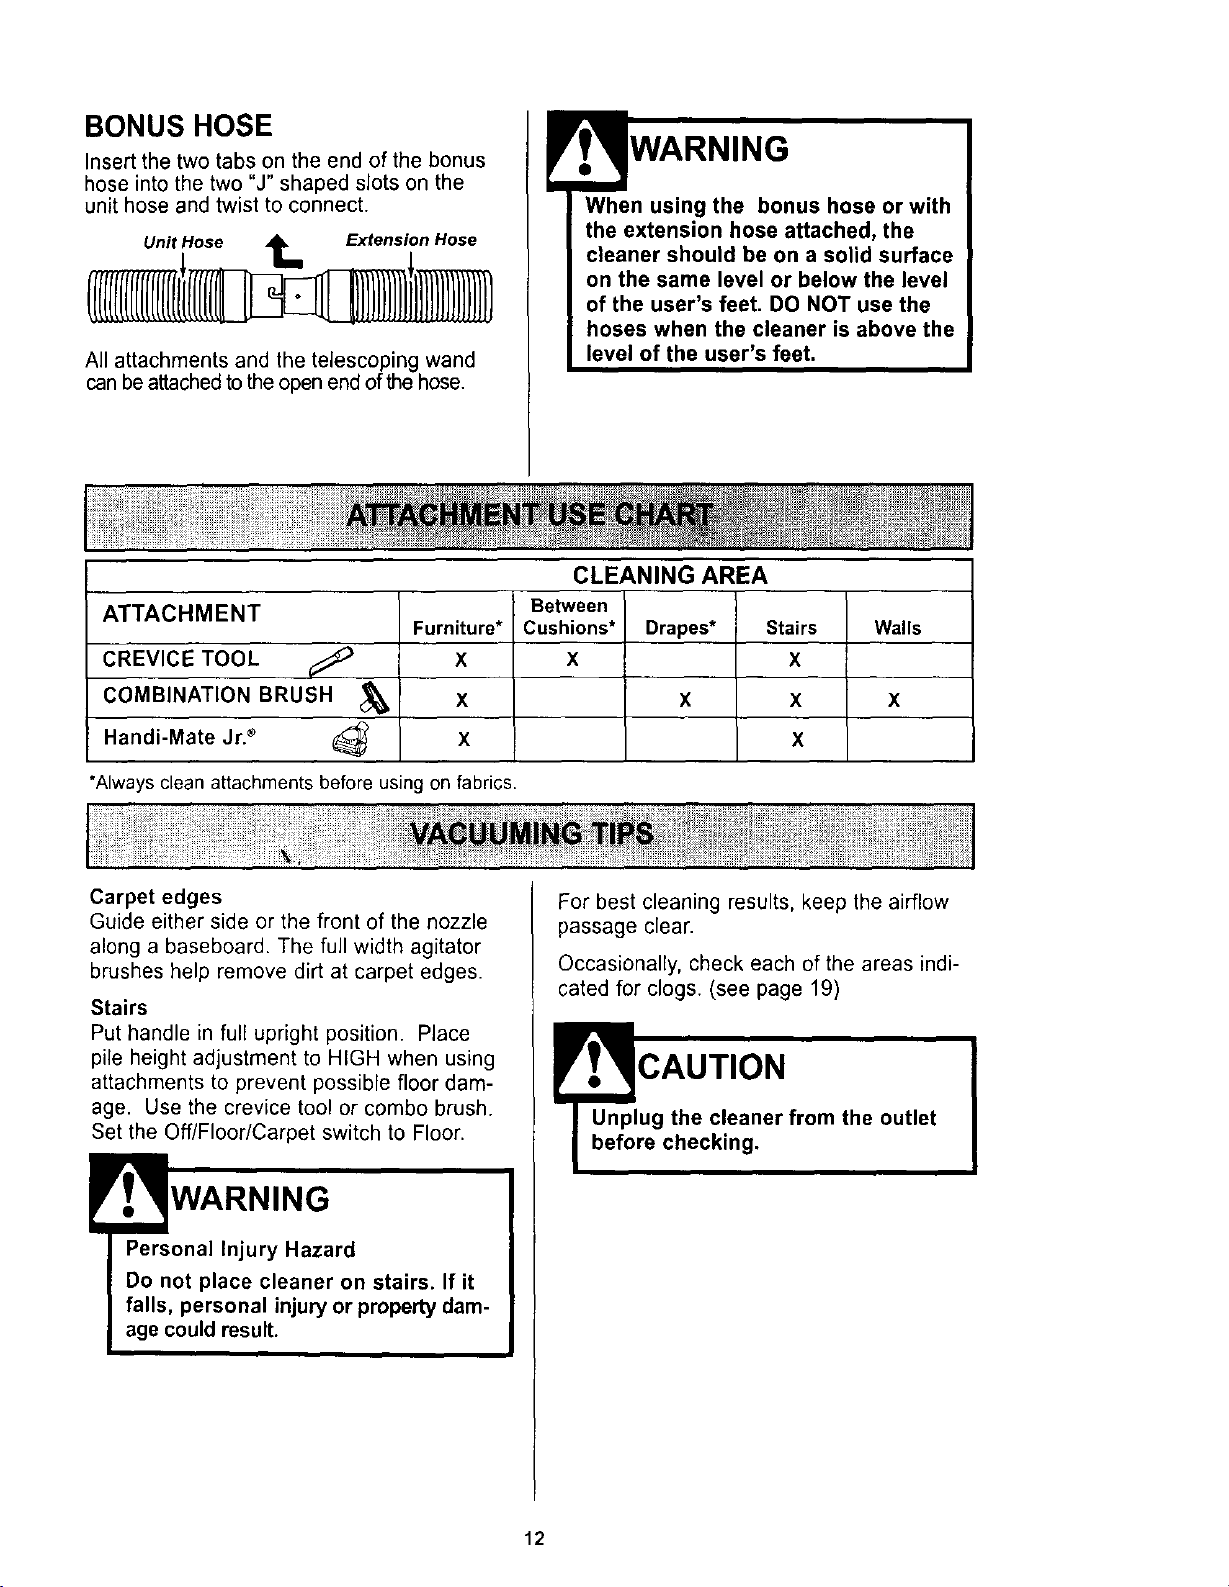
BONUS HOSE
Insert the two tabs on the end of the bonus
hose into the two "J" shaped sJots on the
unit hose and twist to connect.
Unit Hose t_ Extension Hose
All attachments and the telescoping wand
can be attached to the open end of the hose.
When using the bonus hose or with
the extension hose attached, the
cleaner should be on a solid surface
on the same level or below the level
of the user's feet, DO NOT use the
hoses when the cleaner is above the
level of the user's feet.
ATTACHMENT
CREVICE TOOL
COMBINATION BRUSH
Handi-Mate Jr. _
Furniture*
X
X
X
CLEANING AREA
Between
Cushions*
X
Drapes*
X
Stairs
X
X
X
*Always clean attachments before using on fabrics.
Walls
X
Carpet edges
Guide either side or the front of the nozzle
along a baseboard. The full width agitator
brushes help remove dirt at carpet edges.
Stairs
Put handle in full upright position. Place
pile height adjustment to HIGH when using
attachments to prevent possible floor dam-
age. Use the crevice tool or combo brush.
Set the Off/Floor/Carpet switch to Floor.
WARNING
Personal Injury Hazard
Do not place cleaner on stairs. If it
falls, personal injury or property dam-
age could result.
For best cleaning results, keep the airflow
passage clear.
Occasionally, check each of the areas indi-
cated for clogs. (see page 19)
Fr . CAUTION
Unplug the cleaner from the outlet
before checking.
12
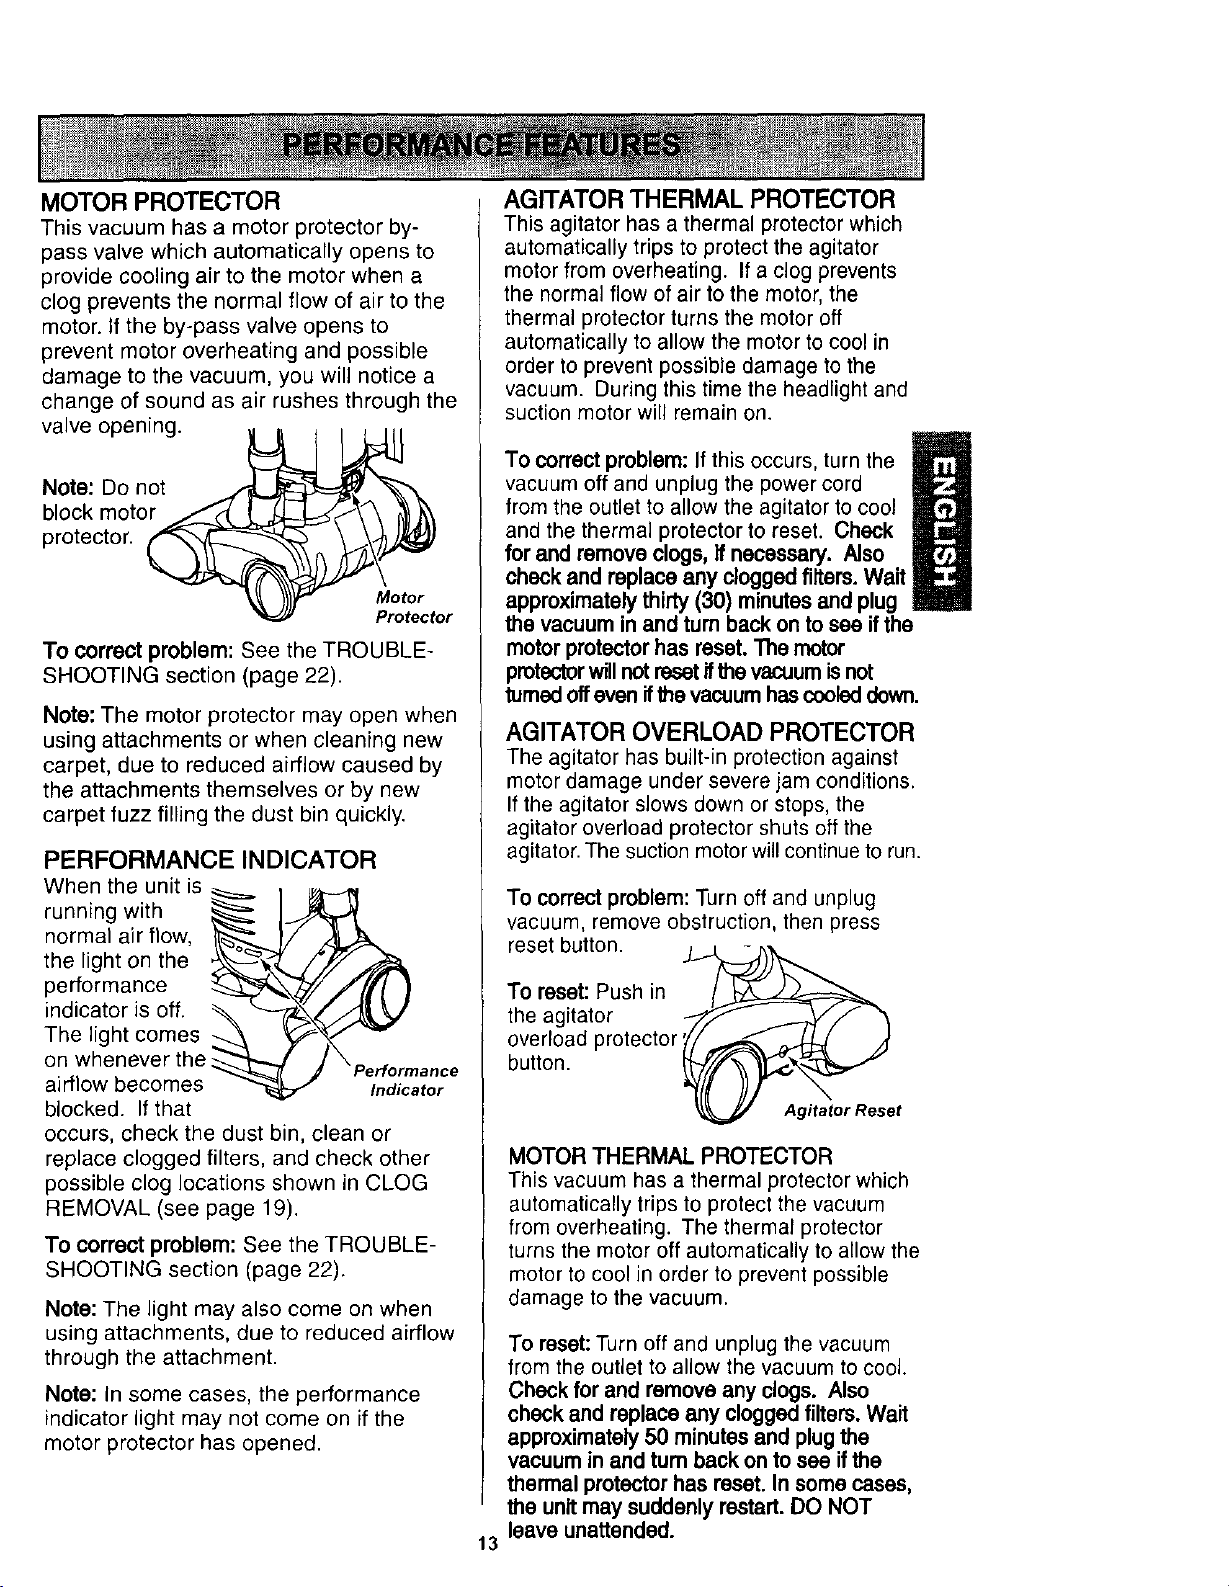
MOTOR PROTECTOR
This vacuum has a motor protector by-
pass valve which automatically opens to
provide cooling air to the motor when a
clog prevents the normal flow of air to the
motor. If the by-pass valve opens to
prevent motor overheating and possible
damage to the vacuum, you win notice a
change of sound as air rushes through the
valve opening.
Note: Do not
block motor
protector.
Motor
Protector
To correct problem: See the TROUBLE-
SHOOTING section (page 22).
Note: The motor protector may open when
using attachments or when cleaning new
carpet, due to reduced airflow caused by
the attachments themselves or by new
carpet fuzz filling the dust bin quickly.
PERFORMANCE INDICATOR
When the unit is
running with __ _
normal air flow,
the light on the
performance
indicator is off. _ -_-i&\_
The light comes
on whenever the _ p
airflow becomes erformanclndicatore
blocked. If that
occurs, check the dust bin, clean or
replace clogged filters, and check other
possible clog locations shown in CLOG
REMOVAL (see page 19).
To correct problem: See the TROUBLE-
SHOOTING section (page 22).
Note: The light may also come on when
using attachments, due to reduced airflow
through the attachment.
Note: In some cases, the performance
indicator light may not come on if the
motor protector has opened.
AGITATOR THERMAL PROTECTOR
This agitator has a thermal protector which
automatically trips to protect the agitator
motor from overheating. If a clog prevents
the normal flow of air to the motor, the
thermal protector turns the motor off
automatically to allow the motor to cool in
order to prevent possible damage to the
vacuum. During this time the headlight and
suction motor will remain on.
/
To correct problem: If this occurs, turn the
vacuum off and unplug the power cord
/
from the outlet to allow the agitator to cool
and the thermal protector to reset. Check
for and remove clogs, If necessary. Also
check and replace any clogged filters. Wait
approximately thirty (30) minutes and plug
the vacuum in and turn back on to see if the
motor protector has reset. "l_e motor
protector will not reset if the vacuum is not
turned off even if the vacuum has cooled down.
AGITATOR OVERLOAD PROTECTOR
The agitator has built-in protection against
motor damage under severe jam conditions.
If the agitator slows down or stops, the
agitator overload protector shuts off the
agitator. The suction motor will continue to run.
To correct problem: Turn off and unplug
vacuum, remove obstruction, then press
reset button. .IJ_
To reset: Push in
the agitator "7"-_- ._-_/'f "N
overload protector _'/,,..._ _ /_
button. _/(_,,,_tI_,_ "_"
Agitator Reset
MOTOR THERMAL PROTECTOR
This vacuum has a thermal protector which
automatically trips to protect the vacuum
from overheating. The thermal protector
turns the motor off automatically to allow the
motor to cool in order to prevent possible
damage to the vacuum.
13
To reset:Turn off and unplug the vacuum
from the outlet to allow thevacuum to cool.
Check for and remove any clogs. Also
check and replace any cloggedfilters. Wait
approximately50 minutesand plugthe
vacuum in and turnback on to see ifthe
thermal protectorhas reset. In somecases,
the unitmay suddenly restart. DO NOT
leave unattended.
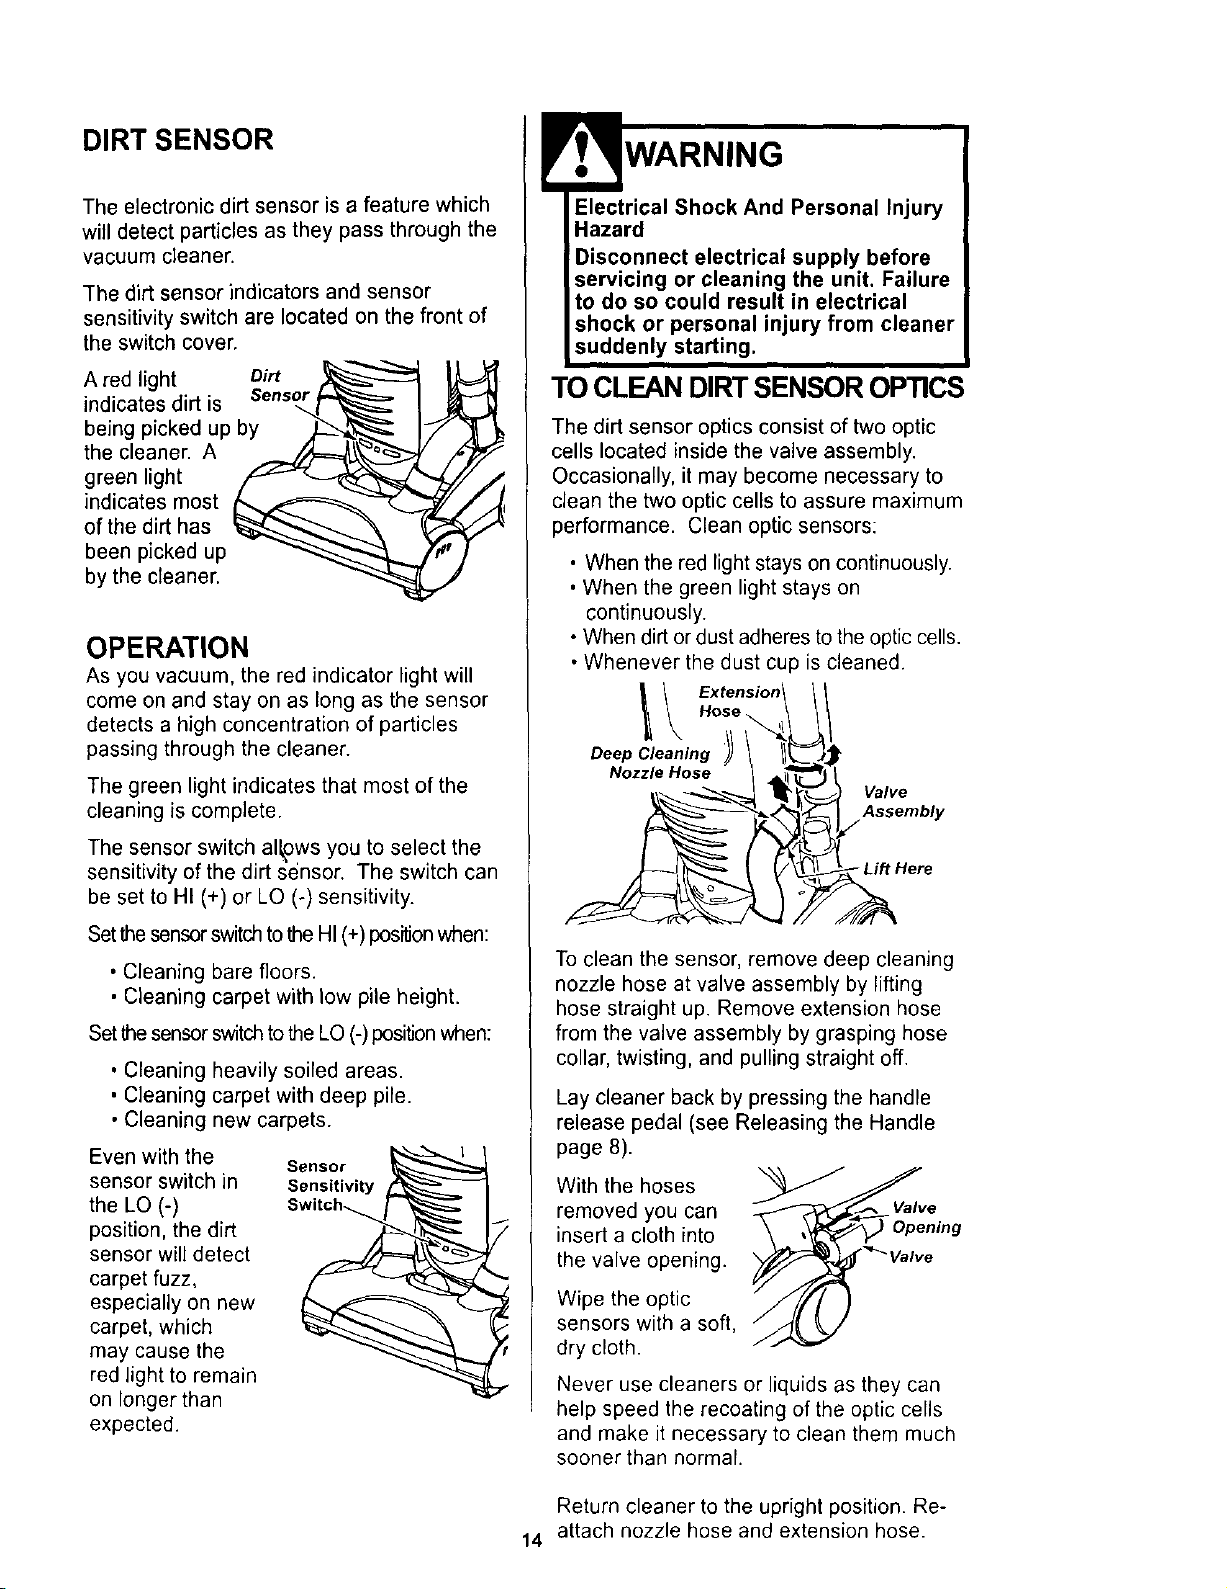
DIRT SENSOR
The electronic dirt sensor is a feature which
will detect particles as they pass through the
vacuum cleaner.
The dirt sensor indicators and sensor
sensitivity switch are located on the front of
the switch cover.
A red light Dirt
indicates dirt is Sensor
being picked up by
the cleaner. A
green light
indicates most
of the dirt has
been picked up
by the cleaner.
OPERATION
As you vacuum, the red indicator light will
come on and stay on as long as the sensor
detects a high concentration of particles
passing through the cleaner.
The green light indicates that most of the
cleaning is complete.
The sensor switch al_ws you to select the
sensitivity of the dirt sensor. The switch can
be set to HI (+) or LO (-) sensitivity.
Set the sensor switch to the HI (+) positionwhen:
• Cleaning bare floors.
• Cleaning carpet with low pile height.
Set the sensor switch to the LO (-) position when:
• Cleaning heavily soiled areas.
• Cleaning carpet with deep pile.
• Cleaning new carpets.
Even with the _------------------_---_1
Sensor
sensor switch in Sensitivity
the LO (-) Switch_,
position, the dirt
sensor will detect
carpet fuzz,
especially on new
carpet, which
may cause the
red light to remain
on longer than
expected.
WARNING
Electrical Shock And Personal Injury
Hazard
Disconnect electrical supply before
servicing or cleaning the unit. Failure
to do so could result in electrical
shock or personal injury from cleaner
suddenly starting.
TO CLEANDIRT SENSOROPTICS
The dirt sensor optics consist of two optic
cells located inside the valve assembly.
Occasionally, it may become necessary to
clean the two optic cells to assure maximum
performance. Clean optic sensors:
• When the red light stays on continuously.
• When the green light stays on
continuously.
• When dirt or dust adheres to the optic cells.
• Whenever the dust cup is cleaned.
Extension\ \
Hose
Deep Cleaning )_ \ II_'_J_
Nozzle.ose
_.-._._ _v___ Valve
__l Assembly
To clean the sensor, remove deep cleaning
nozzle hose at valve assembly by lifting
hose straight up. Remove extension hose
from the valve assembly by grasping hose
collar, twisting, and pulling straight off.
Lay cleaner back by pressing the handle
release pedal (see Releasing the Handle
page 8).
With the hoses
removed you can
insert a cloth into
the valve opening.
Wipe the optic
sensors with a soft,
dry cloth.
Valve
Never use cleaners or liquids as they can
help speed the recoating of the optic cells
and make it necessary to clean them much
sooner than normal.
Return cleaner to the upright position. Re-
14 attach nozzle hose and extension hose.
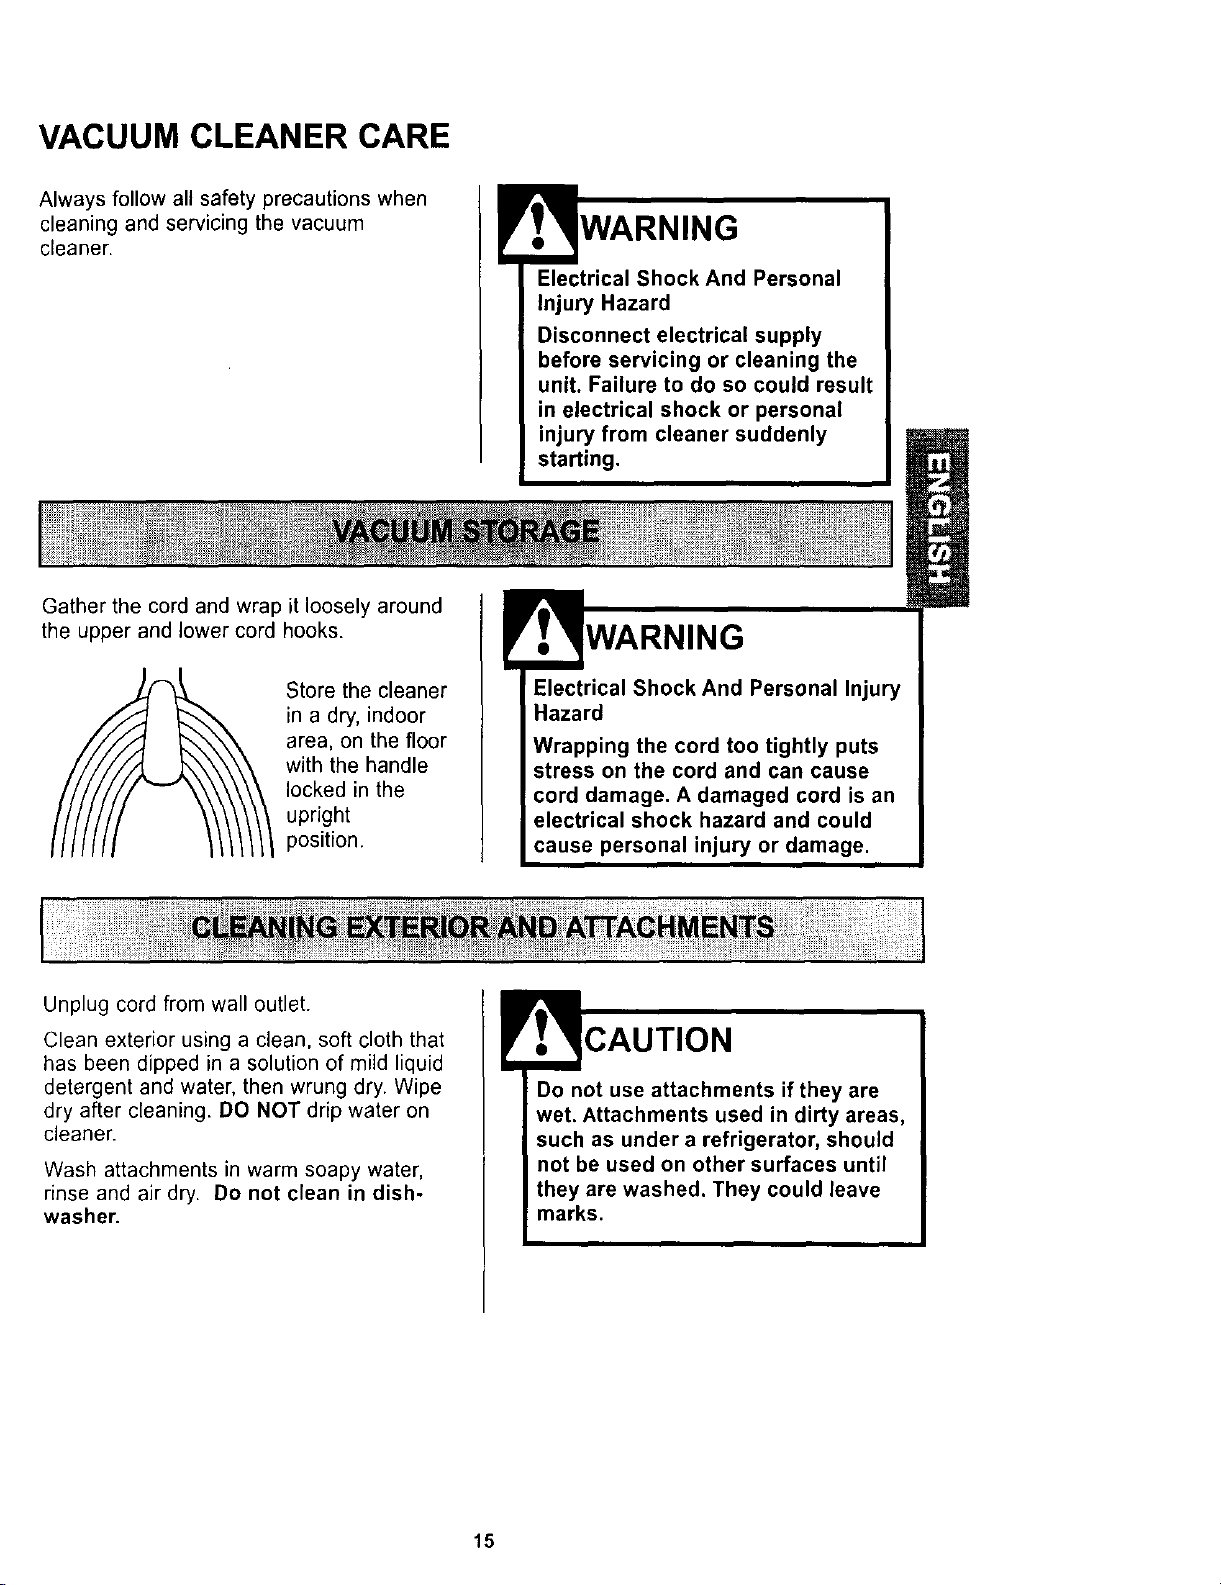
VACUUM CLEANER CARE
Always follow all safety precautions when
cleaning and servicing the vacuum
cleaner.
Gather the cord and wrap it loosely around
the upper and lower cord hooks.
Store the cleaner
in a dry, indoor
area, on the floor
with the handle
locked in the
upright
position.
Electrical Shock And Personal
injury Hazard
Disconnect electrical supply
before servicing or cleaning the
unit. Failure to do so could result
in electrical shock or personal
injury from cleaner suddenly
starting.
WARNING
Electrical Shock And Personal Injury
Hazard
Wrapping the cord too tightly puts
stress on the cord and can cause
cord damage. A damaged cord is an
electrical shock hazard and could
cause personal injury or damage.
Unplug cord from wall outlet.
Clean exterior using a clean, soft cloth that
has been dipped in a solution of mild liquid
detergent and water, then wrung dry. Wipe
dry after cleaning. DO NOT drip water on
cleaner.
Wash attachments in warm soapy water,
rinse and air dry. Do not clean in dish-
washer.
Do not use attachments if they are
wet. Attachments used in dirty areas,
such as under a refrigerator, should
not be used on other surfaces until
they are washed. They could leave
marks.
15
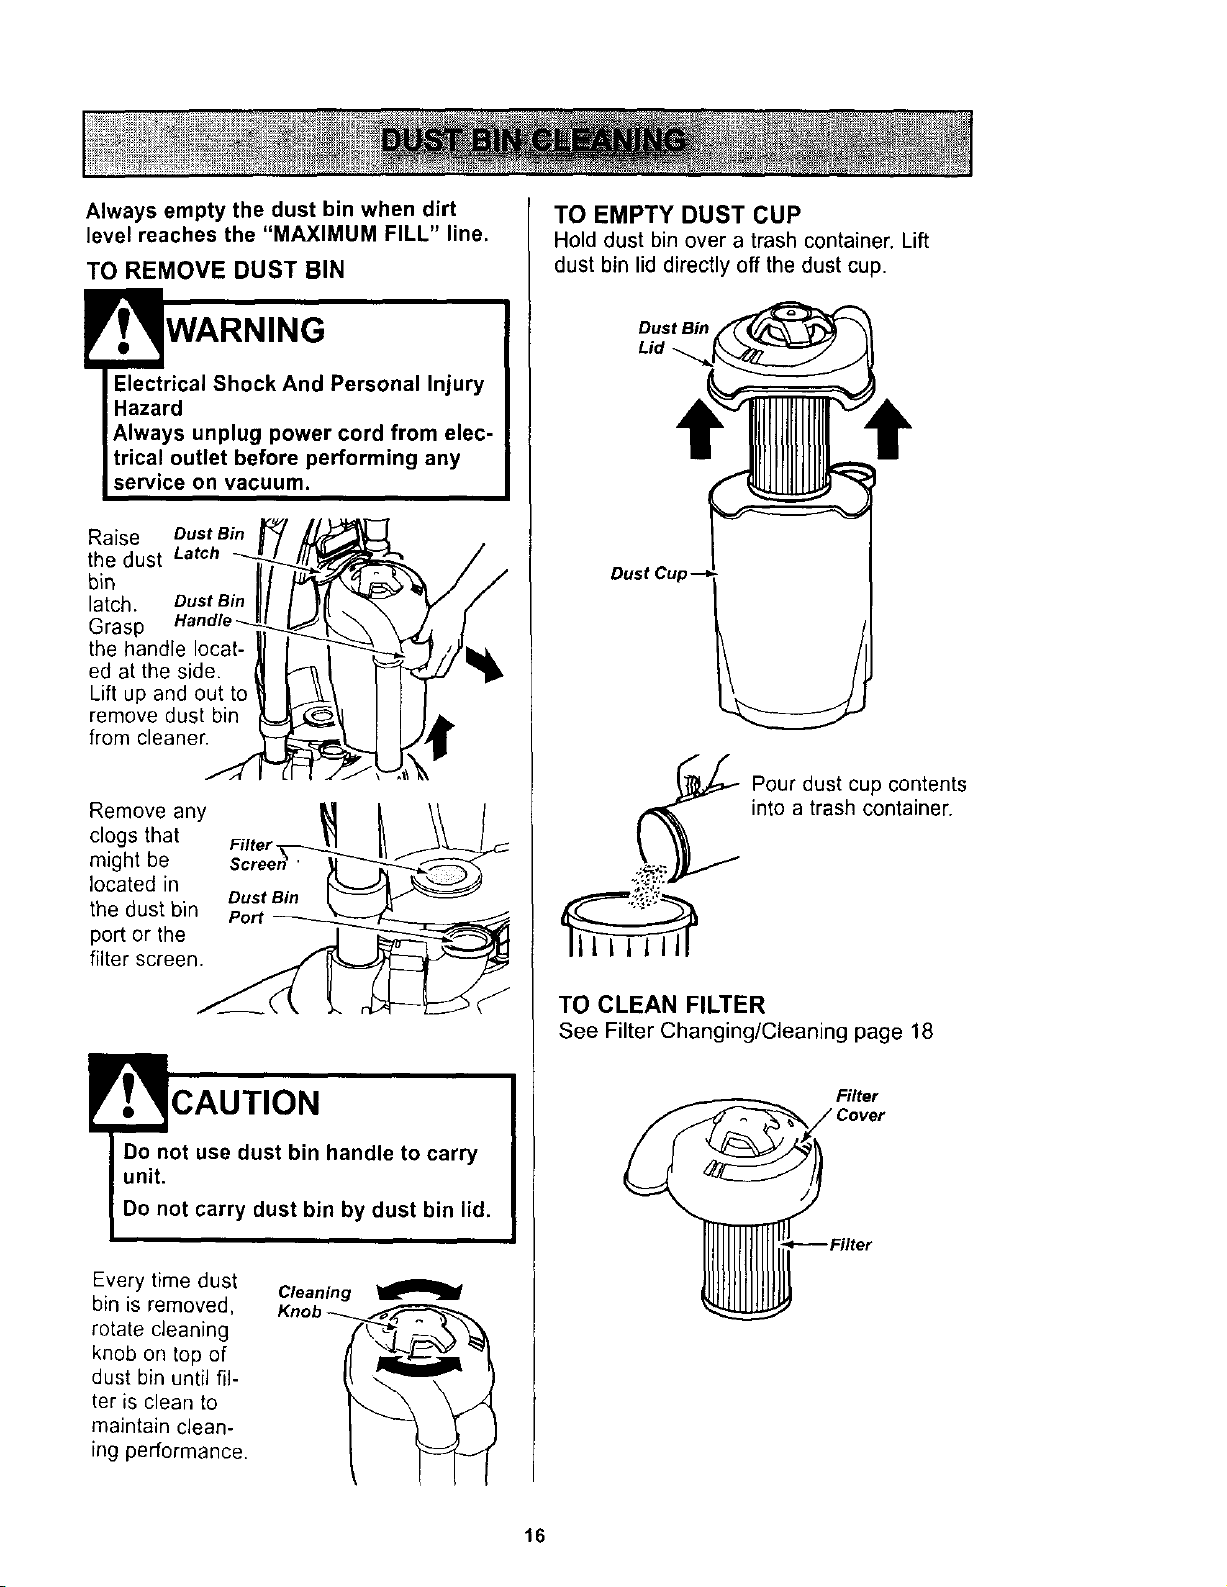
Always empty the dust bin when dirt
level reaches the "MAXIMUM FILL" line.
TO REMOVE DUST BIN
WARNING
Electrical Shock And Personal Injury
Hazard
Always unplug power cord from elec-
trical outlet before performing any
service on vacuum.
Raise Dust Bin
the dust Latch
bin
latch. Dust Bin
Grasp
the handle locat-
ed at the side.
Lift up and out to
remove dust bin
from cleaner.
Remove any
clogs that Filter
might be
located in
Dust Bin
the dust bin port
port or the
filter screen.
CAUTION
Every time dust Cleaning
bin is removed, Knot
rotate cleaning
knob on top of
dust bin until fil-
ter is clean to
maintain clean-
ing performance.
TO EMPTY DUST CUP
Hold dust bin over a trash container. Lift
dust bin lid directly off the dust cup.
Dust Bin
Lid
Dust Cup
Pour dust cup contents
into a trash container.
TO CLEAN FILTER
See Filter Changing/Cleaning page 18
Filter
16
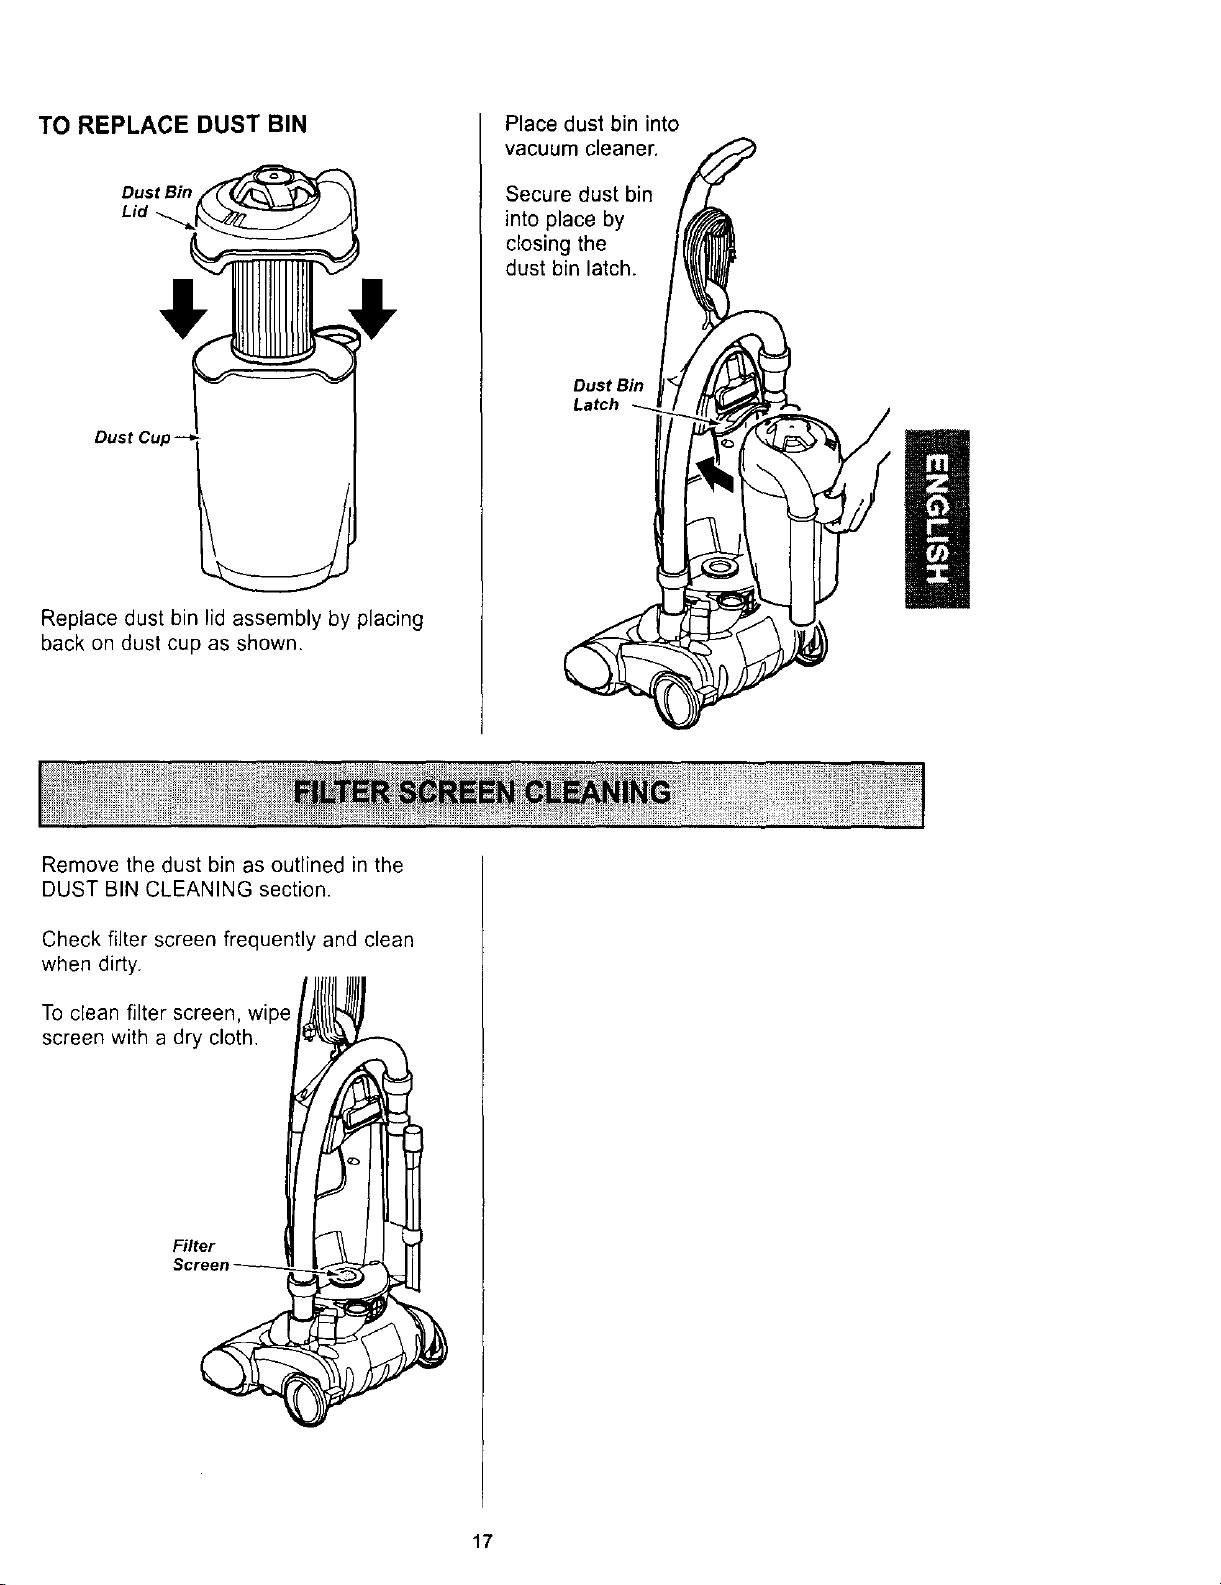
TO REPLACE DUST BIN
Dust Bin
Lid
Dust Cup
Replace dust bin lid assembly by placing
back on dust cup as shown.
Place dust bin into
vacuum cleaner.
Secure dust bin
into place by
closing the
dust bin latch.
Dust Bin
Latch
Remove the dust bin as outlined in the
DUST BIN CLEANING section.
Check filter screen frequently and clean
when dirty.
To clean filter screen, wipe
screen with a dry cloth.
Filter
17
Electrical Shock Hazard
Unplug power cord from electrical
outlet. Do not operate the cleaner
without the primary or exhaust filters.
Be sure the filters are properly
installed to prevent motor failure
and/or electrical shock.
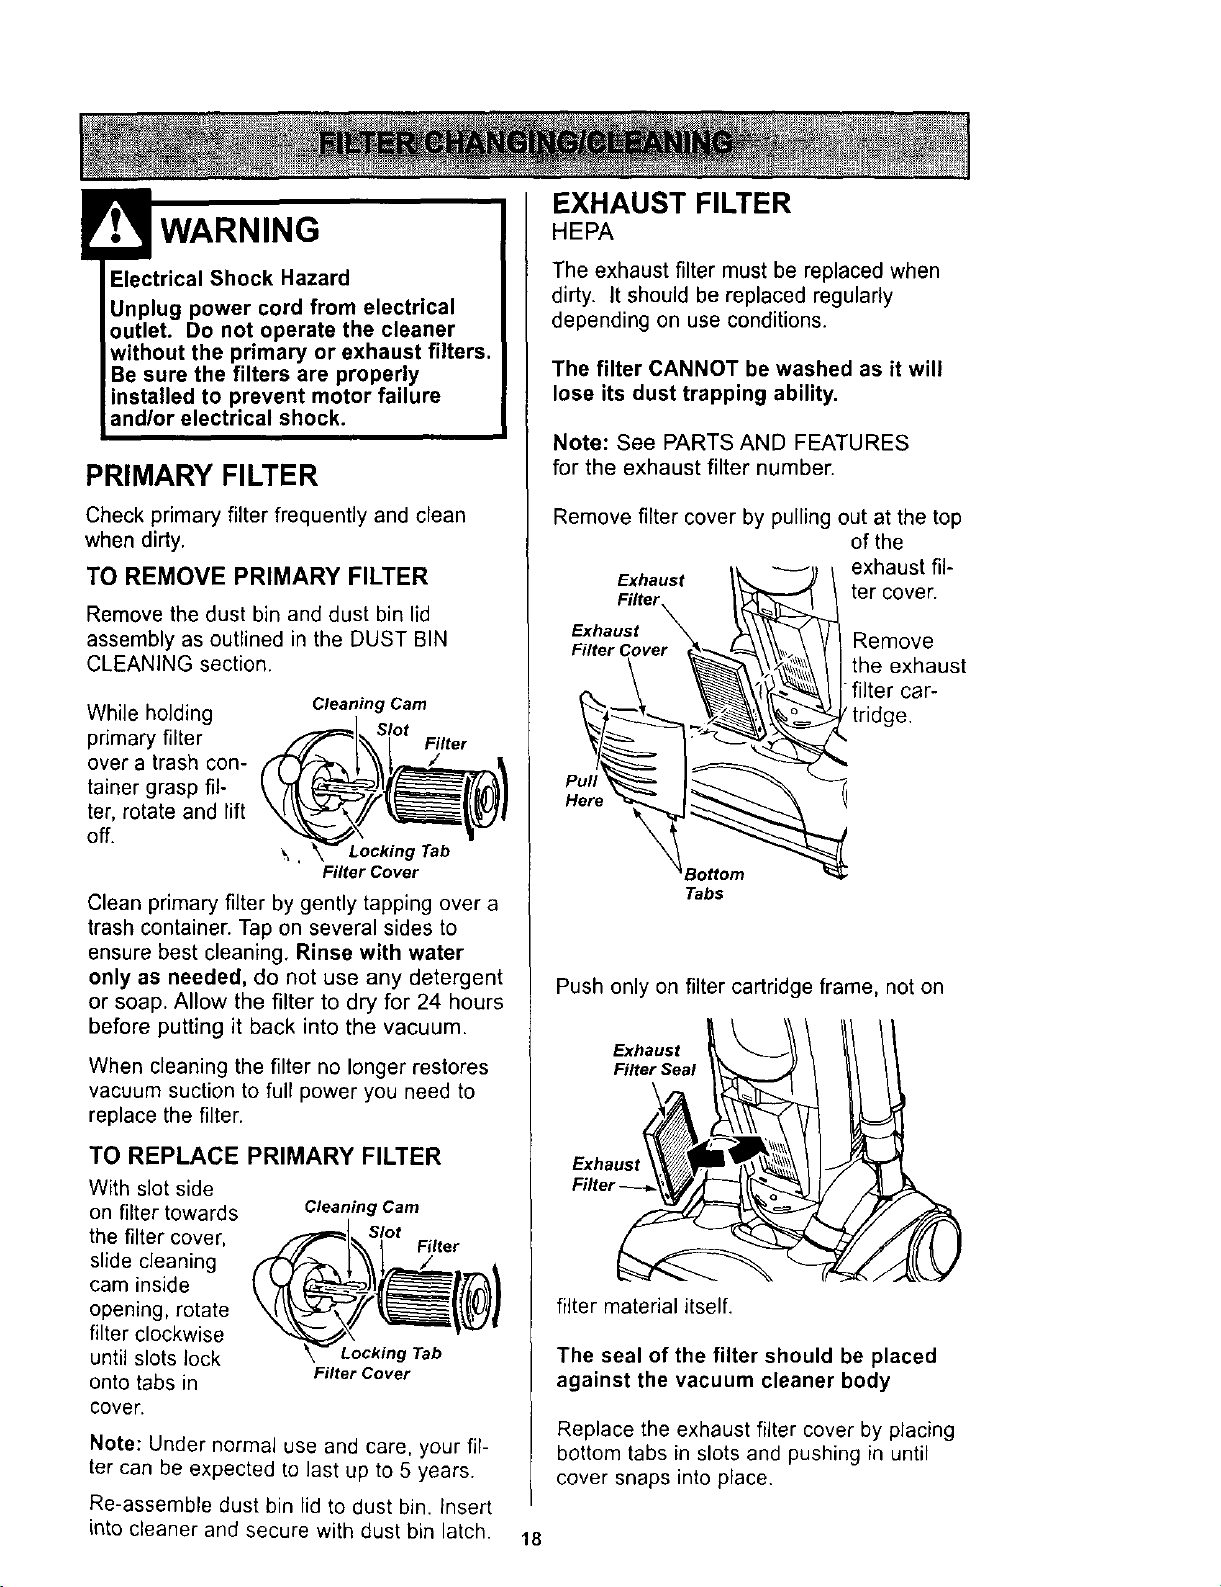
PRIMARY FILTER
Check primary filter frequently and clean
when dirty.
TO REMOVE PRIMARY FILTER
Remove the dust bin and dust bin lid
assembly as outlined in the DUST BIN
CLEANING section.
While holding
primary filter
over a trash con-
tainer grasp fil-
ter, rotate and lift
off.
Cleaning Cam
Slot
Filter
\ , Locking Tab
Filter Cover
Clean primary filter by gently tapping over a
trash container. Tap on several sides to
ensure best cleaning, Rinse with water
only as needed, do net use any detergent
or soap. Allow the filter to dry for 24 hours
before putting it back into the vacuum.
When cleaning the filter no longer restores
vacuum suction to full power you need to
replace the filter.
TO REPLACE PRIMARY FILTER
With slot side
on filter towards
the filter cover,
slide cleaning
cam inside
opening, rotate
filter clockwise
until slots lock
onto tabs in
cover.
Cleaning Cam
_=_1 Slot
_,,- I Filter
Niter Cover
Note: Under normal use and care, your fil-
ter can be expected to last up to 5 years.
Re-assemble dust bin lid to dust bin. Insert
into cleaner and secure with dust bin latch.
EXHAUST FILTER
HEPA
The exhaust filter must be replaced when
dirty, it should be replaced regularly
depending on use conditions.
The filter CANNOT be washed as it will
lose its dust trapping ability.
Note: See PARTS AND FEATURES
for the exhaust filter number.
Remove filter cover by pulling out at the top
of the
Exhaust I_, _) \ exhaust ill-
Filter t\;q_L"'_ I _ ter cover.
Exhaust _ _ Remove_
FilterCover _"_=_\\_ \ YI
u/_!_ __filter car_theexhaust
_ tridge.
Her
_Bottom "_
Tabs
Push only on filter cartridge frame, not on
Exhaust
Filter Seal
filter material itself.
The seal of the filter should be placed
against the vacuum cleaner body
Replace the exhaust filter cover by placing
bottom tabs in slots and pushing in until
cover snaps into place.
18
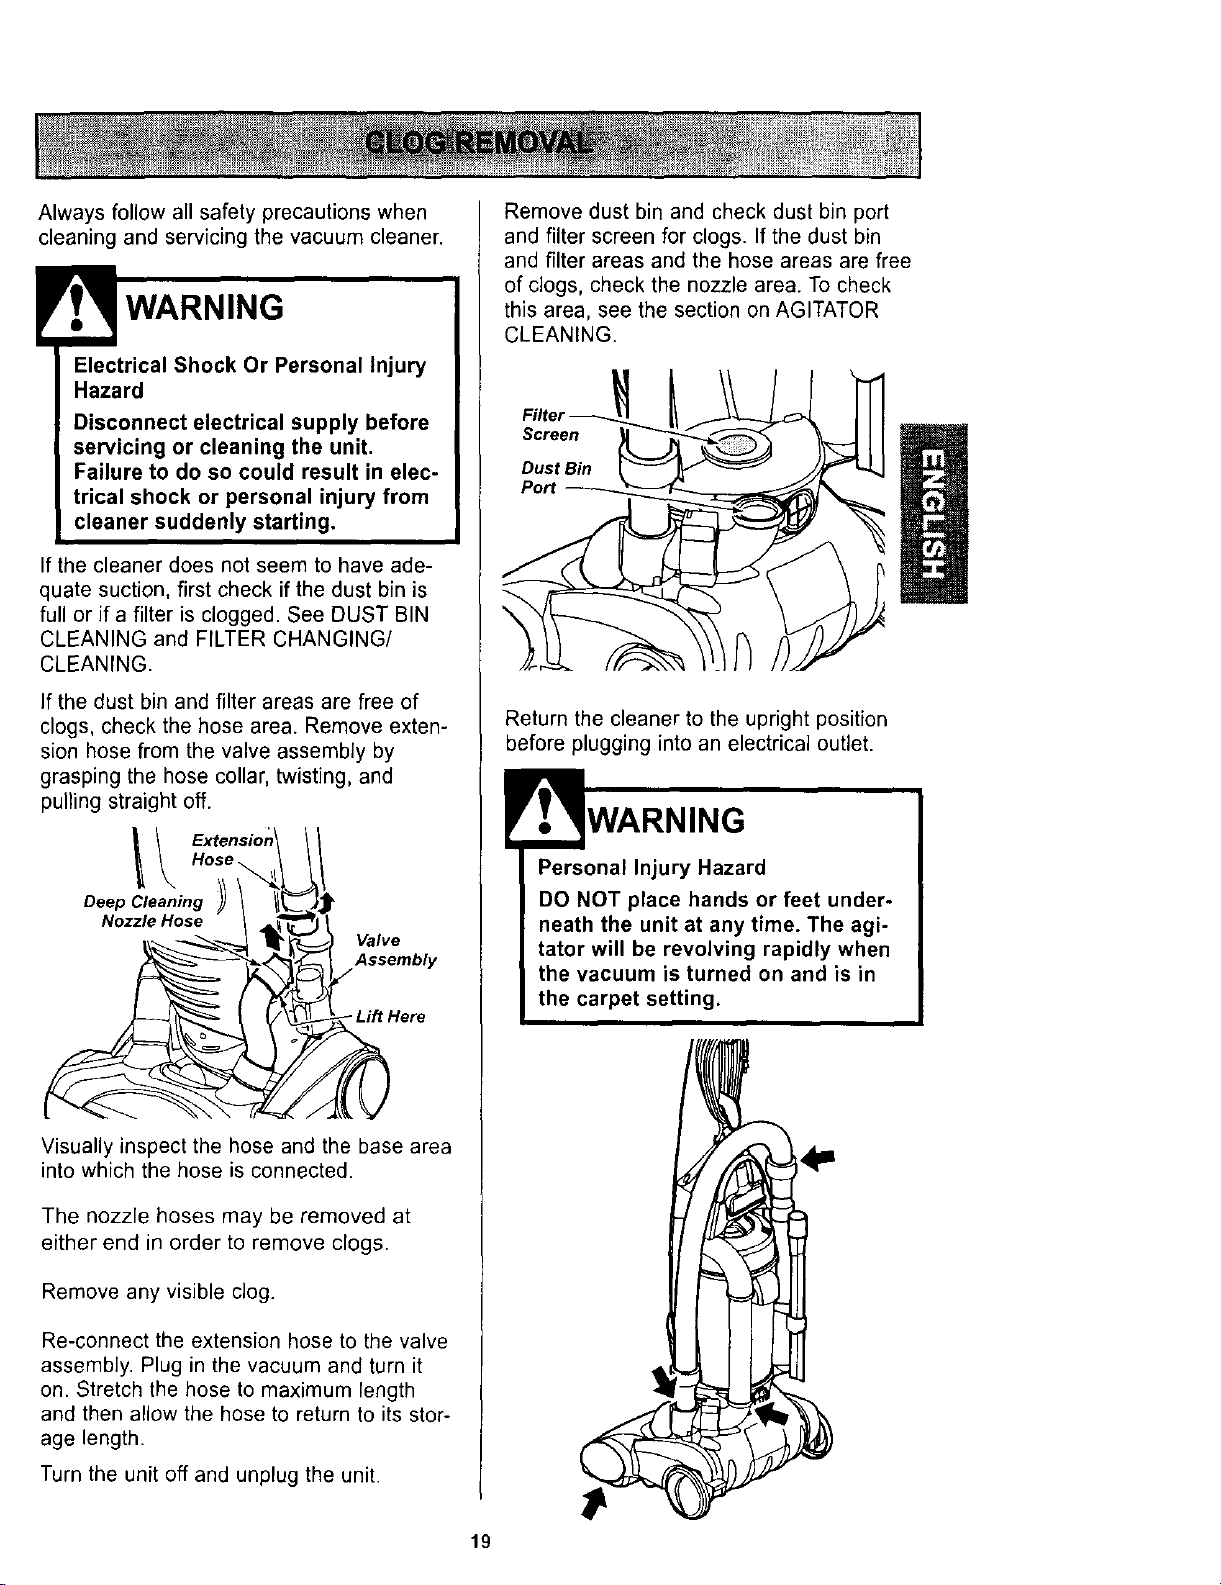
Always follow all safety precautions when
cleaning and servicing the vacuum cleaner.
Electrical Shock Or Personal Injury
Hazard
Disconnect electrical supply before
servicing or cleaning the unit.
Failure to do so could result in elec-
trical shock or personal injury from
cleaner suddenly starting.
the cleaner does not seem to have ade-
quate suction, first check if the dust bin is
full or if a filter is clogged. See DUST BIN
CLEANING and FILTER CHANGING/
CLEANING.
If the dust bin and filter areas are free of
clogs, check the hose area. Remove exten-
sion hose from the valve assembly by
grasping the hose collar, twisting, and
pulling straight off.
Visually inspect the hose and the base area
into which the hose is connected.
The nozzle hoses may be removed at
either end in order to remove clogs.
Remove any visible dog.
Re-connect the extension hose to the valve
assembly. Plug in the vacuum and turn it
on. Stretch the hose to maximum rength
and then allow the hose to return to its stor-
age length.
Turn the unit off and unplug the unit.
Remove dust bin and check dust bin port
and filter screen for clogs. If the dust bin
and filter areas and the hose areas are free
of clogs, check the nozzle area. To check
this area, see the section on AGITATOR
CLEANING.
Screen
Dust Bin
Port
Return the cleaner to the upright position
before plugging into an electrical outlet.
Personal Injury Hazard
DO NOT place hands or feet under-
neath the unit at any time. The agi-
tator will be revolving rapidly when
the vacuum is turned on and is in
the carpet setting.
4=
19
ElectricalShockOrPersonalInjury
Hazard
Disconnectelectricalsupply before
servicing orcleaningthe unit.
Failureto do socould result in elec-
trical shock or personal injury from
cleaner suddenly starting.
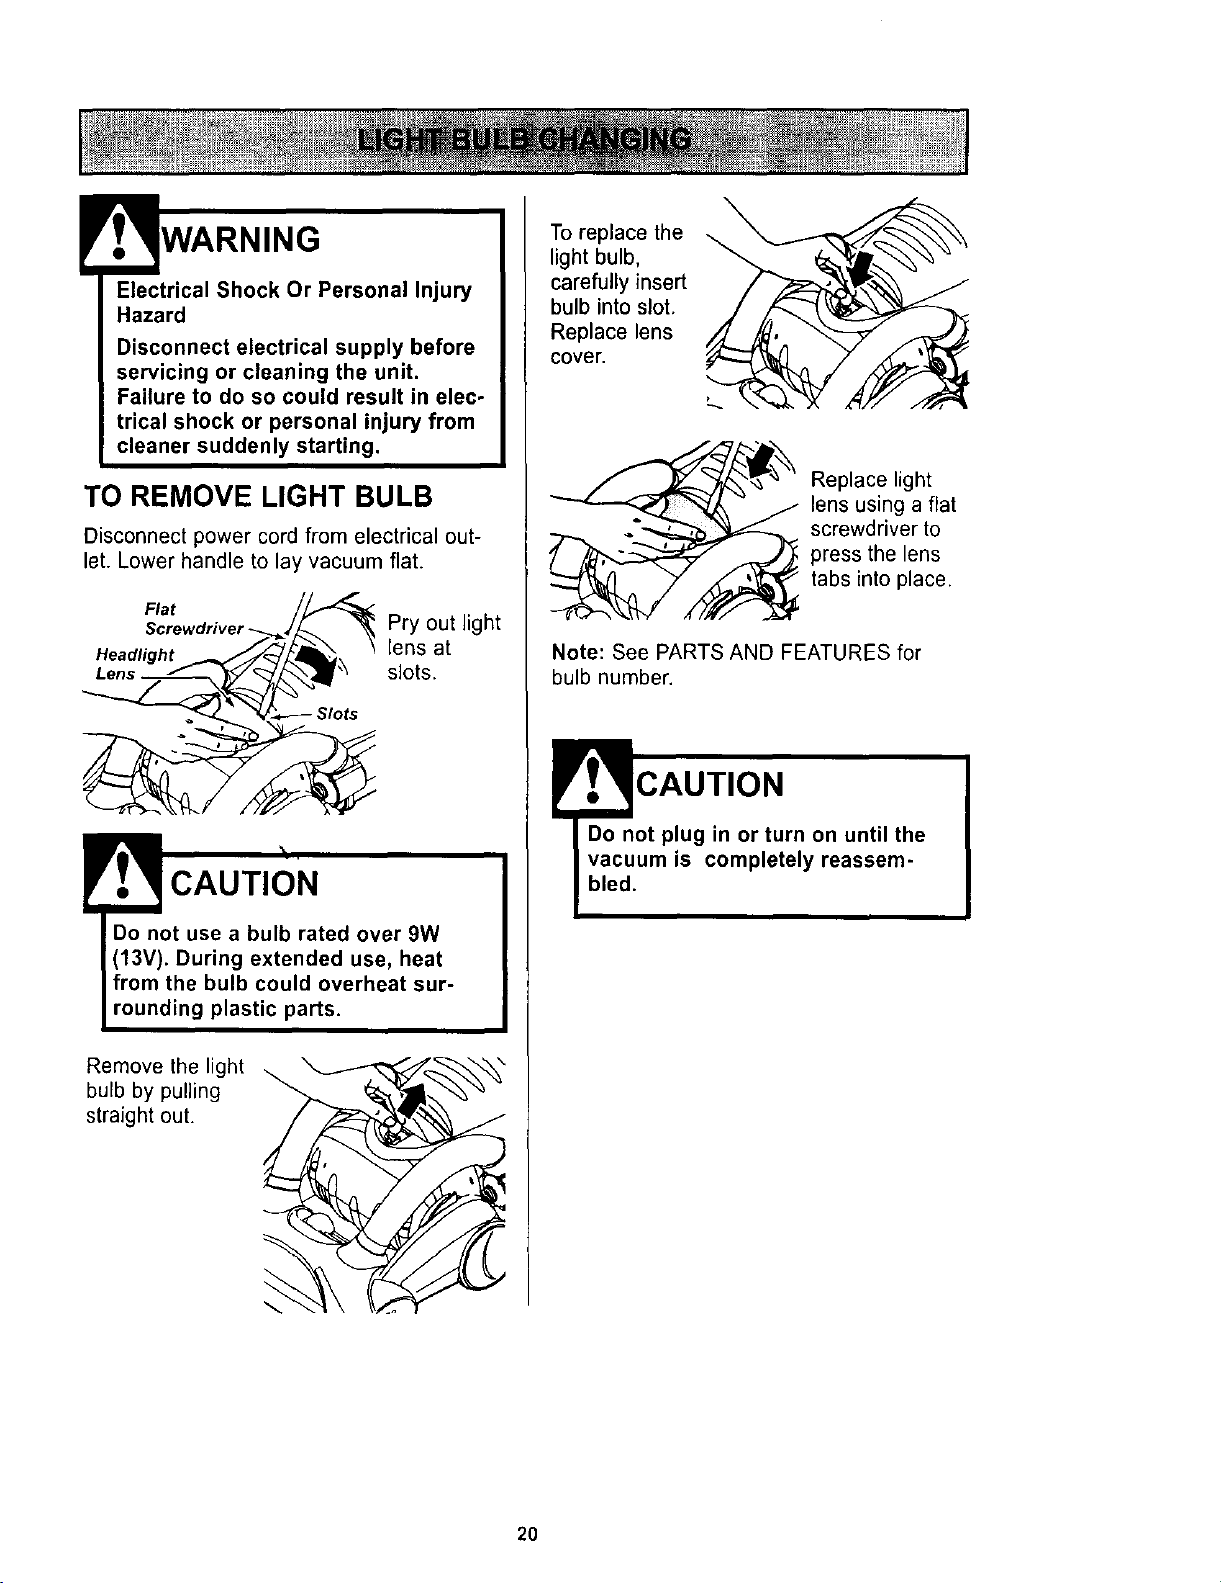
TO REMOVE LIGHT BULB
Disconnect power cord from electrical out-
let. Lower handle to lay vacuum flat.
Flat /_
HeadliShr; _._-" _
Pry out light
lens at
slots.
CAUTION
Do not use a bulb rated over 9W
(13V). During extended use, heat
from the bulb could overheat sur-
rounding plastic parts.
Remove the light
bulb by pulling
straight out.
To replace the
light bulb,
carefully insert
bulb into slot,
Replace lens
cover.
Replace light
lens using a flat
screwdriver to
press the lens
tabs into place.
Note: See PARTS AND FEATURES for
bulb number.
'.T CAUTION
Do not plug in or turn on until the
vacuum is completely reassem-
bled.
2O
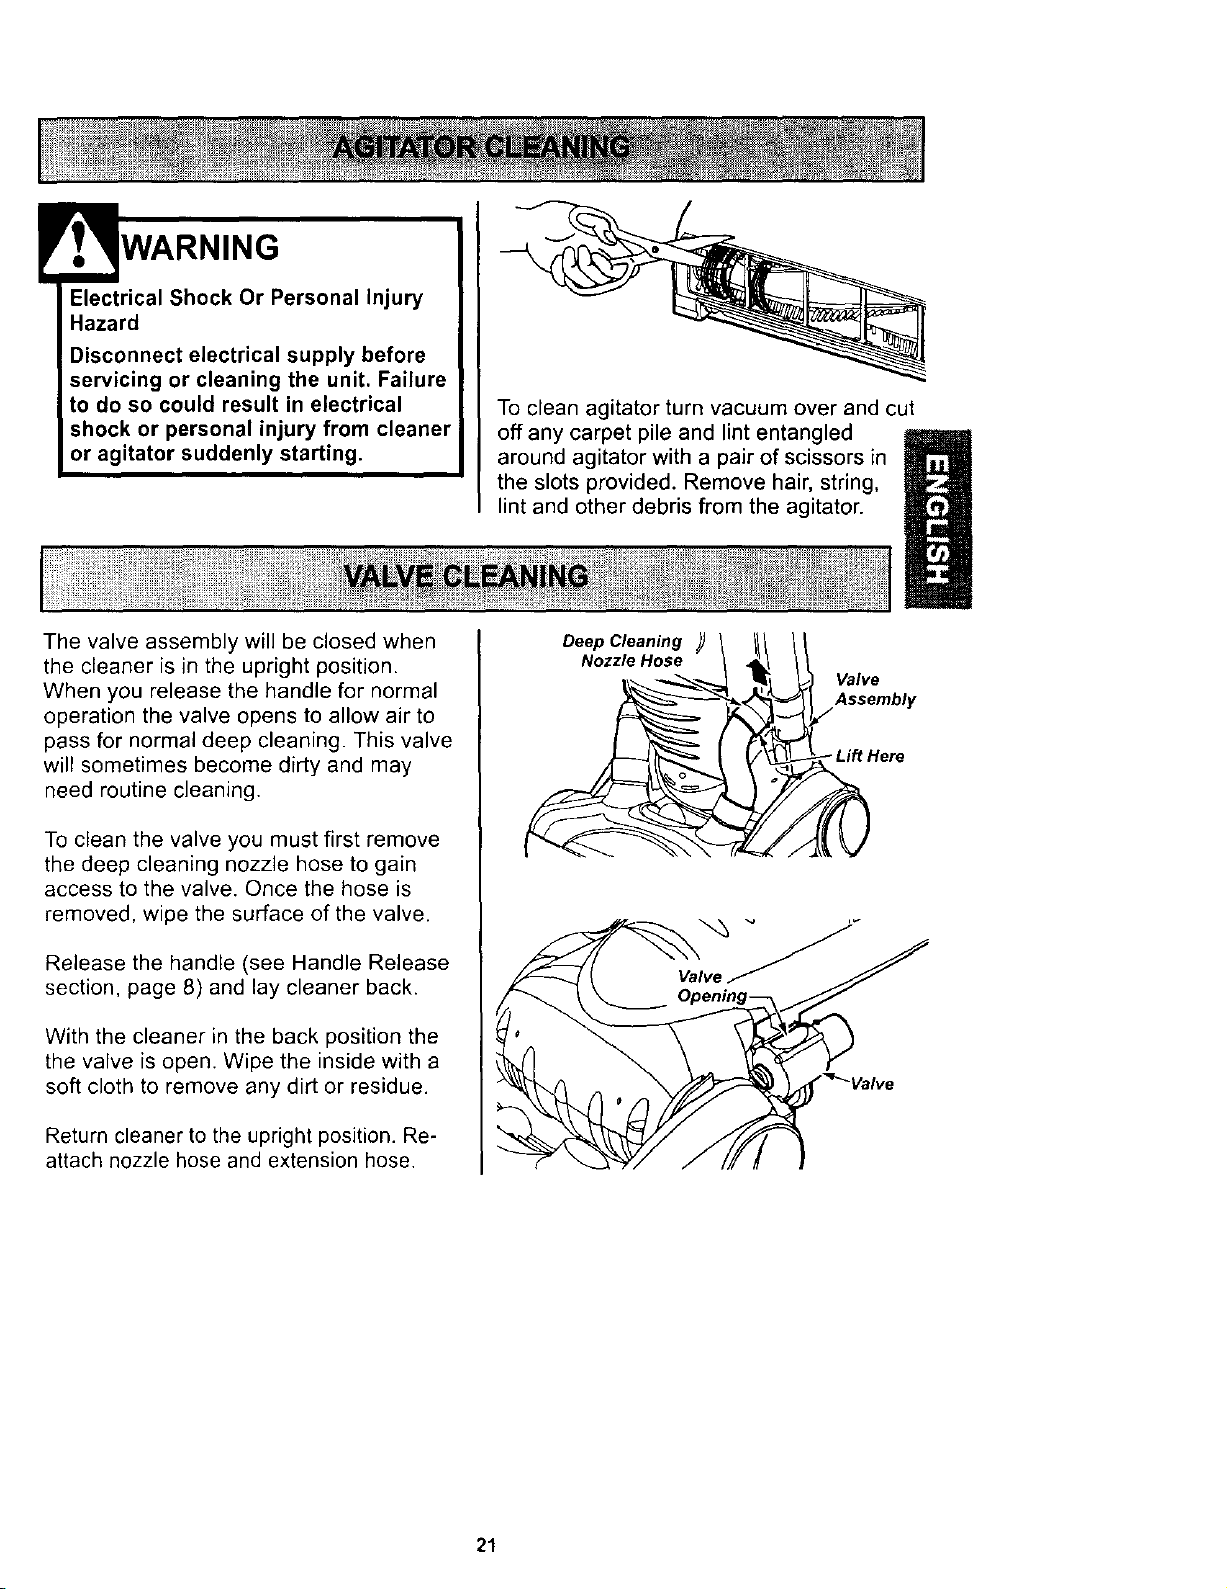
WARNING
Electrical Shock Or Personal Injury
Hazard
Disconnect electrical supply before
servicing or cleaning the unit. Failure
to do so could result in electrical
shock or personal injury from cleaner
or agitator suddenly starting.
The valve assembly will be closed when
the cleaner is in the upright position.
When you release the handle for normal
operation the valve opens to allow air to
pass for normal deep cleaning. This valve
will sometimes become dirty and may
need routine cleaning.
To clean the valve you must first remove
the deep cleaning nozzle hose to gain
access to the valve. Once the hose is
removed, wipe the surface of the valve.
Release the handle (see Handle Release
section, page 8) and lay cleaner back.
With the cleaner in the back position the
the valve is open. Wipe the inside with a
soft cloth to remove any dirt or residue.
Return cleaner to the upright position. Re-
attach nozzle hose and extension hose.
To clean agitator turn vacuum over and cut
off any carpet pile and lint entangled
around agitator with a pair of scissors in
the slots provided. Remove hair, string,
lint and other debris from the agitator.
Deep Cleaning
Nozzle Hose
Valve
Assembly
Lift Here
21
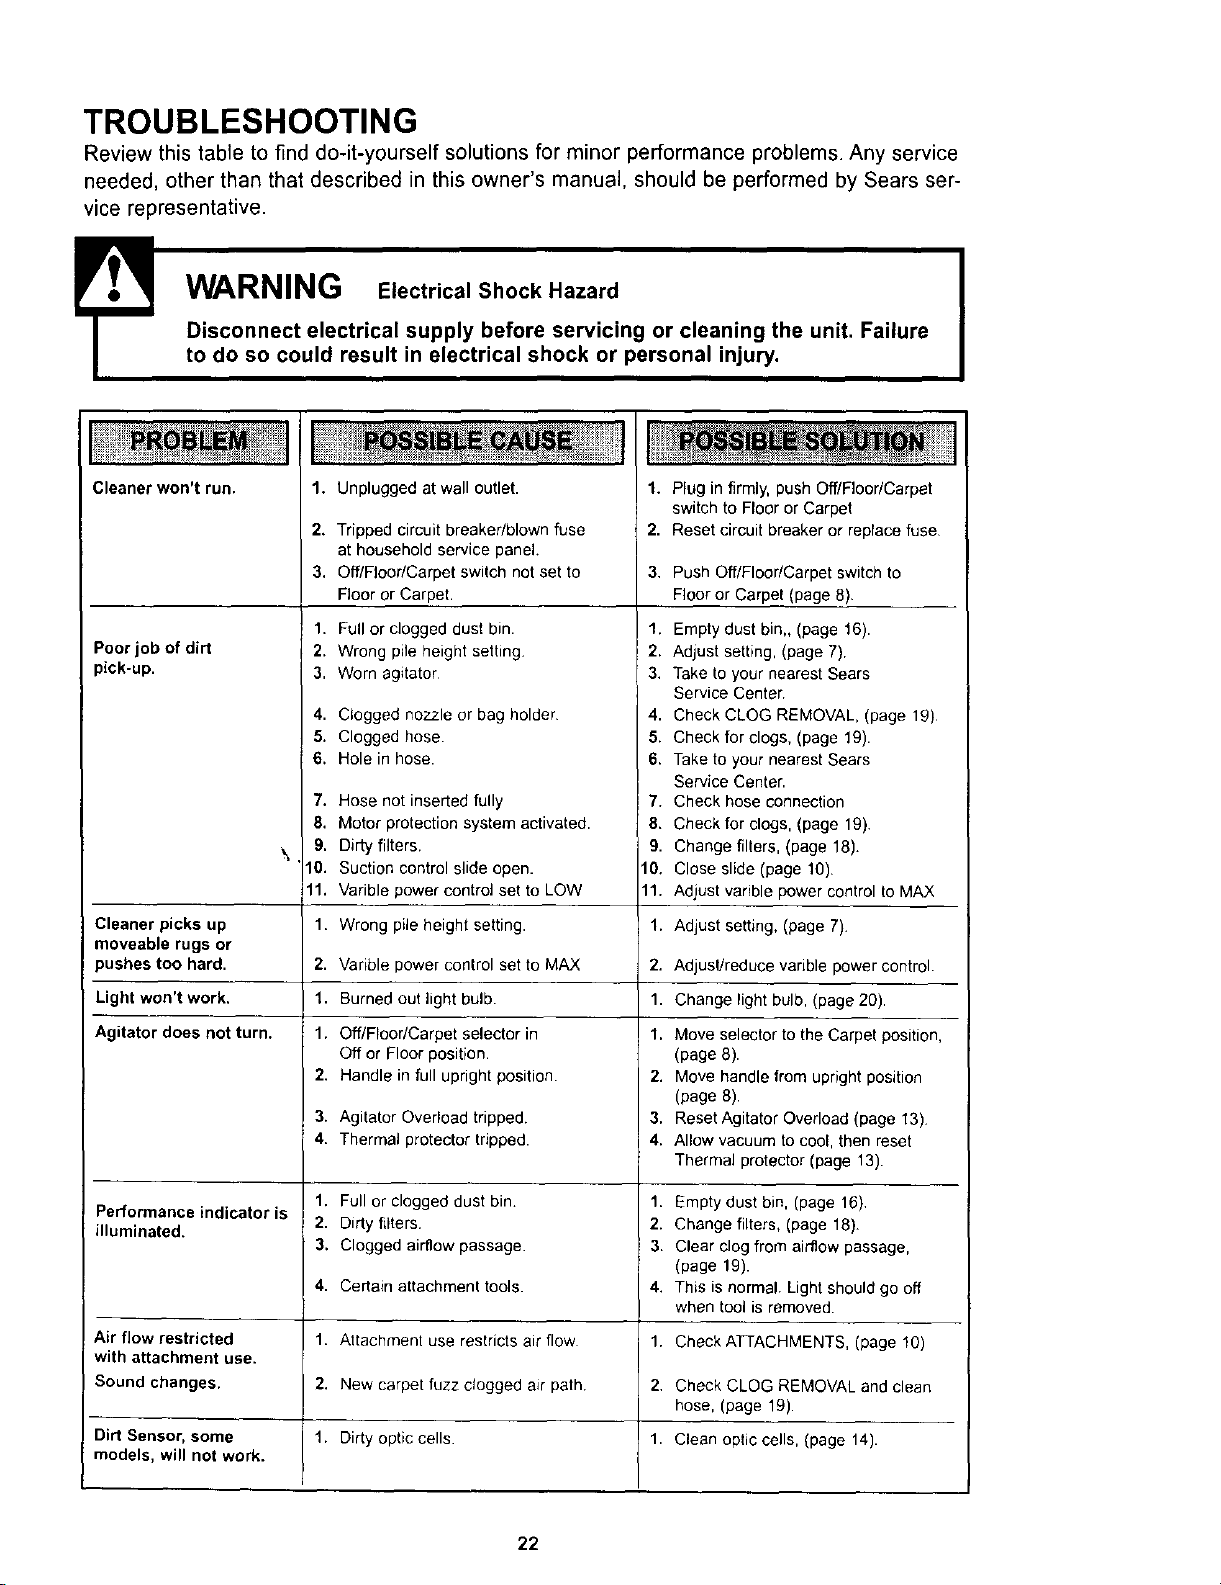
TROUBLESHOOTING
Review this table to find do-it-yourself solutions for minor performance problems. Any service
needed, other than that described in this owner's manual, should be performed by Sears ser-
vice representative.
! WARNING Electrical Shock Hazard
Disconnect electrical supply before servicing or cleaning the unit. Failure
to do so could result in electrical shock or personal injury.
Cleaner won't run.
Poor job of dirt
pick-up.
1.
2.
3.
Unplugged at wall outlet.
Tripped circuit breaker/blown fuse
at household service panel.
Off/Floor/Carpet switch not set to
Floor or Carpet.
1. Full or clogged dust bin.
2. Wrong pile height setting,
3, Worn agitator
4. Clogged nozzle or bag holder
5. Clogged hose.
6. Hole in hose.
7. Hose not inserted fully
8. Motor protection system activated.
9. Dirty filters.
10. Suction control slide open.
11. Varible power control set to LOW
1.
2.
3.
Plug in firmly, push Off/Floor/Carpet
switch to Floor or Carpet
Reset circuit breaker or replace fuse
Push Off/Floor/Carpet switch to
Floor or Carpet (page 8).
1. Empty dust bin,, (page 16).
2. Adjust setting, (page 7).
3. Take to your nearest Sears
Service Center.
4. Check CLOG REMOVAL, (page 19)
5. Check for clogs, (page 19).
6. Take to your nearest Sears
Service Center.
7. Check hose connection
8. Check for clogs, (page 19).
9. Change filters, (page 18).
10. Close slide (page 10).
11. Adjust varible power control to MAX
Cleaner picks up 1. Wrong pile height setting. 1. Adjust setting, (page 7).
moveable rugs or
pushes too hard. 2. 2. AdjuslJreduce varible power control.
Light won't work. 1. 1. Change light bulb, (page 20).
Agitator does not turn. 1. 1.
Varible power control set to MAX
Burned out light bulb.
Off/Floor/Carpet selector in
Off or Floor position.
Handle in full upright position.
2.
3. Agitator Overload tripped.
4. Thermal protector tripped.
1. Full or clogged dust bin.
2. Dirty filters.
3. Clogged airflow passage.
4. Certain attachment tools.
1. Attachment use restricts air flow
2. New carpet fuzz ctogged air path.
Dirty optic cells
Performance indicator is
illuminated.
Air flow restricted
with attachment use.
Sound changes.
Dirt Sensor, some
models, will not work.
1.
Move selector to the Carpet position,
(page 8).
2. Move handle from upright position
(page 8).
3. Reset Agitator Overload(page 13),
4. Allow vacuum to cool, then reset
Thermal protector (page 13).
1. Empty dust bin, (page 16),
2. Change filters, (page 18).
3. Clear clog from airflow passage,
(page 19).
4. This is normal. Light should go off
when tool is removed.
1. Check ATTACHMENTS, (page 10)
2. Check CLOG REMOVAL and clean
hose, (page 19).
1. Clean optic cells, (page 14).
22
Antes de usar su aspiradora nueva ..... 1
Garantia de la aspiradora de Kenmore ... 1
Instrucciones importantes de
seguridad ............................ 2
Caracteristicas de la aspiradora ........ 3
Instrucciones de ensamble ........... 4-5
Instrucciones de operacion ............ 6
Para comenzar ........................ 6
Ajuste y selecci6n de nivel de pelo de la
alfombra ............................ 5
InterrupterAPAGADO/PISO/ALFOMBRA .... 7
Control de VelocidadVariable ............ 7
Desprendimientogel mango .............. 7
Auto Reversa ......................... 8
Accesorios ........................ 9-11
Cuadrode use de losacceserios ......... 11
Sugerencias para aspirar ............... 11
Caracteristicasde rendimiento ........ 12-13
Cuidado de la aspiradora .............. 14
Almacenamiento de la aspiradora ........ 14
Limpieza del exterior y de los accesorios ... 14
Limpieza del la cube de la basura ...... 15-16
Limpieza de la mallasecundaria .......... 16
Cambio/limpiezade los ................ 17
Come eliminar los residues de basura
en los conductos ..................... 18
Cambio de la bombilla ................. 19
Limpieza del agitador .................. 20
Limpieza de la valvula .................. 20
Reconocimiento de problemas ......... 21
Informaci6n de assistancia
o servicio .................. (back page)
Per favor lea esta guia que le ayudara a ensamblar yoperar su aspiradora nueva de Kenmore en una manera
mas seguray efectiva.
Para mas informaci6nacerca del cuidado y operacionde esta aspiradora, Ilame a su tienda Sears mas cer-
cana. Cuando prequnteper informacionusted necesitar_el n_mero completede serie y modelo de la aspi-
radora que esta colocado en la placa de los nL_merosde modeloy serie.
Use el espacio de abajo para registrar el nemerode modelo y serie para su nueva aspiradorade Kenmere.
Nemere de Modelo
N_mero de Serie
Fecha de Compra
Matenga este Iibroy su recibo en un lugarseguro para referencias futuras.
GARANTiALIMITADADE UNANO DE LAASPIRADORAKENMORE
Esta garantia es perunaSodesde la fecha de compra, e incluye solamenteel use de la aspiradoraen
hogares privados.Durante el aSodegarantia, cuandola aspiradoraes operada y mantenida de acuerdo al
manualde instruccionesdel dueSo,Sears repararacualquier defectoen materialeso fabricaci6nlibre de cargo.
Esta garantiaexcluye las bolsas de celecci6n, correas, lamparillas,y filtros, lascuales son partes gastablesque
se deteriorancon el usenormal.
Para el servicio de garantia, retorne esta aspiradora al Centre de Servicio Sears m_s cercano en los
Estadoe Unidos.
Esta garantia se aplica solamente mientras este producto esta en uso en los Estados Unidos. Esta garantia le
da a usted derechos legales especificos, y usted puede tener tambien otros derechos los cuales varian de
estado a estado
Sears, Roebuck and Co., D/817 WA, Hoffman Estates, IL 60179
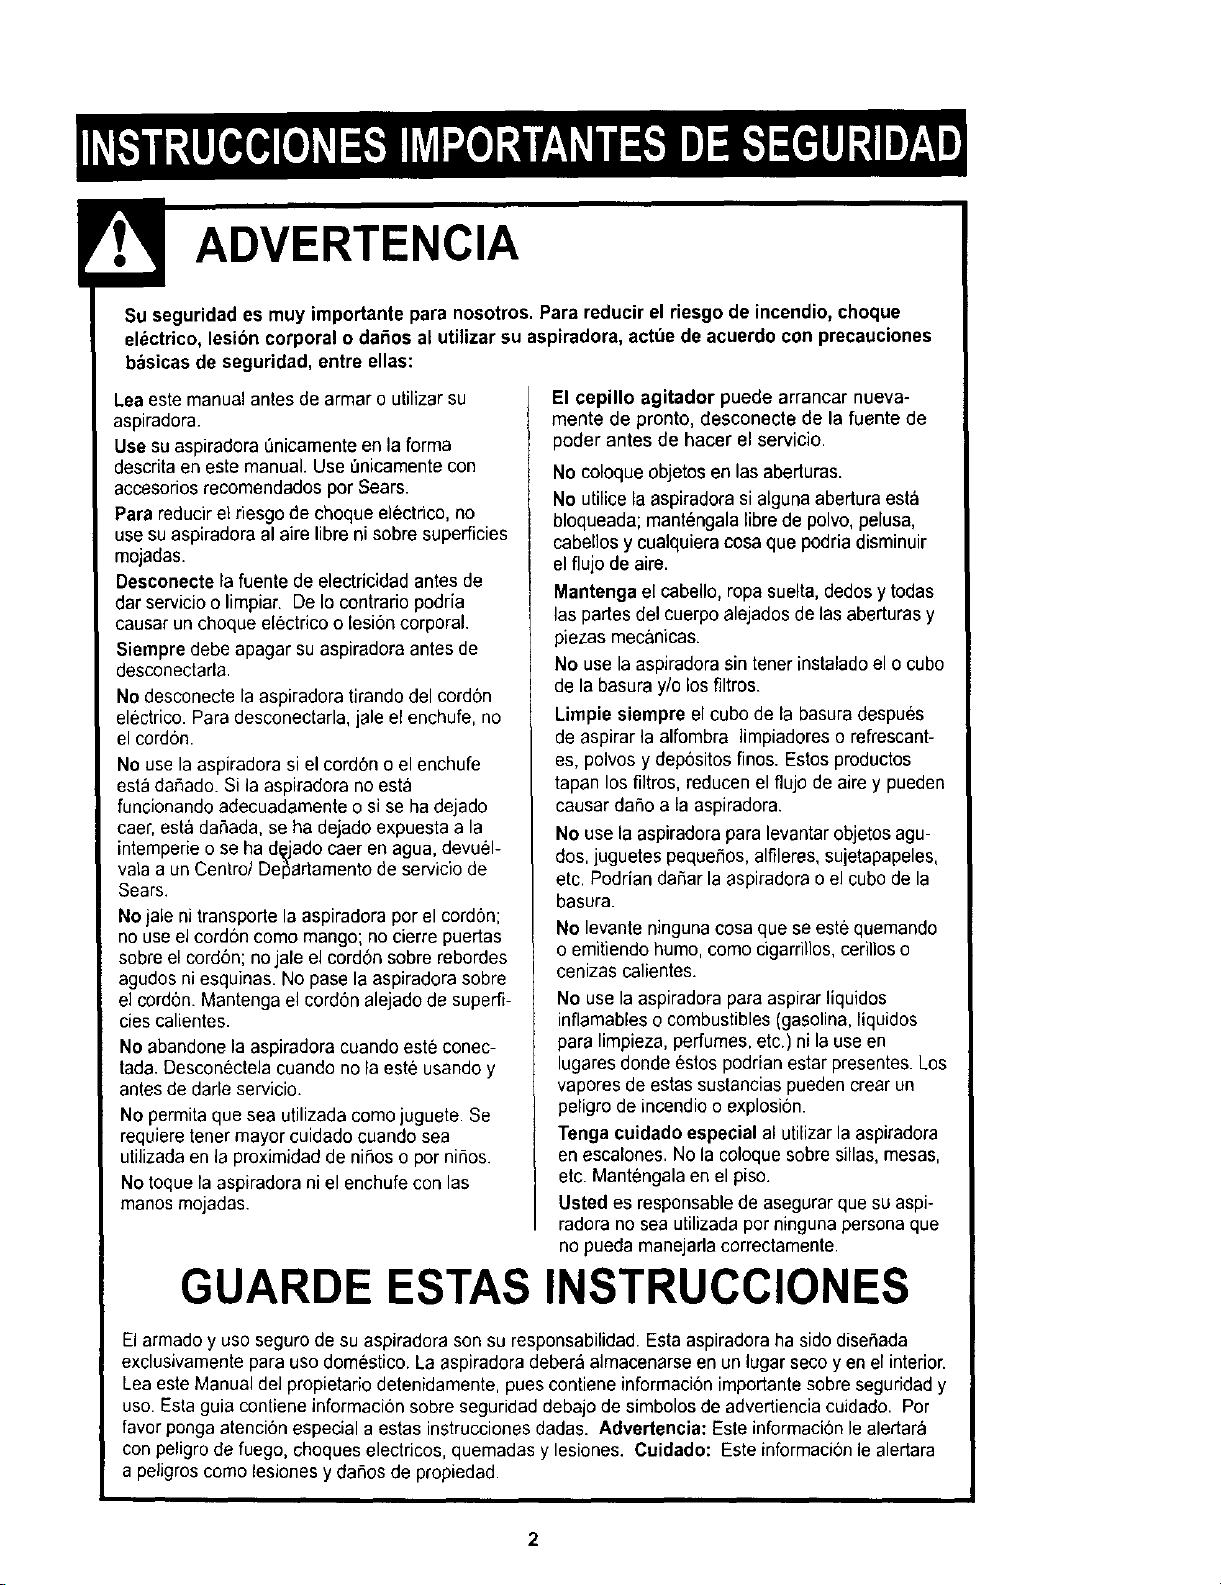
ADVERTENCIA
Su seguridad es muy importante para nosotros. Para reducir el riesgo de incendio,choque
elbctrico, lesion corporal o dafios al utilizar su aspiradora, actOede acuerdocon precauciones
bbsicasde seguridad, entre elias:
Leaeste manual antes de armar o utilizar su
aspiradora.
Usesu aspiradora Qnicarnenteen la forma
descritaen este manual. Use t)nicamentecon
accesoriosrecomendados por Sears.
Para reducirel riesgode choque electrico,no
use suaspiradora al aire libre ni sobre superficies
mojadas.
Desconecte lafuentede electricidad antes de
dar servicioo limpiar. De Iocontrario podria
causar un choque electricoo lesi6n corporal.
Siernpre debe apagar su aspiradora antes de
desconectarla.
No desconecte la aspiradora tirando del cord6n
electrico. Para desconectarla,jale el enchufe, no
el cordon.
Nousela aspiradora si el cord6no el enchufe
esta daSado.Si la aspiradora no esta
funcionandoadecuadarnente o si se ha dejado
caer, esta dafiada, se ha dejado expuesta a la
intemperieo se ha dQ,jado caer en agua, devuel-
valaa un Centro/DelSartamentode servicio de
Sears.
Nojale ni transporte la aspiradora por el cordon;
no useel cord6n como mango; no cierre puertas
sobreel cordSn;no jale el cord6o sobrerebordes
agudos ni esquinas. No pase la aspiradora sobre
el cordSn.Mantenga el cordon alejado de superfi-
cies calientes.
Noabandone la aspiradora cuandoeste conec-
tada. Desconectelacuando no la este usandoy
antes de darle servicio.
No permita que sea utilizadacomojuguete.Se
requiere tenermayor cuidadocuando sea
utilizada en la proxirnidadde nif_oso por nitros.
No toque la aspiradora ni el enchufe con las
manos mojadas.
El cepillo agitador puede arrancar nueva-
rnente de pronto, desconecte de la fuente de
poder antes de hacer el servicio.
No coloque objetosen lasaberturas.
No utilice la aspiradorasi algunaabertura est_l
bloqueada; mant_ngala libre de polvo, pelusa,
cabellos ycualquiera cosa que podria disminuir
el flujode aire.
Mantenga el cabello, ropa suelta,dedosy todas
las partes del cuerpo alejadosde lasaberturas y
piezas mec&nicas.
No use la aspiradorasin tener instaladoel o cubo
de la basura y/o los filtros.
Limpie siempre el cubo de la basura despues
de aspirar la alfombra limpiadoreso refrescant-
es, polvos ydep6sitos finos. Estosproductos
tapan losfiltros, reducen el flujo de aire y pueden
causar dafio a la aspiradora.
No use la aspiradora para levantar objetos agu-
dos, juguetes pequeSos,alfileres,sujetapapeles,
etc. Podrian dafiar la aspiradorao el cubo de la
basura.
No levante ningunacosa que se este quemando
o emitiendo humo, como cigarrillos,cerillos o
cenizas calientes.
No use la aspiradorapara aspirarliquidos
inflamableso combustibles(gasolina, liquidos
para limpieza,perfumes, etc.) ni la useen
lugaresdonde 6stospodrian estar presentes.Los
vapores de estas sustanciaspueden crear un
peligro de incendioo explosion.
Tenga cuidadoespecial al utilizar la aspiradora
en escalones. No la coloquesobresillas, mesas,
etc. Mantengala en el piso.
Usted es responsable de asegurar que su aspi-
radora no sea utilizada pot ninguna personaque
no pueda manejarlacorrectamente.
GUARDE ESTAS INSTRUCCIONES
El armadoy uso seguro de su aspiradorason su responsabilidad. Esta aspiradoraha sido disefiada
exclusivarnentepara uso domestico. La aspiradoradeber_ almacenarseen un lugar secoyen el interior.
Lea este Manual del propietariodetenidamente, puescontiene informaci6nimportantesobre seguridady
uso. Esta guia contiene informaci6nsobre seguridaddebajo de simbolosde advertienciacuidado. Por
favor ponga atencion especial a estas instrucciones dadas. Advertencia: Este informacionle alertara
con peligrode fuego, ehoques electricos, quemadas y lesiones. Cuidado: Este informaci6nle alertara
a peligroscomo lesiones y daf_osde propiedad.
2
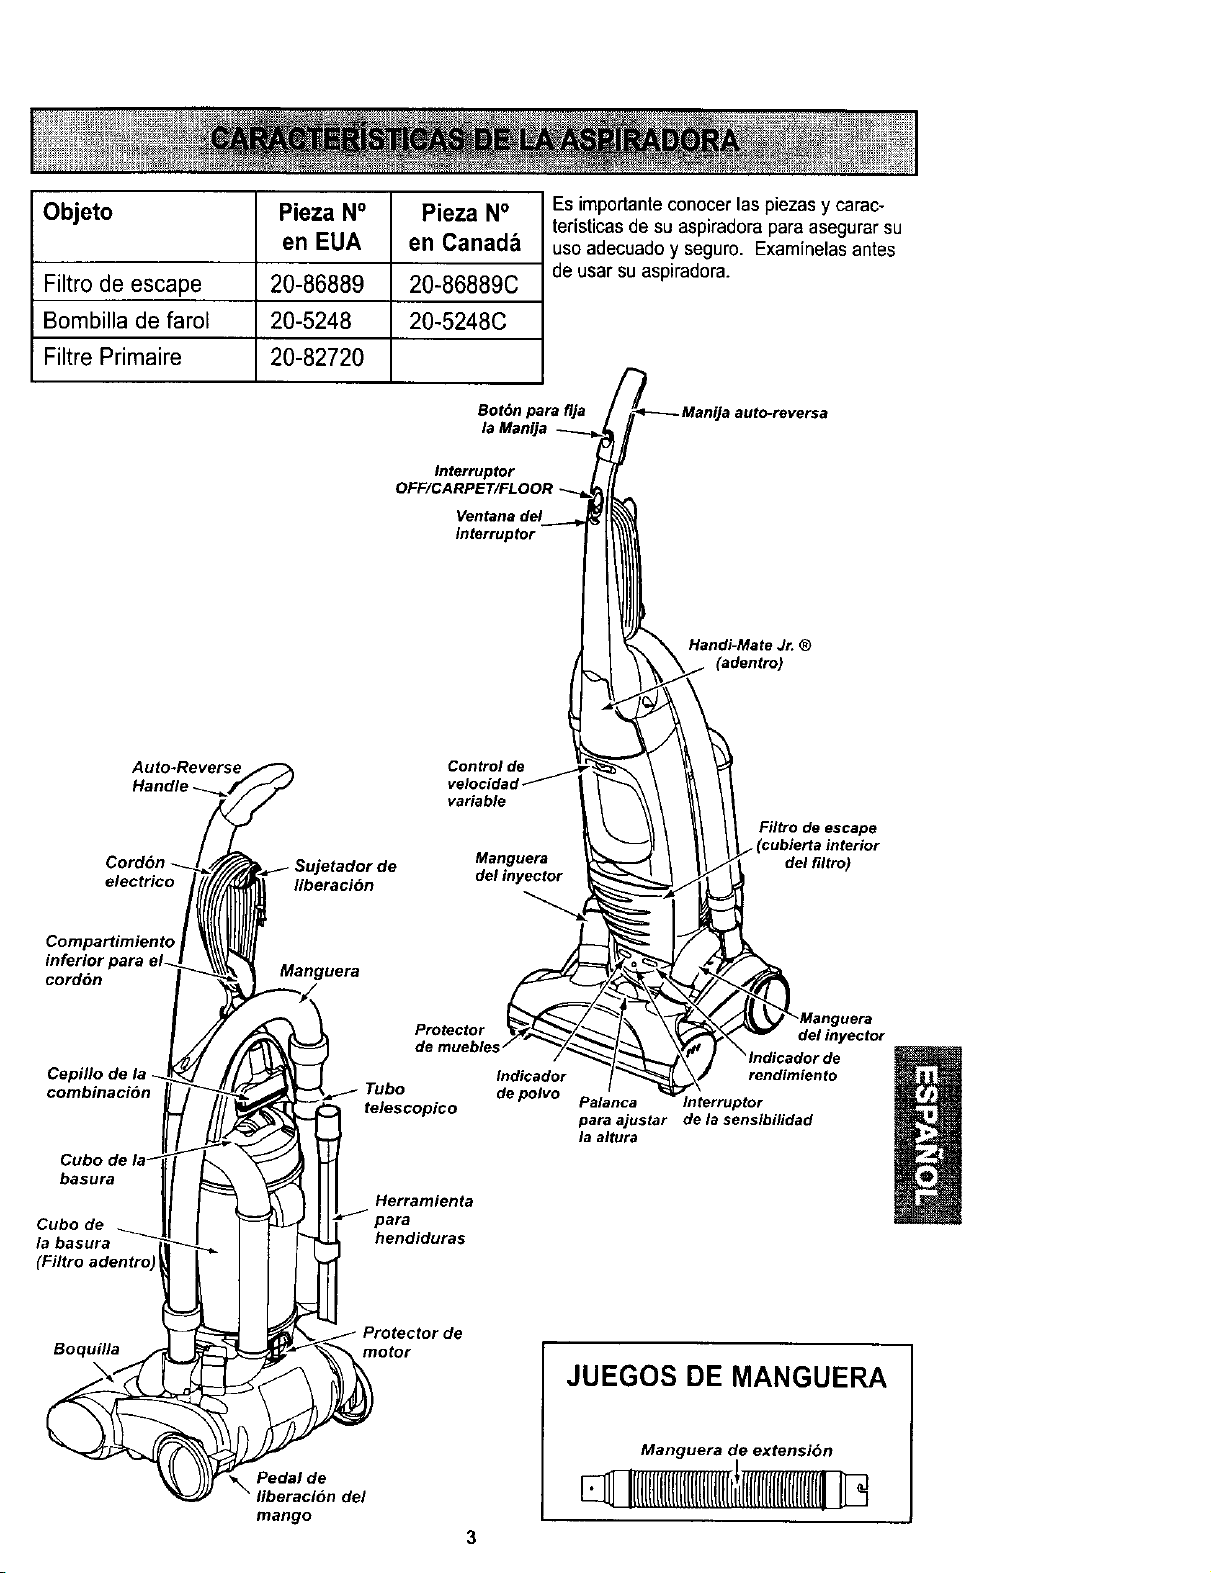
Objeto Pieza N° Pieza N°
en EUA en Canadb
Filtro de escape 20-86889 20-86889C
Bornbilla de faroE 20-5248 20-5248C
Filtre Primaire 20-82720
Es importanteconocer las piezas y carac-
teristicas de su aspiradora para asegurarsu
uso adecuadoy seguro. Examinelasantes
de usar su aspiradora.
Bot6n pare flja
la Manija
Interrupter
OFF/CARPET/FLOOR
Ventana del
interrupter
'a auto-reversa
Handi-Mate Jr. ®
(adentro)
Auto-Reverse
Handle
Cordon
electrico
Sujetador de
liberaci6n
Control de
variable
Manguera
del tnyector
Filtro de escape
I (cublerta interior
del filtro)
Compartimiento
inferior para el-
cordon
Manguera
Cepillo de
combinacion
basura
Cube de
la basura
Protector
Tube
telescopico
Herramienta
hendiduras
Indicador
de polvo
del inyector
rendimiento
Palanca rnterruptor
para ajustar de la sensibilidad
la altura
Boquilla
Pedal de
mango
Protector de
motor
del
JUEGOS DE MANGUERA
Manguera de extension
q 
ADVERTENCIA
Peligrode choque eidctrico
No conecte laaspiradora hasta que ter-
mine de armarla. De Io contrario podrla
causar un choque el_ctrico o lesibn corpo-
ral.
Antes de armar la aspiradora, cheque la LISTA DE
EMBALAJE en la cubierta separada de la Lista de
Partes para Reparaci6n. Useesta lista para veri-
ficar que ha recibido todos las componentes de su
nueva aspiradoraKenmore.
Quite cinta de la cubierta del filtro y picaporte de
caj6n de polvo.
MONTAJE DEL MANGO
Saque los dos (2)tornillos de la manija ubi-
cados en el cuerpo.
Posicione la manija como se muestra en la ilus-
traci6n m_s abajo.
Tornillo_ _ Mango
del _ I
_.___ Tornillo
del
mango
i
Conexi6n I
electrica
I
i
_tNota: No quita cinta.
._ Cuerpo
Cuando instale la manija, apriete firmemente
la manija en el cuerpo. AsegL_rela con los
tornillos provistos.
No apriete demasiado el tornillo.
Si Io aprieta demasiado podria arruinar los
orificios para el tornillo,
No opere la espiradora sin tenet instalado
el tornillo.
COLOCACION DEL CORDON
Asegerese de que el sujetador superiordel cordon
de liberaci6nrapida se encuentre en posici6n verti-
cal. Quite el alambre conel que est&atado el cordon
electrico.
Cerciorarsede
colocar el cable
electrico en la
aspiradorasegL_nla
figura. Estoayuda a
que el cord6n no se
enrede debajo del
agitadorde la
aspiradora.
Hendidura \ \
Com a ,m,eo,o/
'°;°'e°"°2:'a
Enrolle el cordon electric(
_ L Sujetador de
_"_- Iiberaci6n
_ rapidadel
cordon
alrededor de los sujeta-
dores superiory inferiory presionela ranura del
enchufe sobre el cordon.
4
ENSAMBLE DE LA
MANGUERA
Conecte manguera de extensi6n a el
ensamble de la valvula alineando "J" ranura
con la etiqueta levantada en el ensamble de
v_Ivula. Empuje hacia abajo y gire a la
derecha para cerrar en el lugar.
Coloque la herramienta para hendiduras en
la ranura rectangular detr_s del sostenedor
del Tubo Telescopico.
Conecte manguera de extensi6n a la varita
telesc6pico alineando "J" ranura con la eti-
queta levantada en la varita. La manga del
empuj6n hacia abajo y gira a la derecha
para cerrar en el lugar.
Una vez que la manguera es conectada a
el tubo telescopico, conecte el tubo en la
Iocalzaci6n telescopica de la varita.
Para el uso la manguera y el tubo teles-
c6pico y extensi6n ve la secci6n de FIJA-
CLONES en la p_gina 8.
Saque el Handi-Mate Jr. de la bolsa plastica
e insertelo en la aspiradora como se mues-
tra, entonces cierre la cubierta del contene-
dor del Handi-Mate Jr.
en "J"
lerantad,
Ensamble
de valvula
Handi-Mate Jr.®
Handi-Mate Jr.®
Storage Cover
telescopico
para
hendiduras
rectangular
telescopica
de la varita
5
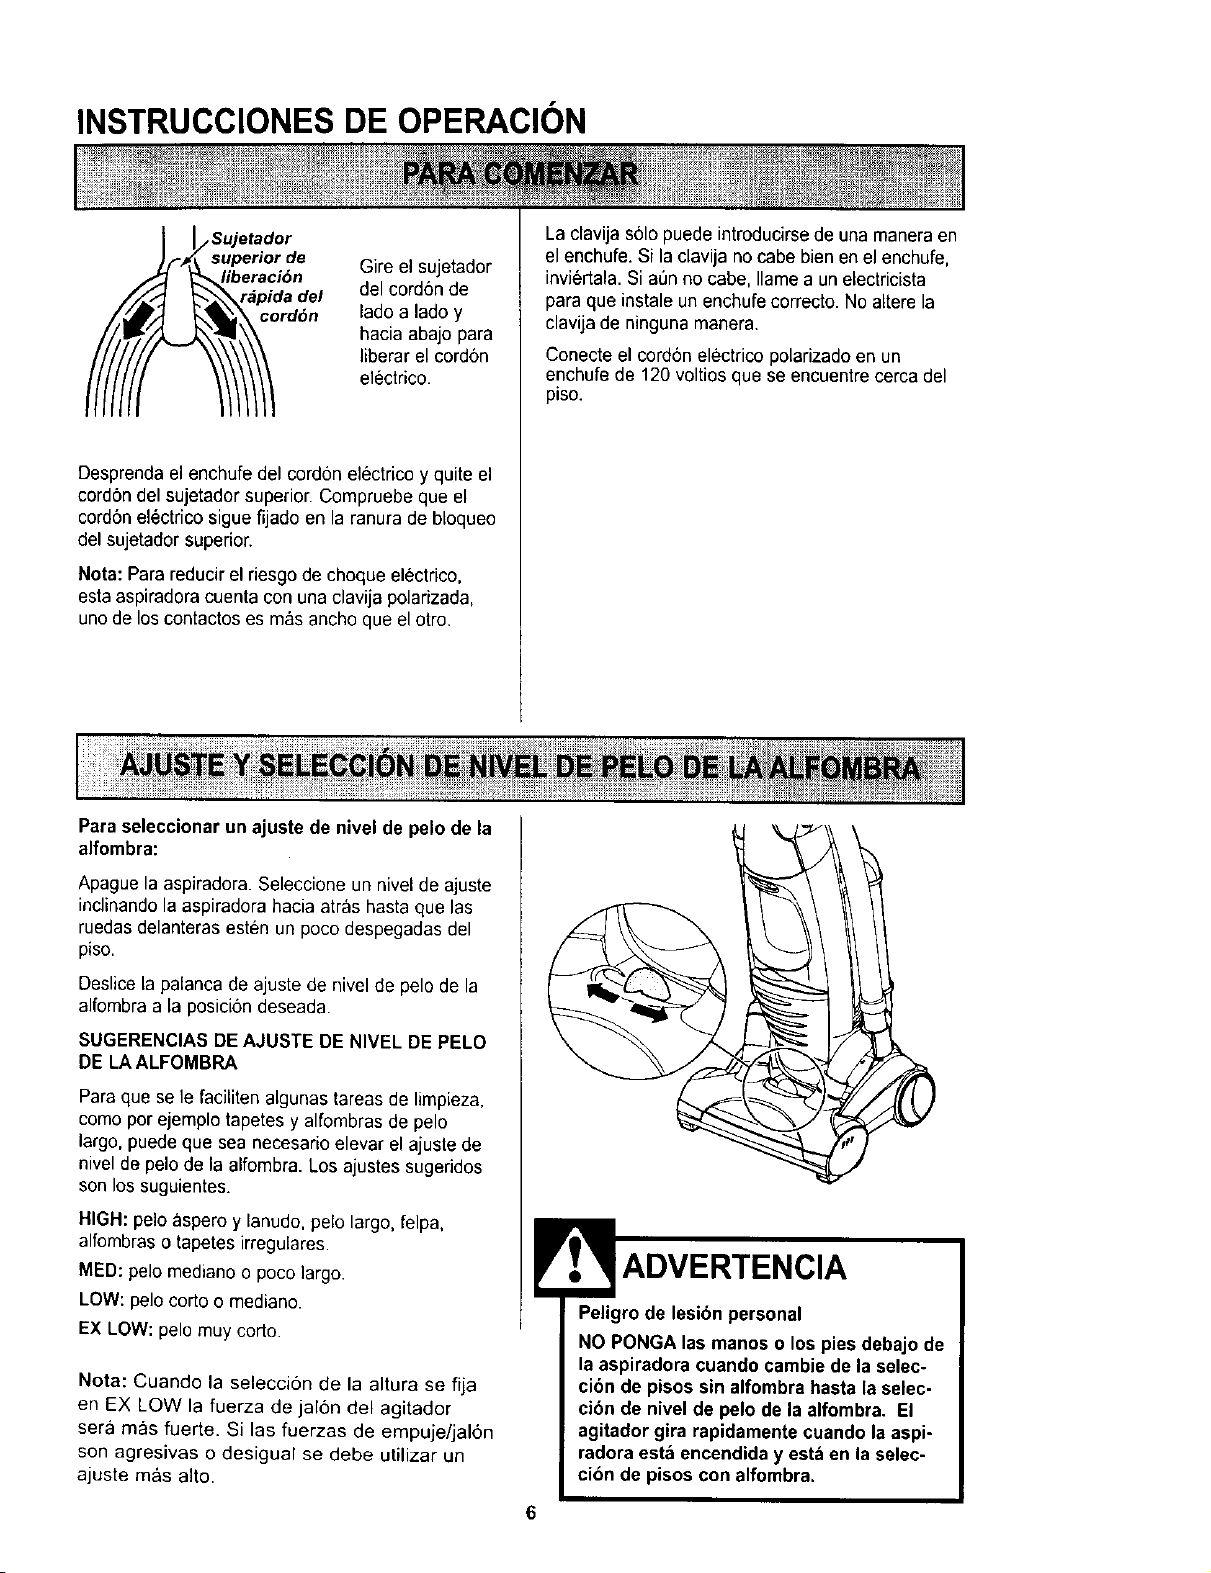
INSTRUCCIONES DE OPERACION
_o Sujetad°r
uperior de
eraci6n
pida del
rd6n
Gire el sujetador
del cord6n de
lade a lade y
hacia abajo para
liberar el cordon
electrico.
Desprendael enchufe del cordon electrico y quite el
cord6n del sujetador superior. Compruebe que el
cord6nelectrico sigue fijado en la ranura de bloqueo
del sujetador superior.
Nora: Parareducir el riesgode cheque el_ctrico,
estaaspiradora cuenta con una clavija polarizada,
uno de los contactoses m_s ancho que el otro.
Paraseleccionar un ajuste de nivel de pelo de la
alfombra:
La clavija solo puede introducirsede una maneraen
el enchufe. Si la clavija no cabe bien en el enchufe,
invi6rtala. Si a_n no cabe, Ilamea un electricista
para que instale un enchufe correcto. Noaltere la
clavija de ninguna manera.
Conecte el cordon electrico polarizadoen un
enchufe de 120 voltios que se encuentre cerca del
piso.
Apague la aspiradora. Selecciene un nivel de ajuste
inclinandola aspiradora hacia arras basraque las
ruedasdelanteras esten un poco despegadas del
piso.
Deslicela palanca de ajuste de nivel de pelo de la
alfombra a la posici6n deseada.
SUGERENCIAS DEAJUSTE DE NIVEL DEPELO
DE LAALFOMBRA
Para que se le faciliten algunas tareas de limpieza,
come per ejemplo tapetes y alfombras de pelo
largo, puede que sea necesario elevar el ajuste de
nivel de pelo de la alfombra. Los ajustes sugeridos
son los suguientes.
HIGH:pelo aspero y lanudo,pelo largo, felpa,
alfombraso tapetesirregulares.
MED: pelo mediano o poco largo.
LOW: pelo corto o mediano.
EX LOW: pelo muy corto.
Nota: Cuando la seleccion de la altura se fija
en EX LOW la fuerza de jal6n del agitador
sera mas fuerte. Si las fuerzas de empuje/jal6n
son agresivas o desigual se debe utilizar un
ajuste m_s alto.
Peligro de lesion personal
NO PONGA las manes o los pies debajo de
la aspiradora cuando cambie de la selec-
cion de pisos sin alfombra hastala selec-
cibn de nivel de pelo de la alfombra. El
agitadorgira rapidamentecuando la aspi-
radora esta encendiday estben la selec-
cion de pisos con alfombra.
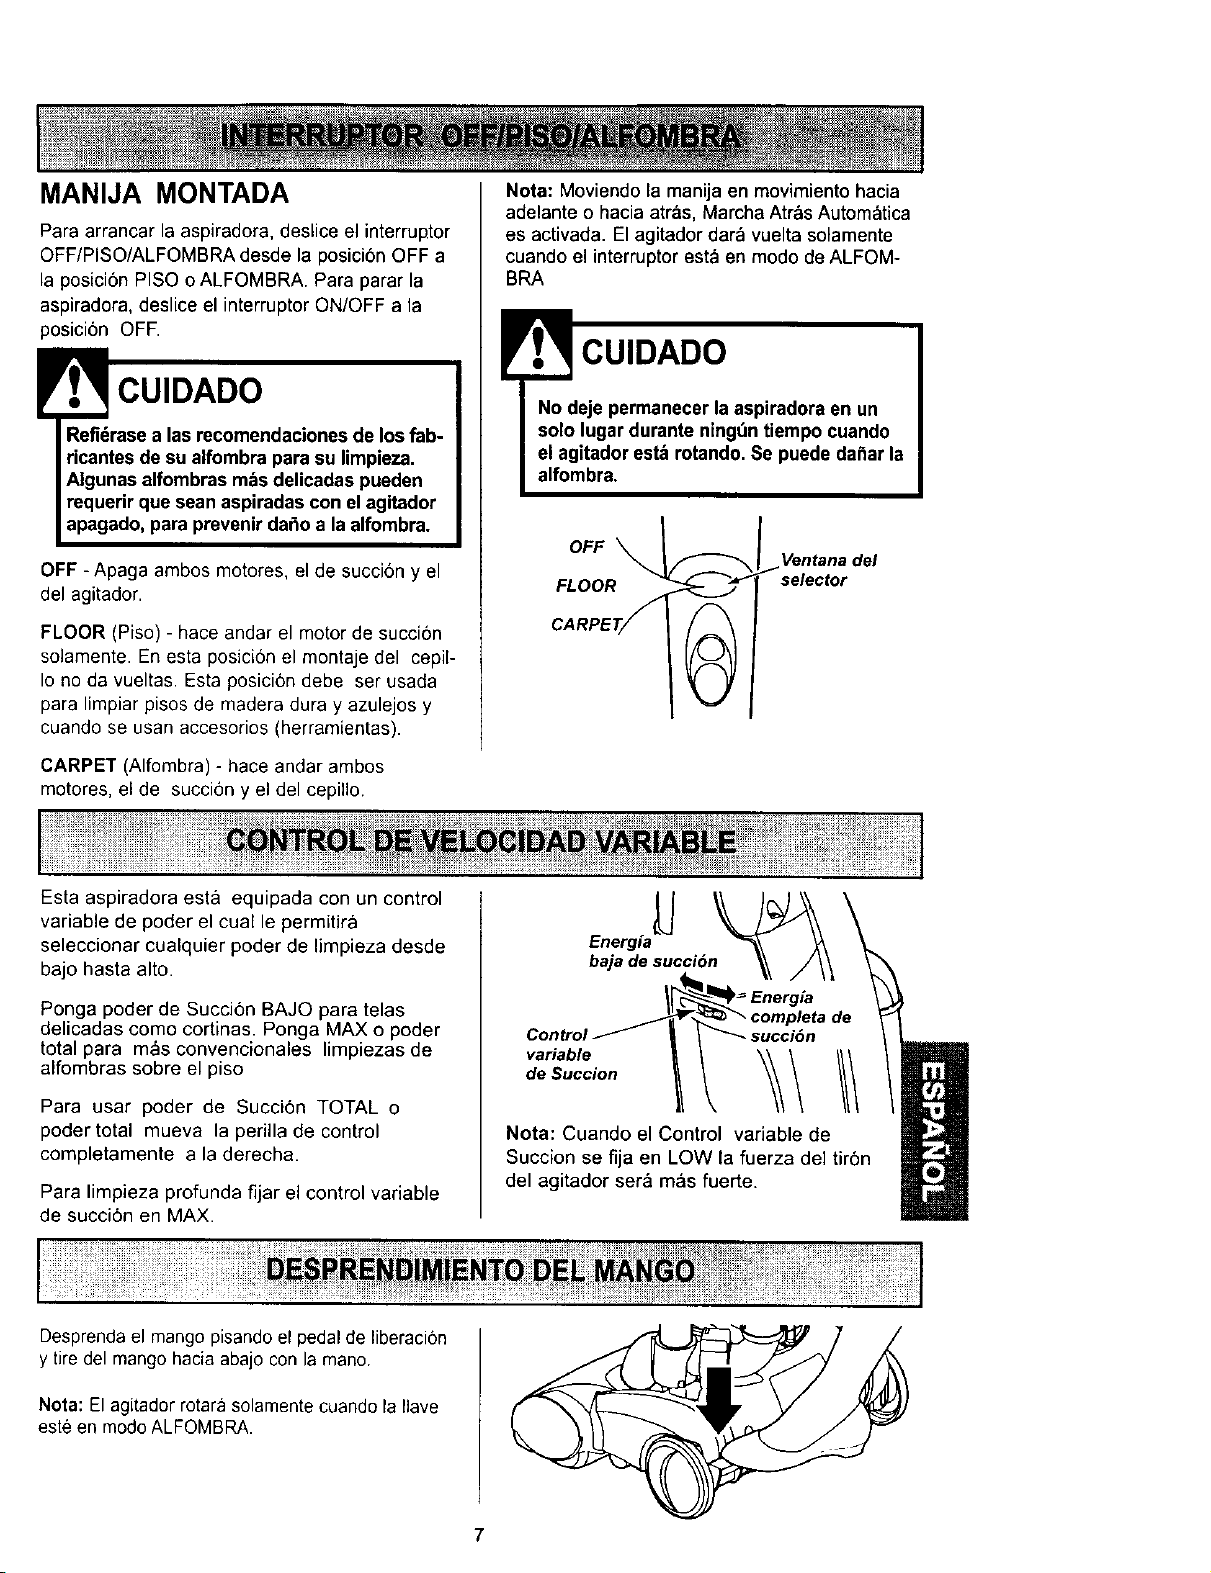
MANIJA MONTADA
Para arrancar la aspiradora, deslice el interruptor
OFF/PISO/ALFOMBRA desde la posicion OFF a
la posici6n PISO o ALFOMBRA. Para parar la
aspiradora, deslice el interruptor ON/OFF a la
posicibn OFF.
CUIDADO
Refidrasea las recomendacionesde los fab-
ricantesde su alfombra para su limpieza.
Algunasalfombras robsdelicadas pueden
requerir que sean aspiradas con elagitador
apagado, para prevenirdafio a la alfombra.
OFF - Apaga ambos motores, el de succi6n y el
del agitador.
FLOOR (Piso) - hace andar el motor de succi6n
solamente. En esta posici6n el montaje del cepil-
Io no da vueltas. Esta posici6n debe ser usada
para limpiar pisos de madera dura y azulejos y
cuando se usan accesorios (herramientas).
CARPET (Alfombra) - hace andar ambos
motores, el de succi6n y el del cepillo.
Nota: Moviendo la manija en movimiento hacia
adelante o hacia atras, Marcha AtrC=sAutom_tica
es activada. El agitador dar_,vuelta solamente
cuando el interruptor esta en modo de ALFOM-
BRA
CUIDADO
OFF \
Ventana del
FLOOR selector
Esta aspiradora est& equipada con un control
variable de poder el cual le permitira
seleccionar cualquier poder de limpieza desde
bajo hasta alto.
Ponga poder de Succi6n BAJO para telas
delicadas como cortinas. Ponga MAX o poder
total para m_s convencionales limpiezas de
alfombras sobre el piso
Para usar poder de Succi6n TOTAL o
poder total mueva la perilla de control
completamente a la derecha.
Para limpieza profunda fijar el control variable
de succi6n en MAX.
Energia
baja de succiOn
_[_ Ec:mrg/atade
Control_ | I _ succi6n
variable _ _ I1_
de Succion 11_ _ III
Nota: Cuando el Control variable de
Succion se fija en LOW la fuerza del tir6n
del agitador ser& m&s fuerte.
Desprendael mango pisandoel pedal de liberaci6n
y tire del mango hacia abajo con la mano.
Nota: Elagitador rotarasolamente cuando la Ilave
este en modoALFOMBRA.
7
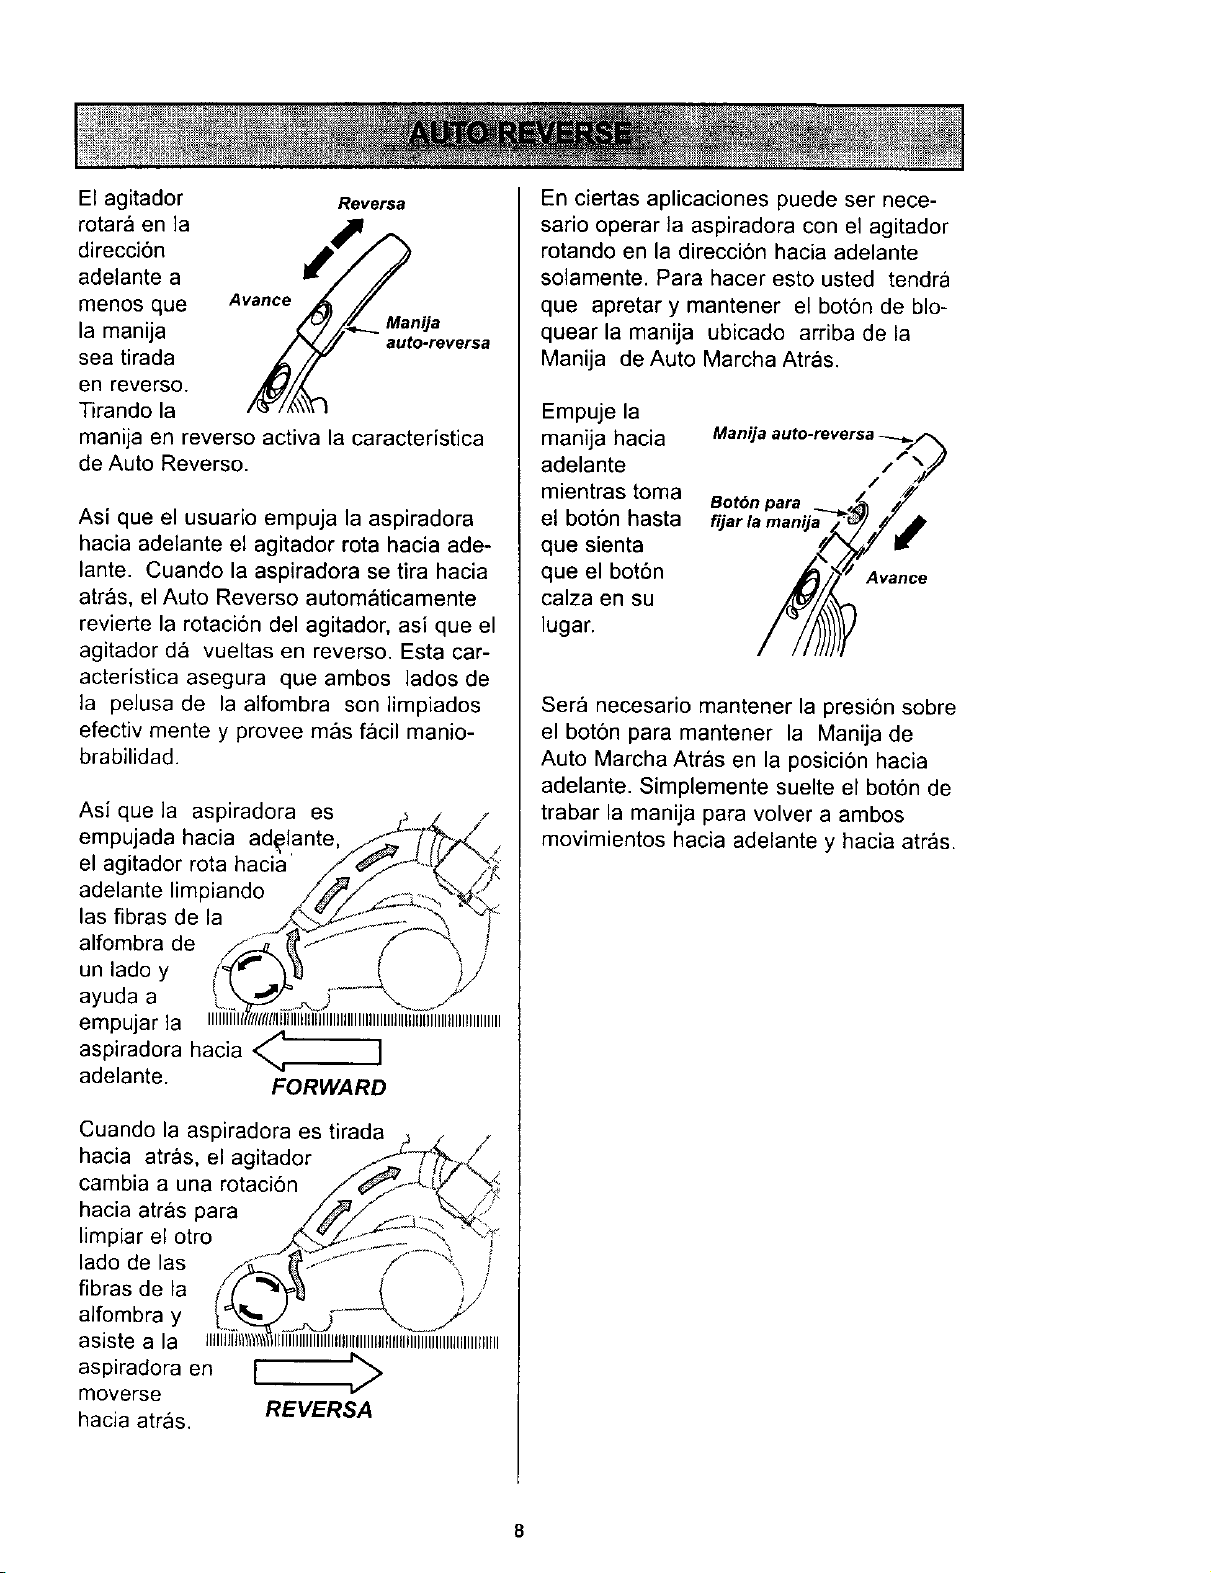
El agitador Reversa
rotar& en la
direcci6n
adelante a
menos que Avance
la manija Manija
auto-reversa
sea tirada
en reverso.
Tirando la
manija en reverso activa la caracteristica
de Auto Reverso.
Asi que el usuafio empuja la aspiradora
hacia adelante el agitador rota hacia ade-
lante. Cuando la aspiradora se tira hacia
atr_s, el Auto Reverso automaticamente
revierte la rotaci6n del agitador, asi que el
agitador d& vueltas en reverso. Esta car-
acteristica asegura que ambos lados de
la pelusa de la aifombra son limpiados
efectiv mente y provee m_ls f_icil manio-
brabilidad.
Asi que la aspiradora es LL_Z /
empujada hacia ad_iante,//_./_ .
el agitador rota haci_t' /__. _.._
adelante limpiando __l/_"
las fibras de la _%._S._"_- - _ "_
alfombra de //_S_ _" ..... " i'f-"_ i
unladoy i_ r ]_ [ )j
ayuda a _ .k'-_/_._._..5 ..... "_ .J:"
empujar la iiiiiliTirrm(f/t!l_llilililllllllilllllllllllllllllllllllllllllllllllllllllll
aspiradora hacia < ]
adelante. FORWARD
En ciertas aplicaciones puede ser nece-
sario operar la aspiradora con el agitador
rotando en la direcci6n hacia adelante
solamente, Para hacer esto usted tendra
que apretar y mantener el boton de blo-
quear la manija ubicado arriba de la
Manija de Auto Marcha Atr_ls.
Empuje la
manija hacia
adelante
mientras toma
el bot6n hasta
que sienta
que el bot6n
calza en su
lugar.
Manija auto-reversa _../,_
F_
/ ")/
Botdn para
Avance
Sera necesario mantener la presidn sobre
el boton para mantener la Manija de
Auto Marcha Atr_ls en la posici6n hacia
adelante. Simplemente suelte el bot6n de
trabar la manija para volver a ambos
movimientos hacia adelante y hacia atras.
8
Handi-Mate Jr.®
Cepillopara
combinaci6n
para
hendiduras
Identifiquecada uno de losaccesorios mostrados a
continuaci6n.
Quiteel fin superior de la mangueraque es conec-
tadaa el tubo telesc6picoagarrando el cuellode
manguera, tuerce y estira derechofuera. Las fija-
ciones ahora se pueden ar_adira la manguera.
Nota: La valvula de desviaci6n puede estar abierta
mientrasse usan losaccesorios o para limpiaruna
alfombra nueva a causa de un flujo reducidode aire
pot los accesorios mismos o
por la pelusade la alfombra que Ilenela bolsarapi-
damente. Consulte el cuadro RECONOCIMIENTO
DE PROBLEMAS.
I ADVERTENCIA
Peligro de choque eldctricoo lesi6n corpo-
ral
Desconecte la unidadantes de limpiarla o
darle servicio. De Io contrario podria pro-
ducirse un choque electrico o causar
lesibn corporal si la aspiradoraarranca de
manera imprevista.
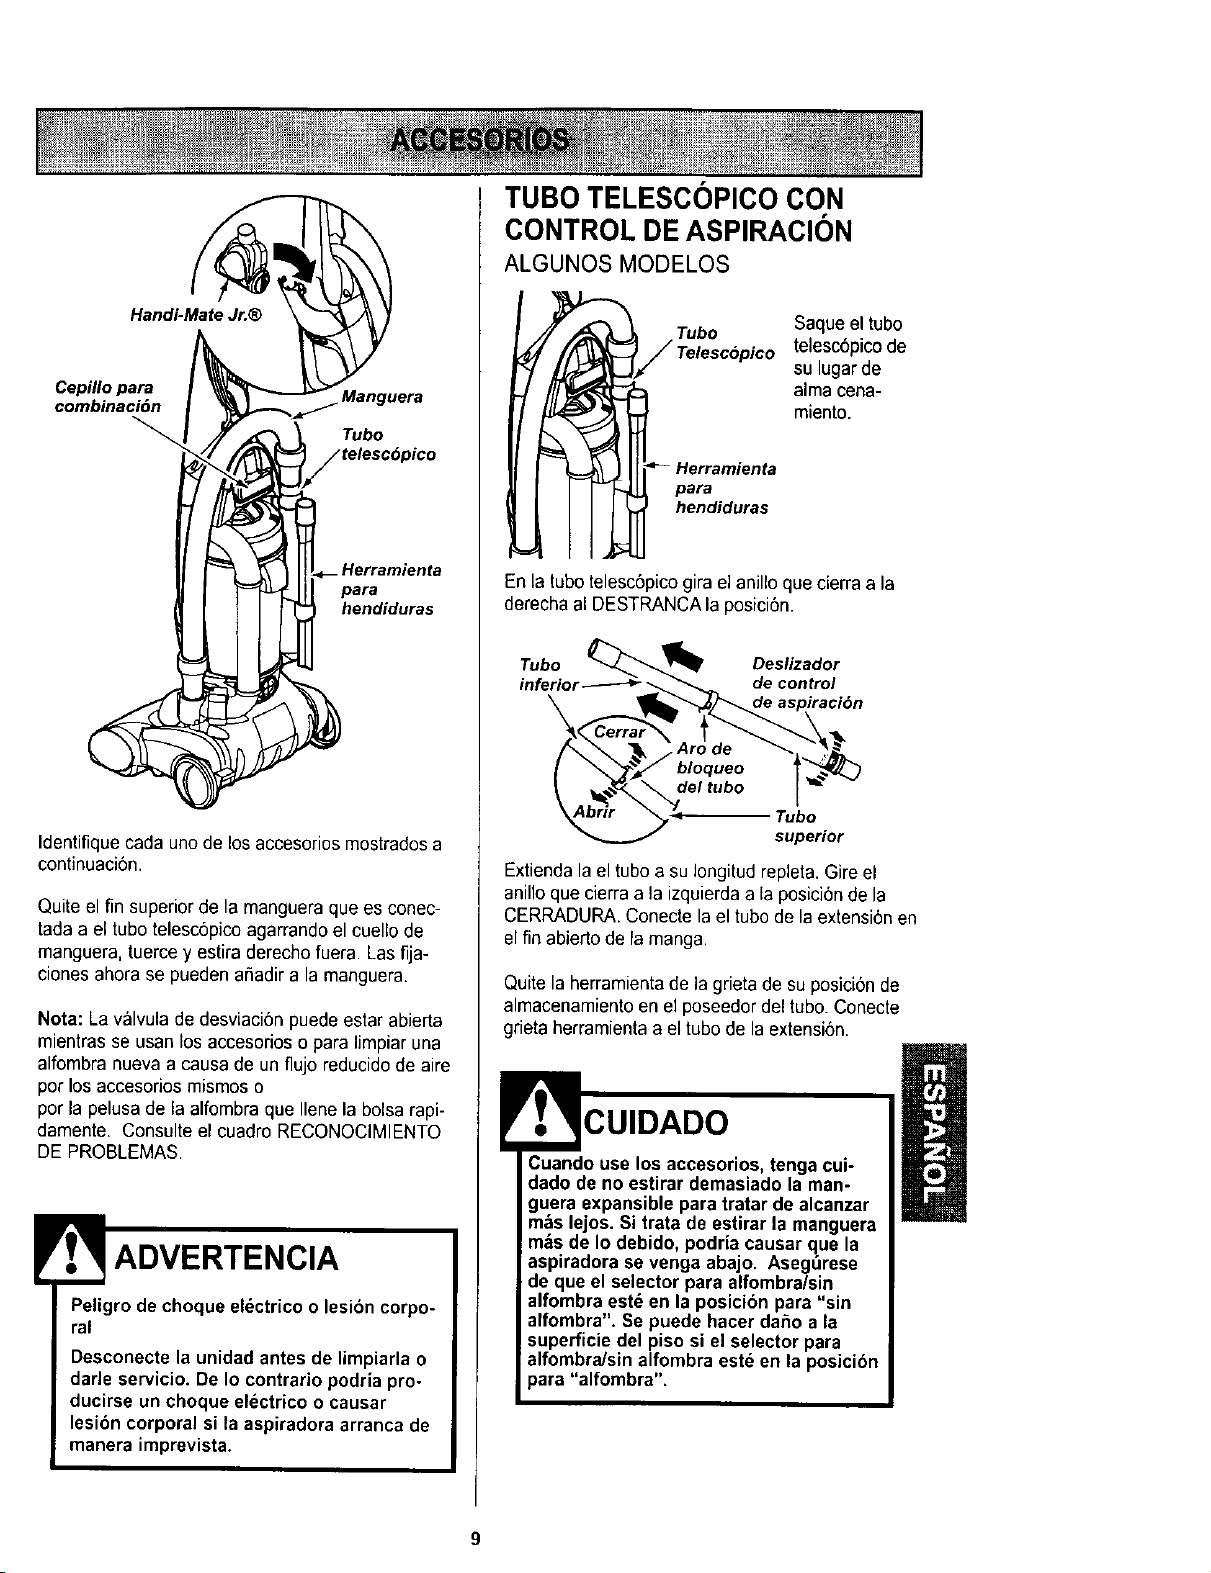
TUBO TELESCOPICO CON
CONTROL DE ASPIRAClON
ALGUNOS MODELOS
Tubo
Telescopico
Herramienta
hendiduras
Saqueel tubo
telescbpico de
su lugar de
alma cena-
miento.
En la tubo telesc6pico gira el anillo que cierraa la
derechaal DESTRANCAla posici6n.
Tubo _-_-._ Deslizador
inferior-_--_ _ decontrol
\ _de aspiraci6n
."4 I
L'o'r'%-,uoo
superior
Extienda la el tubo a su Iongitud repleta. Gire el
anillo que cierraa la izquierdaa la posici6nde la
CERRADURA.Conecte la el tube de la extensi6nen
el finabierto de la manga.
Quitela herramientade la grietade su posici6nde
almacenamiento en el poseedordel tubo. Conecte
grieta herramienta a el tubo de la extensi6n.
CUIDADO
9
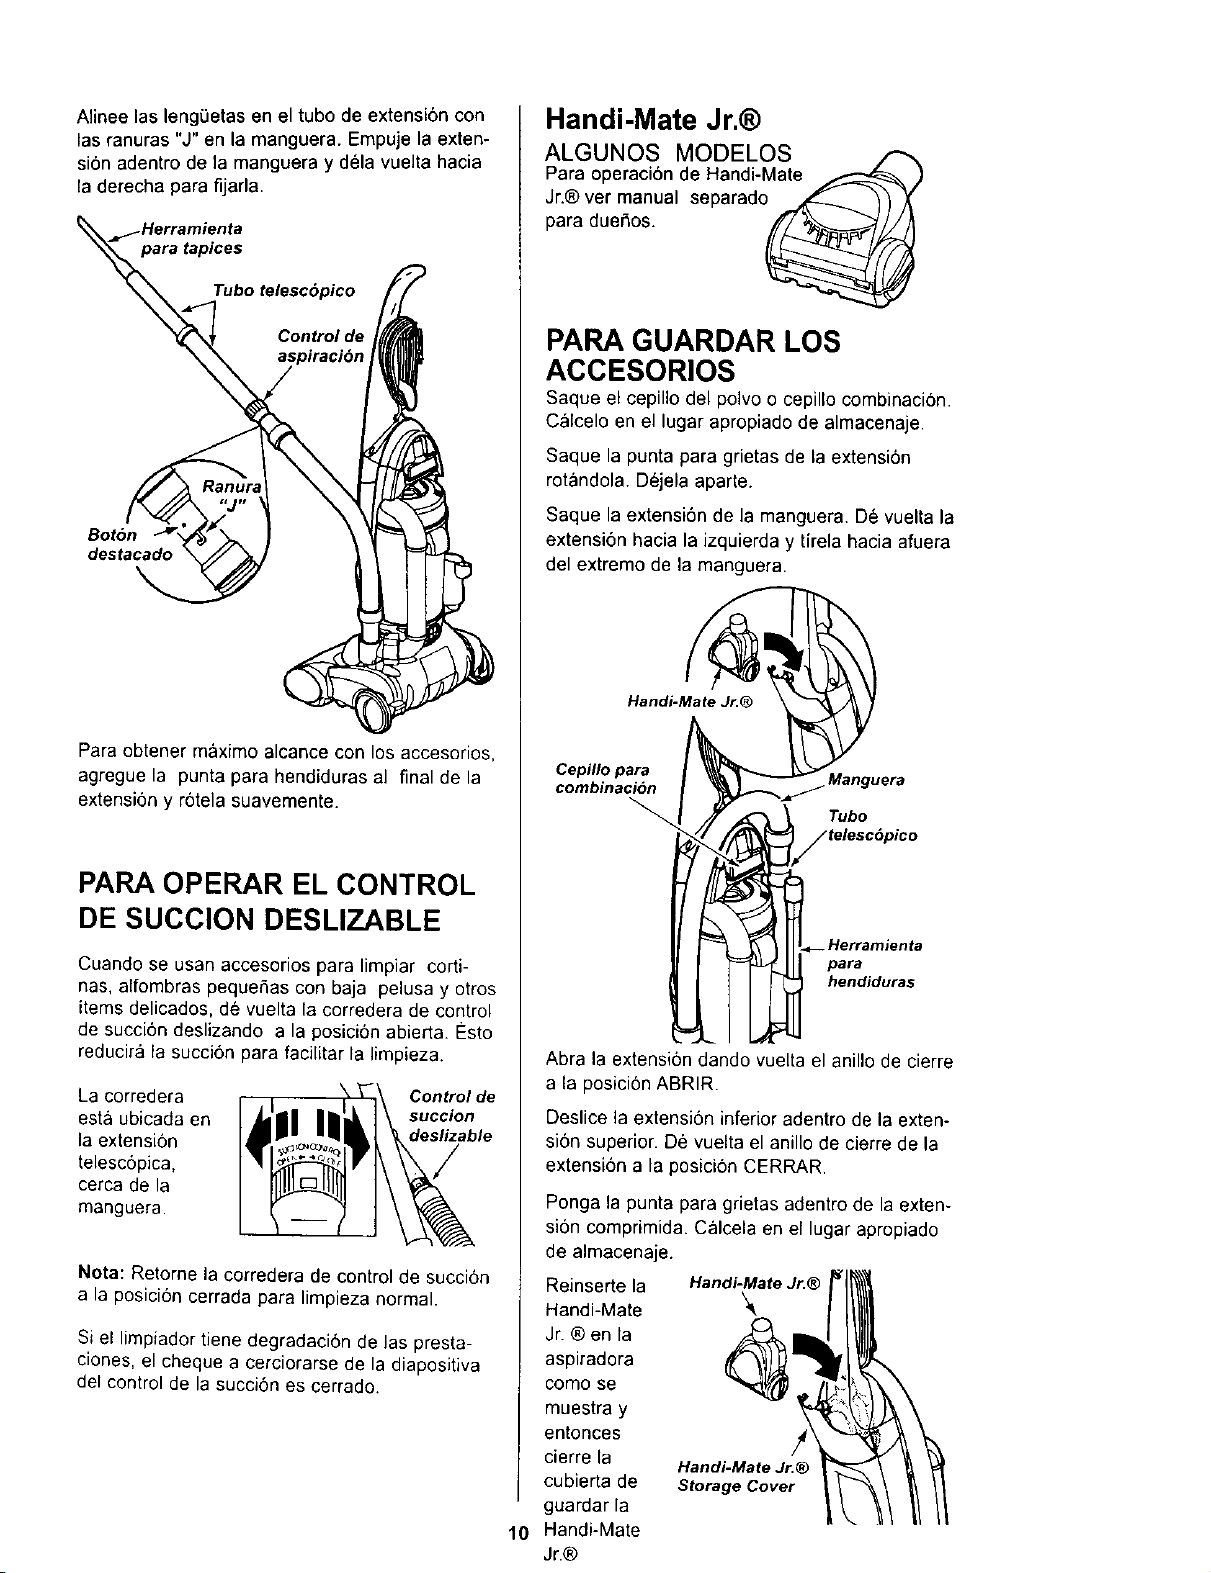
Alineelasleng0etaseneltubodeextensi6ncon
lasranuras"J"enlamanguera.Empujelaexten-
si6nadentrodelamangueraydelavueltahacia
laderechaparafijarla.
tapices
Control de
Bot6n
destacado
Para obtener meximo alcance con los accesorios,
agregue la punta para hendiduras al final de la
extension y r6tela suavemente.
PAPA OPERAR EL CONTROL
DE SUCCION DESLIZABLE
Cuando se usan accesorios para limpiar corti-
has, alfombras pequeSas con baja pelusa y otros
items delicados, de vuelta la corredera de contro_
de succi6n deslizando a la posici6n abierta Esto
reducir& la succi6n para facilitar la limpieza.
La corredera Controlde
esta ubicada en succion
la extensi6n deslizable
telesc6pica,
cerca de la
manguera.
Nora: Retome la corredera de control de succi6n
a la posici6n cerrada para limpieza normal.
Si el limpiador tiene degradacidn de Laspresta-
ciones, el cheque a cerciorarse de la diapositiva
del control de la succi6n es cerrado.
Handi-Mate Jr.@
ALGUNOS MODELOS
Para operaciende Handi-Mate
Jr.®vetmao,,ateepara_o_ 11
para due_os.
)
PAPA GUARDAR LOS
ACCESORIOS
Saque el cepillodel polvo o cepillo combinacion.
Calcelo an el lugarapropiadode almacenaje.
Saque la punta para grietasde la extensi6n
rotando}a. Dejela aparte.
Saque la extensi6n de la manguera. De vuelta la
extensi6n hacia la izquierda y tirela hacia afuera
del extremo de la manguera.
Handi-Mate Jr.@
Cepillo para Manguera
combinaci6n
Tubo
.Herramienta
para
hendiduras
10
Abra la extensi6n dando vuelta el anillo de cierre
a la posici0n ABRtR.
Deslice la extensien inferior adentro de la exten-
si6n superior. De vuelta el aniUode cierre de la
extension a la posicion CERRAR.
Ponga la punta para grietas adentro de la exten-
si6n comprimida. Calcela en el lugar apropiado
de almacenaje.
Reinserte la Handi-MateJr.®
Handi-Mate
Jr. ® en la
aspiradora
como se
muestra y
entonces /4
cierre la Handi-MateJr.@
cubierta de Storage Cover
guardar la
Handi-Mate
Jr.®
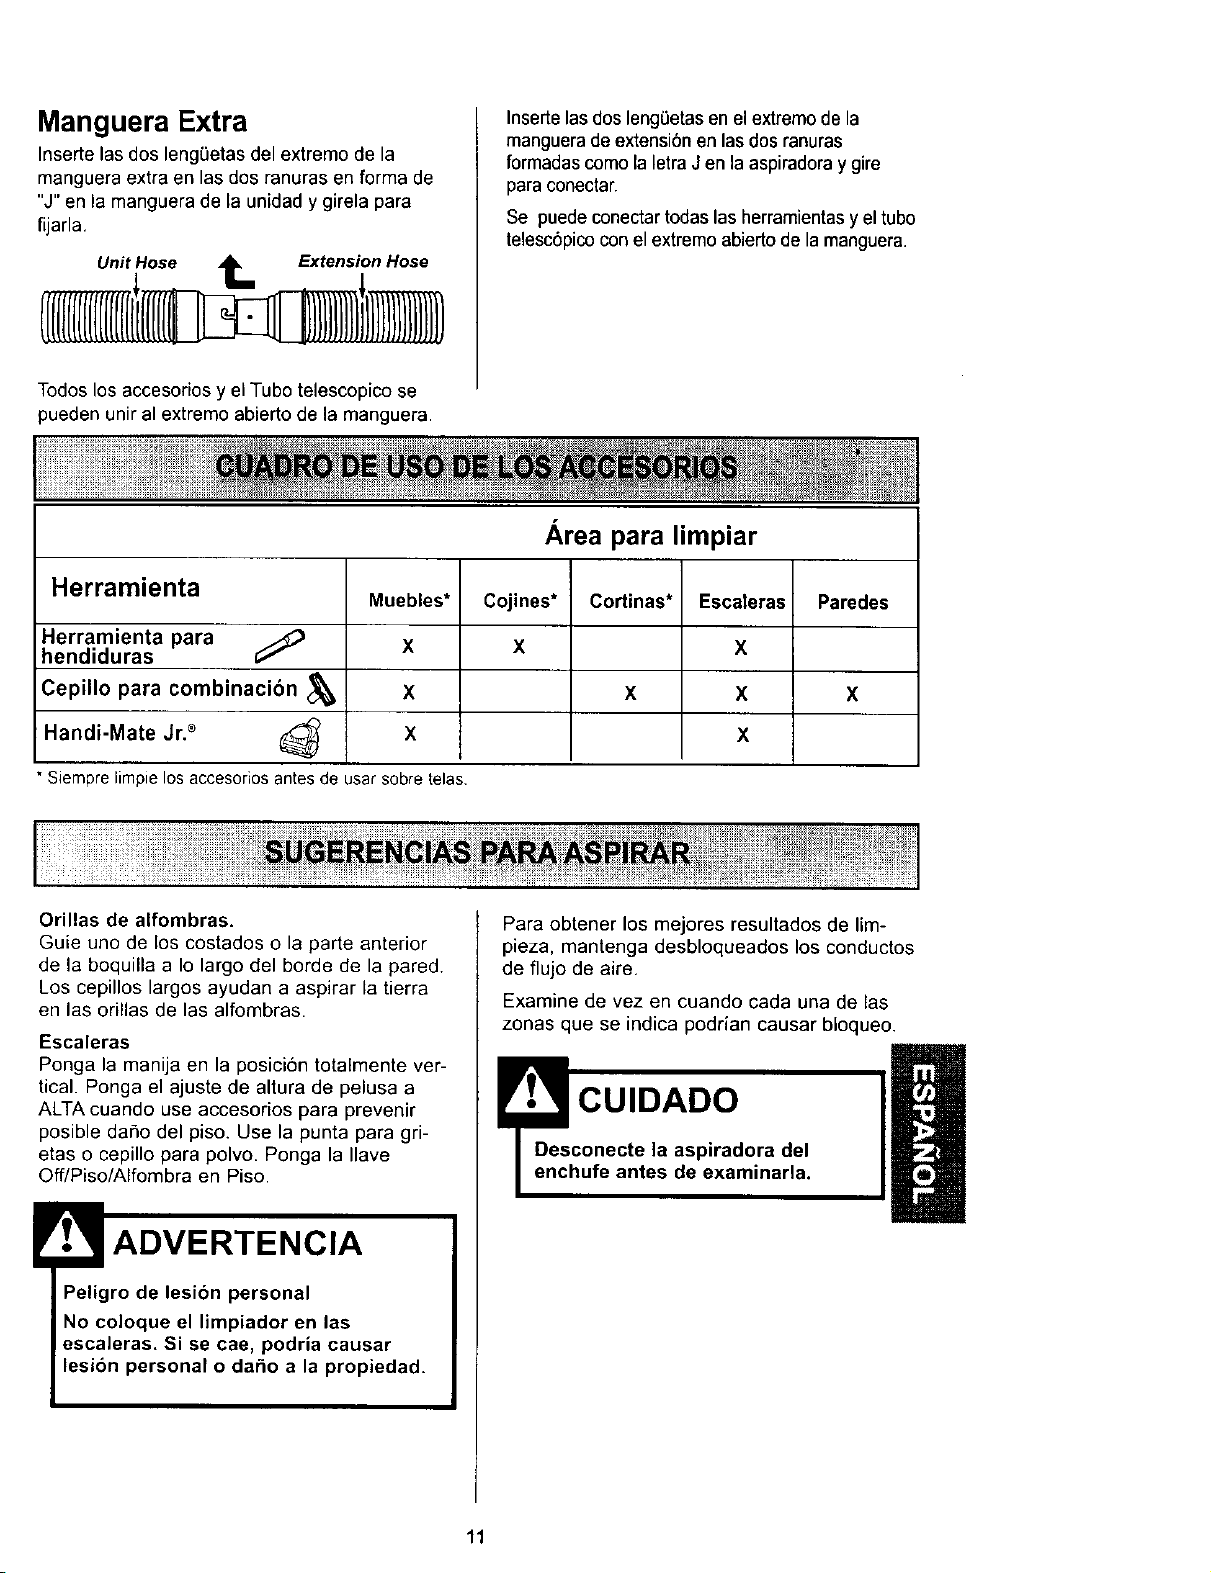
Manguera Extra
Insertelas dos lengBetas del extreme de la
manguera extra en las dos ranuras en forma de
"J" en la manguera de la unidad y girela para
fijarla.
Unit Hose tee Extension Hose
Insertelas dos lengBetasen el extremo de la
manguerade extensi6n en las dos ranuras
formadascomo la letraJ en la aspiradoray gire
para conectar.
Se puede conectar todas las herramientasy el tubo
telesc6picocon el extremo abierto de la manguera.
Todos los accesorios y el Tubo telescopico se
pueden unir al extremo abierto de la manguera.
Herramienta
Herramienta para
hendiduras
Cepillo para combinacibn
Handi-Mate Jr2 (_
* Siemprelimpielosaccesoriosantesde usarsobretelas.
Muebles*
X
X
X
Area para limpiar
Cojines*
X
Cortinas*
X
Escaleras
X
X
X
Paredes
x
Orillas de alfombras.
Guie uno de los costados o la parte anterior
de la boquilla a Io largo del borde de la pared.
Los cepillos largos ayudan a aspirar la tierra
en las orillas de las alfombras.
Escaleras
Ponga la manija en la posici6n totalmente ver-
tical. Ponga el ajuste de altura de pelusa a
ALTA cuando use accesorios para prevenir
posible daSo del piso. Use la punta para gri-
eras o cepillo para polvo. Ponga la Ilave
Off/Piso/Alfombra en Piso.
ADVERTENCIA
Peligro de lesion personal
No coloque el limpiador en las
escaleras. Si se cae, podria causar
lesion personal o dar_o a la propiedad.
Para obtener los mejores resultados de lim-
pieza, mantenga desbloqueados los conductos
de flujo de aire.
Examine de vez en cuando cada una de las
zonas que se indica podrian causar bloqueo.
CUIDADO
11

PROTECTOR DE MOTOR
Esta aspiradora tiene una v_lvula de
desviaoibn que sirve como protector de motor
que se abre automaticamente para proveer un
flujo de aire al motor cuando una obstrucei6n
impida que circule et aire al motor. Si se abre la
v_lvula bypass pare impedir que se recaliente
el motory que no baga dafio ala aspiradora,
se notaria un cembio de sonido mientras el aire
por la abertura de la v_lvula.
Nota: No obstruye el
protector de motor•
Protector
de motor
Para corregir el problema: Consulte el cuadro
RECONOCIMIENTO DE PROBLEMAS.
Nota: La valvula de desviaci6n puede estar
abierta mientras se usan los accesorios opara
limpiaruna alfombra nueva a causa de un flujo
reducido de aire por los accesorios mismos o
por la pelusa de la alfombra que Ilene la cubo
de la basura rapidamente. Consulte el cuadro
RECONOCIMIENTO DE PROBLEMAS.
\.
INDICADOR DE RENDIMIENTO
ALGUNOS MODELOS
Cuando la _d
unidad est_
funcionando
con el flujo
normal de aire,
el indicador de
rendimiento
esta apagado.
Se enciende la orde
luz cuando el rendimiento
flujo de aire
este obstruido. Si eso ocurre, chequee el cubo
de la basura, limpie/reemplace filtros tapados,
y chequee otros lugares posibles de
obstrucciones que se muestran en COMO
ELIMINAR LOS RESIDUOS DE BASURA EN
LOS CONDUCTOS. (ver pagina 18).
Para corregir el problema: Vease el diagrama
RECONOCIMIENTO DE PROBLEMAS.
Nota: Es posible que la luz encienda al user
los accesorios porque el flujo de aire es
reducido por los accesorios.
Nota: En algunos casos el indicador de
rendimiento no se prendera si el protector del
motor est& abierto.
AGITADOR PROTECTOR TERMAL
Estaagitadortieneunprotectortermalquese ajusta
autom_ticamenteparaprotegerala agitadordel
sobrecalentamiento.Siuna obstrucci6nimpideel
flujo normalde aireal motor,elprotectortermal
apagaelmotorautom_ticamenteparapermitirque el
motor seenfriea fin deevitarposiblesdafiosala
aspiradora.Duranteestetiempolaluzdelanterase
mantieneprendida.
Paracorregir el problema: Si esto ocurre, apague
laaspiradoray desenchufeel oord6ndel
tomacorrientepara permitirque laaspiradorase
enfrieyque elprotectortermalse reajuste. Busque
y saque las obstrucciones, sies necesario.
Examinetambi_n y reemplace cualquierfiltro
obstruido. Espereaproximadamentetreinta (30)
minutosy enchufe laaspiradora y volt_ela pare
ver si elprotector del motorse ha reajustado.El
protectordel motor no se reajustar:_si no se ha
apagado la aspiradoraaun caando laaspiradora
se hayaenfriado.
El PROTECTOR de la SOBRECARGA
del MEZCLADOR
El agitador tiene protecci6n incorporada contra
dafio al motor en condiciones de atasque sew
eras. Si el mezclador retrasa o las paradas, el
protector de la sobrecarga del agitador apag6 el
agitador. El motor de la succibn continuar& fun-
cionando.
Para corregir prob- f___)_
lema: De vuelta __"_
apagado y des- _ F_.TY'_" "_
enchufe al vacio, _ _j/
quite la obstrucci6n,_///[ /1_'_'_'_
despues presione u_ u/ . ." . . .
• _ Reajuste del
para reaJustarel agitador
bot6n,
Para reajustar: Empuje hacia adentro el boton
del protector de la sobrecarga del mezclador.
12
PROTECTOR TERMAL DE MOTOR
Estaaspiradoratieneunprotectortermalque se
ajusta automaticamenteparaprotegerala
aspiradoradel sobrecalentamiento.Elprotector
termalapagaelmotor automaticamentepara permitir
queelmotor se enfriea fin deevitar posibles dafios
ala aspiradora.
Parerestabiecer:Apague la aspiradoray des-
enchufeel cord6n del tomacorriente para permitir
que la aspiradora se enfrie. Busquey saque las
obstrucciones, si es necesado. Examinetambi_n y
reemplacecualquierfiltro obstruido. Espereaproxi-
madamente50 minutosy enchufe la aspiradoray
voltdela para ver si el protector del motor se ha rea-
justado. En algunos casos, la unidad puede volver a
arrancars,_bitamente,NO LA DEJE desatendida.
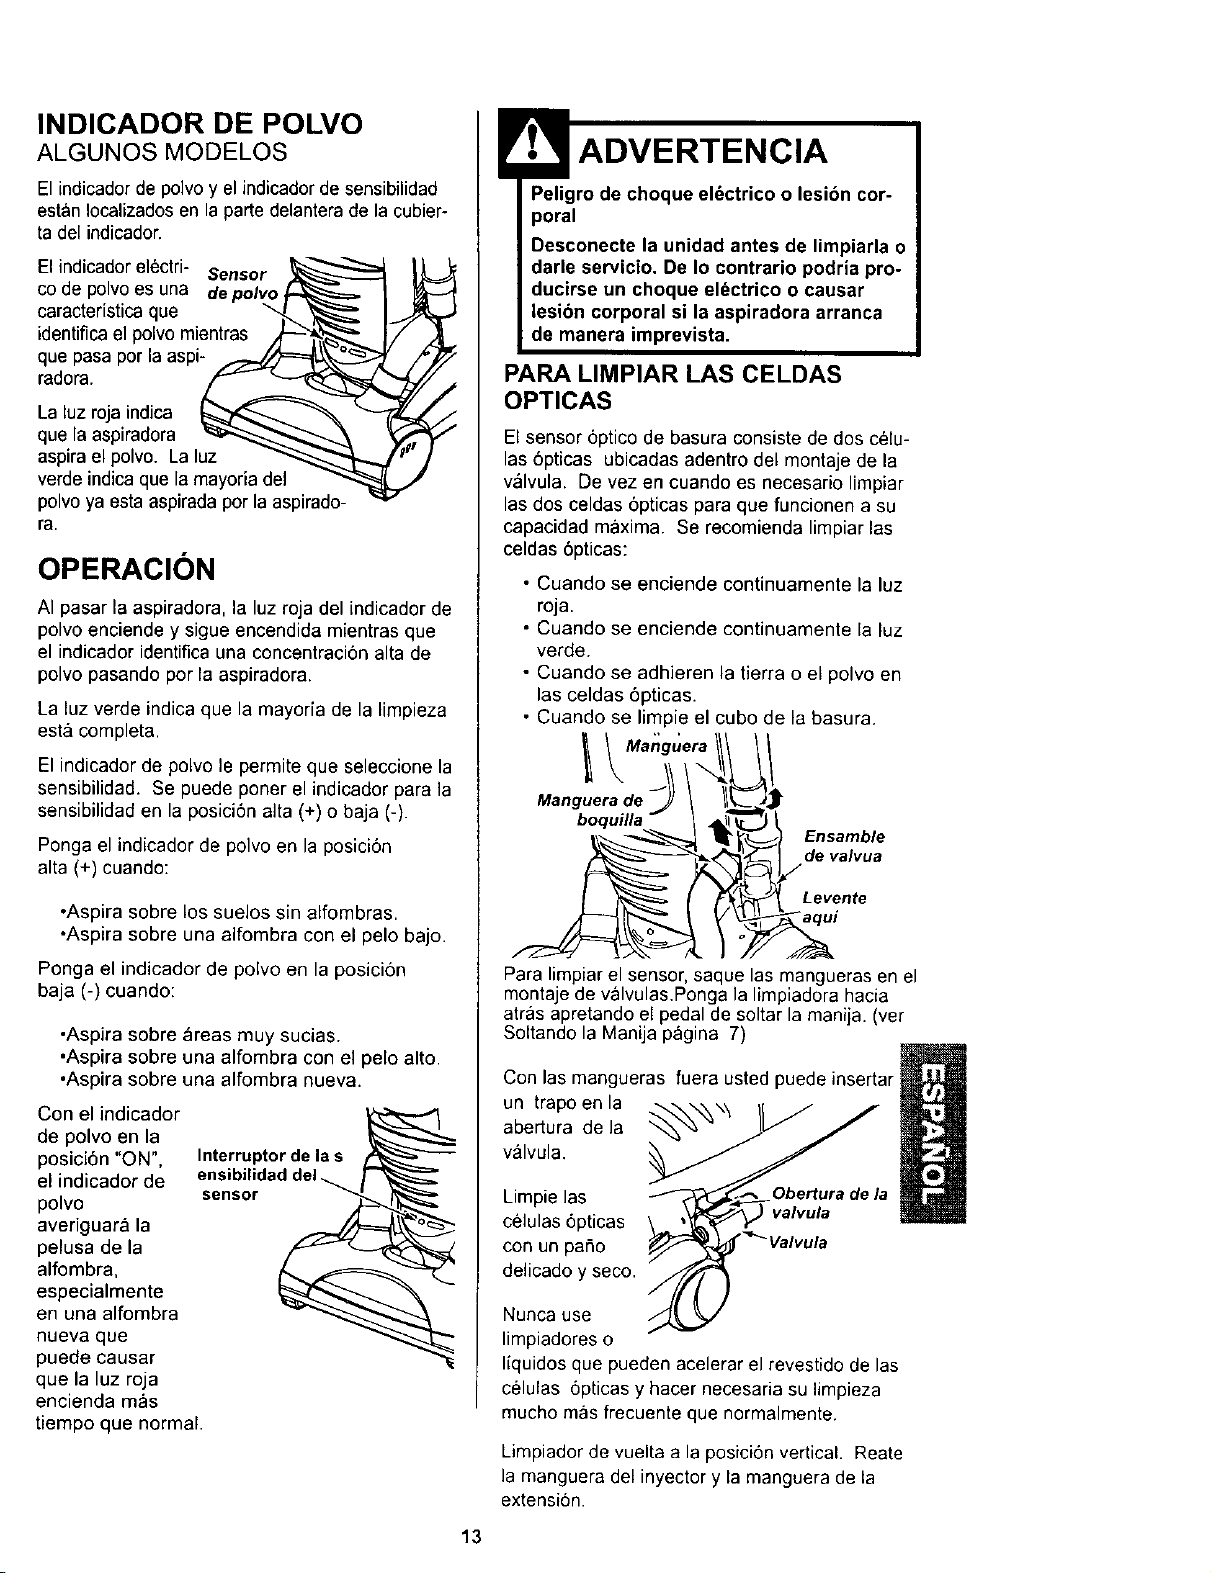
INDICADOR DE POLVO
ALGUNOS MODELOS
El indicador de polvo y el indicadorde sensibilidad
estan Iocalizadosen la parte delantera de la cubier-
ta del indicador.
El indicador elOctri- Sensor
co de polvo es una depolvo _
caractedstica que _ _ l-
identificael polvo mientras .dL-"'_ll_ ]i
que pasa por la aspi- _._/_'===___...._
radora. A_z"_'- ===:::__
La luz roja indica _ _
que la aspiradora _"_""-....._ '_
aspirael polvo. La luz _-.,_
verde indica que la mayoria del
polvoya esta aspirada por la aspirado-
ra.
I
OPERACION
AI pasar la aspiradora, la luz roja del indicador de
polvo enciende y sigue encendida mientras que
el indicador identifica una concentraciOn alta de
polvo pasando por la aspiradora.
La luz verde indica que la mayoria de la limpieza
est& completa.
El indicador de polvo le permite que seleccione la
sensibilidad. Se puede poner el indicador para la
sensibilidad en la posici6n alta (+) o baja (-).
Ponga el indicador de polvo en la posici6n
alta (+) cuando:
•Aspira sobre los suelos sin alfombras.
•Aspira sobre una alfombra con el pelo bajo.
Ponga el indicador de polvo en la posicion
baja (-) cuando:
•Aspira sobre _reas muy sucias.
•Aspira sobre una alfombra con el pelo alto.
°Aspira sobre una alfombra nueva.
Con el indicador
de polvo en la
posici6n "ON",
el indicador de
polvo
averiguara la
pelusa de la
alfombra,
especialmente
en una alfombra
Interruptor de la s
sensor
nueva que
puede causar
que la luz roja
encienda mas
tiempo que normal.
Peligro de choque elOctrico o lesion cor-
poral
Desconecte la unidad antes de limpiarla o
darle servicio. De Io contrario podria pro-
ducirse un choque el_ctrico o causar
lesion corporal si la aspiradora arranca
de manera imprevista.
PARA LIMPIAR LAS CELDAS
OPTICAS
El sensor 6ptico de basura consiste de dos celu-
las 6pticas ubicadas adentro del montaje de la
valvula. De vez en cuando es necesario limpiar
las dos celdas 6pticas para que funcionen a su
capacidad m_,xima. Se recomienda limpiar las
celdas 6pticas:
• Cuando se enciende continuamente la luz
roja.
• Cuando se enciende continuamente la luz
verde.
• Cuando se adhieren la tierra o el polvo en
las celdas 6pticas.
• Cuando se limpie el cubo de la basura.
I 1/
x!
Manguera de _ \ II_"_J:
boquilla- I 4_
Levente
Para limpiar el sensor, saque las mangueras en el
montaje de valvulas.Ponga la limpiadora hacia
atras apretando el pedal de soltar la manija. (vet
Soltande la Manija pagina 7)
Con las maegueras fuera usted puede insertar
un trapo en la
abertura de la
valvula.
Limpie las
celulas 6pticas
con un patio
delicado y seco.
Obertura de la
valvula
Nunca use
limpiadores o
liquidos que pueden acelerar el revestido de las
celulas 6pticas y hacer necesaria su limpieza
mucho mas frecuente que normalmente.
Limpiador de vuelta a la posicion vertical. Reate
la manguera del inyector y la manguera de la
extensi6n.
13
Sigasiempretodaslasinstrucciones de seguridad
al limpiar y darle servicioa su aspiradora.
Peligrode choque el_ctrico o lesibn corpo-
ral
Desconecte la unidadantes de limpiarla o
darle servicio. De Io contrario podria produ-
cirse un choque eldctricoo causar lesibn
corporal si la aspiradora arranca de manera
imprevista.
Recojael cord6ny enrr611eloen los sujetadores su-
periore inferior, sin que quede muy apretado.
Guarde ]a aspiradora
bajo techo en un lugar
seco, con el mango
en posici6n vertical.
Peligrode choque el_ctrico o lesibn corpo-
ral
Si enrollael cordbn muy apretado puede
tensarlo muchoy causarle daSos.De dar_ar-
se, el cordbnpodria causar descargas el(_c-
tricas y lesiones o daSos personales.
Desconecteel cord6nelectrico de la clavija de la
pared.
Limpieel exterior con un trapo suave y limpio,que
ha sidoexprimido despues de remojaren una solu-
ci6n de agua y detergente liquido ]igero. Seque el
exterior con un trapo seco despues de limpiar. NO
choree agua sobre la aspiradora.
Lavelosaccesorios en agua tibiajabonosa,
enjuague y deje secar al aire. No los lave en lava.
dora de platos.
CUIDADO
No use los accesoriossil estan mojados.
Los accesorios que se utilicenen areas
sucias, debajo del refrigerador,no deben
usarse en otras superficiessin antesser
lavados. Podriandejar marcas.
14
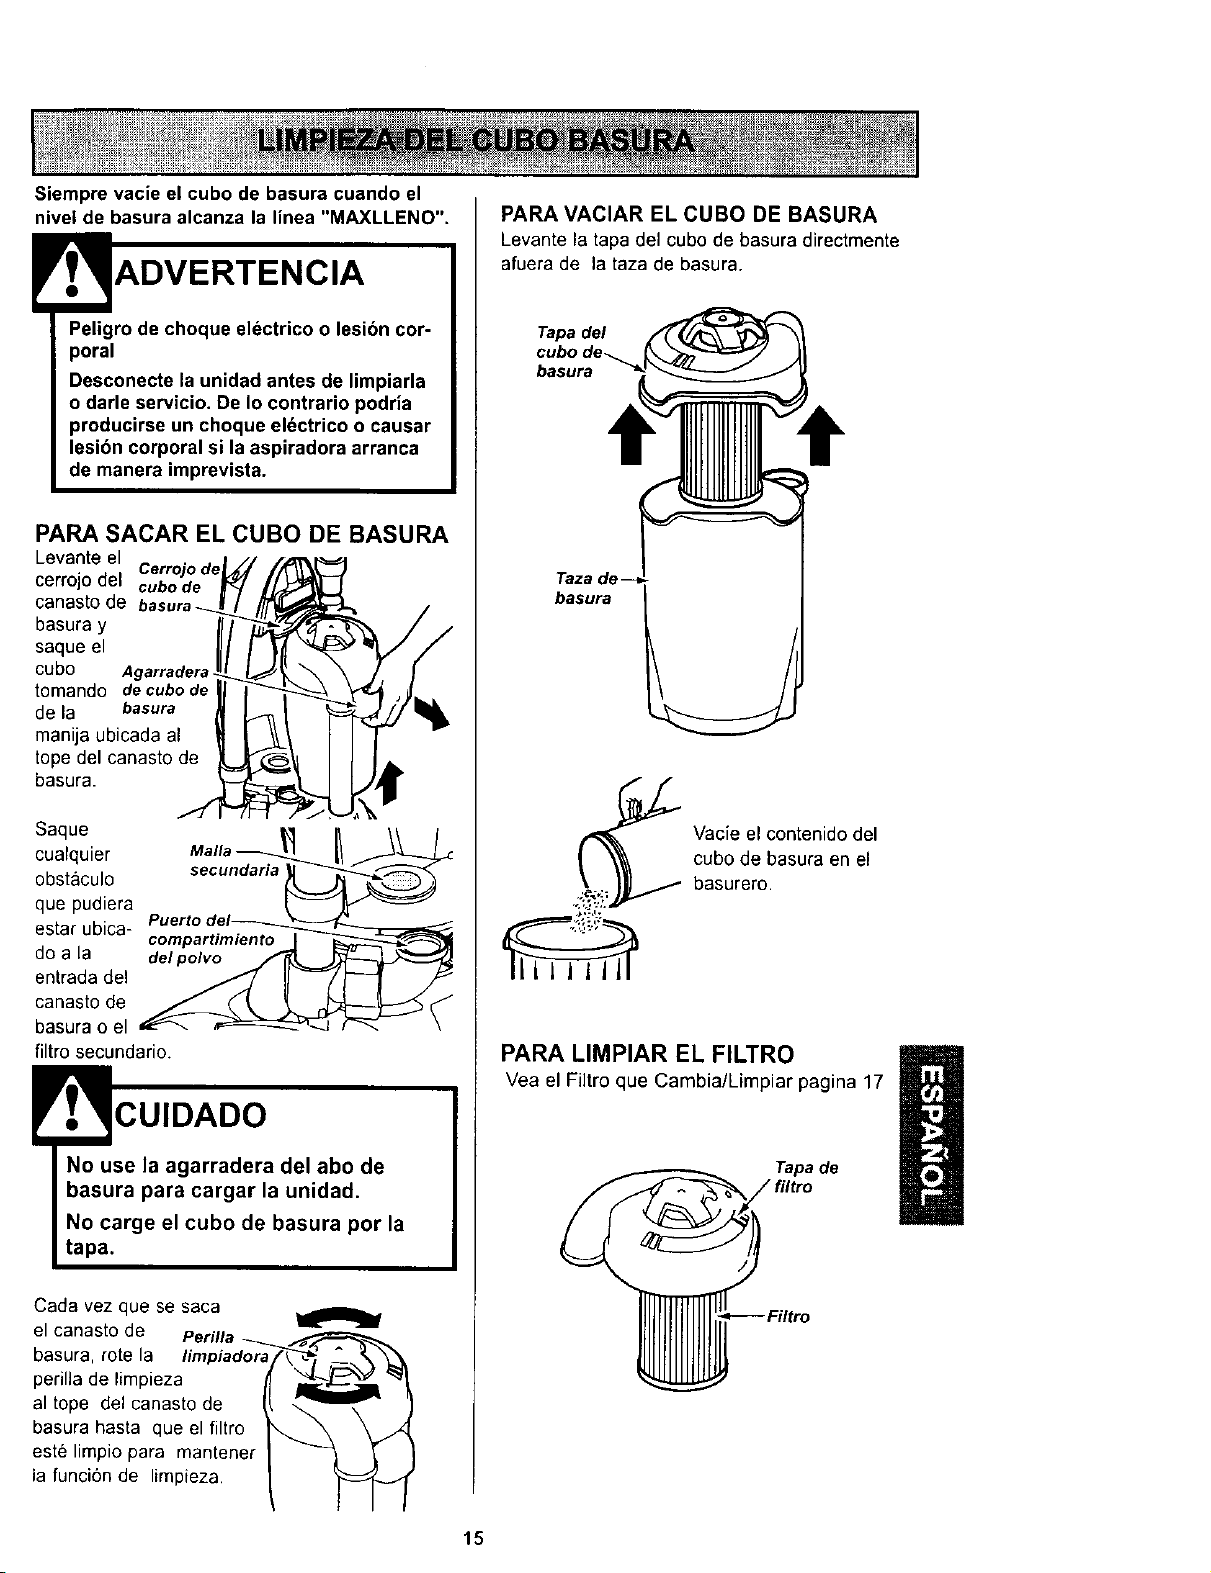
Siempre vacie el cubo de basura cuando el
nivel de basura alcanza la linea "MAXLLENO".
Peligro de choque electrico o lesibn cor-
poral
Desconecte la unidad antes de limpiarla
o darle servicio. De Io contrario podria
producirse un choque el_ctrico o causar
lesibn corporal si la aspiradora arranca
de manera imprevista.
PARA SACAR EL CUBO DE BASURA
Levanteel
Cerrojo de
cerrojodel cubode
oanasto de
basura y
saque el
cubo Agarradera
tomando de cubo de
de la basura
manija ubicada al
tope del canasto de
basura.
Saque _ lea//uan_
cualquier
obstaculo
que pudiera
Puertodel_
estar ubica- compartimiento _J
do a la del#olvo/_KL
entrada del
canasto de
basura o el
filtro secundario.
CUIDADO
No use la agarradera del abo de
basura para cargar la unidad.
No carge el cubo de basura por la
tapa.
Cada vez que se saca
el canasto de
basura, rote la limpiadora
perilla de limpieza
al tope del canasto de
basura hasta que el filtro
este limpio para mantener
la funci6n de limpieza
PARA VACIAR EL CUBO DE BASURA
Levante la tapa del cubode basura directmente
afuera de la taza de basura.
Tapa del
basura
Taza de
basura
Vacie el contenido del
cubo de basura en el
basurero.
PARA LIMPIAR EL FILTRO
Vea el Fiitroque Cambia/Limpiar pagina 17
Tapa de
15

REMPLAZO DEL BOTE DE POLVO
Tapa del cubo
de basura
Tapa de
basura
Reemplace el montaje de la tapa del canasto de
basura poniendola de vuelta sobre el canasto de
basura como se muestra.
Cerrojo de
basura
Ponga el canasto de basura adentro de la aspi-
radora.
Asegure el canasto de basura en su lugar cerran-
do el cerrojo del canasto de basura.
Chequee el filtro sec_ndario frecuente-
mente y limpielo cuando este sucio.
MALLA SECUNDARIA
Remueva el canasto de basura como se
describe en la secci6n LIMPIEZA CANAS-
TO DE BASURA.
Remueva el filtro secundario de la aspirado-
ra cleaner.
Malla
secundaria
Lave el filtro secundario en agua jabonosa
caliente, enjuague y seque cuidadosamente
estrujando el filtro en su mano y dej&ndolo secar
al aire.
NO LO LAVE en el lavaplatos.
NO LO instale hdmedo.
Reemplace el flltrosecundarioseco. Asegure
que el flltroesta propiamenteinstaladosobre la
abertura del filtro.
Reemplace el canasto de basura come se expli-
ca en la secci6n LIMPIEZA DEL CANASTO DE
BASURA.
16
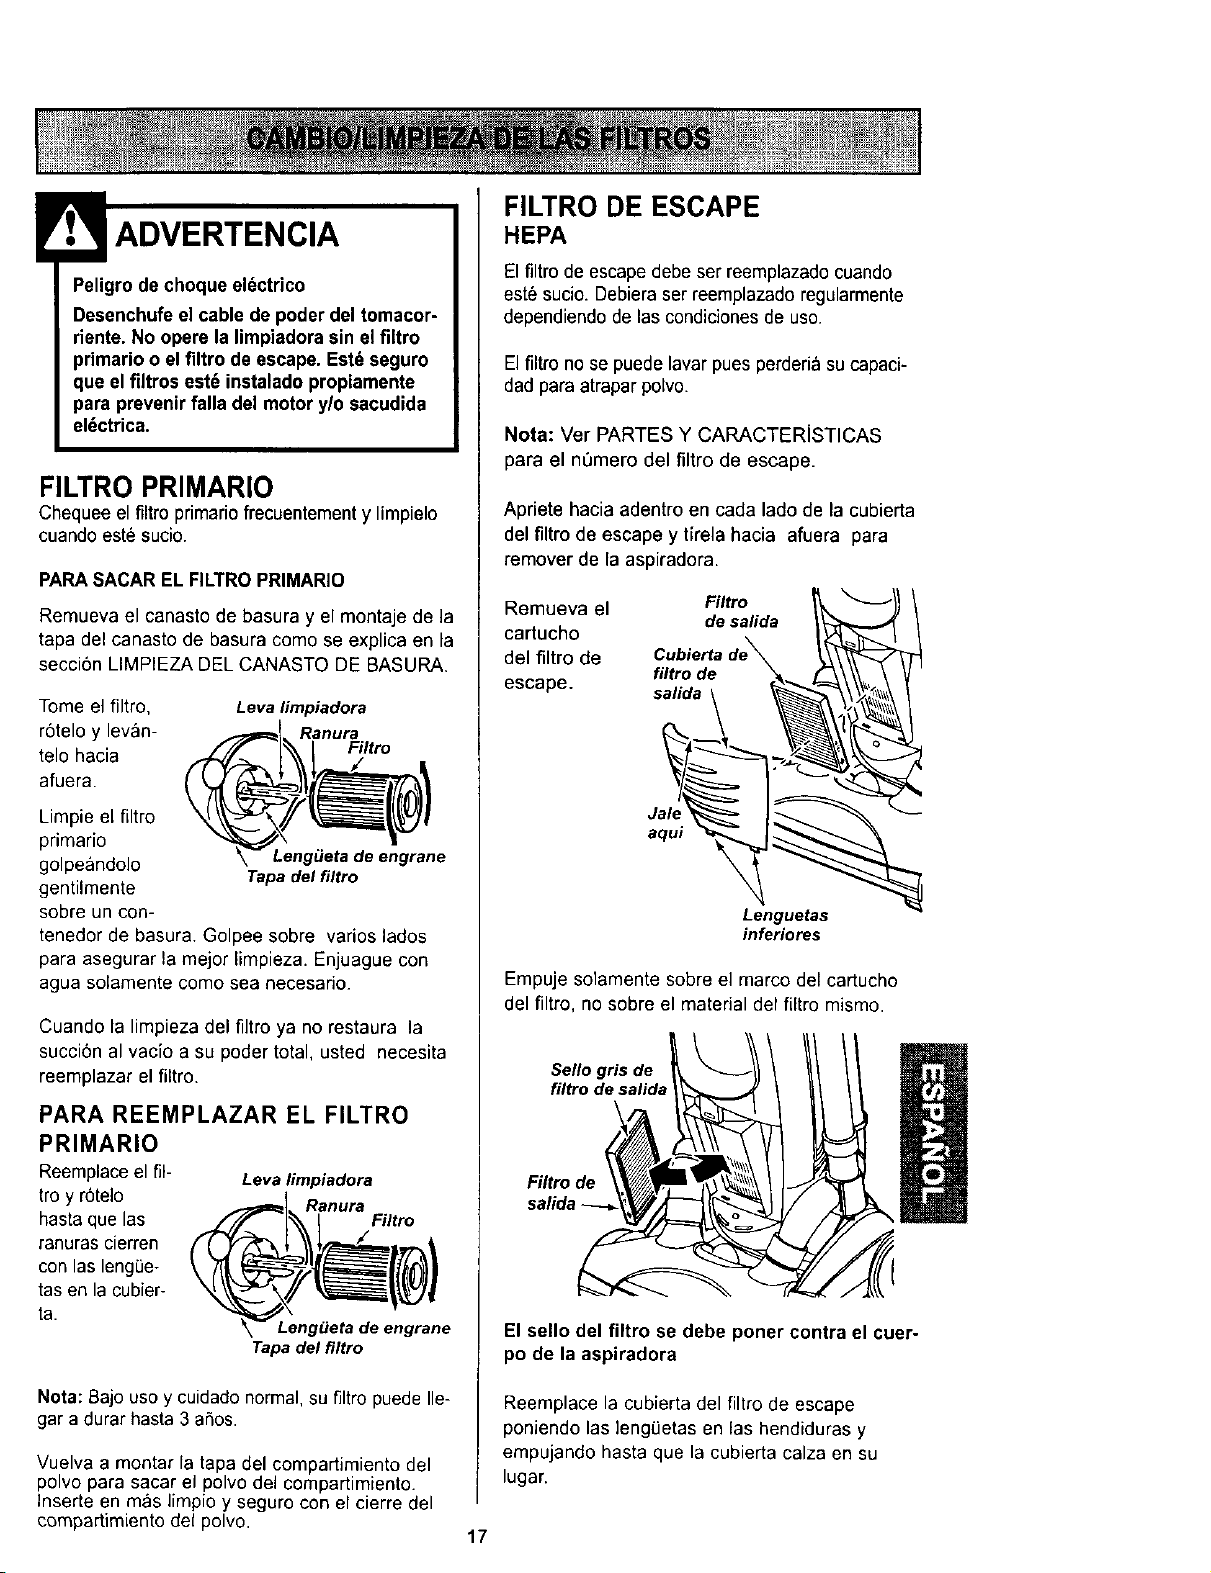
Peligro de cheque el_ctrico
Desenchufe el cable de poder del tomacor-
riente. No opere la limpiadorasin elflltro
primario o el filtro de escape. Est_ seguro
que elfiltros est_ instaladopropiamente
para prevenirfalla del motor y/o sacudida
el_ctrica.
FILTRO PRIMARIO
Chequee el filtro primariofrecuentementy limpielo
cuando este sucio.
PARASACAR EL FILTROPRIMARIO
Remueva el canasto de basura y el montaje de la
tapa del canasto de basura come se explica en la
secci6n LIMPIEZA DEL CANASTO DE BASURA.
Tome el filtro, Levalimpiadora
r6telo y levan- Ranura
telo hacia Filtro
afuera.
Limpie el filtro
primario
golpeandolo
gentilmente
sobre un con-
tenedor de basura. Golpee sobre varies lades
para asegurar la mejor limpieza. Enjuague con
agua solamente come sea necesario.
Leng_leta de engrane
Tapa del filtro
Cuando la limpieza del filtro ya no restaura la
succi6n al vacio a su poder total, usted necesita
reemplazar el filtro.
PARA REEMPLAZAR EL FILTRO
PRIMARIO
Reemplaceel ill- Levalimpiadora
troy r6telo Ranura
hasta que las Filtro
ranuras cierren
con las leng0e-
tas en la cubier-
ta.
Leng_Jeta de engrane
Tapa del filtro
Neta: Bajo use y cuidado normal, su filtro puede Ile-
gar a durar hasta 3 aSos.
Vuelva a montar la tapa del compartimiento del
polvo para sacar el polvo del compartimiento.
Inserte en mas limpio y seguro con el cierre del
eompartimiento del polvo.
FILTRO DE ESCAPE
HEPA
El filtro de escape debe ser reemplazado cuando
est_ sucio. Debieraser reemplazado regularmente
dependiendo de las condicionesde use.
El filtro no se puede lavar pues perderiasu capaci-
dad para atrapar polvo.
Nota: Ver PARTES Y CARACTERiSTICAS
para el n0mero del filtro de escape.
Apriete hacia adentro en cada lade de la cubierta
del filtro de escape y tlrela hacia afuera para
remover de la aspiradora.
Remueva el Filtro
desalida
cartucho
del filtro de
filtro de
escape, salida
Jalq
aqui
Lenguetas
inferiores
Empuje solamente sobre el marco del cartucho
del filtro,no sobre el material del filtro mismo.
Sello gris de
filtro de salida
I
El sello del filtro se debe poner contra el cuer-
po de la aspiradora
Reemplace la cubierta del filtro de escape
poniendo las leng0etas en las hendiduras y
empujando basra que lacubierta calza en su
lugar.
17
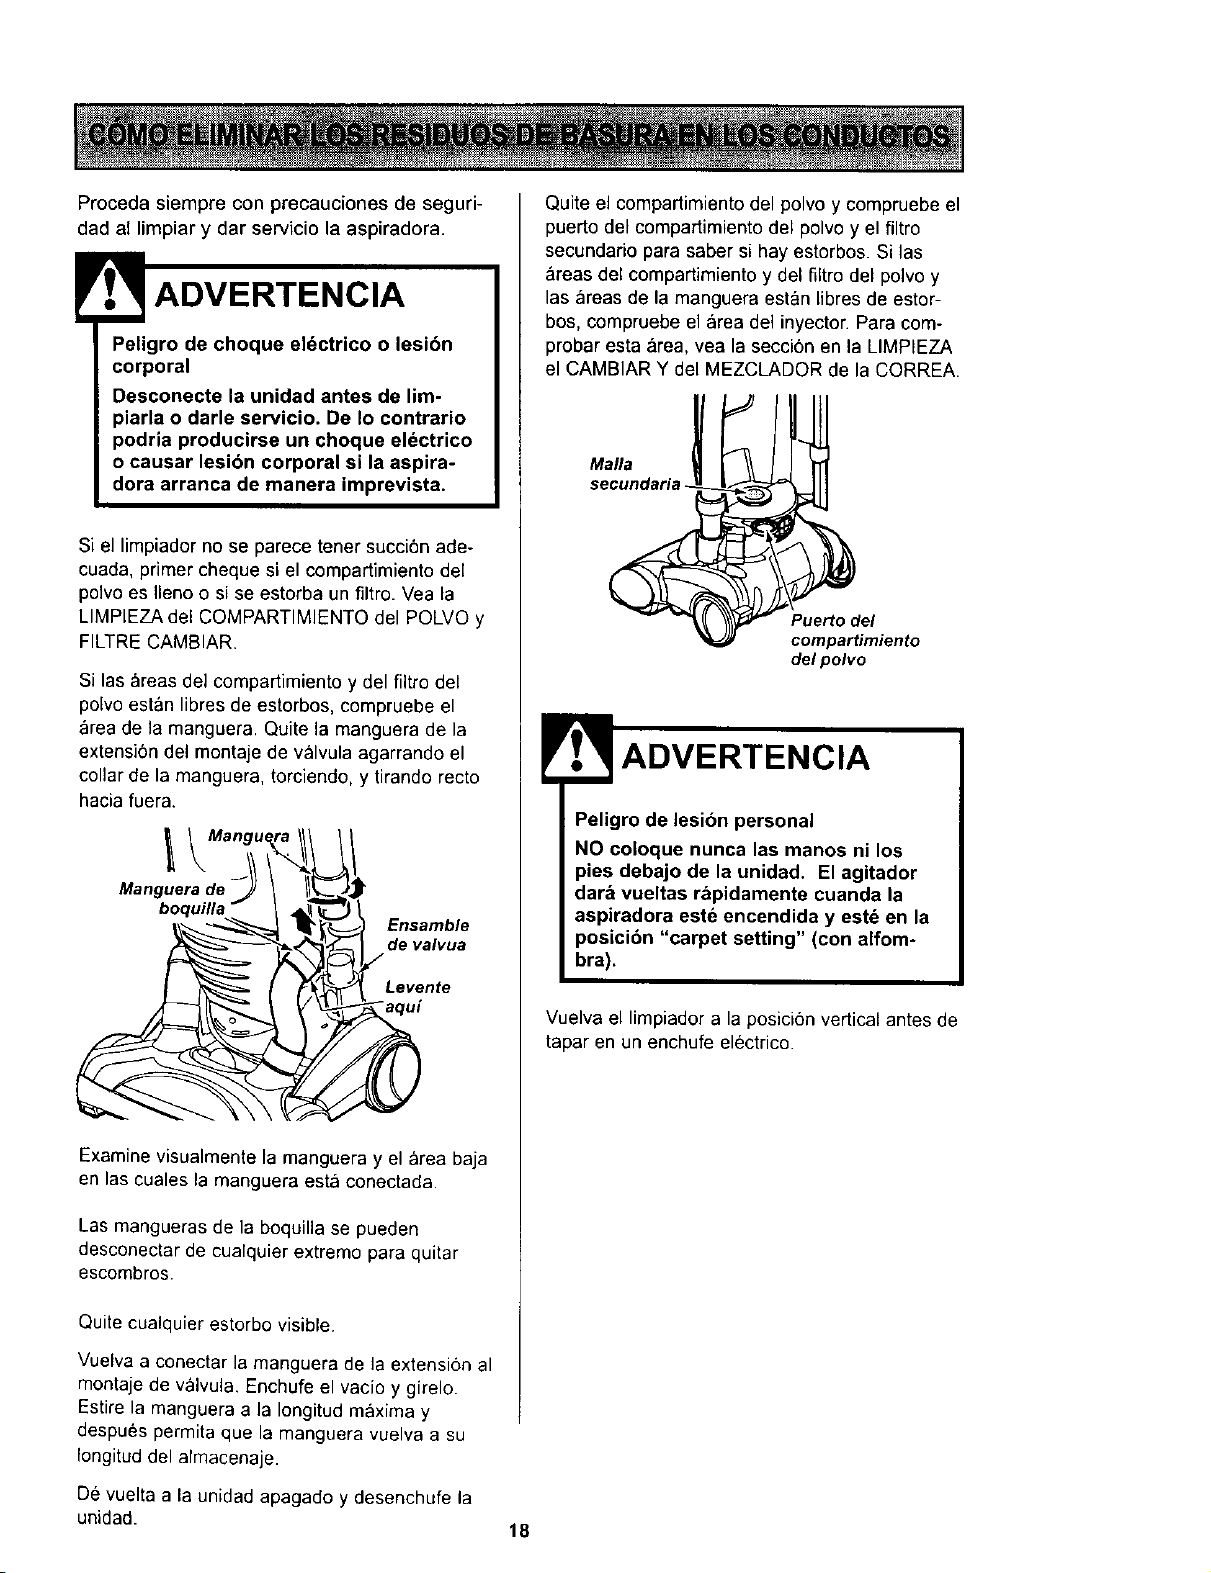
Proceda siempre con precauciones de seguri-
dad al limpiar y dar servicio la aspiradora.
Peligro de choque eldctrico o lesibn
corporal
Desconecte la unidad antes de lim-
piarla o darle servicio. De Io contrario
podria producirse un choque eldctrico
o causar lesibn corporal si la aspira-
dora arranca de manera imprevista.
Si el limpiadorno se parece tenet succi6n ade-
cuada, primer chequesi el compartimiento del
polvo es Ileno o si se estorba un filtro. Vea la
LIMPIEZA del COMPARTIMIENTO del POLVO y
FILTRE CAMBIAR.
Si las areas del compartimiento y del filtro del
polvo esten libres de estorbos, compruebe el
area de la manguera. Quite la manguera de la
extensi6n del montaje de valvula agarrando el
collar de la manguera, torciendo, y tirando recto
hacia fuera.
Manguera de _ \ t_=.__J_
boquilla _ _
_,_ _ _) Ensamble
_,_) ,e valvua
Examine visualmente la manguera y el area baja
en las cuales la manguera esta conectada.
Las mangueras de la boquilla se pueden
desconectar de cualquier extremo para quitar
escombros.
Quite cualquier estorbo visible.
Vuelva a conectar la manguera de la extensi6n al
montaje de valvula. Enchufe el vacio y girelo.
Estire la manguera a la Iongitud maxima y
despu_s permita que la manguera vuelva a su
Iongitud del almacenaje.
De vuelta a la unidad apagado y desenchufe la
unidad.
Quite el compartimiento del polvo y compruebe el
puerto del compartimiento del polvo y el filtro
secundado para saber si hay estorbos. Si las
areas del compartimiento y del filtrodel polvo y
las areas de la manguera estan libres de estor-
bos, compruebe el area del inyector. Para com-
probar esta &rea, vea la seccibn en la LIMPIEZA
el CAMBIAR Y del MEZCLADOR de la CORREA.
Mafia
secundaria
Puerto del
compartimiento
de/polvo
Peligro de lesion personal
NO coloque nunca las manos ni los
pies debajo de la unidad. El agitador
dare vueltas rapidamente cuanda la
aspiradora este encendida y est_ en la
posici6n "carpet setting" (con alfom-
bra).
Vuelva el limpiador a la posicion vertical antes de
tapar en un enchufe electrico.
18
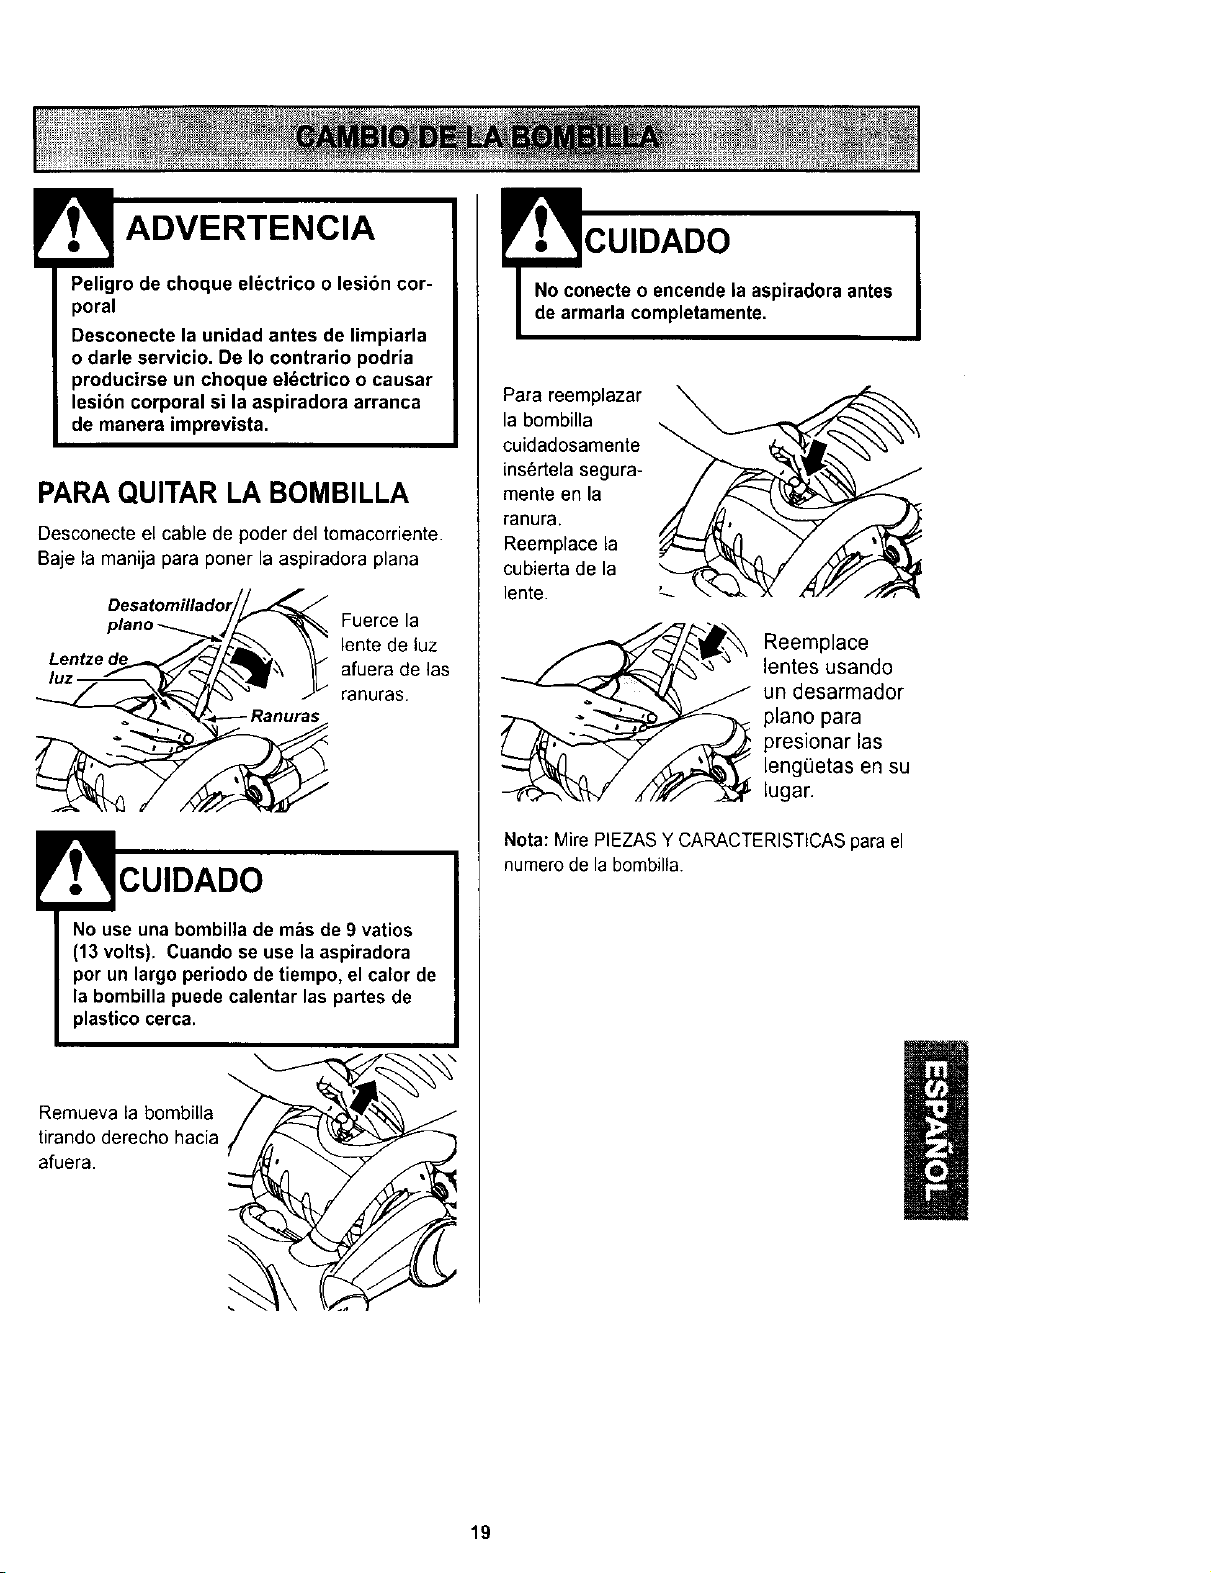
0ec.o.uoo,.tricoo.es,6ncor-
Desconecte la unidad antes de limpiarla
o darle servicio. De Io contrario podria
producirse un choque eldctrico o causar
lesibn corporal si la aspiradora arranca
de manera imprevista.
PARA QUITAR LA BOMBILLA
Desconecte el cable de poder del tomacorriente.
Baje la manija para poner la aspiradora plana
Fuerce la
lente de luz
afuera de las
ranuras.
CUIDADO
No use una bombilla de mas de 9 vatios
(13 volts). Cuando se use la aspiradora
por un largo periodo de tiempo, el calor de
la bombilla puede calentar las partes de
plastico cerca.
Remueva la bombilla
tirando derecho hacia
afuera.
_m cUIDADO
necte o encende la aspiradora antes
aria completamente.
Para reemplazar
la bombilla
cuidadosamente
ins6rtela segura-
mente en la
ranura.
Reemplace la
cubierta de la
lente.
Reemplace
lentes usando
un desarmador
piano para
presionar las
leng(_etas en su
iugar.
Nota: Mire PIEZASY CARACTERISTICASparael
numerode la bombilla.
/
19

ADVERTENCIA
Peligro de choque el_ctrico o lesibn cor-
poral
Desconecte la fuente de electricidad
antes de hacer el servicio o limpiar la
unidad. Dejar de hacer esto puede
resultar en una sacudida o lesibn
personal debidas a un arranque s_bito
de la aspiradora o del agitador.
Para limpiar el agitador apague la aspirado corte
cualquier acumulacibn de pelusa y alfombras
alrrededor del agitador con un par de tijeras a
traves de las ranuras provistas.
Quite el pelo, la secuencia, la pelusa y la otra
ruina del mezclador.
El ensamble de valvula estara cerrado cuando
la aspiradora este en posici6n vertical. Cuando
se libera el mango para opercion normal la
valvula se abre para permitir el paso de aire.
Esta valvula puede ensuciarse y requerir
limpieza de rutina.
Para limpiar la v_lvula _lebera remover la
manguera de la boquilla para poder accesar la
valvula. Una vez que se ha quitado la
manguera libere el mango (ver la secci6n
desprendimiento del mango) y acueste la
aspiradora.
Con la aspirador acostada, de vuelta al
activador de la valvula mientras Io limpia con un
trapo para remover cualquier residuo.
Limpiador de vuelta a la posiciSn vertical.
Coloque la manguera del inyector y la manguera
de la extensi6n.
Manguera de _ _mnVt!_e
boquilla _
a u!
20
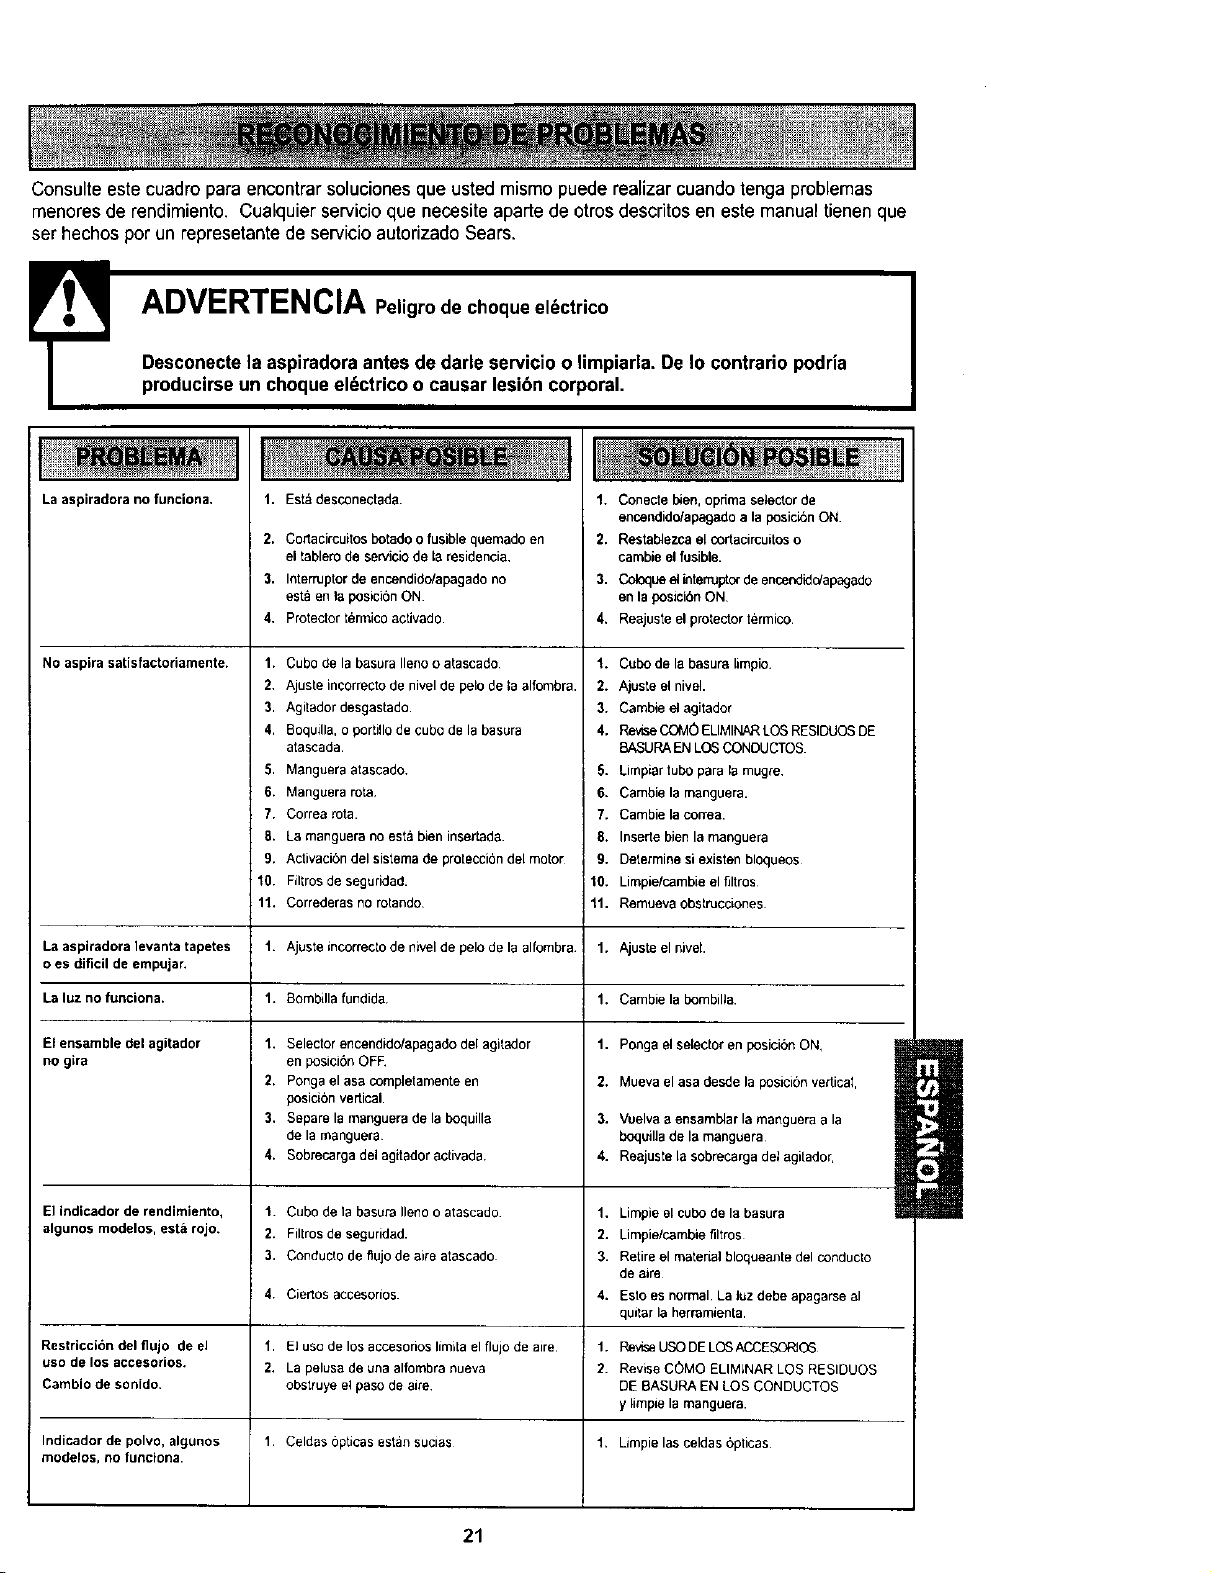
Consulte este cuadropara encontrar soluciones que usted mismo puede realizar cuandotenga problemas
menoresde rendimiento. Cualquier servicio quenecesite aparte deotros descritos en este manualtienen que
ser hechos pot un represetantede servicio autorizado Sears.
E Peligro de choque el_ctrico
ADVERTENCIA
Desconectela aspiradora antes de darle servicio o limpiarla. De Io contrario podria
producirseun choque el_ctrico o causar lesibn corporal•
La aspiradora no funelona.
No aspira satisfactoriamente.
1,
2.
3.
4,
Estd desconectada.
Co_acircuitos botado o fusible quemado en
el tablero de servicio de la residencia,
Interruptor de encendido/apagado no
esta en la posici6n ON
Protector termico activado.
1. Cubo de la basura Ileno (}atascado
2. Ajuste incorrect(} de nivel de pelo de la alfombra.
3. Agitador desgastado
4. Boquilla, o portillo de cubo de la basura
atascada.
5. Manguera atascado.
6. Manguera rota
7. Correa rota.
8. La manguera no esta bien insertada.
9. Activaci6n del sistema de protecci6n del mot(}[
10. FJltros de seguridad.
11. Correderas no rotand(}
1. Conecte I_en, opdma select(}r de
encendido/apagado a la posick_n ON.
2. Restablezca el cortacircuitos o
cambie el fusible.
3. Coloque el _terruptor de encendida/apagado
en la posicibn ON
4. Reajuste el pr(}lect(}r termico
1. Cubo de la basura limpio.
2. Ajuste el nivel.
3. Cambie el agitad(}r
4. Revise COM0 ELIMINAR LOS RESIDUOS DE
8ASURA EN LOS CONDUCTOS
5. Limpiar tubo para la mugre
6. Cambie la manguera.
7. Cambie la correa.
8. Inserte bien la manguera
9. Determine si existen bloqueos
10. Limpie/cambie el filtros
11. Remueva obstrucci(}nes
La aspiradora ]evanta tapetes 1. Ajuste incorrecto de nivel de pel(} de la alfombra 1. Ajuste el nivel.
o es dificil de empujar.
Laluznofunciona. 1. Bombdlafundida. 1. Cambielabombilla.
El ensamble del agitador
no gira
El indicador de rendimiento,
algunos modelos, esta rojo.
Restriccibn del flujo de el
uso de los accesorios.
1. Selector encendido/apagado del agitador
en posiciSn OFE
2. Ponga el asa completamente en
posicibn vertical.
3, Separe la manguera de la boquilla
de la manguera
4. S(}brecarga del agitador activada.
1. Cubo de la basura Ileno o atascado
2. Filtros de seguridad.
3. C(}nduelo de flujo de aire atascado
4, Ciertos acces(}rlo5
1. El use de los accesori(}s limita el flujo de aire
2. La pelusa de una alfombra nueva
(}bstruye el paso de ake
1. Celdas opticas estan sucias
Cambio de sonido.
Indicador de polvo, algunos
modelos, Ro fLIRCIoRa.
1. Ponga el selector en posiciSn ON,
2. Mueva el asa desde la posicibn vedicaI,
3. Vuelva a ensamblar la manguera a la
boquilla de la manguera
4. Reajuste la sobrecarga del agitador,
1, Limpie el cubo de la basura
2. Limpie/cambie filtros
3. Retire el material bloqueante del conducto
de aire
4. Esto es normal La Juzdebe apagarse al
quitar la herramienta.
1. Revise USO DE LOSACCESORIC_
2. Revise COMO ELIMINAR LOS RESIDUOS
DE BASURA EN LOS CONDUCTOS
y limpie la manguera.
1, Limpie las celdas opticas
l
21
Your Home
For repair - in your home - of all major brand appliances,
lawn and garden equipment, or heating and cooling systems,
no matter who made it, no matter who sold it!
For the replacement parts, accessories and
owner's manuals that you need to do-it-yourself.
For Sears professional installation of home appliances
and items like garage door openers and water heaters.
1-800-4-MY-HOME _ Anytime, day or night
(1-800-469-4663) (U.S.A. and Canada)
www.sears.com www.sears.ca
Our Home
For repair of carry-in products like vacuums, lawn equipment,
and electronics, call or go on-line for the nearest
Sears Parts and Repair Center.
"_-800-488-1222 Anytime, day or night (U.S.A. only)
www.sears.com
To purchase a protection agreement (U.S.A.)
or maintenance agreement (Canada) on a product serviced by Sears:
1-800-827-6655 (u.sJ_)
1-800-361-6665 (Canada)
Para pedir servicio de reparaci6n
a domicilio,y para ordenar piezas:
1-888-SU-HOGAR sM
(1-888-784-6427)
Au Canada pourserviceen _:
I=800-LE-FOYER uc
(1_
www.sears.ca
SBARS
©,S,_u_P,oetx_ andC_
® Registered Trademark / T_ Trademark / sM Service Mark of Sears. Roebuck and Co.
® Marca Registrada / T_ Marca de F&brica / s_.4Marca de Servicio de Seers, Roebuck end Co.
_*cMarque de cornrnerce/ ac, Marque d_,posee de Sears, Roebuck and Co.