ge.com
F--
oL__
LJj
{!1
Safety Instructions .......... 2,3
Operating Instructions
Care and Cleaning ................ 15
Control Panel and Settings ....... 4-7
Flashing Displag Lights .............. 7
Loading Place Settings ............ 14
Loading the Racks ............. 12-14
Using the Dishwasher ........... 8-11
Troubleshooting Tips ..... 16-18
Consumer Support
Consumer Support ................ 24
Product Registration ........... 19, 20
Warranty ......................... 23
CDW9000 Series
PDW8000 Series
PDW9000 Series
Write the model and serial
numbers here:
Model #
Serial #
Youcan find them on the tub wail
just insidethe dooE
165D4 700P36 7 49-55042 10-07 JR

IMPORTANT SAFETY INFORMATION.
READ ALL INSTRUCTIONS BEFORE USING --
SAVE THESEINSTRUCTIONS
WARNING!
For gour safety, the information in this manual must be followed to minimize the risk of fire
or explosion, electric shock, end to prevent property damage, personal injury, or death.
_l I S
WARNING! WATERHEATERSAFETY
Under certain conditions, hydrogen gas may be produced in a water heater that has not been used
'__ _ for two weeks or more. HYDROGEN GAS IS EXPLOSIVE.
Ifthe hot water has not been usedfor two weeks or more, prevent the possibility of damage or injury
by turning on all hot water faucets and allow them to run for several minutes. Dothis before usingang
electricalappliance which isconnected to the hot water system.This simple procedure will allow any built-
up hgdrogen gas to escape.Sincethe gas isflammable, do notsmoke or usean open flame or appliance
during this process.
%
PROPERINSTALLATIONAND MAINTENANCE
This dishwasher must be properly installed and located in accordance with the Installation
Instructions before it is used. If gou did not receive on Installation Instructions sheet with
gout dishwasher, gou con receive one bg visiting our website at ge.com.
• Connect to a grounded metal, permanent wiring
system; or run an equipment-grounding
conductor with the circuit conductors and
connect to the equipment-grounding terminal
or lead of the appliance.
• Improper connection of the equipment-grounding
conductor can resultin a risk of electricshock.
Checkwith a qualified electrician or service
representative if you are in doubt whether the
appliance isproperly grounded.
• Disposeof discarded appliances and shipping
or packing material properly.
• Donot attempt to repair or replace any part
of your dishwasher unlessit isspecifically
recommended in this manual. All other servicing
should be referredto a qualified technician.
• To minimizethe possibility of electric shock,
disconnect this appliance from the power supply
beforeattempting any maintenance.
NOTE:Tuming thedishwasher offdoesnot
disconnect the appliancefrom thepower supplg.
Werecommend havingo qualified technician
serviceyour appliance.
CAUTION: Topreventminorinjurgorpropertgdamage
• Contentswashed in Anti-bacterial mode, if
available,mag be hot to the touch. Usecare
before handling.
• Usinga detergent that is
not specifically designed
for dishwashers will cause
the dishwasher to fill with
suds.
• If your dishwasher is connected to a
wall switch, ensure that the switch is
on prior to use.
• On dishwasherswith electronic
controls, if you choose to turn the wall
switch off between wash cgcles,allow
5-10 secondsafter turning the switch on before
touching START/RESETto allow the control to
reboot.
• Non-Dishware Items:Donot wash items such
aselectronic air cleanerfilters, furnace filters and
paint brushes in your dishwasheEDamage to
dishwasher and discoloration or staining of
dishwasher mag result.
• Closesupervisionis necessary ifthis appliance
isused bg or near children.
• Load light, plastic items so theg will not
become dislodged and drop to the bottom
of the dishwasher-theg might come into
contact with the heating element and be
damaged.

ge.com
WARNING! RISK OF CHILD ENTRAPMENT
PROPER DISPOSAL OF THE DISHWASHER
Junked or abandoned dishwashers are dangerous...
evenif they will sit for 'just a few days/' If Souare
getting rid of sour old dishwasher,pleasefollow
the instructions to help prevent accidents.
Before You Throw Away Your Old Dishwasher
Take off the door of the washing compartment or
remove the door latch (as shown).
NOTE: CDW9000 Series and PDW9200-PDW9900
Series models also have a latch screw which must be
removed (Step 1) as shown.
Screw
(on some
models)
WARNING!
When using your dishwasher, follow basic precautions,
including the following:
• Usethis appliance onlg for its intended purpose
as described in this Owner's Manual.
• Use onlg powder,tabs, liquid detergents or rinse
agents recommended for usein a dishwasher and
keepthem out of the reach of children.Cascade®,
Cascade ®Complete and Electrasol ®Automatic
Dishwashing Detergents, and Jet-Dru ®and
Cascade Crustal Clear_ rinse agents have been
approved for use in all GE dishwashers,
• Do not mix any chlorine bleach-based automatic
dishwashing detergent with any dishwashing
detergent containing enzymes as this could
cause the detergents to congeal and lead to
blockage of the SmartDispense TMsystem.
• Locate sharp items so that they are not likely
to damage the door seal.
• Load sharp knives with the handles up to reduce
the riskof cut-type injuries.
• Do not wash plastic items unless marked
dishwasher safe or the equivalent. For plastic
items not so marked, check the manufacturer's
recommendations.
• Donot touch the heating element during or
immediatelg after use.
• Donot operate gout dishwasher unlessall
enclosure panels are properlg in place.
• Donot tamper with controls.
• Donot abuse,sit on or stand on the door or dish
rack ofthe dishwashen
• Donot allow children to plag around dishwasher
when opening or closing door due to the possibilitg
of small fingers being pinched in doon
• Donot discarda dishwasherwithout first removing
the door of the washing compartment or the door
latch.
• Donot storeor usecombustible materials, gasoline
or other flammable vapors and liquids in the
vicinitg of this or ang other appliance.
• Donot allow children to plag with, on or insidethis
appliance or ang discarded appliance.
READAND FOLLOW THISSAFETYINFORMATION
CAREFULLY.
SAVETHESE INSTRUCTIONS

About the dishwasher control panel.
Youcanlocateyourmodelnumberonthetubwalljustinsidethedoor.Throughoutthismanual,featuresandappearancemayvaryfromgoutmodel.
li 0 0
PDW9200 Series-PDW9900 Series and CDWgO00 Series
ENHANCEMENTS STATUS --
_u_ @ tO_DETER_EICT®DRYIN6
_ss @ SENSING ® SANITIZED
H_Dr_
_oRas_ @ W,_HING • OLE_N
El 0 El
Control Settings
O Status Indicator Lights (Indicatorsvary by models)
TheStatusdisplaytells you what ishappening while the dishwasherisin operation and may flash,
indicating a malfunction.Thelightswill come ONindicating the sequenceof thedishwasheroperation.
LOWDETERGENTDisplayedwhen the SmartDispenseTM needsto be refilledwith liquid or gelautomatic
dishwasherdetergent.
NOTE:Ifyou are not usingSmartDispenseTM and you want to tum the LOWDETERGENT
LEDlightoff, presstheADDEDHEATpad 5times within 3 seconds.Youwillhear 3
beeps;then the lightwill go off.Youcan turn the light back on bg pressingtheADDED
HEATpad Stimes within 3 seconds.
SENSINGDisplagedwhilethe CleanSensorTM ismeasuring the amount of soiland temperature
of wateEThedishwasherwilladjust the selectedcgcleto achieveoptimal performance.
ADD-A-DISH Displaged during prewash, indicating that dishes added now will still be cleaned.
WASHING Displagedduring prewash,main wash and rinseperiods.
RINSING Displayed during rinseperiods.
DRYING Displayedduring HEATEDDRY.
SANITIZED Displagedwhen cgde hasmet sanitizationconditions.
CLEAN Displagedwhen a wash cgde iscomplete.
O Time Remaining Display (onsomemodels)
Duringoperation,the displagshowsthe minutes remaininguntil the cycleiscomplete.Thedisplagmay
adjust the remainingtime while the Sensinglightison.Thetime displayedat the start of eachcycle may
change from the factory setting asthe unit customizesitselfto home use.Duringa delay start, the display
will show hoursof time remaining untilthe cycle starts.
_lSelections
PDWGO00Series:Pressthepad for thedesiredwash cycle.
CDWgO00Seriesand PDWgO00Series:UsetheArrow Podsf_ _ to scrollthrough thewash cycles.
NOTE:All cgcletimes and water usageinformation contained in the following sectionare approximate
values.Actual resultswilldepend on severalfactors,includingbut not limited to inlettemperature,
householdwater pressureand amount ofsoilin thewash wateE
Thelight above or nextto the selectedpad will beONto indicate which WASHCYCLEhasbeen selected.

ge.com
Selections (continued)
ANTI-BACTERIAHeavg 8.8gal.,!05 rain.
Medium 7.5gal.,95 rain.
Light 6.3gal.,85 rain.
Thiscgcle raisesthe water temperature in the final rinseto sanitizegout dishware.The
cgcle lengthwillvarg depending on the temperature of gout inletwatec
NOTE:TheAnti-Bacteriacgcleismonitored for sanitization requirements.Ifthe cgcleis
interrupted during or after the main wash portionor ifthe incoming water temperature is
solow that adequate water heatingcannot be achieved,the sanitizingconditionsmag
notbe met. Inthese cases,the sanitizedlightwill not illuminate at theendof the cgcle.
NOTE:NSF-certifiedresidentialdishwashersare not intendedfor licensedfood
establishments.
Heavg !0.0 gal.,B0 rain.
Medium 8.8gal.,70 rain.
Light 7.5gal.,60 rain.
Thiscgcle ismeant for heavilgsoileddishesor cookwarewith dried-on or baked-onsoils.
Thiscgcle mag not remove burned-on foods. Evergdagdishesare safeto be used in
this cgcle.
Heavg 8.8gal.,70 rain.
Medium 7.5gal.,60 rain.
Light 5.0gal., 50 rain.
Thiscgcle isfor mediumiheavilg soileddishes and glassware.
7.5gal.,35 rain.
Thiscgcle isfor evergdag dishesand glassware.
7.5gal.,35 rain.
Thiscgcle isfor lightlg soiledchina and crgstal.
7.5gal.,30 rain.
Thiscgcle isspecificallg designed for glasses.
Heavg 8.8gal., !20 rain.
Medium 7.5gal.,:!_05rain.
Light 5.0gal.,90 rain.
Thelonger time for this cgcle includes a built-in drging portion that isspecificallg
designedto reduce the risk of melting plastic items and improve plasticdrging.
Forremoving redtomato-based stains,GErecommends the useof Cascade®
PlasticBoosterTM.
Heavg 8.2gal.,70 min.
Medium 7.0gal.,60 min.
Light 4.6gal., 50 min.
Thiscgcle washes lightlg soileddishes on the upper rack onlg.
2.5gal., 10 min.
Forrinsing partial loadsthat will be washed late[ Donot usedetergent with this cgcle.
COOKWARE
{POTS& PANS)
NORMAL WASH
SPEED CYCLE
(on some models)
CHINA CRYSTAL
GLASSES
(onsome models)
PLASTICS CYCLE
(on some models)
SINGLE RACK WASH
(on some models)
RINSEONLY
NOTE: On the PDW8000 Series models, the CHINA CRYSTAL/PLASTICS selector is o toggle pad, push pad
to switch between CHINA CRYSTALand PLASTICS.
NOTE: This dishwasher is equipped with CleonSensoF '_ with automatic temperature control, therefore,
cgde length and time may vorg depending on soil and water temperature conditions.
NOTE: Only the Anti-Bacteria cycle has been designed to meet the requirements of Section 6, NSF 18/4 for
soil removal and sanitizotion efficacy.

About the dishwasher control panel.
_l_ Enhancements
ADDED HEAT
{EXTRA HOT WASH)
Thelight above the selected pad will be ONto indicate which ENHANCEMENThasbeenselected.
DELAYHOURS Youcan delay the start of a wash cycle for up to 24 hours (dependingon model).Press
the DELAYSTARTpad to choosethe number of hours you want to delay the start of
the cycle; then pressSTART/RESET.
PDW8000 Series:Themachine will count down and start automatically at the
correct time.
CDW9000 Seriesand PDW9000 Series:After closing the door,the machine will count
down and automatically start at the correct time.
NOTE:Tocancel the DELAYSTARTselection beforethe cycle begins, repeatedly press
the DELAYSTARTpad until the display isblank.
When selected,the cycle will run longer with heating element on to improve both wash
and dry performance.
NOTE:Cannot be selectedwith RINSEONLYcycle.
PREWASH Forusewith heavily soiledand/or dried-on, baked-on soils.Thisoption MUSTbe
(on some models) selectedPRIORto starting the cycle. Thisoption adds !5 minutes to the cycle time.
NOTE:Cannot be selectedwith RINSEONLYcycle.
HEATEDDRY Shuts offthe drying heat option.Disheswill air dry naturally (PDW8900Series)or
Light Off fan dry (PDW9200-PDW9900Seriesand CDW9000Series)to save energy.
HEATEDDRY Turnsthe heater onfor fast drying. Thiswill extend the total cycle time by iS minutes
LightOn for the ANTI-BACTERIALcycle,38 minutesfor the NORMAL,SINGLERACKWASH
and COOt(WAREcycles,8 minutes for the SPEEDcycle, !5 minutes for the
PLASTICScycle and 30 minutesfor all othercycles.
NOTE:Cannot be selectedwith RINSEONLYcycle.
LOCK Youcan lock the controls to prevent any selections from being made. Or you can lock
_1 the controls after you have started a cycle.
Children cannot accidentallg start dishwasher bg touching pads with this option
selected.
Tounlock the dishwasher controls, pressand hold the HEATEDDRYpad for 3 seconds.
Thelight above the lock pad will turn off.To lock the dishwasher,pressand hold the
HEATEDDRYpad for 3 seconds.The light above the LOCKpad will turn on.
RESETTochange a cycle after washing starts...
PDW8000Series:Touchthe START/RESETpad to cancelthe cycle.TheSTART/RESETlight
will flash while the water ispumped out if needed.This takes approximately 2 minutes.
PDW9000 Series:Openthe door slowly to prevent splash-out. Touchthe START/RESET
pad to cancel the cycle. If the START/RESETlight isflashing, closethe door untilthe
water pumps out (thistakes approximately 2 minutes)and the light stopsflashing.
When the light stopsflashing,the dishwashercan be reprogrammed and restarted.
_ Start
PDW8000 Series
Closeand latch the dishwasher door and selectthe cycle and desiredenhancements.Touchthe
START/RESETpadto beginthe cycle.Water fill beginsimmediately, and approximately 80 secondslater
the wash action begins.
When the dishwasher door isfully closed and latched,the control panel lights will display the last settings
you selected.If you don't want to change any of the settings,simply touch the START/RESETpad to
begin the cycle.
If the door isclose&the indicator lightswill turn off ifthe START/RESETpad isnot selectedwithin 5 minutes.
Toactivate the display,open and closethe door or pressany pad.

ge.com
_ Start (continued)
D
PDW9000Series
After selectingthe cycle and desiredenhancements, touch the START/RESETpad to ready the
dishwasher to begin the cycle. Closethe door to start the cycle or begin the DELAVSTARTcountdown.
When the cycle starts, the water fill begins and approximately 60 secondslater the wash action begins.
The dishwasherwill always display your last selection and enhancements. If you don't want to change
the settings,simply touch the START/RESETpad to ready the dishwasher and closethe door to begin
the cycle.
Also,if a power failure occurs NORMALand HEATEDDRYwill automatically be programmed. Hake any
new selectionsand touch the START/RESETpad to beginthe new cgcle.
When the door isopened,the indicator lightswill turn off ifthe START/RESETpad is not selectedwithin
5 minutes.Toactivate the displag, open and close the door or touch ang pad.
Clean
PDW8000Series
TheCLEANlight is illuminated when the selected cgcle and enhancements are complete. Thelight will
stag ONuntil a pad is pressedor the door isopened and then closed.
PDW9200Series-PDW9900 Seriesand CDW9000Series
TheCLEANlight is illuminated and a double beep willsound when the selected cgcle and enhancements
are complete. You mag remove the dishes at ang time.The high-efficiencg fan will run quietly for 30
minutesto 4 hours (depending on selected cgcle)after the CLEANlight is illuminated to continue drying
the dishes.Thefan can be turned off bg opening the door and pressingang kegpad.
ALL MODELS:Toturn off the audible end-of-cgcle signal (or re-activate it ifit was previously tumed off),
pressthe HEATEDDRYpad 5 times within 3 seconds.A triple beep will sound to indicate the end-of-cgcle
beepoption has been toggled.
Flashingdisplay lights.
Status Indicator Lights What It Means
START/RESET
Cgclehasbeen interrupted bg pressingthe START/RESETpad,or there
hasbeen o power failure. Light will stop flashing after the dishwasher
automatically drains out the water.Thedishwasher will restart if the
interruption was the result of o power failure.
Recommended dishwasher products.
GErecommends the following products for usein its
dishwashers:
• For your manual detergent dispenser,Cascade®
and ElectrasoF powder, liquidor gel automatic
dishwasher detergents are approved.
• For your SmartDispenseTM Detergent Dispenser,use
only the recommended detergents listedon page
10of this manual,
• Jet Dry ®or Cascade Crystal Clear®rinseagents
to remove spots and prevent new film buildup on
your dishes,glasses,flatware, cookware and
plastic. Using rinseagent also improves drg
performance.
• Cascade®Plastic BoosterTM to remove red staining
insidegour dishwasher that can come from some
tomato-based foods.
• Cerama Brgte®StainlessSteelAppliance Cleaner
to clean the exterior stainlesssteel panel of GEand
ProfileTM dishwashers (forstainlesssteel exterior
models only).

Using the dishwasher.
Check the Water Temperature
The entering water should be at least J20°F and not more than 150°F for effective cleaning and to
prevent dish damage. Check the water temperature with a candy or meat thermometer. Turn on the
hot water faucet nearest the dishwasher, place the thermometer in a gloss and let the water run
continuously into the glass until the temperature stops rising.
Use ®or Cascade Cr_jstal Clear®Rinse Agent
Jet-Dry ®or Cascade Crystal Clear ¢ rinse agent improves drying, removes spots and prevents new
film buildup on your dishes, glosses, flatware, cool<ware and plastic.
Filling the Dispenser Rinse Aid Setting
The rinse agent dispenser holds ].5 oz. of rinse agent.
Under normal conditions, this will last approximately
one month. Try to keep it full, but do not overfill.
[] Make sure the dishwasher door is fully open.
'2] Turn the dispenser
cap to the left and
lift it out.
F1Add rinse agent until
the indicator window
looks full.
[] Cleanup any spilled
rinseagent with a Indicator t
damp cloth, window Dispenser cap
Theamount of rinseagent releasedinto the final
wash can be adjusted.Thefactory setting isat the
midpoint. If there are ringsof calcium (hardwater)
spots on dishes,try a higher setting. If there is
foaming, usea lower setting.
TOadjust the setting:
Removethe dispenser cap;
then turn the adjuster
counterclockwise to
increasethe amount
jent
of rinseagent or adjuster
clockwiseto reduce
the amount of rinseagent dispensed.
E] Replacethe dispenser cap.
Dish Preparation Prior to Loading
• No prerinsing of normal food soilisrequired. • Removelarge quantities of any remaining food.
• Scrapeoff hard soils,bones,toothpicks, skinsand • Removeleafy vegetables,meat trimmings and
seeds, excessiveamounts of grease or oil.

ge.com
Monuol Detergent Dispenser
Yourdishwashercomesequippedwithan automaticliquid Forheavilysoiledloads,usea bitmoredetergent.Forwater
dishwasherdetergentdispenser(SmartDispenseTM) and a temperaturesabove140%,usea bitlessdetergent.
manualdispenser.Youcanuseeitherofthesedispensers
butdon'tusebothatthesametime.
Hedium Hedium E×tremely
Soft Soft Hard Hard
SmartDispense T"
MAINWASH
HOnUQI Detergent
Dispenser
Forheodlysoiledfoods,usethePotsondPonsor HeovyWash
cycle.
Thecoverofthemanualdispenserwillopenduringthe
washcycle.IfyouareusingSmartDispenseTM, leavethe
coverofthemanualdispenseropenbeforestartingthe
cycle.
Forthemanualdispenser,Cascade®and Electrasol®
AutomaticDishwashingDetergentshavebeenapproved.
Youmayusepowder,liquid,gelortabletsinthisdispenserIt
isimportanttokeeppowdereddetergentsandtabletsfresh
anddrysothey don'tloseeffectiveness.Therefore,do not
putdetergentintothemanualdispenseruntilyouare ready
to washdishes.
Filling Manual Detergent Dispenser
Theamountofdetergentto usedependsonwhetheryour
waterishardor soft.Withhardwater,youneedextra
detergent.Withsoftwater,youneedlessdetergent.
Protectyourdishesanddishwasherbycontactingyour
waterdepartmentand askinghowhardyourwateris.
TwelveormoregrainsisextremelyhardwaterAwater
softenerisrecommended.Withoutit, limecanbuildupin
thewatervalve,whichcouldstickwhileopenandcause
flooding.Toomuchdetergentwithsoftwatercancausea
permanentcloudinessofglassware,calledetching.
Usetheinformationinthetablebelowasa guideto
determinetheamountofautomaticdishwasherdetergent
to placeinthedispenserYoumay usepowder,liquid,gel
ortabletsinthisdispenser
Whenusingautomaticdishwashingdetergenttablets,
simplyplaceonetabletinthemainwashsectionandclose
the cover
Number
of Grains Detergent Cups to Fill
Lessthan 4 Fillcup to soft line (1/3 full)
4 to 8 Fillcup to medium soft line (2/3full)
8 to 12 Fillcup to medium hard line
(completely full)
Greater Fillboth main wash cup
than 12 and pre wash cup
DO NOTUSEHAND DISHDETERGENT
m
m
NOTE:Usingadetergentthatisnotspedficallbtdesigned
fordishwasherswillcausethedishwasherto fillwith suds.
Duringoperation,thesesudswdspilloutofthedishwasher
vents,coveringthekitchenfloorandmakingthefloorwet.
Becausesomanydetergentcontainerslookalike,storethe
dishwasherdetergentina separatespacefromall other
cleaners.Showanyonewho mayusethedishwasherthe
correctdetergentandwhereitisstored.
Whiletherewillbe nolastingdamagetothedishwasher,
yourdisheswillnotgetcleanusinga dishwashing
detergentthat isnotformulatedto workwithdishwashers.

Using the dishwasher.
SmartDispense TMDetergent Dispenser (somemodels;
This dishwasher may haveSmartDispenseTM, a Aim the detergent bottle at the opening in the door
feature which automatically dispensesliquid and begin to fill.
automatic dishwasher detergent into each cgcle
based on soil level and water hardness.
To utilize the SmartDispense TM Detergent Dispenser,
it must first be filled. Although any liquid or gel
automatic dishwashing detergent can be used in the
SmartDispense TM system, all liquid or gel automatic
dishwashing detergents are not the same. Most
automatic dishwashing detergents are chlorine
bleach-based (such as Cascade ® or Electrasol ®)
while others contain enzymes (such as Cascade
Complete ®or Electrasol ®Advanced TM Gel).
Do not mix ang chlorine bleach-bused automatic
dishwashing detergent with any dishwashing
detergent containing enzymes as this could cause
the detergents to congeal and lead to blockage of
the SmartDispense TM system. Check the detergent
label to determine if the detergent is chlorine
bleach-based or one that contains enzymes. It is
recommended that the same type of detergent be
used when refilling your SmartDispense TM system.
CAUTION! Absolutely do not add
powder detergent, tablets or any liquid soap or
detergent normally usedfor washing handsor
dishesin a sink.Only useliquid or gel detergent
specifically designedfor usein an automatic
dishwashe.
Toopen the dispenserfor filling, pushdown and
turn the blue cap counterclockwise untilthe cap is
loose.Lift cap off.
The dispenserwill hold 45 ozof liquid dishwasher
detergent (standard sizebottle).
Turn clockwise.
When full,replace the cap and turn clockwise until
tight to ensure no water enters the SmartDispenseTM
dispense, If residueis left on the door,itwill be
washed off in the next cycle.
An indicator light will turn on to notify you when the
dispenser needsto be filled again.After filling, the light
will not turn off until the door isclosed.A full dispenser
will last approximately i month for the average use.
STATUS
Light will SmartOispense
turn on _ 0 LOWBETERGENT0 DRYING
when 0 SENSING • SANmZED
time to
refill _ WASHING ® CLEAN
Setthe door at a comfortable angle to fill the
dispense.
(appearancemagvarg)
NOTE: Ifyou are not using SmartDispense TM and you
want to turn the LOW DETERGENTLEDlight off, press
the ADDED HEAT pad 5 times within 3 seconds. You will
hear 3 beeps; then the light will go off. You can turn the
light back on by pressing the ADDED HEAT pad 5 times
within 3 seconds.
10

ge.com
SmartDispense TMDetergent Dispenser
Water Hardness Calibration
Priorto the first use,the dishwasher needsto
be calibrated for water hardness.Pleasefollow
directions below to calibrate the dishwasherto
the hardnessof gour tap wateE
Determine the Hardness of Your Tap Water
In the bag that contained these instructions, gou
should find a water hardness test strip package.Read
the instructions on the package,remove the test strip
and follow the instructions to determine the hardness
levelof gour tap wateEYouwill usethis information to
calibrate gour dishwasher to dispensethe optimal
amount of detergent.
Waterhardnessteststrip indication
SOFT
0 RED
1 RED
2 RED
3 RED
4 RED
HARD
Value to Enter
into Dishwasher
I I I I I I I I I 1
3
Calibration of 12-Button Front-Control
Models With 3-Digit Display
Press at the same time. Display
r_ Closeand latch the door (lightson,dishwasher
not running).
171 Pressthe COOKWAREand DELAYHOURSpads
at the same time for 3 seconds.Thedisplag will
show a number from i to 5.Thisisthe water
hardness value currentlg set.
1-31Pressthe COOKWAREpad to raisethe value or
the NORMALpad to lowerthe value. Setthe
water hardnessvalue to the number determined
with the test strip and table above.
14--IOncethe water hardness isset, the
press
START/RESETpad to save the setting and return
the dishwasher to normal operation.
Calibration of 7-Button Front-Contro!
Models With 3-Digit Display
/ T
Displag Press at the same time.
r_ Open the door and touch a pad (otherthan
START)to turn lights on.
1-21Pressthe "Up" (_ Arrow Padand DELAY
HOURSpad at the same time for 3 seconds.The
displagwill show a number from i to 5.This isthe
water hardnessvalue currentlg set.
r-3-1Pressthe "Up" fix5Arrow Padto raisethe value
or the "Down" EE)Arrow Padto lowerthe value.
Setthe water hardnessvalueto the number
determined with the test strip and table atthe left.
E] Oncethe water hardness isset, the
press
START/RESETpad to save the setting and return
the dishwasher to normal operation.
Calibration of Models Without a 3-D(git Display
Front controls
[] Close and latch the door (lights on, dishwasher
not running).
r-21 Press the COOKWARE and DELAYHOURS pads
together for 3 seconds. Alllights will light up and
gou willhear i to 5 beeps. The number of beeps
indicates the current hardness value.
r-31 To change the setting, press the DELAYHOURS
pad the number of times that corresponds to the
water hardness value determined at the left. The
control willbeep each time gou press the pad.
Once finished pressing the pad, gou will hear a
confirmation with beeps for the number of times
gou pressed the pad.
[] Ifthe number of beeps is not what gou desire,
start pressing the DELAYHOURS pad again to
reenter a new water hardness level.
1-61Once the water hardness is set, the
press
START/RESET pad to save the setting and return
the dishwasher to normal operation.
Top controls
]Open the door and touch a pad to turn lights on.
[] Pressthe "Up" _ Arrow Pad and DELAY
HOURSpad at the same time for 3 seconds.All
lights will light up and gou will hear i to 5 beeps.
The number of beepsindicates the current
hardness value.
[-3-]To change the setting, pressthe DELAYHOURS
pad the number of times that corresponds to the
water hardnessvalue determined at the left.The
control will beep each time gou pressthe pad.
[_ Oncefinished pressingthe pad, gou will hear a
confirmation with beepsfor the number of times
gou pressedthe pad.
[_ If the number of beepsisnot what gou desire,
start pressingthe DELAYHOURSpad again to
reenter a new water hardness level.
[_] Oncethe water hardness isset, pressthe
START/RESETpad to save the setting and return
the dishwasher to normal operation.
NOTE:Youshould recalibrate the dishwasher control
if water conditions change; for example,if a water
softener sgstem isadded or removed from gour
home. 11

Loading the dishwasher racks.
For best dishwoshing results, follow these loading guidelines. Features and appearance of racks and silverware
baskets may vary from gout model.
Upper Rack
Although the upper rack isprimarily for
glasses,cups and saucers,pots and pans can
beplaced in this rack for effective cleaning.
Cupsand glassesfit best along the sides.This
isalso a secure place for dishwasher plastics.
Theutility shelf (somemodels)may be placed
in the up or down position to add flexibility.A
wine glass holder (some models)secureswine
glassesfor best washability.
Somemodels have contoured metal cup
shelvesthat can secure up to 12wine glasses
(asshown).
Becausewine glassescome in various sizes,
after loading,slowly push in the rack to make
surethey will clearthe top of the dishwasher.
Somemodels have an Angled Back System,
which allows you to angle your dishes,such
as coffee mugs,for better cleaning and
quicker drying. To position the tines, pullthe
leverforward then drop the tines into
position,then releasethe lever.
Theupper rack isgood for all kindsof
odd-shaped utensils.Saucepans,mixing
bowls and other items should be placed face
down. Fold-down tines (onsome models)
provide flexibility for extra-large and hard-
to-fit items.
Securelarger dishwasher-safe plastics over
2 tines when possible.
Make suresmall plastic items are secure so
they can't fall onto the heater.
Be surethat itemsdo not protrude through
the bottom of the rack and block rotation of
the middle spray arm.This could result in
poor wash performance for items in the
upper rack.
Checkto make surethat no items will block
rotation ofthe wash arm.
NOTE:TheSingle RackWash selection,on
models with this feature, washesthe upper
rack only. If you usethis feature, do not load
items in the lower rack.
IIt/l/J(
I II II II II If II /I II II II
Adjustable Upper Rack
Thestandard position of your adjustable rack
is"up" which allows for maximum clearance
for your taller items in the lower rack. If you
havetaller wine glasses,tumblers or other
items to placein the upper rack,you may
want to adjust the rack to the lower position.
Tolower the reck, support the weight of the
rackwith your hands asshown and press
bothfinger pads about 1/4" toward the inside
of the rack asindicated and guide the rack
down to its lower position.
Toraise the rack to the "up" position,pull up
on the center ofthe rack sideframe until the
rack locksinto place.
12
Lower Rock
Thelower rack isbest usedfor plates,saucers
and cookware. Large items such as broiler
pansand baking racks shouldgo along the
left-hand side.Load platters, pots and bowls
along the sides,in corners or in the back.The
soiledsideof items shouldface the center of
the rack. If necessary,oversizedglassesand
mugs can be placed in the lower rack to
maximize loading flexibility.
Also,be careful not to let a portion of an item
such asa pot or dish handle extend through
the bottom rack.Thiscould block the wash
arm and cause poor washing results.
Fold-down tines (on some models)provide
flexibility for extra-large and hard-to-fit items.
Thetines may be left in the up position or
folded down to customize the lower rack.

Shower Nozzle Service
Part Number WD12X10134
Press thumb
tab out Remove end cap
ge.com
Removing the Upper Rack
Your new dishwasher hasthe capability to
wash extra large items in the lower rack.This
isaccomplished by removing the upper rack
and installing a nozzleoverthe port that
normally supplieswater to the upper rack.
Thenozzleis not included with your
dishwasher,but is availablefor purchase from
GE.CallGEat 1.800.626.2002or go to the GE
website ge.com and request NozzleSpray
Asm,part number WD12X10134.
Customersin Canada can order on-line at
geappliances.ca 24 hoursevery day, or by
phone at 1.800.661.1616during normal
businesshours.
NOTE:Do not usethe SINGLERACKWASH
cgcle (some models)with this feature. Single
RackWash cycle isfor upper rack wash onlg.
Therecommended cgcle for lower rack onlg
use isthe COOKWAREcgcle.
NOTE:Nozzlemust be in placewith upper
rack removed.If not installed properly, poor
wash performance and noisewill result.
Toremove the upper rack:
['_ Pressthumb tab out and remove the
front end caps on each sideof the rail.
r_ pull the rack straight out and off the rails.
r_ Replacethe end caps.
[] Pushthe rails allthe way back into the
dishwasheE
F_ Slidethe shower nozzleattachment over
the spout.
"Shower nozzle
attachment
[] Then fillthe lower rack and begin
your cycle.
NOTE:Don't forget to remove the shower
nozzleattachment before you replacethe
upper rack.
One-piece basket Ion some models)
Three-piece basket Ion some models)
Don't let any
item extend
through bottom.
Silverware Basket
Toload flatware, simply pushthe adjustable
handle to either side(on some models).Put
flatware in the removable basket with fork
and knife handles up to protect your hands.
Placespoons in the basket with handles
down. Mix knives,forks and spoons sothey
don't nesttogethen Distribute evenly. Small
plastic items, such as measuring spoons and
lidsfrom small containers should go in the
bottom of the silverware basketwith the
silverware on top.
Theone-piece silverware basket(on some
models) can be placed in the front, right side
or back of the lower rack.
A variety of options is available regarding
the three-piece silverware basket(on some
models) in your dishwasheEThecomplete
basket isdesignedto fit on the right sideof
the lower rack.Additionally, each end of
the basket is removable to add loading
flexibility to accommodate flatware and
lower rack capacity needs.
Thelidsof both end and middle baskets (on
some models)can be closedto contain small
items. Long items can be placed on the utility
shelf in the upper rack.
tt it
To remove end baskets, grasp the
basket at opposite corners and
slide apart.
13
Loading the dishwasher racks.
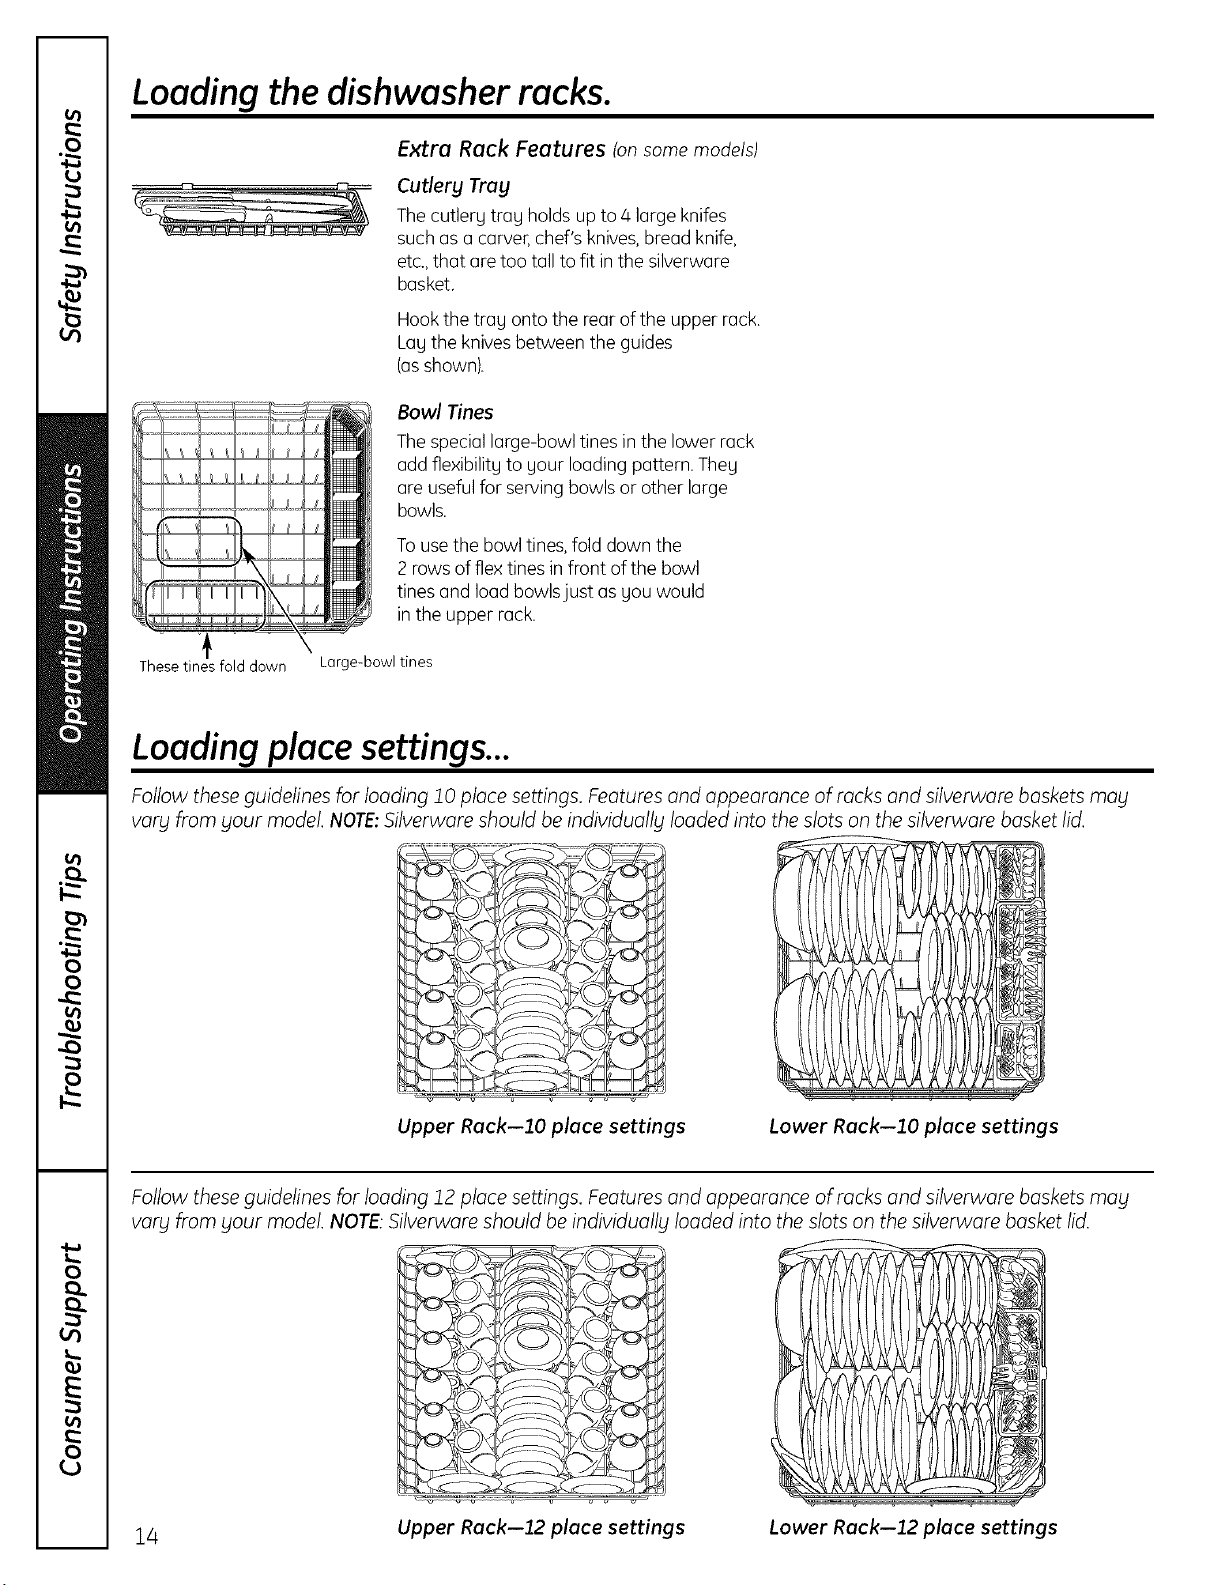
Extra Rack Features (onsomemodels)
Cutlery Tray
Thecutlers trag holds up to 4 large knifes
such as a carver,chef's knives,bread knife,
etc.,that aretoo tall to fit in the silverware
basket.
Hookthe trag onto the rear of the upper rack.
Lag the knivesbetween the guides
{asshown).
These tines fold down
Bowl Tines
Thespecial large-bowl tines in the lower rack
add fle×ibilitgto sour loading pattern. Theg
are useful for serving bowls or other large
bowls.
Tousethe bowl tines,fold down the
2 rows of flex tines in front of the bowl
tines and load bowls just as gou would
in the upper rack.
Large-bowl tines
Loadingplacesettings...
Follow these guidelines for loading 10 place settings. Features and appearance of racks and silverware baskets may
vary from gout model. NOTE:Silverware should be individuoll9 loaded into the slots on the silverware basket lid.
Upper Rack--lO place settings Lower Rack--lO place settings
Follow these guidelines for loading 12 place settings. Features and appearance of rocks and silverware baskets may
vary from gout model. NOTE:Silverware should be individuall9 loaded into the slots on the silverware basket lid.
14
Upper Rack--12 place settings Lower Rack--12 place settings

Caring for the dishwasher, gecom
Cleaning the Exterior Door Panel
Beforecleaning the front panel,make
sure gou know what tgpe of panel gou have.
Referto the last two lettersof gour model
numbeEYoucan locate gour model number
on the left-hand tub walljust insidethe dooE
If gour model number ends with BB,CC,WW,
SAor BG,then gou have a PaintedDoor
panel. If gour model number endswith SS,
then gou have a StainlessSteelDoor panel.If
gour model number ends with CS,then gou
have a CleanSteelpanel.
Follow the instructions below for cleaning the
door panel for gour specific model.
Pointed Door Panel (modelnumbers ending
in BB-block, CC-bisque,WW-White, SA-silver
metallic or BG-grophite block)
Use a clean, soft, lightlg dampened cloth,
then drg thoroughlg. Youmag also usea
good appliance wax or polish.
Stainless SteelDoor Panel (modelnumbers
ending in SS)
Thestainlesssteel panels can be cleaned
with StainlessSteelMagic or a similar product
usinga clean, soft cloth. Do not useappliance
wax, polish,bleach or products containing
chlorine on StainlessSteeldoors.
Youcan order StainlessSteelMagic
#WXJOXJ5through GEParts bg calling
800.626.2002.
CleanSteel Door Panel (model numbers
ending in CS)
Use a clean, soft, lightlg dampened cloth,
then drg thoroughlg. Do not use appliance
wax, polish or any chemical agent on
CleanSteel doors.
Do not wipe the dishwasher with a soiled
dish cloth or wet towel. Thesemag leave
o residue. Do not use scouring pods or
powdered cleaners because these products
con scratch the finish.
Stainless Steel Interior-Tub and Inner Door
Thestainlesssteel usedto make the
dishwasher tub and inner door provides
the highest reliability available in a GE
dishwasher.If the dishwasher tub or inner
door should be scratched or dented during
normal use,they will not rust or corrode.
Thesesurface blemisheswill not affect
their function or durability.
Cleaning the Control Panel
Toclean the control panel,usea lightly
dampened cloth.Then drg thoroughly.
Protect Against Freezing
If your dishwasher is left in an unheated
place during the winter,ask a service
technician to:
r_cut off electrical power to the
dishwasher.Removefusesor trip
circuit breaker.
[-_ Turnoff the water supply and disconnect
the water inlet linefrom the water valve.
r_ Drainwater from the water inlet line
and water valve.(Usea pan to catch
the water.)
F] Reconnectthe water inlet line to the
water valve.
. _. i .,rl -
A,rgap _ '- :dI_--_
Check the air gap any time
yourdishwasherisn'tdraining
well.
Does Your Dishwasher Have an Air Gap?
An air gap protects your dishwasher
against water backing up into it if a drain
clogs.Theair gap isnot a part of the
dishwasher.It is not covered by your
warranty. Not all plumbing codes require
air gaps,so you may not have one.
The air gap is easg to clean.
[] Turn off the dishwasher and lift offthe
cover.
r-_] Remove the plastic cap and clean with
a toothpick.
15

Before you call for service...
Troubleshooting Tips
Save time and money! Review the charts on the following
pages, or visit ge.com. You may not need to call for service.
Error Messages Possible Causes What To Do
START/RESETstatus You have pressed the
indicator light flashing START/RESETpad while the
dishwasher is running. This will
cancel the cgcle. The light will
stop flashing after the dishwasher
drains (about 90 seconds).
• PresstheSTART/RESETpadonluonetimetostartthedishwasher.Whenthe
dishwasherisrunning,onlupresstheSTART/RESETpadif Uouwishtocancel
(reset)thecucle.
Powerto thedishwasherwas
turnedoff whileacgclewas
runningand powerhasjust been
restoredto thedishwasher.The
blinkinglights indicatethat the
dishwasherisdrainingwater
inside.
• Thelightwillstopflashingafterthedishwasherdrainsoutthewater.Anew
cuclewillstartautomaticalluwhenthedrainends.
Dishwasher BEEPS
once every 30 seconds
Thisisa reminderthat gour
dishwasherdoor hasbeenleft
openduringoperation.It will
continuebeepinguntil gouclose
thedoor.
• Closeandlatchthedoorafteropeningit mid-cucle.Beepingwillstopand
dishwasherwillcompletecucle.
Beeping at the end
of the cycle
This is normal. The dishwasher
will beep twice at the end of
the cgcle.
• Toturnoffthedoublebeepindicator(orre-activateitifitwas previouslu
turnedoff),presstheHEATEDDRYpad5timeswithin3 seconds.Atriple
beepwillsoundtoindicatetheend-of-cuclebeepoptionhasbeenturned
on oroff.
Low Detergent
Light ON
SmartDispense TM has less than • Fillthe SmurtDispenseTM reservoir with liquiddishwasher detergent. After
10 cgcles worth of detergent filling the reservoir,the LOW DETERGENTlightwill turn OFFoncethe
left in the dishwasher, door is closed.
Problem
Dishesandflatware
not clean
Possible Causes Whet ToDo
Lowinletwater temperature • Hake sure inletwater temperature iscorrect (seepage 8).Turn on the hot
water faucet nearest the dishwasher; let run until the water temperature
stops rising.Then start the dishwasher and turn offthe faucet. Thisensures
the entering water is hot.
• TrUnottousethedishwasherwhenhotwaterisbeingusedelsewhere
inthehouse;forexample,whendoinglaundryorwhena familymember
isusingtheshower.
Water pressure istemporarilg low • Turn on afaucet. Iswater coming out more slowly than usual?Ifso,wait
until pressure is normal before using your dishwashen
• Try not to use the dishwasher when hot water isbeing used elsewhere
in the house;for example,when doing laundry orwhen a family member
isusing the shower.
Air gap or disposer is clogged • Cleanthe air gap or flush the disposer.
Improper rack loading • Hake sure large dishware does not blockthe detergent dispenser or the
wash arms. Seethe Loadingthe dishwasher rocks section.
No air gap or high drain loop • Verify that you have an air gap or a high drain loop. Referto the
Installation Instructions.
16

ge.com
Problem Possible Causes What To Do
Spotsandfilming
onglassesand
flatware
Cloudiness on
glassware
Sudsin thetub
Detergent left in
dispenser cups
oron door
Water in the
SmartDispense"
dispenser
Blackor gray
markson dishes
Dishesdon'tdry
Extremelyhardwater
Lowinletwatertemperature
Overloadingthedishwasher
Improperloading
Oldor damppowderdetergent
Rinseagentdispenserempty
Toolittle detergent
Combinationofsoftwater and
too muchdetergent
Water temperatureentering
the dishwasherexceeds150°F
Correctdetergent
wasn'tused
Rinseagentwasspilled
Dishesare blockingthe
detergentcupor
SmartDispenseT"outlet
Capnot tightenedafter filling
the dispenser
Aluminumutensilshave
rubbedagainstdishes
Lowinletwater temperature
Rinseagentdispenserisempty
ControlpanelrespondedDoorlatch may not beproperlg
toinputsbutdishwasherseated
neverfilledwith water Water valvemagbeturnedoff
Stainedtubinterior Sometomato-basedfoodscan
causereddishstains
• UseJet-Dry®orCascadeCrystalCleaPrinseagentstoremovespotsand
prevent new filmbuildup.
• Hake sure water temperature isat least 120°F.
• Loaddishwasher as shown in the LoadingPlaceSettings section.
• Hake sure detergent isfresh.
• Ifwater isextremelg hard,a softener mag be required.
Teaorcoffee stains
• Thisiscalledetchingandispermanent.Topreventthisfrom happening,
uselessdetergentif SouhavesoftwatenWashglasswareintheshortest
cgclethatwillgetthemclean.Recalibratethe SmartDispenseTnsgstemif
youareusingit. Seepages9and !!.
• Thiscouldbeetching.Lowerthewaterheatertemperature.
• Useonlgautomaticdishwasherdetergentstoavoidsudsing.
Cascade®andElec¢rasol®AutomaticDishwashingDetergents
havebeenapprovedforuseinallGEdishwashers.
• Toremovesudsfromthetub,openthedishwasherandlet
sudsdissipate.Closeandlatchthedishwasherdoor Pumpoutwater
bgtouchingtheSTART/RESETpadonce;then30secondslater,
touchtheSTART/RESETpadagain.Repeatif necessary.
• Alwayswipeup rinseagentspillsimmediately.
• Repositionthedishes,sothewaterfromthelowersprayarmcan
flushthedetergentcupor outletfromtheSmartDispenseTM system.
Seepages13and 14.
• Useaturkegbasterto removeasmuchwateraspossiblefromthe
SmartDispense_ dispenserand refillitasnormal.Besureto tightenthe
capfullsto preventwaterfromenteringthedispenser
Removemarkswitha mild,abrasivecleaner
®
®
o
Anoverallyelloworbrownfilm can •
becausedbyirondepositsinwater
White film on insidesurface- •
hard water minerals
®
Hakesureinletwatertemperatureisat least120°R
SelectHEATEDDRY.
• UsePREWASHorADDEDHEAToptions.
• Selecta highercycle,suchasANTI-BACTERIAor COOKWARE.
• Checktherinseagentdispenserandfillasrequired.
• Hakesurethedoorisfirmlyclosed.
Hakesurewatervalve(usuallglocatedunderthesink)isturnedon.
UseoftheRINSEONLYcgcleafteraddingthedishtothe load
candecreasethelevelofstaining.GErecommendsCascade®
PlasticBoosterto helpremovethesetypesofstains.
Removethestainbghand,usinga solutionof 1/2cupbleach
and3 cupswarmwater
WARNING
Beforecleaninginterior,wait atleast20 minutesaftera cgcleforthe
heatingelementsto cooldown.Failuretodosocanresultin burns.
Aspecialfilterinthewatersupplylineistheonlywagto correct
thisproblem.Contacta watersoftenercompany.
GErecommends Jet-Dry®or Cascade Crystal CleaPto help
prevent hard water mineraldeposits fromforming.
Rundishwasherwithcitricacidto removemineraldeposits.Citric
acid(Partnumber:WD3gX151)canbeorderedthroughGEParts.
Seebackcoverfororderinginformation.
17

Before you call for service...
Troubleshooting Tips
Problem Possible Causes What To Do
Dishwasherwon't run
• ReplacefuseorresetcircuitbreakenRemoveanuotherappliancesfrom
the circuit.
• Insomeinstallations,thepowertothedishwasherisprovidedthrougha
wallswitch,oftenlocatednextto thedisposerswitch.Hakesureitison.
Controlpanelislocked • Unlockcontrolpanel.Seepage6.
Controlpanelneedsto be • Turnoff powertothedishwasher(circuitbreakerorwallswitch)for
rebooted 30seconds;thenturn backon.
Controlpanellights Timetoolongbetween • Eachpadmustbetouchedwithin5minutesoftheothers.
gooffwhen you're touchingof selectedpads Torelight,touchanupadagain,orunlockandrelatchdoon
settingcontrols
Waterstandingin Thisisnormal • Asmallamountofcleanwateraroundtheoutletonthetub
thebottomof thetub bottomatthe backofthetub keepsthepumpseallubricated.
Waterwon't pump Drainisclogged • If Uouhaveanair gap,cleanit.Seepage15.
outof thetub • Ifthedishwasherdrainsintoa disposer,rundisposerclean
• Checktoseeifuourkitchensinkisdrainingwell.If not,you
mauneeda plumben
Steam Thisisnormal • Warm,moistaircomesthroughthevent buthedoorlatchduringdrying
andwhenwaterisbeingpumpedout.Thisisnecessarufordruing.
Sanitizedlight does Thedoorwasopenedand the • Donotinterruptthecucleanutimeduringoraftermainwash.
notilluminateat the cyclewasinterrupted during
endofthecycle or after the mainwashportion
(Anti-Bacteria Theincomingwater • Raisethewaterheatertemperatureto between120°Fand140°E
cyde only) temperaturewastoo low
Noise Normaloperatingsounds • Theseareallnormal.Noactionisrequired.
Detergentcupopening
Water enteringdishwasher
Themotor stopsand starts at
varioustimesduringthecycle
Drainpumpsoundsduring
pumpout
Dryingfanrunning for2-4 hours
offer CLEANlight isilluminated
(TopControlPanelmodelsonly)
Rattlingdisheswhenthe spray
arm rotates
Fuseisblownor circuitbreaker
istripped
Poweristurned off
• Hakesuredishesareproperlgloaded.SeetheLoodingthe
dishwasherrackssection.
18

GE Service Protection Plus'"
GE, a name recognized worldwide for quality and dependability, offers you
Service Protection Plus_'-comprehensive protection on all your appliances-
No Matter What Brand!
Benefits Include:
• Backed bg GE
• All brands covered
• Unlimited service calls
• All parts and labor costs included
• No out-of-pocket expenses
• No hidden deductibles
• One 800 number to call
We'll Cover Ang
Appliance. Angwhere.
Angtime.*
You will be completely satisfied with our service protection or you mug request your money back
on the remaining value of your contract. No questions asked. It's that simple.
Protect your refrigerator, dishwasher, washer and dryer, range, TV,VCRand much more-any brand!
Plusthere's no extra charge for emergency service and low monthly financing is available. Even icemaker
coverage and food spoilage protection is offered. You can rest easy, knowing that all your valuable household
products are protected against expensive repairs.
Place your confidence in GEand call us for more information in the U.S.
toll-free at800.626.2224 and in Canada, toll-free at888.261.2133.
*All brands covered, up to 20 gears old, in the continental US
_Cut here
Please place in envelope and mail to:
Generol Electric Compong
Warranty Registration Department
RO. Box 32150
Louisville, KY 40232-2150
19

Consumer Product Ownership Registration
Dear Customer:
Thank you for purchasing our product and thank you for placing your confidence in us.
We are proud to have you as a customer!
Follow these three steps to protect your new appliance investment:
Complete and mail
your Consumer
Product Ownership
Registration today.
Have the peace of
mind of knowing we
can contact you in
the unlikely event of a
safety modification.
After mailing the
registration below, store
this document in a safe
place. It contains
information you will need
should you require
service. Our service
number is 800.GE.CARES
(800.432.2737) in the U.S.
and 800.361.3400
in Canada.
Model Number
Read your Owner's
Hanual carefully.
It will help you
operate your new
appliance properly.
Serial Number
I I I I I I I
Important: If gou did not get a registration card with gour product, detach
and return the form below to ensure that gour product is registered,
or register online at ge.com. Canadian consumers, please use the
mail-in card on page 19 in the French Language section.
._,,_ Cut here
Consumer
Product Ownership Registration
Model Number Serial Number
I,,,,,, , , , , , I I , , , , , ,
Mc Ms. Mrsi Missi
FirstI I Lastl
Name I I I I I I I I I Name I I I I I I I I I I I I
Street IAddress l I I I I I I I I I I I I I I I I I I I I I I I I
Apt.# I I I I I I I I I E-mailAddress*
zipI
DitylI, I I I I, I I I I I I I statel, 1 Dode'' ' I I
Date Placed
i.u_ol, I I , I I , I phone
Numberl I, I-I,, I-I,,, I
Month Day Year
GE Consumer & Industrial
Appliances
General Electric Company
Louisville, KY40225
ge.com
* Please provide your e-mail address to receive, via e-mail, discounts, special offers and other important
communications from GE Appliances (GEA).
Check here if you do not want to receive communications from GEA's carefully selected partners.
FAILURE TO COMPLETE AND RETURN THIS CARD DOES NOT DIMINISH YOUR
WARRANTY RIGHTS.
For information about GEA's privacy and data usage policy, go to ge.com and click on "Privacy Policy"
or call 800.626.2224.
20

Notes.
r._
¢h
0
2
r._
¢h
0
0
0
¢b
0
"0
0
2!

0
13
0
0
0
O.
E
0
£J
Notes.
22
GEDishwasher Warrants.
Allwarranty service provided bg our Factors Service Centers, or an
authorized Customer Care ®technician. To schedule service, on-line,
24 hours a dog, visit us at ge.com, or call 800.GE.CARES (800.432.2737)
in the United States. In Canada, call 1.800.561.3344. Please have
serial number and model number available when calling for service.
Staple your receipt here.
Proof of the original purchase
date is needed to obtain service
under the warrants.
For The Period Of: GE Will Replace:
One Year Any part of the dishwasher which fails due to a defect in materials or workmanship. During
From the doteof the this limited one-gear warranty, GEwill also provide,free of charge, all labor and in-home service
original purchase to replace the defective part.
Five Years Thedishwasher rocks end the electronic control module if theg should fail due to a defect
From the dateof the in materials or workmanship Duringthis five-gear limited warranty, gou will be responsible
original purchase for ang labor or in-home servicecosts
Lifetime of Product TheStainlesstub or door liner, if it failsto contain water due to a defect in materials or
workmanship Duringthis limited warranty, GEwill also provide,free of charge, all labor and
in-home serviceto replacethe defective part
Whet GE Will Not Cover (for customers in the United States):
• Service trips to gour home to teach gou how to use
the product.
• Improper installation, deliverg or maintenance.
• Failure of the product if it is abused, misused, or used for
other than the intended purpose or used commerciallg.
• Replacement of house fuses or resetting of circuit breakers.
• Product not accessible to provide required service.
• Damage to the product caused bg accident, fire, floods
or acts of God.
• Incidental or consequential damage caused bg possible
defects with this appliance.
• Cleaningor servicing ofthe air gap device in the drain line.
• Damage caused after deliverg, including damage from
items dropped on the door.
EXCLUSION OF IMPLIED WARRANTIES--Your sole and exclusive remedy is product repair as provided in this Limited
Warranty. Any implied warranties, including the implied warranties of merchantability or fitness for o particular
purpose, ore limited to one gear or the shortest period allowed by low.
Thiswarranty isextendedto theoriginal purchaser and ong succeedingowner forproducts purchasedfor homeusewithin the
USA.If theproduct islocatedin an area whereserviceby o GEAuthorizedServicerisnot available,you may be responsibleforo trip
chargeor you may berequired to bring theproduct to onAuthorized GEServicelocation forservice.Proofoforiginal purchasedote
isneededto obtain serviceunder thewarranty. InAlaska,the warranty excludesthe costofshipping or servicecallsto your home
Somestatesdo not allow the exclusionor limitation of incidentalor consequentialdamages.Thiswarranty gives you specific legal
rights,and you may alsohoveother rights which vary from state to state.Toknow what your legal rights ore,consultyour local
or stateconsumer affairsoffice or your state'sAttorney General.
Warrantor: General Electric Compung. Louisville, KY 40225
Whet Is Not Covered (for customers in Canada):
• Service trips to gour home to teach gou how to use
the product.
• Improper installation.
If gou have an installation problem, contact gour dealer
or installeE You are responsible for providing adequate
electrical, exhausting and other connecting facilities.
• Failure of the product if it isabused, misused, or used for
other than the intended purpose or used commerciallg.
• Replacement of house fuses or resetting of circuit breakers.
• Damage to the product caused bg accident, fire, floods
or acts of God.
• Damage caused after deliverg.
I EXCLUSIONOFIMPLIEDWARRANTIES--Yoursole andexclusive remedg isproduct repair as provided in this Limited I
I
Warranty. Ang implied warranties, including the implied warranties of merchantebilitg or fitness for a particular
I
purpose, ore limited to one gear or the shortest period allowed bg low.
This warranty is extended to the originalpurchaser and any succeeding owner forproducts purchased for home use within Canada.
tnhome warranty servicewill beprovidedin areaswhereit isavailableand deemedreasonableby Ntabeto provide.
I WARRANTOR IS NOT RESPONSIBLE FOR CONSEQUENTIAL DAMAGES. J
J Warrantor: HABE CANADA INC. I 25

Consumer Support.
q I GEAppliances Website IntheU.S.:ge.com
Have a question or need assistancewith uour appliance?Try the GEAppliances Website 24 hours a day,
' any day of the gear! Forgreater convenience andfaster service,Uoucan now download Owner's Manuals,
order parts or even schedule serviceon-line.In Canada: www.geappliances.ca
Schedule Service ,ntheU.S.:ge.com
Expert GErepair serviceisonlu one step away from your door,Geton-line and schedule your serviceat your
convenience 24 hours any day of the uead Or call800,GE.CARES(800,432.2737)during normal businesshours
In Canada, cell 1.800.561.3344
RealLife Design Studio Inthe u.s.:ge.com
GEsupports the UniversalDesignconcept-products, services and environments that can be usedby people of all
ages,sizesand capabilities. Werecognize the need to designfor a wide range of physical and mental abilities and
impairments. Fordetails of GE'sUniversalDesignapplications, including kitchen designideasfor people with disabilities,
check out our Websitetodag. Forthe hearing impaired, pleasecall800.TDD.GEAC(800.83B.4322).
In Canada, contact: Manager,Consumer Relations,Mabe Canada Inc.
Suite310, 1 Factory Lane
Moncton, N.B.EIC 9M3
ExtendedWarranties ,ntheU,S.:ge.com
Purchasea GEextended warranty and learn about specialdiscounts that are available while gour warrantg is still
in effect. You can purchase it on-line angtime, or call800.626.2224during normal businesshours. GEConsumer Home
Serviceswill still be there after your warranty expires.In Canada, call 1.888.261.2133
[ I
J
Parts and Accessories
In the U.S.:ge.com
Individualsqualified to service their own appliances can have parts or accessoriessent directly to their homes
(VISA,HasterCard and Discovercards are accepted).Orderon-line todag, 24 hours every dag or bg phone at
800.626.2002during normal businesshours.
Instructions contained in this manuel cover procedures to be performed by any user. Other servicing generally
should be referred to qualified service personnel. Caution must be exercised,since improper servicing may cause
unsafe operation.
Customers in Canada can order parts and accessorieson-line at www.geappliances.ca,24 hoursevery day, or by
phone at 1.800.661.1616during normal businesshours.
Contact Us In the U.S.:ge.com
If you are not satisfied with the service you receive from GE,contact us on our Website with all the details including
your phone number, or write to: General Manager, Customer Relations
GEAppliances, Appliance Park
Louisville, KY40225
In Canada: www.geappliances.ca, or write to: Director, Consumer Relations, Mabe Canada Inc.
Suite B10, 1 Factory Lane
Moncton, N.B.EIC 9MB
"I Register YourAppliance IntheU.S.:ge.com
Register your new appliance on-line--at your convenience!Timely product registration will allow for enhanced
communication and prompt serviceunder the terms of your warranty, should the need arise.Youmay also mail
in the pre-printed registration card included in the packing material. In Canada: www.geappliances.ca
Printed in the United States
24 _
.... Printed on Recycled Paper

www.electromenagersge.ca
OJ
fl)
fl)
Instructions de s_curit_ ..... 2,3
Instructions de fonctionnement
Chargement des couverts ......... 1/4
Chargement des paniers ...... 12-14
Panneau de contr61e
et r_glages ...................... 4-7
Soins et nettogage ................ 15
Utilisation du lave-vaisselle ...... 8-11
Vogants clignotant .................. 7
Conseils de dgpannage... 16-18
Soutienau consommateur
Garantie .......................... 23
Inscription du produit .......... 19, 20
Soutien au consommateur ........ 24
S@riesCDW9000
S@riesPDW8000
S@riesPDW9000
Inscrire le module et le num_ro
de s_rie ici :
Modgle #
S_rie #
Vous les trouverez sur la paroi de la
cuvejuste 6 I'int_rieur dela porte.
165D4 700P36 7 49-55042 10-07 JR

INFORMATION IMPORTANTE SUR LA SECURITE.
LISEZ TOUTES LES INSTRUCTIONS AVANT L'UTILISATION --
CONSERVEZCESINSTRUCTIONS
A AVERTISSEMENT !
Pour votre s&curit&, les instructions de ce manuel doivent @tresuivies pour r&duire le risque
d'incendie ou d'explosion, d'&lectrocution et pour &viter les dommages _ la proprietY, les
blessures ou la mort.
AVERTISSEMENT ! SdLCURITdLDUCHAUFFE-EAU
Dons certoines conditions, de !'hydrog_ne peut _tre prdseot dons un chouffe-eau qui n'a pos 4t4
utilis4 pendant deux semaines ou dovontage. L'HYDROGENE ESTUN GAZ EXPLOSIF.
SiI'eauchaude n'a pas @t@utilis@ependant deux semainesou plus,r@duisezles risquesde dommages
ou de blessureen ouvrant tousles robinets d'eau chaude pendant plusieurs minutes. Faitescela avant
d'utilisertout appareil @lectriqueraccord@6 la canalisation d'eau chaude. Cettepr@cautionpermettra
6 toute accumulation d'hgdrog@nede sedissipe£Etant donn@que ce gazest inflammable, nefumez
paset n'utilisez pas de flamme ou d'appareil pendant ce processus.
%
CONFORMITdLDE L'INSTALLATIONET ENTRETIEN
Ce Iove-vaisselle doit _tre correctement instolld et plocd en conformitd ovec les instructions
d'instollotion ovant d'etre utilisd. Si vous n'ovez pos re_u les instructions d'instollotion avec
ce Iove-voisselle, vous pouvez vous en procurer en allant sur notre site web _ ge.com.
• Raccordez I'appareil 6 un sgst@me @lectrique
permanent et mis 6 la terre ou installez un fil
de mise 6 la terre des appareils avec les ills
d'alimentation et raccordez-le 6 la borne ou
au fil de mise 6 la terre de I'appareil.
• Un mauvais raccordement au fil de mise
la terre peur causer un risque de choc
@lectrique. Consultez un @lectricien comp@ent
ou un agent du service si vous ne savez pas si
I'appareil est correctement mis 6 la terre.
• Disposez des appareils @lectriques bars service
et des mat@iaux d'emballage ou d'exp@dition
correctement.
• Netentez pas der@parerou de remplacer une
pi@cedece lave-vaisselle6 mains que cela soit
sp@cifiquementrecommand@dans ce manuel.
Tout autre entretien ou r@parationdevrait @tre
confi@6 un technicien comp@ent.
• Pourminimiser la possibilit@d'@lectrocution,
d@branchezI'appareilducircuit d'alimentotion
avant tout entretien.
REPIARQUE:lbrr_t du lave-vaissellene d_branche
pas l'appareilde l'olimentotion @lectrique.Nous
recommandons qu'un techniciencomp@tent
r@parevotreappareil
pour _viter les blessures mineures ou les
ZkMISE EN GARDE : omma esma rie,s
• Lesarticleslav@savecle mode anti-bact@ien,
s'ilg a lieu,peuvent @trechauds au toucher
A manipuler avec pr@caution.
• L'utilisationd'un d@ergent
qui n'estpas conqu
sp@cifiquementpour le
lave-vaisselleremplira
celui-ci de mousse.
• Si le lave-vaisselle est raccord@6
un interrupteur mural, assurez-vous
que celui-ci est activ@avant d'utiliser
cet appareil.
• Sur leslave-vaisselledot@sde
commandes @lectroniqueset sivous
pr@f@ezfermer I'interrupteur mural entre les
cycles de lavage, attendez de 5 6 10 secondes
apr@savoir remisI'interrupteur avant de toucher
au bouton START/RESETpour permettre 6 la
commande de ser@initialisen
• Articlesautres que la vaisselle:ne lavezpas des
articles comme lesfiltresde purificateur d'air,filtres
de chaudi@esou pinceaux dans lelave-vaisselle.
Lelave-vaissellepourrait @treendommag@et une
d@colorationou destaches pourraient en r@sulten
• Unesurveillance attentive est n@cessairesicet
appareil est utilis@par ou pr@sdes enfants.
• Chargez lesarticles I@gersen plastique de
mani@re6 ce qu'ils ne se d@placentpas et ne
tombent pas au fond; ils pourraient @treen
contact avec I'@l@mentde chauffage et @tre
endommag_s.

www.electromenagersge.ca
%
AVERTISSEMENT ! RISQUE D'ENFANT PRIS AU PIEGE
BONNE DISPOSITION DE VOTRE LAVE-VAISSELLE
Leslave-vaissellejet@sou abandonn@ssont
dangereux...m@mesivous neles laissezjet6sque
quelquesjours,sivousvoulezjetervotre vieuxlave-
vaisselle,suivezlesinstructionspour emp@cherles
accidents.
Avant dejeter votre vieux lave-vaisselle
Enlevezlaporte du compartiment de lavage ou enlevez
leverrou de la porte (comme le montre I'illustration).
NOTE: Lesmodules des s_riesCDW9000et
PDW9200-PDW9900 ont aussi une vis de verrouque
vous devez enlever (_tape 1)comme I'indiquela figure.
O Vis
(surcertains
modules)
AVERTISSEMENT ! Lorsdufonctionnernent, suivezlespr#cautions
de bose dont celles-ci :
• N'utilisezcet appareil que pour I'objectif pour lequel • Netouchez pas6 1'616mentchauffant pendant ou
il a 6t6 conqu tel que d6crit dans le Guide de
I'utilisateur.
N'utilisezque lesd@ergentset agents de rinqage
liquides,en poudre ou en tablette, recommand6s
pour leslave-vaisselleet gardez-leshors de la
port6e des enfants. Lesd@ergentspour lave-
vaisselleCascade ®,Cascade ®Complete et
Electrasol ®et lesagents de rin_ageJet-Drg ®
et Cascade Crystal Clear+ sont approuv6s avec
leslave-vaisselleGE.
• Prenezsoin de ne pas m_langer un d_tergent
6 base dejavellisant avec un autre 6 base
d'enzgme, cela pourrait faire tiger les d_tergents,
cequi aura pour effet d'obturer le distributeur
SmartDispenseMD.
• Placezlesarticles coupants de mani@e6 ce qu'ils
n'ab?mentpas lesceau de la porte.
• Placezlescouteaux avec le manche vers le haut
pour r6duire lesrisques de coupures.
• Nelavez pas lesarticles de plastique @moins qu'ils
n'aillentau lave-vaisselleou 1'6quivalent.Siles
articles de plastique ne sont pas marqu6s ence
sens,vogez les recommandations du fabricant.
imm6diatement apr@sI'utilisation.
• Nefaites pasfonctionner le lave-vaissellesiles
panneaux de I'habitaclene sont pas install6s.
• N'alt6rezpas lescommandes.
• Ne maltraitez pas,ne vous assogezpaset ne
montez passur la porte ou surle plateau de
vaisselle.
• Ne laissezpas lesenfantsjouer autour du lave-
vaisselleIorsque vous ouvrez et fermez la porte
pour _viter que leafs petits doigts nese coincent
clansla porte.
• Nejetez pasun lave-vaissellesans d'abord enlever
la porte du compartimentde lavageou leverroude
la porte.
• N'entreposez paset n'utilisezpasde produits
combustibles, de I'essenceou desvapeurs ou
liquidesinflammables pr@sde cet appareil ou
de tout autre appareil.
• Ne laissezpas lesenfants s'amuseravec ou clans
cet appareil ou de tout appareil mis au rebut.
LISEZ ET RESPECTEZ CES CONSIGNES DE SE-CURITE-.
CONSERVEZ CES INSTRUCTIONS

Lepanneaude contr61edu lave-vaisselle.
Vous pouvez trouver votre numdro de mod_fe sur to paroi de to cuve,juste _ t'intdrieur de to porte. Dons ce manuel,
tes coroctdristiques et l'opporence peuvent vorier sefon temod_fe.
S_ries PDW8100-PDW8900 H i r_ n
irt El El
S#ries PDW9200-PDW9900 et CDWgO00
ENHANCEMENTS -- -- STATUS --
_o_ • LeWgETE_GEtCT@DRYING
H D j co,'m_s @ SEHSIHG ® NAHITIZEN
@ WASHING @ CLE_
la lri El El
Rdglage des contrGles
H Vogants lumineuxd'_tat_lesvogantspeuvent varierselon lemodule)
Lesvoyants lumineu× vousindiquent ce qui sepassependant lefonctionnement du lave-vaisselle
automatique. IIspeuvent clignoter sile lave-vaissellefonctionne mal. Lesvoyants indiquent ON[marche)
pour donner la s_quence de fonctionnement du lave-vaisselle.
LOW DETERGENT
(d_tergentbas)
SENSING
(senseur)
ADD-A-DISH
(ajoutez une assiette)
WASHING
(levage)
RINSING
(ringage)
DRYING
(s6chage)
SANITIZED
(sanitis_)
CLEAN
(propre)
Appar_t quond vous devez remplir le SmQrtDispense MDde d_tergent liquide ou gel pour
IQve-wisselle QutomQtique.
NOTE : si vous n'utilisez pus IQfonction SmQrtDispense MDet que vous d_sirez 6teindre le voyQnt
lumineux LOW DETERGENT [d_terBent bag, oppuyez 6 5 reprises sur IQtouche ADDED HEAT
[chaleur 4-)en mains de 5 secondes. Trois bips sonores seront 6mis et le voyQnt lumineu×
s'_teindrQ. Pour r&activer le voyQnt, Qppuyez simplement 6 5 reprises sur IQtouche ADDED HEAT
[chaleur 4-)en mains de 3 secondes.
AppQraTt quQnd le Clean Sensor _umesure le montQnt de sQlet6 et IQtemp_rQture de I'eQu.
Le IQve-wisselle Qjuste le cycle choisi pour obtenir le rendement optimal.
AppQraTt pendant le pr_bwge pour indiquer que si vous Qjoutez mQintenQnt de IQvQisselle,
elle serQ _gQlement IQv_e.
AppQrQTtpendant le pr_bwge, le IQvQge principal et le rinqQge.
AppQrQ]t pendant le rinqage.
Apparent pendQnt le HEATED DRY (s_chage chaud).
AppQrQTtquund le cycle u rempli les conditions d'QseptisQtion.
AppQrQTtquund un cycle de IQvQge est termin&
_'_ Vogant de temps restant (surcertoinsmodules)
Pendant le fonctionnement, ce voyant indique le nombre de minutes qui restent pour terminer le cycle.
Ce vogant peut ajuster le temps restant quand les lumi&res du senseur sont allum6es. Le temps indiqu6 au
d6but de chaque cycle peut changer par rapport au r6glage en usine, car votre appareil s'ajuste h votre
utilisation personnelle. Pendant la mise en marche retardGe, ce vogant indique le nombre d'heures qui
restent avant le dGbut du cycle.
4

www.electromenugersge.ea
m
Choix
Sdries PDW8000 : Appuyez sur Io hanna touche pour obtenir le cycle de Iovage ddsir&
Sdries CDW9000 et PDWgO00 : Utilisez les touches de fl_che t'W__ pour loire ddfiler les cycles de Iovage.
REMARQUE : toute I'information sur les dur_es de cgcle et I'utilisation d'eau dans cette section ne sont qua des valeurs
appro×imatives. Les r_sultats actuels d_pendent de diff_rents facteurs, g compris, mais sons s'g limiter, la temp@ature
d'entr_e, la pression d'eau r6sidentielle et le niveau de salissure dans I'eau de lavage.
La lumi@e au-dessus ou (_c6t_ de la touche choisie indique ON (murehe) pour donner le CYCLE DE
LAVAGE choisi.
ANTI-BACTERIA
(anti-bact@rie)
COOKWARE
(POTS & PANS)
(casseroles)
NORMALWASH
(lavage normal)
SPEED CYCLE
(cgde rapide)
(sur certains modeles)
Maximum 8,8 gal., 105 min.
Medium 7,5 gal., 95 rain.
Minimum 6,3 gal., 85 rain.
Ce cgcle augmente la temp@ature de I'eau dons le rinqage final pour aseptiser votre lave-vaisselle.
La dur@e du cgcle d@end de la temp@ature de reau qui alimente votre lave-vaisselle.
NOTE : le cgcle bact@icide est v@ifi@pour obtenir une bonne aseptisation. Si le cgcle est
interrompu pendant ou opres le lavage principal ou sila temp@ature d'alimentation d'eau est
trap basse pour obtenir une temp@ature d'eau suffisante, les conditions d'aseptisation peuvent
ne pas exister pleinement. Encons@quence, le vogant d'aseptisation ne s'allume pasa la fin
du cgcle.
NOTE :les lave-vaisselle r6sidentiels certifi6s par le NSF ne sont pas conqus pour les
6tablissements agant un permis de vente d'aliments.
Maximum 10,0 gal., 80 min.
Medium 8,8 gQl., 70 min.
Minimum 7,5 gal., 60 min.
Ce cgcle est con_u pour la vaisselle ou les casseroles tres soles ou les casseroles contenant des
aliments s6ch6s ou cults. Ce cgcle peut ne pas r6ussir (_nettoger les aliments brQI6s. Ce cgcle
convient (_la vaisselle ordinaire.
Maximum 8,8 gal., 70 rain.
Medium 7,5 gal., 60 min.
Minimum 5,0gal., 50 min.
Ce cgcle est congu pour les assiettes et les verres mogennement!extr@mement soles.
7,5 gal., 35 min.
Ce cgcle est conqu pour les assiettes etles verres ordinaires.
CHINA CRYSTAL
(porcelaine cristal)
GLASSES
(verres)
(sur certains modeles)
7,5 gal., 35 min.
Ce cgcle est conqu pour la porcelaine etles cristaux I@g@ement sales.
7,5 gal., 30 min.
Ce cgcle est sp@cifiquement conqu pour la verrerie.
PLASTICS CYCLE
(moti_res plastiques)
(sur certains modeles)
Maximum 8,8 gal., 120 min.
Medium 7,5 gal., 105 min.
Minimum 5,0 gal., 90 min.
Lo dur@e pluslongue de ce cgclecomprend une partieint@gr@ede s@chage quiestcongu pour
r@duirelerisquede foirefondrelesarticlesen mati@replastiqueetpour am@liorerleurs@chage.
Pourenleverlestachesrougesoccasionn@es par lesproduits5 bose de tomates,GE
recommande l'utilisationde Cascade ® PlasticBoosterMD.
SINGLE RACK WASH
(Lavage une clagette)
(sur certains modeles)
RINSE ONLY
(dnqoge seulement)
Maximum 8,2 gal., 70 min.
Medium 7,0gal.,60 rain.
Minimum 4,6 gal., 50 min.
Cecgcle love les assiettesI@g@ementsolessur la clagette du haut uniquement.
2,5 gal.,10 rain.
Cecgcle est congu pour rincer des charges partielles qui seront lav@esplustard. N'utilisezpas
de d@tergentpour ce cgcle.
NOTE: sur le mod_te des s4ries PDWSO00, la touche CHINA CRYSTAL/PLASTICS(PORCELAINE
CRISTAL/PLASTIQUE)est alternative. Appugez sur Io touche pour olterner entre CHINA CRYSTAL(PORCELAINE
CRISTAL)et PLASTICS(PLASTIQUE)
NOTE: ceIove-voisselle est dquip_ de Clean Sensorn_dot_ d'un contr61eoutomotique de Iotemperature.
AussL la durra du cblctepeut varlet satanle degrd de salet4 et de temperature de I'eau.
NOTE: saul, lecbtcleanti-bacteria est concu pour remplir les exigences de #article 6,NSF 184, relatif 5
I'efficacit4 de lavage et d'aseptisation.

Lepanneau de contr61edu lave-vaisselle.
D Options
La lumi@esitu6e au-dessusde la touche choisie s'allume pourindiquer leOPTIONchoisi.
DELAY HOURS
(mise en marche
retard_e)
ADDED HEAT
(EXTRA HOT WASH)
(chaleur +)
flavage ultra-chaud)
Vous pouvez retarder la mise en marche du cgcle de lavagejusqu'8 24 heures(selonle mod@le
Appugezsur la touche DELAYSTART(raise enmar€he retardS,e)pour choisir dans combien
d'heuresvous voulez mettre en marche votre lave-vaisselle,puisappugez sur la touche
START/RESET(mise en marche/remise 6 z6ro).
S6ries PDW8000: Votre lave-vaissellecompte le d61aid6sir6et commence automatiquement a
rheure choisie.
S_ries CDW9000 et PDW9000 : Apr@sque vous agez ferm@ sa porte, votre lave-vaisselle compte
le d61ai d6sir6 et commence automatiquement 5 rheure choisie.
NOTE : Pour annuler la mise en marche retard6e avant le d6but du cgcle, appugez 5 plusieurs
reprises sur la touche DELAY START (mise en marche retard6e)jusqu'a ce que 1'6cran n'indique
plus rien.
Cette option est conqu pour faire fonctionner plus Iongtemps 1'616ment de chauffage, afin d'am61iorer
le rendement du lavage et du s@chage.
NOTE :vous ne pouvez pas choisir ce compl6ment avec le cgcle RINSE ONLY (ringage seulementJ.
PRE WASH
(pr_lavage)
(sur certains mod@les)
HEATED DRY
(s_chage chaud)
(lumiere 6teinte)
HEATED DRY
(s6chage chaud)
(lumi@e allum6e)
LOCK
(verrouillage)
RESET
(remise _ z_ro)
Cette option est concu pour la vaisselle tres sale ou qui a des aliments cuits. Vous DEVEZ choisir cette
option AVANT de commencer le cgcle. Cette option ajoute 15 minutes au cgcle.
NOTE :vous ne pouvez pas choisir cette option avec le cgcle RINSE ONLY (ringage seulementL
Cette option 6teint I'option de s6chage chaud. L'air s@che la vaisselle sans chaleur
(S6rie PDW8900) ou s@che8 I'aide d'un ventilateur (S6ries PDW9200-PDW9g00 et CDW9000)
pour 6conomiser 1'6nergie.
Cette option met en marche le chauffage pour s6cher rapidement. Cela allonge le cgcle total de 15
minutes pour le cgcle ANTI-BACTERIAL (anti-bacteria), de 38 minutes pour les cgcles NORPIAL,
SINGLE RACK WASH (lavage une clagette) et COOKWARE, de 8 minutes pour le cgcle SPEED (rapide),
de 15 minutes pour le cgcle des PLASTICS (mati_res plastiques) et de 30 minutes pour tous les autres
cgcles.
NOTE :Vous ne pouvez pas choisir cette option avec le cgcle RINSE ONLY (ringage seulemeng.
Vous pouvez verrouiller les contr61es pour 6viter toute s61ection. Ou bien, vous pouvez verrouiller les
contr61es apr_s avoir choisi un cgcle.
Les enfants ne peuvent pas mettre en marche aecidentellement votre lave-vaisselle si vous avez
choisi carte option.
Pour d6verrouiller les contr61es de votre lave-vaisselle, appugez sur la touche HEATED DRY (s6ehage
chaud) et maintenez-la appug6e pendant 3 secondes. Le vogant situ6 au-dessus de la touche LOCK
(verrouillage) s'6teindra. Pour verrouiller votre lave-vaisselle, appugez sur la touche HEATED DRY
(s4chage chaud) pendant 3 secondes. La lumi@e situ@e au-dessus de la touche LOCK (verrouillage)
s'allumera (ON).
Pour changer de cgcle apr@s le d6but du lavage.
S_ries PDW8000 : Appugez sur la touche START/RESET (mise en marche/remise 6 z_ro) pour annuler
le cgcle. La lumi_re START/RESET (raise en marche/rernise 6 z6ro) clignote pendant que reau est
pomp6e en dehors de votre lave-vaisselle si n6cessaire. Cela prend environ 2 minutes.
S_ries PDW9000 :Ouvrez lentement la porte pour _viter les _claboussures. Appugez sur la touche
START/RESET Imise en rnarche/rernise 6 z6ro) pour annuler le cgcle. Si la lumi@e START/RESET
(raise en rnarche/remise 6 z6ra) clignote, fermez la porte jusqu'a ce que reau soit pomp6e en
dehors de votre lave-vaisselle (cela prend environ 2 minutes) et la lumi@e cesse de clignoten
Quand la lumi@e cesse de clignoter, vous pouvez reprogrammer votre lave-vaisselle et le remettre
en marche.
6

www.electromenagersge.ca
Miseenmarche
m
S_ries PDW8000
Fermez et verrouillez la porte devotre lave-vaisselle et choisissez le cycle et lescompl_ments d_sir6s. Appugez sur la touche START/RESET
Imise en marche/remise _ z_ro) pour commencer le cycle. L'eaucommence imm6diatement 6 emplir votre lave-vaisselle et, environ 60
secondes plus tard, le lavage commence.
Quand la porte du lave-vaisselle est bien ferm6e et verrouill6e, Its lumi_res du panneau de contrSle indiquent Its demiers r6glages choisis.
Sivous ne voulez rienchanger 6 ces r_glages, appuyez simplement sur la touche START/RESETfmiseen marche/remise 6z_ro) pour
commencer le cycle.
Quand la porte est ferrule, Its voyants hmineu× s'6teignent sivous ne choisissez pas la touche START/RESETfmise enmarche/remise
6 z6ro)en 5 minutes. Pourremettre en marche Its voyants, ouvrez et fermez laporte ou appuyez sur n'importe quelle touche.
S_riesPDW9000
Apr6savoirchoisilecycleetlesoptionsd6sir_es,appugezsurlatoucheSTART/RESETfmiseenmarche/remise6z6raJpourpr6parervotre
lave-vaisselle6commencersoncgde.Fermezla portepourcommencerlecgcleou commencerlecomptedetempsduDELAYSTART
fmiseenmarcheretard6e).Quandlecyclecommence,I'eaucommence6 remplirvotrelave-vaisselleet,environ60secondesplustard,
lelavagecommence.
Votrelave-vaisselleindiquetoujoursvotredernierchoi×decycleetd'options.Sivousnevoulezrienchanger_ces r6glages,appuyez
simplementsurlatoucheSTART/RESET(raiseenmarche/remise6z6ro)pourpr6parervotrelave-vaisselleetfermezlaportepour
commencerlecycle.
_galement,s'ilseproduitunepannedecourant,lescyclesNORMALetHEATEDDRYfs6chagechaud)sontautomatiquement
programm6s.Choisissezunnouveaur_glageetappuyezsurlatoucheSTART/RESET(raiseenmarche/remisebz6ro)pourcommencer
unnouveaucycle.
Ouandlaporteestouverte,Its vogantsindicateurss'6teignentsilatoucheSTART/RESETfmiseen marche/remise6z6ro)n'estpaschoisi
clansIts5 minutes.Pourmettreenmarche1'6cran,ouvrezetfermezlaporteouappugezsurunetouche.
Propre
S_riesPDW8000
LevoyantCLEAN(propre)s'allumequandlecycleetlesoptionschoisiessontterminus.LevoyantresteALLUMEjusqu'_cequ'unetouche
soitpress6eouquela portesoitouverteetpuisferm6e.
S_riesPDW9200-PDW9900et CDW9000
LevoyantCLEAN(propre)s'allumeet undoublebipr6sonnequandlecgcleetlesoptionschoisiessontterminus.Vouspouvezenlever
votrevaissellen'importequand.Leventilateur6hautrendementcontinue_fonctionnerdoucementde30minutes_4 heures(selonle
cyclechoisi)apr@squelevogantCLEANfprapreJsesoitallum_,pourcontinuer6 s6cherlavaisselle.Vouspouvez6teindreleventilateuren
ouvrantlaporteetenappugantsurn'importequelletouche.
TOUSLESHODELES: pour_teindrelesignalsonoredefindecycle(ouler6activersivousI'avez_teintauparavant),appugezsurlatouche
HEATEDDRYfs6chagechaud)5foisaucoatsde 3secondes.Untriplebipr@sonnepourindiquerqueI'optionsonore6 lafindu cyclea6t6
activ6e.
Voyantslumineux qui clignotent.
Voyants indicateurs d'6tat
START/RESET
Imise en marche/remise 6 z6ro)
Cequecelasignifie
VousavezinterrompulecycleenappugantsurlatoucheSTART/RESET(raiseenmarche/remisebz6ro)
ouunepannedecourantestsurvenue.Levogants'arr_tedeclignoterapr_squevotrelave-vaissellese
soitvid_detoutesoneau.Dansle casd'unepannedecourant,lelave-vaisselleseremettraenmarche.
Produits de lavage de vaissefle recommand6s.
GErecommandelesproduitssuivantspourseslave-vaisselle:
[] Pourvotredistributeurmanuelded6tergent,lesd@tergentsdelave-
vaisselleautomatiqueCascade®etEle_Crasal®enpoudre,liquide
ouengelsont recommand6s.
[] Pourvotredistributeurde d6tergentSmartDispenseMD,utilisez
seulementlesd6tergentsrecommand6sdontlalistesetrouve6la
page!0 decemanuel.
[] Lesagentsderin_ageJet Dry®ou CascadeCrystalClear®pour
enleverIts tachesetemp6cherunenouvellepelliculedese
constituersurvosassiettes,vosverres,votreargenterie,vos
casseroleset vosinstrumentsenmati_replastique.L'utilisation
d'un agent de tin,age am61iore6galement les6chage.
[] Cascade®PlasticBoastern®pourenlever6 I'int6rieurdevotre
lave-vaissellelestachesrougeslaiss6esparcertainsaliments6
basedetomate.
[] CeramaBryte®nettogantpourappareil6lectrom_nagerenacier
inoxydablepournettogerlepanneauext6rieurenacierinoxgdable
deslave-vaisselleGEet Profile"D{pourlesmod@les6panneau
ext6rieurenacierinoxgdableseulement}.

Utilisation du lave-vaissdle.
Vdrifiezla tempdrature de I'eau
L'ofimentotion d'eau doit _tre _ au mains 120 °F et au plus _ 150 °Fpour bien lover et emp_cher tout
dommoge _ to voisseffe. Vdfifiez fo tempdmture de t'eau avec un therrnom_tre _ p6tissefie ou _ viande.
Ouvrez te robinet d'eau choude situd le plus pros de votm tave-voissdfe, pfacez fether-mom_tre dons
un verre et taissez f'eau coufer dons te verrejusqu'@ ce que to tempdmture s'arr_te de monter:
Utilisez un agent de fin?age Jet-Dry ®ou Cascade Crystal Clear®
Lbgent de rinqoge Jet-Dry ®ou Cascade Crystal Clear ®omdliore le sdchoge, enl_ve les toches et
emp_che Io constitution d'une nouve!le pellicule sur vos ossiettes, vos verres, votre orgenterie, vos
casseroles et vos moti_res plostiques.
Remplissage du distributeur R_glage de I'agent de ringage
Le distributeur d'agent de rin_age contient
3,5onces d'agent de rin_age.Normalement, cette
quantit@doit durer environ un mois.Essagezde
conserver le distributeur plein,mais sans lefaire
d@borden
r_ Assurez-vousque laporte de votre lave-vaisselle
soit bien ouverte.
[]
pq
Tournezle bouchon du distributeur vers la
gauche et soulevez-le.
Ajoutez I'agent de
rinqagejusqu'6 ceque
la fen@reindicatrice
semble pleine.
Nettogez tout agent
de rinqage renvers@
6 I'aided'un linge Fen_tre A
humide, indicatrice
T
Capuchon du
distributeur
E] Remettezen place le
bouchon du distributeu_
Vouspouvez r_gler le montant d'agent de rinqage
lib@_dons le lavagefinal. Ler_glage d'usineest au
milieu. Sivous avezdes marques de calcium (eau
riche en sels)sur lesassiettes,essagezun r_glage
plus _lev_.S'ily a de la mousse, essagezun r_glage
plus has.
Ajuster le r_glage :
Enlevezlebouchon du
distributeur ettournez
ensuite le r_glage dans
le senscontraire des ede
aiguillesd'une montre rin_age de
pour augmenter le I'agent
montant d'agent de rin_age ou dens le sensdes
aiguillesd'une montre pour r_duire la quantit_ d'agent
de tin,age distribu_.
Preparation de Io voisselle ovont son chorgement
• Vousn'avez pasbesoin de pr&rincer lesd_chets • Enleveztoutes lesquantit_s importantes de
alimentaires normaux, d_chets alimentoires.
• Grattez lesd_chets importants, lesas, lescure-
dents,les peauxet lesgraines.
• EnlevezlesI_gumes 6feuille,lesparures de viande
et lesmontants excessifsde graisse ou d'huile.

www.electromenugersge.ca
" Distfibuteur de ddter ent
Votrelave-vaisselleestequip_d'undistributeur
automatiquededetergentliquidepourlave-vaisselle d"_r'",.,v;',,_,_,,,_
(SmartDispenseMD)etd'undistributeurmanuel.Vouspouvez
utiliserI'undecesdistributeurs,maisnelesutilisezjamais
lesdeuxen m_metemps.
SmartDispense MD
Distributeur manuel
de d_tergent
Lecouvercledudistributeurmanuels'ouvrependantle
Tossesde d#tergent
pour remplir
Hoins de 4 Remplir la tassejusqu'6 la douce
graduation (1/3 de tasse)
4 6 8 Remplir latassejusqu'a la graduation
au milieu douce (2/3 detasse)
8 6 12 Remplir la tasse jusqu'a la
graduation au milieu dure (tasse
enti_rement remplie)
Plus de 12 Remplir la tasse de lavage
principale et la tasse de pr_lavage
Pourdeschargestr_ssouillees,utilisezunpeuplusde
detergent.Silatemp@aturedeI'eauestsup_rieure6
140°F(60°C),utilisezunpeumainsde detergent.
cgcledelavage.SivousutilisezSmartDispenseMD,laissez
ouvertlecouvercledudistributeurmanuelavantde
commencerlecurie.
Pourledistributeurmanuel,lesdetergentsdelave-
vaisselleautomatiqueCascade®etElectrusol®ant_t_
recommandes.Cedistributeurconvient6desdetergents
sousformedepoudre,liquide,geloupains.IIestimportant
derangerlesdetergentsen poudreouen painsdansun
endroitfraiset secafindeconserverleurefficacit6.IIest
doncdeconseill_deverserled_tergentdansledistributeur
manuelavantdelaverlavaisselle.
Remplissugedu distributeur munuel de
d#tergent
Laquantitede detergentnecessairepourvotrevaisselle
Douce Mi-douce Hi-dure Extr&mement dure
Pour/eschargesparticuli_rementsales,utilisezlecgdede
chaudronsoulecgdedelavagesale.
N'UTILISEZPASDEDE-TERGENTDE LAVAGEA LAMAIN
d@enddeladureteou deladouceurdevotreeau.Avecde
I'eaudure,vousavezbesoindeplusdedetergent.Avecde
I'eaudouce,vousavezbesoindemainsded6tergent.
Prot_gezvotrevaisselleetvotrelave-vaisselleencontactant
leservicedeseauxet envousrenseignantsurladuret6de
votreeau.Douzegrainset plusestuneeauextr_mement
dure.IIestrecommanded'utiliserunadoucisseurd'eau.
Sivousn'enutilisezpas,celapourraitmener6une
accumulationdechauxdanslerobinetd'eauqui pourrait
m
m
ensuitecalleren positionouverteetprovoquerune
inondation.Trapdedetergentavecuneeaudoucepourrait
cr6erdesvoilessurlesverres,cequeI'onappelle
unegravure.
UtilisezI'informationdutableausuivantcommeguidepour
determinerlaquantit@dedetergentdelave-vaisselle
automatique6 mettredansledistributeunVous pouvez
utiliser lesd@ergentsde lave-vaisselleautomatique
en poudre, gel,liquide ou des pains.
Ouandvousutilisezdespainsdedetergentpourlave-
vaisselleautomatique,placezsimplementunpainde
detergentdanslasectionprincipaledelavageetfermez
lecouvercle.
REkIAROUE: utiliserundetergentquin'estpas
spedfiquementcon_upourleslave-vdssellesremplira
Ibppareildemousse.Pendantlenettogage,cettemousse
deborderadeseventsdulave-vdssdle,tomberasurle
plancherdela cuisinequideviendramouille.
Puisquebeaucoupde contenantsded6tergentse
ressemblent,rangezledetergentdelave-vaisselledans
unendroitdistinctdetouslesautresnettogants.Montrez
6toute personnequi utiliseralelave-vaisselleleban
detergent6 utiliseretoOilestrang_.
Bienquecetteerreurnecauserapasdedommages
permanentsaulave-vaisselle,votrevaisselleneserapas
bienlargeaveccetgpeded_tergentnonformulepour
leslave-vaisselles.

Utilisation du lave-vaisselle.
Distributeur de d tergent 5mortDispense M°(certa nsmo e es)
Celave-vaissellepeuvent comporter lafonction Ouvrezla porte (_un angle confortable pour remplir
SmartDispenseMD,une caract@istiquequi distribue le distributeu_
10
automatiquement led_tergent liquide pour lave-
vaisselleautomatique dans chaque cycle en sebasant
sur le niveau de salet_ de la vaisselleet de duret_ de
I'eau.
Avant d'utiliser le distributeur de d@ergent
SmartDispenseMD,vousdevez d'abord le remplir.M_me
si n'importe quel d@ergentpour distributeur
automatique sous forme liquide ou de gel convient au
distributeur SmartDispenseMD,il est important de
savoir qu'ilexiste une diff@enceentre lesdivers
d@ergents.Laplupart des d@ergentspour
distributeurs automatiques sont _ base dejavellisant
(comme Cascade®ou Electrasol®),tandis que d'autres
contiennent des enzgmes(comme Cascade
Complete®ou Electrasol®AdvancedMDGel).
Prenezsoin de ne pas m_langer un d_tergent _ base
dejavellisant avec un autre 6 base d'enzgme, cela
pourrait faire tiger les d_tergents, cequi aura pour
effet d'obturer le distributeur SmartDispenseMD.
V@ifiezI'@iquettesur le d_tergent pour savoir s'il
contient dujavellisant ou desenzgmes.Nousvous
conseillonsd'utiliserle m@metgpe de d@tergentpour
remplir ledistributeur SmartDispenseMD.
Dirigezla bouteille de d@ergentvers I'ouverture de
la porte et commencez _ rempliE
Le distributeur contient 45 oz de d@ergent liquide
pour lave-vaisselle (bouteille de taille normale).
ATTEN7"10N!
N'ajoutezabsolumentjamais de d@ergenten
poudre,en pains ou tout autre savon ou d@ergent
liquide utilis_normalement pour laverla vaisselle
la main dans un _vier.N'utilisezque du d@ergent
liquide ou gel sp_cifiquement conqupour le
lave-vaisselleautomatique.
Pourouvrir le distributeur afin de leremplir,poussez
vers le bas et tournez le capuchon bleu dans le sens
oppos_ 5 celuidesaiguilles d'une montrejusqu'5 ce
que le capuchon est desserr& Retirezle capuchon.
Tournez dans le sens des aiguilles d'une montre.
q:)uandledistributeurestplein,remettezlebouchonsur
letroud'acc_settournezdanslesensdesaiguillesd'une
montrejusqu'_cequ'ilsoitserr_pourassurerquedeI'eau
nep_n@repasdansledistributeurSmartDispenseMD.S'il
restedesr_sidussurla porte,ilsserontlavespendantle
cyclesuivant.
Unvogant s'allumera pour vous avertir que le
distributeur doit @rerempli 5 nouveau. Apr_sque
vous ayez rempli ledistributeur, le voyant ne
s'@eindraqu'_ la fermeture de la porte. Un
distributeur pleindure environ 1 mois d'usagenormal.
STATUS
Le vogant SmartBispeflse
s'allumera _O LOWDETERGENT ODRYING
Iorsqu'il 0 SENSING ® SANITIZED
faut
remplir O WASHING 0 CLEAN
(l'apparence peut varier)
REHAROUE: Sivous n'utilisezpasla fonction
SmartDispenseMDet que vousd@sirez@eindrelevoyant
lumineuxLOWDETERGENT(d#tergenthas),appuyez
5 5 reprisessurlatouche ADDEDHEAT(chaleur+)en
moins de 3 secondes.Troisbipssonoresseront_mis et
levoyant lumineux s'@eindra.Pourr_activer levoyant,
appuyez simplement _ 5reprisessurla touche ADDED
HEAT(cheleur+) en moinsde 3secondes.

www.electromenagersge.ca
Calibrage de duretd de I'eau de distributeur
de ddtergent 5martDispense
Avantsapremi@eutilisation,vousdevezcalibrervotrelave-
vaisselleenfonctiondeladuretedevotreeau.Veuillezsuivre
lesinstructionssuivantespourcalibrervotrelave-vaisselleen
fonctiondeladuretedevotreeaud'alimentation.
Trouvezla duret_ de votre eau d'alimentation
Danslesacquicontenaitcesinstructions,voustrouverez
un paquetdebandesdetestdeduret_de I'eau.Lisezles
instructionssurlepaquet,enlevezlaban@d'essaietsuivez
lesinstructionspourtrouverledegr_deduret_devotreeau
du robinet.Vousutiliserezcetteinformationpourcalibrer
votrelave-vaissellecequivouspermettradedistribuer
lemontantoptimaldedetergent.
Indication de la bande d'essai de duret_ d'eau
EAU
DOUCE 0 ROuGE ll_
i ROuGE ll _
2 ROuGE ll _
3 ROUGE ll _
EAU
DURE
Calibrate des modules _ panneau de commande
frontal a 12 boutons avec afficheur 6 3 chiffres
La valeur 6
entrer dans le
lave-vaisselle
2
2
3
4
5
Appuger sur les touches simultun6ment. Afficheur
r_ Fermezet verrouillez la porte (vogantsallum_s,
lave-vaisselleau repos).
F21 Appugezen m_metempssurlestouchesCOOKWARE
(casseroles)etDELAYHOURS(miseen marche
retard_e)pendant3secondes.L'afficheur indiquera
un nombre de "/(]5.Cenombre indique le niveau
de duret6 de I'eau actuellement r6gl&
r_ Appugezsur Iotouche COOKWARE(casseroles)
pour augmenter la valeur ou surla touche
NORHALpour I'abaisseEUtilisezlenombre
obtenu avec la bande d'essaiet letableau ci-
dessuspour r6gler le niveau de duret6 de I'eau.
[] Ap@savoirr6g16laduret6de I'eau,appugezsur
latouche START/RESET(d6marrage/r6initialisation)
pour sauvegarderla configurationet revenirau
modenormalde fonctionnementdu lave-vaisselle.
Calibrage des modules 6 panneau de commande
frontal _ 7 boutons avec afficheur 6 3 chiffres
/ "r
Appuger sur les touches simultan6ment.
Afficheur
E10uvrez la porte et appugez sur une touche (autre
que la touche START(d6marrage) pour actionner
lesvogants.
I-_ Appugezen m6metempspendant3secondessurles
touches"Up"(verslehaut)_ etDELAYHOURS
(mise en marche retard_e)}. L'afficheurindiquera
un nombre de "/6 5.Cenombre indique le niveau
de duret6 de I'eau actuellement r6gl&
[] Appugezsurla touche "Up"(haut)dE3pour
augmenter la valeurdu niveauou sur la touche
"Down"(bas)_2 pourI'abaisse:Utilisezle nombre
obtenu avec la bande d'essaiet letableau 6
gauche pour r6glerle niveaude duret6 de I'eau.
[] Apr_savoirr6g16la duret6de I'eau,appugezsur
latouche START/RESET (d4marrage/r_initialisation)
pour sauvegarderla configurationet revenirau
modenormal defonctionnement du lave-vaisselle.
Calibrage des modules sans afficheur 6 3 chiffres
Commandes sur le devant
[] Fermezet verrouillezla porte (vogantsallum6s,
lave-vaisselleau repos).
r-2-]Appugezen m6metempssurlestouchesCOOKWARE
(casseroles)etDELAYHOURS(miseen marche
retard_e) pendant 3secondes. Tousles vogants
s'illumineront et vous entendrez de 1 6 5 bips. Le
nombre de bips indique la valeur r6elle de la
duret6 de I'eau.
]Pour modifier laconfiquration, appugez surla
touche DELAYHOURS(miseen marche retard_e)
6 autant de reprisesqu'au nombre correspondant
de la colonne 6 gauche, laquelle indique la valeur
de la duret6 de I'eau.Le panneau 6met un bip
chaque fois que vous appugez sur latouche.
[] Lorsquevousavezfinid'appugersurlatouche,vous
entendrezuneconfirmationcorrespondant6 autant
debipsquelenombredeloisquevousavezappug6
surlatouche.
[] Silenombrede bipsn'estpasceluiquevousd6sirez,
recommencez6 appugersurlatoucheDELAYHOURS
pourentrerunnouveauniveaudeduret_de I'eau.
Apr_savoirr6g16la duret6de I'eau,appugezsur
latouche START/RESETId_marrage/r_initialisation)
pour sauvegarderla configurationet revenirau
modenormal defonctionnement du lave-vaisselle.
Cammandes sur le haut
r_ Ouvrezlaporte etappugezsur unetouche pour
actionnerlesvogants.
r-2-i Appugezenm6metempspendant3secondessurles
touches"Up"(verslehaut)r_ etDELAYHOURS(raise
en marche retard_e).Touslesvogantss'illumineront
etvousentendrezde 1_]5hips.Lenombredehips
indiquelavaleurr6elledeladuretedeI'eau.
]Pour modifier laconfiquration, appugez surla
touche DELAYHOURS(miseen marche retard_e)
6 autant de reprisesqu'au nombre correspondant
de la colonne 6 gauche, laquelle indique la valeur
de la duret6 de I'eau.Le panneau 6met un bip
chaque fois que vous appugez sur latouche.
E] Lorsquevousavezfinid'appugersurlatouche,vous
entendrezuneconfirmationcorrespondant6 autant
dehipsquelenombredefoisquevousavezappug6
surlatouche.
E] Silenombrede bipsn'estpasceluiquevousdesirez,
recommencez6 appugersurlatoucheDELAYHOURS
pourentrerunnouveauniveaudeduret6de I'eau.
F_ Ap@savoirr6gl6la duret6de I'eau,appugezsur
latouche START/RESET(d_marrage/r_initialisation)
pour sauvegarderla configurationet revenirau
modenormal defonctionnement du lave-vaisselle.
REHARQUE:Vousdevriez recalibrerle lave-vaissellesi
lesconditions de duret6 de I'eau changent comme
dans le cas de I'ajout ou du retrait d'un sgst6me 11
d'adoucisseurd'eau 6 votre domicile.

Chargement des paniers de votre lave-vaisselle.
Pour obtenir de bans rdsultats, suivez cos directives de chorgement. Los caroct4ristiques et I'opparence des paniers et
des paniers _ argenterie peuvent vorier solon votre mod_le.
Panier sup_rieur
Bienque la clayette sup@ieuresuit destin_e
en premier lieu auxverres,aux tasseset aux
soucoupes,vous pouvez y mettre des
casserolespour bien leslaver Lestasses etles
verrestiennent le mieux le long desc6t@s.
Cest aussi un ban endroit pour lesmati@es
plastiques.
Cepanier (certains mod@les)peat @replac@e
en position haute ou basse pour faciliter le
rangement. Unporteur de verres (_vin
(certains mod@les)tient lesverres @vin pour
un ban lavage.
Certains mod@lesant des paniersde tasses
en m@alform@,qui peuvent contenirjusqu'(_
12verres @vin (comme dans I'illustration).
Comme lesverres (_vin ant desformes
diverses,apr@slesavoir mis,appuyez-les
doucement dans le panier pour qu'ilsne
touchent pas le haut de votre lave-vaisselle.
Certains mod@lesant un syst@medeclayette
inclin@e,quivous permet d'incliner vos plats,
comme lestasses de caf@,pour mieux
nettoyer ets@cherplusrapidement. Pour
mettre en place lesdents tirez leleviervers
I'avant,puis laisseztomber lesdents en
position,puislaissezle levien
Lepunier sup@rieur est con(?ue pour toutes
sortesd'ustensilesde cuisinede formes
diverses.Vousdevezplacerlessoucoupes,
lesbols_ m@langerettousles autres article
(_I'envers.Lestiges pliantes (surcertains
mod@les)permettent de ranger lesarticles
difficiles5 caserou extra-grands.
Mettez lesarticles en mati@e plastique
lavables en lave-vaissellesur deuxtiges
repliablessi possible.
Assurez-vousque tousles articles en mati@e
plastique soient bien cal@set qu'ilsne
risquent pasde tomber sur le chauffage.
Assurez-vousqu'aucun articlene sorte en bas
de la clayette et ne bloque la rotation du bras
d'arrosage du milieu. Celapeat occasionner
un mauvais lavage desarticles plac@sdans
le panier sup@rieu_
V@ifiezqu'aucun article ne bloque la rotation
du brasde lavage.
NOTE:Las_lection Single Rack Wash (an
seulpanied n'effectue que le lavage du
panier sup@ieursur lesmod@lesqui offrent
cette fonctionnalit@.Sivous choisissezcette
fonctionnalit@,ne d@posezpas devaisselle
dans le panier inf@ieu_
I ]l II I1 II i] 1111 ]1 ]l II
Panier sup_rieur ajustable
Laposition normale de votre panier ajustable
est en haut, cequi permet aux articles plus
grands, situ@sdans le panier du bas, d'avoir
un maximum d'espace.Sivous avezdes
verres _ vin hauts, desgobelets ou d'autres
articles longs dans le panier sup@lear,vous
pouvezajuster ce panier afin de la mettre en
position basse.
Pour abaisser le punier, soutenezle poids
du panier avec vos mains comme I'indique
I'illustration,appuyez sur lesdeux taquets
avec vos doigts environ 1/4" vers I'int@ieur
du panier,comme I'indique I'illustration,et
guidez lepanier vers le has en position basse.
Pour fuire monter le punier en position
haute, tirez sur le centre du chOssisde c6t_
du panierjusqu'5 ceque le panier sefixe
en place.
12
Panier inf_rieur
Lepartier inf@ieurest con_ue pour les
assiettes,lessoucoupes et lescasseroles.
Vousdevez mettre lesarticles de grande
taille,comme lesgrils-I@chefriteet les
plateaux _ p@tisserie,le long du c6t@gauche.
Lesassiettes@servir,lescasseroleset lesbols
vont le long desc6t@s,dans lescoins ou
I'arri@e.Lec6t@sale de la vaisselledoit @re
tourn@versle centre du paniet Sin@cessaire,
vous pouvezmettre lesverres et lestasses de
grande taille dans le panier inf@ieurpour
faciliter le chargement.
Aussi,faites attention de ne pas laisser
une partie d'article comme un manche de
casseroleou une poign@ede plat, sortir par
le bas du panier inf@ieu_Celapeat bloquer
le bras de lavage et occasionner un mauvais
lavage.
Destiges pliantes (surcertains mod@les)
facilitent le rangement d'articles
extr@mementgrands ou difficiles @case_
Vouspouvez soulever cestiges vers le haut
ou lesrepliervers le bas pour faciliter le
rangement dans le panier inf@ieu_

www.electromenagersge.co
Pomme de douche,
num6ro de pi6ce WD12X10134
votre pouce Enlevez le capuchon
pour enlever
le taquet
Enl_vement du punier sup_rieur
La clayette inf6rieure de votre nouveau
lave-vaissellepeut recevoirde grands articles.
Pour cefake, enlevezsimplement la clayette
sup6rieureet installezune pomme de douche
sur le gicleur qui alimente normalement
la clayette sup6rieureen eau.Lapomme
de douche n'est pascomprise avec le
lave-vaiselle,mais on peut sela procurer
aupr_s de GE.Communiquez avec GEau
1.800.626.2002ou visitez le site ge.comet
demandez I'article <<NozzleSprayAsm >>,
num6ro de pieceWD12X10134.
Lesconsommateurs canadiens peuvent
commander sur lesite electromenagers.ca
24 heuresparjour, 7jours par semaine,ou
par t616phoneau 1.800.661.1616durant les
heures d'affairesnormales.
NOTE: N'utilisezpasle cycle de SINGLERACK
WASH(certainsmodules)(lavage d'un seul
panier) avec cette fonction. Lecycle <<Single
RackWash >>n'effectue que le lavage de la
vaisselled6pos6e dansle panier sup6rieur.Le
cycle recommand6 pour I'utilisationdu panier
inf_rieur seulement est le cycle COOKWARE
(casserole).
NOTE:Lapommededouchedoit_treenplace
aveclaclayettesup6rieureenlev6e.Sivousne
I'installezpasbien,vouslaverezmaletvotrelave-
vaisselleferadubruit.
Pour enlever le panier inf_rieur :
FT] Appuyez avec votre pouce pour
enlever le taquet et enlevez les
capuchons d'extr@mit6de devant
de chaque c6t6 des rails.
r2-1Tirez lepanier tout droit et enlevez-la
desrails.
r_ Remettezen place lescapuchons
d'extr6mit&
[] Poussezlesrailsjusqu'au fond du
lave-vaisselle.
[] Faitesglisser lapomme de douche sur
le bec.
"Pomme
de douche
F] Remplissez ensuite le panier inf6rieur et
commencez votre cycle.
NOTE : N'oubliez pas d'enlever la pomme
de douche avant de remettre en place le
panier sup6rieu_
Punier en une piece (sur certains
mod_les)
Panier en trois pi_ces (sur
certains mod_les)
Ne laissez oucun
article sortir par
le has.
Punier _ argenterie
Pour charger I'argenterie,poussez
simplement la poign6e ajustable d'un c6t6
ou de I'autre (surcertains modules).Mettez
I'argenterie dans le panier amovible avec les
poign6es de fourchette etde couteau vers
le haut pour prot6ger vos mains. Placezles
cuillers dans le panier avec lespoign6es
vers le has. M61angezlescouteaux, les
fourchettes et lescuillersde mani6re _ ce
qu'ilsne soient pas coll6slesun aux autres.
R6partissez6galement. Mettez lespetits
articles en mati6re plastique,comme les
cuillers _ mesurer et lesbouchons de petits
contenants, en bas du panier (_argenterie
avec I'argenterie sur eux.
Le panier _]argenterie en une pi6ce(sur
certains modules)peut 6tre plac6 _ I'avant,
du c6t6 droit ou _ I'arri_redu panier inf6rieuE
De nombreusesoptions existent pour le
panier _]argenterie en trois pi6ces(sur
certains modules)dans votre lave-vaisselle.
Le panier entier est conqu pour aller du c6t6
droit du panier inf6rieuc Enoutre, chaque
extr6mit6 du panier est amovible pour
faciliter le chargement de I'argenterieet
remplir lesbesoins de capacit6 du panier
inf6rieu_
Vouspouvez fermer lescouvercles des
paniers du centre et de chaque c6t6 (sur
certains modules) pour g mettre despetits
articles.Vous pouvez placer lesarticleslongs
sur le plateau du panier sup6rieuE
t t
Pour enlever les poniers des extr#mit6s,
soisissez le ponier oux coins opposes et
foites glisser pour s6porer.
13

Chargement des paniersdu lave-vaisselle.
Caract6ristiques de paniers suppl6mentaires lsurcertains modules)
Plateau de coutellerie
Leplateau de coutellerie contientjusqu'5
quatre grand couteaux, comme un couteau
de d6coupage, un couteau de chef, un
couteau 5 pain,etc qui sont trop longs pour
oiler dons le panier _ argenterie.
Accrochezle plateau 5 I'arrbre du partier
sup6rieucMettez lescouteaux entrelesguides
(commeI1ndiqueI'illustration).
Ces tiges Tiges
se d&plient grand bols
Tiges 6 bol
Lestiges sp6ciales5 bol donsle partier
inf6rieur facilitent le chargement. IIssont
utilespour lesbols5 servir ou d'autres grands
bols,
Pourutiliser lestiges 5 bol,d_pliez lesdeux
rang_esde tiges flexiblesen face destiges
bol etchargez lesbolsexactement comme
vous le feriez dons le panier sup_rieu_
Chargement des couverts...
Suivez les directives suivantes pour mettre 10 couverts. Les camct_ristiques et I'opporence des poniers et des poniers
orgenterie peuvent vorier pot ropport _ votre module. REMARQUE :on devroit chorger I'orgenterie dons/es fentes
du couvercle du ponier pr)vues _ cet effet.
Ill
Panier sup_rieur--lO couverts
Panier inf_rieur--lO couverts
Suivez /es directives suivantes pour mettre 12 couverts. Les caroct)ristiques et I'opporence des poniers et des poniers
orgenterie peuvent vorier pot ropport _ votre module. REMARQUE :on devroit chorger I'orgenterie dons/es fentes
du couvercle du ponier pr)vues _ cet effet.
14 Panier sup_rieur--12 couverts
Panier inf_rieur--12 couverts

Soinsde votre lave-vaisselle, www.electromenagersge.ca
Nettoyer le panneau de la porte
ext#rieur
Avant de nettoger le panneau avant, assurez-vous
de savoir quel tgpe de panneau vous avez.
Reportez-vous aux deux derni_res lettresde votre
numero de module.Cenum@o setrouve sur la
paroi de la cuve, du c6t_ gauche, juste 6 I'int_rieur
de la porte.Sivotre num6ro de module setermine
par BB,CC,WW, SA ou par BG,olors vous avez
un panneau de porte peinte. Sivotre num6ro de
module se termine par SS,alors vous avez un
panneau de porte d'acier inoxgdable. Sivotre
num6ro de module setermine par CS,alors vous
avez un panneau de porte CleanSteel.
Suivezlesinstructionsplusbaspournettogerle
panneaude portedevotremoduleprecis.
Panneau de porte peinte (numeres de modele
se terminantpar BB-noir,CC-bisque, WW-blonc,
SA-argent m_tollique ou BG-noir graphite)
Utilisezunchiffonpropre,doux,unpeuhumide,
puisessugezbien.Vouspouvezutiliseraussiun
banpoliouunebonnecired'appareilelectro-
m_nugen
Panneau de porte d'acier inoxydable (numeros
de modele se terminontparSS)
Les panneaux d'acierinoxgdable se nettoient avec
StainlessSteelI_ogicou un produitsemblable et6
I'aided'un chiffonpropreet doux. N'utilisezpas de
cire,poll,agent de blanchiment ou produits
contenantduchloresurlesportesd'acier
inoxgdable.
VouspouvezcommanderduStainlessSteelMagic
n.WXlOX15aupr_sdu servicedepi_cesGEen
appelantle 1.800.626.2002.
Panneau de porteCleanSteel (numerosde modde
se terminontpar CS)
Utilisezunchiffonpropre,doux,unpeuhumide,
puisessugezbien.N'utilisezpusdecired'appareil
_lectromenager,depolioutout autreagent
chimiquesurlesportesenacierinoxgdable
CleanSteel.
N'utilisezposdelingedevoisselleoudeserviette
humidesolespournettogerleIove-voissellepour
_viterdeIoisserdesresidus.N'utilisezposde
tampons_recurerni denettogontenpoudre
pouvonteroflerlefinL
Ponneoux en ocier inoxydable
Int_rieuren acier ino×ydable-Cuve et porte
int_rieure
L'acierino×gdableutilis_pourlacuveetla porte
int_rieuredu lave-vaissellefournitla meilleure
qualit_quevouspuissieztrouverdansunIove-
vaisselleGE.Silacuveoula porteint_rieuredu
lave-vaisselleserageou reqoituncouppendant
sonusagenormal,ellenerouillepasou nese
s'o×gdepas.Cesraguresdesurfaceneg_nentpas
sesfonctions,ousar_sistance.
Nettoyer le panneau de commando
Pournettogerlepanneaudecontr61e,
utilisezun lingeleg_rementhumide,puiss_chez
compl_tement.
Protection contre le gel
Sivouslaissezvotrelave-vaisselledansunendroit
sanschauffagependantrhiver,demandez6 un
techniciendeserviced'effectuerlesoperations
suivantes:
ri-] couperI'alimentationelectriquedu lave-
vaisselle.Enleverlesfusiblesoufaites
basculerledisjoncteun
r-_ couperI'alimentationd'eauetdebrancherla
conduited'olimentationd'eoudu robinet.
r-_ VidezI'eoudelaconduited'alimentation
d'eauetdu robinet(utilisezunecasserole
pourrecueillirI'eau}.
Rebranchezlaconduited'alimentationd'eau
ou robinet.
/
Ecart an_i-retour ,_ ,!_ot;li:_
v ,_,.,",¢ •
Est-ce que votre lave-vaisselle a un _cart anti-retour?
Unecartanti-retourprot@gevotrelave-vaisselle
contreunretourd'eausiundrainsebouche.
L'ecartanti-retournefait paspartiedevotre
lave-vaisselle.IIn'estpascouvertparvotre
garantie.Touslescodesdeplomberiene
requi_rentpasdes6cartsanti-retour,etil
estpossiblequevousn'enagezpas.
L'_cartanti-retour est facile _ nettoyer.
[] Eteignezvotrelave-vaisselleet soulevez
lecouverclechrome.
F] Enlevezlecapuchon en mati_re plastique
et nettogez avec un cure-dents.
V#rifiez I'_cort anti-retour choque lois
que votre Iove-voisselle ne se vide
pos bien.
15

Avant d'appeler le service de r parations...
_ enseignements pmtiques
Economisez du temps et de I'argent! Exominez les tableaux des
pages suivontes, ou visitez le site www.electromenagersge.ca.
Celo vous )vitero peut-_tre d'oppeler le service de r)porotions.
Messages d'erreur Causes possibles Ce qu'i! faut faire
Le vogant indiquant Vous avez enfonc_ le bloc
le statut START/RESET START/RESET(miseen
(raiseen marche/remise marche/remise _z_ro)tandis que
z_ro) clignote lelave-veisselle _tait en marche.
* AppugezsurleblocSTART/RESET(d6marrage/r6initialisation) seulement
unefoispourdemarrerlelave-vaisselle.Unefoislelave-vaisselleenmarche,
appugezsurleblocSTART/RESET(d6marrage/r6initialisatianl seulement
unefoissivousvoulezannuler(r6initialer)lecgcle.
CeciannuleraJe cgde.Levogant
cesserade clignoter6 Iofin dela
vidangedu lave-voisselle(environ
90secondes).
Lelave-vaissellea _t_mis hors
tensiontandis qu'uncgcle_tait
en marcheetlecourant vient de
reprendre.Lesvogantsclignotants
indiquentquale lave-vaisselle
_vocueI'eau_I'int6rieur.
* Levogantcesseradeclignoterapr_squeI'eausoit6vacu6e
du lave-vaisselle.Unnouveaucgcledemarreraautomatiquementa lafin
de lavidange.
Lelave-vaissellefait
entendreun signal
sonora(BIP)routes
les30secondes
Ceciest un rappel que votre
porte de lave-vaisselle est rest6e
ouverte duront J'op_ration. Le
signal se poursuivra jusqu'6 ce
que vous fermiez la porte.
* Fermezetverrouillezlaporteapr_sI'avoirouverte@mi-cgcle.Lesbips
cesserontdesefaireentendreet lelave-vaisselleeffectuerauncgcle
complet.
Signalsonora6 la fin Ceciestnormal.Lelave-vaisselle * Pour6teindreledoubleindicateursonore(oupourlereactiverapr@s
ducycle fera entendrelesignalsonore I'avoir6teint),appugezsurleblocHEATEDDRY(s6chagechaud)5fois
deu×fois _ lafin du cgcle, en 3secondes.TroisbipsseferontentendrepourindiquerqueI'option
sonoredefin decgclea 6t6activ6eoud6sactiv6e.
Levogant de basse LeSmartDispense"Da du * Remplissezler6servoirSmartDispenseMDded6tergentliquidede lave-
quantit6 ded6tergent d_tergent pour mains de vaisselle.Apr_savoirrempliler6servoir,levogantLOWDETERGENT
estALLUME 10cgclesdons le Iove-voisselle. (foibleniveauded6tergent)s'6teindraapr@squela portesaltferm6e.
Probl_me Causes possibles Cequ'il faut faire
Foibletemperatured'eaud'entr_e • Assurez-vousd'avoirlabonnetemp6ratured'entr_e(voirpage8).
Ouvrezlerobinetd'eauchaudeleplusprosdu lave-vaisselle,laissezI'eau
coulerjusqu'acequa latemperaturedereaucessed'augmenten
D6marrezalorslelave-vaisselleetfermezlerobinet.Cecipermetde
s'assurerquareausoitchaudeenentrant.
Lavaisselle etles
couverts ne sont pas
propres
• Essagezde nepasutiliserlelave-vaisselleIorsquede I'eauchaudeest
solliciteeailleursdanslamaison;p.ex.,Iorsquevousfaiteslalessiveou
qu'unmembredelafamilleutiliseladouche.
Lapressiond'eauest
temporairementtrap bosse
• Ouvrezunrobinet.Est-cequeI'eaucoulepluslentementque
d'habitude?Sioui,attentezjusqu'acequela pressionsaltnormale
avantd'utiliserlelave-vaisselle.
• Essagezde nepasutiliserlelave-vaisselleIorsquede I'eauchaudeest
solliciteeailleursdanslamaison;p.ex.,Iorsquevousfaiteslalessiveou
qu'unmembredelafamilleutiliseladouche.
I]cart anti-retour oule brogeur • NettogezI'&cartanti-retourou rincezlebrogeun
estbloqu_
Hauvaisechargesurletiroir • Assurez-vousquelalargevaissellenebloquepasledistributeurde
detergentoule brasgicleunReportez-vous6 lasectionChargerleIove-
voisselle.
Aucun _cart anti-retour ou
boucle _lev_ de la vidange
• V6rifiezquevousavezbienunecartanti-retourouune boucleelev6ede
vidange.Reportez-vousauxinstructionsd'installation.
16

www.electromenagersge.ca
Probl_me Causes possibles
Tachesetpelliculesur Eaue×tr_mementdure
lesverresetlescouvertsFaibletemperatured'eau
Voilesur/asverres
d'entr_e.
Luve-vaissellesurcharg_
Mauvaischargement
D_tergentenpoudrehumide
ouvieux
Distributeurd'agentde
rin_agevide
Trappeuded_tergent
M_langed'eaudouceettrap de
d_tergent
Latemp6raturedeI'eauentrant •
danslelave-vaisselled_passe
150°F(65°C)
Moussedonsla cure Mauvaistgpe ded_tergentutilis_ •
Cequ'il faut faire
• UtilisezdesagentsderinqageJet-Drg®ouCascadeCrgstalClear®pour
retirerlestacheset@iterunenouvelleaccumulation.
• Assurez-vousqualatemperaturedeI'eauestd'aumains48,8°C(120°F).
• Chargezlelave-vaissellecommeilestillustr_5 lasectionChargementdes
cooverts.
• Assurez-vousqueledetergentestfrais.
• SiI'eauestexcessivementdure,unadoucisseurd'eausarapeut-_tre
n_cessaire.
Cecis'appelleunegravureetelleestpermanente.Poureviterce
probl_me,utilisezmainsdedetergentsivousavezdeI'eaudouce.
Lavezlesverresau cgclelepluscourt pourqu'ilssoientpropres.
Recalibrezlesgst_meSmartDispenseMDsivousI'utilisez.Reportez-vousaux
pages9 et11.
Cecipourrait8treunegravure.Reduisezlatemperatureduchauffe-eau.
Utilisezseulementund6tergentdelave-vaisselleautomatiquepour@iter
I'exc@sde mousse.Lesdetergentsdelave-vaisselleautomatiqueCascade®
etElectrasol ant6t_approuv_spourtousleslave-vaissellesGE.
• Pourretirerla mousedelacuve,ouvrezlelave-vaisselleetlaissezlamousse
s'@vaporenFermezetverrouillezlaportedu lave-vaisselle.SortezI'eauen
touchantleblocSTART/RESET(miseenmerche/remise_z#ro)unefois,
attendez30secondesettouchezau bloc6 nouveau.R@_tezau besoin.
L'agentde ringagea _t_d_vers_ • Essugeztouslesd@ersementsd'agentderinqageimmediatement.
D_tergentqui reste Lavaissellebloqueler_servoir • ReplacezlavaissellepourqueI'eaudu brasgicleurinf@ieurpuisse
dunslesr_servoirs du d_tergentoulasortie du rincerler_servoirdedetergentoulasortiedu sgst_meSmartDispenseMD.
dudistributeurou sgst_meSmartDispense'D Reportez-vousauxpages15et 14.
surlaporte
Eaudunsle Vousn'avezpasviss_lecapuchon • Utilisezunepoke5juspourenleverautantd'eauquapossibledudistributeur
distributeur apr_savoirrempliledistributeur SmartDispenseMDetremplisseznormalement.Assurez-vousdebienvisser
SmurtOispenseno lecapuchonpouremp_cherI'eaude p_n_trerdansledistributeun
Murquesnoiresou Desustensilesd'aluminiumse • Retirerlestachesavecun nettogantdoux,abrasif.
grisessurlavaisselle sont frott_s contrelavaisselle
Lavaissellenes_chepus Faibletemperatured'eeud'entr_e • Assurez-vousqualatemperaturedeI'eaud'entr@salt5 au mains
120°F(49°C).
• ChoisissezHEATEDDRY(s_chagechaud).
• Utilisezlesoptions PREWASH(pr&lavage)ou ADDEDHEAT(chuleur
ajout_e).
Choisissezuncgcleplus_lev_,telqueANTI-BACTERIA(antibact_rien),
ouCOOKWARE(casseroles).
V&rifiezledistributeurd'ogentderinqogeetremplissezaubesoin.Ledistributeur d'agent de rinqage •
est vide
Lepanneau de Leverrou de la porte n'est pas • Assurez-vousquela portesoitbienferm_e.
commandea r#agiaux bien plac6
entr_es,maisle Lerobinetd'eauestpeut-_tre • Assurez-vousquele robinetd'eau(normalementsousI'evier)soit
lave-vuisselle ne s'est ferm_ ouvert.
jamais remplid'eau
Levogant d'aseptisation Loporte _tait ouverte et lecgcle • N'interrompezpas lecgcle durant ou apr_s lelavage principal.
ne s'allume pas _ la fin a _t_ interrompu durant ou apr_s
du cgcle (seulement le lavage principal
lecgcle anti-bact_rie) Latemperature d'entr_e de I'eau • Augmentezlatemperature de I'eaudu chauffe-eau entre 120 et 140°F
_tait trop basse (49et 60 °C).
17

Avant d'appeler le service de r6parations...
Renseignements pmtiques
Probl_me Causes possibles
Int_rieurde cuve tach_e Certains aliments 6 base de
Lelave-vaisselle
ne fonctionne pas
tomate peuvent causer des taches
rougeOtres
Tachesde caf_ ou de th_ •
Unepelliculejauneoubrune
pourmit _trecaus_epardes
d_p6tsdeferdansl'eau
Pelliculeblanchesurlasurface •
int_rieure-min_mux d'eaudure
Unfusibleest grill_ou
ledisjoncteurest d_clench_
Lecourantest coup_
Lepanneaudecommande •
est verrouill_
Lepanneaudecontr61edoit •
_tre r_initialis_
Le vogant du panneau Trap de temps entre les •
de commande s'_teint s_lections de blocs
enr_glantlescommandes
IIg a de I'eau uu fond Ceci est normal •
de la cure
L'eaunesortpus Ledrain estbloqu_ •
de la cure •
Vapeur Ceciest normal •
Bruit Sons de fonctionnement normal •
Ouverture du r_servoir
de d_tergent
L'eauentre dans le lave-vaisselle
Lemoteur s'arr_te et d_marre
plusieurs foisdurant le cgde.
Lapompe de vidange _met un
bruit en vidant
Leventilateur de s_cbage
fonctionne de 2a 4 heures apr_s
que le vogant CLEAN(propre)
s'allume(modUlesa panneau de
commande sup_rieurseulement)
18
Cequ'il faut faire
• UtiliserlecgcleRINSEONLY(ringageseulement)apr_savoirajout_le
plat6 lachargepourraitr6duirelestaches.GErecommanded'utiliser
Cascade®PlasticBoosterpouraider(_retirercestypesdetaches.
Retirezlatache6 lamainavecunesolutionde 1/2tassed'agentde
blanchimentet3tassesd'eauchaude.
& AVERTISSEMENT
AvantdenettogerI'int_rieur,attendezau mains20minutesapr_sun
cgclepourlaisserleselementschauffantsrefroidi_Sivousnelefaitespas,
vouspourriezavoirdesbrOlures.
• Unfiltrespecialdanslacanalisationd'eauestla seulefaqondecorriger
ceprobl_me.Contactezunesoci6t_d'adoucissementd'eau.
GErecommanded'utiliserJet-Drg®ouCascade CrgstalCleate pour
empScherlaformationded_p6tsdeminerouxd'euudure.
• Fuitesfonctionnerlelave-vaisselleavecdeI'ucidecitriquepourretirer
cesd@6ts.Vouspouvezcommanderde I'ucidecitrique(num6rodepiece:
WD35X151)aupr_sduservicede pi_cesGE.Reportez-vousaucouvercle
urri_repourI'informationsurlescommandes.
• Remplacezlefusibleou remettezledisjoncteur(_z6ro.Retireztous les
autresoppareilsdu circuit.
• Danscertainesinstallations,lecourantau luve-vaisselleestfourniparune
prisemuralequisetrouvesouventprosdeI'interrupteurdubrogeur.
Assurez-vousqu'ilsoiten murche.
D_verrouillezlepanneuudecommande.Voirpage6.
Coupezlecourantau lave-vaisselle(disjoncteurouprisemurale)pendant
30secondeset remettezenmarche.
Chaqueblocdolt8tretouch6(_I'int6rieurd'uneperiodede5 minutes.
Pourallumer(_nouveau,retoucheztout blocoud6verrouillezet
reverrouillezlaporte.
Unepetitequantit_d'eaupropreautourde lasortieaufondde lacuve,
(_I'arri_redelacuvegardeleraccorddela pompebienlubrifi&
Sivousavezunecartanti-retour,nettogez-le.Voirpage15.
Silelave-vaissellesevidangedansunbrogeur,faitesfonctionnercedemier.
V6rifiezsirevierdecuisinesevidebien.Sinon,vousaurezpeut-6trebesoin
d'unplombier.
L'airchaudethumidepasseparreventparleverroudeportedurantle
s6chageet Iorsquereauestpompeepourlasortir.Ceciestnecessaire
pourles6chage.
L'emissiondecesbruitsesttout 6fait normale.Aucuneinterventionn'est
requise.
Lavaisselle6metun bruit decasse• Assurez-vousquelavaissellesoitbienchargee.Reportez-vous(_lasection
Iorsquele brasgicleurtourne Chargerlelave-vaisselle.

Service Protection Plus MDGE
GE, nom connu dans le monde entier pour sa qualit_ et sa fiabilit_, vous offre le plan Service
Protection PlusMD,une protection int_gr_e pour tous vos appareils _lectrom_nagers, quelle que
soit leur marque!
Les avantages de ce plan sont les suivants :
• II est soutenu par GE
• Toutes les marques sont couvertes
• Le nombre d'appels de service est illimit_
• Tous les co0ts de pi_ces et de main d'oeuvre sont compris
• Aucun faux-frais
• Aucune franchise cach_e
• Un num_ro 800 6 appeler
Nous couvrirons
tous vos appareils
lectrom nagers,
partout, tout le temps*
Vous serez compl_tement satisfait par notre protection de service ou vous pourrez demander
un remboursement de la valeur restante de votre contrat. Nous ne poserons aucune question.
C'est tellement simple!
Prot@gez votre r@frig_rateur, votre lave-vaisselle, votre laveuse et votre s@cheuse, votre four, votre t@l_viseur,
votre magn_toscope, etc.-quelle que soit leur marque! En outre, il n'g a aucun frais suppl_mentaire en cas
d'urgence et nous vous offrons un financement mensuel bas. Nous offrons m_me une couverture pour votre
machine _ glaqons et une protection contre la d_t@ioration des aliments. Vous pouvez dormir sur
vos deux oreilles, en sachant que tous vos pr_cieux appareils _lectrom_nagers sont proteges en cas de
r_parations coOteuses.
Faites confiance en GEet appelez nous au Canada sans frais au 1.888.261.2133
pour de plus amples informations.
*Les appareHs de toutes les marques sont couverts au Canada, vieux de jusquk_ 20 ans
FIRST
CLASS
POSTAGE
REQUIRED
PORTD.E
PREMIERE
CLASSE
REQUIS
OWNERSHIPREGISTRATION
P.O.BOX1780
MISSISSAUGA,ONTARIO
L4Y4G1
(FORCANADIANCONSUMERSONLY)
(SEULEMENTPOURLESCONSOMMATEURSCANADIENS)
19

Inscription de propri t de produit de consommation
Cher client
Merci d'avoir achet_ notre produit et merci de nous faire confiance.
Nous sommes tiers de vous avoir comme client!
Suivez ces trois _tapes pour prot_ger votre nouvel investissement
en appareil _lectrom_nager •
Remplissez et
envoyez votre
inscription de
propri_t_ de produit
de consommetion
eujourd'hui.
Sogez rassur_ en
sachant que nous
pouvons vous
contacter dons le
cos improbable de
modifications dues
d des questions
de s6curit&
Apr_s avoir envoy_
I'inscription ci-dessous,
conservez ce document
dons un endroit sQr. II
contient des
renseignements dont
vous aurez besoin si
vous devez appeler le
service de r¶tions.
Le num6ro de
t_16phone de notre
service de r_parations
au Canada est le
1.800.361.3400.
Lisez soigneusement
votre manuel du
propri&taire. II vous
aidera (_bien loire
fonctionner votre
nouvel appareil
_lectrom6nager
Num_ro de module Num_ro de s_rie
I I I I I I
Important : Si vous n'avez pus trouv_ votre carte d'inscription
avec votre produit0 d_tachez et envogez le formulaire
ci-dessous pour vous assurer que votre produit soit
inscrit0 ou pour les clients au Canada inscrivez-le en
ligne sur le site www.electromenagersge.ca.
_lT_Vl_l:lli,tll I'Jlli :1_11,1i:l._| i lll_llPI llll I I :lIPId| i _ I I_ll _iH I__li 13 i lll_ |Ill| dllll Ull 111_llli
I ROBOX/cP1780 I "MISSISSAUGA,ONT.L4Y 4G1
MODEL/MODELE SERIAL/SERIF INSTALLATIONDATE Y/A M
DATED'INSTALLATION
PLEASE COMPLETE AND RETURN THIS
CARD IMMEDIATELY TO ENABLE US TO
CONTACTYOU IN THE REMOTEEVENTA
SAFETY NOTIFICATION IS ISSUED FOR
THIS PRODUCT.
VEUILLEZ REMPLIR ETRETOURNER LAI
PRESENTEFICHESANSTARDERAFIN DEI
NOUSPERMETTREDECOMMUNIOL)ERAVEO.I
VOUS SI JAMAIS UN AVIS DE.SECURITE
CONCERNANTCEPRODUT ETATEMS.
CHECK \ MR. MRS. FIRSTNAME/PRENOM
ONE k ElM rqMME
COOHEZ/aMMLSSaMS2 I I I I I I I I I
STREETNO, STREETNAME/RUE
N° RUE
I I I I I I I I I I I I
CITY/VILLE
LASTNAME/NOM
I I I I I I I I I I I
APTNOJAPR/RR#
I I I I I I I I I I I I I I
PROVINCE POSTALCODE/POSTAL
NAMEOFSELLINGDEALER/NOMDUMARCHAND
,I
IIIIIIIII
ARM CODETELEPHONE
IND.REG,
I I I I I I-I I I
, I
CORRESPONDENCE FRENCH ENGLISH
CORRESPONDANCE _ FRANOAIS ANGLAIS
2O
Notes.
2!
r._
¢h
0
¢b
L
r_
v
0
_°
Q
1:1
1:1
0
0
1:1

_o
0
€3
_L_
LW_
0
L.J
E
E
0
0
Notes.
22

Garantie GEsur los lave-vaisselle.
Toutes los rOparotions sous gomntie seront effectudes par
nos centres de rdparotion ou nos rdparoteurs outorisds.
Appelez le 1.800.561.3344. Veui!lez foumir le numdro
de sOrie et le numdro de modOle Iorsque vous oppelez
pour obtenir le service.
Agmfez le re_u d'achat icL
Pour obtenir le service sous
garantie, vous devrez foumir
la preuve de I'aehat original.
Pour une p_riode de : GE remplacera :
Un an Toute piece du lave-vaisselle qui se casse 6 cause d'un vice de mat_riau ou de main-d'oeuvre.
partir de la date Au cours de cette annie de garontie/imit4e, GE foumira, grotuitement, toute la main-d'oeuvre
d'achat initial et le service 6 la maison n@cessaires pour remplacer la pi@ce d@fectueuse.
Cinq arts Los paniers et le module de eontr61e 4leetronique du /ave-vuisse/le s'ils ne fonctionnent plus
partir de la date 6 cause d'un vice de mat@riau ou de main-d'oeuvre. Au cours de ces cinq arts de garontie
d'achat initial /imit_e, vous serez responsable de tous frais de main-d'oeuvre ou de service 6 la maison.
Toute /a vie du produit La cure en aeier ino×gdable ou /a doublure de porte, si elles ne peuvent plus arr@ter I'eau
6 cause d'un vice de mat@riau ou de main-d'oeuvre. Au cours de eette garontie limit4e, GE
fournira &galement, gratuitement, toute la main-d'oeuvre et le service 6 la maison n_cessaires
pour remplacer la piece ddectueuse.
Ce qui n'est pus couvert :
[] Tout d_placement de service chez vous pour vous
apprendre 6 utiliser votre lave-vaisselle.
[] Toute mauvaise installation.
Si vous oyez un probl_me d'installation, appelez
votre revendeur ou un installateur. Vous @tes
responsable de fournir une bonne alimentation
@lectrique, un ban @chappement et tout autre
branchement n@cessaire.
[] Tout remplacement des fusibles de la maison ou tout re
branchement des disjoncteurs.
[] Tout dommage occasionn_ par un accident, un incendie,
une inondation ou un acte de Dieu.
[] Tout dommage subi apr_s la livraison.
[] Le service s'il est impossible d'avoir acc_s au produit
pour ce faire.
[]Toute panne du produit s'il a _t_ malmen_, mal us_
ou utilis_ 6 une autre fin que cello pr_vue ou utilis_
commercialement.
EXCLUSION DE GARANTIES IMPLICITES- Votreseul et unique recours est la reparation du produit selon les
dispositions de cette Garantie limitee. Toutesles garanties implicites, incluant les garanties de commercialite
et d'adequation a un usage specifique, sont limitees a une annee ou a la periode la plus courte autorisee par
la legislation.
Cette garantie est valable pour le premier propri_taire et tout autre propri_taire du produit s'ilachet_ pour utilisation domestique au
Canada. Le service _ domicile sous garontie sera foumi 1_oO ilest disponible et dons los r_gions que Mabe consid_re que l'offre de
service est raisonnable.
I
I
LE GARANT N'EST PAS RESPONSABLE DES DOMMAGES CONSECUTIFS.
Garant • MABE CANADA INC.
I
I
23

Soutien au consommateur.
l Site Web opporeils _lectrom_nogers GE www.electromenagersge.ca
Vous avez une question ou vous avez besoin d'aide pour votre appareil _lectrom_nager? Contactez-nous par
' Internet au site www.electromenagersge.ca 24 heures parjour, tous lesjours de I'ann_e.
Service de r_porotions
Service de r_parations GE est tout pros de vous.
Pour faire r_parer votre _lectrom_nager GE, il suffit de nous t_l_phone_
1.800.561.3344
Studio de conception rdoliste
Sur demande, GE peut fournir une brochure sur I'am@nagement d'une cuisine pour les personnes
_]mobilit@ r@duite.
Ecrivez: Directeur, Relations avec les consommateurs, Mabe Canada Inc.
Bureau 310, 1 Factorg Lane
Moncton, NB. E1C 9M3
Prolongation de gorontie www.electromenagersge.ca
Achetez un contrat d'entretien GE avant que votre garantie n'expire et b_n_ficiez d'un rabais substantiel. Ainsi
le service apr_s-vente GE sera toujours I_ apr_s expiration de la garantie.
Visitez notre site Web ou appelez-nous au 1.800.461.:3636.
I I
J
Pi_ces et occessoires
Ceux qui d#sirent r#parer eux-m#mes leurs #lectrom#nagers peuvent recevoir pi_ces et accessoires directement (_
la maison (cartes VISA, MasterCard et Discover accept#es).
Les directives stipul_es duns le present manuel peuvent _tre effectu_es par n'importe quel utilisateur. Les autres
r_parutions doivent g_n_rulement _tre effectu_es par un technicien qualifi_. Soyez prudent, car une r_parution
inadequate peut affecter le fonctionnement s_curituire de I'uppareil.
Les consommateurs au Canada peuvent commander des pi@ces et des accessoires en ligne au site
www.electromenagersge.ca, 24 heures sur 24 et tous lesjours, ou par t@l@phone au 1.800.661.1616 pendant
les heures de bureau.
Contoctez-nous
Si vous n'_tes pus satisfait du service apr_s-vente dont vous avez b_n_fici_ :
Premi_rement, communiquez avec les gens qui ant r_par_ votre appareil.
Ensuite, si vous n'_tes toujours pas satisfait envogez tous les d_tails-num_ro de t_l_phone compris-au
Directeur, Relations avec les consommateurs, Mabe Canada Inc.
Bureau 310, 1 Factorg Lane
Moncton, NB. EIC 9M3
"I Inscrivez votre opporeil _lectrom_noger www.electromenagersge.ca
Inscrivez votre appareil _lectrom_nager en direct, aussit6t que possible. Cela am_liorera has communications
et notre service apr_s-vente. Vous pouvez _galement nous envoger par la paste le formulaire d'inscription joint _]
votre documentation.
_÷_'. Imprim_auxEtats-Unis
.... Imprim_surdu papierrec£Tcld

