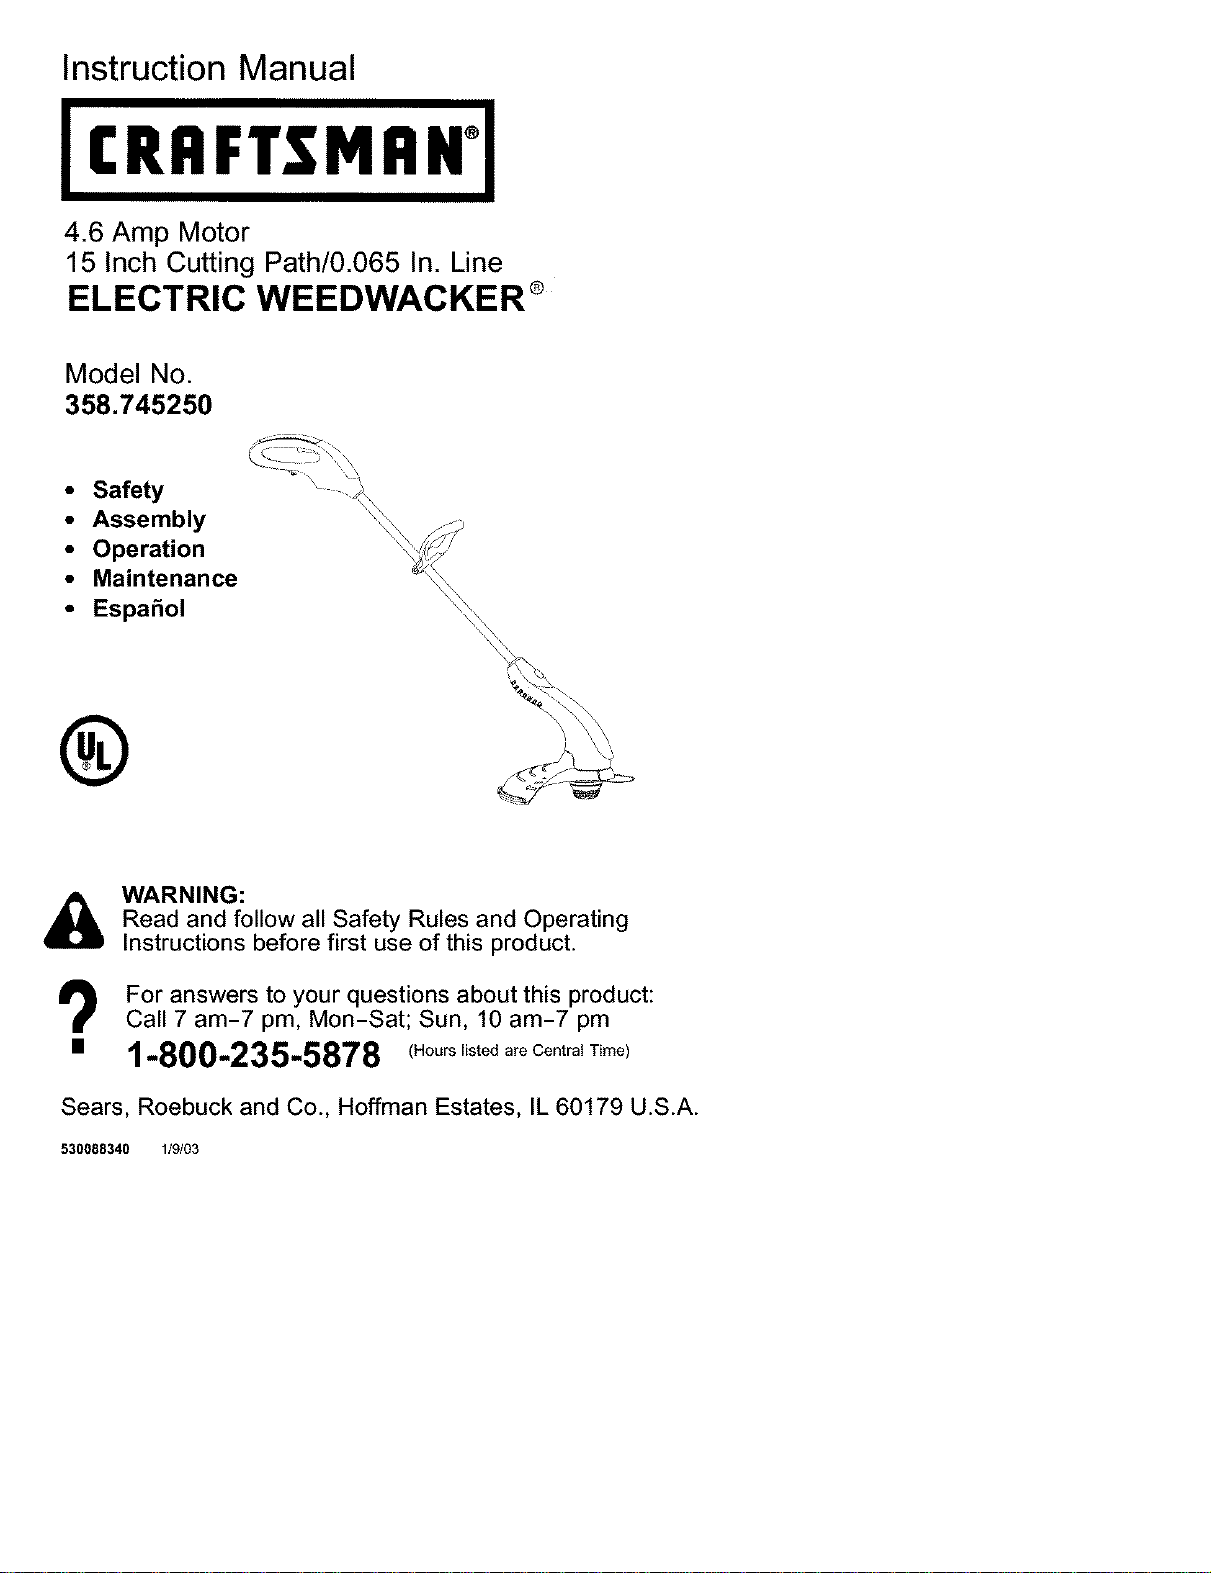
Instruction Manual
ICRRFTSlVlRN°I
4.6 Amp Motor
15 Inch Cutting Path/0.065 In. Line
ELECTRIC WEEDWACKER ®
Model No.
358.745250
• Safety
• Assembly
• Operation
• Maintenance
• Espa_ol
®
WARNING:
Read and follow all Safety Rules and Operating
Instructions before first use of this product.
i_ For answers to your questions about this product:
Call 7 am-7 pm, Mon-Sat; Sun, 10 am-7 pm
• 1-800-235-5878 {.oo_listed are CentraI Time)
Sears, Roebuck and Co., Hoffman Estates, IL 60179 U.S.A.
530088340 1/9/03
Warranty Statement 2 Parts Available 9
Safety Rules 2 Storage 10
Assembly 5 Troubleshooting Table 10
Operation 6
Maintenance 8 Spanish 11
Service & Adjustments 9 Parts Ordering Back Cover
FULL ONE YEAR WARRANTY ON CRAFTSMAN ELECTRIC WEEDWACKER ®
LINE TRIMMER
If this Craftsman Electric Weedwacker ® Line Trimmer fails to perform properly
due to a defect in material or workmanship within (1) one year from the date of
purchase, Sears will replace it free of charge.
This warranty does not cover the nylon line.
WARRANTY SERVICE IS AVAILABLE BY RETURNING THE CRAFTSMAN ELECTRIC
WEEDWACKERC">LINETRIMMER TO THE NEAREST SEARS STOREOR SERVICECEN-
TER IN THE UNITED STATES.
This warranty gives you specific legal rights, and you may also have other rights
which vary from state to state.
Sears, Roebuck and Co., D/817WA, Hoffman Estates, IL 60179
A _
,I_WARNING: When using electric
gardening appliances, basic safety
precautions must always be followed
to reduce the risk of fire, electric
shock, and serious injury. Read and
follow all instructions.
SAFETY INFORMATION
ON THE UNIT
This power unit can be dangerous!
Operator is responsible for following
the warnings and instructions in this
manual and on the unit. Read entire
instruction manual before using unit!
Be thoroughly familiar with the con-
trols and the proper use of the unit.
Restrict the use of this unit to persons
who read, understand, and follow unit
and manual warnings and instruc-
tions. Never allow children to operate
this unit. Close attention is necessary
when used near children.
DANGER: Never use blades or
flailing devices. Unit is designed for line
trimmer use only. Use of any other ac-
cessories or attachments will increase
the risk of injury.
@©@
_WARNING: Trimmer line throws
objects violently. You and others can
be blinded/injured. Wear safety
glasses, boots, and leg protection.
Keep body parts clear of rotating line.
Safety Glasses or similar eye protection
li ooots
Keep children, bystanders, and ani-
mals 50 feet (15 meters) away. If ap-
proached stop unit immediately.
if situations occur which are not cov-
ered in this manual, use care and
good judgement. If you need assis-
tance, call 1-800-235-5878.
OPERATOR SAFETY
• Dress properly. Always wear safety
glasses or similar eye protection
when operating, or performing main-
tenance on your unit. (Safety
2
glasses are available.) Always wear
face or dust mask if operation is
dusty. Always wear heavy, long
pants, long sleeves, boots, and
gloves. Do not go barefoot or wear
sandals.
• Secure hair above shoulder length.
Secure or remove loose clothing
and jewelry or clothing with loosely
hanging ties, straps, tassels, etc.
They can be caught in moving parts.
• Being fully covered also helps pro-
tect you from debris and pieces of
toxic plants thrown by spinning line.
• Stay Alert. Do not operate unit when
you are tired, ill, upset or under in-
fluence of alcohol, drugs, or medica-
tion. Watch what you are doing; use
common sense.
• Avoid unintentional starting of the
unit. Never carry unit with your fin-
ger on the switch. Be sure the
switch is in the OFF position and
never touch the switch when con-
necting extension cord.
ELECTRICAL SAFETY
_WARNING: Avoid a dangerous
environment. To reduce the risk of
electrical shock, do not use in rain, in
damp or wet locations, or around
swimming pools, hot tubs, etc. Do not
expose to snow, rain, or water to avoid
the possibility of electrical shock.
• Use a voltage supply as shown on
unit.
• Avoid dangerous situations. Do not
use in the presence of flammable
liquids or gases to avoid creating a
fire or explosion and/or causing
damage to unit.
• To reduce the risk of electrical
shock, this equipment has a polar-
ized plug (one blade is wider than
the other) and will require the use of
a polarized extension cord. The ap-
pliance plug will fit into a polarized
extension cord only one way. If the
plug does not fit fully into the exten-
sion cord, reverse the plug. If the
plug still does not fit, obtain a correct
polarized extension cord. A polar-
ized extension cord will require the
use of a polarized wall outlet. This
plug will fit into the polarized wall
outlet only one way. If plug does not
fit fully into the wall outlet, reverse
the plug. If it still does not fit, contact
a qualified electrician to install the
proper wall outlet. Do not change
the equipment plug, extension cord
receptacle, or extension cord plug in
any way.
• To reduce risk of electrical shock,
use extension cords specifically
marked as suitable for outdoor ap-
pliances having electrical rating not
less than the rating of unit. Cord
must be marked with suffix "W-A" (in
Canada "W"). Make sure your exten-
sion cord is in good condition. In-
spect extension cord before use and
replace if damaged. Do not use a
damaged cord. Cord insulation
must be intact with no cracks or de-
terioration. Plug connectors must be
undamaged. An undersized exten-
sion cord will cause a drop in line
voltage resulting in loss of power
and overheating. If in doubt, use the
next heavier gauge. The lower the
gauge number, the heavier the cord
(see SELECT AN EXTENSION CORD
in the OPERATION section).
• Do not use multiple cords.
• Do not abuse cord. Never carry the
unit by the extension cord or yank
extension cord to disconnect unit.
• Use cord retainer to prevent discon-
nection of extension cord from unit
and possible damage to the unit due
to plug movement. See ATTACH THE
EXTENSION CORDTO YOUR TRIM-
MER in the OPERATION section.
• Do not use the unit if the switch
does not turn the unit on and off
properly. Repairs to the switch must
be made by your Sears Service
Center.
• Keep the extension cord clear of op-
erator and obstacles at all times. Do
not expose cords to heat, oil, water,
or sharp edges.
• To avoid the possibility of electric
shock, avoid body contact with any
_lerounded conductor, such as metal
nces or pipes.
• Ground Fault Circuit Interrupter
(GFCI) protection should be pro-
vided on circuit or outlet to be used.
Receptacles are available having
built-in GFCI protection and may be
used for this measure of safety.
UNIT SAFETY
• Inspect unit before use. Replace
damaged parts. Make sure all han-
dles, guards, and fasteners are in
place and securely fastened. Parts
that are damaged must be repaired
or replaced by a Sears Service Cen-
ter These include head parts that
are cracked, or chipped, guards,
and any other part that is damaged.
3
• Do not repair unit yourself.
• Use only 0.065 inch (1.65 mm) di-
ameter recommended trimmer line
(see SERVICE AND ADJUSTMENTS).
Never use wire, rope, string, etc.
• Use specified trimmer spool. Make
sure spool is properly installed and
all parts are securely fastened.
• Use only Craftsman replacement
parts and accessories as recom-
mended.
CUTTING SAFETY
• Inspect area to be cut. Remove ob-
jects (rocks, broken glass, nails,
wire, string, etc.) which can be
thrown orbecome entangled in cut-
ting head.
• Do not overreach or stand on unsta-
ble support. Keep firm footing and
balance.
• Keep the cutting head below waist
level. Do not raise handles above
your waist. Cutting head can come
dangerously close to your body.
• Keep away from cutting head and
spinning line.
• Use unit properly. Use only for trim-
ming, edging, scalping, and mow-
ing. Do not force unit. It will do the
job better and with less risk of injury
at the rate for which it was designed.
• Use only in daylight or in good artifi-
cial light.
MAINTENANCE SAFETY
_WARNING: Disconnect unit from
the power supply before performing
maintenance, or when changing trim-
mer line.
• Maintain unit according to recom-
mended procedures. Keep cutting
line at proper length. Follow instruc-
tions for changing trimmer line.
• Have all service and maintenance
not explained in this manual per*
formed by a Sears Service Center to
avoid creating a hazard.
• Never douse or squirt the unit with
water or any other liquid. Clean unit
and labels with a damp sponge.
Keep handles dry, clean, and free
from oil and grease.
• Keep the air vents clean and free of
debris to avoid overheating the mo-
tor. Clean after each use.
TRANSPORTING AND STORAGE
• Stop the unit and disconnect the
power source when not in use.
• Carry the unit with motor stopped.
• Store the unit so the line limiter
blade (on underside of shield) can*
not cause injury.
• Store unit indoors in a high, dry
place out of the reach of children.
Store unit unplugged.
• Do not hang unit so that the trigger
switch is depressed.
DOUBLE INSULATION
CONSTRUCTION
This unit is double insulated to help
protect against electric shock. Double
insulation construction consists of two
separate "layers" of electrical insula-
tion instead of grounding.
Tools built with this insulation system
are not intended to be grounded. No
grounding means is provided on this
unit, nor should a means of grounding
be added to this unit. As a result, the
extension cord used with your unit can
be plugged into any standard 120 volt
electrical outlet.
Safety precautions must be observed
when operating any electrical tool.
The double insulation system only
provides added protection against in-
jury resulting from an internal electrical
insulation failure.
A _
_WARNING: All electrical repairs
to this unit, including housing, switch,
motor, etc., must be diagnosed and
repaired by qualified service person-
nel. Replacement parts for a double
insulated appliance must be recom-
mended by the manufacturer. A
double insulated appliance is marked
with the words "double insulation" or
"double insulated". The symbol
(square within a square) [] may also
be marked on the appliance. Failure
to have the unit repaired by qualified
service personnel can cause the
double insulation construction to be-
come ineffective and result in serious
injury.
SAVE THESE INSTRUCTIONS
4
CARTON CONTENTS
Check carton contents against the fol*
1owing list.
Model 358.745250
• Trimmer
• Shield
Examine parts for damage. Do not
use damaged parts.
NOTE: If you need assistance or find
parts missing or damaged, call
1-800-235-5878.
ASSEMBLY
_WARNING: If received as-
sembled, review all assembly steps to
ensure your unit is properly as-
sembled and all fasteners are secure.
ADJUSTING ASSIST HANDLE
1. Place unit on a flat surface.
2. Loosen and remove wing nut and
bolt from assist handle.
3. Firmly push the assist handle over
the tube. To make installation eas-
ier, tilt handle toward trigger hous-
ing while pushing down (see il-
lustration).
4. Reinstall bolt in handle. Thread
wing nut onto bolt.
5. Adjust the handle up or down the
tube to a comfortable position;
tighten wing nut securely.
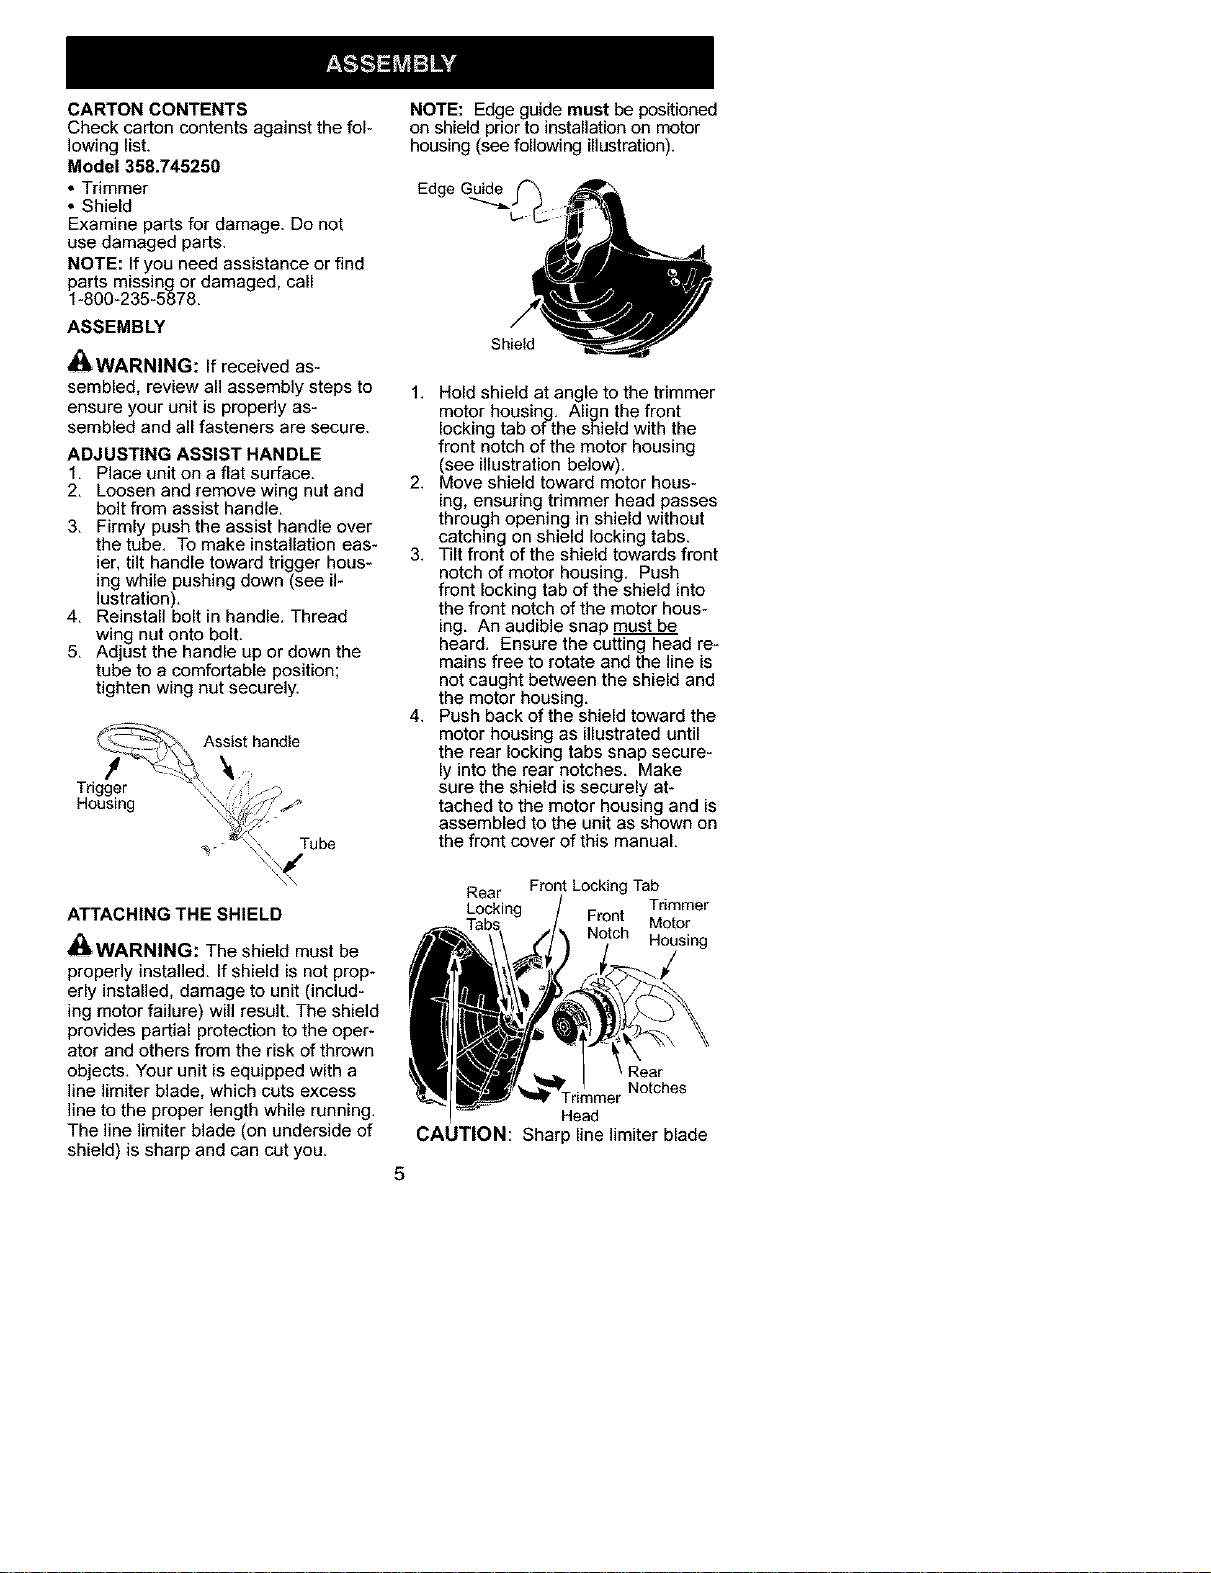
NOTE: Edge guide must be positioned
on shield prior to installation on motor
housing (see following illustration).
Edge C
L.-
Shield
1. Hold shield at angle to the trimmer
motor housing. Align the front
locking tab of the shield with the
front notch of the motor housing
(see illustration below).
2. Move shield toward motor hous-
ing, ensuring trimmer head passes
through opening in shield without
catching on shield locking tabs.
3. Tilt front of the shield towards front
notch of motor housing. Push
front locking tab of the shield into
the front notch of the motor hous-
ing. An audible snap must be
heard. Ensure the cutting head re-
mains free to rotate and the line is
not caught between the shield and
the motor housing.
4. Push back of the shield toward the
motor housing as illustrated until
the rear locking tabs snap secure-
ly into the rear notches. Make
sure the shield is securely at-
tached to the motor housing and is
assembled to the unit as shown on
the front cover of this manual.
ATTACHING THE SHIELD
BWARNING: The shield must be
properly installed. If shield is not prop-
erly installed, damage to unit (includ-
ing motor failure) will result. The shield
provides partial protection to the oper-
ator and others from the risk of thrown
objects. Your unit is equipped with a
line limiter blade, which cuts excess
line to the proper length while running.
The line limiter blade (on underside of
shield) is sharp and can cut you.
Rear Front Locking Tab
Trimmer
Locking Front Motor
Housing
Rear
Notches
Trimmer
Head
CAUTION: Sharp line limiter blade
5
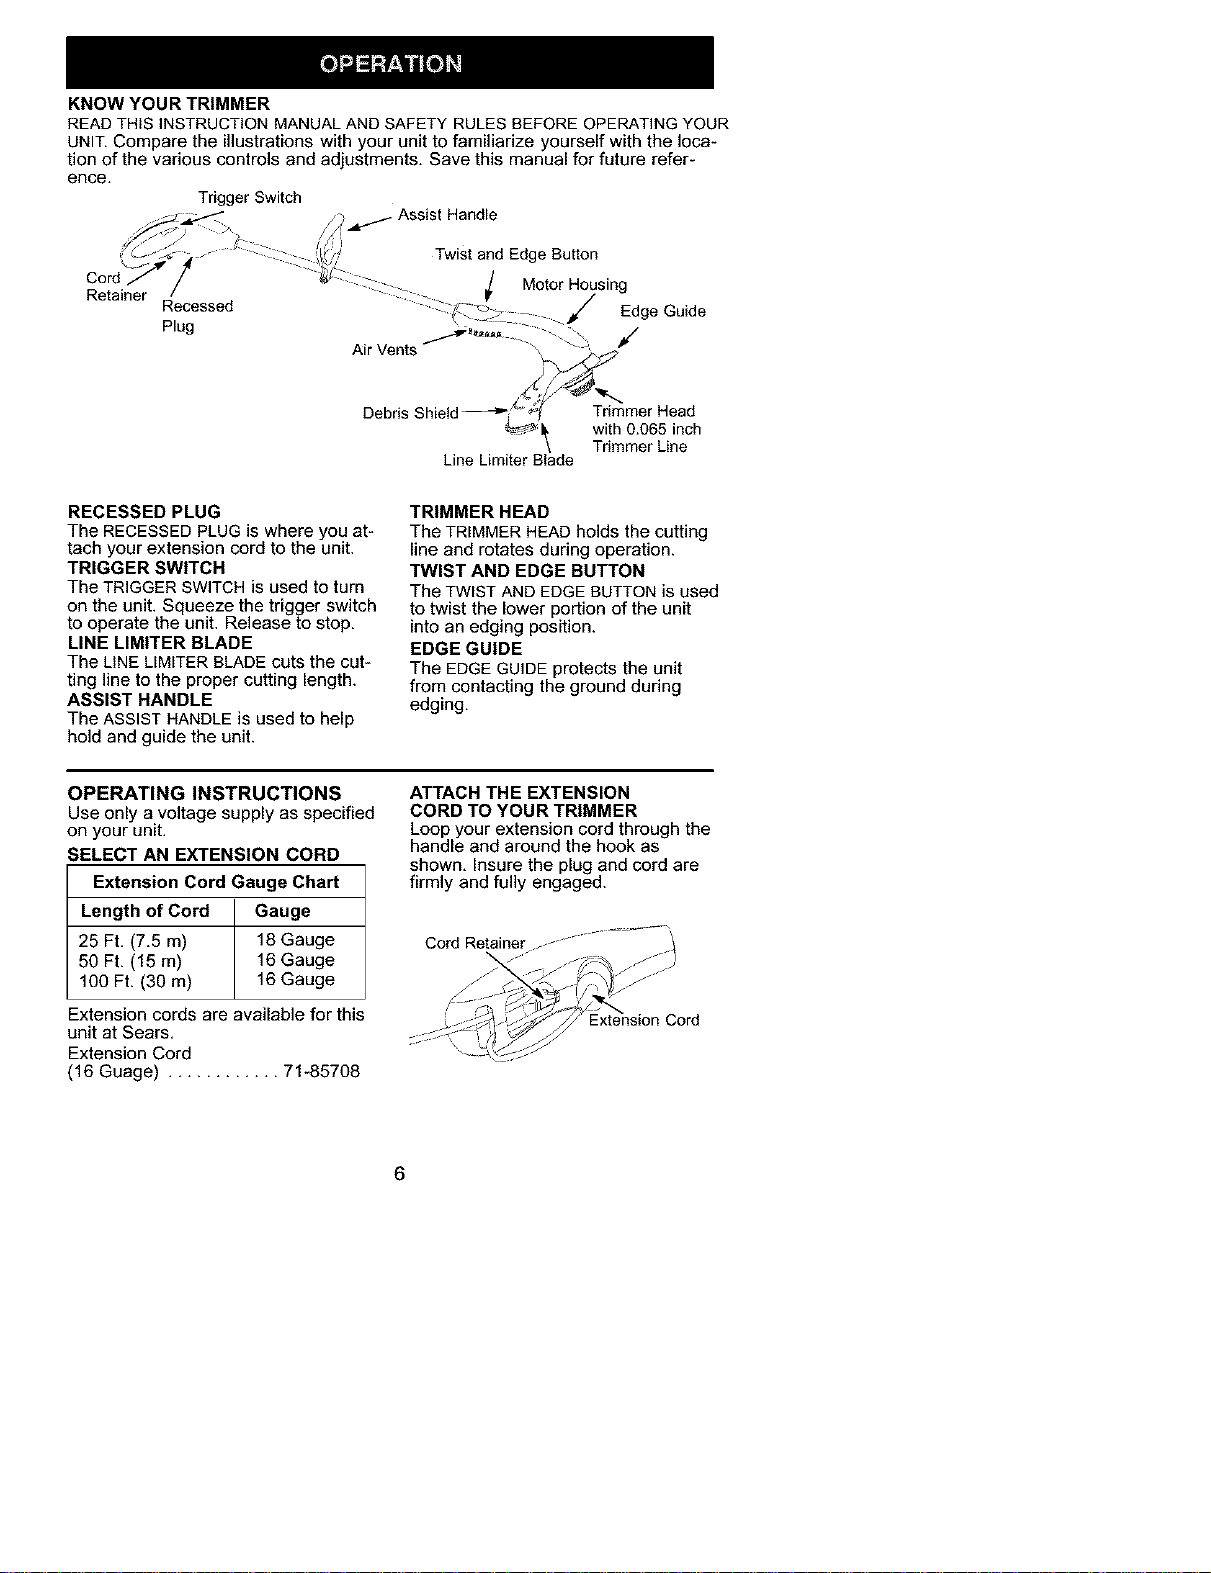
KNOW YOUR TRIMMER
READ THiS INSTRUCTION MANUAL AND SAFETY RULES BEFORE OPERATING YOUR
UNI]_ Compare the illustrations with your unit to familiarize yourself with the loca-
tion of the various controls and adjustments, Save this manual for future refer-
ence,
Trigger Switch
i_L_- Assist Handle
_...f Twist and Edge Button
Cord i_ Motor Housing
Retainer
Recessed / Edge Guide
Plug _._ /
Air Vents
Debris Shield_'_ _
Line Limiter Blade
Trimmer Head
with 0.065 inch
Trimmer Line
RECESSED PLUG
The RECESSED PLUG is where you at-
tach your extension cord to the unit.
TRIGGER SWITCH
The TRIGGER SWITCH is used to turn
on the unit. Squeeze the trigger switch
to operate the unit. Release to stop,
LINE LIMITER BLADE
The LINE LIMITER BLADE cuts the cut-
ting line to the proper cutting length.
ASSIST HANDLE
The ASSIST HANDLE is used to help
hold and guide the unit.
TRIMMER HEAD
The TRIMMER HEAD holds the cutting
line and rotates during operation.
TWIST AND EDGE BUTTON
The TWIST AND EDGE BUTTON is used
to twist the lower portion of the unit
into an edging position.
EDGE GUIDE
The EDGE GUIDE protects the unit
from contacting the ground during
edging,
OPERATING INSTRUCTIONS
Use only a voltage supply as specified
on your unit.
SELECT AN EXTENSION CORD
Extension Cord Gauge Chart
Length of Cord Gauge
25 Ft. (7,5 m) 18 Gauge
50 Ft. (15 m) 16 Gauge
100 Ft. (30 m) 16 Gauge
Extension cords are available for this
unit at Sears,
Extension Cord
(16 Guage) ............ 71-85708
ATTACH THE EXTENSION
CORD TO YOUR TRIMMER
Loop your extension cord through the
handle and around the hook as
shown, Insure the plug and cord are
firmly and fully engaged.
6
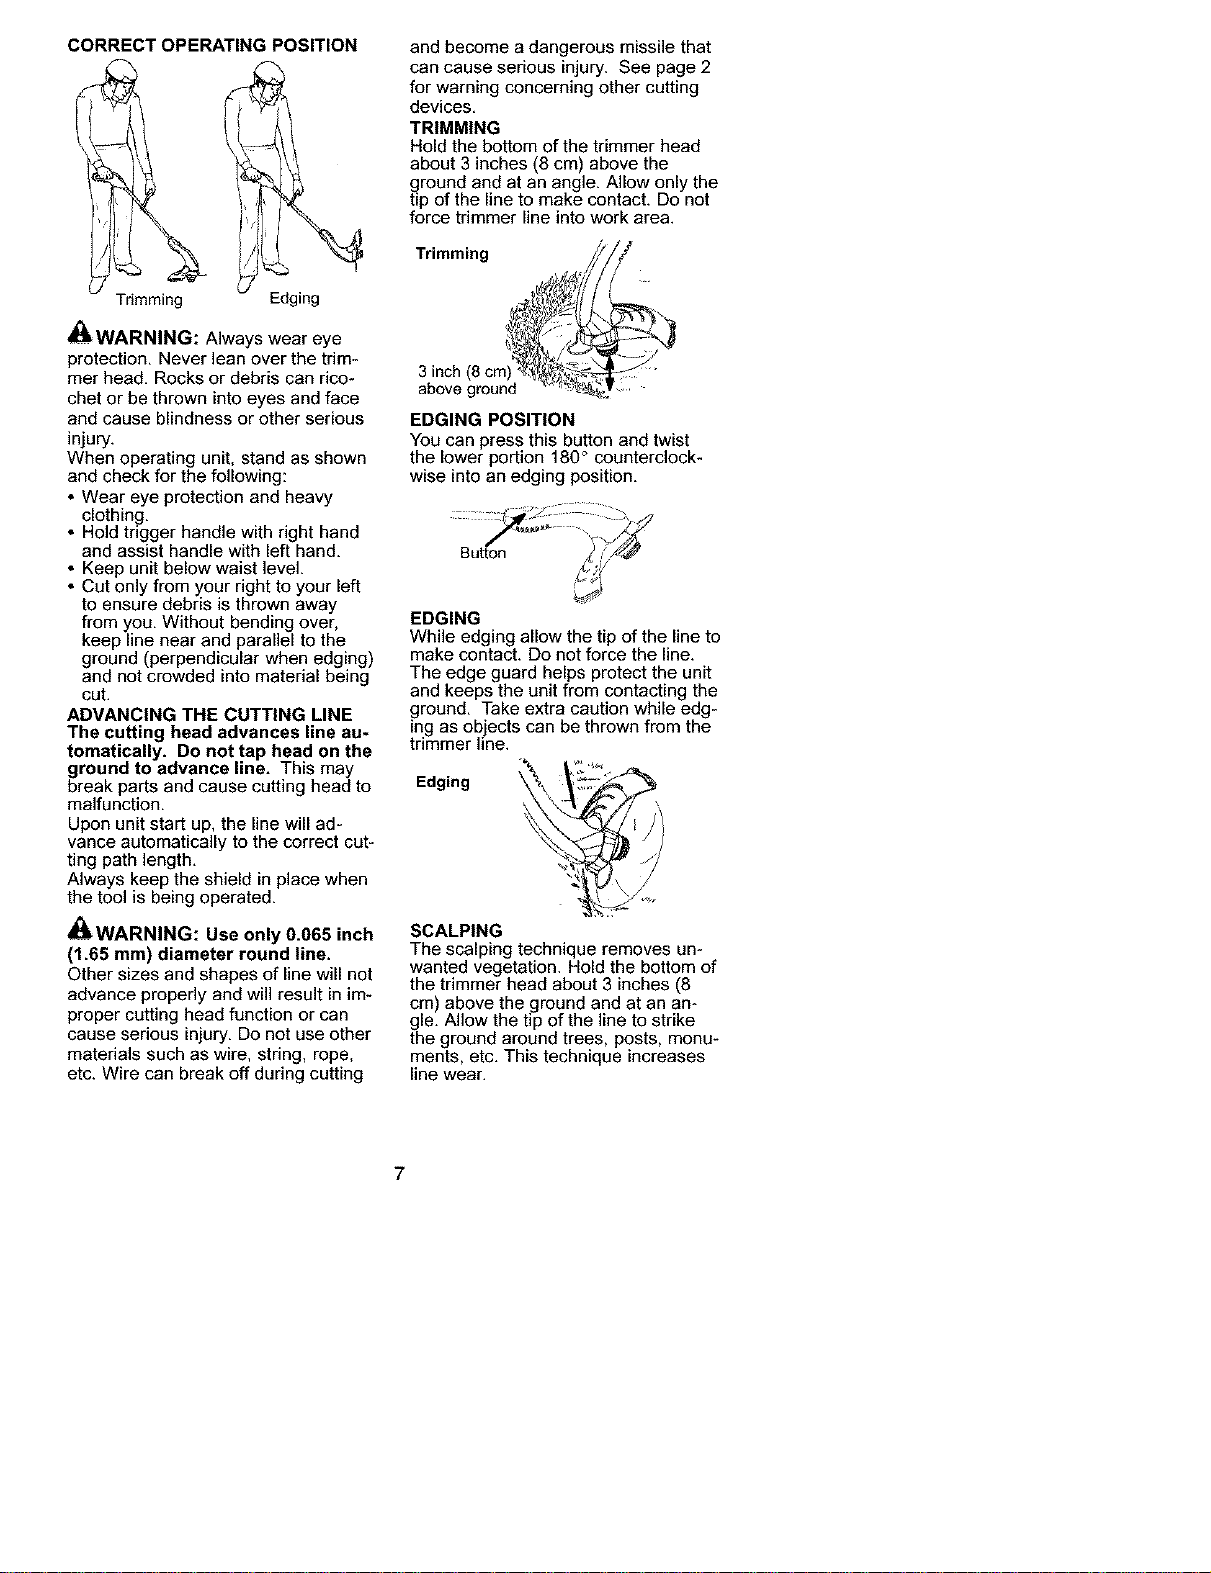
CORRECT OPERATING POSITION
Trimming Edging
WARNING: Always wear eye
protection. Never lean over the trim-
mer head. Rocks or debris can rico-
chet or be thrown into eyes and face
and cause blindness or other serious
injury.
When operating unit, stand as shown
and check for the following:
* Wear eye protection and heavy
clothing.
* Hold trigger handle with right hand
and assist handle with left hand.
* Keep unit below waist level.
* Cut only from your right to your left
to ensure debris is thrown away
from you. Without bending over,
keep line near and parallel to the
ground (perpendicular when edging)
and not crowded into material being
cut.
ADVANCING THE CUTTING LINE
The cutting head advances line au-
tomatically. Do not tap head on the
ground to advance line. This may
break parts and cause cutting head to
malfunction,
Upon unit start up, the line will ad-
vance automatically to the correct cut-
ting path length.
Always keep the shield in place when
the tool is being operated.
_WARNING: Use only 0.065 inch
(1.65 mm) diameter round Fine.
Other sizes and shapes of line will not
advance properly and will result in im-
proper cutting head function or can
cause serious injury. Do not use other
materials such as wire, string, rope,
etc. Wire can break off during cutting
and become a dangerous missile that
can cause serious injury. See page 2
for warning concerning other cutting
devices.
TRIMMING
Hold the bottom of the trimmer head
about 3 inches (8 cm) above the
ground and at an angle. Allow only the
tip of the line to make contact. Do not
force trimmer line into work area.
Trimming 1 " _/[/¢/
3inch (8 cm);_N_
above ground .,_ .i
EDGING POSITION
You can press this button and twist
the lower portion 160 ° counterclock-
wise into an edging position.
EDGING
While edging allow the tip of the line to
make contact. Do not force the line.
The edge guard helps protect the unit
and keeps the unit from contacting the
ground. Take extra caution while edg-
ing as objects can be thrown from the
trimmer line.
Edging
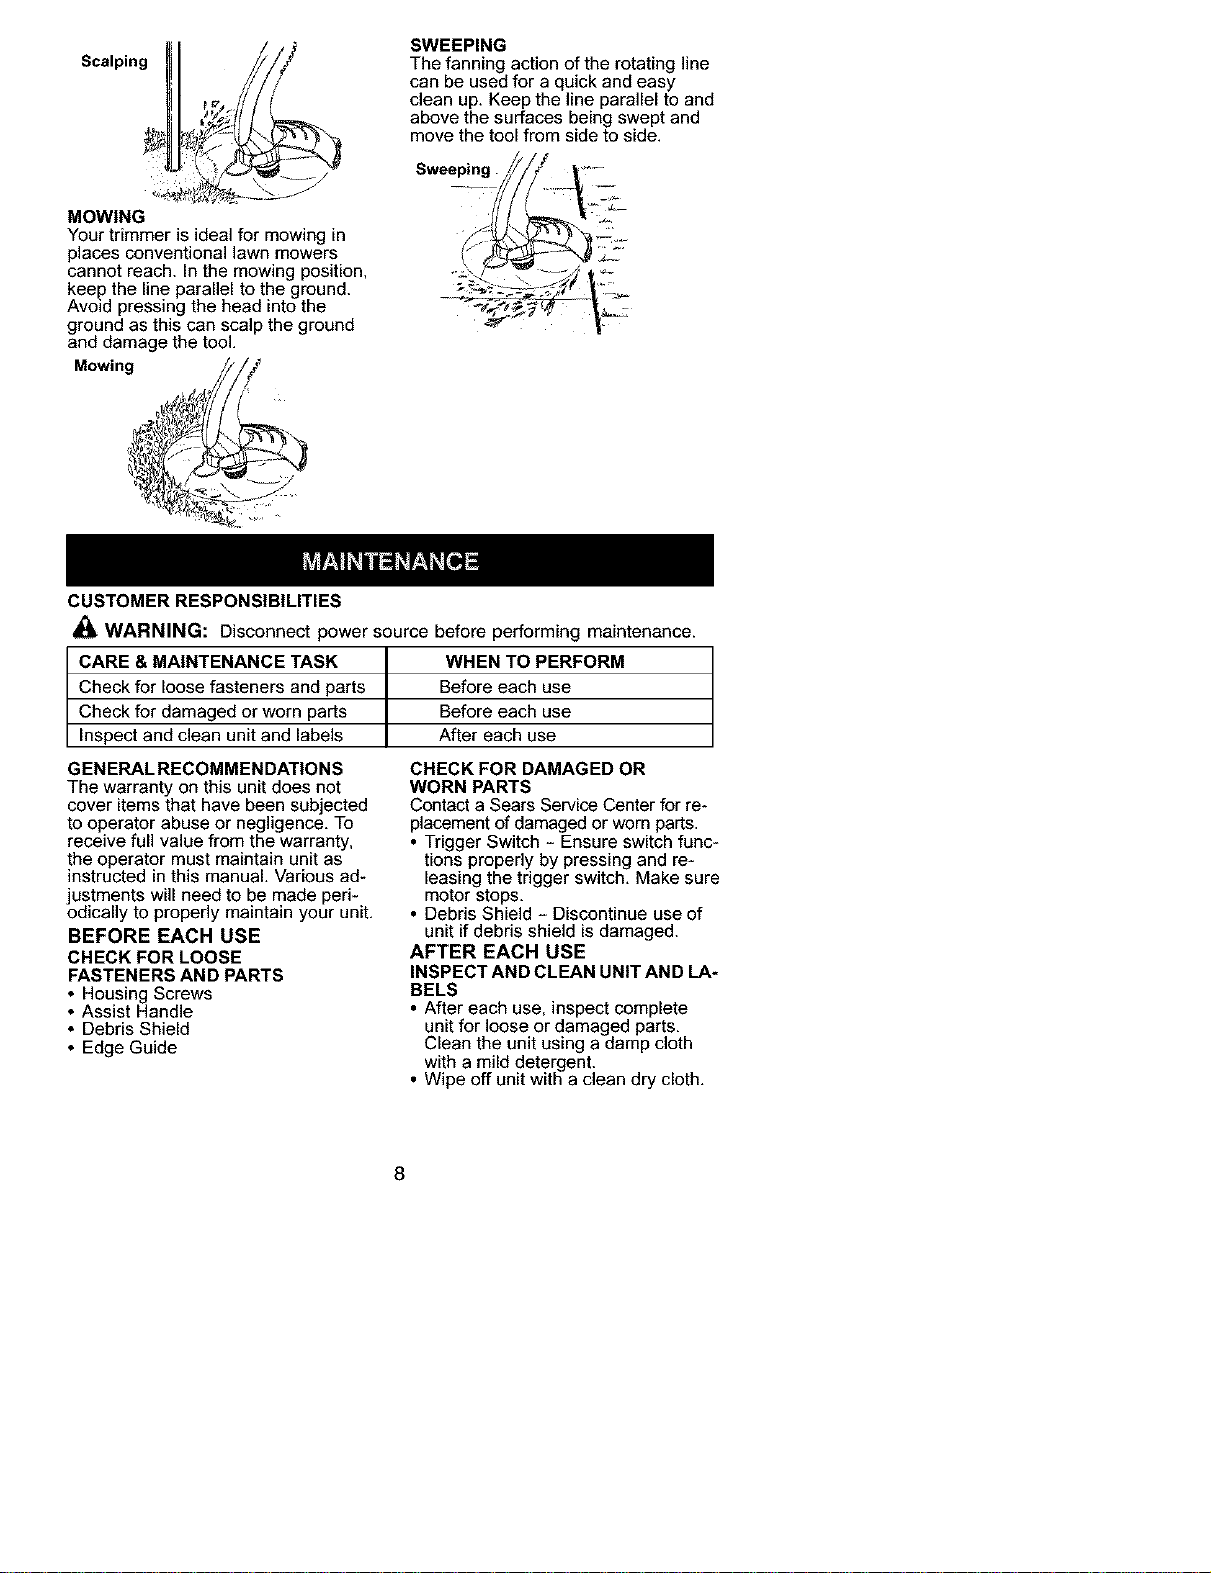
SCALPING
The scalping technique removes un-
wanted vegetation. Hold the bottom of
the trimmer head about 3 inches (8
cm) above the ground and at an an-
gle. Allow the tip of the line to strike
the ground around trees, posts, monu-
ments, etc. This technique increases
line wear.
7
Scalping
MOWING
Your trimmer is ideal for mowing in
places conventional lawn mowers
cannot reach. In the mowing position,
keep the line parallel to the ground.
Avoid pressing the head into the
ground as this can scalp the ground
and damage the tool.
.owing,////
SWEEPING
The fanning action of the rotating line
can be used for a quick and easy
clean up. Keep the line parallel to and
above the surfaces being swept and
move the tool from side to side.
Sweeping
CUSTOMER RESPONSIBILITIES
,_ WARNING: Disconnect power source before performing maintenance.
CARE & MAINTENANCE TASK WHEN TO PERFORM
Check for loose fasteners and parts Before each use
Check for damaged or worn parts Before each use
Inspect and clean unit and labels After each use
GENERAL RECOMMENDATIONS
The warranty on this unit does not
cover items that have been subjected
to operator abuse or negligence. To
receive full value from the warranty,
the operator must maintain unit as
instructed in this manual. Various ad-
justments will need to be made peri-
odically to properly maintain your unit.
BEFORE EACH USE
CHECK FOR LOOSE
FASTENERS AND PARTS
• Housing Screws
• Assist Handle
• Debris Shield
• Edge Guide
CHECK FOR DAMAGED OR
WORN PARTS
Contact a Sears Service Center for re-
placement of damaged or worn parts.
• Trigger Switch - Ensure switch func-
tions properly by pressing and re-
leasing the trigger switch. Make sure
motor stops.
• Debris Shield - Discontinue use of
unit if debris shield is damaged.
AFTER EACH USE
INSPECT AND CLEAN UNIT AND LA-
BELS
• After each use, inspect complete
unitfor loose or damaged parts,
Clean the unit using a damp cloth
with a mild detergent.
• Wipe off unit with a clean dry cloth.
8
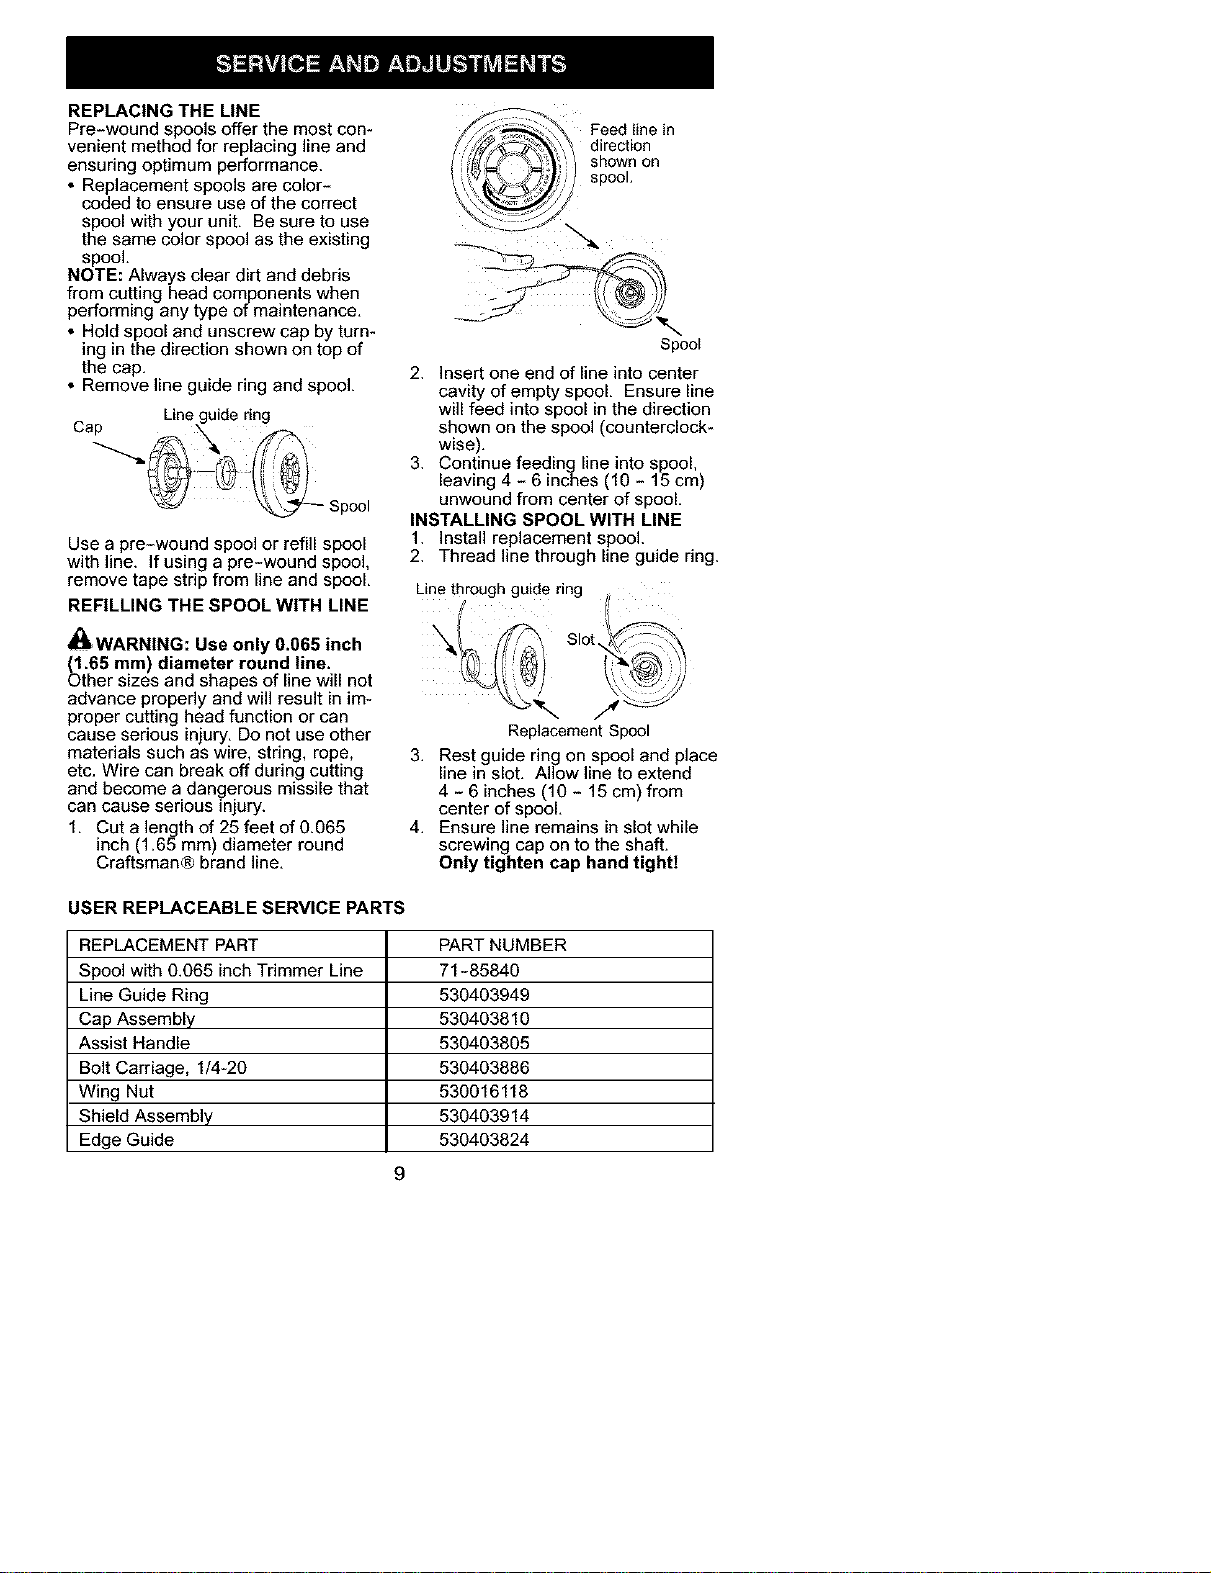
REPLACING THE LINE
Pre-wound spools offer the most con-
venient method for replacing line and
ensuring optimum performance.
* Replacement spools are color-
coded to ensure use of the correct
spool with your unit. Be sure to use
the same color spool as the existing
spool.
NOTE: Always clear dirt and debris
from cutting head components when
performing any type of maintenance.
* Hold spool and unscrew cap by turn-
ing in the direction shown on top of
the cap.
* Remove line guide ring and spool.
Use a pre-wound spool or refill spool
with line. If using a pre-wound spool,
remove tape strip from line and spool,
REFILLING THE SPOOL WITH LINE
_WARNING: Use only 0.065 inch
_.65 mm) diameter round line.
ther sizes and shapes of line will not
advance properly and will result in im-
proper cutting head function or can
cause serious injury. Do not use other
materials such as wire, string, rope,
etc. Wire can break off during cutting
and become a dangerous missile that
can cause serious _njury.
1. Cut a length of 25 feet of 0.065
inch (1.65 ram) diameter round
Craftsman® brand line.
Feed line in
direction
shown on
spool.
Spool
2. Insert one end of line into center
cavity of empty spool. Ensure line
will feed into spool in the direction
shown on the spool (counterclock-
wise).
3. Continue feeding line into spool,
leaving 4 - 6 inches (10 - 15 cm)
unwound from center of spool.
INSTALLING SPOOL WITH LINE
1. Install replacement spool.
2. Thread line through line guide ring.
Replacement Spool
3. Rest guide ring on spool and place
line in slot. Allow line to extend
4 - 6 inches (10 - 15 cm) from
center of spool.
4. Ensure line remains in slot while
screwing cap on to the shaft.
Only tighten cap hand tightI
USER REPLACEABLE SERVICE PARTS
REPLACEMENT PART
Spool with 0.065 inch Trimmer Line
Line Guide Ring
Cap Assembly
Assist Handle
Bolt Carriage, 1/4-20
Wing Nut
Shield Assembly
Edge Guide
PARTNUMBER
71-85840
530403949
530403810
530403805
530403886
530016118
530403914
530403824
9
_WARNIN6: Performthefollow-
ingstepsafter each use.
* Stop the unit and disconnect the
power source when not in use.
* Carry the unit with motor stopped.
* Store the unit so the line limiter
blade cannot cause injury.
• Store unit and extension cord in-
doors in a high, dry place out of the
reach of children. Store unit un-
plugged.
• Store unit with all guards in place.
Position unit so that any sharp ob-
ject cannot accidentally cause injury.
TROUBLESHOOTING TABLE
,_ WARNING: Always stop unit and disconnect from the power source before
performing all of the recommended remedies below except remedies that re-
quire unit to be operating.
TROUBLE
Trimmer head
stops under a
load or does not
turn when switct
_s pressed,
Line does not
advance or
0_aks while
_u_ing,
CAUSE
1. Crowding trimmer line
against material being
cut.
2. Electrical failure.
3. Thrown circuit breaker.
4. Debris stopping head,
1. Line improperly routed
in head.
2. Line improperly
wound into spool.
3. Incorrect line size
4. Not enou h line
outside u_ head.
5. Dirt buildup on unit.
1. Line size is incorrect.
2. Incorrect spool.
3. Line is being crowded
against material being
cut.
1. Line improperly
routed in head,
2. Spool damaged.
REMEDY
1.Allow tip of line to do the cutting,
2. Contact Sears Service (see back
cover).
3. Check Breaker Box.
4. Remove debris,
1. Check line routing.
2. Rewind line tightly and evenly,
3. Use only 0,065 inch (1.65 mm) dia. line,
4. Remove cover and pull 4 inches
(10 cm) of line out of head.
5. Clean unit.
1. Use only 0.065 inch (1.65 mm) dia. line.
2. Replace with correct spool.
3. Cut with tip of line fully extended.
Line welds onto
_poel.
Line releases 1, Check line routing,
sontinuously.
2, Replace spool.
Line usage is 1. Line improperly routed 1, Check line routing,
_=xcessive, in head,
2. Line size is incorrect. 2. Replace spool.
3. Crowding line against 3, Cut with tip of line fully extended,
material being cut,
4. Spoel worn or damaged. 4, Replace spoel.
Line pulls back 1, Too little line outside 1. Remove cover and pull 4 inches
into head. of head. (10 cm) of line outside of head.
2, Line size incorrect. 2. Use only 0,065 inch (1.65 mm) dia, line,
10
Declaraci6n de Garantia Limitada 11 Servicio y Ajustes 18
Regias de Seguridad 11 Piezas de Repuesto 19
Montaje 14 Almacenamiento 20
Uso 15 Tabla Diagn6stica 20
Mantenimiento 18 Piezas y Encargos Contratapa
GARANTIA COMPLETA DE UN A_IO PARA LA CORTADORA A LINEA ELEC+
TRICO CRAFTSMANe
Siesta Cortadora EI6ctrica Weedwacker ® Craftsman tiene alguna falla de funcio-
namiento debida a materiales o mano de obra, durante un a_o a partir de la fe-
cha de compra, Sears la repondr_ gratuitamente,
Esta garantia excluye la linea de nylon,
EL SERVICIO BAJO GARANTIA ESTA A SU DISPOSICION CON SOLO DEVOLVER LA
CORTADORA A LINEA ELECTRICA WEEDWACKER CRAFTSMAN AL TIENDA CE
SEARS O CENTRO DE SERVIClO SEARS MAS CERCANO EN LOS ESTADOS UNIDOS.
Esta garantia le confiere derechos juridicos especificos adem_s ud. Podr_ tener
otros derechos que varian entre estados.
Sears, Roebuck and Co., D/817WA, Hoffman Estates, IL. 60179
_ADVERTENCIA: Siempre que
se use cualquier cortador el6ctrico,
deben observarse precauciones b_si-
cas de seguridad para reducir el ries-
go de incendio, choque el6ctrico y
graves heridas. Lea y cumpla con to-
das las instrucciones.
INFORMACION DE
SEGURIDAD EN EL
APARATO
Este aparato de fuerza puede ser pefi-
groso. El usuario tiene la responsabili-
dad de cumplir con todas las instruc-
clones y advertencias en el aparato y
en el manual. Lea el manual de
instrucciones en su totalidad antes de
usar el aparato! Familiaricese comple-
tamente con los controles y el uso
correcto de] aparato. Limite el uso de
este aparatc a aquellas personas que
lean, comprendan, y cumpian con las
advertencias e instrucciones en el
aparato yen el manual. Nunca permi-
ta a los niSos que usen el aparato.
Toda su atenci6n es necesaria cuando
use este aparato cerca de lugares en
donde haya niSos.
,_ PEMGRO: Nunca use cuchillas
ni dispositivos desgrandores. Este
aparato ha sido diseSado exclusiva-
mente como cortador a linea. El uso
de cualguier otto accesorio o pieza
incrementar_ el peligro de heridas.
@©0
A
_ADVERTENCIA: La linea de
corte arroja objetos violentamente.
Los objetos arrojados pueden cegarlo
o herirlo a usted y a terceros. Use an-
teojos de seguridad+ botas y protecd-
ci6n para las piernas. Mantenga el
cuerpo alejado de la linea girante.
Anteojaos de seguridad oproteccion simi-
larde ojos.
_ / Zona d/'f_epel_'_igro
Mantenga a los niSos, los animales y
los espectadores a una distancia
minima de 15 metros (50 pies). Pare
el aparato inmediatamente si alguien
se le acerca.
Si acontece alguna situaci6n no pre-
vista en este manual, tenga cuidado y
use buen criterio, si necesita ayuda,
Ilame al 1-800-235-5878.
11

SEGURIDAD DEL USUARIO
• Vitese de forma apropiada. Siempre
use anteojos de seguridad o pretec-
ci6n de ojos similar al hacer uso o
mantenimiento del aparato. (Existen
anteo os de seguridad.) Use
s empre m_scara protectora de a
cara o m_scara anti-polvo al usar el
aparato en ambientea polvorientos.
Use siempre pantalones largos
gruesos, mangas largas, betas y
guantes. No use el aparato descal-
zo ni con sandalias.
• Mantenga el cabello per encima de
los hombres, at_ndolo para tal efec-
to si es necesario. No use joyas,
ropa suelta o ropa con tiras, corba-
tas, borlas, etc. que cuelguen libre-
mente; pueden enredarse en las
piezas en movimiento.
• Si est_ completamente tapado, es-
tar_ m_s protegido de los escom-
bros y pedazos de plantas t6xicas
arrojados per la Ifnea girante.
• Mant6ngase alerta. No use este
aparato cuando est6 cansado, en-
fermo, trastomado o bajo la influen-
cia del alcohol, de drogas o de re-
medies. Vigile bien Io que est_
haciendo; use del sentido comDn.
• Evite los arranques no intenoionales
del motor. AI Ilevar el aparato de un
lado a otro, nunca ponga el dedo en
el interruptor. AsegDrese de que el
interrupter est6 en la posici6n OFF y
nunca que toca el interruptor al con-
ectar el cable de extensi6n.
SEGURIDAD ELECTRICA
_ ADVERTENClA: Evite los ambi-
entes peligrosos. Para reducir el riesgo
de choque el6ctrico, no use los apara-
tos en lugares hQmedos o majados ni
cerca de piscinas, de los hidromasajes,
etc. No exponga el aparato a la nieve, a
la Iluvia ni al agua para evitar la posibili-
dad de choque el6ctrico.
• Use el voltaje especificado en el
aparato.
• Evite las situaciones peligrosas. No
use el aparato en la presencia de
gases o liquidos inflamables para
evitar incendios, explosiones y/o
daSos al aparato.
• Para reducir el riesgo de cheque
el6ctrico, este equipo viene con en-
chufe polarizado (una aleta es m_s
ancha que la otra) y requerir_ el uso
de un cable de extensi6n polariza-
do. Este enchufe entrar_ solamente
en una posici6n en el enchufe pola-
12
rizado del cable de extension. Si
este enchufe no entrara completa-
mente dentro del enchufe del cable
de extensi6n, invierta el enchufe. Si
continQa sin entrar, obtenga el cable
de extensi6n polarizado cerrecto. El
enchufe polarizado del cable de ex-
tensi6n requerir_ el uso de un toma-
corriente de pared polarizado. El
enchufe polarizado del cable de ex-
tensi6n entrar_ en el tomacorriente
de una sola form& Si el enchufe no
entra completamente en el tomacor-
riente de pared, invierta el enchufe.
Si centint_a sin entrar, centacte un
electricista autorizado para que isn-
tale el tomacorriente apropiado. No
cambie el equipo del enchufe, el re-
cept_culo del cable de extensi6n o
el enchufe del cable de extensi6n
de ninguna manera.
• Para reducir el riesgo de choque
el6ctrico, use cables de extensi6n
que vengan especificamente marca-
dos como apropiados para aparatos
de uso en exteriores y que tengan
una clasificaci6n el6ctrica no menor
que la del aparato. El cable deber_
venir marcado con el sujifo "W-A"
("W" en Canada). Asegurese de que
el cable de extensi6n est6 en buenas
condiciones. Inspeccione el cable de
extensi6n antes de usado y si est_
daSado, c_mbielo. No utilice una
cable de extension daSada. El ais-
lante del cable de la extensi6n debe
ser intacto sin las grietas o la deterio-
raci6n. Los conectores del enchufe
deben ser indemnes. Los cables de-
masiado fines causar_n una baja en
el voltaje de line& Io que provocar_
falta de potencia y exceso de temper-
atura. En case de duda entre dos
cables, use el m_s grueso. Cuanto
m_s pequeSo es el nt_mero de cla-
sificaci6n, m_s grueso es el cable
(vea SELECCION DEL CABLE DE EX-
TENSI6N en la secci6n USO DEL
APARATO).
• No utilice m_s de uno los cables de
extensi6n.
• No use el cable indebidamente.
Nunca Ileve el aparato por el cable
de extensi6n ni la desconecte del
enchufe tirando del cable.
• Use el retentor de cables para evitar
que el cable de extensi6n se desco-
necte del aparato y cause posible
daSo a el aparato debido al movi-
miento del enchufe. Vea ENCHUFE
EL CABLE DE EXTENSION AL APARA-
TO en la secci6n USO DEL APARATO.
• Nouseelaparatosielinterruptorno
Ioprendeyapagacorrectamente.El
CentredeServicioSearsdeber_
hacertodaslasreparacionesalin-
terruptor.
• Mantengaelcabledeextensi6nale-
jadodelusuarioydelosobst_culos
entodomemento.Noexpongalos
cablesalcalor,alaceite,alaguaoa
losbordesfilosos.
• Evitetodocontactodelcuerpocon
losconductoresatierra,talescome
lascercasoloscaSosdemetalpara
evitarlaposibilidaddechoque
el6ctrico.
• Elcircuitooeltomacorrientequese
useconesteaparatodeber_estar
provistodeprotecci6ndeInterruptor
deFallasenelCircuitoaTierra
(GroundFaultCircuitInterrupter--
GFCI).Lostomacorrientesconpro-
tecci6nGFCIincorporadapueden
serusadosparaestamedidadese-
guridad.
SEGURIDAD DEL APARATO
• Inspeccione el aparato completa-
mente antes de cada uso. Haga que
un Centre de Servicio Sears repare
o cambie las piezas da_adas. Esto
incluye las piezas del cabezal que
est6n resquebrajadas o descantilla-
das, los protectores y cualquier otra
pieza daSada.
• No intente reparar ud. mismo el apa-
rate.
• Use exclusivamente la linea de
certe con di_metro de 1,65 mm
(0,065 de pulgada) recomendado.
(Vea secci6n SERVIC]O Y AJUSTES).
Nunca use alambre, soga, hilo, etc.
• Use la bobina especificada.
Asegerese que la bobina est6 cer-
rectamente instalada y que el arc de
retenci6n est6 bien fijo.
• Use exclusivamente los repuestos y
accesorios recomendados de la
marca Craftsman.
SEGURIDAD AL CORTAR
• Inspeccione el _rea a ser cortada.
Retire los objetos (piedras, vidrio
roto, clavos, alambre, hilo, etc.) que
puedan ser arrojados o que se pue-
dan enredar en el cabezal de corte.
• No se incline excesivamente ni se
pare en superficies inestables. Man-
tenga el equilibrio, con los pies en
una superficie firme y estable, en
todo momento.
• Mantenga el cabezal de corte por
debajo del nivel de la cintura. No le-
vante las manijas per encima del ni-
vel de la cintura. El cabezal de corte
se le puede acercar peligrosamente
al cuerpo.
• Evite de cabezal de corte y la linea
girante.
• Use el aparato debidamente. Uselo
exclusivamente para recortar y para
cortar c6sped. No sobrecargue el
aparato; dar_ memor rendimiento
con menor probabilidad de heridas
si se Io hace funcionar al ritmo para
el cual fue diseSado.
• Use el aparato t]nicamente de dia o
en luz artificial fuerte.
SEGURIDAD EN EL MANTENIMIENTO
_ADVERTENCIA: Desconecte el
aparato de la fuente de electricidadan-
tes de hacer cualquier mantenimiento.
• Haga el mantenimiento del aparato
de acuerdo a los procedimientos re-
comendados. Mantenga la Ifnea de
corte al largo que corresponde.
• Todo servicio y mantenimiento no
explicado en este manual deber_
ser efectuado por el Centro de Ser-
vicio Sears para evitar peligros.
• Nunca le heche agua ni ningen otro
liquido al aparato, ni ]e direccione
chorrosde agua ni de ningen otro
liquido. Limpieel aparato y las calco-
manias y placas con una esponja
ht]meda. Mantenga las manijas se-
cas, limpias y libres de aceite y grasa.
• Mantenga las aberturas de vetila-
ci6n limpias y libres de escombros
para evitar el calentamiento excesi-
vodel motor. Lfmpielas despu6s de
cada use.
TRANSPORTE Y ALMACENADO
• Pare el motor y desconecte el apa-
rato de la corriente el6ctrica siempre
que no est6 en uso.
• Cuando cargue el aparato en las
manos, mantenga el motor apagado.
• Guarde el aparato de mode que el
cuchilla ]imitadora de linea (debajo
de la protector) no pueda causar
heridas accidentalmente.
• Guarde el aparato al abrigo de ]a in-
temperie, desenchufado, en un ]u-
gar alto, seco y fuera del alcance de
los niSos.
• No cuelgue el aparato para no pres-
ionar el gatillo interrupter.
CONSTRUCCION CON DOBLE AIS-
LAMIENTO
Este aparato tiene aislamiento doble
para incrementar la protecci6n contra
el choque el6ctrico. El aislamiento
doble consiste de dos "capas" separa-
das de aislamiento el6ctrico en vez de
cable a tierra.
13
Lasherramientasyloselectrodom6stk
cosconaislamientodoblenonecesitan
cableatierra.Noselehaprovisto
ningDnmediodeconexi6natierraa
esteaparato,tampccoseledebeagre-
garningDnmediodeconexi6natierra.
Comoresultado,elcabledeextensi6n
usadoconsuaparatopuedeseren-
chufadoencualquiertomacorriente
el6ctriconormalde120voltios.
Debenobservarseprecaudonesde
seguridadal trabajar con toda herra-
mienta el6ctrica. El sistema de aisla-
miento doble solamente provee una
protecd6n adicional contra las heddas
provocadas por una falla en el aisla-
miento el6ctrico interno.
_ ADVERTENCIA: Todo diagnds-
tico y reparad6n de indole el6ctnca a
este aparato, incluyendo a la caja, el
interruptor, el motor, etc., deber_n ser
efectuados por personal de servicio
capadtado. Los repuestos para un
aparato con aislamiento doble deben
ser recomendados por el fabricante.
Los aparatos con aislamiento doble
vienen marcados con ]as palabras
"double insulation" (aislamiento doble)
o "double insulated" (doblemente ais-
lado). Tambi6n puede aparecer el
simbolo (cuadroado dentro de un cua-
droado) [] en el aparato. El aparato
debe ser reparado por un personal de
servicio cualificado; de Io contrario el
sistema de aislamiento doble puede
quedar inutilizado, acarreando graves
heridas.
GUARDE ESTAS INSTRUCCIONES
CONTENIDO DE LA CAJA
Verifique el contenido de la caja por la
]ista siguiente.
Modelo 358.745250
• Cortadora
• Protector
Verifique que las piezas no est6n
daSadas. No use piezas daSadas.
AVISO: Si necesita ayuda o si faltan
piezas o hay piezas daSadas. No use
piezas daSadas, Ilame al
1-800-235-5878.
MONTAJE
_I_ADVERTENClA: Si recibi6 el
aparato ya armado, repita todos los
pasos para asegurarse de que est6
correctamente armado y que todos
los fijadores est6n bien ajustados.
AJUSTE DEL MANIJA AUXlLIAR
1. Ponga el aparato en una superfi-
de plan&
2. Afloje y remueva la tuerca maripo-
sa de la manija auxiliar.
3. Empuje firmemente la manija
auxiliar para que se fije en el tubo.
Para hacer la instalaci6n m_s f_cil,
incline la manija hacia la caja del
acelerador mientras que empuja
hacia abajo (vea la ilustraci6n).
4. Reinstale el tornillo en la manija.
Enrosque la tuerca mariposa en el
tornillo.
5. Ajuste la posici6n de la manija
hasta quede c6moda para el
usuario; apriete firmemente la
tuerca mariposa.
O ;'ila°x'"ar
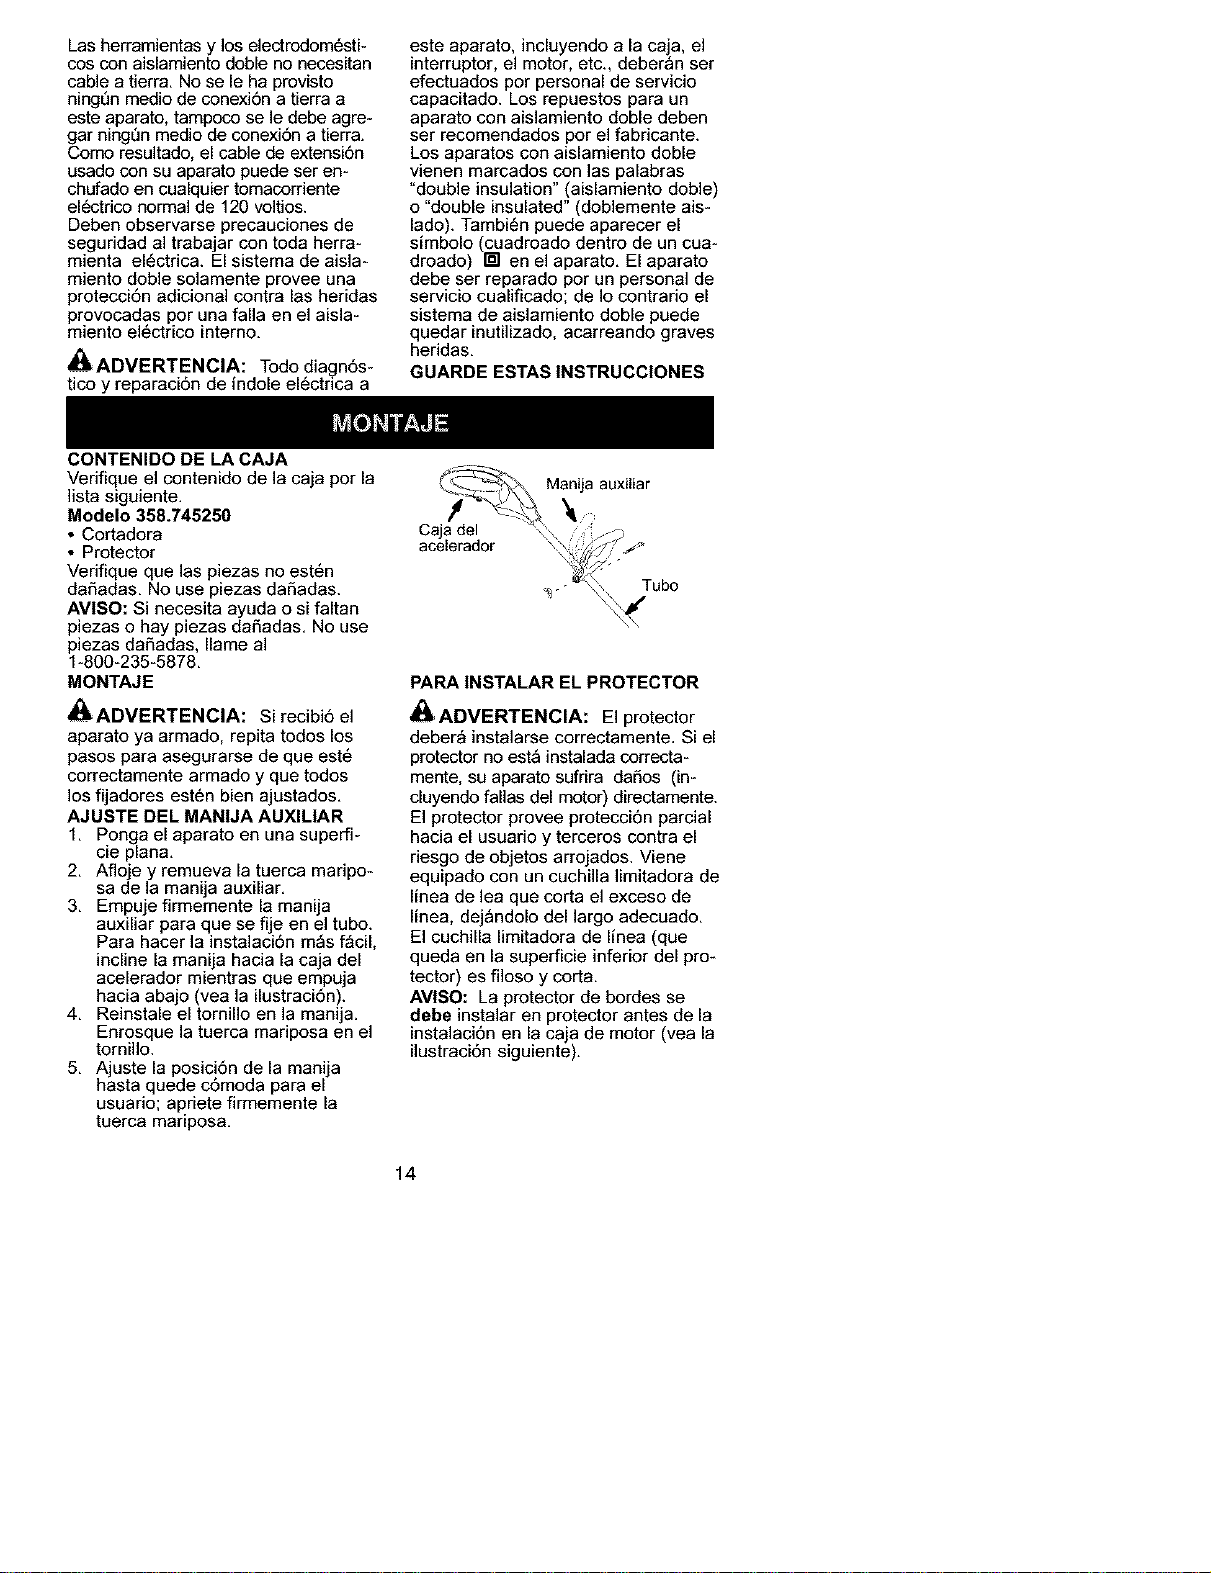
Ca "4'\ ._
acelerador \'-, _j ._
PARA INSTALAR EL PROTECTOR
_ADVERTENCIA: El protector
deber_ instalarse correctamente. Si el
protector no est_ instalada correcta-
mente, su aparato sufrira da_os (in-
clugendo fallas del motor) directamente.
El protector provee proteccidn parcial
hacia el usuado g terceros contra el
desgo de objetos arrojados. Viene
equipado con un cuchilla limitadora de
linea de lea que corta el exceso de
line& dej_ndolo del largo adecuado,
El cuchilla limitadora de linea (que
queda en la superficie inferior del pro-
tector) es filoso y corta,
AVISO: La protector de bordes se
debe instalar en protector antes de la
instalaci6n en la caja de motor (vea la
ilustraci6n siguiente).
14
Protector de
bordes
Protector
1. Sostenga el protector en el _ngulo
de la caja del motor. Alinee la
lengLienta de cierre delantera del
protector con la muesca delantera
de la ca a del motor (v6a la ilustra-
c 6n s gu ente).
2. Mueva el protector hacia la caja del
motor, asegurando que el cabezal
de corte pase sobre la rendija del
protector sin ser atrapada en la
lengLienta del cierre del protector.
3. Incline el frente del protector hacia
la muesca delantera de la caja del
motor. Empuje la lengLienta de
cierre delantera del protector en la
muesca delantera de la caja del
motor. Un broche de presi6n audi-
ble debe ser oido. Asegure que el
cabezal de corte este libre al rotary
la linea no sea atrapada entre el
protector y la caja del motor.
CONOZCA SU APARATO
4.
Empuje detr_s del protector hacia
la caja del motor segt]n Io ilustrado
hasta que la len_eenta de cierre
trasera se encala a presi6n con
seguridad hacia las muescas pos-
teriores. AsegDrese de que el pro-
tector est6 conectado con seguri-
dad a la caja del motor y que sea
ensamblado al aparato como es
mostrado en la portada de este
manual.
LengQenta de Cierre
LengfJenta de Delantera
Cierre Trasere Muesca Caja del
Delantera Motor
Muesces
Cabezal Posteriores
de Co_e
PRECAUCI(_N: Cuchilla limitadora
de linea es filosa
LEA ESTE MANUAL DE ]NSTRUCCIONES Y LAS REGLAS DE SEGURIDAD ANTES DE
PONER EL APARATO EN FUNCIONAMIENTO. Compare las ilustraciones a su apara-
to para familiarizarse con la ubicaci6n de los controles y ajustes. Guarde este
manual para uso futuro.
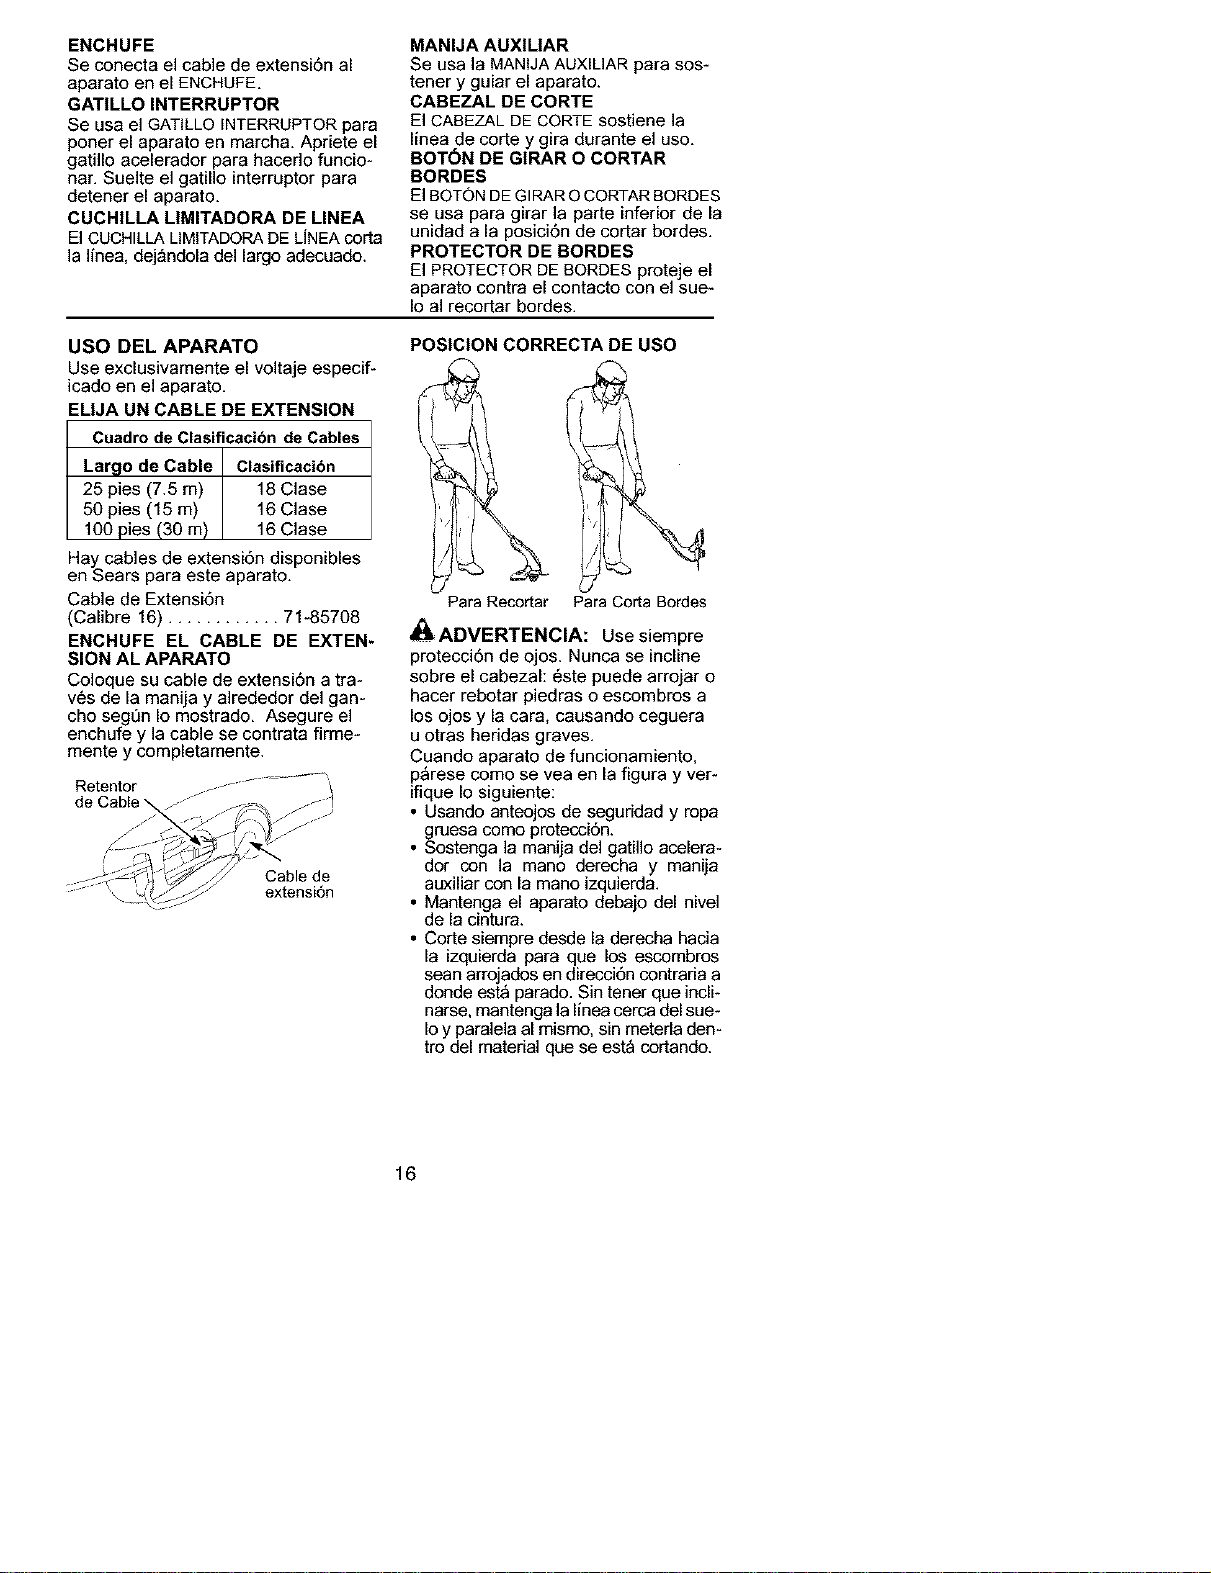
Getillo Interruptor
i_,// Manija Auxilier
Boton de Girar
oCortar Bordes
Retentor Enchufe _ Ceja del MotOrprotecto r
de Cable de bordes
de Ventllac_or',/_" -\ "-._.s _€/
Aberturas Protector_ i_.Sf
_k, Cabezal de
_ I_ Corte con Linea
• , •\ de Corte del
Cechdla Dm_tadora di&metro 0,065
de linea
de pulgada
15
ENCHUFE
Se conecta el cable de extensi6n al
aparato en el ENCHUFE,
GATILLO INTERRUPTOR
Se usa el GATILLO INTERRUPTOR para
porter el aparato en march& Apriete el
gatillo acelerador para hacerlo funcio-
nar. Suelte el gatillo interruptor para
detener el aparato,
CUCHILLA MMITADORA DE LINEA
El CUCHILLALIMITADORADE LJNEAcorta
]a line& dej_ndola del largo adecuado.
MANIJA AUXIMAR
Se usa la MANIJA AUXIUAR para SOS-
tener y guiar el aparato.
CABEZAL DE CORTE
El CABEZAL DE CORTE sostiene la
linea de corte y gira durante el uso,
BOT6N DE GIRAR O CORTAR
BORDES
El BOTONDE GIRAR OCORTARBORDES
se usa para girar la parte inferior de la
unidad a la posici6n de cortar hordes,
PROTECTOR DE BORDES
El PROTECTOR DE BORDES proteje el
aparato contra el contacto con el sue-
Io al recortar bordes.
USO DEL APARATO
Use exclusivamente el voltaje especif-
icado en el aparato.
EMJA UN CABLE DE EXTENSION
Cuadro de Clasificacibn de Cables
Largo de Cable Clasificacibn
25 pies (7.5 m) 18 Clase
50 pies (15 m) 16 Clase
100 pies (30 m) 16 Clase
Hay cables de extensi6n disponibles
en Sears para este aparato.
Cable de Extensi6n
(Calibre 16) ............ 71-85708
ENCHUFE EL CABLE DE EXTEN-
SION AL APARATO
Coloque su cable de extensi6n a tra-
v6s de la manija y alrededor del gan-
cho segQn Io mostrado, Asegure el
enchufe y la cable se contrata firme-
mente y completamente.
Retentor
de
Cable de
extensi6n
POSICION CORRECTA DE USO
Para Recortar Para Corta Bordes
_ ADVERTENClA: Use siempre
protecci6n de ojos. Nunca se incline
sobre el cabezal: 6ste puede arrojar o
hacer rebotar piedras o escombros a
los ojos y la cara, causando ceguera
u otras heridas graves.
Cuando aparato de funcionamiento,
p_rese como se vea en la figura y ver-
ifique Io siguiente:
• Usando anteojos de seguridad y ropa
gruesa como protecci6n.
• Sostenga la manija del gatillo acelera-
dor con la mano derecha y manija
auxiliar con la mano izquierda.
• Mantenga el aparato debajo del nivel
de la cintura.
• Corte siempre desde la derecha hacia
la izquierda para que los escombros
sean arrojados en direcci6n contraria a
donde est_ parado. Sin tener que incli-
narse, mantenga la linea cerca del sue-
Ioy paralela al mismo, sin meterla den-
tro del material que se est_ cortando.
16
EXTENSION DE LA BNEA
El cabezal de corte hace mover au*
tombticamente la linea hacia ade*
lante. Para que la linea de corte se
mueva hacia adelante, no es necesa*
rio dar golpes contra el suelo at ca-
bezal de corte. De Io contrado,eeta
acci6n podria tener como resultado pie-
zas rotas y el funcionamiento defectuo-
so del cabezaL
Despu6s de que el aparato se haya
puesto en marcha, la linea progresar_
el largo correcto para efectuar el corte
de manera autom_tica.
Mantenga siempre el protector en su
]ugar cuando la herramienta se en-
cuentre en funcionamiento.
_ADVERTENClA: Utilice exclu-
sivamente linea redonda de 1,65
mm (0,065 de pulgada) de dibmetro.
Otro tipo de tamafios y formas har_n
que la linea no gire de forma apropiada
Io que resultar_ en el funcionamiento
inadecuado del cabezal de corte o en
accidentes de seria gravedad. No uti-
lice otro tipo de materiales tales como
alambre, hilo, soga, eta El alambre
puede romperse durante el corte y con-
vertirse en un misil peligroso Io que
puede causar lesiones de seria grave-
dad. Yea la pagina 11 para advertencia
referente a otros dispositivos de corte.
PARA RECORTAR
Sostenga el cabezal a unes 8 cm (3
pulgadas) del suelo yen _ngulo. Per-
mita 6nicamente que la punta de la
linea haga contacto. No meta la linea
de corte en el _rea de trabajo.
Para recortar
3 in.(8 cm)
arribadel suelo
POSICION PARA CORTAR BORDES
Usted puede presionar este bot6n y
rotar la parte inferior 180 grados a la
izquierda en una posici6n de corte
para orillas.
PARA CORTAR BORDES
AI cortar bordes, deje que la punta de la
linea haga centacto. No fuerce la linea.
El protector de bordes ayuda a protegar
el aparato y Io mantiene separado de la
tierra. Ponga mucha atenci6n mientras
est6 usando la podadora y sea precabi-
do, ya que la linea de corte puede arro-
jar objetos al aire.
Para cortar _
bordes _\
PARA ESCALPAR
La t6cnica de escalpado retira la
vegetaci6n no deseada, Sostenga el
cabezal a unos 8 cm (3 pulgadas) de
la tierra y en _ngulo, Deje que la pun-
ta de la linea golpee contra la tierra
alrededor de _rboles, ostes, monu-
mentos, eta Esta t6cnica aumenta el
desgaste de la linea,
, = _.,7_
PARA CORTAR CESPED
El aparato es ideal para cortar c6sped
en los lugares donde no alcanzan las
cortadoras de c6spea convencio-
nales. En la posici6n de cortar pasto
se mantiene la linea paralela a la tier-
ra. Evite presionar el cabezal contra la
tierra, ya que hacerlo puede escalpar
la tierra y dafiar el aparato.
Para cortar C6sped//i//f
17
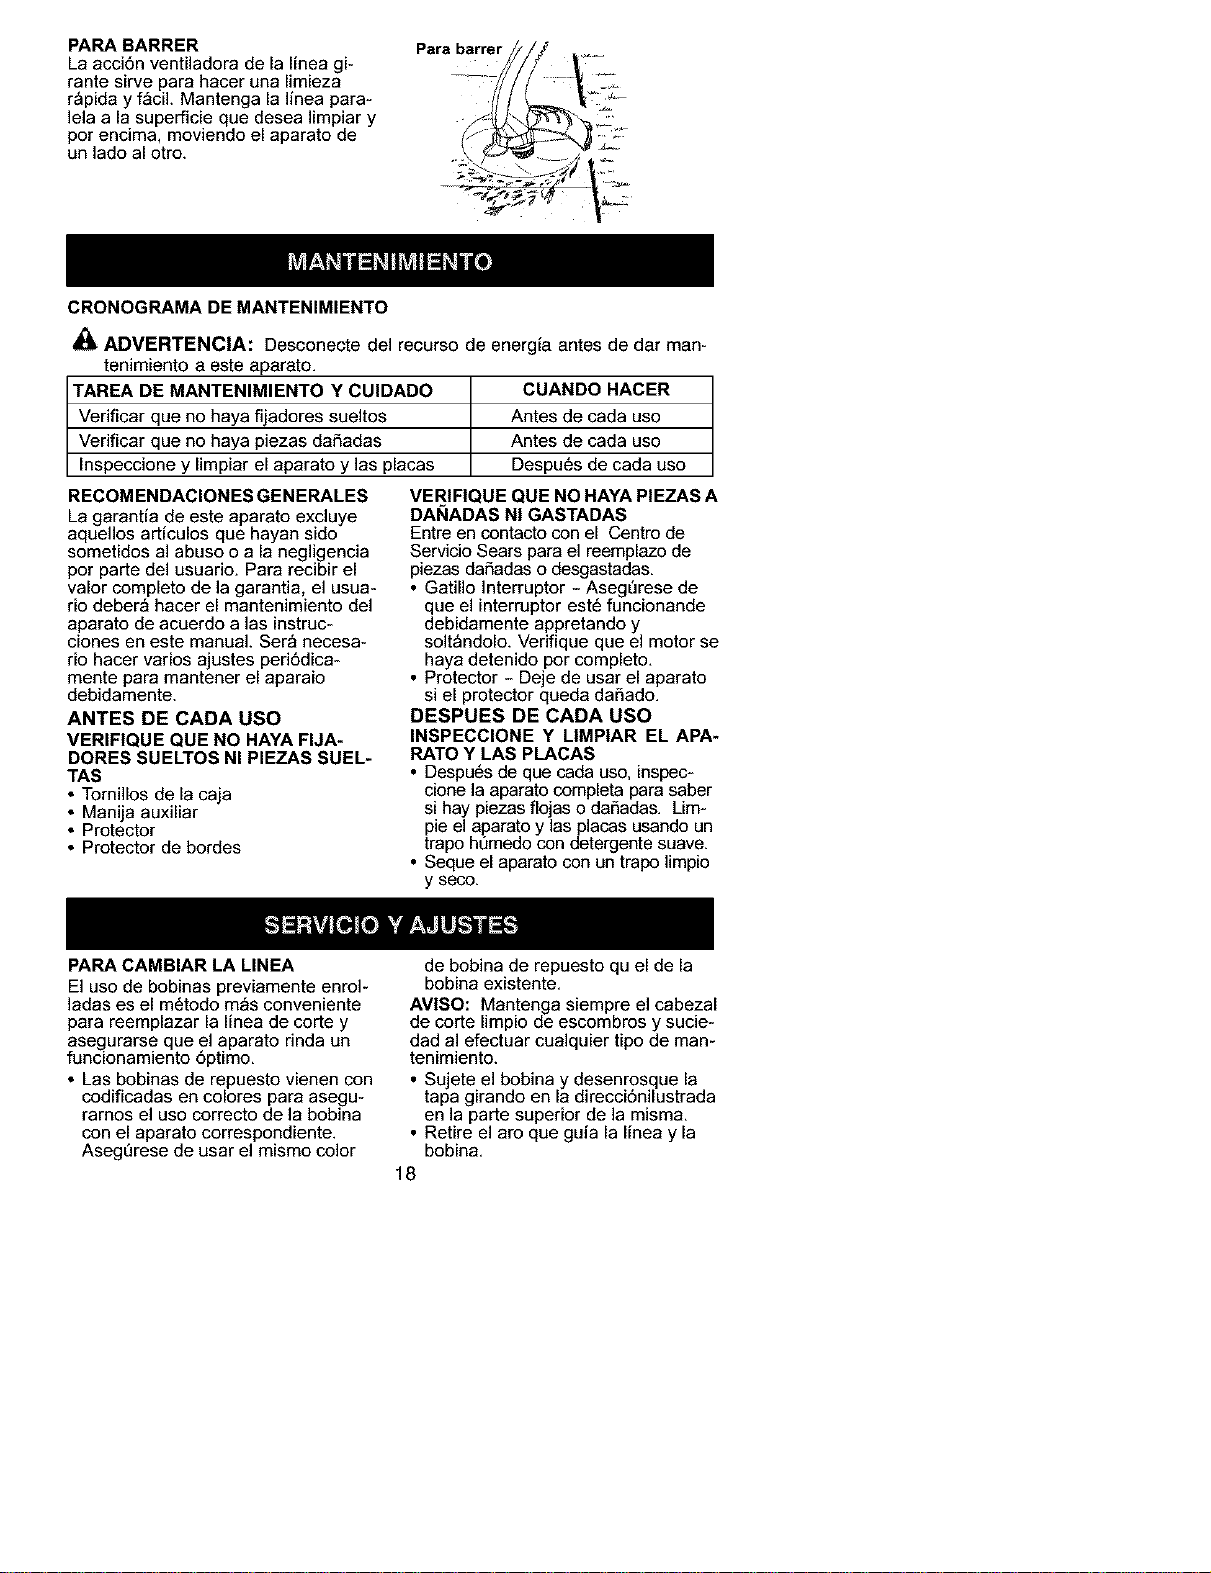
PARA BARRER
La acci6n ventiladora de la linea gi-
rante sirve para hacer una limieza
r_pida y f_ciL Mantenga la linea para-
lela a la superficie que desea limpiar y
p3r encima, moviendo el aparato de
un lado al otro.
Para barter
CRONOGRAMA DE MANTENIMIENTO
,_ ADVERTENCIA: Desconecte del recurso de energia antes de dar man-
tenimiento a este aparato.
TAREA DE MANTENIMIENTO Y CU|DADO CUANDO HACER
Verificar que no haya fijadores sueltos Antes de cada uso
Verificar que no haya piezas daSadas Antes de cada uso
Inspeccione y limpiar el aparato y las placas Despu6s de cada uso
RECOM ENDACIONES GENERALES
La garantia de este aparato excluye
aquellos articulos que hayan sido
sometidos al abuso o a la negligencia
p3r parte del usuario. Para recibir el
valor completo de la garantia, el usua-
rio deber_ hacer el mantenimiento del
aparato de acuerdo alas instruc-
clones en este manual. Ser_ necesa-
rio hacer varios ajustes peri6dica-
mente para mantener el aparaio
debidamente.
ANTES DE CADA USO
VERIFIQUE QUE NO HAYA FIJA-
DORES SUELTOS NI PIEZAS SUEL-
TAS
• Tornillos de la caja
• Manija auxiliar
• Protector
• Protector de bordes
VERIFIQUE QUE NO HAYA PIEZAS A
DAI_IADAS N! GASTADAS
Entre en contacto con el Centro de
Servicio Sears para el reemplazo de
piezas da_adas o desgastadas.
• Gatillo Interruptor - AsegDrese de
que el interruptor est6 funcionande
debidamente appretando y
solt_ndolo. Verifique que el motor se
haya detenido por completo.
• Protector - Deje de usar el aparato
si el protector queda daEado.
DESPUES DE CADA USO
INSPECClONE Y LIMPIAR EL APA-
RATO Y LAS PLACAS
• Despu6s de que cada uso, inspec-
clone la aparato completa para saber
si hay piezas flojas o daEadas. Lim-
pie el aparato y las placas usando un
trap3 hOmedo con detergente suave.
• Seque el aparato con un trap3 limpio
y seco.
PARA CAMBIAR LA LINEA
El uso de bobinas previamente enrol-
ladas es el m6todo m_s conveniente
para reemplazar la linea de corte y
asegurarse que el aparato rinda un
funcionamiento 6ptimo.
• Las bobinas de repuesto vienen con
codificadas en colores para asegu-
rarnos el uso correcto de la bobina
con el aparato corresp3ndiente.
Asegerese de usar el mismo color
de bobina de repuesto qu el de la
bobina existente.
AMISO: Mantenga siempre el cabezal
de corte limpio de escombros y sucie-
dad al efectuar cualquier tip3 de man-
tenimiento.
• Su ete el bobina y desenrosque la
tapa g rando en a d recc6n ustrada
en la parte superior de la misma.
• Retire el aro que guia la linea y la
bobina.
18
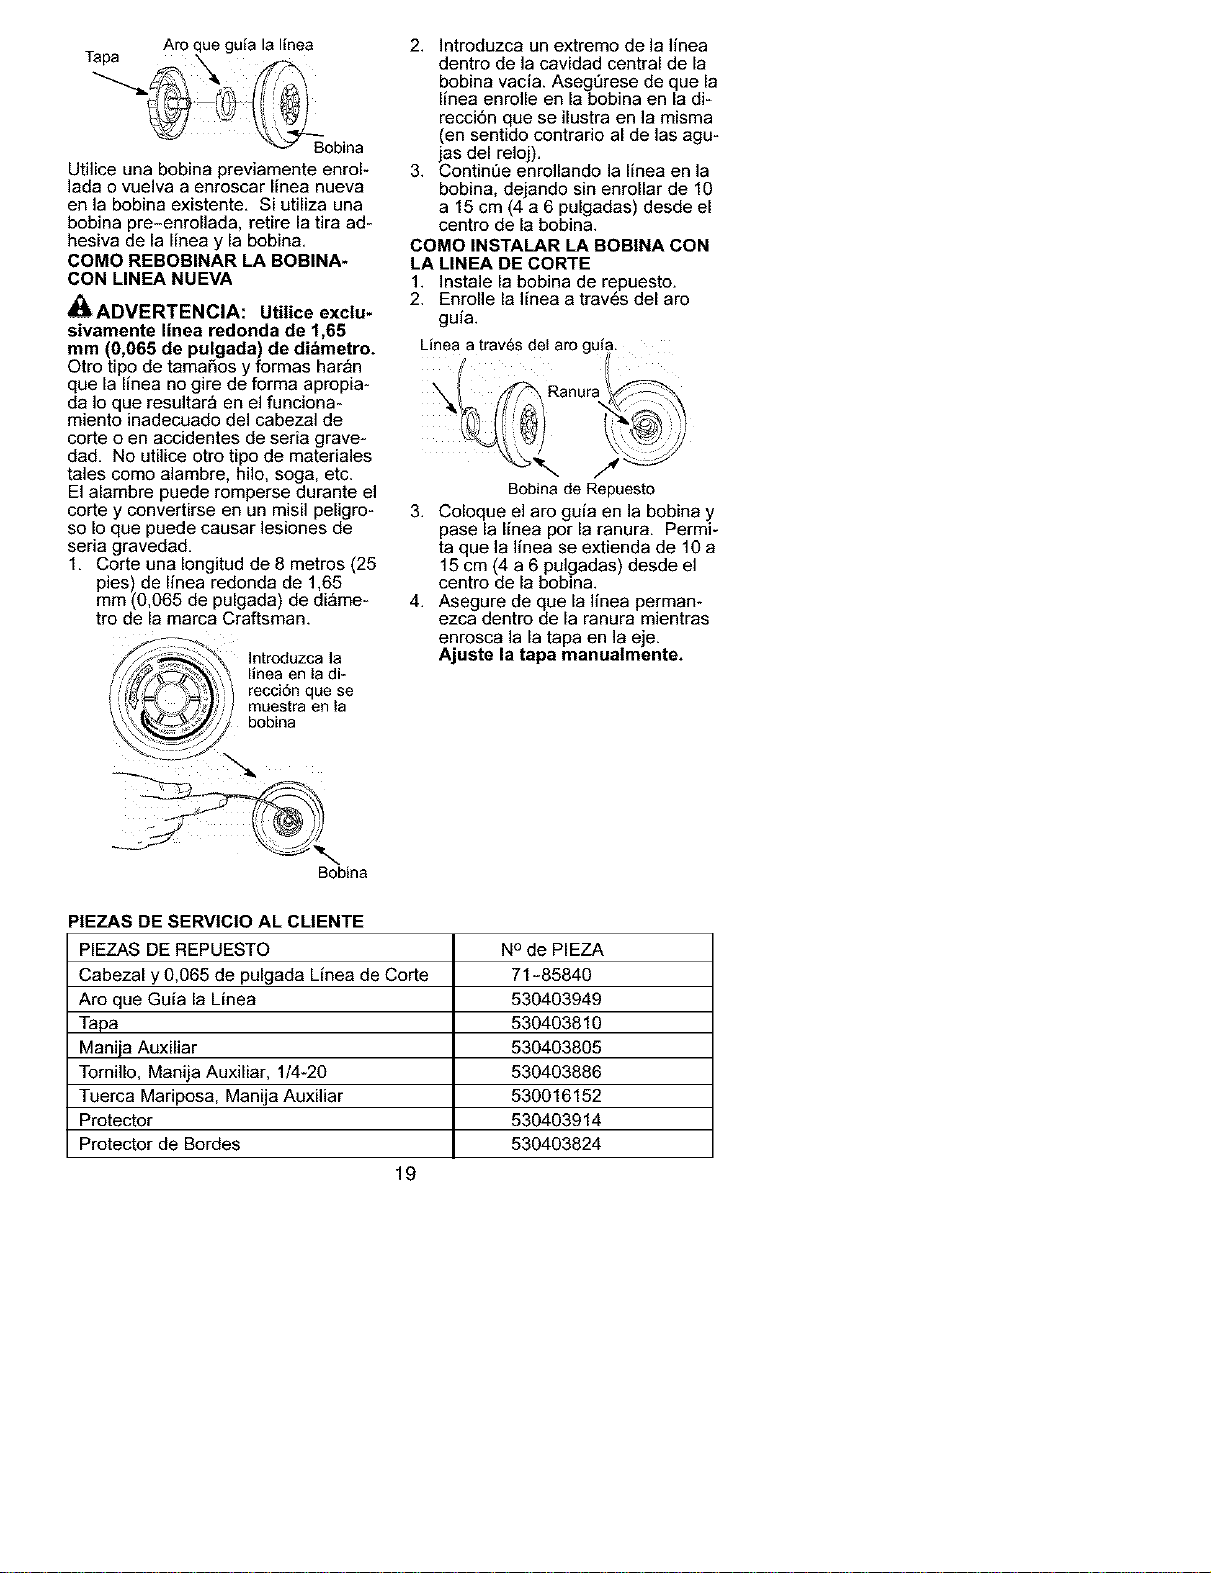
Tapa Arequegu{alaI{nea
Bobina
Utiliceunabobinapreviamenteenrol-
]adaovuelvaaenroscarlineanueva
enlabobinaexistente,Siutilizauna
bobinapre-enrollada,retirelatiraad-
hesivadelalineaylabobina,
COMeREROBINAR LA BOBINA-
CON LINEA NUEVA
_ADVERTENCIA: Utilice exclu-
sivamente linea redonda de 1,65
mm (0,065 de pulgada) de dibmetro.
Otro tipo de tamales y formas har_n
que la linea no gire de forma apropia-
da Io que resultar_ en el funciona-
miento inadecuado del cabezal de
corte o en accidentes de seria grave-
dad. No utilice otro tipo de materiales
tales come alambre, hilo, soga, etc.
El alambre puede romperse durante el
corte y convertirse en un misil peligro-
so Io que puede causar lesiones de
seria gravedad.
1. Corte una Iongitud de 8 metros (25
pies) de linea redonda de 1,65
mm (0,065 de pulgada) de di_me-
tro de la marca Craftsman.
2. ]ntroduzca un extreme de la linea
dentro de la cavidad central de la
bobina vacia. Asegt]rese de que la
linea enrolle en la bobina en la di-
recci6n que se ilustra en la misma
(en sentido contrario al de las agu-
as del reloj).
3. Contint_e enrollando la I nea en la
bobina, dejando sin enrollar de 10
a 15 cm (4 a 6 pulgadas) desde el
centre de la bobina.
COMe INSTALAR LA BOBINA CON
LA LINEA DE CORTE
1. ]nstale la bobina de repuesto.
2. Enrolle la linea a trav6s del are
guia.
Bobina de Repuesto
3. Coloque el are guia en la bobina y
pase la linea per la ranura. Permi-
ta que la linea se extienda de 10 a
15 cm (4 a 6 pulgadas) desde el
centre de la bobina.
4. Asegure de que la linea perman-
ezca dentre de la ranura mientras
enrosca la la tapa en la eje.
Ajuste la tapa manualmente.
Bobina
PIEZAS DE SERVIClO AL CLIENTE
PIEZAS DE REPUESTO
Cabezal y 0,065 de pulgada Linea de Corte
Are que Guia la Linea
Tapa
Manija Auxiliar
Tornillo, Manija Auxiliar, 1/4-20
Tuerca Mariposa, Manija Auxiliar
Protector
Protector de Bordes
19
NOde PIEZA
71-85840
530403949
530403810
530403805
530403886
530016152
530403914
530403824
_ADVERTENCIA: Realice los
siguientes pasos despu6s de cada
uso:
• Pare el motor y desconecte el aparato
de la corriente el6ctrica siempre que
no est6 en uso.
• Cuando cargue el aparato en las
manos, mantenga el motor apagado.
• Guarde el aparato de modo que el lim-
itador de linea no pueda causar heri-
das.
• Guarde el aparato y el cable de exten-
si6n al abrigo de la intemperie, desen-
chufados, en un lugar alto, seco y
fuera del alcance de los niSos.
• Guarde el aparato con todos los pro-
tectores en su lugar correspondiente.
Cologue el aparato de modo que
ningt]n objeto filoso pueda causar
heridas accidentalmente.
TABLA DIAGNOST|CA
,_ ADVERTENClA: Siempredesconectelaunidadantesdehacercualquiera
de las reparaciones recomendadas que estan listadas siguientemente que
no requieran que la aparato este en operaci6n.
SINTOMA CAUSA SOLUCION
El cabezal de 1. Se est& metiendo la linea 1. Corte con la punta de la linea
corte se detiene en el material que se t3nicamente.
bajo carga o no esta cortando.
gira cuando se 2. Falla el6ctrica. 2. Entre en contacto con el Servicio
apreta el gatillo Sears (vea parte trasera del manual).
interruptor. 3. Inspeccione la caja de fusibles.
4. Retire los escombros.
1. Verifique la trayectoria de la line&La linea no
avaaza o se
rompe al cortar.
La linea se
funde en la
bobina.
La linea evanza
constantemente.
Uso o desgaste
excesivo de la
line&
La linea retro-
cede al cabe-
zal.
3. Interruptor de circuito
accionado.
4. Escombros parando el
cabezal.
1. Tra_ectoria incorrecta de
la hnea en el cabezal.
2. La linea est_ enroscada
de forma incorrecta en la
bobina.
L Diametro incorrecto de la
linea.
4. Insuficiencia de linea
afuera del cabezal
5. Acumulaci6n de tierra
tapa.
1. Diametro incorrecto de la
line&
2. Bobina incorrecta.
3. Se esta metiendo la linea
en el material que se est&
cortando.
1. Tra/vectoria incorrecta de
la hnea en el cabezaL
2. Bobina da_ada.
1. Tra.yectoria incorrecta de
la hnea en el cabeal.
2. Di&metro incorrecto de la
line&
3. Se est& metiendo la linea
en el material que se
est& cortando.
¢. Los dientes de la bobina
est6n gastados o daSados.
1. Insuficiencia de linea
afuera del cabezaL
2. Di&metro incorrecto de
la line&
2. Rebobinado nuevamente la linea de
forma pareja y tirante.
3. Uso solo linea del di_metro correcto
(0,065 de pulgada/1,65 ram).
4. Retire la tapa y saque 10 cm
(4 pulgadas) de linea hacia afuera.
5. Limpie la tap&
1. Uso solo linea del di_metm correcto
(0,065 de pulgada/1,65 mm).
2. Uso la bobina apropiada.
3. Corte con ]a punta de la linea
plenamente extendida.
1. Verifique la trayectoria de la line&
2. Cambie la bobina.
1. Verifique la trayectoria de la line&
2. Cambie la bobina.
3. Corte con la punta de la linea
plenamente extendida.
4. Cambie la bobina.
1. Retire la tapa y saque 10 cm
4 pulgadas) de linea hacia afuera.
2. Uso s61o I nea del diametro correcto
(0,065 de pulgada/1,65 mm).
2O