Loading ...
Loading ...
Loading ...
m
A I WARNING: Operate this unit only in a well-ventilated outdoor area.
i
_ Carbon monox de exhaust fumes can be etha n a conf ned area. j
_llb I WARNING: Avoid accidental starting. Make sure to be in the !
starting position when pulling the starter rope (Fig. 10). To avoid serious
! injury, the operator and unit must be in a stable position while starting.
STARTING iNSTRUCTiONS
1. Mix gas with oil. See Oil and
Fuel Mixing Instructions.
2. Fill the fuel tank with the
fuel/oil mixture.
NOTE: There is no need to turn
the unit on. The On/Off
Control is in the ON ( I )
position at all times (Fig. 7).
3. Fully press and release the
primer bulb 10 times, slowly.
Some amount of fuel should
be visible in the primer bulb
and fuel lines (Fig. 8). If fuel
can not be seen in the bulb,
press and release the bulb as
many times as it takes until
/
fuel can be seen in it.
4. Flip the choke lever clockwise
until it clicks (Fig. 9).
5. Crouch in the starting position
(Fig. 10). Do not squeeze the
throttle. Pull the starter rope
with a controlled motion until
the unit starts.
6. Wait and allow the unit to idle for
5 - 10 seconds. If the unit stops
running during this time, squeeze Choke LeverJ
the throttle control and pull the
starter rope in a controlled
motion until the unit starts.
7. Squeeze and hold the throttle
control for 30 to 60 seconds to
allow the unit to warm up.
NOTE: The unit uses the
INCREDI=PULL TM starting
system, which significantly
reduces the effort required
to start the engine. The
starter rope must be
pulled out far enough to
hear the engine attempt to
start. There is no need to / =qu,pp_o,,m\
pull the rope briskly-- there I_-P_L4g/Jd _
is no harsh resistance ........................
when pulling. Be aware _ncr_!-Pu.
that this starting method is
vastly different from (and
much easier than) what
you may be used to.
IF,.. The engine does not start,
go back to step 3.
NOTE: If the unit is hot and fails
to start within 3 pulls of
off (o)-__
_(_ Throttle
Control
Fig. 7
Primer
Bulb
Fig. 8
Fig. 9
Starting
Position
Fig. 10
the starter rope, squeeze the throttle control and pull the starter rope
until the unit starts.
STOPPING INSTRUCTIONS
1. Release the throttle control and allow the engine to cool down by idling.
2. Press and hold the On/Off Control in the OFF (O) position until the
engine comes to a complete stop (Fig. 7).
HOW TO START THE UNIT USING THE PLUG=IN POWER START OR
POWER BiT START ACCESSORY
NOTE= This unit can use a Plug-in Power Start or Power Bit Start
optional accessory!
Please refer to the Plug-In Power Start or Power Bit Start operator's
manual for proper use of this feature. (Items Sold Separately! Please
refer to page 9 of this manual about purchasing these accessories.)
STARTING INSTRUCTIONS
1. Mix gas with oil. See Oil and Fuel Mixing Instructions.
2. Fill the fuel tank with the fuel/oil mixture.
NOTE: There is no need to turn the unit on. The On/Off Control is in the
ON (I) position at all times (Fig. 7).
3. Fully press and release the primer bulb 10 times, slowly. Some amount of
fuel should be visible in the primer bulb and fuel lines (Fig. 8). If fuel can not
be seen in the bulb, press and release the bulb as many times as it takes
until fuel can be seen in it.
4. Flip the choke lever clockwise until it clicks (Fig. 9).
5. Crouch in the starting position (Fig. 10). Do not squeeze the throttle. Place
the Plug-In Power Start or Power Bit Start into the back of the unit.
Refer to the Operation section of the Plug-In Power Start or Power Bit
Start operator's manual.
6. Press and hold the ON (I) button of the Plug-in Power Start or Power Bit
Start equipped drill in intervals no longer than 4 seconds each until the
unit starts.
7. Wait and allow the unit to idle for 5 - 10 seconds. If the unit stops running
during this time, squeeze the throttle control, then press and hold the ON (I)
button of the Plug-in Power Start or Power Bit Start equipped drill in intervals
no longer than 4 seconds each until the unit starts.
8. Remove the Plug-In Power Start or drill from the unit.
9. Squeeze and hold the throttle control for 30 to 60 seconds to allow the
unit to warm up.
IF,.. The engine does not start, go back to step 3.
IF,.. The engine fails to start after a few attempts, squeeze the throttle
control, then press and hold the Plug-In Power Start or drill ON (I)
button in intervals no longer than 4 seconds each until the unit starts.
STOPPING INSTRUCTIONS
1. Release the throttle control and allow the engine to cool down by idling.
2. Press and hold the On/Off Control in the OFF (O) position until the
engine comes to a complete stop (Fig. 7).
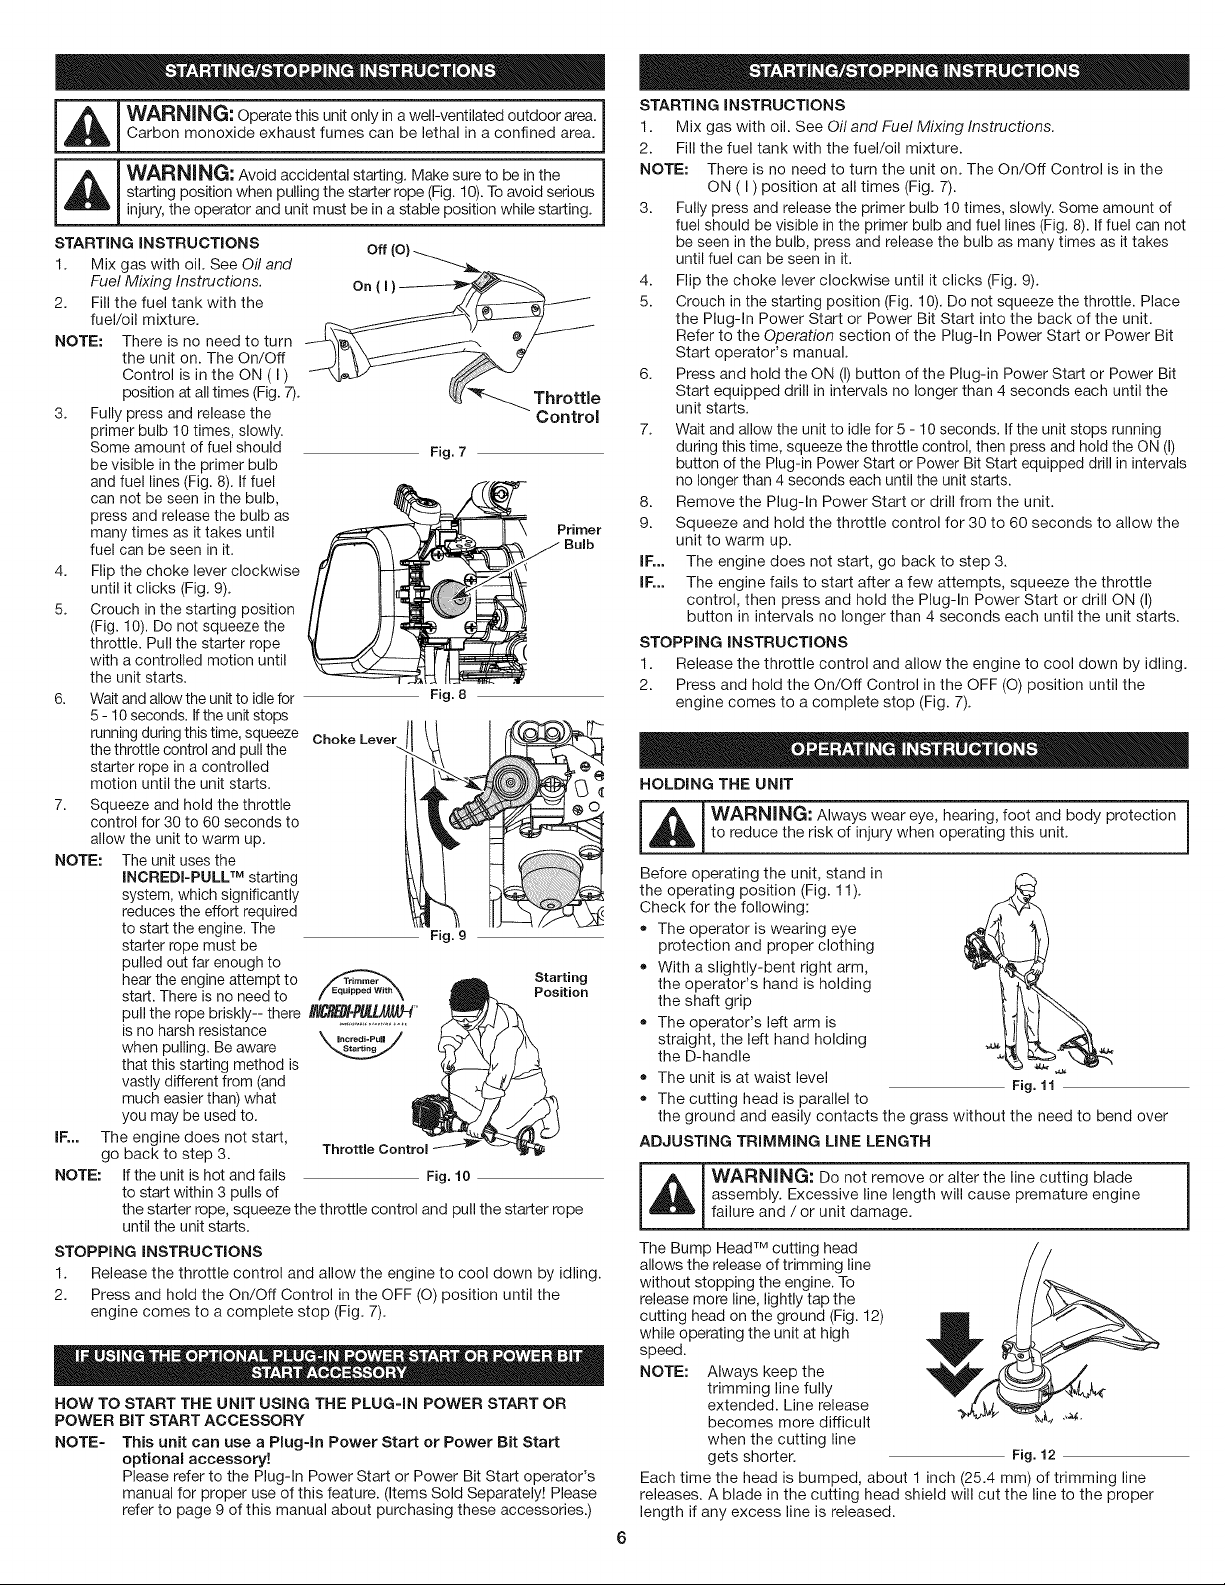
HOLDING THE UNIT
-- i_L_ ARNING: Always wear eye, hearing, foot and body protection
to reduce the risk of injury when operating this unit.
Before operating the unit, stand in
the operating position (Fig. 11).
Check for the following:
• The operator is wearing eye
protection and proper clothing
With a slightly-bent right arm,
the operator's hand is holding
the shaft grip
The operator's left arm is
straight, the left hand holding
the D-handle
The unit is at waist level Fig. 11'_
The cutting head is parallel to
the ground and easily contacts the grass without the need to bend over
ADJUSTING TRIMMING LINE LENGTH
_ WARNING: Do not remove or alter the line cutting blade |
/
assembly. Excessive line length will cause premature engine
J
failure and / or unit damage.
The Bump Head TM cutting head
allows the release of trimming line
without stopping the engine. To
release more line, lightly tap the
cutting head on the ground (Fig. 12)
while operating the unit at high
speed.
NOTE: Always keep the
trimming line fully
extended. Line release
becomes more difficult "_
when the cutting line
gets shorter. Fig. 12
Each time the head is bumped, about 1 inch (25.4 mm) of trimming line
releases. A blade in the cutting head shield will cut the line to the proper
length if any excess line is released.
Loading ...
Loading ...
Loading ...