.!10.COrn
E-
©
"iO
Safely Instructions ............ 2-7
Operating Instrudions
Adjusting Temperature .......... 34
Clock, Timer and
Conuol Lockout ............... 19
Controls .................... 9-11
Com_ction ................ 24-27
Defrost Feanlre, Guide ....... 19, 90
Introduction ................... 8
Oven ..................... 13-15
Proof, _4armer and VL_rm ....... 99
Recipes ....................... 98
Sabbath Feature ............ 35-37
Self-Cleaning Oven .......... 30, 31
Settings ................... 39, 33
Speed Baking/
Speed Roasting ............. 16, 17
Speed Broiling, (;uide ....... 17, 18
Timed Baking
and Roasting ............ 99, 96, 97
Traditional Baking/Roasting . .21,22
Traditional Broiling, (;uide ...... 93
Careand Cleaning
Broiler Pan and Grid ........... 39
Cleaning Oven Door . .......... 38
Conuol Panel ................. 39
Light Bulb .................... 37
Packaging _q)e ................ 37
Racks ........................ 39
Stainless Smel Surl2_ces .......... 38
Troubleshooting Tips ....... 40-43
Accessories . .................. 44
Consumer Support
Consumer Support ..... Back Coxer
Product Registration ........ 45, 46
V(:mantv ..................... 47
ff930--30" Single Wall (kJen
fF980--30" Do_lble Wall (kJen
Write the model and serial
numbers here:
Model #
Serial #
_m can find them on a label on
the side trim or on the ti'ont of the
(lower) oven behind tile oven dooi:
49-80347 11-05JR
iMPORTANTSAFETYiNFORMAtiON.
READALLiNSTRUCtiONSBEFOREUSING
WARNING!
For your safe_, the information in this manual must be followed to minimize the risk of fire or
explosion, electric shock, or to prevent property damage, personal injury, or loss of life.
PRECAUTIONSTOAVOIDPOSSIBLEEXPOSURETOEXCESSIVE
MICROWAVEENERGY
_{_Do not attempt to operate this oven with
the door open since ope_>door operation
can _esuh in hannflfl exposure to
microwme energy'. It is importantnot to
defeat or tamper with the safety interlocks.
_51:,iDo not place any ol)ject between the oxen
front lace and the door or allow soil or
cleaner residue to accumulate on sealing
snrfaces.
_?{:_The oxen should not be adjusted or
repaired by anyone except properly
qualified service personnel.
_?_::Do not operam fl_e oven if it is damaged.
It is parucularly important that the oxen
door close properly and that theie is no
damag> to the:
[] door (bent),
[] hinges and latches (broken or
loosened),
[] door seals and sealing suriZaces.
IMPORTANTSAFETYNOTICE
The California Safe Drinking Water and ToxicEnforcement Act requires the Governor of California
to publish a list of substances known to the state to cause cancer, birth defects or other reproductive
harm, and requires businesses to warn customers ofpotential exposure to such substances.
The fiberglass insulation in self-clean ovens gives off a very small amount of carbon monoxide during
the cleaning cycle. Exposure can be minimized by venting with an open window or using a ventilation
fan or hood.
2
ge.com
SAFETYPRECAUTIONS
When using electrical appliances, basic safety precautions should be followed, including the following:
WARNING-trouncingInstructions:
This appliance must he connected to a
gronnded, metallic, permanent wiring
system, or an eq uipment g_ounding
conductor should be run wifl/the circuit
conductors and connected to file equipment
gTounding terminal or lead on fl_e
appliance.
WARNING-Toreducetheris*ofburns,
electric shock, fire, injurytopersons or
exposure to excessive microwave energy:
_; Use d, is appliance only' %r its intended
puq)ose as descfihed in d_is manual. Do
not use conosive chemicals or vapors in
this appliance. This oxen is specifically
designed to heat or cook food, and is not
inmnded for lahorato U or industrial use.
_7{:_Be sine your appliance is properly
installed and grounded by a qualified
mchnician in accordance with tile
provided installation instructions.
;_i:.iDo not atmmpt m repah or replace any
part of your oxen unless it is specifically
_ecommended in this manual. All other
servicing should he _efened m a qualified
mchnician.
_7{_Haw the installer show you the location of
the chvuit hreaker or fllse. Mark it for easy'
reference.
_7{_;Be%re per%nning any service, disconnect
d,e oven power supply at file household
disuibufion panel by removing the fl_se or
switching off the circuit h_eaken
_7_:;Do *lot leaxe children alone--<hildren
should not be left alone or unattended in
an a_ea where an appliance is in use. They
should nex>r be allowed m sit or stand on
any part of the appliance.
;_;Do not store this appliance outdoors.
Do not use this product near water--
for example, in a wet hasement, or near
a swimming pool.
_7{_Do not operam this appliance if it has a
damag>d cord or plug, if it is not working
properly or if it has heen damag>d or
dropped.
_7_:;This appliance should be serviced o,,17
hy qualified service personnel. Contact
nearest authorized service £_cilitv for
examination, tei)air or adjusnnent.
_i:.;Do not allow anyone to climh, stand or
hang on the door They could damag_ the
ox>n, or cause sex>re personal inju U.
;f; Be sure tile ox>n is securely installed in a
cahinet that is firmly attached to the house
structure. Nex>r ,]low anyone to climh, sit,
stand or hang on the oven door
_7_:;Ne_er leme the oxen door open when you
ale not watching fl_e oven.
;_i:,:Alwws kee I) comhnsuhle wall coxerings,
curtains or drapes a sat> distance flom
your oven.
;_;Alwws kee I) dish towels, dish cloths, pot
holders and other linens a sad distance
fl'on/vonr oxen.
_; Always kee I) wooden and plastic umnsils
and canned %od a safe distance away
from your oxen.
;_;Teach children not m play wifll fl_e
controls or any oilier part of fl_e oven.
_i:.:i,arge scratches or impacts m glass doors
ca** lead m hroken or shatmred glass.
_7_:;Do *lot co\er or hlock any opening:s on
the appliance.
3
IMPORTANTSAFETYINFORMAtiON.
READALLINSTRUCTIONSBEFOREUSING.
4
WARNING!
SAFETYPRECAUTIONS
_{_Do not store flan/n/able materials in
an oxen.
CAUtiON:Itenls ofinterestto
children should not be stored in cabinets
aboxe an oxen; children climbing on tile
oxen to reach iten/s could be seriously
injured.
Never wear loose-fitting or hanging
garn/ents while using tile appliance. Be
careflll when reaching for items stored in
cabinets ox.er file oven. Flammable material
could be ignimd if brougtlt in contact with
hot snrfitces or heating elements and m W
cause sex.ere bnF/ls.
Use only di T pot holders--moist or damp
pot holders on hot snrfaces may I.esult in
bums from steam. Do not let pot holders
touch hot heating elen/ents. Do not use a
towel or other bulky cloth.
For your safety, nexer use your appliance
tbr wanning or heating tile room.
Do not let cooking grease or other
flammable mateiials accnnnllate in or
near tile oxen,
Do not use water on gTease fires. Nexer pick
up a flaming pan. Turn tile controls off'.
Flame in the ox.en can be smodlered
completely 1)yclosing tile ox.en door and
turning tile oven off or by using a multi-
purpose di y chemical or foam-type fii.e
extinguishen
Do not touch file heating elements or tile
inmfior sniface of file ox.en. These surPaces
may be hot enougil to burn ex.en though
they are dark in colon During and after
use, do not touch, or let clothing or oilier
flammable mamiials contact any inmiior
area of tile ox.en; allow sufficient tin/e for
cooling first.
Potentially hot surfitces inchlde oven x.ent
opening:s, surfaces near tile opening:s,
crevices around the oven dooi; the edg.es
of the window and metal trin/parts abox.e
the door
REMEMBER:The inside surface of tile oxen
may be hot when tile door is opened.
_::Nexer lemejars or cans of fat drippings in
or Ileal vonr oxen.
_: Do not store or use combustible n/ateiials,
gasoline or other flammable vapors and
liquids in the vicinity of this or any other
appliance.
_: Stand away flom tile oxen when opening
tile oxen doon Hot air or steam which
escapes can cause bums to hands, fi_ce
and/or eyes.
;f; Do not heat unopened food containers.
Pressure could build up and tile container
could burst, causing an injn U.
;_?Kee I) tile oven xent unobstructed.
'_!_i_Kee I) tile oxen flee ffon/gTease buildup.
_7_:Place the oxen rack in tile desired position
while tile oxen is cool. If racks n/nst be
handled when hot, do not let pot holder
contact tile heating elen/ents.
E:,:When using cooking or roasting bags in the
oxen, follow tile n/annfactnrer's directions.
E:,IPulling out the rack to the stoI>lock is a
comenience in lifting heax T tbods. It is also
a precanfion against bnrns flonl touching
hot snrfitces of tile door or oxen walls.
_7_:Do not use tile oxen to di T newspapers.
If oxerheated, they can catch on fire.
_: Do not use the oxen for a storage area,
hen/s stored in an oxen can ignite.
E:,IDo not leme paper products, cooking
utensils or tbod in tile oxen when not
in nse,
_: After broiling, always take tile broiler pan
out of the oxen and clean it. I,eftoxer
grease in tile broiler pan can catch fire
next tin/e yon use tile pan.
_: Clean only parts listed in tills )wner s
Manual.
_7_:Do not use ahuninum tbil to line oxen
bottoms, hnproper installation of
ahm/innn/ foil may resuh in a risk
of electric shock or fire.
ge.com
TRIVECTIO MOVEN
Road and follow the specific "Precautions toAvoid Possible Exposureto ExcessiveMicrowave Energy"
section in this manual
Toreduce the risk offire in the even cavity:
_):Do not overtook food. Carefully attend
appliance if papei, plastic or other
combustible materials are placed inside
rile oven to fi_cilimte cooking.
_i:,iIll defrost mode, remox.e wire twist-ties
flom paper or plastic containers before
placing bag_ ill file ox.en.
_fi:,iOven Cooking Bags---Do not use the wire
twist-tie to close file bag.
q_{i:Do not use paper towels.
_i_Do not use your ox.en to di T newspapers.
_;; Do not ox.ercook potatoes. They could
dehydrate and catch fire, causing damag.e
to VOnl _ ox.en,
E:,IDo not operate rile ox.en while empty to
ax_id damag.e to tile ox.en and tile dang.er
of fire.
E:,IDo not use the ox.en for storag.e pnqloses.
Do not leax.e paper pioducts, cooking
umnsils or food in tile ox.en when not
in use,
E:,Iff mamfials inside the oven should ignim,
keep tile ox.en door closed, turn tile ox.en
off"and shut off"power at tile fllse or ciIvuit
breaker panel. If tile door is opened, tile
fire m W spread.
E:,:This oven is not approx.ed or msmd for
nlaiJne use,
_;:Some products such as whole eggs and
sealed containers for example, closed
jinx--will explode and shouM not be
heated in this ox.en. Such use of tile ox.en
could result ill injm T.
E:,:Do not boil eg_:s ill this ox.en. Pressm.e will
build up in0de tile egg yolk and will cause
it m burst, possibly I.esulfing in iI_m T.
E:,IDo not pop popcorn in your oven.
_fi:,iFoods wifll unbroken outer "skin" such as
potatoes, sausag.es, tomatoes, apples, egg
yolks, chicken livers and oilier giblets
should be pierced to allow steam to escape
during cooking.
;fi:,iDon't defrost frozen bex.erages in nanow-
necked bottles (especially carbonated
beverag.es). Ex.en if file container is
opened, pressure can build up. This can
cause file container to burst, possibly
I.esulting ill iI_nI>
_: Hot foods and steam call cause bulTlS.
Be careflll when opening any containers
of hot food, cooking pouches and boxes.
To pI.ex.ent possible iI_jnry, diI.ect smam
away from hands and time.
E:,:As wifll aW appliance, close snpervision is
necessaiw when used by children.
5
IMPORTANTSAFETYINFORMATION.
READALLINSTRUCTIONSBEFOREUSING.
ALLTHESETHINGSARENORMALWITHYOURTRIVECTIOAf_OVEN
_{:;Steam or xapor escaping from around
tile door
_fi:,:Dimming of tile oxen light and change
in tile blower sound may occur
_?{:_Tile microwme fan may operate with both
oxens off'. It is cooling tile conuol and will
turn itself off'.
_?{:_Some TV-radio inmrference migilt be
nouced while using your oxen. It is
similar to the inmrference caused by other
small appliances and does not indicate a
problem with your oven.
ARCING
If you see arcing open the door and correct the problem.
Arcing isthe microwave termfor sparks in the
oven.Arcing iscaused by:
_:_Metal or fbil touching tile side of tile oxen.
_i:,:Foil not molded to food (upUlmed edges
act like anmnnas).
_i:,:Metal, such as twist-des, poulu T pins or
g_ld-rimmed dishes in tile oxen.
_?{::Recycled paper towels containing small
metal pieces being used in file oxen.
SUPERHEATEDWATERANDSPONTANEOUSBOILING
IJquids such as watel; coffee or ma are able
to be oxerheamd beyond the boiling point
without appealing to be boiling. Visible
bubbling or boiling when tile container is
remoxed from tile microwaxe oxen is not
always present. THISCOULDRESULTIN VERY
HOTLIQUIDSSUDDENLYBOILINGOVERWHEN
THECONTAINERIS DISTURBEDORA UTENSIL
IS INSERTEDINTO THELIQUID.
ge.com
COOKMEATANDPOULTRYTHOflOUGHLY.,.
Cookmeatandpoultry thoroughly--meat to at bast anINTERNALtemperatureof 160°Fandpoultry
toat bast an INTERNALtemperatureof 180°ECookingto thesetemperaturesusuallypretectsagainst
foodbomeillness.
SELF-CLEANINGOVEN
_{:_Do not clean the door gasket. Tile door
gasket is essential for a good seal. Care
should be taken not to rub, damag> or
mox> the gasket.
;fi:,iDo not use oven cleaners. No comme_vial
o_n cleaner or oven liner promctive
coaung of any kind should be used in or
around any part of the oven. Residue from
ox>n cleaners will damage the inside of the
ox>n when the self-clean cycle is used.
;_i:,:Kee I) the oxen x_nt nnobstrncted.
q_{:_Before self-cleaning the oven, remove the
broiler pan, g_id, racks and other cookware.
;f; Be sure to wipe up excess spillag_ before
starting the self-cleaning operation.
_{:_If the self-cleaning mode malfunctions,
mrn the ox>n off and disconnect the power
supply. Hax> it serviced by a qualified
mchnician.
_{::Listen %r thn--A fan noise should be
heard sometime dining the cleaning Q'cle.
If not, call a serviceman before self-
cleaning again.
READANDFOLLOWTHISSAFETYINFORMAtiONCAREFULLY.
SAVETHESEINSTRUCTIONS
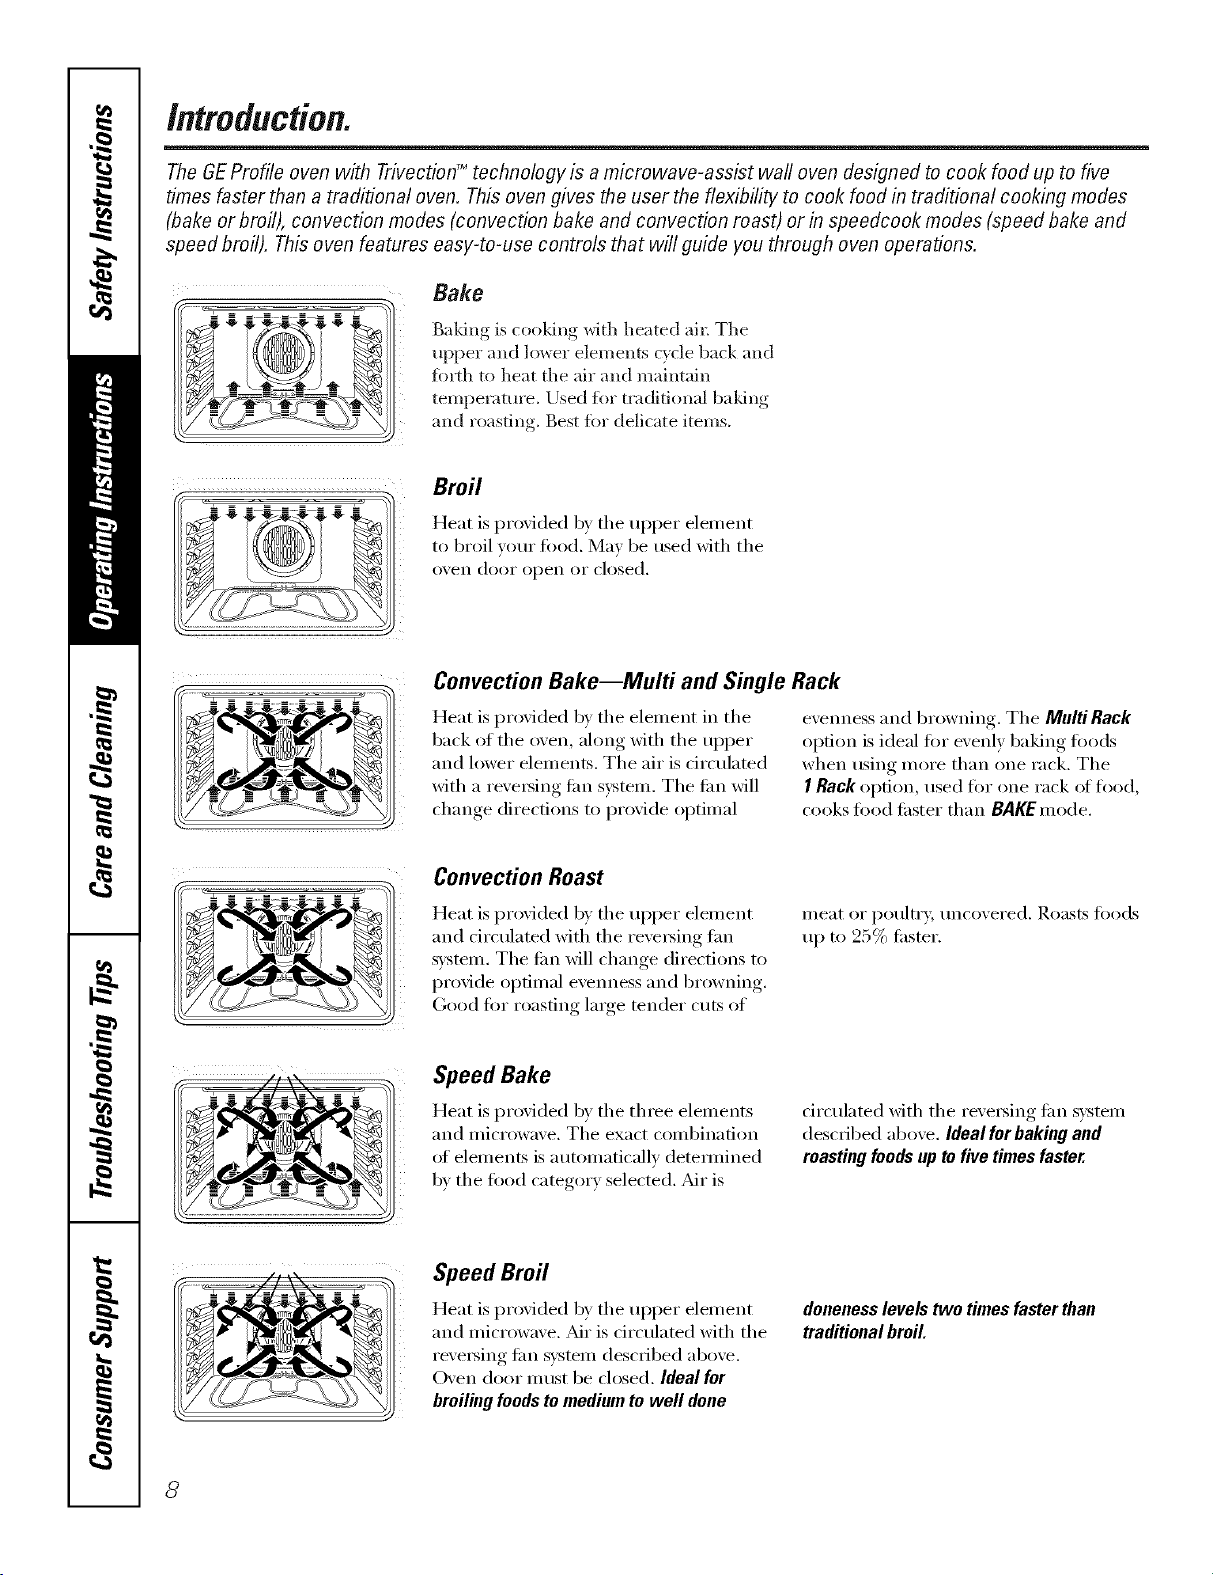
Introduction.
The GEProfile oven with TrivectionTM technology is a microwave-assist wall oven designed to cook food up to five
times faster than a traditional oven. This oven gives the user the flexibility to cook food in traditional cooking modes
(bake or broil), convection modes (convection bake and convection roast) or in speedcook modes (speed bake and
speed broil). This oven features easy-to-use controls that will guide you through oven operations.
Bake
Baking is cooldng with heated ail; The
upper all(] lower elements cycle back and
_m_th to heat the air and maintain
temperature, lJsed ii)r traditional baldng
and roasting. Best %5" delicate items.
Broil
Heat is provided by the upper element
to broil veto" fi)o(l. May be used with the
oven dooi" open oI" closed.
Convection Bake--Multi and Single Rack
Heat is provided by the elemelK in the
back of the oven, along with the upper
and lower elen/ents, The air is circulated
with a reveI_ing tim system, The tim will
change directions to provide optimal
evelmess and browning. The Multi Rack
option is ideal tot evenly 1)aking foods
when using more than one rack. The
I Rack option, used fl)r one rack ot rise(l,
cooks fi)od tisster than BAKEmode.
i .... //\'N ....
Convection Roast
Heat is provided by the upper elemei_t
and drculated with the revelsing tim
s)'stem. The tim will change directions to
provide optimal evellness and browning,
Good fl)r roasting large tender cuts of
Speed Bake
Heat is provided by the three elemelKs
aim microwave. The exact confl)ilmfion
of elemei_ts is autonmticallv (letemfined
b)' the fi)o(l categoi T selected. _di" is
ineat or poultry; uncoxered. Roasts fi)ods
tlI) to 25% fisster.
circulated with the i'e_ei_ing tim s)stem
(lescfibed above. Ideal forbaking and
roasting foodsup tofive times faster.
Speed Broil
Heat is provided by the upper element
aim microwave. Mr is circulated with the
I'eveI_ing tim svsteln described above.
Oven door Ill51st be closed. Ideal for
broiling foods to medium to well done
doneness levels two times faster than
traditional broil.
8

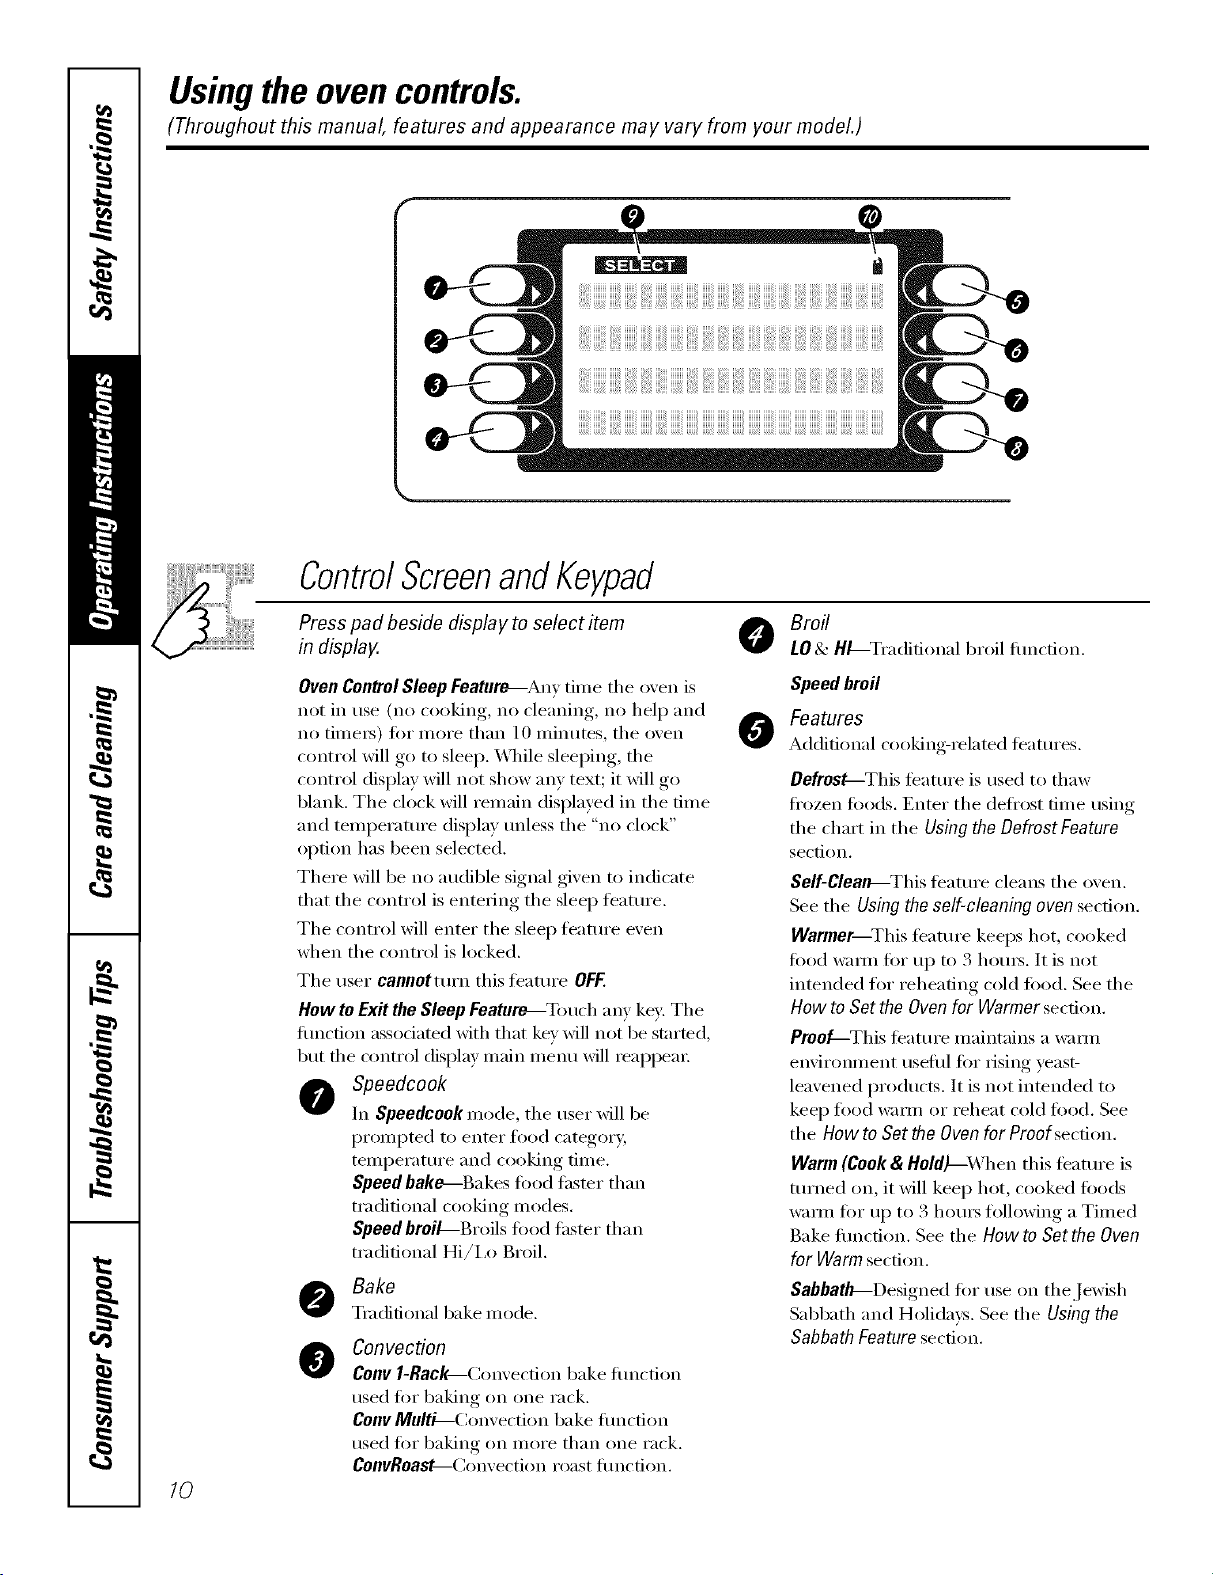
Usingtheovencontrols.
(Throughout this manual, features and appearance may vary from your model.) go.cam
Single oven control.
Double oven control.
OvenControlLayoutandDescription
0
Control Screen & Keypad
PJI (ooldng modes, spedal featm'es and
oven settings are directed and operated
fl'om tile control screen. Directions fi)r
operating the oven and prompting fiw
required ilflbnnafion are displayed within
tile COlltrol screen.
Numeric Keypad
lJsed to ente_ infi)mlation requiting
numbe*s sudl as time of day on tile clock,
timer, oxen temperatme, start time and
length (4 operation fi)r timed baking and
selgdeaning.
Control Lockout
Pdlows the use_ to lock the control so that
the touch pads cmmot be arti;rated when
pressed.
7ime and Temperature DNplay
_MItime and temperatm'e infimnation
is displayed ix* this area as fbedback to
the usel;
If "F- and a number or letter" flash in the display and
the oven control signals, this indicates a function
error code. Pressthe CLEPR/OFFpad Allow the ovento
cool for one hour Put the ovenback/bto operation.If the
functionerror coderepeats,disconnectthe power tothe
ovenand carl for serv/2e.
If your oven was set for a timed oven operation
and a power outage occurred, the c/ockandall
programmedfunctionsmust be reset.
The time of day will flash in the display when there
has been a power outage.
Kitchen 77mer
Tm'ns the ldt(hen timer on and off.
Does I1O[ COlltrol tile (Aell.
Oven Light
Turns o',en light on or off.
Clear/Off
Cancels ALL o_,en operations EgCEPTthe
clock and time_
9
Usingthe ovencontrols.
(Throughout this manual, features and appearance may vary from your model.)
10
ControlScreenandKeypad
Press pad beside display to select item
in display.
Broil
LO& H_-Tradifional broil flmcfion.
Oven ControlSleep Feature_Any tilne the oven is
not ill use (no cooking, 11(7cleaning, 11(7help and
no tilnei_) for nlore than 10 nlinutes, the oven
control will go to sleep. \4]/ile sleeping, the
control display will not show any text; it will go
blank. The clock will remain displayed in the time
and temperatm'e display tmless the "no clock"
option has been selected.
There will be no audible signal given to indicate
that tile control is entering tile sleep teatm'e.
The control will enter the sleep timture even
when the control is locked.
Tile user caoootturn this teatuI'e OFF.
How toExit the Sleep Feature--Touch any key: The
flmction associated with that key will not be started,
but tile control display inain inenu will reappeaI:
Speedcook
In Speedcook mode, tile user will be
promlTted to enter food category,
telnl)erature and cooking time.
Speed bake---Bakes t0od faster than
traditional cooking modes.
Speed broil-Broils fi)od thsmr than
traditional Hi/ix) Broil.
Bake
Tmdidonal bake mode.
@
Convection
Cenv l-Rac_Convecfion bake flmcfion
used for baking on one rack.
Conv Multi--( _onvection bake flmction
used t0r baking on inore than one rack.
CoovRoa_-(_onvection roast flmction.
0
Speed broil
Features
Additional cooking-related teatllres.
Defrost--This feature is used to thaw
ti'ozen t0ods. Enter the defl'ost time using
the chart in the Using the Defrost Feature
section.
Self-Clealb---This teatm'e cleans tile oven.
See tile Using the self-cleaning oven section.
Warmer--This teature keeps hot, cooked
food warm for uI7 to 3 houI_. It is not
intended f()r reheating cold fi)()d. See the
How to Set the Oven for Warmer secdon.
Proo_-This teatllx'e i/laintains a Waii/l
elwirolmlent usefld for rising yeast-
leavened products. It is not inmnded to
keep food _lm/ or reheat cold food. See
the How to Set the Oven for Proof section.
Warm (Cook & HoldJ--_'hen this feature is
turned on, it will keep hot, cooked ti)ocls
warnl for t117to 3 houI_ ti)llowing a Tilned
Bake flulction. See tile How to Set the Oven
for Warm section.
Sabbath_Designed fi)r use on the Jewish
Sabbath and Holidays. See tile Using the
Sabbath Feature sect.ion.
ge.com
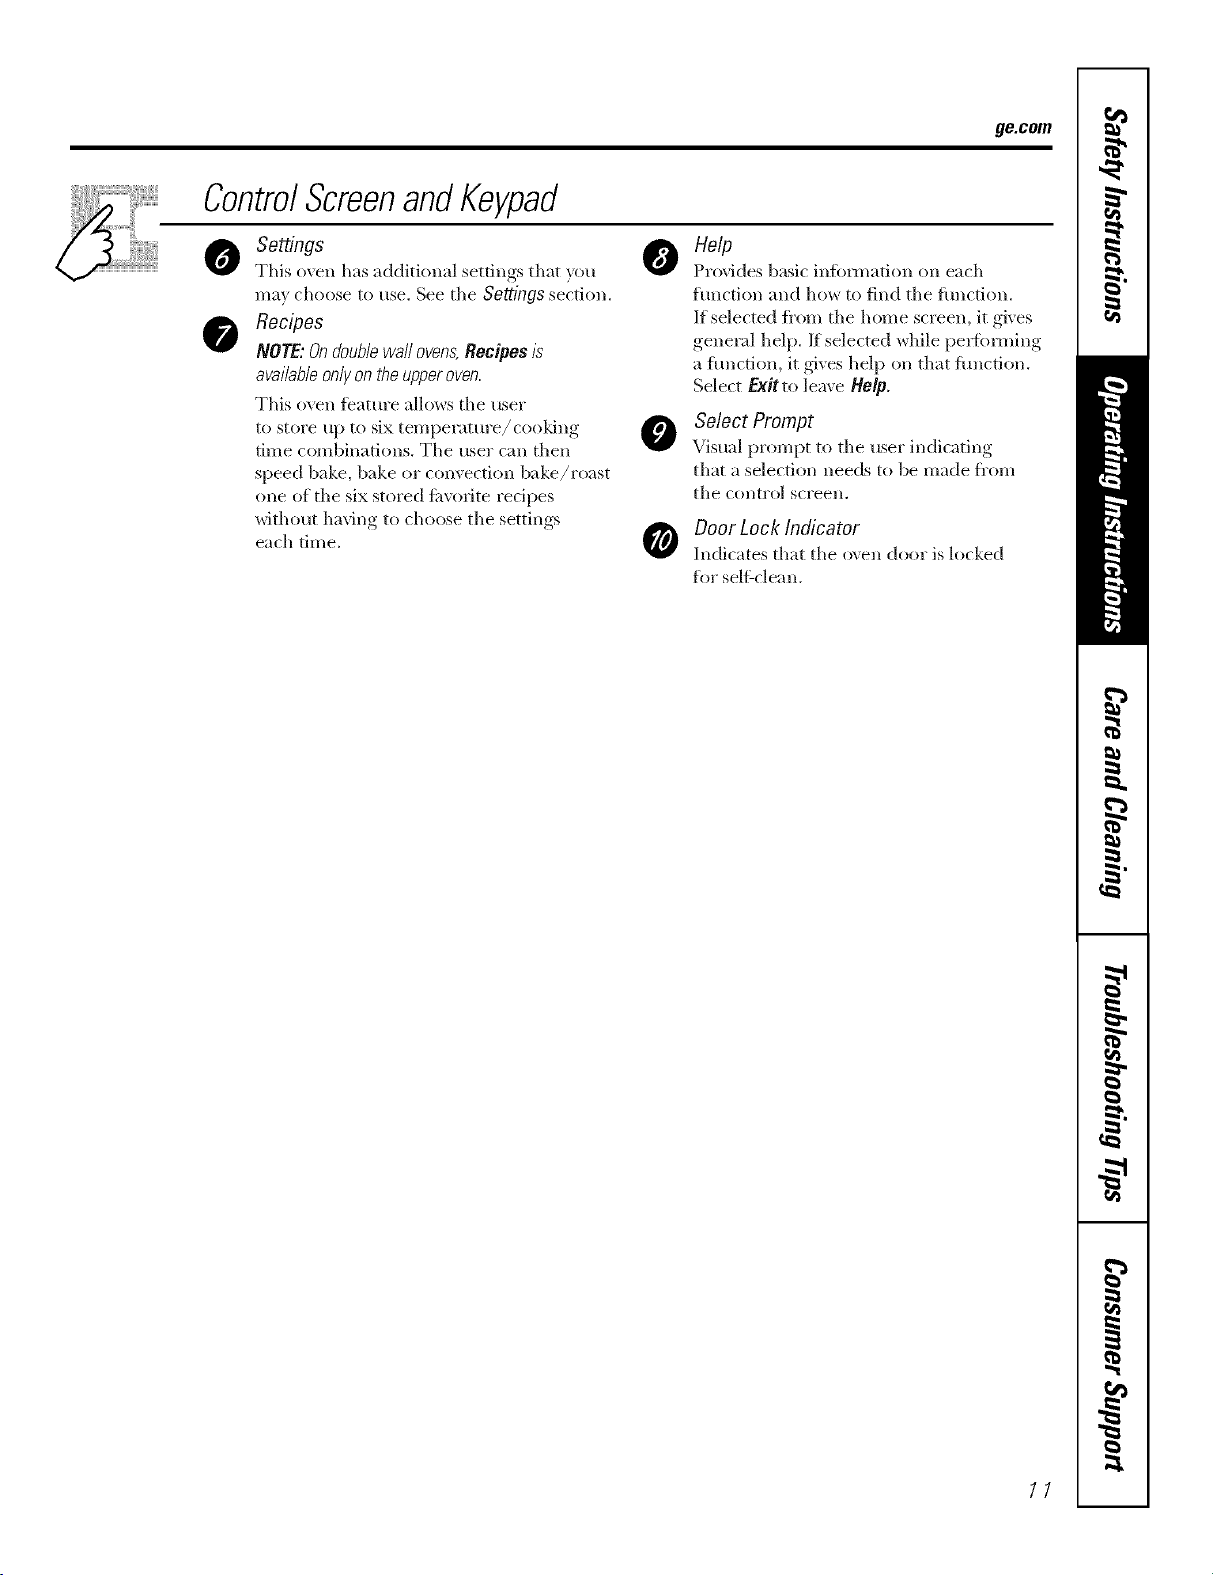
ControlScreenandKeypad
Settings
This oxen has additional settings that _ou
ma_ choose to use. See tile Settingssection.
Recipes
NOTE:Ondoub/ewaftovens,Recipes/s
available only on the upper oven,
This oven feature allows tile user
to store up to six temperature/cooking
time combinations. The user can then
speed bake, bake or convection bake/roast
one of the six sto_'ed fi_v(wite recipes
without having to choose the settings
each time.
o elp
Provides basic infbm_afion on each
hmction and how to find the flmction.
If selected t_'om the home screen, it gives
general help. If selected while pei_bnning
a flmcti(m, it gives help on that flmction.
Select Exit to leave ttolp.
Select Prompt
Visual prompt to the user indicating
that a selection needs to be made fl'om
tile COlltl'ol SCl'eell.
Door Lock Indicator
Indicates that the o\en dool" is locked
for seltLcleall.
11
Usingthe clock, timerandcontrollockout.
Make sure flTeclock is set to the
correct time of da_
ToSet the Clock
The clock must be set to the correct time
of day fin" the aumnmtic oven timing
tractions to work properl> The time of
day cannot be changed during timed
baking, a selfk'leaning cycle or delayed
start time.
[] Select SETTINGS.
[] Select CLOCK
[] Press the number pads.
[] Select ENTER.
The timer is anhour and mflTute
timer onl>
The timer does not control oven
operations. The maximum setting on
the timeris 9hours and 59 mhTutes.
Toset I0 mhTutes,enter I0. DONOT
enter lO:OO!
To Set the Timer
[] Press the KITCHEN TIMER pad.
[] Press the mmfl_er pads tmtil the
ai//otlnt of time }ou want shows
in the display: For example, to set
2 houls and 45 ininutes, press 2, 4[
and 5 in that order If you make a
mistake, press the KITCHEN TIMER
pad and begin again.
[] Select START.
Atier selectingSTART SETdisappears,
this tells youthe time iscounting down,
although the displaydoes notchange until
oneminute haspassed Secondswill not be
shown in thedisplayuntil the/astminute is
countIw down.
[]
_4q_en the timer reaches :00,
the control will beep 3 times
followed by one beep exe_)
6 seconds tmtil the KITCHEN
TIMER pad is pressed once.
The continuous beep can be canceled by
tollowing the steps in the Settings section
trader Tonesatthe Endofa timed Cycle.
To Reset the Timer
If the remaining time is not in the display
(clock, delay start or cooking time are in
the display), recall the remaining time by
pressing the KITCHENTIMERpad or using
REVIEW TIMES.
Y)u may change it by pressing the
KITCHEN TIMERpad, then press the
nmnber pads until the time you want
appea_ in the displa>
ToCancel the Timer
Press KITCHEN TIMERpad twice.
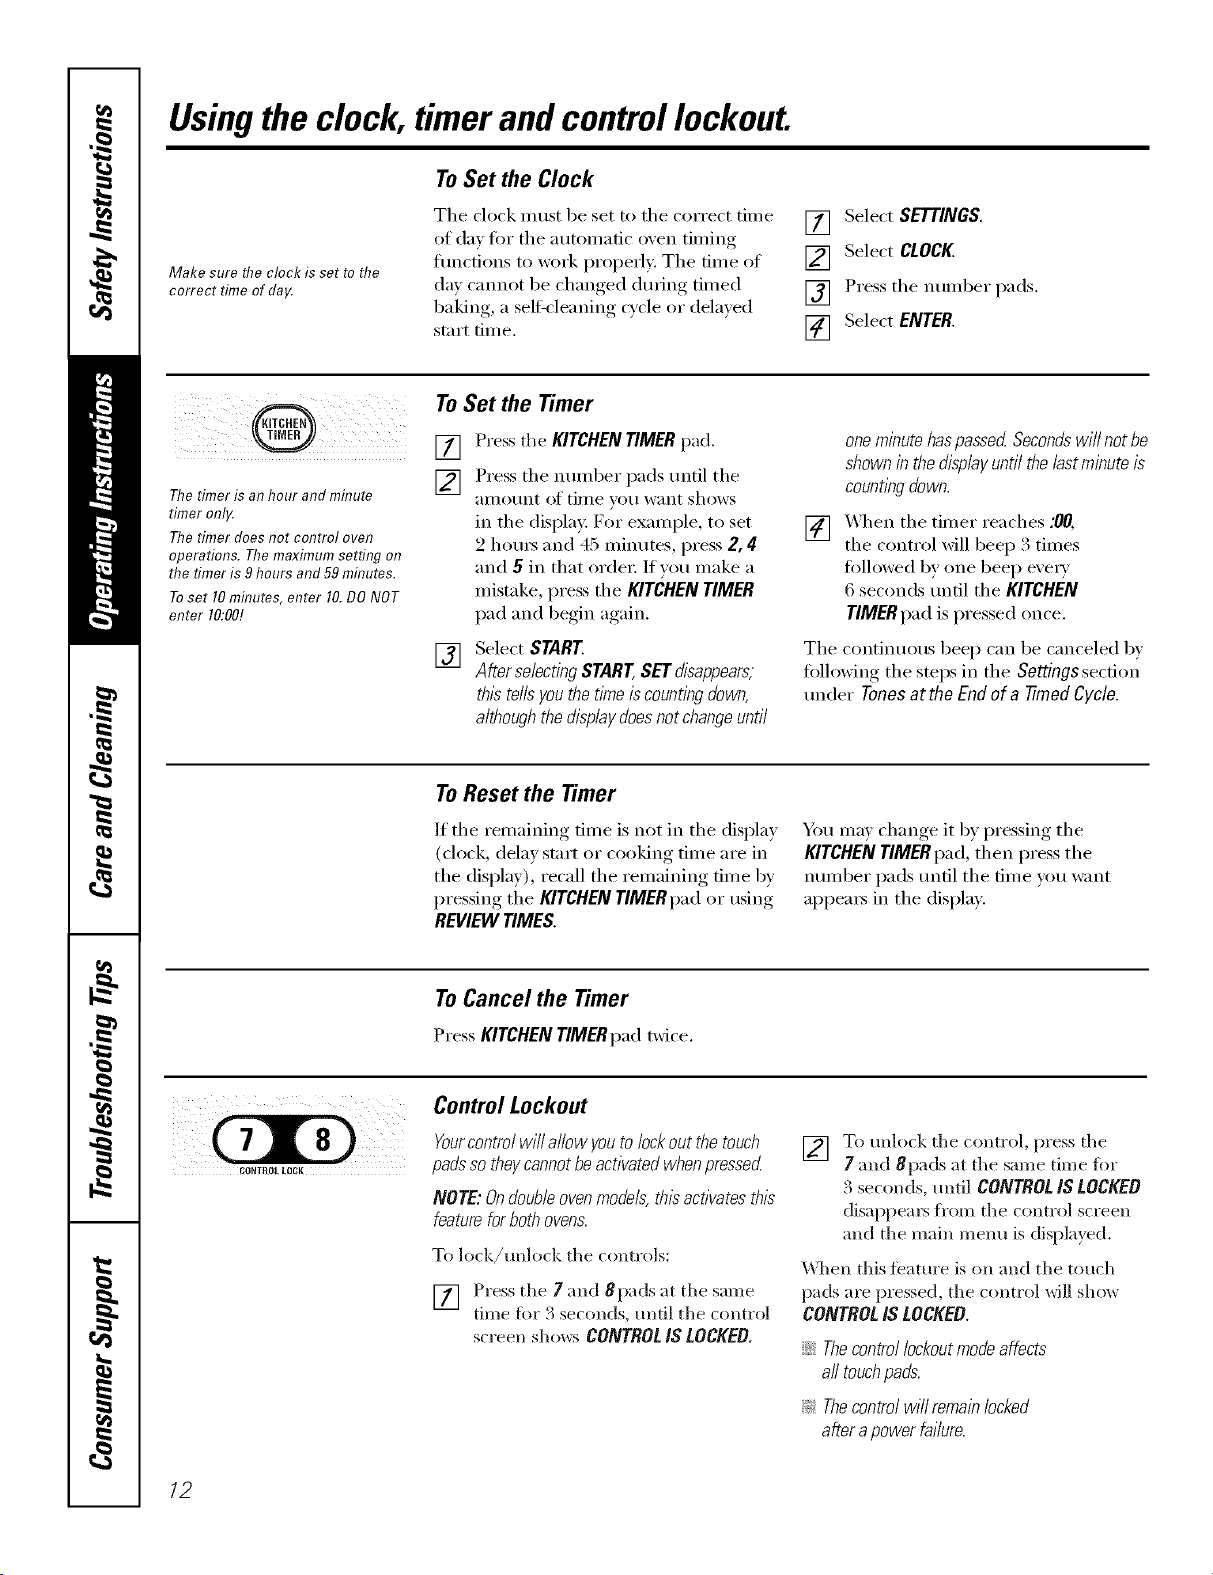
CONTROLLQCK
Control Lockout
Yourcontrol will allow youto lock out the touch
padsso they cannotbeactivated when pressed
NOTE: Ondoubb oven models,th/_activates th/_
feature forboth ovens.
To lock/mflock the controls:
[] Press the 7and 8pads at the same
• " '2 "
tm_e fin"., seconds, untd the control
scl'eell shows CONTROLIS LOCKED.
[] To unlock the control, press the
7 and 8pa& at the same time fi'_r
:4seconds, tmfil CONTROLIS LOCKED
disappem_ fl'om the control screen
and the main menu is displayed.
\_]_en this ibamre is on and the touch
pads are pressed, the control will show
CONTROLIS LOCKED.
::Ji::Thecontrol/ockoutmodeaffects
all touchpads.
_: Thecontrolwillremainlocked
afterapowerfailure.
12
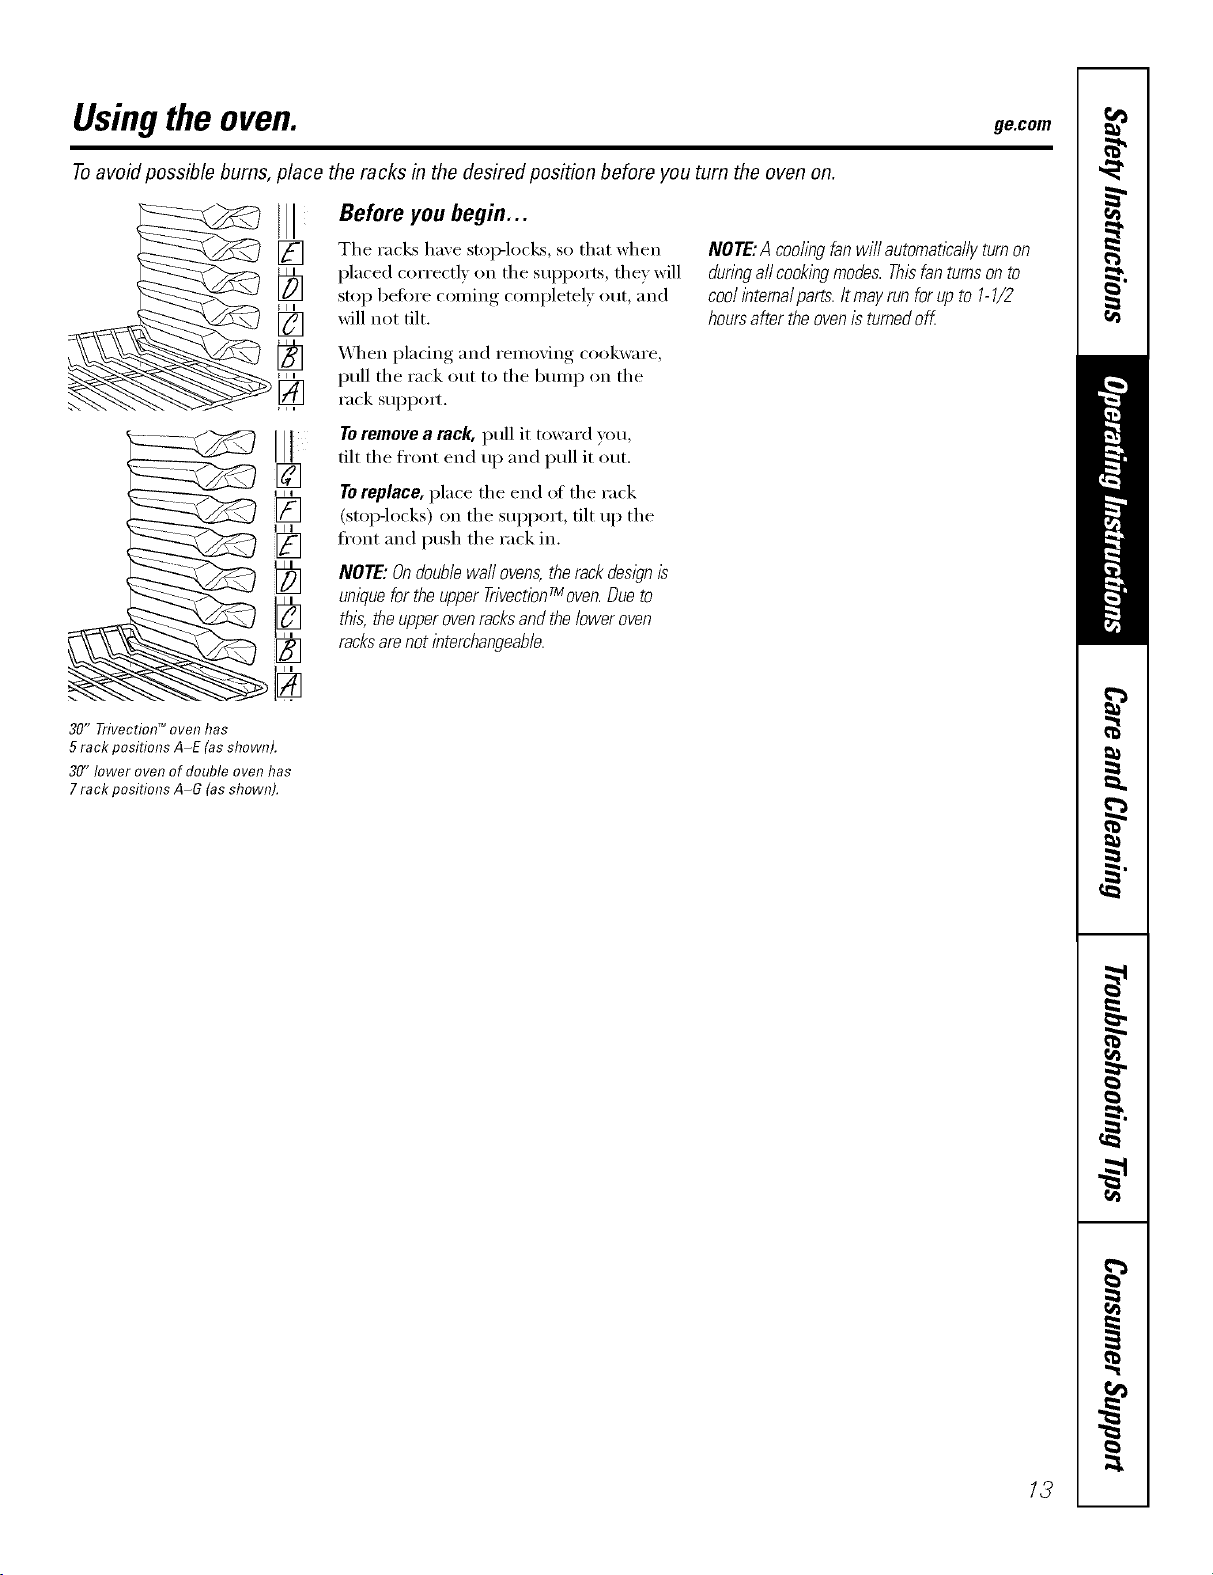
Usingthe oven. gecom
Toavoid possible bums, place the racks in the desired position before you turn the oven on.
Before you begin...
The racks have stop-locks, so that when
})laced correctly on the SUpl)orts, they will
stop heft)re coming conll)letely out, and
will not tilt.
_,_l_enpladng and removing cookware,
pull the rack out to the bran I) on the
rack suI_pom
tilt the front end up and pull it out.
[]
7"0replace, place the end of the rack
_[_ (stop-locks) on the stq)port, tilt up the
ti'ont and push the rack in.
NOTE:Ondoublewallovens,therackdesl)nIs
uniquefortheupperTrivectionTmoven.Dueto
this,theupperovenracksandtheloweroven
racksarenotinterchangeable.
NOTE:A coollbgfanwill automaticallyturnon
dunbgallcookingmodes.Thisfanturnsonto
coolintemalparts.Itmayrunforupto 1-1/2
hoursaftertheovenisturnedoff.
30" Trivectiol7 TM oven has
5 rack positions A-E (asshown).
30" lower oven of double oven has
7 rack positions A-G (as shown).
/3
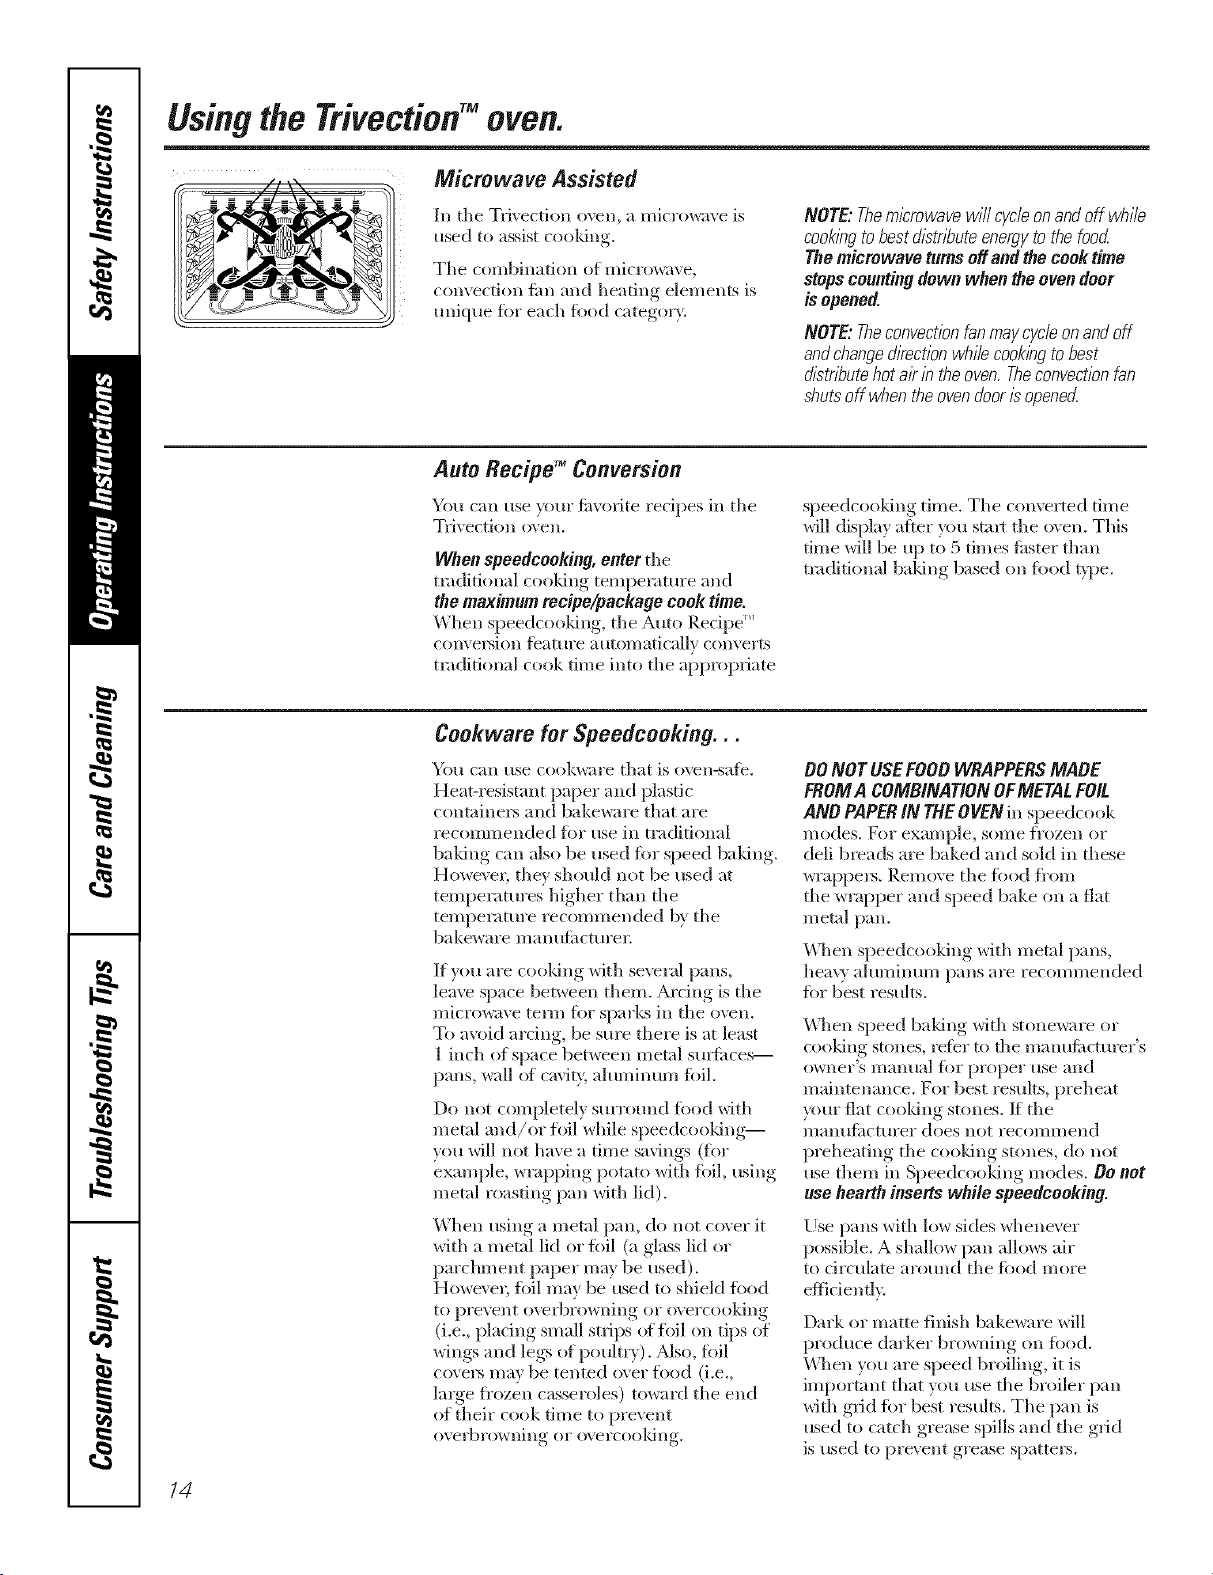
Usingthe TrivectionTM oven.
Ill tlle Tvi_ection oven, a microwave is
used to assist cooldng.
Tile combination of microwave,
convection tim and beating elements is
unique fiw each rood category.
NOTE:Them/2rowavewi//cycle,onandoff while
cook/bgtobestdistributeenergytothefood
Themicrowaveturnsoffandthecook time
stopscountingdownwhentheovendoor
isopened.
NOTE:Theconvectionfanmaycycleonandoff
andchangedkectionwhilecookingtobest
d/2tr/_utehotairb theoven.Theconvectionfan
shutsoff whentheovendoor/2openecZ
Auto Recipg =Conversion
You ran use }ore" fi_xofite recipes ill tile
Tfivection o\en.
When speedceeking, enter tile
traditional cooking temperatm'e and
the maximum recipe/package cool< time.
When speedrooldng, tlle Auto P,ecil)e '_
c(mveIMon tbature automatically convelts
traditional cook time into tile appropriate
speedcooking time. Tlle converted time
will display after you stml tlle o\en. This
time will be up to 5 times tisster than
traditional baldng based on %od t}])e.
Cookwaro for $peedcooking. . .
'_/O/l Call Hse cookwiH'e that is ovesl-sate.
Heat-I esistant paper and plastic
containel_ and bakeware that aIe
recommended %5"use ill traditional
baking call also be used for speed baldng.
HoweveL tile} should not be used at
tenlperatures higher than tlle
temperature iecommended by tlle
bakeware manufimtm'es;
If you are cooldng with several pans,
leave space between them. Ardng is tile
microwave term ibr sparks ill tlle oven.
To a_xfid arcing, be sm'e there is at least
1 inch of space between metal sui#itces--
pans, wall of cavity, aluminum toil.
Do not completely surr(*mld fi_od with
metal and/or foil while speedcooldng--
you will not have a time savings (for
example, wrapping potato with %il, using
metal roasting pan with lid).
When using a metal pan, do not cover it
with a metal lid or tbil (a glass lid or
parchment paper may be used).
However, foil may be used to shiekI toDd
to prevent oxvrbrowning oi" overcooking
(i.e., plating small strips of toil on tips of
wings and legs of poultry). Also, fbil
covers may be tented over tiled (i.e.,
large fi'ozen casseloles) towald tlle end
of their cook time to prevent
overbrowning or overcoold51g.
00 NOT USEFOOD WRAPPERSMADE
FROMA COMBINATION OFMETALFell
AND PAPERIN THEOVEN ill speedcook
lllodes. For exalnple, SOllle i]'ozen oi"
dell breads are baked and sold ill these
wrai)peis. Remove tile todd fl'om
tlle wmpi)er and speed bake on a flat
metal pan.
S ) ) * o F
\\qlen .'I)eedc5 5king x_lth metal pans,
heav_ ahslllilltln/ pilllS are recoi//n/eslded
for best restdts.
\\]len speed baking with stoneware or
cooldng stones, refer to tile manufiwtm'er's
owner's illant/al ik)I" prslper rise and
maintenance. For best results, preheat
_/ur fiat cooldng stones. If tile
l//allHfitctHrer does not recollllllesld
preheating tile cooldng stones, do not
use them ill Speedcooldng modes. De not
use hearth inserts while speedcooking.
[)se pans with low sides whenever
possible. A shallow })all allows air
to circulate aroHsld tlle tbod I/lore
eflidenflv.
Dark or matte finish bakeware will
produce darker browning on tbod.
Udlen you are speed broiling, it is
important that you use tile bIoiler pan
with grid for best results. Tile pan is
used to catch grease spills and tile grid
is used to prevent grease spatters.
14
Other Speedcooking Tips...
Youmust preheat your oven.
Put tile fi)od in tile oven after tile
preheat beep when tile oven control
displays "Put Food In Oven" and then
press START. Youmust press the START
key after placing the food in the oven to
start the speedcook mode.
_]/en choosing a speedcook fi)od
category, refer to tile chart on page 16.
All frozen foods should be speedcooked
using the FROZENFOODS category,
_,_q/en baking potatoes, tile
recommended cooking temperature
is 350°F and cooking time is 90 minutes
fi)r medium sized pot;m)es. Add an
additional 15-30 minutes tot large
potatoes or when baking more than
iO/lI" potatoes.
In general, when cooking meats wrapped
in dough or reti_igerated dough product,
use the Biscuit/Roll or BakedGoods
camgory.
For redpes using a lmge quanfiQ'
ot cheese, milk and/or eggs, use the
gakedGoods categm T.
imger amo/mts offi)od or multiple racks
(ff fl)od may require additional time.
Check fi)od doneness as prompted and
continue cooking as needed.
Items such as appetize_, cookies, biscuits
and rolls can be speed baked on multiple
racks. Cooking time may increase slightly
fi)r some fi)ods, but since two or three
racks of toed are being cooked at tile
same time, tile overall result is substantial
time saved.
_q/en cooking multiple items or pans,
leave space between them fi)r maximmn
air circulation.
ge.com
Cakes and quick breads (banana,
zucchini or pmnpkin bread) are not
recomm ended fi)r m uldple rack speed
baking. Place cakes side-by-side on one
rack if speed baking. When using more
than one rack to cook these fl)ods, rise
CONVMULTI inode. See Using the
convection modes section,
Meats/Poultry
Cooking times will \my depending on
tile etlt of meat. Check fi)r doneness at
minimum time. Note:Meats will continue
to cook and internal temperatures will
IJse alter they }lI'e i'eilloved J[i'Oill tile oven
(standing time).
Use tile broiler pan and grid provided
with veto" oven fl)r best results.
._s in a conventional (wen, ahmfinum fi)il
may be used to shield fi)od--to prevent
overbrowning or overcooking (i.e., placing
small strips ot fi)il on til> el wings and leg,s
of poult_T). Mso, foil cox'e_ may be ranted
over food (i.e., large fl'ozen casseroles)
toward file end ot fl/eir cook time to
pI'event ( )x'eI'bI'( )wiling of ( )x'ei'cooking,
Make sm'e that tile fi)il is secureN am_ched
to the toed. However; lmge amo/mts of
foil or flflly enclosing fi)od in foil blocks
the microwave ener_:, which eliminates
time savings.
Do not use oventhermometers, meat
thermometers or wire twist-ties in the
oven while speedcooking.
Pop-u l) them_omete_ in your meat
may be inaccurate. Check file tempemtme
of tile meat with a them_ometer alter
removing the meat fl'om the oven.
For best results, speed bake turkeys
tmstufli_d.
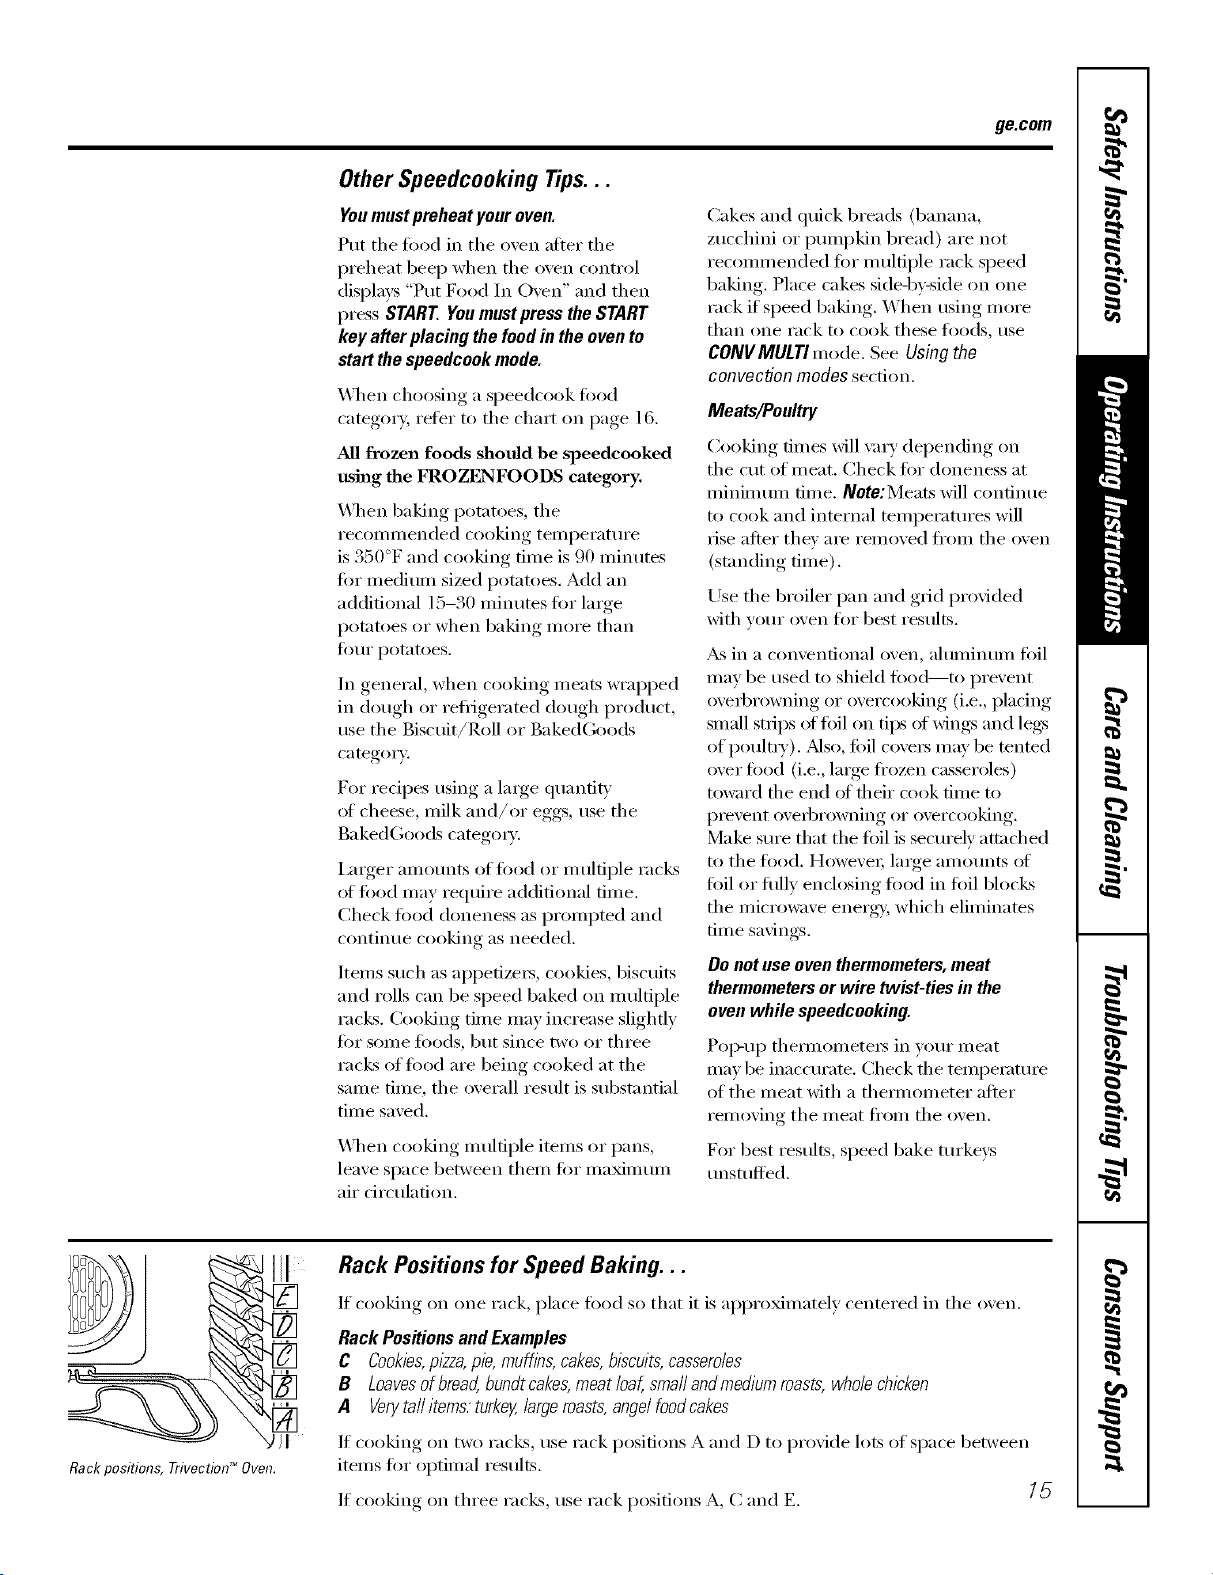
Rackpositions,Trivectiod_Oven.
Rack Positions for Speed Baking...
If cooking on one rack, place food so that it is approximately centered in the oven.
Rack Positionsand Examples
C Cookies,pizza,pie, muffins, cakes,biscuits,casseroles
B Loavesofbread,bundt cakes,meat loaf,smafl andmediumroasts,whole chicken
A Ven/tail items. turkey,large roasts,angelfoodcakes
If cooking on two I';l(]z_s, rise I'ack positions A and D to provide lots of space between
items fi)r optimal results.
If cooking on three racks, use rack positions A, C and E. [_
Usingthe TrivectionTM oven.
How to Set the Ovenfor Speed Baking
[] Select SPEEDCOOKIi'om tile []
Illain I/lentl,
[]
[]
Select SPEED BAKE wllen baking
oI" I'oasting.
no-
Select food _pe. You can select
FROZENFOODS,MEATor VEG/CASS.
Select MOREto seeadditional
categories--POULTRY/FISH,
BAKEDGOODSand BREADS.
Reference tile table firr fired
category and tiine savings.
NOTE:You wiii need to select a
subcatego_ T fin" some toed _'pes.
For example, if you select VEG/CASS,
wru will need to select between
BAKEDPOTATO,VEGETABLEor
CASSEROLE.
] Enter recipe cook temperature.
[] Enter maximum recipe orpackage
cook time.
[_] Select START Cook time wiil
atltoi//aticaliv c(ril_ei't [(r slloi'teE
time and dispia} on controi screen.
[] You must aiwa}s prei/eat tile oxen.
X_'ait tot Ix'el/eat si_mai,_and message,
on displa} to "PUT FOODIN OVEN"
befirre i)iacing, fired in o'_en.
Select START Start will not appearon
controlscreenuntil dooris openedand
food isput in oven. Youmust select START
to startcooking Countdownof cook time
will begin.
Note:FoodmaybecheckedatanytlYne
byopeningthedoor Themicrowaveand
convectionfanwillturnoffandthecooking
tl/necountdownwillstopwhilethedooris
open.Aftthreewill resumewhenthedoor
isclosed
[] Ci/eck fired wi/en prompted and
add more time if desired.
After thecookingtimehasended,theoven
willprompttheusertoadd"MORETIME"
tofurthercookfoodifdesiredAdd
additionaltithebyselectingMORETIME
Entertraditionalcookingtl/neinminutes
andselectSTAR[ Onceagain,theoven
automaticallyconvertsthetraditionaltkne
totheappropriatespeedcooktkne(nearest
minute).PressCLEAR/OFFpadif food
hasfinishedcooking
Food Type Food Subcategory Approximate Time Savings
FrozeeFood Desserts 1-1/2tkneafaster
MainDishes 2 tkeeafaster
Seack/Sides 2 to3 timesfaster
Meat Ham 1-1/2timesfaster
Pork 2-1/2 to3 timesfaster
Beef 2-1/2 to3 timesfaster
Lamb 2-1/2 to3 timesfaster
Game/Wild 2-1/2 to3 timesfaster
Veg/Cass BakedPotato 5timeafaster
Vegetable 4 timeafaster
Casserole 4 timesfaster
Poultry/Fish 2 to3timesfaster
BakedGoods 2timesfaster
Breads QuickBread
DoughBread
Biscuit/Roll
Food Examples
Frozen:Pies,Beakbs,Cobblers
Frozen:Entrees,Lasagna,TVDinners,Pizzas
Frozen:Snacks,Appetizers,Vegetables,FrenchFries
Frozen:Rolls,Biscuits
Ham
PorkTenderloin,PorkRoast
MeatBaf,BeefRoast
LegofLamb
Venison
BakedPotatoes
Unfrozen:Vegetables(carrots,squash,etc.)
Unfrozen:Meat Casserolesor Lasagna,
Unfrozen:VegetableCasearobs
Chicken,Fish,Turkey,Seafood,CornishHens
Cookies,Muffins,Cupcakes,Appetizers,BarCookies,Cakes,
FreshPies,Brownies,Souflbs,Bobbbrs
QuickBreadssuchas BornBreadandBananaBread
YeastBread,Freshor DeftPizzas
Biscuits,SweatRolls,DinnerRolls,Breadstbks
2timesfaster
3timesfaster
3timesfaster
16
ge.com
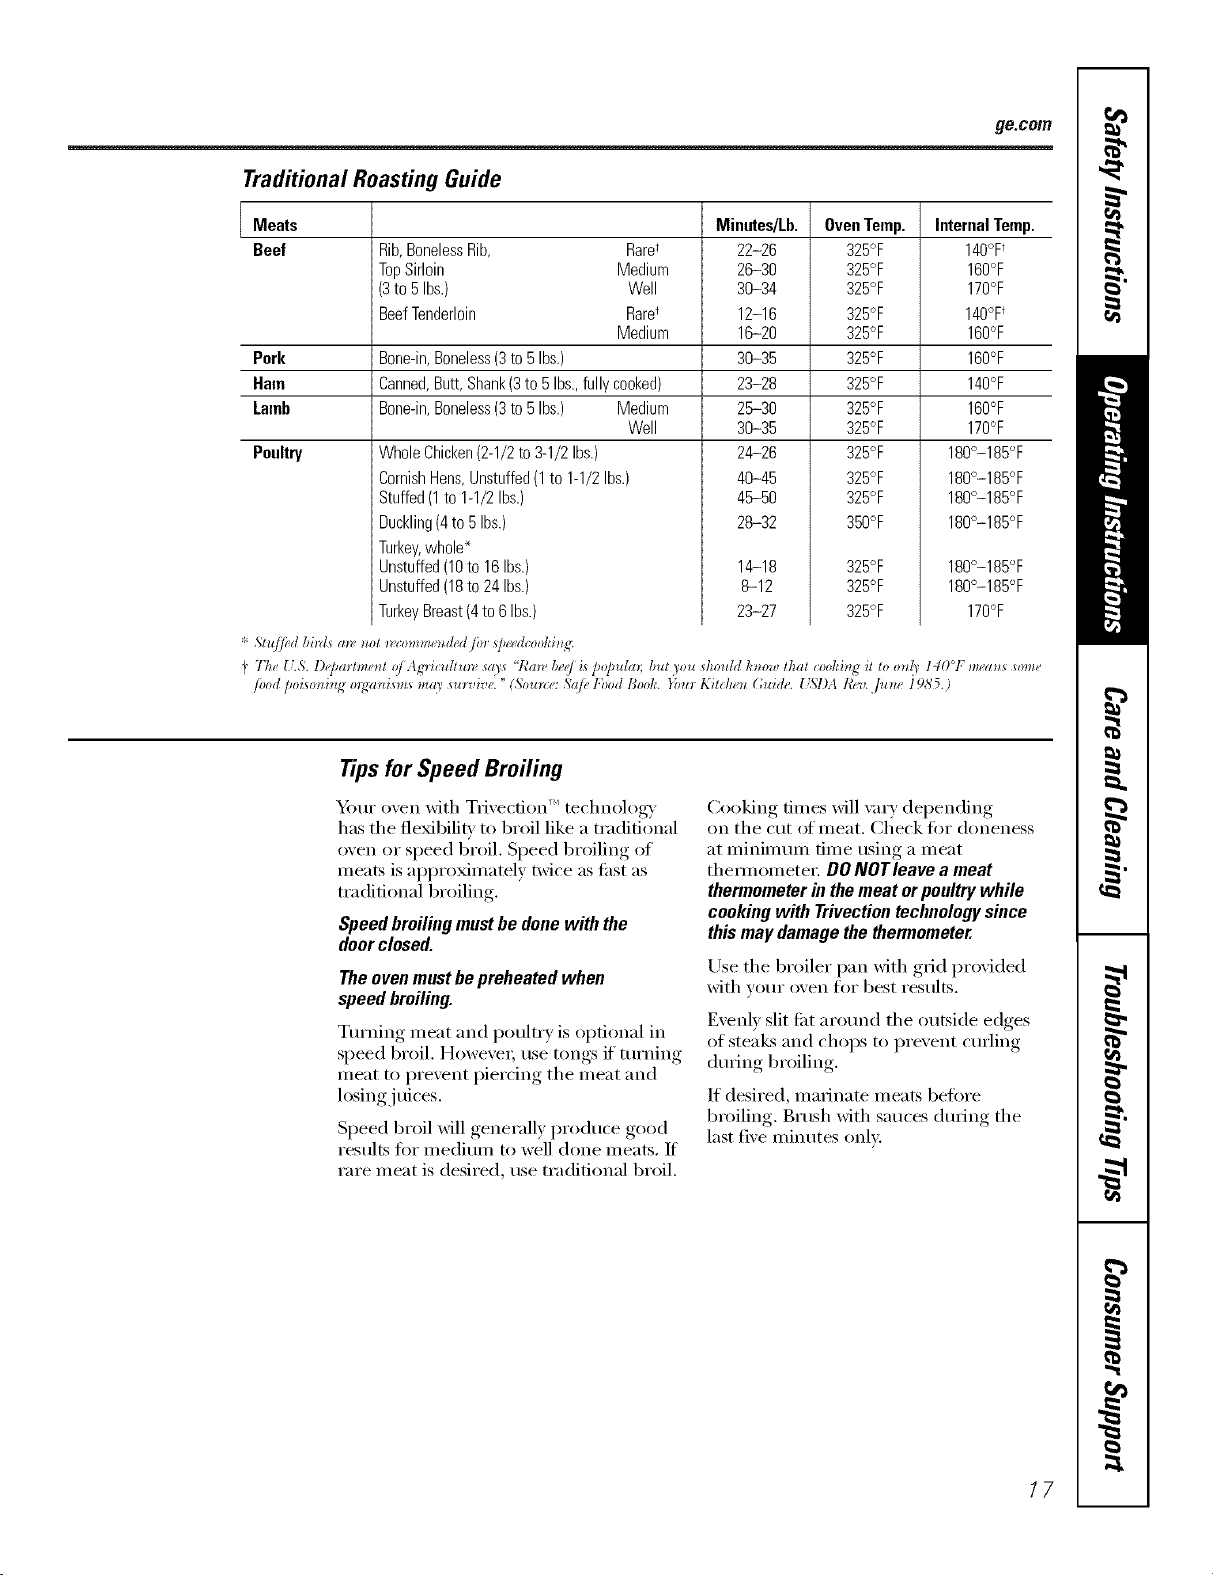
Traditional Roasting Guide
Meats
Beef Rib,BonelessRib, Raret
TopSirloin Medium
(3to 5Ibs.) Well
BeefTenderloin Raret
Medium
Pork Bone-in,Boneless(3to5Ibs.)
Ham
Lamb
Banned,Butt,Shank(3to 5Ibs.,fullycooked)
Bone-in,Boneless(3to5Ibs.) Medium
Well
Poultry WholeChicken(2-1/2to3-1/2Ihs.)
CornishHens,Unstuffed(1to 1-1/2Ibs.)
Stuffed(1to1-1/2Ibs.)
Duckling(4to 5Ibs.)
Turkey,whole*
Unstuffed(10to 16Ibs.)
Unstuffed(18to24Ibs.)
TurkeyBreast(4to6 Ibs.)
Minutes/Lb.
22-26
26-30
36-34
12-16
16-20
36-35
23-28
26-30
36-35
24-26
46-45
46-50
28-32
OvenTemp.
325°F
325°F
325°F
325°F
325°F
325°F
325°F
325°F
325°F
325°F
325°F
325°F
350°F
14-18 325°F
8-12 325°F
23-27 325°F
InternalTemp.
140°Ft
160°F
170°F
140°Ft
160°F
160°F
148°F
16O°F
170°F
180°-185°F
180°-185°F
180°-185°F
180°-185°F
180°-185°F
180°-185°F
170°F
Tips for Speed Broiling
• , i_1 (
Y_mr oxen with Tmecnon technolosa
has the flexibiliD to broil like a traditional
oxen or speed broil. Speed broilino_ of
meats is approMmately twice as ti_st as
traditional broiling.
Speedbroilingmustbedonewith the
doorclosed.
Theovenmustbepreheatedwhen
speedbroiling.
Turning meat and poultry is optional in
speed broil, Howexe_, rise tongs if ttlrning
meat to prexent piercing the meat and
losing./trices.
Speed broil x611 ,generallx, l)roduce ,good
results fi)r medium to well done meats, If
rare meat is desired, use traditional broil.
Cooking, times will ",_rv, del)ending,
on the cut ot meat. Check fi)r doneness
at minimum time using a meat
them_omete_: OONOTleave a meat
thermometer in themeat or poultry while
cooking with Trivection technology since
this may damage the thermometer.
Use the broiler pan with g_cl proxided
with yore" oven fl)r best results.
Exenl_ slit ti_t around the outside edges
of steak_ and chops to l)rexent curling
(ltu'ing broiling.
If desired, marinate meats heft)re
broiling. Brash with sauces during the
last five minutes only.
17
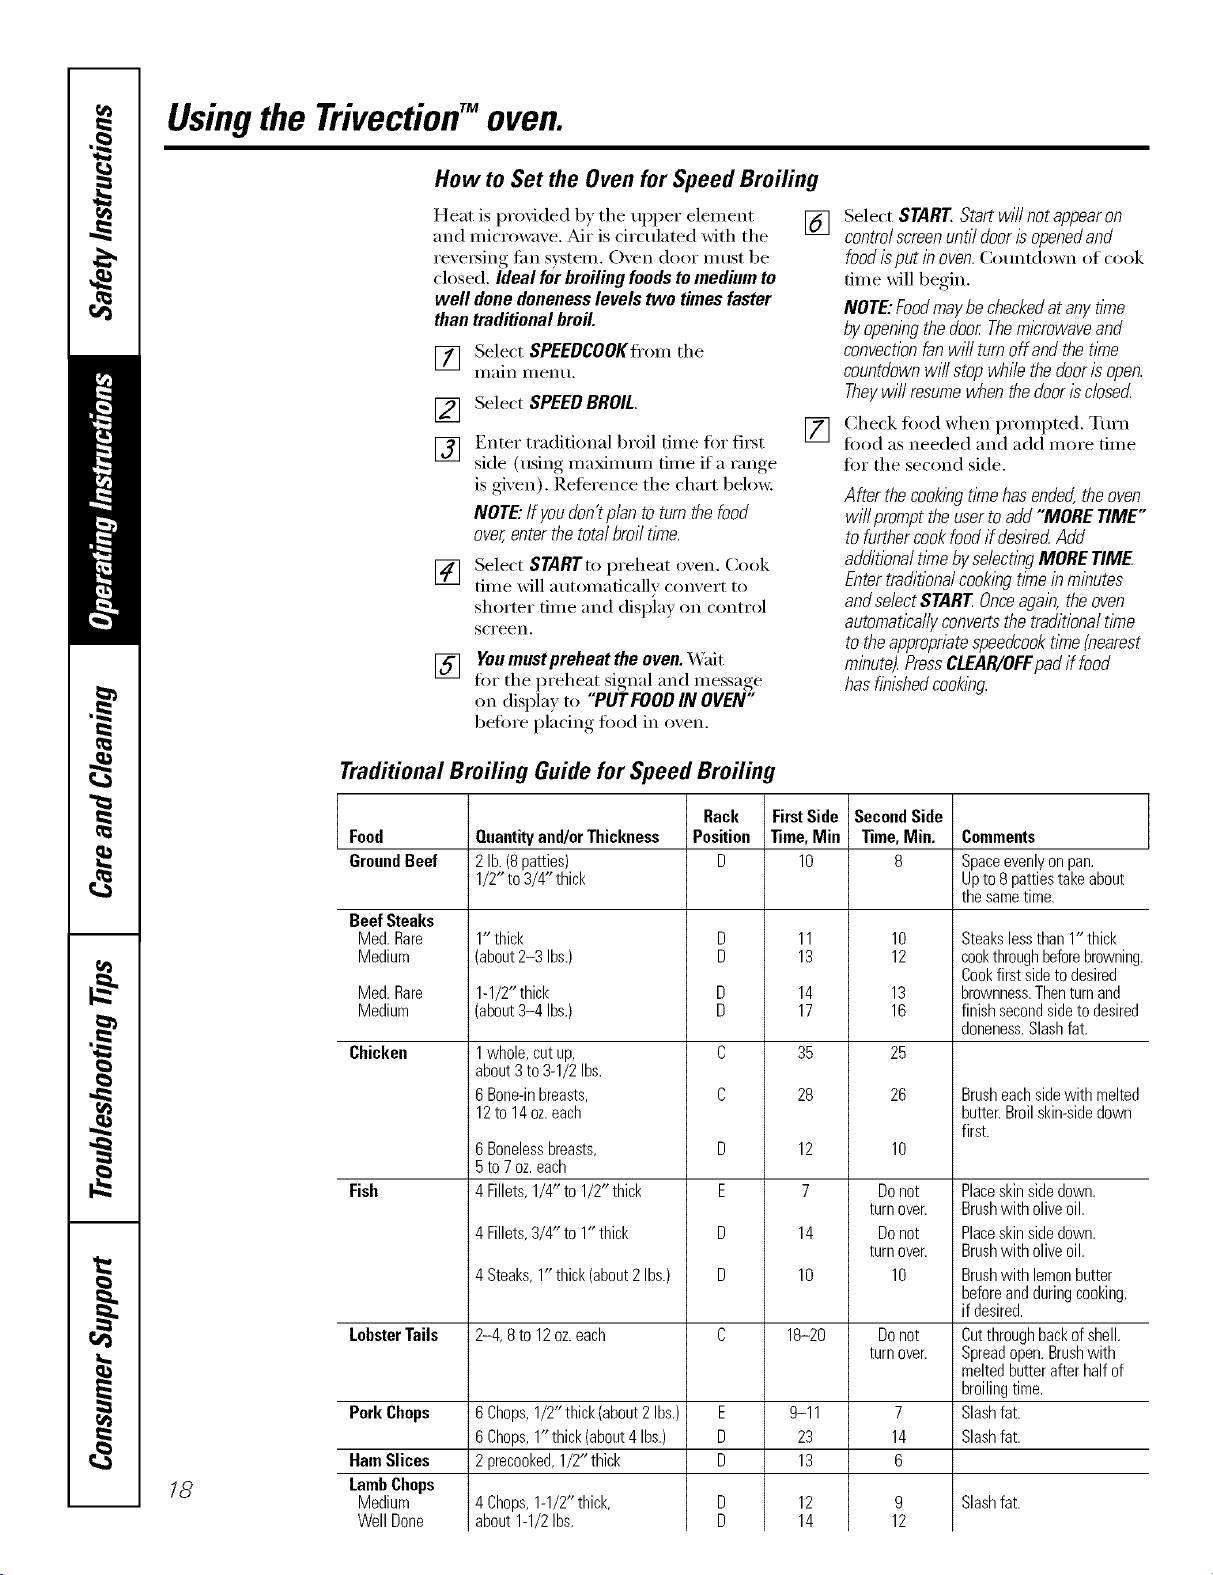
Usingthe TrivectionTMoven.
How to Set the Ovenfor Speed Broiling
Heat is provided by the upper dement
and micro_m'e, Air is circulated with the
reve_ing tim system. Oven door must be
closed. Ideal for broiling foodsto medium to
well done donenesslevels two times faster
than traditional broil.
[]
[] Select SPEEDCOOKffom the
Ill}lln I/1 entl,
[]
[]
Select SPEEDBROIL.
Enter traditional broil time fin" fit_t
side (using maximum time if a range
is gixen). Reterence the chin1 below.
NOTE:If youdon'tplan to turn the food
over,enter thetotal broil t/me.
[]
[] Select STARTto preheat oxen. Cook
time will automatically comert to
shorter time and displa) on control
SCl'een,
[] You must preheat the oven. X_fit
fin- the l)reheat signal, and message,
on display to "PUT FOODIN OVEN"
befin'e placing food in oxen.
Select START.Startwi//notappearon
controlscreenuntildoorisopenedand
foodisputinoven.Countdown of cook
dine will begin.
NOTE:Foodmaybecheckedatanytime
byopeningthedoor Themicrowaveand
convectionfanwillturnoffandthetime
countdownwillstopwhilethedoorisopen.
Theywill resumewhenthedoor/sclosecL
Check fi_od when prompted. Turn
fi)od as needed and add more time
fin" the second side.
After thecookingtimehasended,theoven
willprompttheusertoadd"MORETIME"
tofurthercookfoodifdeskedAdd
additionaltimebyselectingMORETIME
Entertraditionalcookingtimeinminutes
andselectSTARTOnceagain,theoven
automaticallyconvertsthetraditionaltime
totheapproprbtespeedcooktime{nearest
minute).PressCLEAR/OFFpadif food
hasfinishedcooking
Traditional Broiling Guide for Speed Broiling
18
Food
GroundBeef
Beef Steaks
Med.Rare
Medium
Med.Rare
Medium
Chicken
Fish
LobsterTails
PorkChops
HamSlices
LambChops
Medium
WellDone
Quantityand/orThickness
2lb. (8patties)
1/2"to 3/4"thick
1" thick
(about2-3 Ibs.)
1-1/2"thick
(about3-4 Ibs.)
1whole,cutup,
about3to9-1/2Ibs.
6Bone-inbreasts,
12to 14oz.each
6 Boneless breasts,
5 to 7 oz. each
4 Fillets, 1/4" to 1/2" thick
4Fillets,3/4" to 1" thick
4Steaks,1"thick(about2Ibs.)
2-4, 8 to 12oz. each
6Chops,1/2"thick(about2Ibs.)
6Chops,1"thick(about4Ibs.)
2precooked,1/2" thick
4Chops,1-1/2"thick,
about1-1/2Ibs.
Rack
Position
D
D
E
D
D
E
D
D
FirstSide
Time,Mie
lO
11
13
14
17
35
28
12
7
14
10
18-20
9-11
23
13
12
14
SecondSide
Time,Min.
8
10
12
13
16
25
26
10
Donot
turn oven
Donot
turn oven
10
Donot
turn over.
7
14
6
9
12
Comments
Spaceevenly onpan.
Up to 8 patties take about
the same time.
Steakslessthan1" thick
cookthroughbeforebrowning.
Cookfirstsidetodesired
brownness.Thenturnand
finishsecondsidetodesired
doneness.Slashfat.
Brusheachsidewith melted
butter.Broilskin-sidedown
first.
Placeskinsidedown.
Brushwith oliveoil.
Placeskinsidedown.
Brushwith oliveoil.
Brushwith lemonbutter
beforeandduringcooking,
if desired.
Cutthroughbackofshell.
Spreadopen.Brushwith
meltedbutterafterhalfof
broilingtime.
Slashfat.
Slashfat.
Slash fat.
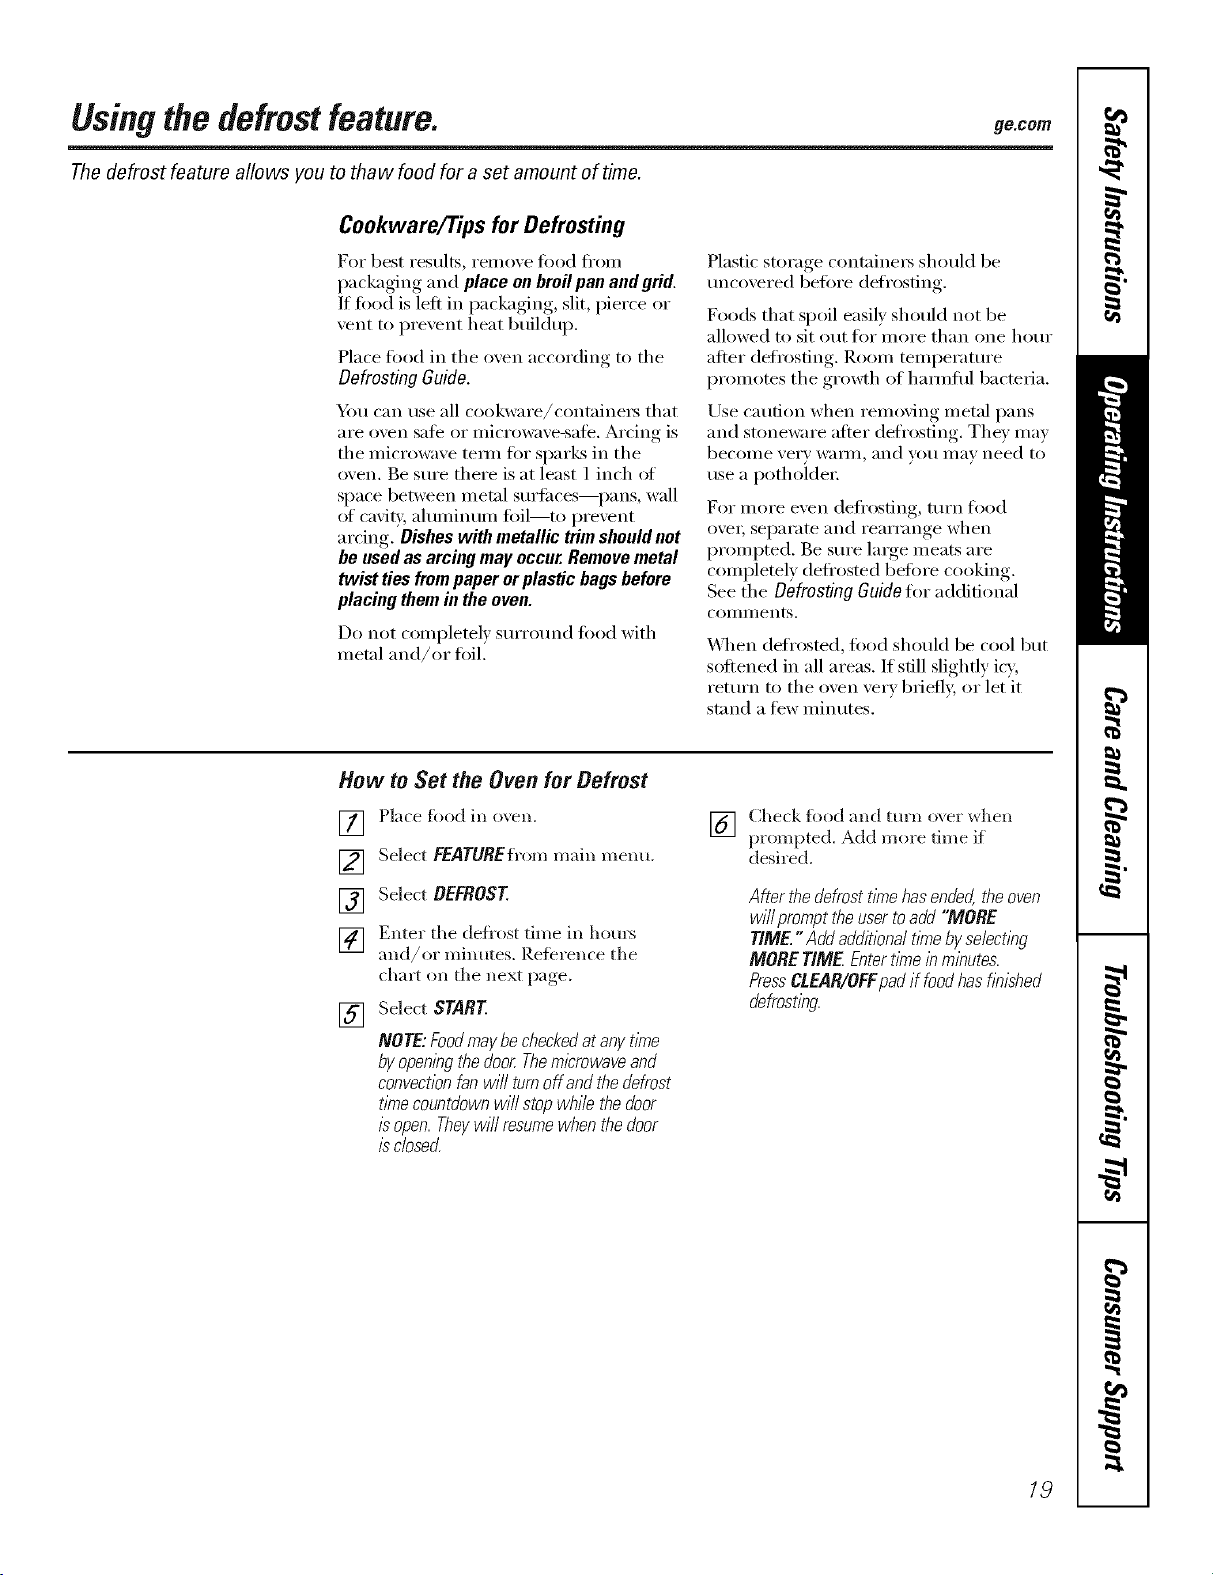
Using the defrost feature, gecom
The defrost feature allows you to tha w food for a set amount of time.
Cookware/Tips for Defrosting
For best results, reinove todd fl'oin
packaging and place on broil pan and grid.
If food is left in packaging, slit, pierce or
vent to prevent heat buildup.
Place fi)od in the oxen according to the
Defrosting Guide.
_4m can use all cookware/containe_ that
are oven sate or microwave-sate. Arcing is
tile microwave tem_ for sparks in tile
oven. Be stlre there is at least 1 inch ot
space between metal surti_ces--pans, wall
of caviq/, ahmfinum toil--to prevent
ardng. Disheswith metallic trim should not
be usedas arcing may occur.Remove metal
twist ties frompaper orplastic bags before
placing them in the oven.
Do not completel) surro/md fi_od with
metal and/or hill.
S S ) (
Pla _tic _t_rage contmnex_ should be
uncoxered betore defrosting.
Foods that spoil easily should not be
allowed to sit out tot more than one hour
after defrosting, Room temperature
promotes the gro_h of hmmflfl bacteria.
Use caution when removing metal pans
and stoneware after defrosting. Tile)' may
becollle ver}' _V;III/I, and vl)/i Ill}IV need to
use a potholder
For nitre even defl'osting, mrn fl_od
ove_; separate and rearrange when
prompted. Be Stli'e lmge meats are
completely deti'osted betore cooking.
See tile Defrosting Guide for additional
COIIlII/ents.
_]_en deti'osted, fi)od should be cool but
sottened in all areas. If still slightly icy,
return to tile oven ve_T briefly, or let it
stand a few minutes.
How to Set the Oven for Defrost
[]
[]
[]
[]
[]
Place fbod in oxen.
Select FEATUREfrom main menu.
Select DEFROST
Enter tile defl'ost time in ho/u_
and/or minutes. Retbrence tile
chm_ on tile next page.
Select START
NOTE:FoodmaybecheckedatanytlnTe
byopeningthedoorThemicrowaveand
convectionfanwill turnoffandthedefrost
timecountdownwillstopwhilethedoor
isopen.Theywillresumewhenthedoor
/sclosed.
I_q Check tbod and turn oxer when
IC, I
prompted. Add more time if
desired.
Afterthedefrostt/nTehasende4theoven
willprompttheusertoadd"MORE
T/ME."Addadditionaltimebyse/ect/?)g
MORET/ME Entert/nTe/))m/))utes
PressCLEAR/OFFpadif foodhasf/))/shed
defrost/bg.
/9
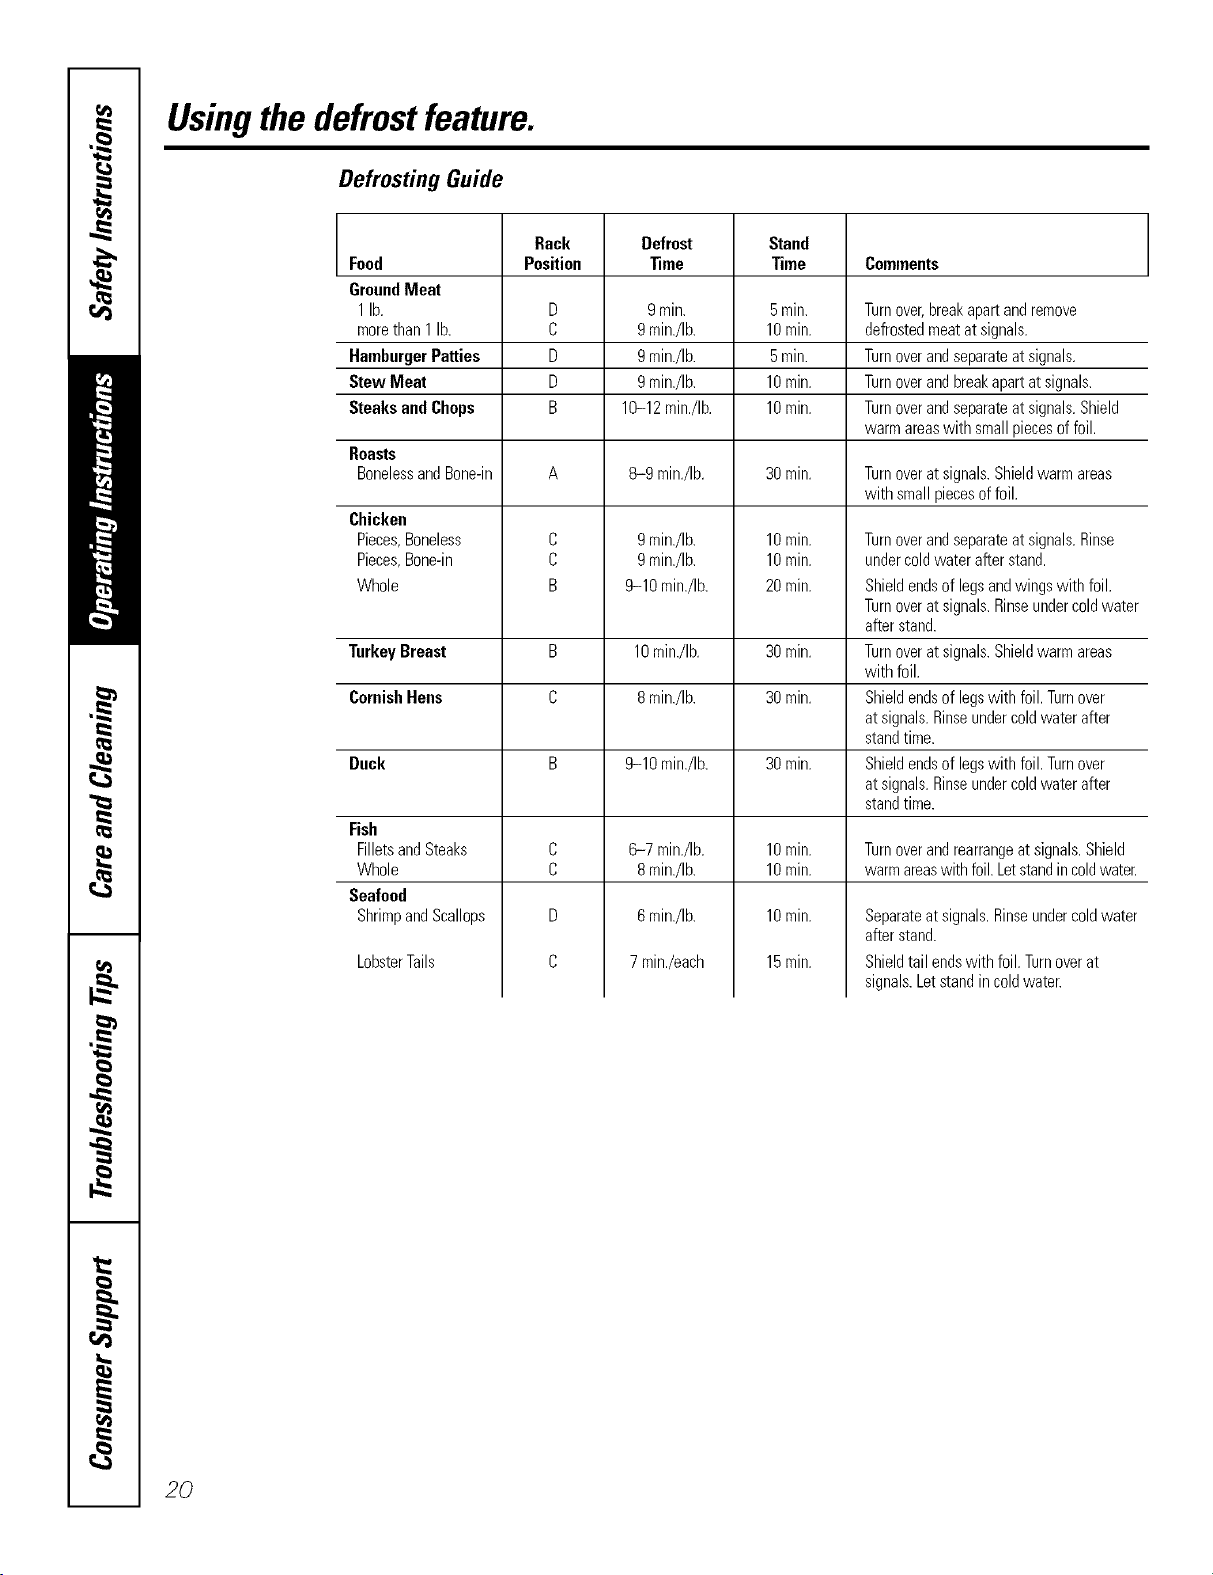
Usingthedefrostfeature.
Defrosting Guide
Rack Defrost Stand
Food Position _me Time Comments
GroundMeat
1lb. D 9mitt. 5rain. Turnover,breakapartandremove
morethan1 lb. C 9min./Ib. 10rain. defrostedmeatatsignals.
HamburgerPatties D 9min./Ib. 5rain. Turnoverandseparateatsignals.
StewMeat D 9min./Ib. 10rain. Turnoverandbreakapartatsignals.
SteaksandChops B 10-12min./Ib. 10rain. Turnoverandseparateatsignals.Shield
warmareaswith smallpiecesoffoil.
Roasts
BonelessandBone-in A 8-9 mirr./Ib. 30rain. Turnoveratsignals.Shieldwarmareas
with smallpiecesoffoil.
Chicken
Pieces,Boneless
Pieces,Bone-in
Whole
Turnover andseparate at signals. Rinse
under coldwater after stand.
Shield endsof legs andwings with foil.
Turnover at signals. Rinseundercold water
after stand.
Turnover at signals. Shield warm areas
with foil.
Shield endsof legswith foil. Turnover
at signals. Rinseunder cold water after
stand time.
Shield endsof legswith foil. Turnover
at signals. Rinseunder cold water after
stand time.
C
C
B
9min./Ib.
9min./Ib.
9-10 min./Ib.
10min.
10min.
20rain.
TurkeyBreast B 10min./Ib. 30rain.
CornishHens C 8min./Ib. 30min.
Duck B 9-10 min./Ib. 30min.
C
C
D
C
Fish
FilletsandSteaks
Whole
Seafood
ShrimpandScallops
6-7 min./Ib.
8min./Ib.
6min./Ib.
7min./each
LobsterTails
10rain.
10rain.
10rain.
15rain.
Turnover andrearrange at signals. Shield
warm areaswith foil. Letstand in coldwater.
Separateatsignals.Rinseundercoldwater
afterstand.
Shieldtail endswith foil.Turnoverat
signals.Letstandincoldwater.
20

Usingtraditionalbake and mast. gocorn
Toavoid possible bums, place the racks in the desired position before you turn the oven on.
Cut slits in UTefo ust Iil(e tlTegrid.
Aluminum Foil
Ybu can use aluminmn fifil to line tile
broiler pan and broiler grid. However;
you m ust mold tile fl)il tightly to tile grid
and cut slits in it just like tile grid.
Never entirely cover a rack with aluminum
foil. This will disturb tile heat drculation
and result in poor baking.
A smaller sheet (g fi)il may be used to
catch a spiHover by placing it on a lower
rack several inches below tile fi)od.
Preheating and Pan Placement for Baking
Preheat tile oven if tile recipe calls for it.
To preheat, set tile oven at tile correct
temperature. Preheating is necessai y for
good results when baking cakes, cookies,
pastI T and breads.
Baking results will be better if baking pans
aI'e centered in tile oven as Ill tlch as
possible. Pans should not touch each
other or the walls of the oven. If wm need
to tlse two I';Icks, rise CONVMULTImode
described in Using the convection modes
section for best I'estllts, pladng fi)od oil
rocks A and D (B and E for lower ()veil
on double oven models).
NOTE: Ondouble waftovens,the rackdesign/s
unique forthe upper TrivectionTmoven.Dueto
this, the upperovenracksandthe lower oven
racksarenot interchangeable.
Rack Position
Trivectioff" Lower
TypeofFood 30' Oven 30" Oven
Frozenpies BorC CorD
(oncookiesheet)
Angelfoodcake A A
Bundtorpoundcakes B B
Biscuits,muffins, BorC CorD
brownies,cookies,
cupcakes,layer
cakes,pies
Casseroles BorC CorD
How to Set the Oven for Baking or Roasting
[]
[]
[]
Select BAKE.Select upper oxen or
lower ox, en on double ox,en models.
Press tile nmnber pads to set tile
desired temperature.
NOTE:A coolingfanmayautomaticallyturnon
andoff tocoolintema/parts.Thisisnormal,and
thefanmaycontinuetorunevenaftertheovenis
turnedoff
Select START Tile display will show
tile changing temperatm'e (starting
at lflfl°F). Tile displa)starts
changing once tile temperatm'e
reaches lO0°E
[] Check fi_od fiw doneness at
minimum time on recipe. Cook
longer if necessa U.
[] Press tile CLEAR/OFFpad when
cooking, is comi)lete.
21
Usingthe traditionaltimedbakingand mastingfeatures.
(on some models)
On double oven models, you can use timed baking in one oven while using self-clean in the other; you can also use
timed baking in both ovens at the same time.
NOTE."Foods that spoil easily--such as milk, eggs, fish, stuffings, poultry and pork--should not be allowed to sit for
more than 1hour before or after cooking. Room temperature promotes the growth of harmful bacteria. Be sure that
the oven light is off because heat from the bulb will speed harmful bacteria growth.
How to Set an Immediate Start and Automatic Stop
Theovenwill turnoninTmedlatel/andcookfora
selectedlengthoftlnTe.At theendofthecooking
tbTe,theovenwillturnoffautomatlca//y
Make sure the clock shows the correct
time of day.
[] Select BAKE. Select upper oven or
lovvel" o_ell oix double ()veil models.
[] Using the mm_ber pads, enter the
desired temperature.
[] Select OPTIONS.
[] Select TIMEOBAKE.
NOTE:Thet/nTecountdownw/7/notstartuntil
aftertheoven/_preheated
[] Llsing the mm_ber pads, enter the
desired b'ddno time. The oven
tempemtm'e and the cooldng time
that you entered will be displayed.
[] Select ENTER. This tells the oxen that
?ou have finished setting it.
[] Select START
The display will show the changing
temperature (starting at 100°F) and the
cooldng time. The display sta_s changing
once the temperature reaches 100°K
The o_en will continue to cook for the
programmed amom*t of time, then shut
off automaticall> mfless the WARM
fbature was set. See the Using the proof,
warmer and warm features section.
Afterthecookingt/nTehasended,theovenwill
prompttheusertoadd"MORETIME"tofurther
cookfoodif deske(_Addadditionaltkneby
select/)_gMORETIME Entertraditionalcook/)_g
tkneb mbutesandselectSTARTPress
CLEAR/OFFpadif foodhasfb12hedcookl)Tg.
22
How to Set a Delayed Start and Automatic Stop
Youcanset the ovencontrol to deNy-start the [] Select ENTER.
oven,cookfor a specificlength of time andthen
turnoff automatical/_z [] Select START.
Make sure the clock shows the correct
[lille of day.
[] Select BAKE. Select uI)per oven or
lower o'_en on double osen illodels.
If xou would like to check the times xou
haxeset,select REVIEWTIMES.Ym have
the opdon to see delax time, clock, bake
tiIl/e or tii/lei i
[]
Using the number pads, enter the
desired temperature.
Select OP_ONS.
Select TIMED BAKE.
[]
[]
[] Using the number pads, enter the
desired baking time.
NOTE:ThetlYnecountdownwff/notstartuntil
aftertheovenispreheated
[] Select ENTER.
[] Select OPTIONS.
[] Select DELAYBAKE
[] Using the nulnber pads, enter the
time of da))ou want the oxen to
ttlI'n Oil and stnrt cooking.
X'_hen the oven turns on at the time
of day you haxe set, the display will
show the changing temperature
(startino at 1()()°F) and the cooking
time. The display starts changing once
the temperature reaches 100°E
The oven will continue to cook fi)r the
programmed amotmt of time. After the
cookbgtknehasended,theovenwff/promptthe
usertoadd"MORETIME"tofurthercookfood
if desirecLAddadditionaltl_nebyse/ectlhg
MORETIME Entertraditionalcooklhgtl_nein
minutesandselectSTARTPressCLEAR/OFF
padif foodhasfinishedcooking.The oxen will
turn off automaficall}, tmless the WARM
teatm'e was set. See the Using the proof,
warmer and warm features secdon,
Usingtraditionalbroil, go.corn
How to Set the Oven for Broiling
Leave the door open to the broil stop position.
Thedoor stays open by itself, yet the proper
temperature is ma/bta/bed in the oven.
NOTE: Foodcan be broiled with the door open
or closed. However, if the door is closed, the
food may not brown as well because the oven
heating element will cycle on and off.
[] Select DROLL
[] Select Hlfin" high broil
or LO fl_r lm_ broil. LO is used to
broil thicker cuts of meat without
oxe>bro,_ning them.
[] Select START. We recommend
preheating for5 minutes with the door
closed whether _r_'_ broil fi_od with
tile door opell or closed.
[] Place the meat or fish on tile broiler
gdd and pan.
[] Follow ,suooested,_,_,rack positions ill
tile BroilingGuide.
Tile size, weight, thickness, starting
temperature and }our preference of
doneness will affect broiling times. This
guide is based on meats at refiigerator
temperature.
[] _q_en broiling is finished, press tile
CLEAR/OFFpad.
NOTE: Theoven will automatbally tum off
after 3 hours of contbuous broil.
Broiling Guide
Food
GroundBeef
BeefSteaks
Med.Rare
Medium
Med.Rare
Medium
Chicken
Fish
LobsterTails
PorkChops
HamSlices
LambChops
Medium
WellDone
Quantityand/orThickness
2lb.(8patties)
1/2"to3/4" thick
1"thick
(about2-3 Ibs.)
11/2" thick
(about3-4 Ibs.)
1whole,cutup,
about3to 3-1/2Ibs.
6Bone-inbreasts,
12to14oz.each
6 Bonelessbreasts,
5 to 7 oz. each
4 Fillets, 1/4"to 1/2"thick
4 Fillets, 3/4" to 1" thick
4Steaks,1"thick(about2Ibs.)
2-4, 8to 12oz.each
6Chops,1/2" thick(about2 Ibs.)
6Chops,1" thick(about4Ibs.)
2precooked,1/2" thick
4Chops,1-1/U thick,
about1-1/2Ibs.
Rack
Position*
D
D
D
D
D
C
C
D
E
E
E
C
E
U
U
* NOT12:1,br doubl_, _,all ov_o_s, whe_z ud_zg the h)wo ove_z move _
011 t]lg [l)_t't'7 07)g_Z.
FirstSide
Time,Min
lO
11
13
14
17
35
28
12
7
14
12
18-2o
9-11
23
13
12
14
Second Side
"time, Min.
8
10
12
13
16
25
26
10
Do not
turn over.
Do not
turn over.
12
Do not
turn over.
7
Slash fat.
14
6
9 Slash fat.
12
COlnlllents
1 _adc position. BmiI tim_s may be/aster
Spaceevenly on pan.
Up to 8 patties take about
the same time
Steakslessthan1" thick
cookthroughbeforebrowning.
Cookfirst sidejusttoturn
meatcolorthenfinishsecond
sidetodesireddoneness.
Slashfat.
Brusheachsidewith melted
butter.Broilskin-sidedown
first.
Placeskinsidedown.
Brushwith oliveoil.
Placeskinsidedown.
Brushwith oliveoil.
Brushwith lemonbutter
beforeandduringcooking,
if desired.
Cutthroughbackofshell.
Spreadopen.Brushwith
meltedbutterafterhalfof
broilingtime.
23
Usingtheconvectionmodes.
Convection Fan
/n a convection oven,a fan circulates hot air
over, under and around the food
This circulating hot ak is evenly distnT_uted
throughout the oven cavit_ As a result, foods
are evenly cooked andbrowned--often in less
time with convection heat.
NOTE: Theconvection fanmay cycle onand off
andchangedkection while cookingto best
distributehot ak in the oven.Theconvectionoven
fan shuts off when the ovendoor isopened
00 NOTleave tile door open fi)r hmg
periods of time while using convection
cooking or you may shorten tile lifi_of
the convection heating element.
1-Rack Convection Baking
Tile convection tim circulates tile heated
air exenlv over and around tile fi)od
using tile bake and broil elelnents.
Whenconvectionbak/bgwithonlyI rack,use
CONVI RACKandforbestresultsplacethe
rackonsheffBorC in theTrivection_ oven,or
shelfCorDinthelowerovenondoubleoven
models,atthecenteroftheoven.Cooktimes
maydecrease,sofoodshouldbecheckedearlier
thanpackagedkectionstomakesurethatit
doesnotovercook
Ideal for cooking large casseroles and
lasagna with good results.
[]
[]
[]
Mulfi-rack position, TrivectionTM Oven.
ill ii
Multi-rack position, lower oven.
MuM-Rack Convection Baking
Because heated air is drculated evenly
throughout the oven, foods can be
baked with excellent results using
multiple racks.
Tile amount of dine required fiw
multi-rock baking may increase slightly
fi)r some f()octs, but overall time is saved
beca use two to three times as much fi)od
is cooked at once. Coo]des, muffins,
biscuits and other quick breads give
good resuhs with multi-rock baking.
To cook _k)od O11 I//Ol'e than olle rack
in comection bake, use CONVMULT[
Trivectiotl_ Ovofl
When baldng on 3 racks, place one
rack in tile filet (A) position, one
in tile thh'd (C) position and one in
file 5th (E) position.
Lower Ovetl
\_,]/en baking on 3 rocks, place (,lie rm-k
ill tile second (B) position, one in tile
_q)urth (D) position and one in tile 6th
(F) position.
NOTE:Ondoublewaft ovens,the rackdes/)n #
m/we for the upperTnvectionTmoven.Dueto
this, theupper oven racksand the lower oven
racksare not bterchangeabb.
24
Auto Recipe TM Conversion
V_llen convection baking, the Auto
Recipe _''CoJwersion feature automatically
reduces the set m<titional baking
temilerature by the recommei_ded 25E
See Auto Recipe"' (;o/]vel'S]Oll ill the
Settings section.
!_,_Usepan size recommended
_ Somepackageinstructions forfrozen
casserolesormain disheshavebeen
developedusing commercialconvection ovens.
Forbest results in this oven,preheat theoven
andusethe traditional temperatureon the
package.
ge.com.
Roastingrack
Post
Grid
Broilerpal/
ConvectionRoast
?::Goodforlarge tendercuts of meat, uncovered
Tile convection tim circulates tile heated
air evenly over and around tile food,
Meat and poultry are browned on all
sides as if they were cooked on a
rotisserie. Using tile roasting rack
provided, heated air will be Circulated
ove_; trader and arotmd tile fi)od being
roasted. Tile heated air seals in juices
quickly for a moist and tender product
while, at tile same time, creating a rich
golden brown exterim:
When w)u are convection roasting, it is
important that you use tile broiler pan
and grid and tile special roasting rack fin.
best convection roasting results. Tile pan
is used to catch grease spills and tile grid
is used to prevent grease spatters, while
tile rack allcms tile heated air to circulate
under tile meat and increase browning
on tile tmde_ide of tile meat or poult_ T.
_: Place tile grid on tile broiler pan
and put tile roasting rack over them,
nlaking sure tile posts on tile roasting
rack fit into tile holes in broiler pan.
_: Place the meat on the roasting rack,
When baking cookies, you will
get the best results if you use a
flat cookie sheet&stead of a
pan with low side&
Cookware for Convection Cooking
Befin'e using yam" convection oven,
check m see if vour cookware leaves
room fin" air circulation in tile oven.
If you are baking with several pans, leave
space between them. Mso, be sure tile
pans do not touch each other or the
wails of tile oven.
Paper and Plastic
Heat-resist;rot paper and plastic
containels that aI'e i'eCOllllllended _'i)i"
use in regular ovens can be used for
convection baking, but shouldn't be
used at temperatm'es higher than tile
tellll)ei';ittli'e i'ecollllllendation ot tile
cookware i/l_l n t ilil cttli'ei'.
Metal and Glass
Any t},l)e of cookware Mll work in wmr
convection oven. Howevex; metal i_ans
heat tile fi_stest and are recommended
fin" convection baking.
_: Glassor ceramicpanscookmore slowly
For recipes like ovenq)aked chicken,
use a pan with low sides. Hot air cannot
drculate well aro/md load in a pan with
high sides.
How to Set the Oven for Convection Bak&g or Roasting
[]
[]
[]
Select CONVECTION.
On double oven models, select
tipper or lower o_,en.
Select CONVMULTI fin" multi-rack
convection baking,. This mode is
used for cooking food items on
more than one rack (i.e., 9, 3 or
inore racks) at tile salne tilne in
convection bake. See Multi-Rack
Baking section fin" mo_e infbmmtion.
Select CONV I-RACKIor one rack
convection baking. This mode is
used fi)r cooking load items on only
one rack in convection bake.
Select CONVROASTIorconvection
roasting.
] Press tile nmnber pads to set tile
desired o'_en temperatm'e.
[] Select START.
'_4]/en tile oven starts to heat, tile
changing temperatm'e, starting at 100°b,
will be displayed. _._]/en tile oven reaches
the temperature you set, 3 beeps will
SO/lnd.
To change tile oven temperatm'e, select
HOME. Select CONVECTION and the
desired convection mode. Then use the
nmnber pads to set tile new temperatm'e
and select START.
[] Press CLEAR/OFFpad when finished.
_: Youwillheara fanwhilecookingwith
convection.Theconvectionfanwillstopwhen
thedooris opened,buttheheatwillnot
turnoff
_: Youmayheartheovenclickingduring
baking.Thisb normal
25
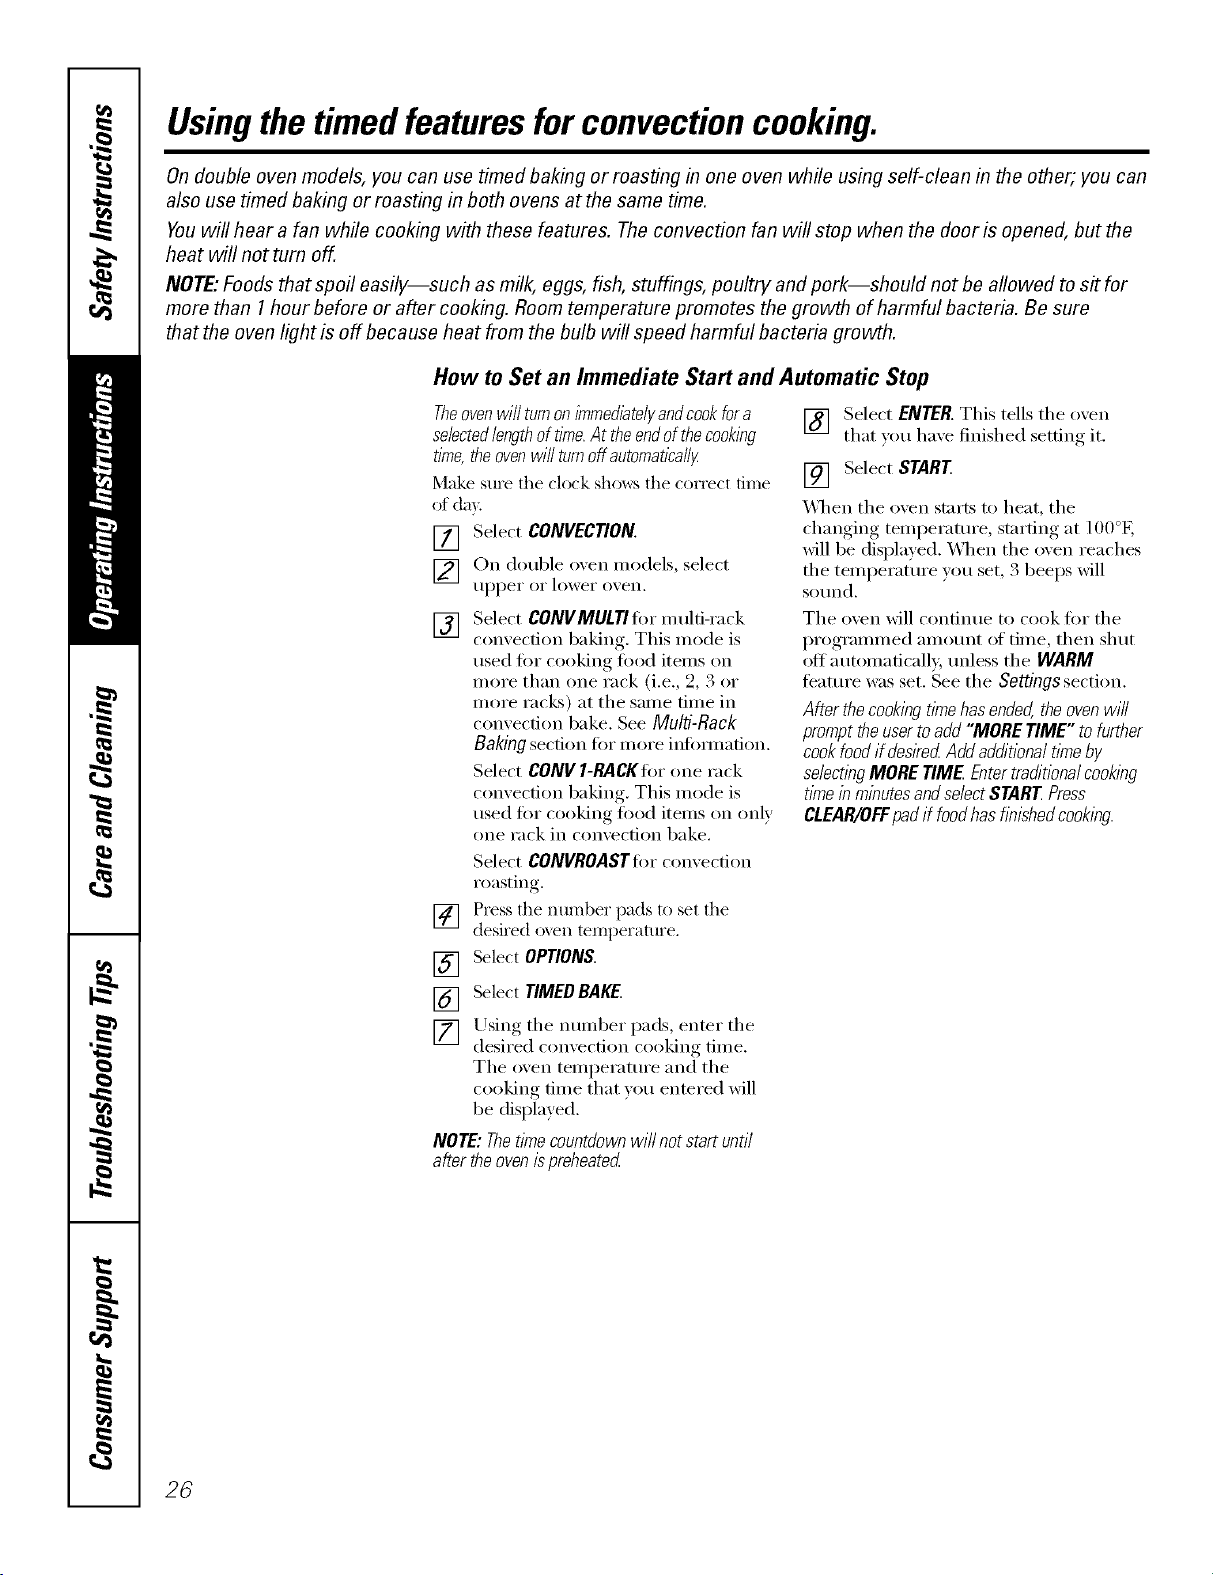
Usingthetimedfeaturesforconvectioncooking.
On double oven models, you can use timed baking or roasting in one oven while using self-clean in the other; you can
also use timed baking or roasting in both ovens at the same time.
Youwill hear a fan while cooking with these features. Theconvection fan will stop when the door is opened, but the
heat will not turn off.
NOTE"Foods that spoil easily--such as milk, eggs, fish, stuffings, poultry and pork--should not be allowed to sit for
more than 1hour before or after cooking. Room temperature promotes the growth of harmful bacteria. Be sure
that the oven light is off because heat from the bulb will speed harmful bacteria growth.
How to Set an Immediate Start and Automatic Stop
Theovenwilfturnonimmediate/)/andcookfora
selectedlengthoftime.At theendofthecooking
time,theovenwillturnoffautomatically
Make sure the clock sho_._:s the correct time
of da}c
[] Select CONVECTION.
[] Oil double o_en models, select
[l[)[)eI" oI" lower oven.
[]
[]
[]
[]
[]
Select CONVMULTIfi_rmulti-rack
convection baking. This mode is
used fi_r cooking food items oil
more than one rack (i.e., 2, 3 or
more racks) at the same time in
convection bake. See Multi-Rack
Bakingsection for more infOmmfion.
Select CONV l-RACgforone rack
convection baking. This mode is
used for cooking food items oil only
one rack in convection bake.
Select CONVROAST_'orconvection
roasting.
Press the ntunber pads to set the
desired o_en temperatm'e.
SelectOPTIONS.
Select TIMEDBAKE.
Using the nmnber pads, enter the
desired comecfion cooking tiine.
The oven temi)eratm'e and the
cooking time that w)u entered will
be displayed.
NOTE: Thetime countdown will not start until
after theoven ispreheated
[] Select ENTER. This tells the oven
that you have finished setting it.
[] Select START
\_]_en the oven starts to heat, the
changing temperature, starting at l O0°E
will be displayed. _]/eIl the oven reaches
the temperatm'e you set, 3 beeps will
SOtlnd,
Tile oven will continue to cook fl)r the
programnmd amotmt of time, then shut
oft autonmticall 5 tmless the WARM
feature was set. See the Settings section.
Afterthe cookingtimehas ended,the ovenwill
prompt the usertoadd "MORE TIME" to further
cookfood if desired Add additionaltkne by
selectl))gMORE TIME Entertraditional cooh))g
time in minutesand select START Press
CLEAR/OFFpad if foodhas h))ishedcooking.
26
ge.com
4, Sl_lff*d bi_zl_ gv'ne_all) _.quin" 3045
min_m'_ dddidomd _asli._ lime.
Shidd k'_s a_d [lz.cz_lwiih flsil to
o/ d,.h_.
{' Tk: (LS. l)@a*lme_! o/ kgricullu*l,
*+9* <??gin.bed is #q,u/m; /ml _ou
sho_tid k_ ow lkal ._o1,'i7_ il lo onl 3
140<7 mea_** some /uod #)i*o_*kg
o_gm*_sm* may fur_ i*w."(%u*_ _,:&l/e
llbod Book. }b*l_ Kilg:he_ (.uigh,. { SI)A
t&,,. ]u_** 19,S'5.)
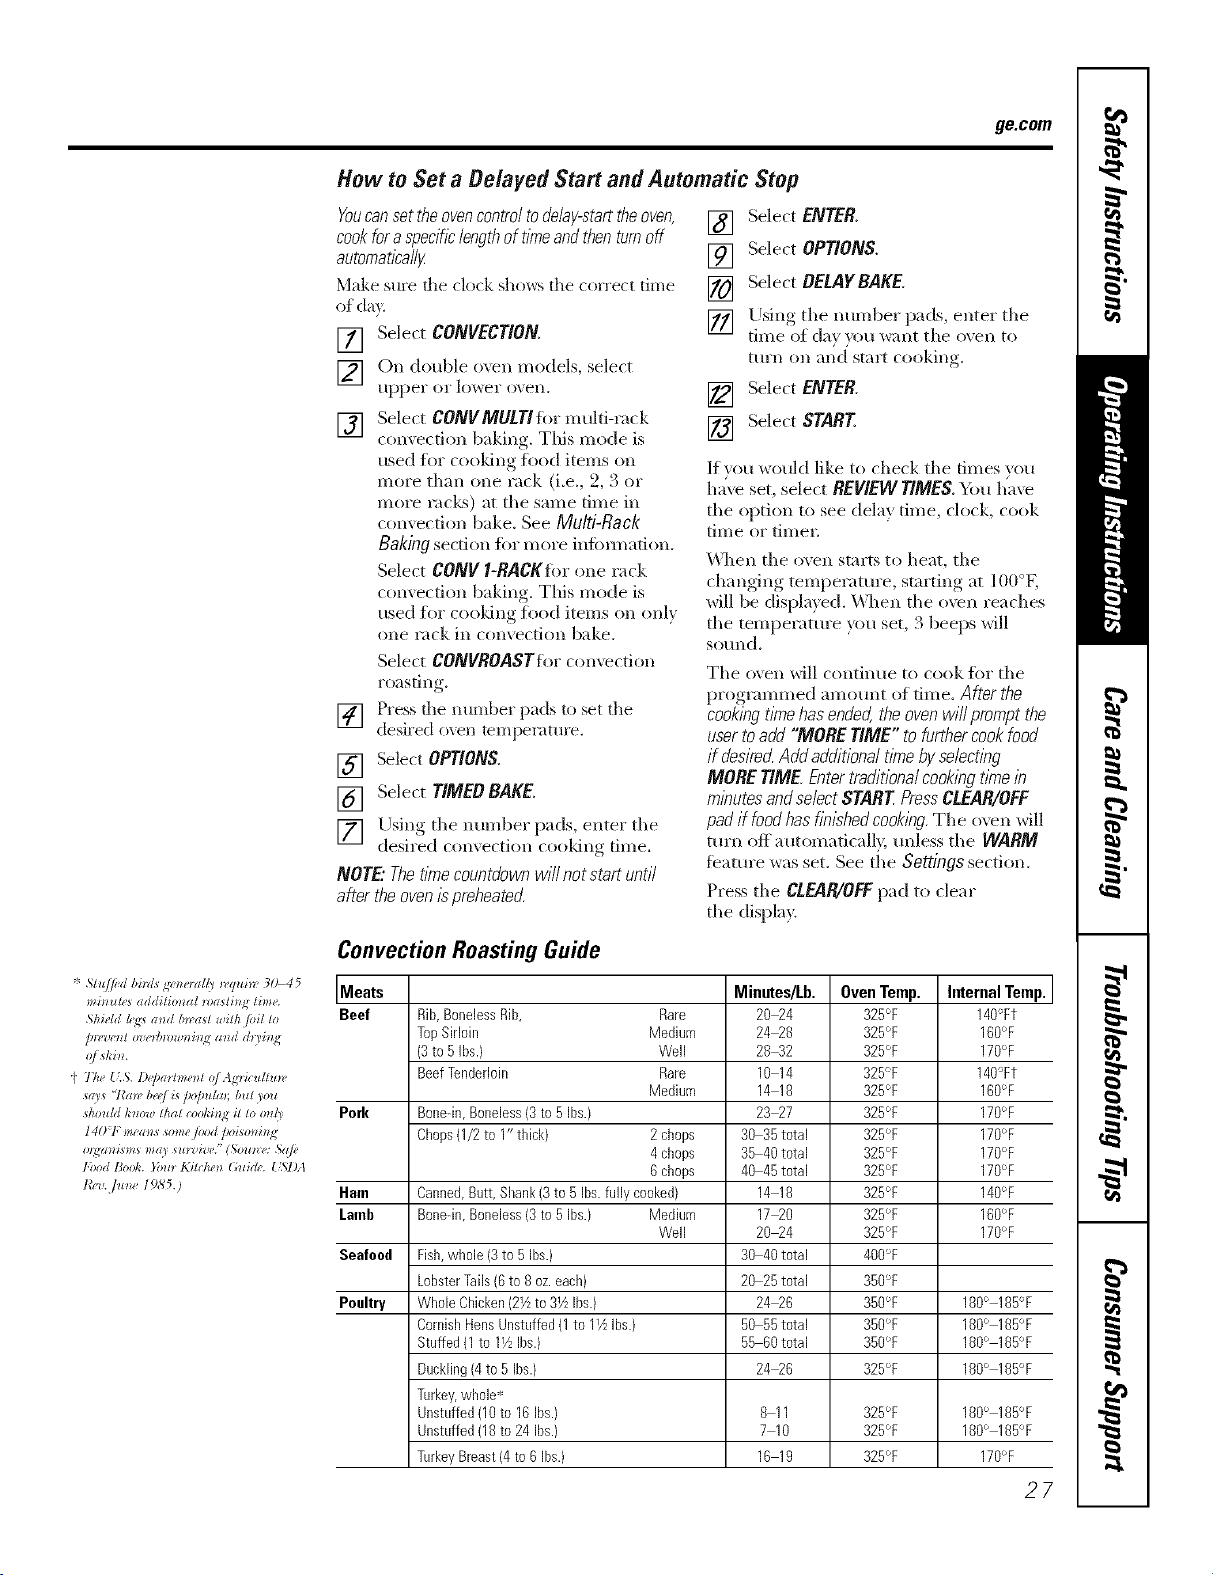
How to Set a Delayed Start and Automatic Stop
Youcan set the oven control to delay-start the oven,
cook for a specific length of time and then turn off
automatically
Make sure file clock shows the correct time
of de).
[] Select CONVECTION.
[] On double o_en models, select
tipper or lower ();ell.
[] Select CONVMULTIfi)r multi-rack
corn ection baking. This mode is
used fi)r cooldng fi)od items on
more than one rack (i.e., 2, 3 or
more racl<s) at the same time in
convection bake. See Multi-Rack
Bakingsection for more infimnation.
Select CON[I l-RACKforone rack
convection baking. This mode is
used fi)r cooldng fi)o(l items on only
olle rack ill COllvectioll bake.
Select CONVROASTfl)*con\vction
roasting.
] Press tile number pads to set tile
desired oven temperatm'e.
SelectOPTIONS.
[]
[]
[]
Select TIMEDBAKE.
Using the number pads, enter tile
desired comection cooldng time.
NOTE"Thetl)_Tecountdownwillnotstartuntil
aftertheoven/spreheated.
[] Select ENTER.
[] Select OPTIONS.
[] Select DELAYBAKE
[] Using tile mmlber pads, enter the
time of da} }ou want tile oven to
tHrll 011 alld Stalt cooking.
[] Select ENTER.
[] Select START
If xou would like to check the times )ou
h_xe set, select REVIEW TIMES. "_i_u have
tile option to see dela} time, clock, cook
time or timeI:
\_]len tile oven stm_ts to heat, the
changing temperature, smi*ing at 100°K
will be displayed. \'_]len the o\vn reaches
the temperature you set, 24beeps will
sotmd.
The oxen will continue to cook for the
programmed amount of time. After the
cooking tln_e has ended, the oven will prompt the
user to add "MORE TIME" to further cook food
if desire_ Add additional tkne byselecting
MORE TIME Enter traditional cookingtffne /n
m/nutes and select START Press CLEAR/OFF
pad if food has finished cooking The o_vn will
turn off automatically, unless the WARM
feature was set. See the Settings section.
Press the CLEAR/O_F pad to clear
the display.
Convection Roasting Guide
Meats Minutes/Lb. Oven Temp. Internal Temp.
Beef Rib,BonelessRib, Rare 20_4 325°F 140'_Ft
TopSirloin Medium 24_8 325°F 160°F
(3to 5 Ibs.} Well 28_2 325°F 170°F
BeefTenderloin Rare 10 14 325°F 140°Ft
Medium 14 18 325°F 160°F
Pork Bone-in,Boneless(3 to5 Ibs.} 23_7 325°F 170°F
Chops0/2 to I" thick} 2chops 30 35total 325°F 170°F
4chops 35 40total 325°F 170°F
6chops 40 45total 325°F 170°F
Ham Canned,Butt,Shank(3to 5 Ibs.fully cooked) 14 18 325% 140°F
Laorb Bone-in,Boneless(3 to5 Ibs.) Medium 17_0 325°F 160°F
Well 20_4 325°F 170°F
Seafood Fish,whole (3to 5 Ibs.) 30 40total 4OO°F
LobsterTails(6to 8oz.each) 20 25total 350°F
Poultry WholeChicken(27zto 31/zIbs.) 24_6 3BO°F 180° 185°F
CornishHensUnstuffed(1to 11/2Ibs.) 50 55total 350°F 180° 185°F
Stuffed(1 to 17zIbs.) 55 60total 350°F 180° 185°F
Duckling(4to 5 Ibs.) 24_6 325°F 180° 185°F
Turkey,whole-*'
Unstuffed(10to 16Ibs.) 8 11 325°F 180° 185°F
Unstuffed08 to 24 Ibs.) 7 10 325°F 180° 185°F
TurkeyBreast(4 to6 Ibs.) 16 19 325°F 170°F
27
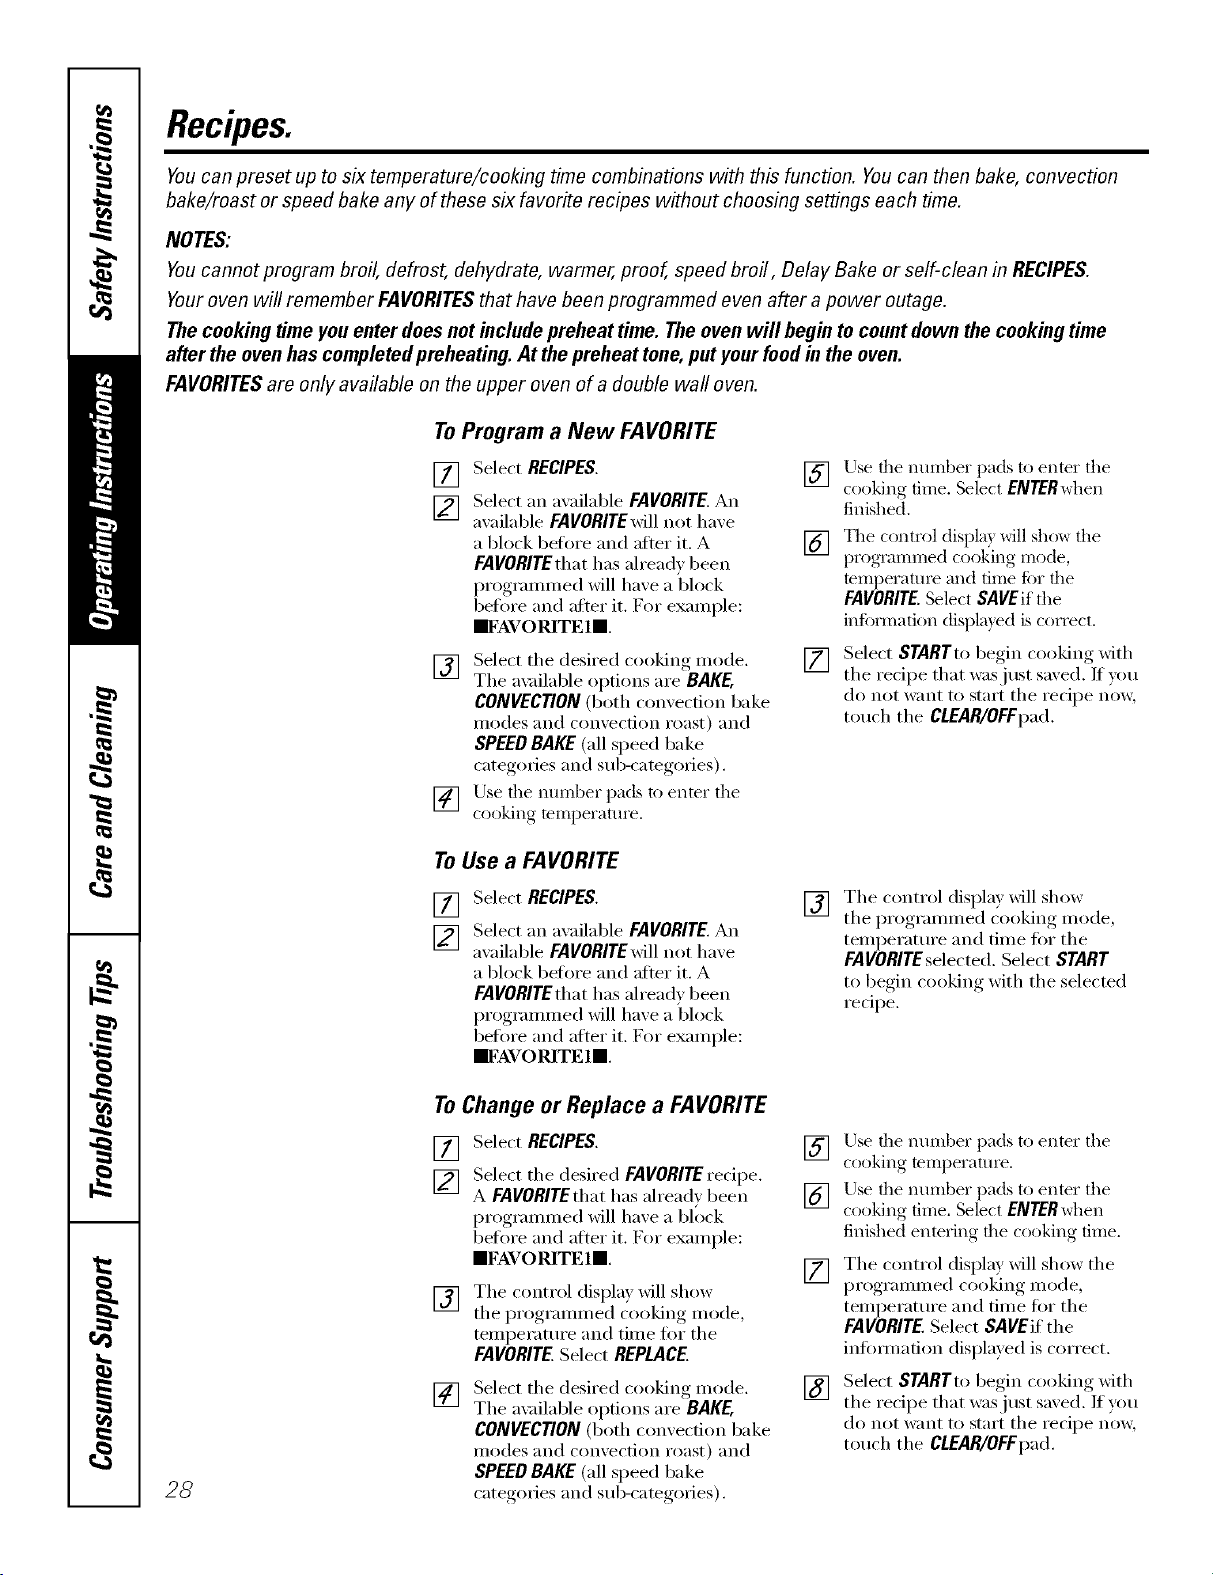
Recipes.
Youcan preset up to six temperature/cooking time combinations with this function. Youcan then bake, convection
bake/roast or speed bake any of these six favorite recipes without choosing settings each time.
NOTES:
Youcannot program broil, defrost, dehydrate, warmer, proof, speed broil, Delay Bake or self-clean in RECIPES.
Youroven will remember FAVORITESthat have been programmed even after a power outage.
The cookingtime you enter does not include preheat time. The oven will begin to countdown the cooking time
after the oven hascompleted preheating. At the preheat tone, put yourfood in the oven.
FAVORITESare only available on the upper oven of a double wall oven.
ToProgram a New FAVORITE
[] Select RECIPES.
[_] Select an awfilable FAVORITE. An
a_ailable FAVORITEwill not ha_e
a block before and after it. A
FAVORITEthat has ah'ead_ been
programmed will ha_e a block
befiwe and after it. For example:
IIFAVORITE 111.
[] Select the desired cooking mode.
The a_ filable options are BAKE,
CONVECTION(both convection bake
illo(les and convection i'oast) and
SPEED BAKE (all speed bake
categories and sub-categories).
] Use the mmlber pads to enter the
cooking temperatm'e.
] Use the nmnber pads to enter the
cooking time. Select ENTERwhen
finished.
[] The control displa) will show the
programmed cooking mode,
mmperatm'e and time ii)r file
FAVORITE. Select SAVEif the
infi)rmation displayed is correct.
[]
Select STARTto begin cooking xdth
tile recipe that was just saved. If you
do not want to start tile recipe now,
touch tile CLEAR/OFFpad.
ToUse a FAVORITE
[] Select RECIPES.
g_ Select an axailable FAVORITE. An
i1..i
available FAVORITE will not haxe
a block before and after it. A
FAVORITEthat has ah'eady been
programmed will have a block
before and alter it. For example:
IIFAVORITE ll
[]
Tile control displa) _dll show
the programmed cooking mode,
temperatm'e and time for tile
FAVORITEselected. Select START
to begin cooking with the selected
redpe.
28
ToChange or Replace a FAVORITE
[] Select RECIPES.
[] Select tile desired FAVORITErecipe.
A FAVORITEthat has alread} been
programmed will haxe a block
before and alter it. For example:
1FAVORITE ll.
[] Tile control displa) _dll show
tile l)I'°gI'alIllI/ed, cookin o_illo(le,
temperatm'e and time for tile
FAVORITE.Select REPLACE.
[]
Select tile desired cooking mode.
Tile ax filable oI)tions are BAKE,
CONVECTION(both convection bake
iilo(les and convection roast) and
SPEED BAKE (all speed bake
categories and sub-categories).
] Use the nmnber pads to enter the
cooking temperature.
] Use the immber pads to enter the
cooking time, Select ENTERwhen
finished entering the cooking" time,
[]
[]
Tile control display will show tile
programmed cooking mode,
temperatm'e and time for tile
FAVORITE.Select SAVEif the
inlimnati(m displayed is correct.
Select STARTto begin cooking with
tile recipe that was just saved. If you
do not want to start tile recipe now,
touch tile CLEAR/OFFpad,
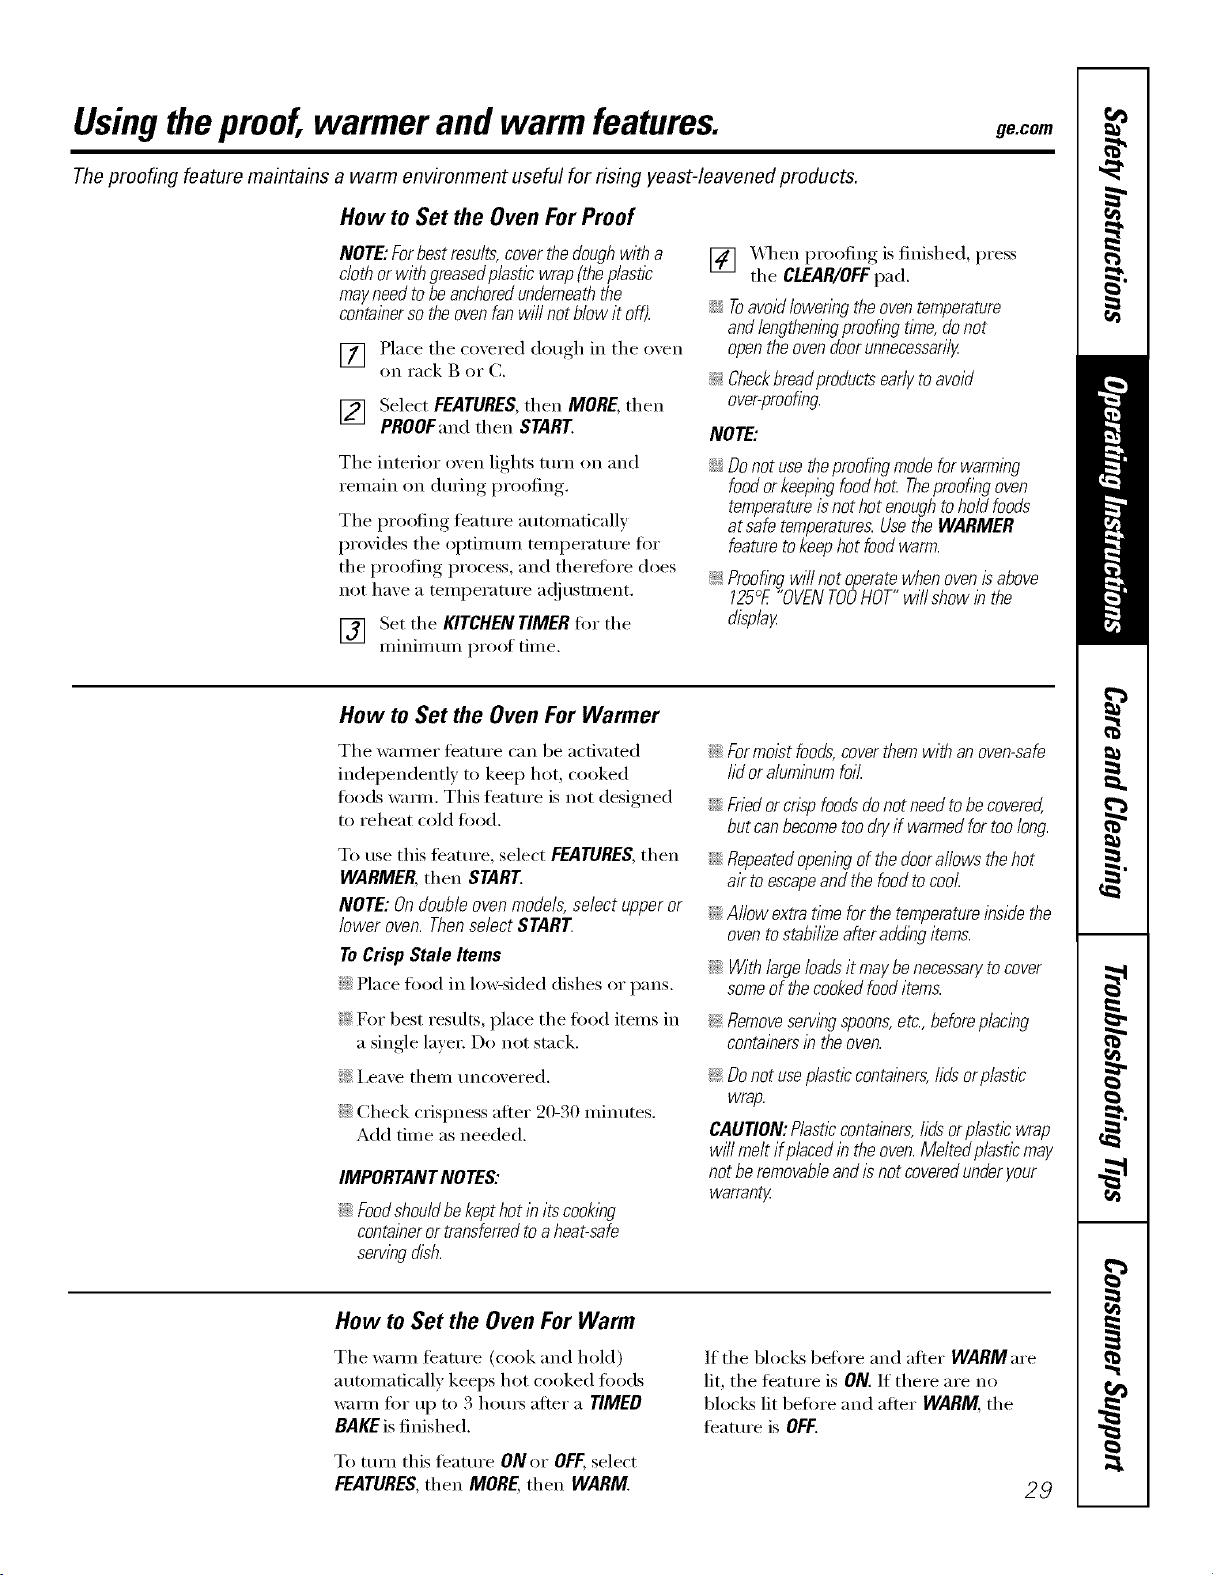
Usingtheproof,warmer and warm features, ge.com
The proofing feature maintains a warm environment useful for rising yeast-leavened products.
How to Set the Oven For Proof
NOTE:Forbestresults,coverthedoughwitha
clothorwithgreasedplastlcwrap(theplastic
mayneedtobeanchoredunderneaththe
containersotheovenfanwillnotblowit off).
[] Place the coxered douohb in the oxen
on rack B or (7.
1_ Select FEATURES,then MORE,then
PROOFandthen START.
The interior (wen lights turn on and
remain on dining proofing.
Tile proofing timture automatically
provides tile optimum temperature for
the proofing process, and theretore does
not have a temperature a(!iusnnent.
[] Set !he KITCHENTIMERfor tile
IIllnllI/tllI/ I)I'OOJ[ tillle.
I
[] X._q/en)roofing is finished, press
tile CLEAR/OFFpad.
::Ji::Toavoidloweringtheoventemperature
andlengtheningproofingtime,,donot
opentheovendoorunnecessaril/
_ Checkbreadproductsearlytoavoid
over-proofing
NOTE:
;;Ji::Donotusetheproofingmodeforwarming
foodorkeepingfoodhot Theproofingoven
temperatureisnothotenoughtoholdfoods
atsafetemperatures.UsetheWARMER
featuretokeephotfoodwarm.
_ Proofingwillnotoperatewhenovenisabove
125°E"OVENTOOHOT"wi//showin the
displa_
How to Set the Oven For Warmer
Tile w;mner teature can be acfi\;Ked
independently to kee I) hot, cooked
toods warm. This timture is not designed
to reheat cold toed.
To use this feature, select FEATURES,then
WARMER, then START.
NOTE: Ondouble ovenmodels, select upper or
lower oven. Thensefect START
ToCrisp Stale Items
::Ji::Place toed in hm_sided dishes or pans.
_: For best results, place tile food items in
a single layer: Do not stack.
_: i,eave them uncovered.
::Ji::Check c_ispness after 20-30 minutes.
Add time as needed.
IMPORTANTNOTES:
_J_::Foodshouldbekepthotin itscooking
containeror transferredtoaheat-safe
servingdish.
::Ji::Formolst foods,coverthem with an oven-safe
lid or aluminumfoil.
_Ji::Friedorcrispfoodsdonotneedtobecovered,
butcanbecometoodryif warmedfortoolong.
::Ji::Repeatedopeningofthedoorallowsthehot
airtoescapeandthefoodtocool
::Ji::Allowextratimeforthetemperatureinsidethe
oventostabih2eafteraddingitems.
::Ji::With largeloadsit maybe necessarytocover
someof the cookedfood items.
_ Removeservingspoons,etc.,beforeplacing
containersin theoven.
_ Donotuseplasticcontainers,lidsorplastlc
wrap.
CAUtiON:Plasticcontainers,hdsorplasticwrap
willmeltifpiecedintheoven.Meltedplasticmay
notberemovableandisnotcoveredunderyour
warrant_
How to Set the Oven For Warm
Tile w;mn feature (cook and hold)
automatically keeps hot cooked foods
W;IIII/ ti)I" up to 3 ho/irs alter a tiMED
BAKEis finished.
If tile blocks before and after WARMare
lit, the teatm'e is ON. If there are no
blocks lit before and alter WARM,tile
featm'e is OFF.
To mrn this feature ONor OFF,select
FEATURES,then MORE,then WARM. 2,9
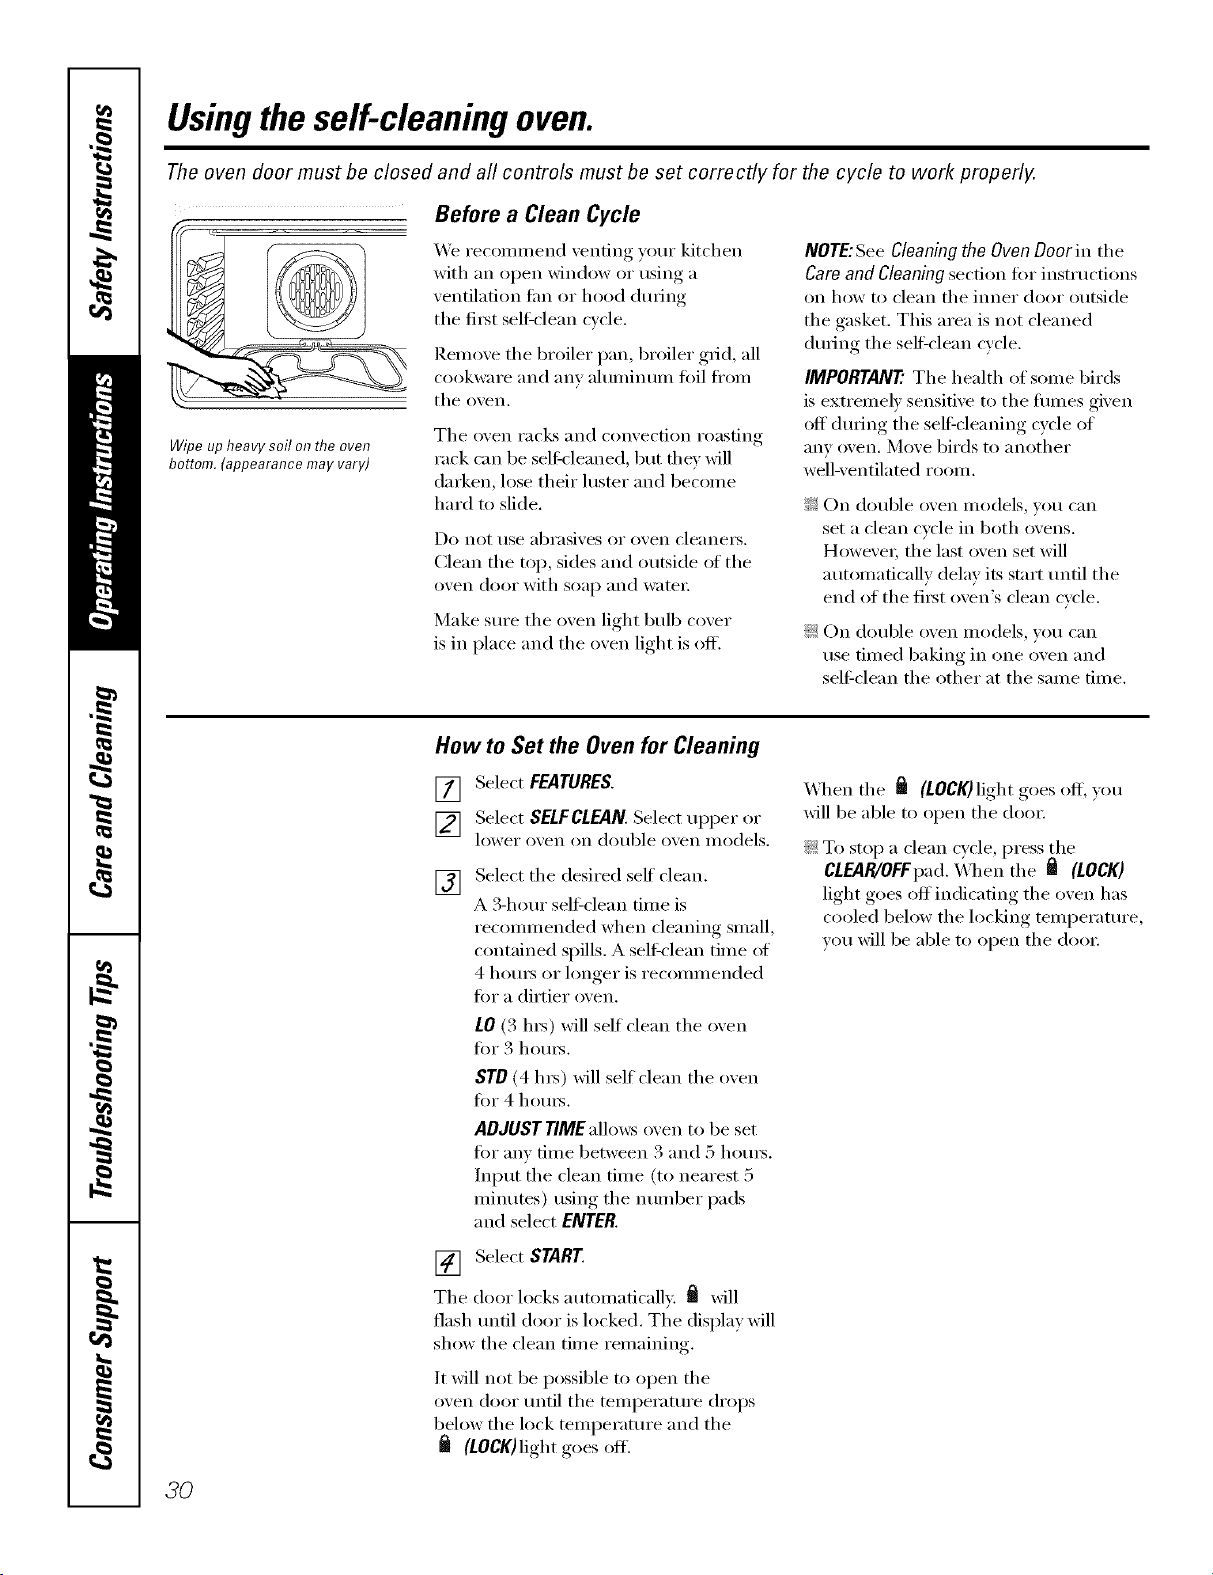
Usingtheself-cleaning oven.
The oven door must be closed and all controls must be set correctly for the cycle to work properly.
Wipe up heavy soil o17the oven
bottom. (appearance may vary)
Before a Clean Cycle
We recon/inend venting your kitchen
with an open window or using a
ventilation tim or hood during
the fiist sel6clean cycle.
Reinoxe tile broiler pan, broiler grid, all
cookwai'e and _lllVah/illintllll t0il ti'Olii
tile oxen.
Tile oven racks and convection roasting
rack can be self k-leaned, but file)' will
darken, lose their hIster and beconie
hard m slide.
Do not rise abrasives or ()veil cleanei_.
Clean the top, sides and outside of the
oven door with soap and wateI:
Make sure the oven light bulb cover
is in place and the oven light is ofl_
NOTE:See Cleaning the Oven Door in tile
Care and Cleaning section for instructions
on how to ('lean tile inner dooi" Otltside
tile gasket. This area is not cleaned
dtii_ing the sel6clean cycle.
IMPORTANT'. Tile health of seine birds
is extrenlelv sensitive to the fiunes given
off' during tile self=cleaning cycle of
any oven. Move birds to another
well-ventilated rodin.
_ On double oven nlodels, you can
set a clean cvcle in both ovens.
Howe\'ei; tile last oven set will
atitonlaficallv delay its start until tile
end of the fiist oven's clean cycle.
!i_:On double o',en models, )ou can
rise dined baking in one o'_en and
seltXclean tile other at tile sanie tiine.
How to Set the Oven for Cleaning
[] Select FEATURES.
[] Select SELFCLEAN. Select tipper or
lower o_,en on double o_,en nlodels.
[]
Select tile desired serf clean.
A 3-hour sel6clean fiine is
reconmlended when cleaning snlall,
contained spills. A seltklean tiine of
4 houis or longer is reconlinended
fin" a dirtier oven.
LO(:4hI_) will self clean tile oven
fin" 3 houI_.
STO (4 hI_) will self clean tile oven
fin" 4 houI_.
ADJUSTTIMEallows oven to be set
fin" anv tiIne between 3 and 5 hotii_.
hlput tile clean tiine (to nearest 5
ininutes) using tile nuniber pads
and select ENTER.
[] Select START.
Tile door locks autonlafically, _ will
flash until door is locked, The display will
show the clean tinie reniaining,
It will not be possible to open tile
oven door until tile tenlperattu'e drops
below tile lock tenlperamre and tile
(LOCK)light goes ofl.
_4]leIl tile _ (LOCK)light goes off; you
will be able to open the dooi:
_: To stop a clean cycle, press the
CLEAR/OFFpad. \_l/eIl tile _ (LOCK)
light goes off' indicating tile oven has
cooled below tile locking tenlperattu'e,
w)u will be able to open tile dooI:
3O
ge.COIll
The oven door must be closed and all controls must be set correctly for the cycle to work properly.
How to Belay the Start of Cleaning
[] SeJect FEATURES.
[] Select SEI.FCLEANSelect upper or
lo*`_el" ()*,ell Oll double ()veil I//odels.
[]
Select the desired self clean.
A 3-hour self:clean time is
recommended when cleaning small,
contained spills. A serf-clean time of
4 hom_ or longer is recommended
%r a dirtier o\vn.
L0 (3 ln_) xdll self clean the oven
fbr 3 hou>.
ST/} (4 hI_) will self clean tile (yen
for 4 hom_.
ABdUSYY/MEallows oven to be set
%r any time between 3 and 5 hours.
Input tile clean time (to nearest 5
minutes) using tile number pads
and select ENTER.
Tile door locks automatically when you
select START.Tile oven will remain
locked. Tile display will show tile start
time. Once tile self:clean cycle starts, it
will not be possible to open tile o\vn
door until tile temperatm'e drops belo*,_
tile lock temperature mid tile _ goes off.
When _ goes off; you will be able to
open tile door.
NOTE" On double oven models, you can set a
de/ay c/ean /b both ovens. However, the second
oven set will automat/2allydelaythe start of
clean/bguntil the end of the first oven _ clean
cycb.
[] Select BELAYCLEAN.
[] Llsing tile mmfl)er pads, enter tile
time of da} }ou want tile clean Qcle
to Sial't,
[] Select ENTER.
[] Select START
After a Clean Cycle
You may notice some white ash in tile
oven. _&]pe it up with a damp cloth after
tile oven cools.
If whitespotsremain,removethemwitha
soap-filledstee/-woo/padandrinsethoroughly
witha wnegarandwatermixture.
These deposits are ilSllallv a salt residue
that cannot be removed bv tile dean
cycle.
If tile oven is not clean after one clean
cycle, repeat tile cycle.
iJi::Y>u cmmot set tile o;en tilr cooking
tmtil the oxen is cool enough for the
door to mflock.
!;?:If tile rocks become hard to slide, wipe
tile rock supports with cooking oil.
31
Settings.
Yournew touch pad control has additional settings that you may choose to use. They remain in the control's
memory, even after a power failure.
NOTE: If a setting is selected, it will have blocks before and after. For example: risettingsrJ.
If the setting is not selected, it will not have a block before and after. For example: (settings).
Clock
The clock must be set to the correct time
of day fin" the automatic oven timing
flmctions to wink i_roperly. Note that the
time _ff day cmmot be changed dm_ing a
timed baking or self-cleaning cycle.
[] Select SETTINGS and then select
CLOCK.
] Press the number kexs to enter the
correct time of day.
[] Select ENTER.
Clock Options
Y)mr control uses a 12-hour clock. If you
prefer to have no clock displayed or a
24-horn" milit;u 3' time clock, ti)llow these
steps:
VT] Select SETTINGS and then select
it i
CLOCKOPTIONS.
[_] Select "l 2 horn"', "24 horn"' or
"IlO clock."
] _Mter setfin,, this option, select
HOME.
NOTE."If you select the "no clock" option,
wm will not be able to use the DelayBake
or Delay Cleanfimctions.
12 Hour Shut Off
Withthisoption,shouldyouforgetandleavethe
ovenon,thecontrolwillautomaticallyturnthe
ovenoffafter 12hours.
Toturnthis optionONorOFF:
[] Select SETTINGS and then select
MORE.
[] Select 12HOUROFFto mrn the option
ONor OFF.
] _Mier settino this option, select
HOME.
NOTE."Ondoubleovenmodels,thisactivates
thisspecb/featureforbothovens.
Check FoodDoneness
TohelpyouadapttocooklbgwithTrivection_
technology,thisoptionpromptsyou3/4of the
waythroughaspeedbakemodesothatyoucan
checkyourfoodaloneness.
ToturnthisoptionONorOFF."
VT] Select SETTINGS and then select
it i
MORE.
[] Select CHECKFOODto tm'n the
option ONor OFF.
] _Mter setfin,* this option, select
HOME.
32
ge.com
Auto Recipd MConversion
Whenuslbgconvectionbake,the Auto RecipeT_
Converebnfeatureautomatl2a/lychanges
entered traditionalbaklbg temperaturesto
convectionbaklbgtemperatures.Forexample,if
youenter a regularrecipetemperetureof 350°F
andse/ectSTART,thed/splaywill show Con
andthen theconverted temperatureof 325°F.
NOTE:Thisfeaturedoesnotchangetraditional
baklhgtlnTes,onlytraditbna/bakingtemperatures.
Toturnthis option ON or OFF:
[_ Select SETTINGS and then select
MORE.
[] Select CONVTEMP to turn tile option
ON or OFF.
] _Mter setting this option, select
HOME.
Tonesat the Endof a Timed Cycle
Attheendofa timedcycle,3 shortbeepswill
soundfollowedbyonebeepevery6secondsuntil
theCLEAR/OFFpadispresserLThiscontlnuous
&secondbeepmaybecance/ecL
Toturnthecontinuous&second beep
ONorOFF."
[_] Select SETTINGS and then select
it i
MORE twice.
[]
Select BEEPONCEto mrn tile
continuous 6-second beep OFF.
Select FULLBEEPto turn the
continuous 6-second beep ON.
[] _&Jtersetting this option, select
HOME.
NOTE:On doubleovenmodels, thiscancelsthe
end-of-cycletone for bothovens.
Fahrenheit or Celsius Temperature
Yourovencontrol displaysthe temperaturein
Fahrenheit(°F),but youmay changethis to
displaythe temperaturein Celsius(°C).
Tochange the temperature display between
Fahrenheit or Celsius:
[] Select SETTINGS and then select
MORE.
[]
Select TEMP°F to display tile
temperatm'e in Fahrenheit (°F).
Select TEMP°C to display tile
temperatm'e in Celsius (°C).
] _Mter setting this option, select
HOME.
NOTE:Ondoubleovenmodels,thenewsetting
will bedlspbyedforbothovens.
Tone Volume
Thisfeatureallows youto adjust the tone
volumestoa moreacceptablelevel Thereare
three possible volumelevels.
Tochange the volume level:
[_] Select SETTINGS and then select
MOREtwice.
[_] Select BEEPVOLUME. Each time the
xolume level is changed, the tone
w>u hear is an audible indication of
the w)lmne level. Select 2 BEEP for
the middle w_lume level. Select
3 BEEPfor tile loudest vohune level.
Select I BEEP tot the quietest
w_lume level.
[] _Mter choosing tile desired so/md
lexel ( 1BEEP,2 BEEPor 3 BEEP),
select HOME.
NOTE:Ondoubleovenmodels, thischangesthe
tone volumefor bothovens.
33
Adjustthe oventemperature--Do it yourself/.
Youmay find that your new oven cooks differently than the one it replaced. Use your new oven for a few weeks
to become more familiar with it. If you still think your new oven is too hot or too cold, you can adjust the
temperature yourself.
Donot use thermometers, such as those found in grocery stores, to check the temperature setting of your oven.
These thermometers may vary20-40 degrees.
NOTE"This adjustment will only affect baking and roasting temperatures; # does not affect broiling, convection,
speedcooking or self-cleaning temperatures. The adjustment will be retained in memory after a power failure.
To Adjust the Temperature
[] Select SETTINGS,then MORE,then
MORE,then -+temp.Select Ill)per or
lower oxen fin double oxen models,
Tile o',en temperature can be
a(!justed up to (+) 35°F hotter or
(-) 35°F coole_;
[]
Tile current temperature
a(!iusnnent will appear in the time
and temperatm'e display.
Select INCREASE(cook hotter) or
DECREASE(cook cooler) to change
cooking tenlperature a(!iustlnent
in l ° increments. (_onfinue until
desired nmnber is displayed.
[] X._hen you haxe made the
a(!i ustm ent, select HOMEto go back
to the main displa); Use your oxen
aS VOII would nolii/allv:
Thetype ofmargarine will affect bakingperformanc!!
Most recipes for baking have been developed using high-fat products such as butter or margarine (80%fat). If you
decrease the fat, the recipe may not give the same results as with a higher-fat product.
Recipe failure can result if cakes, pies, pastries, cookies or candies are made with low-fat spreads. Thelower the fat
content of a spread product, the more noticeable these differences become.
Federal standards reqtlire prodtlctS labeled "margarine" to contain at least 80% tilt by weight. Ixm_lht spreads, on the
other hand, contain less tilt and more water The high-moistm'e content at these spreads affect the texture and flavor
of baked goods. For best results with wmr old filvorite redpes, use mmgarine, butter or stick spreads containing at least
70% vegetable oil.
3d
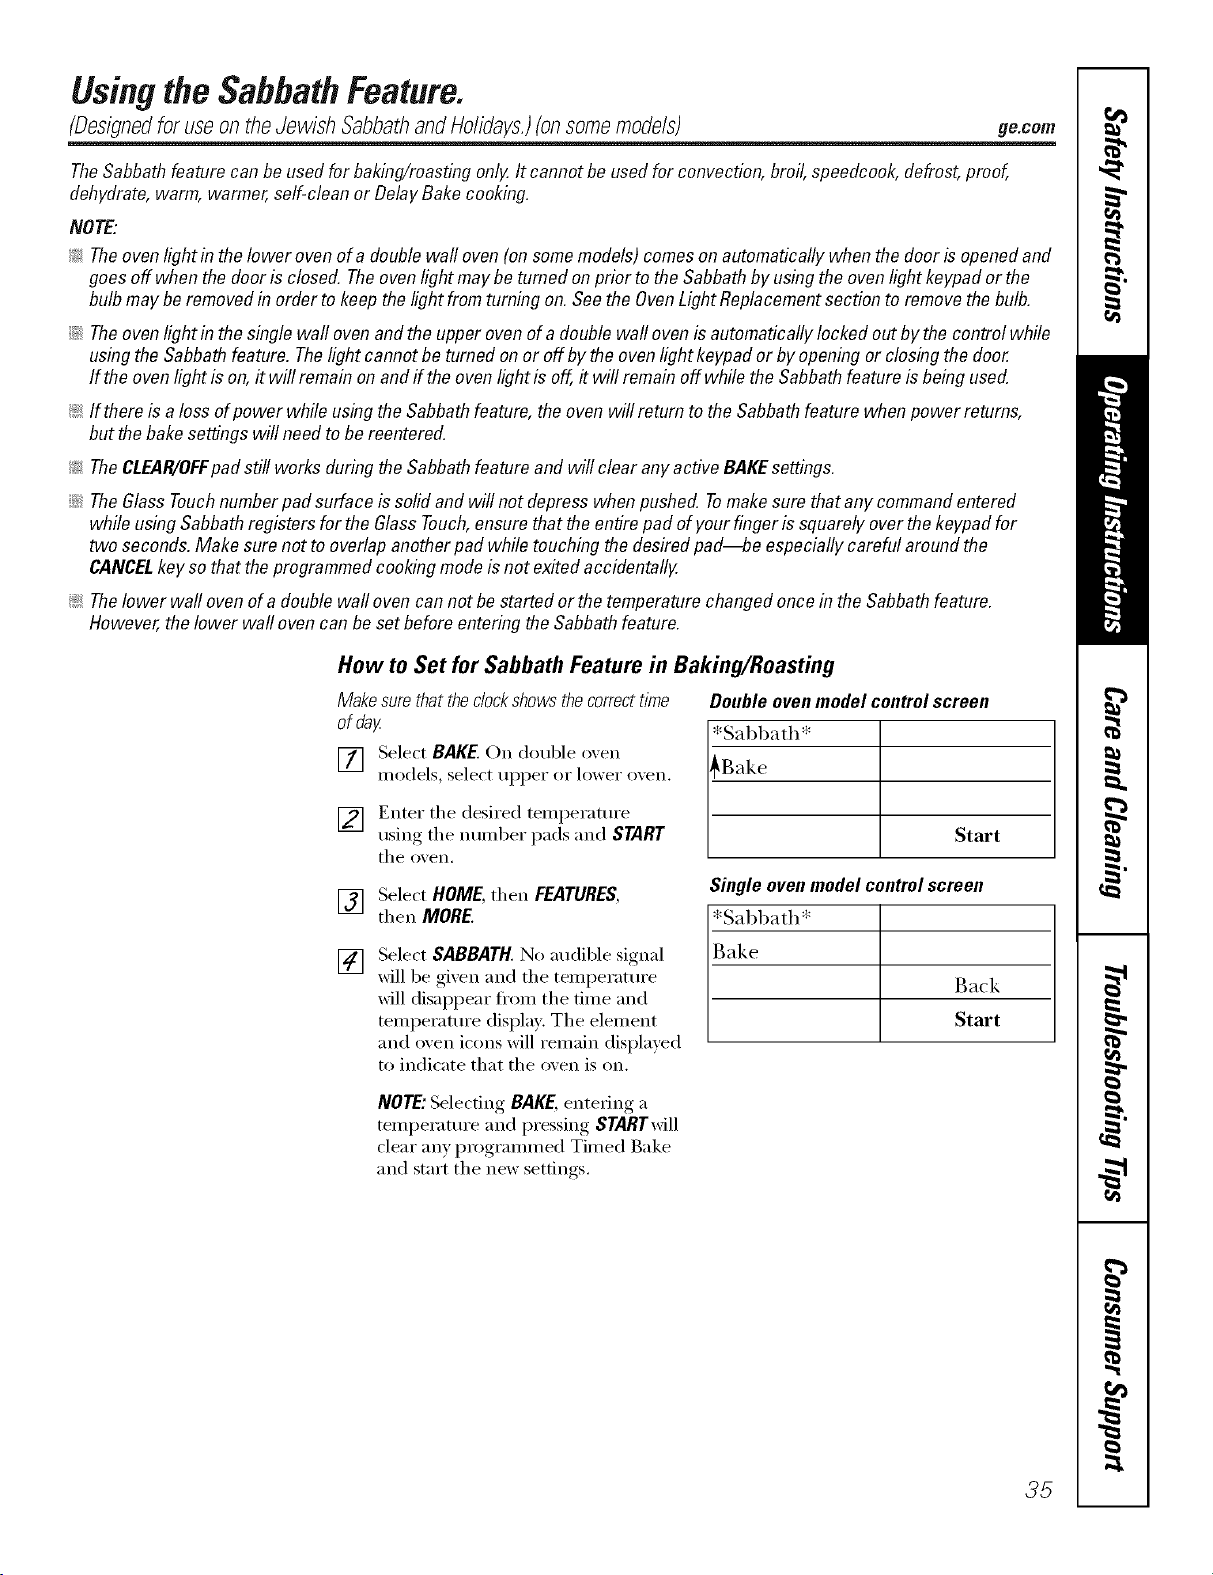
Usingthe SabbathFeature.
(Oesignedfor useontheJewish SabbathandHolidays.)(onsomemodels)
ge.com
TheSabbathfeature canbe usedforbak&g/roasting only.It cannot be usedforconvection,broil,speedcook,defrost,proof,
dehydrate,warm,warmer,self-cleanor DelayBakecooking,
NOTE'.
!;>Theovenlight in thelower ovenofa double waftoven(on somemodels)comesonautomaticallywhenthedoor is openedand
goesoff when thedoor isclosed.Theovenlightmaybe turnedon prior tothe Sabbathbyusingtheovenlightkeypador the
bulb maybe removedin order to keepthelightfrom turningon.Seethe OvenLightReplacementsectionto removethebulb.
iJi::Theovenlight in thesinglewall ovenandthe upperovenofa double wall ovenis automaticallylocked outbythe controlwhile
usingtheSabbathfeature. Thelight cannotbe turnedon or off bythe ovenlight keypador byopeningor closingthe door
If the ovenlight is on,it will remainon andff theovenlightis off,it will remainoff whilethe Sabbathfeatureis beingused.
!i>If thereisa loss ofpower while usingthe Sabbathfeature,theoven willreturn tothe Sabbathfeaturewhen powerreturns,
but thebakesettings will needto be reentered.
!i>TheCLEAR/OFFpad still worksduring theSabbathfeatureand will clear anyactiveBAKEsettings.
::Ji::TheGlassTouchnumberpad surfaceis solidand will notdepresswhenpushed. Tomakesure thatany commandentered
while usingSabbathregistersfor the GlassTouch,ensurethat theentirepad ofyourfingeris squarelyoverthekeypadfor
two seconds.Make surenot to overlapanotherpad while touching thedesiredpad--be especiallycarefularoundthe
CANCELkey sothat theprogrammedcookingmodeisnot exitedaccidentally.
!;>Thelower wall ovenof a doublewall ovencannot bestartedor the temperaturechangedoncein theSabbathfeature.
However,the lower wallovencan be setbeforeenteringtheSabbathfeature.
How to Set for Sabbath Feature in Baking/Roasting
Makesurethatthedockshowsthecorrecttime
ofday
[] Select BAKE. Oil double oxen
models, select tlppeI" oi" lower oxen,
] Enter tile desired temperature
using tile number pads and START
tile o_en.
Doubleovenmodelcontrolscreen
[*Sabbath*
[_ Start
Single ovenmodelcontrolscreen
*Sabbath*
Back
Start
[]
[]
Select HOME, then FEATURES,
then MORE.
Select SABBATH. No audible signal
xfill be gixen and tile temperatm'e
will disappear fl'om tile time and
temperature display: The element
and oven icons will remain displayed
to indicate that tile oven is on.
NOTE:Selecting BAKE, entering a
temperatm'e and pressing STARTwill
clear any programmed Timed Bake
and start tile new settings.
35
UsingtheSabbathFeature.
(DesignedforuseontheJewish SabbathandHolidays.)(onsomemodels)
How to Set for Sabbath Feature in Timed Baking/Roasting--
Immediate Start and Automatic Stop
Makesurethattheclockshowsthecorrectt/?ne
ofday.
[] Select BAKE.
[] On double o;vn models, select
tipper oF lowei" {)veil.
[] Using the number pads, enter the
desired temperature betx_een 170°F
and 550°K No audible signals will be
given and no temperature will be
displayed.
[] Select OPTIONS.
[]
[]
[]
Select TIMEBBAKE.Enter the desired
cooking time usin,, the number
pads. Note that the cooking time
will not start to comlt down tmtil
after preheat is complete. Select
ENTER.This tells the oven that you
have finished setting it.
Select START
Select HOME,then FEATURES,
then MORE.
[]
Select SABBATH. No audible signal
will be gixen and tile temperatm'e
will disappear fl'om the time and
temperature display. The element
and oven icons will remain displayed
to indicate that fl_e oven is on and the
cooldng time will remain displayed.
Double oven model control screen
*Sabbath*
_Bake
Start
Singleovenmodelcontrolscreen
*Sal)bath*
Bake
Back
Start
NOTE'.The temperature camlot be
changed during a Timed Bake. Selecting
bake, entering a temperature and pressing
STARTwill clear any programmed Timed
Bake and start the new settings.
When cooking is finished, _R:OOwill
appear in the time and temperature
display. Then the _A:OOalong with the
element and o\vn ic(ms will turn off;
indicating that the (wen has tin'ned OFF.
The control remains in the Sabbath
fbature.
36
Once in Sabbath Feature, How to Set for Baking/Roasting or Adjust
Baking Temperature (upper oven of double wall ovens only)
[] Select BAKE.No audible signal xfill
be gixen.
[] Lrsing the number pads, enter tll(e° .
desired temperatm'e between 1/ ) l_
and 550°E No audible signals will be
gixen and no temperatm'e will be
displayed.
[] Select START No audible signal will
be gixen.
NOTE:
;;Ji::Whensettingthe ovenfor baking/roasting,
the elementand ovenicons will lightafter
a randomdelayperiod ofapproximately
30secondsto 1minuteto indicatethat the
ovenisbaking/roasting,ff theelementand
ovenicons donot appearin thetime and
temperaturedisplay,startagain atstep 1.
Thecontrol didnot recognizethe
temperatureenteredasa validtemperature,
;;J_::Whenadjustingthetemperaturesetting
of theoven,theelementandovenicons
remainlit toindicate that theovenisstiff
on.ff the elementand oveniconsturn off,
startagain atstep 1.Thecontrol did not
recognizethetemperatureenteredasa
validtemperature.
_ TheG/assTouchnumberpadsufface is
solidand will notdepresswhenpushed.
Tomakesurethat anycommandentered
while usingSabbathregistersforthe Glass
Touch,ensurethatthe entirepad of your
fingeris squarelyoverthekeypadfor
two seconds.Make surenot to overlap
anotherpad whiletouching thedesired
pad--be especiallycareful aroundthe
CANCELkey sothat theprogrammed
cookingmodeisnot exitedaccidentally.
;;Ji::Thelower wall ovenof a doublewall oven
can notbe startedor thetemperature
changedoncein the Sabbathfeature.
However,the lower wallovencan be set
beforeenteringtheSabbathfeature.
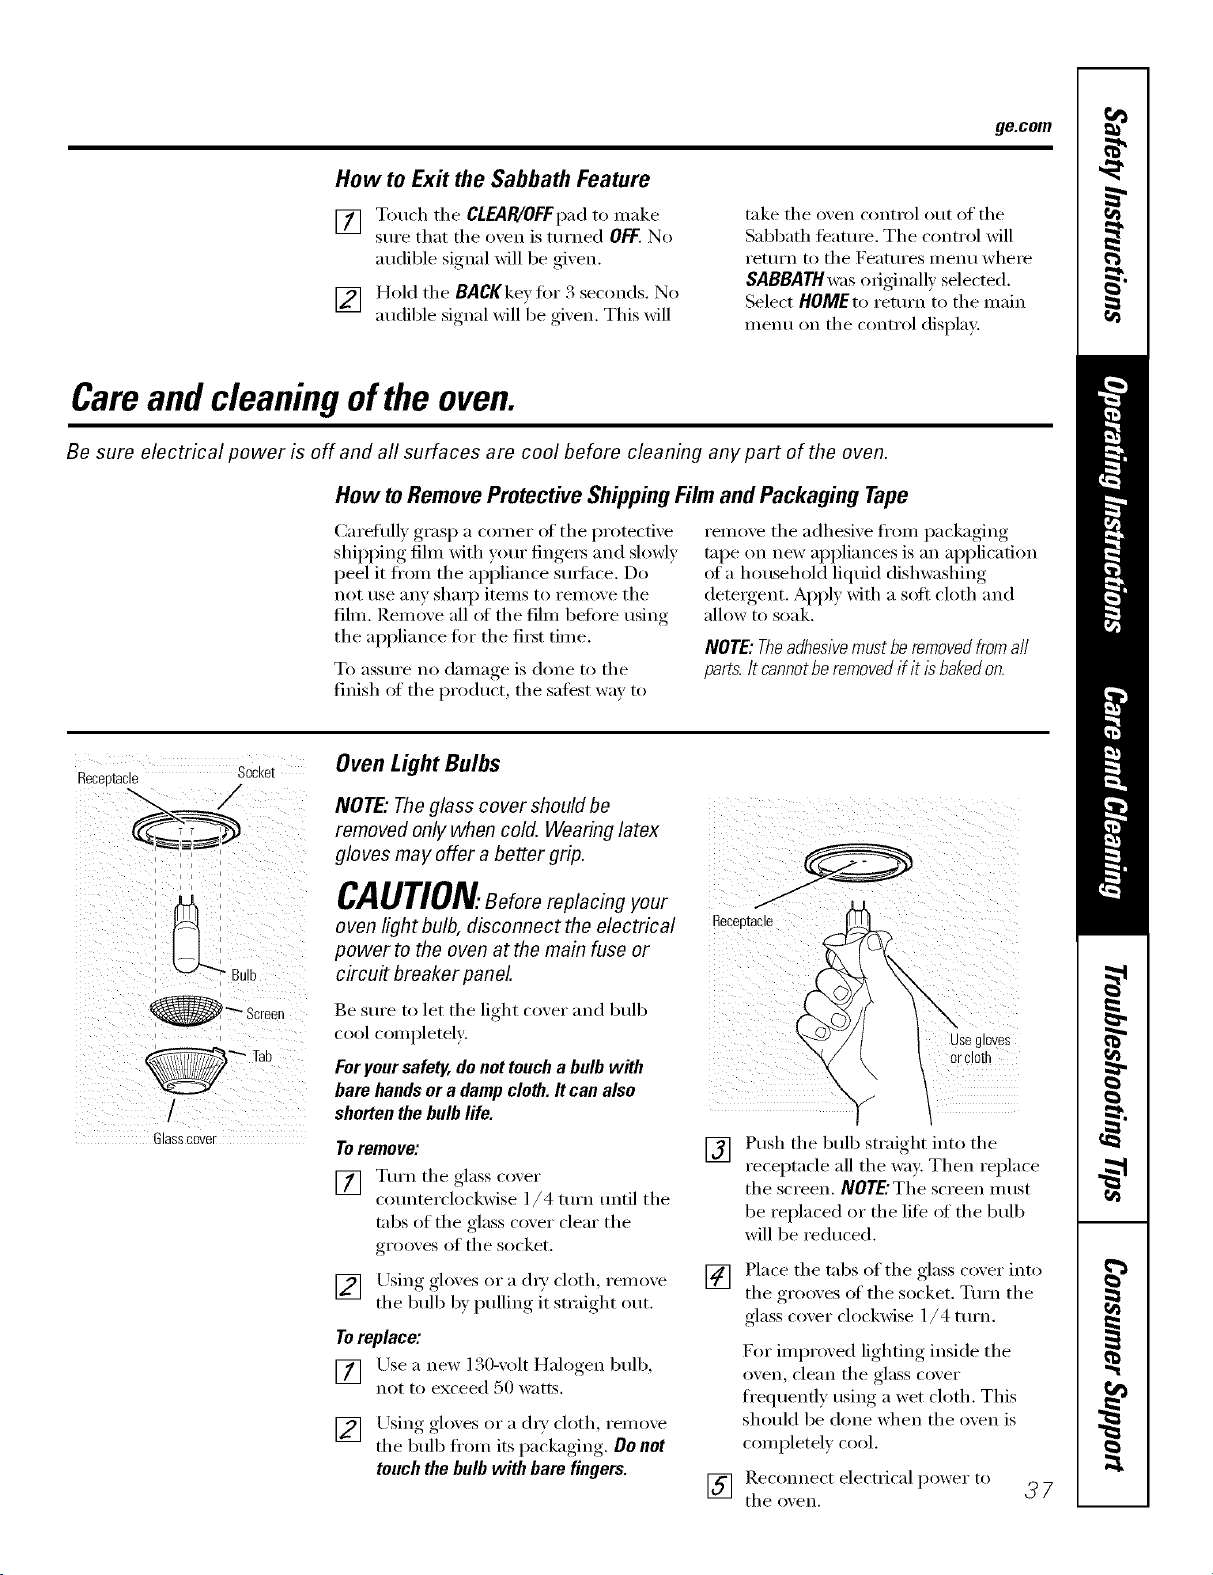
ge.com
How to Exit the Sabbath Feature
[] Touch tile CLEAR/OFFpad to make
sure that tile o',en is turned OFF.No
audible signal will be gixen.
[] Hold tile BACKkey fiw 3 seconds. No
audible signal will be gixen. This will
take tile oven cxmtrol out of tile
Sabbath teature. The control will
I'etllYn to tile Featlli'es i//enll where
SABBATH was originally selected.
Select HOMEto return to tile main
menu on tile control displa):
Careand cleaning ofthe oven.
Be sure electrical power is off and all surfaces are cool before cleaning any part of the oven.
How toRemoveProtectiveShippingFilmand Packaging Tape
(_arefully grasp a corner of tile protective
shipping fihn with your finge_ and slowly
peel it ti'om tile appliance s/m'i_ce. Do
not use any shall) itelns to relnove tile
fihn. Remove all of tile fihn before using
tile appliance fl)r tile fi_t time.
To aSStlI'e no dai/lage is done to tile
finish of tile product tile safest way to
rei]love tile adhesive fl'om packaging
tape on new appliances is an application
_ffa household liquid dishwashing
detelgent. Apply with a soft cloth and
allow to soak.
NOTE:Theadhesivemustberemovedfromall
parts.It cannotberemovedif itisbakedon.
Receptacle Socket
Glasscover
Oven Light Bulbs
NOTE," The glass cover should be
removed only when cold. Wearing latex
gloves may offer a better grip.
CAUTION.Beforereplacingyour
oven light bulb, disconnect the electrical _eceetac,e
power to the oven at the main fuse or
circu# breaker panel.
Be sure to let the light cover and lmlb
cool completely, i
Foryour safety, donot toucha bulb with
bare handsor a damp cloth. It can also
shorten the bulb life.
ToremoveJ
[] Turn tile glass taxer
counterclockwise l/4 turn tmtil tile
tabs of tile glass cover clear tile
grooves of tile socket.
[] Using gloxes or a (hT cloth, remoxe
tile bulb b} pulling it straight out.
Toreplace:
y
[] Lrsea new 130-xolt Halogen bulb,
not to exceed 50 watts.
[] Using_, ,_oloxesor a ch_',cloth, renlove
tile bulb ti'om its packaging, , . Do not
touch the bulb with bare fingers.
[]
use gloves
or cloe
"v /
Push the bulb straight into the
receptacle all the way. Then replace
the screen. NOTE'Thescreen must
be replaced or the life ot tile bulb
will be reduced.
[] Place tile tabs of tile glass coxer into
tile grooxes of tile socket. Turn tile
glass cover clockwise 1/4 turn.
D:,r improved lighting inside tile
oven, clean tile glass cover
ti'equenfly using a wet cloth. This
should be done when tile oven is
completely cool.
[] tl/eRec°nnectoxen,electrical power to _ 7
Careand cleaning oftheoven.
Stainless Steel Surfaces (onsomemodels)
Donotusea steelwoolpad;itwill scratch
thesurface.
To clean the stainless steel sm_i_ce,
use wam_ suds)' water or a stainless steel
cleaner or polish. _Mways wipe the sm_hce
in the direction of the grain, Follow the
cleaner instructions fi)r cleaning the
stainless steel sm]i_ce,
To inquire about i)urchasing stainless
steel appliance cleaner or polish, or to
find the location of a dealer nearest you,
please call our toll-ti'ee number:
National Parts Center
1.800.626.2002
ge.com
Donotrub or cleanthedoorgasket--
it hasanextremelylow resistanceto
abrasion.
Ifyou noticethegasketbecomingworn,
frayed ordamagedin anyway or ifit has
becomedisplacedonthedoor,you should
haveit replaced.
Cleaning the Oven Door
Toclean the inside of the door:
_7!iBecause the area inside the gasket is
cleaned during the self_'lean cycle, you
do not need to clean this by hand.
_: The area outside the gasket and
the door liner can be cleaned with a
soap-filled or plastic scouring pad,
hot _;_mr and dem_gent. Rinse well
with a vinegar and wamr solution.
Toclean the outside of the door:
_: Use soap and water to thoroughly
clean the rap, sides and ti'ont of the
oven door. ]_dnse well. _0/I Ill,IV also
use a glass cleaner to clean the glass
on the outside of the doo_: Do not let
wamr drip into the vent openings.
If any stain on the door vent trim is
persistent, use a sott abrasive cleaner
and a sponge-scrubber fin" best results.
Spillage ot marinades, fl'uitj uices,
tomato sauces and basting materials
containing acids may cause
discoloration and should be wiped
up immediately. _]_en surfi_ce is cool,
clean and rinse.
Do not rise oven cleanelN_ cleaning
powde_ or hm_h abrasives on the
outside of the doo_:
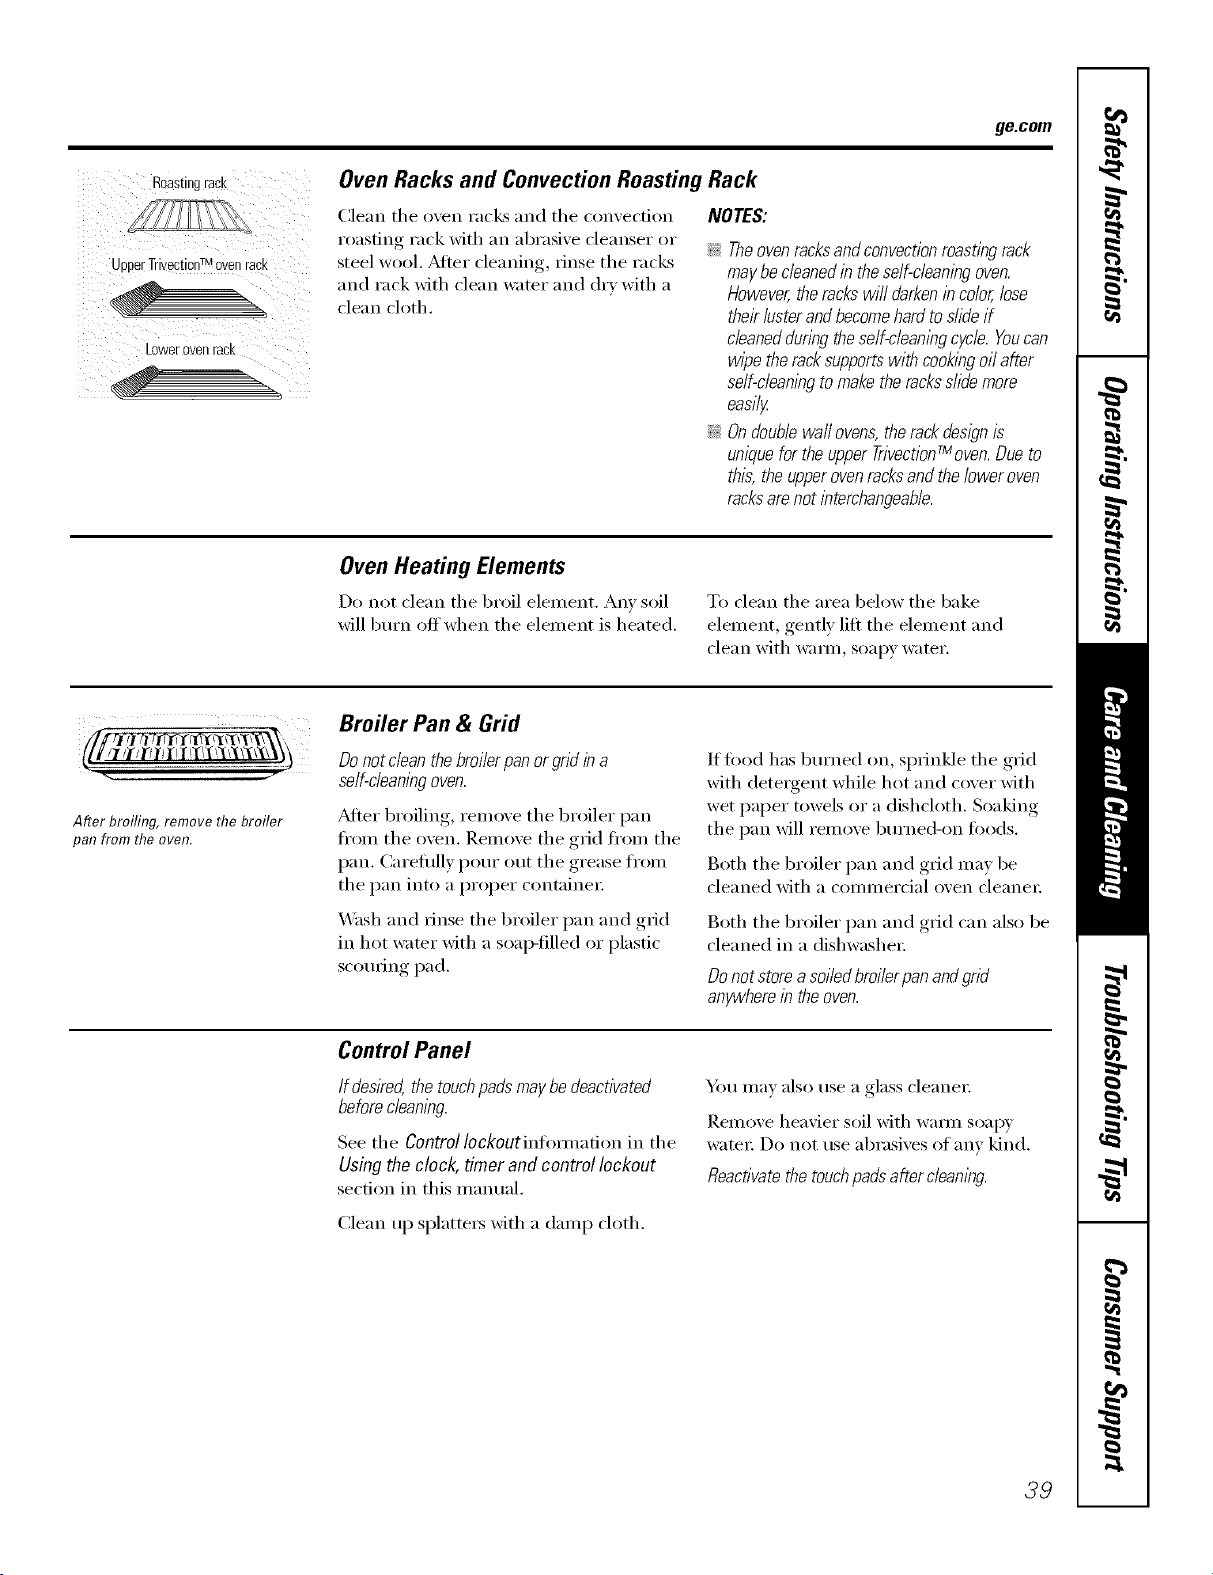
ge.com
Roastingrack
_DDerTrivectionTMovenrack
_owerovenrack
Oven Racks and Convection Roasting Rack
Clean the oven racks and the convection
roasting rack with an abrasive cleanser or
steel wool. _Mter cleaning, rinse the racks
and rack with clean water and dry with a
clean cloth.
NOTES:
_; Theovenracksandconvectionroastingrack
maybecleanedin theself-cleaningoven.
However,therackswilldarkenincolor,lose
theirlusterandbecomehardtoslideif
cleanedduringtheself-cleanlegcycle.Youcan
wipetheracksupportswithcookingoilafter
self-cleanlegtomaketheracksslidemore
easily
_; Ondoublewaftovens,therackdesignis
uniquefortheupperTr/vectionfMoven.Dueto
this,theupperovenracksandtheloweroven
racksarenotinterchangeable.
Oven Heating Elements
Do not clean the broil element. Any soil
will burn off when the element is heated.
To clean the area below the bake
element, gently lift the element and
clean with warm, soapy water.
i_ I , i
After broiling, remove the broiler
pan from the oven.
Broiler Pan & Grid
Do not cleanthe broilerpan or grid in a
seff-cleanlegoven.
_6dteI"broiling, relnove the broiler pan
fl'om the oven. Remove the grid fl'om the
pan. Careflflly pour out the grease fl'om
the pan into a proper containe_:
_M_sh and rinse the broiler pan and grid
in hot wamr with a soap-tilled or plastic
scouring pad.
If food has burned on, sprinkle the grid
with detergent while hot and cover with
wet paper towels or a dishcloth. Soaking
the pan will remove burned-on leeds.
Both the broiler pan and grid may be
cleaned with a commercial oven cleane_:
Both the broiler pan and grid can also be
cleaned in a dishwasher:
Donotstoreasoiledbroilerpanandgrid
anywherein theoven.
Control Panel
Ifdesked,thetouchpadsmaybedeactivated
beforecleaning
See the ControlIockoutinlimnadon in the
Usingtheclock, timer andcontrol lockout
section in this manual.
Y)m may also use a glass cleanei:
Remove heavier soil with wam_ soap)'
wateI: Do not use abrasives of any kind.
Reactivatethe touchpa& after cleanleg.
Clean up splatters with a damp cloth.
39
Beforeyoucall forservice...
Troubleshooting -tips
Save time and money/. Review the charts on the following
pages first and you may not need to call for service.
Possible Causes What To Do
Fooddoes not
speed bake properly
Oven controls
ilnproperly set.
Rack position is incorrect
or the rack is not level.
• See Using the Trivection TM Oven section.
• See Using the Trivection TM Oven section.
Incorrect use of cookware • See Using the Trivection'_ Ovensection.
mad/or almnhamn foil.
Cookware of improper size
being used.
Door not closed. • Close door completely.
Very delicate item. • Use traditional bake.
Food not to desired • (look times will vary due to re(ipe and p:lll variations.
doneness. Check food when prompted and add additional time
with More Time if needed.
Sauce on food gets too brown. • AII,_ )Iv sauce later in cooking, cycle.
Meat cooked too long. • I_eIHox'e ti'om oven sooner and allow to stand. Meat
teHq)erature will contintw to rise.
Food put in too early. • Place food in the oven once the oven is preheated and
the display shows "PUTFOOD IN OVEN"
Temperature reading Don't use a meat • Take the temperature of the meat after removing it
on meat thermometer thermometer in oven ti'om the oven.
seems inaccurate while speedcookhag.
Food does not Oven controls • See Using the TrivectionTM Oven section.
speed broil properly improperly set.
Improper rack position • See the Broiling Guide.
being used.
Cookware not suited to broiling. • Use the broiling, l_an and ,grid that crone with your oven.
Door not closed. • Close door completely.
Food overcooked. • Rell/ove ][i'Oll/ oxell SOOlleY :111(1 allow to st;llld. Food
tel/iper_ltt/res will Colltillt/e to lJse.
Food madercooked. • Speed broil for additional time using MoreTime.
\vhel'e H l'Hl'e 10 l]/edit/lll I'Hl'e dollelless is desired.
Meat is too done ha center. • Use traditional broil fin" x'e_y thin stealcs or fi)r fl)ods
Food put in too early. • Place food in the oven once the oven is preheated and
the display shows "PUTFOOD IN OVEN"
Cook time doesn't Oven controls improperly set. • See Using the Trivection" Oven section.
countdown while
Door is not • Chase door completely.
speedcooking closed completely.
STARTnot selected. • Press STARTonce fi)od is placed in the oven.
4O
ge.com
iHi iiii i!liiili li i li iii!iii!li iiii liil ii
Arcingbetweenmetal
surfaces in oven while
speedcookingor
Possible Causes
hnproper spacing hetween
metaJ surfaces mad/or
aJmnhamn foil.
What ToDo
• See Usingthe TrivectionTM Ovensection.
Display shows Wiring from house to oven • Coutnct installer or qualified electrician to check house
"Miswired detected" is incorrect, wiring to oven.
Option not seen on the Option may be listed • Select MORE to see additional items.
displayscreen on the next screen.
Hot air from o yen When using the cooking • This is normal.
features, hot air will exit
the oven through the vent
located above the door.
Fooddoesnotbakeor Oven controls improperly set. • See the Usingtraditionalbakeand roastsection.
roast properly in the Shelf position is incorrect • See the Using traditional bake and roast section.
oven
or the shelf is not level.
Incorrect cookware or • See the Using traditional bakeand roast secdon.
cookware of hnproper
size being used.
Oven temperature needs • See the Adjust theoventemperature Do it yourself!
adjustment, se(-ti()u.
Fooddoes notbroil Oven controls improperly set. • Make sure xou select BROIL
properly
hnproper shelf position • See the Broiling Guide.
being used.
Cookware not suited • Use the broiling pan mad grid that came with your oven.
for broiling.
Altanhmm foil used on the • See the Using traditional bakeand roast secfi(>n.
broiling pan madgrid has
not been fitted properly and
slit as recommended.
In some areas the power • Preheat the broil element fi)r lO minutes.
(voltage) may be low. • Broil for the lon(_est_, period of time recolmneuded in
the Broiling Guido.
Clock and timer The clock is ha the • See the Settingssection fi)r the oven clock.
do not work or no clock mode.
displaygoesblank
Controls improperly set. • See the Usingthe clockand lower oventimer secti()n.
A fuse ha your home may be • Replace the fl_se or reset the circuit breaker.
blown or the circuit breaker
tripped.
47
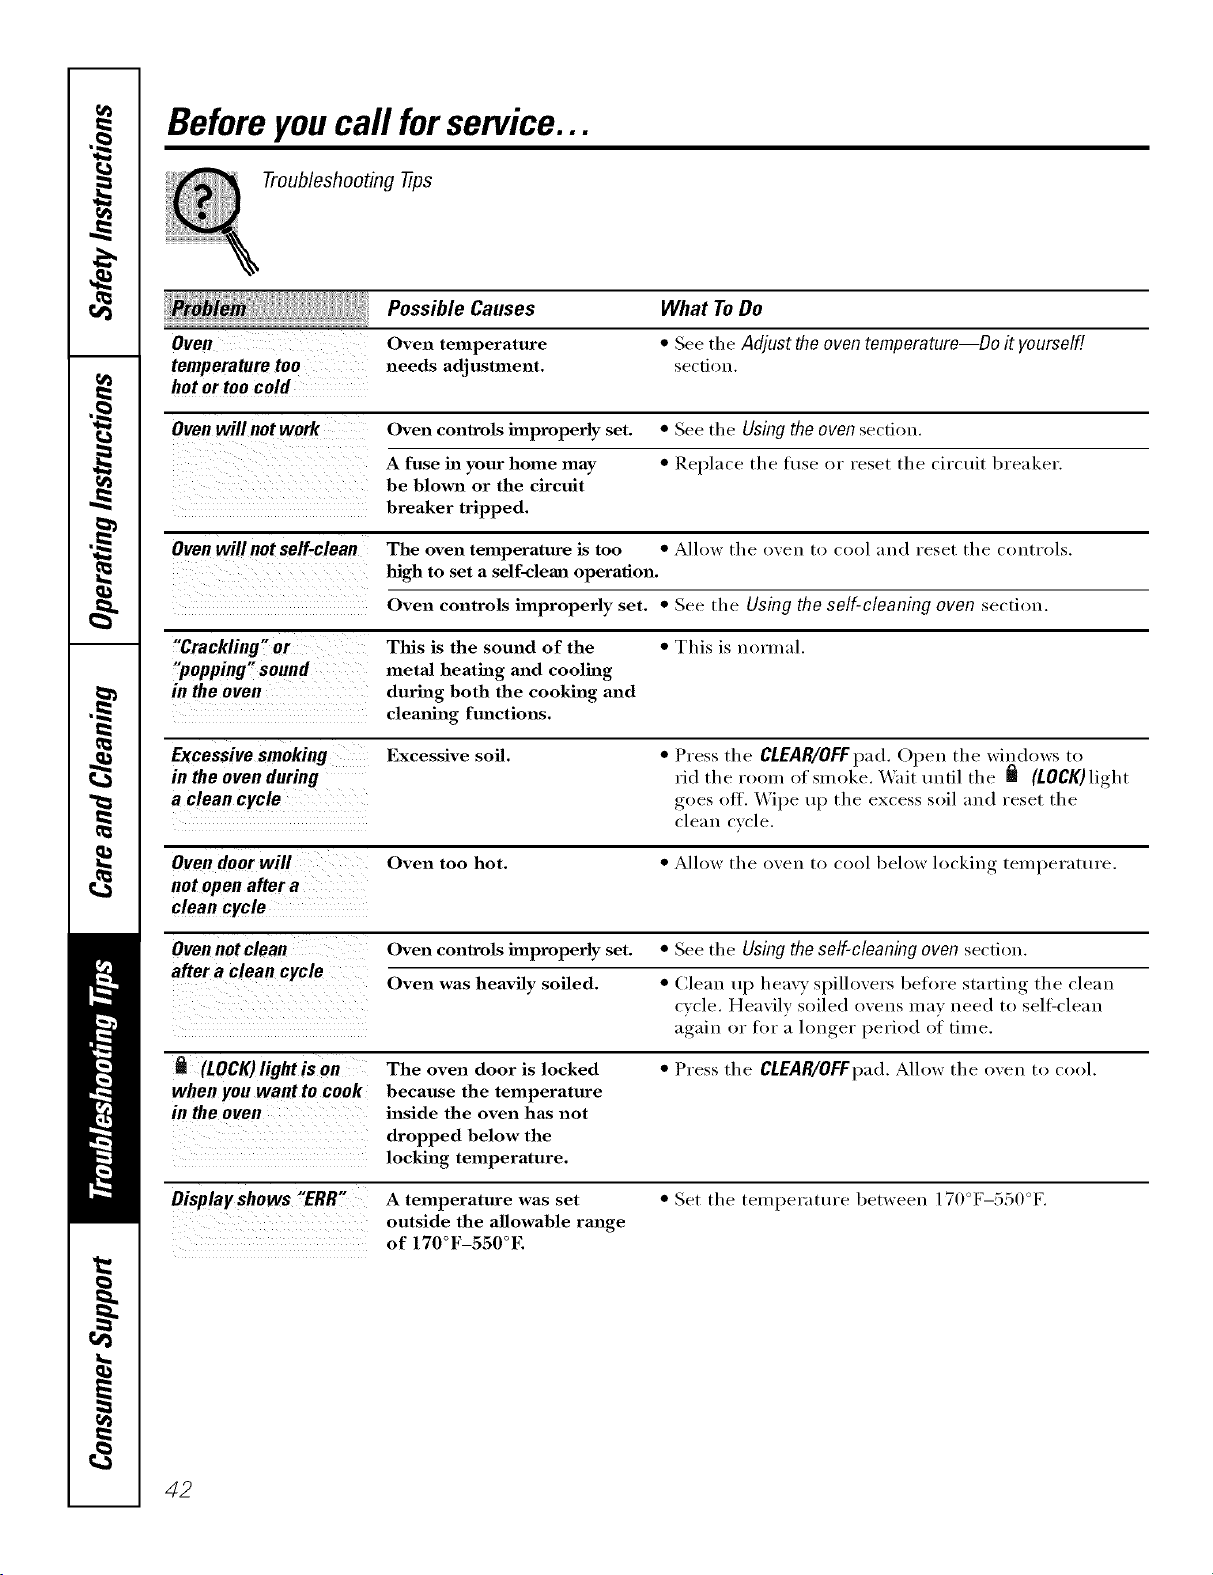
Beforeyoucall forservice...
Troubleshooting tips
Possible Causes
Oven Oven temperature
temperature too needs adjustment.
hot or too cold
What To Do
• See the Adjust theoventemperature--Do it yourself!
se€tion.
Oven will not work Oven controls improperly set. • See tile Using the oven section.
A fuse in your home may • Replace the hlse or reset the circuit breaker.
be blown or the circuit
breaker tripped.
Oven will not self-clean The oven temperature is too • Allow the oven to cool and reset tile ctmtrols.
high to set a self-clema operation.
Oven controls improperly set. • See tile Using the self-cleaning oven section.
"Crackling" or This is the sound of the • This is normal.
"popping" sound metal heating and cooling
in the oven during both the cooking and
cleaning fmzctions.
Excessive smoking Excessive soil. • Press the CLEAR/OFFpad. Open the windows to
in the oven during rid the room of smoke. _'ait tmtil the _ (LOCK) light
a clean cycle goes ott. \.Vipe up the excess soil and reset the
cle;lu cycle.
Oven door will Oven too hot. • Allow the oven to cool below locking, teml)erattu'e.
not open after a
clean cycle
Oven not clean Oven controls improperly set. • See the Using the self-cleaning oven section.
after a clean cycle Oven was heavily soiled. • Clean up heavy spillovers before starting the clean
cycle. Heavily soiled ovens may need to sell=clean
again, or for a h)n,_er_ period of time.
(LOCK)light is on The oven door is locked • Press the CLEAR/OFFpad.Allow the oven to cool.
when you want to cook because the temperature
in the oven inside the oven has not
dropped below the
locking temperature.
Display shows "ERR" A temperature was set
outside the allowable range
of 170°F-550°E
• Set the temperature between 170°F-550°E
42
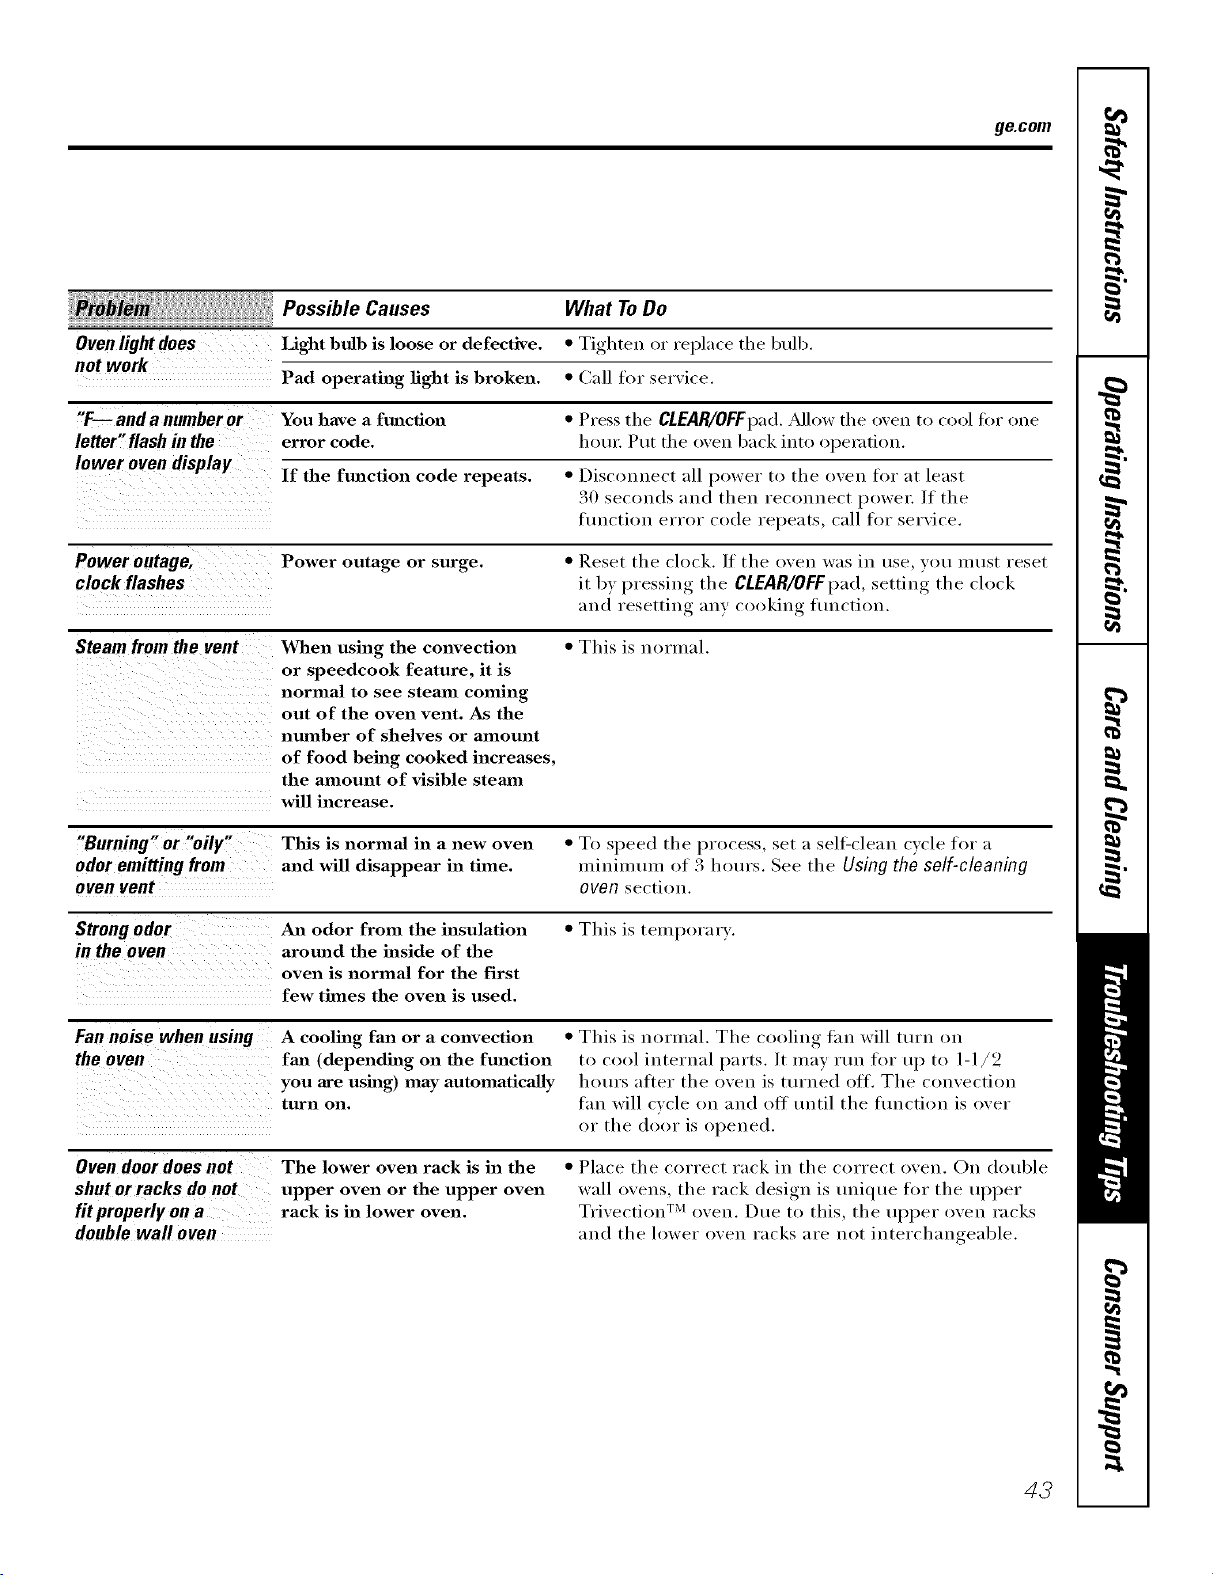
ge.com
, PossibleCaoses
Oven light does Light bulb is loose or defective.
not work
Pad operating fight is broken.
What ToDo
• Tighten or replace the bulb.
• Call for service.
"F--anda numberer You have a function • Press tile CLEAR/OFFI)ad. _Mlow tile oven to cool tor one
letter" flash in the error code. houl: Put tile oven back into operation.
lower oven display
If the function code repeats. • Disconue(t all power to the oven ti)r at least
30 seconds and then reconnect l)owel:/f the
ftmctiou error code repeats, call fin" service.
Power outage, Power outage or surge. • Reset the clock. ]f the oven was in use, )'()t! must reset
clock flashes it by pressing the CLEAR/OFFI)ad, setting the clock
and resetting :my cooking flmctiou.
Steam from the vent When using the convection • This is normal.
or speedcook feature, it is
normal to see steam coming
out of the oven vent. As the
number of shelves or amount
of food being cooked increases,
the amount of visible stemn
will increase.
"Burning" or "oily"
odor emitting from
oven vent
This is normal in a new oven • To speed the process, set a sell_clean cycle for a
and will disappear in time. minimmn of 3 hours. See the Using the self-cleaning
oven section.
Strongodor
in the oven
An odor from the insulation
around the inside of the
oven is normal for the first
few times the oven is used.
• This is tempora_ T.
Fannoisewhen using
theoven
A cooling fan or a convection
fml (depending on the function
you are using) may automatically
turn on.
• This is normal. The cooling tim will turn on
to cool internal parts. It may run for up to 1-1/2
hours after the oven is turned off. The convection
tim will cycle on and off tmtil the flmction is over
or the door is opened.
Oven door does not
shut or racks do not
fit properly on a
double wall oven
The lower oven rack is in the
upper oven or the upper oven
rack is in lower oven.
• Place the correct rack in the correct oven. On double
wall ovens, the rack design is tudque ti)r the ul)per
Trivection TM oven. Due to this, the upl)er oven racks
and the lower oven racks are not interchangeable.
43
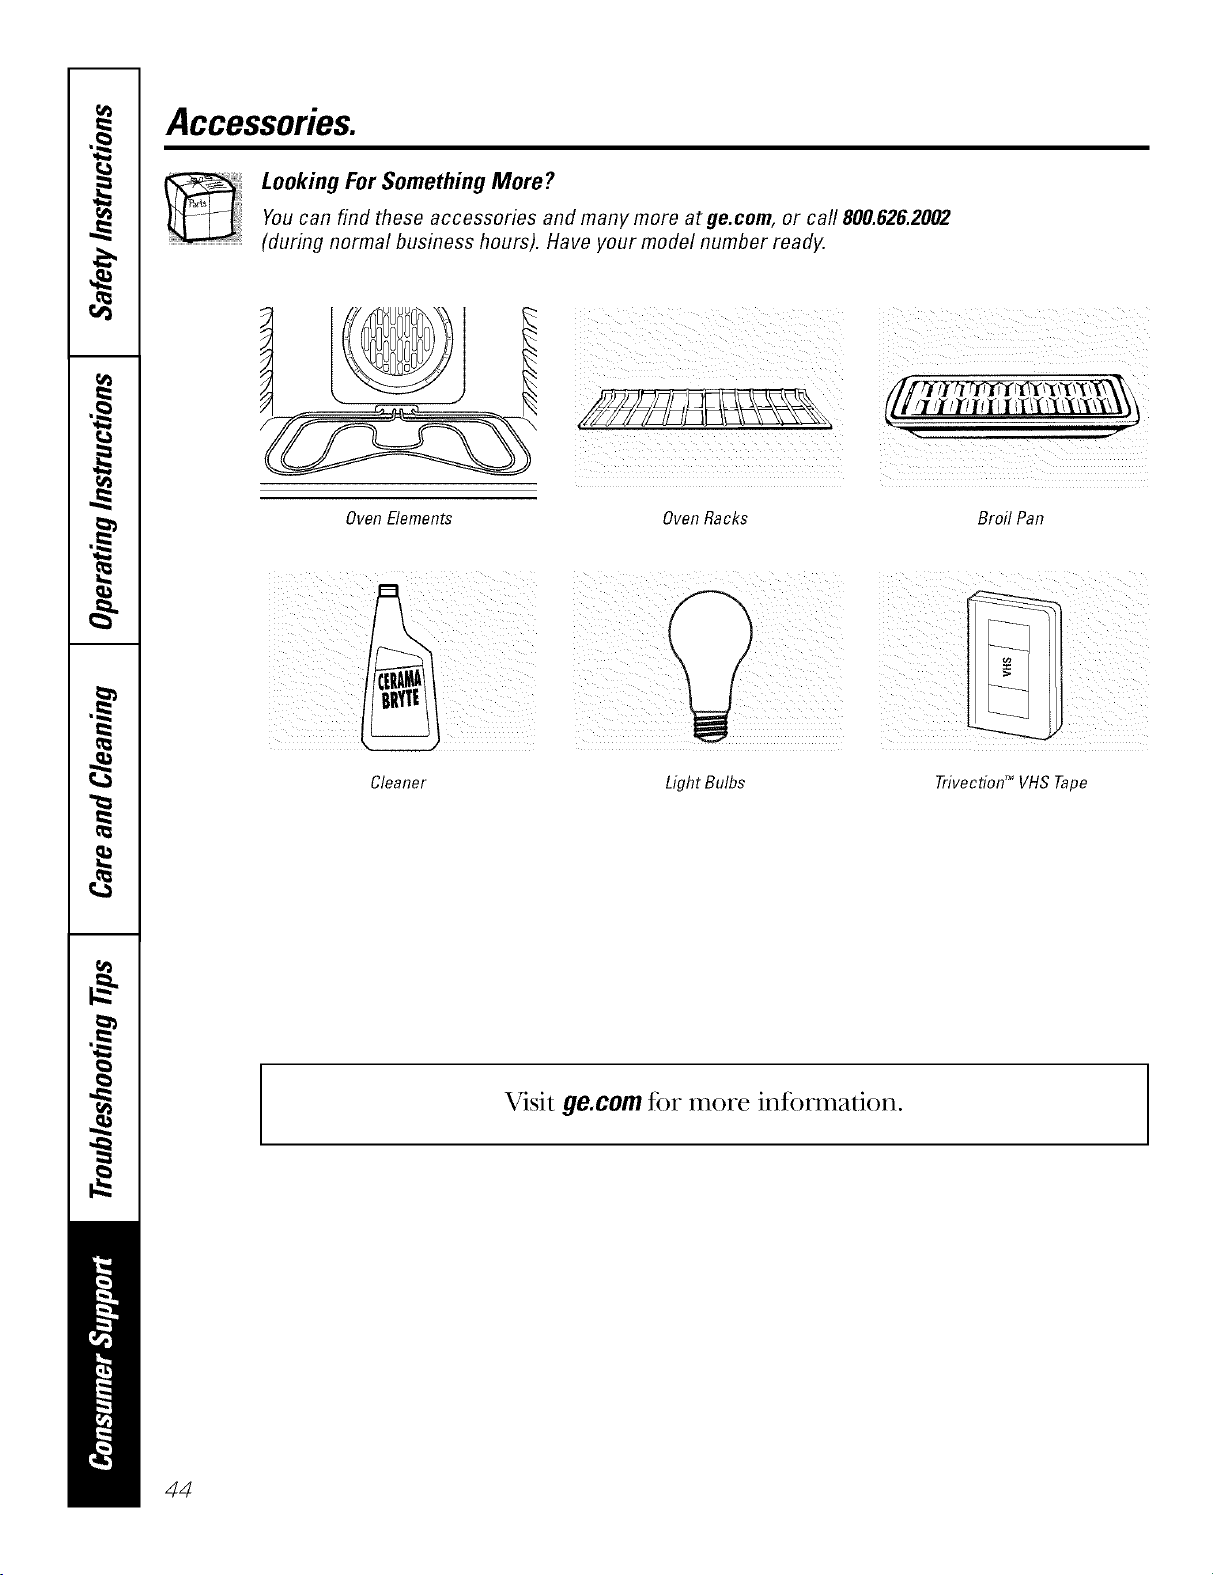
Accessories.
Looking For Something More?You can find these accessories and many more at ge.com, or call 800.626.2002
(during norma/ business hours). Have your mode/number ready.
iuui°O1
OvenElements Oven Racks Broil Pan
Cleaner
LightBulbs Trivection TM VHS Tape
Visit ge.com for more information.
44
GE Service Protection Plus 'M
GE, a name recognized _orldwkte if)r qualfly and dependability; of_ers yot_
Service Protection Plus"--comprehensive protection on all yore appliances--
No Matter What Brand!
Benefits Include:
• Backed by GE
• All brands covered
• Unlimited service calls
• All parts and labor costs included
• No out-of-pocket expenses
• No hidden deductibles
• One 800 nmnber to call
We 71Cover Any Appliance,
Anywhere, Anytime,*
YOu xdll be completel} satisfied xdth our service protection or )ou ma} request }our mone) back
on the remaining value of }our contract. No questions asked. It's that simple.
Protect your refl'igerator, dishwasher, washer and dryer, range, TV, VCP. and much more--any brand!
Plus there's no extra charge fl)r emergency service and low monthly financing is available. Even icemaker
coverage and fl_od spoilage protection is oHered. You can rest easy, knowing that all your _:duable
household products are protected against expensive repai_>.
e_._e>.r ,,,,*_;_le,*_ein(;Ea,,_l_:al.s inthet_.S.t,,ll-*ree:_t800.626.2224
_or n/ore ill_orn/_ltiOll.
*All brands (o_<led, up Io 20 )eals old, in Ihe (omineuia/ I.S.
Please place in envelope and mail to:
General Electric Company
Warranty Registration Department
P.O. Box 32150
Louisville, KY 40232-2150
45
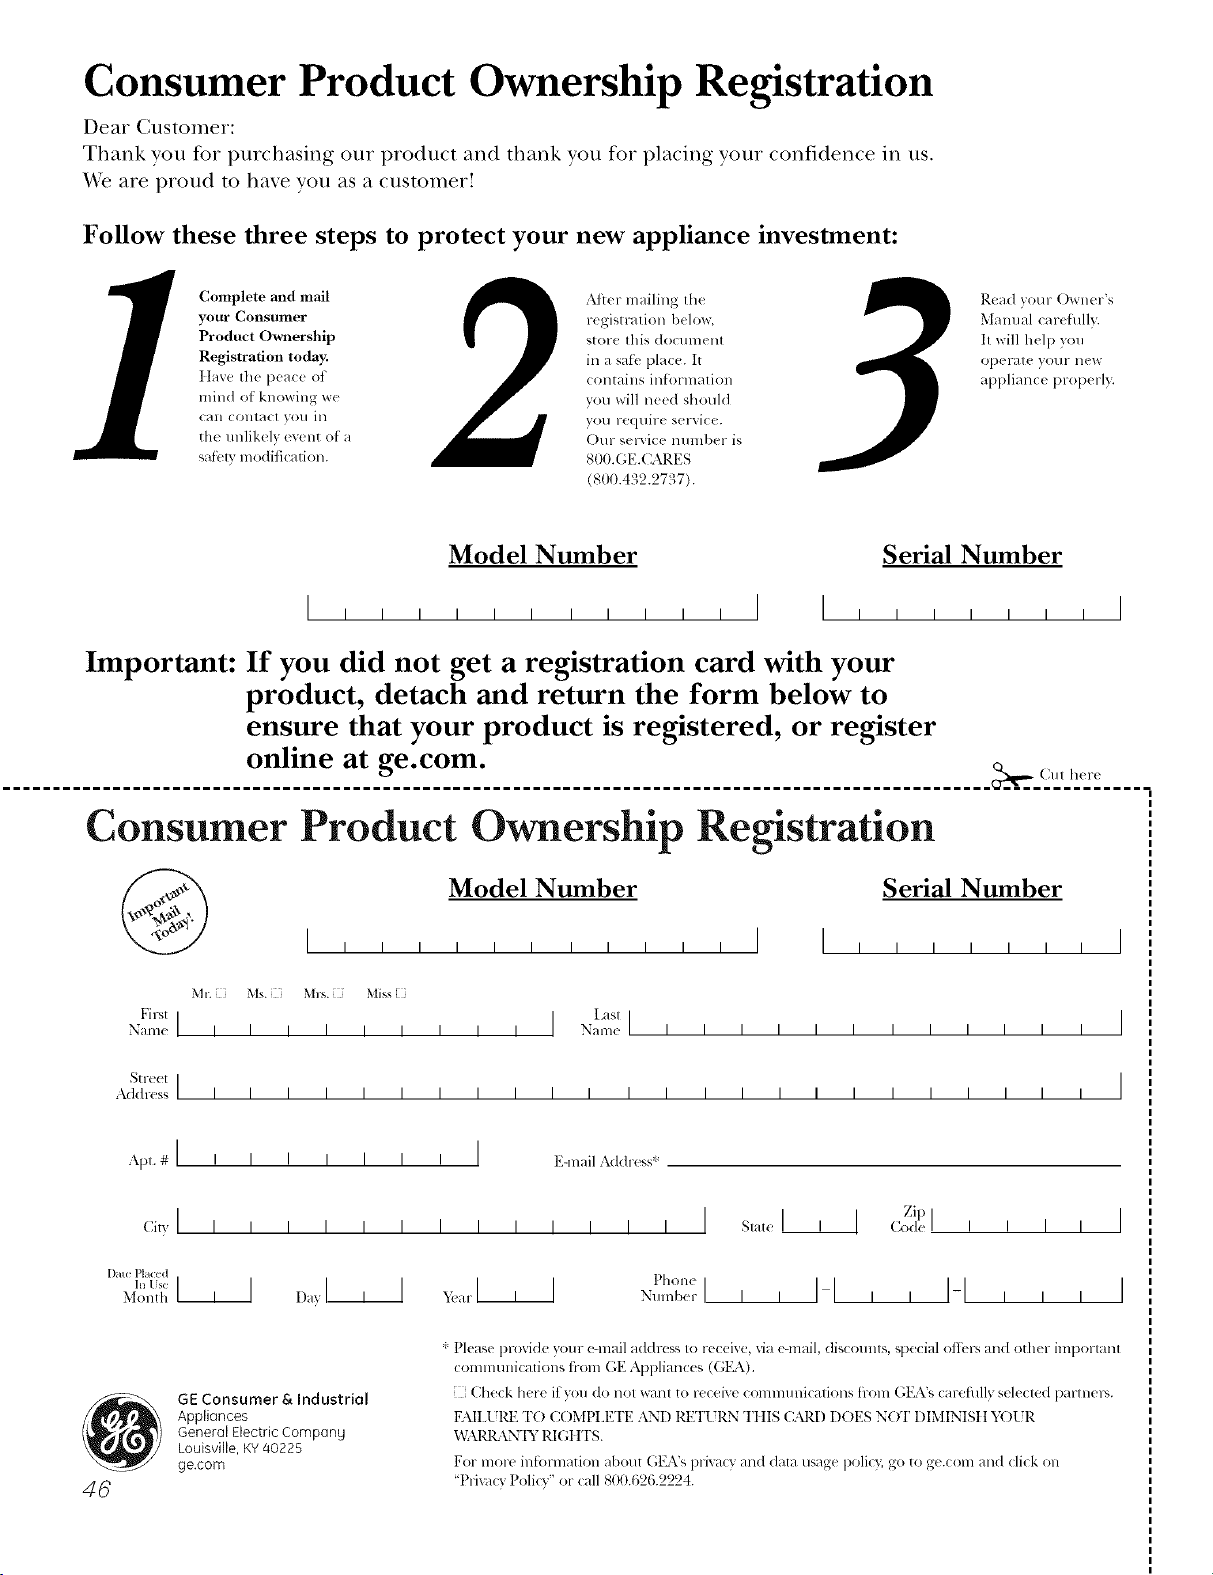
Consumer Product Ownership Registration
Dear Customer:
Thank you for purchasing O/li product and thank you for placing your confidence in us.
V_:eare proud to haxe you as a customer!
Follow these three steps to protect your new appliance investment:
Complete and mail
your Consumer
Product O_mership
Registration today.
IL_ve the pca_c ot
mind ot knowing we
C_tll COIII_t([ }'011 ill
the unlikeh event of' a
saiblV modification.
After mailing the
registration I)elow,
store this doclllllellt
in a saib place. It
contains intormation
vou will need should
you require service.
Our set\ice numl)er is
800.GE.CARES
(80(t.432.2737).
Redid VO/IF ()wller's
Mamlal carefully.
It will help you
operate your new
appliance properl>
Model Number Serial Number
,,,,,,,,, I I , , , , ,
Important: If you did not get a registration card with your
product, detach and return the form below to
ensure that your product is registered, or register
online at ge.com.
Consumer Product Ownership Registration
Model Number Serial Number
I I
Mr. Ms. M*s. Miss
Fil,'st [ [ Lasl[
Nam< I I I I I I I I I Name I I I I I I I I I I I I
Street [
Address I I I I I I I I I I I I I I I I I I I I I I I I
, I
I
I
Apt. 4* [ I [ I ] ] ] I [ E-mail Addlx ss:
Du_ Plac_ d Pholle
Month I I
GE Consumer&, Industrial
Appliances
General Electric Company
Louisville,KY40225
ge.com
46
* Please provide }_nlr eqnail address to receixe, via e-mail, discounts, _,pecial otti,l'_ and other important
commtmications fi-om (;E Appliances ((;1_\).
Check here if you do not wmu to receive (ommuni(afions trom GEA's cm-cthlly sele_ ted parmel,',.
FAII.Lld_ TO COMPlA_:TE AND Pd_TI RN Tt tlS CMd) DOES NOT DIMINISII h_)l R
W.\1_ \NTY RIGt YrS.
For more infi)rmation about GI_Vs privacy and data usage policT,;go to ge.com and (:lick on
"Pri_cy Poli_y" or call 800.626.2224.
GESelf-CleaningOvenwith TrivectionTM Warranty.
All warranty service provided by our Factory Service Centers, or
an authorized Customer Care® technician. Toschedule service,
on-line, 24 hours a day, vis# us at ge.com, or call 800.GE.CARES
(800.432.2737).Please have serial number and model number
available when calling for service.
Staple your receipt here.
Proof of the original purchase
dateis needed to obtain service
under the warrantz
GEWill Replace:
One Year Anypattof the speedcook electric comecfion oxen which tifils due to a defect in materials
Fromthedateof the or wor!unanship. During this limited one-year warranty,GE will also provide, free ofcharge,
originalpurchase all labor and in-home service to replace the defective part.
::Ji::Service trips to your home to teach you how to use
the product.
_: Improper installation, delivery or maintenance.
::Ji_:Failure of the product if it is abused, misused, or
used for other than the intended purpose or used
commercially.
::Ji_:Replacement of house fuses or resetting of
circuit breakers.
::Ji::Damage to the product caused by accident, fire,
floods or acts of God.
!i>Incidental or consequential dmnage caused by
possible defects with this appliance.
iJi::Dmnage caused after delivery.
iJi::Product not accessible to provide required service.
I XCLDSION OFIMPLIED WARRANTIES--Your sole and exclusive remedy isproduct repa# asprovided hi this Limited
Warranty.Any implied warranties, including the implied warranties of merchautabilily or fituessfor a particular purpose,
are limited to one year or the shortestperiod allowed by law.
This warranty is extended to the original purchaser and any succeeding owner for products purchased for
home use within the USA. If the product is located in an area where service by a GEAuthorized Servicer is not
available, you may be responsible for a trip charge or you may be required to bring the product to anAuthorized GE
Service location for service. In Alaska, the warranty excludes the cost of shipping or service calls to your home.
Some states do not allow the exclusion or limitation of incidental or consequential damages. This warranty
gives you specific legal rights, and you may also have other rights which vary from state to state. Toknow
what your legal rights are, consult your local or state consumer affairs office or your state's Attorney General
Warrantor: General Electric Company.Louisville, KY 40225
47
ConsumerSupport.
gEAppliancesWebsite ge.com
Have a ques0on or need assistance with your appliance? Try the GE Appliances Website 24 hom_ a day,
any day of the year! For greater convenience and taster serxJce, you can now download Owner's Manuals,
order parts, cat;dogs, or even schedule service ondine. You can also "_sk Our Team of EN)erts ......
yotlr qtlestions, and so II/tlC}/II/ore...
ScheduleService
Expert (;E repair setsice is onlx one step awa} fl'om your door: Get on-line and schedule vc,t:u"serxice at
your conxenience 24 hours am elm of the _ear! Or call 800.GE.(_AI_ES (800.432.2737) during n{mnal
business hou_.
ge.com
RealLifeDesignStudio ge.com
GE supports the Universal Design concept--products, services and environments that can be used by
people of all ages, sizes and capabili0es. _\'e recognize the need to design fi)r a wide range of physical and
mental abili0es and impaim_ents. For details of GE's Universal Design applica0ons, including kitchen
design ideas fin" people with disabilities, check out {)Ill"X,Vebsimtoday. For the hea_ing impaired, please call
800.TDD.GEAC (800.833.4322).
ExtendedWarranties
ge.com
Purchase a GE extended warrant_ and learn about special discounts that are available while )our warran b,
is still in effect. You can i)urchase it on-line an) time, or call 800.626.2224 during nomml business hours.
(;E (_onsulner Home Serxices will still be there after }our warrant}, expires.
PartsandAccessories
ge.com
Individuals qualified to selMce their own appliances can have parts or accessolies sent direcflv to their
homes (VISA, MasterCard and Discover cards are accepted). Order on-line today, 24 hours eve_a' day or
by phone at 800.626.2002 during nomml business hom_.
Instructions contained in this manual cover procedures to be performed by any user. Otherservicing generally
should be referred to qualified service personnel. Cautionmust be exercised, since improper servicing may cause
unsafe operation.
ContactUs
ge.com
If you are not satisfied with the service you receive fl'om (;E, contact us on our Website with all the details
including your phone numbei; or write to: General Manage_; Customer Relations
GE Appliances, Appliance Park
I,ouisville, KY 40225
RegisterYourApplbnce
Register your new applimlce on-line---at your convellience! Timelx, I)r°(hlct registra0{, m will allow fin.
enhanced communica0on and prompt service under the terms of your warranty, should the need arise.
You mm also mail in the pre-pfinted registra0on card included in the I)ackin'"_ material.
ge.com
Printed in the United States