Loading ...
Loading ...
Loading ...
User Manual
8
Instlltion
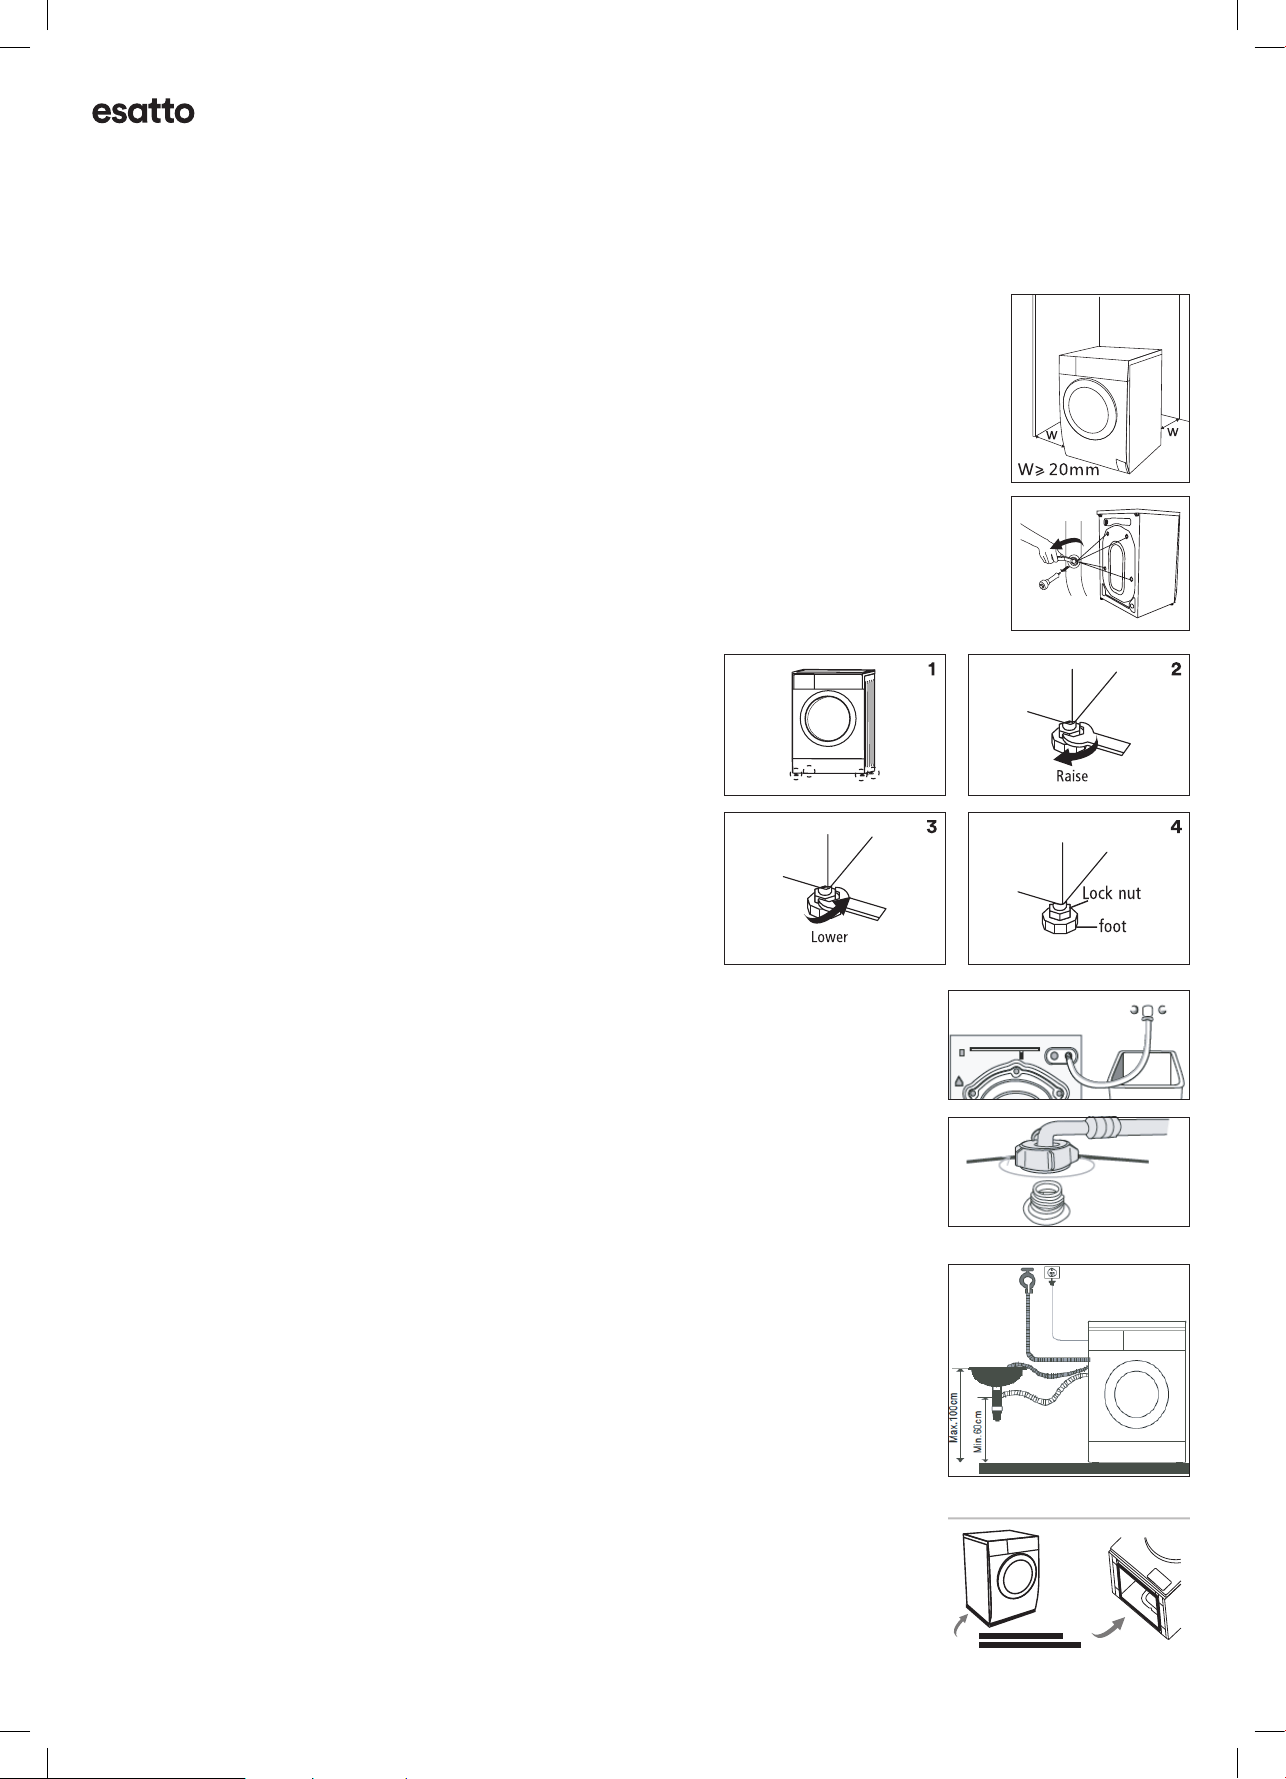
INSTALLATION POSITIONING
Ensure that your appliance is installed on solid and at ground, in a level position. Please
do not place the appliance on a slope, soft carpet or wooden oor. Your appliance should
only be installed within an internal environment. Do not install the appliance outdoors.
REMOVING THE TRANSPORTATION BOLTS
WARNING: Before using the appliance, the transport bolts must be removed from
the backside of this machine. Please take the following steps to remove the bolts:
Loosen all 4 bolts with a spanner and then remove them.
Use the plugs (supplied) to plug the holes.
Keep the transport bolts for future use.
LEVEL ADJUSTING
If the oor is obviously uneven, your appliance feet need to be
adjusted. If your appliance isn’t level, it will cause your appliance
to vibrate, and potentially move from its position.
Once you’ve positioned your washing machine, press down from
the top in all four corners to ensure that it’s completely stable
(i.e. not rocking in any direction). Also use a spirit level to ensure
that it is completely level in all directions.
Should you need to make adjustments, use a spanner to turn the
appliance legs until it makes contact with the oor. Turn the leg
using one hand and then fasten the nut up against the appliance
cabinet, to lock the leg in place.
After making any adjustments to the appliance legs,
re-check to ensure it is level and no rocking occurring.
CONNECT THE INLET PIPE
Connect the hose elbow to the cold water outlet, screwing in a clockwise direction.
Connect the other end of the inlet hose to the water inlet valve on the rear of the washing
machine. After installation, if there are any leaks detected, remove the hose and re-install
using the steps above. The hose is designed to be used on a standard washing machine
outlet.
POSITION THE OUTLET HOSE
The outlet hose (used to drain the discharged water) is to be ideally connected to the
relevant waste pipe, although it can also be positioned to drain into a sink/trough.
Note that the outlet hose has a minimum outlet position of 60cm and a maximum position
of 100cm (as illustrated on the right).
Note: If you are positioning the outlet hose to drain into a sink or trough, please ensure
that it is xed in place and that the sink remains unblocked at all times.
ACOUSTIC SPONGE
To reduce noise and vibrations caused by the machine when in operation,
please apply the acoustic sponges.
• Lay the machine onto the oor with a layer of soft material in between (such as
cardboard, foam or a blanket) to protect the machine and your oor from scratches.
• Stick the 2 × longer sponges to the wider bottom edges of machine, and the 2 × shorter
sponges to the shorter bottom edges.
10
10
INSTALLATION
Drain Hose
There are two ways to place the end of drain hose:
1.Put it into the water trough. 2.Connect it to the branch drain pipe of
the trough.
•
• Position drain hose properly ,otherwise damage might result of water leakage.
Do not kink or protract the drain hose.
Water
trough
100cm
Max.
Warning!
!!
Warning!
!
Min.60cm
• Please make sure to assemble the acoustic sponges, which can effectively
reduce the noise caused by the machine while working, in order to provide
you with a more peaceful and quiet living environment.
Note!
Acoustic Sponge
2x
2x
1. Get the machine laid on the floor, using some soft material like foam or clothes
between the machine and floor for a protection;
2. Stick the 2x longer sponges to the longer bottom edges of machine, and the 2x
shorter sponges to the shorter bottom edges.
Loading ...
Loading ...
Loading ...