Loading ...
Loading ...
Loading ...

6
2
1
3
4
5
6
9
8
7
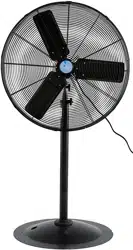
INSTALLATION INSTRUCTION
COLUMN ASSEMBLY INSTRUCTIONS:
1. Attach the coupling (2) to the base (1) with the
screws (4), as shown.
2. Loosen the set knob (6) from the outer tube
connector (8), extend the inner tube (9) to the desired
height, and tighten it.
CAUTION: Tighten the set knob (6) fully before attaching
the motor (16) to the inner tube (9).
COLUMN/MOTOR ASSEMBLY INSTRUCTIONS:
1. Align the motor flange and column.
2. Insert the pivot screw (15) through the motor flange, column
and washer. Attach using the position nut (12) and tighten it.
3. Insert the smaller position screw (11) through the bottom
radius. Attach it with the position knob (11).
GRILLE/MOTOR ASSEMBLY INSTRUCTIONS:
1. Unscrew the nuts and washers (18, 19, 20) from the motor (16).
2. Arrange the rear guard (17) in its proper position.
3. Attach the rear guard by inserting and
tightening the nuts to the motor (through the
eyelets on the guard).
4. Insert the blade (22) into the motor shaft
until it reaches a stopping point and the set
screw (21) is in line with the flat groove on the
motor shaft.
NOTE: Make sure the blade’s set screw is facing
the motor. You may need to loosen the set screw
at the rear of the blade to slide it onto the shaft.
5. Firmly tighten the blade’s set screw with the spanner (not
supplied).
CAUTION: Do not alter the angle of the blades.
6. Turn the clips on the front guard (23) outward.
7. Hang front grill (23) on top rib of rear grill (17) by utilizing the “U” shaped fixed
clip at top of front grill rim.
8. Press down the clip around the front grill to secure.
Loading ...
Loading ...