INSTRUCTION AND
RECIPE BOOKLET
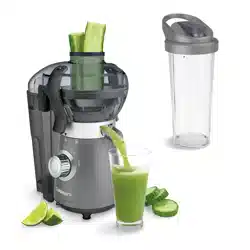
Compact Blender and Juice Extractor Combo
CBJ-450
For your safety and continued enjoyment of this product, always read the instruction book carefully before using.

2
IMPORTANT SAFEGUARDS
When using an electrical appliance, basic safety precautions should
always be taken, including the following:
1. READ ALL INSTRUCTIONS BEFORE USING.
2. Always make sure the juice extractor cover is clamped securely in
place before motor is turned on. Do not unfasten clamps while juicer
is in operation. Be sure to turn switch to STOP position after each
use of your juice extractor. Make sure the motor stops completely
before disassembling.
3. Do not put fingers or other objects into the juice extractor opening
while it is in operation. If food becomes stuck in the opening, use
the food pusher or another piece of fruit or vegetable to push it
down, or turn the motor off and disassemble the unit to remove the
remaining food.
4. If the mesh filter basket blade is damaged, do not use.
5. Do not operate without the pulp container in place.
6. Turn the appliance to STOP, then unplug from the outlet
when not in use, before assembling or disassembling parts
and before cleaning or removing contents from blending cup
or juice extractor. Never put hands into the blending cup or
juice extractor, or handle the blades with appliance plugged.
To unplug, grasp the plug and pull from the outlet. Never pull
from the power cord.
7. To protect against the risk of electrical shock, do not put motor base
in water or other liquids
8. This appliance is not intended for use by persons (including children)
with reduced physical, sensory, mental capabilities, or lack of
experience and knowledge. Close supervision is necessary when any
appliance is used near children. Children should be supervised to
ensure that they do not play with the appliance.
9. Avoid contact with moving parts.
10. Do not operate any appliance with a damaged cord or plug or after
the appliance malfunctions, or is dropped or damaged in any manner.
Contact the manufacturer at their customer service telephone number
1-800-726-0190 for information on examination, repair, and/or
mechanical or electrical adjustment.
11. The use of attachments, not recommended or sold by Cuisinart,
may cause fire, electric shock, or risk of injury to persons.
12. Do not use outdoors.
13. Do not let cord hang over edge of counter or table or touch
hot surfaces.
14. Keep hands, hair, clothing, as well as spatulas and other utensils
away from blending cup during operation to reduce risk of injury to
persons, and/or damage to the appliance. A spatula may be used,
but must be used only when the unit is not operating.
15. Do not touch cutting assembly, interfere with blade movement,
or remove juice extractor cover.
16. BLADES ARE SHARP. HANDLE CAREFULLY.
17. To reduce the risk of injury, never place cutting assembly on base
unless the blending cup is properly attached.
18. Never leave your Compact Blender and Juice Extractor Combo
unattended while running.
19. When using the blender, twist blending cup on firmly. Injury can result
if moving blades accidentally become exposed.
20. Do not use an extension cord with this unit. Doing so may result in
fire, electric shock, or personal injury.
21. Wash the blender and juice extractor parts with warm soapy water
prior to first use.
22. Risk of thermal burn injury due to excessive pressure in the container.
Do Not blend hot liquids.
23. CAUTION! NEVER USE carbonated beverages in the blending
cup.
24. Be certain blade assembly is securely locked in place before
operating the blender.
25. Do not attempt to bypass the interlock system that powers the
unit on.

3
26. To avoid possible malfunction of the appliance switch, never store
juice extractor attachment assembly with cover on in locked position.
27. WARNING: TO REDUCE THE RISK OF ELECTRICAL SHOCK
OR FIRE, DO NOT REMOVE THE BASE PANEL. NO USER-
SERVICEABLE PARTS ARE INSIDE. REPAIR SHOULD BE
DONE ONLY BY AUTHORIZED PERSONNEL.
28. Do not operate your appliance in an appliance garage or under a wall
cabinet. When storing in an appliance garage, always unplug the
unit from the electrical outlet. Not doing so could create a risk of
fire, especially if the appliance touches the walls of the garage or the
door touches the unit as it closes.
SAVE THESE INSTRUCTIONS.
FOR HOUSEHOLD USE ONLY.
NOTICE:
This appliance has a polarized plug (one prong is wider than the other).
To reduce the risk of electric shock, this plug will only fit into a polarized
outlet one way. If the plug does not fit fully into the outlet, reverse the plug.
If it still does not fit, contact a qualified electrician. Do not modify the plug
in any way. Rating of unit is 450-watt peak motor. Recommended
attachments and recipes may draw significantly less power.
This appliance comes with a thermal resettable protection device to
prevent damage to the motor in the case of extreme overload. Should the
unit shut off unexpectedly, unplug it and let it cool for at least 15 minutes
before continuing (see Operating and Safety Tips, on page 6).
UNPACKING INSTRUCTIONS
1. Place the gift box containing your Cuisinart
®
Compact Blender
and Juice Extractor Combo on a flat, sturdy surface before unpacking.
2. Open the top flaps of the box. Inside will be the instruction/recipe
booklet and other printed materials.
3. Remove Compact Blender and Juice Extractor Combo base as well
as all other parts (listed in Parts and Features) and set aside. Before
using for the first time, wash all parts according to the Cleaning and
Maintenance section on page 7 of this booklet to remove any dust
or residue.
To assemble the Compact Blender with Juice Extractor, follow the
Assembly instructions on page 5 of this instruction booklet. Replace all
packaging materials in the box and save for repackaging.
CAUTION: ALL CUTTING TOOLS HAVE VERY SHARP EDGES. To avoid
injury when unpacking the parts, never touch the cutting edges of blades
or filter basket.
NOTE: We recommend that you visit www.cuisinart.com for a fast, efficient
way to complete your product registration
TABLE OF CONTENTS
Important Safeguards ...................................2
Unpacking Instructions ..................................3
Parts and Features .....................................4
Quick Reference Guide ..................................5
Compact Blender Assembly and Operation ..................5
Compact Blender Operating and Safety Tips .................6
Compact Juice Extractor Assembly/Disassembly..............6
Compact Juice Extractor Operation ........................7
Cleaning and Maintenance ...............................7
Compact Blender and Juice Extractor Troubleshooting .........8
Compact Blender and Juice Extractor and Hints ..............9
Approximate Yield Juicing Chart . . . . . . . . . . . . . . . . . . . . . . . . . .10
Warranty .............................................11
Recipes..............................................12
4
PARTS AND FEATURES
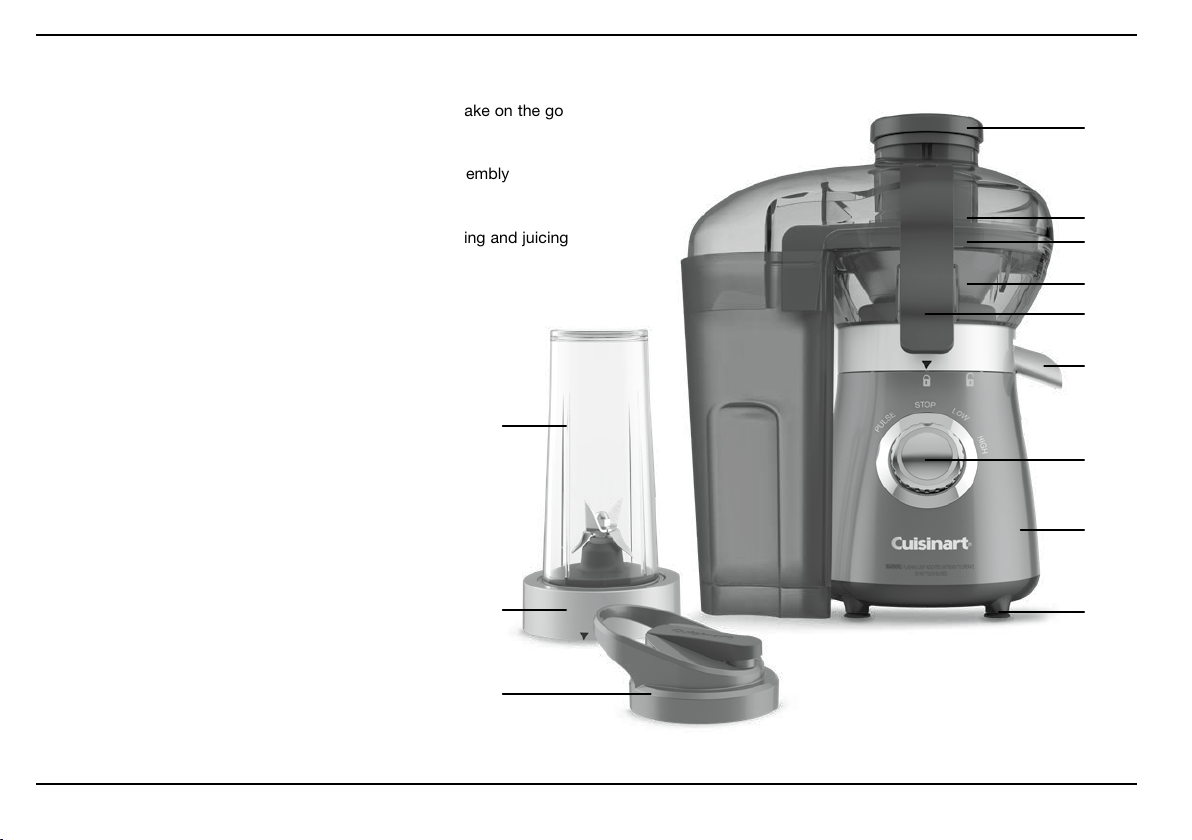
1. 16 Ounce BPA-Free Blending Cup
that doubles as a to-go cup. Comes with flip top lid to take on the go
or to save for later.
2. High-Quality Blade Assembly
is strong enough for all blending tasks. Self-aligning assembly
fits easily onto the base.
3. Heavy-Duty Motor Base
is compact yet strong, sturdy, and stable for both blending and juicing
with 450-watt peak motor and safety shutoff.
4. 3-Function Rotary Dial
with easy-to-use Low, High, and Pulse settings.
5. Slip-Proof Feet
prevent movement during use and damaging marks
on countertops or tables.
6. Juice Extractor Attachment:
6a. Pulp Container
collects pulp from juicing for easy cleaning
6b. Cover with Feed T
ube
for easy juicing
6c.
Pusher
6d.
Filter Housing
6e.
Locking Clamps
for opening and closing safely
6f.
Flow Spout
6g.
Mesh Filter Basket/Blade
NOTE: Blades are SHARP. Handle carefully.
1
2
3
4
5
6b
6a
6c
6d
6e
6g
6f
1

5
COMPACT BLENDER ASSEMBLY
After washing all parts, please see below for assembly instructions.
Place base on flat surface and plug in.
1. Place blending cup on flat surface upright. Add ingredients.
2. Attach blade assembly on round opening of the blending cup
and turn clockwise until tightened.
3. Align the blade collar with base unit triangle marking, place on blender
base firmly.
4. Turn clockwise to lock.
COMPACT BLENDER OPERATION
1. With the base unit on the tabletop and the unit plugged in, turn
blending cup upside down and place the assembled blending cup
onto the base.
Turn clockwise to lock into place. The blue light ring will blink to
indicate that unit is ready to operate. If it doesn't, turn dial to STOP
and check assembly.
2. For continuous blending, turn dial to the desired speed. It is possible
to switch between High and Low speeds by simply turning the dial.
3. To pause the blending process, turn the dial to STOP. The blending
process will stop. To resume blending, choose the desired speed.
4. To pulse, turn the dial to PULSE. Hold, then release after desired
run time. Repeat as needed. The Pulse function can be used to
break apart larger pieces of food. The Pulse function is also effective
for starting the blending process when you do not want continuous
power or for processing items that do not require an extended
amount of blending. Dial will automatically return to the STOP position
upon release.
5. The unit shall auto stop blending after 1Minute. if more blending time
required, simply turn the dial to stop position then turn to desired
speed again.
6. When you have finished blending, turn the dial to STOP. Then remove
the blending cup from the base. Turn cup right side up, turn blade
assembly clockwise to remove. Attach travel cup lid by twisting
counterclockwise. NEVER TOUCH THE BLADE ITSELF. Unplug
the unit.
QUICK REFERENCE GUIDE
To activate blending Place blending cup tted with blade
assembly onto base
To begin blending or juicing Turn dial to desired speed
To change speeds Turn dial to desired speed
To pulse Turn dial left to PULSE
To stop blending or juicing Turn dial to STOP

6
COMPACT BLENDER OPERATING
AND SAFETY TIPS
• Make sure the electrical outlet is rated at the same voltage as that
stated on the bottom of the blender motor base.
• Don’t remove blending cup while unit is running.
• Don’t place blade assembly onto motor base without the
blending cup attached.
• Make sure blade assembly is tightly attached when utilizing the
blending cup.
• Always remove blade assembly before cleaning.
• Never use metal utensils, as damage may occur to the blending cup
or cutting assembly.
• Don’t overload blending cup. If the motor stalls, turn the blender off
immediately, unplug the unit and let it cool for at least 15 minutes.
Then, remove a portion of the food and continue.
• CAUTION: Never use carbonated beverages in the blending cup.
• Don’t blend hot liquids in blending cup.
• Don’t use any container or accessories not recommended by
Cuisinart. Doing so may result in injury.
• To remove blending cup, turn slightly counterclockwise before lifting.
• The blending cup is not recommended for microwave use.
COMPACT JUICE
EXTRACTOR ASSEMBLY
1. Place motor base on a clean flat surface. Make sure the motor base
is unplugged from the power outlet.
2. Place filter housing on top of motor base. Do not lock locking clamps
into place until you’ve completed assembling the juice extractor.
3. Insert the mesh filter basket/blade firmly into filter housing by pressing
down on the rim of the filter so it locks securely in place. Be careful
not to touch the blades in the bottom of the basket and be sure
this part is inserted before every use.
4. Insert the pulp container onto the side of the unit by tilting unit slightly.
Then place cover on top of the filter housing. Be sure to align the feed
tube over the mesh filter basket.
5. Make sure the locking clamps are pushed in the down position
so the cover sits securely in the grooves.
6. Place a glass beneath the spout at the front of the unit.
7. Insert the food pusher inside the feed tube.
8. Move each locking clamp upwards against the bowl and lock them into
place on top cover
COMPACT JUICE
EXTRACTOR DISASSEMBLY
1. Unplug the Compact Juice Extractor.
2. Unlock the locking clamps and cover then remove the pusher. The
cover is unlocked when it is resting at the back of the motor base.
3. Lift and remove cover from filter housing.
4. Carefully remove mesh filter basket/blade from the filter housing by
pulling up on the sides of the rim. Be careful not to touch the blades
in the bottom of the basket.

7
5. Remove the pulp container from the side of the motor base and empty.
COMPACT JUICE
EXTRACTOR OPERATION
1. Make sure your Juice Extractor Attachment is properly assembled
(see Page 6) and attached to the motor base.
2. Plug the power cord into the 120V electrical outlet.
3. Wash all selected fruits or vegetables.
4. While many fruits and vegetables will not need cutting, any item
with a diameter larger than 2 inches will need to be cut.
5. Turn the dial from the STOP position to HIGH.
6. Lift the food pusher out of the feed tube and drop your food
into the opening. Push through by inserting the food pusher
and pressing firmly. Do not pack the feed tube too full of food.
Be sure that the food has been processed through the filter basket/
blade before adding more items.
Note: When using leafy vegetables with stems, please put the leafy
end into the feed tube first followed by the stem. Do not over pack
feed tube.
7. The juice will flow into your glass and the pulp will accumulate
in the pulp container.
8. When finished juicing, turn the dial to the STOP position to stop
the motor.
COMPACT BLENDER AND
JUICE EXTRACTOR COMBO
CLEANING AND MAINTENANCE
Always unplug your Cuisinart
®
Compact Blender and Juice Extractor
Combo from the electrical outlet before cleaning. The base and parts are
made of corrosion-resistant materials that are easy to clean. Before first
use and after every use, clean each part thoroughly. Periodically check all
parts before reassembly. DO NOT USE IF ANY PART IS DAMAGED,
OR IF THE BLENDER CUP IS CHIPPED OR CRACKED.
To remove blade assembly, twist off by turning clockwise.
NEVER TOUCH THE BLADE.
CAUTION: Handle the blade assembly carefully. Blades are SHARP
and may cause injury. DO NOT attempt to remove blades from cutting
assembly, do not attempt to detach the blade assembly from Blade collar.
Wash all parts in warm, soapy water. Rinse and dry thoroughly. All parts
are top rack dishwasher safe.
Tip: You may wish to clean your blade assembly cutting assemblies as
follows: Squirt a small amount of dishwashing liquid into blending cup and
fill halfway with warm (not hot) water. Attach blade assembly and run on
Low for 15 seconds. Repeat, using clean tap water. Carefully disassemble
parts and empty blending cup. Rinse and dry all parts thoroughly.
Finally, wipe the motor base clean with a damp cloth to remove any
residue, and dry thoroughly. Never submerge the motor base in water
or other liquids, or place in a dishwasher.
Any other servicing should be performed by an authorized service
representative.

8
Problem: Solution:
My blender is not
turning on
Be sur
e the blade assembly is on the
blending cup correctly and locked into place
Plug the blender into an independent and
electrical outlet and make sur
e the blender
is securely plugged in. If it still doesn't work,
try plugging into a dif
ferent outlet and/or
check your home's circuit breaker.
The blender stops running
The motor could have overheated.
The resettable fuse, which protects the motor
if overloaded, may have been tripped. When
this happens, r
eset the appliance by unplug-
ging it and letting it cool for a minimum of 15
minutes. Then, r
educe the contents
of the blending cup and/or clear any jams.
Restart the unit as noted in the operating
dir
ections.
The blade assembly is hard
to remove after blending
The ingr
edients cause pressure, and with the
airtight seal, pressure builds up creating a
vacuum or a suction effect. This is normal.
Unit appears to be leaking
Check rubber gasket and make sure it's ush
with the blender assembly. You can also
check the rubber gasket to see if is in place
or even damaged. The blade assembly should
be tight.
COMPACT BLENDER
TROUBLESHOOTING
Problem: Solution:
Juice extractor does not turn on
Check to see if the locking clamps are
properly engaged.
(See Assembly Instructions, page 6.)
T
urn to HIGH to start juicing.
The juice extractor stops running
The motor could have overheated.
The resettable fuse, which protects the motor
if overloaded, may have been tripped.
When this happens, reset the appliance by
unplugging it and letting it cool for a minimum
of 15 minutes. Then, reduce the contents or
clear any jams. Restart the unit as noted in
the operating directions.
Juice ow is slow
Excess pulp in mesh lter basket can
slow juice rate. Stop the juice
extractor and clean lter basket.
Dif
culty getting herbs or leafy
greens down the feed tube
Place herbs between other ingredients. When
using leafy greens, always place the leafy side
in rst and do not over pack the feed tube.
Unit is on but juice/pulp
not owing
Make sur
e the mesh lter basket/blade
is in place.
COMPACT JUICE EXTRACTOR
TROUBLESHOOTING

9
COMPACT BLENDER –
TIPS AND HINTS
• Always put the hardest ingredients into the blending cup first (ice cubes,
frozen fruit) and finish with the softer ingredients and liquids.
• It is recommended that most foods be cut into ½- to 1-inch pieces
to achieve the most uniform result.
• For best results in the fastest time, pulse a few times before running
continuously. Pulses should be short bursts with about 1 second in
between each one to allow the blade to stop rotating between pulses.
• To crush ice, put no more than 3 standard ice cubes into the blending
cup at one time. Pulse until uniformly crushed.
• If food sticks to the sides of the blending cup when blending, stop the
blender, carefully scrape down the food, replace blade assembly and
pulse in short bursts to combine.
• When blending thicker mixtures, lightly hold down top of blending cup
to prevent excessive movement.
• Do not attempt to mash white potatoes or knead bread dough in the
blending cup.
• After blending, flip the blending cup over so that the blade assembly
is on the top. Gently tap the cup on the counter a few times to prevent
any spillage. Remove the blade assembly and replace with the provided
lid.
COMPACT JUICE EXTRACTOR –
TIPS AND HINTS
• Extracted juice captures about 95% of the nutrients from fresh fruits
and vegetables. Drinking extracted juice is a fast and efficient way
for your body to digest and absorb all these nutrients. Digesting whole
fruits can take about an hour; extracted juices take only 15 minutes.
• Freshly extracted juices are an excellent aid in weight management
and in cleanses, which rid the body of toxins.
• Always use fresh, organic, and seasonal produce. Organic produce
is grown without synthetic fertilizers and chemicals, which is very
important when juicing whole foods. Buying foods in season is
considerably less expensive than purchasing off-season, and flavors
are much better.
• Wash all fruits and vegetables immediately after purchasing and store
them in the refrigerator. This way they are ready to juice at any time.
• Always juice fresh fruits and vegetables as soon as possible after
purchasing. The longer produce is held the more nutrients it loses.
• Certain fruits should be peeled before juicing. Examples are pineapples,
melons, mangoes, papayas, citrus – any fruit with skin that you cannot
eat. Also, remove all pits and hard seeds from peaches, cherries,
mangoes, etc.
• Citrus fruit juice is delicious and richer in nutrients.
• If cucumbers are waxy, peel them before juicing.
• Juice the softer ingredients before the harder ones.
• When using the pusher, use gentle pressure to guide food through the
feed tube. Do not press too hard or use too much force.
• When juicing herbs or leafy greens, juice them in the middle of a
combination of ingredients in order to extract the greatest amount
of juice. Always put the leafy end of the greens into the feed tube first
and do not over pack.
• Use your taste to guide you in creating fruit and vegetable
combinations for juices. The recipes provided are a guideline,

10
but the possibilities are endless. Experiment to discover your favorite
combinations.
• Carrots make a great and tasty base for vegetable juices and apples do
the same for fruit juices.
• Beets and carrots both have a naturally high sugar content, so when
added to vegetable juices they can balance out any bitter flavors juiced
vegetables may have.
• Use your Compact Juice Extractor in tandem with your blender.
Blend fresh juices with ingredients like bananas, yogurt, and protein
powders for delicious power smoothies.
• It is also possible to make a healthier, fresher version of your favorite
cocktail with fresh juices.
• Stir fruit juices into sparkling water or seltzer to make a natural soda.
• The pulp that is separated from the juice has its own health benefits.
It is high in fiber and can be used in a variety of ways.
FRUIT AMOUNT YIELD
APPLE (quartered)
1 medium (about 7 ounces) ½ cup or 4 ounces
CANTALOUPE (peeled and seeded)
1 cup, cubed ½ cup or 4 ounces
GRAPES
1 cup ½ cup or 4 ounces
ORANGE (peeled and quartered)
1 medium (about 12 ounces) ²⁄
³
cup or 5 ounces
PEACH (pitted)
1 medium (about 10 ounces) ¼ cup or 2 ounces
PEAR (quartered)
1 medium (about 7 ounces) ½ cup or 4 ounces
PAPAYA (peeled and seeded)
½ fruit (about 1 pound 3 ounces) 1 cup or 8 ounces
PINEAPPLE (peeled and cored)
½ fruit 1 cup or 8 ounces
WATERMELON (peeled and seeded)
1 cup, cubed ½ cup or 4 ounces
STRAWBERRIES
1 cup ½ cup or 4 ounces
GRAPEFRUIT (peeled and quartered)
1 medium to large (about 1 pound) 1¼ cups or 10 ounces
LEMON (peeled)
1 fruit (about 5 ounces) ¼ cup or 2 ounces
KIWI
1 fruit (about 3 ounces) 1 ounce
VEGETABLE AMOUNT YIELD
BEET (quartered)
1 medium (about 6 to 7 ounces) ½ cup or 4 ounces
LEAFY GREENS
1 handful (about 8 leaves) 1½ ounces
CARROT
1 pound 1 cup or 8 ounces
CELERY
4 large stalks ½ cup or 4 ounces
BELL PEPPER (quartered)
1 medium (about 9 ounces) ½ cup or 4 ounces
CUCUMBER
1 medium/large (about 11 ounces) 1 cup or 8 ounces
TOMATO
1 medium (about 5 ounces) ½ cup or 4 ounces
PARSLEY
1 bunch (about 6 ounces) ¼ cup or 2 ounces
CABBAGE
¼ head (about 12 ounces) ¾ cup or 6 ounces
APPROXIMATE YIELD JUICING CHART

11
WARRANTY
Limited 3-Year Warranty
This warranty is available to U.S. consumers only. You are a consumer
if you own a Cuisinart
®
Compact Blender and Juice Extractor Combo
that was purchased at retail for personal, family or household use.
Except as otherwise required under applicable law, this warranty is
not available to retailers or other commercial purchasers or owners.
We warrant that your Cuisinart
®
Compact Blender and Juice Extractor
Combo will be free of defects in materials and workmanship under
normal home use for 3 years from the date of original purchase.
We recommend that you visit our website, https://cuisinart.registria.
com, for a fast, efficient way to complete your product registration.
However, product registration does not eliminate the need for the
consumer to maintain the original proof of purchase in order to obtain
the warranty benefits. In the event that you do not have proof of purchase
date, the purchase date for purposes of this warranty will be the date
of manufacture.
CALIFORNIA RESIDENTS ONLY
California law provides that for In-Warranty Service, California residents
have the option of returning a nonconforming product (A) to the store
where it was purchased or (B) to another retail store that sells Cuisinart
products of the same type. The retail store shall then, according to its
preference, either repair the product, refer the consumer to an
independent repair facility, replace the product, or refund the purchase
price less the amount directly attributable to the consumer’s prior usage
of the product. If neither of the above two options results in the
appropriate relief to the consumer, the consumer may then take the
product to an independent repair facility, if service or repair can be
economically accomplished. Cuisinart and not the consumer will be
responsible for the reasonable cost of such service, repair, replacement,
or refund for nonconforming products under warranty. California
residents may also, according to their preference, return nonconforming
products directly to Cuisinart for repair or, if necessary, replacement by
calling our Consumer Service Center toll-free at 800-726-0190. Cuisinart
will be responsible for the cost of the repair, replacement, and shipping
and handling for such nonconforming products under warranty.
HASSLE-FREE REPLACEMENT WARRANTY
Your ultimate satisfaction in Cuisinart products is our goal, so if your
Cuisinart
®
Compact Blender and Juice Extractor Combo should fail
within the generous warranty period, we will repair it or, if necessary,
replace it at no cost to you. To obtain a return shipping label, email us
at https://www.cuisinart.com/customer-care/product-assistance/
product-inquiry/. Or call our toll-free consumer service department at
1-800-726-0190 to speak with a representative.
Your Cuisinart
®
Compact Blender and Juice Extractor Combo has been
manufactured to the strictest specifications and has been designed for
use only in 120-volt outlets and only with authorized accessories and
replacement parts. This warranty expressly excludes any defects or
damages caused by attempted use of this unit with a converter, as well
as use with accessories, replacement parts or repair service other than
those authorized by Cuisinart. This warranty does not cover any damage
caused by accident, misuse, shipment or other than ordinary household
use. This warranty excludes all incidental or consequential damages.
Some states do not allow the exclusion or limitation of these damages,
so these exclusions may not apply to you. You may also have other
rights, which vary from state to state.
Important: If the nonconforming product is to be serviced by someone
other than Cuisinart’s Authorized Service Center, please remind the
servicer to call our Consumer Service Center at 1-800-726-0190 to
ensure that the problem is properly diagnosed, the product is serviced
with the correct parts, and to ensure that the product is still under
warranty.

12
RECIPES
Summer Fruit Smoothie ...............................12
Sweet Berry Smoothie .................................12
Green Goddess Smoothie ..............................13
Golden Power Smoothie ...............................13
Blueberry-Cocoa Smoothie .............................13
Cherry-Almond Smoothie ..............................14
Sweet Coffee Protein Smoothie..........................14
Tropical Mango Smoothie ..............................14
Ginger-Mint Refresher .................................15
Protein and Greens Smoothie ...........................15
The Mighty Green ....................................15
Sweet Papaya .......................................16
Glow Green .........................................16
Orange-Ginger Plus . . . . . . . . . . . . . . . . . . . . . . . . . . . . . . . . . . .16
Pomegranate Pucker ..................................17
Pineapple Refresh ....................................17
Bright Herb Tonic .....................................17
Earthly Cleanse ......................................17
Garden Green .......................................18
Wake Up Shot .......................................18
Hibiscus Sunrise ....................................18
Spiked Watermelon Refresher ...........................19
Mint Syrup ..........................................19
Garden Citrus Elixir ...................................19
Rosemary Syrup......................................20
Summer Fruit Smoothie
A taste of summer, the extra boost of flaxseed makes this sweet smoothie
a refreshing and healthy treat.
Makes 1 serving
1
∕
3
cup frozen peach pieces
2
∕
3
cup fresh strawberries
1 teaspoon ground flaxseed
½ cup oat milk
1. Put all of the ingredients, in the order listed, into the blending cup.
Secure blade assembly.
2. Run on High until smooth, about 1 minute.
3. Serve immediately.
Nutritional information per serving:
Calories 130 (17% from fat) • carb. 25g • pro. 3g • fat 3g • sat. fat 0g
• chol. 0mg • sod. 59mg • calc. 40mg • fiber 4g
Sweet Berry Smoothie
Also known as pitaya, dragon fruit is very mild in flavor
but packed with fiber and other nutrients.
Makes 1 serving
½ cup frozen strawberries
¼ cup frozen pineapple
½ cup fresh dragon fruit pieces
½ ripe banana, cut into 1-inch pieces
½ cup coconut milk
1. Put all of the ingredients, in the order listed, into the blending cup.
Secure blade assembly.
2. Run on High until smooth, about 1 minute.
3. Serve immediately.

13
Nutritional information per serving:
Calories 148 (21% from fat) • carb. 30g • pro. 2g • fat 4g • sat. fat 2g
• chol. 0mg • sod. 51mg • calc. 260mg • fiber 5g
Green Goddess Smoothie
Creamy avocado is not only a great source of good-for-you fats,
but also makes this silky smoothie very filling. While it can easily
be 1 serving, you may want to split it with a friend.
Makes 1 to 2 servings
1 frozen banana, cut into 1-inch pieces
½ avocado
½ cup packed baby spinach
2 teaspoons matcha powder
1 cup dairy-free milk
1 to 2 teaspoons honey
1. Put all of the ingredients, in the order listed, into the blending cup.
Secure blade assembly.
2. Run on High until smooth, about 1 minute and 15 seconds.
3. Serve immediately.
Nutritional information per serving (based on 2 servings:
Calories 198 (29% from fat) • carb. 35g • pro. 2g • fat 7g • sat. fat 1g
• chol. 0mg • sod. 31mg • calc. 234mg • fiber 4g
Golden Power Smoothie
Who would have thought that sweet potato could be in a smoothie?
We have it mixed here with anti-inflammatory spices and protein powder
making it a great post-workout drink.
Makes 1 serving
1 frozen banana, cut into 1-inch pieces
½ cup steamed sweet potato pieces
½ teaspoon ground turmeric
¼ teaspoon ground cinnamon
2 tablespoons vanilla protein powder
¾ cup coconut milk
1. Put all of the ingredients, in the order listed, into the blending cup.
Secure blade assembly.
2. Run on High until smooth, about 1 minute.
3. Serve immediately.
Nutritional information per serving:
Calories 261 (16% from fat) • carb. 44g • pro. 13g • fat 5g • sat. fat 3g
• chol. 0mg • sod. 263mg • calc. 424mg • fiber 6g
Blueberry Cocoa Smoothie
The cocoa powder in this smoothie can be an acquired taste for some,
so we recommend starting with 1 teaspoon for the first try, then increase
as desired. Also, blueberries are full of natural pectin so drink immediately
after blending to prevent it from thickening too much.
Makes 1 serving
½ cup frozen wild blueberries
1 banana, cut into 1-inch pieces
1 to 2 teaspoons cocoa powder
¼ teaspoon ground cinnamon
½ cup almond milk

14
1. Put all of the ingredients, in the order listed, into the blending cup.
Secure blade assembly.
2. Run on High until smooth, about 1 minute.
3. Serve immediately.
Nutritional information per serving:
Calories 175 (9% from fat) • carb. 39g • pro. 2g • fat 2g • sat. fat 0g
• chol. 0mg • sod. 91mg • calc. 322mg • fiber 8g
Cherry-Almond Smoothie
Use both unsweetened almond butter and almond milk to be sure this
sweet cherry smoothie is the not too sweet!
Makes 1 serving
½ cup frozen cherries
½ cup frozen strawberries
1 banana, cut into 1-inch pieces
1 tablespoon almond butter
¾ cup almond milk
1. Put all of the ingredients, in the order listed, into the blending cup.
Secure blade assembly.
2. Run on High until smooth, about 1 minute.
3. Serve immediately.
Nutritional information per serving:
Calories 288 (29% from fat) • carb. 50g • pro. 6g • fat 10g • sat. fat 1g
• chol. 0mg • sod. 186mg • calc. 457mg • fiber 8g
Sweet Coffee Protein Smoothie
Definitely a healthy jolt to the system first thing in the morning!
Makes 1 serving
1 frozen banana, cut into 1-inch pieces
1 tablespoon cocoa powder
1 tablespoon cashew butter
½ cup cold brew coffee
1. Put all of the ingredients, in the order listed, into the blending cup.
Secure blade assembly.
2. Run on High until smooth, about 1 minute.
3. Serve immediately.
Nutritional information per serving:
Calories 231 (28% from fat) • carb. 34g • pro. 5g • fat 7g • sat. fat 2g
• chol. 0mg • sod. 1mg • calc. 159mg • fiber 5g
Tropical Mango Smoothie
All the flavors of the tropics in one cup. Sure to be a hit
with the kids and grownups alike.
Makes 1 serving
2
∕
3
cup frozen mango pieces
1
∕
3
cup frozen pineapple pieces
½ banana, cut into 1-inch pieces
¾ cup coconut milk
1. Put all of the ingredients, in the order listed, into the blending cup.
Secure blade assembly.
2. Run on High until smooth, about 1 minute.
3. Serve immediately.

15
Nutritional information per serving:
Calories 163 (22% from fat) • carb. 34g • pro. 2g • fat 5g • sat. fat 3g
• chol. 0mg • sod. 31mg • calc. 380mg • fiber 4g
Ginger-Mint Refresher
The flavors are perfectly balanced in this bright, herby, and ginger-zinging
smoothie. It is perfect for breakfast, or an afternoon-pick-me-up.
Makes 1 serving
½ cup frozen mango pieces
½ banana, cut into 1-inch pieces
1 ½-inch piece fresh ginger, peeled and halved
½ cup packed baby spinach
1 tablespoon fresh mint leaves
1 teaspoon fresh lime juice
½ cup coconut water
1. Put all of the ingredients, in the order listed, into the blending cup.
Secure blade assembly.
2. Run on High until smooth, about 1 minute.
3. Serve immediately.
Nutritional information per serving:
Calories 127 (5% from fat) • carb. 31g • pro.2g • fat 1g • sat. fat 0g
• chol. 0mg • sod. 129mg • calc. 86mg • fiber 5g
Protein and Greens Smoothie
The beautiful greenish-blue hue of this smoothie comes from the
spirulina, which is a vibrant green algae that has many health benefits.
Makes 1 serving
½ cup frozen pineapple pieces
1 banana, cut into 1-inch pieces
½ cup baby kale
1 tablespoon protein powder
1 teaspoon spirulina powder
½ cup dairy-free milk
1. Put all of the ingredients, in the order listed, into the blending cup.
Secure blade assembly.
2. Run on High until smooth, about 1 minute.
3. Serve immediately.
Nutritional information per serving:
Calories 206 (13% from fat) • carb. 39g • pro. 11g • fat 3g • sat. fat 1g
• chol. 18mg • sod. 165mg • calc. 372mg • fiber 5g
The Mighty Green
Simple, clean and green!
Makes 1 serving
4 small lacinato kale leaves
3 celery stalks
1 large Swiss chard leaf
1 small handful parsley
1
∕
3
lemon, peeled
1. Assemble the juice extractor attachment.

16
2. Turn to high speed and juice all ingredients.
3. Stir and drink immediately.
Nutritional information per serving:
Calories 98 (10% from fat) • carb. 19g • pro. 6g • fat 1g • sat. fat 0g
• chol. 0mg • sod. 388mg • calc. 259mg • fiber 0g
Sweet Papaya
The fruit gives this juice a nice, thick texture plus a standout flavor
making it a true crowd pleaser
Makes 1 serving (about 12 ounces)
¼ medium papaya, peeled, cut to fit feed tube
4 large strawberries
1 medium tangerine, peeled and halved
1. Assemble the juice extractor attachment.
2. Turn to high speed and juice all ingredients.
3. Stir together and serve immediately.
Nutritional information per serving:
Calories 106 (4% from fat) • carb. 28g • pro. 2g • fat 1g • sat. fat 0g
• chol. 0mg • sod. 13mg • calc. 47mg • fiber 0g
Glow Green
The ginger and lemon brighten up this green-packed juice. We like to
keep lemon juice on hand to add to water or juices, but if you prefer,
you can put in a ¼ of a peeled lemon while juicing
Makes 2 servings
2 medium green apples, cut to fit the feed tube
½ medium cucumber, halved lengthwise
4 celery stalks
4 stems kale, tough bottom stems removed
1 ½-inch piece ginger
¼ lemon, peeled
1. Assemble the juice extractor attachment.
2. Turn to high speed and juice all ingredients.
4. Stir and drink immediately.
Nutritional information per serving:
Calories 84 (4% from fat) • carb. 23g • pro. 0g • fat 0g • sat. fat 0g
• chol. 0mg • sod. 1mg • calc. 220mg • fiber 5g
Orange-Ginger Plus
The ginger gives a zing to this naturally sweet combination.
Makes 2 servings
2 medium to large carrots
1 beet, cut to fit feed tube
1 ½ to 1-inch piece ginger, based on personal preference
1 firm, sweet pear, cut to fit feed tube
1. Assemble the juice extractor attachment.
2. Turn to high speed and juice all ingredients.
3. Stir and drink immediately.
Nutritional information per serving:
Calories 95 (6% from fat) • carb. 25g • pro. 2g • fat 1g • sat. fat 0g
• chol. 0mg • sod. 76mg • calc. 81mg • fiber 5g

17
Pomegranate Pucker
Pomegranate, an antioxidant powerhouse, costars with lemon
and blood orange in this cleansing elixir.
Makes about 12 ounces (1 to 2 servings)
2
∕
3
cup pomegranate seeds
2 blood oranges, halved
1
∕
3
lemon, peeled
1. Assemble juice extractor attachment.
2. Turn to high speed and juice all ingredients.
3. Stir and drink immediately.
Nutritional information per serving (based on 2 servings):
Calories 102 (8% from fat) • carb. 24g • pro. 2g • fat 1g • sat. fat 0g
• chol. 0mg • sod. 3mg • calc. 44mg • fiber 0g
Pineapple Refresh
Pineapple and mint are a perfect pairing. Make it even more refreshing
with a splash of seltzer.
Makes 2 servings
½ pineapple, peeled and cut to fit the feed tube
3 to 4 tablespoons fresh mint leaves
1 cup packed spinach (baby or not)
Pinch pink Himalayan salt
1. Assemble the juice extractor attachment.
2. Turn to high speed and juice all ingredients, except for the salt. Be sure
that the mint and spinach are juiced between pieces of the pineapple in
order to process fully.
3. Add the salt, stir, and drink immediately.
Nutritional information per serving:
Calories 115 (4% from fat) • carb. 29g • pro. 1g • fat 0g • sat. fat 0g
• chol. 0mg • sod. 6mg • calc. 30mg • fiber 5g
Bright Herb Tonic
The bright flavor of fresh herbs and the sweetness of apple
round out this nutrient dense tonic.
Makes 1 serving (about 10 ounces)
1 small handful parsley
1 small handful cilantro
1 small apple
4 small lacinato kale leaves
2 celery stalks
¼ lemon, peeled
1. Assemble the juice extractor attachment.
2. Turn to high speed and juice all ingredients.
3. Stir and drink immediately.
Nutritional information per serving:
Calories 179 (6% from fat) • carb. 42g • pro. 5g • fat 1g • sat. fat 0g
• chol. 0mg • sod. 192mg • calc. 216mg • fiber 0g
Earthly Cleanse
The benefits of beets are too numerous to count. Enjoy them in this
delicious and nutritious juice.
Makes about 8 ounces (1 serving)
1 medium apple, 6 to 7 ounces, cut to fit the feed tube

18
3 ounces cucumber
3 ounces beet, cut to fit the feed tube
1
∕
3
lemon, peeled
1. Assemble the juice extractor attachment.
2. Turn to high speed and juice all ingredients.
3. Stir and drink immediately.
Nutritional information per serving:
Calories 156 (3% from fat) • carb. 40g • pro. 2g • fat 1g • sat. fat 0g
• chol. 0mg • sod. 70mg • calc. 40mg • fiber 0g
Garden Green
A quick trip to the farmer’s market will have you set for this fresh juice.
Perfect for a morning on the go or an afternoon pick-me-up.
Makes 2 servings
½ medium cucumber, halved lengthwise
1 cup packed spinach
4 romaine lettuce leaves
4 celery stalks
¼ cup fresh cilantro leaves and stems
¼ lime, peeled
Pinch sea salt, optional
1. Assemble the juice extractor attachment.
2. Turn to high speed and juice all ingredients, except for the salt.
3. Add the salt, stir and drink immediately.
Nutritional information per serving:
Calories 23 (4% from fat) • carb. 7g • pro. 2g • fat 0g • sat. fat 0g
• chol. 0mg • sod. 61mg • calc. 72mg • fiber 1g
Wake Up Shot
A cleansing way to start your day, the cayenne and ginger in this shot will
give your system a healthy jolt!
Makes about 4 ounces
2 lemons, peeled (about
1
∕
3
cup fresh juice)
1 1½-inch piece fresh ginger
Small pinch cayenne
Pinch pink Himalayan salt
1. Assemble the juice extractor attachment.
2. Juice the lemons and the ginger.
3. Add the cayenne and salt, stir and drink immediately.
Nutritional information per serving:
Calories 17 (7% from fat) • carb. 7g • pro. 1g • fat 0g • sat. fat 0g
• chol. 0mg • sod. 67mg • calc. 17mg • fiber 0g
Hibiscus Sunrise
Antioxidant-packed hibiscus and vitamin C-rich citrus combine
for a delicious immune support tonic.
Makes about 12 ounces (1 to 2 servings)
1 small orange, halved
1
∕
3
lemon, peeled
4 ounces hibiscus flower tea,* chilled
1½ teaspoons agave
1. Assemble the juice extractor attachment.
2. Turn to high speed and juice the orange and lemon. Add the chilled
hibiscus tea and agave and stir.
3. Add ice, if desired, and serve immediately.

1919
* Hibiscus owers can be found loose or in tea bags. Steep according
to manufacturer’s instructions and chill to room temperature or cooler
before using.
Nutritional information per serving (based on 2 servings):
Calories 49 (2% from fat) • carb. 12g • pro. 1g • fat 0g • sat. fat 0g
• chol. 0mg • sod. 2mg • calc. 64mg • fiber 0g
Spiked Watermelon Refresher
Fresh watermelon and mint make this a refreshing cocktail,
especially when the temperature soars.
Makes 12 ounces (1 to 2 servings)
8 ounces watermelon, cut to fit the feed tube
1 ounce good quality rum
1 ounce mint syrup (recipe follows)
1. Assemble the juice extractor attachment.
2. Turn to high speed and juice the watermelon (should yield about 4
ounces of juice).
3. Add the rum and mint syrup. Stir well and serve in tall glass with plenty
of ice.
Nutritional information per serving (based on 2 servings):
Calories 74 (2% from fat) • carb. 11g • pro. 1g • fat 0g • sat. fat 0g
• chol. 0mg • sod. 1mg • calc. 8mg • fiber 0g
Mint Syrup
We use this in our watermelon cocktail, but it is also delicious stirred
into iced tea or lemonade.
Makes ¾ cup
½ cup water
½ cup granulated sugar
4 large mint sprigs
1. Put ingredients into a small saucepan and place over medium-high
heat.
2. Bring mixture to a boil. Once boiling, allow to simmer until sugar is
completely dissolved.
3. Remove from heat and allow to come to room temperature for at least
30 minutes.
4. Chill thoroughly before using.
Nutritional information per serving (based on a1-tablespoon serving):
Calories 32 (0% from fat) • carb. 8g • pro. 0g • fat 0g • sat. fat 0g
• chol. 0mg • sod. 0mg • calc. 1mg • fiber 0g
Garden Citrus Elixir
The rosemary plays well off of the citrus for a tasty grown-up flavor.
Makes one 4-ounce cocktail
1 ounce fresh grapefruit juice
1 ounce good quality vodka
½ ounce fresh lime juice
½ ounce fresh lemon juice
½ ounce rosemary syrup (recipe follows)

20
IB-17202-ESP-A
©2021 Cuisinart
Glendale, AZ 85307
Printed in China
21CE077788
1. Stir or shake all ingredients together with ice.
2. Serve up or over ice.
Nutritional information per serving:
Calories 99 (1% from fat) • carb. 9g • pro. 6g • fat 0g • sat. fat 0g
• chol. 0mg • sod. 1mg • calc. 8mg • fiber 0g
Rosemary Syrup
Easy to make rosemary-infused simple syrup is delicious in our
Garden Citrus Elixir recipe.
Makes ¾ cup
½ cup water
½ cup granulated sugar
3 large sprigs fresh rosemary
1. Put ingredients into a small saucepan and place over medium-high
heat.
2. Bring mixture to a boil. Once boiling, allow to simmer until sugar is
completely dissolved.
3. Remove from heat and allow to come to room temperature for at least
30 minutes.
4. Chill thoroughly before using.
Nutritional information per serving (based on a 1-tablespoon serving):
Calories 34 (2% from fat) • carb. 9g • pro. 0g • fat 0g • sat. fat 0g
• chol. 0mg • sod. 1mg • calc. 4mg • fiber 0g

MANUAL DE INSTRUCCIONES
Y LIBRO DE RECETAS
Licuadora/Extractor de jugo 2 en 1 compacto
CBJ-450
Para su seguridad y para disfrutar plenamente de este producto, siempre lea cuidadosamente las instrucciones antes del uso.

2
MEDIDAS DE SEGURIDAD
IMPORTANTES
Al usar aparatos eléctricos, siempre se deben tomar precauciones básicas
de seguridad,
entre ellas las siguientes:
1. LEA TODAS LAS INSTRUCCIONES ANTES DEL USO.
2. Siempre compruebe que la tapa del extractor de jugo está
firmemente sujetada antes de encender el aparato. No abra la tapa
durante el uso. Apague el aparato, poniendo el interruptor en
“STOP”, después de cada uso. Espere hasta que el motor se detenga
completamente antes de desensamblar el aparato.
3. No introduzca los dedos ni ningún objeto en la boca de alimentación
mientras el aparato está enchufado. Si alimentos quedan atascados
en la boca de alimentación, empújelos con el empujador o con otra
fruta/vegetal, o apague el aparato y desensámblelo.
4. No use el aparato si el colador o la cuchilla están dañados.
5. No use el aparato sin el recolector de pulpa puesto.
6. Apague (“STOP”) y desenchufe el aparato cuando no esté en uso,
antes de instalar/sacar piezas, antes de limpiarlo, y antes de
vaciar el vaso licuador o el extracto de jugo. Nunca introduzca
las manos en el vaso licuador o el extractor de jugo, ni toque las
cuchillas mientras el aparato está enchufado. Para desenchufar,
agarre el enchufe y jálelo de la toma de corriente. Nunca jale el
cable.
7. Para reducir el riesgo de descarga eléctrica, no coloque el bloque-
motor en agua ni en ningún otro líquido
8. 8. Los niños o las personas que carezcan de la experiencia o de los
conocimientos necesarios para manipular el aparato, o aquellas
cuyas capacidades físicas, sensoriales, mentales estén limitadas, no
deben usar este aparato. Supervise el uso de este aparato con
cuidado cuando sea usado cerca de niños. No permita que los niños
jueguen con este aparato.
9. Evite el contacto con las piezas móviles.
10. Llame al servicio de atención al cliente del fabricante al 1-800-726-
0190 para obtener información sobre cómo hacer revisar, reparar y/o
ajustar el aparato (mecánica o eléctricamente). No use este aparato si
el cable o el enchufe están dañados, si no funciona correctamente, si
está dañado, o después de una caída/caída al agua;
11. El uso de accesorios/aditamentos no recomendados por el
fabricante, incluso frascos para conservas, presenta un riesgo de
lesiones personales.
12. No lo use en exteriores.
13. No permita que el cable cuelgue del borde de la encimera o de la
mesa, ni que tenga contacto con superficies calientes.
14. Para evitar el riesgo de lesiones personales o daños al aparato,
mantenga los dedos, cabello, ropa, espátulas y otros utensilios lejos
del vaso licuador durante el funcionamiento. Se puede usar una
espátula de goma, siempre que el aparato esté apagado.
15. No toque ni interfiere con el movimiento de las cuchillas, y no quite la
tapa del extractor de jugo durante el funcionamiento.
16. LAS CUCHILLAS/HOJAS SON MUY AFILADAS; MANIPÚLELAS
CON SUMO CUIDADO.
17. Para reducir el riesgo de lesiones personales, nunca coloque las
cuchillas en la base de la licuadora a menos que el vaso licuador esté
debidamente instalado y ajustado.
18. Nunca descuide/deje el aparato sin vigilancia durante el uso.
19. Cuando use la licuadora, sujete firmemente el vaso licuador,
girándolo hasta que se bloquee. Las cuchillas pueden causar lesiones
graves si quedan al descubierto por accidente.
20. No use un cable alargador/de extensión con este aparato; esto puede
provocar un incendio, una descarga eléctrica o lesiones personales.
21. Lave todas las piezas en agua jabonosa tibia antes del primer uso.
22. Para evitar el riesgo de quemaduras debidas a la excesiva presión en
el recipiente, no mezcle líquidos calientes.
23. ¡PRECAUCIÓN! NUNCA procese líquidos gaseosos en el vaso
licuador.
24. Compruebe que la tapa está debidamente cerrada antes de encender
el aparato.
25. No intente forzar el mecanismo de seguridad del aparato.

3
26. Para evitar un posible mal funcionamiento del interruptor del aparato,
nunca guarde el aditamento extractor de jugo en la base, con la tapa
puesta y en la posición bloqueada.
27. ADVERTENCIA: PARA REDUCIR EL RIESGO DE INCENDIO O
ELECTROCUCIÓN,
NO DESARME LA CARCASA DEL APARATO. ESTE APARATO NO
CONTIENE NINGUNA PIEZA QUE PUEDA SER REPARADA/
CAMBIADA POR EL USUARIO. LAS REPARACIONES DEBEN SER
REALIZADAS POR UN TÉCNICO AUTORIZADO SOLAMENTE.
28. No haga funcionar el aparato debajo o dentro de un armario/
gabinete. Siempre desenchufe el aparato antes de guardarlo en
un armario/gabinete. Dejar el aparato enchufado representa un
riesgo de incendio, especialmente si este toca las paredes o la puerta
del armario/gabinete cuando se cierra.
GUARDE ESTAS INSTRUCCIONES.
PARA USO DOMÉSTICO SOLAMENTE.
AVISO:
El cable de este aparato cuenta con un enchufe polarizado (una pata es
más ancha que otra).
Como medida de seguridad, aquel enchufe se podrá enchufar de una sola
manera en las tomas de corriente polarizadas. Si el enchufe no entra en la
toma de corriente, inviértalo. Si aun así no entra completamente,
comuníquese con un electricista. No intente modificarlo. La potencia
nominal del aparato es de 450 vatios de pico motor; sin embargo, algunos
accesorios/aditamentos pueden usar considerablemente menos
electricidad.
Este aparato está equipado con un dispositivo de protección térmica
reiniciable que apagará el motor en caso de sobrecarga/
sobrecalentamiento para evitar los daños al motor. En caso de que esto
suceda, desenchufe el aparato y permita que se enfríe por 15 minutos o
más antes de continuar (véase la sección “CONSEJOS DE OPERACIÓN Y
SEGURIDAD).
INSTRUCCIONES DE DESEMBALAJE
1. Ponga la caja sobre una superficie espaciosa, plana y segura.
2. Abra la caja. Retire el manual de instrucciones/libro de recetas y otros
materiales impresos.
3. Retire la base de la licuadora/extractor de jugo compacto y todas sus
piezas (véase la sección “PIEZAS Y CARACTERÍSTICAS”). Antes del
primer uso, lave todas las piezas, según se describe en la sección
“Limpieza y Mantenimiento”, a fin de eliminar el polvo y otros residuos.
Para ensamblar la licuadora o el extractor de jugo, siga las instrucciones
de ensamblaje en la sección “INSTRUCCIONES DE ENSAMBLAJE”. Se
recomienda conservar el material de embalaje para su uso futuro.
PRECAUCIÓN: TODAS LAS HERRAMIENTAS DE CORTE SON MUY
AFILADAS. Para evitar lesiones al desembalar las piezas, nunca toque los
filos de las cuchillas o del colador.
NOTA: Se recomienda llenar el formulario de registro disponible en www.
cuisinart.com a fin de facilitar la verificación de la fecha de compra original
de este producto.
ÍNDICE
Medidas de seguridad importantes .........................2
Instrucciones de desembalaje ............................ 3
Piezas y características ..................................4
Guía de referencia rápida................................ 5
Ensamblaje y operación de la licuadora compacta.............5
Consejos de operación y seguridad de la licuadora compacta ...6
Ensamblaje/Desmontaje del extractor de jugo compacto........6
Operación del extractor de jugo compacto...................7
Limpieza y mantenimiento ............................... 7
Resolución de problemas ................................8
Consejos generales .....................................9
Tabla de rendimiento aproximado .........................10
Garantía .............................................11
Recetas .............................................12
4
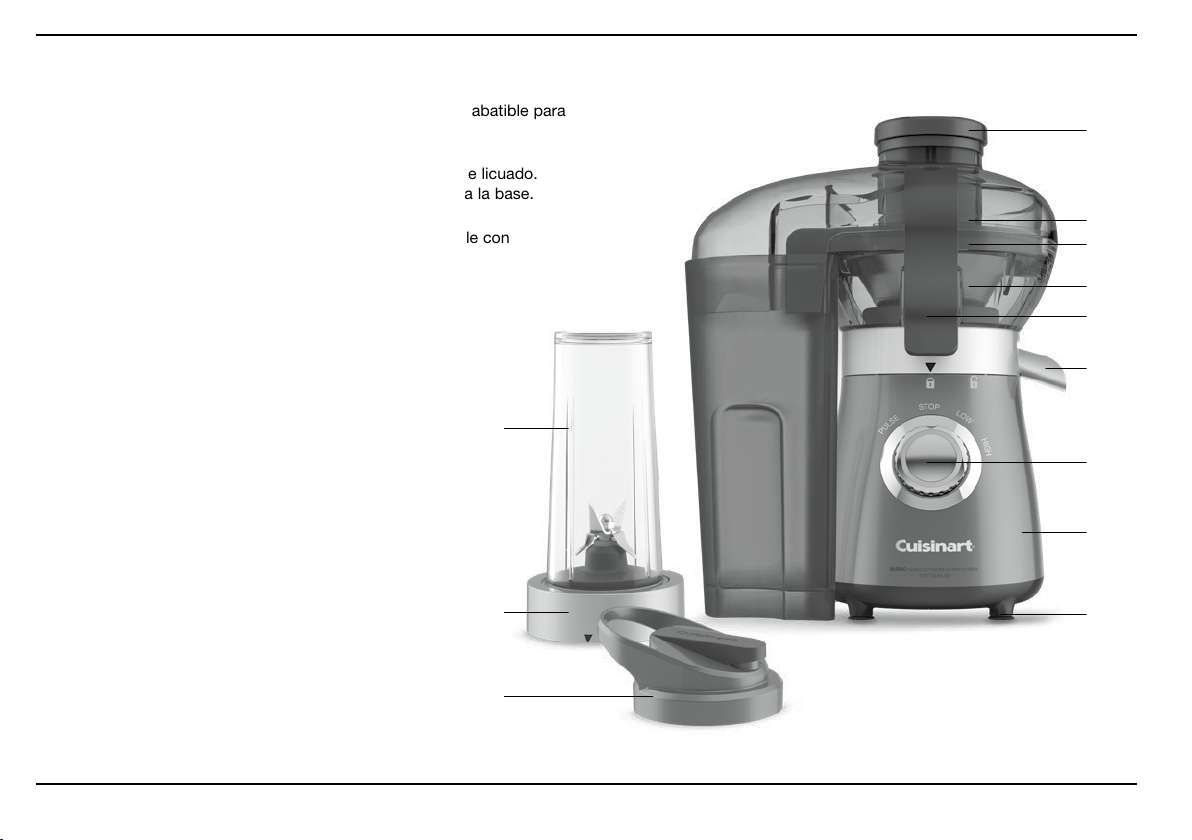
PIEZAS Y CARACTERÍSTICAS
1. Vaso licuador de AS sin BPA de 16 oz (475 ml)
Puede usarse como vaso de viaje. Cuenta con una tapa abatible para
llevarlo o guardarlo para más tarde.
2. Cuchillas de alta calidad
Lo suficientemente resistentes para todos los trabajos de licuado.
El juego de cuchillas autoalineable se ajusta fácilmente a la base.
3. Motor de servicio pesado
Motor de 450 vatios de pico compacto, potente y estable con
apagado automático de seguridad.
4. Perilla de control
Perilla de control fácil de usar con 4 opciones:
“LOW” (baja velocidad), “HIGH” (alta velocidad),
“PULSE” (pulso) y “STOP” (apagado).
5. Pies antideslizantes (no ilustrados)
Mantienen el aparato estable, sin dejar marcas en
las encimeras.
6. Aditamento extractor de jugo:
6a. Recolector de pulpa de 16 oz (475 ml)
El recipiente de fácil limpieza recoge la pulpa
extraída del jugo durante la extracción.
6b. Tapa con boca de alimentación
Para una fácil extracción del jugo.
6c.
Empujador
6d.
Compartimiento del colador
6e.
Abrazaderas de bloqueo
Proporcionan mayor seguridad durante el uso.
6f.
Pico
6g.
Colador de malla con cuchillas extractoras
NOTA: Las cuchillas son MUY AFILADAS; manipúlelas con cuidado.
1
2
3
4
5
6b
6a
6c
6d
6e
6g
6f
1

5
ENSAMBLAJE DE
LA LICUADORA COMPACTA
Después de lavar todas las piezas, siga las instrucciones de ensamblaje
a continuación.
Coloque el aparato en una superficie plana y enchúfelo en una toma
de corriente.
1. Coloque el vaso licuador sobre una superficie llana. Agregue
los ingredientes.
2. Introduzca el juego de cuchillas en la abertura del vaso licuador y gire
en sentido antihorario para apretar.
3. Alinee el aro de la cuchilla con el triángulo en la base y colóquela
firmemente en la base de la licuadora.
4. Gire en sentido horario para bloquear.
OPERACIÓN DE LA LICUADORA
COMPACTA
1. Voltee el vaso licuador y colóquelo sobre la base. Gire el vaso en el
sentido horario para bloquearlo en su sitio; el aro luminoso azul
parpadeará para indicar que la unidad está lista para su uso. Si el aro
luminoso no se enciende, ponga la perilla en “STOP” y compruebe que
el vaso está correctamente ensamblado.
2. Para licuar, gire la perilla de control para elegir la velocidad deseada.
Para cambiar de velocidad, simplemente gire la perilla.
3. Para interrumpir el licuado, ponga la perilla en “STOP”; el motor se
apagará. Para continuar, presione el botón de velocidad deseado.
4. Para pulsar, ponga la perilla en “PULSE”. Mantenga la perilla en
esta posición por el tiempo deseado, y luego suéltela. Repita cuantas
veces sea necesario. La función de pulso se puede usar para romper
pedazos grandes. También puede usarla para empezar a licuar o
procesar alimentos que suelen licuarse rápidamente. La perilla volverá
a la posición de apagado (“STOP”) automáticamente al soltar la perilla.
5. La unidad se apagará automáticamente después de un minuto de
licuado. Si necesita licuar por más tiempo, simplemente ponga la
perilla en “STOP”, y luego en la velocidad deseada para continuar.
6. Después de terminar, ponga la perilla en “STOP”. Luego, retire la jarra
de la base. Voltee el vaso y gire el juego de cuchillas en sentido
antihorario para retirarlo. Coloque una tapa sobre el vaso y gire en
sentido horario para cerrar. NUNCA TOQUE LA CUCHILLA.
Desenchufe el aparato.
GUÍA DE REFERENCIA RÁPIDA
Para activar la licuadora Coloque el vaso licuador,
con las cuchillas puestas, sobre la base
Para empezar a licuar o extraer
jugo
Ponga la perilla de control en la posición
deseada
Para cambiar la velocidad Ponga la perilla de control en la posición
deseada
CÓMO PULSAR Ponga la perilla de control en “PULSE”
Para apagar el aparato Ponga la perilla de control en “STOP”

6
CONSEJOS DE OPERACIÓN
Y SEGURIDAD DE LA
LICUADORA COMPACTA
• Compruebe que la tensión de la red (el voltaje de la toma de corriente)
corresponde al voltaje indicado debajo de la base del aparato.
• No retire el vaso de la base durante el funcionamiento.
• Nunca instale las cuchillas por sí solas sobre la base; el juego
de cuchillas siempre debe encontrarse en el vaso licuador.
• Compruebe que las cuchillas están correctamente sujetadas al vaso
licuador.
• Siempre saque las cuchillas antes de limpiar la jarra.
• Nunca use utensilios de metal, los cuales pueden dañar el vaso
licuador o las cuchillas.
• No sobrellene el vaso. Si nota que el motor está haciendo fuerza,
apague y desenchufe el aparato, y permita que se enfríe por 15
minutos o más. Después, saque una parte de los alimentos de la jarra.
• PRECAUCIÓN: NUNCA procese líquidos gaseosos en el vaso
licuador.
• No licue líquidos calientes en el vaso licuador.
• Nunca use piezas o accesorios no aprobados por Cuisinart; esto
puede causar lesiones.
• Para retirar el vaso licuador, gírelo ligeramente en sentido antihorario
antes de levantarlo.
• El vaso licuador no es apto para microondas.
ENSAMBLAJE DEL EXTRACTOR
DE JUGO COMPACTO
1. Coloque el bloque-motor sobre una superficie limpia y plana.
Compruebe que el aparato está desenchufado.
2. Coloque el recolector de jugo sobre el bloque-motor. No bloquee las
abrazaderas hasta haber terminado de ensamblar el extractor de jugo.
3. Instale el colador en el compartimiento, presionando firmemente las
orillas hasta que quede seguro. Tenga cuidado de no tocar las
cuchillas que se encuentran el fondo del colador y compruebe
que el colador está correctamente instalado antes de cada uso.
4. Instale el recolector de pulpa en la parte lateral de la unidad,
inclinándolo ligeramente. Luego, cierre la tapa, cerciorándose de
alinear el tubo de alimentación con el colador.
5. Compruebe que las abrazaderas de bloqueo están en la posición
inferior para que la tapa se asiente de forma segura en las ranuras.
6. Coloque un vaso debajo del pico.
7. Introduzca el empujador de la boca de alimentación.
8. Mueva cada abrazadera de bloqueo hacia arriba y bloquéelas en su
lugar en la tapa superior.
DESMONTAJE DEL EXTRACTOR
DE JUGO COMPACTO
1. Desenchufe el aparato.
2. Desbloquee las abrazaderas y la tapa, y retire el empujador. La tapa
está desbloqueada cuando se apoya en la parte posterior de la base
del motor.
3. Levante y retire la tapa del recolector de jugo.
4. Con cuidado, retire el colador del compartimiento, agarrándolo por
la orilla con ambas manos y jalando hacia arriba. Tenga cuidado de

7
no tocar los dientes/las cuchillas que se encuentran en el fondo
del colador.
5. Retire el recolector de pulpa del bloque-motor y vacíelo.
OPERACIÓN DEL EXTRACTOR
DE JUGO COMPACTO
1. Compruebe que el extractor de jugo está correctamente ensamblado
y sujetado al bloque-motor (véase la sección “ENSAMBLAJE DEL
EXTRACTOR DE JUGO COMPACTO”).
2. Enchufe el aparato en una toma de corriente de 120 V.
3. Lave las frutas y los vegetales con las cuales desea hacer jugo.
4. Si una fruta/vegetal mide más de 2 in. (7 cm), córtela en pedazos
que quepan en la boca de alimentación.
5. Ponga la perilla de control en la posición “HIGH” (alta velocidad).
6. Retire el empujador del tubo de alimentación e introduzca los
alimentos en esta. Empuje los alimentos, presionando firmemente con
el empujador. No apretuje los alimentos en el tubo de alimentación.
Espere hasta que todos los alimentos se hayan procesado a través del
colador antes de agregar más alimentos.
Nota: Cuando licue verduras de hojas, introduzca las hojas primero, y
luego los tallos. No sobrellene el tubo de alimentación
7. El jugo saldrá por el pico y caerá en el vaso; la pulpa se acumulará
en el recolector de pulpa.
8. Después de terminar, ponga la perilla en “STOP” para apagar
el motor.
LIMPIEZA Y MANTENIMIENTO
Siempre apague y desenchufe el aparato antes de limpiarlo. Las piezas
de la licuadora son anticorrosivas y fáciles de limpiar. Limpie todas las
piezas antes del primer uso y después de cada uso. Examine cada pieza
antes de ensamblar el aparato. SI NOTA ALGÚN SIGNO DE
DETERIORO, O SI EL VASO LICUADOR ESTÁ DESCONCHADO
O RAJADO,
NO USE EL APARATO
.
Para retirar el juego de cuchillas, gírelo en sentido horario.
NUNCA TOQUE LOS FILOS DE LAS CUCHILLAS.
PRECAUCIÓN: Manipule el juego de cuchillas con sumo cuidado;
las cuchillas son MUY AFILADAS y pueden causar lesiones. NO intente
desarmar el juego de cuchillas o separar las cuchillas del aro.
Lave todas las piezas a mano en agua jabonosa tibia. Enjuague y seque
bien. Todas las piezas removibles son aptas para lavavajillas (bandeja
superior solamente).
Consejo: Para limpiar las cuchillas de manera más efectiva, ponga un
poco de detergente en el vaso licuador y llénelo hasta la mitad con agua
tibia (no caliente). Coloque el vaso licuador en la base y haga funcionar
la licuadora a baja velocidad por 15 segundos. Vacíe el agua jabonosa
y repita con agua limpia. Desmonta con cuidado las piezas y vacíe
el vaso. Enjuague y seque todas las piezas.
Finalmente, limpie la base de la licuadora con un paño ligeramente
humedecido y séquela bien. Nunca ponga la base en agua ni en ningún
otro líquido, o en el lavavajillas.
Cualquier otro servicio debe ser realizado por un técnico/representante
de servicio autorizado.

8
Problema: Solución:
La licuadora no se enciende
Compruebe que las cuchillas están
correctamente instaladas y sujetadas.
Enchufe el aparato, cerciorándose que el
cable está debidamente conectado a la toma
de corriente. Si aún no funciona, pruebe
el aparato enchufándolo en otra toma de
corriente y/o comprueba el disyuntor de
su casa.
La licuadora se apaga
de repente
Puede que el motor se haya recalentado.
El fusible reiniciable que protege el motor
en caso de sobrecarga/sobrecalentamiento
puede haberse disparado. En caso de que
esto suceda, desenchufe el aparato y permita
que enfríe por un mínimo de 15 minutos.
Luego, vacíe parcialmente el vaso licuador
o suelte los alimentos trabados. Vuelva a
encender el aparato, según se describe en las
instrucciones de uso.
Las cuchillas son difíciles
de retirar después del uso
Los ingredientes causan presión, la cual crea
un efecto de vacío con el aire; esto es normal.
La unidad está perdiendo líquido
Compruebe que la junta de goma está
contra y al mismo nivel que el cuello del vaso
licuador. Compruebe que la junta de goma
está debidamente posicionada y que no está
dañada. El juego de cuchillas debe estar bien
apretado.
RESOLUCIÓN DE PROBLEMAS
(LICUADORA COMPACTA)
Problema: Solución:
El extractor de jugo no se
enciende
Compruebe que las abrazaderas de bloqueo
están bien encajadas (véase las instrucciones
de ensamblaje en la página 6.)
Ponga la perilla de control en “HIGH” (alta
velocidad) para empezar a extraer el jugo.
El extractor de jugo se apaga
de repente
Puede que el motor se haya recalentado.
El fusible reiniciable que protege el motor
en caso de sobrecarga/sobrecalentamiento
puede haberse disparado.
En caso de que esto suceda, desenchufe el
aparato y permita que enfríe por un mínimo
de 15 minutos. Luego, vacíe o suelte los
alimentos trabados. Vuelva a encender
el aparato, según se describe en las
instrucciones de uso.
El jugo fluye muy despacio
Exceso de pulpa en el colador puede
ralentizar el flujo de jugo. Apague el
extractor de jugo y limpie el colador.
Las hierbas o las verduras de hoja
son difíciles de introducir en la
boca de alimentación
CColoque las hierbas entre otros ingredientes.
Cuando exprima verduras de hoja, siempre
introduzca la hoja (no el tallo) primero
(es decir, apuntando hacia abajo) y no
sobrecargue el tubo de alimentación.
El extractor está encendido
pero no extrae jugo
Compruebe que el colador de malla está
correctamente puesto.
RESOLUCIÓN DE PROBLEMAS
(EXTRACTOR DE JUGO COMPACTO)

9
CONSEJOS DE USO DE LA
LICUADORA COMPACTA
• Siempre agregue los ingredientes más duros primero (cubitos de hielo,
frutas congeladas), y luego los ingredientes más suaves y líquidos.
• Para obtener resultados homogéneos, corte los alimentos en pedacitos
de ½ a 1 in. (1.5 a 2.5cm).
• Para conseguir resultados óptimos de manera rápida, pulse unas
cuantas veces antes de licuar. Use pulsaciones cortas de aprox. 1
segundo y permita que las cuchillas se inmovilicen después de cada
pulsación.
• No pique más de 3 cubitos de hielo a la vez. Pulse hasta obtener la
consistencia deseada.
• Si los alimentos adhieren a la pared del vaso licuador durante el licuado,
apague el aparato y raspe cuidadosamente la jarra con una espátula
antes de continuar, usando pulsaciones cortas para mezclar.
• Cuando licue mezclas más espesas, sostenga ligeramente la parte
superior del vaso licuador para evitar que el aparato se mueva.
• No intente preparar puré de papa o amasar masa de pan en el vaso
licuador.
• Después del licuado, voltee el vaso licuador de manera que el juego de
cuchillas se encuentre arriba. Golpee suavemente el vaso en la encimera
un par de veces para evitar cualquier derrame. Retire el juego de
cuchillas y tape el vaso con la tapa provista.
CONSEJOS DE USO DEL
EXTRACTOR DE JUGO COMPACTO
• El jugo fresco contiene el 95% de los nutrientes de las frutas y de los
vegetales. Tomar jugo fresco es la forma más rápida y eficaz de digerir
frutas/vegetales, y absorber sus nutrientes. Digerir frutas enteras puede
demorar hasta una hora mientras digerir jugo fresco solamente demora
15 minutos.
• Los jugos frescos ayudan a eliminar las toxinas del cuerpo. Por lo tanto,
son una gran ayuda para bajar de peso y limpiar el organismo.
• Siempre use frutas y vegetales frescos y de temporada. Es preferible
usar frutas/vegetales producidos sin químicos o fertilizantes sintéticos.
Las frutas y los vegetales de temporada son mucho más económicos y
más sabrosos.
• Lave las frutas/vegetales inmediatamente después de comprarlos y
guárdelos en el refrigerador. Así, siempre estarán listos para hacer jugo
fresco.
• Siempre use las frutas/vegetales pronto después de comprarlos. Cuanto
más tiempo los guarde, más nutrientes pierden.
• Algunas frutas deben pelarse antes de hacer jugo. P. ej., pele las piñas,
los melones, los mangos, las papayas y todas las frutas de piel no
comestible. También quite los huesos/pepas/semillas de las frutas tales
como los duraznos, las cerezas, los mangos, etc.
• El jugo de cítricos (limón, naranja, toronja, etc.) es sabroso y rico en
nutrientes.
• Pele los pepinos antes de hacer jugo si han sido tratados con cera.
• Cuando combine varios tipos de frutas o vegetales, procese los
alimentos más suaves primero, y luego los ingredientes más duros.
• Al usar el empujador, ejerza una suave presión para guiar los alimentos
del tubo de alimentación. No presione demasiado o ejerza demasiada
fuerza.
• Si una receta incluye hierbas o verduras de hoja, colóquelas entre dos
ingredientes más firmes para sacar máximo jugo. Siempre introduzca la
hoja (no el tallo) de las verduras de hoja apuntando primero (es decir,

10
apuntando hacia abajo) y no sobrecargue el tubo de alimentación.
• Déjese guiar por su gusto para combinar frutas y vegetales. Las recetas
incluidas en el libro de recetas son solo ejemplos; las posibilidades son
infinitas. No dude en probar varias combinaciones de frutas y vegetales
para descubrir sus favoritas.
• Las zanahorias son perfectas para combinar con otros vegetales y las
manzanas son perfectas para combinar con otras frutas.
• Las remolachas y las zanahorias contienen mucho azúcar. Por lo tanto,
son ideales para neutralizar el amargor de algunos vegetales.
• Usar su extractor de jugo conjuntamente con su licuadora ofrece aún
más opciones. P. ej., puede licuar jugo fresco con bananas, yogur y
polvo de proteína para preparar deliciosos batidos proteicos.
• También puede preparar versiones más saludables de sus cócteles
favoritos, usando jugo fresco.
• Combine jugos frescos con agua con gas o “seltzer” para preparar
soda natural.
• La pulpa extraída durante la extracción del jugo tiene muchos beneficios
para la salud. Su contenido en fibras es alto y puede usarse de varias
maneras.
TABLA DE RENDIMIENTO APROXIMADO
FRUTA CANTIDAD RINDE
DURAZNO (sin hueso)
1 mediano (285 g)
¼
de taza o 2 oz (60 ml)
FRESAS
1 taza (250 g)
½
taza o 4 oz (120 ml)
KIWIS
1 fruta (85 g) 1 oz (30 ml)
LIMÓN (pelado)
1 fruta, aprox. 5 oz (140 g)
¼
de taza o 2 oz (60 ml)
MANZANA (en cuartos)
1 mediana (200 g)
½
taza o 4 oz (120 ml)
MELÓN (pelado y sin semillas)
1 taza (250 g), en cubos
½
taza o 4 oz (120 ml)
NARANJA (pelada y en cuartos)
1 mediana (340 g)
5
⁄
8
de taza o aprox. 5 oz
(145 ml)
PAPAYA (pelada y sin semillas)
½ fruta, aprox. 1 lb y 3 oz. (540 g) 1 taza u 8 oz (235 ml)
PERA (en cuartos)
1 mediana (200 g)
½
taza o 4 oz (120 ml)
PIÑA (pelada y descarozada)
½
fruta
1 taza u 8 oz (235 ml)
SANDÍA (pelada y sin semillas)
1 taza (250 g), en cubos
½
taza o 4 oz (120 ml)
TORONJA (pelada y en cuartos)
1 fruta mediana a grande, aprox.
1 lb (455 g)
1¼ tazas o 10 oz (295 ml)
UVAS
1 taza (250 g)
½
taza o 4 oz (120 ml)
VEGETAL CANTIDAD RINDE
APIO
4 ramas
½
taza o 4 oz (120 ml)
COL
¼ col; aprox. 12 oz (340 g)
¾
de taza o 6 oz (175 ml)
PEPINO
1 mediano de aprox. 11 oz (310 g) 1 taza u 8 oz (235 ml)
PEREJIL
1 racimo de aprox. 6 oz (170 g)
¼
de taza o 2 oz (60 ml)
PIMIENTO DULCE ROJO (en cuartos)
1 mediano (255 g)
½
taza o 4 oz (120 ml)
REMOLACHA (en cuartos)
1 mediana (170 a 200 g)
½
taza o 4 oz (120 ml)
TOMATE
1 mediano de aprox. 5 oz (140 g)
½
taza o 4 oz (120 ml)
VERDURAS DE HOJA
8 hojas 1½ oz (45 ml)
ZANAHORIAS
1 lb (455 g) 1 taza u 8 oz (235 ml)

11
GARANTÍA
Garantía limitada de 3 años
Esta garantía es para los consumidores que residen en los EE.UU.
solamente. Usted es un consumidor si posee una licuadora/extractor de
jugo compacto Cuisinart
®
que fue comprado en una tienda para uso
personal, familiar o casero. A menos que la ley aplicable exija lo contrario,
esta garantía no es para los minoristas u otros consumidores/compradores
comerciales. Cuisinart garantiza este producto contra todo defecto de
materiales o fabricación durante 3 años después de la fecha de compra
original, siempre que el aparato haya sido usado para uso doméstico y
según las instrucciones.
Se recomienda llenar el formulario de registro disponible en https://
cuisinart.registria.com a fin de facilitar la verificación de la fecha de
compra original de este producto Sin embargo, registrar el producto no es
necesario para recibir servicio bajo esta garantía. En ausencia del recibo
de compra, el período de garantía será calculado a partir de la fecha de
fabricación.
RESIDENTES DE CALIFORNIA
La ley del estado de California ofrece dos opciones bajo el período de
garantía. Los residentes del estado de California pueden regresar el
producto defectuoso (A) a la tienda donde lo compraron o (B) a otra tienda
que venda productos Cuisinart
®
de este tipo. La tienda podrá, a su
elección, reparar el producto, referir el consumidor a un centro de servicio
independiente, sustituir el producto, o reembolsar al consumidor el precio
de compra menos la cantidad directamente atribuible al uso anterior del
producto por el consumidor. Si estas dos opciones no satisfacen al
consumidor, podrá llevar el aparato a un centro de servicio independiente,
siempre que se pueda arreglar o reparar el aparato de manera económica.
Cuisinart (no el consumidor) será responsable por los gastos de servicio,
reparación, sustitución o reembolso de los productos defectuosos bajo
garantía. Los residentes de California también pueden, si así lo desean,
mandar el aparato defectuoso directamente a Cuisinart para que sea
reparado o sustituido. Para esto, deben llamar a nuestro servicio de
atención al cliente al 800-726-0190.
Cuisinart será responsable por los gastos de reparación, reemplazo,
manejo y envío de los productos defectuosos durante el período de
garantía.
GARANTÍA DE REEMPLAZO SIN DIFICULTADES
Su máxima satisfacción es nuestra prioridad, así que si este producto
Cuisinart
®
falla dentro del generoso período de garantía, lo repararemos
o, de ser necesario, lo reemplazaremos, sin costo alguno para usted.
Para obtener una etiqueta de devolución, envíenos un correo electrónico,
visitando https://www.cuisinart.com/customer-care/product-
assistance/product-inquiry/. O llame sin cargo a nuestro servicio de
atención al cliente, al 1-800-726-0190, para hablar con un representante.
Este producto satisface las más altas exigencias de fabricación y ha sido
diseñado para funcionar con 120 V, usando accesorios y repuestos
autorizados solamente. Esta garantía excluye expresamente los defectos
o daños causados por accesorios, piezas o reparaciones no autorizados
por Cuisinart, así como los defectos o daños causados por el uso de un
convertidor de voltaje. Esta garantía no cubre el uso comercial o industrial
del producto, y no es válida en caso de daños causados por mal uso,
negligencia o accidente. Esta garantía excluye todos los daños
incidentales o consecuentes. Algunos Estados no permiten la exclusión
o limitación de daños incidentales o consecuentes, de modo que las
limitaciones mencionadas pueden no regir para usted. Usted puede tener
otros derechos que varían de un Estado a otro.
Importante: Si debe llevar el producto defectuoso a un centro de servicio
no autorizado, por favor informe al personal del centro de servicio que
deben llamar al Centro de Servicio al Cliente de Cuisinart, al 1-800-726-
0190, a fin de diagnosticar el problema correctamente, usar las piezas
correctas para repararlo y comprobar que el producto aún está bajo
garantía.

12
RECETAS
Smoothie de frutas de verano ...........................12
Smoothie de frutas del bosque ..........................12
Smoothie “Green Goddess” (diosa verde)..................13
Smoothie “poder dorado” ..............................13
Smoothie de arándanos azules y cacao ...................13
Smoothie de cereza-almendra...........................14
Smoothie proteico de café..............................14
Smoothie de mango tropical ............................14
Refresco de jengibre-menta.............................15
Smoothie proteico de verduras . . . . . . . . . . . . . . . . . . . . . . . . . .15
Súper jugo verde .....................................15
Jugo de papaya ......................................16
Jugo verde con jengibre ...............................16
Jugo de naranja y jengibre..............................16
Jugo de granada antioxidante ...........................17
Refresco de piña .....................................17
Tónico de hierbas.....................................17
Jugo de limpieza .....................................17
Jugo de verduras del huerto ............................18
Jugo matinal.........................................18
Jugo de cítricos e hibisco ..............................18
Cóctel de sandía con ron...............................19
Jarabe de menta .....................................19
Elixir de cítricos ......................................19
Jarabe de romero.....................................20
Smoothie de frutas de verano
Este smoothie dulce con sabor a verano lleva linaza, convirtiéndolo en un
placer refrescante y saludable.
Rinde 1 porción
1
∕
3
taza (65 g) de pedazos de duraznos congelados
2
∕
3
taza (135 g) de fresas frescas
1 cucharadita semillas de linaza molidas
½ taza (120 ml) de leche de avena
1. Colocar todos los ingredientes en el vaso licuador, en el orden indicado.
Instalar el juego de cuchillas.
2. Licuar a velocidad alta por aprox. 1 minuto, hasta obtener una mezcla
suave.
3. Servir inmediatamente.
Información nutricional por porción:
Calorías 130 (17 % de grasa) • Carbohidratos 25g • Proteínas 3 g • Grasa 3 g • Grasa saturada 0g
Colesterol 0 mg • Sodio 59 mg • Calcio 40 mg • Fibra 4 g
Smoothie de frutas del bosque
También conocida como pitaya o pitahaya, la fruta del dragón tiene un
sabor muy suave, pero está repleta de fibra y otros nutrientes.
Rinde 1 porción
½ taza (100 g) de fresas congeladas
¼ taza (50 g) de cubos de piña congelados
½ taza (100 g) de pedazos de fruta del dragón
½ banana madura, en trozos de 1 in. (2.5 cm)
½ taza (120 ml) de leche de coco
1. Colocar todos los ingredientes en el vaso licuador, en el orden indicado.
Instalar el juego de cuchillas.
2. Licuar a velocidad alta por aprox. 1 minuto, hasta obtener una mezcla
suave.

13
3. Servir inmediatamente.
Información nutricional por porción:
Calorías 148 (21 % de grasa) • Carbohidratos 30 g • Proteínas 2 g • Grasa 4 g • Grasa saturada 2 g
Colesterol 0 mg • Sodio 51 mg • Calcio 260 mg • Fibra 5 g
Smoothies “Green Goddess” (diosa verde)
El cremoso aguacate no solo es una gran fuente de grasas beneficiosas
para la salud, sino que también hace que este sedoso batido sea muy
sustancioso. Aunque puede preparar fácilmente una porción, compártalo
con un amigo o una amiga.
Rinde 1 a 2 porciones
1 banana congelada, en trozos de 1 in. (2.5 cm)
½ aguacate
½ taza (15 g) de espinaca tierna (espinaca “baby”) fresca
2 cucharaditas de té verde matcha en polvo
1 taza (235 ml) de leche vegetal
1 a 2 cucharaditas de miel
1. Colocar todos los ingredientes en el vaso licuador, en el orden indicado.
Instalar el juego de cuchillas.
2. Licuar a velocidad alta por aprox. 1 minuto y 15 segundos, hasta
conseguir una mezcla suave.
3. Servir inmediatamente.
Información nutricional por porción (basado en 2 porciones):
Calorías 198 (29 % de grasa) • Carbohidratos 35 g • Proteínas 2 g • Grasa 7 g • Grasa saturada 1 g
Colesterol 0 mg • Sodio 31 mg • Calcio 234 mg • Fibra 4 g
Smoothie “poder dorado”
¿Quién iba a pensar que el camote podía estar en un batido?
Aquí lo mezclamos con especias antiinflamatorias y proteína en polvo, lo
que lo convierte en una gran bebida para después de hacer ejercicio.
Rinde 1 porción
1 banana congelada, en trozos de 1 in. (2.5 cm)
½ taza (100 g) de camote cocinado al vapor, en pedazos
½ cucharadita de cúrcuma en polvo
¼ cucharadita de canela en polvo
2 cucharadas de proteína en polvo con sabor a vainilla
¾ taza (175 ml) de leche de coco
1. Colocar todos los ingredientes en el vaso licuador, en el orden indicado.
Instalar el juego de cuchillas.
2. Licuar a velocidad alta por aprox. 1 minuto, hasta obtener una mezcla
suave.
3. Servir inmediatamente.
Información nutricional por porción:
Calorías 261 (16 % de grasa) • Carbohidratos 44 g • Proteínas 13 g • Grasa 5 g • Grasa saturada 3 g
Colesterol 0 mg • Sodio 263 mg • Calcio 424 mg • Fibra 6 g
Smoothie de arándanos azules y cacao
El cacao en polvo en este batido puede ser un sabor adquirido para
algunos, por lo que recomendamos empezar con 1 cucharadita para el
primer intento, y luego aumentar según se desee. Los arándanos azules
están llenos de pectina natural, así que bébalo inmediatamente después de
licuarlo para evitar que se espese demasiado.
Rinde 1 porción
½ taza (75 g) de arándanos azules congelados
1 banana, en trozos de 1 in. (2.5 cm)
1 a 2 cucharaditas de cacao en polvo

14
¼ cucharadita de canela en polvo
½ taza (120 ml) de leche de almendra
1. Colocar todos los ingredientes en el vaso licuador, en el orden indicado.
Instalar el juego de cuchillas.
2. Licuar a velocidad alta por aprox. 1 minuto, hasta obtener una mezcla
suave.
3. Servir inmediatamente.
Información nutricional por porción:
Calorías 175 (9 % de grasa) • Carbohidratos 39 g • Proteínas 2 g • Grasa 2g • Grasa saturada 0g
Colesterol 0 mg • Sodio 91 mg • Calcio 322 mg • Fibra 8 g
Smoothie de cereza-almendra
Use mantequilla de almendras y leche de almendras sin azúcar para
garantizar que este batido de cerezas no sea demasiado dulce.
Rinde 1 porción
½ taza (75 g) de cerezas congeladas
½ taza (100 g) de fresas congeladas
1 banana, en trozos de 1 in. (2.5 cm)
1 cucharada (15 g) de mantequilla de almendra
¾ taza (175 ml) de leche de almendra
1. Colocar todos los ingredientes en el vaso licuador, en el orden indicado.
Instalar el juego de cuchillas.
2. Licuar a velocidad alta por aprox. 1 minuto, hasta obtener una mezcla
suave.
3. Servir inmediatamente.
Información nutricional por porción:
Calorías 288 (29 % de grasa) • Carbohidratos 50 g • Proteínas 6 g • Grasa 10 g • Grasa saturada 1 g
Colesterol 0 mg • Sodio 186 mg • Calcio 457 mg • Fibra 8 g
Smoothie proteico de café
¡Sin duda, una saludable sacudida para el sistema a primera hora de la
mañana!
Rinde 1 porción
1 banana congelada, en trozos de 1 in. (2.5 cm)
1 cucharada (5 g) de cacao en polvo
1 cucharada (15 g) de la mantequilla de anacardo
½ taza (120 ml) de café preparado frío
1. Colocar todos los ingredientes en el vaso licuador, en el orden indicado.
Instalar el juego de cuchillas.
2. Licuar a velocidad alta por aprox. 1 minuto, hasta obtener una mezcla
suave.
3. Servir inmediatamente.
Información nutricional por porción:
Calorías 231 (28 % de grasa) • Carbohidratos 34 g • Proteínas 5 g • Grasa 7 g • Grasa saturada 2 g
Colesterol 0 mg • Sodio 1 mg • Calcio 159 mg • Fibra 5 g
“Smoothie” de mango tropical
Todos los sabores de los trópicos en una taza. Un éxito garantizado para
los niños y los adultos.
Rinde 1 porción
2
∕
3
taza (165 g) de cubos de mango congelados
1
∕
3
taza (65 g) de cubos de piña congelados
½ banana, en trozos de 1 in. (2.5 cm)
¾ taza (175 ml) de leche de coco
1. Colocar todos los ingredientes en el vaso licuador, en el orden indicado.
Instalar el juego de cuchillas.

15
2. Licuar a velocidad alta por aprox. 1 minuto, hasta obtener una mezcla
suave.
3. Servir inmediatamente.
Información nutricional por porción:
Calorías 163 (22 % de grasa) • Carbohidratos 34 g • Proteínas 2 g • Grasa 5 g • Grasa saturada 3 g
Colesterol 0 mg • Sodio 31 mg • Calcio 380 mg • Fibra 4 g
Refresco de jengibre-menta
Un smoothie perfectamente equilibrado con un sabor picante y refrescante
a hierbas y jengibre. Perfecto para el desayuno o como jugo energizante
para la tarde.
Rinde 1 porción
½ taza (125 g) de cubos de mango congelados
½ banana, en trozos de 1 in. (2.5 cm)
1 trozo de ½ in. (1.5 cm) de jengibre, pelado y cortado a la mitad
½ taza (15 g) de espinaca tierna (espinaca “baby”) fresca
1 cucharada de hojas de menta fresca
1 cucharadita de jugo de lima/limón verde fresco
½ taza (120 ml) de agua de coco
1. Colocar todos los ingredientes en el vaso licuador, en el orden indicado.
Instalar el juego de cuchillas.
2. Licuar a velocidad alta por aprox. 1 minuto, hasta obtener una mezcla
suave.
3. Servir inmediatamente.
Información nutricional por porción:
Calorías 127 (5 % de grasa) • Carbohidratos 31 g • Proteínas 2 g • Grasa 1 g • Grasa saturada 0g
Colesterol 0 mg • Sodio 129 mg • Calcio 86 mg • Fibra 5 g
Smoothie proteico de verduras
El hermoso tono azul verdoso de este batido proviene de la espirulina, que
es un alga verde vibrante que tiene muchos beneficios para la salud.
Rinde 1 porción
½ taza (100 g) de cubitos de piña congelados
1 banana, en trozos de 1 in. (2.5 cm)
½ taza (15 g) de col rizada tierna
1 cucharada de proteína en polvo
1 cucharadita de espirulina en polvo
½ taza (120 ml) de leche vegetal
1. Colocar todos los ingredientes en el vaso licuador, en el orden indicado.
Instalar el juego de cuchillas.
2. Licuar a velocidad alta por aprox. 1 minuto, hasta obtener una mezcla
suave.
3. Servir inmediatamente.
Información nutricional por porción:
Calorías 206 (13 % de grasa) • Carbohidratos 39 g • Proteínas 11 g • Grasa 3 g • Grasa saturada 1 g
Colesterol 18 mg • Sodio 165 mg • Calcio 372 mg • Fibra 5 g
Súper jugo verde
¡Simple, limpio y verde!
Rinde 1 porción
4 hojas pequeñas de col rizada “lacinato”
3 ramas de apio
1 hoja grande de acelga
1 puñado pequeño de perejil italiano
1
∕
3
limón, pelado

16
1. Ensamblar el aditamento extractor de jugo.
2. Encender la unidad a velocidad alta y procesar los ingredientes.
3. Revolver y beber inmediatamente.
Información nutricional por porción:
Calorías 98 (10 % de grasa) • Carbohidratos 19 g • Proteínas 6 g • Grasa 1 g • Grasa saturada 0 g
Colesterol 0 mg • Sodio 388 mg • Calcio 259 mg • Fibra 0 g
Jugo de papaya
Las frutas dan a este jugo una textura agradable y espesa, además de un
sabor llamativo, lo que lo convierte en un verdadero placer para todos
Rinde 1 porción de aprox. 12 oz (355 ml)
¼ papaya mediana, en pedazos que quepan en la boca
de alimentación
4 fresas grandes
1 tangerina mediana, pelada y partida por la mitad
1. Ensamblar el aditamento extractor de jugo.
2. Encender la unidad a velocidad alta y procesar los ingredientes.
3. Revolver junto y servir inmediatamente.
Información nutricional por porción:
Calorías 106 (4 % de grasa) • Carbohidratos 28 g • Proteínas 2 g • Grasa 1 g • Grasa saturada 0g
Colesterol 0 mg • Sodio 13 mg • Calcio 47 mg • Fibra 0 g
Jugo verde con jengibre
El jengibre y el limón avivan este jugo repleto de verduras. Nos gusta tener
jugo de limón a mano para añadirlo al agua o a los jugos, pero si lo prefiere,
puede poner un cuarto de limón pelado mientras extrae el jugo.
Rinde 2 porciones
2 manzanas verdes medianas, en pedazos que quepan en la boca
de alimentación
½ pepino mediano, partido por la mitad a lo largo
4 ramas de apio
4 tallos de col rizada, sin la parte dura de abajo
1 trozo de ½ in. (1.5 cm) de jengibre
¼ limón, pelado
1. Ensamblar el aditamento extractor de jugo.
2. Encender la unidad a velocidad alta y procesar los ingredientes.
4. Revolver y beber inmediatamente.
Información nutricional por porción:
Calorías 84 (4 % de grasa) • Carbohidratos 23 g • Proteínas 0 g • Grasa 0 g • Grasa saturada 0 g
Colesterol 0 mg • Sodio 1 mg • Calcio 220 mg • Fibra 5 g
Jugo de naranja y jengibre
El jengibre le da un sabor picante a esta combinación naturalmente dulce.
Rinde 2 porciones
2 zanahorias medianas a grandes
1 remolacha, en pedazos que quepan en la boca de alimentación
1 trozo de ½ a 1 in. (1.5 a 2.5 cm) de jengibre, según su
preferencia
1 pera dulce firme, en pedazos que quepan en la boca de
alimentación
1. Ensamblar el aditamento extractor de jugo.
2. Encender la unidad a velocidad alta y procesar los ingredientes.
3. Revolver y beber inmediatamente.
Información nutricional por porción:
Calorías 95 (6 % de grasa) • Carbohidratos 25g • Proteínas 2 g • Grasa 1 g • Grasa saturada 0 g
Colesterol 0 mg • Sodio 76 mg • Calcio 81 mg • Fibra 5 g

17
Jugo de granada antioxidante
La granada, un potente antioxidante, se combina con el limón y la naranja
roja en este elixir limpiador.
Rinde aprox. 12 oz (355 ml); 1 a 2 porciones
2
∕
3
taza (100 g) de semillas de granada
2 naranjas rojas, partidas por la mitad
1
∕
3
limón, pelado
1. Ensamblar extractor de jugo.
2. Encender la unidad a velocidad alta y procesar los ingredientes.
3. Revolver y beber inmediatamente.
Información nutricional por porción (basado en 2 porciones):
Calorías 102 (8 % de grasa) • Carbohidratos 24 g • Proteínas 2 g • Grasa 1 g • Grasa saturada 0 g
Colesterol 0 mg • Sodio 3 mg • Calcio 44 mg • Fibra 0 g
Refresco de piña
La piña y la menta se combinan a la perfección en este sabroso refresco.
Añádale un chorro de “seltzer” (agua con gas) para que sea aún
más refrescante.
Rinde 2 porciones
½ piña, pelada y cortada en pedazos que quepan en la boca de
alimentación
3 a 4 cucharadas de hojas de menta fresca
1 taza llena (30 g) de espinaca tierna (espinaca “baby”)
1 pizca de sal rosada del Himalaya
1. Ensamblar el aditamento extractor de jugo.
2. Encender la unidad a velocidad alta y procesar todos los ingredientes
uno por uno, excepto la sal.
Cerciórese de procesar la menta y espinaca entre trozos de la piña para
extraer el máximo jugo.
3. Agregar la sal, revolver y beber inmediatamente.
Información nutricional por porción:
Calorías 115 (4 % de grasa) • Carbohidratos 29 g • Proteínas 1 g • Grasa 0 g • Grasa saturada 0 g
Colesterol 0 mg • Sodio 6 mg • Calcio 30 mg • Fibra 5 g
Tónico de hierbas
El intenso sabor de las hierbas frescas y la dulzura de la manzana
completan este tónico lleno de nutrientes.
Rinde 1 porción de aprox. 10 oz (295 ml)
1 puñado pequeño de perejil italiano
1 puñado pequeño de cilantro
1 manzana pequeña
4 hojas pequeñas de col rizada “lacinato”
2 ramas de apio
¼ limón, pelado
1. Ensamblar el aditamento extractor de jugo.
2. Encender la unidad a velocidad alta y procesar los ingredientes.
3. Revolver y beber inmediatamente.
Información nutricional por porción:
Calorías 179 (6 % de grasa) • Carbohidratos 42 g • Proteínas 5 g • Grasa 1 g • Grasa saturada 0 g
Colesterol 0 mg • Sodio 192 mg • Calcio 216 mg • Fibra 0 g

18
Jugo de limpieza
Los beneficios de la remolacha son demasiado numerosos para contarlos.
Disfrútalos en este delicioso y nutritivo jugo.
Rinde 1 porción de aprox. 8 oz (235 ml)
1 manzana mediana de aprox. 6 a 7 oz (170 a 225 g), en pedazos
que quepan en la boca de alimentación
3 onzas (85 g) de pepino
3 onzas (85 g) de remolacha, en pedazos que quepan en la boca
de alimentación
1
∕
3
limón, pelado
1. Ensamblar el aditamento extractor de jugo.
2. Encender la unidad a velocidad alta y procesar los ingredientes.
3. Revolver y beber inmediatamente.
Información nutricional por porción:
Calorías 156 (3 % de grasa) • Carbohidratos 40 g • Proteínas 2 g • Grasa 1 g
Grasa saturada 0 g • Colesterol 0 mg • Sodio 70 mg • Calcio 40 mg • Fibra 0 g
Jugo de verduras del huerto
Con un rápido viaje al mercado o a la finca, tendrá todo listo para este jugo
fresco. Es el perfecto jugo energizante en la mañana o en la tarde.
Rinde 2 porciones
½ pepino mediano, partido por la mitad a lo largo
1 taza (30 g) de espinaca tierna (espinaca “baby”) fresca
4 hojas de lechuga romana
4 ramas de apio
¼ taza (15 g) de cilantro fresco (hojas y tallos)
¼ lima/limón verde, pelada
1 pizca de sal marina, opcional
1. Ensamblar el aditamento extractor de jugo.
2. Encender la unidad a velocidad alta y procesar todos los ingredientes
uno por uno, excepto la sal.
3. Agregar la sal, revolver y beber inmediatamente.
Información nutricional por porción:
Calorías 23 (4 % de grasa) • Carbohidratos 7 g • Proteínas 2 g • Grasa 0 g
Grasa saturada 0 g • Colesterol 0 mg • Sodio 61 mg • Calcio 72 mg • Fibra 1 g
Jugo matinal
¡La cayena y el jengibre son perfectos para limpiar su sistema antes de
empezar el día y son sin duda una sacudida saludable para el cuerpo!
Rinde aprox. 4 oz (120 ml)
2 limones pelados; aprox.
1
∕
3
de taza (80 ml) de jugo fresco
1 trozo de 1½ in. (4 cm) de jengibre fresco
1 pizca pequeña de pimienta de Cayena
1 pizca de sal rosada del Himalaya
1. Ensamblar el aditamento extractor de jugo.
2. Procesar los limones y el jengibre.
3. Agregar la pimienta de Cayena y la sal, revolver y beber inmediatamente.
Información nutricional por porción:
Calorías 17 (7 % de grasa) • Carbohidratos 7 g • Proteínas 1 g • Grasa 0 g
Grasa saturada 0 g • Colesterol 0 mg • Sodio 67 mg • Calcio 17 mg • Fibra 0 g
Jugo de cítricos e hibisco
El hibisco repleto de antioxidantes, y la vitamina C de los cítricos se
combinan para obtener un delicioso tónico de apoyo inmunológico.
Rinde aprox. 12 oz (355 ml); 1 a 2 porciones

19
1 naranja pequeña, partida por la mitad
1
∕
3
limón, pelado
4 onzas (120 ml) de té de flor de hibisco*, helado
1½ cucharaditas de jarabe de agave
1. Ensamblar el aditamento extractor de jugo.
2. Encender la unidad a velocidad baja y exprimir la naranja y el limón.
Agregar el té de flor de hibisco y el jarabe de agave; revolver.
3. Agregar hielo si desea, y disfrutar inmediatamente.
* Las flores de hibisco pueden encontrarse sueltas o en bolsas de té.
Dejar remojar según las instrucciones del fabricante y dejar enfriar a
temperatura ambiente o menos antes de usar.
Información nutricional por porción (basado en 2 porciones):
Calorías 49 (2 % de grasa) • Carbohidratos 12 g • Proteínas 1 g • Grasa 0 g
Grasa saturada 0 g • Colesterol 0 mg • Sodio 2 mg • Calcio 64 mg • Fibra 0 g
Cóctel de sandía con ron
La sandía y la menta frescas hacen de esta bebida un cóctel refrescante,
especialmente cuando las temperaturas suben.
Rinde 12 oz (355 ml); 1 a 2 porciones
8 onzas (225 g) de sandía, en pedazos que quepan en la boca
de alimentación
1 onza (30 ml) de ron de buena calidad
1 onza de jarabe de menta (receta a continuación)
1. Ensamblar el aditamento extractor de jugo.
2. Encender la unidad a velocidad alta y procesar la sandía; debería
obtener aprox. 4 oz (120 ml) de jugo.
3. Agregar el ron y el jarabe de menta. Revolver bien y servir en vasos altos
con mucho hielo.
Información nutricional por porción (basado en 2 porciones):
Calorías 74 (2 % de grasa) • Carbohidratos 11 g • Proteínas 1 g • Grasa 0 g
Grasa saturada 0 g • Colesterol 0 mg • Sodio 1 mg • Calcio 8 mg • Fibra 0 g
Jarabe de Menta
Usamos este jarabe en nuestro cóctel de sandía con ron, pero también es
delicioso mezclado con té helado o la limonada.
Rinde ¾ de taza (175 ml)
½ taza (120 ml) de agua
½ taza (100 g) de azúcar granulada
4 ramitas grandes de menta fresca
1. Colocar todos los ingredientes en una cacerola pequeña y poner a
calentar a fuego medio-alto.
2. Calentar hasta que hierva. Cuando empiece a hervir, bajar el fuego y
dejar que hierva a fuego lento hasta que el azúcar esté completamente
disuelto.
3. Retirar del fuego y dejar enfriar a temperatura ambiente por un mínimo
30 minutos.
4. Refrigerar antes de usar.
Información nutricional por porción de 1 cucharada (15 ml):
Calorías 32 (0 % de grasa) • Carbohidratos 8 g • Proteínas 0 g • Grasa 0 g
Grasa saturada 0 g • Colesterol 0 mg • Sodio 0 mg • Calcio 1 mg • Fibra 0 g

20
IB-17202-ESP-A
©2021 Cuisinart
Glendale, AZ 85307
Impreso en China
21CE077788
Elixir de cítricos
El romero se combina bien con los cítricos para obtener un rico sabor
“adulto”.
Rinde un cóctel de 4 oz (120 ml)
1 onza (30 ml) de jugo de toronja fresco
1 onza (30 ml) de vodka de buena calidad
½ onza (15 ml) de jugo de lima/limón verde fresco
½ onzas de jugo de limón fresco
½ onza de jarabe de romero (receta a continuación)
1. Revolver o agitar los ingredientes, juntos con hielo.
2. Servir así o con hielo adicional.
Información nutricional por porción:
Calorías 99 (1 % de grasa) • Carbohidratos 9 g • Proteínas 6 g • Grasa 0 g
Grasa saturada 0 g • Colesterol 0 mg • Sodio 1 mg • Calcio 8 mg • Fibra 0 g
Jarabe de romero
Este jarabe simple con infusión de romero es delicioso en
nuestro elixir de cítricos.
Rinde ¾ de taza (175 ml)
½ taza (120 ml) de agua
½ taza (100 g) de azúcar granulada
3 ramitas grandes de romero fresco
1. Colocar todos los ingredientes en una cacerola pequeña y poner a
calentar a fuego medio-alto.
2. Calentar hasta que hierva. Cuando empiece a hervir, bajar el fuego y
dejar que hierva a fuego lento hasta que el azúcar esté completamente
disuelto.
3. Retirar del fuego y dejar enfriar a temperatura ambiente por un mínimo
30 minutos.
4. Refrigerar antes de usar.
Información nutricional por porción de 1 cucharada (15 ml):
Calorías 34 (2 % de grasa) • Carbohidratos 9 g • Proteínas 0 g • Grasa 0 g
Grasa saturada 0 g • Colesterol 0 mg • Sodio 1 mg • Calcio 4 mg • Fibra 0 g