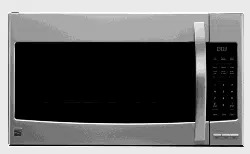
MICROWAVE
OVEN
STOCK NO.
89650
KNOW YOUR UNIT
Read this booklet so you
will be able to enjoy all the
features in your Kenmore
Microwave Oven.
Record in space provided
below the Model No. and
the Serial No. of this appli-
ance. Open the door to
find the numbers on the
front face of the cavity.
Model No, '_
Serial No.
Retain this information for
future reference.
Sears, Roebuck and Co., Hoffman Estates, IL. 60179, U.S.A.
3874W500864
IMPORTANT SAFETY INSTRUCTIONS
The Sears Kenmore Microwave Oven, though simple to use, is not a toy.
Respect it as an electric cooking appliance. Become familiar with microwave energy, its uses and limitations.
The safety instructions below will tell you how to use your oven to avoid harm to yourself or damage to your
oven.
PRECAUTIONSTO AVOIDPOSSIBLEEXPOSURE
TOEXCESSIVEMICROWAVEENERGY
Do not attempt to operate this oven with
the door open, since open-door operation can
result in harmful exposure to microwave energy.
It is important not to defeat or tamper with the
safety interlocks.
Do not place any objects between the
oven front face and the door, or allow soil
of cleaner residue to accumulate on sealing sur-
faces.
Do not operate the oven if it is damaged.
It is particularly important that the oven door
close properly and that there is no damage to
the:
• door (bent)
, hinges and latches (broken or loosened)
, door seals and sealing surfaces.
The oven should not be adjusted or
repaired by anyone except properly qualified
service personnel.
WARNINGTo re uc:the r_sk of burns, electric shock, fire, injury to persons or exposure to exces-
sive microwave energy:
READ ALL THE INSTRUCTIONS BEFORE USING YOUR OVEN.
DO NOT ALLOW CHILDREN 7"0 USE THIS OVEN WITHOUT CLOSE SUPERVISION!
Read and follow the specific "PRECAUTIONS TO AVOID POSSIBLE EXPOSURE TO EXCESSIVE
MICROWAVE ENERGY" found on this page.
®
O
DO NOT TAMPER WITH THE BUILT-IN SAFETY SWITCHES ON THE OVEN DOOR!
The oven has several built-in safety switches to make sure the power is off when the door is open.
WHEN CLEANING THE DOOR AND THE SURFACES THAT TOUCH THE DOOR, USE ONLY
MILD, NON-ABRASIVE SOAPS OR DETERGENTS AND A SPONGE OR SOFT CLOTH_ (See the
Care and Cleaning Section, page 22)
If your oven is dropped or damaged, have it thoroughly checked by a qualified service technician before
using it again.
TO AVOID A FIRE HAZARD:
• DO NOT SEVERELY OVERCOOK FOODS. Severely overcooked foods can start a fire in the oven.
Watch the oven carefully, especially if you have paper, plastic, or other combustibles in the oven.
e DO NOT USE RECYCLED PAPER PRODUCTS IN YOUR OVEN. These can contain particles that can
cause arcing or may ignite,
e DO NOT OVERCOOK POTATOES. Overcooking could cause a fire. At the end of the cooking time,
the potatoes should be slightly firm,
® DO NOT STORE COMBUSTIBLE ITEMS (bread, cookies, etc.) IN THE OVEN, because if lightning
strikes the power lines, it may cause the oven to turn ON.
• DO NOT USE WIRE TWIST_TIES IN THE OVEN. Be sure to inspect purchased items for wire twist_ties
and remove them before placing the item in the oven.
• DO NOT USE THE CAVITY FOR STORAGE PURPOSES. Do not leave paper products cooking uten-
sils, or food in the cavity when not in use_
IF A FIRE SHOULD START:
® KEEP THE OVEN DOOR CLOSED.
o TURN THE OVEN OFF.
® DISCONNECT THE POWER CORD OR SHUT OFF THE POWER AT THE FUSE OR CIRCUIT
BREAKER PANEL.
TO AVOID ELECTRIC SHOCK:
• THIS APPLIANCE MUST BE GROUNDED! Connect it only to a properly grounded outlet.
SeetheGROUNDING INSTRUCTIONS on age -
® DO NOT OPERATE THIS APPLIANCE IF IT HAS A DAMAGED CORD OR PLUG, ifit is not working
properly or if it has been damaged or dropped.
o DO NOT IMMERSE THE ELECTRICAL CORD OR PLUG IN WATER.
• KEEP THE CORD AWAY FROM HEATED SURFACES.
• This appliance should be serviced only by qualified service personnel. Contact the nearest authorized ser-
vice facility for examination, repair 6_ adjustment.
TO AVOID IMPROPERLY COOKING SOME FOODS:
Some foods or containers should not be used with the microwave ovem
Personal injury could result.
e DO NOT HEAT ANY TYPES OF BABY BOTTLES OR BABY FOOD. Uneven heating may occur and
possibly cause personal injury.
e DO NOT HEAT SMALL-NECKED CONTAINERS, such as syrup bottles, in the microwave oven.
Liquids heated in round containers can overheat. The liquid may splash out loudly during or after heating
or adding ingredients (instant coffee, etc.), causing harm to the oven and possible personal injury. In all
containers, for best results, stir the liquid several times before heating. Always stir liquids several times
while reheating.
• DO NOT DEEP-FAT FRY IN YOUR MICROWAVE OVEN. This is not a safe procedure in a confined
cavity.
• DO NOT ATTEMPT HOME CANNING IN YOUR MICROWAVE OVEN. It is impossible to be sure all
areas of the jar have reached boiling temperature for the proper processing time.
® DO NOT HEAT THE FOLLOWING ITEMS IN THE MICROWAVE OVEN: whole eggs, in the shell;
water with oil or fat; sealed containers or closed glass jars. These items may explode.
CAUTION !
TAKE GOOD CARE OF YOUR OVEN TO KEEP IT TROUBLE-FREE.
IN GENERAL:
® DO NOT USE THIS OVEN FOR COMMERCIAL PURPOSES. Do not use corrosive chemicals or
vapors, such as sulfide and chloride, in the oven. This type of oven is specifically designed to heat, cook,
or dry food. It is not designed for industrial or laboratory use.
o Install or locate your oven according to the instructions in this manual Be sure the oven is level
e Keep the glass tray and the turntable roller rest in the oven when you are cooking.
e Use your oven only for the operations described in this manual.
• Do not use the oven outdoors. Do not store the oven outdoors. Do not use this product near water for
example, near a kitchen sink, in a wet basement, or near a swimming pool, and the like.
® Do not cover or block any openings in the oven.
® Unless you are using the oven as a timer and set the power level to "0".DO NOT RUN THE OVEN
EMPTY, without food in it.
® Do not let the cord hang over the edge of the table or counter.
PRESERVE THE GLASS TURNTABLE:
o DO NOT HEAT THE GLASS TURNTABLE EXCESSIVELY.
- Do not allow the grey film on special microwave cooking packages (example: french fries, popcorn) to
touch the glass turntable directly. Put the package on a microwave-safe dish.
- Do not cook bacon directly on the glass turntable.
- Keep a browning dish at least 3/16 inch above the glass turntable. Carefully read and follow the
instructions for the browning dish. If you use a browning dish incorrectly, you could break the glass
turntable.
o Place cookware gently on the glass turntable and handle the turntable carefully to avoid breaking it.
e Be careful not to chip or scratch the edges of the turntable. Chips or scratches may cause the turntable
to break during use.
SAVE THESE INSTRUCTIONS
SAFETY CERTIFICATION
The Sears Kenmore Microwave Oven is designed and thoroughly tested to meet exacting safety standards.
It meets UL and FCC requirements and complies with safety performance standards of the U.S. Department of
Health and Human Services.
TABLE OF CONTENTS
MICROWAVE OVEN
USE INSTRUCTIONS
IMPORTANT INFORMATION ABOUT YOUR OVEN
[] Location of Model Number Label ...................... 6
[] Specifications .................................................. 6
[] IMPORTANT-Electrical Grounding
Instructions ...................................................... 6
[] Installation ....................................................... 7
Names of the Oven Parts .................................. 7
Setting the "Time of Day". ................................. 8
[] Oven Control Panel .......................................... 9
[] Easy Use Chart .............................................. 10
SPECIAL FEATURES
[] Quick On ...................................................... 11
mRegular Timer ................................................ 1 ]
[] Child Lock ..................................................... II
GENERAL COOKING INSTRUCTIONS
[] Quick Touch Cooking .................................... 12
[] "HI-Power'/'Multi-Power" Cooking ................. 13
a Cooking Guide for Multi-Power Settings ........... 14
a Multi-Stage Cooking ....................................... 15
[] Automatic Defrost .............................. ,_..... 16-18
a Automatic Defrost Chart .......................... 19-20
MICROWAVE UTENSIL GUIDE .................... 21
CARE AND CLEANING ................................. 22
MICROWAVE COOKING RECIPES
AND TABLES
INTRODUCTION TO MICROWAVE COOKING
a How Your Microwave Oven Works .................. 23
t Getting the Best Results from Your
Microwave Oven ........................................... 23
m Food Characteristics Affect
Microwave Cooking ........................................ 23
n Special Techniques for
Microwave Cooking ........................................ 24
a An Alphabetical List of
Microwaving Shortcuts ............................... 24-25
APPETIZERS/SAUCES/SOUPS .............. 26-28
n Cooking Appetizers: Tips and
Techniques .................................................... 26
m Recipes: Nachos, Stuffed Mushrooms .............. 26
a Cooking Sauces: Tips and Techniques ............. 27
a Recipes: White Sauce,
Basic Brown Saude ........................... 27
[] Cooking Soups: Tips and Techniques .............. 28
[] Recipes: Vegetable Soup, Onion Soup ............. 28
MEAT ....................................................... 29-31
[] Cooking Meat: General Directions ................... 29
[] Meat Cooking Table .................................. 29-31
POULTRY ................................................ 3 2 -3 4
[] Cooking Poultry: General Directions ................ 32
Poultry Cooking Table ............................... 32-33
Recipes: Barbecued Chicken, Coq Au Vin,
Sherried Chicken .............................. 34
FISH AND SHELLFISH ................................. 35
= Cooking Fish and Shellfish:
General Directions ......................................... 35
[] Fish and Shellfish Cooking Table ..................... 35
[] Recipes: Poached Fish Fillets, Baked
Whitefish Meuniere ........................... 35
VEGETABLES .......................................... 36-40
[] Cooking Vegetables: General Directions ........... 36
[] Vegetable Cooking Table ........................... 37-40
PASTA AND RICE/EGG AND CHEESE ,,41-42
[] Cooking Pasta, Rice and Cereal:
Tips and Techniques ...................................... 41
[] Pasta Cooking Table ...................................... 41
[] Rice Cooking Table ........................................ 41
[] Basic Scrambled Eggs ..................................... 42
[] Recipes: Basic Omelet, Eggs Benedict
Spinach Ring with Cheese ................. 42
SANDWICHES/BREADS/CAKES ........... 4 3 -4 6
[] Heating Sandwiches: Tips and
Techniques .................................................... 43
[] Recipes: Beef and Tomato Pitas. Reuben
Sandwiches, Ham and
Egg Sandwiches ................................ 43
[] Baking Bread: General Directions .................... 44
a Recipes: Apricot Walnut Bread, Banana Bread,
Garlic Bread, Orange Raisin Bread,
Pumpkin Bread ............................ 44-45
a Convenience Cakes and Mixes:
Tips and Techniques ...................................... 46
mConvenience Cakes and
Mixes Cooking Table ...................................... 46
BEVERAGES .................................................. 47
mHeating Beverages: Tips and Techniques ......... 47
a Recipes: Spicy Hot Chocolate, Irish
Coffee, Orange Coffee ...................... 47
REHEATING FOODS .................................... 48
mGeneral Directions for Reheating ..................... 48
a Reheating Table ............................................. 48
RECIPE INDEX .............................................. 49
QUESTIONS AND ANSWERS ................. 50-51
BEFORE CALLING FOR SERVICE ............... 52
SEARS SERVICE ........................................... 53
SEARS WARRANTY .................... Back Cover
IMPORTANT INFORMATION
ABOUT YOUR OVEN
Enjoy a new cooking experience from Sears. Please read this manual. Ittakes only a few minutes-time well
spent to learn to use all the features of your microwave oven.
Advice on using and caring for Sears appliances is always available at your nearest, Sears store. When you need
information, be sure you have the complete model number, located on the plastic label.
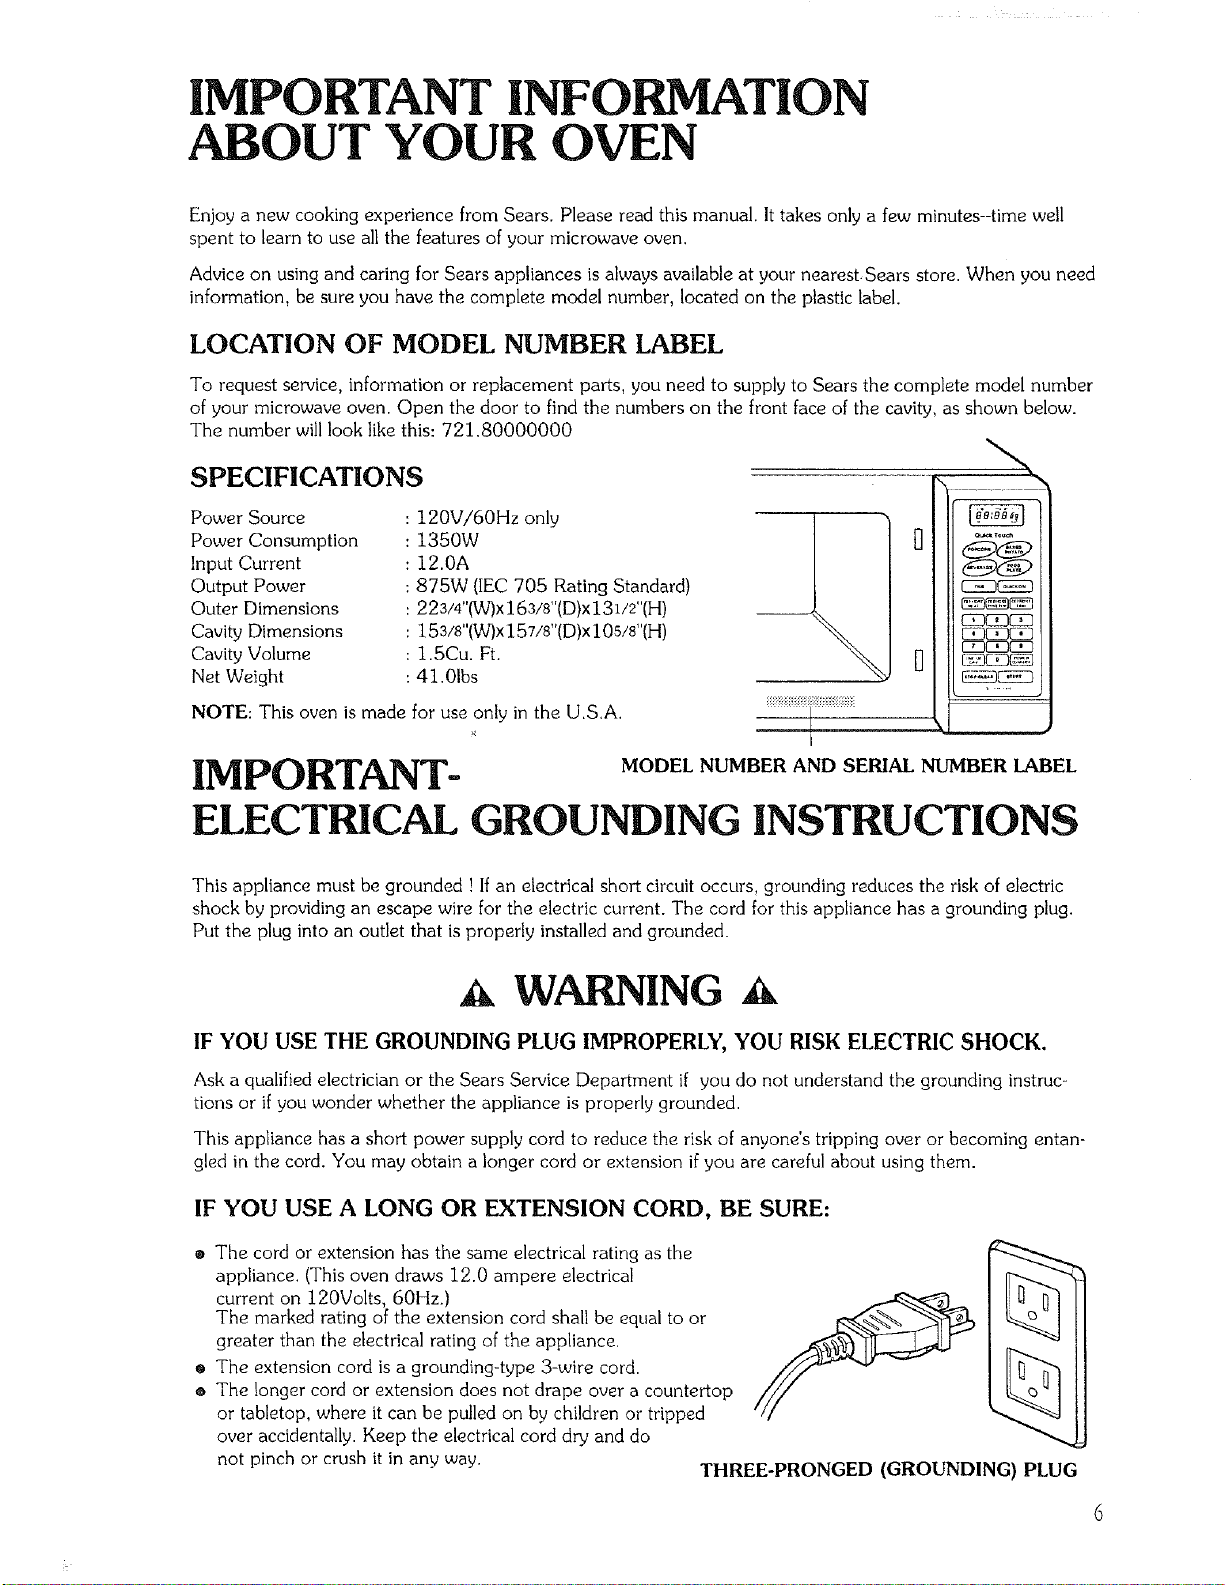
LOCATION OF MODEL NUMBER LABEL
To request service, information or replacement parts, you need to supply to Sears the complete model number
of your microwave oven. Open the door to find the numbers on the front face of the cavity, as shown below.
The number willlook like this: 721.80000000
SPECIFICATIONS
120V/60Hz only
1350W
12.0A
875W (IEC 705 Rating Standard)
223/4"(W)x163/8"(D)x131/2"(H)
153/8"(W)x 157i8"(D)x10s!8"(H)
1.5Cu. Ft.
41.01bs
for use only in the U.S.A.
Power Source
Power Consumption
Input Current
Output Power
Outer Dimensions
Cavity Dimensions
Cavity Volume
Net Weight
NOTE: This oven is made
IMPORTANT-
I
MODEL NUMBER AND SERIAL NUMBER LABEL
ELECTRICAL GROUNDING INSTRUCTIONS
This appliance must be grounded ! If an electrical short circuit occurs, grounding reduces the risk of electric
shock by providing an escape wire for the electric current. The cord for this appliance has a grounding plug.
Put the plug into an outlet that is properly installed and grounded.
A WARNING A
IF YOU USE THE GROUNDING PLUG IMPROPERLY, YOU RISK ELECTRIC SHOCK.
Ask a qualified electrician or the Sears Service Department if you do not understand the grounding instruc-
tions or if you wonder whether the appliance is properly grounded.
This appliance has a short power supply cord to reduce the risk of anyone's tripping over or becoming entan-
gled in the cord. You may obtain a longer cord or extension if you are careful about using them.
IF YOU USE A LONG OR EXTENSION CORD, BE SURE:
o The cord or extension has the same electrical rating as the
appliance. (This oven draws 12.0 ampere electrical
current on 120Volts, 60Hz.)
The marked rating of the extension cord shall be equal to or
greater than the electrical rating of the appliance.
® The extension cord is a grounding-type 3-wire cord.
® The longer cord or extension does not drape over a countertop
or tabletop, where it can be pulled on by children or tripped
over accidentally. Keep the electrical cord dry and do
not pinch or crush it in any way.
THREE-PRONGED (GROUNDING) PLUG
INSTALLATION
Install your oven on a table or countertop by following these six simple steps:
Step I : Remove your Kenmore Microwave Oven and all material from the shipping carton. Your oven will be
packed with the following items:
I Use & Care Manual and Cookbook
1 Glass Turntable
1 Turntable Roller Rest
Your oven and its parts appear below:
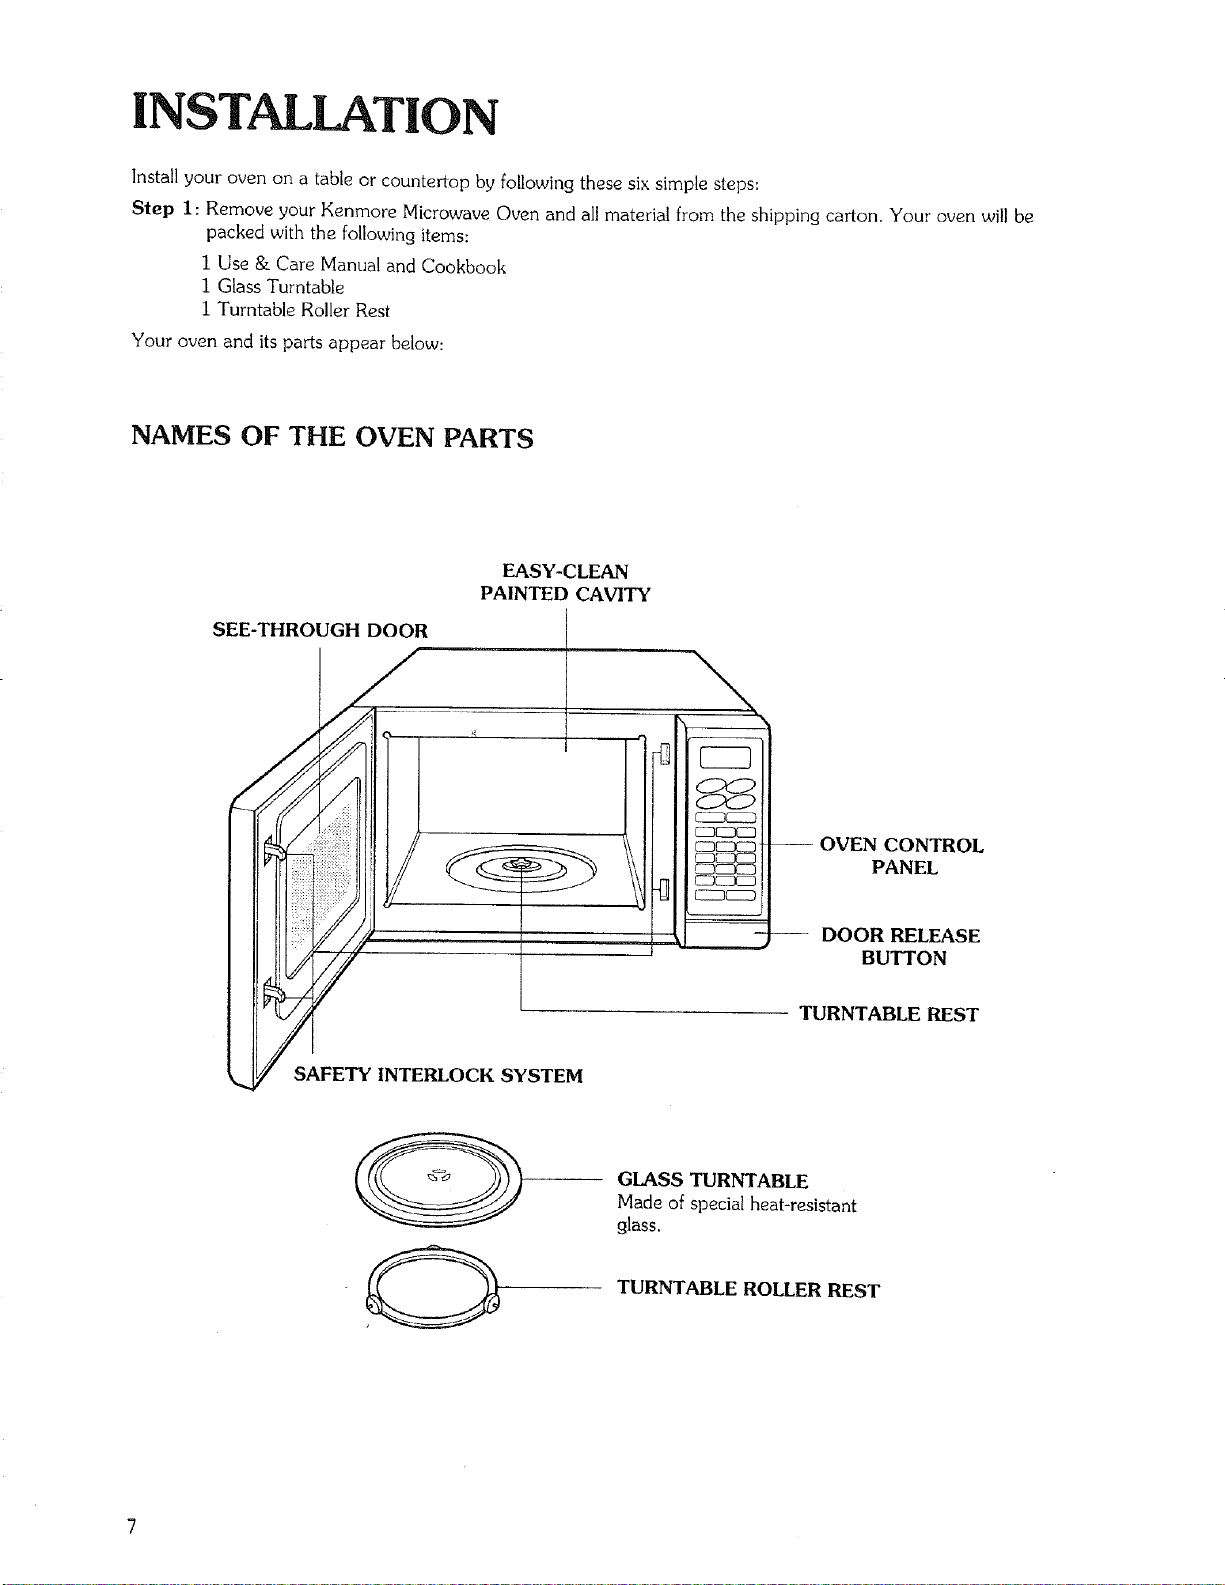
NAMES OF THE OVEN PARTS
SEE-THROUGH DOOR
EASY-CLEAN
PAINTED CAVITY
OVEN CONTROL
PANEL
DOOR RELEASE
BUTTON
TURNTABLE REST
SAFETY INTERLOCK SYSTEM
GLASS TURNTABLE
Made of special heat-resistant
glass.
TURNTABLE ROLLER REST
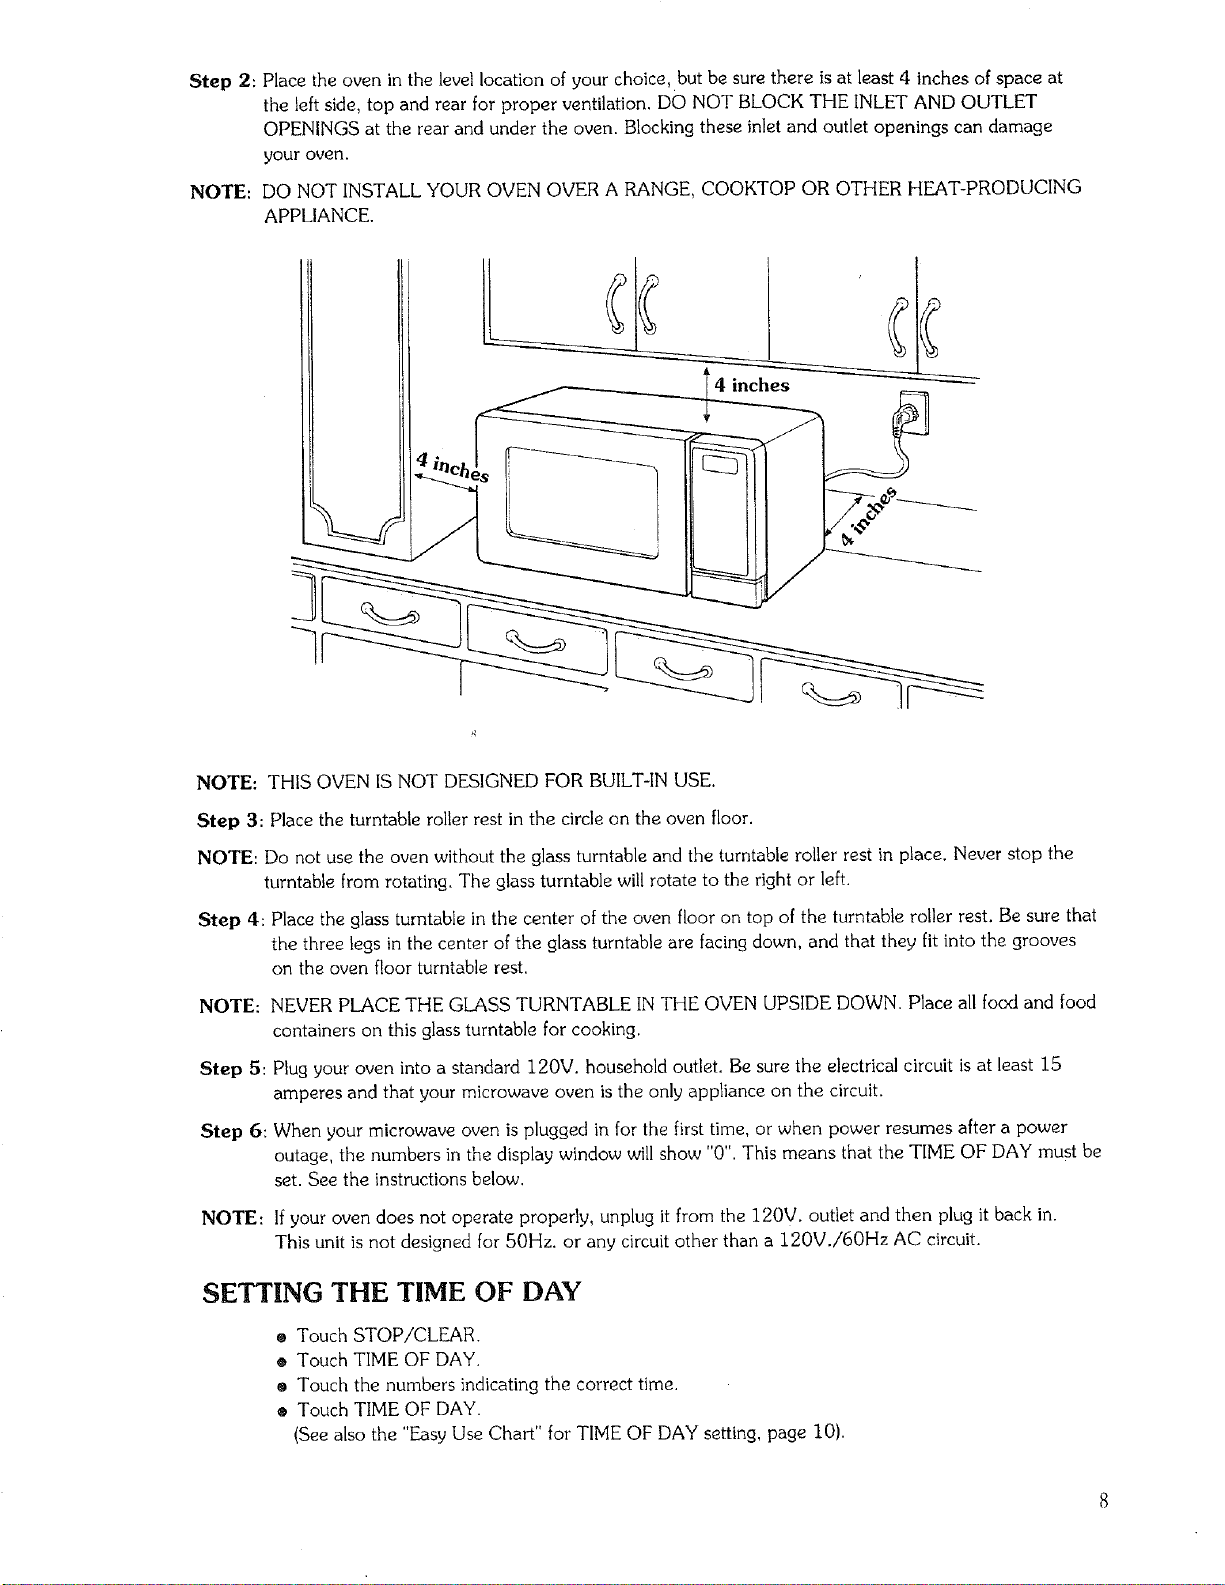
Step 2: Place the oven in the level location of your choice, but be sure there is at least 4 inches of space at
the left side, top and rear for proper ventilation, DO NOT BLOCK THE INLET AND OUTLET
OPENINGS at the rear and under the oven. Blocking these inlet and outlet openings can damage
your oven,
NOTE: DO NOT INSTALL YOUR OVEN OVER A RANGE, COOKTOP OR OTHER HEAT-PRODUCING
APPLIANCE.
NOTE: THIS OVEN IS NOT DESIGNED FOR BUILT-IN USE.
Step 3: Place the turntable roller rest in the circle on the oven floor.
NOTE: Do not use the oven without the glass turntable and the turntable roller rest in place. Never stop the
turntable from rotating. The glass turntable will rotate to the right or left.
Step 4: Place the glass turntable in the center of the oven floor on top of the turntable roller rest. Be sure that
the three legs in the center of the glass turntable are facing down, and that they fit into the grooves
on the oven floor turntable rest.
NOTE:
Step 5:
Step 6:
NEVER PLACE THE GLASS TURNTABLE IN THE OVEN UPSIDE DOWN. Place all food and food
containers on this glass turntable for cooking.
Plug your oven into a standard 120V. household outlet. Be sure the electrical circuit is at least 15
amperes and that your microwave oven is the only appliance on the circuit.
When your microwave oven is plugged in for the first time, or when power resumes after a power
outage, the numbers in the display window will show "0". This means that the TIME OF DAY must be
set. See the instructions below.
NOTE: If your oven does not operate properly, unplug it from the 120V. outlet and then plug it back in.
This unit is not designed for 50Hz. or any circuit other than a 120V./60Hz AC circuit.
SETTING THE TIME OF DAY
® Touch STOP/CLEAR.
® Touch TIME OF DAY.
o Touch the numbers indicating the correct time.
® Touch TIME OF DAY.
(See also the "Easy Use Chart" for TIME OF DAY setting, page 10).
OVEN CONTROL PANEL
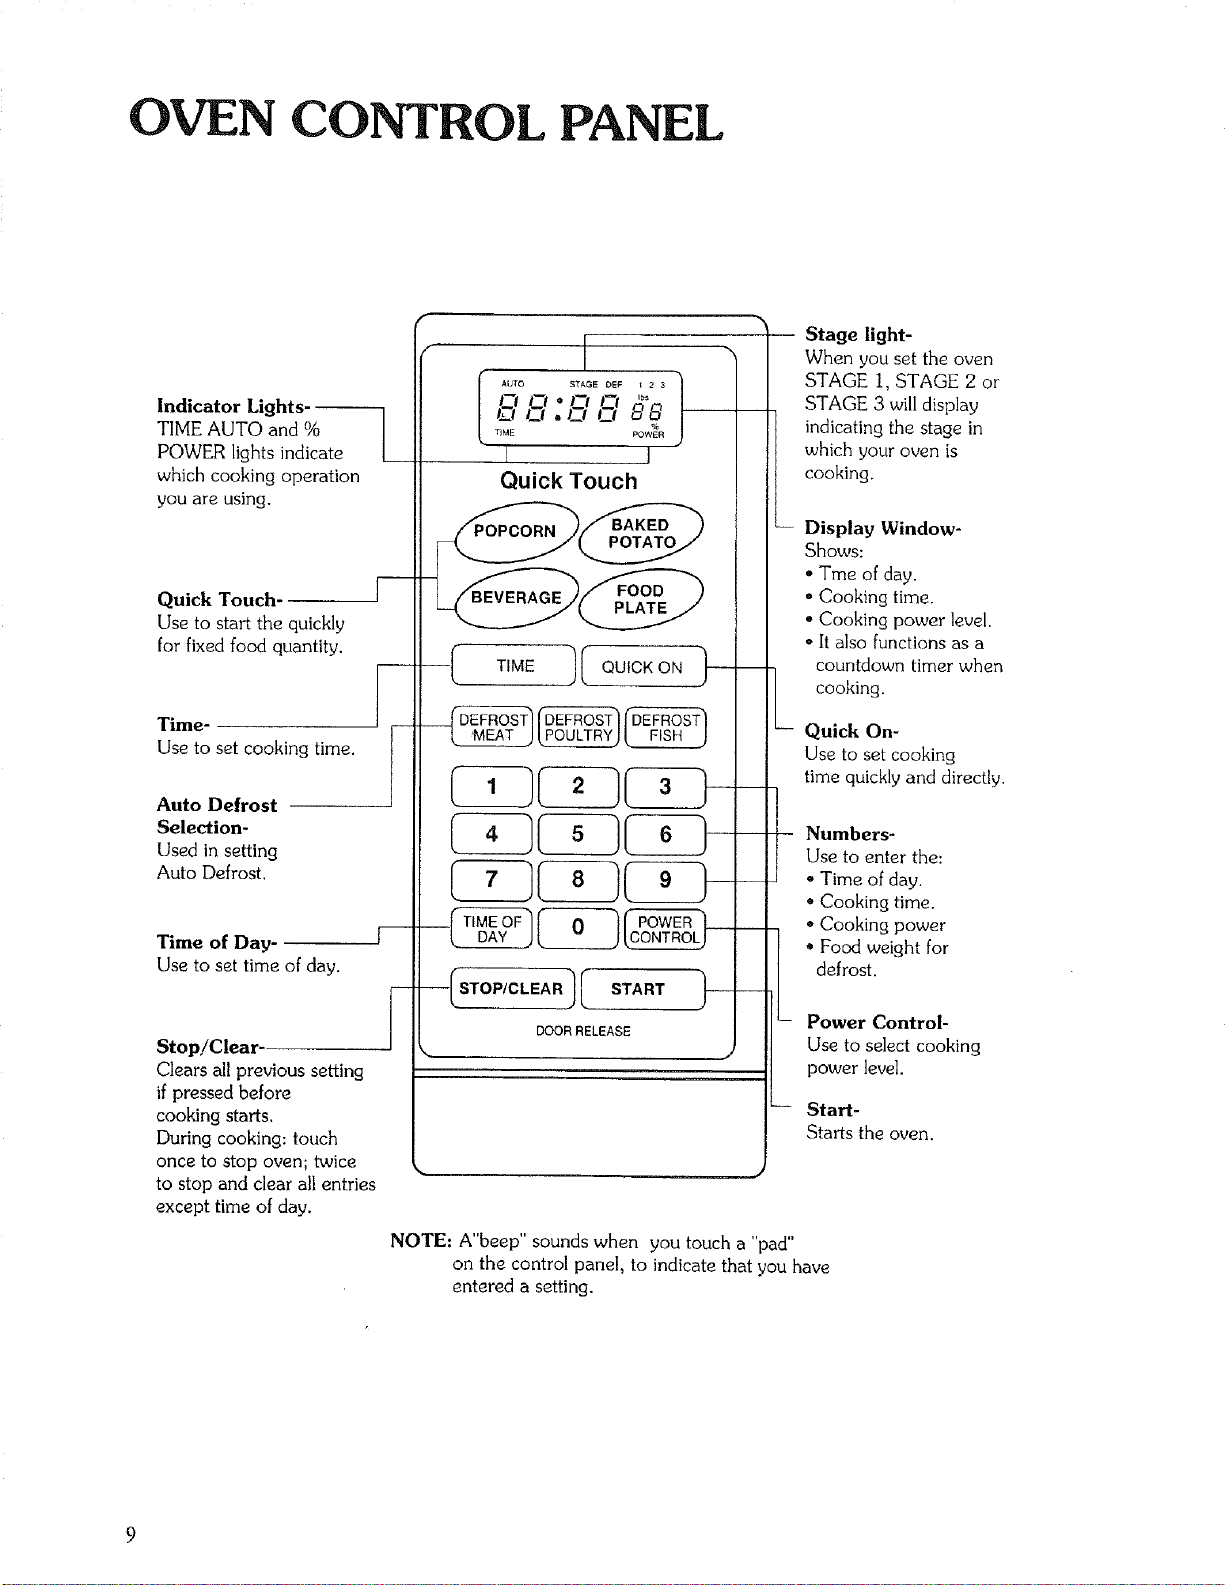
Indicator Lights
TIME AUTO and %
POWER lights indicate
which cooking operation
you are using.
L
Quick Touch-
Use to start the quickly
for fixed food quantity.
Time-
Use to set cooking time.
Auto Defrost
Selection-
Used in setting
Auto Defrost.
Time of Day-
Use to set time of day.
Stop!Clear-
Clears all previous setting
if pressed before
cooking starts.
During cooking: touch
once to stop oven; twice
to stop and clear all entries
except time of day,
8 f-1°f-I f-t L_88
0,C10 o_
TIME POWER
I _J
Quick Touch
POTATO
FOOD
PLATE
OEFROS
__ HL__EE_J
--ISTO,,OL A.)ISTA.T
BOOR RELEASE
m
m
Stage light-
When you set the oven
STAGE i, STAGE 2 or
STAGE 3 will display
indicating the stage in
which your oven is
cooking.
Display Window-
Shows:
• Tme of day.
• Cooking time.
• Cooking power level,
• It also functions as a
countdown timer when
cooking.
-- Quick On-
Use to set cooking
time quicklyand directly.
-- Numbers-
Use to enter the:
• Time of day.
• Cooking time.
• Cooking power
Food weight for
defrost.
- Power Control-
Use to select cooking
power level.
-- Start-
Starts the oven.
NOTE: A"beep" sounds when you touch a "pad"
on the control panel, to indicate that you have
entered a setting.
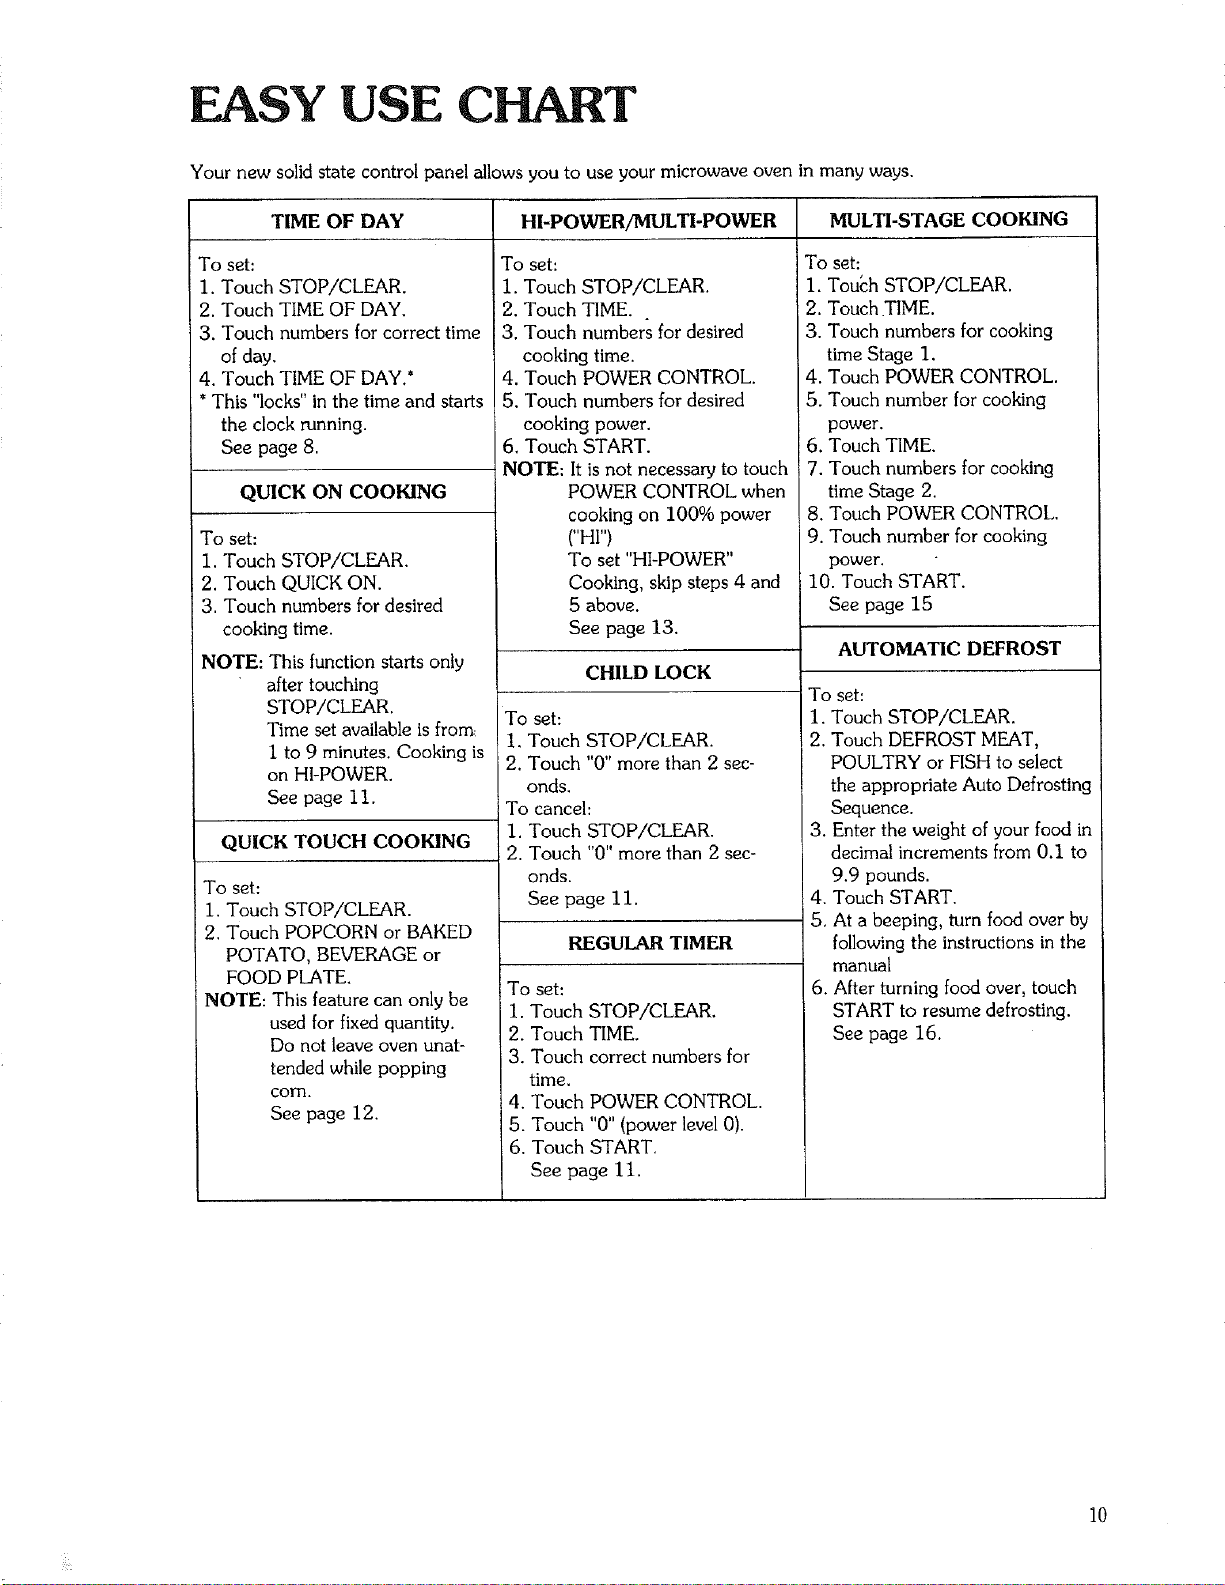
EASY USE CHART
Your new solid state control panel allows you to use your microwave oven in many ways.
TIME OF DAY HI-POWER/MULTI-POWER MUL_-STAGE COOKING
To set:
1. Touch STOP/CLEAR.
2, Touch TIME OF DAY.
3. Touch numbers for correct time
of day,
4. Touch TIME OF DAY.*
*This "locks" in the time and starts
the clock running.
See page 8.
QUICK ON COOKING
To set:
1. Touch STOP/CLEAR.
2. Touch QUICK ON.
3. Touch numbers for desired
cooking time.
NOTE: This function starts only
after touching
STOP/CLEAR.
Time set available is from:
I to 9 minutes. Cooking is
on HI-POWER.
See page 11.
QUICK TOUCH COOKING
To set:
1. Touch STOP/CLEAR.
2. Touch POPCORN or BAKED
POTATO, BEVERAGE or
FOOD PLATE.
NOTE: This feature can only be
used for fixed quantity.
Do not leave oven unat-
tended while popping
coin.
See page 12.
To set:
I. Touch STOP/CLEAR.
2. Touch TIME.
3. Touch numbers for desired
cooking time.
4. Touch POWER CONTROL.
5. Touch numbers for desired
cooking power.
6. Touch START.
NOTE: It is not necessary to touch
POWER CONTROL when
cooking on 100% power
{"HI")
To set "HI-POWER"
Cooking, skip steps 4 and
5 above.
See page 13.
CHILD LOCK
To set:
I. Touch STOP/CLEAR.
2. Touch "0" more than 2 sec-
onds.
To cancel:
1. Touch STOP/CLEAR,
2. Touch "0" more than 2 sec-
onds.
See page 11.
REGULAR TIMER
To set:
1. Touch STOP/CLEAR.
2. Touch TIME.
3. Touch correct numbers for
time.
4. Touch POWER CONTROL.
5. Touch "0" (power level 0).
6. Touch START,
See page 11.
To set:
1. Tou&h STOP/CLEAR.
2, Touch TIME.
3. Touch numbers for cooking
time Stage 1.
4. Touch POWER CONTROL.
5. Touch number for cooking
power.
6. Touch TIME.
7. Touch numbers for cooking
time Stage 2.
8. Touch POWER CONTROL.
9. Touch number for cooking
power.
10. Touch START.
See page 15
AUTOMATIC DEFROST
To set:
1. Touch STOP/CLEAR.
2. Touch DEFROST MEAT,
POULTRY or FISH to select
the appropriate Auto Defrosting
Sequence.
3. Enter the weight of your food in
decimal increments from 0.1 to
9.9 pounds.
4. Touch START.
5. At a beeping, turn food over by
following the instructions in the
manual
6. After turning food over, touch
START to resume defrosting.
See page 16.
10
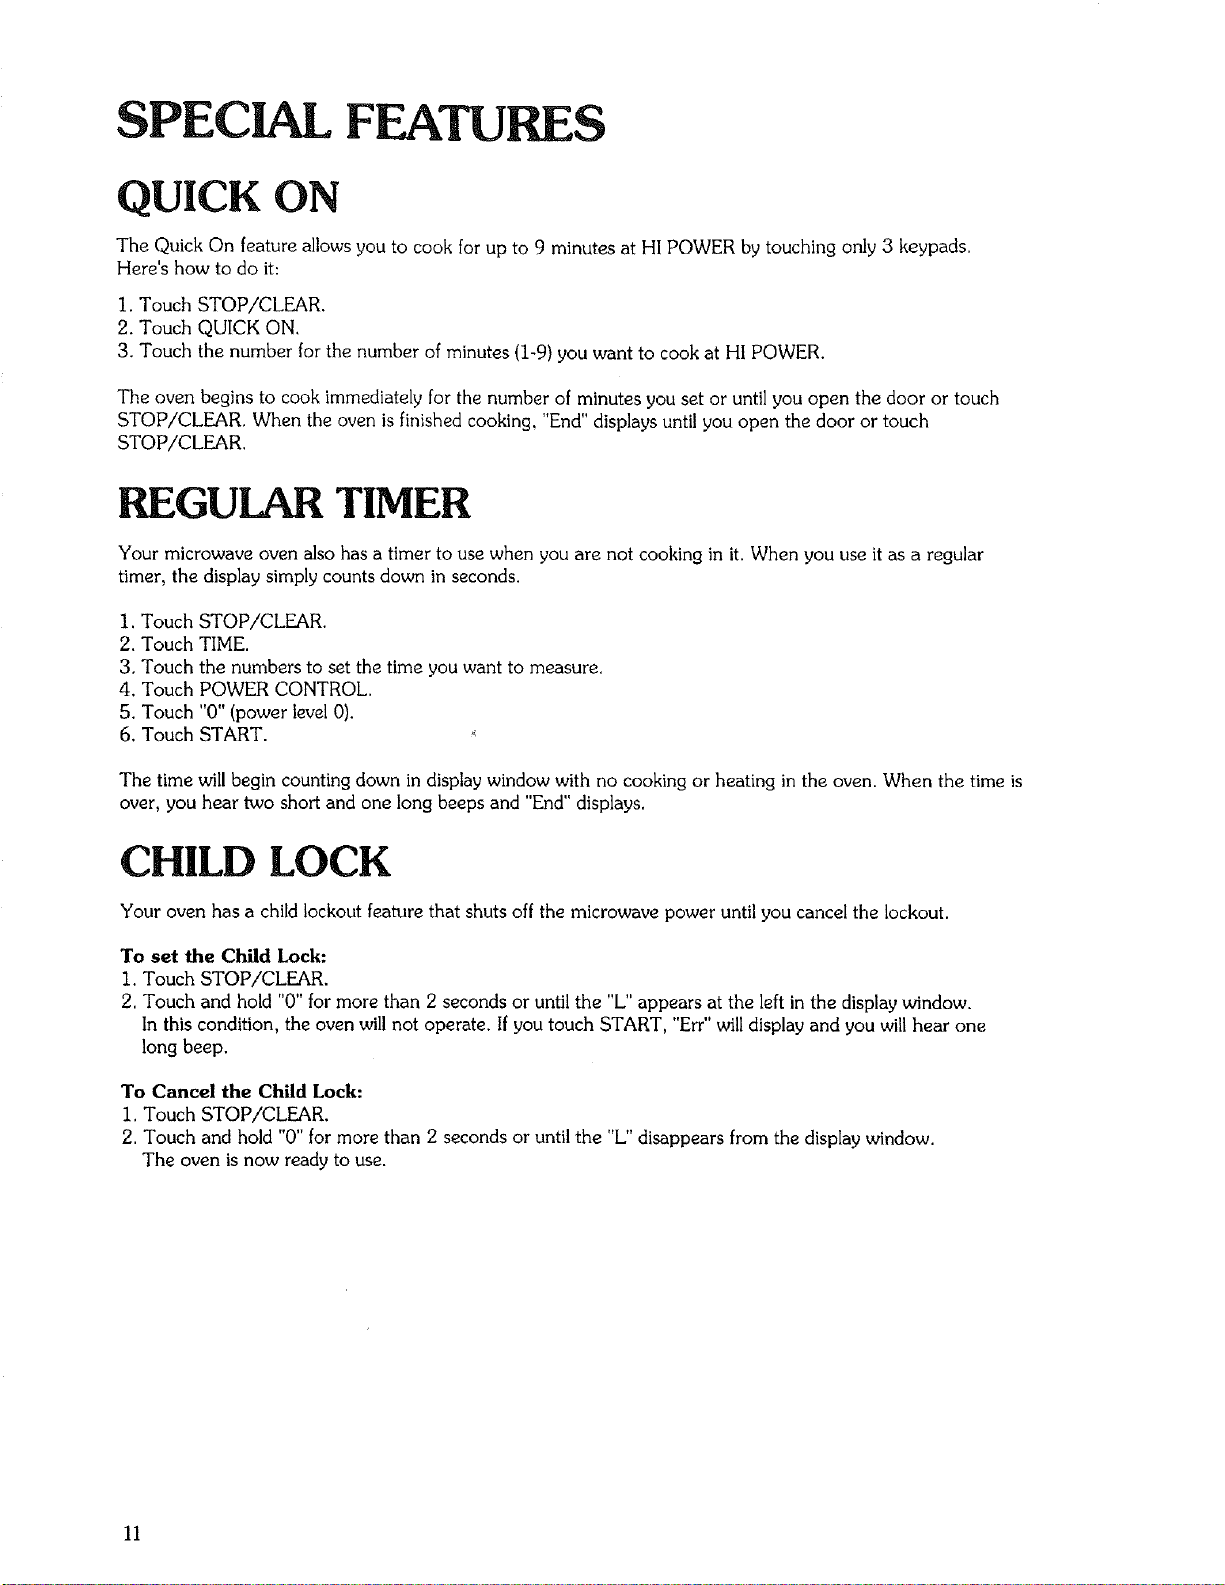
SPECIAL FEATURES
QUICK ON
The Quick On feature allows you to cook for up to 9 minutes at HI POWER by touching only 3 keypads.
Here's how to do it:
1. Touch STOP/CLEAR.
2. Touch QUICK ON.
3. Touch the number for the number of minutes (1-9) you want to cook at HI POWER.
The oven begins to cook immediately for the number of minutes you set or until you open the door or touch
STOP/CLEAR. When the oven is finished cooking, "End" displays until you open the door or touch
STOP/CLEAR.
REGULAR TIMER
Your microwave oven also has a timer to use when you are not cooking in it. When you use it as a regular
timer, the display simply counts down in seconds,
1. Touch
2. Touch
3. Touch
4. Touch
5. Touch
6. Touch
STOP/CLEAR.
TIME.
the numbers to set the time you want to measure.
POWER CONTROL.
"0" (power level 0).
START.
The time will begin counting down in display window with no cooking or heating in the oven. When the time is
over, you hear two short and one long beeps and "End" displays.
CHILD LOCK
Your oven has a child lockout feature that shuts off the microwave power until you cancel the lockout.
To set the Child Lock:
I. Touch STOP/CLEAR.
2. Touch and hold '*0"for more than 2 seconds or until the "L" appears at the left in the display window.
In this condition, the oven will not operate. If you touch START, "Err" will display and you will hear one
long beep.
To Cancel the Child Lock:
1. Touch STOP/CLEAR.
2. Touch and hold "0" for more than 2 seconds or until the "L" disappears from the display window.
The oven is now ready to use.
11
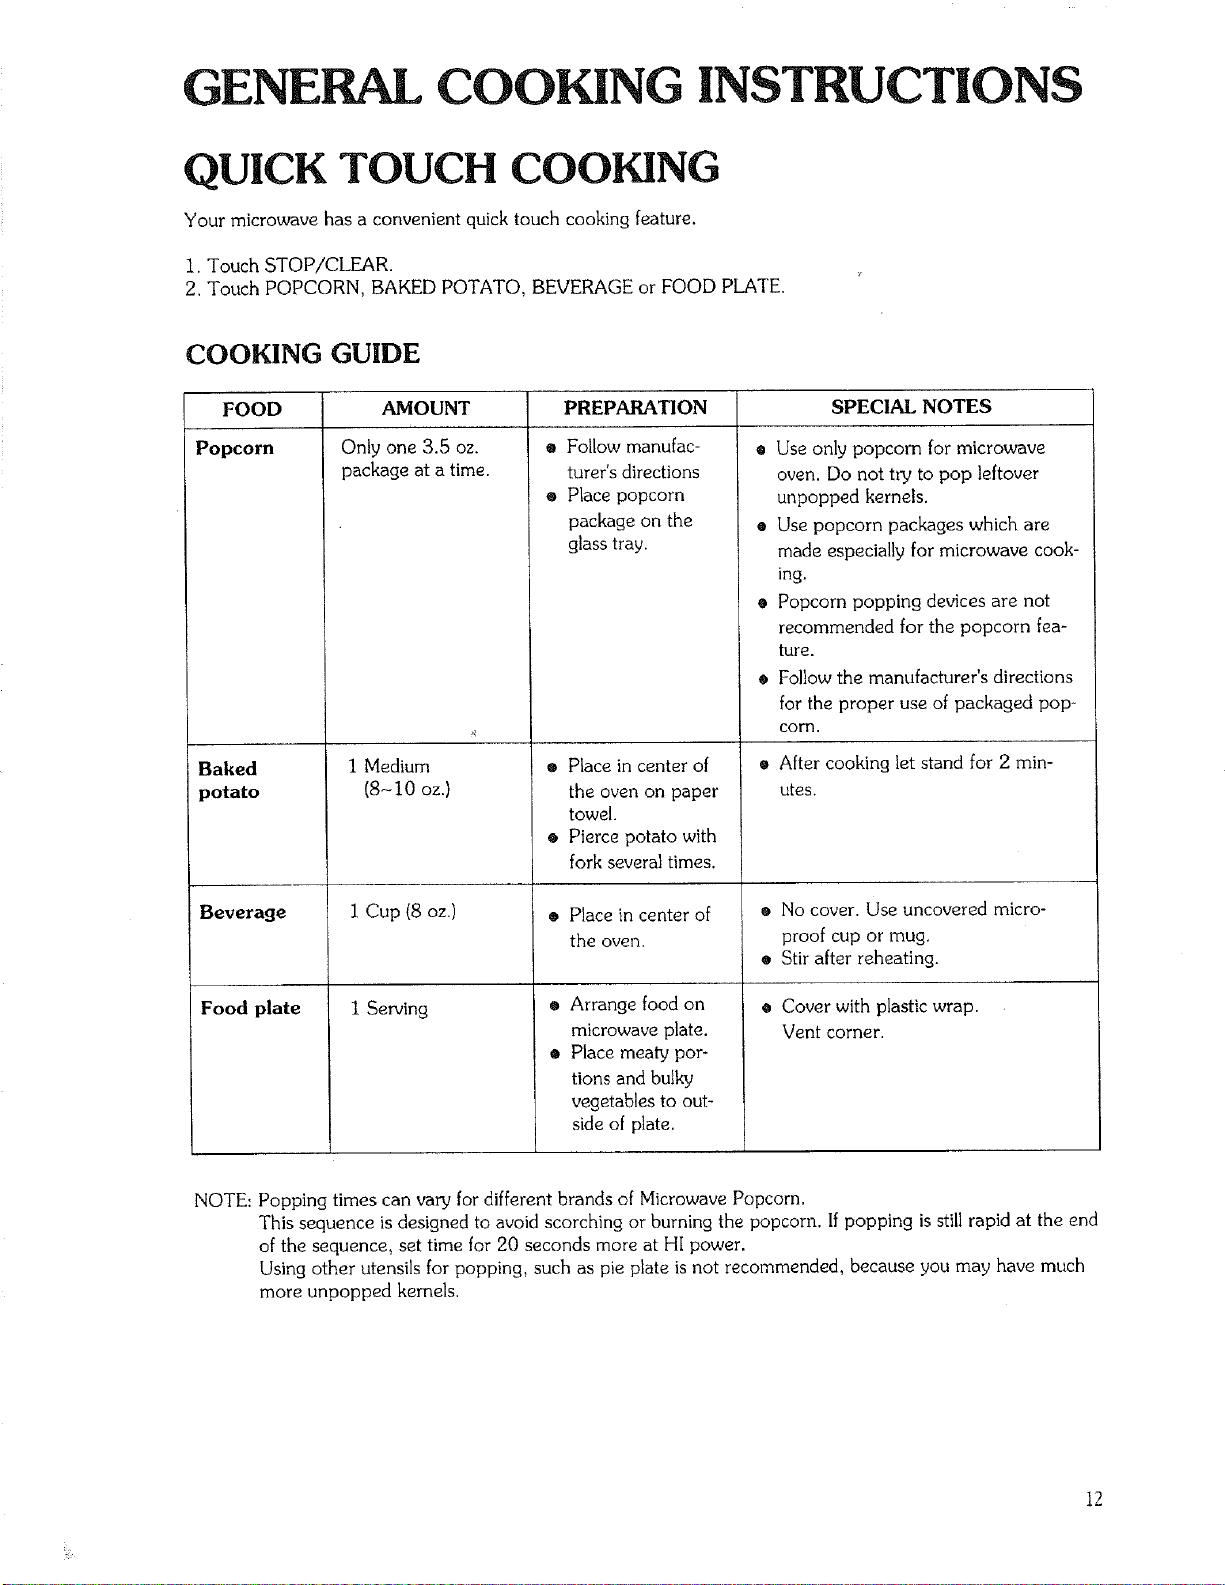
GENERAL COOKING INSTRUCTIONS
QUICK TOUCH COOKING
Your microwave has a convenient quick touch cooking feature.
I. Touch STOP/CLEAR.
2. Touch POPCORN, BAKED POTATO, BEVERAGE or FOOD PLATE.
COOKING GUIDE
FOOD
Popcorn
Baked
potato
Beverage
Food plate
AMOUNT
Only one 3,5 oz.
package at a time.
1 Medium
(8-10 oz.)
i Cup (8 oz.)
1 Serving
PREPARATION SPECIAL NOTES
Q
o Follow manufac-
turer's directions
® Place popcorn
package on the
glass tray.
® Place in center of
the oven on paper
towel.
• Pierce potato with
fork several times.
o Place in center of
the oven.
® Arrange food on
microwave plate.
• Place meaty por-
tions and bulky
vegetables to out-
side of plate.
Use only popcorn for microwave
oven. Do not try to pop leftover
unpopped kernels.
• Use popcorn packages which are
made especially for microwave cook-
ing.
• Popcorn popping devices are not
recommended for the popcorn fea-
ture.
• Follow the manufacturer's directions
for the proper use of packaged pop _
corn.
® After cooking let stand for 2 min-
utes.
® No cover. Use uncovered micro-
proof cup or mug.
o Stir after reheating.
• Cover with plastic wrap.
Vent corner.
NOTE: Popping times can vary for different brands of Microwave Popcorn.
This sequence is designed to avoid scorching or burning the popcorn. If popping is still rapid at the end
of the sequence, set time for 20 seconds more at HI power.
Using other utensils for popping, such as pie plate is not recommended, because you may have much
more unpopped kernels.
12
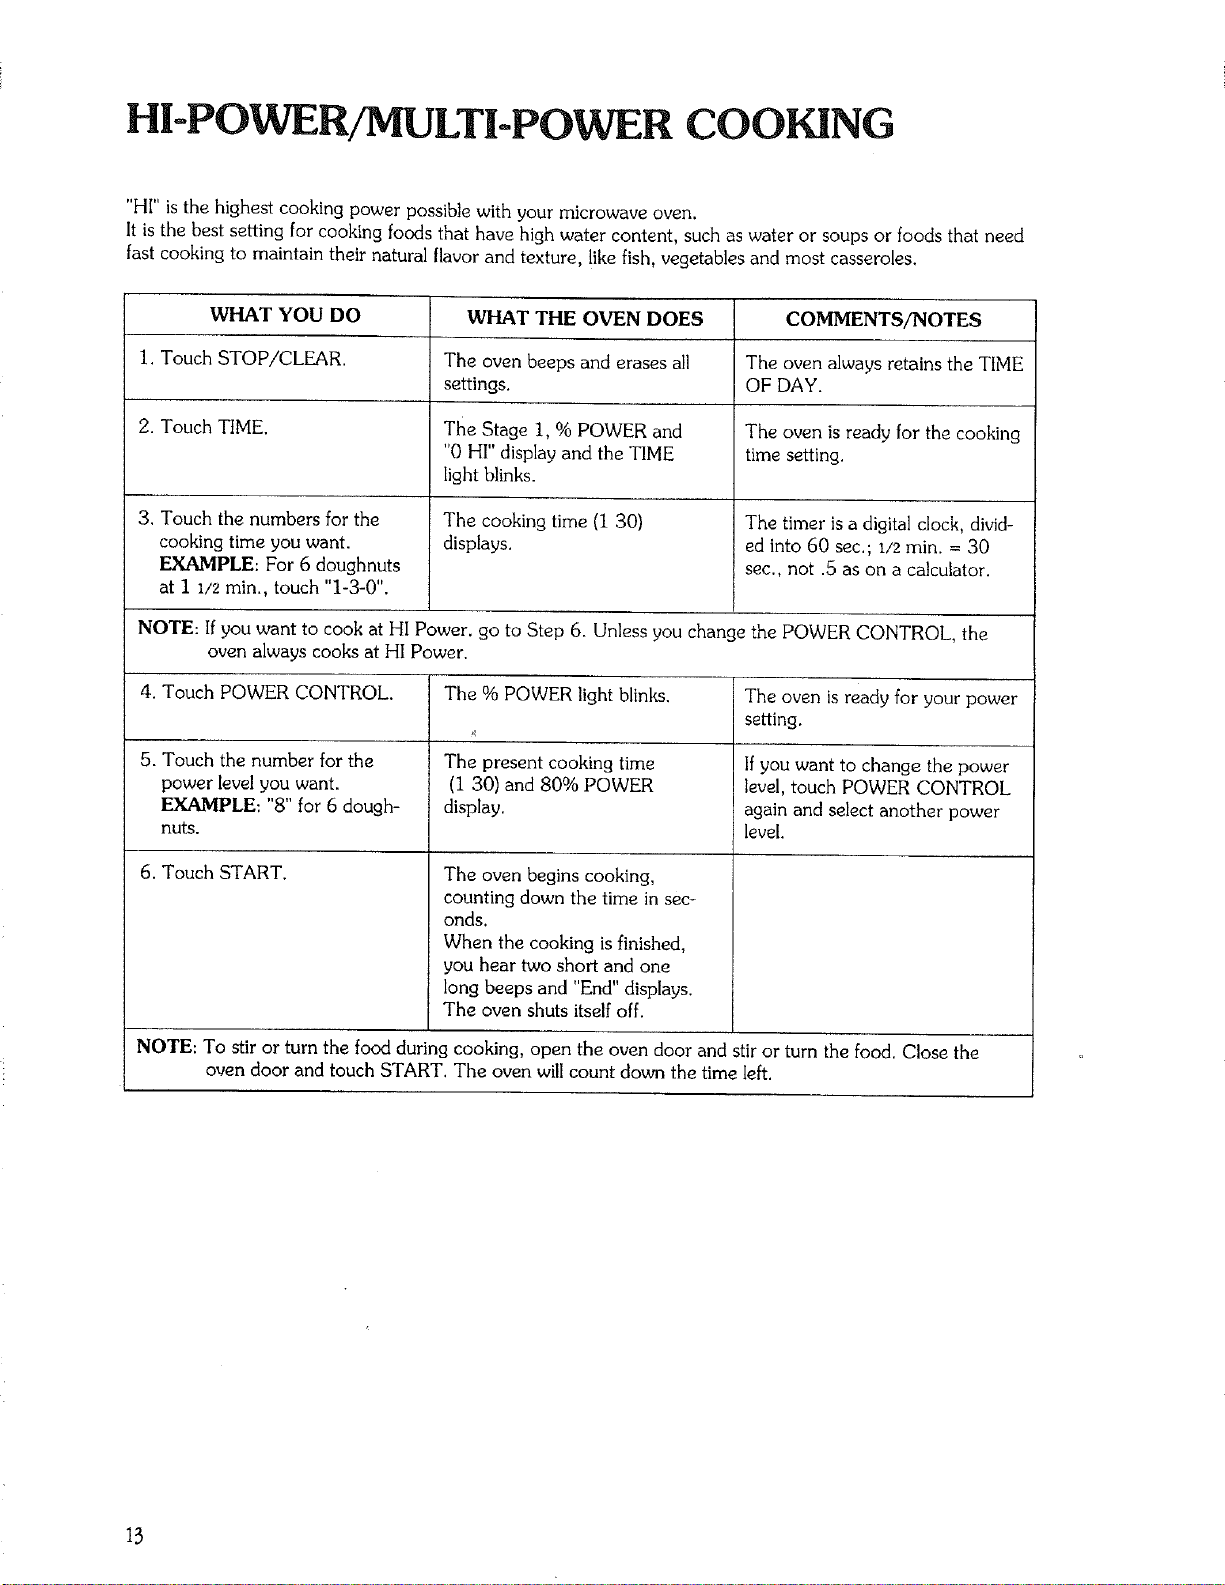
HI-POWER/MULTI-POWER COOKING
"HI" is the highest cooking power possible with your microwave oven.
It is the best setting for cooking foods that have high water content, such as water or soups or foods that need
fast cooking to maintain their natural flavor and texture, like fish, vegetables and most casseroles.
WHAT YOU DO WHAT THE OVEN DOES COMMENTS/NOTES
I. Touch STOP/CLEAR. The oven beeps and erases all The oven always retains the TIME
settings. OF DAY.
2. Touch TIME. The Stage 1, % POWER and The oven is ready for the cooking
"0 HI" display and the TIME time setting.
light blinks.
3. Touch the numbers for the The cooking time (1 30) The timer is a digital clock, divid-
cooking time you want. displays, ed into 60 sec.; I/z min. = 30
EXAMPLE: For 6 doughnuts sec., not .5 as on a calculator.
at 1 I/2 min, touch "1-3-0".
NOTE: If you want to cook at HI Power. go to Step 6. Unless you change the POWER CONTROL, the
oven always cooks at HI Power.
4. Touch POWER CONTROL. The % POWER light blinks. The oven is ready for your power
setting,
5. Touch the number for the The present cooking time If you want to change the power
power level you want. (1 30) and 80% POWER level, touch POWER CONTROL
E_L_d_FPLE:"8" for 6 dough- display, again and select another power
nuts. level.
6. Touch START.
The oven begins cooking,
counting down the time in sec-
onds.
When the cooking is finished,
you hear two short and one
long beeps and "End" displays.
The oven shuts itself off.
NOTE: To stir or turn the food during cooking, open the oven door and stir or turn the food. Close the
oven door and touch START. The oven will count down the time left.
13
COOKING GUIDE FOR
MULTI-POWER SETTINGS
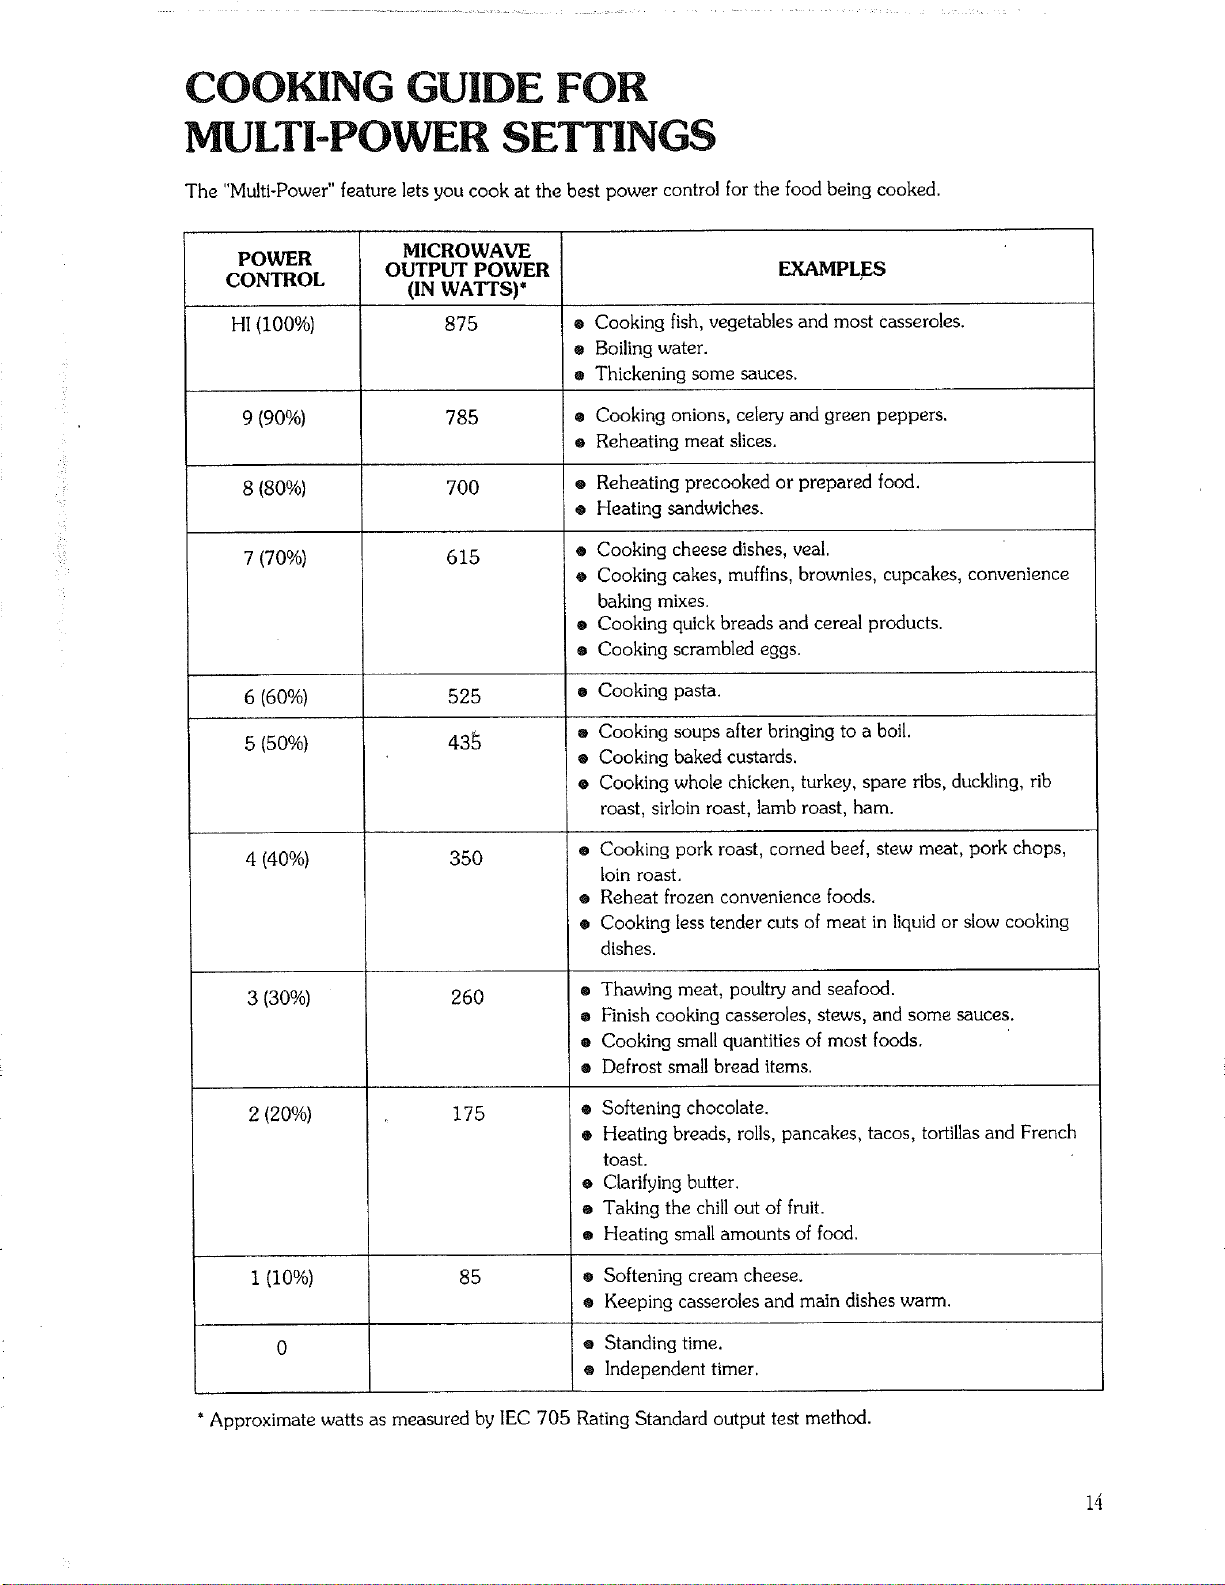
The "Multi-Power" feature lets you cook at the best power control for the food being cooked.
!7
i_'i_
POWER
CONTROL
HI(100%)
9 (90%)
MICROWAVE
OUTPUT POWER
(IN WATTS)*
875
785
EXAMPLES
o Cooking fish, vegetables and most casseroles.
e Boiling water.
® Thickening some sauces.
® Cooking onions, celery and green peppers.
• Reheating meat slices.
8 (80%) 700 o Reheating precooked or prepared food.
• Heating sandwiches.
7 (70%) 615
e Cooking cheese dishes, veal.
o Cooking cakes, muffins, brownies, cupcakes, convenience
baking mixes.
o Cooking quick breads and cereal products.
e Cooking scrambled eggs.
6 (60%) 525 • Cooking pasta.
5 (50%) 43_ ® Cooking soups after bringing to a boil.
• Cooking baked custards.
• Cooking whole chicken, turkey, spare ribs, duckling, rib
roast, sirloin roast, lamb roast, ham.
4 (40%) 350
260
175
3 (30%)
2 (20%)
1 (10%)
85
o Cooking pork roast, corned beef, stew meat, pork chops,
loin roast.
o Reheat frozen convenience foods.
• Cooking less tender cuts of meat in liquid or slow cooking
dishes.
o Thawing meat, poultry and seafood.
• Finish cooking casseroles, stews, and some sauces.
• Cooking small quantities of most foods.
® Defrost small bread items.
• Softening chocolate.
e Heating breads, rolls, pancakes, tacos, tortillas and French
toast.
® Clarifying butter.
o Taking the chill out of fruit.
e Heating small amounts of food.
* Softening cream cheese.
® Keeping casseroles and main dishes warm.
e Standing time.
® Independent timer.
*Approximate watts as measured by IEC 705 Rating Standard output test method.
14
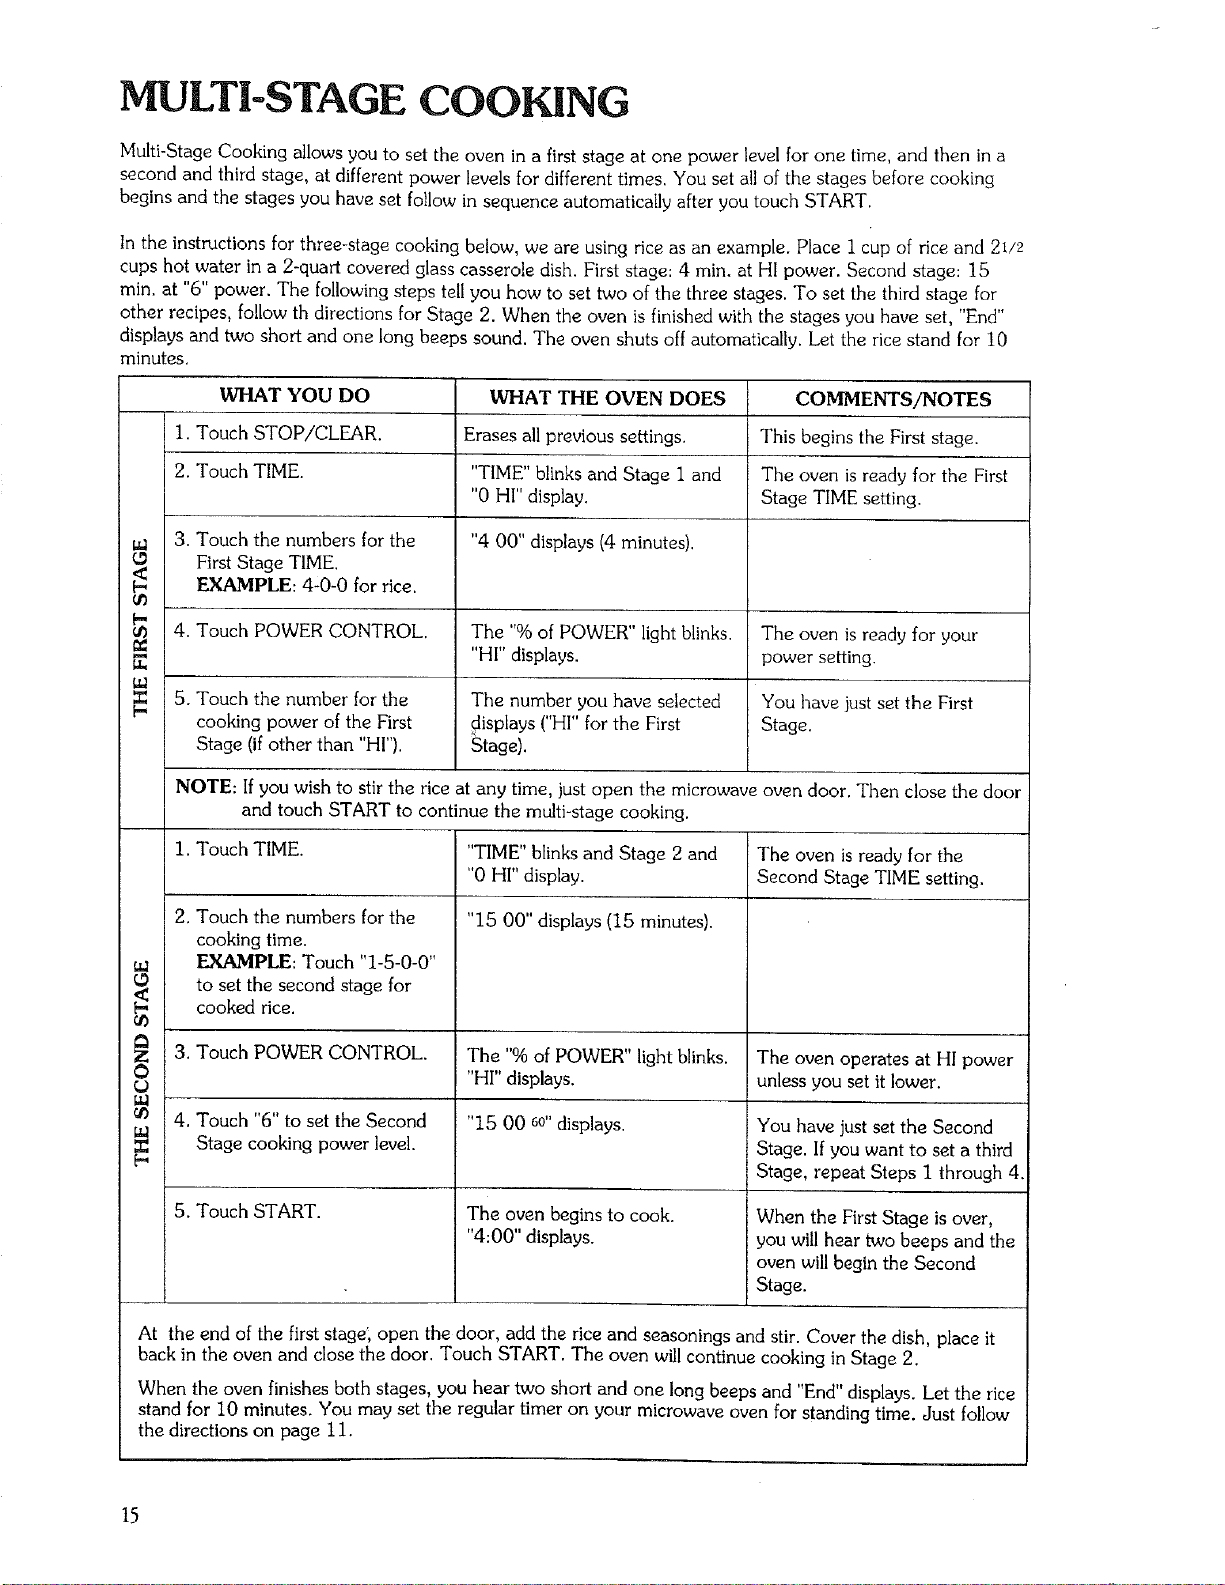
MULTI-STAGE COOKING
Multi-Stage Cooking allows you to set the oven in a first stage at one power level for one time, and then in a
second and third stage, at different power levels for different times. You set all of the stages before cooking
begins and the stages you have set follow in sequence automatically after you touch START.
In the instructions for three-stage cooking below, we are using rice as an example. Place I cup of rice and 21/2
cups hot water in a 2-quart covered glass casserole dish. First stage: 4 min. at HI power. Second stage: 15
min. at "6" power. The following steps tell you how to set two of the three stages. To set the third stage for
other recipes, follow th directions for Stage 2. When the oven is finished with the stages you have set, "End"
displays and two short and one long beeps sound. The oven shuts off automatically. Let the rice stand for 10
minutes.
WHAT YOU DO WHAT THE OVEN DOES COMMENTS/NOTES
1. Touch STOP/CLEAR. Erases all previous settings. This begins the First stage.
2. Touch TIME. "TIME" blinks and Stage I and The oven is ready for the First
"0 HI" display. Stage TIME setting.
m 3. Touch the numbers for the "4 00" displays (4 minutes).
O First Stage TIME.
EXAMPLE: 4_0-0 for rice.
4. Touch POWER CONTROL. The "% of POWER" light blinks. The oven is ready for your
"HI" displays, power setting.
co
5. Touch the number for the The number you have selected You have just set the First
cooking power of the First displays ("HI" for the First Stage.
Stage (if other than "HI"). Stage).
NOTE: If you wish to stir the rice at any time, just open the microwave oven door. Then close the door
and touch START to continue the multi-stage cooking.
I. Touch TIME. "TIME" blinks and Stage 2 and The oven is ready for the
"0 HI" display. Second Stage TIME setting.
2. "15 00" displays (15 minutes).
CO
L_
CO
co
,v
Touch the numbers for the
cooking time.
EXAMPLE: Touch "1-5-0-0"
to set the second stage for
cooked rice.
3. Touch POWER CONTROL.
. Touch "6" to set the Second
Stage cooking power level.
5. Touch START.
The "%of POWER" light blinks.
"HI" displays.
"15 00 60" displays.
The oven begins to cook.
"4:00" displays.
The oven operates at HI power
unless you set it lower.
You have just set the Second
Stage. If you want to set a third
Stage, repeat Steps 1 through 4.
When the First Stage is over,
you will hear two beeps and the
oven will begin the Second
Stage.
At the end of the first stage; open the door, add the rice and seasonings and stir. Cover the dish, place it
back in the oven and close the door. Touch START. The oven will continue cooking in Stage 2.
When the oven finishes both stages, you hear two short and one long beeps and "End" displays. Let the rice
stand for 10 minutes. You may set the regular timer on your microwave oven for standing time. Just follow
the directions on page 1I.
15
AUTOMATIC DEFROST
Three defrost sequences are preset in the oven. The "Auto Defrost" feature provides you with the best defrost-
ing method for frozen foods.
HOW TO GET THE BEST RESULTS FROM AUTO DEFROST:
• Remove any metal twist ties from packaging.
e Plastic microwavable pouches need to be pierced several times with a fork.
o Place food item on microwable rack or glass container.
® Meat of irregular shape and large, fatty cuts of meat should have the narrow or fatty areas shielded with foil
at the beginning of the defrost sequence to prevent them from cooking.
• Do not use AUTO DEFROST for less then I/4 lb. ground beef.
• It is helpful to freeze ground beef in doughnut shape.
o Depress center of ground beef patties before freezing.
o Remove thawed portions of ground beef or cubes; return remainder to oven for additional defrosting.
o To reduce moisture loss, defrost meats just before cooking.
o Meats with a casing, such as hot dogs and sausage, need to be pierced to let steam escape.
• You'll have best results defrosting meats, fish and poultry up to 9.9 Ibs.
Those meat items over 6 Ibs may need more defrost time, shielding and turning.
• Rinse poultry and seafood in cold water after Auto Defrost cycle.
® Before cooking, make sure all areas of food item are totally defrosted.
Remove giblets from poultry and rinse ice crystals from cavity.
Pierce dense roasts with skewer to check if defrosted.
o When calculating weight of food item to be defrosted, round to the nearest lower tenth decimal. For exam-
ple, if meat weights 2.45 Ibs., u_e 2.4 as weight to program for Auto Defrost.
o Monitor results when using Auto Defrost. If food items consistently cook at edges when defrosting, reduce
the amount of weight programmed in.
16
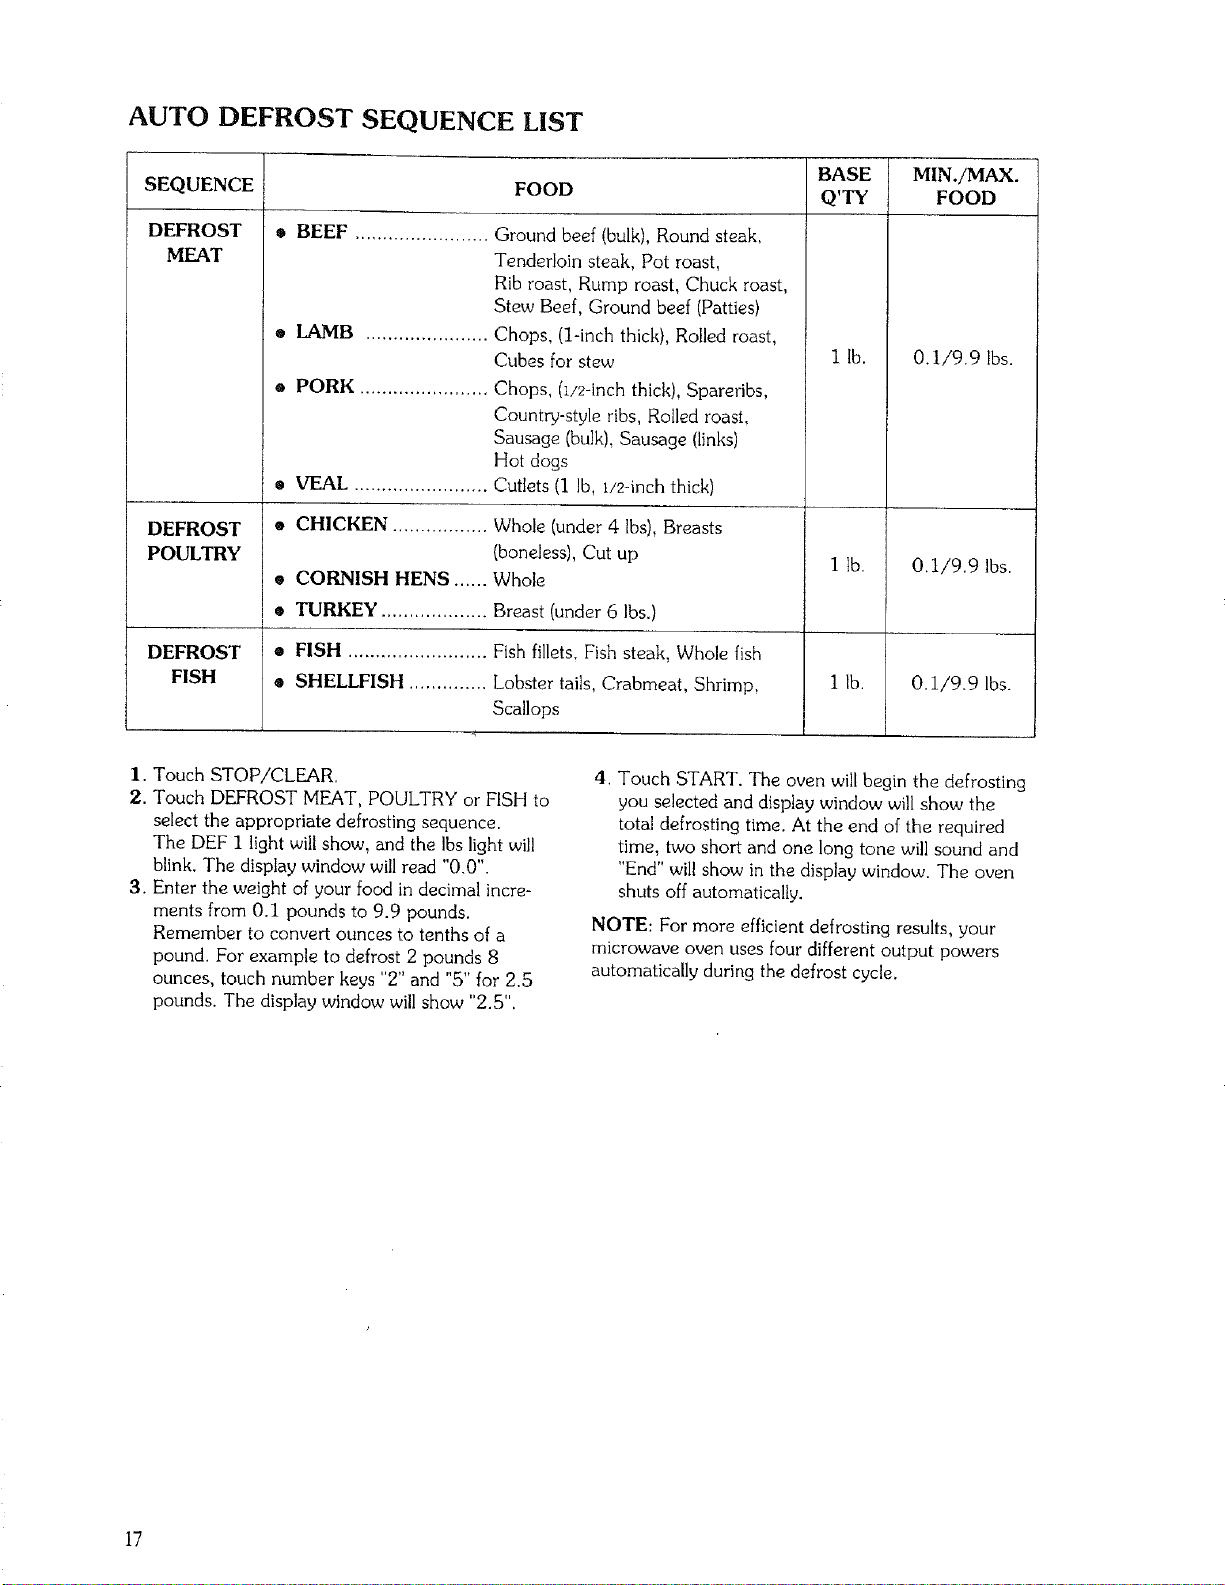
AUTO DEFROST SEQUENCE LIST
SEQUENCE
DEFROST
MEAT
DEFROST
POULTRY
DEFROST
FISH
FOOD
o BEEF ........................ Ground beef (bulk), Round steak,
Tenderloin steak, Pot roast,
Rib roast, Rump roast, Chuck roast,
Stew Beef, Ground beef (Patties)
• LAMB ...................... Chops, (1-inch thick), Rolled roast,
Cubes for stew
e PORK ....................... Chops, (I!>inch thick), Spareribs,
Country-style ribs, Rolled roast,
Sausage (bulk), Sausage (links)
Hot dogs
• VEAL ........................ Cutlets (I Ib, i/2-inch thick)
, * TURKEY ...................
* CHICKEN ................. Whole (under 4 Ibs), Breasts
(boneless), Cut up
o CORNISH HENS ...... Whole
Breast (under 6 lbs.)
• FISH ......................... Fish fillets, Fish steak, Whole fish
• SHELLFISH .............. Lobster tails, Crabmeat, Shrimp,
Scallops
BASE
Q'_
1 lb.
1 lb.
1 lb.
MIN./MAX.
FOOD
0.1/9.9 lbs.
O.1/9.9 lbs.
O.1/9.9 lbs.
1. Touch STOP/CLEAR.
2. Touch DEFROST MEAT, POULTRY or FISH to
select the appropriate defrosting sequence.
The DEF 1 light will show, and the lbs light will
blink. The display window will read "0.0".
3. Enter the weight of your food in decimal incre-
ments from 0.1 pounds to 9.9 pounds.
Remember to convert ounces to tenths of a
pound. For example to defrost 2 pounds 8
ounces, touch number keys "2" and "5" for 2.5
pounds. The display window will show "2.5".
4, Touch START. The oven will begin the defrosting
you selected and display window will show the
total defrosting time. At the end of the required
time, two short and one long tone will sound and
"End" will show in the display window. The oven
shuts off automatically.
NOTE: For more efficient defrosting results, your
microwave oven uses four different output powers
automatically during the defrost cycle,
17
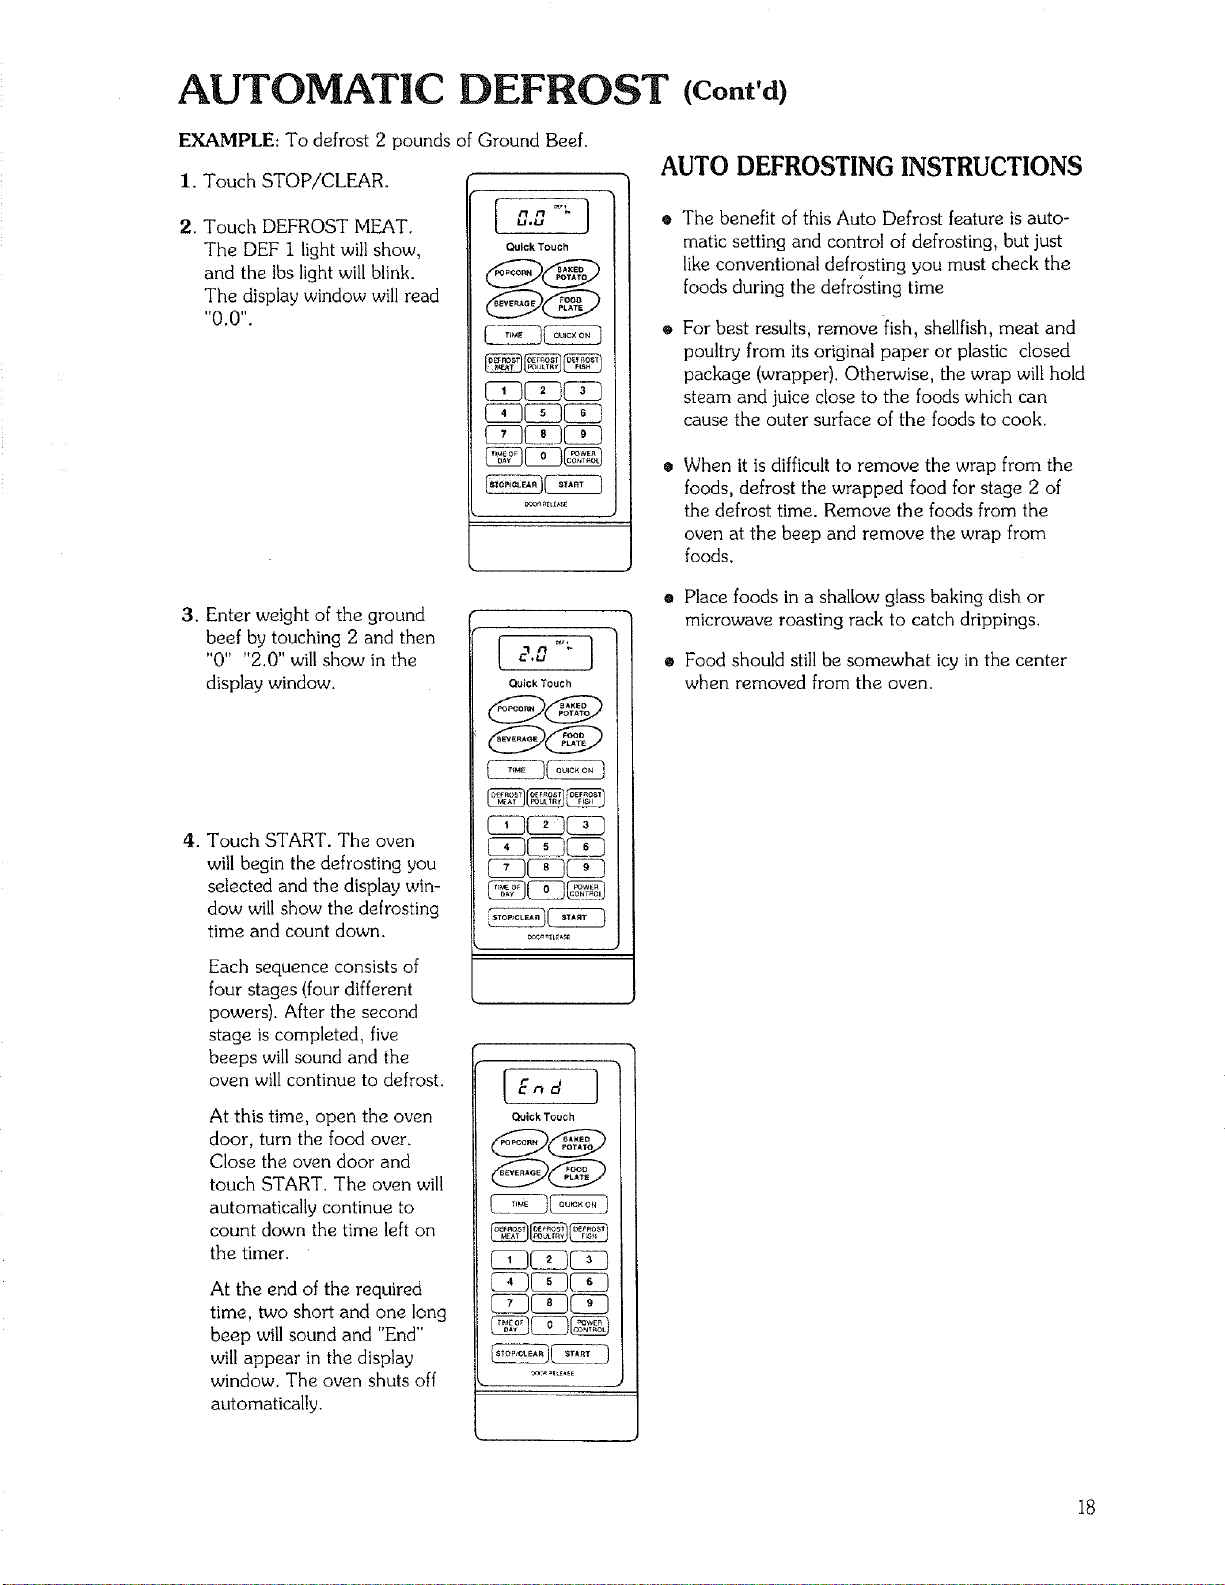
AUTOMATIC DEFROST (Cont'd)
EXAMPLE: To defrost 2 pounds of Ground Beef.
1. Touch STOP/CLEAR.
2. Touch DEFROST MEAT.
The DEF i light will show,
and the Ibs light will blink.
The display window will read
"0.0".
C.G "_ ]
Qtlick Touch
3. Enter weight of the ground
beef by touching 2 and then
"0" "2.0" will show in the
display window.
4. Touch START. The oven
will begin the defrosting you
selected and the display win-
dow will show the defrosting
time and count down.
Each sequence consists of
four stages (four different
powers). After the second
stage is completed, five
beeps will sound and the
oven will continue to defrost,
At this time, open the oven
door, turn the food over.
Close the oven door and
touch START. The oven will
automatically continue to
count down the time left on
the timer.
At the end of the required
time, two short and one long
beep will sound and "End"
will appear in the display
window. The oven shuts off
automatically.
Quick Touch
End ]
Quick Touch
AUTODEFROSTINGINSTRUCTIONS
The benefit of this Auto Defrost feature is auto-
matic setting and control of defrosting, but just
like conventional defrosting you must check the
foods during the defrc_sting time
For best results, remove fish, shellfish, meat and
poultry from its original paper or plastic closed
package (wrapper). Otherwise, the wrap will hold
steam and juice close to the foods which can
cause the outer surface of the foods to cook.
When it is difficult to remove the wrap from the
foods, defrost the wrapped food for stage 2 of
the defrost time. Remove the foods from the
oven at the beep and remove the wrap from
foods.
Place foods in a shallow glass baking dish or
microwave roasting rack to catch drippings.
Food should stillbe somewhat icy in the center
when removed from the oven.
18
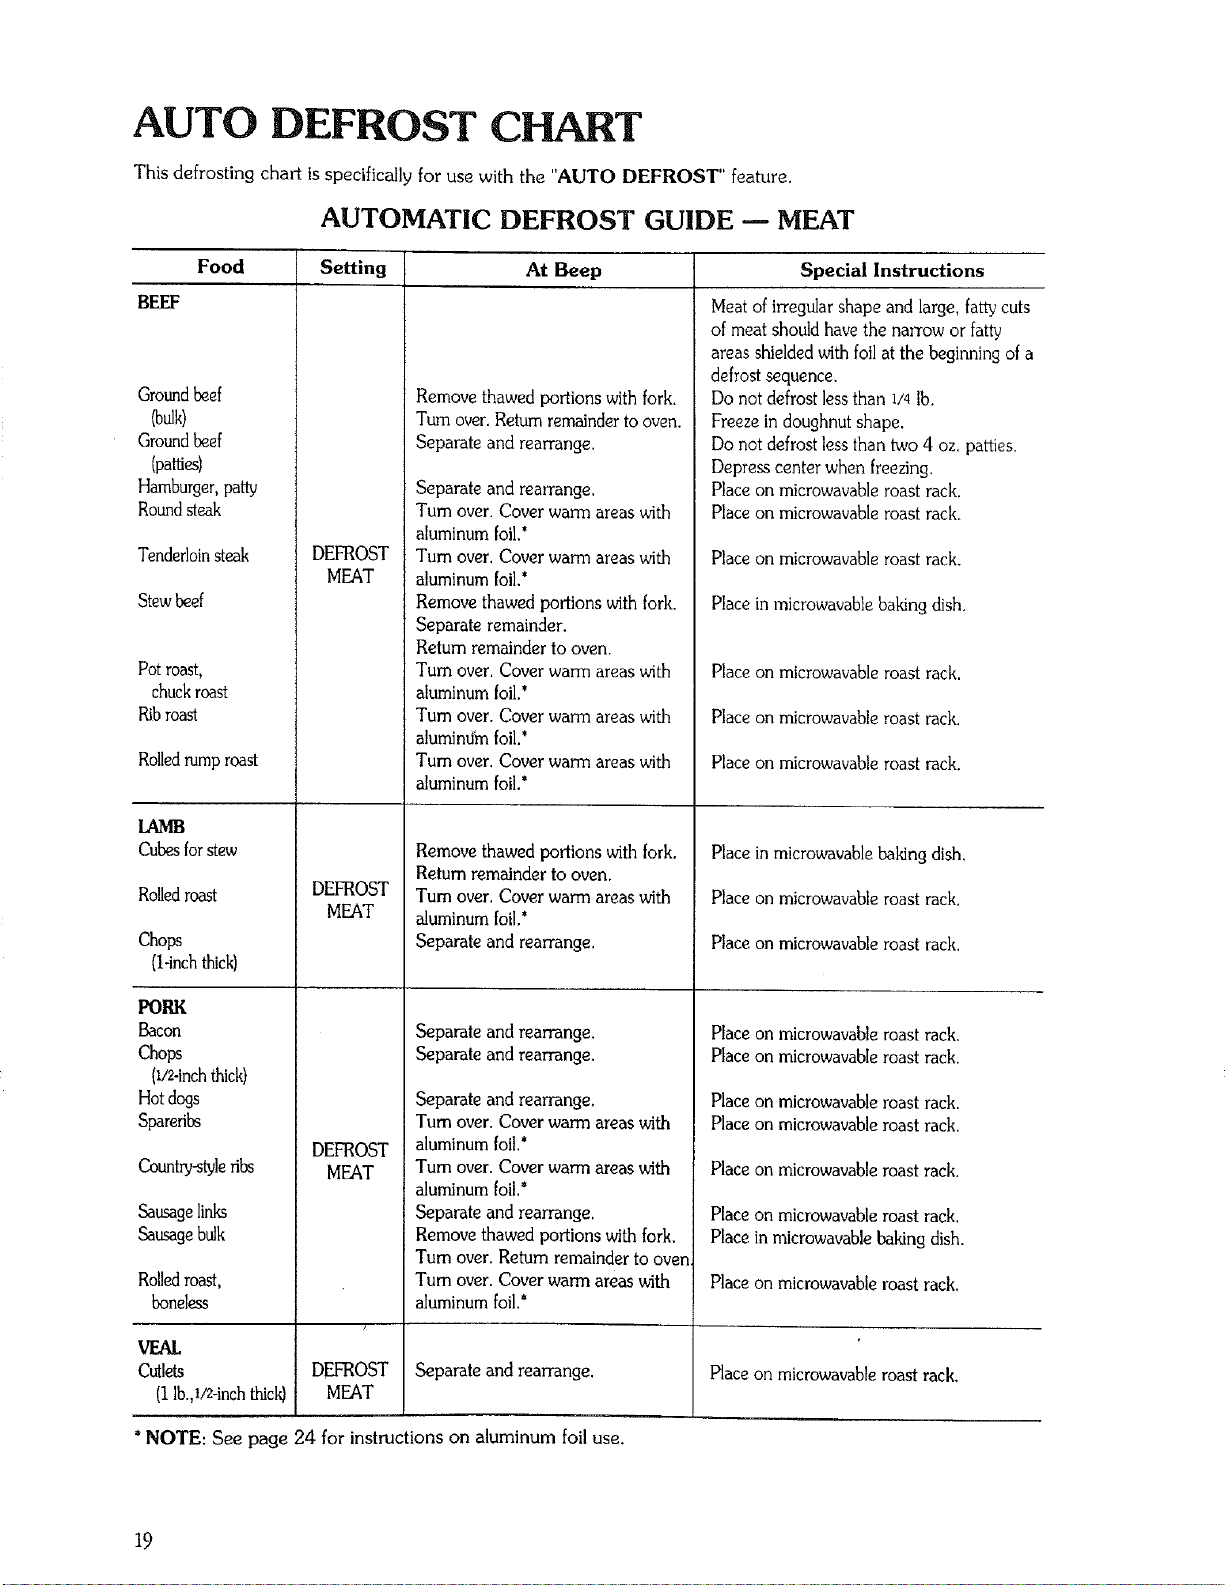
AUTO DEFROST CHART
This defrosting chart is specifically for use with the "AUTO DEFROST" feature.
AUTOMATIC DEFROST GUIDE m MEAT
Food Setting At Beep Special Instructions
BEEF
Groundbeef
_0ulk)
Groundbeef
(patties)
Hamburger,patty
Roundsteak
Tenderloin steak
Stewbeef
Potroast,
chuckroast
Ribroast
Rolledrumproast
LAMB
Cubesforstew
Rolledroast
Chops
(1-inchthick)
PORK
Bacon
Chops
(I/2qnchthick)
Hotdogs
Spareribs
Country-styleribs
Sausagelinks
Sausagebulk
Rolledroast,
boneless
VEAL
Cutlets
(I Ib.,U2-inchthick)
DEFROST
MEAT
DEFROST
MEAT
DEFROST
MEAT
DEFROST
MEAT
Remove thawed portions with fork.
Turn over. Return remainder to oven.
Separate and rearrange.
Separate and rearrange.
Turn over. Cover warm areas with
aluminum foil,*
Turn over, Cover warm areas with
aluminum foil.*
Remove thawed portions with fork,
Separate remainder.
Retum remainder to oven.
Turn over. Cover warm areas with
aluminum foil.*
Turn over. Cover warm areas with
aluminum foil.*
Tum over. Cover warm areas with
aluminum foil.*
Remove thawed portions with fork.
Return remainder to oven.
Turn over. Cover warm areas with
aluminum foil.*
Separate and rearrange.
Separate and rearrange.
Separate and rearrange.
Separate and rearrange.
Turn over. Cover warm areas with
aluminum foil.*
Tum over. Cover warm areas with
aluminum foil.*
Separate and rearrange.
Remove thawed portions with fork.
Turn over. Return remainder to oven
Turn over. Cover warm areas with
aluminumfoil.*
Separate and rearrange,
Meat of irregular shape and large, fattycuts
of meat should have the narrow or fatty
areas shielded with foilat the beginning of a
defrost sequence.
Do not defrost less than I/4 lb.
Freeze in doughnut shape.
Do not defrost less than two 4 oz. patties,
Depress center when freezing,
Place on microwavable roast rack.
Place on mierowavable roast rack.
Place on microwavable roast rack.
Place in microwavable baking dish.
Place on microwavable roast rack.
Place on microwavable roast rack,
Place on microwavable roast rack.
Place in microwavable baking dish.
Place on microwavable roast rack.
Place on microwavable roast rack.
Place on microwavableroast rack,
Place on microwavableroast rack.
Place on microwavableroast rack.
Place on microwavableroast rack.
Place on microwavableroast rack.
Place on microwavableroast rack.
Place in microwavablebaking dish.
Place on microwavableroast rack,
Place on microwavable roast rack.
*NOTE: See page 24 for instructions on aluminum foil use.
19
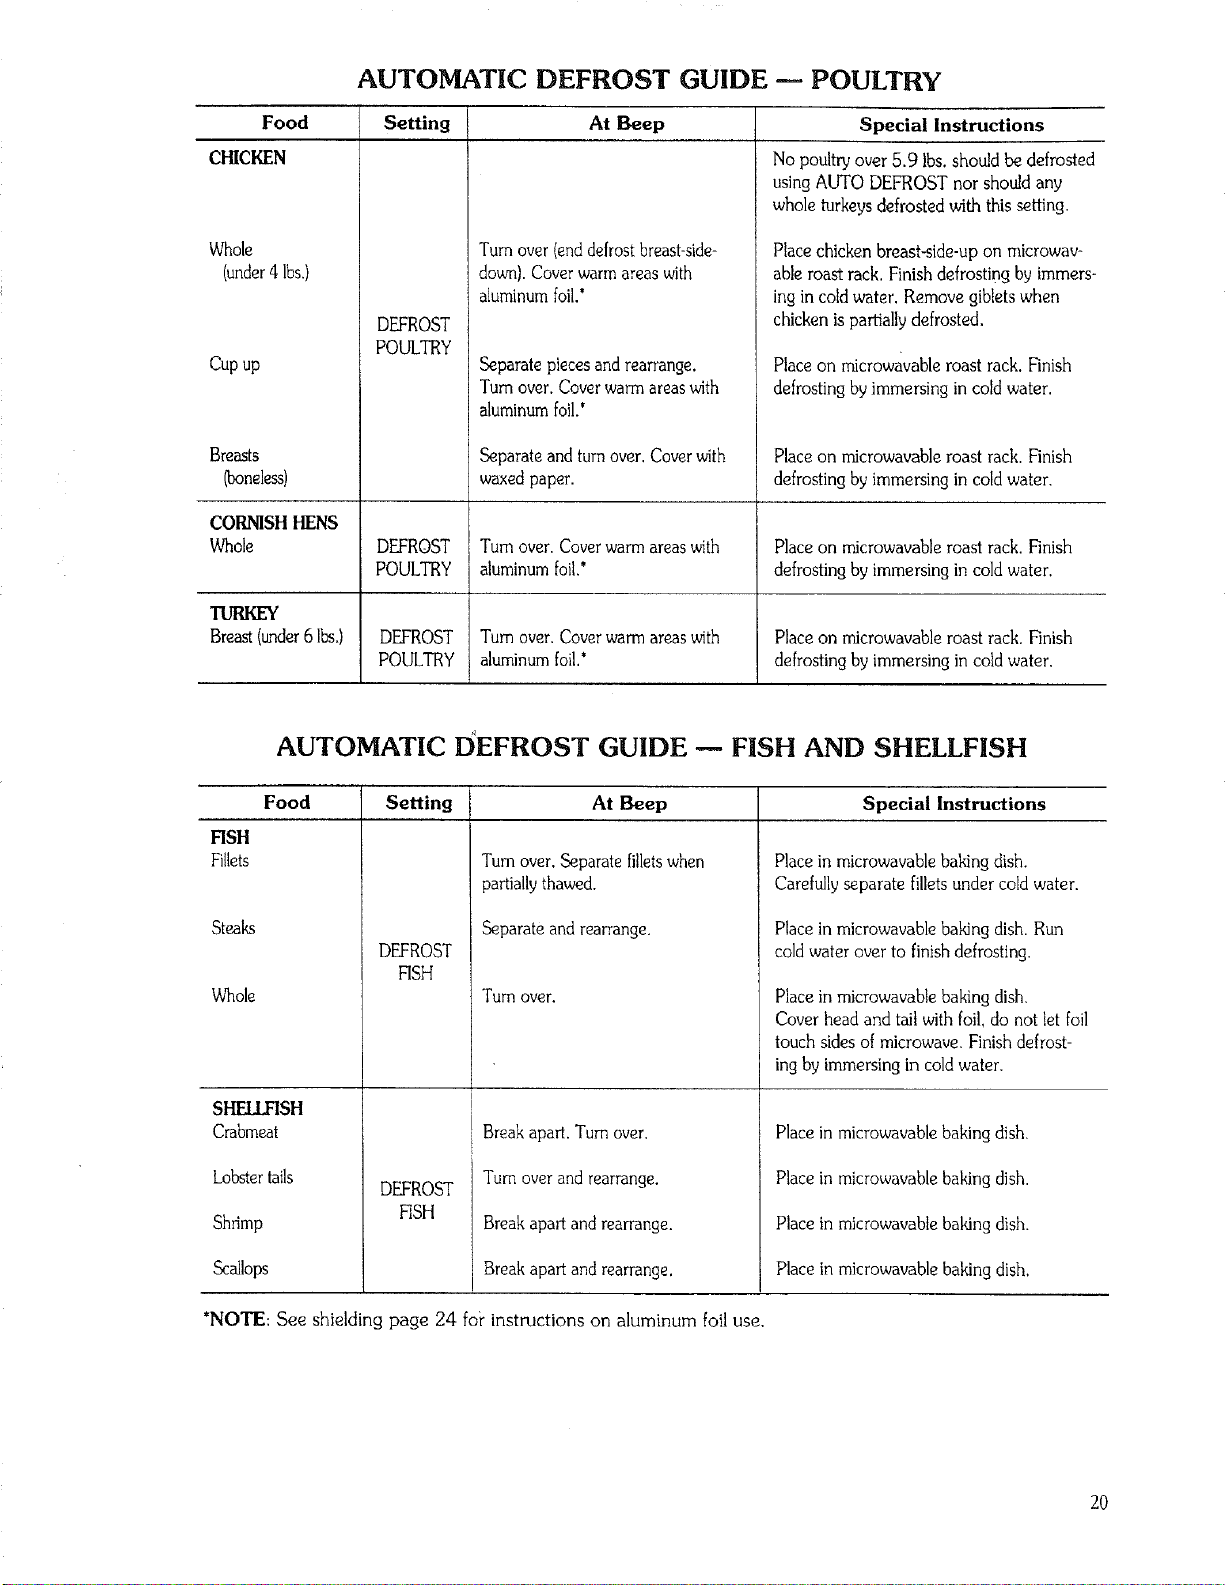
AUTOMATIC DEFROST GUIDE -- POULTRY
Food Setting At Beep
CHICKEN
Whole
(under 4 Ibs.)
DEFROST
POULTRY
Cup up
Turnover (enddefrostbreast-side-
down).Cover warmareas with
aluminumfoil.'
Separate pieces and rearrange.
Tum over. Cover warm areas with
aluminum foil.*
Special Instructions
No poultryover 5.9 Ibs.should be defrosted
usingAUTO DEFROST norshould any
whole turkeysdefrosted with this setting.
Place chicken breast-side-up on microwav-
able roast rack. Finishdefrosting by immers-
ing in coldwater. Remove giblets when
chicken ispartiallydefrosted,
Placeon microwavableroast rack. Finish
defrosting byimmersing in coldwater,
Breasts Separate and turnover. Coverwith Placeon microwavableroast rack. Finish
(boneless) waxedpaper, defrostingby immersing in coldwater.
CORNISH HENS
Whole DEFROST Turn over. Coverwarm areas with Placeon _crowavable roast rack. Finish
POULTRY aluminumfoil." defrostingby immersing in coldwater,
Breast(under6Ibs.) DEFROST Turn over. Coverwarm areaswith Place on microwavableroast rack, Finish
POULTRY aluminumfoil.* defrostingby immersing in coldwater.
AUTOMATIC DEFROST GUIDE -- FISH AND SHELLFISH
Food Setting Special Instructions
HSH
Fillets
Steaks
Whole
SHELLFISH
Crabmeat
Lobstertails
Shrimp
Scallops
At Beep
Turn over. Separate fillets when
partially thawed.
Separate and rearrange,
DEFROST
RSH
Tum over.
DEFROST
FISH
Breakapart. Turn over.
Turn overand rearrange.
Breakapart and rearrange.
Breakapart and rearrange.
Place in microwavablebaking dish.
Carefullyseparate filletsunder coldwater.
Place in mierowavable baking dish. Run
cold water over to finish defrosting.
Place in microwavable baking dish.
Cover head and tail with foil, do not let foil
touch sides of microwave. Finish defrost-
ing by immersing in cold water.
Place in microwavable baking dish.
Place in microwavable baking dish.
Place in microwavable baking dish.
Place in microwavable baking dish.
*NOTE: See shielding page 24 fo_"instructions on aluminum foil use.
20
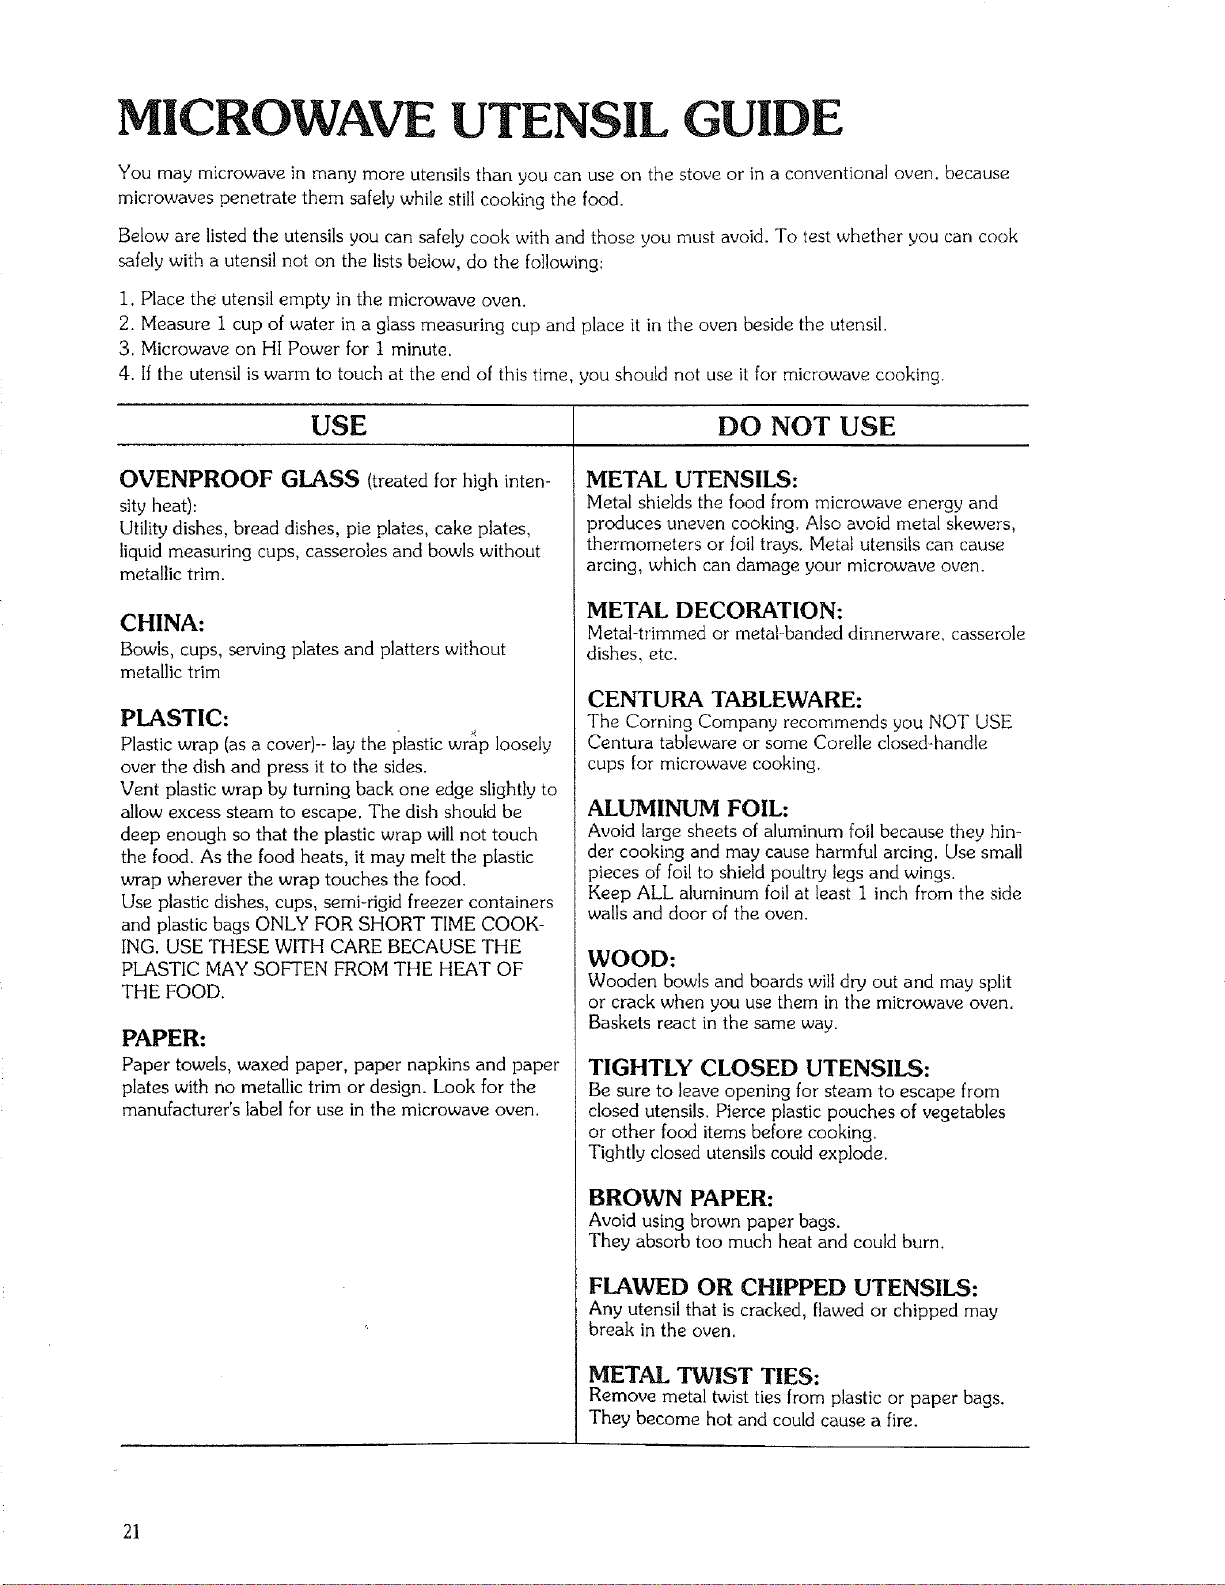
MICROWAVE UTENSIL GUIDE
You may microwave in many more utensils than you can use on the stove or in a conventional oven. because
microwaves penetrate them safely while still cooking the food.
Below are listed the utensils you can safely cook with and those you must avoid. To test whether you can cook
safely with a utensil not on the lists below, do the following:
I, Place the utensil empty in the microwave oven.
2. Measure I cup of water in a glass measuring cup and place it in the oven beside the utensil.
3. Microwave on HI Power for I minute.
4. If the utensil is warm to touch at the end of this time, you should not use it for microwave cooking.
USE DO NOT USE
OVENPROOF GLASS (treated for high inten-
sity heat):
Utility dishes, bread dishes, pie plates, cake plates,
liquid measuring cups, casseroles and bowls without
metallic trim.
CHINA:
Bowls, cups, serving plates and platters without
metallic trim
PLASTIC:
Plastic wrap (as a cover)-- lay the plastic wrap loosely
over the dish and press it to the sides.
Vent plastic wrap by turning back one edge slightly to
allow excess steam to escape, The dish should be
deep enough so that the plastic wrap will not touch
the food. As the food heats, it may melt the plastic
wrap wherever the wrap touches the food.
Use plastic dishes, cups, semi-rigid freezer containers
and plastic bags ONLY FOR SHORT TIME COOK-
ING. USE THESE WITH CARE BECAUSE THE
PLASTIC MAY SOFTEN FROM THE HEAT OF
THE FOOD.
PAPER:
Paper towels, waxed paper, paper napkins and paper
plates with no metallic trim or design. Look for the
manufacturer's label for use in the microwave oven.
METAL UTENSILS:
Metal shields the food from microwave energy and
produces uneven cooking. Also avoid metal skewers,
thermometers or foil trays. Metal utensils can cause
arcing, which can damage your microwave oven.
METAL DECORATION:
Metal-trimmed or metal-banded dinnerware, casserole
dishes, etc.
CENTURA TABLEWARE:
The Corning Company recornmends you NOT USE
Centura tableware or some Corelle closed-handle
cups for microwave cooking.
ALUMINUM FOIL:
Avoid large sheets of aluminum foil because they hin-
der cooking and may cause harmful arcing, Use small
pieces of foil to shield poultry legs and wings.
Keep ALL aluminum foil at least 1 inch from the side
walls and door of the oven.
WOOD:
Wooden bowls and boards will dry out and may split
or crack when you use them in the microwave oven.
Baskets react in the same way.
TIGHTLY CLOSED UTENSILS:
Be sure to leave opening for steam to escape from
closed utensils. Pierce plastic pouches of vegetables
or other food items before cooking.
Tightly closed utensils could explode.
BROWN PAPER:
Avoid using brown paper bags.
They absorb too much heat and could burn.
FLAWED OR CHIPPED UTENSILS:
Any utensil that is cracked, flawed or chipped may
break in the oven,
METAL TWIST TIES:
Remove metal twist ties from plastic or paper bags.
They become hot and could cause a fire.
21
CARE AND CLEANING
What to Clean
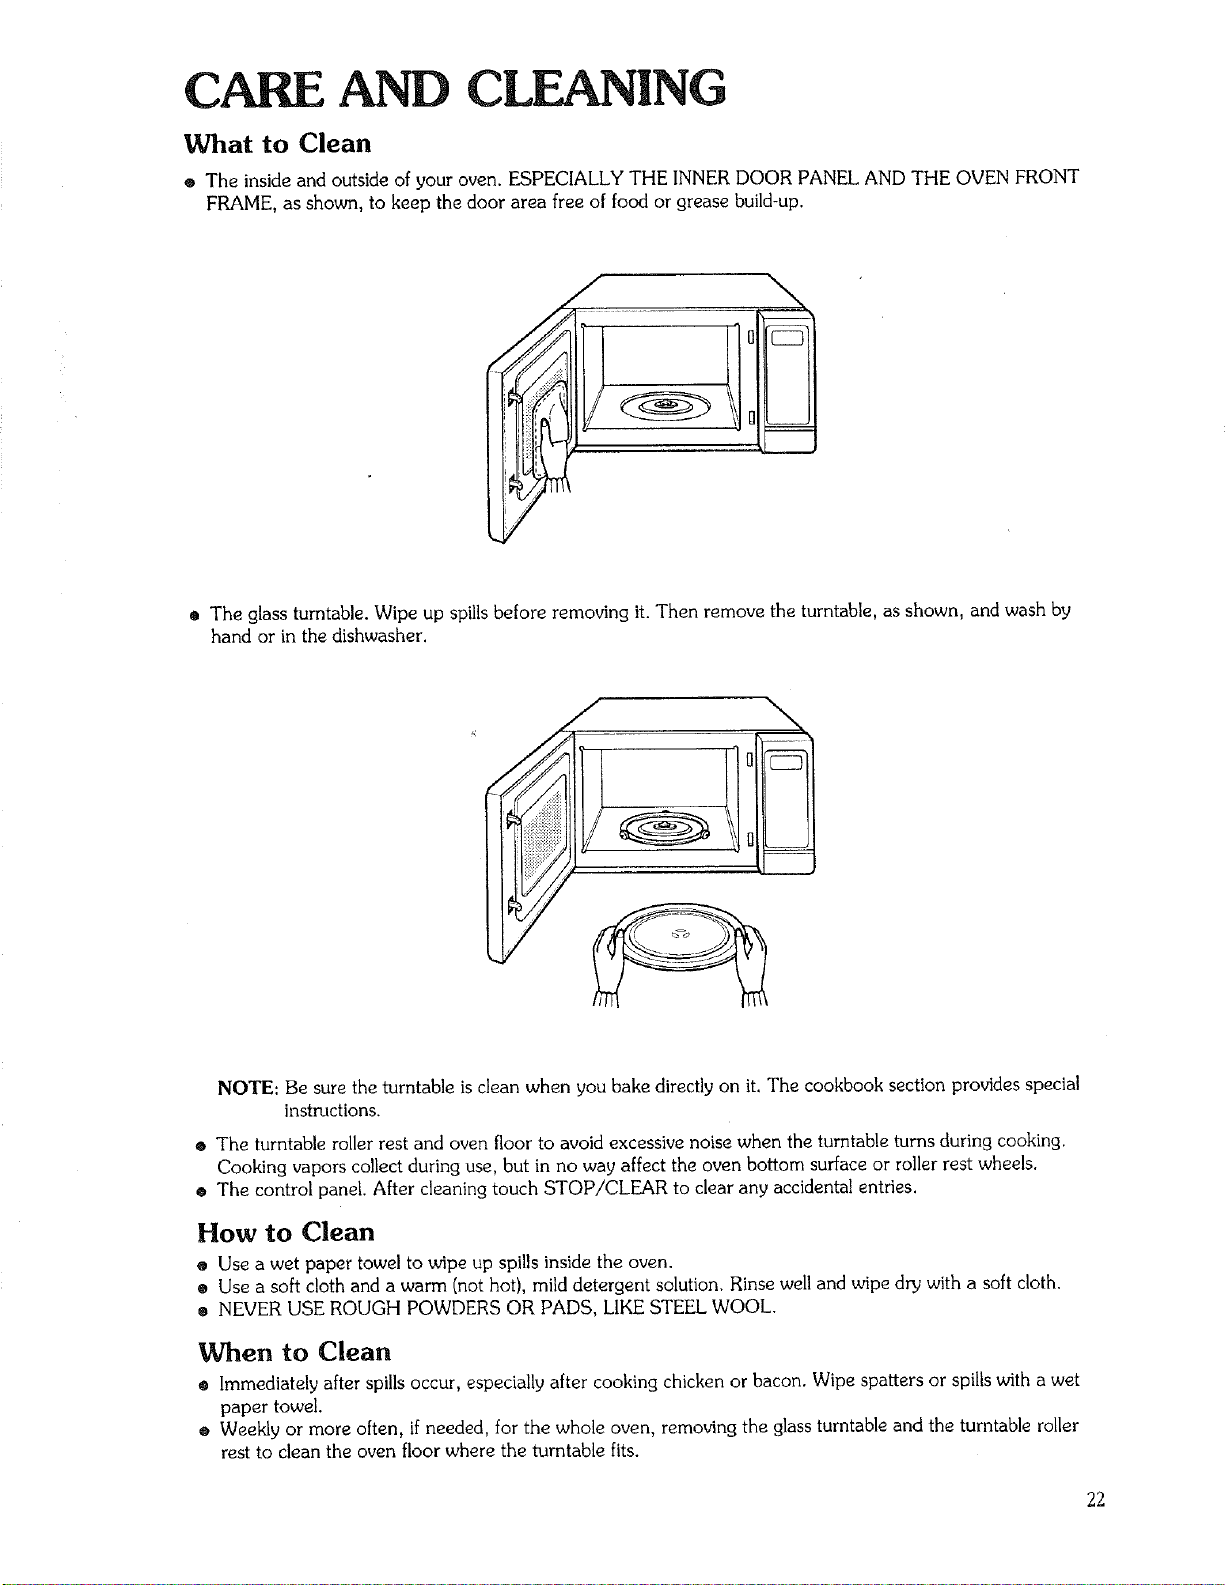
® The inside and outside of your oven. ESPECIALLY THE INNER DOOR PANEL AND THE OVEN FRONT
FRAME, as shown, to keep the door area free of food or grease build-up.
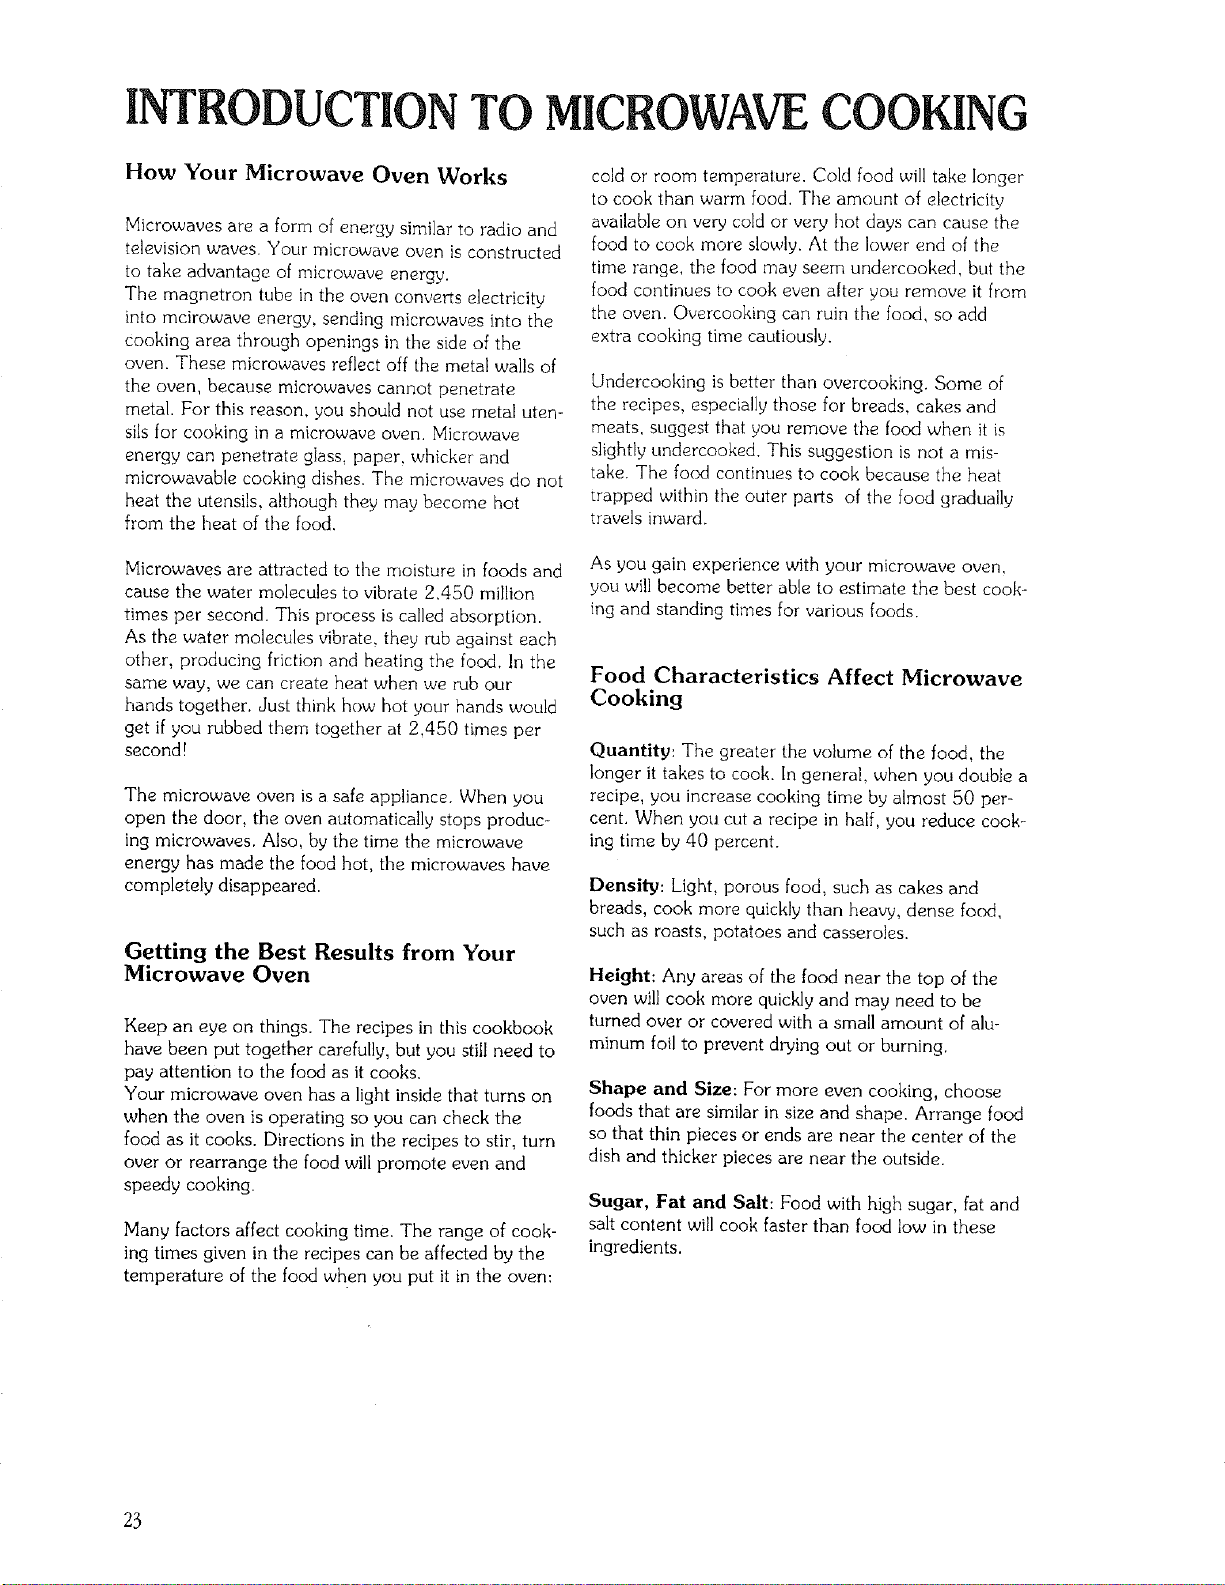
• The glass turntable. Wipe up spills before removing it. Then remove the turntable, as shown, and wash by
hand or in the dishwasher.
\
NOTE: Be sure the turntable is clean when you bake directly on it. The cookbook section provides special
instructions.
• The turntable roller rest and oven floor to avoid excessive noise when the turntable turns during cooking.
Cooking vapors collect during use, but in no way affect the oven bottom surface or roller rest wheels.
® The control panel. After cleaning touch STOP/CLEAR to clear any accidental entries.
How to Clean
• Use a wet paper towel to wipe up spills inside the oven.
• Use a soft cloth and a warm (not hot), mild detergent solution. Rinse well and wipe dry with a soft cloth.
• NEVER USE ROUGH POWDERS OR PADS, LIKE STEEL WOOL.
When to Clean
® Immediately after spills occur, especially after cooking chicken or bacon. Wipe spatters or spills with a wet
paper towel.
® Weekly or more often, ifneeded, for the whole oven, removing the glass turntable and the turntable roller
rest to clean the oven floor where the turntable fits.
22
INTRODUCTIONTO MICROWAVECOOKING
How Your Microwave Oven Works
Microwaves are a form of energy similar to radio and
television waves. Your microwave oven is constructed
to take advantage of microwave energy.
The magnetron tube in the oven converts electricity
into mcirowave energy, sending microwaves into the
cooking area through openings in the side of the
oven. These microwaves reflect off the metal walls of
the oven, because microwaves cannot penetrate
metal. For this reason, you should not use metal uten-
sils for cooking in a microwave oven. Microwave
energy can penetrate glass, paper, whicker and
microwavable cooking dishes. The microwaves do not
heat the utensils, although they may become hot
from the heat of the food.
Microwaves are attracted to the moisture in foods and
cause the water molecules to vibrate 2.450 million
times per second. This process is called absorption.
As the water molecules vibrate, they rub against each
other, producing friction and heating the food. In the
same way, we can create heat when we rub our
hands together. Just think how hot your hands would
get if you rubbed them together at 2,450 times per
second !
The microwave oven is a safe appliance. When you
open the door, the oven automatically stops produc-
ing microwaves. Also, by the time the microwave
energy has made the food hot, the microwaves have
completely disappeared.
Getting the Best Results from Your
Microwave Oven
Keep an eye on things. The recipes in this cookbook
have been put together carefully, but you still need to
pay attention to the food as it cooks.
Your microwave oven has a light inside that turns on
when the oven is operating so you can check the
food as it cooks. Directions in the recipes to stir, turn
over or rearrange the food will promote even and
speedy cooking.
Many factors affect cooking time. The range of cook-
ing times given in the recipes can be affected by the
temperature of the food when you put it in the oven:
cold or room temperature. Cold food will take longer
to cook than warm food. The amount of electricity
available on very cold or very hot days can cause the
food to cook more slowly. At the lower end of the
time range, the food may seem undercooked, but the
food continues to cook even after you remove it from
the oven. Overcooking can ruin the food, so add
extra cooking time cautiously.
Undercooking is better than overcooking. Some of
the recipes, especially those for breads, cakes and
meats, suggest that you remove the food when it is
slightly undercooked. This suggestion is not a mis-
take. The food continues to cook because the heat
trapped within the outer parts of the food gradually
travels inward.
As you gain experience with your microwave oven,
you will become better able to estimate the best cook-
ing and standing times for various foods.
Food Characteristics Affect Microwave
Cooking
Quantity: The greater the volume of the food, the
longer it takes to cook. In general, when you double a
recipe, you increase cooking time by almost 50 per-
cent. When you cut a recipe in half, you reduce cook-
ing time by 40 percent.
Density: Light, porous food, such as cakes and
breads, cook more quickly than heavy, dense food,
such as roasts, potatoes and casseroles.
Height: Any areas of the food near the top of the
oven will cook more quickly and may need to be
turned over or covered with a small amount of alu-
minum foil to prevent drying out or burning.
Shape and Size: For more even cooking, choose
foods that are similar in size and shape. Arrange food
so that thin pieces or ends are near the center of the
dish and thicker pieces are near the outside.
Sugar, Fat and Salt: Food with high sugar, fat and
salt content will cook faster than food low in these
ingredients.
23
Special techniques for Microwave
Cooking
Browning: Meat and poultry with high fat content
cooked 10 or 15 minutes or longer will brown lightly.
If you want to achieve an appealing brown color for
foods cooked a shorter time, you may brush the meat
with a browning agent, such as Worcestershire sauce,
soy sauce or barbecue sauce.
Covering: If you cover the food, you will trap heat
and steam and the food will cook more quickly. Use a
lid or plastic wrap with one corner folded back to vent
the excess steam. Remember that the lids on glass
casseroles can become hot during cooking, so handle
them carefully. Waxed paper can prevent the food
from spattering in the oven and will help retain heat.
Waxed paper, napkins or paper towels are good cov-
erings to use when warming bread items. To absorb
extra moisture, wrap sandwiches and fatty foods in
paper towels.
Spacing: IndMdual foods, such as baked potatoes,
cupcakes and hors d'oeuvres will cook more evenly if
you place them in a circular pattern at least an inch
apart.
Stirring: Stirring the food blends the flavors and
redistributes the heat in foods. AIways stir from the
outside toward the center of the dish, because the
food at the outside of the dish heats first.
Turning Over: Larger sized foods, such as roasts
and whole poultry, should be turned over so that the
top and bottom cook evenly. Also turn over chicken
pieces and chops.
Arrangement: Do not stack the food, but arrange in
a single layer in the dish to permit more even cook-
ing. Because dense foods cook more slowly, place
thicker portions of meat, poultry, fish and vegetables
toward the outer edge of the baking dish.
These thicker portions will receive more microwave
energy and the food will cook more evenly.
Testing for Doneness: Because foods cook quickly
in a microwave oven, you need to test frequently for
doneness. Follow the recipes in the cookbook for
more specific information.
Standing Time: The food often needs to stand from
2 to 15 minutes after you remove it from the oven.
Usually you need to cover the food during standing
time to retain the heat. Remove most foods when
they are slightly undercooked and they will finish
cooking during standing time. The internal tempera-
ture of the food will rise about 10°F. during standing
time.
Shielding: To prevent some portions of rectangular
or square dishes from overcooking, you may need to
shield them with small strips of aluminum foil to block
the microwaves. You can also cover poultry legs and
wing tips with foil to keep them from overcooking.
ALWAYS KEEP FOIL AT LEAST I INCH FROM
OVEN WALLS to prevent arcing.
Piercing: To prevent them from bursting, pierce the
shell, skin or membrane of foods before cooking.
Foods that require piercing include: yolks and whites
of eggs, hot dogs, clams, oysters, and whole vegeta-
bles, such as potatoes and squash.
An Alphabetical List of Microwaving
Shortcuts
Below is a list of foods you may not have considered
microwaving. You can save both time and taste by
following the directions given.
Almonds, toasting:
® Place sliced or slivered almonds in a shallow baking
dish.
• Add I tsp. butter or margarine per I/2 cup of nuts.
® Cook uncovered 2 min. to 3 min. at HI power, or
until light brown, stirring every minute.
Bacon, cooking:
e Place bacon slices on double-thick paper towel on
a paper plate and cover with a paper towel.
® Cook 45 sec. to I min. per slice at HI power or
until crisp.
If you want to save the drippings, cook bacon on a
rack in a microwavable dish.
Bread/Rolls, warming:
• Wrap bread or rolls in a napkin or place in a nap-
kin-lined wicker basket.
® Cook uncovered 15 sec. to 30 sec. at Power
Control 8, or until bread or rolls feel warm.
24
Butter/Margarine, Melting:
o Place butter or margarine in a custard cup or glass
measuring cup.
® Cook covered at HI power until melted.
Butter/Margarine/Cream Cheese, Softening:
o Unwrap and place on a serving plate.
• Cook uncovered at Power Control 1, checking at
20 second intervals,
Caramels, Melting:
® Combine one 14-oz. pkg. of caramels and 2
Tbsp. of water in a 4-cup glass measuring cup.
® Cook uncovered 11/2 rain. to 2 min. at Power
Control 7, or until melted, stirring every minute.
Chips/Pretzels, Freshening if Stale:
® Place chips or pretzels in a napkin-lined wicker
basket.
o Cook uncovered about 30 sec. per cup at HI
power, or until snacks feel warm. Let stand a few
minutes to cool before serving.
Chocolate Squares or Pieces, melting:
• Place chocolate squares/pieces in a custard cup or
glass bowl.
o Cook uncovered at Power Control 7. I sq. choco-
late or i c. pieces takes I rain. to 11/2 rain. 2 sq.
chocolate or 2 c. pieces takes 1]/2 min. to 2 rain.
Stir until smooth.
Cocoa, hot:
® Place I or 2 tsp. each of cocoa powder and sugar
in an 8-oz. mug.
® Gradually add 6 oz. of milk, stirring to blend.
® Cook uncovered I rain. to 11/2 rain. at Power
Control 8, or until hot, stirring once.
Coconut, toasted:
® Place unsweetened, flaked or grated coconut in a
9-inch glass pie plate,
® Cook uncovered 11/2 rain. to 2 rain. at Power
Control 7, or until light brown, stirring every
minute.
Coffee, instant:
® Put 6 oz. of water into a microwavable cup or
mug.
® Cook uncovered I rain. to ] I/2 min. at HI power,
or until hot. Stir in coffee.
Syrup or Honey, heated:
® Place syrup or boney in a glass pitcher.
• Cook uncovered at HI power until warm 1 c.
syrup or honey takes I rain. to 11/2 min.
Stir once.
Water, boiling:
® Put I cup of water in a 2-cup glass measuring
cup.
• Cook uncovered 2 min. to 21/2 rain. at HI power,
or until boiling.
25
APPETIZERS/SAUCES/SOUPS
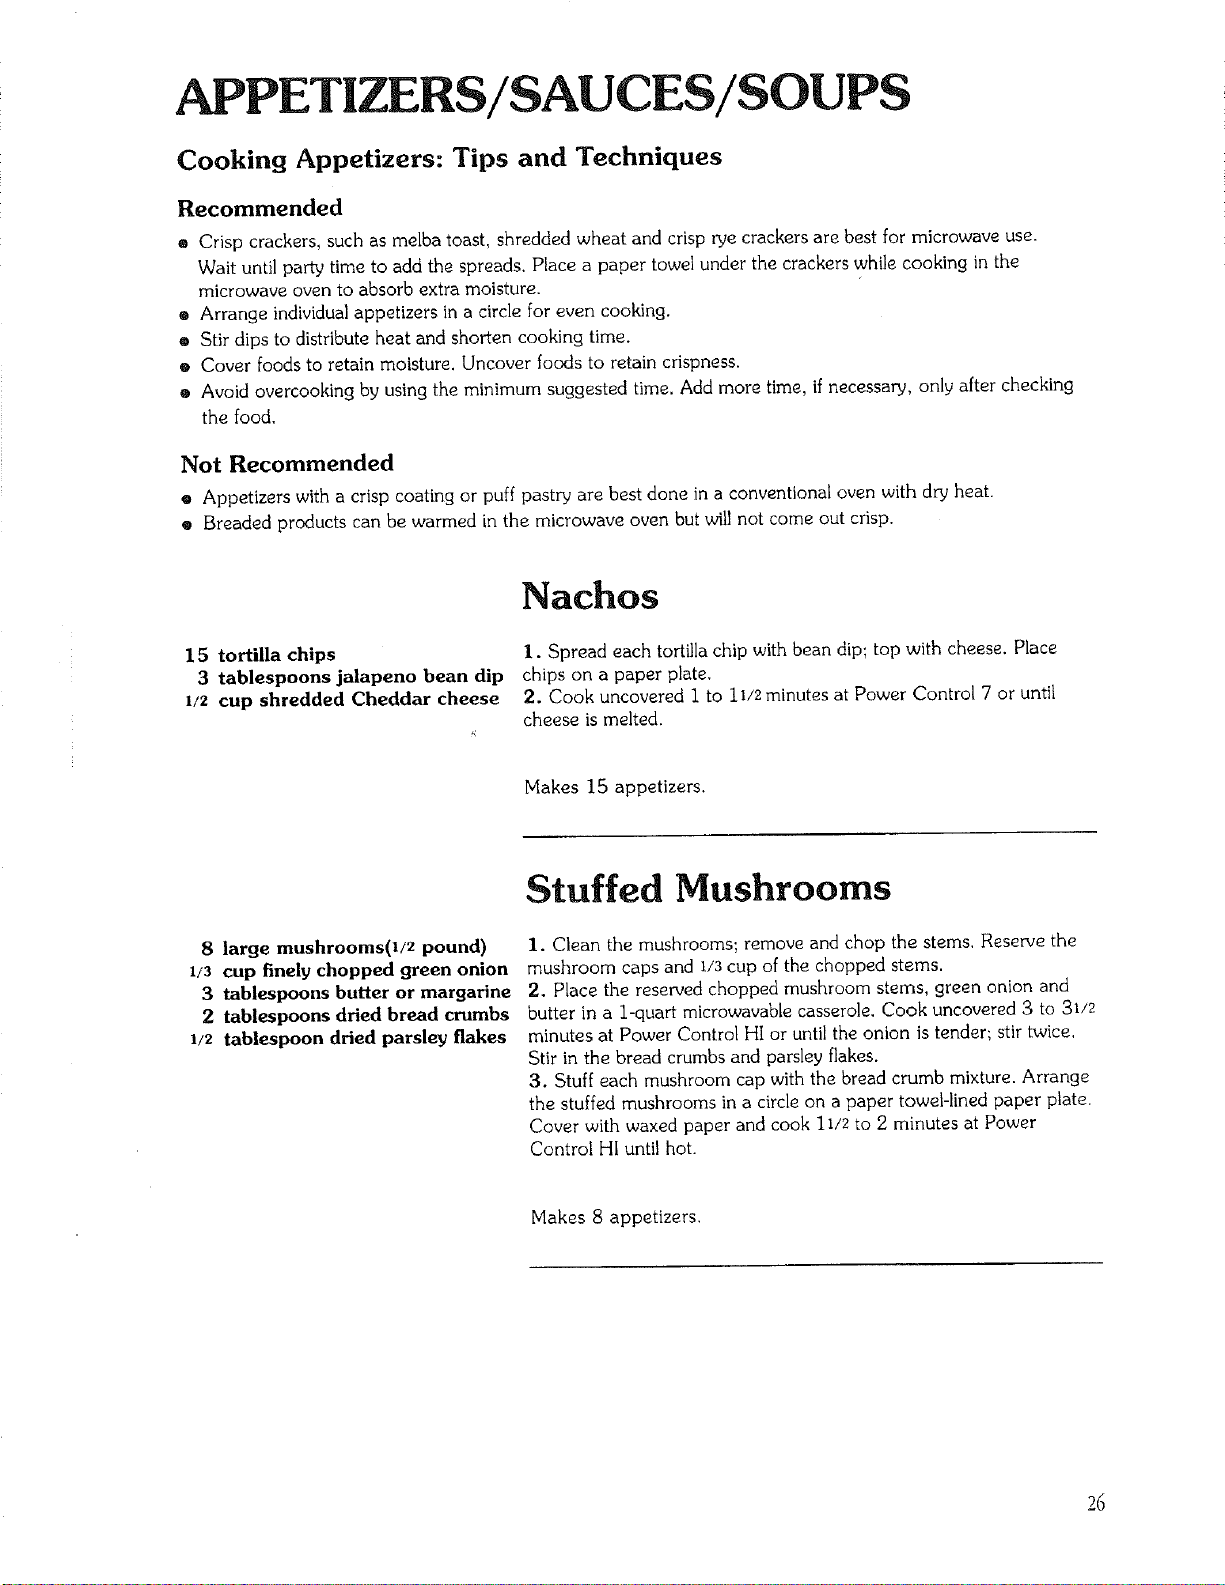
Cooking Appetizers: Tips and Techniques
Recommended
o Crisp crackers, such as melba toast, shredded wheat and crisp rye crackers are best for microwave use.
Wait until party time to add the spreads. Place a paper towel under the crackers while cooking in the
microwave oven to absorb extra moisture.
• Arrange individual appetizers in a circle for even cooking.
o Stir dips to distribute heat and shorten cooking time.
• Cover foods to retain moisture. Uncover foods to retain crispness,
• Avoid overcooking by using the minimum suggested time. Add more time, if necessary, only after checking
the food.
Not Recommended
• Appetizers with a crisp coating or puff pastry are best done in a conventional oven with dry heat.
• Breaded products can be warmed in the microwave oven but will not come out crisp.
Nachos
15 tortilla chips 1. Spread each tortilla chip with bean dip; top with cheese. Place
3 tablespoons jalapeno bean dip chips on a paper plate,
I/2 cup shredded Cheddar cheese 2. Cook uncovered I to 11/2 minutes at Power Control 7 or until
cheese is melted.
4
Makes 15 appetizers.
8 large mushrooms0/2 pound)
1/3 cup finely chopped green onion
3 tablespoons butter or margarine
2 tablespoons dried bread crumbs
1/2 tablespoon dried parsley flakes
Stuffed Mushrooms
1. Clean the mushrooms; remove and chop the stems. Reserve the
mushroom caps and i/3 cup of the chopped stems.
2. Place the reserved chopped mushroom stems, green onion and
butter in a l-quart microwavable casserole, Cook uncovered 3 to 31/2
minutes at Power Control HI or until the onion is tender; stir twice,
Stir in the bread crumbs and parsley flakes.
3. Stuff each mushroom cap with the bread crumb mixture. Arrange
the stuffed mushrooms in a circle on a paper towel-lined paper plate.
Cover with waxed paper and cook 11/2 to 2 minutes at Power
Control HI until hot.
Makes 8 appetizers.
2_
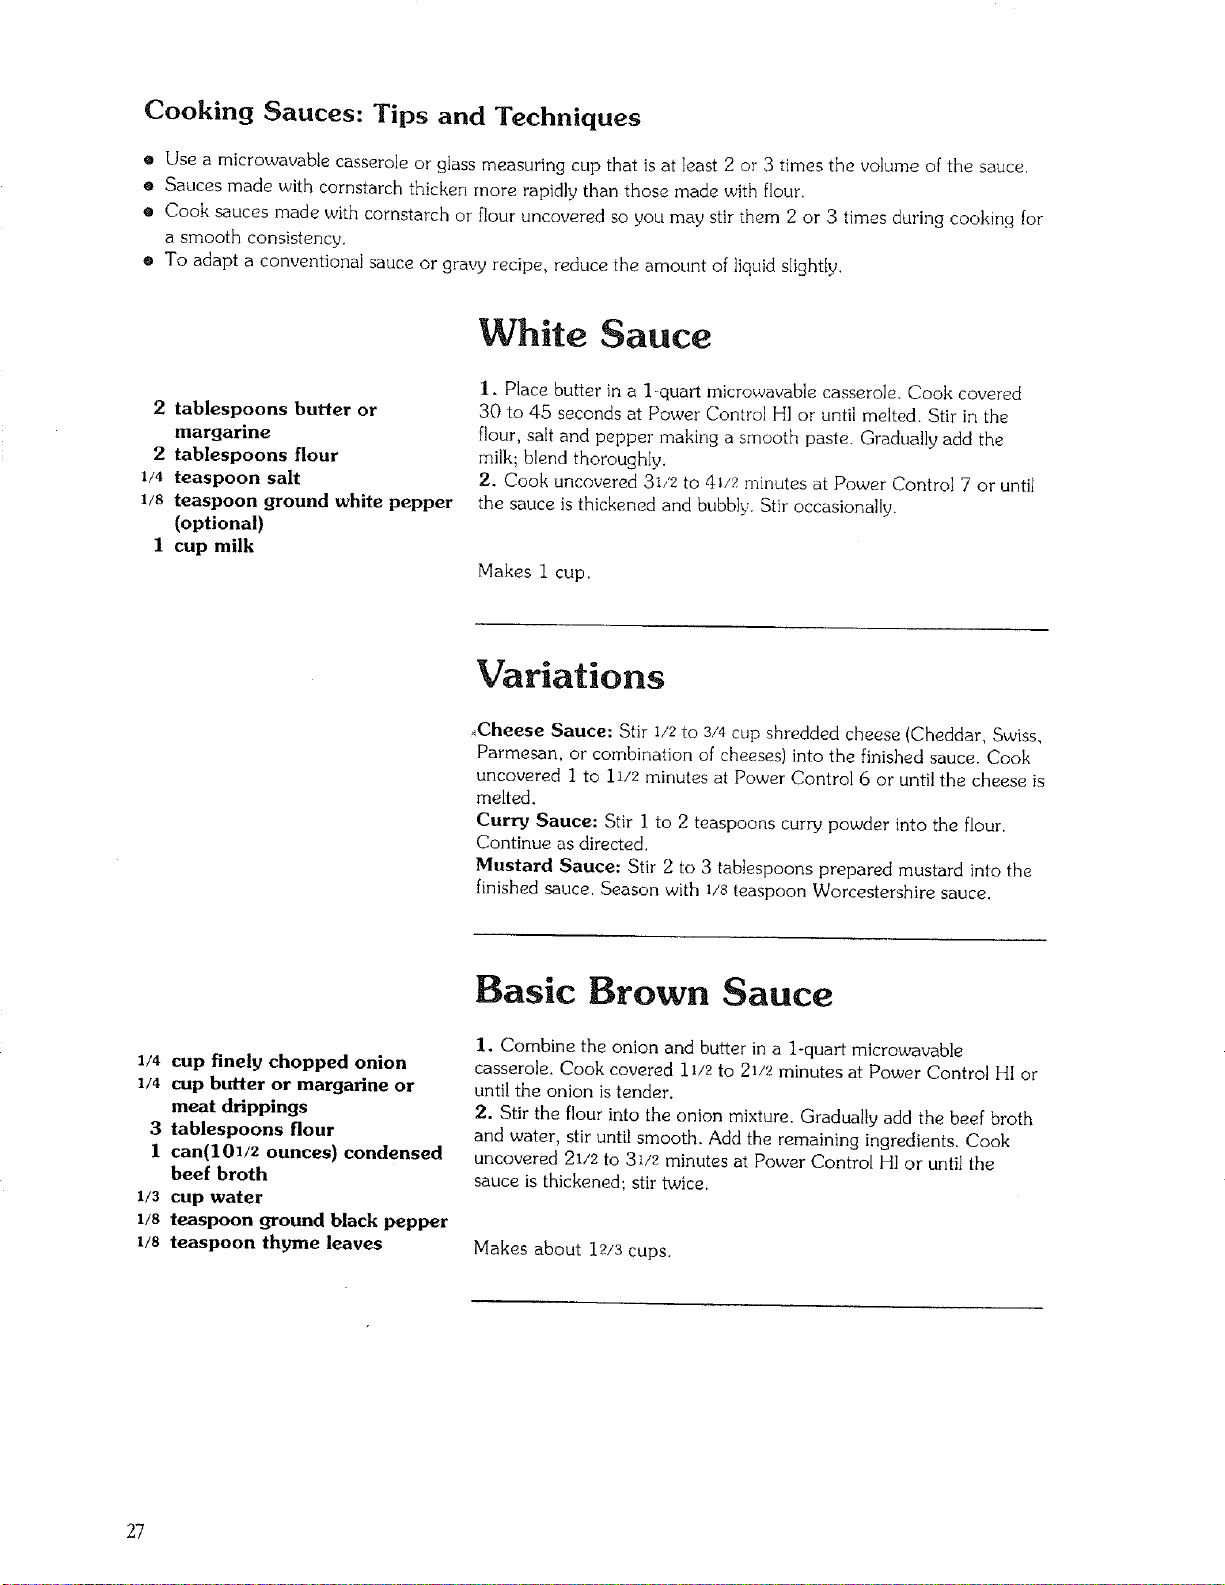
Cooking Sauces: Tips and Techniques
• Use a microwavable casserole or glass measuring cup that is at least 2 or 3 times the volume of the sauce.
o Sauces made with cornstarch thicken more rapidly than those made with flour.
e Cook sauces made with cornstarch or flour uncovered so you may stir them 2 or 3 times during cooking for
a smooth consistency.
o To adapt a conventional sauce or gravy recipe, reduce the amount of liquid sIightty.
2 tablespoons butter or
margarine
2 tablespoons flour
1/4 teaspoon salt
1/s teaspoon ground white pepper
(optional)
I cup milk
White Sauce
1. Place butter in a 1-quart microwavable casserole. Cook covered
30 to 4,5 seconds at Power Cont,o[ H1 or until melted. Stir in the
flour, salt and pepper making a smooth paste. Gradually add the
milk; blend thoroughIy.
2. Cook uncovered 3I/2 to 41/_ minutes at Power Control 7 or until
the sauce is thickened and bubbly. Stir occasionally.
Makes 1 cup.
Variations
Cheese Sauce: Stir I/2 to 3/4 cup shredded cheese (Cheddar, Swiss,
Parmesan, or combination of cheeses) into the finished sauce. Cook
uncovered 1 to ll/_ minutes at Power Control 6 or until the cheese is
melted.
Curw Sauce: Stir I to 2 teaspoons curry powder into the flour.
Continue as directed.
Mustard Sauce: Stir 2 to 3 tablespoons prepared mustard into the
finished sauce. Season with I/s teaspoon Worcestershire sauce.
1/4 cup finely chopped onion
1/4 cup butter or margarine or
meat drippings
3 tablespoons flour
1 can(101/2 ounces) condensed
beef broth
1/3 cup water
1/s teaspoon ground black pepper
1/s teaspoon thyme leaves
Basic Brown Sauce
1. Combine the onion and butter in a l-quart microwavable
casserole. Cook covered 11/2 to 21/_ minutes at Power Control HI or
until the onion is tender.
2. Stir the flour into the onion mixture. Gradually add the beef broth
and water, stir until smooth. Add the remaining ingredients. Cook
uncovered 21/2 to 31/2 minutes at Power Control HI or until the
sauce is thickened; stir twice.
Makes about 12/3 cups.
27
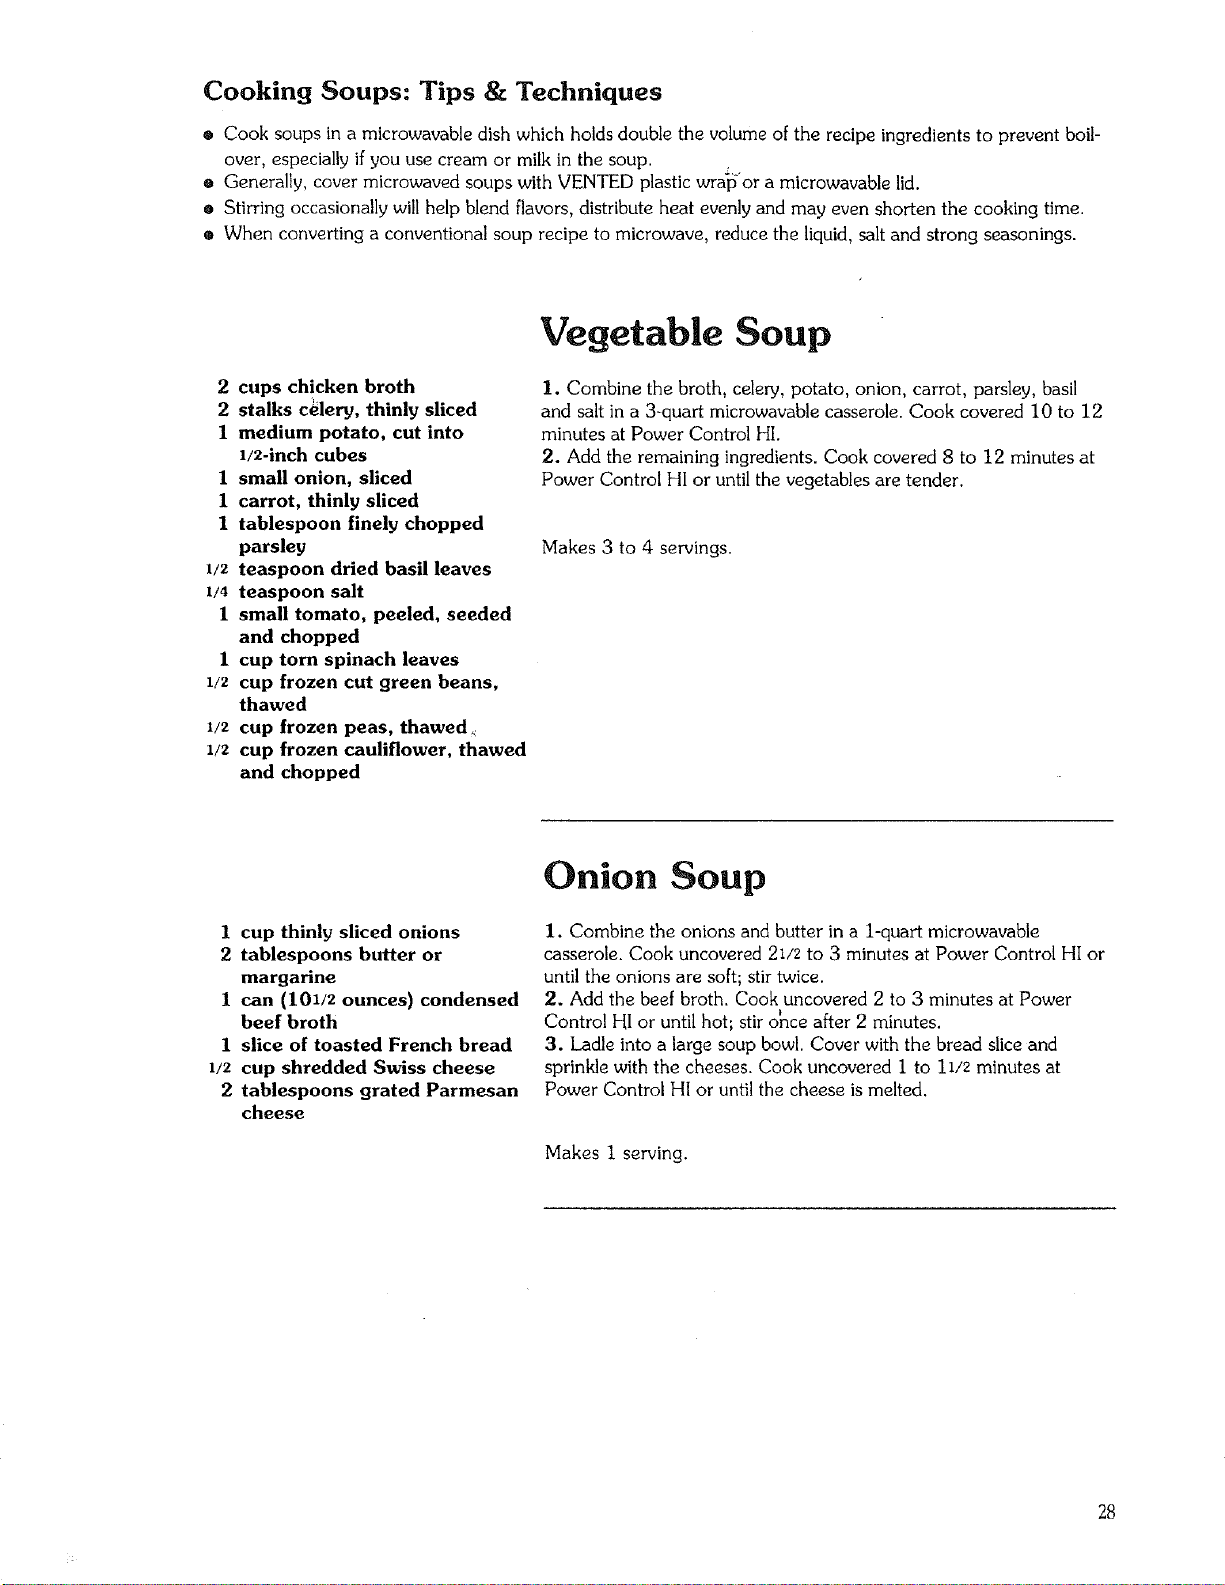
Cooking Soups: Tips & Techniques
® Cook soups in a microwavable dish which holds double the volume of the recipe ingredients to prevent boil-
over, especially if you use cream or milk in the soup.
o Generally, cover microwaved soups with VENTED plastic wra-p_ora microwavable lid.
• Stirring occasionally will help blend flavors, distribute heat evenly and may even shorten the cooking time.
® When converting a conventional soup recipe to microwave, reduce the liquid, salt and strong seasonings.
2 cups chicken broth
2 stalks c_lery, thinly sliced
1 medium potato, cut into
1/2-inch cubes
1 small onion, sliced
1 carrot, thinly sliced
1 tablespoon finely chopped
parsley
1/2 teaspoon dried basil leaves
1/4 teaspoon salt
1 small tomato, peeled, seeded
and chopped
1 cup torn spinach leaves
1/2 cup frozen cut green beans,
thawed
1/2 cup frozen peas, thawed
1/2 cup frozen cauliflower, thawed
and chopped
Vegetable Soup
I. Combine the broth, celery, potato, onion, carrot, parsley, basil
and salt in a 3-quart microwavable casserole. Cook covered 10 to 12
minutes at Power Control HI.
2. Add the remaining ingredients. Cook covered 8 to 12 minutes at
Power Control HI or until the vegetables are tender.
Makes 3 to 4 servings.
1 cup thinly sliced onions
2 tablespoons butter or
margarine
I can (101/2 ounces) condensed
beef broth
1 slice of toasted French bread
1/2 cup shredded Swiss cheese
2 tablespoons grated Parmesan
cheese
Onion Soup
I. Combine the onions and butter in a l-quart microwavable
casserole. Cook uncovered 21/2 to 3 minutes at Power Control HI or
until the onions are soft; stir twice.
2. Add the beef broth. Cook uncovered 2 to 3 minutes at Power
• !
Control HI or until hot., stlr once after 2 minutes.
3. Ladle into a large soup bowl. Cover with the bread slice and
sprinkle with the cheeses. Cook uncovered i to 11/2 minutes at
Power Control HI or until the cheese is melted.
Makes I serving.
28
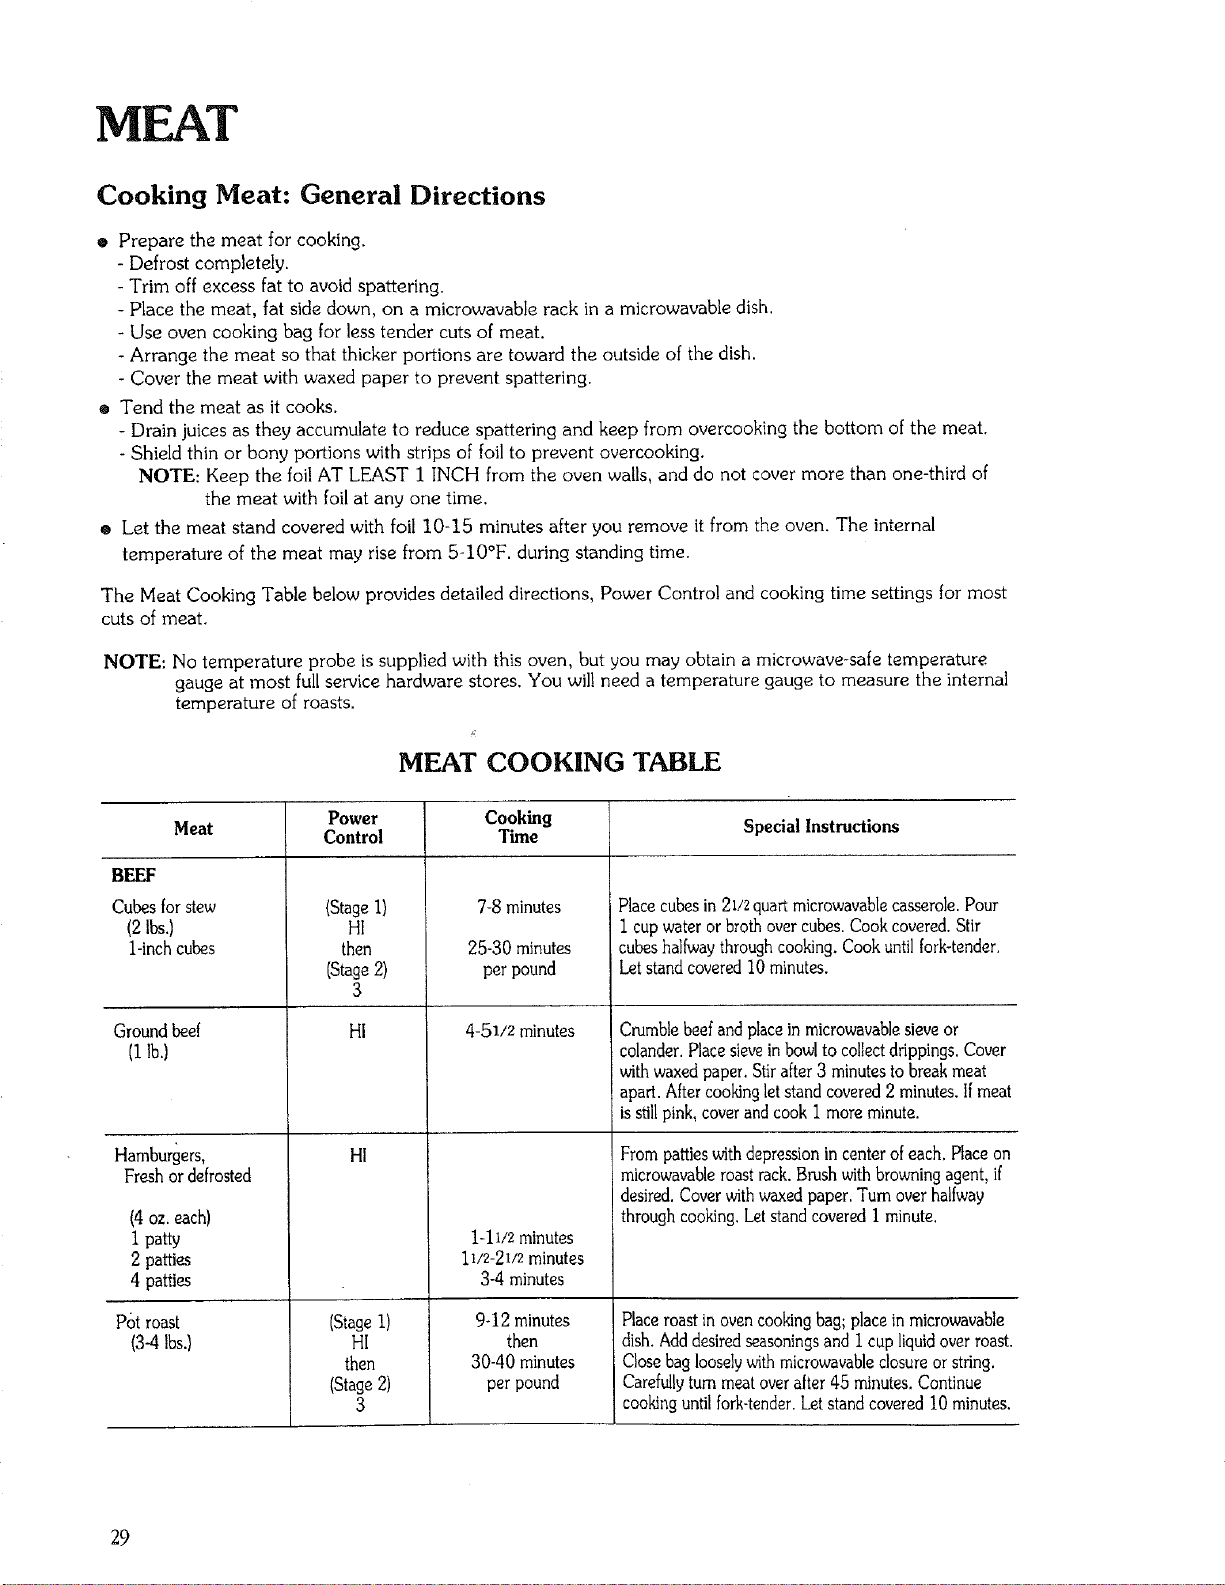
MEAT
Cooking Meat: General Directions
• Prepare the meat for cooking.
- Defrost completely.
- Trim off excess fat to avoid spattering.
- Place the meat, fat side down, on a microwavable rack in a microwavable dish.
- Use oven cooking bag for less tender cuts of meat,
- Arrange the meat so that thicker portions are toward the outside of the dish.
- Cover the meat with waxed paper to prevent spattering.
® Tend the meat as it cooks.
- Drain juices as they accumulate to reduce spattering and keep from overcooking the bottom of the meat.
- Shield thin or bony portions with strips of foil to prevent overcooking,
NOTE: Keep the foil AT LEAST 1 INCH from the oven walls, and do not cover more than one-third of
the meat with foil at any one time.
• Let the meat stand covered with foil 10-15 minutes after you remove it from the oven. The internal
temperature of the meat may rise from 5-I0°F. during standing time,
The Meat Cooking Table below provides detailed directions, Power Control and cooking time settings for most
cuts of meat.
NOTE: No temperature probe is supplied with this oven, but you may obtain a microwave_safe temperature
gauge at most full service hardware stores, You will need a temperature gauge to measure the internal
temperature of roasts.
MEAT COOKING TABLE
Meat
BEEF
Cubesfor stew
(2 tbs.)
1-inchcubes
Ground beef
(1lb.l
Hamburgers,
Fresh ordefrosted
(4oz. each)
I patty
2 patties
4 patties
Pot roast
(3-4 lbs.)
Power
Control
(StageI)
HI
then
(Stage2)
3
HI
HI
(StageI)
HI
then
(Stage2)
3
Cooking
Time
%8 minutes
25-30 minutes
per pound
4-51/2 minutes
1-1i/2 minutes
11/2-21/2 minutes
3-4 minutes
9-12 minutes
then
30-40 minutes
per pound
Special Instructions
Placecubesin 21/2quart microwavablecasserole.Pour
I cup water or brothovercubes. Cook covered.Stir
cubeshalfwaythroughcooking.Cookuntilfork-tender,
Let standcoveredI0 minutes.
Crumblebeefand placein microwavablesieveor
colander. Placesievein bowlto collectdrippings. Cover
withwaxed paper. Stirafter3 minutes to break meat
apart. Aftercookingletstand covered2 minutes,Ifmeat
iss_llpink, coverandcook I more minute.
Frompatties withdepressionin center ofeach, Place on
microwavableroastrack.Brushwith browningagent, if
desired.Coverwithwaxed paper. Turn overhalfway
through cooking.Letstand coveredI minute.
Placeroast in ovencookingbag;place in microwavable
dish.Adddesiredseasoningsand I cup liquidoverroast.
Closebag loosely_4thmicrowavableclosureor string.
Carefullyturnmeat overafter 45 minutes.Continue
cookinguntilfork-tender.Letstand covered 10 minutes.
29
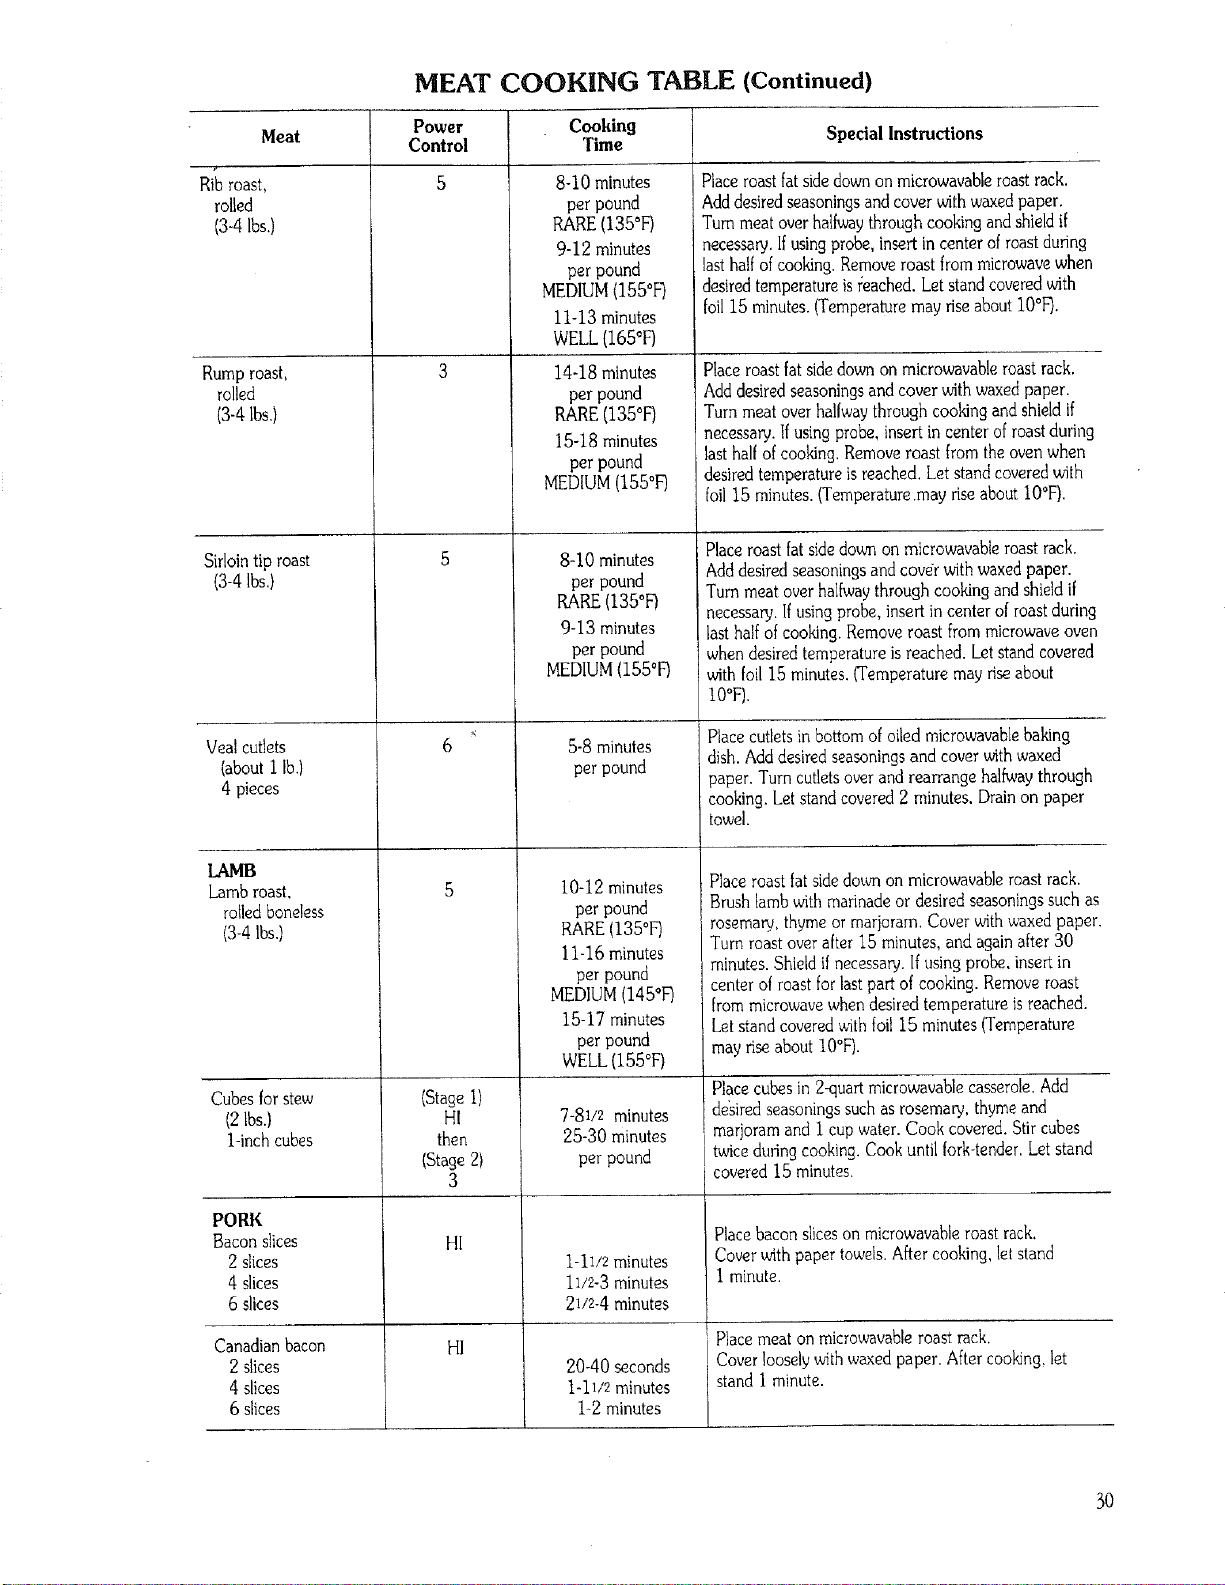
MEAT COOKING TABLE (Continued)
Meat
Rib roast,
rolled
(3-4 Ibs.)
Rumproast,
rolled
(3-4lbs,)
Sirlointip roast
(3-4lbs,)
Veal cutlets
(about I lb.)
4 pieces
Lamb roast,
rolled boneless
(3-4 lbs.)
Cubes for stew
(2 Ibs.)
l-inch cubes
PORK
Bacon slices
2 slices
4 slices
6 slices
Canadian bacon
2 slices
4 slices
6 slices
Power
Control
6
(Stage 1)
HI
then
(Stage 2)
3
HI
HI
Cooking
Time
8-10 minutes
per pound
RARE(135°F)
9-12 minutes
per pound
MEDIUM(155°F)
11-13 minutes
WELL(165°F)
14-18 minutes
per pound
RARE(135°F)
15-18 minutes
per pound
MEDIUM(155°F)
8-10 minutes
per pound
RARE (135o1=)
9-13 minutes
per pound
MEDIUM (155°F)
5-8 minutes
per pound
10-12 minutes
per pound
RARE (135°F)
11-16 minutes
per pound
MEDIUM (145°F)
15-17 minutes
per pound
WELL (155°F)
7-81/2 minutes
25-30 minutes
per pound
1-11/2minutes
11/2-3 minutes
21/2-4minutes
20-40 seconds
1-11/2 minutes
1-2 minutes
Special Instructions
Placeroastfat sidedownon microwavableroastrack.
Adddesiredseasoningsandcover withwaxedpaper.
Turnmeat overhalfwaythroughcookingandshieldif
necessary.Ifusingprobe,insert in centerof roastduring
lasthalfof cooking.Removeroast frommicrowavewhen
desiredtemperatureis_:eached.Let standcoveredwith
foil15 minutes.(Temperaturemay riseabout10°F).
Place roast fat side down on microwavable roast rack.
Add desired seasonings and cover with waxed paper.
Turn meat over halfway through cooking and shield if
necessary. If using probe, insert in center of roast during
last half of cooking. Remove roast from the oven when
desired temperature is reached. Let stand covered with
foil 15 minutes. (Temperature .may rise about 10°F).
Place roast fat side down on microwavable roast rack.
Add desired seasonings and cover with waxed paper.
Turn meat over halfway through cooking and shield if
necessary. If using probe, insert in center of roast during
last half of cooking. Remove roast from microwave oven
when desired temperature is reached. Let stand covered
with foil 15 minutes. (Temperature may rise about
lO°F).
Place cutlets in bottom of oiled microwavable baking
dish. Add desired seasonings and cover with waxed
paper. Turn cutlets over and rearrange halfway through
cooking. Let stand covered 2 minutes. Drain on paper
towel.
Place roast fat side down on microwavable roast rack.
Brush lamb with marinade or desired seasonings such as
rosemary, thyme or marjoram. Cover with waxed paper.
Turn roast over after 15 minutes, and again after 30
minutes. Shield if necessary. If using probe, insert in
center of roast for last part of cooking. Remove roast
from microwave when desired temperature is reached.
Let stand covered with foil 15 minutes (Temperature
may rise about 10°F).
Place cubes in 2-quart microwavable casserole. Add
desired seasonings such as rosemary, thyme and
marjoram and I cup water. Cook covered. Stir cubes
twice during cooking. Cook until fork-tender. Let stand
covered 15 minutes.
Placebacon sliceson microwavableroastrack.
Coverwithpaper towels.Aftercooking,letstand
1minute,
Place meat on microwavable roast rack.
Cover loosely with waxed paper. After cooking, let
stand i minute.
30
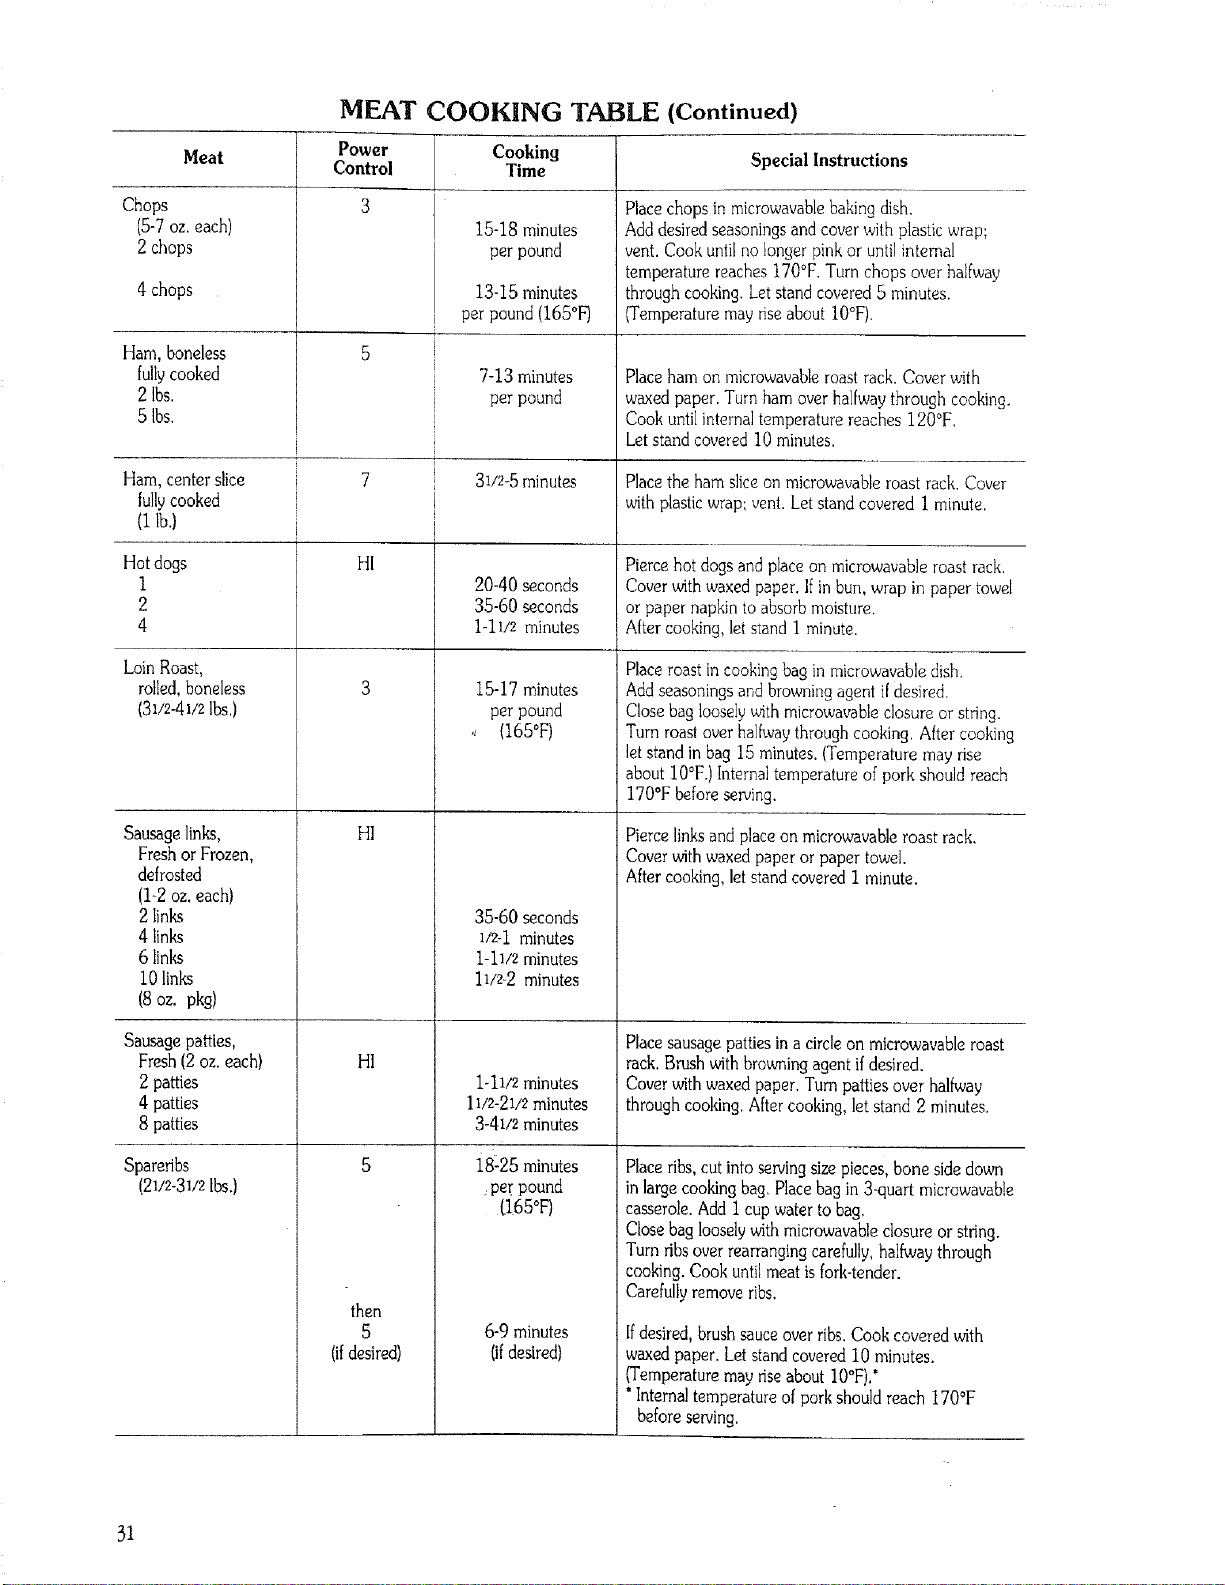
MEAT COOKING TABLE (Continued)
Meat Power Cooking Special Instructions
Control Time
3
Chops
(5-7oz. each)
2 chops
4 chops
Ham, boneless
tullycooked
2 Ibs.
5 Ibs.
Ham, center slice
fullycooked
(Ilb.)
Hot dogs
I
2
4
Loin Roast,
rolled,boneless
(31/2-4]/2lbs,)
Sausagelinks,
Freshor Fmzen,
defrosted
(1-2oz.each)
2 links
4 links
6 links
i0 links
(8oz. pkg)
Sausage patties,
Fresh (2 oz. each)
2 patties
4 patties
8 patties
Spareribs
(21/2-3w2Ibs.)
HI
HI
HI
then
5
(ifdesired)
15-18 minutes
per pound
13-15 minutes
per pound (165°F)
7-13 minutes
per pound
31/2-5 minutes
20-40 seconds
35-60seconds
1-11/_minutes
15-17 minutes
per pound
(165°F)
35-60 seconds
a/2-1 minutes
1-11/2minutes
11/2-2 minutes
1-11/2minutes
11/2-21/2minutes
3-41/2minutes
i8_.25 minutes
pa: pound
(165°F)
6-9 minutes
(ifdesired)
Place chops in microwavable baking dish.
Add desired seasonings and cover with plastic wrap;
vent. Cook until no longer pink or until internal
temperature reaches 170°F. Turn chops over halfway
through cooking. Let stand covered 5 minutes.
(Temperature may rise about 10°F).
Place ham on microwavable roast rack. Cover with
waxed paper. Turn ham over halfway through cooking.
Cook until internal temperature reaches 120°F.
Let stand covered 10 minutes.
Placethe hamslice on microwavableroast rack. Cowr
with plastic wrap; vent. Let stand covered I minute.
Pierce hot dogs and place on microwavable roast rack.
Cover with waxed paper. If in bun, wrap in paper towel
or paper napkin to absorb moisture.
Alter cooking, let stand 1 minute.
Place roast in cooking bag in microwavable dish.
Add seasonings and browning agenl i[desired.
Close bag loosely with microwavable closure or string.
Turn roast over halfway through cooking. After cooking
let stand in bag 15 minutes. (Temperature may rise
about 10°F.)Internal temperature of pork should reach
170°F before serving.
Pierce links and place on microwavable roast rack.
Cover with waxed paper or paper towel.
After cooking, let stand covered 1 minute.
Place sausage patties in a circle on microwavable roast
rack. Brush with browning agent if desired.
Cover with waxed paper. Turn patties over halfway
through cooking. After cooking, let stand 2 minutes.
Place ribs, cut into serving size pieces, bone side down
in large cooking bag. Place bag in 3_uart microwavable
casserole. Add I cup water to bag.
Close bag loosely with microwavable closure or string.
Turn ribs over rearranging carefully, halfway through
cooking. Cook until meat is fork-tender.
Carefully remove ribs.
Ifdesired, brush sauce over ribs. Cook covered with
waxed paper. Let stand covered I0 minutes.
(Temperature may rise about 10°F).*
' Internal temperature of pork should reach 170°F
before serving.
31
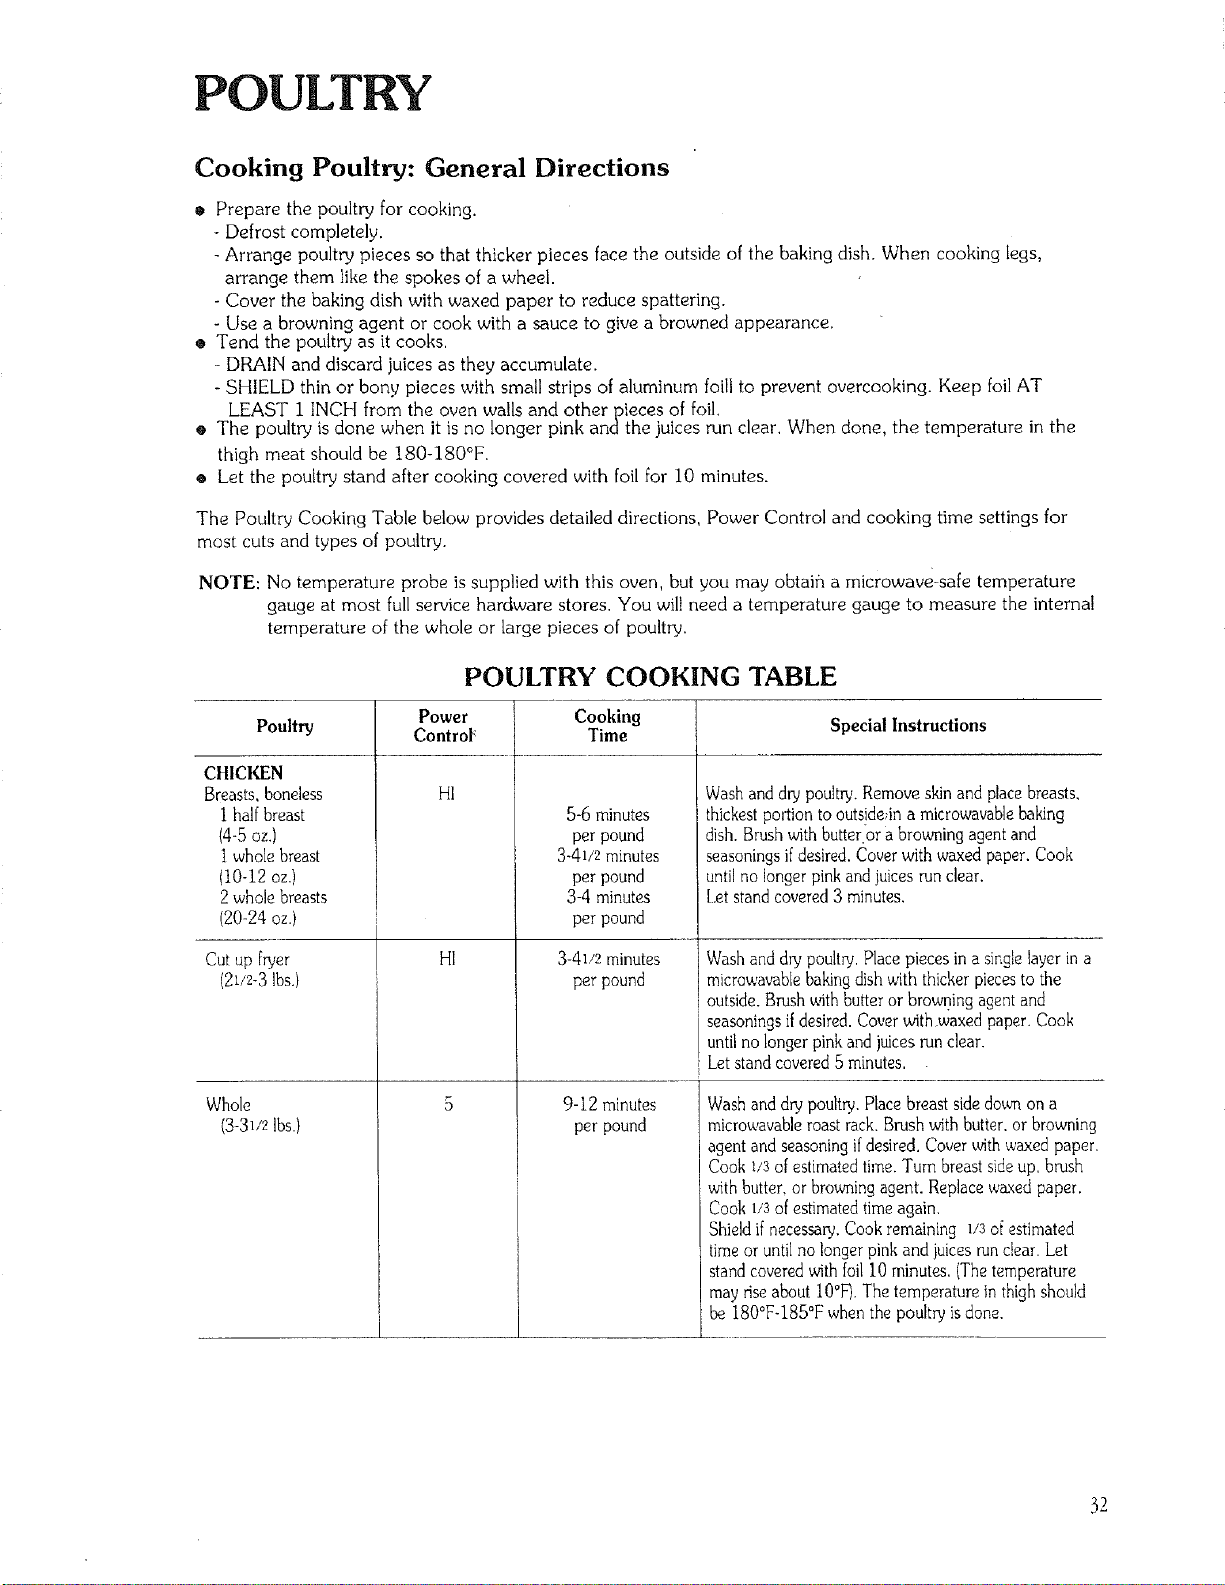
POULTRY
Cooking Poultry: General Directions
• Prepare the poultry for cooking.
- Defrost completely.
- Arrange poultry pieces so that thicker pieces face the outside of the baking dish. When cooking legs,
arrange them like the spokes of a wheel.
- Cover the baking dish with waxed paper to reduce spattering.
- Use a browning agent or cook with a sauce to give a browned appearance,
® Tend the poultry as it cooks,
- DRAIN and discard juices as they accumulate.
- SHIELD thin or bony pieces with small strips of aluminum foil[ to prevent overcooking. Keep foil AT
LEAST i INCH from the oven walls and otherpieces of foil.
• The poultry is done when it is no longer pink andthe juices run clear. When done, the temperature in the
thigh meat should be 180-180°F.
• Let the poultry stand after cooking covered with foil for 10 minutes.
The Poultry Cooking Table below provides detailed directions, Power Control and cooking time settings for
most cuts and types of poultry.
NOTE: No temperature probe is supplied with this oven, but you may obtain a microwave-safe temperature
gauge at most full service hardware stores. You will need a temperature gauge to measure the internal
temperature of the whole or large pieces of poultry.
POULTRY COOKING TABLE
Power Cooking Special Instructions
Poultry Control_ Time
CHICKEN
Breasts, boneless
I half breast
(44 oz,)
Iwhole breast
(i0-12 oz.)
2 whole breasts
(20-24 oz.)
Cut up fryer
(21/2-3 Ibs.)
Whole
(3-31/slbs.)
HI
HI
5-6minutes
per pound
3-41/2minutes
per pound
3-4minutes
per pound
3-41/2 minutes
per pound
9-12 minutes
per pound
Wash and dry poultry, Remove skin and place breasts,
thickest portion to outs!de;in a microwavable baking
dish. Brush with butter or a browning agent and
seasonings if desired. Cover _th waxed paper. Cook
until no longer pink and juices run clear.
Let stand covered 3 minutes,
Wash and dry poultry, Place pieces in a single layer in a
microwavable baking dish with thicker pieces to the
outside. Brush with butter or browning agent and
seasonings ifdesired. Cover with waxed paper. Cook
until no longer pink and juices run clear.
Let stand covered 5 minutes. .
Wash and dry poultry. Place breast side down on a
microwavable roast rack. Brush with butter, or browning
agent and seasoning if desired. Cover with waxed paper.
Cook 1/3of estimated time. Turn breast side up, brush
with butter, or browning agent. Replace waxed paper.
Cook 1/3ofestimated time again,
Shield if necessary.Cook remaining 1/3oi estimated
time or until no longer pink and juicesrunclear.Let
standcoveredwith foil 10 minutes, (Thetemperature
may riseabout 10°F).The temperature inthigh should
be 180°F485°F when the poultry is done.
32
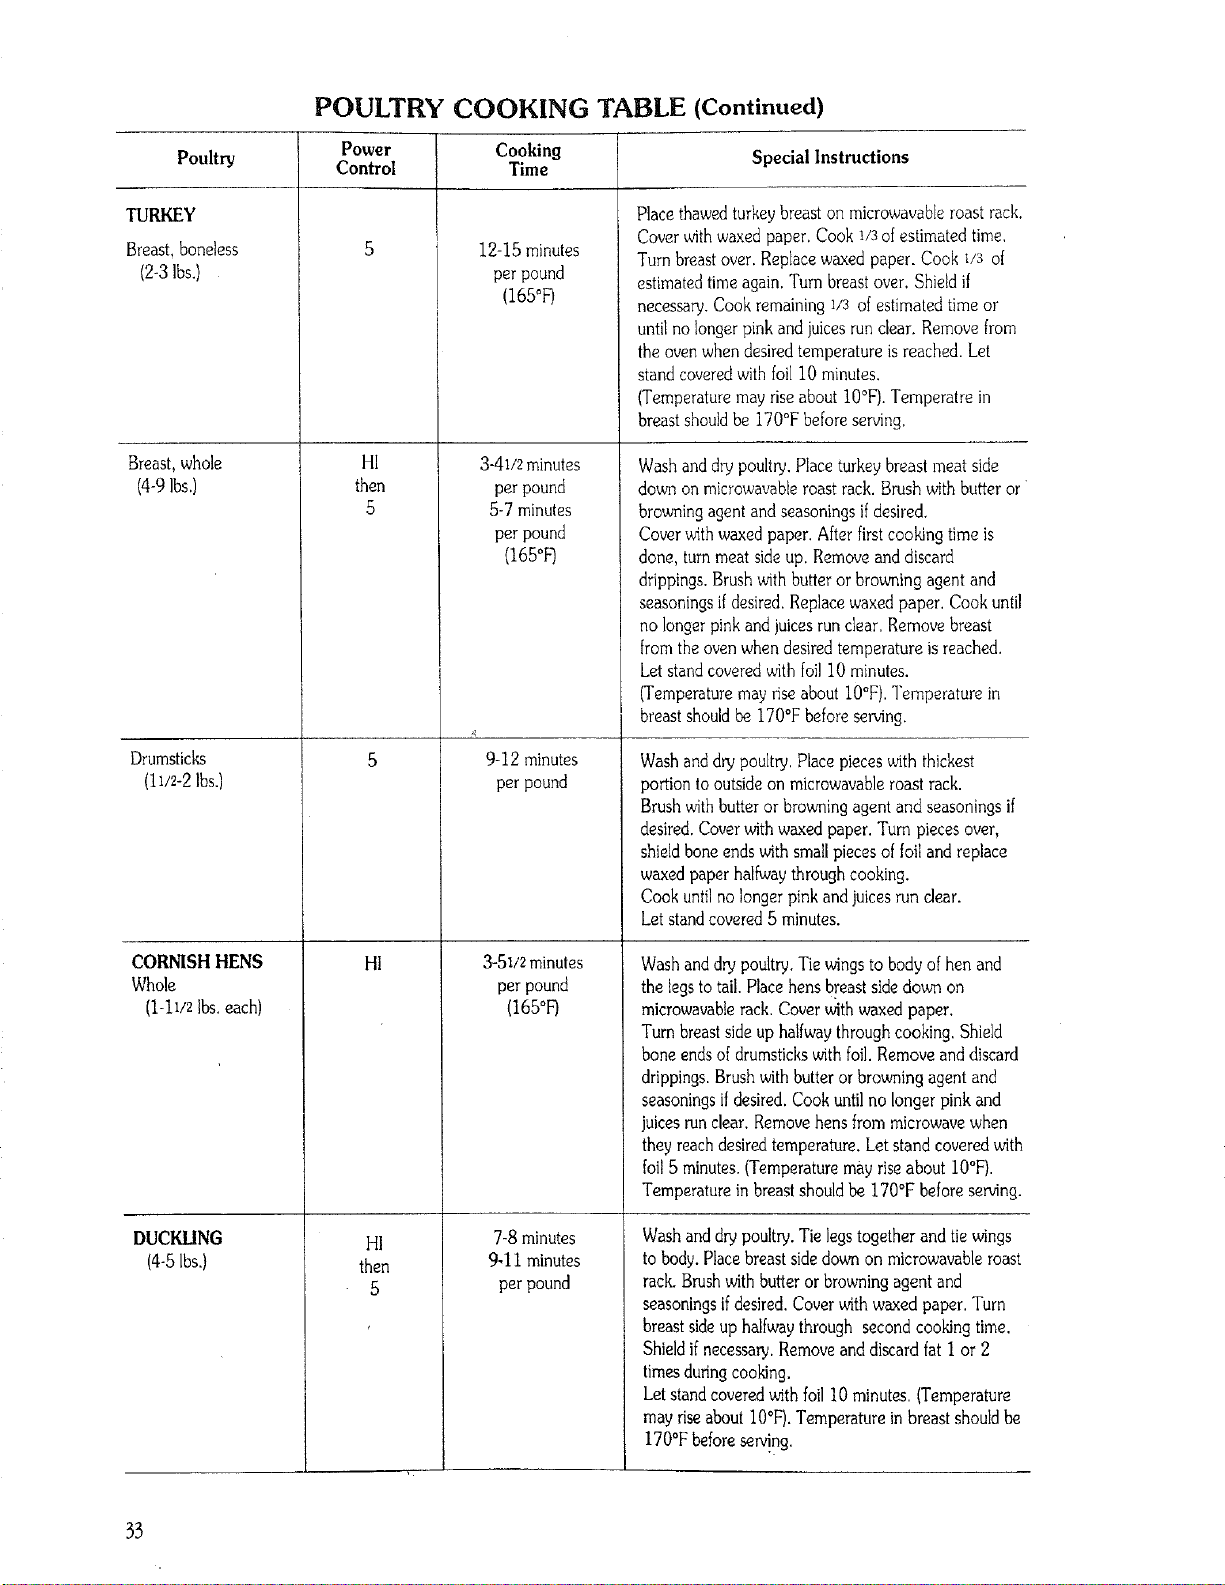
Poultry
TURKEY
Breast,boneless
(2-3lbs.)
Breast,whole
(4-9Ibs.)
Drumsticks
(11/2-2lbs.)
CORNISHHENS
Whole
(1-11!albs.each)
DUCKLING
(4-5Ibs.)
POULTRY COOKING TABLE (Continued)
Power
Control
HI
then
5
HI
HI
then
5
Cooking
Time
12-15 minutes
per pound
(165°F)
3-41/2 minutes
per pound
5-7 minutes
per pound
(165oF1
9-12 minutes
per pound
3-51/2 minutes
per pound
(165°F)
7-8 minutes
%11 minutes
per pound
Special Instructions
Place thawed turkey breast on microwavable roast rack,
Cover with waxed paper, Cook !/3 of estimated time.
Turn breast over. Replace waxed paper. Cook I/3 of
estimated time again. Turn breast over, Shield if
necessary. Cook remaining i/3 of estimated time or
until no longer pink and juices run clear. Remove from
the oven when desired temperature is reached. Let
stand covered with foil I0 minutes.
(Temperature may rise about 10°F). Temperatre in
breast should be 170°F before serving,
Wash and dw poultry. Place turkey breast meat side
down on microwavable roast rack. Brush with butter or
browning agent and seasonings ifdesired.
Cover vdth waxed paper. After first cooking time is
done, turn meat side up. Remove and discard
drippings. Brush with butter or browning agent and
seasonings ifdesired. Replace waxed paper. Cook until
no longer pink and juices run clear. Remove breast
from the oven when desired temperature is reached.
Let stand covered with foil i0 minutes.
(Temperature may rise about 10°F), Temperature in
breast should be 170°F before serving.
Wash and dry poultry, Place pieces with thickest
portion to outside on microwavable roast rack.
Brush with butter or browning agent and seasonings if
desired. Cover with waxed paper. Turn pieces over,
shield bone ends with small pieces of foil and replace
waxed paper halfway through cooking.
Cook until no longer pink and juices run dear.
Let stand covered 5 minutes.
Wash and dry poultry, Tie wings to body of hen and
the legs to tail. Place hens breast side down on
microwavable rack. Cover _th waxed paper.
Turn breast side up halfway through cooking. Shield
bone ends of drumsticks with foil. Remove and discard
drippings. Brush with butter or browning agent and
seasonings ifdesired, Cook until no longer pink and
juices run clear. Remove hens from microwave when
they reach desired temperature, Let stand covered with
foi!5 minutes. (Temperature may rise about 10°F).
Temperature in breast should be 170°F before se_ng.
Washanddrypoultry.Tie legstogether and tie wings
to body.Placebreast sidedown on microwavableroast
rack.Brushwith butteror browningagent and
seasoningsifdesired.Coverwithwaxedpaper. Turn
breastside up halfwaythrough second cookingtime.
Shieldifnecessary.Removeand discardfat i or 2
timesduringcooking.
Let standcoveredwithfoil 10 minutes.(Temperature
mayriseabout 10°F).Temperaturein breastshouldbe
170°F beforesaMng.
33
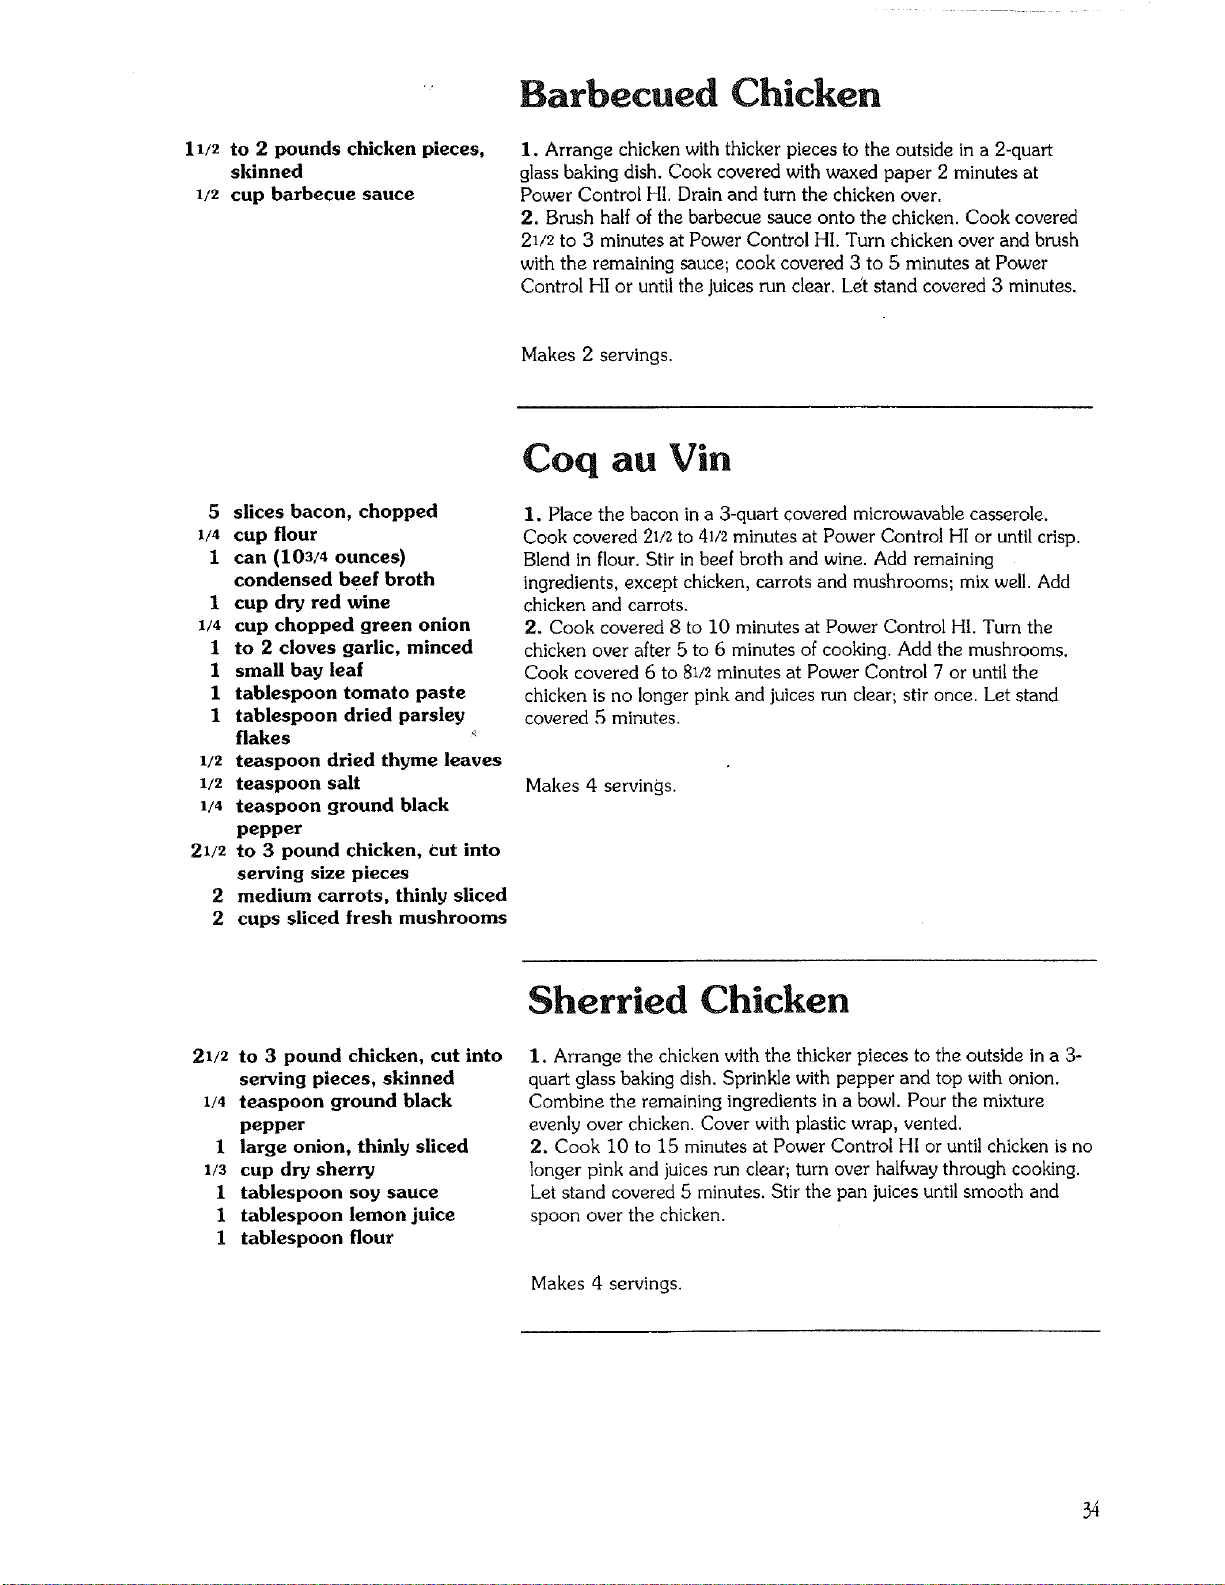
11/2 to 2 pounds chicken pieces,
skinned
1/2 cup barbecue sauce
Barbecued Chicken
I. Arrange chicken with thicker pieces to the outside in a 2-quart
glass baking dish. Cook covered with waxed paper 2 minutes at
Power Control HI. Drain and turn the chicken over.
2. Brush half of the barbecue sauce onto the chicken. Cook covered
21/2 to 3 minutes at Power Control HI. Turn chicken over and brush
with the remaining sauce; cook covered 3 to 5 minutes at Power
Control HI or until the juices run clear. Let stand covered 3 minutes.
Makes 2 servings.
5 slices bacon, chopped
1/4 cup flour
1 can (103/4 ounces)
condensed beef broth
1 cup dry red wine
1/4 cup chopped green onion
1 to 2 cloves garlic, minced
1 small bay leaf
I tablespoon tomato paste
1 tablespoon dried parsley
flakes _
1/2 teaspoon dried thyme leaves
1/2 teaspoon salt
1/4 teaspoon ground black
pepper
21/2 to 3 pound chicken, cut into
serving size pieces
2 medium carrots, thinly sliced
2 cups sliced fresh mushrooms
Coq au Vin
I. Place the bacon in a 3-quart covered microwavable casserole.
Cook covered 21/2to 41/2minutes at Power Control HI or until crisp.
Blend in flour, Stir inbeef broth and wine. Add remaining
ingredients, except chicken, carrots and mushrooms; mix well. Add
chicken and carrots.
2. Cook covered 8 to 10 minutes at Power Control HI. Turn the
chicken over after 5 to 6 minutes of cooking. Add the mushrooms.
Cook covered 6 to 81/2minutes at Power Control 7 or until the
chicken is no longer pink and juices run clear; stir once. Let stand
covered 5 minutes.
Makes 4 servings.
21/2 to 3 pound chicken, cut into
serving pieces, skinned
1/4 teaspoon ground black
pepper
1 large onion, thinly sliced
1/3 cup dry sherry
1 tablespoon soy sauce
1 tablespoon lemon juice
I tablespoon flour
Sherried Chicken
1. Arrange the chicken with the thicker pieces to the outside in a 3-
quart glass baking dish. Sprinkle with pepper and top with onion.
Combine the remaining ingredients in a bowl. Pour the mixture
evenly over chicken. Cover with plastic wrap, vented.
2. Cook 10 to 15 minutes at Power Control HI or until chicken is no
longer pink and juices ran clear; turn over halfway through cooking.
Let stand covered 5 minutes. Stir the pan juices until smooth and
spoon over the chicken.
Makes 4 servings.
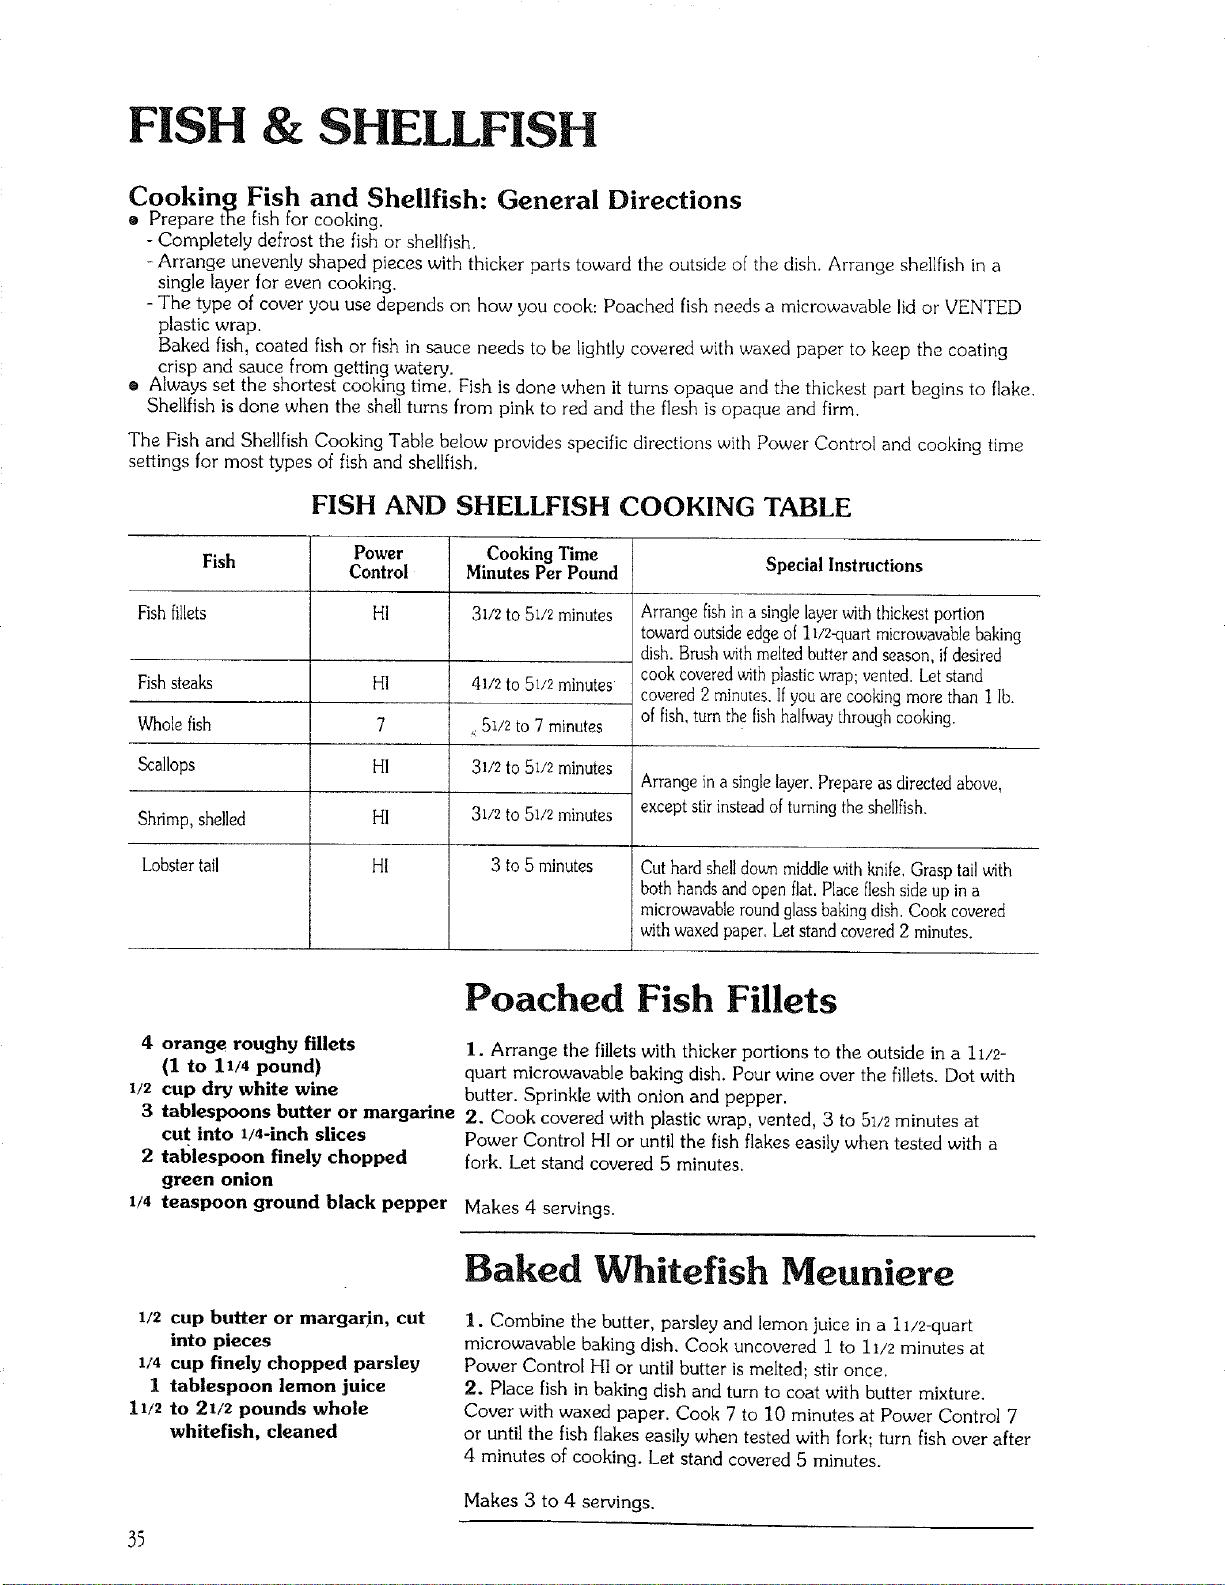
FISH & SHELLFISH
Cooking Fish and Shellfish: General Directions
o Prepare tee fish for cooking.
- Completely defrost the fish or shellfish.
- Arrange unevenly shaped pieces with thicker parts toward the outside of the dish. Arrange shellfish in a
single layer for even cooking.
- The type of cover you use depends on how you cook: Poached fish needs a microwavable lid or VENTED
plastic wrap.
Baked fish, coated fish or fish in sauce needs to be lightly covered with waxed paper to keep the coating
crisp and sauce from getting watery.
o Always set the shortest cooking time. Fish is done when it turns opaque and the thickest part begins to flake.
Shellfish is done when the shell turns from pink to red and the flesh is opaque and firm.
The Fish and Shellfish Cooking Table below provides specific directions with Power Control and cooking time
settings for most types of fish and shellfish.
FISH AND SHELLFISH COOKING TABLE
Fish Power Cooking Time
Control Minutes Per Pound Special Instructions
Fish fillets HI 31/2 to 51/2 minutes
Fishsteaks
Wholefish
Scallops
Shrimp,shelled
Lobstertail
HI
7
HI
HI
HI
41/2 to 51/2 minutes
,. 51/2 to 7 minutes
31/2 to 51/2 minutes
31/2 to 51/2 minutes
3 to 5 minutes
Arrange fish in a single layer with thickest portion
toward outside edge of 11/2_!uart microwavable baking
dish. Brush with melted butter and season, ifdesired
cook covered _,Ith plastic wrap; vented. Let stand
covered 2 minutes. If you are cooking more than I lb.
of fish, turn the fish halfway Lhroughcooking.
Arrange in a single layer, Prepare as directed above,
except stir instead of turning the shellfish.
Cut hard shell down middle with knife, Grasp tail with
both hands and open fiat. Place flesh side up in a
microwavable round glass baking dish. Cook covered
with waxed paper, Let stand covered 2 minutes.
4 orange roughy fillets
(1 to 11/4 pound)
1/z cup dry white wine
3 tablespoons butter or margarine
cut into 1/4-1nch slices
2 tal_lespoon finely chopped
green onion
1/4 teaspoon ground black pepper
1/2 cup butter or margadn, cut
into pieces
1/4 cup finely chopped parsley
1 tablespoon lemon juice
11/2 to 21/z pounds whole
whitefish, cleaned
35
Poached Fish Fillets
1. Arrange the fillets with thicker portions to the outside in a ll/2-
quart microwavable baking dish. Pour wine over the fillets. Dot with
butter. Sprinkle with onion and pepper.
2. Cook covered with plastic wrap, vented, 3 to 51/2 minutes at
Power Control HI or until the fish flakes easily when tested with a
fork. Let stand covered 5 minutes.
Makes 4 servings,
Baked Whitefish Meuniere
1. Combine the butter, parsley and lemon juice in a 1 i/2-quart
microwavable baking dish. Cook uncovered I to 11/2 minutes at
Power Control HI or until butter is melted; stir once.
2. Place fish in baking dish and turn to coat with butter mixture.
Cover with waxed paper. Cook 7 to 10 minutes at Power Control 7
or until the fish flakes easily when tested with fork; turn fish over after
4 minutes of cooking. Let stand covered 5 minutes.
Makes 3 to 4 servings.
VEGETABLES
Vegetables retain their beautiful color, fresh taste and crip texture when cooked in the microwave oven.
Because vegetables have a high moisture content, you need only add 2 to 4 tablespoons of liquid.
Cooking Vegetables: General Directions
Whole, Large Vegetables
• Pierce the skins of whole potatoes, sweet potatoes, and winter squash before cooking. Piercing allows the
steam to escape and prevents bursting in the oven.
® Place the whole vegetable on a paper towel to absorb moisture.
e When cooking more than one or two whole vegetables, arrange them in a circle, allowing space in between.
® Rean_ange large vegetables halfway through cooking so that they cook evenly.
Fresh Vegetables
• Arrange stalk type vegetables like broccoli and asparagus with the thicker, tougher portions to the outside of
the dish.
o Cover the vegetables with a microwavable cover or VENTED plastic wrap. Add water as directed in the
chart below.
Frozen Vegetables
• Remove the outer wrapping and cook the vegetables in their original carton_
o Lay the carton on double-thick paper towels to absorb moisture.
e Pierce cooking pouches with a fork to allow steam to escape.
In General
o Cook vegetables at POWER CONTROL HI.
® Allow most vegetables to stand 2 minutes to complete cooking.
• Salt vegetables AFTER cooking to prevent them from drying out.
• Lift the lid or the cover away from you to avoid steam burn.
The Vegetable Cooking Table below provides specific directions and cooking times for most vegetables.
36
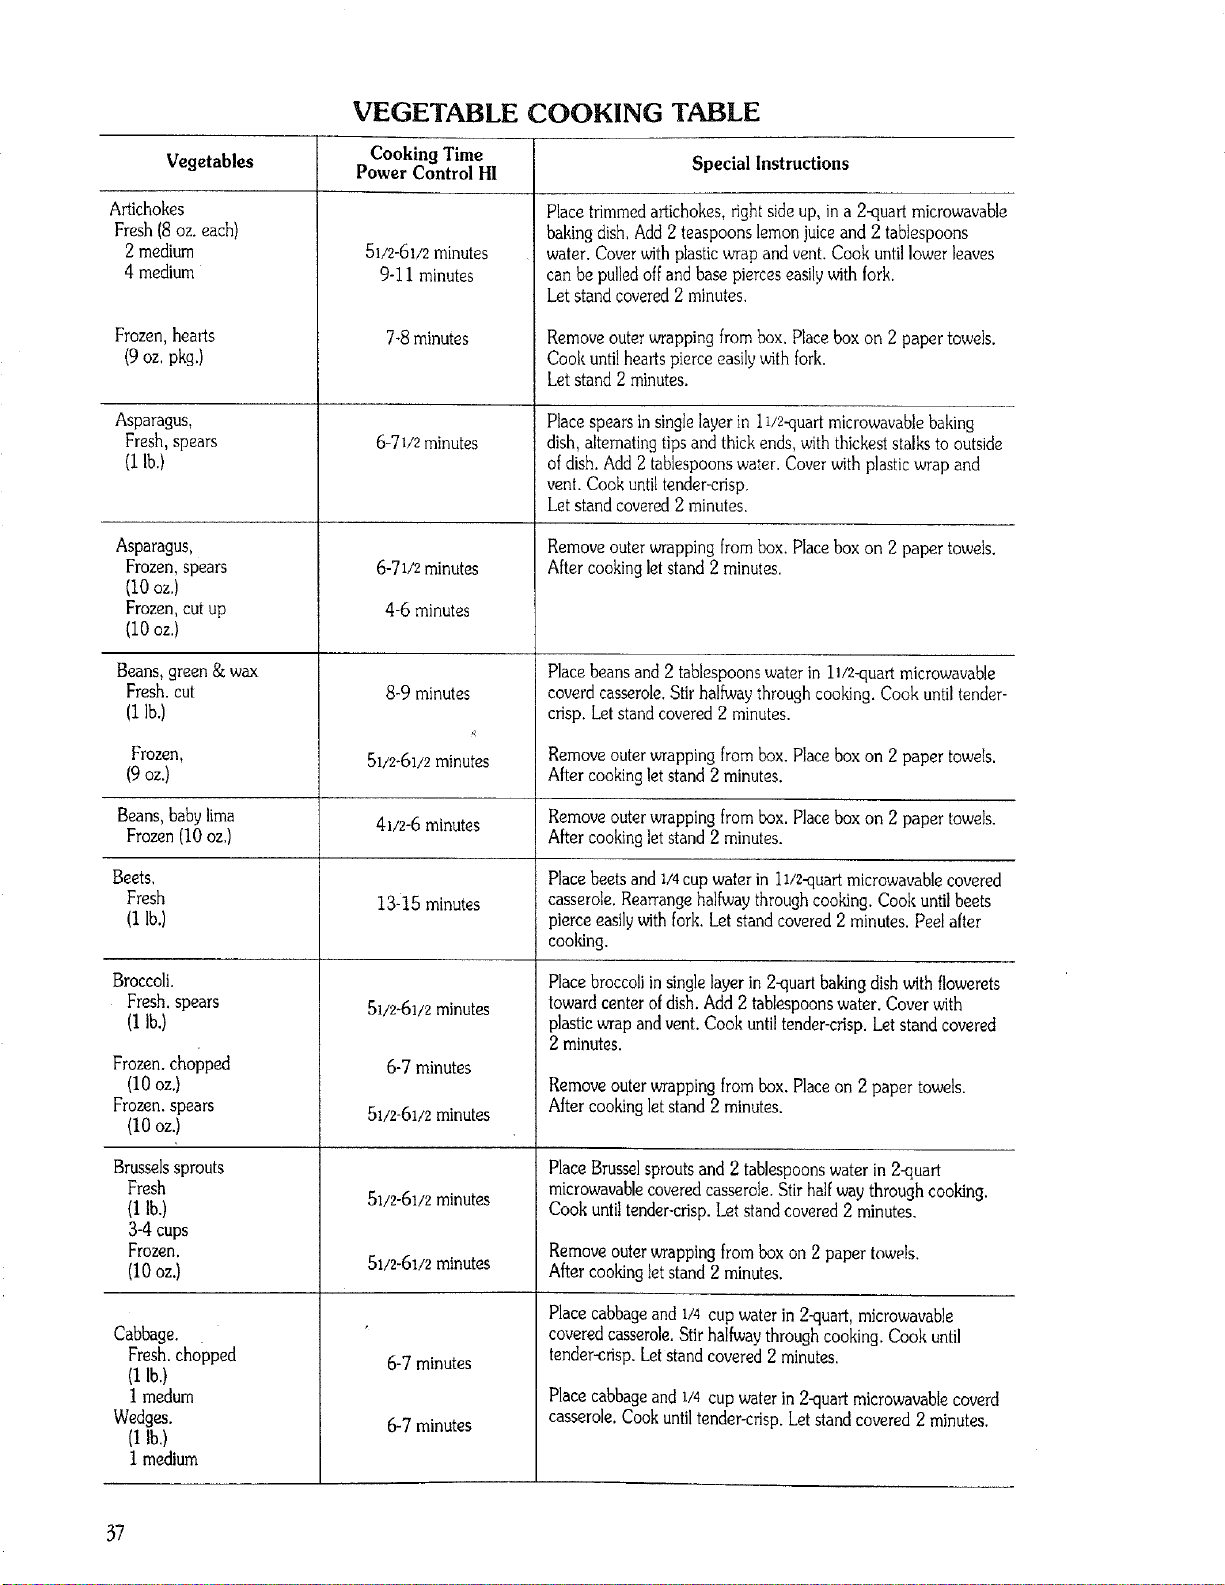
VEGETABLE COOKING TABLE
Vegetables Cooking Time Special Instructions
Power Control H1
Artichokes
Fresh(8 oz.each)
2 medium
4 medium
Frozen,hearts
(9 oz. pkg.)
Asparagus,
Fresh, spears
(1 lb.)
Asparagus,
Frozen, spears
(I0oz,)
Frozen, cut up
(i0 oz.}
Beans,green& wax
Fresh. cut
(1lb.)
51/2-61/2 minutes
9-i i minutes
7-8minutes
6-7 i/2 minutes
6-71/2minutes
4-6 minutes
8-9 minutes
51f2-61/2 minutes
Placetrimmedartichokes,rightside up, ina 2-quartmicrowavable
bakingdish. Add2 teaspoons lemon juiceand 2 tablespoons
water. Coverwithplasticwrap and vent.Cook untillowerleaves
can bepulledoffand base pierces easilywith fork.
Let stand covered2 minutes.
Removeouter wrappingfrombox. Placebox on 2 paper towels.
Cookuntil heartspierceeasilyv_th fork.
Let stand 2 minutes.
Place spears in single layer in 1i/2-quart microwavable baking
dish, alternating tips and thick ends, with thickest stalks to outside
of dish. Add 2 tablespoons water. Cover with plastic wrap and
vent. Cook until tender-crisp.
Let stand covered 2 minutes.
Remove outer wrapping from box. Place box on 2 paper towels.
After cooking let stand 2 minutes.
Place beans and 2 tablespoons water in lw2qua_t microwavable
coverd casserole. Stir halfway through cooking. Cook until tender-
crisp. Let stand covered 2 minutes.
Frozen, Remove outer wrapping from box. Place box on 2 paper towels.
(9 oz.) After cooking let stand 2 minutes.
Beans, baby lima 4wz-6 minutes Remove outer wrapping from box. Place box on 2 paper towels.
Frozen (10 oz.) After cooking let stand 2 minutes.
Beets. Place beets and I/4 cup water in lw2-quart microwavable covered
Fresh 13-15 minutes casserole. Rearrange halfway through cooking. Cook until beets
(I lb.) pierce easilywith fork. Let stand covered 2 minutes. Peel after
cooldng.
51/2-61/2 minutes
6-7 minutes
51/2-61/2 minutes
51/2-61/2 minutes
51/2-61/2 minutes
Broccoli.
Fresh. spears
(1lb.)
Frozen. chopped
(10 oz.)
Frozen. spears
(10 oz.)
Brussels sprouts
Fresh
(1lb.)
3-4 cups
Frozen.
(I0 oz.)
Cabbage.
Fresh. chopped
(1lb.)
I medum
Wedges.
(1 lb.)
1 medium
6-7 minutes
6-7 minutes
Place broccoli in single layer in 2-quart baking dish with flowerets
toward center of dish. Add 2 tablespoons water. Cover with
plastic wrap and vent. Cook until tender-crisp. Let stand covered
2 minutes.
Remove outer wrapping from box. Place on 2 paper towels.
After cooking let stand 2 minutes.
Place Brussel sprouts and 2 tablespoons water in 2-quart
microwavable covered casserole. Stir half way through cooking.
Cook until tender-crisp. Let stand covered 2 minutes.
Removeouter wrappingfrombox on 2 paper towels.
Aftercookingletstand 2 minutes.
Place cabbage and 1/4 cup water in 2-quart, microwavable
covered casserole. Stir halfway through cooking. Cook until
tender-crisp. Let stand covered 2 minutes.
Placecabbage and 1/4cup waterin 2-quartmicrowavablecoverd
casserole. Cookuntiltender-crisp.Letstandcovered 2 minutes.
37
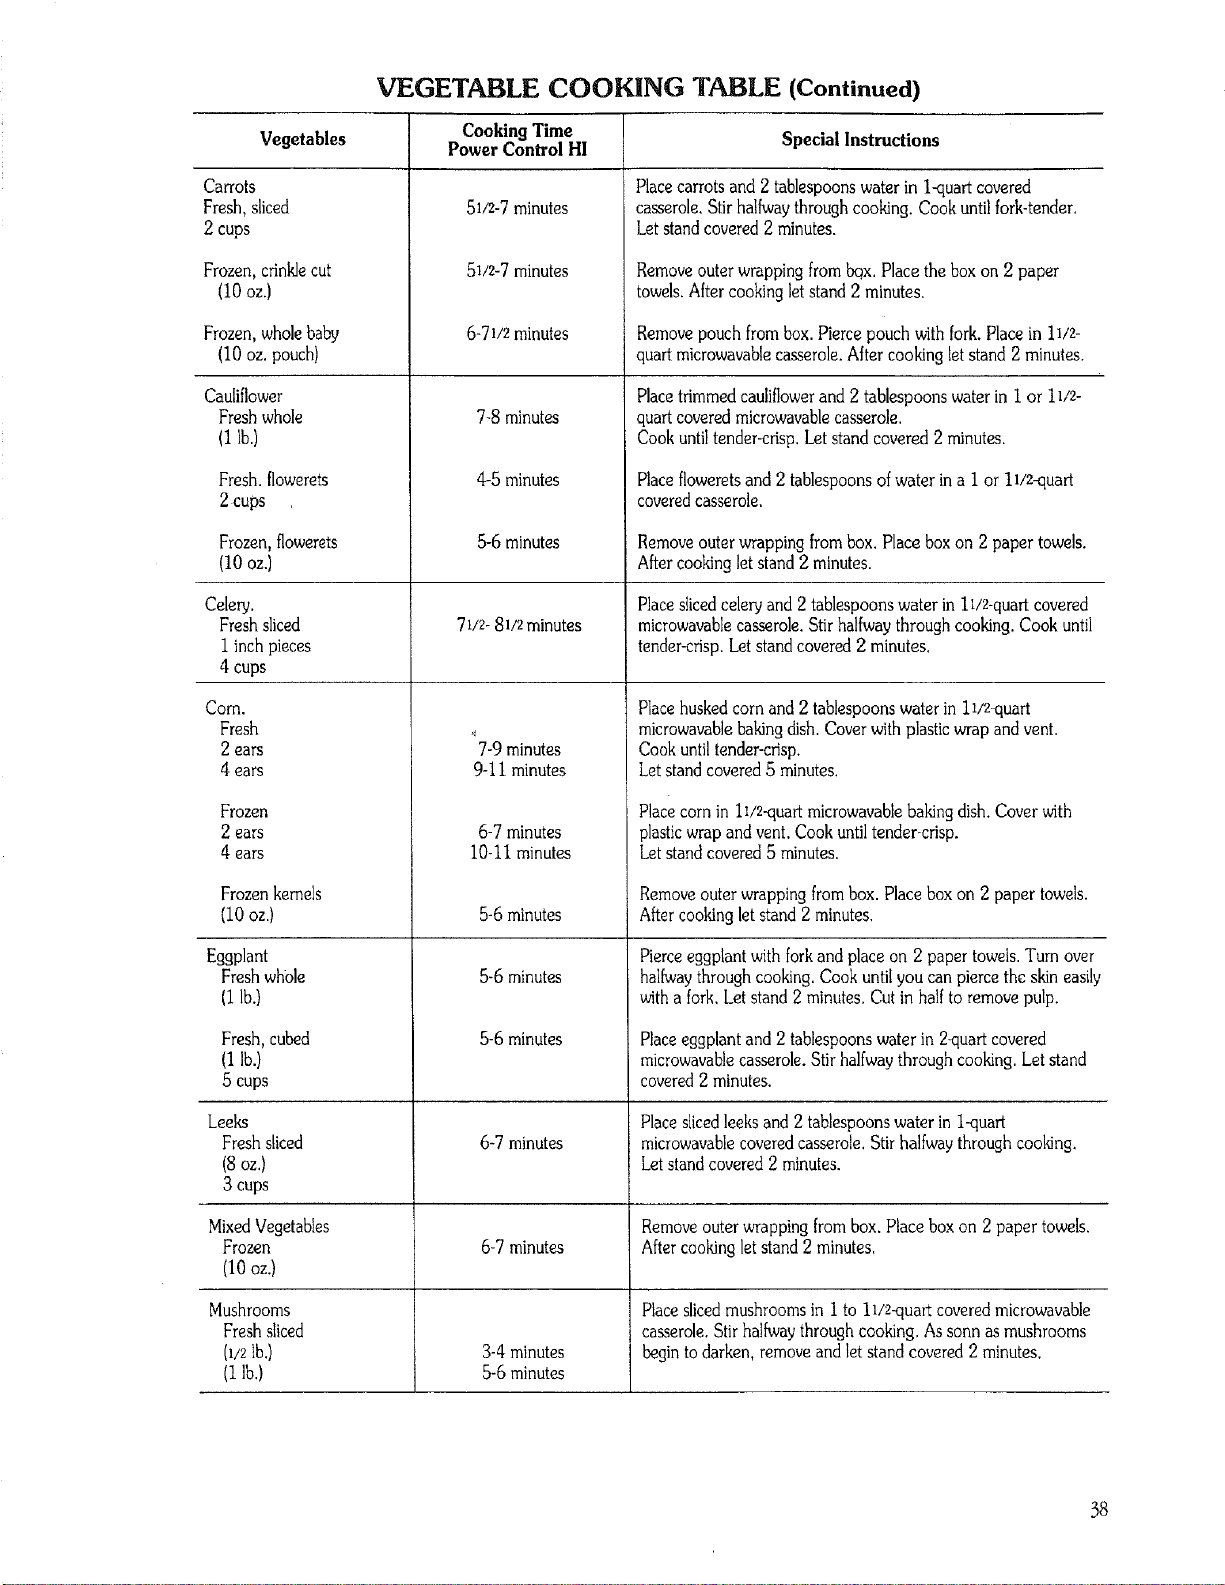
VEGETABLE COOKING TABLE (Continued)
Vegetables Special Instructions
Carrots
Fresh, sliced
2 cups
Frozen, crinklecut
(10 oz.)
Frozen, wholebaby
(10 oz. pouch)
Cauliflower
Fresh whole
(I lb.)
Fresh. flowerets
2cups
Frozen,flowerets
(10oz.)
Celery.
Fresh _iced
I inchpieces
4 cups
Com.
Fresh
2 ears
4 ears
Frozen
2 ears
4 ears
Frozenkernels
(10oz.)
Eggplant
Fresh whole
(1 lb.)
Fresh, cubed
(1 lb.)
5 cups
Leeks
Freshsliced
(8oz.)
3 cups
MixedVegetables
Frozen
(10 oz.)
Mushrooms
Fresh sliced
(1/2lb.)
(1lb.)
Cooking Time
Power Control HI
51/2-7 minutes
51/2-7 minutes
6-71/2 minutes
7-8 minutes
4-5 minutes
5-6 minutes
71/2- 81/2 minutes
_:7-9minutes
9-I I minutes
6-7 minutes
10-11 minutes
5-6 minutes
5-6 minutes
5-6 minutes
6-7 minutes
6-7 minutes
3-4 minutes
5.6 minutes
Placecarrotsand 2 tablespoonswater in I-quart covered
casserole.Stir hallwaythroughcooking. Cook untilfork-tender.
Letstandcovered 2 minutes.
Removeouter wrappingfrom_x. Place the boxon 2 paper
towels.Aftercookingletstand 2 minutes.
Removepouch frombox. Piercepouch withfork. Place in 11/2-
quartmicrowavablecasserole.After cookingletstand 2minutes.
Place trimmed cauliflower and 2 tablespoons water in 1 or 11/2-
quart coveredmicrowavablecasserole.
Cook until tender-crisp, Let standcovered 2 minutes.
Placefloweretsand 2 tablespoonsofwater ina I or 11/2-quart
coveredcasserole.
Removeouterwrappingfrom box. Placebox on 2 paper towels.
Aftercookinglet stand2 minutes.
Placeslicedceleryand 2 tablespoonswater in 1;/2-quartcovered
microwavablecasserole.Stir halfwaythroughcooking.Cook until
tender-crisp.Let standcovered2 minutes.
Place husked corn and 2 tablespoons water in 11i2_quart
microwavable baking dish. Cover with plastic wrap and vent.
Cook until tender-crisp.
Let stand covered 5 minutes,
Placecornin ll/2-quart microwavablebakingdish. Cover with
plasticwrap and vent.Cook untiltender-crisp.
Let standcovered5 minutes.
Removeouter wrappingfrombox. Place boxon 2 paper towels.
Aftercookingletstand 2 minutes.
Pierce eggplant with fork and place on 2 paper towels. Turn over
hallway through cooking. Cook until you can pierce the skin easily
with a fork. Let stand 2 minutes. Cut in half to remove pulp.
Place eggplant and 2 tablespoons water in 2quart covered
microwavable casserole. Stir halfway through cooking. Let stand
covered 2 minutes.
Place sliced leeks and 2 tablespoons water in l-quart
microwavable covered casserole. Stir halfway through cooking.
Let stand covered 2 minutes,
Removeouterwrappingfrom box. Placebox on 2 paper towels.
Aftercookingletstand 2 minutes.
Placeslicedmushroomsin I to 11/2-quartcoveredmicrowavable
casserole.Stirhallwaythroughcooking. Assonn as mushrooms
beginto darken, removeand letstand covered2 minutes.
58
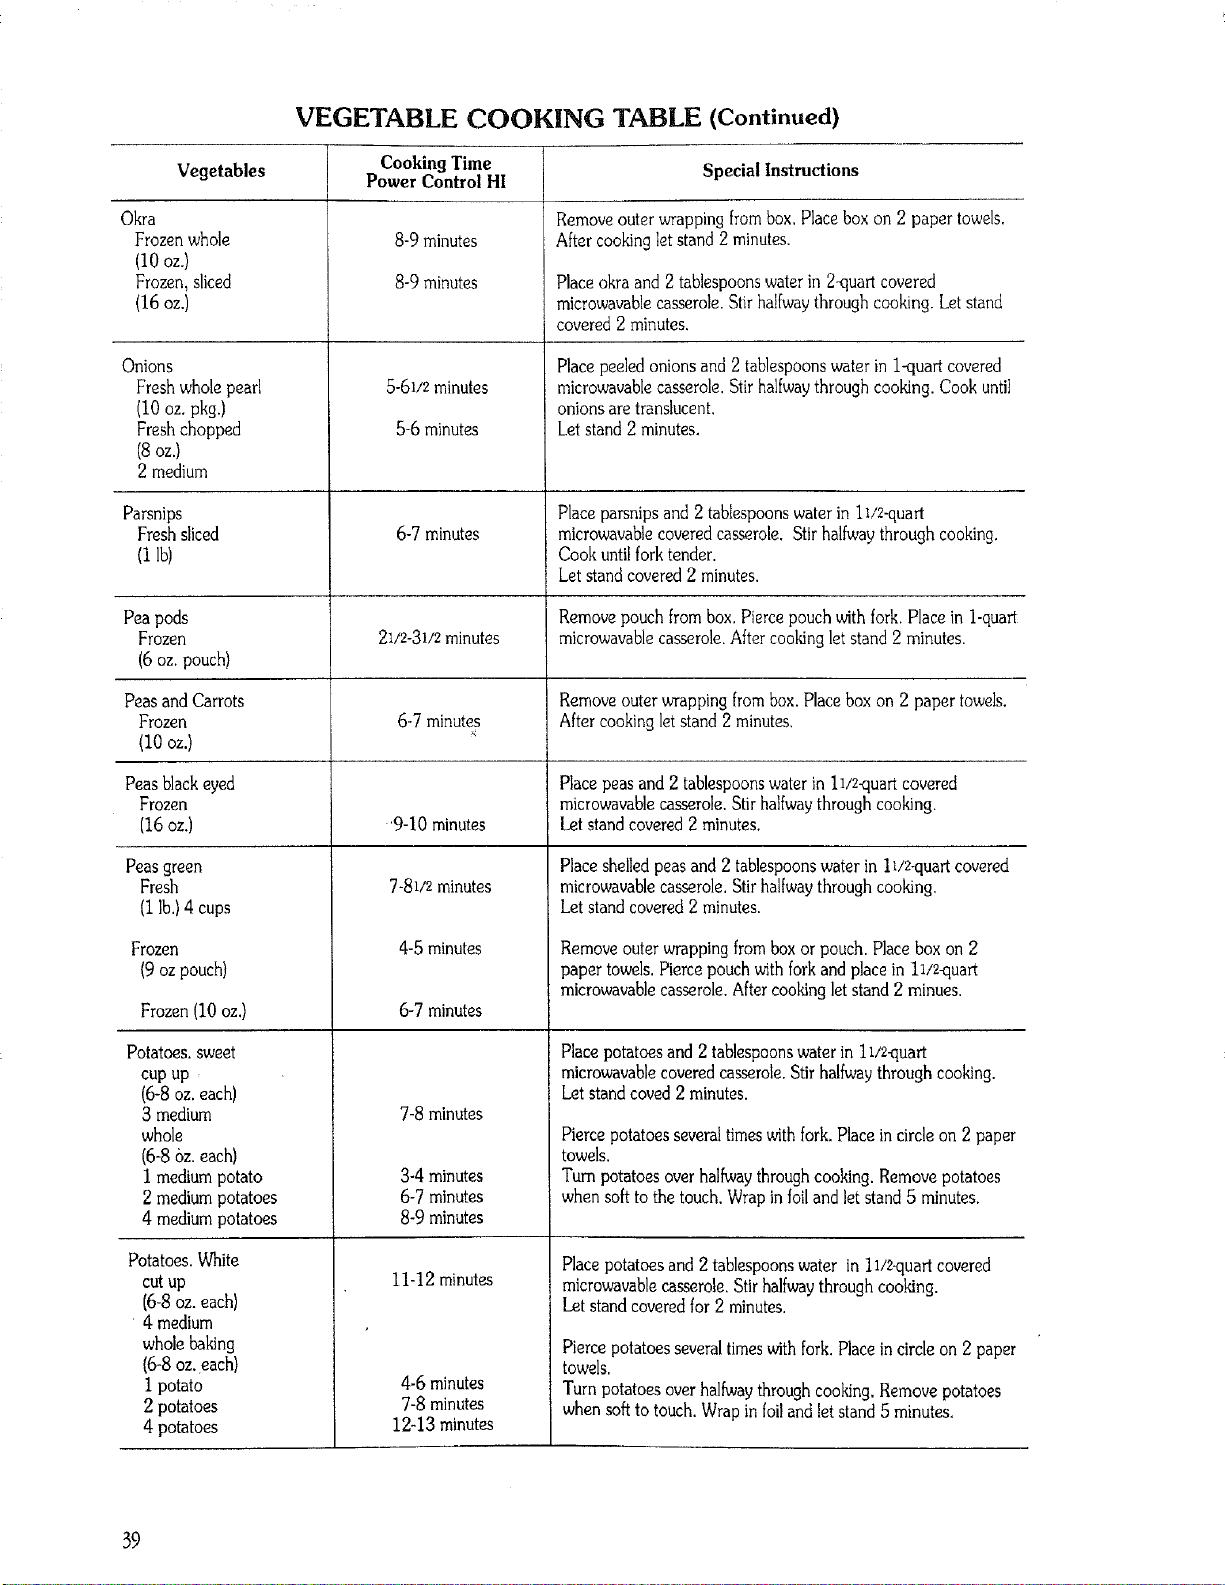
VEGETABLE COOKING TABLE (Continued)
Vegetables
Okra
Frozen whole
(10 oz.)
Frozen, sliced
(16 oz.)
Onions
Fresh whole pearl
(10 oz. pkg.)
Fresh chopped
(8oz.)
2 medium
Parsnips
Fresh sliced
(iIb)
Cooking Time
Power Control HI
8-9 minutes
8-9 minutes
5-61/2 minutes
5-6 minutes
6-7 minutes
Special Instructions
Remove outer wrapping from box. Place box on 2 paper towels.
After cooking let stand 2 minutes.
Placeokra and 2 tablespoonswater in 2_quartcovered
mierowavablecasserole.Stir halfwaythrough cooking. Letstand
covered2 minutes.
Place peeledonions and 2 tablespoonswater in l-quart covered
microwavablecasserole.Stir halfwaythrough cooking. Cook until
onions are transhcent
Letstand 2 minutes.
Placeparsnipsand 2 tablespoonswater in 11/2-quart
microwavablecoveredcasserole. Stirhalfwaythrough cooking.
Cook untilfork tender.
Let standcovered2 minutes.
Pea pods Remove pouch from box. Pierce pouch with fork. Place in l-quart
Frozen 21/2-31/2 minutes microwavable casserole. After cooking let stand 2 minutes.
(6 oz. pouch)
Peas and Carrots Remove outer wrapping from box. Place box on 2 paper towels.
Frozen 6-7 minutes After cooking let stand 2 minutes.
(10 oz.)
Peas black eyed Place peas and 2 tablespoons water in ll/Zquart covered
Frozen microwavable casserole. Stir halfway through cooking.
(16 oz.) Let stand covered 2 minutes.
9-10 minutes
7-81/2 minutes
4-5 minutes
6-7 minutes
7-8 minutes
3-4 minutes
6-7 minutes
8-9 minutes
11-12 minutes
4-6 minutes
7-8 minutes
12-13 minutes
Peas green
Fresh
(I lb.) 4 cups
Frozen
(9oz pouch)
Frozen(10 oz.)
Potatoes.sweet
cupup
(6-8 oz.each)
3 medium
whole
(6-8oz. each)
I mediumpotato
2 mediumpotatoes
4 mediumpotatoes
Potatoes. White
cut up
(6-8oz. each)
• 4 medium
wholebaking
(6-8 oz.each)
I potato
2 potatoes
4 potatoes
Place shelled peas and 2 tablespoons water in ll/2-quart covered
microwavable casserole. Stir halfway through cooking.
Let stand covered 2 minutes.
Remove outer wrapping from box or pouch. Place box on 2
paper towels. Pierce pouch with fork and place in 11i2quart
microwavable casserole. After cooking let stand 2 minues.
Placepotatoes and 2 tablespoonswater in 1I/2_!uart
microwavablecoveredcasserole.Stirhalfwaythrough cooking.
Letstand coved2 minutes.
Piercepotatoesseveral timeswithfork.Place in circleon 2 paper
towels,
Turn potatoes overhalfwaythroughcooking.Remove potatoes
when softto the touch. Wrap infoiland let stand 5 minutes.
Placepotatoes and 2 tablespoonswater in ll/2-quart covered
mierowavablecasserole.Stir halfwaythrough cooking.
Letstand coveredfor 2 minutes.
Piercepotatoes severaltimeswithfork. Placeincircle on 2 paper
towels.
Turnpotatoes over halfwaythroughcooking.Remove potatoes
whensoft to touch.Wrap in foiland let stand 5 minutes,
39
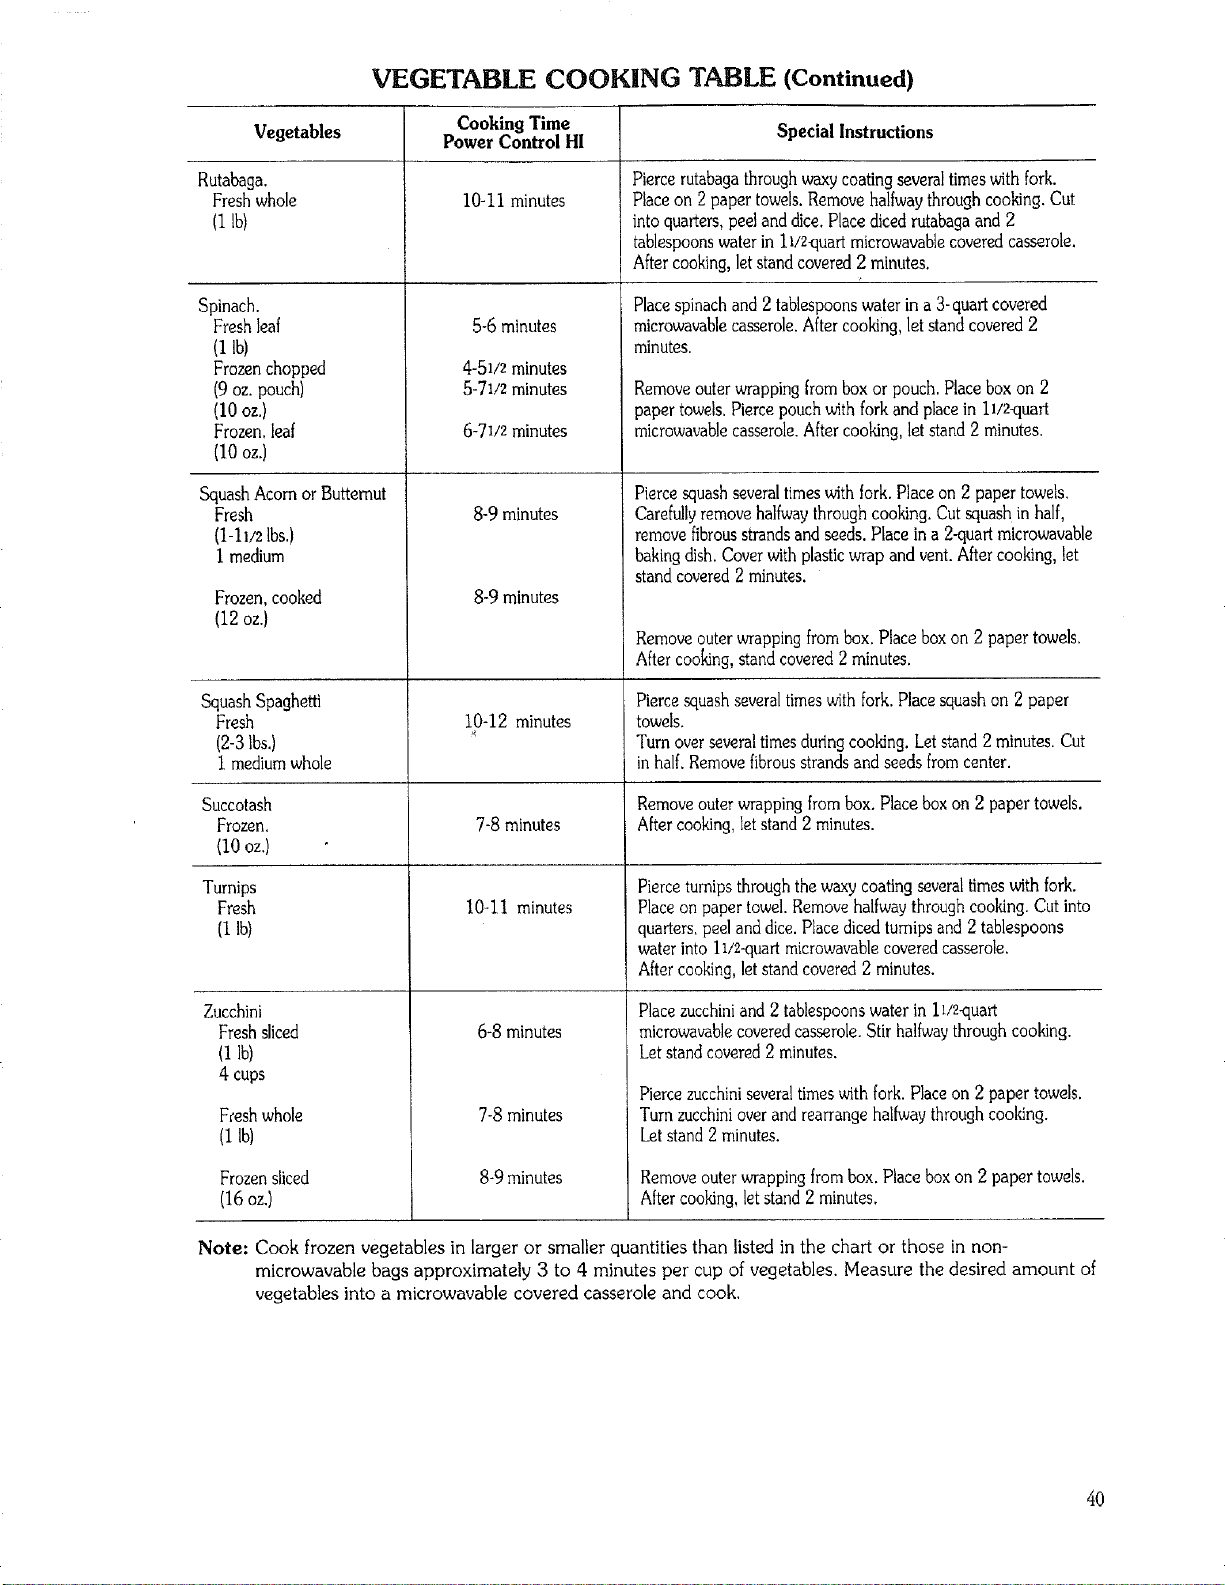
VEGETABLE COOKING TABLE (Continued)
Vegetables
Rutabaga.
Freshwhole
11Ib)
Spinach.
Fresh leaf
11Ibl
Frozen chopped
(9oz. pouch)
(10oz.)
Frozen,leaf
(10oz.)
Squash Acomor Butternut
Fresh
(1-11/2IbM
I medium
Frozen, cooked
(12 oz.)
SquashSpaghetti
Fresh
(2-3]bs.)
i mediumwhole
Cooking Time
Power Control HI
10-11minutes
5-6 minutes
4-51/2minutes
5-71/2minutes
6-71/2minutes
8-9 minutes
8-9minutes
10-12 minutes
SpecialInstructions
Piercerutabagathroughwaxy coatingseveraltimeswith fork.
Placeon 2 paper towels.Removehalfwaythrough cooking.Cut
into quarters,peeland dice. Placedicedrutabagaand 2
tablespoonswaterin 11/2quartmicrowavablecoveredcasserole,
Aftercooking,letstandcovered 2 minutes.
Placespinachand 2tablespoonswater in a 3-quart covered
mierowavablecasserole.Aftercooking,let standcovered2
minutes.
Removeouterwrappingfrom boxor pouch. Placebox on 2
paper towels.Piercepouchwithfork and placein 11/2quart
microwavablecasserole.Aftercooking, letstand 2 minutes.
Piercesquashseveraltimeswithfork. Placeon 2 paper towels.
Carefullyremovehalfwaythrough cooking.Cutsquash in half,
removefibrousstrands and seeds.Place ina 2-quartmierowavable
bakingdish. Coverwithplasticwrap and vent.Aftercooking, let
stand covered2 minutes.
Removeouterwrappingfrom box.Place boxon 2 paper towels.
Aftercooking,standcovered 2 minutes.
Piercesquashseveraltimes withfork. Placesquashon 2 paper
towels.
Turnoverseveraltimesduringcooking. Letstand 2 minutes.Cut
in half.Removefibrousstrandsand seedsfromcenter.
Succotash
Frozen.
(10oz.)
Turnips
Fresh
(1lb)
Zucchini
Fresh_iced
(IIb)
4 cups
Freshwhole
(I Ibl
Frozensliced
(16 oz.)
7-8 minutes
I0-11 minutes
6-8 minutes
7-8 minutes
8-9 minutes
Remove outer wrapping from box, Place box on 2 paper towels.
After cooking, let stand 2 minutes.
Pierce turnips through the waxy coating several times with fork.
Place on paper towel. Remove halfway through cooking. Cut into
quarters, peel and dice. Place diced turnips and 2 tablespoons
water into 11/2-quart microwavable covered casserole,
After cooking, let stand covered 2 minutes.
Place zucchini and 2 tablespoons water in ll!2-quart
microwavable covered casserole. Stir halfway through cooking.
Let stand covered 2 minutes.
Pierce zucchini several times with fork. Place on 2 paper towels,
Turn zucchini over and rearrange hallway through cooking.
Let stand 2 minutes.
Removeouterwrappingfrombox. Place boxon 2 paper towels.
Aftercooking,let stand2 minutes.
Note: Cook frozen vegetables in larger or smaller quantities than listed in the chart or those in non-
microwavable bags approximately 3 to 4 minutes per cup of vegetables. Measure the desired amount of
vegetables into a microwavable covered casserole and cook.
4O
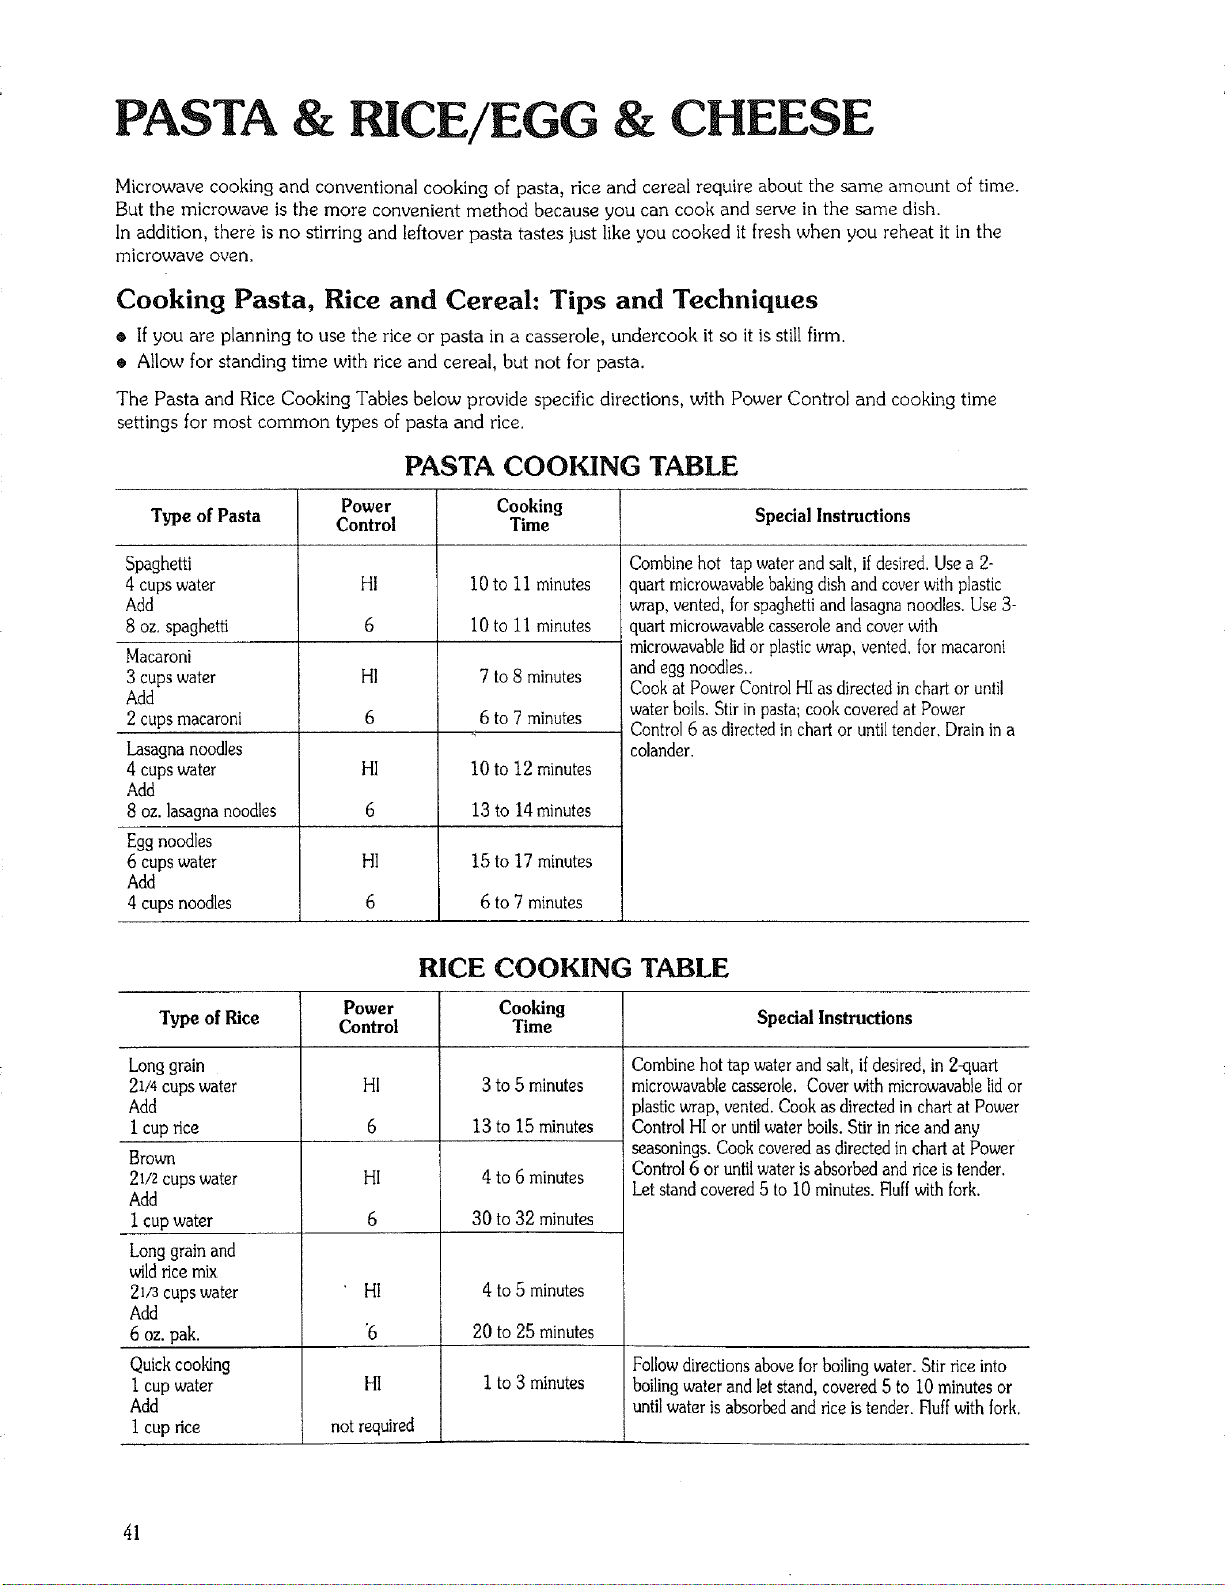
PASTA & CE/EGG & CHEESE
Microwave cooking and conventional cooking of pasta, rice and cereal require about the same arnount of time.
But the microwave is the more convenient method because you can cook and serve in the same dish.
In addition, there is no stirring and leftover pasta tastes just like you cooked it fresh when you reheat it in the
microwave oven+
Cooking Pasta, Rice and Cereal: Tips and Techniques
® If you are planning to use the rice or pasta in a casserole, undercook it so it is still firm.
® Allow for standing time with rice and cereal, but not for pasta.
The Pasta and Rice Cooking Tables below provide specific directions, with Power Control and cooking time
settings for most common types of pasta and rice.
PASTA COOKING TABLE
Type of Pasta
Spaghetti
4 cups water
Add
8 oz.spaghetti
Macaroni
3 cups water
Add
2 cups macaroni
Lasagnanoodles
4 cups water
Add
8 oz. lasagna noodles
Eggnoodles
6 cups water
Add
4 cups noodles
Power
Control
HI
6
HI
6
HI
6
HI
6
Cooking
Time
i0 to 11 minutes
I0 to 11 minutes
7 to 8 minutes
6 to 7 minutes
10 to 12 minutes
13 to 14 minutes
15 to 17 minutes
6 to 7 minutes
Special Instructions
Combine hot tap water and salt, if desired. Use a 2-
quart microwavable baking dish and cover with plastic
wrap, vented, for spaghetti and lasagna noodles. Use 3-
quart microwavable casserole and cover with
mlcrowavable lid or plastic wrap, vented, for macaroni
and egg noodles..
Cook at Power Control HI as directed in chart or until
water boils. Stir in pasta; cook covered at Power
Control 6 as directed in chaff or until tender, Drain in a
colander.
Type of Rice
Long grain
21/4 cups water
Add
I cup rice
Brown
21/2 cups water
Add
I cup water
Long grain and
wild rice mix
21/_ cups water
Add
6 oz. pak.
Quick cooking
I cup water
Add
1 cup rice
Power
Control
HI
6
HI
6
HI
'6
HI
not required
RICE COOKING TABLE
Cooking
Time
3to 5 minutes
13 to 15 minutes
4to 6 minutes
30 to 32 minutes
4 to 5 minutes
20 to 25 minutes
I to 3 minutes
Special Instructions
Combinehot tap water and salt,ifdesired,in 2<luart
microwavablecasserole. Coverwith microwavablelidor
plasticwrap, vented.Cookas directedin chart at Power
ControlHI or untilwaterboils.Stir in riceand any
seasonings. Cookcoveredasdirectedin chart at Power
Control6 or untilwateris absorbedand riceistender.
Letstand covered5 to 10 minutes. Fluffwithfork.
Followdirectionsaboveforboilingwater. Stir riceinto
boilingwater and letstand, covered5 to I0 minutesor
untilwater isabsorbedand riceistender. Huffwithfork.
41
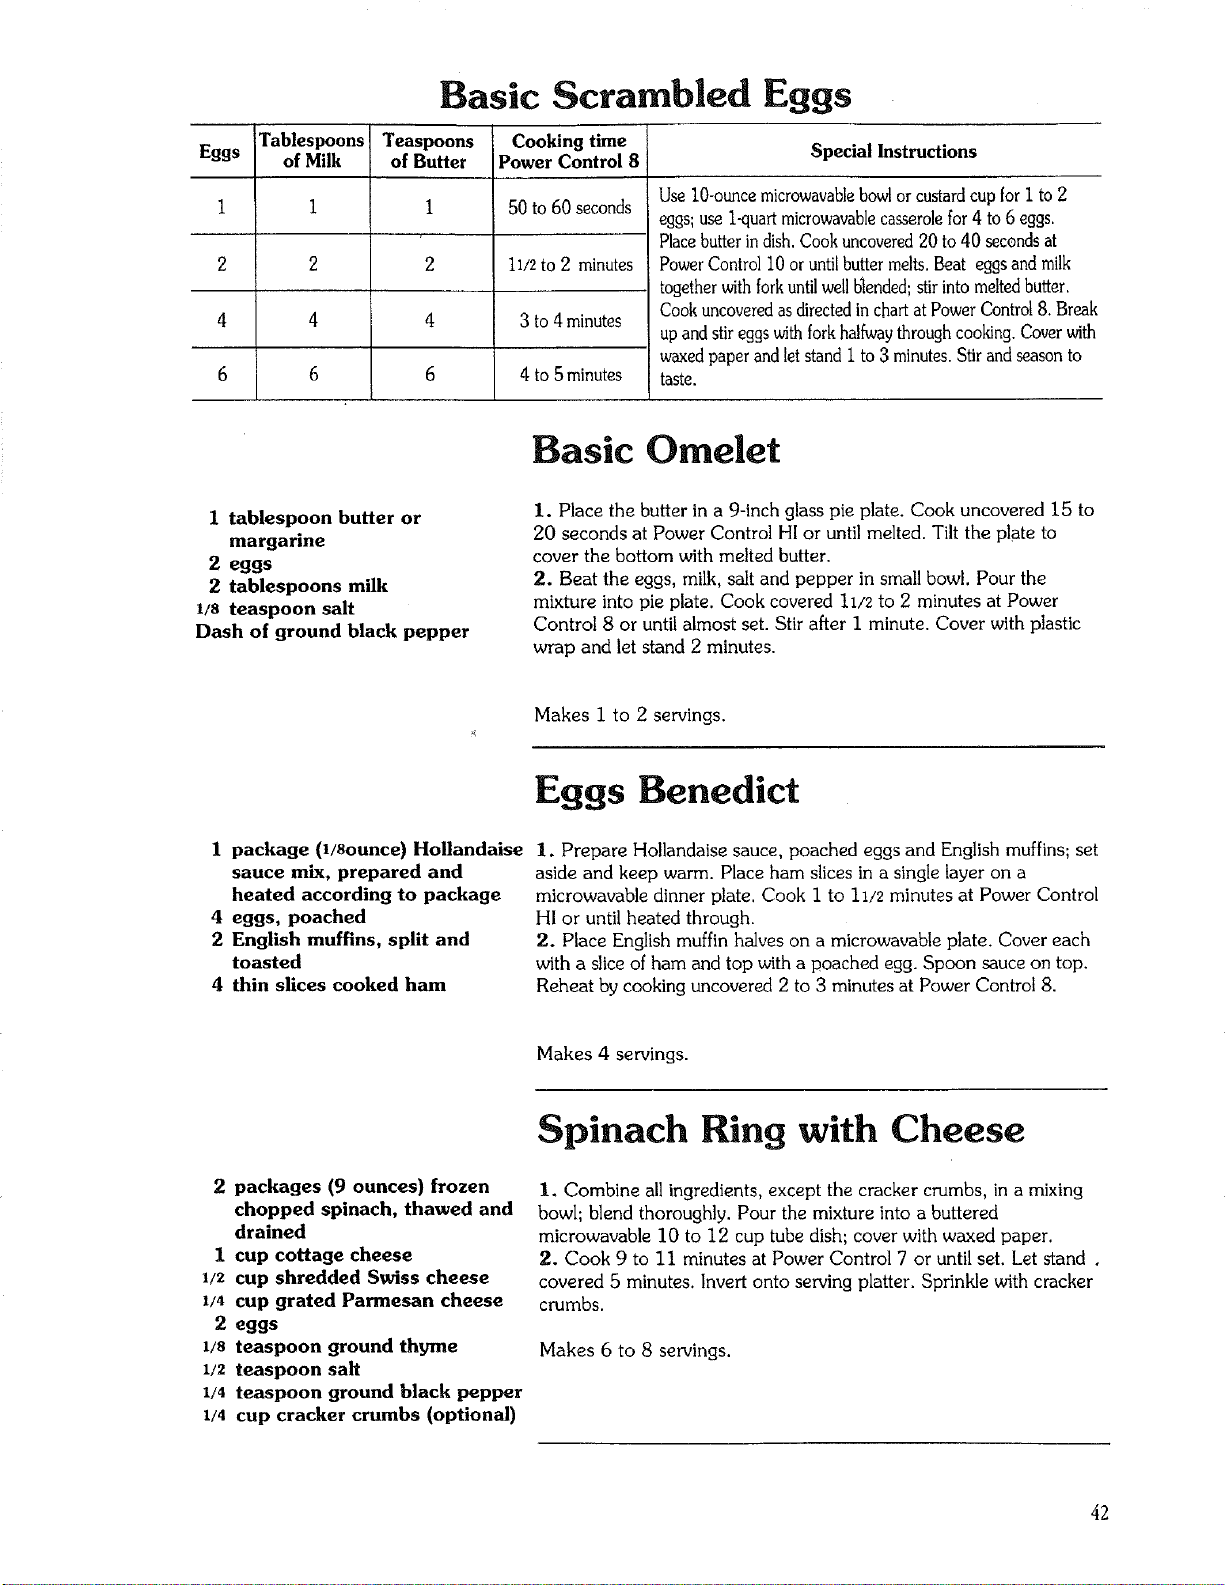
Eggs
1
2
4
6
Basic Scrambled Eggs
Tablespoons
of Milk
i
2
4
6
Teaspoons
of Butter
1
2
4
6
Cooking time
Power Control 8
50 to60 seconds
11/2to2 minutes
3 to 4 minutes
4 to 5minutes
Special Instructions
Use 10-ouncemicrowavablebowlor custardcup for I to 2
eggs:use l_uart microwavablecasserolefor4 to 6 eggs.
Placebutter indish. Cook uncovered20 to 40 secondsat
Power Control10 or untilbutter melts,Beat eggs and milk
togetherwith forkuntilwellbYnded;stir into meltedbutter.
Cookuncoveredas directedinchart atPower Control8. Break
upand stireggswithfork halfwaythrough cooking.Coverwith
waxedpaper and let stand i to 3 minutes.Stir and seasonto
taste,
Basic Omelet
1 tablespoon butter or
margarine
2 eggs
2 tablespoons milk
1/s teaspoon salt
Dash of ground black pepper
i. Place the butter in a 9-inch glass pie plate. Cook uncovered 15 to
20 seconds at Power Control HI or until melted. Tilt the plate to
cover the bottom with melted butter.
2. Beat the eggs, milk, salt and pepper in small bowl. Pour the
mixture into pie plate, Cook covered I:/2 to 2 minutes at Power
Control 8 or until almost set. Stir after 1 minute. Cover with plastic
wrap and let stand 2 minutes.
Makes 1 to 2 servings.
1 package (1/sounce) Hollandaise
sauce mix, prepared and
heated according to package
4 eggs, poached
2 English muffins, split and
toasted
4 thin slices cooked ham
Eggs Benedict
I. Prepare Hollandaise sauce, poached eggs and English muffins; set
aside and keep warm. Place ham slices in a single layer on a
microwavable dinner plate, Cook I to 1:/2 minutes at Power Control
HI or until heated through.
2. Place English muffin halves on a microwavable plate. Cover each
with a slice of ham and top with a poached egg. Spoon sauce on top.
Reheat by cooking uncovered 2 to 3 minutes at Power Control 8.
Makes 4 servings.
2 packages (9 ounces) frozen
chopped spinach, thawed and
drained
1 cup cottage cheese
1/2 cup shredded Swiss cheese
1/4 cup grated Parmesan cheese
2 eggs
l/s teaspoon ground thyme
1/2 teaspoon salt
1/4 teaspoon ground black pepper
1/4 cup cracker crumbs (optional)
Spinach Ring with Cheese
1. Combine all ingredients, except the cracker crumbs, in a mixing
bowl; blend thoroughly. Pour the mixture into a buttered
microwavable 10 to 12 cup tube dish; cover with waxed paper.
2. Cook 9 to 11 minutes at Power Control 7 or until set. Let stand o
covered 5 minutes. Invert onto serving platter. Sprinkle with cracker
crumbs.
Makes 6 to 8 servings.
42
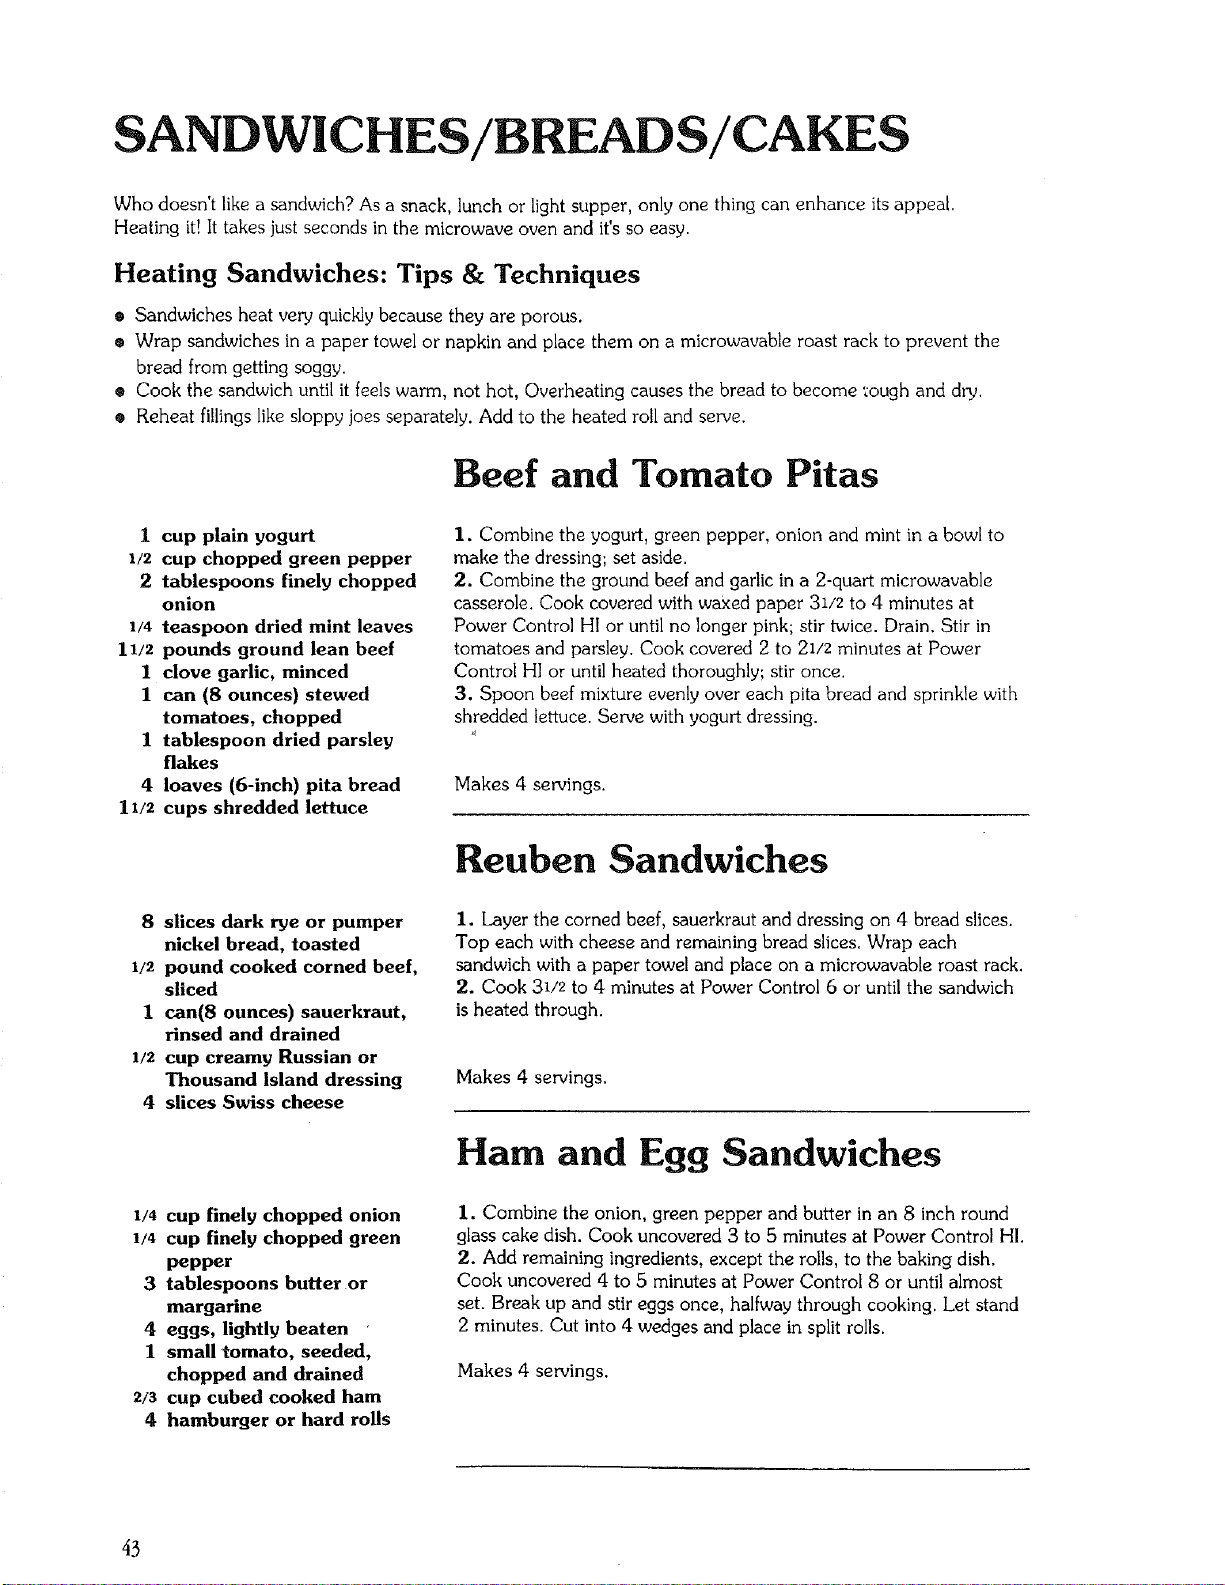
SANDWICHES/BREADS/CAKES
Who doesn't like a sandwich? As a snack, lunch or light supper, only one thing can enhance its appeal
Heating it! It takes just seconds in the microwave oven and it's so easy.
Heating Sandwiches: Tips & Techniques
o Sandwiches heat very quickly because they are porous.
• Wrap sandwiches in a paper towel or napkin and place them on a microwavable roast rack to prevent the
bread from getting soggy.
• Cook the sandwich until it feels warm, not hot, Overheating causes the bread to become _ough and dry_
® Reheat fillings like sloppy joes separately. Add to the heated roll and serve.
Beef and Tomato Pitas
1 cup plain yogurt
1/2 cup chopped green pepper
2 tablespoons finely chopped
onion
1/4 teaspoon dried mint leaves
11/z pounds ground lean beef
1 clove garlic, minced
I can (8 ounces) stewed
tomatoes, chopped
1 tablespoon dried parsley
flakes
4 loaves (6-inch) pita bread
11/2 cups shredded lettuce
1. Combine the yogurt, green pepper, onion and mint in a bowl to
make the dressing; set aside.
2. Combine the ground beef and garlic in a 2-quart microwavable
casserole. Cook covered with waxed paper 31/z to 4 minutes at
Power Control HI or until no longer pink; stir twice. Drain. Stir in
tomatoes and parsley. Cook covered 2 to 21/z minutes at Power
Control HI or until heated thoroughly; stir once.
3. Spoon beef mixture evenly over each pita bread and sprinkle with
shredded lettuce. Serve with yogurt dressing.
Makes 4 servings.
Reuben Sandwiches
8 slices dark rye or pumper
nickel bread, toasted
1/2 pound cooked corned beef,
sliced
1 can(8 ounces) sauerkraut,
rinsed and drained
1/2 cup creamy Russian or
Thousand Island dressing
4 slices Swiss cheese
1/4 cup finely chopped onion
1/4 cup finely chopped green
pepper
3 tablespoons butter or
margarine
4 eggs, lightly beaten '
I small tomato, seeded,
chopped and drained
2/3 cup cubed cooked ham
4 hamburger or hard rolls
1. Layer the corned beef, sauerkraut and dressing on 4 bread slices.
Top each with cheese and remaining bread slices. Wrap each
sandwich with a paper towel and place on a microwavable roast rack,
2. Cook 31/_ to 4 minutes at Power Control 6 or until the sandwich
is heated through.
Makes 4 servings.
Ham and Egg Sandwiches
I. Combine the onion, green pepper and butter in an 8 inch round
glass cake dish. Cook uncovered 3 to 5 minutes at Power Control HI.
2. Add remaining ingredients, except the rolls, to the baking dish.
Cook uncovered 4 to 5 minutes at Power Control 8 or until almost
set. Break up and stir eggs once, halfway through cooking. Let stand
2 minutes. Cut into 4 wedges and place in split rolls.
Makes 4 servings.
43
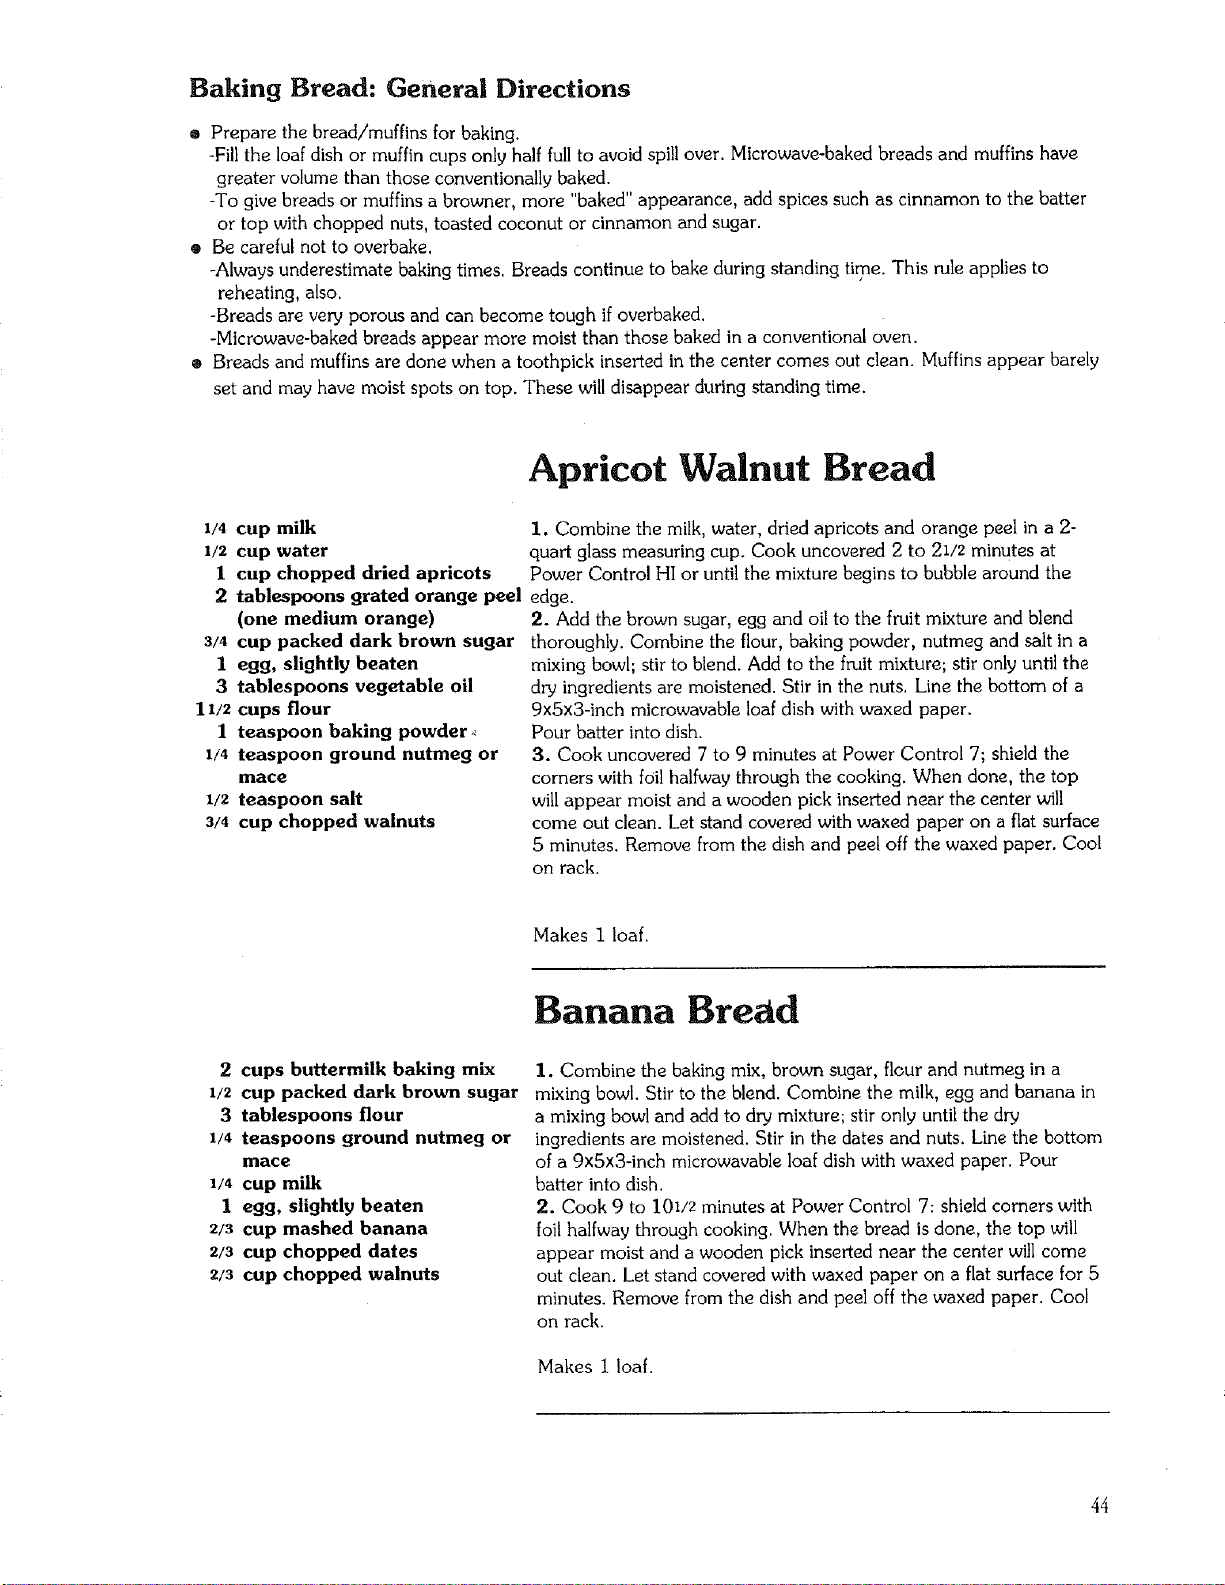
Baking Bread: General Directions
o Prepare the bread/muffins for baking.
-Fill the loaf dish or muffin cups only half full to avoid spill over. Microwave-baked breads and muffins have
greater volume than those conventionally baked.
-To give breads or muffins a browner, more "baked" appearance, add spices such as cinnamon to the batter
or top with chopped nuts, toasted coconut or cinnamon and sugar.
® Be careful not to overbake.
-Always underestimate baking times. Breads continue to bake during standing time. This role applies to
reheating, also.
-Breads are very porous and can become tough if overbaked.
-Microwave-baked breads appear more moist than those baked in a conventional oven.
® Breads and muffins are done when a toothpick inserted in the center comes out clean. Muffins appear barely
set and may have moist spots on top. These will disappear during standing time.
1/4 cup milk
1/2 cup water
1 cup chopped dried apricots
2 tablespoons grated orange peel
(one medium orange)
3/4 cup packed dark brown sugar
1 egg, slightly beaten
3 tablespoons vegetable oil
11/2 cups flour
1 teaspoon baking powder _
1/4 teaspoon ground nutmeg or
mace
l/z teaspoon salt
3/4 cup chopped walnuts
Apricot Walnut Bread
1. Combine the milk, water, dried apricots and orange peel in a 2-
quart glass measuring cup. Cook uncovered 2 to 21/2 minutes at
Power Control HI or until the mixture begins to bubble around the
edge.
2. Add the brown sugar, egg and oil to the fruit mixture and blend
thoroughly. Combine the flour, baking powder, nutmeg and salt in a
mixing bowl; stir to blend. Add to the fruit mixture; stir only until the
dry ingredients are moistened. Stir in the nuts. Line the bottom of a
9x5x3-inch microwavable loaf dish with waxed paper.
Pour batter into dish.
3. Cook uncovered 7 to 9 minutes at Power Control 7; shield the
corners with foil halfway through the cooking. When done, the top
will appear moist and a wooden pick inserted near the center will
come out clean. Let stand covered with waxed paper on a flat surface
5 minutes. Remove from the dish and peel off the waxed paper. Cool
on rack.
Makes I loaf.
Banana Bread
2 cups buttermilk baking mix
1/2 cup packed dark brown sugar
3 tablespoons flour
1/4 teaspoons ground nutmeg or
mace
1/4 cup milk
1 egg, slightly beaten
_/3 cup mashed banana
2/3 cup chopped dates
2/3 cup chopped walnuts
I. Combine the baking mix, brown sugar, flour and nutmeg in a
mixing bowl. Stir to the blend. Combine the milk, egg and banana in
a mixing bowl and add to dry mixture; stir only until the dry
ingredients are moistened. Stir in the dates and nuts. Line the bottom
of a 9x5×3-inch microwavable loaf dish with waxed paper. Pour
batter into dish.
2. Cook 9 to 101/2 minutes at Power Control 7: shield comers with
foil halfway through cooking. When the bread is done, the top will
appear moist and a wooden pick inserted near the center will come
out clean. Let stand covered with waxed paper on a flat surface for 5
minutes. Remove from the dish and peel off the waxed paper. Cool
on rack.
Makes I loaf.
44
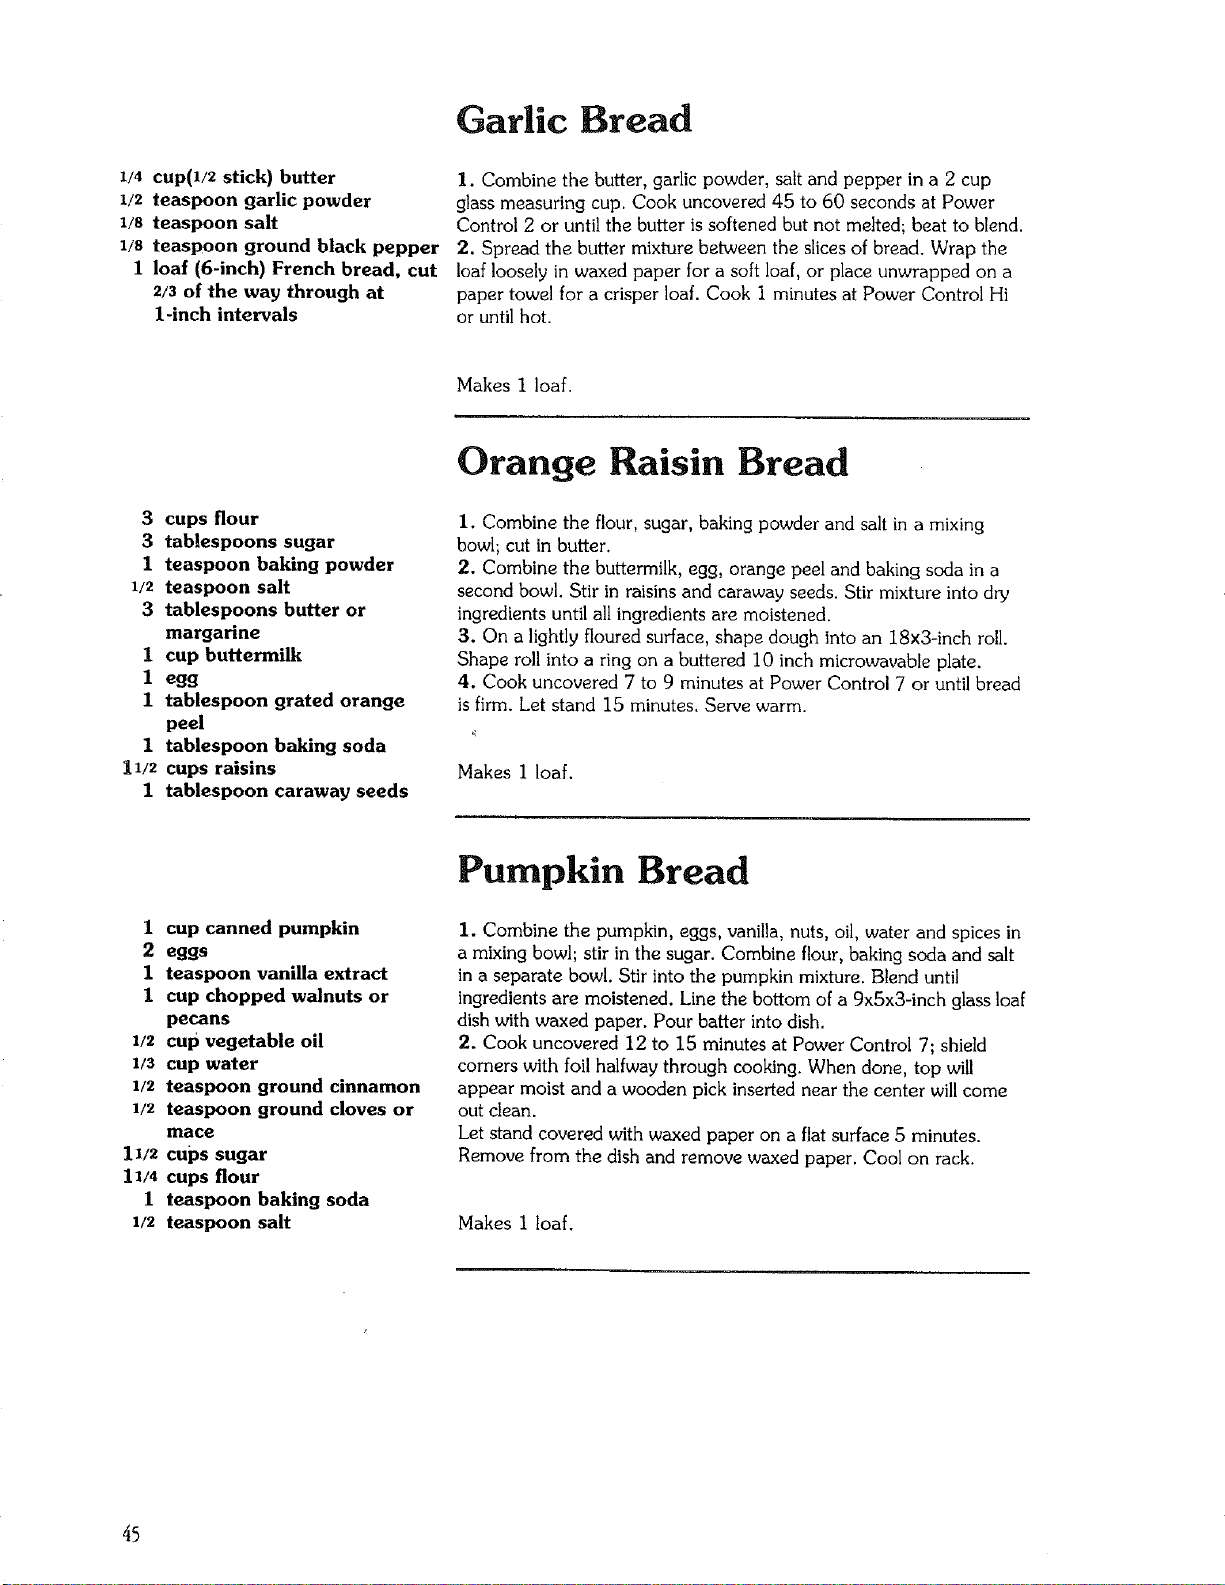
1/4 cup(l/2 stick) butter
1/2 teaspoon garlic powder
1/s teaspoon salt
1is teaspoon ground black pepper
1 loaf (6-inch) French bread, cut
2/3 of the way through at
1-inch intervals
Garlic Bread
I. Combine the butter, garlic powder, salt and pepper in a 2 cup
glass measuring cup. Cook uncovered 45 to 60 seconds at Power
Control 2 or until the butter is softened but not melted; beat to blend.
2. Spread the butter mixture between the slices of bread. Wrap the
loaf loosely in waxed paper for a soft loaf, or place unwrapped on a
paper towel for a crisper loaf. Cook 1 minutes at Power Control Hi
or until hot.
Makes 1 loaf.
3 cups flour
3 tablespoons sugar
1 teaspoon baking powder
1/2 teaspoon salt
3 tablespoons butter or
margarine
1 cup buttermilk
1 egg
1 tablespoon grated orange
peel
1 tablespoon baking soda
11/2 cups raisins
1 tablespoon caraway seeds
Orange Raisin Bread
1. Combine the flour, sugar, baking powder and salt in a mixing
bowl; cut in butter.
2. Combine the buttermilk, egg, orange peel and baking soda in a
second bowl. Stir in raisins and caraway seeds. Stir mixture into din
ingredients until all ingredients are moistened.
3. On a lightly floured surface, shape dough into an 18x3-inch roll.
Shape roll into a ring on a buttered 10 inch microwavable plate.
4. Cook uncovered 7 to 9 minutes at Power Control 7 or until bread
is firm. Let stand 15 minutes. Serve warm.
Makes 1 loaf.
1 cup canned pumpkin
2 eggs
1 teaspoon vanilla extract
1 cup chopped walnuts or
pecans
1/2 cup vegetable oil
1/3 cup water
1/2 teaspoon ground cinnamon
1/2 teaspoon ground cloves or
mace
11/2 cups sugar
11/4 cups flour
1 teaspoon baking soda
1/2 teaspoon salt
Pumpkin Bread
1. Combine the pumpkin, eggs, vanilla, nuts, oil, water and spices in
a mixing bowl; stir in the sugar. Combine flour, baking soda and salt
in a separate bowl. Stir into the pumpkin mixture. Blend until
ingredients are moistened. Line the bottom of a 9xSx3-inch glass loaf
dish with waxed paper. Pour batter into dish.
2. Cook uncovered 12 to 15 minutes at Power Control 7; shield
comers with foil halfway through cooking. When done, top will
appear moist and a wooden pick inserted near the center will come
out clean.
Let stand covered with waxed paper on a fiat surface 5 minutes.
Remove from the dish and remove waxed paper. Cool on rack.
Makes I loaf.
45
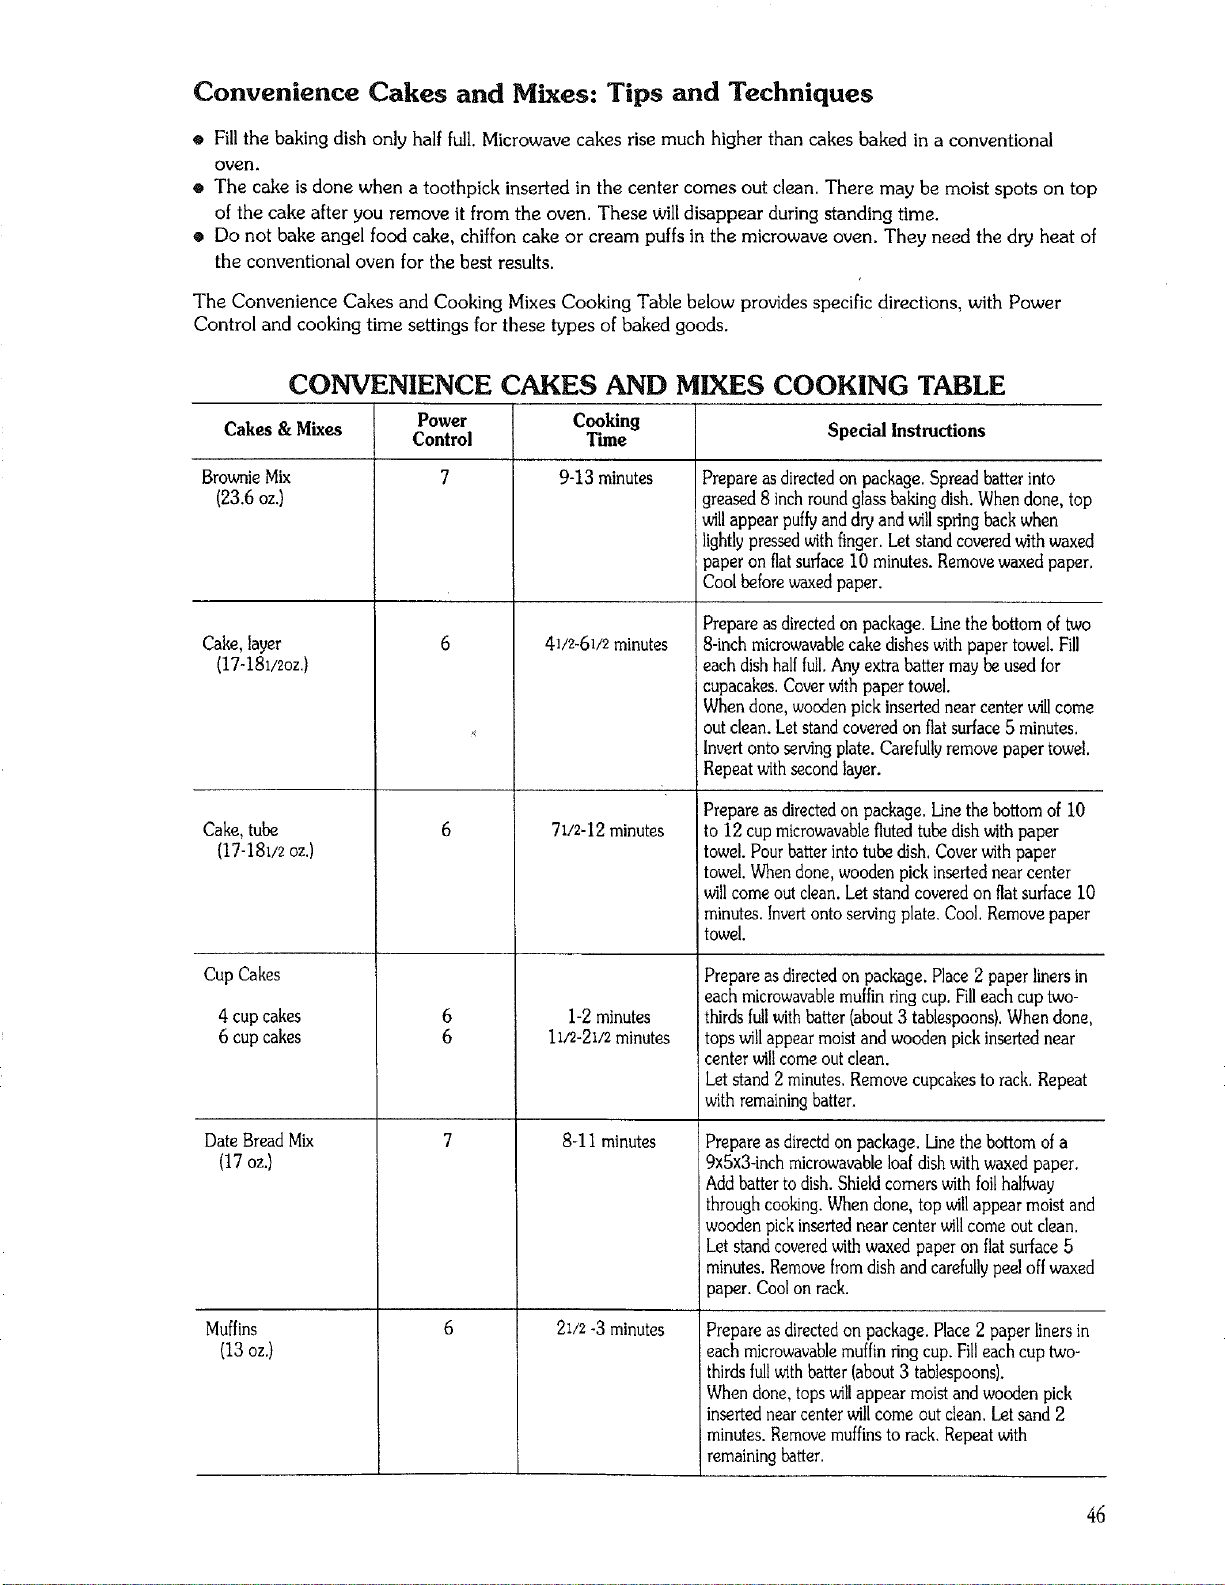
Convenience Cakes and MLxes: Tips and Techniques
e Fillthe baking dish only half full. Microwave cakes rise much higher than cakes baked in a conventional
oven.
® The cake is done when a toothpick inserted in the center comes out clean. There may be moist spots on top
of the cake after you remove it from the oven. These will disappear during standing time.
o Do not bake angel food cake, chiffon cake or cream puffs in the microwave oven. They need the dry heat of
the conventional oven for the best results.
The Convenience Cakes and Cooking Mixes Cooking Table below provides specific directions, with Power
Control and cooking time settings for these types of baked goods.
Cakes& Mixes
BrownieMix
(23.6 oz.)
Cake, layer
(17-181/2oz.)
Cake, tube
(17-181/2oz.)
Cup Cakes
4 cup cakes
6 cup cakes
Date BreadMix
(17 oz.)
Muffins
(13 oz,)
CONVENIENCE CAKES AND MIXES COOKING TABLE
Power Cooking
Control Tune Spedal Instructions
7 9-13 minutes
6
6
41/2-61/2 minutes
71/2-12minutes
1-2minutes
11/2-21/2minutes
8-11minutes
21/2-3 minutes
Prepare asdirectedon package.Spread batter into
greased8 inch roundglassbakingdish. Whendone, top
willappear puffyand dry and willspringback when
lightlypressedwithfinger.Letstand coveredwithwaxed
;paper on fiatsurfaceI0 minutes. Removewaxed paper.
Coolbeforewaxedpaper.
Prepare asdirectedon package. Linethe bottom of two
8-inch microwavablecakedishes withpaper towel.Fill
each dishhalffull.Anyextra battermaybe used for
cupacakes.Coverwithpaper towel.
Whendone, woodenpick insertednear centerwillcome
out clean.Let standcovered on flatsurface5 minutes.
Invertonto sewingplate. Carefullyremovepaper towel.
Repeat withsecondlayer.
Prepare as directedon package. Linethe bottom of 10
to 12 cup microwavableflutedtubedishwith paper
towel. Pourbatterinto tubedish. Coverwith paper
towel. Whendone,wooden pickinsertednear center
willcome outclean.Let stand coveredon flatsurface i0
minutes.Invertonto servingplate. Cool.Removepaper
towel.
Prepare asdirectedon package. Place2 paper linersin
each microwavablemuffinringcup. Filleachcup two-
thirdsfullwithbatter (about3 tablespoons).Whendone,
tops willappear moistand woodenpick insertednear
center willcomeout clean.
Letstand 2minutes.Removecupcakesto rack. Repeat
with remainingbatter.
Prepare as directdon package. Linethe bottom ofa
9x5x3-inchmicrowavableloafdishwith waxedpaper.
Addbetterto dish. Shieldcomers with foilhalfway
throughcooking.Whendone, top willappear moistand
wooden pickinsertednear center willcome out clean.
Letstand coveredwithwaxed paper on flatsurface5
minutes.Removefromdish and carefullypeel offwaxed
paper. Coolon rack.
Prepare asdirectedon package. Place 2 paper linersin
each microwavablemuffinringcup. Filleach cup two-
thirdsfullwithbatter(about3 tablespoons).
Whendone, topswillappear moistand woodenpick
insertednear centerwillcome outclean. Letsand 2
minutes.Removemuffinsto rack. Repeatwith
remainingbatter.
46
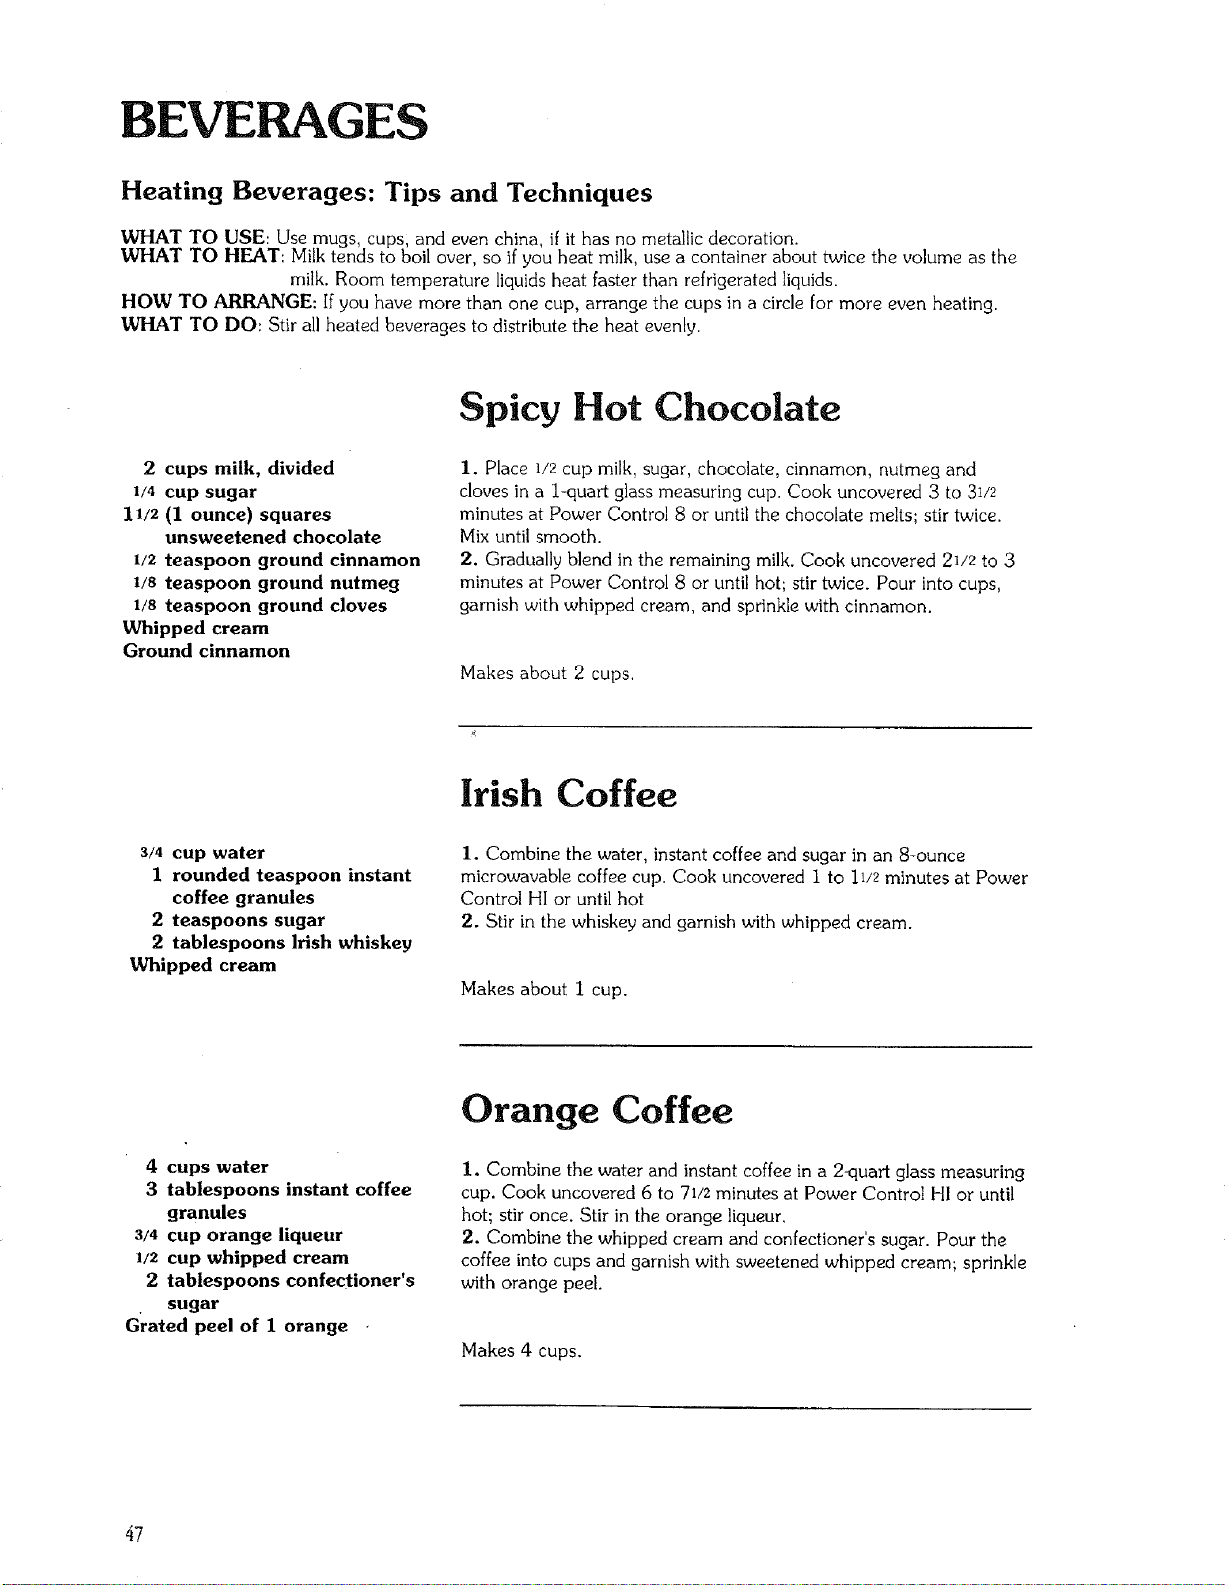
BEVERAGES
Heating Beverages: Tips and Techniques
WHAT TO USE: Use mugs cups, and even china, if it has no metallic decoration.
WHAT TO HEAT: Mi k tends to boil over, so if you heat milk, use a container about twice the volume as the
milk. Room temperature liquids heat faster than refrigerated liquids.
HOW TO ARRANGE: If you have more than one cup, arrange the cups in a circle for more even heating.
WHAT TO DO: Stir all heated beverages to distribute the heat evenly.
2 cups milk, divided
1/4 cup sugar
11/2 (1 ounce) squares
unsweetened chocolate
1/2 teaspoon ground cinnamon
1/8 teaspoon ground nutmeg
1is teaspoon ground cloves
Whipped cream
Ground cinnamon
Spicy Hot Chocolate
1. Place I/2 cup milk, sugar, chocolate, cinnamon, nutmeg and
cloves in a l-quart glass measuring cup. Cook uncovered 3 to 31/2
minutes at Power Control 8 or until the chocolate melts; stir twice.
Mix until smooth.
2. Gradually blend in the remaining milk. Cook uncovered 21/2 to 3
minutes at Power Control 8 or until hot; stir twice. Pour into cups,
garnish with whipped cream, and sprinkle with cinnamon.
Makes about 2 cups.
Irish Coffee
3/4 cup water
1 rounded teaspoon instant
coffee granules
2 teaspoons sugar
2 tablespoons Irish whiskey
Whipped cream
I. Combine the water, instant coffee and sugar in an 8-ounce
microwavable coffee cup. Cook uncovered i to 11/2 minutes at Power
Control HI or until hot
2. Stir in the whiskey and garnish with whipped cream.
Makes about 1 cup.
4 cups water
3 tablespoons instant coffee
granules
3/4 cup orange liqueur
1/2 cup whipped cream
2 tablespoons confectioner's
sugar
Grated peel of 1 orange ,
Orange Coffee
1. Combine the water and instant coffee in a 2_luart glass measuring
cup. Cook uncovered 6 to 71/2 minutes at Power Control HI or until
hot; stir once. Stir in the orange liqueur.
2. Combine the whipped cream and confectioner's sugar. Pour the
coffee into cups and garnish with sweetened whipped cream; sprinkle
with orange peel.
Makes 4 cups.
47
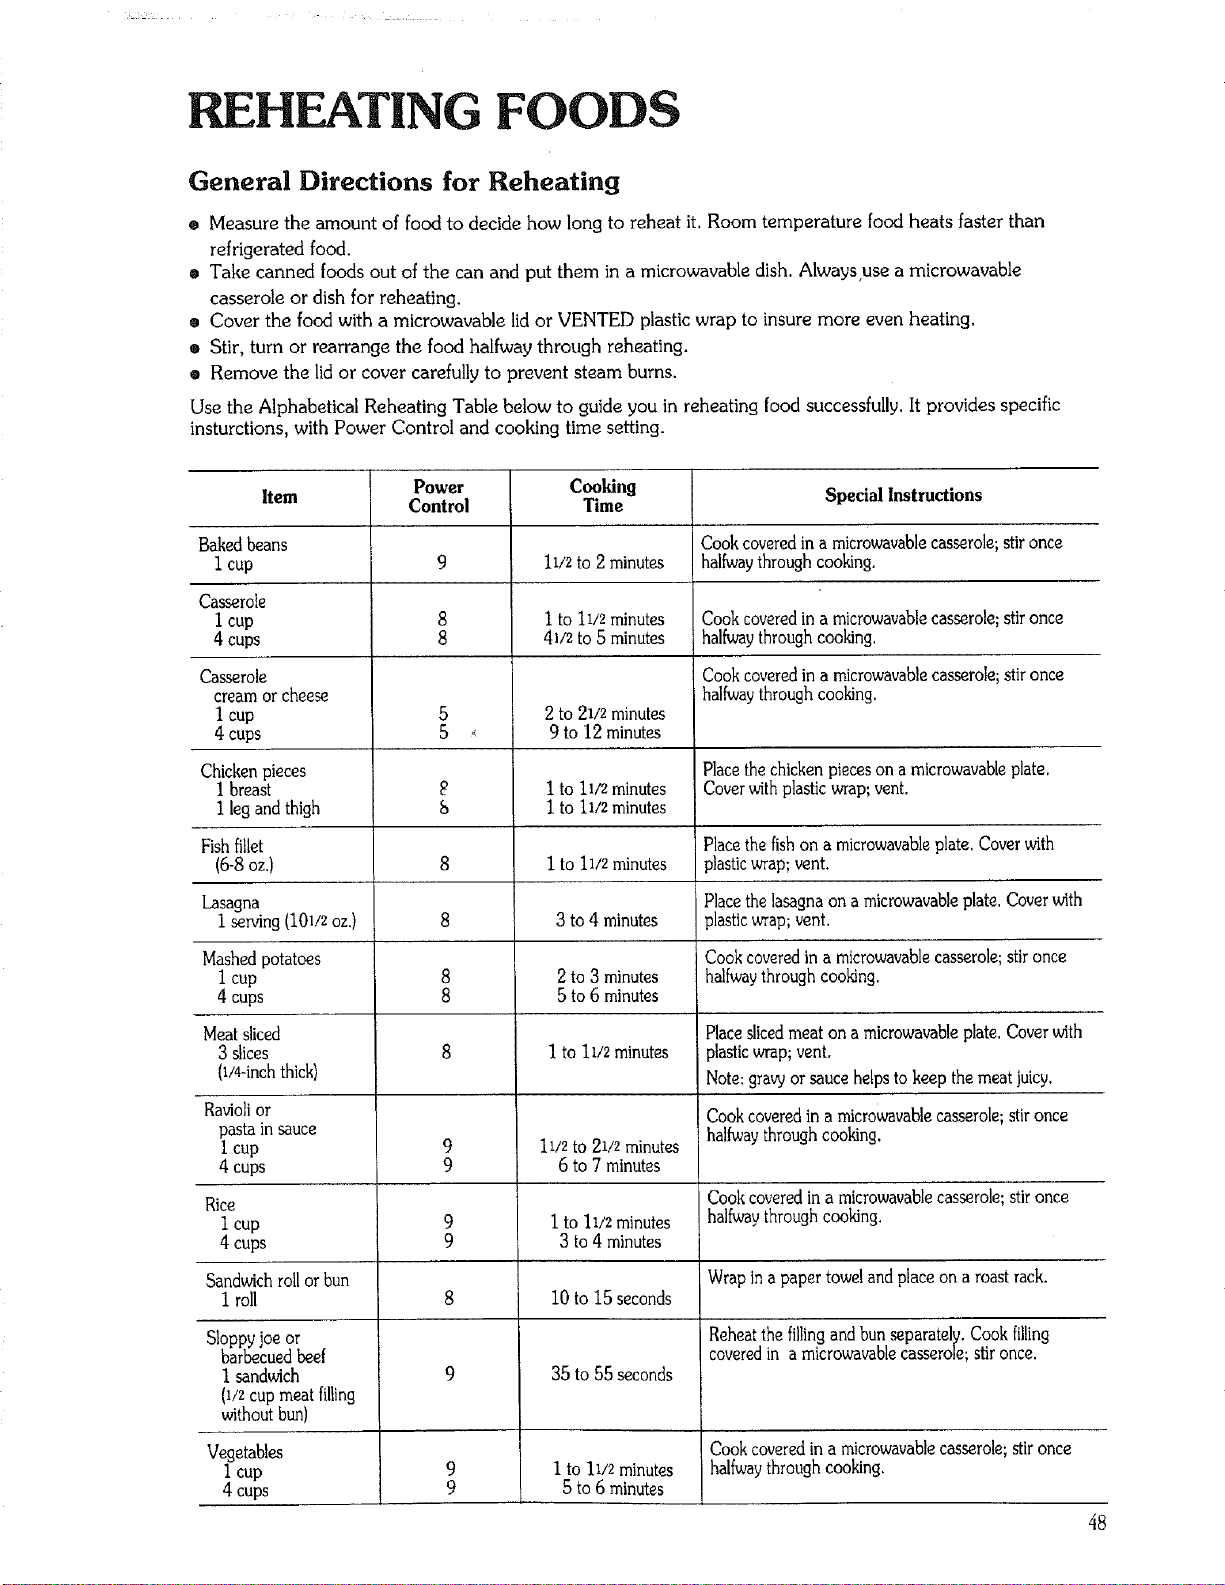
REHEATING FOODS
General Directions for Reheating
o Measure the amount of food to decide how long to reheat it, Room temperature food heats faster than
refrigerated food.
o Take canned foods out of the can and put them in a microwavable dish. Alwaysuse a microwavable
casserole or dish for reheating.
• Cover the food with a microwavable lid or VENTED plastic wrap to insure more even heating.
® Stir, turn or rearrange the food halfway through reheating.
e Remove the lid or cover carefully to prevent steam burns.
Use the Alphabetical Reheating Table below to guide you in reheating food successfully. It provides specific
insturctions, with Power Control and cooking time setting.
Item
Bakedbeans
I cup
Casserole
I cup
4 cups
Casserole
cream or cheese
1 cup
4 cups
Chickenpieces
I breast
I leg and thigh
Fish fillet
(6-8 oz.)
Lasagna
I serving(I01/2 OZ.)
Mashedpotatoes
I cup
4 cups
Meat sliced
3 slices
(I/4-inch thick)
Raviolior
pasta in sauce
I cup
4 cups
Rice
I cup
4 cups
Sandwichrollor bun
1 roll
Sloppyjoe or
barbecuedbeef
I sandwich
0/z cup meat filling
withoutbun)
Vegetables
I cup
4 cups
Power
Control
5
5 _:
8
8
8
8
8
8
Cooking
Time
11/2 to 2 minutes
1 to 11/2 minutes
41/2 to 5 minutes
2 to 21/2minutes
9 to 12 minutes
I to 11/_minutes
I to 11/2minutes
I to 11/2minutes
3 to 4 minutes
2 to 3 minutes
5 to 6 minutes
1 to II/2 minutes
11/2 to 21/2 minutes
6 to 7 minutes
I to 11/2 minutes
3 to 4 minutes
10 to 15 seconds
35 to 55 seconds
I to ll/2minutes
5 to 6minutes
Special Instructions
Cookcoveredin a microwavablecasserole;stir once
halfwaythrough cooking.
Cookcoveredin a microwavablecasserole;stir once
halfwaythroughcooking.
Cook covered in a microwavable casserole; stir once
halfway through cooking.
Place the chicken pieces on a microwavable plate.
Cover with plastic wrap; vent.
Placethe fishon a microwavableplate. Coverwith
plasticwrap; vent.
Place the lasagna on a microwavable plate. Cover with
31asticwrap; vent.
Cookcoveredin a microwavablecasserole;stir once
halfwaythrough cooking.
Place sliced meat on a microwavable plate. Cover with
_lasticwrap; vent.
Note: gravy or sauce helps to keep the meat juicy.
Cookcoveredin a microwavablecasserole;stir once
halfwaythroughcooking.
Cookcoveredin a microwavablecasserole;stir once
halfwaythroughcooking,
Wrap ina paper towel andplace on a roast rack.
Reheatthe fillingandbun separately.Cook filling
coveredin a microwavablecasserole;stironce.
Cookcoveredina microwavablecasserole;stironce
halfwaythroughcooking.
48
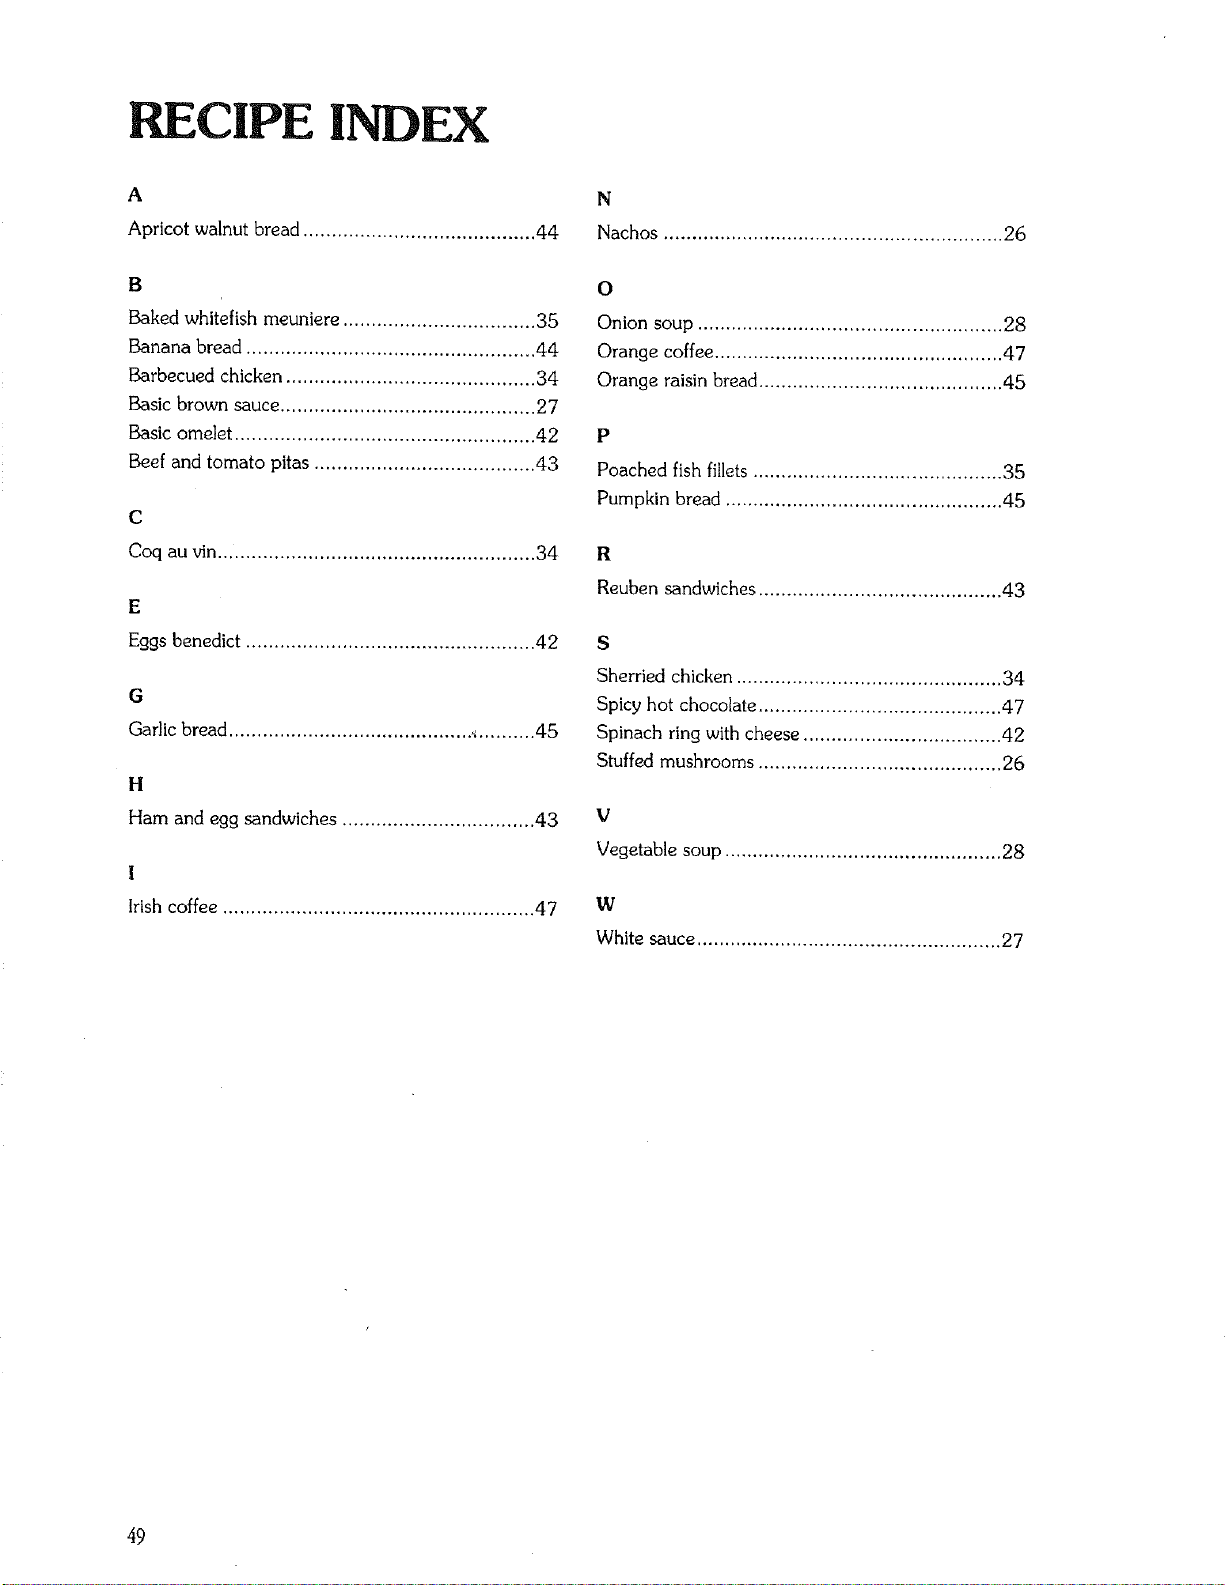
RECIPE INDEX
A
Apricot walnut bread ......................................... 44
B
Baked whitefish meuniere .................................. 35
Banana bread ................................................... 44
Barbecued chicken ............................................ 34
Basic brown sauce ............................................. 27
Basic omelet ..................................................... 42
Beef and tomato pitas ....................................... 43
C
Coq au vin........................................................ 34
E
Eggs benedict ................................................... 42
G
Garlic bread ........................................... ,l.......... 45
H
Ham and egg sandwiches .................................. 43
I
Irish coffee ....................................................... 47
N
Nachos ............................................................ 26
O
Onion soup ...................................................... 28
Orange coffee ................................................... 47
Orange raisin bread ........................................... 45
P
Poached fish fillets ............................................ 35
Pumpkin bread ................................................. 45
R
Reuben sandwiches ........................................... 43
S
Sherried chicken ............................................... 34
Spicy hot chocolate ........................................... 47
Spinach ring with cheese ................................... 42
Stuffed mushrooms ........................................... 26
V
Vegetable soup ................................................. 28
W
White sauce ...................................................... 27
49
QUESTIONS AND ANSWERS
OPERATION
Q. What is wrong when the oven light will not glow during cooking?
A. There may be several reasons why the oven light will not glow. Perhaps:
® Cooking time has not been set.
• START has not been touched.
• The light bulb is bumed out.
Q. Why does steam come out of the air exhaust vent?
A. Steam is normally produced during cooking. The microwave oven has been designed to vent this steam,
Q. Will the microwave oven be damaged if it operates empty?
A, Yes. Never operate the oven empty or without the glass turntable.
Q. Does microwave energy pass through the viewing screen in the door?
A. No. The metalscreen bounces back the energy to the oven cavity. The holes (or ports) only allow light to
pass through. They do not let microwave energy pass through.
Q. Why does the "beep" sound when a "pad" on the control panel is touched?
A. The "beep" tell you that the setting is properly entered..
Q. Can my microwave oven be damaged if food is cooked for too long a period of time?
A. Like any other cooking appliance, it is possible to overcook food to the point where the food creates smoke
and even possible fire damage to the inside of the oven. It is always best to be near the oven while it is in
the cooking process. See "Important Safety Instructions: on page 2.
Q. When the oven is plugged into wall outlet for the first time, it might not work properly. What is wrong?
A. The microcomputer controlling your oven may temporarily become scrambled and fail to function as
programmed when you plug in for the first time or when power resumes after a power interruption. Unplug
the oven from the 120 volt household outlet and then plug it back in to reset the microcomputer.
Q. Why do I see light reflection around the outer case?
A. This light is from the oven light which is located between the oven cavity and the outer wall of the oven.
Q. What are the various abnormal sounds I hear when the microwave oven is operating?
A. The clicking sound is caused by a mechanical switch turning the microwave oven's magnetron ON and OFF.
The heavy hum and clunk is from the change in power the magnetron draws as it is turned ON and OFF by
a mechanical switch.
The change in blower speed is from the change in line voltage caused by the magnetron being turned ON
and OFF.
5O
QUESTIONS AND ANSWERS Co.t,d)
FOODS
Q What is wrong when baked foods have a hard, dry, brown spot?
A. A hard, dry, brown spot indicates overcooking. Shorten the cooking or reheating time.
Q. Why do eggs sometimes pop?
A. When baking, frying or poaching eggs, the yolk may pop due to steam build-up inside the yolk membrane.
To prevent this, simply pierce the yolk with a wooden pick before cooking.
CAUTION: NEVER MICROWAVE EGGS IN THE SHELL.
Q. Why are scrambled eggs sometimes a little dry after cooking?
A. Eggs dry out ifthey are overcooked though the same recipe is used each time. The cooking time may need
to be varied for one of these reasons:
. Eggs vary in size.
. Eggs are at room temperature one time and at refrigerator temperature another time.
. The shapes of utensils vary, thereby making it necessary to vary the cooking time.
. Eggs continue cooking during standing time.
Q. Is it possible to pop corn in a microwave oven?
A. Yes, ifusing one of the two method described below:
(1)Microwave-popping devices designed specifically for microwave cooking,
(2) Prepackaged commercial microwave popcorn that contains specific times and power outputs needed for
an acceptable final product.
FOLLOW EXACT DIRECTIONS GIVEN BY EACH MANUFACTURER FOR THEIR POPCORN POPPING
PRODUCT AND DO NOT LEAVE THE OVEN UNATTENDED WHILE THE CORN IS BEING POPPED.
IF CORN FAILS TO POP AFTER THE SUGGESTED TIMES, DISCONTINUE COOKING.
OVERCOOKING COULD RESULT IN AN OVEN FIRE,
CAUTION: . NEVER USE A BROWN PAPER BAG FOR POPPING CORN OR ATFEMPT TO POP
LEFTOVER KERNELS.
. DO NOT POP PREPACKAGED COMMERCIAL MICROWAVE POPCORN DIRECTLY ON
THE GLASS TURNTABLE. TO AVOID EXCESSIVE HEATING OF THE GLASS
TURNTABLE, POSITION THE POPCORN BAG ON A PLATE.
Q. Why do baked apples sometimes burst during cooking?
A. The peeling has not been removed from the top half of each apple to allow for expansion of the interior of
the apple during cooking. As in conventional cooking methods, the interior of the apple expands during the
cooking process.
Q. Why do baked potatoes sometimes burn during cooking?
A. If the cooking time is too long, fire could result. At the end of the recommended cooking time potatoes
should be slightly firm.
CAUTION: DO NOT OVERCOOK.
Q. Why is a standing time recommended after microwave cooking time is over?
A. Standing time allows foods to continue cooking evenly for a few minutes after the actual microwave oven
cooking cycle. The amount of standing time depends upon the density of the food.
Q. Why is additional time required for cooking food stored in the refrigerator?
A. As in conventional cooking, the initial temperature of food affects total cooking time. You need more time
to cook food taken out of a refrigerator than for food at room temperature.
51

BEFORE CALLING SERVICE
You can often correct operating problems yourself. If your microwave oven fails to work properly, locate the
operating problem in the list below and try the solutions listed for each problem.
If the microwave oven still does not work properly, contact the nearest Sears Service Center. Sears Service
Centers are fully equipped to handle your service requirements.
PROBLEM:
Oven will not start
® Is the power cord plugged in?
o Is the door closed?
• Is the cooking time set?
Arcing or Sparking
® Are you using approved cookware?
• Is the oven empty?
Incorrect Time of Day
o Have you tried to reset the Time of Day?
Unevenly Cooked Foods
e Are you using approved cookware?
• Is the glass turntable in the oven?
o Did you turn or stir the food while it was cooking?
® Were the foods completely defroste_d?
® Was the time/cooking power level correct?
Overcooked Foods
® Was the time/cooking power level correct?
Undercooked Foods
• Are you using approved cookware?
• Were the foods completely defrosted?
o Was the time/cooking power level correct?
• Are the ventilation ports clear?
Improper Defrosting
• Are you using approved cookware?
• Was the time/cooking power level correct?
• Did you turn or stir the food during the defrosting cycle?
• Is the glass turntable in the oven?
52
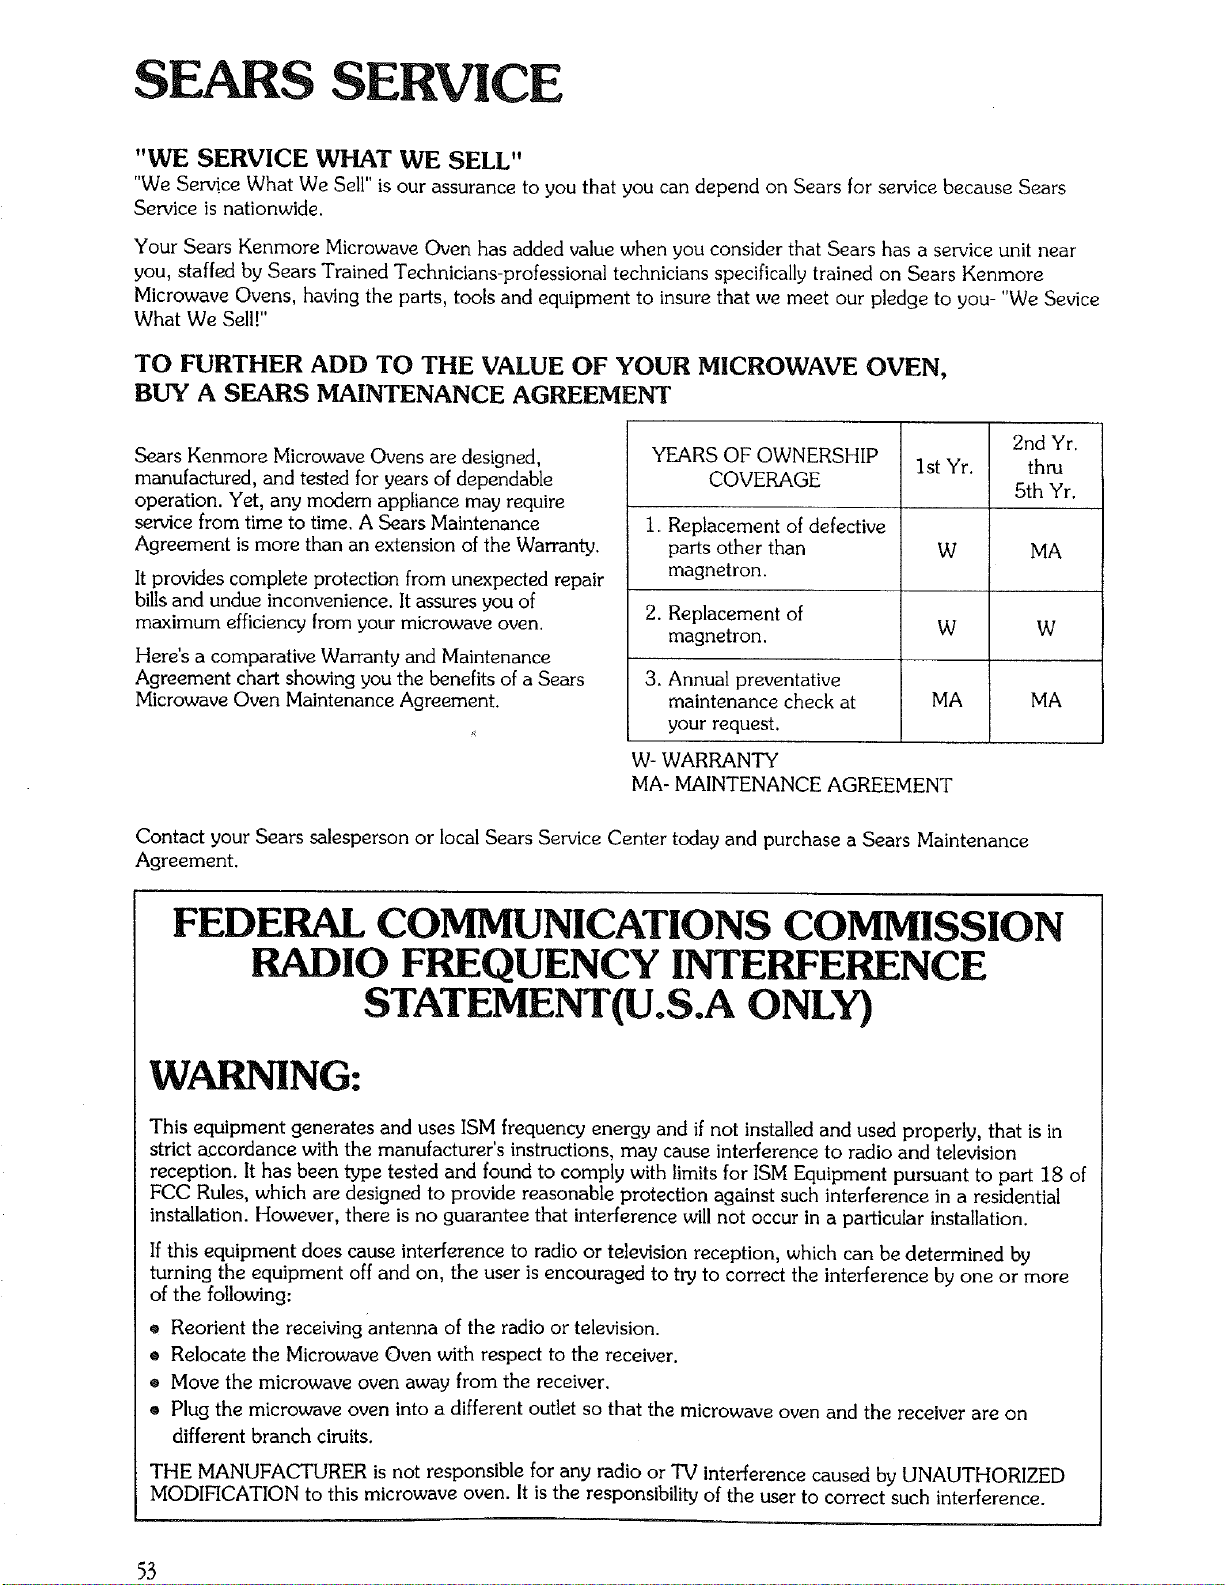
SEARS SERVICE
"WE SERVICE WHAT WE SELL"
"We Service What We Sell" is our assurance to you that you can depend on Sears for service because Sears
Service is nationwide.
Your Sears Kenmore Microwave Oven has added value when you consider that Sears has a service unit near
you, staffed by Sears Trained Technicians-professional technicians specifically trained on Sears Kenmore
Microwave Ovens, having the parts, tools and equipment to insure that we meet our pledge to you- "We Sevice
What We Sell!"
TO FURTHER ADD TO THE VALUE OF YOUR MICROWAVE OVEN,
BUY A SEARS MAINTENANCE AGREEMENT
Sears Kenmore Microwave Ovens are designed,
manufactured, and tested for years of dependable
operation. Yet, any modem appliance may require
service from time to time. A Sears Maintenance
Agreement is more than an extension of the Warranty.
It provides complete protection from unexpected repair
bills and undue inconvenience. It assures you of
maximum efficiency from your microwave oven.
Here's a comparative Warranty and Maintenance
Agreement chart showing you the benefits of a Sears
Microwave Oven Maintenance Agreement.
2nd Yr.
YEARS OF OWNERSHIP 1st Yr. thru
COVERAGE 5th Yr.
I. Replacement of defective
parts other than W MA
magnetron.
2. Replacement of
magnetron. W W
3. Annual preventative
maintenance check at MA MA
your request.
W- WARRANTY
MA- MAINTENANCE AGREEMENT
Contact your Sears salesperson or local Sears Service Center today and purchase a Sears Maintenance
Agreement.
FEDERAL COMMUNICATIONS COMMISSION
RADIO FREQUENCY INTERFERENCE
STATEMENT(U.S.A ONLY)
WARNING:
This equipment generates and uses ISM frequency energy and if not installed and used properly, that is in
strict _ccordance with the manufacturer's instructions, may cause interference to radio and television
reception. It has been type tested and found to comply with limits for ISM Equipment pursuant to part 18 of
FCC Rules, which are designed to provide reasonable protection against such interference in a residential
installation. However, there is no guarantee that interference will not occur in a particular installation.
If this equipment does cause interference to radio or television reception, which can be determined by
turning the equipment off and on, the user is encouraged to try to correct the interference by one or more
of the following:
® Reorient the receiving antenna of the radio or television.
® Relocate the Microwave Oven with respect to the receiver.
® Move the microwave oven away from the receiver.
® Plug the microwave oven into a different outlet so that the microwave oven and the receiver are on
different branch ciruits.
THE MANUFACTURER is not responsible for any radio or TV interference caused by UNAUTHORIZED
MODIFICATION to this microwave oven. It is the responsibility of the user to correct such interference.
53
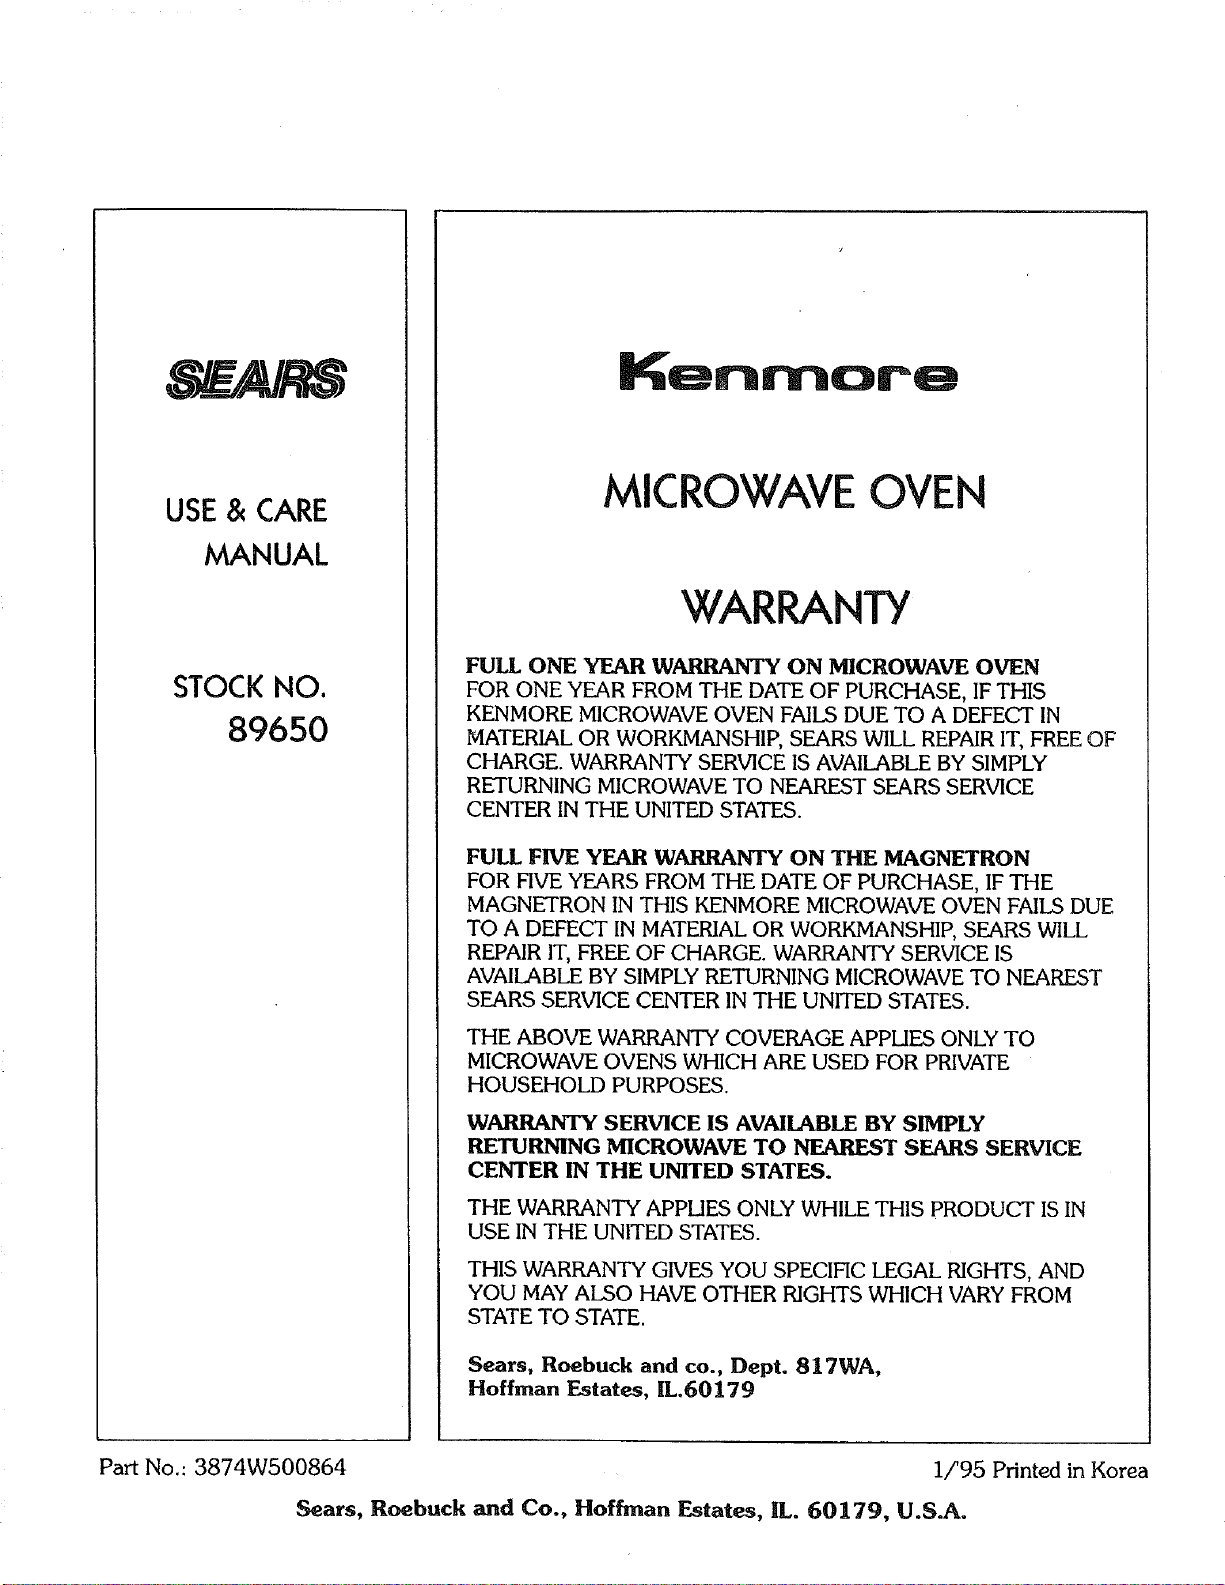
USE & CARE
MANUAL
STOCKNO.
89650
MICROWAVE OVEN
WARRANTY
FULL ONE YEAR WARRANTY ON MICROWAVE OVEN
FOR ONE YEAR FROM THE DATE OF PURCHASE, IF THIS
KENMORE MICROWAVE OVEN FAILS DUE TO A DEFECT IN
MATERIAL OR WORKMANSHIP, SEARS WILL REPAIR IT, FREE OF
CHARGE. WARRANTY SERVICE IS AVAILABLE BY SIMPLY
RETURNING MICROWAVE TO NEAREST SEARS SERVICE
CENTER IN THE UNITED STATES.
FULL FIVE YEAR WARRANTY ON THE MAGNETRON
FOR FIVE YEARS FROM THE DATE OF PURCHASE, IF THE
MAGNETRON IN THIS KENMORE MICROWAVE OVEN FAILS DUE
TO A DEFECT IN MATERIAL OR WORKMANSHIP, SEARS WILL
REPAIR IT, FREE OF CHARGE. WARRANTY SERVICE IS
AVAILABLE BY SIMPLY RETURNING MICROWAVE TO NEAREST
SEARS SERVICE CENTER IN THE UNITED STATES.
THE ABOVE WARRANTY COVERAGE APPLIES ONLY TO
MICROWAVE OVENS WHICH ARE USED FOR PRIVATE
HOUSEHOLD PURPOSES.
WARRANTY SERVICE IS AVAILABLE BY SIMPLY
RETURNING MICROWAVE TO NFAREST SEARS SERVICE
CENTER IN THE UNITED STATES.
THE WARRANTY APplIES ONLY WHILE THIS PRODUCT IS IN
USE IN THE UNITED STATES.
THIS WARRANTY GIVES YOU SPECIFIC LEGAL RIGHTS, AND
YOU MAY ALSO HAVE OTHER RIGHTS WHICH VARY FROM
STATE TO STATE.
Sears, Roebuck and co., Dept. 817WA,
Hoffman Estates, IL60179
Part No.: 3874W500864 1/'95 Printed in Korea
Sears, Roebuck and Co., Hoffman Estates, IL. 60179, U.S.A.