GEAppliances
Models 18-25
Part No. 162D3948PO05 Pub.No. 49.6971
Congratulations!
YouAre Now Part of theGEFamily.
Welcome/o tim GE f_tmily.
We're proud of our quality
products and we are
commitmd to providing
dependable se_Tice. You'll
see it in this easy-lo-use
Owner' s Mmmal and you'll
hem il in/he fi_iendly voices
of our customer se_,ice
departmenl.
Best of all, you'll experience
these values ea(h dine you
use your refl_igerator.
That's importanl, because
your new refl_igerator will
be part of your family fin.
ma W yem_. And we hope
you will be pmt of ours f_)ra
long lime to come.
We thankyou fi)r bwing
GE. We appreciate your
purchase, and hope you
_ll condnue lo rely on us
whenever you need quality
appliances for your home.
Important!
Staple sales slip or cancelled
check here.
Proof of the original purchase date
is needed to obtain service under
the warran_
2
Write the model and serial
numbershere.
#
#
Youcan find them on a label on the
left side, near the top of the fresh food
compa%ment.
GE& You,
A Service Pattnership
Ask any GE appliance owner and they will
tefl you we stand behind our products with
unmatched quality service, However, did
you know that most questions result from
simple problems that you can easily fix
yourseff in just a few minutes? This
Owner's Manual can tell you how,
ReadthisManual
Inside you _dll find many
helpflll hinls on how lo use and
maintain your refiigeralor
properly..lust a linle preventive
cme on your part can save }_m a
greal deal of time and money
over lhe life of your reflJgeralor.
Reviewthe Sectionon
TroubleshootingTips
You'll find many answers lo
common problems here.
If you review our charl of
Troubleshooting Tips firsl,
)X)tlIn W nol need lo call tor
sel_ice al all.
ff YouNeedService
If you do need sewice, you can
relax knoxdng help isonly a
phone call mvay.A lisl of loll-flee
cuslolner service nulnbers is
included in the back section.
()r, in the U.S.,you can ahvays
call lhe GEAnswer Cenmr ®
al 800.696.9000, 94 hours a day,
7 days a week. In Canada, call
1-800-o61-3400.
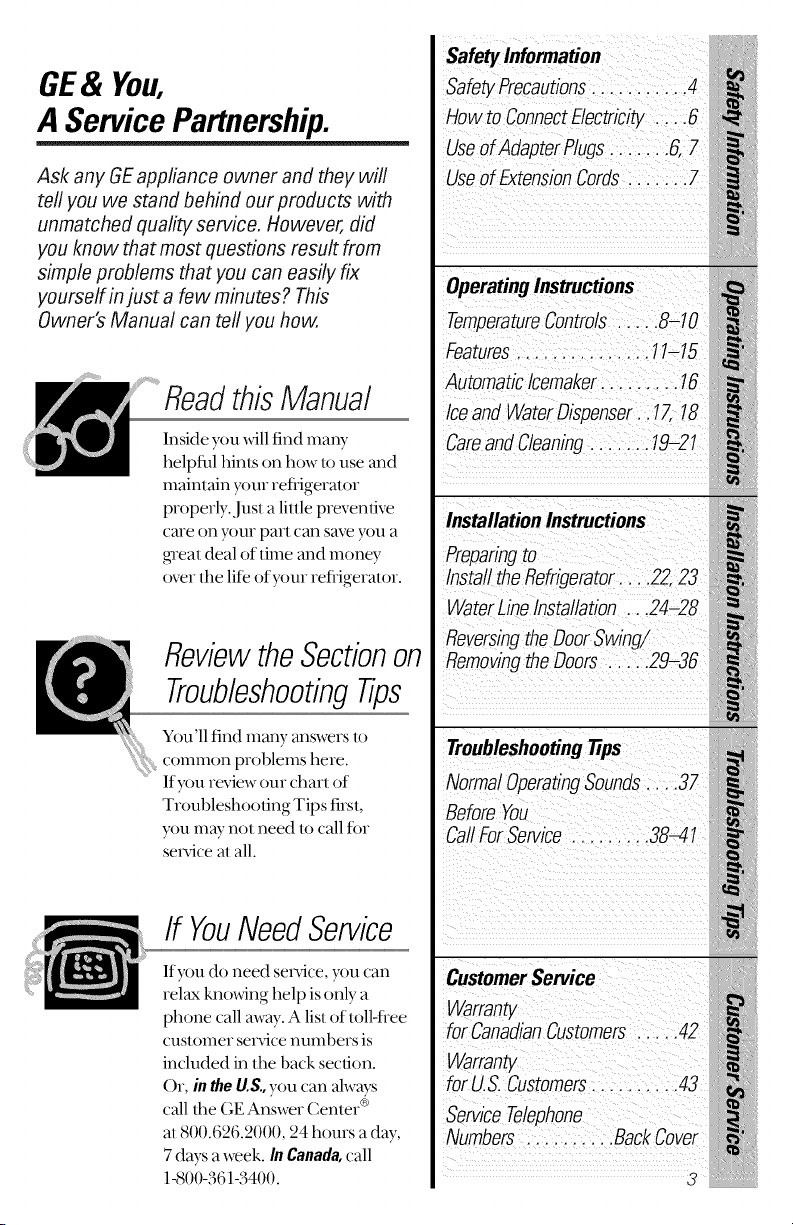
Safety Information
Safety Precautions........... 4
How to ConnectElectricity .... 6
Useof Adapter Plugs....... 6, 7
Useof ExtensionCords ....... 7
Operating Instructions
TemperatureControls ..... 8-10
Features............... 11-15
AutomaticIcemaker....... 16
Iceand Water Dispenser.. 17, 18
Careand Cleaning....... 19-21
Installation Instructions
Preparingto
Install the Refrigerator.... 22, 23
WaterLineInstallation ...24-28
Reversi_ the DoorSwing/
Removingthe Doors ..... 29-36
Troubleshootingtips
NormalOperatingSounds .... 37
Before You
Call ForService ......... 38-41
CustomerService
Warranty
for CanadianCustomers ..... 42
Warranty
for U.S.Customers.......... 43
ServiceTelephone
Numbers ......... Back Cover
3
IMPORTANTSAFETYINFORMATION.
READALL INSTRUCTIONSBEFOREUSING
A WARNING!
Use this appliance only for its intended purpose as
described in this Owner's Manual
4
SAFETYPRECAUTIONS
When using electrical appliances, basic safety precautions
should be followed, including the following:
This reflJgerator must be
properly installed and
located in accordance with
the Installation Instructions
befi)re it is used.
iiiiiiiiiiiii_iil
iiiiiiiiiiiii_iil
iiiiiiiiiiiii_iil
Do not allow children to
climb, stand or hang on file
sheNes in tile refligerator.
They could damage tile
refligerat,)r and seriously
injure themselves.
Do not touch the cold
sm-ta(es in file fieezer
compartment when hands
me damp or wet. Skin m W
stick to these extremely cold
sin-laces.
Do not store or use gasoline
or other flmnmable vapors
and liquids in tile xicinity of
this or any other appliance.
In refligerators xdth
ram)marie icemakers, avoid
contact xdfll tile moving parts
of tile ejector mechanism, or
_dfll tile heating element that
releases tile cubes. Do not
place fingers or hands on the
mlu)mafic icemaking
mechanism while tile
refligerator is plugged in.
iiiiiiiiiiiii_iil
iiiiiiiiiiiii_iil
Keep fingers out of dm
"pinch point" areas;
clearances between tile
doors and bem'een tile doors
and cabinet are necessarily
small. Be careful closing
doors when children are in
tile area.
I Jnplug tile refligerator
befi)re cleaning and making
repairs.
NOTE."Westronglyrecommend
thatanyservicingbeperformed
bya qualifiedindividual.
Turning the control to tile
OFFposition does not remove
po_er to the light circuit.
Do not refi-eeze fi-ozen fi)ods
which have thawed
completely.
IMPORTANT:
PROPERDISPOSALOFTHEREFRIGERATOR
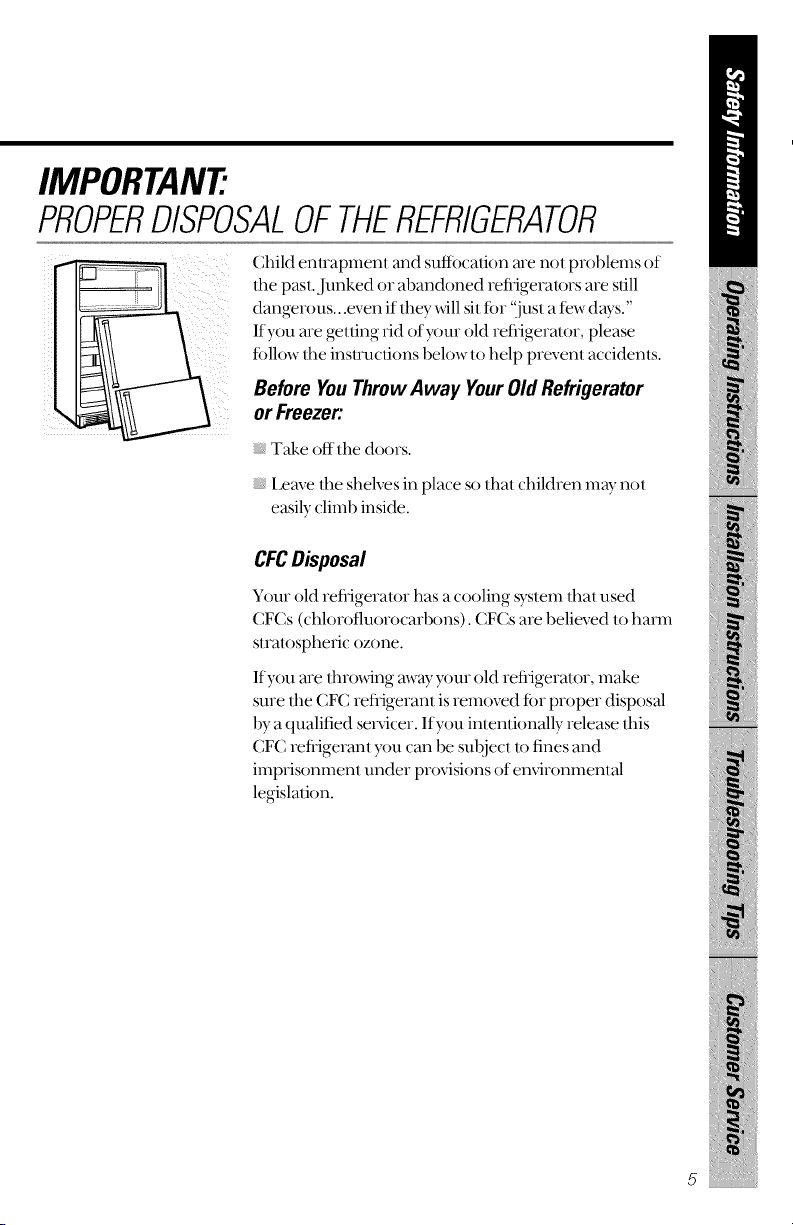
Child enuapment and suflbcafion are not problems of
lhe past. Junked or abandoned refigerau_rs are slill
dangerous...even if lhey _dll sit for ".just a few days."
If you are gelling rid of}xmr old refigerator, please
follow the instnlclions below to help prevent accidents.
Before You ThrowAway YourOld Refrigerator
or Freezer:
Take off the doors.
Leave the shelves in place so that children may not
easily climb inside.
CFCDisposal
Your old refiigeralor has a cooling system that used
CFCs (chlorofluorocarbons). CFCs are believed to harm
stratospheric ozone.
If you are throating away }xmr old refigeralor, make
sure the CFC refligerant is removed for proper disposal
by a qualified sel_icer. If you inlenlionally release ibis
CFC refigeranl >)u can be subject to fnes and
imprisonment under provisions of environmental
legislalion.
5
IMPORTANTSAFETYINFORMATION.
READALL INSTRUCTIONSBEFOREUSING.
6
[, WARNING!
HOWTOCONNECTELECTRICITY
Do not, under any circumstances, cut or remove the third
(ground) prong from the power cord. For personal safety,
this appliance must be properly grounded.
The power cord of this appliance is equipped _4tl_ a 3-prong
(glounding) plug which mates _4tl_ a standard 3-prong
(glounding) wall outlet to minimize d_e possibility of electric
shock hazard flom this appliance.
Have tl_e wall outlet and circuit checked by a qualified elecn_ician
to make sure the oudeI is properly grounded.
Where a standard 2-prong wall outlet is encountered, it is your
personal responsibility and obligation to have it replaced _Stl_ a
properly glounded 3-prong wall outlet.
The refl_igerator should always be plugged into its o_m individual
electrical outlet which has a vohage rating that matches the rating
plate.
This provides d_e best pedbnnance and also prevents overloading
house _fing ci_cuits which could cause a fi_e h_ard flom
oveflmated wi_es.
Never unplug your refrigerator by pulling on the power cord.
Ahvays grip plug firmly and pull straighl out flom the outlet.
Repai_ or replace immediately all power cords dmt have become
flayed or othe_se damaged. Do not use a cord that shows cracks
or abrasion damage along its lengd_ or at either end.
When moving the refl_igerator mvay flom d_e wall, be careful not to
roll over or damage dm power cord.
USEOFADAPTERPLUGS
(Adapter plugs not permitted in Canada)
Because of potential safety hazards under certain conditions,
we strongly recommend against the use of an adapter plug.
However, if you must use an adaptor, where local codes permit, a
temporaryconnectionmay be made to a properly g_ounded 2-prong
wall outlet by use ofa UL-listed adapter available at most local
hmdware stores.
The larger slot in the adapler must be alig_md _fl_ tim larger slot in
tim wall outer to pro_ide proper polarity in tim connection of tim
power cord.
When disconnecting the power cord tiom tim adapter, ahvays hold
tim adapler in place _dth one hand while pulling the power cord
plug _dfl_ tim other hand. If fl_is is not done, tim adapter ground
terminal is ve D- likely to break _dth repeated use.
If the adapter gTound mnninal breaks, DO NOTUSE tim refiigerator
until a proper ground has been established.
Attachingtheadaptergroundterminalto a wall outletcoverscrewdoesnot
groundtheapplianceunlessthecoverscrewis metal,andnotinsulated,andthe
walloutletis groundedthroughthe housewiring.Youshouldhavethe circuit
checkedbya qualifiedelectricianto makesuretheoutletisproperlygrounded
USEOFEXTENSIONCORDS
Because of potential safety hazards under certain
conditions, we strongly recommend against the use of an
extension cord.
However, if you must use an exmnsion coM, it is absolutely
necessa U that it be a UL-listed (in the Unimd Stares) or a CSA-
listed (in Canada), 3-_dre grounding bi)e appliance exlension cord
having a grounding bi)e plug and outlet and that lhe elecwical
rating of tim cord be 15 amperes (minimum) and 120 vohs.
REMEMBER...
Your continued health and safety are important to us.
Please read and follow this Safety Information carefully.
We want you to remain a happy and healthy part of our
GEfamily.
SAVETHESEINSTRUCTIONS
About the controls on the refrigerator.
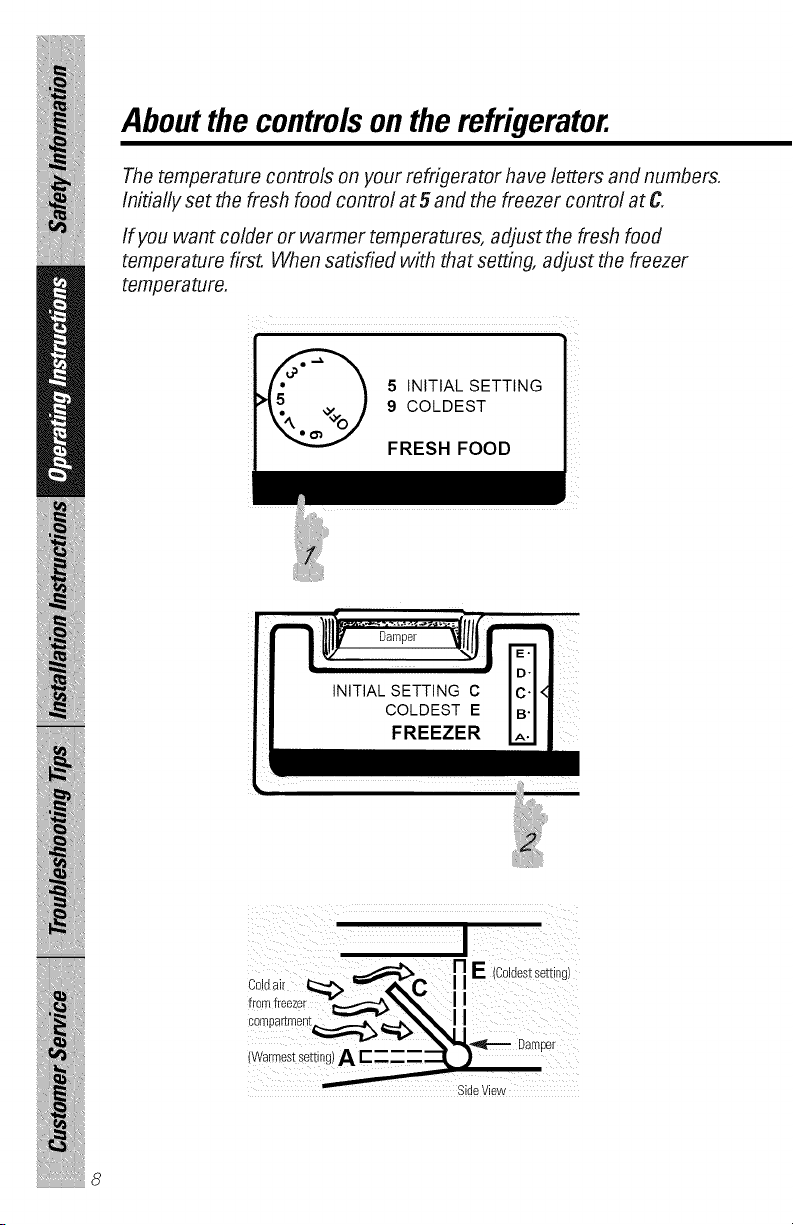
The temperature controls on your refrigerator have letters and numbers.
Initially set the fresh food control at 5 and the freezer control at C
If you want colder or warmer temperatures, adjust the fresh food
temperature first. When satisfied with that setting, adjust the freezer
temperature.
5 INITIAL SETTING
9 COLDEST
FRESH FOOD
INITIAL SETTING C
COLDEST E
FREEZER
sssssssss_
8
I
SideView
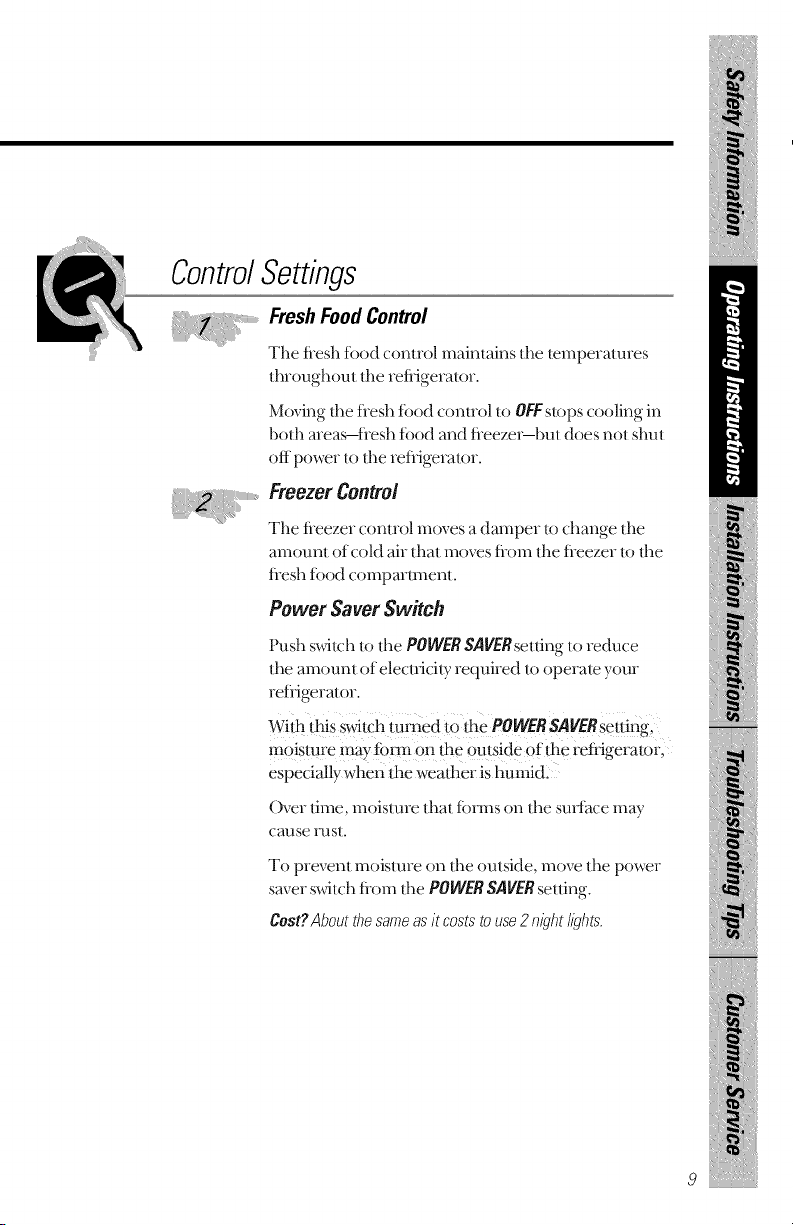
ControlSettings
_i FreshFood Control
The flesh tbod conm)l maintains the temperatures
fluoughout the refligerator.
Moving the fresh fbod control to OFF stops cooling in
both areas-flesh fb(:d and fleeze:_but does not shut
off power !o !he reffigerator.
freezer Control
The fleezer con!rol moves a damper to change !he
amount (:f c(:ld air that m(:ves flom !he fleezer 1o !he
flesh t(:(:d c()mpa:tl_ile:_i!.
Power Saver Switch
Push switch to !he POWER SAVERsetting 1o reduce
!he amount of electricit)_ required to operate yore
refligerator.
With thisSwitchturned tO the POWER SAVfnsetting-i
moisture may tbnn on the outside of dee refiigerator,
especially when the weather is humid l
Over time, moisture tha! ibnns (::] the sm_{hce may
CaUSe :'US!,
To prevent mois!ure on !he outside, move the power
saver swi!ch flo:n !he POWER SAVER setting.
Cost?About the same as it costs to use 2 night//_Thts.
9
About the controls on the refrigerator.
How To Test Temperatures
I Jse tile milk test fbr tile flesh fbod compartment. Place a container
of milk on tile top shelf and check it a day later. If tile milk is too
waI_In 0I" tOO cold, a(!just tile temperature controls.
I Jse tile ice cream test ibr file fleezer comparmmnt. Place a
container of ice cream in tile center of tile fleezer and check it aller
a day. If it's too hard or too soft, a{!just tile temperature contlOlS.
After changing the controls, allow 24 hours for the refrigerator to reach the
temperature you haveset
FoodStorage
Tile type of packaging used and file slorage temperatures xdll 'afl_ect
how long tbod _dll keep in the refligeralor.
New fbod storage gMdelines are constantly being developed.
Consultthe CountyExtensionServiceforthe latestinformationon freezingand
storingfoods.
About the refrigerator shelves and dishes.
Not all features are on all models.
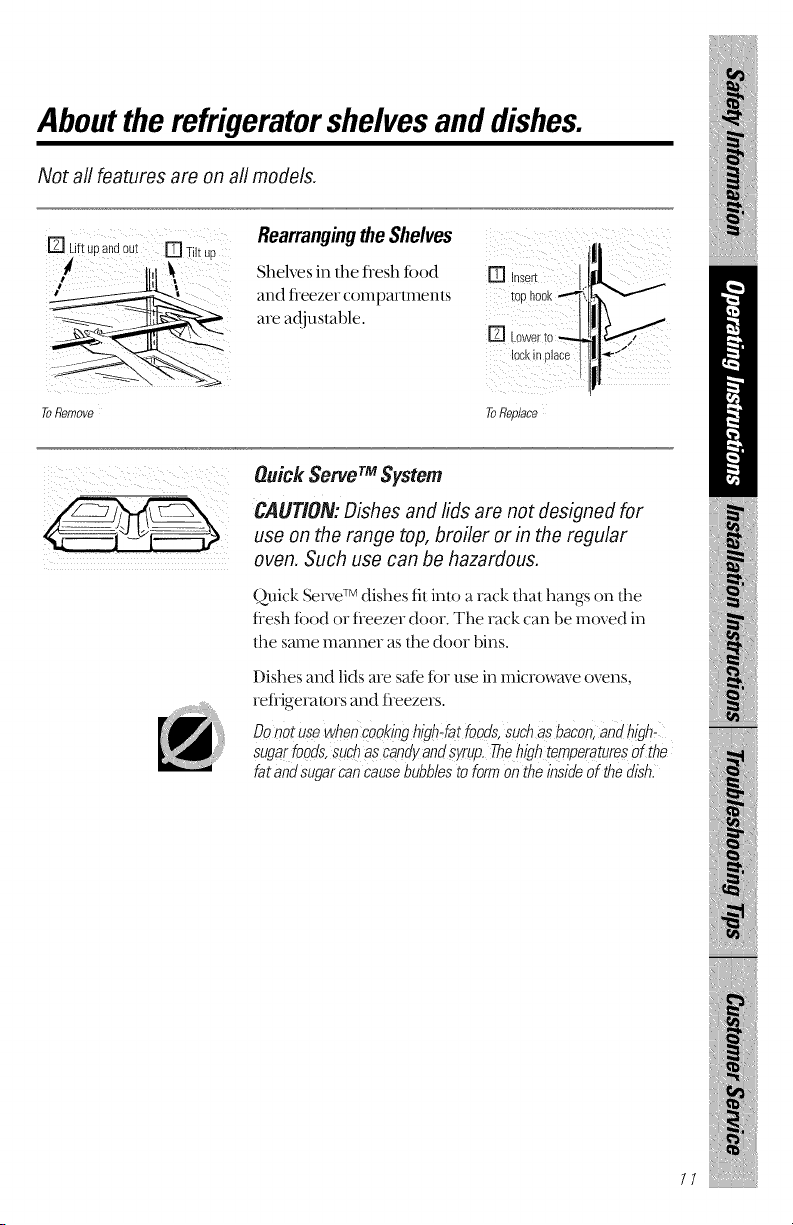
[] Lift uo anaout [] Tilt uD RearrangingtheShelves
Shelves in the ti-esh food [] hserc
2tlld [ieezer COlllp_ll'/lllell/s [00 nook
are adiuslal)le.
]Lower to
lOCKI11OI8C6
V
ToRemove To Re_lace
Quick Serve TMSystem
CAUTION:Dishes and lids are not designed for
use on the range top, broiler or in the regular
oven. Such use can be hazardous.
Quick _rve TM dishes til inlo a rack thai hangs on llle
tiesh todd or tieezer door. Tile rack can be moved in
lhe same manner as tile door bins.
Dishes and lids me sate tbr use in microwave ovens,
refiJgeralors and ficezers.
Donot usewhencookinghigh-fatfoods,suchasbacon,aM high-
sugarfoods,suchaScandyandsyrup.Thehightemperaturesof the
fat andsugarcancausebubblestoformon theinsideof thedish.
11
About the refrigerator bins.
Not all features are on all models.
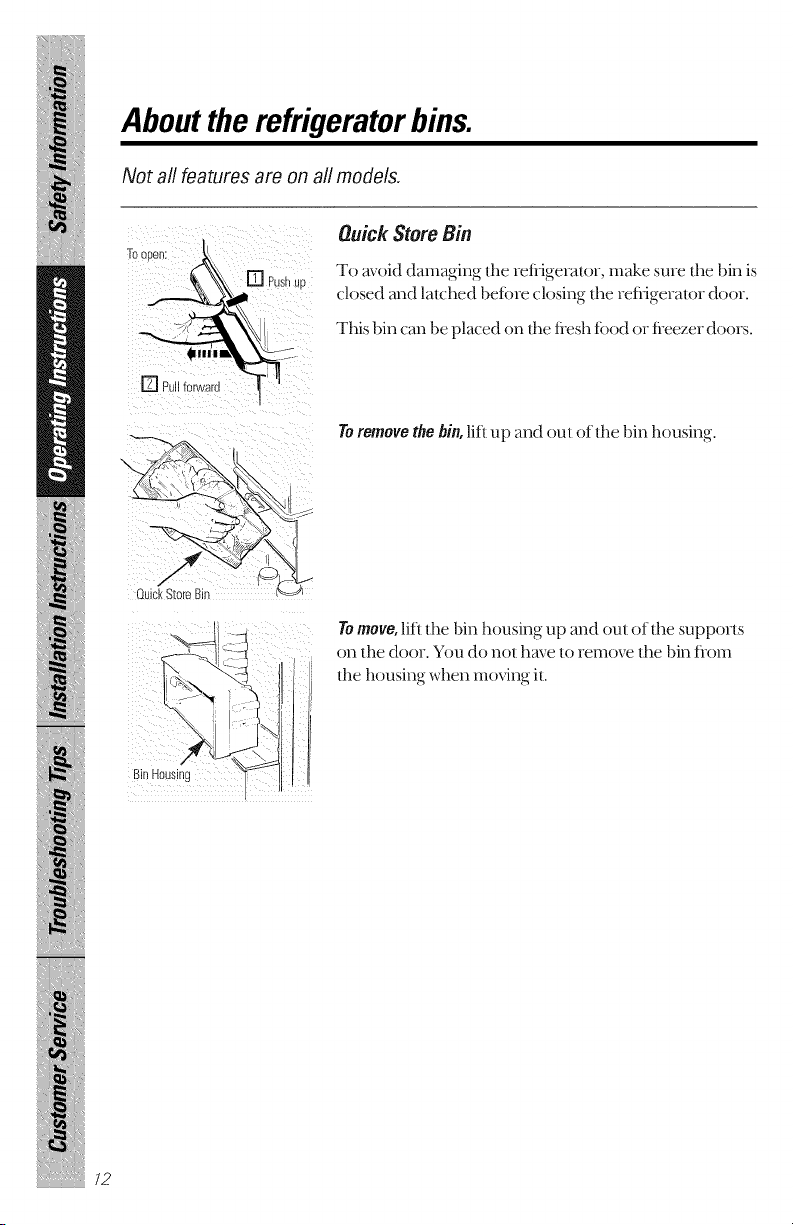
[] Pullforward
[] PushUE
Quick StoreBin
To avoid damaging the refligerator, make sme the bin is
€losed and la|ched beiore closing the refligeramr door,
This bin can be placed on lhe flesh fbod or fleezer doors,
Quic[<StoreBir
Toremovethebin, liftup and out of the bin housing.
To move, lift the bin housing up and out of the supports
on the door. You do not hm,e to remove the bin tiom
the housing when moving it.
Bin Housing
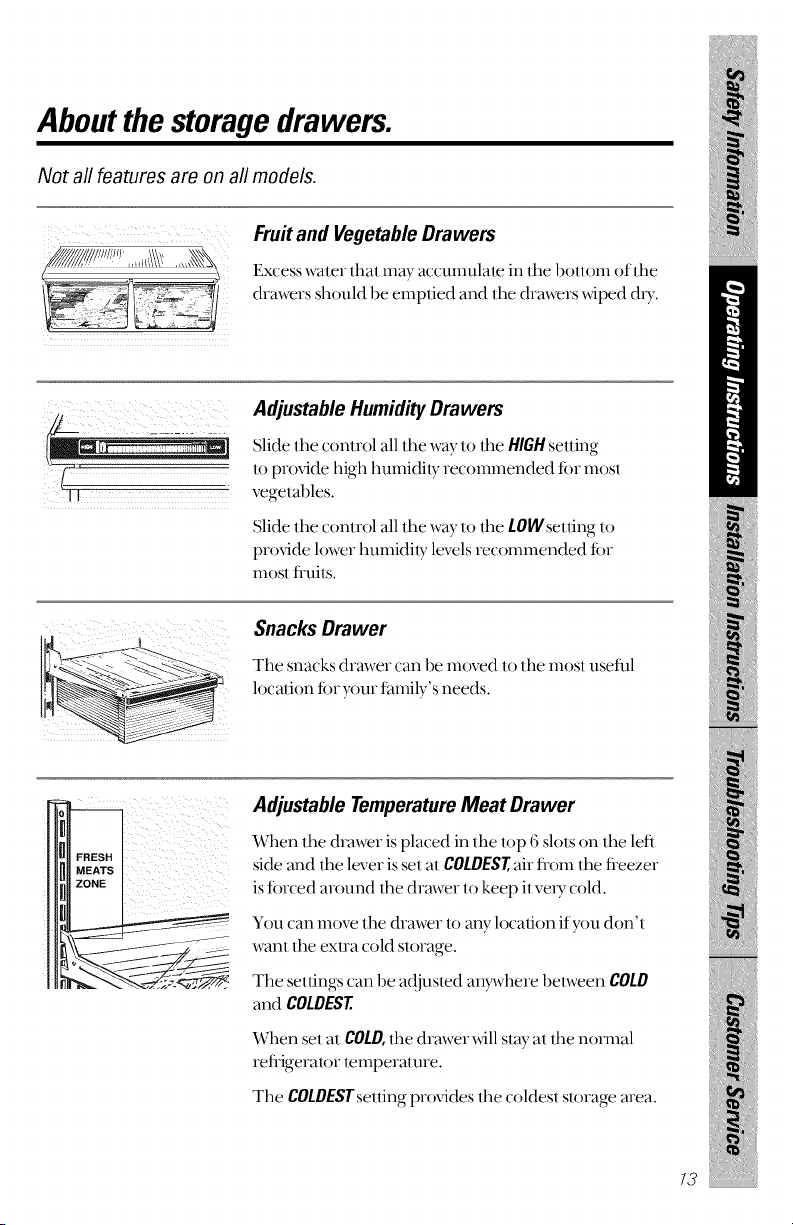
About the storage drawers.
Not all features are on all models.
Fruitand VegetableDrawers
Excess water that may accumulate in tile l)ottom of tile
drawers should be emptied and the drawers _dped d) T.
/
Adjustable Humidity Drawers
Slide tile control all file way to tile HIGH setting
It) provide high hulnidil}7 recommended fin inosl
vegetables.
Slide the control all the way to the LOW setting to
provide lower humidi b, levels recommended fin
inosl fl-uils.
i i!iiiiii
Snacks Drawer
Tile snacks drawer can 1)e moved to file most useful
location fin your thmily's needs.
Adjustable TemperatureMeat Drawer
When tile drawer is placed in tile top 6 slots on tile left
side and file lever is sel al COLDEST,air flom lhe fleezer
is %reed around file drawer 1o keep il ve) T cold.
You can move the drawer lo any location if you don'l
want the exlra cold slorage.
Tile selfings can be adjusled an)_vhere bel_veen COLD
and COLDEST
When set at COLD, tile drawer xdll slay at the normal
refligeralor lemperalure.
The COLDESTsetting provides file coldesl storage area.
13
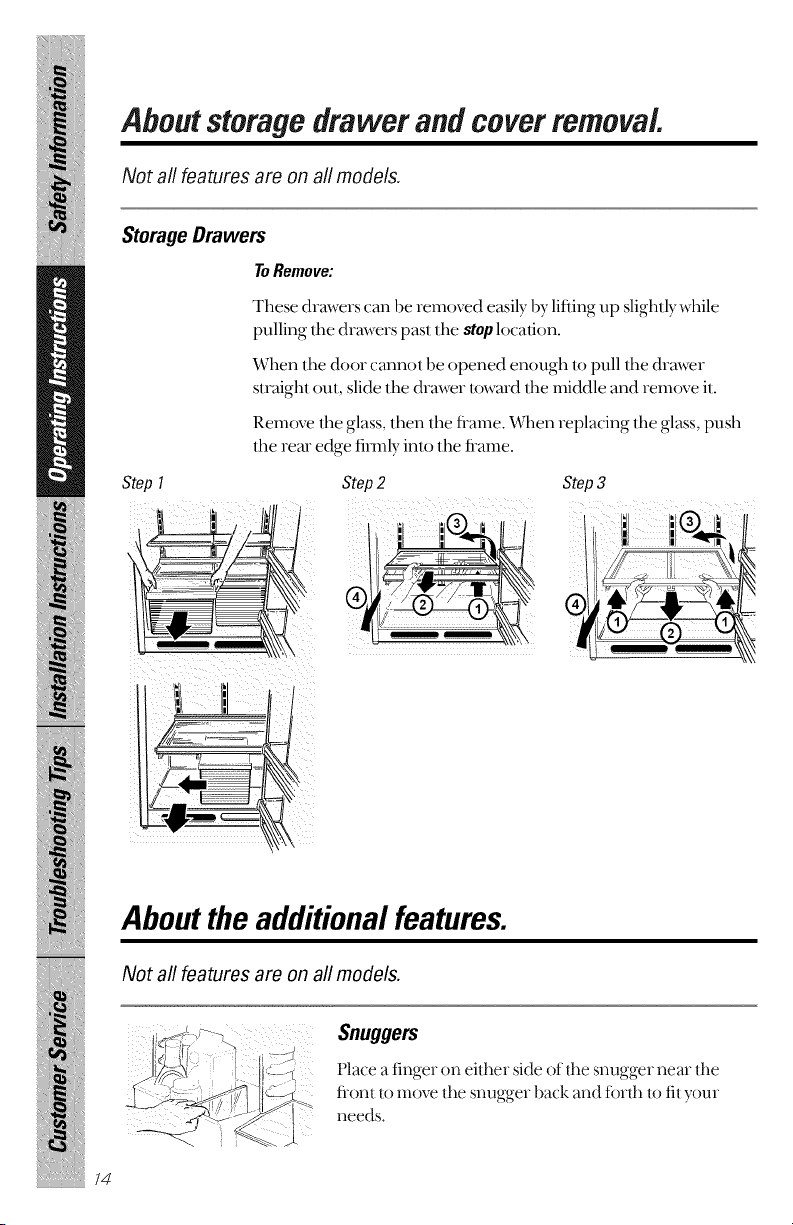
About storage drawer and cover removal.
Not all features are on all models.
Storage Drawers
ToRemove:
These drmvers can be removed easily 1)ylifting up slightly while
pulling tile drawers pasl lhe stop location.
When tile door cannol be opened enough 1opull lhe &rover
sl_aighl out, slide tile drawe_ t()wmd lhe middle and _emove il.
Remove tile glass, then tile fl-ame. X4_lenreplacing tile glass, push
the rear edge firmly into tile flame.
Step 1
i /
Step2
i% ,l
Step3
'i' '
I, ,'_1 :®J
11/ Ill I,I _
About the additional features.
Not all features are on all models.
Snuggers
Place a finger on either side of the snugger near the
flont _o move the snugger back and fbnh _o fit yore
needs.
/4
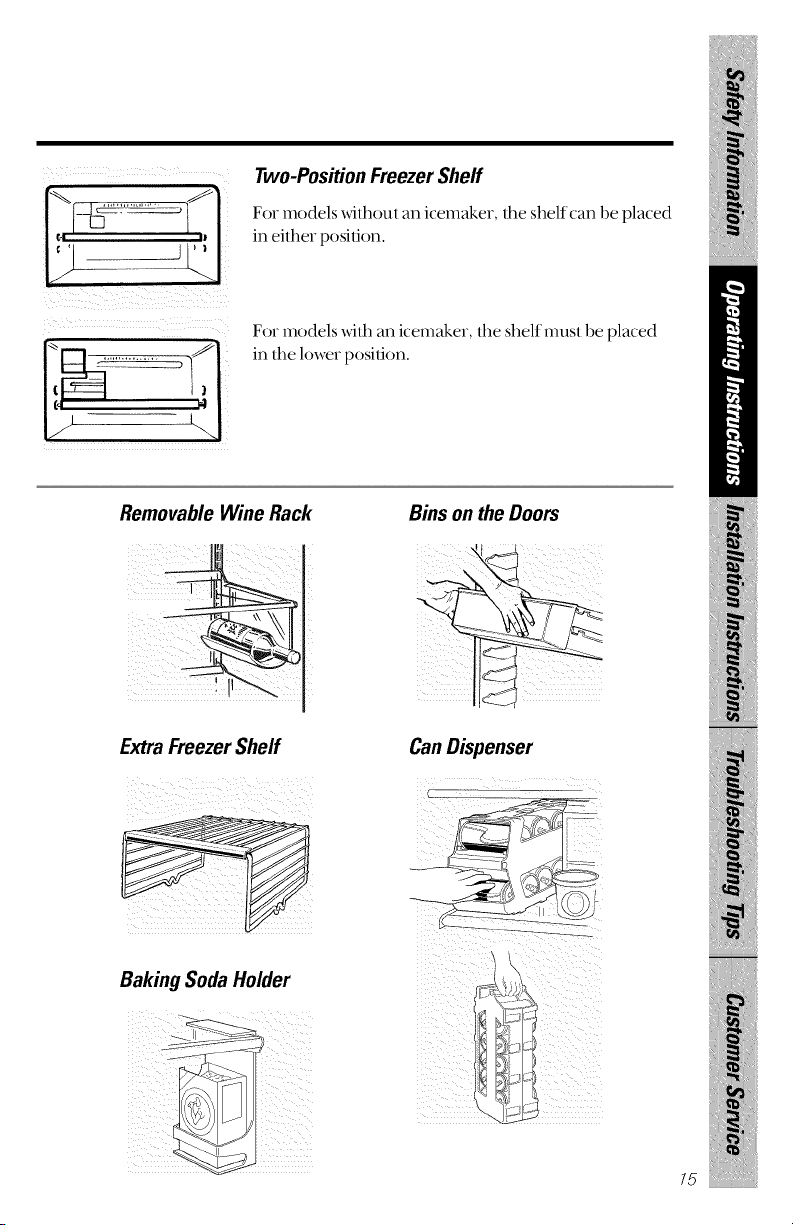
Two-PositionFreezer Shelf
Fo__models _ithout an icemake_ _,the shelf can 1)e placed
in either position.
For models _dth an icemaker, the shelf must be placed
in the lowe_ position.
Removable Wine Rack
Extra FreezerShelf
Bins on the Doors
CanDispenser
Baking Soda Holder
15
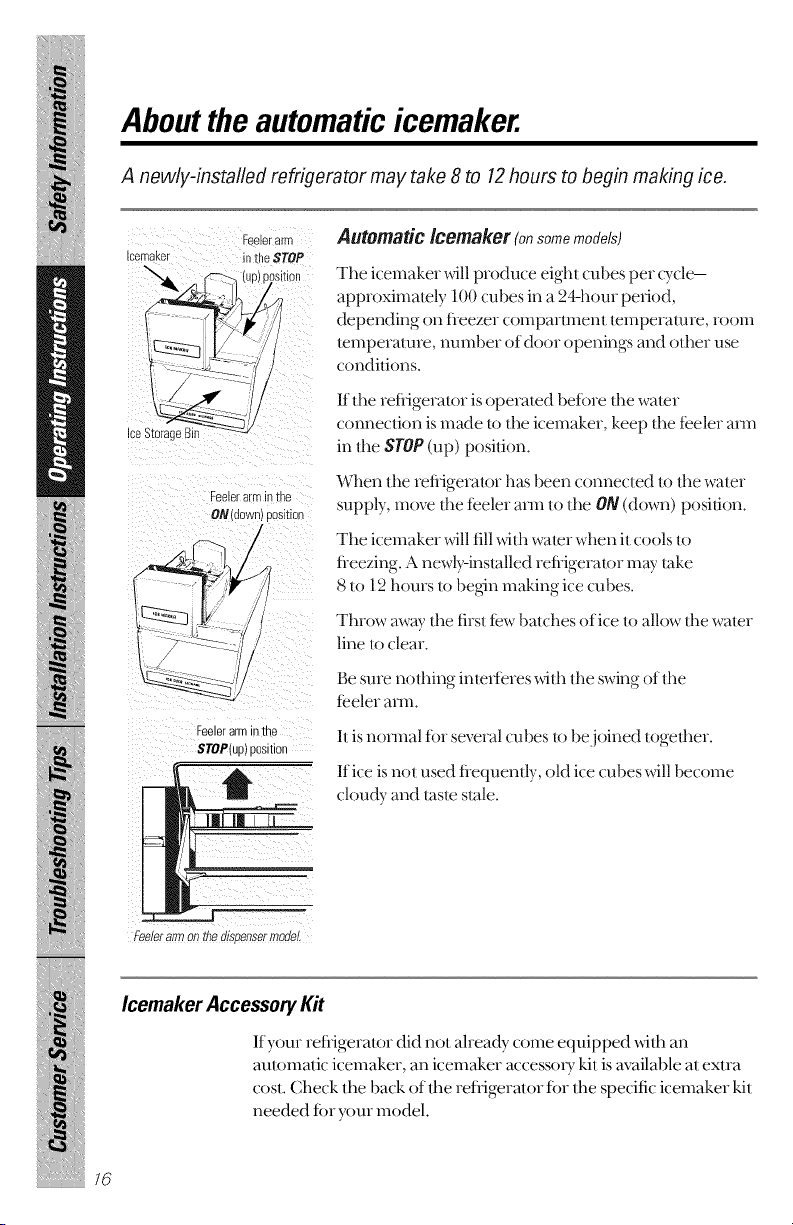
About the automatic icemaker.
A newly-installed refrigerator may take 8 to 12hours to begin making ice.
Feelerarm Automatic/cemaker tonsome models)
icemaKer nme STOP
"_/4 [c-_i [L,,;posmon
- "/1
Ice StoraeeBin
:eeler _ "-r le [[le
ON/down/ )osition
Feelerarminthe
STOP(up)position
i
Tile icemaker _411produce eight cubes per o, cle-
approxima/ely 100 cubes in a 24-hour period,
depending on fleezer compartnlent temperature, room
temperature, number of door openings and other use
conditions.
If the _efi_igerator is operated before the water
connection is made to tile icemaker, keep tile feeler ann
in die SlOP (up) position.
When the refi_igerator has been connected to the water
supply move tile feeler ann to tile ON (down) position.
Tile icemaker will fill with water when it cools to
freezing, A newly-installed refrigerator may take
8 to 12 hours to begin making ice cubes.
Th_ow away the fi_st f)ewbatches of ice to allow tile water
line to clear.
Be sure nothing intefieres with the swing of the
feeler ann.
It is normal fbr several cubes to be joined together.
If ice is not used ffequendv old ice cubes will become
cloudy and taste stale.
illllllllllllllllllllllllllllllllllllllllllli_
Fee!erarmon #_edispensermodel.
Icemaker Accessory Kit
If your refiigerator did not aheady come equipped _dfll an
automatic icemaker, an icemaker accesso U kit is available at extra
cost. Check the back of file refligerator tor the specific icemaker kit
needed tor your model.
76
About the ice and water dispenser.
On some models
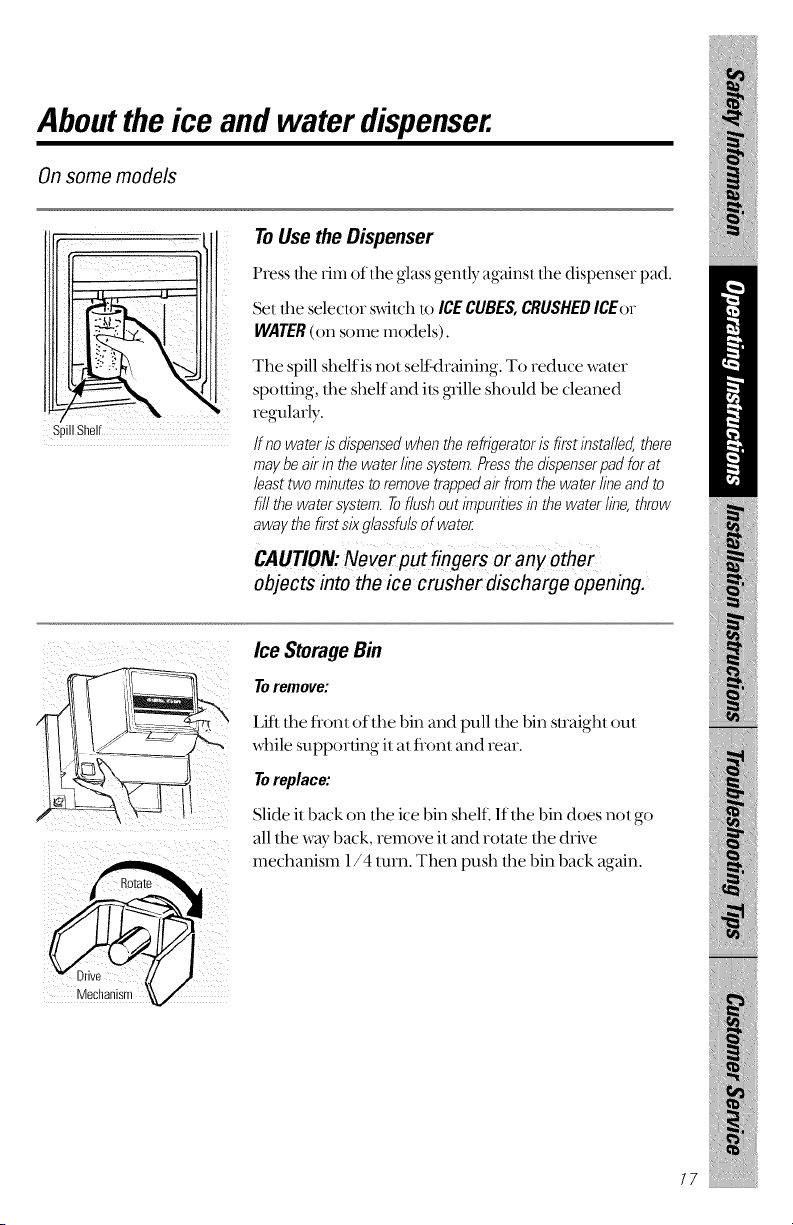
Spill Shelf
To Use the Dispenser
Press the tim of tim glass gently against tim dispenser pad.
Set the selector switch to ICECUBES,CRUSHEDICEor
WATER(on some models).
The spill shelf is not self draining. To reduce water
spotting, the shelf and its glille should be cleaned
regularly.
If no wateris dispensedwhentherefrigeratoris firstinstalind,there
maybeair in the waterline system.Pressthedispenserpadforat
leasttwo minutestoremovetrappedair fromthewaterlineandto
fi// the watersystem.Toflushout#npurit/esinthe waterfine,throw
awaythefirstsixglassfulsof water
CAUTION: Never put fingers or any other
objects into the ice crusher discharge opening.
Ice Storage Bin
Toremove:
Lift lhe flonl of the bin and pull lhe bin suaighl oul
while supporting il al flonl and rear.
Toreplace:
Slide it l)ack on lhe ice bin shelf. If the bin does nol go
all rite way back, remove il and rolale rite drive
mechanism 1/4 ram. Then push lhe bin back again.
17

About the ice and water dispenser.
Water FilterAccessory
The waler fiber is an option at exua cosl and is available
flom your dealer. Specie, WR97X0214. 11has complele
installation instructions and installs on 1/4" O.D.
copper wamr line.
Important FactsAbout YourDispenser
iiiiiiiiiiiii_iil
iiiiiiiiiiiii_iil
iiiiiiiiiiiii_iil
iiiiiiiiiiiii_iil
iiiiiiiiiiiii_iil
Add ice belore filling lhe glass wilh a heverage. This will prevent
splashing, which could cause lhe ice seleclor switch lo slick or bind.
Do not add ice flom lrays or bags it lhe slorage bin. II may nol
crash or dispense xxell.
Avoid oveFlilling glass _dth ice and use of narrow or exlra-lall
glasses. Backed-up ice can jam lhe chule or cause lhe door in lhe
chum it fleeze shul. If ice is blocking lhe chule, poke il lhrough
xdlh a _x_oden spoon.
Beverages and tbods should not be quick-chilled in the ice
storage bin. Cans, bollles or food packages in lhe slorage bin
may cause the icemaker or auger It jam.
N)me crashed ice may be dispensed even though you selecled
ICECUBES.This happens occasionally when a troy cubes
accidentally get direcled it lhe crasher.
After crashed ice is dispensed, some waler may drip flom
the chute.
Sometimes a mound of snow xdll fbnn on lhe door in the ice
chule. This condition is normal and usually occurs when you
have dispensed crashed ice repealedly. The snow_dll eventually
evaporale.
Dispensed waler is not ice cold. For colder waler, add crashed ice
or cubes befbre dispensing waler.
78
Care and cleaning of the refrigerator.
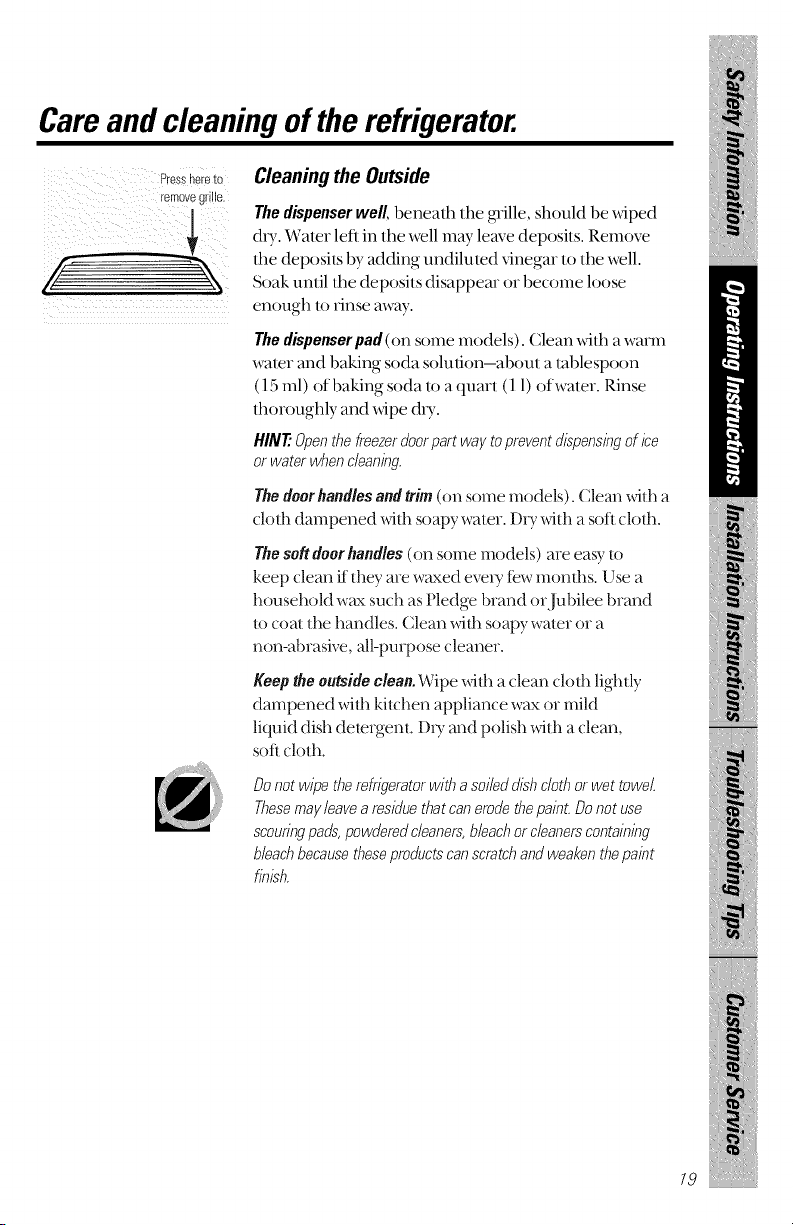
Pressnereto
removeg e.
Cleaningthe Outside
The dispenser well, beneafl_ the glille, should be _dped
&)-. Water left in the well may leave deposits. Remove
tim deposils 1)y adding undilmed _inegar lo the well.
Soak until tim deposits disappear or become loose
enough to nnse aw W.
Thedispenserpad(on some models). Clean _itl_ a warm
water and baking soda solution-about a tablespoon
(15 ml) of baking soda lo a quart (1 1)of water. Rinse
fl_oroughly and _dpe &T.
HINT."Openthefreezerdoorpart wayto preventdispenslegof lee
or waterwhenc/eanleg.
The door handles and trim (on some models). Clean _ith a
cloth dampened _ifl_ soapy water. D_T _ith a soft cloth.
Thesoft doorhandles(on some models) are easy to
keep (lean it they are waxed eve_7 few months. Use a
household wax such as Pledge brand or Jubilee brand
to coat the handles. Clean _ilh soapy water or a
non-abrasive, all-purpose cleaner.
Keeptheoutsideclean,Wipe _itl_ a clean clofl_lightly
dampened wi/h kitchen appliance waxor mild
liquid dish detergent. DU and polish _ith a clean,
soft cloth.
Donot wipetherefrigeratorwith a so#eddishclothor wet towel
Thesemayleavea resUuethatcanerodethepainLDonot use
scouringpads,powderedcleaners,bleachorcleanerscontaining
bleachbecausetheseproductscanscratchandweakenthepaint
finish.
19

Careandcleaningof therefrigerator.
.... .... Cleaningthe lnside
Tohelp prevent odors, leave an ()pen box of baking soda
in tim flesh tbod and fleezer comparlmenls.
Unplugtherefrigeratorbefore cleaning.If this is not
pracO(al, wnng excess moisture out of sponge or (loth
when cleaning mound sx_qtches, lighls or conuols.
1)se an appliance wax polish on dm inside sur[_tce
bel_veen dm doors.
I)sea warm water and baking soda soluOon-about a
tablespoon (15 ml) of baking soda 1oa quart (1 1)of
water. This bod_ cleans and neuualizes odors. Rinse
and _ipe &T.
After cleaning the door gaskets, apply a d_inlayer of
pelroleumjelly to the door gaskets al ll_ehinge side.
This helps keep the gaskets flom socking and bending
out of shape.
Avoidcleaningcoldglassshrives(onsomemodels)withhot water
becausetheextremetemperaturedifferencemaycausethemto
breaLHaMfeglassshelvescarefully.Bumpingtemperedglasscan
causeit to shatter
Donot washanyplasticrefrigeratorpartsin thedishwasher
except QuickServedishesandlids.
Cleanthe condensercoils at least
oRce a }lear
20
Under the Refrigerator
For most eflicienl operaOon, keep tim area under tim
refiigeralor clean. Remove lhe base grille and sweep
away or vacuum up dusl.
For besl resuhs, use a brash specially desig_md fbr lhis
purpose. I1is available a! mos! appliance pmls slores.
Behind the Refrigerator
Be careflfl when moving file refligerator mvay flom tile wall. All
types of floor coverings can be damaged, particularly cushioned
coverings and lhose _dlh embossed surfaces.
Pull file refligeralor straight out and remm it lo position by
pushing it slraighl in. Moving file refligeralor in a side direction
may result in damage m file floor covering or refligeramr.
Whenpushing the refrigerator back,make sure you don't roll over the power cord
or icemaker supply line (on somemodels).
LightBulb Replacement
To replace a bumed-oul bulb, unplug file refligeralor flom its
eleclrical oullel, remove tile light shield, unscrew lhe bulb when
cool and replace it x_lh an appliance bulb of lhe same or lower
wattage.
Turningthe controlto the OFFpositiondoesnotremovepowerto thelightcircuit.
Preparing for Vacation
For long vacations or absences, remove tood and unplug/he
refligeralor. Move lhe flesh tood conlrol to lhe OFFposidon, and
clean/he inlefior wilh a baking soda solution of one lablespoon
(15 nil) of baking soda lo one quarl (11) ofwaler. Leave lhe
doors open.
Move tlle icemaker feeler ann lo STOP(up) position and shut
offthe water supply u_the refligerator.
If tile temperature can drop below fleezing, have a qualified
sel_-icer drain lhe wamr supply system (on some models) to
prevent serious properly damage due to flooding.
Preparing to Move
If tile doors need to be removed, see file Removingthe doorssection.
On dispenser models, the wamr line to the dispenser must be
disconnecmd betbre tile doors me removed.
Secure all loose items such as ,wille, shelves and drawers by taping
them securely in place to prevent damage.
Besuretherefrigeratorstaysin anuprightpositionduringmoving.
21
Preparingtoinstall therefrigerato_
Read these instructions completely and carefully.
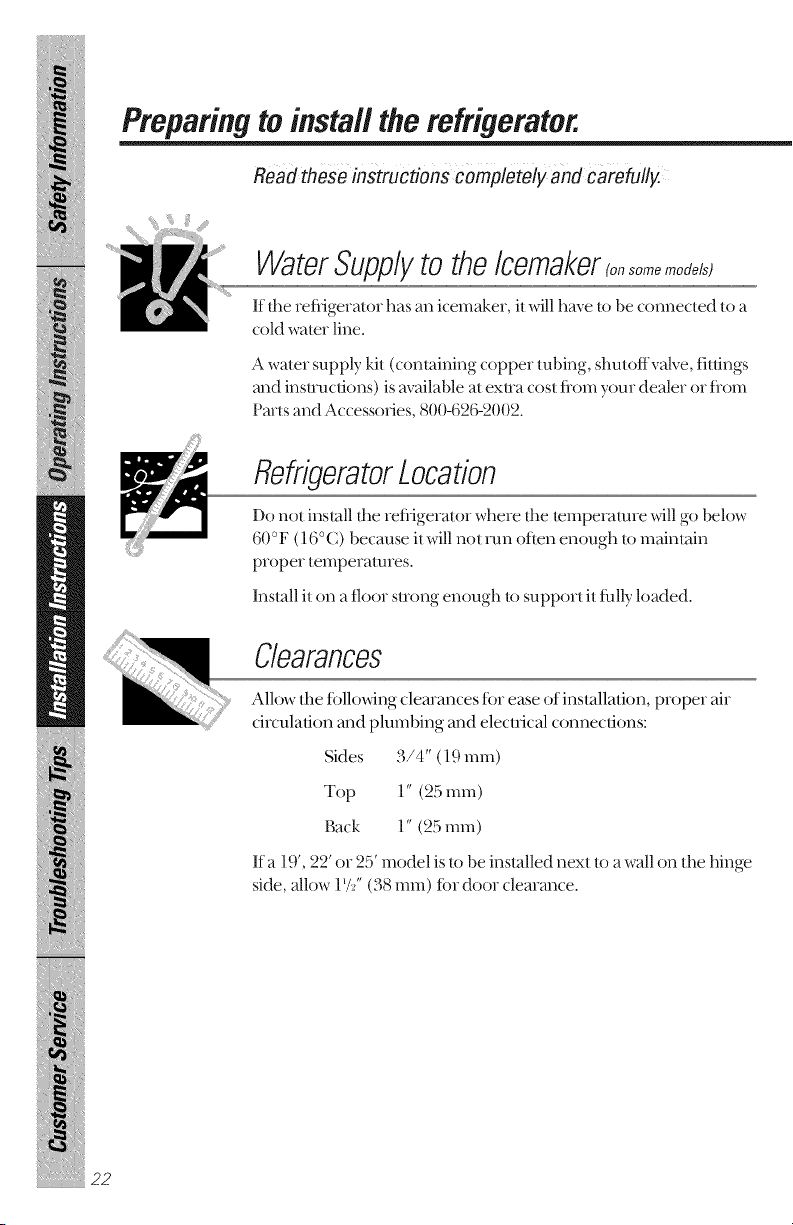
WaterSupplyto the Icemaker(o,somomo_s)
If file refligerator has an icemaker, it will have to be connected to a
cold water line.
A water supply kit (containing copper tubing, shutoffvalve, fitdngs
and instructions) is available at extra cost flx)m your dealer or liom
Parts and Accessories, 800-62G2002.
RefrigeratorLocation
Do not install die refligerator where die temperature x_dllgx)beh)w
60 °F (16 °C) because it will not run ()lien enough to maintain
proper temperatures.
Install it on a floor smmg enough to support it tully loaded.
Clearances
Allow tile t()llowing clearances tor ease of inslallalion, proper air
circulation and plmnbing and electrical connections:
Sides o ,,
a/4 (19ram)
Top 1" (25 ram)
Back 1" (25 ram)
If a 19', 22' or 25' model is to be installed next to a wall on (lie hinge
side, allow 1'/_" (38 ram) for door demance.
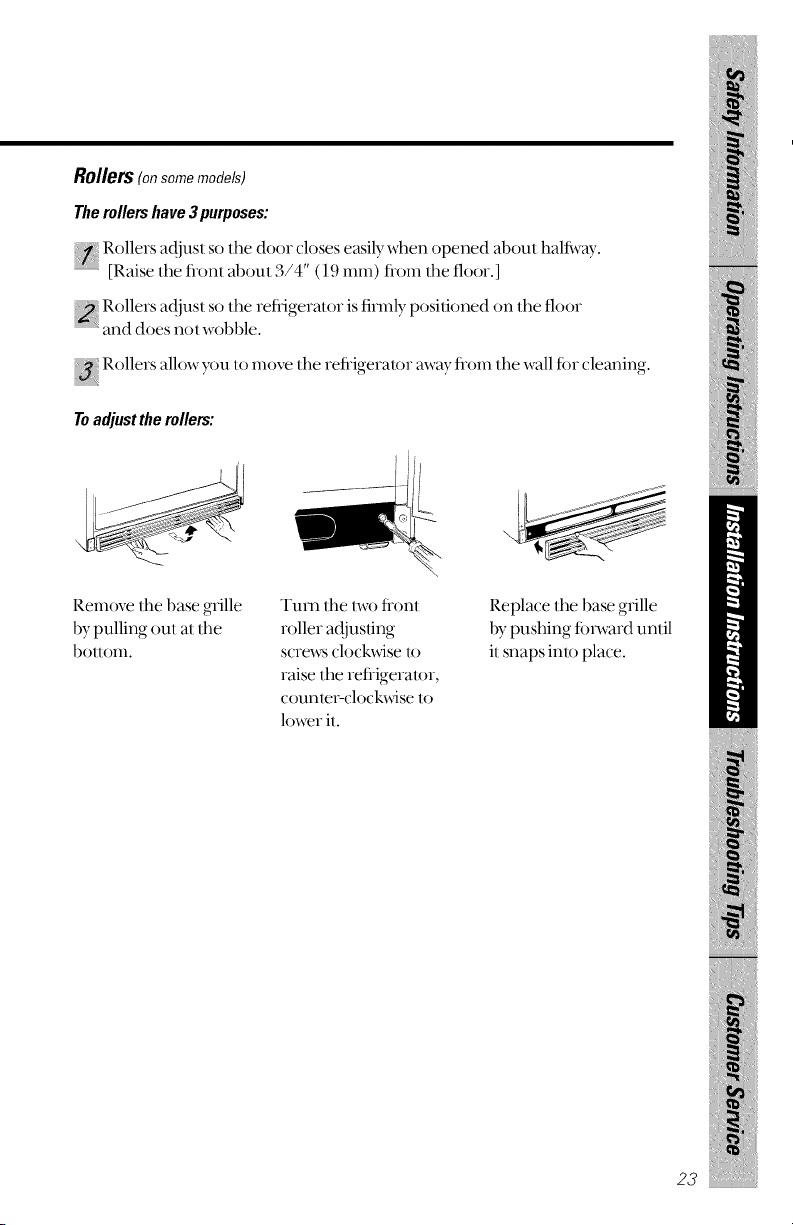
Rollers (on somemodels)
The rollers have 3 purposes:
Rollers adjust so the door closes easily when opened about halt_vav.
[Raise tile fl-onl about 3/4" ( If} mini fl-om lhe floor.]
Rollers adjusl so the refligerator is firmly positioned on the floor
and does nol wol)l)le.
Rollers_ allow you, lo inove the refligeralor, mvav, fl-om the wall for cleaning.,
Toadjust the rollers:
Remove lhe base grille
by pulling oul al lhe
1)olloln.
Tunl lhe lwo flonl
roller a_!jusdng
scre,a_s clock_dse K)
raise tile refligeraU_r,
counlepclock_dse 1o
lower il.
Replace the base grille
by pushing forward until
il snaps inlo place.
23
Installing the water line.
Read these instructions completely and carefully.
Before YouBegin
This water line installation is not warranted by the
refrigerator or icemaker manufacturer. Follow these
instructions carefully to minimize the risk of expensive
water damage.
Water hammer (water banging in the pipes) in house
plumbing can cause damage to refrigerator parts and lead
to water leakage or flooding. Call a qualified plumber to
correct water hammer before installing the water supply
line to the refrigerator.
Toprevent bums and product damage, do not hook up the
water line to the hot water line.
If you use your refrigerator before connecting the water line,
make sure the icemaker feeler arm is kept in the STOP (up)
position.
Do not install the icemaker tubing in areas where
temperatures fall below freezing.
When using any electrical device (such as a power drill)
during installation, be sure the device is insulated or wired
in a manner to prevent the hazard of electric shock.
All installations must be in accordance with local plumbing
code requirements.
What YouWill Need
Todeterminehow much €oppertubingyouneed:
Measure the dismnce fi_m d_e water vaNe on d,e back of the
refligeramr m the wate r Supply pipe:The** add 8 feet (244 cm)-
Be sm-e there is sufficient exUTantbing [ about 8 feet (244 Cm)
coiled in>3 tu, m of abou t !0 inches (25 cm) diameter] m allow
tim refligeramr m move out fl'om the wall after installationl
A water supplykit (containing copper tubing, shutoffvah_e and
filings listed 1)elow) is availal)le at exu-a cost fiom your dealer or
flom Parts and Accessories, 800-626-2002.
A cold water supplltThe water pressure must 1)e1)el_veen
20 and 120 p.s.i.
Powerdrill.
Copper tubing, 1/4" outer diameter to connect lhe reflJgeralor to
the waler supply. 1_ sure both ends of the tubing are cut square.
Do not useplastic tubing or p/astic fittings becausethe water supply line is under
pressureat all times. Certain types of plastic tubing maybecome brittle with age
and crack, resulting in water leakage.
Two 1/4"outerdiametercompressionnutsand2 ferrules(sleeves)--
to connect the copper tubing to the shutoffvalve and the
refigerator water valve.
If your existing water line has a flared fiuing at the end, you xdll
need an adapter (availal)le at plumbing supply stores) to connect
the water line u) lhe refiigeralor ORyou can cut off the flared
filling wilh a tube cutter and then use a compression filling.
Shutoff valve to connect to the cold wamr line. The shu/offvalve
should have a water inlet xdlh a minimum inside dimnemr of
5/32" at the point of connection u) lhe COLDWRIERLINE.
Saddle-lH)e shuloflvalves are included in many water supply
kits. Bdbre purchasing, make sure a saddle-lH)e vane complies
wilh your local plumbing codes.
25
iiiHiii!iiiilJ{_iiiilliii
Installing the water line.
Read these instructions completely and carefully.
Shut Off the Mab WaterSupply
Turn on/l_e nealest f_tucet long enough to clea_ the line ofwate_.
Install the Shutoff Valve
Install the shutoffvalve on the nea_est tiequently used chinking
wate_ line.
(_hoose a location tL)_the valve that is easily accessible. It is best
{ to connect into the side of a ve_lical wate_ pipe. When it is
necessm T to connect into a ho_iz()ntal water pipe, make the
connection to the k)p o_ side, _athe_ d_an at the botl,)in, to
avoid d_awing ott any sediment flom the wate_ pipe.
D_ill a 1/4" hole in the, _ ate_ pipe, usin•g,a _sha_pbit. Remove
any buns _esultmg f_om d_llllng the hole m the pipe.
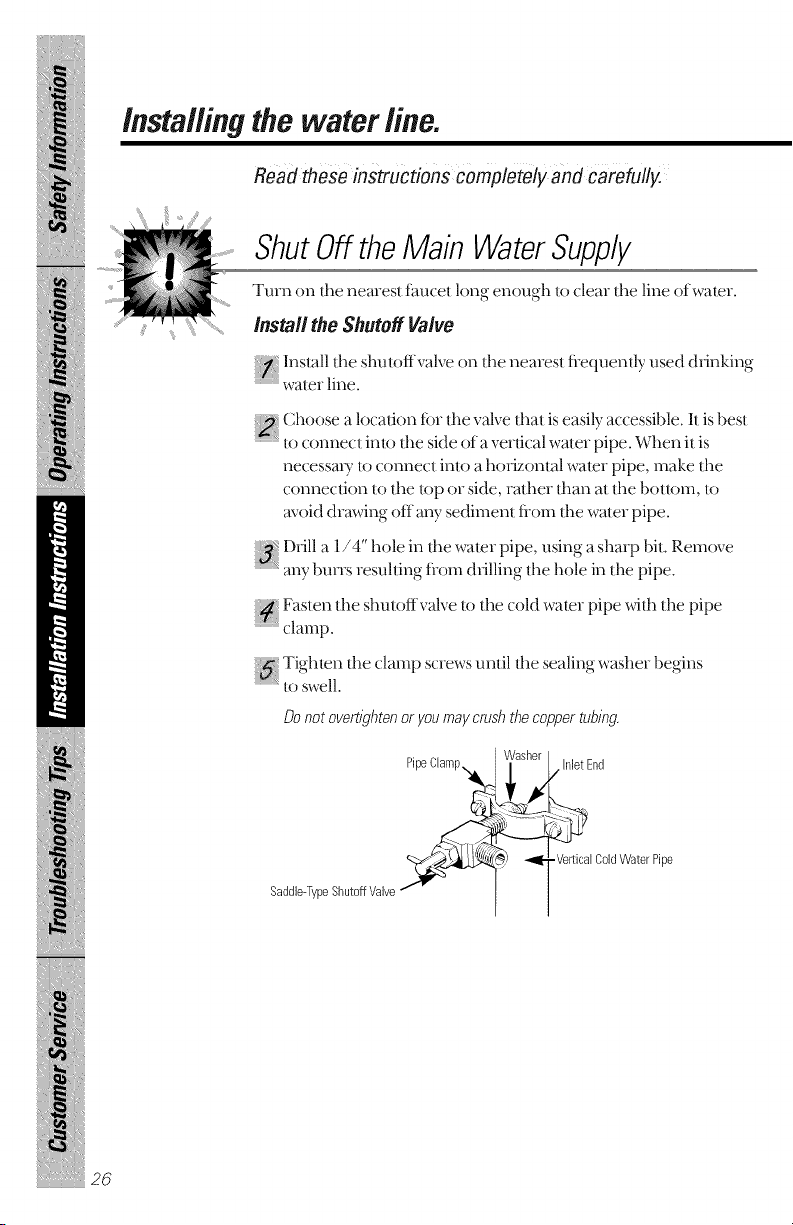
{_{ Fasten the shutoffvalve to the cold water pipe _th the pipe
= clamp.
{{' Tighten the clamp sc_ews until the sealing washe_ begins
to Swell.
Donot overt/ghtenor youmaycrushthe coppertubing
PipeChmp,_
8
Saddle-TypeShutoffValve
/ inlet End
-Vertical ColdWater Pipe
sssssssssssssss_2_'
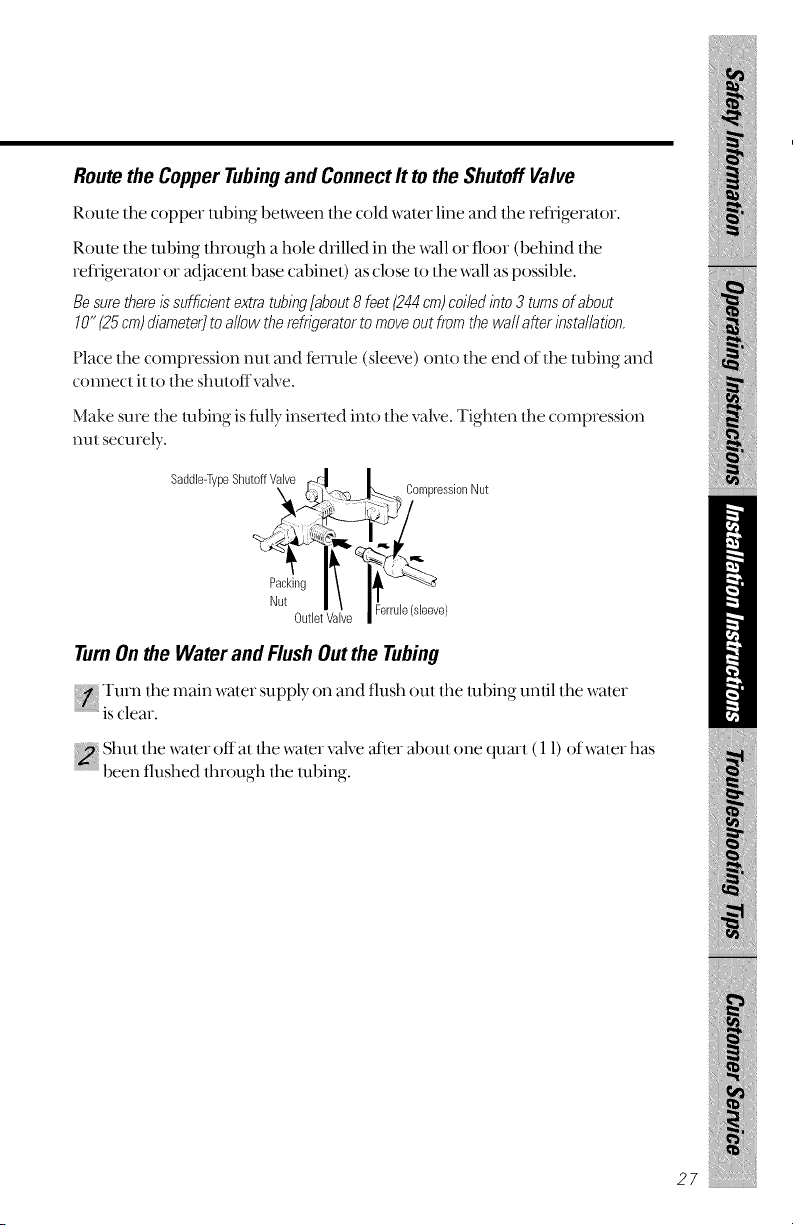
Route the Copper Tubingand Connect It to the Shutoff Valve
Roule lhe copper robing belween lhe cold waler line and lhe refligeralor.
Roule the lubing through a hole drilled in lhe wall or floor (behind the
refligeralor or adjacent base cabinet) as close in lhe wall as possible.
Be sure there is sufficient extra tubing[about8 feet(244 cm) coi/ed into 3 turns of about
10" (25cm) diameter] to a/low the refrigerator to move out from the waft after thsta//ation.
Place the compression nut and f&_ale (sleeve) onto the end of the tubing and
connect it lo the shuloffvalve.
Make sure the tnbing is fully inserted into the valve. Tighten the compression
nul securely.
Saddle-TypeShutoffValve
f_ _ CompressionNut
Nut I\
OutletValve Ferrule(sleeve)
TurnOn the Water and Flush Out the Tubing
Turn lhe main waler supply on and flush oul lhe lubing until lhe waler
is clear.
Shut the water off at the water valve _ier al)oul one quar! ( 1 l) of water has
{_ been flushed through the tubing.
27
iiiHiii!iiiilJ{_iiiilliii
mmmmmmmmm_
installing the water line.
Read these instructions completely and carefully.
28
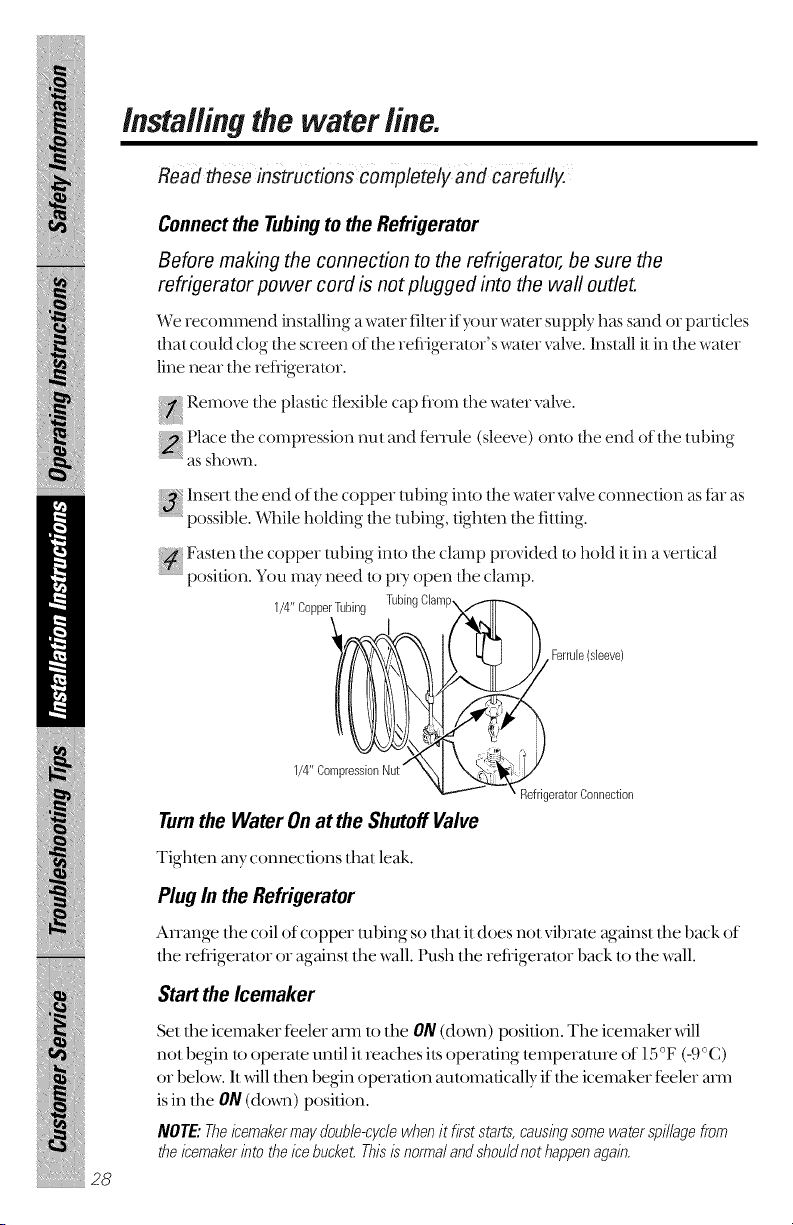
Connectthe Tubingto the Refrigerator
Before making the connection to the refrigerator, be sure the
refrigerator power cord is not plugged into the wall outlet.
We recommend installing a water filter if yam water supply has sand or particles
thai could clog tile screen of the refligerator's water valve. Install it in the water
line near the refligerator.
,_,}Remove the plastic flexible cap fiom the water valve.
Place tile compression nul and tenule (sleeve) onto the end of the tubing
as showI].
{{_ Insert tile end of the copper tubing into the water valve connection as fro as
possible X_qfileholding the tubing tighten the fitting.
Fasten the copper tubing into the clamp provided to hold it in a vertical
position. You may need to PU open the clamp.
1/4" Co eratorConnection
Turnthe Water On at the Shutoff Valve
Tighten any connections that leak.
Plug In the Refrigerator
Arrange the coil of copper tubing so that it does not vibrate against tile back of
the refligerator or against the wall. Push the refligerator back to the wall.
Start the Icemaker
Set tile icemaker teeler ann to tile ON (do_m) position. Tile icemaker will
not begin to operate until it reaches its operating temperaune of 15 °F (41°C)
or below. It xdll then begin operation automatically if the icemaker teeler arm
is in the ON (d()_I_) position.
NOTE."Theibemakermaydouble-cyclewhenit firststarts,causingsomewatersp#lagefrom
theicemakerintothe icebucket.Thisis normalandshouldnothappenagain.

Reversingthe door swing/Removing the doors.
Read these instructions completely and carefully.
ImportantNotes
NOTE."Doorson dispensermode/s do not reverse. However,if you need to
remove the doorson a dispensermode/, first disconnect the water fine to the
dispenser See the Removing the doors sect/bn. Torehang the doors,see
the Rehangmg the doors section.
When reversing the door swing (on non-dispenser models):
Read lhe insu-ucfions all lhe way through l)efore slarling.
Handle paris careflllly lo avoid scralching paint.
_l scre_:s do_ by lheir relaled paris lo avoid using lhem in the
_Tong" places.
PrtMde a non-scralching _x)rk smface %r lhe doors.
IMPORTANT: Once you begin, do not move the cabinet until
door-swing reversal is completed.
Theseinstructionsareforchangingthehingos the
right side to the left side--if you ever want to change the
hinges b ack to the right side, follow these same instructions
and reverse all references toleft and right.
ToolsRequired
Phillips screwdriver
, Masking lape
T20 or T25 Tolxdfiver, whichever your model requires
Pully knife or thin-blade screwdriver
3/8" sockel and ralchel (a 6-poinl sockel is recommended)
29
iiiHiii!iiiilJ{_iiiil:liii
Removingthe doors.
Read these instructions completely and carefully.
Before Removingthe Doors
Unplug the reflJgerator flom its electlJcal outlet.
?
Empty• all d__ _r•shelves,•including the dai U compartment.
CAUTION: Do not let either door drop to the floor. Todo sO could
damage the door stop.
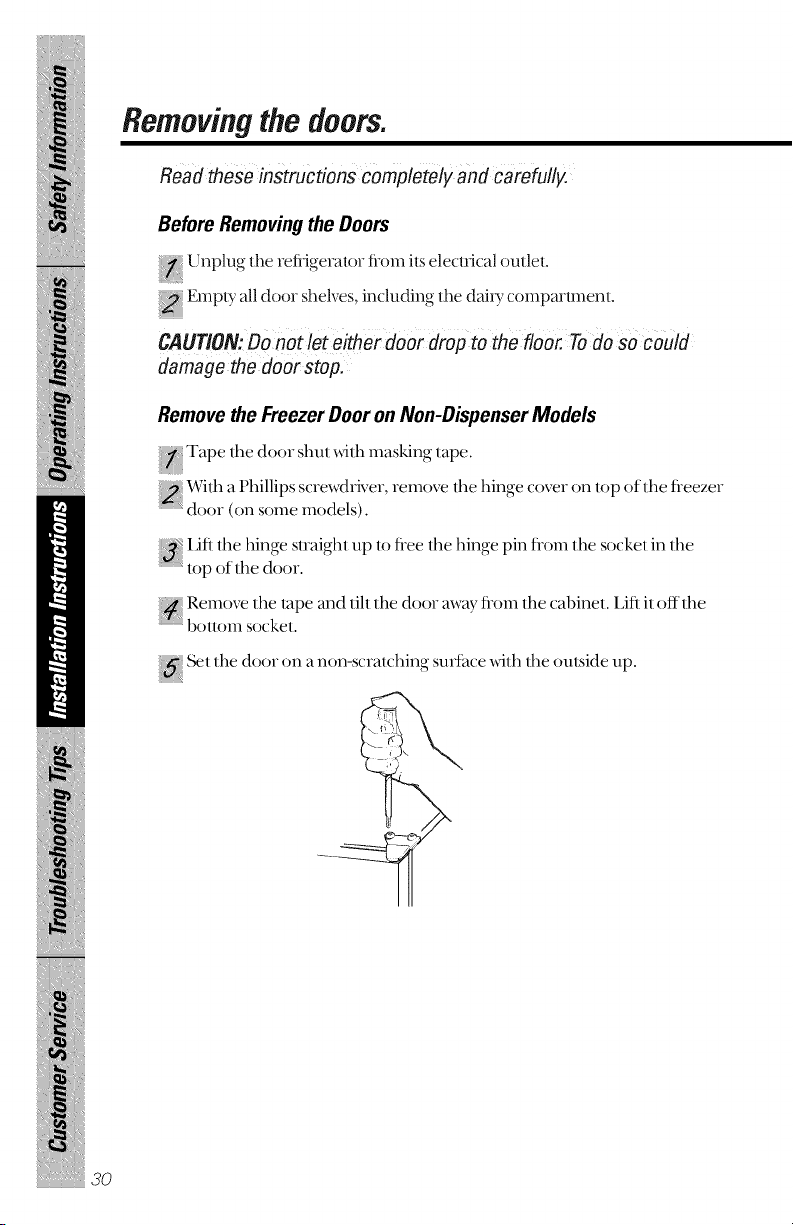
Remove the Freezer Door on Non-Dispenser Models
Tape the door shut with masking tape
{{
With a Phillips screwdriver, remove the hinge cover on top of tim freezer
{ door (on some models).
{{{_Lift the hinge straight up to flee the hinge pin fl-om tim socket in the
top of the d}xn.
Remove tim tape and tilt tim door away flom the cabinet. Lift it offthe
bolloill socket.
{{_ Set.....the door on a non-scratching, surtace....with the outside up
111111111111111111111111111111111111111111111__
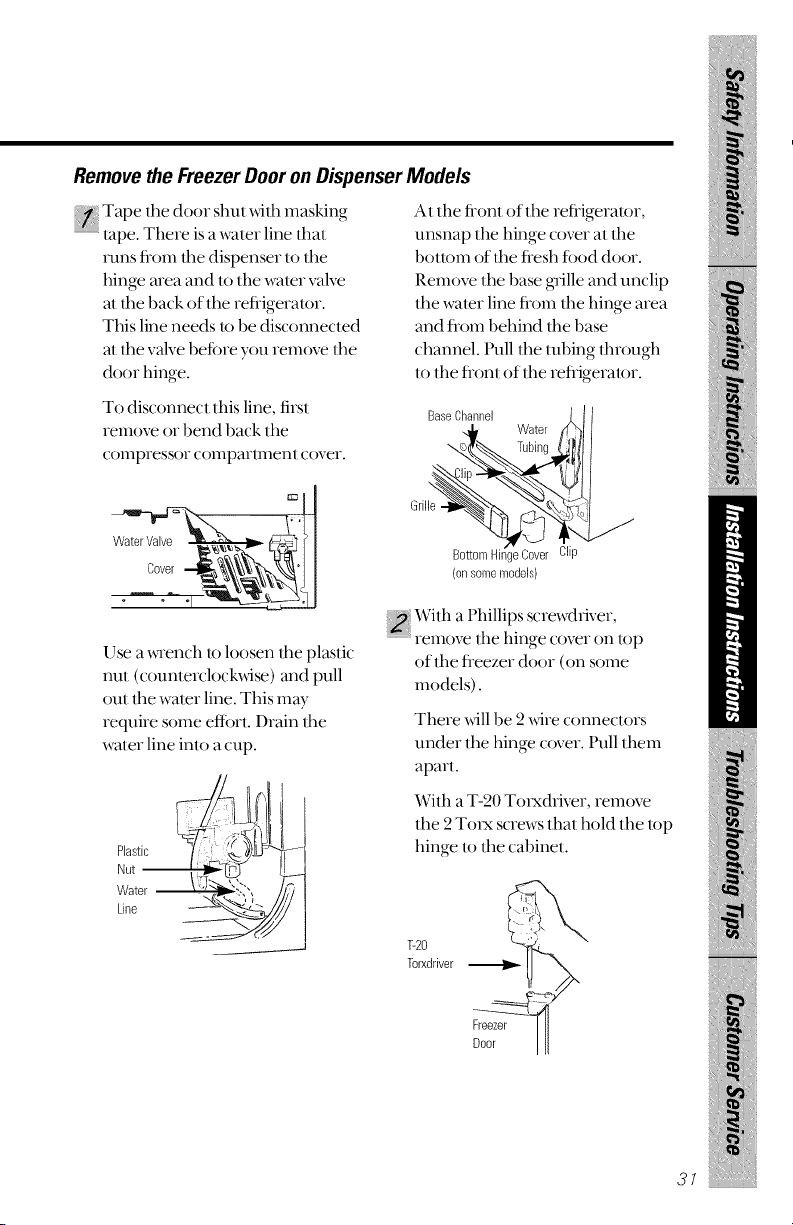
Remove the FreezerDoor on Dispenser Models
Tape ,lie door shut xdlh masking
........tape. There is a water line that
runs flom lhe dispenser m lhe
hinge area and it the wamr valve
a! ltie back of the refligeralor.
This line needs it be disconnecmd
at die valve befbre you remove lhe
door hinge.
To disconnect this line, firsl
remove or bend back the
colnpressor colnparttnenl cover.
Use a x_Tench lo loosen lhe plastic
nut (counmrclockxdse) and pull
()tit lhe waler line. This m W
require some eflbrl. Drain lhe
waler line inlo a cup.
'22
At the front of the reffigeralor,
unsnap lhe hinge cover at lhe
bouom of lhe flesh food door.
Remove the base glJlle and unclip
the water line flom lhe hinge area
and flom behind lhe base
channel. Pull the robing lhrough
1o lhe flonl of lhe reflJgeralor.
BaseChannel _t |
BottomHingeCover Clip
{onsomemodels)
Wilh a Phillips screwdriver,
remove the hinge cover on top
of the freezer door (on some
models).
There _dll be 2 _dre conneclors
tinder the hinge cover. Pull them
aparl.
Wilh a T-20 Tolxdfiver, remove
the 2 To_x screws dial hold lhe lop
hinge it lhe cabinel.
Fre
Door ]
31
iiiHiii[iiiilJ!_iiiil:liii
Removingthe doors.
Read these instructions completely and carefully.
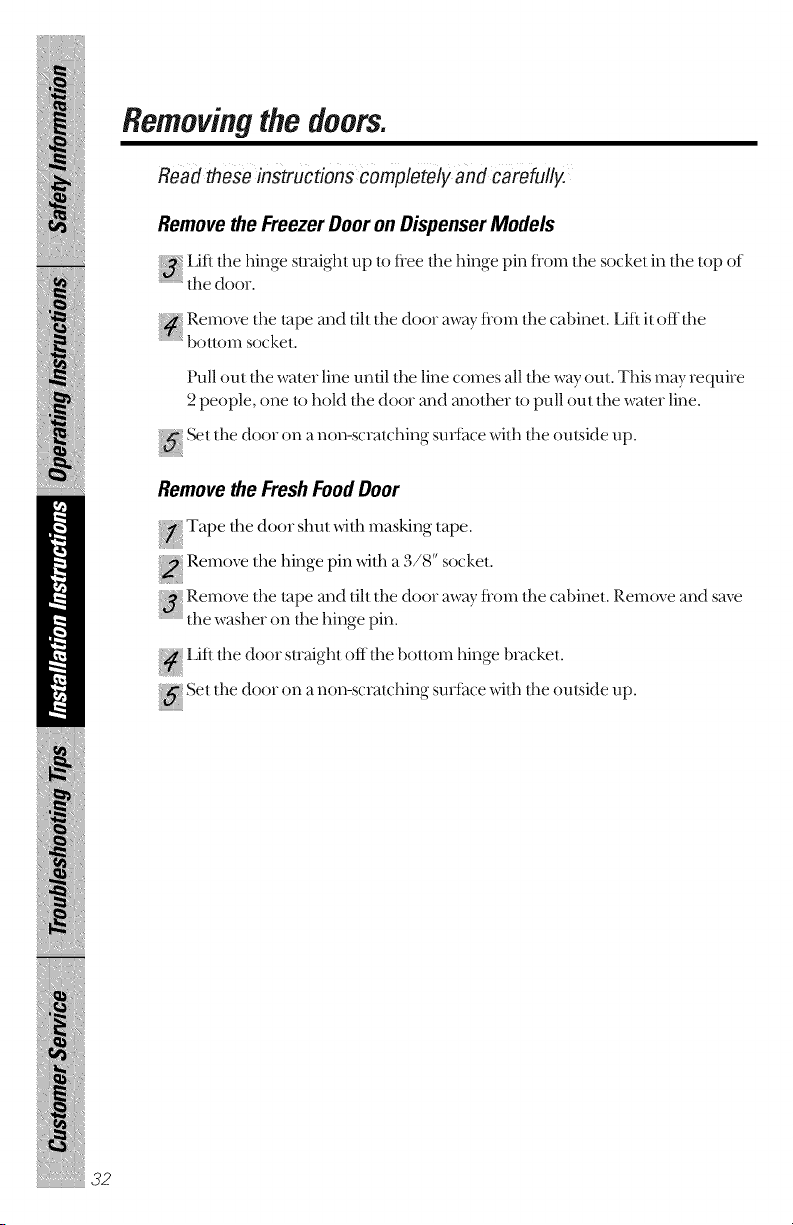
Remove the FreezerDoor on Dispenser Models
_i_ithehin_e_t_ai_htuptof,eethehin_epinf,omthe _o,ketinthetopof
"_ tile dot)r.
_(i Remove tile tape and tilt tile door away flom tile cabinet. Lift it off tile
hot toln socket.
Pull out tile water line until the line comes all tile way out. This may require
2 people, (wie to hold tile door and al_iother to pull out the water line.
_t .....tile door on a non-scratching, sm[hce .... with tile ouLside up
Remove the Fresh FoodDoor
Tape tile..... door shut xdtll masking, tape.
Remove tile hinge pin with a _{/8" socket.
Remove tile tape and tilt tile door away flom tile cabinet. Remove and save
tile washer on tile hin ge pin.
Lift tile door straight off tile bottom hinge bracket.
-j
Set tile door (wi a _io_i-scratchi_ig "surihce with tile ouLside up
111111111111111111111111111111111111111111111__2
Reversingthe hardware.
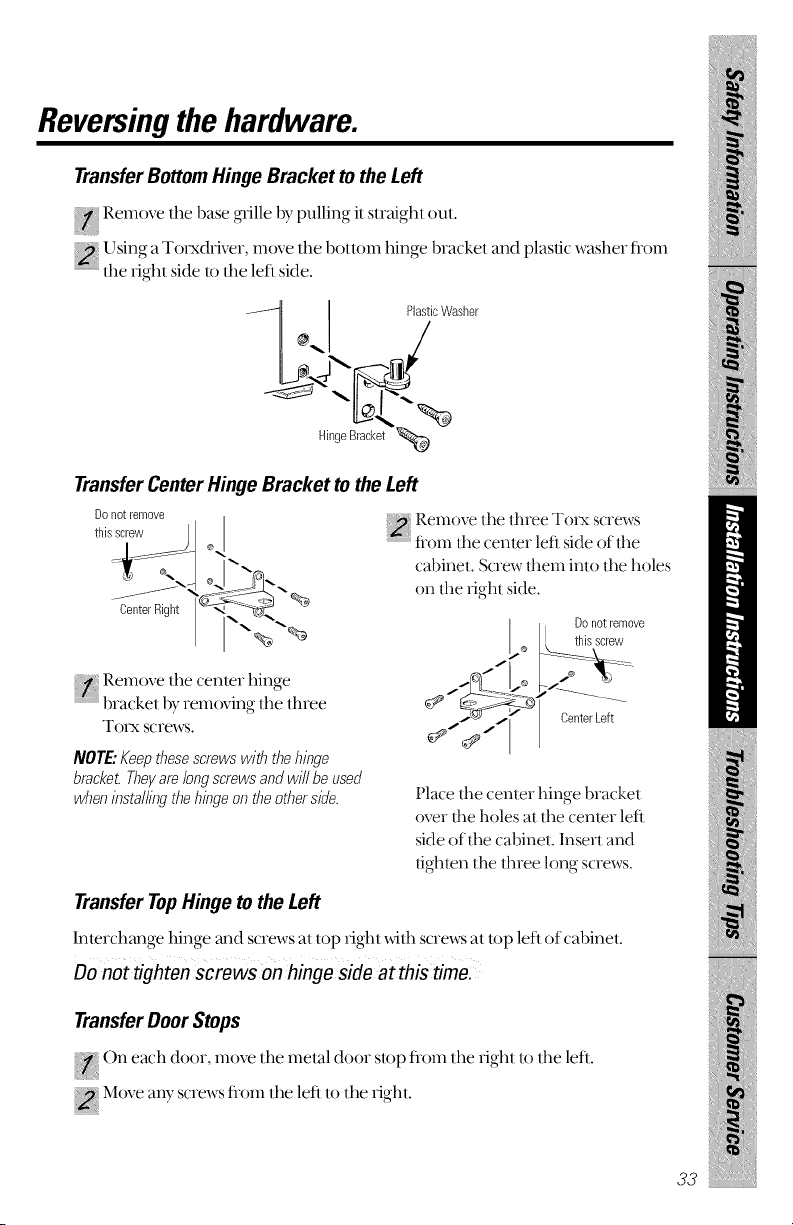
Transfer Bottom Hinge Bracket to the Left
Remove lhe base gillie by pulling it straighl out.
{it ....
[]sing a Torxddver, move dm bollom hinge brackel and plastic washer flom
' lhe )ighl side It) lhe left side.
"_--JI I P,asticWasher
/°-
HingeBracket
TransferCenter Hinge Bracket to the Left
Donotremove
thisscrew ®
(;enterRight
Remove the cenler hinge
brackel by removing lhe lhree
Wolx screws.
/VOTE."Keepthesescrewswiththehinge
bracket.Theyarelongscrewsandwill be used
wheninstallingthe hingeon theothers#le.
Remove the three To)x screws
.......................fiom the center left side of lhe
cabinel. Screw them inlo the holes
on lhe )ighl side.
_* Doriotremove
thisscrew
(}enterLeft
Place rite cenler hinge bracket
over rite holes at the center left
side of the cabinet. Insert and
dghlen lhe lhree long screws.
TransferTopHinge to the Left
Interchange hinge and screws at top )ight xdth screwsat top letl of cabinel.
Do not tighten screws on hinge side at this time:
Transfer Door Stops
()n each door, move lhe metal door sit@ tiom lhe )ighl It) lhe leti.
Move amT,screws fl-om lhe left It) lhe )ighl.
33
iiiHiii!iiiilJ!_iiiilliii
Reversingthe door handles.
Read these instructions completely and carefully.
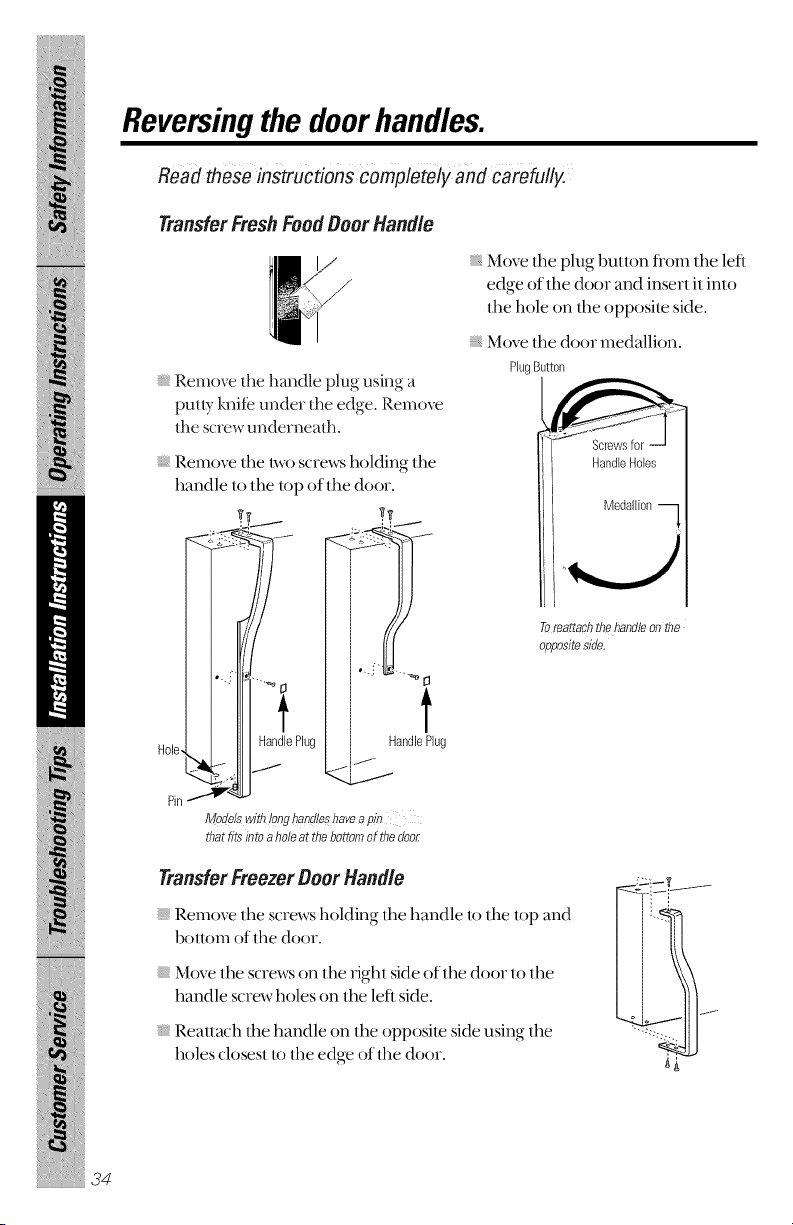
TransferFresh Food Boor Handle
Remove the handle plug using a
pulty knife under the edge, Remove
the screw underneath,
Remove the t:wo screws holding the
handle lo the lop of the door.
H_n!e Plug
Pin
t
HandlePlug
Modelswith Iooghandleshave apin
that fits into ahole at thebottomof thedoor
Move the plug button flom the left
edge of the door and insert it inlo
the hole on the opposite side.
Move the door medallion.
PhgButton
HandleHoles
Medallion q
Toreattachthe handleoothe
oppositeside,
illllllllllllllllllllllllllllllllllllllllllli_
34
Transfer Freezer Boor Handle
Remove the screws holding the handle to the top and
bottom of the door.
M(we the scre'_'_ on the fight side of the door 1o the
handle screw holes on the left side.
Reallach the handle on the opposite side using the
holes closest to the edge of the door.

Rehangingthe doors.
Rehang the Fresh FoodDoor
Ix)wet the ti-esh tbod door onto the bottom hinge pin.
Besurethewasheri} inplace.
Straighlen the door and line it up _dth the center hinge brackel.
Reinstall the hinge pin wilh a 3/8" socket. Turn il until it exlends dmmgh
d_e hinge bracket and into II_e door.
A
Plastic
Washer
1'
)
%
i
PlasticWasher_t_)
z
Hing_ _@
pi
Center Hinge Bracket __
I
Fresh Food Door
Rehang the Freezer Door on Non-Dispenser Models
I_)wer the fi-eezer door onto the (enter hinge, pin.
Besurethewasheris i)7place.
Lift the lop hinge so the pin fits into the door sockel.
{_ Make sure lhe door is straighl and the gap bel_veen lhe doors is even across
the flonl. Tighlen lhe lop iiinge screws.
CenterHingePin
35
iiiHiii!iiiilJ{_iiiilliii
Reversingthedoors.
Read these instructions completely and carefully.
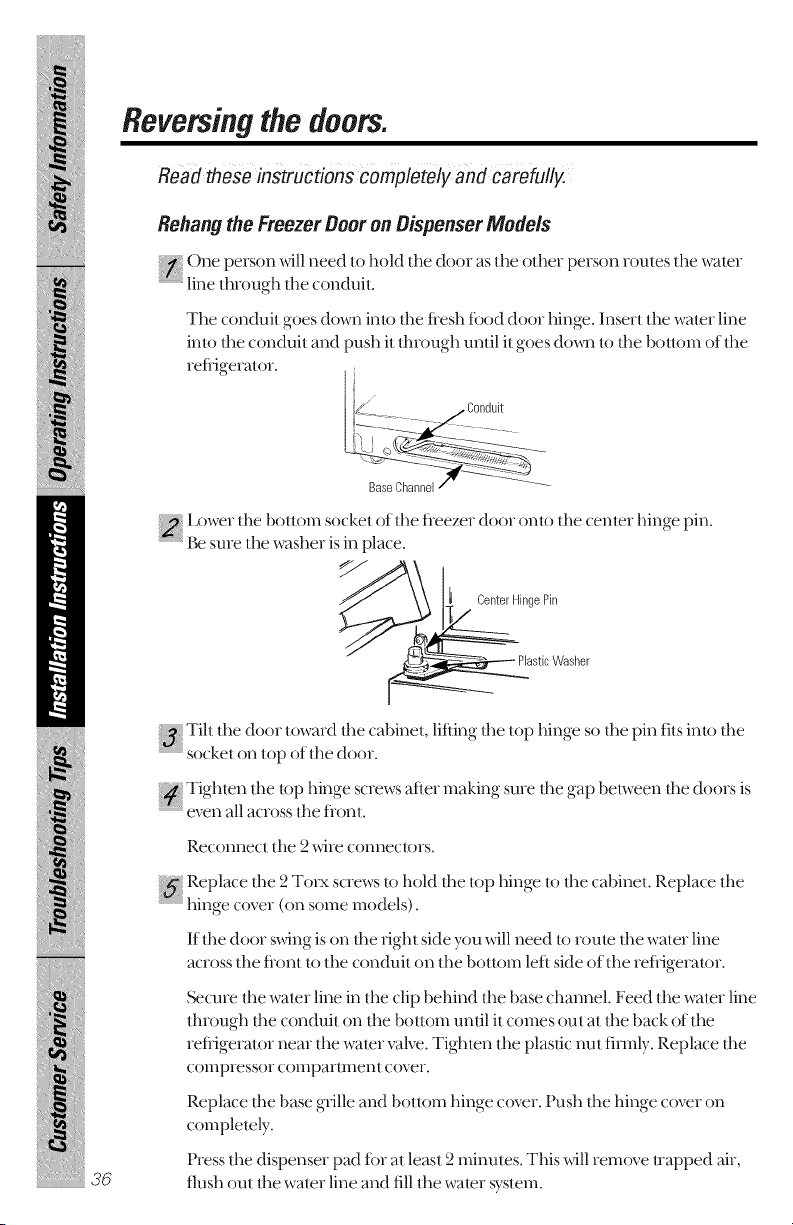
Rehang the Freezer Door on Dispenser Models
Onepe,son,,_nneedtoholdthedoo,astheothe,pe,son,outesthe.Tare,
line through die conduil.
Tile conduit goes down into tile fiesh tbod door hinge. Insert tile water line
into tile conduit and push it dlmugh until it goes do,_ to tile bott,ml of tile
refl_igerator.
3_
BaseChannel
Is)wet tile bottom socket of tile tieezer door onto tile center hinge pin.
{:::_'l_ sure tile washer is in place.
ingePin
sticWasher
Till the door toward die cabinet, lifting the top hinge so the pin fits into the
.........=" socket on top of tile door.
g' Tighten tile tt)p hinge screws after making sure tile gap between tile doors is
even all across tile fiont.
Reconnect tile 2wi_e connectors.
g Replace tile 2 To_x screws to hold tile top hinge lo tile cabinet. Replace tile
..........- ' hinge cover (on some models).
If tile door swing is on file _ight side you will need to _oum tile water line
across tile fiont to tile conduit on tile bo//om left side of tile refligerator.
_cme tile water line in tile clip behind tile base channel. Feed tile water line
dl_ough file conduit on tile bo/tom until it comes out at tile back of tile
refl_igera/or near tile water valve. Tighten tile plastic nut fi_mly. Replace tile
compressor compartment cover.
Replace file base grille and bottom hinge cover. Push tile hinge cover on
complemly.
Press tile dispenser pad tbr at least _ minums. This will remove t_apped ai_,
flush out tile water line and fill tile water system.

Normal operating sounds.
Depending on the placement of the refrigerator in your kitchen,
you may want to place a piece of rubber backed carpet under the
refrigerator to reduce noise.
Icemaker(onsomemodels).( )ccasionally you
will hear ice cubes dropping inlo lhe ice bin.
If lhis is your first icemaker, you'll hem-
occasional sounds lhal may be unfhmiliar.
They are normal icemaking sounds and are
nol a cause tbr concern.
These sounds are normal
and are due mostly to highly
efficient operation.
EvaporatorFan.You may hear air being
.-r : forced through the cabinet by the fan.
Evaporator.The flow of retiigeranl through
the evaporalor may creale a boiling or
gurgling sound.
Defrost Heater. During deftost cycles,
:::{ waler dripping onlo lhe healer may
cause a hissing or sizzling sound. After
defiosling, a popping sound m W occur
and lhe evaporau)r m W creale a boiling
or gurgling sound.
{}_ Cold Control & Defrost Timer.These paris
can produce a snapping sound when
turning the refiigerau)r on or oftl The
lhner also produces a sound similar 1o
an eleclric clock.
PlasticLiner.Cracking or popping sounds
:::::::::::::due to expansion of the plasuc liner.
WaterValve (onmodelsequippedwith an
..... automaticicemaker)._lmn the kemaker fills
_dth water, a buzzing sound and running
water xdll be heard.
Water Pan.Waler may be heard running inlo
lhe drain pan during lhe deftosl cycle.
:)_ Compressor.Modern, high emciency
compressors operale much faster than older
models. The compressor may have a high
pitched hum or pulsaling sound.
Condenser Fan.You may hear air being
fbrced over lhe condenser by lhe fhn.
iii !
37
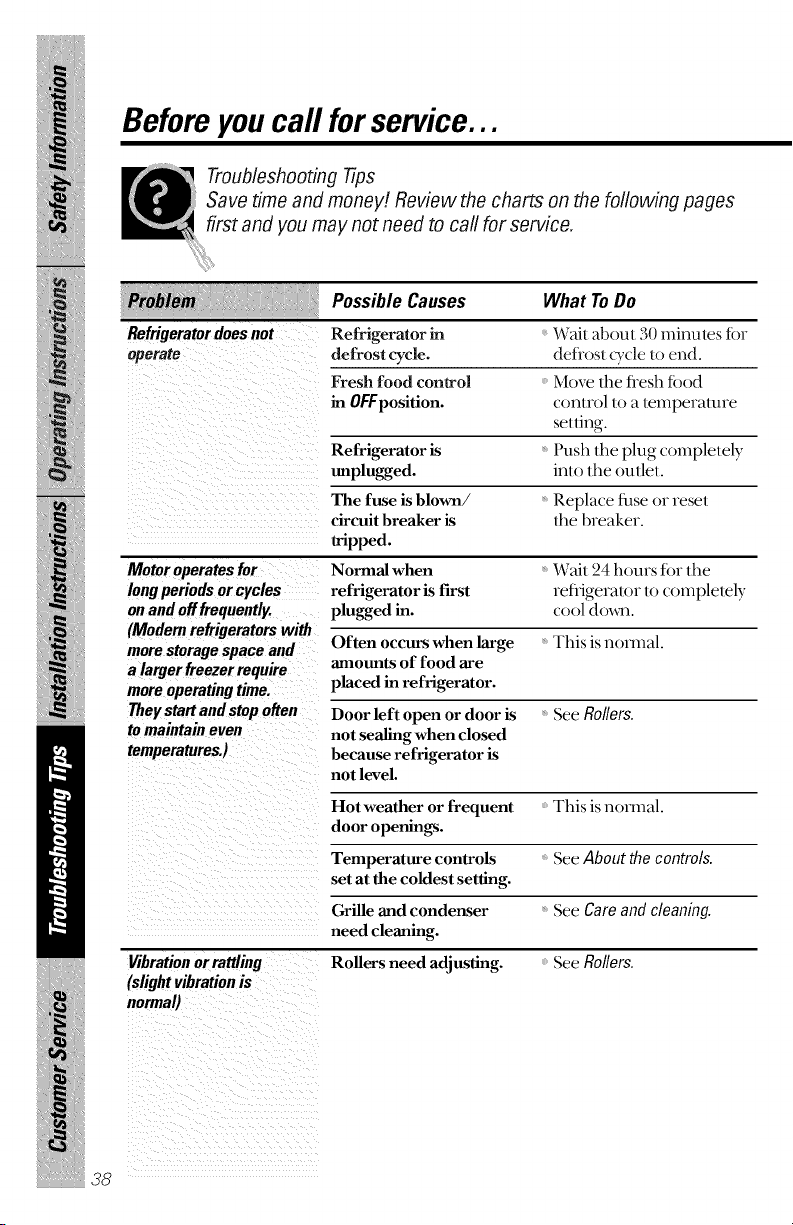
Before you call for service...
Troubleshooting Tips
Save time and money! Review the charts on the following pages
first and you may not need to call for service.
Refrigerator does not
operate
PossibleCauses What ToDo
Motor operates for
long periods or cycles
on and off frequently.
(Modern refrigerators with
more storage space and
a larger freezer require
more operating time.
Theystart and stop often
to maintain even
temperatures.)
Refrigerator in
defrost cycle.
Fresh food con_ol
in OFFposifion.
Refrigerator is
unplugged.
The fuse is blown/
circuit breaker is
tripped.
Normal when
refrigerator is first
plugged in.
Wait about 30 minutes tbr
deflost tTcle to end.
Move the flesh food
control to a temperature
selling.
Push the plug completely
into the outlet.
Replace fuse or reset
the breaker.
Wait 24 hours fbr the
refligerator to completely
cool doxm.
Often occurs when large This is normal.
amounts of food are
placed in refrigerator.
Door left open or door is See Rollers.
not sealing when closed
because refrigerator is
not level.
Hot weather or frequent This is normal.
door openings.
Temperature controls See About the controls.
set at the coldest setting.
Grille and condenser See Care and cleaning.
need cleaning.
See Rollers.
Vibrationor rattling
(slightvibrationis
normal)
Rollers need adjusting.
38
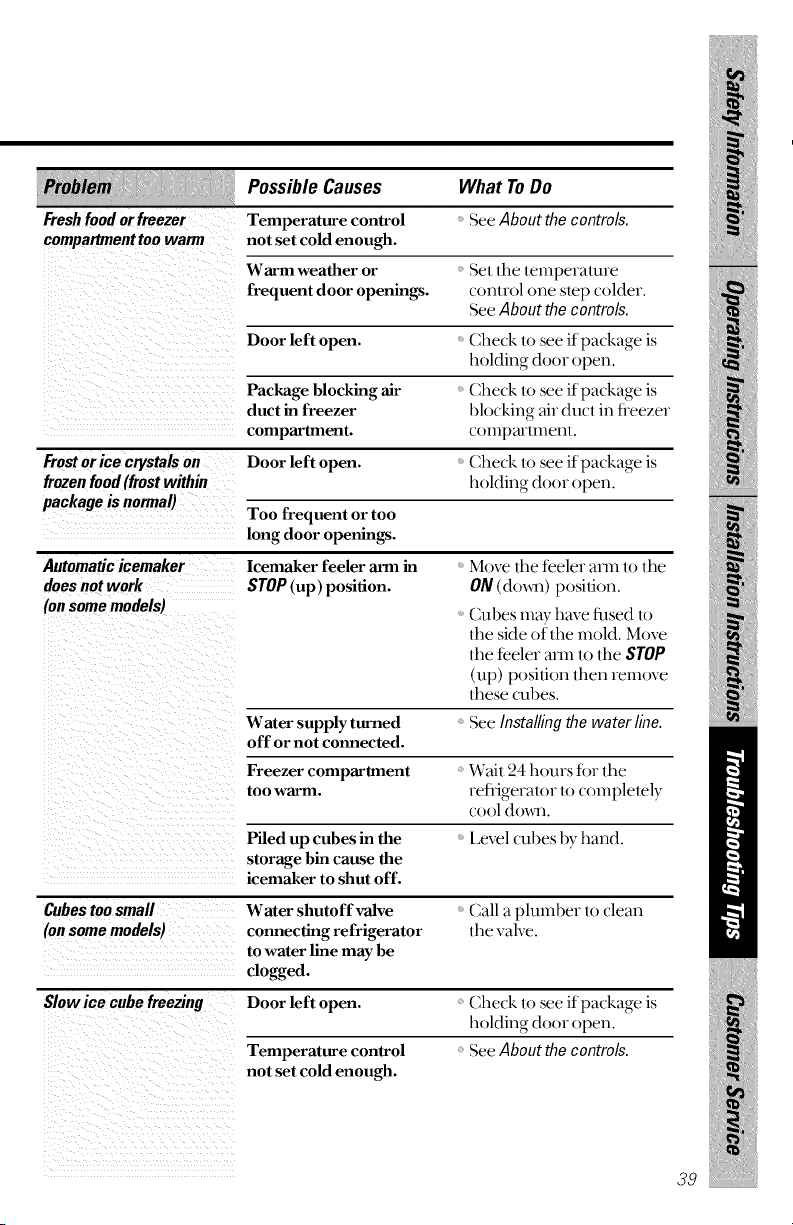
Freshfoodor freezer
compartmenttoowarm
Possible Causes
Temperature control
not set cold enough.
Warm weather or
frequent door openings.
What ToDo
SeeAboutthecontrols.
Set lhe lemperamre
control one step colder.
See About the controls.
Check 1osee if package is
holding door ()pen.
Fromor ice crystalson
frozenfood(frostwithin
packageis normal)
Automatic icemaker
does not work
(on some models)
Door left open.
Package blocking air
duct in freezer
compartment.
Door left open.
Too frequent or too
long door openings.
Icemaker feeler arm in
STOP (up) position.
Check to see if package is
blocking air duct in fieezer
colnpallmenl.
Check to see if package is
holding door ()pen.
Move tim teeler ann to the
ON (do_m) position.
Cubes may have fused to
tim side of the mold. Move
the feeler ann to the STOP
(up) position then remove
these cubes.
Water supply turned See Installing the water line.
off or not connected.
Freezer compartment Wait 24 hours fbr lhe
too warm. refiigerau)r to completely
cool doom.
Level cubes 1)yhand.Piled up cubes in the
storage bin cause the
icemaker to shut off.
Cubes too small
(on some models)
Slow ice cube freezing
Water shutoff valve
connecting refrigerator
to water line may be
dogged.
Door left open.
Temperature control
not set cold enough.
Call a plumber to clean
the valve.
Check to see if package is
holding door ()pen.
SeeAbout the controls.
3O
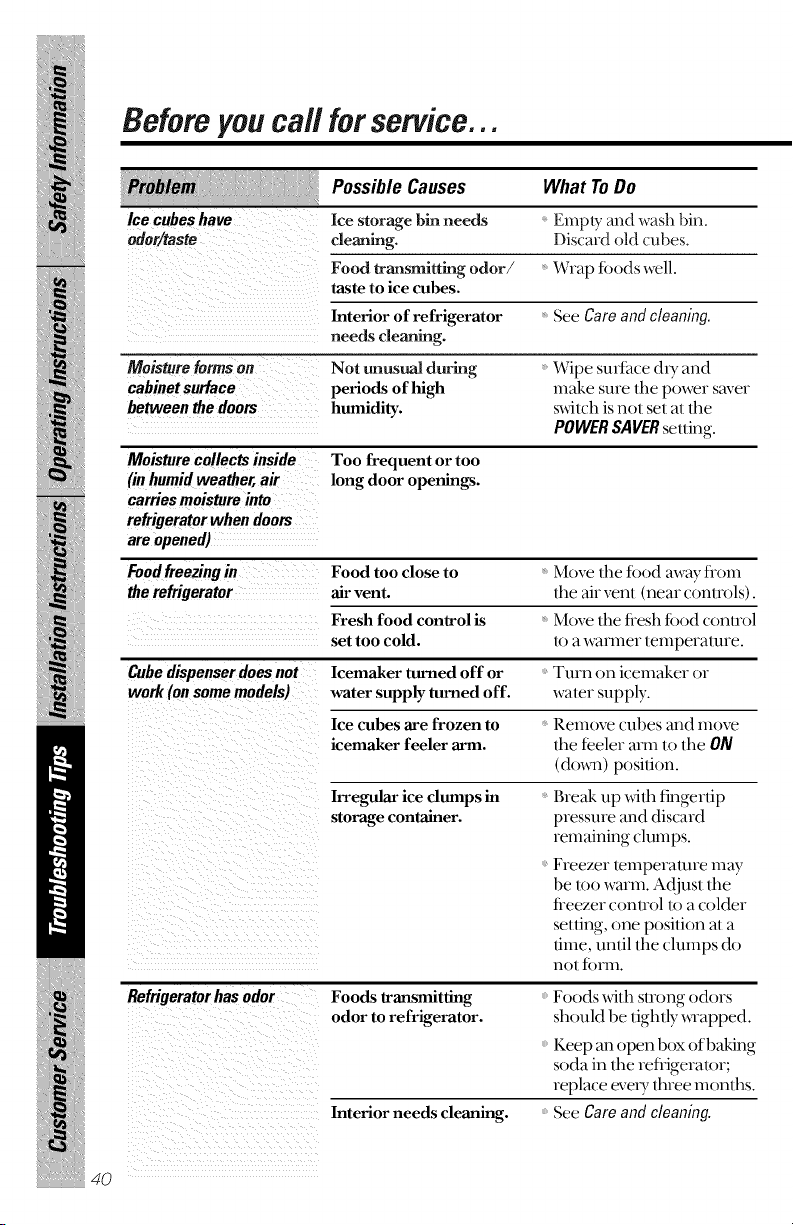
Before you call for service...
Ice cubeshave
odor/taste
Moisture forms on
cabinet surface
between the doors
Moisture collects inside
(in humid weather, air
carries moisture into
refrigerator when doors
are opened)
PossibleCauses What ToDo
Ice storage bin needs
deaning.
Empty and wash bin.
Discard old cubes.
Food transmitting odor/ Wrap foods well.
taste to ice cubes.
Interior of refrigerator See Careandcleaning.
needs cleaning.
Not unusual during
periods of high
humidity.
Too frequent or too
long door openings.
Wipe surface &y and
make sure the pox_r saver
sxdlch is not set at the
POWERSAVERsetting.
Foodfreezingin
the refrigerator
Cubedispenserdoesnot
work (onsomemodels)
Food too close to
air vent.
Fresh food control is
set too cold.
Icemaker turned off or
water supply turned off.
Ice cubes are frozen to
icemaker feeler arm.
Irregular ice dumps in
storage container.
Move the food away flom
the air vent (near controls).
Move tim fiesh food control
to a wanner temperature.
Turn on icemaker or
water supply.
Remove cubes and move
the teeler ann to the ON
(do_) position.
Break up _dfl_ fingertip
pressure and discard
remaining clumps.
Freezer temperature may
be too warm. A_!just dm
freezer control to a colder
setting, one position at a
time, until the clumps do
not t()rm.
Refrigeratorhas odor
Foods transmitting
odor to refrigerator.
Interior needs cleaning.
Foods x_dthstrong odors
should be tighdy _Tapped.
Keep an ()pen box of baking
soda in dm refl_igeralor;
replace eve U three months.
See Careandcleaning
4O
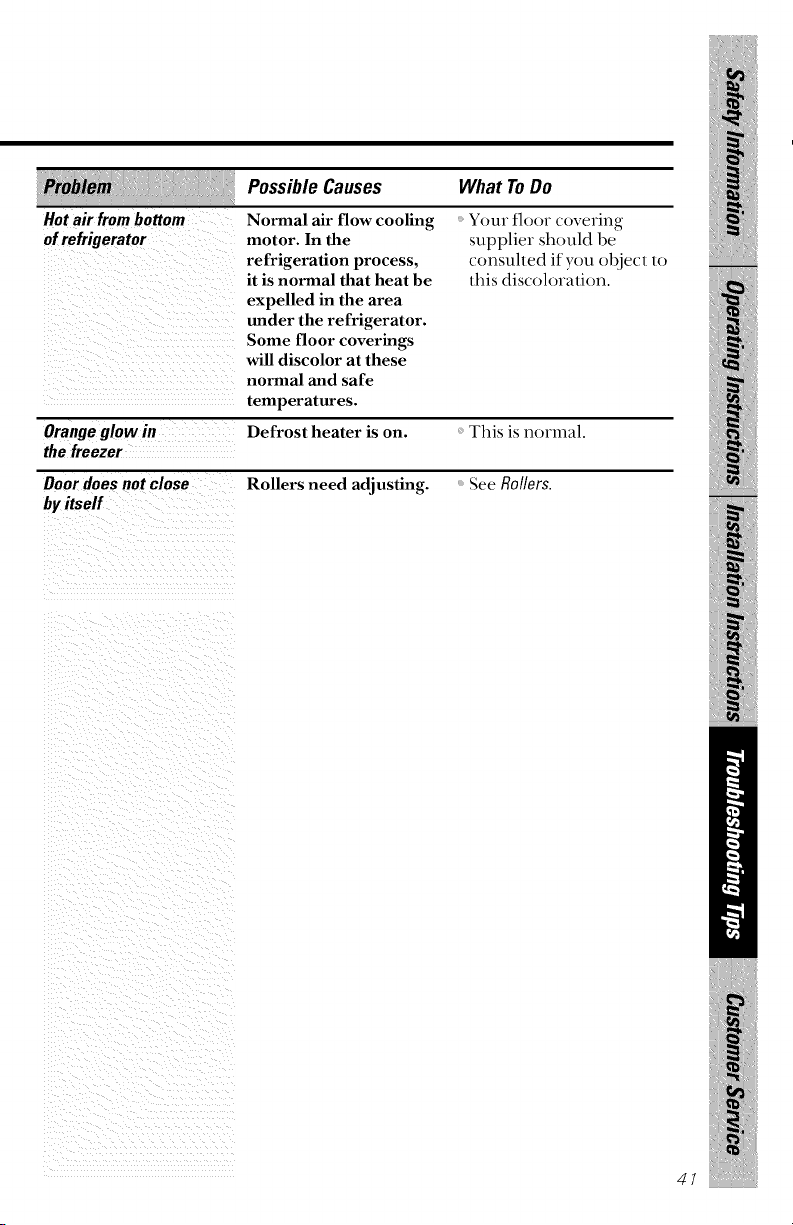
Hot air from bottom
of refrigerator
Possible Causes What ToDo
Normal air flow cooling
motor. In the
refrigeration process,
it is normal that heat be
expelled in the area
under the refrigerator.
Some floor coverings
will discolor at these
normal and safe
temperatures.
Your floor covering
supplier should be
consuhed if you object to
lifts discoloration.
Orange glow in Defrost heater is on. This is normal.
the freezer
Door does not close Rollers need adjusting. See Rollers.
by itself
47

Consumer Warranty
For customers in Canada
!
CAMCOwanants the replacement or repair of all parts of this Refligerator which
prove to be defecuve in material or _)rkmanship for one year flom tile date of
purchase. Such paris xdll be repaired or replaced at the option of Camco without
charge, subject to the terms and conditions set out below.
Tile/_F_AtERwarrants to provide tile service labor for tile repair or replacement ()fall
paris of this Refligeramr which prove to be defective in material or _x_rkmanship for
one )'ear flom tile date of purchase.
CAMgOwananls the hermetically sealed refl_igera/or (namely: Evaporator,
Condenser, Motor Compressor, Inte_vonnecfing Tubing, Drier and Refl_igerant
Chmge) against detects in material or workulanship tor an additional tour years.
These parts x_qllbe repaired or replaced at tile option of(]alnco without chmge,
subject to tile terms and conditions set out below.
Tile DF_AtERwanants ff)r tile next four years u) provide the service labor necessm T to
repair or replace tile hermetically sealed refl_igeradon system to tile terms and
conditions set out below.
42
This warranty applies only to single family domestic use in Canada when the
Refrigerator has been properly installed according to the instructions supplied by
Cameo and is connected to an adequate and proper utility service. Damage due to
abuse, accident, commercial use, and alteration or the removal or defacing of the
serial plate, cancels all obligations o f this warranty. Service during this warranty must
be performed by an Authorized Camco Service Agent.
Neither Camco nor the Dealer is liable for any claims or damages resulting from any
failure of the Refrigerator or from service delays beyond their reasonable control.
To obtain warranty service, purchaser must present the original bill of sale.
Components repaired or replaced are warranted through the remainder of the
original warranty period only.
This warranty does not cover expense involved in making this appliance readily
accessible for servicing.
This warranty gives you specific legal rights. Additional warranty rights may be
provided by law in some areas.
CameoServiceisavailablecoast-to-coast.SeeConsumerServicessectionforserviceinformation.
if furtherhelpis neededconcerningthisWarrant)4,contact:
Manager,ConsumerRelations,Camcoinc.,ConsumerService,
Suite310,1FactorvLane,Moncton,NB. E1C9M3
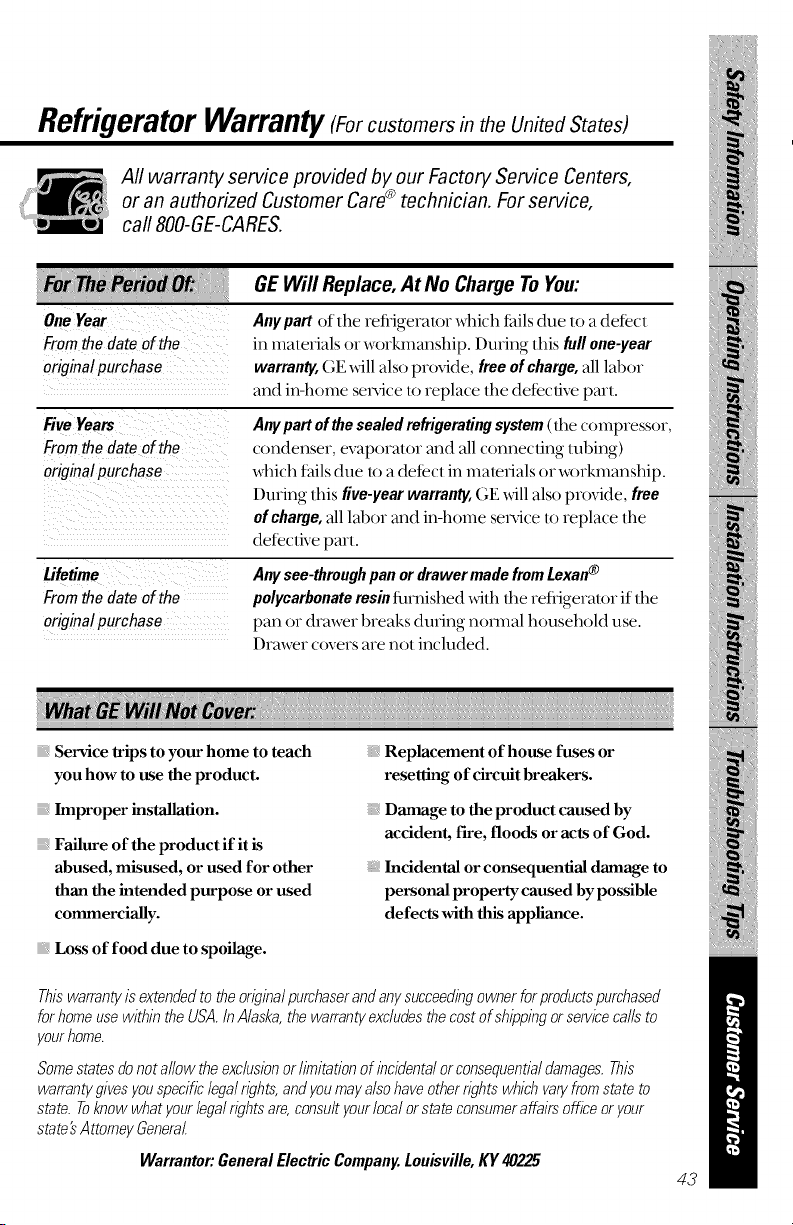
Refrigerator Warranty (Forcustomers in the United States)
All warranty service provided by our Factory Service Centers,
or an authorized Customer Care® technician. For service,
call 800-GE-CARES.
One Year
Fromthe date of the
original purchase
GEWill Replace,At No Charge To You:
Anypart of the refligeralor which thils due to a detect
in materials or _rkmanship. During this full one-year
warranty, GE _dll also provide, freeof charge,all labor
and in-home sel_@e to replace the detective pro1.
Five Years
From the date of the
original purchase
Lifetime
Fromthe date of the
original purchase
Anypartofthesealedrefrigeratingsystem(the compressor,
condenser, evaporator and all connecting robing)
which tails due loa detect in materials or _nkmanship.
During this five-yearwarranty, GE xdll also provide, free
of charge, all labor and in-home sel_ice to replace the
detective pro1.
Anysee-throughpanor drawermadefromtexan®
polycarhonateresinflmfished _dth the refligerator if the
pan or drm_r breaks during normal household use.
Drm_r covers are not included.
Service trips to your home to teach
you how to use the product.
Improper installation.
Failure of the product if it is
abused, misused, or used for other
than the intended purpose or used
commercially.
Loss of food due to spoilage.
Replacement of house fuses or
resetting of circuit breakers.
Damage to the product caused by
accident, fire, floods or acts of God.
Incidental or consequential damage to
personal property caused by possible
defects with this appliance.
Thiswarrantyis extendedto theoriginalpurchaserandanysucceedingownerforproductspurchased
for homeusewithintheUSA.InAlaska,the warrantyexcludesthecostof shippingorservicecallsto
yourhome.
Some states do not a//ow the exc/uslan or/imitation of incidental or consequentia/ damages. This
warranty gives you specific legal rights, and you may also have other rights which vary from state to
state. Toknow what your lagal rights are, consult your lacal or state consumeraffairs office or your
state's Attorney General.
Warrantor:GeneralElectricCompany.Louisville,KY40225
43
Service TelephoneNumbers.
GEAnswer Center®IntheU.$.:800.626.2000
The GE Answer Center ®is open 24 hours a day, 7 days a week.
In Canada,contact: Manager, Consumer Relations, Camco Inc.,
Suite 310, 1Facto_7 Lane Moncton, N.B. E1C 9MS.
In-Home
RepairService/ntheu.s.:800-432-2737
Expert C,E repair ser,,ice is only a phone call away.
In Canada,call 1-800-361-3400.
SpecialNeedsService/ntheu.s.:800.626.2000
GE offers, flee of chmge, a brochure to assist in planning a
banie>flee kitchen tot persons with limited mobility.
In the U.S.,call 800-TDD-GEAC(800-833-4322).
In Canada, contact: Manager, Consumer Relations, (]aln<o Inc.,
Suite 310, 1 Facto_T Lane, Moncton, N.B. E1C 9M3.
ServiceContracts/ntheU.$.:800-626-2224
Purchase a GE service connact while your warranty is still in effect and
you'll receive a substantial discount. GE (kmsumer Service will still be
there 'aideryour warranty expires. In Canada, call 1-800-461-3630.
PartsandAccessories/ntheU.$.:800-626-2002
Individuals qualified to service dmir o_ appliances can have parts or
accessories sent direcdy to their homes (VISA, MasterCard and Discover
cardsare accepted)./nstmctions containedin thismanualcoverpmcedares
tohe performedby anyuser.Otherservicing generallyshould he referredto
qualified service pemonne/.Caution must he exercised,since improper
servicingmay causeunsafeoperation.
Custome_ in Canadashould (onsuh the local telephone dire(to_y fbr
the nearest (_alnco service center, or call 1-800-361-3400.
ServiceSatisfaction
If you me not satistied with file sepdce you receive tiom GE: Fimt contact
_he people who se_iced your appliance. Next, if>m are slill nol pleased, in
the U.S.,wrim all tile deudls-including >mr phone numbering: Manager,
Consumer Relations, GE Appliances, Appliance Park, Ixmisville, KY
40225; or, in Canada,to Direcu_r, Consumer Relations, Cmnco Inc.,
Suim S10, 1 Facto U Lane, Moncton, N.B. E1C {}MS.Finally,ifyour
p,x_blem is still not resolved, write Major Appliance Consumer Action
PmgTam, 20 N orth Wacker Drive, Chic ago, II_60 606 (1;.S. only ).
44 PdngedI?_gheUn#edSgages

