Loading ...
Loading ...
Loading ...
- 6 -
05/2021
Copyright © 2021, Fast ČR, a.s.
EN
Automatic
smoothie blender
User'smanual
BEFORE FIRST USE
■ Prior to using this appliance, please read the user'smanual thoroughly, even in cases,
when one has already familiarised themselves with previous use of similar types of
appliances. Only use the appliance in the manner described in this user’smanual.
Keep this user'smanual in asafe place where it can be easily retrieved for future use.
In the event that you hand this appliance over to somebody else, make sure to also
include this user'smanual.
■ We recommend saving the original cardboard box, packaging material, purchase
receipt and responsibility statement of the vendor or warranty card for at least the
duration of the legal liability for unsatisfactory performance or quality. In the event
of transportation, we recommend that you pack the appliance in the original box
from the manufacturer.
■ Carefully unpack the appliance and take care not to throw away any part of the
packaging before you find all the parts of the appliance.
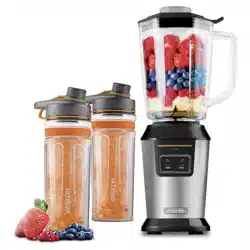
DESCRIPTION OF THE APPLIANCE AND ACCESSORIES
A1 Inner cap
Serves to close the filling cap
opening or as aliquid measuring
cup
A2 Outer lid
A3 Glass blending jar with 0.9 l capacity
A4 Blade assembly for the blending jar
Contains six high quality titanium
coated stainless steel blades
A5 Motor base unit
A6 Control and signalling elements
A7 Anti-slip feet for stability of the
appliance during operation
A8 Sports bottle for processing food
with 0.6l capacity
The bottle is made from impact-
resistant bisphenol-A-(BPA)-free
PCTG
It is suitable for taking along to
training, on the bicycle and fits
perfectly into the cup holder in
motor vehicles
A9 Blade assembly for sports bottles
Contains six removable high quality
titanium coated stainless steel
blades
A10 Second sports bottle for processing
food with 0.6l capacity
It has identical properties to the first
bottle
A11 Lid for the first sports bottle
A12 Lid for the second sports bottle
B1 LED blending progress indicator
B2 SOFT mode for soft fruit/vegetables
such as strawberries, tomatoes, etc.
B3 HARD mode for hard fruit /
vegetables such as pineapples and
carrots
PURPOSE OF USE AND APPLIANCE FEATURES
■ This smoothie blender is intended for processing a standard amount of food
in the household. It is ideal for preparing drinks from fresh fruit or fitness drinks,
milkshakes and other cocktails, mixed drinks, salsas, creamy soups, sauces and
blended baby foods.
■ Ingredients can be blended either in the glass blending jar or in one of the two
sports bottles. The blending jar and the bottles have their own removable six-blade
assembly made from high quality stainless steel. The bottle lid has aclosable spout
that enables the bottle to be easily carried without any spillage. Both the bottles
perfectly fit into the cup holder in motor vehicles or abicycle bottle holder.
■ The progress of blending is shown on an LED indicator and the blender automatically
turns off when it is finished. So it is not necessary to keep the button of one of the
two blending modes pushed down during the blending/grinding process.
■ The anti-slip feet with suction cups ensure outstanding stability of the base unit
during operation.
■ This smoothie blender is not intended for mashing potatoes, mixing dough,
whipping eggs or grinding raw meat.
BEFORE FIRST USE
■ Before first use, thoroughly wash all parts that come into contact with food (glass
blending jar and its parts, both bottles, bottle lid and both blade assemblies) in hot
water using neutral dishwashing detergent. Then rinse everything with clean warm
water and allow to dry naturally or wipe dry thoroughly using a wiping cloth. Parts
A3, A8, and A10 may be washed in a dishwasher.
Attention:
When washing the blade assemblies, take special care to avoid
injury on the sharp cutting edges.
Do not rinse the motor base unit or its power cord under water or
submerge it in water. The motor base unit is not intended to be
washed in adishwasher.
■ Use alightly dampened wiping cloth to wipe the outside parts of the motor base
unit.
PREPARING FOR OPERATION
Attention:
Prior to mounting the glass blending jar or sports bottles on the
motor base unit, the base unit must always be disconnected from
the power socket.
ASSEMBLING AND FILLING THE GLASS BLENDING JAR
■ Into the bottom part of the glass blending jar A3, insert the blade assembly A4 so
that the blades point inwards into the blending jar and screw the blade assemblyin.
Check that it is firmly and correctly screwed in and that liquid is not leaking out of
the blending jar.
■ Place the ingredients that you wish to process into the jar. Always fill up to the
maximum mark on the jar. We recommend to add the ingredients into the jar in the
order described in section QUICK GUIDE TO PROCESSING INGREDIENTS.
Warning:
Before pouring hot liquids into the blending jar, allow these
liquids to cool down to at least 40 °C. When processing hot liquids
or liquids that expand in volume during the blending process, it
is recommended to fill the blending jar to no more than ⅔ of its
maximum capacity.
■ Place the lid A2 on to the blending jar so that its edges copy the neck of the jar, and
push it down thoroughly along its entire perimeter. Into the hole in the lid, insert the
inner cap A1 and lock it by turning it clockwise.
ASSEMBLING AND FILLING THE SPORTS BOTTLES
■ Into the sports bottle A8 or A10, add the ingredients that you wish to process.
Always fill up to the maximum mark on the bottle. We recommend to add the
ingredients into the bottle in the order described in section QUICK GUIDE TO
PROCESSING INGREDIENTS.
Warning:
Before pouring hot liquids into the bottle, allow these liquids
to cool down to at least 40 °C. When processing hot liquids or
liquids that expand in volume during the blending process, it is
recommended to fill the bottle to no more than ⅔ of its maximum
capacity.
■ From above, mount the blade assembly A9 on to the bottle so that the blades point
inwards into the bottle and screw in the blade assembly. Check that it is firmly and
correctly screwed in and that liquid is not leaking out of the bottle.
■ Turn the assembled bottle around so that the blade assembly is at the bottom.
Again, check that no liquid is leaking out of the bottle.
MOUNTING THE BLENDING JAR OR BOTTLE ON TO THE MOTOR BASE UNIT
■ Place the motor base unit A5 on adry, even surface such as akitchen countertop,
however, do not connect it to the power grid.
■ Seat the assembled jar/bottle on the motor base unit so that the arrow on the blade
assembly is aligned with the arrow on the motor base unit. Rotate the jar/bottle in
the direction towards the closed padlock symbol on the base unit until it is firmly
mounted. When the jar/bottle are correctly mounted on the base unit, it is not
possible to lift them off the base unit.
OPERATION
QUICK GUIDE TO PROCESSING INGREDIENTS
■ Before blending, decide whether to put the ingredients into the glass jar or into
the sports bottle. The glass jar is suitable for cases where it is necessary to add the
ingredients during the blending process since it enables them to be added through
the hole in the lid without needing to remove the jar from the motor base unit.
■ If you wish to achieve optimal blending results, add the ingredients into the
blending jar or bottle in the following order: liquids, fresh fruit, frozen fruit, yoghurt
and ice cream.
■ First cut ingredients with afirm consistency or with larger dimensions into smaller
pieces measuring 2 to 3 cm and only then blend them.
■ Remove hard peals, stones or hard seeds from any fruit and vegetables.
■ If you need to blend food of a solid consistency together with liquids, we
recommend that you first blend the food of solid consistency and a part of the
liquids. Then gradually add the remaining liquids through the hole in the lid while
blending.
■ First, blend a smaller amount of ingredients and then gradually add more
ingredients through the hole in the lid while blending. In this way, you will achieve
better results than by adding all ingredients into the blending jar at once.
■ Frozen ingredients (ice cubes, frozen banana, strawberries, etc.) should not be larger
than 2×2 cm. Ice cubes must be processed immediately upon being removed from
the freezer. When the ice starts to melt, the ice cubes will stick together and it will
not be possible to blend them.
Attention:
Do not use this smoothie blender for pressing potatoes, mixing
dough, whipping eggs or grinding raw meat.
Loading ...