User manual Microwave
Getting to Know Your Microwave Oven
This section discusses the concepts behind microwave cooking. It also shows you the basics you need to know to operate your microwave oven. Please read this information before you use your oven.
How your microwave oven works
- Microwave ovens are safe. Microwave energy is not hot. It causes food to make its own heat, and it's this heat that cooks the food.
- Microwaves are like TV waves, radio waves, or light waves. You cannot see them, but you can see what they do.
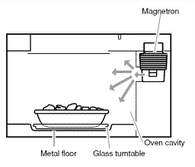
- A magnetron in the microwave oven produces microwaves. The microwaves move into the oven where they contact food as it turns on the turntable.
- The glass turntable of your microwave oven lets microwaves pass through. Then they bounce off a metal floor, back through the glass turntable, and are absorbed by the food.
- Microwaves pass through most glass, paper, and plastics without heating them so food absorbs the energy. Microwaves bounce off metal containers so food does not absorb the energy.
Radio interference
Using your microwave oven may cause interference to your radio, TV, or similar equipment. When there is interference, you can reduce it or remove it by:
- Cleaning the door and sealing surfaces of the oven.
- Adjusting the receiving antenna of the radio or television.
- Moving the receiver away from the microwave oven.
- Plugging the microwave oven into a different outlet so that the microwave oven and receiver are on different branch circuits.
For the best cooking results
- Always cook food for the shortest cooking time recommended. Check to see how the food is cooking. If needed, touch Add Minute while the oven is operating or after the cooking cycle is over (see the "Using add minute" section).
- Stir, turn over, or rearrange the food being cooked about halfway through the cooking time for all recipes. This will help make sure the food is evenly cooked.
- If you do not have a cover for a dish, use wax paper, or microwave-approved paper towels or plastic wrap. Rememberto turn back a corner of the plastic wrap to vent steam during cooking.
Cookware guide
Most heat resistant, nonmetallic cookware is safe for use in your microwave oven. However, to test cookware before using,follow these steps:
- Place the empty cookware in the microwave oven.
- Measure 1cup (250ml) water ina glass measuring cup and place it in the oven beside the cookware.
- Microwave on 100% powerfor 1 minute. If the dish is warm, it should not be used for microwave cooking.
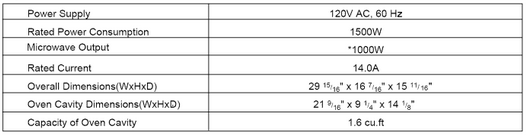
Specifications
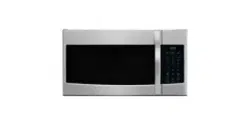
Microwave oven features
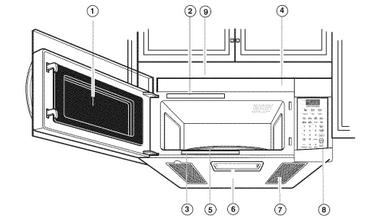
Your microwave oven is designed to make your cooking experience as enjoyable and productive as possible. To get you up and running quickly, the following is a list of the oven's basic features:
- Metal Shielded Window The shield prevents microwaves from escaping. It is designed as a screen to allow you to view food as it cooks.
- Model and Serial Number Plate
- Cooking Guide label
- Vent Grille
- Turntable. The turntable turns food as it cooks for more even cooking. It must be in the oven during operation for best cooking results.
- Cooktop Light
- Grease Filters. See "Caring for the filters" section,
- Control Panel. Touch the pads on this panel to perform all functions.
- Charcoal Filter (behind Vent Grille)
The turntable reverses rotation each time the microwave oven door is opened and closed, This helps cook food evenly, Do not operate the microwave oven without the turntable in place.
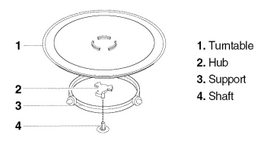
To Install:
- Place the support on the oven cavity bottom,
- Place the turntable on the support.
Fit the raised, curved lines in the center of the turntable bottom between the three spokes of the hub.
The rollers on the support should fit inside the turntable bottom ridge.
Control panel features
Your microwave oven control panel lets you select the desired cooking function quickly and easily. All you have to do is touch the necessary Command Pad. The following is a list of all the Command and Number Pads located on the control panel. For more information on these features, see "Using your microwave oven" section.
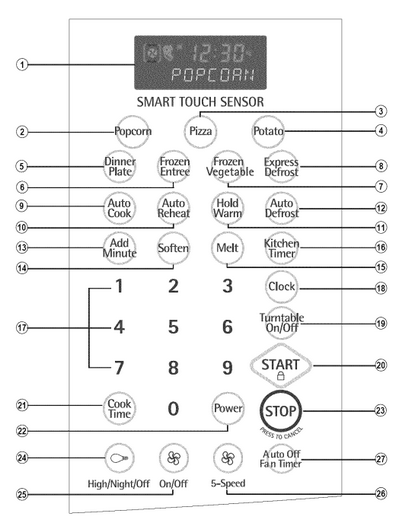
- Display. The display includes a clock and indicators to tell you time of day, cooking time settings, cook powers, quantities, weights and cooking functions selected.
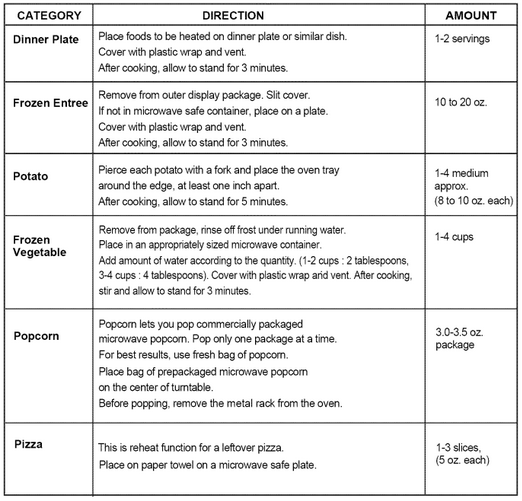
- Popcorn. Touch this pad to pop popcorn with the sensor feature. The oven's sensor will tell the oven how long to cook depending on the amount of humidity it detects from the popcorn. Remove the metal rack before cooking popcorn.
- Pizza. Touch this pad to reheat one or several slices of pizza without entering a cook time or power.
- Potato. Touch this pad to cook potatoes without entering a cook time or power.
- Dinner Plate. Touch this pad to cook without entering a cook time or power.
- Frozen Entree. Touch this pad to cook a 10 to 20 ounce (284 to 567 g) frozen entree without entering a cook time or power.
- Frozen Vegetable. Touch this pad to cook without entering a cook time or power.
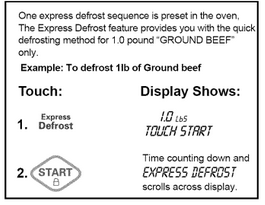
- Express Defrost. Touch this pad to express defrost. "GROUND BEEF 1.0 LBS TOUCH START" will appear in the display.
- Auto Cook. Touch this pad to cook microwavable foods without entering a cook time or power.
- Auto Reheat. Touch this pad to reheat microwavable foods without entering a cook time or power.
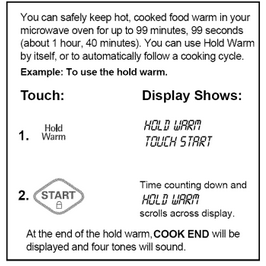
- Hold Warm. Touch this pad to keep hot, cooked foods safely warm in your oven for up to 99 minutes, 99 seconds. Hold Warm can be used by itself, or it can automatically follow a cooking cycle.
- Auto Defrost. Touch this pad followed by Number Pads to thaw frozen meat by weight.
- Add Minute. Touch this pad to cook for 1 minute at 100% cook power, or to add extra minutes at the set cook power to your cooking cycle.
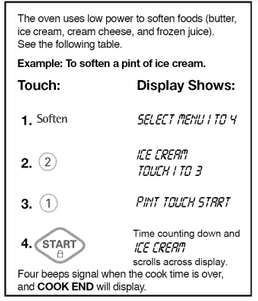
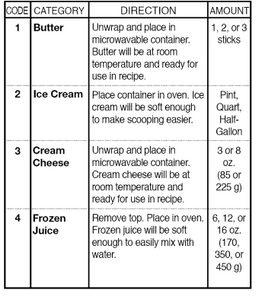
- Soften. Touch this pad to soften butter, ice cream, cream cheese, or frozen juice.
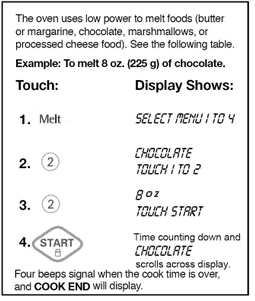
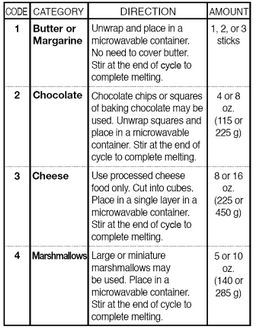
- Melt. Touch this pad to melt butter or margarine, chocolate, cheese, or marshmallows.
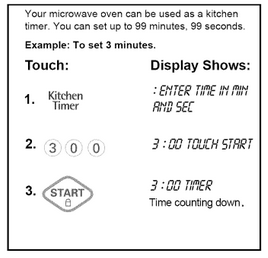
- Kitchen Timer. Touch this pad to set the kitchen timer.
- Number Pads. Touch number pads to enter cooking times, cook powers, quantities, weights, or food categories.
- Clock. Touch this pad to enter the correct time of day.
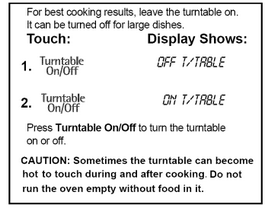
- Turntable On/Off. Touch this pad to turn off the turntable. "T/TABLE OFF" will appear in the display.
- START. Touch this pad to start a function. If the door is opened after the oven begins to cook, retouch START.
- Cook Time. Touch this pad followed by Number Pads to set a cooking time.
- Power. Touch this pad after the cook time has been set, followed by a Number Pad to set the amount of microwave energy released to cook the food. The higher the number, the higher the microwave power or "cooking speed."
- STOP. Touch this pad to erase an incorrect command, cancel a program during cooking, or to clear the Display.
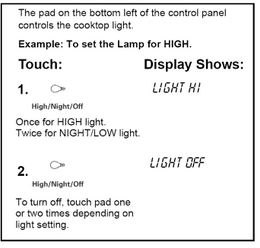
- Light. Touch this pad to turn the light on high, night (low) or off.
- Fan On/Off. Touch this pad to turn the fan on or off.
- Fan 5 Speed. Touch this pad to choose one of 5 fan speeds.
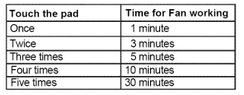
- Auto Off Fan Timer. Touch this pad followed by Number pad to set a time for the fan stopping automatically.
NOTE: A programming tone will sound each time you touch a pad. If you try to enter incorrect instruction you will not hear any tones. Touch STOP and re-enter the instructions.
MICROWAVE COOKING TIPS
Amount of food
- If you increase or decrease the amount of food you prepare, the time it takes to cook that food will also change. For example, if you double a recipe, add a little more than half the original cooking time. Check for doneness and, if necessary, add more time insmall increments.
Starting temperature of food
- The lower the temperature of the food being put into the microwave oven, the longer it takes to cook. Food at room temperature will be re-heated more quickly than food at refrigerator temperature.
Composition of food
- Food with a lot of fat and sugar will be heated fasterthan food containing a lot of water. Fat and sugar will also reach a highertemperature than water in the cooking process.
- The more dense the food, the longer it takes to heat. "Very dense"food like meat takes longer to heat than lighter, more porous food like sponge cakes.
Size and shape
- Smaller pieces of food will cook faster than larger pieces.Also, same shaped pieces cook more evenly than different-shaped pieces.
- With foods that have different thicknesses, the thinner partswill cook fasterthan the thicker parts. Place the thinner partsof chicken wings and legs in the center of the dish.
Stirring, turning foods
- Stirring and turning foods spreadsheat quicklyto the center of the dish and avoids overcooking at the outer edges of the food.
Covering food
Cover food to:
- Reduce splattering
- Shorten cooking times
- Keepfood moist
You can use any covering that lets microwaves pass through. See "Getting to Know Your Microwave Oven"for materials that microwaves will pass through.
Releasing pressure in foods
- Several foods (forexample:baked potatoes, sausages, egg yolks, and some fruits) are tightly covered by a skin or membrane. Steam can build up under the membrane during cooking, causing the food to burst. To relieve the pressureand to prevent bursting, pierce these foods before cooking with a fork, cocktail pick, or toothpick.
Using standing time
- Always allow food to stand eitherin or out of oven after cooking power stops. Standing time after defrosting and cooking allows the temperature to evenly spread throughout the food, improving the cooking results. For inside oven standing time, you can program "0" power sencond stage of the cooking cycle. See Two-Stage Cooking.
- The length of the standing time depends on how much food you are cooking and how dense it is. Sometimes it can be as short as the time it takes you to remove the food from the oven and take it to the serving table. However,with large, denser food item, the standing time may be as long as 10 minutes.
Arranging food
For best results, place food evenly on the plate. You can do this in several ways:
- If you are cooking several items of the same food, such as baked potatoes, place them in a ring pattern for uniform cooking.
- When cooking foods of uneven shapes or thickness, such as chicken breasts, place the smaller or thinner area of the food towards the center of the dish where it will be heated last.
- Layer thin slices of meat on top of each other.
- When you cook or reheat whole fish, score the skin - this prevents cracking.
- Do not let food or a container touch the top or sides of the oven. This will prevent possible arcing. Arcing is a spark that can cause damage to the oven interior.
Using aluminum foil
Metal containers should not be used in a microwave oven. There are, however, some exceptions. If you have purchased food which is prepackaged in an aluminum foil container,refer to the instructionson the package. When using aluminum foil containers, cooking times may be longer because microwaves will only penetrate the top of the food. If you use aluminum containers without package instructions, follow these guidelines:
- Place the container in a glass bowl and add some water so that it covers the bottom of the container, not more than 1/4in, (.64 cm) high, This ensures even heating of the container bottom.
- Always remove the lid to avoid damage to the oven,
- Use only undamaged containers,
- Do not use containers tallerthan 3/4 in. (1.9 cm),
- Container must be at least half filled,
- To avoid arcing, there must be a minimum 1/4in, (.64 cm) between the aluminum container and the walls of the oven and also between two aluminum containers.
- Always place the container on the turntable,
- Shield with small pieces of aluminum foil, parts of food that may cook quickly, such as wing tips and leg ends of poultry.
- Heating food in aluminum foil containers usually takes up to double the time compared to reheating in plastic,glass, china, or paper containers, The time when food is ready will vary depending upon the type of container you use,
- Let food stand for 2 to 3 minutes after heating so that heat is spread evenly throughout container.
Cooking you should not do in your microwave oven
- Do not do canning of foods in the oven, Closed glassjars may explode, resulting in damage to the oven,
- Do not use the microwave oven to sterilize objects (baby bottles, etc,), It is difficultto keep the oven at the high temperature needed for sterilization,
Using Your Microwave Oven
This section gives you instructions for operating each function. Please read these instructions carefully.
AUDIBLE SIGNALS
Audible signals are available to guide you when setting and using your oven:
- A programming tone will sound each time you toucha pad.
- Seven tones signal the end efa Kitchen Timer countdown.
- Four tones signal the end of a cooking cycle.
CLOCK
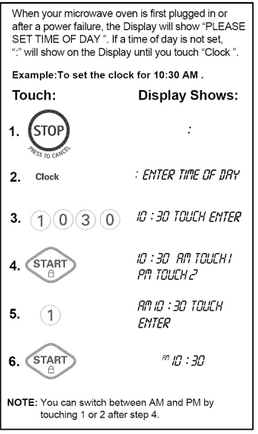
NOTE: You can switch between AM and PM by touching 1 or 2 after step 4.
INTERRUPTING COOKING
- You can stop the oven during a cycle by opening the door. The oven stops heating and the fan stops, but the light stays on.
- To restart cooking, close the door and Touch START.
- If you do not want to continue cooking, open the door and touch STOP.
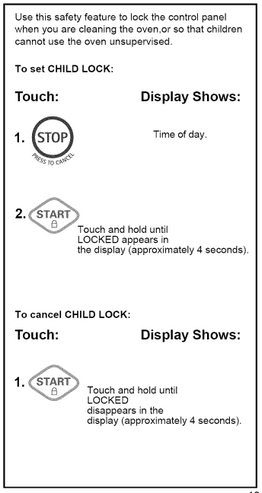
CHILD LOCK
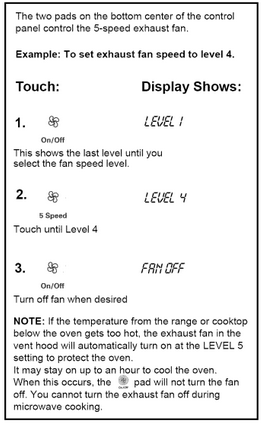
EXHAUST FAN
KITCHEN TIMER
AUTO OFF FAN TIMER
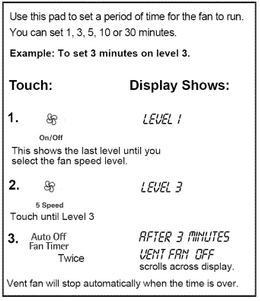
The following table shows you the method to useAuto Off Fan Timer
COOKTOP LIGHT
TURNTABLE ON/OFF
EXPRESS DEFROST
ADD MINUTE

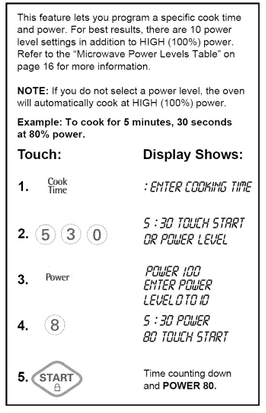
TIMED COOKING
TWO-STAGE COOKING

MICROWAVE POWER LEVELS
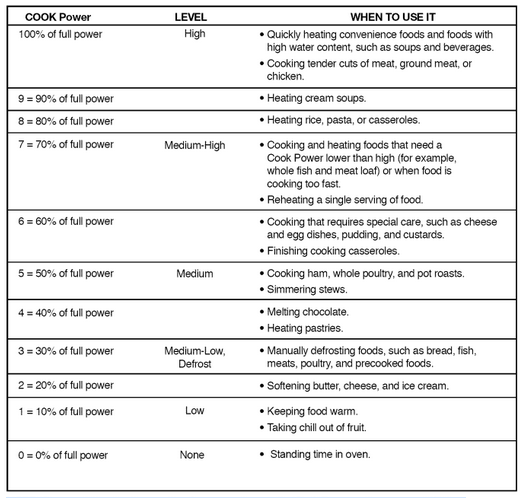
For best results, some recipes call for different cook powers. The lower the cook power, the slower the cooking. Each numberfrom 1 to 9 stands for a different percentage of full cook power.
The following chart gives the percentage of cook power each number pad stands for, and the cook power name usually used.
Italso tells you when to use each cook power. Follow recipe or food package instructions if available.
NOTE: Referto a reliablecookbook for cooking times based on the 1000 Watt cook power of your microwave oven.
NOTE: Once cook time has been entered, you can also use the Cook Power pad as a second Kitchen Timer by entering "0" forthe Cook Power. The oven will count down the cooking time you set without cooking.
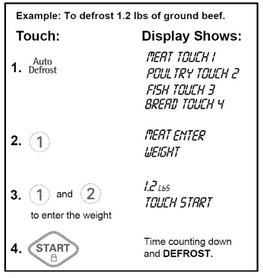
AUTO DEFROST
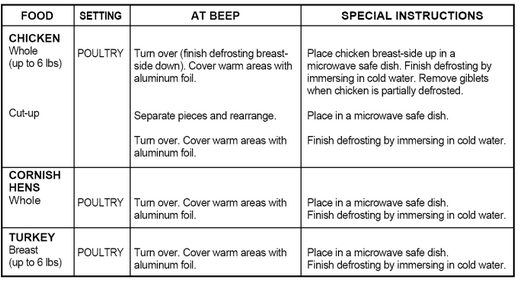
Four defrost sequences are preset in the oven. The auto defrost feature provides you with the best defrosting method for frozen foods. The cooking guide will show you which defrost sequence is recommended for the food you are defrosting.
For added convenience, the Auto Defrost includes a built-in beep mechanism that reminds you to check, turn over, separate, or rearrange to get best defrost results. Four different defrosting levels are provided.
1 MEAT
2 POULTRY
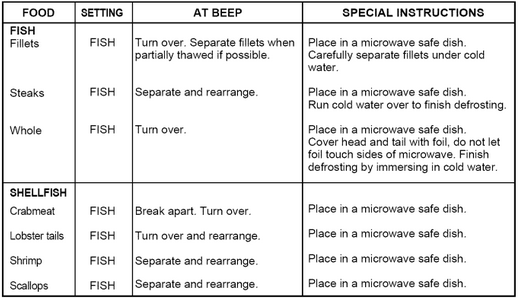
3 FISH
4.BREAD
NOTE:
- When you touch the START pad, the display changes to defrost time count down. The oven will beep during the DEFROST cycle. At this time, open the door and turn, separate, or rearrange the food.
- Remove any portions that have thawed.
- Return frozen portions to the oven and touch START to resume the defrost cycle.
OPERATING TIPS
- For best results, remove fish, shellfish, meat, and poultry from its original closed paper or plastic package (wrapper). Otherwise, the wrap will hold steam and juice close to the foods, which can cause the outer surface of the foods to cook.
- For best results, shape your ground meat into the form of a doughnut before freezing. When defrosting, scrape off thawed meat when the beep sounds and continue defrosting.
- Place foods in a shallow container or on a microwave roasting rack to catch drippings.
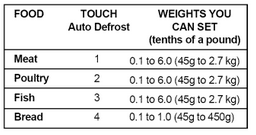
This table shows you food type selections and the weights you can set for each type. For best results, loosen or remove covering on food.
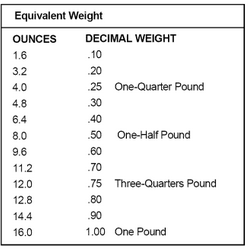
Weight conversion table
You are probably used to food weights as being in pounds and ounces that are fractions of a pound (for example, 4 ounces equals 1/4 pound). However, in order to enterfood weight in Auto Defrost, you must specify pounds and tenths of a pound.
If the weight on the food package is in fractions of a pound, you can use the following table to convert the weight to decimals.
NOTE: If between two decimal weights, choose the lower weight for the best defrosting results.
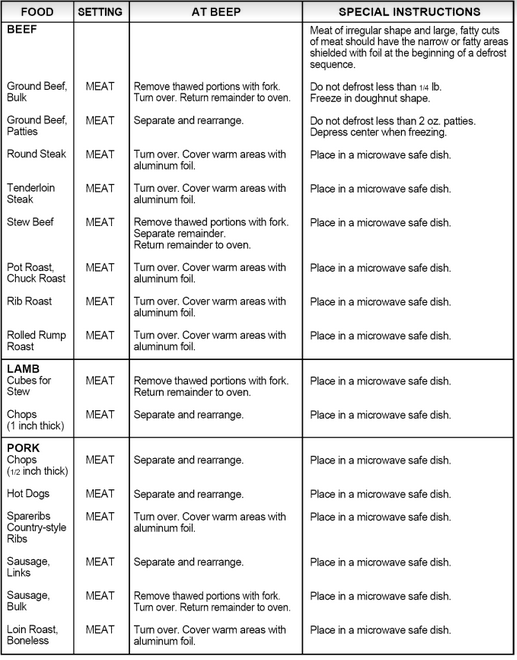
AUTO DEFROST TABLE
Meat setting
Poultry setting
Fish setting
DEFROSTING TIPS
- When using Auto Defrost, the weight to be entered is the net weight in pounds and tenths of pounds (the weight of the food minus the container).
- Before starting, make sure you have removed any of the metal twist-tieswhich often come with frozen food bags, and replace them with strings or elastic bands.
- Open containers such as cartons before they are placed in the oven.
- Always slit or pierce plastic pouches or packaging.
- If food is foil wrapped, remove foil and place it in a suitable container.
- Slit the skins, if any, of frozen food such as sausage.
- Bend plastic pouches of food to ensure even defrosting.
- Always underestimate defrosting time. If defrosted food is still icy in the center, return it to the microwave oven for more defrosting.
- The length of defrosting time varies accordingto how solidly the food is frozen.
- The shape of the package affects how quickly food will defrost. Shallow packages will defrost more quickly than a deep block.
- As food begins to defrost, separate the pieces. Separated pieces defrost more easily.
- Use small pieces of aluminum foil to shield parts of food such as chicken wings, legtips, fish tails, or areas that start to get warm. Make sure the foil does not touch the sides, top, or bottom of the oven. The foil can damage the oven lining.
- For better results, let food stand after defrosting. (For more information on standing time, see the "Microwave Cooking Tips" section).
- Turn over food during defrosting or standing time. Break apart and removefood as required.
HOLD WARM
To make Hold Warm automatically follow another cycle:
- While you are touching in cooking instructions, touch Hold Warm before touching START.
- When the last cooking cycle is over, you will hear two tones. "HoldWarm" will come on while the oven continues to run.
- You can set Hold Warm to follow Auto Defrost, Cook, or two-stage cooking.
NOTES:
- Hold Warm operates for up to 99 minutes, 99 seconds.
- Opening the oven door cancels Hold Warm. Close the door and touch Hold Warm, then touch START if additional Hold Warm time is desired.
- Food cooked covered should be covered during Hold Warm.
- Pastry items (pies,turnovers, etc.)should be uncovered during Hold Warm.
- Complete meals kept warm on a dinner plate should be covered during Hold Warm.
- Do not use more than one complete Hold Warm cycle (about 1 hour, 40 minutes). The quality of some foods will suffer with extended time.
SOFTEN
SOFTEN TABLE
MELT
MELT TABLE
Using Sensor Cooking
SENSOR COOKING
SENSOR OPERATING INSTRUCTIONS
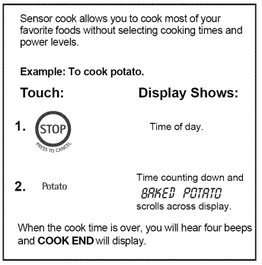
Sensor Cook allows you to cook most of your favorite foods without selecting cooking times and power levels. The oven automatically determines required cooking time for each food item. When the internal sensor detects a certain amount of humidity coming from the food, it will tell the oven how much longer to heat. The display will show the remaining heating time. For best results by Sensor, following these recommendations.
- Food cooked with the sensor system should be at normal storage temperature.
- Glass Tray and outside of container should be dry to assure best cooking results.
- Foods should always be covered looselywith microwavable plastic wrap, waxed paper or a lid.
- Do not open the door or touch the "STOP/Clear" key during the sensing time. When sensing time is over, the oven beeps twice and the remaining cooking time will appear in the display window. At this time you can open the door to stir, turn or rearrange the food.
SENSOR COOKING GUIDE
Appropriate containers and coverings help assure good Sensor cooking results.
- Always use microwavable containers and cover them with lids or vented plasticwrap.
- Never use tight-sealing plastic covers. They can prevent steam from escaping and cause food to overcook.
- Match the amount to the size of the container. Fill containers at least half full for best results.
- Be sure the outside of the cooking container and the inside of the microwave oven are dry before placing food in the oven. Beads of moisture turning into steam can mislead the sensor.
POTATO (EXAMPLE)
SENSOR COOKING TABLE
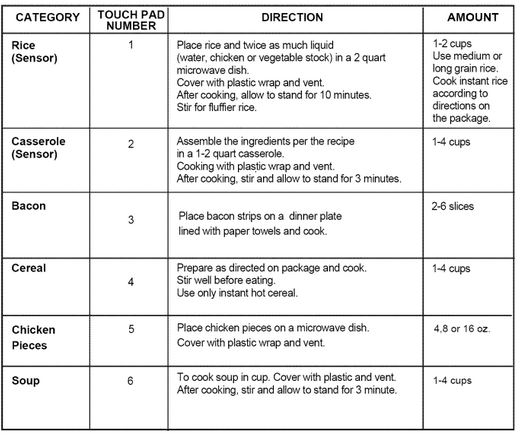
AUTO COOK
AUTO REHEAT
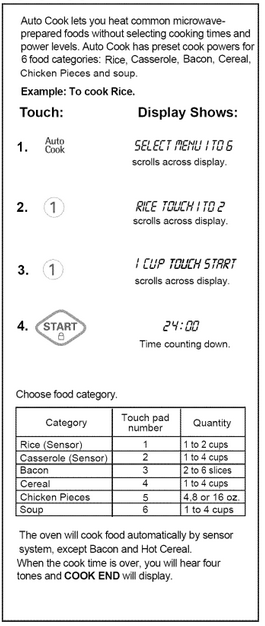
AUTO COOK TABLE
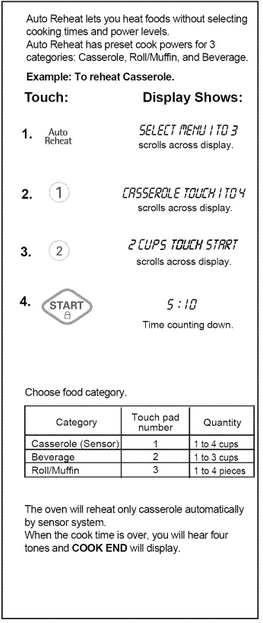
AUTO REHEAT TABLE
Caring for Your Microwave Oven
To make sure your microwave oven looks good and works well for a long time, you should maintain it properly. For proper care, please follow these instructions carefully.
For interior surfaces: Wash often with warm, sudsy water and a sponge or soft cloth.
Use only mild, nonabrasive soaps or a mild detergent. Be sure to keep the areas clean where the door and oven frame touch when closed. Wipe well with clean cloth.

Over time, stains can occur on the surfaces as the result of food particles spattering during cooking. This is normal.
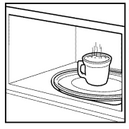
For stubborn soil, boil a cup of water in the oven for 2 to 3 minutes. Steam will soften the soil. To get rid of odors inside the oven, boila cup of water with some lemon juice or vinegar in it.
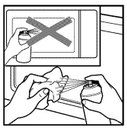
For exterior surfaces and control panel: Use a soft cloth with spray glass cleaner. Apply the spray glass cleaner to the soft cloth; do not spray directly on the oven.
NOTE: Abrasive cleansers, steel wool pads, gritty wash cloths, some paper towels, etc., can damage the control panel and the oven surfaces.
To clean turntable and turntable support, wash in mild, sudsy water; for heavily soiled areas use a mild cleanser and scouring sponge. The turntable and turntable support are dishwasher safe.
Questions and Answers
Can I operate my microwave oven without the turntable or turn the turntable over to hold a large dish?
- No. If you remove or turn over the turntable, you will get poor cooking results. Dishes used in your oven must fit on the turntable.
Can I use either metal or aluminum pans in my microwave oven?
- You can use aluminum foil for shielding (use small, flat pieces), small skewers, and shallow foil trays (if tray is not taller than 3/4 in. [1.9 cm] deep and is filled with food to absorb microwave energy). Never allow metal to touch walls or door.
Is it normal for the turntable to turn in either direction?
- Yes. The turntable reverses rotation each time the microwave oven door is opened and closed. This helps cook food evenly.
Sometimes the door of my microwave oven appears wavy. Is this normal?
- This appearance is normal and does not affect the operation of your oven.
What are the humming noises that I hear when my microwave oven is operating?
- You may hear the sound of the transformer when the magnetron tube cycles on.
Why does the dish become hot when I microwave food in it? I thought that this should not happen,
- As the food becomes hot it will conduct the heat to the dish. Be prepared to use hot pads to remove food after cooking.
What does "standingtime" mean?
- "Standing time" means that food should be removed from the oven and covered for additional time to allow it to finish cooking. This frees the oven for other cooking.
Why does steam come out of the air exhaust vent?
- Steam is normally produced during cooking. The microwave oven has been designed to vent this steam out the vents.
Can I pop popcorn in my microwave oven? How do I get the best results?
- Yes. Pop packaged microwave popcorn following manufacturer's guidelines. Do not use regular paper bags.
- Do not repop unpopped kernels. Do not pop popcorn in glass cookware.
Troubleshooting
MICROWAVE OVEN DOES NOT WORK
Nothing works.
- The power supply cord is not plugged into a grounded 3 prong outlet. (See the Electrical Requirements" section on page 6 and the "Electrical connection" section on Page 8.)
- A household fuse has blown or a circuit breaker has tripped.
- The electric company has had a power failure.
The microwave oven will not run.
- You are using the oven as a timer. Touch STOPto cancel the Kitchen Timer.
- The door is not firmly closed and latched.
- You did not touch START.
- You did not follow directions exactly.
- An operation that you set earlier is still running. Touch STOP to cancel that operation.
COOKING TIMES
Food is not cooked enough.
- The electric supply to your home or wall outlets is low or lower than normal. Your electric company can tell you if the line voltage is low. Your electrician or service technician can tell you if the outlet voltage is low.
- The cook power is not at the recommended setting. Check the chart on Page 16.
The display shows a time counting down but the oven is not cooking.
- The oven door is not closed completely.
- You have set the controls as a kitchen timer. Touch STOP to cancel the Kitchen Timer.
TURNTABLE
The turntable will not turn.
- The turntable is not correctly in place or the turntable could be in the turntable "OFF" mode. The glass plate should be correct-side up and sitting firmly on the center shaft.
- The support is not operating correctly. Remove the turntable and restart the oven. If the support still does not move, call Sears Service at 1-800-4-MY-HOME. Cooking without the turntable can give you poor results.
TONES
- You do not hear the programming or end-of- cycle tone.
- You have not entered the correct command.