RHB100U
CPT445U

2
Congratulations on you purchase of the Cuisinart Hand
Blender.
For over 30 years Cuisinart’s aim has been to produce the
very finest kitchen equipment. All Cuisinart products are
engineered for exceptionally long life and designed to be
easy to use as well as to give excellent performance day
after day.
To learn more about our products and for recipe ideas visit
our website www.cuisinart.co.uk

3
Contents
Product Control Guide ............................................................................. 4
Important Safety Cautions ...................................................................... 5
Instructions for Use ................................................................................... 9
Cleaning & Maintenance ........................................................................15
Guarantee ................................................................................................ 16
UK After Sales Service ........................................................................... 17
4
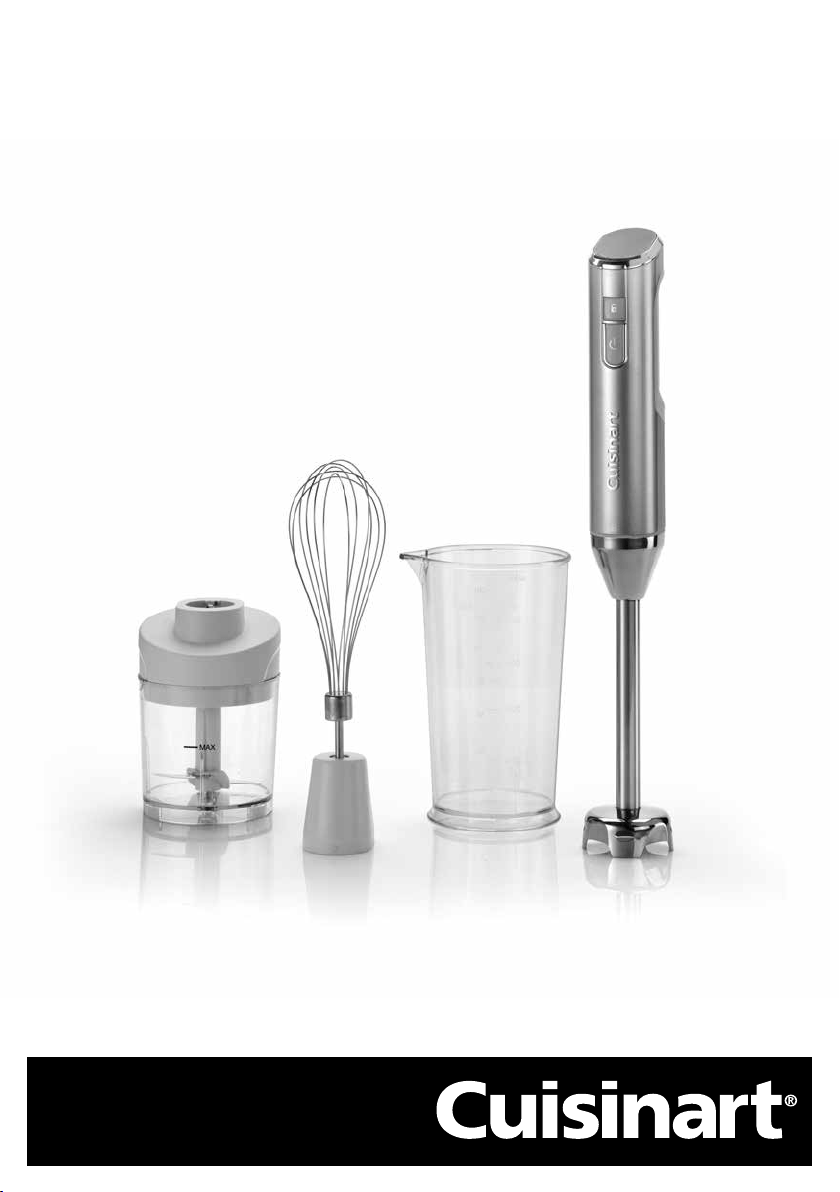
Product Control Guide
Blending Shaft
Whisk Gearbox
Main Unit
USB lead and adaptor
On / Off Switch
Lock / Unlock Button
Indicator Lights
Mini Chopper
Whisk Attachment
Blending Jug
Charging port
(not shown)
Blade protector

5
Important Safety Cautions
Carefully read all the instructions before using the appliance and
keep in a safe place for future reference.
Always follow these safety cautions when using this appliance to avoid
personal injury or damage to the appliance. This appliance should be
used only as described within this instruction book. There is a risk of
injury if the product is misused.
1. This appliance is for domestic use only and is not intended to be
used in applications such as: staff kitchen areas in shops, offices and
other working environments; farm houses; by customers in hotels,
motels and other residential type environments; bed and breakfast
type establishments.
2. Care should be taken when handling the attachments, during use and
cleaning.
3. Be careful if hot liquid is poured into the blending jug as it can be
ejected out due to sudden steaming. N.B Only luke warm liquids/
ingredients should be used with the blending jug.
4. The appliance is not intended to be operated by means of external
timer or separate remote control system.
5. This appliance is not intended for use by persons with reduced physical,
sensory or mental capabilities, or lack of experience and knowledge,
unless they have been given supervision or instruction concerning use
of the appliance by a person responsible for their safety.
6. Children should always be supervised to ensure that they do not play
with this product.
7. This appliance shall not be used by children. Keep the appliance and
power adapter out of reach of children during and after use.
8. Always inspect the appliance and appliance accessories before use for
noticeable signs of damage. Do not use if damaged, or if the appliance
has been dropped. In the event of damage, or if the appliance develops
a fault, contact the Cuisinart Customer Care Line (refer to “UK After
Sales Service section” for further information).
9. Do not use the appliance if the lead is damaged. In the event of
lead damage, discontinue use immediately. If the lead is damaged it
must be replaced by the manufacturer. Return the appliance to the
Customer Care Centre (refer to ‘UK After Sales Service’ section for
further information). No repair must be attempted by the consumer.

6
10. Never pull the plug out of the mains socket by the lead.
11. Do not wrap the lead around the main body of the appliance during
or after use.
12. The appliance is safe to be left plugged into the electrical supply
when not in use to ensure the batteries are always charged. It should
however be unplugged before assembling, disassembling, cleaning
or if not being used for a prolonged period of time.
13. This product contains a Lithium Ion rechargeable battery pack that
is not to be removed from the appliance for charging. The batteries
in this appliance are non-replaceable.
14. The supply terminals are not to be short circuited.
15. WARNING:For the purposes of recharging the battery pack, only use
the detachable charging supply unit provided with this appliance.
This symbol indicates there is a detachable power supply for
means of charging.
16. This product complies fully with all appropriate EU and UK legislation
and the standards relevant to this type and class of appliance. We
are an ISO9001:2015 certified company that continually evaluates
our Quality Management System performance. If you have any
queries regarding product safety and compliance, please contact
our Customer Services Department (see “U.K. After Sales Service”
section).
17. WARNING: Avoid contact with moving parts. Keep hands,
hair, clothing, as well as spatulas and other utensils away from
attachments during operation to reduce risk of injury to persons,
and/or damage to the appliance. A spatula may be used, but only
when the unit is not operating.
18. WARNING: Do not put fingers near the attachments. To dislodge
food ensure mixer is not in operation first.
19. The charger should be plugged into an electrical socket away from a
sink or any hot surface.
20. Do not use an extension cord. Plug the charger directly into an
electrical socket.
21. Do not charge the unit using an outdoor socket.
22. To protect against electrical shock, do not put the main unit in water
or other liquids. Only the attachments, of this appliance, have been
designed for submersion in water or other liquids. Never submerge
any other portion of this unit. If the hand mixer falls into liquid,
remove immediately, clean and dry the unit thoroughly before
continuing.

7
23. Always remove blade assembly from the cup before cleaning.
24. Do not overload the blending cup. Observe the maximum fill line.
25. Do not run the blender empty - this will damage the motor.
26. Do not blend hot liquids in the blending cup.
27. Do not put the main unit in water or other liquids
CAUTION: Handle the blade carefully. The blades are sharp and may
cause injury. DO NOT attempt to remove blades from assembly.
Use the Blade Protector, when not in use, to store the blade safely.
N.B The stainless steel blade cannot be removed from the black blade
assembly.
WARNING: Polythene bags over the product or packaging may
be dangerous. To avoid danger of suffocation, keep away from
babies and children. These bags are not toys.
BATTERY DISPOSAL
To minimise hazards to health and the environment at the end of this
product’s life, laws dealing with Waste Electrical and Electronic Equipment
(WEEE) and The Waste Battery Directive require you to dispose of this
product at a suitable collection facility where it will be sent in order to
remove the batteries and for appropriate recycling. Please contact your
local authorities for more details on recycling and safe disposal of these in
your area.
The symbol
on the product or on its packaging indicates that this
product may not be treated as household waste. Instead it should be
handed over to the applicable collection point for the recycling of electrical
and electronic equipment. By ensuring this product is disposed of correctly,
you will help prevent potential negative consequences for the environment
and human health, which could otherwise be caused by inappropriate
waste handling of this product. For more detailed information about the
recycling of this product, please contact your local council office or your
household waste disposal service.

8
Safety During Use
Before first use, remove all packaging and any promotional labels or stickers
from the Hand Blender.
• Handle the blending shaft with extreme care, the blades are VERY sharp.
• To avoid splashing, always insert the attachment into the mixture before
activating, and release the ‘On/Off’ button before removing.
• When mixing cool/ lukewarm liquids, use a tall container such as the jug
provided or make small quantities at a time to reduce spillage.
• WARNING: When mixing hot liquids, use a much larger heat-
proof container or process smaller quantities. Use extra care when
working with hot liquids to avoid injury from overflowing, sudden
steaming and splattering. In order to avoid scalds from steam it may
be advisable to angle the blender slightly so that your hand is not
directly above the steam. The blending jug provided is not suitable
for use with hot liquids.
• Prevent unintentional starting. Never press the ‘Safety lock/unlock’
button while pressing the ‘On/Off’ button unless you are ready to use
your blender.
• Do not use this hand blender for anything other than its intended use of
preparing foods and beverages.
• The charger should be plugged into an electrical socket away from a sink
or any hot surface.
• Do not use an extension cord. Plug the charger directly into an electrical
socket.
• Do not charge the unit using an outdoor socket.
• To protect against electrical shock, do not put the main unit in water or
other liquids. If the hand blender falls into liquid, remove immediately,
clean and dry the unit thoroughly before continuing.

9
Instructions For Use
Before first use, we recommend that you wipe the main unit with a clean,
damp cloth to remove any dirt or dust. Dry it thoroughly with a soft absorbent
cloth. Carefully clean all the attachments (except for the charging base) in
warm soapy water.
N.B. Do not use abrasive cleaners, hard implements or a scourer. Take care
when handling the blending shaft, as the blades are very sharp.
A. Charging the Hand Blender
The batteries in your hand blender have not been fully charged. Before using,
the batteries must be charged until all three blue lights are illuminated.
With a full charge, your hand blender will run for approximately 30
minutes, depending on the recipe. Your hand blender will be fully charged
in approximately 130 minutes.
N.B. To charge the main unit, insert the Micro USB end of charging lead
into the charging port at the back of the main unit. Plug the USB end
directly into the adapter plug and then into a mains supply outlet.
Battery Life Indicator Lights
The indicator lights will flash blue, when the battery is being charged. When
all three lights are illuminated, this means the battery is fully charged and
is then ready to use. As the battery starts to run down, the indicator lights
will turn off. The battery will need to be recharged when the last indicator
light is flashing. If the battery has completely run down on the unit, it will
not operate.
N.B. The Hand Blender cannot be used while it is plugged in and charging.
B. Selecting the attachment
Before use, you will need to select which attachment is most suitable for
the ingredients you wish to process. As a guide, the attachments can be
used for the following functions:
• Blending shaft – Use for blending/mixing tasks such as puréeing fruits and
vegetables, emulsifying ingredients such as mayonnaise, mixing sauces,
dressings & smoothies and blending soups to a smooth consistency. It is
also ideal for combining dry ingredients and frothing milk.
• Whisk attachment – This attachment is great for incorporating air and
can be used to whip cream, egg whites for meringues, batters or mousses
(plus any other task that you would normally whisk by hand).
10
• Blending Jug – This is recommended for use with the blending shaft for
cool/lukewarm ingredients only, the high sided jug is ideal for blending
ingredients without splashing.
• Mini Chopper – This is great for chopping vegetables, such as onions,
into smaller pieces and can be used to make dips and dressings. It can
also be used when making pate (such as mackerel or chicken liver) and
sauces, such as pesto. It’s also ideal for making breadcrumbs and for
chopping herbs and spices.
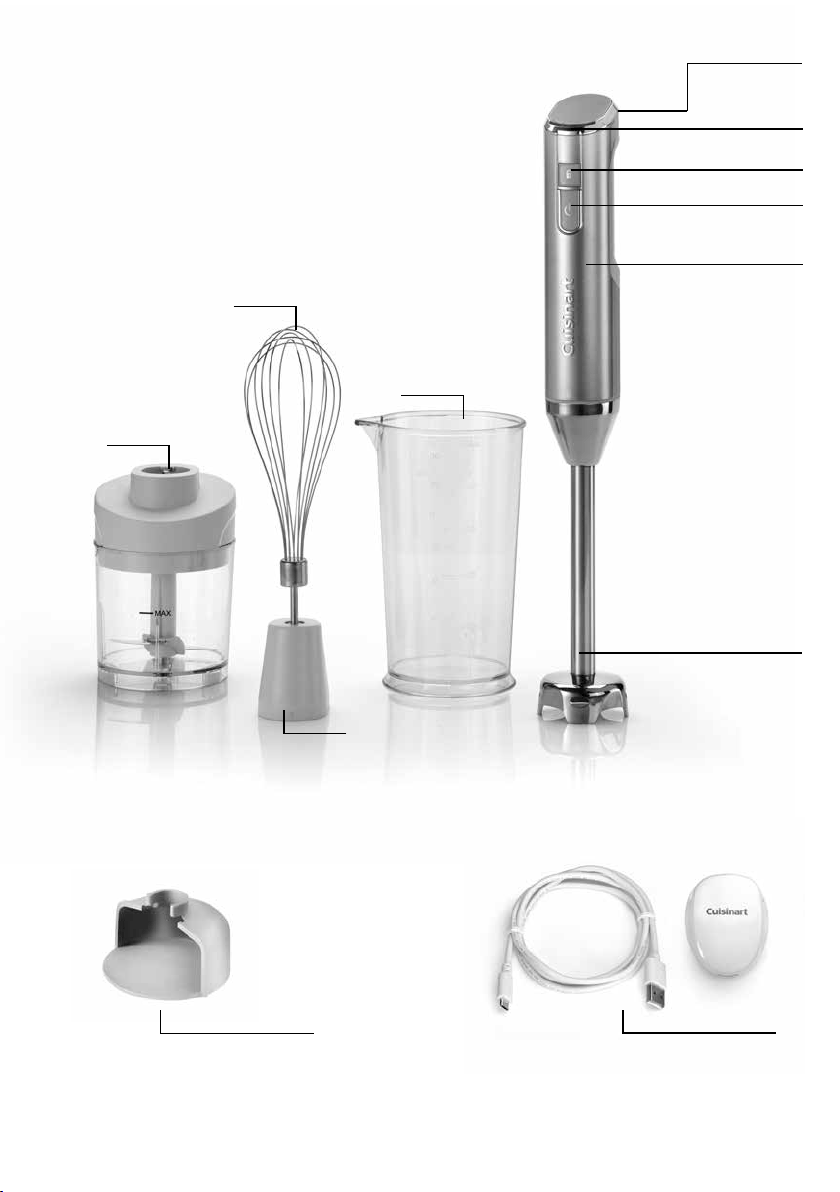
C. Assembly
On the main unit, there are / symbols, these
match up with the arrows which are shown on each
attachment. (See fig. 1)
• Blending shaft
Place the main unit onto the blending shaft and twist
anti-clockwise until the arrow on the blending shaft
aligns with the lock symbol on the main unit.
• Whisk Attachment
Ensure the whisk attachment is fitted onto its gearbox, by pushing the two
pieces together, until you feel them connect securely into place. Place the
main unit onto the assembled whisk attachment and, holding the gearbox
section, twist the whisk anti-clockwise until arrow on the gearbox aligns
with the lock symbol on the main unit.
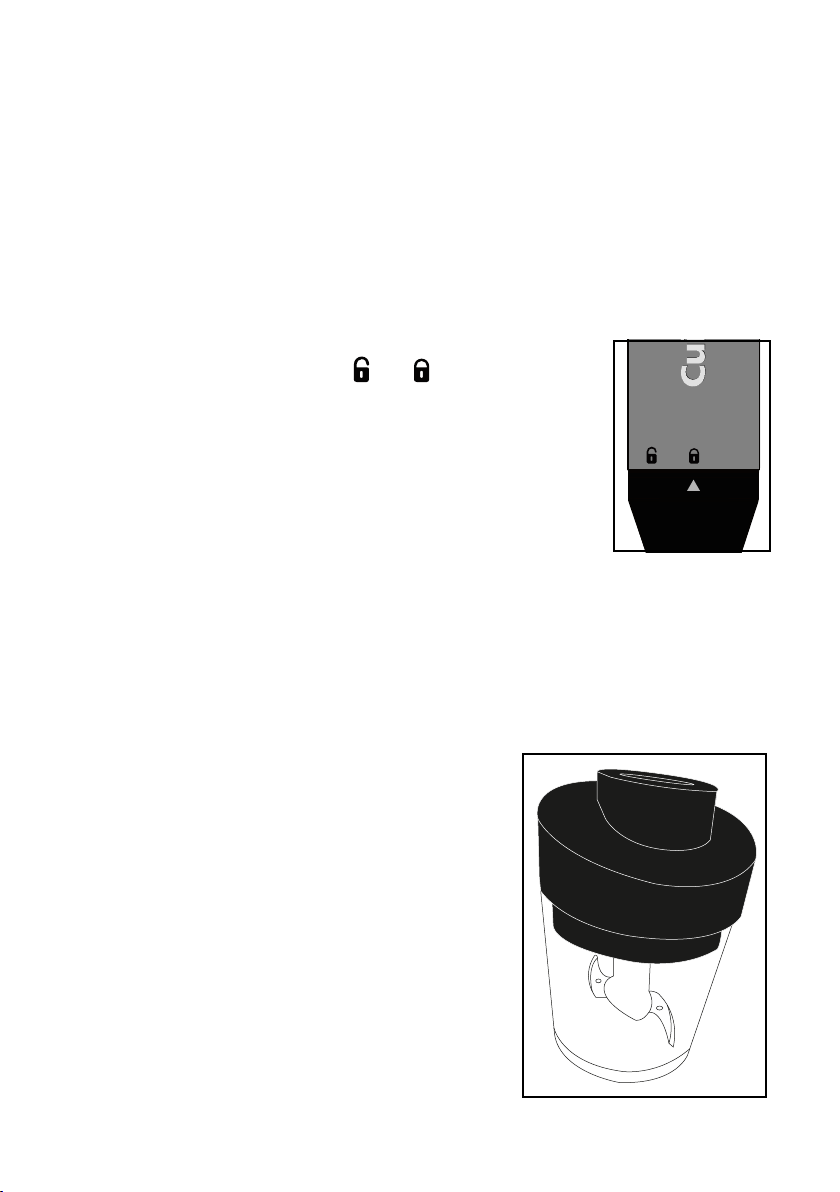
• Mini Chopper
Place the main handle onto the lid of the
mini chopper, hold the attachment securely
and twist the main unit anti-clockwise until
the arrow on the attachment aligns with the
lock symbol on the main unit.
N.B. The lid needs to be on the mini chopper
before the main unit is attached. (See fig. 2)
1:1
FIG. 1
FIG. 2
11
D. Removing the attachments
To remove each attachment, hold the main unit with one hand and with
the other hand twist the top of the attachment clockwise (then arrow
symbols should align with the unlock symbol on the main unit) then pull
away from the main unit.
Note: When removing the whisk assembly, take care not to grasp the
stainless steel whisk attachment itself (use the whisking gearbox instead).
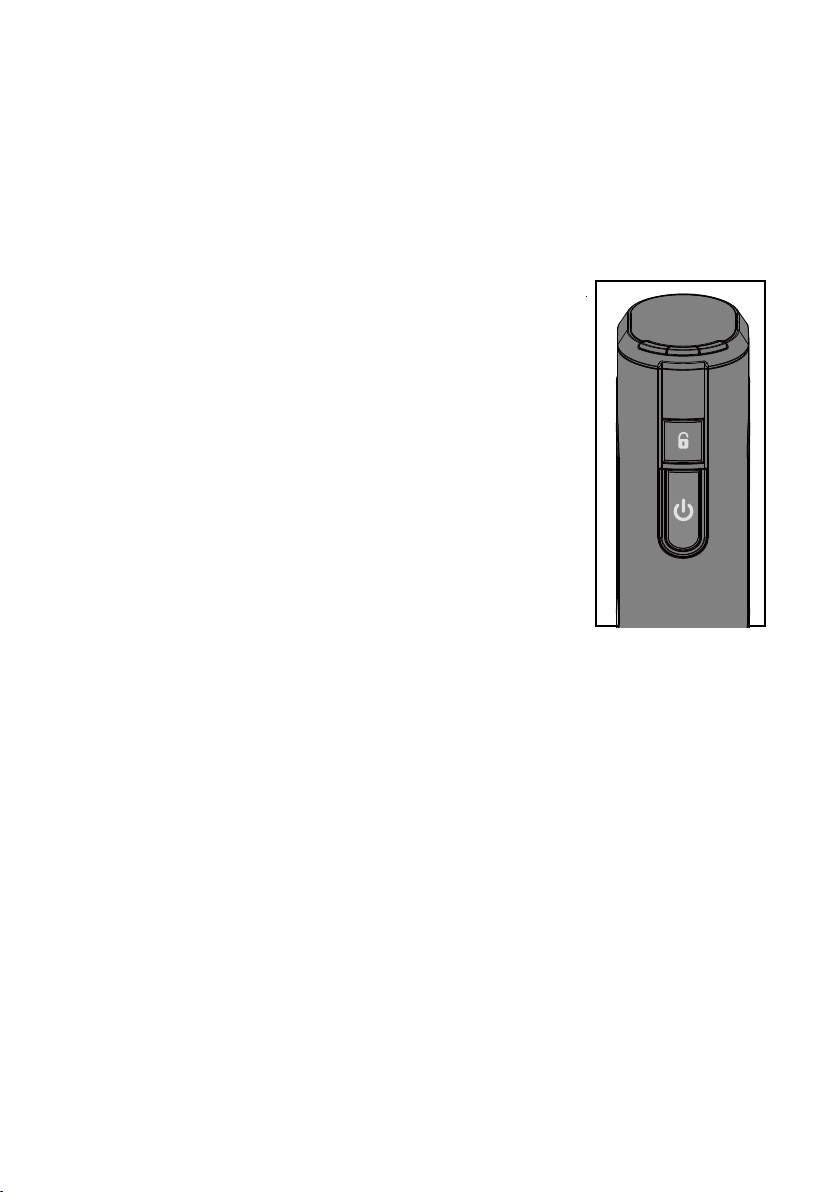
E. Operation
To operate the hand blender, press and hold the ‘Safety
unlock’ button until the blue lights illuminate, then
press the power button to start the appliance (see fig
3.)
NB: The appliance has a safety feature and will
automatically lock again after the power button is
released for more than 1.5 seconds. Follow the same
sequence as above to re-activate the blender.
NB: To Pulse, press and hold the ‘Safety unlock’ button
to activate the unit, then repeatedly press the ‘On/
Off’ button as desired.
Note: The product comes with an overload protection
feature. If the unit stops unexpectedly, it will cut out
and the battery power indication light will flash blue.
You can reactivate by pressing the ‘Safety unlock’ button
and the ‘On/Off’ button.
WARNING: Keep hands, hair, clothing, as well as spatulas and other
utensils away from the whisk attachment during operation to reduce risk
of injury to persons, and/ or damage to the appliance. A spatula may be
used, but only when the unit is not operating.
1:1
FIG. 3

12
F. Hints & Tips
Blending Attachment
• The blade mixes and stirs while adding only a small amount of air to your
mixture.
• To avoid splashing, insert the Hand Blender into the mixture before
activating, and release the ‘On/Off’ button before removing the Hand
Blender out of the mixture.
• Use a gentle up and down motion, whilst ensuring the protective blade
guard on the blending shaft remains fully submerged in the liquid to
avoid splatter (tilt the pan or bowl away from you to create a deeper area
for blending).
• When blending in a non-stick pan/container, be careful not to scratch
the coating with the hand blender.
• When blending in a saucepan over heat, remove the pan from the heat
source to protect the Hand Blender from overheating. The blending shaft
is safe to be used for food/liquid up to 100°C.
• When mixing liquids (especially hot liquids) use a tall heat-proof container
or make small quantities at a time to reduce spillage, splattering and
possibility of injury from burning.
N.B. The blending jug included is not suitable for use with hot liquids
• When puréeing soups, pulse first to break up the large, already tender
ingredients, then increase the speed for a smooth finish.
WARNINGS:
• Be careful never to remove the blending shaft from the liquid while in
operation as it will splatter.
• Do not let the hand blender stand in a hot pot over heat while not in use.
• Do not attempt to blend fruit pits, bones or other hard materials as these
are liable to damage the blade.
• Do not overfill chosen mixing containers. The level of mixture will rise
when blending and can overflow.
• Do not put fingers near the blades. To dislodge food ensure blender is not
in operation first.
• Use the blade protector to cover the blade, on the blending attachment,
when not in use for safe storing.

13
Whisking Attachment
• When beating egg whites use a clean metal or glass bowl. To help stabilize
the egg whites, add 1/8 teaspoon of cream of tartar per egg white prior
to beating them. Beat the egg whites until desired peaks form.
• Beating egg whites for too long causes them to dry out and become less
stable.
• When adding sugar to beaten egg whites, add it slowly when soft peaks
just begin to form and then continue beating to form desired peaks.
• When beating heavy cream, if possible and time allows, use a chilled
bowl and chill the whisk attachment. The best shaped bowl for whipping
cream is one that is deep with a rounded bottom to minimize any splatter.
• The cream should come out of the fridge just before whipping. Whipped
cream may be used at either soft or firm peaks depending on preference.
It may be flavoured as desired. For best results, whip cream just before
using.
Caution: Do not immerse the whisk attachment gearbox in water or any
other liquid.
WARNING: Keep hands, hair, clothing, as well as spatulas and other
utensils away from the whisk attachment during operation to reduce risk
of injury to persons, and/or damage to the appliance. A spatula may be
used, but only when the unit is not operating.
Mini Chopper Attachment
• It is ideal for chopping softer foods such as herbs, onions, celery and
garlic
• Always cut large pieces for food into smaller pieces, of even size, as this
will help to achieve even results
• When chopping fresh herbs, the bowl, blade and the herbs should all be
thoroughly cleaned and dried.
• When chopping meat, poultry or fish, the food should be cold but not
frozen and should also be cut into smaller pieces before putting into the
chopper.
WARNINGS
• Do not overload the work bowl. Overloading causes inconsistent results
and strains the motor.
• The quantities should not exceed the max level indicated on the bowl.

14
A. Chopping fresh herbs:
The herbs, work bowl and blade must all be thoroughly cleaned and dried.
Remove the stems from herbs. Add the leaves to work bowl and process
until they are chopped to the desired consistency.
B. Chopping meat, poultry, fish & shellfish:
The food should be very cold but not frozen. Cut into 1.5cm pieces and
place in the work bowl. Process until the food is evenly chopped. Use a
continuous processing action for a few seconds for a finer chop if required.
Use a spatula to scrape food down from the sides of the work bowl as
necessary.
C. Chopping nuts:
For roughly chopped nuts, process continuously until chopped to
the desired consistency. Check frequently to avoid nuts clumping together.
If necessary, use a spatula to re-distribute the nuts evenly in the work
bowl. If you require more of a powder consistency process continuously
until the desired consistency is achieved.
D. Producing a purée:
Cut the food into 1.5cm pieces and place in the work bowl. Process using a
‘pulse’ action to chop coarsely, then process continuously until food is
puréed.
N.B. Cooked potatoes are an exception to this procedure. They develop
a gluey texture when processed with the metal blade.

15
Cleaning & Maintenance
Always clean the appliance thoroughly after use.
Main Unit: Ensure any attachment has been removed from the unit. Clean
the main unit with a sponge or damp cloth only. Do not use abrasive
cleaners that could scratch the surface.
Blending Shaft: Release the attachment from the main unit. To clean the
blending shaft, wash by hand using warm, soapy water or place on the top
rack of the dishwasher.
Warning: Be mindful of the fixed razor-sharp edges of the blades, they are
very sharp and should be handled carefully to avoid injury.
Whisk Attachment: Release the fully assembled whisk attachment from
the main unit. To clean the whisk attachment, detach the metal whisk from
the gearbox by pulling the pieces apart. To clean the gearbox, simply wipe
with a damp cloth. To clean the metal whisk, wash with warm, soapy water
or place on the top rack of the dishwasher. Do not submerge the gearbox
in water or any other liquids.
Mini Chopper: Remove the attachment from the main unit. To remove
the lid from the bowl, twist anti-clockwise for it release. To clean the lid,
simply wipe with a damp cloth. To clean the blade and bowl, wash with
warm soapy water or place on the top rack of the dishwasher.
Warning: Take care when cleaning the blades as they are very sharp and
should be handled with care, to avoid injury.
Blending Jug: To clean the blending jug, wash with warm soapy water or
place on the top rack of the dishwasher.

16
Guarantee
This appliance is guaranteed for consumer use for 2 years and is only valid
within the United Kingdom.
This guarantee covers consumer use only i.e. defects occurring under
normal use within the home from date of purchase or date of delivery,
whichever is later.
If the product develops a fault due to defects in materials or manufacture
within 12 months from the date of purchase, to avoid delays and
unnecessary inconvenience, where possible please return the product to
the point of purchase for an exchange.
If the product develops a fault due to defects in materials or manufacture
after 12 months from the date of purchase, and within the guarantee
period, Conair UK After Sales Service will repair or replace the product.
Exclusions
This guarantee will no longer be valid meaning that The Conair Group Ltd
will not be liable to repair or replace your product where:
1. The appliance has been used on a voltage supply other than that which
is marked on the product, or advised within this instruction booklet
2. The appliance has been purchased from an unauthorised stockist*
3. The appliance is used for professional / non-domestic usage
4. Repairs or alterations have been attempted by unauthorised persons
5. The failure of the appliance is a direct result of misuse
6. The failure is a result of not following the instructions for use
This guarantee does not cover any cosmetic damage due to misuse of the
product nor any damage to persons or property that occurs because of
product misuse.
*unauthorised stockists include, but are not limited to online auction sites,
private sellers and those selling second hand goods, refurbished products
etc.
Please contact the Conair Customer Care Line on 03702 406902 (09:00
to 17:00 Monday to Friday) or email [email protected] for further
information on authorised stockists.

It is important to retain your proof of purchase. We recommend
attaching your receipt to this page.
Even where a refund may be applicable, no refund will be provided
without a valid receipt or proof of purchase, we will only be able
to offer a repair or replacement service. Please note this does not
apply if the product was purchased directly from The Conair Group
Ltd.
Guarantees on replacement products run from the original purchase date or
date of delivery, whichever is later, and not from the date of replacement.
This guarantee is an additional benefit and does not affect your
statutory rights as a consumer.
If you have any queries regarding this guarantee, please contact the Conair
Customer Care Line on 03702 406 902 (09:00 to 17:00 Monday to Friday)
or email your enquiry to [email protected]
UK After Sales Service
For further advice on using the appliance or should you need to return
your product, please contact the Conair Customer Care Line on 03702 406
902 (09:00 to 17:00 Monday to Friday) or email your enquiry to support@
cuisinart.co.uk
Return address:
Customer Care Centre
Conair Logistics
Unit 4, Revolution Park
Buckshaw Avenue
Buckshaw Village
Chorley
PR7 7DW
Please enclose your returns number, name and address details, together
with a copy of proof of purchase and details of the fault.
Please note this Instruction Booklet is not the guarantee.


IB-20/318A
www.cuisinart.co.uk