:::: :1:5_::/: :!::i:i¸
: i::!!:iEn0ctr c¸¸Range
Record Your Model & Serial Numbers ................................ Cover
Important Safety Instructions .................................................. 2-4
Control Pad Functions ................................................................. 5
Setting the Clock & Minute Timer .............................................. 6
Setting Surface Controls ............................................................. 7
Before Setting Oven and Warm & Ready Drawer Controls ..... 8
Setting Oven Controls ............................................................ 9-11
Adjusting Oven Temperature ................................................... 11
Setting Warm & Ready Drawer Controls ................................. 12
Oven Cleaning ...................................................................... 13-14
General Cleaning .................................................................. 15-17
Changing (_ooktop and/or Oven Lights (some models) ......... 18
Avoid Service Checklist ........................................................ 19-20
Warranty .................................................................................... 21
Sears Service .............................................................................. 22
Read a!l instructions before ustng
this appliance This book contains
valuable information about:
= Operation
o Care
o Service
Keep it in a safe place.
L I" ,i i,, ] ]_11 I" ,,i,l,,ijl],,,i, I, ! II]_11_1]111' , i ,11,, ,111,i,,i,,,,11 _jt,_l[t,l,j,T_
Read and Save These instructions
Record Your Model and Serial Numbers
The model and serial numbers of your range are located under the
lift-up cooktop Record and retain these numbers,
Model Number:
Serial Number:
Date of Purchase:
Sears, RoebucE and Co., Hoffman Estates, IL 60179 U.S.A.
P/N 316000922 (9612)
nMPO ANT SAFETY INSTRUCTIONS
Read all instructions before using this
appliance. Save these instructions for future
reference.
This guide contains important safety symbols and
instructions Pleasepay special attention to these symbols
and follow all instructions given, Here is a brief explanation
of the use of these symbols.
Y!_This symbol will help alert you to situations
that may cause serious bodily harm, death or property
damage,
_i__This symbol will help alert you to situations
that may cause bodily injury or property damage
= Remove all tape and packaging wrap before using
the range. Destroy the carton and plastic bags after
unpacking the range,, Never allow children to play with
packaging material
= Proper Installation--Be sure your appliance is
properly installed and grounded by a qualified
technician in accordance with the National Electrical
Code ANSI/NFPA No. 70--latest edition and local
code requirements, Install only per installation
instructions provided in the literature package for this
range
Ask your dealer to recommend a qualified technician and
an authorized repair service,,Know how to disconnect the
electrical power to the range at the circuit breaker or fuse
box in case of an emergency
= User Servicing--Do not repair or replace any part of
the appliance unless specifically recommended in the
manuals, All other servicing should be done only by a
qualified technician to reduce the risk of personal injury
and damage to the range
o Never modify or alter the construction of a range by
removing leveling legs, panels, wire covers, anti-tip
brackets/screws, or any other part of the product.
Stepping, leaning or sitting on the doors
or drawers of this range can result in serious injuries
and may also cause damage to the range. Do not allow
children to climb or play around the range The weight of a
child on an open door may cause the range to tip, resulting
in serious burns or other injury
Do not use the oven for storage.
__ Do not store items of interest to children
in the cabinets above or on the backguard of a range_
Children climbing on the range to reach items could be
seriously injured
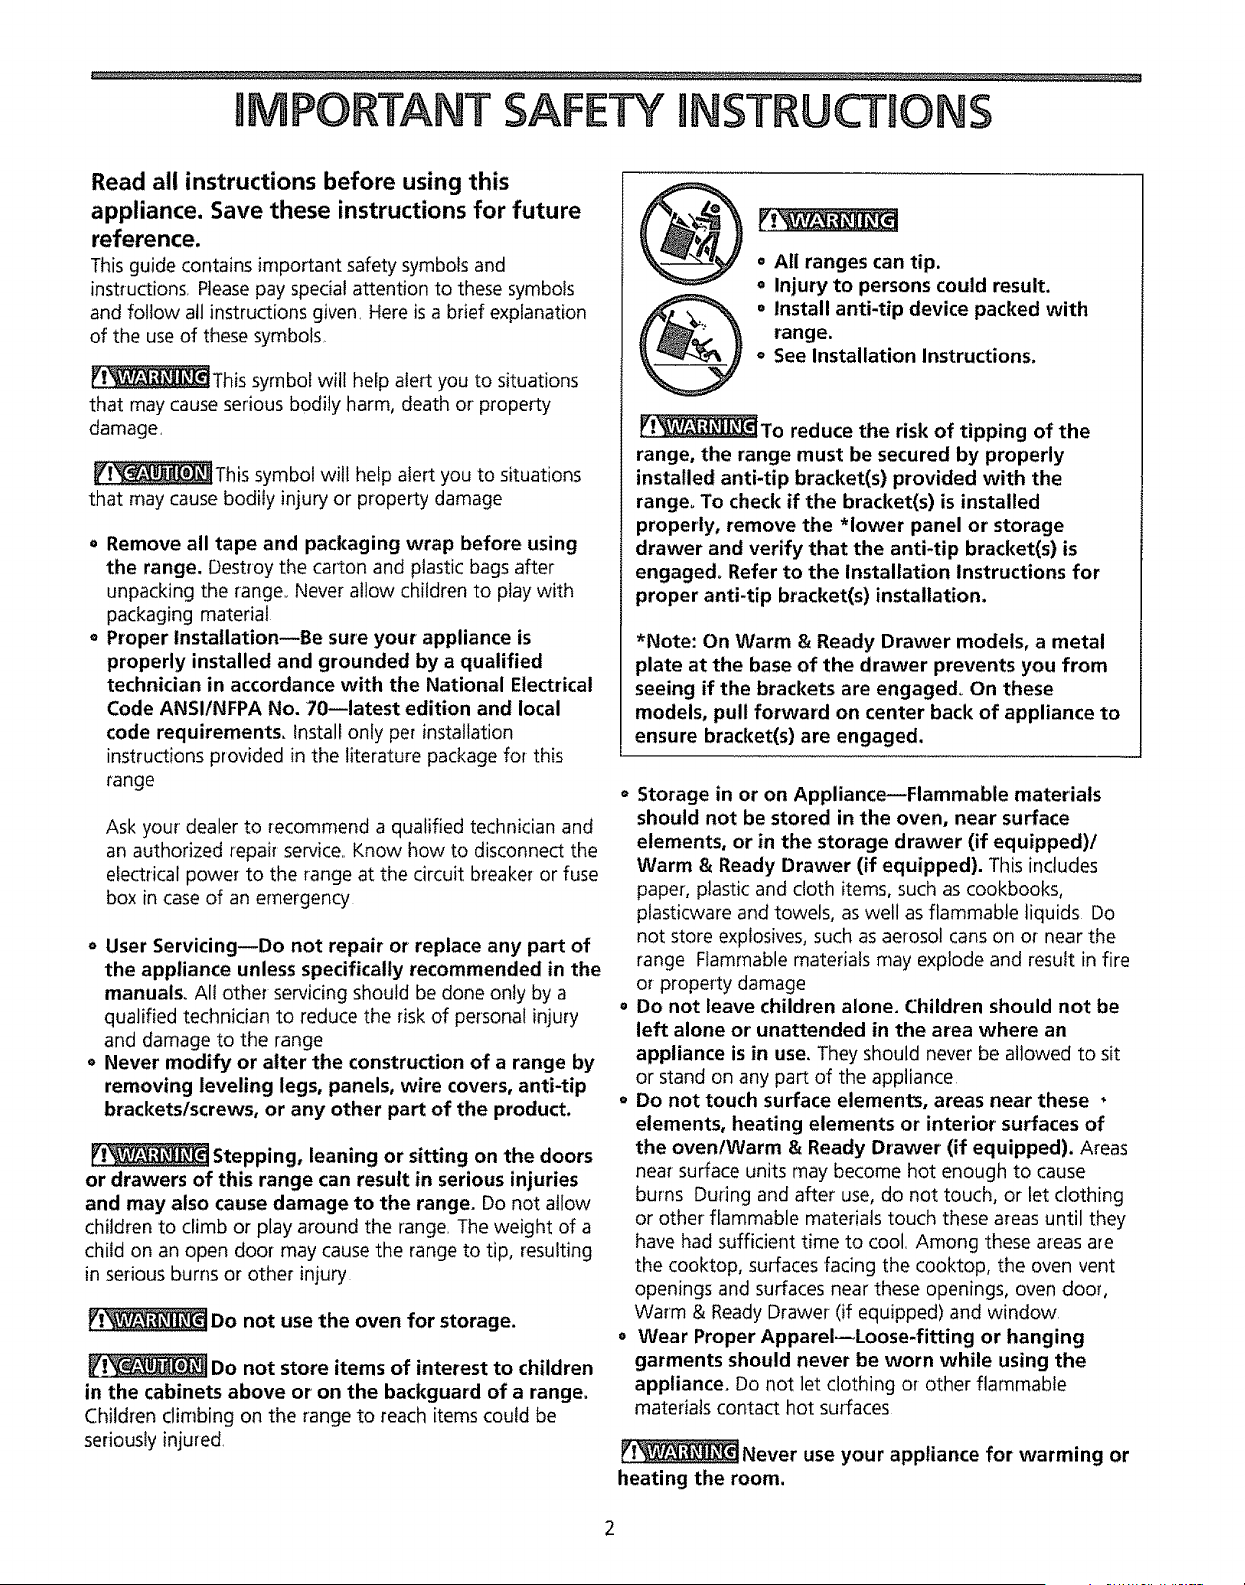
= All ranges can tip.
o Injury to persons could result.
= install anti-tip device packed with
range.
= See Installation Instructions.
_To reduce the risk of tipping of the
range, the range must be secured by properly
installed anti-tip bracket(s) provided with the
range° To check if the bracket(s) is installed
properly, remove the *lower panel or storage
drawer and verify that the anti-tip bracket(s) is
engaged° Refer to the Installation Instructions for
proper anti-tip bracket(s) installation.
*Note: On Warm & Ready Drawer models, a metal
plate at the base of the drawer prevents you from
seeing if the brackets are engaged_ On these
models, pull forward on center back of appliance to
ensure bracket(s) are engaged.
= Storage in or on Appliance--Flammable materials
should not be stored in the oven, near surface
elements, or in the storage drawer (if equipped)/
Warm & Ready Drawer (if equipped). This includes
paper, plastic and cloth items, such as cookbooks,
plasticware and towels, as well as flammable liquids Do
not store explosives, such as aerosol cans on or near the
range Flammable materials may explode and result in fire
or property damage
o Do not leave children alone. Children should not be
left alone or' unattended in the area where an
appliance is in use. They should never be allowed to sit
or stand on any part of the appliance
o Do not touch surface elements, areas near these
elements, heating elements or interior surfaces of
the oven/Warm & Ready Drawer (if equipped). Areas
near surface units may become hot enough to cause
burns During and after use, do not touch, or let clothing
or other flammable materials touch these areas until they
have had sufficient time to cool, Among these areas are
the cooktop, surfaces facing the cooktop, the oven vent
openings and surfaces near these openings, oven door,
Warm & Ready Drawer (if equipped) and window
o Wear Proper Apparel_Loose-fitting or hanging
garments should never be worn while using the
appliance. Do not let clothing or other flammable
materials contact hot surfaces
_Never use your appliance for warming or
heating the room.
IMPORTANT SAFETY mNSTRUCTIONS
= Do Not Use Water or Flour on Grease FireswSmother
the fire with a pan lid, or use baking soda, a dry
chemical or foam-type extinguisher.
o When heating fat or grease, watch it closely. Fat or
grease may catch fire if allowed to become too hot
o Use Only Dry Potholders--Moist or damp potholders
on hot surfaces may result in burns from steam° Do
not let the potholders touch the surface units Do not use
a towel or other bulky cloth instead of a potholder
o Do Not Heat Unopened Food Containers--Build-up
of pressure may cause the container to burst and
result in injury.
° Remove the oven door from any unused range if it is
to be stored or discarded.
Cold temperatures can damage the
electronic control° When using the appliance for the first
time, or when the appliance has not been used for an
extended period of time, be certain the unit has been in
temperatures above 32°F for at least 3 hours before turning
on the power to the appliance
e IMPORTANT--Do not attempt to operate the oven
during a power failure° if the power fails, always
turn the oven off_ If the oven is not turned off and the
power resumes, the oven will begin to operate again
Food left unattended could catch fire or spoil
Important Instructions for Using Your
Cooktop
o Know which knob controls each surface heating
element°
o Use proper pan size--This appliance is equipped with
one or more surface elements of different sizes. Select
utensils having flat bottoms large enough to cover the
surface element The use of undersized utensils will
exposea portion of the heating element to direct contact
and may result in ignition of clothing Proper relationship
of utensil to element will also improve efficiency.
o Utensil Handles Should Be Turned Inward and
Should Not Extend Over Adjacent Surface
Elements--To reduce the risk of burns, ignition of
flammable materials, and spillage due to unintentional
contact with the utensil, the handle of the utensil should
be positioned so that it is turned inward, and does not
extend over adjacent surface units
o Never Leave Surface Elements Unattended at High
Settings--Boilovers cause smoking and greasy spillovers
that may ignite, or a pan that has boiled dry may melt
o Make sure drip pans or drip bowls are in place w
Absence of these pans or bowls during cooking may
subject wiring or components underneath to damage
o Protective Liners--Do not use aluminum foil to line
surface unit reflector pans, drip bowls, oven bottom or
any other part of the range. Only use aluminum foil as
recommended in the Cooking Guide (provided with
range) Any other use of protective liners or aluminum foil
may result in a risk of electric shock or fire
o Glazed Cooking Utensils--Only certain types of glass,
glass/ceramic, ceramic, earthenware, or other glazed
utensils are suitable for rangetop service without breaking
due to the sudden change in temperature Check the
manufacturer's recommendations for rangetop use
• Do Not Use Decorative Surface Element Covers If an
element is accidentally turned on, the decorative cover
wilt become hot and possibly melt You will not be able to
see that the surface unit is on Burns will occur if the hot
covers are touched Damage may also be done to the
cooktop
MPORTANT SAFETY gNSTRUCTION$
Important Instructions for Using Your Oven/
Warm & Ready Drawer (some models)
o Use Care When Opening the Oven Door or
Warm & Ready Drawer (if equipped)--Stand to the
side of the range when opening the door of a hot
ovenfWarm & Ready Drawer, Let hot air or steam
escape before you remove or_replace food in the oven/
Warm & Ready Drawer (some models)
o Keep Oven Vent Ducts Unobstructed. The oven
vents through the left rear surface elernent, Touching
the surfaces in this area when tile oven is operating
may cause severe burns, Also, do not place plastic or
heat-sensitive items on or near the oven vent These
items could melt or ignite,
o Placement of Oven/Warm & Ready Drawer Racks.
Always place racks in desired location while oven is
cool,.If a rack must be moved while the oven is hot,
use extreme caution, Use potholders and grasp the
rack with both hands to reposition_ Do not let
potholders contact the hot oven element or interior of
the oven/Warm & Ready Drawer, Remove all utensils
from the rack before removing rack
• Do not use the broiler pan without its insert. The
broiler pan and grid allow dripping fat to drain and be
kept away from the high heat of the broiler.
• Do not cover' the broiler grid or Warm & Ready
Drawer with aluminum foil. Exposed fat and grease
could ignite
, Do not touch a hot light bulb (some models) with
a damp cloth, Doing so could cause the bulb to break
Disconnect the range or turn off the power to the
range before removing and replacing the light bulb
Important Instructions for Cleaning Your
Range
o Clean the range regularly to keep all parts free of
grease that could catch fire. Pay particular attention
to the area underneath each surface element, Exhaust
fan ventilation hoods and grease filters should be kept
clean. Do not allow grease to accumulate Greasy
deposits in the fan could catch fire Refer to the hood
manufacturer's instructions for cleaning,
• Kitchen cleanerslaerosols--Always follow the
manufacturer's recommended directions for use. Be aware
that excessresidue from cleaners and aerosols may ignite
causing damage and/or injury
Self-Cleaning Ovens:
Clean in the self-cleaning cycle only the parts of
the oven listed in this owner's guide° Before self-
cleaning the oven, remove the broiler' pan and any
utensils stored in the oven,
• Do not clean the oven door gasket. The door gasket
is essential for' a good seal. Care should be taken not to
rub, damage or move the gasket
• Do not use oven cleaners. No oven cleaner or oven
liner protective coating of any kind should be used in or
around any part of the oven,
SAVE TN E INSTRUCR
4
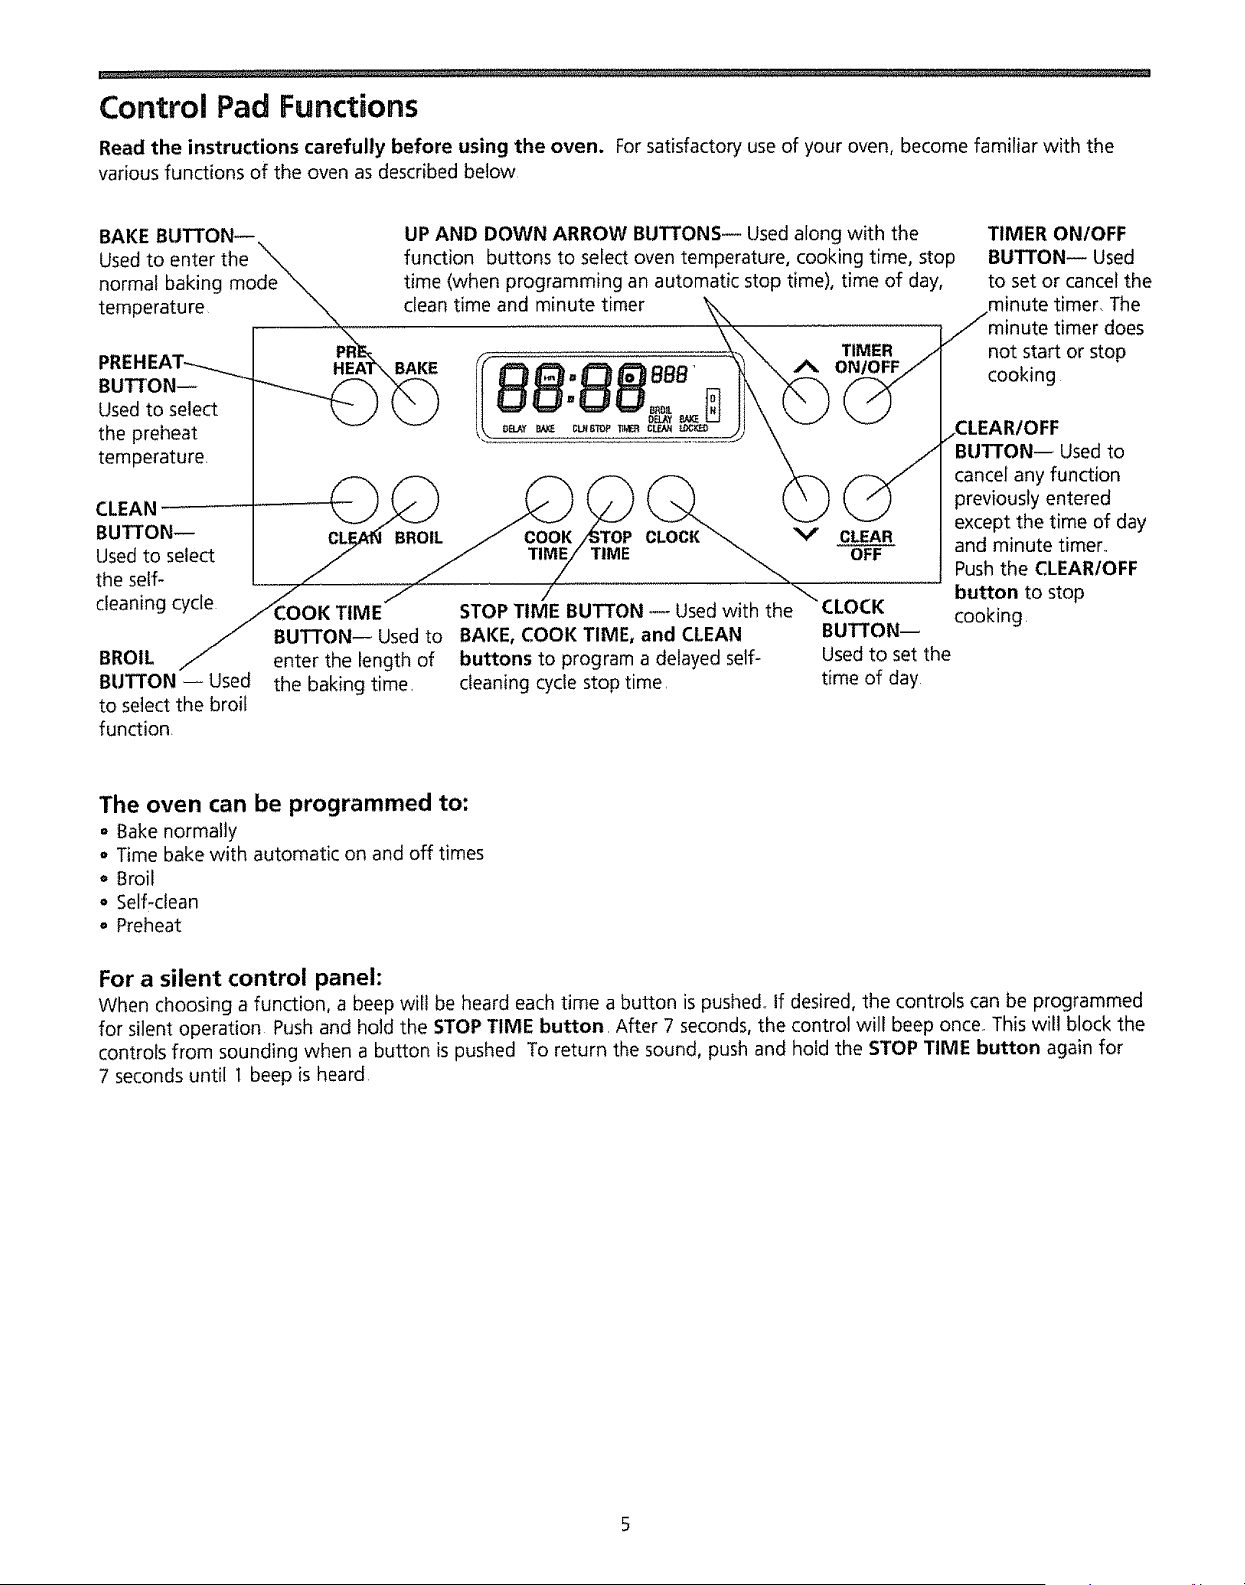
Control Pad Functions
Read the instructions carefully before using the oven. For satisfactory use of your oven, become familiar with the
various functions of the oven as described below
BAKE BUTTON--
Used to enter the '_
normal baking mode
temperature _..
Pt
BUTTON--
Used to select
the preheat
temperature
UP AND DOWN ARROW BUTTONS-- Used along with the
function buttons to select oven temperature, cooking time, stop
time (when programming an automatic stop time), time of day,
clean time and minute timer
TIMER ONIOFF
BUTTON-- Used
to set or cancel the
minute timer. The
iJminute timer does
!not start or stop
cooking
/CLEAR/OFF
BtJTTON-- Used to
cancel any function
CLEAN° __ _(__ previously entered
B,UTli0N- _- . CLF-./_"BROIL J COOK/_TOP CLOCK_. V CLEAR except the time of day
usea I:o select J J TIME!" TIME _ OFF and minute timer.,
the self- ./ j../ // ......._ Push the CLEAR/OFF
cleaning cycle _OK TIME 7 STOP TIME BUTTON -- Used with the"" CLOCK button to stop
BUTTON-- Used to BAKE, COOK TIME, and CLEAN BUTTON-- cooking
BROIL J" enter the length of buttons to program a delayed self- Used to set the
BUTTON -- Used the baking time, cleaning cycle stop time, time of day
to select the broit
function.
The oven can be programmed to:
° Bake normally
• Time bake with automatic on and off times
o Broil
o Self-clean
° Preheat
For a silent control panel:
When choosing a function, a beep will be heard each time a button is pushed° If desired, the controls can be programmed
for silent operation Push and hold the STOP TIME button. After 7 seconds, the control will beep once.. This will block the
controls from sounding when a button is pushed To return the sound, push and hold the STOP TIME button again for
7 seconds until I beep is heard
PRE- TIMER
"ATIiaa: ;°o' ill
©©
tt_M _ CU_grOP _
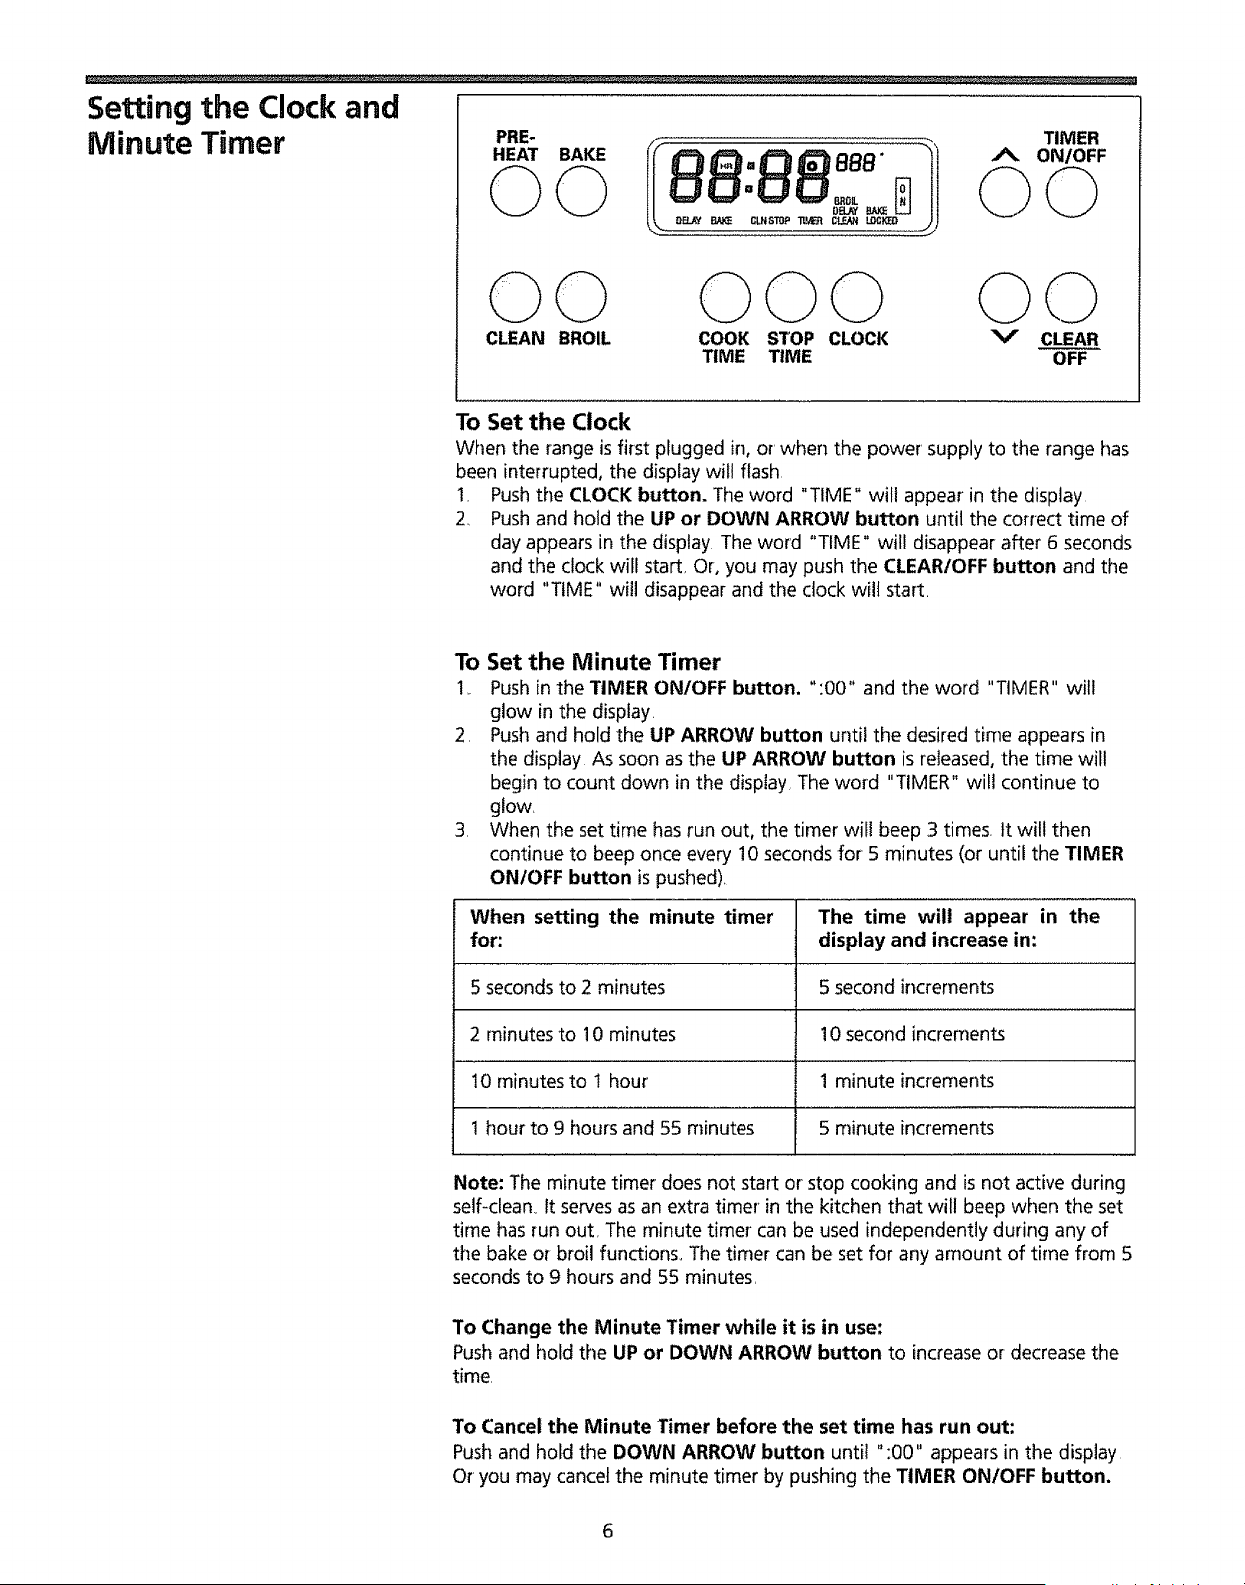
Setting the Clock and
©© ©©© ©©
CLEAN BROIL COOK STOP CLOCK V CLEAR
TIME TIME OFF
Minute Timer
To Set the Clock
When the range is first plugged in, or when the power supply to the range has
been interrupted, the display will flash,
1. Push the CLOCK button. The word "TIME" will appear in the display
2, Push and hold the UP or DOWN ARROW button until the correct time of
day appears in the display The word "TIME" will disappear after 6 seconds
and the clock will start, Or, you may push the CLEAR/OFF button and the
word "TIME" will disappear and the clock will start.
To Set the Minute Timer
1_. Push inthe TIMER ON/OFF button. ":00" and the word "TIMER" will
glow in the display.
2. Push and hold the UP ARROW button until the desired time appears in
the display As soon as the UP ARROW button is released, the time will
begin to count down in the display, The word "TIMER" will continue to
glow,
3, When the set tirne has run out, the timer will beep 3 times, tt will then
continue to beep once every 10 seconds for 5 minutes (or until the TIMER
ON/OFF button is pushed)
When setting the minute timer The time will appear in the
for" display and increase in:
5 seconds to 2 minutes 5 second increments
2 minutes to 10 minutes 10 second increments
10 minutes to ! hour 1 minute increments
1 hour to 9 hours and 55 minutes 5 minute increments
Note: The minute timer does not start or stop cooking and is not active during
seif-clean_ It serves as an extra timer in the kitchen that will beep when the set
time has run out, The minute timer can be used independently during any of
the bake or broil functions, The timer can be set for any amount of time from 5
seconds to 9 hours and 55 minutes,
To Change the Minute Timer while it is in use:
Push and hold the UP or DOWN ARROW button to increase or decrease the
time,
To Cancel the Minute Timer before the set time has run out:
Push and hold the DOWN ARROW button until ":00" appears in the display
Or you may cancel the minute timer by pushing the TIMER ON/OFF button.
6
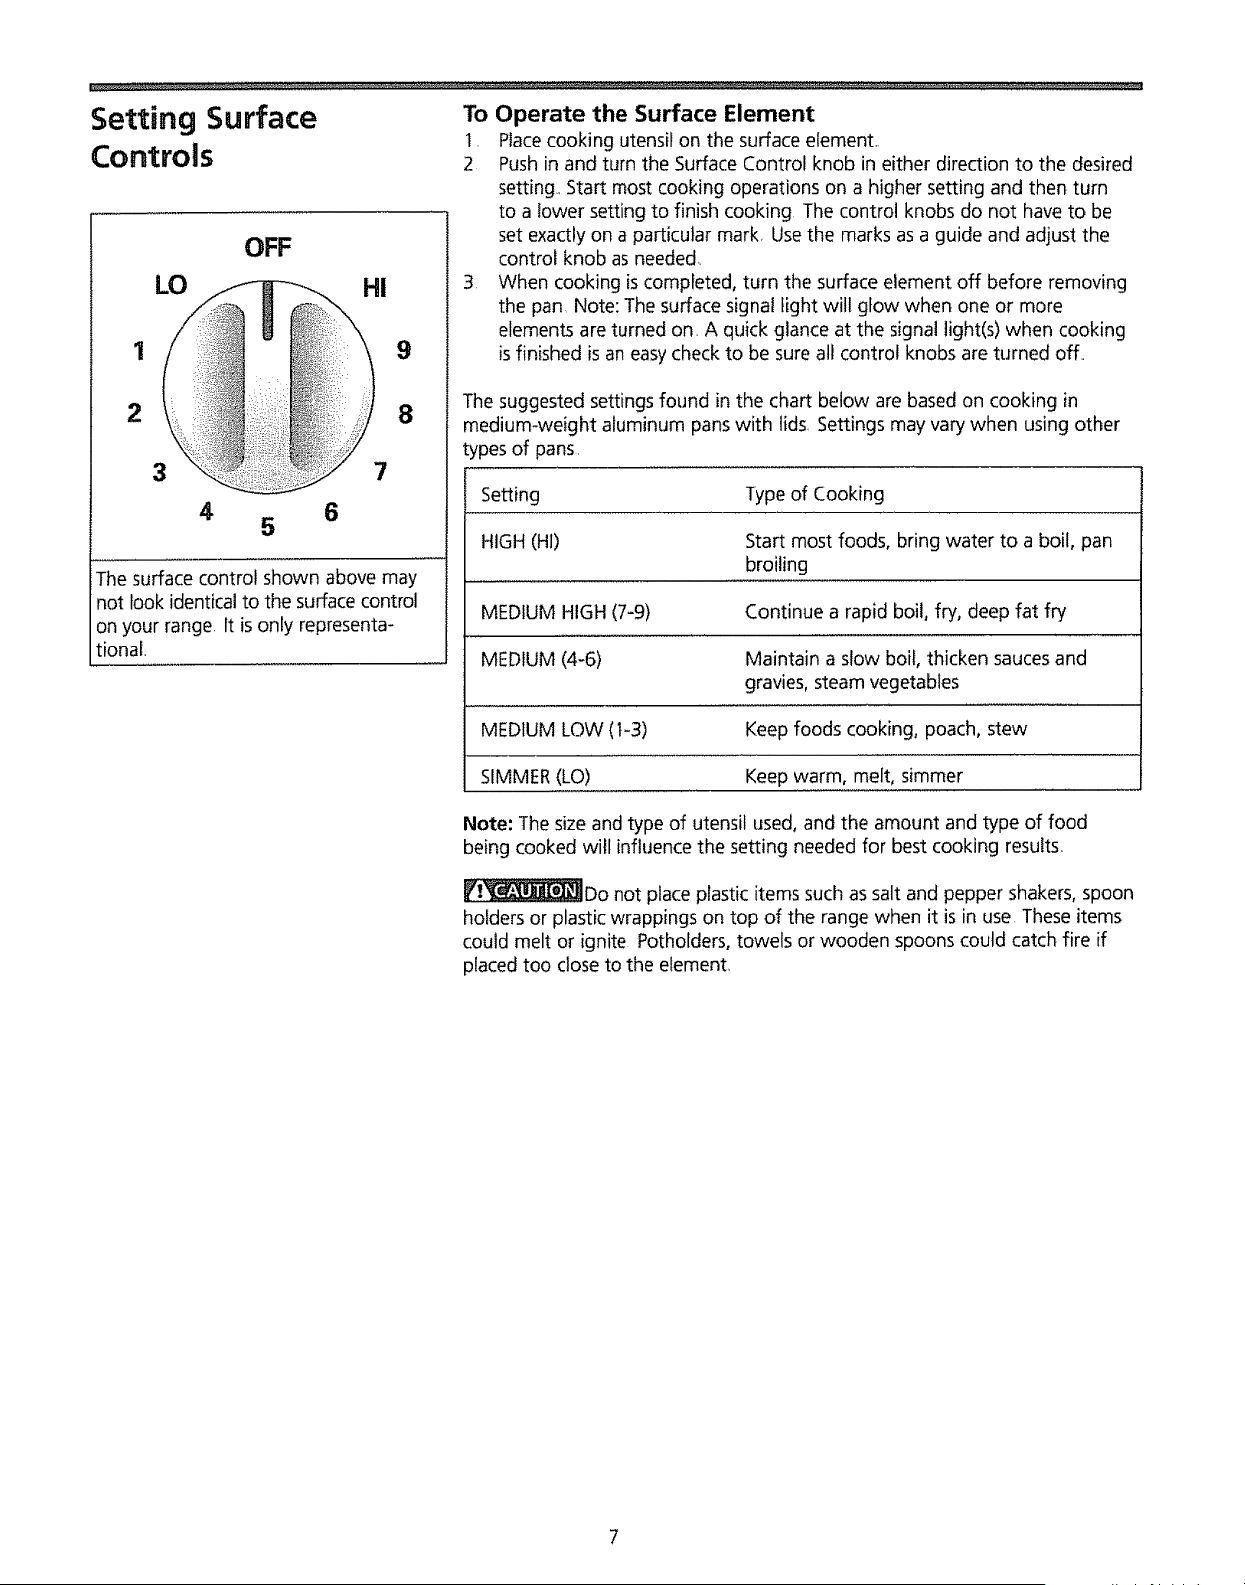
Setting Surface To Operate the Surface Element
t. Place cooking utensil on the surface element._
Controls
1
2
LO
i
3
4
OFF
5
Hi
8
7
6
The surface control shown above may
not look identicalto the surface control
on your range It is only representa-
tional.
2 Push in and turn the Surface Control knob in either direction to the desired
setting., Start most cooking operations on a higher setting and then turn
to a lower setting to finish cooking The control knobs do not have to be
set exactly on a particular mark, Use the marks as a guide and adjust the
control knob as needed,
3. When cooking is completed, turn the surface element off before removing
the pan Note: The surface signal light wilt glow when one or more
elements are turned on, A quick glance at the signal light(s) when cooking
isfinished isan easy check to be sure all control knobs are turned off,,
The suggested settings found in the chart below are based on cooking in
medium-weight aluminum pans with lids Settings may vary when using other
types of pans.
Setting Type of Cooking
HIGH (HI) Start most foods, bring water to a boil, pan
broiling
MEDIUM HIGH (7-9) Continue a rapid boil, fry, deep fat fry
MEDIUM (4-6) Maintain a slow boil, thicken sauces and
gravies, steam vegetables
MEDIUM LOW (t-3) Keep foods cooking, poach, stew
SIMMER(LO) Keep warm, melt, simmer
Note: The size and type of utensil used, and the amount and type of food
being cooked will influence the setting needed for best cooking results_
-v__ Do not place plastic items such as salt and pepper shakers, spoon
holders or plastic wrappings on top of the range when it is in use These items
could melt or ignite Potholders, towels or wooden spoons could catch fire if
placed too close to the element,
Before Setting Oven
and Warm & Ready
Drawer Controls
Oven Vent Location
The oven is vented under the left rear surface element When the oven is on,
warm air is released through the vents, This venting is necessary for proper air
circulation in the oven and good baking results,
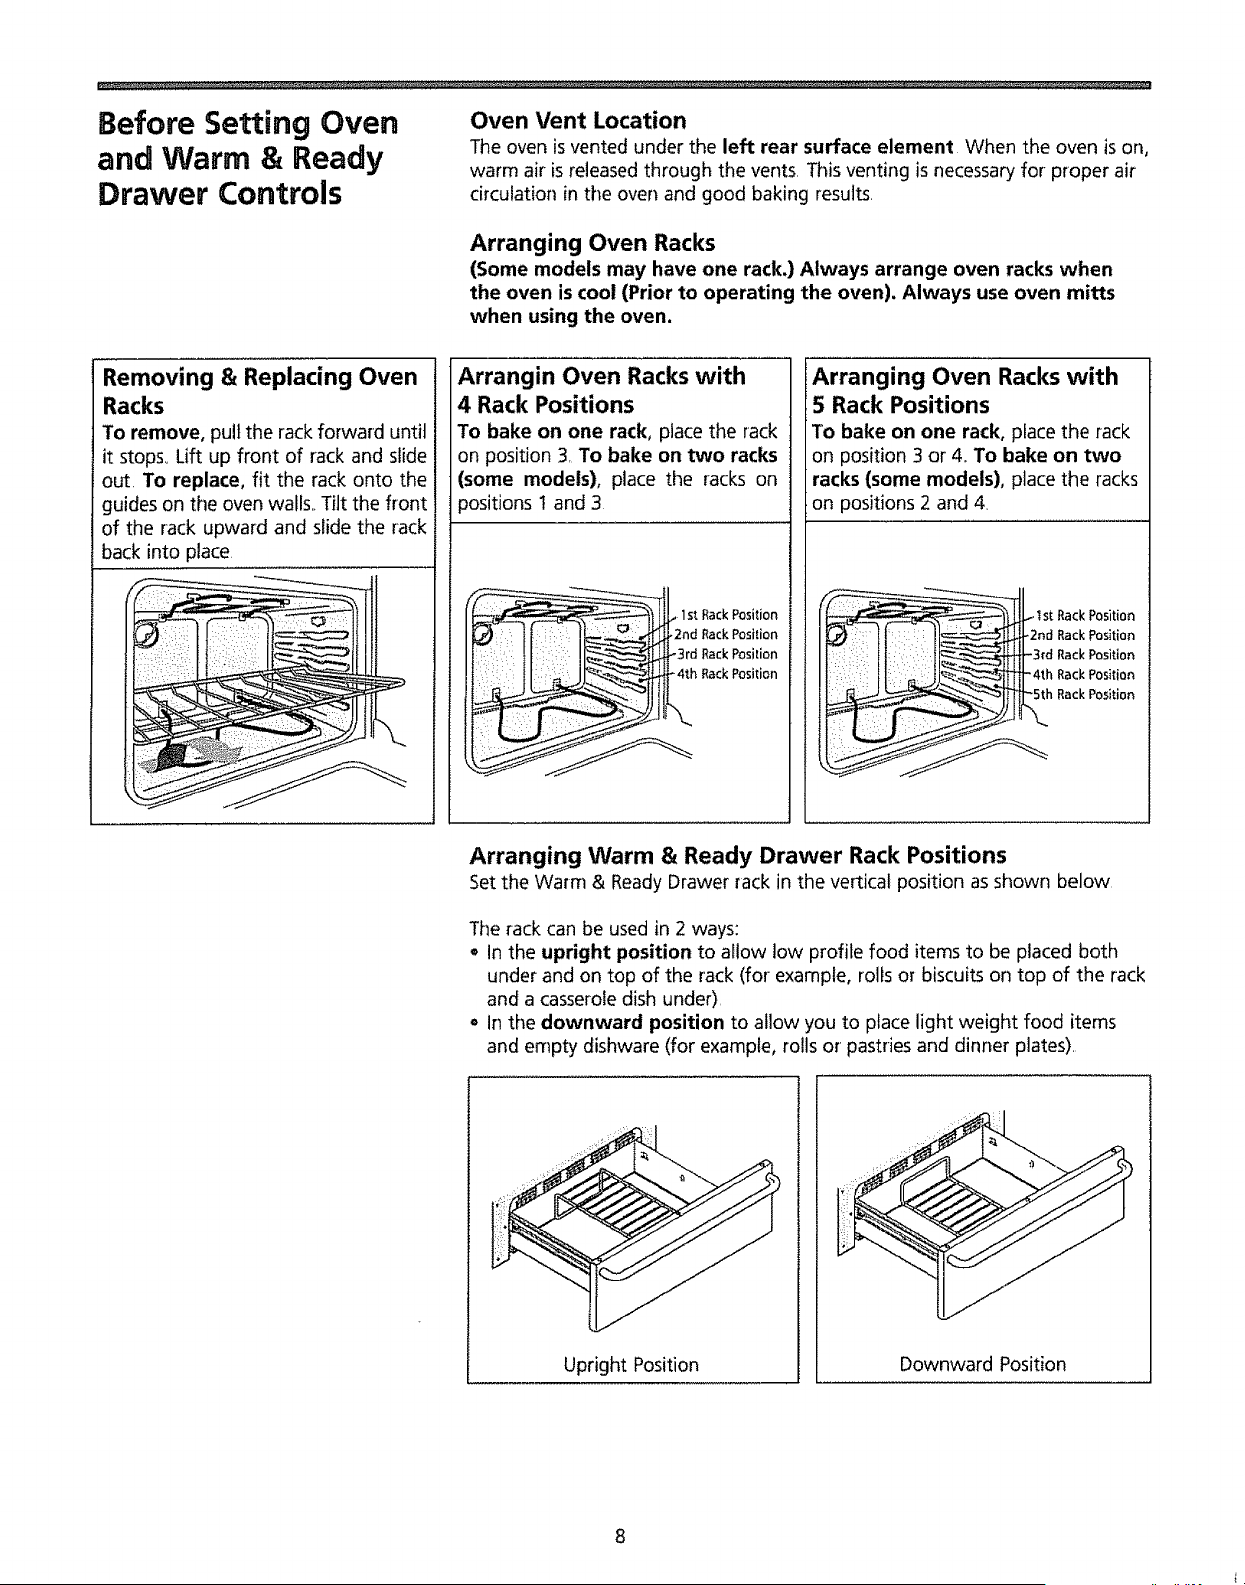
Arranging Oven Racks
(Some models may have one rack.) Always arrange oven racks when
the oven is cool (Prior to operating the oven). Always use oven mitts
when using the oven.
Removing & Replacing Oven
Racks
To remove, pullthe rack forward until
it stops._Lift up front of rack and slide
out, To replace, fit the rack onto the
guides on the oven walls,,Tilt the front
of the rack upward and slide the rack
back into place,
\
Arrangin Oven Racks with
4 Rack Positions
To bake on one rack, place the rack
on position 3 To bake on two racks
(some models), place the racks on
_ositions 1 and 3
1s_Rack Position
nd RackPosition
rd RR:_ Ppo°Ssiiii__
Arranging Oven Racks with
5 Rack Positions
To bake on one rack, place the rack
on position 3 or 4_To bake on two
racks (some models), place the racks
on positions 2 and 4,
1st Rack Position
nd Rack Position
td Rack Position
Arranging Warm & Ready Drawer Rack Positions
Set the Warm & Ready Drawer rack in the vertical position as shown below
The rack can be used in 2 ways:
o In the upright position to allow low profile food items to be placed both
under and on top of the rack (for example, rolB oT biscuits on top of the rack
and a casserole dish under),
= In the downward position to allow you to place light weight food items
and empty dishware (for example, rolls or pastries and dinner plates).
Upright Position
Downward Position
Setting
Oven ControUs
PRE-
HEAT BAKE
0
©0 000
CLEAN BROIL COOK STOP CLOCK
TIME TIME
TIMER
II ,#%. ON/OFF
O0
V
0
CLEAR
OFF
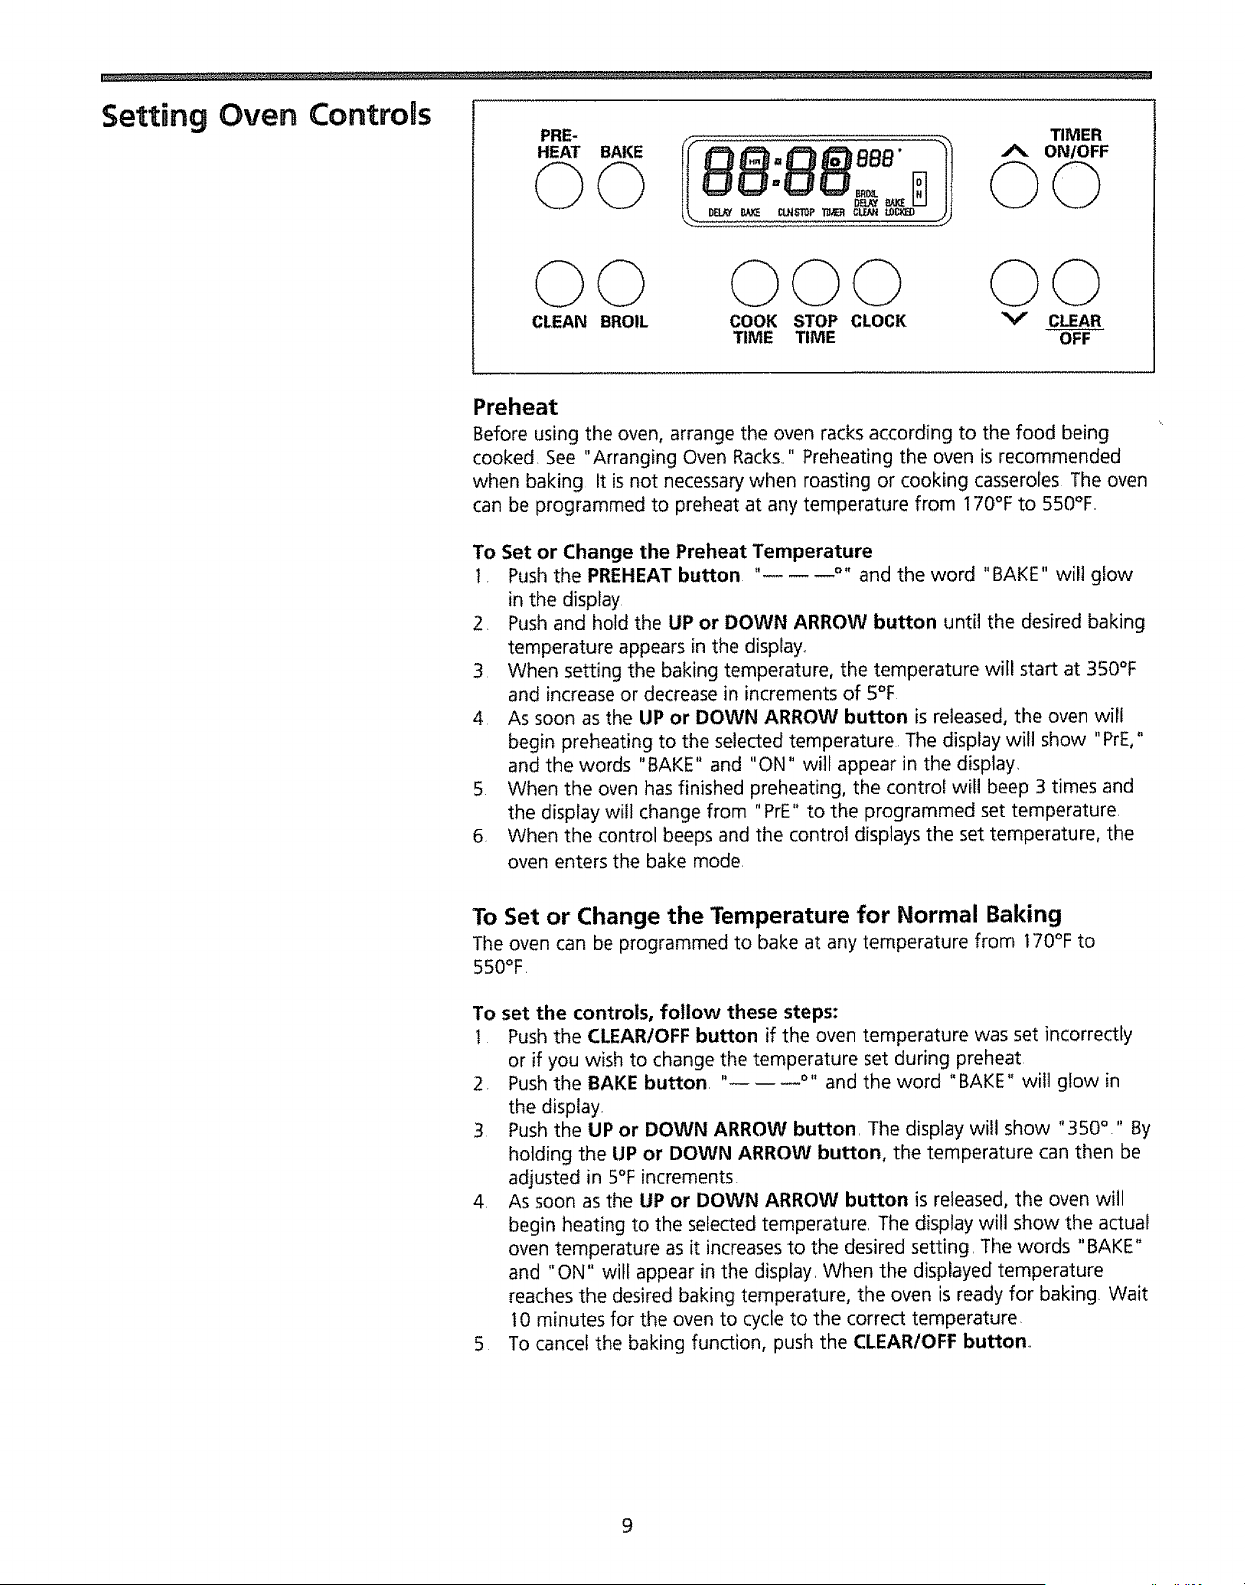
Preheat
Before using the oven, arrange the oven racks according to the food being
cooked, See "Arranging Oven Racks,," Preheating the oven is recommended
when baking It is not necessary when roasting or cooking casseroles The oven
can be programmed to preheat at any temperature from 170% to 550%,,
To Set or Change the Preheat Temperature
t. Push the PREHEAT button " °" and the word "BAKE" will glow
in the display
2. Push and hold the UP or DOWN ARROW button until the desired baking
temperature appears in the display°
3 When setting the baking temperature, the temperature will start at 350°F
and increase or decrease in increments of 5%
4 As soon as the UP or DOWN ARROW button is released, the oven will
begin preheating to the selected temperature The display will show "PrE,"
and the words "BAKE" and "ON" will appear in the display,
5 When the oven has finished preheating, the control will beep 3 times and
the display will change from "PrE" to the programmed set temperature
6 When the control beeps and the control displays the set temperature, the
oven enters the bake mode,
To Set or Change the Temperature for Normal Baking
The oven can be programmed to bake at any temperature from t70°F to
550°F.
To set the controls, follow these steps:
I Push the CLEAR/OFF button if the oven temperature was set incorrectly
or if you wish to change the temperature set during preheat
2. Push the BAKE button, " °" and the word "BAKE" will glow in
the display.
3 Push the UP or DOWN ARROW button, The display will show "350 °.'' By
holding the UP or DOWN ARROW button, the temperature can then be
adjusted in 5°F increments.
4. As soon as the UP or DOWN ARROW button is released, the oven will
begin heating to the selected temperature, The display will show the actual
oven temperature as it increasesto the desired setting, The words "BAKE"
and "ON" will appear in the display, When the displayed temperature
reaches the desired baking temperature, the oven is ready for baking. Wait
I 0 minutes for the oven to cycle to the correct temperature_
5 To cancel the baking function, push the CLEARIOFF button,,
Setting Oven Controns
(continued)
PRE- TIMER
O0 000 O0
CLEAN BROIL COOK STOP CLOCK V CLEAR
TIME TIME OFF
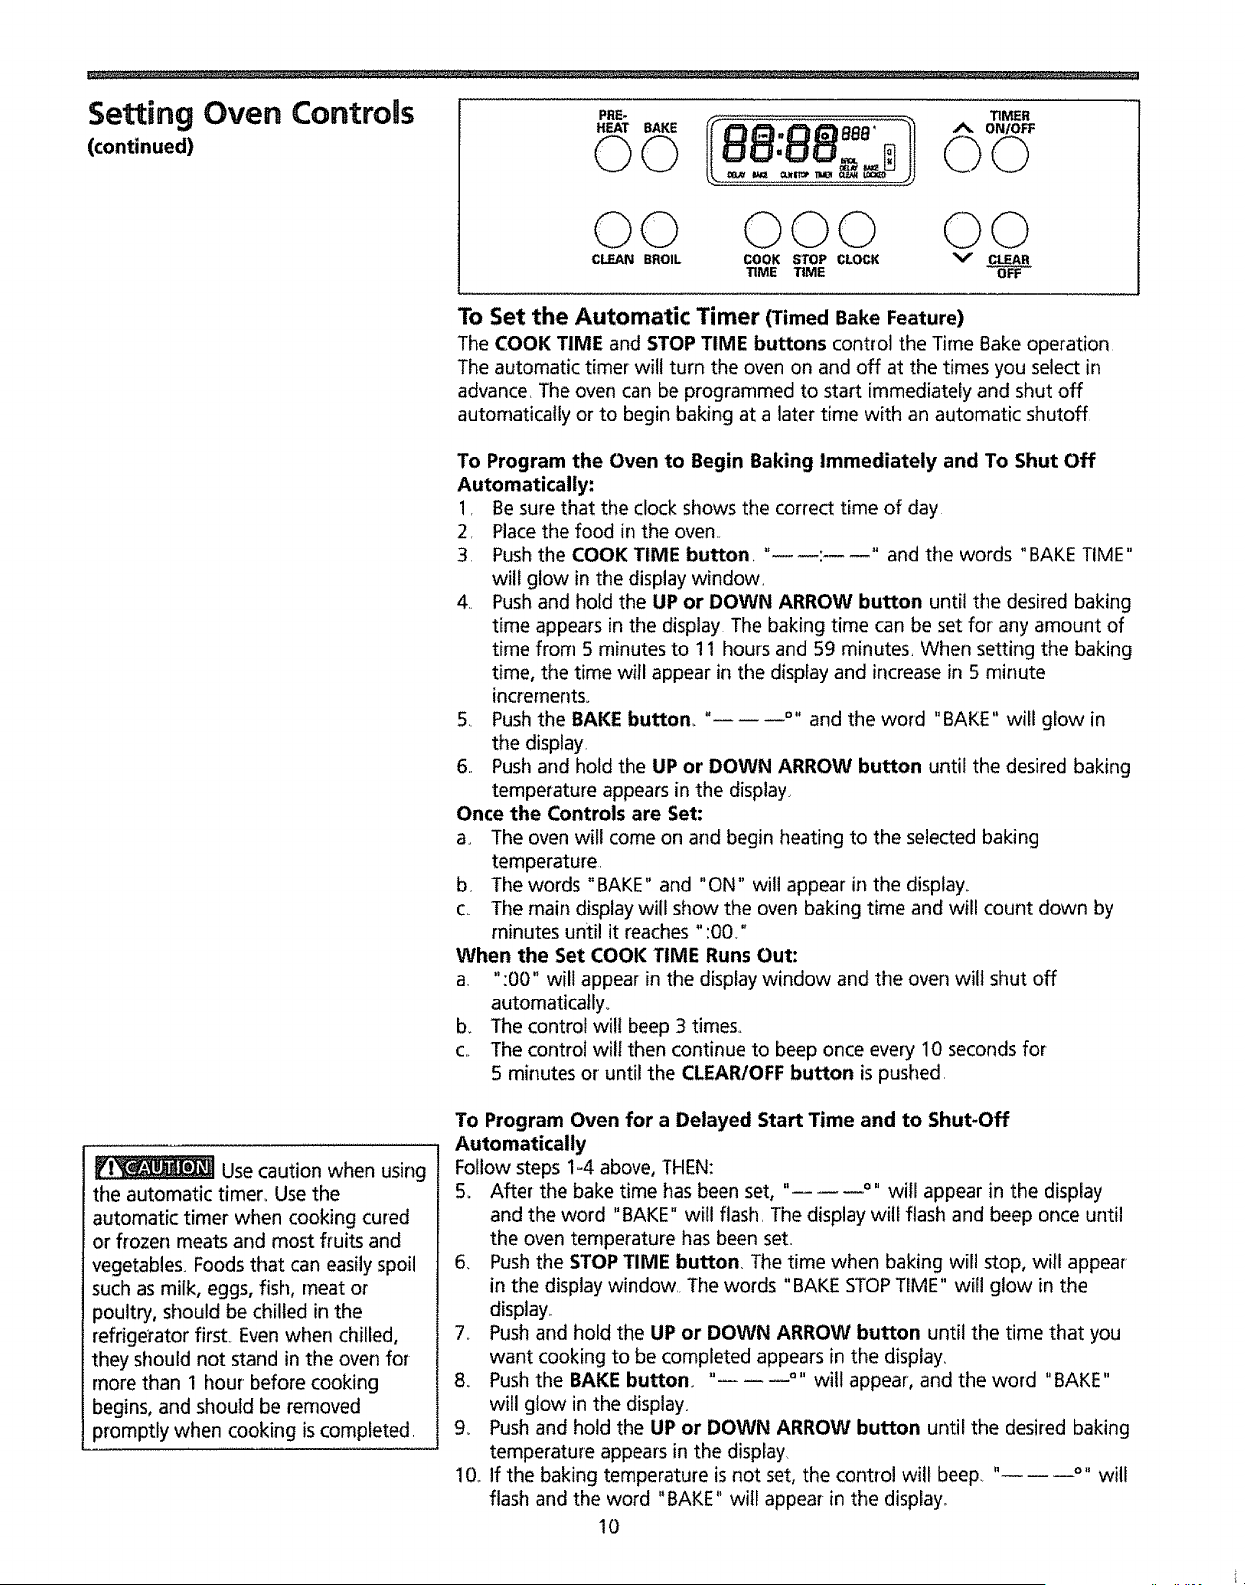
To Set the Automatic Timer (Timed Bake Feature)
The COOK TIME and STOP TIME buttons control the Time Bake operation
The automatic timer will turn the oven on and off at the times you select in
advance. The oven can be programmed to start immediately and shut off
automatically or to begin baking at a later time with an automatic shutoff
To Program the Oven to Begin Baking Immediately and To Shut Off
Automatically:
1. Be sure that the clock shows the correct time of day
2. Place the food in the oven.
3. Push the COOK TIME button. " : " and the words "BAKETIME"
will glow in tile display window.
4._ Push and hold the UP or DOWN ARROW button until the desired baking
time appears in the display The baking time can be set for any amount of
time from 5 minutes to 11 hours and 59 minutes, When setting the baking
time, the time will appear in the display and increase in 5 minute
incrernents_
5. Push the BAKE button_ '.... and the word "BAKE" will glow in
the display.
6.. Push and hold the UP or DOWN ARROW button until the desired baking
temperature appears in the display
Once the Controls are Set:
a_ The oven will come on and begin heating to the selected baking
temperature
b_ The words "BAKE" and "ON" wilt appear in the display°
c.. The main display will show the oven baking time and will count down by
minutes until it reaches ":00."
When the Set COOK TIME Runs Out:
a. ":00" will appear in the display window and the oven wilt shut off
automatically..
b. The control wil! beep 3 times..
c.. The control will then continue to beep once every 10 seconds for
5 minutes or until the CLEARIOFF button is pushed.
Use caution when using
the automatic timer._Use the
automatic timer when cooking cured
or frozen meats and most fruits and
vegetables_ Foods that can easily spoil
such as milk, eggs, fish, meat or
poultry, should be chilled in the
refrigerator first_ Even when chilled,
they should not stand in the oven for
more than 1 hour before cooking
begins, and shouId be removed
promptly when cooking is completed.
To Program Oven for a Delayed Start Time and to Shut-Off
Automatically
Follow steps 1-4 above, THEN:
5, After the bake time has been set, " °" will appear in the display
and the word "BAKE" will flash. The display will flash and beep once until
the oven temperature has been set.
6, Push the STOP TIME button, The time when baking will stop, will appear
in the display window The words "BAKE STOPTIME" will glow in the
display_
7.. Push and hold the UP or DOWN ARROW button until the time that you
want cooking to be completed appears in the display,
8_ Push the BAKE button " °" will appear, and the word "BAKE"
will glow in the display,
9_ Push and hold the UP or DOWN ARROW button until the desired baking
temperature appears in the display
10._If the baking temperature is not set, the control wilt beep. " °" will
flash and the word "BAKE" will appear-in the display,.
10
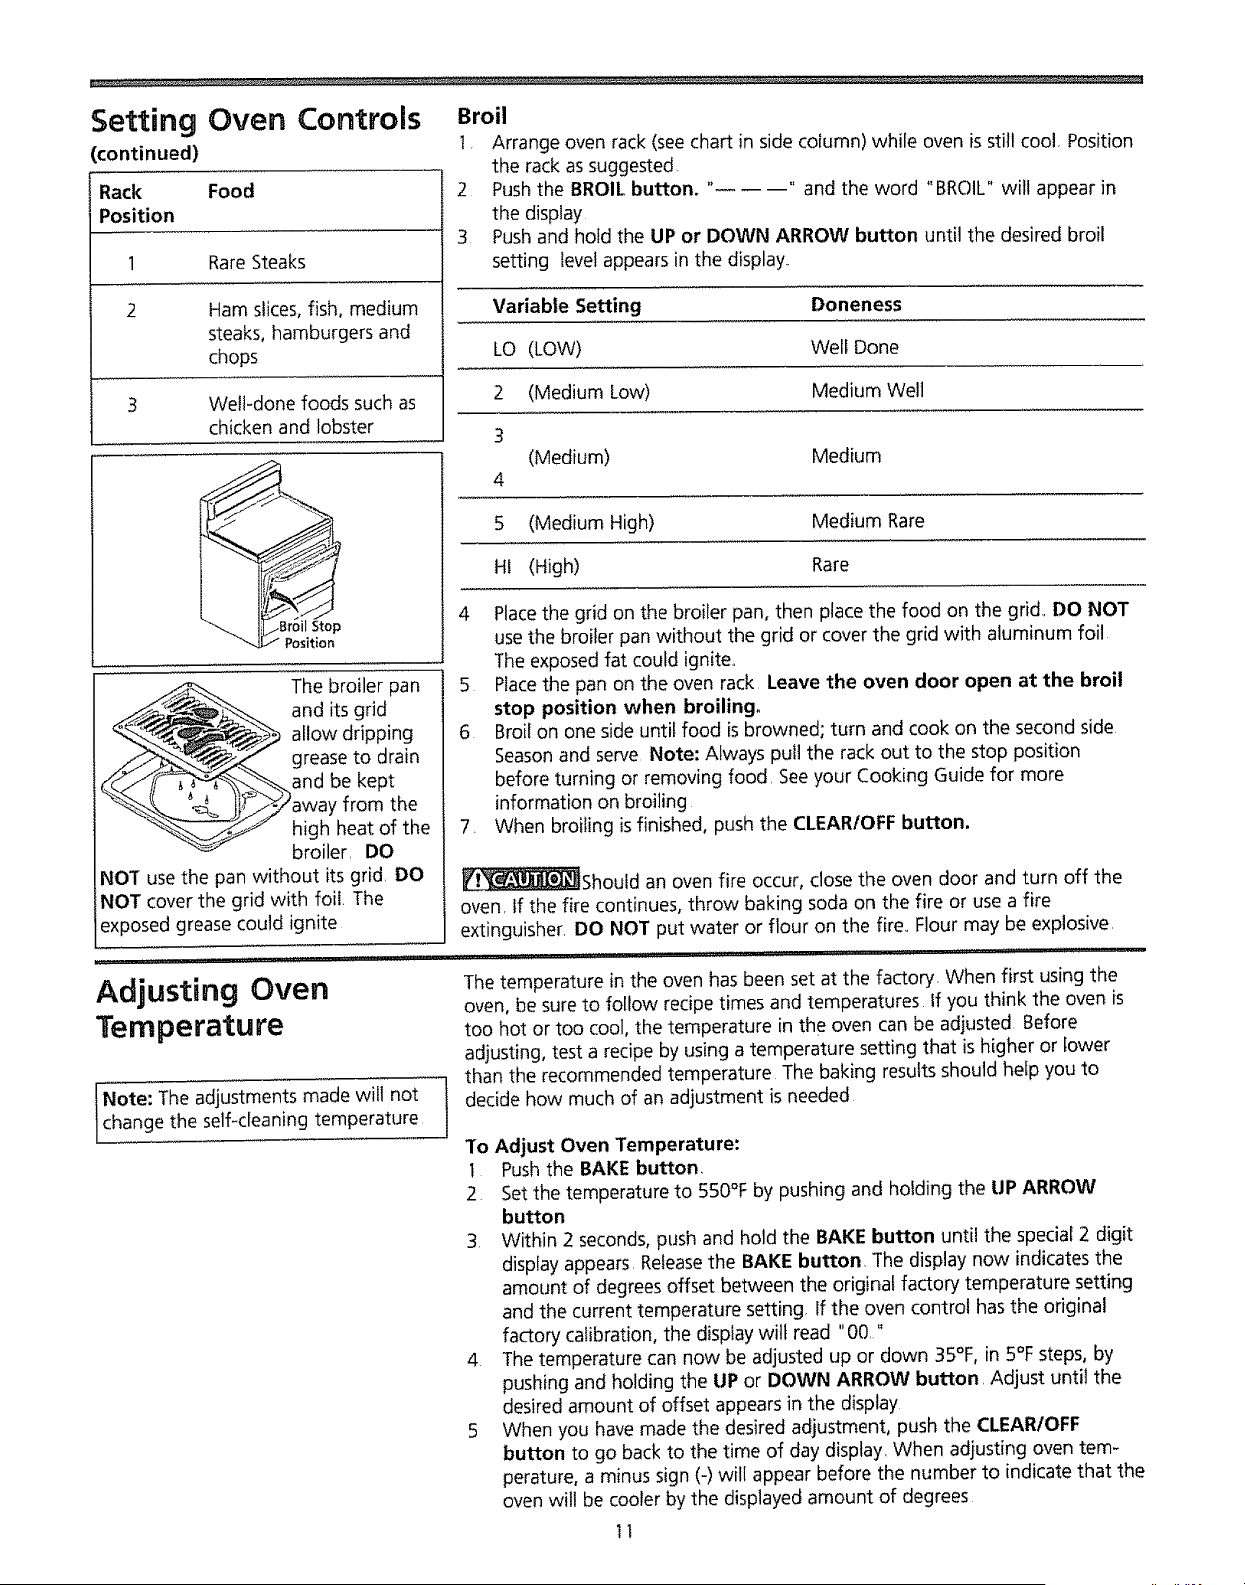
Setting Oven Controls Broil
continued)
Rack Food
Position
1 Rare Steaks
2 Ham slices, fish, medium
steaks, hamburgers and
chops
3 Well-done foods such as
chicken and Lobster
Stop
:ion
The broiler pan
and its grid
allow dripping
grease to drain
and be kept
away from the
high heat of the
broiler, DO
t. Arrange oven rack (see chart in side column) while oven is still cool, Position
the rack as suggested.
2 Pushthe BROIL button. " " and the word "BROIL" wilt appear in
the display
3 Push and hold the UP or DOWN ARROW button until the desired broil
setting level appears in the display,,
Variable Setting Doneness
LO (LOW) Well Done
2 (Medium Low) Medium Well
3
(Medium) Medium
4
5 (Medium High) Medium Rare
HI (High) Rare
4
Place the grid on the broiler pan, then place the food on the grid., DO NOT
use the broiler pan without the grid or cover the grid with aluminum foil
The exposed fat could ignite,,
5 Place the pan on the oven rack Leave the oven door open at the broil
stop position when broiling_
6 Broil on one side until food is browned; turn and cook on the second side
Seasonand serve Note: Always pull the rack out to the stop position
before turning or removing food, See your Cooking Guide for more
information on broiling
7. When broiling is finished, push the CLEAR/OFF button,
NOT use the pan without its grid, DO
NOT cover the grid with foil. The
exposed grease could ignite
_!_Should an oven fire occur, close the oven door and turn off the
oven, If the fire continues, throw baking soda on the fire or use a fire
extinguisher, DO NOT put water or flour on the fire,, Flour may be explosive,
Adjusting Oven
Temperature
Note: The adjustments made wilt not
change the self-cleaning temperature
The temperature in the oven has been set at the factory. When first using the
oven, be sure to follow recipe times and temperatures If you think the oven is
too hot or too cool, the temperature in the oven can be adjusted Before
adjusting, test a recipe by using a temperature setting that is higher or lower
than the recommended temperature The baking results should help you to
decide how much of an adjustment is needed
To Adjust Oven Temperature:
1 Push the BAKE button
2 Set the temperature to 550°F by pushing and holding the tJP ARROW
button
3 Within 2 seconds, push and hold the BAKE button until the special 2 digit
display appears, Releasethe BAKE button, The display now indicates the
amount of degrees offset between the original factory temperature setting
and the current temperature setting, If the oven control has the original
factory calibration, the display wilt read "00,"
4. The temperature can now be adjusted up or down 35°F, in 5°F steps, by
pushing and holding the UP or DOWN ARROW button, Adjust until the
desired amount of offset appears in the display
5 When you have made the desired adjustment, push the CLEARIOFF
button to go back to the time of day display, When adjusting oven tem-
perature, a minus sign (-) will appear before the number to indicate that the
oven will be cooler by the displayed amount of degrees
11
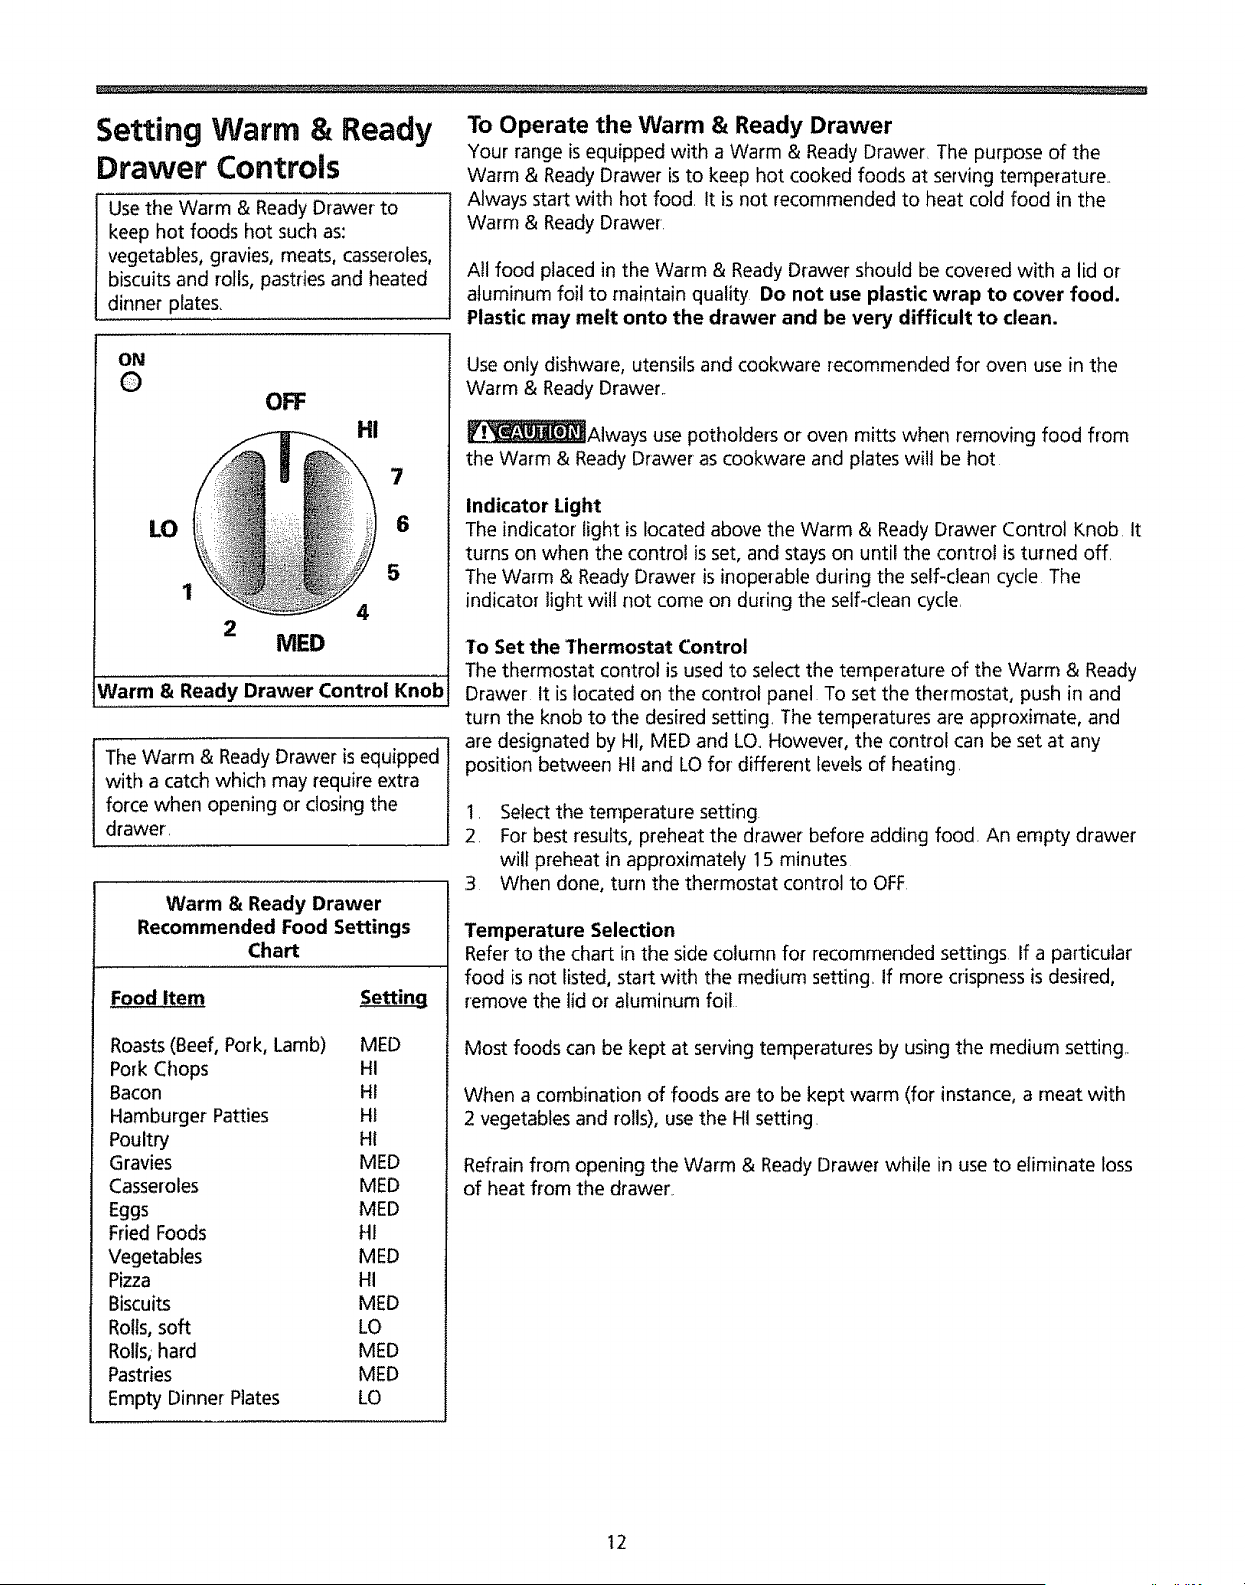
Setting Warm & Ready
Drawer Controls
Use the Warm & Ready Drawer to
keep hot foods hot such as:
vegetables, gravies, meats, casseroles,
biscuits and rolls, pastries and heated
dinner plates,
To Operate the Warm & Ready Drawer
Your range is equipped with a Warm & Ready Drawer The purpose of the
Warm & Ready Drawer is to keep hot cooked foods at serving temperature
Always start with hot food it is not recommended to heat cold food in the
Warm & Ready Drawer:
All food placed in the Warm & Ready Drawer should be covered with a lid or
aluminum foil to maintain quality Do not use plastic wrap to cover food.
Plastic may melt onto the drawer and be very difficult to clean.
ON
O
LO
1
OFF
_ HI
5
2
MED
Warm & Ready Drawer Control Knob
The Warm & Ready Drawer is equipped
with a catch which may require extra
force when opening or closing the
drawer
Warm & Ready Drawer
Recommended Food Settings
Chart
Food Item
Roasts(Beef, Pork, Lamb) MED
Pork Chops HI
Bacon HI
Hamburger Patties HI
Poultry HI
Gravies MED
Casseroles MED
Eggs MED
Fried Foods HI
Vegetables MED
Pizza HI
Biscuits MED
Rolls, soft LO
Rolls; hard MED
Pastries MED
Empty Dinner Plates LO
Use only dishware, utensils and cookware recommended for oven use in the
'Warm & Ready Drawer..
__Always use potholders or oven mitts when removing food from
the Warm & Ready Drawer as cookware and plates wilt be hot
Indicator Light
The indicator light is located above the Warm & Ready Drawer Control Knob. It
turns on when the control is set, and stays on until the control is turned off,
The Warm & Ready Drawer is inoperable during the self-clean cycle The
indicator Light will not come on during the self-clean cycle,
To Set the Thermostat Control
The thermostat control is used to select the temperature of the Warm & Ready
Drawer It is located on the control panel To set the thermostat, push in and
turn the knob to the desired setting, The temperatures are approximate, and
are designated by HI, MED and LO. However, the control can be set at any
position between HI and LO for different levels of heating.
1. Select the temperature setting
2, For best results, preheat the drawer before adding food, An empty drawer
will preheat in approximately 15 minutes
3 When done, turn the thermostat control to OFF
Temperature Selection
Refer to the chart in the side column for recommended settings If a particular
food is not listed, start with the medium setting.. If more crispness is desired,
remove the lid or aluminum foil
Most foods can be kept at serving temperatures by using the medium setting
When a combination of foods are to be kept warm (for instance, a meat with
2 vegetables and rolls), use the HI setting.
Refrain from opening the Warm & Ready Drawer while in use to eliminate loss
of heat from the drawer.
12
Oven CDeaning
_!_ During the self-cleaning
cycle, the outside of the range can
become very hot to the touch DO
NOT leave small children unattended
near the appliance
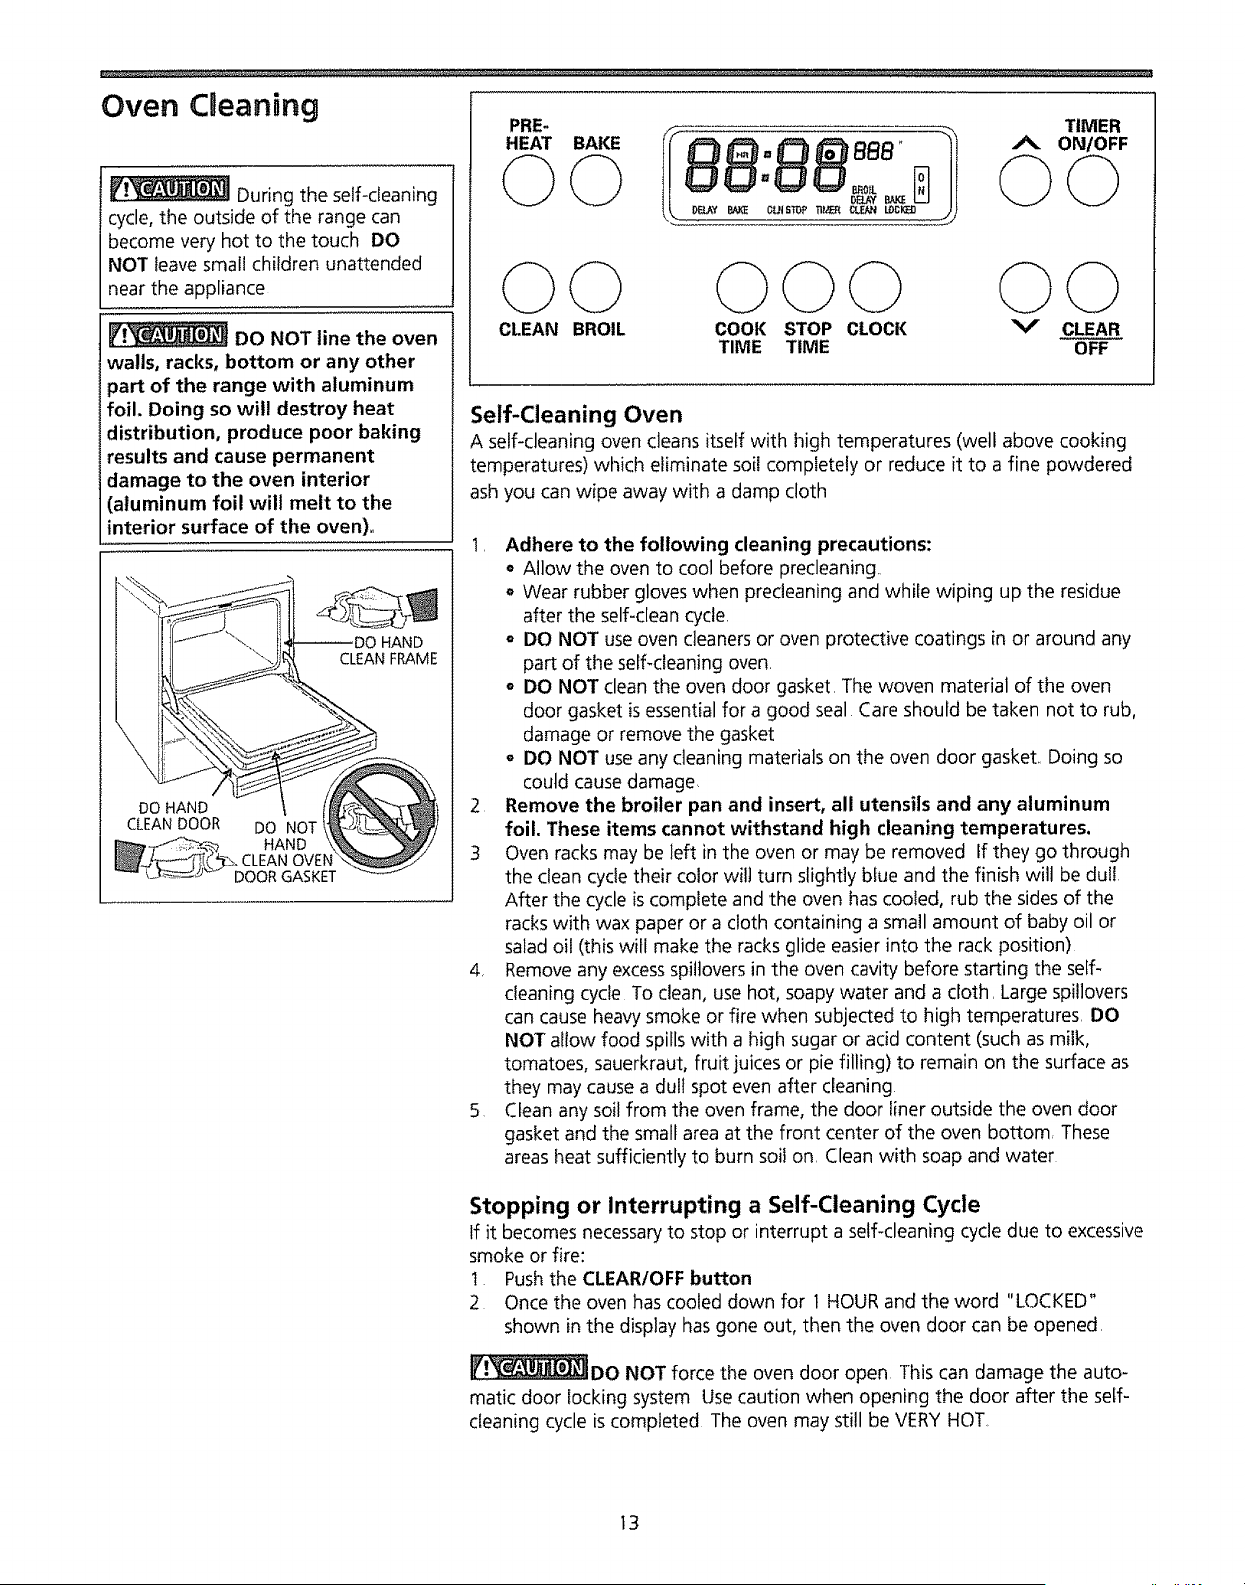
DO NOT line the oven
walls, racks, bottom or any other
part of the range with aluminum
i foil. Doing so will destroy heat
i distribution, produce poor baking
i results and cause permanent
damage to the oven interior
(aluminum foil wilt melt to the
interior surface of the oven)°
HAND
CLEAN FRAME
DO HAND
CLEAN DOOR
DO NOT
HAND
CLEAN OVEN
GASKET
PRE- TIMER
1l Oo.o
©©
CLEAN BROIL COOK STOP CLOCK
TIME TIME
©©
V CLEAR
OFF
Self-Cleaning Oven
A self-cleaning oven cleans itself with high temperatures (well above cooking
temperatures) which eliminate soil completely or reduce it to a fine powdered
ash you can wipe away with a damp cloth
1, Adhere to the following cleaning precautions:
o Allow the oven to cool before precleaning,,
o Wear rubber gloves when precleaning and while wiping up the residue
after the self-clean cycle,
o DO NOT use oven cleaners or oven protective coatings in or around any
part of the self-cleaning oven.
o DO NOT clean the oven door gasket, The woven material of the oven
door gasket is essential for a good seal Care should be taken not to rub,
damage or remove the gasket
o DO NOT use any cleaning materials on the oven door gasket,, Doing so
could cause damage
2 Remove the broiler pan and insert, all utensils and any aluminum
foil. These items cannot withstand high cleaning temperatures.
3 Oven racks may be left in the oven or may be removed If they go through
the clean cycle their color will turn slightly blue and the finish wilt be dull
After the cycle is complete and the oven has cooled, rub the sides of the
racks with wax paper or a cloth containing a small amount of baby oil or
salad oil (this wilt make the racks glide easier into the rack position)
4, Remove any excess spillovers in the oven cavity before starting the self-
cleaning cycle To clean, use hot, soapy water and a cloth, Large spillovers
can cause heavy smoke or fire when subjected to high temperatures, DO
NOT allow food spills with a high sugar or acid content (such as milk,
tomatoes, sauerkraut, fruit juices or pie filling) to remain on the surface as
they may cause a dull spot even after cleaning
5 Clean any soil from the oven frame, the door liner outside the oven door
gasket and the small area at the front center of the oven bottom These
areas heat sufficiently to burn soil on, Clean with soap and water
Stopping or Interrupting a Self-Cleaning Cycle
If it becomes necessary to stop or interrupt a self-cleaning cycle due to excessive
smoke or fire:
1 Push the CLEARtOFFbutton
2 Once the oven has cooled down for 1 HOUR and the word "LOCKED"
shown in the display has gone out, then the oven door can be opened,
_DO NOT force the oven door open This can damage the auto-
matic door locking system Use caution when opening the door after the self-
cleaning cycle is completed The oven may still be VERY HOT
13

Oven Cleaning
(continued)
PRE-
HEAT BAKE
©©
©©
CLEAN BROIL
TIMER
ON/OFF
COOK
TIME
©© ©©
STOP CLOCK V CLEAR
TIME OFF
Use care when opening
the oven door after the self-cleaning
cycle. Stand to the side of the oven
when opening the door to allow hot air
or steam to escape.
(f!_DO NOT force the oven
door'6pen, This can damage the
automatic door' locking system. Use
caution when opening the door after
the self-cleaning cycle is completed
The oven may still be VERY HOT
To Start the Self-Clean Cycle
*We recomrnend a 2 hour-self-clean cycle for light soils, a 3 hour cycle for
average soils, and a 4 hour cycle for heavy soils (to assure satisfactory
results).
To Set the Controls for the Self-Cleaning Cycle To Start Immediately and
Shut Off Automatically:
1.. Be sure the clock shows the correct time of day._
2. Push the CLEAN button "CLN TIME" will appear in the display.
3. Push and hold the UP or DOWN ARROW button until "3 HR:O0" appears
in the display Set the cleaning time based on the amount of soil you
have--light, medium or heavy, *See above
4,. As soon as the controls are set, the motor driven lock will begin to close
automatically and the "LOCKED" indicator light will be displayed (It takes
about 15 seconds for' the lock to close)
5. The "Clean" light wilt come on The "Oven" light will come on and cycle
with the oven burner units
Note: tf the self-cleaning cycle is cancelled while at a high temperature, make
sure the word "LOCKED" is not in the display and the oven has cooled down
for at least ONE HOUR before trying to open the oven door.
To Set the Controls for the Self-Cleaning Cycle To Start at a Delayed
Time and Shut off Automatically:
Follow steps t-3 above, THEN:
4, Pushthe STOP TIME button, The time of day that the self-cleaning cycle
ends will appear in the display The words "CLN STOPTIME" wilt glow in
the display.
5 Push and hold the UP or DOWN ARROW button until the time of day
that you want the cleaning to be completed appears in the display.
6 The control will calculate backward from the set stop time to determine
when the self-cleaning cycle should begin The words "DELAY" and "CLN
STOPTIME" will glow in the display.
7_ The self-cleaning cycle will come on automatically at the calculated time.
At that time, the word "DELAY" will go out and "ON" will appear.
When the Self-Clean Cycle is Completed:
1_ The time of day will appear in the display window and the word
"LOCKED" may remain in the display.
2, Once the oven has cooled down for' ONE HOUR and the word "LOCKED"
shown in the display has gone out, then the oven door can be opened
14
General Cleaning Cleaning Various Parts of Your Range
Before cleaning any part of the range, be sure all controls are turned OFFand
the range is cool Remove spillovers and heavy soiling as soon as possible,
Regular cleanings will reduce the number of major cleanings later.
.....Surfaces ......................
Aluminum (Trim Pieces) &
Vinyl
Glass, Painted and Plastic
Control Knobs, Body Parts,
and Decorative Trim
Control Panel
Porcelain Enamel
Cooktop, Under Cooktop,
Broiler Pan and Insert, Door
Liner, Warm & Ready Drawer
(if equipped)
Stainless Steel, Chrome
Decorative Trim
Oven Racks
Oven Door
How to C!ean ........
Use hot, soapy water and a cloth Dry with a clean cloth
For general cleaning, use hot, soapy water and a cloth, For more difficult soils and built-
up grease, apply a liquid detergent directly onto the soil Leave on soil for 30 to 60
minutes., Rinsewith a damp cloth and dry DO NOT use abrasive cleaners on any of
these materials; they can scratch
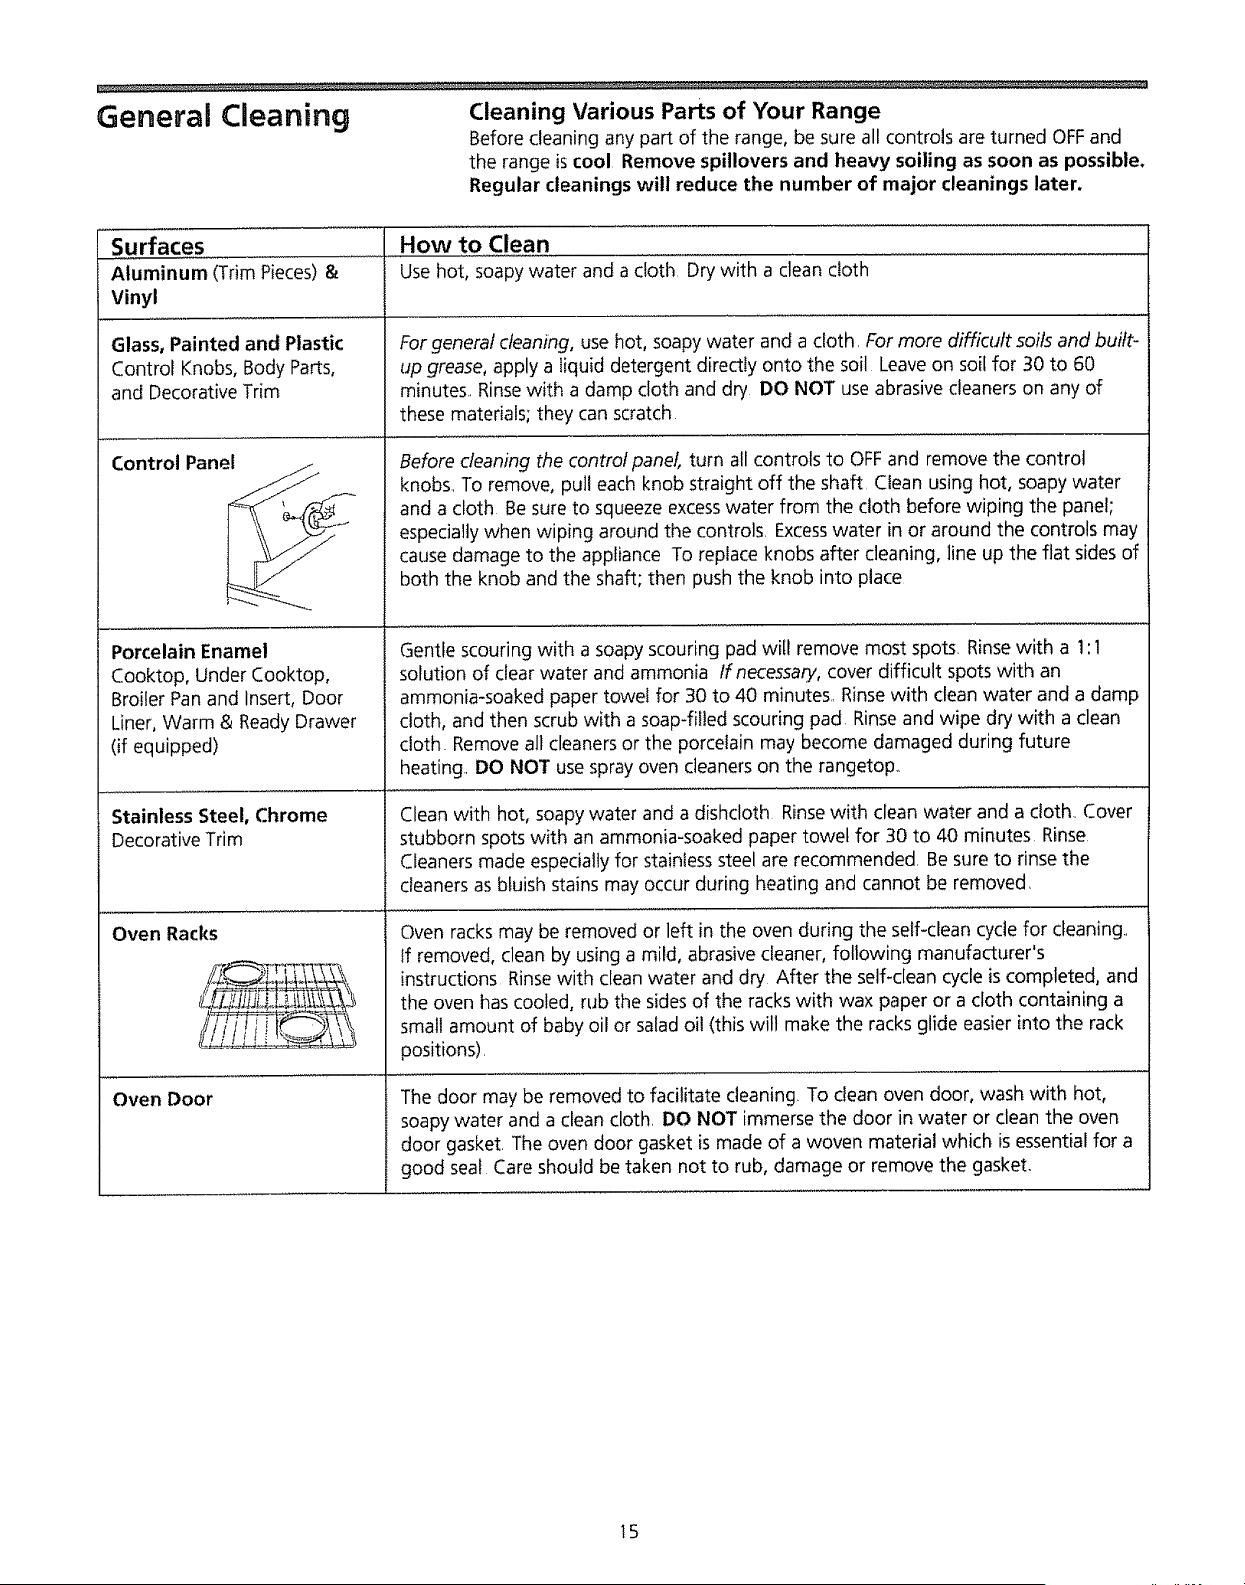
Before cleaning the control panel, turn all controls to OFFand remove the control
knobs.,To remove, pull each knob straight off the shaft, Clean using hot, soapy water
and a cloth Be sure to squeeze excesswater from the cloth before wiping the panel;
especially when wiping around the controls, Excesswater in or around the controls may
cause damage to the appliance To replace knobs after cleaning, line up the flat sides of
both the knob and the shaft; then push the knob into place
Gentle scouring with a soapy scouring pad will remove most spots. Rinse with a 1'I
solution of clear water and ammonia If necessary, cover difficult spots with an
ammonia-soaked paper towel for 30 to 40 minutes. Rinse with clean water and a damp
cloth, and then scrub with a soap-filled scouring pad Rinse and wipe dry with a clean
cloth Remove all cleaners or the porcelain may become damaged during future
heating.. DO NOT use spray oven cleaners on the rangetop,.
Clean with hot, soapy water and a dishcloth Rinsewith clean water and a cloth,_Cover
stubborn spots with an ammonia-soaked paper towel for 30 to 40 minutes Rinse
Cleaners made especially for stainless steel are recommended. Be sure to rinse the
cleaners as bluish stains may occur during heating and cannot be removed
Oven racks may be removed or left in the oven during the self-clean cycle for cleaning..
If removed, clean by using a mild, abrasive cleaner, following manufacturer's
instructions Rinsewith clean water and dry After the self-clean cycle is completed, and
the oven has cooled, rub the sidesof the racks with wax paper or a cloth containing a
small amount of baby oil or salad oil (this will make the racks glide easier into the rack
positions)
The door may be removed to facilitate cleaning. To clean oven door, wash with hot,
soapy water and a clean cloth. DO NOT immerse the door in water or clean the oven
door gasket. The oven door gasket is made of a woven material which is essential for a
good seal Care should be taken not to rub, damage or remove the gasket,
15
_Be suretherangeiscool
beforeremovingelementsordrip
bowls,.
Genera Cleaning Surface Elements and Drip Bowls
continued) Surface elements can be unplugged and removed to make cleaning the drip
pans easier.The surface elements clean themselves when they are turned on
Food spilled on a hot element will burn off. Food spilled on a cool element may
be cleaned with a damp cloth---any remaining soil will bum off the next time
the element is used Never immerse a surface element in water
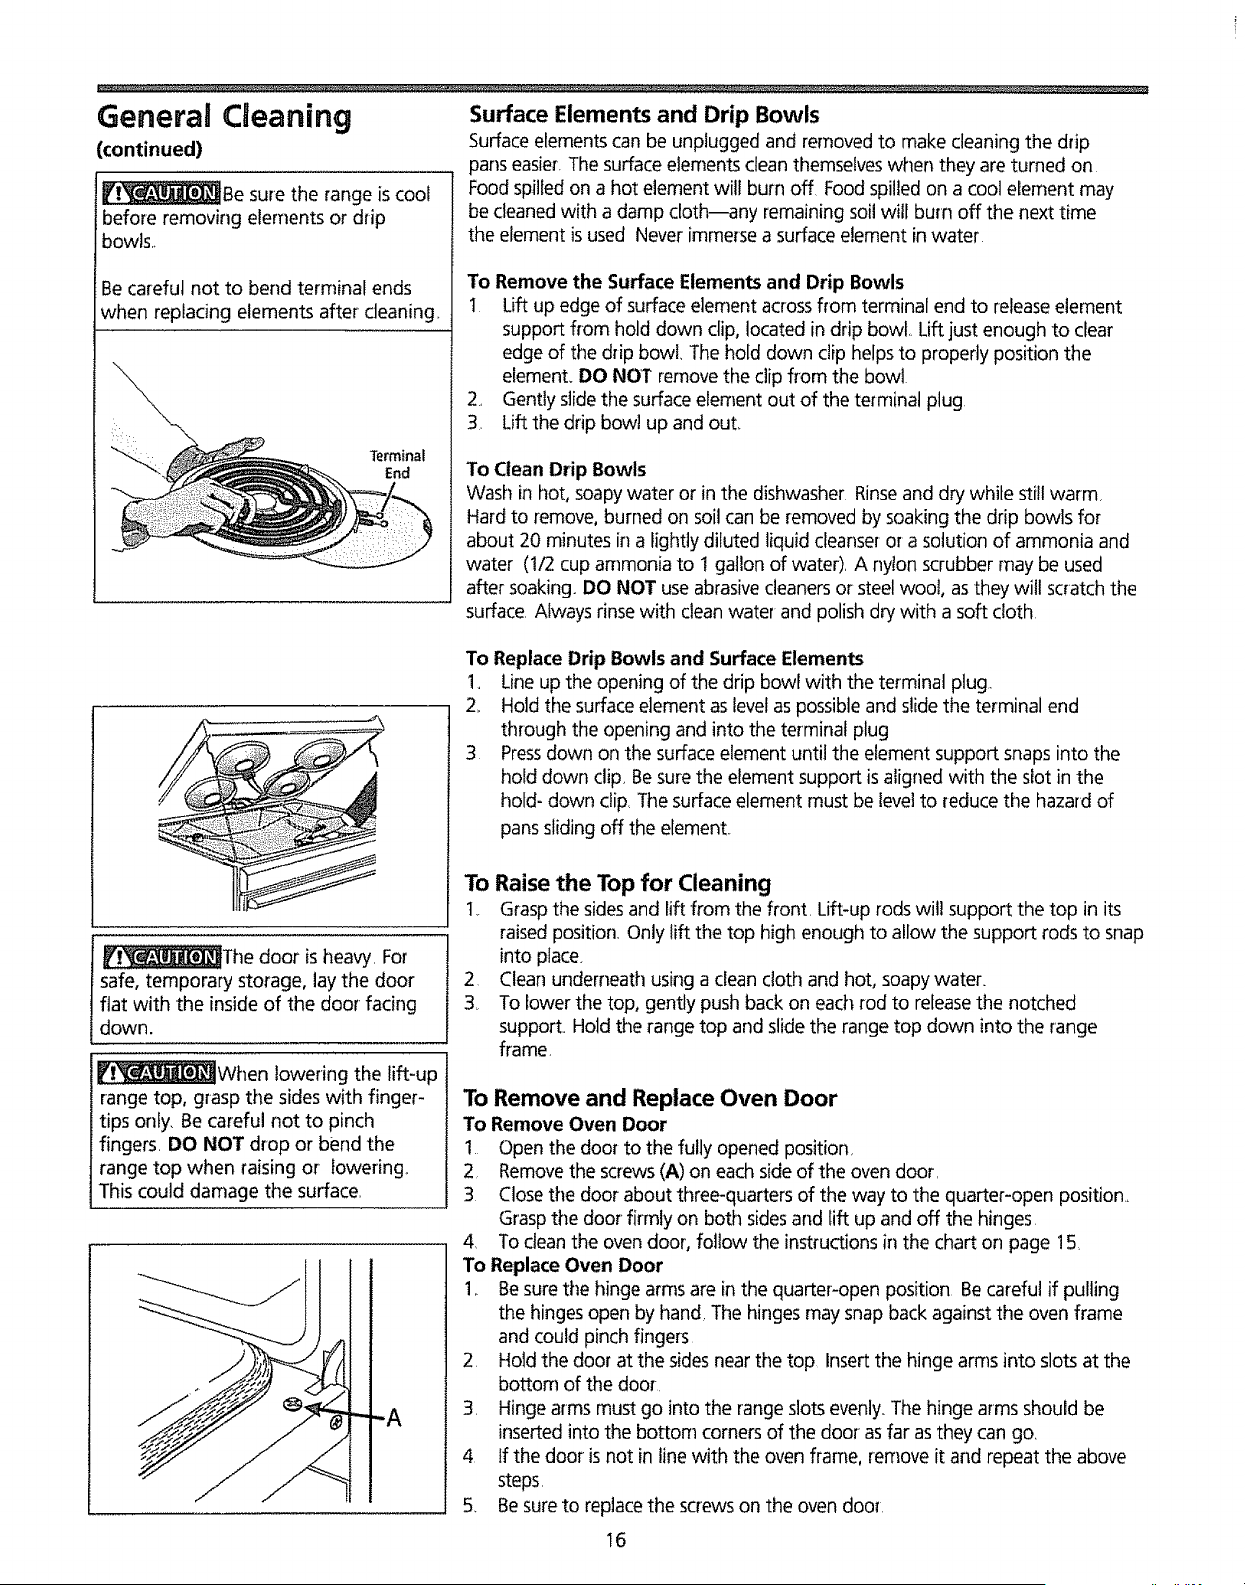
Be careful not to bend terminal ends
when replacing elements after cleaning.
Terminal
End
To Remove the Surface Elements and Drip Bowls
t Lift up edge of surface element across flom terminal end to release element
support from hold down clip, located in drip bowl.. Lift just enough to clear
edge of the drip bowl, The hold down clip helps to properly position the
element. DO NOT remove the clip from the bowl
2, Gently slide the surface element out of the terminal plug.
3. Lift the drip bow! up and out,.
To Clean Drip Bowls
Wash in hot, soapy water or in the dishwasher Rinseand dry while still warm,
Hard to remove, burned on soil can be removed by soaking the drip bowls for
about 20 minutes in a lightly diluted liquid cleanseror a solution of ammonia and
water (1/2 cup ammonia to 1 gallon of water), A nylon scrubber may be used
after soaking. DO NOT use abrasivecleaners or steel wool, as they will scratch the
surface. Always rinse with clean water and polish dry with a soft cloth
To Replace Drip Bowls and Surface Elements
1. Line up the opening of the drip bowl with the terminal plug.
2,. Hold the surface element as level as possible and slide the terminal end
through the opening and into the terminal plug
3 Pressdown on the surface element until the element support snaps into the
hold down clip. 8e sure the element support is aligned with the slot in the
hold- down clip, The surface element must be level to reduce the hazard of
pans sliding off the element..
_!_The door is heavy. For
safe, temporary storage, lay the door
flat with the inside of the door facing
down.
[Fl_When lowering the lift-up
range top, grasp the sides with finger-
tips only. Be careful not to pinch
fingers. DO NOT drop or bend the
range top when raising or lowering°
This could damage the surface.
""A
To Raise the Top for Cleaning
t._ Grasp the sides and lift from the front. Lift-up rods will support the top in its
raised position, Only lift the top high enough to allow the support rods to snap
into place.
2 Clean underneath using a clean cloth and hot, soapy water.
3_ To lower the top, gently push back on each rod to releasethe notched
support.. Hold the range top and slide the range top down into the range
frame
To Remove and Replace Oven Door
To Remove Oven Door
1 Open the door to the fully opened position
2, Remove the screws(A) on each side of the oven door,
3 Close the door about three-quarters of the way to the quarter-open position.
Grasp the door firmly on both sidesand lift up and off the hinges
4 To clean the oven door, follow the instructions in the chart on page 15
To Replace Oven Door
1,. Besure the hinge arms are in the quarter-open position Be careful if pulling
the hinges open by hand, The hinges may snap back against the oven frame
and could pinch fingers
2. Hold the door at the sides near the top Insert the hinge arms into slots at the
bottom of the door.
3 Hinge arms must go into the range slots evenly. The hinge arms should be
inserted into the bottom corners of the door as far as they can go,
4 If the door is not in line with the oven frame, removeit and repeat the above
steps.
5. Besure to replace the screws on the oven door.
16
General
(continued)
Caeaning
To Remove and Replace Warm & Ready Drawer
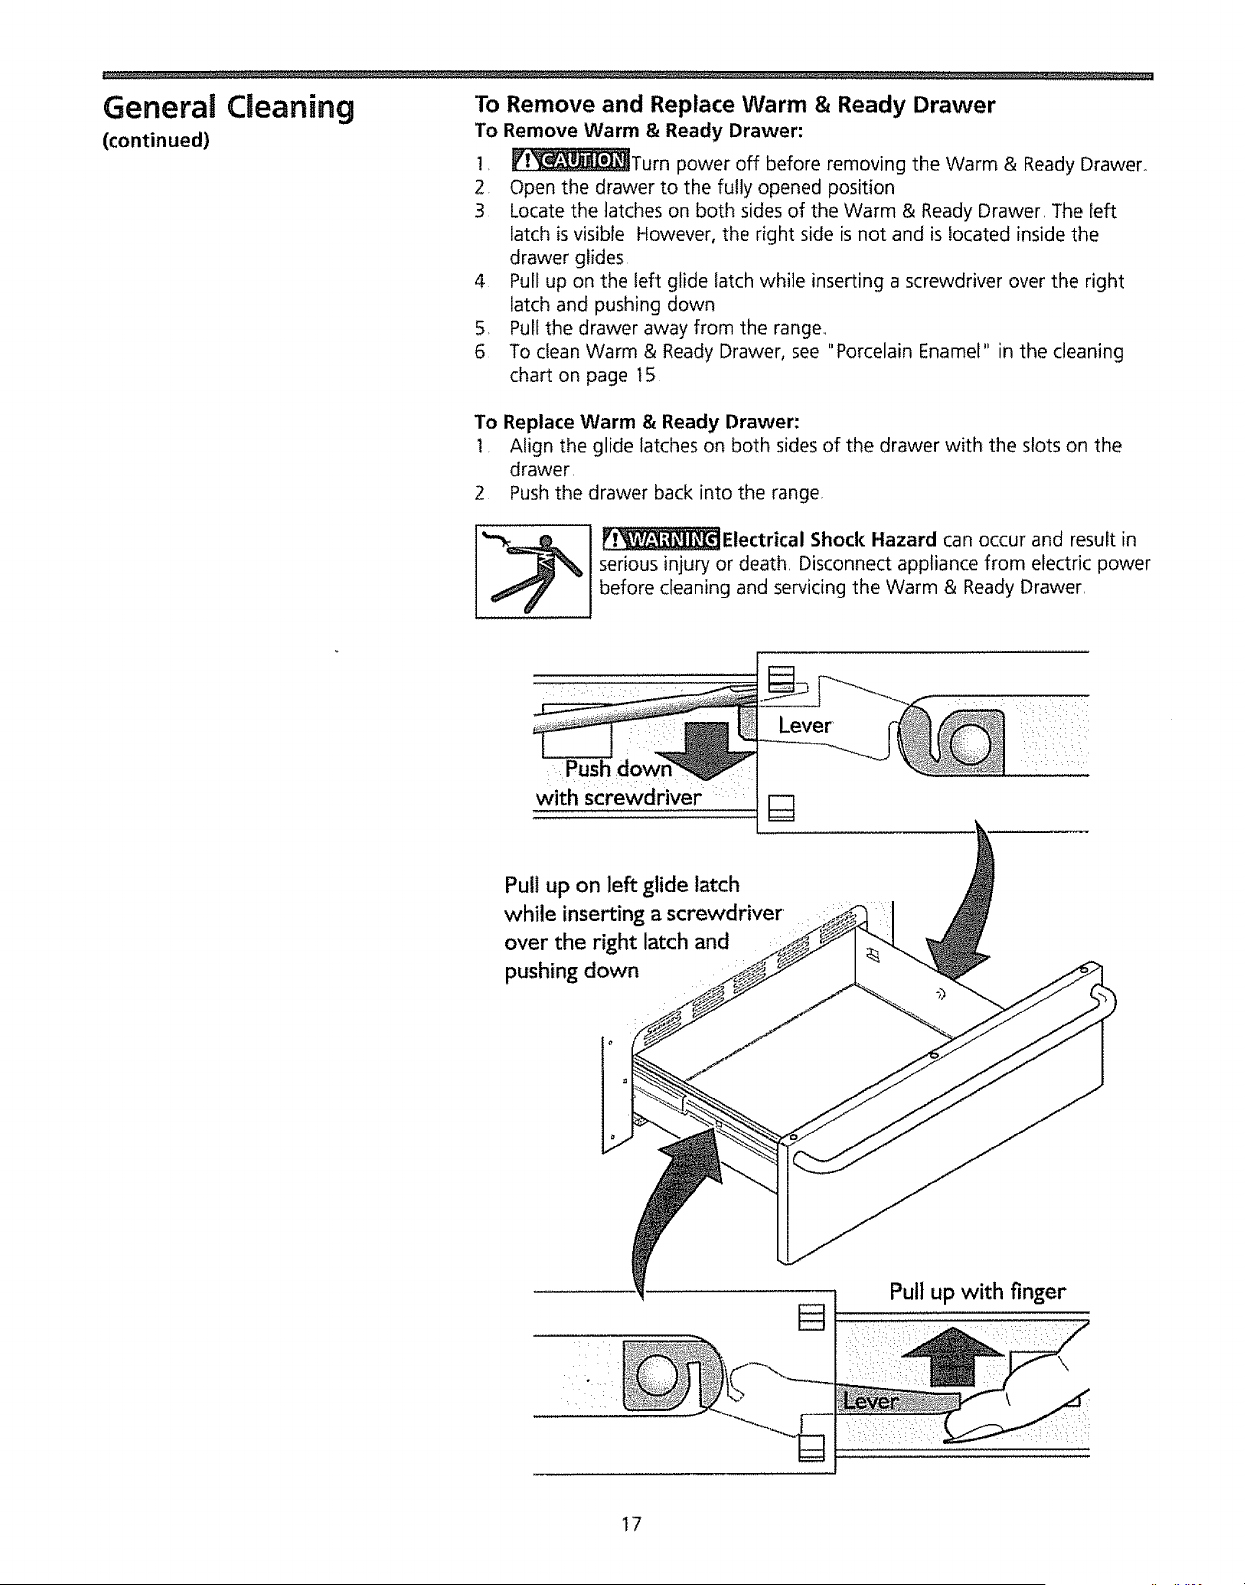
To Remove Warm & Ready Drawer:
1, IF!_Turn power off before removing the Warm & Ready Drawer,,
2. Open the drawer to the fully opened position
3 Locate the latches on both sides of the Warm & Ready Drawer, The left
latch is visible However, the right side is not and is located inside the
drawer glides
4 Pull up on the left glide latch while inserting a screwdriver over the right
latch and pushing down
5. Pull the drawer away from the range,,
6 To clean Warm & Ready Drawer, see "Porcelain Enamel" in the cleaning
chart on page t5
To Replace Warm & Ready Drawer:
1. Align the glide latches on both sides of the drawer with the slots on the
drawer.
2 Push the drawer back into the range,
,v__ Electrical Shock Hazard can occur and result in
serious injury or death, Disconnect appliance from electric power
before cleaning and servicing the Warm & Ready Drawer,
Push
with screwdriver _
Pull up on left glide latch
while inserting a screwdriver
over the right latch and
pushing down
t Pull up with finger
•_:i•:::/I¸_::•:>•:_•::•_••>:_•i•:i:•i:::i:! •......:H•••::_•I¸•¸•il•:•:_:i:
t7

Changing Cooktop
and/or Oven Lights
(some models)
To Change the Cooktop Light (some models)
Your model will either have a canopy cover that lifts up or 2 Phillips® Head
screws that secure the light cover_Before changing the cooktop light, be
sure to turn the power off at the main source or unplug the range,
_Be sure the range is
unplugged and all parts are COOL
before replacing the surface or oven
lights. Wear a leather-faced glove for
_rotection against possible broken
glass
For models with a canopy cover that lifts up, follow these instructions:
I_ Grasp the front edge of the canopy cover as illustrated in the side column, Pull
forward and lift the cover up and off toward rear of range,
2, Remove bulbltube by rolling up and out Install the new bulb by sliding down
into place and rolling toward front of range
3 Align front edge of light cover with inside lip of end cap Lower rear of cover
into place and snap down,
4. Turn power back on at the main source (or plug the range back in),
For models with 2 Phillips® Head screws that secure the light cover, follow
these instructions:
I. Turn power off at the main source or unplug the range
2,, Remove Phillips® Head screws (2) that secure the light cover and then lift the
light cover off.
3.. Remove bulb by rolling back and up, Install the new bulb by sliding down and
rolling forward into place,
4_ Re-install light cover and secure with Phillips® Head screws (2).
To Change the Oven Light (some models)
On some models, the oven light automatically turns on when the door is opened_
Some models have a switch located on the control panel to turn on the light, The
oven light is located at the rear of the oven and is covered with a glass shield held
by a wire holder. The glass shield must be in place whenever the oven is in use
To replace the oven light:
I,. Turn electrical power off at the main source or unplug the range
2,_ Presswire holder to one side to release the glass shield
3,, Replacebulb with a new 40 watt appliance bulb
4. Replaceglass shield over bulb and snap wire holder into place_
5. Turn power back on again at the main source (or plug the range back in)
6.. The clock(if equipped) will then need to be reset To reset, see Setting the
Clock and Minute Timer in this Owner's Guide,.
18
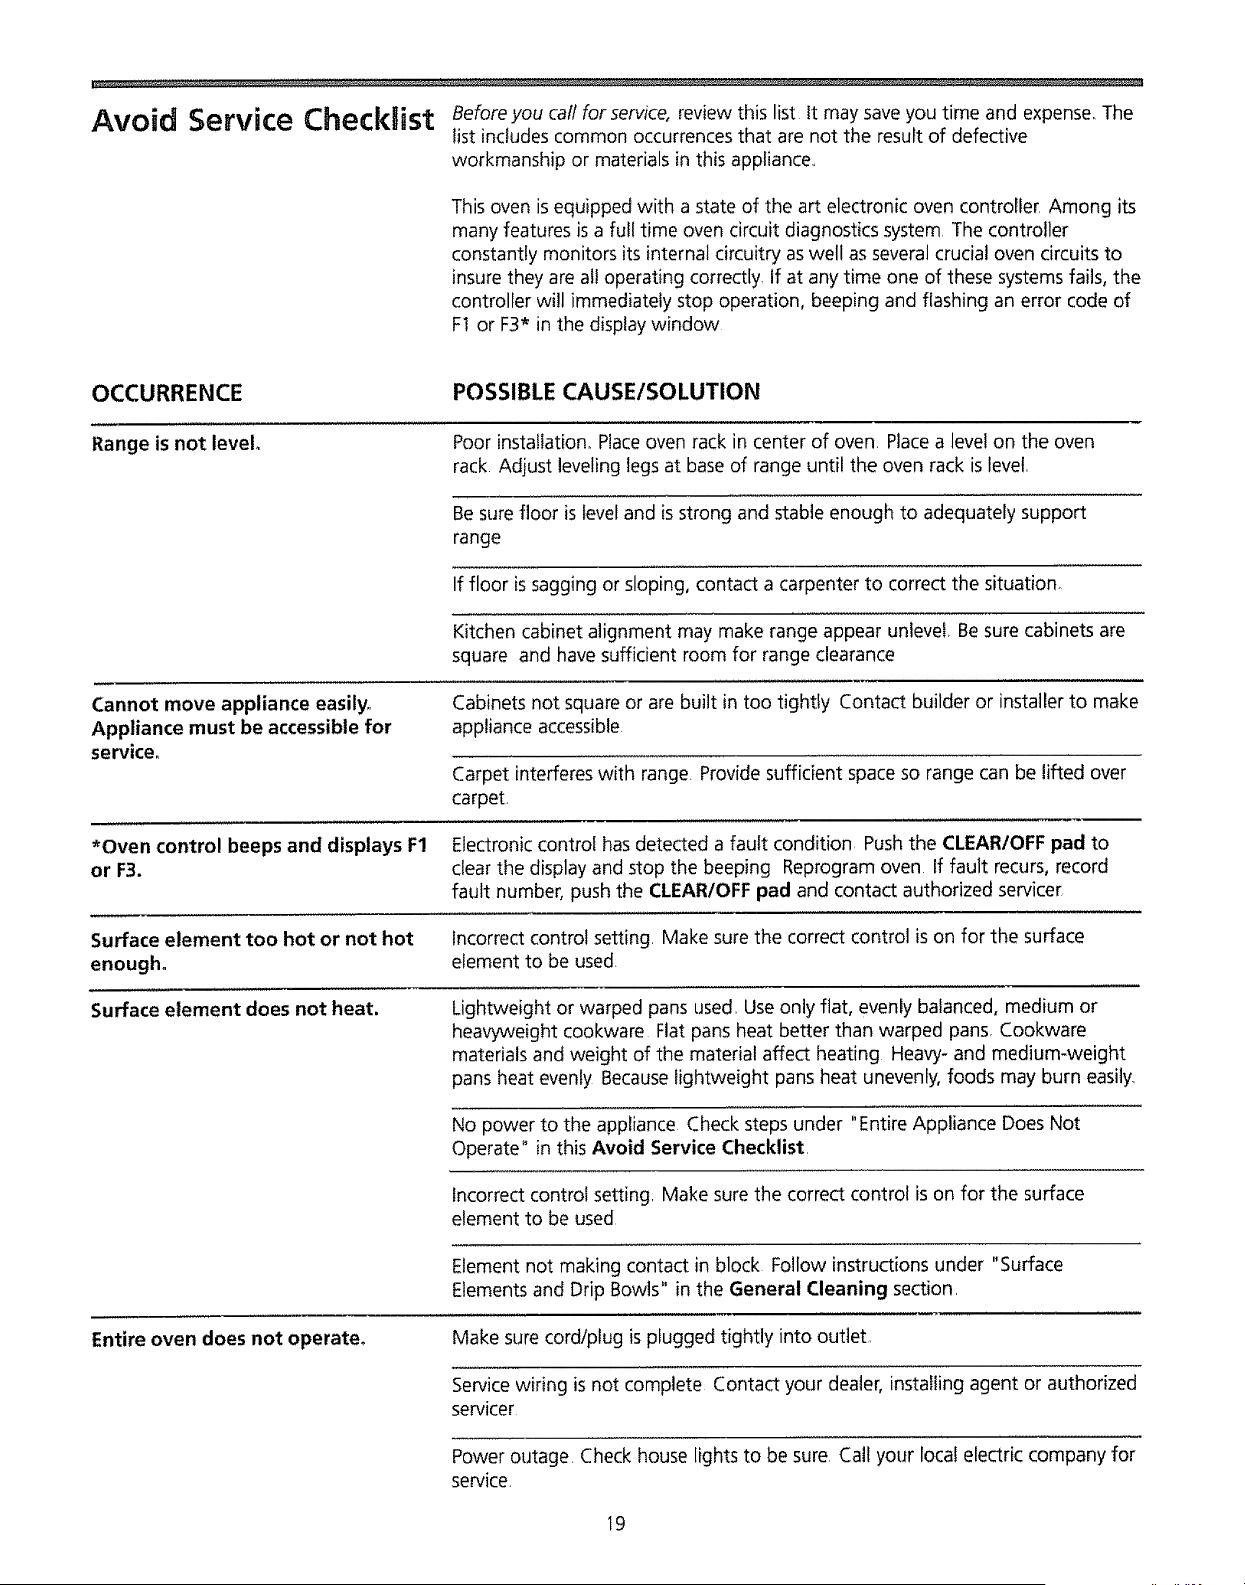
Avoid Service Checklist Beforeyou call for service, review this list It may save you time and expense, The
list includes common occurrences that are not the result of defective
workmanship or materials in this appliance,,
This oven is equipped with a state of the art electronic oven controller Among its
many features is a full time oven circuit diagnostics system The controller
constantly monitors its internal circuitry as well as several crucial oven circuits to
insure they are al! operating correctly if at any time one of these systems fails, the
controller will immediately stop operation, beeping and flashing an error code of
Ft or F3* in the display window
OCCURRENCE
POSSIBLE CAUSE/SOLUTION
Range is not level.
Poor installation,. Placeoven rack in center of oven Place a level on the oven
rack. Adjust leveling legs at base of range until the oven rack is level.
Be sure floor is level and is strong and stable enough to adequately support
range
If floor is sagging or sloping, contact a carpenter to correct the situation.
Kitchen cabinet alignment may make range appear unlevel. Besure cabinets are
square and have sufficient room for range clearance
Cannot move appliance easily°
Appliance must be accessible for
service°
Cabinets not square or are built in too tightly Contact builder or installer to make
appliance accessible.
Carpet interferes with range. Provide sufficient space so range can be lifted over
carpet
*Oven control beeps and displays F1 Electronic control has detected a fault condition. Pushthe CLEAR/OFF pad to
or F3. clear the display and stop the beeping Reprogram oven If fault recurs, record
fault number, push the CLEAR/OFF pad and contact authorized servicer
Surface element too hot or not hot
enough°
Incorrect control setting. Make sure the correct control is on for the surface
element to be used.
Surface element does not heat. Lightweight or warped pans used. Use only flat, evenly balanced, medium or
heawweight cookware Flat pans heat better than warped pans, Cookware
materials and weight of the material affect heating Heavy- and medium-weight
pans heat evenly Because lightweight pans heat unevenly, foods may burn easily.
No power to the appliance Check steps under "Entire Appliance Does Not
Operate" in this Avoid Service Checklist.
Incorrect control setting. Make sure the correct control is on for the surface
element to be used
Element not making contact in block Follow instructions under "Surface
Elements and Drip Bowls" in the General Cleaning section.
Entire oven does not operate° Make sure cord/plug is plugged tightly into outteL
Servicewiring is not complete Contact your dealer, installing agent or authorized
servicer
Power outage. Check house lights to be sure, Call your local electric company for
service
19
Cooktop andtor Oven lights (some
models) do not work.
Replace or tighten bulb, SeeChanging Cooktop and/or Oven Lights (some
models) in this Owner's Guide for instructions
Oven smokes excessively during
broiling.
Control(s) not set properly Follow instructions under Setting Oven Controls,_
Make sure oven door is opened to broil stop position,
Meat too close to the element, Reposition the rack to provide proper clearance
between the meat and the element. Preheat broil element for searing,
Meat not properly prepared Remove excessfat from meat.. Cut remaining fatty
edges to prevent curling, but do not cut into lean.
Grid on broiler pan wrong side up and grease not draining. Always place grid on
the broiler pan with ribs up and slots down to allow grease to drip into pan.
Grease has built up on oven surfaces Regularcleaning is necessarywhen broiling
frequently Old grease or food spatters cause excessive smoking.
Poor baking results. Review the Baking section in the Cooking Guide for hints,causes and
corrections.
Self-cleaning cycle does not work. Control(s) not set properly Follow instructionsunder Oven Cleaning.
Self-cleaning cycle was interrupted Follow steps under "Stopping or Interrupting
a Self-Cleaning Cycle" under Oven Cleaning
Soil not completely removed after
self-cleaning cycle.
Failureto clean bottom, front top of oven, frame of oven or door area outside
oven seal Theseareas are not in the self-cleaning area, but get hot enough to
burn on residue..Clean these areas before the self-cleaning cycle is started
Burned-on residue can be cleaned with a stiff nylon brush and water or a nylon
scrubber Be carefui not to damage the oven gasket
Flames inside oven or smoking from
vent.
Excessivespillovers in oven Set self-clean cycle for a longer cleaning time_
Excessivespillovers in oven, This is normal, especially for high oven temperatures,
pie spiflovers or large amounts of grease on bottom of oven Wipe up excessive
spillovers before starting cycle tf flames or excessivesmoke are present, stop the
self-clean ejcle and follow steps under "Stopping or Interrupting a Self-Cleaning
Cycle" in the Oven Cleaning section..
20
Range Warranty
Full One Year Warranty On The Functioning Of All Parts
Except Glass Parts
if, within one year from the date of installation, any part, other than a glass part, fails to function
properly due to a defect in material or workmanship, Searswill repair or replace it, free of charge=
Full 30-Day Warranty On Glass Parts And Finish Of Porcelain, Painted Or
Bright Metal Finished Parts
tf, within 30 days from the date of installation, any glass part or the finish on any porcelain enamel,
painted or bright metal part is defective in material or workmanship, Searswill replace the part,
free of charge,
Full 90-Day Warranty On Mechanical Adjustments
For 90 days from the date of installation,Searswill provide, free of charge, any mechanical
adjustments necessaryfor proper operation of the range, except for normal maintenance
If the range is subjected to other than private family use, the above warranty coverage is effective
for only 90 days,
Warranty Service Is Available By Contacting The Nearest Sears Service
Center/Department in the United States
This warranty applies only while this product is in use in the United States This warranty gives you
specific legal rights, and you may also have other rights which vary from state to state
Sears, Roebuck and Co., Dept. 817WA, Hoffman Estates, IL 60179
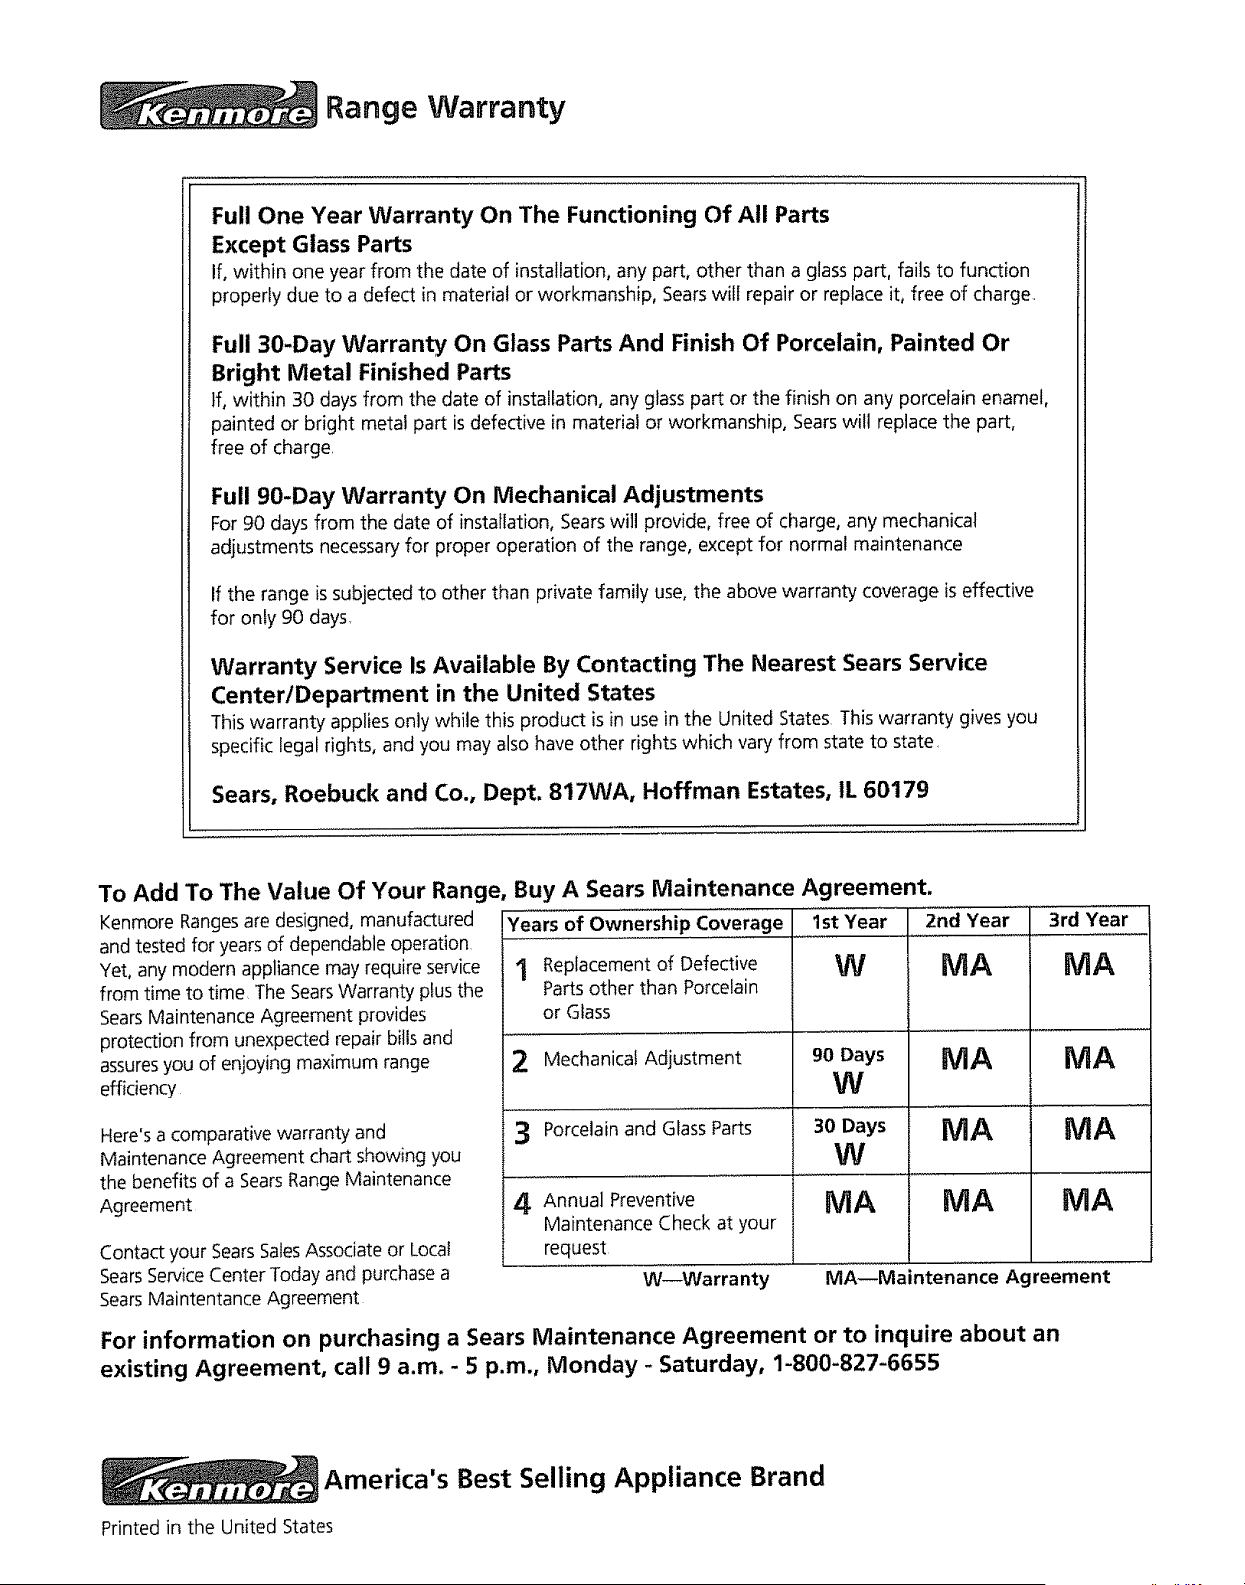
To Add To The Value Of Your Range, Buy A Sears Maintenance Agreement.
Kenmore Rangesare designed, manufactured
and tested for years of dependable operation
Yet, any modern appliance may require service
from time to time, The SearsWarranty plus the
SearsMaintenance Agreement provides
protection from unexpected repair bills and
assuresyou of enjoying maximum range
efficiency
Here's a comparative warranty and
Maintenance Agreement chart showing you
the benefits of a SearsRange Maintenance
Agreement
Contact your SearsSalesAssociate or Local
SearsServiceCenter Today and purchase a
Sears Maintentance Agreement
Years of ownership Coverage
'! Replacement of Defective
Parts other than Porcelain
or Glass
2 Mechanical Adjustment
3 Porcelain and Glass Parts
4 Annual Preventive
Maintenance Check at your
request
'1'st Year .........2nd Year
.......w MA I
90 Days MA
W
30 Days r_l_A
W
MA MA
W--Warranty
3rd Year
MA
MA
MA
MA
m
MA--Maintenance Agreement
For information on purchasing a Sears Maintenance Agreement or to inquire about an
existing Agreement, call 9 a.m. - 5 p.m., Monday - Saturday, 1-800-827-6655
America's Best Selling Appliance Brand
Printed in the United States
Forthe repair or replacement partsyouneed
Call7 am- 7 pm,7 daysa week
(1-800-366-7278)
Forin-home major brandrepaBrservice
Call24 hoursa day,7 daysa week
(1-800-473-7247)
Forthe locationof a
SearsRepairServiceCenterin yourarea
Call24 hoursa day,7 daysa week
UW
II
Forinformation onpurchasinga Sears
Maintenance Agreementorto inquire
aboutan exmtlngAgreement
call9 am - 5 pm,Monday-Saturday
America's Repair Speciafists
22
Registre su modelo y numero de serie ..................................... Portada
Instrucciones importantes sobre la seguridad ................................. 2-4
Funciones del panel de control ............................................................ 5
Reglaje del reloj y del minutero ........................................................... 6
Ajuste de los controles de la superficie ............................................... 7
Antes de ajustar del horno y del caj6n de calentar y retener ........... 8
Reglaje de los controles del caj6n de calentar y retener .................. 12
Ajuste de los controles del homo ................................................... 9-11
Ajuste de ta temperatura del horno .................................................. 11
Reglaje de los controles del cajbn de calentar y retener ................. 12
Limpieza del horno ........................................................................ 13-14
Limpieza general ............................................................................ 15-17
Cbmo cambiar las bombillas de ta estufa y/o del horno
(algunos modelos) .............................................................................. 18
Lista para evitar las Ilamadas de servicio ..................................... 19-20
Garantia ............................................................................................... 21
Servicio Sears ...................................................................................... 22
....._'_L_ "1:1111 i,ii L
Lea todas las instrucciones antes de
usar este aparato, Este manual
contiene informaci6n importante
sobre:
o La operaci6n
o EIcuidado
o El servicio
Lea y Guarde Estas Rnstrucdones
Registre su modelo y nOmero de serie
En el espacio siguiente registre el modelo y el nomero de serie que
se encuentran en la plata ubicada debajo de la cubierta abatible de
la estufa
Modelo nt_mero:
Ntimero de serie:
Fecha de compra:
Sears, Roebuck and Co., Hoffman Estates, ill 60179 EE.UU.
P/N 316000922 (9612)
INSTRUCCaONES UMPORTANTES SOBRE LA SEGURIDAD
Lea todas las instrucciones antes de usar este
aparato, Guarde estas instrucciones para consulta
futura.
Esta gu[a contiene sfmbolos e instrucciones importantes sobre la
seguridad Enseguida, se da una breve expiicaci6n sobre et uso de
estos sfmbolos Porfavor preste atenci6n especial a estos sfmbolos y
siga todas Ins instrucdones Esta es una explicaci6n breve del uso de
estos sfmbolos,
Este s[mbolo alerta acerca de situaciones que
pueden ptovocar serios daQos corporates, muerte o daffos
materiales
Este sfmbolo alerta acerca de situaciones que
pueden provocar dar_oscorporales o materiales.
= Quitetodas las cintas y todo el embataje antes de usar la
estufao Despuds de haberla desempacado destruya todo
car_6n de embalaje y las bolsas pl_sticasoNunca permita que los
ni_os jueguen con el material de embataje
o lnstalaci6n correcta--Aseg_rese que un t_cnico calificado
instale y ponga a tierra su aparato correctamente y de acuerdo
con la t_ltima edici6n del C6digo Nacional de E[ectricidad ANSI/
NFPANOo70,asicomo deacuerdo conlos requisitosde los c6digos
locales, tnstale su aparato solamente de acuerdo alas instrucdones
impartidas en la literatura adjunta correspondiente a esta estufa
PIdale a su proveedor que le recomiende un t_cnico calificado,
as( como un servicio de reparaci6n autorizado Para los casos de
emergencia, aprenda a desconectar el suministro el_ctrico de su
estufa, ya sea sirvi_ndose del interruptor de circuito o de ta caja de
fusibles
Las temperaturas altas pueden da_ar el control
electr6nico. Cuando se use el apa rato por primera vez, o cuando el
aparato no ha sidousado por un periododetiempo largo, aseg_irese
de que la unidad ha estado en temperaturas por encima de 32°F
pot Io menos 3 horas antes de conectar la electricidad al aparato.
• Servicio por parte del usuario--No repare ni reemplace ninguna
parte del aparato a menos que losmanuales asilo recomienden_
Solamente un t_cnico catificado puede ocuparse de todos los demos
servicios; as[ se reducir_ el riesgo de lesiones personales y de daSos a
la estufa
= Nunca modifique ni attere ia construcci6n de una estufa
quit_ndole sus patas niveladoras, los panetes, el revestimiento
de los alambres, los tornillos, los soportes antivuelco ni sus
tornillos, ni cuatquier parte det producto.
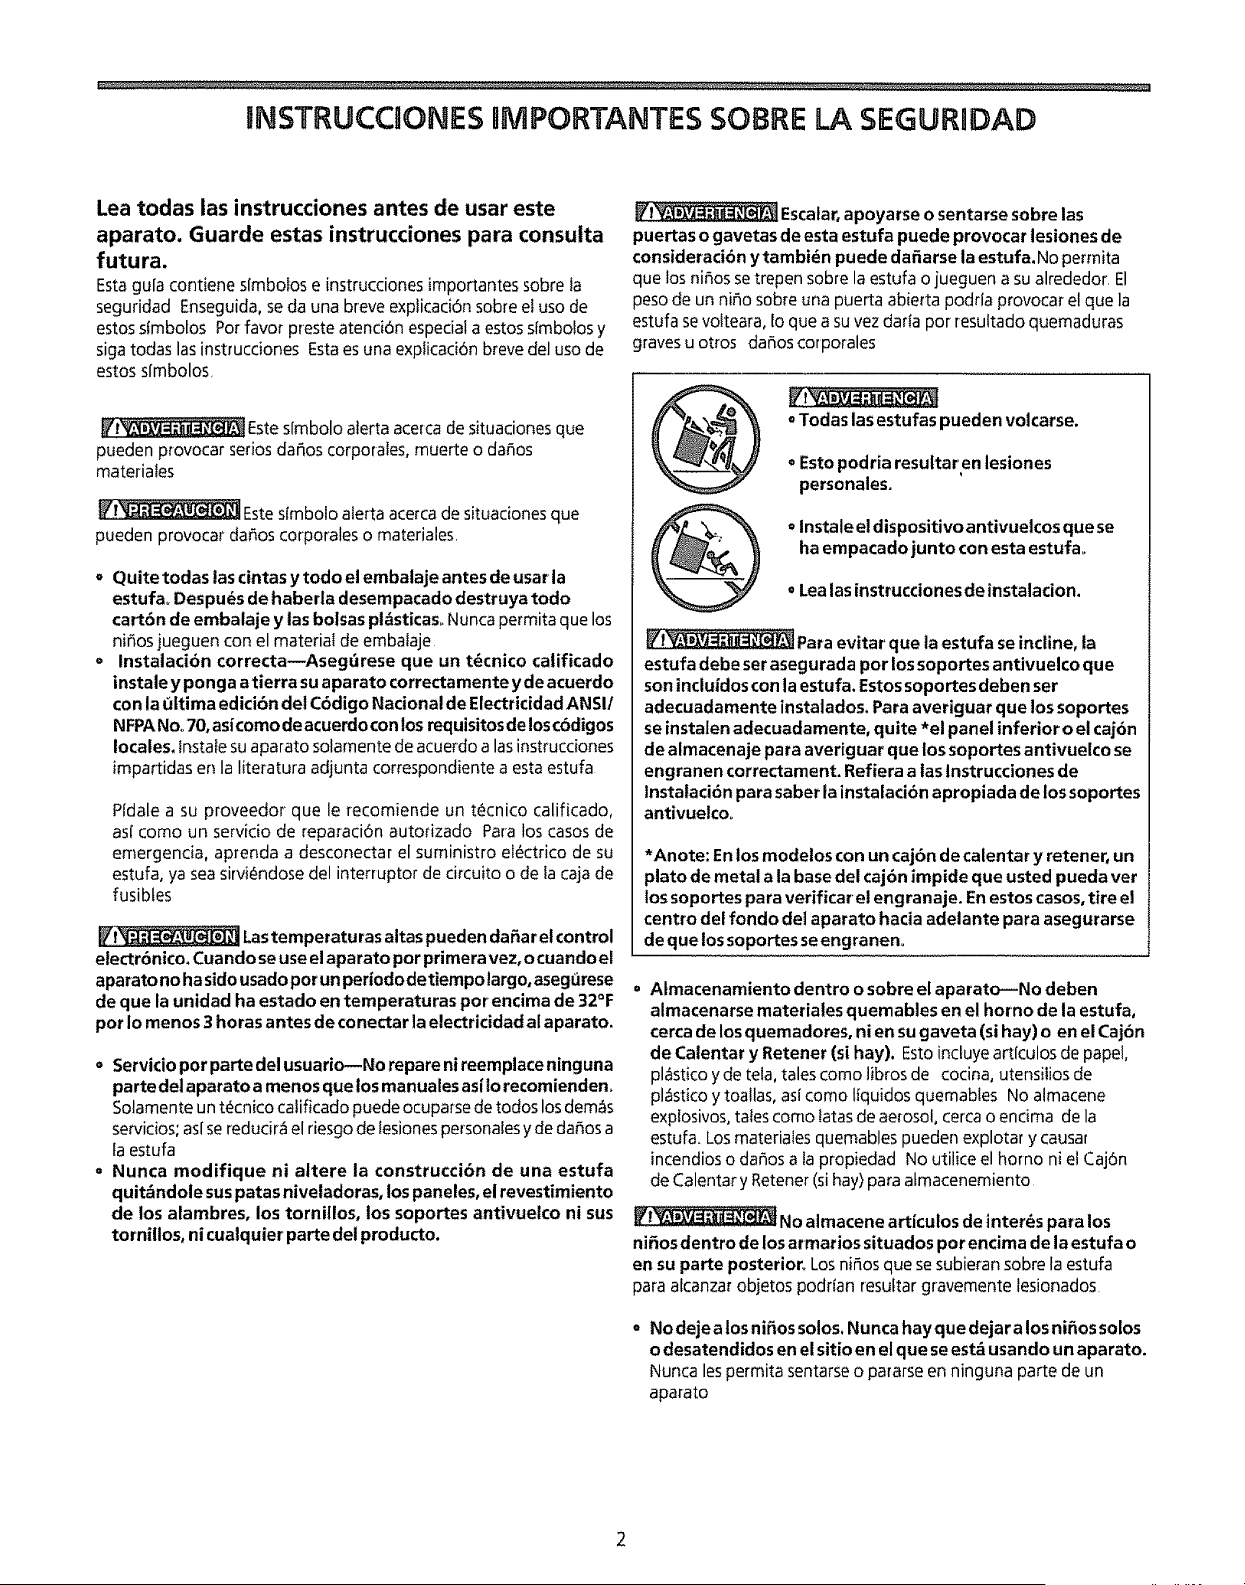
Escatar,apoyarse o sentarse sobre ias
puertas o gavetas de esta estufa puede provocar lesiones de
consideraci6n y tambi_n puede dafiarse la estufa. No permita
que los ni_os setrepen sobre la estufa o jueguen a su alrededor, El
peso de un nitro sobre una puerta abierta podria provocar el que la
estufa sevolteara, Io que a su vez dafla por resuttadoquemaduras
graves u otros da_os corporales
° Todas las estufas pueden vo{carse.
• Esto podria resu[tar en lesiones
personales,
= Instale e! dispositivo antivuelcos que se
ha empacado junto con esta estufa_
o Lea las instrucciones de instalacion.
_Para evitar que la estufa se incline, la
estufa debe ser asegurada por los soportes antivuelco que
son incluidos con la estufa. Estossoportes deben ser
adecuadamente instalados. Para averiguar que los soportes
se instalen adecuadamente, quite *el panel inferior o el caj6n
de almacenaje para averiguar que los soportes antivuelco se
engranen correctament. Refiera a las tnstrucciones de
Instalaci6n para saber la instalacibn apropiada de los soportes
antivuelcoo
*Anote: En los modelos con un caj6n de calentar y retener, un
plato de metal a la base del caj6n impide que usted pueda ver
los soportes para verificar el engranaje. En estos casos, tire el
centro del rondo dei aparato hacia adelante para asegurarse
de quelos soportesseengranen_
° Almacenamiento dentro o sobre el aparato--No deben
almacenarse materiales quemables en el horno de ta estufa,
cerca de los quemadores, ni en su gaveta (si hay) o en el Cajbn
de Calentar y Retener (si hay). Esto incluye artlculos de papel,
pl_stico y de tela, tales como libros de cocina, utensilios de
pl_stico y toallas, asi como liquidos quemables No almacene
explosivos, tales como tatasde aerosol, cerca o encima de la
estufa. Los materiales quemables pueden explotar y causar
incendios o dar_osa ia propiedad No utilke el homo ni el Caj6n
de Calentar y Retener (si hay) para atmacenemiento
No almacene articulos de interns para los
nifios dentro de los armarios situados por encima de la estufa o
en su parte posterior_ Los ni_os que se subieran sobre la estufa
para alcanzar objetos podrfan resuftar gravemente lesionados,
= No deje a los nifios solos. Nunca hay que dejar a los ni_os solos
o desatendidos en el sitio en el que se est& usando un aparato.
Nunca lespermita sentarse o pararse en ninguna parte de un
aparato
INSTRUCCIONES IIVIPORTANTES SOBRE LA SEGURnDAD
• No toque los quemadores de superficie, lasareas cercanas a
esos quemadores, el quemador del horno o tassuperficies
interiores det homo o el Caj6n de Calentar y Retener, Lasareas
cercanas a los quemadores de superficie pueden calentarse to
suficiente como para causar quemaduras Durante y despu_s de su
uso, no toque, ni permita que ningun tipo de tela o material
quemables toquen estas areas hasta que hayan tenido el tiempo
necesario de enfriarse Entre elias se cuentan facubierta de la
estufa, las superficies que se encuentran mirando a la cubierta, ias
aberturas de los respiraderos del homo y lassuperficies cercanas a
los respiraderos, la puerta y la ventana ctethomo
• P6ngase ropa adecuada--Nunca lleve puesta ropa suelta o
prendas que cuelguen mientras est_ usando la estufa.No deje
que su ropa ni otros materiales quemables entren en contacto con
superficies caiientes
l__Nunca use su estufa para mantener un cuarto
caliente ni para calentarlo_
o No vierta agua ni harina sobre el fuego provocado pot
grasamAhogue las llamas con la tapa de una otla, o con
bicarbonato de sosa, un producto quimico seco o un
extinguidor a base de espuma.
o Cuando caliente manteca o grasa, obs_rvela de cerca. La
manteca o la grasa pueden incendiarse si se calientan demasiacto
o Use solamente manoplas o agarraderas secas--Cuando se las
pone sobre superficies calientes, las manoplas, o las
agarraderas humedas o mojadas, pueden causar quemaduras
resultantes del vapor, No deje que dichos protectores toquen los
quemadores catientes ni las resistencias interiores del homo AI
ask utensilios calientes, no use toallas ni artfculos de tela gruesos
en lugar de una manopla o una agarradera
o No caliente envases de comida sin antes abrirlos--La presi6n
resultante podria causar el estatlido del envase y provoca r
lesiones.,
Desmonte ta puerta del homo de cualquier estufa que no se
use porque se va a almacenar o desecharo
o IMPORTANTE--No intente usar su horno cuando haya
ocurrido una falla el_ctrica_ Si la corriente el_ctrica faila,
apague el homo. Si no se ha apagado el homo y luego vuelve ta
corriente, el aparato comenzar_ a funcionar de nuevo Entonces, la
comida que se habfa dejaclo a cooer podria quemarse o echarse a
perder
Instrucciones Importantes Para El Uso De La
Cubierta De Su Estufa
o Familiaricese con las perillas que controlan cada quemador de
superficie.
• Utilice una cacerota de tamafio adecuado--Este aparato tiene
uno o m_s quemadores de superficie de varios tamaflos
Seleccione utensilios con el rondo piano Io sufidente grande para
cubrir la superficiedel elemento quemador El uso de utensilios
demasiado pequefios expondr_ una porci6n del quemador af
contacto directo y puede resuttar en un encendido de ropa Una
relaci6n adecuada entre quemador y utensilio tambi_n mejorar_ la
eficacia del producto
o Losmangos de los utensitios deben quedar hacia adentroyno
tienen que estar extendidos encirna de los quemadores
adyacentes--Para reducir el riesgo de quemaduras, ignici6n de
materiales inflamables y derrames debido al contacto no
intentional con el utensilio, hay que colocar su mango de tal
manera que quede volteado hada adentro y no sobre los
quemadores adyacentes
o No sumeda ni remoje elementos de quemador separables_
Los quemadores nunca se deben sumergir en agua Los
quemadores se autotimpian durante el funcionamiento normal
o Nunca deje desatendidos los quemadores cuando est_n
funcionando a alta ternperatura_Lo que al hecvir causa humo o
desbordamientos de grasa puede provocar la ignici6n Asimismo,
una cacerola que se ha dejado hervir hasta secarse puede derretirse
o Aseg_tese de que los recipientes de goteo est_n bien
ubicados_La ausencia de estos recipientes durante la cocci6n
pueden causar da_os al atabrado o a los componentes que estEn
clebaio
o Revestimientos de protecci6n_No use hojas de aluminio para
proteger las bandejas de los quemadores de superficie0 el fondo
del homo o en cualquier otra parte del aparato Solo debe usarse
este tipo de hojas siguiendo las indicacionesque se dan en la Gu[a
para Cocinar (incluida con la estufa) Eluso de cualquier otro
revestimiento protector u hojas de aluminio, puede perjudicar la
distribuci6n de aire y de calor, asi como la combusti6n Pueden
ocurrir dafios personates o da_os a la estufa
• Utensilios de cocina vidriados_Sotamente ciertos tipos de
viddo, vitrocer_mica, cer_mica, barro y otros utensifios vidriados se
pueden utilizar sobre la cubierta de la estufa sin romperse a causa
de cambios de temperatura subitos Vea Ias recomendaciones del
fabricante acerca de su uso sobre la cubierta de la estufa
o No use cubiertas decorativas para los quemadores de
superficie,, Siseenciende un quemador accidentalmente0 la
cubierta decorativa se calentara y puede derretirse Ustecl no podr_
ver que el quemador esta encenclido Se quemar_ si toca las
cubiertas calientes
3
;
UNSTRUCCaONESIMPORTANTES SOBRE LA SEGUR|DAD
Instrucciones Importantes Para Usar Su Horno/
Cajbn de Calentar y Retener (si hay)
= Tenga cuidadocuando abra la puerta del horno o el Caj6n
de Calentar y Retener--Mant_angase a un lado de la estufa
cuando abra ta puerta de un homo catiente Deje que el aire
catiente o el vapor escapen antes de retirar comida det horno/
Caj6n de Calentar y Retener o at vober a meteda_
= Mantenga losductos de aireacibn de| hornosin
obstruccioneso El homo se ventila debajo del tabiero posterior
Tocar lassuperficies de ese area cuando el homo estE
fundonando puede provocar quemaduras graves Tampoco
coloque artfcutos de pl_stico, o sensibies al caior, sobre el
respiradero de! homo o cerca de _1,ya que pueden derretirse o
encenderse
o Colocaci6n de las parrillas deÁhorno o el Caj6n de Calentar Y
Retener (si hay)° Coloque siempre tas parrillas dei homo en et
sitio deseado, cuando est_a frio. Si hay que mover iasparrillas
cuando el homo esta catiente, h_gato con extrema precauci6n
Use manoplas o agarraderas, y tome la parrilla con ambas
manos para colocarta donde desee No deje que las agarraderas
hagan contacto con la tiamadei quemador dei homo caliente o
el interior de _ste_Saque todos los utensilios de la parritta antes
de retirarIa
= No use el asador sin su complemento_ Elasador y sucharola
ranurada permiten que escurra ia grasa0y la mantienen aleiada
dei intenso caior del asador
o No cubra la charo|a ranurada del asador o eLCaj6n de
Calentar y Retener con hojas de aluminiooLa manteca y la
grasa pueden encenderse.
= No toque la bombilla de luz con un pafiohumedocuando
est_ caliente. Hacerlo podda causar el estallidode la bombilta
Antes de quitar o reemplazar la bombitla, desconecte la estufa o
ap_guela para que no le Ilegue cor_iente
Instrucciones Importantes Para La Limpieza De Su
Estufa
o Limpie haestufa regularmente para mantener todas sus
partes fibres de grasa y evitar que se enciendan. Preste
atenciHn especial al area debajo de cada quemador de superficie
Hay que mantener limp|as las campanas de aireaci6n del
ventiiador y los filtros de grasa No permita que la grasa se
acumule Lagrasa que se deposita en ei ventitador puede
encenderse Tome en cuenta las recomendaciones del fabricante
de la campana
= Limpiadores y aerosoles--Observe siempre las instrucciones de
uso que recomiendan tos fabricantes Tome en cuenta ei hecho
que ei exceso de residuos de limp|adores y aerosoles podria
encenderse, Io cuala su vez podr[a provocar da_os y/o lesiones
Hornos Autolimpiantes
o Limpie en etcido autolimpiante solamente las partes del
homo que aparecen en el manual de! usuario,Antes de hater
que ei homo se autolimpie, quite la bandeja del asador y cualquier
utensilio que se haya guardado en el homo
= No limpie la junta de empaque de ta puerta del horno,La junta
de empaque de fa puerta es de suma importancia para Iograr que
cierre herm_ticamente Hay que obrar con mucho cuidado para no
frotar; da_ar ni mover iajunta de empaque
e No use limpiadores para hornos, No use dentro ni alrededor del
horno ningOn tipo de limpiador para hornos ni ning_n tipo de
revestimientoprotector para hornos
GUARDE ESTASINSTRUCCUONES
4
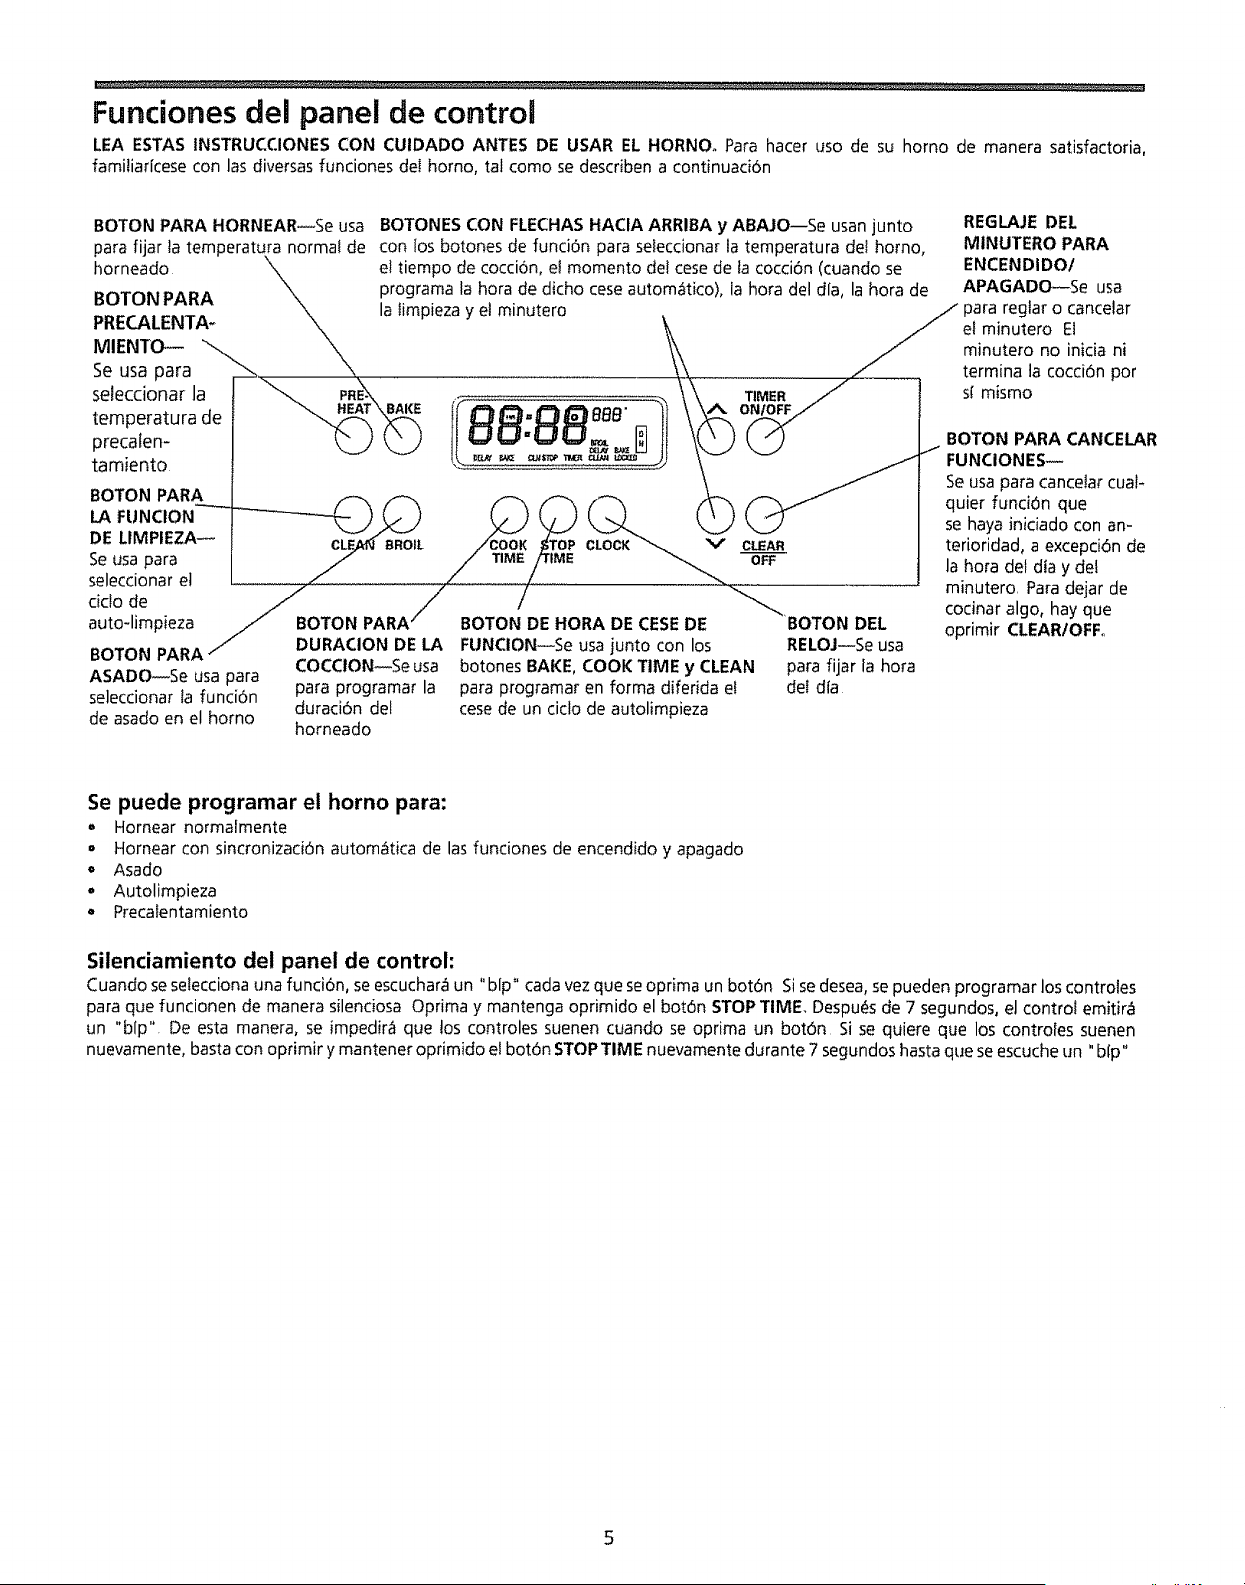
Funciones del panel de control
LEA ESTAS INSTRUCCIONES CON CUIDADO ANTES DE USAR EL HORNOo Para hacer uso de su homo de manera satisfactoria,
famitiaricese con las diversas funciones del homo, tal como se describen a continuaci6n
BOTON PARA HORNEAR--Se usa
para fijar ]a temperatura normaI de
horneado _'\ \\\\.\
BOTON PARA
LA FUNCION
DE LIMPIEZA_
Se usa para
BOTON PARA
PRECALENTA-
MIENTO-- "-\
Se usa para
seleccionar la "_ PR_\
temperatura de "_- ,_\_
precalen-
tamiento
seleccionar e!
dclo de _B
auto-limpieza OTON
BOTON PARA / DURACION DE LA
COCCION--Se usa
ASADO--Se usa para
seleccionar ta funci6n para programar la
de asado en el homo duraci6n del
horneado
BOTONES CON FLECHAS HACIA ARRIBA y ABAJO--Se usan junto
con los botones de funci6n para seleccionar la temperatura del homo,
el tiempo de coccion, el momento de! cese de ta cocci6n (cuando se
programa la hora de dicho cese autom_tico), la hora del dfa, la hora de
la timpieza y et minutero
FUNCION--Se usa junto con los
botones BAKE, COOK TIME y CLEAN
para programar en forma diferida e!
cese de un ciclo de autolimpieza
DEL
RELOJ--Se usa
para fijar la hora
deI dla
REGLAJE DEL
MINUTERO PARA
ENCENDiDO/
APAGADOmSe usa
//para reglar o cancelar
el minutero El
./minutero no inicia ni
.,./termina la cocci6n pot
s[ mismo
BOTON PARA CANCELAR
ti
FUNCIONES--
Se usa para cancelar cual-
quier funciOn que
se haya iniciado con an-
terioriclad, a excepci6n de
la hora del dia y del
minutero. Para dejar de
cocinar algo, hay que
oprimir CLEAR/OFFo
Se puede programar el horno para:
• Hornear normalmente
o Hornear con sincronizaciOn automatica de las funciones de encendido y apagado
• Asado
Autolimpieza
= Precalentamiento
Silenciamiento del panel de control:
Cuando se selecciona una funciOn, se escuchara un "blp" cada vez que seoprima un botOn Si se desea, se pueden programar los controles
para que funcionen de manera silenciosa Optima y mantenga oprimido el bot6n STOP TIME. Despu_s de 7 segundos, el control emitira
un "blp". De esta manera, se impedir_ que los controles suenen cuando se optima un botOn Si se quiere que los controles suenen
nuevamente, basta con oprimir y mantener oprimido el botOn STOP TIME nuevamente durante 7 segundos hasta que se escuche un "blp"

Reglaje del reloj y del
minutero
PRE- TIMER
©© --.
©
CLEAN BROIL
COOK V
TINIE
©©
STOP CLOCK
TIME
©
CLEAR
OFF
Reglaje del reloj
Cuando se enchufe ta estufa pot primera vez, o cuando se interrumpa su suministro
eI_ctrico, la pantatla se pondr_ a parpadear,
1 Optima e] bot6n marcado CLOCK, Aparecer_ la palabra "TIME" en la pantatla
2 Optima y mantenga opfimido el bot6n con ta FLECHA HACIA ARRIBA o HACIA
ABAJO hasta que aparezca la hora del dia correcta en la pantalla Despu_asde 6
segundos, desaparecera ta patabra "TIME" y et reloj comenzar_ a funcionar, O
tambi_n, usted puede anular la funci6n del minutero puJsando el bot6n
CLEAR/OFF y desaparecera ta patabra "TIME" de la pantalla y el reloj comenzara a
funcionar
Reglaje del minutero
1 Optima e[ bot6n marcado TIMER ONIOFF En la panta]la aparecer_n ":00" y la
palabra "TIMER"
2 Optima y mantenga oprimido el bot6n con la FLECHA HACtA ARRIBA hasta que
aparezca la hora del dfa deseada en la pantalla Tan pronto como suelte el bot6n
con la FLECHA HAC1A ARRIBA, los minutos y la hora comenzaran a correr en
forma regresiva en ta panta]la La patabra "TIMER" seguir_ en la pantalla
3 Cuando haya transcurfido el tapso de tiempo ajustado, e! minutero ernitira tres
"bfps"_ Enseguida, continuara emitiendo "hips" una vez cada 10 segundos, pot
espacio de 5 minutos (o hasta que se optima el bot6n marcado TIMER ON/OFF)
Cuando se quiere que el minutero Ellapso de tiempo seleccionado
marque de: aumentar_ en:
5 segundos a 2 minutos incrementos de 5 segundos
2 minutos a 10 minutos incrementos de 10 segundos
10 minutos a 1 hora incrementos de 1 minuto
1 hora a 9 horas 55 minutos incrementos de 5 minutos
Nota: El minutero no ihicia ni termina la cocci6n por s[ mismo ni estar_ activo durante
la autolimpieza Sirve como minutero adicional en la cocina para anunciar que se ha
cumplido el lapso de tiempo seleccionado, El minutero se puede utilizar de manera
independiente durante cualquiera de las funciones de homear o asar al homo Se
puede reglar el minutero para que marque cualquier cantidad de tiempo, desde 5
segundos hasta 9 horas con 55 minutos
Para cambiar el minutero mientras se estd usando:
Oprima y mantenga opfimido el bot6n con ia FLECHA HACIA ARRIBA o HACIA
ABAJO para aumentar o disminuir la cantidad de tiernpo,
Para cancelar el minutero antes de que termine de correr el tiempo asignado:
Optima y mantenga opfimido el bot6n con la FLECHA HACIA ABAJO hasta que
aparezca ":00" en ta pantatla 0 tambi_n, usted puede anular la funci6n del minutero
pulsando el bot6n TIMER ON/OFF.
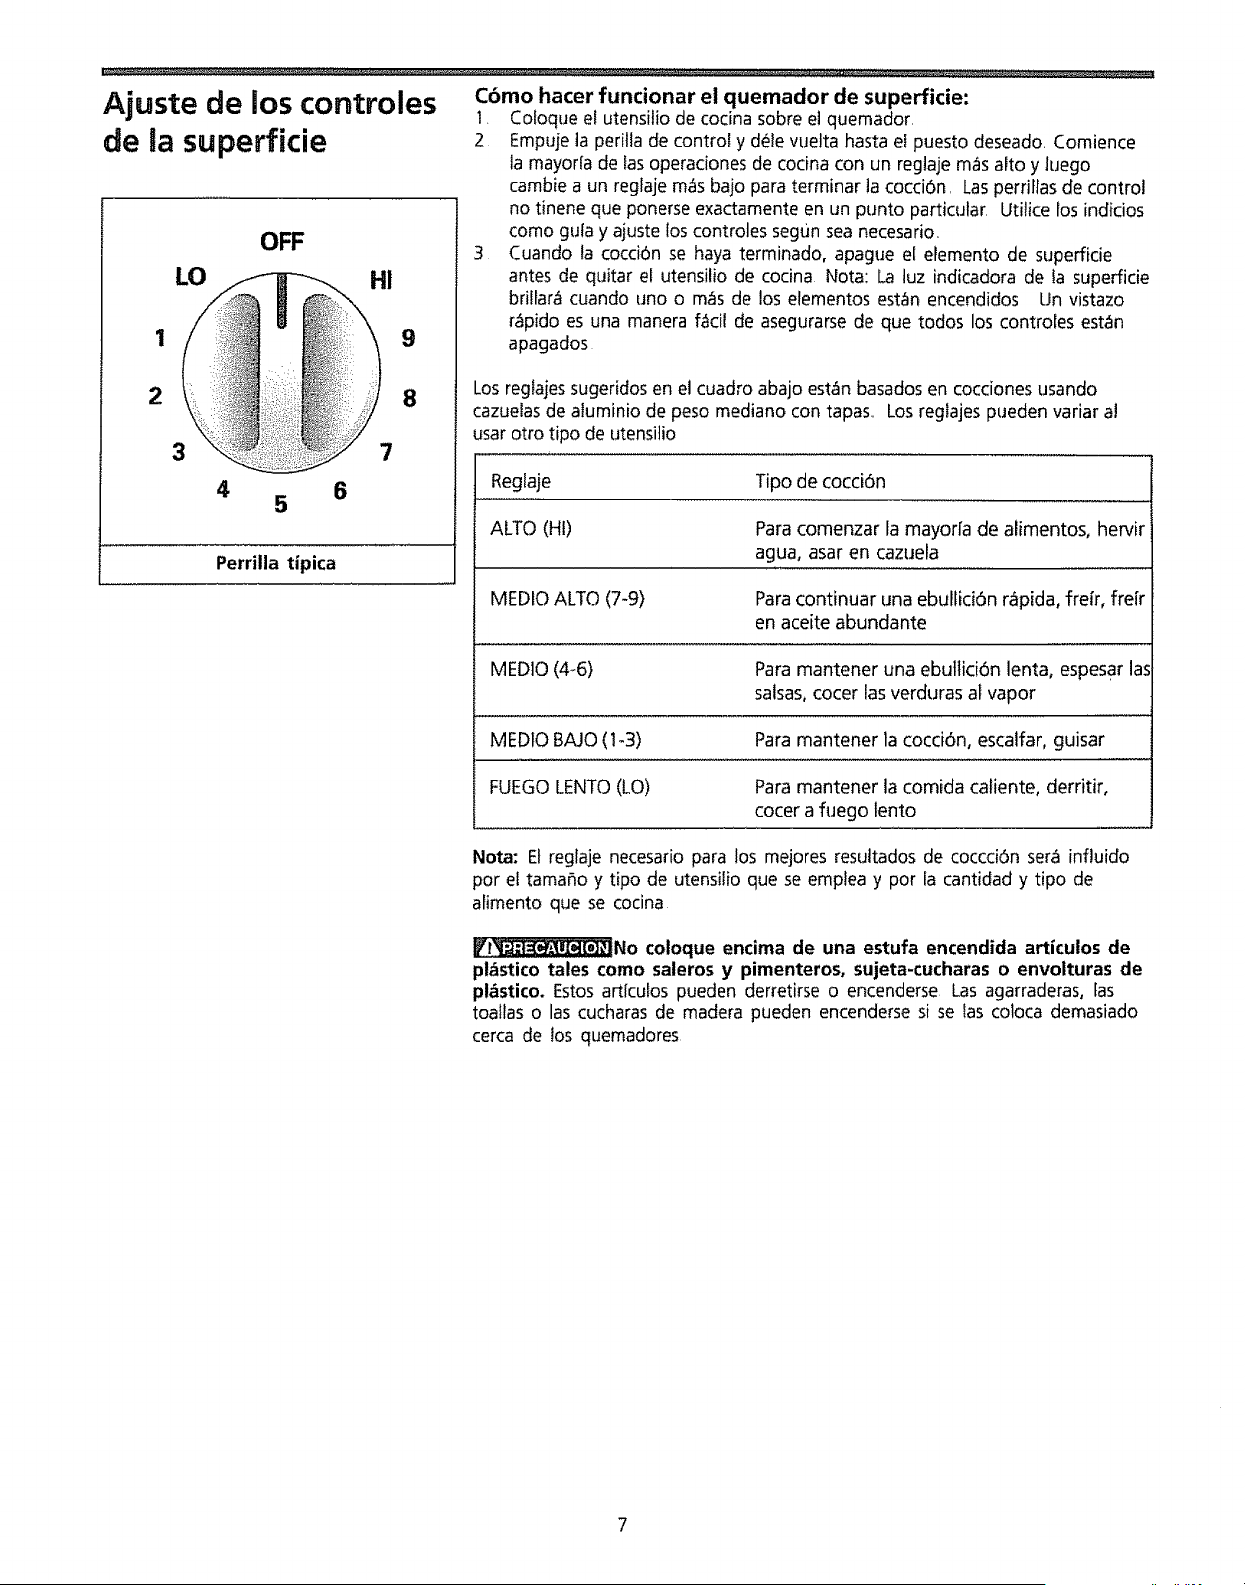
Ajuste de los controles
de nasuperficie
1
2
LO
I
OFF
4 6
5
HI
t 98
Perrilla tipica
Cbmo hacer funcionar el quemador de superficie:
1, Cofoque el utensilio de cocina sobre et quemador,
2 Empuje la perilla de control y d_ie vuelta hasta ei puesto deseado_ Comience
ta mayorfa de tas operaciones de cocina con un regtaje m_s afro y Juego
cambie a un reglaje mas bajo para terminar la cocci6n, Las perri[las de control
no tinene que ponerse exactarnente en un punto particular Utilice ros indicios
como guia y ajuste los controles segun sea necesario,
3 Cuando ta cocci6n se haya terminado, apague et eremento de superficie
antes de quitar el utensilio de cocina Nota: La tuz indicadora de la superficie
brittara5cuando uno o rues de los elementos estan encendidos Un vistazo
r_pido es una manera f_cil de asegurarse de que todos los contro[es est_n
apagados
Los regtajes sugeridos en e] cuadro abajo estEn basados en cocciones usando
cazueias de aiuminio de peso mediano con tapas, Los regiajes pueden variar a!
usar otto tipo de utensi]io
Regiaje Tipo de cocci6n
ALTO (HI) Paracomenzar ta mayorla de alimentos, hervir
agua, asar en cazLJela
MEDIO ALTO (7-9) Paracontinuar una ebuHici6n r_pida, frefr, frefr
en aceite abundante
MEDIO (4-6) Para mantener una ebutlici6n lenta, espesar las
salsas,cocer las verduras al vapor
MEDtO BAJO(1-3) Para mantener la cocci6n, escalfar, guisar
FUEGOLENTO(LO) Para mantener la comida caliente, derritir,
cocer a fuego lento
Nota: Et regfaje necesario para los mejores resuttados de coccci6n sera influido
por el tama_o y tipo de utensilio que se emplea y por la cantidad y tipo de
atimento que se cocina
_No coloque encima de una estufa encendida articulos de
pl&stico tales como saleros y pimenteros, sujeta-cucharas o envoituras de
pl_stico, l=stos artlcufos pueden derretirse o encenderse Las agarraderas, [as
toaltas o las cucharas de madera pueden encenderse si se las coloca demasiado
cerca de los quemadores
7
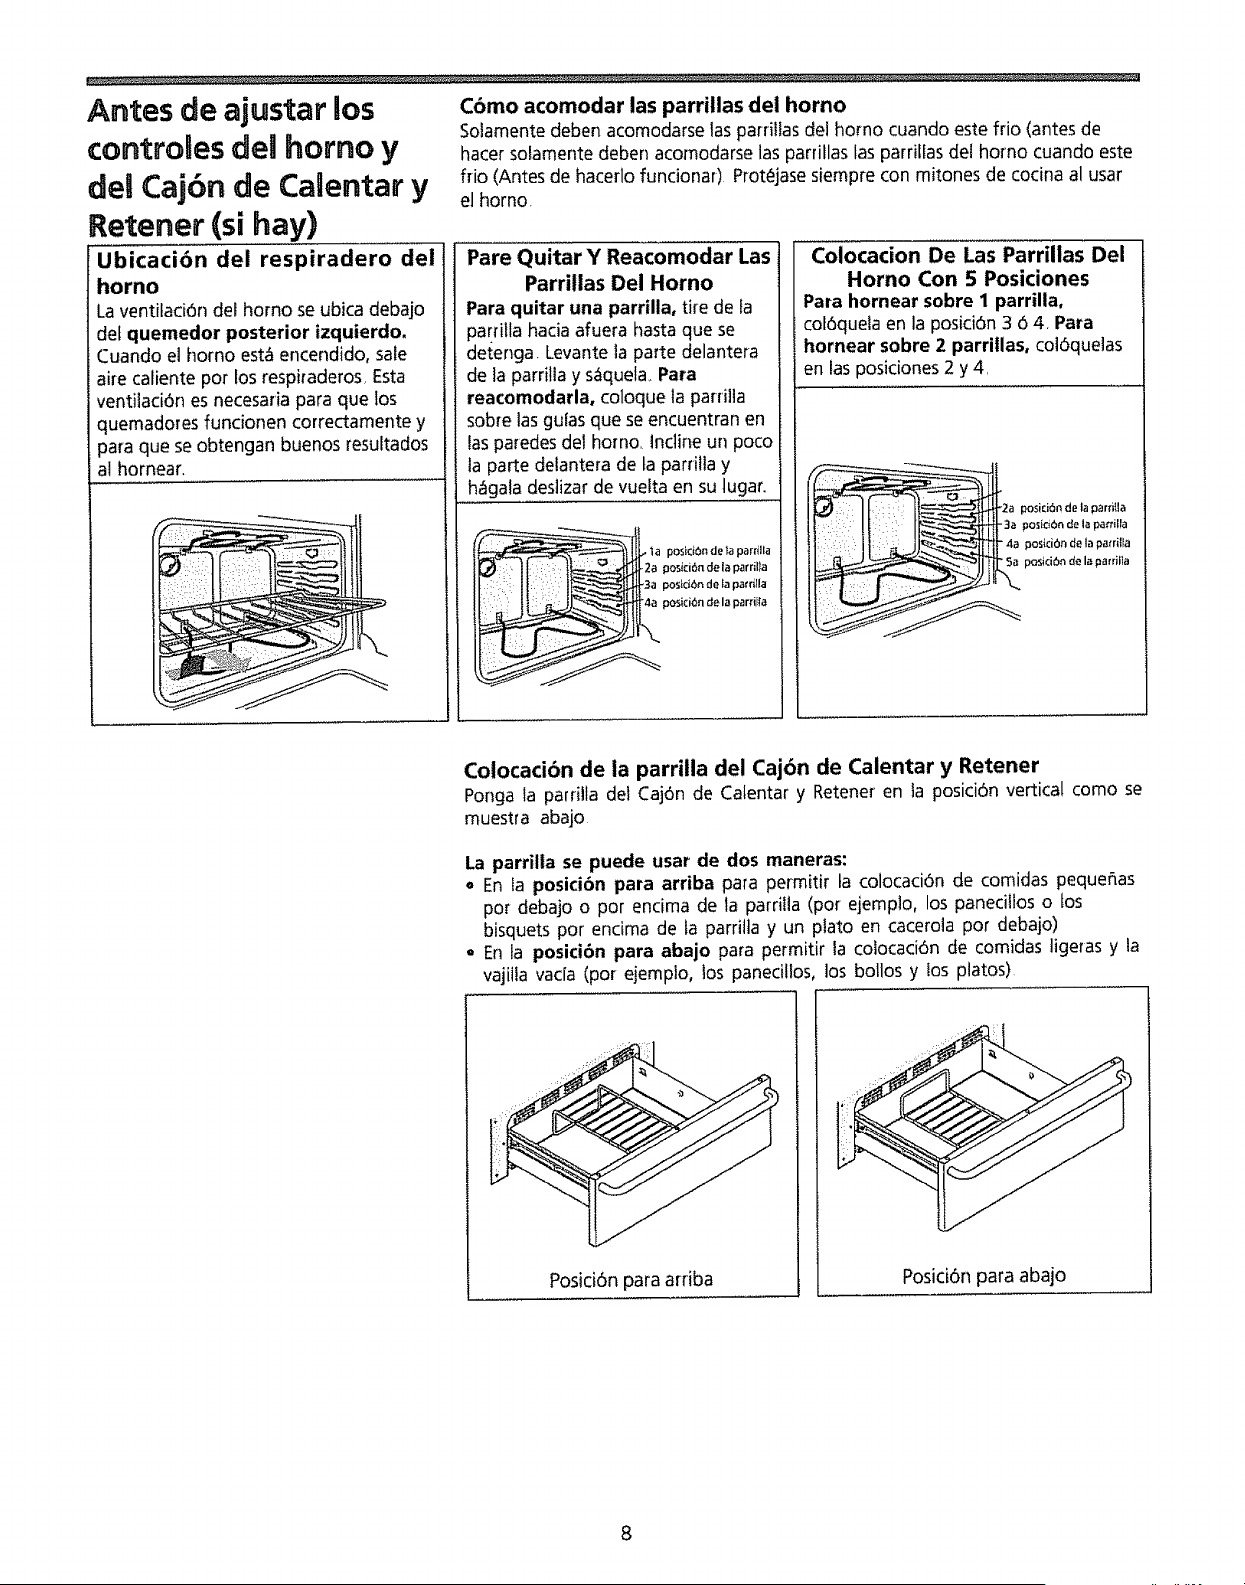
Antes de ajustar los
controles del homo y
del Cajbn de Calentar y
Retener (si hay)
-Ubicadbn del respiradero del
horno
Laventitaci6n dei homo se ubica debajo
dei quemedor posterior izquierdo,
Cuando el homo est_ encendido, sale
aire caliente por los respiraderos, Esta
ventiiaci6n es necesaria para que los
quemadores funcionen correctamente y
para que se obtengan buenos resultados
al hornear.
C6mo acomodar las parrillas del horno
Solamente deben acomodarse tas parriilasdei homo cuandoeste frio (antes de
hacer solamente deben acomodarse las parriHaslas parriHasdel homo cuando este
flio (Antes de hacerlo funcionar) Prot_jase siempre con mitones de cocina al usar
el homo.
Pare Quitar Y Reacomodar Las
Parrillas Del Horno
Para quitar una parrilla, tire de fa
parritla hacia afuera hasta que se
detenga. Levante la parte delantera
de la parrilla y saquela,,Para
reacomodarla, coloque la panilia
sobre las gufas que se encuentran en
lasparedes del homo. inclineun poco
ta parte deiantera de ta pardtla y
hagala deslizar de vueita en su lugar,
2a posici6n de la parril_a
3a poslci6n de la pacrilla
posi¢i6n de la parriIla
Colocacion De Las Parrillas Del
Horno Con 5 Posiciones
Para hornear sobre I parrilla,
col6queia en la posici6n 3 6 4. Para
hornear sobre 2 parrillas, col6quelas
en las posiciones 2 y 4,
2a posirJ6n de la pamlla
pos_clC_nde la parni]a
Colocaci6n de la parrilla del Caj6n de Calentar y Retener
Ponga la parrilla del Caj6n de Calentar y Retener en la posici6nvertical como se
muestra abajo
La parrilla se puede usar de dos maneras:
- En ia posici6n para arriba para permitir la colocaci6n de comidas pequer_as
por debajo o por endma de ta parriita (pot ejemplo, los panecillos o los
bisquets por encima de ta parritta y un plato en cacerola por debajo)
o En la posicibn para abajo para permitir la coiocaci6n de comidas ligeras y la
vajiiia vac[a (pot ejempio, los paneciHos, los botlos y los platos)
Posici6n para arriba
Posid6n para abajo
8

PRE-
HEAT
Ajuste de los controles
det horno
TIMER
Iiea:a
O B_0IL
D_Y _
08J_" _ CL_IOP T_ Ct.E_l L_
© ©©
CLEAN BROIL COOK STOP CLOCK
TIME TIME
©©
Y CLEAR
OFF
Precalentamiento
Antes de usar et homo, acomode las parri!las segun el alimento que va a cocinar
Vea '°C6mo acomodar las parrillas def homo" Se recomienda precalentar para
hornear No es necesario para asar o para guisos Se puede programar eJ horno
para precalentar a cualquier temperatura desde los 170°F hasta los 550°F,
Para reglar o cambiar la temperatura de precalentamiento
! Optima e! bot6n PREHEAT." °" y la palabra "BAKE" aparecer_n en la
panta]la
2 Optima y mantenga oprimido el bot6n con la FLECHA HACIA ARRIBA o
HACIA ABAJO hasta que aparezca en la pantalla la temperatura deseada
3 Cuando se hace et reglaje de la temperatura de horneado, Qsta comienzaa
350°F y se puede ajustar en incrementos o decrementos de 5°F
4 Tanpronto como suelte el bot6n conla FLECHAHACIA ARRIBA o HAClA
ABAJO, el homo comenzar_ a precalentar a la temperatura elegida En la
pantafta aparecera "PrE" y las palabras "BAKE" y "ON"
5 Tanpronto como el homo termine de precafentar, el control har_ 3 "bfps" y la
pantalla cambiara de "PrE" a la temperatura programada
6 Cuando se oye el "bfp" y la pantalla muestra la temperatura seleccionada, e!
homo entra en el modo de horneado
Para reglar o cambiar la temperatura para horneado normal
Se puede programar el homo para hornear a cualquier temperatura desde Ios170°F
hasta los 550°E
Para reglar los controles, siga estos pasos:
1 Oprima el bot6n CLEAR/OFFsi la temperatura det homo fue reglada de
manera incorrectao si quiere cambiar la temperatura reglada durante el
precalentamiento
2 Optima el bot6n BAKE. " °" y la palabra "BAKE" aparecer_n en la
pantalla
3 Optima el bot6n con fa FLEe.HAHAClA ARRIBA o HAClA ABAJO. En la
pantalla aparecera "350°F" La temperatura se puede ajustar en incrementos
de 5°F manteniendo oprimido el bot6n con la FLECHAHAaA ARRIBA o
HACIA ABAJO,
4 Tanpronto como suelte el bot6n con la FLECHA HA(:IA ARRIBA o HACIA
ABAJO, el homo comenzar_ a catentarse a la temperatura elegida En la
pantalla aparecer_ la temperatura del homo a medida que va aumentando
hasta la temperatura deseada Tamb[(_napareceran las palabras "BAKE" y
"ON" Cuando la temperatura que aparece en la pantalla es la que se
selection6 para hornear, quiere decir que el homo est_ listo Se necesitan 10
minutos para que el homo alcance la temperatura correcta
5 Para cancefar ta fund6n de hornear, optima el bot6n CLEARtOFF.
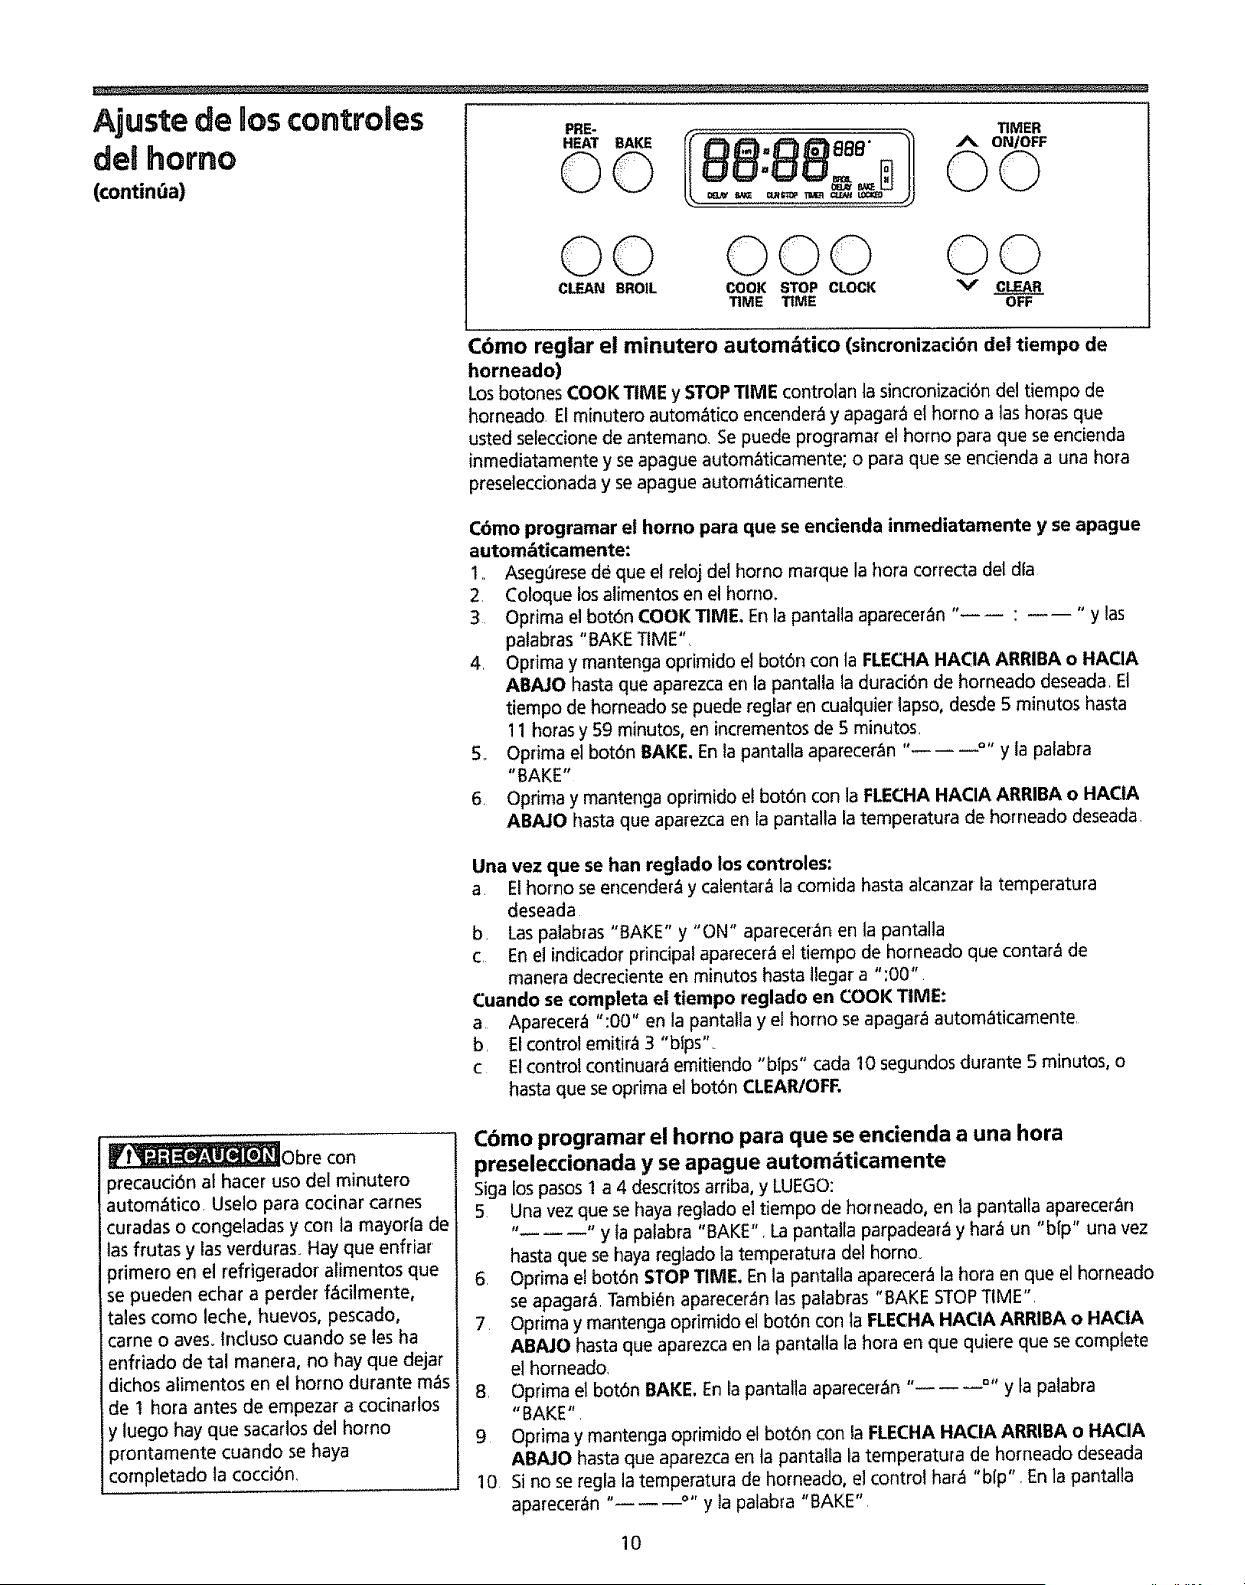
Ajuste de los controles
del horno
(continUa)
PRE-
HEAT BAKE
©©
oo_o3
joo
O0 000 O0
CLEAN BROIL COOK STOP CLOCK V CLEAR
3rIME TIME OFF
C6mo reglar el minutero automdtico (sincronizaci6n de! tiempo de
horneado)
Losbotones COOKTIME y STOPTIME controlan la sincronizaci6ndel tiempo de
homeado. El minutero automatico encendera y apagara el homo alas horas que
usted seleccionede antemano. Sepuede programar et homo para que se encienda
inmediatamente y se apague automaticamente; o para que se encienda a una hora
preselecdonada y se apague autorn_ticamente
C6mo programar el homo para que seendenda inmediatamente y se apague
autom_ticamente:
1,, Aseg_rese de que el reloj delhomo marque la hora correcta deldfa
2. Coloque losalimentos en el horno.
3 Optima el bot6n COOKTIME. En la pantatla apareceran " : "y las
palabras "BAKE TIME",
4, Optima y mantenga oprimido el bot6n con la FLECHAHACIA ARRIBAo HACIA
ABAJO hasta que aparezcaen la pantalla la duraci6n de horneado deseada, El
tiempo de homeado sepuede reglar en cualquier iapso, desde 5 minutos hasta
11 floras y 59 minutos, en incrementosde 5 minutos,
5_ Optima el bot6n BAKE. En la pantalta aparecer_n ..... y lapalabra
"BAKE"
6, Optima y mantenga oprimido el bot6n con la FLECHAHACIA ARRIBAo HACIA
ABAJO hasta que aparezca en la pantalla latemperatura de horneado deseada
Una vez que sehan reglado los controles:
a, Elhomo seencender_ y calentar_la comida hastaalcanzar la temperatura
deseada
b. Laspalabras "BAKE" y "ON" aparecer_nen la pantalla
c,. Enel indicador principal aparecerael tiempo de horneado que contara de
manera decreciente en minutos hasta llegar a ";00".
Cuando se completa el tiempo reglado en COOK TIME:
a, Aparecera ":00" en la pantallay el homo seapagara autom_ticamente,
b, Elcontrol emitira 3 "bfps',.
c Elcontrol continuar_ emitiendo "btps" cada 10 segundos durante5 minutos, o
hastaque se oprima el bot6n CLEAR/OFF.
Vi'__lObre con
_recauci6n al hacer uso del minutero
autom&tico. Uselo para codnar tames
curadas o congeladas y con la mayorla de
las ftutas y lasverduras. Hay que enfriar
Jrimero en el refrigerador alimentos que
se pueden echar a perder f_cilmente,
tales como leche, huevos, pescado,
came o ayes. lncluso cuando se les ha
enfriado de tal manera, no hay que dejar
dichos alimentos en el horno durante m&s
de ! hora antes de empezar a cocinar!os
t luego hay que sacarlos del homo
)rontamente cuando se haya
:ompletado la cocci6n,
C6mo programar el horno para que se encienda a una hora
preseleccionada y se apague automdticamente
Sigalos pasos I a 4 descritosarriba, y LUEGO:
5 Una vezque se haya reglado el tiempo de horneado, en la pantalfa apareceran
.... y ta palabra "BAKE", LapantalIa parpadearEy har_ un "b[p" una vez
hasta que se haya reglado la temperatura de! horno,
6, Optima el bot6n STOPTIME, Enla pantalla aparecerala hora en que el homeado
se apagara, Tambi_n apareceran las palabras "BAKE STOPTIME",
7, Oprima y mantenga oprimido el bot6n con la FLECHAHACIA ARRIBA o HACIA
AB/UO hastaque aparezca en la pantalla la hora en que quiere que se complete
el horneado,
8, Oprima el bot6n BAKE.En Ia pantalla apareceran ..... y ta palabra
"BAKE",
9 Oprima y mantenga oprimido el bot6n con la FLECHAHACIA ARRIBA o HACIA
ABAJO hasta que aparezcaen ta pantalla la temperatura de horneado deseada
10, Si no se regla latemperatura de horneaclo,el control har_ "blp", Enla pantalla
aparecer_n " °" y la palabra "BAKE",
10
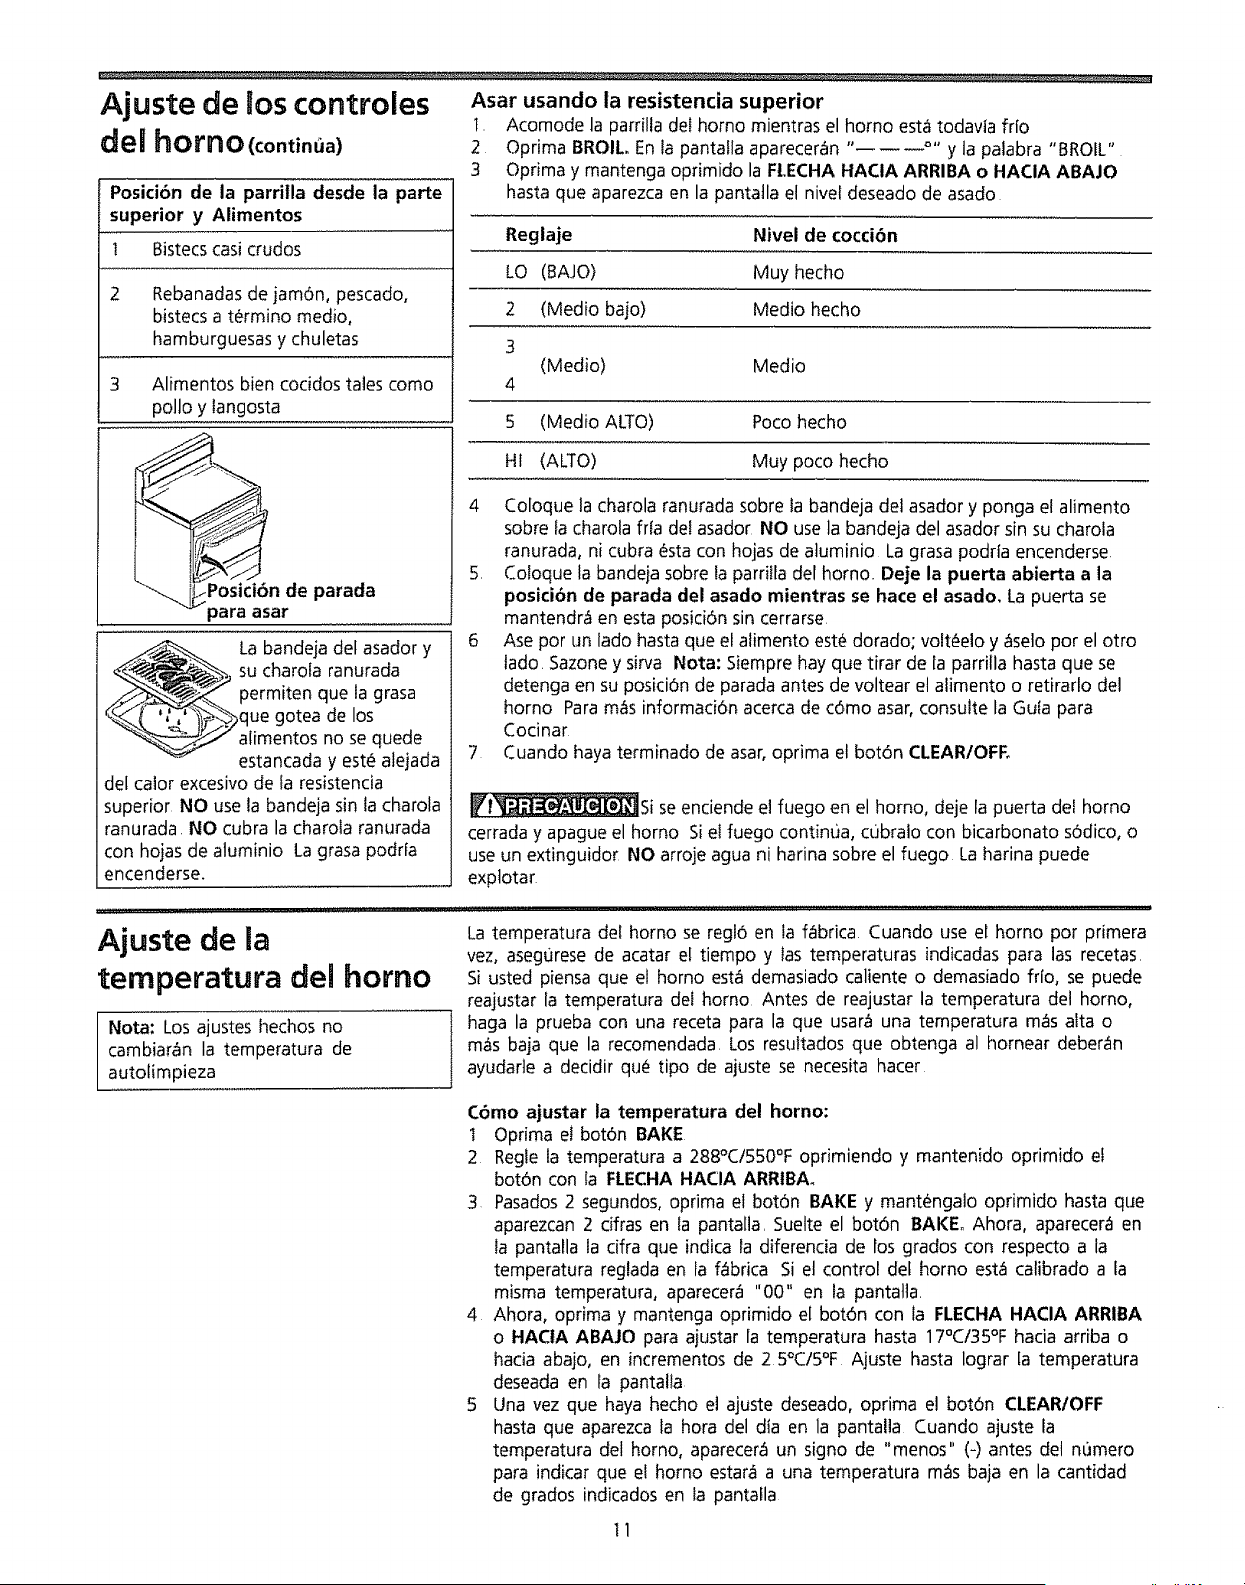
Ajuste de los controles Asar usando la resistencia superior
de_ horno (continua)
Posici6n de la parrilla desde la parte
superior y Alimentos
1 Bistecscasicrudos
2 Rebanadasde jam6n, pescado,
bistecs a termino medio,
hamburguesas y chuletas
3 Alimentos bien cocidos tales como
polio y langosta
Posici6n de parada
para asar
La bandeja del asador y
su charola ranurada
permiten que la grasa
que gotea de los
atimentos no se quede
estancada y est_ alejada
del calor excesivo de fa resistencia
t. Acomode la parrilia del homo mientras el homo esta todavta fdo
2 Optima BROIL, En ia pantafla apareceran ..... y la palabra "BROIL"
3 Optima y mantenga oprimido la FLECHA HACIA ARRIBA o HAGIA ABAJO
basra que aparezca en la pantatla el nivel deseado de asado
Reglaje Nivel de coccibn
LO (BAJO) Muy hecho
2 (Medio bajo) Medio hecho
3
(Medio) Medio
4
5 (Medio ALTO) Poco hecho
HI (ALTO) Muy poco hecho
4
Coloque la charola ranurada sobre ta bandeja del asador y ponga el alimento
sobre la charola frfa del asador NO use la bandeja del asador sin su charola
ranurada, ni cubra (_sta con hojas de atuminio La grasa podria encenderse
5, Cotoque la bandeja sobre ia parrilla der homo Deje la puerta abierta a la
posici6n de parada del asado mientras se hace el asado. La puerta se
mantendr_ en esta posici6n sin cerrarse
6 Ase pot un lado hasta que el atimento est_ dorado; volt_elo y _selo por el otro
tado. Sazone y sirra Nota: 5iempre hay que tirar de la parrilla hasta que se
detenga en su posici6n de parada antes de voltear el alimento o retirarto del
homo Para mas informaci6n acerca de c6mo asar, consulte la Guta para
Cocinar
7 Cuando haya terminado de asar, oprima el bot6n CLEAR/OFR
superior NO use la bandeja sin la charola
ranurada_NO cubra la charola ranurada
con hojas de aluminio Lagrasa podrfa
encenderse.
_Si se enciende el fuego en el homo, deje la puerta del homo
cerrada y apague el homo Si el fuego continua, cubralo con bicarbonato s6dico, o
use un extinguido[ NO arroje agua ni harina sobre el fuego La harina puede
explotar
............................ lu Jul,_u_l,,u,,ii,,u
Ajuste de la
temperatura del homo
Nota: Los ajustes hechos no
cambiar_n la temperatura de
autofimpieza
Latemperatura del horno se regl6 en ia fabrica Cuando use el homo por primera
vez, asegurese de acatar el tiempo y las temperaturas indicadas para las recetas,
Si usted piensa que el homo estOdemasiado caliente o demasiado fr[o, se puede
reajustar la temperatura deI homo Antes de reajustar la temperatura del homo,
haga la prueba con una receta para la que usar_tuna temperatura mas alta o
mas baja que la recomendada, Los resultados que obtenga al hornear deberan
ayudarte a decidir quO tipo de ajuste se necesita hacer
Cbmo ajustar ta temperatura del horno:
10prima ef bot0n BAKE
2 Regte la temperatura a 288°C1550°Foprimiendo y mantenido oprimido el
bot6n con ta FLECHA HACIA ARRIBA_
3 Pasados2 segundos, oprima el bot6n BAKE y mant_ngalo oprimido hasta que
aparezcan 2 cifras en fa pantalla, Suelte el bot6n BAKE° Ahora, aparecera en
Ia pantatla la dfra que indica la diferencia de los grados con respecto a ia
temperatura reglada en fa fabrica Si el control def homo esta calibrado a la
misma temperatura, aparecera "00" en la pantatla,
4 Ahora, oprima y mantenga oprimido el bot6n con la FLECHA HAClA ARRIBA
o HACtA ABAJO para ajustar la temperatura hasta 17°C/35°F hacia arriba o
hacia abajo, en incrementos de 2 5°C/5°F Ajuste hasta Iograr la temperatura
deseada en la panta!la
5 Una vez que haya hecho el ajuste deseado, oprima el bot6n CLEARtOFF
hasta que aparezca fa hora del dta en la pantalla Cuando ajuste la
temperatura del homo, aparecera un signo de "menos" (-) antes del numero
para indicarque el homo estara a una temperatura rues baja en la cantidad
de grados indicados en la pantafla
tl
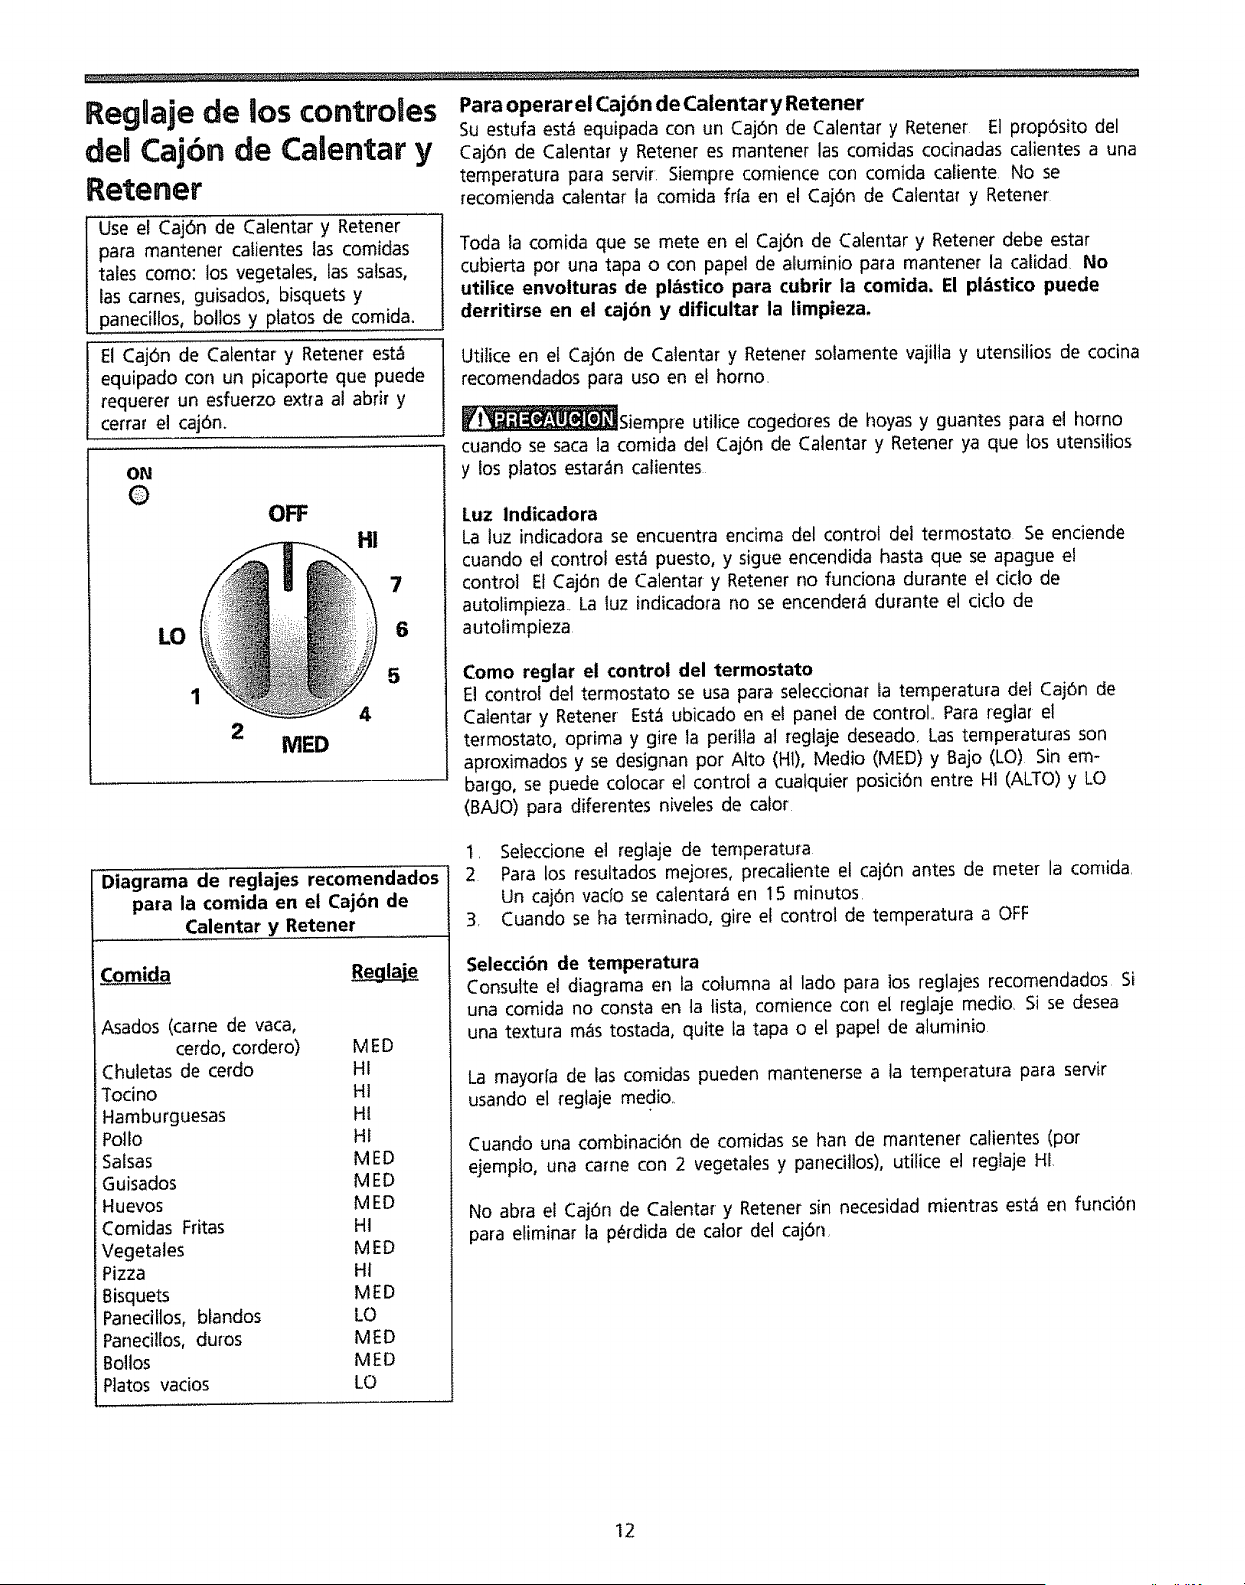
Reglaje de los controles
del Cajbn de Calentar y
Retener
Use el Caj6n de Calentar y Retener
para mantener catientes las comidas
tales como: los vegetales, las saisas,
las carnes0 guisados, bisquets y
panecillos, bolios y platos de comida.
Para operar el Caj6n de Calentar y Retener
Su estufa est_ equipada con un Caj6n de Calentar y Retener El prop6sito del
Caj6n de Calentar y Reteneres mantener las comidas codnadas catientes a una
temperatura para servir. Siempre comience con comida caliente No se
recomiendacaientar la comida fda en el Caj6n de Calentat y Retener
Toda la comida que se mete en el Caj6n de Ca[entar y Retener debe estar
cubierta pot una tapa o con papeJ de aluminio para mantener la calidad, No
utilice envolturas de ph_sticopara cubrir la comida. El pl&stico puede
derritirse en el cajbn y dificultar la limpieza.
E! Caj6n de Calentar y Retener esta
equipado con un picaporte que puede
requerer un esfuerzo extra al abrir y
cerrar el caj6n.
ON
0
OFF
HI
LO 6
5
1
2
MED
Utilice en el Caj6n de Catentar y Retener soiamente vajilta y utensilios de cocina
recomendados para uso en el homo.
Vl_siempre utilice cogedoPes de hoyas y guantes papa el horno
cuando se saca la comida de! Caj6n de Calentar y Retener ya que los utensilios
y los p]atos estar_n caiientes
Luz indicadora
La luz indicadorase encuentra encima del control del termostato Se enciende
cuando el controi esta puesto, y sigue encendida hasta que se apague el
control El Caj6n de CalentaP y Retener no funciona durante el cido de
autolimpieza. La luz indicadora no se encender_ durante e[ ciclo de
autoiimpieza
Como reglar el control del termostato
El control del termostato se usa papa.selecdonar ia temperatura del Caj6n de
Calentar y Retener Est_ ubicado en el panel de control.. Para regiar el
termostato, opdma y gire la perilla at reglaje deseado. Las temperaturas son
aproximados y se designan pot Alto (HI), Medio (MED) y Bajo (LO) Sin em-
bargo, se puede colocar e] control a cualquier posici6n entre HI (ALTO) y LO
(BAJO) para diferentes niveles de calor
Diagrama de reglajes recomendados
para la comida en el Caj6n de
Calentar y Retener
Comida
Asados (came de vaca,
cerdo, cordero) M ED
Chuletas de cerdo HI
Todno HI
Hamburguesas HI
=olIo H i
Saisas M ED
Guisados M ED
Huevos MED
Comidas Fritas HI
Vegetales MED
Pizza Hi
8isquets M ED
Panecff[os, btandos LO
Panecillos, duPos MED
8ollos M ED
Platos vacios LO
1, Seleccione el regtaje de temperatura
2 Para los resuttados mejo[es, precaliente el caj6n antes de meter la comida
Un caj6n vacfo se calentara en 15 minutos
3, Cuando se ha terminado, gire et control de temperatura a OFF
Selecci6n de temperatura
Consulte el diagrama en la columna al lado para los reglajes recomendados Si
una comida no consta en ta tista, comience con el reglaje medio Si se desea
una textura mas tostada, quite la tapa o el papel de aluminio
La mayorfa de las comidas pueden mantenerse a la temperatura para servir
usando el reglaje medio,
Cuando una combinaci6n de comidas se hart de mantener calientes (par
ejemplo, una came con 2 vegetales y panecillos), utilice el reglaje HI,
No abra el Caj6n de Calentar y Retener sin necesidad mientras esta en funciOn
para eliminar la p_rdida de calor del caj6n
12
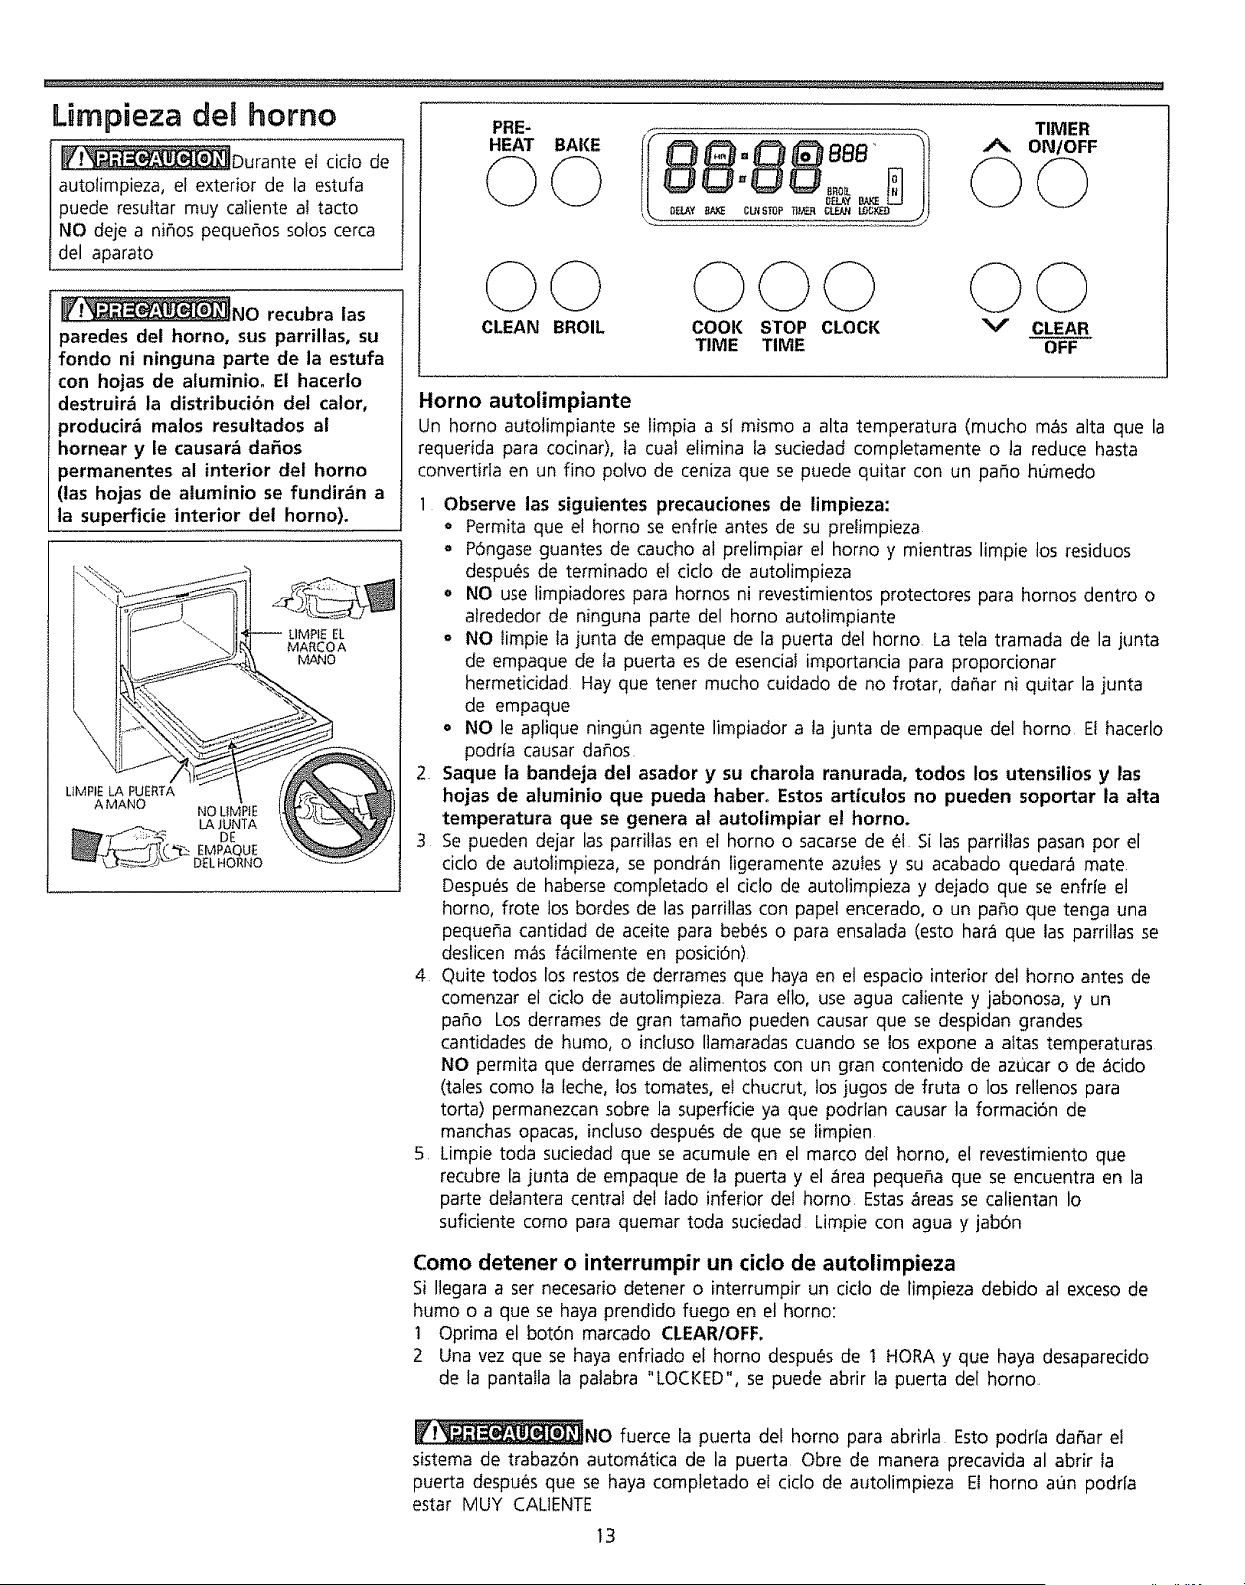
Limpieza det homo PRE-
_Durante el cicIo de
autolimpieza, el exterior de la estufa
puede resultar muy caliente aI tacto
NO deje a nifios pequefios solos cerca
del aparato
_NO recubra las
paredes del homo, sus parrillas, su
fondo ni ninguna parte de la estufa
con hojas de atuminio° El hacerlo
destruir_ la distribuci6n del calor,
producirb malos resultados al
hornear y le causarb da_os
permanentes at interior del homo
(las hojas de aluminio se fundir_n a
la superficie interior del horno).
LIMPIE LA PUERTA
A MANO NO UMPtE
HEAT BAKE
©
©
EMPAQUE
LIMPI(_ EL
MANO
©
TIMER
ON/OFF
CLEAN BROIL COOl( STOP CLOCK
TIME TIME
©©
V CLEAR
OFF
Horno autolimpiante
Un homo autolimpiante se limpia a si mismo a alta temperatura (mucho m_s alta que la
requerida para cocinar), ta cual elimina la suciedad completamente o ta reduce hasta
convertirla en un fino polvo de ceniza que se puede quitar con un patio humedo
1 Observe las siguientes precauciones de limpieza:
° Permita que el homo se enfrte antes de su prelimpieza
o P6ngase guantes de caucho al prelimpiar el homo y mientras limpie los residuos
despues de terminado el ciclo de autolimpieza
o NO use limpiadores para hornos ni revestimientos protectores para hornos dentro o
atrededor de ninguna parte del homo autolimpiante
° NO timpie fa junta de empaque de la puerta del homo La tela tramada de la junta
de empaque de ta puerta es de esencial importancia para proporcionar
hermetiddad Hay que tener mucho cuidado de no frotar, dafiar ni quitar la junta
de empaque
• NO le aplique ningun agente limpiador a ta junta de empaque del homo El hacerlo
podrfa causar dafios.
2. Saque la bandeja del asador y su charota ranurada, todos los utensilios y las
hojas de aluminio que pueda haber° Estos articutos no pueden soportar la a|ta
temperatura que se genera al autolimpiar el homo°
3 Se pueden dejar las parriltas en el homo o sacarse de _i Si las parri!las pasan por el
ciclo de autolimpieza, se pondran ligeramente azutes y su acabado quedar_ mate
Despu_s de haberse completado el ciclo de autolimpieza y dejado que se enfrie el
homo, frote los bordes de las parrillas con pape! encerado, o un patio que tenga una
pequefia cantidad de aceite para bebes o para ensalada (esto hara que las parrillas se
desficen mas faciimente en posici6n)
4 Quite todos los restos de derrames que haya en el espacio interior del homo antes de
comenzar el ddo de autolimpieza, Para ello, use agua caliente y jabonosa, y un
patio Los derrames de gran tamafio pueden causar que se despidan grandes
cantidades de humo, o induso Ilamaradas cuando se los expone a altas temperaturas
NO permita que derrames de alimentos con un gran contenido de azucar o de acido
(tales como ta leche0 los tomates, el chucrut, los jugos de fruta o los rellenos para
torta) permanezcan sobre la supefficie ya que podrian causar la formaci6n de
manchas opacas, incluso despues de que se timpien
5, Limpie toda suciedad que se acumule en el marco del homo, el revestimiento que
recubre la junta de empaque de la puerta y el area pequefia que se encuentra en la
parte delantera central del lado inferior del homo. Estas areas se calientan Io
suficiente corno para quemar toda sudedad Limpie con agua y jab6n
Como detener o interrumpir un cido de autolimpieza
Si Ilegara a set necesario detener o interrumpir un cido de limpieza debido al exceso de
humo o a que se haya prendido fuego en el homo:
t Oprima el bot6n marcado CLEAR/OFF.
2 Una vez que se haya enfriado el homo despues de 1 HORA y que haya desaparecido
de la pantalla ta patabra "LOCKED", se puede abrir la puerta del homo,
_NO fuerce la puerta del homo para abrirla Esto podria dafiar el
sistema de trabaz6n automatica de la puerta Obre de manera precavida al abrir ta
puerta despu_s que se haya completado el ciclo de autolimpieza El homo at]n podr[a
estar MUY CALIENTE
t3
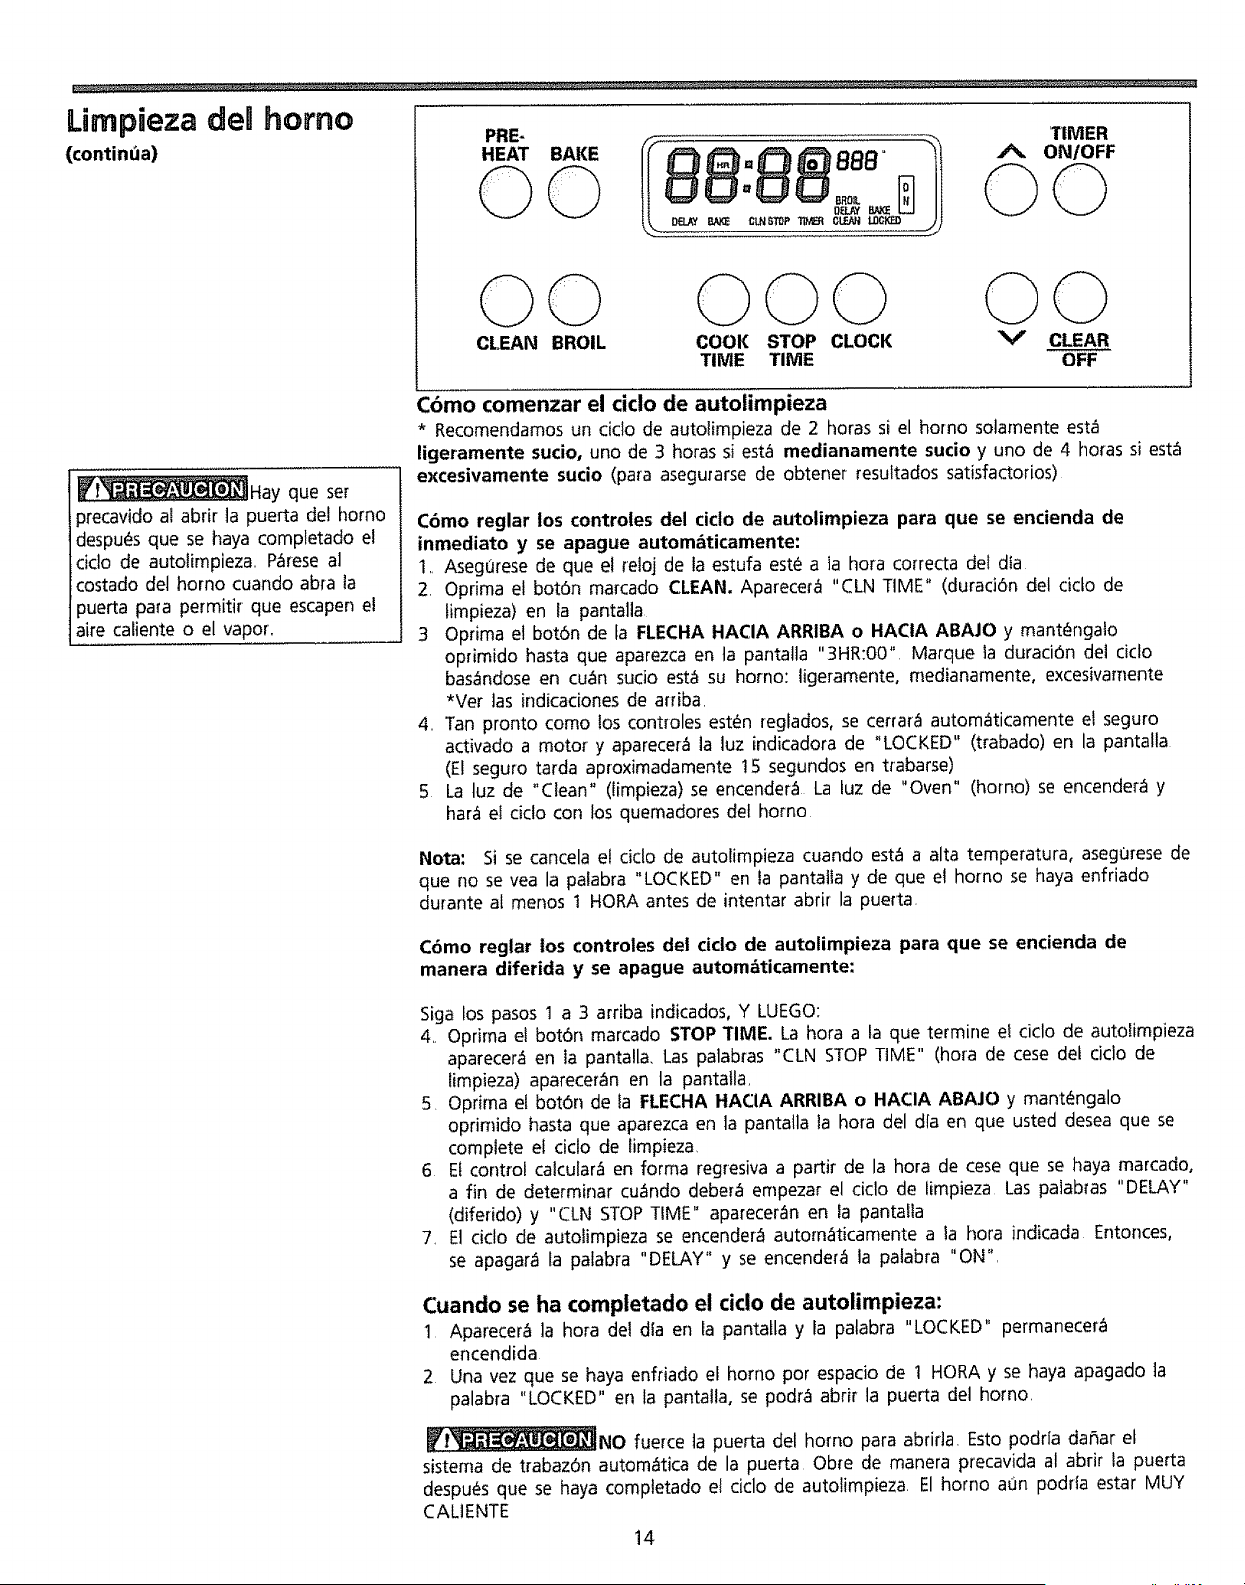
Lirnpieza cleHhomo
(contin(la)
PRE-
HEAT BAKE
©
A
CLEAN BROIL V
TIMER
ON/OFF
©
©
CLEAR
OFF
_f_Hay que set
precavido a! abfir ]a puerta del homo
despu_s que se haya completado el
ddo de autolimpieza,, P_rese a]
costado del homo cuando abra la
puerta para permitir que escapen el
aire caliente o el vapor.
Cbmo comenzar el ciclo de autolimpieza
* Recomendamos un ddo de autotimpieza de 2 horas si el homo solamente est_
ligeramente sucio, uno de 3 horas si est.1 medianamente sucio y uno de 4 horas siesta
excesivamente sudo (para asegurarse de obtener resultados satisfactorios)
Cbmo reglar los controles del ciclo de autolimpieza para que se encienda de
inmediato y se apague autom_ticamente:
1,, AsegOrese de que el retoj de ta estufa este a la hora correcta del dia
2, Optima el bot6n marcado CLEAN. Aparecefa "CLN TIME" (duraci6n del cido de
timpieza) en la pantalla
3 Optima el bot6n de la FLECHA HACIA ARRIBA o HACIA ABAJO y mantengalo
oprimido hasta que aparezca en ta pantatta "3HR:00", Marque la duraci6n de1 cicto
bas_ndose en cu_n sucio esta su homo: ligeramente, medianamente, excesivamente
*Ver las indicaciones de arriba
4,, Tan pronto como los controles est_n reglados, se cerrara automaticamente el seguro
activado a motor y aparecera la luz [ndicadora de "LOCKED" (trabado) en la pantalla
(El seguro tarda aproximadamente 15 segundos en trabarse)
5 La tuz de "Clean" (Iimpieza) se encendera La tuz de "Oven" (homo) se encendera y
bar& el ciclo con los quemadores del homo
Nota: Si se cancela el ciclo de autolimpieza cuando est,1 a alta temperatura, asegorese de
que no se yea la palabra "LOCKED" en la pantatla y de que el homo se haya enfriado
durante al menos 1 HORA antes de intentar abrir la pue_ta.
C6mo reglar los controles del cicio de autolimpieza para que se encienda de
manera diferida y se apague automAticamente:
Siga los pasos 1 a 3 ardba indicados, Y LUEGO:
4,, Oprima el bot6n marcado STOP TIME. La hora a la que termine el ciclo de autolimpieza
aparecer_ en la pantalla. Las palabras "CLN STOP TIME" (hora de cese det ciclo de
limpieza) apareceran en ta pantatla
5. Optima el bot6n de la FLECHA HACIA ARRIBA o HACIA ABAJO y mant_ngalo
oprimido hasta que aparezca en la pantalla la hora del dla en que usted desea que se
complete el ciclo de limpieza
6 El control calcular_ en forma regresiva a partir de la hora de cese que se haya marcado,
a fin de determinar cuando debera empezar el ciclo de fimpieza Las palabtas "DELAY"
(difeddo) y "CLN STOP TIME" apareceran en ia pantaIla
7, El dclo de autolimpieza se encender_ autom_ticamente a la hora indicada Entonces,
se apagara la pafabra "DELAY" y se encender_ la palabra "ON",
Cuando se ha completado el ciclo de autolimpieza:
1 Aparecer_ la hora del dia en la pantafla y la palabra "LOCKED" permanecer_
encendida
2 Una vez que se haya enfriado el homo por espacio de 1 HORA y se haya apagado la
palabra "LOCKED" en la pantalla, se podr_ abrir la puerta del homo,
_I_NO fuerce ta puerta del homo para abrida. Esto podda dar_ar et
sistema de trabaz6n automatica de la puerta Oboe de manera precavida al abrir la puerta
despuL,s que se haya comptetado e! ciclo de autolimpieza El homo aon podria estar MUY
CALIENTE
14
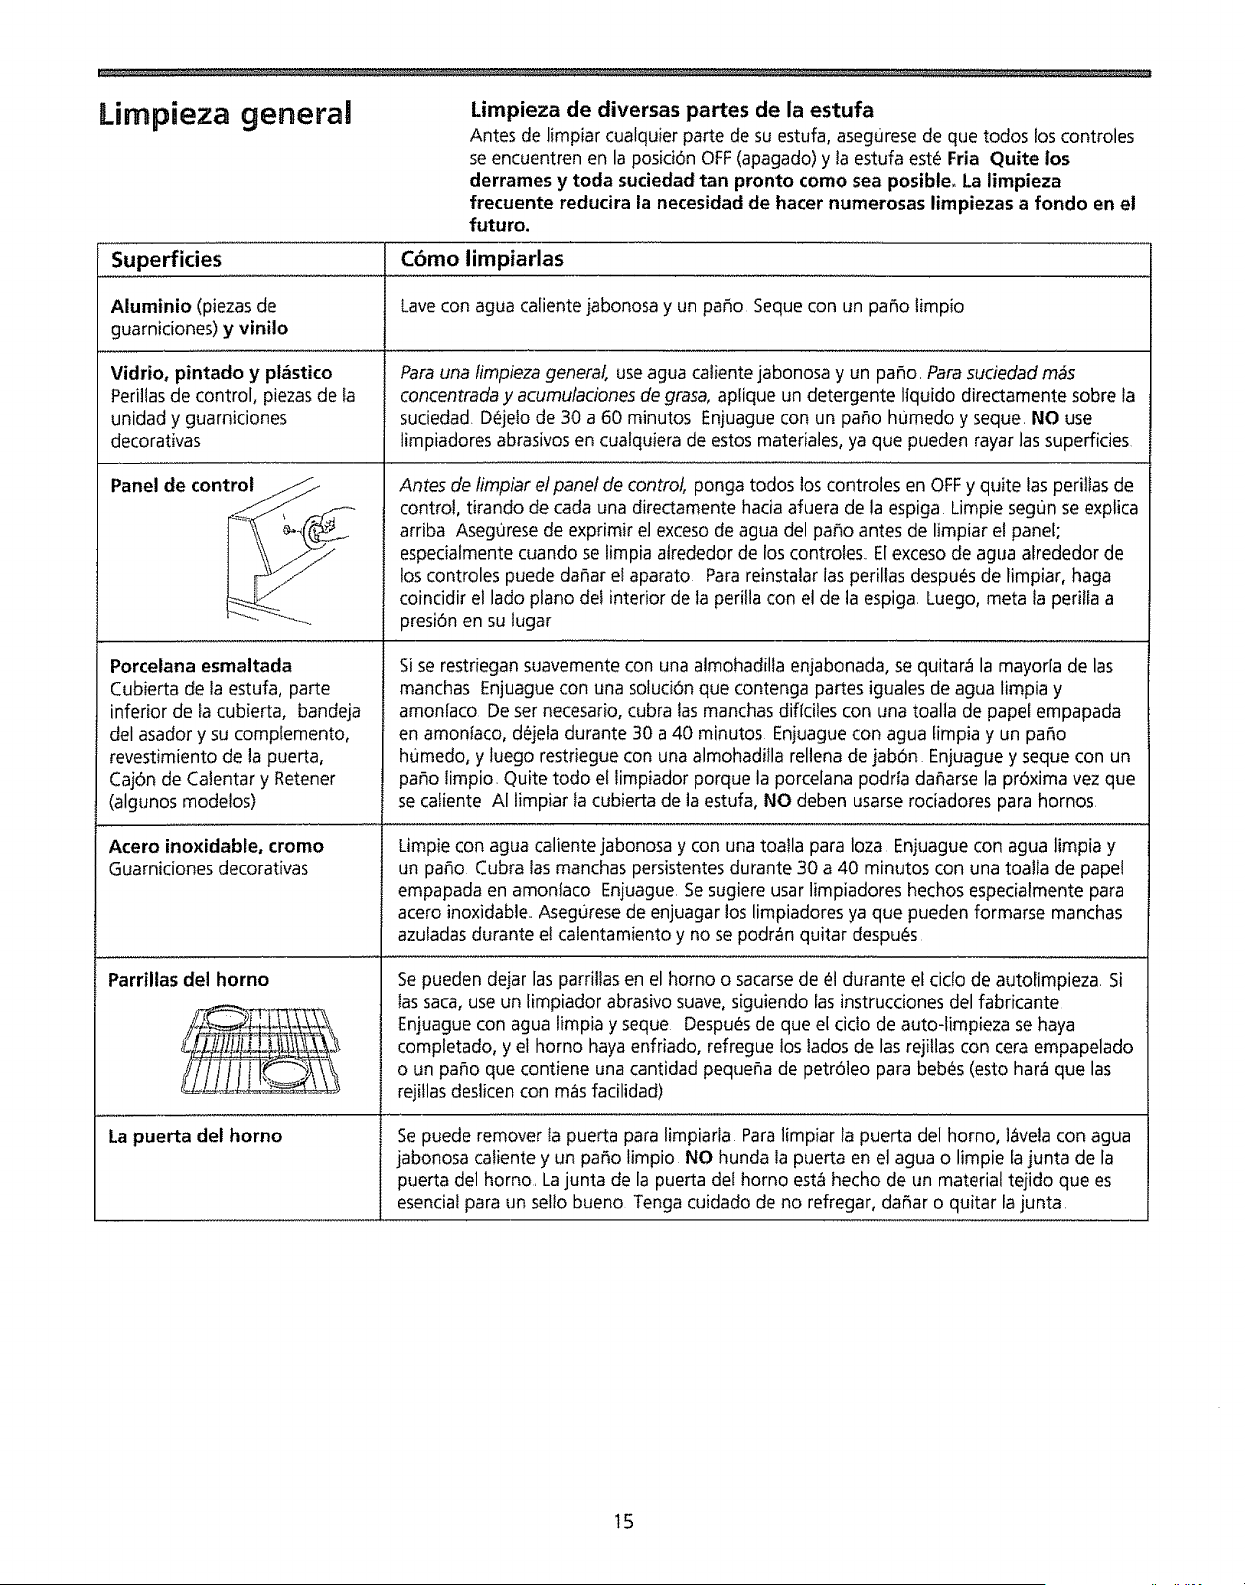
Limpieza general
Limpieza de diversas partes de la estufa
Antes de limpiar cualquier parte de su estufa, asegurese de que todos los controles
se encuentren en la posici6n OFF (apagado) y la estufa est_ Fria Quite los
derrames y toda suciedad tan pronto como sea posible_ La limpieza
frecuente reducira la necesidad de hacer numerosas limpiezas a fondo en el
futuro.
Superficies Cbmo limpiarlas
Aluminio (piezas de Lave con agua caliente jabonosa y un patio Seque con un patio limpio
guamiciones) y vinilo
Vidrio, pintado y pl,_stico
Perillas de control, piezas de la
unidad y guarniciones
decorativas
Panel de control _'_
Porcelana esmaltada
Cubierta de la estufa, parte
inferior de fa cubierta, bandeja
del asador y su complemento,
revestimiento de la puerta,
Caj6n de Calentar y Retener
(algunos modelos)
Acero inoxidable, cromo
Guamiciones decorativas
Parriltas del horno
La puerta del horno
Para una limpieza general, use agua caliente jabonosa y un patio, Para suciedad m&s
concentrada y acumutaciones de grasa, aplique un detergente ltquido directamente sobre la
suciedad D_jelo de 30 a 60 minutos Enjuague con un patio humedo y seque. NO use
limpiadores abrasivos en cualquiera de estos materiales, ya que pueden rayar las superficies
Antes de limpiar et panel de control, ponga todos los controles en OFF y quite las periltas de
control, tirando de cada una directamente hacia afuera de la espiga Limpie segun se explica
arriba Asegurese de exprimir el exceso de agua del patio antes de limpiar el panel;
especialmente cuando se limpia atrededor de los controtes,, Elexceso de agua alrededor de
los controles puede dafiar el aparato Para reinstalar las perillas despu_s de limpiar, haga
coincidir el lado piano del interior de la perilla con el de la espiga Luego, meta la peritla a
presi6n en su tugar
Si se restriegan suavemente con una almohadilla enjabonada, se quitar_ la mayorla de las
manchas Enjuague con una soluci6n que contenga partes iguales de agua limpia y
amoniaco De ser necesario, cubra las manchas dificiles con una toalla de papel empapada
en amonfaco, d_ela durante 30 a 40 minutos Enjuague con agua limpia y un patio
humedo, y luego restriegue con una almohadilla rellena de jabOn Enjuague y seque con un
patio limpio. Quite todo el limpiador porque la porcelana podria dafiarse la prOxima vez que
se caliente AI limpiar la cubierta de la estufa, NO deben usarse rociadores para hornos
Limpie con agua caliente jabonosa y con una toalla para loza Enjuague con agua limpia y
un patio Cubra las rnanchas persistentes durante 30 a 40 minutos con una toalla de papel
empapada en amonfaco Enjuague Se sugiere usar limpiadores hechos especialmente para
acero inoxidable. Aseg0rese de enjuagar los limpiadores ya que pueden formarse manchas
azuladas durante el calentamiento y no se podran quitar despu_as
Se pueden dejar las parrillas en el homo o sacarse de 61 durante el ciclo de autolimpieza Si
las saca, use un limpiador abrasivo suave, siguiendo las instrucciones del fabricante
Enjuague con agua limpia y seque Despues de que el ciclo de auto-limpieza se haya
completado, y el homo haya enfriado, refregue los lados de las rejillas con cera empapelado
o un patio que contiene una cantidad pequefia de petr61eo para beb_s (esto har_ que las
rejillas deslicen con mas facilidad)
Se puede remover la puerta para limpiarla Para limpiar la puerta del homo, l&vela con agua
jabonosa caliente y un patio limpio NO hunda la puerta en el agua o limpie la junta de la
puerta del homo, La junta de la puerta del homo estL_hecho de un material tejido que es
esencial para un sello bueno Tenga cuidado de no refregar, dafiar o quitar la junta,
15
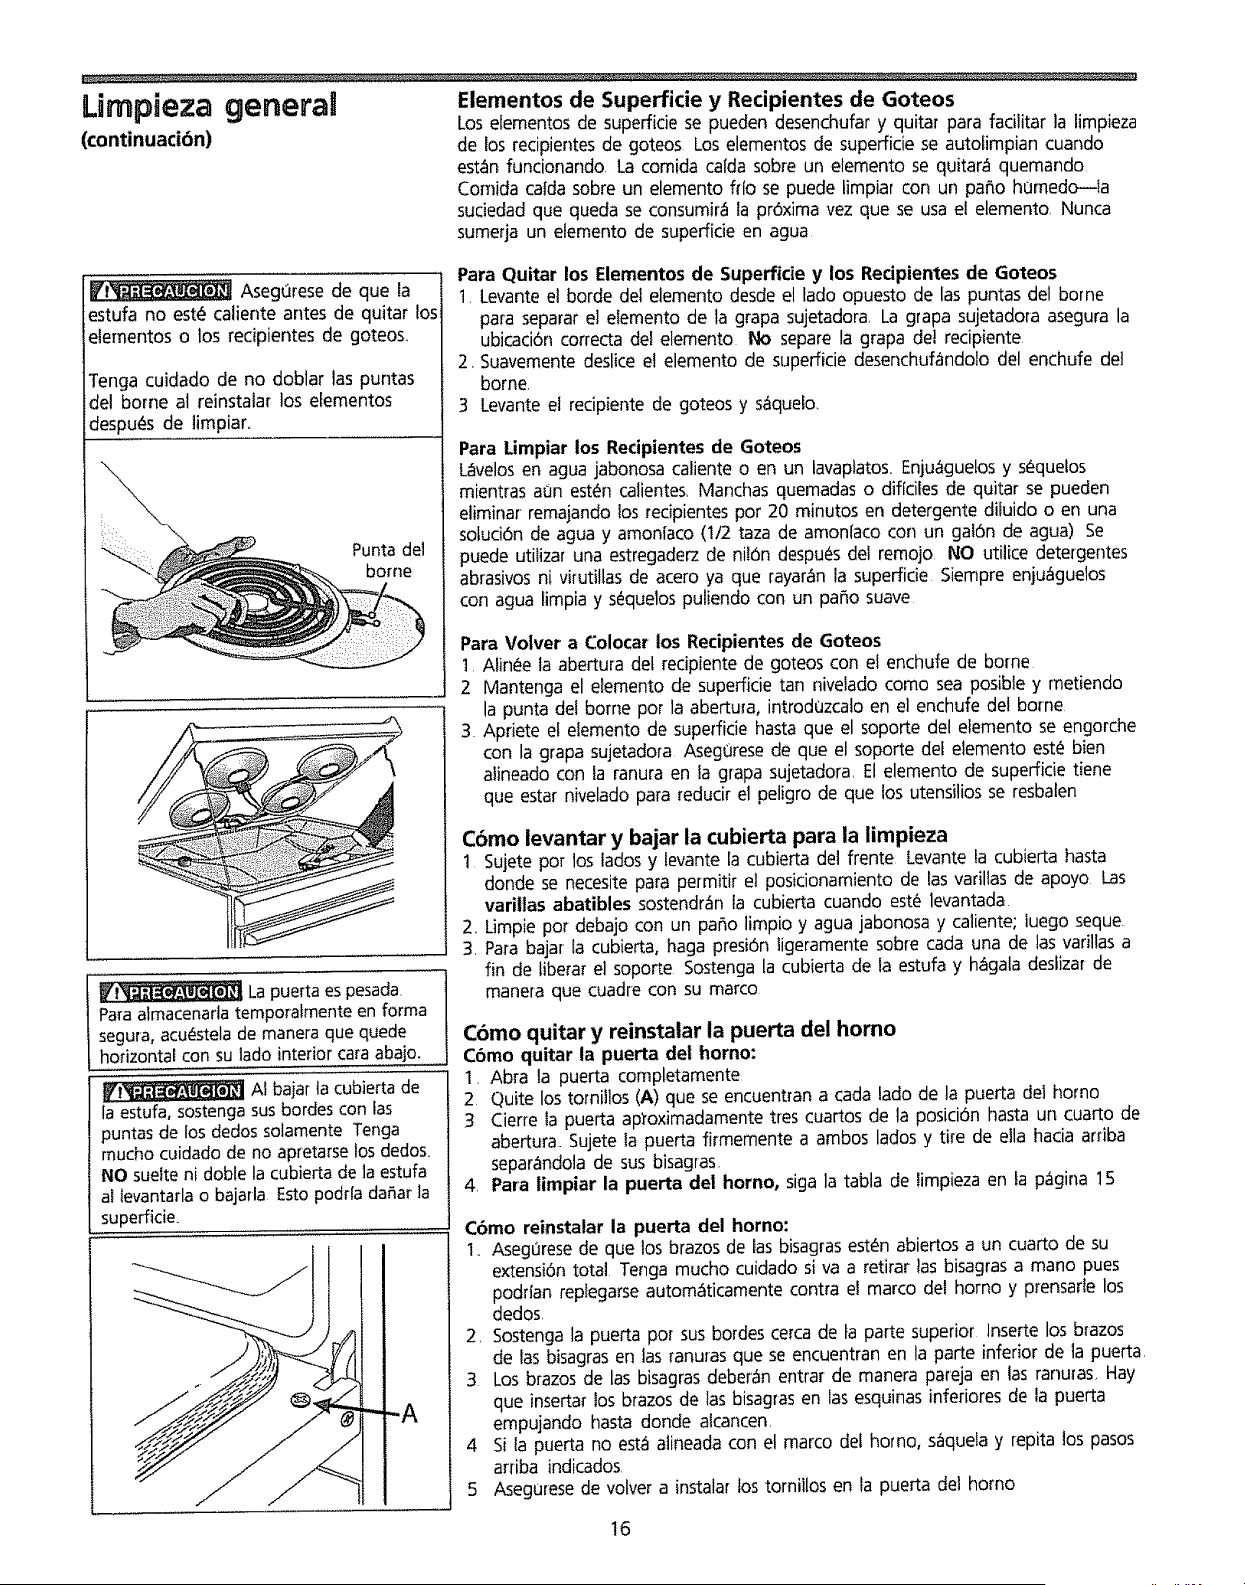
LirnpJeza general Elementos de Superficie y Recipientes de Goteos
Los elementos de superficie se pueden desenchufar y quitar para facilitar ]a limpieza
(continuaci6n) de los recipientesde goteos Los elementos de superficie se autofimpian cuando
estan funcionando, La comida cafda sobre un elemento se quitar_ quemando
Comida catdasobre un elemento fflo se puede limpiar con un patio hOrnedo--la
suciedad que queda se consumir_ la pr6xima vez que se usa el elemento Nunca
sumeda un elemento de superficie en agua
Wi_ Aseg0rese de que la
estufa no est_ caliente antes de quitar los
etementos o los recipientes de goteos,
Tenga cuidado de no doblar ]aspuntas
del borne al reinsta]ar los elementos
desputSsde ]impiar_
Punta del
borne
Para Quitar los Elementos de Superficie y los Recipientes de Goteos
1. Levante el horde det elemento desde el fadoopuesto de las puntas del borne
para separar e] elemento de la grapa sujetadora La grapa sujetadora asegura la
ubicaci6n correcta det elemento No separe la grapa det recipiente
2, Suavemente deslice el elemento de superficie desenchufandolo del enchufe de!
borne,
3 Levanteel recipiente de goteos y saquelo,,
Para Limpiar los Recipientes de Goteos
LEvelos en agua jabonosa caliente o en un lavaplatos. Enjuaguelos y s_quetos
mientras aun est_n caiientes. Manchas quemadas o diffci[es de quitar se pueden
eliminar remajando !os recipientes pot 20 minutos en detergente diluido o en una
sotud6n de agua y amonlaco (1/2 taza de amon/aco con un gaI6n de agua) Se
puede utilizar una estregaderz de nil6n despu_s del remojo NO utilice detergentes
abrasivos ni virutillas de acero ya que rayaran la supefficie Siempre eniu_guelos
con agua limpia y s_quelos puliendo con un patio suave
Para Volver a Colocar los Recipientes de Goteos
1. Atin_e la abertura det recipiente de goteos con el enchufe de borne
2 Mantenga el elemento de superficie tan nivelado como sea posibie y metiendo
la punta dei borne pot la abertura, introd0zcalo en el enchufe del borne
3. Apriete el elemento de supefficie hasta que el soporte del elemento se engorche
con la grapa sujetadora P_seg0rese de que el soporte de[ elemento est_ bien
alineado con la ranura en la grapa sujetadora. El elemento de superficie tiene
que estar nivelado para reducir e] peligro de que los utensilios se resbalen
La puerta es pesada
Para atmacenarla temporatmente en forma
segura, acu_stela de manera que quede
horizontal con su lado interior cara abajo.
AI baiar la cubierta de
la estufa, sostenga sus bordes con las
puntas de Ios dedos solarnente Tenga
mucho cuidado de no apretarse los dedos.
NO sueffe ni doble la cubierta de ]a estufa
al tevantarla o bajarla Esto podrla daAar la
superficie
Cbmo ievantar y bajar la cubierta para la limpieza
1 Sujete pot los lados y levantela cubierta del frente Levante la cubierta hasta
donde se necesite para permitir el posicionamiento de las vafillas de apoyo Las
varillas abatibles sostendran la cubierta cuando est_ levantada
2..Limpie pot debajo con un par3olimpio y agua jabonosa y caliente; luego seque
3. Para bajar la cubierta, haga presiOnligeramente sobre cada una de las varillas a
fin de liberar el soporte Sostengala cubierta de la estufa y h_gala deslizar de
manera que cuadre con su marco
Cbmo quitar y reinstalar la puerta del homo
C6mo quitar la puerta del homo:
I. Ab_a la puerta completamente
2 Quite los tornillos (A) que se encuentran a cada lado de la puerta del homo
3 Cierre la puerta aptoximadamente ires cuartos de la posici6n hasta un cuarto de
abertura. Sujete la puerta firmemente a ambos lados y tire de ella hacia arfiba
separando]ade sus bisagras.
4. Para limpiar la puerta del homo, siga la tabla de limpieza en la pagina 15
C6mo reinstalar la puerta del homo:
I .. Aseg_rese de que los brazos de las bisagras est_n abiertos a un cuarto de su
extensibn total Tenga mucho cuidado siva a retirar]as bisagras a mano pues
podrian replegarseautomaticamente contra el marco del homo y prensarle los
dedos.
2. Sostengala puerta pot sus bo_descerca de la parte superior Inserte los b_azos
de las bisagrasen las ranuras que se encuentran en la parte inferior de la puerta.
3 Los brazos de las bisagrasdeber_n entrar de manera pareja en las ranuras, Hay
que insertar los brazos de las bisagras en las esquinas inferiores de ia puerta
empujando hasta donde alcancen.
4 Si la puerta no esta alineada con el marco del homo, sequela y repita lospasos
arfiba indicados
5 Aseguresede votver a instalar los tornillos en la puerta del homo
16
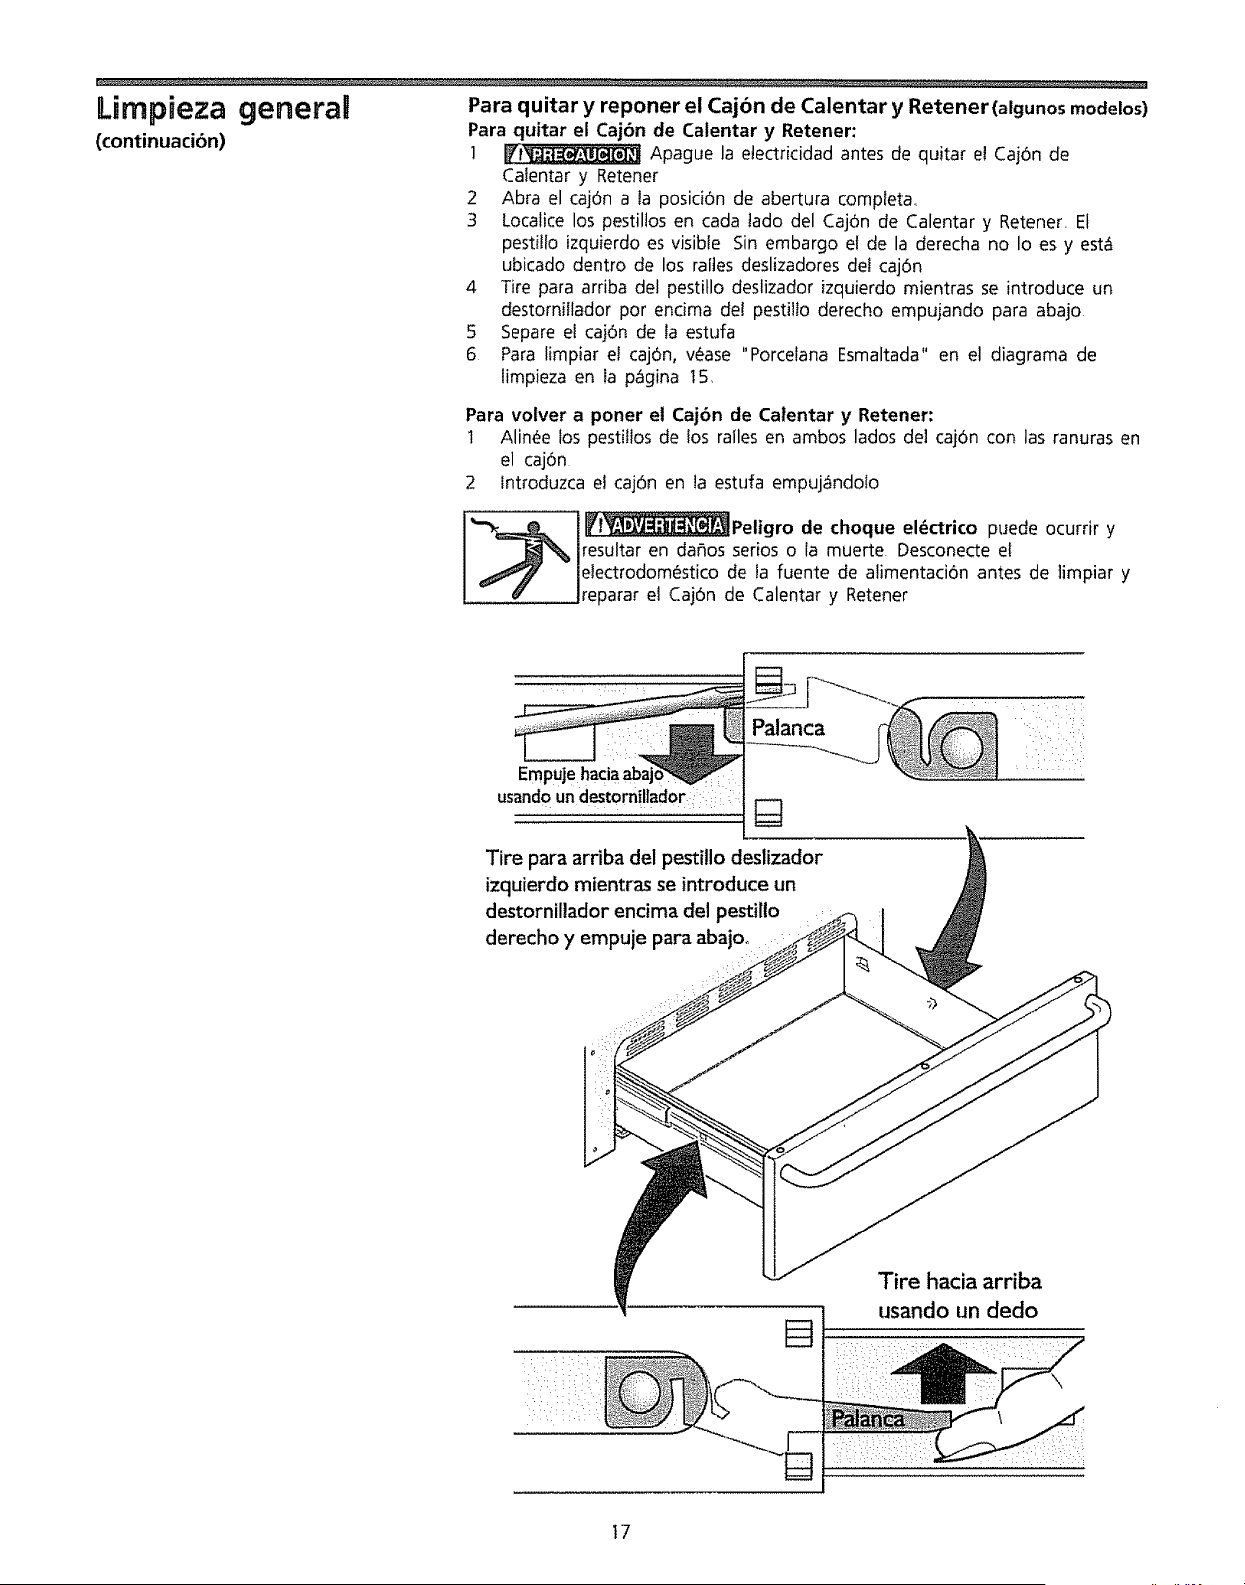
Lirnpieza general Para quitar y reponer el Cajbn de Calentar y Retener(algunos modelos)
(continuaci6n) Para quitar el Cajbn de Calentar y Retener:
1 _i_ Apague la etectricidad antes de quitar e! Caj6n de
Calentar y Retener
2 Abra el caj6n a la posid6n de abertura completa.
3 Localice los pestillos en cada tado del Caj6n de Calentar y Retener= El
pestillo izquierdo es visible Sin embargo e! de la derecha no Io es y est_
ubicado dentro de los raites deslizadores def caj6n
4 Tire para arriba del pestitlo deslizador izquierdo mientras se introduce un
destornillador pot endma del pestiilo derecho empujando para abajo
5 Separe el caj6n de la estufa
6 Para limpiar el caj6n, v_ase "Porcelana Esmaltada" en el diagrama de
limpieza en la pagina t5
Para voIver a poner et Cajbn de Calentar y Retener:
1 Alin_e los pestilfos de los railes en ambos lados del cajOn con las ranuras en
el cajOn
2 fntroduzca e! caj6n en la estufa empuj_ndolo
I I__Peligro de choque el_ctrico puede ocurrir y
resuitar en da_0s serios o la muerte Desconecte et
electrodom_stico de la fuente de atimentaci6n antes de ]impiar y
reparar el Caj6n de Calentar y Retener
Empuje .......
usandoun destorn!!lador
Tire para arriba del pesti!lo deslizador
izquierdo mientras se introduce un
destornillador encima del pestillo
derecho y empuje para abajoo :
t7
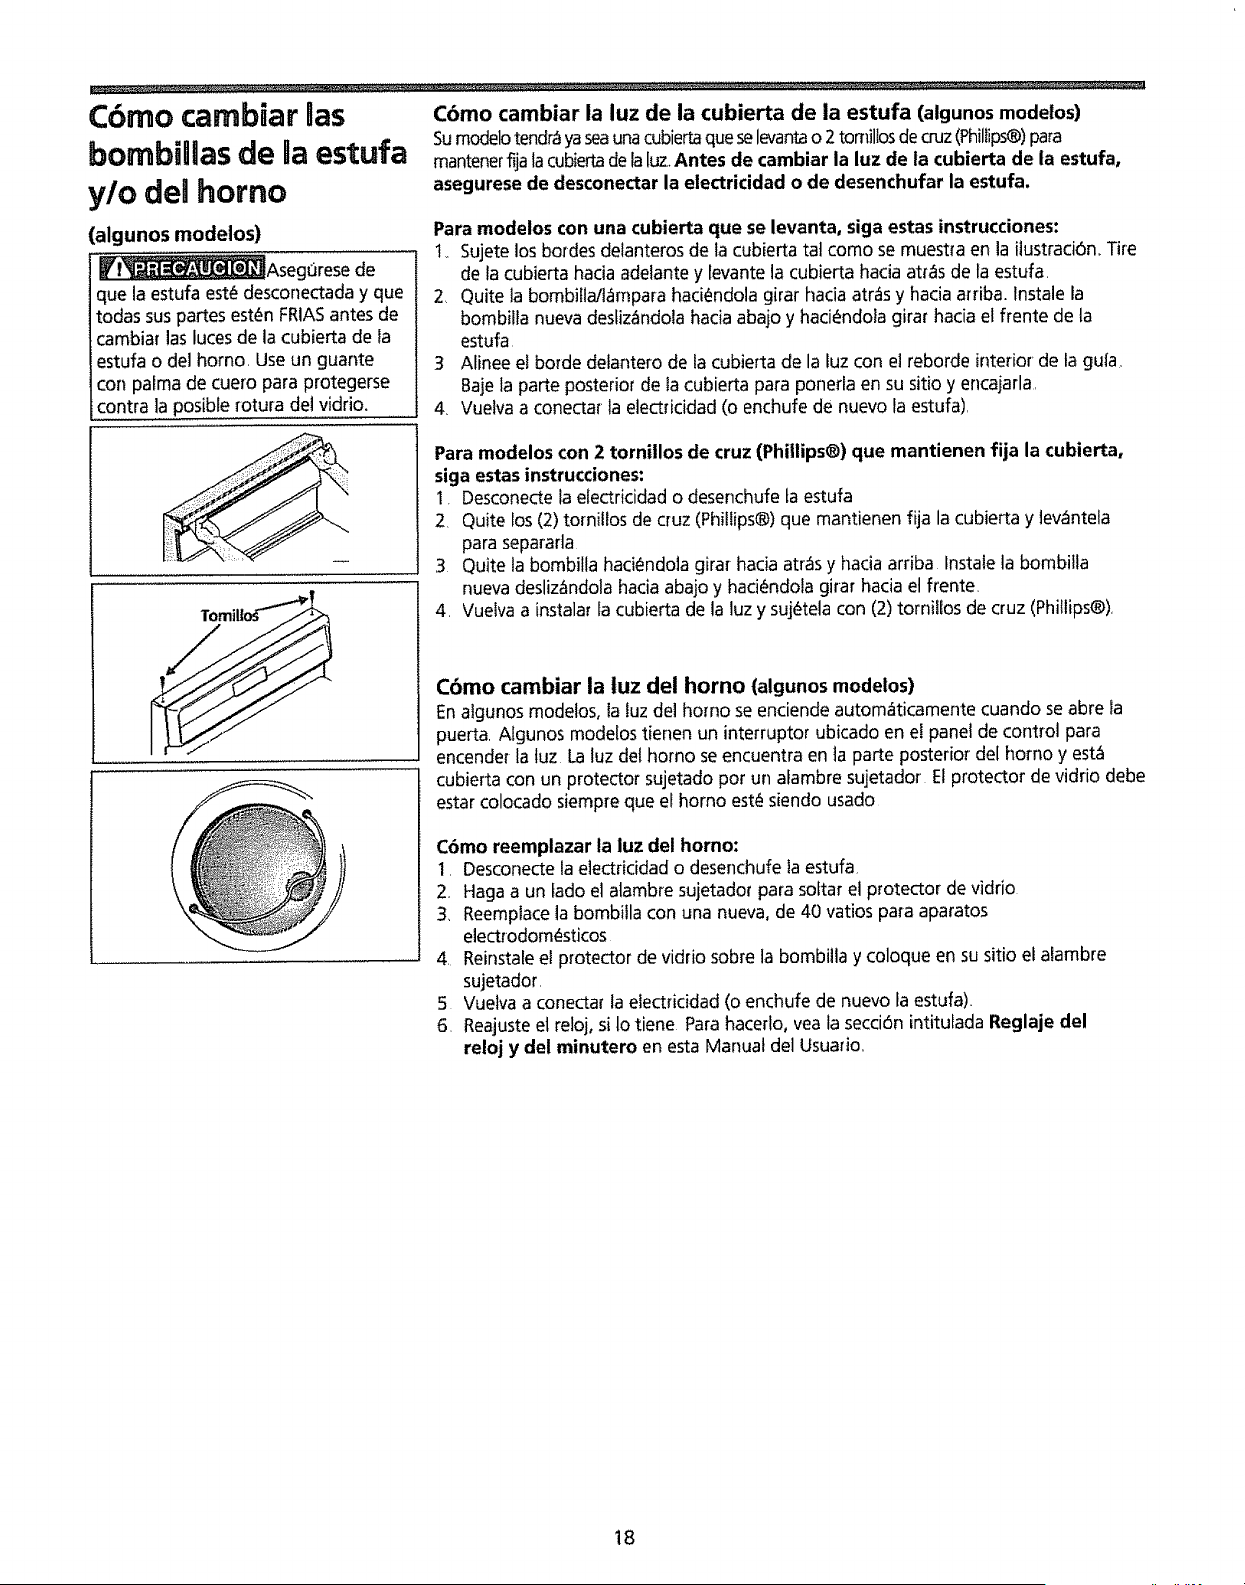
Cbrno carnbiar Oas
bornbiHHasde Haestufa
y/o dellhomo
(algunos modelos)
Wi_Aseg_irese de
que la estufaest_desconectada y que
todas sus partes est_n FRIASantes de
cambiar las lutesde la cubierta de la
estufa o de1homo Use un guante
con parma de cuero para protegerse
contra la posiblerotura del vidrio.
Cbmo cambiar la luz de la cubierta de la estufa (algunos modelos)
Sumodelotendr_yaseaunacubiertaqueselevantao 2 tomillosdecruz(Phillips®)para
mantenerfija tacubiertadelaluz,_Antes de ¢ambiar la luz de la ¢ubierta de la estufa,
asegurese de desconectar la electriddad o de desenchufar la estufa.
Para modelos con una cubierta que se levanta, siga estas instrucciones:
14 Sujete los bordes delanteros de la cubierta tat como se muestra en la itustraci6n_Tire
de la cubierta hacia adelante y levante la cubierta hacia atlas de fa estufa
2 Quite ta bombilla/tampara hadOndola girar hacia atr_s y hacia arriba. Instale la
bombiIla nueva destiz_ndola hacia abajo y haci_ndola girar hacia el frente de la
estufa
3 Alinee el horde defantero de la cubierta de la luz con el reborde interior de la gufa,
Baje ta parte posterior de ta cubierta para ponerla en su sitio y encaiarla,
4. Vuetva a conectar la elecbicidad (o enchufe de nuevo la estufa),
Para modelos con 2 tornillos de cruz (Phillips®) que mantienen fija la cubierta,
siga estas instrucciones:
1. Desconecte Ia eiectricidad o desenchufe ta estufa
2, Quite los (2) tornillos de cruz (Phillips®) que mantienen fija la cubierta y lev_ntela
para separarta
3 Quite ta bombilla haciOndola girar hacia atr_s y hacia arriba Instate la bombitla
nueva deslizandola hada abajo y haci_Sndola girar hacia el frente
4. VueNa a instalar la cubierta de la luz y sujcStelacon (2) tomillos de cruz (Phillips®),
Cbmo cambiar la tuz del horno (algunos modelos)
Enalgunos modelos, la luz del homo se enciende autom_ticamente cuando se abre la
puerta Algunos modelos tienen un interruptor ubicado en el panel de control para
encender la luz La luz del homo seencuentra en la parte posterior de[ homo y esta
cubierta con un protector sujetado por un alambre sujetador Elprotector de vidrio debe
estar colocado siempre que el homo est_ siendo usado
Cbmo reemplazar la luz del horno:
I. Desconecte la electricidado desenchufe la estufa
2. Haga a un lado el alambre sujetador para soltar el protector de vidrio
3, Reemplacela bombilla con una nueva, de 40 vatios para aparatos
electrodom_sticos
4. Reinstaleel protector de vidrio sobre la bombilla y coloque en su sitio el alambre
sujetador.
5 Vuelva a conectar la electricidad (o enchufe de nuevo la estufa).
6. Reajusteel reloj, si Io tiene Parahacedo, yea la secciOnintitulada Reglaje del
reloj y del minutero en esta Manual del Usuario..
18
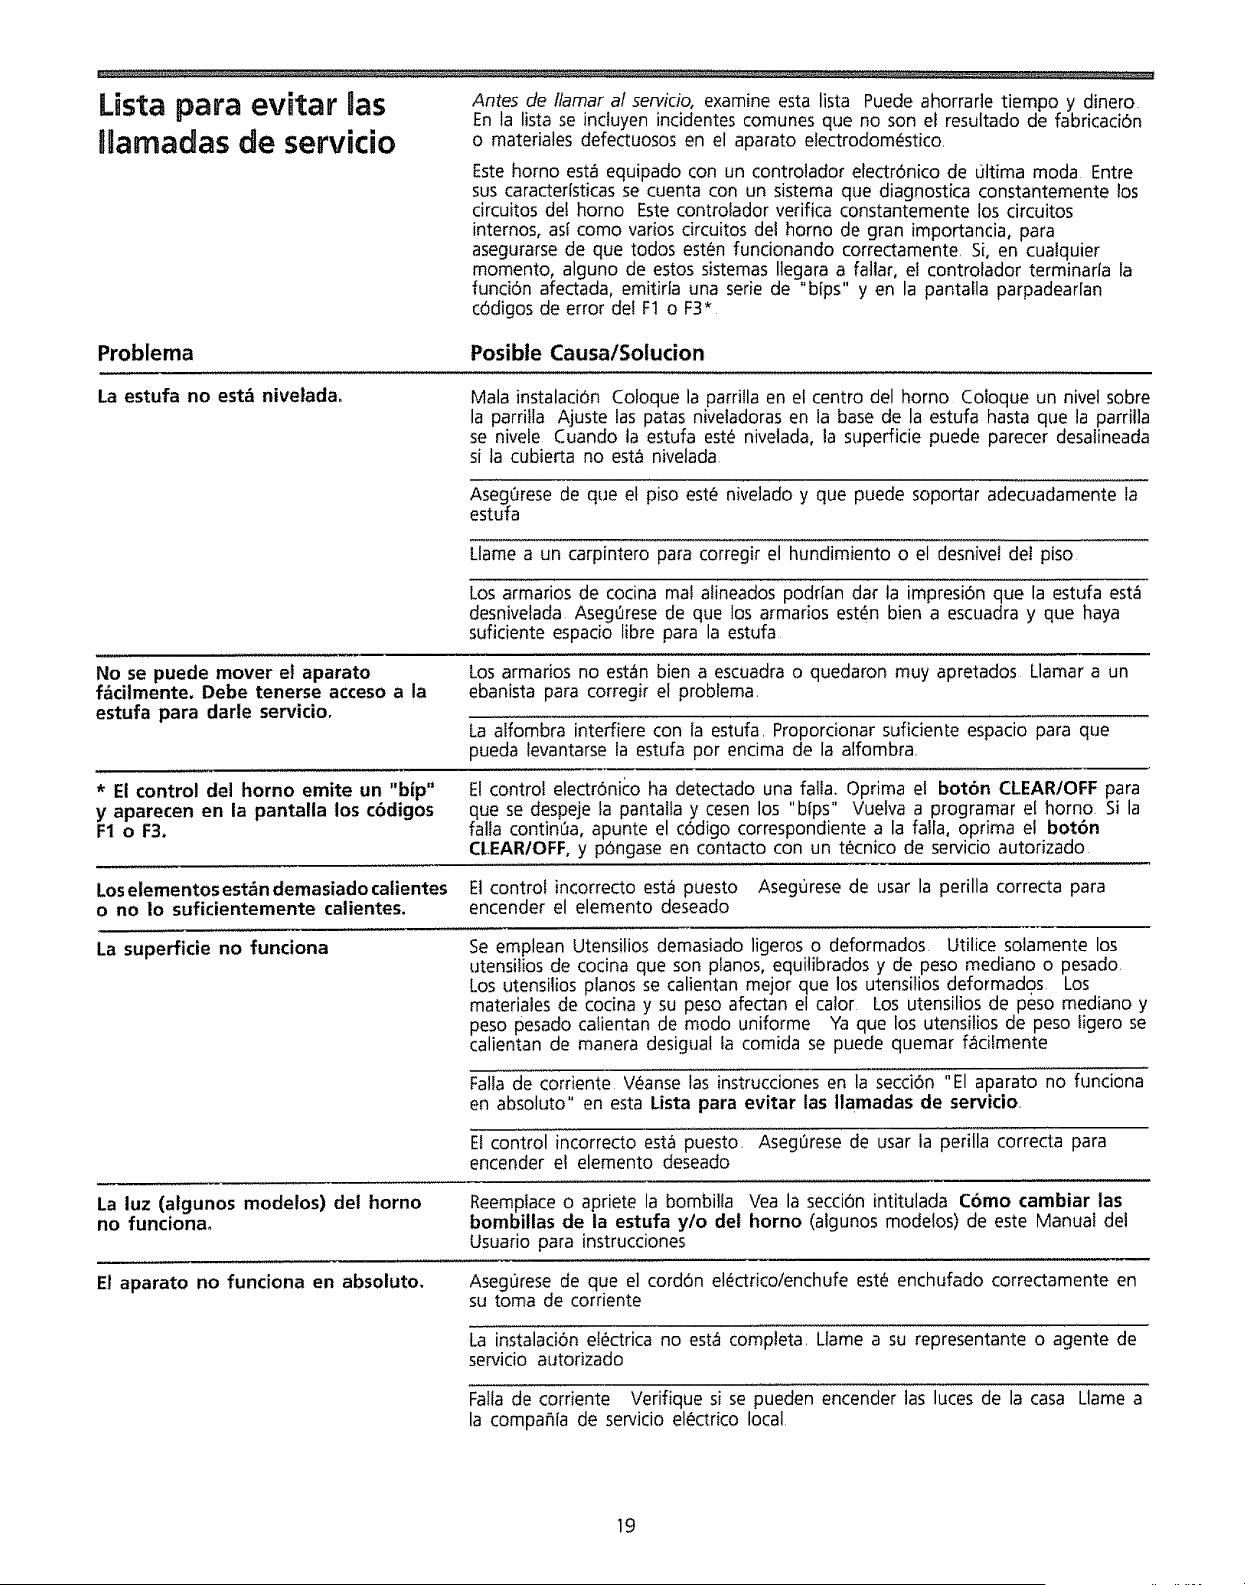
Lista para evitar Bas
Hamadas de servicio
Antes de/famar af servicio, examine esta lista Puede ahorrarle tiempo y dinero
En la lista se induyen inddentes comunes que no son eJ resultado de fabricad6n
o materiales defectuosos en el aparato electrodom_stico
Estehomo est6 equipado con un controiador e[ectr6nico de Ldtima moda Entre
sus caracter{sticasse cuenta con un sistema que diagnostica constantemente los
circuitos de! homo Este controlador vedfica constantemente los circuitos
internos, as{ como varios drcuitos dei homo de gran importancia, para
asegurarsede que todos esten fundonando correctamente, Si, en cuaiquier
momento, alguno de estos sistemas Ilegara a fallar, el controtador terminarfa la
funci6n afectada, emitiria una serie de "bips" yen la pantafla parpadear[an
c6digos de error dei F1 o F3*
Problema
Posible Causa/Solucion
La estufa no est& niveladao
Mala instalaciOn Coloque la parriila en et centro del homo Coloque un nivel sobre
la parrilla Ajuste las patas niveladoras en la base de la estufa hasta que la parrilla
se nivele Cuando ta estufa estc_nivelada, la superficie puede parecer desalineada
si la cubierta no est_ nivelada
AsegOresede que et piso estca nivelado y que puede soportar adecuadamente la
estufa
Llame a un carpintero para corregir el hundimiento o el desnivel del piso
Los armarios de cocina mal alineados podrlan dar la impresi0n que [a estufa est_
desnivelada AsegQresede que los armarios est_n bien a escuadra y que haya
suficiente espacio libre para la estufa
No se puede mover el aparato
f_citmente. Debe tenerse acceso a la
estufa para darte servicio,
Los armarios no est_n bien a escuadra o quedaron muy apretados Llamar a un
ebanista para corregir el problema_
La alfombra interfiere con la estufa. Proporcionar suficiente espacio para que
pueda levantarse la estufa por encima de la alfombra
* El control del horno emite un "bip"
y aparecen en la pantalla los cbdigos
F1 o F3.
El control electr6nii:o ha detectado una fat!& Oprima el botbn CLEAR/OFF para
que se despeje la pantalta y cesen los "bips" Vuelva a programar el homo Si la
falla continOa, apunte el c6digo correspondiente a la falla, oprima el bot6n
CLEARIOFF,y p6ngase en contacto con un tecnico de servicio autorizado
Loselementosest_ndemasiadocalientes El contro! incorrectoest6 puesto Asegurese de usar la perilla correcta para
o no !o suficientemente calientes, encender el elemento deseado
La superficie no funciona Se emplean Utensilios demasiado ligeros o deformados. Utilice solamente los
utensiiios de cocina que son p{anos, equitibrados y de peso mediano o pesado
Los utensilios pianos se calientan mejor que los utensilios deformados Los
materiales de cocina y su peso afectan el calor Los utensilios de peso mediano y
peso pesado calientan de modo uniforme Ya que los utensilios de peso tigerose
calientan de manera desigual ta comida se puede quemar f_tcifmente
Falla de corriente V_anse las instrucciones en la seccidn "El aparato no funciona
en absoluto" en esta Lista para evitar las Ilamadas de servicio
El control incorrecto esta puesto AsegOrese de usar ia perilla correcta para
encender el elemento deseado
La luz (algunos modelos) del homo
no funciona_
Reemplace o apriete la bombilla Vea la secciOnintitulada C6mo cambiar las
bombillas de la estufa y/o det homo (algunosmodelos) de este ManuaI del
Usuario para instrucciones
El aparato no funciona en absoluto, Asegurese de que el cord6n electrico/enchufe este enchufado correctamente en
su toma de corriente
La instalacibn e!_ctrica no est_ completa_ Llame a su representante o agente de
servicio autodzado
Falla de corriente Verifique si se pueden encender las luces de la casa Llame a
la compaSia de servicio electrico local
19

El homo humea excesivamente cuando se Los controles no estan correctamente regiados Siga las instrucciones en ia secci6n Ajuste
asa usando la resistencia superior, de los controles del homo
La puerta deberfa estar abierta a la posici6n para asar durante un asado
Lacarne esta demasiado cercanaa la resistenciasuperior Reacomode ta parrilla para quehaya
suficiente espacio fibre entre la came y la resistencia
No seprepar6 la came adecuadamente Quttele el excesode grasa a lacame Corte los bordes
grasosos sob_antes en _ngu!o recto para evitar el pandeamiento de la came, pero no corte
hasta la parte magra
La parrilta de la cazuela asadora esta puesta al rev_s. La grasa no se escurve a la cazuela
asadora Siempre coloque la parrilta asadora por encima de la cazuela con las costillas para
arriba y las ranuras para abajo para permitir el drenaje de la grasa a i a cazuela
El homo necesita ser limpiado Se ha acumulado la grasa en las paredes del homo Cuando
seusa elasador con frecuencia, hayque limpia_el homo en forma regular La grasa acumutada
o las safpicaduras de comida causan humo en exceso
Malos resuitados al hornearo Muchos factores afectan losresuitados de hornear. Vea la secci6n intitulada Hornear en su
Gufa para Cocinar en donde se dan sugerencias, causas y sotuciones
Etcido de autolimpieza no funciona. Los controres no estan debidamente aiustados Siga las instrucdones de Limpieza del
homo.
Elcido de autotimpieza fue interrumpido. El tiempo para la detenci6n debe set regtado para
2 a 4 horas despu_s det inicio Siga los pasos que se dan en taparte intitulada "C6mo detener
o interrumpir un cicto de autotimpieza", de ta secci6n denominada Limpieza del horno.
No se ha eliminado la suciedad
completamente.
No selimpi6 correctamente la parte inferior del frente, ta parte superior del homo o las areas
de ta puerta fuera de la junta de empaque del homo Estas partes no est_n en el area de
autolirnpieza, pero se calientan io suficiente como para quemar residuos Limpie estas areas
antes de iniciar el cido de autolimpieza_ Los residuos que se hayan quemado sobre las
superficies se pueden limpiar con un cepitio de nil_n duro y agua, o con un restregador de
nil6n Tenga cuidado de no dafiar la junta de empaque del homo
Derrames demasiado grandes dentro del homo Haga durar ei dcfo de autolimpieza durante
rn_s tiempo
Hay llamas dentro del horno o sale humo
del respiradero,
Derrames demasiado grandes dentro del homo £sto es normal, especialmente si se hornean
tartas o cuando se acumula una gran cantidad de grasa en el fondo Limpie dichos derrames
antes de iniciar el ciclo de autolimpieza Sisurgen llamas o hay demasiado humo, detenga
el ciclo de autotimpieza y siga los pasos que se dan en ia parte intitulada "C6mo detener
o interrumpir un cido de autolimpieza", de la secci6n denominada Umpieza del horno,
2O
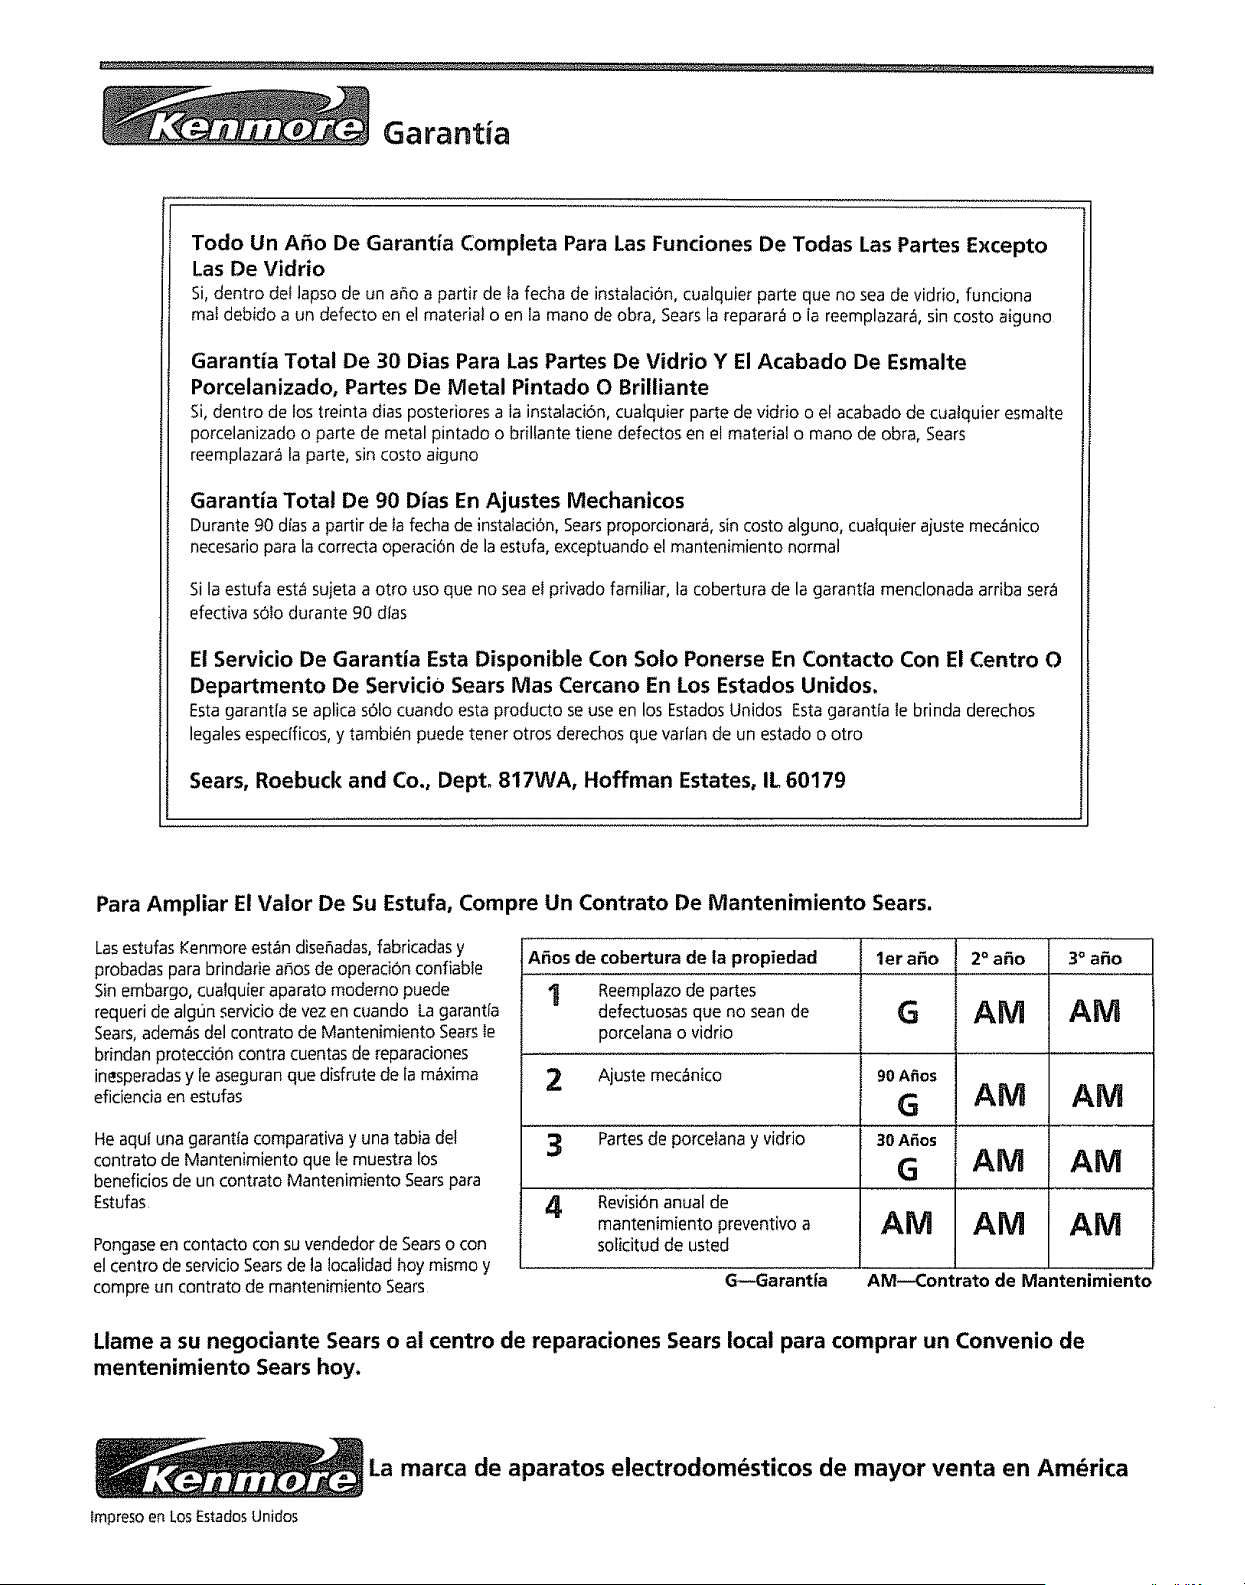
Garant a
Todo Un Afio De Garantia Completa Para Las Funciones De Todas Las Partes Excepto
Las De Vidrio
Si,dentro del lapsode un a_oa partir de Ia fechade instalad6n,cualquierparte queno seade vidrio, funciona
maIdebido a un defecto en elmaterialo en la manode obra, Searslareparar_ o la reemplazar&sin costo aiguno
Garantia Total De 30 Dias Para Las Partes De Vidrio Y El Acabado De Esmalte
Porcelanizado, Partes De Metal Pintado O Brilliante
Si, dentro de los treinta dias posteriores a la instalaci6n, cuatquier parte de vidrio o e! acabado de cualquier esmalte
porcelanizado o parte de metal pintado o brillante tiene defectos en el material o mano de obra, Sears
reemplazara la parte, sin costo aiguno
Garantia Total De 90 Dias En Ajustes Mechanicos
Durante 90 dias a partir de la fecha de instalaci6n, Searspropordonar& sin costo alguno, cualquier ajuste mec:Inico
necesario para la correcta operad6n de la estufa, exceptuando el mantenimiento normal
Sila estufa esta sujeta a otro uso que no sea el privado familiar, la cobertura de la garantia menclonada arriba sera
efectiva s61odurante 90 dlas
E! Servicio De Garantia Esta Disponible Con Solo Ponerse En Contacto Con El Centro O
Departmento De Servicio Sears Mas Cercano En Los Estados Unidos.
Estagarantfaseaplicas61ocuandoestaproducto se useen los EstadosUnidos Estagarantia le brinda derechos
legalesespecfficos,y tambi_n puedetener otros derechosque variande un estado o otro
Sears, Roebuck and Co., Depto 817WA, Hoffman Estates, IL 60179
Para Ampliar El Valor De Su Estufa, Compre Un Contrato De Mantenimiento Sears.
Las estufas Kenmore est_n diseSadas, fabricadas y
probadas para brindarie aSos de operad6n confiable
Sin embargo, cualquier aparato moderno puede
requeri de algtJn servicio de vez en cuando La garantfa
Sears,ademas del contrato de Mantenimiento Sears Ie
brindan protecci6n contra cuentas de reparaciones
inesperadas y le aseguran que disfrute de la m_xima
eficiencia en estufas
He aqul una garantla comparativa y una tabia del
contrato de Mantenimiento que le muestra los
beneficios de un contrato Mantenimiento Sears para
Estufas.
Pongaseen contacto con su vendedor de Searso con
el centro de servicio Sears de ta localidad hoy mismo y
compre un contrato de mantenimiento Sears
A5os de cobertura de la propiedad , ler afio
I Reemplazo de partes
defectuosas que no sean de
porcelana o vidrio
2 Ajuste mec_nico
G
90 Afios
f3
2° afio 3° afio
AM
AM
AM
AM
3 Partes de porcelana y vidrio 30Aries
G AM AM
, i , ...... J
4 Revisi6n anual de
mantenimiento preventivoa Are AM AM
solicitud de usted
G--earantfa AM--Contrato de Mantenimiento
Liame a su negociante Sears o a! centro de reparaciones Sears local para comprar un Convenio de
mentenimiento Sears hoy.
ta marca de aparatos electrodom_sticos de mayor venta en America
Impreso en Los Estados Unidos
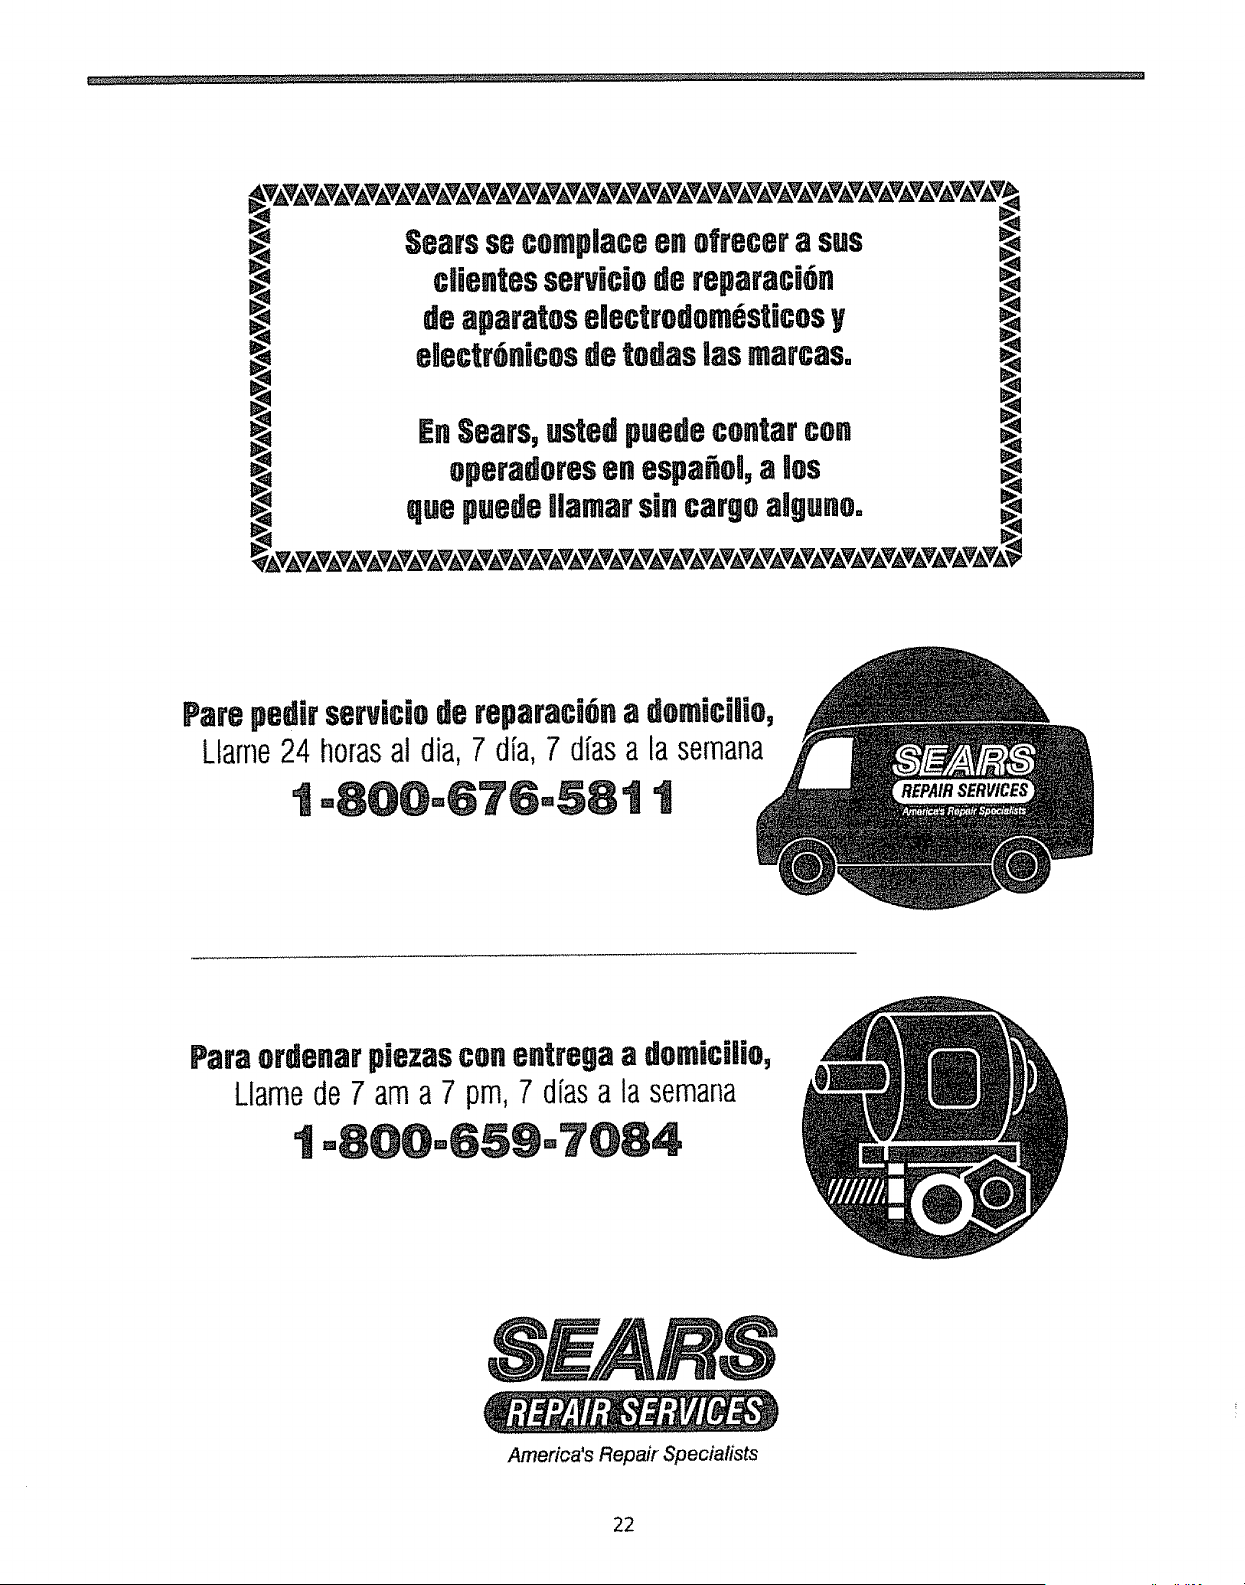
SearssecompJaceen ofrecera sus
cfientesservicio de reparacion
deaparatos egectrodom6sUcosy
eUectrbnicosde todas[asmarcaso
EnSears,ustedpuedecontarcon
operadoresenespafioJ,a Uos
quepuedeflamarsin cargoalguno.
ParepedirservBcDode reparacJbna domJcfiio,
Llame24 horasa] dia, 7 d[a,7 d[asa lasemana
1
Paraordenarpiezasconentrega a dornicfiio,
Llarnede 7 ama 7 pm,7 d[asa la semana
America's Repa#' Specialists
22


