FORM NO. Z2497
REV. B-02/20/2018
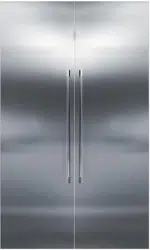
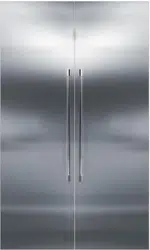
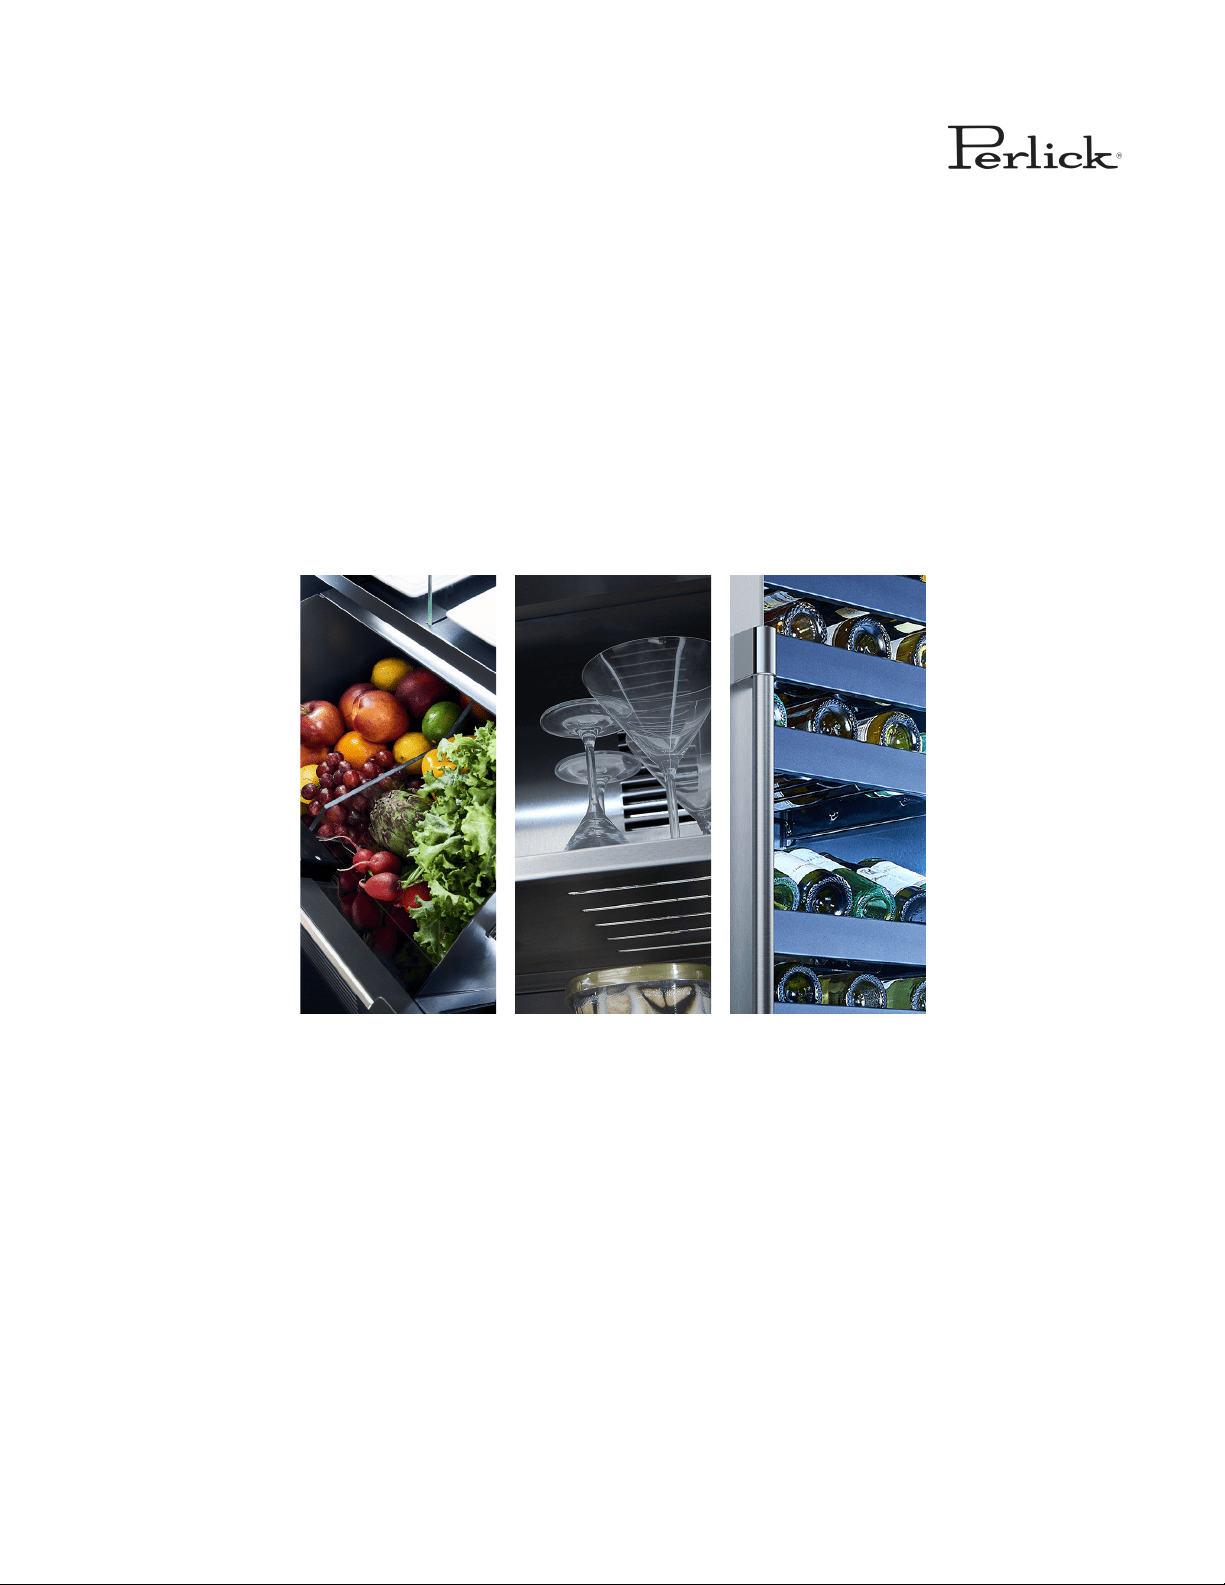
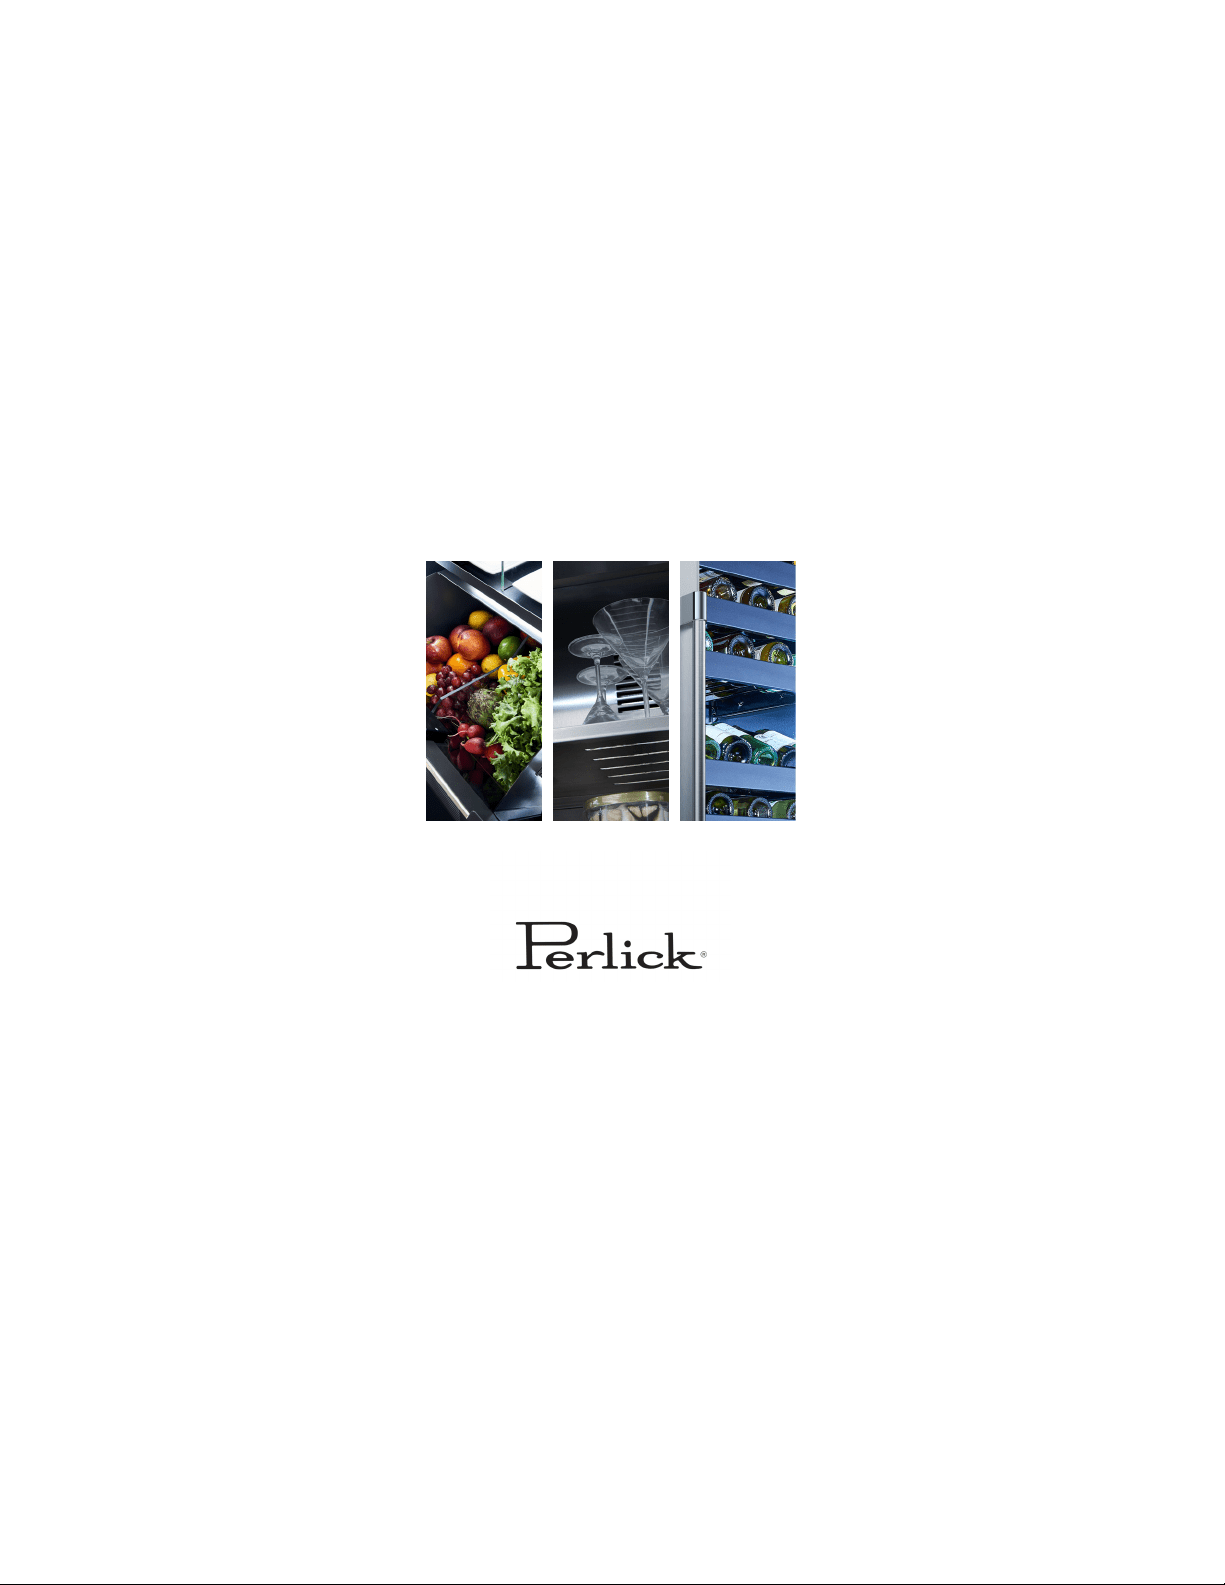
PERLICK COLLECTION 24” COLUMN REFRIGERATION
To prevent appliance damage and injury, read these instrucons thoroughly
prior to operaon.
CR24
USE & CARE GUIDE

PERLICK RESIDENTIAL COLUMN REFRIGERATION USE & CARE GUIDE
2 | perlick.com/residential
CONTENTS
3 Introducon
4 Touch-screen Controller Operaon
4 Refrigerator
8 Freezer
10 Wine Reserve
13 Freezer Ambient Condions
14 Stainless Steel/Surface Care
15 Adjusng the Wine Shelves
16 Filter Installaon
17 Troubleshoong
19 Warranty
21 Contact Us
THANK YOU FOR CHOOSING PERLICK
Congratulaons on the purchase of your Perlick home
appliance. Perlick’s innovave refrigeraon product oering
gives you the professional performance and funconality
demanded in commercial kitchens and beyond. As a h-
generaon, family-owned company, our appliances reect the
quality and cramanship that we demand in our own homes.
Perlick has been designing, engineering and manufacturing
award-winning products for the commercial food/beverage
service industry for over 100 years. Our award-winning
products are trusted by bars, restaurants, hotels and large
venues around the world because a Perlick is built to last. Your
Perlick home appliance is built with beauty and durability for
a lifeme of use. This use and care guide will show you how to
properly operate and care for your new Perlick product.
We dedicate a considerable amount of me ensuring each
and every one of our products provide you the highest level
of customer sasfacon. If, however, service is required at any
point, call Perlick at (800) 558-5592. For your own protecon,
never return merchandise for credit without Perlick approval.
Perlick proudly oers the industry’s most comprehensive
product warranty (see page 19). Enjoy a three full year
warranty by registering your product at
www.perlick.com/RegisterMyPerlick. Be sure to register
your product immediately upon installaon to receive the
warranty from installaon date instead of shipment date. If le
blank, the date will revert back to shipment date. Thank you
again for selecng a Perlick home appliance for your home!
Need to order replacement lters for your CR24 Column
Refrigerator or Wine Reserve?
Contact your selling dealer or visit
perlick.com/residenal to nd a Perlick dealer near you.

PERLICK RESIDENTIAL COLUMN REFRIGERATION USE & CARE GUIDE
perlick customer service (800)558-5592 | 3
INTRODUCTION
ABOUT THIS GUIDE
This Use & Care Guide pertains to all Perlick CR24 Column
Refrigeraon models.
Keep this manual in a safe place for future reference. To beer
serve you, record your product’s informaon below, as we will
request this informaon in the event you need assistance.
Model Number: ______________________________________
Serial Number: _______________________________________
Selling Dealer Name: __________________________________
Selling Dealer Phone Number: ___________________________
Sold Date: ___/___/______ Installaon Date: ___/___/______
PRODUCT IDENTIFICATION PLATE
Your product informaon can be found on the product’s
idencaon plate. The idencaon plate for CR24 column
refrigeraon models is located on the sidewall behind the toe
kick plate. To access the indencaon plate, simply remove
the toe kick plate (grill). The idencaon plate will be adhered
to the right sidewall.
SAFETY PRECAUTIONS
Please take note of the following safety precauons prior to
using your Perlick CR24 column refrigerator, freezer or wine
reserve.
▪ Perlick column refrigeraon is heavy. With a weight of up
to 550 lbs., it is imperive that the unit is properly installed
and that the an-p brackets are fully engaged.
▪ Do not use or store ammable liquids (ie; gasoline) or
vapors near the appliance.
▪ Take special care to keep ngers away from pinch points
such as the hinges and gaps between the door and
cabinets. This can result in injury, especially to young
children.
▪ Unplug the refrigerator prior to cleaning or performing
technical service.
▪ In the event your unit needs repair, repair work must be
performed by a Perlick authorized servicer. Work done by
unauthorized individuals could potenally be dangerous
and will void the warranty.
PERLICK RESIDENTIAL COLUMN REFRIGERATION USE & CARE GUIDE
4 | perlick.com/residential
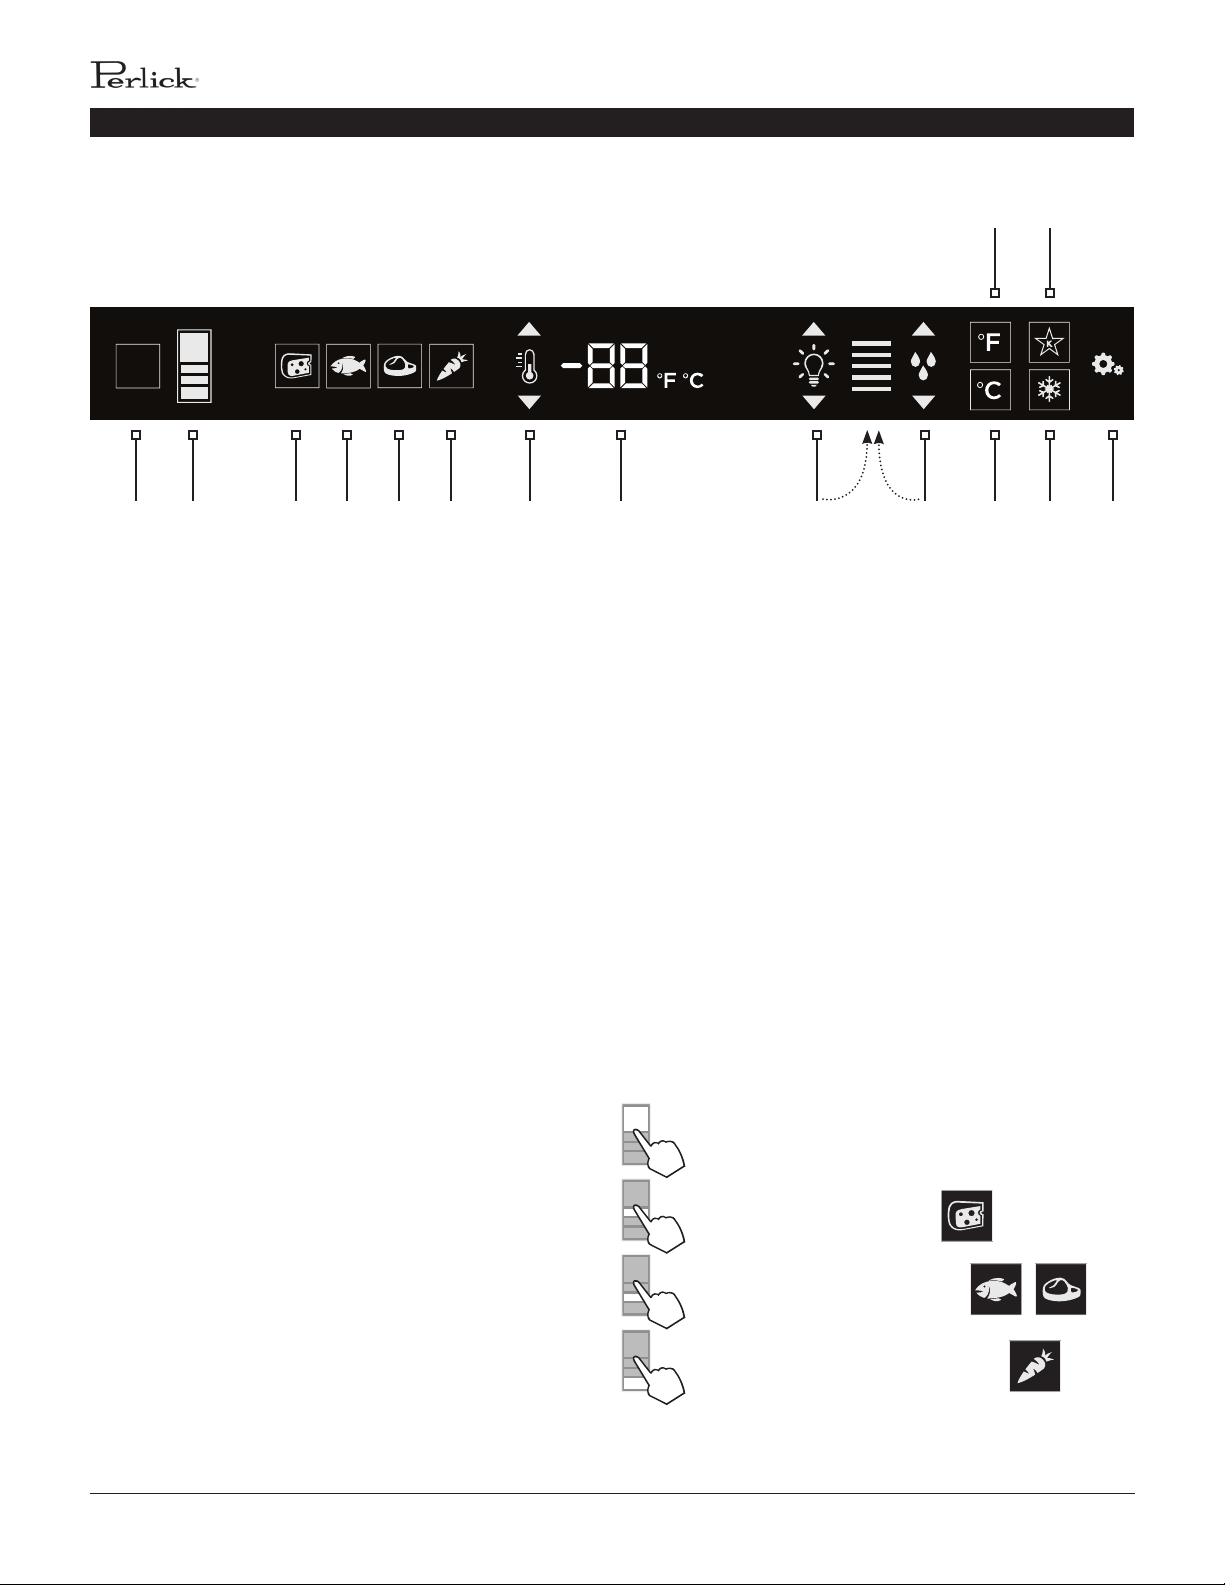
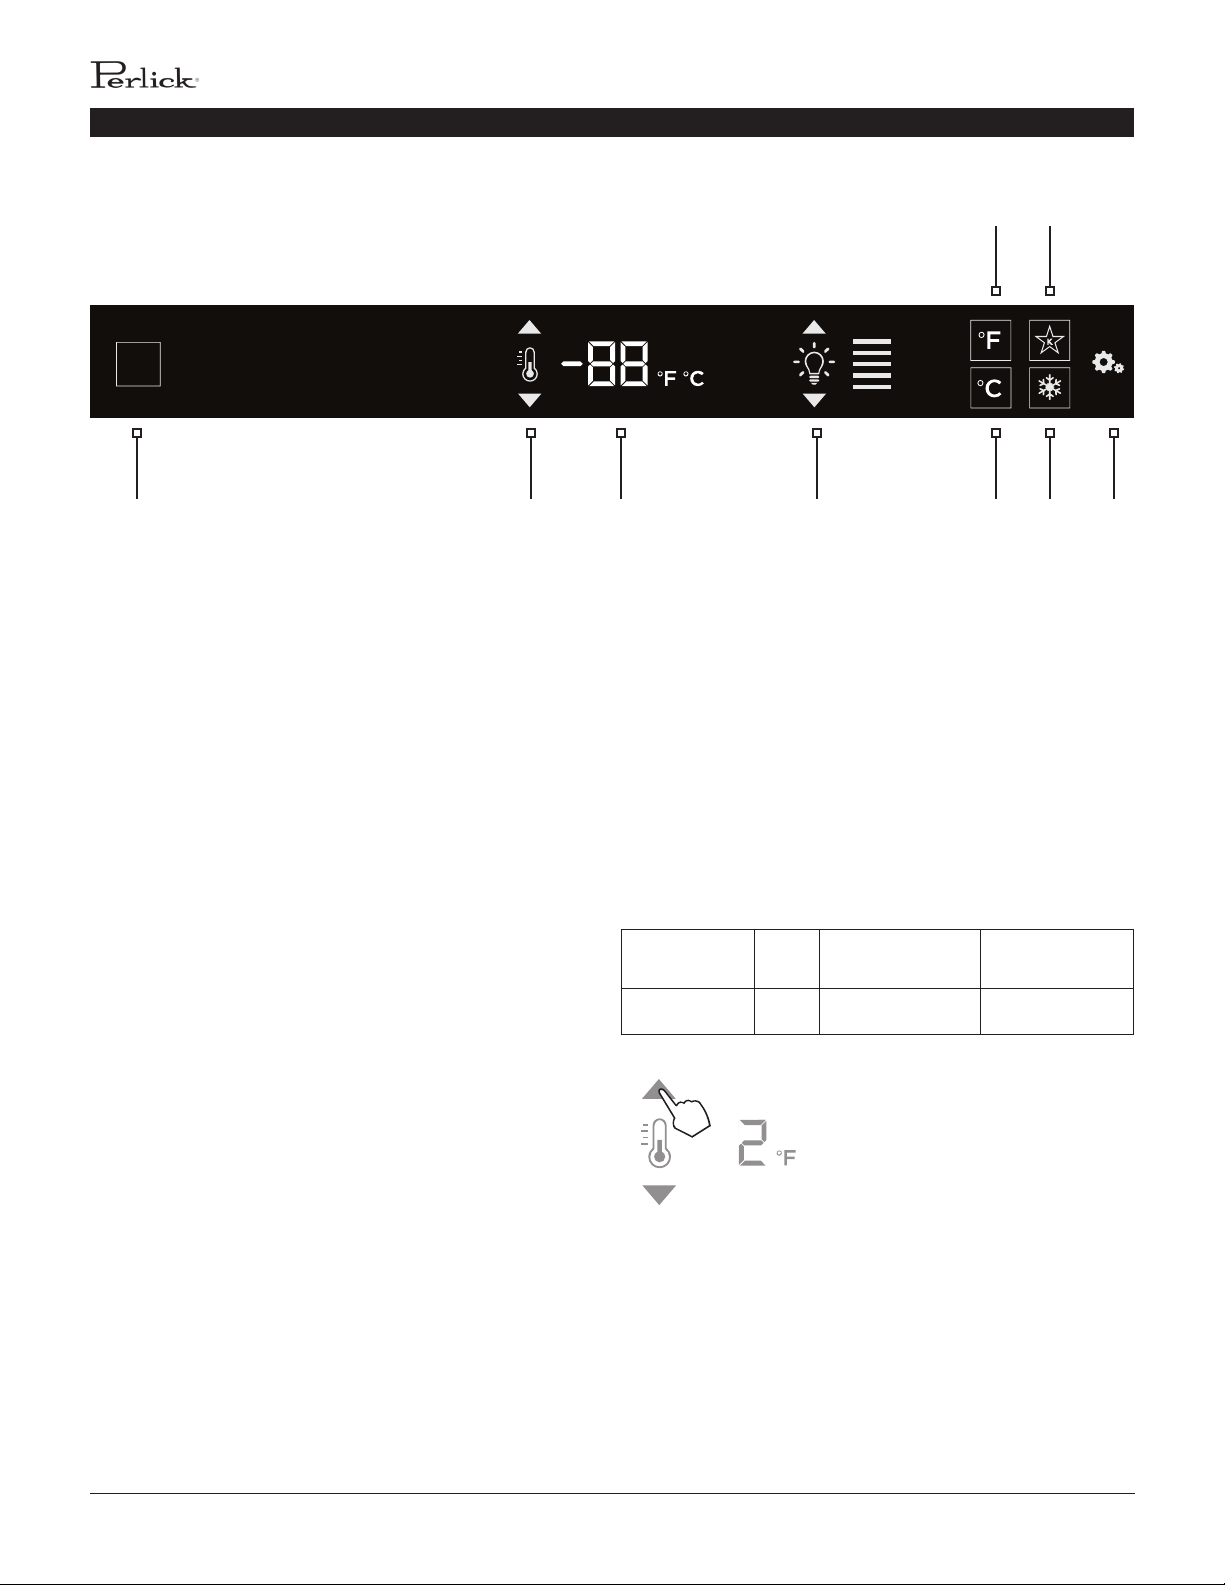
TOUCH-SCREEN CONTROL OPERATION - REFRIGERATOR MODELS
REFRIGERATOR CONTROL OPERATION
The following instrucons are for the touch-screen control in
Perlick column refrigerators (model CR24R).
2 3 4 5 6 7 8 9 10 12 14 151
11 13
1 Wake Buon
2 Temperature zone selecon
3 Deli temperature seng
4 Fish/Seafood temperature seng
5 Meat temperature seng
6 Fresh Produce temperature seng
7 Temperature adjustment (up and down in
1° increments)
8 Temperature readout
9 Light intensity adjustment
10 Humidity control adjustment
11 Fahrenheit temperature mode
12 Celsius temperature mode
13 Sabbath mode
14 QuickCool mode
15 Sengs menu
Using the Refrigerator Column Control
Upon door opening, the Wake buon (1) outline will
illuminate. Once acvated, the temperature zone selecon
(2), temperature adjustment (7), temperature readout (8) and
sengs (15) menu icons will illuminate.
Selecng a Temperature Zone
Perlick’s touch-screen controller is preset with recommended
temperature sengs for various goods. Within these presets,
you have the ability to adjust the temperature in 1° increments
as you desire.
Press the temperature zone selecon (2) icon to toggle through
the zones unl desired zone is illuminated. Zone and preset
icon will illuminate to prompt you to store certain goods in that
parcular zone as shown below:
Main Compartment
Deli Drawer Compartment
Middle Drawer Compartment
Tip-Out Produce Bin Compartment
Control shown fully illuminated below for illustraon purposes only.
PERLICK RESIDENTIAL COLUMN REFRIGERATION USE & CARE GUIDE
perlick customer service (800)558-5592 | 5
TOUCH-SCREEN CONTROL OPERATION - REFRIGERATOR MODELS
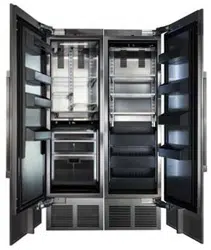
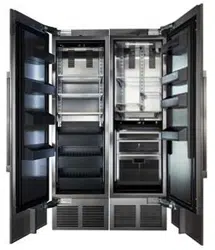
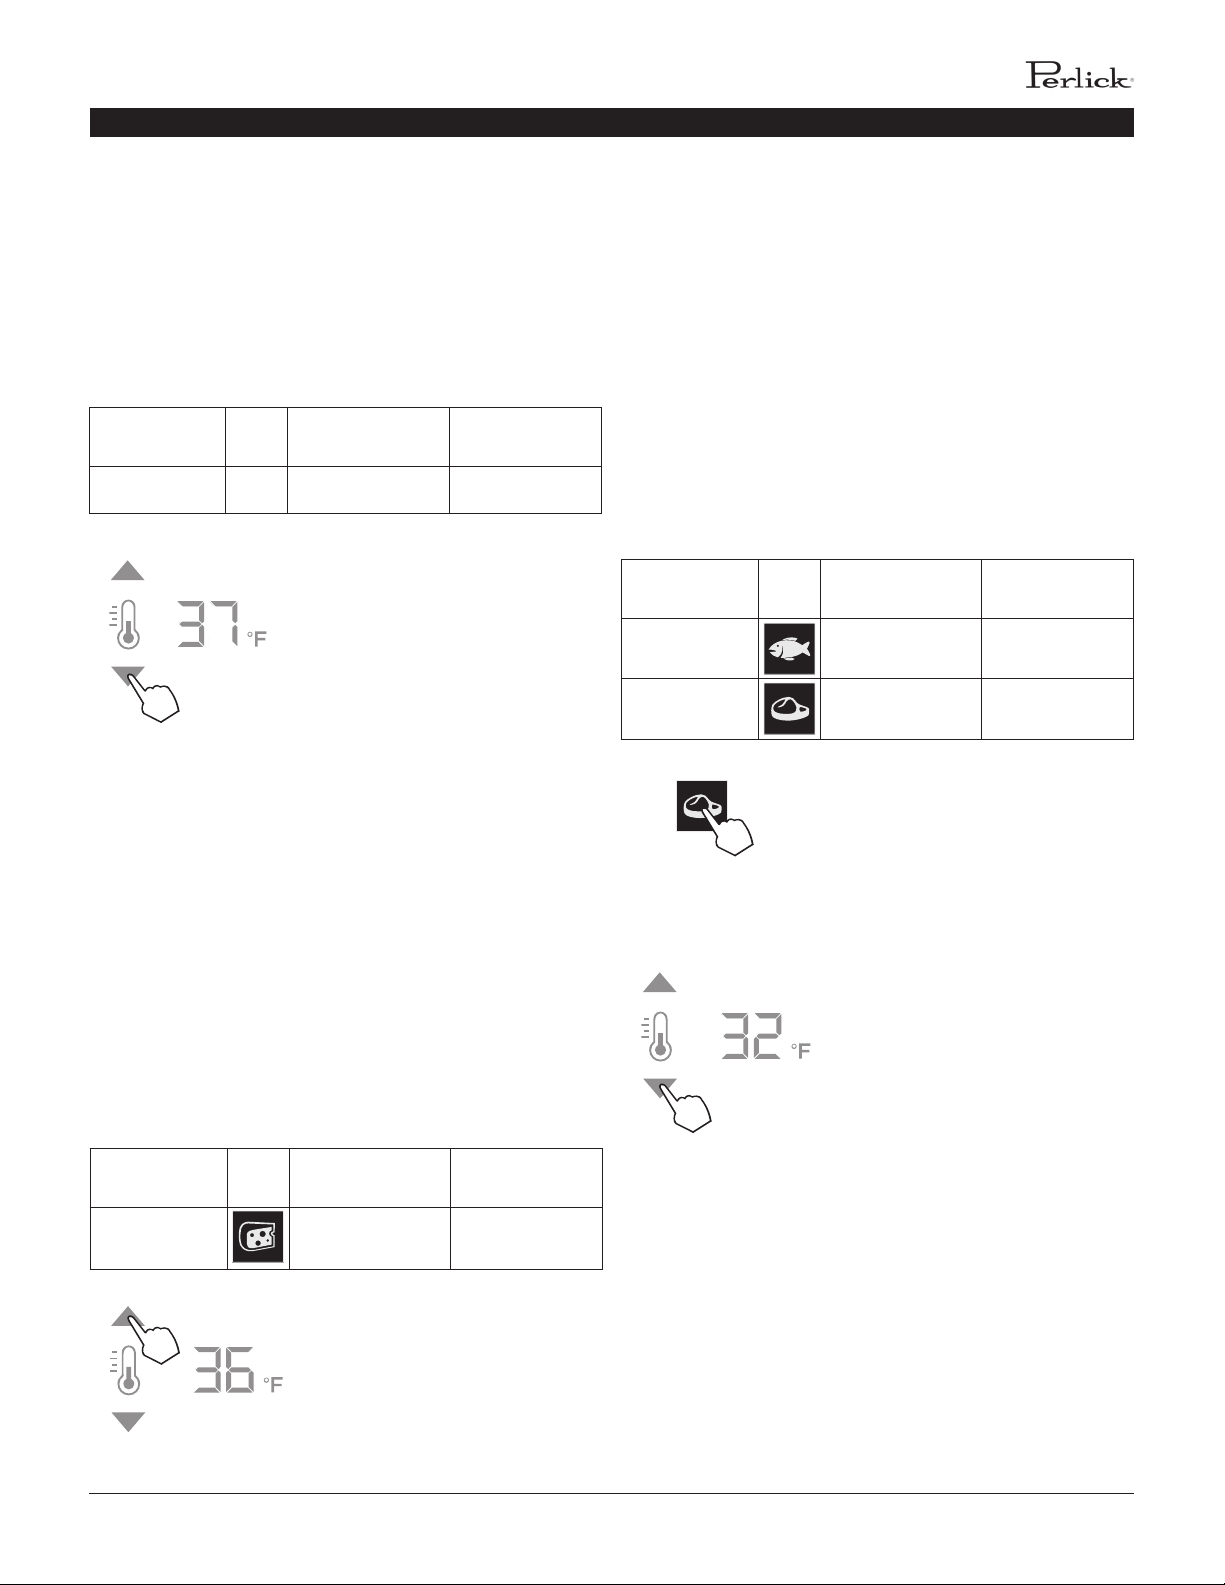
Main Compartment
The main compartment of the refrigerator features two
full-width shelves and a split shelf that can be adjusted to
t tall items. Because this is a common zone that doesn’t
store specic items, only the temperature adjustment (7)
and temperature readout (8) will illuminate - no specialty
temperature sengs (Sp.) will appear.
Compartment Sp. Factory Seng Temperature
Range
Main N/A 38°F 34°F - 42°F
The main compartment of the
refrigerator will come set from
the factory to 38°F. To adjust the
temperature up or down, press the
temperature adjustment (7) arrows
unl desired temperature is reected
in the temperature readout (8).
Double keep indicates that minimum
or maximum temperature has been
reached. Temperature will ash twice
to indicate the new seng.
Top Drawer Compartment
The deli compartment (top drawer) of the refrigerator features
a two-er design for storing and displaying charcuterie items
such as arsan meats and cheeses. When this zone is chosen,
the charcuterie (cheese) temperature seng (3), temperature
adjustment (7) and the temperature readout (8) will illuminate.
Compartment Sp. Factory Seng Temperature
Range
Deli Drawer 33°F 32°F - 37°F
The two-er charcuterie(deli) drawer
of the refrigerator will come set from
the factory at 33°F. To adjust the
temperature up or down, press the
temperature adjustment (7) arrows
unl desire temperature is reected
in the temperature readout (8).
Double beep indicates that the
minimum or maximum temperature
has been reached. Temperature will
ash twice to indicate new seng.
Middle Drawer Compartment
The middle drawer compartment of the refrigerator features
a full-width drawer designed for storing meat and seafood.
When this zone is chosen, the sh/seafood (sh) temperature
seng (4), meat (steak) temperature seng (5), temperature
adjustment (7) and temperature readout (8) will illuminate.
Compartment Sp. Factory Seng Temperature
Range
Middle 33°F 32°F - 37°F
Middle 35°F 32°F - 37°F
The middle drawer compartment of
the refrigerator will come set from
the factory to 35°F (meat). If storing
sh or other types of seafood, press
the sh icon to bring the drawer to
the preset mode of 33°F.
As with the other compartments, you
have the ability to raise or lower the
temperature in 1°F increments. To
adjust the temperature up or down,
press the temperature adjustment (7)
arrows unl desired temperature is
reected in the temperature readout
(8). Double beep indicates that
minimum or maximum temperature
has been reached. Temperature will
ash twice to indicate new seng.
PERLICK RESIDENTIAL COLUMN REFRIGERATION USE & CARE GUIDE
6 | perlick.com/residential
TOUCH-SCREEN CONTROL OPERATION - REFRIGERATOR MODELS
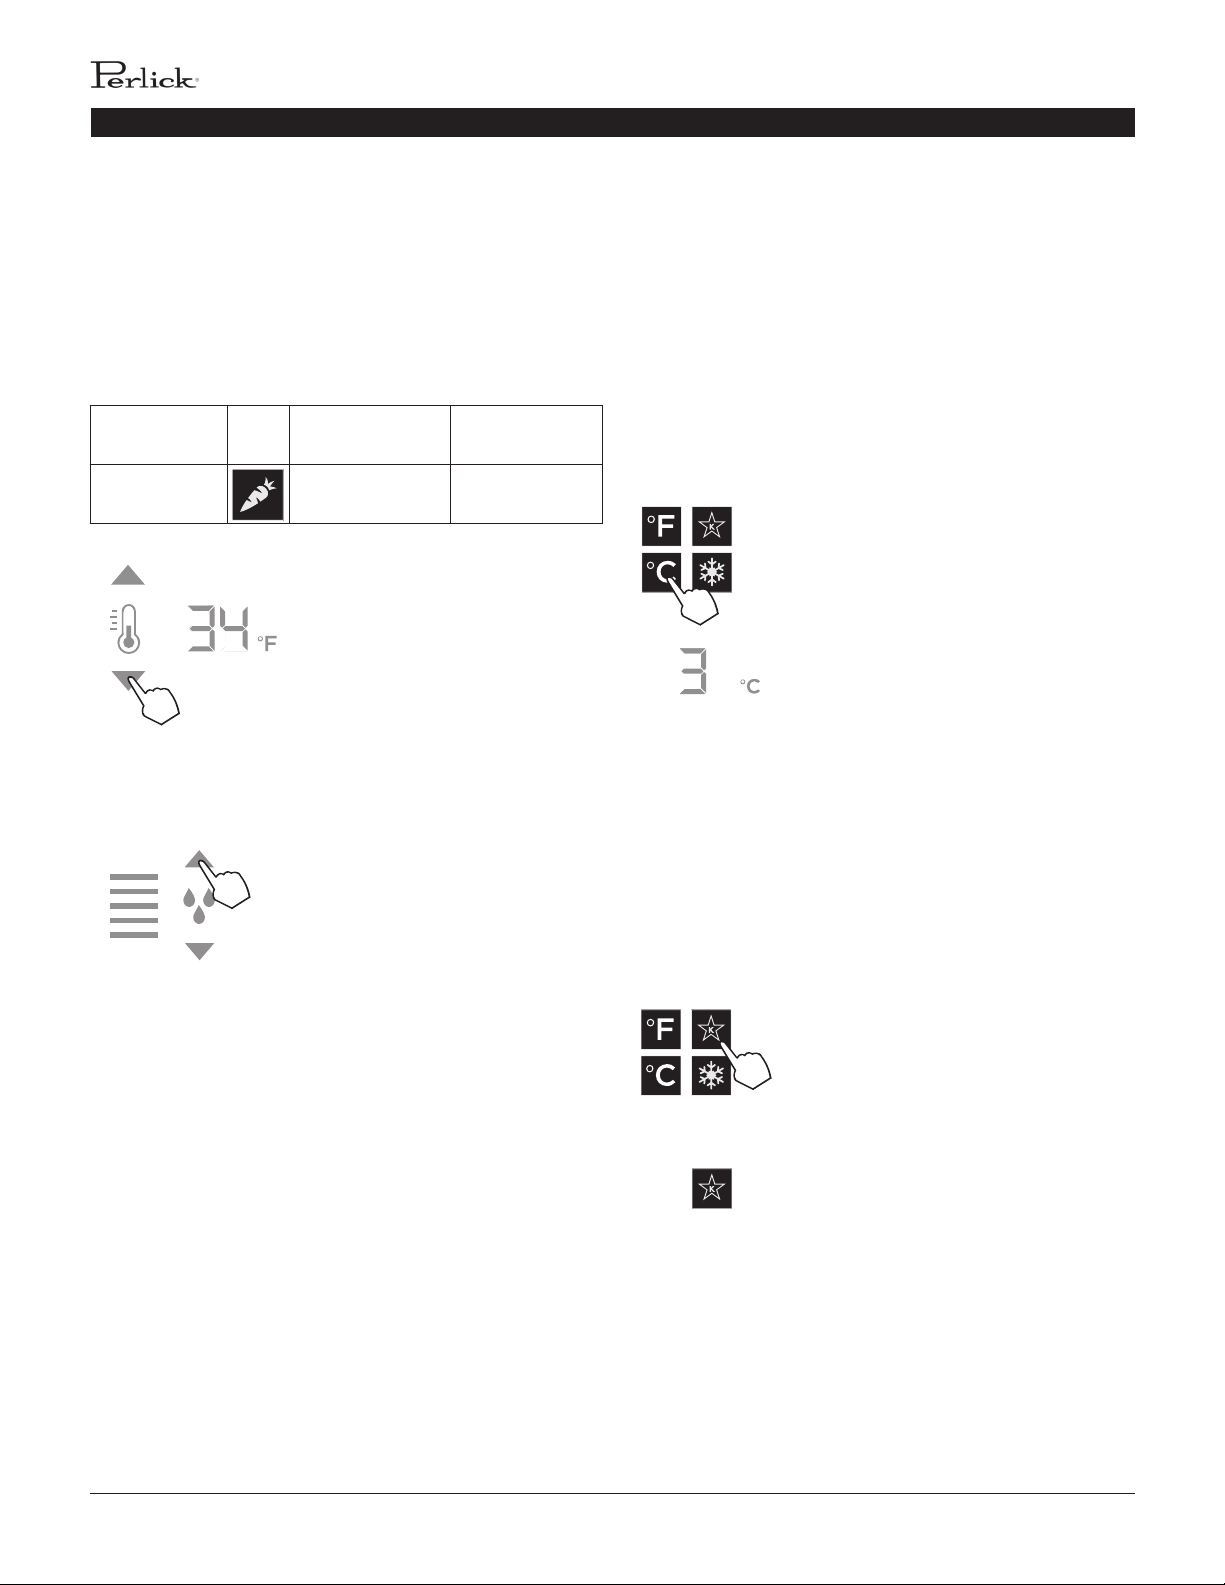
Boom Drawer Compartment
The boom drawer compartment of the refrigerator features a
unique p out bin design for storing fresh produce. When this
zone is chosen, the fresh produce (carrot) temperature seng
(6), temperature adjustment (7) and temperature readout (8)
will illuminate. In addion to temperature-related icons, the
humidity control adjustment (10) icon will also illuminate.
Compartment Sp. Factory Seng Temperature
Range
Tip-out
Produce Bin
35°F 32°F - 37°F
As with the other compartments, you
have the ability to raise or lower the
temperature in 1°F increments. To
adjust the temperature up or down,
press the temperature adjustment (7)
arrows unl desired temperature is
reected in the temperature readout
(8).
The p-out produce bin also features
a comprehensive humidity system
that delivers real moisture based
on your desired humidity levels.
This keeps produce such as leafy
greens fresher for longer. The
humidity is factory set to 80%, but
can be adjusted up and down in 10%
increments between 50% and 90%
by pressing the up or down arrows
in the humidity control adjustment
icon (10). The more bars that
illuminate, the higher the humidity
seng. Double beep indicates that
the minimum or maximum level has
been reached. Icons will ash twice to
indicate new seng.
Column Theatre Lighng
Perlick column refrigerators feature an impressive amount of
lighng for clear viewing and display of goods. Main lighng
runs vercally down the walls and horizontally across the ceiling
of the main compartment, deli drawer, meat/sh drawer and
p-out produce bin.
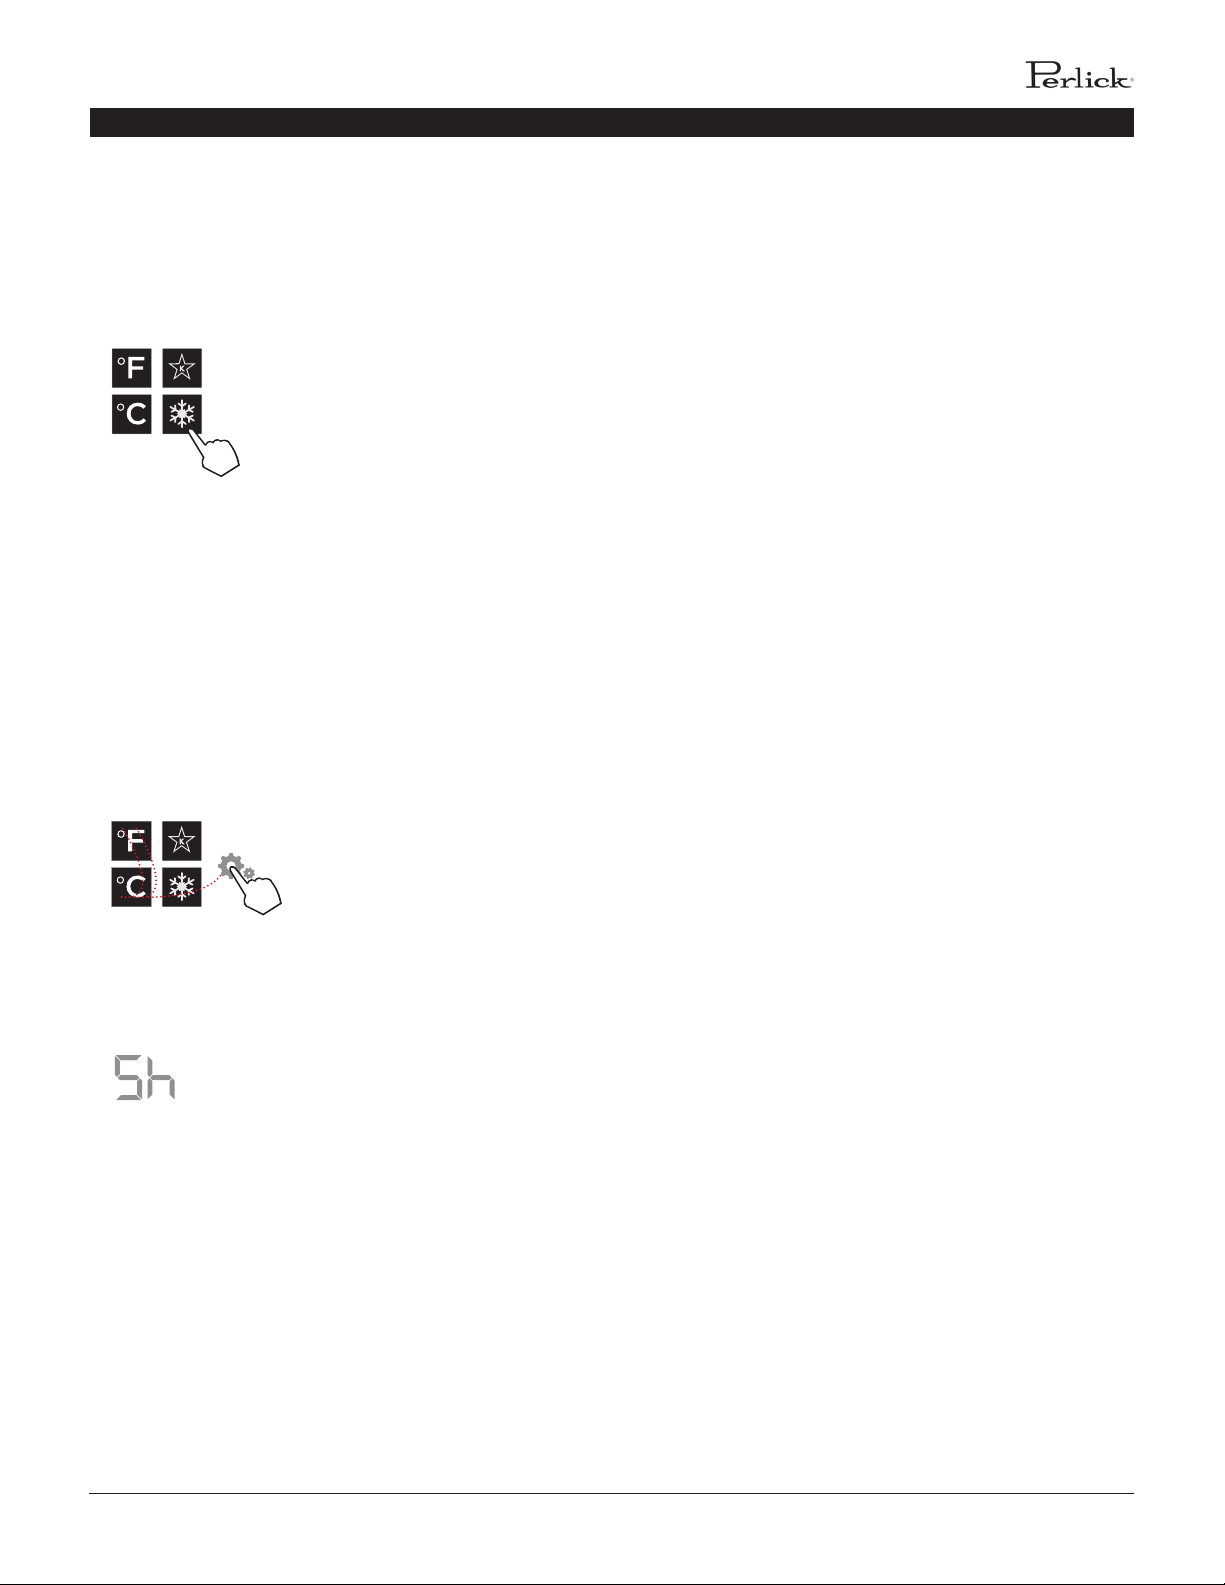
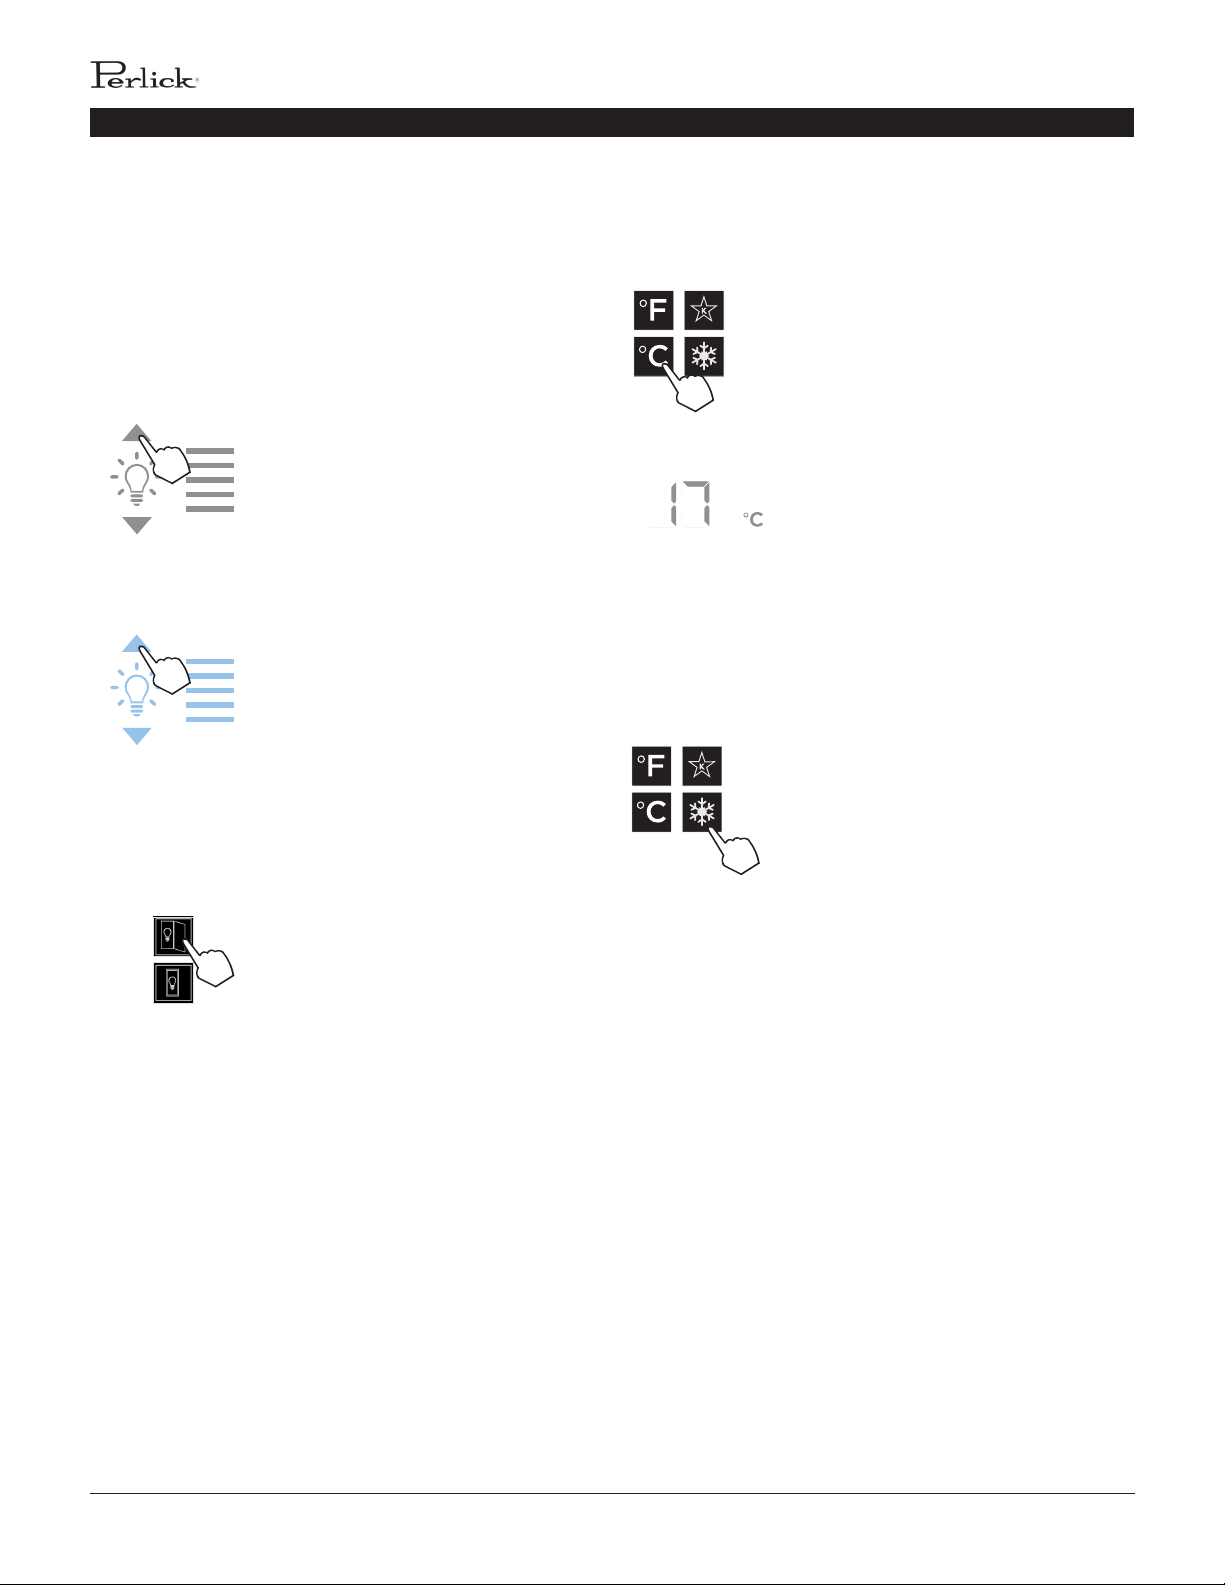
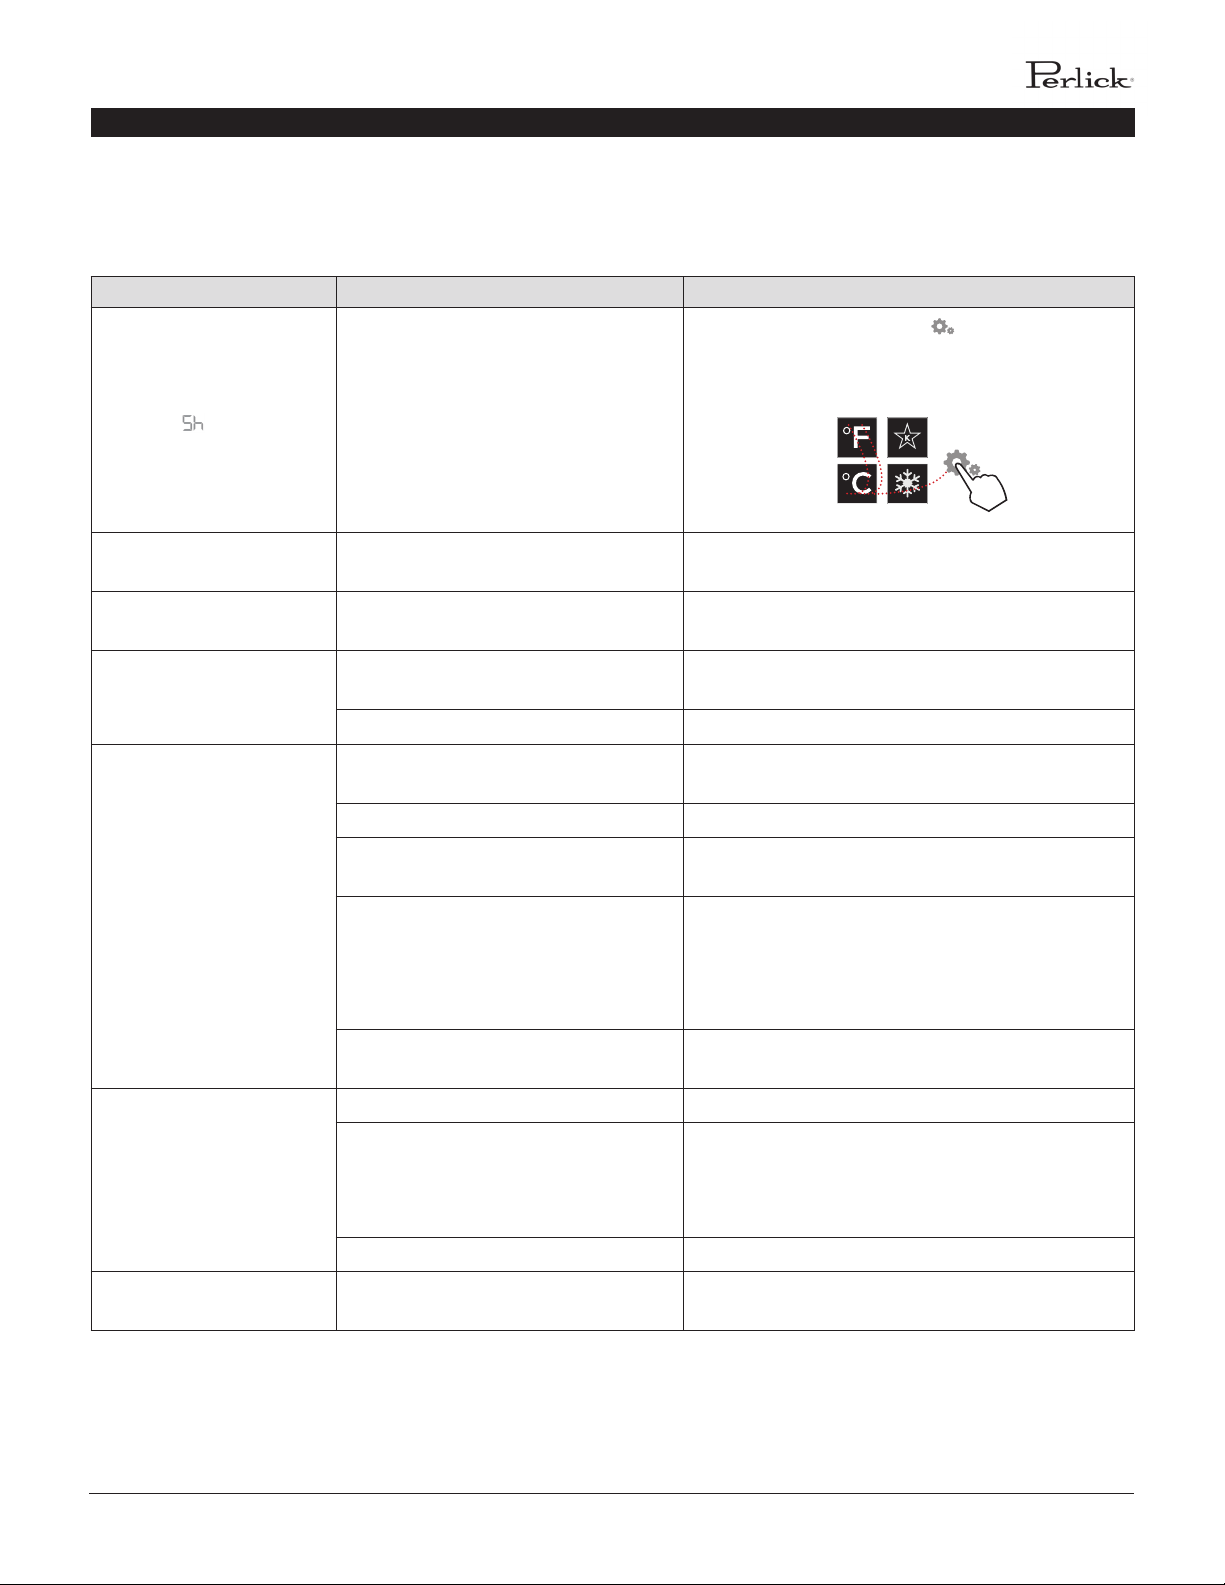
Changing from Fahrenheit to Celsius scale
The controller is factory set to Fahrenheit scale, but can easily
be changed to read Celsius in the sengs menu.
Press the sengs menu (15) icon
on the far right. This will illuminate
a cluster of four icons as shown to
the le. To display temperatures in
Celsius, press the Celsius readout (12)
icon.
Change will be reected in the
temperature readout (8). The C will
be illuminated to signify the scale.
Sabbath Mode
All Perlick column refrigeraon models have Sabbath mode
capabilies. This allows the user to interact with the unit
without changing the amount of energy it is using. In this mode,
the interior lighng is turned o unl user turns o Sabbath
mode.
Press the sengs menu (15) icon on
the far right. This will illuminate a
cluster of four icons as shown to the
le. To acvate Sabbath mode, press
the Sabbath mode icon.
Please note that, when in Sabbath
mode, the Sabbath mode (13) icon
will be the only icon that will be
illuminated (connuously) unl user
presses the Sabbath mode icon to
turn the mode o.
PERLICK RESIDENTIAL COLUMN REFRIGERATION USE & CARE GUIDE
perlick customer service (800)558-5592 | 7
TOUCH-SCREEN CONTROL OPERATION - REFRIGERATOR MODELS
Quick Cool (Shopping) Mode
The main compartment of the refrigerator can be set to Quick
Cool (shopping) mode to lower the temperature aer loading a
large quanty of product to quickly bring them to the preferred
temperature.
Press the sengs menu (15) icon
on the far right. This will illuminate
a cluster of four icons as shown
to the le. To acvate Quick Cool
(shopping) mode, press the Quick
Cool (14) icon. This will acvate the
mode and the Quick Cool (14) will
remain illuminated unl the set point
is achieved.
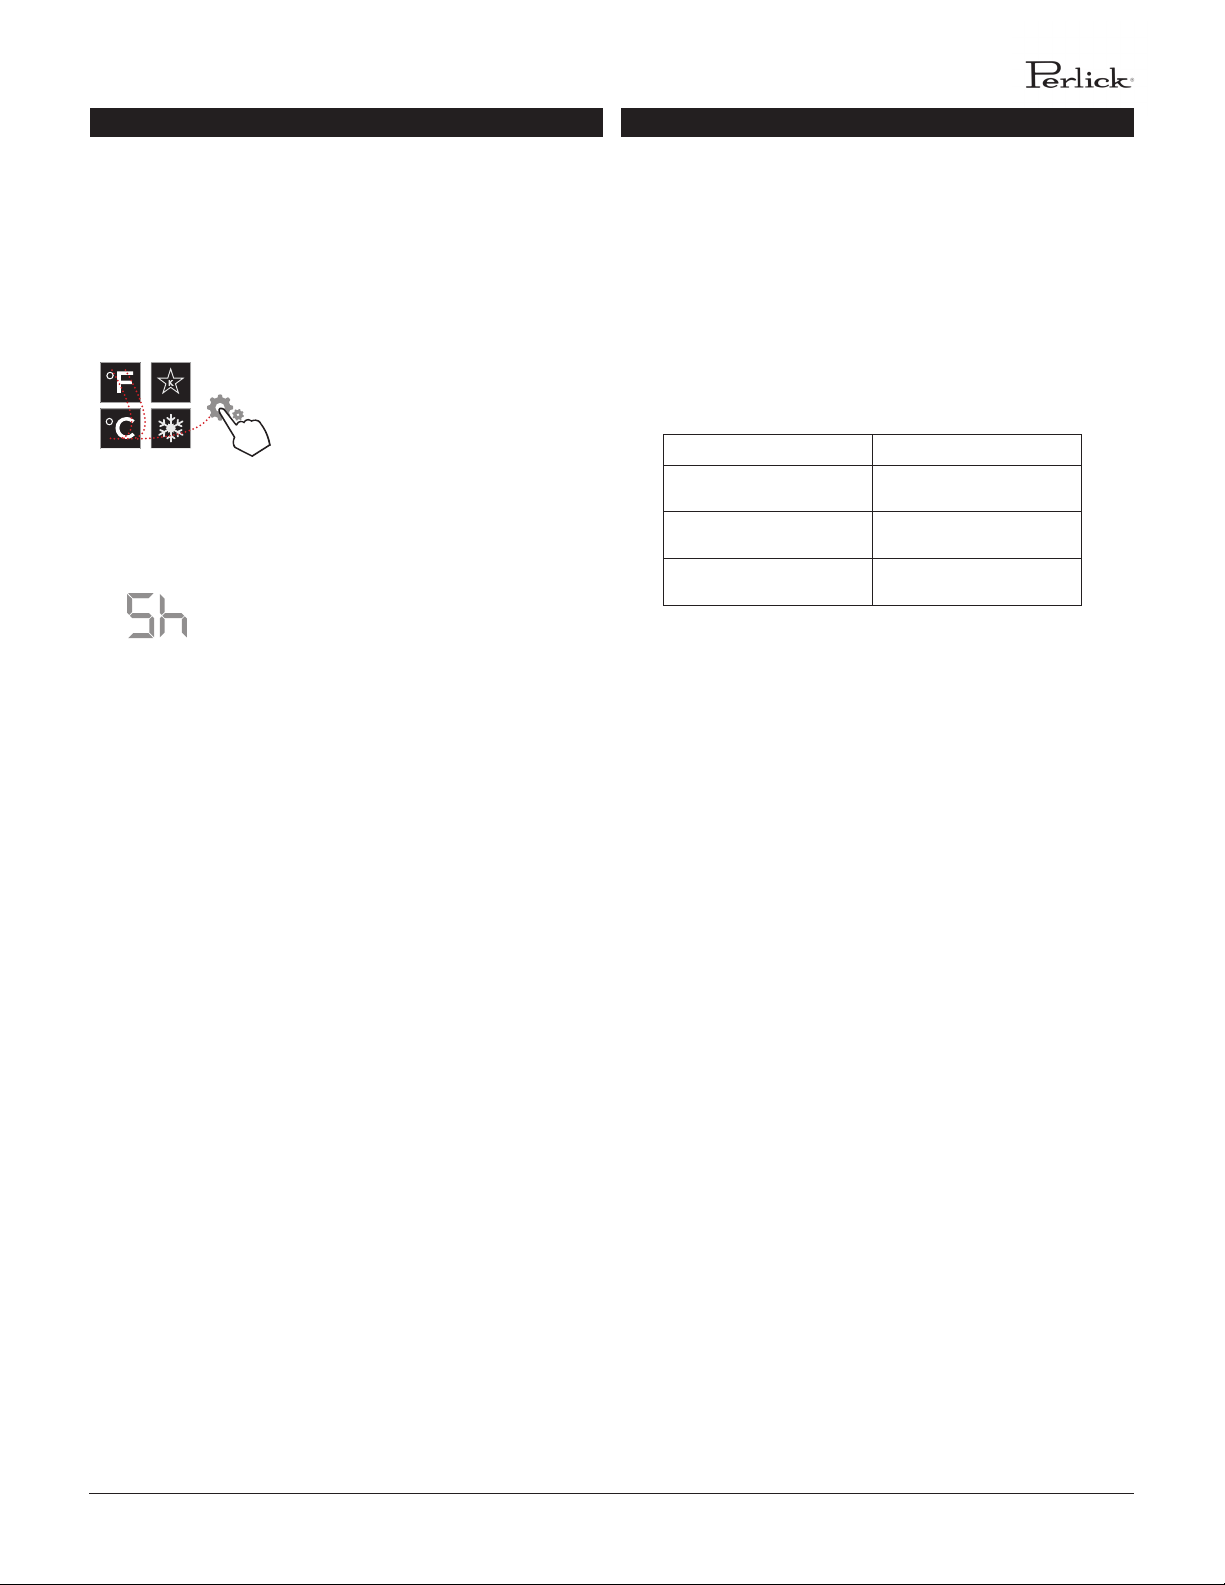
Showroom Mode
Select Showroom mode for units that are being used solely
for display purposes. Showroom mode has the user interface
fully funconal along with the cabinet lights, however, no
compressor, evaporator fans or condenser fans will operate.
Press the sengs menu (15) icon
on the far right. This will illuminate
a cluster of four icons as shown
to the le. A 5 key combinaon*,
including the Fahrenheit readout (11)
icon, Celsius readout (12) icon and
sengs menu (15) icon, will acvate
Showroom mode: F-C-F-C-Sengs.
Upon acvang showroom mode, the
temperature readout (7) with show
Sh each me the door is opened unl
showroom mode is turned o.
To exit showroom mode, enter the 5
key combinaon.
*5 key combinaon must be
completed within 5 seconds to turn
showroom mode on and o.
1
2 4
3
5
PERLICK RESIDENTIAL COLUMN REFRIGERATION USE & CARE GUIDE
8 | perlick.com/residential
TOUCH-SCREEN CONTROL OPERATION - FREEZER MODELS
2 3 4 6 8 91
5 7
FREEZER CONTROL OPERATION
The following instrucons are for the touch-screen control in
Perlick column freezers (model CR24F).
1 Wake Buon
2 Temperature adjustment (up and down in
1° increments)
3 Temperature readout
4 Light intensity adjustment
5 Fahrenheit readout
6 Celsius readout
7 Sabbath mode
8 Quick cool mode
9 Sengs menu
Using the Freezer Column Control
Upon door opening, the Wake buon (1) outline will illuminate.
Once acvated, temperature adjustment (2), temperature
readout (3) and sengs (9) menu icons will illuminate.
Freezer Temperature
The freezer is the same temperature throughout, so only the
temperature adjustment (2) and temperature readout (3) will
illuminate.
Compartment Sp. Factory Seng Temperature
Range
All N/A 0°F -10°F - 10°F
The freezer will come set from
the factory to 0°F. To adjust the
temperature adjustment (2) arrows
unl desired temperature is reected
in the temperature readout (3).
Double beer indicates that minimum
or maximum temperature has been
reached. Temperature will ash twice
to indicate new seng.
Control shown fully illuminated below for illustraon purposes only.
PERLICK RESIDENTIAL COLUMN REFRIGERATION USE & CARE GUIDE
perlick customer service (800)558-5592 | 9
TOUCH-SCREEN CONTROL OPERATION - FREEZER MODELS
Column Theatre Lighng
Perlick column freezers feature an impressive amount of lighng
for clear viewing and display of goods. White LED lighng runs
vercally down the walls and horizontally across the ceiling of
main compartment.
To adjust the brightness of the
lighng when the door is opened,
press the up and down arrows in the
light intensity adjustment icon (4).
Double beep indicates that minimum
or maximum level has been reached.
Icons will ash twice to indicate new
seng.
Changing from Fahrenheit to Celsius scale
The controller is factory set to Fahrenheit scale, but can easily
be changed to read Celsius in the sengs menu.
Press the sengs menu (9) icon
on the far le. This will illuminate
a cluster of four icons as shown to
the le. To display temperatures in
Celsius, press the Celsius readout icon
(6).
Change will be reected in the
temperature readout (3). The C will
be illuminated to signify the scale.
Sabbath Mode
All Perlick column refrigeraon models have Sabbath mode
capabilies. This allows the user to interact with the unit
without changing the amount of energy it is using. In this mode,
the interior lighng is turned o unl user turns o Sabbath
mode.
Press the sengs menu (9) icon on
the far right. This will illuminate a
cluster of four icons as shown to the
le. To acvate Sabbath mode, press
the Sabbath mode icon (7).
Please note that, when in Sabbath
mode, the Sabbath mode (7) icon
will be the only icon that will be
illuminated (connuously) unl user
presses the Sabbath mode icon to
turn the mode o.
Quick Cool (Shopping) Mode
The main compartment of the freezer can be set to Quick Cool
(shopping) mode to lower the temperature aer loading a
large quanty of product to quickly bring them to the preferred
temperature.
Press the sengs menu (9) icon on
the far right. This will illuminate a
cluster of four icons as shown to the
le. To acvate Quick Cool (shopping)
mode, press the Quick Cool (8) icon.
This will acvate the mode and the
Quick Cool (8) will remain illuminated
unl the set point is achieved.
Showroom Mode
Select Showroom mode for units that are being used solely
for display purposes. Showroom mode has the user interface
fully funconal along with the cabinet lights, however, no
compressor, evaporator fans or condenser fans will operate.
Press the sengs menu (9) icon
on the far right. This will illuminate
a cluster of four icons as shown
to the le. A 5 key combinaon*,
including the Fahrenheit readout (5)
icon, Celsius readout (6) icon and
sengs menu (9) icon, will acvate
Showroom mode: F-C-F-C-Sengs.
Upon acvang showroom mode, the
temperature readout (7) with show
Sh each me the door is opened unl
showroom mode is turned o.
To exit showroom mode, enter the 5
key combinaon.
*5 key combinaon must be
completed within 5 seconds to turn
showroom mode on and o.
1
2 4
3
5
PERLICK RESIDENTIAL COLUMN REFRIGERATION USE & CARE GUIDE
10 | perlick.com/residential
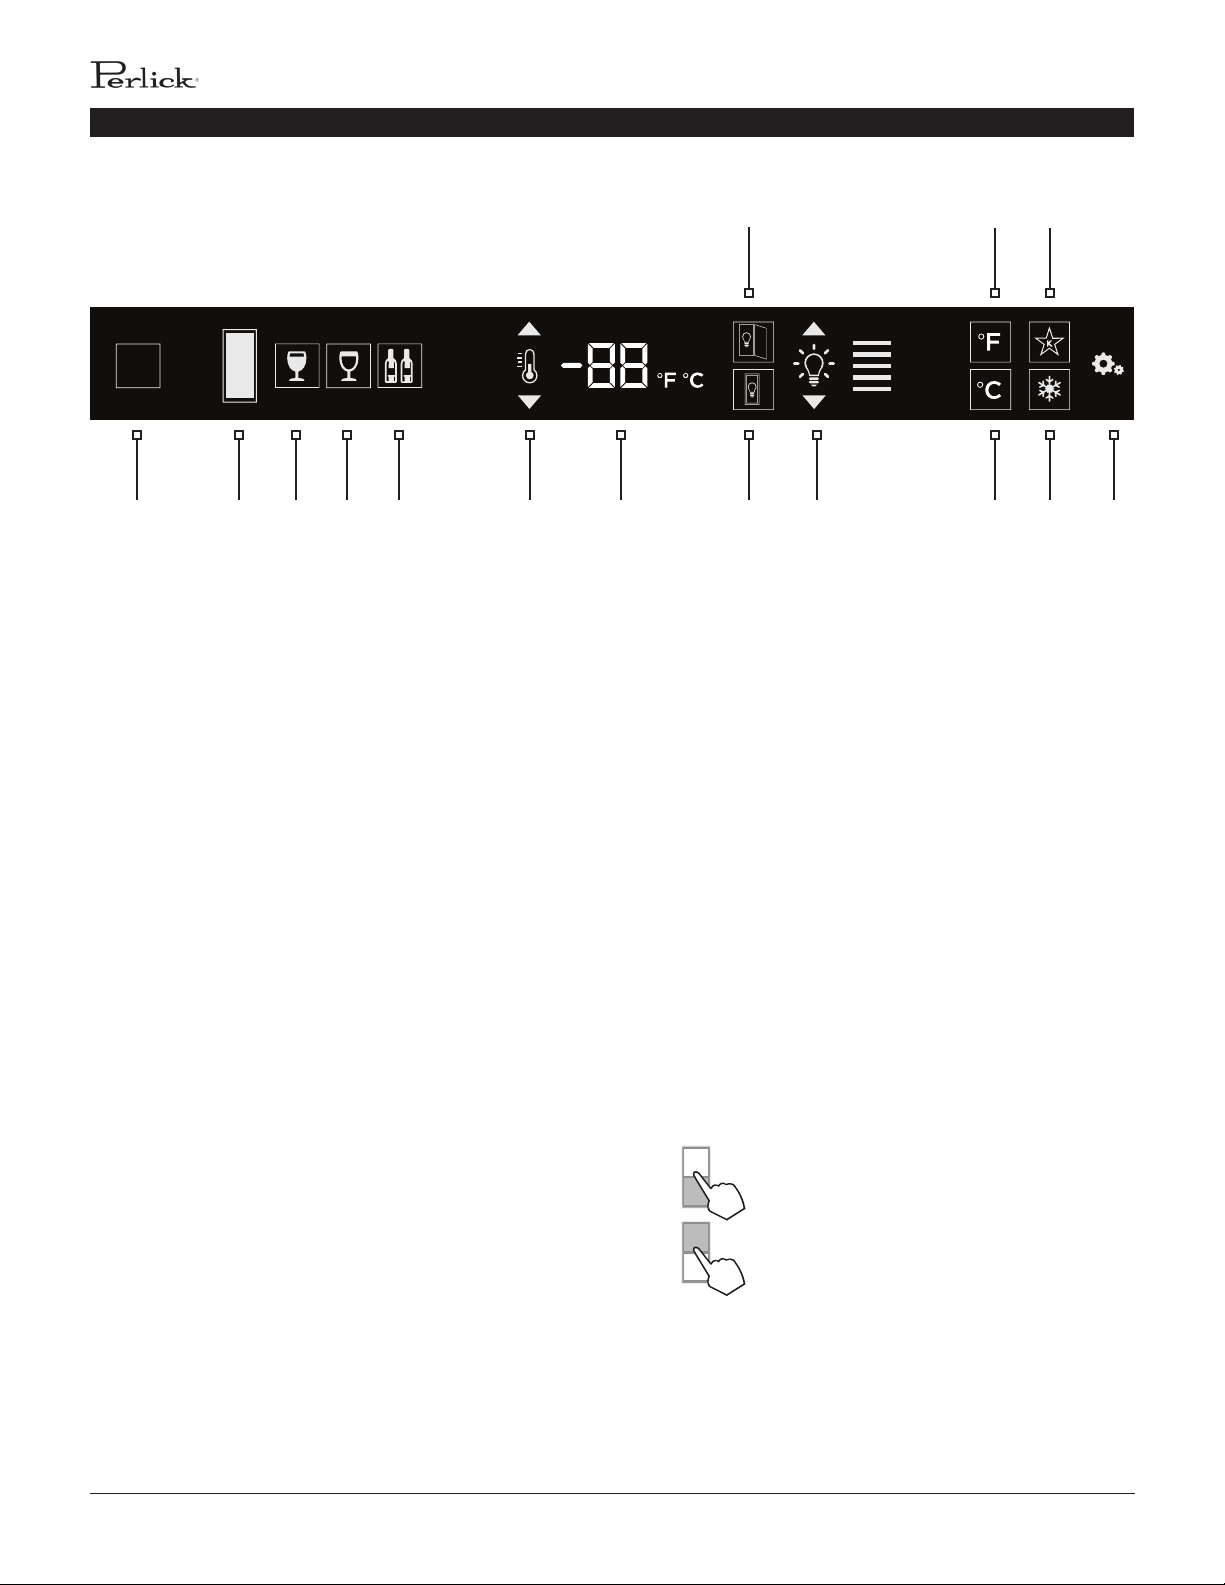
TOUCH-SCREEN CONTROL OPERATION - WINE MODELS
2 3 4 5 6 7 109 12 14 151
11 13
8
Control shown fully illuminated below for illustraon purposes only.
WINE RESERVE CONTROL OPERATION
The following instrucons are for the touch-screen control in
Perlick column wine reserves (model CR24W and CR24D).
1 Wake Buon
2 Temperature zone selecon (Dual-zone models)
3 White wine temperature seng
4 Red wine temperature seng
5 Cellar temperature seng
6 Temperature adjustment (up and down in
1° increments)
7 Temperature readout
8 Light adjustment (door open)
9 Light adjustment (door closed)
10 Light intensity adjustment
11 Fahrenheit temperature mode
12 Celsius temperature mode
13 Sabbath mode
14 QuickCool mode
15 Sengs menu
Using the Wine Column Control
Upon door opening, the Wake buon (1) outline will
illuminate. Once acvated, the temperature zone selecon
(2), temperature adjustment (7), temperature readout (8) and
sengs (15) menu icons will illuminate.
Selecng a Temperature Zone
Perlick’s touch-screen controller is preset with recommended
temperature sengs for white wine, red wine and cellaring.
Within the presets, you have the ability to adjust the
temperature in 1° increments as you desire. Because single
zone models (CR24W) are one temperature throughout, there
is no zone selecon. On dual zone models (CR24D), press the
temperature zone selecon (2) icon to toggle through the zones
unl desired zone is illuminated. Single zone models come
factory set to 50°F. Dual zone models come factory set to 60°F
in the top zone and 50°F in the boom zone.
Top Zone
Bottom Zone

PERLICK RESIDENTIAL COLUMN REFRIGERATION USE & CARE GUIDE
perlick customer service (800)558-5592 | 11
TOUCH-SCREEN CONTROL OPERATION - WINE MODELS
Storing White Wine
Perlick wine columns are preset with expert-recommended
temperature sengs for white wine. To set a zone in dual zone
models to this preset, touch the temperature zone selecon
icon (2) to illuminate the zone you’d like to set to white wine
temperature, then choose the white wine temperature seng
icon (3) to set. For single zone models, simply choose the white
wine temperature seng icon (3).
Compartment Sp. Factory Seng Temperature
Range
Any
50°F 40°F - 68°F
To adjust the temperature up
or down, press the temperature
adjustment (6) arrows unl desired
temperature is reected in the
temperature readout (7). Double
beep indicates that minimum or
maximum temperature has been
reached. Temperature will ash twice
to indicate new seng.
Storing Red Wine
Perlick wine columns are preset with expert-recommended
temperature sengs for red wine. To set a zone in dual zone
models to this preset, touch the temperature zone selecon
icon (2) to illuminate the zone you’d like to set to red wine
temperature, then choose the red wine temperature seng
icon (4) to set. For single zone models, simply choose the red
wine temperature seng icon (4).
Compartment Sp. Factory Seng Temperature
Range
Any
60°F 40°F - 68°F
To adjust the temperature up
or down, press the temperature
adjustment (6) arrows unl desired
temperature is reected in the
temperature readout (7). Double
beep indicates that minimum or
maximum temperature has been
reached. Temperature will ash twice
to indicate new seng.
Cellaring Wine
Perlick wine columns are preset with expert-recommended
temperature sengs for cellaring (long-term storage) wine.
By choosing the cellar mode, the enre cabinet will default to
55°F for long-term storage. For dual zone models, touch the
temperature zone selecon icon (2) to illuminate, then choose
the Cellar temperature seng icon (5) to set. For single zone
models, simply choose the Cellar temperature icon (5).
Compartment Sp. Factory Seng Temperature
Range
Any 55°F 40°F - 68°F
To adjust the temperature up
or down, press the temperature
adjustment (6) arrows unl desired
temperature is reected in the
temperature readout (7). Double
beep indicates that minimum or
maximum temperature has been
reached. Temperature will ash twice
to indicate new seng.
PERLICK RESIDENTIAL COLUMN REFRIGERATION USE & CARE GUIDE
12 | perlick.com/residential
Column Theatre Lighng
Perlick column wine reserves feature an impressive amount
of lighng for clear viewing and display of wine boles. Door
open white LED lighng runs vercally down the walls and
horizontally across the ceiling of each compartment. Door
closed (display) lighng can be changed from white to blue
(blue will only illuminate the side walls.)
Wine models are factory set to white
lighng. To adjust the brightness of
the lighng when the door is opened,
press the up and down arrows in the
light intensity adjustment icon (4).
Changing from Fahrenheit to Celsius scale
The controller is factory set to Fahrenheit scale, but can easily
be changed to read Celsius in the sengs menu.
Press the sengs menu (15) icon
on the far right. This will illuminate
a cluster of four icons as shown to
the le. To display temperatures in
Celsius, press the Celsius readout icon
(12).
Change will be reected in the
temperature readout (7). The C will
be illuminated to signify the scale.
Quick Cool (Shopping) Mode
The wine column can be set to Quick Cool (shopping) mode to
lower the temperature aer loading a large quanty of product
to quickly bring them to the preferred temperature.
Press the sengs menu (15) icon
on the far right. This will illuminate
a cluster of four icons as shown
to the le. To acvate Quick Cool
(shopping) mode, press the Quick
Cool (14) icon. This will acvate the
mode and the Quick Cool (14) will
remain illuminated unl the set point
is achieved.
TOUCH-SCREEN CONTROL OPERATION - WINE MODELS
To change to blue lighng, connue
pressing the arrows unl the control
turns blue in color (blue light only
illuminates when the door is closed.)
To return to white lighng, connue
pressing the arrows unl controls
illuminate white. Icons will ash twice
to indicate new seng.
Lighng adjustments can be made
separately for when the door is
opened and closed. Select the light
adjustment (door open) icon (8) to
change the intensity of the light when
the door is opened. Select the light
adjustment (door closed) icon (9) to
change the intensity or color of the
light when the door is closed. Please
note that when the door is open, the
lights will automacally go back to
white for visibility.
PERLICK RESIDENTIAL COLUMN REFRIGERATION USE & CARE GUIDE
perlick customer service (800)558-5592 | 13
Showroom Mode
Select Showroom mode for units that are being used solely
for display purposes. Showroom mode has the user interface
fully funconal along with the cabinet lights, however, no
compressor, evaporator fans or condenser fans will operate.
Press the sengs menu (15) icon
on the far right. This will illuminate
a cluster of four icons as shown
to the le. A 5 key combinaon*,
including the Fahrenheit readout (11)
icon, Celsius readout (12) icon and
sengs menu (15) icon, will acvate
Showroom mode: F-C-F-C-Sengs.
Upon acvang showroom mode, the
temperature readout (7) will show Sh
each me the door is opened unl
showroom mode is turned o.
To exit showroom mode, enter the 5
key combinaon.
*5 key combinaon must be
completed within 5 seconds to turn
showroom mode on and o.
1
2 4
3
5
TOUCH-SCREEN CONTROL OPERATION - WINE FREEZER AMBIENT CONDITIONS
Ambient Condions
For units installed in areas with changing ambient condions,
please take note of the table below. In extreme condions that
exceed those listed below, condensaon may start to form on
the front face of the cabinet.
Condensaon will subside as condions return to levels below
those shown in the table.
Ambient (F°) Relave Humidity (%)
70° 80%
80° 78%
90° 75%
PERLICK RESIDENTIAL COLUMN REFRIGERATION USE & CARE GUIDE
14 | perlick.com/residential
SURFACE CARE AND CLEANING
STAINLESS STEEL CARE AND CLEANING
Stainless steel is a “passive” metal because it contains other
metals like Chromium, Nickel and Manganese that stablize the
atoms. Chromium provides an invisible lm that covers the steel
surface, acng as a shield agent against corrosion. As long as
the lm is intact and not contaminated, the metal is passive and
stainless. If the passive lm of stainless steel has been broken,
the surface can start to corrode or rust.
Three materials or processes can break down stainless steel’s
passive layer, allowing corrosion to occur.
▪ Mechanical Abrasion This refers to items that will scratch
stainless steel surfaces. Steed pads, wire brushes and
scrapers are prime examples.
▪ Water Water that comes out of the faucet in varying
degrees of hardness. Hard water may leave spots. When
allowed to sit, these deposits will break down the passive
Chromium layer and rust stainless steel. Other deposits
from food preparaon must be promptly removed with an
appropriate cleaning agent.
▪ Chlorides Chlorides are found everywhere. They are
in water, food and table salt. Household and industrial
cleaners are the worst oenders.
Prevenng Stainless Steel Rust
Use non-abrasive tools to clean stainless steel surfaces. So
cloths and plasc scouring pads will not harm the steel’s passive
layer.
Clean with polish lines. Some stainless steels have visible
polishing lines or “grain”. When visible lines are present, always
scrub in a moon parallel to the lines. When the grain cannot
be seen, polish in a consistent straight paern - not in a circular
moon.
Use alkaline, alkaline chlorinated or non-chloride containing
cleaners. While many tradional cleaners are loaded with
chlorides, the industry is providing an ever-increasing choice of
non-chloride cleaners. If you are not sure of chloride content
in the cleaner being used, contact your cleaner supplier. If you
present cleaner contains chloride, ask your supplier for an
alternave. Avoid cleaners containing quaternary salt; it also
can aack stainless steel and cause ping and/or rusng. Clean
frequently to avoid build-up of hard, stubborn stains.
Stainless Steel Exterior Door Cleaning
Keep exterior stainless steel surface prisne by wiping the
door with a damp microber cloth, followed by a dry polishing
chamois. Always follow the grain direcon when cleaning.
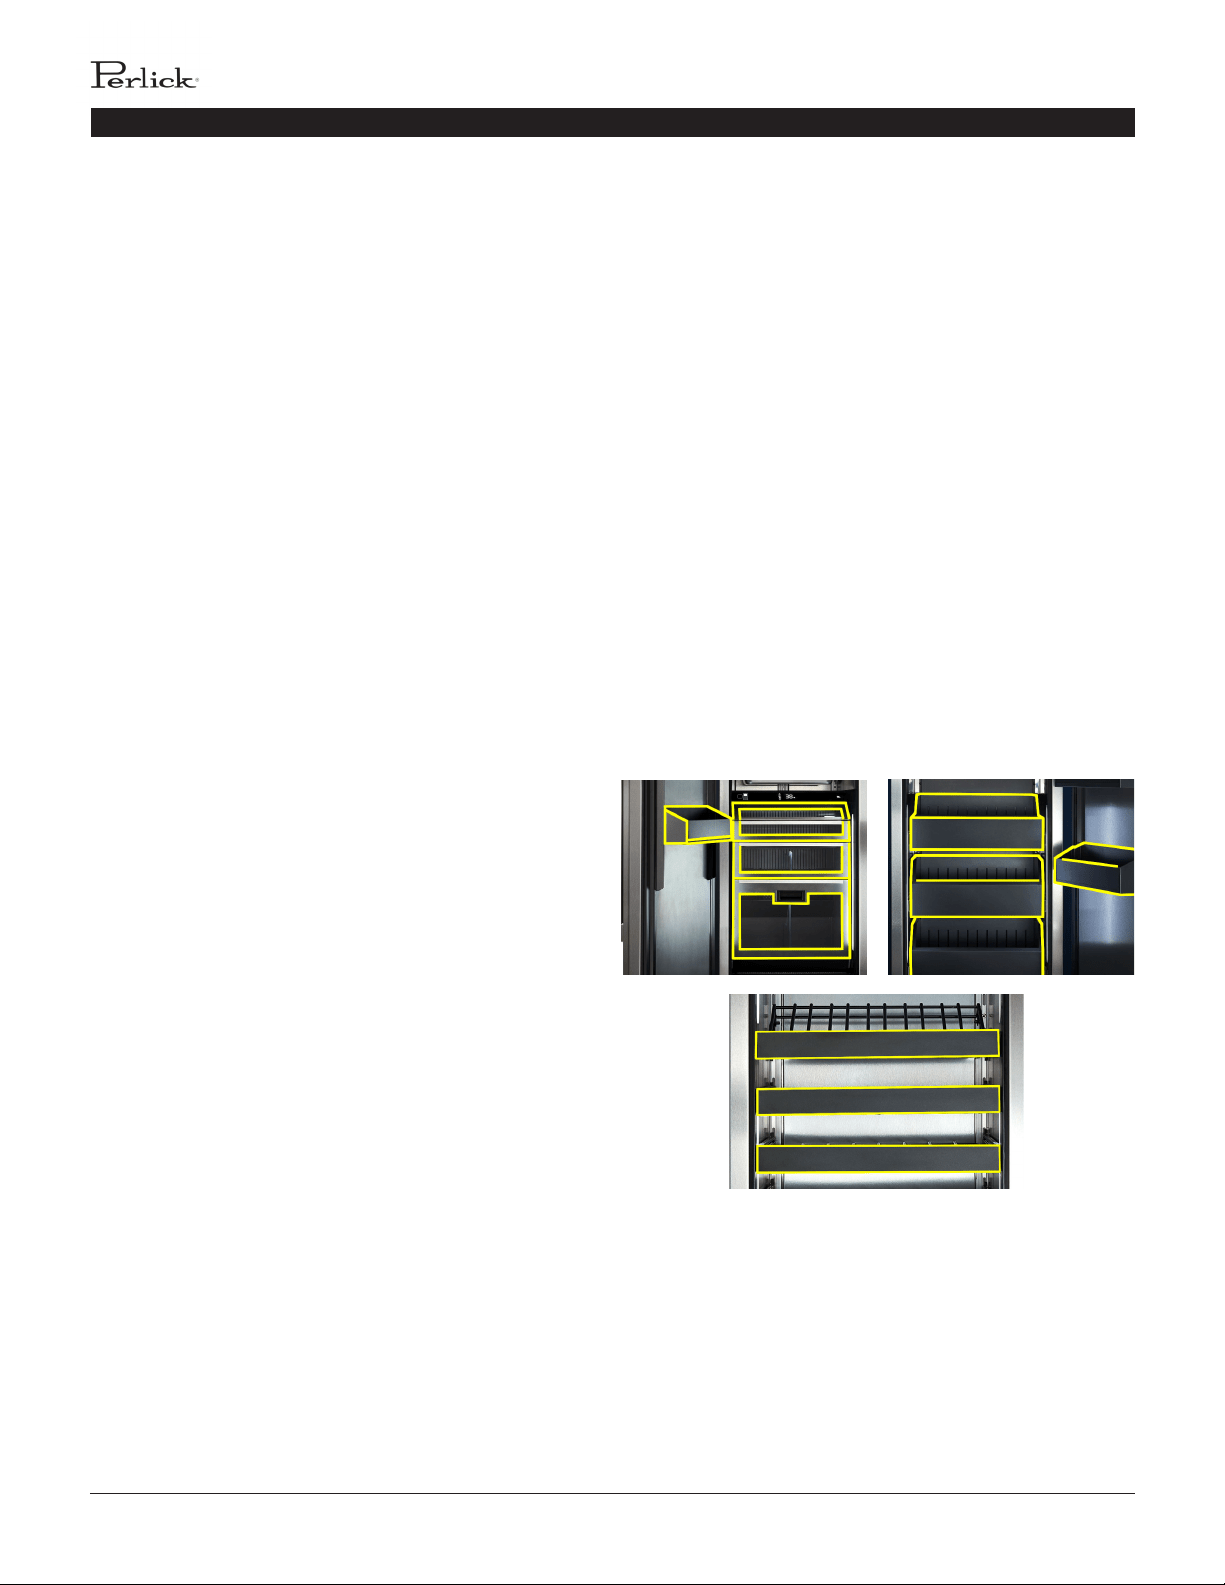
SLATE METALLIC SURFACE CARE AND CLEANING
Perlick’s slate metallic surface is nished with powder coat.
When properly cared for, powder coang provides a durable,
uniform nish that is resistant to scung, scratching and
staining.
The following surfaces are slate metallic (see yellow outlines
below for locaons):
▪ Refrigerator Models Drawers, Tip Out Bin, Door Bins
▪ Freezer Models Drawer Bins, Door Bins
▪ Wine Models Wine Shelf Fronts
To clean the slate metallic surface:
1. Carefully remove any loose debris with a damp sponge.
2. Use a so cloth and a mild household detergent soluon to
remove deposits.
3. Wipe area with so cloth and clean water. Dry thoroughly.
PERLICK RESIDENTIAL COLUMN REFRIGERATION USE & CARE GUIDE
perlick customer service (800)558-5592 | 15
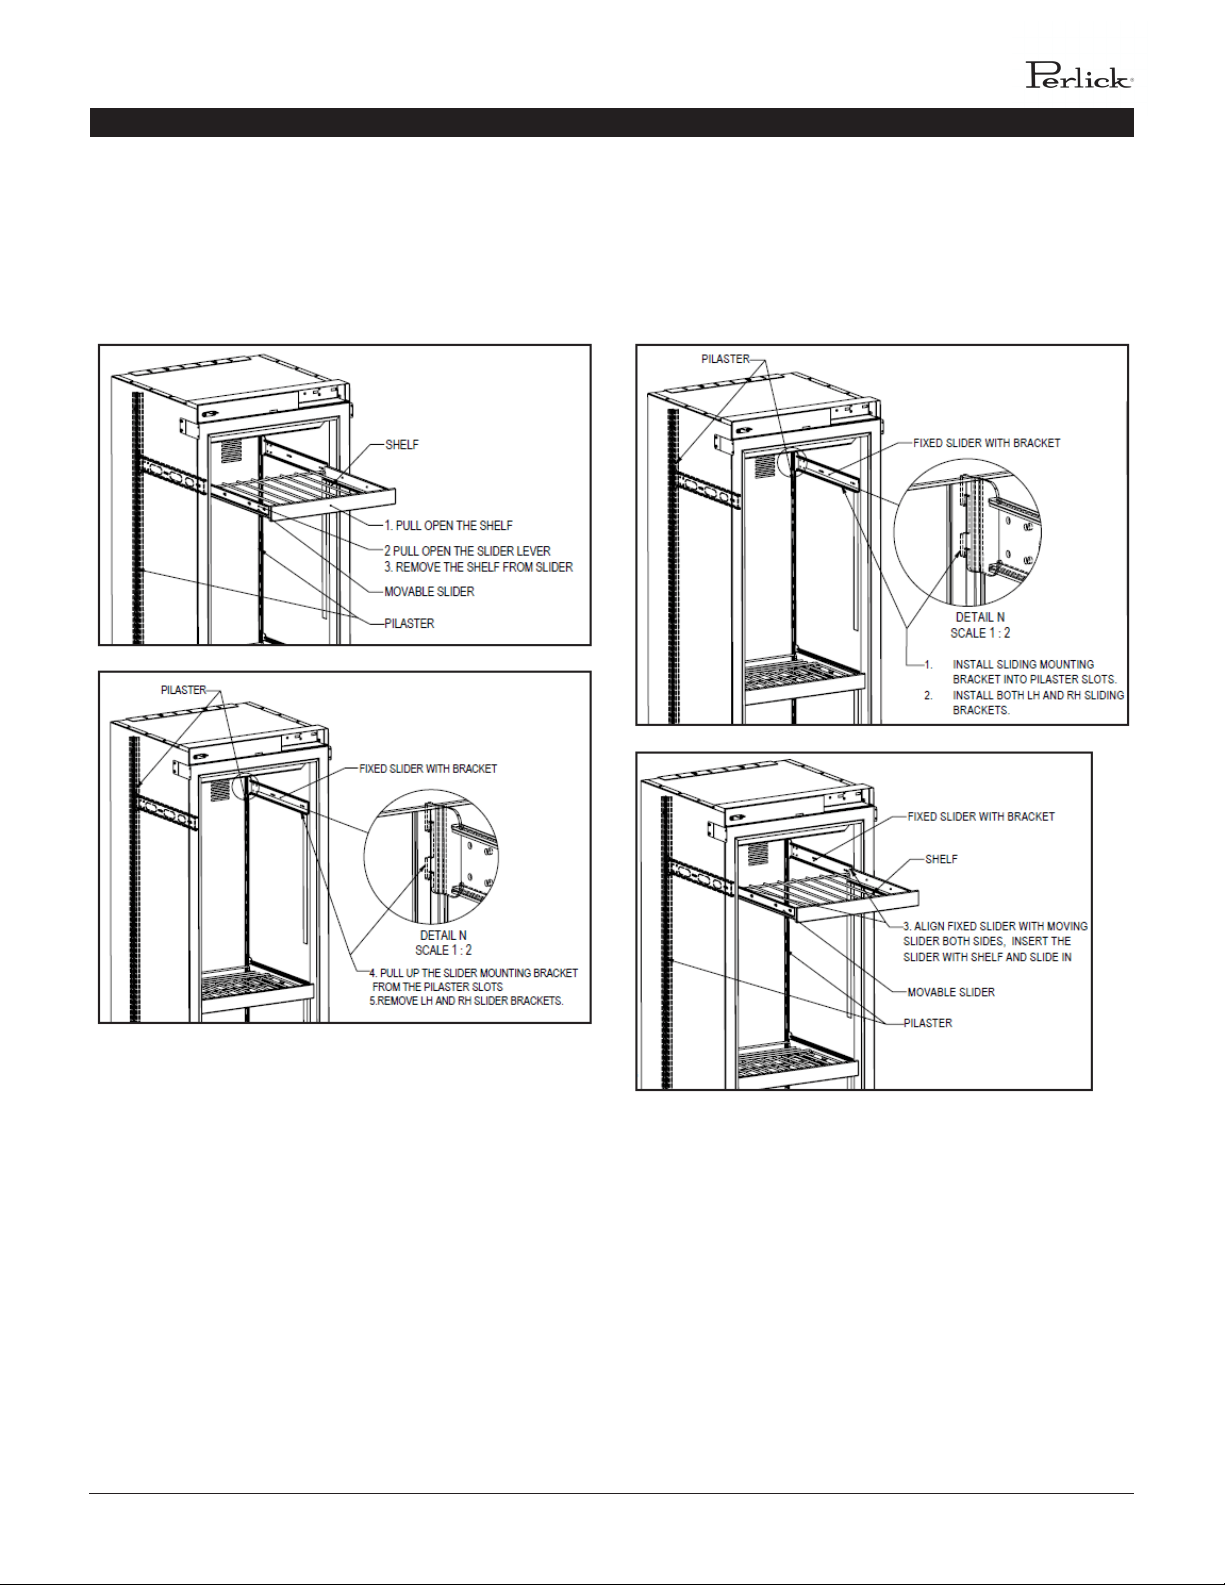
ADJUSTING THE WINE SHELVES
WINE SHELVING
Prior to making shelf adjustments, clear the shelf of product.
Shelf must be empty prior to changing its posion.
TO REMOVE WINE SHELVES TO INSTALL WINE SHELVES
PERLICK RESIDENTIAL COLUMN REFRIGERATION USE & CARE GUIDE
16 | perlick.com/residential
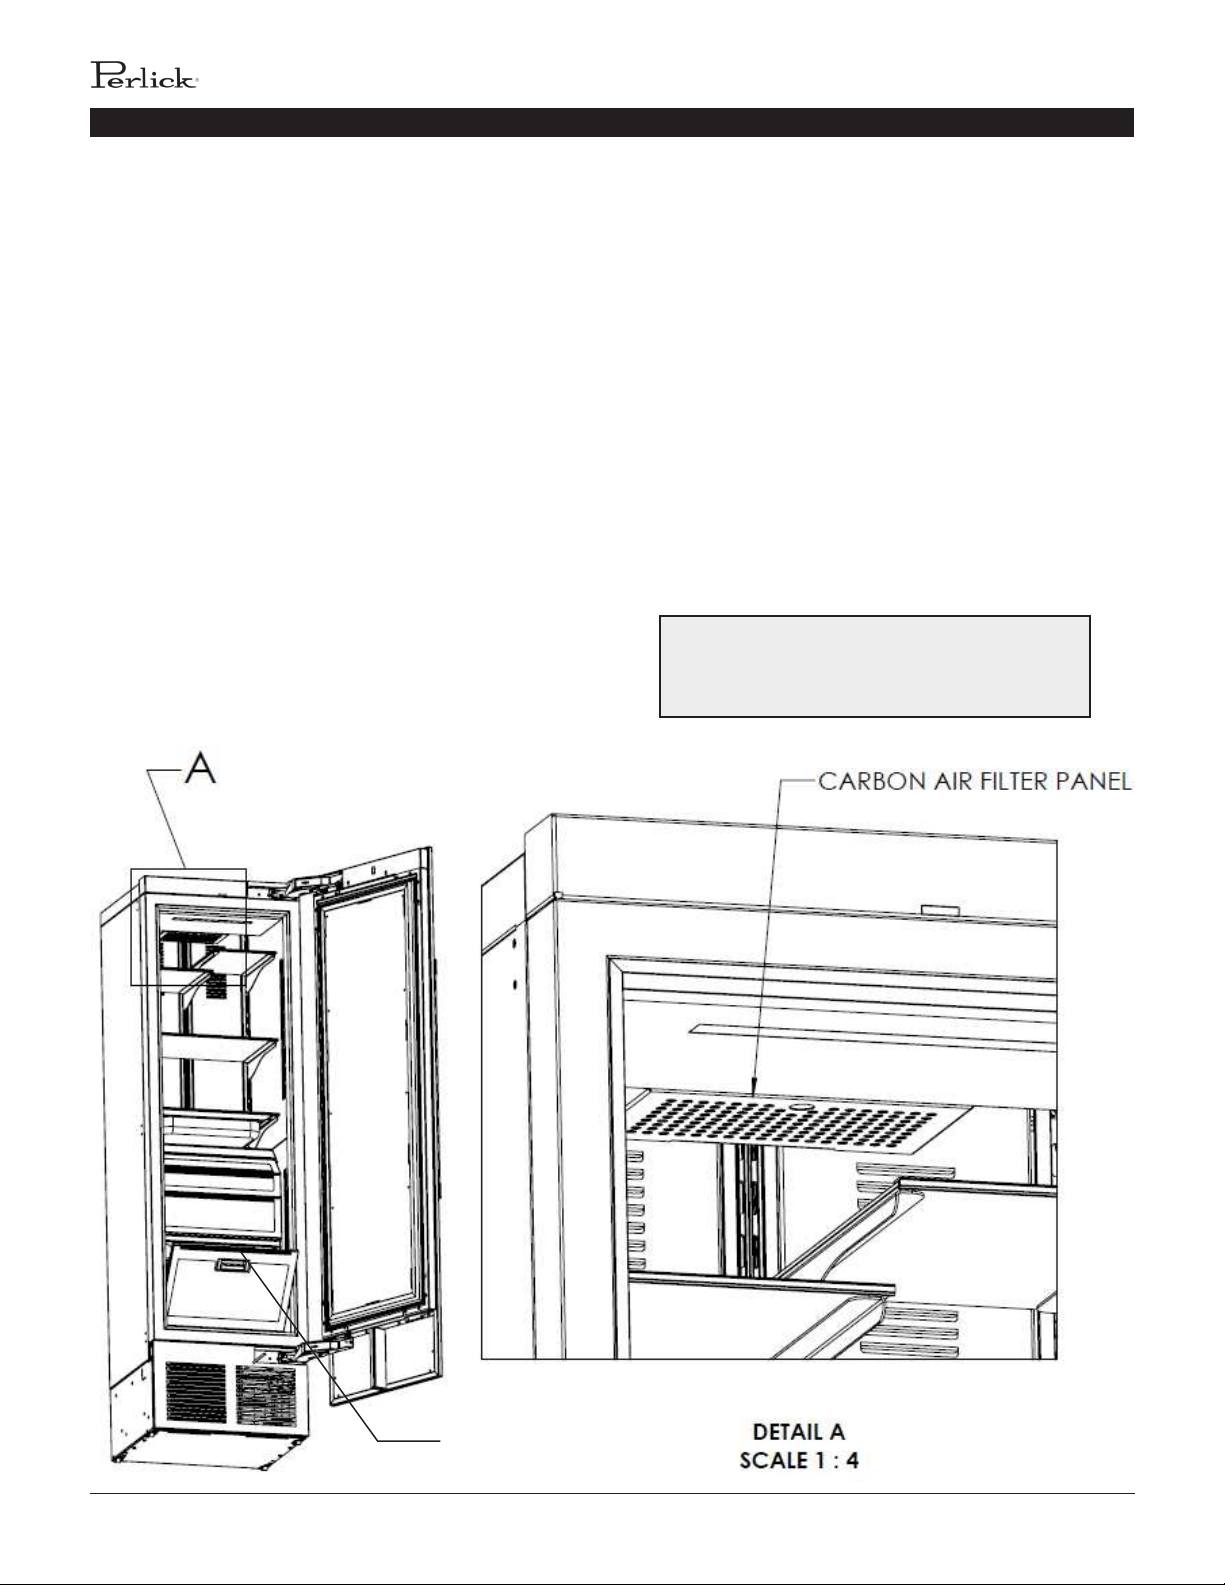
INSTALLING FILTERS
CARBON AIR FILTERS
Carbon air lters should be placed in the holder in the
perforated panel located in the top-rear of the cabinet (A).
NOTE: When installing carbon air lter in wine units, the top
rack will need to be removed to access the perforated panel.
1. Remove the lter from the plasc bag before installing into
the unit. Take care not to open or puncture the tyvek bag in the
casing.
2. Pull rmly to lower the carbon air lter panel.
3. Place the carbon air lter into the holder directly onto the
panel and close panel - push rmly to engage closure clips.
4. It is recommended to replace the carbon air lter every 3-6
months.
B
ETHYLENE FILTERS
Ethylene lters should be placed in the holder in top of the p-
out produce bin (B).
1. Remove the lter from the plasc bag before installing into
the unit. Take care not to open or puncture the tyvek bag in the
casing.
2. Open the p-out bin to access lter housing located on the
top of the bin.
3. Slide lter into housing and close p-out bin.
4. It is recommended to replace the ethylene lter every 3
months.
Need to order replacement lters? Contact your
selling dealer or visit perlick.com/residenal to
nd a Perlick dealer near you.
PERLICK RESIDENTIAL COLUMN REFRIGERATION USE & CARE GUIDE
perlick customer service (800)558-5592 | 17
TROUBLESHOOTING
Problem Cause Soluon
UI ashes Cabinet is in Showroom Mode
Press the sengs menu icon ( ) to illuminate a
cluster of four icons. A ve key combinaon - F-C-F-C-
Sengs - will exit showroom mode as shown below:
Door alarm is beeping
Door has been open for more than 3
minutes
Close the door
Light stays on when door is
closed (wine units)
Door Closed with Light (Display)
Follow direcons above to turn o Door Closed with
Light (Display) mode.
Light stays on when door is
closed (all units)
Door not closing correctly
Determine what may be causing the door to not fully
close
Issue with reed switch and magnet Contact Perlick Technical Service at (844) 411-8050
Compartments are warmer
than usual
Control is preset too warm
Lower the setpoint temperature. Refer to changing
the set point for the specic model in this manual
Condenser is dirty or obstructed Clear the condenser and clear obstrucon
The door is open or has been opened
more frequently lately
Wait 24 hours and recheck the temperature
Internal louvers and/or damper covers
are obstructed
Reset the preset temperature if necessary - refer to
page 4-13 of this manual for sengs
Make sure the louvers and/or the fan are not
obstructed
Warm product was recently placed in the
cabinet
Engage QuickCool mode; see pages 4-13 for
instrucons for instrucons on how
System runs for a long
period of me
Condenser is dirty or obstructed Clean the condenser and clear the obstrucon
Door was kept open for a long me or
was opened more frequently, or warm
product was recently placed in the
cabinet
Wait 24 hours and recheck temperature
Hot day and warm room temperature Normal for the system to run more frequently
Condensaon forms outside
of the unit
High humidity and/or frequent door
opening
Normal operaon (See page 13 for ambient condions
for CR24F Freezer models)
If the unit appears to be malfunconing, check the
troubleshoong guide below to see if you can idenfy the cause
and remedy for the issue and resolve it without a service call.
1
2 4
3
5
PERLICK RESIDENTIAL COLUMN REFRIGERATION USE & CARE GUIDE
18 | perlick.com/residential
Condensaon forms inside
the compartments
Door is not closing and sealing properly
Make sure the door is closing properly. Check the
door deal and replace if necessary
If condensaon persists, contact Perlick Technical
Service at (844) 411-8050
Noisy operaon
So sounds from compressor, fan motor
and valves heard
Normal operaon
“Crackling” sounds during defrost Normal operaon
Unit is not running No power going to the unit
Home circuit breaker was tripped. Reset the circuit
breaker
Ensure the unit is plugged in
Ensure the unit is not in “Showroom” mode
TROUBLESHOOTING

PERLICK RESIDENTIAL COLUMN REFRIGERATION USE & CARE GUIDE
perlick customer service (800)558-5592 | 19
WARRANTY
PERLICK CORPORATION
RESIDENTIAL REFRIGERATION PRODUCTS LIMITED
WARRANTY
WARRANTY:
Perlick Corporaon (“Perlick”) warrants to the original retail
purchaser that during the Basic Warranty Period, Perlick’s
products will be free from defects in material and workmanship,
and during the Extended Warranty Period, the hermecally
sealed refrigeraon system contained in Perlick’s undercounter
or upright refrigerators will be free from defects in material and
workmanship. This system consists enrely of the compressor,
condenser, drier, connecng tubing, evaporator and hot gas
bypass valve.
The Basic Warranty Period is as follows:
▪ For a new product or a oor display model sold within
three (3) years of being put on the oor, in each case
other than the H50IM Clear Ice Maker: The three (3) year
period commencing on the date of purchase by the original
retail purchaser, except that the Basic Warranty Period will
be the two (2) year period commencing on the date of
purchase by the original retail purchaser if the purchase of
the product is not registered with Perlick within ninety (90)
days of purchase in the manner described below.
▪ For the H50IM Clear Ice Maker, a oor display model (other
than of the H50IM Clear Ice Maker) sold more than three
(3) years but less than six years aer being put on the oor
or a factory second (B-Stock) product: The one (1) year
period commencing on the date of purchase by the original
retail purchaser.
▪ For a oor display model of the H50IM Clear Ice Maker sold
more than three (3) years but less than six years aer being
put on the oor: The ninety (90) day period commencing
on the date of purchase by the original retail purchaser.
The Extended Warranty Period applies only to the hermecally
sealed refrigeraon system contained in Perlick’s undercounter
and upright refrigerators. For undercounter refrigerators, the
Extended Warranty Period is the poron of the six (6) year
period commencing on the date of purchase by the original
retail purchaser that is not covered by the Basic Warranty
Period. For upright refrigerators, the Extended Warranty Period
is the poron of the twelve (12) year period commencing on
the date of purchase by the original retail purchaser that is not
covered by the Basic Warranty Period.
For a oor display model sold six years or more aer being put
on the oor, there is no warranty and such product is sold on an
“as is” basis.
REMEDY:
Perlick will provide the parts and labor necessary to repair or
replace (at Perlick’s opon) any parts proven to be defecve
in material or workmanship during the Basic Warranty Period.
Perlick will provide the replacement parts, but not the labor,
for any parts of the hermecally sealed refrigeraon system
proven to be defecve in materials or workmanship during
the Extended Warranty Period. The cost of freight to ship
the replacement parts will be paid by Perlick. Replacement
parts are warranted for the remainder of the original warranty
period, or ninety (90) days, whichever is longer.
REGISTRATION:
Your Perlick product can be registered at
www.perlick.com/RegisterMyPerlick.
OTHER TERMS AND CONDITIONS:
This Warranty applies only to products installed in the y
states of the United States, the District of Columbia and the ten
provinces of Canada.
To obtain the warranty coverage described in this Warranty,
Perlick or its authorized distributor or dealer must receive
wrien noce of the warranty claim within the applicable
warranty period. To receive parts and/or service and the name
and telephone number of the nearest Perlick authorized service
representave, please contact your Perlick dealer or distributor,
or Perlick’s Customer Service Department by wring to it at
Perlick Corporaon, An: Customer Service Department, 8300
West Good Hope Road, Milwaukee, Wisconsin 53223; or by
calling Perlick’s Customer Service Department at
800-558-5592; or by e-mailing Perlick’s Customer Service

PERLICK RESIDENTIAL COLUMN REFRIGERATION USE & CARE GUIDE
20 | perlick.com/residential
Department at warran[email protected]. In addion, you
can nofy Perlick of a warranty claim by subming the form on
the Perlick website at www.perlick.com/residenal/contact
and choosing ‘Service’ from the department list.
All service provided by Perlick under this Warranty must be
performed by Perlick’s authorized service representaves,
unless otherwise specied by Perlick in wring. Service will be
provided during normal business hours.
This Warranty applies only to the original retail purchaser of the
Perlick product, and may not be assigned or transferred.
This Warranty does not apply to:
▪ Damage to Products occurring during transportaon.
▪ Products that are used in a manner that is not normal
residenal or light commercial use.
▪ Products that are: improperly installed; misused or
abused; operated with low voltage; wired in a manner
not conforming to electrical codes; not properly operated
in accordance with Perlick’s instrucons; not cleaned
or maintained in accordance with Perlick’s instrucons;
modied; or damaged by lightning or other acts of nature.
▪ Consumable items such as light bulbs.
▪ Cosmec damage.
▪ Adjustments to controls, door reversal, cleaning the
condenser or other roune maintenance.
▪ Products for which the original proof of purchase, delivery
date or serial number cannot be veried.
▪ Products for which the defecve parts are not returned for
inspecon if requested by Perlick.
▪ Damage to other property caused by the products,
including but not limited to loss of food due to spoilage and
damage caused by water leakage.
THIS LIMITED WARRANTY IS IN LIEU OF ANY OTHER WARRANTY,
EXPRESSED OR IMPLIED, INCLUDING BUT NOT LIMITED TO
ANY IMPLIED WARRANTY OF MERCHANTABILITY OR FITNESS
FOR A PARTICULAR PURPOSE; PROVIDED HOWEVER, THAT TO
THE EXTENT REQUIRED BY LAW, IMPLIED WARRANTIES ARE
INCLUDED BUT DO NOT EXTEND BEYOND THE DURATION OF
THE EXPRESS WARRANTY FIRST SET ABOVE.
PERLICK’S SOLE LIABILITY AND YOUR EXCLUSIVE REMEDY
UNDER THIS WARRANTY ARE SET FORTH IN THE PARAGRAPH
ENTITLED “REMEDY” SET FORTH ABOVE.
PERLICK SHALL HAVE NO LIABILITY WHATSOEVER FOR ANY
INCIDENTAL, CONSEQUENTIAL OR SPECIAL DAMAGES ARISING
FROM THE SALE, USE OR INSTALLATION OF THE PRODUCT OR
FROM ANY OTHER CAUSES WHATSOEVER, WHETHER BASED
ON WARRANTY (EXPRESS OR IMPLIED) OR OTHERWISE BASED
ON CONTRACT, TORT OR ANY OTHER THEORY OF LIABILITY.
IN NO EVENT SHALL PERLICK’S LIABILITY WITH RESPECT TO A
PRODUCT EXCEED THE PURCHASE PRICE OF THE PRODUCT.
Some states do not allow limitaons on how long an implied
warranty lasts, or the exclusion or limitaon of incidental or
consequenal damages, so the above limitaons and exclusions
may not apply to you. This Warranty gives you specic legal
rights, and you may also have other rights, which vary from
state to state.
PERLICK RESIDENTIAL COLUMN REFRIGERATION USE & CARE GUIDE
perlick customer service (800)558-5592 | 21
For Product Informaon
▪ Contact your selling dealer
▪ Inquire via the web at perlick.com/residenal
▪ Call (800) 558-5592 for factory assistance on planning
installaon or product informaon
▪ Write to Perlick Corporaon, Residenal Customer Service,
8300 W. Good Hope Rd., Milwaukee, WI 53223, USA
▪ Email us at residen[email protected]om
For Product Service
▪ Prior to contacng Perlick, check the idencon plate (see
page 2 for locaon) for the serial number on the cabinet
you are calling about.
▪ Visit perlick.com/residenal/contact and live chat with
Perlick Technical Service 7am-6pm Monday-Friday. Look for
the graphic below and click to chat with an agent
▪ Visit perlick.com/residenal/contact and ll out the Contact
form. Select ‘Service’ from Choose a Department and note
the serial number of the cabinet you are wring about in
the Queson or Comment secon.
▪ Call (844) 411-8050 to speak with a Perlick Technical
Service agent
▪ Email us at [email protected]
For Replacement Parts
▪ Use only genuine Perlick replacement parts and
accessories. Genuine Perlick parts and accessories are
designed to work correctly with Perlick products and oer
surperior service life. The use of non-Perlick parts can
damage the unit and may void the warranty.
▪ Prior to contacng Perlick, check the idencon plate (see
page 2 for locaon) for the serial number on the cabinet
you are calling about.
▪ Visit perlick.com/residenal/contact and live chat with
Perlick Technical Service 7am-6pm Monday-Friday. Look for
the graphic below and click to chat with an agent
▪ Visit perlick.com/residenal/contact and ll out the Contact
form. Select ‘Service’ from Choose a Department and note
the serial number of the cabinet you are wring about in
the Queson or Comment secon.
▪ Call (844) 411-8050 to speak with a Perlick Technical
Service agent
▪ Email us at [email protected]
CONTACT US
FORM NO. Z2497
REV. B-02/20/2018
8300 West Good Hope Road, Milwaukee, WI 53223, USA
perlick.com/residenal • (800) 558-5592
Perlick Residential is a division of Perlick Corporation
© 2017 Perlick Corporation