This product can be used in cleaning family homes, hotel rooms, and small offices, and cleans well a variety of short-pile carpets, wood floors, and ceramic tile ,etc.
Functionality overview
It works on a rechargeable lithium-ion battery and under intelligent microcomputer control. It is an intelligent vacuum cleaner featuring UV sterilization, auto cleaning, vacuuming, intelligent wet mopping, timing, schedule cleaning, remote control, multiple identification protection functions, various automatic cleaning modes, and automatic recharging.
Cleaner and accessories
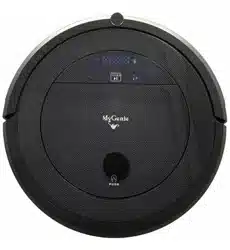
Structure of the cleaner
Unit top
Unit bottom
Panel of the cleaner
Before cleaning, tidy up the small items or obstacles in the room, especially the power cord and other easy entanglements; where the battery is low during cleaning, the cleaner will stop cleaning and give five beeps, light up the recharging touch light, and automatically rolling back to the docking station.
Auto cleaning button
Press this button and the cleaner will starts automatic cleaning until the power is low at which point of time it will automatically go back to the auto charging dock station. In the course of cleaning, touch this button and the cleaner will stop.
Spot cleaning indicator
When this button is on, it will automatically enter into a spot cleaning mode in a spiral pattern within about 1 square meter for approximately 2-3 minutes; in the course of cleaning process, press any button on the remote controller, it will stop.
Docking indicator
Press the " ' "on the remote control, and as this button is on, the cleaner will seek the docking station for charging automatically.
Schedule indicator
Press TIMER" " button and SPOT" "button on the remote controller, the" "icon on the cleaner panel will be on, and the cleaner enters into the current week day hour/minute setting and schedule week day, hour/minute setting.
Digital indicator
An error code will be displayed for an error, for instance: E001 will be displayed as "E001"
Display week day, hour/minute, for instance: Tuesday 08:28A.M. will be digitally displayed as 2and "08:28".
Recharging display "1 1 1 1" In the course of recharging, a "1" will be lit up in turn on the When it is charged full capacity, "FULL" is displayed.
Display of weekday :1,2,3,4,5,6,7
Attention: Before charging , make sure turn the power switch of the cleaner to ON!
Garbage
The " " icon lit up on the cleaner indicating the suction inlet is blocked or the dust bin is full, or the garbage sensors is covered with dust.
Display of FULL GO
When the cleaner at stands by status, press the" "on the remote controller and the cleaner will enter the FULL GO mode. (Definition of FULL GO: When choose this function , then the cleaner will automatically clean one more time after it is fully charged again.)
Display of wall follow cleaning
When the cleaner stands by, press" "on the remote controller, and the cleaner will enter the wall follow cleaning mode.
Display of water seeping speed of the Intelligent water tank
First install the small dustbin with the intelligent water tank, the cleaner will automatically launch to the water tank mopping mode. Press the"" button to start auto deaning& mopping and the" “will be lit up or blinking, when the water tank runs out of water, this icon will light off, display error code E012; and made a voice prompt”inject water, please"; if want to continue this function during cleaning, please take out the water tank and refill it(The default mode is the indicators are normally on(standard water seeping speed, and blinking indicates it is in fast water seeping speed, as configured in the settings by the remote controller).
Attention!
It is suggested to clean the suction inlet and dust sensor each time emptying the dust bin.
When the cleaner is at work, the cleaning path follows default Settings but when it detects any dust, it will automatically switch to focused spiral cleaning.
To maximize the wet mopping effect; Before start, please refill the water tank to the fullest.
Battery installation for the cleaner
1. To install the cleaner battery, please use a screwdriver to loosen the four screws on the half-moon shaped bottom shell, and remove the battery installation cover.
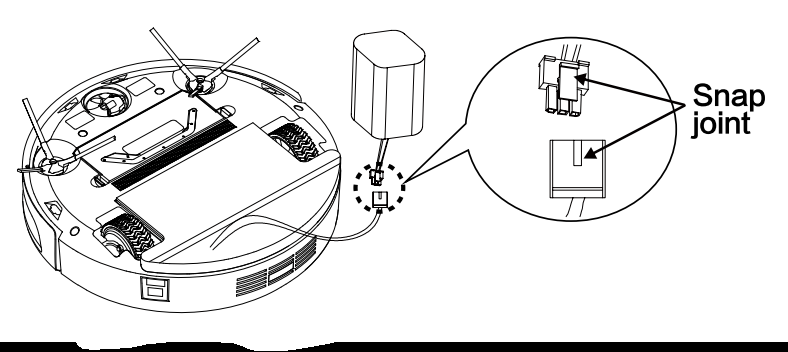
2. When installing the battery, please correctly connect the snap joints of the two terminals.
3. When not in use, place the cleaner into recharging status, which will maintain the battery in optimal use.
4. If the machine is left unused for a long time, please recharge the cleaner once a month on a regular basis to maintain the battery in optimal use.
5. The battery can only be replaced with the battery from the original manufacturer, otherwise it may cause damages or accidents to the cleaner.
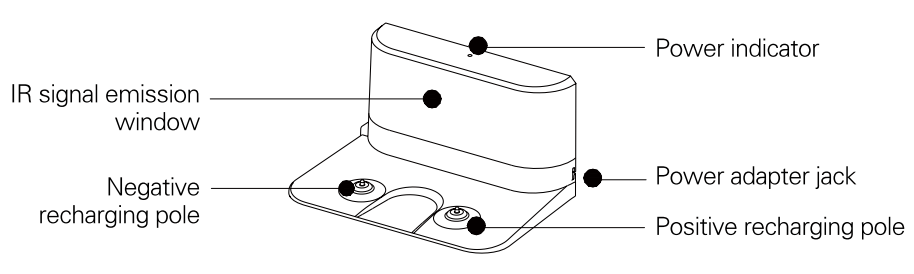
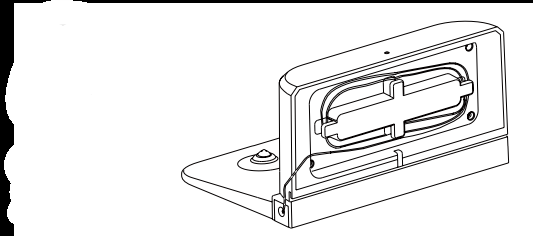
Introduction of the auto charging dock station
Introduction of the auto charging dock station
1. Securely mount the charging dock station onto a flat ground and a wall near and perpendicular to the ground.
2. Avoid obstacles and uneven areas within 2m in front of the docking station and 1m on both sides.
3. If the infrared signal emission surface of the docking station is blocked, the cleaner will be unable to find the docking station for charging.
4. Please keep tidy the DC power cord of the docking station, and do not put the power cord on the ground, otherwise it will affect to search the docking station
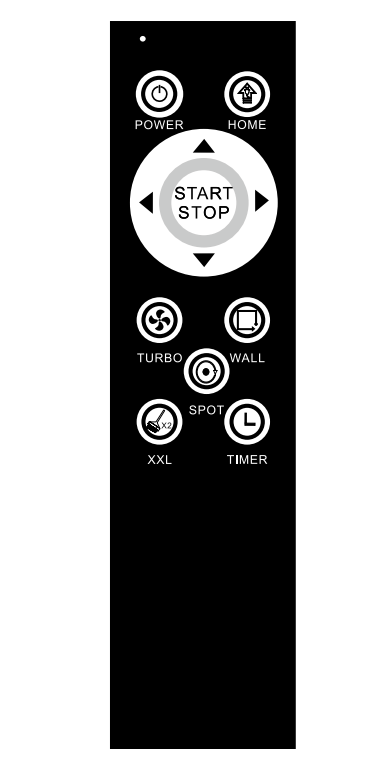
Introduction of the remote controller
Button functions of the remote controller
Press" "and the cleaner will enter the auto charging mode.
Press'" and the cleaner will enter the sleep/wake-up mode (in sleep mode, press and hold this button for 10 seconds to enter the wake-up mode).
Press"' and the cleaner will enter the Turbo cleaning mode, suitable for very dirty floor or hairy carpet.
Press" "and the cleaner will enter the wall follow cleaning mode.
Press" " and the cleaner will enter the spot cleaning mode.
Press" "and the cleaner will enter the FULL GO mode.
XXL
Press" 'and the cleaner will enter the Settings of appointment/time, UV
TIMER
lamp ON/OFF, Water tank outflow (this is a combination button).
Press" "and the cleaner will enter the automatic cleaning mode.
Press" ▲ "and the cleaner will start forward movement.
Press" ▼ "and the cleaner will start backward movement.
Press" ◄ "and the cleaner will start leftward movement.
Press" ► " and the cleaner will start rightward movement.
Attention
Place two AAA batteries to use the remote controller.
When controlling the cleaner with the remote controller, aim the controller at the sensor head of the cleaner, and keep it within 5M from the cleaner.
Settings of the intelligent water tank on the remote controller
At default mode from the factory, it is standard water seeping mode; if you want to use quick water seeping mode, follow the follow guide for setting.
1. Settings of the intelligent water tank
In standby mode, press the" "button, then press the" “button to enter the Settings of the water tank seeping speed (the water droplet icon ”" on the cleaner will flash);
Press the" ▲ “button, and the”"on the cleaner is on, the screen displays" 1111", indicating the water tank is in a standard water seeping mode, suitable for wooden floor, as too much water will ruin the wooden floor. This mode is also suitable for clean floor.
Press the" "button to save the current settings and return to the standby mode.
Press the" ▼ “button, the”"on the cleaner is off, the screen displays"0000"; indicating the water tank is in a quick water seeping mode, suitable for tile/marble floor or dirty floor.
Press the" "button to save the current settings and return to the standby mode.
Attention! Can only use water tank for floor wet mopping;
Only after vacuum cleaning, or use the floor have less large garbage
Settings of Schedule/time for the remote controller
1. Settings of current week day, hour/minute
a. Settings of current week day:
In the standby mode, press the" "button, then press the" "button to enter the Settings of current week day; press the" ◄ "," ► "buttons to switch Monday/Sunday;
Press the" ▲ "button until it is normally on to select a week day; press the" ▼ "button until it flashes to cancel a week day;
Press" "to save the current week day and enter the settings of current hour/minute;
b. Settings of current hour/minute:
After the Settings of current week day is done, press the" "button to enter the specific Settings of current hour/minute.
Press the" ◄ " and" ► "buttons to switch hour/minute;
Press the" ▲ "button to increment the current time, and press the" ▼ "button vice versa;
Press the" "button to save the Settings of appointment hour/minute and exit to the standby mode;
2. Settings of Schedule cleaning
a. Settings of Schedule week day:
In the standby mode, press the" "button, then press the" "button to enter the Settings of schedule week day; press the" ◄ "," ► " buttons to switch Monday/Sunday;
Press the" ▲ "button until it is normally on to select a week day ; press the" ▼ "button until it flashes to cancel a week day;
Press" "to save the appointed week day and enter the Settings of appointed hour/minute;
b. Settings of schedule hour/minute:
After the Settings of schedule week day is done, press the" "button to enter the Settings of appointed hour/minute.
Press the" ◄ "and" ► "buttons to switch hour/minute;
Press the" ▲ "button to increment the appointed time, and press the" ▼ "button vice versa;
Press the" "button to save the settings and enter the week day settings of schedule cleaning.
Introduction of the virtual house
Introduction to the virtual house
Toggle " " to turn off the power for virtual house, switch among front, side, and front/side;
Toggle " " to Off: the power of virtual house is cut off.
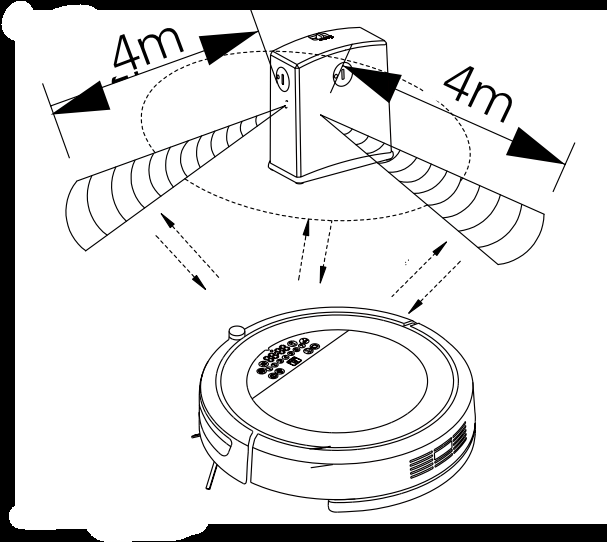
Toggle " " to “ " position: it indicates the power of the virtual house on, at this point of time, this is the front position, and the control radius of the virtual housel is 4 m.
Toggle " ” to “ ” position: it indicates the power of the virtual house is on, at this point of time, this is the sidewise position, and the control radius of the virtual house is 4 m.
Toggle " ” to “ "position: it indicates the power of the virtual house is on, at this point of time, this is the front/sidewise position, and the control radius of the virtual house is 4 m.
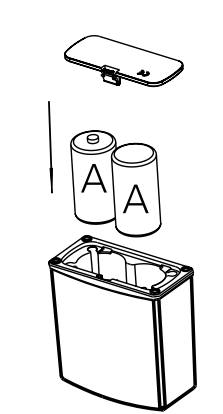
Instructions for the virtual house
1. Before use, remove the underside plate of the battery compartment of the virtual house, and place two D batteries according to the polarity indicated by the instructions into the compartment.
Attention!: Incorrect battery installation will render the virtual house out of order or damaged, and may lead to other accidents.
2. The discharging length of the battery depending on the emission direction, distance and time of use. To make thrifty use of the battery, please select appropriate emission direction and distance to reduce the transmission power; and when the virtual house is not in use, please turn off the power.
3. Typically, place the virtual at staircase or doorway, or calling for the virtual housel.
4. When using the virtual house, make ensure the virtual house and the vacuum cleaner are placed on the same plane, and that there is no obstruction in front of the virtual house as practical as possible, so as not to affect the barrier effect.
5. In actual use, the emission distance of the virtual house will be depending on environment, the movement of the main unit and battery level.
6. When installing it, keep the virtual house 50cm or more from the cleaner, or there will be interference.
7. Before use, do not point the infrared emission head at someone's eyes!
Installation
Installation & removal and cleaning of the dust bin
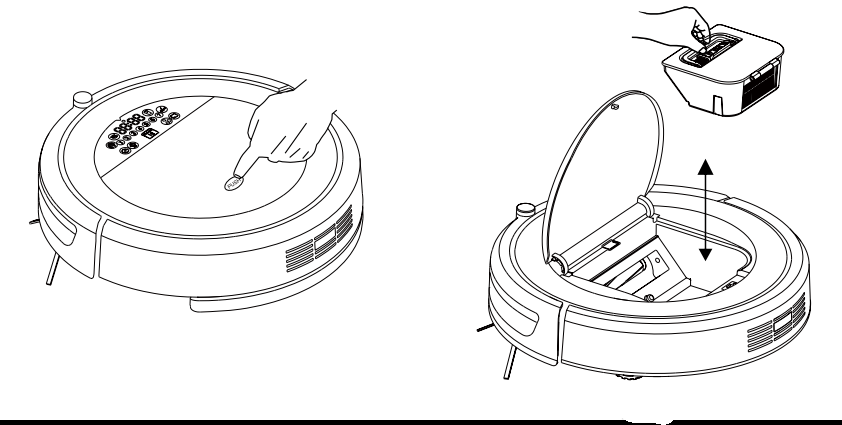
Installation & removal of the dust bin of the cleaner
Press "PUSH" on the panel to pop out the dust cover.
Take out the dust bin.
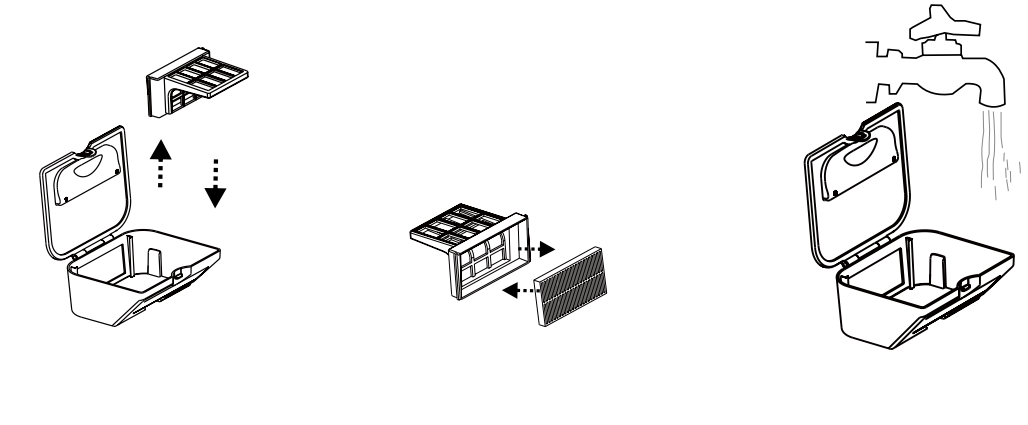
Cleaning of the dust bin
Open the upper cover of the dust bin, pour out the dirt and other junk.
The dust bin and the filter screen can be rinsed with water.
Attention!
After rinsing, dry the dust bin, filter and HEPA before replacing them (with cool air from an electric hair drier).
Please strictly follow the instructions when removing and installing the dust bin.
Water tank can not wash!
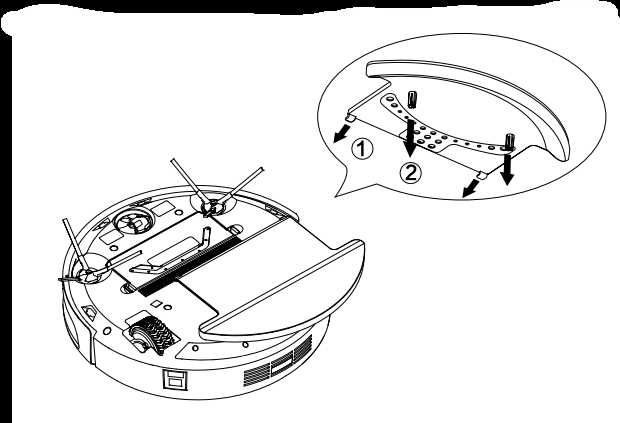
Installation of the intelligent water tank/ trailing bar/ mop
Installation of the trailing bar/ mop:
Install the mop onto the position where it is to be adhered.
As shown in Fig. 1, mount the trailing bar onto the unit by aligning it with holes.
Installation of the intelligent programmable tank:
Mount the small dust bin onto the water tank first before use.
Take out the water tank, open the flexible plastic inlet, inject clear water, and replace the inlet lid.
Place the water tank into the cleaner, replace the cover and the unit is ready to mop.
Attention!
Before injecting water into the water tank, take the tank out rather than directly replenishing the water tank lest any water go into the unit and lead to short circuit.
When using the water tank, it is prohibited to turn over the unit, lest water get into the machine and cause damage.
After the water tank is refilled, clean it if there is water around the water tank.
The cleaner will display error code E012 if the water tank runs out of water.
Common failures and troubleshooting
Attention!
The cleaner will sound the alarm when it stops working or fails to start working in the following circumstances; users may follow the prompts to respond accordingly.
Failure Code
Cause
Failure Identification
Troubleshooting
E001
Failure of ground detection
The sensor head is blocked or the cleaner is stuck in stairs
Clean the cliff sensor ground detector or manually pick up the cleaner
E002
The suction inlet is blocked
The dust senor head is covered with dust or the passage is blocked
Clean the foreign objects off the dust sensor head and the suction inlet
E003
The left and right wheels fail to work
The left and right drive wheels are entangled with wires
Clean the foreign objects on the left and right wheels to resume operation
E004
Failure of side brushes
The left or right entangled with wires
Clean the foreign objects on the left or right side drushes to resume operation
E005
The left and right wheels are off the ground
The drive wheels are in the air
Place the cleaner back onto a flat ground to resume operation
E006
not in use
not in use
not in use
E007
Low battery
The cleaner won’ twork properly
Manually move the cleaner back to the docking station recharging
E008
The cleaner won’ be recharged
The power switch of the cleaner is not turned on or the battery is not connected in place
Turn the power switch of the cleaner to ON or properly place the battery in place
E009
Wall detection failure
The sensor head for wall detection is blocked
Clean the transparent front collision member of the cleaner to resume operation
E010
Front bumper
The switch and the front bumper blocked
Push heavliy the front bumper, then check whether the front bumper can bounces back
E011
Battery NTC
Check if the battery is properly installed
Unplug the battery terminals or replace the battery


 Auto cleaning button
 Spot cleaning indicator
 Docking indicator
 ' "on the remote control, and as this button is on, the cleaner will seek the docking station for charging automatically.
 Schedule indicator
 " button and SPOT"
  "button on the remote controller, the"
  "icon on the cleaner panel will be on, and the cleaner enters into the current week day hour/minute setting and schedule week day, hour/minute setting.
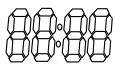 Digital indicator
 Garbage
 " icon lit up on the cleaner indicating the suction inlet is blocked or the dust bin is full, or the garbage sensors is covered with dust.
 Display of FULL GO
 "on the remote controller and the cleaner will enter the FULL GO mode. (Definition of FULL GO: When choose this function , then the cleaner will automatically clean one more time after it is fully charged again.)
 Display of wall follow cleaning
 "on the remote controller, and the cleaner will enter the wall follow cleaning mode.
 Display of water seeping speed of the Intelligent water tank
 " button to start auto deaning& mopping and the"
  “will be lit up or blinking, when the water tank runs out of water, this icon will light off, display error code E012; and made a voice prompt”inject water, please"; if want to continue this function during cleaning, please take out the water tank and refill it(The default mode is the indicators are normally on(standard water seeping speed, and blinking indicates it is in fast water seeping speed, as configured in the settings by the remote controller).
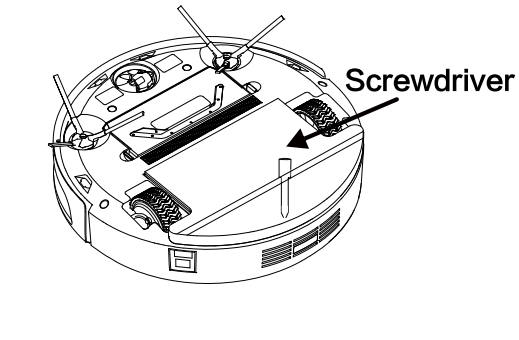

 "and the cleaner will enter the auto charging mode.
 " and the cleaner will enter the sleep/wake-up mode (in sleep mode, press and hold this button for 10 seconds to enter the wake-up mode).
 ' and the cleaner will enter the Turbo cleaning mode, suitable for very dirty floor or hairy carpet.
 "and the cleaner will enter the wall follow cleaning mode.
 " and the cleaner will enter the spot cleaning mode.
 "and the cleaner will enter the FULL GO mode.
 'and the cleaner will enter the Settings of appointment/time, UV
 "and the cleaner will enter the automatic cleaning mode.
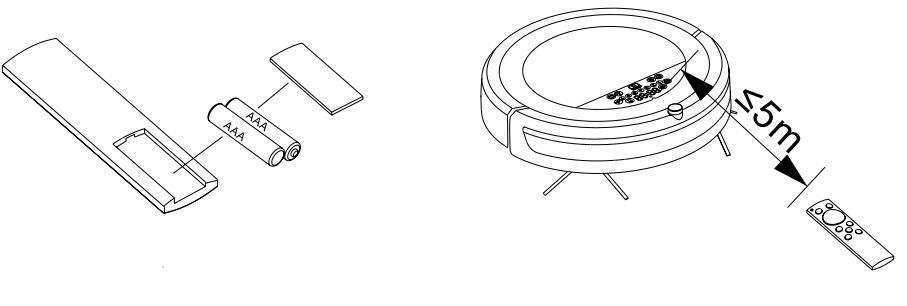
 "button, then press the"
  “button to enter the Settings of the water tank seeping speed (the water droplet icon ”
 "on the cleaner is on, the screen displays"
  "button to save the current settings and return to the standby mode.
 "button to enter the Settings of current week day; press the" ◄ "," ► "buttons to switch Monday/Sunday;
 "button to enter the Settings of schedule week day; press the" ◄ "," ► " buttons to switch Monday/Sunday;
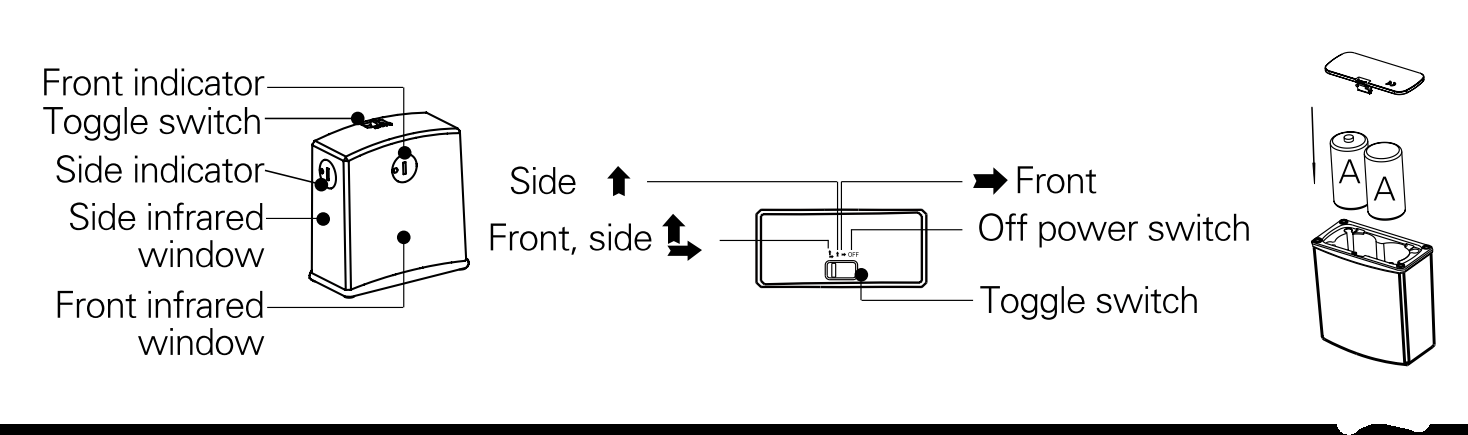
 " to turn off the power for virtual house, switch among front, side, and front/side;
 " position: it indicates the power of the virtual house on, at this point of time, this is the front position, and the control radius of the virtual housel is 4 m.
 ” position: it indicates the power of the virtual house is on, at this point of time, this is the sidewise position, and the control radius of the virtual house is 4 m.
 "position: it indicates the power of the virtual house is on, at this point of time, this is the front/sidewise position, and the control radius of the virtual house is 4 m.