TO BE REMOVED BY THE CUSTOMER AFTER INSTALLATION IS COMPLETE
[]
[]
[] INSTALLATION CHECKOFF UST
Doors Ice Maker
[] HandIesare secure and tight
[] Door seals completely to cabinet on all sides
[] Freezer door is level across the top
[] House water supply connected to refrigerator
[] No water leaks present at att connections - recheck in 24 hours
[] Ice Maker is turned ON.
Leveling Final Checks
[] Refrigerator is level, side to side and tilted 1/4" (6mm) front to back
[] Toe grille is properly attached to refrigerator
[] Cabinet is setting solid on atl corners
Electrical Power
House power turned on
Refrigerator plugged in
[] Shipping material removed
[] Fresh Food and Freezer controls set
[] Crisper Humidity controls set
[] Registration Card sent in
f
Tools You Will Need:
Phillips'' head
3/5"
Fke@
)
1
4
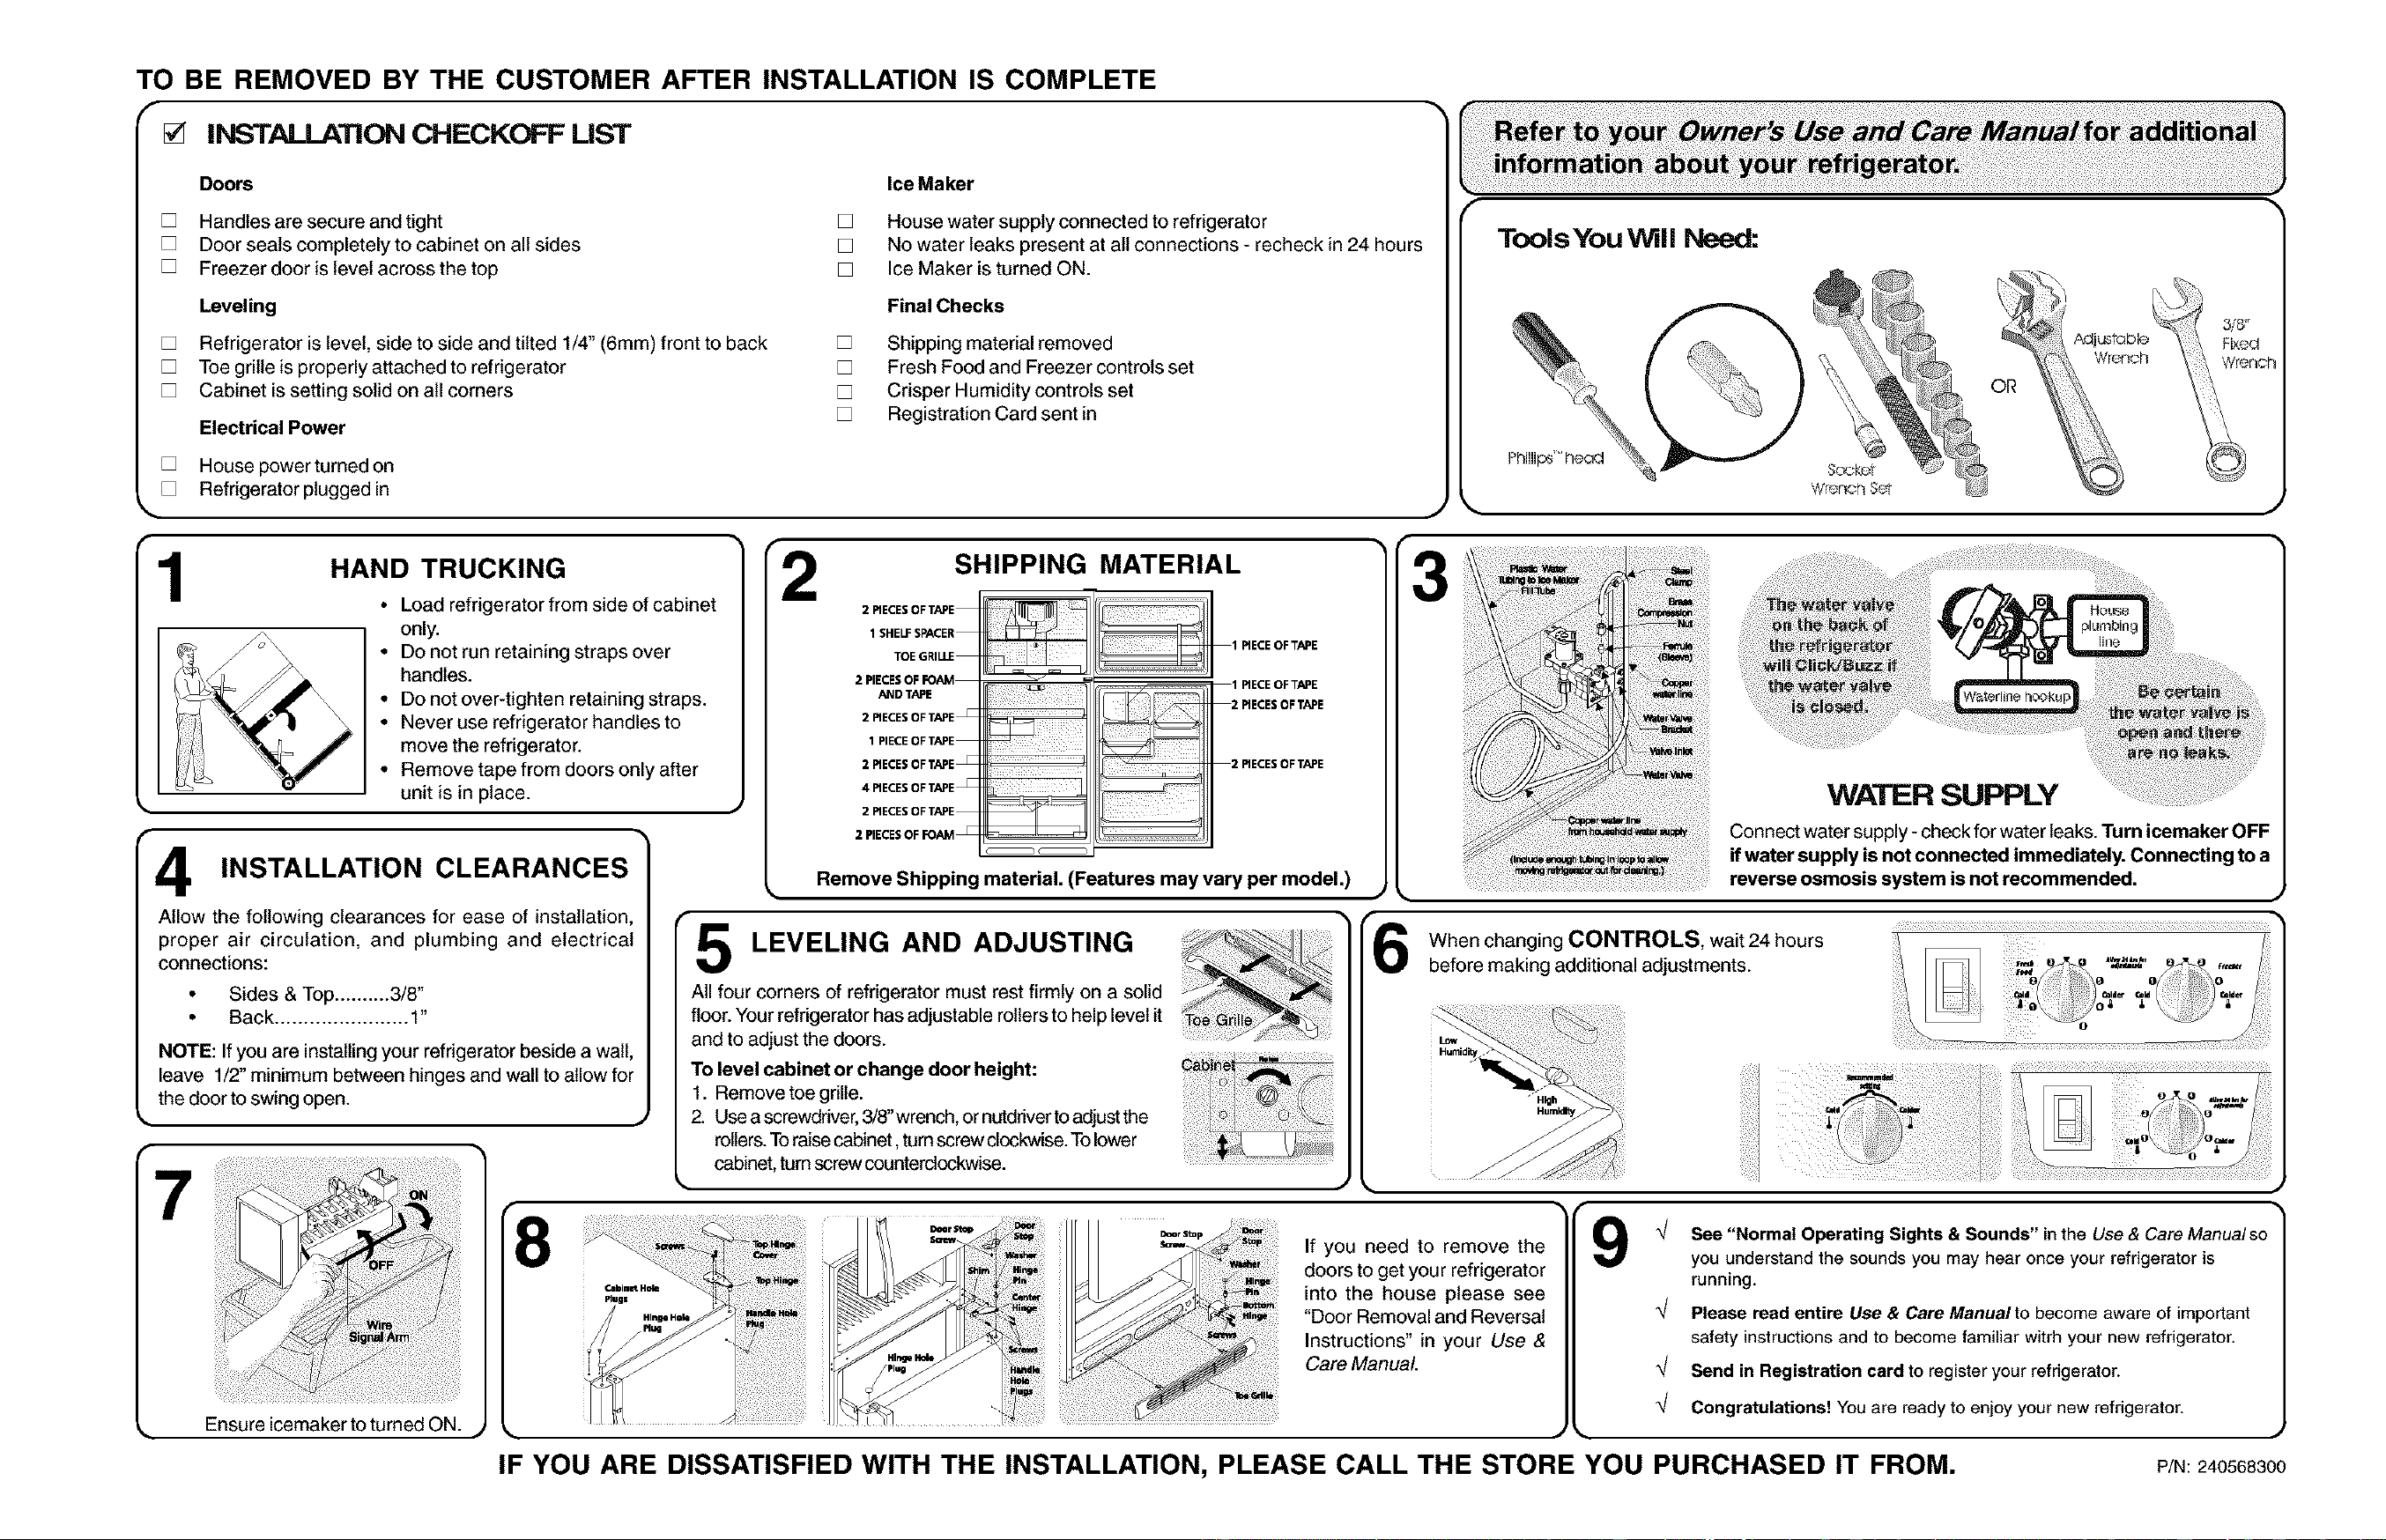
HAND TRUCKING
• Load refrigerator from side of cabinet
only.
• Do not run retaining straps over
handles.
• Do not over-tighten retaining straps.
• Never use refrigerator handles to
move the refrigerator.
• Remove tape from doors only after
unit is in place.
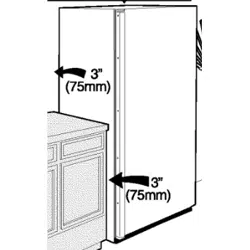
INSTALLATION CLEARANCES
Allow the following clearances for ease of installation,
proper air circulation, and plumbing and electrical
connections:
• Sides & Top .......... 3/8"
• Back ....................... 1"
NOTE: If you are installing your refrigerator beside a wall,
leave 1/2" minimum between hinges and wall to allow for
the door to swing open.
7
Ensure icemaker to turned ON.
8
Plugi
2
SHIPPING MATERIAL
2 PIECES OF TAPE
1 SHELF SPACER
TOE GRILLE
2 PIECES OF ,r_AM
AND TAPE
2 PIECES OF TAPE_
1 PIECE OF TAPE
2 PIECES OF TAPE_
4 PIECES OF TAPE_
2 PIECES OF TAPE
2 PIECES OF FOAM _
iiiilXii!i X _ R:i
1 PIECEOFTAPE
1 PIECEOFTAPE
2 PIECESOFTAPE
2 PIECESOFTAPE
k, Remove Shipping material. (Features may vary per model.)
5 LEVELING AND ADJUSTING
All four corners of refrigerator must rest firmly on a solid
floor. Your refrigerator has adjustable rollers to help level it
and to adjust the doors. ....
To level cabinet or change door height:
1. Remove toe grille.
2. Use a screwdriver, 3/8"wrench, or nutdriver toadjust the
rollers.To raisecabinet, tum screw clockwise.To lower
cabinet, tum screw counterclockwise.
3
reverse osmosis system is not recommended.
When changing CONTROLS, wait 24 hours
before making additional adjustments.
: (U(%J%J%J%J%J%J ¸ :@: @ (U(%J%J%J%J%J%J%J%J%Rk
If you need to remove the
doors to get your refrigerator
into the house please see
"Door Removal and Reversal
Instructions" in your Use &
Care Manual
_,
See "Normal Operating Sights & Sounds" in the Use & Care Manualso
you understand the sounds you may hear once your refrigerator is
running.
Please read entire Use & Care Manualto become aware of important
safety instructions and to become familiar witrh your new refrigerator.
Send in Registration card to register your refrigerator.
Congratulations! You are ready to enjoy your new refrigerator.
IF YOU ARE DISSATISFIED WITH THE INSTALLATION, PLEASE CALL THE STORE YOU PURCHASED IT FROM.
P/N: 240568300
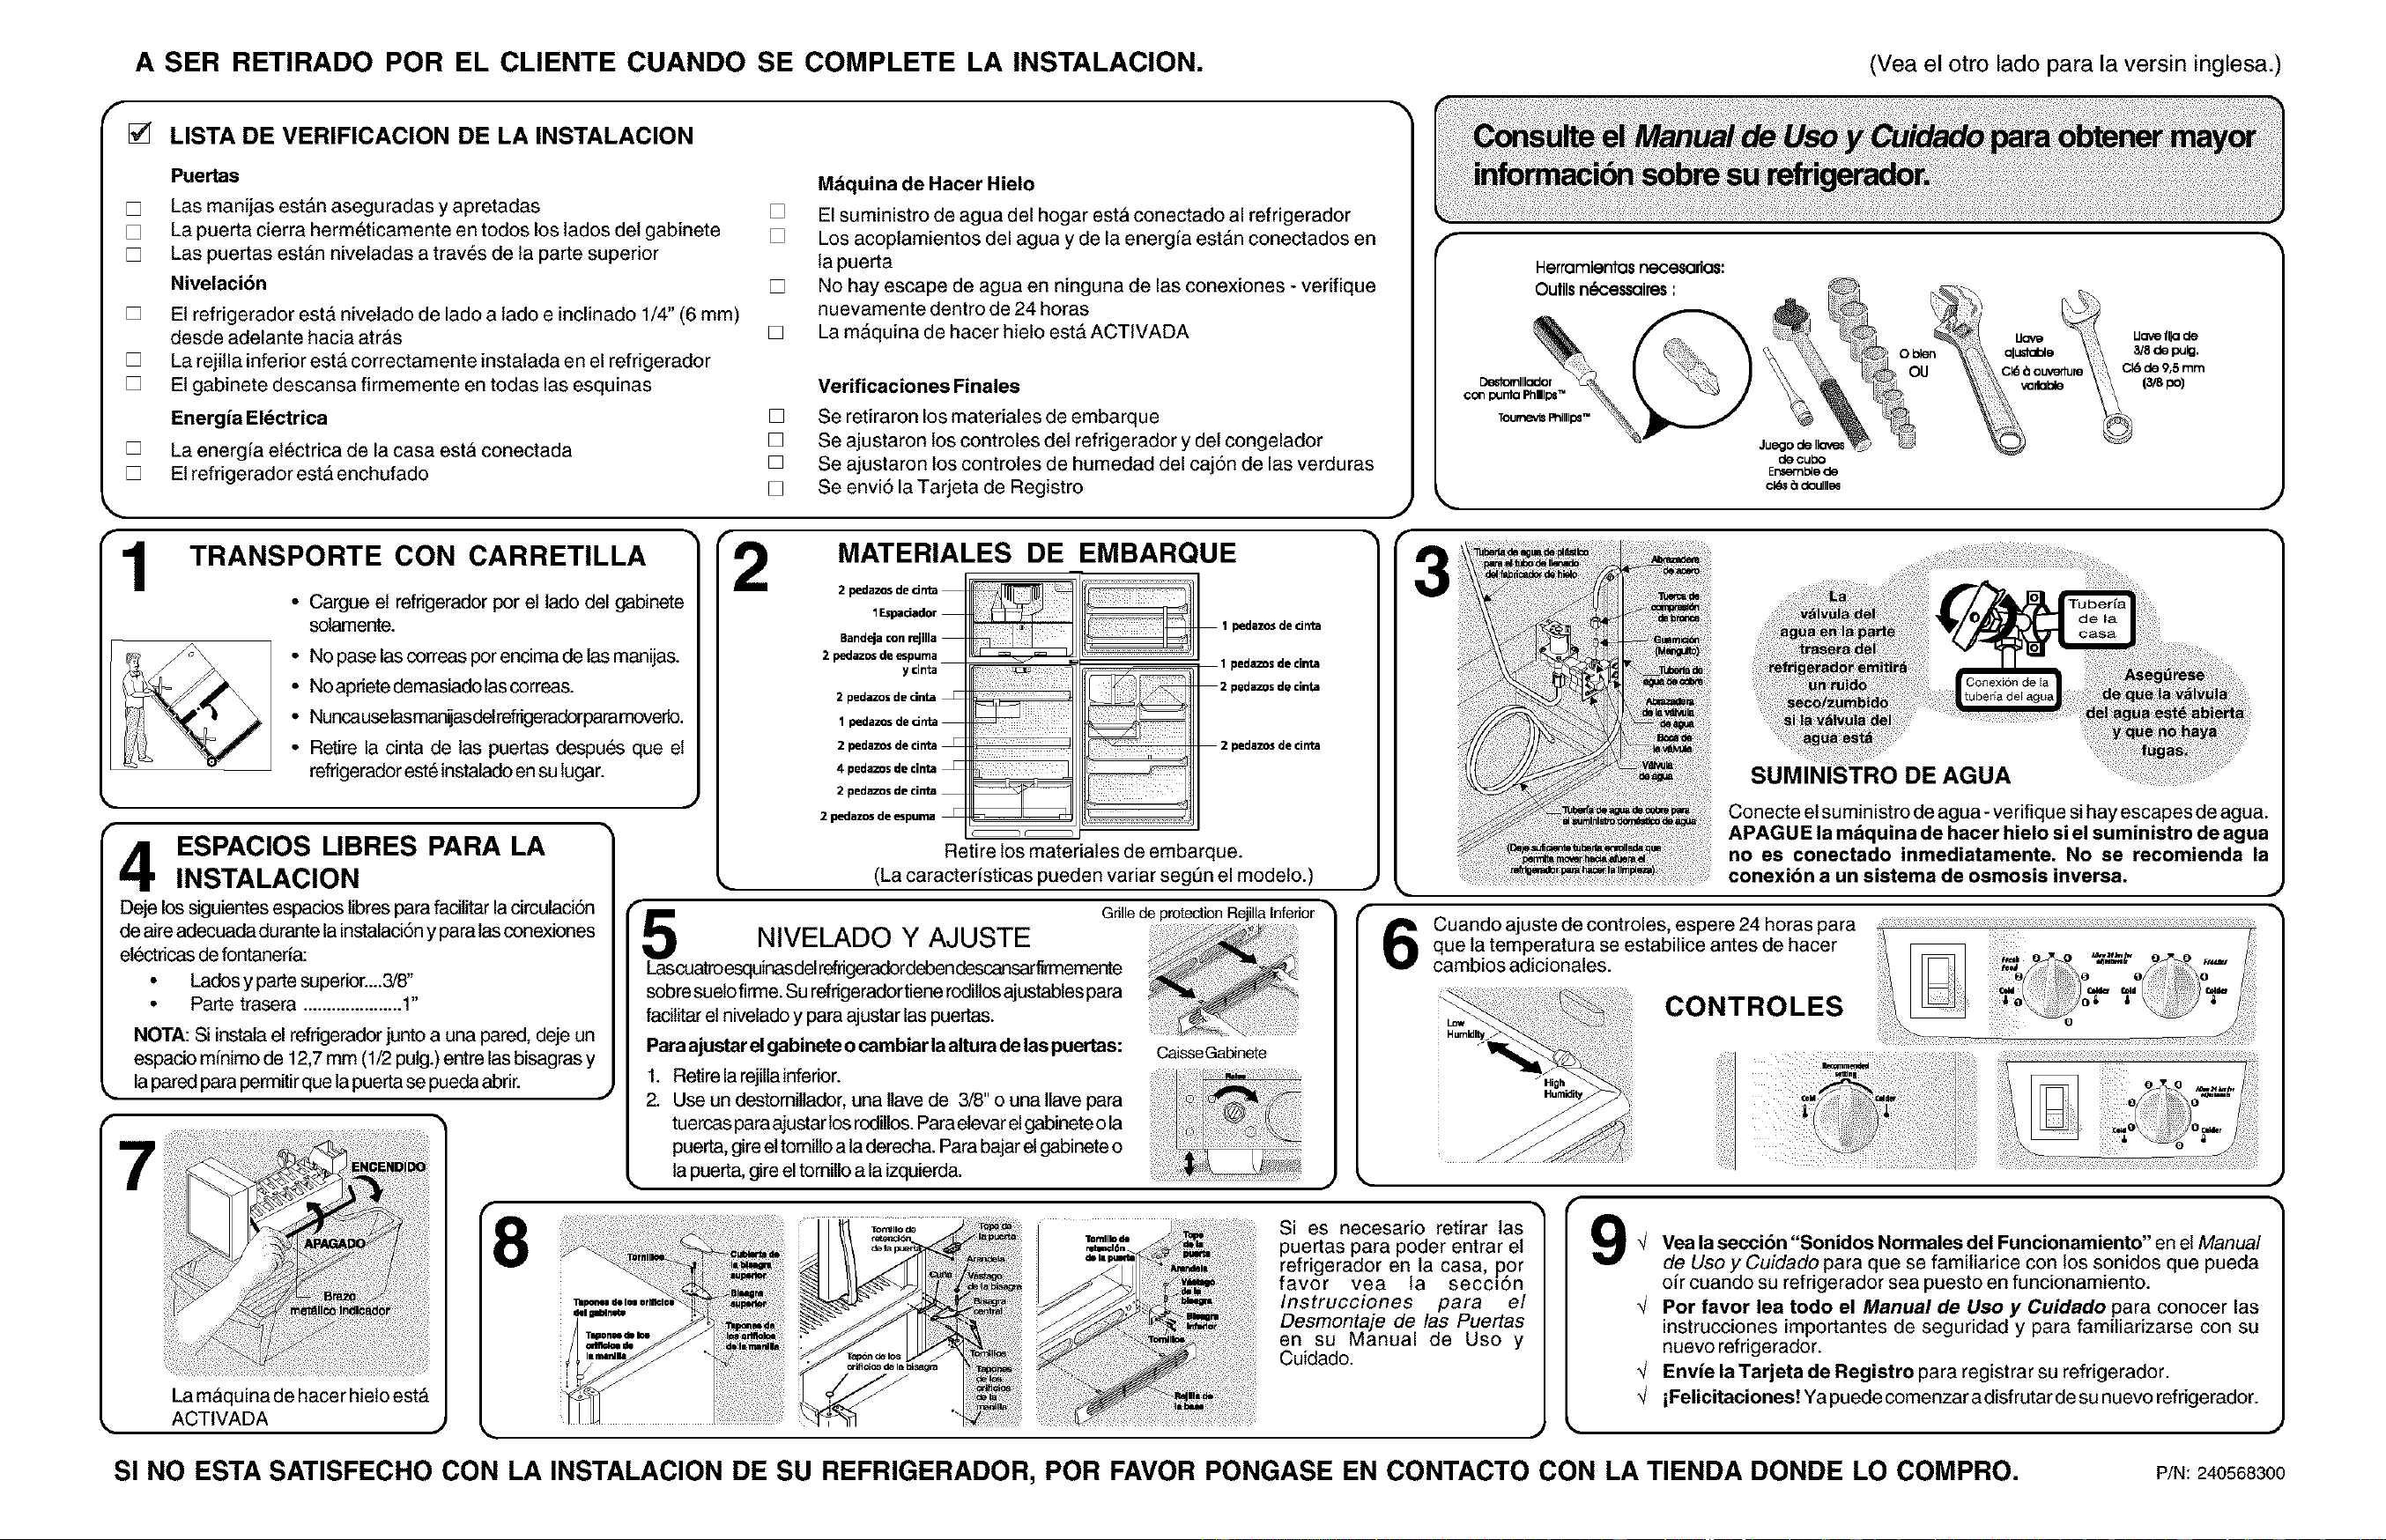
A SER RETIRADO POR EL CLIENTE CUANDO SE COMPLETE LA INSTALACION. (Yea el otro lado para la versin inglesa.)
f
[] LISTA DE VERIFICACION DE LA INSTALACION
Puertas
[] Las manijas estAn aseguradas y apretadas
[] La puerta cierra herm6ticamente en todos los lados det gabinete
[] Las puertas estAn niveladas a trav6s de la parte superior
Nivelaci6n
[] Et refrigerador est_ nivelado de lado a lado e inclinado 1/4" (6 mm)
desde adelante hacia atr&s
[] La rejitla inferior est& correctamente instalada en el refrigerador
[] Et gabinete descansa firmemente en todas las esquinas
Energia Eldctrica
[] La energia et6ctrica de la casa estA conectada
[] Et refrigerador estA enchufado
Mdquina de Hacer Hielo
[] El suministro de agua del hogar est& conectado al refrigerador
[] Los acoplamientos del agua y de la energia est&n conectados en
la puerta
[] No hay escape de agua en ninguna de las conexiones - verifique
nuevamente dentro de 24 horas
[] La m&quina de hacer hielo est& ACTIVADA
Verificaciones Finales
1
TRANSPORTE CON CARRETILLA
[] Se retiraron los materiales de embarque
[] Se ajustaron los controles det refrigerador y det congelador
[] Se ajustaron los controles de humedad del caj6n de las verduras
[] Se envi6 la Tarjeta de Registro
• Cargue el refrigerador por et lado del gabinete
sotamente.
• No pase lascorreas por encima de las manijas.
• Noapriete demasiado las correas.
• Nuncauselasrnanijasdetrefrigeradorparamovedo.
• Retire la cinta de las puertas despu_s que et
refrigerador est6 instaladoen su lugar.
ESPACIOS LIBRES PARA LA
INSTALACION
Deje los siguientes espacios libres para facilitar la circulaci6n
de aire adecuada durante lainstalaci6n y para las conexiones
et_ctricas de fontaneria:
• Ledos y parte superior....3/8"
• Parte trasera .....................1"
NOTA: Si instala el refrigerador junto a una pared, deje un
espacio minimo de 12,7 mm (1/2 pulg.) entre las bisagras y
la pared para permitir que la puerta se pueda abrir.
7
[2
MATERIALES DE EMBARQUE
2 pedazos de dnta
1Espadador
Bandeja con rejilla
2 pedazo5 de espuma
y dnta
2 pedazos de ¢irita
1 pedazos de drrta
2 pedazos de dnta
4 pedazos de cinta
2 pedazos de ¢inta
2 pedazos de espurna
_J
T
1 pedazosdednta
8
1 pedazosdecinta
2 pedazosdecinta
"5 NIVELADO Y AJUSTE
Lascuatroesquinasdelrefrigeredordebendescansarfirmernente
sobre suelo firme. Su refrigeradortiene rodiUosajustabtes para
facilitar el nivelado y para ajustar las puertas.
Para ajustar elgabinete o cambiar la alturade las puertas:
1. Retirela rejillainferior.
2. Use un destomillador, una llave de 3/8" o una llave para
tuercas paraajustar los rodillos.Paraetevar elgabinete o la
puerta, gire eltomitlo a la derecha. Para bajarel gabinete o
la puerta, gire el tomillo a la izquierda.
2 pedazos de cinta
< ii ,
Retire los materiates de embarque.
(La caracteristicas pueden variar segSn el modeto.)
Gnlle de protection Rejllla Infenor
CaisseGabinete
t-
Herromientos Roc_orios:
Outils n_cessQiPss:
Destomlllodor
cc_ I_JntoPhllll_TM
de cubo
Er_I_B de
J
SUMINISTRO DE AGUA
Conecte et suministro de agua- verifique si hay escapes de agua.
APAGUE la mdquina de hacer hielo si el suministro de agua
no es conectado inmediatamente. No se recomienda la
conexi6n a un sistema de osmosis inversa.
6
Cuando ajuste de controles, espere 24 horas para
que la temperatura se estabilice antes de hacer
cambios adicionales.
CONTROLES
Si es necesario retirar ias
puertas para poder entrar et
refrigerador en la casa, por
favor yea la secc_on
Instrucciones para el
Desmontaje de las Puertas
en su Manual de Uso y
Cuidado.
9
_ Vea la seccibn "Sonidos Normales del Funcionamiento" en el Manual l
de Uso y Cuidado para que se familiarice con los sonidos que pueda
oir cuando su refrigerador sea puesto en funcionamiento.
_ Por favor lea todo el Manual de Uso y Cuidado para conocer las
instrucciones importantes de seguridad y para familiarizarse con su
nuevo refrigerador.
_ Envie la Tarjeta de Registro para registrar su refrigerador.
_ iFelicitaciones! ya puede comenzar adisfrutar de su nuevo refrigerador.
SI NO ESTA SATISFECHO CON LA INSTALACION DE SU REFRIGERADOR, POR FAVOR PONGASE EN CONTACTO CON LA TIENDA DONDE LO COMPRO. P/N:240568300