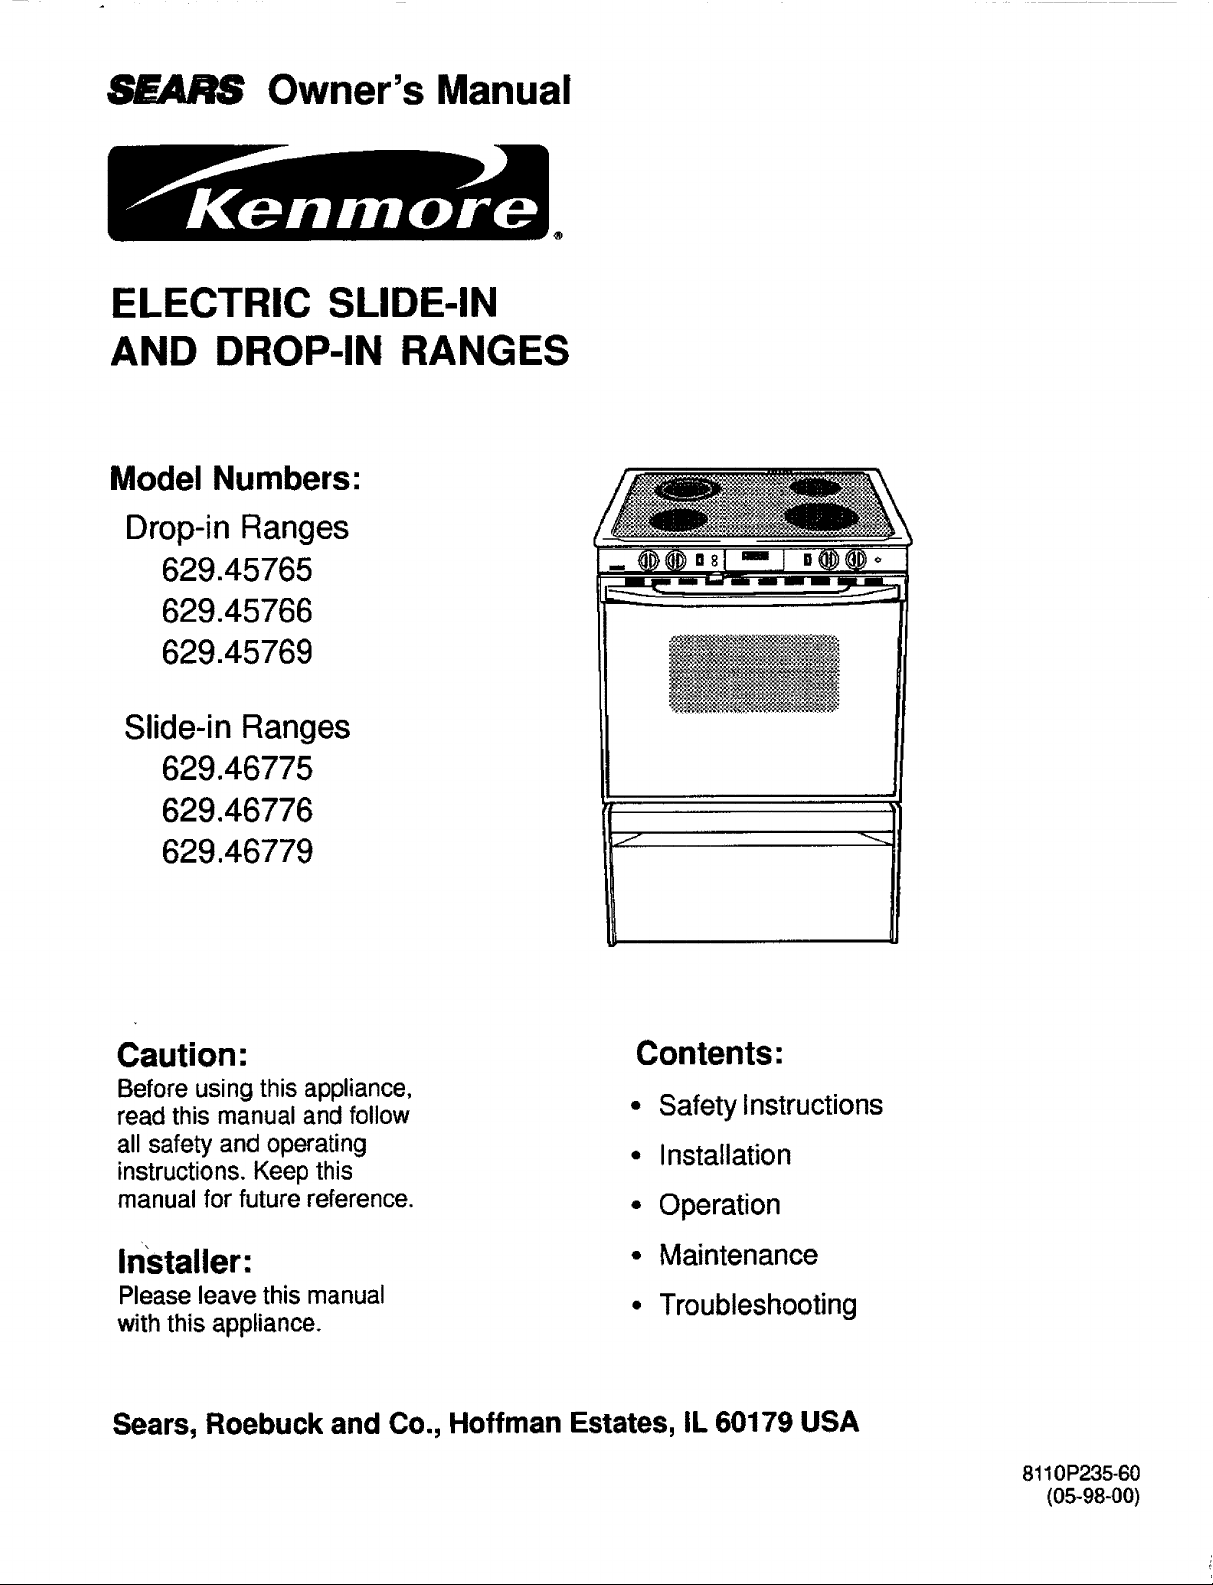
SF=AR$ Owner's Manual
ELECTRIC SLIDE-IN
AND DROP-IN RANGES
Model Numbers:
Drop-in Ranges
629.45765
629.45766
629.45769
Slide-in Ranges
629.46775
629.46776
629.46779
_- --i
,__®nsI n®_o
,,, ,,,,,
Caution:
Before using this appliance,
read this manual and follow
all safety and operating
instructions. Keep this
manual for future reference.
Installer:
Please leave this manual
with this appliance.
Contents:
• Safety Instructions
° installation
° Operation
• Maintenance
• Troubleshooting
Sears, Roebuck and Co., Hoffman Estates, IL 60179 USA
8110 P235-60
(05-98-00)
Read all instructions before using this appliance.
ii!i++ i! ++!!+!+i ! ii ! i+iiii+!ii+iii!+i+i i iiii!ii+iii+ iii+i+iii+iiiii+i+ii ii+ ii+i
IMPORTANT SAFETY INSTRUCTIONS ............ 1-4
INSTALLATION INSTRUCTIONS ................. 5-11
Instructions on the following pages are based on safety
considerations and must be strictly followed to eliminate
the potential risks of fire, electric shock, or personal injury.
CLOCK AND OVEN CONTROL ................... 12
SMOOTHTOP COOKTOP ..................... 13-14
COOKTOP USE ................................. 15
Control knobs ................................. 15
Cooking tips ................................... 15
Canning ...................................... 15
Heat setting guide .............................. 15
OVEN USE ................................... 16-21
Oven light ..................................... 16
Oven vent ..................................... 16
Oven characteristics ............................ 16
Fan .......................................... 16
Preheating .................................... 16
How to set oven ............................... 16
Oven racks .................................... 17
General baking tips ............................ 18
Common baking problems chart ................. 19
Automatic oven cooking feature .................. 20
Broiling and chart .............................. 21
MAINTENANCE ................................. 22
Oven door .................................... 22
Storage drawer ................................ 22
Leveling legs .................................. 22
CARE AND CLEANING CHART ................ 23-24
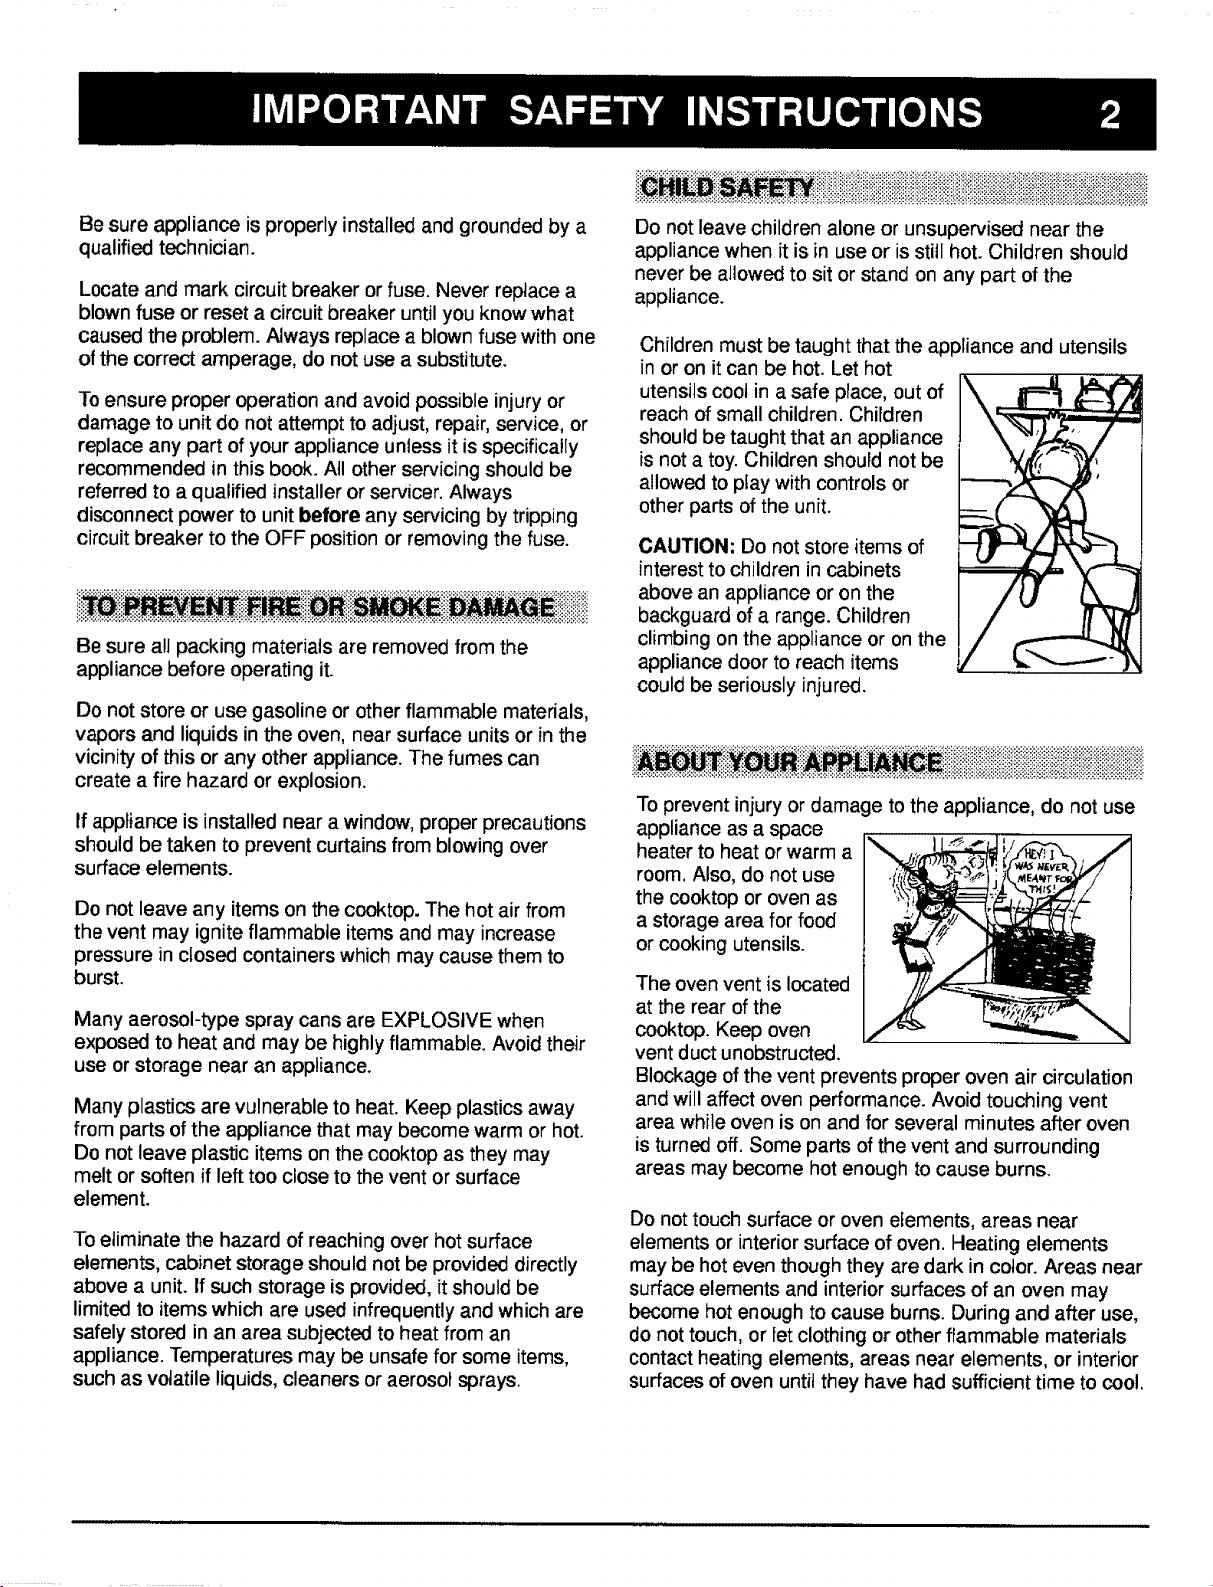
WARNING: To reduce the risk of tipping of the
appliance from abnormal usage or by excessive loading
of the oven door, the appliance must be secured by a
properly installed anti-tip device.
If the range is moved from the walt for cleaning, be sure
the anti-tip device is engaged when the range is
replaced. Remove storage drawer, if equipped, and look
underneath range to verify that one of the rear leveling
legs is properly engaged in the bracket slot. The anti-tip
device secures the rear leveling leg to the floor when
properly engaged.
WARNING
, ALL RANGES CAN TIP AND
CAUSE INJURIES TO
PERSONS.
INSTALLANTI-TIPDEVICES
PACKEDWITH RANGE.
FOLLOWALL INSTALLATION
INSTRUCTIONS.
SELF-43;LEAN OVEN .......................... 25-26
SERVICE INFORMATION ...................... 27-28
How to obtain service ........................... 27
Explanation of fault codes ....................... 27
Adjusting oven temperature ..................... 27
Troubleshooting chart .......................... 28
WARRANTY .................................... 30
Turn off appliance and ventilating hood to avoid spreading
the flame. Extinguish flame then turn on hood to remove
smoke and odor.
Use dry chemical or foam-type extinguisher or baking
soda to smother fire or flame. Never use water on a
grease fire.
If fire is in the oven or broiler pan, smother by closing
oven door.
If fire is in a pan on the surface element, cover pan.
Never attempt to pick up or move a flaming pan.
Besureapplianceisproperlyinstalledandgroundedbya
qualifiedtechnician.
Locateandmarkcircuitbreakerorfuse.Neverreplacea
blownfuseorreseta circuitbreakeruntilyouknowwhat
causedtheproblem.Alwaysreplacea blownfusewithone
ofthecorrectamperage,donotuseasubstitute.
To ensure proper operation and avoid possible injury or
damage to unit do not attempt to adjust, repair, service, or
replace any part of your appliance unless it is specifically
recommended in this book. All other servicing should be
referred to a qualified installer or servicer. Always
disconnect power to unit before any servicing by tripping
circuit breaker to the OFF position or removing the fuse.
Be sure all packing materials are removed from the
appliance before operating it.
Do not store or use gasoline or other flammable materials,
vapors and liquids in the oven, near surface units or in the
vicinity of this or any other appliance. The fumes can
create a fire hazard or explosion.
If appliance is installed near a window, proper precautions
should be taken to prevent curtains from blowing over
surface elements.
Do not leave any items on the cooktop. The hot air from
the vent may ignite flammable items and may increase
pressure in closed containers which may cause them to
burst.
Many aerosol-type spray cans are EXPLOSIVE when
exposed to heat and may be highly flammable. Avoid their
use or storage near an appliance.
Many plastics are vulnerable to heat. Keep plastics away
from parts of the appliance that may become warm or hot.
Do not leave plastic items on the cooktop as they may
melt or soften if left too close to the vent or surface
element.
To eliminate the hazard of reaching over hot surface
elements, cabinet storage should not be provided directly
above a unit. If such storage is provided, it should be
limited to items which are used infrequently and which are
safely stored in an area subjected to heat from an
appliance. Temperatures may be unsafe for some items,
such as volatile liquids, cleaners or aerosol sprays.
Do not leave children alone or unsupervised near the
appliance when it is in use or is still hot. Children should
never be allowed to sit or stand on any part of the
appliance.
Children must be taught that the appliance and utensils
in or on it can be hot. Let hot
utensils cool in a safe place, out of
reach of small children. Children
should be taught that an appliance
is not a toy. Children should not be
allowed to play with controls or
other parts of the unit.
CAUTION; Do not store items of
interest to children in cabinets
above an appliance or on the
backguard of a range. Children
climbing on the appliance or on the
appliance door to reach items
could be seriously injured.
Z _ w_
/ _
To prevent iniury or damage to the appliance, do not use
appliance as a space
heater to heat or warm a
room. Also, do not use
the cooktop or oven as
a storage area for food
or cooking utensils.
The oven vent is located
at the rear of the
cooktop. Keep oven
vent duct unobstructed.
Blockage of the vent prevents proper oven air circulation
and will affect oven performance. Avoid touching vent
area while oven is on and for several minutes after oven
is turned off. Some parts of the vent and surrounding
areas may become hot enough to cause burns.
Do not touch surface or oven elements, areas near
elements or interior surface of oven. Heating elements
may be hot even though they are dark in color. Areas near
surface elements and interior surfaces of an oven may
become hot enough to cause burns. During and after use,
do not touch, or let clothing or other flammable materials
contact heating elements, areas near elements, or interior
surfaces of oven until they have had sufficient time to cool.
Othersurfacesoftheappliancemaybecomehotenough
tocauseburns- amongthesesurfacesarethecooktop,
surfacesfacingthecooktop,ovenventopeningand
surfacesneartheventopening,ovendoor,andoven
window.
Donotallowaluminumfoil,meatprobesoranyother
metalobject,otherthanautensilonasurfaceelement,to
contactheatingelements.
Donottoucha hotovenlightbulbwitha dampclothasthe
bulbcouldbreak.Ifbulbbreaks,disconnectpowertothe
applianceto avoidelectricalshockthenremovebulb.
CAUTION: Do not use
an appliance as a step
stool to cabinets above.
Misuse of appliance
doors or drawers, such
as stepping, leaning or
sitting on the door or
drawer, may resutt in
possible tipping of the
appliance, breakage of
door, and serious injuries.
iii i Gi! iiiiiiLiiiiiiliiiiiTiiiii!ililiiiiii!iiiiiiiiiiiiiiii!i!i
Always turn off surface element or the oven when cooking
is completed.
It is normal for some parts of the cooktop, especially areas
surrounding the surface elements, to become warm or hot
during surface cooking operations. Therefore, do not touch
the cooktop until it has had sufficient time to cool. If
necessary, use dry pot holders to protect hands.
Do not cook on a broken ceramic glass cooktop. If cooktop
should break, cleaning solutions and spillovers may
penetrate the broken cooktop and create a risk of electric
shock. Contact a qualified technician immediately.
Always place a pan on a surface element before turning it
on. Be sure you know which knob controls which surface
element. Make sure the correct element is turned on.
Begin cooking on a higher heat setting then reduce to a
lower setting to continue cooking. To prevent boilovers,
reduce to the desired heat setting just as the food begins
to cook or water begins to boil.
Never leave a surface cooking operation unattended
especially when using a
high heat setting or
when deep fat frying.
Boilovers cause
smoking and greasy
spiNovers may ignite.
Clean up greasy spills
as soon as possible. Do
not use high heat for
extended cooking
operations.
Always let quantities of hot fat used for deep fat frying cool
before attempting to move or handle.
Never heat an unopened container as pressure build-up
may cause container to burst resulting in serious personal
injury or damage to the appliance.
Use dry, sturdy pot holders. Moist or damp pot holders on
hot surfaces may cause burns from steam. Do not let pot
holders touch hot heating elements. Do not use a towel or
other bulky cloth.
Do not let cooking grease or other flammable materials
accumulate in or near the appliance, vent hood or vent
fan. Clean hood frequently to prevent grease from
accumulating on hood or filter. When flaming foods under
the hood turn the fan off as the fan may spread the flame.
Use caution when wearing garments made of flammable
material to avoid clothing
fires. Loose fitting or long
hanging-sleeved apparel
should not be worn while
cooking. Clothing may
ignite or catch utensil
handles.
Always place oven racks in the desired positions while
oven is cool, Slide oven rack out to add or remove food;
avoid reaching into the oven. tf a rack must be moved
while oven is hot, use a dry pot holder and avoid touching
hot element in oven.
Use care when opening the oven door. Let hot air or steam
escape before removing or replacing food.
PREPARED FOOD WARNING: Follow food
manufacturer's instructions. If a plastic frozen food
container and/or its cover distorts, warps, or is otherwise
damaged during cooking, immediately discard the food
and its container. The food could be contaminated.
.ii!.!ii!. ii .ii i ii i ii i iiiiiiiiiii!ii iiii ! i i!!i! iiii i!i! i !i ! ! i i iii iiiii i !ii!!ii !!!i!i!
Use proper pan size. This appliance is equipped with one
or more surface elements of different sizes. Select utensils
having flat bottoms large enough to cover the surface
element. The use of undersized utensils will expose a
portion of the heating element to direct contact and may
result in ignition of clothing. Proper relationship of utensil
to element will also improve efficiency.
Use pans with flat bottoms and handles that are easily
grasped and stay coot. Avoid using unstable, warped,
easily tipped or loose handled pans. Pans that are heavy
to move when filled with food may also be hazardous.
Be sure utensil is large enough to properly contain food
and avoid boilovers. Pan size is particularly important in
deep fat frying. Be sure pan will accommodate the volume
of food that is to be added as well as the bubble action of
fat.
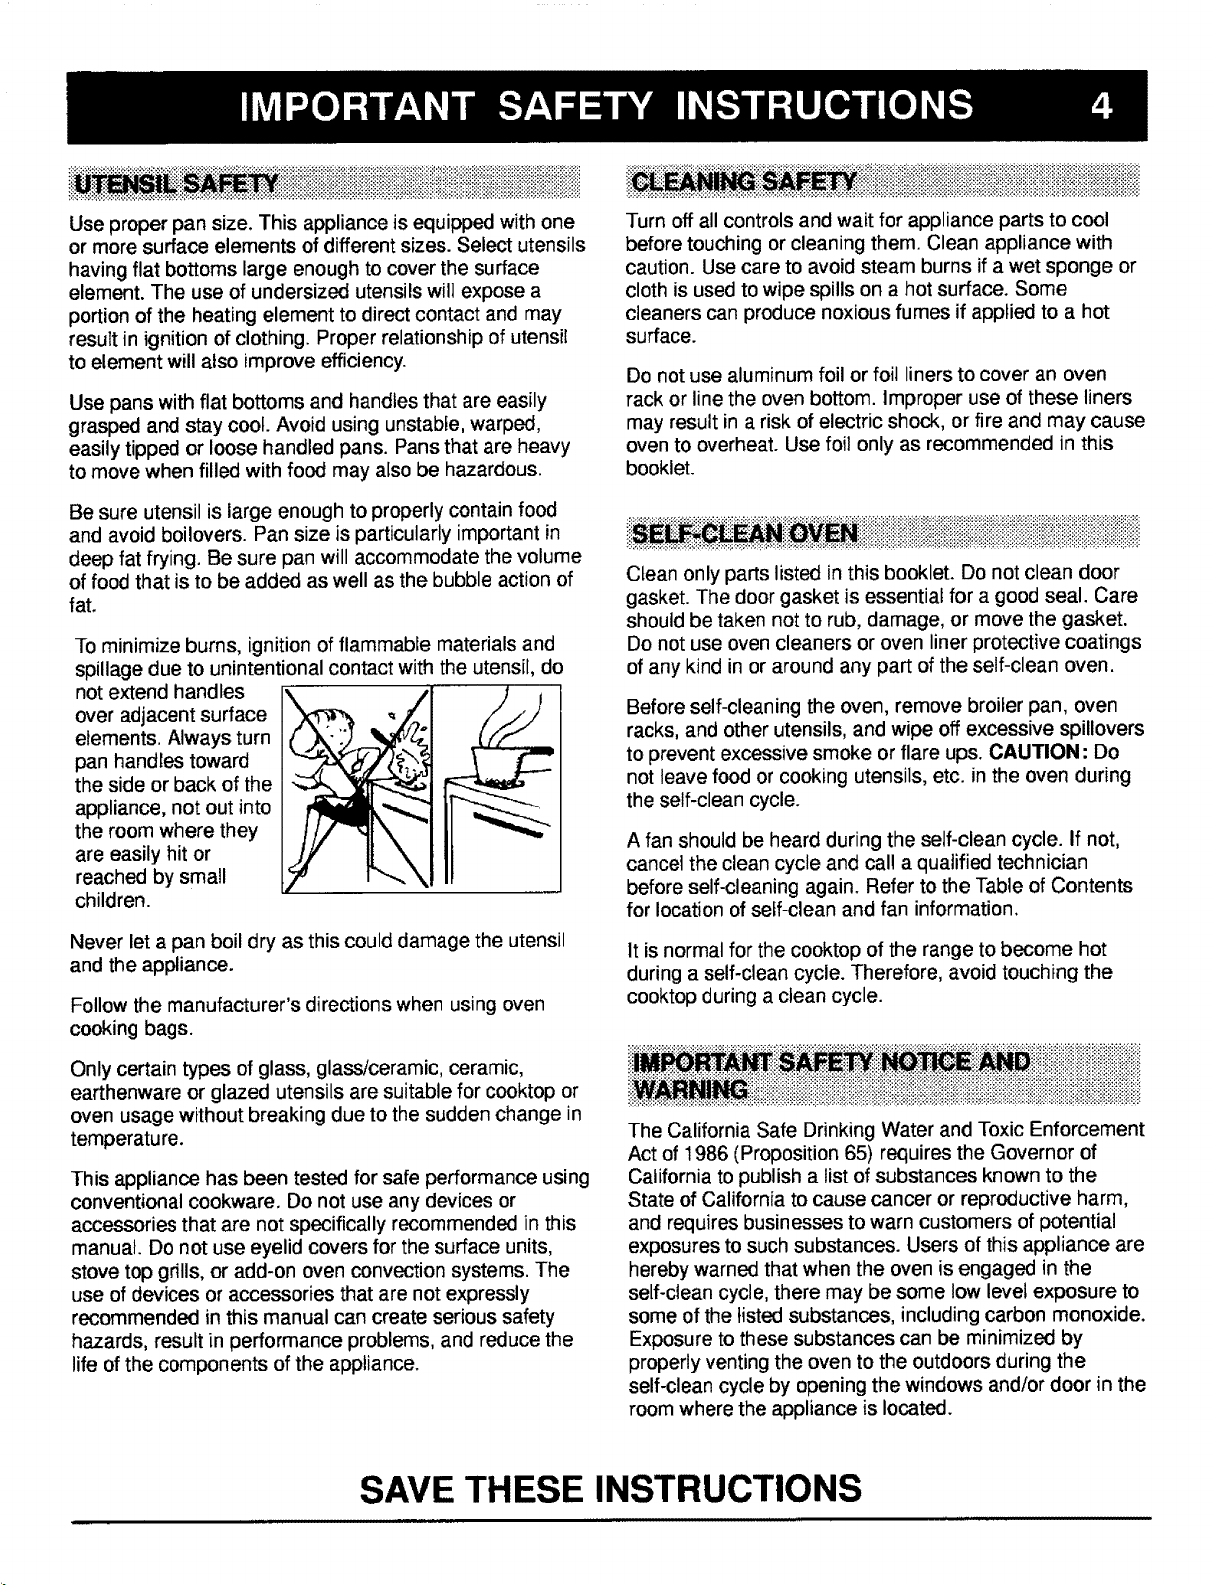
To minimize burns, ignition of flammable materials and
spillage due to unintentional contact with the utensil, do
not extend handles
over adjacent surface
elements. Always turn
pan handles toward
the side or back of the
appliance, not out into
the room where they
are easily hit or
reached by small
children•
Never let a pan boil dry as this could damage the utensil
and the appliance.
Follow the manufacturer's directions when using oven
cooking bags.
Only certain types of glass, glass/ceramic, ceramic,
earthenware or glazed utensils are suitable for cooktop or
oven usage without breaking due to the sudden change in
temperature.
This appliance has been tested for safe performance using
conventional cookware. Do not use any devices or
accessories that are not specifically recommended in this
manual. Do not use eyelid covers for the surface units,
stove top grills, or add-on oven convection systems. The
use of devices or accessories that are not expressly
recommended in this manual can create serious safety
hazards, result in performance problems, and reduce the
life of the components of the appliance.
iiiiiiiii!!iiii!iiiii i!iiiiii iiii!!i!i!i!iii!ii!i!iiiiiJi
Turn off all controls and wait for appliance parts to cool
before touching or cleaning them. Clean appliance with
caution. Use care to avoid steam burns if a wet sponge or
cloth is used to wipe spills on a hot surface. Some
cleaners can produce noxious fumes if applied to a hot
surface.
Do not use aluminum foil or foil liners to cover an oven
rack or line the oven bottom. Improper use of these liners
may result in a risk of electric shock, or fire and may cause
oven to overheat. Use foil only as recommended in this
booklet.
Clean only parts listed in this booklet. Do not clean door
gasket. The door gasket is essential for a good seal. Care
should be taken not to rub, damage, or move the gasket.
Do not use oven cleaners or oven liner protective coatings
of any kind in or around any part of the self-clean oven.
Before self-cleaning the oven, remove broiler pan, oven
racks, and other utensils, and wipe off excessive spillovers
to prevent excessive smoke or flare ups. CAUTION: Do
not leave food or cooking utensils, etc. in the oven during
the self-clean cycle.
A fan should be heard during the self-clean cycle. If not,
cancel the clean cycle and call a qualified technician
before self-cleaning again. Refer to the Table of Contents
for location of seff-clean and fan information.
It is normal for the cooktop of the range to become hot
during a self-clean cycle. Therefore, avoid touching the
cooktop during a clean cycle.
ilij ili !!i!! iiii fli!!ii!i:iii!ii!!i!i !iii!!iiii!i!!iii
ii iii!iiii!iiiiiiiiiiiiiiiiiiiii!iii!iiiiiiiii!ii!ilil!i!filliililiiiiii!iiiii ililiiilili
The California Safe Drinking Water and Toxic Enforcement
Act of 1986 (Proposition 65) requires the Governor of
California to publish a list of substances known to the
State of California to cause cancer or reproductive harm,
and requires businesses to warn customers of potential
exposures to such substances. Users of this appliance are
hereby warned that when the oven is engaged in the
self-clean cycle, there may be some low level exposure to
some of the listed substances, including carbon monoxide.
Exposure to these substances can be minimized by
properly venting the oven to the outdoors during the
self-clean cycle by opening the windows and/or door in the
room where the appliance is located.
SAVE THESE INSTRUCTIONS
These installation instructions are intended to assist in the
initial installation and adjustments of the range.
SPECIAL WARNING
Only qualified personnel should install or service this
range.
Read safety instructions in this manual before using
range.
Improper installation, adjustment, alteration, service,
maintenance or use of range can result in serious injury
or property damage.
Place range where it will be well lighted. Do not set range
over holes in the floor or other locations where it may be
subject to strong drafts. Any opening in the wail behind the
range and in the floor under the range should be sealed.
Make sure the flow of combustion or ventilation air is not
obstructed.
To eliminate the risk of burns or fire by reaching over
heated surface units, cabinet storage space located above
the surface units should be avoided, if cabinet storage is
to be provided, the risk can be reduced by installing a
range hood that projects horizontally a minimum of 5
inches beyond the bottom of the cabinets.
The installation of a range designed for mobile home
installation must conform with the Manufactured Home
Construction and Safety Standard, Title 24 CFR, Part
3280 (formerly the Federal Standard for Mobile Home
Construction and Safety, Title 24 HUD, Part 280) or, when
such standard is not applicable, the Standard for
Manufactured Home Installations 1982 (Manufactured
Home Sites, Communities and Set-Ups), ANSI
A225.1-1 984, or with local codes.
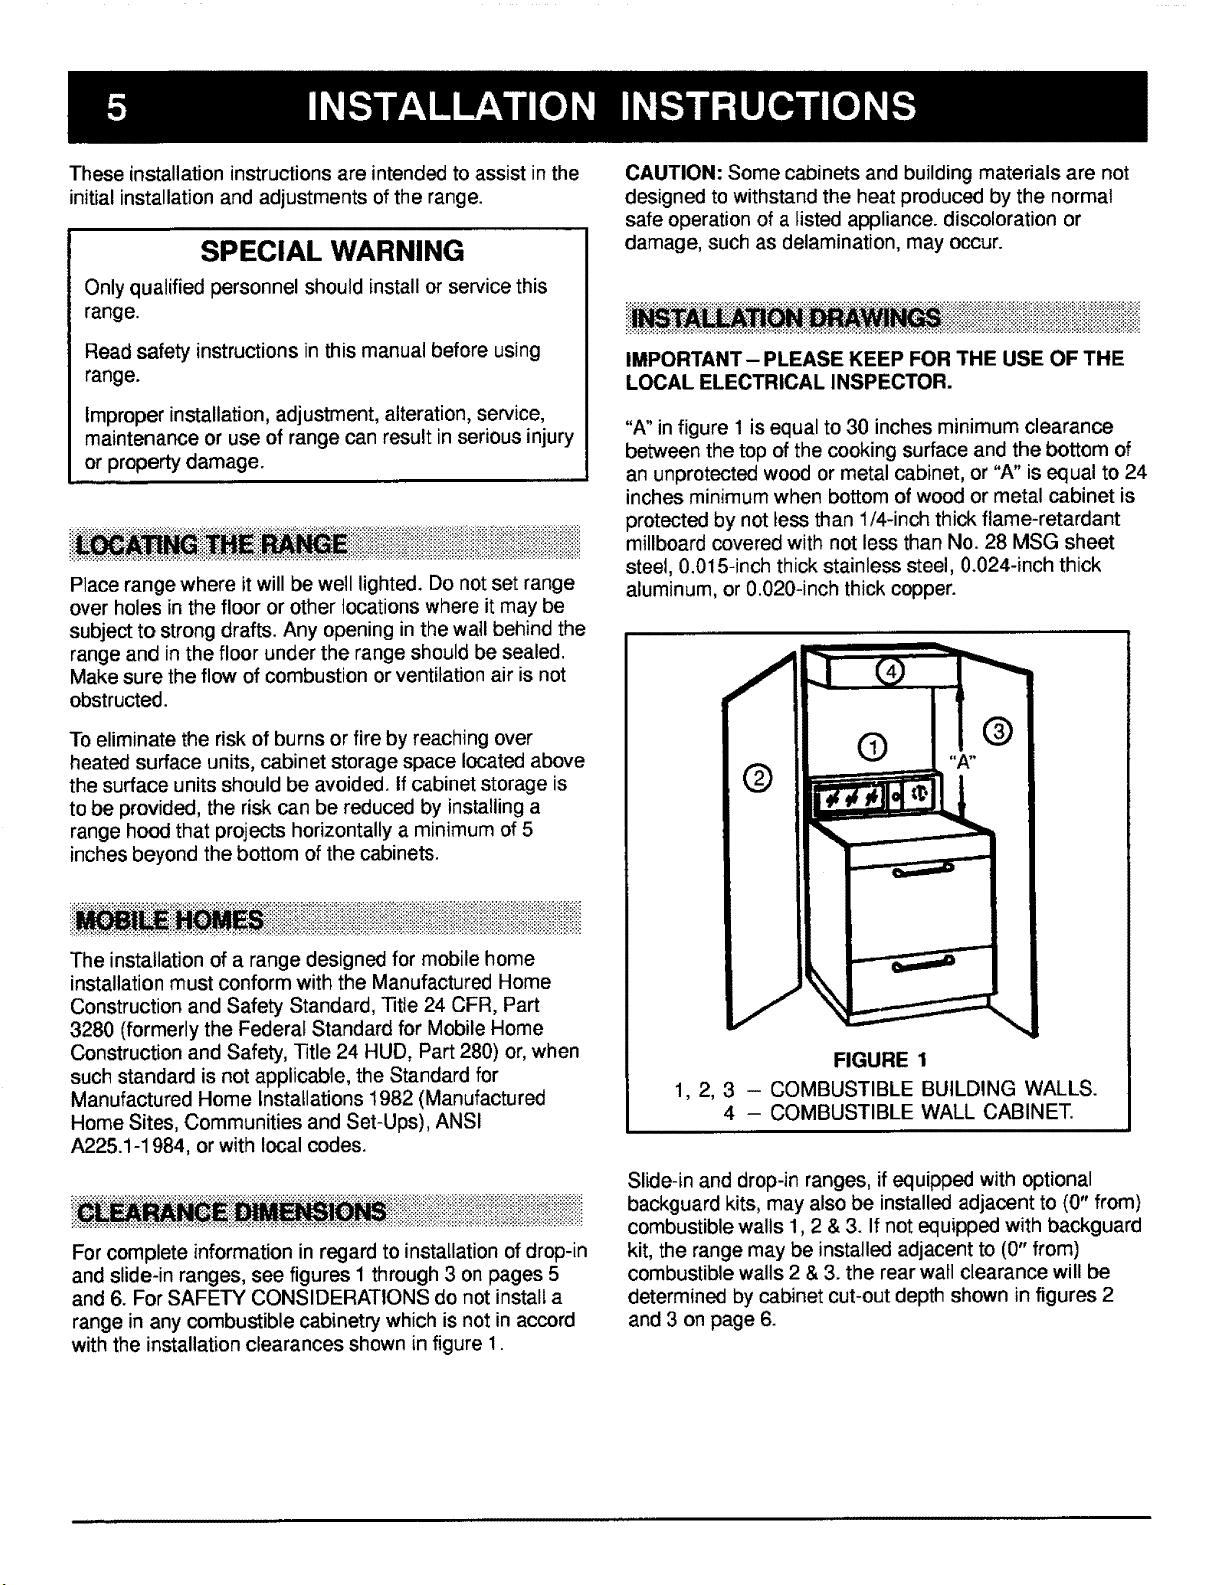
For complete information in regard to installation of drop-in
and slide-in ranges, see figures 1 through 3 on pages 5
and 6. For SAFETY CONSIDERATIONS do not install a
range in any combustible cabinetry which is not in accord
with the installation clearances shown in figure !.
CAUTION: Some cabinets and building materials are not
designed to withstand the heat produced by the normal
safe operation of a listed appliance, discoloration or
damage, such as delamination, may occur.
iii ii i !i!i!!iliiiiiiii!ii!iiiiiiiiiiiiiiiiiiiiiiiii!iiiiiii
IMPORTANT- PLEASE KEEP FOR THE USE OF THE
LOCAL ELECTRICAL INSPECTOR.
"A" in figure 1 is equal to 30 inches minimum clearance
between the top of the cooking surface and the bottom of
an unprotected wood or metal cabinet, or "A" is equal to 24
inches minimum when bottom of wood or metal cabinet is
protected by not tess than 1/4-inch thick flame-retardant
millboard covered with not less than No. 28 MSG sheet
steel, 0.015-inch thick stainless steel, 0.024-inch thick
aluminum, or 0.020-inch thick copper.
FIGURE 1
1, 2, 3 - COMBUSTIBLE BUILDING WALLS.
4 - COMBUSTIBLE WALL CABINET.
Slide-in and drop-in ranges, if equipped with optional
backguard kits, may also be installed adjacent to (0" from)
combustible walls 1,2 & 3. If not equipped with backguard
kit, the range may be installed adjacent to (0" from)
combustible walls 2 & 3. the rear wall clearance will be
determined by cabinet cut-out depth shown in figures 2
and 3 on page 6.
FIGURE 2
SLIDE-IN
23 3/4"
MIN. FLAT
AREA
TOUT
WITH THIS DIMENSION, FILLER STRIP
IS NOT USED. FOR CUTOUT GREATER THAN
I/2", USE FILLER KIT 62g.40480.
NOTE:
ON COUNTER TOPS WITH
FORMED FRONT EDGE,
SHAVE RAISED SECTION
TO CLEAR TOP.
BEFORE ATTEMPTING
INSTALLATION, ADJUST
RANGE LEVELING LEGS
TO ACCOMMODATE
THIS DIMENSION.
\
36" COUNTER
TOP HEIGHT
(MINIMUM)
5 3/4
CABINET
ENINGj
CAUTION:
SOME WHITE EUROPEAN STYLE CABINETS ARE EQUIPPED WITH
DELICATE WHITE VINYL DRAWER AND DOOR FRONTS. THE VINYL
MAY NOT BE DESIGNED TO WITHSTAND THE HEAT PRODUCED BY THE
NORMAL SAFE OPERATION OF A SELF-CLEANING RANGE,
DISCOLORATION OR DELAMINATION MAY OCCUR.
1DE FOR !20/208,
120/240 VOLT OUTLET
PER APPLICABLE
CORD IN THIS AREA.
25" MINIMUM
COUNTER
DEPTH
24 ° CABINET
FIGURE 3
DROP-IN
WITH THIS DIMENSION, FILLER STRIP
IS NOT USED. FOR CUTOUT GREATER THAN
23 1/2", USE FILLER KIT 629.40480.
23 3/4"
MIN. FLAT
AREA
10 3/4"
1/2" CUTOUT
NOTE:
ON ODUNTER TOPS WITH
FORMED FRONT EDGE,
SHAVE RAISED SECTION
TO CLEAR TOP.
-PROVIDE FOR 120/208,
120/240 VOLT JUNCTION
BOX FOR RANGE CONDUIT,
27 1/2"
FROM TOP OF
COUNTER
a NOTE: BEFORE
ATTEMPTING INSTALLATION,
ADJUST RANGE LEVELING
LEGS TO ACCOMMODATE
THIS DIMENSION.
36" COUNTER
TOP HEI GIlT
TOP DEPTH j
CABINET
-RECOMMEND THE "'-,,_DEPTH
USE OF 3 1/2" WIDE
SLATS ON EACH SIDE,
OR SOLID FLOOR.
WARNING: A risk of range tip-over exists if the appliance
is not installed in accordance with the installation
instructions provided. The proper use of this device
minimizes the risk of TIP-OVER. In using this device the
consumer must still observe the safety precautions as
stated in the OWNER'S MANUAL and avoid using the
oven door and/or lower drawer as a step stool.
Installation instructions are provided for wood and cement
in either floor or wall. Any other type of construction may
require special installation techniques as deemed
necessary to provide adequate fastening of the ANTI-TIP
bracket to the floor or wall. The bracket may be installed to
engage the left or right rear leveling leg.
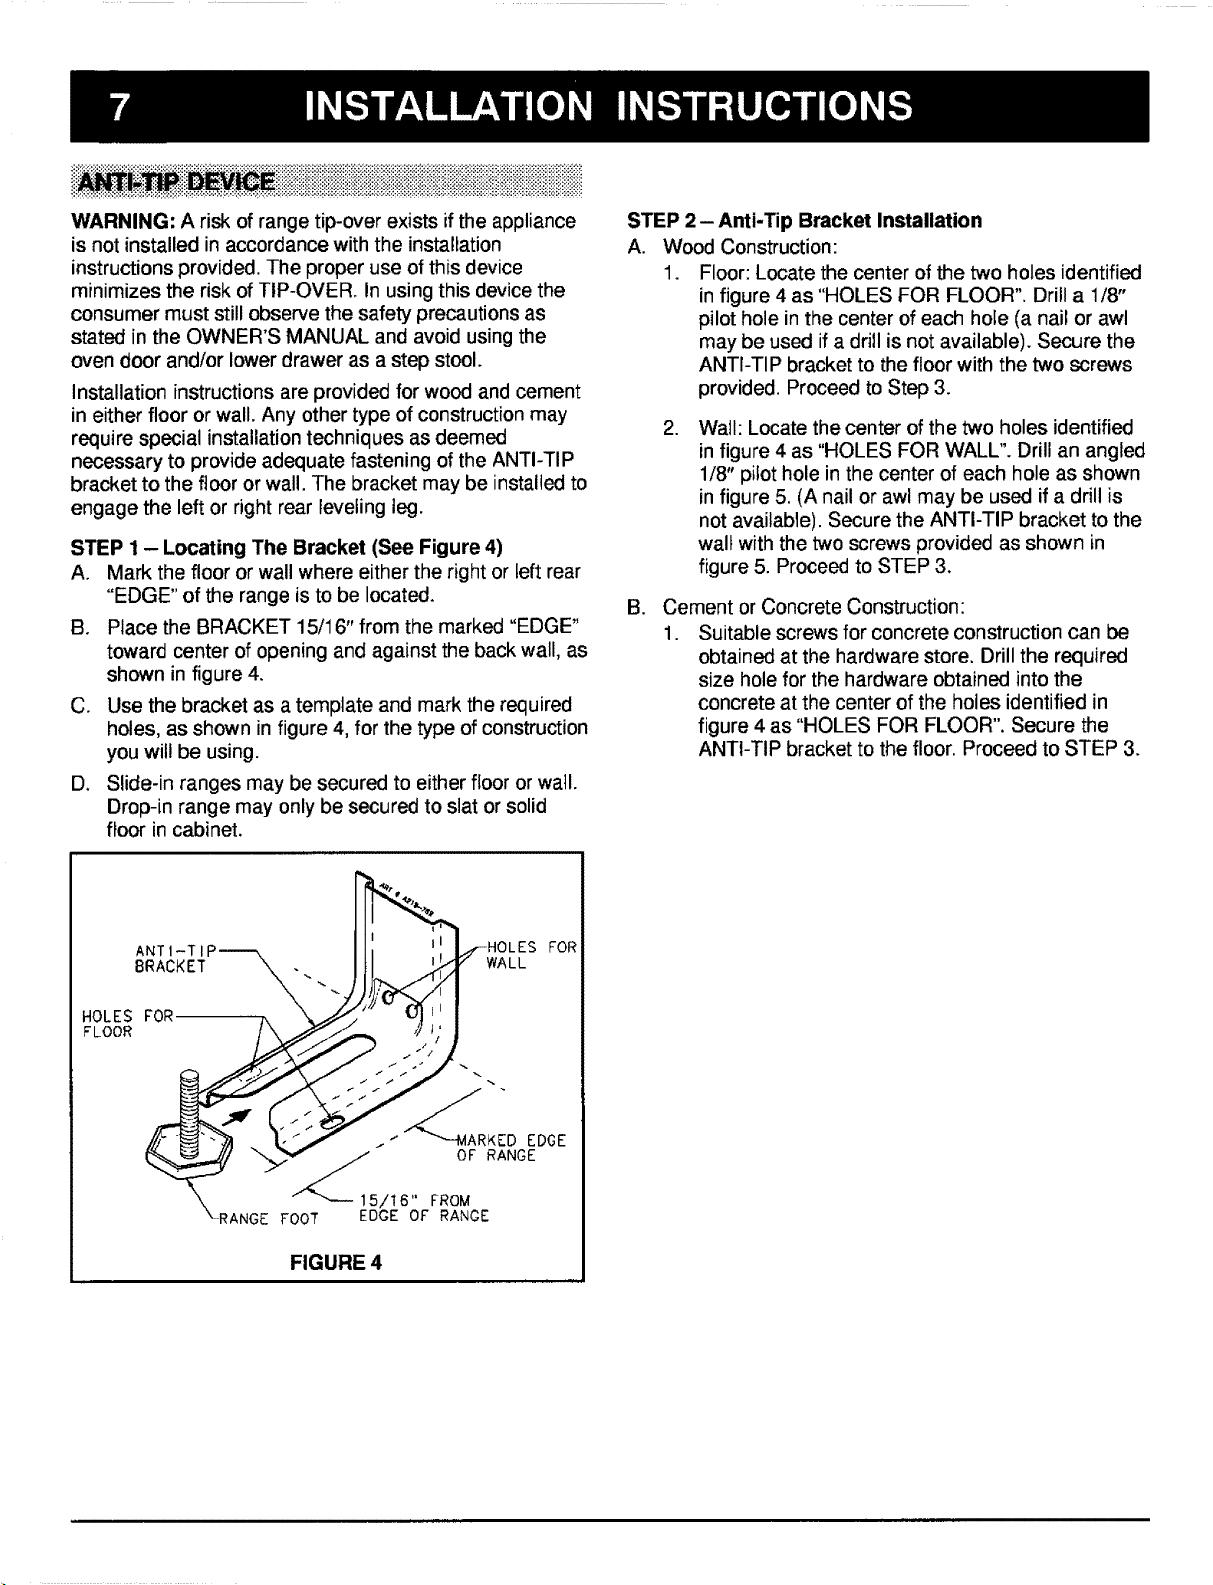
STEP 1 - Locating The Bracket (See Figure 4)
A. Mark the floor or wall where either the right or left rear
"EDGE" of the range is to be located.
B. Place the BRACKET 15/16" from the marked "EDGE"
toward center of opening and against the back wall, as
shown in figure 4.
C. Use the bracket as a template and mark the required
holes, as shown in figure 4, for the type of construction
you will be using.
D. Slide-in ranges may be secured to either floor or wail.
Drop-in range may only be secured to slat or solid
floor in cabinet.
STEP 2 - Anti-Tip Bracket Installation
A Wood Construction:
1. Floor: Locate the center of the two holes identified
in figure 4 as "HOLES FOR FLOOR". Drill a 1/8"
pilot hole in the center of each hole (a nail or awl
may be used if a drill is not available). Secure the
ANTI-TIP bracket to the floor with the two screws
provided. Proceed to Step 3.
. Wall: Locate the center of the two holes identified
in figure 4 as "HOLES FOR WALL". Drill an angled
1/8" pilot hole in the center of each hole as shown
in figure 5. (A nail or awl may be used if a drill is
not available). Secure the ANTI-TIP bracket to the
walt with the two screws provided as shown in
figure 5. Proceed to STEP 3.
B, Cement or Concrete Construction:
1. Suitable screws for concrete construction can be
obtained at the hardware store. Drill the required
size hole for the hardware obtained into the
concrete at the center of the holes identified in
figure 4 as "HOLES FOR FLOOR". Secure the
ANTI-TIP bracket to the floor. Proceed to STEP 3.
ANTI-TIP---_
BRACKET
HOLES FOR
FLOOR
WALL
FOR
i * _KED EDGE
_11 OF RANGE
5/16" FROM
_RANGE FOOT EDGE OF RANGE
FIGURE 4
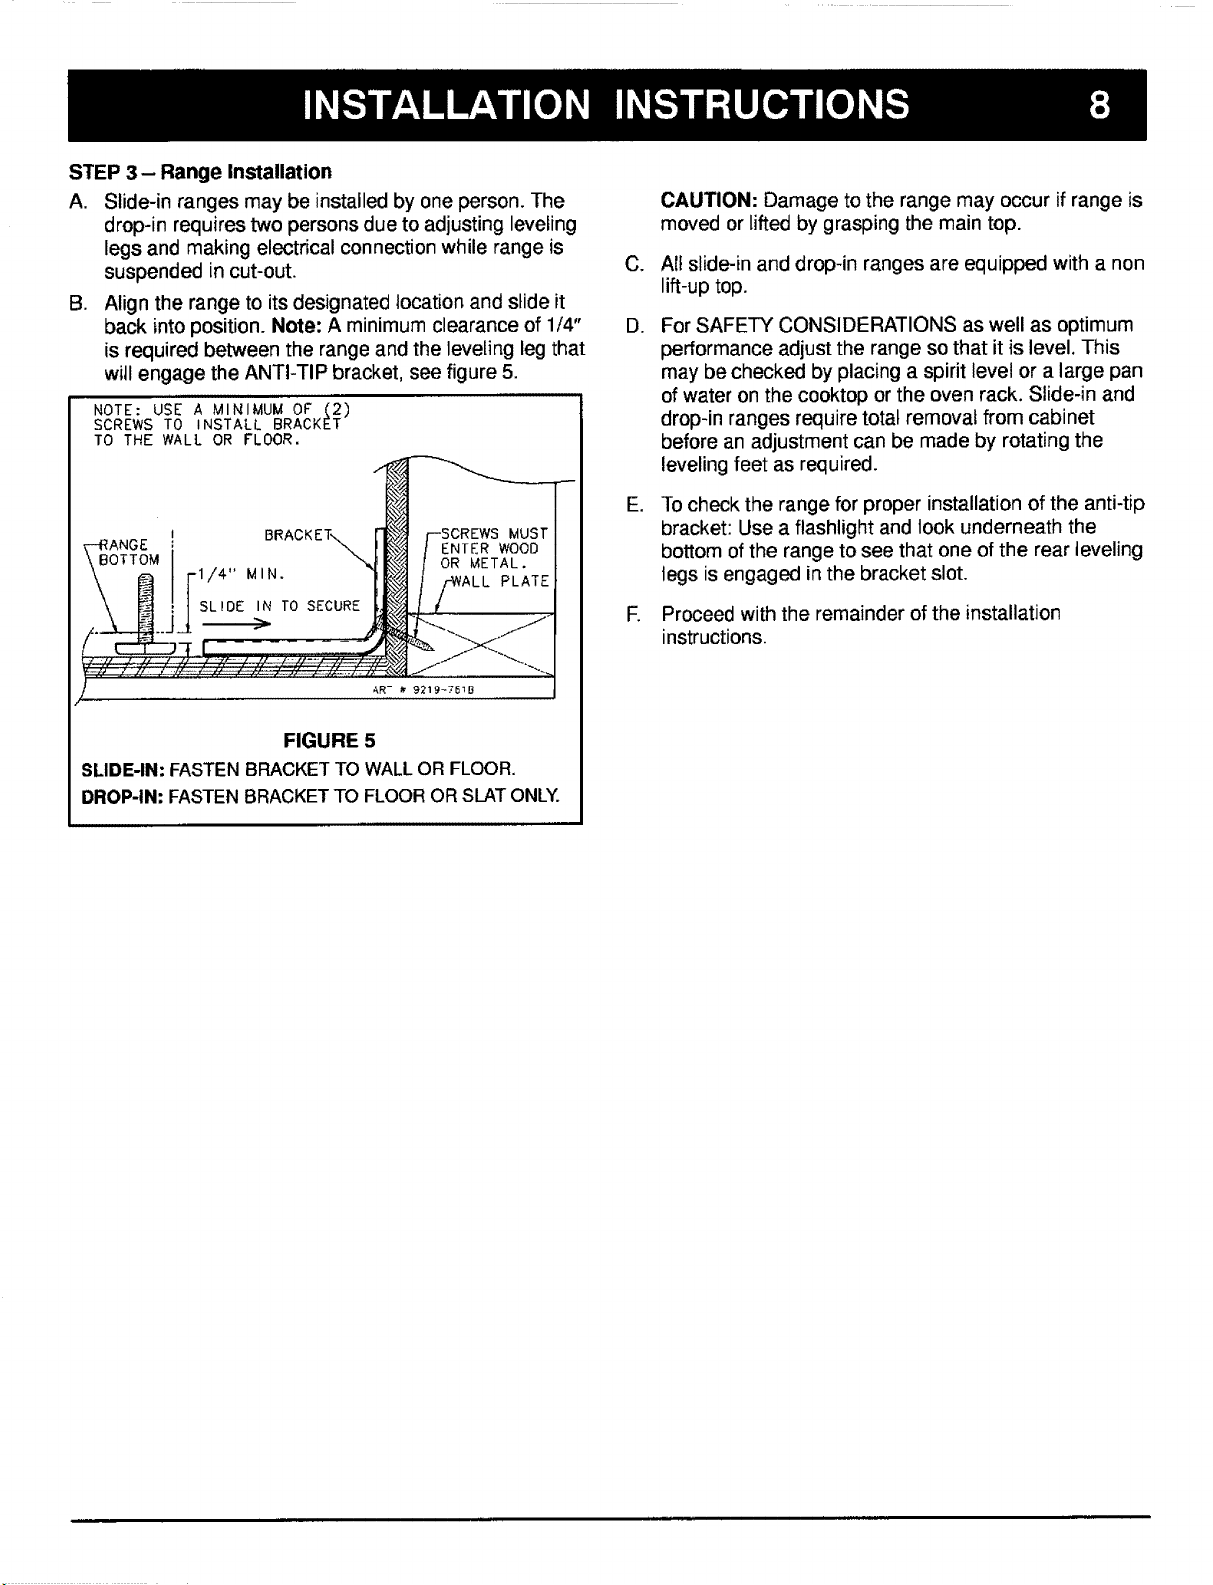
STEP3- RangeInstallation
A. Slide-in ranges may be installed by one person. The
drop-in requires two persons due to adjusting leveling
legs and making electrical connection while range is
suspended in cut-out.
B. Align the range to its designated location and slide it
back into position. Note: A minimum clearance of 1/4"
is required between the range and the leveling leg that
will engage the ANTI-TIP bracket, see figure 5.
NOTE: USE A MINIMUM OF (2)
SCREWS TO INSTALL BRACKET
TO THE WALL OR FLOOR.
FIGURE 5
SLIDE-IN: FASTEN BRACKET TO WALLOR FLOOR.
DROP-IN: FASTEN BRACKETTO FLOOR OR SLATONLY.
C.
D,
E.
E
CAUTION: Damage to the range may occur if range is
moved or lifted by grasping the main top.
All slide-in and drop-in ranges are equipped with a non
lift-up top.
For SAFETY CONSIDERATIONS as well as optimum
performance adjust the range so that it is level. This
may be checked by placing a spirit level or a large pan
of water on the cooktop or the oven rack. Slide-in and
drop-in ranges require total removal from cabinet
before an adjustment can be made by rotating the
leveling feet as required.
To check the range for proper installation of the anti-tip
bracket: Use a flashlight and took underneath the
bottom of the range to see that one of the rear leveling
legs is engaged in the bracket slot.
Proceed with the remainder of the installation
instructions.
ii i ! i ii !i i iiiii7iii ii iiiiiiiiiiiiiiiiiiiiiiiiiii7iiiiiii iiiiiiiiiiiii
The range must be installed in accordance with Local and
National Electric Code (NEC) ANSI/NFPA No. 70-1996.
See rating plate on range front frame for total connected
KW rating.
iii i i!!iiiiiiiiiiiiiiiiiiiiiiiiiiiiiiiii!Tiiiiiiiiiliiililiiiii!iiiiiiiiiiLii
Your local utility company will tell you whether the present
electric service to your home is adequate, tt may be
necessary to increase the size of the wiring to the house
and service switch to take care of the electrical load
demanded by the range. The kilowatt rating for the range
is specified on the name plate on the range.
!iH ! i i iiiiiii!!iiii!ii!!iiii!iiiiiiiiiiiiiiiiiiiiiiiiiiiiiiiiTi!!i!!!!!!iiiiiiiii........iTLili!!iiiiii
Most local Building Regulations and Codes require that all
electrical wiring be done by licensed electricians. All wiring
should conform to Local and National Electrical Codes.
This range requires a single phase three wire 120/240 or a
120/208 volt, 60 Hz, AC circuit. Wiring codes require a
separate circuit be run from the main entrance panel to the
range and that it be equipped with separate disconnect
switch and fuses, either in the main entrance panel or in a
separate switch and fuse box. In some communities, a
solid or flexible continuous armored conduit must be used
from main entrance panel to the terminal box on the rear
of the range. Others will permit the termination of the
range circuit at a polarized three or four wire plug-in outlet
placed at a convenient point near the back of the range.
The range is then connected to this outlet through an
approved range connector (pigtail) fastened securely to
the terminal block with proper strain relief at the range and
a three or four pronged plug at the opposite end.
i i iiiiiiiiiiiiiiiiiiiiTiiiiiiiiiiiiililiiiiiiiiiiiiiiiiiiiiiiiiiiiiii
Some models are shipped direct from the factory with
service cords (pigtails) attached. There are no range
connections necessary on these models. Just plug into the
range outlet. On models not provided with a service cord
and models having a conduit, connection to the power
supply is necessary. REMEMBER- mobile homes and
some LOCAL CODES DO NOT PERMIT GROUNDING
THROUGH NEUTRAL. Hence, 4-wire service MUST be
provided for such installations. All others permit 3-wire
service. Use COPPER WIRE ONLY. Make connections as
explained below and with reference to the appropriate
illustration (see figures 8 thru 11 on pages I 0 and 11).
After installation, insure tightness of all electrical
connections and replace all covers.
NOTE: Cord replacement- ONLY a power supply cord
rated at 240 volts minimum, 40 amperes or 50 amperes
power supply cord that is marked for use with nominal 1
3/8" (34.93 mm) diameter connection opening, with closed
loop terminals and marked for use with ranges shall be
used.
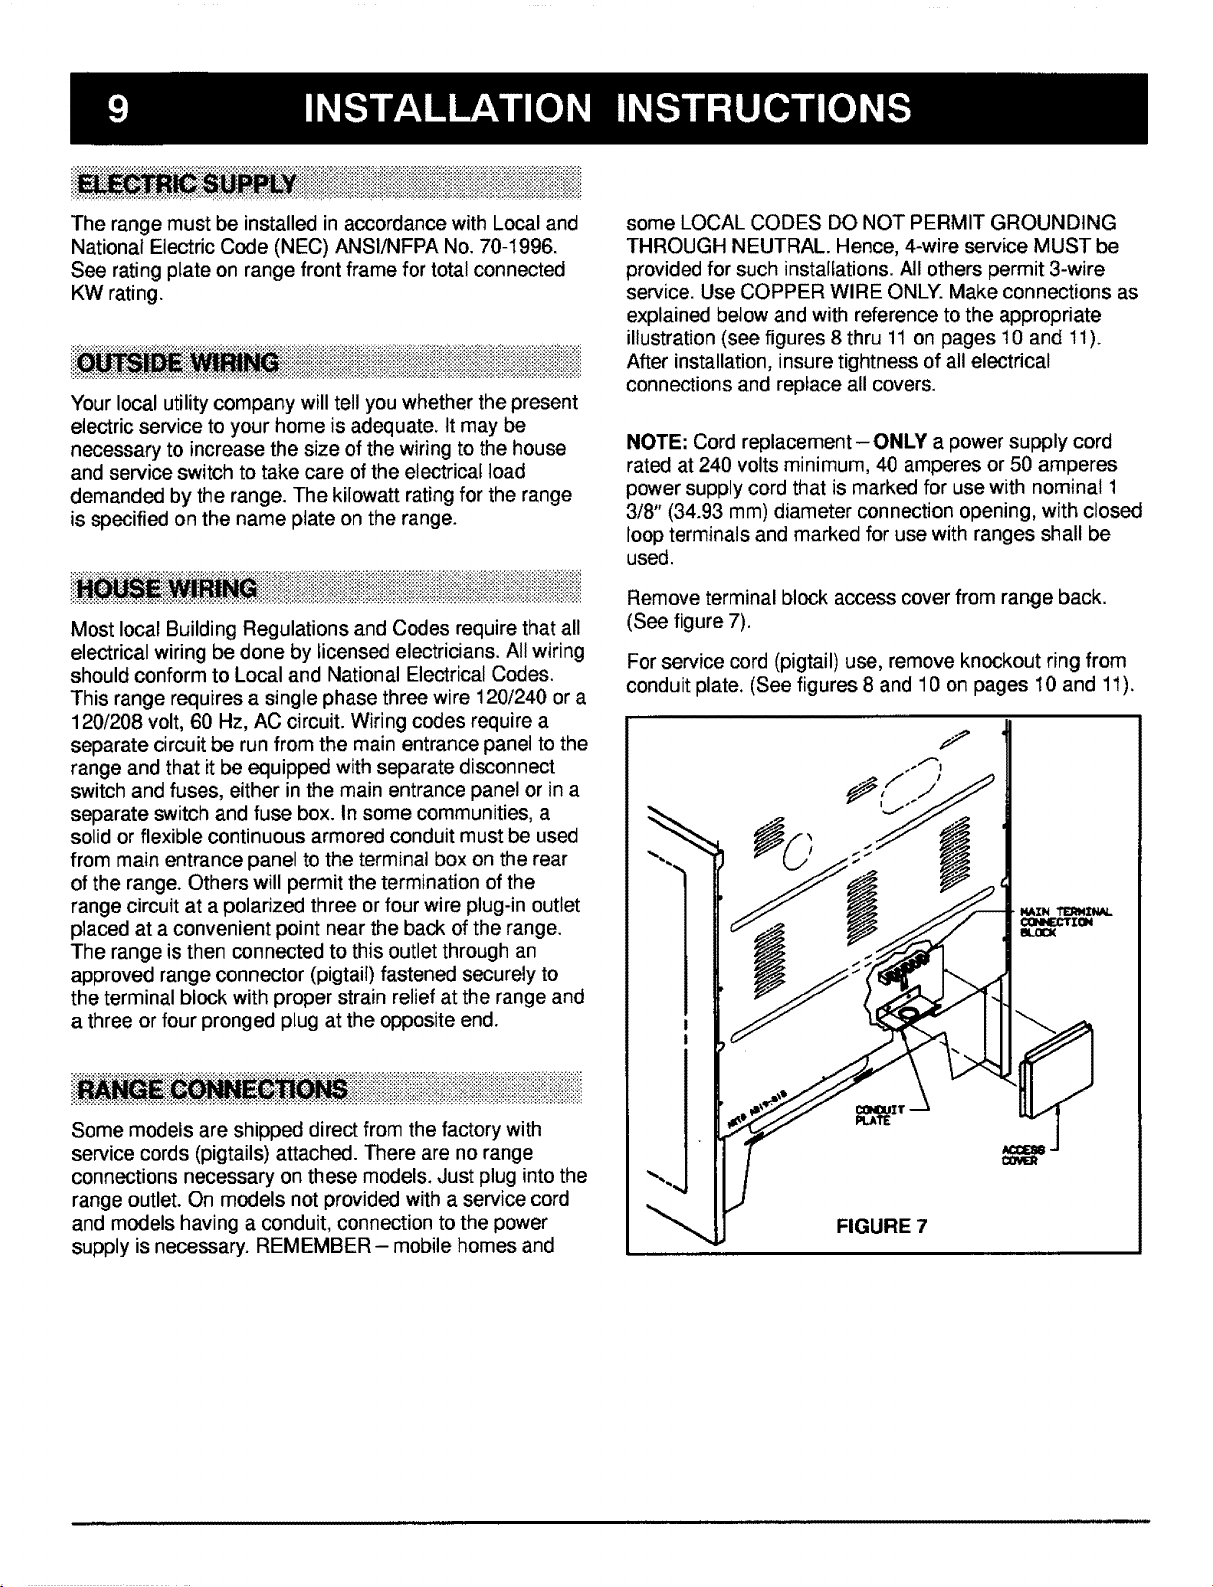
Remove terminal block access cover from range back.
(See figure 7).
For service cord (pigtail) use, remove knockout ring from
conduit plate. (See figures 8 and 10 on pages 10 and 11).
FIGURE 7
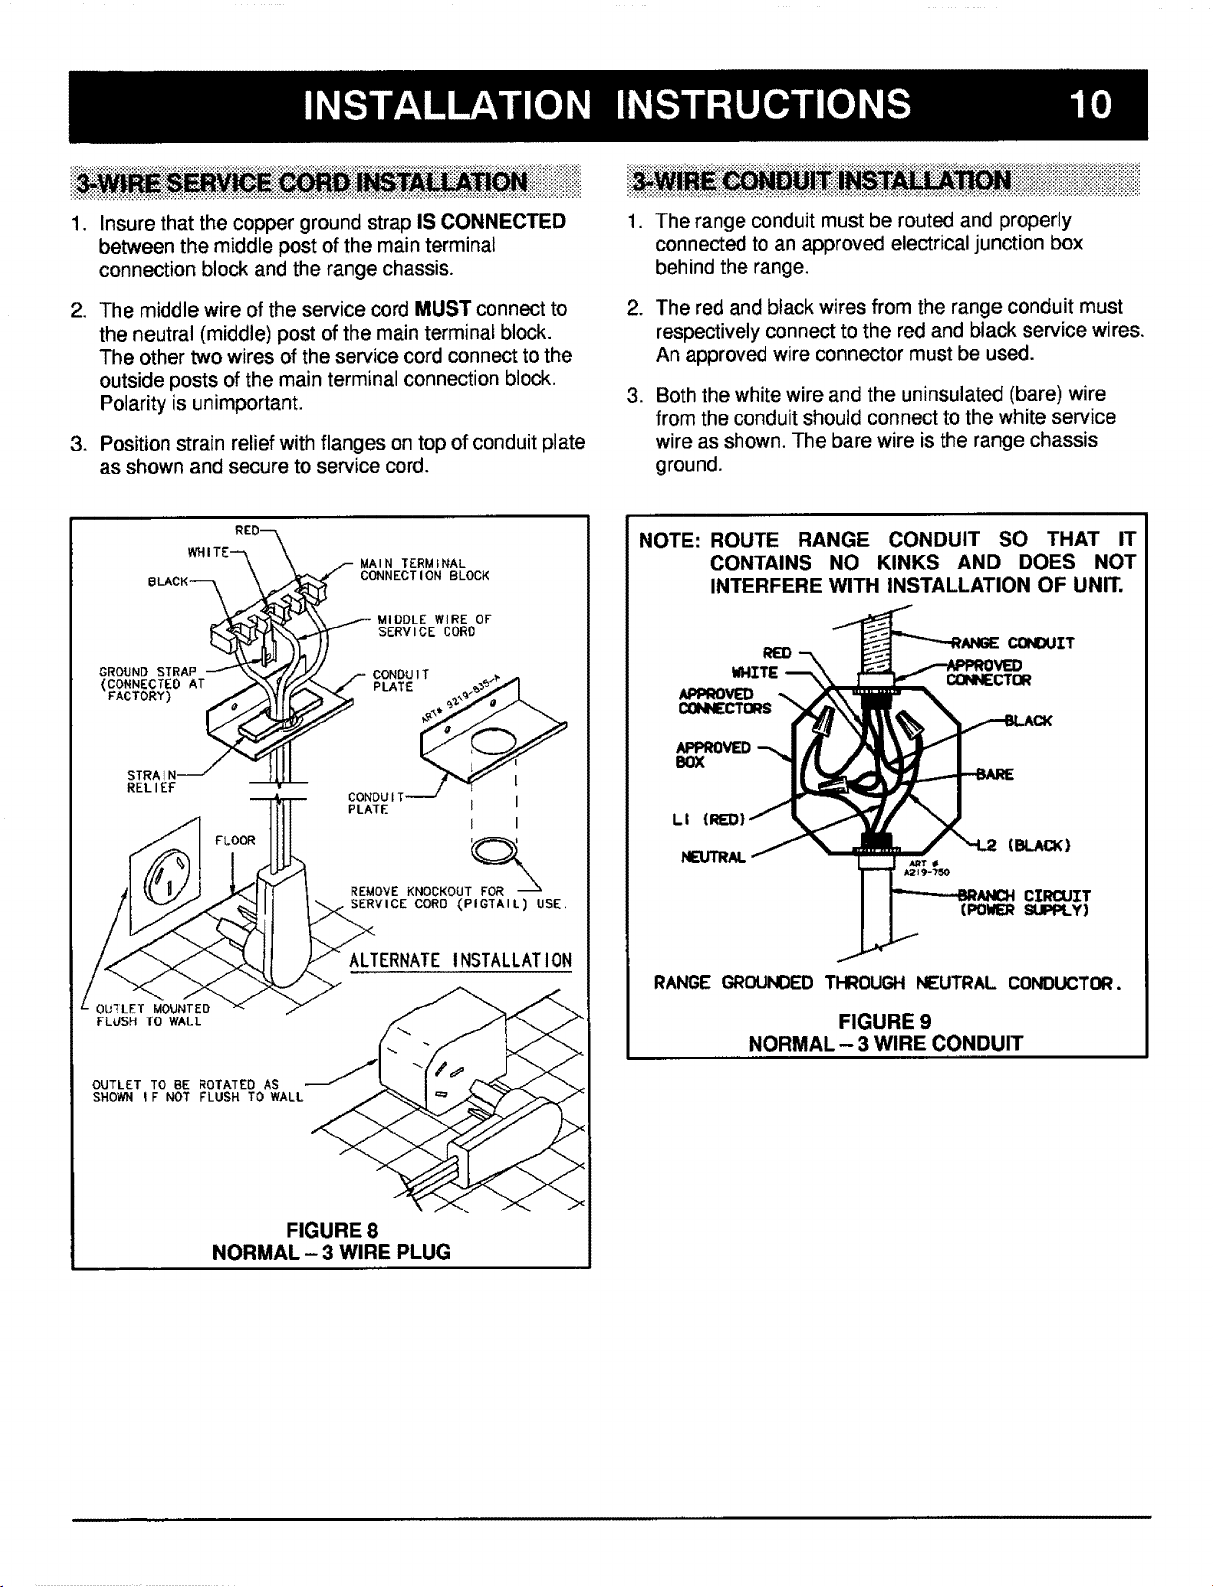
,
.
.
Insure that the copper ground strap IS CONNECTED
between the middle post of the main terminal
connection block and the range chassis.
The middle wire of the service cord MUST connect to
the neutral (middle) post of the main terminal block.
The other two wires of the service cord connect to the
outside posts of the main terminal connection block.
Polarity is unimportant.
Position strain relief with flanges on top of conduit plate
as shown and secure to service cord.
,
.
.
The range conduit must be routed and properly
connected to an approved electrical junction box
behind the range.
The red and black wires from the range conduit must
respectively connect to the red and black service wires.
An approved wire connector must be used.
Both the white wire and the uninsulated (bare) wire
from the conduit should connect to the white service
wire as shown. The bare wire is the range chassis
ground.
RED--_
WHIT(--_
B LACK ---3k_
GROUND STRAP _ _'_L
(CONNECTE0 AT
FACTORY)
STRAI N-----"
REL I EF
MA_IN T£RMINAL
CONNECTION BLOCK
MIDDLE WIRE OF
SERVICE COR0
I CONDUIT
PLATE
1
CONDUIT
PLATE I J
I I
REMOVE KNOCKOU 'i_
SERVICE CORD (PIGTAIL) USE.
L OUTLET MOUNTED
FLUSH IO WALL
ALTERNATEINSTALLATION
OUTLET TO BE ROTATED AS
SHOWN IF NOT FLUSH TO WALL
FIGURE 8
NORMAL - 3 WIRE PLUG
NOTE: ROUTE RANGE CONDUIT SO THAT IT
CONTAINS NO KINKS AND DOES NOT
INTERFERE WITH INSTALLATION OF UNIT.
/I (RE)}
NEUTRAL
{BLACK)
CIRCUIT
{POWER SUI_Y)
RANGE GROUM:IEDTHROUGHNEUTRAL CONDUCTOR.
FIGURE 9
NORMAL - 3 WIRE CONDUIT
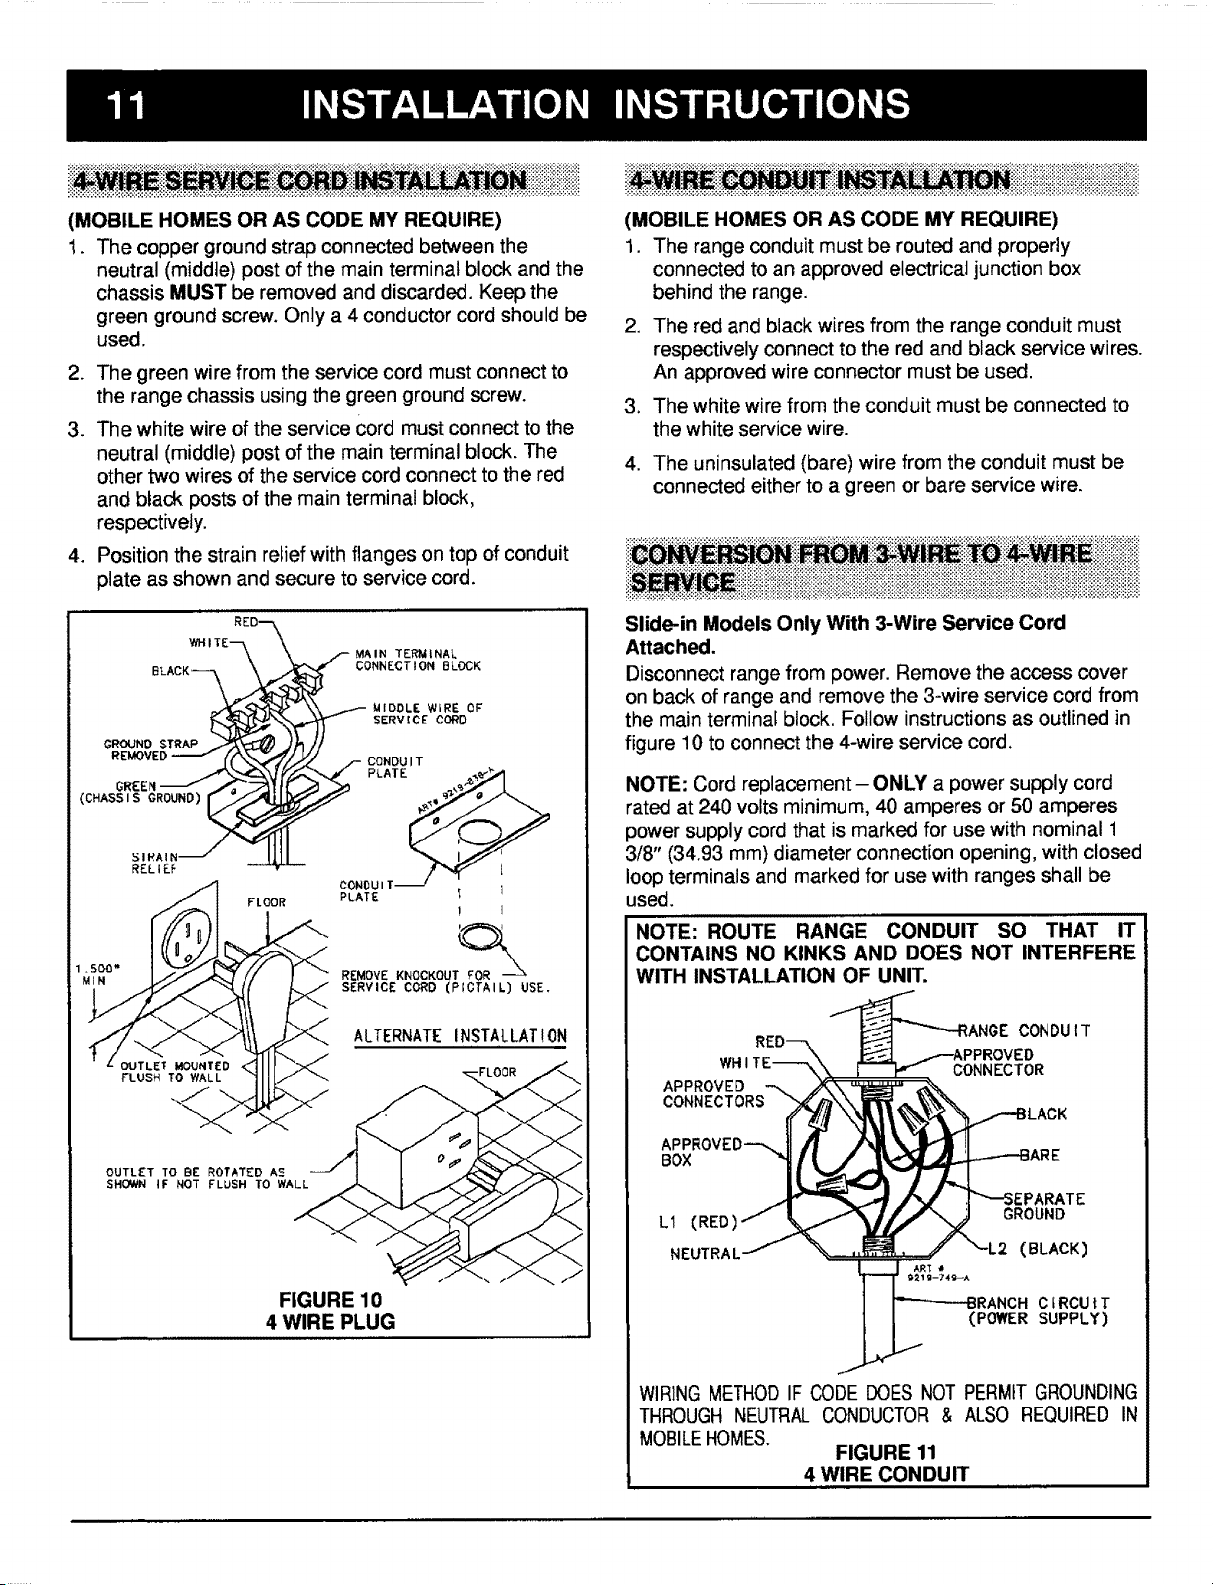
(MOBILE HOMES OR AS CODE MY REQUIRE)
1. The copper ground strap connected between the
neutral (middle) post of the main terminal block and the
chassis MUST be removed and discarded. Keep the
green ground screw. Only a 4 conductor cord should be
used.
2. The green wire from the service cord must connect to
the range chassis using the green ground screw.
3. The white wire of the service Cord must connect to the
neutral (middle) post of the main terminal block. The
other two wires of the service cord connect to the red
and black posts of the main terminal block,
respectively.
4. Position the strain relief with flanges on top of conduit
plate as shown and secure to service cord.
RED--_
VtI-I I TE_\
BLACK---__
GROUNO STRAP =..-TT._I:_,#)j_
(CHASSIS GROUND) __
FtOOR
MAIN TERMINAL
CONNECTION BLOCK
/MIDDLE WiRE OF
SERVICF CORD
,-- CONDUIT
PLATE
[
OONDUII
PLATE I 1
I I
REMOVE KNOCKOU_FOR_O_
SERVICE CORD (PIOTAIL) USE.
OUTLEt MOUNTED
FLUSH TO WALL
ALTERNATE INSTALLAT10N
OUTLET TO BE ROTATED A_
SHOWN IF NOT FLUSH TO WALL
FIGURE 10
4 WIRE PLUG
(MOBILE HOMES OR AS CODE MY REQUIRE)
1. The range conduit must be routed and properly
connected to an approved electrical junction box
behind the range.
2. The red and black wires from the range conduit must
respectively connect to the red and black service wires.
An approved wire connector must be used.
3. The white wire from the conduit must be connected to
the white service wire.
4. The uninsulated (bare) wire from the conduit must be
connected either to a green or bare service wire.
!iii!i!i!iiiii!ili!iiiiiiiiiiii!iiiiii!
Slide-in Models Only With 3-Wire Service Cord
Attached.
Disconnect range from power. Remove the access cover
on back of range and remove the 3-wire service cord from
the main terminat block. Follow instructions as outlined in
figure 10 to connect the 4-wire service cord.
NOTE: Cord replacement- ONLY a power supply cord
rated at 240 volts minimum, 40 amperes or 50 amperes
power supply cord that is marked for use with nominal 1
3/8" (34.93 mm) diameter connection opening, with closed
loop terminals and marked for use with ranges shall be
used.
NOTE: ROUTE RANGE CONDUIT SO THAT IT
CONTAINS NO KINKS AND DOES NOT INTERFERE
WITH INSTALLATION OF UNIT.
WHITE_
APPROVED
CONNECTORS
CONDUIT
CONNECTOR
BOX
L1
NEUTRAL
GROUND
CIRCUIT
(POWER SUPPLY)
WIRING METHODIF CODE DOES NOT PERMIT GROUNDING
THROUGH NEUTRAL CONDUCTOR& ALSO REQUIRED IN
MOBILEHOMES.
FIGURE 11
4 WIRE CONDUIT
IF.l• zIn 3Su'-'
I II° III o BA, Ro, ooK
DELAY TIMED BAKE
'=== _ STOP TIMER
sET BAKF. CLEAN COOK
t-CLLI
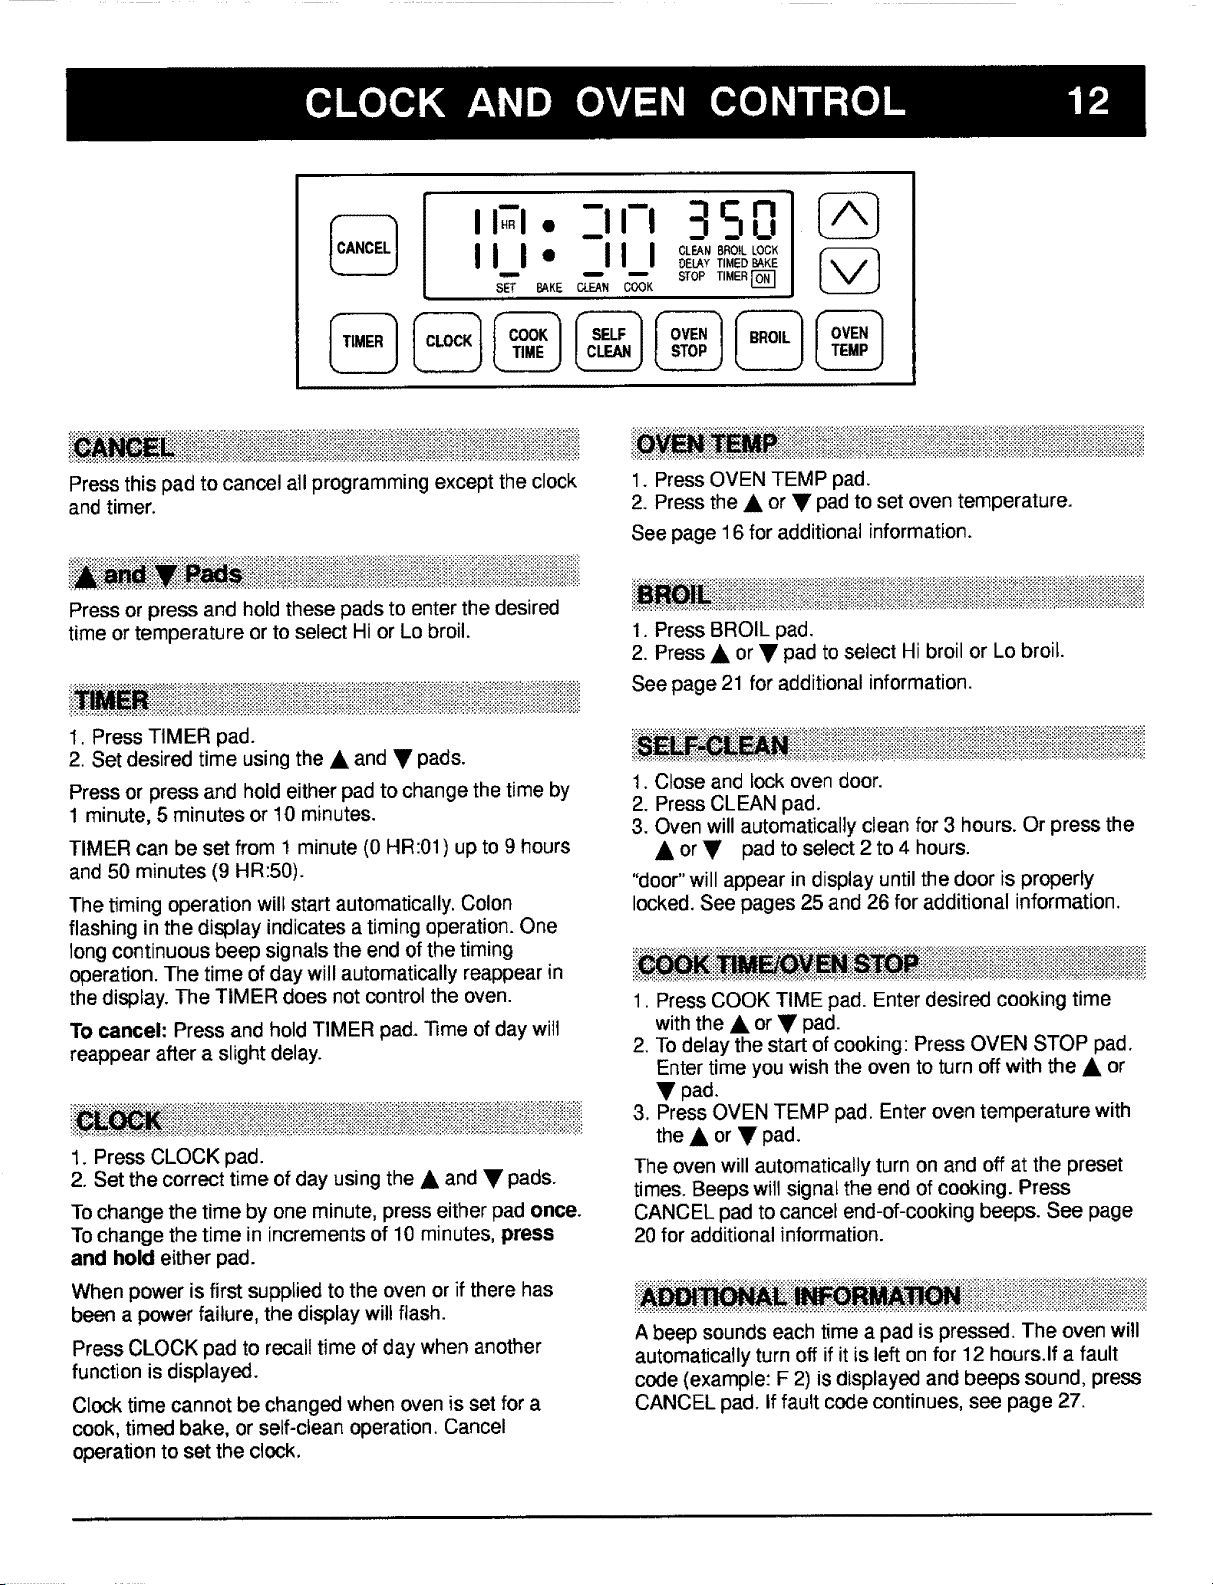
ii ii ii!iii i!iiii ii iiii i .i.!i.!ii!. i iiii .i i! !ii.!!! i i ii.ii i.ii. i i. . . i!i! ii !i iiiii ii!ii.i !iii.i! i.i.i.iiii.ii i i.i i i.ii!i! ii!iill!;i i! i i iiiiii !!i! !i!!i!!iii! iiiiii}iiiiii i i i i !
Press this pad to cancel all programming except the clock
and timer.
ii ii ii!i iiiiii!iiii!!i!iiiiilUiiiiiiiiiiiiiiiiii!ii!iiiiiiiiiiiiiiiiiiiiiiliiii!i!i!iiiii!iiiiiiiiiiiiiiii!!i
Press or press and hold these pads to enter the desired
time or temperature or to select Hi or Lo broil.
iii i ii.!iiiili!iiiiiiiiiiii!ii!!ii!i!ii!ii!iiiiii!i!iiiiiiiiliii!ii!!iiiiliiiiiiiiiiiiii!iiiiiiiiiiiiiiiiiiiiii!i!iiiii!i!iiiiii
I. Press TIMER pad.
2. Set desired time using the & and • pads.
Press or press and hold either pad to change the time by
1 minute, 5 minutes or 10 minutes.
TIMER can be set from 1 minute (0 HR:01) up to 9 hours
and 50 minutes (9 HR:50).
The timing operation wilt start automatically, Colon
flashing in the display indicates a timing operation. One
long continuous beep signals the end of the timing
operation. The time of day will automatically reappear in
the display. The TIMER does not control the oven.
To cancel: Press and hold TIMER pad. Time of day will
reappear after a slight delay.
,iiill ,iiiiii
1. Press CLOCK pad.
2. Set the correct time of day using the • and • pads.
To change the time by one minute, press either pad once.
To change the time in increments of 10 minutes, press
and hold either pad.
When power is first supplied to the oven or if there has
been a power failure, the display wil! flash.
Press CLOCK pad to recall time of day when another
function is displayed.
Clock time cannot be changed when oven is set for a
cook, timed bake, or self-clean operation. Cancel
operation to set the clock.
i ii i iiiii i iii!ii!!!!! !iiii i. ii.iiiii i.ii.i!ii ii! iii iii!!i! i ii i!i i i iii iiiii i iii ii !ii i ! i i ii i! ii!iii!iiii!ii i ii i iiii iiii i
1. Press OVEN TEMP pad.
2. Press the • or • pad to set oven temperature.
See page 16 for additional information.
1. Press BROIL pad.
2. Press • or • pad to select Hi broil or Lo broil.
See page 21 for additional information.
ill!ii!iiiiiiiiiiliii ii iiiii!iiii ii i iiii i i i i!ii i!i i iii! ! ! !i! iii !ii i ! i i i i i ii i i
1. Close and lock oven door.
2. Press CLEAN pad.
3. Oven will automatically clean for 3 hours. Or press the
,& or • pad to select 2 to 4 hours.
"door" will appear in display until the door is properly
locked. See pages 25 and 26 for additional information.
1. Press COOK TIME pad. Enter desired cooking time
with the ,& or • pad.
2. To delay the start of cooking: Press OVEN STOP pad.
Enter time you wish the oven to turn off with the • or
• pad.
3. Press OVEN TEMP pad. Enter oven temperature with
the • or • pad.
The oven will automatically turn on and off at the preset
times. Beeps will signal the end of cooking. Press
CANCEL pad to cancel end-of-cooking beeps. See page
20 for additional information.
A beep sounds each time a pad is pressed. The oven will
automatically turn off if it is left on for 12 hours.If a fault
cede (example: F 2) is displayed and beeps sound, press
CANCEL pad. If fault code continues, see page 27.
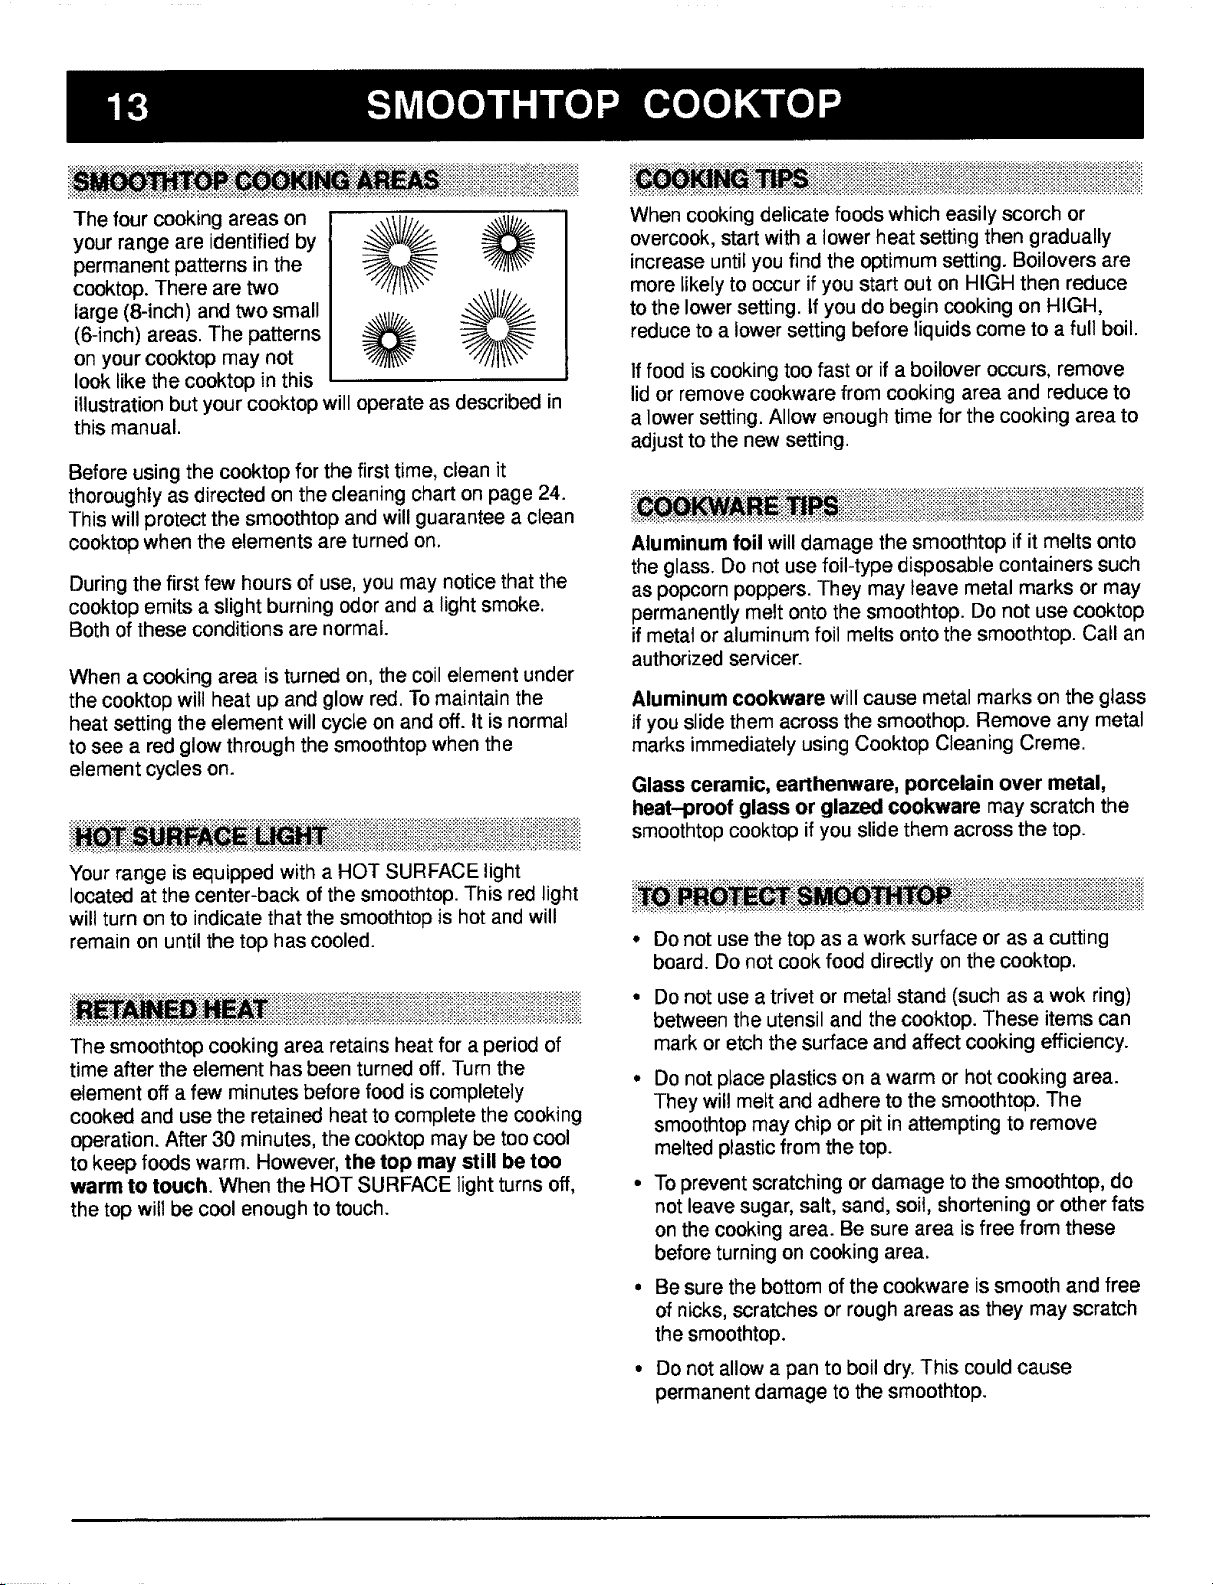
Thefourcookingareason
yourrangeareidentifiedby
permanentpatternsin the
cooktop.Therearetwo
large(8-inch)andtwosmall
(6-inch)areas.Thepatterns
onyourcooktopmaynot
looklikethecooktopinthis
illustration but your cooktop will operate as described in
this manual.
Before using the cooktop for the first time, clean it
thoroughly as directed on the cleaning chart on page 24.
This will protect the smoothtop and will guarantee a clean
cooktop when the elements are turned on.
During the first few hours of use, you may notice that the
cooktop emits a slight burning odor and a light smoke.
Both of these conditions are normal.
When a cooking area is turned on, the coil element under
the cooktop will heat up and glow red. To maintain the
heat setting the element will cycle on and off. It is normal
to see a red glow through the smoothtop when the
element cycles on.
Your range is equipped with a HOT SURFACE light
located at the center-back of the smoothtop. This red light
will turn on to indicate that the smoothtop is hot and will
remain on until the top has cooled.
_________!__!!_iii_ii_iiiiiiiiiiiiii_ii_i_i_i_i_i_i_i_!iiii_i!!ii_iii!ii_iii_i____ii__iii_iiii_ii__i_______iii__i_
The smoothtop cooking area retains heat for a period of
time after the element has been turned off. Turn the
element off a few minutes before food is completely
cooked and use the retained heat to complete the cooking
operation. After 30 minutes, the cooktop may be too cool
to keep foods warm. However, the top may still be too
warm to touch. When the HOT SURFACE light turns off,
the top will be cool enough to touch.
When cooking delicate foods which easily scorch or
overcook, start with a lower heat setting then gradually
increase until you find the optimum setting. Boilovers are
more likely to occur if you start out on HIGH then reduce
to the lower setting, tf you do begin cooking on HIGH,
reduce to a lower setting before liquids come to a full boil.
If food is cooking too fast or if a boilover occurs, remove
lid or remove cookware from cooking area and reduce to
a lower setting. Allow enough time for the cooking area to
adjust to the new setting.
i ii i i i iiiiiiiiiiiiiii !i iiiii !i!ii iii ill i!i!!ii! i iii ii i!! ii i iiiii!ii
Aluminum lob will damage the smoothtop if it melts onto
the glass. Do not use foil-type disposable containers such
as popcorn poppers. They may leave metal marks or may
permanently melt onto the smoothtop. Do not use cooktop
if metal or aluminum foil melts onto the smoothtop. Call an
authorized servicer.
Aluminum cookware will cause metal marks on the glass
if you slide them across the smoothop. Remove any metal
marks immediately using Cooktop Cleaning Creme.
Glass ceramic, earthenware, porcelain over metal,
heat-proof glass or glazed cookware may scratch the
smoothtop cooktop if you slide them across the top.
Do not use the top as a work surface or as a cutting
board. Do not cook food directly on the cooktop.
Do not use a trivet or metal stand (such as a wok ring)
between the utensil and the cooktop. These items can
mark or etch the surface and affect cooking efficiency.
Do not place plastics on a warm or hot cooking area.
They will melt and adhere to the smoothtop. The
smoothtop may chip or pit in attempting to remove
melted plastic from the top.
To prevent scratching or damage to the smoothtop, do
not leave sugar, salt, sand, soil, shortening or other fats
on the cooking area. Be sure area is free from these
before turning on cooking area.
Be sure the bottom of the cookware is smooth and free
of nicks, scratches or rough areas as they may scratch
the smoothtop.
Do not allow a pan to boil dry. This could cause
permanent damage to the smoothtop.
ii i il i! i!iii!i!!ii!!iiiiliiiii!!iiiiiiiiiiii!i!!i!!!!i!i
To help keep cooktop clean, be sure cooking area and
cookware bottom are clean and dry before each use.
To prevent possible damage to the cooktop, always rinse
the bottom of cookware to completely remove any
cleaning agent residue. This is especially important when
using a copper or aluminum cleaner. In the presence of
heat, the cleaning residue may stain, discolor or etch the
smoothtop.
Carefully blot up spitlovers around the outside of the
cooking area as they occur with dry paper towels. BE
CAREFUL NOT TO BURN HANDS WHEN WIPING UP
SPILLS. DO NOT USE A DAMP CLOTH WHICH MAY
CAUSE STEAM BURNS.
CALITION: Do not use cooktop if the smoothtop is
cracked, broken, or if metal melts onto the cooktop.
Call an authorized servicer. Do not attempt to repair the
ooktop yourself.
When surface is cool, clean as directed in the chart on
page 26. DO NOT USE the following cleaning agents:
• Abrasives (metal scouring pads, cleansing powders,
scouring cleaners or pads) will scratch the smoothtop.
• Chemicals (oven cleaners, chlorine bleaches, rust
removers or ammonia) may damage the finish of the
smoothtop.
• Glass cleaners containing ammonia may harm the
smoothtop.
• Soiled cloth or sponge will leave an invisible film on the
cooktop which may scratch or cause discoloration the
next time the cooktop is used.
IMPORTANT: Watch sugary or starchy solutions
carefully to avoid boilovers. If a sugar solution (such as
jam, jelly, candy) or a starch solution (such as potatoes,
rice) boils over, it may pit or discofor the smoothtop.
Turn element to LOW and clean sugary boilovers
immediately. See page 24 for complete cleaning
instructions.
!j!iiiiii!i !!iii!ij!iiiiiiili!,i!i!i!i!iiiili!iiii!iii!i!iiiili!iii!iiiiiiiii i!i !i!ii!i!i!ii!i!ii!!i!! i!ii iii!iiiiii ii!ii iiiii!i ii!iii!ii!i!!i! iiiii ii!!iiiii!!i !i ii!iiiiiiiiiiii!iiiiiiiii
Tiny scratches or
abrasions
Metal-marking
Brownstreaksand
specks
Areasof discoloration
witha metallicsheen
Pittingorflaking.
Coarse particles (dust, salt and
sand) between cookware bottom
and cooktop. Incorrect cleaning
materials. Sliding glassware or metal
across top or using cookware with
rough bottoms.
sl i,gor ;. 'pingmotaiuten's sor
oven racksacrosscooktop.
Boilovers,incorrectcleaning
materials, usedsoiled clothor
sponge,soiled cookware.
Tiny scratches are not removable and do not affect cooking. In
time, the scratches will become smoother and less visible. Be
sure cookware bottoms and cooktop are clean before use. Use
cookware with a smooth, non-scratching bottom. Do not slide
cookware across cooktop.
Remove boilovers before reusing the cooktop. Use a clean
cloth or sponge, Be sure cookware, especially bottoms, are
clean and dry.
• Mineraldepositsfrom waterand
foods, heat setting to prevent boilovers....
................ , ...... ., f Hi i ,i
Sugary boilovers from sugar syrups, Use correct heat setting and large enough utensil. Watch
candy, jams, jellies, dessert sauces, cooking operation to prevent boilovers or spattering.
etc.
HH, H,I
i_ i_ii!ii!ii!!iii!iiiiilii!i!ii!i!ii
Your cooktop is equipped with control knobs that provide
an infinite choice of settings from LOW to HIGH. The knob
can be set on or between any of the numbered settings.
To operate push in and turn the knob in either direction to
the desired setting. An indicator light will glow when a
surface element is turned on, The indicator light will
remain on until the element is turned off. After a cooking
operation, be sure the element and indicator light are off.
To operate dual element:
• Press the rocker switch marked COIL SIZE to select
either the 9" or 6" size element.
NOTE: If the 9" size is selected, both the inner and outer
circles will heat. if the 6" size is selected, only the inner
circle witl heat.
• Push in and turn the LEFT REAR surface control knob
to the desired heat setting.
i!_ _i _i_ii!iiiiiiii!i!!!iiiiiiiiiiiiiiiiiiiiiiiiiiiiiiiiiiiill
To prevent damage to the range or utensil, never operate
surface unit without a pan in place, never allow a pan to
boil dry and never operate an element on HIGH for
extended periods of time.
Food will not cook any faster at a higher setting than
needed to maintain a gentte boil. Water boits at the same
temperature whether boiling gently or vigorously. If a high
setting is used, excessive spattering will occur and food
may stick or burn onto the bottom of the pan.
If a higher heat setting is used to bring liquid to a boil or to
begin cooking, always reduce to a lower setting once
liquid comes to a boil or food begins cooking. Never leave
food unattended during a cooking operation.
Fit the size of the cookware to the size of the element.
This conserves energy.
Use HIGH just until water comes to a boil or pressure is
reached in the pressure canner. Then, reduce to the
lowest heat setting that maintains the boil or pressure.
Prolonged use of HIGH or the use of incorrect canning
utensils will produce excessive heat. Excessive heat can
cause permanent damage to the cooktop.
!i!i!.!ii!ii!iiiiiii!i!iiiiili!iiLiiiiiiiiiiiii!!!ili!iiiii!ilili.iiiiii!i!i!!i!.ii!,ii!iiililliiiiiiiiiiliiiilii!!iiiiiiiiii.___! i_iii__!iii_i_i!ilii!ii!iiiiliiii!!!iiiiiiiiiiii!ili!iii!ilillii!ili!iiii!!ii'!.!iii!.!i!ii.iliilii_..!iiiiiiiiii!iiliii!i.ii!iiiiii!iilii!iiiiiiiliiiiii
Refer to cookware manufacturer's recommendations for suggested heat settings. Some manufacturers do not recommend
the use of HIGH, or the use of HIGH for extended cooking operations.
HIGH
;::_:Medium-High :
i :;7-9
Medium
4-6
: Modium-Low :
1-3
To bring liquid to a boil, blanch, preheat skillet, or reach pressure in a pressure cooker.
Always reduce to a lower heat setting when liquids just begin to boil or foods begin to cook.
: Tobrown:orsearmeat; heat oil fOrdeep.fatlrying; scald; tO sauteor fry.: ::::_:i: _:: ::_ :;
;Maintain fast boil for large amountsof Iiquids_: :
To maintain moderate to slow boil for large amounts of liquids.
To continue cooking uncovered foods and for most frying operations.
To continue cooking covered foods and to maintain pressure: in :most pressure cookers. : :
Stew, braise or steam operations, :
To maintain boit for small amounts of liquid, poach, steam or simmer.
/.
LOW To keep foods warm before serving. Melt chocolate.
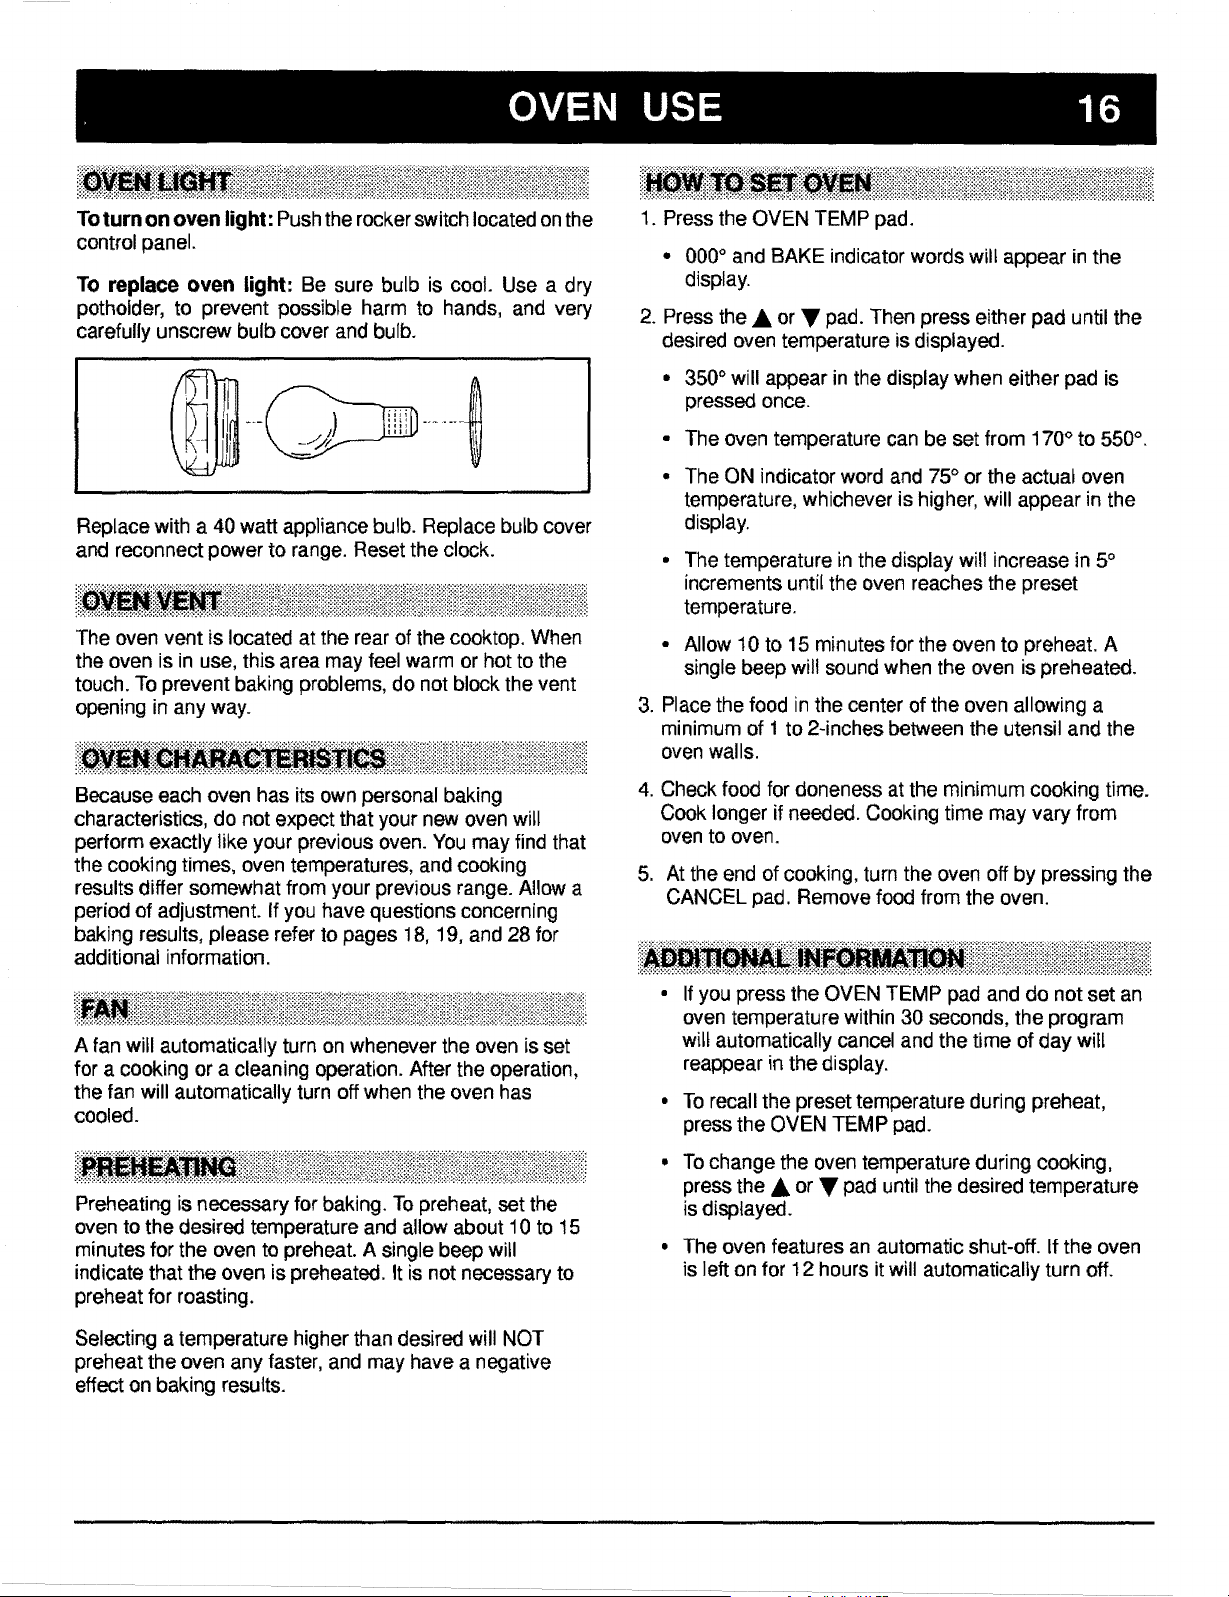
To turn on oven light: Push the rocker switch located on the
control panel.
To replace oven light: Be sure bulb is cool. Use a dry
potholder, to prevent possible harm to hands, and very
carefully unscrew bulb cover and bulb.
Replace with a 40 watt appliance bulb. Replace bulb cover
and reconnect power to range. Reset the clock.
ii i iiiiiiiii ili!iiiii!i!ii!ii!!i!iiiiiii!!ii!iiiii!iiii!iiiiiiii!ili!iiiiiiiiili!i
The oven vent is located at the rear of the cooktop. When
the oven is in use, this area may feel warm or hot to the
touch. To prevent baking problems, do not block the vent
opening in any way.
ii! iii i! ii!ill iiiiiiiiii ii L i iiiiii
Because each oven has its own personal baking
characteristics, do not expect that your new oven will
perform exactly like your previous oven. "Youmay find that
the cooking times, oven temperatures, and cooking
results differ somewhat from your previous range. Allow a
period of adjustment. If you have questions concerning
baking results, please refer to pages 18, 19, and 28 for
additional information.
A fan will automatically turn on whenever the oven is set
for a cooking or a cleaning operation. After the operation,
the fan will automatically turn off when the oven has
cooled.
J ii!i',iiiiii ii!! ,ii!i iiiililiiiii iiiiiiiiiiiiiiiiii!iii iiiii',iiiiiiiiiiiiiiiiiiii!!!iiiiiiii!!i iiiiiii
Preheating is necessary for baking. To preheat, set the
oven to the desired temperature and allow about 10 to t 5
minutes for the oven to preheat. A single beep will
indicate that the oven is preheated. It is not necessary to
preheat for roasting.
Selecting a temperature higher than desired will NOT
preheat the oven any faster, and may have a negative
effect on baking results.
ii
1. Press the OVEN TEMP pad.
• 000 ° and BAKE indicator words wilt appear in the
display.
2. Press the A or V pad. Then press either pad until the
desired oven temperature is displayed.
• 350 ° will appear in the display when either pad is
pressed once.
• The oven temperature can be set from 170° to 550 °.
° The ON indicator word and 75° or the actual oven
temperature, whichever is higher, will appear in the
display.
• The temperature in the display will increase in 5°
increments until the oven reaches the preset
temperature.
• Allow 10 to 15 minutes for the oven to preheat. A
single beep will sound when the oven is preheated.
3. Place the food in the center of the oven allowing a
minimum of 1 to 2-inches between the utensil and the
oven walls.
4. Check food for aloneness at the minimum cooking time.
Cook longer if needed. Cooking time may vary from
oven to oven.
5. At the end of cooking, turn the oven off by pressing the
CANCEL pad. Remove food from the oven.
iiiiiiiiiiiiiiiiiiiiiiiiiiiii!i!iiiiiiiiiiiii!ii
• If you press the OVEN TEMP pad and do not set an
oven temperature within 30 seconds, the program
wilt automatically cancel and the time of day will
reappear in the display.
• To recall the preset temperature during preheat,
press the OVEN TEMP pad.
• To change the oven temperature during cooking,
press the A or V pad until the desired temperature
is displayed.
° The oven features an automatic shut-off. If the oven
is left on for 12 hours it will automatically turn off.
!,_ii__!ii iiiiiiiiiiiiiiiii!iiiii!!iiiiiii!i!iii!iiii!iiiii!iiiiiiliiiiiiiiiiiiiiiiiii!i!iiiiiiii!iii!iiiiii!ili!il
The two oven racks are designed with a safety lock-stop
position to keep the racks from accidently coming
completely out of the oven when pulling the rack out to
add or remove food.
I CAIJTION: Do not attempt to change the rack positions
I
when the oven is hot.
I
To remove: Be sure the rack is cool. Pull the rack straight
out until it stops at the lock-stop position. Tilt the front end
of the rack up and continue pulling the rack out of the
oven,
To replace: Place the rack on the rack supports and tilt
the front end of the rack up slightly. Slide it back until it
clears the lock-stop position. Lower the front and slide the
rack straight in. Pull the rack out to the lock-stop position
to be sure it is positioned correctly and then return it to its
normal position.
It is important that air can circulate freely within the oven
and around the food. To help ensure this, place food on
the center of the oven rack. Allow two inches between the
edge of the utensil(s) and the oven walls.
For optimum baking results of cakes, cookies or biscuits,
use one rack. Position the rack so the food is in the center
of the oven. Use either rack position 2 or 3.
If cooking on more than one rack, stagger the food to
ensure proper air flow.
If cooking on two racks, use rack positions 2 and 4 for
cakes and rack positions 1 and 4 when using cookie
sheets. Never place two cookie sheets on one rack.
If roasting a large turkey, place the turkey on rack 1 and
the side dishes on rack 5.
iiiiii!!iiiiiiiiii'!!iii!i!!iiii!i_,iiii!!ii!iiliiiiiiii!_iiiiil!iii!ili!iiii!iilii!ii!!iii!iiiliiiiiiiiii!i!i!!i!iiiiiiiiii!ii!iiiiiiii!i!i_i!ili!i!_i!i!_i_iiiiiiiiii!i191!!!iiiiiiiii!iiiiiii!i!iiiiiiiiiliiililiii!ii!i!!ii!ii!i!iiiiiiiiii!iiiililii!iiiiii!i!iiii!iiii!iiiiiilliiliili!iii!iii!i!iiii!!i!!ii!i!!i!ii!ii!iiiiiiiiili!iiii!i!i!!!!iii
RACK 5
(highest position)
RACK 4
RACK 3
RACK 2
RACKI
Used for toasting bread, or for two-rack baking.
,,,,,,,, JL II,,,,,,,,,,,,,,
Used for most broiling and two-rack baking.
, ,,,,,,,,,,,,,,,,,,,,
Used for most baked goods on a cookie sheet or
jelly roll pan, or frozen convenience foods, or for
two-rack baking.
i
Used for roasting small cuts of meat, large
casseroles, baking loaves of bread, cakes (in
either tube, bundt, or layer pans) or two-rack
baking.
Used for roasting large cuts of meat and large
poultry, pies, souffles, or angel food cake, or for
two-rack baking.
i!ii+iiiiiiiii+iiii!+iiiiii+iliiiiii+i
Use a reliable recipe and accurately measure fresh
ingredients. Carefully follow directions for oven
temperature and cooking time.
Preheat oven if recommended in the recipe or package
directions. Selecting a temperature higher than the
desired temperature wilt not preheat the oven any faster.
In fact, this may have a negative effect on baking results.
Use the correct rack position. Baking results may be
affected if the wrong rack position is used. For optimum
results, bake foods on one rack. Select a rack position
that locates the food in the center of the oven. If baking on
two racks, select rack positions #2 and 4, #1 and 4 or #2
and 5.
• Top browning may be darker if food is located
toward the top of the oven.
° Bottom browning may be darker if food is located
toward the bottom of the oven.
When using two racks for baking, allow enough space
between the racks for proper air circulation. Browning
and cooking results will be affected if air flow is
blocked.
Cool(ware material plays an important part in baking
results. Always use the type and size of pan called for in
the recipe. Cooking times or cooking resutts may be
affected if the wrong size is used.
• A shiny metal pan reflects heat away from the food.
This type of pan produces lighter browning and a softer
crust. Use shiny pans for baking cakes or cookies.
A dark, dull, anodized or satin-finish metal pan
absorbs heat and produces darker browning with a
crisper crust. Use dark pans for pies, pie crusts or
bread.
• For optimum baking results, bake cookies and biscuits
on a flat cookie sheet. If the pan has sides, such as a
jelly rotl pan, browning may not be even.
If using heat-proof glassware, or dark pans such as
Baker's Secret or Wilton reduce the oven temperature
by 25°F except when baking pies or bread. Use the
same baking time as called for in the recipe.
Use of aluminum foil: Do not cover the oven bottom or
an entire rack with foil or place foil directly under
cookware. To catch spillovers, place a piece of foil a little
larger than the pan, on the rack below the pan.
Allow hot air to flow freely through the oven for
optimum baking results. Improper placement of pans in
the oven will block air flow and may result in uneven
browning. For optimum browning and even cooking
results:
° Do not crowd a rack with pans. Never place more than
one cookie sheet, one 13x9x2-inch cake pan or two
9-inch round cake pans on one rack.
• Stagger pans when baking on two racks so one pan is
not directly over another pan.
•Ailow one to two inches between the pan and the oven
walls.
Check the cooking progress at the minimum time
recommended in the recipe. If necessary, continue
checking at intervals until the food is done. If the oven
door is opened too frequently, heat will escape from the
oven; this can affect baking results and wastes energy.
If you add additional ingredients or alter the recipe,
expect cooking times to increase or decrease slightly.
{iii!i{iiiiiiiii{i!!!iiiiiij!iiii!iiiiiiiii!i{iiIiii{iIi!iiiiiiii{i{ii ii !i!ii ii i [ ii !i !i i{ i i{ !i i! i iiiiiiiiiiiiii i!iiii!!iiii i! !ii !i i { i iiii iiii
iiiiiiiiiiiili ii ii!i i !iiiiiiiiiiiiiiiiiii i iiiiiiiiiiii iiiiiii i ii iii!iiiii iiiiii iiiiii iiiii ii i i[iiiiiii ii !iiiiii!ii!iiii ii !iiii li i iiiii ill i
:::_::_:_::::_:_:_:::::::_:_::_:_i:i:i:i::i:ii:%ii:::_::::::::::_:::::::_:::ii:i:i:i:_:i_:::::::_:_::::::_:_:7 i_i::i:i:i;_i:i:::::::::::::::::_:::_::_:::i:i:i:ii:i:i:i:i:i:i:i:i::r::::::_::::::::::::_:i:_':::?::i:ili:::::_::_::::::::::i::::::: :¸:::-¸::::_ _: ..........._::'¸_:?_:<i:if_:_::I::: : :_:_ ::_:_: .
Cakes are uneven, • Pans too close or touching each other or oven walls. Batter uneven in pans.
• Temperature set too low or baking time too short. • Oven not level. • Undermixing. • Too
much liquid.
Cake falls , Too much shortening or sugar. • Too much or too little liquid. • Temperature set too low.
• Old or too little baking powder ° Pan too small • Oven door opened frequently. - Added
incorrect type of oil to cake mix. • Added additional ingredients to cake mix or recipe.
Cakes, cookies, biscuits • Oven not preheated, • Pans touching each other or oven walls. • incorrect rack position.
too brown on bottom, * Incorrect use of aluminum foil. • Placed 2 cookie sheets on one rack. • Used glass, dark,
stained warped or dull finish metal pans. (Use a shiny cookie sheet.)
Follow cookware manufacturer's instructions for oven temperature. Glassware and dark
cookware such as Ecko's Baker's Secret may require lowering the oven temperature by
25oF.
Excessive shrinkage. • Too little leavening. • Overmjxing.. Pan too large. • Temperature set too high. • Baking
time too long. • Pans too close to each other or oven walls.
Cakes have tunnels. ° Not enough shortening. • Too much baking powder. • Overmixing or at too high a speed.
Pie crust edges too
brown.
• Temperature set too high.
• Temperature set too high. • Pans touching each other or oven walls. • Edges of crust too
thin; shield with foil.
Pies have soaked crust, • Temperature too low at start of baking. • Filling too juicy. • Used shiny metal pans.
TheAutomaticOvenCookingfeatureis usedtoturnthe
ovenonandoffat apresettimeofday.Thisfeaturecan
beusedto:
• Turn the oven on immediately (immediate start).
• Delay the start of cooking (delay start).
The feature can be used with either oven cooking or the
self-cleaning oven feature. See page 26 for instructions
on detaying the start of a clean cycle.
The clock must be functioning and set at the correct time
of day for the Automatic Oven Cooking feature to operate
properly.
IMPORTANT
Highly perishable foods such as dairy products,
pork, poultry, seafood, or stuffing are not
recommended for Delay Start cooking.
If cooking more than one food, select foods that
cook for the same length of time and at the same
oven temperature.
To recall the preset cook time or stop time, press the
corresponding pad.
To cancel the Automatic Oven Cooking operation, press
the CANCEL pad.
At the end of the Automatic Oven Cooking operation, the
oven will automatically turn off and continuous beeps will
sound to remind you to remove food from the oven, Press
the CANCEL pad to cancel the beeps.
This feature will only delay cooking up to eleven hours
and fifty five minutes (11:55).
If you delay more than 30 seconds behveen pressing a
pad and the A or V pad, the display will either:
° Return to the previous setting.
° Beep and flash to indicate the next entry.
° Return to the current time of day and cancel the
operation.
To set oven:
1. Place food in the oven.
2. Press the COOK TIME pad.
° The words SET COOK TIME will flash in the display.
3. Press the A or y pad to enter the cooking time.
4. To delay the start of cooking:
° Press the OVEN STOP pad.
The words SET STOP TIME will flash in the display.
• Press the • or V pad to enter the time you wish the
oven to turn off.
NOTE: The control will automatically determine when to
turn the oven on based on the COOK TIME and OVEN
STOP TIME you set. tt is NOT necessary to set a start
time.
5. Press the OVEN TEMP pad.
° The words BAKE and 000 ° will appear in the
display.
6. Press the • or V pad to enter the oven temperature.
At the end of the preset cooking time, the oven will
automatically turn off and END will appear in the display.
Continuous beeps will remind you to remove the food
from the oven.
Press the CANCEL pad to cancel the beeps. The current
time of day will reappear in the display when the CANCEL
pad is pressed. Remove the food from the oven.
i@ iiiiiiii!iiii!i!ii!i!i!i!i!i!i!i!!i!iii!i!iiii!iiiii!ii!iiiiiiiiii!ii!iii!!iiii!i!iiiiiiiiiiiiiiii!ii!iili!iii!iiii!i!iiiiiiiiiii!iiii!
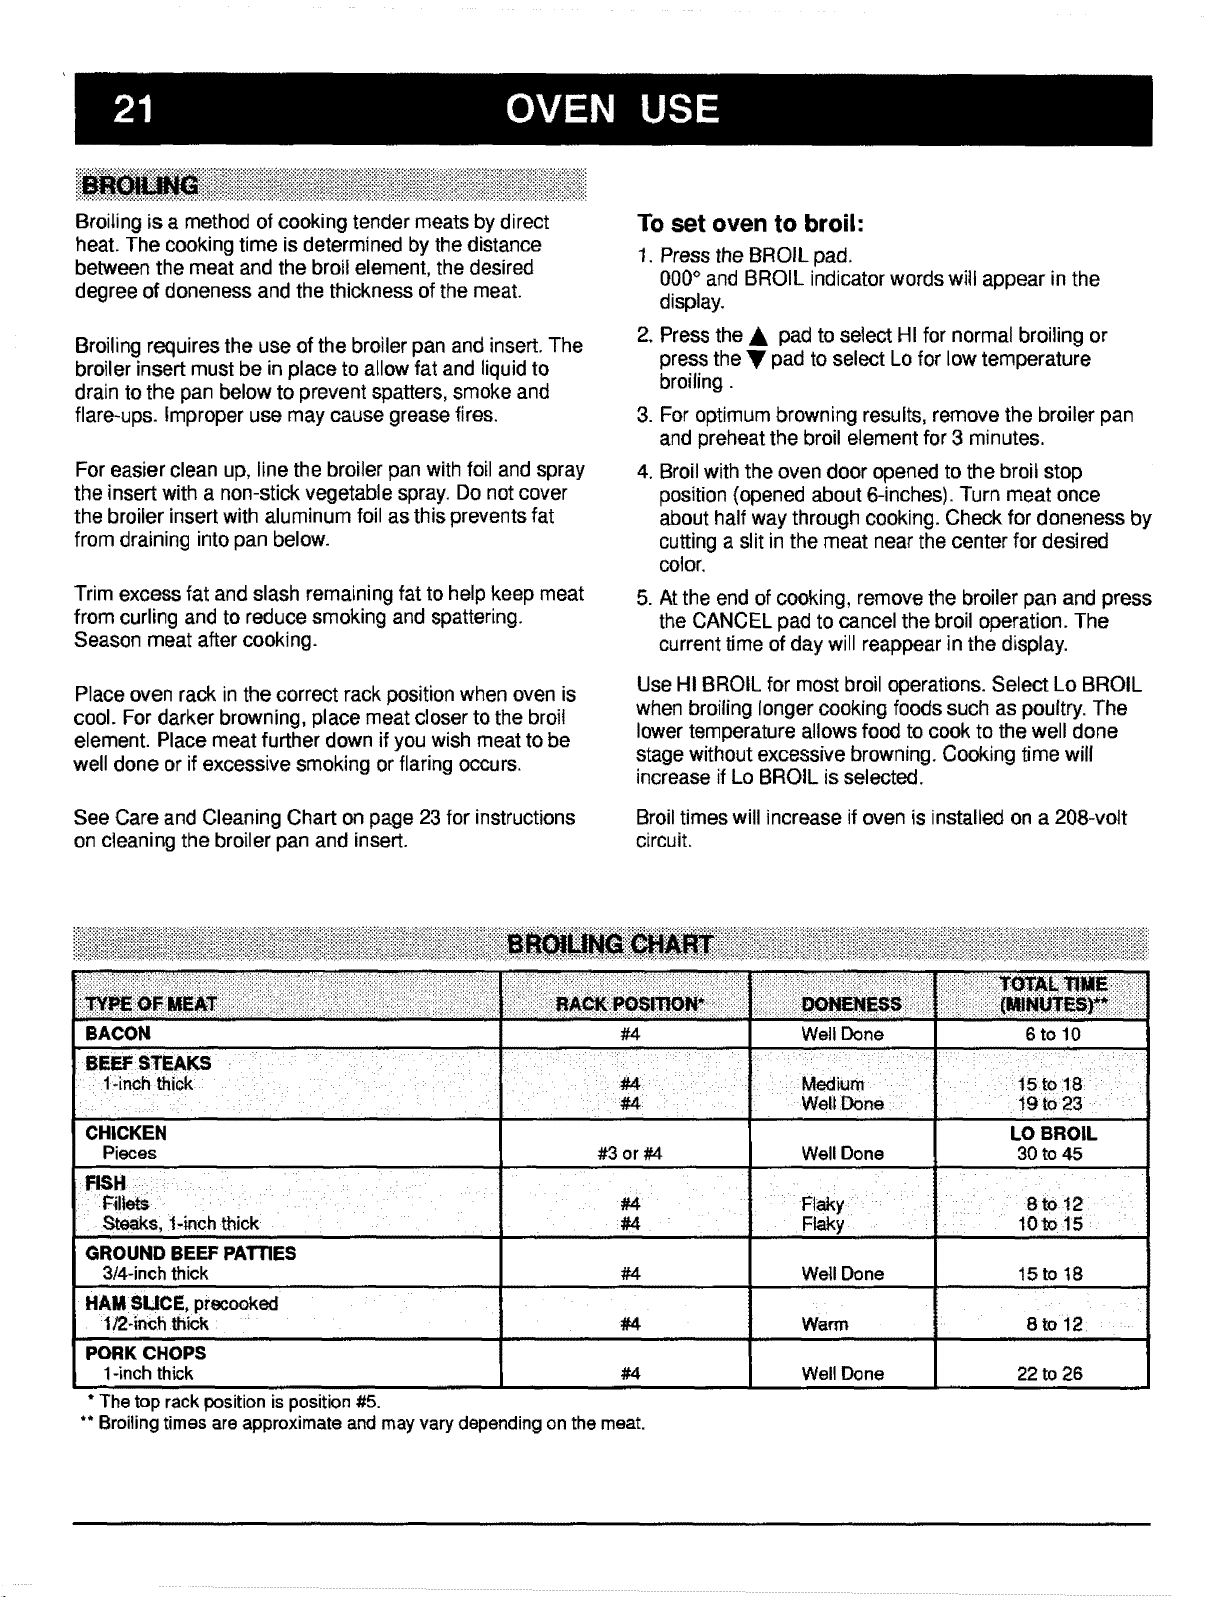
Broiling is a method of cooking tender meats by direct
heat. The cooking time is determined by the distance
between the meat and the broil element, the desired
degree of doneness and the thickness of the meat.
Broiling requires the use of the broiler pan and insert. The
broiler insert must be in place to allow fat and liquid to
drain to the pan below to prevent spatters, smoke and
flare-ups. Improper use may cause grease fires.
For easier clean up, line the broiler pan with foil and spray
the insert with a non-stick vegetable spray. Do not cover
the broiler insert with aluminum foil as this prevents fat
from draining into pan below.
Trim excess fat and slash remaining fat to help keep meat
from curling and to reduce smoking and spattering.
Season meat after cooking.
Place oven rack in the correct rack position when oven is
cool. For darker browning, place meat closer to the broil
element. Place meat further down if you wish meat to be
well done or if excessive smoking or flaring occurs.
See Care and Cleaning Chart on page 23 for instructions
on cleaning the broiler pan and insert.
To set oven to broil:
1. Press the BROIL pad.
000° and BROIL indicator words will appear in the
display.
.
1
.
Press the A pad to select HI for normal broiling or
press the V pad to select Lo for low temperature
broiling.
For optimum browning results, remove the broiler pan
and preheat the broil element for 3 minutes.
Broil with the oven door opened to the broil stop
position (opened about 6-inches). Turn meat once
about half way through cooking. Check for doneness by
cutting a slit in the meat near the center for desired
color.
5. At the end of cooking, remove the broiler pan and press
the CANCEL pad to cancel the broil operation. The
current time of day will reappear in the display.
Use HI BROIL for most broil operations. Select Lo BROIL
when broiling longer cooking foods such as poultry. The
lower temperature allows food to cook to the well done
stage without excessive browning. Cooking time will
increase if Lo BROIL is selected.
Broil times will increase if oven is installed on a 208-volt
circuit.
ilL!i.....i,iiiiiiiii!ii,ilillii i!iii
BACON
CHICKEN
Pieces
:FISHI::: i : ........ I[ : [:
: Steaks; il,inch thick
, ,,,.,..........
GROUND BEEF PATTIES
3/4-inchthick
HAM SUCE, precooked
1/2-inch thick
,,,,,
PORK CHOPS
1-inchthick
iiiii_:_iiii_iiii_::::_::::i_::_:_'_'ii............_:::::;.............!:::_:_ii!iiiili!i!iiiiil
#3 or #4
• !#4 :
#4
#4
,,,,,,,,,,....,,
#4
* The top rack position is position #5.
** Broiling times are approximate and may vary depending on the meat.
!ii!i!iiiii iiiiiiiiiiiil}!ii iii!iiiiiiiill':':'
Well Done 6to 10
LO BROIL
30to 45Well Done
, ,,,,,,,,,,,,, ......................,
7: i i
Ftakyi:: : 1 :: 18to 1!2: : :
Flaky 10to15 ::
15 to t8
!,,
8 to 12
, ,,,,,,,,,,,,
Well Done
, J,,,,,,,,,,,,
Warm
.,....
WellDone
22 to 26
Donotplaceexcessiveweightonanopenovendooror
standon anopenovendooras,insomecases,it could
causetherangetotipover,breakthedoororcause
seriousinjurytotheuser.
Whenopeningtheovendoor,allowsteamandhotairto
escapebeforereachingin oventocheck,addorremove
food.
Donotattempttoopenorclosedooruntilthedooris
completelyseatedonthehingearms.Neverturnonthe
ovenunlessdoorisproperlyinplace.Whenbaking,be
surethedooriscompletelyclosed.Bakingresultswillbe
affectedifthedooris notsecurelyclosed.
CAUTION: Hinge arms are spring mounted and will
slam shut against the range if accidently hit. Never
place hand or fingers between the hinges and the
front oven frame. You could be injured if hinge snaps
back.
To remove lilt-off door: When cool, open the door to the
"stop" position (opened about 6 inches) and grasp the
door at each side, Do not use the door handle to lift the
door. Lift up evenly until the door clears the hinge arms.
,i! i i!',!ii!iiiiiii i
The oven door is locked for a self-clean operation only. Do
not move the door lock lever to the right or locked position
during a cooking operation.
If the door is locked, the operation wil! automatically be
cancelled and "door" will appear in the display. If the oven
is hot enough to engage the internal lock, the oven door
will not open. Allow the oven to cool for up to an hour,
then unlock and open the door.
i i iiiiiiiiiiii!i!iii!ii!i!!!!iiiiiiii!iiiiii!!!!i!iiii!ii!!i!iiiiii
On slide-in models only, the storage drawer at the bottom
of the range is safe and convenient for storing metal and
glass cookware. DO NOT store plastic, paperware, food
or flammable material in this drawer. Remove drawer to
clean under range. NOTE: Drop-in ranges do not feature
a storage drawer.
To remove: Empty drawer then pull drawer out to the first
stop position. Lift up front of drawer and pull to the second
stop position. Grasp sides and lift up and out to remove
drawer.
To replace: Fit the ends of the drawer glides onto the
rails. Lift up drawer front and gently push in to first stop
position. Lift up drawer again and continue to slide drawer
to the closed position.
To replace door: Grasp the door at each side, align slots
in the door with the hinge arms and slide the door down
onto the hinge arms until it is completely seated on
hinges.
ii iiiiiiiiiiiiiiiiiiiiiiiliiii!ii!!iiiii!!!ii'i!iiiiiiii!iiiii=iiiiiiiiii!i!iiiill
Some floors are not level.
For proper baking, your
range must be level.
Leveling legs are located
on each corner at the base
of the range. Level by
turning the legs. To prevent
range from accidently
tipping, range should be secured to the floor by sliding a
rear leveling leg into the anti-tip bracket supplied with the
range.
READTHEMANUFACTURER'SINSTRUCTIONStobe
surethecleanercanbesafelyusedonthisappliance.
Also,readandcarefullyfollowthemanufacturer's
directionswhenusinganycleaningproduct.
Todetermineif acleaningproductissafe,testa small
inconspicuousareausinga verylightpressuretoseeif
thesurfacemayscratchordiscolor.Thisisparticularly
importantforporcelainenamel,metal,plasticorhighly
polished,shiny,orpaintedsurfaces.
Thefollowingbrandsmayhelpyouto makean
appropriatese]ection:
GlassCleaners - Bon Ami, Cinch, Glass Plus, Windex.
Dishwashing Liquid Detergents- Dawn, Dove, Ivory,
Joy.
Mild Liquid Spray Cleaners- Fantastik, Formula 409.
Non-Abrasive Cleaners- Bon Ami, paste of baking
soda and water.
Mildly Abrasive Powder or Liquid Cleansers - Ajax,
Barkeepers Friend, Cameo, Comet, Soft Scrub.
Non--Abrasive or Scratchless Plastic or Nylon
Scouring Pads or Sponges - Chore Boy Plastic
Cleaning Puff, Scrunge Scrub Sponges, or Scotch-Brite
No Scratch, Cookware or Kitchen Sponge.
Abrasive Scouring Pads- S.O.S., Brillo Steel Wool
Soap, Scotch-Brite Wool Soap Pads.
(Brand names for the above cleaning products are registered
trademarks of the respective manufacturers.)
NOTE: Be sure appliance is off and all parts are cool
before handling or cleaning to avoid damage and possible
burns. If a part is removed, be sure it is correctly replaced.
To prevent staining or discoloration, clean cooktop
after each use.
Baked Enamel:
• Side panels
• Storage drawer
• Oven door
• Backguard
Con_olKnobs
• Detergent and water
• Mild liquid cleaner
= Glass cleaner
• Detergent and water
• Mild liquid sprays
• Glass cleaners
- !iI;
_,Elemente,_..... •
"-'--'ii/_ _v.,,. _ i_ ' .......... _ i •
Glass • Detergent and water
• Oven window • Glass cleaner
Metal Flnlshee = Detergent and water
• Trim • Grass cleaner
Use a dry paper towel or cloth to wipe up spills, especially acid spills, as soon as they
occur. This is especially important for white surfaces. When surface is cool, wash with
detergent and water. Do not use abrasive or harsh cleaning liquids and powders or
oven cleaners. These will scratch and permanently damage the finish. Dry with a soft
cloth. On smoothtop cooldops, clean vent opening area after each oven use.
For ease of cleaning, turn off knob and remove by pulling forward. Wash, rinse, and
dry. Do not use abrasive cleaning agents as they may scratch the finish and remove
the markings. Turn on each element to be sure knobs have been correctly replaced.
"" '............. I : ''i"_"
:. Etementsareset|-_ning_Soilwitibum0ffaselemerrts:areused, Do notspray oven
cleaner_onefements, e_ectdcalhookuporconnecti0n.:i :i : : i: _!i:: :
To prevent staining of the oven window, avoid using excessive amounts of water
which may seep underorbehind glass. Wash with detergentand water. Remove stub-
born soil with paste of baking soda and water. Do not use abrasive matedals such as
sceudng pads, steel wool or powdered cleaning agents. They witl damage glass.
Rinse with clear water and dry.
Do not use oven cleaner or abrasive agents, as they will damage the finish. Remove
slubbom soi!with detergent and water. Polish with a soft cloth.
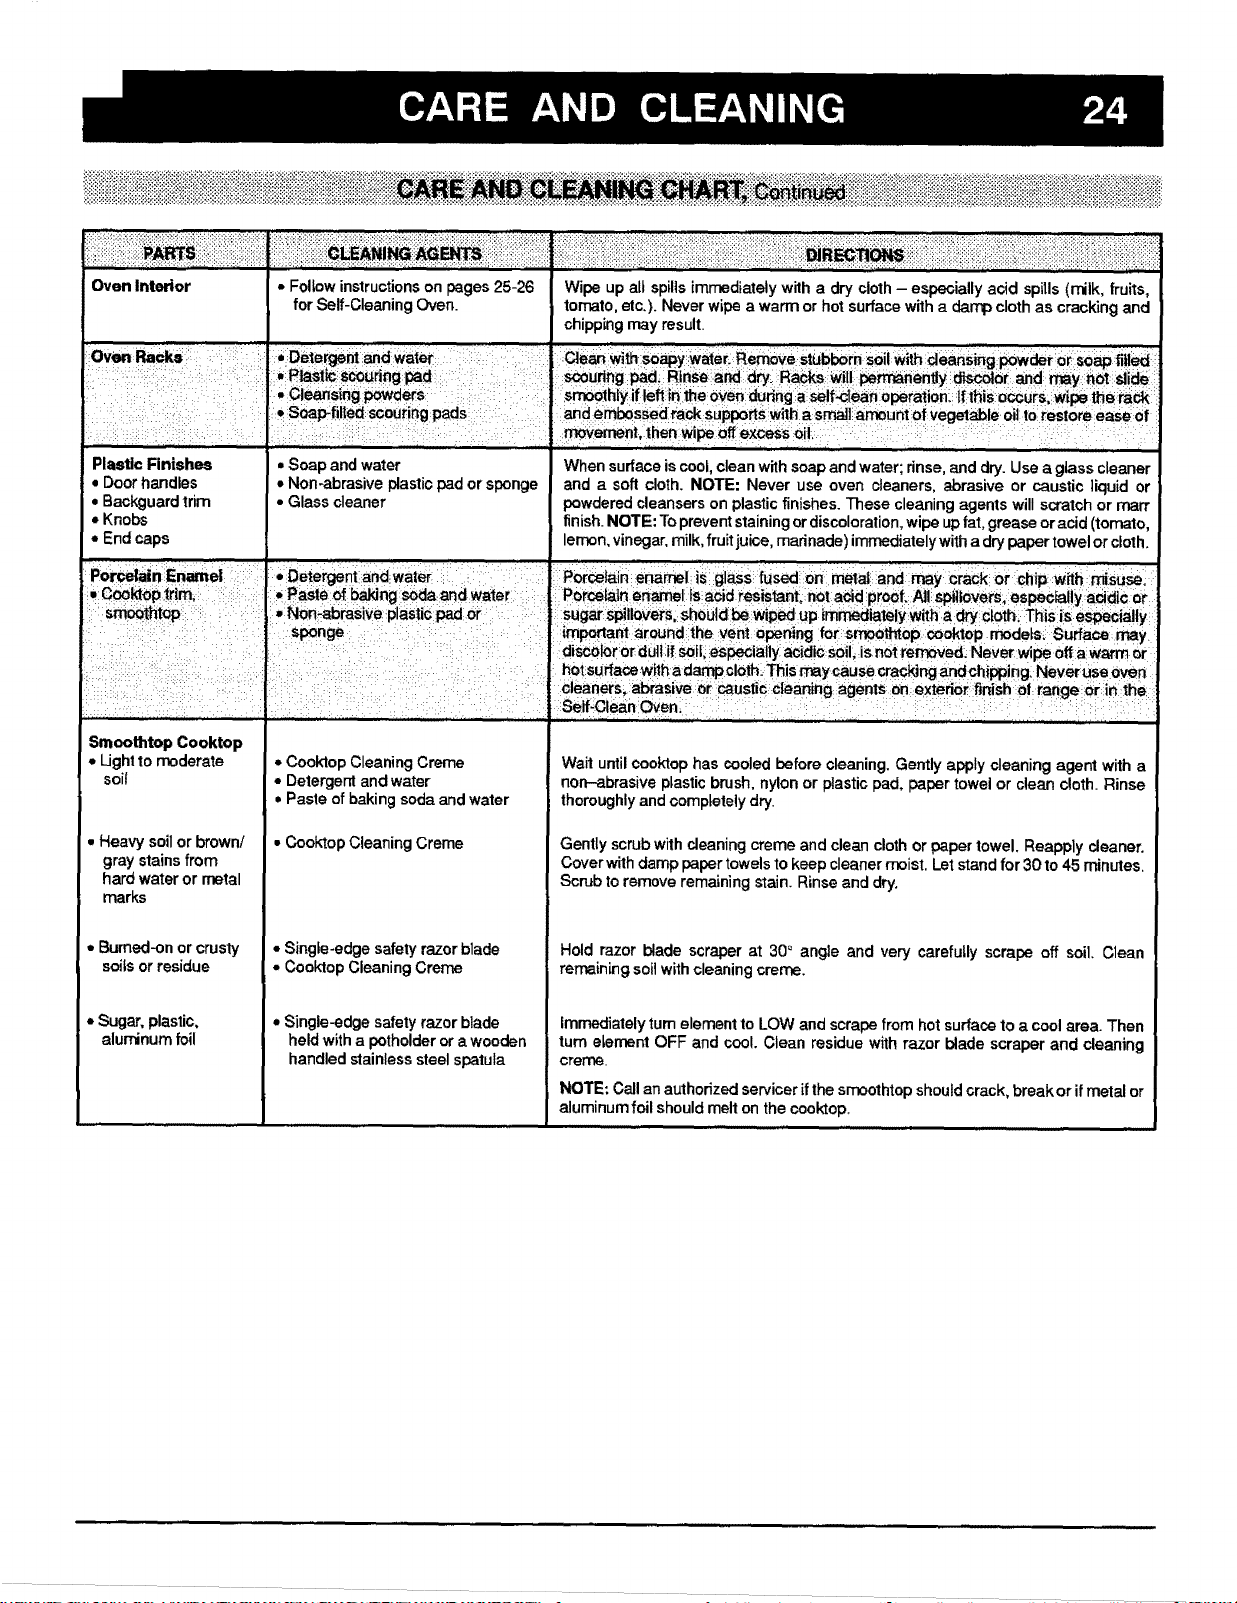
OvenInterior
PlasticFinishes
• Doorhandles
• Backguardtrim
• Knobs
• End caps
Smoothtop Cooktop
• Light to moderate
soil
• Heavy soilor brown/
gray stainsfrom
hardwater or metal
marks
• Burned-onor crusty
soilsorresidue
• Sugar,plastic,
aluminum foi!
• Foltowinstructionson pages25-26
for Self-CleaningOven.
• Soap and water
• Non-abrasive plastic pad or sponge
• Glass cleaner
• Cooklop CleaningCreme
• Detergent and water
• Pasteof bakingsodaandwater
• CooktopCleaning Creme
• Single-edge safety razor blade
• Cooktop Cleaning Creme
• Single-edgesafety razorblade
heldwitha potholderor a wooden
handledstainlesssteelspatula
Wipe up all spillsimmediately witha drycloth- especially acid spills(milk, fruits,
tomato,etc.). Never wipea warm or hot surfacewitha dampcloth as crackingand
chippingmay result.
When surfaceiscool,cleanwith soapand water;rinse,and dry. Use a glasscleaner
and a soft cloth. NOTE: Never use oven cleaners, abrasive or caustic liquid or
powdered cleanserson plasticfinishes. These cleaningagents will scratchor rnarr
finish. NOTE: Topreventstainingordiscoloration,wipe upfat,grease or acid (tomato,
lemon,vinegar,milk,fruitjuice,marinade) immediatelywitha drypapertowelor cloth.
Wait until cooktop has cooled before cleaning, Gently apply cleaning agent with a
non-abrasive plastic brush, nylon or plastic pad, paper towel or clean cloth. Rinse
thoroughly and completely dry.
Gently scrub with cleaning creme and clean cloth or paper towel, Reappiy cleaner.
Cover with damp paper towels to keep cleaner moist. Let stand for 30 to 45 minutes,
Sceab to remove remaining stain. Rinse and dry.
Hold razor blade scraper at 30° angle and very carefully scrape off soil. Clean
remaining soilwithcleaningcreme.
Immediately turn element to LOW and scrape from hot surface to a cool area. Then
turn e_ement OFF and cool. Clean residue with razor blade scraper and cleaning
creme.
NOTE: Call an authorized servicer if the smeothtop should crack, break or if metal or
aluminum foil should melt on the cooktop,

iiiii!iiiiiiiiiiiiiiiiiiii!i!!iiiiii!iiiiiiiiii!iiiiiiii!!iii!!!i!ii
The self-clean oven uses temperatures above normal
cooking temperatures to automatically clean the entire
oven interior.
CAUTION: It is normat for parts of the range to become
hot during a clean cycle. Therefore, during a clean
cycle, avoid touching the cooktop, oven vent area, oven
door and window.
It is better to clean the oven regularly rather than to wait
until there is a heavy build-up of soil in the oven.
Turn off the oven light before a clean cycle. If the oven
light is left on, the light bulb will burn out during the clean
cycle.
Before Self-Cleaning
Remove broiler pan, all pans and the oven racks from the
oven. The racks will discolor and may not slide easily
after a clean cycle.
Clean oven frame, door frame and around the oven vent
with a non-abrasive cleaning agent such as Bon Ami or
detergent and water. These areas are not exposed to
cleaning temperatures and shouJd be cleaned to prevent
soil from baking on during the clean cycle.
Wipe up excess grease or spillovers from the oven bottom
to prevent excessive smoking and flare-ups during the
clean cycle.
Wipe up sugary spfllovers and acid spillovers such as
lemon juice, tomato sauce or milk-based sauces.
Porcelain enamel is acid resistant, not acid proof. The
porcelain finish may discolor if acid spills are not wiped up
immediately.
Do not use oven cleaners on the self-clean oven finish
or around any part of the oven as they will damage the
finish or parts.
To prevent damage, do not clean or rub the gasket around
the oven door. The gasket is designed to seal in heat
during the clean cycle.
During Self-Cleaning
When the door is locked and the CLEAN pad is pressed,
the oven wilt automatically begin to heat to cleaning
temperatures.
NOTE: A fan will automatically turn on during the
self-clean cycle and will automatically turn off after the
clean cycle when the oven has cooled.
As the oven reaches cleaning temperatures, the LOCK
indicator will appear in the display to show that an internal
tock mechanism has engaged. At this point, the oven door
can not be unlocked and opened.
To prevent damage to the door and lock lever, do not
force the door open when the LOCK indicator is
displayed.,
The first few times the oven is cleaned, some smoke and
odor may be detected. This is norma] and will lessen or
disappear with use. If the oven is heavily soiled, or if the
broiler pan was accidently left in the oven, smoke and
odor may occur.
As the oven heats and cools, you may hear sounds of
metal parts expanding and contracting. This is normal and
wili not damage your appliance.
After Self-Cleaning
About one hour after the end of the clean cycle, the
internal lock wilt disengage and the LOCK indicator will
turn off. At this point, the door can be unlocked and
opened. Move the door lock lever to the left or unlocked
position and open the door. The oven may still be hot.
Some soil may leave a light gray, powdery ash which can
be removed with a damp cloth. If soil remains, it indicates
that the clean cycle was not long enough. The soil will be
removed during the next clean cycle.
if the oven racks were left in the oven and do not slide
smoothly after a clean cycle, wipe racks and embossed
rack supports with a small amount of vegetable oil to
restore ease of movement.
Clean around the oven vent opening at the rear of the
cooktop if there is a deposit from the fumes vented during
the clean cycle. Use detergent and water and a cloth or
non-abrasive pad.
Fine, hair-like lines may appear in the oven interior or
oven door. This is a normal condition resulting from
heating and cooling of the porcelain finish. These lines do
not affect the performance of the oven.
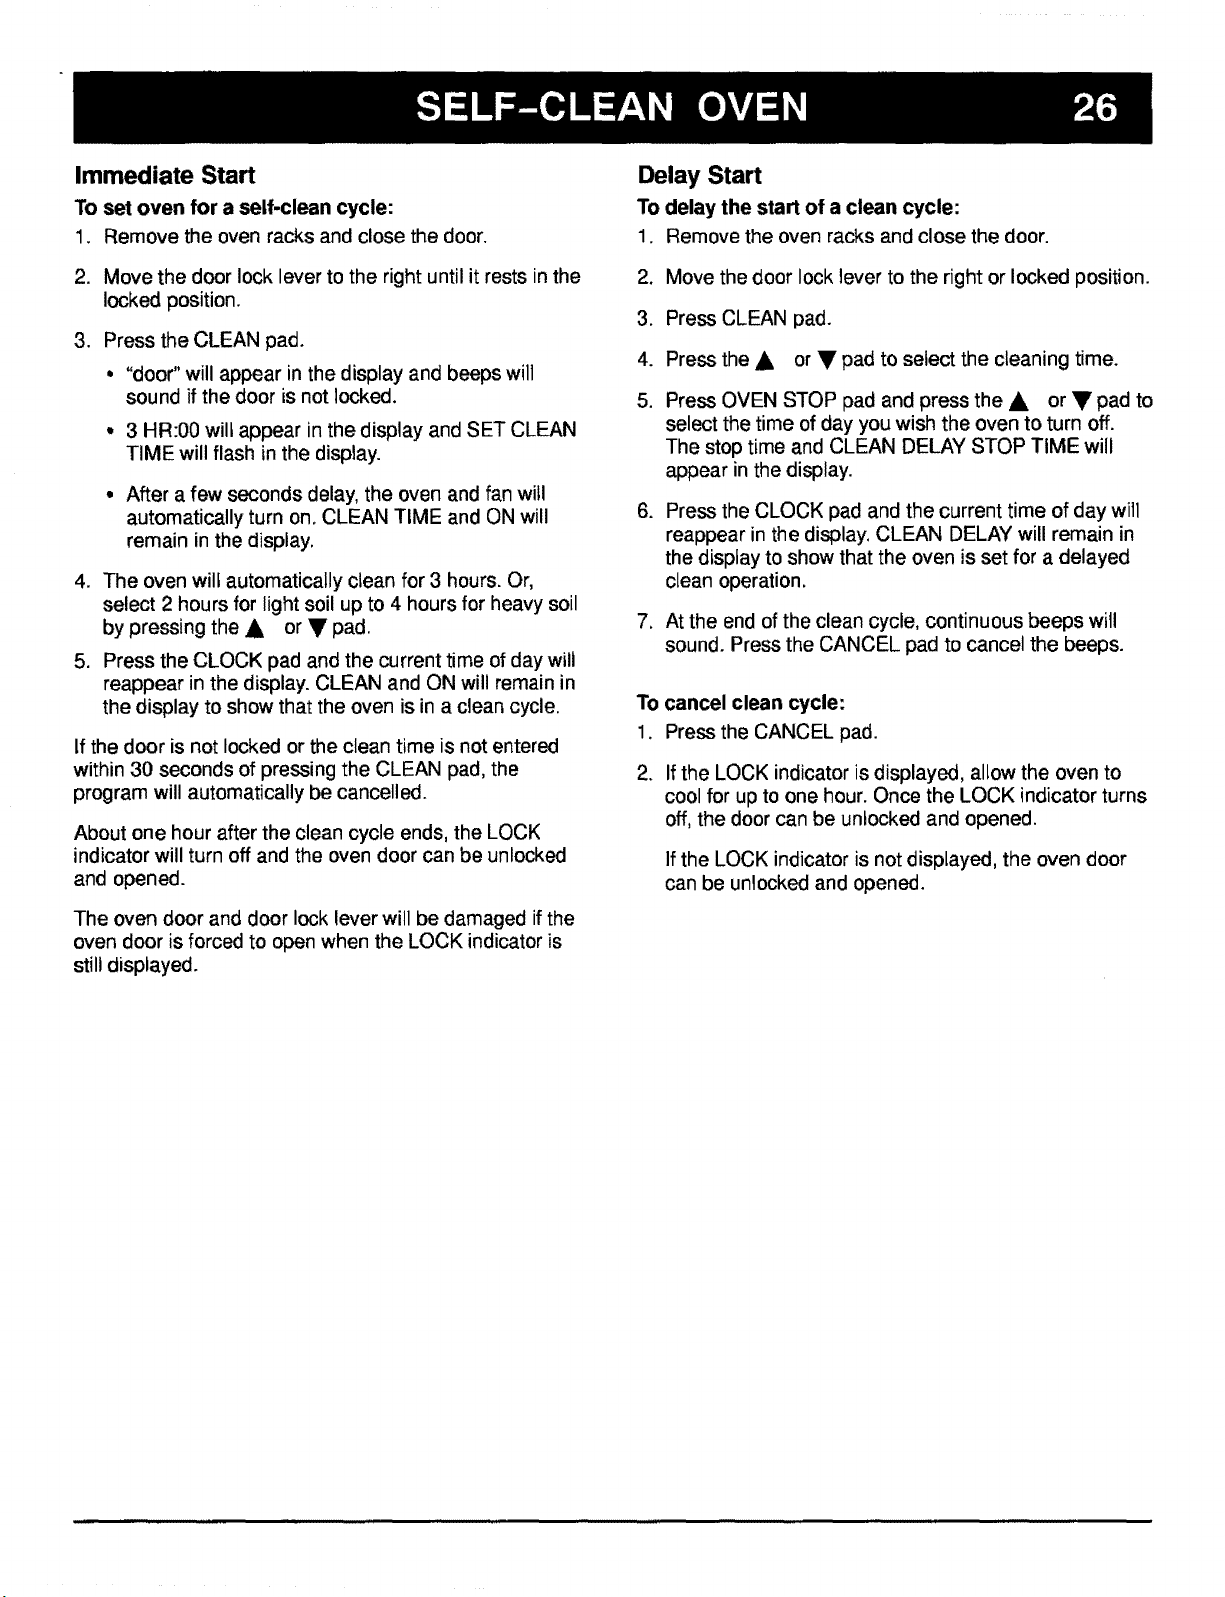
Immediate Start
To set oven for a self-clean cycle:
1. Remove the oven racks and close the door.
2. Move the door lock lever to the right until it rests in the
locked position.
.
Press the CLEAN pad.
• "door" will appear in the display and beeps will
sound if the door is not locked.
• 3 HR:00 wilt appear in the display and SET CLEAN
TIME will flash inthe display.
• After a few seconds delay, the oven and fan will
automatically turn on. CLEAN TIME and ON will
remain in the display.
4. The oven wilf automatically clean for 3 hours. Or,
select 2 hours for light soil up to 4 hours for heavy soil
by pressing the A or • pad.
5. Press the CLOCK pad and the current time of day will
reappear in the display. CLEAN and ON will remain in
the display to show that the oven is in a clean cycle.
If the door is not locked or the clean time is not entered
within 30 seconds of pressing the CLEAN pad, the
program will automatically be cancelled.
About one hour after the clean cycle ends, the LOCK
indicator will turn off and the oven door can be unlocked
and opened.
The oven door and door lock lever will be damaged if the
oven door is forced to open when the LOCK indicator is
still displayed.
Delay Start
To delay the start of a clean cycle:
1. Remove the oven racks and close the door.
2. Move the door lock lever to the right or locked position.
3. Press CLEAN pad.
4. Press the ,_ or • pad to select the cleaning time.
5. Press OVEN STOP pad and press the A, or • pad to
select the time of day you wish the oven to turn off.
The stop time and CLEAN DELAY STOP TIME will
appear in the display.
6. Press the CLOCK pad and the current time of day will
reappear in the display. CLEAN DELAY will remain in
the display to show that the oven is set for a delayed
clean operation.
7. At the end of the clean cycle, continuous beeps will
sound. Press the CANCEL pad to cancel the beeps.
To cancel clean cycle:
1. Press the CANCEL pad.
2_
If the LOCK indicator is displayed, allow the oven to
cool for up to one hour. Once the LOCK indicator turns
off, the door can be unlocked and opened.
If the LOCK indicator is not displayed, the oven door
can be unlocked and opened.
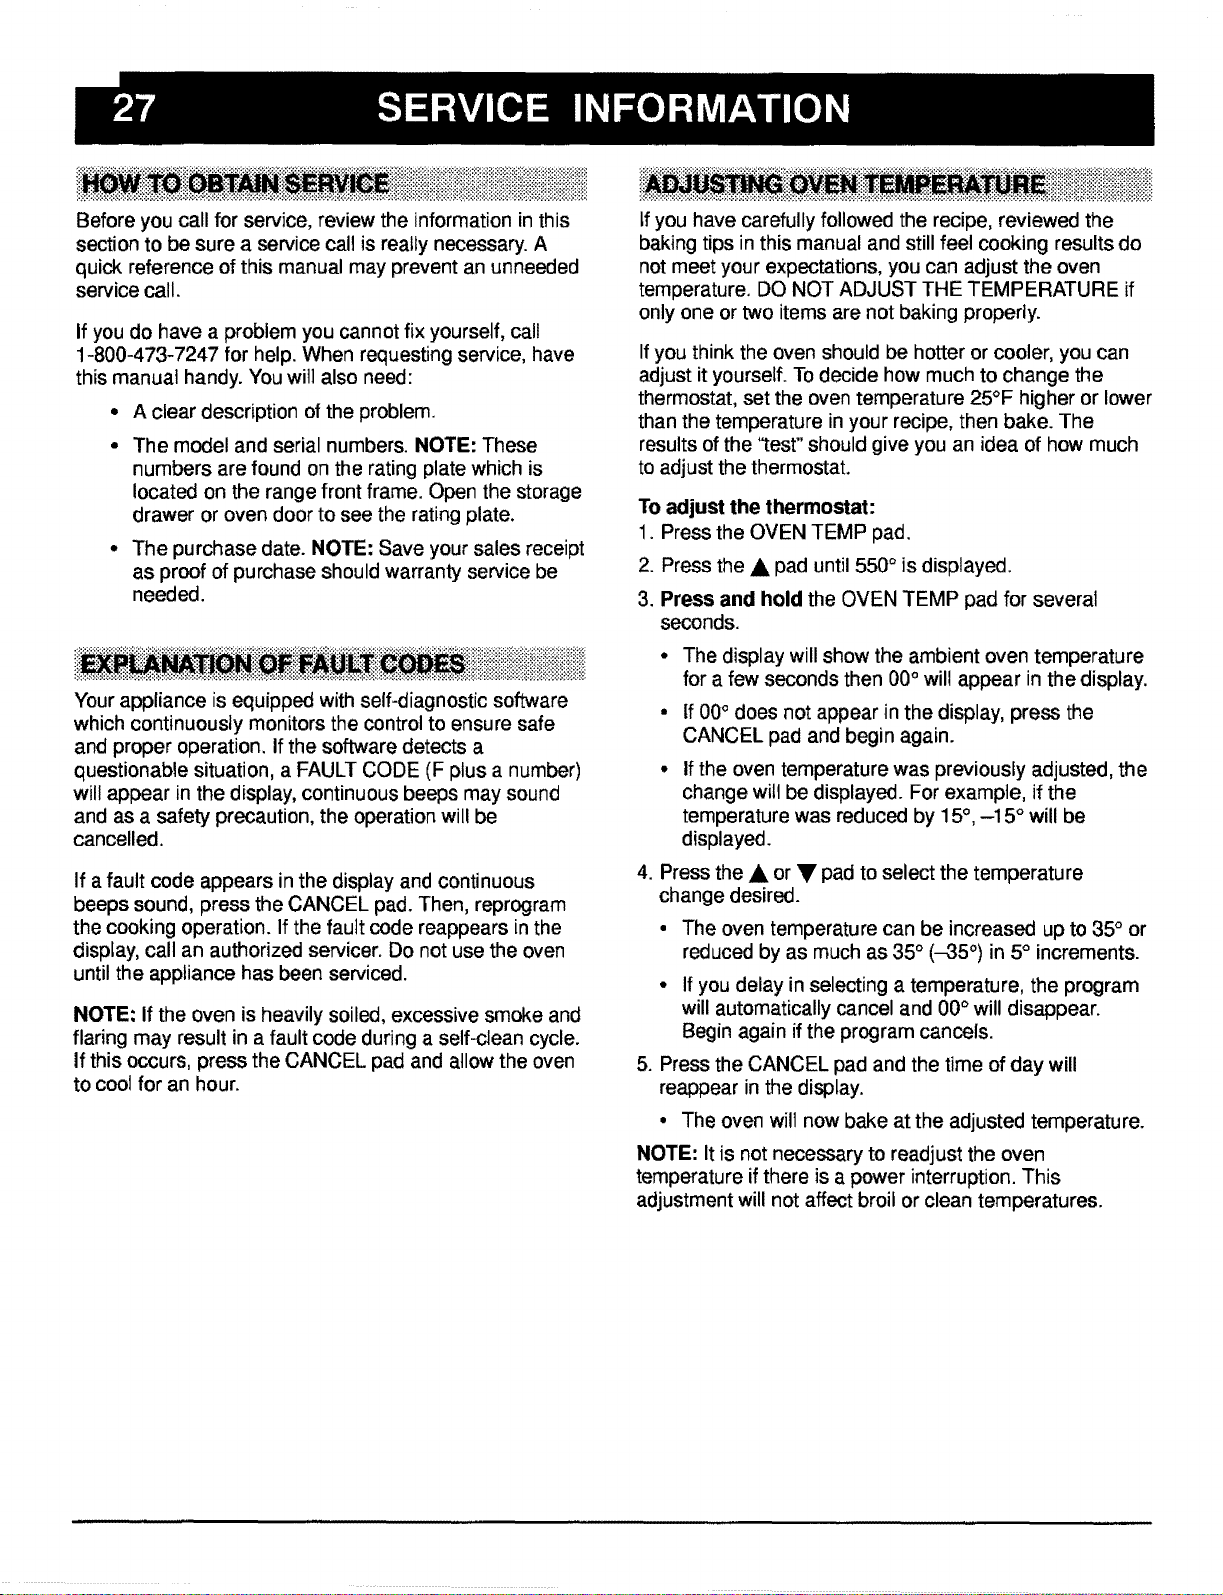
Beforeyoucallforservice,reviewtheinformationinthis
sectionto besureaservicecallis reallynecessary.A
quickreferenceofthismanualmaypreventanunneeded
servicecall.
Ifyoudohavea problemyoucannotfixyourself,call
1-800-473-7247forhelp.Whenrequestingservice,have
thismanuathandy.Youwillalsoneed:
• A clear description of the problem.
The model and serial numbers. NOTE: These
numbers are found on the rating plate which is
located on the range front frame. Open the storage
drawer or oven door to see the rating plate.
• The purchase date. NOTE: Save your sales receipt
as proof of purchase should warranty service be
needed.
Your appliance is equipped with self-diagnostic software
which continuously monitors the control to ensure safe
and proper operation. If the software detects a
questionable situation, a FAULT CODE (F plus a number)
will appear in the display, continuous beeps may sound
and as a safety precaution, the operation will be
cancelled.
If a fault code appears in the display and continuous
beeps sound, press the CANCEL pad. Then, reprogram
the cooking operation. If the fault code reappears in the
display, call an authorized servicer. Do not use the oven
until the appliance has been serviced.
NOTE: If the oven is heavily soiled, excessive smoke and
flaring may result in a fault code during a self-clean cycle.
If this occurs, press the CANCEL pad and allow the oven
to cool for an hour.
If you have carefully followed the recipe, reviewed the
baking tips in this manual and still feel cooking results do
not meet your expectations, you can adjust the oven
temperature. DO NOT ADJUST THE TEMPERATURE if
only one or two items are not baking properly.
If you think the oven should be hotter or cooler, you can
adjust it yourself. To decide how much to change the
thermostat, set the oven temperature 25°F higher or lower
than the temperature in your recipe, then bake. The
results of the "test" should give you an idea of how much
to adjust the thermostat.
To adjust the thermostat:
1. Press the OVEN TEMP pad.
2. Press the • pad until 550 ° is displayed.
3. Press and hold the OVEN TEMP pad for several
seconds.
° The display will show the ambient oven temperature
for a few seconds then 00° will appear in the display.
• If 00° does not appear in the display, press the
CANCEL pad and begin again.
If the oven temperature was previously adjusted, the
change will be displayed. For example, if the
temperature was reduced by 15°, -15 ° will be
displayed.
4. Press the • or T pad to select the temperature
change desired.
• The oven temperature can be increased up to 35° or
reduced by as much as 35 ° (-35 °) in 5° increments.
° If you delay in selecting a temperature, the program
will automatically cancel and 00° will disappear.
Begin again if the program cancels.
5. Press the CANCEL pad and the time of day will
reappear in the display.
• The oven will now bake at the adjusted temperature.
NOTE: It is not necessary to readjust the oven
temperature if there is a power interruption. This
adjustment will not affect broil or clean temperatures.
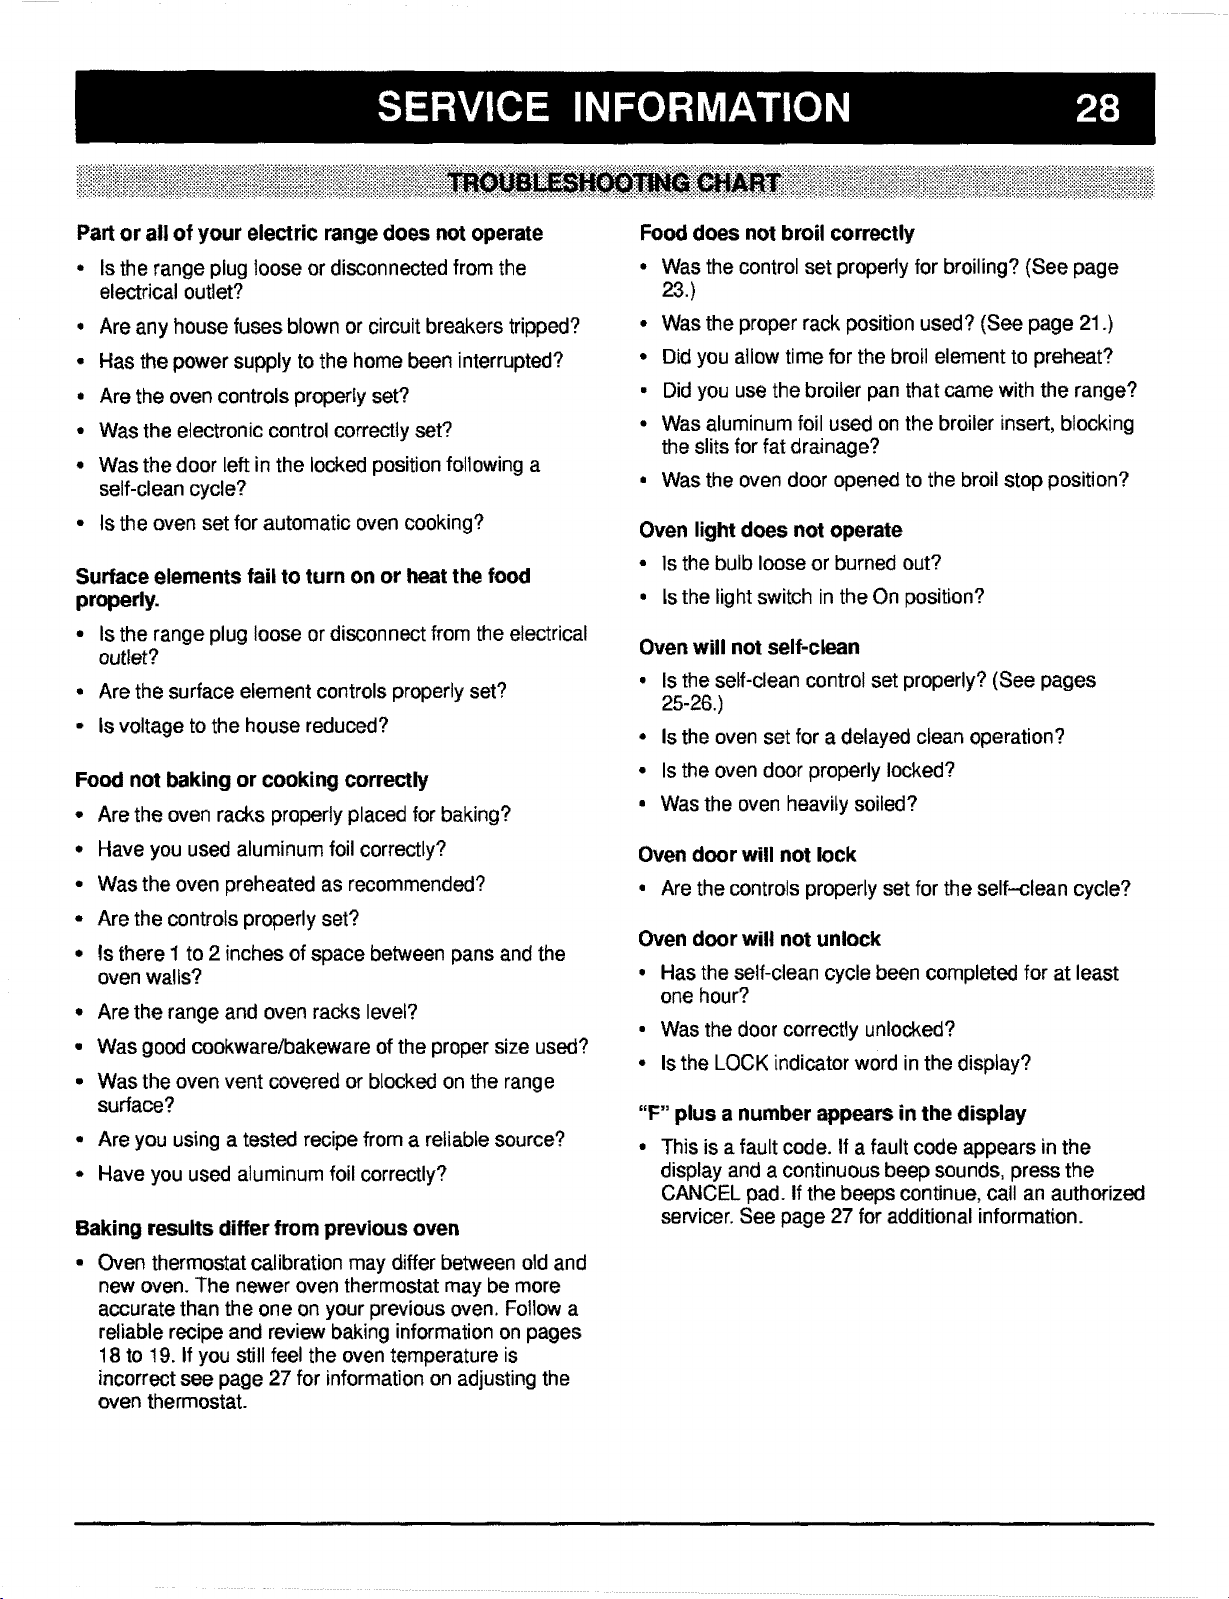
iiiii!iii!iiiiiii!iiiiiiliiiiiiii!iiiiiiiiiiiiiiiiiiiiiiiiilil
Part or all of your electric range does not operate
• Is the range plug loose or disconnected from the
electrical outlet?
, Are any house fuses blown or circuit breakers tripped?
• Has the power supply to the home been interrupted?
• Are the oven controls property set?
• Was the electronic control correctly set?
• Was the door left in the locked position following a
self-clean cycle?
• ts the oven set for automatic oven cooking?
Surface elements fail to turn on or heat the food
properly.
• Is the range plug loose or disconnect from the electrical
outlet?
• Are the surface element controls properly set?
• Is voltage to the house reduced?
Food not baking or cooking correctly
• Are the oven racks properly placed for baking?
• Have you used aluminum foil correctly?
• Was the oven preheated as recommended?
• Are the controls properly set?
• Is there 1 to 2 inches of space between pans and the
oven walls?
• Are the range and oven racks level?
• Was good cookware/bakeware of the proper size used?
• Was the oven vent covered or blocked on the range
surface?
• Are you using a tested recipe from a retiabie source?
• Have you used aluminum foil correctly?
Baking results differ from previous oven
• Oven thermostat calibration may differ between old and
new oven. The newer oven thermostat may be more
accurate than the one on your previous oven. Follow a
reliable recipe and review baking information on pages
18 to 19. If you still feel the oven temperature is
incorrect see page 27 for information on adjusting the
oven thermostat.
Food does not broil correctly
• Was the control set properly for broiling? (See page
23)
• Was the proper rack position used? (See page 21.)
• Did you allow time for the broil element to preheat?
• Did you use the broiler pan that came with the range?
• Was aluminum foil used on the broiler insert, blocking
the slits for fat drainage?
• Was the oven door opened to the broil stop position?
Oven light does not operate
• ls the bulb loose or burned out?
• ls the light switch in the On position?
Oven will not self-clean
• Is the self-clean control set properly? (See pages
25-26.)
• Is the oven set for a delayed clean operation?
• Is the oven door properly locked?
• Was the oven heavily soiled?
Oven door will not lock
• Are the controls properly set for the self-clean cycle?
Oven door will not unlock
• Has the self-clean cycle been completed for at least
one hour?
• Was the door correctly unlocked?
• Is the LOCK indicator word in the display?
"F" plus a number appears in the display
This is a fault code. If a fault code appears in the
display and a continuous beep sounds, press the
CANCEL pad. If the beeps continue, call an authorized
servicer. See page 27 for additional information.
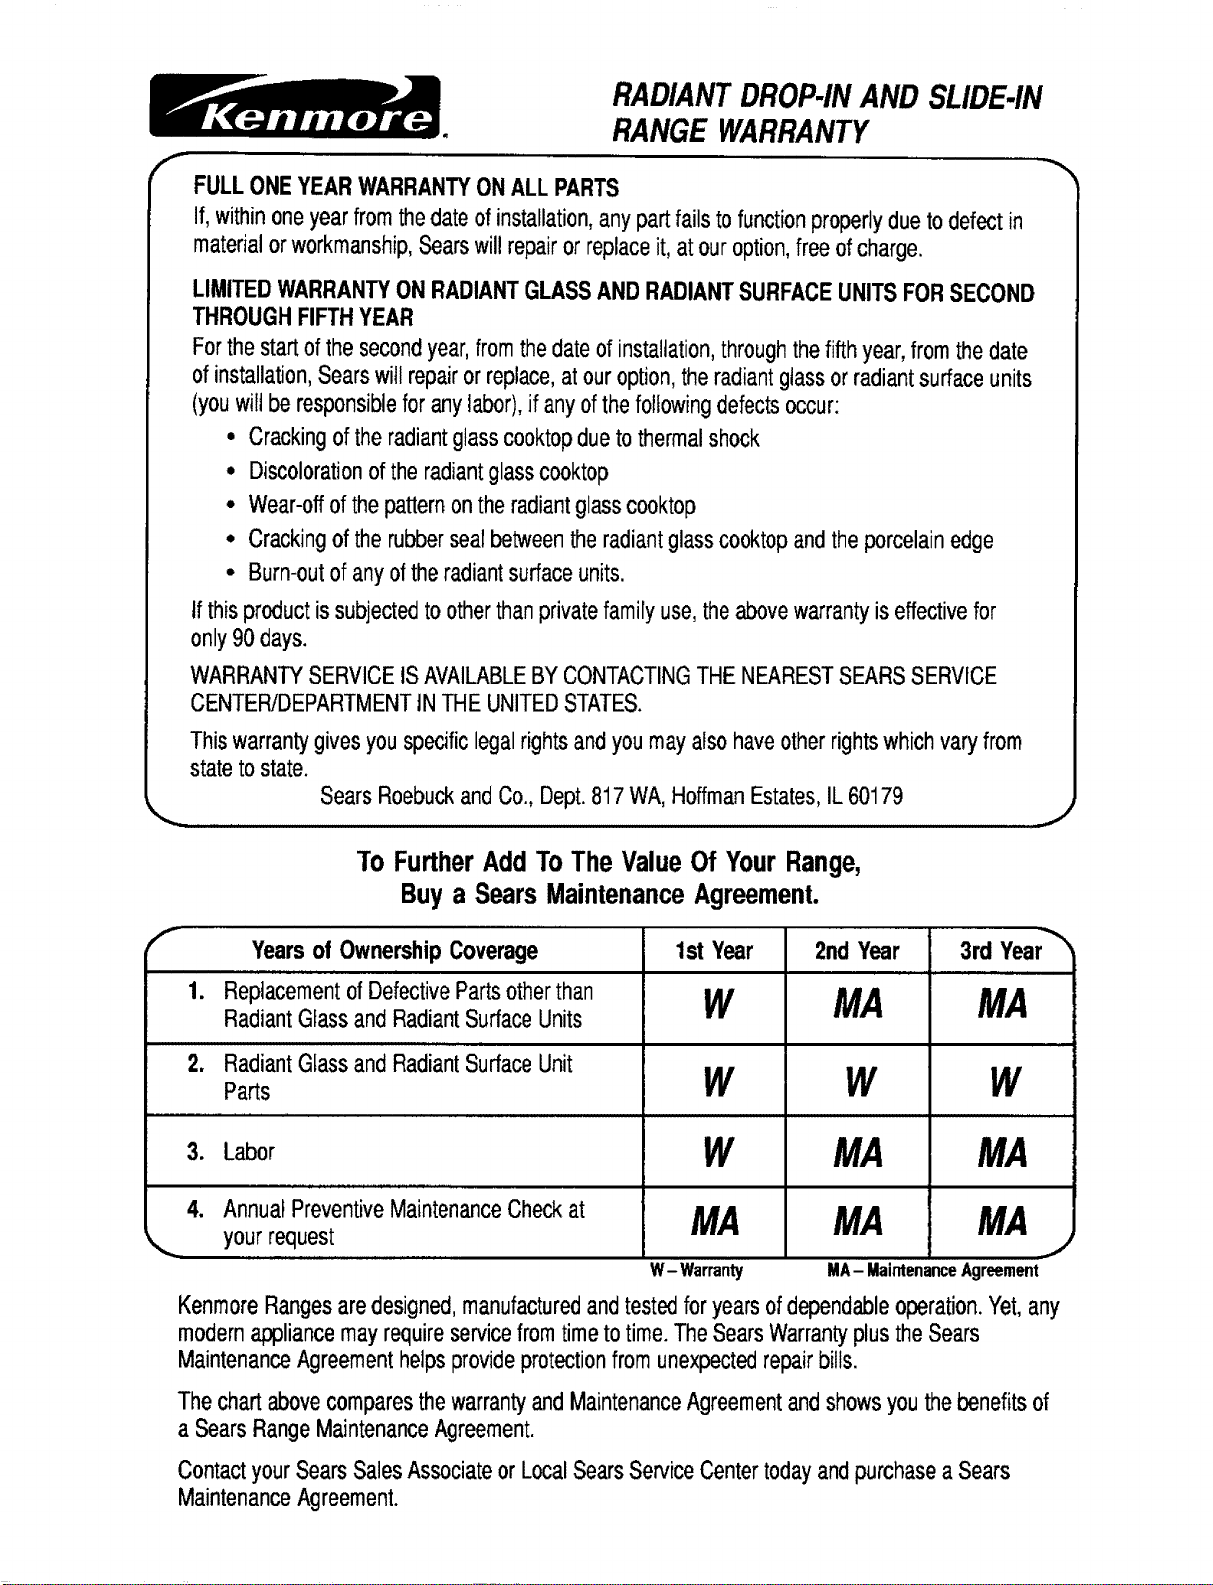
f
i i,i i i
RADIANTDROP-INAND SLIDE-IN
RANGE WARRANTY
FULL ONEYEARWARRANTYONALLPARTS
If,withinoneyearfromthedateofinstallation,any partfailsto functionproperlydueto defectin
materialor workmanship,Searswil!repairor replaceit, atour option,freeof charge.
LIMITEDWARRANTYONRADIANTGLASSANDRADIANTSURFACEUNITSFORSECOND
THROUGHFIFTHYEAR
Forthe startof the secondyear,fromthe dateof installation,throughthefifthyear,fromthe date
of installation,Searswill repairor replace,at ouroption,theradiantglassor radiantsurfaceunits
(youwiltbe responsiblefor anylabor),if anyofthe followingdefectsoccur:
• Crackingof theradiantglasscooktopdueto thermalshock
• Discolorationof the radiantglasscooktop
• Wear-offof the patternonthe radiantglasscooktop
° Crackingof the rubbersealbetweenthe radiantglasscooktopandthe porcelainedge
• Burn-outof anyof the radiantsurfaceunits.
If thisproductis subjectedto otherthanprivatefamilyuse,theabovewarrantyis effectivefor
only90 days.
WARRANTYSERVICEISAVAILABLEBYCONTACTINGTHENEARESTSEARSSERVICE
CENTER/DEPARTMENTtNTHEUNITEDSTATES.
Thiswarrantygivesyou specificlegalrightsandyoumayalsohaveotherrightswhichvaryfrom
stateto state.
SearsRoebuckandCo.,Dept.817WA,HoffmanEstates,IL 60179
,,,, J
To Further Add To The Value Of Your Range,
Buy a Sears MaintenanceAgreement.
f Yearsof OwnershipCoverage 1st Year 2nd Year 3rd Year_h
,,,,,,,,,,u,,,,,,,,,,, ,,,LL ,,ui, , I m, H I
1. Replacementof DefectivePartsotherthan W MA MA
RadiantGlassand RadiantSurfaceUnits
2. RadiantGlassand RadiantSurfaceUnit
Parts W W W
3. L bor W MA MA
4. AnnualPreventiveMaintenanceCheckat MA MA MA
your request _,j
W- Warranty MA- MaintenanceAgreement
KenmoreRangesaredesigned,manufacturedandtestedfor yearsof dependableoperation.Yet,any
modernappliancemayrequireservicefromtimeto time.TheSearsWarrantyplustheSears
MaintenanceAgreementhelpsprovideprotectionfromunexpectedrepairbills.
ThechartabovecomparesthewarrantyandMaintenanceAgreementandshowsyouthe benefitsof
a SearsRangeMaintenanceAgreement.
Contactyour SearsSalesAssociateor LocalSearsServiceCentertodayandpurchasea Sears
MaintenanceAgreement.

For the repair or replacement parts you need
Call 7 am-7 pm, 7 days a week
1-800-366-PART
(1-800-366-7278)
For in-home major brand repair service
Call 24 hours a day, 7 days a week
1-800-4-MY-HOME _
(1-800-469-4663)
For the location of a
Sears Parts and Service Center
in your area
Call 24 hours a day, 7 days a week
1-800-488-1222
For more information on purchasing a
Sears Maintenance Agreement
or to inquire about an existing Agreement
Call 9 am-5 pm, Monday-Saturday
1-800-827-6655
SEARS
The ServiceSideof Sears._
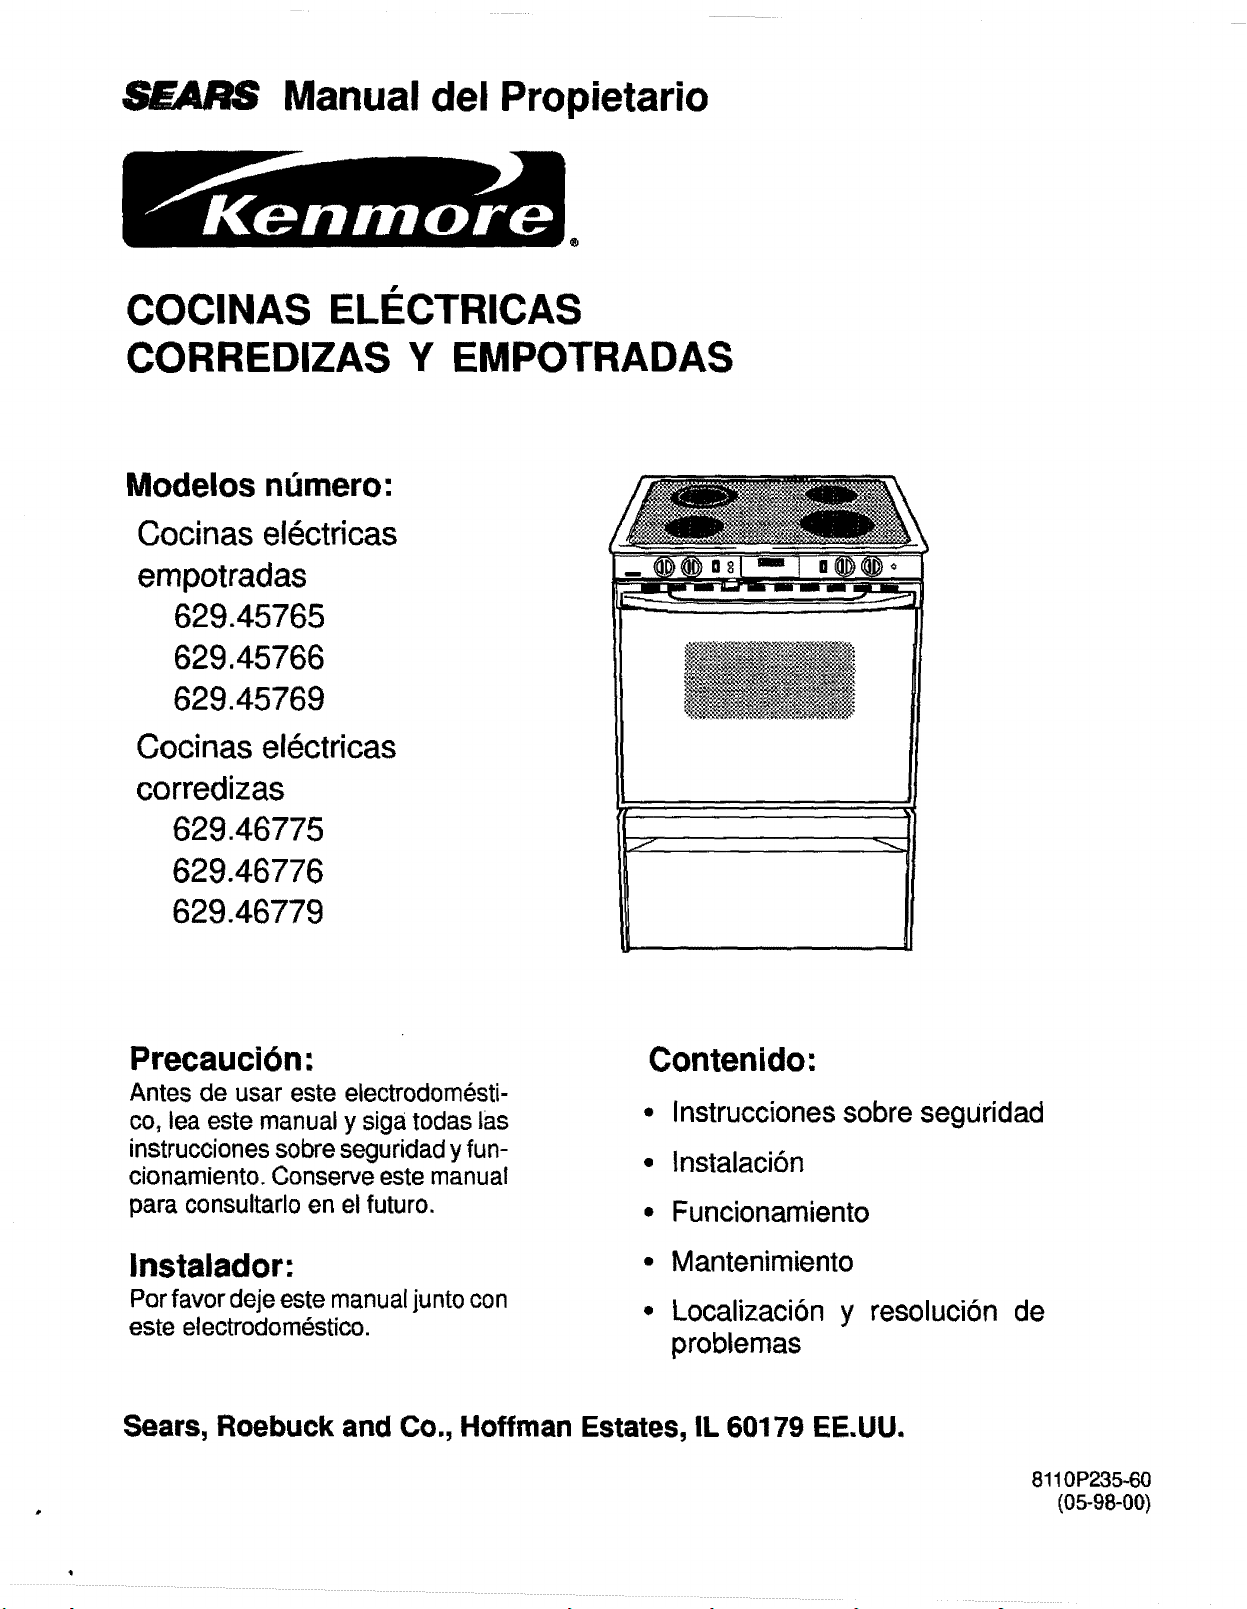
SEARS Manual del Propietario
f
COCINAS ELECTRICAS
CORREDIZAS Y EMPOTRADAS
Modelos numero:
Cocinas el6ctricas
empotradas
629.45765
629.45766
629.45769
Cocinas el6ctricas
corredizas
629.46775
629.46776
629.46779
__oii m! n_o
Precaucion:
Antes de usar este electrodomesti-
co, lea este manual y siga todas las
instrucciones sobre seguridad y fun-
cionamiento. Conserve este manual
para consultarlo en el futuro.
Instalador:
Por favor deje este manual junto con
este electrodom_stico.
Contenido:
• Instrucciones sobre seguridad
• lnstalacibn
• Funcionamiento
° Mantenimiento
• Localizaci6n y resolucibn de
problemas
Sears, Roebuck and Co., Hoffman Estates, IL 60179 EE.UU.
81 !0P235-60
(05-98-00)
Lea todas las instrucciones antes de usar este electrodomestico.
ii i i!iiiii!!iiiiiili!ii!iii!iiiiii!iii!iiiiiiiii!!iiii!!i!iiili!ili!i!i!i !!iiili!iiiili!!i
IMPORTANTES INSTRUCCIONES SOBRE SEGURIDAD . 1-4
INSTRUCCIONES PARA LA INSTALACI(_N ............ 5-11
CONTROL DEL RELOJ Y EL HORNO ................... 12
SUPERFICIE PARA COCINAR LISA .................. 13-t4
COMO USAR LA SUPERRCIE PARA COCINAR ......... 15
Botones de control .................................. 15
Consejos generates para cocinar ..................... 15
Conservas ......................................... 15
Gu[a de sugerencias para graduar el calor ............. 15
COMO USAR EL HORNO ............................ 16-21
Luz del homo ...................................... 16
Respiradero del horno ............................... 16
Caracterfsticas de! horno ............................ 16
Ventiiador .......................................... 16
Precalentamiento ................................... 16
C6mo graduar el homo .............................. 16
Informaci6n adicionat ................................ 16
Parritlas del horno .................................. 17
Posiciones de las parriLlas............................ 17
Consejos generates para hornear ..................... 18
Tabla de problemas comunes al hornear ............... 19
Caractedstica de cocci6n autom&tica en el homo ....... 20
Tabla para asados .................................. 21
MANTENIMIENTO .................................... 22
Puertadel homo .................................... 22
Palancapara trabarla puerta ......................... 22
Caj6n paraalmacenar ............................... 22
Patas niveladoras ................................... 22
TABLA PARA CUIDADO Y UMPIEZA ................. 23-24
HORNO AUTOLIMPIADOR .......................... 25-26
INFORMACION SOBRE SERVICIO ................... 27-28
Cbmoobtenerservicio............................... 27
Explicacibnde loscbdigosde falla .................... 27
Ajustede Latemperatura del homo .................... 27
Tablapara Iocatizacibny resoluci6nde problemas....... 28
GARAN_A ........................................... 30
Las instrucciones contenidas en las p&ginas siguientes se basan
en consideraciones de seguridad y hay que seguirlas al pie de la
letra a fin de eliminar los posibtes riesgos de incendio, choque
eldctrico o lesiones personales.
ADVERTENCIA: para reducir el riesgo de votcar el
etectrodom6stico debido ai uso inadecuado o at peso excesivo
sobre la puerta del homo, hay que afianzar el electrodom6stico
mediante un dispositivo antivuelco bien instalado.
Si saca la cocina el_ctrica de la pared para limpiarla,
aseg_rese de que el dispositivo antivuelco quede engranado
cuando ta vuelva a colocar en su sitio. De tenerlo, saque et
caj6n para almacenar y mire debajo de la cocina etL=ctrica para
comprobar que una de las patas niveladoras traseras estd
debidamente engranada en la ranura de soporte. Cuando est&
bien engranado, el dispositivo antivuelco afianza la pata
niveladora trasera al piso.
ADVERTENCIA
* TODA COCINA ELF.CTRICA
SE PUEDE VOLCAR Y
CAUSAR LESIONES A LAS
PERSONAS.
INSTALE LOS DISPOSITIVOS
ANTIVUELCO Q.UE VAN CON
LA COCINA ELECTRICA.
SIGA TODAS LAS
INSTRUCCIONES PARA LA
INSTALAClON.
ii i i! ii!ii!iii i iiii iii!iiiiiiiiiiiii !ii!iiiiiiiiiiiiiii
Apague el electrodom_stico y el capuchbn ventilador a fin de
evitar que se propaguen 1as llamas. Extinga las llamas y luego
active el capuchin para eliminar el humo y el olor.
Para apagar el incendio o las llamas use un extintor tipo qufmico
seco o de espurna o bicarbonato de soda. Nunca use agua en
incendios ocasionados por grasa.
Si et incendio es en el horno o en el molde de la parrilla,
sofOquelo cerrando la puerta del homo.
Si el incendio es en una olla sobre el elementode superficie,
cubrala olla. Nuncaintente alzar o moveruna oltaen llamas.
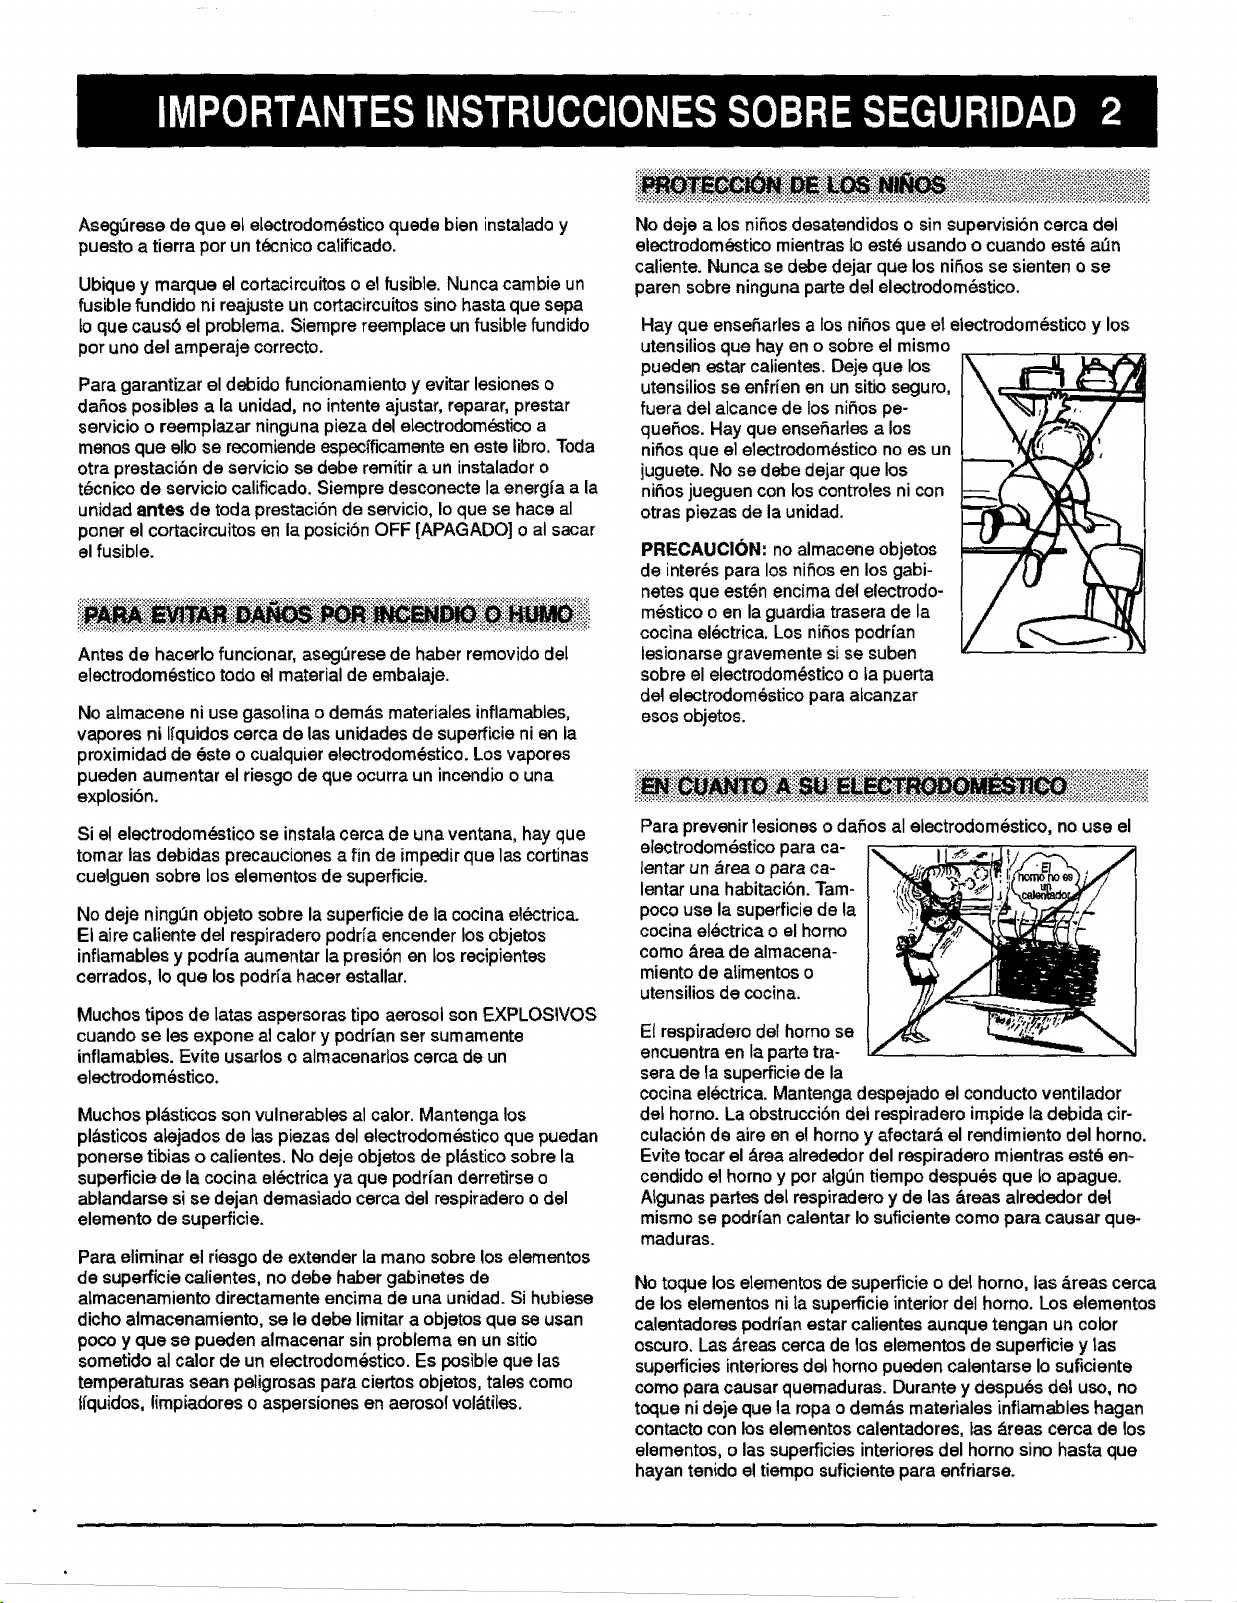
Aseg_rese de que el eLectrodom_stico quede bien instalado y
puesto a tierra por un t_nico calificado.
Ubique y marque el cortacircuitos o ei fusible. Nunca cambie un
fusible fundido ni reajuste un cortacircuitos sino hasta que sepa
to que caus6 el problema. Siempre reemplace un fusible fundido
por uno del amperaje correcto.
Para garantizar el debido funcionamLento y evitar lesiones o
daSos posibles a la unidad, no intente ajustar, reparar, prestar
servicio o reemplazar ninguna pieza del eLectrodomdstico a
menos que ello se recomLende especfficamente en este libro. Toda
otra prestaci6n de servicio se debe remitir a un instalador o
t_cnico de servicio calificado. Siempre desconecte la energia a la
unidad antes de toda prestacibn de servicio, Io que se hace al
poner el cortacircuitos en la posici6n OFF [APAGADO] o al sacar
el fusible.
Antes de hacerlo funcionar, aseg_rese de haber removido det
electrodom6stico todo el material de embataje.
No atmacene ni use gasotina o demos materiales inflamables,
vapores ni Ifquidos cerca de las unidades de supefficie ni en la
proximidad de este o cualquier electrodom_stico. Los vapores
pueden aumentar el riesgo de que ocurra un incendio o una
explosi6n.
Si e! electrodom_stico se instala cerca de una ventana, hay que
tomar las debidas precauciones a fin de impedir que las cortinas
cuelguen sobre los elementos de superficie.
No deje ningL_nobjeto sobre la superficie de la cocina et_,ctrica.
El aire caliente del respiradero podrfa encender los objetos
inftamables y podr[a aumentar la presibn en los recipientes
cerrados, Io que los podr_a hacer estallar.
Muchos tipos de latas aspersoras tipo aerosol son EXPLOSIVOS
cuando se les expone al calor y podr[an set sumamente
inflamables. Evite usarlos o almacenarlos cerca de un
electrodom_stico.
Muchos pl_.sticos son vulnerables al calor. Mantenga los
pl&sticos aLejados de tas piezas del electrodomestico que puedan
ponerse tibias o calientes. No deje objetos de pl&stico sobre la
superficie de la cocina el_ctrica ya que podrfan derretirse o
ablandarse si se dejan demasiado cerca del respiradero odel
elemento de superficie.
Para eliminar el riesgo de extender la mano sobre los elementos
de superficie calientes, no debe haber gabinetes de
almacenamiento directamente encima de una unidad. Si hubiese
dicho almacenamiento, se le debe limitar a objetos que se usan
poco y que se pueden almacenar sin problema en un sitio
sometido al calor de un electrodom_stico. Es posible que las
temperaturas sean peligrosas para ciertos objetos, tales como
Ifquidos, limpiadores o aspersiones en aerosol vol&ti[es.
No deje a los niP,os desatendidos o sin supervisi6n cerca del
electrodomestico mientras to est6 usando o cuando est8 a_n
caliente. Nunca se debe dejar que los niSos se sienten o se
paten sobre ninguna parte del electrodom_stico.
Hay que enseP,arles a los niSos que el electrodomestico y los
utensilios que hay en o sobre el mismo
pueden estar catientes. Deje que los
utensilios se enfr[en en un sitio seguro,
fuera del alcance de los niSos pe-
queSos. Hay que ensefiarles a los
nifios que el electrodom_stico no es un
juguete. No se debe dejar que los
nil_os jueguen con los controles ni con
otras piezas de la unidad.
PRECAUCI(_N: no almacene objetos
de interns para los nifios en los gabi-
netes que est6n encima del electrodo-
m_stico o en la guardia trasera de la
cocina el6ctrica. Los niSos podr_an
lesionarse gravemente si se suben
sobre el electrodom_stico o ta puerta
del electrodom_stico para a[canzar
esos objetos.
Para prevenir lesiones o dafios al electrodomestico, no use el
electrodom6stico para ca-
lentar un &tea o para ca-
lentar una habitaci6n. Tam-
poco use la superficie de la
cocina el_ctrica o el homo
como &rea de almacena-
miento de alimentos o
utensilios de cocina.
E(respiraderodelhomo se
encuentra en la parte tra-
sera de la superficie de la
cocina electrica. Mantenga despejado el conducto ventilador
de[ horno. La obstrucci6n dei respiradero impide la debida cir-
culaci6n de aire en e! homo y afectar& el rendimiento del homo.
Evite tocar el &rea alrededor del respiradero mientras est_ en-
cendido el homo y por algOn tiempo despu_s que to apague.
Algunas partes de[ respiradero y de las &reas alrededor del
mismo se podr(an calentar Io suficiente como para causar que-
maduras.
No toque los elementos de superficie o det homo, las 8reas cerca
de los elementos ni la superficie interior del horno. Los elementos
calentadores poddan estar calientes aunque tengan un color
oscuro. Las &teas cerca de los elementos de superficie y las
superficies interiores det homo pueden calentarse Io suficiente
como para causar quemaduras. Durante y despues del us(}, no
toque ni deje que la ropa o demds materiales inflamables hagan
contacto con los elementos calentadores, las _.reas cerca de los
elementos, o las superficies interiores del homo sino hasta que
hayan tenido el tiempo suficiente para enfriarse.
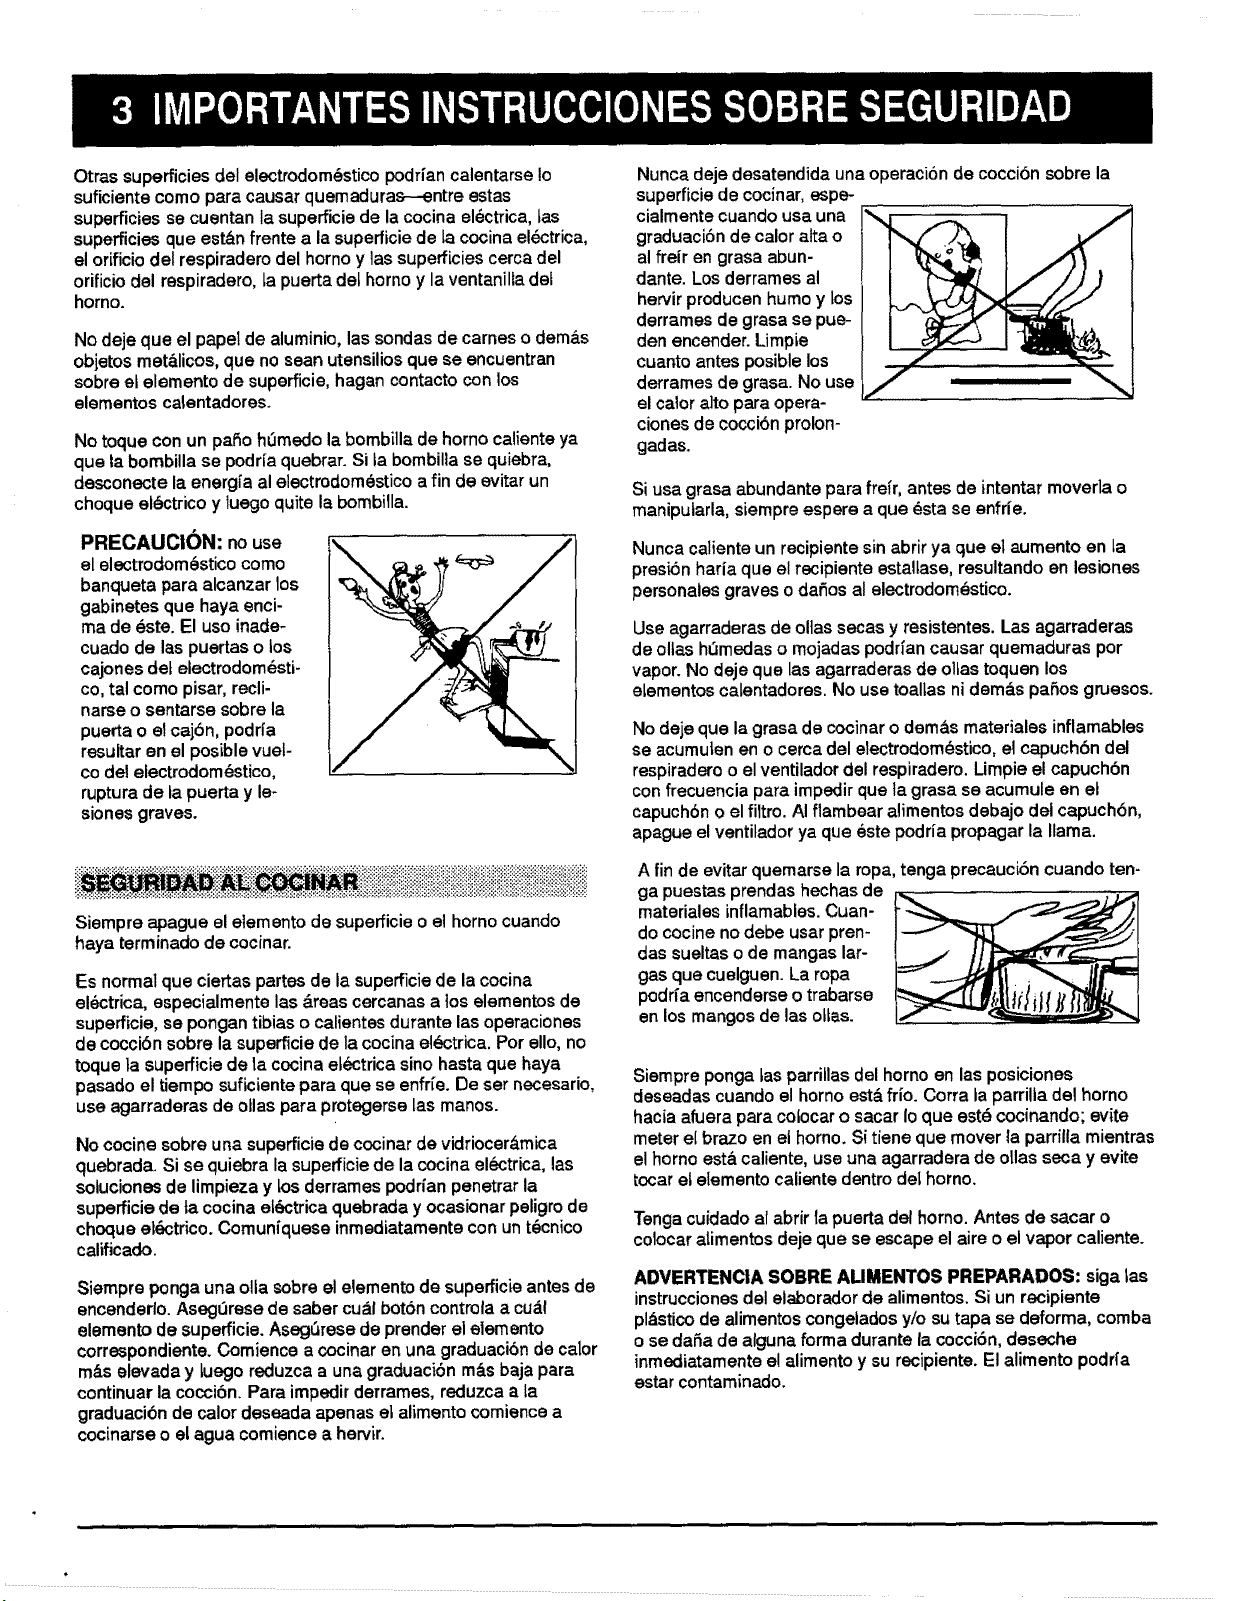
Otrassuperficies del electrodom_stico podfian calentarse !o
suficiente como para causar quemaduras--entre estas
superficies se cuentan la superficie de la cocina el_ctrica, tas
superficies que est_n frente a la superficie de la cocina el6ctrica,
el orificio del respiradero del homo y ]as superficies cerca del
orificio del respiradero, la puerta det homo y la ventanilta del
homo.
No deje que el paper de aluminio, las sondas de carnes o dem&s
objetos met,_licos, que no sean utensilios que se encuentran
sobre el elemento de superficie, hagan contacto con los
elementos ca_entadores.
No toque con un paso h_medo la bombilla de homo caliente ya
que ta bombilla se podr[a quebrar. Si ta bombilla se quiebra,
desconecte la energfa al electrodom_stico a fin de evitar un
choque el_ctrico y ]uego quite la bombilla.
PRECAUCION: no use
el electrodom_stico como
banqueta para alcanzar los
gabinetes que haya enci-
ma de _ste. El uso inade-
cuado de las puertas o los
cajones det electrodom6sti-
co, tal como pisar, recli-
narse o sentarse sobre la
puerta o el cajbn, podda
resultar en el posible vuel-
co del electrodom_stico,
ruptura de la puerta y le-
siones graves.
i i i i !!ii !iii i ii i ! ii;iiiii !! i!iiiii!iiii i i!i iii!iii!iii !if!!
Siempre apague el elemento de superficie o el homo cuando
haya terminado de cocinar.
Es normal que ciertas partes de la superficie de la cocina
el6ctrica, especialmente las &teas cercanas a ]os elementos de
superficie, se pongan tibias o calientes durante las operaciones
de coccibn sobre la superficie de la cocina el_ctrica. Por ello, no
toque la supefficie de la cocina et_ctrica sino hasta que haya
pasado el tiempo suficiente para que se enfr_e. De ser necesario,
use agarraderas de otlas para protegerse las manos.
No cocine sobre una superficie de cocinar de vidriocer&mica
quebrada. Si se quiebra la superficie de la cocina el_ctrica, las
soluciones de limpieza y los derrames podrfan penetrar la
supefficie de ta cocina el6ctrica quebrada y ocasionar peligro de
choque el_ctrico. Comunfquese inmediatamente con un t_cnico
calificado.
Siempre ponga una olla ,*,obre el eiemento de supefficie antes de
encenderlo. AsegOrese de saber cual botbn controla a cu_.!
elemento de supefficie. AsegSrese de prender el elemento
correspondiente. Comience a cocinar en una graduaci6n de calor
m&s elevada y tuego reduzca a una graduaci6n m&s baja para
continuar la cocci6n. Para impedir derrames, reduzca a ta
graduacibn de calor deseada apenas et alimento comience a
cocinarse o el agua comience a hervir.
Nunca deje desatendida una operacibn de cocci6n sobre la
superficie de cocinar, espe-
cialmente cuando usa una
graduacibn de calor alta o
al freir en grasa abun-
dante. Los derrames al
hervir producen humo y los
derrames de grasa se pue-
den encender. Limpie
cuanto antes posible los
derrames de grasa. No use
el calor a]to para opera-
ciones de coccibn prolon-
gadas.
Si usa grasa abundante para freir, antes de intentar moverla o
maniputarla, siempre espere a que _sta se enfrfe,
Nunca caliente un recipiente sin abrir ya que el aumento en la
presi6n haria que el recipiente estaltase, resultando en lesiones
personales graves o dafios al electrodomestico.
Use agarraderas de olias secas y resistentes. Las agarraderas
de ollas h_medas o mojadas podrfan causar quemaduras por
vapor. No deje que las agarraderas de ollas toquen los
eLementoscaientadores. No use toallas ni dem&s patios gruesos.
No deje que la grasa de cocinar o dem&s materiales inflamables
se acumulen en o cerca del electrodom_stico, el capuch6n del
respiradero o el ventilador del respiradero. Limpie el capuch6n
con frecuencia para impedir que ta grasa se acumule en el
capuchbn o el filtro. AI flambear afimentos debajo del capuch6n,
apague el ventilador ya que _ste podda propagar la llama.
A fin de evitar quemarse la ropa, tenga precaucibn cuando ten-
ga puestas prendas hechas de
materiales inflamables. Cuan-
do cocine no debe usar pren-
das sueltas o de mangas lar-
gas que cuelguen. La ropa
podr_a encenderse o trabarse
en los mangos de las ottas.
Siempre ponga tas parrillas del horno en las posiciones
deseadas cuando el homo est& fr[o. Corra la parrilia de! homo
hacia afuera para cotocar o sacar Io que est_ cocinando; evite
meter el brazo en el horno. Si tiene que mover la parrilla mientras
el homo esta caliente, use una agarradera de ollas seca y evite
tocar et elemento caliente dentro det horno.
Tenga cuidado al abrir la puerta del homo. Antes de sacar o
colocar atimentos deje que se escape el aire o el vapor caliente.
ADVERTENCiA SOBRE ALIMENTOS PREPARADOS: siga tas
instruccionesdel elaboradorde alimentos.Si un recipiente
pl,_sticode alimentoscongeladosy/o su tapa se deforma,comba
o se dafiade algunaforma durantela cocci6n,deseche
inmediatamentee! alimentoy su recipiente.El alimentopodrfa
estarcontaminado.
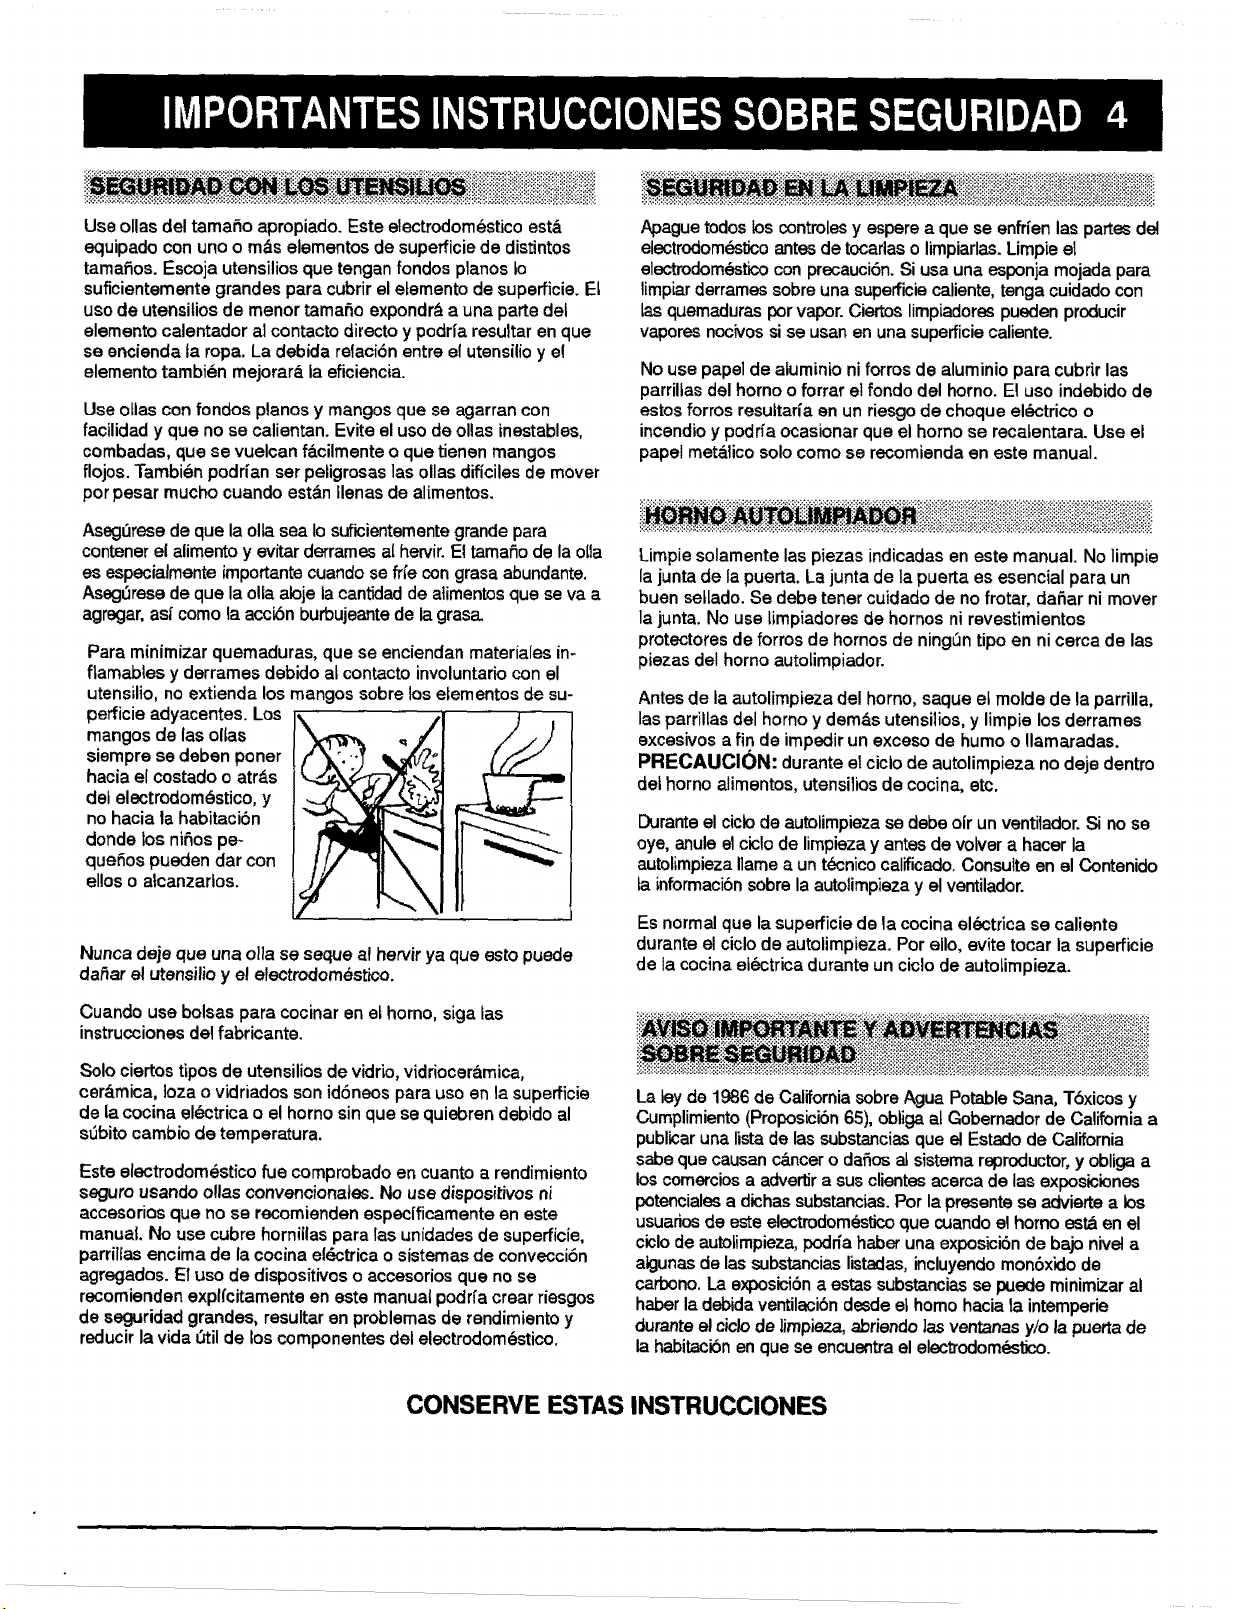
Use ollas del tamaho apropiado. Este electrodom6stico est&
equipado con uno o m&s elementos de supefficie de distintos
tamafios. Escoja utensilios que tengan fondos pianos to
suficientemente grandes para cubrir el etemento de superficie. EL
uso de utensilios de menor tamaSo expondr& a una parte del
elemento calentador al contacto directo y podria resultar en que
se encienda la ropa. La debida relaci6n entre el utensilio y el
elemento tambien mejorara la eficiencia.
Use otlas con fondos pianos y mangos que se agarran con
facilidad y que no se calientan. Evite el uso de elias inestables,
combadas, que se vuelcan f&cilmente o que tienen mangos
flojos. Tambien podrfan set peligrosas las ollas dificiles de mover
por pesar mucho cuando est&n Ilenas de alimentos.
Asegl3rese de que la olla sea Io suficientemente grande para
contener el alimento y evitar derrames aI hervir. El tamafio de la olla
es especialmente importante cuando se fr_econ grasa abundante.
Aseg_rese de que la olla abje la cantidad de aiimentos que se va a
agregar, asi como la accLbn burbujeante de la grasa.
Para minimizar quemaduras, que se enciendan materiales in-
flamables y derrames debido al contacto involuntario con el
utensilio, no extienda los mangos sobre los elementos de su-
perficie adyacentes. Los
mangos de las oltas
siempre se deben poner
hacia el costado o atr_.s
del electrodom6stico, y
no hacia ta habitaci6n
donde los niSos pe-
queSos pueden dar con
ellos o alcanzarlos.
_t
Nunca deje que una olla se seque al hervir ya que asto puede
daFiar el utensilio y e! electrodom_stbo.
Cuando use bolsas para cocinar en et homo, siga tas
instrucciones del fabricante.
Solo ciertos tipos de utensilios de viddo, vidrioceramica,
cerbmica, toza o vidriados son id6neos para uso en la supefficie
de la cocina el_:trica o el homo sin que se quiebren debido al
s_bito cambio de temperatura.
Este electrodom6stbo fiJecomprobadoen cuantoa rendimiento
seguro usandooUasconvencionates.No use dispositivos ni
accesoriosque no se recomiendenespecfficamenteen este
manual.No use cubrehorniilasparalas unidades de superficie,
parrillasencima de la cocinae!6ctricao sistemas de convecci6n
agregados. El uso de dispositivoso accesoriosque no se
recomiendenexplfcitamenteen este manualpodrfacrear riesgos
de seguridadgrandes, resultaren problemasde rendimiento y
reducirla vida z3tilde los componentesdel electrodom6stico.
Aoague todos bs controles y espere a que se enfr{en las partes del
electrodom6stico antes de tocarlas o limpiarlas. Limpie el
electrodom_stico con precauciSn. Si usa una esponja mojada para
limpiar derrames sobre una superficie caliente, tenga cuidado con
las quemaduras por vapor. Ciertos limpiadores pueden producir
vapores nocivos si se usan en una supefficie caliente.
No use papel de atuminio ni forros de aluminio para cubrir las
parriltas del homo o forrar el rondo del homo. El uso indebido de
estos forros resuftarfa en un riesgo de choque el_ctrico o
incendio y podrfa ocasionar que el homo se recatentara. Use el
papel met&lico solo como se recomienda en este manual.
i.i! !i.ii i .!i !ii i! iii.iii i !i.i !i..ii. i.ii.iii. iii i i .i!. iii. ii.iiii.iii. i.
Limpie solamente las piezas indicadas en este manual. No limpie
la junta de la puerta. La junta de la puerta es esencial para un
buen sellado. Se debe tenet cuidado de no frotar, daSar ni mover
la junta. No use limpiadores de hornos ni revestimientos
protectores de forros de hornos de ning_n tipo en ni cerca de las
piezas del horno autolimpiador.
Antes de la autolimpieza del homo, saque el molde de la parrilla,
las parrillas del homo y dem,_s utensilios, y limpie los derrames
excesivos a fin de impedir un exceso de humo o Ilamaradas.
PRECAUCION: durante el ciclo de autolimpieza no deje dentro
det homo alimentos, utensilios de cocina, etc.
Duranteel cicb de aut_limpiezase debe oir un ventilador.Si no se
oye,anuleel ciclode limpiezay antesde votvera hacerla
autolimpiezaIlamea un t6cnicocalificado.Consulteen el Contenido
ta informaci6nsobrela autolimpiezay el ventilador.
Es normal que la supefficie de la cocina el6ctrica se caliente
durante el ciclo de autolimpieza. Por ello, evite tocar la supefficie
de la cocina electrica durante un ciclo de autolimpieza.
La tey de 1986 de California sobre Agua Potable San& T6xicos y
Cumplimiento (Proposici6n 65), obliga at Gobernador de California a
publk:ar una lista de las substancias que el Estado de California
sabe que causan c&ncer o dafios al sistema reproductor, y obliga a
los comercios a adverlJra sus clientes acerca de las exposicbnes
potenciales a dichas substancias. Por la presente se advierte a bs
usuarios de este electrodom_sticoque cuando el homo est& en el
ciclode autolimpieza, podfia haber una exposicibn de bajo nivel a
atgunas de las substancias listadas,incluyendo mon6xido de
carbono. La exposicibn a estas substancias se l_jede minimizar al
haber la debida ventilacibn desde et homo hacia la intemperie
durante el ciclode iimpieza, abriendo ]as ventanas y/o la puerta de
la habitacibn en que se encuentra el electrodom_stico.
CONSERVE ESTAS INSTRUCCIONES
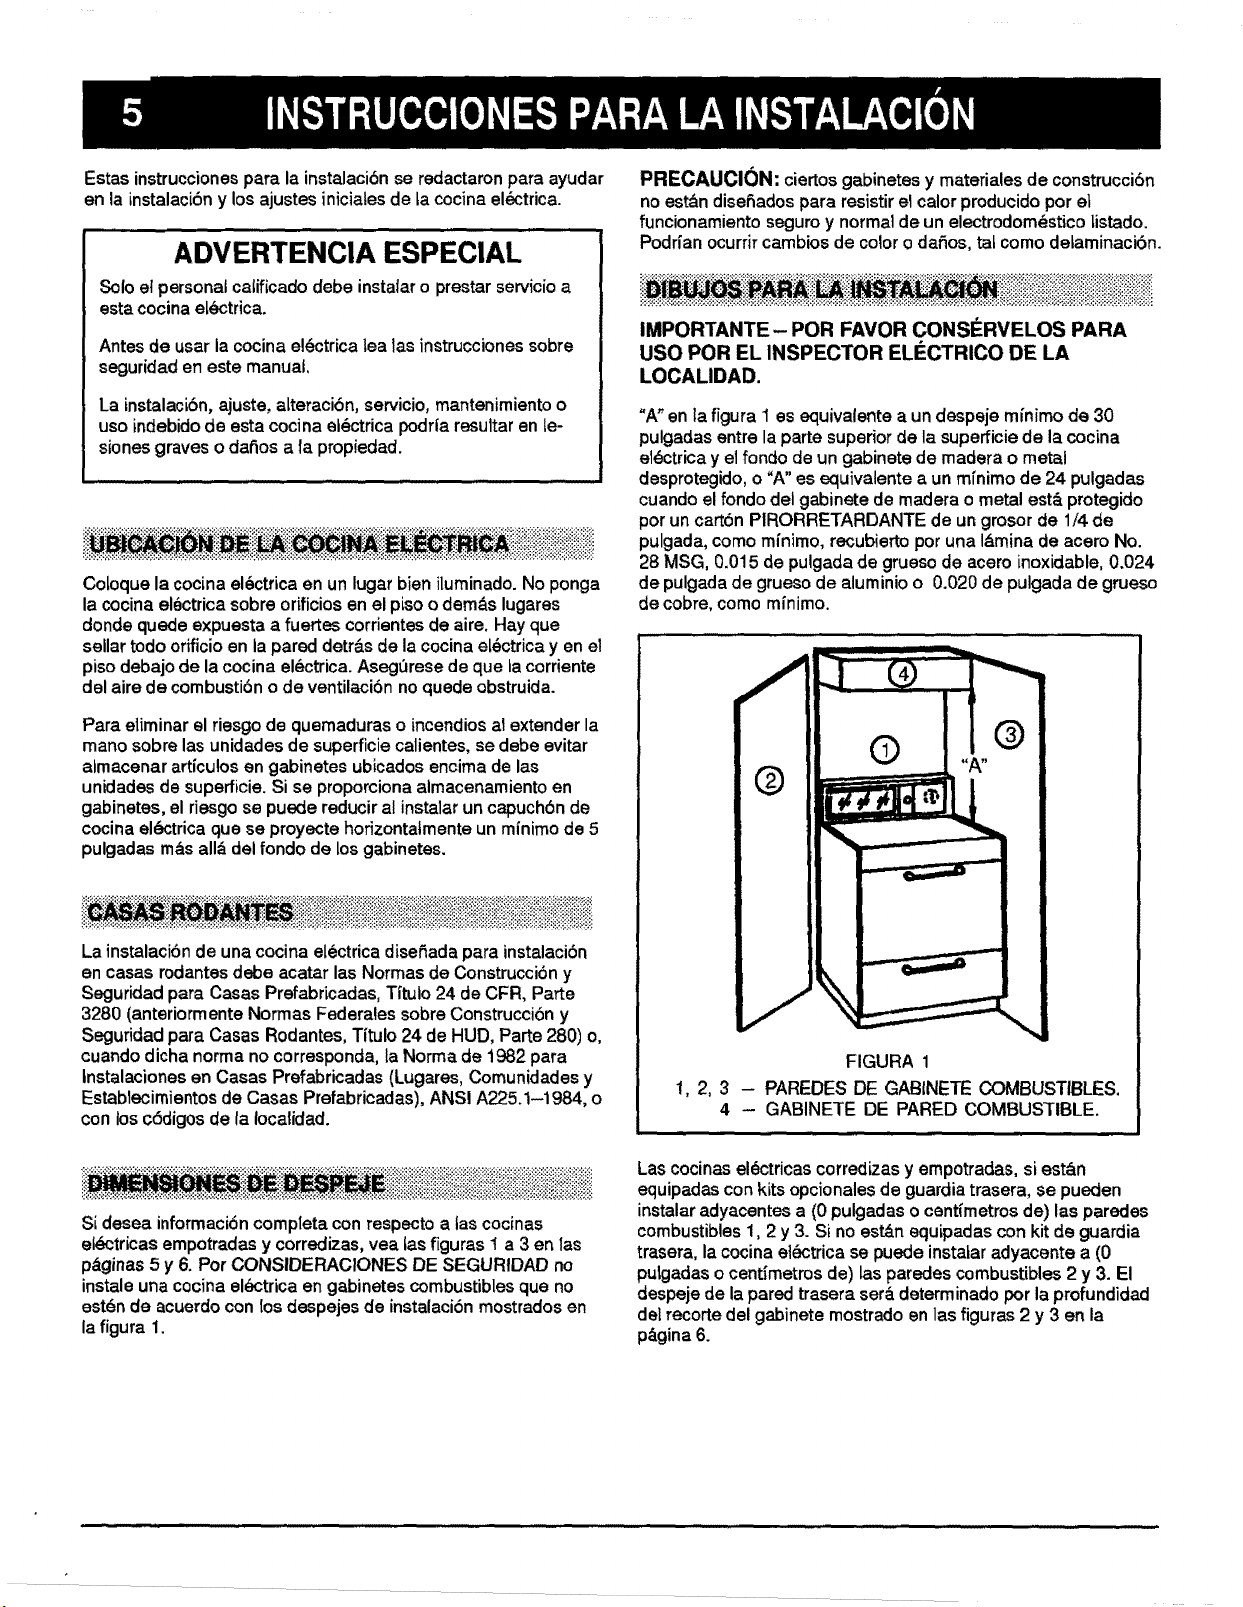
Estas instrucciones para la instalacibn se redactaron para ayudar
en la instalaci6n y los ajustes iniciates de ta cocina el_ctrica.
ADVERTENCIA ESPECIAL
Solo el personal catificado debe instaiar o prestar servicio a
esta cocina el_ctrica.
Antes de usar la cocina el_ctrica lea las instrucciones sobre
seguridad en este manual,
La instalaci6n, ajuste, alteracibn, servicio, mantenimiento o
uso indebido de esta cocina el_ctrica podr[a resultar en le-
siones graves o da_os a la propiedad.
Coloque la cocina electrica en un lugar bien iluminado. No ponga
la cocina el_ctrica sobre orificios en el piso o dem&s lugares
donde quede expuesta a fuertes corrientes de aire. Hay que
sellar todo orificio en la pared detrbs de la cocina eldctrica yen el
piso debajo de la cocina el_ctrica. Asegt3rese de que la corriente
del aire de combusti6n o de ventilacibn no quede obstruida.
Para eliminar el riesgo de quemaduras o incendios al extender la
mano sobre las unidades de superficie calientes, se debe evitar
almacenar articulos en gabinetes ubicados encima de las
unidades de superficie. Si se proporciona almacenamiento en
gabinetes, el riesgo se puede reducir al instalar un capuchbn de
cocina ek_ctrica que se proyecte horizontatmente un minimo de 5
pulgadas m&s all_ del rondo de los gabinetes.
La instalacibn de una cocina electrica diseSada para instalacibn
en casas rodantes debe acatar las Normas de Construccibn y
Seguridad para Casas Prefabricadas, Titulo 24 de CFR, Parte
3280 (anteriormente Normas Federales sobre Construccibn y
Seguridad para Casas Rodantes, Titulo 24 de HUD, Parte 280) o,
cuando dicha norma no corresponda, la Norma de 1982 para
tnstalaciones en Casas Prefabricadas (Lugares, Comunidades y
Establecirnientos de Casas Prefabricadas), ANSI A225.1-1984, o
con los c6digos de la Iocalidad.
Si desea informacibn completa con respecto alas cocinas
et_tricas empotradas y corredizas, vea tas figuras 1 a 3 en las
p,_ginas 5 y 6. Por CONSIDERACIONES DE SEGURIDAD no
instale una cocina ek_ctrica en gabinetes combustibles que no
estdn de acuerdo con los despejes de instalacibn mostrados en
la figura 1.
PRECAUCI(_N: ciertos gabinetes y materiales de construcci6n
no est&n diseSados para resistir el calor producido por el
funcionamiento seguro y normal de un electrodom_stico tistado.
Podrian ocurrir cambios de color o daSos, tat como delaminaci6n.
IMPORTANTE - POR FAVOR CONSERVELOS PARA
USO POR EL INSPECTOR ELI_CTRICO DE LA
LOCALIDAD.
"Anen la figura I es equivalente a un despeje minimo de 30
pulgadas entre la parte superior de la superficie de la cocina
e16ctrica y el fondo de un gabinete de madera o metal
desprotegido, o "A" es equivalente a un minimo de 24 pulgadas
cuando el rondo del gabinete de madera o metal est_ protegido
por un cartbn PIRORRETARDANTE de un grosor de 1/4 de
pulgada, como minimo, recubie_to por una I(_mina de acero No.
28 MSG, 0.015 de pulgada de grueso de acero inoxidable, 0.024
de pulgada de grueso de aluminio o 0.020 de pulgada de grueso
de cobre, como minimo.
FIGURA 1
I, 2, 3 - PAREDES DE GABINETE COMBUSTIBLES.
4 - GABINETE DE PARED COMBUSTIBLE,
Las cocinas el6ctricas corredizas y empotradas, si est&n
equipadas con kits opcionales de guardia trasera, se pueden
instalar edyacentes a (0 pulgadas o centimetros de) las paredes
combustibles 1, 2 y 3. Si no est&n equipadas con kit de guardia
trasera, la cocina el_ctrica se puede instalar adyacente a (0
pulgadas o centimetros de) las paredes combustibles 2 y 3. El
despeje de la pared trasera ser& determinado por la profundidad
del recorte del gabinete mostrado en las figuras 2 y 3 en la
p,_gina 6.
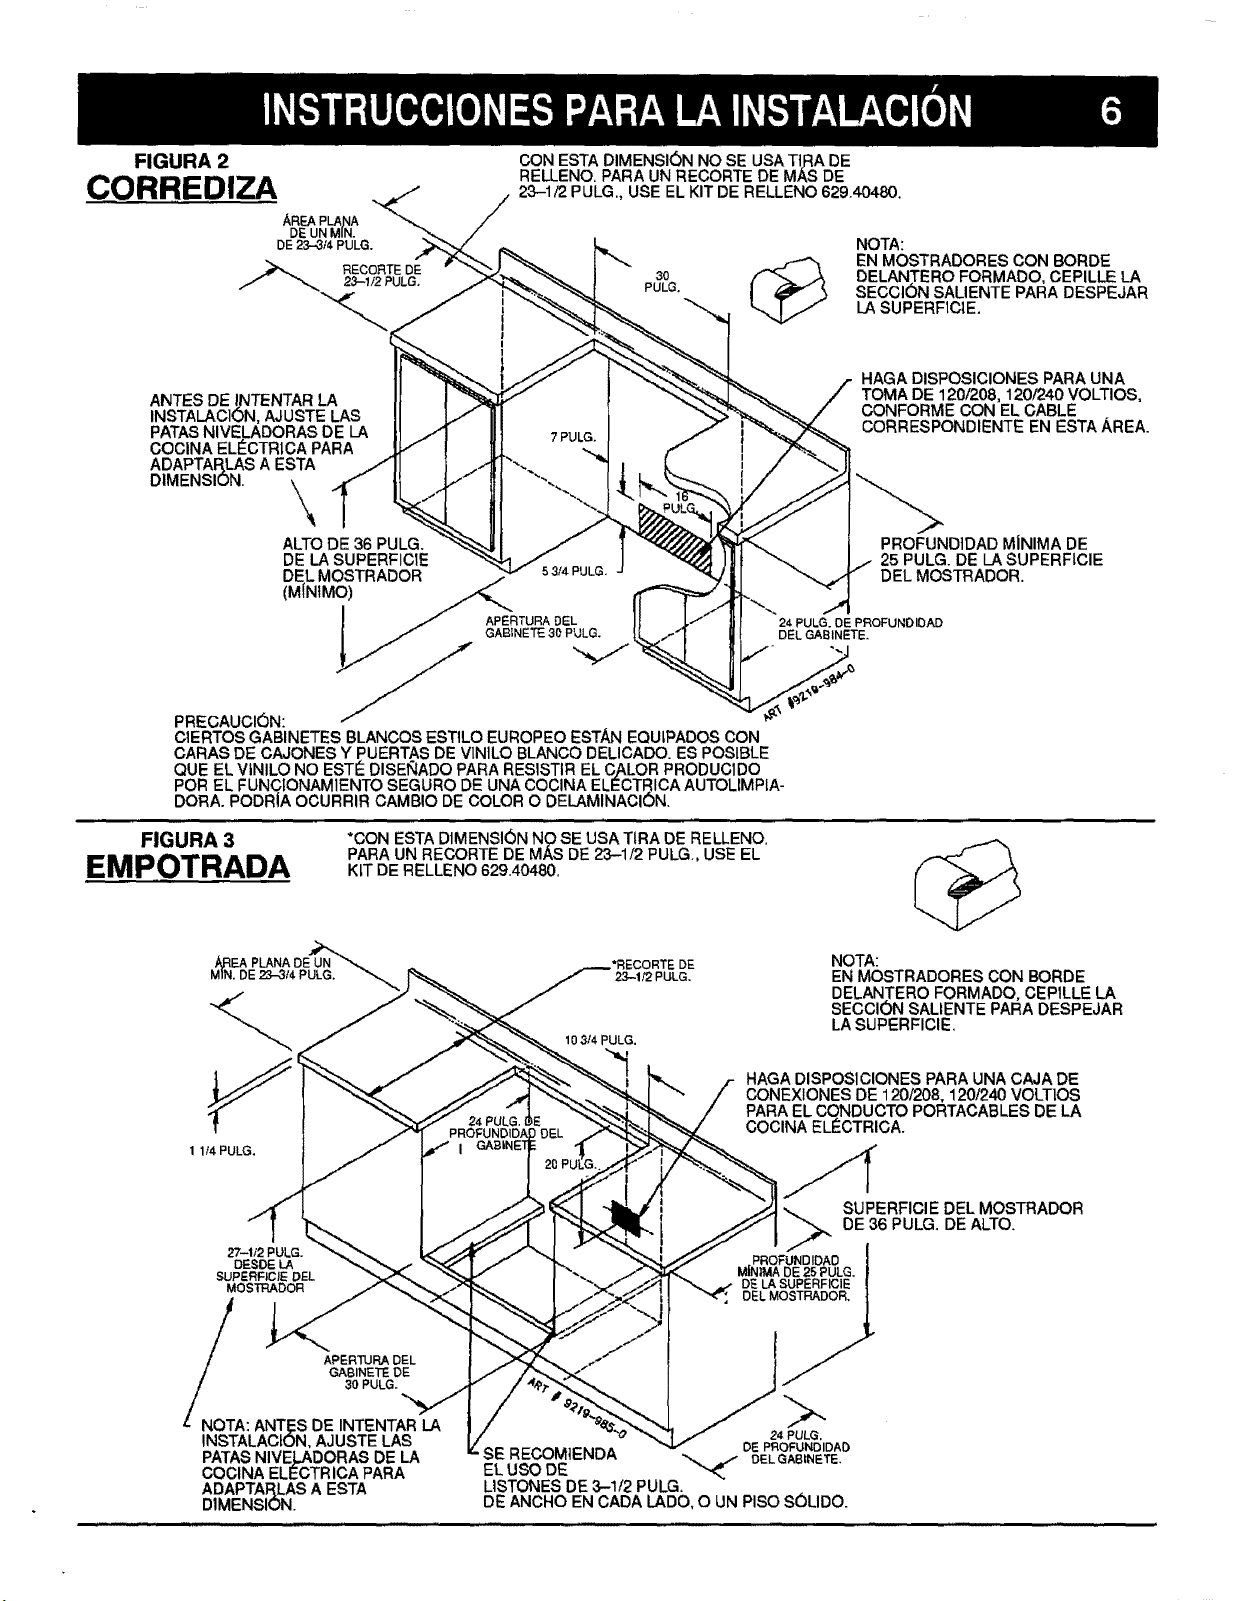
FIGURA 2
CORREDIZA
AREAPLANA
DE UNMIN.
DE23-_3t4PULG.
RECORTEDE
23-1/2 PULG,
CON ESTA DIMENSI6N NO SE USATt_A DE
RELLENO. PARA UN RECORTE DE MAS DE
23-1/2 PULG., USE EL KIT DE RELLENO629.40480.
30
PULG,
NOTA:
EN MOSTRADORES CON BORDE
DELANTERO FORMADO CEPILLE LA
SECCION SALIENTE PARA DESPEJAR
LASUPERF1CIE.
ANTES DE I_TENTAR LA
INSTALAC1ON, AJUSTE LAS
PATAS NIVELADORAS DE LA
COCINA ELI_CTRICA PARA
ADAPTAR,LAS A ESTA
DIMENSION. \\\
ALTO DE 36 PULG.
DE LA SUPERFICIE
DEL MOSTRADOR I s ,314PULG.
(M'NIMO) _NETE 30P_
I / APERTURA DEL
PRECAUCI(_N: _ _ABI
CIERTOS GABINETES BLANCOS ESTILO EUROPEO ESTAN EQUtPADOS CON
CARAS DE CAJONES Y PUERTAS DE VlN1LO BLANCO DELICADO. ES POSIBLE
QUE EL VtNILO NO EST_ DISEI_ADO PARA RESISTIR EL C)_LOR PRODUCIDO
POR EL FUNCtONAMIENTO SEGURO DE UNA COCINA ELECTRICA AUTOLIMPIA-
DORA. PODAIA OCURRIR CAMB!O DE COLOR O DELAMINACION.
HAGA DISPOSICIONES PARA UNA
TOMA DE 120/208, 120/240 VOLTIOS,
CONFORME CON EL CABLE
CORRESPONDIENTE EN ESTA AREA.
j_
PROFUNDIDAD MINIMA DE
25 PULG. DE LA SUPERFICIE
DEL MOSTRADOR.
24 PULG. DE PROFUNDIDAD
DEL GABINETE.
FIGURA 3
EMPOTRADA
*CON ESTA D1MENSI6N N_ SE USA TtRA DE RELLENO.
PARA UN RECORTE DE MAS DE 23-1/2 PULG, USE EL
KtT DE RELLENO 629.40480.
M_NEA PLANA DE UN
•DE23-3t€PULG.
23-112 PULG.
10 314 PULG,
NOTA:
EN MOSTRADORES CON BORDE
DELANTERO FORMADO CEPILLE LA
SECClON SALIENTE PAISA DESPEJAR
LA SUPERFICIE.
HAGADISPOSICIONES PARA UNA CAJA DE
CONEXIONES DE 120/208, 120/240 VOLTLOS
PARA EL CONDUCTO PORTACABLESDE LA
COCINA EL_CTRICA.
1 114 PULG.
27-1/2PULG.
DESDELA
SUPERFtCIEDEL
MOSTRADOR
APERTURADEL
GABINETE DE
30PULG.
NOTA: ANTICS DE INTENTAR LA
INSTALACtON, AJUSTE LAS
PATAS NIVE_J_DORAS DE LA
COCINA ELECTR ICA PARA
ADAPTARLAS A ESTA
DIMENSION.
SUPERFICIE DEL MOSTRADOR
DE 36 PULG. DE ALTO.
,PROFUNDIDAD I
MINIMA DE 25 PULG. |
D_: LA SUPERFICIE |
DEL M_-__
24 PULG.
0E PROFUNDIDAb
•SE RECOMiENDA
DEL GABtNETE.
EL USO DE
USTONES DE 3-1/2 PULG.
DE ANCHO EN CADA LADO, O UN PISO SOLIDO.
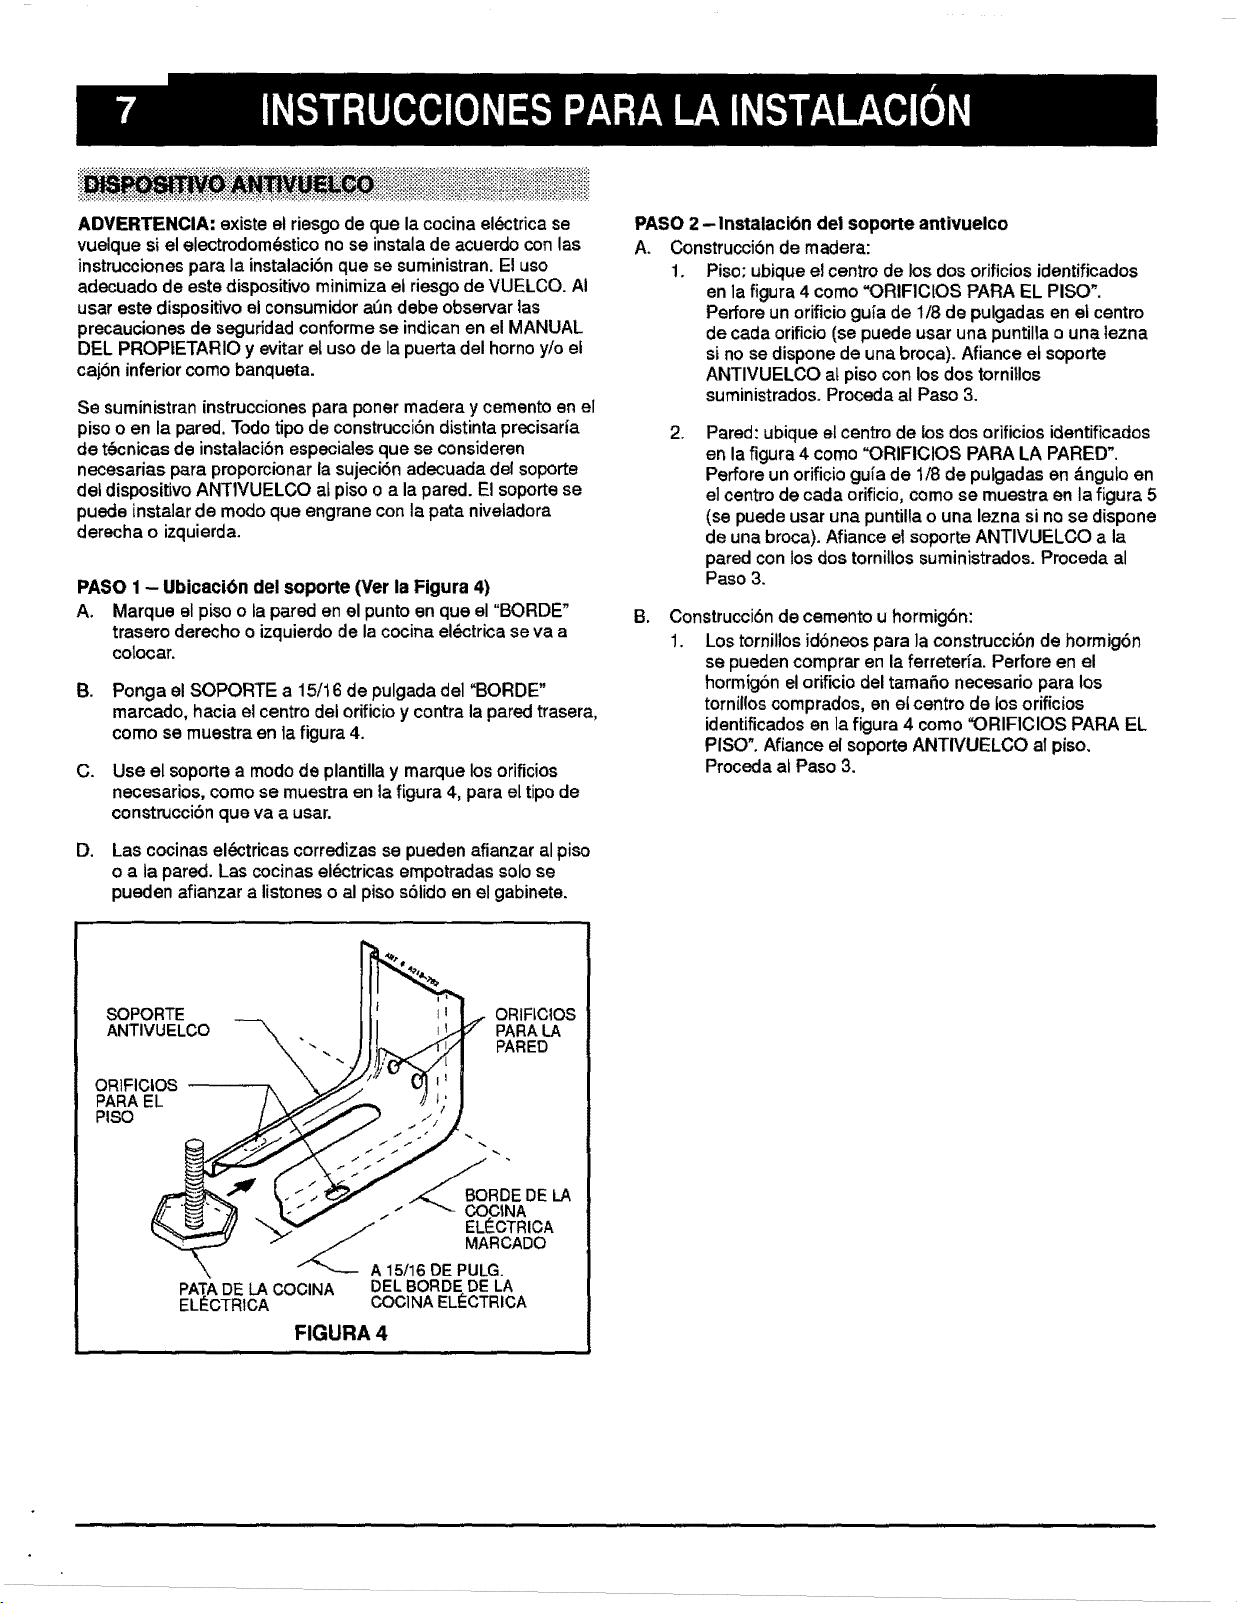
ADVERTENCIA: existe el riesgo de que la cocina ek_ctrica se
vuelque si el electmdom_stico no se instala de acuerdo con las
instrucciones para la instalaci6n que se surninistran. El uso
adecuado de este dispositivo minimiza ei riesgo de VUELCO. AI
usar este dispositivo ei consumidor a6n debe observar ias
precauciones de seguridad conforme se indican en el MANUAL
DEL PROPIETARIO y evitar el uso de la puerta del homo y/o el
caj6n inferior como banqueta.
Se suministraninstrucciones para poner madera y cemento en el
pisoo en la pared.Todotipo de construcci6ndistintaprecisarfa
de t6cnicas de instalacibnespecialesque se consideren
necesariaspara proporcionarla sujeci6nadecuadadel soporte
deldispositivoANT1VUELCOat pisoo a la pared. El soportese
puede instalar de modoqueengrane conla pata niveladora
derechao izquierda.
PASO 1- Ubicaci6n del soporte (Ver la Figura 4)
A. Marque el piso o la pared en el punto en que el "BORDE"
trasero derechoo izquierdode la cocinael_,ctricaseva a
colocar.
B. Ponga el SOPORTE a 15/16 de pulgada del "BORDE"
marcado, hacia el centro del orificio y contra la pared trasera,
como se muestra en la figura 4.
C. Use el soporte a modo de plantilla y marque los orificios
necesarios, como se muestra en la figura 4, para el tipo de
construccibn que va a usar,
D. Las cocinas el_ctricas corredizas se pueden afianzar al piso
o a la pared. Las cocinas el6ctricas empotradas solo se
pueden afianzar a listones o al piso s61ido en el gabinete.
PASO 2-lnstalaci6n det soporte antivuelco
A. Construcci6n de madera:
1. Piso: ubique el centro de los dos orificios identificados
en la figura 4 como "ORIFICIOS PARA EL PISO".
Perfore un orificio gu_a de 1/8 de pulgadas en el centre
de cada orificio (se puede usar una puntila o una lezna
si no se dispone de una broca). Afiance el soporte
ANTIVUELCO aL piso con los dos tornilos
suministrados. Proceda al Paso 3.
.
Pared: ubique el centro de los dos orificios identificados
en la figura 4 como "ORIFICIOS PARA LA PARED".
Perfore un orificio gufa de 1/8 de pulgadas en _ngulo en
el centro de cada orificio, como se muestra en la figura 5
(se puede usar una puntilla o una lezna si no se dispone
de una broca). Afiance el soporte ANTIVUELCO a la
pared con los dos tornillos suministrados. Proceda al
Paso 3.
B,
Construcci6n de cemento u hormig6n:
1. Los tornillos id6neos para la construcci6n de hormig6n
se pueden comprar en la ferreterfa. Perfore en el
hormig6n el orificio del tamaSo necesario para los
tornillos comprados, en et centro de los orificios
identificados en la figura 4 como '_RIFIClOS PARA EL
PISO". Afiance el soporte ANTIVUELCO al piso.
Proceda al Paso 3.
SOPORTE ORIFICIOS
ANTIVUELCO -_X PARA LA
N
PARED
OR1FICtOS
PARA EL
PISO
BORDE DE LA
.. -" COCINA
_,7_ A EL__CTRICA
MARCADO
15/16 DE PULG.
PATADE LA COCINA DEL BORDE DE LA
EL_CTRICA COC1NAELC:CTRICA
FIGURA 4
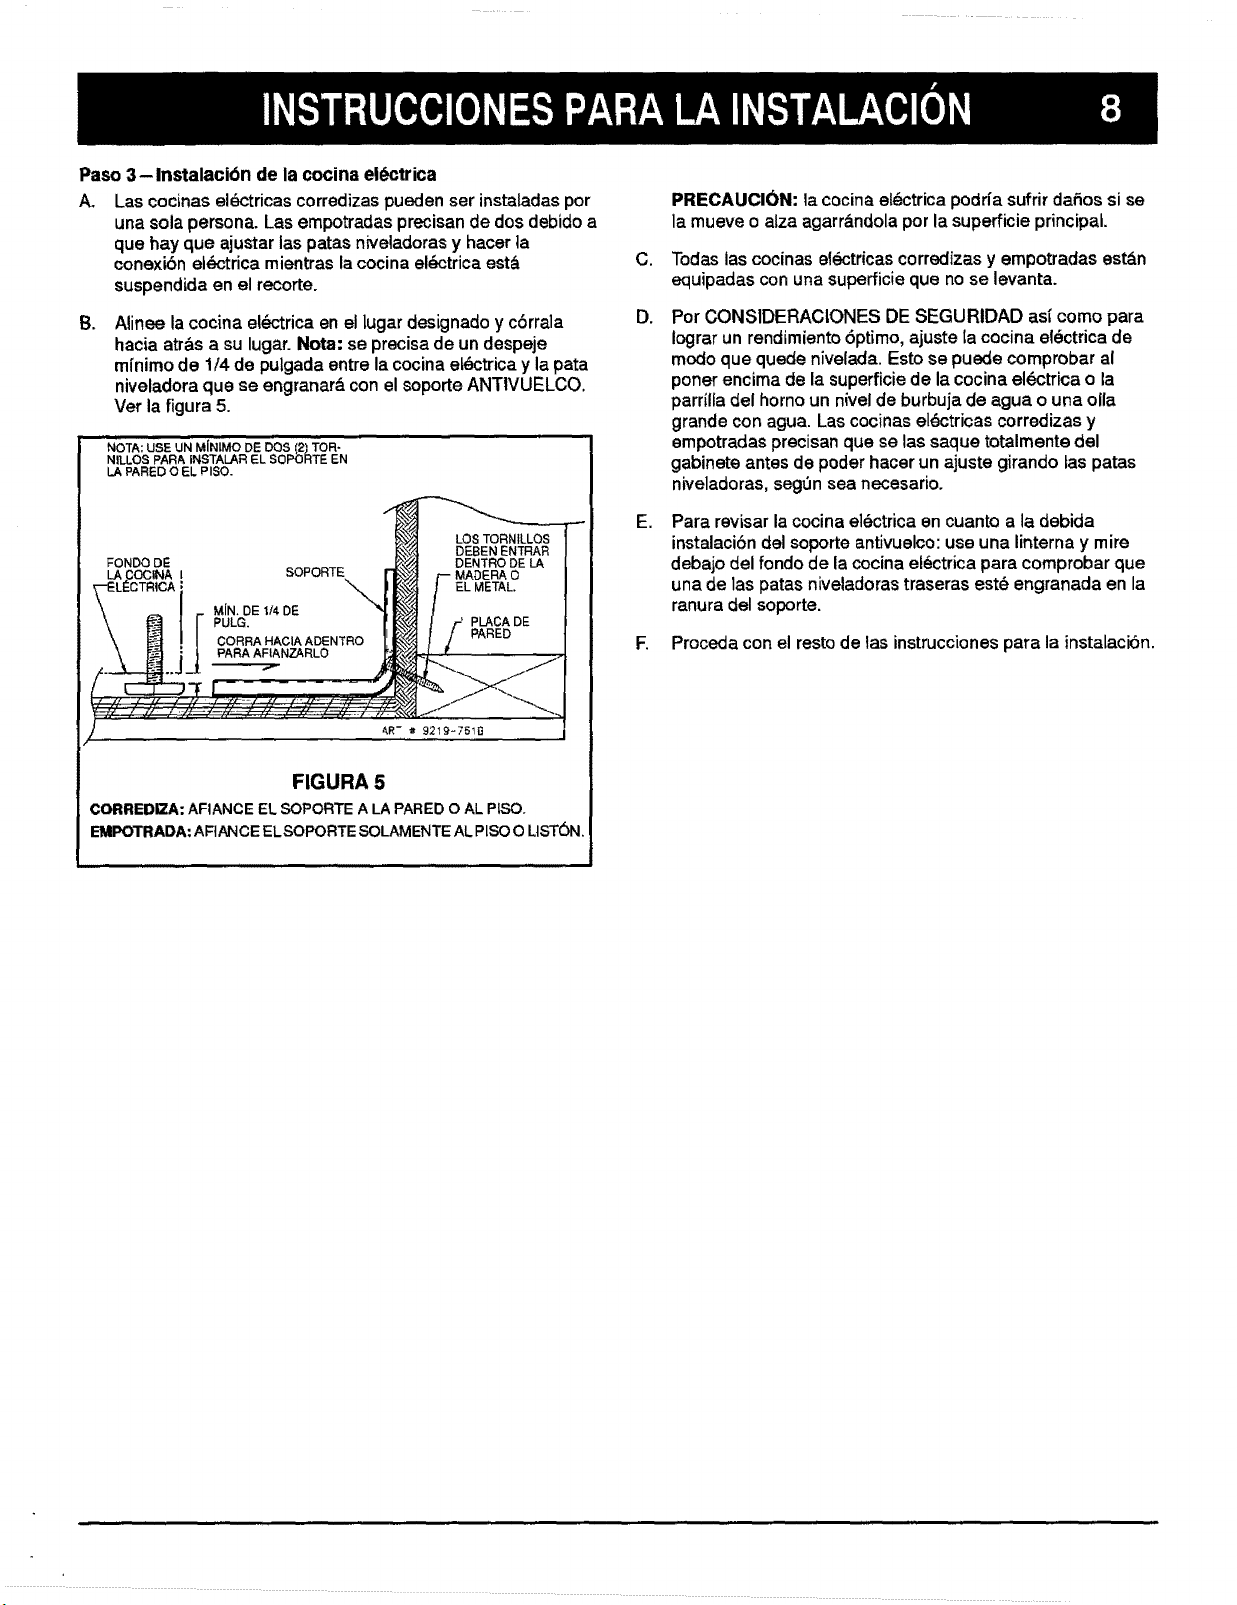
Paso 3-Instalacibn de la cocina ei_ctrica
A_
Las cocinas eldctricas corredizas pueden ser instaladas por
una sola persona. Las empotradas precisan de dos debido a
que hay que ajustar las patas niveladoras y hacer ta
conexibn el_ctrica mientras la cocina el_ctrica est&
suspendida en el recorte.
B.
Alinee la cocina e!_,;'trica en el lugar designado y cSrrala
hacia atr&s a su lugar. Nora: se precisa de un despeje
m{nimo de 1/4 de pulgada entre la cocina el_ctrica y la pata
niveladora que se engranar_, con el soporte ANTlVUELCO.
Ver la figura 5.
NOTA: USE UN MINIMO DE DOS (2)TOR-
NILLOS PARA INSTALAR EL SOPORTE EN
LA PARED O EL PISO.
FONDO DE
1 SOPORTE
MIN. DE I_ DE
_[ PULG.
CORRA HACIA ADENTRO
PARA AFIANZARLO
LOS TORNILLOS
DEBEN ENTRAR
DENTRO DE LA
O
EL METAL.
PLACA DE
PARED
FIGURA 5
CORREDIZA:AFIANCEEL SOPORTEA LAPAREDO ALPtSO.
EMPOTRADA:ARANCEELSOPORTESOLAMENTEALPISOO LIST6N.
C.
g.
E.
PRECAUCION: la cocinael_ctricapodrfa sufrir da_os si se
la mueve o alza agarr&ndolapor la superficieprincipal.
Todas las cocinas electricas corredizas y empotradas est&n
equipadas con una superficie que no se levanta.
Por CONS1DERACIONES DE SEGURIDAD as{ como para
Iograr un rendimiento 6ptimo, ajuste la cocina el_ctrica de
modo que quede nivelada. Esto se puede comprobar al
poner encima de la superficie de la cocina el6ctrica o la
parrilla del homo un nivel de burbuja de agua o una olla
grande con agua. Las cocinas el_ctricas corredizas y
empotradas precisan que se las saque totalmente del
gabinete antes de poder hacer un ajuste girando tas patas
niveladoras, segOn sea necesario.
Para revisar la cocina el_ctrica en cuanto a la debida
instalacibn del soporte antivuelco: use una linterna y mire
debajo del fondo de la cocina el_ctrica para comprobar que
una de 1aspatas niveladoras traseras est_ engranada en la
ranura del soporte.
F. Proceda con el resto de las instrucciones para la instalaci6n.
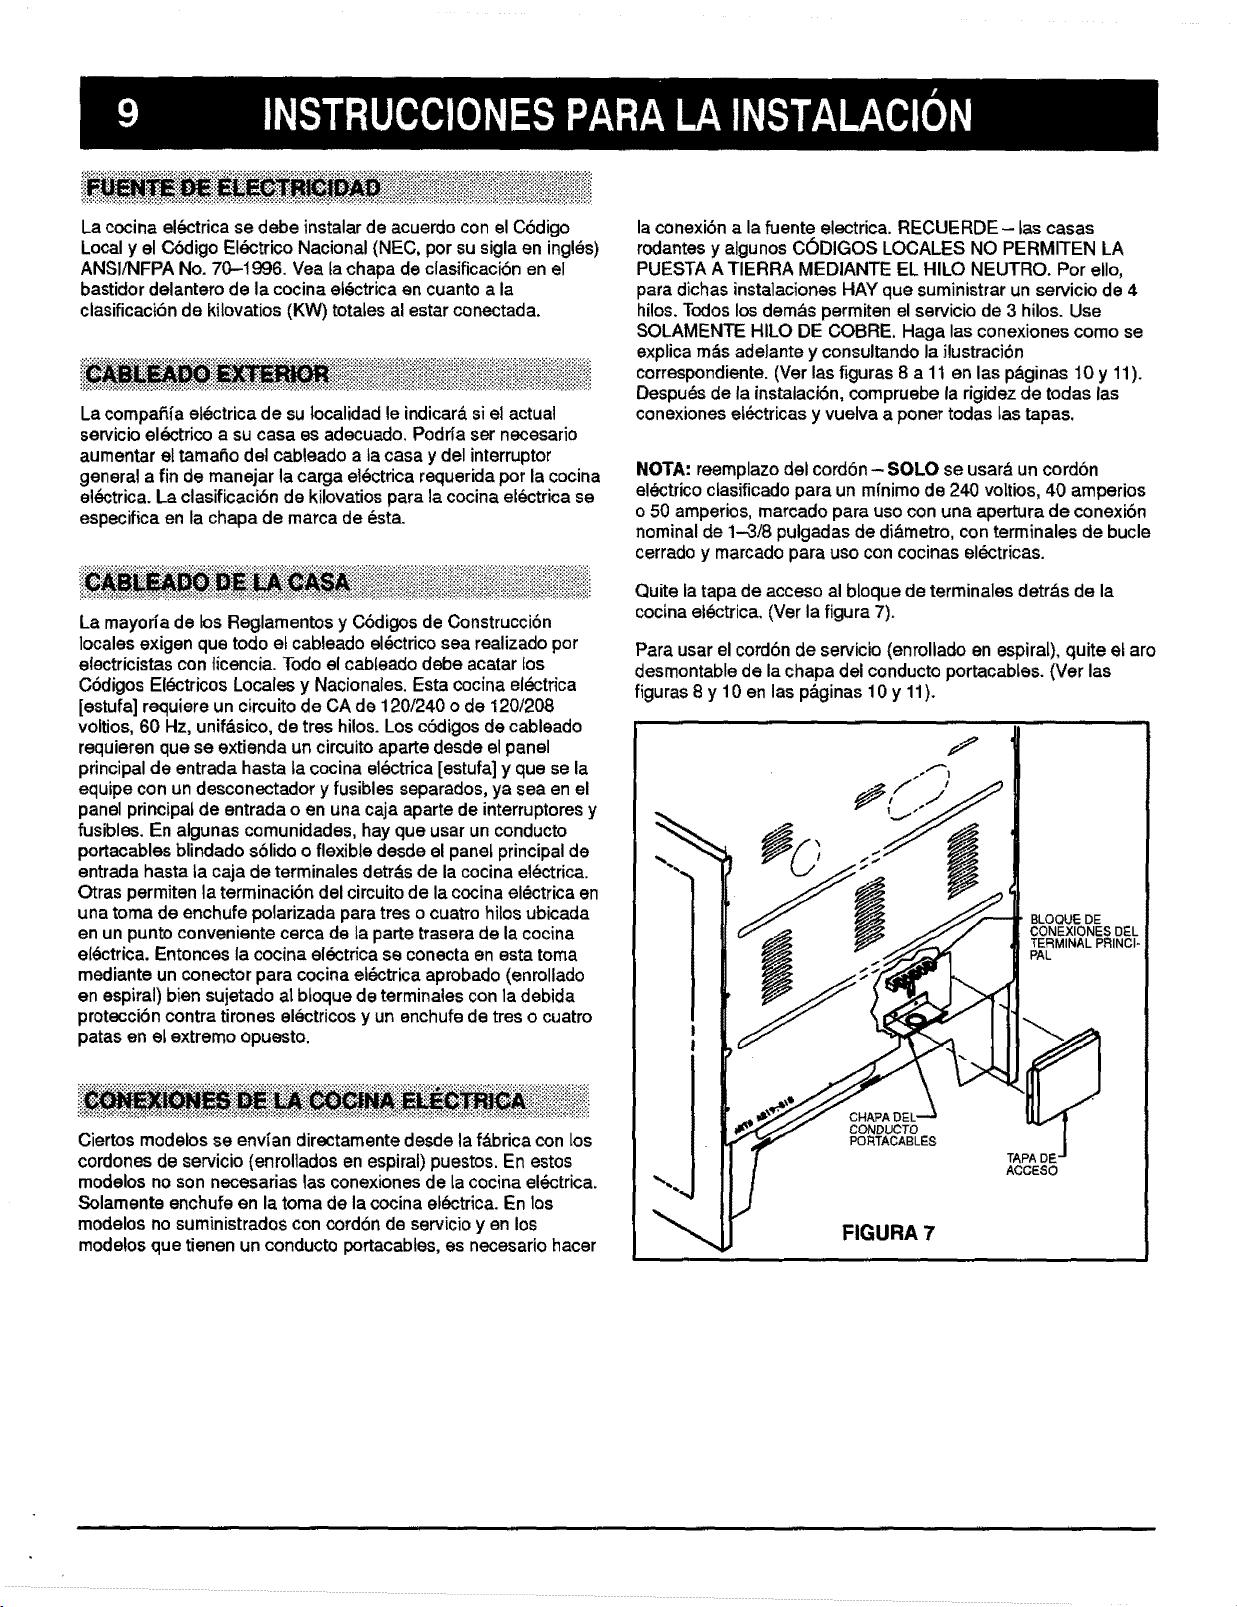
La cocina el_ctrica se debe instalar de acuerdo con el C6digo
Local y el Cbdigo EI6ctrico Nacional (NEC, per su sigla en inglSs)
ANSI/NFPA No. 70-t996. Vea ta chapa de clasificaci6n en el
bastidor delantero de la cocina el6ctrica en cuanto a la
clasificaci6n de kilovatios (KW) rotates al estar conectada.
La compafi{a et_ctrica de su tocalidad le indicar& si el actual
servicio el6ctrico a su casa es adecuado. Podda ser necesario
aurnentar el tamaSo del cableado a la casa y del interrupter
general a fin de manejar la carga el6ctrica requerida per la cocina
el_ctrica. La clasificaci6n de kilovatios para la cocina electrica se
especifica en la chapa de marca de _sta.
iiiiiii.ilitli,
La mayorfa de los Reglamentos y C6digos de Construccibn
locales exigen que todo et cableado el_ctrico sea realizado per
electricistas con licencia. Todo el cableado debe acatar los
C6digos El_ctricos Locales y Nacionales. Esta cocina el6ctrica
[estufa] requiere un circuito de CA de 120/240 o de 120/208
voltios, 60 Hz, unif_.sico, de tres hilos. Les c6digos de cableado
requieren que se extienda un circuito aparte desde el panel
principal de entrada hasta ta cocina el_ctrica [estufa] y que se la
equipe con un desconectador y fusibles separados, ya sea en el
panel principal de entrada o en una caja aparte de interruptores y
fusibles. En algunas comunidades, hay que usar un conducto
portacables blindado s61ido o flexible desde el panel principal de
entrada hasta la caja de terminales detr&s de la cocina el_ctrica.
Otras permiten la terminaci6n del circuito de la cocina electrica en
una torna de enchufe polarizada para tres o cuatro hilos ubicada
en un punto conveniente cerca de la parte trasera de la cocina
el6ctrica. Entonces la cocina el_,,trica se conecta en esta toma
mediante un conector para cocina el_ctrica aprobado (enrollado
en espiral) bien sujetado at btoque de terminales con la debida
protecci6n contra tirones electricos y un enchufe de tres o cuatro
patas en el extreme opuesto.
Ciertos modelos se envfan directamente desde la f_.brica con Los
cordones de servicio (enrollados en espiral) puestos. En estos
modelos no son necesarias las conexiones de la cocina el_ctrica.
Solamente enchufe en la toma de la cocina el_ctrica. En los
modelos no suministrades con cord6n de servicio yen los
modelos que tienen un conducto portacables, es necesario hacer
la conexiSn a la fuente electrica. RECUERDE - tas casas
rodantes y algunos C(_DIGOS LOCALES NO PERMITEN LA
PUESTA A TIERRA MEDIANTE EL HILO NEUTRO. Per ello,
para dichas instalaciones HAY que suministrar un servicio de 4
hilos. Todos los dem&s permiten el servicio de 3 hilos. Use
SOLAMENTE HILO DE COBRE, Haga las conexiones come se
explica m_s adelante y consultando la ilustracibn
correspondiente. (Ver las figuras 8 a 11 en las p&ginas t0 y 11).
Despu_s de la instalaci6n, ¢ompruebe la rigidez de todas las
conexiones et_ctricas y vuelva a poner todas tas tapas.
NOTA: reemplazodel cordSn- SOLO se usar_ un cordSn
el_ctricoclasificadopara un m{nimo de 240 voltios,40 amperios
o 50 amperios,marcado para useconuna apertura de conexibn
nominal de 1--3/8pulgadasde dibmetro,conterminalesde bucle
cerradoy marcadopara use concocinasel6ctricas.
Quite la tapa de acceso al bloque de terminales detr&s de la
cocina et_ctrica. (Ver la figura 7).
Para usar el cord6n de servicio (enrollado an espiral), quite et are
desmontable de la chapa del conducto portacabtes. (Ver las
figuras 8 y 10 en las p&ginas 10 y 11).
BLOQUE DE
CONEXIONES DF.L
TERMINAL PRINCI-
PAL
CHAPA DEL '
CONDUCTO
PORTACABLES
TAPA DE'
ACGESO
FIGURA 7
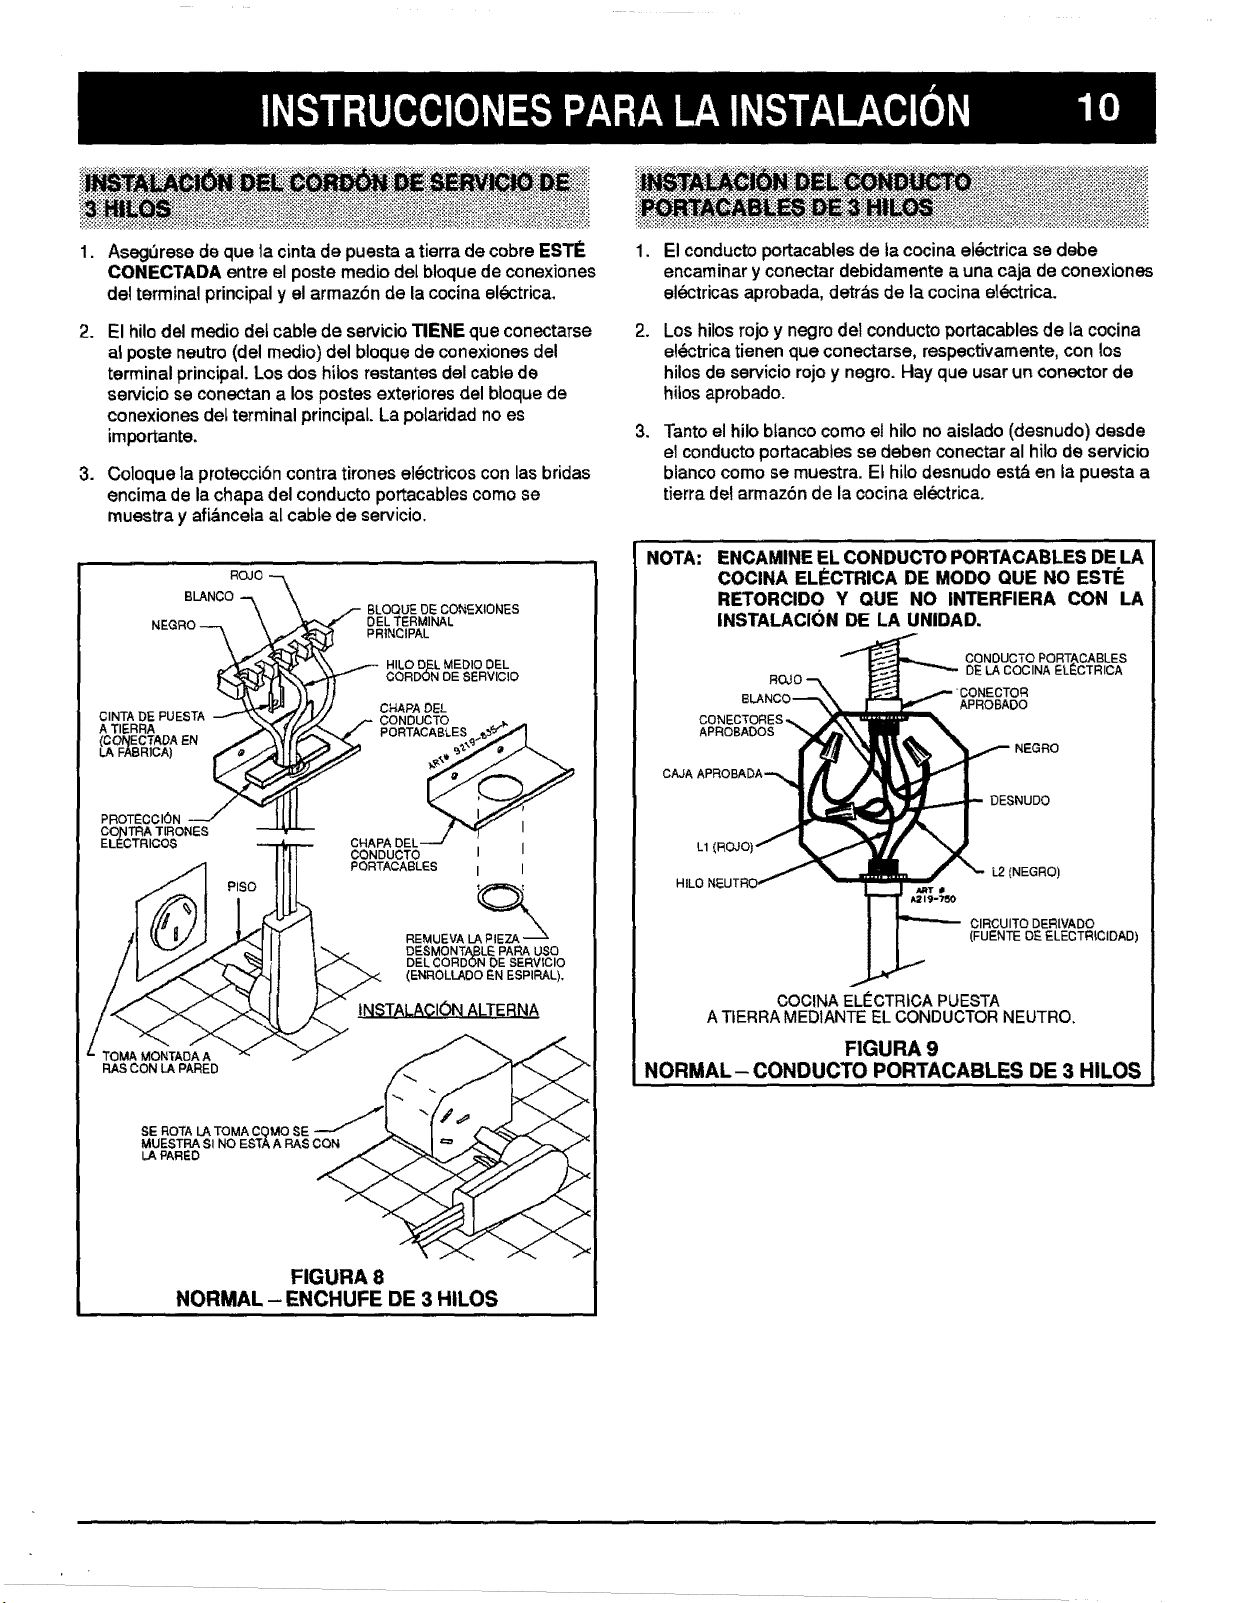
1. Asegerese de que ta cinta de puesta a tierra de cobre EST_
CONECTADA entre el poste medic del bloque de conexiones
del terminal principal y el armaz6n de la cocina el_ctrica.
.
.
El hilo del medic det cable de servicio TIENE que conectarse
at poste neutro (del medic) del bloque de conexiones del
terminal principal. Los dos hilos restantes del cable de
servicio se conectan a los postes extedores del bloque de
conexiones det terminal principal. La polaridad no es
importante.
Coloque la protecci6n contra tirones eldctricos con las bridas
encima de la chapa del conducto portacables corno se
muestra y afibncefa al cable de servicio.
ROJO
(CONECTADA EN /
LA FABRICA) _
PROTECCION
CONTRA TIRONES _
ELECTRICO$
1
=" TOMA MONTADA A
RAS CON LA PARED
BL_.//- OQUE DE CONEXIONES
i DEL TERMINAL
PRINCIPAL
HILO D,EL MEDIC DEL
CORDON DE SERVICIO
)_ CHAPA DEL
CONDUCTO
CONDUCTO I I
PORTACA@LES I I
REMUEVA _PlE__
DESMONTABLEPAPA U$O
DEL CORDON DE SERVICIO
(ENROLLADO EN ESPIPAL),
INSTALAC!0N AI-TERNA
SE ROTA LA TOMA CQMO SE
MUESTRA SI NO ESTA A RA$ CON
LA PARED
FIGURA 8
NORMAL - ENCHUFE DE 3 HILOS
iii!iiiiiiiiiiii iliiiii iiii iiiiiii
1. El conducto portacables de ta cocina el_ctrica se debe
encaminar y conectar debidamente a una caja de conexiones
ek_ctricas aprobada, detras de la cocina el_ctrica.
.
Los hilos rojo y negro del conducto portacables de la cocina
el_ctrica tienen que conectarse, respectivamente, con los
hilos de servicio rojo y negro. Hay que usar un conector de
hitos aprobado.
.
Tanto el hilo btanco come el hilo no aislado (desnudo) desde
el conducto portacabtes se deben conectar al hilo de servicio
blanco como se muestra. Et hilo desnudo est_ en la puesta a
tierra de! armaz6n de la cocina el_ctrica.
NOTA:
ENCAMINEEL CONDUCTO PORTACABLES DE LA
COClNA ELECTRICA DE MODO QUE NO EST¢:
RETORCIDO Y QUE NO INTERFIERA CON LA
INSTALAClON DE LA UNIDAD,
CONDUCTO PORT, CABLES
DE LACOCINA ELECTRICA
BLANCO_ APROBADO
CO_
APROBAOOS
NEGRO
DESNUDO
LI (ROJC
L2 (NEGRO)
CIRCUITO DERIVADO
(FUENTE O_:ELECTRtCIDAD)
COCINA ELI_CTRICA PUESTA
A TIERRA MEDIANTE EL CONDUCTOR NEUTRO.
FIGURA 9
NORMAL- CONDUCTO PORTACABLES DE 3 HILOS
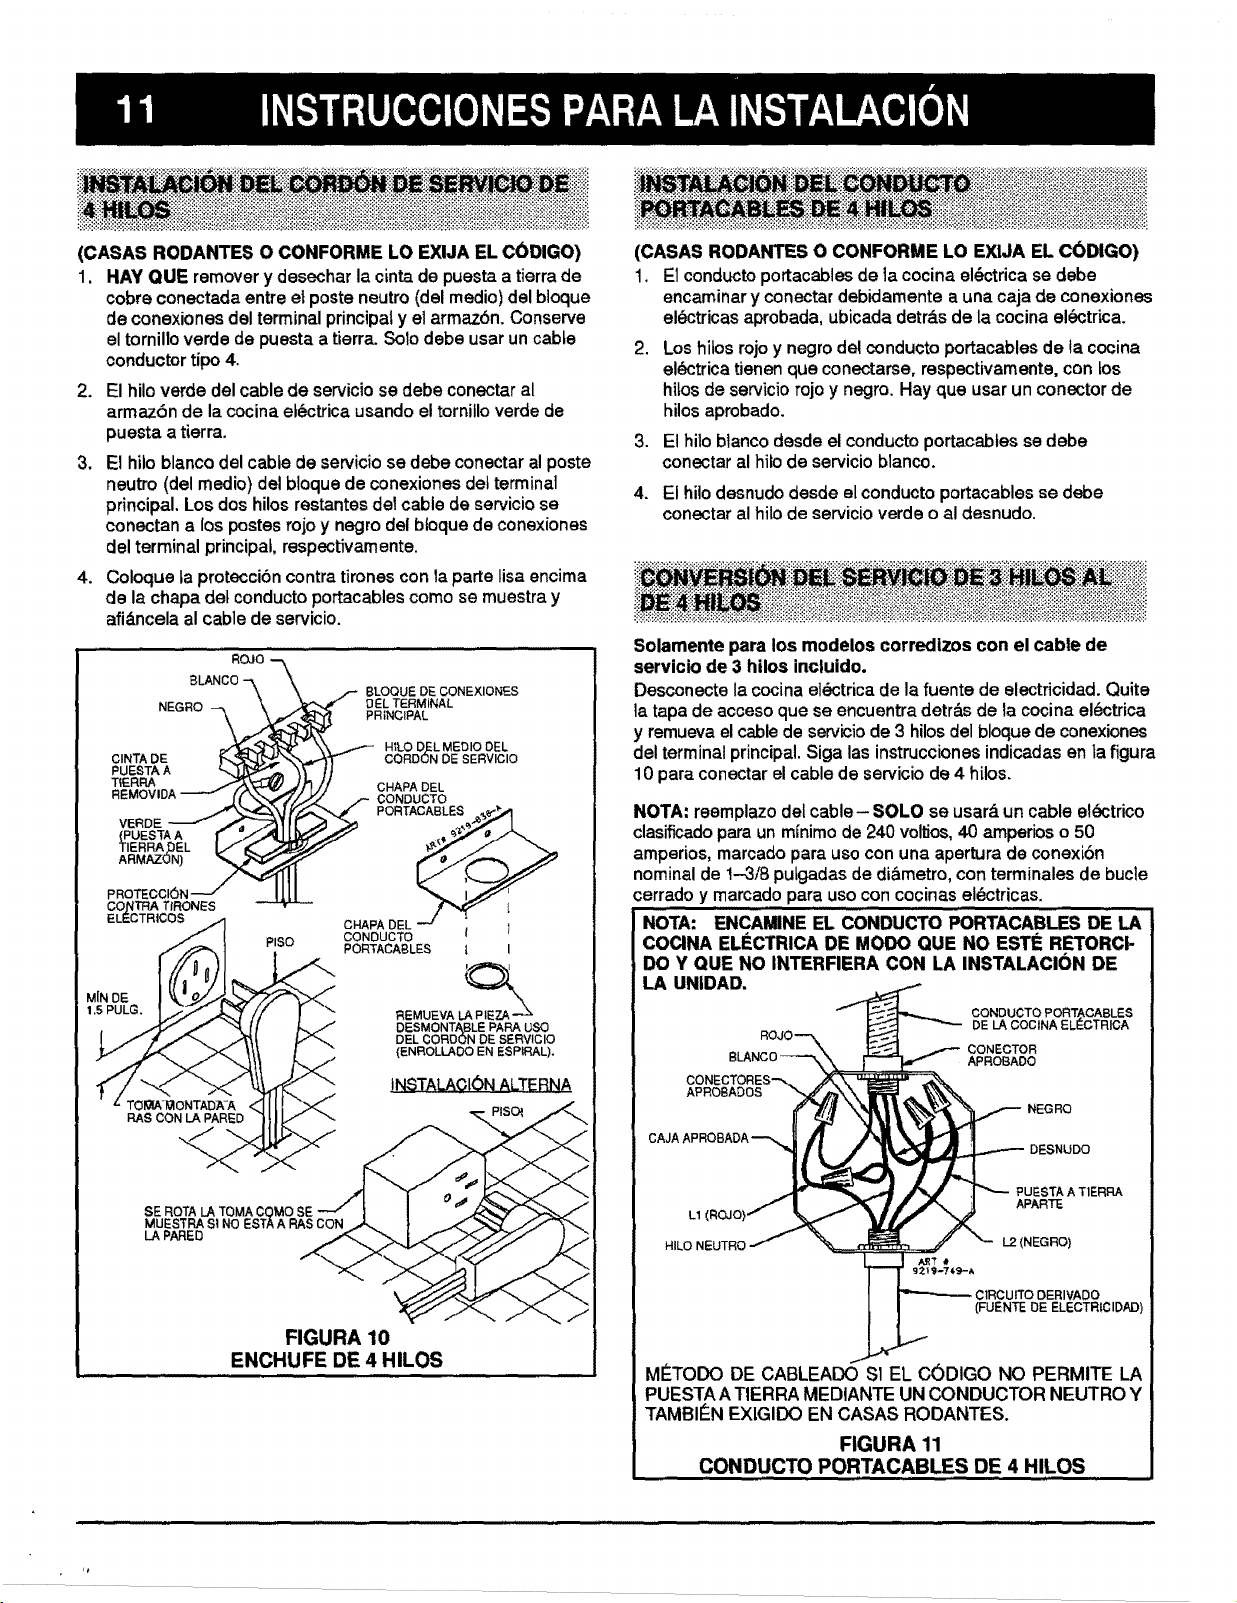
(CASAS RODANTES O CONFORME LO EXlJA EL CODIGO)
1. HAY QUE remover y desechar la cinta de puesta a tierra de
cobre conectada entre et poste neutro (del medic) del bloque
de conexiones del terminal principal y el armazbn. Conserve
el tornilto verde de puesta a tierra. Solo debe usar un cabte
conductor tipo 4.
2. El hilo verde del cable de servicio se debe conectar al
armazbn de la cocina el@ctrica usando el tornillo verde de
puesta a tierra.
,
El hilo blanco del cable de serviciose debe conectaral poste
neutro(del medic)delbloquede conexionesdelterminal
principal,Losdos hilosrestantesdelcable de servicio se
conectana los postesrojo y negrodel btoquede conexiones
delterminalprincipal,respectivamente.
4. Coloque ta proteccibn contra tirones con la parte lisa encima
de la chapa det conducto portacables como se muestra y
afi_.ncela al cable de servicio.
ROJO
BLANCO
NEGRO
CINTA DE
PUESTA A
T_ERRA /
REMOVIDA _--fj_
_IF_RRA9F_L
ARMAZON) _
PROTECCI_N
cONTRA I*/RONF,S
ELF,CTRICOS
PISO
f LOQUE DE CONEXIONES
DF'L TERMINAL
PRINCIPAL
HtLO D,EL MEDIO DEL
CORDON DE SERVICIO
CHAPA DEL
CONDUCTO
_ PORTACABLES
CHAPA DEL
CONDUCTO I
PORTACA_LES 1 I
I=,F,MUEVA _ p_(_"_
DESMONTA.BLE PARA USO
DEL CORDON DE SE'RVtCIO
{ENROLLADO EN ESPtRAL),
TOI_iKIglONTADA-A
SE ROTA LA TOMA COMO SF,
MUESTRA S, NO F,STAA RAS CON ik_ | ._/_
FIGURA 10
ENCHUFE DE 4 HILOS
tNSTALACION ALTERNA
so_
(CASAS RODANTES O CONFORME LO EXlJA EL C(_DIGO)
1. El conducto portacables de ia cocina el@ctrica se debe
encaminar y conectar debidamente a una caja de conexiones
elSctricas aprobada, ubicada detras de la cocina electrica.
,
.
Los hilos rojo y negro del conducto portacables de la cocina
ek_ctrica tienen que conectarse, respectivamente, con los
hitos de servicio rojo y negro. Hay que usar un conector de
hilos aprobado.
El hiloblanco desde el conducto portacabtes se debe
conectar al hilo de servicio blanco.
4. El hilo desnudo desde el conducto portacables se debe
conectar al hilo de servicio verde o al desnudo.
Solamente para los modelos corredizos con el cable de
servicio de 3 hilos incluido.
Desconecte la cocina electrica de la fuente de electricidad. Quite
la tapa de acceso que se encuentra detr_s de la cocina el_ctrica
y remueva el cable de serviciode 3 hilos del bloque de conexiones
del terminal principal. Siga las instrucciones indicadas en la figura
10 para conectar el cable de servicio de 4 hilos.
NOTA: reemplazo del cable- SOLO so usard un cable el_ctrico
clasificado para un m_nimo de 240 voltios, 40 amperios o 50
ampedos, marcado para uso con una apertura de conexibn
nominal de 1-3/8 putgadas de di&metro, con terminales de bucle
cerrado y marcado para uso con cocinas el_ctricas.
NOTA: ENCAMINE EL CONDUCTO PORTACABLES DE LA
COQNA EL_:CTRICA DE MOO0 QUE NO ESTI: RETORCI-
DO Y QUE NO INTERFIERA CON LA INSTALACION DE
LA UNIDAD.
BLANCO
CONDUCTOPORT_CABLF,S
DE LACOCINAF,LF,CTRICA
CONECTOR
APROBADO
APROBADOS
NEGRO
CAJAf
DESNUDO
PUESTA A T1ERRA
APARTE
HILO NEUTRO
1_2(NEGRO)
VADO
(FUENT_ DE ELECTRICIDAD)
MC:TODO DE CABLEADO SI EL CODIGO NO PERMITE LA
PUESTA A TIERRA MEDIANTE UN CONDUCTOR NEUTRO Y
TAMBI¢:N EXIGIDO EN CASAS RODANTES.
FIGURA 11
CONDUCTO PORTACABLES DE 4 HILOS
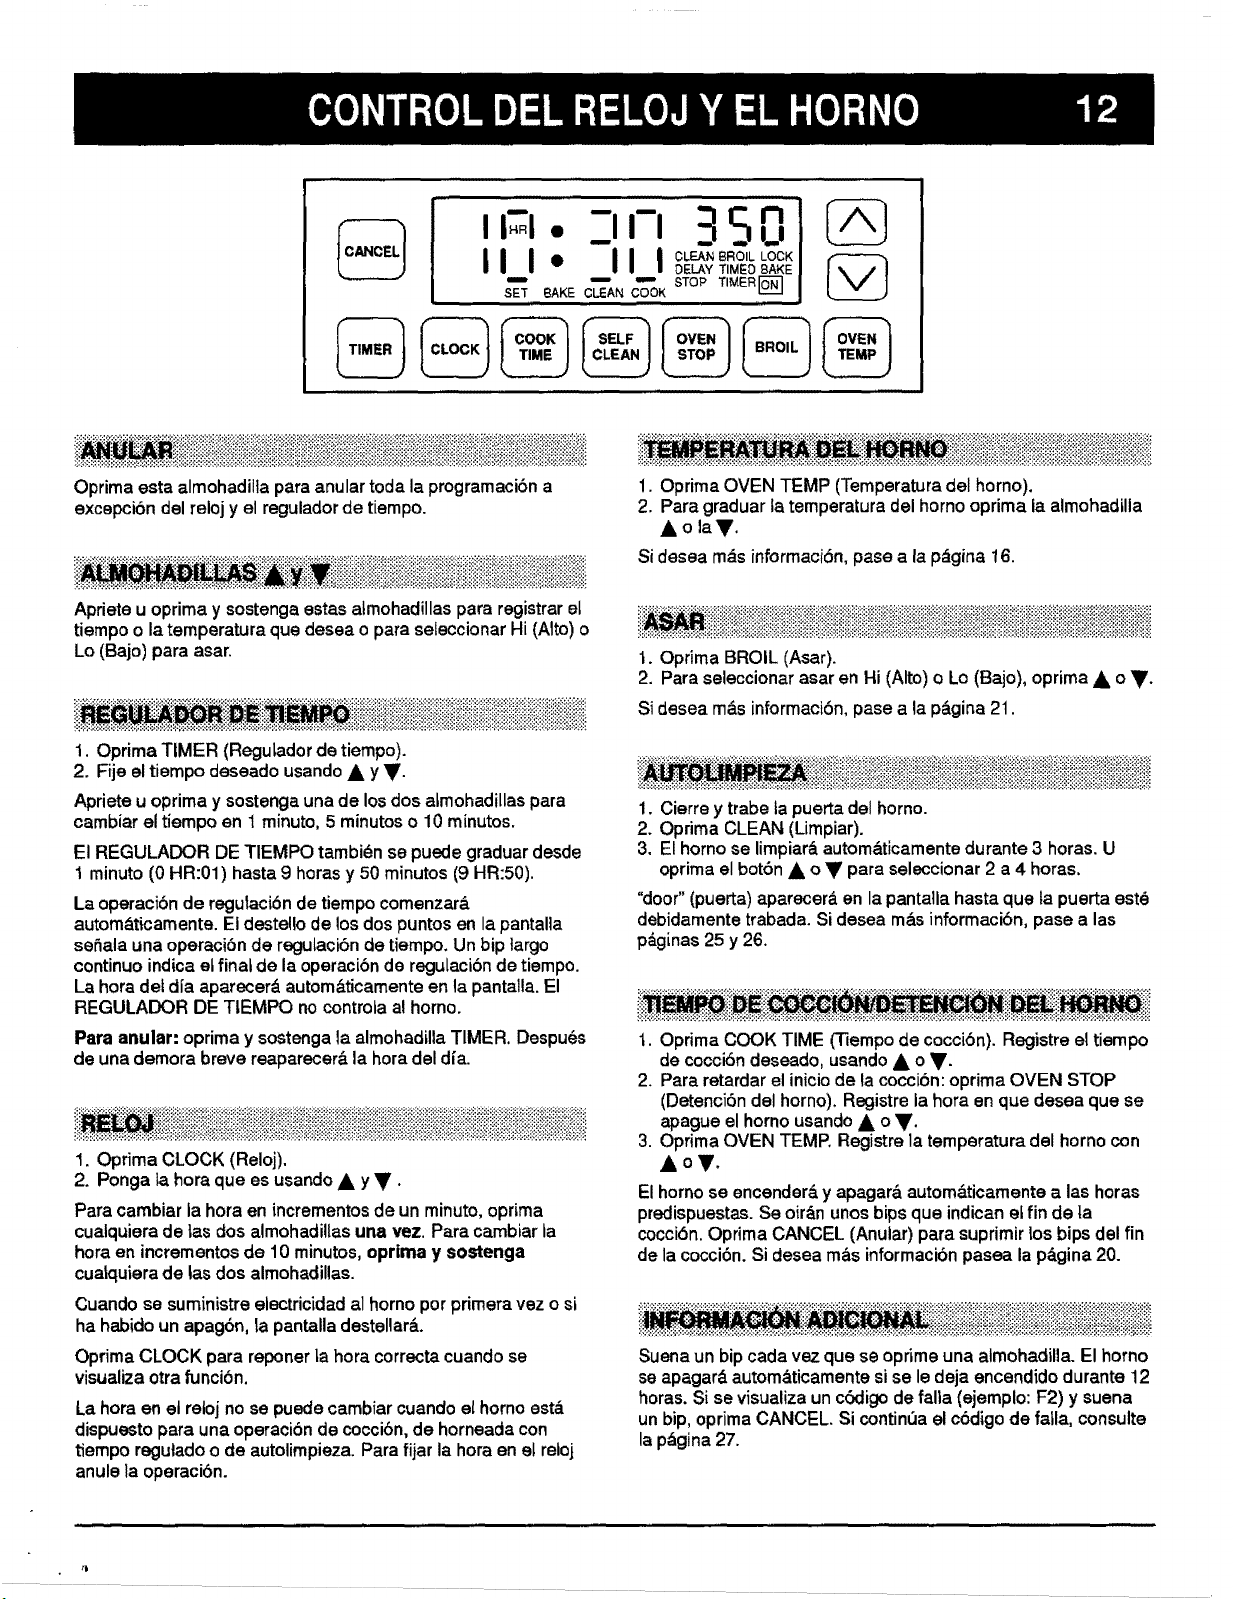
-,,7 3501
L,. ,,_I
C'_AN COOK
BAKE STOP TIMERI-_" ] I
_i__:!jiyi_!!iiii;!!_i!iiii_i_!!_iii_`_ii_i_i_!_;_!_!ii_i_!_i_iiii_;_!!iJ_ii!i`i_i_i_i_!!i!i_iiii_!!!!!_ii_ii_i_i!ii!_i;_i_i_i_i_!!!i`i_i_ii_`!!!!_!ii_ii_ii!_i_
Oprima esta almohadilta para anular toda la programacibn a
excepcion del reloj y el regulador de tiempo.
ii___Yi_i iLiiiiiiiiiiiiiiiiiiiiiii!i!!i_ii_ill!!i',iii'_iiiiiliiiiiii
Apriete u oprima y sostenga estas atmohadillas para registrar et
tiempo o la temperatura que desea o para seleccionar Hi (Alto) o
Lo (Bajo) para asar.
1. Oprima TIMER (ReguLador de tiempo).
2. Fije el tiempo deseado usando A y y.
iiiiiiiiiiiiiiiii
Apriete u oprima y sostenga una de los dos a_mohadillas para
cambiar el tiempo en 1 minuto, 5 minutos o 10 minutos.
El REGULADOR DE TIEMPO tambi_n se puede graduar desde
t minuto (0 HR:01) hasta 9 horas y 50 minutos (9 HR:50).
La operacibn de regulacibn de tiempo comenzar&
autom&ticamente. El destello de los dos puntos en la pantalla
seSala una operacibn de regulacibn de tiempo. Un bip largo
continuo indica et final de la operacibn de regulacibn de tiempo.
La hora det dla aparecer_ autom&ticamente en la pantalla. El
REGULADOR DE TIEMPO no controla al horno.
Para anular: oprima y sostenga la almohadilla TIMER. Despues
de una demora breve reaparecer& la hora del d{a.
iii_!!illiiiii!iiliiiiiiiiiiiiiiiiiiiiiiiiiiiiiili!iili!iliiiiiliiiliili!iilliiiliii!ii!!!ii!iiiiiiii!!iliiiiiii!i!i!iiiiiiii!iliii!!ij!ii!i!ii!!iiiiiiii!iiiiiii
1. Optima CLOCK (Reloj).
2. Ponga la hera que es usando • y V.
Para cambiar Jahora en incrementos de un minuto, oprima
cualquiera de las dos almohadillas una vez. Para cambiar la
hora en incrementos de 10 minutos, optima y sostenga
cuatquiera de tas dos almohadillas.
Cuando se suministre electricidad al homo por primera vez o si
ha habido un apagbn, la pantalla destellar&.
Optima CLOCK para reponer la hora correcta cuando se
visualiza otra funcibn.
La hora en el retojno se puedecambiarcuandoel homo esta
dispuestopara unaoperacionde coccibn,de horneadacon
tiemporegutadoo de autolimpieza. Para fijar la horaen et reloj
anule la operacibn.
_ii_ _i!_!i _iiiiiiiiii!i!iiiiiiiii!i!ilj!ii!i!ii!iiii_!i!!_iii!iii!i!!iiiii!iiii!ii!!!i!il
1. Oprima OVEN TEMP (Temperatura del horno).
2. Para graduar la temperatura del homo oprima fa almohadilla
AolaV.
Si desea m_s informaciSn, pase a la p&gina 16.
_i_iii!iii!iiii!i!i!iiiliiii!i!i!i!iiiiiiii!iii!i!i!iii!!iii!iiiiiii!!!i!!iiiiii!i!!ii!!i!!i!!i!!i!iiiii!iiii!i!!iiiiiiiii!i!i!iii!i!iiii!!i!i!i!ii!!!iiiiiiiiliiiil!
1. Oprima BROIL (Asar).
2. Para seleccionar asar en Hi (Alto) o Lo (Bajo), oprima • o _'.
Si desea m&s informacibn, pase a la p&gina 21.
ii___!i_i_i!_!!!!ii_iiiii_iiii!i_!_iiiii!iii!_!iiii_i!ii_i!iiiiiiii!iiiii!iiii_i_ii!_i_!!!iiii!_!i_i_iiiiiii_!ii_i_!ii_ii_i_iii_i!i!!i!ii
1. Cierre y trabe ta puerta del homo.
2. Oprima CLEAN (Limpiar).
3. El homo se limpiar& autom_ticamente durante 3 horas. U
oprirna el botbn • o y para seleccionar 2 a 4 horas,
"door" (puerta) aparecer& en la pantalla hasta que la puerta este
debidamente trabada. Si desea m&s informaci6n, pase alas
p_ginas 25 y 26.
t. Oprima COOK TIME (]]empo de coccibn). Registre el tiempo
de coccibn deseado, usando • o V.
2. Para retardar el inicio de la coccibn: oprima OVEN STOP
(DetenciSn del horno). Registre la hora en que desea que se
apague el homo usando • o V.
3. Optima OVEN TEMP, Registre la temperatura del homo con
•or.
El homo se encender& y apagar& autom&ticamente alas horas
predispuestas. Se oir_.n unos bips que indican ef fin de ta
cocciSn. Oprima CANCEL (Anular) para suprimir _os bips del fin
de la cocci6n. Si desea m&s informacibn pasea la p_.gina 20.
Suena un bip cada vez que se oprime una almohadilia. El homo
se apagar& autom&ticamente si se le deja encendido durante 12
horas. Si se visualiza un c(_ligo de falla (ejemplo: F2) y suena
un bip, oprima CANCEL. Si continua el cbdigo de faila, consulte
la p_gina 27.

Lascuatro breas para cocinar
de su cocina el_ctrica se iden-
tifican por los diseSos perma-
nentes en la superficie de coci-
nat. Hay dos &reas grandes (8
pulgadas) y dos pequefias (6
pulgadas). Es posible que los
dise5os en su superficie de
cocinar no luzcan como los de
la supefficie de cocinar en esta itustraciSnpero la suya
funcionar& conforme se describe en este manual.
Antes de usar la supefficie de cocinar por primera vez, I_mpiela
completamente conforme se indica en la tabla de limpieza en la
p&gina 24. Esto proteger& la superficie Lisay garantizar& que la
superficie de cocinar est_ timpia cuando se enciendan los
elementos.
Durante las primeras horas de uso, es posible que vea que la
superficie de cocinar emite un ligero otor a quemado y un humo
leve. Estas dos situaciones son normales.
Cuando un &tea de cocinar este encendida, el elemento
bobinado debajo de la supefficie de cocinar se catentar_ y
brillar,_ con un rojo difuso. Para mantener la graduacibn del
calor, e! elemento Ilevar& a cabo un ciclo de encendido y
apagado. Es normal ver un brillo rojo a trav_s de la superficie
lisa cuando et etemento tleve a cabo el ciclo de encendido.
iil.iii !.iiiii!ii!i!ii!,!iii,iiii i!!ii!iiii!iiii
Su cocina el6ctrica est& equipada con una luz de supefficie
caliente (HOT SURFACE) ubicada en el centro, detr_s de la
supefficie lisa. Esta luz roja se encender& para indicar que La
superficie lisa est,. caliente y permanecer& encendida hasta que
se enfrie _sta.
i i iiiiii iiii iiiiiiiiii!i!iiii!iiiiiiiiiiliiiiii i
El &tea de la superficie de cocinar lisa retiene el calor por un
tiempo despu_s de que se apaga el elemento. Apague el
elemento unos minutos antes de que et alimento est6
completamente eocinado y use et calor retenido para compLetar
la cocci6n. Despues de 30 minutos, es probable que ]a
superficie de cocinar est6 demasiado fria para mantener
calientes los alimentos. No obstante, puede que la supefficie
todavfa est_ demasiado caliente como para tocarla. Cuando se
apague la luz HOT SURFACE, la superficie estar& Io
suficientemente fria para tocarla.
iiiiii!i!iiili!iiiiiiiiiiiiiiiiiiiiiiil
Cuando cocine alimentos delicados que se pueden quemar o
sobrecocinar f_,cilmente, comience con una graduaci0n de calor
baja y aumente poco a poco hasta que encuentre la graduaci6n
6ptima. Es m_s probable que haya derrames al hervir si
comienza en HIGH (Alto) y luego reduce a una graduacibn m&s
baja. Si comienza a cocinar en HIGH, reduzca a una graduaciSn
m&s baja antes de que los liquidos Iteguen a hervir
completamente.
Si el alimento se est& cocinando con demasiada rapidez o si hay
un derrame al hervir, quite ta tapa o quite la olla del &rea de
cocinar y reduzca a una graduacibn m&s baja. Espere el tiempo
suficiente para que el &rea de cocinar se ajuste a la nueva
graduaci6n.
El papel de aluminio dafiar& la supefficie lisa si se derrite sobre
el vidrio. No use recipientes desechabtes tipo papei de metal
tales como los que se usan para hacer palornitas de maiz.
Poddan dejar mamas de metal o derretirse permanentemente
sobre la superficie lisa. No use la superficie de cocinar si el
papel de metal o de aluminio se derrite sobre la superficie de
cocinar lisa. Llame a un tecnico autorizado.
Las ollas de aluminio dejar_nmamas de metal sobre et vidrio
si se lasdestizapor ta superficielisa. Remueva inmediatamente
toda mamade metal conCooktopCleaningCreme (Crema para
limpiar superficiesde cocinar).
Lasollas de vidriocer_mica, Ioza, porcelana sobre metal,
vidrio refractario o vidriadas podrlan rayarla superficie de
cocinarlisasi se las deslizaraporella.
No use la supefficie de cocinar como lugar de trabajo ni como
tabla para cortar. No cocine alimentos directamente sobre la
superficie de cocinar.
No use salvamanteles ni soportes metalicos (tales como aros
para cazuelas chinas) entre el utensilio y la superficie de
cocinar. Estos objetos pueden mamar o grabar la supefficie y
afectar la eficiencia de cocciOn.
No ponga objetos de plbstico sobre un area de cocinar tibia o
caliente. Estos se derretirbn y se pegarbn a la superficie lisa.
La superficie lisa se podria astillar o picar cuando se tratara
de remover de la supefficie et plbstico derretido.
Para prevenir rayas o daSos a la superficie lisa, no deje sobre
eL&rea de cocinar azQcar, sal, arena, tierra, manteca u otras
grasas. Aseg_rese de que no haya nada de esto antes de
encender el &rea de cocinar.
Aseg_rese de que el fondo de las ollas sea piano y que no
tenga mellas ni rayas o partes &speras ya que podr[an rayar
la supefficie lisa.
No permita que una otta se seque cuando hierva, Esto podria
causar dafios permanentes a la supefficie lisa.
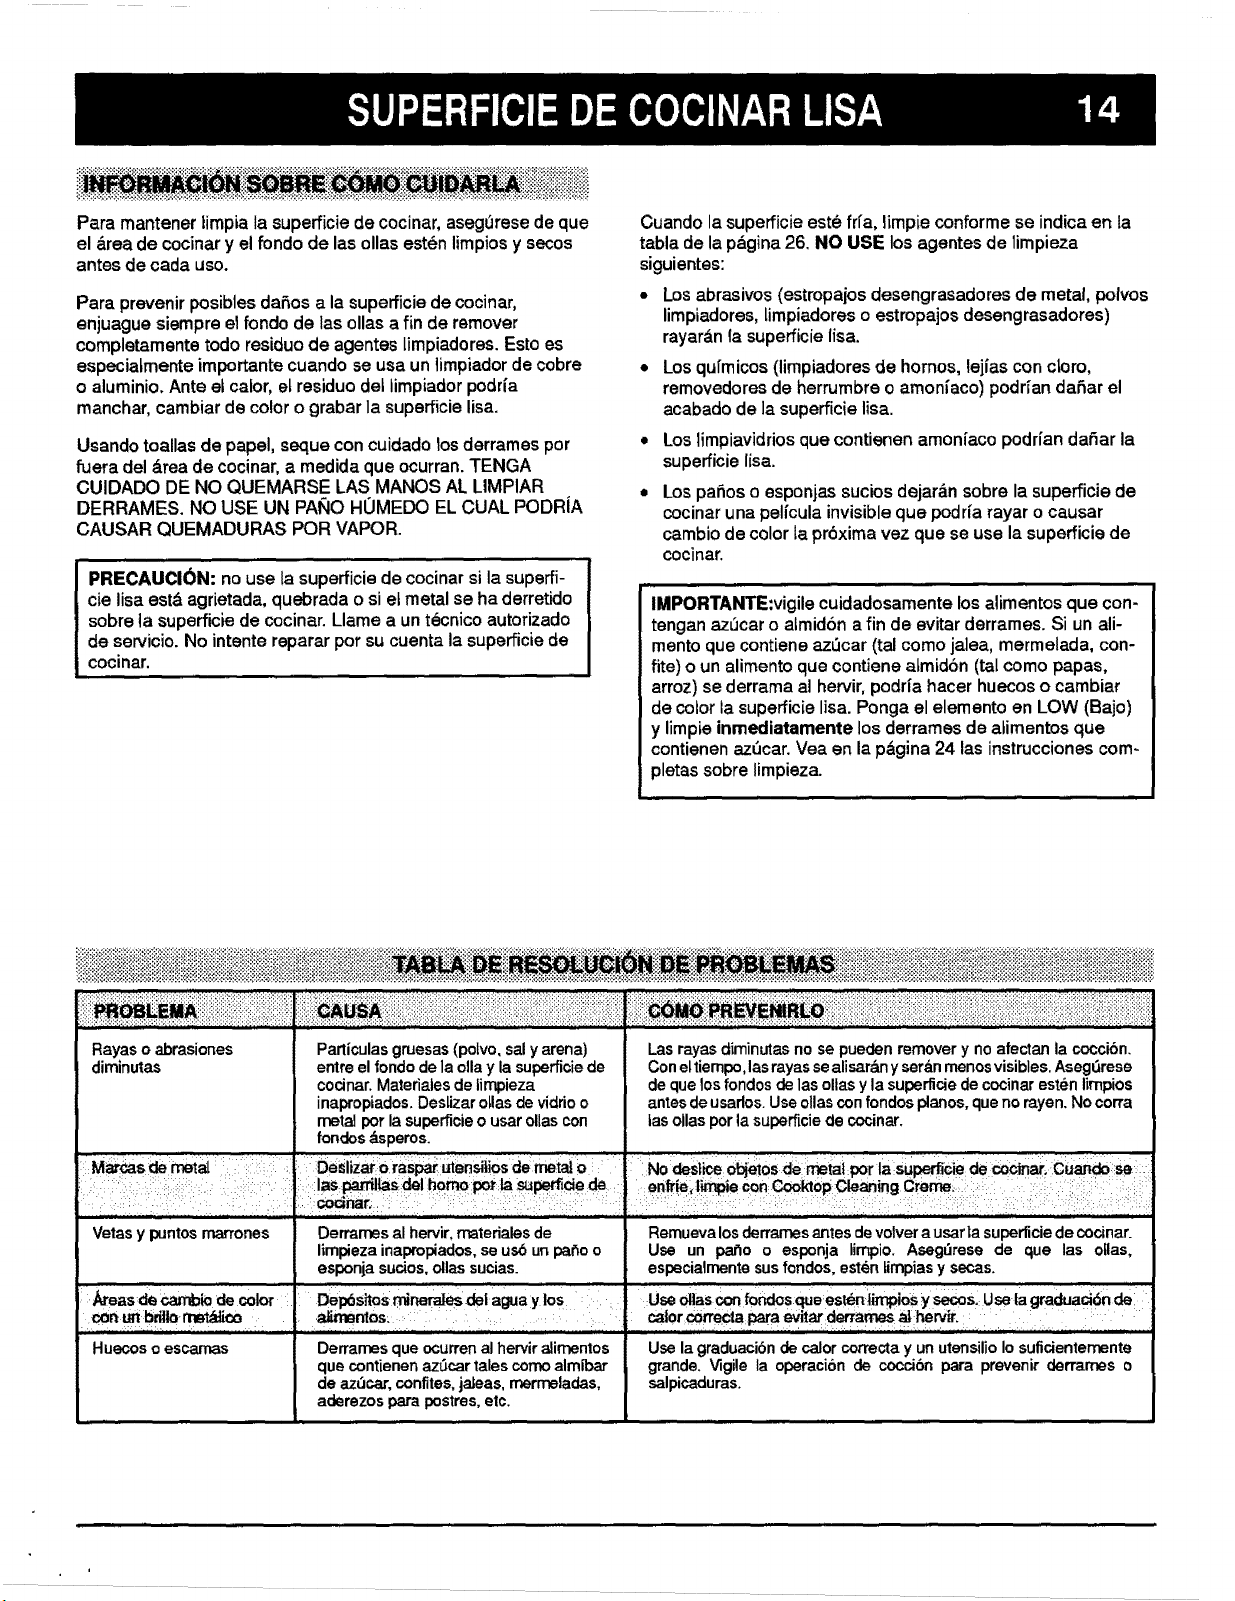
Paramantenerlimpia la supefficie de cocinar, aseg0rese de que
el &rea de cocinar y el rondo de las ollas est_n limpios y secos
antes de cada uso.
Para prevenir posibles daSos a la supefficie de cocinar,
enjuague siempre el rondo de las ollas a fin de remover
completamente todo residuo de agentes limpiadores. Esto es
especiatmente importante cuando se usa un limpiador de cobre
o aluminio. Ante et calor, et residuo del limpiador podr(a
manchar, cambiar de color o grabar la superficie lisa.
Usando toallas de papel, seque con cuidado los derrames por
fuera del &rea de cocinar, a medida que ocurran. TENGA
CUlDADO DE NO QUEMARSE LAS MANOS AL LIMPIAR
DERRAMES. NO USE UN PAI_IO HOMEDO EL CUAL PODRiA
CAUSAR QUEMADURAS POR VAPOR.
PRECAUCI(_N: no use la supefficie de cocinar si la superfi-
cie lisa est,_ agrietada, quebrada o si et metal se ha derretido
sobre la superficie de cocinar. Llame a un tecnico autorizado
de servicio. No intente reparar pot su cuenta la superficie de
cocinar,
Cuando la supefficie este frfa, limpie conforme se indica en la
tabla de la p&gina 26. NO USE los agentes de limpieza
siguientes:
• Los abrasivos (estropajos desengrasadores de metal, polvos
limpiadores, [impiadores o estropajos desengrasadores)
rayar&n la superficie lisa.
• Los qufmicos (limpiadores de hornos, lejias con cLoro,
removedores de herrumbre o amonfaco) podrian daSar el
acabado de la superficie lisa.
• Los limpiavidrios que contienen amoniaco poddan daPiar la
supefficie lisa.
Los patios o esponjas sucios dejar&n sobre la superficie de
cocinar una pelicula invisible que podria rayar o causar
cambio de color la prdxima vez que se use la supefficie de
cocinar.
IMPORTANTE:vigile cuidadosamente los alimentos que con-
tengan azdcar o atmidbn a fin de evitar derrames. Si un ali-
mento que contiene azL_car(tal como jalea, mermelada, con-
rite) o un alimento que contiene atmidbn (tal como papas,
arroz) se derrama al hervir, podrfa hacer huecos o cambiar
de color la supefficie lisa. Ponga el elemento en LOW (Bajo)
y limpie inmediatamente los derrames de alimentos que
contienen azdcar. Vea en la p&gina 24 las instrucciones com-
pletas sobre limpieza.
Rayaso abrasiones
diminutas
Vetas y puntosrr_rrones
Huecoso escamas
Particulas gruesas (polvo, sal y arena)
entre el rondo do la olla y la superficie de
cocinar. Materiales de limpieza
inapropiados. Destizar otlas de vidrio o
metal pot la superficie o usar ollas con
fondes &speros.
Derrames al hervir, matedalos de
limpieza inapropiados, se usb un pal_o o
esponja sucios, ollas sucias.
Dorrarnes que ocurrenal hervir alimentos
que contienenazficartalescornoalmibar
de azdcar,confitos,jaJeas,mermeladas,
aderezospara postres,etc.
Lasrayas diminutasno se pueden removery no afectan la coccibn.
Coneltiempo,lasrayassealisarany seranmenosvisibies.Aseg_rese
dequelos fondos de las ollas y la superficiedecocinaresten limpios
antes deusados.Use ollasconrondos pianos,queno rayen.Nocorra
laseliaspor la superficie de cocinar.
Romuevalosderrames antes dovolvera usar la superliciedo cocinar.
Use un paso o esponja limpio. Aseg_rese de que las oflas,
especialrrentesusrondos, est_n timpias y secas.
I :Use ollasconfondosClue:es_n iirnpios __s.: Use la graduaciSn
_: ca{or:_rrecta:paraevitarderrames,d:hervir.
Use la graduacibnde calorcorrectay un utensilioIo suficientemente
grande. _gile la operacionde coccibnpara provenirderrarres o
salpicaduras.
i!ii!!i! i!iili!!1!iiihiiiiiii!!!!!!iiiii !iikiiiiii!!i!!
Su superficiede cocinarest&equipada conbotonesde controlque le
bdndanuna seleccibninfinitade selecciones,desde LOW (Bajo)a HIGH
(Alto).El botbnse puedeponeren o entrecuatquieradelas
graduacionesnumeradas.
Pare haceda funcionar empujey giree! boronen cuaiquierade losdos
sentidos,hasta la graduacibndeseada.Cuandoun elementocalentador
est6 encendido,brillar&una luz indicadora.La luzindicadora
permanecer_encendidahasta que se apagueel elernento,Despuesde
unaoperad6n de coccibn,aseg_resede apagaret elememoy ta luz
indicadora.
Para hacer _uncionar el elemento doble:
• Oprima el interruptor oscilante marcado COIL SIZE (Tamafio
del bobinado) para seleccionar el elemento del tamafio de 6
pulgadas o el de 9 pulgadas.
NOTA: si se selecciona el elemento de 9 pulgadas, se
caientar_.n el circulo interior y el exterior. Si se selecciona el
elemento de 6 pulgadas, solo se catentar& el c{rculo interior.
• Empuje y gire e! bot6n de control de superficie LEFT REAR
(Atr_s izquierdo) a ta graduacibn de calor deseada.
Para impedirdai_osa la cocinael_ctdca o al utensilio,nunca haga
funcionar unaunidadde superficiesin ponerunaolla sobreella',nunca
deje queuna o]lase sequeal herviry nuncahaga funcionar un
elementoen HIGH potper{odesde tiempo prolongados.
Losalirnentos no se cocinardnm&srapidoa unagraduaci6nrods alia de
la necesada pararnantenerun hervidoleve. El agua hiervea la misrna
temperaturaya sea quehiervaleveo vigorosarnente.Si so usa una
graduationalia, habra salpicadurasexcesivasyes posibLeque los
alimentosse pegueno se quemenen el fondode la olta.
Si se usa unagraduaci6ndecalorm&salia para hervirun tiquido o para
iniciar la coccion,siemprereduzca a unagraduaci6nrnas bajacuando
el ffquido hiervao elalimentose comiencea cocinar.Nunca deje los
aUmentosdesatendidoa durante una opera¢|6n de ©occi6n.
Escoja el tamanode olla para el tarna_odel elemento.Esto ¢onserva
energia.
Use HIGH hasta que el agua hierva o se Iogre la presi6n en la
conservera a presi6n. Luego, reduzca a la graduacibn m&s baja
que mantenga el hervido o la presibn, El uso prolongado de
HIGH o et uso de utensilios inapropiados para hacer conservas
produciria un cator excesivo. El cator excesivo puede causar
dafios permanentes a la superficie de cocinar.
iiiiii! .iiiiiii!i!iiiiii!!iiiiiiiiiiiiii!i!ii!ii!iiiiiiiiiiiii!iiiiiiiiiiiiiiiiiiiiiiiii!iii iiiiiiliii iliiiiiii i!ii!!!iiiiiiii!i! i
Consulte en las recornendacionesde!fabricantede la ollatas graduacionesdecatorsugeridas.Algunosfabdcantes no recomiendanel uso de HIGH, o el
uso de HIGH para operacionesdecoccibnprolongadas.
HIGH (ALTO) Para hervir I[quidos, escaldar, precalentar sartenes o tograr ta presi6n en una olla a preston.
Siempre reduzca a una graduaci6n de calor rn&s baja cuando los l{quidos comiencen a hervir o los alimentos comiencen a
cocinar.
MEDIUM (MODERADO) Para mantener el hervidode moderadea lento para grandescantidadesde li'quidos.
4-6 Para seguircocinando a|imentosdestapadosy para la mayoriade lasoperacionesde freir.
:i 'I'"I"I:..... _: ...... : . ............ ::: ; . .... : ...... : ...... : : ................
MED UM-_LOW, : Para seguircocinand0alimentostapadosy mantenerla presi6n:enlamayodade las O;lasa presi6n.;:: :: i :i: ::: :::
LOW (BAJO) Para mantenertibioslosatirnentos,antes de servirlos. Derretirchocolate.
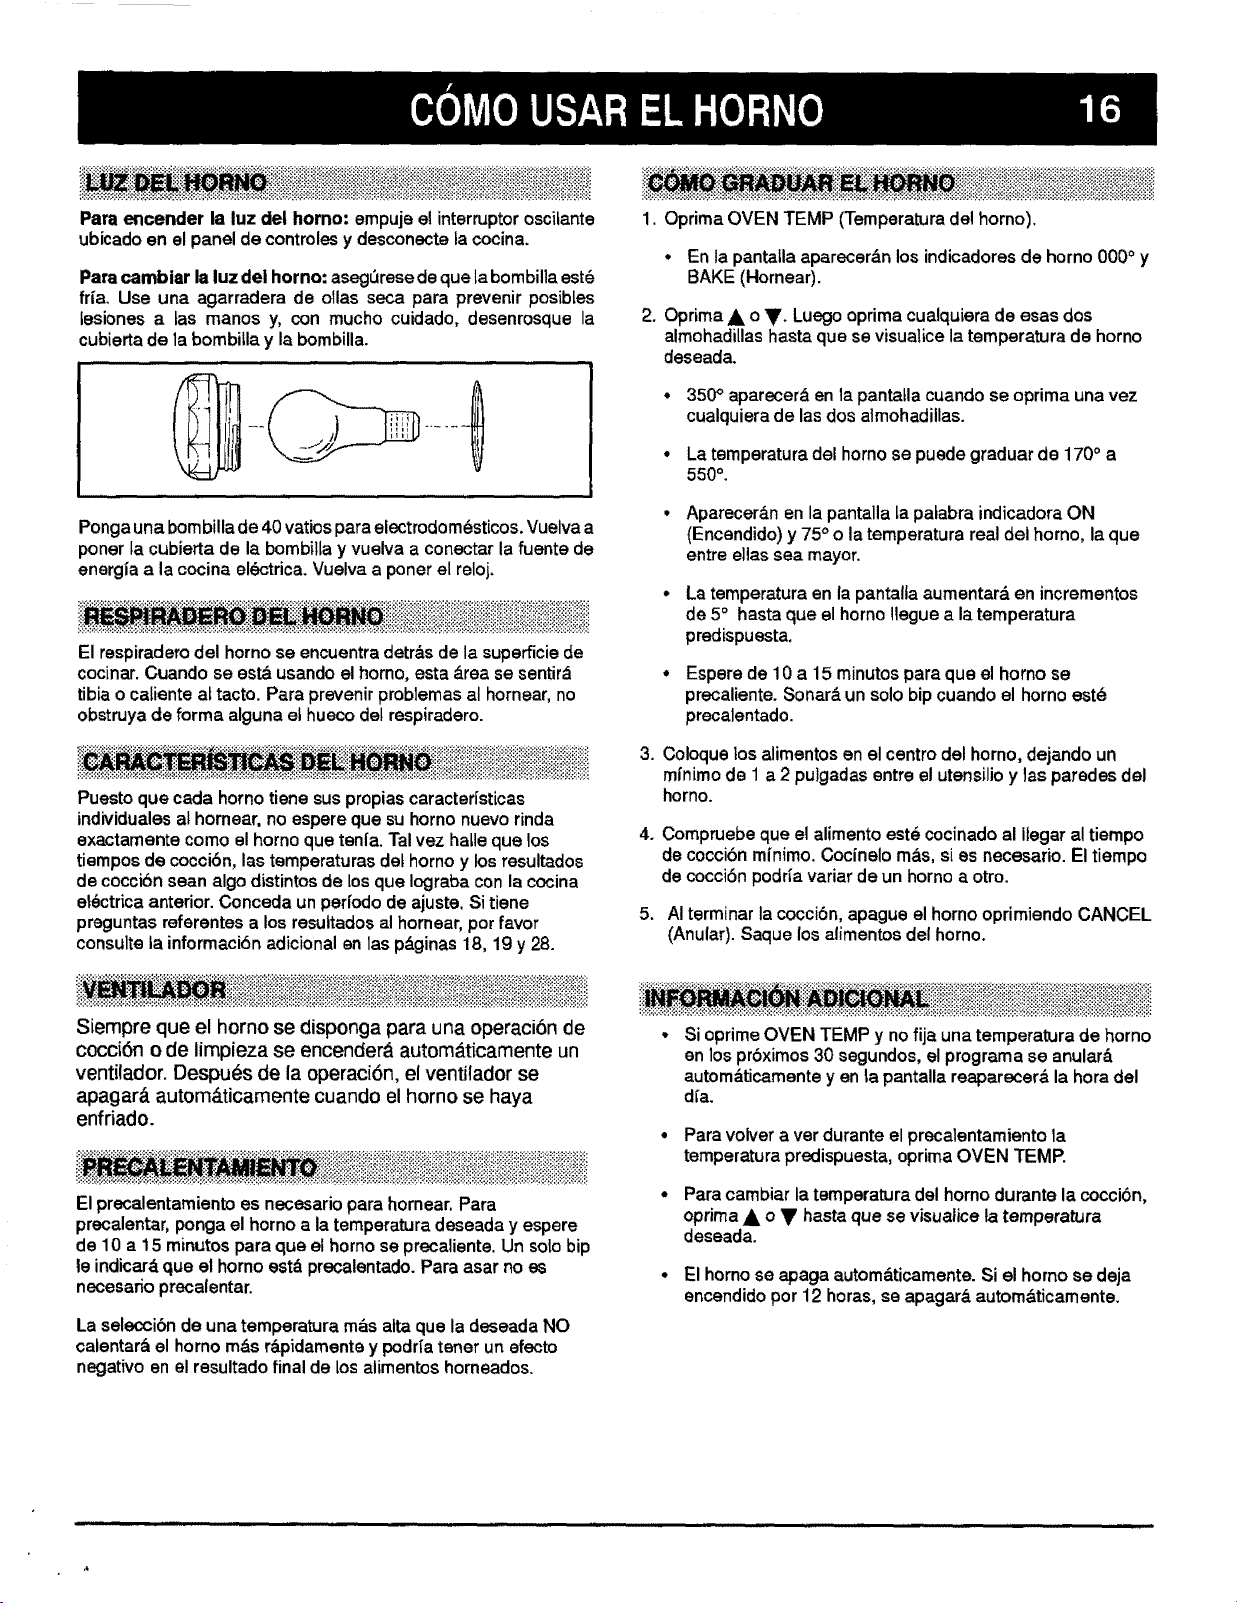
i@iii!iiliiiiiiiiiiiiiiiiiiiiiiiiiiiii!iiiil
Para encender la luz del homo: empuje el interrupter osctante
ubicado en el panel de contmles y desconecte la cocina.
Paracambiar la luz dei horno: aseg_resede que la bombille est6
fr{a. Use una agarradera de ollas seca para prevenirposibles
tesiones e tas manos y, con mucho cuidado, desenrosquela
cubiertade la bombilla y le bombilla.
Ponga una bornbi!la de 40 vatios pera electrodom_sticos. Vuelva a
poner la cubierta de la bombila y vuelva a conectar la fuente do
energia a la cocina electrica. Vuelva a poner el reloj.
i i !iiiiii!!iiii!iiiiii!iiii!ii!i!ii!ii iiiiiii
El respiradero del horno se encuentra detras de la superficie de
cocinar. Cuando se est& usando el homo, esta &rea se sentir&
tibia o caliente at tacto. Para prevenir problemas al hornear, no
obstruya de forma alguna et hueco del respiradero.
! i! i!iii!iliiiii iiliilii!i
Puesto que cada homo tiene sus propias caractedstices
individuales al hornear, no espere que su homo nuevo rinda
exactamente como el homo que tenfa. Tal vez hale que los
tiempos do coccibn, las temperaturas deLhorno y los resultados
de coccibn sean algo distintos de los que Iograba con la cocina
el_ctrica anterior. Conceda un perlodo do ajuste. Si tiene
preguntas referentes a los resuttados al hornear, por favor
consulte fa informaci6n adicional en las p_.ginas 18, 19 y 28.
i iiii!iii!iiiii iii!iiiii!!iii!!!iiiii!!i!iiiiiiliiill
Siempre que el horno se disponga para una operaci6n de
cocci6n o de limpieza se encender_, autom_ticamente un
ventilador. Despu_s de la operaci6n, el ventilador se
apagarb, autom_.ticamente cuando el homo se haya
enfdado.
! !iili!!iiiiiii!i!iiiiiiiiiiiiiiiiiiiiiiiii!!!illiiiiilil!
El precalentamiento es necesario para hornear, Para
precalentar, ponga el horno a la temperatura deseada y espere
de 10 a 15 minutes para que el homo so precaliente. Un solo bip
te indicar_ que el homo est& precalentado. Pare asar no es
necesar_o precalentar.
La selecci6nde una temperatura m_s alta que la deseada NO
calentar_el homo m_s r&pidementey podr{atenor unefecto
negativoen el resultadofinal de los alimentos horneados.
1. Oprima OVEN TEMP (Temperatura del homo).
• En la pantatla aparecer_.n los indicadores de homo 000 ° y
BAKE (Hornear).
2. Opdma A o V- Luego oprima cualquiera de esas dos
almohadillas hasta que se visualice la temperatura de horno
deseada.
• 350 ° aparecer& en le pantala cuando se oprima una vez
cualquiera de las dos aimohadillas.
• La temperatura del homo se puede graduarde 170° a
550°.
• Aparecer_n en la pantalla la palabre indicadore ON
(Encendido) y 75 ° o la temperatura real del homo, la que
entre elas sea mayor.
• La temperatura en la pantalla aumentar& en incrementos
de 5° hasta que el homo liegue a la temperatura
predispuesta,
• Espere de 10 a 15 minutos para que el homo so
precaliente. Sonar& un solo bip cuando el homo est_
precelentado.
3. Coloque los alimentos en el centro del homo, dejando un
mlnimo de 1 a 2 puigadas entre el utensilio y tas paredes del
homo.
4. Compruebe que el alimento este cocinado al IJegar al tiempo
de coccibn mfnimo. Coc{nelo re&s, si es necesario. El tiempo
de cocci6n podr{a varier de un homo a otro.
5. AI terminar la coccibn, apague el homo oprimiendo CANCEL
(Anular). Saque los alimentos del horno.
! ! !iiiiiiiii!i!ii!iiiiii!!ii!iiiiii!!ii!ii:!
• Si oprime OVEN TEMP y no fija una temperatura de homo
en los prbximos 30 segundos, el programa se anular_.
autom_ticamente yen la pantalla reaparecerb la hora del
d{a.
• Para volvera ver durante el precalentamientola
temperaturapredispuesta,oprimeOVEN TEMP.
• Para cambier la temperatura del homo durante la cocci6n,
oprima A o V haste que se visualice ta temperatura
deseada.
• Elhomose apaga autom&ticamente.Si el homose deja
encendidopor 12 horas,se apagardautom&ticamente.
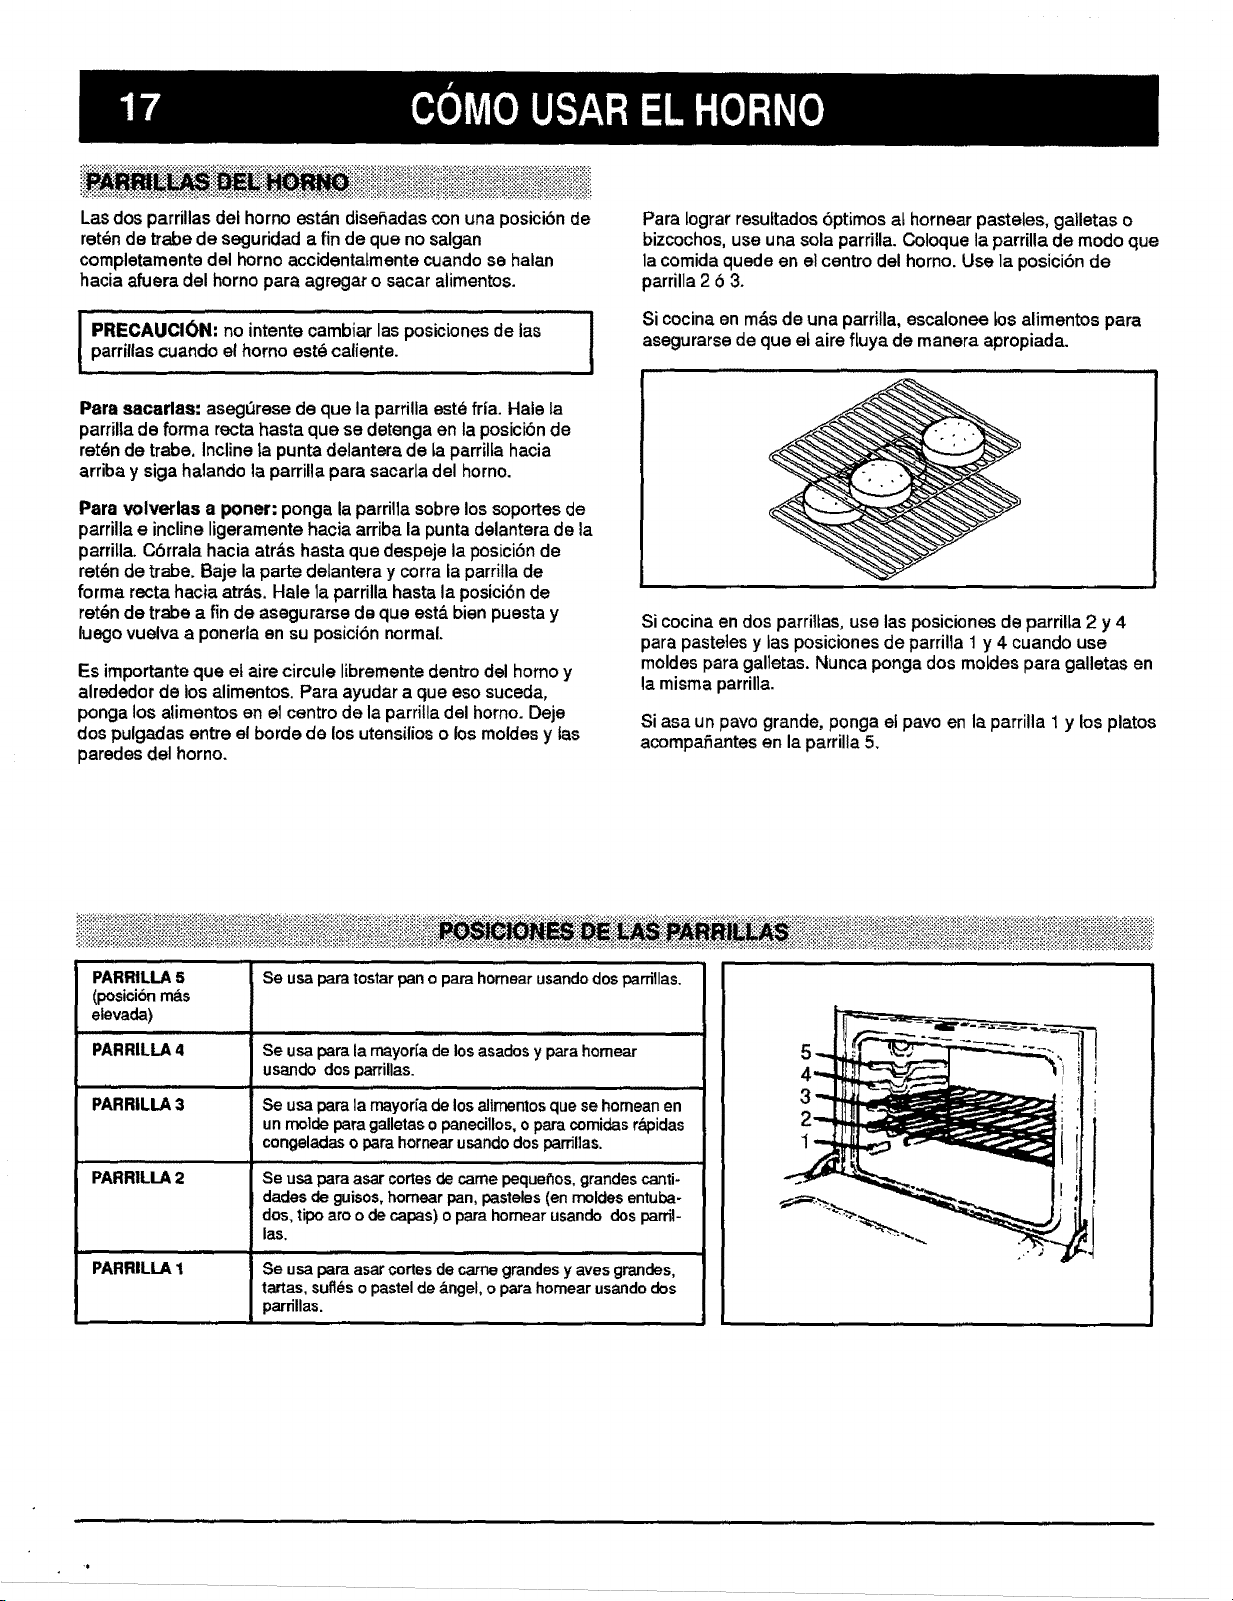
i!i ! !!iiiiiiii .iiiii!i!!!i ii!iii!iiiiiiii!i!i!i!ii!!iiii.i! iii. iiiiii iiii!i!iiiiiii! ii i!!i i!!i
Las dos parrillas del horno est&n dise5adas con una posicibn de
retch de trabe de seguridad a fin de que no salgan
completamente del homo accidentatmente cuando sa halan
hacia afuera del horno para agregar o sacar alimentos.
I PRECAUClON; no intente cambiar las posiciones de ias J
!
parrillas cuando el homo est8 caliente.
i
Para sacarlas: aseg_resede qua la parrillaest_ fria. Hale la
parrillade forma rectabasra qua se detengaen la posicibnde
ret_nde trabe. Inclinela puntadelanterade taparrillahacia
arribay sigahalandola parrillapara sacar[adel homo.
Para volverlas a poner: ponga la parrilla sobrelos soportes de
parrillae inclineligeramentehaciaarriba la puntadelanterade la
parrilla.Cbrralahaciaatr&shastaqua despejela posiciSn de
ret_nde trabe. Baje la parte delanteray corraia parrillade
forma recta haciaarras. Hale la parrillahastala posicibn de
ret_nde trabea fin de asegurarsede que est&bienpuestay
luegovuelvaa ponerlaan su posici6nnormal.
Es importante qua et aire circule libremente dentro del homo y
alrededor de los alimentos. Para ayudar a que eso suceda,
ponga los alimentos en el centro de la parrilla del homo. Deje
dos pulgadas entre el borde de los utensilios o los moldes y tas
parades del horno.
Para lograr resultados 6ptimos at hornear pasteles, galletas o
bizcochos, use una sola parrilla. Coloque la parrilla de modo qua
la comida quede en el centro del horno. Use la posicibn de
parrilla 2 6 3.
Si cocina en m_s de una parrilla, escalonee tos alimentos para
asegurarse de qua et aire fluya de manera apropiada.
Si cocina en dos parriltas, use las posiciones de parrilla 2 y 4
para pasteles y las posiciones de parrilla 1 y 4 cuando use
moldes para galletas. Nunca ponga dos too[des para galletas en
la misma parrilla.
Si asa un pavo grande, ponga el pavo en la parrilla 1 y los platos
acompafiantes en la parrUla 5.
iiiii!iliililiii!iiiiiiiiiiii!iiiiiiiiili!iil!i!!ill!i!iiiiilii!i!iiii!ii!!iii!iiii!iiii i!iliiiiiiiiiii!iiiiiiiiii jiiiii!ii!!iiii ii i iii i iiiiiiiiiii!ii!ili!iiiii!iiii!iiiiiiiii!iiii!iiiii!!!iiiiiiiiiii!!iiii!!i!iii!iiiiiiii!iii!i!!iiiiii i!!iiiiiiiiiii!ii!!iiiii!ii
PARRILLA5
(posicibn rnas
elevada)
PARRILLA 4
PARRILLA 3
PARRILLA 2
,,, ,,,
PARRILLA1
So usa loamlostar pano para homear usandodos parrillas.
Se usa para la rnayor[ade losasadosy para homear
usando dos parrillas.
Se usa para la mayor[a de los alimentosque se homean en
un rnoide para galletaso panecillos, o para comidasr&pidas
congeladaso parahornearusandodospardllas.
H,. , ....,, i,
Se usa para asar cortesde came peque_os,grandescanti-
dadesde guisos,homear pan,pasteles (an moldesentuba-
dos,tipoaro o de capas) o para homear usando dospardi-
las.
Se usa papa asar cortes de came grandes y ayes grandes,
tartas, sufl_s o pastel de a.ngel, o para homear usando des
parrillas.
5
3
,t
Use una receta confiable y mida conprecisi6nlosingredientes
frescos Siga las instrucciones al piede la letraen cuantoa la
temperaturadel homoy e!tiempode coccibn.
Precaliente el homo si Io recomiendan la receta o las
instrucciones del envase. La se]eccibn de una temperatura
mayor que Latemperatura deseada no precalentar,fi el homo con
mayor rapidez. En realidad, esto podda tenet un efecto negativo
en el resultado final de los atimentos horneados.
Use la posicibn de parrilla correcta. Los resultadosal hornear
se podrfan ver afectados si se usa una posici6n de parrilla
indebida.Para Iograrresultados6ptimos, horneelosalimentos
en unasola parriUa Elijaunaposicibnde parrillaquepongaa
losalimentosen el centrodet horno.Si homeaen dosparritlas,
use tas posicionesde parriliaNo. 2 y No 4, No. I y No. 4 o No
2yNo5
• E! doradoporencimapodrfa ser mds oscuro si el alimentose
encuentracerca de la partede arribadel homo.
• El dorado por debajo podr_aser m&soscurosi el atimento se
encuentracerca de la partede abajo del homo
Cuando use dos parrittas para hornear, deje el espacio
suficiente entre las parrilias para la debida circulacibn del
aire. Los resu]tados de dorado y de coccibn ser_n afectados
si se obstruye la corriente de aire.
Losutensilios de cocina desemper_anun papel importante en
el resultadofinal de los productoshorneados Siempreuse el
tipo y el tamaSode utensilioindicadoen la receta Lostiemposo
losresuttadosde coccibnpoddan ser afectadossi se usa el
tamaSoindebido
Los moides de metal brillante reflejan el calory Io apartan
delalimento. Este tipo de utensUioproduceundorado mas
leve y unacorteza m_s suave Use losmoldes brillantespara
hornearpasteleso gatletas
Los moldes de metal con acabado oscuro, apagado,
anodizado o satinado abso_en calory producen un dorado
m&s oscuro y una corteza m_s crujiente. Use los moldes
oscuros para tartas, cortezas para tartas o pan.
Para tograr bptimos resultados al hornear, hornee galletas y
paneciltos en un molde piano para hornear galletas. Si el
molde tiene lados, tat como un molde para hornear
panecillos, el dorado podrfa no ser uniforme.
Si usa moldes de vidrio refractario o moldes oscuros
tales como los de Baker's Secret o Wilton, reduzcala
temperaturaen 25°F exceptocuandohorneatartas o pan.
Horneeduranteel mismotiempoindicadoen la receta
Uso de papel de aluminio: no cubra con papel metdlico el
fondo del homo ni toda una parrilla y tampoco ponga papel
met&iico debajo de los moldes, Para recoger derrames, ponga
un trozo de papel met&lico m&s grande que el molde en la
parrilla debajo del molde.
Deje que el aire caliente corra libremente por el homo a fin
de Iograr 6ptimos resultados al hornear. La colocaci6n
inapropiada de los moldes on el homo obstruird la corriente dot
aire y podr_a resultar en un dorado desiguai. Para Iograr el
dorado 6ptimo y resultados de cocci6n uniformes:
Noapileuna parritlaconmoldes Nunca pongaen la misma
parrillamdsde un moldepara galletas,unmolde para pastef
de 13x9x2pulgadaso dosmoldes redondosde 9 pulgadas
parapastel.
• AI horneardispongalos moldesen dos parritlasde modo que
uno noest_ directamentesobreel otro.
• Deje de una a dos pulgadas entre el molde y las paredes del
homo.
Revise el adelanto de la coccidn at tlempo m|nimo
rocomendado en La receta. De ser necesario, siga revisando a
interva!os hasta que la comida este hecha. Si la puerta det
homo se abre con demasiada frecuencia, el calor so escapard
del homo; esto puede afectar el resultado final de los atimentos
y desperdicia energia.
Sl agrega ingredlemes adiclonales o modifica la receta,tenga
en cuentaque lostiemposdo cocci6npodr_anaumentar o
disminuirtigeramente
iiiilii iiliii!iiiiiiiiiiiii¸
Pasteles irregulares, • Motdesdemasiadocercauno de1otro o que se tocan entre si o tocan las paredes del homo.
• Una mezcladesigualen los moldes. • Se pusounatemperaturademasiadobajao no se horne6
por suficientetiempo.• El homonoest_ nivelado.• No se mezcl5 Io suficiente.• Demasiado
Ifquido,
Elpastelse desploma. • Demasiadagrasao azScar.• Demasiadoo muypocoIfquido.* Se pusouna temperatura
demasiadobaja. • Polvode hornearviejoo se usb muypoco.• Moldedemasiadopeque5o.* La
puertadel homose abri5conmuchafrecuencia. • Se agregba la mezcla del pasteluntipo de
aceite inapropiado, • Se le agregba la mezclao la recetadel pastelingredientesadicionales,
Pasteles,galletas, • No se precalent6 el homo. • Losmoldes se tocan entres[o tocan las paredes del horno.
bizcochos demasiado • Posicibnde parrillaincorrecta.• Uso incorrecto del papelde aluminio.° Se pusierondos moldes
doraciospor debaJo, paragalletasen la misma parrilla.• Se usaronmoldes de vidrio,oscuros,manchados, combados
o de acabadoapagado.(Useun moldepara galletasbrillante).
Sigalas instruccionesdel fabricantede losutensiliosen cuantoa temperaturadel horno.Los
utensiliosde vidrioy lososcuros,tales como losde Ecko'sBakersSecret, podffanprecisarque
se bajara la temperatura del homoen 25°F.
i!_i! ii_i;'._;!!;14:;:i:i: !!!!!!!:! _i_: ii:i!i!:!!ii!;!!:i i i!!ii i:!;!;!i;i!ii_ if! i:iiii:ii!! :;: :!:::!;::!;i;:'::::: i:i i;;;;;;; : :_::i:i::!:;!:!;';:;;;:;.:i.:::::::::::::::::::::::::::::::::::::::::::::::::::::::::::::::::::::::::::
Reducci_n exce$iva, • Muy poca levadura. • Se mezclb demasiado. • Moldedemasiado grande.• Se pusouna
temperaturademasiadoalta.• Se hornebdemasiadotiempo. • Moldesdemasiadocerca entres{
o quetocan las paredesdel horno.
=
Los pasteles tienen • Muypoca grasa. • Demasiado polvo de hornear, • Se mezclb demasiadoo se mezclba una
tdneles, velocidadmuy r_.pida.* Se pusounatemperaturademasiadoalta.
Los bordes de la corteza
de la tarta demasiado
dorados.
• Se puso una temperatura demasiado alta. * Moldes se tocan entre s[ o tocan las paredes del
horno. • Bordes de la corteza demasiado delgados; cubierta con papet met&tico.
:,:::.::::: ;._!:'::;:-::;.:..:;:;::::::::::::::::-::-:;-:::-:;:::::::::::::::::::;_;::::-:::::"ii"i":'.:;-:::::.::.::::.:::;:::::;-;::::.'i_':';:";'i:"'::' ::::.::!': ::::::::.-:: : ;!":'!!'::-:;:.:-::'::::.::.:..::.::::: :;:::.::::::::::::::::::::::::::::::::!:;:::;:,:::;:::::ii'i:i'i"i'i'i'i'i'i'!'!'i::;i;%::: i:i::!:-::::_:::::::!!'!':'!I'!':::.::.i ;_n.,:::-::: .:;.::
::iii:i::::::i;ii::;:i_illiiii::!::i::!;:iili::i::i;,!::i;i!;!::ilii!iii_:.iiiiii::::illi::!iii!ii::,i_::.:i:.:i:i!:.::,i:i_::ili i::ili:.i::ili;_n_U.!te;;i!_i__i _::i_!::_ase;ii i;::iiii:ri:i:i:'.:_iiiiiilili!iii::ii;::'i!_:.:il:.ii:i:_!:::!:::-:.i:.illi:::_i:::;::ii;::i::':i!:":_:_!::;::i:::ii:i:::;:;iEii:;i::ii:::-:.:::-!:.:::i';i':i'iiii::i_i'::rii,i_iii_ii:i:r::;i::!ii:::;:i;i:i;i:i:::::__iii_:::'!i:;i
ii:i:i'.:i;::i:::ii:i:i:i:!:!:J.::.i:(:: !i:i:i:i:_'.ii ::i_ i :i:i:i:::i:.::i:;:i__::i: r; :.!:::.::i ' i::ii ::_i:::: :::::!:::::!:!::i:::_:;:::=:;::::;=::;::::'i:;:!;; ;i i i:!:ii i i!:! !Ei i!ii;i;i;_;::i:i!;:i!!7::i:i:!]:!i!:!::i::::!i:ii:! i:ii il !:!'i:: :!!:i:iT!!ii:!!:!:!!:!i::i::!i!i];I!::::'1!! !]iii!_!_i!ii::ii:ili:i:i:i:;!_iiii:ii:i!i!i;i;_i:::iii!:!ii: i!:i!!ii:',:iiiiii:ii:i
Las tartas tienen una , Se puso unatemperatura muy baja cuando secomenzba hornear. • Relleno demasiado
corteza rnoJada. Ilquido. • Se usaron moldes de metal brillante.
La caracterfstica de cocci6n autom&tica en el homo se usa para
encender y apagar el homo a una hora del dfa predeterrninada.
Esta caractedstica se puede usar para:
• Encender el homo inmediatamente (inioio inmediato).
• Retrasar el inicio de la cocciOn (irli¢lo retrasado).
La caracteristica se puede usar con cocci6n en el homo o con la
caractedstica de autotimpieza del horno. Vea en la p_.gina 26 las
instrucciones para retrasar el inicio de un ciclo de limpieza.
Elrelojtiene que estarfuncionando y puesto a la hora correctaa
fin de que la caracterfsticade cocci6n autom_.ticaen el homo
funcione bien.
IMPORTANTE
No se recomienda la cocci6n con inicio retrasado para
alimentos sumamente perecederos tales como pmduc-
tos I=_cteos,cerdo, ayes, mariscos o rellenos.
Si cocina m&s de un alimento, elija alimentos que se
cocinan durante el mismo tiempo y a la misma tempe-
ratura det horno.
Para volver a vet la hora de coccibn o de finalizaci6n
predeterminada,oprima la almohadillacorrespondiente.
Para anular la operaci6nde cocci6nautom&ticaen el homo,
optimaCANCEL (Anular).
AI final de la operacibn de cocci6n autom&tica en el homo, el
homo se apagar& autom&ticamente y se oir_n bips continuos
para recordarle que saque la comida del homo. Para suprimir
los bips, oprima CANCEL.
Esta caracteristica retrasar& solamente la coccibn hasta un
mSximo de once horas y cincuenta y cinco minutos (11:55).
Si demora m_s de 30 segundos en oprimir cualquier almohadilta
y A o V, la pantalla:
° Volver_ a la disposicibn previa.
° Emitir,_ bips y destellar_ para indicar el registro siguiente.
O bien:
• Regresar& a la hora del dfa y anular& la operaci6n.
Para activar el horno:
1. Pongalos alimentos dentro det horno.
2. Oprima COOK TIME (Tiempo de coccibn).
° En la pantalla destellar&n las palabras SET COOK TIME
(Fije el tiempo de coccibn).
3. Oprima A o y para registrar el tiempo de cocci6n.
4. Para retrasar et inicio de la cocci6n:
° Oprima OVEN STOP (Detenci6n del homo).
En la pantalla destellar&n las palabras SET STOP TIME
(Fije ta hora de detenci6n).
• Oprima A o _' para registrar la hora a la que desea que
se apague el horno.
NOTA:el controldeterminaraautom,_ticamentecu_.ndo
apagarel homoseg0n el tiempode cocci6ny la hora de
detenci6ndel homoque ustedregistre.NO es necesario
registraruna hora de inicio.
5, Oprima OVEN TEMP (Temperatura del homo).
° En la pantalla aparecer&n las palabras BAKE (hornear) y
000%
6. Oprima A o V para registrar la temperatura det horno.
AI final del tiempo de cocci6n predeterminado, el homo se
apagara autom&ticamente yen la pantalla aparecer& END (Fin).
Los bips continuos le recordaran que debe sacar la comida del
horno.
Para suprimir los bips oprima CANCEL. AI oprirnir CANCEL
reaparecer& en la pantalla la hora del dia. Saque la comida del
horno.
Asar es un rn_todo de cocinar carnes tiernas con caLordirecto.
El tiempo de cocci6n se determina por la distancia entre la came
y el elemento asador, et grado de cocido que se desea y et
grosor de la came.
iii!ii!iiiiii!iiiiiiiii!!iili!ili!i
El asado precisa de! uso del molde y del accesorio de la parrilla.
El accesorio debe estar puesto para que la grasa y el liquido
drenen at molde de abajo para prevenir salpicaduras, humo y
llamas. El uso indebido podrfa causar incendios de grasa,
Para lirnpiar con mayor facilidad, forre con papel met&tico e!
molde de ta parrilla y roche el accesorio con un roc{o vegetal
antiadherente. No cubra el accesorio de la parrilla con papal de
aluminio ya que eso impide que la grasa drene hacia abajo.
Recorte la grasa excesiva y acuchitle la grasa restante a fin de
qua la came no se abarquille y para reducir el hurno y las
salpicaduras. Sazone la came despuds de cocinarla.
Ponga la parrilla del homo en la posicibn de parrilla correcta
cuando el homo est_ fdo. Para un dorado rn&s oscuro, ponga la
came m&s cerca del elemento asador. Ponga la came m&s
abajo si desea la came bien cocinada o si hay un exceso de
hurno o de tlarnas.
Yea en la tabla para cuidado y lirnpieza en la p&gina 23 las
instrucciones para limpiar el rnoLde y el accesorio de la parrilla.
Como activar el homo para asar:
1. Oprima BROIL (Asar).
En la pantalla aparecer&n las palabras indicadoras 000 ° y
BROIL.
.
.
4.
5.
Oprima A para seleccionar Hi (Nto) para el asado normal u
oprima y para seleccionar Lo (Bajo) para eL asado a baja
temperatura.
Para 6ptimos resultados de dorado, saque el molde de la
parrilla y precaliente eL elemento asador por 3 minutos.
Ase con la puerta del homo abierta hasta la posicibn ret_n de
asado (abierta aproximadamente 6 pulgadas). D_ vuelta la
came una vez, aproximadamente a la mitad de ta coccibn.
Revise cuan cocida est& haciendo una hendedura en la came
cerca del centro, para ver el color que desea.
AI final de la cocci6n, saque el molde del asador y oprima
CANCEL (Anular) para anular la operacibn de asado. En la
pantalla reaparecer_ la hora de! d{a.
Use HI BROIL (Asar en alto) para la mayor{a de las operaciones
de asado. Seleccione Lo BROIL (Asar en bajo) cuando ase
alimentos qua se demoran m&s en cocinar, tales como aves. La
temperatura m&s baja ]e deja cocinar el alimento para que
quede bien hecho sin un dorado excesivo. Si se selecciona Lo
BROIL aurnentar, _.el tiernpo de cocci6n.
Los tiempos para asar aumentar&n si el horno se instala en un
circuito de 208 voltios.
TOClNO
POLLO
#4
Presas #3 o #4
:::::::::::::::::::::::::::::::::::::::::::::::::::::::::i:::::i:::-:i::::i'.i::?_;!:i:i:
Bien cocido
Bien cocidas
6a10
LO BROIL
(Asar en bajo)
30 a 45
PASTEULLOS DE CARNE MOLIDA
3/4 de pulgada de grueso
#4
CHULETAS DE CERDO
1 pu|gadade gmeso
* La parrillasuperiorest,. en la posioibn#5.
"* Lostiemposde asado sonaproximadosy varianseg_n la came.
#4
Bien ¢oddos
Biencocidas
15a!8
22 a26
....
No coloque peso excesivo sobre la puerta del homo abierta ni
se pare sobre etla ya que, en ciertos ca.sos, podr[a hacer que la
cocina ek_ctrica se volcara, que se rompiera la puerta o podrfa
causar lesiones graves al usuario.
Cuando abra la puerta del homo, deje que el vapor y el aire
caliente se escapen antes de meter el brazo en el horno para
revisar, agregar o sacar alimentos.
No intente abrir o cerrar la puerta sino hasta que la puerta est_
completamente alojada en los brazos abisagrados. Nunca
encienda el horno a menos que la puerta est_ debidamente en
su lugar. AI hornear, asegQrese de que la puerta est6
completamente cerrada. El resultado final de los alimentos
horneados sever& afectado si la puerta no est,. bien cerrada.
PRECAUCI(_N: los brazos abisagrados est_n montados en
muelles y se cerrar&n con fuerza contra la cocina el_ctrica
si se les toca accidentatmente. Nunca ponga la mano o
los de<los entre las bisagras y la parte delantera del
bastidor del horno. Se podrfa lesionar si la bisagra
retrocede s_bitamente.
Para quitar la puerta despegable: cuandoest_frfa, abra la
puertahasta la posici6nde "stop" ("ret6n")(abierta
aproximadamente 6 pulgadas)y agarre la puertapor losdos
lados.Nuncause el mango paralevantarla puerta.Lav&ntela
uniformemente hastaque la puertadespejelos brazos
abisagrados.
.i iiii iii ii i.iiii!i!i!!iiiii!iiiii!iiiii!iiiii!ii!i!.!iiiii
La puerta del homo se traba solamente para la operacibn de
autolimpieza. No mueva la palanca para trabar la puerta hacia la
derecha o posicibn trabada durante una operacibn de coccibn.
Si la puerta est& trabada, la operacibn ser& anulada
automdticamente y en la pantalla aparecer& la palabra "door"
("puerta'). Si el homo est& 1osuficientemente caliente como
para engranar el trabe interno, no se abrir_, la puerta del horno.
Deje que la puerta se enfde por hasta una hora y seguidamente
destrabe y abra la puerta.
Sotamente en los modelos corredizos, el caj6n para atmacenar
al rondo de ta cocina el_ctrica es un sitio seguro y conveniente
para almacenar ollas de metal y vidrio. NO almacene en este
caj6n arti'culos de pldstico, papel, atimentos ni materiales
inflamables. Saque el cajbn para limpiar debajo de la cocina
el_ctrica. NOTA: las cocinas el_ctricas empotradas no tienen un
cajbn para almacenar.
Para sacarlo: vacle el cajbn y sdquelohasta la primera posici6n
de retdn.Alce lapartedelanteradel cajbny hdlelohastala
segunda posicibnde retdn,Agarrelos]ados y dlcelo hacia
afuera parasacarlo.
Para volverlo a poner: encaje en los rieles las puntas de las
gu[as del cajbn. Alce la parte delantera del cajbn y emp_jelo
suavemente hasta la primera posicidn de ret_n. Vuelva a alzar el
cajbn y continue desliz&ndolo hasta la posiciSn cerrada.
Para volver a poner la puerta: agarre la puertapot los dos
lados,alinee tas ranuras en la puertacon losbrazos
abisagradosy deslicela puertahaciaabajo sobre los brazos
abisagradoshasta que est_ completamentealojadaen las
bisagras.
i.
Algunos pisos no est&n nivela-
dos. Para hornear debida-
mente, la cocina electrica
tiene que estar nivelada. Las
paras niveladoras se encuen-
tran en cada una de las pun-
tas de la base de la cocina
el_ctrica. Niv61ela girando las
patas. Para impedir que se
vuelque accidentalmente, ta cocina electrica se debe afianzar al
piso corriendo una de las patas niveladoras traseras dentro del
soporte antivuelco suministrado con la cocina el_ctrica.
LEA LAS INSTRUCCIONES DEL FABRICANTEa fin de
asegurarse de que el limpiadorse puede usar sin problemasen
esteelectrodom_stico.Asimismo,cuandouse unproducto
limpiador,lea y sigaal pie de la letra las instruccionesdel
fabricante.
Pare determiner siun producto limpiador es seguro, haga una
prueba en un punto que no se vea, usando una presi6n muy
leve pare versi la supefficie se raya o cambia de color. Esto es
especialmente importante en superficies de esmalte de
porcetana, met&licas, pl&sticas o sumamente pulidas, brillantes
o pintadas.
Las maroas siguientes te ayudardn a hacer la seleccibn
apropiada:
Limpiavldrios- Ben Ami, Cinch, Glass Plus,Windex.
Detergentes Ilquidos para laver plates - Dawn, Dove, Ivory,
Joy.
Limpiadores rociadores I|quidos suaves - Fantastik, Formula
409.
Limpladores no abrasives- Ben Ami, pasta de bicarbonate de
sosa y ague.
Limpiadores en polvo o Iiquidos ligeramente abrasives-
Ajax,BarkeepersFriend,Cameo, Comet,Soft Scrub.
Estropajo o esponjas de pt_stico o nylon no abrasives o
que no rayan - Chore BoyPlasticCleaningPuff,Scrunge
ScrubSponges,o Scotch-BriteNo Scratch, Cookwareo Kitchen
Sponge.
Estropajos abrasives- S.O.S., BrilloSteel Wool Soap,
Scotch-Brite WoolSoapPads.
(Las marcas de los pre_adentes productos limpiadores son
marcas industriaies registradas de ios respectivos fabricantes).
NOTA: asegLiresede que el electrodomdstico estd apagadoy
de quetodas las partesse hayan enfriadoantesde tocarloo
limpiarlopare asi evitardaSoy posiblesquemaduras.Si se
remueveunapieza, aseg_rese de que se tareemplace
correctamente.
Para prevenir manchas o cambio de color, limpie la superficie de
cocinar despu_s de cada use.
Esmalte de la cocina
eldctrica:
,Paneles laterales
• CajSn pard atmacenar
• Puerta del homo
, Guardia trasera
° Detergente y ague
• Limpiador llquido suave
• Limpiavidrios
Use una toalla de papel o pei_o seco pare limpiar derrames, especiatmente derramesacldicos, tan
pronto come sucedan. Eslo es especialmente importanta en las superficies btancas. Cuando Ia
superficie es1_ frla, l&vela con ague y detergente. No use Ifquidos ni polvos limpiadores abrasives
o &speros ni tampoco limpiadores de homes, i_slos rayar_n y dai_ar_n permanentemente el
acabado. Seque con un paho suave. En superficies de cocinar lisas, limpie el area det orificio del
respiradero cada vez que use el homo.
i'i:ii i::i: : liii? Estropaj0de Pl,f_st!co:0e_lia_nadO :i::;:::t: veg_!a_iadhe_ei_!etb{ c0m0PamipiMaZ9 a ::: ::: ii: :ii_I_ : : }! i !:if: ! :.i:iiiii _ : ;:
::: :: I:: i:i::::i::ii: .i :::::i:}:i:n ,o, ii!!!i!iil' i::
Botones de control ° Detergents y ague Pare facilidad de Iimpieza, desactive el bot6n y quhelo hai_ndolo. L_velo, enju_gue!o y S_luelo.
• Rociadores tlquidos suaves No use agentes limpiadores abrasives ya que podrlan rayar el acabado y remover Ias marcas.
• Limpiavidrios Enciendacada elemento pare cerciorarse de que los botones se volvieron a porter correctamente.
Viddo
• VentaniUadel homo
Pare prevenir las manchas en la ventanilla del homo, evite el use de cantidades de agua excesi-
vas que podrIan fittrarse debajo o detr_s del vidrio. L_vele con ague y detergente. Remueva la
suciedad diflcil de quitar con una pasta de bicarbonate de sosa y ague. No use materi_des abrasi-
ves tales come estropajos, estropejos de acoro o agentes limpiadores en polvo. I_stosdahar_n el
vidrio. Enju_guela con ague limpia y s_uela.
• De_ergentey agua
* Limpiavidrios
, .1 .
A_badO_ demetal: : • [:_tet_en_yagua
' ..., : ............
suciedad d_ftcilde qu_r con ague y detetgente. Pule:con un p_o SUture. .... .
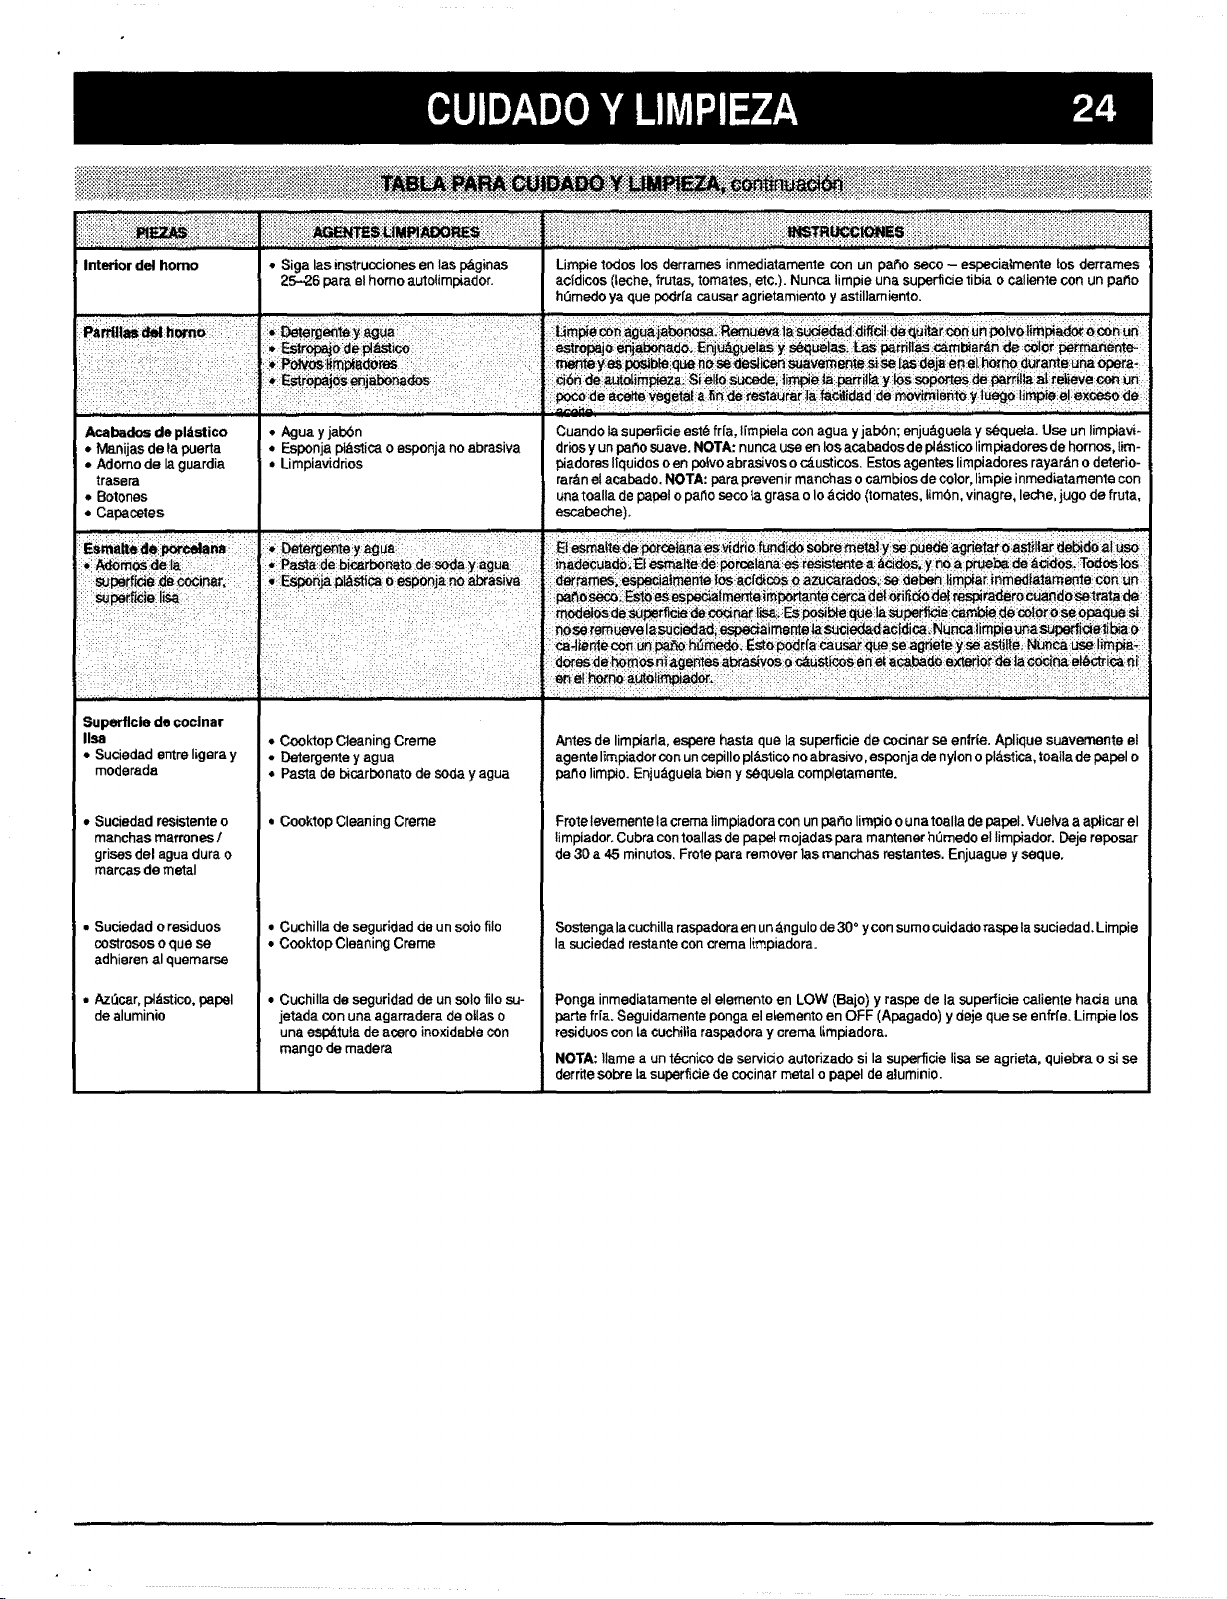
::+::::i_i:i:i:i:_::-+::_:_::;_:;;:::+:::::::;:_++_:::+++::++:::++.:++i::::::::_:i:i:i:i:i:i:i:i_:i:i:::::::3+:i:!:+:i:i:+:i:_::_+:;::++;_>.:::::::++::ii:i:i:+:i_:+:i?.!:!+,+:!:i::_::+:i:i%:+:i+i:i:i_:_::+:::;_+:*.:::+:+:+::i:i:i:i:_:i:_:i::+:i:!++!:+!::+:_:5+i_+:!:?'+:i:i:_:i$!::++:'r:::+":::+:+i:::::i:+:i:i:!:!:i:+!¢__ ++$i+:::i:+:+:i++:i'i:!+::i:i++?+:::::::¢_+¢+i$!+!:!:!:i_.:i:_:_:i:i_+::¢_+i":;!:i$i:::+::::+_:: :i::::.:::+:++i:!:!+!:r:!+'i:i3i+!:+:+++:+;!:?+:_:
++++++++++++i++++++++++++.++++++++++i+++++i+++,+++++++++++++++++++++++! +++++++++++++i++++i+!++++!+!++++i++i+++++++,+++++++++++++++++++i+,i;+,++++++++++++++++++++++++++
,++:r:" :':':*+ : :4+:':'++ip:':':+:':=:' > > ;'+';r+;':'++_'t+++:'' + + ',+, + * : "='_+_'': '+'>_' > ":'_.',+.p.'+''+'_":'+": q+:':+++':.+,_*_*++:,:4 :+:+_+_ X+>+'_4">+'L" ':+:''?+;';': :q'_':+++'t'+q" ' ':' + ' ':4+;'+ :+:':':*:+
Interior del homo + Siga las instrucciones en las p_ginas Limpie todos los dflrramea inmediatameme con un paso seco - especiaimente tos derrames
25-26 pare el homo autolimp_ador, ac|dicos (teche, frutas, tomates, etc.). Nunca limpie una superficie tibia o caliente con un patio
h0medo ya que padrfa causer agrietamlento y astiliamiento.
:;ii:i: +:: = i-i-: : |: • Estr_oldepl_stico: i ....... i i+ + + :|. eSt+]o +jabOt_d_O. Enju_e!es y seq+elas+ [as pafr_ilias:mmlmardn de color pern'_nente-
+.-:i:;i+::::::-t::::::;:.::::::::::.:::'.I:.++Pm.v_+tmpmd+_m+:.....: ::,++I _e,yeSp_bte qm_n+se:oesltenSUavementesiselasdejaer_:e,;horno:_tor_nt_urmopera+
:
:"
:
:
_
:"
"_:
"_
r':
:'t
_
_r_jOS
_ja_na_
:
:
!
:_
_
_:_t_im_Za;
S
_l_q
_e
ti_e a patti _y I_s S0po_esdeparn!I_,a! relieve con Un
_.ab_dos de pldstico • Agu_ yjab6n Cuando lasuperficieest+_fr[a,l[mpielacon agua yjab6n;enju_.guelay s+queta.Use un limpiavk
• Manijas de la pJerta • Esponja pibstica o eaponja no abrasive drios y un patto suave. NOTA: nunca use en los acabados de pl_tsticolie piadores de homos, tim-
. Adomo de la guardia • Limpiav_drios piadores Hquidos o en pofvoabra.sivos o cdusticos. Estos agentes limpiadores rayar_.n o deterio-
trasera rar_n el acabado< NOTA: p_r_ prevenir manchas o cambios de color, Iimpie inmediatamenle con
• Botones una toalla de papal o patio soco _agrasa o Io &cido (lomates, timbn, vinagre, leche, jugo de fruta,
+ Capacotes eacabeche)+
++J++:mi,,+m++.+a+ua:+ ::
:,i:_moslder:I_: :: i:i ii i i |i:.!nadecU_db_i_tesm_ltede:pometana:esmsis_te-a!_cidos+:yno_a pi'ue1_de_cid0S_TodoSlos i
:r;
_r_rf_
:de_i_r,:
:
r:
]
_
_ES_
pl&st{Ca0 esP0nj_ no _LbrasivB :|: _l_rames_: especia!_ente Ios.a,cf_coS () _z_lc_rados;: se debe n I!mpfac inmedf_aman!e c0nl Un
:::;SUPeit+me:llS_ =: : |: :. :+.: :: .-: : : ;: .;::: 1 _o_; ESt_es:es_almenteimpOF!_nte cerca _le_or f_d0_e_respiraderocua_do:se:_t+'_t ade:
r
:
:
;
:
_
:
::
:_
'
....
Jl + + i J! no se _ ueve la:sucieda_d,espec_almerrte ia_ied_d acidica_ Nunca +impieun_supa_+e_tibia:o
: ; ; I .... ; ..... : ...... |i: _+liente cort _n _ih_. Esto p<)drla _u_ quese agdet_ ylseastite; Nunca _:!:irnpia_ :
i i:i: ' ; i |:;_ ' t d°resdet_m°sn:i_g entes:a_ra'_ws_c_us!_Ose_e=aCabad_exte_'_t:+_iacod_e_i_i: i
Superflcle de coelnar
lisa
• Suciedad entre Iigera y
moderada
• Suciedad resistente o
manchas marmnes /
grises del ague dura o
marcas de metal
• Suciedad o res_duos
costrosos o que se
adhieren _1quemarse
• Az_c_r,pl,'fstico,papal
dealuminio
• Cooktop Cleaning Creme
• Detergente y ague
• Pasta de bica.rbonato de soda y agua
• Cooktop Cleaning Creme
• Cuchilla de seguridad de un soto filo
• Cooktop Cleaning Creme
• CuchilIa de seguridad de un solo filo su-
jetada con una agarradera de olias o
una esp_tuta de acero inoxidebte con
mango de madera
Anles de limpiarla, espere haste que la superficie de cocinar se enlr|e. Aplique suavemente et
agente limpiador con un copillo pl&slico no abrasivo, esponja de nylon o pl&stica, toaila de pepel o
!:ratio limpio+ Enju_guela bien y s_quela completamente,
Frote levemente la creme limpiadora con un paflo limpio o una toalla de papal. Vuelva a apticar el
limpiador. Cubra con toallas de Impel mojadas pare mantener hemedo el limpiador, Deje reposar
de 30 a 45 minutos, Frote pare remover las manchas restantes. Enjuague y seque,
Sostenga lacuchilla raspadora en un _,ngulo de 30 ° ycon sumo cuidaao raspe la suciedad, Limpie
la suciedad restante con creme limpiadora.
Ponga inmediatamente el elemento en LOW (Bajo) y raspe de la superficie caliente hada una
parte fr[a. Seguidamente ponga el e_emento en OFF (Apagado) y deje que se enfr_e. Limpie los
residuos con Lacuchilta raspadora y creme timpiadora.
NOTA: }lame a un tL=cnico de servido autorizado si la superficie lisa se agrieta, quiebra o si se
derr_tesobre Lasuperficie de cocinar metal o papal de aluminio.
B iiiiiili i!!Biiiii!iii!!!!ili!iii!i!!iii!iiiiii,18i!
El homo autolimpiador usa temperaturas por encima de las
temperaturas de coccibn normales para timpiar autombtica-
manta todo el interior del homo.
PRECABCiON: es normal qua ciertaspartes de la superficie
de cocinarse calientendurante el ciclode limpieza.Por ello,
duranteel ciclode limpieza,evitetocarla superficie de coci-
nar,el &rea del respiraderodel homo,la puertay la ventanilla
delhorno.
Es major limpiar el homo regularmente y no esperar hasta que
haya una gran acumulacibn de suciedad en _ste.
Apague la luz del homo antes del ciclo de limpieza. Si se deja
encendida la luz det homo, la bombilla se quemar& durante el
ciclo de limpieza.
Antes de ia autolimpieza
Saque del homo el molde de la parrilla, todos los moides y tas
parrillas del horno. Las parrillas cambian de color y es
posible que no se deslicen suavemente despuds de un ciclo
de limpleza.
Limpie el bastidor del homo, el marco de la puerta y alrededor
del respiradere del homo con un agente timpiador no abrasivo
tal como Bon Ami o con detergente y agua. Estas partes no
estbn expuestas alas temperaturas de limpieza y se las debe
limpiar para impedir qua la suciedad se pegue durante el ciclo
de limpieza.
Limpie el exceso de grasa o los derrames del rondo del homo a
fin de impedir un exceso de humo o Ilamaradas durante el ciclo
de limpieza.
Limpie los derrames azucarados y los derrames acidicos tales
como jugo de limbn, salsa de tomate o salsas a base de leche.
E! esmalte de porcelana es resistente a _.cidos, y no a prueba
de b.cidos.Es posible qua el acabado de porcelana cambie de
color si no se limpian inmediatamente los derrames acidicos.
No use Iimpladores de horno en el acabadodel horno
autotimpiadornicerca de ningunaplaza del homoya que
datiar_.nel acabadoo las plazas.
Para prevenirdatios,nolimpie ni frote la junta alrededorde la
puertadel homo.La junta est&disetiadaparamantener el calor
por dentroduranteel ciclode lirnpieza.
Durante la autolimpieza
Cuando la puerta este trabada y se oprima el botbn CLF-AN
(Limpiar), el homo comenzar& autom,_ticamente a calentarse a
las temperaturas de timpieza.
NOTA: durante el cic!o de autolimpieza se encender&
automdticamente un ventitador, que se apagar&
autombticamente despu_s del ciclo de limpieza, cuando el homo
se haya enfriado.
En cuanto el homo Ilegue alas temperaturas de limpieza,
aparecerd en la pantalla el indicador LOCK (Trabe) para indicar
qua se engranb un mecanismo de trabe interior. En este punto
la puerta del homo no se puede destrabar ni abrir.
Para evitar daSos a la puerta y a la palanca de trabe, no fuerce
la puerta para abrirla cuando se visuatiza el indicador LOCK.
Las primeras veces que se limpie el homo, es posible que se
detecte algo de humo y olor. Esto es normal y disminuir& o
desaparecerb con el uso. Si el homo estb sumamente sucio, o si
se dejb an e! homo accidentalmente el molde de la parrilla,
habrb hurno y olor.
A medida que el horno se calienta y se enfrfa es posible que
oiga ruidos de las plazas de metal al expanderse y contraerse.
Es normal y no daSarb al electrodom_stico.
Despu_s de la autolimpieza
Aproximadamente una hora despu6s de finalizado el cicto de
limpieza, el trabe interior se desengranard y se apagar& el
indicador LOCK. Ahora se puede destrabar y abrir la puerta.
Mueva ta palanca de trabe de la puerta hacia la izquierda, o sea
la posicibn sin trabe, y abra la puerta. Es posible que el horno
todavia este caliente.
Puedeque parte de la suciedaddeje una ceniza polvorienta
colorgrisclare, que se puederemovercon un paso h_medo. Si
queda suciedad, elloindicaque e] ciclode limpiezano fue Io
suficientementelargo.La suciedadser&removidaen el ciclode
limpiezasiguiente.
Si se dejarondentro delhomo las parrillas del horno y &stas no
se deslizansuavementedespu_sde unciclode limpieza,limpie
las parrillasy los soportesal relievede la parrillaconun pocode
aceitevegetala fin de restaurarla facilidad de movimiento.
Limpiealrededordel orificio del respiraderodel hornoen la parte
trasera de la superficie de cocinarsi hayalg_n depbsitode los
vaporesexpedidosduranteel ciclode timpieza. Use agua y
detergentey un patioo unaesponjano abrasiva.
Es posiblequa en el interiorde la puerta del homo aparezcan
tlneas finas, tipopelo. Se tratade una condici6nnormal
resultantede1calentadoy enfriadodel acabadode porcelana.
Estalineas no afectan el rendimientodel homo.
Inicio inmediato
Para poner el horno en un ciclo de autolimpieza:
1. Saque las parriflas del homo y cierre la puerta.
2. Mueva la palanca de trabe de la puerta hacia la derecha
hasta que quede en la posici6n de trabe.
.
Oprima CLEAN (Limpiar).
• "door" (puerta) aparecer_, en la pantalla y sonarb_n bips si
la puerta no estd trabada.
° 3 HR:00 aparecerd en la pantalla y destellard en La
pantalla SET CLEAN TIME (Fije el tiempo de limpieza).
Oespu6s de una demora de unos segundos, el ventilador
y el homo se encenderdn autom&ticamente.
Permanecer&n en la pantalla CLEAN TIME (tiempo de
limpieza) y ON (Encendido).
4,
5.
El homo se limpiar_, autom&ticamente durante 3 horas. O
elija 2 horas para la suciedad ligera o hasta 4 horas para ta
suciedad resistente oprimiendo A o V-
Oprima CLOCK (Refoj) y la hora del dia reaparecer_, en la
pantalla. CLEAN y ON permanecer&n en la pantafla para
indicar que el homo se encuentra en un ciclo de limpieza.
Si la puerta no se traba o si no registra el tiempo de limpieza
dentro de los 30 segundos despu6s de haber oprimido CLEAN,
el programa se anutard autom&ticamente.
Tras una hora despu6s de finalizado el ciclo de limpieza, se
apagar& el indicador LOCK y se podr_ destrabar y abrir la
puerta del homo.
La puerta del homo y la palanca de trabe de la puerta se
daSar_.n si se fuerza la puerta para abrirla cuando todavfa se
visualiza el indicador LOCK.
Inicio retrasado
Para retrasar el inicio de un ciclo de Umpieza:
1. Saque las parrillas del homo y cierre la puerta.
2. Mueva la palanca de trabe de la puerta hacia la derecha, o
sea la posici6n de trabe.
3. Oprima CLEAN (Limpiar),
4. OprimaA o V para seleccionarel tiempo de limpieza.
5.
OprimaOVEN STOP (Oetenci6n del homo) y A o V para
seleccionarla horaen que deseaque se apague el homo.
En la pantallaaparecer&ta horade detenci6ny CLEAN
DELAY STOP TIME (Hora de detenci6nde limpieza
retrasada).
6.
Oprima CLOCK y la hora del dfa reaparecer_ en la pantatta.
CLEAN DELAY (Limpieza retrasada) permanecer_ en la
pantalla para indicar que et homo est& puesto para una
operacibn de limpieza retrasada.
7. AI final del ciclo de limpieza, habr& bips continuos. Oprima
CANCEL (anular) para terminar con los bips.
Para anular el ciclo de limpieza:
1. Oprima CANCEL.
2. Si se visualiza el indicador LOCK, deje que el horno se
enfde por hasta una hora. Cuando se apague el indicador
LOCK, la puerta se puede destrabar y abrir.
Si no se visuaLiza el indicador LOCK, ta puerta del homo se
puede destrabar y abrir.
Antesde Uamar para pedir que le presten servicio, repase la
informacibn contenida en esta seccibn para asegurarse de que
es necesaria una visita de servicio. Es posible que con la
consulta r&pida en este manual se evite una visita de servicio
innecesaria.
Si en realidad tiene un problema que no puede resolver per su
cuenta, Ilame al 1-800-473-7247 para pedir ayuda. AI solicitar
servicio, tenga este manual a la mane. Tambien necesitar_.:
o
o
Una descripci6n clare def problema.
Losn_merosde modelo y de serie. NOTA" estos
n_memsse encuentranen la chapade clasificaci6nque
est&en el bastidordelanterode la cocinael_ctrica,Pare
ver lachapa de clasificaci6nabra el caj6npara
almacenaro la puertadel horno.
La fecha de compra. NOTA: conserve el recibo de venta
come prueba de compra en case de que sea necesario
el servicio bajo garantfa.
Su electrodom&stico est& equipado con software para
autodiagnbstico que constantemente vigila et control a fin de
garantizar el funcionamiento seguro y debido. Si el software
detecta alguna situacibn dudosa, aparecer& en la pantalla un
CODIGO DE FALLA (F m_s un nSmero), habr_ bips continues y,
come precauciSn de seguridad, se anular& la operacibn.
Si en la pantalla apareceun cbdigode falla y haybips
continues,oprimaCANCEL (Anular).Seguidamente,vuelva a
programarla operacibnde cocci6n.Si vuelvea apareceren la
pantallael cbdigode falla, Ilame a un t_cnicode servicio
autorizado. Nouse el homo sinehasta que se haya prestadoel
servicio al electrodom_stico.
NOTA: si e! horno est& sumamente sucio, es posible que el
humo excesivo y las llamas resulten en un c6digo de falla
durante un ciclo de autolimpieza. Si ello sucede, oprima CLEAN
y deje que el homo se enfrie durante una hera.
Si usted sigui6 la receta al pie de la letra, repasb los consejos
para hornear contenidos en este manual y aOn cree que los
resultados de coccibn no resultan ser los que usted esperaba,
puede ajustar la temperatura del homo. NO AJUSTE LA
TEMPERATURA si no hornean bien solo uno o dos articutos.
Si cree que el horno debe estar m&s caliente o m,_s fdo, puede
ajustarlo per su cuenta. Para decidir cu&nto cambiar el
termostato, gradOe la temperatura del homo a 25°F mbs o
menos de la ternperatura indicada en su receta y hornee. Los
resultados de la °prueba" le dar&n una idea de cu_.nto ajustar el
termostato,
Para ajustar el termostato:
1, OprimaOVEN TEMP (Temperaturedel horno).
2. OprimaA hastaque se visualice550°.
3. Oprima y sostenga OVEN TEMP durante unossegundes.
° La pantal]amostrara ta temperatura ambientedel homo
duranteunossegundosy luego00° aparecer&en la
pantalla.
° Si 00° noaparece en la pantalla,oprima CANCEL y vuelva
a comenzar.
• Si ya se habfa ajustado la temperatura del horno, se
visualizar_, ese cambio. Per ejemplo, si la temperature se
redujo en 15°, se visualizara -15 °.
4. Oprima A o V para seleccionar el cambio de temperature
deseado.
• La temperatura del homo se puede aumentaren hasta 35°
o reduciren hasta35° (--35),en incrementosde 5°.
° Si se demora en seleccionar una temperatura, el prograrna
se anular& autom_.ticamente y desaparecer& 00 °. Si et
programa se anula, vuelva a comenzar.
5. Oprima CANCEL y reaparecer& en la pantalla la hera del dfa.
• El homo hornear& ahora a la temperature ajustada.
NOTA: no es necesario reajustar la temperatura det horno si hay
un apagbn el_ctrico. Este ajuste no afectar& tas tempereturas de
asado o limpieza.
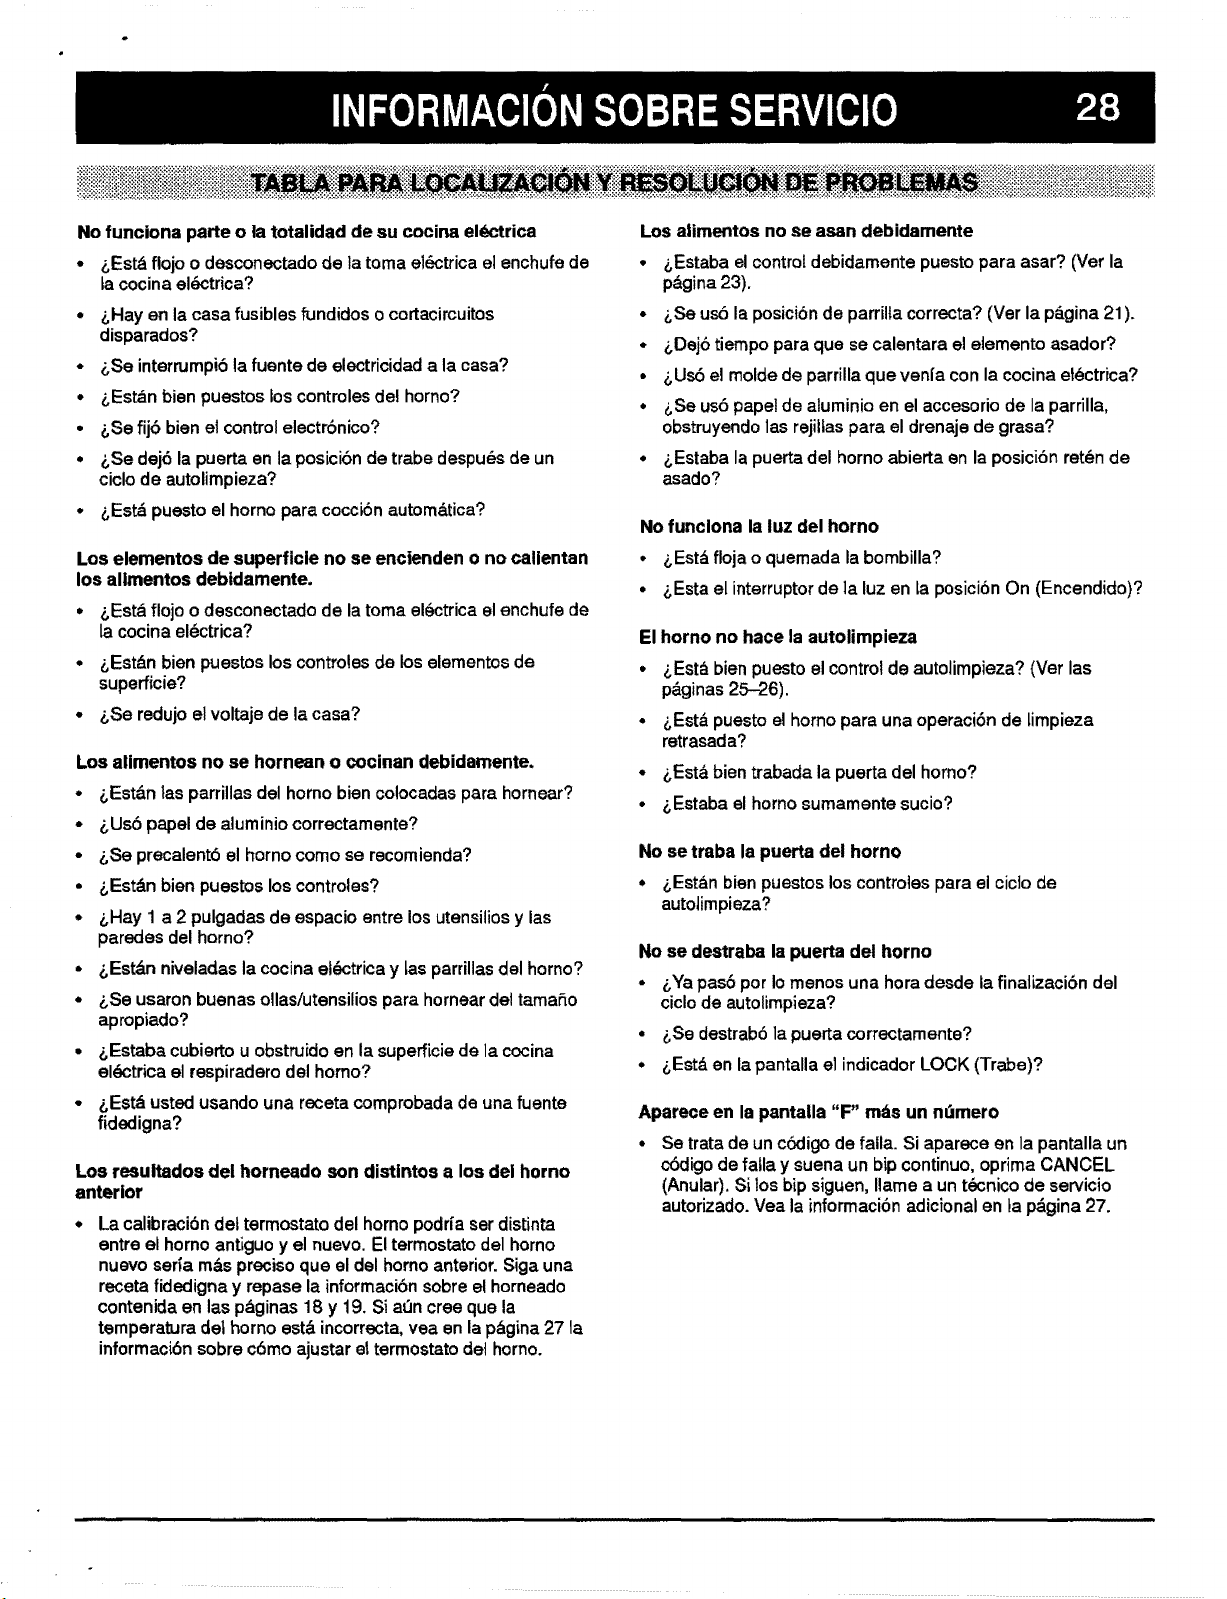
No funciona parte o la totalidad de su coeina eldctrica
,, i`Est_ flojo o desconectado de la toma el6ctrica el enchufe de
ta cocina el_ctrica?
• /,Hay en la casa fusibles fundidos o cortacircuitos
disparados?
* i`Se interrumpi6 la fuente de electricidad ala casa?
• i`Est,_n bien puestos los controles del horno?
• _Se fij6 bien et control electrbnico?
, i, Se dej6 la puerta en la posici6n de trabe despu6s de un
ciclo de autolimpieza?
• 6Est_ puesto el homo pare cocci6n automdtica?
Los elementos de superficle no se encienden o no callentan
los alimentos debidamente.
i`Estd flojo o desconectado de la tome el6ctrica el enchufe de
la cocina el_ctrica?
&Estbn bien puestos los controles de los elementos de
superficie?
i`Se redujo el voltaje de la casa?
Los alimentos no se hornean o cocinan debidamente.
• i, Est_.n las parrillas del homo bien colocadas pare hornear?
• /`Us6 papel de aluminio correctamente?
• i`Se precalent6 el homo come se recomienda?
• i`Est&n bien puestos los controles?
- /`Hay 1 a 2 pulgadas de espacio entre los utensilios y las
paredes del homo?
• i`Estdn niveladas la cocina el_ctrica y tas parrillas del homo?
• i`Se usaron buenas ollas/utensilios pare hornear det tamaSo
apropiado?
• i`Estaba cubierto u obstruido en la supefficie de la cocina
el_ctrica el respiradero del homo?
• &Estd usted usando una receta comprobada de una fuente
fidedigna?
Los resultados del horneado son distintos a los dei homo
anterior
La calibraci6n del termostato del homo podda ser distinta
entre el homo antiguo y el nuevo. El termostato del homo
nuevo sefia m&s precise que el del homo anterior. Siga una
receta fidedigna y repase la informaci6n sobre el horneado
contenida en las pbginas 18 y 19. Si aQn cree que la
temperature del homo est_ incorrecta, yea en la pbgina 27 la
informaci6n sobre cdmo ajustar el termostato det homo.
Los alimentos no se as,an debidamente
• i`Estaba el control debidamente puesto para asar? (Ver la
p&gina 23).
• i, Se us6 la posici6n de parrilla correcta? (Ver la p_gina 21 ).
• i`Dej6 tiempo para que se calentara el elemento asador?
• /`Us6 el molde de parrilla que venfa con la cocina el6ctrica?
• 6Se us6 papel de aluminio en el accesorio de la parrilla,
obstruyendo las rejilfas para el drenaje de grasa?
• i`Estaba la puerta del homo abierta en la posici6n ret_n de
asado?
Nofunclona la luz del horno
• i`Estd floja o quemadala bombilla?
• i`Esta el interrupterde la luz en la posici6nOn (Encendido)?
El homo no hace la autolimpieza
• i`Est_ bien puesto el control de autolimpieza? (Ver las
p_.ginas 25-26).
• i`Estd puesto el homo pare una operaci6n de limpieza
retrasada?
• 6Estd bien trabada la puerta del homo?
• i`Estaba el homo sumamente sucio?
No se traba la puerta del homo
• 6Estan bien puestos los controles para el cicio de
autotimpieza?
No se destraba la puerta del horno
• i`Ya pas6 per Io rnenos una hera desde la finalizacibn del
ciclo de autolimpieza?
• i_Se destrab6 la puerta correctamente?
. i`Estd en la pantalla el indicador LOCK (Trabe)?
Aparece en la pantalla "F" m6s un ndmero
Se trata de un cddigo de falla. Si aparece en la pantalla un
c6digo de fafla y suena un bip continue, oprima CANCEL
(Anular). Si los bip siguen, Ilame a un t_cnico de servicio
autorizado. Vea la informaci6n adicional en la pdgina 27.
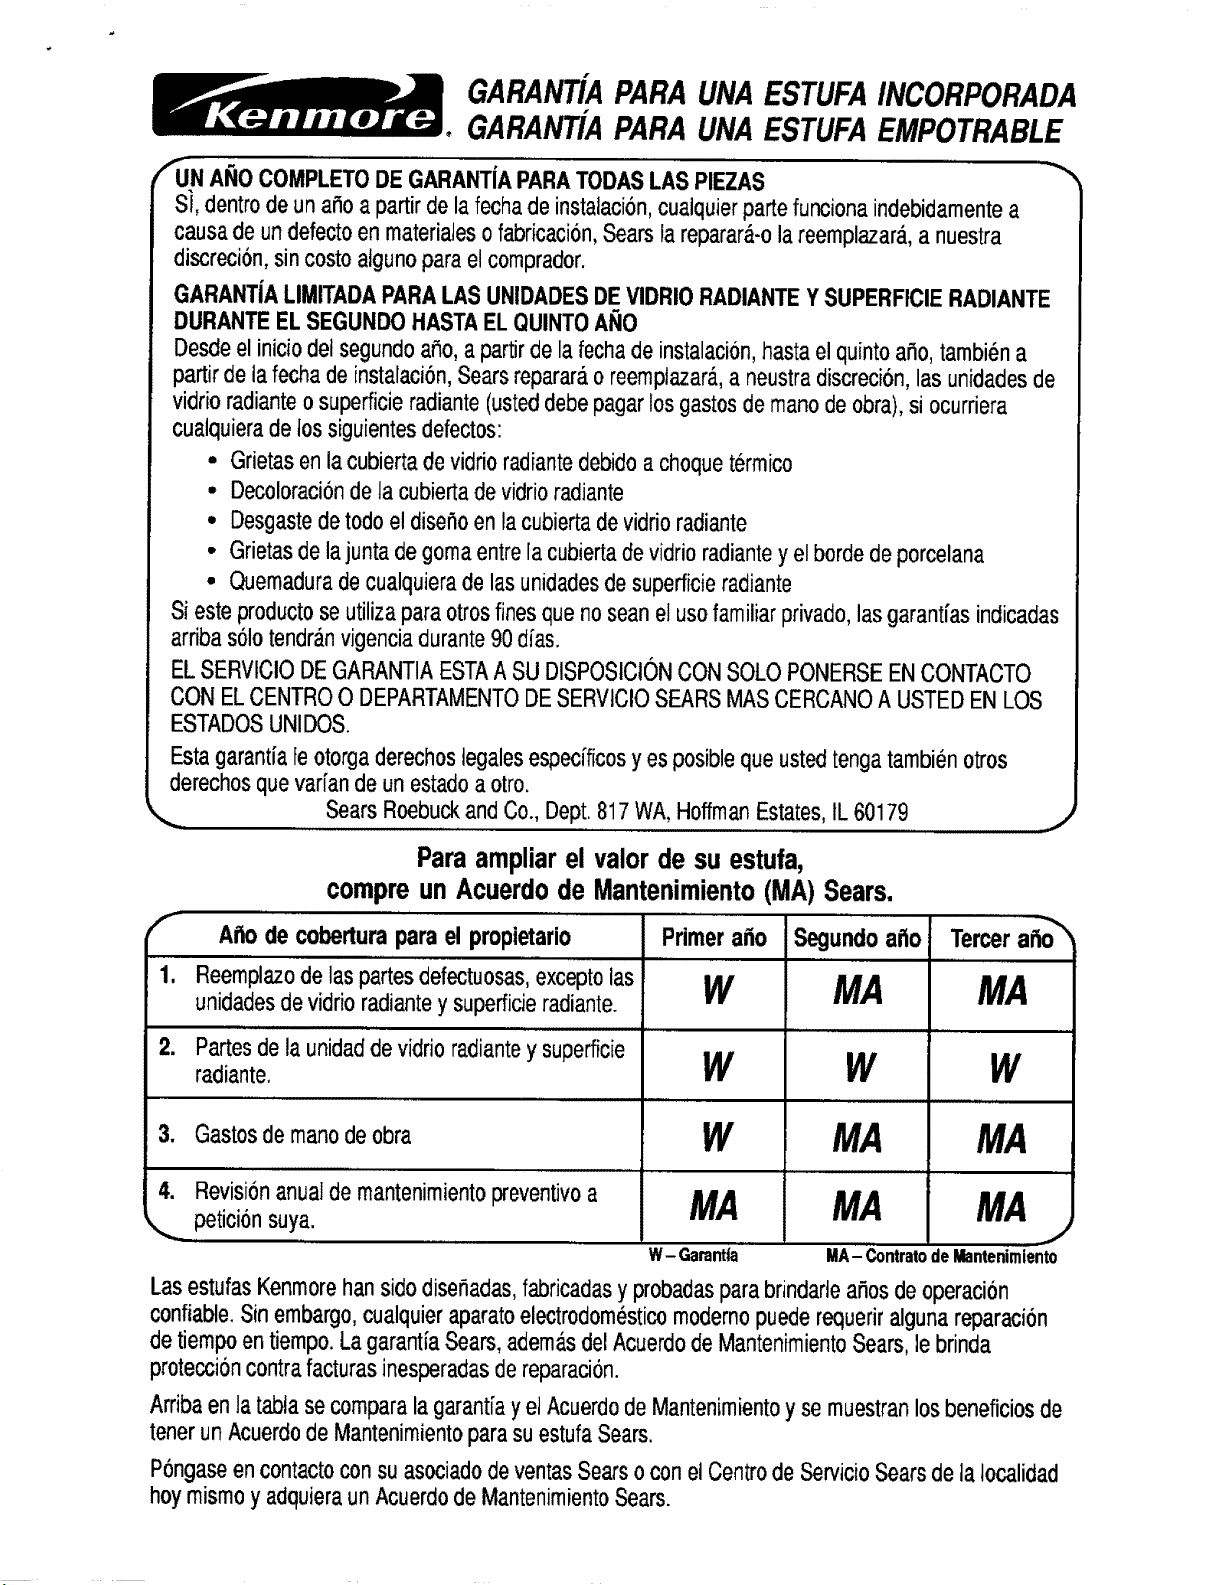
GARANTiAPARA UNAESTUFAINCORPORADA
GARANTiAPARA UNA ESTUFAEMPOTRABLE
F'UN AI_O COMPLETODE GARANTIA PARATODAS LAS PIEZAS
Estagarantialeotorgaderechoslegalesespecfficosyes posiblequeustedtengatambienotros
derechosquevaffande un estadoa otro.
SearsRoebuckand Co.,Dept.817WA,HoffmanEstates,IL60179
Paraampliar el valor de su estufa,
compre un Acuerdo de Mantenimiento (MA) Sears,
,, , ,, ,,
Aflo de coberturapara el propietario Primerafio Segundoaflo Tercera_'o
,,, ....... , .... ,,,
1. Reemplazode laspartesdefectuosas,exceptolas W MA MA
unidadesdevidrioradiantey superficieradiante.
, , ,,,,
2. Partesde la unidaddevidrioradiantey superficie
radiante. W W W
..... ,, i .iu ,,
3. Gastosde manode obra W MA MA
4. Revisionanualde mantenimientopreventivoa M.4 M.4 M.4
_.. petici6nsuya. jl
W-Garantta MA-Contrato de Mantenimiento
LasestufasKenmorehansidodisefiadas,fabricadasy probadasparabrindarteafiosde operacion
confiable.Sinembargo,cualquieraparatoelectrodomesticomodernopuederequeriralgunareparacion
de tiempoentiempo.La garantfaSears,adem_.sdel Acuerdode MantenimientoSears,le brinda
protecci6ncontrafacturasinesperadasde reparacion.
Arribaen la tablase comparalagarantiay el Acuerdode Mantenimientoy se muestranlosbeneficiosde
tenerun Acuerdode Mantenimientoparasu estufaSears.
Pongaseencontactoconsu asociadode ventasSearso conel Centrode ServicioSearsde la tocalidad
hoymismoy adquieraun Acuerdode MantenimientoSears.
Si, dentro de un afio a partir de la fecha de instalaci6n,cualquier parte funciona indebidamente a
causa de un defecto en materiates o fabricacion, Sears la reparar_-o la reemplazara.,a nuestra
discrecion, sin costo atguno para el comprador.
GARANTIA LIMITADA PARA LAS UNIDADES DEVIDRIO RADIANTEY SUPERFICIE RADIANTE
DURANTE EL SEGUNDO HASTA EL QUINTO ANO
Desde el inicio dei segundoafio, a partir de la fecha de instalaci6n,basra el quinto afio, tambien a
partir de la fecha de instalaci6n,Sears reparara,o reemplazar_.,a neustra discreci6n,las unidades de
vidrio radiante o superficie radiante (usted debe pagar los gastos de mano de obra), si ocurriera
cualquiera de los siguientes defectos:
° Grietas en la cubierta de vidrio radiante debido a choque termico
° Decoloracionde la cubierta de vidrio radiante
• Desgaste de todo el disefio en la cubierta de vidrio radiante
• Grietas de la junta de goma entre la cubierta de vidrio radiantey el borde de porcelana
° Quemadura de cualquiera de las unidadesde superficie radiante
Si este producto se utiliza para otros fines que no sean el uso familiar privado, las garantfas indicadas
arriba solo tendran vigencia durante 90 dfas.
EL SERVlCIO DE GARANTIA ESTAA SU DISPOSICIONCON SOLO PONERSE EN CONTACTO
CON EL CENTRO O DEPARTAMENTODE SERVICIO SEARS MAS CERCANOA USTED EN LOS
ESTADOSUNIDOS.
Para la reparaci6n o los repuestos
que necesita que se entreguen
Llame de 7 a.m. a 7 p.m., los 7 dias de la semana
1-800-366-PART
(1-800-366-7278)
Para la reparaci6n en casa
de las marcas principales
Llame durante las 24 horas del dia,
los 7 dias de la semana
1-800-4-MY-HOME _M
(1-800-469-4663)
wm.ml_l._lgl_|_mmelmmm_m_ mBl_q|om,=l_
Para la direcci6n de un Centro de Piezas
y Reparaci6n de Sears en su _rea
Llame durante las 24 horas del clio,
los 7 dias de la semana
1-800-488-1222
Si desea informaci6n acerca de la
compra de un Convenio de
Mantenimiento de Sears o para preguntar
acerca de un Convenio existente
Llame de 9 a.m. a 5 p.m., lunes a s6bado
1-800-827-6655
The ServiceSide of Sears._
.


