
Instructions for the Use and Care and Installation of
BCCT64X
Touch Control Cooktop


Dear Customer
You will nd that the modern look of your Blanco rangehood blends in perfectly with
your kitchen décor. It is easy to use and performs to a high standard.
Blanco also makes a range of products that will enhance your kitchen – such as cooktops,
ovens, dishwashers, microwaves, sinks and taps. There are models to complement your
new Blanco rangehood. Blanco now has a range of laundry products to choose from.
Of course, we make every e ort to ensure that our products meet all your requirements,
and our Customer Service Department is at your disposal, to answer your questions and
to listen to your suggestions.
Please complete the warranty section of this manual and keep your receipt as proof of
purchase. Retain all documents relating to the purchase of Blanco product.
Blanco is committed to providing increasingly e cient products that are easy to use,
respect the environment and are attractive and reliable.
BLANCO
- 3 -

SAFETY WARNINGS
· Read the following carefully to avoid an electric shock or re.
· It is most important that this instruction book should be retained with the appliance for future
reference.
· Should the appliance be sold or transferred, always ensure that the book is left with the appli-
ance in order that the new owner can get to know the functions of the appliance and the relevant
warnings.
· These warnings are provided in the interest of safety. You MUST read them carefully before install-
ing or using the appliance.
· All operations related to electrical wiring and installation must be carried out by quali ed persons,
in accordance with safety regulations.
· Means for disconnection must be incorporated in the xed wiring in accordance with the wiring
rules
· This appliance is not intended for use by young children or in rm persons unless they have been
adequately supervised by a responsible person to ensure that they can use the appliance safely.
· Young children should be supervised to ensure that they do not play with the appliance.
· WARNING: If the surface is cracked, switch o the appliance to avoid the possibility of an electric
shock
· Metallic objects such as knives, forks, spoons and lids should not be placed on the hob surface
since they can get hot.
· Do not spray aerosols in the vicinity of the appliance when it is in operation.
· Do not store or use ammable liquids or items in the vicinity of this appliance, e.g. aerosols.
· WARNING: Accessible parts will become hot when in use. To avoid burns and scalds children
should be kept away.
· Do not allow large cookware to overhang the hob onto the adjacent benchcooktop. This will
cause scorching to the benchcooktop surface.
· Before using the appliance, ensure that all packing materials are removed from the appli-
ance.
· Only authorised personnel should carry out servicing.
· Always ensure the appliance is switched o before cleaning or replacing parts.
· To maintain safe operation, it is recommended that the product be inspected every ve years
by an authorized service person.
· If the supply cord is damaged, it must be replaced by the manufacturer or its service agent or
similarly quali ed person in order to avoid a hazard.
· Do not use a steam cleaner to clean this appliance.
· Do not turn on the heating zones if aluminium foils or plastic items have been placed on the
hob surface.
Before connecting the appliance to the electricity supply:
Check that the voltage and power values listed on the data plate (positioned on the lower part of
the appliance) are compatible with the electricity supply and socket. If you have any doubts, please
consult a quali ed electrician for assistance.
GENERAL
Carefully read the contents of this manual since it provides important instructions regarding
safety of installation, use and maintenance. Keep the manual for possible future consultation. All
the operations relating to installation/replacement (electrical connections) must be carried out
by specialised personnel in conformity with the regulations in force.
Important
Avoid spilling liquid, therefore to boil or heat liquids, reduce the heat.
Do not leave the heating elements on with empty pots and pans or without receptacles.
- 4 -
When you have nished cooking, switch o the relevant heating element.
INSTALLATION INSTRUCTIONS
These instructions address specialised installers and serve as a guide for installation, adjustment
and maintenance in conformity with the laws and regulations in force. If a built-in oven or any
other appliance that generates heat must be tted directly under the glass-ceramic cooktop,
The COOKTOP MUST BE SUITABLY INSULATED in such a way that the heat generated by the oven,
measured on the bottom right of the cooktop, does not exceed 60°C. Failure to respect this
precaution may determine improper functioning of the TOUCHCONTROL system.
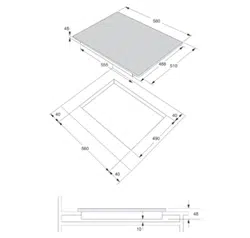
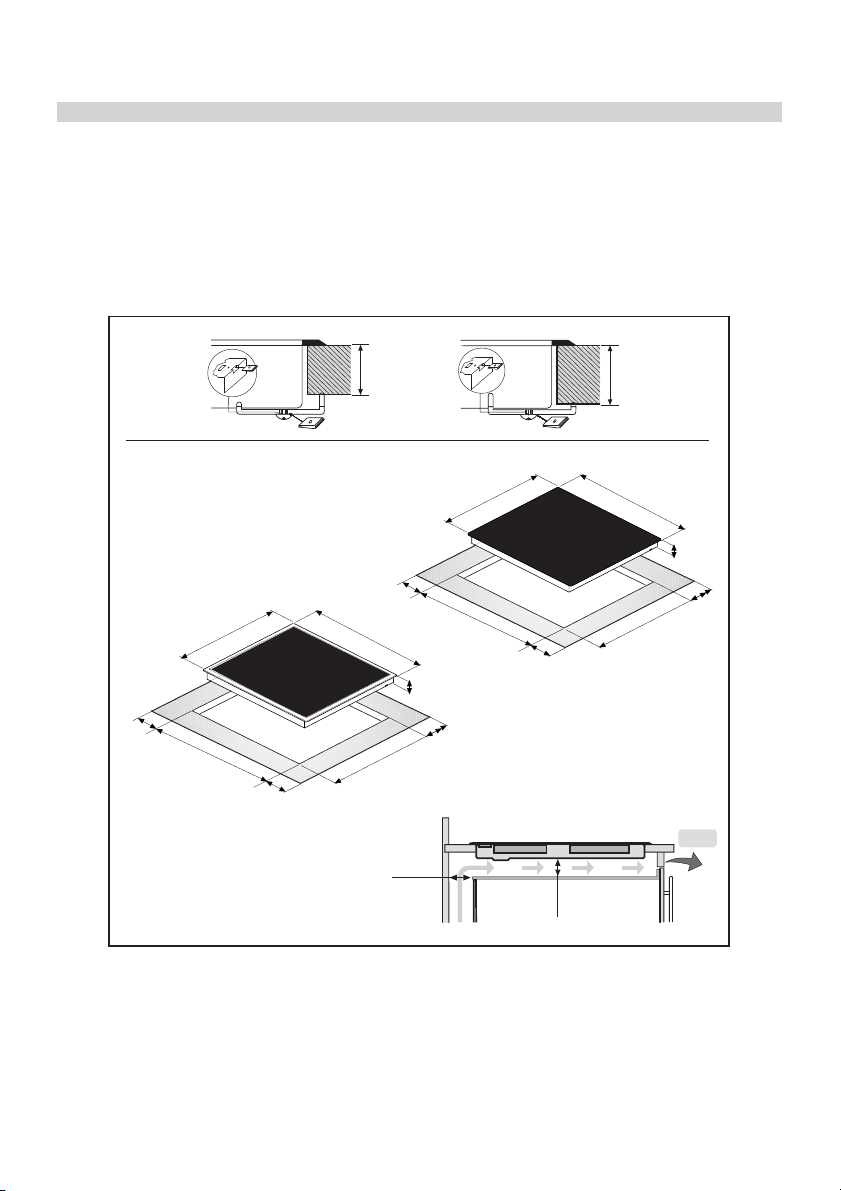
Positioning (fig.1)
20 mm
4 mm
25 mm
Dimension with frame
30 mm
40 mm
Dimension without frame
50
Min
490
53.5
50
M
in
510
48
5
8
0
560
50
Min
490
53.5
50
M
in
516
48
5
8
6
560
Front
Front
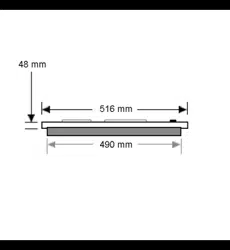
The domestic appliance is designed to be built into a worktop as illustrated in the specific
figure. Apply sealant around the entire perimeter (cut-out dimensions Fig.1B). Fix the domestic
appliance on the worktop by means of the 4 brackets provided, taking the thickness of the
worktop into account (Fig.1A). If the lower part of the appliance, after installation, is accessible
via the lower part of the cabinet then it is necessary to mount a separator panel respecting
the distances indicated (Fig.1C). If the appliance is installed with an oven underneath then the
separator is not necessary.
Fig. 1
A
B
- 5 -
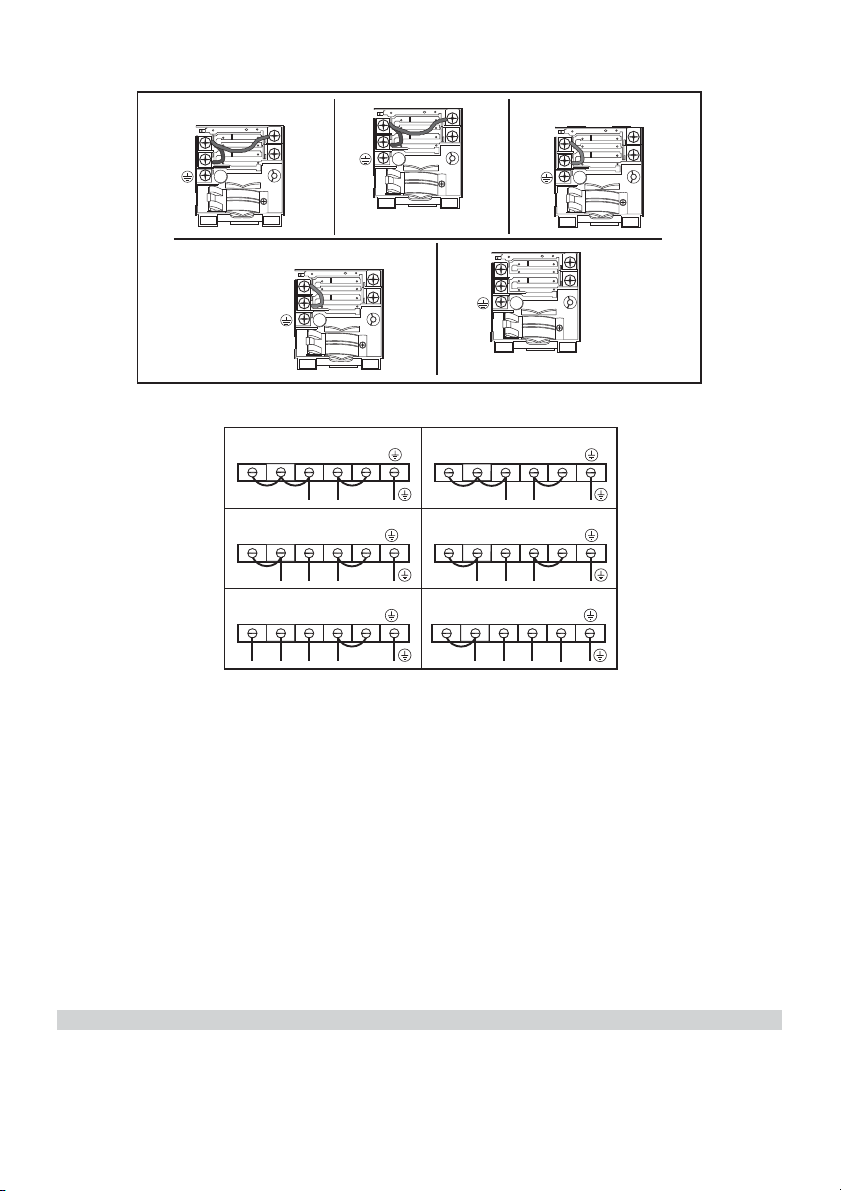
Electrical connectionS (Fig.2)
L
3
L
2
L
1
220-240V 3~ H05V2V2-F 4G 2.5mm
2
N
L
1
L
2
L
3
380-415V 3N~ H05V2V2-F 5G 2.5mm
2
L
N
220-240V 1N ~ H05V2V2-F 3G 2.5mm
2
L
2
L
1
N
380-415V 2N~ H05V2V2-F 4G 2.5mm
2
L
1
L
2
220-240V 2~ H05V2V2-F 3G 2.5mm
2
4321
43
L3
L2
21
L1
L2
L1
4
4
220-240 V3~ H05V2V2-F 4G
220-240 V2~ H05V2V2-F 3G
4 432
44
4 4
N
32
32
L2
L1
LN
1
1
1
220-240 V~ H05V2V2-F 3G
N
L3
L1
L2
380-415 V2N~ H05V2V2-F 4G
380-415 V3N~ H05V2V2-F 5G
220-240 V2N2~
H05V2V2-F 5G
43
N1
L2
21
L1
4
N2
Before making the electrical connections, check that:
- the ground cable is 2 cm longer than the other cables;
- the system ratings meet the ratings indicated on the identi cation plate xed on the lower part
of the worktop;
- the system is tted with e cient earthing compliant to the laws and regulations in force.
Earthing is obligatory by law.
If the appliance is not tted with a cable, use type:
“H05V2V2-F” for a power level of up to 6400 Watts, the cross-section of the cable should be at least
2.5 mm, or 4 mm for greater power levels.
The appliance is designed for permanent connection to the electricity supply and should therefore
be tted with an omnipolar switch which has a minimum opening of 3 mm between contacts. The
switch should be suitable for the charge indicated on the appliance data plate and must conform
to all current legislation (the yellow/green earth wire must not be interrupted by the switch).
The omnipolar switch must be easy to reach once the installation process has been completed.
USE AND MAINTENANCE
Maintenance
Remove any residues of food and drops of grease from the cooking surface using the special scraper
supplied (Fig.3).
- 6 -
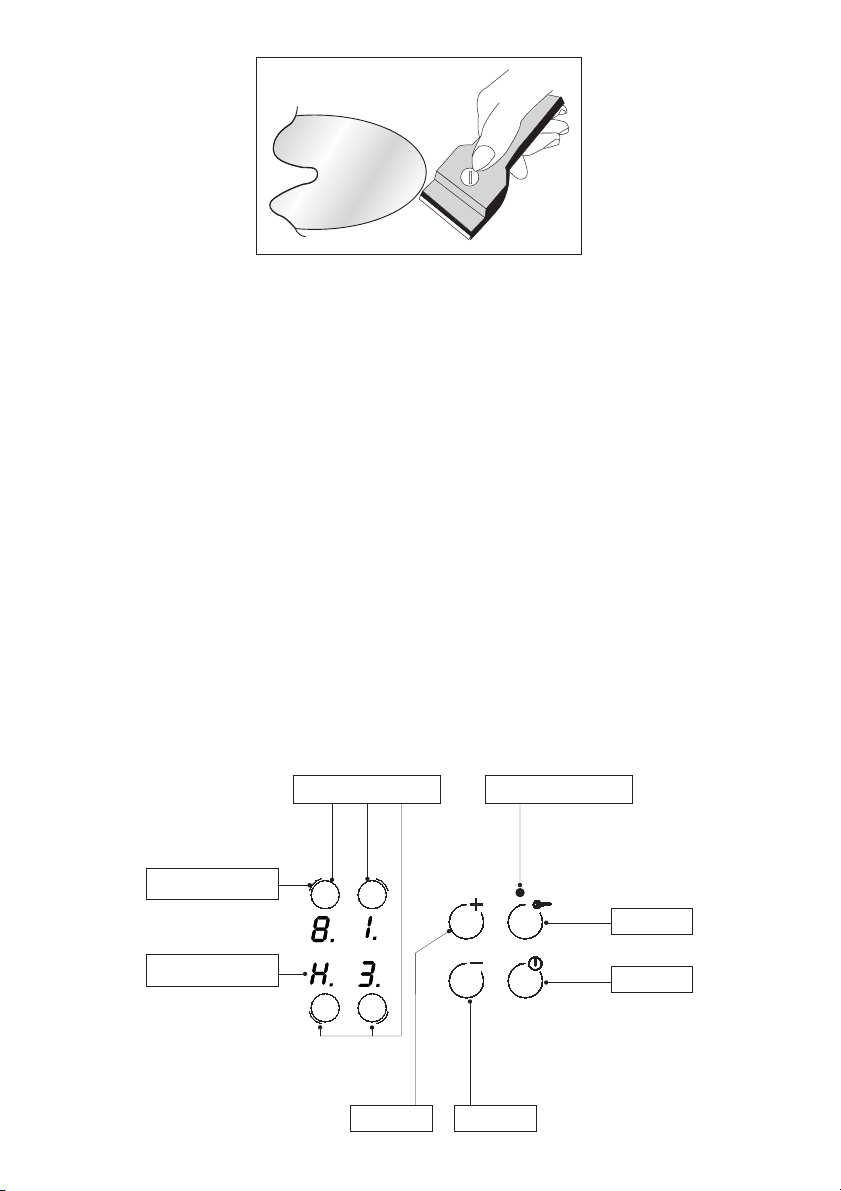
Clean the heated area as thoroughly as possible using SIDOL, STAHLFIX or similar products and a
cloth/paper, then rinse with water and dry with a clean cloth. Using the special scraper (optional)
immediately remove any fragments of aluminium and plastic material that have unintentionally
melted on the heated cooking area or residues of sugar or food with a high sugar content (Fig.3).
In this way, any damage to the cooktop surface is prevented. Under no circumstances use abrasive
sponges or irritating chemical detergents such as oven sprays or stain removers.
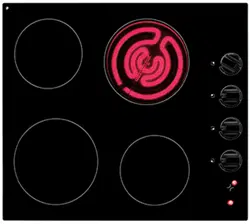
Use
Use the touch control system in the corresponding position relative to the individual cooking needs.
Keep in mind that the higher the number, the more heat that it is produced.
NOTE: THE COOKTOP HAS A LOCK FUNCTION.
The rst time the stove top is switched on, a key button indicating light (E) (Fig4) will be lit. By
pressing pad (B) ( g. 4) for 2 seconds, the lock function will be deactivated.
The B function blocks the functioning of the cooktop on selection. e.g.: if the function is activated
while the cooktop has one area switched on the programme remains blocked even if you try to
switch another area on. The same thing happens if the appliance is switched o and the function is
activated; the cooktop doesn’t switch on. To activate or deactivate it, hold a nger on the B sensor
for about two seconds. The function is active when warning light (E) is switched on.
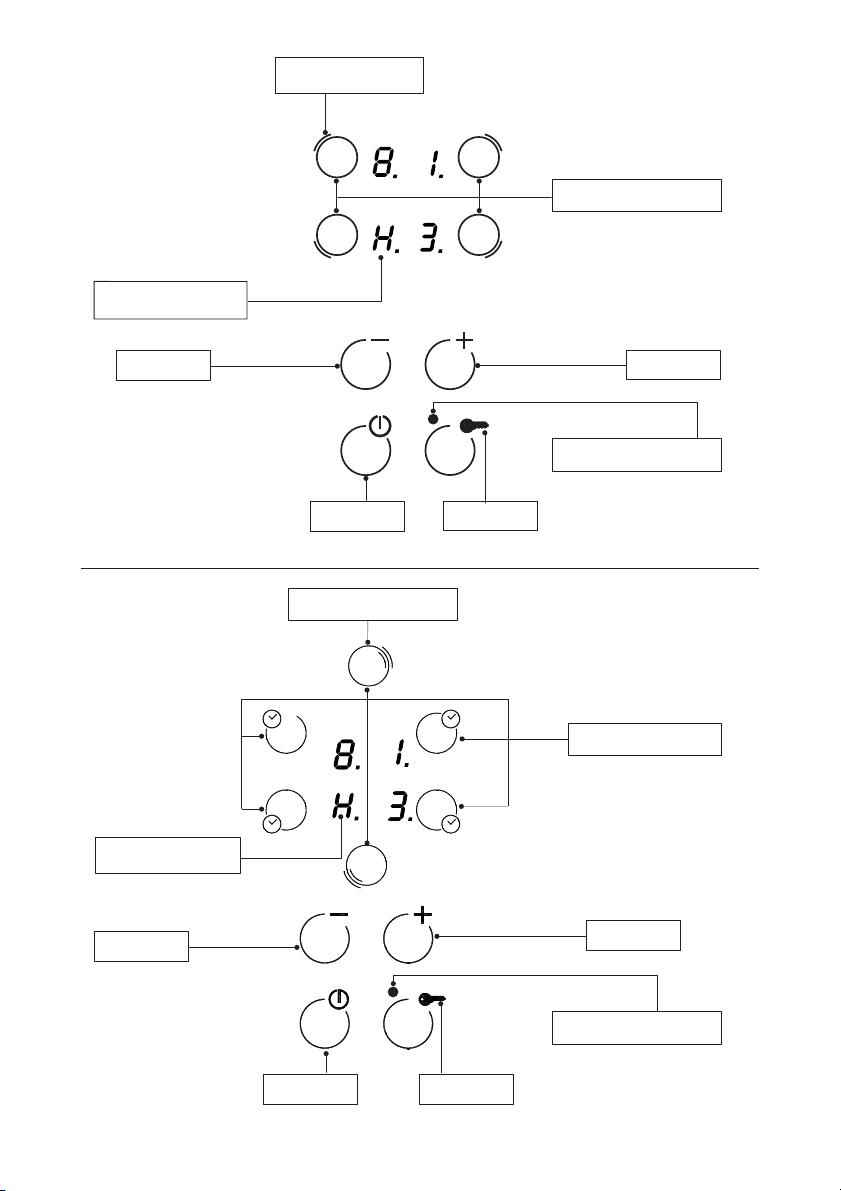
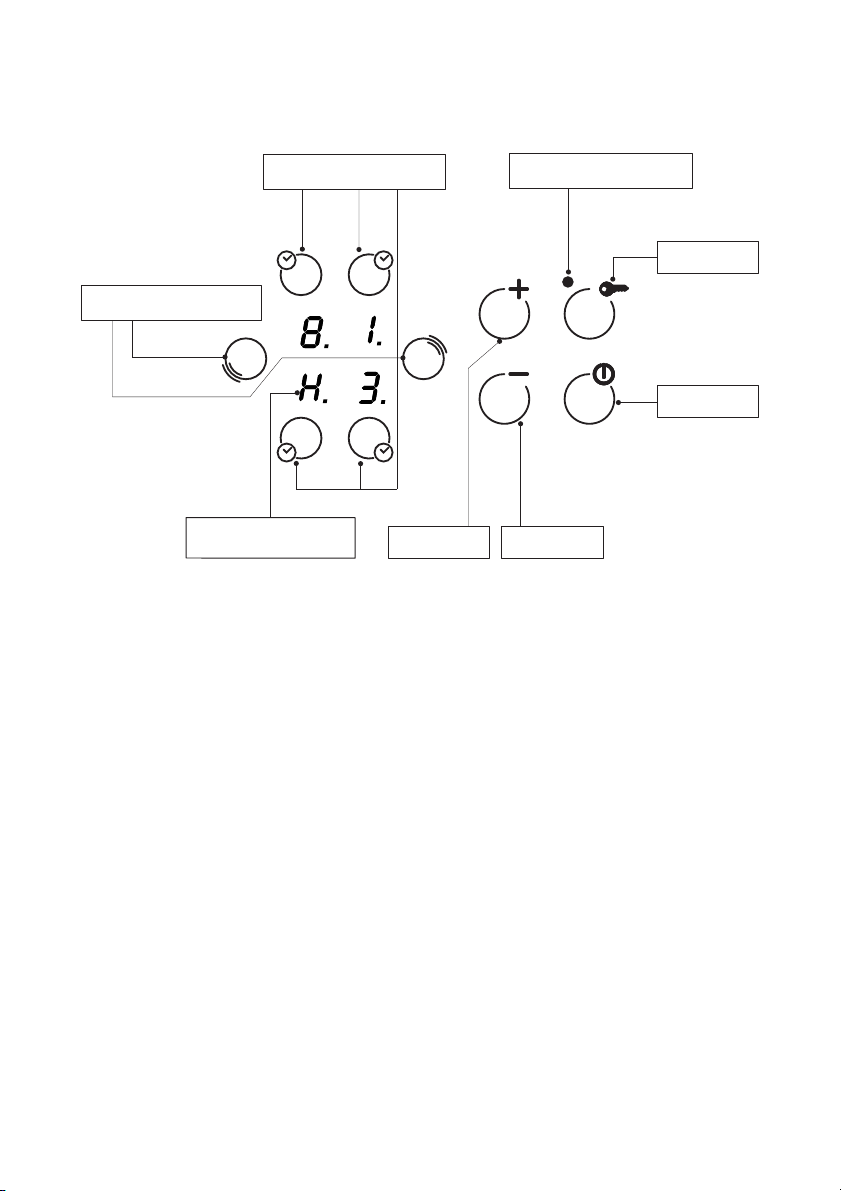
Functioning
On the basis of the model you own, the appliance can be switched on by touching On/O Pad “A”
(Fig.4-5-6-7-8 A). One zero will appear on all displays within 10 seconds. If no display is actuated
within 10 seconds, the cooktop will switch o again.
- Key cooking area selection
F
- Cooking area display
H
- Lock-key
B
- Key On/Off
A
- Key (-)
D
- Key (+)
C
- Key-lock on/off pilot light
E
- Heating zone indicator
G
Fig. 3
Fig. 4
- 7 -
F1
F2
- Key for double zone selection
L
- Key cooking area selection
F
- Key (+)
C
- Key-lock on/off pilot light
E
- Lock-key
B
- Key (-)
D
- Key On/Off
A
- Cooking area display
H
- Cooking area display
H
- Key On/Off
A
- Key-lock on/off pilot light
E
- Lock-key
B
- Key (-)
D
- Key (+)
C
- Key cooking area selection
F
- Heating zone indicator
G
Fig. 5
Fig. 6
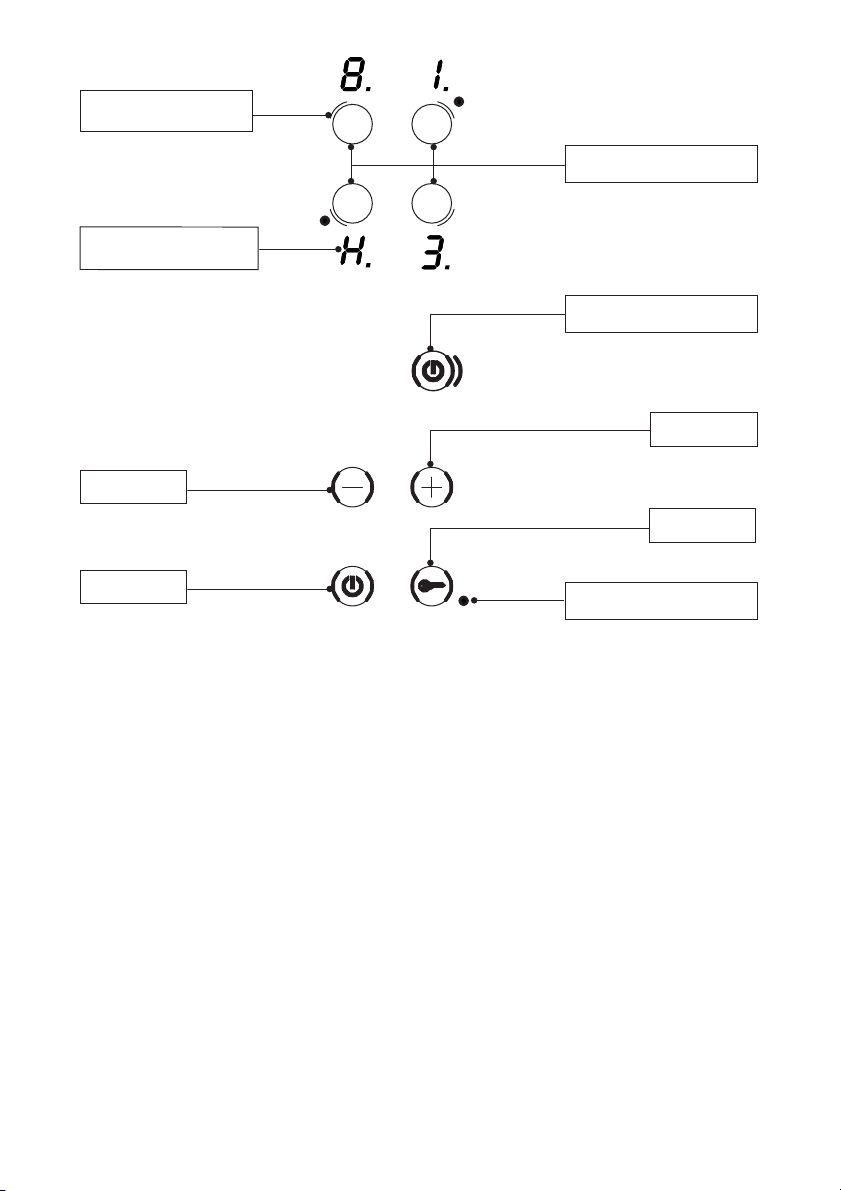
- 8 -
F1
F1
- Heating zone indicator
G
- Key cooking area selection
F
- Cooking area display
H
- Lock-key
B
- Key On/Off
A
- Key (-)
D
- Key (+)
C
- Key-lock on/off pilot light
E
- Key for double zone selection
L
- Touch selection pad F for the desired cooking zone, a ashing “0” will appear on the respective
display.
- A zone may be switched on by activating the “+” or “-” sensor within 10 seconds. If sensor D is
used, the display will show selection 9, while if sensor C is used, the display shows selection 1 or 5,
depending on the model.
- Once this operation has been performed choose the temperature adjustment with the “+” or “-”
pads.
- Zones can be individually switched o , select the zone by touching pad F, select “0” with the D
sensor, after 3 seconds the cooking zone is automatically switched o . It is always possible to switch
a plate o by touching the “+” and “-” sensors at the same time.
-The cooktop can be switched o by touching the main start-up sensor (Fig.4-5-6-7-8 A). If all the
plates are selected on “0” the cooktop will switch o after 10 seconds.
-If the cooktop is equipped with plates with an extension ( g.5-7-8) switching on of the outer zone
can be activated as follows.
- Check that the cooktop is not locked.
- Touch the On/O Pad “A” to switch the cooktop on.
- Choose the desired zone and adjust the power using the “+” or “-” pads.
- Once the power has been adjusted touch pad (L) to activate the double area.
- To deactivate the double zone select the appropriate zone ( g.5-7-8 F) and touch the pad ( g.5-7-8
L).
- If an object is placed above the controls, the cooking cooktop will automatically move to the OFF
position.
Fig. 7
- 9 -
- When a plate is in the OFF position and the temperature is higher than 50° there will be a luminous
signal “H” near to the respective selection key (Fig.4- 5- 6-7-8 H).
Timer (Fig.8).
F1
F2
- Key for double zone selection
L
- Cooking area display
H
- Key On/Off
A
- Key (-)
D
- Key (+)
C
- Lock-key
B
- Key cooking area selection
F
- Key-lock on/off pilot light
E
- Select the desired zone with the required power level.
- Press the selection key again of the already-activated zone.
- Using the “+” and “-” keys set the desired time.
-The decimal point at the side of the power level will indicate that the plate has the TIMER function
activated.
-
An acoustic signal will indicate switching o of the cooking area.
Heat up (Rapid heating)
Select the hotplate by pressing the + button until setting 9 is displayed; if the button is pressed
again a decimal point will appear on the display (next to the digit 9) for 5 seconds. This means the
“Heat up” function is active.
The desired power level (between 1 and 8) should be selected within 5 seconds.
If power level 9 is selected, the function is disabled.
To deactivate the Heat up function, simply select the + button and hold it down until setting 9 is
reached and the decimal point disappears from the display.
When the “Heat up” function is active, the previously selected temperature level may be increased
by pressing the (+) button.
Once the cooking zone has reached the selected temperature, the “Heat up” function is automati-
cally deactivated and the hob emits a BEEP. The cooking zone will operate in a constant manner,
at the set power level.
Saucepans.
It is recommended to use at-bottom pans with a diameter equal to or slightly larger than that of
the heated area. Do not use pans with a rough base to prevent scratching the heat surface of the
cooktop (Fig.9). We recommend the use of only Stainless Steel saucepans, which are at based and
excellent conductors of heat, therefore shortening the cooking time and reacting to temperature
changes more rapidly than other cookware.
Fig. 8
- 10 -
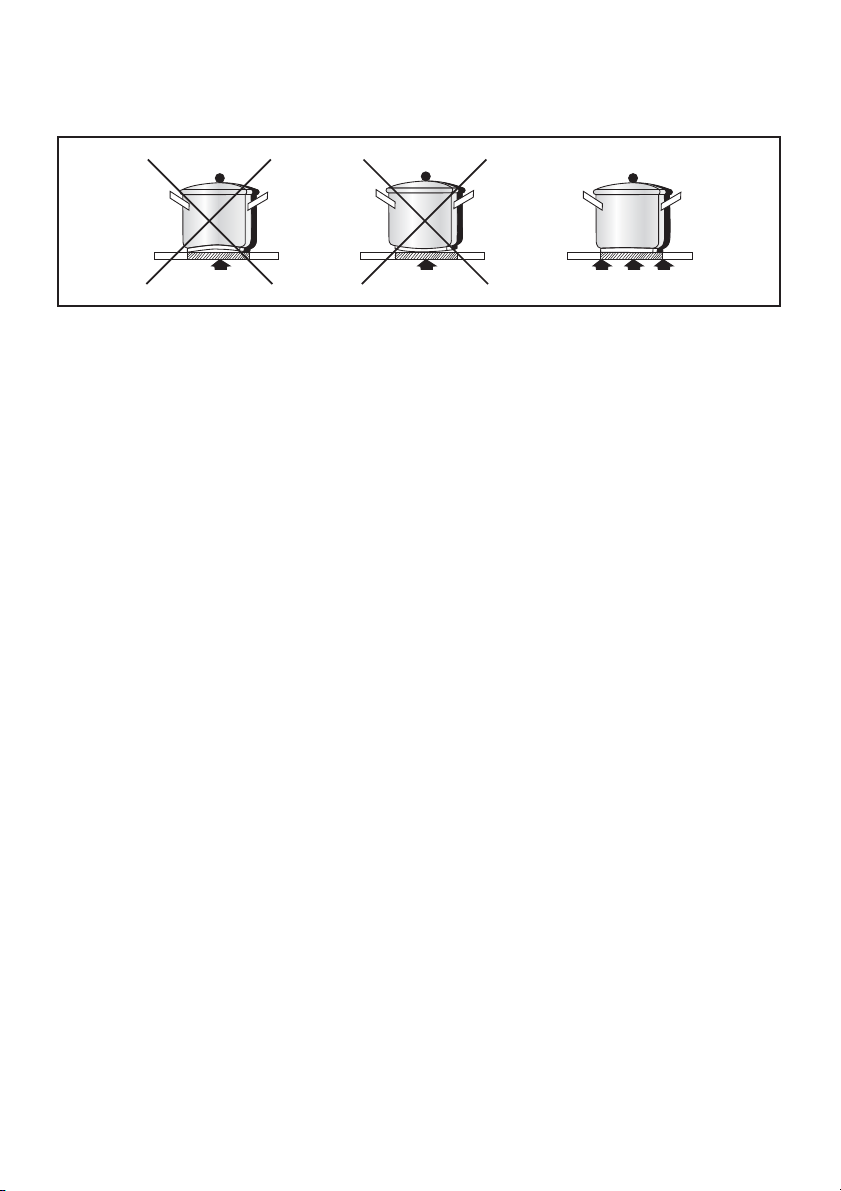
The use of cast iron, copper based and aluminium saucepans and pots is not recommended
as these can cause damage to the cooktop surface. The base of all cookware should be dry
prior to placing on the cooktop.
THE MANUFACTURER DECLINES ALL RESPONSIBILITY FOR EVENTUAL DAMAGES CAUSED
BY BREACHING THE ABOVE WARNINGS.
Fig. 9
- 11 -

Blanco Contact Information.
NEW SOUTH WALES
Head O ce, Sales & Marketing O ce
104 Vanessa Street
Kingsgrove NSW 2208
Telephone: 02 9503 2888
Facsimile: 02 9503 2810
NSW Showroom*
40 Ebley Street
Bondi Junction NSW 2022
Telephone: 02 9386 1190
Facsimile: 02 9386 1671
Agent and Sales O ce.
Hi –Performance Marketing
7 Coleman Street
Mascot NSW 2020
Telephone: 02 88354937
Facsimile: 02 90048739
Service and Spare Parts
All General Whitegoods Service
Telephone: 02 8788 8666
Facsimile: 02 9756 1091
AUSTRALIAN CAPITAL TERRITORY
Service and Spare Parts
Detlevs Appliance & Electrical Care
1/88 Sheppard Street
Hume
ACT 2905
Telephone: 02 6280 1033
Facsimile: 02 6260 1035
VICTORIA
State O ce and Showroom*
35 Centre Road
Scoresby VIC 3179
Telephone: 03 8756 7888
Facsimile: 03 8756 7907
Service and Spare Parts
Advantage Appliances
Telephone: 03 9874 4222
Facsimile: 03 9874 6917
QUEENSLAND
State O ce and Showroom*
148 Robinson Road - East
Geebung
QLD 4034
Telephone: 07 3259 2555
Facsimile: 07 3265 6933
Endeavour Appliances
Telephone: 07 3872 7444
Facsimile: 07 3852 2465
Platinum Appliance Service
Telephone: 07 3862 1154
Facsimile: 07 3862 1114
Roshad (Gold Coast)
Telephone 07 5535 7044
Facsimile 07 5535 7407
SOUTH AUSTRALIA & NORTHERN TERRITORY
Agent and Sales O ce
S C Lighting & Electrical Supplies
47 North Terrace
Hackney SA 5069
Telephone: 08 8362 4599
Facsimile: 08 8362 4591
Service and Spare Parts
Prestige Appliance Repair Centre
Telephone: 08 8352 2022
Facsimile: 08 8352 3044
WESTERN AUSTRALIA
1 Alvan Street
SUBIACO WA 6008
Telephone: 08 9382 1161
Service and Spare Parts
Metropolitan Appliance Repairs
Telephone: 08 9330 1724
Facsimile: 08 9317 1296
TASMANIA
Agent and Sales O ce
Mark Pearce Agencies
23 Tranmere Road
Howrah TAS 7018
Tel/Fax: 03 6247 9215
Service and Spare Parts
Electrical Equipment Service (Launceston)
Telephone: 03 6339 3873
Facsimile: 03 6339 4588
Baldocks Appliance Service (Hobart)
Telephone: 03 6234 5995
Facsimile: 03 6234 8134
BLANCO CUSTOMER SERVICE
1300 739 033
Website: www.meaappliances.com.au
* Showrooms open six days a week
- 12 -

BLANCO COOKING PRODUCT WARRANTY
STATEMENT OF STANDARD
WARRANTY CONDITIONS
1. Subject to the “Statement of Standard Warranty
Conditions” this product is covered by the following
Warranty.
TWO (2) YEARS WARRANTY from date of purchase,
covering all parts and labour.
2. The appliance is warranted under normal single
family domestic installation and use, as set out in the
instruction manual, against manufacturing defects
for the Warranty periods shown above.
3. Should service be required under this Warranty,
the purchaser should contact an approved BLANCO
Service Provider during their normal business hours.
4. At no time does BLANCO/MEA have liability for
any freight or transportation costs or for any damage
during transit or for any consequence of failure of this
appliance outside of the normal service area, unless
such limitation of liability is prohibited by statute.
5. This Warranty excludes replacement of parts re-
quired due to normal wear and tear including light
globes.
6. This Warranty only applies, provided the appliance
has been used in accordance with the manufactur-
er’s instructions and provided an accident, misuse,
neglect or abuse has not damaged the appliance.
7. None of the above Warranties purport to exclude,
restrict or modify either the application or the exer-
cise of a right conferred by any applicable Statute.
8. Please complete the details below, which should
be retained for future reference along with your
proof of purchase:
Date of Purchase: ……………………………..
Model No: ……………………………………….
Serial No: ………………………………………..
1. The Warranty only applies provided that the appli-
ance has been used in accordance with the manufac-
turer’s instructions and provided that the appliance
has not been damaged by an accident, misuse, ne-
glect or abuse of any person other than the manu-
facturer or BLANCO/Major Electrical Appliances
(“MEA”) or from faulty installation, mis-adjustment or
tampering by unauthorised persons.
2. When a service inspection reveals the alleged fault
or faults are caused by incorrect operation, contrary
to the instruction manual, and otherwise the appli-
ance is in good order and working condition, the
purchaser shall be liable for a service fee charged by
BLANCO/MEA or one of its’ Service Providers.
3. If the appliance is used in Commercial Applications
or for Rental purposes, a separate warranty of Twelve
(12) months covering all parts with Three (3) months
on the labour will apply.
4. Subject to the provisions of any applicable statute
this Warranty applies to the original retail purchaser
only and is not transferable.
5. Subject to the provisions of any applicable stat-
ute, at no time does BLANCO/MEA have liability for
freight, transport or travel costs outside normal ser-
vice areas.
6. None of the above Warranties purport to exclude,
restrict or modify either the application or the exer-
cise of a right conferred by any applicable statute.
7. Subject to any Warranties implied by statute, at no
time will BLANCO/MEA or its’ Service Providers be li-
able for any economic loss consequent upon the fail-
ure of the appliance.
8. This Warranty is only valid for major appliances im-
ported and distributed by BLANCO/MEA, purchased
and used in Australia.
MEA0702
- 13 -


3LIP0181
Printed on recycled paper