Loading ...
Loading ...
Loading ...
10
Control knob for minute minder
(for some models)
The minute minder is a countdown
timer which emits an audible signal
when the cooking time has elapsed.
The minute minder runs
independently of the oven.
Use this control knob to set the
cooking time.
USE OF THE ELECTRIC GRILL
Accessories
The accessories can be inserted in the oven in 4 different shelf
positions.
You can pull the accessories two-thirds of the way out without
them tipping. This allows dishes to be removed easily.
You can buy accessories from the after-sales service or
from specialist retailers.
Baking and roasting shelf
For ovenware, cake tins,
roasts, grilling and frozen
meals.
Enamelled baking tray
For moist cakes, pastries,
frozen meals and large
roasts. Can also be
inserted underneath the
wire rack or rotary spit and
used as a drip tray to
collect fat.
Rotisserie (option)
For roasts and large pieces
of poultry. Use only in
combination with the
enamelled baking tray.
Accessory Description
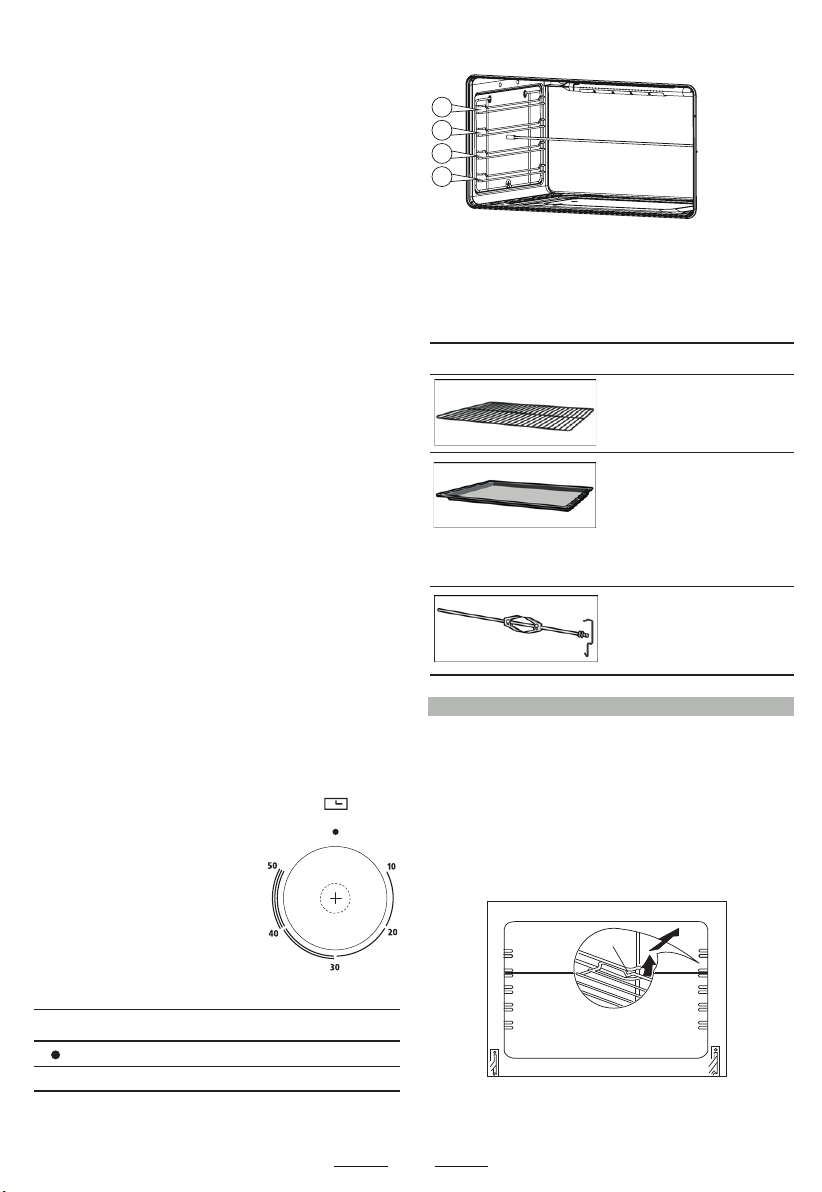
1
2
3
4
Setting Meaning
Off
1 - 59 Cooking time in minutes
Bump
Install shelves by locating them in the horizontal guide rails on
the oven walls. The raised portion of the shelf is to be facing
the rear wall of the oven.
USING THE GRILL
Turn the oven knob to the right and place it on the grill
position. The grill pan should be located on the top oven shelf
position. Always preheat the grill on full for 3-5 minutes before
inserting the food.
The user can change the shelves, depending on his personal
whishes and on the different food.
To remove the shelves from the oven, pull them forward
you, tilt front end upward and pull them out.
To replace it in the reverse of above.
over, it will automatically turn off the heating and the buzzer is
buzzing to inform the user.
Press twice to get into the continuous time setting mode
under the common mode, press three times to get into the
end time.
When the continuous time setting is ok or the end time setting
is ok, then press K2 to get into the other kind of automatic
program time setting, "Auto-programming Icon" flashes,
press K1 and K3 to ad just continuous time and end time
setting mode.
5s after automatic program setting, it will automatically work,
and "Auto-programming Icon" keeps lighting up. Turn off the
relay conntact, and the icon i s dark. When work until the
starting time, the relay contact is connected, the icon is light.
When the continuous time is counting down, if the continuous
time is 0,turn off the relay contact, "Relay Operation Icon" is
dark, "Auto-programming Icon" flashes, and the buzzer is
buzzing.
The continuous time and the end time under this model will be
set as follow: Starting time = end time - continuous time
For example, the present time is 2:00, set the continuous time
to 3:00, and the end time to 10:00, then the starting time is
7:00 (7:0010:003:00). The relay contact is connected and its
icon is light. After working for continuous 3 hours, the
continuous time is 0, turn off the relay contact, "Relay
Operation Icon" is dark, “Auto-programming Icon” flashes,
the buzzer is buzzing.
Note:
1 End time > present time + continuous time,
< but 23 hours and 59 minutes
For example: the present time is 2:00, continuous time is
0:01, then the range for end time is 2:02 (2:02 2:00+1).
2 Continuous time> 1 minute, continuous time and end time
both will be set.
3 If the continuous time is equ al to 0 or the end time is equal
to the present time it meas the automatic program is over.
4 When the automatic program is over, the continuous time is
0, and the end time is the same with the present time.
4Cancel Function
When semiautomatic or automatic function is starting, press
K1 and K3 at the same time which can cancel the automatic
mode. (to cancel continuous time and end time).
Loading ...
Loading ...
Loading ...