
Write the model and serial
numbers here:
Model # _________________
Serial # _________________
Find these numbers on a label
on the left side, near the middle
of the refrigerator compartment.
49-1000364 Rev. 1 12-19 GEA
PSB42
PSB48
OWNER’S MANUAL &
INSTALLATION
INSTRUCTIONS
REFRIGERATORS
Side by Side
GE is a trademark of the General Electric Company. Manufactured under trademark license.
SAFETY INSTRUCTIONS .....3
USING THE REFRIGERATOR
Controls ..........................5
Dispenser .........................6
Automatic Icemaker ................7
Sabbath Mode .....................7
Water Filter .......................8
Climate Controlled Drawer ..........9
Storage Drawers ...................9
Shelves ..........................10
Bins and Baskets ..................11
Wi-Fi Connect .................... 12
Care and Cleaning ................ 13
INSTALLATION INSTRUCTIONS
Preparing to Install the
Refrigerator ...................... 15
Installing the Refrigerator ..........20
TROUBLESHOOTING TIPS ..26
Normal Operating Conditions ......26
CONSUMER SUPPORT
MWF Performance Data Sheet ......29
MWF Water Filter Cartridge
Limited Warranty ...............30
Warranty ........................ 31
Consumer Support ................32
ESPAÑOL
Para consultar una version en
español de este manual de
instrucciones, visite nuestro sitio de
internet GEAppliances.com.
Française
Pour obtenir une version française
de ce manuel, visitez notre site
web sur GEAappliances.com.

2 49-1000364 Rev. 1
THANK YOU FOR MAKING GE APPLIANCES A PART OF YOUR HOME.
Whether you grew up with GE Appliances, or this is your first, we’re happy to have you in the family.
We take pride in the craftsmanship, innovation and design that goes into every GE Appliances
product, and we think you will too. Among other things, registration of your appliance ensures that we
can deliver important product information and warranty details when you need them.
Register your GE appliance now online. Helpful websites and phone numbers are available in the
Consumer Support section of this Owner’s Manual. You may also mail in the pre-printed registration
card included in the packing material.
49-1000364 Rev. 1 3
SAFETY INFORMATION
READ AND SAVE THESE INSTRUCTIONS
IMPORTANT SAFETY INFORMATION
READ ALL INSTRUCTIONS BEFORE USING THE APPLIANCE
CAUTION
To reduce the risk of injury when using your refrigerator, follow these basic safety precautions.
Ŷ 'RQRWFOHDQJODVVVKHOYHVRUFRYHUVZLWKZDUP
water when they are cold. Glass shelves and
covers may break if exposed to sudden temperature
changes or impact, such as bumping or dropping.
Tempered glass is designed to shatter into many
small pieces if it breaks.
Ŷ .HHSILQJHUVRXWRIWKH³SLQFKSRLQW´DUHDV
clearances between the doors and between the
doors and cabinet are necessarily small. Be careful
closing doors when children are in the area.
Ŷ 'RQRWWRXFKWKHFROGVXUIDFHVLQWKHIUHH]HU
compartment when hands are damp or wet, skin
may stick to these extremely cold surfaces.
Ŷ 'RQRWUHIUHH]HIUR]HQIRRGVZKLFKKDYHWKDZHG
completely.
Ŷ ,QIUHH]HUVZLWKDXWRPDWLFLFHPDNHUVDYRLGFRQWDFW
with the moving parts of the ejector mechanism, or
with the heating element that releases the cubes.
'RQRWSODFHILQJHUVRUKDQGVRQWKHDXWRPDWLFLFH
PDNLQJPHFKDQLVPZKLOHWKHIUHH]HULVSOXJJHGLQ
WARNING
To reduce the risk of fire, explosion, electric shock, or injury when using your refrigerator, follow
these basic safety precautions:
Ŷ 7KLVUHIULJHUDWRUPXVWEHSURSHUO\LQVWDOOHG
DQGORFDWHGLQDFFRUGDQFHZLWKWKH,QVWDOODWLRQ
,QVWUXFWLRQVEHIRUHLWLVXVHG
Ŷ
Unplug the refrigerator before making repairs, or
cleaning.
NOTE: Power to the refrigerator cannot be
disconnected by any setting on the control panel.
NOTE: Repairs must be performed by a qualified
Service Professional.
Ŷ 5HSODFHDOOSDUWVDQGSDQHOVEHIRUHRSHUDWLQJ
Ŷ 'RQRWXVHDQH[WHQVLRQFRUG
Ŷ .HHSIODPPDEOHPDWHULDOVDQGYDSRUVDZD\IURPWKH
refrigerator.
Ŷ 'RQRWVWRUHH[SORVLYHVXEVWDQFHVVXFKDVDHURVRO
cans with a flammable propellant in this appliance.
Ŷ 7RSUHYHQWVXIIRFDWLRQDQGHQWUDSPHQWKD]DUGV
WRFKLOGUHQUHPRYHWKHUHIULJHUDWRUDQGIUHH]HU
doors from any refrigerator before disposing of it or
discontinuing its use.
Ŷ 7RDYRLGVHULRXVLQMXU\RUGHDWKFKLOGUHQVKRXOGQRW
stand on, or play in or with the appliance.
Ŷ &KLOGUHQDQGSHUVRQVZLWKUHGXFHGSK\VLFDOVHQVRU\
or mental capabilities or lack of experience and
knowledge can use this appliance only if they are
supervised or have been given instructions on safe
XVHDQGXQGHUVWDQGWKHKD]DUGVLQYROYHG
Ŷ 7KLVDSSOLDQFHLVLQWHQGHGWREHXVHGLQKRXVHKROG
and similar applications such as: staff kitchen areas
LQVKRSVRIILFHVDQGRWKHUZRUNLQJHQYLURQPHQWV
IDUPKRXVHVE\FOLHQWVLQKRWHOVPRWHOVEHG
EUHDNIDVWDQGRWKHUUHVLGHQWLDOHQYLURQPHQWV
catering and similar non-retail applications.
Ŷ&RQQHFWWRSRWDEOHZDWHUVXSSO\RQO\$FROGZDWHU
supply is required for automatic icemaker operation.
The water pressure must be between 40 and 120 psi
(275-827 kilopascals).
Ŷ 'RQRWDSSO\KDUVKFOHDQHUVWRWKHUHIULJHUDWRU
Certain cleaners will damage plastic which may
cause parts such as the door or door handles to
detach unexpectedly. See the Care and Cleaning
section for detailed instructions.
WARNING
FIRE OR EXPLOSION HAZARD Flammable Refrigerant
This appliance contains isobutane refrigerant,
also known as R600a, a natural gas with high
environmental compatibility. However, it is also
combustible. Adhere to the warnings below to
reduce the risk of injury or property damage.
1. When handling, installing and operating the
appliance, care should be taken to avoid damage to
the refrigerant tubing.
2. 6HUYLFHVKDOORQO\EHSHUIRUPHGE\DXWKRUL]HG
VHUYLFHSHUVRQQHO8VHRQO\PDQXIDFWXUHUDXWKRUL]HG
service parts.
3. 'LVSRVHRIUHIULJHUDWRULQDFFRUGDQFHZLWKWKH
Federal and Local Regulations. The flammable
refrigerant and insulation material used in this
product require special disposal procedures. Contact
your local authorities for the environmentally safe
disposal of your refrigerator.
4. .HHSYHQWLODWLRQRSHQLQJVLQWKHDSSOLDQFH
enclosures or in the built-in structure clear of
obstruction.
5. To remove frost, scrape with a plastic or wood
VSDWXODRUVFUDSHU'RQRWXVHDQLFHSLFNRUDPHWDO
or sharp-edged instrument as it may puncture the
IUHH]HUOLQHUDQGWKHQWKHIODPPDEOHUHIULJHUDQW
tubing behind it.
6. 'RQRWXVHHOHFWULFDODSSOLDQFHVLQVLGHWKHIRRG
storage compartment of the appliance.
7. 'RQRWXVHDQ\HOHFWULFDOGHYLFHWRGHIURVW\RXU
IUHH]HU
4 49-1000364 Rev. 1
CONNECTING ELECTRICITY
Do not, under any circumstances, cut or remove the third (ground) prong from the power cord.
For personal safety, this appliance must be properly grounded.
The power cord of this appliance is equipped with a
3-prong (grounding) plug which mates with a standard
SURQJJURXQGLQJZDOORXWOHWWRPLQLPL]HWKH
SRVVLELOLW\RIHOHFWULFVKRFNKD]DUGIURPWKLVDSSOLDQFH
Have the wall outlet and circuit checked by a qualified
electrician to make sure the outlet is properly
grounded.
Where a standard 2-prong wall outlet is encountered, it
is your personal responsibility and obligation to have it
replaced with a properly grounded 3-prong wall outlet.
'RQRWXVHDQDGDSWHU
The refrigerator should always be plugged into its own
individual electrical outlet which has a voltage rating
that matches the rating plate.
$9ROW$&+]RUDPSIXVHGJURXQGHG
electrical supply is required. This provides the best
performance and also prevents overloading house
ZLULQJFLUFXLWVZKLFKFRXOGFDXVHDILUHKD]DUGIURP
overheated wires.
Never unplug your refrigerator by pulling on the power
cord. Always grip plug firmly and pull straight out from
the outlet.
,PPHGLDWHO\GLVFRQWLQXHXVHRIDGDPDJHGVXSSO\
FRUG,IWKHVXSSO\FRUGLVGDPDJHGLWPXVWEH
replaced by a qualified service professional with an
DXWKRUL]HGVHUYLFHSDUWIURPWKHPDQXIDFWXUHU
When moving the refrigerator away from the wall, be
careful not to roll over or damage the power cord.
WARNING
ELECTRICAL SHOCK HAZARD
Plug into a grounded 3-prong outlet
'RQRWUHPRYHWKHJURXQGSURQJ
'RQRWXVHDQDGDSWHU
Failure to follow these instructions can result in death, fire, or electrical shock.
SAFETY INFORMATION
IMPORTANT SAFETY INFORMATION
READ ALL INSTRUCTIONS BEFORE USING THE APPLIANCE
READ AND SAVE THESE INSTRUCTIONS
PROPER DISPOSAL OF YOUR OLD REFRIGERATOR
WARNING
SUFFOCATION AND ENTRAPMENT HAZARD
Failure to follow these disposal instructions can result in death or serious injury
IMPORTANT: Child entrapment and suffocation are
not problems of the past. Junked or abandoned
refrigerators are still dangerous even if they will sit
IRU³MXVWDIHZGD\V´,I\RXDUHJHWWLQJULGRI\RXUROG
refrigerator, please follow the instructions below to help
prevent accidents.
Before You Throw Away Your Old Appliance
Ŷ7DNHRIIWKHIUHVKIRRGDQGIUHH]HUGRRUV
Ŷ Leave the shelves in place so that children may not
easily climb inside.
Refrigerant and Foam Disposal:
'LVSRVHRIDSSOLDQFHLQDFFRUGDQFHZLWK)HGHUDODQG/RFDO5HJXODWLRQV)ODPPDEOHUHIULJHUDQWXVHGUHTXLUHV
special disposal procedures. Contact your local authorities for the environmentally safe disposal of your appliance.
INSTALLATION
WARNING
FIRE OR EXPLOSION HAZARD
.HHSIODPPDEOHPDWHULDOVDQGYDSRUVDZD\IURPUHIULJHUDWRU)DLOXUHWRGRVRFDQUHVXOWLQILUHH[SORVLRQRUGHDWK
WARNING
Tip Over Hazard.
These appliances are top heavy, especially with any doors open, and must be secured to prevent tipping forward
which could result in death or serious injury. Read and follow the entire installation instructions for securing the
appliance with the anti-tip system.
49-1000364 Rev. 1 5
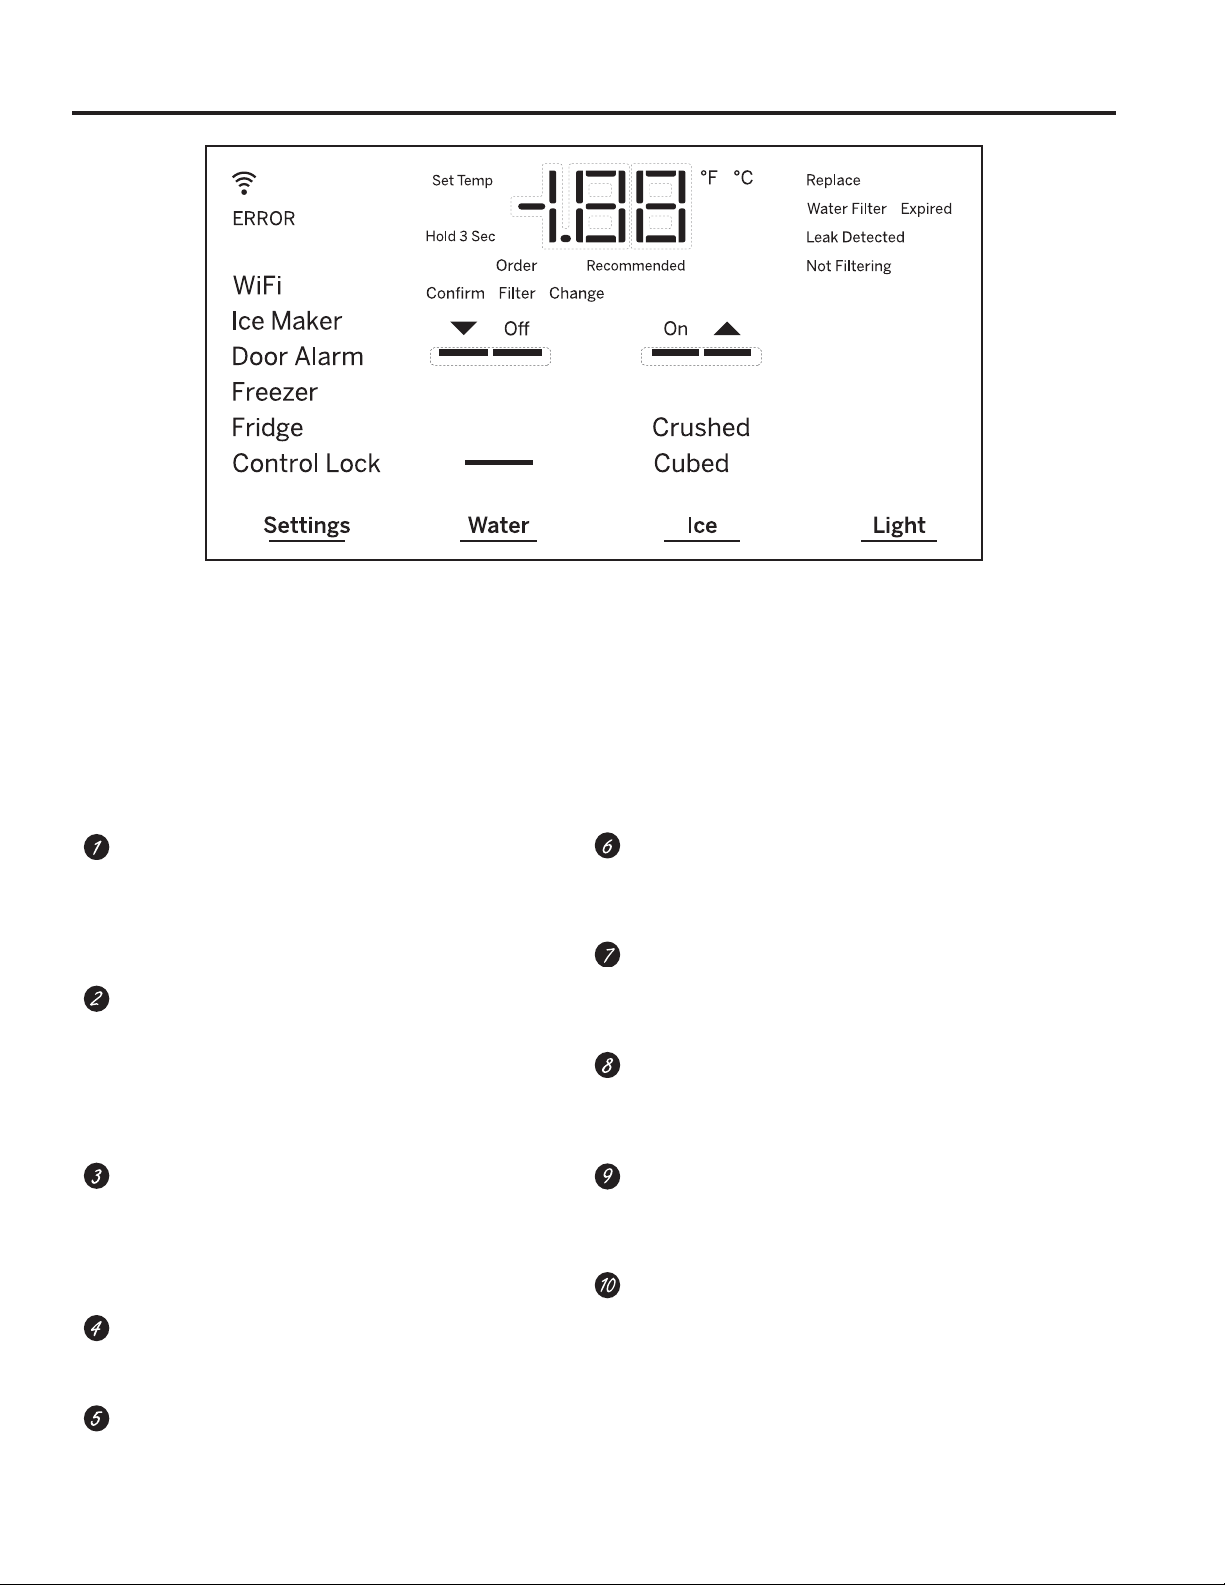
Controls
USING THE REFRIGERATOR: Controls
The temperature controls are preset in the factory at 37°F (3°C) for the refrigerator compartment and 0°F (-18°C) for
WKHIUHH]HUFRPSDUWPHQW$OORZKRXUVIRUWKHWHPSHUDWXUHWRVWDELOL]HWRWKHSUHVHWUHFRPPHQGHGVHWWLQJV
The temperature controls display the SETWHPSHUDWXUHLQWKHUHIULJHUDWRUDQGIUHH]HU7KHDFWXDOWHPSHUDWXUHPD\
vary slightly from the SET temperature based on usage and operating environment.
NOTE: The refrigerator is shipped with protective film covering the temperature controls.
,IWKLVILOPZDVQRWUHPRYHGGXULQJLQVWDOODWLRQUHPRYHLWQRZ
Changing the Temperature
To change the temperature, press the Settings
NH\XQWLO)ULGJHRU)UHH]HULVVHOHFWHG7KHGLVSOD\
will show the current set temperature, press the
up or down arrow bars until the desired temperature
is displayed.
Cooling System On/Off
To turn off cooling system, press the Settings key,
QDYLJDWHWR³)ULGJH´RU³)UHH]HU´LQ6HWWLQJVPHQX
7KHQSUHVVDQGKROGWKH,FHDQG/LJKWNH\VIRU
seconds. Press the Off button to turn the cooling
system off OR press the On button to turn the
cooling system on.
Lock Controls
To lock out the ice and water dispenser and all
feature and temperature buttons, press the Settings
menu for Control Lock and select ON. To turn off,
press the Settings menu for Control Lock and
select Off.
LED dispenser Light
/LJKWNH\LV/('OLJKWLQJWKDWFDQEHWXUQHG2Q2IIWR
light your dispenser.
Door Alarm
6RXQGVWRDOHUWZKHQWKHIUHH]HURUUHIULJHUDWRU
door has been open for more than 2 minutes.
,WLVDFFHVVLEOHWKURXJKWKH6HWWLQJV0HQXWRWXUQ
Off or On.
Ice Maker Setting
To turn the ice maker Off or On, press the Settings key
XQWLO,FH0DNHULVVHOHFWHGDQGWKHQVHOHFWWKHGHVLUHG
setting.
Metric/English units
3UHVVWKH6HWWLQJVNH\XQWLO,FH0DNHULVVHOHFWHG
SUHVVDQGKROGWKH,FHDQG/LJKWNH\VDWWKHVDPHWLPH
for 3 seconds. Select degrees F or degrees C.
Reset water Filter
3UHVVWKH6HWWLQJVNH\XQWLO,FH0DNHULVVHOHFWHG
SUHVVDQGKROGWKH:DWHUDQG,FHNH\VDWWKHVDPH
time for 3 seconds.
TurboFreeze
TM
setting
$FWLYDWH7XUER)UHH]HWRTXLFNO\UHVWRUHIUHH]HU
temperature after frequent door openings. Only
available through the mobile app.
TurboCool
TM
setting
Activate TurboCool to quickly restore refrigerator
temperature after frequent door openings. Only
available through the mobile app.
6 49-1000364 Rev. 1
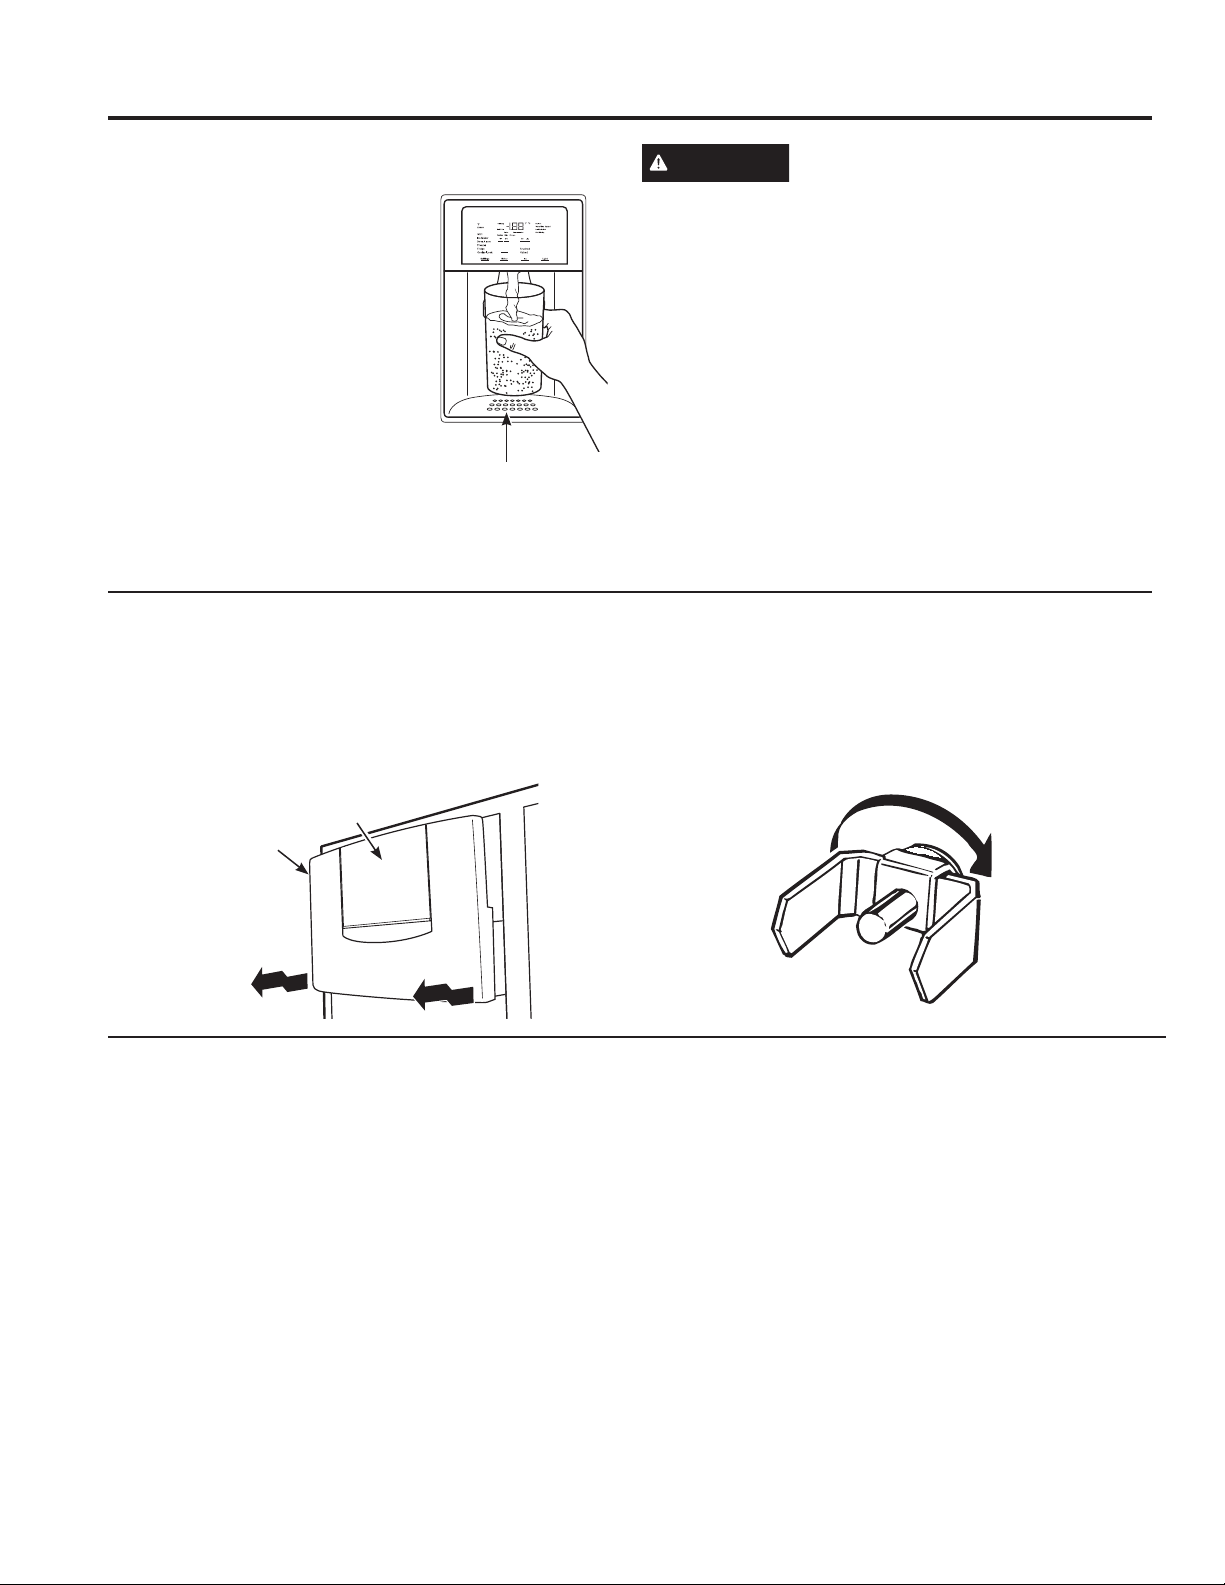
Ice and Water Dispenser (On some models.)
To dispense water or ice: select Water, Crushed, or Cubed.
Press the glass gently against the
top of the dispenser cradle.
The drip tray is not self-draining.
To reduce water spotting, the
shelf and its grille should be
cleaned regularly.
,IQRZDWHULVGLVSHQVHGZKHQ
the refrigerator is first installed,
there may be air in the water
line system. Press the dispenser
cradle for at least two minutes to
remove trapped air from the water
line and to fill the water system.
To flush out impurities in the water line, throw away the
first gallon (3.8 liters) of water.
CAUTION
Never put fingers or any other
objects into the ice crusher discharge opening.
Locking the Dispenser:
Press Settings menu for Control Lock and select ON. To
unlock, press Settings menu for Control Lock and select
OFF.
Light:
This feature turns the light on and off. The light also
comes on when the dispenser cradle is pressed.
Important Facts About Your Dispenser
Ŷ'RQRWDGGLFHIURPWUD\VRUEDJVWRWKHVWRUDJHELQ,W
may not crush or dispense well.
Ŷ$YRLGRYHUILOOLQJJODVVZLWKLFHDQGXVHRIQDUURZJODVVHV
Backed-up ice can jam the chute or cause the door in the
FKXWHWRIUHH]HVKXW,ILFHLVEORFNLQJWKHFKXWHSRNHLW
through with a wooden spoon.
Ŷ%HYHUDJHVDQGIRRGVVKRXOGQRWEHTXLFNFKLOOHGLQWKH
ice storage bin. Cans, bottles or food packages in the
storage bin may cause the icemaker or auger to jam.
Ŷ7RNHHSGLVSHQVHGLFHIURPPLVVLQJWKHJODVVSXWWKH
glass close to, but not touching, the dispenser opening.
Ŷ6RPHFUXVKHGLFHPD\EHGLVSHQVHGHYHQWKRXJK\RX
selected Cubed. This happens occasionally when a few
cubes have been left in the crusher.
Ŷ$IWHUFUXVKHGLFHLVGLVSHQVHGVRPHZDWHUPD\GULSIURP
the chute.
Ŷ6RPHWLPHVDVPDOOPRXQGRIVQRZZLOOIRUPRQWKHGRRU
in the ice chute. This condition is normal and usually
occurs when you have dispensed crushed ice repeatedly.
The snow will eventually evaporate.
Ŷ7KHILUVWJODVVRIZDWHUGLVSHQVHGPD\EHZDUPHUWKDQ
the following ones. This is normal.
Ŷ'LVSHQVHGZDWHULVQRWLFHFROG)RUFROGHUZDWHUVLPSO\
add crushed ice or cubes before dispensing water.
Ŷ 7RHOLPLQDWHGULSVRQWKHGULSWUD\WLOWWKHJODVVLQ
slightly when dispensing water.
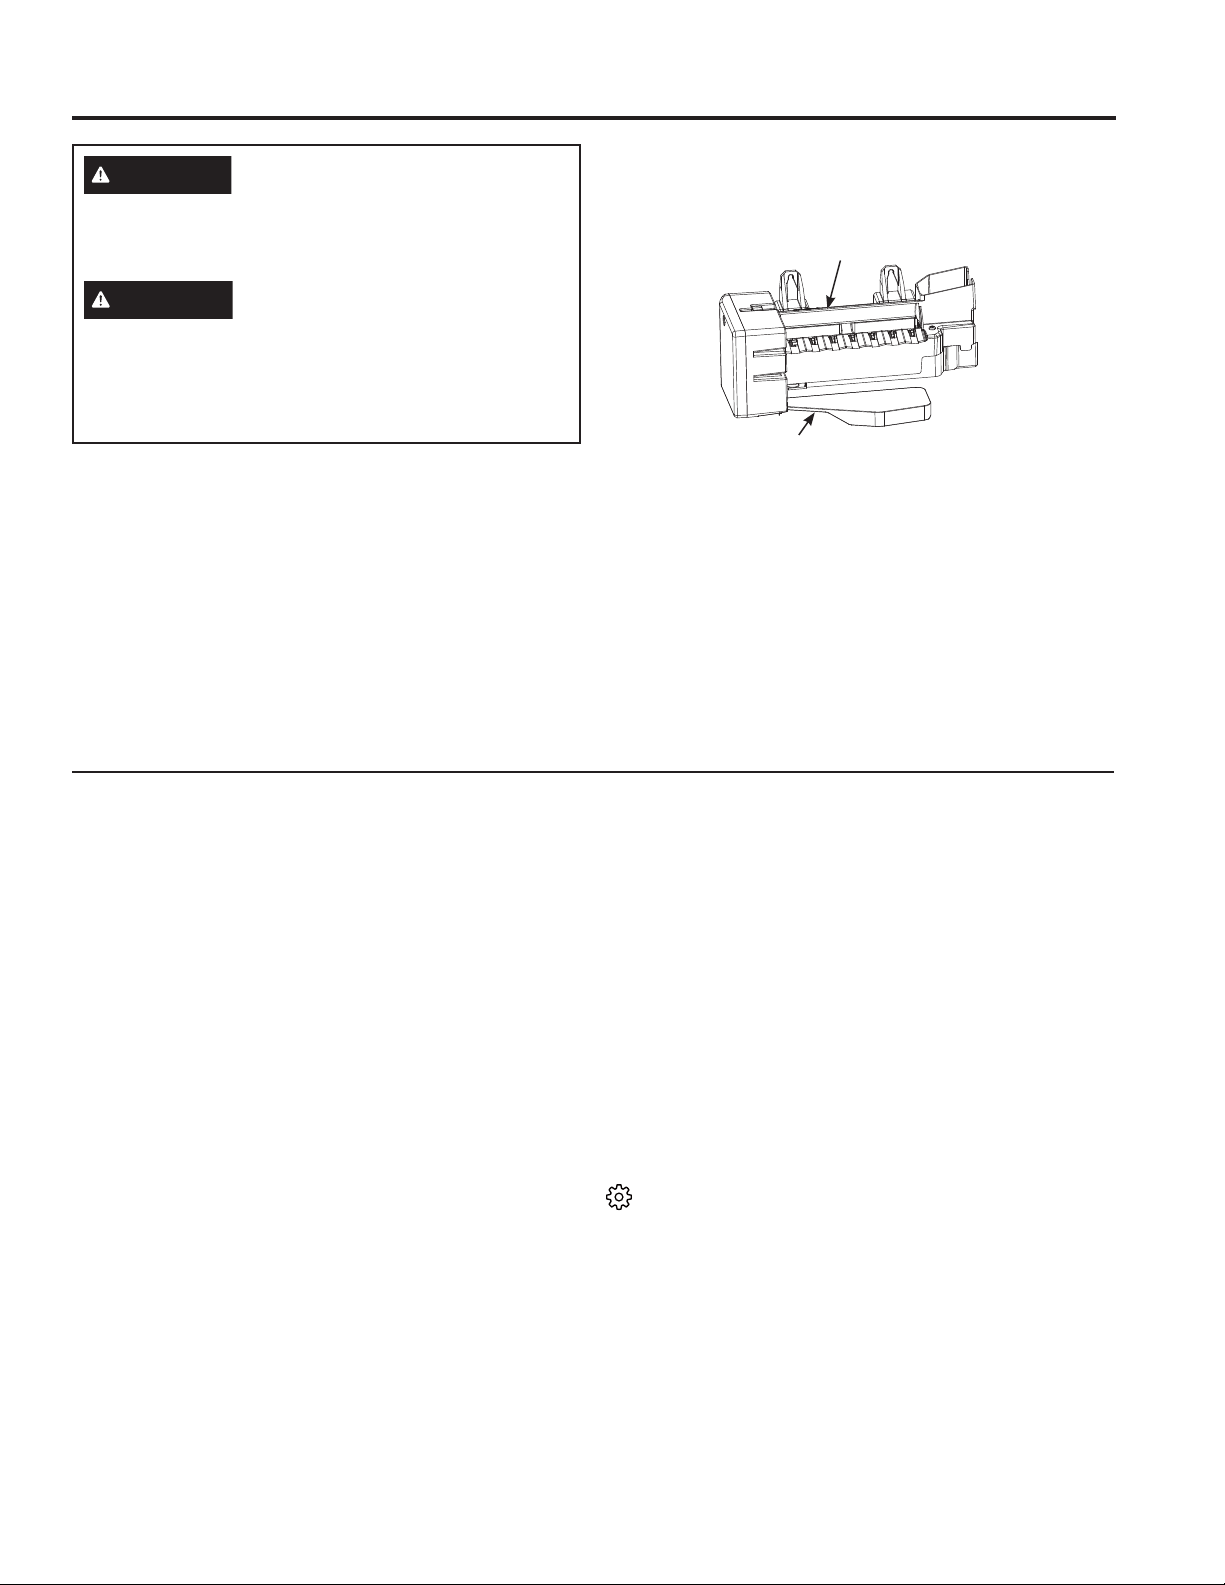
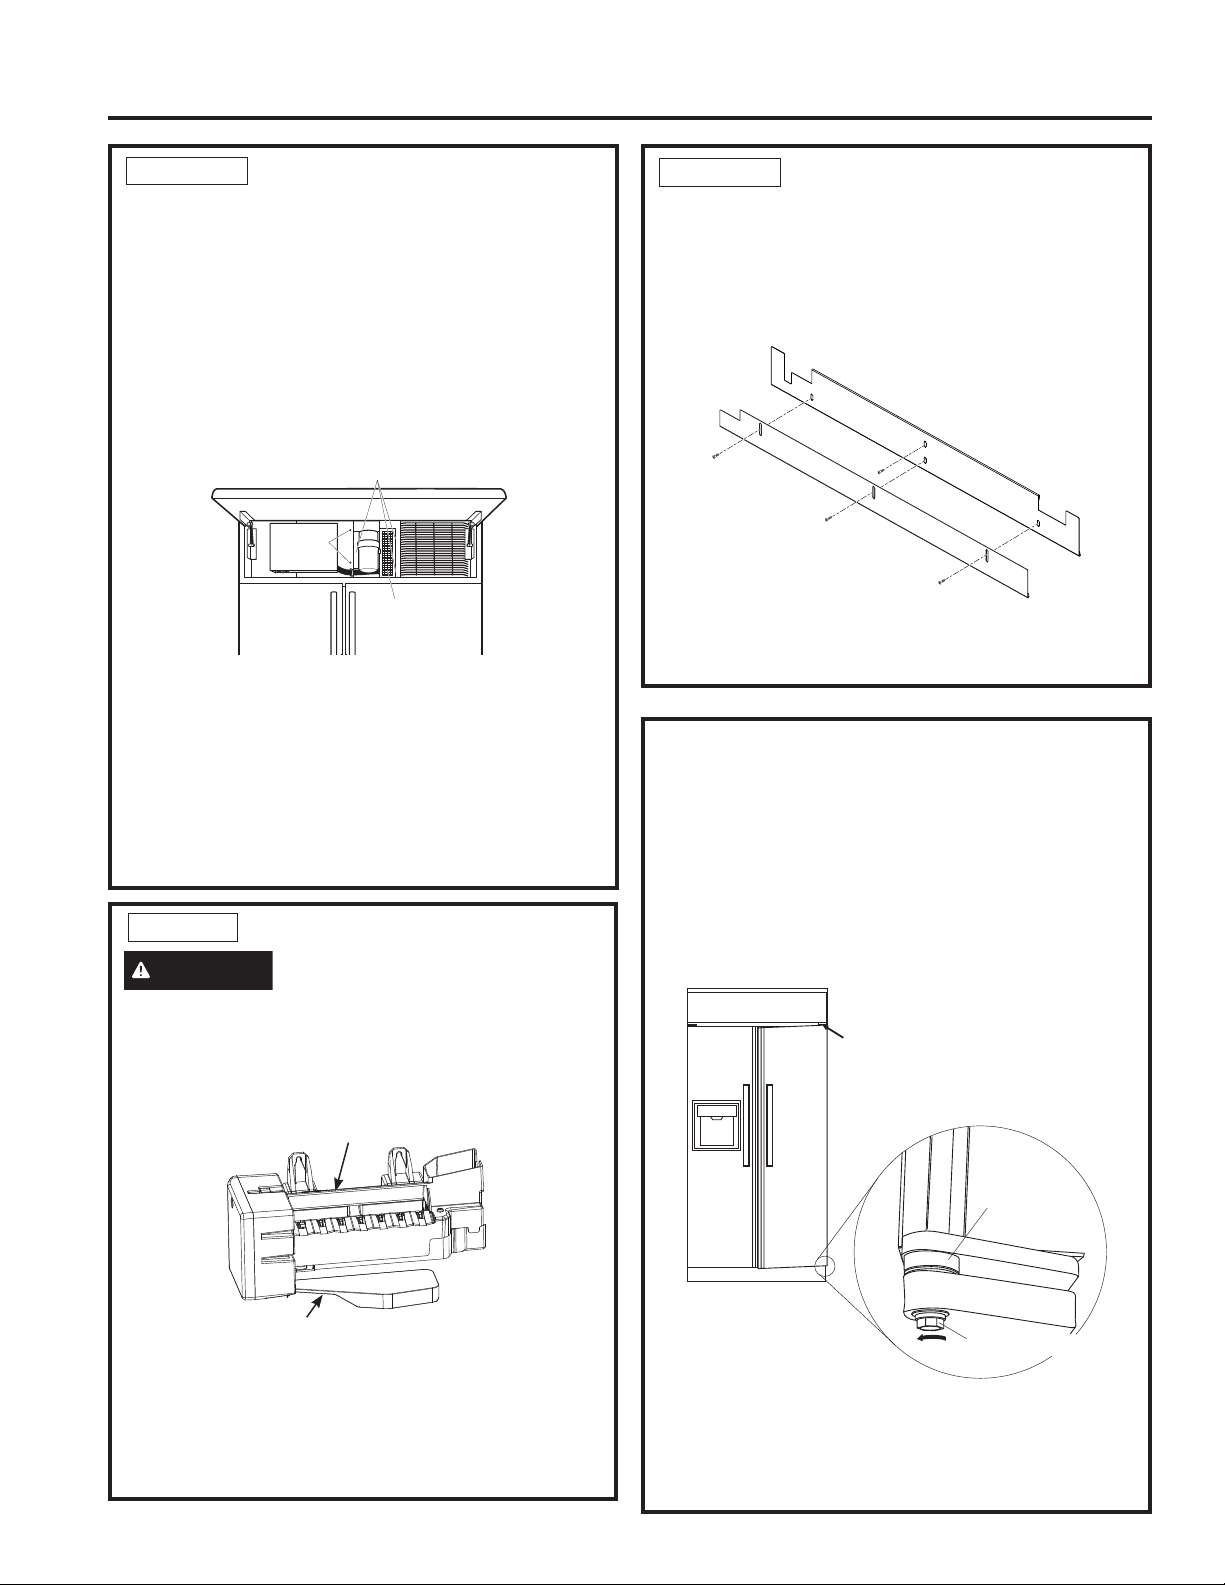
Ice Storage Drawer on Dispenser Models
To remove:
Lift up the access door to reach the icemaker. Set the
icemaker power switch to the OFF position. With the
access door closed, support the storage bin at the
bottom while slightly lifting. Pull bin straight out.
To replace:
Slide the bin back until the tab on the bin locks into the
VORWRQWKHVKHOI,IWKHELQGRHVQRWJRDOOWKHZD\EDFN
UHPRYHLWDQGURWDWHWKHGULYHPHFKDQLVPWXUQ7KHQ
push the bin back again.
Drive
Mechanism
Rotate
Drip Tray
,FH6WRUDJH%LQ
$FFHVV'RRU
USING THE REFRIGERATOR:,FHDQG:DWHU'LVSHQVHU
49-1000364 Rev. 1 7
USING THE REFRIGERATOR:$XWRPDWLF,FHPDNHU6DEEDWK0RGH
A newly-installed refrigerator may take 12–24 hours
to begin making ice.
The icemaker will produce seven cubes per cycle—
approximately 15 cycles in a 24-hour period, depending
RQIUHH]HUFRPSDUWPHQWWHPSHUDWXUHURRPWHPSHUDWXUH
number of door openings and other use conditions.
,IWKHUHIULJHUDWRULVRSHUDWHGEHIRUHWKHZDWHUFRQQHFWLRQ
is made to the icemaker, turn the icemaker off by
pressing and holding the plus and minus buttons for the
refrigerator temperature control on the internal control
board
When the refrigerator has been connected to the water
supply, turn the icemaker on by pressing and holding the
plus and minus buttons for the refrigerator temperature
control on the internal control board.
Throw away the first full bucket of ice.
Be sure nothing interferes with the sweep of the feeler
arm.
When the bin fills to the level of the feeler arm, the
icemaker will stop producing ice.
,WLVQRUPDOIRUVHYHUDOFXEHVWREHMRLQHGWRJHWKHU
,ILFHLVQRWXVHGIUHTXHQWO\ROGLFHFXEHVZLOOEHFRPH
cloudy, taste stale and shrink.
NOTE: ,FHPDNHUZRUNVEHVWEHWZHHQDQG36,
(275-827 kPa) home water pressure.
Automatic Icemaker
Important Facts About Your Icemaker
Ŷ<RXPD\KHDUDEX]]LQJVRXQGHDFKWLPHWKHLFHPDNHU
fills with water.
Ŷ7KURZDZD\WKHILUVWIHZEDWFKHVRILFHWRDOORZWKHZDWHU
line to clear.
Ŷ%HVXUHQRWKLQJLQWHUIHUHVZLWKWKHVZHHSRIWKHIHHOHU
arm.
Ŷ:KHQWKHELQILOOVWRWKHOHYHORIWKHIHHOHUDUPWKH
LFHPDNHUZLOOVWRSSURGXFLQJLFH,WLVQRUPDOIRUVHYHUDO
cubes to be joined together.
Ŷ,ILFHLVQRWXVHGIUHTXHQWO\ROGLFHFXEHVZLOOEHFRPH
cloudy, taste stale and shrink.
NOTE: ,QKRPHVZLWKORZHUWKDQDYHUDJHZDWHUSUHVVXUH
you may hear the icemaker cycle multiple times when
PDNLQJRQHEDWFKRILFH,FHPDNHUZRUNVEHVWEHWZHHQ
and 120 psi (275-827 kPa).
WARNING
Connect to potable water supply
only. A cold water supply is required for automatic
icemaker operation. The water pressure must be
between 40 and 120 psi (275-827 kilopascals).
CAUTION
7RPLQLPL]HWKHULVNRISHUVRQDO
injury, avoid contact with the moving parts of the
ejector mechanism, or with the heating element that
UHOHDVHVWKHFXEHV'RQRWSODFHILQJHUVRUKDQGVRQ
the automatic ice making mechanism while the
refrigerator is plugged in.
Feeler Arm
,FHPDNHU
Sabbath Mode (on some models, see Controls Section)
Sabbath Mode was designed for use on the Jewish
Sabbath and Holidays. The Sabbath Mode feature
makes it possible for observant Jews to refrigerate and
IUHH]HIRRGGXULQJWKHGXUDWLRQRIWKHKROLGD\
The Sabbath Mode feature can be set to override typical
reactions to actions in your appliance. While in the
Sabbath Mode, your appliance will still operate normally.
However, the appliance will not respond to your actions.
While in the Sabbath Mode, you may notice the fan
UXQQLQJZKHQWKHGRRULVRSHQHGKRZHYHUWKLVLVQRW
a result of your actions. The fan will operate at random
times. The defrost heater will continue to defrost the
DSSOLDQFHDQGIUHH]HUDQGZLOOEHDFWLYDWHGRQDWLPHU
The defrost heater will not defrost as a result of door
openings or any consumer actions.
SABBATH MODE —Simultaneously hold the Settings (
), Water, and Light buttons for three seconds to enter
DQGH[LW6DEEDWKPRGH'LVSOD\ZLOOVKRZ³6$´DQG
mode will automatically exit after 3 days.
DISPLAYS, ALARMS and LIGHTS—The main
temperature control, door alarms and lights will be
disabled.
ICEMAKER—The icemaker will be disabled.
8 49-1000364 Rev. 1
Water Filter Cartridge (On some models.)
USING THE REFRIGERATOR: Water Filter Cartridge
Water filter cartridge
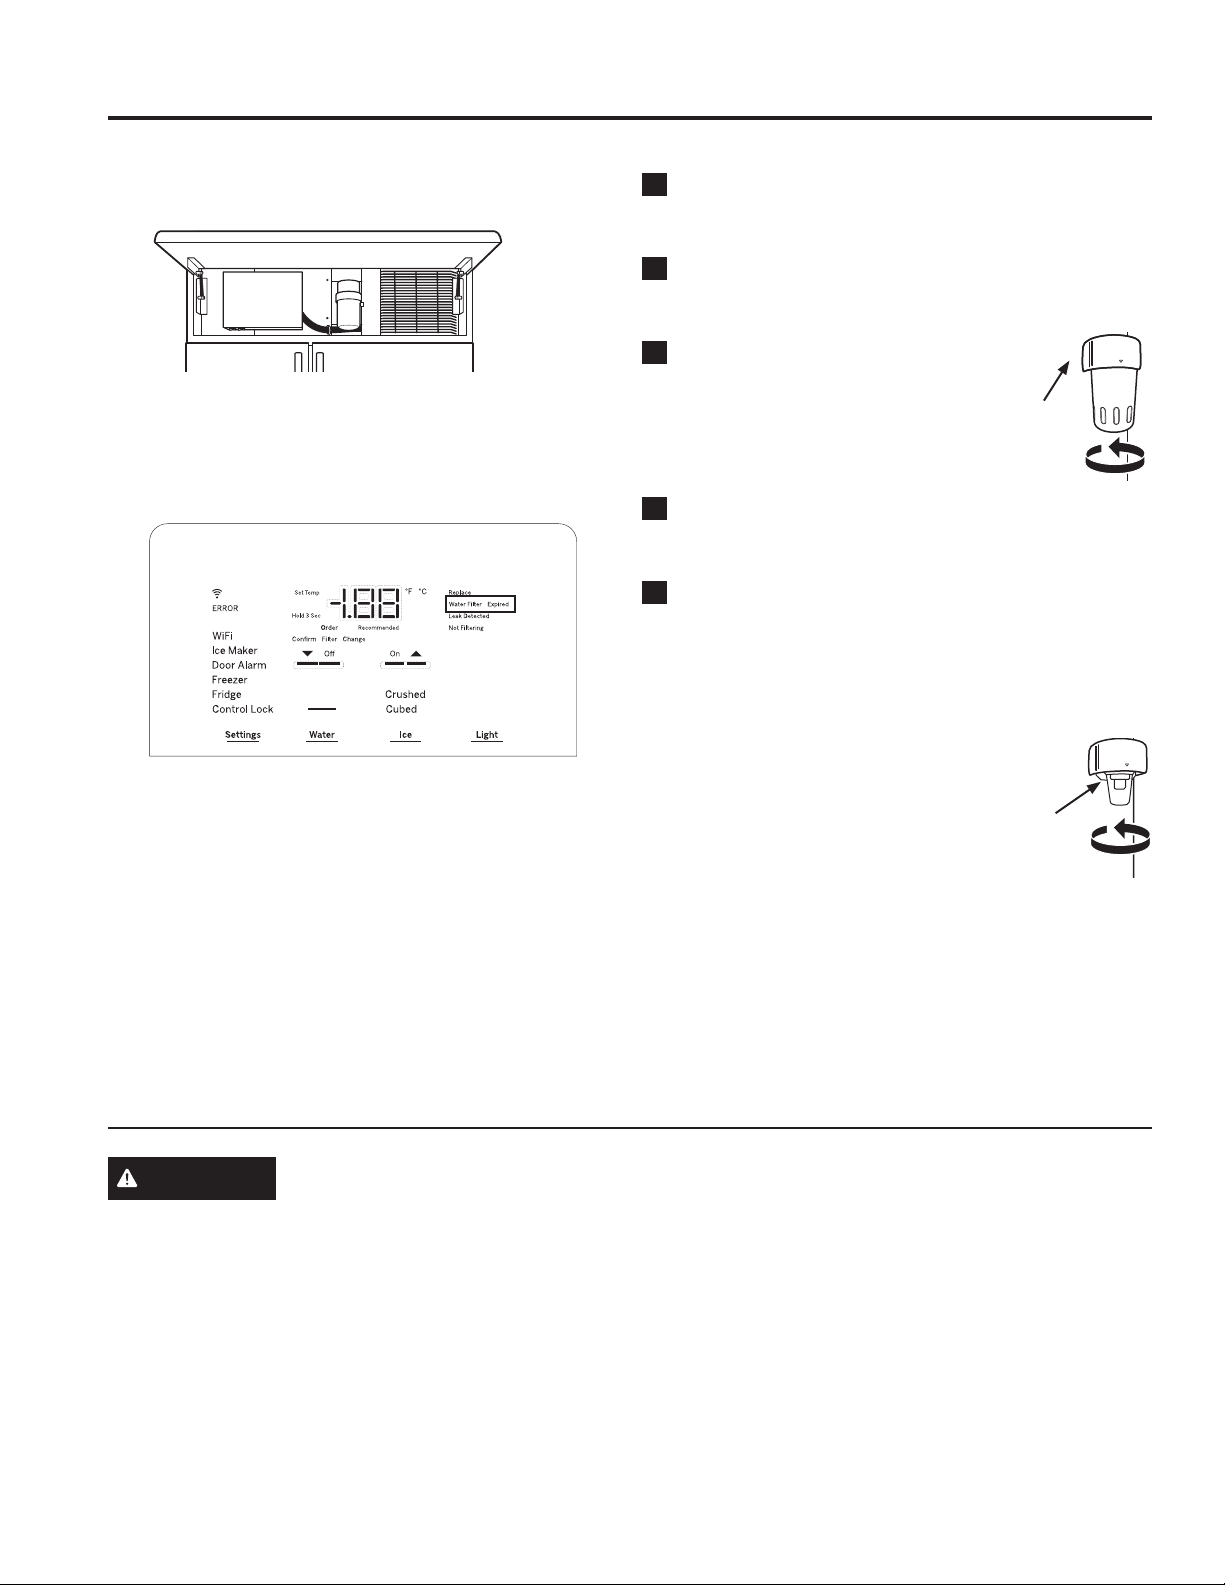
The water filter cartridge is located behind the upper
cover at the top of the refrigerator.
When to replace the filter on models with a
replacement indicator light
There is a replacement indicator light for the water filter
cartridge on the dispenser. This light will turn orange to
tell you that you need to replace the filter soon.
The filter cartridge should be replaced when the
replacement indicator light turns red or if the flow of
water to the dispenser or icemaker decreases.
Removing the filter cartridge
,I\RXDUHUHSODFLQJWKHFDUWULGJHILUVWUHPRYHWKHROG
one by slowly turning it to the left. Do not pull down on
the cartridge. A small amount of water may drip down.
NOTE: To reduce the risk associated with property
damage due to water leakage, read and follow
instructions before installation and use of this system.
,QVWDOODWLRQDQGXVH0867FRPSO\ZLWKDOOVWDWHDQGORFDO
plumbing codes.
Installing the filter cartridge
1
Fill the replacement cartridge with water from the
tap to allow for better flow from the dispenser
immediately after installation.
2
Line up the arrow on the cartridge and the cartridge
holder. Place the top of the new cartridge up inside
the holder. Do not push it up into the holder.
3
Slowly turn it to the right until the
ILOWHUFDUWULGJHVWRSV'2127
29(57,*+7(1$V\RXWXUQWKH
cartridge it will automatically raise
itself into position. The cartridge
ZLOOPRYHDERXWDWXUQ
4
5XQZDWHUIURPWKHGLVSHQVHUIRUJDOORQV
liters) (about three minutes) to clear the system and
prevent sputtering.
5
Press the SettingsNH\XQWLO,FH0DNHULVVHOHFWHG
press and hold the Water and Ice keys at the same
time for 3 seconds to reset filter.
NOTE: A newly installed water filter cartridge may cause
water to spurt from the dispenser.
Filter bypass plug
To reduce the risk of water damage due
to water leakage, you MUST use the filter
bypass plug in the following conditions:
D,I\RXKDYHDKRXVHKROGUHYHUVH
RVPRVLVZDWHUV\VWHPDQGRUDQRWKHU
form of home water filtration system
E,IDUHSODFHPHQWILOWHULVQRWDYDLODEOH
To obtain a free bypass plug, visit geappliances.com
,Q&DQDGDYLVLWgeappliances.ca The bypass plug is
installed in the same way as a filter cartridge.
The icemaker will not operate without the filter or filter
bypass plug.
Cartridge
Holder
Filter
Bypass
Plug
To reduce the risk associated with choking, do not allow children under 3 years of age to have access to
small parts during the installation of this product.
The disposable filter cartridge should be replaced every 6 months at the rated capacity, or sooner if noticeable
reduction in flow rate occurs.
For the maximum benefit of your filtration system, GE Appliances recommends the use of GE Appliances-branded
filters only. Using GE Appliances-branded filters in GE Appliances and Hotpoint refrigerators provides optimal
performance and reliability. GE Appliances filters meet rigorous industry NSF standards for safety and quality that are
important for products that are filtering your water. GE Appliances has not qualifed non-GE Appliances branded filters
for use in GE Appliances and Hotpoint refrigerators and there is no assurance that non-GE Appliances branded
filters meet GE Appliances standards for quality, performance and reliability.
If you have questions, or to order additional filter cartridges, visit our website at gewaterfilters.com or call
GE Appliances Parts and Acessories, 877.959.8688. In Canada, call 800.661.1616.
WARNING
49-1000364 Rev. 1 9
USING THE REFRIGERATOR: &OLPDWH&RQWURO'UDZHU6WRUDJH'UDZHUV
Sealed Deli Pan
8VHWKH6HDOHG'HOL3DQIRUWKHFRQYHQLHQWVWRUDJHRI
lunch meats and cheese, hors d’oeuvres, spreads and
snacks. The pan and shelf to which it is attached can be
adjusted to any height.
Excess water that may accumulate in the bottom of the
drawers should be emptied and the drawers wiped dry.
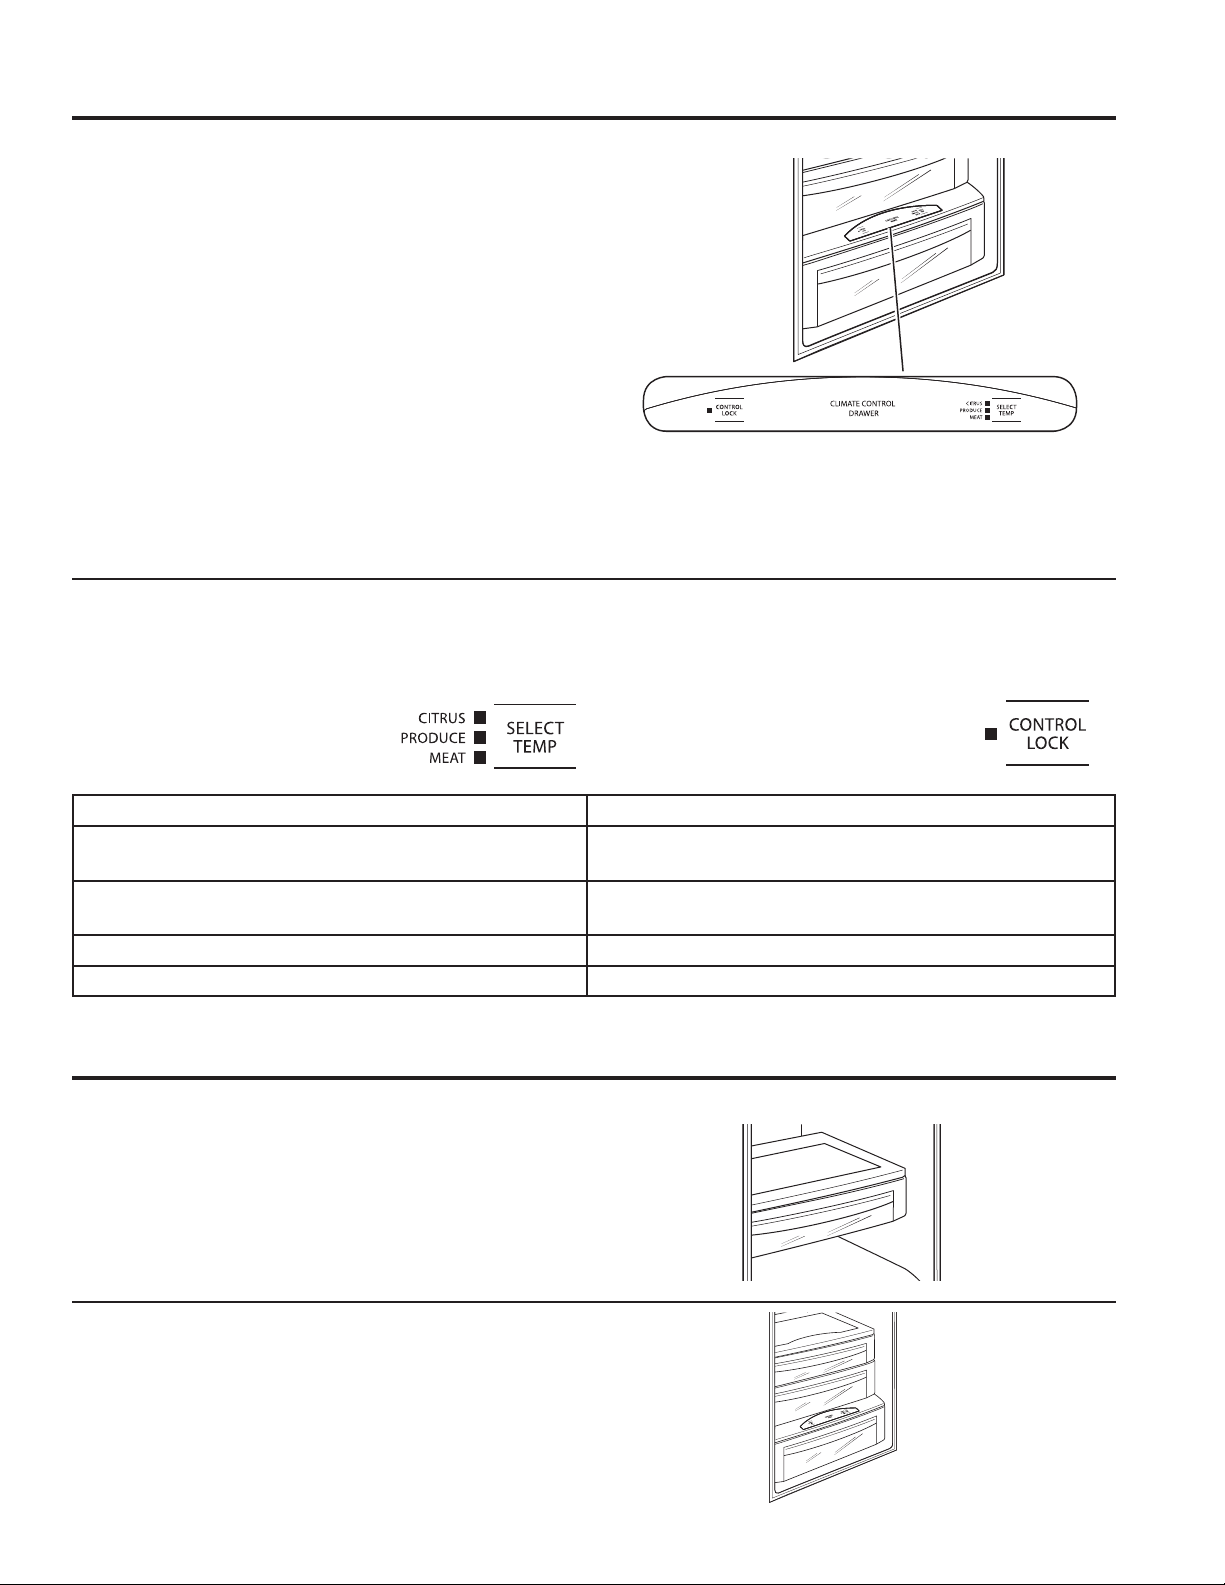
Climate Control Drawer
The Climate Control feature is a system of dampers, a
fan, a temperature thermistor, and a heater. The Climate
Control drawer can be used to store items at their
optimum temperatures.
The drawer is tightly sealed to prevent the drawer’s
temperature from causing temperature fluctuations in the
rest of the refrigerator.
SELECT TEMP—Use this feature to store items at their
optimum temperatures. See Climate Control Chart below.
CONTROL LOCK—Use this feature to lock the
temperature controls.
NOTE: When the controls on the Climate Control drawer
are turned off, the drawer will maintain temperatures at
42-48°F (5.6-8.9°C).
Climate Control Chart
NOTE: Results may vary depending on packaging,
starting temperature and other food traits.
Control Lock
Press and hold this pad for 3 seconds to lock the
settings for the Climate Control drawer. To unlock, press
and hold for another 3 seconds.
Produce Setting (31–38°F) (-0.6 - 3.3°C) Citrus Setting (39–47°F) (3.9-8.3°C)
6WUDZEHUULHV5DVSEHUULHV.LZLIUXLW3HDUV&KHUULHV
Blackberries, Grapes, Plums, Nectarines, Apples
Oranges, Lemons, Limes, Pineapple, Cantaloupe
Asparagus, Broccoli, Corn, Mushrooms, Spinach,
&DXOLIORZHU.DOH*UHHQ2QLRQV%HHWV2QLRQV
Beans, Cucumbers, Tomatoes, Peppers, Eggplant, Squash
Meat Setting (27–37°F) (-2.8 - 2.8°C)
Raw Meat, Fish and Poultry
Storage Drawers
Sealed Produce Pan
The top pan is designed to provide constant high
humidity levels.
Make sure the drawers are closed completely to maintain
the correct humidity level.
Excess water that may accumulate in the bottom of the
drawers should be emptied and the drawers wiped dry.

10 49-1000364 Rev. 1
Storage Drawers
USING THE REFRIGERATOR:6WURUDJH'UDZHUV6KHOYHV
Drawer/Pan Removal
To remove a drawer/pan:
1.3XOOWKHGUDZHUSDQRXWWRWKHVWRSSRVLWLRQ
2./LIWWKHIURQWRIWKHGUDZHUSDQXSDQGRXWRIWKHZLUH
holder.
3./LIWWKHEDFNRIWKHGUDZHUSDQXSDQGRXW
To replace a drawer/pan:
1.3ODFHWKHEDFNRIWKHGUDZHUSDQLQWKHZLUHKROGHU
making sure the wire holder fits into the grooves on
WKHEDFNRIWKHGUDZHUSDQ
2./RZHUWKHIURQWRIWKHGUDZHUSDQLQWRWKHZLUHKROGHU
3.3UHVVILUPO\RQWKHWRSRIWKHGUDZHUSDQWRVQDSLW
into the wire holder.
Shelves
Lighted Vegetable Drawer Shelf
The lighted vegetable drawer shelf provides lighting for
the lower compartments. The lights are recessed into the
shelf to illuminate the drawers below.
To remove shelf:
1. Remove the top drawer (see Drawer/pan removal
section).
2. Push down gently on the back center of the climate
control drawer top surface to release the bottom of the
water tank cover. Pull out and down to remove the water
tank cover and expose the wire harness.
3. Lift the shelf and carefully pull forward to expose the
wires.
4. Unplug the shelf and carefully remove it from the
refrigerator.
To replace shelf:
1. Carefully set the shelf onto the side rails, leaving the plug
exposed.
2. Plug the shelf into the refrigerator.
3. Carefully slide the shelf into place.
4.,QVHUWWKHZDWHUWDQNFRYHUWRSILUVWVRWKDWLWJRHVXS
behind the gasket hanging down from the vegetable
drawer shelf. Gently push the bottom of the water tank
cover until the bottom snaps into the the top of the
&OLPDWH&RQWURO'UDZHUFRYHU
5. Replace the drawer (see Drawer/pan removal section).
Water Tank Cover
Climate
Control
'UDZHU7RS
Surface
Water Tank
Cover
Lighted
Vegetable
'UDZHU6KHOI
49-1000364 Rev. 1 11
USING THE REFRIGERATOR: 6KHOYHV%LQVDQG%DVNHWV
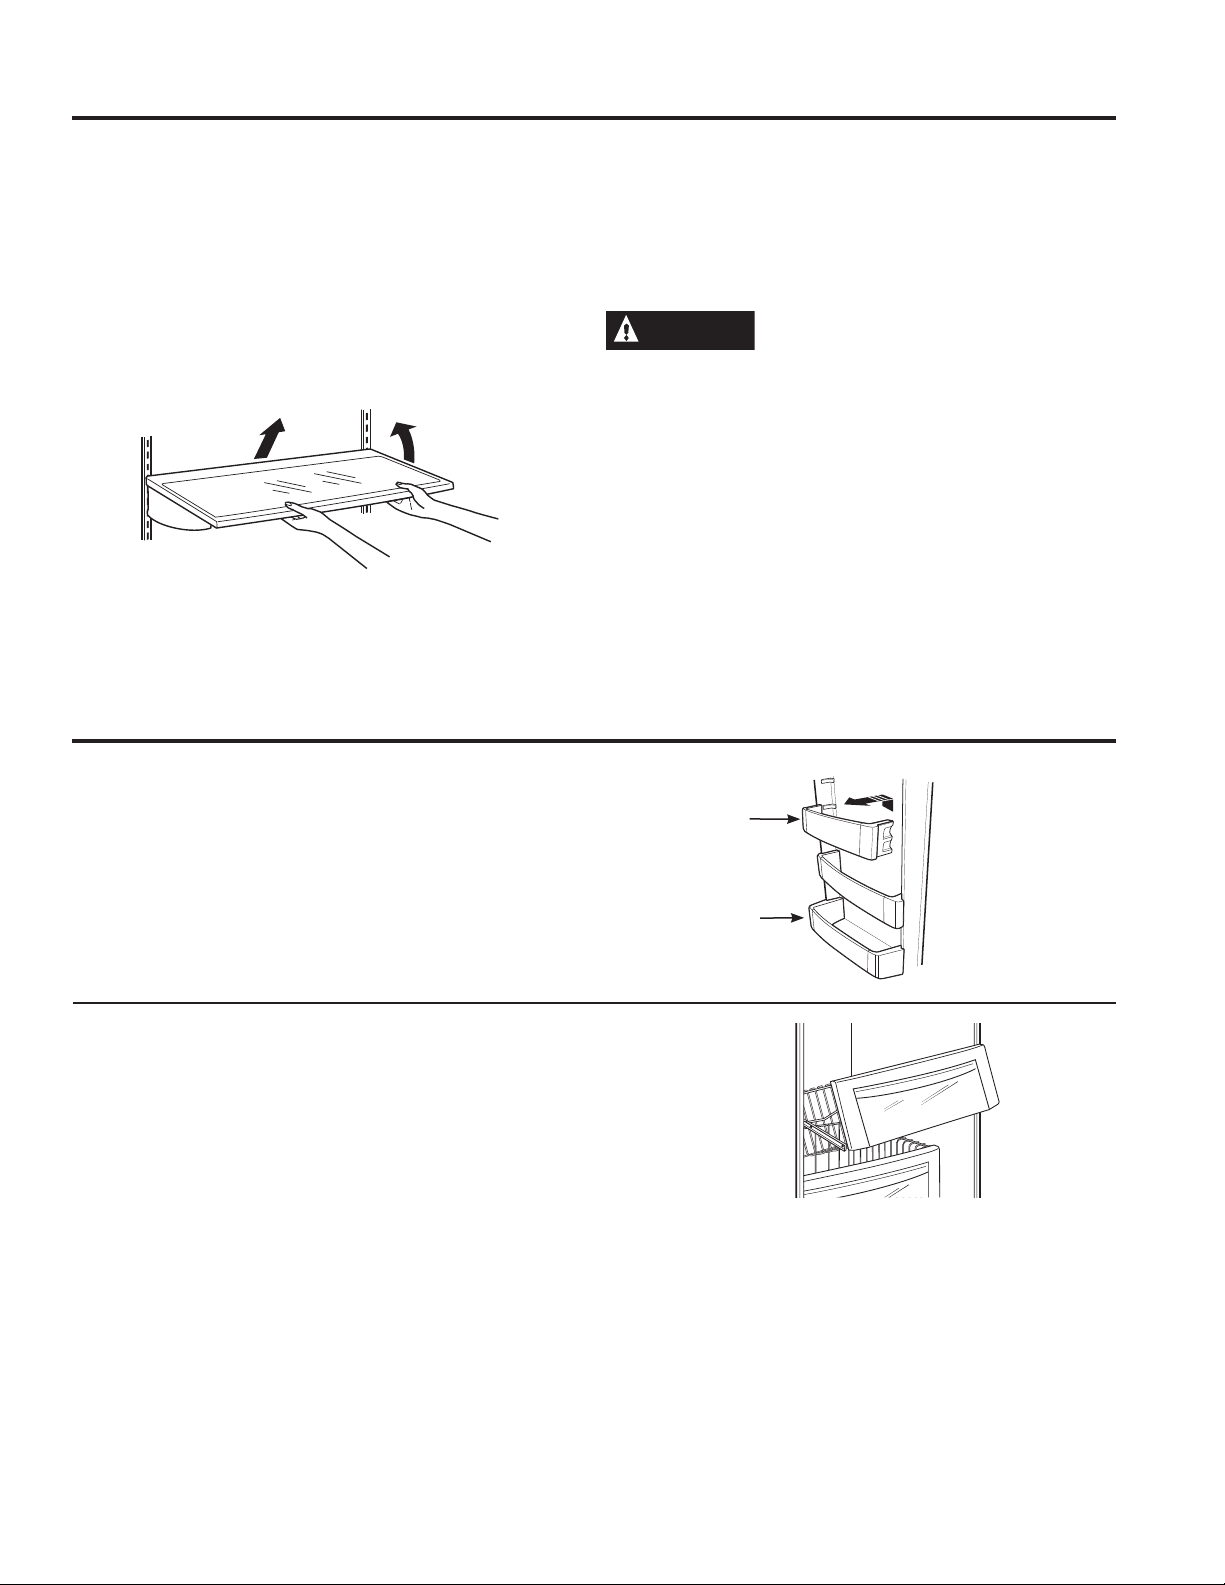
To rearrange shelves
Tempered glass shelves in the fresh food compartment
DQGZLUHVKHOYHVLQWKHIUHH]HUFRPSDUWPHQWDUH
adjustable, enabling you to make efficient shelf
arrangements to fit your family’s food storage needs.
To remove shelves:
Tilt shelf up at front, then lift it up and out
RIWUDFNVRQUHDUZDOORIUHIULJHUDWRU'RQRWPRYHVLGHWR
side to avoid any potential scratching to the wall.
To replace shelves:
Select desired shelf height. With shelf front raised
slightly, engage top lugs in tracks at rear of cabinet.
Then lower front of shelf until it locks into position.
CAUTION
Handle glass shelves carefully. Glass
shelves and covers may break if exposed to impact,
such as bumping or dropping. Tempered glass is
designed to shatter into many small pieces if it breaks.
Shelves
Bins and Baskets
Door bins
All door bins, except for the deep gallon door bin, are
adjustable using one of 2 tabs on each end of the bin.
They can be moved up and down to many different
positions to meet your storage needs. The deep gallon
door bin can be removed for cleaning.
To remove any bin:
Lift the bin up and slide it toward you.
Adjustable
'RRU%LQ
Gallon
'RRU%LQ
Freezer baskets
:LUHVOLGHRXWIUHH]HUEDVNHWVFDQEHSXOOHGRXWIRUHDV\
DFFHVVWRIUR]HQIRRGV
To remove:
Pull basket out. Lift the front of the basket up and then
take it out.

12 49-1000364 Rev. 1
USING THE REFRIGERATOR: WiFi Connect
REGULATORY INFORMATION
FCC/IC Compliance Statement:
This device complies with Part 15 of the FCC Rules. Operation is subject to the following two conditions:
1. This device may not cause harmful interference.
2. This device must accept any interference received, including interference that may cause undesired operation.
This equipment has been tested and found to comply with the limits for a Class B digital device, pursuant to Part 15 of
the FCC Rules. These limits are designed to provide reasonable protection against harmful interference in a residential
installation. This equipment generates, uses, and can radiate radio frequency energy and, if not installed and used in
accordance with the instructions, may cause harmful interference to radio communications. However, there is no guarantee
WKDWLQWHUIHUHQFHZLOOQRWRFFXULQDSDUWLFXODULQVWDOODWLRQ,IWKLVHTXLSPHQWGRHVFDXVHKDUPIXOLQWHUIHUHQFHWRUDGLRRU
television reception, which can be determined by turning the equipment off and on, the user is encouraged to try to correct
the interference by one or more of the following measures:
• Reorient or relocate the receiving antenna.
,QFUHDVHWKHVHSDUDWLRQEHWZHHQWKHHTXLSPHQWDQGUHFHLYHU
• Connect the equipment into an outlet on a circuit different from that to which the receiver is connected.
&RQVXOWWKHGHDOHURUDQH[SHULHQFHGUDGLRWHOHYLVLRQWHFKQLFLDQIRUKHOS
Labelling: Changes or modifications to this unit not expressly approved by the manufacturer could void the user’s
authority to operate the equipment.
ConnectPlus module only (or similar communication module)
5)([SRVXUH7KLVGHYLFHLVRQO\DXWKRUL]HGIRUXVHLQDPRELOHDSSOLFDWLRQ$WOHDVWFPRIVHSDUDWLRQGLVWDQFHEHWZHHQ
the ConnectPlus device and the user’s body must be maintained at all times.
WiFi Connect (for customers in the United States, its territories and Canada):
WiFi Connect Enabled*
Your refrigerator is WiFi Connect Enabled. A WiFi communication card is built into the product allowing it to
communicate with your Smart Phone for remote monitoring, control, and notifications. Please visit geappliances.com/
connect to learn more about connected appliance features, and to learn what connected appliance App’s will work with
your Smart Phone.
WiFi Connectivity: For assistance with the appliance or the network connectivity (for models that are WiFi enable),
please visit geappliances.com/connect. ,Q&DQDGDgeappliances.ca/connect.
WIFI CONNECT
49-1000364 Rev. 1 13
CARE AND CLEANING
Care and Cleaning
Cleaning the Inside
To help prevent odors, leave an open box of baking
VRGDLQWKHUHIULJHUDWRUDQGIUHH]HUFRPSDUWPHQWV
Unplug the refrigerator before cleaning.
,IWKLVLVQRWSUDFWLFDOZULQJH[FHVVPRLVWXUHRXWRI
sponge or cloth when cleaning around switches, lights or
controls.
Use an appliance wax polish on the inside surface
between the doors.
Use warm water and baking soda solution—about a
tablespoon (15 ml) of baking soda to a quart (1 liter) of
ZDWHU7KLVERWKFOHDQVDQGQHXWUDOL]HVRGRUV5LQVHDQG
wipe dry.
CAUTION
'RQRWFOHDQJODVVVKHOYHVRUFRYHUV
with warm water when they are cold. Glass shelves and
covers may break if exposed to sudden temperature
changes or impact such as bumping or dropping.
Tempered glass is designed to shatter into many small
pieces if it breaks.
'RQRWZDVKDQ\SODVWLFUHIULJHUDWRUSDUWVLQWKH
dishwasher.
Cleaning Outside
The dispenser spill shelf and the area beneath it
should be cleaned periodically with a mild liquid dish
detergent.
Dispenser cradle—Before cleaning, lock the dispenser
by touching LOCK for 3 seconds to prevent activating
the dispenser. Clean with warm water and a mild liquid
dish detergent. Rinse thoroughly and wipe dry. Unlock
the dispenser by touching LOCK for 3 seconds.
Stainless Steel - Outside surfaces, door handles, and trim
NOTE: DO NOT allow stainless steel cleaner to come in contact with any plastic parts such as trim pieces, handle
KDUGZDUHDQGOLQHUV,IXQLQWHQWLRQDOFRQWDFWRIFOHDQHUVZLWKSODVWLFSDUWVGRHVRFFXUFOHDQSODVWLFSDUWZLWKD
sponge and mild detergent mixed with warm water.
DO USE DO NOT USE
Soft, clean cloth or sponge Abrasive cloths, scrubbing sponges (with or without
soap), scouring or steel wool pads
Mild detergent mixed with warm water
$SSURYHGVWDLQOHVVVWHHOFOHDQHUV9LVLW
the Monogram Appliances parts store for
approved stainless steel cleaners:
Monogram.com
Cleaners with oxalic acid such as Bar
.HHSHUV)ULHQG6RIW&OHDQVHUFDQ
be used to remove surface rust, tarnish
and small blemishes on stainless steel
surfaces only
Abrasive powders or sprays
Window Sprays or Ammonia
Citrus or plant oil-based cleaners
Acidic or vinegar-based cleaners
Oven cleaners
Cleaners containing acetone (propanone)
$Q\FOHDQHUZLWK:$51,1*DERXWSODVWLFFRQWDFW
14 49-1000364 Rev. 1
Care and Cleaning
CARE AND CLEANING
Behind the Refrigerator
Be careful when moving the refrigerator away from
the wall. All types of floor coverings can be damaged,
particularly cushioned coverings and those with
embossed surfaces.
Raise the leveling legs located at the bottom front of the
refrigerator.
Pull the refrigerator straight out and return it to position
by pushing it straight in. Moving the refrigerator in a side
direction may result in damage to the floor covering or
refrigerator.
Lower the leveling legs until they touch the floor.
When pushing the refrigerator back, make sure you
don’t roll over the power cord or water supply line.
Preparing for Vacation
Set the icemaker power switch to the OFF position
and be sure to shut off the water supply to the
refrigerator.
For long vacations or absences, remove food from the
UHIULJHUDWRUIUHH]HU6HWWKHFRQWUROWR2))DQGFOHDQWKH
interior with a baking soda solution of one tablespoon
(15 ml) of baking soda to one quart (1 liter) of water.
Leave the door open.
For shorter vacations, remove perishable foods and
leave controls at regular settings. However, if the room
temperature is expected to drop below 60°F (16°C),
follow the same instructions as for long vacations.
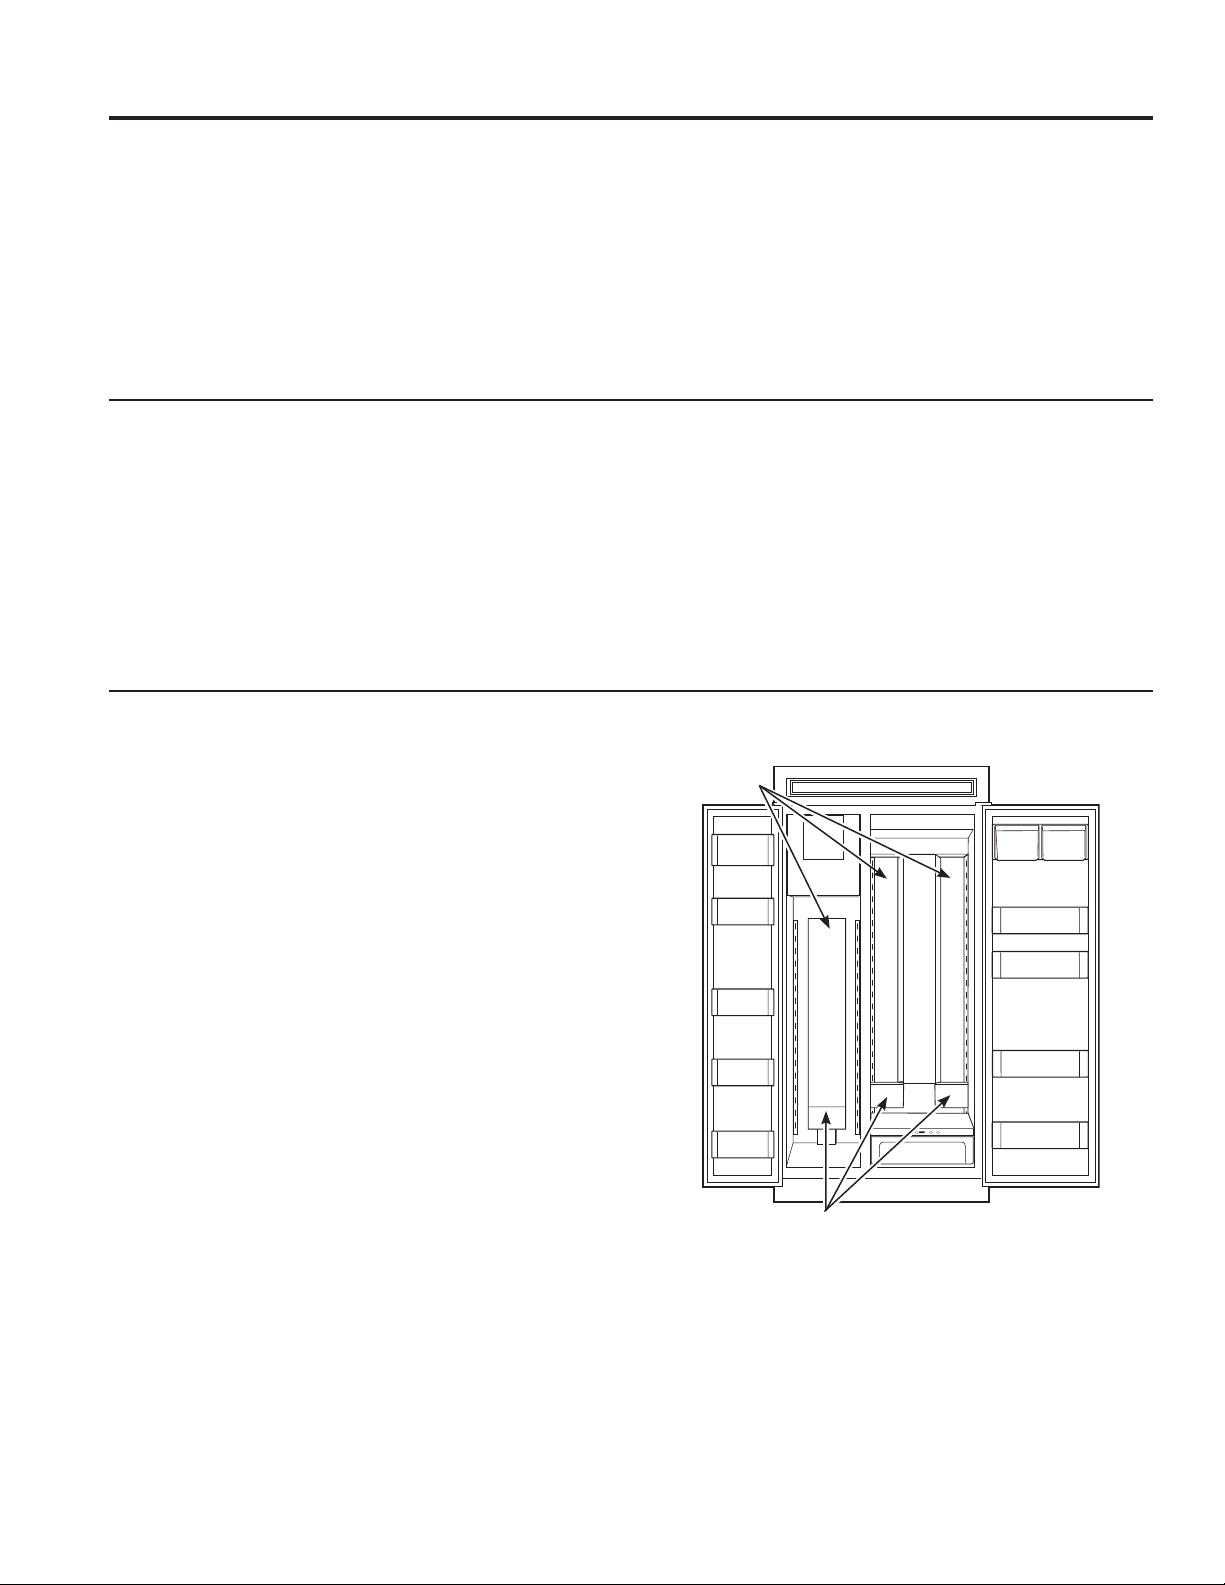
Replacing the Lights
/('/LJKWV
Light
Columns
The columns along the back wall of the refrigerator and
IUHH]HUFRPSDUHPHQWVDUHOLWXSE\/('OLJKWVORFDWHG
behind the top pan in the fresh food compartment and the
ERWWRPEDVNHWLQWKHIUHH]HUFRPSDUWPHQW
$QDXWKRUL]HGWHFKQLFLDQZLOOQHHGWRUHSODFHWKH/('
light.
,IWKLVDVVHPEO\QHHGVWREHUHSODFHGFDOO*($SSOLDQFHV
Service at 1.800.432.2737 in the United States or
1.800.561.3344 in Canada.

49-1000364 Rev. 1 15
INSTALLATION INSTRUCTIONS
BEFORE YOU BEGIN
Read these instructions completely and carefully.
•
IMPORTANT — Save these instructions for
local inspector’s use.
•
IMPORTANT — Observe all governing codes
and ordinances.
• Note to Installer – Be sure to leave these
instructions with the Consumer.
• Note to Consumer –.HHSWKHVHLQVWUXFWLRQVIRU
future reference.
• Skill level – ,QVWDOODWLRQRIWKLVDSSOLDQFHUHTXLUHV
basic mechanical skills.
• Completion time –5HIULJHUDWRU,QVWDOODWLRQ
15 minutes
• Proper installation is the responsibility of the
installer.
• Product failure due to improper installation is not
covered under the Warranty.
Installation
Instructions
Refrigerator
Questions? Call 800.GE.CARES (800.432.2737) or visit our Website at: GEAppliances.com
In Canada, call 1.800.561.3344 or visit our Website at: GEAppliances.ca
WARNING
Tip Over Hazard.
These appliances are top heavy, especially with any
doors open, and must be secured to prevent tipping
forward which could result in death or serious injury.
Read and follow the entire installation instructions for
securing the appliance with the anti-tip system.
WARNING
Electrical Shock Hazard.
Plug into a grounded 3-prong outlet.
'RQRWUHPRYHWKHJURXQGSURQJ
'RQRWXVHDQDGDSWHU
,PPHGLDWHO\GLVFRQWLQXHXVHRIDGDPDJHGVXSSO\
FRUG,IWKHVXSSO\FRUGLVGDPDJHGLWPXVWEH
replaced by a qualified service professional with an
DXWKRUL]HGVHUYLFHSDUWIURPWKHPDQXIDFWXUHU
'RQRWXVHDQH[WHQVLRQFRUGZLWKWKLVDSSOLDQFH
Failure to follow these instructions can result in death,
fire, or electrical shock.
Follow the instructions in the section Grounding the
unit.
This appliance must be installed with a means in the
fixed house wiring or circuit breaker for disconnecting
the appliance from the electrical supply after
installation.
WARNING
FIRE OR EXPLOSION
HAZARD
.HHSIODPPDEOHPDWHULDOVDQGYDSRUVDZD\
from refrigerator. Failure to do so can result in
fire,explosion, or death.
WARNING
FIRE OR EXPLOSION
HAZARD Flammable
Refrigerant
This appliance contains isobutane refrigerant,
also known as R600a, a natural gas with high
environmental compatibility. However, it is also
combustible. Adhere to the warnings below to
reduce the risk of injury or property damage.
1. When handling, installing and operating the
appliance, care should be taken to avoid damage to
the refrigerant tubing.
2. 6HUYLFHVKDOORQO\EHSHUIRUPHGE\DXWKRUL]HG
service personnel. Use only manufacturer-
DXWKRUL]HGVHUYLFHSDUWV
3. 'LVSRVHRIUHIULJHUDWRULQDFFRUGDQFHZLWK
the Federal and Local Regulations. The
flammable refrigerant and insulation material
used in this product require special disposal
procedures. Contact your local authorities for the
environmentally safe disposal of your refrigerator.
4. .HHSYHQWLODWLRQRSHQLQJVLQWKHDSSOLDQFH
enclosures or in the built-in structure clear of
obstruction.
5. To remove frost, scrape with a plastic or wood
VSDWXODRUVFUDSHU'RQRWXVHDQLFHSLFNRUD
metal or sharp-edged instrument as it may puncture
WKHIUHH]HUOLQHUDQGWKHQWKHIODPPDEOHUHIULJHUDQW
tubing behind it.
6. 'RQRWXVHHOHFWULFDODSSOLDQFHVLQVLGHWKHIRRG
storage compartment of the appliance.
7. 'RQRWXVHDQ\HOHFWULFDOGHYLFHWRGHIURVW\RXU
IUHH]HU
16 49-1000364 Rev. 1
INSTALLATION INSTRUCTIONS
WARNING
To reduce the risk associated with
choking, do not allow children under 3 years of age to
have access to small parts during the installation of
this product.
CAUTION
Lifting Hazard
This unit is very heavy. To reduce the risk of
person injury during maneuvering and installing
this appliance, 4 people are required for proper
installation.
CAUTION
.HHSILQJHUVRXWRIWKH³SLQFKSRLQW´
DUHDVFOHDUDQFHVEHWZHHQWKHGRRUVDQGEHWZHHQ
the doors and cabinet are necessarily small. Be
careful closing doors when children are in the area.
REFRIGERATOR LOCATION
• 'RQRWLQVWDOOWKHUHIULJHUDWRUZKHUHWKH
temperature will go below 55°F (13°C) because
it will not run often enough to maintain proper
temperatures.
• 'RQRWLQVWDOOWKHUHIULJHUDWRUZKHUHWKH
temperature will go above 100°F (37°C) because
it will not perform properly.
• 'RQRWLQVWDOOWKHUHIULJHUDWRULQDORFDWLRQH[SRVHGWR
water (rain, etc.) or direct sunlight.
• ,QVWDOOLWRQDIORRUVWURQJHQRXJKWRVXSSRUWLWIXOO\
loaded.
For proper installation, the refrigerator/freezer
must be placed on a level surface of hard material
the same height as the rest of the flooring. This
surface should be strong enough to support a
fully loaded refrigerator, or approximately
1,500 lbs. (680.39 kg) each.
Installation Instructions
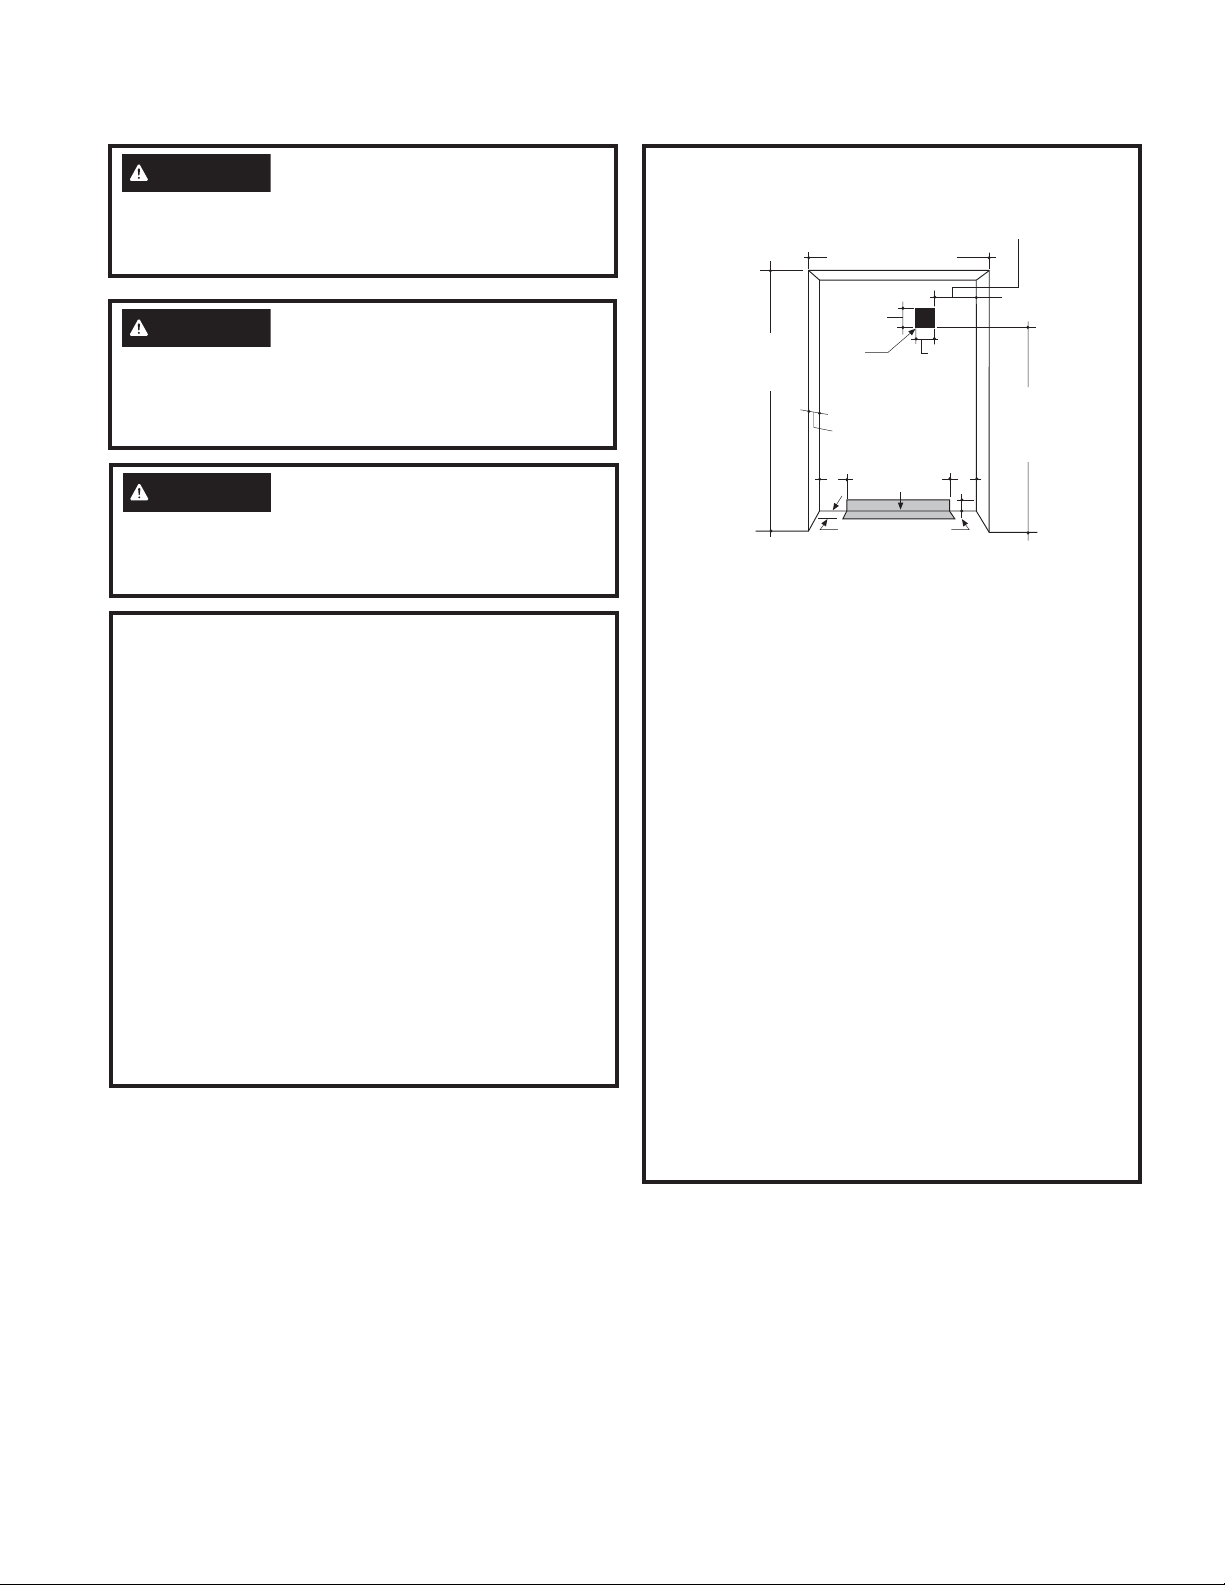
THE INSTALLATION SPACE
Water And Electrical Locations
The opening must be prepared with the electrical
and the cold water supply located as shown.
The Cutout Depth Must Be 24” (60.96 cm)
The refrigerator will project forward, slightly beyond
adjacent cabinetry for standard installation.
Additional Specifications
$YROW+]RUDPSSRZHUVXSSO\LV
required. An individual properly grounded branch
FLUFXLWRUFLUFXLWEUHDNHULVUHFRPPHQGHG,QVWDOO
a properly grounded 3-prong electrical receptacle
recessed into the back wall. Electrical must be
located on the rear wall as shown.
• The water line can enter the opening through
the floor or back wall. The water line should be
´2'FRSSHUWXELQJRU6PDUW&RQQHFW
kit
between the cold water line and water connection
location, long enough to extend to the front of the
UHIULJHUDWRU,QVWDOODWLRQRIDQHDVLO\DFFHVVLEOH
shut-off valve in the water line is required.
*Finished Width
6 3/4"
6 3/4"
Electrical
Area
84 ±1/2" max
Finished
Opening
75" From Floor
to Bottom
of Electrical
Area
24"
5"
5"
3-1/2"
Water Supply
3-1/2"
42" Models 18"
48" Models 20"
*The finished cutout width must be:
´FPIRU´PRGHOV
´FPIRU´PRGHOV
49-1000364 Rev. 1 17
INSTALLATION INSTRUCTIONS
Installation Instructions
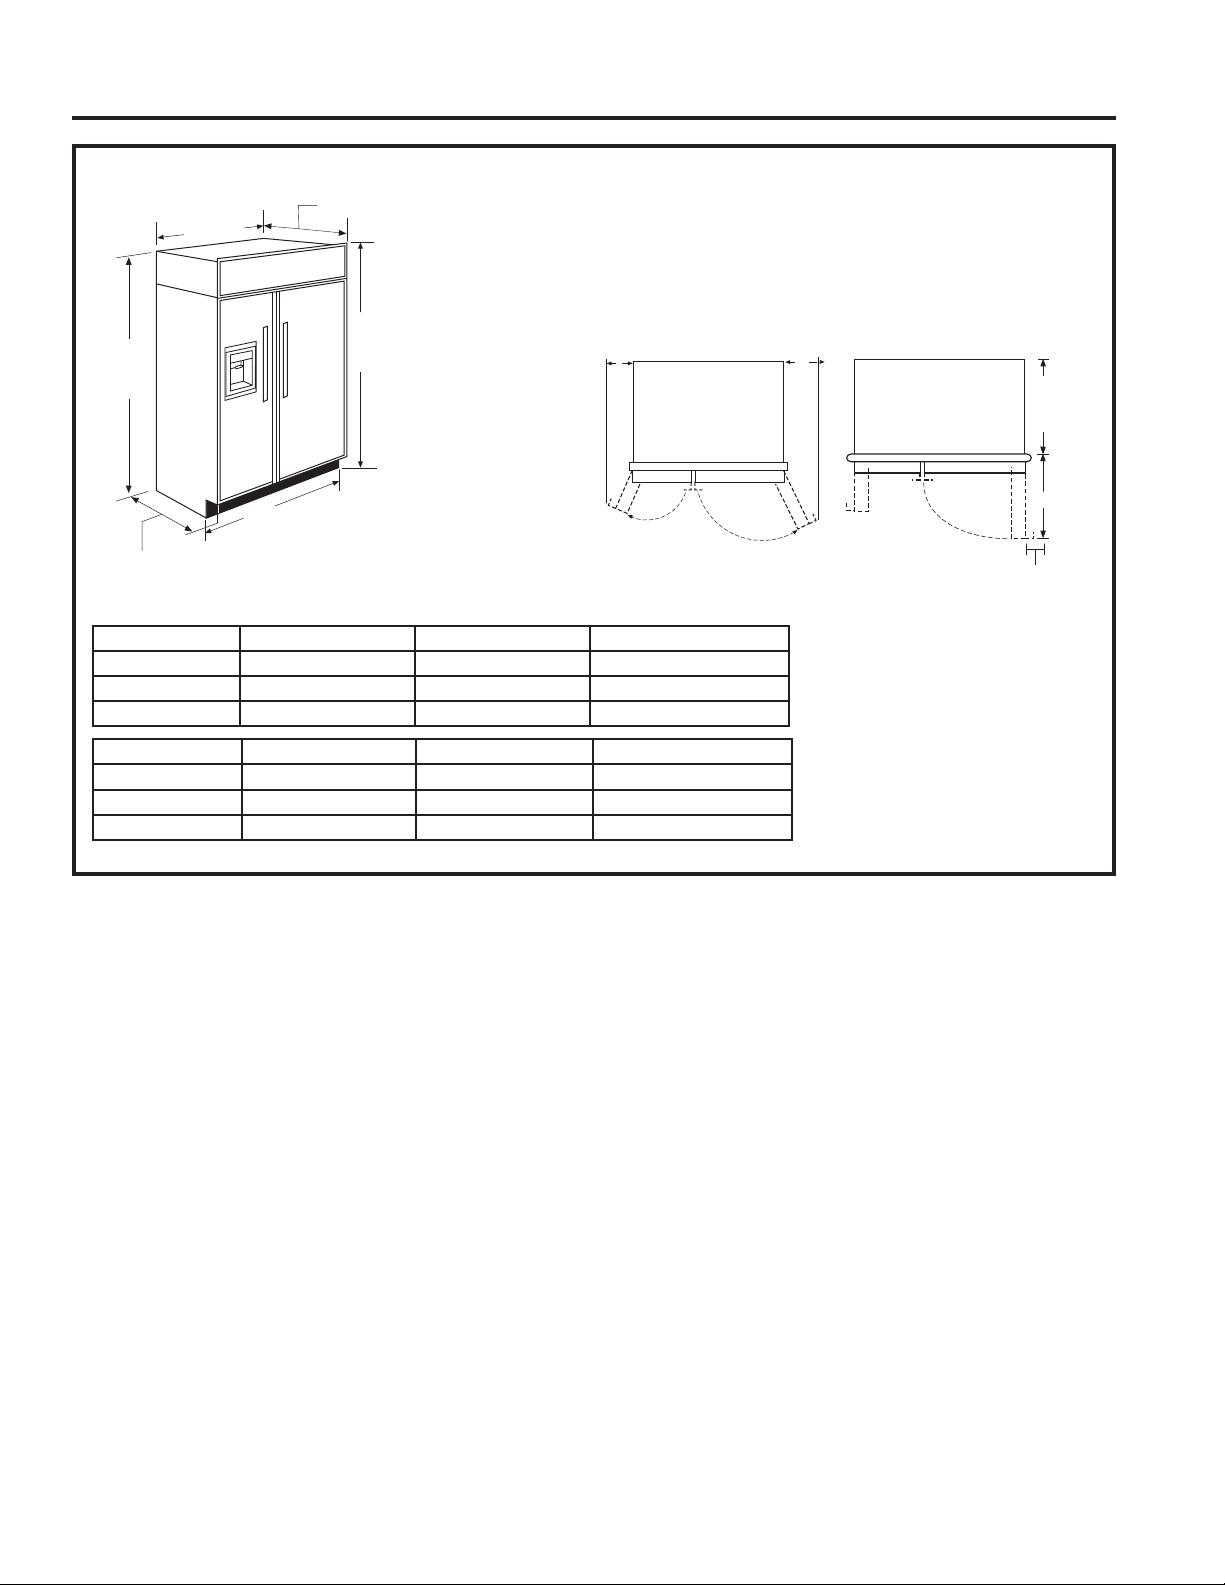
DIMENSIONS AND CLEARANCES
* Shipping height.
The refrigerator
can be adjusted
to fit into a cutout
WKDWLV´
(214.63 cm)
in height. Use
leveling legs
and wheels for
DPD[LPXP´
(2.54 cm) height
adjustment.
Product Clearances
These refrigerators are equipped with a 3-position
door stop. The factory-set 115° door swing can be
adjusted to 90° if clearance to adjacent cabinets or
walls is restricted.
For a 90° door swing, allow
´FPPLQFOHDUDQFH
to a wall, for framed and
VWDLQOHVVVWHHOPRGHOV,IWKH
door stop position is used, pan
access is maintained, but pan
removal is restricted.
*84"
From
Floor
25-3/4"
Depth Including Handles:
28-5/16"
42" or 48"
Frame to Frame
41", or 47"
Case Width
*83-1/2"
at
Rear
'RRU6ZLQJ
'RRU6ZLQJ
23-7/8"
Behind
Frame
C
*Min. Distance
to Wall
B
A
´
Behind
Frame
Model 48" A B C
90° ´
(5.87 cm) ´ (5.87 cm) ´(72.71 cm)
115° ´(20.04 cm) ´ (34.45 cm) ´(72.71 cm)
130° ´(35.08 cm) ´ (48.1 cm) ´(72.71 cm)
Model 42" A B C
90° ´
(5.87 cm) ´ (5.87 cm) ´(67.47 cm)
115° ´(21.75 cm) ´ (32.39 cm) ´(67.47 cm)
130° ´(28.58 cm) ´ (44.77 cm) ´(67.47 cm)

18 49-1000364 Rev. 1
INSTALLATION INSTRUCTIONS
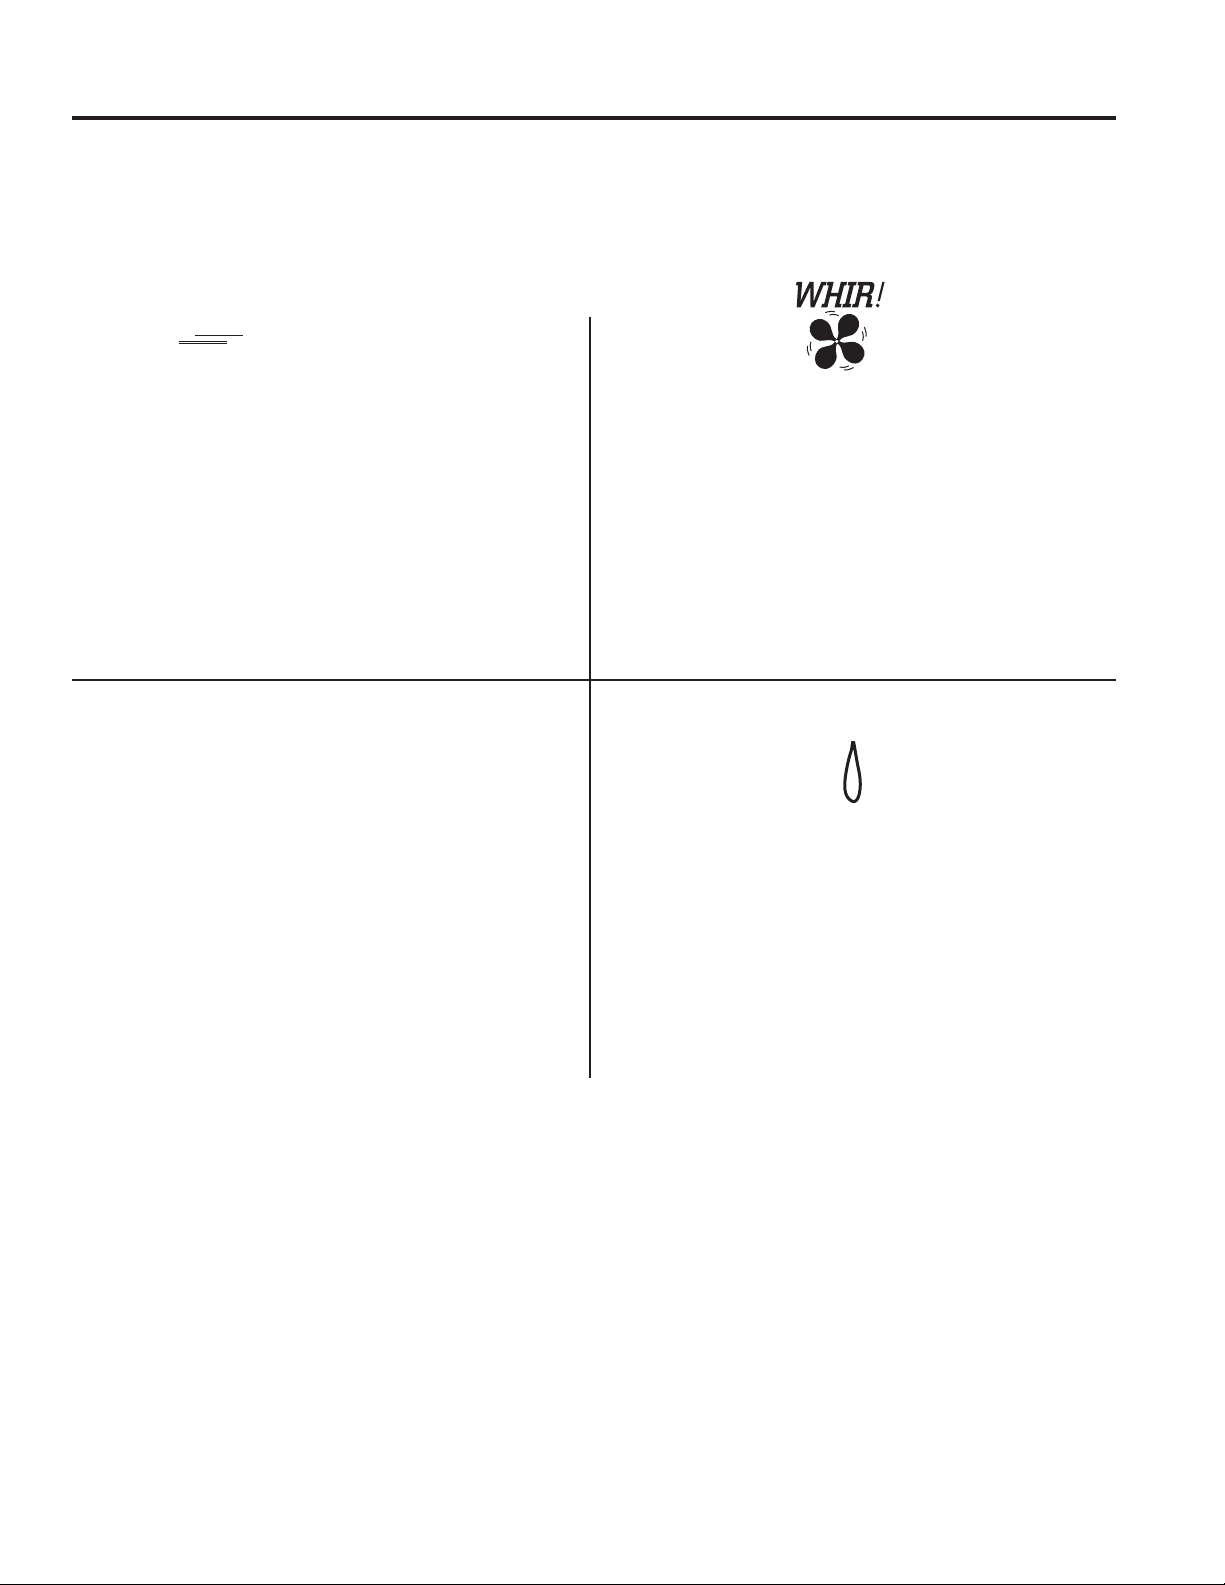
SIDE PANELS
Side panels must be used whenever the sides of the
UHIULJHUDWRUZLOOEHH[SRVHG7KH´FPVLGH
panels will slip into the side case trim. Secure the
panels to the refrigerator with stick-on hook and loop
fastener strips. Order the side panels from the cabinet
manufacturer.
• Cut a notch in the top front corner as shown to allow
clearance for corner keys in the front side trim.
*84"
2-9/16"
24"
*3" to 4"
3/16"
1-7/8"
'HSHQGLQJRQLQVWDOODWLRQKHLJKW
Installation Instructions
TOOLS AND MATERIALS
REQUIRED
• Tinsnips to cut banding
• Stepladder
´%LWH[WHQVLRQ
• Tape measure
• Gloves
´'U\ZDOOVFUHZV
• 5-Gal. Bucket with cover
´6SLULWOHYHO
• Appliance hand truck
• Tubing cutter
´RSHQHQGZUHQFK
• #2 Phillips screwdriver
'ULOODQGDSSURSULDWHELWV
´´VRFNHW
• Safety glasses
´RSHQHQGZUHQFK
• Pliers
´´&RPER5DFKHW
´ORQJ[IRU$QWL7LSVXSSRUW
´FRSSHUZDWHUOLQHWXELQJRU6PDUW&RQQHFW
Refrigerator Tubing kits
• Water shut-off valve
• Custom panels for doors and grille panel
• Screws to secure refrigerator to cabinetry
• Stick-on hook and loop fastener strips for
´VLGHSDQHOV
HARDWARE SUPPLIED
• Water filter bypass plug (on some models)
• Toekick
´QXWDQGIHUUXOH
FLOORING
For proper installation, this refrigerator must be
placed on a level surface of hard material that is
at the same height as the rest of the flooring. This
surface should be strong enough to support a fully
loaded refrigerator, or approximately 1,500 lbs.
(680.39 kg).
NOTE: Protect the finish of the flooring. Cut a large
section of the cardboard carton and place under
the refrigerator where you are working.
GROUNDING THE REFRIGERATOR
WARNING
Electrical Shock Hazard.
Failure to follow these instructions can result in
death, fire, or electrical shock.
The power cord of this appliance is equipped
with a 3-prong (grounding) plug which mates
with a standard 3-prong (grounding) wall receptacle
WRPLQLPL]HWKHSRVVLELOLW\RIHOHFWULFVKRFNKD]DUG
from this appliance.
Have the wall outlet and circuit checked by a qualified
electrician to make sure the outlet is properly
grounded.
Where a standard 2-prong wall outlet is encountered,
it is your personal responsibility and obligation to
have it replaced with a properly grounded 3-prong
wall outlet.
'212781'(5$1<
&,5&8067$1&(6&8725
5(029(7+(7+,5'*5281'
PRONG FROM THE POWER
&25'
'212786($1$'$37(5
PLUG TO CONNECT
7+(5()5,*(5$72572$
2-PRONG OUTLET.
'212786($1(;7(16,21&25':,7+7+,6
$33/,$1&(
49-1000364 Rev. 1 19
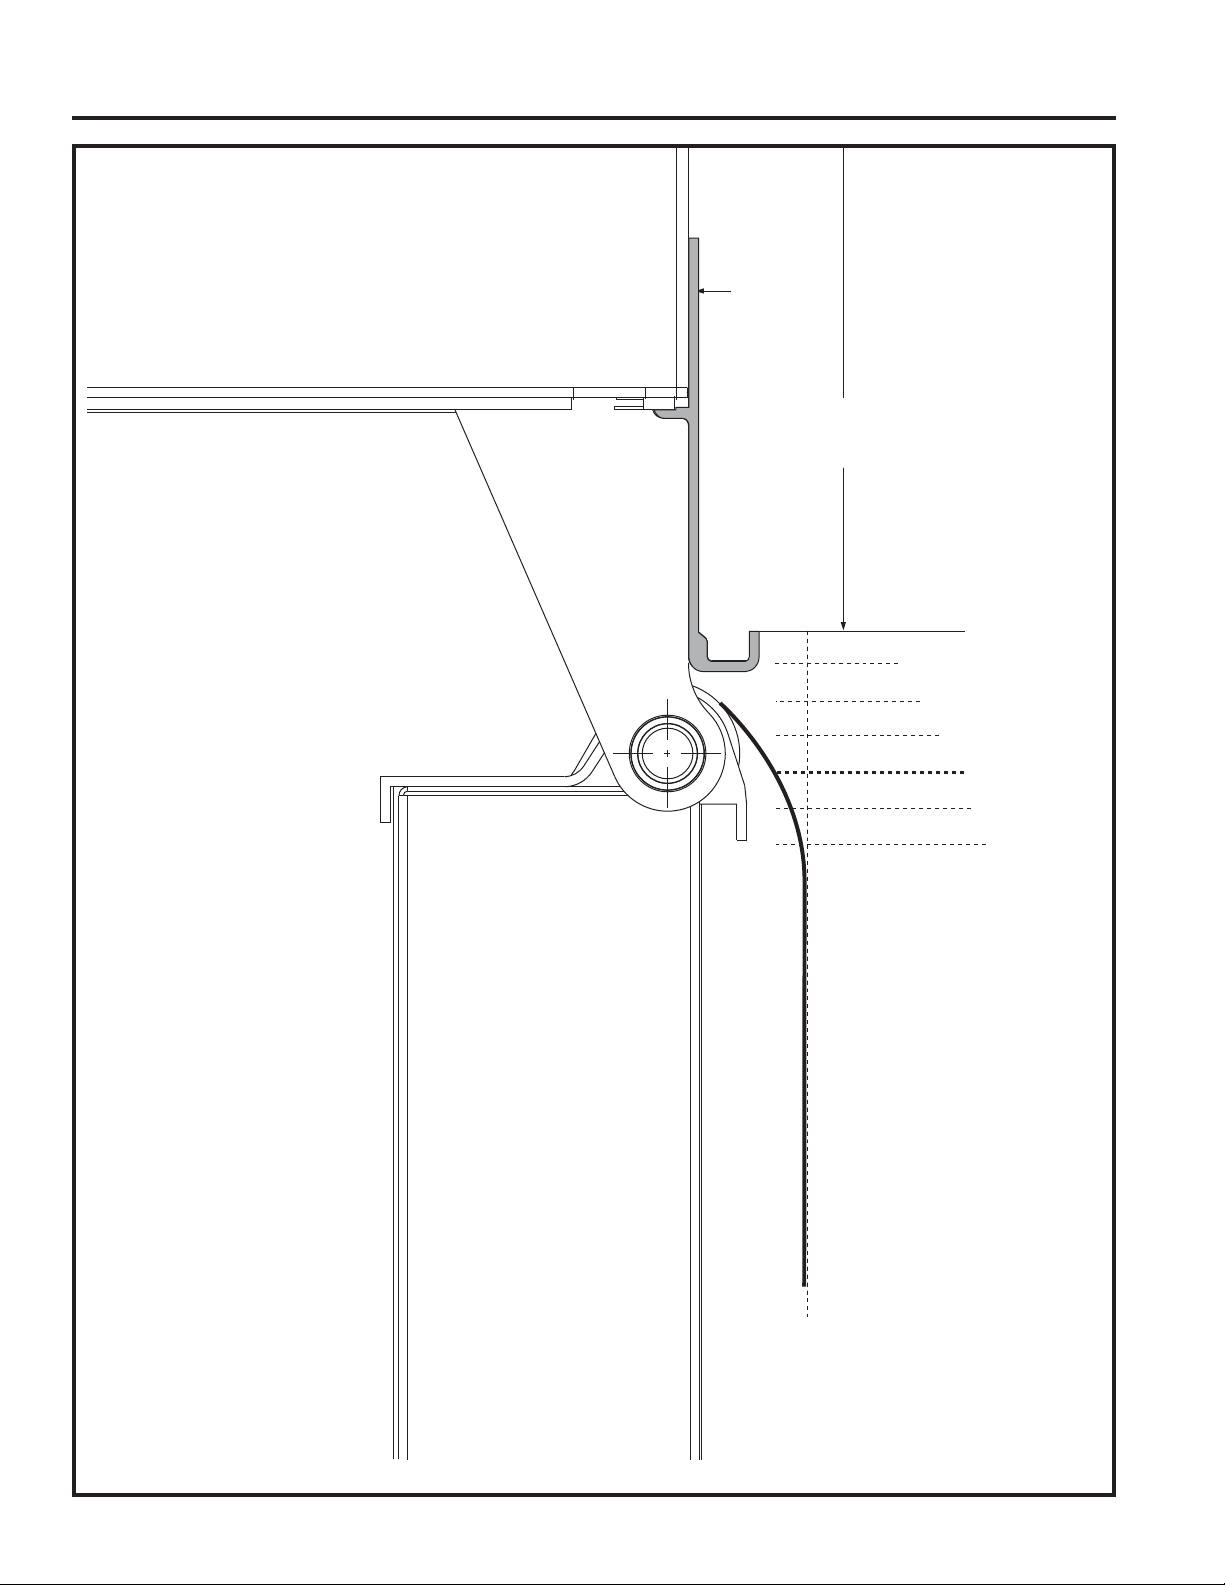
INSTALLATION INSTRUCTIONS
3/4"
1/4"
1/2"
3/4"
1"
1-1/4"
1-1/2"
23-9/16"
From Rear of
Refrigerator
Case Trim
Refrigerator
Door
Stainless Steel
Top View
90° DOOR SWING
Scale 1:1
Frameless Cabinets:
The case trim overlaps
cabinets at the top
and sides. Therefore,
frameless cabinets may
require filler strips to
prevent interference
with cabinet door
swing. The opening
must allow for filler
strips.
Installation Instructions
20 49-1000364 Rev. 1
INSTALLATION INSTRUCTIONS
Installation Instructions
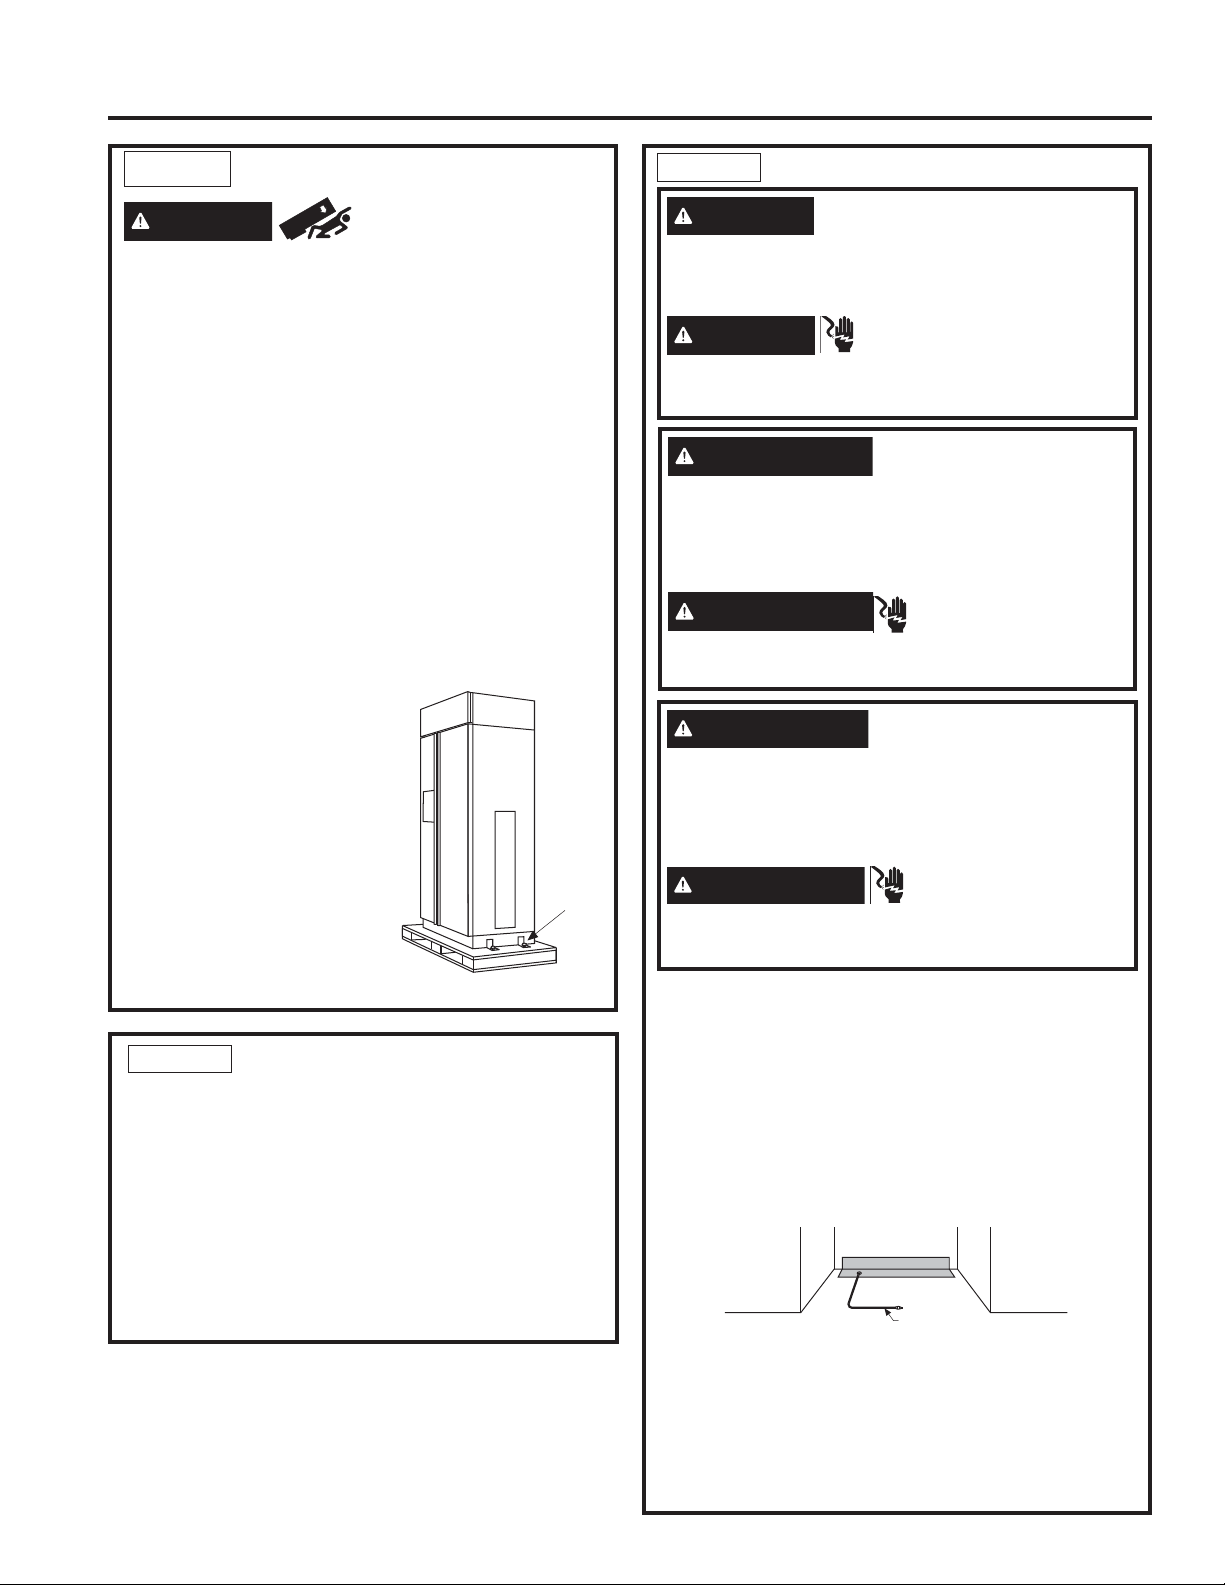
STEP 1 REMOVE PACKAGING
WARNING
Tip Over Hazard.
The refrigerator is much heavier at the top than at the
bottom—be careful when moving. When using a hand
truck, handle from the side only.
• Carefully cut banding at the top and bottom, remove
the outer carton.
• Slide out the back corner posts (2).
• Slide the carton off the top of the cabinet.
NOTE: ,7,61271(&(66$5<72/$<7+(
&$%,1(7'2:1,125'(5725(029(7+(
6.,'
• The unit is secured to the skid with 4 slotted tie-
GRZQVWUDSV5HPRYHWKHVL[´EROWVIURPWKH
base channels in the tie-downs.
5HPRYHWKHVL[´EROWVVHFXULQJWKHVWUDSVWR
the skid.
NOTE: '2127$77(0377252//81,72))
6.,'
• The support blocks on the bottom of the refrigeration
case must be removed
before the refrigerator is
taken off the skid or damage
will occur. Carefully tilt the
refrigerator and slide the
blocks out from beneath.
• Remove the toekick and set
aside for final installation.
• Lift the refrigerator off the
skid with an appliance dolly.
Handle from the sides.
Remov
e
Tie Dow
n
Toekick
STEP 2 MOVE THE
REFRIGERATOR INTO THE HOUSE
• Re-use the corner posts from the packaging to
protect stainless steel models. Run the appliance
dolly straps over the posts and under the handles.
• Leave the protective film on the refrigerator until
installation is complete. IMPORTANT: Never lift the
refrigerator by the handle or push against the grille
SDQHOWKLVFRXOGFDXVHGDPDJHRUPLVDOLJQPHQW
• Avoid laying the unit on its back or side to prevent
sealed system restrictions.
STEP 3 INSTALL WATER LINE
• A cold water supply is required for automatic
icemaker operation. The water pressure must be
between 40 and 120 p.s.i. (275-827 kPa).
5RXWH´2'FRSSHURU6PDUW&RQQHFW
plastic
tubing between house cold water line and the water
connection location.
• The tubing should be long enough to extend to the
front of the refrigerator. Allow enough tubing to
accommodate the bend leading into the water line
connection.
NOTE: The only GE Appliances approved
plastic tubing is supplied in the SmartConnect
5HIULJHUDWRU7XELQJNLWV'RQRWXVHDQ\RWKHU
plastic water supply line because the line is under
pressure at all times. Other types of plastic may
crack or rupture with age and cause water damage
to your home.
WARNING
Connect to potable water supply
only. A cold water supply is required for automatic
icemaker operation. The water pressure must be
between 40 and 120 psi (275-827 kilopascals).
WARNING
ELECTRIC SHOCK HAZARD
$WWDFKWXELQJFODPSXVLQJH[LVWLQJKROHRQO\'2
NOT drill into the refrigerator.
Floor
Cold Water Line
AVERTISSEMENT
Raccordez l’appareil à
une alimentation d’eau potable seulement. Une
alimentation d’eau froide est requise pour faire
fonctionner la machine à glaçons et le pichet à
remplissage automatique. La pression d’eau doit se
situer entre 40 et 120 psi. (275 à 827 kPa).
AVERTISSEMENT
RISQUE DE DÉCHARGE
ÉLECTRIQUE
)L[H]OHFROOLHUGHVHUUDJHGDQVOHWURXSUpVHQW
VHXOHPHQW1(3(5&(=3$6GDQVOHUpIULJpUDWHXU
ADVERTENCIA
Realice la conexión a un
suministro de agua potable únicamente. Se requiere
un suministro de agua fría para el funcionamiento
de la máquina de hielos automática y de la jarra de
llenado automático. La presión del agua deberá estar
entre 40 y 120 p.s.i. (275 – 827 kPa).
ADVERTENCIA
PELIGRO DE
DESCARGA ELÉCTRICA
Adhiera la abrazadera de la tubería usando el agujero
existente únicamente. NO perfore el refrigerador.
49-1000364 Rev. 1 21
INSTALLATION INSTRUCTIONS
Installation Instructions
STEP 5 INSTALL SIDE PANELS
Skip this step when not using side panels.
,I\RXDUHXVLQJ´FPVLGHSDQHOVWKH\
should be inserted into the case trim. Fasten the
panels to the refrigerator with stick-on hook and loop
fastener strips before setting the refrigerator in place.
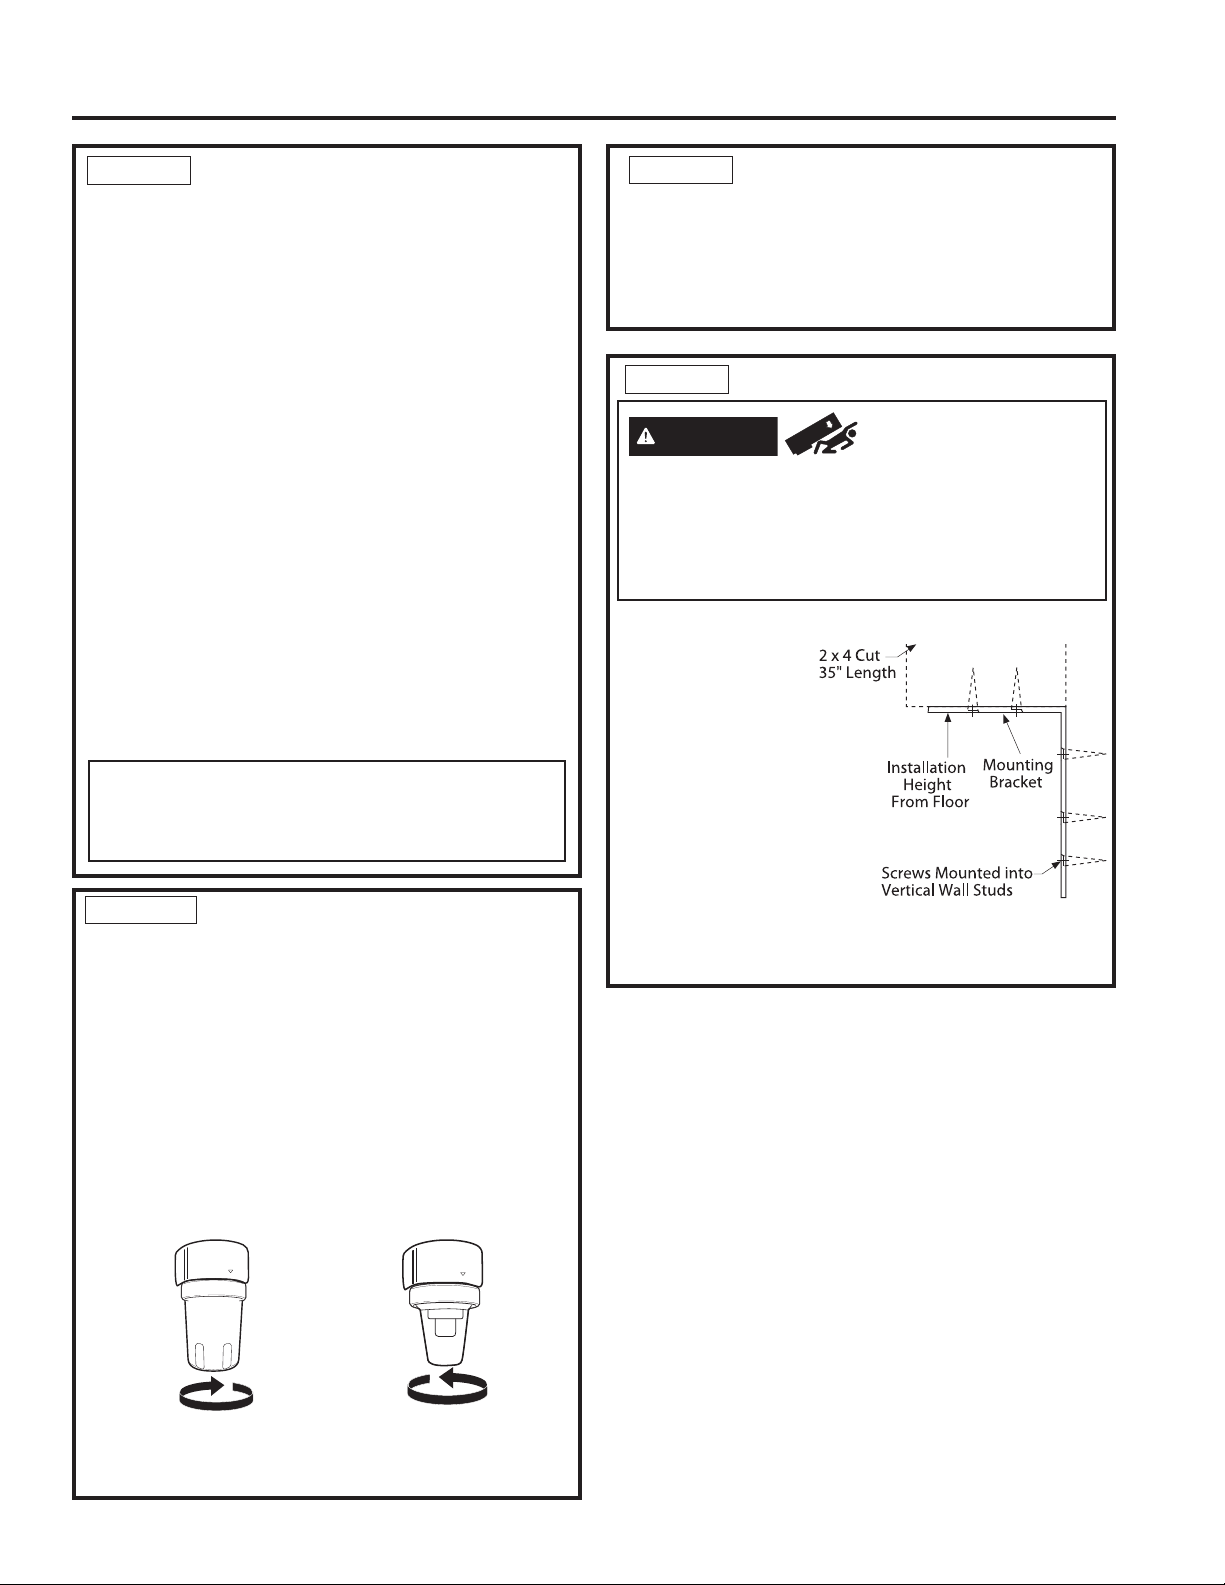
STEP 6
ANTI-TIP PROCEDURE
&XWD´[´EORFN
´FP
long and secure
the block to the
mounting brackets
provided using #12
or #14 wood screws.
• Secure the bracket
with wood block to
the back wall so that
LWLV´FP
from the finished
floor. Use #12 or
#14 wood screws. See the illustration.
WARNING
Tip Over Hazard.
These refrigerators are top heavy, especially with
any doors open, and must be secured to prevent
tipping forward which could result in death or
serious injury. Read and follow the entire installation
instructions for securing the refrigerator with the
anti-tip system.
STEP 3 INSTALL WATER LINE
(Cont.)
SmartConnect
5HIULJHUDWRU7XELQJ.LWVDUHDYDLODEOH
in the following lengths:
¶P:;;
¶P:;;
¶P:;;
¶P:;;
Shut off the main water supply.
Turn on the nearest faucet long enough to clear the
line of water.
,QVWDOODVKXWRIIYDOYHEHWZHHQWKHLFHPDNHUZDWHU
valve and cold water pipe in a basement or cabinet.
The shut-off valve should be located where it will be
easily accessible.
• Turn on the main water supply and flush debris.
Run about a quart of water through the tubing into
a bucket. Shut off the water supply at the shut-off
valve.
NOTE: Saddle type shut-off valves are included in
many water supply kits. Before purchasing, make sure
a saddle type valve complies with your local plumbing
codes.
NOTE: Commonwealth of Massachusetts Plumbing
Codes 248CMR shall be adhered to. Saddle valves
are illegal and use is not permitted in
Massachusetts. Consult with your licensed plumber.
STEP 4 WATER LINE
INSTALLATION WITH A REVERSE
OSMOSIS SYSTEM OR OTHER
HOUSEHOLD FILTRATION SYSTEM
Skip this step when not using an RO System or
other household filtration system.
,IWKHZDWHUVXSSO\WRWKHUHIULJHUDWRULVIURPD
household filtration system, use the refrigerator’s filter
bypass plug. Using the refrigerator’s water filtration
cartridge with the RO filter can result in hollow ice
cubes.
Filter Bypass
Plug
Rotate Counterclockwise
to Remove

22 49-1000364 Rev. 1
INSTALLATION INSTRUCTIONS
Installation Instructions
STEP 7 LEVEL REFRIGERATOR
All models have 4-point leveling. The front is
supported by leveling legs, the rear is supported by
adjustable wheels. Both are accessible from the front
of the refrigerator.
7ROHYHOWKHEDFNRIWKHUHIULJHUDWRUWXUQWKH´
hex nut located above the front wheels. Turn
clockwise to raise or
counterclockwise to lower
the refrigerator.
• For front leveling, use a
´RSHQHQGZUHQFK
• Adjust height of
refrigerator to match
installation cutout
RSHQLQJ´
cm). The refrigerator should be level and plumb with
cabinetry.
NOTICE: The rear leveling wheels and front leveling
OHJVDUHOLPLWHGWRDPD[LPXPKHLJKWDGMXVWPHQWRI´
FP,IWKHLQVWDOODWLRQUHTXLUHVPRUHWKDQ
´FPKHLJKWWKHLQVWDOOHUVKRXOG
elevate the refrigerator on a sheet of plywood or
runners. Cabinetry trim could also be added across
the top of the opening to shorten the opening. If you
attempt to raise the refrigerator more than 1” (2.54
cm), you will damage the front leveling legs and
the rear leveling wheels. Make adjustments in
small increments.
STEP 8 ALTERNATE ANTI-TIP
PROCEDURE
The refrigerator must be secured to prevent
tipping.
• Raise the grille panel to access case trim.
8VHD´ELWWRGULOOIRXUHYHQO\VSDFHGFOHDUDQFH
holes through the metal top case trim.
• The screws must penetrate at least one inch into the
vertical wall studs.
,IPHWDOZDOOVWXGVXVHVHOIWDSSLQJVKHHWPHWDO
screws in place of wood screws.
IMPORTANT: When the refrigerator is installed under
a soffit or if there is not enough height for this method
of security, brackets cannot be used. Proceed to step
7 to level the refrigerator and then to step 8 to secure
refrigerator to cabinets. The refrigerator must be
secured to prevent tipping.
Connect power cord:
• Before pushing the refrigerator into the opening,
plug the power cord into the receptacle. The water
filter guard will need to be removed for access
(some models). Remove the 3 screws holding it in
SODFH,IDFFHVVLVVWLOOWRRWLJKWUHPRYHWKHVFUHZV
holding the water filter bracket and move aside.
Open the grille panel and reach into the opening at
the back to grasp the power cord. Pull the power
cord into the opening as you push the refrigerator
back. Secure the bracket and guard with the original
screws.
• Gently push refrigerator into the opening with hands
against front corners.
STEP 6
ANTI-TIP PROCEDURE
(Cont.)
49-1000364 Rev. 1 23
INSTALLATION INSTRUCTIONS
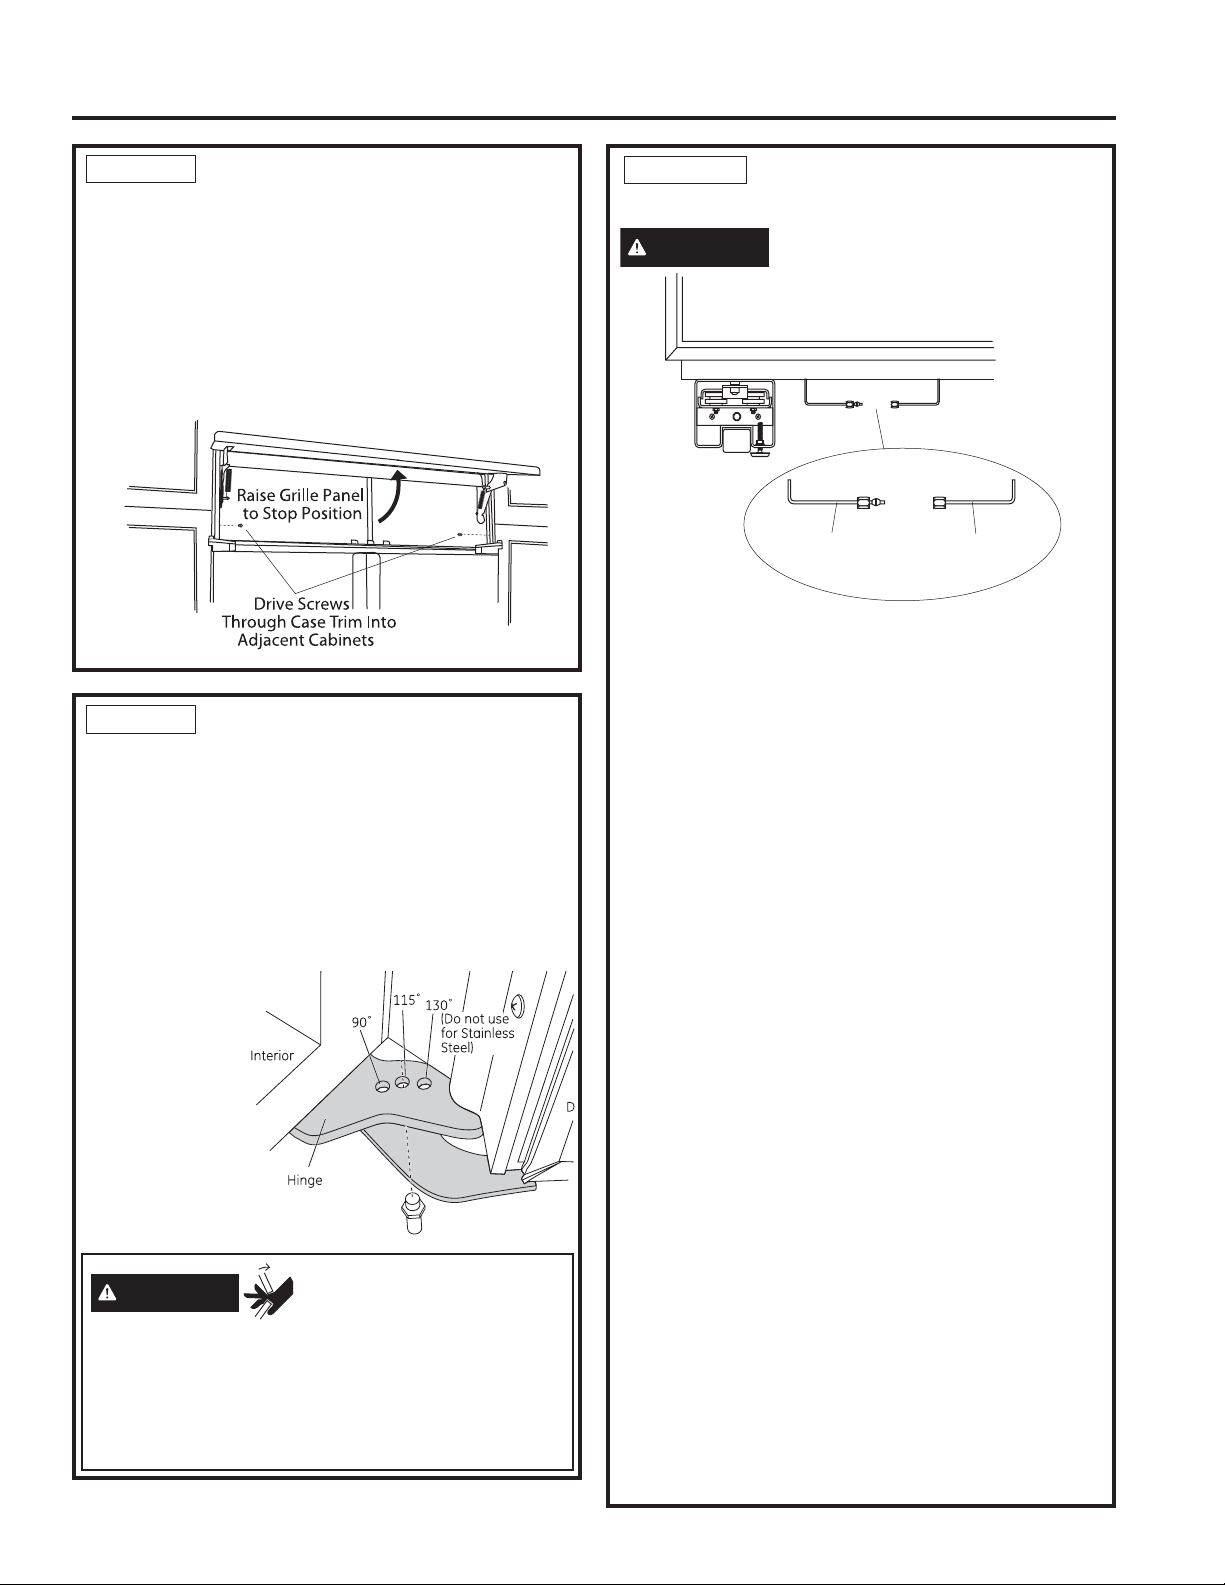
STEP 9 ADJUST DOOR SWING
NOTE: This refrigerator has a 2-position door stop.
When space does not allow the door to swing open
fully to 115°, you may change the door swing to a
90° opening. The 130°, door swing option is not to be
XVHGIRUWKH6[6´DQG´PRGHOVSkip this step
if door opening is satisfactory for your installation
situation.
• Open the door to view the bottom hinge.
Note the door stop pin locations. The pin is factory
installed in
the 115°
position.
• Close the
door. From
below, use
pliers to
unscrew the
door stop
and reinstall
into the 90°
position.
8VHD´ELWWRGULOOWRSLORWKROHVWKURXJKWKH
metal clearance holes and into the wood soffit.
7KHKROHVVKRXOGEHFHQWHUHGLQWKHVRIILWRUD´
(1.91 cm) min. wood brace. The brace spanning the
enclosure must be securely fastened to cabinets on
both sides.
,QVWDOOIRXU´GU\ZDOOVFUHZVLQWRWKHSLORWKROHV
'ULOOVFUHZVLQWRDGMDFHQWFDELQHWVWKURXJKVLGHFDVH
trim.
WARNING
Door Trim Pinch Point
Hazard
,PSURSHULQVWDOODWLRQFDQOHDGWRDILQJHUSLQFKSRLQW
KD]DUGEHWZHHQWKHVLGHGRRUWULPDQGWKHFDELQHWV
when operating the door, especially with children.
7RPLQLPL]HWKLVULVN\RXPXVWIROORZWKHLQVWDOODWLRQ
instructions for cabinet dimensions, trim assembly,
and door stop angle.
STEP 8 ALTERNATE ANTI-TIP
PROCEDURE (Cont.)
Installation Instructions
STEP 10 CONNECT WATER
SUPPLY
WARNING
Connect to potable water supply
only.
• Locate and bring the tubing to the front of the
cabinet.
• Turn the water on to flush debris from the line. Run
about a quart of water through the tubing into a
bucket, then shut off the water.
Copper Tubing:
6OLSD´QXWDQGIHUUXOHSURYLGHGRYHUERWKHQGV
RIWKHFRSSHUWXELQJ,QVHUWWKHWXEHLQWRWKHXQLRQ
fitting on the unit and tighten the nut to the union.
• Turn on the water to check for leaks.
SmartConnect
™
Tubing:
NOTE: The only GE Appliances-approved plastic
tubing is supplied in the SmartConnect
Refrigerator
7XELQJNLWV'RQRWXVHDQ\RWKHUSODVWLFZDWHUVXSSO\
line because the line is under pressure at all times.
Other types of plastic may crack or rupture with age
and cause water damage to your home.
SmartConnect
5HIULJHUDWRU7XELQJ.LWVDUHDYDLODEOH
in the following lengths:
¶P:;;
¶P:;;
¶P:;;
¶P:;;
,QVHUWWKHPROGHGHQGRIWKHWXELQJLQWRWKH
refrigerator connection. Tighten the compression nut
until it is just hand tight.
• Tighten one additional turn with a wrench.
2YHUWLJKWHQLQJFDQFDXVHOHDNV
• Turn on the water to check for leaks.
• Run dispenser, if available, for 2 minutes or 1 gallon
RIZDWHU,WLVQRUPDOIRUWKHGLVSHQVHUWRVSXWWHUIRU
the first few cups.
NOTE: Make sure excess tubing length does not
interfere with the toekick installation.
Refrigerator
Water Supply
House
Water Supply
24 49-1000364 Rev. 1
INSTALLATION INSTRUCTIONS
Installation Instructions
INSPECT FINAL INSTALLATION
Check door alignment. Stand back away from the
refrigerator to inspect the final installation.
• Check to be sure the handles are evenly aligned
with each other at the top. To adjust, loosen the
handle screws and slide up or down. Tighten the
screws.
• Shipping or the addition of heavy door panels may
have caused the doors to move slightly out of
alignment.
,IQHFHVVDU\WKHIUHVKIRRGGRRUPD\EHDGMXVWHG
XSRUGRZQWRDOLJQZLWKWKHIUHH]HUGRRU
8VHD´ZUHQFKWRDGMXVWWKHKLQJHSLQDV
shown.
Bushing
Door Hinge
Case Hinge
5/16" Wrench
Raise
Door Out of
Alignment
STEP 13 INSTALL TOEKICKS
• Locate the supplied toekicks (shipped taped to the
side of the refrigerator.
• Attach the LARGER toekick to the refrigerator using
ONLY the top center hole (1).
• Attach the toekick skirt to the refrigerator using the
three lower slots (2).
• A custom toekick can be installed to match or
complement the surrounding cabinetry. Use the
supplied toekick as a template to cut the shape.
1
2
STEP 11 CONNECT POWER,
CLOSE GRILLE PANEL
• Open the grille panel.
• Plug in the power cord (if necessary) by reaching
into the opening next to the water filter. The water
filter guard will need to be removed for access
(some models). Remove the 3 screws holding it in
SODFH,IDFFHVVLVVWLOOWRRWLJKWUHPRYHWKHVFUHZV
holding the water filter bracket and move aside. Plug
in the power cord. Secure the bracket and guard
with the original screws.
• Check to make sure power to refrigerator is on by
opening refrigerator door to see if interior lights are
on.
• The temperature controls are preset at 37°F (3º C)
for the fresh food section and 0°F (-18º C) for the
IUHH]HU
$OORZKRXUVWRVWDELOL]HEHIRUHPDNLQJ
adjustments.
Water Filter
Guard in Front of
Electric Outlet
Access
Bracket
Screws
Screws
STEP 12 START ICEMAKER
CAUTION
Avoid contact with the moving
parts of the ejector mechanism, or with the heating
element (located on the bottom of the icemaker) that
UHOHDVHVWKHFXEHV'RQRWSODFHILQJHUVRUKDQGV
on the automatic ice making mechanism while the
refrigerator is plugged in.
• Slide the power switch to ON.
• The icemaker will begin operation automatically.
• Be sure nothing interferes with the sweep of the
feeler arm.
'LVFDUGWKHILUVWIXOOEXFNHWRILFHFXEHV
• To turn the icemaker off, slide the switch to OFF.
Feeler Arm
,FHPDNHU
49-1000364 Rev. 1 25
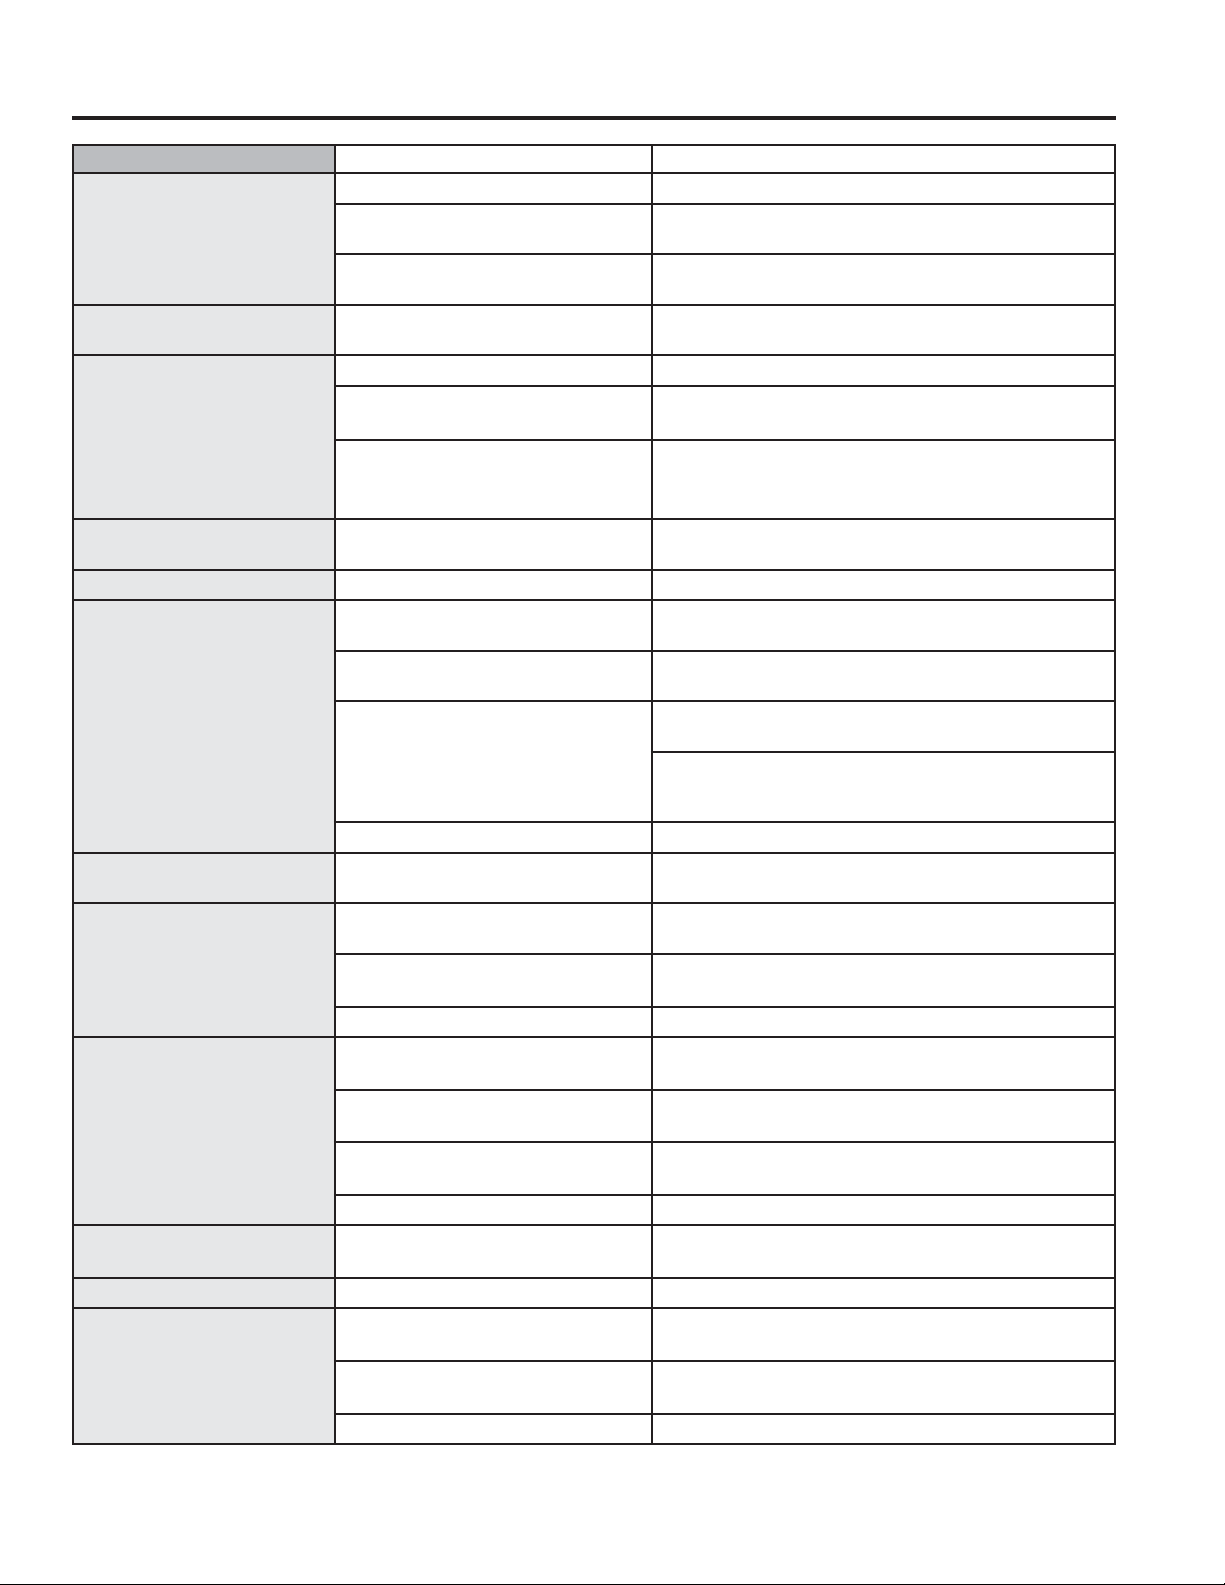
Normal Operating Conditions.
TROUBLESHOOTING TIPS: Normal Operating Conditions
Newer refrigerators sound different from older refrigerators. Modern refrigerators have more features and
use newer technology.
'R\RXKHDUZKDW,KHDU"7KHVHVRXQGVDUHQRUPDO
HUMMM...
WHOOSH...
Ŷ
The new high efficiency compressor may run faster
and longer than your old refrigerator and you may
hear a high-pitched hum or pulsating sound while it
is operating.
Ŷ
Sometimes the refrigerator runs for an extended
period, especially when the doors are opened
IUHTXHQWO\7KLVPHDQVWKDWWKH)URVW*XDUG
IHDWXUHLVZRUNLQJWRSUHYHQWIUHH]HUEXUQDQG
improve food preservation.
Ŷ
You may hear a whooshing sound when the doors
FORVH7KLVLVGXHWRSUHVVXUHHTXDOL]LQJZLWKLQWKH
refrigerator.
Ŷ
You may hear the fans spinning at high speeds.
This happens when the refrigerator is first plugged in,
when the doors are opened frequently or when
a large amount of food is added to the refrigerator
RUIUHH]HUFRPSDUWPHQWV7KHIDQVDUHKHOSLQJWR
maintain the correct temperatures.
Ŷ
,IHLWKHUGRRULVRSHQIRURYHUPLQXWHV\RXPD\
hear the fans come on in order to cool the light bulbs.
Ŷ
The fans change speeds in order to provide optimal
cooling and energy savings.
CLICKS, POPS,
CRACKS and CHIRPS
Ŷ
You may hear cracking or popping sounds when the
refrigerator is first plugged in. This happens as the
refrigerator cools to the correct temperature.
Ŷ
Electronic dampers click open and closed to provide
optimal cooling and energy savings.
Ŷ
The compressor may cause a clicking or chirping
sound when attempting to restart (this could take up
to 5 minutes).
Ŷ
The electronic control board may cause a clicking
sound when relays activate to control refrigerator
components.
Ŷ
Expansion and contraction of cooling coils during
and after defrost can cause a cracking or popping
sound.
Ŷ
On models with an icemaker, after an icemaking
cycle, you may hear the ice cubes dropping into the
ice bucket.
WATER SOUNDS
Ŷ
7KHIORZRIUHIULJHUDQWWKURXJKWKHIUHH]HUFRROLQJ
coils may make a gurgling noise like boiling water.
Ŷ
Water dropping on the defrost heater can cause a
VL]]OLQJSRSSLQJRUEX]]LQJVRXQGGXULQJWKHGHIURVW
cycle.
Ŷ
A water dripping noise may occur during the defrost
cycle as ice melts from the evaporator and flows into
the drain pan.
Ŷ
Closing the door may cause a gurgling sound due to
SUHVVXUHHTXDOL]DWLRQ
26 49-1000364 Rev. 1
Troubleshooting Tips... Before you call for service
6DYHWLPHDQGPRQH\5HYLHZWKHFKDUWVRQWKHIROORZLQJSDJHVILUVWDQG\RXPD\QRWQHHGWRFDOOIRUVHUYLFH
TROUBLESHOOTING TIPS
Problem Possible Causes What To Do
Refrigerator does not
operate
Refrigerator in defrost cycle. Wait about 30 minutes for defrost cycle to end.
Freezer control in 0 (off)
position.
0RYHWKHIUHH]HUFRQWUROWRDORZHU
temperature setting.
Refrigerator is unplugged. Push the plug completely into the outlet.
The fuse is blown/circuit
breaker is tripped.
Replace fuse or reset the breaker.
Energy Smart™ feature
is altering refrigerator
performance
Wait about 2 hours for normal operation
to continue.
5HIULJHUDWRURUIUHH]HU
compartment too warm
Temperature control not set
cold enough.
See About the controls.
Warm weather or frequent door
openings.
Set the temperature control one step colder. See
About the controls.
Door left open. Check to see if package is holding door open.
Energy Smart™ feature
is altering refrigerator
performance
SHH$ERXW(QHUJ\6PDUW0RGHOV
Vibration or rattling Front rollers need adjusting. See Rollers. Slight vibration is normal.
Motor operates for long
periods or cycles on and
off frequently. (Modern
refrigerators with more
storage space and a
ODUJHUIUHH]HUUHTXLUHPRUH
operating time. They start
and stop often to maintain
even temperatures.)
Normal when refrigerator is first
plugged in.
Wait 24 hours for the refrigerator to completely
cool down.
Often occurs when large
amounts of food are placed in
refrigerator.
This is normal.
Door left open. Check to see if package is holding door open.
Hot weather or frequent door
openings.
This is normal.
Temperature controls set at the
coldest setting.
See About the controls.
Frost or ice crystals on
IUR]HQIRRGIURVWZLWKLQ
package is normal)
Door left open. Check to see if package is holding door open.
Too frequent or too long door
openings.
'LYLGHUEHWZHHQUHIULJHUDWRU
DQGIUHH]HUFRPSDUWPHQWV
feels warm
Automatic energy saver
system circulates warm liquid
around front edge of freezer
compartment.
This helps prevent condensation on the outside.
Automatic icemaker does not
work (on some models)
Icemaker power switch is in the
OFF position.
Slide the power switch to the ON position.
Water supply turned off or not
connected.
6HH,QVWDOOLQJWKHZDWHUOLQH
Freezer compartment too warm. Wait 24 hours for the refrigerator to completely
cool down.
Piled up cubes in the storage
bin cause icemaker to shut off.
Level cubes by hand.
Ice cubes stuck in icemaker. Turn off the icemaker, remove cubes and turn the
icemaker back on.
49-1000364 Rev. 1 27
TROUBLESHOOTING TIPS
Troubleshooting Tips... Before you call for service
Problem Possible Causes What To Do
,FHFXEHVKDYHRGRUWDVWH Ice storage bin needs cleaning. (PSW\DQGZDVKELQ'LVFDUGROGFXEHV
Food transmitting odor/taste to
ice cubes.
Wrap foods well.
Interior of refrigerator needs
cleaning.
See Care and cleaning.
Small or hollow cubes Water filter clogged. Replace filter cartridge with new cartridge or with
plug.
6ORZLFHFXEHIUHH]LQJ Door left open. Check to see if package is holding door open.
Temperature control not set
cold enough.
See About the controls.
Energy Smart™ feature
is .altering refrigerator
performance
6HH$ERXW(QHUJ\6PDUW0RGHOV
'RRUQRWFORVLQJSURSHUO\ Door gasket on hinge side
sticking or folding over.
Apply petroleum jelly on face of gasket
2UDQJHJORZLQIUHH]HU Defrost heater is on. This is normal.
Cube dispenser does not
work (on some models)
Icemaker or water supply turned
off.
Turn on icemaker or water supply.
Ice cubes are frozen to
icemaker feeler arm.
Remove cubes.
Irregular ice clumps in storage
container.
Break up with fingertip pressure and discard
remaining clumps.
)UHH]HUPD\EHWRRZDUP$GMXVWWKHIUHH]HUFRQWURO
to a colder setting, one position at a time, until
clumps do not form.
Dispenser is /2&.('. Press and hold the Lock pad for 3 seconds.
:DWHUKDVSRRUWDVWHRGRU
(on some models)
Water dispenser has not been
used for a long time.
'LVSHQVHZDWHUXQWLODOOZDWHULQV\VWHPLV
replenished.
Water in first glass is warm
(on some models)
Normal when refrigerator Wait 24 hours for the refrigerator to completely cool
down.
Water dispenser has not been
used for a long time.
'LVSHQVHZDWHUXQWLODOOZDWHULQV\VWHPLV
replenished.
Water system has been drained. Allow several hours for replenished supply to chill.
Water dispenser does not
work (on some models)
Water supply line turned off or
not connected.
6HH,QVWDOOLQJWKHZDWHUOLQH
Water filter clogged. Replace filter cartridge or remove filter and install
plug.
Air may be trapped in the water
system.
Press the dispenser arm for at least two minutes.
Dispenser is /2&.('. Press and hold the Lock pad for 3 seconds.
Water spurting from
dispenser
Newly-installed filter cartridge. Run water from the dispenser for 3 minutes (about
1
1
2 gallons [5.7 liters]).
Water is not dispensed Water in reservoir is frozen. Call for service.
No water or ice cube
production
Supply line or shutoff valve is
clogged.
Call a plumber.
Water filter clogged. Replace filter cartridge or remove filter and install
plug.
Dispenser is /2&.('. Press and hold the Lock pad for 3 seconds.

28 49-1000364 Rev. 1
Troubleshooting Tips... Before you call for service
TROUBLESHOOTING TIPS
Problem Possible Causes What To Do
Refrigerator has odor Foods transmitting odor to
refrigerator.
Foods with strong odors should be tightly
wrapped.
.HHSDQRSHQER[RIEDNLQJVRGDLQWKH
UHIULJHUDWRUUHSODFHHYHU\WKUHHPRQWKV
Interior needs cleaning. See Care and cleaning.
Defrost water drainage system
needs cleaning.
See Care and cleaning.
Moisture forms on
outside of refrigerator
Not unusual during periods of
high humidity.
Wipe surface dry.
Moisture collects inside Too frequent or too long door
openings.
,QWHULRUOLJKWGRHVQRW
work
No power at outlet. Replace fuse or reset the breaker.
Light bulb burned out. See Replacing the light bulbs.
Water on kitchen floor or
RQERWWRPRIIUHH]HU
Drain in the bottom of the
freezer clogged.
See Care and cleaning.
Cubes jammed in chute. Poke ice through with a wooden spoon.
Hot air from bottom of
refrigerator
Normal air flow cooling motor.
In the refrigeration process,
it is normal that heat be
expelled in the area under
the refrigerator. Some floor
coverings are sensitive and
will discolor at these normal
and safe temperatures.
&XEHG,FHZDVVHOHFWHG
EXW&UXVKHG,FHZDV
dispensed (on some
models)
Last setting was &UXVKHG,FH. A few cubes were left in the crusher from the
previous setting. This is normal.
,IFRQWLQXDOFUXVKHGLFHLVGLVSHQVHGZKLOHFXEHG
ice is selected, adjust ice bin. See Ice storage bin.
)UHTXHQW³EX]]LQJ´
sound
Icemaker power switch is in
the
Slide the power switch to the OFF position.
.HHSLQJLWLQWKH21SRVLWLRQZLOOGDPDJHWKH
water valve.
49-1000364 Rev. 1 29
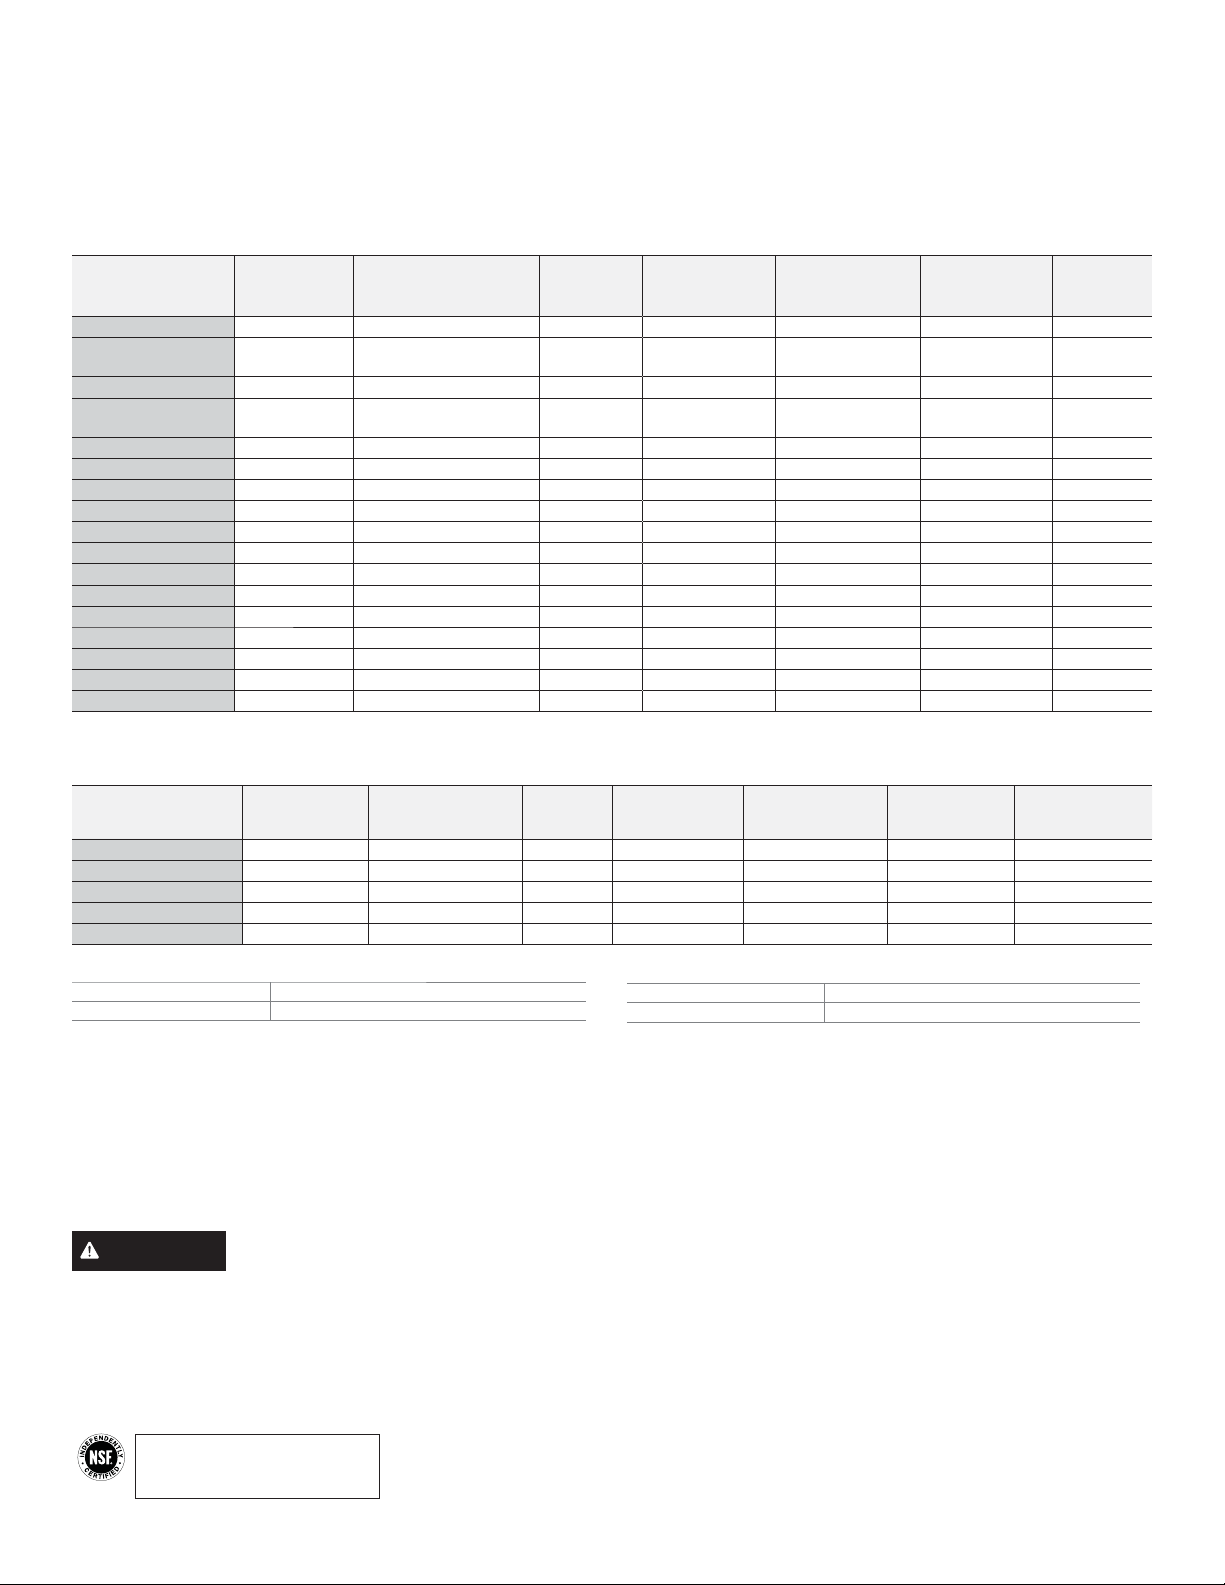
3HUIRUPDQFH'DWD6KHHW
SmartWater
Filtration System—GE Appliances MWF Cartridge
The concentration of the indicated substances in water entering the system was reduced to a concentration less than or equal to the
SHUPLVVLEOHOLPLWIRUZDWHUOHDYLQJWKHV\VWHPDVVSHFLILHGLQ16)$16,6WDQGDUGDQG6WDQGDUG6\VWHPWHVWHGDQGFHUWLILHGE\16)
,QWHUQDWLRQDODJDLQVW16)$16,6WDQGDUGDQG6WDQGDUGIRUWKHUHGXFWLRQRIVXEVWDQFHVOLVWHGEHORZ
The following pharmaceutical reduction claims have not been certified by NSF International or the state of California.
Claims tested and verified by independent laboratory:
Contaminant
Reduction
Average
Influent
NSF specified
Challenge
Concentration
Avg %
Reduction
Average
Product Water
Concentration
Max Permissible
Product Water
Concentration
NSF Reduction
Requirements
NSF
Test Report
Atenolol 978 ng/L N/A 99.5% 5.0 ng/L N/A N/A J-00121587
Fluoxetine 907 ng/l N/A 99.4% 5.4 ng/L N/A N/A J-00121587
Ibuprofen 885 ng/L N/A 94.1% 52.3 ng/L N/A N/A J-00121588
Progesterone 1097 ng/L N/A 99.5% 5.0 ng/L N/A N/A J-00121589
Trimethoprim 415 ng/L N/A 99.5% 2.0 ng/L N/A N/A J-00121587
,WLVHVVHQWLDOWKDWWKHPDQXIDFWXUHU¶VUHFRPPHQGHGLQVWDOODWLRQPDLQWHQDQFHDQGILOWHUUHSODFHPHQWUHTXLUHPHQWVEHFDUULHGRXWIRUWKHSURGXFWWRSHUIRUPDV
DGYHUWLVHG6HH,QVWDOODWLRQ0DQXDOIRU:DUUDQW\LQIRUPDWLRQ
Application Guidelines/Water Supply Parameters
Service Flow 0.5 gpm (1.9 lpm)
Water Supply Potable Water
Water Pressure 40-120 psi (2.8-8.2 bar)
Water Temperature 33°F-100°F (0.6°C-38°C)
Note: While the testing was performed under standard laboratory
conditions, actual performance may vary. Contaminant reduction
testing is conducted every five years by certifying agency to
maintain certification.
Replacement Cartridge: MWF. For estimated costs of replacement
elements please call 1.877.959.8688 or visit our website at
geapplianceparts.com.
WARNING
To reduce the risk associated with ingestion of contaminants:
• Do not use with water that is microbiologically unsafe or of
unknown quality without adequate disinfection before and
after the system. Systems certified for cyst reduction may be
used on disinfected water that may contain filterable cysts.
NOTICE
To reduce the risk associated with property damage due to
water leakage:
• Read and follow use instructions before installation and use of
this system.
,QVWDOODWLRQDQGXVHMUST comply with all state and local
plumbing codes.
• Do notLQVWDOOLIZDWHUSUHVVXUHH[FHHGVSVLEDU,I
your water pressure exceeds 80 psi (5.5 bar), you must install a
pressure-limiting valve. Contact a plumbing professional if you
are uncertain how to check your water pressure.
• Do notLQVWDOOZKHUHZDWHUKDPPHUFRQGLWLRQVPD\RFFXU,I
water hammer conditions exist you must install a water hammer
arrester. Contact a plumbing professional if you are uncertain
how to check for this condition.
• Do not install on hot water supply lines. The maximum operating
water temperature of this filter system is 100º F (38º C).
• Protect filter from freezing. 'UDLQILOWHUZKHQWHPSHUDWXUHVGURS
below 33ºF (0.6ºC).
• The disposable filter cartridge should be replaced every 6
months at the rated capacity, or sooner if a noticeable reduction
in flow rate occurs.
Capacity 300 Gallons (1,135 Liters). Contaminant Reduction Determined by NSF testing.
Substance Tested
for Reduction
Average
Influent
NSF specified
Challenge
Concentration
Avg %
Reduction
Average
Product Water
Concentration
Max Permissible
Product Water
Concentration
NSF Reduction
Requirements
NSF
Test Report
Chlorine Taste and Odor 2.0 mg/L 2.0 mg/L ± 10% 97.4% 0.05 mg/L N/A J-00137878
Nominal Particulate Class
,WRP 11,333,333 pts/mL At least 10,000 particles/mL 99.9% 5,510 pts/mL N/A J-00137881
Cyst* 101,000 cysts/L Minimum 50,000 cysts/L 99.99% 1 cyst/L N/A J-00100036
Asbestos 133 MF/L
10
7
to 10
8
fibers/L; fibers
JUHDWHUWKDQPLQOHQJWK >99% 0)/ N/A J-00137886
Atrazine 0.008 mg/L 0.009 mg/L ± 10% 91.3% 0.0007 mg/L 0.003 mg/L N/A J-00137910
Benzene 0.014 mg/L 0.015 mg/L ± 10%± 96.5% 0.0005 mg/L 0.005 mg/L N/A J-00137912
Carbofuran 0.08 mg/L 0.08 mg/L ± 10% 74.5% 0.01 mg/L 0.04 mg/L N/A J-00147488
Endrin 0.007 mg/L 0.006 mg/L ± 10% 97.1% 0.0002 mg/L 0.002 mg/L N/A J-00100039
Lead @ pH 6.5 0.148 mg/L 0.15 mg/L ± 10% 99.3% 0.001 mg/L 0.010 mg/L N/A J-00137914
Lead @ pH 8.5 0.155 mg/L 0.15 mg/L ± 10% 99.3% 0.001 mg/L 0.010 mg/L N/A J-00137915
Lindane 0.002 mg/L 0.002 mg/L ± 10% 96.5% 0.00002 mg/L 0.0002 mg/L N/A J-00137924
Mercury @ pH 6.5 0.006 mg/L 0.006 mg/L ± 10% 87.6% 0.0004 mg/L 0.002 mg/L N/A J-00137925
Mercury @ pH 8.5 0.006 mg/L 0.006 mg/L ± 10% 93.2% 0.0007 mg/L 0.07 mg/L N/A J-00092355
P-Dichlorobenzene 0.223 mg/L 0.225 mg/L ± 10% 99.8% 0.005 mg/L 0.075 mg/L N/A J-00137926
Tetrachloroethylene 0.014 mg/L 0.015 mg/L ± 10% 96.5% 0.0005 mg/L 0.005 mg/L N/A J-00137929
Toxaphene 0.017 mg/L 0.015 mg/L ± 10% >93.9% 0.001 mg/L 0.003 mg/L N/A J-00137928
2, 4-D 0.192 mg/L 0.210 mg/L ± 10% 77.7% 0.040 mg/L 0.07 mg/L N/A J-00147489
*Based on the use of Cryptosporidium parvum oocysts.
REPLACEMENT
ELEMENT
Tested and certified by NSF International against
NSF/ANSI Standard 42 and Standard 53 in model
GE Appliances MWF for the reduction of the
claims specified on the performance data sheet.
30 49-1000364 Rev. 1
,I\RXU*($SSOLDQFHVSDUWIDLOVEHFDXVHRIDPDQXIDFWXULQJGHIHFWZLWKLQWKLUW\GD\VIURPWKHGDWHRIRULJLQDOSXUFKDVHIRUXVHZHZLOOJLYH\RX
a new or, at our option, a rebuilt part without charge. Return the defective part to the parts supplier from whom it was purchased together with a
FRS\RIWKH³SURRIRISXUFKDVH´IRUWKHSDUW,IWKHSDUWLVGHIHFWLYHDQGVKRZVQRVLJQVRIDEXVHLWZLOOEHH[FKDQJHG7KHZDUUDQW\GRHVQRW
FRYHUWKHIDLOXUHRISDUWVZKLFKDUHGDPDJHGZKLOHLQ\RXUSRVVHVVLRQDUHDEXVHGRUKDYHEHHQLQVWDOOHGLPSURSHUO\,WGRHVQRWFRYHUWKHFRVW
RIUHWXUQLQJWKHSDUWWRWKHVXSSOLHUIURPZKRPLWZDVSXUFKDVHGQRUGRHVLWFRYHUWKHFRVWRIODERUWRUHPRYHRULQVWDOOLWWRGLDJQRVHWKHIDXOW,W
GRHVQRWFRYHUSDUWVXVHGLQSURGXFWVLQFRPPHUFLDOXVHH[FHSWLQWKHFDVHRIDLUFRQGLWLRQLQJHTXLSPHQW,QQRHYHQWVKDOO*($SSOLDQFHVEH
liable for consequential damages. Warrantor: GE Appliances
Seller:
Name
Address
City State Zip
Signature 'DWH
Buyer:
Name
Address
City State Zip
Signature 'DWH
Staple your receipt here. Proof of the original purchase
date is needed to obtain service under the warranty.
What GE Appliances will not cover:
Ŷ Service trips to your home to teach you how to use
the product.
Ŷ ,PSURSHULQVWDOODWLRQ
Ŷ Failure of the product if it is abused, misused, used for
other than the intended purpose or used commercially.
Ŷ Replacement of house fuses or resetting of circuit
breakers.
Ŷ 'DPDJHWRWKHSURGXFWFDXVHGE\DFFLGHQWILUH
floods, or acts of God.
Ŷ ,QFLGHQWDORUFRQVHTXHQWLDOGDPDJHFDXVHGE\
possible defects with this appliance.
MWF Water Filter Cartridge Limited Warranty
This warranty is extended to the original purchaser and any succeeding owner for products purchased for home use
ZLWKLQWKH86$,Q$ODVNDWKHZDUUDQW\H[FOXGHVWKHFRVWRIVKLSSLQJRUVHUYLFHFDOOVWR\RXUKRPH
Some states do not allow the exclusion or limitation of incidental or consequential damages. This warranty gives you
specific legal rights, and you may also have other rights which vary from state to state. To know what your legal rights
are, consult your local or state consumer affairs office or your state’s Attorney General.
For Purchases Made In Iowa: This form must be signed and dated by the buyer and seller prior to the
consummation of this sale.
This form should be retained on file by the seller for a minimum of two years.
For the period of GE Appliances will replace
Thirty Days
From the date
of the original
purchase
Any part of the water filter cartridge which fails due to a defect in materials
or workmanship during this limited thirty-day warranty.*
Contact us at geapplianceparts.com, or call GE Appliances at 800.GE.CARES.
EXCLUSION OF IMPLIED WARRANTIES
Your sole and exclusive remedy is part exchange as provided in this Limited Warranty. Any implied warranties,
including the implied warranties of merchantability or fitness for a particular purpose, are limited to six months or
the shortest period allowed by law.
49-1000364 Rev. 1 31
Ŷ Service trips to your home to teach you how to use
the product.
Ŷ,PSURSHULQVWDOODWLRQGHOLYHU\RUPDLQWHQDQFH
Ŷ)DLOXUHRIWKHSURGXFWLILWLVDEXVHGPLVXVHGRU
used for other than the intended purpose or used
commercially.
Ŷ/RVVRIIRRGGXHWRVSRLODJH
Ŷ5HSODFHPHQWRIKRXVHIXVHVRUUHVHWWLQJRIFLUFXLW
breakers.
Ŷ'DPDJHFDXVHGDIWHUGHOLYHU\
Ŷ5HSODFHPHQWRIWKHZDWHUILOWHUFDUWULGJHLI
included, due to water pressure that is outside
the specified operating range or due to excessive
sediment in the water supply.
Ŷ5HSODFHPHQWRIWKHOLJKWEXOEVLILQFOXGHGRU
water filter cartridge, if included, other than as
noted above.
Ŷ'DPDJHWRWKHSURGXFWFDXVHGE\DFFLGHQWILUH
floods or acts of God.
Ŷ,QFLGHQWDORUFRQVHTXHQWLDOGDPDJHFDXVHGE\
possible defects with this appliance.
Ŷ3URGXFWQRWDFFHVVLEOHWRSURYLGHUHTXLUHGVHUYLFH
Ŷ'DPDJHFDXVHGE\DQRQ*($SSOLDQFHV%UDQG
water filter.
Ŷ'DPDJHWRILQLVKVXFKDVVXUIDFHUXVWWDUQLVKRU
small blemishes not reported within 48 hours of
delivery.
What GE Appliances Will Not Cover:
For the Period of: GE Appliances Will Replace
GE and GE PROFILE MODELS
One Year
From the date of the
original purchase
Any part of the refrigerator which fails due to a defect in materials or workmanship.
'XULQJWKHlimited one-year warranty, GE Appliances will also provide, free of
charge, all labor and related service to replace the defective part.
Thirty Days
(Water filter, if included)
From the original purchase
date of the refrigerator
Any part of the water filter cartridge which fails due to a defect in materials or
ZRUNPDQVKLS'XULQJWKLV limited thirty-day warranty, GE Appliances will also
provide, free of charge, a replacement water filter cartridge.
GE PROFILE ™ MODELS ONLY
Five Years
From the date of the
purchase
Any part of the sealed refrigerating system (the compressor, condenser, evaporator
an all connecting tubing) which fails due to a defect in materials or workmanship.
'XULQJWKLVOimited five-year sealed refrigerating system warranty, GE Appliances
will also provide, free of charge, all labor and related service to replace the defective
part in the sealed refrigerating system.
GEAppliances.com
For US Customers, DOOZDUUDQW\VHUYLFHLVSURYLGHGE\RXU)DFWRU\6HUYLFH&HQWHUVRUDQDXWKRUL]HG&XVWRPHU&DUH
®
technician. To schedule service online, visit us at geappliances.com/service, or call GE Appliances at 800.GE.CARES
(800.432.2737). Please have your serial number and your model number available when calling for service.
In Canada, call 800.661.1616.
GE Appliances Refrigerator Warranty
EXCLUSION OF IMPLIED WARRANTIES
Your sole and exclusive remedy is product repair as provided in this Limited Warranty. Any implied warranties,
including the implied warranties of merchantability or fitness for a particular purpose, are limited to one year or the
shortest period allowed by law.
For US Customers: This warranty is extended to the original purchaser and any succeeding owner for products
SXUFKDVHGIRUKRPHXVHZLWKLQWKH86$,IWKHSURGXFWLVORFDWHGLQDQDUHDZKHUHVHUYLFHE\D*($SSOLDQFHV$XWKRUL]HG
Servicer is not available, you may be responsible for a trip charge or you may be required to bring the product to an
$XWKRUL]HG*($SSOLDQFHV6HUYLFHORFDWLRQIRUVHUYLFH,Q$ODVNDWKHZDUUDQW\H[FOXGHVWKHFRVWRIVKLSSLQJRUVHUYLFH
calls to your home.
Some states do not allow the exclusion or limitation of incidental or consequential damages. This warranty gives you
specific legal rights, and you may also have other rights which vary from state to state. To know what your legal rights
are, consult your local or state consumer affairs office or your state’s Attorney General.
Warrantor: GE Appliances, a Haier company
Louisville, KY 40225
For Customers in Canada: This warranty is extended to the original purchaser and any succeeding owner for
SURGXFWVSXUFKDVHGLQ&DQDGDIRUKRPHXVHZLWKLQ&DQDGD,QKRPHZDUUDQWVHUYLFHZLOOEHSURYLGHGLQDUHDVZKHUH
it is available and deemed reasonable by Mabe to provide.
Warrantor Canada: MC Commercial, Burlington, Ontario, L7R 5B6
Staple your receipt here. Proof of the original purchase
date is needed to obtain service under the warranty.
WARRANTY

32 49-1000364 Rev. 1
Printed in United States
CONSUMER SUPPORT
Consumer Support
GE Appliances Website
+DYHDTXHVWLRQRUQHHGDVVLVWDQFHZLWK\RXUDSSOLDQFH"7U\WKH*($SSOLDQFHV:HEVLWHKRXUVDGD\DQ\GD\RIWKH\HDU
You can also shop for more great GE Appliances products and take advantage of all our on-line support services designed for
\RXUFRQYHQLHQFH,QWKH86GEAppliances.com ,Q&DQDGDGEAppliances.ca
Register Your Appliance
5HJLVWHU\RXUQHZDSSOLDQFHRQOLQHDW\RXUFRQYHQLHQFH7LPHO\SURGXFWUHJLVWUDWLRQZLOODOORZIRUHQKDQFHGFRPPXQLFDWLRQDQG
prompt service under the terms of your warranty, should the need arise. You may also mail in the pre-printed registration card
included in the packing material.
,QWKH86GEAppliances.com/register
,Q&DQDGDProdsupport.mabe.ca/crm/Products/ProductRegistration.aspx
Schedule Service
Expert GE Appliances repair service is only one step away from your door. Get on-line and schedule your service at your
FRQYHQLHQFHDQ\GD\RIWKH\HDU,QWKH86GEAppliances.come/service
or call 800.432.2737 during normal business hours.
,Q&DQDGDGEAppliances.ca/en/support/service-request or call 800.561.3344
Extended Warranties
Purchase a GE Appliances extended warranty and learn about special discounts that are available while your warranty is still
LQHIIHFW<RXFDQSXUFKDVHLWRQOLQHDQ\WLPH*($SSOLDQFHV6HUYLFHVZLOOVWLOOEHWKHUHDIWHU\RXUZDUUDQW\H[SLUHV,QWKH86
GEAppliances.com/extended-warranty
or call 800.626.2224 during normal business hours.
,Q&DQDGDGEAppliances.ca/en/support/purchase-extended-warranty or call 866.277.9842
Parts and Accessories
,QGLYLGXDOVTXDOLILHGWRVHUYLFHWKHLURZQDSSOLDQFHVFDQKDYHSDUWVRUDFFHVVRULHVVHQWGLUHFWO\WRWKHLUKRPHV
9,6$0DVWHU&DUGDQG'LVFRYHUFDUGVDUHDFFHSWHG2UGHURQOLQHWRGD\KRXUVHYHU\GD\
,QWKH86GEApplianceparts.com or by phone at 877.959.8688 during normal business hours.
Instructions contained in this manual cover procedures to be performed by any user. Other servicing generally should
be referred to qualified service personnel. Caution must be exercised, since improper servicing may cause unsafe
operation.
Customers in Canada should consult the yellow pages for the nearest Mabe service center, visit our website at GEAppliances.
ca/en/products/parts-filters-accessories or call 800.661.1616.
Contact Us
,I\RXDUHQRWVDWLVILHGZLWKWKHVHUYLFH\RXUHFHLYHIURP*($SSOLDQFHVFRQWDFWXVRQRXU:HEVLWHZLWKDOOWKHGHWDLOVLQFOXGLQJ
your phone number, or write to:
,QWKH86*HQHUDO0DQDJHU&XVWRPHU5HODWLRQV_*($SSOLDQFHV$SSOLDQFH3DUN_/RXLVYLOOH.<
GEAppliances.com/contact
,Q&DQDGD'LUHFWRU&RQVXPHU5HODWLRQV0DEH&DQDGD,QF_6XLWH)DFWRU\/DQH_0RQFWRQ1%(&0
GEAppliances.ca/en/contact-us

