Loading ...
Loading ...
Loading ...

NOTE: This unit is shipped without gasoline or oil. In
order to avoid damage to the unit, refer to O//
and Fuel Information to put oil and gas in the
crankcase before attempting to start it.
NOTE: Before setting up your cultivator / edger,
disconnect the spark plug wire from the spark
plug and ground to a stud on the engine.
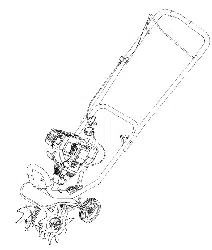
POSITIONING THE HANDLEBARS
1. Loosen the two knobs on the inside of the
handlebars (Fig. 1).
2. With the unit upright, swing the handlebars up into
the operating position (Fig. 1).
NOTE: Take care not to pinch the throttle cable or
switch wires when positioning the handlebar.
3. Tighten the knobs to secure the handlebars in place.
NOTE: Do not over-tighten the knobs,
ADJUSTING THE HANDLEBAR HEIGHT
1,
Remove the knobs and mounting bolts and reinstall
them through either the top or bottom holes in the
handlebar assembly (Fig. 2) in order to adjust the
height of the handlebars.
2. Be sure to tighten the knobs to secure the
handlebars in place.
Fig. 1
Handlebars -_
Handlebar ----4_f _)_(_)
Knob Washer/"
Top Hole
Bolt
_----_ Bottom Hole
Fi .2
ADJUSTING TINE DEPTH
To adjust the wheel support bracket proceed as follows:
1. Stop the engine and disconnect the spark plug to
avoid accidental starting.
2. Remove cotter pin from the clevis pin and slide pin
out of tailpiece bracket (Fig. 3).
3. Slide the wheel support bracket up or down in the
tailpiece, aligning the holes to the desire height.
4. Place the clevis pin through the hole and secure with
a cotter pin.
Clevis Pin
Cotter Pin _
Wheel
Support
Bracket
Fig. 3
Tailpiece Bracket
ATTACHING THE EDGER WHEEL AND
BLADE
To convert the cultivator to an edger proceed as follows:
1. Push the On/Off switch to Off (O) position to stop
engine and tines and disconnect spark plug to avoid
accidental starting.
NOTE: It may be necessary to lay the cultivator / edger
back in a horizontal position on a flat level surface
with the upper handle touching the ground.
2,
3.
4.
5.
Remove the click pin from each end of the tine shaft
and slide the tines off the shaft.
Slide the edger wheel, with the hub facing inward,
onto the right side of the tine shaft and secure with
the click pin in the inside hole (Fig. 4).
Slide the edger blade with the hub facing out onto
the left side of tine shaft and secure with the click pin
in the inside hole (Fig. 4).
Guide the edger blade along a flower bed, sidewalk,
or driveway with the edger wheel along the outside
edge. Use the edger guide line to line up edger blade.
Edger Guide
Line
Edger Wheel
Edger Blade
Fig. 4
Hub
Click Pin
J
Loading ...
Loading ...
Loading ...