®
Microwave Hood Combination
Use & Care Gull_de
Horno de Microondas con
Combinaci6n de Campana
ManL_alde L_SOy CL_
Models/Modelos 721.81 622 / 721.81 624
721.81 629 / 721.81 623
qqD
•qaqlll q
Part No. 382885A0056 Sears, Roebuck and Co., Hoffman Estates, IL 60179 U.S.A www.sears.com
Table of Microwave Hood
Contents
Warranty ............................................................................ 2
Microwave Oven Safety .............................................. 3-5
Getting to Know Your Microwave Oven ................. 6-10
How Your Kenmore Microwave Oven Works ................ 6
Radio Interference .......................................................... 6
Testing Your Microwave Oven ....................................... 6
Testing Your Dinnerware or Cookware .......................... 7
Operating Safety Precautions ........................................ 7
Electrical Connection ...................................................... 7
Microwave Oven Features ............................................. 8
Control Panel Features ............................................ 9-10
Microwave Cooking Tips ........................................ 11-12
Using Your Microwave Oven .................................. 13-20
Audible Signals ............................................................. 13
Clock ............................................................................. 13
Child Lock ..................................................................... 13
Kitchen Timer ................................................................ 13
Exhaust Fan ................................................................. 14
Cooktop Light ............................................................... 14
Options .......................................................................... 14
Timed Cooking ............................................................. 15
Add 30 Sec ................................................................... 15
Interrupting Cooking ..................................................... 15
Multistage Cooking ....................................................... 15
Microwave Power Levels ............................................ 16
Auto Defrost .................................................................. 17
Weight Conversion Table ............................................. 17
Auto Defrost Table .................................................. 18-19
Time Defrost and Express Defrost ............................... 20
Defrosting Tips ............................................................. 20
Using Sensor Cooking ........................................... 21-29
Sensor Operating Instructions ..................................... 21
Sensor Cooking Guide ................................................. 21
Sensor Popcorn ............................................................ 21
More/Less ..................................................................... 21
Sensor Cook ................................................................. 22
Sensor Reheat .............................................................. 22
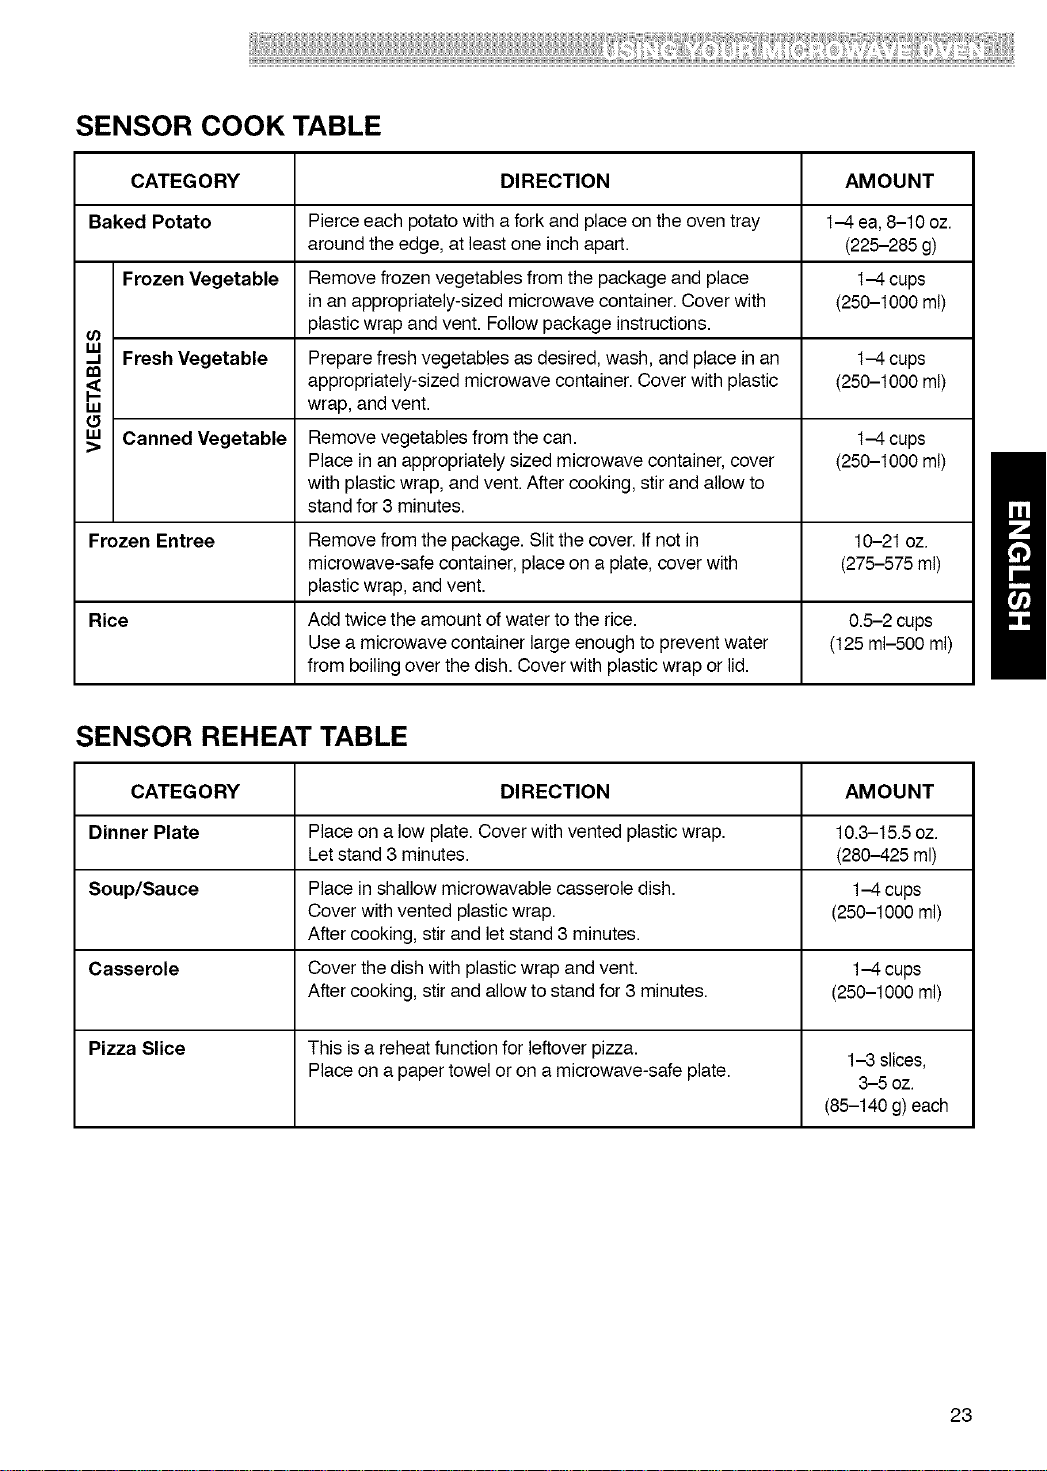
Sensor Cook Table ....................................................... 23
Sensor Reheat Table .................................................... 23
Soften ............................................................................ 24
Soften Table .................................................................. 24
Melt ................................................................................ 24
Melt Table ...................................................................... 24
Grill Cooking Introduction ............................................. 25
Grill Rack ....................................................................... 25
Crisping Tray ................................................................. 25
Auto Grill Cooking ........................................................ 25
Auto Grill Cooking Table ......................................... 26-27
Crisping Tray Cooking Table ........................................ 27
Combi. Cookin_ ............................................................ 28
Combi. Modes Time Table ........................................... 28
Multimode Cooking ....................................................... 28
Caring for Your Microwave Oven .......................... 29-32
Caring for the Filters ............................................... 30-31
Replacing the Cooktop and Oven Lights .............. 31_?,2
Questions and Answers ................................................ 33
Troubleshooting ........................................................ 34-35
Master Protection Agreement ...................................... 71
Combination
Warranty
One-Year Limited Warranty
When installed, operated and maintained according
to all instructions supplied with the product, if
this appliance fails due to a defect in material or
workmanship within one year from the date of purchase,
cal! 1-800-4-MY-HOME _ to arrange for free repair.
This warranty covers only defects in material and
workmanship. Sears will NOT pay for:
1. Expendable items that can wear out from normal use,
including but not limited to filters, belts, light bulbs,
and bags.
2. A service technician to instruct the user in correct
product installation, operation, or maintenance.
3. A service technician to clean or maintain this product.
4. Damage to or failure of this product if it is net
installed, operated, or maintained according to all
instructions supplied with the product.
5. Damage to or failure of this product resulting from
accident, abuse, misuse, or use for other than its
intended purpose.
6. Damage to or failure of this product caused by the
use of detergents, cleaners, chemicals, or utensils
other than those recommended in a!! instructions
supplied with the product.
7. Damage to or failure of parts or systems resulting
from unauthorized modifications made to this product.
Disclaimer of implied warranties, limitation of
remedies
Customer's sole and exclusive remedy under this
limited warranty shal! be product repair as provided
herein. Implied warranties, including warranties of
merchantability or fitness for a particular purpose,
are limited to one year or the shortest period allowed
by law. Sears shall net be liable for incidenta! or
consequential damages. Some states and provinces
do net allow the exclusion or limitation of incidental or
consequential damages, or limitations on the duration of
implied warranties of merchantability or fitness, so these
exclusions or limitations may not apply to you.
This warranty applies only while this appliance is used
in the United States and Canada.
This warranty gives you specific legal rights, and you
may also have other rights which vary from state to
state.
Sears, Roebuck and Co., Dept. 817WA,
Hoffman Estates, IL 60179
Sears Canada Inc., Toronto, Ontario, Canada
M5B 2B8
Microwave Oven Safety
Your safety and the safety of others is very important.
We have provided many important safety messages in this manual and on your appliance.
Always read and obey all safety messages.
This is the safety alert symbol.
This symbol alerts you to hazards that can kill or hurt you and others.
All safety messages will be preceded by the safety alert symbol and the word
"DANGER" or "WARNING." These words mean:
You will be killed or seriously injured
if you don't follow instructions immediately.
You can be killed or seriously injured
if you don't follow instructions.
All safety messages will identify the hazard, tell you how to reduce the chance of injury, and tell
you what can happen if the instructions are not followed.
IMPORTANT SAFETY INSTRUCTIONS
When using electrical appliances, basic safety precautions should be followed, including the
following:
a, WARNING: Toreducethe
risk of burns, electric shock, fire, injury to
persons, or exposure to excessive
microwave energy:
• Read all instructions before using the
microwave oven.
• Read and follow the specific
"PRECAUTIONS TO AVOID POSSIBLE
EXPOSURE TO EXCESSIVE MICROWAVE
ENERGY" found in this section.
• The microwave oven must be grounded.
Connect only to properly grounded outlet.
See "GROUNDING INSTRUCTIONS" found
at the end of this section.
• Install or locate the microwave oven only
in accordance with the provided installation
instructions.
• Some products such as whole eggs in the
shell and sealed containers - for example,
closed glass jars - are able to explode and
should not be heated in the microwave
oven.
• Use the microwave oven only for its
intended use as described in this manual.
Do not use corrosive chemicals or vapors
in the microwave oven. This type of oven is
specifically designed to heat, cook, or dry
food. It is not designed for industrial
or laboratory use.
• As with any appliance, close supervision is
necessary when used by children.
• Do not operate the microwave oven if it has
a damaged cord or plug, if it is not working
properly, or if it has been damaged or
dropped.
SAVE THESE INSTRUCTIONS
IMPORTANT SAFETY INSTRUCTIONS
•The microwaveovenshouldbe servicedonly by
qualifiedservicepersonnel.Callan authorized
servicecompanyfor examination,repair,or
adjustment.
•Seedoorsurfacecleaninginstructionsinthe"Caring
forYourMicrowaveOven"section.
•Toreducetheriskoffire intheovencavity:
- Donotovercookfood.Carefullyattendthe
microwaveovenwhenpaper,plastic,or other
combustiblematerialsareplacedinsidethe oven
tofacilitatecooking.
- Removewiretwist-tiesfrom paperor plasticbags
beforeplacingbagsin oven.
- If materialsinsidetheovenignite,keepoven
doorclosed,turnovenoff,anddisconnectthe
powercord,or shut off poweratthefuse orcircuit
breakerpanel.
- Donotusethecavityforstoragepurposes.Do not
leavepaperproducts,cookingutensils,or foodin
thecavitywhennotin use.
•Thismicrowaveovenissuitablefor useaboveboth
gasand electriccookingequipment.
•Thismicrowaveovenisintendedtobeusedabove
rangeswith maximumwidth of36 inches(91cm).
•Cleanventilatinghoodsfrequently- greaseshould
notbe allowedto accumulateon hoodor filter.
•Whenflamingfoodsunderthehood,turnthe fanon.
• Usecarewhencleaningthevent-hoodfilter.
Corrosiveovencleanersmaydamagethefilter.
•Oversizedfoodsoroversizedmetalutensilsshould
notbe insertedinthe microwaveovenasthey may
createa fireor riskof electricshock.
• Donotcleanwith metalscouringpads.Piecescan
burn offthepad andtouch electricalpartsinvolvinga
risk ofelectricshock.
•Donotstoreanythingdirectlyontopof the
microwaveovenwhen themicrowaveovenis in
operation.
•Donotcoverorblockanyopeningson the
microwaveoven.
•Donotstorethismicrowaveovenoutdoors.Donot
usethemicrowaveovennearwater- forexample,
neara kitchensink,in a wet basement,neara
swimmingpool,or similarlocation.
•Donotimmersecordorplug inwater.
•Keepcordawayfrom heatedsurfaces.
•Donotletcordhangoveredgeoftableor counter.
•Donotmountoverasink.
•Donotcoverracksoranyotherpartofthe ovenwith
metalfoil.Thiswillcauseoverheatingoftheoven.
•Liquids suchas water, coffee,ortea are able to
be overheated beyondthe boiling point without
appearing to be boilingdueto surfacetension
ofthe liquid. Visible bubbling or boiling when the
container is removedfrom the microwave oven
is not always present. This could result invery
hot liquids suddenly boiling overwhen a spoon or
other utensil is inserted into the liquid.To reduce
the risk of injury to persons:
1) Do not overheat the liquid.
2) Stir the liquid both before and halfwaythrough
heating it.
3) Do not use straight-sided containers with
narrow neoNs.
4)After heating,allow the container to stand in
the microwave oven for a short time before
removing the container.
5) Use extremecare when inserting a spoonor
other utensil intothe container.
SAVE THESE INSTRUCTIONS
¸i!!ii!ii:¸I!!!I III!IIII :!!!!!!!!!!!
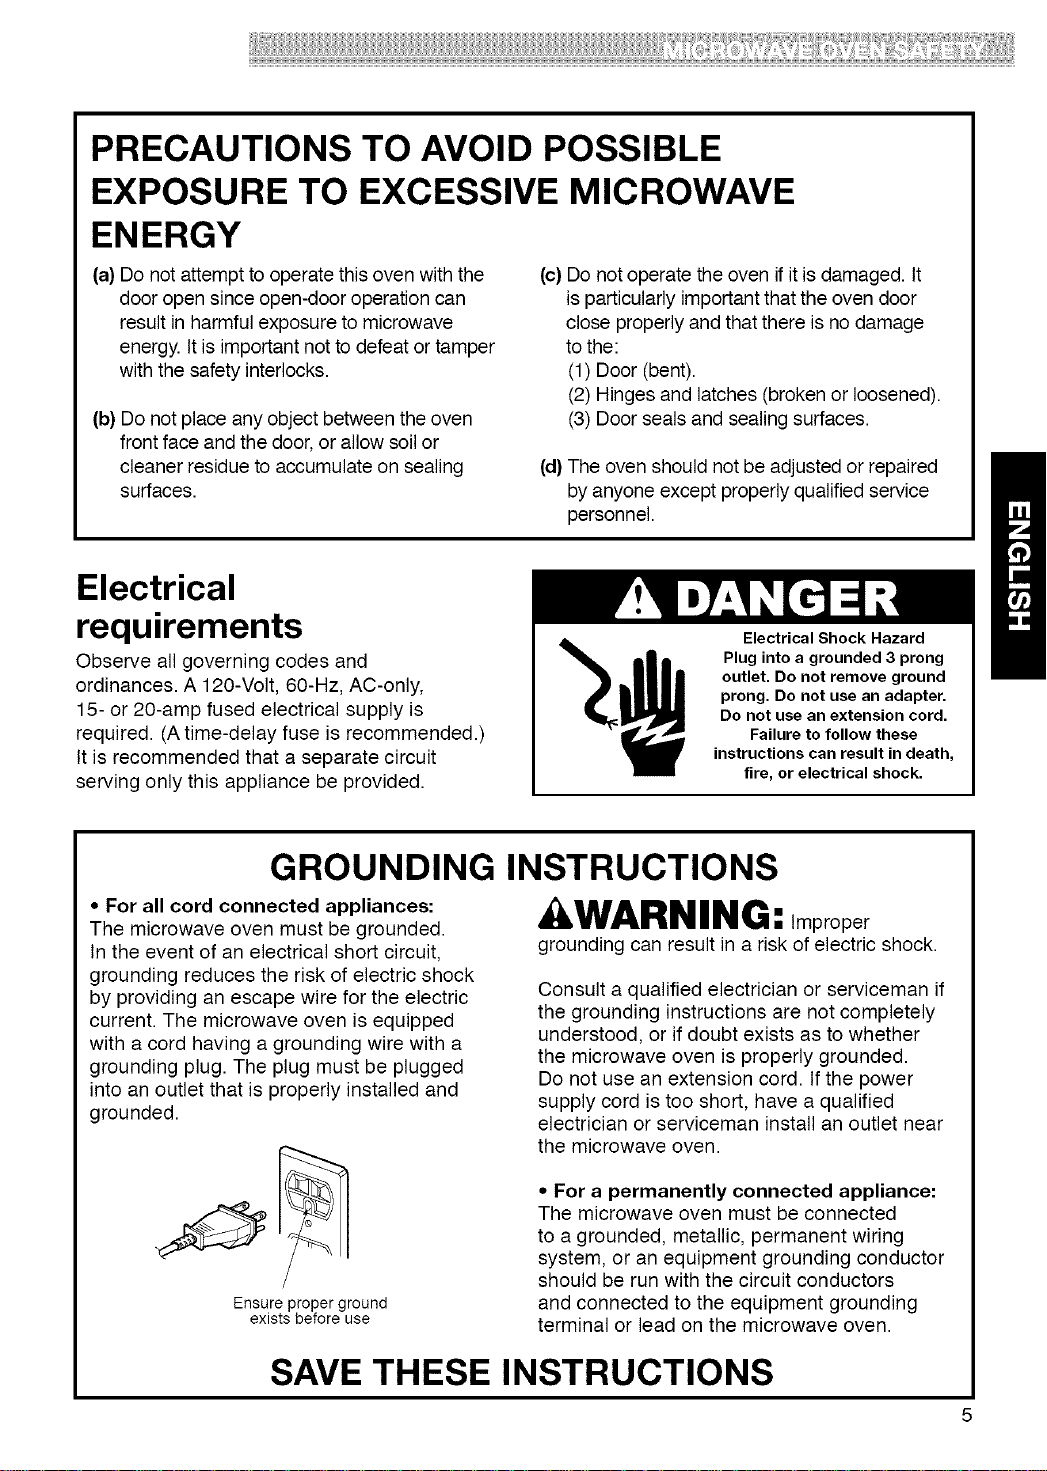
PRECAUTIONS TO AVOID POSSIBLE
EXPOSURE TO EXCESSIVE MICROWAVE
ENERGY
(a) Do not attempt to operate this oven withthe
door open since open-door operation can
result in harmful exposure to microwave
energy. It is important not to defeat or tamper
with the safety interlocks.
(b) Do not place any object between the oven
front face and the door, or allow soil or
cleaner residue to accumulate on sealing
surfaces.
(c) Do not operate the oven if it is damaged. It
is particularly important that the oven door
close properly and that there is no damage
to the:
(1) Door (bent).
(2) Hinges and latches (broken or loosened).
(3) Door seals and sealing surfaces.
(d) The oven should not be adjusted or repaired
by anyone except properly qualified service
personnel.
Electrical
requirements
Observe all governing codes and
ordinances. A 120-Volt, 60-Hz, AC-only,
15- or 20-amp fused electrical supply is
required. (A time-delay fuse is recommended.)
It is recommended that a separate circuit
serving only this appliance be provided.
Electrical Shock Hazard
Plug into a grounded 3 prong
outlet. Do not remove ground
prong. Do not use an adapter.
Do not use an extension cord.
Failure to follow these
instructions can result in death,
fire, or electrical shock.
GROUNDING INSTRUCTIONS
• For all cord connected appliances:
The microwave oven must be grounded.
In the event of an electrical short circuit,
grounding reduces the risk of electric shock
by providing an escape wire for the electric
current. The microwave oven is equipped
with a cord having a grounding wire with a
grounding plug. The plug must be plugged
into an outlet that is properly installed and
grounded.
Ensure proper ground
exists before use
kWARNING: Improper
grounding can result in a risk of electric shock.
Consult a qualified electrician or serviceman if
the grounding instructions are not completely
understood, or if doubt exists as to whether
the microwave oven is properly grounded.
Do not use an extension cord. If the power
supply cord is too short, have a qualified
electrician or serviceman install an outlet near
the microwave oven.
• For a permanently connected appliance:
The microwave oven must be connected
to a grounded, metallic, permanent wiring
system, or an equipment grounding conductor
should be run with the circuit conductors
and connected to the equipment grounding
terminal or lead on the microwave oven.
SAVE THESE INSTRUCTIONS
Getting to Know Your
Microwave Oven
This section discusses the concepts behind microwave cooking. It also shows you the basics
you need to know to operate your microwave oven. Please read this information before you use
your oven.
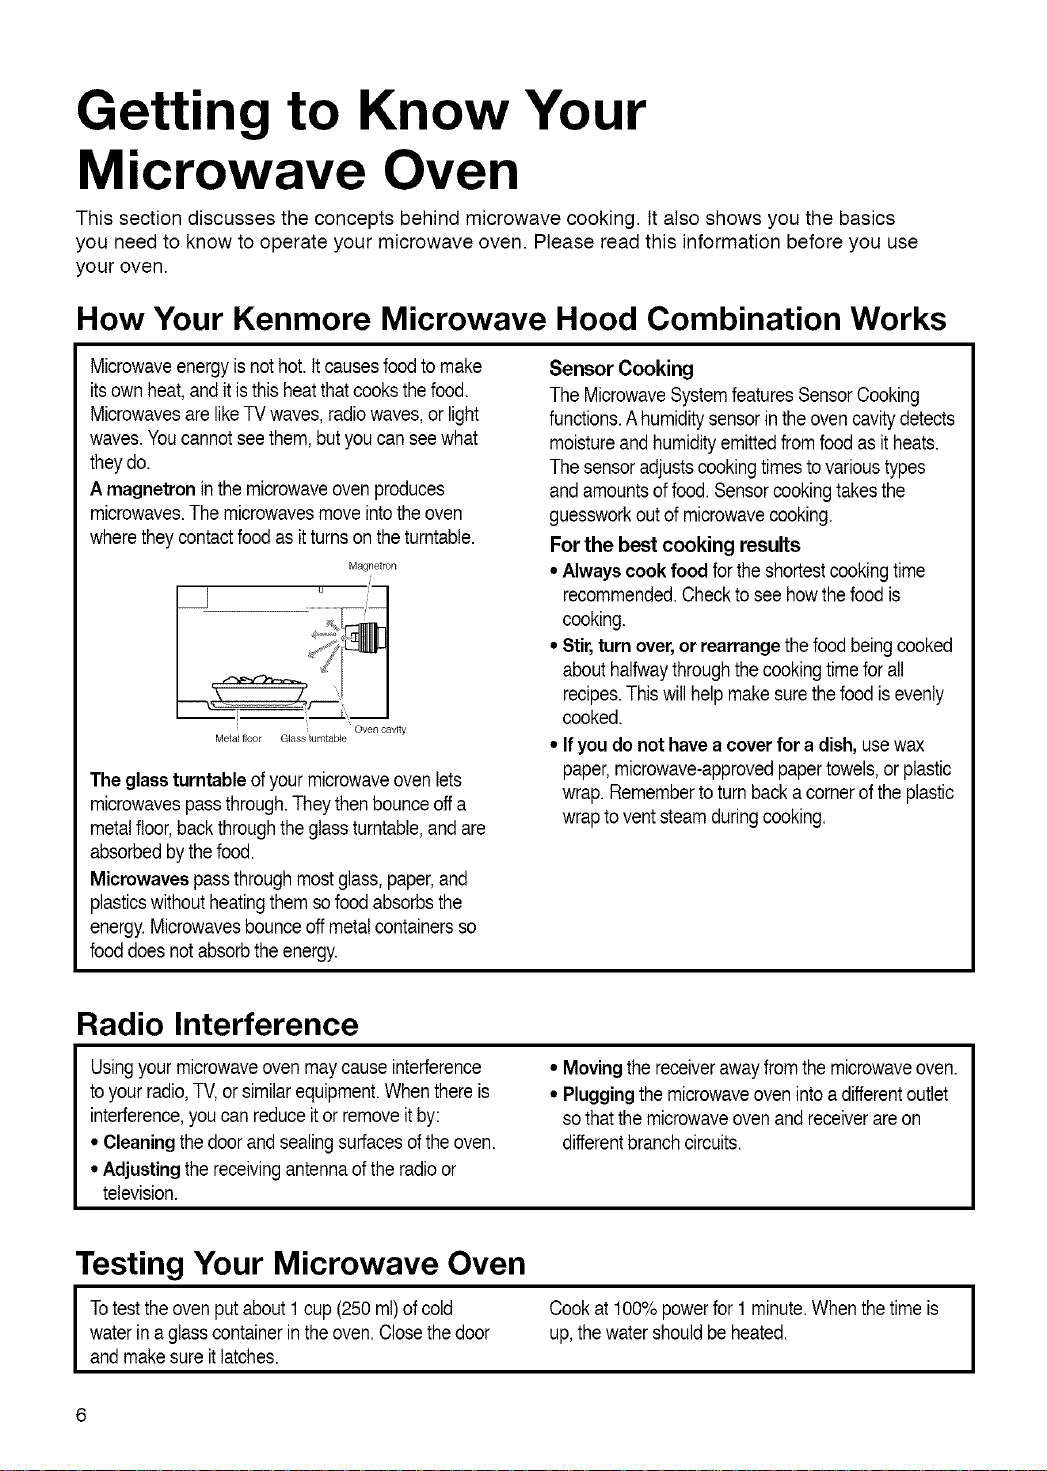
How Your Kenmore Microwave Hood Combination Works
Microwaveenergyisnothot. ttcausesfoodto make
itsown heat,anditisthisheatthatcooksthefood.
Microwavesare likeTV waves,radiowaves,or light
waves. Youcannotseethem,butyoucanseewhat
they do.
A magnetron inthe microwaveovenproduces
microwaves.The microwavesmove intotheoven
wherethey contactfoodas itturnson theturntable.
Magnetron
i
f
Oven cavity
Metal floor Glass turntable
The glass turntable ofyour microwaveoven lets
microwavespassthrough.Theythenbounceoffa
metalfloor,backthroughtheglassturntable,andare
absorbedbythefood.
Microwavespassthroughmostglass,paper,and
plasticswithoutheatingthem sofoodabsorbsthe
energy.Microwavesbounceoffmetalcontainersso
fooddoes notabsorbtheenergy.
Sensor Cooking
TheMicrowaveSystemfeaturesSensorCooking
functions.Ahumiditysensorin theovencavitydetects
moistureandhumidityemittedfrom foodasitheats.
Thesensoradjustscookingtimestovarioustypes
andamountsof food.Sensorcookingtakesthe
guessworkoutof microwavecooking.
For the best cooking results
• Always cook food forthe shortestcookingtime
recommended.Checkto seehowthefoodis
cooking.
• Stir, turn over,or rearrange thefoodbeingcooked
abouthalfwaythroughthecookingtimefor all
recipes.Thiswillhelp makesurethefoodisevenly
cooked.
• If you do not have a cover for a dish, usewax
paper,microwave-approvedpapertowels,or plastic
wrap. Remembertoturn backa cornerofthe plastic
wraptovent steamduringcooking.
Radio Interference
Usingyourmicrowaveovenmaycause interference
to yourradio,TV,or similarequipment.Whenthereis
interference,youcan reduceitor removeitby:
• Cleaning thedoor and sealingsurfacesofthe oven.
• Adjusting the receivingantennaoftheradioor
television.
• Moving the receiverawayfromthemicrowaveoven.
• Plugging the microwaveovenintoa differentoutlet
sothat themicrowaveovenand receiverare on
differentbranchcircuits.
Testing Your Microwave Oven
I otesttheovenputabout1cup(250ml)of cold
water in a glasscontainerintheoven.Closethedoor
andmake sureitlatches.
Cookat 100%powerfor 1 minute.Whenthetime is
up,thewater shouldbe heated.
I
Testing Your Dinnerware or Cookware
Test dinnenNareor cookware beforeusing.To
test adishfor safeuse, putitintotheovenwitha
cupofwaterbesideit Cook at 100%cook power
for one minute Ifthe dish gets hot, do not use it.
Somedishes (melamine,someceramicdinnerware,
etc.)absorbmicrowaveenergy,becomingtoo hotto
handleandslowingcookingtimes. Cookingin metal
containersnotdesignedfor microwaveusecould
damagetheoven,as couldcontainerswithhidden
metal(twist-ties,foillining,staples,metallicglaze
ortrim).
Operating Safety Precautions
• Neverleanonthe dooror allowa childto swingonit
whenthedoor isopen.
• Usehot pads. Microwaveenergydoesnotheat
containers,butthe heatfromthefoodcan makethe
containerhot.
• Donot usenewspaperor otherprintedpaper
in theoven.
• Donot dryflowers,fruit,herbs,wood,paper,
gourds,or c!othesin theoven.
• Donot starta microwaveovenwhenitisempty.
Productlifemaybe shortened.Ifyou practice
programmingtheoven,place a containerofwater
in theoven. Itis normalfortheovendoorto look
wavyaftertheovenhas beenrunningfor awhile.
• Donot tryto meltparaffinwax in theoven. Paraffin
wax willnotmeltin a microwaveovenbecauseit
allowsmicrowavesto passthroughit.
• Donot operatethe microwaveovenunlessthe
glassturntableissecurelyin placeandcanmove
freely.Theturntablecanmove ineitherdirection.
Make sure theturntableiscorrect-sideup inthe
oven. Handleyour turntable with care when
removingitfromthe ovento avoidpossiblybreaking
it. tf yourturntablecracksor breaks,contactyour
dealerfora replacement.
• When you use a browning dish, the browningdish
bottommustbeat least3/16in.(0.5cm)abovethe
turntable.Followthedirectionssuppliedwith the
browningdish.
• Never cookor reheata wholeegg insidethe
shell.Steambuildupinwholeeggsmaycausethem
to burst,and possiblydamagetheoven.Slice hard-
boiledeggsbeforeheating.Inrarecases, poached
eggshavebeen knownto explode.Cover poached
eggsand allow a standingtimeof one minute
beforecuttingintothem.
• For best results, stir any liquid several times
during heating or reheating. Liquidsheatedin
certaincontainers(especiallycontainersshapedlike
cylinders)maybecomeoverheated.The liquidmay
splashoutwith a loudnoiseduringorafter heating
or whenaddingingredients(coffeegranules,tea
bags,etc.).Thiscan harmtheoven.
• Microwaves may notreachthecenterof a roast.
The heatspreadstothecenterfrom theouter,
cookedareasjust as inregularovencooking.This
is oneofthe reasonsfor lettingsomefoods (for
example,roastsorbakedpotatoes)standfora while
aftercooking,or forstirringsomefoodsduringthe
cookingtime.
• Do not deepfry inthe oven. Microwavable
utensilsare notsuitableand itis difficultto maintain
appropriatedeep-fryingtemperatures.
• Do not overcook potatoes. At theendof the
recommendedcookingtime,potatoesshouldbe
slightlyfirm becausethey willcontinuecooking
duringstandingtime.After microwaving, let
potatoesstandfor5 minutes.Theywil!finish
cookingwhilestanding.
Electrical Connection
I Ifyourelectricpowerlineoroutletvoltageis lessthan 110volts,cookingtimesmay be longer.
Havea qualifiedelectriciancheckyourelectrical
system. I
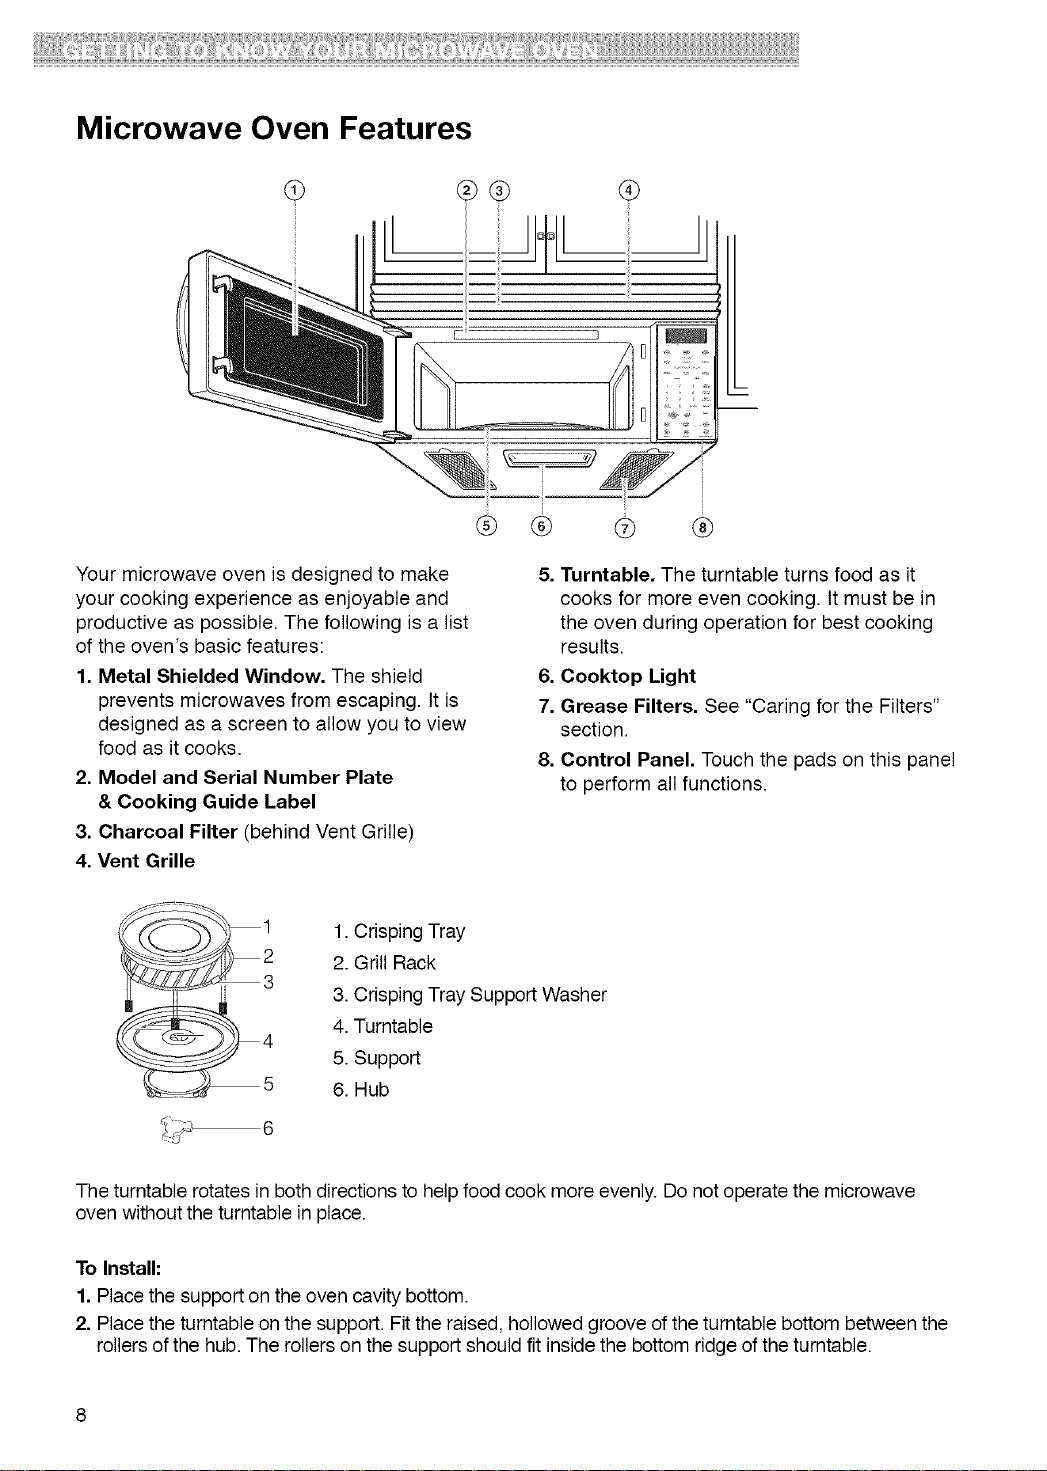
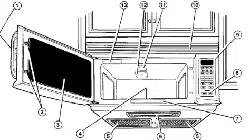
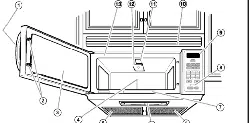
Microwave Oven Features
3
Your microwave oven is designed to make
your cooking experience as enjoyable and
productive as possible. The following is a list
of the oven's basic features:
1. Metal Shielded Window. The shield
prevents microwaves from escaping. It is
designed as a screen to allow you to view
food as it cooks.
2. Model and Serial Number Plate
& Cooking Guide Label
3. Charcoal Filter (behind Vent Grille)
4. Vent Grille
® ®
® ®
5. Turntable. The turntable turns food as it
cooks for more even cooking. It must be in
the oven during operation for best cooking
results.
6. Cooktop Light
7. Grease Filters. See "Caring for the Filters"
section.
8. Control Panel. Touch the pads on this panel
to perform all functions.
_i 1. Crisping Tray
2. Grill Rack
3. Crisping Tray Support Washer
I
4. Turntable
4
5. Support
5 6. Hub
The turntable rotates in both directions to help food cook more evenly. Do not operate the microwave
oven without the turntable in place.
To Install:
1. Place the support on the oven cavity bottom.
2. Place the turntable on the support. Fit the raised, hollowed groove of the turntable bottom between the
rollers of the hub. The rollers on the support should fit inside the bottom ridge of the turntable.

Control Panel Features
Your microwave oven control panel lets you select the desired cooking function quickly and easily
by simply touching the appropriate Command Pad. The following is a list of all the Command and
Number Pads located on the control panel. For more information on these features, see "Using
Your Microwave Oven" section.
®
®
®
@
AUtO GRILL
eli/ol
Pork
SMARTTOUCHSENSOR
I
S_n's(r S<'n_;0r
-- Pol_com Cook £_h(_a
So_tcm Mdt
®
®
®
@
@
@
@
@
@
@
@
@
@
1. Display. The display includes a clock and
indicators to tell you time of day, cooking
time settings, cook powers, quantities,
weights, and the cooking functions selected.
2. Grill. This feature will allow you to brown
and crisp food quickly.
3.Micro.Thisfeaturewillcookfoodwiththe
microwavefunction.
4.Combi.Thisfeaturewillcookfoodwiththe
microwaveandthegrillfunctionsalternately.
5.Seafood.Touchthispadtocookshrimp,fish
fillets,orlobstertailseasilywiththegrillfunction.
6.BeeforPork.Touchthispadtoeasilycook
hamburgerpatties,beefsteaks,andporkchops
withthegrillfunction.
7.Poultry.Touchthispadtoeasilycookchicken
pieces,chickenbreasts,andchickennuggets
withthegrillfunction.
8.SensorCook.Touchthispadtocookbaked
potatoes,frozenvegetables,freshvegetables,
cannedvegetables,frozenentrees,andrice.
Theovensensorwilltelltheovenhowlongto
cook,dependingontheamountofhumidity
comingfromthefood.
9.SensorReheat.Touchthispadtoreheata
casserole,dinnerplate,pizzaslice,orsoups/
sauces.Theovensensorwilltelltheoven
howlongtocook,dependingontheamountof
humiditycomingfromthefood.
10.SensorPopcorn.Touchthispadtopop
popcornwiththesensorfeature.Theoven
sensorwilltelltheovenhowlongtocook,
dependingontheamountofhumidityitdetects
fromthepopcorn.
11.Soften.Touchthispadtosoftenbutter,ice
cream,creamcheese,orfrozenjuice.
12.Melt.Touchthispadtomeltbutter
ormargarine,chocolate,cheese,or
marshmallows.
13.AutoDefrost.Touchthispadfollowedby
NumberPadstothawfrozenmeatbyweight.
14.ExpressDefrost.Touchthispadtodefrost
1lb.(0.5kg)offrozengroundbeef.
15.TimeDefrost.Touchthispadtochoosethe
amountoftimeyouwanttodefrost.
16.NumberPads.Touchnumberpadstoenter
thecookingtime,powerlevel,quantities,or
weights.
17.Add30 sec. Touch this pad to add 30
seconds of cook time to a cycle or to set and
start quickly at 100% power level.
18. START/Enter. Touch this pad to start a
function or enter all entries. If you open the
door after the oven begins to cook, touch
START/Enter again.
19. Power. To set the amount of microwave
energy released to cook the food, touch this
pad after the cook time has been set. The
higher the number, the higher the microwave
power level.
20. More. Touching this pad adds 10 seconds
of cook time each time you press it.
21. Less. Touching this pad subtracts 10 seconds
of cook time each time you press it.
22. STOP/Clear. Touch this pad to erase an
incorrect command, cancel a program during
cooking, or to clear the display.
23. Kitchen Timer. Touch this pad to set the
kitchen timer.
24. Clock. Touch this pad to enter the correct time
of day.
25. Option. Touch this pad to change the oven
default setting for sound, clock, display speed,
and defrost weights.
26. Fan (_) 5 Speed. Touch this pad to choose
one of 5 fan speeds.
27. Fan (_) On/Off. Touch this pad to turn the
fan On or Off.
28. High/Night/Off (). Touchthis pad to turn
the light on High, Night, or Off.
NOTE: Ifyou try to enter an incorrect command or
setting, you will not hear any beeps. Touch STOP/
Clear and re-enter the instructions.
10
!ii'i:! i!ii!!i iiiii!!!!;iii i!i!!!: i!i'iII!ii:!!iiiiii!i !iii!!i!!!!!!!i!ilillii,i! !!i!!i!:
MICROWAVE COOKING TIPS
Amount of Food
• Ifyou increase or decrease the amount of food
you prepare,the time it takesto cook that food will
also change. Forexample, if you doublea recipe,
add a littlemore than halfthe original cooking time.
Check for doneness and, ifnecessary,add more
time insmall increments.
Starting Temperature of Food
• The lower the temperature ofthe food being
put intothe microwave oven, the longer ittakes to
cook. Food at roomtemperature will be re-heated
more quicklythan food at refrigeratortemperature.
Composition of Food
• Food with a lot of fat and sugar will be heated
fasterthan food containing alot of water. Fatand
sugar willalso reacha higher temperature than
water inthe cooking process.
• The denser the food, the longer ittakes to heat.
Size and Shape
• Smaller pieces of food will cookfaster than larger
pieces.Also, same-shaped piecescook more
evenly than different-shaped pieces.
• With foods that have different thicknesses, the
thinner parts willcook faster thanthe thicker parts.
Place the thinner parts of chicken wings and legs
in the center of the dish.
Stirring and Turning Foods
• Stirring and turning foods spreads heat quickly
tothe center of the dish and avoids overcooking at
the outer edges ofthe food.
Covering Food
Cover food to:
• Reduce splattering
• Shorten cooking times
• Keep food moist
You can use any covering that letsmicrowaves pass
through. See "Gettingto Know Your Microwave
Oven" for materialsthat microwaves will pass
through. Ifyou are using the Sensor function, be
sure tovent.
ReleasingPressurein Foods
• Severalfoods (forexample:bakedpotatoes,
sausages,egg yolks,and somefruits)aretightly
coveredbya skin or membrane.Steamcan buildup
underthe membraneduring cooking,causingthe
foodtoburst.Torelievethepressureandto prevent
bursting,pierce these foodsbeforecookingwitha
forkor toothpick.
UsingStanding Time
• Alwaysallowfood tostand eitherin oroutside
theovenaftercookingpowerstops.Standingtime
afterdefrostingand cookingallowsthetemperature
toevenly spreadthroughoutthefood, improvingthe
cookingresults.Forstandingtime insidetheoven,
programa "0"powersecondstageofthe cooking
cycle.See "Two-StageCooking."
• The lengthofthe standing time dependson the
amountoffood beingcookedandhowdenseit is.
Sometimesit canbe asshort asthetime ittakesto
removethefoodfromthe ovenand moveitto the
servingtable. However,with larger,denserfood items,
thestandingtime maybe aslong as 10minutes.
Arranging Food
Forbest results,placefoodevenly onthe plate.Youcan
do this in severalways:
• If you are cooking several items of the same food,
suchas bakedpotatoes,place them in a ring pattern
foruniformcooking.
• Whencooking foodsof unevenshapes or
thickness, such as chicken breasts, place the
smallerorthinnerarea ofthefoodtowardthe center
ofthe dishwhere itwillbe heatedlast.
• Layer thin slices of meat ontop ofeachother.
• When you cook or reheat whole fish, score the
skin- this preventscracking.
• Do not letfoodor a containertouchthe topor sidesof
theoven.This willpreventpossiblearcing(sparking.)
11
MICROWAVE COOKING TIPS (CONT.)
Using Aluminum Foil
Metal containers should not be used in a microwave
oven. There are, however, some exceptions. If you
have purchased food which is prepackaged in an
aluminum foil container, refer to the instructions on
the package. When using aluminum foil containers,
cooking times may be longer because microwaves
will only penetrate the exposed top of the food and
not the bottom or the sides. If you use aluminum
containers without package instructions, follow
these guidelines:
• Place the aluminum foil container in a glass bowl
and add some water so that it covers the bottom of
the container, but not more than 1/4 in. (0.64 cm)
deep. This ensures even heating of the container
bottom.
• Always remove the container lid to avoid damage
to the oven.
• Use only undamaged containers.
• Do not use containers taller than 3/4 in. (1.9 cm).
• Container must be at least half filled.
• To avoid arcing, there must be a minimum 1/4
in. (0.64 cm) between the aluminum container
and the walls of the oven and also between two
aluminum containers.
• Always place the container on the turntable.
• Shield parts of food that may cook quickly, such as
wing tips and leg ends of poultry, with small pieces
of aluminum foil.
• Heating food in aluminum foil containers usually
takes up to double the time compared to reheating
in plastic, glass, china, or paper containers.
The time when food is ready will vary depending
upon the type of container you use.
• Let food stand for 2 to 3 minutes after heating so
that heat is spread evenly throughout the container.
Cookingyou shouldnot do in your
microwave oven
• Do not can foods in the oven. Closed glass jars
may explode, resulting in damage to the oven.
• Do not use the microwave oven to sterilize objects
(baby bottles, etc.). It is difficult to keep the oven at
the high temperature needed for sterilization.
• Do not deep fry foods.
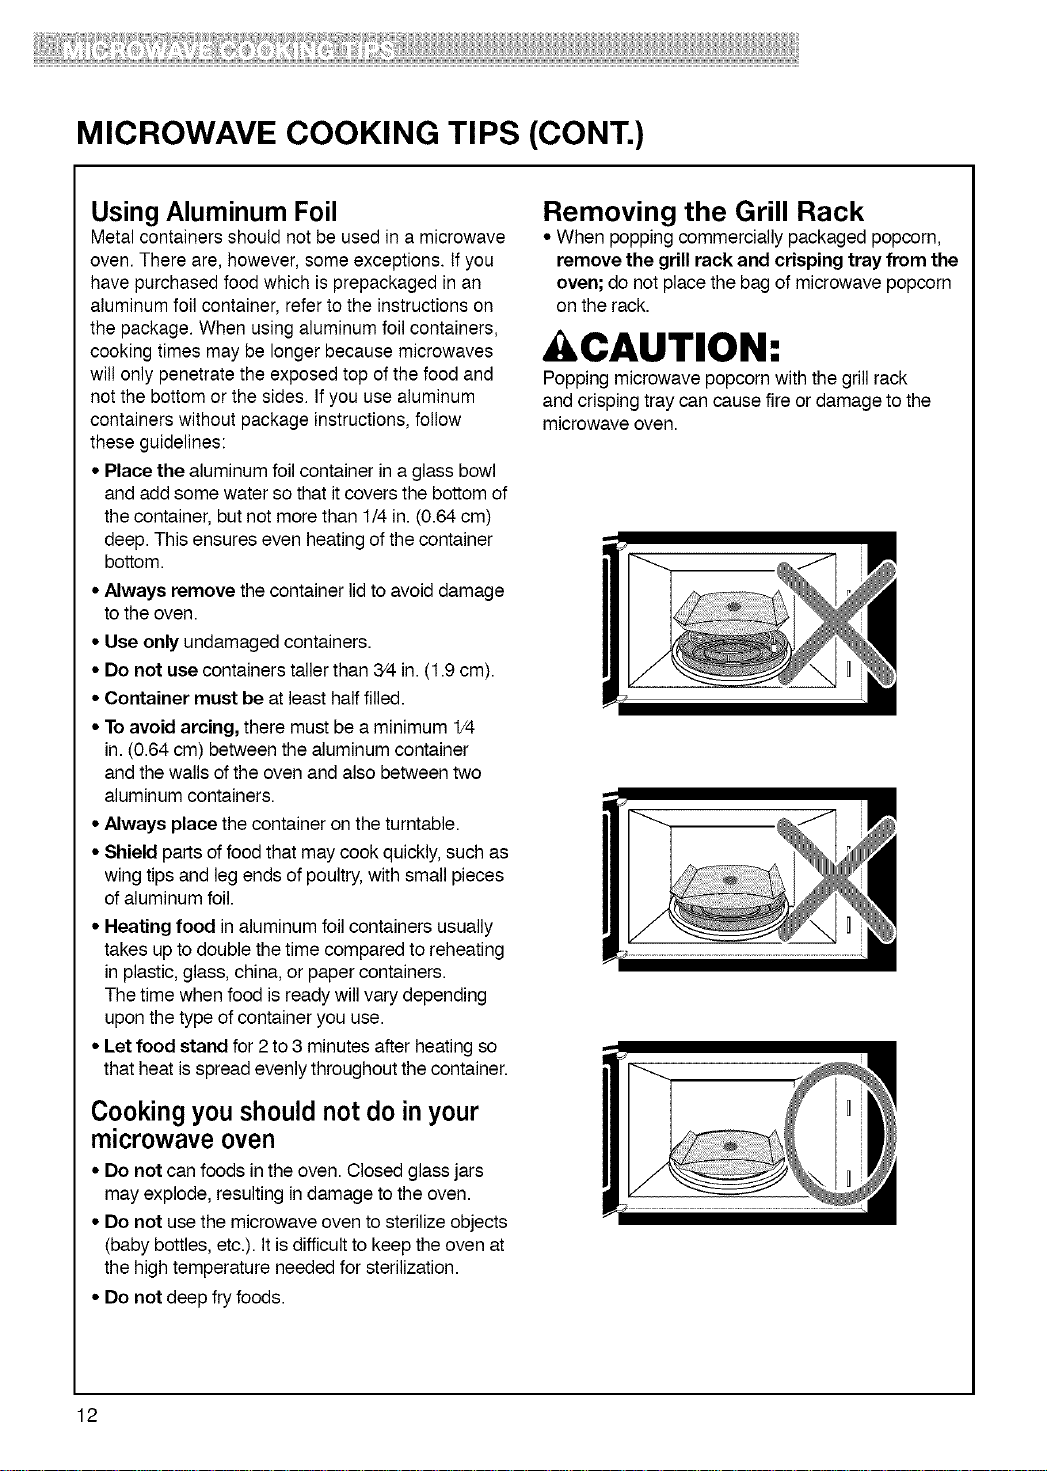
Removing the Grill Rack
• When popping commercially packaged popcorn,
remove the grill rack and crisping tray from the
oven; do not place the bag of microwave popcorn
on the rack.
CAUTION:
Popping microwave popcornwith the grill rack
and crispingtraycan cause fire or damage to the
microwave oven.
12
Using Your Microwave Oven
This section gives you instructions for using
each function. Please read these instructions
carefully.
AUDIBLE SIGNALS
Audible signals are available for guidance
when setting and using the oven:
• A programming tone will beep each time a
key pad is touched.
• Seven beeps signal the end of the Kitchen
Timer countdown.
• Four beeps signal the end of a cooking cycle.
CLOCK
Whenyourmicrowaveoven isfirstpluggedinor
aftera powerfailure,theDisplaywillshow "PLEASE
SETTIMEOF DAY.''Ifatimeofday isnotset," :"
willshowon the Displayuntilyou touch"Clock."
Example: To set the clock for 10:30AM.
Touch:
Display Shows:
=
=
TImG mG n
E/_/Z'E/? 111I!.. !..,1 u/q_ f
=
=
=
ii"t • i"1 TI-IIIFU _I_IT_
It-l" __£1 / l-,l-,l-l i l-l l / l-l_
ll-t. FI
ILl " __£I
PIll Till IFU I
IO_I Till IFU ,._
Till IFU _I_ITC
=
CHILD LOCK
Use this safety feature to lock the control panel
when you are cleaning the oven, or so that
children cannot use the oven unsupervised.
To set CHILD LOCK:
Touch:
Display Shows:
1. Time of day.
=
Touch and hold until
LOCKED appears in the
display (approximately
4 seconds).
To cancel CHILD LOCK:
Touch:
=
Display Shows:
Touch and hold until
LOCKED disappears
in the display
(approximately
4 seconds).
KITCHEN TIMER
Your microwave oven can be used as a kitchen
timer. You can set up to 99 minutes, 99 seconds.
Example: To set for 3 minutes.
Touch: Display Shows:
IIIIL. III IIIII
1. 6';'T_ ,-,mc.,, m,,,,
R,';_SEE
= "7: Fill Till IFU "I" "I"!-1!-1 I !-'!-'!-I I SI;_I_I
=
__ : FfFt TI/11_
TIMER and time
counting down.
13
EXHAUST FAN
The two pads on the bottom center of the contro!
pane! control the 5-speed exhaust fan.
Example: To set the exhaust fan speed to
level 4.
Touch:
Display Shows:
/ G//G/
/-L. VL./- /
This shows the last level until the fan speed
level is selected•
=
/ GHG/
Touch until Level 4.
i?niOif
Turn off the fan when desired.
NOTE: If the temperature from the range or
cooktop below the oven gets too hot, the exhaust
fan inthe vent hood will automatically turn on at
the LEVEL 4 setting to protect the oven.
The fan may run up to an hour to cool the oven.
When this occurs, the i_. pad will not turn off the
fan. You cannot turn the exhaust fan off during
microwave cooking.
COOKTOP LIGHT
A pad on the bottom of the control pane! controls
the cooktop light.
Example: To set the Lamp to High.
Touch: Display Shows:
. I IFUT UI_.l_JI/I I/I
H / i
Once for High light
Twice for Night light
!-H.'tlll _.ll I
/ I/
To turn off, touch the pad one or two times,
depending on the light setting.
OPTIONS
You can change the default values for beep sound,
clock, display speed, and defrost weight. See the
following chart for more information.
No,
1
2
3
Function No. Result
Beep ON/OFF 1 Sound ON
control 2 Sound OFF
Clock display control 1 Clock ON
2 Clock OFF
Display 1 Slow speed
2 Normal speed
3 Fast speed
Defrost weight mode 1 Lbs.
selected 2 Kg.
Example:Tochangedefrostweightmode(fromIbs.tokg).
Touch:
1.
Display Shows:
Ill II_lrl II/_l I Il_ Till//FU I
__IIJI H_I l_ll l I I_II I l l_llJl_l l l
FI /"IF I Ill_l i Il_ Till IFU ,._
LLLIL/_/ Lt/I I Lt/ / /LtLtL/I /,.
5E,_EILL 5,°_D TEILIEH__
I / IF
_.85, I% ,-ii,,,-u ,,
2. {4
L85 Til,.-u ,
I._ Till IFU
14
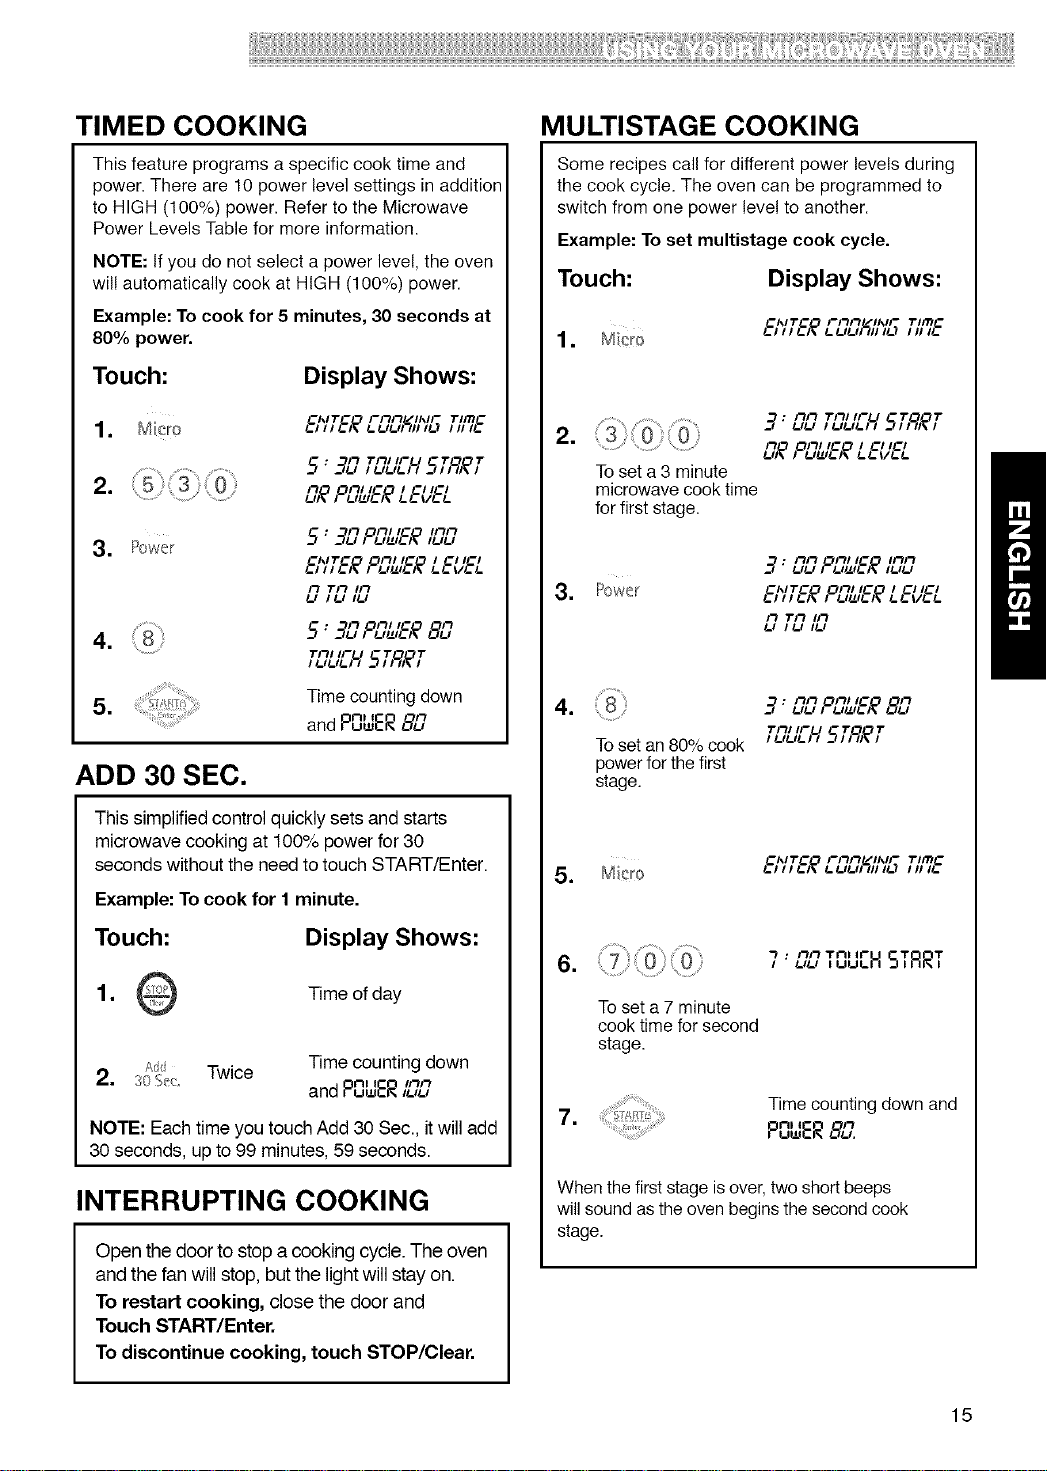
TIMED COOKING
This feature programs a specific cook time and
power. There are 10 power level settings in addition
to HIGH (100%) power. Refer to the Microwave
Power Levels Table for more information.
NOTE: If you do not select a power level, the oven
will automatically cook at HIGH (100%) power.
Example: To cook for 5 minutes, 30 seconds at
80% power.
Touch:
Display Shows:
_I',ITC'O FIIIlrlZ/IIVF TIITIC
Tnl IFU T T
5: __g,_=,, 5,;q,_,
n on/IC I Cl/Cl
!-,_ / !-,_!,!-)_ !-!- v!-!-
3. Power
: n on/t_ inn
ChlTC Oil/IC I Cl ICl
!-111!-)_1 !-,I.L,!-I_!-!- V!-!-
il Tit lit
!-I /!-I I!-I
• Il Oil/t_ il
4. 5" 3[.,, !-,_,!-;_8[.,
I !-I!-I!-I I
=
Time counting down
nl I
and Puw_, _
ADD 30 SEC.
This simplified control quickly sets and starts
microwave cooking at 100% power for 30
seconds without the need to touch START/Enter.
Example: To cook for I minute.
Touch:
Display Shows:
1. Time of day
Add Twice Time counting down
2. 30_;_: nt I iiln
and PuwER ,!-.-,
NOTE: Each time you touch Add 30 Sec., it will add
30 seconds, up to 99 minutes, 59 seconds.
INTERRUPTING COOKING
Open the door to stop a cooking cycle. The oven
and the fan will stop, butthe lightwill stay on.
To restart cooking, close the door and
Touch START/Enter.
To discontinue cooking, touch STOP/Clear.
MULTISTAGE COOKING
Some recipes call for different power levels during
the cook cycle. The oven can be programmed to
switch from one power level to another.
Example: To set multistage cook cycle.
Touch:
Display Shows:
1
ClVT_O Filil!-/ll',lF TIITIC
!- I I I !-A !- !-#!-#1111I!-) I II I!-
=
3; ilil"ii"_'u 5T,q,ff
!-I!-I I !-I!-I!-I I
_ ,°SL,l_ LE'/&'_
Toset a 3 minute
microwave cook time
for first stage.
ilil OFt/lC IIlil
__ : !.ILl I !-ll_l!-)_ l!-l!-l
ChlT_ Oil/ IC I _I ICl
3. Power _,l,_)_,u=i!-)_ u.v!-!-
il "ril lil
!-l I !-I l!-l
nil On/lC n
4. _9'uu , u_,!-;_8{.i
"rill IF U 1" 1"
To set an 80% cook , uuu __q,)ql_,
power for the first
stage.
5. Micro
Chl'r_°O FIIII /IhlFPIL "rlITIC
1
To set a 7 minute
cook time for second
stage.
• Ilil Till If" T T
7" uu ,uu_H S,RR,
Time counting down and
7.
nl I
P=ER 8Llq
When the first stage isover, two short beeps
will sound as the oven begins the second cook
stage.
15
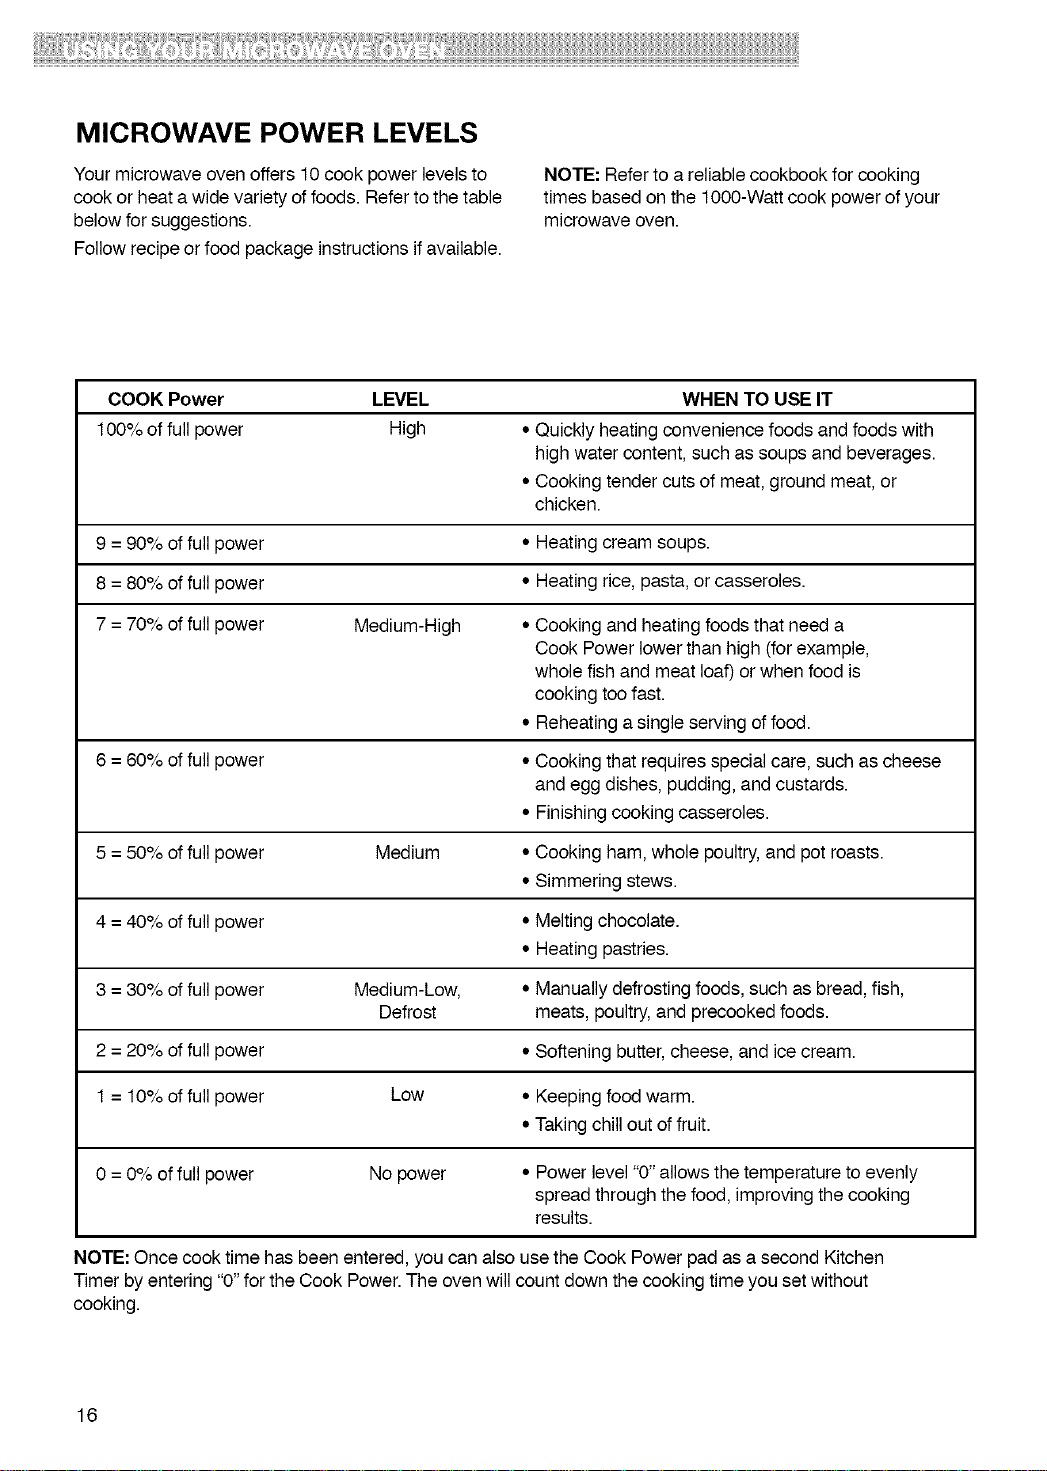
MICROWAVE POWER LEVELS
Your microwave oven offers 10 cook power levels to
cook or heat a wide variety of foods. Refer to the table
below for suggestions.
Follow recipe or food package instructions if available.
NOTE: Refer to a reliable cookbook for cooking
times based on the lO00-Watt cook power of your
microwave oven.
COOK Power LEVEL WHEN TO USE IT
100% of full power High • Quickly heatingconvenience foods and foods with
high water content, suchas soups and beverages.
• Cooking tender cuts of meat, ground meat, or
chicken.
9 = 90% offull power • Heating cream soups.
8 = 80% offull power • Heating rice, pasta, or casseroles.
7 = 70% offull power Medium-High • Cooking and heatingfoodsthat need a
Cook Powerlower than high (forexample,
whole fish and meat loaf) or when food is
cooking toofast.
• Reheating a single serving offood.
6 = 60% offull power • Cooking that requiresspecial care, such as cheese
and eggdishes, pudding,and custards.
• Finishing cooking casseroles.
5 = 50% offull power Medium • Cooking ham, whole poultry,andpot roasts.
• Simmering stews.
4 = 40% offull power • Melting chocolate.
• Heating pastries.
3 = 30% offull power Medium-Low, • Manually defrostingfoods, such as bread, fish,
Defrost meats,poultry,and precooked foods.
2 = 20% offull power • Softening butter,cheese, and icecream.
1 = 10% offull power Low • Keeping food warm.
• Taking chillout of fruit.
0 = 0% of full power No power • Power level"0" allows the temperature to evenly
spread through the food, improving the cooking
results.
NOTE: Once cook time has beenentered, you can also usethe Cook Power pad as a second Kitchen
Timer by entering"0"for the Cook Power.The oven will count down the cooking time you setwithout
cooking.
16
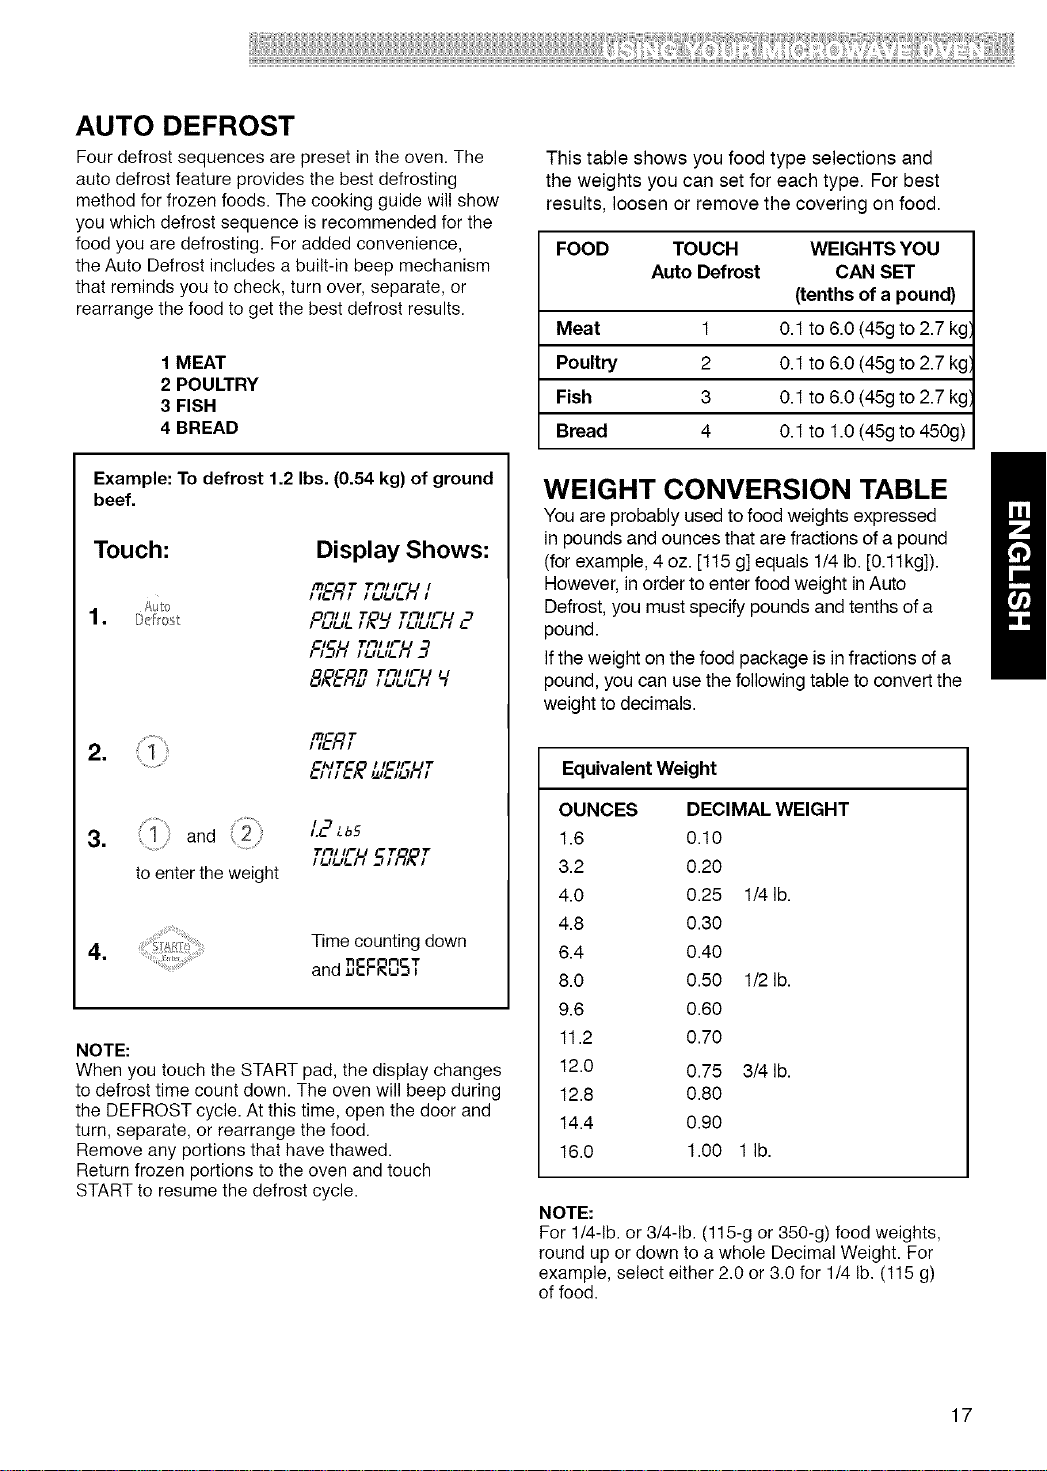
AUTO DEFROST
Four defrost sequences are preset in the oven. The
auto defrost feature provides the best defrosting
method for frozen foods. The cooking guide will show
you which defrost sequence is recommended for the
food you are defrosting. For added convenience,
the Auto Defrost includes a built-in beep mechanism
that reminds you to check, turn over, separate, or
rearrange the food to get the best defrost results.
1 MEAT
2 POULTRY
3 FISH
4 BREAD
Example: To defrost 1.2 Ibs. (0.54 kg) of ground
beef.
Touch: Display Shows:
R&gT Tn,,,-u,
£ulo
onJ, _" _'nJ,ru
FISH,TSLIEH_?
8,_gD TC,UEH Y
6';'T&_L,I&'61-/,T
3. { 1 : and (2
to enter the weight
Time counting down
4.
and ,_qEFROST
NOTE:
When you touch the START pad, the display changes
to defrost time count down. The oven will beep during
the DEFROST cycle. At this time, open the door and
turn, separate, or rearrange the food.
Remove any portions that have thawed.
Return frozen portions to the oven and touch
START to resume the defrost cycle.
This table shows you food type selections and
the weights you can set for each type. For best
results, loosen or remove the covering on food.
FOOD TOUCH WEIGHTS YOU
Auto Defrost CAN SET
(tenths of a pound)
Meat 1 0.1 to 6.0 (45g to 2.7 kg',
Poultry 2 0.1 to 6.0 (45g to 2.7 kg',
Fish 3 0.1 to 6.0 (45g to 2.7 kg',
Bread 4 0.1 to 1.0 (45g to 450g)
WEIGHT CONVERSION TABLE
You are probably used to food weights expressed
in pounds and ounces that are fractions of a pound
(for example, 4 oz. [115 g] equals 1/4 lb. [0.11kg]).
However, in order to enter food weight in Auto
Defrost, you must specify pounds and tenths of a
pound.
If the weight on the food package is in fractions of a
pound, you can use the following table to convert the
weight to decimals.
EquivalentWeight
OUNCES DECIMAL WEIGHT
1.6 0.10
3.2 0.20
4.0 0.25 1/4 lb.
4.8 0.30
6.4 0.40
8.0 0.50 1/2 lb.
9.6 0.60
11.2 0.70
12.0 0.75 3/4 lb.
12.8 0.80
14.4 0.90
16.0 1.00 1 lb.
NOTE:
For 1/4-1b. or 3/4-1b. (115-g or 350-g) food weights,
round up or down to a whole Decimal Weight. For
example, select either 2.0 or 3.0 for 1/4 lb. (115 g)
of food.
17
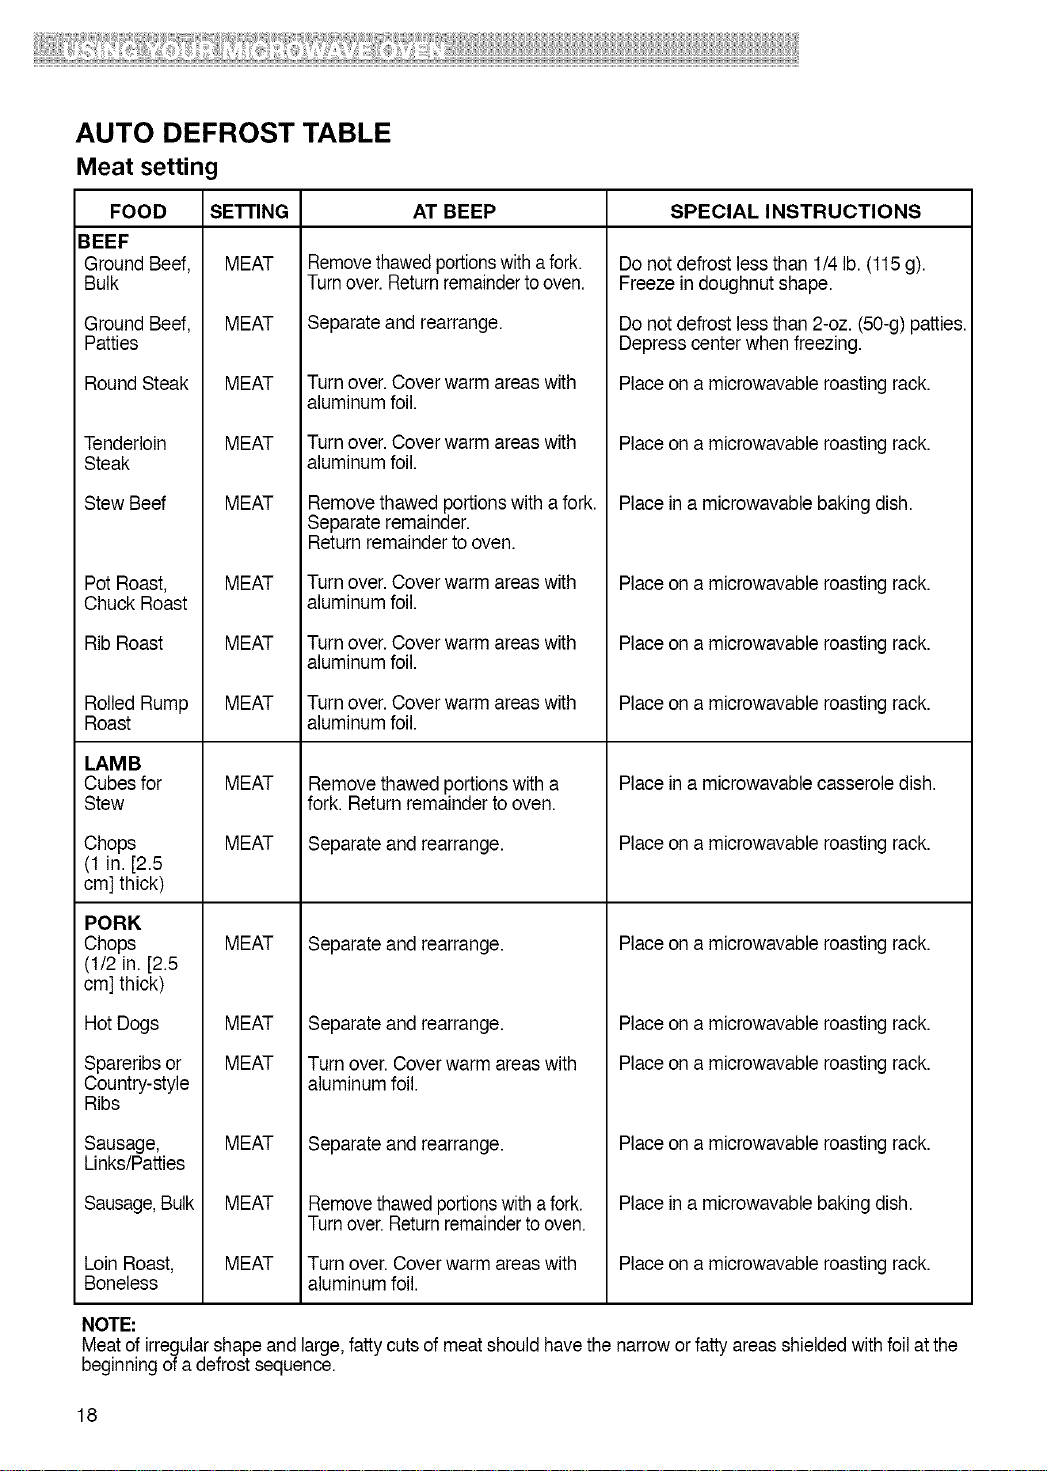
AUTO DEFROST TABLE
Meat setting
FOOD
BEEF
Ground Beef,
Bulk
Ground Beef,
Patties
Round Steak
Tenderloin
Steak
Stew Beef
Pot Roast,
Chuck Roast
Rib Roast
Rolled Rump
Roast
LAMB
Cubes for
Stew
Chops
(1 in. [2.5
cm] thick)
PORK
Chops
(t/2 in. [2.5
cm] thick)
Hot Dogs
Spareribsor
Country-style
Ribs
Sausage,
Links/Patties
Sausage,Bulk
Loin Roast,
Boneless
SETTING
MEAT
MEAT
MEAT
MEAT
MEAT
MEAT
MEAT
MEAT
MEAT
MEAT
MEAT
MEAT
MEAT
MEAT
MEAT
MEAT
AT BEEP
Removethawedportionswith afork.
Turnover.Returnremaindertooven.
Separateand rearrange.
Turn over. Cover warmareas with
aluminum foil.
Turn over. Cover warm areas with
aluminum foil.
Removethawed portionswith a fork.
Separateremainder.
Return remainder to oven.
Turn over. Cover warm areas with
aluminum foil.
Turn over. Cover warm areas with
aluminum foil.
Turn over. Cover warm areas with
aluminum foil.
Remove thawed portionswitha
fork. Return remainder to oven.
Separate and rearrange.
Separate and rearrange.
Separate and rearrange.
Turnover. Cover warm areas with
aluminum foil.
Separate and rearrange.
Removethawedportionswith a fork.
Turnover.Returnremainderto oven.
Turn oveL Cover warmareas with
aluminum foil.
SPECIAL INSTRUCTIONS
Do notdefrost less than 1/4lb. (115 g).
Freeze in doughnut shape.
Do notdefrost less than 2-oz. (50-g)patties.
Depresscenter whenfreezing.
Placeon amicrowavable roasting rack.
Placeon amicrowavable roasting rack.
Placein a microwavable baking dish.
Placeon amicrowavable roasting rack.
Placeon amicrowavable roasting rack.
Placeon amicrowavable roasting rack.
Placein a microwavablecasserole dish.
Placeon amicrowavable roasting rack.
Placeon amicrowavable roasting rack.
Placeon amicrowavable roasting rack.
Placeon amicrowavable roasting rack.
Placeon amicrowavable roasting rack.
Placein a microwavable baking dish.
Placeon amicrowavable roasting rack.
NOTE:
Meatof irregularshape and large,fatty cutsof meatshould havethe narrowor fatty areas shieldedwithfoil atthe
beginningof a defrostsequence.
18
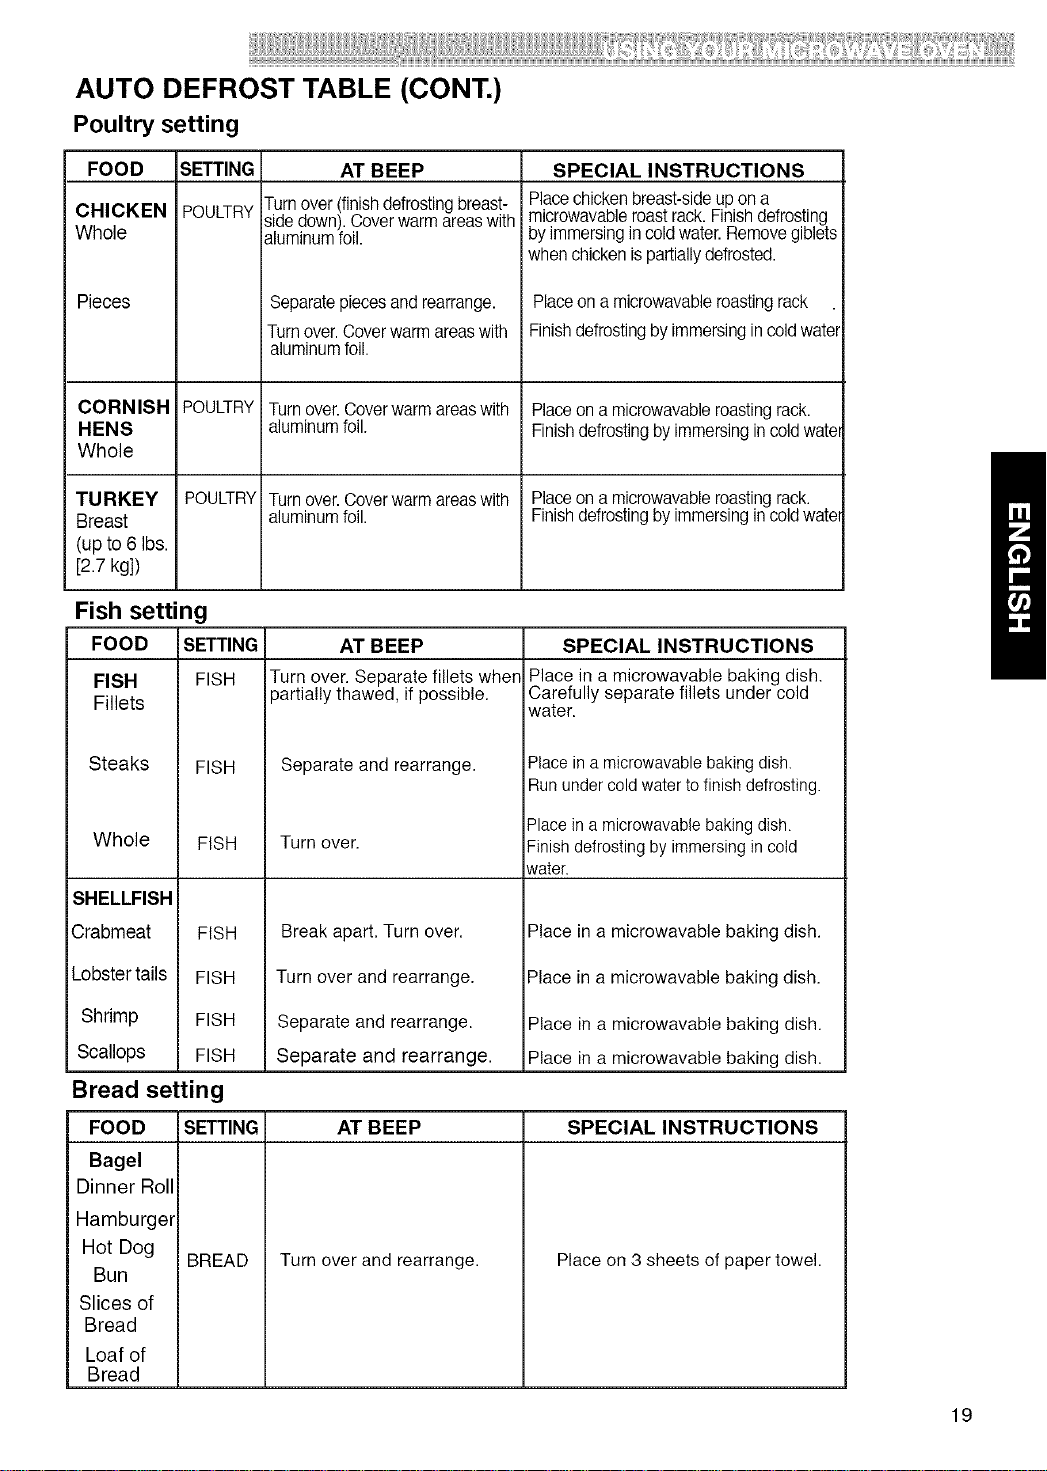
AUTO DEFROST TABLE (CONT.)
Poultry setting
FOOD
CHICKEN
Whole
Pieces
SETTING
POULTRY
AT BEEP
Turnover (finishdefrosting breast-
side down). Cover warm areas with
aluminum foil.
Separatepieces and rearrange.
Turn over.Cover warm areas with
aluminum foil.
SPECIAL INSTRUCTIONS
Place chicken breast-side up on a
microwavable roast rack.Finish defrosting
by immersing in cold water. Remove giblets
when chicken is partiallydefrosted.
Place on a microwavable roasting rack
Finish defrosting by immersing in cold water
CORNISH POULTRY Turn over. Coverwarm areas with Place on a microwavable roasting rack.
HENS aluminum foil. Finishdefrosting by immersing in cold wate
Whole
TURKEY POULTRY Turn over. Cover warm areas with Place on a microwavable roasting rack.
Breast aluminum foil. Finishdefrosting by immersing in coldwate
(up to 6 Ibs.
[2.7 kg])
Fish setting
SETTING AT BEEP
FISH Turn over. Separate fillets when
partially thawed, if possible.
FOOD
FISH
Fillets
Steaks
Whole
SHELLFISH
Crabmeat
Lobstertails
Shrimp
Scallops
FISH
FISH
FISH
Separate and rearrange.
SPECIAL INSTRUCTIONS
Place in a microwavable baking dish.
Carefully separate fillets under cold
water.
Place in a microwavable baking dish.
Run under cold water tofinish defrosting.
FISH
FISH
FISH
Bread setting
FOOD
Bagel
Dinner Roll
Hamburger
Hot Dog
Bun
Slices of
Bread
Loaf of
Bread
Turn over.
Break apart. Turn over.
Turn over and rearrange.
Separate and rearrange.
Separate and rearrange.
Place ina microwavable baking dish.
Finish defrosting by immersing in cold
water.
Place in a microwavable baking dish.
Place in a microwavable baking dish.
Place in a microwavable baking dish.
Place in a microwavable baking dish.
SETTING AT BEEP SPECIAL INSTRUCTIONS
BREAD
Turn over and rearrange. Place on 3 sheets of paper towel.
19
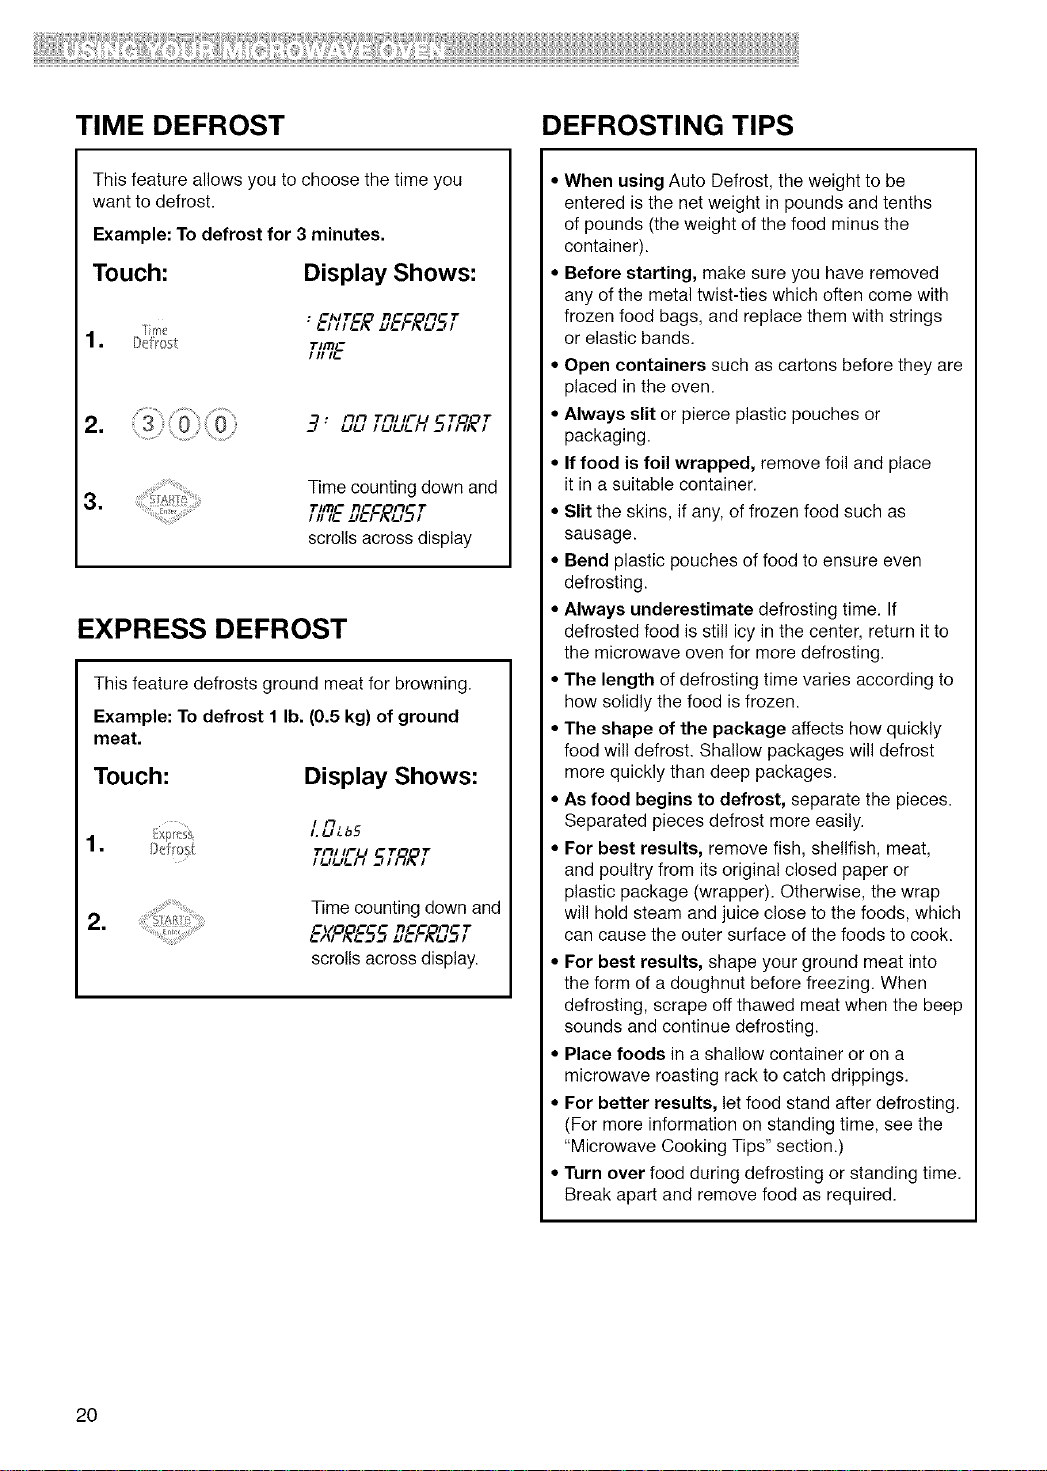
TIME DEFROST DEFROSTING TIPS
This feature allows you to choose the time you
want to defrost.
Example: To defrost for 3 minutes.
Touch: Display Shows:
• _AIT_ ;3C_ Ft 1"
1. Bef _,1 Time"
///I_.
= -7: Fill Till IFU "I" "I"!_l!_l I !_l!_l!_l l SI I_I_I
=
Time counting down and
,TImC n_c m ,1.
111I!.. _!..1 ;_r _/
scrolls across display
EXPRESS DEFROST
This feature defrosts ground meat for browning.
Example: To defrost 1 lb. (0.5 kg) of ground
meat.
Touch: Display Shows:
LOLb5
T_,,_'U5TRET
I !_I!_I!_I I
=
Time counting down and
E)_9_E55D6S_OST
scrolls across display.
• When using Auto Defrost, the weight to be
entered is the net weight in pounds and tenths
of pounds (the weight of the food minus the
container).
• Before starting, make sure you have removed
any of the metal twist-ties which often come with
frozen food bags, and replace them with strings
or elastic bands.
• Open containers such as cartons before they are
placed in the oven.
• Always slit or pierce plastic pouches or
packaging.
• If food is foil wrapped, remove foil and place
it in a suitable container.
• Slit the skins, if any, of frozen food such as
sausage.
• Bend plastic pouches of food to ensure even
defrosting.
• Always underestimate defrosting time. If
defrosted food is still icy in the center, return it to
the microwave oven for more defrosting.
• The length of defrosting time varies according to
how solidly the food is frozen.
• The shape of the package affects how quickly
food will defrost. Shallow packages will defrost
more quickly than deep packages.
• As food begins to defrost, separate the pieces.
Separated pieces defrost more easily.
• For best results, remove fish, shellfish, meat,
and poultry from its original closed paper or
plastic package (wrapper). Otherwise, the wrap
will hold steam and juice close to the foods, which
can cause the outer surface of the foods to cook.
• For best results, shape your ground meat into
the form of a doughnut before freezing. When
defrosting, scrape off thawed meat when the beep
sounds and continue defrosting.
• Place foods in a shallow container or on a
microwave roasting rack to catch drippings.
• For better results, let food stand after defrosting.
(For more information on standing time, see the
"Microwave Cooking Tips" section.)
• Turn over food during defrosting or standing time.
Break apart and remove food as required.
20
@!@!!!!!!!!!!!!!!!!!!!!!!!!!!!!!!!!!!!!!!!!!!!!!!ii!!!32i!!!iiii:i!ii(! ! !!!!iiilli!iiiiiii!!!!3!S!!!!!!!!!;!
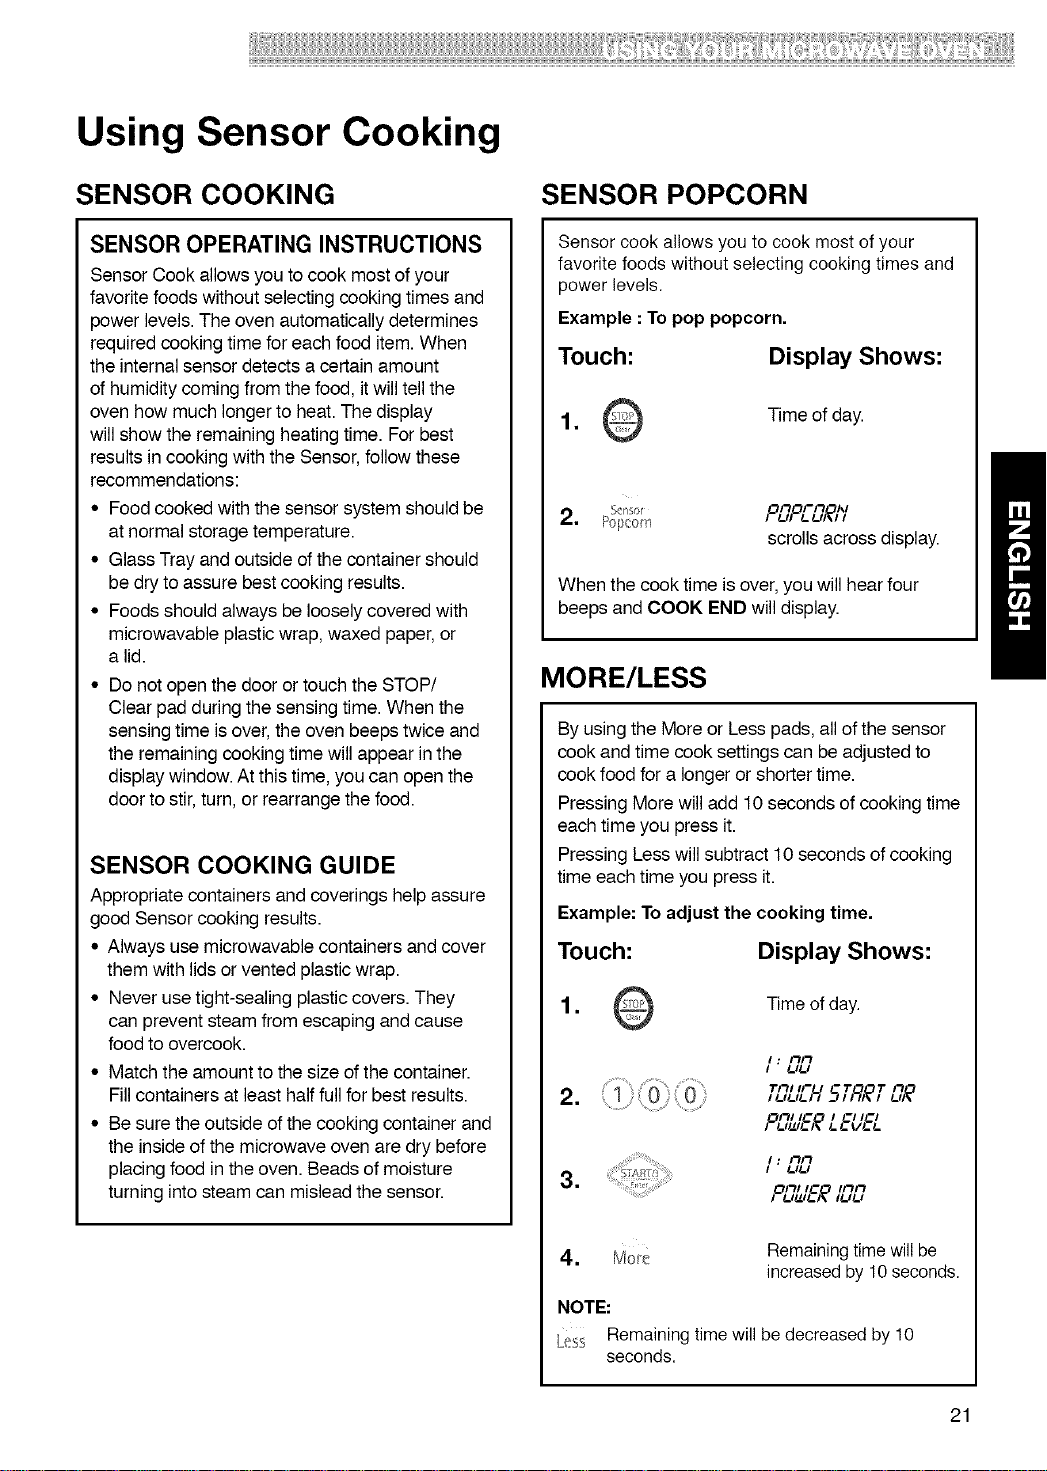
Using Sensor Cooking
SENSOR COOKING
SENSOR OPERATING INSTRUCTIONS
Sensor Cook allows you to cook most of your
favorite foods without selecting cooking times and
power levels. The oven automatically determines
required cooking time for each food item. When
the internal sensor detects a certain amount
of humidity coming from the food, it will tell the
oven how much longer to heat. The display
will show the remaining heating time. For best
results in cooking with the Sensor, follow these
recommendations:
• Food cooked with the sensor system should be
at normal storage temperature.
• Glass Tray and outside of the container should
be dry to assure best cooking results.
• Foods should always be loosely covered with
microwavable plastic wrap, waxed paper, or
a lid.
• Do not open the door or touch the STOP/
Clear pad during the sensing time. When the
sensing time is over, the oven beeps twice and
the remaining cooking time will appear in the
display window. At this time, you can open the
door to stir, turn, or rearrange the food.
SENSOR COOKING GUIDE
Appropriate containers and coverings help assure
good Sensor cooking results.
• Always use microwavable containers and cover
them with lids or vented plastic wrap.
• Never use tight-sealing plastic covers. They
can prevent steam from escaping and cause
food to overcook.
• Match the amount to the size of the container.
Fill containers at least half full for best results.
• Be sure the outside of the cooking container and
the inside of the microwave oven are dry before
placing food in the oven. Beads of moisture
turning into steam can mislead the sensor.
SENSOR POPCORN
Sensor cook allows you to cook most of your
favorite foods without selecting cooking times and
power levels.
Example : To pop popcorn.
Touch:
Display Shows:
1. Time of day.
OFtO/-Ft I_1
2. Sensor / /-II /-/-I_1
Popcorn
scrolls across display.
When the cook time is over,you will hearfour
beeps and COOK END willdisplay.
MORE/LESS
By using the More or Less pads, all of the sensor
cook and time cook settings can be adjusted to
cook food for a longer or shorter time.
Pressing More will add 10 seconds of cooking time
each time you press it.
Pressing Less will subtract 10 seconds of cooking
time each time you press it.
Example: To adjust the cooking time.
Touch:
Display Shows:
= Time of day.
=
=
I: FtFt
I /-I/-I
Till IFU T T Ft
,/-,/-,/-,, 5,;q,_, /-,_
OFt/IC I _1/CI
I /-Itz_/-)_/-/-I//-&
I : FtFt
I /-I/-I
OFt/I_ /FtFt
=
NOTE:
Remaining time will
seconds.
Remainingtime willbe
increased by 10 seconds.
be decreased by 10
21
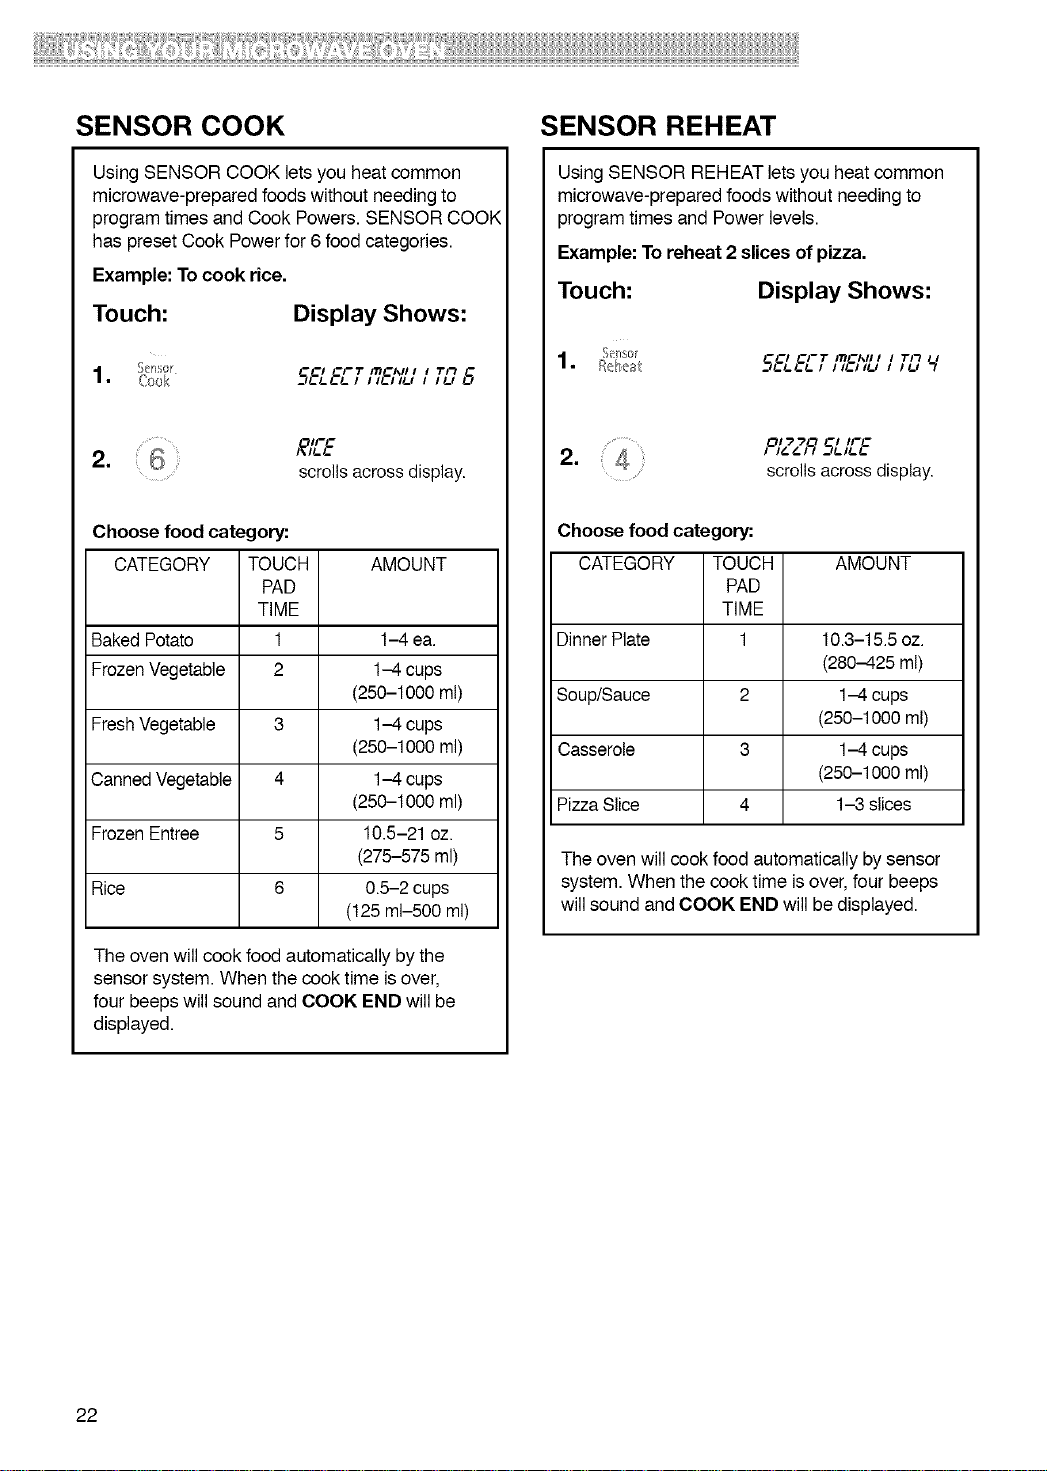
SENSOR COOK
Using SENSOR COOK lets you heat common
microwave-prepared foods without needing to
program times and Cook Powers. SENSOR COOl4
has preset Cook Power for 6 food categories.
Example: To cook rice.
Touch:
Display Shows:
°
-_!,.!,.!,.1 IH.II_J I 1_: 8
2. ,£IEE
scrolls across display.
Choose food category:
CATEGORY TOUCH AMOUNT
PAD
TIME
Baked Potato 1 1-4 ea.
Frozen Vegetable 2 1-4 cups
(250-1000 ml)
Fresh Vegetable 3 1-4 cups
(250-1000 ml)
Canned Vegetable 4 1-4 cups
(250-1000 ml)
Frozen Entree 5 10.5-21 oz.
(275-575 ml)
Rice 6 0.5-2 cups
(125 ml-500 ml)
The oven will cook food automatically by the
sensor system. When the cook time is over,
four beeps will sound and COOK END will be
displayed.
SENSOR REHEAT
Using SENSOR REHEAT lets you heat common
microwave-prepared foods without needing to
program times and Power levels.
Example: To reheat 2 slices of pizza.
Touch:
Display Shows:
U
OI "2 "2 I IF_
2. , ,_&9 £,_
scrolls
..... across u_sp_ay.
Choose food category:
CATEGORY TOUCH AMOUNT
PAD
TIME
Dinner Plate 1 10.3-15.5 oz.
(280-425 ml)
Soup/Sauce 2 1-4 cups
(250-1000 ml)
Casserole 3 1-4 cups
(250-1000 ml)
Pizza Slice 4 1-3 slices
The oven will cook food automatically by sensor
system. When the cook time is over, four beeps
will sound and COOK END will be displayed.
22
SENSOR COOK TABLE
CATEGORY DIRECTION AMOUNT
Baked Potato Pierce each potato with a fork and place on the oven tray 1-4 ea, 8-10 oz.
around the edge, at least one inch apart. (225-285 g)
Frozen Vegetable Remove frozen vegetables from the package and place I-4 cups
in an appropriately-sized microwave container. Cover with (250-1000 ml)
plastic wrap and vent. Follow package instructions.
Fresh Vegetable Prepare fresh vegetables as desired, wash, and place in an 1-4 cups
appropriately-sized microwave container. Cover with plastic (250-1000 ml)
w wrap, and vent.
,_ Canned Vegetable Remove vegetables from the can. I-4 cups
Place in an appropriately sized microwave container, cover (250-1000 ml)
with plastic wrap, and vent. After cooking, stir and allow to
stand for 3 minutes.
Frozen Entree Remove from the package. Slit the cover. If not in 10-21 oz.
microwave-safe container, place on a plate, cover with (275-575 ml)
plastic wrap, and vent.
Rice Add twice the amount of water to the rice. 0.5-2 cups
Use a microwave container large enough to prevent water (125 ml-500 ml)
from boiling over the dish. Cover with plastic wrap or lid.
SENSOR REHEAT TABLE
CATEGORY DIRECTION AMOUNT
Dinner Plate Place on a low plate. Cover with vented plastic wrap. 10.3-15.5 oz.
Let stand 3 minutes. (280-425 ml)
Soup/Sauce Place in shallow microwavable casserole dish. 1-4 cups
Cover with vented plastic wrap. (250-1000 ml)
After cooking, stir and let stand 3 minutes.
Casserole Cover the dish with plastic wrap and vent. 1-4 cups
After cooking, stir and allow to stand for 3 minutes. (250-1000 ml)
Pizza Slice This is a reheat function for leftover pizza. 1-3 slices,
Place on a paper towel or on a microwave-safe plate. 3-5 oz.
(85-140 g) each
23
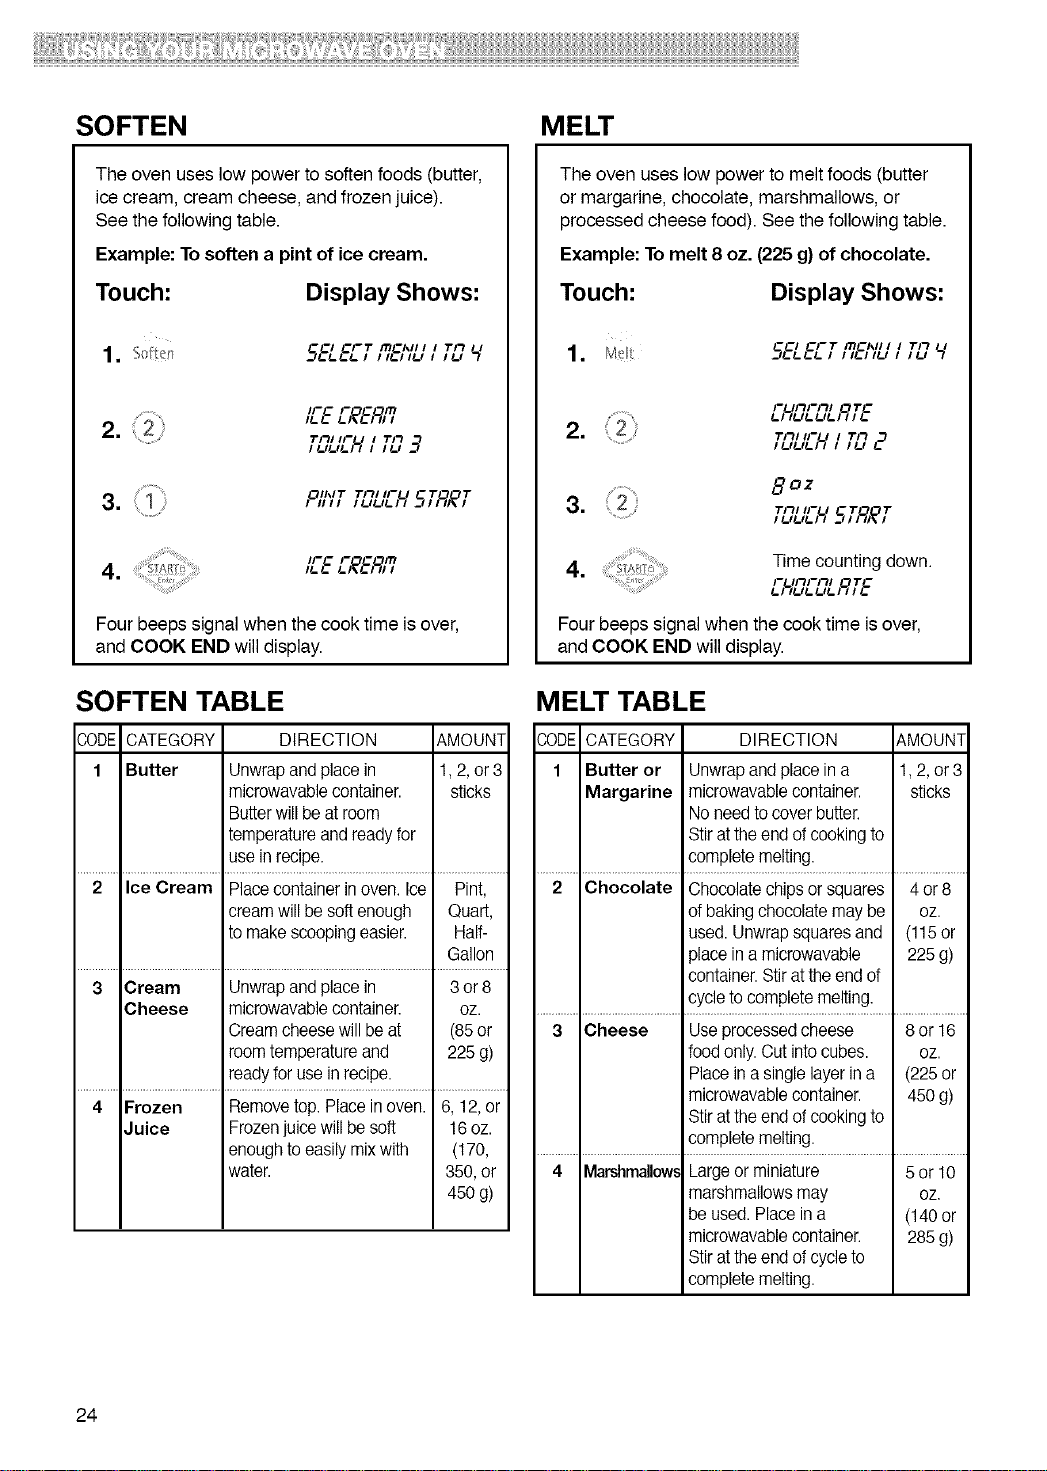
SOFTEN MELT
The oven uses low power to soften foods (butter,
ice cream, cream cheese, and frozen juice).
See the following table.
Example: To soften a pint of ice cream.
Touch:
Display Shows:
_I _FT ITI_I_II I I
-_L_=LI III-IILI I Tit
IFC F'Of.'O,Cm
2.
Tit/IFU I Tit .3
Oil',IT Titl IFU T T
3. ,,i,
IFC F C I1"1
Four beeps signal when the cook time is over,
and COOK END will display.
SOFTEN TABLE
,?,ODECATEGORY DIRECTION AMOUNT
1 Butter Unwrap and place in 1,2, or 3
microwavable container, sticks
Butterwill be at room
temperature and ready for
use in recipe.
2 Ice Cream Place container in oven. Ice Pint,
cream will be soft enough Quart,
to make scooping easier. Half-
Gallon
3 Cream Unwrap and place in 3 or 8
Cheese microwavable container, oz.
Cream cheese will be at (85or
room temperature and 225g)
ready for use in recipe.
4 Frozen Remove top. Place in oven. 6, 12, or
Juice Frozen juice will be soft 16oz.
enough to easily mix with (t 70,
water. 350, or
450g)
The oven uses low power to melt foods (butter
or margarine, chocolate, marshmallows, or
processed cheese food). See the following table.
Example: To melt 8 oz. (225 g) of chocolate.
Touch:
Display Shows:
=
_l CFT ITl_l_ll I I
--_!-L._.I IIL.II_J I TitI!_l I I
FUItFItl TC
2. Titl,-U l Tit :
8OZ
3. Titl,-U 5T,_'T
IuU_.l I
4. _::r,_T__ Time counting down.
_.1FUitFitlIU_.U!-I_ITC !-
Four beepssignal when the cook time isover,
and COOK END will display.
MELT TABLE
30DE CATEGORY DIRECTION &MOUNT
1 Butter or Unwrapand place ina 1,2, or 3
Margarine microwavable container, sticks
No need to cover butter.
Stir at the end of cooking to
complete melting.
2 Chocolate Chocolate chips or squares 4 or 8
of baking chocolate may be oz.
used. Unwrap squares and (115or
3lace ina microwavable 225 g)
container. Stir at the end of
cycle to complete melting.
3 Cheese Use processed cheese 8or 16
food only. Cutinto cubes, oz.
Place ina single layer in a (225 or
microwavable container. 450 g)
Stir at the end of cooking to
complete melting.
4 Marshmallow,,Largeor miniature 5or 10
marshmallows may oz.
be used. Place in a (140 or
microwavable container. 285 g)
Stir at the end of cycleto
complete melting.
24
:!:!i!!+i!!!!!!
GRILL COOKING
INTRODUCTION
This oven cooks the outside of foods much like
conventional radiant heat, while also penetrating
the surface so the inside cooks simultaneously.
Grilling is cooking under direct heat. This oven
can grill meat, fish, poultry, and vegetables, or
toast bread.
Your oven uses grill cooking whenever you use
the Grill Command Pads.
• Foods that are suitable for broiling should be
tender, moderately lean and no morethan 1 in.
(2.5 cm) thick. Fishsteaks, chicken breasts,and
hamburgers are idealfor grilling.
• Foreven browning, turn the food over after 2/3
of grilling time.
• Do not leavethe door open for a longperiod
of time when usingthe grill element. This will
cause the oven temperature to drop and could
affect cooking performance.
• For best grilling performance, limit useof fan
speeds to 1,2, or 3 while grilling.
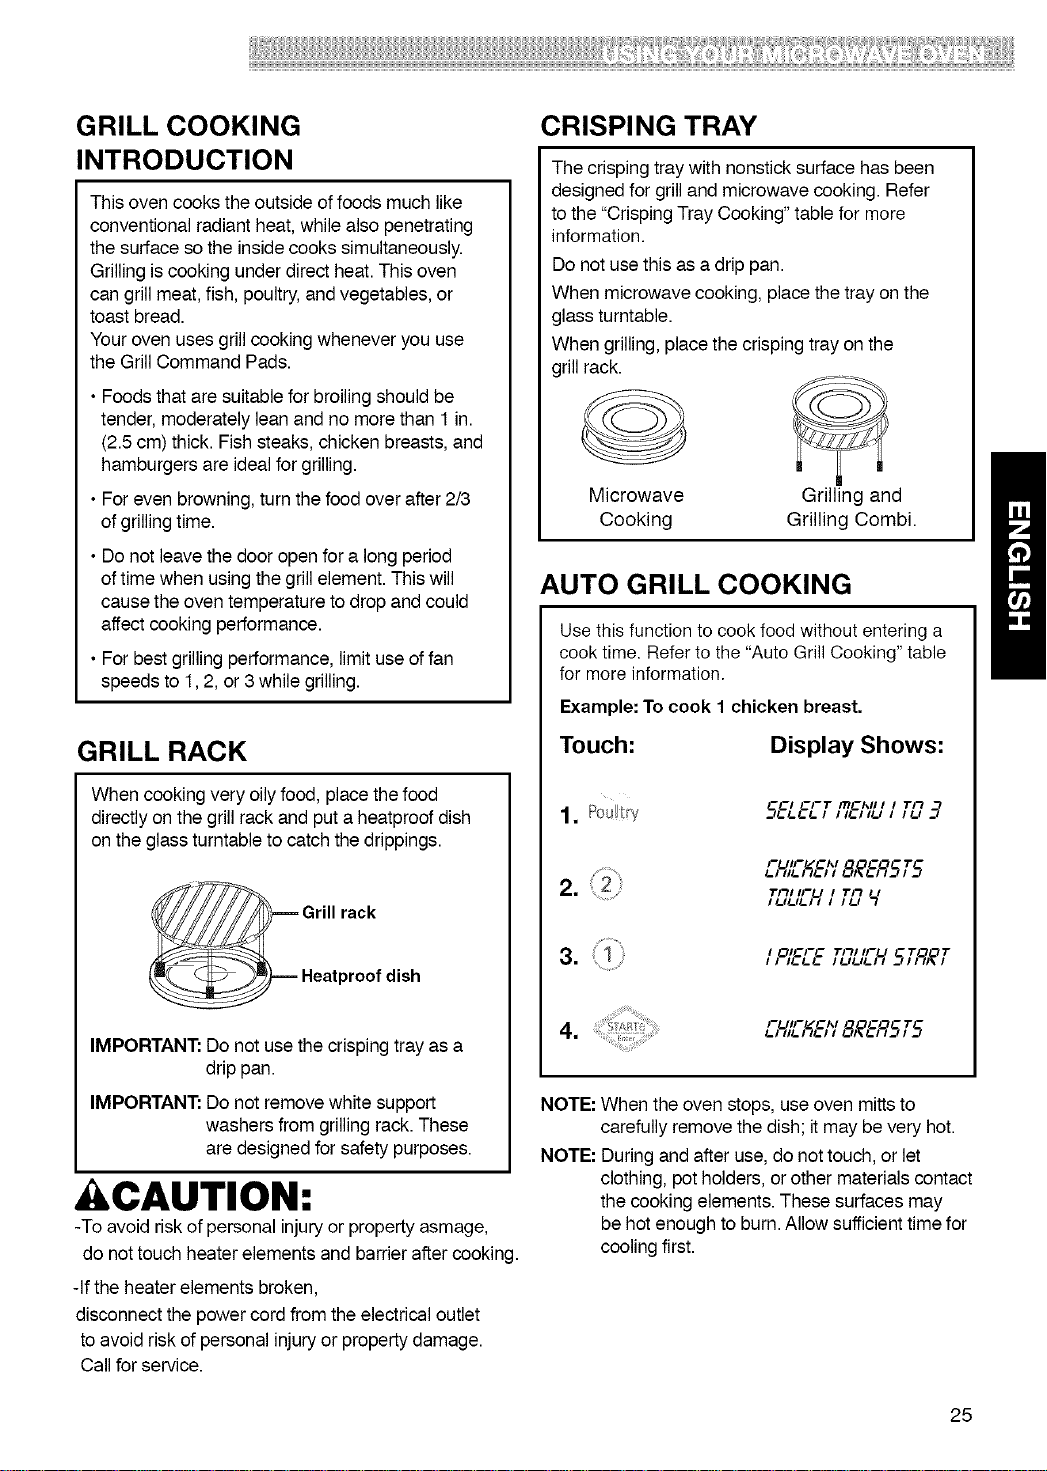
GRILL RACK
When cooking very oily food, placethe food
directly on the grill rackandput a heatproof dish
on the glass turntable to catch the drippings.
_ Grill rack
__)==== Heatproof dish
IMPORTANT:Do not usethe crispingtray as a
drip pan.
IMPORTANT: Do not remove white support
washers from grilling rack.These
are designed for safety purposes.
CAUTION:
-To avoid risk of personal injury or property asmage,
do nottouch heater elements and barrierafter cooking.
-If the heater elements broken,
disconnect the power cord from the electrical outlet
to avoid risk of personal injuryor propertydamage.
Callfor service.
CRISPING TRAY
The crisping tray with nonsticksurface has been
designedfor grilland microwave cooking. Refer
to the "CrispingTray Cooking"table for more
information.
Do not usethis as adrip pan.
When microwave cooking, placethe tray on the
glass turntable.
When grilling,place the crisping tray onthe
grill rack.
Microwave Grilling and
Cooking Grilling Combi.
AUTO GRILL COOKING
Use this function to cook food without entering a
cook time. Refer to the "Auto Grill Cooking" table
for more information.
Example: To cook 1 chicken breast.
Touch:
Display Shows:
1.+++++'i
CI CFT I_CI_II I I Tit
FUll--/CI_I _ 7"
_,._;%,, 8,_bqS,5
2. 2 rn,,-u,Tn,,
.......... ILILILII I ILl "1
I OICFC Till IFU T T
FUll--/CI_I _ T
NOTE: When the oven stops, use oven mitts to
carefully remove the dish; it maybevery hot.
NOTE: During and afteruse,do nottouch, or let
clothing, pot holders, or other materialscontact
the cooking elements.Thesesurfaces may
be hot enoughto burn.Allow sufficienttime for
cooling first.
25
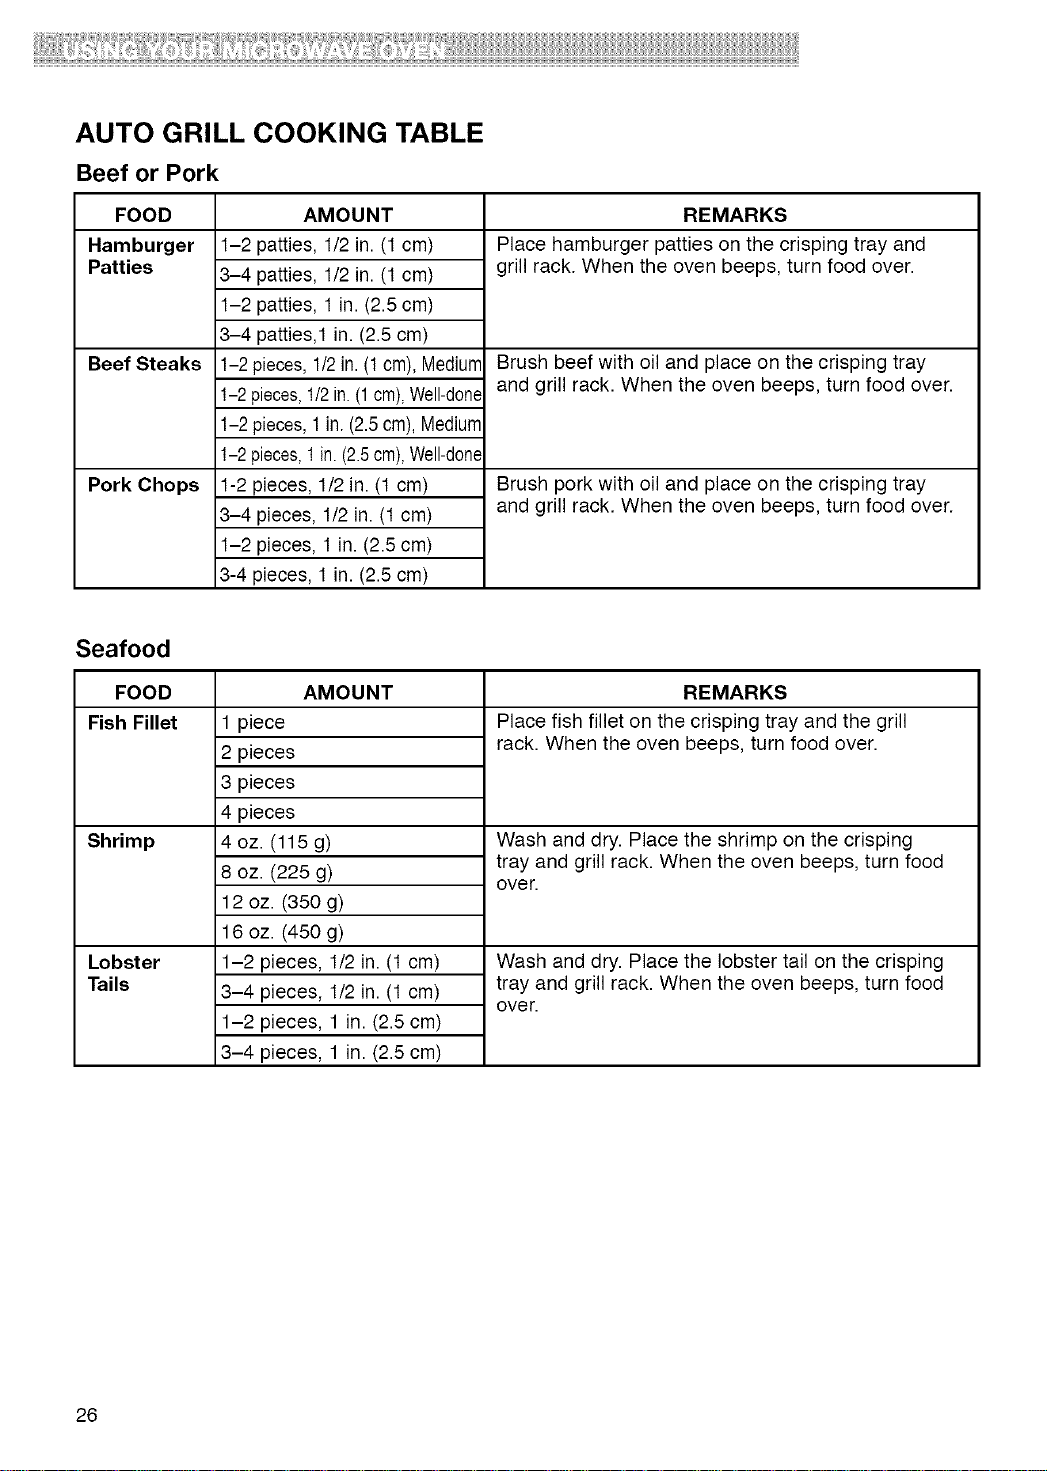
AUTO GRILL COOKING TABLE
Beef or Pork
FOOD
Hamburger
Patties
Beef Steaks
Pork Chops
AMOUNT
1-2 patties, 1/2 in. (1 cm)
3-4 patties, 1/2 in. (t cm)
1-2 patties, 1 in. (2.5 cm)
3-4 patties,1 in. (2.5 cm)
1-2 pieces,1/2in. (1cm), Mediurr
1-2 pieces,1/2in.(1 cm),Well-done
1-2 pieces,1 in. (2.5cm), Mediurr
1-2 pieces,1in.(2.5cm),Well-done
1-2 pieces, 1/2 in. (t cm)
3-4 pieces, 1/2 in. (t cm)
1-2 pieces, 1 in. (2.5 cm)
3-4 pieces, 1 in. (2.5 cm)
REMARKS
Place hamburger patties on the crisping tray and
grill rack. When the oven beeps, turn food over.
Brush beef with oil and place on the crisping tray
and grill rack. When the oven beeps, turn food over.
Brush pork with oil and place on the crisping tray
and grill rack. When the oven beeps, turn food over.
Seafood
FOOD
Fish Fillet
Shrimp
Lobster
Tails
AMOUNT
1 piece
2 pieces
3 pieces
4 pieces
4 oz. (115 g)
8 oz. (225 g)
12 oz. (350 g)
16 oz. (450 g)
1-2 pieces, 1/2 in. (t cm)
3-4 pieces, 1/2 in. (t cm)
1-2 pieces, 1 in. (2.5 cm)
3-4 pieces, 1 in. (2.5 cm)
REMARKS
Place fish fillet on the crisping tray and the grill
rack. When the oven beeps, turn food over.
Wash and dry. Place the shrimp on the crisping
tray and grill rack. When the oven beeps, turn food
over.
Wash and dry. Place the lobster tail on the crisping
tray and grill rack. When the oven beeps, turn food
over.
26
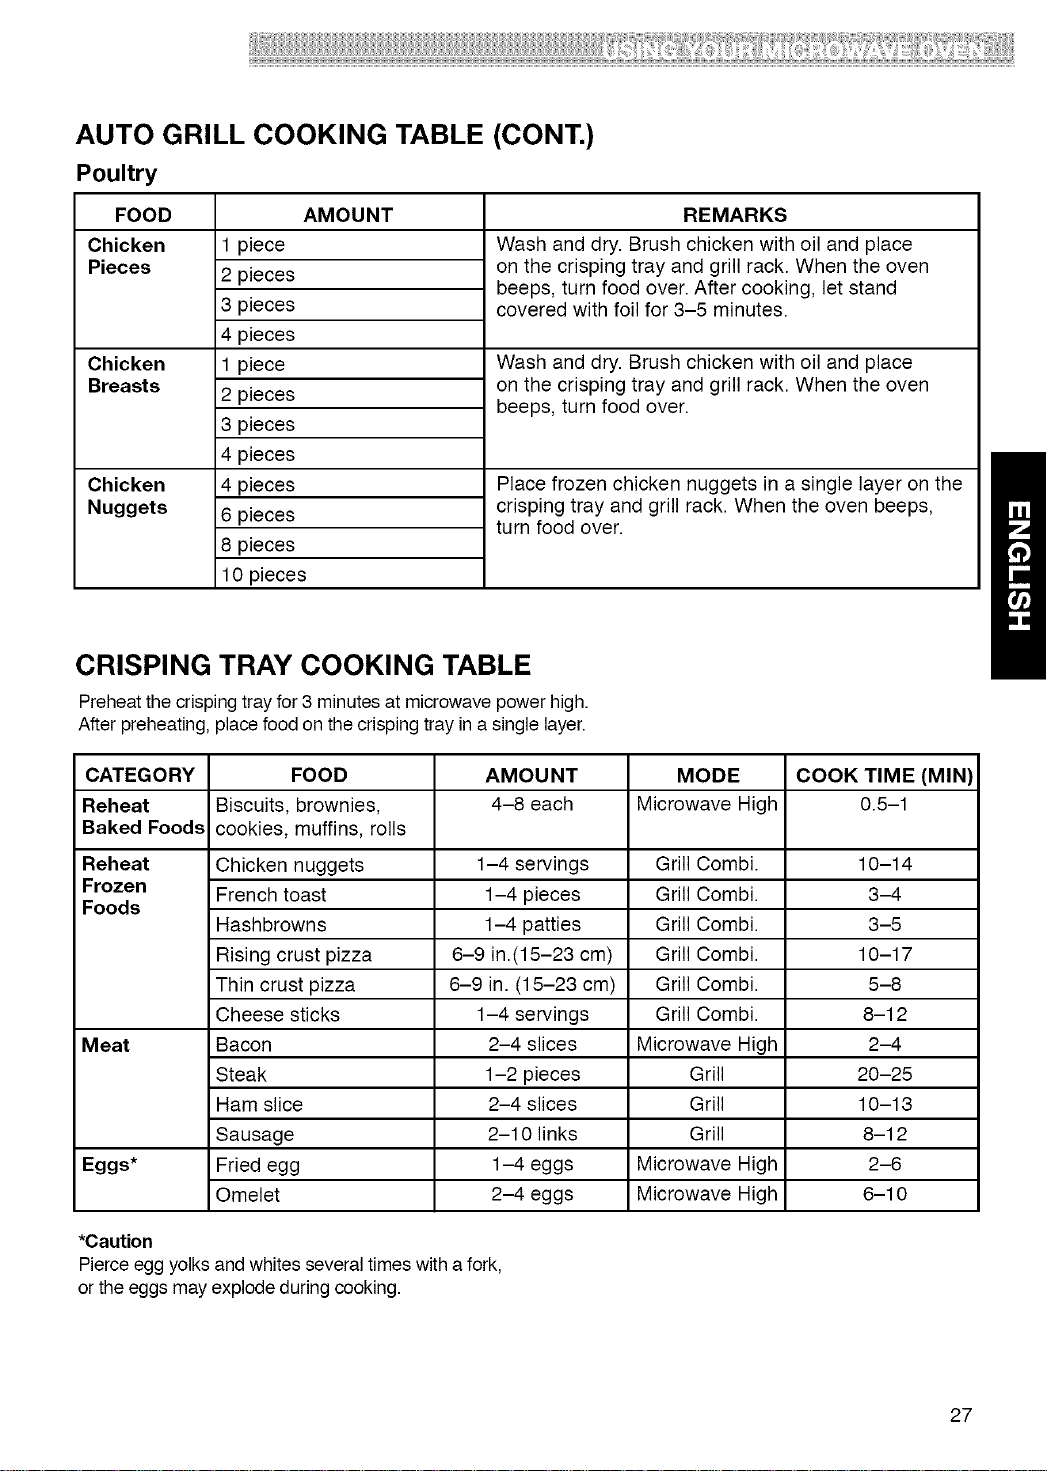
AUTO GRILL COOKING TABLE (CONT.)
Poultry
FOOD AMOUNT REMARKS
Chicken
Pieces
Chicken
Breasts
Chicken
Nuggets
1 piece
2 pieces
3 pieces
4 pieces
1 piece
2 pieces
3 pieces
4 pieces
4 pieces
6 pieces
8 pieces
10 pieces
Wash and dry. Brush chicken with oil and place
on the crisping tray and grill rack. When the oven
beeps, turn food over. After cooking, let stand
covered with foil for 3-5 minutes.
Wash and dry. Brush chicken with oil and place
on the crisping tray and grill rack. When the oven
beeps, turn food over.
Place frozen chicken nuggets in a single layer on the
crisping tray and grill rack. When the oven beeps,
turn food over.
CRISPING TRAY COOKING TABLE
Preheatthe crispingtray for 3 minutes at microwave power high.
After preheating, place food on the crisping tray ina single layer.
CATEGORY FOOD AMOUNT MODE COOK TIME (MIN)
Reheat Biscuits, brownies, 4-8 each Microwave High 0.5-1
Baked Foods cookies, muffins, rolls
Reheat Chicken nuggets 1-4 servings Grill Combi. 10-14
Frozen French toast 1-4 pieces Grill Combi. 3-4
Foods
Hashbrowns 1-4 patties Grill Combi. 3-5
Rising crust pizza 6-9 in.(15-23 cm) Grill Combi. 10-17
Thin crust pizza 6-9 in. (15-23 cm) Grill Combi. 5-8
Cheese sticks 1-4 servings Grill Combi. 8-12
Meat Bacon 2-4 slices Microwave High 2-4
Steak 1-2 pieces Grill 20-25
Ham slice 2-4 slices Grill 10-13
Sausage 2-10 links Grill 8-12
Eggs* Fried egg 1-4 eggs Microwave High 2-6
Omelet 2-4 eggs Microwave High 6-10
*Caution
Pierce egg yolks and whites several times with a fork,
or the eggs may explode during cooking.
27
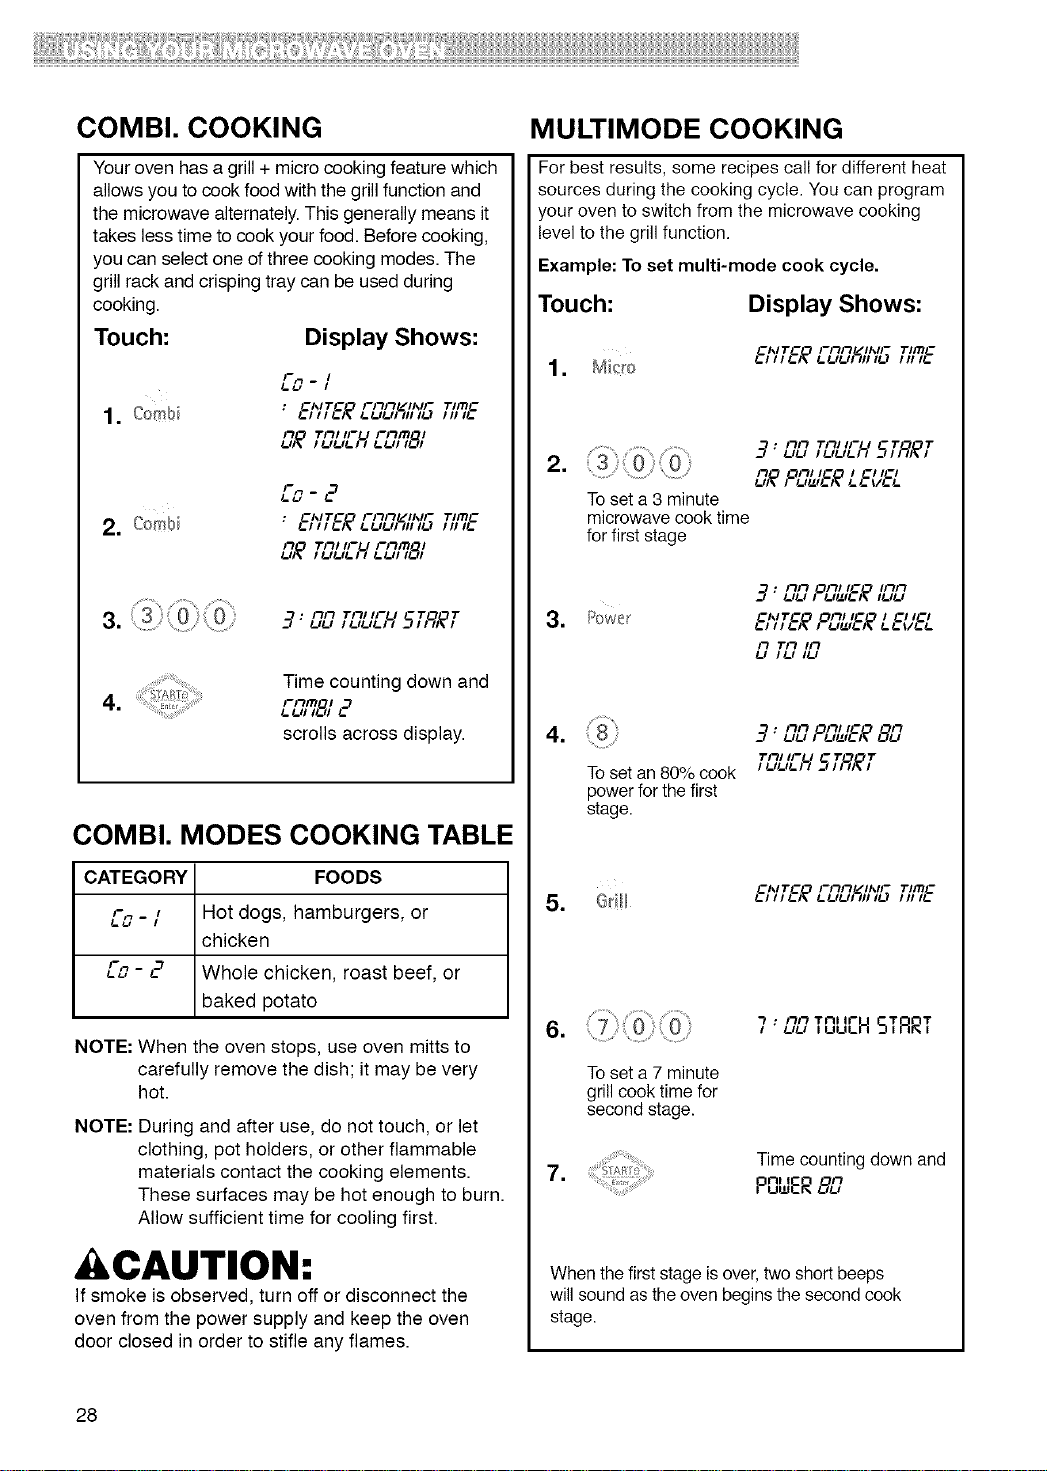
COMBI. COOKING
MULTIMODE COOKING
Your oven has a grill + micro cooking feature which
allows you to cook food with the grill function and
the microwave alternately. This generally means it
takes less time to cook your food. Before cooking,
you can select one of three cooking modes. The
grill rack and crisping tray can be used during
cooking.
Touch: Display Shows:
/-m
_=tJ -/
CA*IT_ FIIFI /IAJF TIITI c
U_ TnHFu rnm ,
C'_IT_ Filil "_IF
2. Com_ : _.,,,_.;__.uu;%,_.,,T'mc,,,_.
UIlOl'_ Till IFU Film_,_J,,
3. _ 3: ilil ,ii,,_u , ,
...... ....... Time counting down and
o Film , ,._
scrolls across display.
COMBI. MODES COOKING TABLE
CATEGORY FOODS
L"_ - / Hot dogs, hamburgers, or
chicken
Co - 2 Whole chicken, roast beef, or
baked potato
NOTE: When the oven stops, use oven mitts to
carefully remove the dish; it may be very
hot.
NOTE:
During and after use, do not touch, or let
clothing, pot holders, or other flammable
materials contact the cooking elements.
These surfaces may be hot enough to burn.
Allow sufficient time for cooling first.
CAUTION:
If smoke is observed, turn off or disconnect the
oven from the power supply and keep the oven
door closed in order to stifle any flames.
For best results, some recipes call for different heat
sources during the cooking cycle. You can program
your oven to switch from the microwave cooking
level to the grill function.
Example: To set multi-mode cook cycle.
Touch:
Display Shows:
=
C'_IT_O FiiiiL/",IF T'ITIC
=
.
,-7: ilil Till IFU T Tt_lt_, I!_1!_1!_1, SI ;_I_,
il OFt/I_ / G,/_1
To set a 3 minute
microwave cook time
for first stage
ilil Oil/IC I/'I/'I
17 : uu / UUIG/_ ,uu
C'_ITC Oill lC I C' IC'
!-HI I_I_ _ !_1tZI!_)_ !_!_ ill_l_
Il Til Ill
!_1 /_.1 ,1_1
nil Oil, _C n
4. 3' uu , _1_1_;_8L,
1"ill IFU T T
Toset an 80% cook _uu__H __;9_
power for the first
stage.
5. @ill
.
To set a 7 minute
grill cook time for
second stage.
ilil Till Ir
7' uu ,uu_H STRRT
7. Time counting down and
nl I il
P_wER8L,
When the first stage is over, two short beeps
will sound as the oven begins the second cook
stage.
28
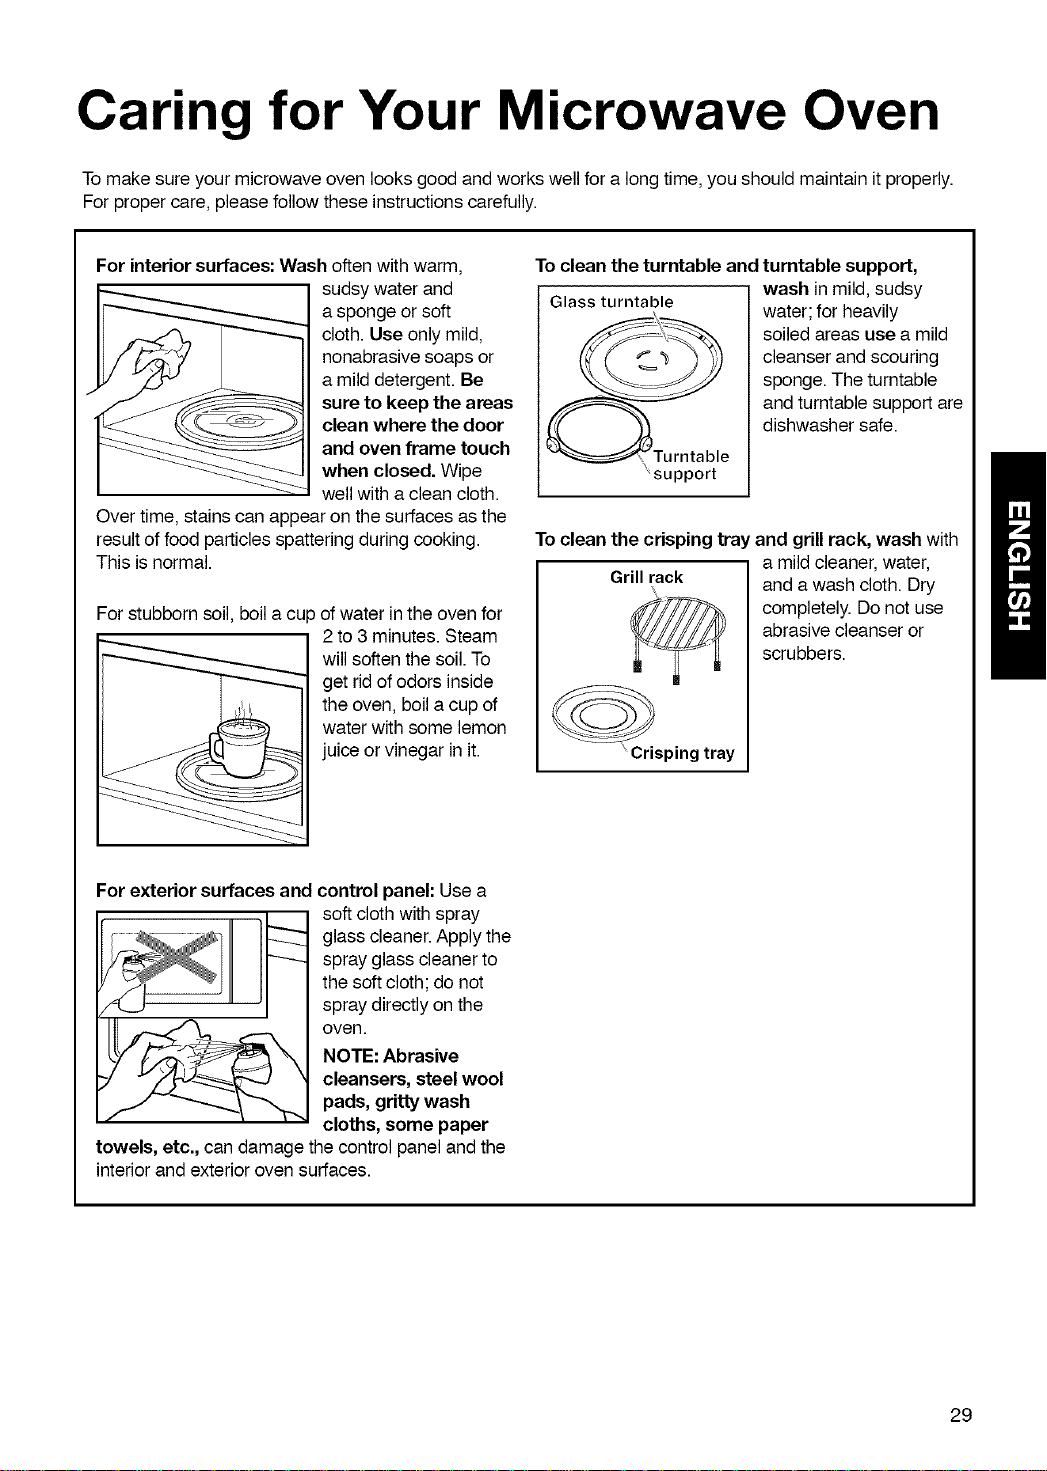
Caring for Your Microwave Oven
Tomake sure your microwave oven looksgood and workswellfor a long time,you should maintain it properly.
For proper care, please follow these instructions carefully.
For interiorsurfaces: Wash often withwarm,
sudsy water and
a sponge or soft
cloth. Use only mild,
nonabrasive soaps or
a mild detergent. Be
sure to keep the areas
clean where the door
and oven frame touch
when closed. Wipe
wellwith aclean cloth.
Overtime, stainscan appear on the surfaces asthe
result of food particlesspattering during cooking.
This is normal.
For stubborn soil, boila cup of water in the oven for
2 to 3 minutes.Steam
will softenthe soil.To
get rid of odors inside
the oven, boilacup of
water withsome lemon
juice or vinegar in it.
To clean the turntable and turntable support,
wash in mild, sudsy
Glass turntable water; for heavily
soiled areas use a mild
cleanser andscouring
sponge. The turntable
and turntablesupport are
dishwasher safe.
\support
To clean the crisping tray and grillrack, wash with
Grillrack
"Crisping tray
a mildcleaner, water,
and awash cloth. Dry
completely. Donot use
abrasive cleanser or
scrubbers.
For exterior surfaces and control panel: Use a
soft cloth with spray
glass cleaner. Apply the
spray glass cleaner to
the soft cloth; do not
spray directly on the
oven.
NOTE: Abrasive
cleansers, steel wool
pads, gritty wash
cloths, some paper
towels, etc., can damage the control panel and the
interior and exterior oven surfaces.
29
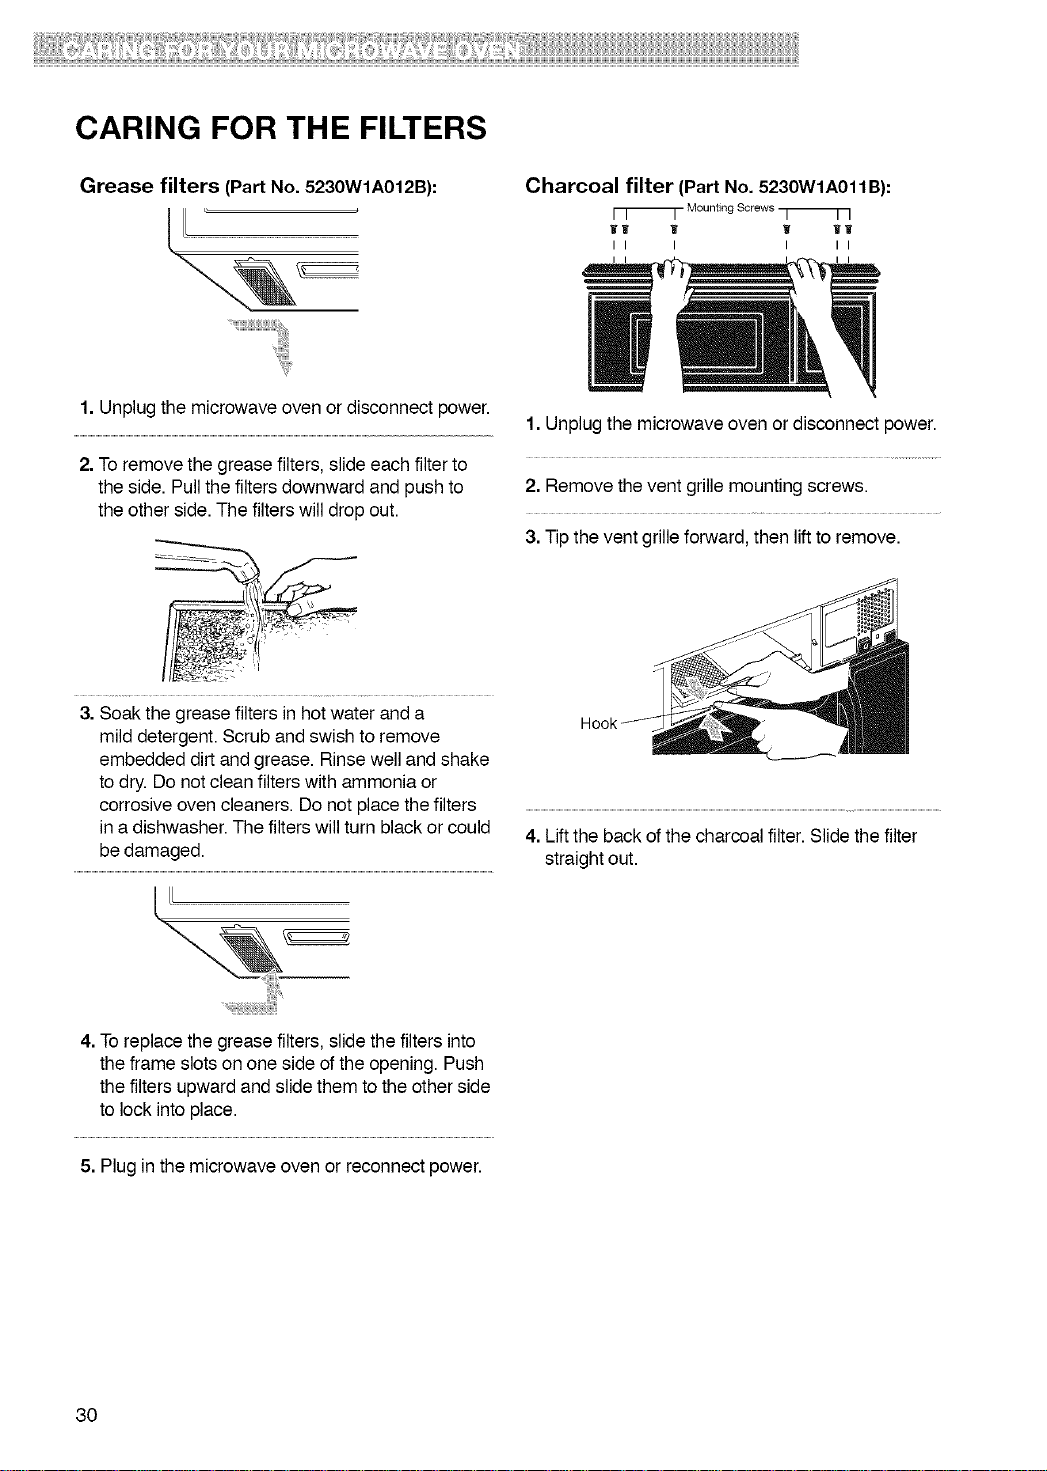
CARING FOR THE FILTERS
Grease filters (Part No. 5230WIA012B): Charcoal filter (Part No. 5230WIA011B):
r T ]- Mounting Screws q ] ]
11 'if W Wl
II I I II
1. Unplug the microwave oven or disconnect power.
2. To remove the grease filters, slide each filter to
the side. Pull the filters downward and push to
the other side. The filters will drop out.
3. Soak the grease filters in hot water and a
mild detergent. Scrub and swish to remove
embedded dirt and grease. Rinse well and shake
to dry. Do not clean filters with ammonia or
corrosive oven cleaners. Do not place the filters
in a dishwasher. The filters will turn black or could
be damaged.
1. Unplug the microwave oven or disconnect power.
2. Remove the vent grille mounting screws.
3. Tip the vent grille forward, then lift to remove.
4. Lift the back of the charcoal filter. Slide the filter
straight out.
4. To replace the grease filters, slide the filters into
the frame slots on one side of the opening. Push
the filters upward and slide them to the other side
to lock into place.
5. Plug in the microwave oven or reconnect power.
30
'I;;
CARING FOR THE FILTERS REPLACING THE COOKTOP
(CONT.) AND OVEN LIGHTS
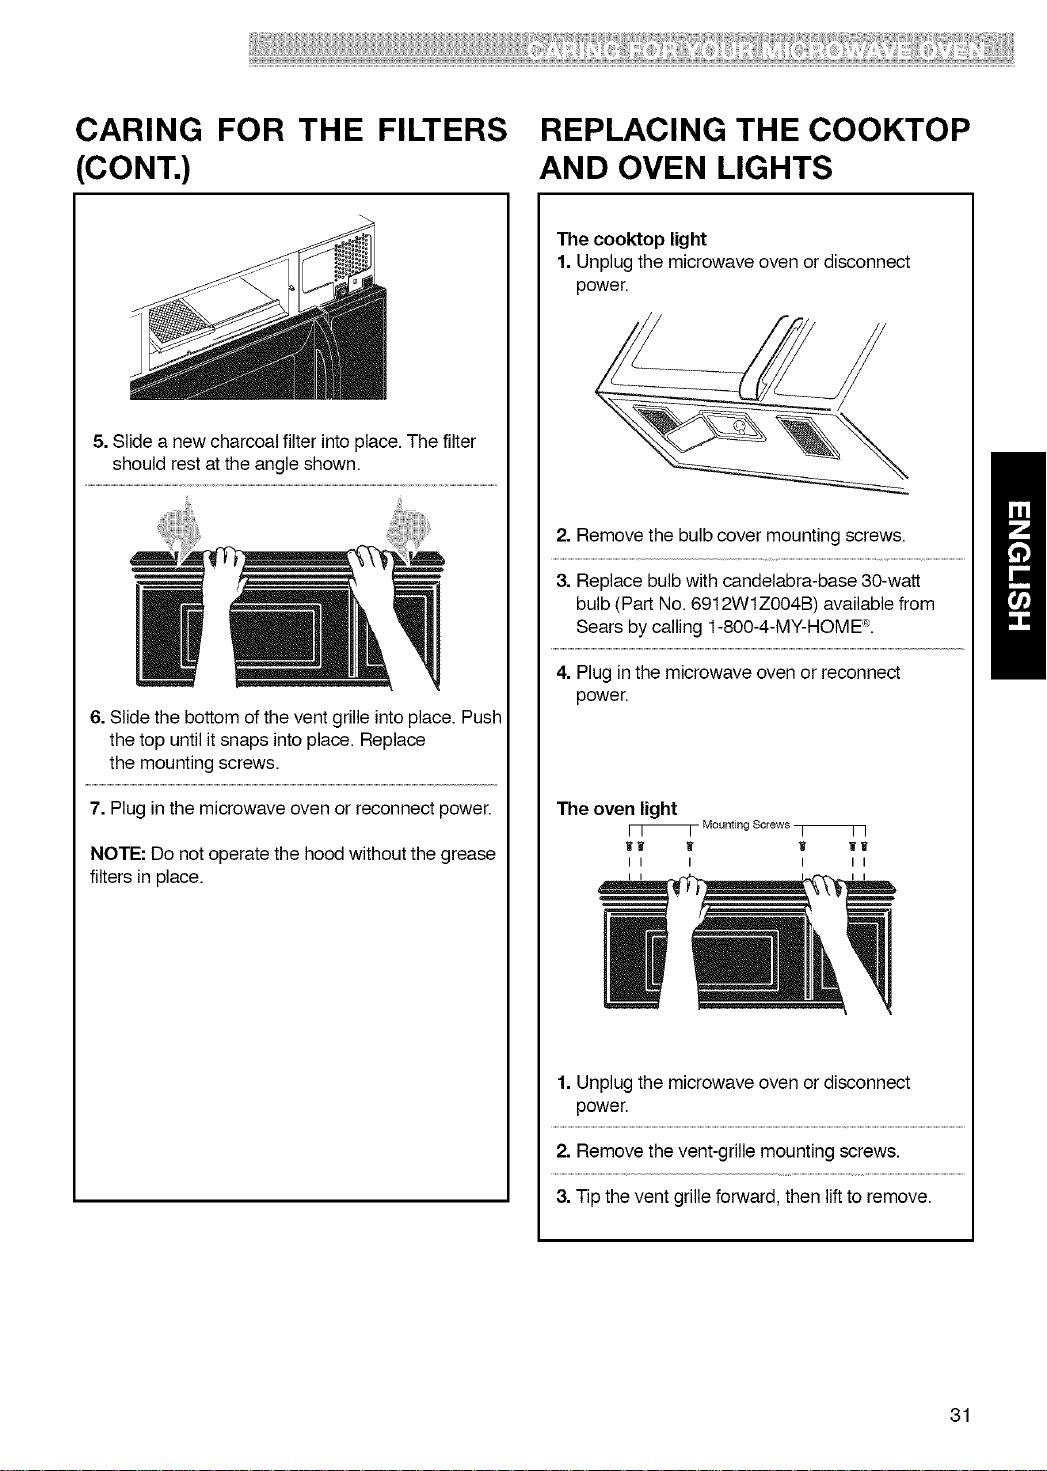
5. Slide a new charcoal filter into place. The filter
should rest at the angle shown.
6. Slide the bottom of the vent grille into place. Push
the top until it snaps into place. Replace
the mounting screws.
7. Plug in the microwave oven or reconnect power.
NOTE: Do not operate the hood without the grease
filters in place.
The cooktop light
1. Unplug the microwave oven or disconnect
power.
2. Remove the bulb cover mounting screws.
3. Replace bulb with candelabra-base 30-watt
bulb (Part No. 6912WlZOO4B) available from
Sears by calling 1-800-4-MY-HOME ®.
4. Plug in the microwave oven or reconnect
power.
The oven light
[ [ _- Mounting Screws _- r ]
wl w Ii ww
ii i i ii
1. Unplug the microwave oven or disconnect
power.
2. Remove the vent-grille mounting screws.
3. Tip the vent grille forward, then lift to remove.
31
REPLACING THE COOKTOP
AND OVEN LIGHTS (CONT.)
Bulb holder
\
4. Lift up the bulb holder.
5. Replace the bulb with a candelabra-base 30-
watt bulb (Part No. 6912WIZOO4B) available
from Sears by calling 1-800-4-MY-HOME "_.
6. Slide the top of the vent grille into place. Push
the bottom until it snaps into place. Replace the
mounting screws.
7. Plug in the microwave oven or reconnect power.
32
Questions and Answers
QUESTIONS ANSWERS
Can the microwave oven operate without the No. If the turntable is removed or turned over, you
turntable or turn the turntable over to hold a will get poor cooking results. Dishes used in the
large dish? oven must fit on the turntable.
Can metal or aluminum pans be used in
the microwave oven?
Aluminum foil can be used for shielding (use small,
flat pieces), small skewers, and shallow foil trays
(if tray is not taller than 3/4 in. [1.9 cm] deep and is
filled with food to absorb microwave energy). Never
allow metal to touch the walls or the door.
Is it normal for the turntable to turn in either
direction?
Yes. The turntable rotates clockwise or counter-
clockwise, depending on the rotation of the motor
when the cooking cycle begins.
Sometimes the door of the microwave oven
appears wavy. Is this normal?
This appearance is normal and does not affect the
operation of the oven.
What are the humming noises the microwave
oven makes when it is operating?
The sound of the transformer when the magnetron
tube cycles on may be heard.
Why does the dish become hot when food is
microwaved in it?
As the food becomes hot it will conduct the heat to
the dish. Be prepared to use hot pads to remove
after cooking.
What does "standing time" mean? "Standing time" means that food should be
removed from the oven and covered for addtional
time to allow it to finish cooking. This frees the oven
for other cooking.
Why does steam come out of the air
exhaust vent?
Steam is normally produced during cooking. The
microwave oven has been designed to vent this
steam out the vents.
Can popcorn be popped in the microwave
oven? How are the best results achieved?
Yes. Pop packaged microwave popcorn following
manufactures guidelines. Do not use regular paper
bags. Do not repop unpopped kernels. Do not pop
popcorn in glass cookware.
33
Troubleshooting
Most cooking problems often are caused by little things you can find and fix withouttools of any kind. Check
the lists below and on the next page before calling for assistance or service. If you still need help, call SEARS
PARTS & REPAIR at 1-800-4-MY-HOME _.
MICROWAVE OVEN DOES NOT WORK
PROBLEM CAUSE
The microwave oven will
not operate and the display
is blank.
• The power supply cord isnot plugged intoa grounded 3prongoutlet. (Seethe
"Electrical Requirements"section on page 5 and the "Electrical Connection"
section on page 7).
• A householdfuse has blown or a circuit breaker hastripped.
• A powerfailure hasoccurred.
The microwave oven will
not run.
• You are using the oven as a timer. Touch STOP/Clear to cancel the Kitchen
Timer.
• The door is not firmly closed and latched.
• You did not touch START.
• You did not follow directions exactly.
• A function set earlier has not been cleared. Touch STOP/Clear to cancel
that function.
COOKING TIMES
PROBLEM CAUSE
Food is undercooked.
The display shows a time
counting down, but the
oven is not cooking.
• The electric supply to your home or wall outlets is low or lower than normal.
Your electric company can tell you if the line voltage is low. Your electrician or
service technician can tell you if the outlet voltage is low.
• The cook power is not at the recommended setting.
Check the table on page 16.
• The oven door is not closed completely.
• You have set the controls as a kitchen timer. Touch the STOP/Clear pad and
cancel the Kitchen Timer.
34
_!!!!_!!!!!!!_!!_!!_!!!!!!!!!!!!!!!!!!!!!!!!!!!!!!!!!!!!!!!!!!!!!!!!!!!!!!!!!!!!!!!!!!!!!!!!!iii!ii!iiiiiii!ii!!!i!ii!i_!!i!!i!ii!!_iii!!!iii¸!!!!!iiii!!!!!_!!:i!i!!!!iiiiiiiiiliii_!!i:ii!ii!i!!!i!iii!i!i!!iii!_i_iiii,!:!!iiiii!!i!_!!!i_i:!i_ii!!!!!!!_!!!!!
TURNTABLE
PROBLEM CAUSE
The turntable will not turn.
• The turntable isnot correctly in place. It should be correct-side up and sitting
firmly on the center hub.
• The support is not positionedcorrectly. Removethe turntable and restartthe
oven. Ifthe hub still does not move, call Sears Service at 1-800-4-MY-HOME_.
Cooking without the turntable willcause poor results.
AUDIBLE SIGNALS
PROBLEM CAUSE
You do not hear • You have not entered the correct command.
the programming or
end-of-cycle beep.
DISPLAY MESSAGES
PROBLEM CAUSE
The display is flashing" : ". • There has been a power interruption. Reset the clock. (See the "Clock" section
on page 13.)
If none of these items are causing your problem, call Sears Service at 1-800-4-MY-HOME ®.
35

Your Home
For repair-in your home-of all major brand appliances,
lawn and garden equipment, or heating and cooling systems,
no matter who made it, no matter who sold it!
For the replacement parts, accessories and
owner's manuals that you need to do-it-yourself.
For Sears professional installation of home appliances
and items like garage door openers and water heaters.
1-800-4-MY-HOME ® (1-800-469-4663)
Call anytime, day or night (U.S.A. and Canada)
www.sears.com www.sears.ca
Our Home
For repair of carry-in items like vacuums, lawn equipment,
and electronics, call or go on-line for the location of your nearest
Sears Parts & Repair Center.
1-800-488-1222
Call anytime, day or night (U.S.A. only)
www.sears.com
To purchase a protection agreement (U.S.A.)
or maintenance agreement (Canada) on a product serviced by Sears:
1-800-827-6655 (U.S.A.) 1-800-361-6665 (Canada)
Para pedir servicio de reparaci6n
a domicilio, y para ordenar piezas:
1-888-SU-HOGAR ®
(1-888-784-6427)
Au Canada pour service en fran(_ais:
1-800-LE-FOYER Mc
(1-800-533-6937)
www.sears.ca
TM SM
® Registered Trademark / Trademark / Service Mark of Sears Brands, LLC
TM
® Marca Registrada / Marca de Fabrica / SMMarca de Servicio de Sears Brands, LLC
MC MD
•Marque de commerce / Marque d6posee de Sears Brands, LLC
© Sears Brands, LLC