Loading ...
Loading ...
Loading ...

RECORDING INSTRUCTIONS
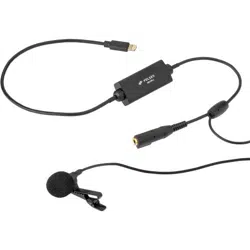
The MO-IPL2 is compatible with any authorized audio
or video recording app from Apple’s App Store.
Important! The MO-IPL2 is disabled when an
incoming phone call is received. To ensure your
recording is not interrupted by a phone call, enable
Airplane Mode in your iPhone’s settings.
1. Plug the Lightning connector into your iOS device.
The LED indicator on the A/D converter will blink to
confirm that it’s connected and receiving power.
2. Plug your headphones into the headphone jack.
Note: The headphone jack is for playback only. You
cannot monitor your recording through the
headphones.
3. Place the windscreen over the mic capsule, attach
the mic clip, and then attach the clip to your
subject. The mic should be approximately 6 to 8
inches from the sound source.
4. Open a compatible audio or video recording app on
your device. The LED indicator on the A/D converter
lights up during recording.
5. When you’ve finished recording, press the stop
button. The microphone will be disabled. Listen to
the playback through the headphones.
Note: AirPods will be disabled during recording, and
they will become active again once the recording has
stopped.
RECORDING TIPS
• For the best recording quality, the MO-IPL2
microphone should be approximately 6 to 8 inches
from the sound source.
• Always use the foam windscreen to diminish vocal
plosives (e.g., the “pop” from P and B sounds) and
wind noise.
• To prevent cable tension that can move the
microphone and create handling noise during
recording, create a loop in the cable, and tape it to
the inside of a garment.
• If you experience excessive breath noises or
inconsistent levels due to head movement, try
attaching the mic upside down.
Loading ...
Loading ...
Loading ...