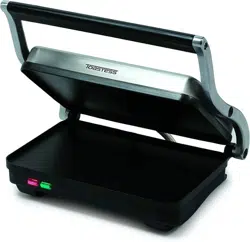
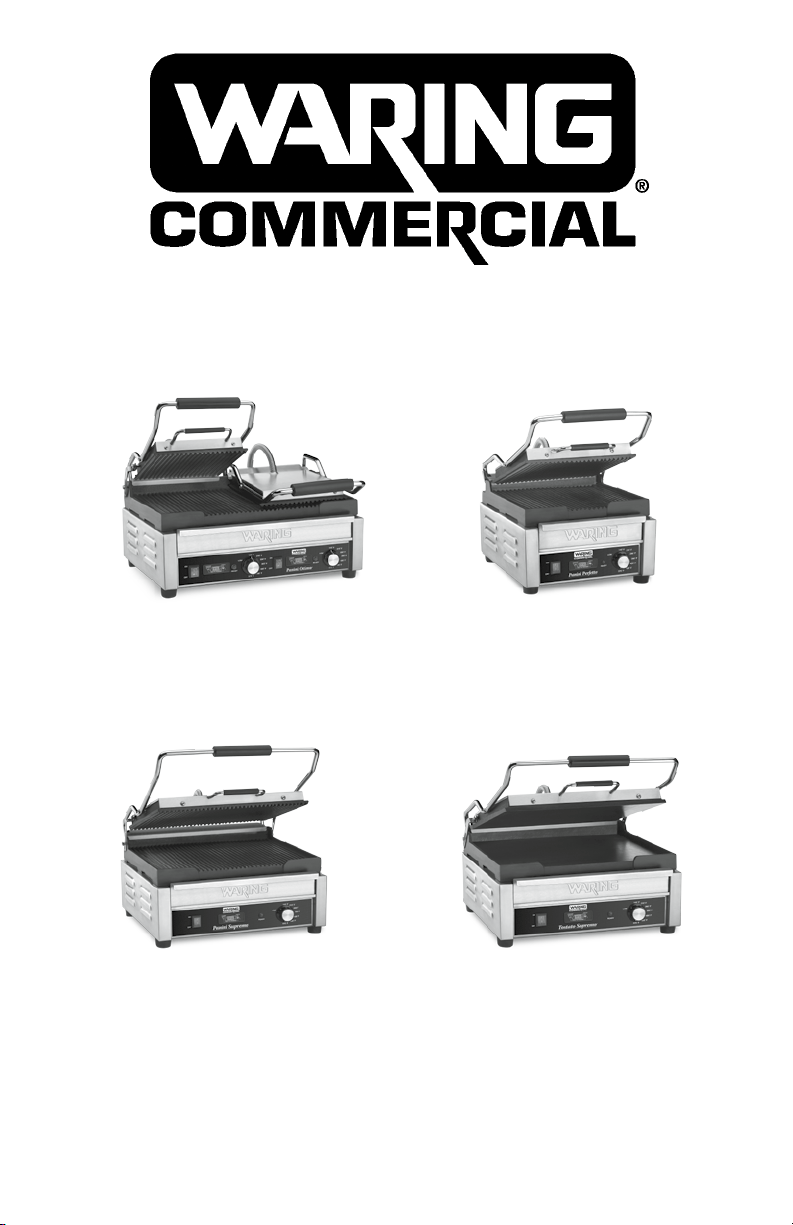
COMMERCIAL PANINI/TOASTING GRILLS
PARRILLAS/SANDWICHERAS COMERCIALES
GRILS/PRESSE-PANINI COMMERCIAUX
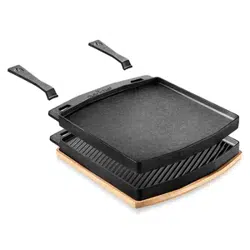
WPG300T
WFG300T/WDG300T
(not shown/ no ilustrado/ non illustré)
WPG150T
WFG150T/WPG150TB
(not shown/ no ilustrado/ non illustré)
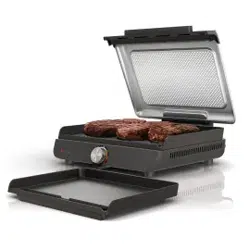
WPG250T
WFG250T/WDG250T/WPG250TB
(not shown/ no ilustrado/ non illustré)
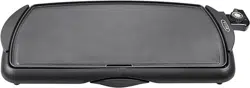
WFG275T
WDG275T/WPG275T
(not shown/ no ilustrado/ non illustré)
For your safety and continued enjoyment of this product,
always read the instruction book carefully before using.
Para su seguridad y para disfrutar plenamente de este producto,
siempre lea las instrucciones cuidadosamente antes de usarlo.
An que votre appareil vous procure en toute sécurité beaucoup de satisfaction,
lire attentivement le mode d’emploi avant de l’utiliser.

2
IMPORTANT SAFEGUARDS
When using electrical appliances, basic safety precautions should
always be followed, including the following:
1.
READ ALL INSTRUCTIONS.
2. Unplug from outlet when not in use, before putting on or
taking off parts and before cleaning.
3. Always unplug from outlet prior to handling or cleaning.
4. To protect against risk of electrical shock, do not put appliance
in water or other liquids.
5. This appliance is not intended for use by persons (including
children) with reduced physical, sensory or mental capabilities,
or lack of experience and knowledge, unless they have been
given supervision or instruction concerning use of the appliance
by a person responsible for their safety.
6. Do not touch surfaces that may be hot. Use handles and knobs
provided.
7. Avoid contact with moving parts.
8. Do not operate the Waring
®
Commercial Panini/Toasting Grill
or any other electrical equipment with a damaged cord or plug,
or after the unit malfunctions or is dropped or damaged in any
manner. Return it to the nearest authorized service center for
examination, repair, and/or adjustment.
9. The use of attachments not recommended or sold by Waring
may cause re, electric shock, or injury.
10. Do not use outdoors.
11. Always check that the control is off before plugging cord into
wall outlet. To disconnect, turn the control knob to OFF, then
remove plug from wall.
12. D o not place near a hot gas or electric burner or heated oven.
13. Do not let cord hang over edge of table or counter, or touch hot
surfaces.
14. When ON, the Waring
®
Commercial Panini/Toasting Grill should
always be on a stable countertop or table.
15. Close supervision is necessary when any appliance is used by
or near children.
16. Do not use appliance for other than intended use.
3
SAVE THESE INSTRUCTIONS
APPROVED FOR
COMMERCIAL USE
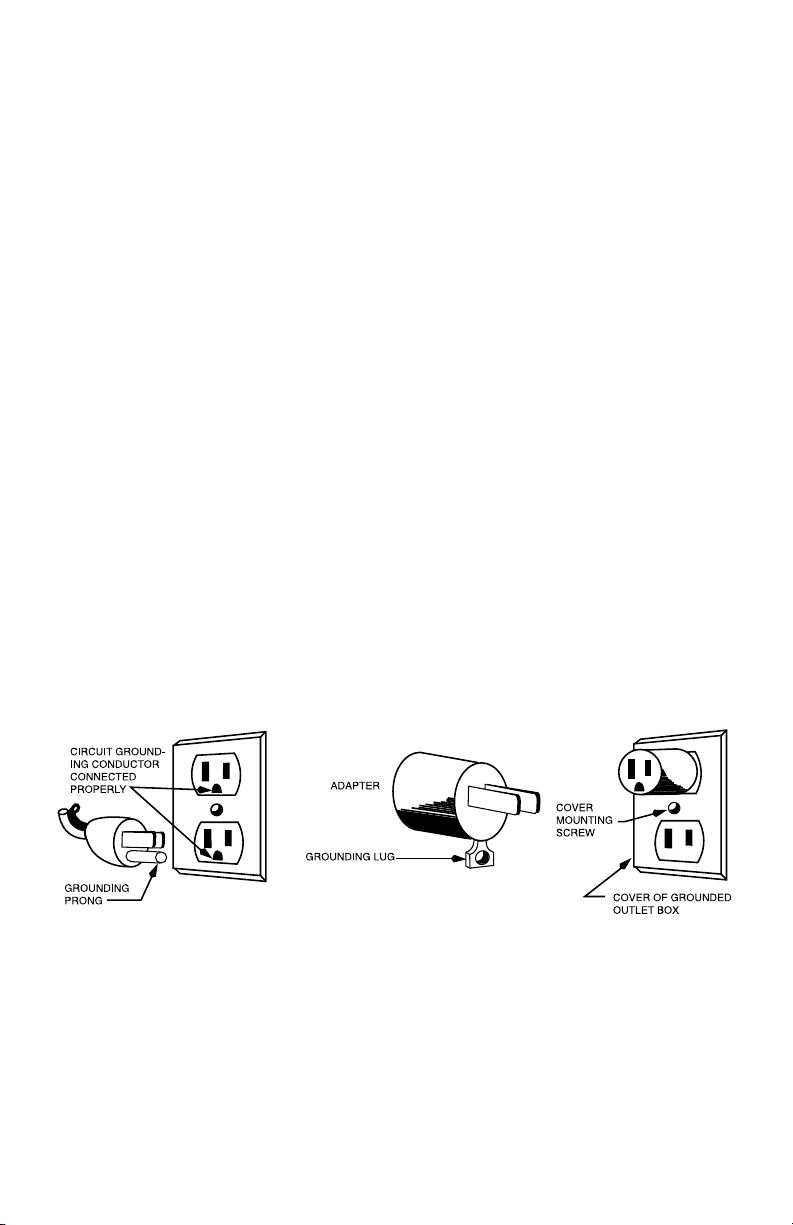
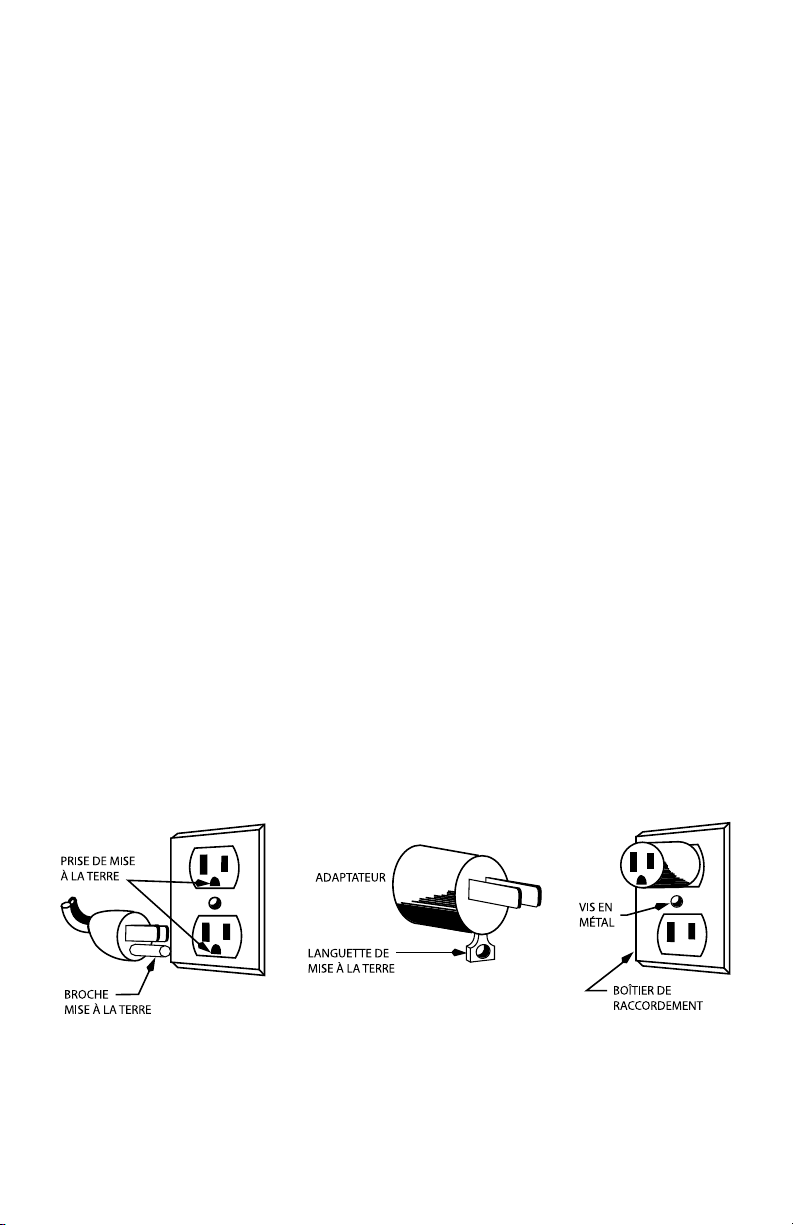
GROUNDING INSTRUCTIONS
This appliance must be grounded while in use to protect the operator
from electrical shock. The appliance is equipped with a 3-conductor
cord and 3-prong grounding-type plug to t the proper grounding-
type receptacle. The appliance has a plug that looks like the plug
in drawing (A). An adapter, as in drawing (B), should be used for
connecting the appliance plug to two-prong receptacles. The
grounding tab that extends from the adapter must be connected to a
permanent ground such as a properly grounded outlet box as shown
in drawing (C) using a metal screw.
CAUTION: Before using an adapter, it must be determined that the
outlet cover plate screw is properly grounded. If in doubt, consult a
licensed electrician. Never use an adapter unless you are sure it is
properly grounded.
NOTE: Use of an adapter is not permitted in Canada and Europe.
(A)
(B)
(C)

4
GROUNDING METHOD
The lightning ash with arrowhead symbol within an
equilateral triangle is intended to alert the user to the
presence of uninsulated dangerous voltage within the
product’s enclosure that may be of sufcient magnitude
to constitute a risk of re or electric shock to persons.
The exclamation point within an equilateral triangle is
intended to alert the user to the presence of important
operating and maintenance (servicing) instruction in the
literature accompanying the appliance.

5
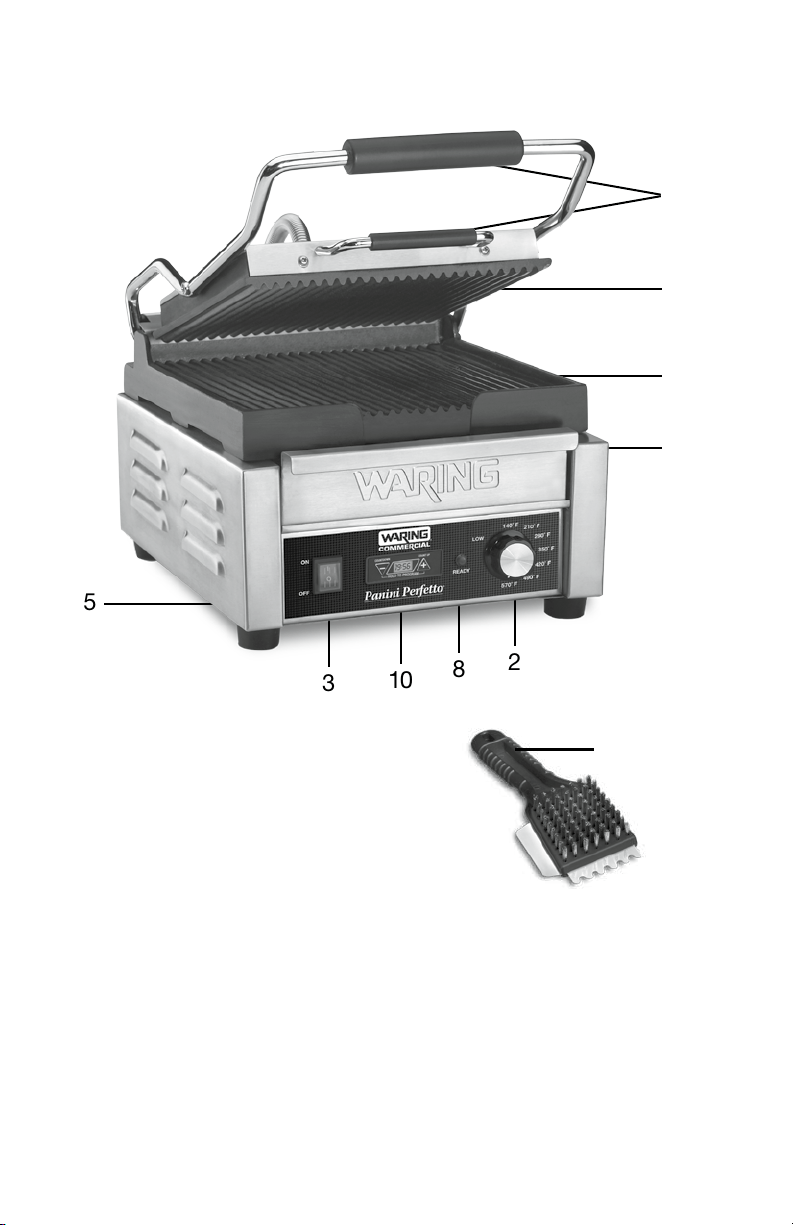
PARTS
2
8
10
3
7
1
6
4
5
9
1. Thermo-insulated handles
2. Temperature dial
3. ON/OFF power switch
4. Removable drip tray
5. Stainless steel housing
6. Bottom grill plate (ribbed or at)
7. Top grill plate (ribbed or at)
8. Ready indicator light
9. Cleaning brush/scraper
10. Reprogrammable timer: CAC124

6
Model Description Voltage Power
Cooking Surface
WPG150T Compact Panini Grill with 120 Volt 1800 Watt 9.75" x 9.25"
Ribbed Plates
WFG150T Compact Panini Grill with 120 Volt 1800 Watt 9.75" x 9.25"
Flat Plates
WPG150TB Compact Panini Grill with 208 Volt 2400 Watt 9.75" x 9.25"
Ribbed Plates
WPG250T Large Panini Grill with 120 Volt 1800 Watt 14.5" x 11"
Ribbed Plates
WPG250TB
Large Panini Grill with 208 Volt 2800 Watt 14.5" x 11"
Ribbed Plates
WFG250T Large Panini Grill with 120 Volt 1800 Watt 14.5" x 11"
Flat Plates
WDG250T Large Panini Grill with
120 Volt 1800 Watt 14.5" x 11"
Ribbed Top and Flat
Bottom Plates
WFG275T Full-Size Panini Grill with 120 Volt 1800 Watt 14" x 14"
Flat Plates
WPG275T Full-Size Panini Grill with 120 Volt 1800 Watt 14" x 14"
Ribbed Plates
WDG275T Full-Size Panini Grill with
120 Volt 1800 Watt 14" x 14"
Ribbed Top and Flat
Bottom Plates
WPG300T Double Panini Grill with 240 Volt 3200 Watt 17" x 9.25"
Ribbed Plates
WFG300T Double Panini Grill with 240 Volt 3200 Watt 17" x 9.25"
Flat Plates
WDG300T Double Panini Grill with 240 Volt 3200 Watt 17" x 9.25"
Flat and Ribbed Plates
These panini grills are compatible with the CAC124 Reprogrammable
Timer (included).
INSTRUCTIONS FOR USE
1. Remove Waring
®
Commercial Panini/Toasting Grill from
packaging.
2. Place on a rm and stable surface.
3. Remove all packaging and instruction book.
4. Please read all instructions prior to rst use.
5. Keep this instruction book in a safe location for future reference.
6. It is highly recommended that you clean the plates before
rst use.

7
7. Warm up unit in closed position for 10 minutes. This will allow all
oils and other sediment to burn off.
8. After cleaning (see page 9), the Waring
®
Commercial Panini/
Toasting Grill is ready for use.
9. Turn unit on. Allow grill to warm up. Depending on size and
model, this could take 10–25 minutes. The READY indicator
light will illuminate once temperature is reached.
10. Lift the handle to open panini grill.
11. Carefully place food on bottom plate.
12. F or double-sided cooking, push handle down; this will press top
plate down on food and cook both sides simultaniously.
13. For single-sided cooking, simply keep handle raised in open
position.
REPROGRAMMABLE TIMER INSTRUCTIONS
Installation
The CAC124 Reprogrammable Timer can only be installed in Waring
Commercial appliances that have the appropriate port compatible
with the CAC124.
NOTE: Always be sure the appliance is unplugged and cool prior to
installing or removing the reprogrammable timer.
1. Installing the batteries
•Removebatteriesfrompackaging
•Openbatteryboxcover
•Installbatteriesasdisplayedontheinsideofthebatterybox
•Oncebatteriesareproperlysecured,slidebatterycoverback
into position until you hear a click and the cover is securely
closed
•Checktimertoensurepowerissuppliedbypressing
–
2. Installing timer into the unit
•Alwaysbesuretheapplianceisunpluggedandcoolpriorto
installing the timer
•Inserttimerintotheportuntilsidetabslockintoplace
•Yourtimerisnowinstalled,operationalandreadyforuse
3. Removing the reprogrammable timer
•Alwaysbesurethattheapplianceisunpluggedandcoolprior
to removing the timer
•Toremovethetimer,placeyourngersonthetwotabson

8
the sides of the timer and rmly depress while gently pulling
towards you. This will release the timer unit.
•Ifyouhavetroubleusingyourngers,youmayuseaat
head screw driver to gently press tabs and pull the timer out
of position. Always use caution when using a metal tool to
remove the timer so that you do not cause harm to the timer,
the appliance or yourself.
Programming the Timer
NOTE: The CAC124 Timer will not automatically shut off your unit.
Once your programmed time has lapsed, the unit will beep 5 times
and the screen will go blank.
Program Manually
To manually program the timer, hold both and at the same time
for four seconds. The timer will beep twice. After the second beep,
use the
–
and
+
to scroll to your desired time setting up to 19:59.
HINT: For fast scroll, hold the button down until you’ve reached your
desired time setting. The timer will automatically program the setting
after ve seconds. Now that you’ve programmed your time, you may
press the
–
button any time to start the timer. Once programmed, the
timer will always default to the time setting until otherwise changed.
–
+
Program Using Count-Up Mode
Your reprogrammable timer allows you to program your time using
count-up mode. This is convenient for when you need to rst measure
the time required to grill your sandwich before programming. Once
you’ve started grilling, press the
+
button to start the timer.
When you’ve nished grilling, press both
–
and
+
to set the time.
Once programmed, the timer will always default to this time setting
until otherwise changed.
NOTE: When batteries are removed, the timer automatically defaults
to the factory setting of 10 seconds.
SAFETY AND TROUBLESHOOTING
Please note that the Waring
®
Commercial Panini/Toasting Grill will be
too hot to handle immediately after use.
The panini grill has a thermal cutoff safety device to avoid overheating.
If panini grill shuts off automatically, unplug it and allow it to cool for
30 minutes in the open position. Plug back in and continue use.

9
CLEANING AND MAINTENANCE
For best results, your panini grill must be cleaned thoroughly after
each use with warm soapy water. Daily buildup of sediment left over
from cooking can affect the performance of the grill plates.
The Waring
®
Commercial Panini Grills come with a cleaning brush
(CAC105). The cleaning brush features heavy-duty bristles for
initial removal of sediment from the cast iron plates. The brush also
features a scraper custom designed to clean in between the ribs as
well as the at surfaces.
The exterior of unit may be cleaned by carefully wiping with a damp
cloth.
Clean plates while the unit is warm, using warm soapy water and the
cleaning tool provided. DO NOT USE COLD WATER ON WARM
PLATES.
To clean drip tray, carefully remove tray, wash with warm soapy water
and dry, or you may place the tray in the dishwasher. Tray must be
completely dry before putting back into the unit.
LIMITED ONE-YEAR WARRANTY
Waring warrants every new Waring
®
Commercial Panini Grill to
be free from defects in material and workmanship for a period of
one year from the date of purchase when used with foodstuffs,
nonabrasive liquids (other than detergents) and nonabrasive semi-
liquids, provided it has not been subject to loads in excess of the
indicated rating. Under this warranty, Waring will repair or replace
any part which, upon our examination, is defective in materials
or workmanship, provided the product is delivered prepaid to the
Waring Service Center at 314 Ella T. Grasso Ave. Torrington, CT
06790, or any Factory Approved Service Center. This warranty
does not: a) apply to any product that has become worn, defective,
damaged or broken due to use or due to repairs or servicing by
other than the Waring Service Center or a Factory Approved Service
Center, or due to abuse, misuse, overloading or tampering; or b)
cover incidental or consequential damages of any kind. Warning:
This warranty is void if appliance is used on Direct Current (DC).
WARING COMMERCIAL
314 Ella T. Grasso Ave.
Torrington, CT 06790

10
MEDIDAS DE SEGURIDAD
IMPORTANTES
Siempre que use aparatos eléctricos, debe tomar precauciones
básicas de seguridad, entre las cuales las siguientes:
1.
LEA TODAS LAS INSTRUCCIONES.
2. Desconecte el aparato cuando no esté en uso, antes de
instalar o remover piezas y antes de limpiarlo.
3. Desconecte el aparato antes de cualquier manipulación o
mantenimiento.
4. Para reducir el riesgo de electrocución, no coloque la base del
aparato en agua u otro líquido.
5. Los niños o las personas que carezcan de la experiencia o
de los conocimientos necesarios para manipular el aparato,
o aquellas cuyas capacidades físicas, sensoriales o mentales
estén limitadas, no deben utilizar el aparato sin la supervisión o
la dirección de una persona responsable por su seguridad.
6. No toque las supercies calientes. Utilice las asas y los botones
o perillas.
7. Evite el contacto con las piezas móviles.
8. No utilice este aparato si el cordón o la clavija estuviesen
dañados, después de que hubiese funcionado mal o que se
hubiese caído o si estuviese dañado. Regrese el aparato a un
centro de servicio autorizado para su revisión, reparación o
ajuste.
9. El uso de accesorios no recomendados o vendidos por Waring
presenta un riesgo de incendio, electrocución o herida.
10. No lo utilice en exteriores.
11. Asegúrese de que el botón de encendido/apagado esté en
la posición "OFF" antes de enchufar el cable en la toma de
corriente. Ponga el control en la posición "OFF" antes de
desconectar el aparato.
12. N o coloque el aparato sobre o cerca de un quemador a gas o
una hornilla eléctrica caliente, ni en un horno caliente.
13. No permita que el cordón cuelgue del borde de la encimera o
de la mesa, ni que haga contacto con supercies calientes.
14. Coloque el aparato sobre una supercie llana y segura, como
una mesa o una encimera.
11
15. Supervise el uso de este aparato cuidadosamente cuando esté
usado por o cerca de niños.
16. No utilice el aparato para ningún otro n que no sea el indicado.
GUARDE ESTAS INSTRUCCIONES
APROBADO PARA
USO COMERCIAL
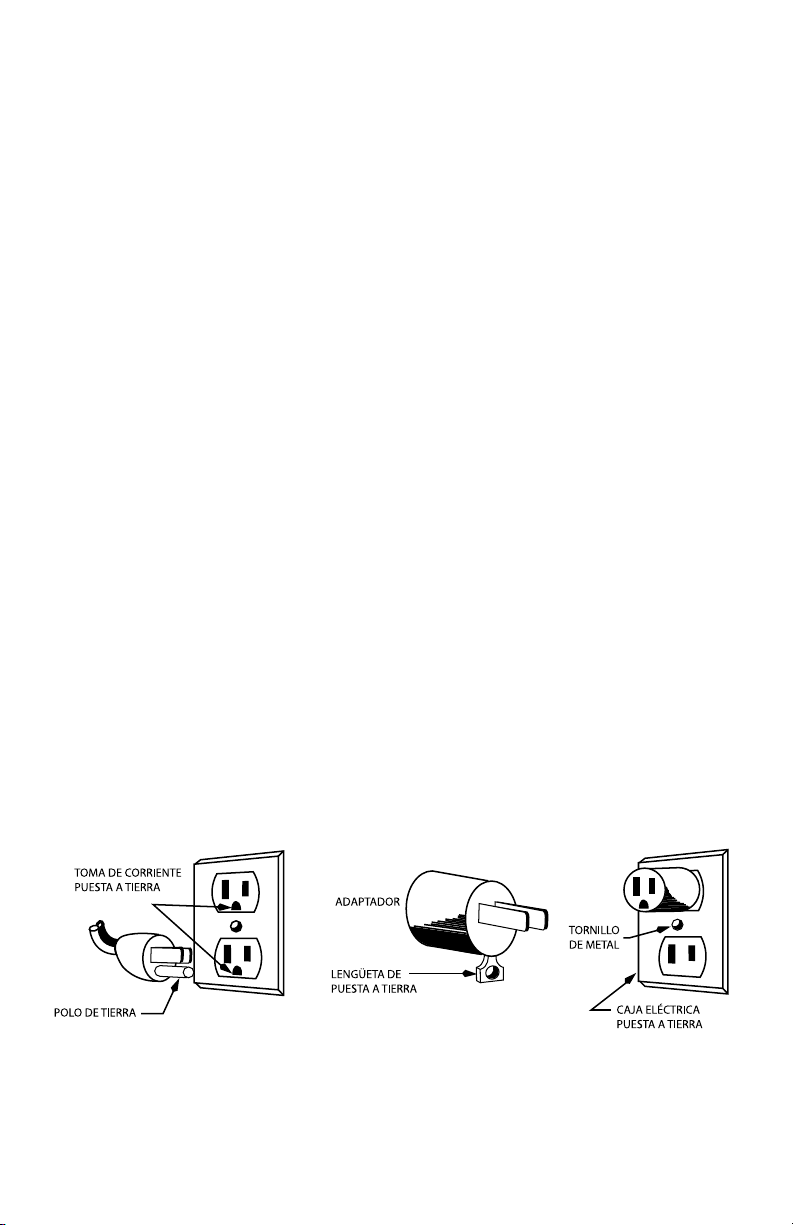
INSTRUCCIONES DE PUESTA A TIERRA
Para su protección, este aparato está equipado con un cable/
enchufe con puesta a tierra, el cual debe ser conectado a una
toma de corriente debidamente puesta a tierra (Fig. A). Si una
toma de corriente puesta a tierra no está disponible, se podrá usar
un adaptador para conectar el aparato a una toma de corriente
polarizada (Fig. B). El adaptador debe ser puesto a tierra mediante
un tornillo de metal que conecte la lengüeta del mismo a la caja
eléctrica (Fig. C).
PRECAUCIÓN: Antes de conectar el adaptador, asegúrese de
que la toma de corriente esté puesta a tierra. Si no está seguro,
comuníquese con un electricista. Nunca use un adaptador sin estar
seguro de que la toma de corriente esté puesta a tierra.
NOTA: Está prohibido usar un adaptador en el Canadá y en Europa.
(A)
(B)
(C)
12
MÉTODO DE PUESTA A TIERRA
El símbolo representado por un relámpago con punta de
echa dentro de un triángulo equilátero tiene como n
alertar al usuario de la presencia de voltajes peligrosos
no aislados en el interior del aparato, los cuales pueden
ser de suciente magnitud para constituir un riesgo de
incendio o electrocución.
El signo de exclamación dentro de un triángulo equilátero
tiene como n alertar al usuario de la presencia de
instrucciones importantes de operación y mantenimiento
(servicio) en la documentación que acompaña al equipo.
13
9
PIEZAS
1. Asas aislantes
2. Control de temperatura
3. Botón de encendido/apagado
4. Bandeja de goteo removible
5. Cuerpo de acero inoxidable
6. Placa inferior (plana/"plancha" o estriada/"parrilla")
7. Placa superior (plana/"plancha" o estriada/"parrilla")
8. Luz de listo
9. Cepillo de limpieza/raspador
10. Temporizador programable (CAC124)
2
8
10
3
7
1
6
4
5

14
Modelo Descripción Voltaje Potencia
Placa
WPG150T Parrilla/Sandwichera
120V 1800W 25 cm x 23.5 cm
compacta con placas
estriadas
WFG150T Parrilla/Sandwichera
120V 1800W 25 cm x 23.5 cm
compacta con placas
planas
WPG150TB Parrilla/Sandwichera
208V 2400W 25 cm x 23.5 cm
compacta con placas
estriadas
WPG250T Parrilla/Sandwichera
120V 1800W 37 cm x 28 cm
grande con placas
estriadas
WPG250TB
Parrilla/Sandwichera
208V 2800W 37 cm x 28 cm
grande con placas
estriadas
WFG250T Parrilla/Sandwichera 120V 1800W 37 cm x 28 cm
grande con placas planas
WDG250T Parrilla/Sandwichera
120V 1800W 37 cm x 28 cm
grande con placa estriada
arriba y placa plana abajo
WFG275T Parrilla/Sandwichera de
120V 1800W 35.5 cm x 35.5
tamaño estándar con
cm
placas planas
WPG275T Parrilla/Sandwichera de
120V 1800W 35.5 cm x 35.5
tamaño estándar con
cm
placas estriadas
WDG275T Parrilla/Sandwichera de
120V 1800W 35.5 cm x 35.5
tamaño estándar con placa
cm
estriada arriba y placa
plana abajo
WPG300T Parrilla/Sandwichera doble 240V 3200W 43 cm x 23.5 cm
con placas estriadas
WFG300T Parrilla/Sandwichera doble 240V 3200W 43 cm x 23.5 cm
con placas planas
WDG300T Parrilla/Sandwichera doble 240V 3200W 43 cm x 23.5 cm
con placas plana y estriada
Todos los modelos descritos anteriormente son compatibles con el
temporizador programable CAC124 (incluido).

15
INSTRUCCIONES DE USO
1. Retire el aparato de la caja.
2. Ponga el aparato sobre una supercie llana y segura.
3. Remueva el material de embalaje y el libro de instrucciones.
4. Lea atentamente el modo de empleo antes de utilizar este
aparato por primera vez.
5. Guarde el modo de empleo para futura referencia.
6. Le recomendamos que limpie las placas antes del primer uso.
7. Encienda el aparato y permita que caliente, con las placas
cerradas, durante 10 minutos. Esto quemará el aceite y otros
residuos acumulados durante la fabricación y el transporte.
8. Una vez terminada la limpieza, el aparato está listo.
9. Encienda el aparato. Permita que caliente. Según el modelo y el
tamaño del aparato, esto puede demorar 10–25 minutos. La luz
de listo se encenderá cuando el aparato alcance la temperatura
deseada.
10. Alce el asa para abrir la placa.
11. Disponga los alimentos sobre la placa inferior.
12. B aje la placa superior para asar los alimentos por ambos lados.
13. Para asar los alimentos por solamente un lado, deje la placa
superior abierta.
TEMPORIZADOR PROGRAMABLE
Instalación
El temporizador programable CAC124 puede ser instalado sobre
todos los aparatos Waring equipados con un puerto compatible.
NOTA: Siempre apague y desconecte el aparato antes de instalar/
remover el temporizador.
1. Instalación de las pilas
•Retirelaspilasdelpaquete
•Abraelcompartimientodelaspilas
•Instalelaspilas,segúnseindicasobreeldiagramaadentro
del compartimiento
•Cierreelcompartimientodelaspilas,deslizandolatapahasta
que escuche un "clic"
•Oprimirelbotón
–
para averiguar que el temporizador está
funcionando

16
2. Instalación del temporizador
•Siempreapagueydesconecteelaparatoantesdeinstalarel
temporizador
•Introduzcaeltemporizadorenelpuertodelaparato,hastaque
las patas laterales se bloqueen
•Sutemporizadoryaestáinstalado,operativoylistoparausar
3. Remoción del temporizador
•Siempreapagueydesconecteelaparatoantesderemoverel
temporizador.
•Presionermementelaspataslateralesmientrasjalael
temporizador hacia usted para liberarlo.
•Siesnecesario,utiliceundestornilladorplanoparapresionar
las patas. Tenga cuidado de no dañar el temporizador y de no
lastimarse.
Cómo fijar el temporizador
NOTA: El temporizador CAC124 no apagará automáticamente el
aparato. Al nal del tiempo programado, el temporizador emitirá 5
pitidos y la pantalla se apagará.
Programación manual
Mantenga oprimidos los botones
–
y durante 4 segundos. E
temporizador emitirá 2 pitidos. Después del segundo pitido, utilice los
botones
–
y
+
para jar el tiempo, hasta 19:59 minutos.
CONSEJO: Mantenga el botón oprimido para avanzar más
rápidamente. El temporizador guardará el tiempo en memoria
automáticamente después de 5 segundos. Después de la
programación, presione el botón
–
para empezar la cuenta. El
tiempo programado se volverá el tiempo por defecto hasta que vuelva
a programa el temporizador.
+
Programación por cronometraje
El temporizador también puede ser programado por cronometraje, un
método que consiste en medir el tiempo de cocción de un alimento
para jar el temporizador en consecuencia para la próxima cocción.
Oprima el botón
+
cuando empiece a asar.
Oprima simultáneamente los botones
–
y
+
al nal de la cocción
para guardar el tiempo. El tiempo programado se volverá el tiempo
por defecto hasta que vuelva a programa el temporizador.
NOTA: El temporizador regresa al tiempo por defecto programado en
fábrica (10 segundos) al retirar las pilas.

17
PRECAUCIONES
El aparato estará muy caliente después del uso. No lo toque ni lo
mueva hasta que haya enfriado.
Este aparato está equipado con un sistema de seguridad
que lo apagará automáticamente en caso de recalentamiento. Si esto
ocurriera, apague el aparato inmediatamente, desenchúfelo y permita
que enfríe durante 30 minutos. Tras enfriarse, vuelva a conectarlo.
LIMPIEZA Y MANTENIMIENTO
Limpie el aparato después de cada uso. La acumulación diaria de
residuos puede afectar el rendimiento de las placas.
Las parrillas/sandwicheras Waring
®
Commercial incluyen un cepillo
de limpieza (CAC105). Las cerdas duras del cepillo son ideales
para eliminar los residuos de las placas de hierro fundido. El cepillo
también cuenta con un raspador diseñado para limpiar las planchas/
parrillas.
Limpie el cuerpo del aparato con un paño humedecido.
Limpie las placas aún tibias, usando agua jabonosa tibia y el
raspador provisto. NO ECHE AGUA FRÍA SOBRE LAS PLACAS
CALIENTES.
Retire la bandeja de goteo y lávela en agua jabonosa tibia, o en el
lavavajillas. Permita que seque antes instalarla de nuevo.
GARANTÍA LIMITADA DE UN AÑO
Waring garantiza toda nueva parrilla/sandwichera Waring
®
Commercial contra todo defecto de materiales o fabricación durante
un año a partir de la fecha de compra, siempre en cuando haya
sido usada con alimentos, líquidos no abrasivos (a excepción de
detergentes) y semi-líquidos no abrasivos, y que no haya sido
sujeta a cargas que excedan su máxima capacidad. Bajo esta
garantía, Waring reparará o reemplazará toda pieza que, tras
estar inspeccionada por nuestro servicio posventa, demuestre
defectos de materiales o fabricación, siempre que el producto
se entregue con franqueo pagado a: Waring Service Center, 314
Ella T. Grasso Ave., Torrington, CT 06790, o a cualquier servicio
postventa aprobado. Esta garantía: a) no se aplica a ningún producto
desgastado, defectuoso, dañado o roto debido a uso, reparaciones/
servicio realizados por personas no autorizadas, o abuso, mal uso,
sobrecarga o daños intencionales; b) no cubre daños incidentales o
consecuentes de ningún tipo. Advertencia:
El utilizar este aparato con corriente continua (C.C.) invalidará la
garantía.
WARING COMMERCIAL
314 Ella T. Grasso Ave., Torrington, CT 06790

18
IMPORTANTES CONSIGNES
DE SÉCURITÉ
L'utilisation d'appareils électriques requiert la prise de précautions
élémentaires, parmi lesquelles les suivantes :
1.
LIRE TOUTES LES INSTRUCTIONS.
2. Débrancher l'appareil après usage et avant toute
manipulation ou entretien.
3. Débrancher l'appareil avant toute manipulation ou entretien.
4. An de prévenir tout risque de choc électrique, ne jamais placer
l'appareil dans l’eau ou tout autre liquide.
5. Cet appareil ne devrait pas être utilisé par des enfants ou
des personnes souffrant d’un handicap physique, mental ou
sensoriel, ou qui ne disposent pas des connaissances ou de
l'expérience nécessaires, à moins qu'une personne responsable
de leur sécurité leur en ait expliqué le fonctionnement ou les
encadre.
6. Ne pas toucher les surfaces chaudes. Utiliser les poignées ou
les boutons.
7. Éviter tout contact avec les éléments en mouvement.
8. Ne pas utiliser l'appareil si le cordon d’alimentation ou la che
sont endommagés, s’il ne fonctionne pas correctement, s'il est
abîmé ou après qu'il soit tombé. Envoyer l'appareil à un service
après-vente autorisé an qu’il soit inspecté, réparé ou réglé au
besoin.
9. L’utilisation d’accessoires non recommandés ou vendus par
Waring peut présenter un risque d'incendie, d'électrocution ou
de blessure.
10. Ne pas utiliser l'appareil à l'air libre.
11. Vérier que l'appareil est éteint avant de le brancher. Toujours
éteindre l'appareil (OFF) avant de le débrancher.
12. N e pas mettre l’appareil sur ou à proximité d'une plaque à gaz
ou électrique, ni dans un four chaud.
13. Ne pas laisser le cordon pendre au bord d'une table ou d'un
plan de travail, ni entrer en contact avec des surfaces chaudes.
14. Placer l'appareil sur une surface nivelée et sûre.
19
15. Il convient d'exercer une surveillance étroite lorsque cet appareil
est utilisé par ou près d’enfants.
16. Ne pas utiliser cet appareil à des ns autres que celles pour
lesquelles il a été conçu.
GARDER CES INSTRUCTIONS
USAGE COMMERCIAL AUTORISÉ
INSTRUCTIONS DE MISE À LA TERRE
Pour votre protection, cet appareil est équipé d'une che à trois
broches. Cette che doit être branchée dans une prise de terre
correctement congurée (Fig. A). Un adaptateur temporaire (B) peut
être utilisé pour brancher l’appareil dans une prise polarisée jusqu’à
ce que vous fassiez installer une prise de terre adéquate par un
électricien. La languette de l’adaptateur doit être mise à la terre, en la
xant à un boîtier de raccordement (C) à l'aide d'une vis en métal.
ATTENTION : Vérier que le boîtier est mis à la terre avant d'utiliser
l'adaptateur. En cas de doute, demander conseil à un électricien. Ne
jamais utiliser un adaptateur, à moins qu'il ne soit correctement mis à
la terre.
REMARQUE : L’utilisation d’un adaptateur comme celui mentionné
ci-dessus est interdite au Canada et en Europe.
(A)
(B)
(C)

20
MÉTHODE DE MISE À LA TERRE
Le symbole composé d’une èche en forme d’éclair à
l'intérieur d'un triangle équilatéral, à pour objet d'alerter
l'utilisateur de la présence d'une tension dangereuse non-
isolée à l'intérieur du boîtier, qui peut être d'une ampleur
sufsante pour constituer un risque d'incendie ou de
choc électrique.
Le point d'exclamation, à l'intérieur d'un triangle
équilatéral, à pour objet de prévenir l'utilisateur de
l'importance des instructions de fonctionnement et de
maintenance, jointes à l'appareil.

21
PIÈCES
2
8
10
3
7
1
6
4
5
9
1. Poignées isolées
2. Réglage de température
3. Interrupteur
4. Bac de récupération des graisses amovible
5. Boîtier en acier inoxydable
6. Plaque inférieure (plate/"gril" ou striée/"plancha")
7. Plaque supérieure (plate/"gril" ou striée/"plancha")
8. Voyant de préchauffage
9. Brosse de nettoyage/racloir
10. Minuteur programmable (CAC124)

22
Modèle Description Tension Puissance
Plaque
WPG150T Gril/Presse-panini compact 120V 1800W 25 cm x 23,5 cm
avec plaques "gril"
WFG150T Gril/Presse-panini compact 120V 1800W 25 cm x 23,5 cm
avec plaques "plancha"
WPG150TB Gril/Presse-panini compact 208V 2400W 25 cm x 23,5 cm
avec plaques "gril"
WPG250T Grand gril/Presse-panini 120V 1800W 37 cm x 28 cm
avec plaques "gril"
WPG250TB
Grand gril/Presse-panini 208V 2800W 37 cm x 28 cm
avec plaques "gril"
WFG250T Grand gril/Presse-panini 120V 1800W 37 cm x 28 cm
avec plaques "plancha"
WDG250T Grand gril/Presse-panini
120V 1800W 37 cm x 28 cm
avec plaque "gril" en haut
et plaque "plancha" en bas
WFG275T Gril/Presse-panini de taille
120V 1800W 35,5 cm x 35,5cm
standard avec plaques
"plancha"
WPG275T Gril/Presse-panini de taille
120V 1800W 35,5 cm x 35,5cm
standard avec plaques
"gril"
WDG275T Gril/Presse-panini de taille
120V 1800W 35,5 cm x 35,5cm
standard avec plaque "gril"
en haut et plaque "plancha"
en bas
WPG300T Gril/Presse-panini double 240V 3200W 43 cm x 23,5 cm
avec plaques "gril"
WFG300T Gril/Presse-panini double 240V 3200W 43 cm x 23,5 cm
avec plaques "plancha"
WDG300T Gril/Presse-panini double
240V 3200W 43 cm x 23,5 cm
avec plaques "gril" et
"plancha"
Tous les grils/presse-panini ci-dessus sont compatibles avec le
minuteur programmable CAC124 (inclus).
MODE D'EMPLOI
1. Sortir l'appareil de la boîte.
2. Placer l'appareil sur une surface stable et nivelée.
3. Retirer le matériel d'emballage et la documentation technique.
4. Lire attentivement le mode d'emploi avant d'utiliser l'appareil.

23
5. Conserver le mode d'emploi pour référence ultérieure.
6. Il est conseillé de nettoyer les plaques avant la première
utilisation.
7. Allumer l'appareil et le laisser chauffer, les plaques fermées,
pendant 10 minutes. Cela éliminera les huiles et autres résidus
accumulés pendant la fabrication et le transport.
8. Une fois le nettoyage terminé, l'appareil est prêt.
9. Allumer l'appareil. Le laisser chauffer. Selon le modèle et
la taille, cela peut prendre 10–25 minutes. Le voyant de
préchauffage s'allumera lorsque la température aura atteint le
niveau voulu.
10. Soulever la poignée pour ouvrir le gril.
11. Placer les ingrédients à griller sur la plaque inférieure.
12. B aisser la plaque supérieure pour griller les aliments des deux
côtés.
13. Laisser la plaque supérieure ouverte pour griller les aliments
d'une seul côté.
MINUTEUR PROGRAMMABLE
Installation
Le minuteur programmable CAC124 peut s'installer sur tous les
appareils Waring équipés d'un port compatible.
REMARQUE : Éteindre et laisser l'appareil refroidir avant de procéder
au retrait ou à l'installation du minuteur.
1. Installation des piles
•Déballerlespiles
•Ouvrirlecompartimentàpiles
•Installerlespilesdanslecompartiment,enrespectantles
signes de polarité
•Refermerlecompartimentàpile,enfaisantglisserle
couvercle jusqu'à ce que vous entendiez un "clic"
•Presserlebouton
–
pour vérier que le minuteur fonctionne
2. Installation du minuteur
•Éteindreetlaisserl'appareilrefroidiravantdeprocéderà
l'installation du minuteur
•Introduireleminuteurdansleportdel'appareil,jusqu'àque
les pattes latérales se bloquent

24
•Leminuteurestmaintenantestmaintenantinstallé,
opérationnel et prêt à l'emploi
3. Retrait du minuteur
•Éteindreetlaisserl'appareilrefroidiravantdeprocéderau
retrait du minuteur
•Presserfermementlespatteslatéralestoutentirant
doucement le minuteur vers vous pour le libérer.
•Aubesoin,utiliseruntournevisplatpourpresserlespattes.
Faire attention de ne pas abîmer le minuteur et de ne pas vous
blesser.
Programmation du minuteur
REMARQUE : Le minuteur CAC124 n'éteindra pas automatiquement
l'appareil. À la n du temps programmé, le minuteur sonnera 5 fois et
l'écran s'éteindra.
Programmation manuelle
Appuyer simultanément sur les boutons et pendant 4
secondes. Le minuteur sonnera deux fois. Après la deuxième
sonnerie, utiliser les boutons
–
et
+
pour régler le temps désiré,
jusqu'à 19:59 minutes.
CONSEIL: Pour faire déler les chiffres plus vite, appuyer
continuellement sur le bouton. Le temps programmé sera
automatiquement sauvegardé après 5 secondes. Une fois le minuteur
programmé, appuyer sur le bouton
–
pour le mettre en route. Le
temps programmé deviendra le temps par défaut jusqu'à ce que vous
reprogrammiez le minuteur.
–
+
Programmation par chronométrage
Le minuteur peut être programmé par chronométrage, une méthode
consistant à chronométrer le temps de cuisson d'un aliment et
programmer le minuteur en conséquence pour la prochaine cuisson.
Appuyer sur le bouton
+
lorsque vous commencez à cuire/griller.
Appuyer simultanément sur les boutons
–
et
+
à la n de la
cuisson pour sauvegarder le temps de cuisson. Le temps programmé
deviendra le temps par défaut jusqu'à ce que vous reprogrammiez le
minuteur.
REMARQUE : Le minuteur retourne au temps par défaut programmé
en usine (10 secondes) chaque fois qu'on retire les piles.

25
ATTENTION
L'appareil reste chaud pendant longtemps après la cuisson. Ne pas le
toucher ou le déplacer avant qu'il n'ait refroidi.
L'appareil est équipé d'un mécanisme de sécurité qui l'éteint
automatiquement en cas de surchauffe. Si cela se produisait,
éteindre, débrancher puis laisser l'appareil refroidir pendant 30
minutes. Une fois refroidi, le rebrancher.
NETTOYAGE ET ENTRETIEN
Nettoyer l'appareil après chaque utilisation. L'accumulation
quotidienne de résidus de cuisson peut affecter les performances
des plaques du gril.
Les grils/presse-panini Waring
®
Commercial incluent une brosse de
nettoyage (CAC105). Les poils durs de la brosse sont idéaux pour
éliminer les résidus de cuisson des plaques en fonte. La brosse
comprend également un racloir conçu pour nettoyer les plaques,
qu'elles soient plates ou striées.
Nettoyer le boîtier à l'aide d'un linge légèrement humide.
Nettoyer les plaques avant qu'elles n'aient complètement refroidi,
avec de l'eau tiède et du détergent, et en utilisant l'outil de nettoyage
inclus. NE PAS VERSER D'EAU FROIDE SUR LES PLAQUES
CHAUDES.
Retirer le bac de récupération des graisses et le laver avec de l'eau
tiède et du détergent, ou mettre au lave-vaisselle. Laisser sécher
avant de remettre en place.
GARANTIE LIMITÉE D'UN AN
Waring garantit tout nouveaux gril/presse-panini Waring
®
Commercial
contre tout vice de matière ou de fabrication pendant une période
d'un an suivant sa date d’achat, à condition qu’il ait été utilisé
uniquement avec des produits alimentaires, des liquides non-abrasifs
(autres que des détergents) et des semi-liquides non-abrasifs, à
condition que l'appareil n'ait pas été soumis à des charges excédant
sa capacité maximale. Au titre de cette garantie, Waring réparera ou
remplacera toute pièce nous paraissant afcher un vice de matière
ou de fabrication. Pour un service au titre de cette garantie, envoyez
l'appareil, port payé, à l'adresse suivante : Waring Service Center,
314 Ella T. Grasso Ave., Torrington, CT 06790. Cette garantie a) n’est

26
pas valable si l’appareil est endommagé, cassé, détérioré ou s’il
afche un vice ou défaut résultant de l’utilisation, de l’entretien ou
de la réparation par des personnes non autorisées, ou consécutif
à l’usage abusif ou inapproprié, à la surcharge ou à la modication
de l'appareil ; b) ne couvre aucun dommage accessoire ou indirect.
Avertissement:
Brancher cet appareil sur Courant Continu (C.C.) annulera la garantie.
WARING COMMERCIAL
314 Ella T. Grasso Ave.
Torrington, CT 06790

27

©2013 Waring Commercial
314 Ella T. Grasso Avenue
Torrington, CT 06790
www.waringcommercialproducts.com
Printed in China
Impreso en la China
Imprimé en Chine
13WC139154
WFG/WPG/WDG Timer Series IB
IB-11956