ruse and Care Guide
KltchenAld"
FOR THE WAY IT'S MADE."
A Note to You .................. 2
Understanding
DishwasherSafety ............ 3
KnowingYour
Dishwasher'sFeatures...... 5
Operating Your
Dishwasher....................... 7
Loading Your
Dishwasher..................... 15
Cadng forYour
Dishwasher..................... 18
Changklg FrontPanels... 21
SolvingCommon
DishwashingProblems.... 24
Troubleshooting.............. 28
IfYou Need Assistance
orSelvice ....................... 30
Index ............................. 31
Warranty ........................ 32
1-800-422-1230
Call ourConsumer Assistance Center
withquestionsor comments.
KITCHENAID" Undercounter Dishwasher
Model: KUDX23HB
Note to You
Thankyou for buying a KitchenAid®appliance!
KitchenAid appliances have everything you would expect of a superior appliance,
plusthe distinct style and thoughtful details which contribute to the overall look of
your home and your enjoyment of it. To ensure that you enjoy many years of
trouble-free operation, we developed this Use and Care guide. It contains valuable
information concerning how to operate and maintain your new appliance properly
and safely. Please read it carefully.
Also, please complete and mail the enclosed Product Registration Card.
Your safety is important to us.
This guide contains safety symbols and statements. Please pay special attention to these
symbols and follow any instructions given. Here is a brief explanation of the use of each
symbol.
This symbol will help alert you to such
dangers as personal injury, burns, fire,
and electrical shock.
This symbol will help you avoid actions
which could cause product damage
(scratches, dents, etc.) and damage to
your personal property.
Our Consumer Assistance Center telephone number,
1-800-422-1230, istoll-free 24 hours a day.
If you ever have a question concerning your home appliance's operation, or if you need
service, first see "If You Need Assistance or Service" on page 30. Ifyou need further help,
call our toll-free Consumer Assistance Center telephone number for help. When calling, you
will need to know your appliance's complete model number and serial number. You can find
this information on the model and serial number label (see diagram on page 5). Record these
numbers and purchase information below. You willneed this information if you require
service. Keep this book and the sales sliptogether in a safe place for future reference.
NOTE: You must provide proof of purchase or installationdate for in-warranty service.
Model Number Builder/Dealer Name
Serial Number Address
Date Installed Phone
2
nderstanding Dishwasher
Safety
IMPORTANTSAFETYINSTRUCTIONS
To reduce the riskof fire, electrical shock, or injury when using
your dishwasher, follow basic precautions including the following:
• Read all instructionsbefore using the
dishwasher.
• Use your dishwasher only for the uses
described in this manual.
• DISHWASHER MUST BE ELECTRI-
CALLY GROUNDED. Read the Installa-
tion Instructionsfor details.
• When discarding an old dishwasher,
always remove the door to prevent
accidental entrapment or suffocation.
• Use ONLY detergents and rinse agents
recommended for use in a dishwasher.
• Store dishwasher detergent in a cool, dry
place WHERE CHILDREN CAN'T
REACH IT.
When loading items to be washed:
-Load sharp items and knives with the
handles up to reduce risk of cut-type
injuries.
-Locate sharp items and knives so that
they are not likelyto damage the door
seal.
• DO NOT let children play in or on the
dishwasher.
• DO NOT wash plastic items unless
marked "dishwasher safe" or the
equivalent. If not marked, check
manufacturer's recommendations.
• DO NOT reach intothe area below the
bottom rack until the heating element
has cooled for at least 20 minutes.
• DO NOT use your dishwasher unless
all enclosure panels are properly in
place.
• DO NOT siton, stand on, or abuse the
dishwasher door or dishracks.
• DO NOT tamper with controls.
• Ifhot water has not been used recently
(usually two weeks or longer), hydro-
gen gases may build up in the water
heater and the hot water pipes.
HYDROGEN GAS IS EXPLOSIVE. To
prevent injuryor damage, before using
your dishwasher, turn on all hot water
faucets and allow water to runfor
several minutes. This will allow gases
to escape.
Do not smoke or use any open flame
near the faucet while it is open.
• DO NOT store or use gasoline or other
flammable vapors and liquids in the
vicinityof this or any other appliance.
The fumes can create a fire hazard or
explosion.
• Disconnect electrical power to the
dishwasher before attempting
to service.
-SAVE THESEINSTRUCTIONS-
3
+"Understanding Dishwasher Safely
Help us help you
Please:
• Have your dishwasher installed by a
qualified installer.
• Install where dishwasher is protected from
the elements. Protect against possible
rupture of fill valve by freezing. Such
ruptures are not covered by the warranty.
See winter storage information on
page 19.
• Install and level dishwasher on a floor that
will hold the weight, and in an area suitable
for itssize and use.
• Properly connect dishwasher to electricity,
water, and drain.*
• Remove all shipping plugs from hoses and
connectors (such as the cap on the drain
outlet) before installing.*
• Remove all hang tags and temporary
labels.
• Make sure dishwasher is not used by
anyone unable to operate itproperly.
• Properly maintain dishwasher.
See page 18.
* See Installation Instructions for complete
information.
4
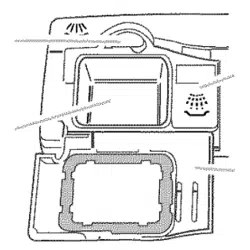
_ owing YourDishwasher's
Features
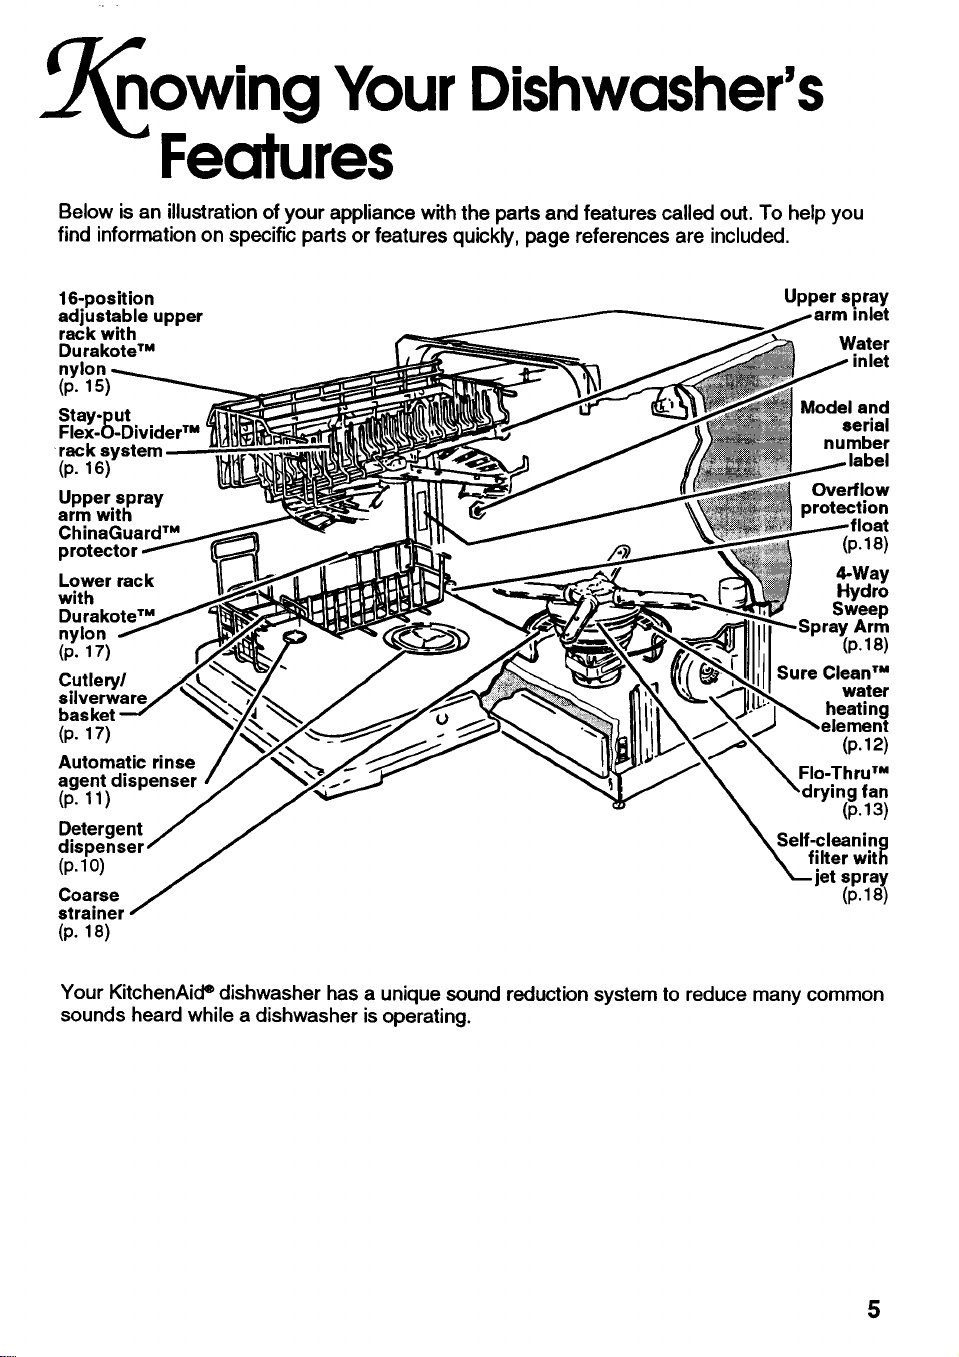
Below is an illustration of your appliance with the parts and features called out. To help you
find information on specific parts or features quickly, page references are included,
16-position Upper spray
adjustable upper inlet
rack with
DurakoteTM Water
nylon inlet
(p. 15)
Stay-put Model end
Flex.O.DividerTM serial
rack number
(p. 16) label
Upper spray Overflow
arm with protection
ChinaGuardTM (p.18)
Lower rack 4-Way
with Hydro
Sweep
nylon Arm
(p. 17) (p.18)
Cutlery/ Sure Clean TM
silverware water
basket heating
(p. 17)
Automatic rinse
agent dispenser
(p. 11)
Detergent
dis
(p,lO)
Coarse
strainer
(p. 18)
(p.12)
FIo-Thru TM
ying fan
(p.13)
Self-cleaning
filter with
jet spray
(p,18)
Your KitchenAide dishwasher has a unique sound reduction system to reduce many common
sounds heard while a dishwasher is operating.
5

_owing Your Dishwasher's Features
Control panel
Door handle
Cycle selectlon dlal
Buttons
6
Option selector buttons
( perating YourDishwasher
This section tells you how to operate the dishwasher. Operating your dishwasher properly
enables you to obtain the best possible results.
IN THIS SECTION
Page
Before starting your dishwasher ...... 7
Starting your dishwasher .................. 7
Cycle selection chart .......................... 8
What happens in each option ............ 9
Adding dishes during a cycle ............ 9
Changing a cycle setting ................... 9
Changing an option .......................... 10
Canceling a cycle ............................. 10
Page
Using the detergent dispenser ........ 10
Using the rinse agent dispenser ..... 11
Sure-Clean" water heating ............... 12
FIo-Thru" drying system ................... 13
Quiet operating tips .......................... 13
Energy saving tips ............................ 13
Tips for washing special items ....... 14
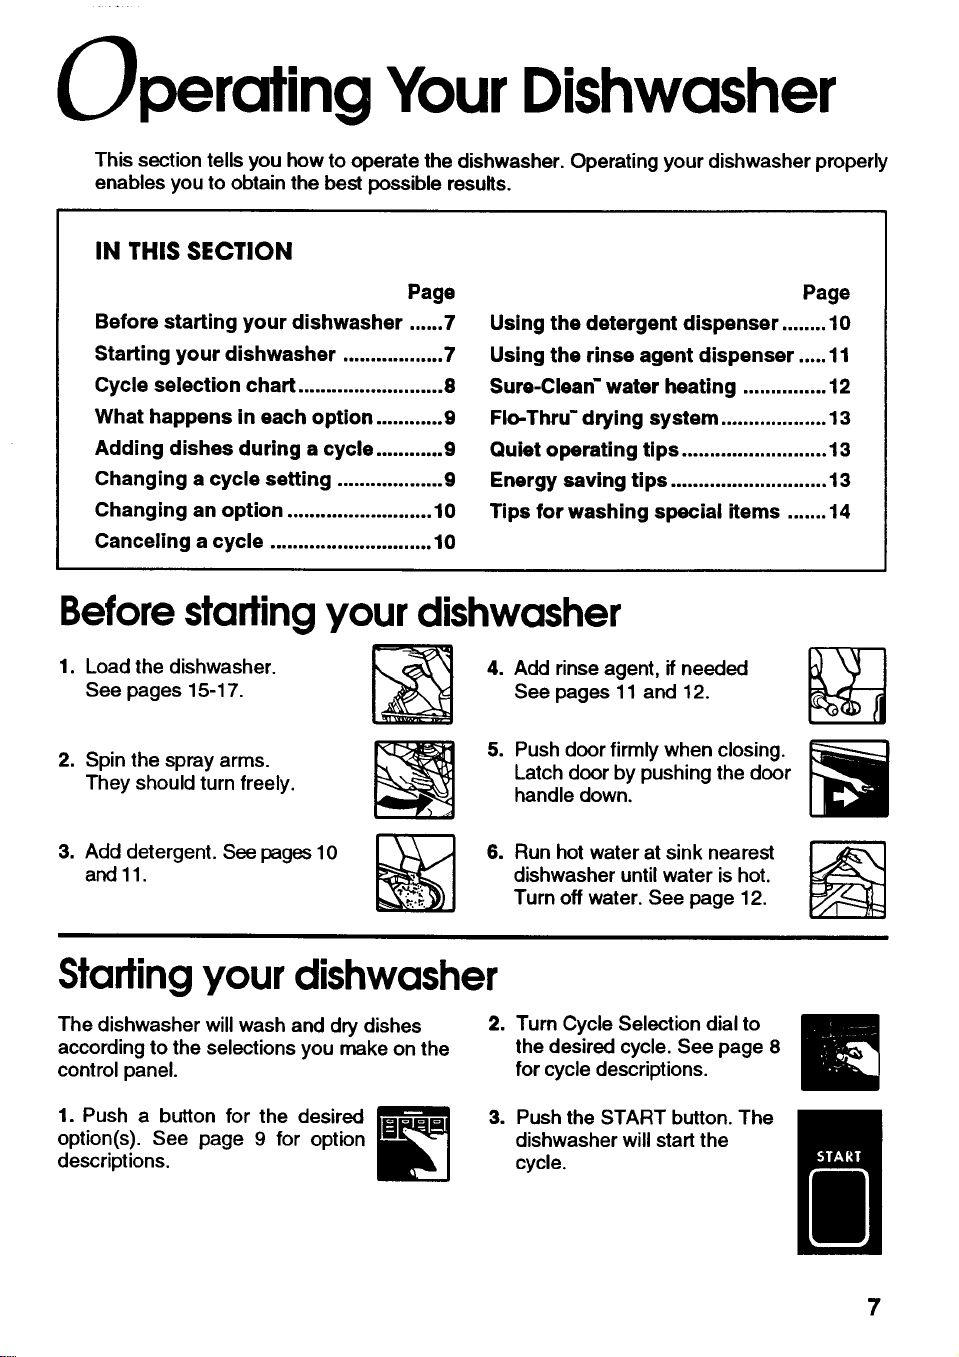
Before starting your dishwasher
1. Load the dishwasher. _,,_ _ 4. Add rinse agent, if needed
See pages 15-17. I_ See pages 11 and 12.
2. Spin the spray arms.
They should turn freely.
3. Add detergent. See pages 10
and 11.
5. Push door firmly when closing.
Latch door by pushing the door
handle down.
6. Run hot water at sink nearest
dishwasher until water ishot.
Turn off water. See page 12.
Starting your dishwasher
The dishwasher will wash and dry dishes
according to the selections you make on the
control panel.
2. Turn Cycle Selection dial to
the desired cycle. See page 8
for cycle descriptions.
1. Push a button for the desired
option(s). See page 9 for option
descriptions.
3. Push the START button. The
dishwasher willstart the
cycle.
7
perafing YourDishwasher
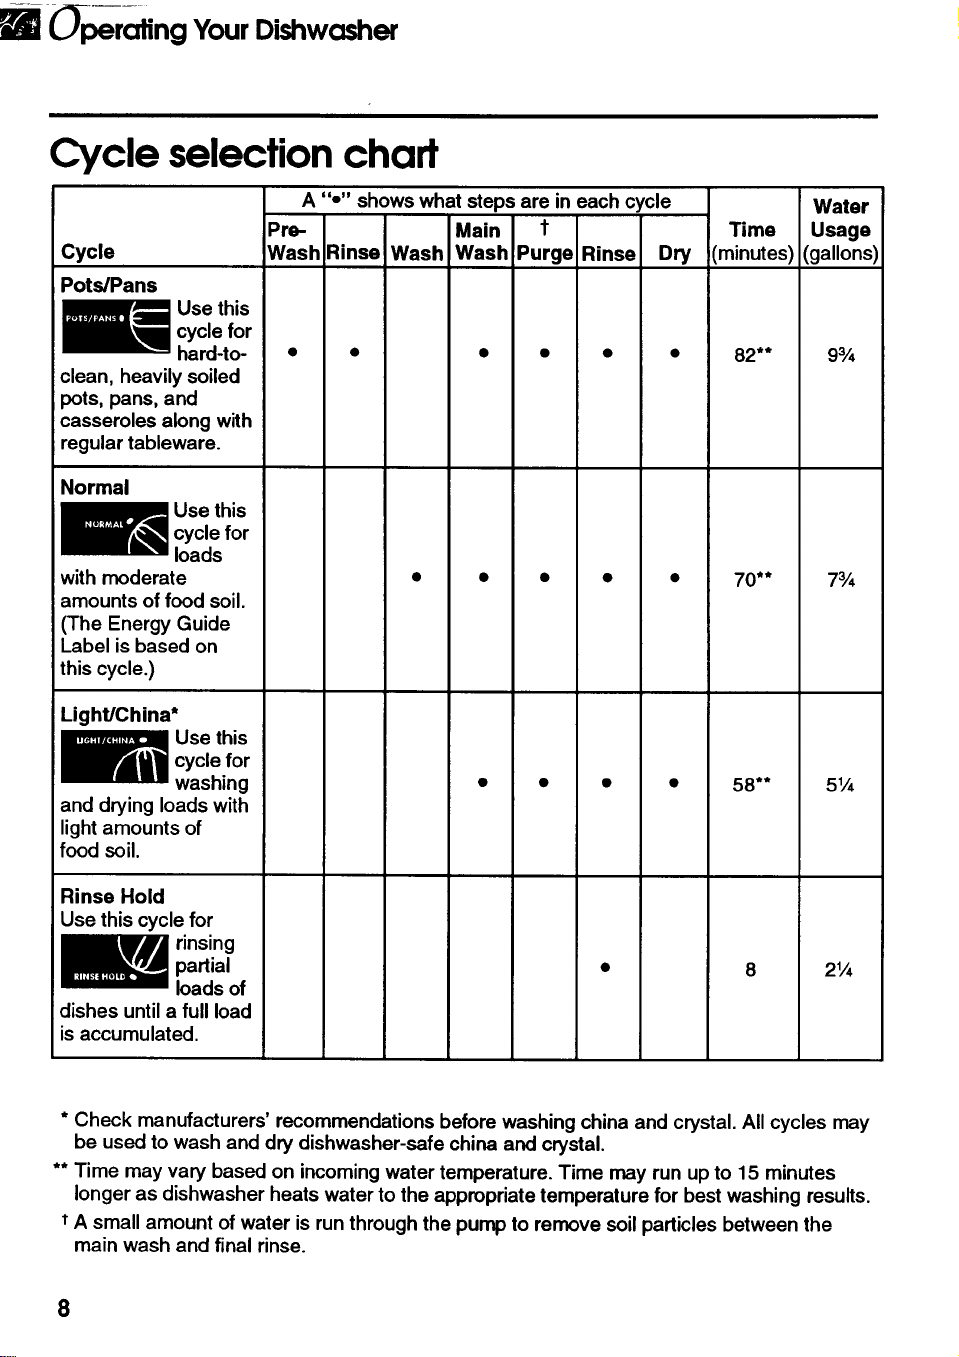
Cycle selection chaff
Cycle
Pots/Pans
A "o" shows what steps are in each cycle Water
Pro- Main t Time Usage
Wash Rinse Wash Wash Purge Rinse Dry (minutes) (gallons)
Use this
cycle for
hard-to-
i clean, heavily soiled
pots, pans, and
casseroles along with
regular tableware.
• • • • • • 82** 9¾
Normal
Use this
1
cycle for
loads
lwith moderate
Iamounts of food soil.
(The Energy Guide
Label is based on
this cycle.)
• • 70** 7¾
Light/China*
Use this
cycle for
washing
and drying loads with
light amounts of
food soil.
58** 5¼
Rinse Hold
Use this cycle for
rinsing
partial
loads of
dishes untila full load
isaccumulated.
2¼
* Check manufacturers' recommendations before washing china and crystal. All cycles may
be used to wash and dry dishwasher-safe china and crystal.
** Time may vary based on incoming water temperature. Time may run up to 15 minutes
longer as dishwasher heats water to the appropriate temperature for best washing results.
t A small amount of water isrun through the pump to remove soilparticles between the
main wash and final rinse.
(_)perating Your Dishwasher
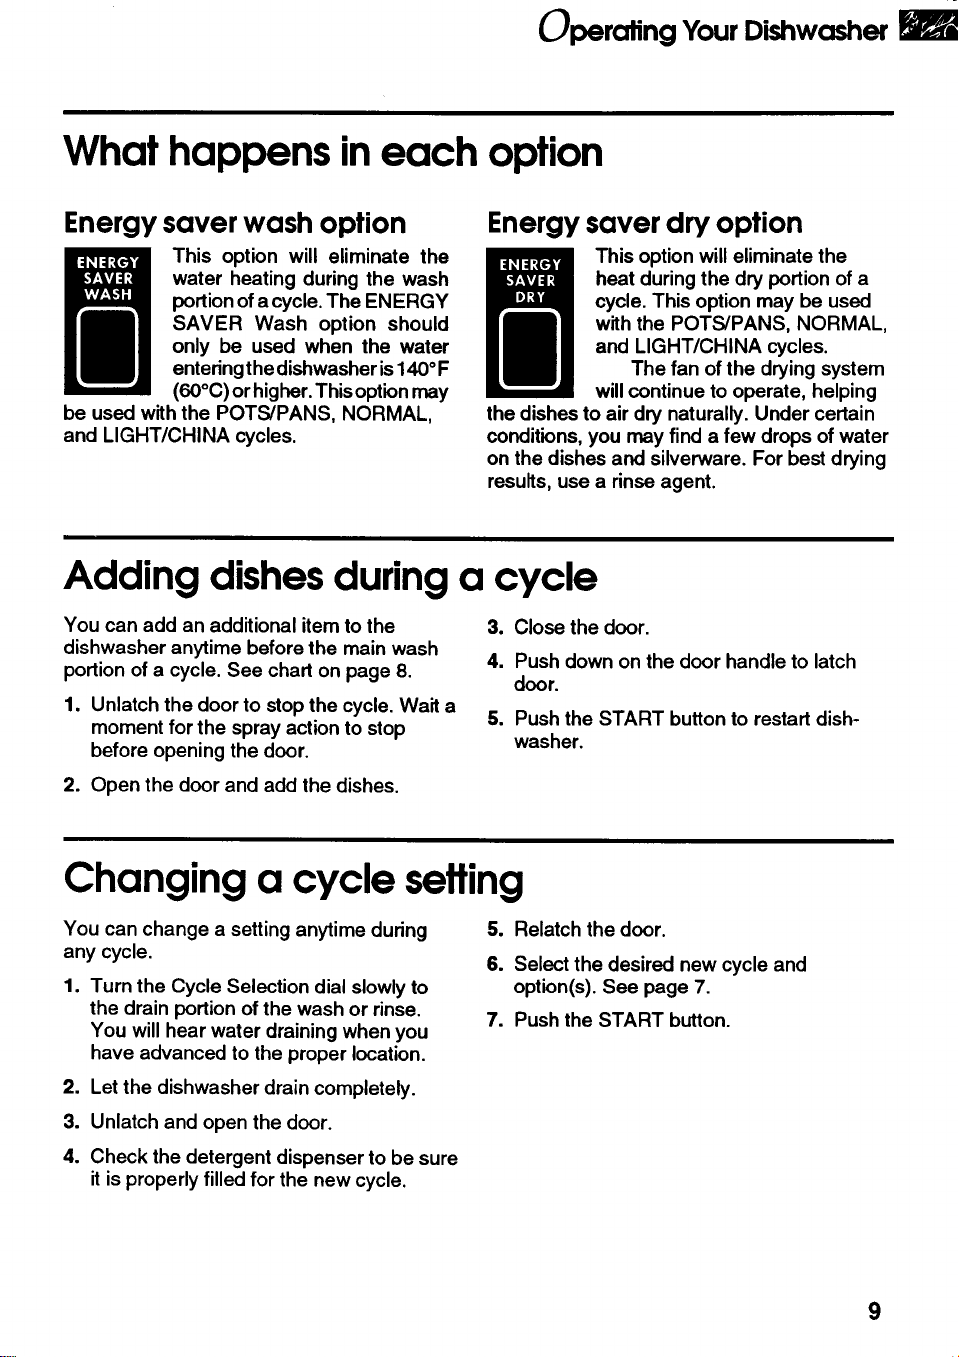
What happens in each option
Energy saver wash option
This option will eliminate the
water heating during the wash
portionofa cycle. The ENERGY
SAVER Wash option should
only be used when the water
enteringthe dishwasheris140°F
(60°C) or higher.Thisoptionmay
be used with the POTS/PANS, NORMAL,
and LIGHT/CHINA cycles.
Energy saver dry option
I his option will eliminate the
heat during the dry portion of a
cycle. This option may be used
with the POTS/PANS, NORMAL,
and LIGHT/CHINA cycles.
The fan ofthe drying system
willcontinue to operate, helping
the dishes to air dry naturally. Under certain
conditions, you may find a few drops of water
on the dishes and silverware. For best drying
results, use a rinse agent.
Adding dishes during a cycle
You can add an additional item to the
dishwasher anytime before the main wash
portion of a cycle. See chart on page 8.
1. Unlatch the door to stop the cycle. Wait a
moment for the spray action to stop
before opening the door.
3. Close the door.
4. Push down on the door handle to latch
door.
5. Push the START button to restart dish-
washer.
2. Open the door and add the dishes.
Changing a cycle setting
You can change a setting anytime during
any cycle.
1. Turn the Cycle Selection dial slowly to
the drain portion of the wash or rinse.
You will hear water draining when you
have advanced to the proper location.
2. Let the dishwasher drain completely.
3. Unlatch and open the door.
5. Relatch the door.
6. Select the desired new cycle and
option(s). See page 7.
7. Push the START button.
4. Check the detergent dispenser to be sure
it is properly filled for the new cycle.
9

(_perating YourDishwasher
Changing an option
You can change an option anytime during a
cycle. To change the selected option(s):
1. Push the OPTION RESET button.
2. Push an Option Selector button for each
desired option.
Canceling a cycle
You can cancel a cycle anytime during the
cycle.
.
Turn the Cycle Selection dial slowly to
the drain portion of the wash or rinse.
You will hear water draining when you
have advanced to the proper location.
2. Let the dishwasher drain completely.
3. Unlatch the door.
4. Advance the Cycle Selection dial to the
OFF position.
The cycle is now canceled.
Usingthe detergent dispenser
What type of detergent to use
• For best results use powdered automatic
dishwasher detergent. Other detergents
are too mild and much too sudsy to work in
the dishwasher.
• Follow manufacturer's directions when
using concentrated dishwasher detergent.
• Do not add detergent until you are ready
to wash.
• Store detergent tightly closed in a cool, dry
place. Fresh automatic dishwasher
detergent is necessary for best washing
results.
NOTE: Different brands of dishwasher
detergent have different amounts of phospho-
rus for softening water. If water is hard and
phosphorus content is low (6.0% or less), you
may need to:
• Use more detergent.
OR
• Use a brand with a higher phosphorus
content (8.7%).
10
See phosphorus
content on
package labels
( peraling Your Dishwasher
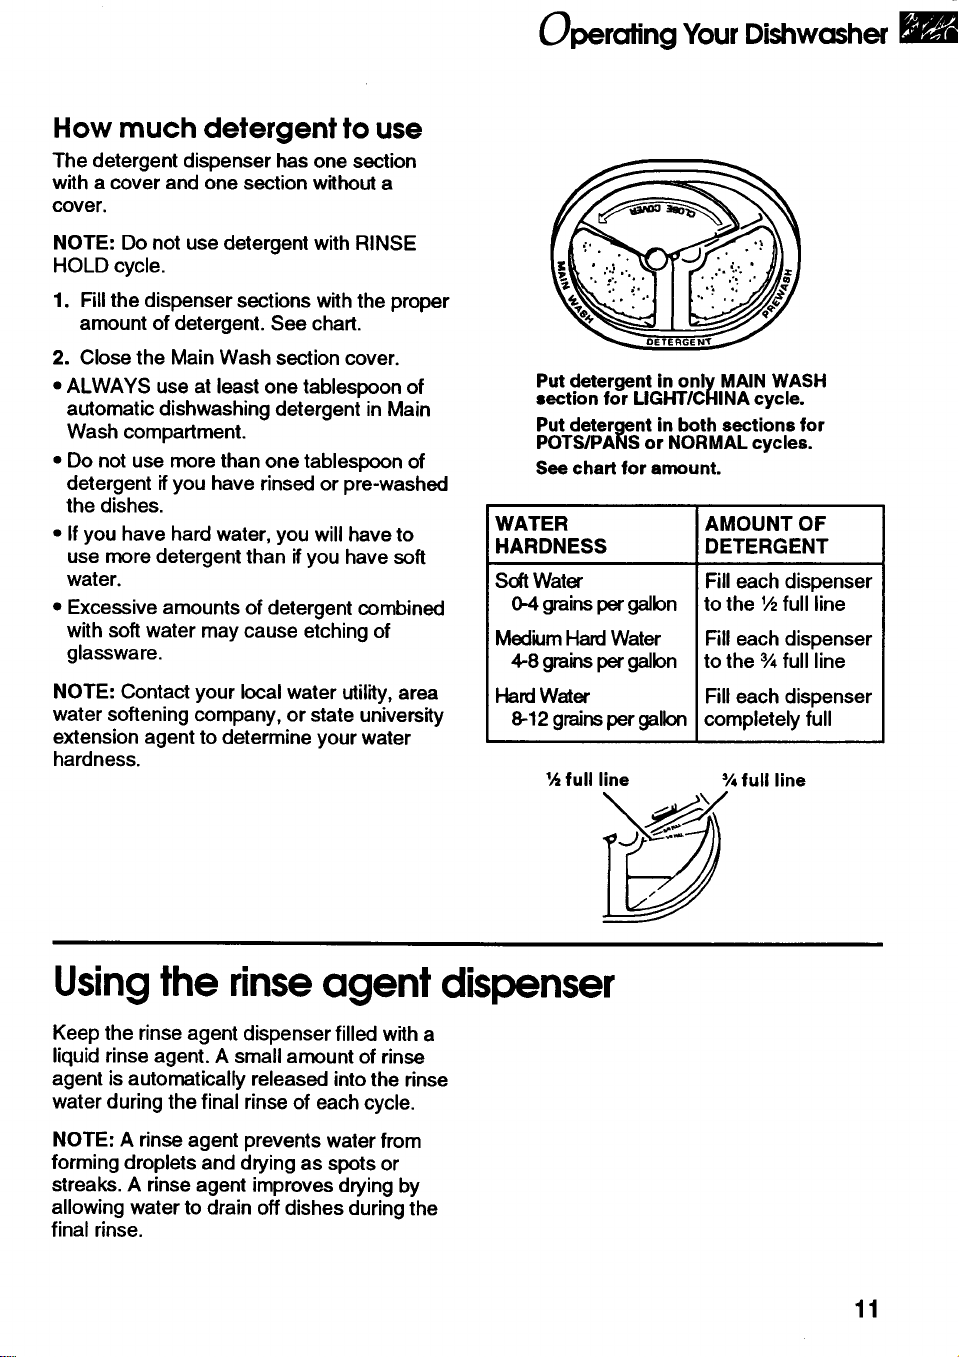
How much detergent to use
The detergent dispenser has one section
with a cover and one section without a
cover.
NOTE: Do not use detergent with RINSE
HOLD cycle.
1. Fill the dispenser sections with the proper
amount of detergent. See chart.
2. Close the Main Wash section cover.
• ALWAYS use at least one tablespoon of
automatic dishwashing detergent in Main
Wash compartment.
• Do not use more than one tablespoon of
detergent ifyou have rinsed or pre-washed
the dishes.
• Ifyou have hard water, you will have to
use more detergent than if you have soft
water.
• Excessive amounts of detergent combined
with softwater may cause etching of
glassware.
NOTE: Contact your local water utility, area
water softening company, or state university
extension agent to determine your water
hardness.
Put detergent in only MAIN WASH
section for LIGHT/CHINA cycle.
Put detergent in both sections for
POTS/PANS or NORMAL cycles.
See chart for amount.
WATER
HARDNESS
SoftWater
0-4 grainspergallon
MediumHard Water
4-8 grainspergallon
HardWater
8-12 grainspergallon
AMOUNT OF
DETERGENT
Fill each dispenser
to the lh full line
Fill each dispenser
to the % full line
Fill each dispenser
completely full
1,_full line % full line
Usingthe rinseagent dispenser
Keep the rinse agent dispenser filled with a
liquid rinse agent. A small amount of rinse
agent is automatically released into the rinse
water during the final rinse of each cycle.
NOTE: A rinse agent prevents water from
forming droplets and drying as spots or
streaks. A rinse agent improves drying by
allowing water to drain off dishes during the
final rinse.
11
Operating Your Did'lwa,.@l
Check the dispenser
For best drying results, remove the dispenser
cap and check the dispenser periodically to see
ifrefilling is needed. You do not have to wait
untilthe dispenser is empty to refill it, but do not
overfill it.
The rinse agent dispenser will hold 7 fluid
ounces of rinse agent. Under normal conditions,
this will last about 3 months.
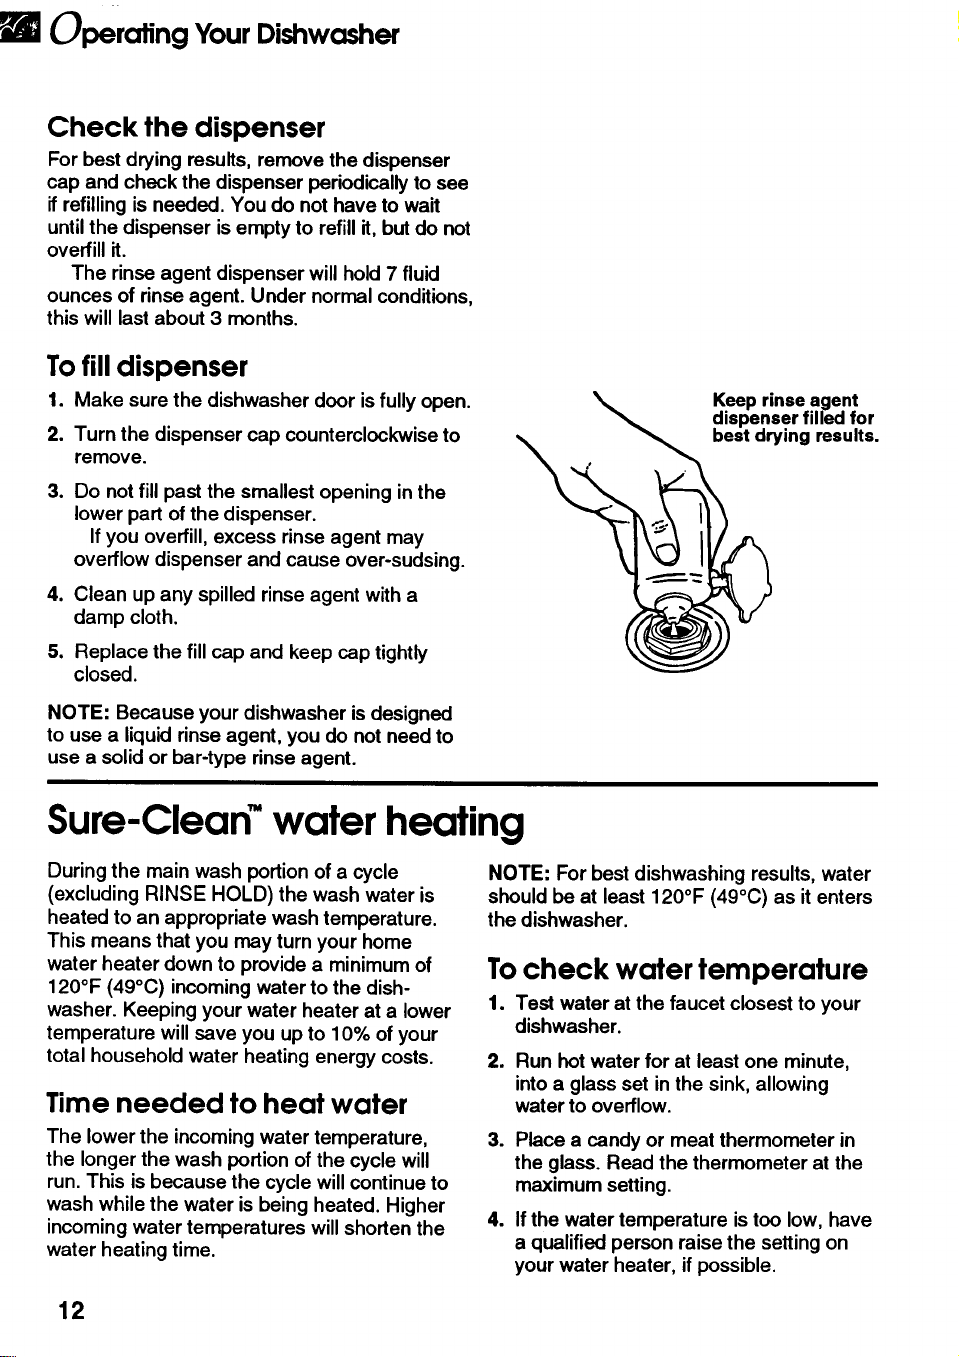
Tofill dispenser
1. Make sure the dishwasher door isfully open.
2. Turn the dispenser cap counterclockwise to
remove.
1
=
Q
Do not fill past the smallest opening in the
lower part of the dispenser.
Ifyou overfill, excess rinse agent may
overflow dispenser and cause over-sudsing.
Clean up any spilled rinse agent with a
damp cloth.
Replace the fillcap and keep cap tightly
closed.
NOTE: Because your dishwasher is designed
to use a liquid rinse agent, you do not need to
use a solid or bar-type rinse agent.
Keep rinse agent
dispenser filled for
_ best drying results.
Sure-Clean TM water heating
During the main wash portion of a cycle
(excluding RINSE HOLD) the wash water is
heated to an appropriate wash temperature.
This means that you may turn your home
water heater down to provide a minimum of
120°F (49°C) incoming water to the dish-
washer. Keeping your water heater at a lower
temperature will save you up to 10% of your
total household water heating energy costs.
Time needed to heat water
The lower the incoming water temperature,
the longer the wash portion of the cycle will
run. This is because the cycle willcontinue to
wash while the water is being heated. Higher
incoming water temperatures will shorten the
water heating time.
NOTE: For best dishwashing results, water
should be at least 120°F (49°C) as it enters
the dishwasher.
Tocheck water temperature
1. Test water at the faucet closest to your
dishwasher.
m
=
°
Run hot water for at least one minute,
into a glass set in the sink, allowing
water to overflow.
Place a candy or meat thermometer in
the glass. Read the thermometer at the
maximum setting.
If the water temperature is too low, have
a qualified person raise the setting on
your water heater, if possible.
12
Operating YourDishwasher
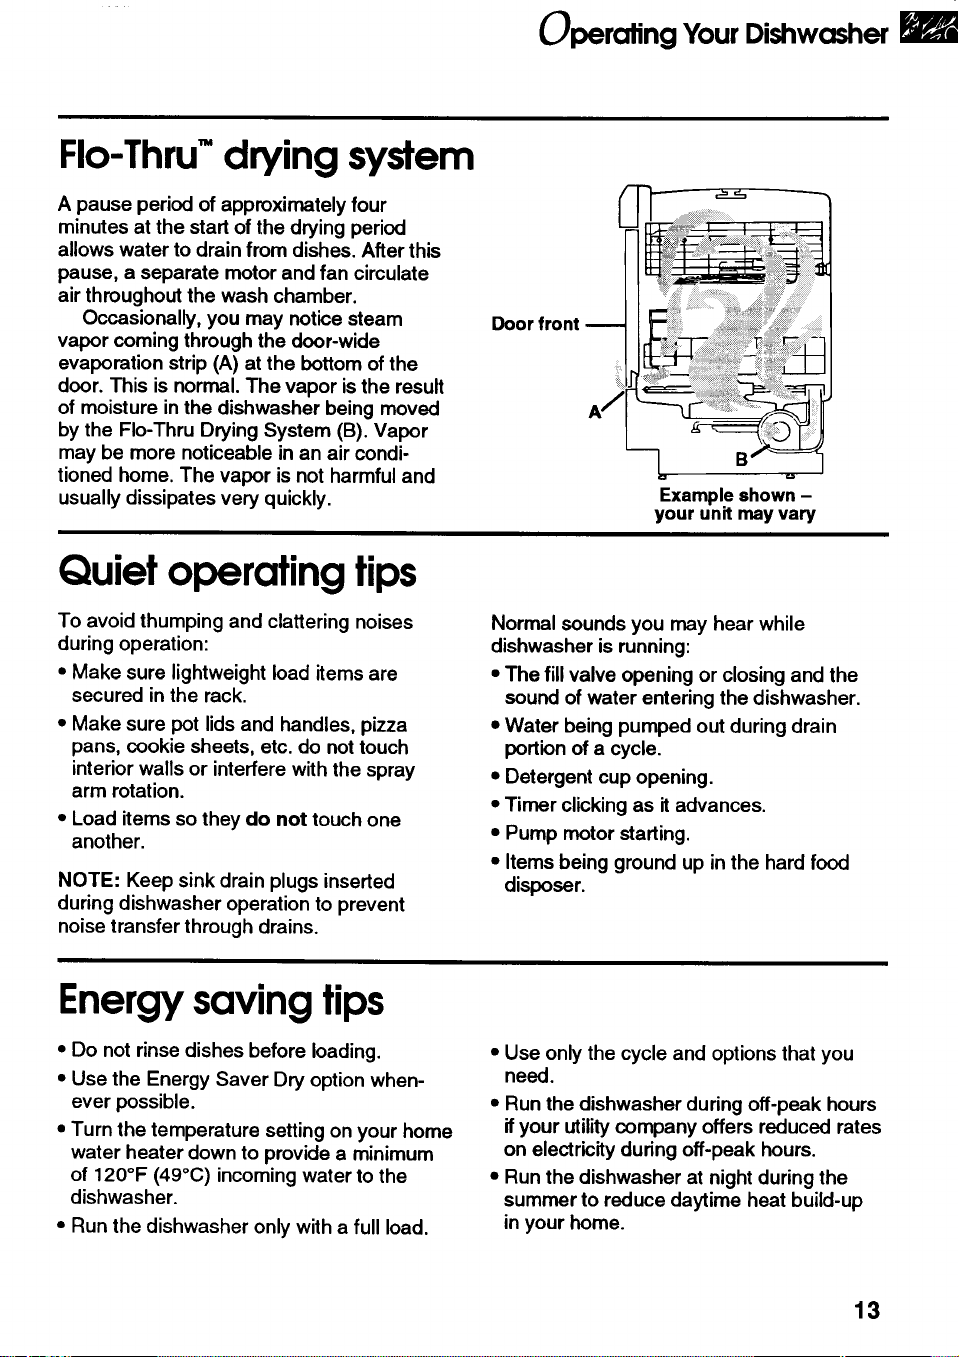
FIo-Thru"drying system
A pause period of approximately four
minutes at the start of the drying period
allows water to drain from dishes. After this
pause, a separate motor and fan circulate
air throughout the wash chamber.
Occasionally, you may notice steam
vapor coming through the door-wide
evaporation strip (A) at the bottom of the
door. This is normal. The vapor isthe result
of moisture inthe dishwasher being moved
by the FIo-Thru Drying System (B). Vapor
may be more noticeable in an air condi-
tioned home. The vapor is not harmful and
usually dissipates very quickly.
Doorfront
iii_iiiii _i_iiiiiiii_i ¸ _! !iiiiiiiiiiiiii
=
Example shown -
your unit may vary
Quiet operating tips
To avoid thumping and clattering noises
during operation:
• Make sure lightweight load items are
secured in the rack.
• Make sure pot lids and handles, pizza
pans, cookie sheets, etc. do not touch
interior walls or interfere with the spray
arm rotation.
• Load items so they do not touch one
another.
NOTE: Keep sink drain plugs inserted
during dishwasher operation to prevent
noise transfer through drains.
Normal sounds you may hear while
dishwasher is running:
• The fill valve opening or closing and the
sound of water entering the dishwasher.
• Water being pumped out during drain
portion of a cycle.
• Detergent cup opening.
• Timer clicking as itadvances.
• Pump motor starting.
• Items being ground up in the hard food
disposer.
Energy saving tips
• Do not rinse dishes before loading.
• Use the Energy Saver Dry option when-
ever possible.
• Turn the temperature setting on your home
water heater down to provide a minimum
of 120°F (49°C) incoming water to the
dishwasher.
• Run the dishwasher only with a full load.
Use only the cycle and options that you
need.
• Run the dishwasher during off-peak hours
ifyour utility company offers reduced rates
on electricity during off-peak hours.
• Run the dishwasher at night during the
summer to reduce daytime heat build-up
in your home.
13
Operoting YourDishwasher
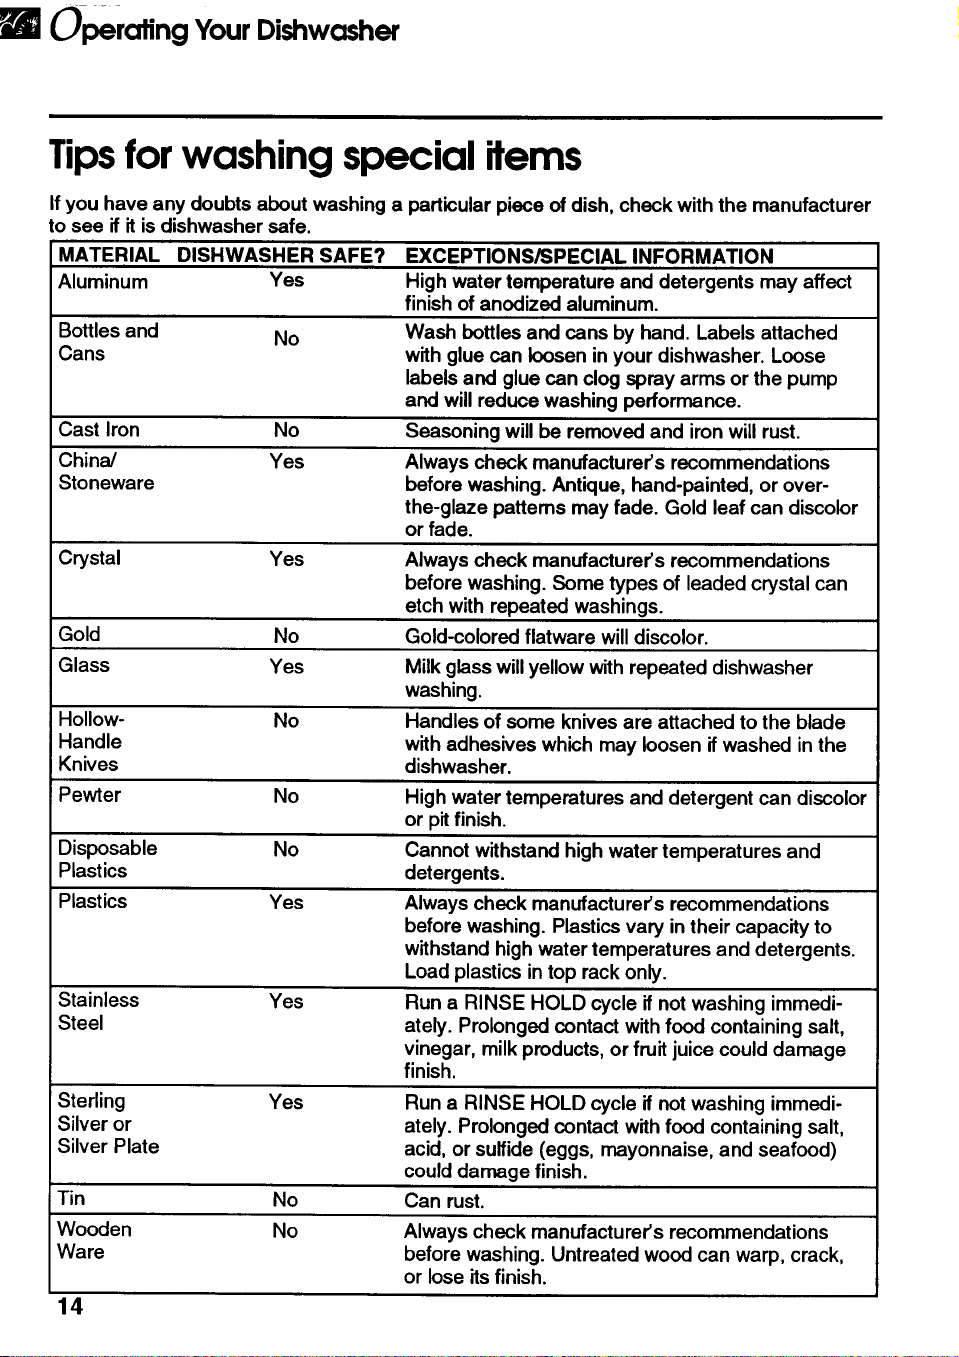
Tipsfor washing special items
Ifyou have any doubts about washing a particular piece of dish, check with the manufacturer
to see if itis dishwasher safe.
MATERIAL DISHWASHER SAFE? EXCEPTIONS/SPECIAL INFORMATION
Aluminum Yes High water temperature and detergents may affect
finish of anodized aluminum.
Bottles and No Wash bottles and cans by hand. Labels attached
Cans with glue can loosen in your dishwasher. Loose
labels and glue can clog spray arms or the pump
and willreduce washing performance.
Cast Iron No Seasoning will be removed and iron willrust.
China/ Yes Always check manufacturer's recommendations
Stoneware before washing. Antique, hand-painted, or over-
the-glaze patterns may fade. Gold leaf can discolor
or fade.
Crystal Yes Always check manufacturer's recommendations
before washing. Some types of leaded crystal can
etch with repeated washings.
Gold No Gold-colored flatware willdiscolor.
Glass Yes Milk glass will yellow with repeated dishwasher
washing.
Hollow- No Handles of some knives are attached to the blade
Handle with adhesives which may loosen if washed in the
Knives dishwasher.
Pewter No High water temperatures and detergent can discolor
or pit finish.
Disposable No Cannot withstand high water temperatures and
Plastics detergents.
Plastics Yes Always check manufacturer's recommendations
before washing. Plastics vary in their capacity to
withstand high water temperatures and detergents.
Load plastics in top rack only.
Stainless Yes Run a RINSE HOLD cycle if not washing immedi-
Steel ately. Prolonged contact with food containing salt,
vinegar, milk products, or fruit juice could damage
finish.
Sterling Yes Run a RINSE HOLD cycle if not washing immedi-
Silver or ately. Prolonged contact with food containing salt,
Silver Plate acid, or sulfide (eggs, mayonnaise, and seafood)
could damage finish.
Tin No Can rust.
Wooden No Always check manufacturer's recommendations
Ware before washing. Untreated wood can warp, crack,
or lose its finish.
14
. _. oading YourDishwasher
This section tells you how to properly load your dishwasher for the best washing and
rinsing results.
IN THIS SECTION
Page
Preparing to load the
dishwasher ........................................ 15
Loading the upper rack .................... 15
Adjusting the upper rack ................ 16
Page
Using Flex-O-Divider"
rack system ....................................... 16
Loading the lower rack .................... 17
Loading the silverware basket ........ 17
Preparing to load the dishwasher
• To save water and energy, do not rinse
dishes before putting them intothe
dishwasher.
• Scrape leftover food, bones, toothpicks,
and other hard itemsfrom dishes.
• Foods like eggs, rice, pasta, spinach, and
cooked cereals may be hard to remove if
they are left to dry over a period of time.
Run a RINSE HOLD cycle to keep
dishes moist if you do not plan to wash
them soon.
• Load dishes so soiled surfaces face the
rotating wash arm.
• Load dishes so they are not stacked or
overlapping, ifpossible. It is important
for the water spray to reach all soiled
surfaces. For best drying, water must be
able to drain from all surfaces.
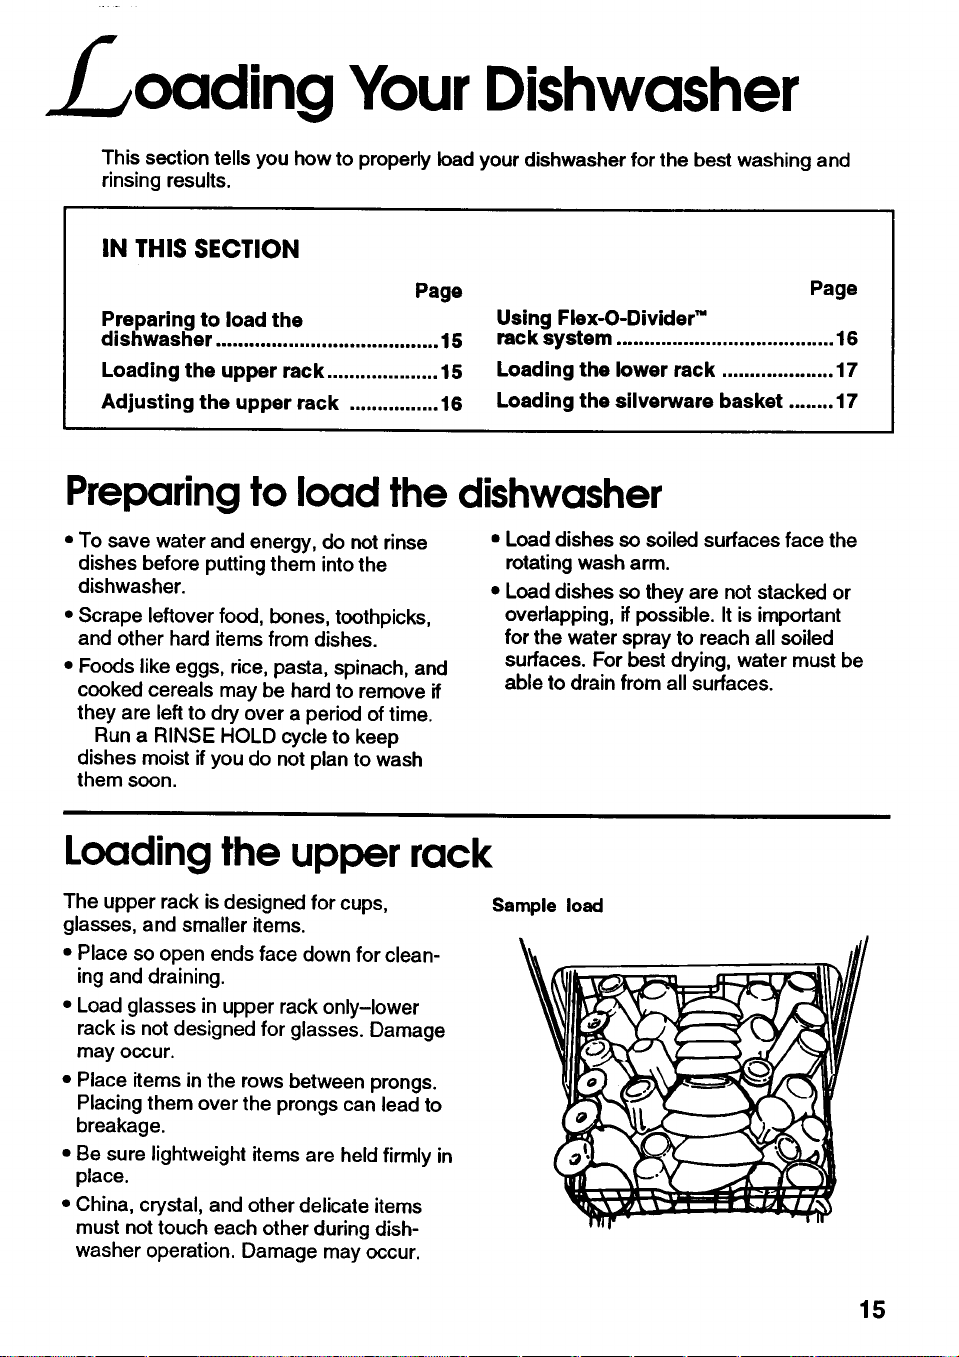
Loading the upper rack
The upper rack is designed for cups,
glasses, and smaller items.
• Place so open ends face down for clean-
ing and draining.
• Load glasses in upper rack only-lower
rack is not designed for glasses. Damage
may occur.
• Place items in the rows between prongs.
Placing them over the prongs can lead to
breakage.
• Be sure lightweight items are held firmly in
place.
• China, crystal, and other delicate items
must not touch each other during dish-
washer operation. Damage may occur.
Sample load
15
. : ding Your Dishwasher
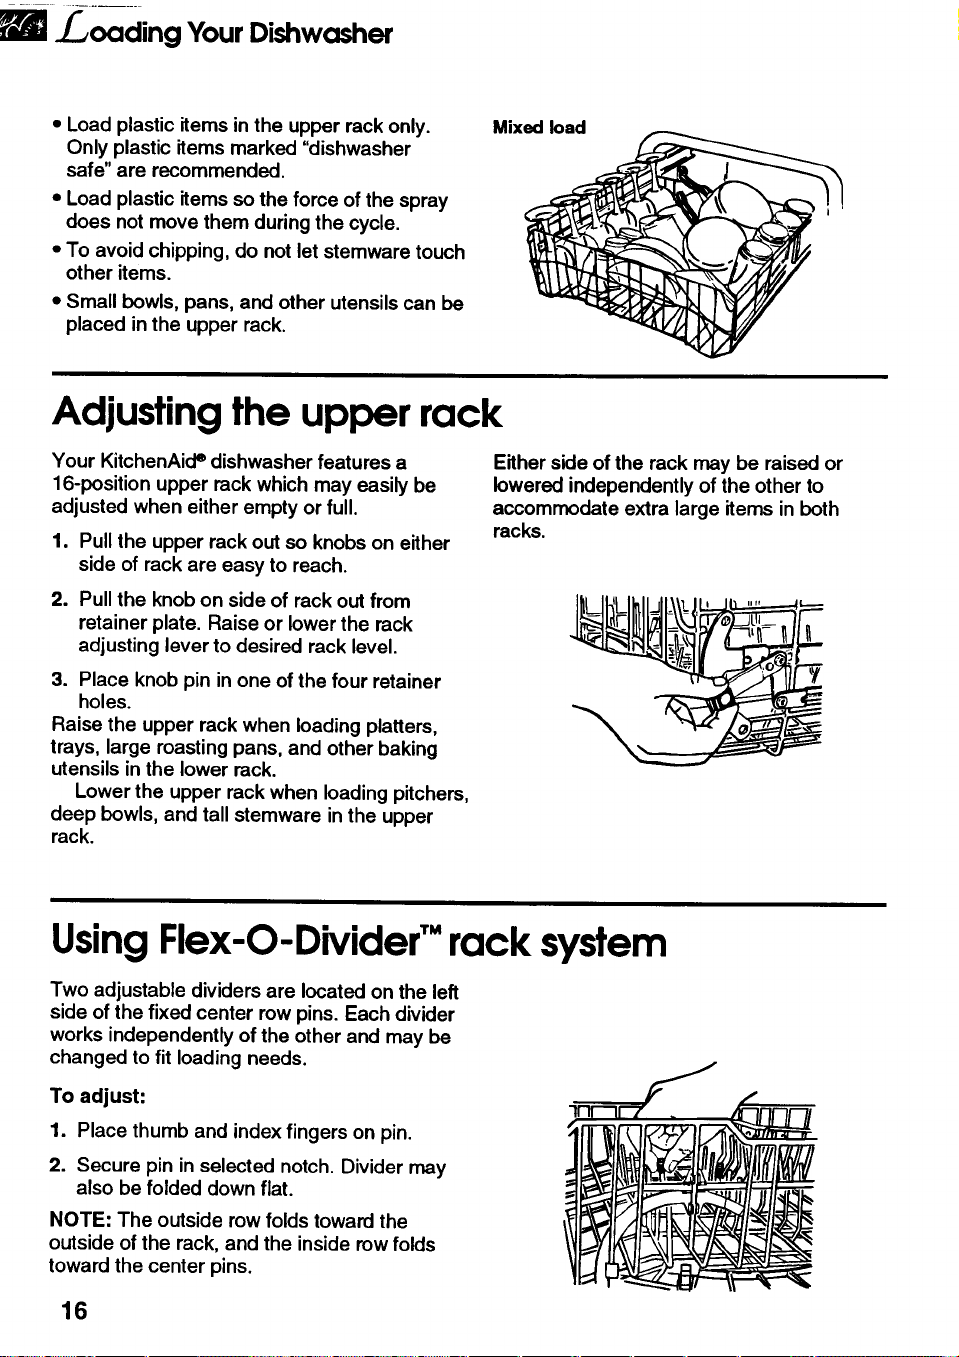
Load plastic items in the upper rack only.
Only plastic items marked "dishwasher
safe" are recommended.
* Load plastic items so the force of the spray
does not move them during the cycle.
• To avoid chipping, do not let stemware touch
other items.
Small bowls, pans, and other utensils can be
placed in the upper rack.
Mixed load
Adjusting the upper rack
Your KitchenAicP dishwasher features a
16-position upper rack which may easily be
adjusted when either empty or full.
1. Pullthe upper rack out so knobs on either
side of rack are easy to reach.
2. Pull the knob on side of rack out from
retainer plate. Raise or lower the rack
adjusting lever to desired rack level.
3. Place knob pin in one of the four retainer
holes.
Raise the upper rack when loading platters,
trays, large roasting pans, and other baking
utensils in the lower rack.
Lower the upper rack when loading pitchers,
deep bowls, and tall stemware in the upper
rack.
Either side of the rack may be raised or
lowered independently of the other to
accommodate extra large items in both
racks.
¥
Using Flex-O-Divider" rack system
Two adjustable dividers are located on the left
side of the fixed center row pins. Each divider
works independently of the other and may be
changed to fit loading needs.
To adjust:
1. Place thumb and index fingers on pin.
2. Secure pin in selected notch. Divider may
also be folded down flat.
NOTE: The outside row folds toward the
outside of the rack, and the inside row folds
toward the center pins.
16
. oading YourDishwasher
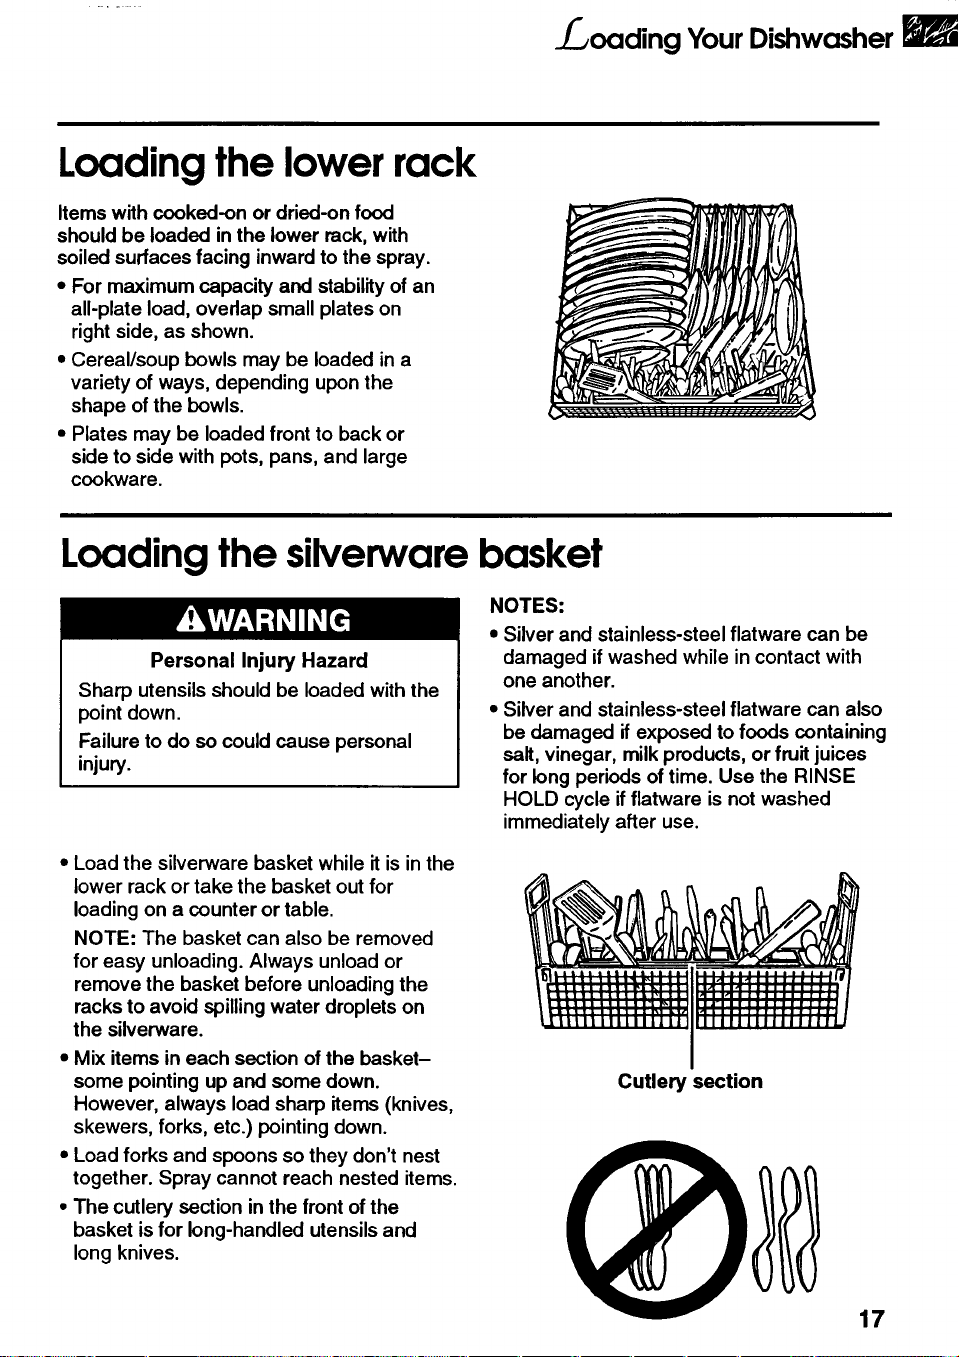
Loading the lower rack
Items with cooked-on or dried-on food
should be loaded in the lower rack, with
soiled surfaces facing inward to the spray.
• For maximum capacity and stability of an
all-plate load, ovedap small plates on
right side, as shown.
• Cereal/soup bowls may be loaded in a
variety of ways, depending upon the
shape of the bowls.
• Plates may be loaded front to back or
side to side with pots, pans, and large
cookware.
Loading the silverware basket
Personal Injury Hazard
Sharp utensils should be loaded with the
point down.
Failure to do so could cause personal
injury.
NOTES:
• Silver and stainless-steel flatware can be
damaged ifwashed while in contact with
one another.
• Silver and stainless-steel flatware can also
be damaged ifexposed to foods containing
salt, vinegar, milk products, or fruit juices
for long periods of time. Use the RINSE
HOLD cycle if flatware is not washed
immediately after use.
• Load the silverware basket while it is inthe
lower rack or take the basket out for
loading on a counter or table.
NOTE: The basket can also be removed
for easy unloading. Always unload or
remove the basket before unloading the
racks to avoid spilling water droplets on
the silverware.
• Mix items in each section of the basket-
some pointing up and some down.
However, always load sharp items (knives,
skewers, forks, etc.) pointing down.
• Load forks and spoons so they don't nest
together. Spray cannot reach nested items.
• The cutlery section in the front of the
basket isfor long-handled utensils and
long knives.
Cutlery section
17
Caring forYourDishwasher
Your new dishwasher is designed to give you many years of dependable service. How-
ever, there are a few things you are expected to do in order to maintain your dishwasher
properly. This section tells you how to clean and care for your dishwasher.
IN THIS SECTION
Page
Sure-Scrub" wash system ............... 18
Overflow protection float ................. 18
Cleaning your dishwasher ............... 19
Page
Storing your dishwasher ................. 19
The drain air gap ............................... 20
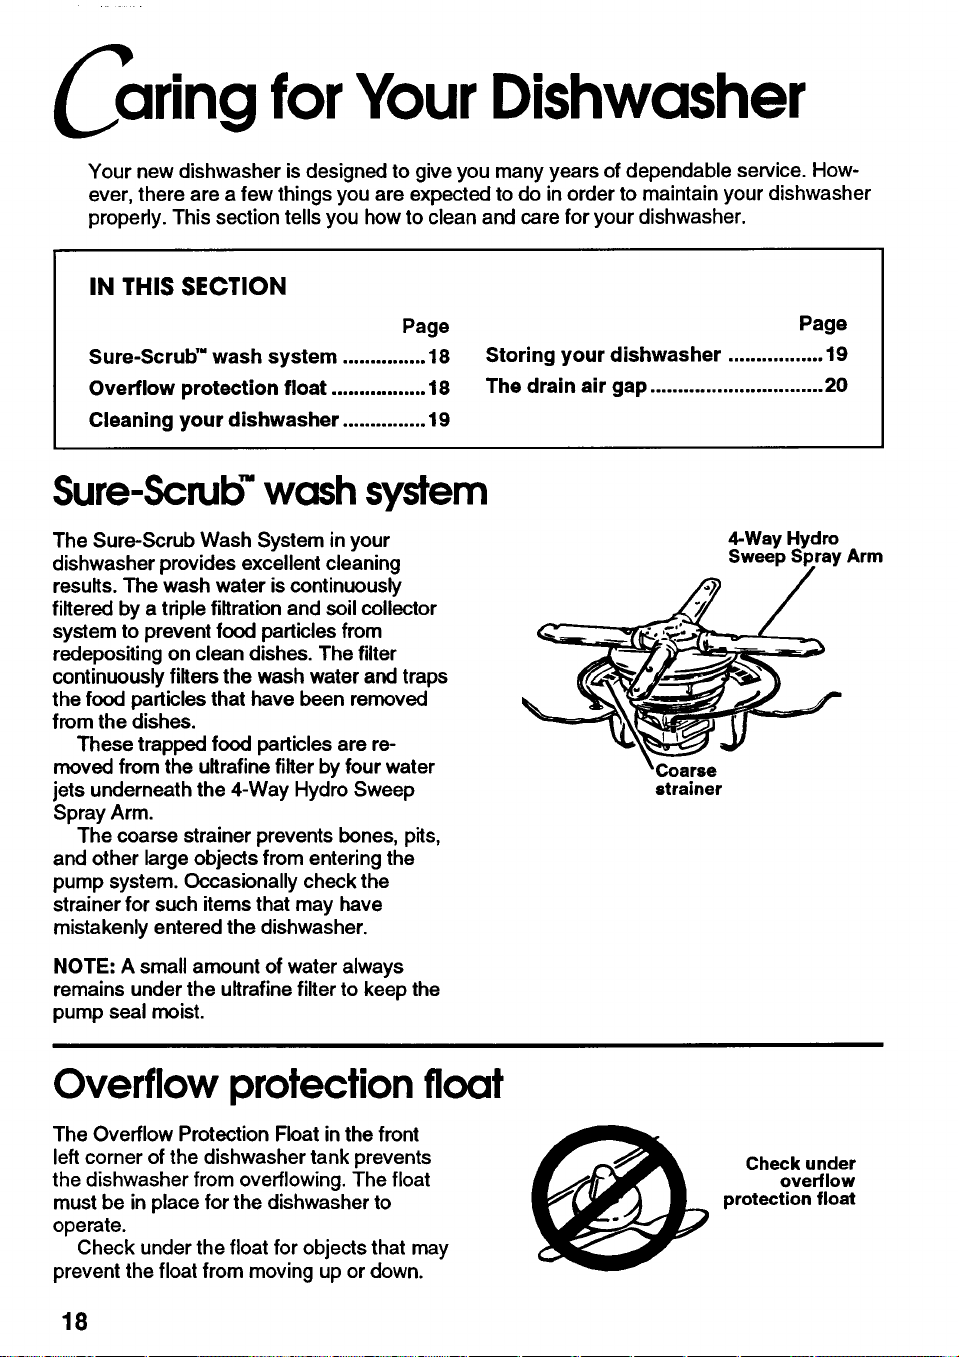
Sure-Scrub"wash system
The Sure-Scrub Wash System in your
dishwasher provides excellent cleaning
results. The wash water iscontinuously
filtered by a triple filtration and soil collector
system to prevent food particles from
redepositing on clean dishes. The filter
continuously filters the wash water and traps
the food particles that have been removed
from the dishes.
These trapped food particles are re-
moved from the ultrafine filter by four water
jets underneath the 4-Way Hydro Sweep
Spray Arm.
The coarse strainer prevents bones, pits,
and other large objects from entering the
pump system. Occasionally check the
strainer for such items that may have
mistakenly entered the dishwasher.
NOTE: A small amount of water always
remains under the ultrafine filter to keep the
pump seal moist.
strainer
Arm
Overflow protection float
The Overflow Protection Float in the front
left corner of the dishwasher tank prevents
the dishwasher from overflowing. The float
must be in place for the dishwasher to
operate.
Check under the float for objects that may
prevent the float from moving up or down.
Check under
overflow
protection float
18
Caring for YourDishwasher
Cleaning your dishwasher
Cleaning the interior
The porcelain enamel interior of your
dishwasher will seldom need cleaning.
However, if mineral deposits from hard
water accumulate, clean the interior with a
mild scouring powder or follow the sugges-
tions indicated in the "Removing spots and
film"section on page 27.
DO NOT USE any type of cleanser that
may cause foaming or sudsing. USE
cleansers made for stainlese-steel products.
Wipe door seal regularly with a damp
cloth to remove food residue.
NOTE: Run the dishwasher through a
normal cycle with detergent after cleaning
the interior.
Cleaning the exterior
Wipe the control panel with a damp cloth,
then dry. Never use abrasive detergents or
powdered cleansers which may scratch the
finish.
Clean the front and sides with a soft cloth
and a mild, nonabrasive soap and water
solution. Dry with a soft cloth.
Storingyour dishwasher
Storing for the winter
Property Damage Hazard I
Protect dishwasher and water lines I
against freezing.
Fai ure to do so can cause water damage. I
To safeguard your KitchenAid e dishwasher
when it is exposed to freezing temperatures
in a seasonal dwelling, refer to the Installa-
tion Instructions and have a qualified person
do the following:
1. Close and latch the door.
2. Turn off electrical power supply to the
dishwasher.
3. Shut off water supply. Place pan under
fill valve and disconnect fill valve at both
inlet and outlet sides. Drain water into pan.
=
Place a pan under the check valve outlet,
and disconnect the flexible tubing at the
check valve. Drain machine water into pan.
Leave fill and check valve disconnected.
To restore service, reconnect the fill valve and
the flexible tubing at the check valve. Turn on
the electrical power supply and the water
supply. Close and latch the door. Select the
NORMAL cycle and letthe machine complete
the cycle. Check connections to make sure
they are water tight and do not leak.
19
Caring for Your Dishwasher
Storing for the summer
Two simple steps will safeguard your
KitchenAid®dishwasher during an idle
summer:
1. Turn off the water supply.
2. Turn off the electrical power supply to the
dishwasher.
The drain air gap
Check the drain air gap
anytime your dishwasher
isn't draining well.
Some state or local plumbing codes require
the addition of a drain air gap between a
built-in dishwasher and the home drain
system. This device protects your dish-
washer against water backing up into it
when a drain clogs.
The drain air gap is usually located on
top of the sink or countertop near the
dishwasher. To order drain air gap acces-
sory part number 300096, contact your local
KitchenAid dealer or call 1-800-422-1230.
NOTE: The drain air gap is an external
plumbing device that is not part of your
KitchenAid dishwasher. The warranty
provided with your dishwasher does not
cover service costs directly associated with
the cleaning or repair of the external drain
air gap.
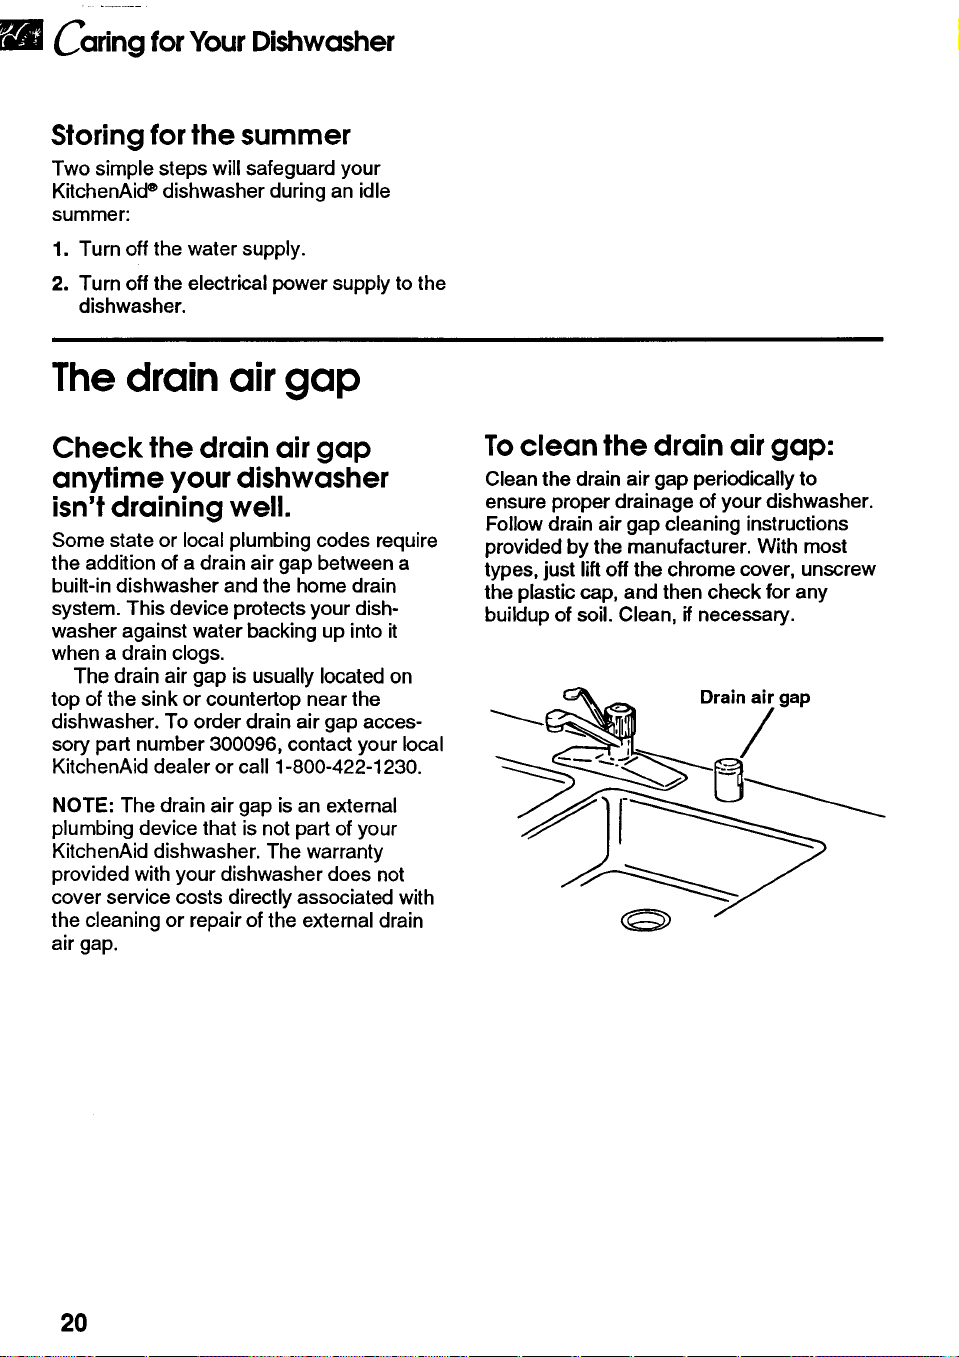
Toclean the drain air gap:
Clean the drain air gap periodically to
ensure proper drainage of your dishwasher.
Follow drain air gap cleaning instructions
provided by the manufacturer. With most
types, just liftoff the chrome cover, unscrew
the plastic cap, and then check for any
buildup of soil. Clean, ifnecessary.
Drain air gap
/
20
anging FrontPanels
Your new KitchenAide dishwasher comes with a reversible front panel. You may choose
from black or white (front and back of panel) or build a custom panel. See "Optional front
panels" on page 23 ifyou want to use custom front panels.
IN THIS SECTION
Page
Changing the front panels ............... 21
L
Page
Optional front panels ....................... 23
Changing the front panels
Personal Injury Hazard
Wear gloves and handle panels carefully.
Failure to do so can result in cuts to hands
or other parts of your body.
If you want to change the color of the panels,
follow one of the options below:
OPTION A
Use these directions when dishwasher
front protrudes several inches from the
cabinets.
Upper Panel:
1. Disconnect electrical power supply.
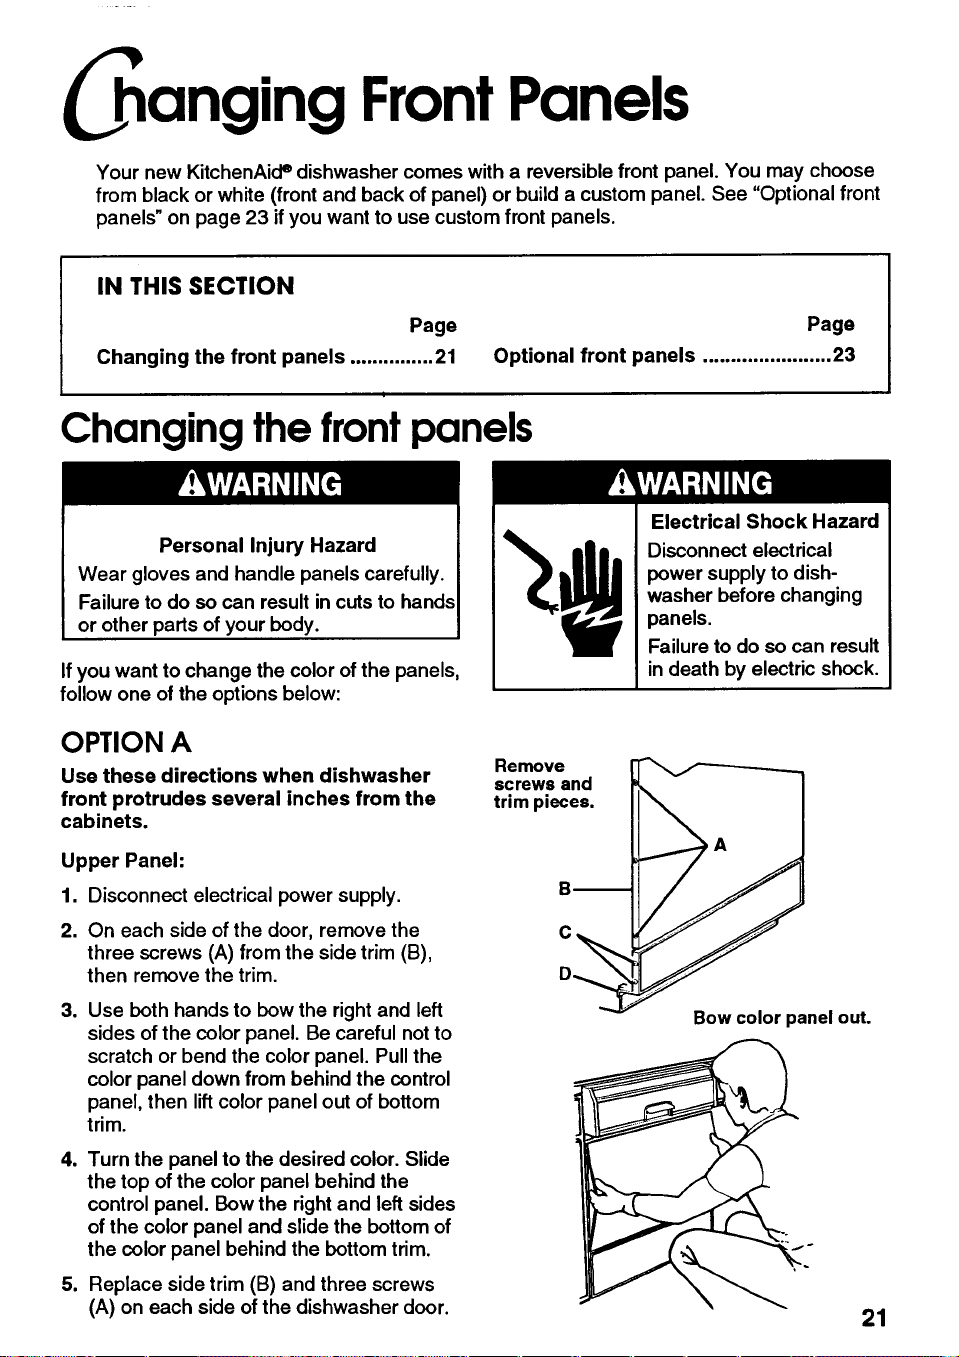
2. On each side of the door, remove the
three screws (A) from the side trim (B),
then remove the trim.
e
Use both hands to bow the right and left
sides of the color panel. Be careful notto
scratch or bend the color panel. Pull the
color panel down from behind the control
panel, then lift color panel out of bottom
trim.
4. Turn the panel to the desired color. Slide
the top of the color panel behind the
control panel. Bow the right and left sides
of the color panel and slide the bottom of
the color panel behind the bottom trim.
5. Replace side trim (B) and three screws
(A) on each side of the dishwasher door.
Electrical Shock Hazard
Disconnect electrical
power supply to dish-
washer before changing
panels.
Failure to do so can result
in death by electric shock.
Remove
screws and
trim pieces.
B A
/
C j .
D
Bow color panel out.
21
Changing Front Panels
Lower Panel:
=
With the door closed, remove the two
screws (C) on either side of the lower
panel. Remove the loosened piece of
trim (D).
.
Slide the color panel out. Handle the panel
carefully to avoid scratching or bending the
panel. Turn the panel to the desired color.
Slide the color panel in position.
3. Replace trim (D) and two screws (C).
4. Reconnect electrical power supply.
OPTION B
Use these directions when the dish-
washer front is flush with the cabinets.
Upper Panel:
1. Disconnect electrical power supply.
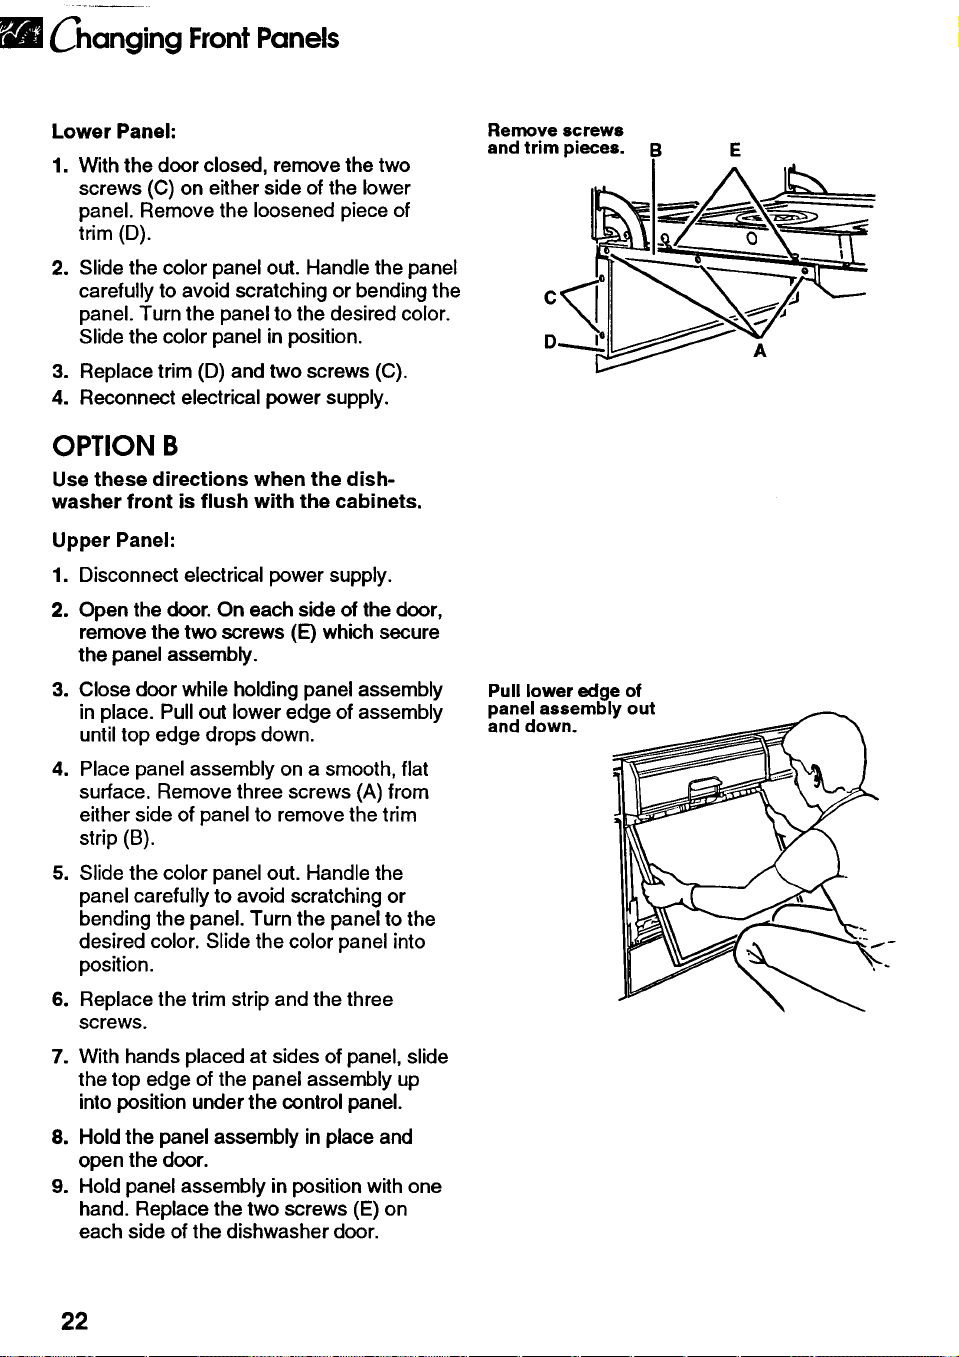
2. Open the door. On each side of the door,
remove the two screws (E) which secure
the panel assembly.
:3. Close door while holdingpanel assembly
in place. Pull out lower edge of assembly
untiltop edge drops down.
o
Place panel assembly on a smooth, flat
surface. Remove three screws (A) from
either side of panel to remove the trim
strip (B).
=
Slide the color panel out. Handle the
panel carefully to avoid scratching or
bending the panel. Turn the panel to the
desired color. Slide the color panel into
position.
6. Replace the trim strip and the three
screws.
.
With hands placed at sides of panel, slide
the top edge of the panel assembly up
into position under the control panel.
8. Hold the panel assembly in place and
open the door.
9. Hold panel assembly in position with one
hand. Replace the two screws (E) on
each side of the dishwasher door.
Remove screws
and trim pieces.
Pull lower edge of
panel assembly out
and down.
A
22
Changing FrontPanels
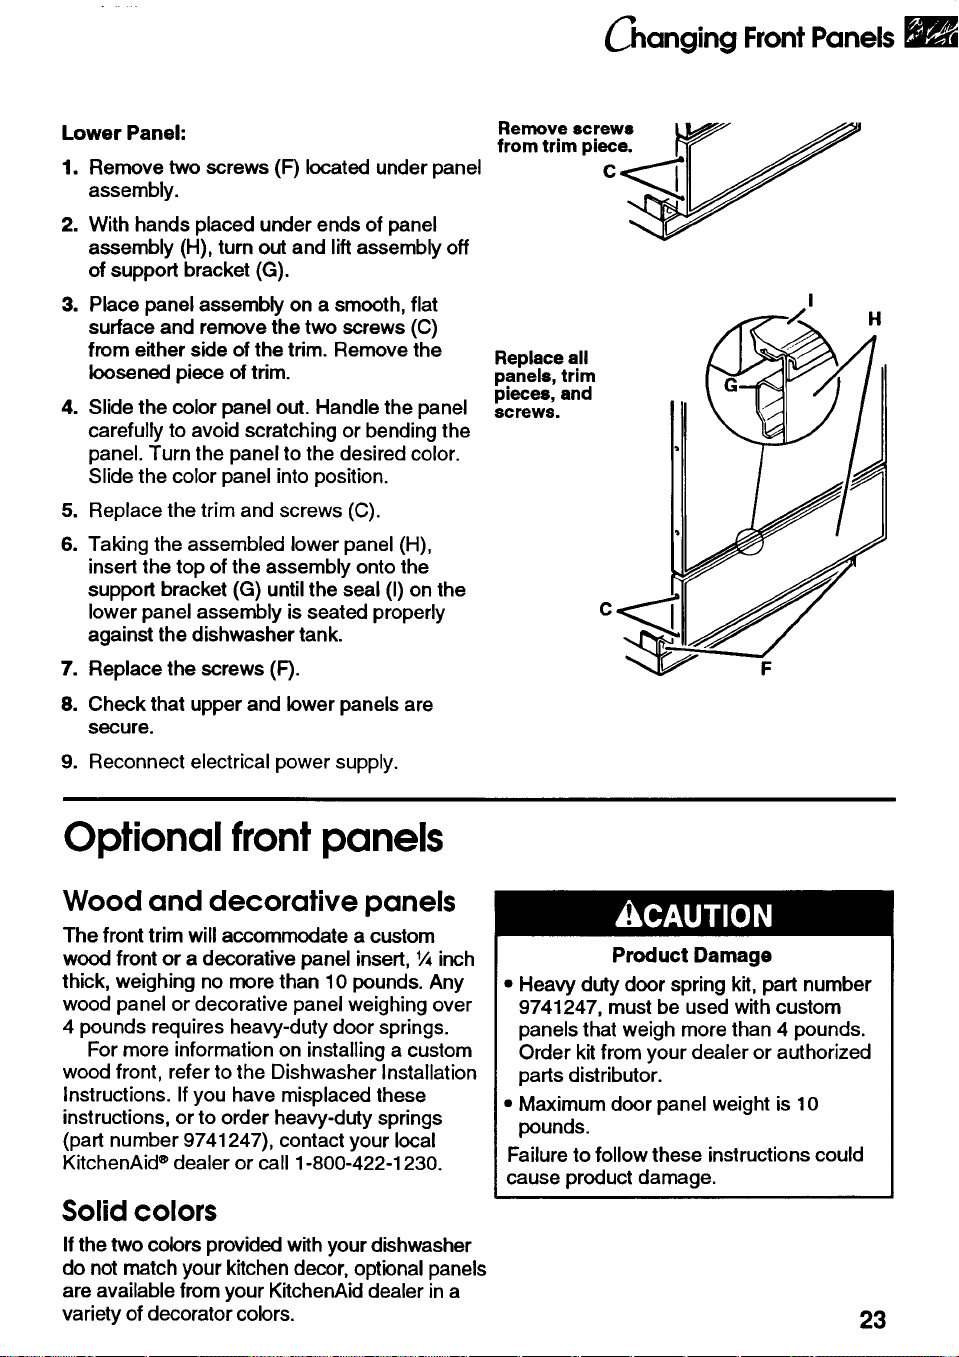
Lower Panel:
1. Remove two screws (F) located under panel
assembly.
2. With hands placed under ends of panel
assembly (H), turn out and lift assembly off
of support bracket (G).
3. Place panel assembly on a smooth, flat
surface and remove the two screws (C)
from either side of the trim. Remove the
loosened piece of trim.
4. Slide the color panel out. Handle the panel
carefully to avoid scratching or bending the
panel. Turn the panel to the desired color.
Slide the color panel into position.
o
6.
=
8.
Replace the trim and screws (C).
Taking the assembled lower panel (H),
insert the top of the assembly onto the
support bracket (G) until the seal (I) on the
lower panel assembly is seated properly
against the dishwasher tank.
Replace the screws (F).
Check that upper and lower panels are
secure.
9. Reconnect electrical power supply.
Remove
screws
from trim piece.
C
Replace all
panels, trim
pieces, and
screws.
H
Optional front panels
Wood and decorative panels
The front trim willaccommodate a custom
wood front or a decorative panel insert, 1,_inch
thick, weighing no more than 10 pounds. Any
wood panel or decorative panel weighing over
4 pounds requires heavy-duty door springs.
For more information on installing a custom
wood front, refer to the Dishwasher Installation
Instructions. Ifyou have misplaced these
instructions, or to order heavy-duty springs
(part number 9741247), contact your local
KitchenAid®dealer or call 1-800-422-1230.
Solid colors
If the two colors provided with your dishwasher
do not match your kitchen decor, optional panels
are available from your KitchenAid dealer in a
variety ofdecorator colors.
Product Damage
• Heavy duty door spring kit, part number
9741247, must be used with custom
panels that weigh more than 4 pounds.
Order kitfrom your dealer or authorized
parts distributor.
• Maximum door panel weight is 10
pounds.
Failure to follow these instructionscould
cause product damage.
23

Solving Common Dishwashing
Problems
This section explains how you can handle minor performance problems. Go over this list
before calling for service. If you can't solve your dishwasher's problem, turn to page 28
for service information.
IN THIS SECTION
Page
Solution chart ................................... 24
Page
Removing spots and film ............... 27
Solution chart
PROBLEM
Food soil
left on dishes
CAUSE SOLUTION
Slowdown of spray arm
due to high suds
Never use soap or laundry detergents. Use
recommended dishwasher detergents only.
Do not overfill rinse agent dispenser. Wipe
up rinse agent spills before running a cycle.
Improper loading
Follow loading instructions on pages
15-17.
Insufficient filldue to low
water pressure
Home water pressure should be 20 to 120
pounds per square inch (psi) for proper
dishwasher fill. A booster pump on the
water supply may be necessary ifpressure
istoo low.
Use of incorrect, too
little, or ineffective
detergent
Use recommended dishwasher detergents
only. Follow recommendations on pages
10-11 for amounts; never use less than one
tablespoon per load. Detergent must be
fresh to be effective. Always store detergent
tightly-closed in a cool, dry place.
Detergent cakes in
dispenser
Use fresh detergent only. Do not allow
detergent to sit for several hours in a wet
dispenser. Check dispenser for caked
detergent. Clean dispenser when caked
detergent ispresent.
Water temperature too
low
Turn home water heater up to ensure water
entering dishwasher is 120°F (49°C)
minimum. See recommended procedure in
"Sure-Clean TM water heating" on page 12.
Do not use the ENERGY SAVER WASH
option.
24
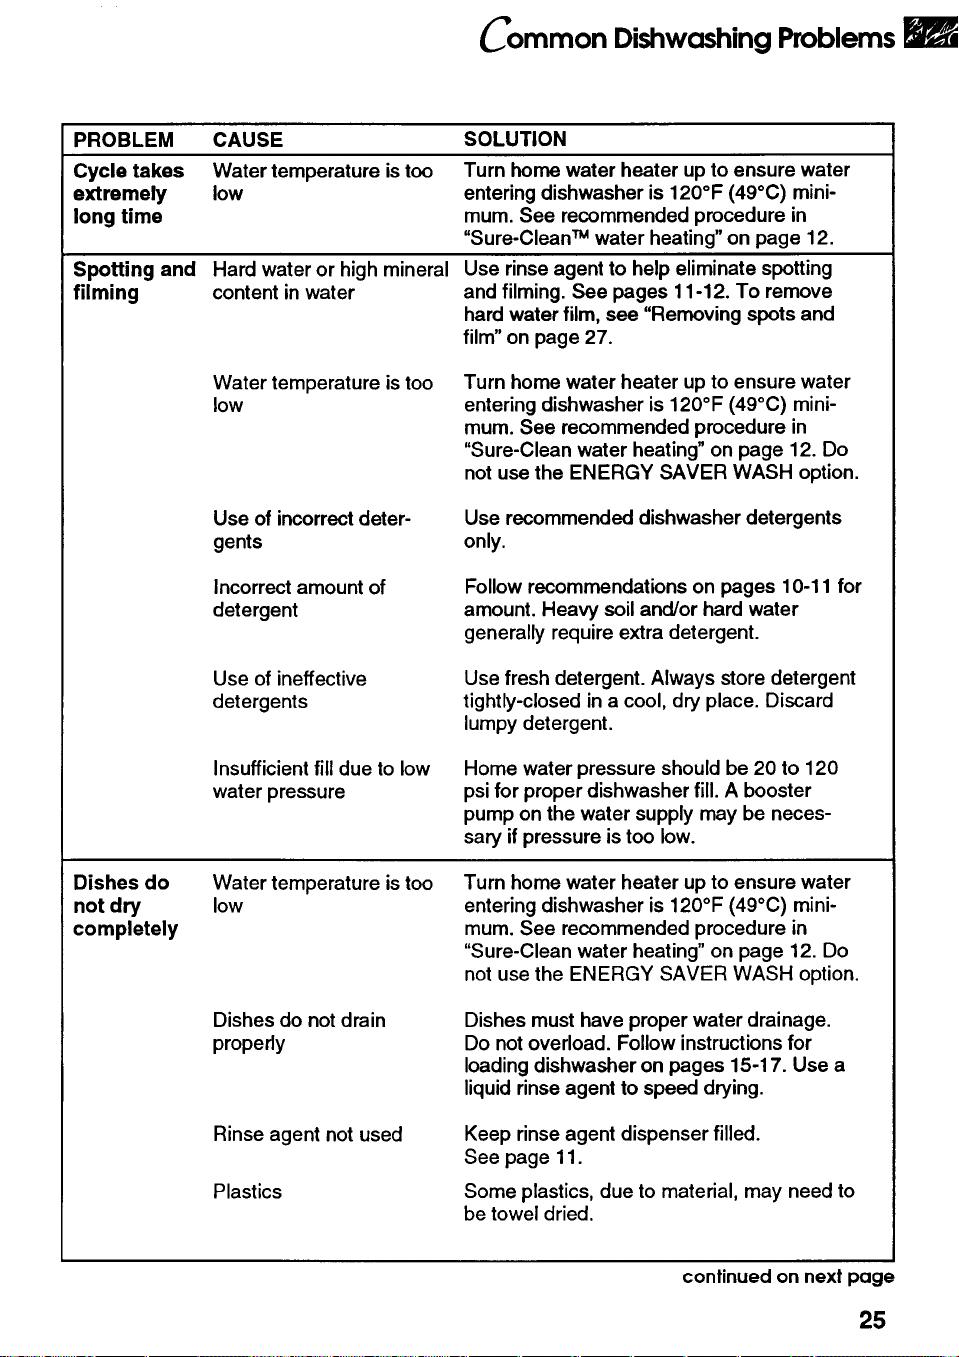
Common DishwashingProblems
PROBLEM CAUSE SOLUTION
Cycle takes Water temperature is too Turn home water heater up to ensure water
extremely low entering dishwasher is 120°F (49°C) mini-
long time mum. See recommended procedure in
"Sure-Clean TM water heating" on page 12.
Spotting and Hard water or high mineral Use rinse agent to help eliminate spotting
filming content in water and filming. See pages 11-12. To remove
hard water film, see "Removing spots and
film" on page 27.
Dishes do
not dry
completely
Water temperature is too
low
Turn home water heater up to ensure water
entering dishwasher is 120°F (49°C) mini-
mum. See recommended procedure in
"Sure-Clean water heating" on page 12. Do
not use the ENERGY SAVER WASH option.
Use of incorrect deter-
gents
Use recommended dishwasher detergents
only.
Incorrect amount of
detergent
Follow recommendations on pages 10-11 for
amount. Heavy soil and/or hard water
generally require extra detergent.
Use of ineffective
detergents
Use fresh detergent. Always store detergent
tightly-closed in a cool, dry place. Discard
lumpy detergent.
Insufficient fill due to low
water pressure
Home water pressure should be 20 to 120
psi for proper dishwasher fill. A booster
pump on the water supply may be neces-
sary if pressure is too low.
Water temperature is too
low
Turn home water heater up to ensure water
entering dishwasher is 120°F (49°C) mini-
mum. See recommended procedure in
"Sure-Clean water heating" on page 12. Do
not use the ENERGY SAVER WASH option.
Dishes do not drain
properly
Dishes must have proper water drainage.
Do not overload. Follow instructionsfor
loading dishwasher on pages 15-17. Use a
liquid rinse agent to speed drying.
Rinse agent not used
Plastics
Keep rinse agent dispenser filled.
See page 11.
Some plastics, due to material, may need to
be towel dried.
continued on next page
25
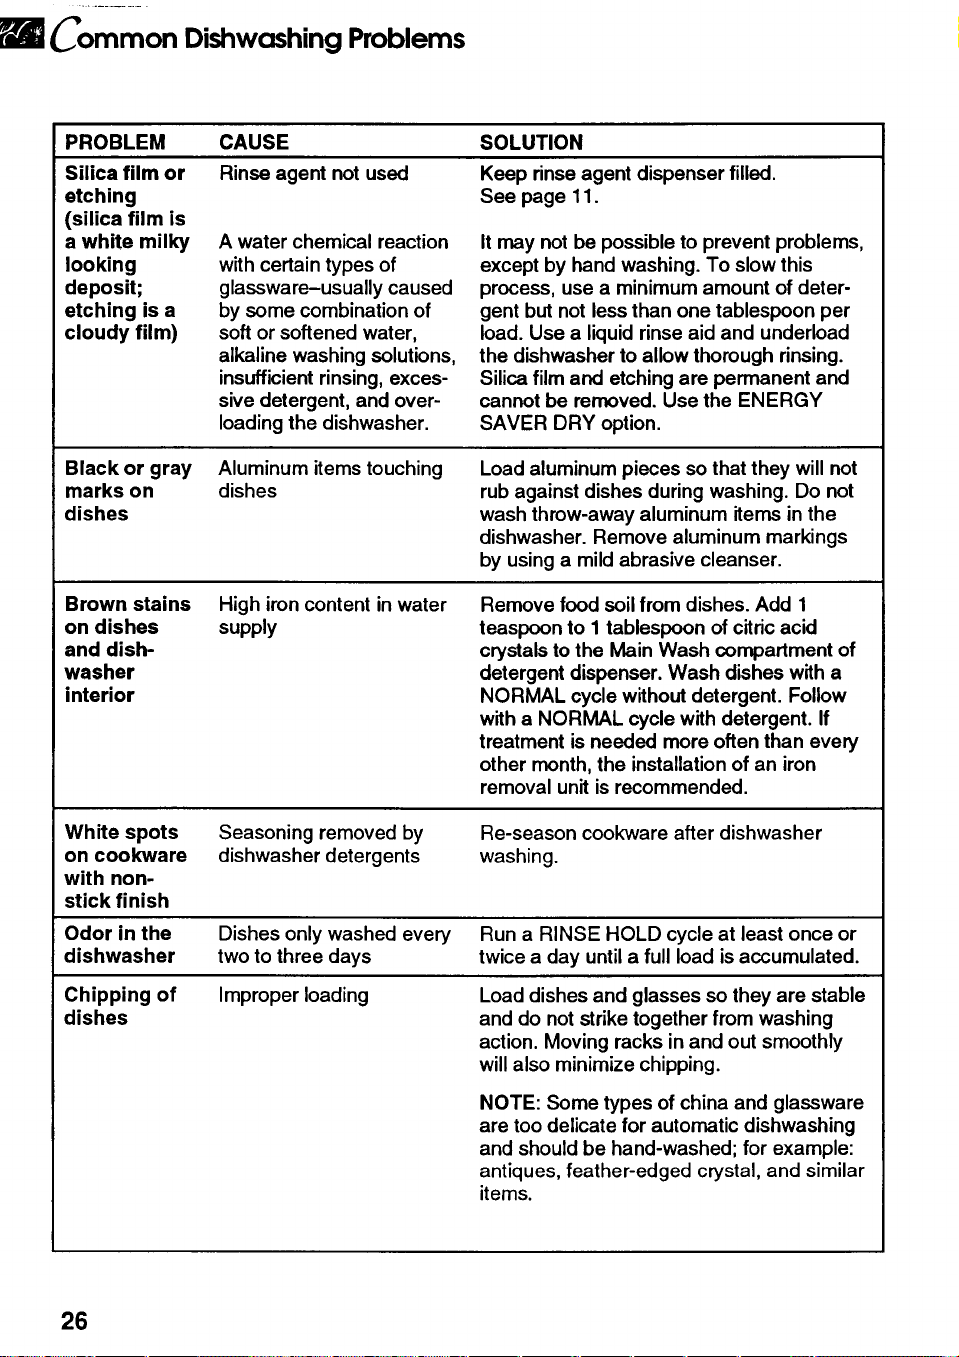
C'ommon DishwashingProblems
PROBLEM
Silica film or
etching
(silica film is
a white milky
looking
deposit;
etching is a
cloudy film)
Black or gray
marks on
dishes
Brown stains
on dishes
and dish-
washer
interior
White spots
on cookware
with non-
stick finish
Odor in the
dishwasher
Chipping of
dishes
CAUSE
Rinse agent not used
SOLUTION
Keep rinse agent dispenser filled,
See page 11.
A water chemical reaction
with certain types of
glassware-usually caused
by some combination of
soft or softened water,
alkaline washing solutions,
insufficient rinsing, exces-
sive detergent, and over-
loading the dishwasher.
It may not be possible to prevent problems,
except by hand washing. To slow this
process, use a minimum amount of deter-
gent but not less than one tablespoon per
load. Use a liquid rinse aid and underload
the dishwasher to allow thorough rinsing.
Silica film and etching are permanent and
cannot be removed. Use the ENERGY
SAVER DRY option.
Aluminum items touching
dishes
Load aluminum pieces so that they will not
rub against dishes during washing. Do not
wash throw-away aluminum items in the
dishwasher. Remove aluminum markings
by using a mild abrasive cleanser.
High iron content in water
supply
Remove food soil from dishes. Add 1
teaspoon to I tablespoon of citricacid
crystals to the Main Wash compartment of
detergent dispenser. Wash dishes with a
NORMAL cycle without detergent. Follow
with a NORMAL cycle with detergent. If
treatment is needed more often than every
other month, the installation of an iron
removal unit is recommended.
Seasoning removed by
dishwasher detergents
Re-season cookware after dishwasher
washing.
Dishes only washed every Run a RINSE HOLD cycle at least once or
two to three days twice a day until a full load is accumulated.
Improper loading Load dishes and glasses so they are stable
and do not strike together from washing
action. Moving racks in and out smoothly
will also minimize chipping.
NOTE: Some types of china and glassware
are too delicate for automatic dishwashing
and should be hand-washed; for example:
antiques, feather-edged crystal, and similar
items.
26
Common Dishwashing Problems
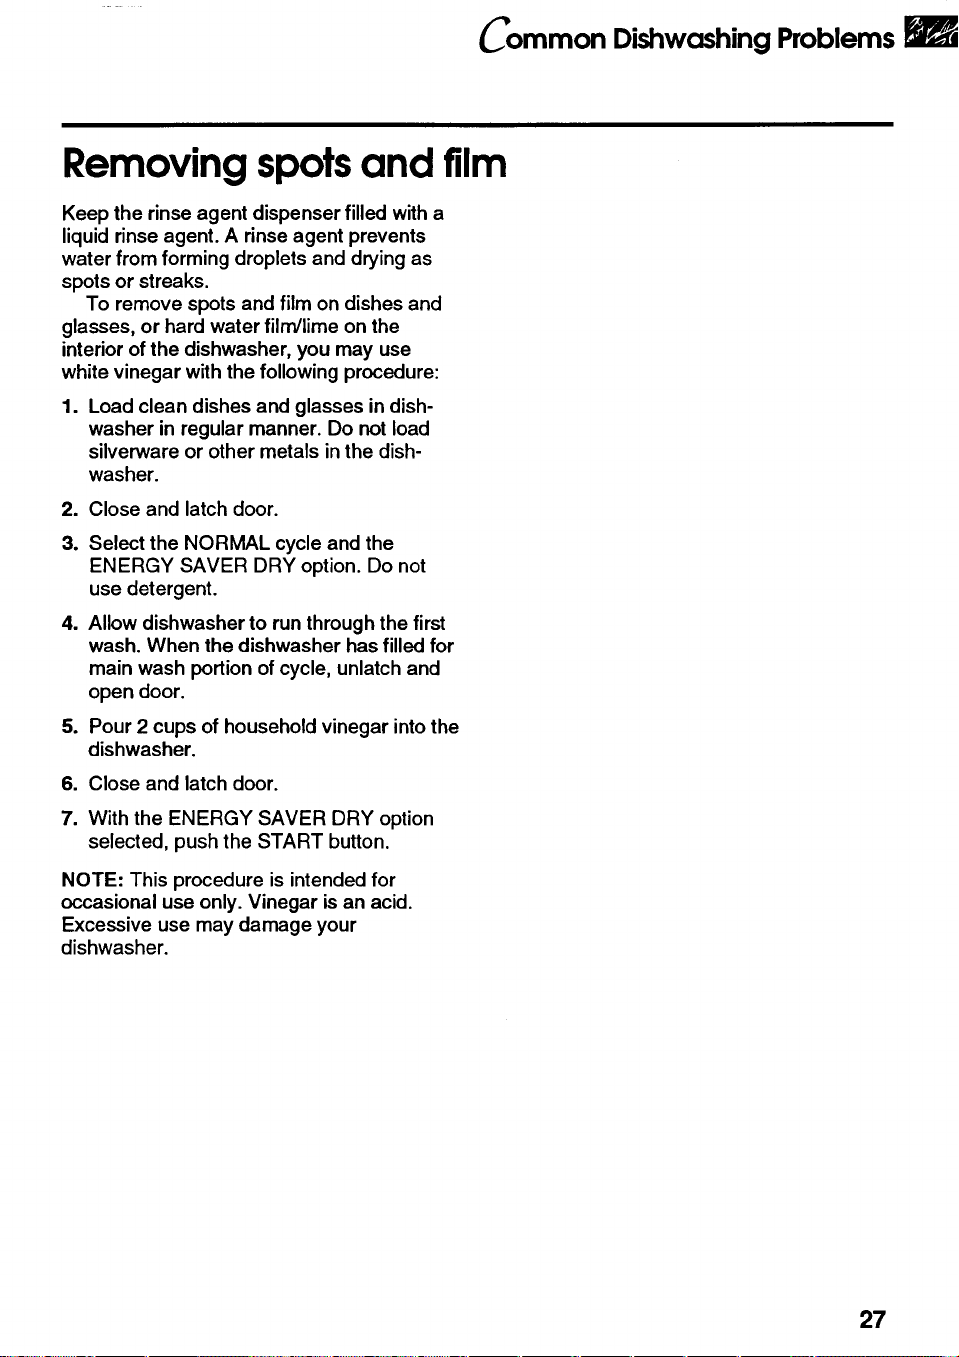
Removing spots and film
Keep the rinse agent dispenser filled with a
liquid rinse agent. A rinse agent prevents
water from forming droplets and drying as
spots or streaks.
To remove spots and film on dishes and
glasses, or hard water film/lime on the
interior of the dishwasher, you may use
white vinegar with the following procedure:
1. Load clean dishes and glasses in dish-
washer in regular manner. Do not load
silverware or other metals in the dish-
washer.
2. Close and latch door.
3. Select the NORMAL cycle and the
ENERGY SAVER DRY option. Do not
use detergent.
4. Allow dishwasher to run through the first
wash. When the dishwasher has filled for
main wash portion of cycle, unlatch and
open door.
5. Pour 2 cups of household vinegar into the
dishwasher.
6. Close and latch door.
7. With the ENERGY SAVER DRY option
selected, push the START button.
NOTE: This procedure is intended for
occasional use only. Vinegar is an acid.
Excessive use may damage your
dishwasher.
27
Toubleshooting
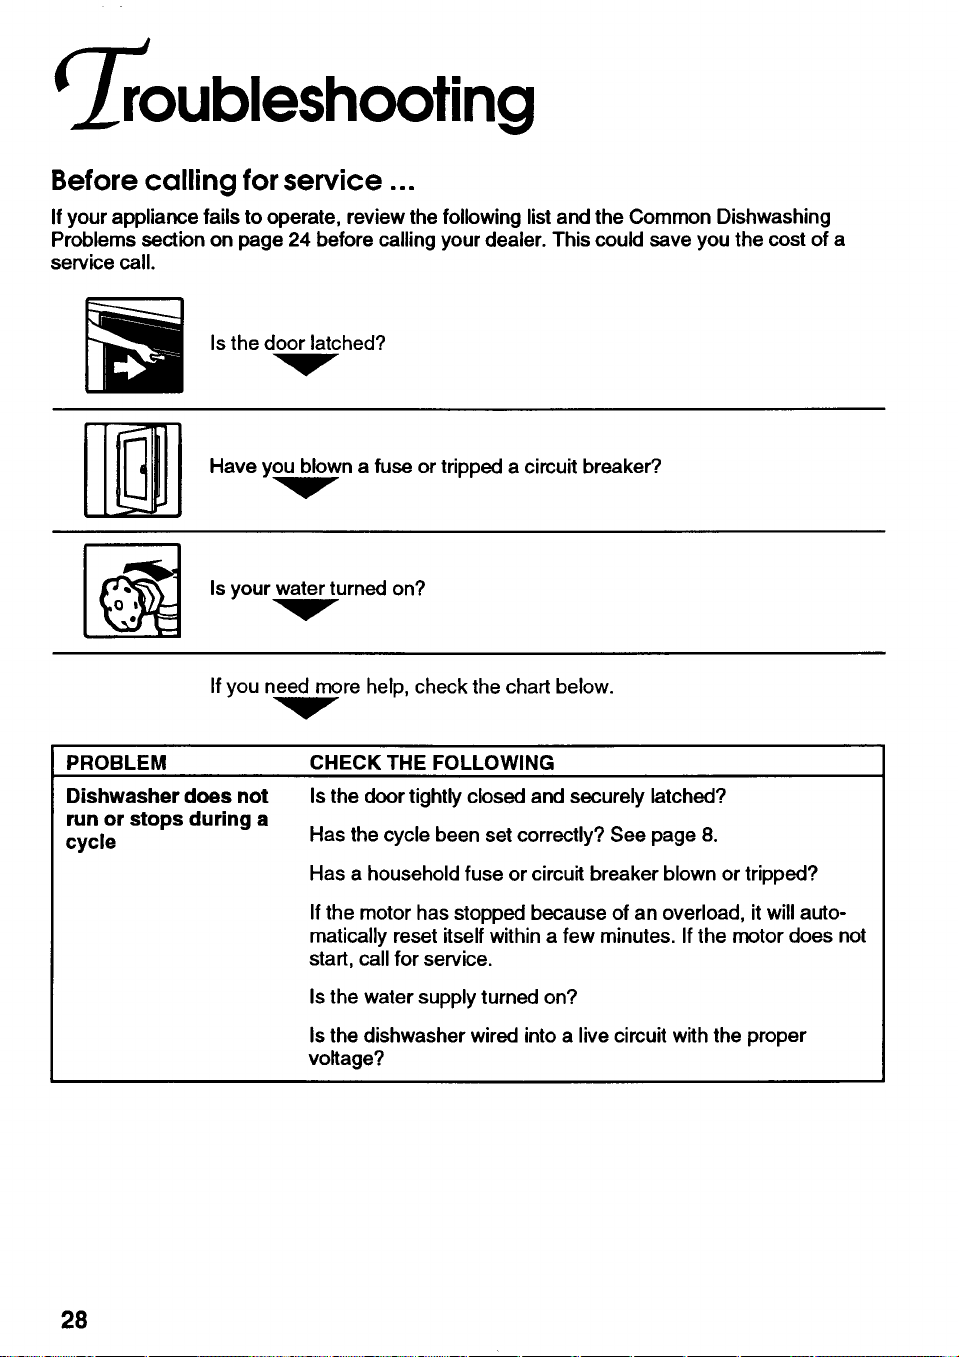
Before calling for service...
If your appliance fails to operate, review the following list and the Common Dishwashing
Problems section on page 24 before calling your dealer. This could save you the cost of a
service call.
Is the door latched?
Have y._,wn a fuse or tripped a circuit breaker.9
Is your water turned on?
If you need more help, check the chart below.
PROBLEM
Dishwasher does not
run or stops during a
cycle
CHECK THE FOLLOWING
Is the door tightly closed and securely latched?
Has the cycle been set correctly? See page 8.
Has a household fuse or circuit breaker blown or tripped?
Ifthe motor has stopped because of an overload, it willauto-
matically reset itself within a few minutes. Ifthe motor does not
start, call for service.
Isthe water supply turned on?
Isthe dishwasher wired intoa live circuit with the proper
voltage?
28
Troubleshooting
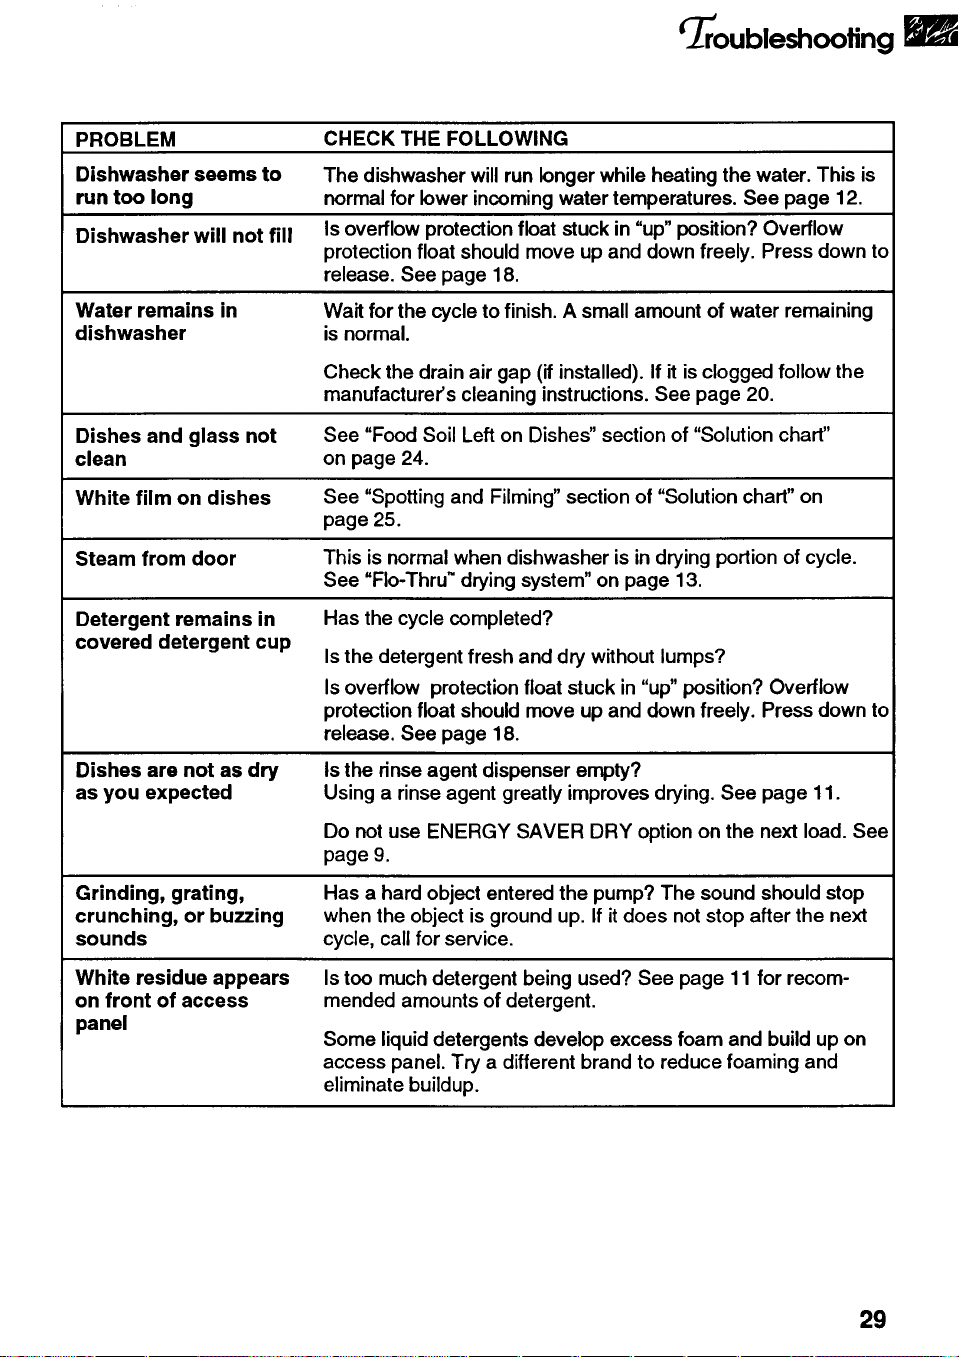
PROBLEM CHECK THE FOLLOWING
Dishwasher seems to The dishwasher will run longer while heating the water. This is
run too long normal for lower incoming water temperatures. See page 12.
Dishwasher will not fill Is overflow protection float stuck in "up" position? Overflow
protection float should move up and down freely. Press down to
release. See page 18.
Water remains in
dishwasher
Wait for the cycle to finish. A small amount of water remaining
is normal.
Check the drain air gap (if installed). If it isclogged follow the
manufacturer's cleaning instructions. See page 20.
Dishes and glass not See "Food Soil Left on Dishes" section of "Solution chart"
clean on page 24.
White film on dishes See "Spotting and Filming"section of "Solution chad" on
page 25.
Steam from door This is normal when dishwasher is in drying portion of cycle.
See "Flo-Thru TM drying system" on page 13.
Detergent remains in Has the cycle completed?
covered detergent cup
Is the detergent fresh and dry without lumps?
Is overflow protection float stuck in "up" position? Overflow
protection float should move up and down freely. Press down to
release. See page 18.
Dishes are not as dry
as you expected
Is the rinse agent dispenser empty?
Using a rinse agent greatly improves drying. See page 11.
Do not use ENERGY SAVER DRY option on the next load. See
page 9.
Grinding, grating,
crunching, or buzzing
sounds
Has a hard object entered the pump? The sound should stop
when the object is ground up. If itdoes not stop after the next
cycle, call for service.
White residue appears
on front of access
panel
Istoo much detergent being used? See page 11 for recom-
mended amounts of detergent.
Some liquid detergents develop excess foam and build up on
access panel. Try a different brand to reduce foaming and
eliminate buildup.
29
IfYou Need
Assistanceor Service
I. Ifyou need assistance*...
• Call KitchenAid Consumer Assistance
Center:
1-800-422-1230
One of our trained consultants can instruct
you in how to obtain satisfactory operation
from your appliance or, if service is neces-
sary, recommend a qualified service
company in your area.
• If you prefer, write to:
Consumer Assistance Center
KitchenAid
2000 North M-63
Benton Harbor, MI 49022-2692
2. If you need service*...
• Call your dealer or the repair service
recommended.
• All service should be handled locally by the
dealer from whom you purchased the unit
or an authorized KitchenAid servicer.
• If you are unable to obtain the name of a
local authorized KitchenAid servicer, call
our Consumer Assistance Center tele-
phone number (see Step 1).
3. Ifyou are not satisfied
with the action taken:
• Contact the Major Appliance Consumer
Action Panel (MACAP). MACAP is a group
of independent consumer experts that
voices consumer views at the highest
levels of the major appliance industry.
• Contact MACAP only when the dealer,
authorized servicer, and KitchenAid have
failed to resolve your problem.
Major Appliance Consumer Action Panel
20 North Wacker Drive
Chicago, IL 60606
• MACAP will in turn inform us of your
action.
*When asking for help or service:
Please provide a detailed description of
the problem, your appliance's complete
model and serial numbers, and the
pumhase date. (See page 2.) This
information will help us respond properly
to your request.
Don't forget, KitchenAld offers a full line of quality home appliances.
Built-in Refrigerators Trash Compactors Ranges & Cooktops
Freestanding Refrigerators Hot Water Dispensers Microwave Ovens
50-Pound Ice Makers Food Waste Disposers Washers & Dryers
Dishwashers Built-in Ovens Mixers & Blenders
For more information on these appliances, or the one you have purchased, call our
toll-free Consumer Assistance Center telephone number, 1-800-422-1230.
30
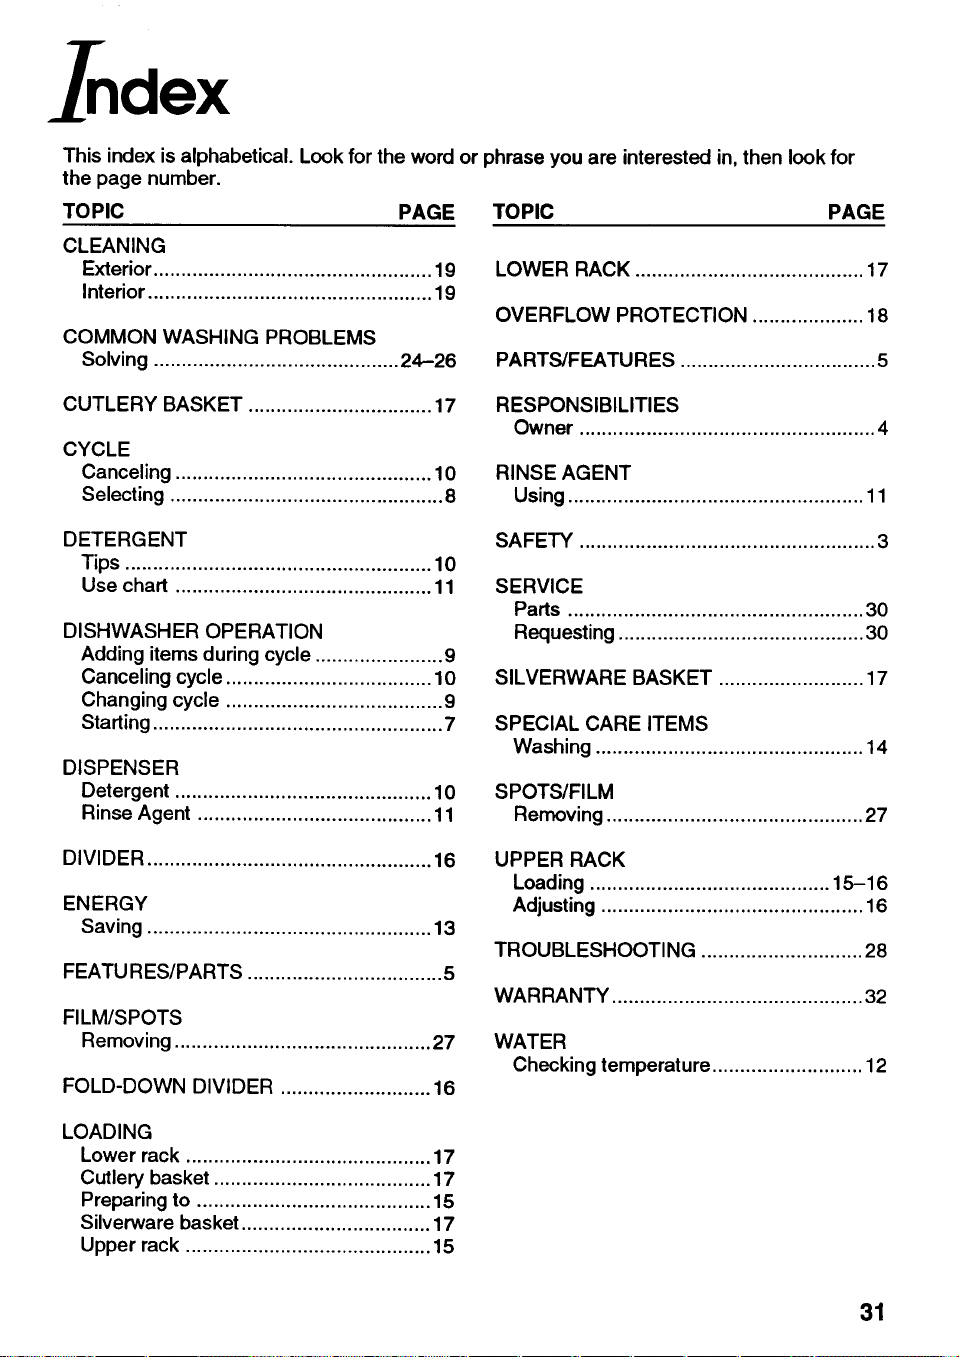
This index is alphabetical. Look for the word or phrase you are interested in, then lookfor
the page number.
TOPIC PAGE TOPIC PAGE
CLEANING
Exterior.................................................. 19
Interior ................................................... 19
COMMON WASHING PROBLEMS
Solving ............................................ 24-26
LOWER RACK ......................................... 17
OVERFLOW PROTECTION .................... 18
PARTS/FEATURES ................................... 5
CUTLERY BASKET ................................. 17
CYCLE
Canceling .............................................. 10
Selecting ................................................. 8
RESPONSIBILITIES
Owner ..................................................... 4
RINSE AGENT
Using ..................................................... 11
DETE RGENT
Tips ....................................................... 10
Use chart .............................................. 11
DISHWASHER OPERATION
Adding items during cycle ....................... 9
Canceling cycle ..................................... 10
Changing cycle ....................................... 9
Starting .................................................... 7
DISPENSER
Detergent .............................................. 10
Rinse Agent .......................................... 11
SAFETY ..................................................... 3
SERVICE
Parts ..................................................... 30
Requesting ............................................ 30
SILVERWARE BASKET .......................... 17
SPECIAL CARE ITEMS
Washing ................................................ 14
SPOTS/FILM
Removing .............................................. 27
DIVIDER ................................................... 16
ENERGY
Saving ................................................... 13
FEATU RES/PARTS ................................... 5
FILM/SPOTS
Removing .............................................. 27
FOLD-DOWN DIVIDER ........................... 16
UPPER RACK
Loading ........................................... 15-16
Adjusting ............................................... 16
TROUBLESHOOTING ............................. 28
WARRANTY ............................................. 32
WATER
Checking temperature ........................... 12
LOADING
Lower rack ............................................ 17
Cutlery basket ....................................... 17
Preparing to .......................................... 15
Silverware basket .................................. 17
Upper rack ............................................ 15
31
KltchenAId"
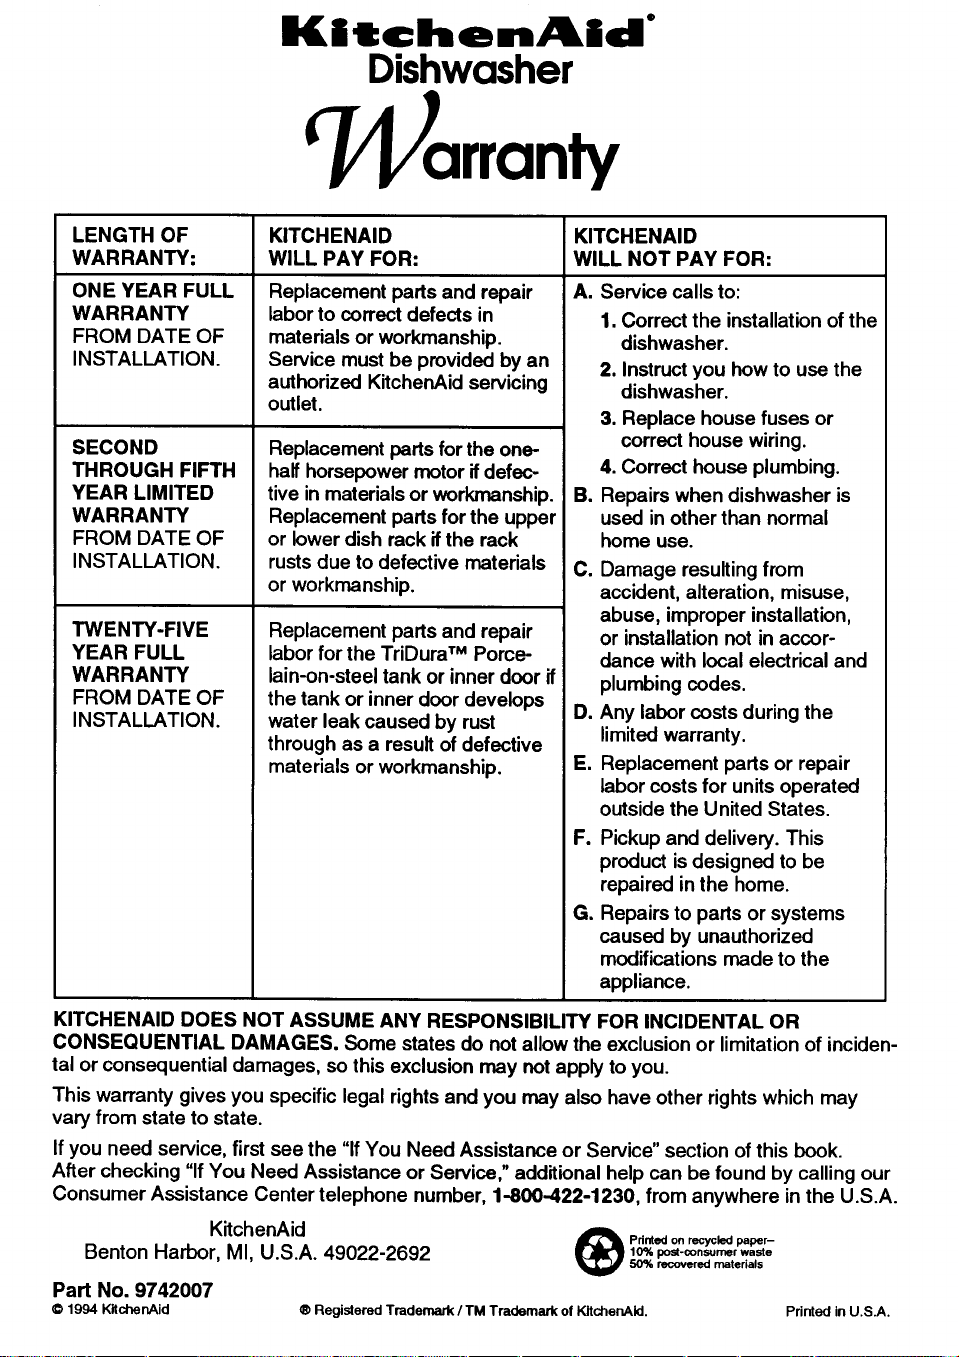
Dishwasher
Warranty
LENGTH OF
WARRANTY:
ONE YEAR FULL
WARRANTY
FROM DATE OF
INSTALLATION.
SECOND
THROUGH FIFTH
YEAR LIMITED
WARRANTY
FROM DATE OF
INSTALLATION.
TWENTY-FIVE
YEAR FULL
WARRANTY
FROM DATE OF
INSTALLATION.
KITCHENAID KITCHENAID
WILL PAY FOR: WILL NOT PAY FOR:
A.
Replacement parts and repair
labor to correct defects in
materials or workmanship.
Service must be provided by an
authorized KitchenAid servicing
outlet.
Replacement parts for the one-
half horsepower motor ifdefec-
tive in materials or workmanship.
Replacement parts for the upper
or lower dish rack if the rack
rusts due to defective materials
or workmanship.
Replacement parts and repair
labor for the TriDura TM Porce-
lain-on-steel tank or inner door if
the tank or inner door develops
water leak caused by rust
through as a result of defective
materials or workmanship.
Service calls to:
1. Correct the installation of the
dishwasher.
2. Instructyou how to use the
dishwasher.
3. Replace house fuses or
correct house wiring.
4. Correct house plumbing.
B. Repairs when dishwasher is
used in other than normal
home use.
C. Damage resulting from
accident, alteration, misuse,
abuse, improper installation,
or installation not in accor-
dance with local electrical and
plumbing codes.
D. Any labor costs during the
limited warranty.
E. Replacement parts or repair
labor costs for unitsoperated
outside the United States.
F. Pickup and delivery. This
product isdesigned to be
repaired in the home.
G. Repairs to parts or systems
caused by unauthorized
modifications made to the
appliance.
KITCHENAID DOES NOT ASSUME ANY RESPONSIBILITY FOR INCIDENTAL OR
CONSEQUENTIAL DAMAGES. Some states do not allow the exclusion or limitation of inciden-
tal or consequential damages, so this exclusion may not apply to you.
This warranty gives you specific legal rights and you may also have other rights which may
vary from state to state.
If you need service, first see the "If You Need Assistance or Service" section of this book.
After checking "IfYou Need Assistance or Service," additional help can be found by calling our
Consumer Assistance Center telephone number, 1-800-422-1230, from anywhere in the U.S.A.
KitchenAid 4L_L Pdnted on recycled paper-
Benton Harbor, MI, U.S.A. 49022-2692 _l _o_p=,.=,=,ma,..=.
r 50% recovered materials
Part No. 9742007
O 1994 KitchenAid ® Regislered Trademark/TM Trademark of KitchenAId. Printed in U.S.A.