Loading ...
Loading ...
Loading ...
6
METHOD 2
● If the installation surface of the cabinet is not suitable for installing the cooker hood, then as per
gures, x the cooker hood on the correct position of the wall.
● On the wall, install 2 screws (supplied) according to the relative position of 2 key holes at the back
of hood.
● Also install screws in the security holes to provide a safer use in case the hood moves back and
forth.
CONNECTIONS
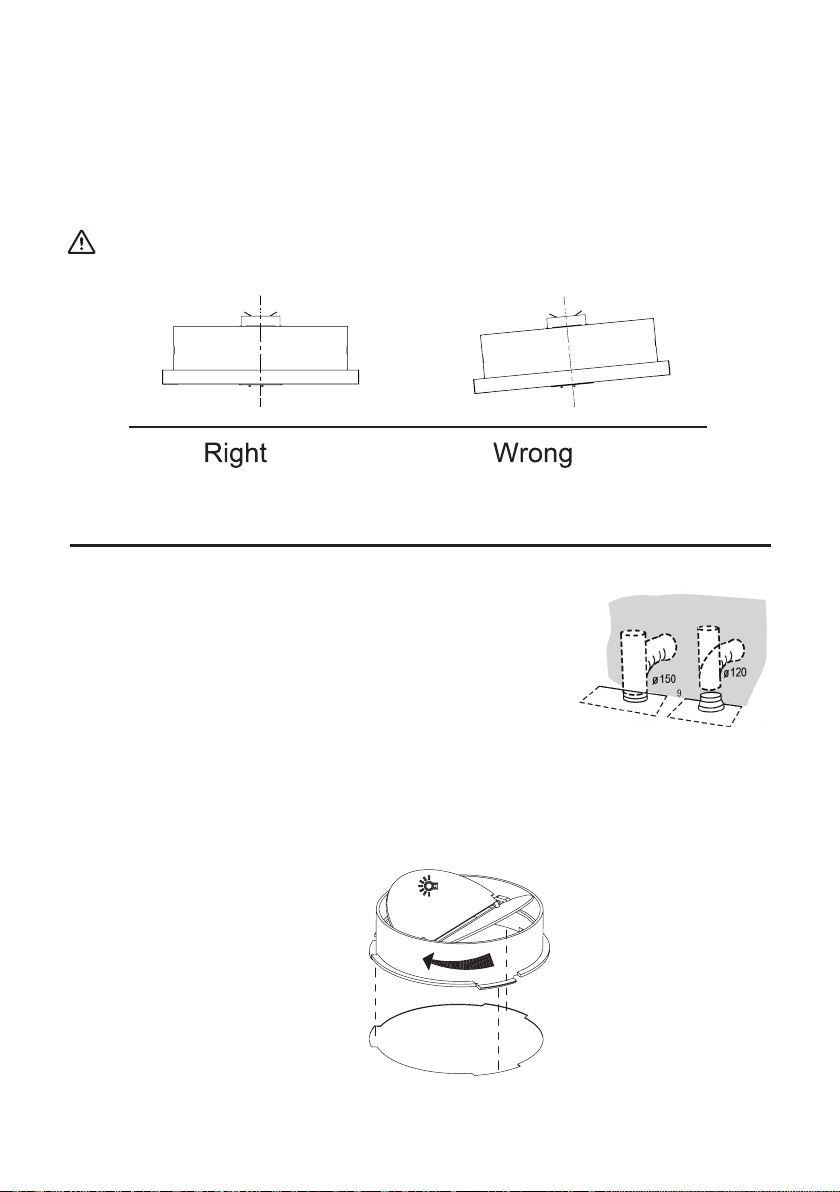
DUCTED VERSION AIR EXHAUST SYSTEM
When installing the ducted version, connect the hood to the chimney
using either a exible or a rigid pipe of ɸ 150 or ɸ 120 mm, the choice
of which is left to the installer.
● To install a ɸ 120 mm air exhaust connection, insert the reducer
ange 3 on the hood body outlet.
● Fix the pipe 4 in position using sufcient pipe clamps (not supplied).
● Remove possible charcoal lters.
Information
Congratulations on your purchasing our cooker hood. Before installing and/or using the
cooker hood, carefully read all the instructions.
6
In the installation surface in cabinet don’t adapt to install the cooker hood, then as per fig, fix
the position of cooker hood on the wall.
On the wall, install 2 screws ( supplied ) according to the relative position of 2 key holes on
the back of hood.
The extent of screwing should be convenience to the next installation.
Also install screws in the security holes, in case of front and back moving of hood, so that the
using is safer.
In
stallation of hoods built in combi cabinets is the same as previous method.
Information
The cooker hood must not be installed and connected to flues where other appliances are
installed and which run off other energy supplied different to electricity(water heater boiled
cookers(range/agas)etc.).
Right Wrong
Information
Congratulations on the purchase our cooker hood which is designed to include many superior
features that permit you the fullest expression of your living. Before installing and/or using the
cooker hood carefully read all the instruction.
CONNECTIONS
DUCTED VERSION AIR EXHAUST SYSTEM
When installing the ducted version, connect the hood to the chimney
using either a flexible or rigid pipe ɸ 150 or ɸ 120 mm, the choice of
which is left to the installer.
To install a ɸ 120 mm air exhaust connection, insert the reducer
flange 3 on the hood body outlet.
Fix the pipe 4 in position using sufficient pipe clamps (not
supplied).
Remove possible charcoal filters.
Hold check valve (black) in your hands and align with the cut out on the top of the Rangehood. Turn
slightly to position check valve in to cut .out.
CHECK VALVE INSTALLATION
Loading ...
Loading ...
Loading ...