
Re visio n V1
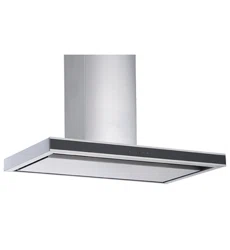
HOME APPLIANCES
www.sc hwe ig e n.c o m .a u
RANG EHO O D & INSTALLATIO N G UIDE
DS3326-9S

Pa g e 2
Ind e x
1. We lc o m e ____________________________________________________________________________________________________ 3
2. Your Sa fe ty
Sa fe ty Ad vic e ____________________________________________________________________________ 4
Be fo re Insta lla tio n __________________________________________________________________________________________ 5
Pro d uc t Use ______________________________________________________________________________ 6
Ma inte na nc e a nd Se rvic e ________________________________________________________________________________ 6
Ele c tric a l C o rd ______________________________________________________________________________________________ 6
3. Tips a nd Sug g e stio ns
Fo r Use rs _________________________________________________________________________________ 7
Fo r Insta lle rs a nd Use rs ____________________________________________________________________ 7
4. De sc riptio n
Ma in Ra ng e ho o d __________________________________________________________________________________________ 8
Sp e e d C o ntro l ______________________________________________________________________________________________ 8
5. O pe ra tio n
C o ntro l Pa ne l _____________________________________________________________________________ 9
6. Cle a ning a nd Ma inte na nc e
Surfa c e s ______________________________________________________________________________________________________ 10
Filte rs _________________________________________________________________________________________________________ 10
C le a ning the Inte rio r _______________________________________________________________________________________ 11
C le a ning the Exte rio r _______________________________________________________________________________________ 12
Re p la c ing the LED La mp s _________________________________________________________________ 13
7. Insta lla tio n
Wa ll Mo unt Insta lla tio n ____________________________________________________________________ 14
Mo unting La ws a nd Re g ula tio ns ___________________________________________________________ 14
Insta lla tio n Instruc tio ns _____________________________________________________________________ 15
Fle xib le Duc ting __________________________________________________________________________ 18
O ve rvie w ________________________________________________________________________________ 18
8. Ma inte na nc e
C o nd e nsa tio n Info rma tio n ________________________________________________________________ 19
Tro ub le sho o ting _____________________________________________________________________________________________ 20
Technical Specications __________________________________________________________________ 20
Fa ulty Insta lla tio n _________________________________________________________________________ 21
9. Specication
DS3326-9S ____________________________________________________________________________________________________ 22
10. Disc la ime r ___________________________________________________________________________________________________ 23

Pa g e 3
1. We lc o me
Mo de l
Purc ha se Da te
Purc ha se Loc a tion
Tha nk yo u fo r p urc ha sing yo ur ne w Sc hwe ig e n ra ng e ho o d .
To g e t the ma ximum o utp ut fro m this unit, p le a se re a d thro ug h this g uid e b e fo re use .
The g uid e c o nta ins imp o rta nt info rma tio n o n the use a nd ma inte na nc e o f the unit, a s we ll a s
imp o rta nt sa fe ty no te s. This will e nsure yo ur p e rso na l sa fe ty a nd the la sting va lue o f yo ur ra ng e ho o d .
We trust tha t yo u will e njo y yo ur ne w Sc hwe ig e n ra ng e ho o d .
Ple a se a lwa ys re ta in yo ur p ro o f o f p urc ha se to a id in a ny wa rra nty q ue rie s.
If yo u a re una b le to lo c a te yo ur wa rra nty c a rd , o ne is a va ila b le to d o wnlo a d fro m o ur we b site
www.sc hwe ig e n.c o m .a u.
This a p p lia nc e a nd its p a c ka g ing a re p ro d uc e d b y p ro c e sse s tha t minimise wa ste a nd re sp e c t the
e nviro nme nt.
Please help us to continue this effort to protect the environment by using the appliance efciently
a nd d isp o se o f the p a c ka g ing in a re sp o nsib le ma nne r.

Pa g e 4
2. Yo ur Sa fe ty
1. The re sha ll b e a d e q ua te ve ntila tio n in the ro o m whe n the ra ng e ho o d is use d a t the sa me time
a s a p p lia nc e s b urning g a s o r o the r fue ls.
2. There is a re risk if cleaning is not carried out in accordance with the instructions.
3. Do not ambé under the rangehood. This will damage the rangehood and will not be covered
b y wa rra nty.
4. Do not ignite burners that give off intense, uncontrolled ames beneath the rangehood.
5. Make sure that no ames emerge from the sides of pans.
6. Do no t le a ve p a c ka g ing ma te ria ls (b a g s, c o rne r b ra c ke ts, e tc ) within re a c h o f c hild re n.
7. This a p p lia nc e is no t inte nd e d fo r use b y p e rso n/ s (inc lud ing c hild re n) with re d uc e d p hysic a l,
se nso ry o r me nta l c a p a b ilitie s, o r la c k o f e xp e rie nc e a nd / o r kno wle d g e . Unle ss the p e rso n
ha s b e e n g ive n sup e rvisio n o r instruc tio n c o nc e rning the use o f the a p p lia nc e b y a p e rso n
re sp o nsib le fo r the ir sa fe ty. Child re n sho uld b e sup e rvise d to e nsure tha t the y d o no t p la y with
the a p p lia nc e , it is no t a to y.
8. The air must not be discharged into a ue that is used for exhausting fumes from appliances
b urning g a s o r o the r fue ls (no t a p p lic a b le to a p p lia nc e s tha t o nly d isc ha rg e the a ir b a c k into the
ro o m).
9. Ac c e ssib le p a rts ma y b e c o me ho t whe n use d with c o o king a p p lia nc e s.
10. Be fo re p e rfo rming a ny c le a ning o r ma inte na nc e o p e ra tio n, d isc o nne c t the ra ng e ho o d fro m the
ma ins using the re sp e c tive ma ins o r se c to r switc h o r b y unp lug g ing it.
11. Do not use the rangehood without the grease lters.
12. Keep the grease lters clean and respect the recommended cleaning frequencies.
13. Turn the ra ng e ho o d mo to r o n b e fo re sta rting to c o o k.
14. Turn the rangehood motor off about 10-15 minutes after you nish cooking.
15. It is fo rb id d e n to use the ra ng e ho o d a s a n a sp ira to r.
16. Never cook foodstuff directly over the ame or have the gas burners on under the rangehood
witho ut using c o o kwa re .
WARNING
Ple a se re a d this se c tio n tho ro ug hly b e fo re a tte mp ting to o p e ra te the
a p p lia nc e . Insp e c t yo ur p ro d uc t up o n re c e ip t. Any d a ma g e o r d e fe c ts
MUST b e re p o rte d within 48 ho urs, o r no c la im will b e re c o g nise d .
DO NOT INSTALL THIS APPLIANCE IF YO U FIND IT DAMAG ED.
If this p ro d uc t is insta lle d d a ma g e d , ne ithe r the sup p lie r, no r the re ta ile r,
will b e re sp o nsib le fo r the c o sts a sso c ia te d with the re p a ir, re p la c e me nt,
re mo va l o r re -insta lla tio n o f the a p p lia nc e s.

Pa g e 5
2. Yo ur Sa fe ty
Be fo re Insta lla tio n
1. We recommend this appliance be installed or repaired by a qualied Schweigen Home
Ap p lia nc e s te c hnic ia n.
2. Ple a se se e o ur we b site www.sc hwe ig e n.c o m .a u fo r re c o mme nd e d insta lle rs.
3. It is dangerous to modify any part of this appliance. Modication of any kind, will immediately
vo id the wa rra nty.
4. The ma nufa c ture r d e c line s a ll re sp o nsib ility in c a se o f fa ilure to a d o p t p ro p e r sa fe ty me a sure s.
5. Ensure tha t the lo c a tio n in whic h this a p p lia nc e is insta lle d , ha s g o o d a nd p e rma ne nt ve ntila tio n.
6. Ple a se c o nsult lo c a l la ws a nd re g ula tio ns a nd insta ll in a c c o rd a nc e .
7. Use a n e le c tric a l c o nne c to r with e a rth tha t is c o rre c t fo r yo ur lo c a tio n.
8. C he c k tha t the vo lta g e in yo ur a re a c o rre sp o nd s to the a p p lia nc e a s ind ic a te d o n the ra ting
la b e l.
9. This a p p lia nc e must b e c o nne c te d to a n e le c tric ity sup p ly with a g ro und c o nne c tio n.
10. Check that the installation and electrical connections are made by a qualied technician and
tha t the ind ic a te d instruc tio ns a nd lo c a l re g ula tio ns in fo rc e a re me t, using ma te ria ls tha t a re
c o mp lia nt with the a p p lic a b le le g isla tio n.
11. The company will not be responsible for installations executed by non-qualied staff and
insta lla tio ns tha t fa il to he e d the a p p lic a b le le g isla tio n o n e le c tric a l sa fe ty (with re g a rd to b o th
mo d e s a nd ma te ria ls).
12. The electrical technical data can be found inside the rangehood, after removing the grease lters.
13. The exible power cable supplied is already connected internally and emerges from the
ra ng e ho o d ne a r the a ir o utle t tub e .
14. Be fo re insta lling the e le c tric a l c o nne c tio ns, yo u sho uld:
• Verify that the indicated electrical data coincide with the voltage values and frequency of the
e le c tric a l c irc uit in the ho use whe re the ra ng e ho o d is to b e insta lle d ;
• Check that the premises has electrical protection against short circuits and electrocution,
p ursua nt to the a p p lic a b le le g isla tio n;
• Always switch off the current using the double-pole switch before maintenance and turn the
p o we r o n a g a in fo r no rma l use o nly whe n the o p e ra tio n ha s b e e n c o mp le te d .

Pa g e 6
2. Yo ur Sa fe ty
Produc t Use
This p ro d uc t is d e sig ne d fo r ho use ho ld use a nd sho uld no t b e use d fo r c o mme rc ia l a p p lic a tio ns.
Afte r use , a lwa ys e nsure tha t a ll c o ntro ls a re in the “ O FF” p o sitio n.
When frying with a gas ame, take particular care not to allow the oil or grease in the pan to catch
re. (Flambé)
Ma inte na nc e a nd Se rvic e
The ra ng e ho o d surfa c e sho uld b e c le a ne d with so ft c lo th a nd no n-c o rro sive d e te rg e nt. Do no t le a ve
the ra ng e ho o d we t a fte r c le a ning o r use , p le a se ke e p ra ng e ho o d d ry.
Important: Never attempt to repair this appliance by yourself. Always refer to a qualied Service
Te c hnic ia n.
Alwa ys switc h o ff the e le c tric ity a nd unp lug the c o nne c tio n b e fo re c o nd uc ting ma inte na nc e o r
c le a ning .
Ele c tric a l C o rd
Ensure the sup p ly c o rd is no t e xp o se d to he a t, c he mic a ls o r sha rp o b je c ts. If the sup p ly c o rd is
damaged, it must be replaced by the manufacturer, service agent or a similarly qualied person in
o rd e r to a vo id a ha za rd .
Pa g e 7
3. Tip s & Sug g e stio ns
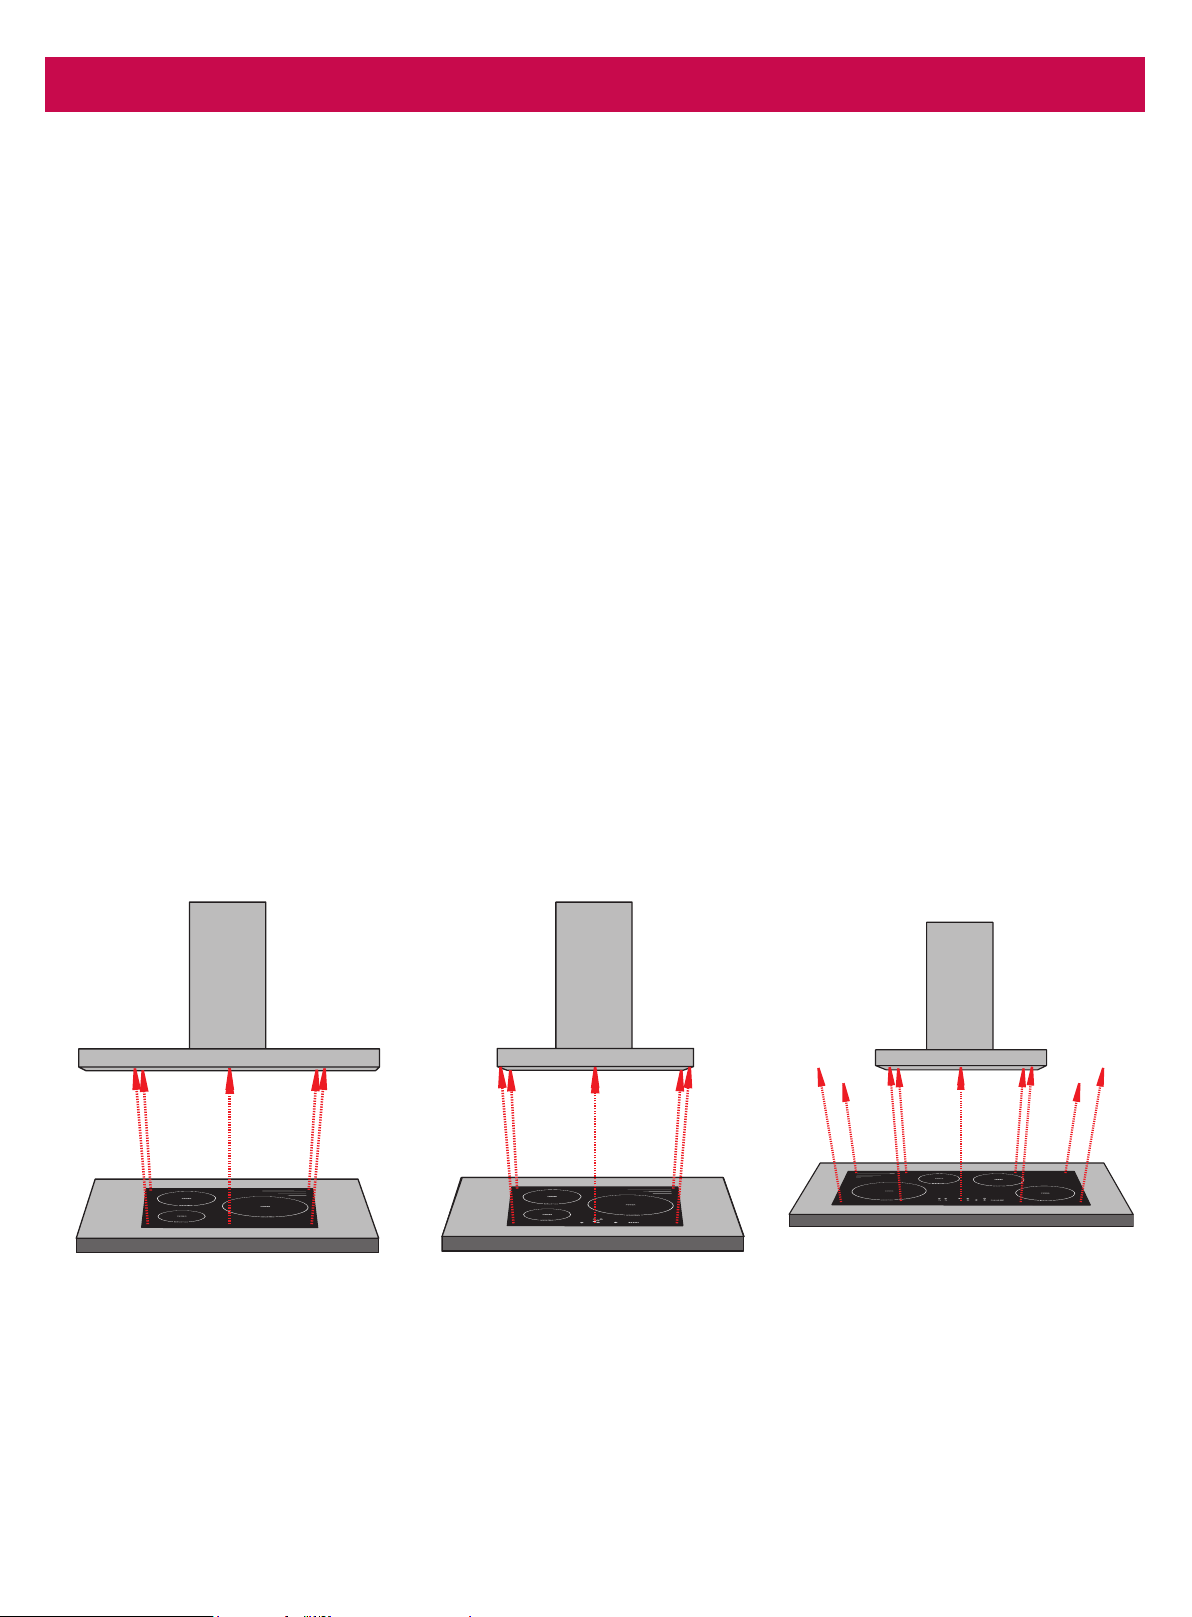
O PTIMAL
Ra ng e ho o d b ig g e r tha n the
c o o king a re a .
ADEQ UATE
Ra ng e ho o d e q ua l to the
c o o king a re a .
INADEQ UATE
Ra ng e ho o d sma lle r tha n the
c o o king a re a .
The Ra ng e ho o d ha s o ne mo d e o f o p e ra tio n:
Air e xtra c tio n: The air is drawn in and cleaned by the grease lters and directed outside. Please
check the cleaning and maintenance section for the lters’ cleaning periods.
For Use rs
1. Do not leave the frying pan or fryer unattended, as the oil could overheat and catch re.
2. Never ambé any foods beneath the rangehood. The ames could cause a re.
3. Be fo re c a rrying o ut a ny o p e ra tio n insid e the ra ng e ho o d , unp lug the a p p lia nc e fro m the
e le c tric a l ma ins.
4. Respect the cleaning frequencies and intervals for changing the lters, as otherwise the
accumulated grease could cause a re or damage the product.
5. C ha ng e s ma d e to the ste e l surfa c e will re nd e r the wa rra nty inva lid .
For Insta lle rs a nd Use rs
1. In a d d itio n to the size , the he ig ht o f the ra ng e ho o d a b o ve the c o o kto p is imp o rta nt to o b ta in the
b e st p e rfo rma nc e .
2. Fo r re c o mme nd e d he ig ht, p le a se re fe r to Mo unting La ws a nd Re g ula tio ns.
Pa g e 8
4. De sc rip tio n
Spe e d C o ntrol
This ra ng e ho o d is e q uip p e d with a 5 sp e e d e le c tro nic control. There are various motor congurations
fro m Iso d rive 650, Twin Iso d rive 650 a nd Iso d rive 1600
Sp e e d c o ntro l usa g e sug g e stio ns:
• Lo w sp e e d fo r simme ring .
• Me d ium sp e e d fo r lig ht c o o king .
• Hig h sp e e d fo r he a vy frying o r he a vy c o o king .
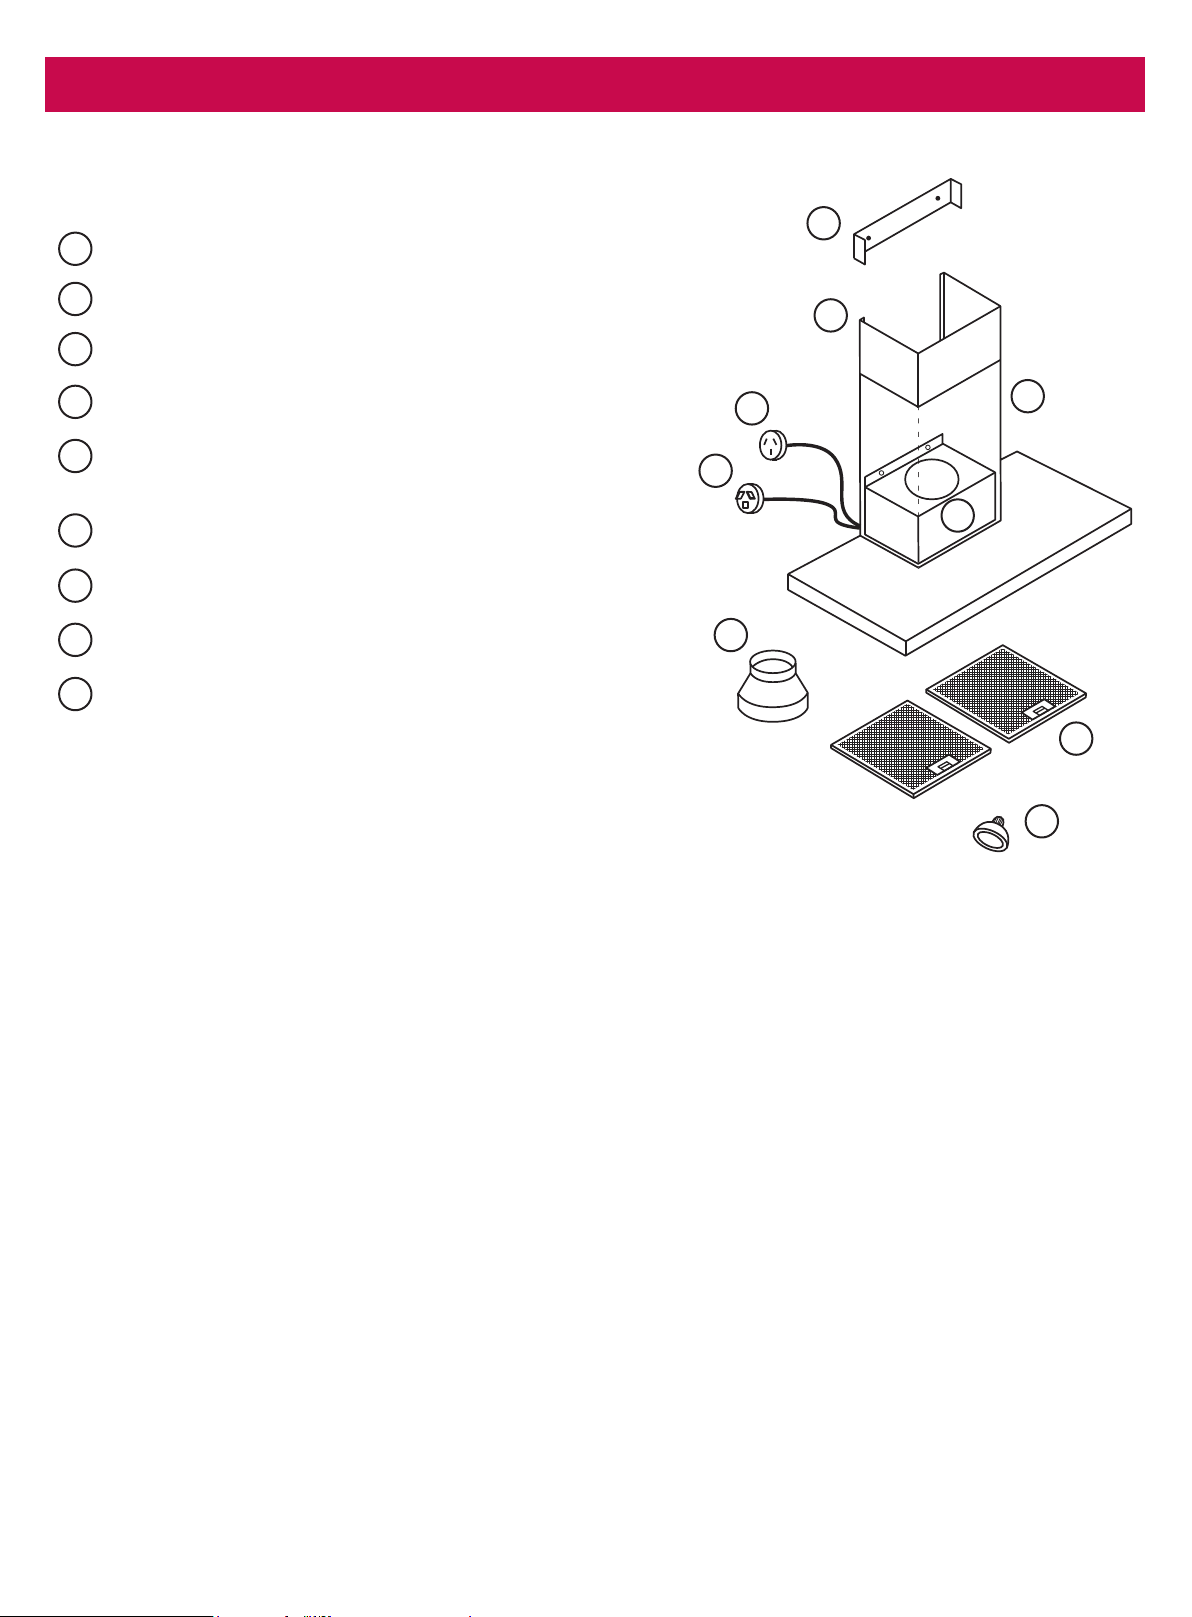
Ma in Ra ng e hoo d
Ma le Plug (Ma in Po we r 240V)
Use d fo r sile nt a nd no n sile nt mo d e ls
Sing le O utle t 200mm
Re d uc e r (Fo r Iso d rive 650 o nly)
Lamp (For GU10 ttings, please twist to remove)
Mo unting Bra c ke t
1
Exte nsio n Flue Pie c e
2
Ma in Flue
Fo r use with Iso d rive mo to r syste m
3
4
5
6
7
8
1
2
3
4
5
6
7
8
9
Filte r
9
NO TE: Filte r a nd lig ht q ua ntity ma y va ry fro m mo d e l
to mo d e l.
Pa g e 9
5. O p e ra tio n
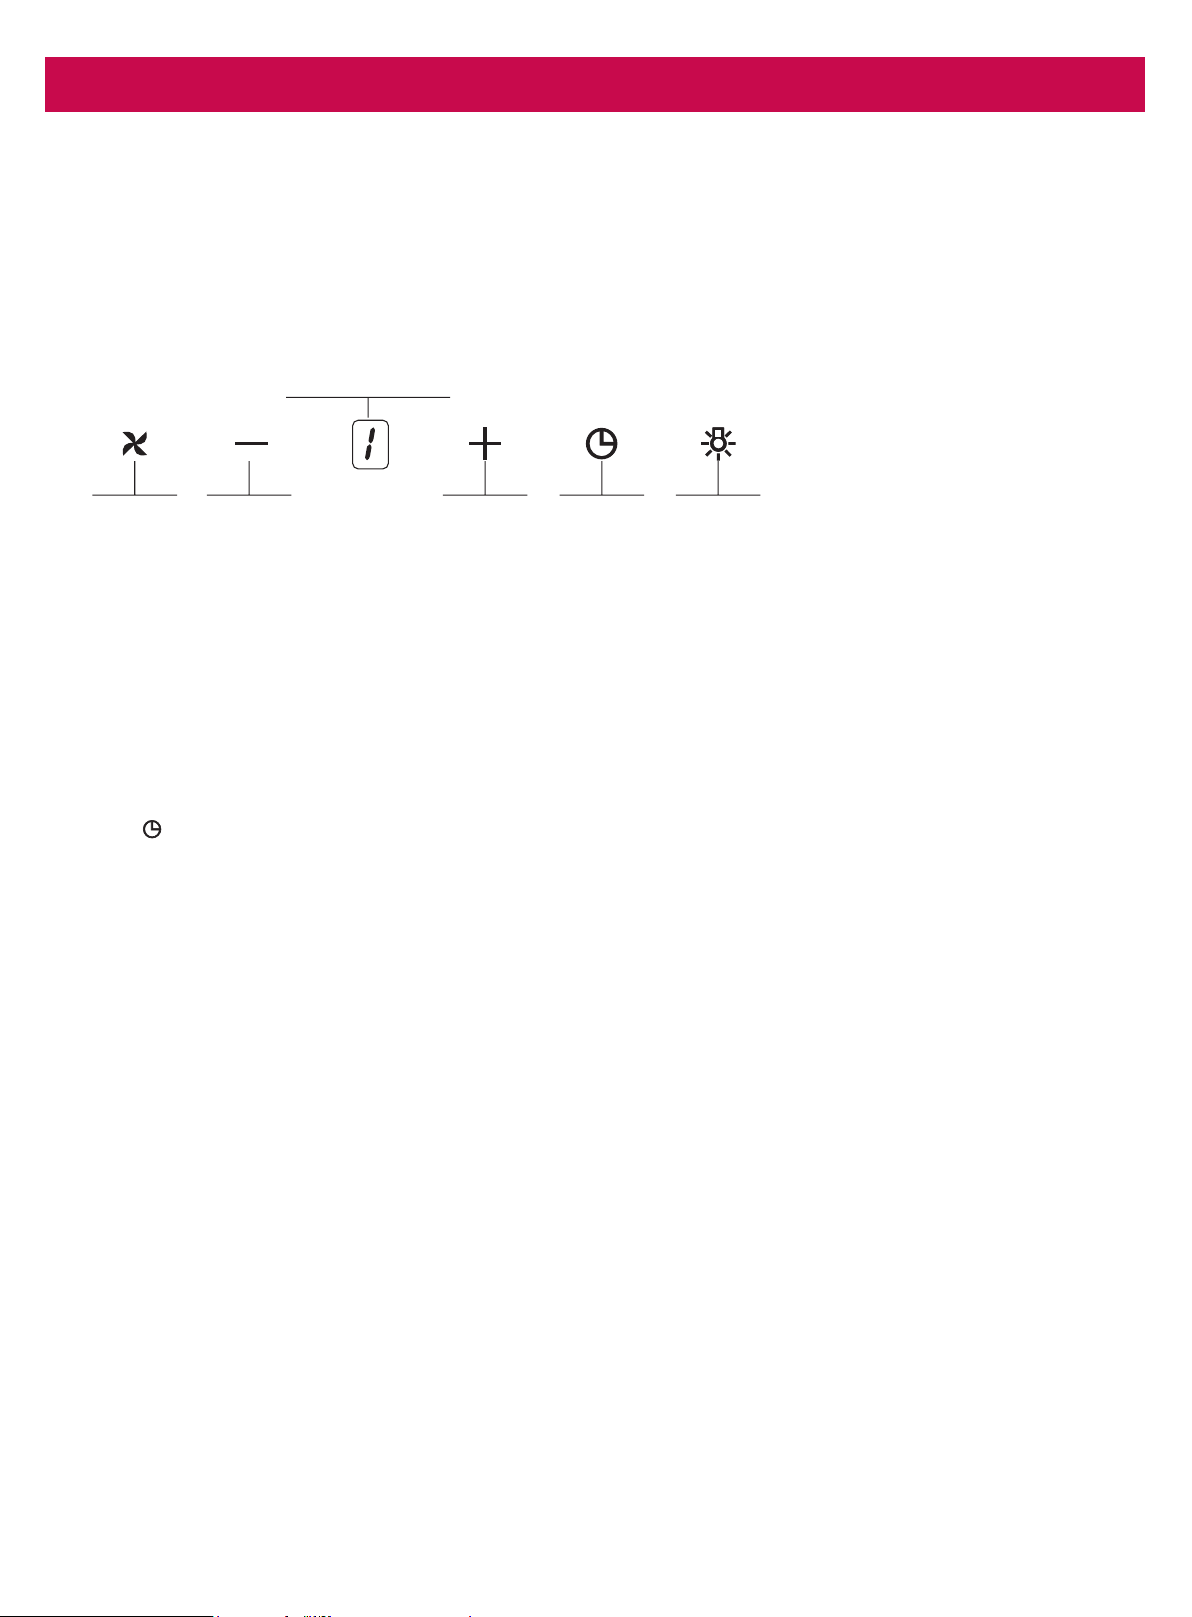
Co ntro l Pa ne l
Sc hwe ig e n sile nt ra ng e ho o d s a re re c o g nise d fo r the ir sile nt o p e ra tio n. Altho ug h this ho ld s true fo r a ll
o f o ur ra ng e ho o d s with e xte rna l mo to rs, o ne must no te tha t the ra ng e ho o d s a re sile nt whe n the y a re
use d fo r re g ula r c o o king o n the lo we r fa n se tting . The re fo re , yo u will o nly he a r the mo ve me nt o f a ir.
Turning o n the ra ng e ho o d.
Pre ss the O n/ O ff b utto n.
Inc re a se the fa n le ve l with + b utto n o r re d uc e the fa n le ve l with - b utto n.
Illumina tion
Yo u ma y turn o n o r o ff the illumina tio n irre sp e c tive o f the fa n.
Time r
Whe n yo u p re ss this b utto n fo r mo re tha n 2 se c o nd s, a time r func tio n o f 15 minute s sha ll b e
a c tiva te d . The d isp la y will sig na l whe n the timing func tio n ha s sta rte d a nd the mo to r will sto p
a uto ma tic a lly a fte r 15 minute s.
Fa n le ve l ind ic a to r
Fa n O n/ O ff Fa n Le ve l
Re d uc tio n
Fa n Le ve l
Inc re a se
Time r La m On/ O ffp
Pa g e 10
6. C le a ning & Ma inte na nc e
WARNING
Alwa ys switc h o ff a nd d isc o nne c t p o we r b e fo re c le a ning .
Surfa c e s
Wa sh with wa rm so a p y wa te r a nd a so ft sp o ng e . Ne ve r use a b ra sive d e te rg e nt, sc o uring p a d s, ste e l
wo o l o r so lve nts o n a ny p a rt o f this a p p lia nc e , Alwa ys ma ke sure to d ry the a p p lia nc e a fte r c le a ning
a nd ne ve r le a ve we t, a s this will c a use irre p a ra b le d a ma g e .
Filte rs
• Fo r this a p p lia nc e to func tio n e ffe c tive ly, re g ula r ma inte na nc e is a must.
• The function of the lter is to absorb the grease particles given off during cooking.
• Clogged lters and heavy oil deposits restrict airow and may cause the motor to overheat and
become a re hazard.
• Filte rs sho uld b e c le a ne d e ve ry 3-6 we e ks o r a fte r 40 ho urs o f use .
• Disc o nne c t e le c tric ity c o nne c tio n b e fo re ma inte na nc e a nd c le a ning p ro c e ss.
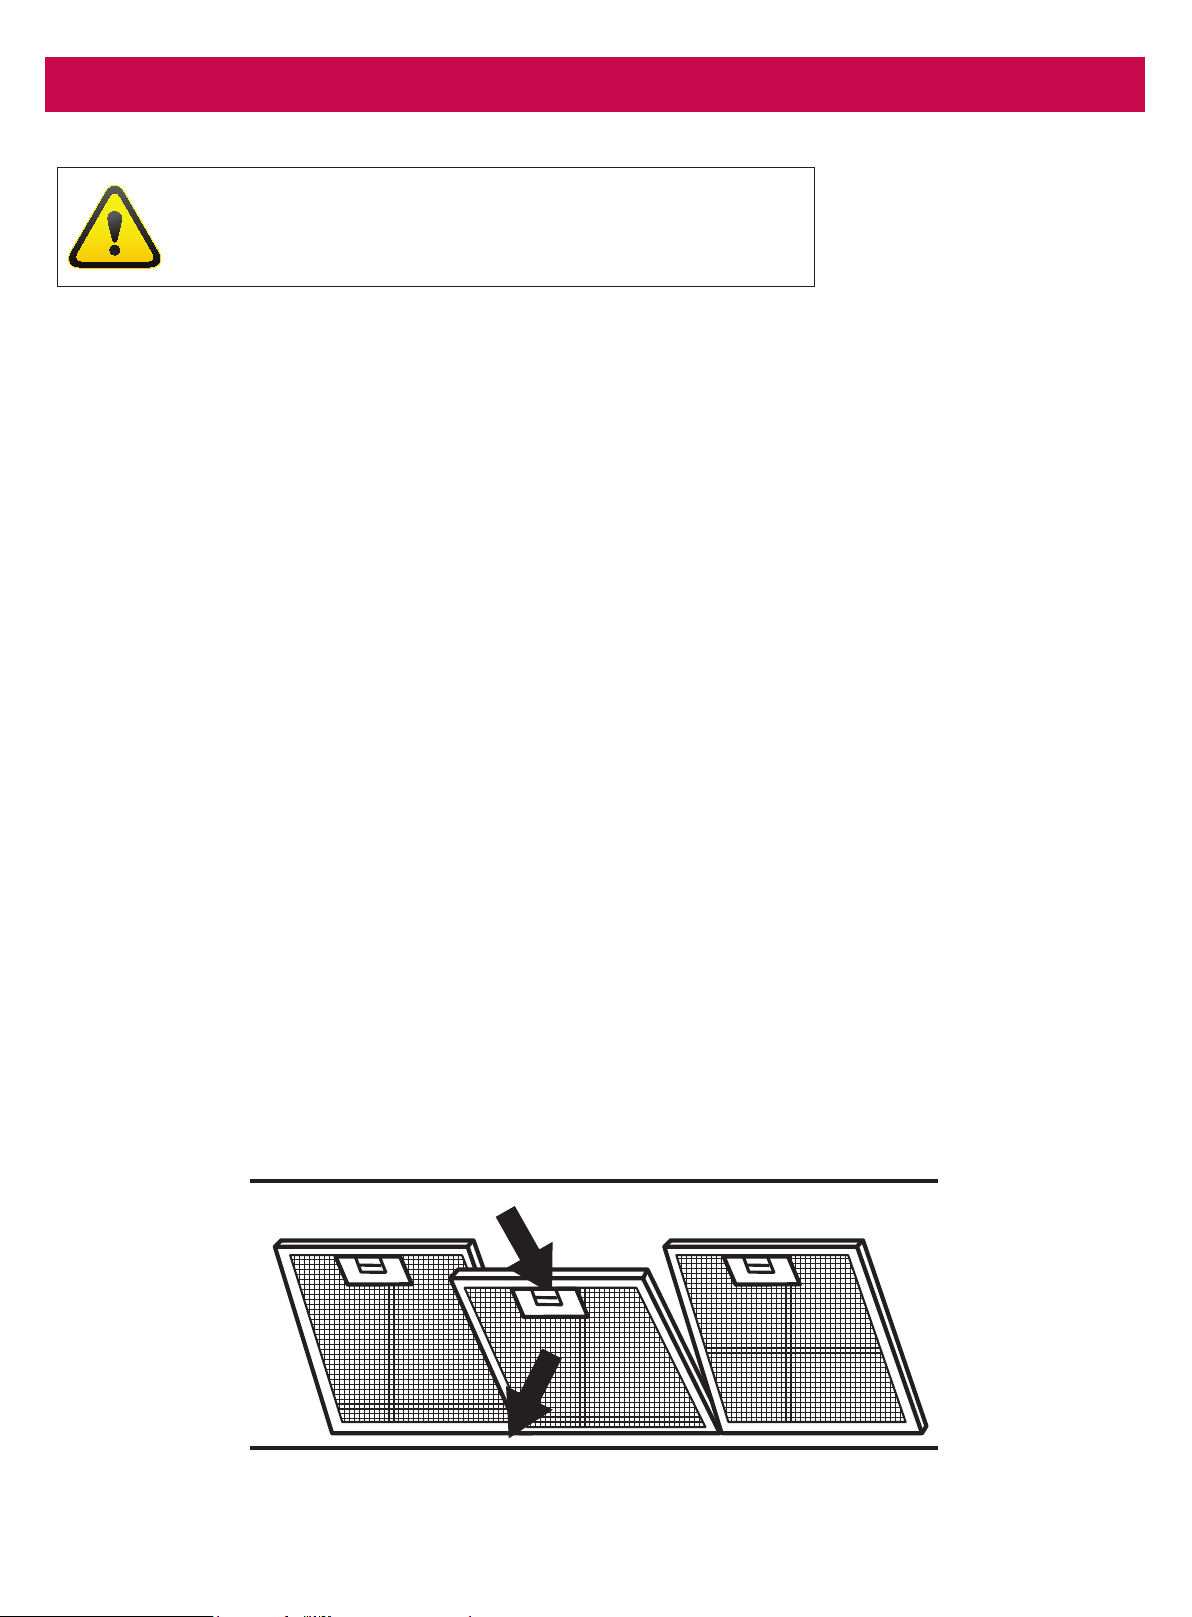
• To remove the lter, press handle and remove it through the front guide; bend it slightly and
remove lter. To replace, perform the same operation but in reverse.
• In ceiling-mounted rangehoods, the doors or glass must be opened before accessing the lters.
• Fo r ind uc tio n c o o kto p , p le a se a im to c le a n the m a t le a st e ve ry 10 d a ys, d e p e nd ing o n use .
• The lters can be washed by hand or in the dishwasher
Wa shing by ha nd - Immerse the lter in hot water and a suitable detergent and when clean, rinse
with p le nty o f ho t wa te r.
Dishwa she r - Put the lter in the dishwasher and select a short program at low temperature.
NO TE: The colour of the metal mesh lters may change after several washes. This is normal and it is
not necessary to change the lters.

Pa g e 11
6. C le a ning & Ma inte na nc e
WARNING
• If the grease lters are very dirty, the motor will extract only a small
quantity of air, which reduces its efciency;
• The grease deposits that build up on the lter are highly ammable and
C O ULD EASILY C ATC H FIRE.
• The manufacturer is exonerated from all responsibility in the event of re
due to poor maintenance of the grease lters.
Cle a ning the Inte rio r
C le a n the inte rio r o f the ra ng e ho o d with a d a mp c lo th a nd a ne utra l d e te rg e nt o r d e na ture d a lc o ho l.
NO TE: Do no t use d e na ture d a lc o ho l o n the e xte rio r o f the ra ng e ho o d . Do no t c le a n the e le c tric
p a rts o r the mo to r with liq uid s o r so lve nts
Pa g e 12
6. C le a ning & Ma inte na nc e
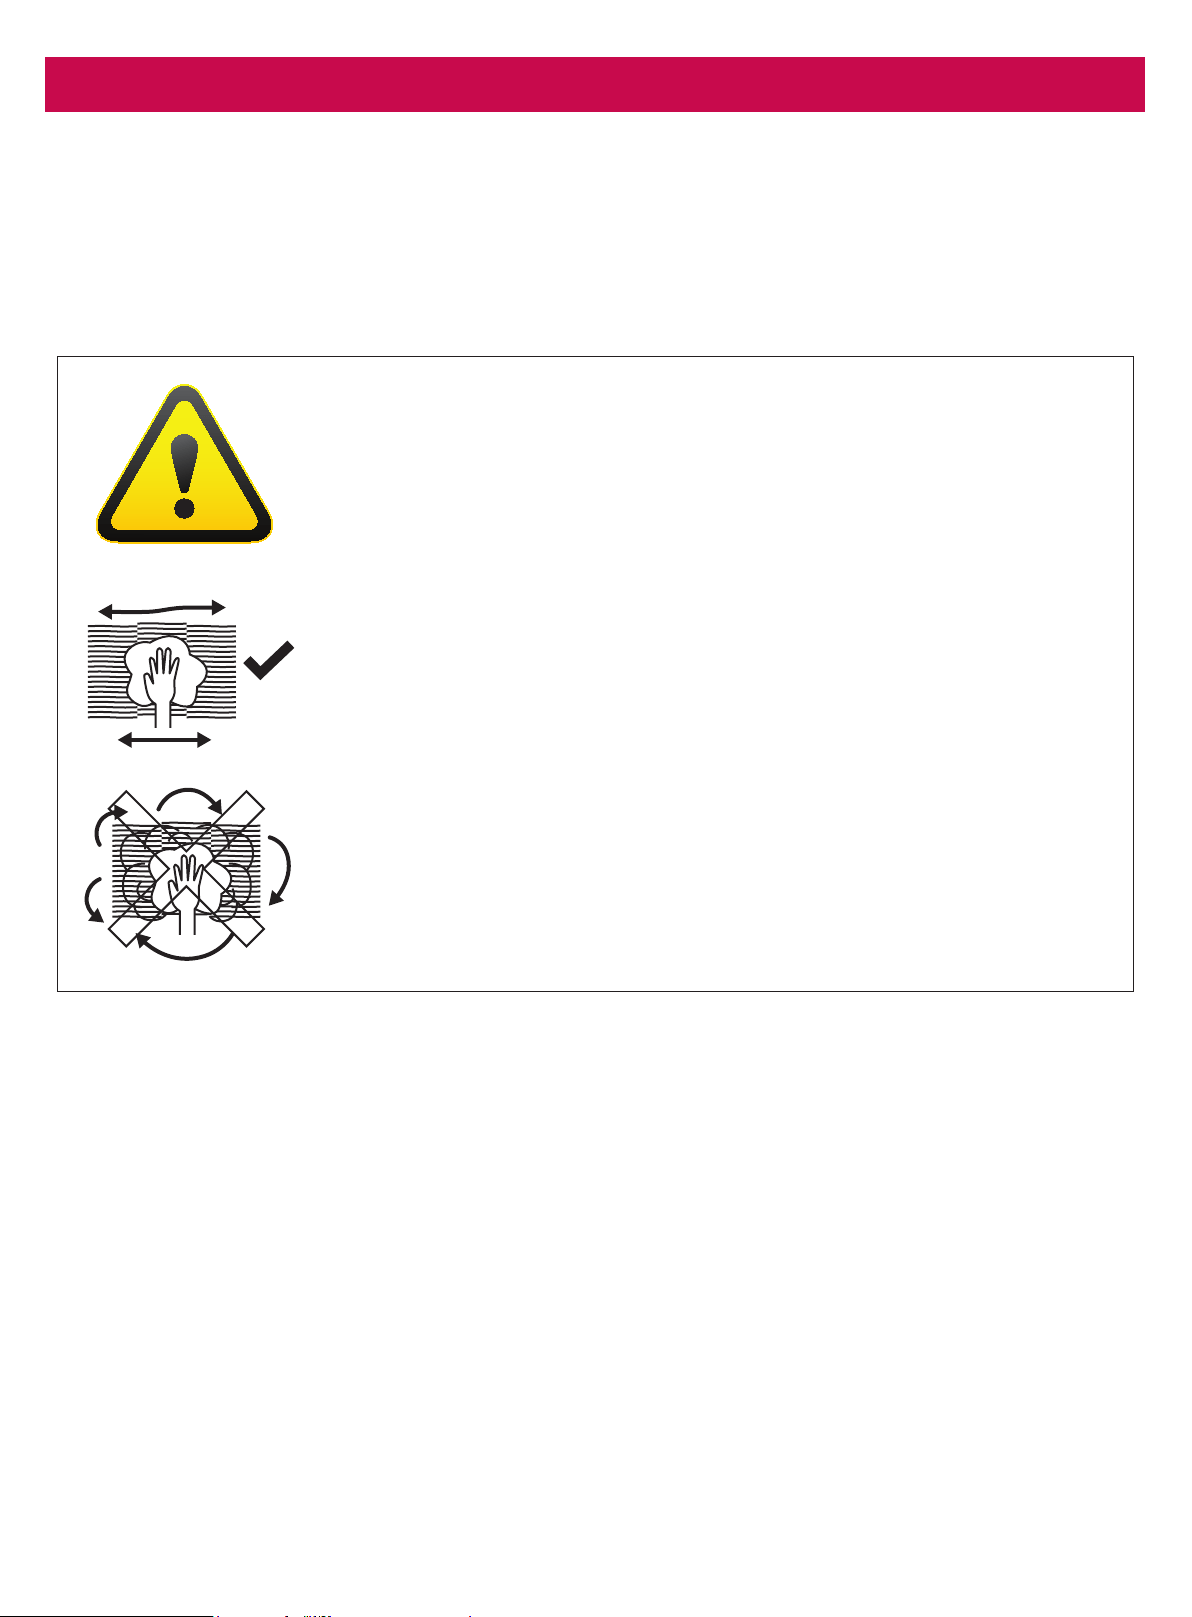
Cle a ning the Exte rio r
We re c o mme nd e d using a so ft c lo th, wa te r a nd a liq uid so a p , rinsing it we ll a nd the n d rying it
tho ro ug hly. Fo r b e tte r re sults, yo u c a n use hig h q ua lity c le a ning a nd p ro te c tio n p ro d uc ts (e g . Ste e l
Kle e n) to c le a n yo ur ra ng e ho o d .
WARNING
• Ma ke sure tha t the e le c tric a l p o we r is o ff.
• The re c o mme nd e d d e te rg e nt is a so lutio n o f wa te r a nd a ne utra l liq uid
so a p .
• It is ve ry imp o rta nt fo r the liq uid so a p to no t c o nta in g ra nule s tha t c o uld
sc ra tc h the surfa c e .
• First a p p ly the so lutio n to a so ft c lo th a nd the n rub the c lo th o ve r the
ra ng e ho o d . It is imp o rta nt to fo llo w the d ire c tio n o f the sta ine d surfa c e
with the cloth (refer to gure on left).
• Do no t p o ur a ny liq uid d ire c tly o n to the ra ng e ho o d .
• The c lo th must ha ve no b utto ns, zip s o r fa ste ne rs tha t c o uld sc ra tc h the
surfa c e .
• It is stric tly fo rb id d e n to use c he mic a l so lve nts, a g g re ssive , g ra iny o r
a b ra sive p ro d uc ts, na p htha , a lc o ho l o r simila r p ro d uc ts tha t c o uld
d a ma g e the surfa c e o f the ra ng e ho o d .
• The ma nufa c ture r will no t b e he ld re sp o nsib le fo r func tio na l o r a e sthe tic
d a ma g e c a use d b y c le a ning with p ro d uc ts whic h a re no t suita b le o r
using ina d e q ua te c le a ning me tho d s.
O K
Pa g e 13
6. C le a ning & Ma inte na nc e
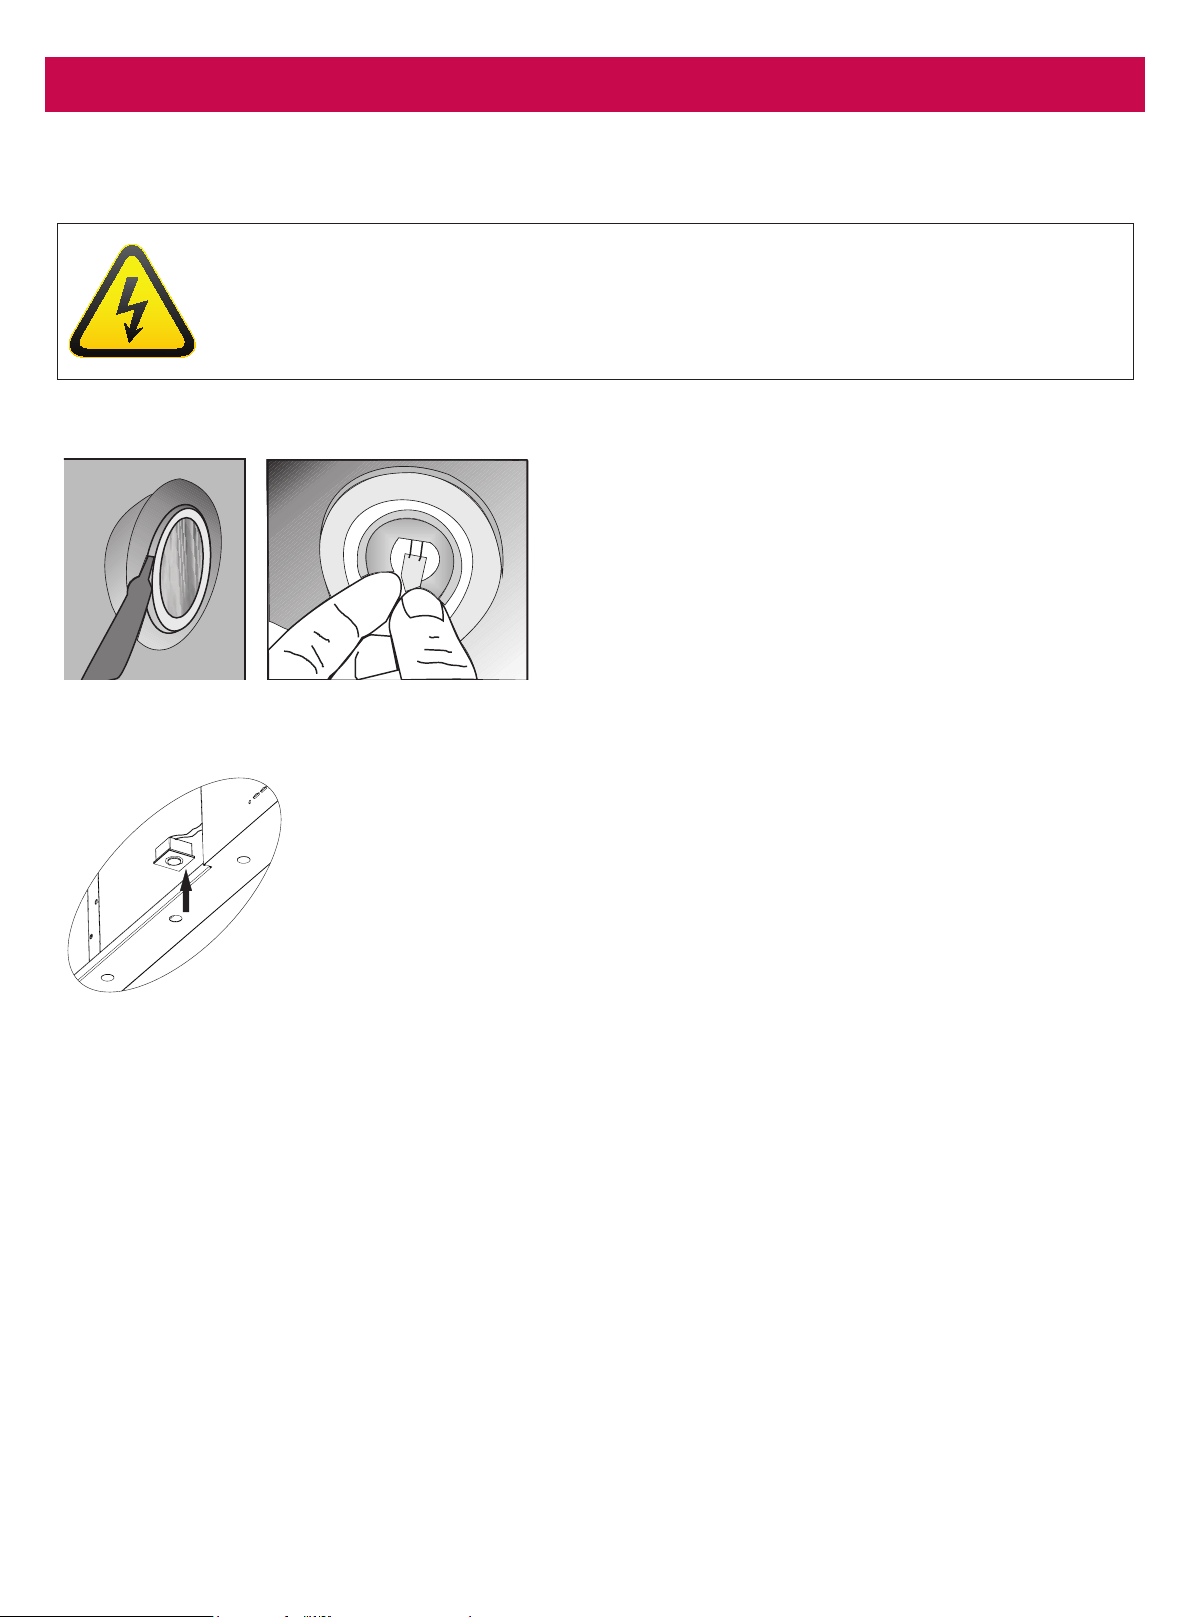
Re pla c ing the LED La m ps
DANG ER
Alwa ys switc h o ff a nd d isc o nne c t p o we r b e fo re re p la c ing the lig hts. Fa ilure to d o
so ma y c a use se rio us injury. Ple a se b e a wa re tha t the lig ht b ulb will re ta in he a t fo r a
sho rt p e rio d o f time a fte r b e ing switc he d o ff.
Disc o nne c t the hoo d fro m m a ins.
• Re mo ve the p o we r c o nne c tio n o f LED la mp .
• Pre ss o n the la mp with yo ur ha nd to re mo ve
the la mp s.
• Re mo ve the a d he sive ta p e a ro und the la mp
fra me fro m the b o d y p la te .
• Be fo re p la c ing the ne w LED b ulb , re mo ve the p ro te c tive fo il o n
the fra me a nd stic k it o n its p o sitio n o n the a p p lia nc e b o d y.
Pa g e 14
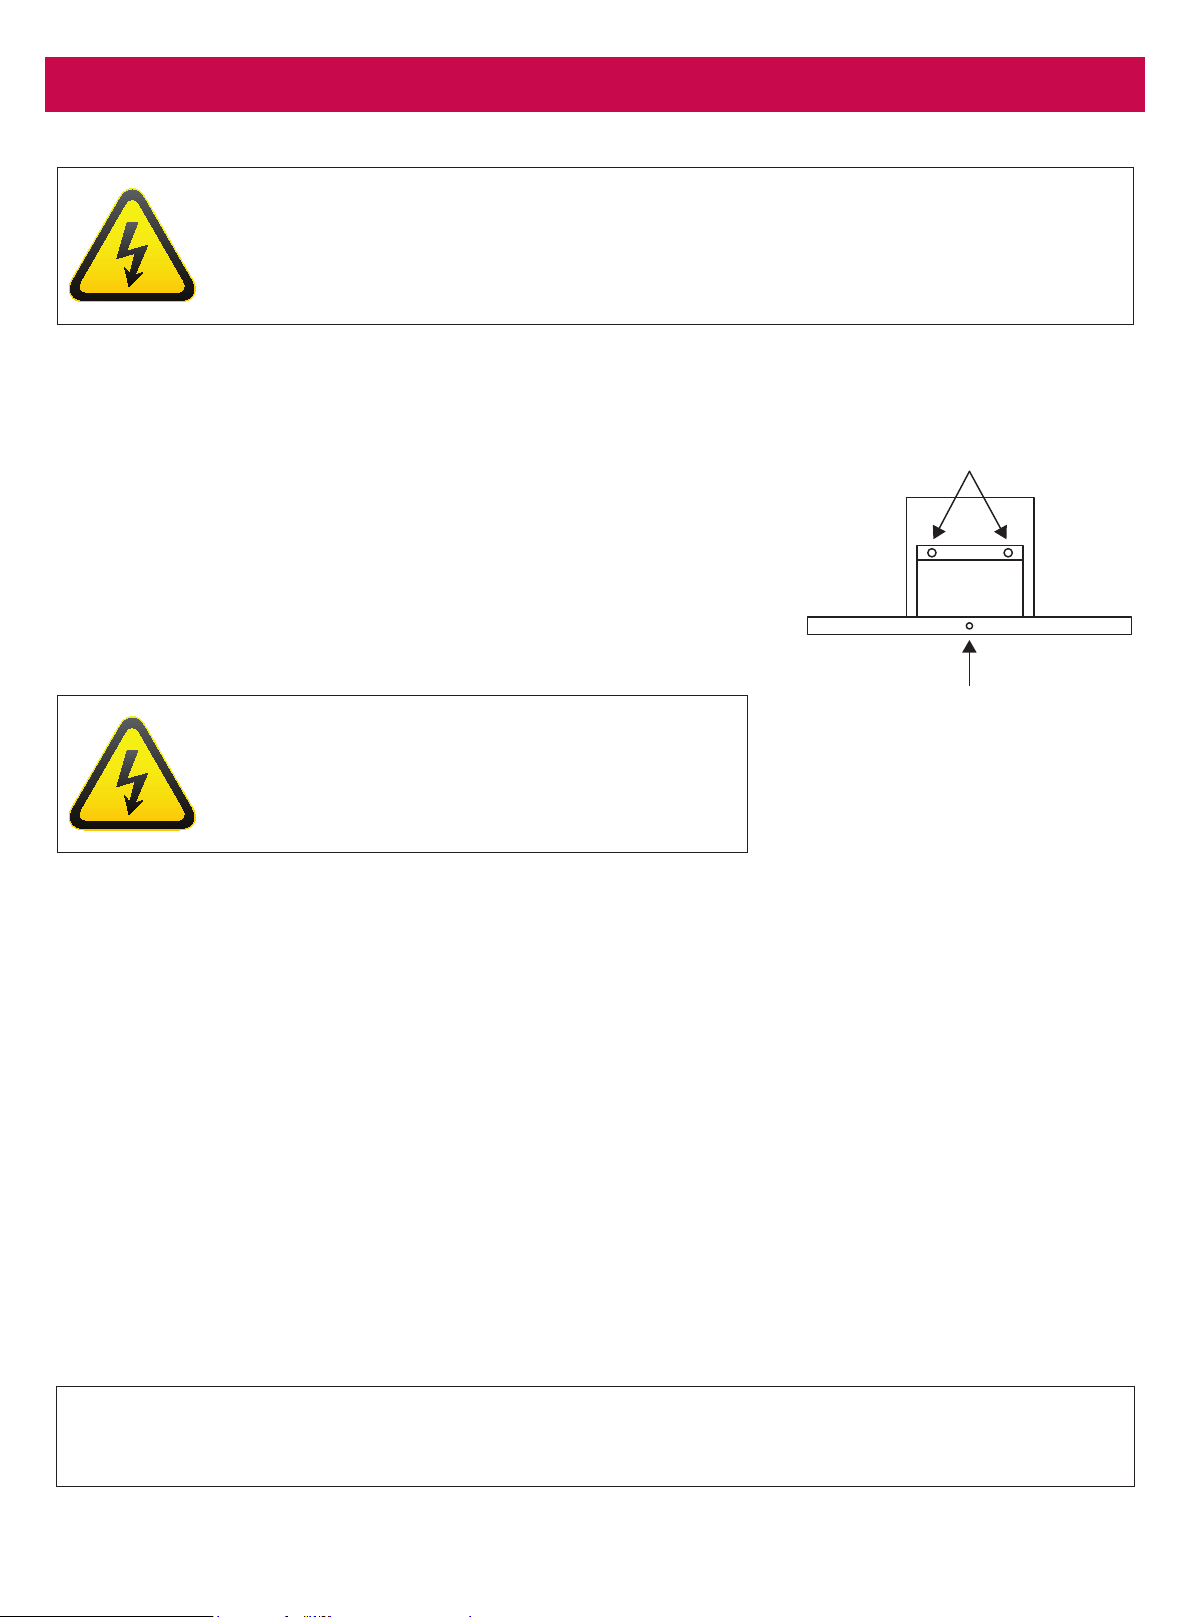
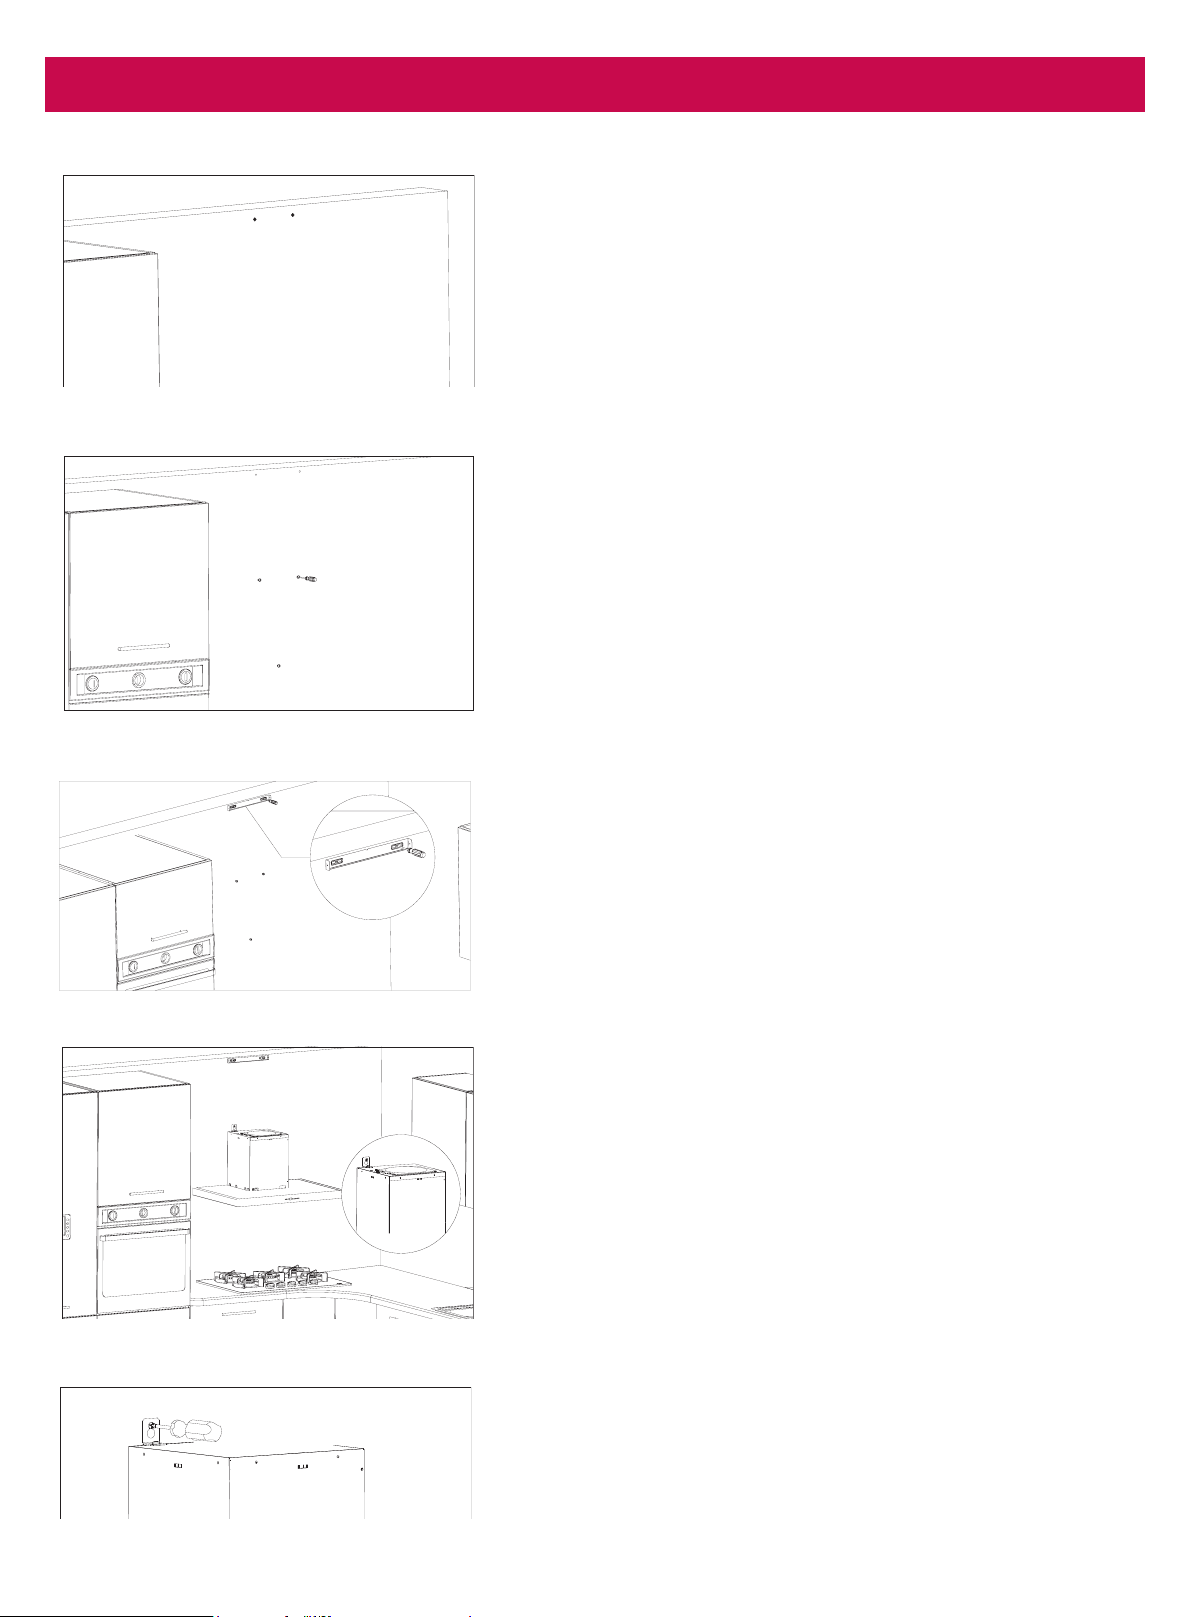
7. Insta lla tio n
DANG ER
Alwa ys switc h o ff a nd d isc o nne c t p o we r b e fo re insta lling the ra ng e ho o d . Fa ilure to
d o so ma y c a use se rio us injury.
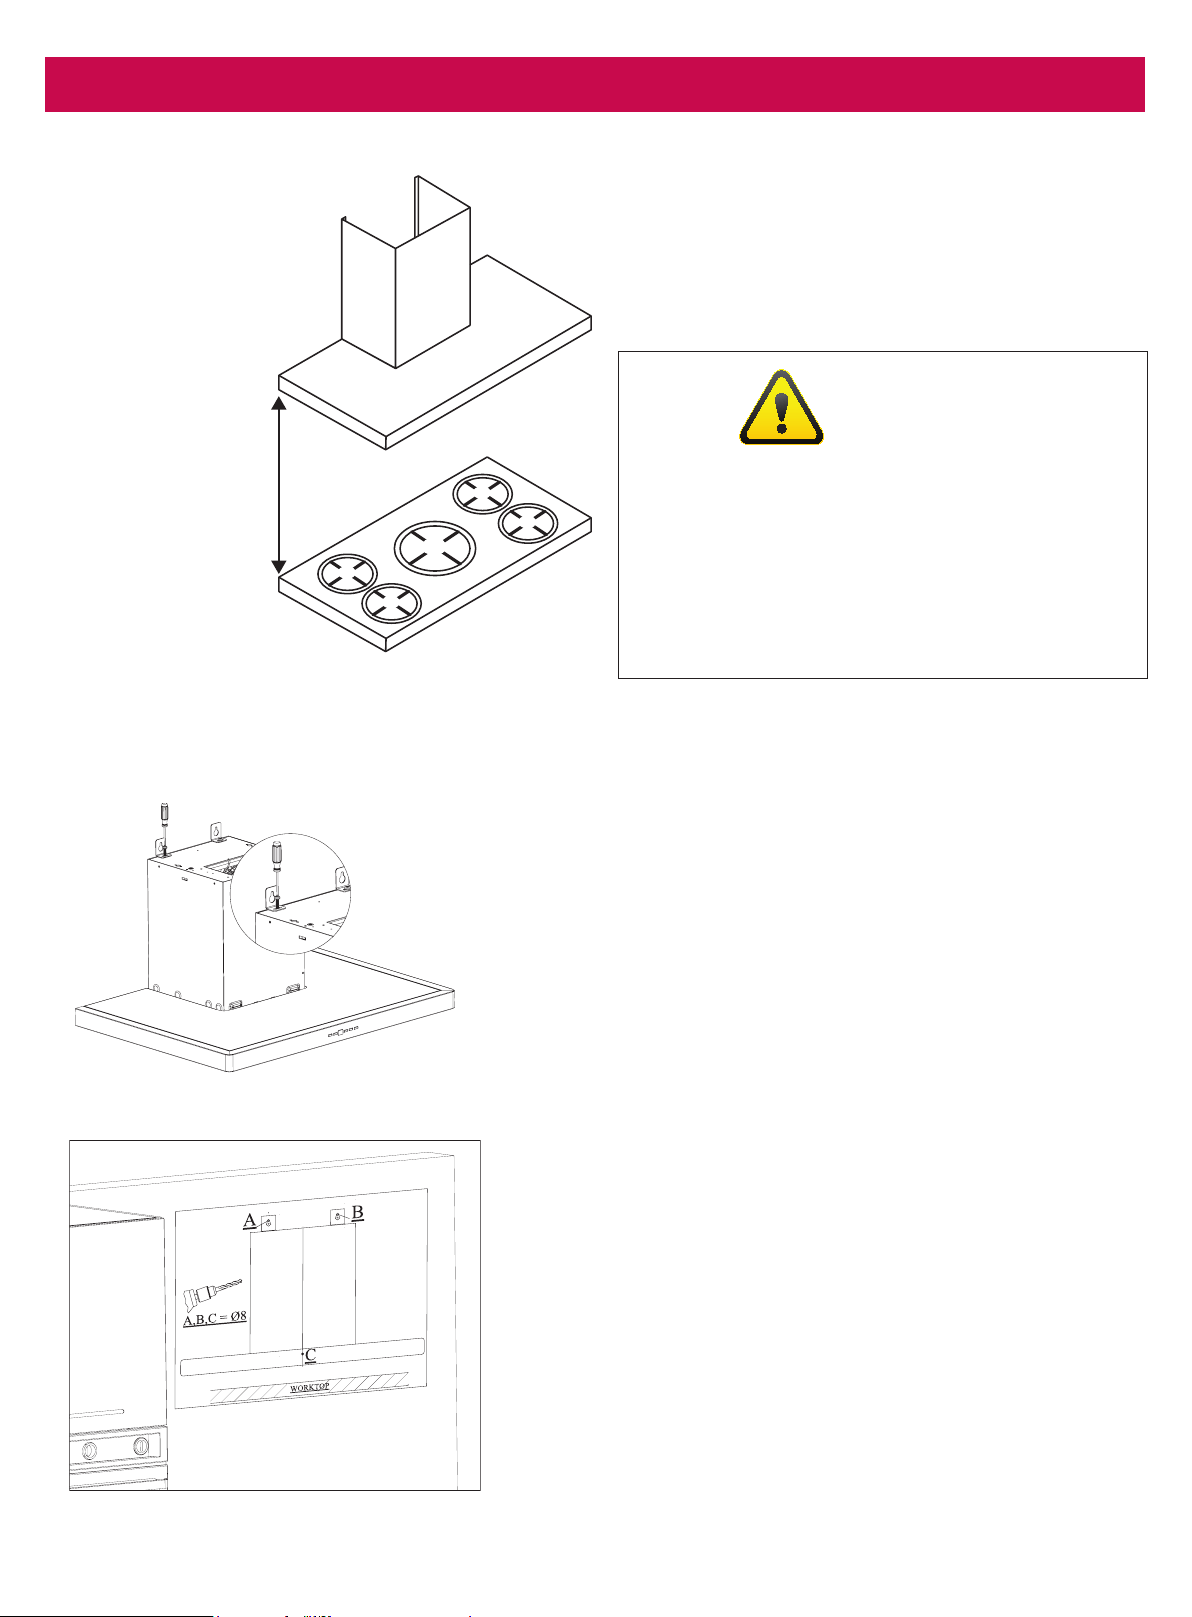
Mo unting La ws a nd Re g ula tio ns
The minimum sa fe ty Insta lla tio n d ista nc e b e twe e n the to p o f a c o o kto p a nd the lo we st p a rt o f the
ra ng e ho o d a re a s fo llo ws:
• Minimum insta lla tio n he ig ht fo r Ele c tric a nd G a s C o o kto p s is 650mm*
• Fo r ra ng e ho o d s 90c m wid e o r la rg e r: Dista nc e s a b o ve 800mm c a n c o mp ro mise the e xtra c tio n
p e rfo rma nc e .
• Fo r 60c m wid e ra ng e ho o d s: Dista nc e s a b o ve 750mm c a n c o mp ro mise the e xtra c tio n
p e rfo rma nc e .
• Sug g e ste d he ig ht a b o ve a Ind uc tio n C o o k to p is 720mm to 800mm.
The lo c a tio n o f the insta lla tio n must ha ve p e rma ne nt o p e ning s fo r ve ntila tio n.
Regulations concerning the expelling of air have to be fullled.
It is stro ng ly re c o mme nd e d tha t the ra ng e ho o d b e insta lle d c e ntra lly o ve r the c o o kto p .
*IMPO RTANT: Ple a se c he c k a ll Sta te a nd Fe de ra l La ws in re la tio n to the m inim um - ma ximum
he ig hts, re g ula tio ns c o nc e rning the e xpe lling o f a ir a nd insta ll yo ur ra ng e hoo d in a c c o rda nc e
with lo c a l la ws a nd re g ula tio ns.
Wa ll Mo unt Insta lla tio n
Eve ry wa ll mo unte d ra ng e ho o d ha s two p rima ry mo unting
points and several secondary mounting points to rmly x the
ra ng e ho o d in its p la c e .
Use suita b le b o lts to mo unt the a p p lia nc e o n a se c ure surfa c e .
Ple a se e nsure tha t the ho le s fo r the two p rima ry mo unting
p o ints a re le ve l b e fo re insta lla tio n.
DANG ER
Alwa ys switc h o ff a nd d isc o nne c t p o we r b e fo re
insta lling the ra ng e ho o d . Fa ilure to d o so ma y
c a use se rio us injury.
Primary mo unting po ints
Se c o nda ry mo unting po int
may diffe r
Pa g e 15
7. Insta lla tio n
Se e Mo unting La ws
a nd Re g ula tio ns
WARNING
If the use r d e c id e s to insta ll the ra ng e ho o d a t
a d ista nc e o f le ss tha n minimum he ig ht a b o ve
the c o o king surfa c e , the c o mp a ny d e c line s
re sp o nsib ility fo r d a ma g e s suffe re d b y the
ra ng e ho o d d ue to e xc e ss he a t o r d a ma g e to
o b je c ts, p e o p le a nd o the rs c a use d d ire c tly o r
indirectly by a malfunction, breakage or re.
Insta lla tio n o f the suspe nsio n pla te to the ho o d:
The re a re 2 (L) sha p e d susp e nsio n p la te s a va ila b le in the
insta lla tio n a c c e sso rie s to susp e nd the a p p lia nc e to the
wa ll. The se p la te s a re sup p lie d with a sc re w se t to p ro vid e
e a se o f insta lla tio n. Sc re w the se p la te s o n M5 d rive nuts o n
the c a b ine ts with M5 x 40 sc re ws b e fo re susp e nd ing the
a p p lia nc e .
Ele c tric G a s
Insta lla tio n Instruc tio ns
Drilling of suspe nsio n ho le s:
Fix the insta lla tio n te mp la te to the surfa c e whe re the ho o d
will b e susp e nd e d a nd d rill ho le s in the p o ints ma rke d with
(A,B,C) using a Ø 8 mm d rill b it.
Ta p 10 mm p la stic d o we ls to the ho le s yo u ha ve d rille d .
Pa g e 16
7. Insta lla tio n
D
E
Drill the D, E points with a Ø 6mm drill bit to screw the ue
insta lla tio n p la te re fe rring to the min. a nd ma x. he ig hts o f
the a p p lia nc e .
Insta ll 6 mm d o we ls to the ho le s yo u ha ve d rille d .
A
B
C
D
E
Tig hte ning the suspe nsio n sc re ws
Tig hte n 5.5x60 susp e nsio n sc re ws to Ø10 mm d o we ls (A,
B) yo u ha ve ta p p e d o n the wa ll. The d ista nc e b e twe e n
sc re w he a d a nd the wa ll will b e 5 mm.
D
E
D
E
Tighten the ue installation plate to the Ø 6 dowels you
ha ve ta p p e d to the wa ll using the 3.9x22 sc re w sup p lie d
with yo ur ho o d .
Suspe nding the Hoo d to the Wa ll:
Ho ld the ho o d fro m its b o d y a nd susp e nd it to the wa ll o n
A and B points using the (L) plates you have xed on the
ho o d c a b ine t b e fo re .
Whe n the susp e nsio n p ro c e d ure is c o mp le te d , tig hte n the
susp e nsio n sc re ws insta lle d to the wa ll with a sc re wd rive r
to p re ve nt mo ving o f the a p p lia nc e .
Pa g e 17
7. Insta lla tio n
After you have xed your hood completely, secure the
b o d y with a sc re w fro m the ho le (C ) insid e the b o d y to
p re ve nt it fro m mo ving .
NO TE: If the ho o d se e ms ske we d , a d just the a lig nme nt o f
the ho o d b y lo o se ning the M5 sc re ws tha t the susp e nsio n
p la te s o n the to p a re insta lle d to .
Insta lla tio n o f a luminum pipe :
Install the exible aluminum pipe to the plastic 200mm
o utle t.
Tighten the inner ue to the ue installation plate secured on the wall from its upper external sides.
Pa g e 18
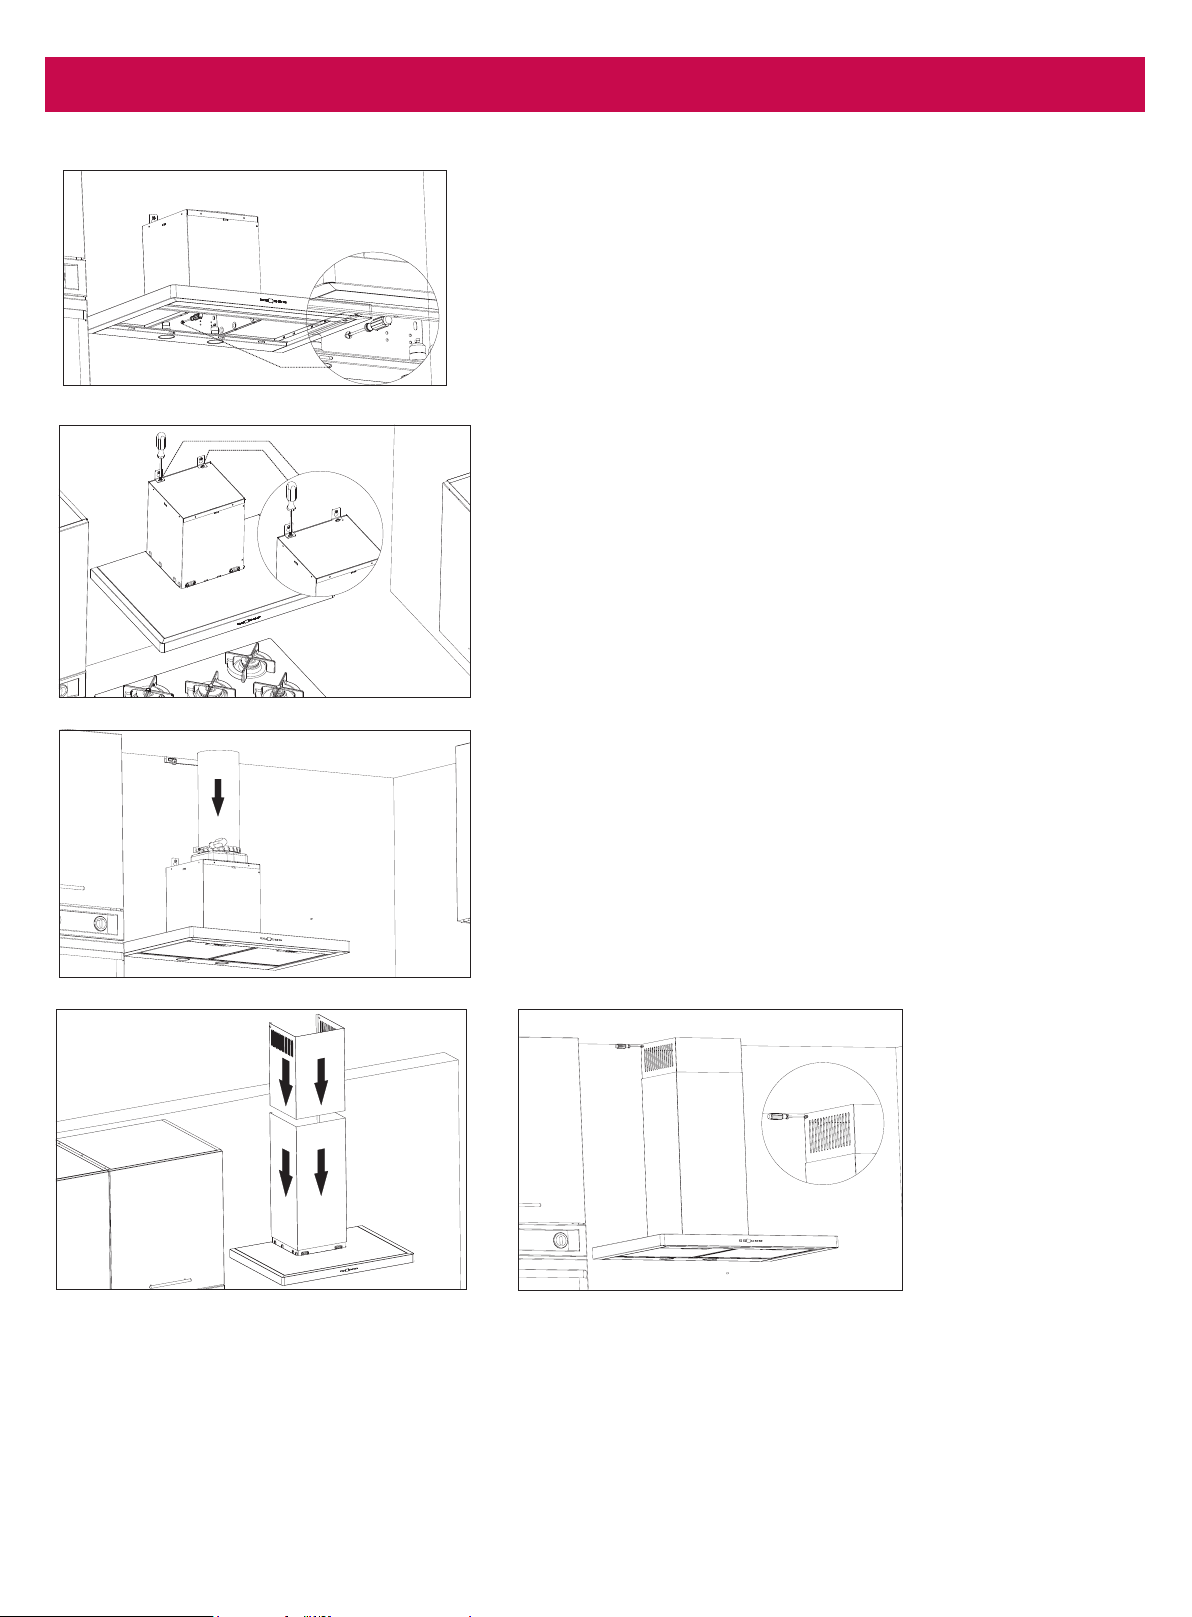
7. Insta lla tio n
O ve rvie w
1
2
3
4
5
6
7
9
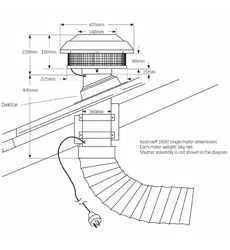
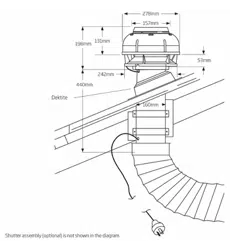
*NO TE: The Iso d rive mo to r syste m d o e s no t inc lud e the ro o f se a l kit, c a b le tie , d uc t ta p e o r the
sup p o rt stra p s. The we a the r shie ld is o nly a va ila b le fo r the Iso d rive 1600 mo to r a nd ne e d s to b e
a tta c he d d ire c tly to the mo to r (1).
Iso d rive Mo to r
1
Ro o f Se a l Kit (De ktite )*
Sup p o rt Stra p s*
Mo to r Po we r Le a d (Ma le Plug )
Ma in Po we r Le a d (Ma le Plug )
Ra ng e ho o d to Mo to r Le a d (Fe ma le Plug )
Fle xi Duc ting must b e p ulle d ta ut. DO NOT
c rush o r kink the d uc ting .
Atta c h Fle xi Duc t to Be ll-Mo uth Ad a p to r
using d uc t ta p e a nd c a b le tie . Ple a se DO
NO T rip the d uc ting .
Connect exi ducting to the outlet on
ra ng e ho o d using d uc t ta p e o r c a b le tie .
Ple a se DO NO T rip the d uc ting .
2
3
5
7
6
8
4
9
WARNING
All e le c tric a l wiring
sho uld b e ke p t insid e
the ro o f sp a c e .
8
Fle xib le Duc ting
For the Isodrive motor, please do not crush or kink exi ducting, as it will reduce air ow and may
c a use no ise to o c c ur thro ug h the syste m. Duc ting ne e d s to b e ke p t ta ut a t a ll time s.
PLEASE REFER TO THE ISO DRIVE MO TO R INSTALLATIO N G UIDE FO R MO RE DETAILS O N FLEXI DUC TING
WITH THE SILENT MO TO R SYSTEM.

Pa g e 19
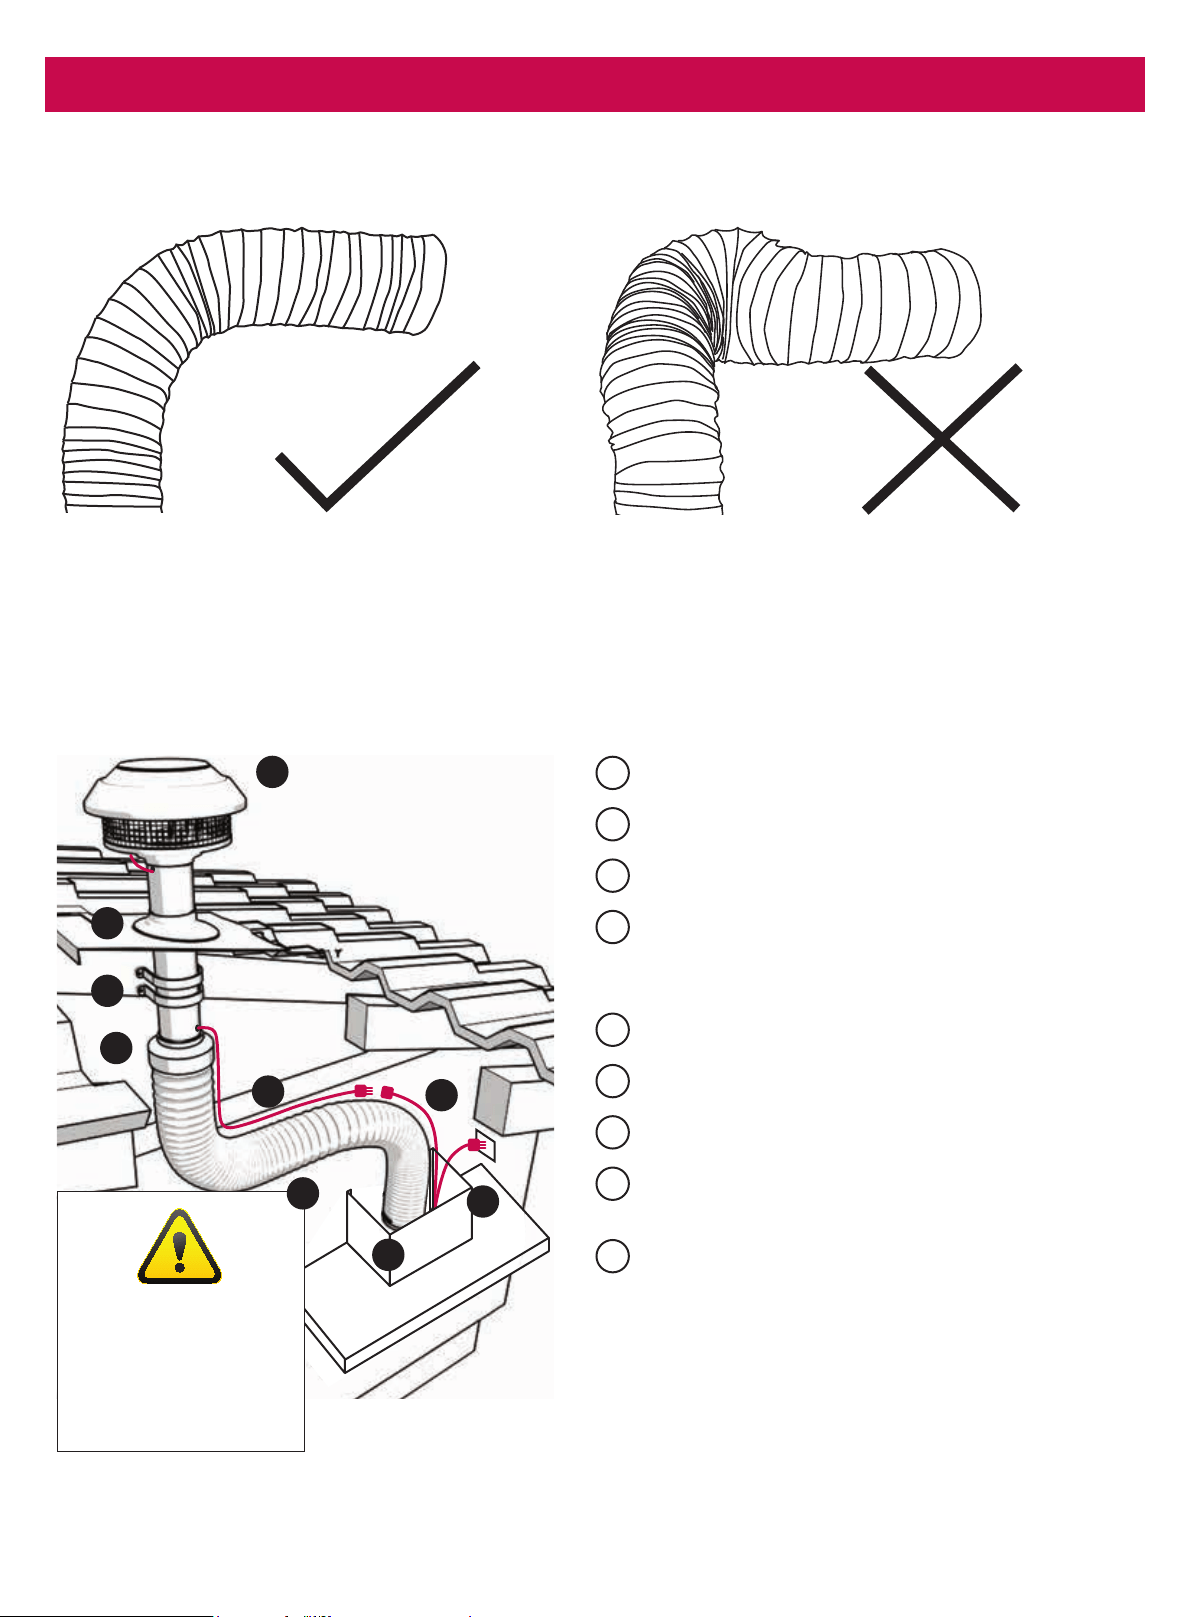
8. Ma inte na nc e
Co nde nsa tio n Info rm a tio n
The induction cooktop is designed to provide rapid heating, improved thermal efciency and greater heat
c o nsiste nc y. Fo r so me c usto me rs with a n ind uc tio n c o o kto p , c o nd e nsa tio n c a n fo rm o n the ir ra ng e ho o d
lters while using their cooktop.
The induction cooktops’ heat source is contained in the conductive base of the pot. When compared with
a g a s, e le c tric o r wo k b urne r, the he a t is no t iso la te d o r c o nta ine d to o ne a re a a nd the re fo re g ra d ua lly
rises up on all sides of the pot or frypan. This combination allows the rangehood lters to warm up slowly
a nd e limina te the fo rma tio n o f c o nd e nsa tio n. Fo r ind uc tio n c o o kto p s, the imme d ia te a nd c o nta ine d he a t
source can produce vapours rapidly. This prevents the lters from gradually warming up and increases the
c ha nc e o f c o nd e nsa tio n fo rming .
The re a re ma ny va ria b le s tha t c a n c o ntrib ute to the c o nd e nsa tio n p ro b le m a sso c ia te d with ind uc tio n
c o o kto p s a nd ra ng e ho o d s. So me o f the se va ria b le s inc lud e , b ut a re no t limite d to :
• The C o untry o r Sta te yo u live in (e xa mp le , WA ve rsus VIC , a nd the va ria b le s in d a ily te mp e ra ture s)
• The p o sitio n o f yo ur ho me a nd kitc he n (mo rning / a fte rno o n sun)
• The q ua lity o f p o ts a nd c o o kwa re yo u a re using
• He ig ht o f ra ng e ho o d
• Ra p id he a ting
• Duc ting a ng le
• Filte r size
If induc tio n, vitro - c e ra m ic hobs a nd the like a re no t use d c o rre c tly, the y c a n le a d to p ro b le ms with the
c o nd e nsa tio n o f liq uid s d ue to te mp e ra ture d iffe re nc e s. Afte r so me time in use , the se c o nd e nse d liq uid s
can build up and possibly appear on the metal lters or the bottom of the rangehood.
Use r a dvic e to a vo id c o nde nsa tio n in the ra ng e ho o d:
• The ra ng e ho o d sho uld b e switc he d o n a p p ro x. 10 minute s p rio r to c o o king a nd the d e la y shut
down timer set after cooking has stopped in order to clear the fumes held in the ue. These steps
will help clear the ue out fully.
• Do no t c o o k a t full p o we r stra ig ht a wa y, i.e . sta rt o n lo w o r me d ium p o we r fo r a while so tha t the
ste e l in the ra ng e ho o d c a n wa rm up .
• Filters must be kept clean. For induction cooktop users, aim to clean lters at least every 10 days,
and replace the lters if their condition begins to deteriorate.
• There must be a constant ow of air into the cooking area to avoid the creation of a depression
whic h c a n a ffe c t the ra te o f a sp ira tio n.
• Fo llo w the a d vic e fro m the instruc tio ns fo r ind uc tio n syste ms with re g a rd s to the c o nd e nsa tio n
e ffe c t.
• Sug g e ste d he ig ht fo r ind uc tio n c o o kto p is a p p ro x. 750mm a b o ve the c o o king surfa c e .
Each person’s circumstances are different, but the vast majority of induction cooktop owners have
ha d no p ro b le ms with c o nd e nsa tio n. Ho we ve r, it is imp o rta nt to und e rsta nd tha t:
Ne ithe r the ra ng e ho o d no r the ind uc tio n c o o kto p a re fa ulty. Tha t in so me c irc umsta nc e s, the
c o mb ina tio n o f the ra ng e ho o d , the ind uc tio n c o o kto p a nd the ma ny va ria b le s within yo ur ho me ,
can lead to condensation forming on your rangehood lters. With a gas or standard electric
c o o kto p , yo u sho uld no t ha ve a ny c o nd e nsa tio n.

Pa g e 20
8. Ma inte na nc e
Tro uble sho o ting
If the pro duc t do e s no t wo rk:
Be fo re yo u c o nta c t the te c hnic a l se rvic e d e p a rtme nt, ma ke sure tha t the p ro d uc t is p lug g e d in,
the e le c tric fuse (o n se le c te d mo d e ls) is in c o rre c tly a nd e le c tric wiring is c o nne c te d . (Fuse s c a n b e
p urc ha se d fro m yo ur lo c a l e le c tric a l d e a le r o r ha rd wa re sto re ). We a k a ir suc tio n ma y b e c a use d b y
back draft ns remaining closed. Do not take any action that will damage the product.
Technical Specications
Mo de l DS3326-9S
Fe e ding Vo lta g e 220-240V 50Hz
C he c k e le c tric c o nne c tio n. Vo lta g e o f the
e le c tric ne two rk sho uld b e b e twe e n 220 -
240V, ra ng e ho o d sho uld b e c o nne c te d to
g ro und e d p lug a nd turne d o n.
C he c k mo to r switc h. Ple a se e nsure tha t
the re is p o we r to the ra ng e ho o d a nd the
ra ng e ho o d is switc he d o n.
C he c k la mp switc h. La mp switc h sho uld b e
a t o n p o sitio n.
Check metal lter. Metal lter should be
washed regularly, see lter cleaning.
Check lamps. Lamps should be rm.
C he c k o utle t. O utle t sho uld b e o p e n.
C he c k la mp s a nd fuse . Ma ke sure the y a re
no t b ro ke n o r fa ulty.
Ple a se m a ke sure the re is no o b struc tio n
in ducting or back draft ns.
C he c k the o utle t, ma ke sure it is no t
b lo c ke d a nd yo u ha ve the c o rre c t
d ia m e te r d uc ting insta lle d .
C he c k Iso d rive insta lla tio n ma nua l, ma ke
sure the exi ducting is installed correctly,
e g . Le ng th o f d uc ting use d , ke e p the
d uc ting ta ut.
Ra ng e ho o d d o e s no t wo rk X X
Lig ht d o e s no t wo rk X X X X
Ra ng e ho o d a ir suc tio n is we a k X X X X
Ra ng e ho o d d o e s no t d ire c t a ir o ut
(thro ug h c himne y)
X X
Lo ud no ise fro m the ra ng e ho o d X X

Pa g e 21
8. Ma inte na nc e
Ca lling the Te c hnic a l Assista nc e Se rvic e Hotline
In the e ve nt tha t the fa ilure is no t d ue to the fa ults me ntio ne d in Tro ub le sho o ting , c o nta c t Te c hnic a l
Se rvic e o n 1300 829 066.
A se rvic e re q ue st will re q uire the fo llo wing info rma tio n:
• The p urc ha se d a te
• The ra ng e ho o d mo d e l a nd mo to r typ e (e g . Iso d rive 650)
• The ra ng e ho o d se ria l numb e r o r b a tc h numb e r (this numb e r is o n a stic ke r insid e the ra ng e ho o d )
Fa ulty Insta lla tio n
It is no t the re sp o nsib ility o f Sc hwe ig e n Ho me Ap p lia nc e s to re c tify a ny inc o rre c t insta lla tio ns. A
se rvic e c a ll o ut fe e will b e c ha rg e d fo r a ny Sc hwe ig e n te c hnic ia n tha t a tte nd s a c a ll, whe re b y
it’s established that the fault is due to an incorrect installation or non-manufacturing fault. Should
the a p p lia nc e b e insta lle d in suc h a wa y tha t the se rvic e a g e nt is una b le to g a in a c c e ss to the
a p p lia nc e , the p e rso n/ s who o wn the p re mise s o r the a p p lia nc e whe re the a p p lia nc e re sid e s — will
b e re sp o nsib le to p ro vid e a c c e ss to the a p p lia nc e a t the ir e xp e nse .
Pa g e 22
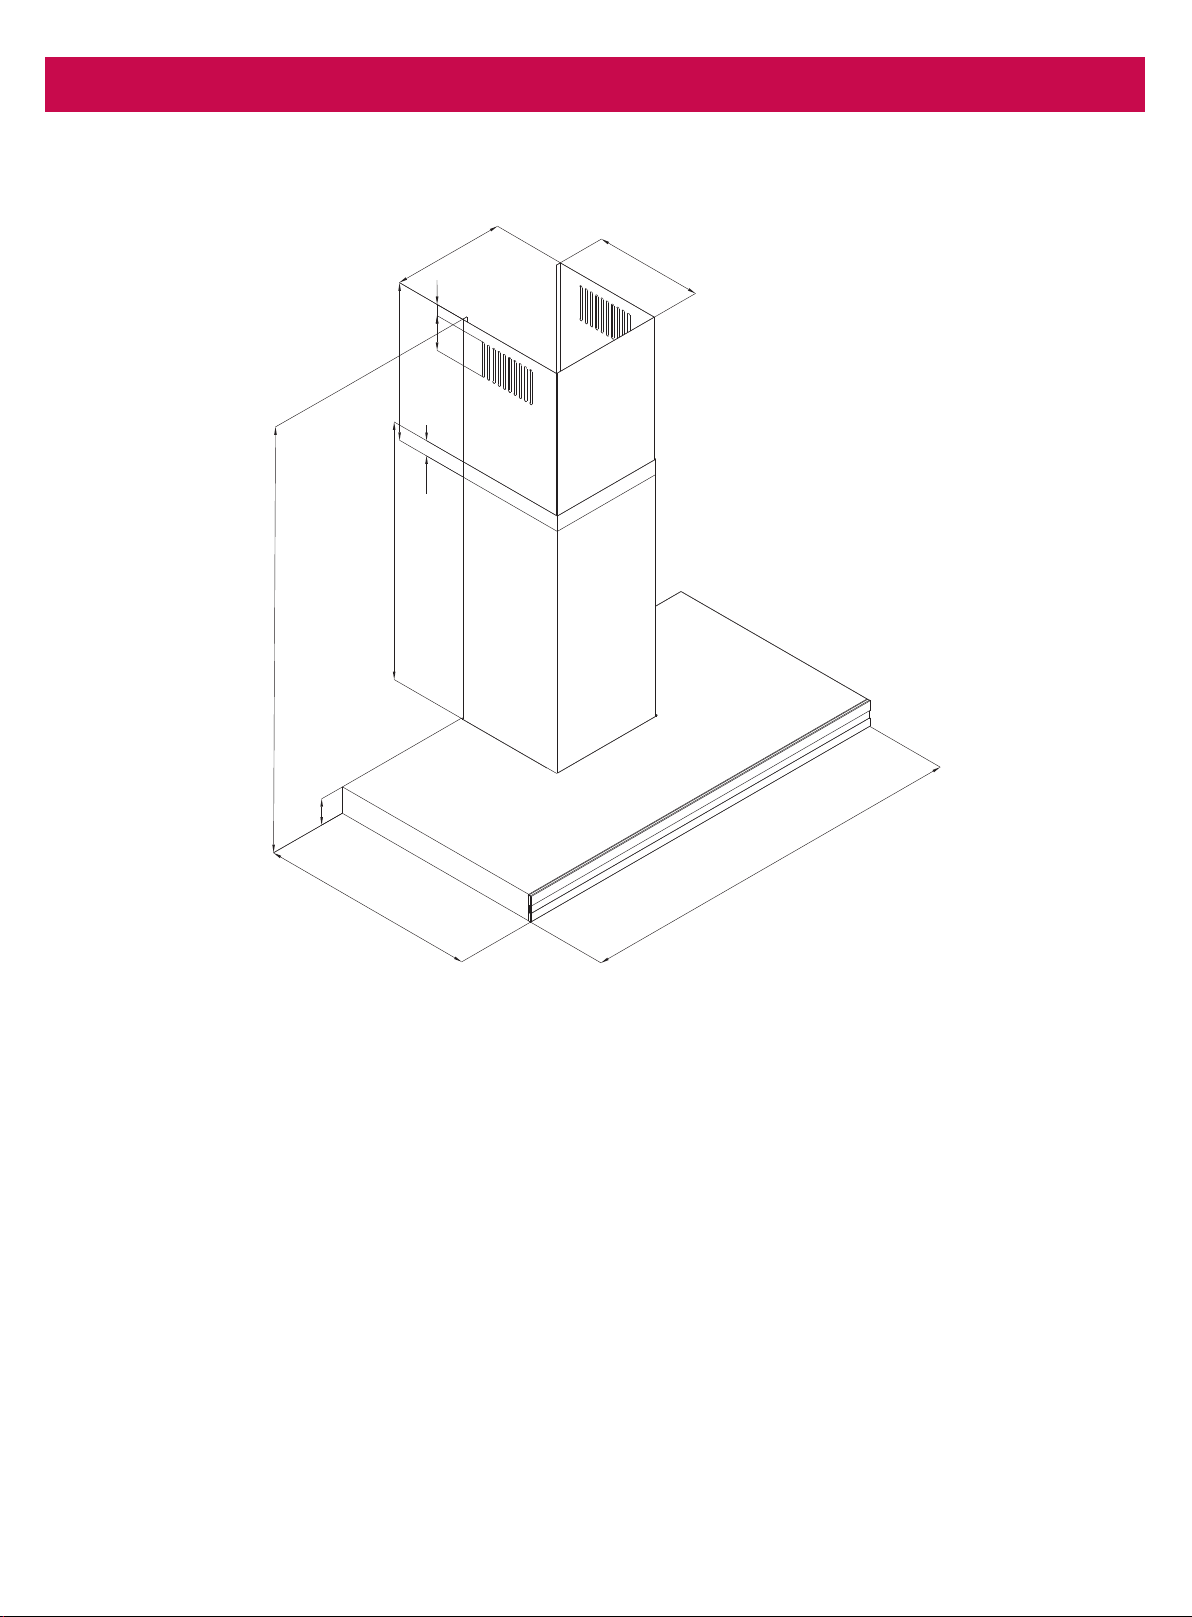
9. Specication
Min 6
47
Ma
x
10
27
50
0
898
60
262
20
80
400
600
20
250
Pa g e 23
10. Disc la ime r
Under our policy of continuous product development, product specications may change without
no tic e . Pro sp e c tive p urc ha se rs sho uld the re fo re c he c k with the re ta ile r to e nsure this p ub lic a tio n
c o rre c tly d e sc rib e s the p ro d uc ts b e ing o ffe re d fo r sa le . All info rma tio n sup p lie d is to b e use d fo r
g e ne ra l re fe re nc e p urp o se s o nly a nd is o n the und e rsta nd ing tha t Sc hwe ig e n Ho me Ap p lia nc e s will
no t b e lia b le fo r a ny lo ss, lia b ility o r d a ma g e o f wha te ve r kind a rising a s a re sult o f a ny re lia nc e up o n
suc h info rma tio n. All p ic ture s use d in the g uid e a re fo r illustra tive p urp o se s o nly.
Although our information and marketing states the term ‘Silent’ for certain models, the following
a p p lie s to va rio us mo d e ls tha t a re so ld with the Iso Drive Syste m. Whe n a mo d e l with the la rg e r
mo to re d Iso Drive Syste m is o p e ra te d a t the hig he r sp e e d / s a ir mo ve me nt ma y b e he a rd . Fo r
e xa mp le , while o p e ra ting o n sp e e d 4 & 5 (Fo r 5 sp e e d mo d e ls) the ra ng e ho o d c a n b e a ud ib le d ue
to the la rg e a mo unt o f a ir mo ve me nt.
*Ple a se ma ke sure tha t the ra ng e ho o d a nd mo to r ha ve b e e n insta lle d a s p e r the instruc tio n g uid e s in
o rd e r fo r o p tima l p e rfo rma nc e .
Sc hwe ig e n Ho me Ap p lia nc e s ha s p re se nte d this info rma tio n in g o o d fa ith to a ll the ir re ta ile rs a nd
d istrib uto rs to c o nve y b e fo re a ny/ a ll p urc ha se / s. Info rma tio n is sup p lie d up o n the c o nd itio n tha t
the p e rso n/ s re c e iving the info rma tio n will ma ke the ir o wn d e te rmina tio n a s to its suita b ility fo r the ir
p urp o se / s p rio r to use . In no e ve nt will Sc hwe ig e n Ho me Ap p lia nc e s b e re sp o nsib le fo r d a ma g e s o f
a ny na ture wha tso e ve r re sulting fro m the use o f, o r re lia nc e up o n, info rma tio n fro m the ir we b site o r
the p ro d uc ts to whic h the info rma tio n re fe rs.
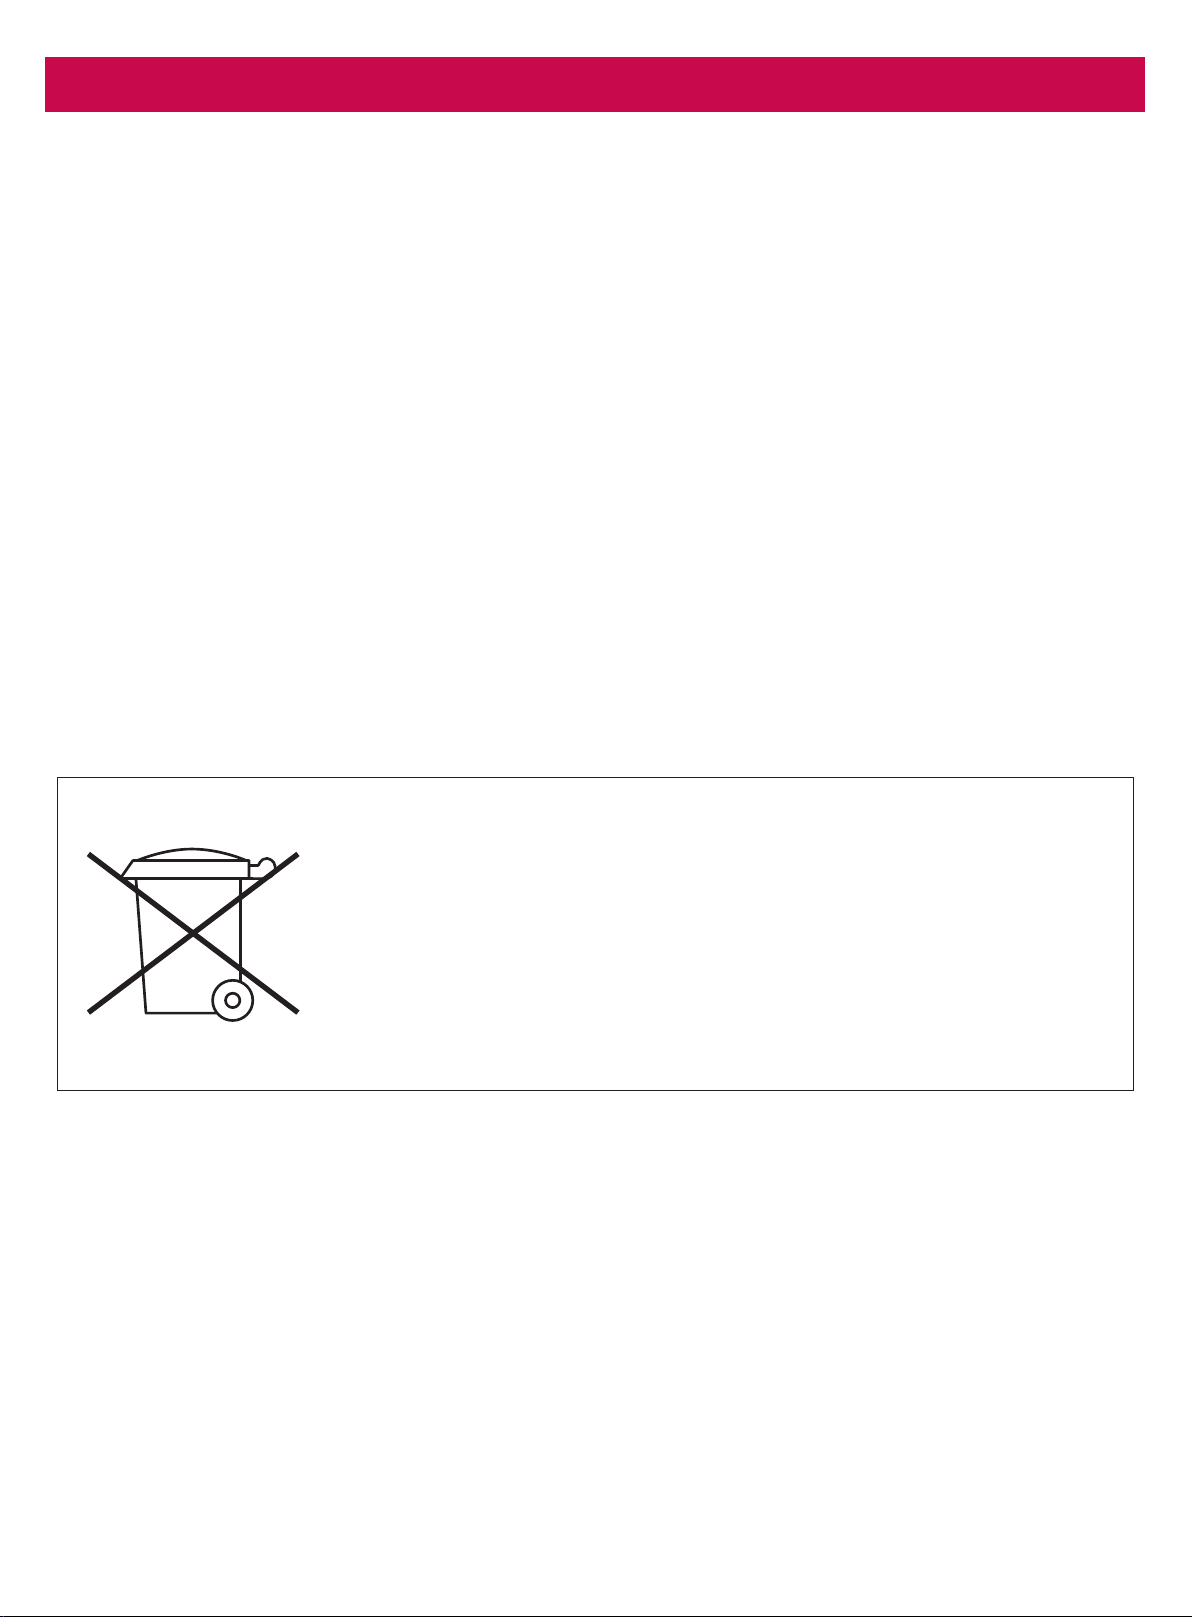
The symb o l o n the p ro d uc t o r its p a c ka g ing ind ic a te s tha t it c a nno t
b e tre a te d a s no rma l ho use ho ld wa ste . Ta ke this p ro d uc t to yo ur
ne a re st e le c tric a l a nd e le c tro nic e q uip me nt wa ste p o int fo r re c yc ling .
By c o rre c tly d isp o sing o f this p ro d uc t, yo u will b e he lp ing to p re ve nt
p o te ntia lly ne g a tive c o nse q ue nc e s fo r the e nviro nme nt a nd p ub lic
he a lth, whic h c o uld a rise if this p ro d uc t is no t ha nd le d in the a p p ro p ria te
wa y. Fo r mo re d e ta ils a b o ut the re c yc ling o f this p ro d uc t p le a se c o nta c t
the a utho ritie s o f yo ur c ity o r to wn, yo ur lo c a l ho use ho ld wa ste se rvic e o r
the sto re whe re yo u p urc ha se d the p ro d uc t.

HOME APPLIANCES
Distrib ute d b y:
Unit 102/ 45 G ilb y Ro a d ,
Mt Wa ve rle y 3149 Vic to ria .
1300 881 693 (EST)
www.sc hwe ig e n.c o m .a u