
GB
1
Contents
Installation, 2-3
Unpacking and levelling
Connecting the electricity and water supplies
The first wash cycle
Technical data
Care and maintenance, 4
Cutting off the water or electricity supply
Cleaning the washing machine
Cleaning the detergent dispenser drawer
Caring for the door and drum of your appliance
Cleaning the pump
Checking the water inlet hose
Precautions and tips, 5
General safety
Disposal
Description of the washing machine
and starting a wash cycle, 6-7
Control panel
Indicator lights
Starting a wash cycle
Wash cycles, 8
Table of wash cycles
Personalisation, 9
Setting the temperature
Setting the spin speed
Functions
Detergents and laundry, 10
Detergent dispenser drawer
Preparing the laundry
Garments requiring special care
Load balancing system
Troubleshooting, 11
Service, 12
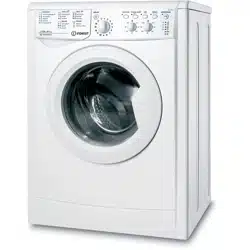
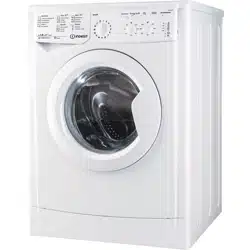
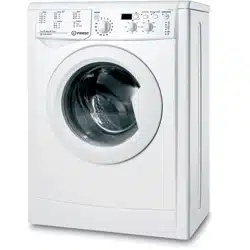
IWC 61251
Instructions for use
WASHING MACHINE
English,1
GB
ES
IT
Italiano, 25
PT
Español,13
SR
Português,37
српски,49
DE
Deutsch,61

2
GB
Installation
! This instruction manual should be kept in a safe
place for future reference. If the washing machine
is sold, transferred or moved, make sure that the
instruction manual remains with the machine so
that the new owner is able to familiarise himself/
herself with its operation and features.
! Read these instructions carefully: they contain
vital information relating to the safe installation
and operation of the appliance.
Unpacking and levelling
Unpacking
1. Remove the washing machine from its packaging.
2. Make sure that the washing machine has not
been damaged during the transportation process.
If it has been damaged, contact the retailer and do
not proceed any further with the installation process.
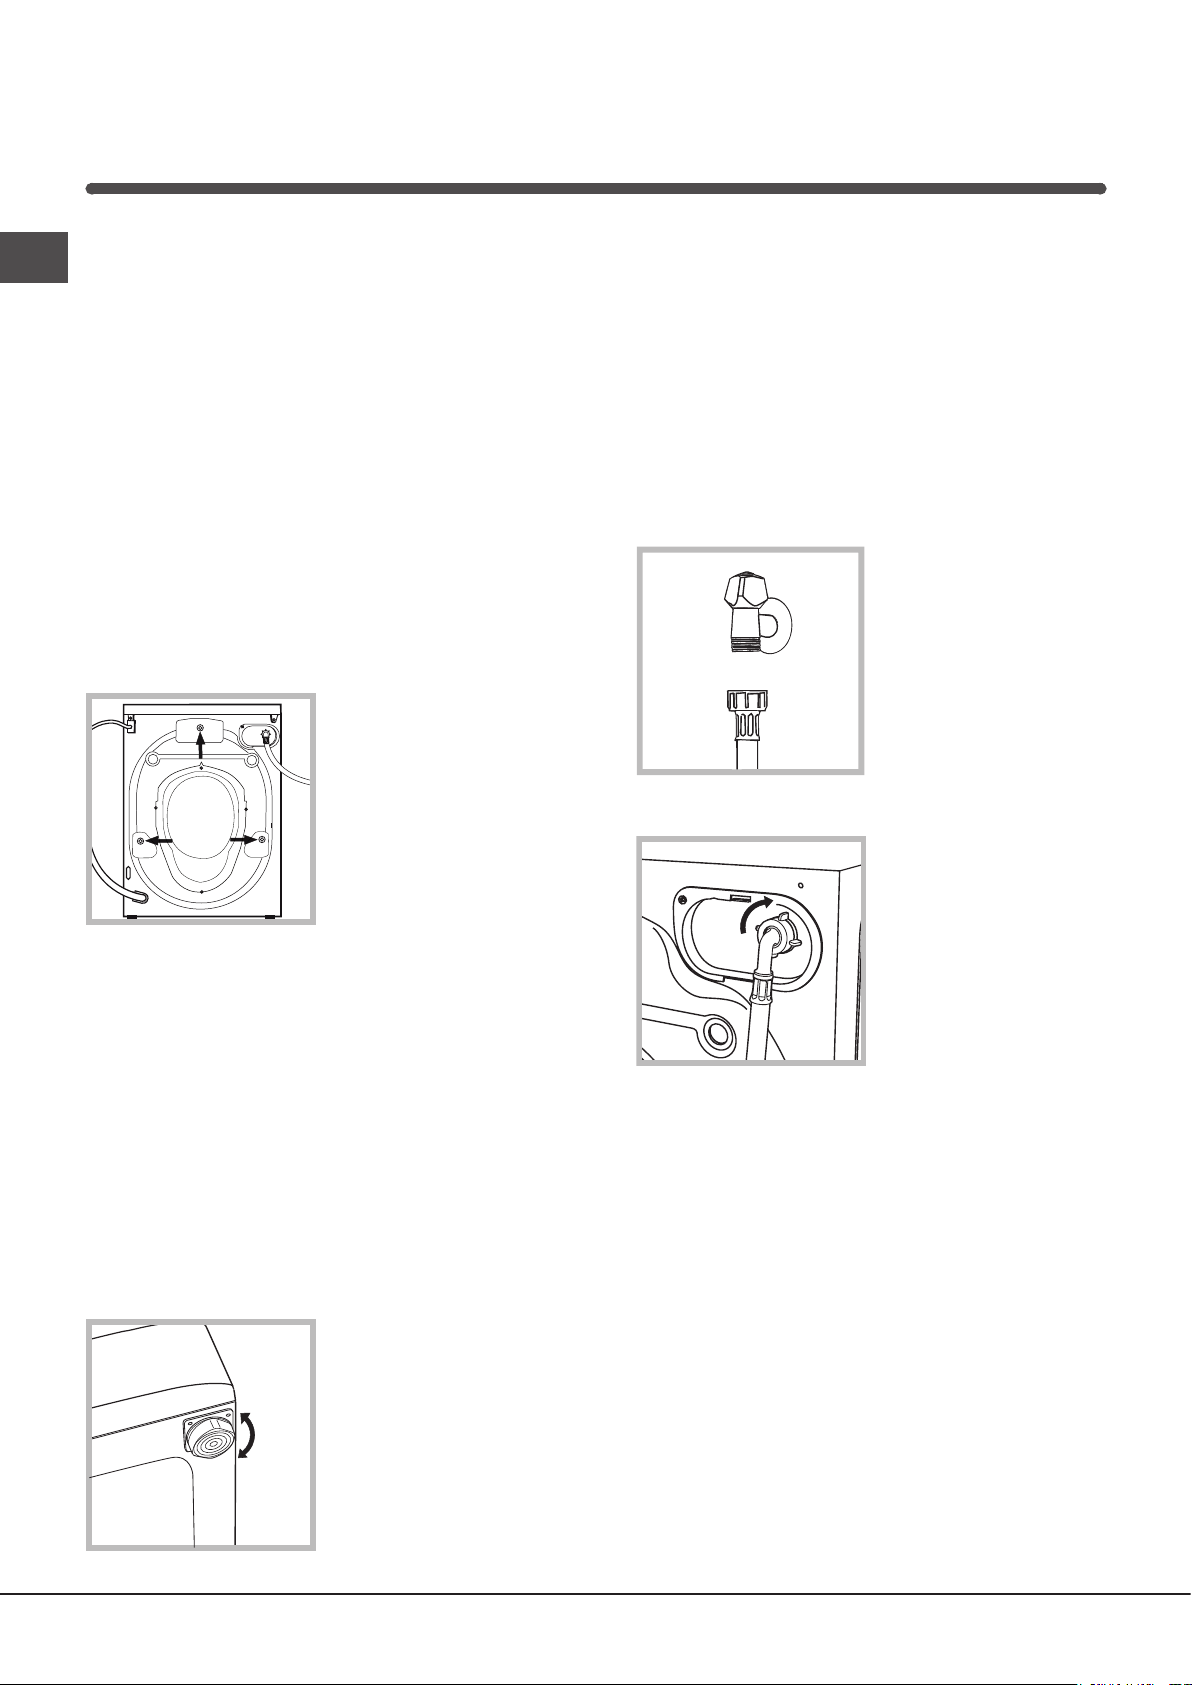
3. Remove the 3 pro-
tective screws (used
during transportation)
and the rubber washer
with the corresponding
spacer, located on the
rear part of the applian-
ce (see figure).
4. Close off the holes using the plastic plugs
provided.
5. Keep all the parts in a safe place: you will need
them again if the washing machine needs to be
moved to another location.
! Packaging materials should not be used as
toys for children.
Levelling
1. Install the washing machine on a flat sturdy
floor, without resting it up against walls, furniture
cabinets or anything else.
2. If the floor is not per-
fectly level, compensa-
te for any unevenness
by tightening or loo-
sening the adjustable
front feet (see figure);
the angle of inclination,
measured in relation to
the worktop, must not
exceed 2°.
Levelling the machine correctly will provide it with
stability, help to avoid vibrations and excessive
noise and prevent it from shifting while it is ope-
rating. If it is placed on carpet or a rug, adjust the
feet in such a way as to allow a sufficient venti-
lation space underneath the washing machine.
Connecting the electricity and wa-
ter supplies
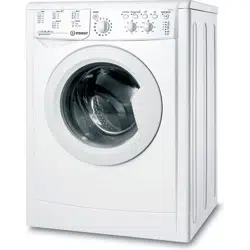
Connecting the water inlet hose
1. Connect the supply
pipe by screwing it to
a cold water tap using
a ¾ gas threaded con-
nection (see figure).
Before performing the
connection, allow the
water to run freely until
it is perfectly clear.
2. Connect the inlet
hose to the washing
machine by screwing
it onto the correspon-
ding water inlet of the
appliance, which is si-
tuated on the top right-
hand side of the rear
part of the appliance
(see figure).
3. Make sure that the hose is not folded over
or bent.
! The water pressure at the tap must fall within
the values indicated in the Technical details table
(see next page).
! If the inlet hose is not long enough, contact a
specialised shop or an authorised technician.
! Never use second-hand hoses.
! Use the ones supplied with the machine.
GB
3
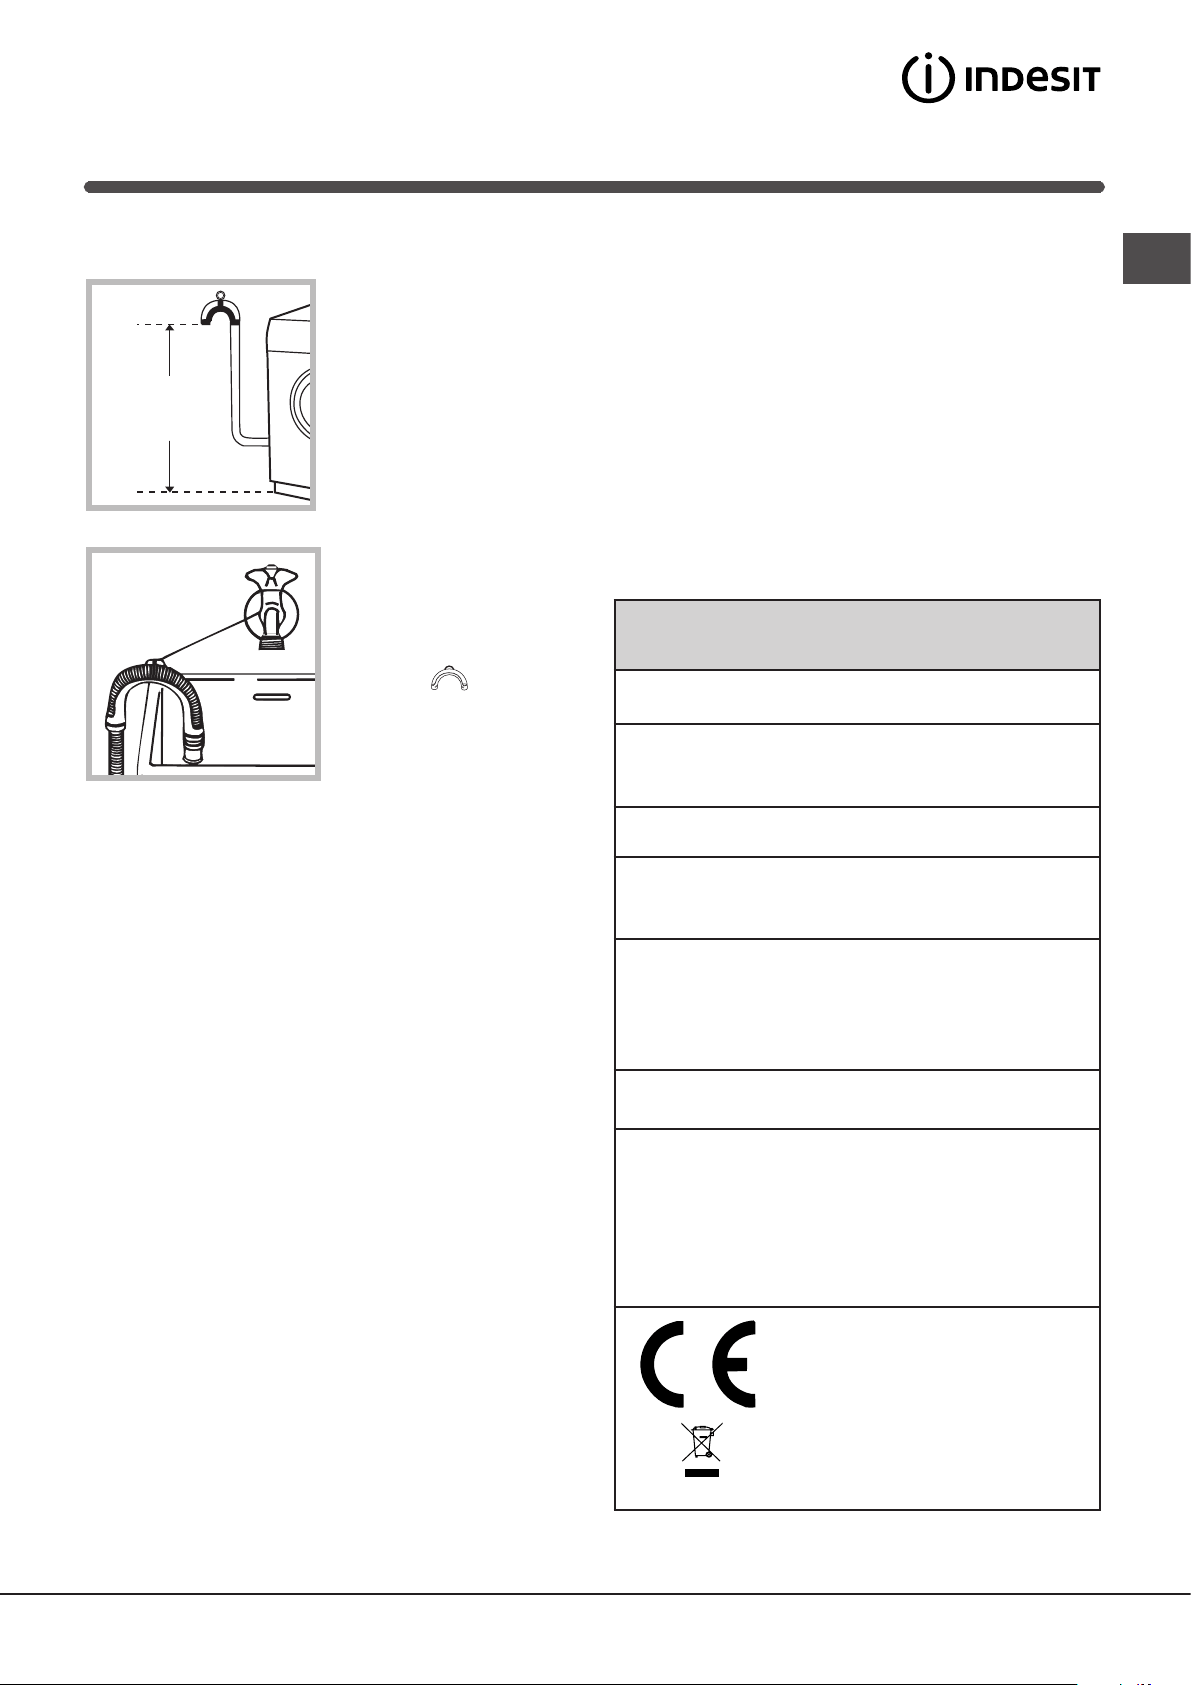
Connecting the drain hose
Connect the drain
hose, without bending
it, to a drainage duct or
a wall drain located at a
height between 65 and
100 cm from the floor.
Alternatively, place the
drain hose over the
edge of a washbasin
or bathtub, by faste-
ning the guide
(which can be purcha-
sed at the technical
assistance centre) to
the tap (see figure).
The free end of the
hose should not be
underwater.
! We advise against the use of hose extensions;
if it is absolutely necessary, the extension must
have the same diameter as the original hose and
must not exceed 150 cm in length.
Electrical connections
Before plugging the appliance into the electricity
socket, make sure that:
•thesocket is earthedandcomplies withall
applicable laws;
•thesocketisabletowithstandthemaximum
power load of the appliance as indicated in the
Technical data table (see opposite);
•thepowersupplyvoltagefallswithinthevalues
indicated in the Technical data table (see opposite);
•thesocketiscompatiblewiththeplugofthe
washing machine. If this is not the case, repla-
ce the socket or the plug.
! The washing machine must not be installed
outdoors, even in covered areas. It is extremely
dangerous to leave the appliance exposed to
rain, storms and other weather conditions.
65 - 100 cm
! When the washing machine has been installed,
the electricity socket must be within easy reach.
! Do not use extension cords or multiple sockets.
! The cable should not be bent or compressed.
! The power supply cable must only be replaced
by authorised technicians.
Warning! The company shall not be held responsible
in the event that these regulations are not respected.
The first wash cycle
Once the appliance has been installed, and
before you use it for the first time, run a wash
cycle with detergent and no laundry, using the
wash cycle 2.
Technical data
Model
IWC 61251
Dimensions
width 59.5 cm
height 85 cm
depth 51,7 cm
Capacity
from 1 to 6 kg
Electrical
connections
please refer to the technical
data plate fixed to the machine
Water
connection
maximum pressure
1 MPa (10 bar)
minimum pressure
0.05 MPa (0.5 bar)
drum capacity 46 litres
Spin speed
up to 1200 rotations per minute
Test wash
cycles in
accordan-
ce with
regulation
1061/2010
and
1015/2010
Programme 2:
Cotton standard 60°C.
Programme 3:
Cotton standard 40°C.
This appliance conforms to
the following EC Directives:
- EMC 2014/30/EU (Electro-
magnetic Compatibility)
- 2012/19/EU - (WEEE)
- LVD 2014/35/EU Low
Voltage)
4
GB
Care and maintenance
Cutting off the water and electri-
city supplies
•Turnoffthewatertapaftereverywashcycle.
This will limit wear on the hydraulic system
inside the washing machine and help to pre-
vent leaks.
•Unplugthewashingmachinewhencleaning
it and during all maintenance work.
Cleaning the washing machine
The outer parts and rubber components of the
appliance can be cleaned using a soft cloth
soaked in lukewarm soapy water. Do not use
solvents or abrasives.
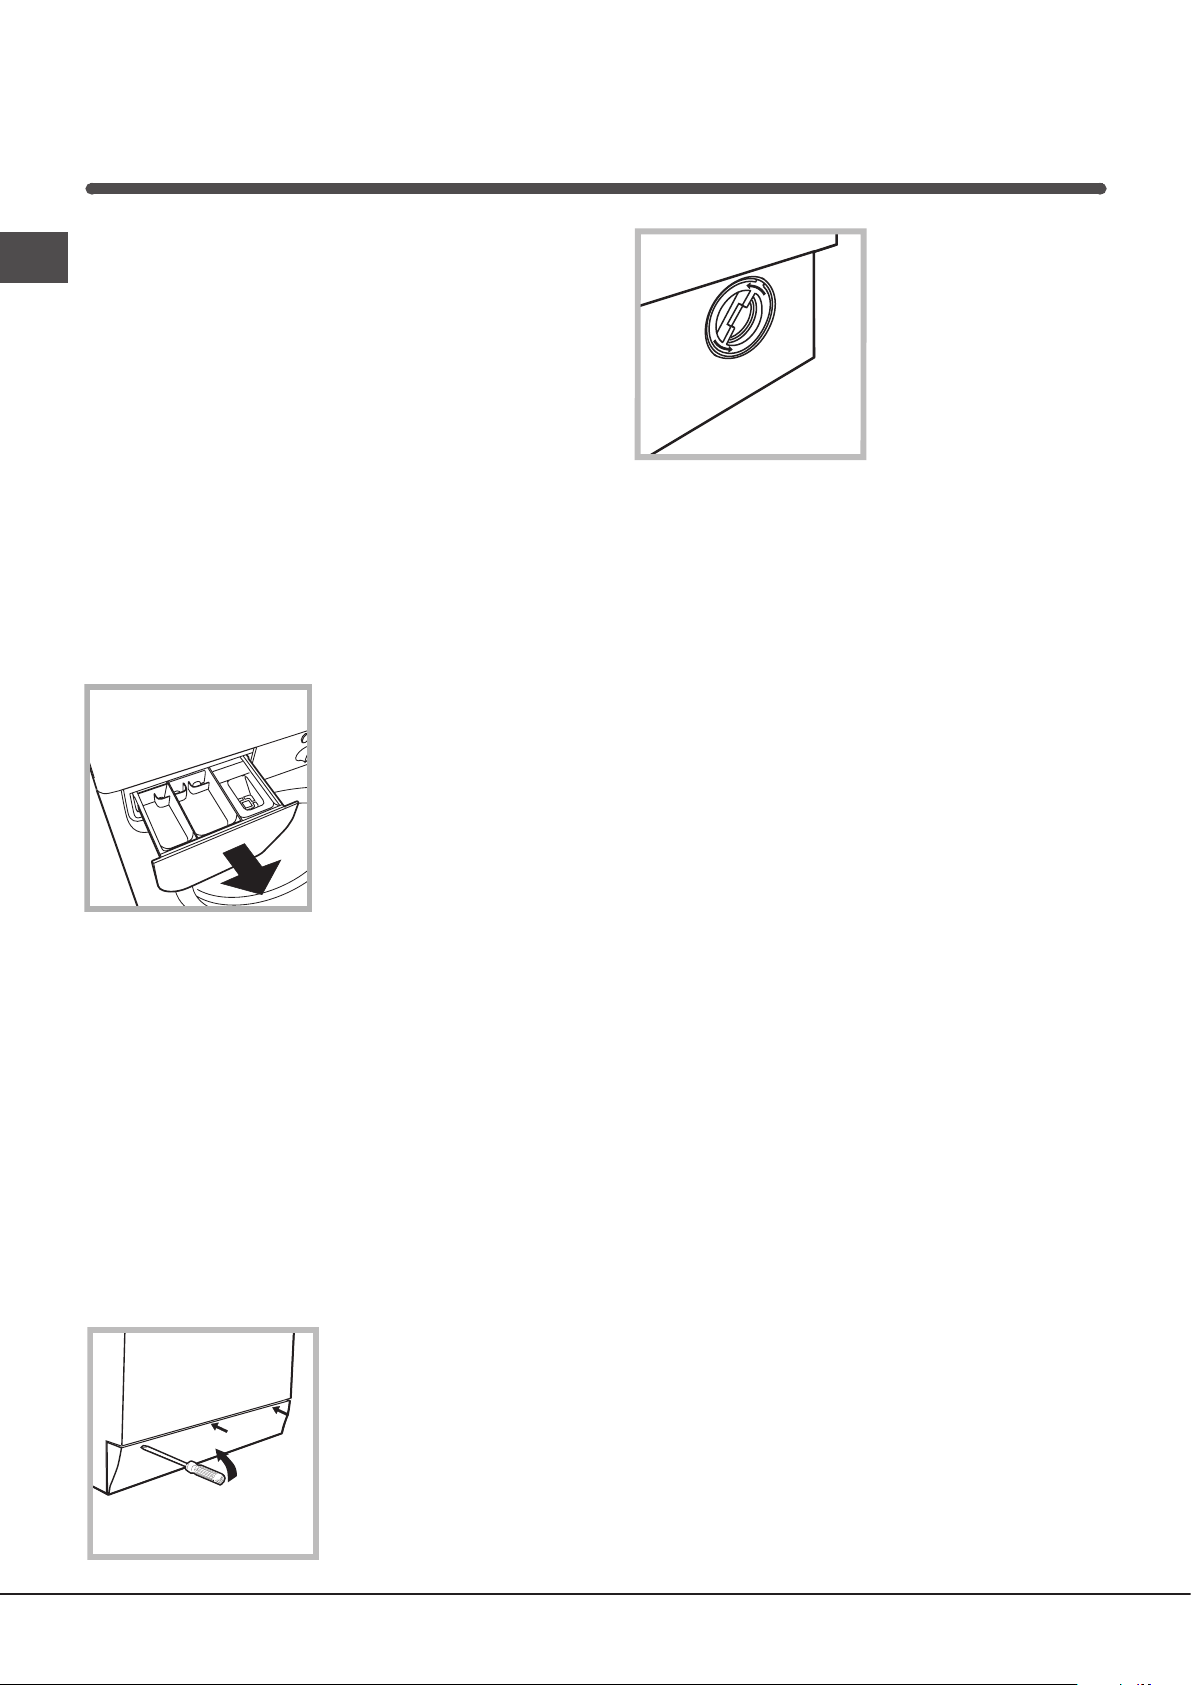
Cleaning the detergent dispenser
drawer
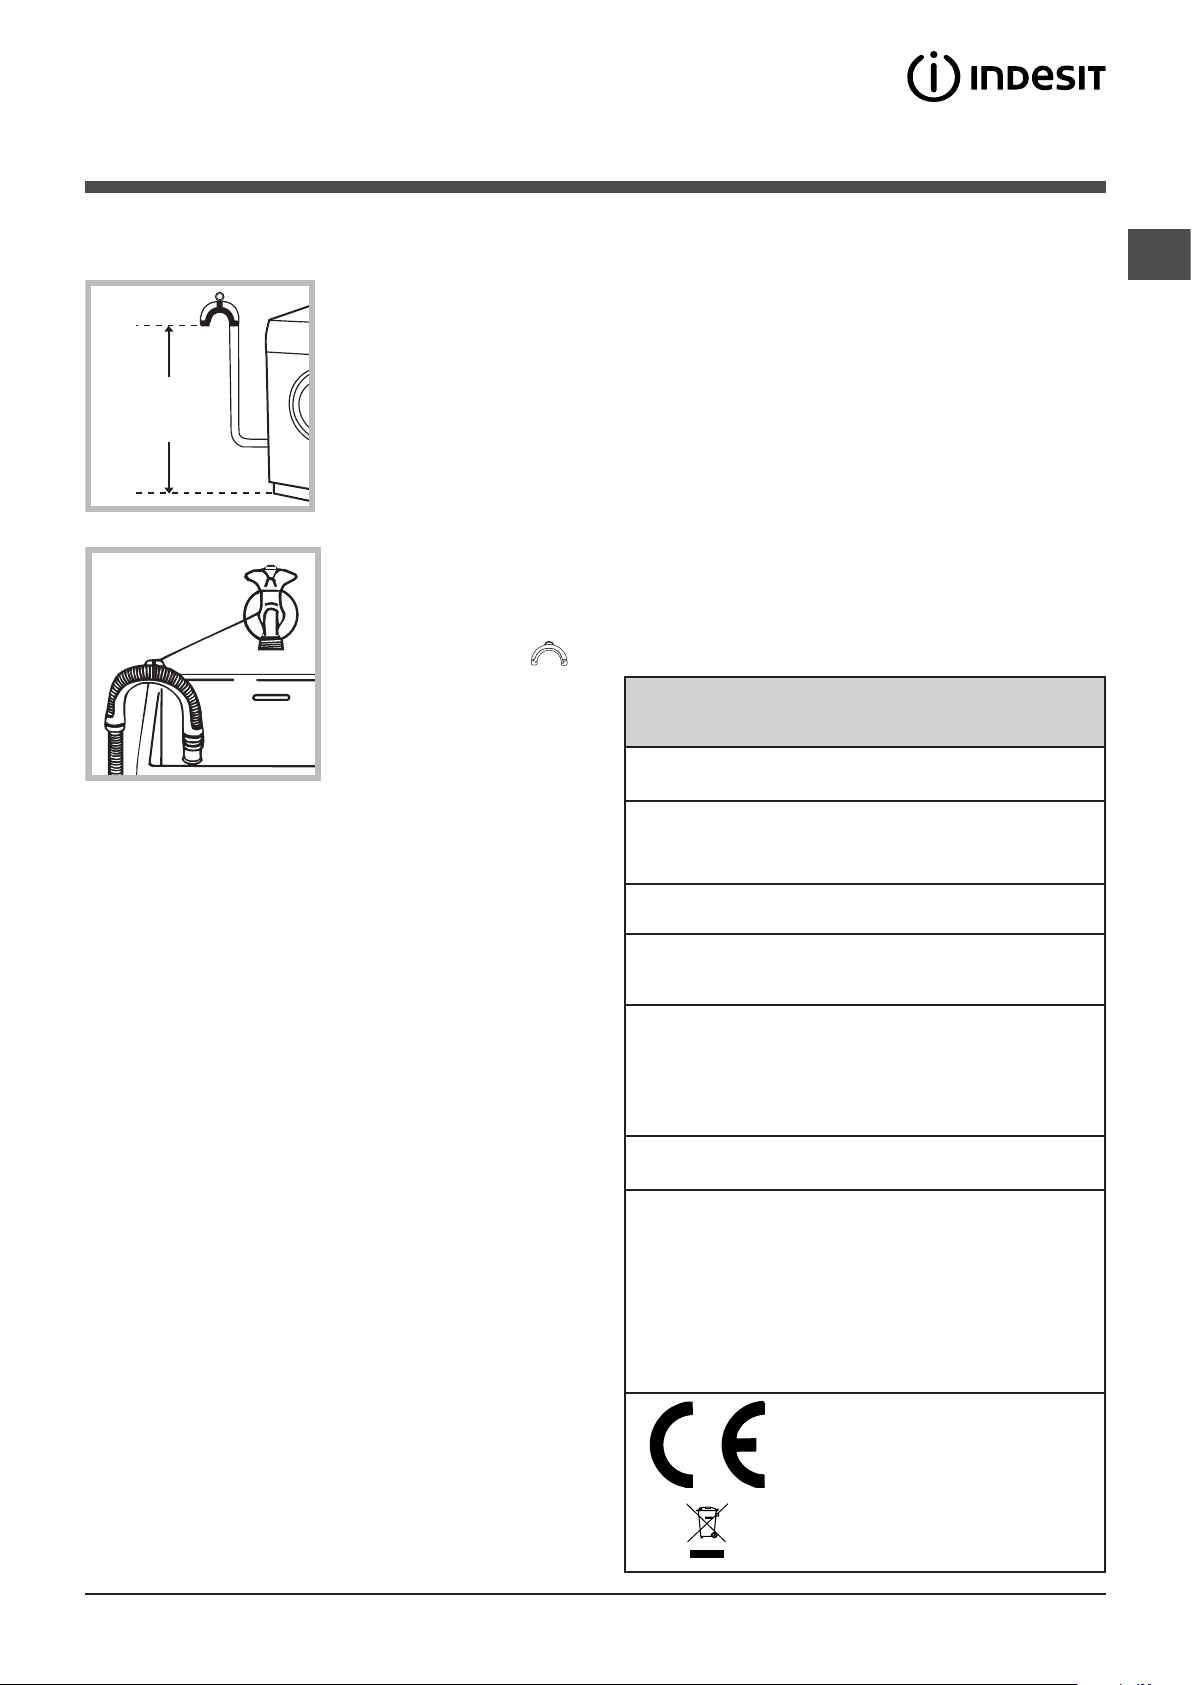
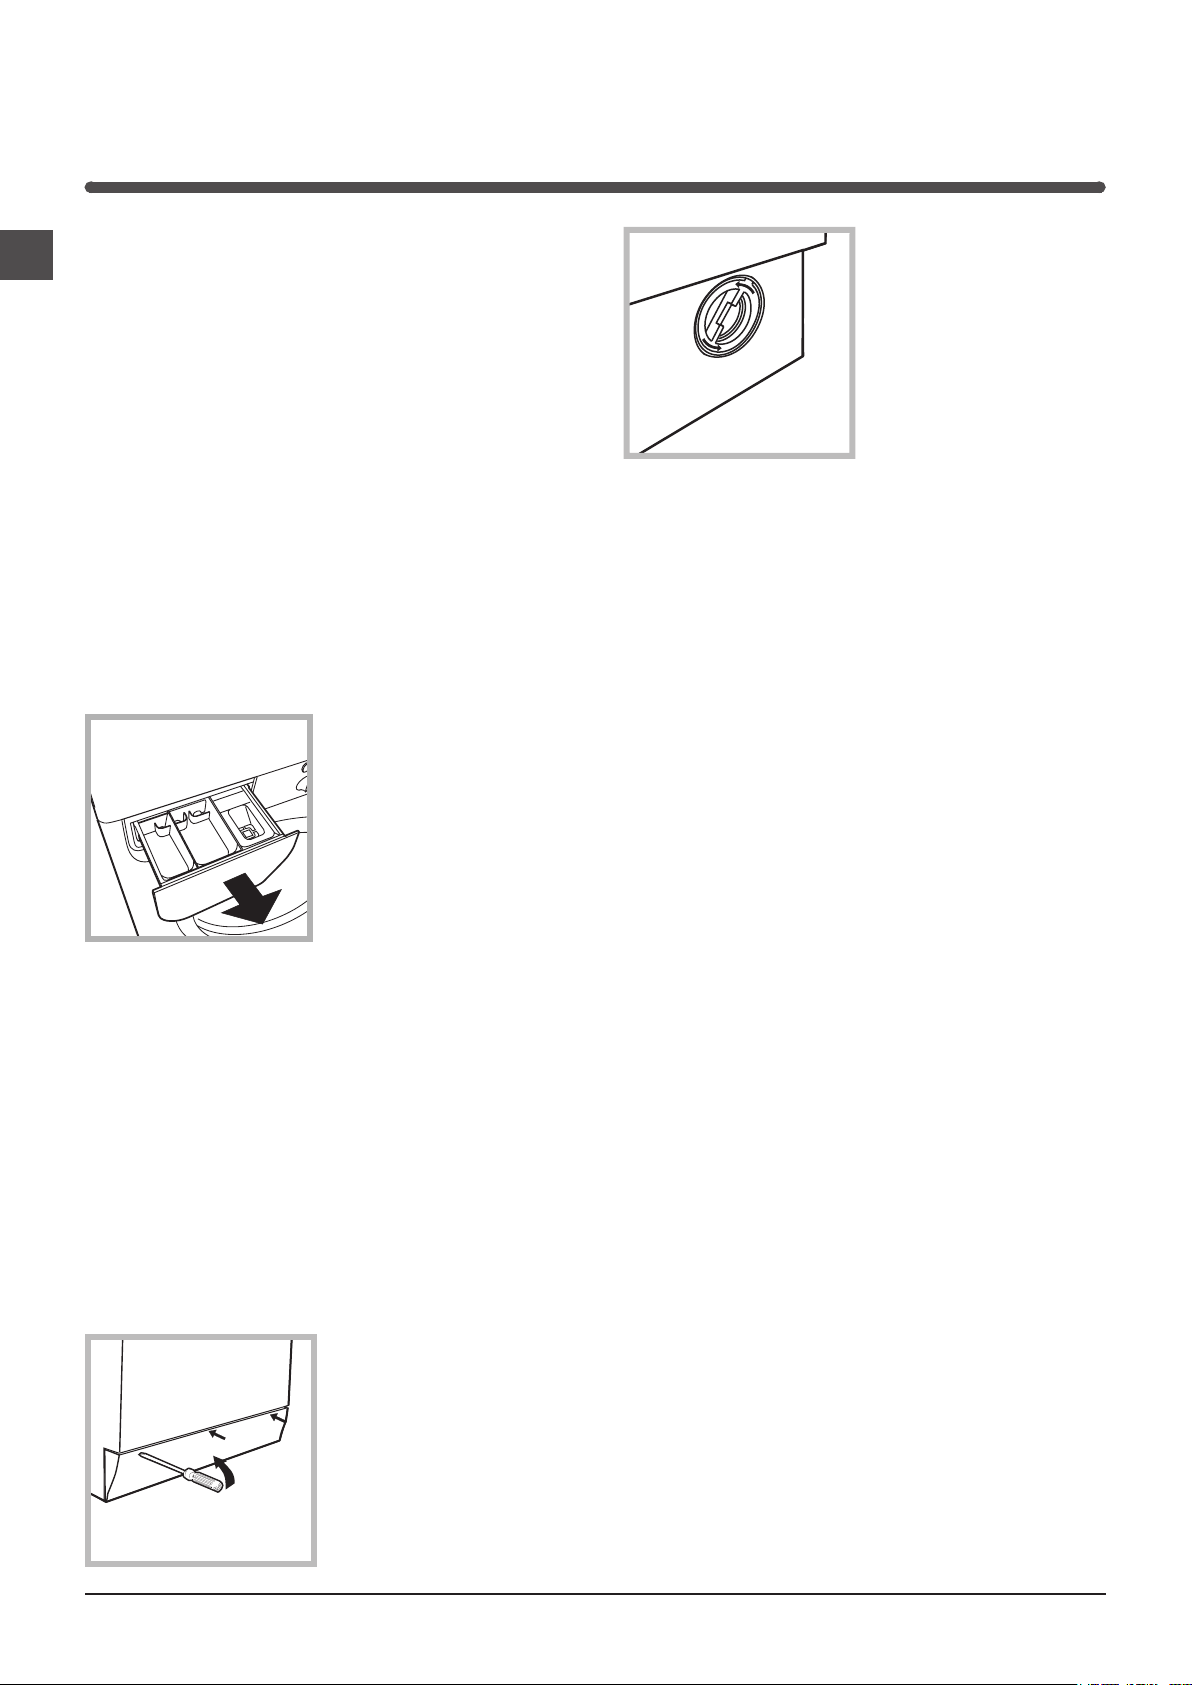
Remove the dispenser
by raising it and pul-
ling it out (see figure).
Wash it under running
water; this operation
should be repeated
frequently.
Caring for the door and drum of
your appliance
•Alwaysleavetheportholedoorajarinorder
to prevent unpleasant odours from forming.
Cleaning the pump
The washing machine is fitted with a self-clea-
ning pump which does not require any mainte-
nance. Sometimes, small items (such as coins
or buttons) may fall into the pre-chamber which
protects the pump, situated in its bottom part.
! Make sure the wash cycle has finished and
unplug the appliance.
To access the pre-chamber:
1. using a screwdri-
ver, remove the cover
panel on the lower
front part of the wa-
shing machine (see
figure);
2. unscrew the lid
by rotating it anti-
clockwise (see figu-
re): a little water may
trickle out. This is
perfectly normal;
3. clean the inside thoroughly;
4. screw the lid back on;
5. reposition the panel, making sure the hooks
are securely in place before you push it onto
the appliance.
Checking the water inlet hose
Check the inlet hose at least once a year. If
there are any cracks, it should be replaced
immediately: during the wash cycles, water
pressure is very strong and a cracked hose
could easily split open.
! Never use second-hand hoses.

GB
5
Precautions and tips
! This washing machine was designed and constructed in
accordance with international safety regulations. The fol-
lowing information is provided for safety reasons and must
therefore be read carefully.
General safety
•Thisappliancewasdesignedfordomesticuseonly.
•This appliance can be used by children aged
from 8 years and above and persons with re-
duced physical, sensory or mental capabilities
or lack of experience and knowledge if they
have been given supervision or instruction
concerning use of the appliance in a safe way
and understand the hazards involved. Children
shall not play with the appliance. Cleaning and
user maintenance shall not be made by children
without supervision.
•Thewashingmachinemustonlybeusedbyadults,inaccor-
dance with the instructions provided in this manual.
•Donottouchthemachinewhenbarefootorwithwetor
damp hands or feet.
•Donotpullonthepowersupplycablewhenunplugging
the appliance from the electricity socket. Hold the plug and
pull.
•Do not open the detergentdispenserdrawerwhile the
machine is in operation.
•Donottouchthedrainedwaterasitmayreachextremely
high temperatures.
• Neverforcetheportholedoor.Thiscoulddamagethesafety
lock mechanism designed to prevent accidental opening.
•Iftheappliancebreaksdown,donotunderanycircum-
stances access the internal mechanisms in an attempt to
repair it yourself.
•Alwayskeepchildrenwellawayfromtheappliancewhile
it is operating.
•Thedoorcanbecomequitehotduringthewashcycle.
•Iftheappliancehastobemoved,workinagroupoftwo
or three people and handle it with the utmost care. Never
try to do this alone, because the appliance is very heavy.
•Beforeloadinglaundryintothewashingmachine,make
sure the drum is empty.
Disposal
•Disposingofthepackagingmaterials:observelocalregu-
lations so that the packaging may be re-used.
•TheEuropeanDirective2012/19/EU(WEEE)onWasteElec-
trical and Electronic Equipment, requires that old household
electrical appliances must not be disposed of in the normal
unsorted municipal waste stream. Old appliances must
be collected separately in order to optimise the recovery
and recycling of the materials they contain and reduce the
impact on human health and the environment.
The crossed out “wheeled bin” symbol on the product
reminds you of your obligation, that when you dispose of
the appliance it must be separately collected. Consumers
should contact their local authority or retailer for information
concerning the correct disposal of their old appliance.
6
GB
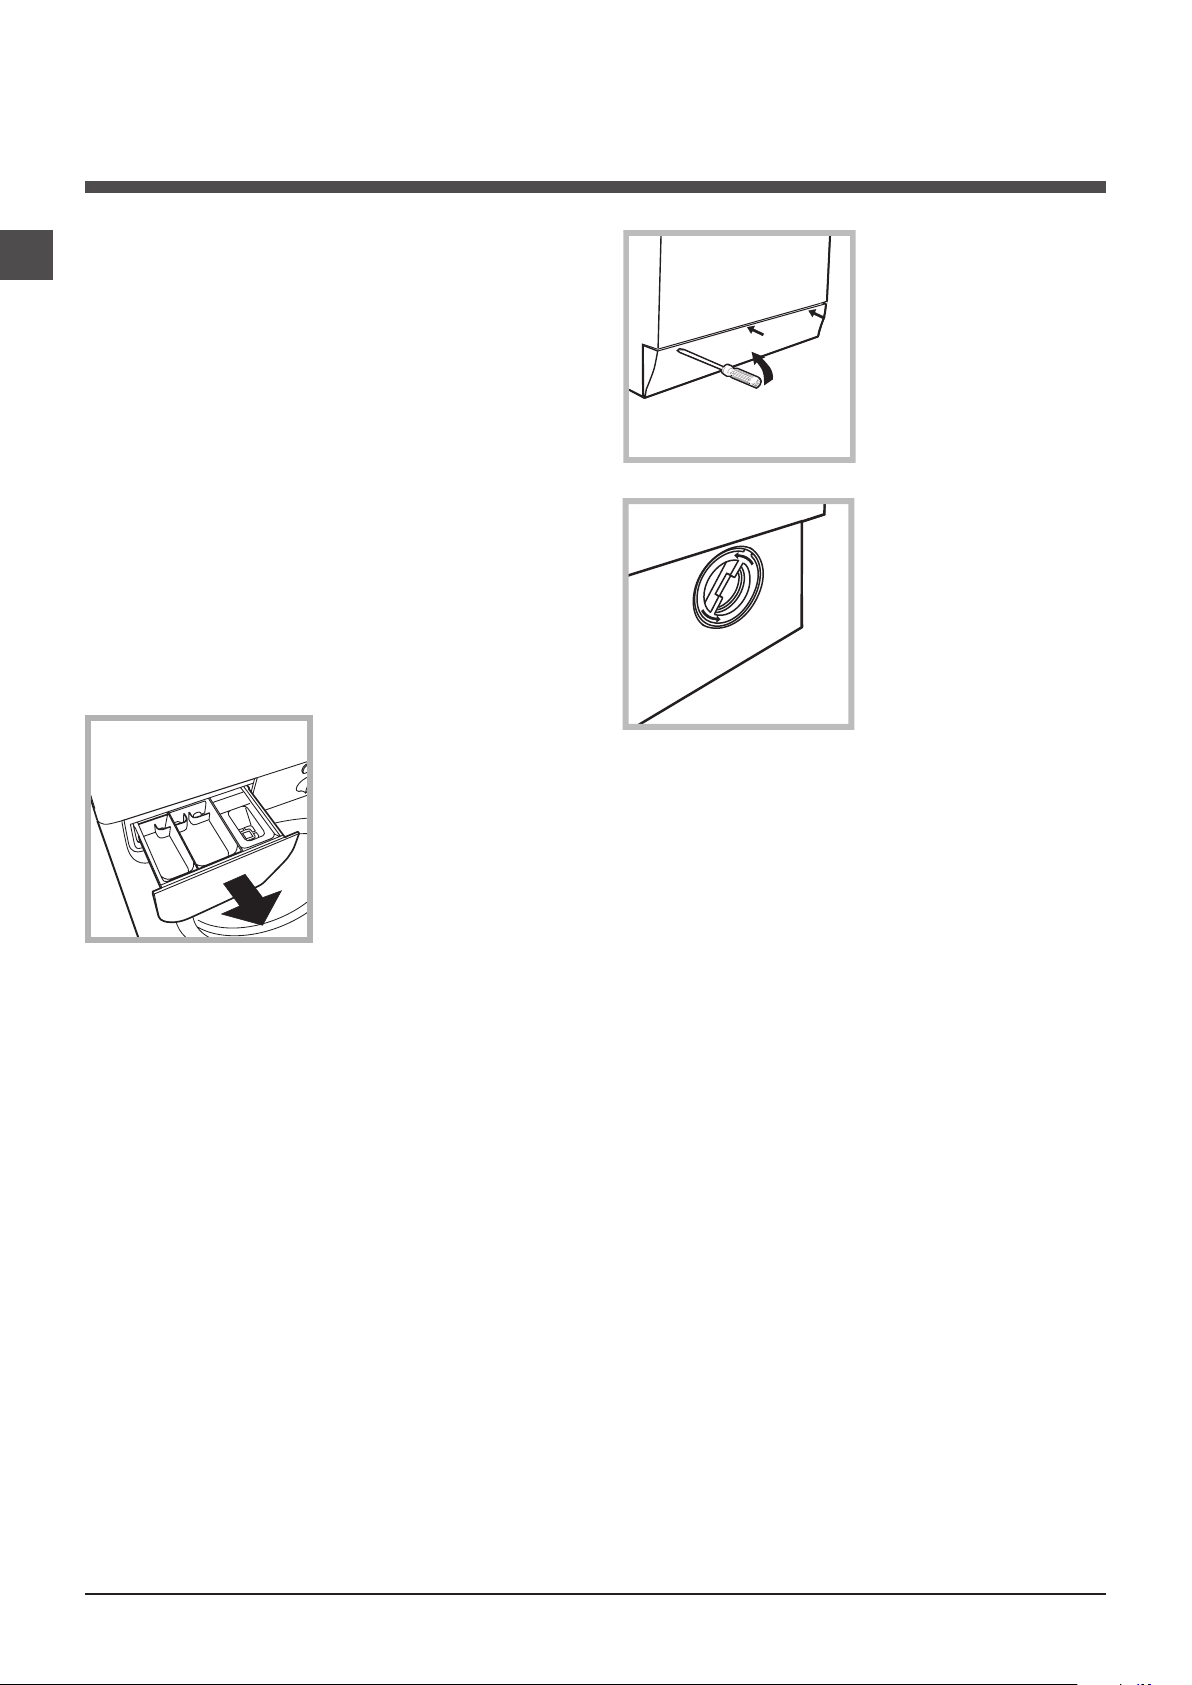
Detergent dispenser drawer: used to dispense deter-
gents and washing additives (see “Detergents and laundry”).
ON/OFF button: switches the washing machine on and off.
WASH CYCLE knob: programmes the wash cycles. During
the wash cycle, the knob does not move.
FUNCTION buttons with indicator light: used to select the
available functions. The indicator light corresponding to the
selected function will remain lit.
TEMPERATURE knob: sets the temperature or the cold
wash cycle (see “Personalisation”).
SPIN SPEED knob: sets the spin speed or exclude the spin
cycle completely (see “Personalisation”).
WASH CYCLE PROGRESS/DELAY TIMER
indicator
light
s: used to monitor the progress of the wash cycle.
The illuminated indicator light shows which phase is in pro-
gress.
If the Delay Timer function has been set, the time remaining
until the wash cycle starts will be indicated (see next page).
DOOR LOCKED indicator light: indicates whether the door
may be opened or not (see next page).
START/PAUSE button with indicator light: starts or tempo-
rarily interrupts the wash cycles.
N.B. To pause the wash cycle in progress, press this button;
the corresponding indicator light will flash orange, while the
indicator light for the current wash cycle phase will remain lit
in a fixed manner. If the DOOR LOCKED indicator light is
switched off, the door may be opened (wait approximately
3 minutes).
To start the wash cycle from the point at which it was inter-
rupted, press this button again.
Standby mode
This washing machine, in compliance with new energy saving
regulations, is fitted with an automatic standby system which
is enabled after about 30 minutes if no activity is detected.
Press the ON-OFF button briefly and wait for the machine
to start up again.
Description of the washing
machine and starting a wash cycle
WASH CYCLE PROGRESS/
DELAY TIMER indicator lights
DOOR LOCKED
indicator light
START/
PAUSE
button with
indicator light
Control panel
Detergent dispenser drawer
ON/OFF
button
WASH CYCLE
knob
TEMPERATURE
knob
FUNCTION
buttons with
indicator lights
SPIN SPEED
knob

GB
7
Indicator lights
The indicator lights provide important information.
This is what they can tell you:
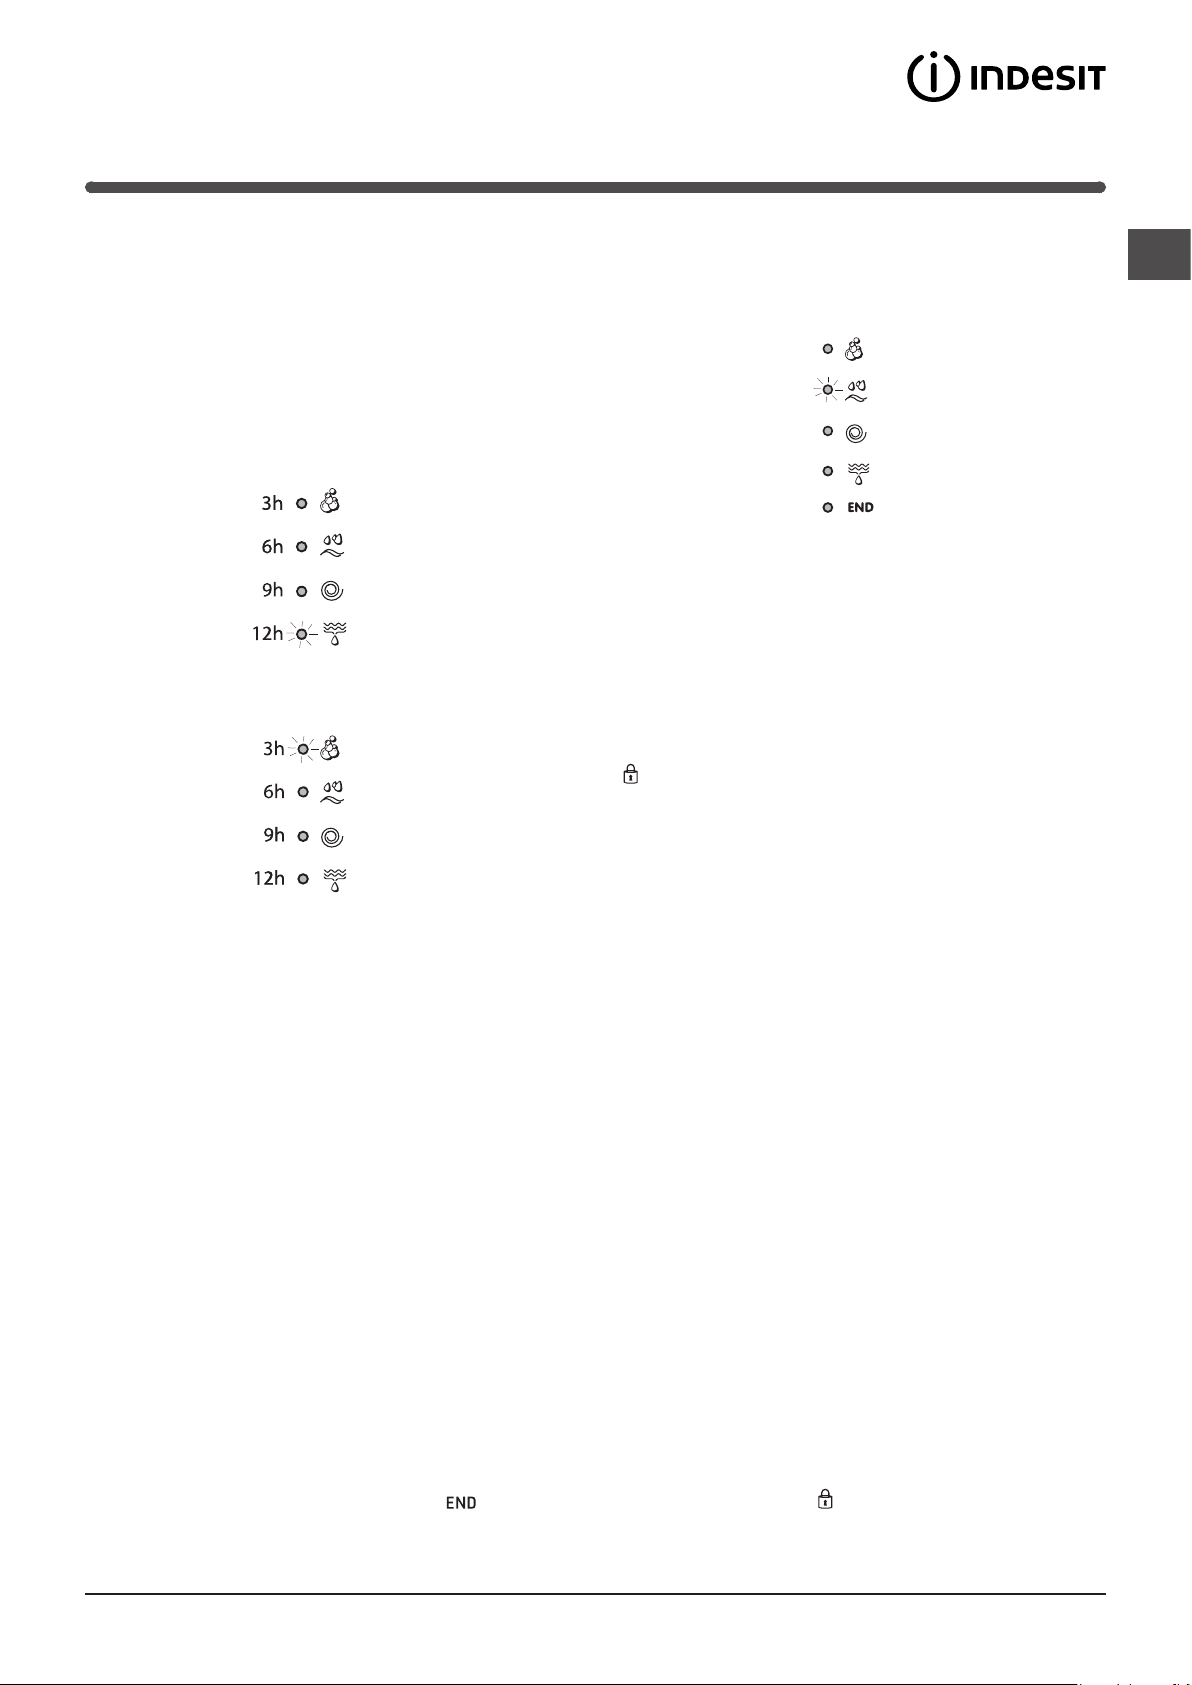
Delayed start
If the DELAY TIMER function has been activated (see “Per-
sonalisation”), after the wash cycle has been started the
indicator light corresponding to the selected delay period
will begin to flash:
As time passes, the remaining delay will be displayed and
the corresponding indicator light will flash:
The set programme will start once the selected time delay
has expired.
Wash cycle phase indicator lights
Once the desired wash cycle has been selected and has be-
gun, the indicator lights switch on one by one to indicate which
phase of the cycle is currently in progress.
Function buttons and corresponding indicator lights
When a function is selected, the corresponding indicator
light will illuminate.
If the selected function is not compatible with the program-
med wash cycle, the corresponding indicator light will flash
and the function will not be activated.
If the selected function is not compatible with another
function which has been selected previously, the indicator
light corresponding to the first function selected will
flash and only the second function will be activated; the
indicator light corresponding to the enabled option will
remain lit.
Door locked indicator light
When the indicator light is on, the porthole door is locked
to prevent it from being opened; make sure the indicator
light is off before opening the door (wait approximately 3
minutes). To open the door during a running wash cycle,
press the START/PAUSE button; the door may be opened
once the DOOR LOCKED indicator light turns off.
Starting a wash cycle
1. Switch the washing machine on by pressing the ON/OFF button. All indicator lights will switch on for a few seconds, then
they will switch off and the START/PAUSE indicator light will pulse.
2. Load the laundry and close the door.
3. Set the WASH CYCLE knob to the desired programme.
4. Set the washing temperature (see “Personalisation”).
5. Set the spin speed (see “Personalisation”).
6. Measure out the detergent and washing additives (see “Detergents and laundry”).
7. Select the desired functions.
8. Start the wash cycle by pressing the START/PAUSE button and the corresponding indicator light will remain lit in a fixed
manner, in green.
To cancel the set wash cycle, pause the machine by pressing the START/PAUSE button and select a new cycle.
9. At the end of the wash cycle the indicator light will switch on. The door can be opened once the DOOR LOCKED
indicator light turns off (wait approximately 3 minutes). Take out your laundry and leave the appliance door ajar to make sure
the drum dries completely. Switch the washing machine off by pressing the ON/OFF button.
Wash
Rinse
Spin
Drain
End of wash cycle
8
GB
Wash cycles
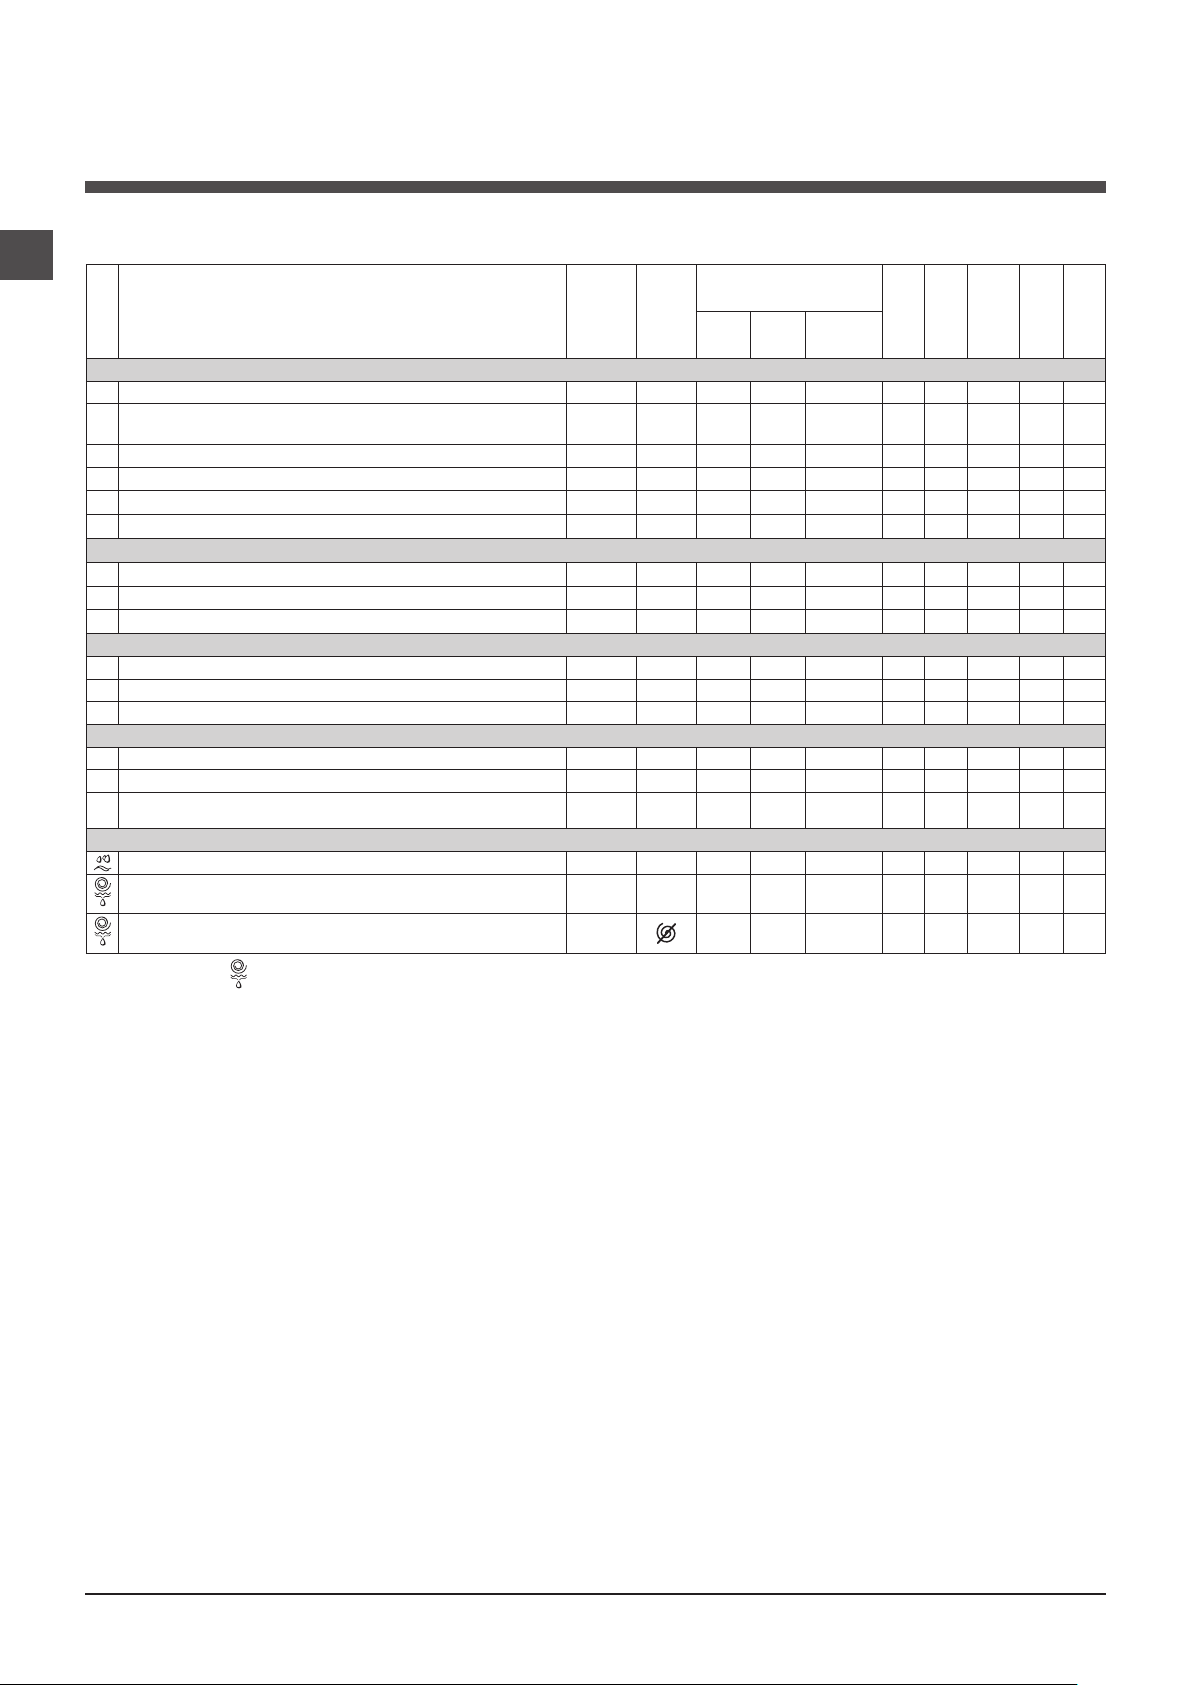
Table of wash cycles
Sport Intensive (
wash cycle
12) is for washing heavily soiled sports clothing fabrics (tracksuits, shorts, etc.); for best
results, we recommend not exceeding the maximum load indicated in the “Table of wash cycles”.
Sport Light (
wash cycle
13) is for washing lightly soiled sports clothing fabrics (tracksuits, shorts, etc.); for best results,
we recommend not exceeding the maximum load indicated in the “Table of wash cycles”. We recommend using a liquid
detergent and dosage suitable for a half-load.
Sport Shoes (
wash cycle
14) is for washing sports shoes; for best results, do not wash more than 2 pairs simultaneously.
The 20° wash cycles (20° Zone) offer effective washing performance at low temperatures, reducing electricity usage and
expenditure while benefitting the environment.The 20° wash cycles meet all requirements:
Cotton Standard 20° (programme 6) ideal for lightly soiled cotton loads. The effective performance levels achieved at cold
temperatures, which are comparable to washing at 40°, are guaranteed by a mechanical action which operates at varying
speed, with repeated and frequent peaks.
Mix Light (programme 7) ideal for mixed loads (cotton and synthetics) with a normal soil level. The effective performance levels
achieved at cold temperatures are guaranteed by a mechanical action which operates at varying speed, across set average
intervals.
20’ Refresh (programme 8) ideal for refreshing and washing lightly soiled garments in a few minutes. It lasts just 20 minutes
and therefore saves both time and energy. It can be used to wash different types of fabrics together (except for wool and silk),
with a maximum load of 1.5 kg.
* If you select programme and exclude the spin cycle, the machine will drain only.
The length of cycle shown on the display or in this booklet is an estimation only and is calculated assuming standard working conditions. The actual duration can vary according to factors such as
water temperature and pressure, the amount of detergent used, the amount and type of load inserted, load balancing and any wash options selected.
1) Test wash cycle in compliance with regulation 1061/2010: set wash cycle 2 with a temperature of 60°C.
This cycle is designed for cotton loads with a normal soil level and is the most efficient in terms of both electricity and water consumption; it should be used for garments
which can be washed at 60°C. The actual washing temperature may differ from the indicated value.
2) Test wash cycle in compliance with regulation 1061/2010: set wash cycle 3 with a temperature of 40°C.
This cycle is designed for cotton loads with a normal soil level and is the most efficient in terms of both electricity and water consumption; it should be used for garments
which can be washed at 40°C. The actual washing temperature may differ from the indicated value.
For all Test Institutes:
2) Long wash cycle for cottons: set wash cycle 3 with a temperature of 40°C.
3) Synthetic program along: set wash cycle 4 with a temperature of 40°C.
Wash cycles
Description of the wash cycle
Max.
temp.
(°C)
Max.
speed
(rpm)
Detergents
Max.
load (kg)
Residual
dampness %
Energy
consum-
ption kWh
Total water lt
Cycle
duration
Pre-
wash
Wash
Fabric
softener
Daily
1
Cotton with prewash: extremely soiled whites.
90°
1200
6
53 1,90 68 155’
2
Cotton Standard 60° (1): heavily soiled whites and resistant colours.
60°
(Max. 90°)
1200
-
6
53 1,01 49,8 195’
3
Cotton Standard 40° (2): lightly soiled whites and delicate colours.
40°
1200
-
6
53 0,86 52 185’
4
Synthetics: heavily soiled resistant colours.
60°
800
-
3
44 0,78 33 105’
4
Synthetics (3): lightly soiled resistant colours.
40°
800
-
3
44 0,49 38 95’
5
Mix Colored: lightly soiled whites and delicate colours.
40°
1200
-
6
53 0,86 56 95’
20° Zone
6
Cotton Standard 20°: lightly soiled whites and delicate colours.
20°
1200
-
6
- - - 170’
7 Mix Light
20°
800
-
6
- - - 120’
8 20’ Refresh
20°
800
-
1,5
- - - 20’
Special
9
Silk/Curtains: for garments in silk and viscose, lingerie.
30°
0
-
1
- - - 55’
10
Wool: for wool, cashmere, etc.
40°
800
-
1,5
- - - 70’
11 Jeans
40°
800
-
3
- - - 75’
Sport
12 Sport Intensive
30° 600 -
3
- - - 85’
13 Sport Light
30° 600 -
3
- - - 60’
14 Sport Shoes
30° 600 -
Max. 2
Pairs
- - - 55’
Partial wash cycles
Rinse
- 1200 - -
6
- - - 36’
Spin + Drain
- 1200 - - - 6
- - - 10’
Drain only *
-
- - -
6
- - - 3’
GB
9
Setting the temperature
Turn the TEMPERATURE knob to set the wash temperature (see Table of wash cycles).
The temperature may be lowered, or even set to a cold wash .
The washing machine will automatically prevent you from selecting a temperature which is higher than the maximum value
set for each wash cycle.
! Exception: if the 2 programme is selected, the temperature can be increased up to a value of 90°C.
Setting the spin speed
Turn the SPIN SPEED knob to set the spin speed for the selected wash cycle.
The maximum spin speeds available for each wash cycle are as follows:
Wash cycles Maximum spin speed
Cottons 1200 rpm
Synthetics 800 rpm
Wool 800 rpm
Silk drain only
The spin speed may be lowered, or the spin cycle can be excluded altogether by selecting the symbol .
The washing machine will automatically prevent you from selecting a spin speed which is higher than the maximum speed
set for each wash cycle.
Functions
The various wash functions available with this washing machine will help to achieve the desired results, every time.
To activate the functions:
1. Press the button corresponding to the desired function;
2. the function is enabled when the corresponding indicator light is illuminated.
Note:
- If the selected function is not compatible with the programmed wash cycle, the corresponding indicator light will flash and
the function will not be activated.
- If the selected function is not compatible with another function which has been selected previously, the indicator light
corresponding to the first function selected will flash and only the second function will be activated; the indicator light
corresponding to the enabled option will remain lit.
Selecting this option enables you to suitably adjust drum rotation, temperature and water to a reduced load of lightly soiled
cotton and synthetic fabrics (refer to the
“Table of wash cycles”
). “ ” enables you to wash in less time thereby saving
water and electricity. We suggest using a liquid detergent suitably measured out to the load quantity.
The function saves energy by not heating the water used to wash your laundry - an advantage both to the
environment and to your energy bill. Instead, intensified wash action and water optimisation ensure great wash results in the
same average time of a standard cycle.
For the best washing results we recommend the usage of a liquid detergent.
Extra rinse
By selecting this option, the efficiency of the rinse is increased and optimal detergent removal is guaranteed. It is particularly
useful for sensitive skin.
Delay timer
This timer delays the start time of the wash cycle by up to 12 hours.
Press the button repeatedly until the indicator light corresponding to the desired delay time switches on. The fifth time the button
is pressed, the function will be disabled.
N.B. Once the START/PAUSE button has been pressed, the delay time can only be modified by decreasing it until launching
the set programme.
Personalisation
10
GB
Detergents and laundry
Detergent dispenser drawer
Good washing results also depend on the correct dose of
detergent: adding too much detergent will not necessa-
rily result in a more efficient wash, and may in fact cause
build up on the inside of your appliance and contribute to
environmental pollution.
! Do not use hand washing detergents because these create
too much foam.
! Use powder detergent for white cotton garments, for pre-
washing, and for washing at temperatures over 60°C.
! Follow the instructions given on the detergent packaging.
Open the detergent di-
spenser drawer and pour
in the detergent or washing
additive, as follows.
compartment 1: pre-wash detergent (powder)
compartment 2: setergent for the wash cycle
(powder or liquid)
Liquid detergent should only be poured in immediately
prior to the start of the wash cycle.
compartment 3: additives (fabric softeners, etc.)
The fabric softener should not overflow the grid.
Preparing the laundry
•Dividethelaundryaccordingto:
- the type of fabric/the symbol on the label
- the colours: separate coloured garments from whites.
•Emptyallgarmentpocketsandcheckthebuttons.
•Donotexceedthevalueslistedinthe“Table of wash
cycles”, which refer to the weight of the laundry when dry.
How much does your laundry weigh?
1 sheet 400-500 g
1 pillow case 150-200 g
1 tablecloth 400-500 g
1 bathrobe 900-1200 g
1 towel 150-250 g
Garments requiring special care
Silk: use special wash cycle 9 to wash all silk garments.
We recommend the use of special detergent which has
been designed to wash delicate clothes.
Curtains: fold curtains and place them in a pillow case or
mesh bag. Use wash cycle 9.
Wool: all wool garments can be washed using programme
10, even those carrying the “hand-wash only” label.
For best results, use special detergents and do not exceed
1,5 kg of laundry.
Jeans: Turn garments inside-out before washing and use
a liquid detergent. Use programme 11.
1
2
3
Load balancing system
Before every spin cycle, to avoid excessive vibrations and
to distribute the load in a uniform manner, the drum rotates
continuously at a speed which is slightly greater than the
washing rotation speed. If, after several attempts, the load
is not balanced correctly, the machine spins at a reduced
spin speed. If the load is excessively unbalanced, the
washing machine performs the distribution process instead
of spinning. To encourage improved load distribution and
balance, we recommend small and large garments are
mixed in the load.

GB
11
Troubleshooting
Your washing machine could fail to work. Before contacting the Technical Assistance Centre (see “Assistance”), make sure
that the problem cannot be not solved easily using the following list.
Problem:
The washing machine does not
switch on.
The wash cycle does not start.
The washing machine does not
take in water (the indicator light for
the first wash cycle stage flashes
rapidly).
The washing machine continuously
takes in and drains water.
The washing machine does not
drain or spin.
The washing machine vibrates a lot
during the spin cycle.
The washing machine leaks.
The “Functions” indicator lights and
the “start/pause” indicator light flash,
while one of the “phase in progress”
indicator lights and the “door locked”
indicator light will remain lit in a fixed
manner.
There is too much foam.
Possible causes / Solutions:
•Theapplianceisnotpluggedintothesocketfully,orisnotmakingcontact.
•Thereisnopowerinthehouse.
•Thewashingmachinedoorisnotclosedproperly.
•TheON/OFFbuttonhasnotbeenpressed.
•TheSTART/PAUSEbuttonhasnotbeenpressed.
•Thewatertaphasnotbeenopened.
•Adelayedstarthasbeenset(see “Personalisation”).
•Thewaterinlethoseisnotconnectedtothetap.
•Thehoseisbent.
•Thewatertaphasnotbeenopened.
•Thereisnowatersupplyinthehouse.
•Thepressureistoolow.
•TheSTART/PAUSEbuttonhasnotbeenpressed.
•Thedrainhoseisnotfittedataheightbetween65and100cmfromthefloor
(see “Installation”).
•Thefreeendofthehoseisunderwater(see “Installation”).
•Thewalldrainagesystemisnotfittedwithabreatherpipe.
If the problem persists even after these checks, turn off the water tap, switch
the appliance off and contact the Assistance Service. If the dwelling is on one of
the upper floors of a building, there may be problems relating to water drainage,
causing the washing machine to fill with water and drain continuously. Special
anti-draining valves are available in shops and help to avoid this inconvenience.
•Thewashcycledoesnotincludedraining:somewashcyclesrequirethedrain
phase to be started manually.
•Thedrainhoseisbent(see “Installation”).
•Thedrainageductisclogged.
•Thedrumwasnotunlockedcorrectlyduringinstallation(see “Installation”).
•Thewashingmachineisnotlevel(see “Installation”).
• Thewashingmachineistrappedbetweencabinetsandwalls(see “Installation”).
•Thewaterinlethoseisnotscrewedonproperly(see “Installation”).
•Thedetergentdispenserdrawerisblocked(forcleaninginstructions,see “Care
and maintenance”).
•Thedrainhoseisnotfixedproperly(see “Installation”).
•Switchoffthemachineandunplugit,waitforapproximately1minuteandthen
switch it back on again.
If the problem persists, contact the Technical Assistance Service.
•Thedetergentisnotsuitableformachinewashing(itshoulddisplaythetext
“for washing machines” or “hand and machine wash”, or the like).
•Toomuchdetergentwasused.
12
GB
Service
Before calling for Assistance:
• Check whether you can solve the problem alone (see “Troubleshooting”);
•Restarttheprogrammetocheckwhethertheproblemhasbeensolved;
•Ifthisisnotthecase,contactanauthorisedTechnicalAssistanceCentreusingthetelephonenumberprovidedonthe
guarantee certificate.
! Always request the assistance of authorised technicians.
Have the following information to hand:
• thetypeofproblem;
• theappliancemodel(Mod.);
• theserialnumber(S/N).
This information can be found on the data plate applied to the rear of the washing machine, and can also be found on the
front of the appliance by opening the door.

ES
13
Español
ES
IWC 61251
Manual de instrucciones
LAVADORA
Sumario
Instalación, 14-15
Desembalaje y nivelación
Conexiones hidráulicas y eléctricas
Primer ciclo de lavado
Datos técnicos
Mantenimiento y cuidados, 16
Interrumpir el agua y la corriente eléctrica
Limpiar la lavadora
Limpiar el contenedor de detergentes
Cuidar la puerta y el cesto
Limpiar la bomba
Controlar el tubo de alimentación de agua
Precauciones y consejos, 17
Seguridad general
Eliminaciones
Descripción de la lavadora y comienzo
de un programa, 18-19
Panel de control
Pilotos
Poner en marcha un programa
Programas, 20
Tabla de programas
Personalizaciones, 21
Seleccionar la temperatura
Seleccionar el centrifugado
Funciones
Detergentes y ropa, 22
Contenedor de detergentes
Preparar la ropa
Prendas especiales
Sistema de equilibrado de la carga
Anomalías y soluciones, 23
Asistencia, 24

14
ES
Instalación
! Es importante conservar este manual para
poder consultarlo en cualquier momento. En
caso de venta, de cesión o de traslado, veri-
fique que permanezca junto con la lavadora
para informar al nuevo propietario sobre el
funcionamiento y brindar las correspondientes
advertencias.
! Lea atentamente las instrucciones: ellas
contienen importante información sobre la
instalación, el uso y la seguridad.
Desembalaje y nivelación
Desembalaje
1. Desembale la lavadora.
2. Controle que la lavadora no haya sufri-
do daños durante el transporte. Si estuviera
dañada no la conecte y llame al revendedor.
3. Quite los 3 tornillos
de protección para el
transporte y la aran-
dela de goma con
el correspondiente
distanciador ubicados
en la parte posterior
(ver la figura).
4. Cubra los orificios con los tapones de plá-
stico suministrados con el aparato.
5. Conserve todas las piezas: cuando la la-
vadora deba ser transportada nuevamente,
deberán volver a colocarse.
! Los embalajes no son juguetes para los
niños.
Nivelación
1. Instale la lavadora sobre un piso plano y
rígido, sin apoyarla en las paredes, muebles ni
en ningún otro aparato.
2. Si el piso no está
perfectamente hori-
zontal, compense las
irregularidades desen-
roscando o enroscan-
do las patas delante-
ras (ver la figura); el
ángulo de inclinación
medido sobre la su-
perficie de trabajo, no
debe superar los 2º.
Una cuidadosa nivelación brinda estabilidad
a la máquina y evita vibraciones, ruidos y
desplazamientos durante el funcionamiento.
Cuando se instala sobre moquetas o alfom-
bras, regule los pies para conservar debajo de
la lavadora un espacio suficiente para la venti-
lación.
Conexiones hidráulicas y eléctricas
Conexión del tubo de alimentación de
agua
1. Conectar el tubo
de tubo enroscándolo
a un grifo de agua fría
con la boca roscada
de 3/4 gas (ver la
figura).
Antes de conectarlo,
haga correr el agua
hasta que esté límpi-
da.
2. Conecte el tubo de
alimentación a la lava-
dora enroscándolo en
la toma de agua cor-
respondiente ubicada
en la parte posterior
derecha (arriba) (ver la
figura).
3. Controle que en el tubo no hayan pliegues
ni estrangulaciones.
! La presión de agua del grifo debe estar com-
prendida dentro de los valores contenidos en
la tabla de Datos técnicos (ver la página corre-
spondiente).
! Si la longitud del tubo de alimentación no es
la suficiente, diríjase a un negocio especializa-
do o a un técnico autorizado.
! No utilice nunca tubos ya usados.
! Utilice los suministrados con la máquina.

ES
15
Conexión del tubo de descarga
Conecte el tubo de
descarga, sin ple-
garlo, a una tubería
de descarga o a una
descarga de pared
colocadas a una altu-
ra del piso entre 65 y
100 cm.
Otra alternativa es
apoyar el tubo de de-
sagüe en el borde de
un lavamanos o de
una bañera, uniendo
la guía (puesta
a disposición para
la venta por el servi-
cio de asistencia) al
grifo (ver la figura). El
extremo libre del tubo
de descarga no debe permanecer sumergido
en el agua.
! No se aconseja utilizar tubos de prolonga-
ción, si fuera indispensable hacerlo, la prolon-
gación debe tener el mismo diámetro del tubo
original y no superar los 150 cm.
Conexión eléctrica
Antes de enchufar el aparato, verifique que:
•latomatengalaconexiónatierrayhaya
sido hecha según las normas legales;
•latomaseacapazdesoportarlacargamá-
xima de potencia de la máquina indicada en
la tabla de Datos técnicos (ver al costado);
•latensióndealimentaciónestécomprendida
dentro de los valores indicados en la tabla
de Datos técnicos (ver al costado);
•latomaseacompatibleconelenchufedela
lavadora. Si no es así, sustituya la toma o el
enchufe.
! La lavadora no debe ser instalada al aire
libre, ni siquiera si el lugar está reparado, ya
que es muy peligroso dejarla expuesta a la
lluvia o a las tormentas.
! Una vez instalada la lavadora, la toma de
corriente debe ser fácilmente accesible.
65 - 100 cm
! No utilice prolongaciones ni conexiones múl-
tiples.
! El cable no debe estar plegado ni sufrir com-
presiones.
! El cable de alimentación debe ser sustituido
sólo por técnicos autorizados.
¡Atención! La empresa fabricante declina toda
responsabilidad en caso de que estas normas
no sean respetadas.
Primer ciclo de lavado
Después de la instalación y antes del uso,
realice un ciclo de lavado con detergente y sin
ropa, seleccionando el programa 2.
Datos técnicos
Modelo
IWC 61251
Dimensio-
nes
ancho 59,5 cm
altura 85 cm
profundidad 51,7 cm
Capacidad
de 1 a 6 kg
Conexiones
eléctricas
ver la placa de característi-
cas técnicas aplicada en la
máquina
Conexiones
hídricas
presión máxima
1 MPa (10 bar)
presión mínima
0,05 MPa (0,5 bar)
capacidad del cesto 46
litros
Velocidad de
centrifugado
máxima 1200 r.p.m.
Programas
de control
según las
regulación
1061/2010 y
1015/2010
Programa 2: programa
normal de algodón a
60°C.
Programa 3: programa
normal de algodón a
40°C.
Esta máquina cumple con lo
establecido por las siguien-
tes Directivas de la Comuni-
dad:
- EMC 2014/30/EU (Com-
patibilidad Electromagnéti-
ca)
- 2012/19/EU - (WEEE)
- LVD 2014/35/EU (Baja
Tensión)
16
ES
Interrumpir el agua y la corriente
eléctrica
•Cierreelgrifodeaguadespuésdecada
lavado. De este modo se limita el desgaste
de la instalación hidráulica de la lavadora y
se elimina el peligro de pérdidas.
•Desenchufelamáquinacuandoladebelim-
piar y durante los trabajos de mantenimiento.
Limpiar la lavadora
La parte externa y las partes de goma se pue-
den limpiar con un paño embebido en agua
tibia y jabón. No use solventes ni productos
abrasivos.
Limpiar el contenedor de deter-
gentes
Extraiga el contenedor
levantándolo y tirán-
dolo hacia fuera (ver la
figura).
Lávelo debajo del agua
corriente, esta limpieza
se debe realizar fre-
cuentemente.
Cuidar la puerta y el cesto
•Dejesiempresemicerradalapuertapara
evitar que se formen malos olores.
Limpiar la bomba
La lavadora posee una bomba autolimpiante
que no necesita mantenimiento. Pero puede
suceder que objetos pequeños (monedas, bo-
tones) caigan en la precámara que protege la
bomba, situada en la parte inferior de la misma.
! Verifique que el ciclo de lavado haya termina-
do y desenchufe la máquina.
Para acceder a la
precámara:
1. quite el panel que
cubre la parte delan-
tera de la lavadora
con la ayuda de un
destornillador (ver la
figura);
2. desenrosque la
tapa girándola en
sentido antihorario
(ver la figura): es nor-
mal que se vuelque
un poco de agua;
3. limpie con cuidado el interior;
4. vuelva a enroscar la tapa;
5. vuelva a montar el panel verificando, antes de
empujarlo hacia la máquina, que los ganchos
se hayan introducido en las correspondientes
ranuras.
Controlar el tubo de alimentación
de agua
Controle el tubo de alimentación al menos una
vez al año. Si presenta grietas o rajaduras debe
ser sustituido: durante los lavados, las fuertes
presiones podrían provocar roturas imprevistas.
! No utilice nunca tubos ya usados.
Mantenimiento y cuidados

ES
17
Precauciones y consejos
! La lavadora fue proyectada y fabricada en conformidad
con las normas internacionales de seguridad. Estas adver-
tencias se suministran por razones de seguridad y deben ser
leídas atentamente.
Seguridad general
•Esteaparatohasidofabricadoparaunusodetipodomé-
stico exclusivamente.
• Este aparato puede ser utilizado por niños de
8 años o más y por personas con capacidades
físicas, sensoriales o mentales disminuidas o
con experiencia y conocimientos insuficientes
siempre que sean supervisados o que hayan
recibido una adecuada formación sobre el uso
del aparato en forma segura y conozcan los
peligros derivados del mismo. Los niños no
deben jugar con el aparato. El mantenimiento
y la limpieza no deben ser realizados por niños
sin supervisión.
•Lalavadoradebeserutilizadasóloporpersonasadultas
y siguiendo las instrucciones contenidas en este manual.
•Notoque la máquina con los piesdesnudosniconlas
manos o los pies mojados o húmedos.
•Nodesenchufelamáquinatirandoelcable,sinotomando
el enchufe.
•Noabraelcontenedordedetergentesmientraslamáquina
está en funcionamiento.
•No toqueel agua de descarga porque puede alcanzar
temperaturas elevadas.
•Enningúncasofuercelapuerta:podríadañarseelmeca-
nismo de seguridad que la protege de aperturas acciden-
tales.
•Encasodeavería,noaccedanuncaalosmecanismos
internos para intentar una reparación.
•Controlesiemprequelosniñosnoseacerquenalamáqui-
na cuando está en funcionamiento.
•Duranteellavado,lapuertatiendeacalentarse.
•Sidebesertrasladada,deberánintervenirdosomásper-
sonas, procediendo con el máximo cuidado. La máquina
no debe ser desplazada nunca por una sola persona ya
que es muy pesada.
•Antesdeintroducirlaropacontrolequeelcestoestévacío.
Eliminaciones
•Eliminacióndelmaterialdeembalaje:respetelasnormas
locales, de ese modo, los embalajes podrán volver a ser
utilizados.
•En base a la Norma europea 2012/19/EU (WEEE) de
Residuos de aparatos Eléctricos y Electrónicos, los elec-
trodomésticos viejos no pueden ser arrojados en los con-
tenedores municipales habituales; tienen que ser recogidos
selectivamente para optimizar la recuperación y reciclado
de los componentes y materiales que los constituyen, y
reducir el impacto en la salud humana y el medioambiente.
El símbolo del cubo de basura tachado se marca sobre
todos los productos para recordar al consumidor la obli-
gación de separarlos para la recogida selectiva.
El consumidor debe contactar con la autoridad local o
con el vendedor para informarse en relación a la correc-
ta eleminación de su electrodoméstico viejo.

18
ES
Contenedor de detergentes: para cargar detergentes
y aditivos (ver “Detergentes y ropa”).
Botón de ON/OFF: para encender y apagar la lavadora.
Mando de PROGRAMAS: para elegir los programas.
Durante el funcionamiento del programa el mando no se
mueve.
Botones con pilotos de FUNCIÓN: para seleccionar las
funciones disponibles. El piloto correspondiente a la fun-
ción seleccionada permanecerá encendido.
Mando de CENTRIFUGADO: para seleccionar el centrifu-
gado o excluirlo (ver “Personalizaciones”).
Mando de TEMPERATURA: para seleccionar la tempera-
tura o el lavado en frío (ver “Personalizaciones”).
Pilotos DE AVANCE DEL CICLO/COMIENZO RE-
TRASADO: para seguir el estado de avance del programa
de lavado.
El piloto encendido indica la fase en curso.
Si se seleccionó la función “Comienzo retrasado”, indi-
carán el tiempo que falta para la puesta en marcha del
programa (ver la página correspondiente).
Piloto PUERTA BLOQUEADA: para saber si la puerta se
puede abrir (ver la página correspondiente).
Botón con piloto START/PAUSE: se utiliza para poner en
marcha los programas o interrumpirlos momentáneamen-
te.
Nota: Presione este botón para poner en pausa el lavado
en curso, el piloto correspondiente centelleará con color
anaranjado mientras que el de la fase en curso permane-
cerá encendido en forma fija. Si el piloto PUERTA BLO-
QUEADA está apagado, se podrá abrir la puerta (espere
3 minutos aproximadamente).
Para que el lavado se reanude a partir del momento en el
cual fue interrumpido, presione nuevamente este botón.
Modalidad de stand by
Esta lavadora está en conformidad con las nuevas norma-
tivas vinculadas al ahorro energético. Está dotada de un
sistema de auto-apagado (stand by) que, en caso de no
funcionamiento, se activa pasados aproximadamente 30
minutos. Presionar brevemente el botón ON/OFF y esperar
que la máquina se active.
Descripción de la lavadora y
comienzo de un programa
Piloto PUERTA
BLOQUEADA
Botón con
piloto START/
PAUSE
Panel de control
Contenedor de detergentes
Botón de ON/OFF
Mando de
PROGRAMAS
Botones con pilotos
FUNCIÓN
Mando de
TEMPERATURA
Mando de
CENTRIFUGADO
Pilotos DE AVANCE DEL
CICLO/COMIENZO
RETRASADO
ES
19
Pilotos
Los pilotos suministran información importante.
He aquí lo que nos dicen:
Comienzo retrasado
Si se ha activado la función “Comienzo retrasado” (ver “Per-
sonalizaciones”), después de haber puesto en marcha el
programa, comenzará a centellear el piloto correspondien-
te al retraso seleccionado:
Con el transcurrir del tiempo se visualizará el retraso resi-
dual con el centelleo de la luz testigo correspondiente:
Una vez transcurrido el tiempo de retraso seleccionado,
comenzará el programa.
Pilotos fase en curso
Una vez seleccionado y puesto en marcha el ciclo de
lavado deseado, las luces testigo se encenderán progresi-
vamente para indicar su estado de avance:
Botones de función y pilotos correspondientes
Seleccionando una función, el piloto correspondiente se
iluminará. Si la función seleccionada no es compatible con
el programa elegido, el piloto correspondiente centelleará y
la función no se activará. Si la función elegida no es com-
patible con otra seleccionada precedentemente, el piloto
correspondiente a la primera función seleccionada centel-
leará y se activará sólo la segunda, el piloto de la función
activada se iluminará.
Piloto puerta bloqueada
El piloto encendido indica que la puerta está bloqueada
impidiendo su apertura; para poder abrir la puerta es ne-
cesario que dicho piloto esté apagado (espere 3 minutos
aproximadamente). Para abrir la puerta mientras un ciclo
está en curso, presione el botón START/PAUSE; si el piloto
PUERTA BLOQUEADA está apagado, será posible abrir la
puerta.
Poner en marcha un programa
1. Encienda la lavadora presionando el botón ON/OFF. Todos los pilotos se encenderán durante algunos segundos, luego se
apagarán y se deberá pulsar el piloto START/PAUSE.
2. Cargue la ropa y cierre la puerta.
3. Seleccione el programa deseado con el mando de PROGRAMAS.
4. Fije la temperatura de lavado (ver “Personalizaciones”).
5. Fije la velocidad de centrifugado (ver “Personalizaciones”).
6. Vierta detergente y aditivos (ver “Detergentes y ropa”).
7. Seleccione las funciones deseadas.
8. Ponga en marcha el programa presionando el botón START/PAUSE y el piloto correspondiente permanecerá encendido,
fijo y de color verde. Para anular el ciclo seleccionado ponga en pausa la máquina presionando el botón START/PAUSE y
elija un nuevo ciclo.
9. Al final del programa se iluminará el piloto . Cuando el piloto PUERTA BLOQUEADA se apague, será posible abrir
la puerta (espere 3 minutos aproximadamente). Extraiga la ropa y deje la puerta semicerrada para permitir que el cesto se
seque. Apague la lavadora presionando el botón ON/OFF.
Lavado
Aclarado
Centrifugado
Descarga
Fin del Lavado

20
ES
Sport Intensive (programa 12) ha sido estudiado para lavar tejidos usados en prendas deportivas (chándales, pantalones cortos, etc.)
muy sucios; para obtener los mejores resultados es aconsejable no superar la carga máxima indicada en la “Tabla de programas”.
Sport Light (programa 13) ha sido estudiado para lavar tejidos usados en prendas deportivas (chándales, pantalones cortos,
etc.) poco sucios; para obtener los mejores resultados es aconsejable no superar la carga máxima indicada en la “Tabla de
programas”. Se recomienda utilizar detergente líquido y la dosis correspondiente a la media carga.
Special Shoes (programa 14) ha sido estudiado para lavar calzado deportivo; para obtener los mejores resultados no lave
más de 2 pares a la vez.
Los programas 20º (20° Zone) ofrecen buenos rendimientos en los lavados a bajas temperaturas permitiendo un menor uso
de energía eléctrica con un ahorro económico y un beneficio para el medio ambiente.
Los programas 20º responden a todas las exigencias:
Programa normal de algodón a 20 °C (programa 6) ideal para cargas de prendas de algodón sucias. Los buenos rendimientos
aún en frío, comparables con los de un lavado a 40º, están garantizados por una acción mecánica que trabaja con variación
de velocidad con picos repetidos y cercanos.
Mix Light (programa 7) ideal para cargas mixtas (algodón y sintéticos) de prendas medianamente sucias. Los buenos rendimientos de
lavado aún en frío están garantizados por una acción mecánica que trabaja con variación de velocidad en intervalos medios y determinados.
20’ Refresh (programa 8) ciclo ideal para refrescar y lavar prendas ligeramente sucias en pocos minutos. Dura sólo 20 minutos y
de esa manera permite ahorrar tiempo y energía. Es posible lavar juntas telas de distintos tipos (excepto lana y seda) realizando
una carga máxima de 1,5 kg.
Programas
Tabla de programas
* Si se selecciona el programa y se excluye el centrifugado, la máquina efectúa sólo la descarga.
La duración del ciclo que se indica en el visor o en el manual es una estimación calculada en base a condiciones estándar. El tiempo efectivo puede variar en función de
numerosos factores como la temperatura y la presión del agua de entrada, la temperatura ambiente, la cantidad de detergente, la cantidad y el tipo de carga, el equilibra-
do de la carga y las opciones adicionales seleccionadas.
1) Programa de control según la regulación 1061/2010: seleccione el programa 2 con una temperatura de 60ºC.
Este ciclo es adecuado para limpiar una carga de algodón normalmente sucia, es el más eficiente en lo que se refiere al consumo combinado con la energía y la cantidad
de agua y se usa con prendas lavables a 60ºC. La temperatura efectiva de lavado puede diferir de la indicada.
2) Programa de control según la regulación 1061/2010: seleccione el programa 3 con una temperatura de 40ºC.
Este ciclo es adecuado para limpiar una carga de algodón normalmente sucia, es el más eficiente en lo que se refiere al consumo combinado con la energía y la cantidad
de agua y se usa con prendas lavables a 40ºC. La temperatura efectiva de lavado puede diferir de la indicada.
Para todos los Test Institutes:
2) Programa algodón largo: seleccione el programa 3 con una temperatura de 40ºC.
3) Programa sintético largo: seleccione el programa 4 con una temperatura de 40ºC.
Programas
Descripción del Programa
Temp.
max.
(°C)
Velocidad
máx.
(r.p.m.)
Detergentes
Carga máx. (Kg.)
Humedad
residual %
Consumo de
energía kWh
Agua total lt
Duración del
ciclo
Prelavado
Lavado
Suavizante
Diario (Daily)
1
Algodón + Prelavado: blancos sumamente sucios. 90°
1200
6
53 1,90 68 155’
2
Programa normal de algodón a 60 °C (1): blancos y colores resistentes muy sucios.
60°
(Max. 90°)
1200
-
6
53 1,01 49,8 195’
3
Programa normal de algodón a 40 °C (2): blancos y colores delicados poco sucios. 40°
1200
-
6
53 0,86 52 185’
4
Sintético: colores resistentes muy sucios. 60°
800
-
3
44 0,78 33 105’
4
Sintético (3): colores resistentes poco sucios. 40°
800
-
3
44 0,49 38 95’
5
Algodón de color: blancos poco sucios y colores delicados. 40°
1200
-
6
53 0,86 56 95’
20° Zone
6
Programa normal de algodón a 20 °C: blancos y colores delicados poco sucios. 20°
1200
-
6
- - - 170’
7
Mix Light
20°
800
-
6
- - - 120’
8
20’ Refresh
20°
800
-
1,5
- - - 20’
Programas Especiales (Special)
9
Seda/Cortinas: para prendas de seda, viscosa, lencería. 30°
0
-
1
- - - 55’
10
Lana: para lana, cachemira, etc. 40°
800
-
1,5
- - - 70’
11 Jeans
40°
800
-
3
- - - 75’
Sport
12 Sport Intensive
30° 600 -
3
- - - 85’
13 Sport Light
30° 600 -
3
- - - 60’
14 Special Shoes
30° 600 -
Max. 2
pares
- - - 55’
Programas Parciales
Aclarado - 1200 - -
6
- - - 36’
Centrifugado + Descarga - 1200 - - - 6
- - - 10’
Sólo descarga *
-
- - -
6
- - - 3’
ES
21
Seleccionar la temperatura
Girando el mando de la TEMPERATURA se selecciona la temperatura de lavado (ver la Tabla de programas).
La temperatura se puede disminuir hasta el lavado en frío ( ).
La máquina impedirá automáticamente seleccionar una temperatura mayor que la máxima prevista para cada programa.
! Excepción: cuando se selecciona el programa 2, la temperatura se puede aumentar hasta 90°.
Seleccionar el centrifugado
Girando el mando de CENTRIFUGADO se selecciona la velocidad de centrifugado del programa seleccionado.
Las velocidades máximas previstas para los programas son:
Programas Velocidad máxima
Algodón 1200 r.p.m.
Sintéticos 800 r.p.m.
Lana 800 r.p.m.
Se puede disminuir la velocidad de centrifugado o excluirlo seleccionando el símbolo .
La máquina impedirá automáticamente efectuar un centrifugado a una velocidad mayor que la máxima prevista para cada
programa.
Funciones
Las distintas funciones de lavado previstas por la lavadora permiten obtener la limpieza y el blanco deseados.
Para activar las funciones:
1. presione el botón correspondiente a la función deseada;
2. el encendido del piloto correspondiente indica que la función está activa.
Nota:
- Si la función seleccionada no es compatible con el programa elegido, el piloto correspondiente centelleará y la función no
se activará.
- Si la función elegida no es compatible con otra seleccionada precedentemente, el piloto correspondiente a la primera función
seleccionada centelleará y se activará sólo la segunda, el piloto de la función activada se iluminará.
Seleccionando esta opción, se optimizan el movimiento mecánico, la temperatura y el agua para una carga reducida de
prendas de algodón y sintéticas poco sucias (ver la “Tabla de programas”). Con “ ” se puede lavar en un tiempo
menor, ahorrando agua y energía. Se aconseja utilizar una dosis de detergente líquido adecuada a la cantidad de carga.
La función contribuye al ahorro energético porque no calienta el agua utilizada para lavar la ropa, esto constituye
una ventaja tanto para el ambiente como para la factura de electricidad. La mayor potencia y el consumo optimizado del
agua, garantizan óptimos resultados para la misma duración promedio de un ciclo estándar.
Para obtener los mejores resultados de lavado, se aconseja el uso de un detergente líquido.
Aclarado extra
Al elegir esta función aumentará la eficacia del aclarado y se asegurará la máxima eliminación del detergente. Es útil para
pieles particularmente sensibles.
Comienzo retrasado
Retrasa la puesta en marcha de la máquina hasta 12 horas.
Presione varias veces el botón hasta hacer encender la luz testigo correspondiente al retraso deseado. La quinta vez que se
presione el botón, la función se desactivará.
Nota: Una vez presionado el botón START/PAUSE, se puede modificar el valor del retraso sólo disminuyéndolo hasta que se
ponga en marcha el programa seleccionado.
Personalizaciones

22
ES
Detergentes y ropa
Contenedor de detergentes
El buen resultado del lavado depende también de la cor-
recta dosificación del detergente: si se excede la cantidad,
no se lava de manera más eficaz, sino que se contribuye a
encostrar las partes internas de la lavadora y a contaminar
el medio ambiente.
! No use detergentes para el lavado a mano porque pro-
ducen demasiada espuma.
! Utilice detergentes en polvo para prendas de algodón
blancas, para el prelavado y para lavados con una tempe-
ratura mayor que 60ºC.
! Respete las indicaciones que se encuentran en el envase
de detergente.
Extraiga el contenedor de
detergentes e introduzca el
detergente o el aditivo de la
siguiente manera:
cubeta 1: Detergente para prelavado (en polvo)
cubeta 2: Detergente para lavado (en polvo o líquido)
El detergente líquido se debe verter sólo antes de la pue-
sta en marcha.
cubeta 3: Aditivos (suavizante, etc.)
El suavizante no se debe volcar fuera de la rejilla.
Preparar la ropa
•Subdividalaropasegún:
- el tipo de tejido / el símbolo en la etiqueta.
- los colores: separe las prendas de color y las blancas.
•Vacíelosbolsillosycontrolelosbotones.
• Nosuperelosvaloresindicadosenla “Tabla de Progra-
mas” referidos al peso de la ropa seca.
¿Cuánto pesa la ropa?
1 sábana 400/500 g
1 funda 150/200 g
1 mantel 400/500 g
1 albornoz 900/1200 g
1 toalla 150/250 g
Prendas especiales
Seda: utilice el programa correspondiente 9 para lavar
todas las prendas de seda. Se aconseja el uso de un
detergente específico para prendas delicadas.
Cortinas: pliéguelas y colóquelas dentro de una funda o
de una bolsa de red. Utilice el programa 9.
Lana: con el programa 10 es posible lavar en la lavadora
todas las prendas de lana, aún las que contienen la etiqueta
“sólo lavado a mano” Para obtener los mejores resultados
utilice un detergente específico y no supere 1,5 Kg. de ropa.
1
2
3
Jeans: vuelva del revés las prendas antes del lavado y
utilice un detergente líquido. Utilice el programa 11.
Sistema de equilibrado de la carga
Antes de cada centrifugado, para evitar vibraciones exce-
sivas y para distribuir la carga de modo uniforme, el cesto
realiza rotaciones a una velocidad ligeramente superior a la
del lavado. Si después de varios intentos, la carga todavía
no está correctamente equilibrada, la máquina realiza el
centrifugado a una velocidad inferior a la prevista. Cuando
existe un excesivo desequilibrio, la lavadora realiza la
distribución antes que el centrifugado. Para obtener una
mejor distribución de la carga y su correcto equilibrado, se
aconseja mezclar prendas grandes y pequeñas.

ES
23
Anomalías y soluciones
Puede suceder que la lavadora no funcione. Antes de llamar al Servicio de Asistencia Técnica (ver “Asistencia”),controle que
no se trate de un problema de fácil solución utilizando la siguiente lista.
Anomalías:
La lavadora no se enciende.
El ciclo de lavado no comienza.
La lavadora no carga agua (cen-
tellea rápidamente el piloto de la
primera fase de lavado).
La lavadora carga y descarga agua
continuamente.
La lavadora no descarga o no cen-
trifuga.
La lavadora vibra mucho durante la
centrifugación.
La lavadora pierde agua.
Los pilotos de las “Funciones” y el
piloto de “START/PAUSE” parpade-
an y uno de los pilotos de la “fase
en curso” y de “puerta bloqueada”
quedan encendidos con la luz fija.
Se forma demasiada espuma.
Posibles causas / Solución:
•Elenchufenoestáintroducidoenlatomadecorriente,onohacecontacto.
•Enlacasanohaycorriente.
•Lapuertanoestácorrectamentecerrada.
•ElbotónON/OFFnohasidopresionado.
•ElbotónSTART/PAUSEnohasidopresionado.
•Elgrifodeaguanoestáabierto.
•Sefijóunretrasodelahoradepuestaenmarcha(ver “Personalizaciones”).
•Eltubodealimentacióndeaguanoestáconectadoalgrifo.
•Eltuboestáplegado.
•Elgrifodeaguanoestáabierto.
•Enlacasanohayagua.
•Nohaysuficientepresión.
•ElbotónSTART/PAUSEnohasidopresionado.
•Eltubodedescarganoestáinstaladoentrelos65y100cm.delsuelo(ver
“Instalación”).
•Elextremodeltubodedescargaestásumergidoenelagua(ver “Instalación”).
•Ladescargadeparednoposeeunrespiradero.
Si después de estas verificaciones, el problema no se resuelve, cierre el grifo de
agua, apague la lavadora y llame a la Asistencia. Si la vivienda se encuentra en
uno de los últimos pisos de un edificio, es posible que se verifiquen fenómenos
de sifonaje, por ello la lavadora carga y descarga agua de modo continuo. Para
eliminar este inconveniente se encuentran disponibles en el comercio válvulas
especiales que permiten evitar el sifonaje.
•Elprogramanoprevéladescarga:conalgunosprogramasesnecesariopo-
nerla en marcha manualmente.
•Eltubodedescargaestáplegado(ver “Instalación”).
•Elconductodedescargaestáobstruido.
•Elcesto,enelmomentodelainstalación,nofuedesbloqueadocorrectamen-
te (ver “Instalación”).
•Lamáquinanoestáinstaladaenunlugarplano(ver “Instalación”).
•Existemuypocoespacioentrelamáquina,losmueblesylapared(ver “Insta-
lación”).
•Eltubodealimentacióndeaguanoestábienenroscado(ver “Instalación”).
•Elcontenedordedetergentesestáobstruido(para limpiarlo ver “Mantenimien-
to y cuidados”).
•Eltubodedescarganoestábienfijado(ver “Instalación”).
•Apaguelamáquinaydesenchúfela,espereaproximadamente1minutoy
luego vuelva a encenderla.
Si la anomalía persiste, llame al Servicio de Asistencia Técnica.
•Eldetergentenoesespecíficoparalalavadora(debeconteneralgunasdelas
frases “para lavadora”, “a mano o en lavadora” o similares).
•Ladosificaciónfueexcesiva.
24
ES
Asistencia
Antes de llamar al Servicio de Asistencia Técnica:
•VerifiquesilaanomalíalapuederesolverUd.solo (ver “Anomalías y soluciones”);
•Vuelvaaponerenmarchaelprogramaparacontrolarsielinconvenientefueresuelto;
•Sinoesasí,llamealServiciodeAsistenciatécnicaautorizado,alnúmerodeteléfonoindicadoenelcertificadodegarantía.
! No recurra nunca a técnicos no autorizados.
Comunique:
• eltipodeanomalía;
• elmodelodelamáquina(Mod.);
• elnúmerodeserie(S/N).
Esta información se encuentra en la placa aplicada en la parte posterior de la lavadora y en la parte delantera abriendo la puerta.
La siguiente información es válida solo para España. Para otros países de habla hispana consulte a su vendedor.
Ampliación de garantía
Llame al 902.363.539 y le informaremos sobre el fantástico plan de ampliación de garantía hasta 5 años.
Consiga una cobertura total adicional de
• Piezasycomponentes
• Manodeobradelostécnicos
• Desplazamientoasudomiciliodelostécnicos
Y NO PAGUE AVERIAS NUNCA MAS
Servicio de asistencia técnica (SAT)
Llame al 902.133.133 y nuestros técnicos intervendrán con rapidez y eficacia, devolviendo el electrodoméstico a sus condi-
ciones óptimas de funcionamiento. En el SAT encontrará recambios, accesorios y productos específicos para la limpieza y
mantenimiento de su electrodoméstico a precios competitivos. ESTAMOS A SU SERVICIO

I
25
Italiano
Sommario
Installazione, 26-27
Disimballo e livellamento
Collegamenti idraulici ed elettrici
Primo ciclo di lavaggio
Dati tecnici
Manutenzione e cura, 28
Escludere acqua e corrente elettrica
Pulire la lavabiancheria
Pulire il cassetto dei detersivi
Curare oblò e cestello
Pulire la pompa
Controllare il tubo di alimentazione dell’acqua
Precauzioni e consigli, 29
Sicurezza generale
Smaltimento
Descrizione della lavabiancheria e
avviare un programma, 30-31
Pannello di controllo
Spie
Avviare un programma
Programmi, 32
Tabella dei programmi
Personalizzazioni, 33
Impostare la temperatura
Impostare la centrifuga
Opzioni
Detersivi e biancheria, 34
Cassetto dei detersivi
Preparare la biancheria
Capi particolari
Sistema bilanciamento del carico
Anomalie e rimedi, 35
Assistenza, 36
Assistenza Attiva 7 giorni su 7
I
LAVABIANCHERIA
IWC 61251
Istruzioni per l’uso
26
I
Installazione
! È importante conservare questo libretto per
poterlo consultare in ogni momento. In caso
di vendita, di cessione o di trasloco, assicu-
rarsi che resti insieme alla lavabiancheria per
informare il nuovo proprietario sul funziona-
mento e sui relativi avvertimenti.
! Leggere attentamente le istruzioni: ci sono
importanti informazioni sull’installazione,
sull’uso e sulla sicurezza.
Disimballo e livellamento
Disimballo
1. Disimballare la lavabiancheria.
2. Controllare che la lavabiancheria non abbia
subìto danni nel trasporto. Se fosse danneg-
giata non collegarla e contattare il rivenditore.
3. Rimuovere le 3 viti
di protezione per il
trasporto e il gom-
mino con il relativo
distanziale, posti
nella parte posteriore
(vedi figura).
4. Chiudere i fori con i tappi di plastica in
dotazione.
5. Conservare tutti i pezzi: qualora la lava-
biancheria debba essere trasportata, dovran-
no essere
rimontati.
! Gli imballaggi non sono giocattoli per bam-
bini.
Livellamento
1. Installare la lavabiancheria su un pavimen-
to piano e rigido, senza appoggiarla a muri,
mobili o altro.
2. Se il pavimento
non fosse perfet-
tamente orizzonta-
le, compensare le
irregolarità svitando
o avvitando i piedini
anteriori (vedi figura);
l’angolo di inclina-
zione, misurato sul
piano di lavoro, non
deve superare i 2°.
Un accurato livellamento dà stabilità alla
macchina ed evita vibrazioni, rumori e spo-
stamenti durante il funzionamento. In caso di
moquette o di un tappeto, regolare i piedini in
modo da conservare sotto la lavabiancheria
uno spazio sufficiente per la ventilazione.
Collegamenti idraulici ed elettrici
Collegamento del tubo di
alimentazione dell’acqua
1. Collegare il tubo
di alimentazione
avvitandolo a un
rubinetto d’acqua
fredda con bocca
filettata da 3/4 gas
(vedi figura).
Prima di allacciare,
far scorrere l’acqua
finché non sia limpi-
da.
2. Collegare il tubo
di alimentazione alla
lavabiancheria
avvitandolo all’appo-
sita presa d’acqua,
nella parte posteriore
in alto a destra (vedi
figura).
3. Fare attenzione che nel tubo non ci siano
né pieghe né strozzature.
! La pressione idrica del rubinetto deve es-
sere compresa nei valori della tabella Dati
tecnici
(vedi pagina a fianco).
! Se la lunghezza del tubo di alimentazione
non fosse sufficiente, rivolgersi a un negozio
specializzato o a un tecnico autorizzato.
! Non utilizzare mai tubi già usati.
! Utilizzare quelli in dotazione alla macchina.
27
I
Collegamento del tubo di scarico
Collegare il tubo di
scarico, senza pie-
garlo, a una condut-
tura di scarico o a
uno scarico a muro
posti tra 65 e 100
cm da terra.
In alternativa, ap-
poggiare il tubo di
scarico al bordo di
un lavandino o di
una vasca, legando
la guida (ac-
quistabile presso il
servizio assistenza)
al rubinetto (vedi
figura). L’estremità
libera del tubo di
scarico non deve rimanere immersa nell’ac-
qua.
! È sconsigliato usare tubi di prolunga; se in-
dispensabile, la prolunga deve avere lo stes-
so diametro del tubo originale e non superare
i 150 cm.
Collegamento elettrico
Prima di inserire la spina nella presa della
corrente, accertarsi che:
• la presa abbia la messa a terra e sia a nor-
ma di legge;
• la presa sia in grado di sopportare il carico
massimo di potenza della macchina, indi
cato nella tabella Dati tecnici (vedi a fianco);
• la tensione di alimentazione sia compresa
nei valori indicati nella tabella Dati tecnici
(vedi a fianco);
• la presa sia compatibile con la spina della
lavabiancheria. In caso contrario sostituire
la presa o la spina.
! La lavabiancheria non va installata all’aper-
to, nemmeno se lo spazio è riparato, perché
è molto pericoloso lasciarla esposta a piog-
gia e temporali.
! A lavabiancheria installata, la presa della
corrente deve essere facilmente raggiungibile.
! Non usare prolunghe e multiple.
! Il cavo non deve subire piegature o compres-
sioni.
! Il cavo di alimentazione deve essere sostituito
solo da tecnici autorizzati.
Attenzione! L’azienda declina ogni responsabilità
qualora queste norme non vengano rispettate.
Primo ciclo di lavaggio
Dopo l’installazione, prima dell’uso, effettuare
un ciclo di lavaggio con detersivo e senza bian-
cheria impostando il programma 2.
65 - 100 cm
Dati tecnici
Modello
IWC 61251
Dimensioni
larghezza cm 59,5
altezza cm 85
profondità cm 51,7
Capacità
da 1 a 6 kg
Collegamen-
ti elettrici
vedi la targhetta caratteristi-
che tecniche applicata sulla
macchina
Collegamen-
ti idrici
pressione massima
1 MPa (10 bar)
pressione minima
0,05 MPa (0,5 bar)
capacità del cesto 46 litri
Velocità di
centrifuga
sino a 1200 giri al minuto
Programmi
di
controllo
secondo il
regolamento
1061/2010 e
1015/2010
programma 2;
Cotone standard 60°C.
programma 3;
Cotone standard 40°C.
Questa apparecchiatura è
conforme alle seguenti Diret-
tive Comunitarie:
- EMC 2014/30/EU (Compa-
tibilità Elettromagnetica)
- 2012/19/EU - (WEEE)
- LVD 2014/35/EU (Bassa
Tensione)
28
I
Escludere acqua e corrente elettrica
• Chiudere il rubinetto dell’acqua dopo ogni
lavaggio. Si limita così l’usura dell’impianto
idraulico della lavabiancheria e si elimina il
pericolo di perdite.
• Staccare la spina della corrente quando si
pulisce la lavabiancheria e durante i lavori
di manutenzione.
Pulire la lavabiancheria
La parte esterna e le parti in gomma possono
essere puliti con un panno imbevuto di acqua
tiepida e sapone. Non usare solventi o abra-
sivi.
Pulire il cassetto dei detersivi
Sfilare il cassetto sol-
levandolo e tirandolo
verso l’esterno (vedi
figura).
Lavarlo sotto l’acqua
corrente; questa
pulizia va effettuata
frequentemente.
Curare oblò e cestello
• Lasciare sempre socchiuso l’oblò per evita-
re che si formino cattivi odori.
Pulire la pompa
La lavabiancheria è dotata di una pompa
autopulente che non ha bisogno di manuten-
zione. Può però succedere che piccoli ogget-
ti (monete, bottoni) cadano nella precamera
che protegge la pompa, situata nella parte
inferiore di essa.
! Assicurarsi che il ciclo di lavaggio sia termi-
nato e staccare la spina.
Per accedere alla
precamera:
1. rimuovere il pan-
nello di copertura
sul lato anteriore
della lavabiancheria
con l’ausilio di un
giravite (vedi figura);
2. svitare il coper-
chio ruotandolo in
senso antiorario
(vedi figura): è nor-
male che fuoriesca
un po’ d’acqua;
3. pulire accuratamente l’interno;
4. riavvitare il coperchio;
5. rimontare il pannello assicurandosi, prima
di spingerlo verso la macchina, di aver inseri-
to i ganci nelle apposite asole.
Controllare il tubo di alimentazio-
ne dell’acqua
Controllare il tubo di alimentazione almeno
una volta all’anno. Se presenta screpolature e
fessure va sostituito: durante i lavaggi le forti
pressioni potrebbero provocare improvvise
spaccature.
! Non utilizzare mai tubi già usati.
Manutenzione e cura

I
29
Precauzioni e consigli
! La lavabiancheria è stata progettata e costruita in
conformità alle norme internazionali di sicurezza. Queste
avvertenze sono fornite per ragioni di
sicurezza e devono essere lette attentamente.
Sicurezza generale
• Questo apparecchio è stato concepito esclusivamente
per un uso di tipo domestico.
• Questo apparecchio può essere usato da
bambini da 8 anni in su e da persone con
capacità fisiche, sensoriali o mentali ridotte
o con esperienza e conoscenze insufficienti
se sono supervisionati o se hanno ricevu-
to adeguata formazione in merito all’uso
dell’apparecchio in modo sicuro e capendo
i pericoli connessi. I bambini non devono
giocare con l’apparecchio. Manutenzione
e pulizia non devono essere effettuati dai
bambini senza supervisione.
• La lavabiancheria deve essere usata solo da persone
adulte e secondo le istruzioni riportate in questo libretto.
• Non toccare la macchina a piedi nudi o con le mani o i
piedi bagnati o umidi.
• Non staccare la spina dalla presa della corrente tirando
il cavo, bensì afferrando la spina.
• Non aprire il cassetto dei detersivi mentre la macchina
è in funzione.
• Non toccare l’acqua di scarico, che può raggiungere
temperature elevate.
• Non forzare in nessun caso l’oblò: potrebbe danneg-
giarsi il meccanismo di sicurezza che protegge da
aperture accidentali.
• In caso di guasto, in nessun caso accedere ai mecca-
nismi interni per tentare una riparazione.
• Controllare sempre che i bambini non si avvicinino alla
macchina in funzione.
• Durante il lavaggio l’oblò tende a scaldarsi.
• Se dev’essere spostata, lavorare in due o tre persone
con la massima attenzione. Mai da soli perché la mac-
china è molto pesante.
• Prima di introdurre la biancheria controlla che il cestello
sia vuoto.
Smaltimento
• Smaltimento del materiale di imballaggio:
attenersi alle norme locali, così gli imballaggi potranno
essere riutilizzati.
• La direttiva Europea 2012/19/EU (WEEE) sui rifiuti di
apparecchiature elettriche ed elettroniche, prevede che
gli elettrodomestici non debbano essere smaltiti nel
normale flusso dei rifiuti solidi urbani. Gli apparecchi
dismessi devono essere raccolti separatamente per
ottimizzare il tasso di recupero e riciclaggio dei materiali
che li compongono ed impedire potenziali danni per la
salute e l’ambiente. Il simbolo del cestino barrato è ripor-
tato su tutti i prodotti per ricordare gli obblighi di raccolta
separata.
Per ulteriori informazioni, sulla corretta dismissione
degli elettrodomestici, i detentori potranno rivolgersi al
servizio pubblico preposto o ai rivenditori.
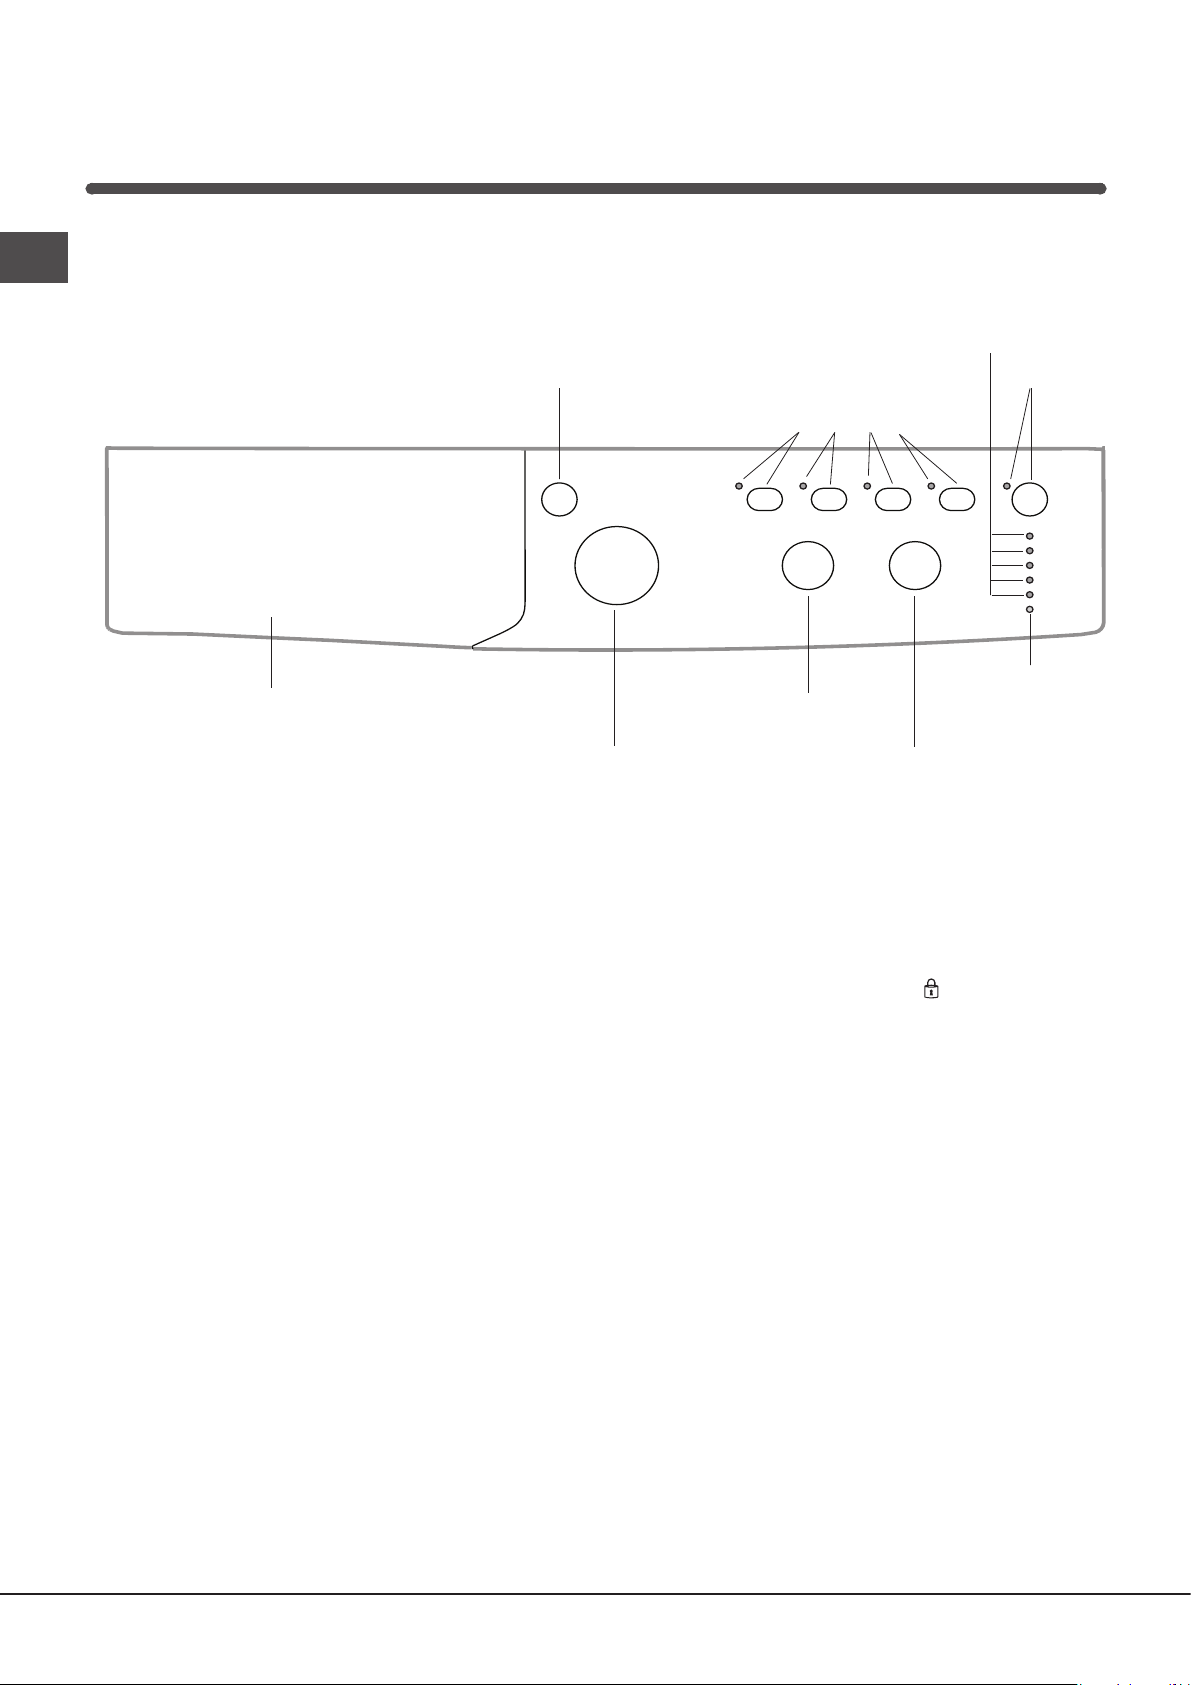
30
I
Pannello di controllo
Descrizione della lavabiancheria e
avviare un programma
Manopola
TEMPERATURA
Manopola
PROGRAMMI
Cassetto dei detersivi
SPIE AVANZAMENTO
CICLO/PARTENZA
RITARDATA
Tasti e spie
OPZIONE
Tasto ON/OFF
Manopola
CENTRIFUGA
Spia
OBLÒ
BLOCCATO
Cassetto dei detersivi: per caricare detersivi e additivi
(vedi “Detersivi e biancheria”).
Tasto ON/OFF: per accendere e spegnere la lavabian-
cheria.
Manopola PROGRAMMI: per impostare i programmi.
Durante il programma la manopola resterà ferma.
Tasti e spie OPZIONE: per selezionare le opzioni di-
sponibili. La spia relativa all’opzione selezionata rimarrà
accesa.
Manopola CENTRIFUGA: per impostare la centrifuga o
escluderla (vedi “Personalizzazioni”).
Manopola TEMPERATURA: per impostare la temperatu-
ra o il lavaggio a freddo (vedi “Personalizzazioni”).
SPIE AVANZAMENTO CICLO/PARTENZA RITAR-
DATA: per seguire lo stato di avanzamento del program-
ma di lavaggio.
La spia accesa indica la fase in corso.
Se è stata impostata l’opzione “Partenza Ritardata”,
indicheranno il tempo mancante all’avvio del programma
(vedi pagina a fianco).
Spia OBLÒ BLOCCATO: per capire se l’oblò è apribile
(vedi pagina a fianco).
Tasto e spia START/PUASE: per avviare i programmi o
interromperli momentaneamente.
N.B.: per mettere in pausa il lavaggio in corso, premere
questo tasto, la spia relativa lampeggerà con colore
arancione mentre quella della fase in corso sarà accesa
fissa. Se la spia OBLÒ BLOCCATO sarà spenta, si
potrà aprire l’oblò (attendere 3 minuti circa).
Per far ripartire il lavaggio dal punto in cui è stato
interrotto, premere nuovamente questo tasto.
Standby
Questa lavatrice, in conformità alle nuove normative
legate al risparmio energetico, è dotata di un sistema di
autospegnimento (stand by) che entra in funzione dopo
circa 30 minuti nel caso di non utilizzo. Premere brevemente
il tasto ON-OFF e attendere che la macchina si riattivi.
Tasto e spia
START/
PUASE
31
I
Spie
Le spie forniscono informazioni importanti.
Ecco che cosa dicono:
Partenza ritardata
Se è stata attivata l’opzione “Partenza ritardata” (vedi “Per-
sonalizzazioni”), dopo avere avviato il programma, inizierà
a lampeggiare la spia relativa al ritardo selezionato:
Col trascorrere del tempo verrà visualizzato il ritardo resi-
duo con il lampeggio della spia relativa:
Trascorso il ritardo selezionato avrà inizio il programma
impostato.
Lavaggio
Risciacquo
Centrifuga
Scarico
Fine lavaggio
Spie fase in corso
Una volta selezionato e avviato il ciclo di lavaggio desi-
derato, le spie si accenderanno progressivamente per
indicarne lo stato di avanzamento:
Tasti opzione e relative spie
Selezionando un’opzione la spia relativa si illuminerà.
Se l’opzione selezionata non è compatibile con il pro-
gramma impostato la spia relativa lampeggerà e l’opzione
non verrà attivata.
Se l’opzione selezionata non è compatibile con un’altra
precedentemente impostata, la spia relativa alla prima
funzione selezionata lampeggerà e verrà attivata solo la
seconda, la spia dell’opzione attivata si illuminerà.
Spia oblò bloccato
La spia accesa indica che l’oblò è bloccato per impedire
l’apertura; per aprire l’oblò è necessario che la spia sia
spenta (attendere 3 minuti circa).
Per aprire l’oblò mentre un ciclo è in corso premere il
pulsante START/PUASE; se la spia OBLÒ BLOCCATO è
spenta sarà possibile aprire l’oblò.
Avviare un programma
1. Accendere la lavabiancheria premendo il tasto ON/OFF. Tutte le spie si accenderanno per qualche secondo, poi si spegne-
ranno e pulserà la spia START/PUASE.
2. Caricare la biancheria e chiudere l’oblò.
3. Impostare con la manopola PROGRAMMI il programma desiderato.
4. Impostare la temperatura di lavaggio (vedi “Personalizzazioni”).
5. Impostare la velocità di centrifuga (vedi “Personalizzazioni”).
6. Versare detersivo e additivi (vedi “Detersivi e biancheria”).
7. Selezionare le opzioni desiderate.
8. Avviare il programma premendo il tasto START/PUASE e la spia relativa rimarrà accesa fissa di colore verde.
Per annullare il ciclo impostato mettere la macchina in pausa premendo il tasto START/PUASE e scegliere un nuovo ciclo.
9. Al termine del programma si illuminerà la spia END. Quando la spia OBLO’ BLOCCATO si spegnerà sarà possibile apri-
re l’oblò (attendere 3 minuti circa). Estrarre la biancheria e lasciare l’oblò socchiuso per far asciugare il cestello.
Spegnere la lavabiancheria premendo il tasto ON/OFF.
32
I
Programmi
Tabella dei programmi
Sport Intensive (programma 12) è studiato per lavare tessuti per abbigliamento sportivo (tute, calzoncini, ecc.) molto sporchi;
per ottenere i migliori risultati è consigliabile non superare il carico massimo indicato nella “Tabella dei programmi”.
Sport Light (programma 13) è studiato per lavare tessuti per abbigliamento sportivo (tute, calzoncini, ecc.) poco sporchi; per
ottenere i migliori risultati è consigliabile non superare il carico massimo indicato nella “Tabella dei programmi”. Si raccomanda
di usare detersivo liquido, usare una dosa adatta a mezzo carico.
Speort Shoes (programma 14) è studiato per lavare scarpe sportive; per ottenere i migliori risultati non lavarne più di 2 paia.
I programmi 20° (Zona 20°) offrono buone performance di lavaggio a basse temperature consentendo un minore utilizzo di
energia elettrica con un risparmio economico e un beneficio per l’ambiente. I programmi 20° rispondono a tutte le esigenze:
Cotone standard (programma 6) ideale per carichi in cotone sporchi. Le buone performance anche a freddo, comparabili con
un lavaggio a 40°, sono garantite da un’azione meccanica che lavora con variazione di velocità a picchi ripetuti e ravvicinati.
Mix light (programma 7) ideale per carichi misti (cotone e sintetici) mediamente sporchi. Le buone performance di lavaggio
anche a freddo sono garantite da un’azione meccanica che lavora con variazione di velocità su intervalli medi e determinati.
20’ refresh (programma 8) ciclo ideale per rinfrescare e lavare capi leggermente sporchi in pochi minuti.
Dura solo 20 minuti e fa così risparmiare tempo ed energia. E’ possibile lavare insieme tessuti di diversa natura (esclusi lana e
seta) con un carico massimo di 1,5 kg.
1) Programma di controllo secondo il regolamento 1061/2010: impostare il programma 2 con una temperaura di 60°C.
Questo ciclo è adatto per pulire un carico di cotone normalmente sporco ed è il più efficiente in termini di consumo combinato di energia e di acqua, da usare su
capi lavabili a 60°. La temperatura effettiva di lavaggio può differire da quella indicata.
2) Programma di controllo secondo il regolamento 1061/2010: impostare il programma 3 con una temperaura di 40°C.
Questo ciclo è adatto per pulire un carico di cotone normalmente sporco ed è il più efficiente in termini di consumo combinato di energia e di acqua, da usare su
capi lavabili a 40°. La temperatura effettiva di lavaggio può differire da quella indicata.
Per tutti Test Institutes:
2) Programma cotone lungo: impostare il programma 3 con una temperatura di 40°C.
3) Programma sintetico lungo: impostare il programma 4 con una temperatura di 40°C.
* Selezionando il programma ed escludendo la centrifuga la macchina effettuerà solo lo scarico.
La durata del ciclo indicata sul display o su questo libretto è una stima calcolata in base a condizioni standard. Il tempo effettivo può variare in base a numerosi fattori quali la temperatura e la
pressione dell’acqua in ingresso, la temperatura ambiente, la quantità di detersivo, la quantità ed il tipo di carico, il bilanciamento del carico, le opzioni aggiuntive selezionate.
Programmi
Descrizione del Programma
Temp. max.
(°C).
Velocità
max.
(giri al
minuto)
Detersivi
Carico max.
(Kg)
Umidità
residua %
Consumo
energia kWh
Acqua
totale lt
Durata ciclo
Prelavaggio Lavaggio Ammorbidente
Giornalieri
1
Cotone con prelavaggio: bianchi estremamente sporchi. 90°
1200
6
53 1,90 68 155’
2
Cotone standard: (1): bianchi e colorati resistenti molto sporchi.
60°
(Max. 90°)
1200
-
6
53 1,01 49,8 195’
3
Cotone standard: (2): bianchi poco sporchi e colori delicati. 40°
1200
-
6
53 0,86 52 185’
4
Sintetici: colori resistenti molto sporchi. 60°
800
-
3
44 0,78 33 105’
4
Sintetici (3): colori resistenti poco sporchi. 40°
800
-
3
44 0,49 38 95’
5
Mix colorati: bianchi poco sporchi e colori delicati. 40°
1200
-
6
53 0,86 56 95’
Zona 20°
6
Cotone standard: bianchi poco sporchi e colori delicati. 20°
1200
-
6
- - - 170’
7
Mix light
20°
800
-
6
- - - 120’
8
20’ refresh
20°
800
-
1,5
- - - 20’
Speciali
9
Seta e tende: per capi in seta, viscosa, lingerie. 30°
0
-
1
- - - 55’
10
Lana: per lana, cachemire, ecc. 40°
800
-
1,5
- - - 70’
11
Jeans
40°
800
-
3
- - - 75’
Sport
12
Sport Intensive
30° 600 -
3
- - - 85’
13
Sport Light
30° 600 -
3
- - - 60’
14
Sport Shoes
30° 600 -
Max. 2 paia
- - - 55’
Parziali
Risciacquo - 1200 - -
6
- - - 36’
Centrifuga + Scarico - 1200 - - - 6
- - - 10’
Solo Scarico * -
- - -
6
- - - 3’

33
I
Personalizzazioni
Impostare la temperatura
Ruotando la manopola TEMPERATURA si imposta la temperatura di lavaggio (vedi Tabella programmi).
La temperatura si può ridurre sino al lavaggio a freddo ( ). La macchina impedirà automaticamente di impostare una tempe-
ratura maggiore a quella massima prevista per ogni programma.
! Eccezione: selezionando il programma
2
la temperatura può essere portata sino a 90°.
Impostare la centrifuga
Ruotando la manopola CENTRIFUGA si imposta la velocità di centrifuga del programma selezionato.
Le velocità massime previste per i programmi sono:
Programmi Velocità massima
Cotone 1200 giri al minuto
Sintetici 800 giri al minuto
Lana 800 giri al minuto
Seta solo scarico
La velocità di centrifuga può essere ridotta, oppure esclusa selezionando il simbolo .
La macchina impedirà automaticamente di effettuare una centrifuga maggiore a quella massima prevista per ogni program-
ma.
Opzioni
Le varie opzioni di lavaggio previste dalla lavabiancheria permettono di ottenere la pulizia e il bianco desiderati.
Per attivare le opzioni:
1. premere il tasto relativo all’opzione desiderata;
2. l’accensione della spia relativa segnala che l’opzione è attiva.
Nota:
- Se l’opzione selezionata non è compatibile con il programma impostato la spia relativa lampeggerà e l’opzione non verrà
attivata.
- Se l’opzione selezionata non è compatibile con un’altra precedentemente impostata, la spia relativa alla prima funzione
selezionata lampeggerà e verrà attivata solo la seconda, la spia dell’opzione attivata si illuminerà.
Selezionando questa opzione la movimentazione meccanica, la temperatura e l’acqua sono ottimizzate per un carico ridotto
di cotoni e sintetici poco sporchi (vedi “Tabella dei programmi”).
Con “ ” puoi lavare in tempi ridotti, risparmiando acqua ed energia. Si consiglia di utilizzare una dose di detersivo
liquido adatta alla quantità di carico.
L’opzione risparmia energia non riscaldando l’acqua utilizzata per lavare i tuoi capi, un vantaggio sia per l’ambiente
che per la tua bolletta dell’elettricità. Al contrario, un’azione meccanica intensificata ed un utilizzo ottimizzato dell’acqua
assicurano ottimi risultati di lavaggio nello stesso tempo di un ciclo standard.
Per i migliori risultati di lavaggio, raccomandiamo l’utilizzo di detergente liquido.
Extra Risciacquo
Selezionando questa opzione si aumenta l’efficacia del risciacquo, e si assicura la massima rimozione del detersivo.
E’ utile per pelli particolarmente sensibili.
Partenza ritardata
Ritarda l’avvio della macchina sino a 12 ore.
Premere più volte il tasto fino a far accendere la spia relativa al ritardo desiderato. Alla quinta pressione del tasto la l’opzione
si disattiverà.
N.B.: Una volta premuto il tasto START/PUASE, si può modificare il valore del ritardo solo diminuendolo fino ad avviare il
programma impostato.
34
I
Detersivi e biancheria
Cassetto dei detersivi
Il buon risultato del lavaggio dipende anche dal corretto
dosaggio del detersivo: eccedendo non si lava in modo più
efficace e si contribuisce a incrostare le parti interne della
lavabiancheria e a inquinare l’ambiente.
! Non usare detersivi per il lavaggio a mano, perché formano
troppa schiuma.
! Usare detersivi in polvere per capi in cotone bianchi e per il
prelavaggio e per lavaggi con temperatura superiore a 60°C.
! Seguire le indicazioni riportate sulla confezione di detersivo.
Estrarre il cassetto dei de-
tersivi e inserire il detersivo o
l’additivo come segue.
vaschetta 1: Detersivo per prelavaggio (in polvere)
vaschetta 2: Detersivo per lavaggio (in polvere o liquido)
Il detersivo liquido va versato solo prima dell’avvio.
vaschetta 3: Additivi (ammorbidente, ecc.)
L’ammorbidente non deve fuoriuscire dalla griglia.
Preparare la biancheria
• Suddividere la biancheria secondo:
- il tipo di tessuto / il simbolo sull’etichetta.
- i colori: separare i capi colorati da quelli bianchi.
• Vuotare le tasche e controllare i bottoni.
• Non superare i valori indicati nella “Tabella dei Program-
mi” riferiti al peso della biancheria asciutta.
Quanto pesa la biancheria?
1 lenzuolo 400-500 gr.
1 federa 150-200 gr.
1 tovaglia 400-500 gr.
1 accappatoio 900-1.200 gr.
1 asciugamano 150-250 gr.
Capi particolari
Seta: utilizzare l’apposito programma 9 per lavare tutti i
capi in seta. Si consiglia l’utilizzo di un detersivo specifico
per capi delicati.
Tende: si raccomanda di piegarle e sistemarle dentro una
federa o un sacchetto a rete. Utilizzare il programma 9.
Lana: con il programma 10 è possibile lavare in lavatrice
tutti i capi in lana, anche quelli con l’etichetta “solo lavaggio
a mano” . Per ottenere i migliori risultati utilizzare un
detersivo specifico e non superare 1,5 kg di bucato.
Jeans: rovesciare i capi prima del lavaggio ed utilizzare un
detersivo liquido. Utilizzare il programma 11.
Sistema bilanciamento del carico
Prima di ogni centrifuga, per evitare vibrazioni eccessive e
per distribuire il carico in modo uniforme, il cestello effettua
delle rotazioni ad una velocità leggermente superiore
a quella del lavaggio. Se al termine di ripetuti tentativi
il carico non fosse ancora correttamente bilanciato la
macchina effettua la centrifuga ad una velocità inferiore a
quella prevista. In presenza di eccessivo sbilanciamento
la lavabiancheria effettua la distribuzione anzichè la
centrifuga. Per favorire una migliore distribuzione del carico
e il suo corretto bilanciamento si consiglia di mescolare
capi grandi e piccoli.
1
2
3

I
35
Può accadere che la lavabiancheria non funzioni. Prima di telefonare all’Assistenza (vedi “Assistenza”), controllare che non si
tratti di un problema facilmente risolvibile aiutandosi con il seguente elenco.
Anomalie e rimedi
Anomalie:
La lavabiancheria
non si accende.
Il ciclo di lavaggio
non inizia.
La lavabiancheria non carica
acqua (lampeggia velocemente la
spia della prima fase di lavaggio).
La lavabiancheria carica e scarica
acqua di continuo.
La lavabiancheria non scarica
o non centrifuga.
La lavabiancheria vibra
molto durante la centrifuga.
La lavabiancheria perde acqua.
Le spie delle “opzioni” e la spia di
“START/PUASE” lampeggiano e una
delle spie della “fase in corso” e di
“oblò bloccato” si accendono fisse.
Si forma troppa schiuma.
Possibili cause / Soluzione:
• La spina non è inserita nella presa della corrente, o non abbastanza
da fare contatto.
• In casa non c’è corrente.
• L’oblò non è ben chiuso.
• Il tasto ON/OFF non è stato premuto.
• Il tasto START/PUASE non è stato premuto.
• Il rubinetto dell’acqua non è aperto.
• Si è impostato un ritardo sull’ora di avvio.
• Il tubo di alimentazione dell’acqua non è collegato al rubinetto.
• Il tubo è piegato.
• Il rubinetto dell’acqua non è aperto.
• In casa manca l’acqua.
• Non c’è sufficiente pressione.
• Il tasto START/PUASE non è stato premuto.
• Il tubo di scarico non è installato fra 65 e 100 cm da terra (vedi “Installazione”).
• L’estremità del tubo di scarico è immersa nell’acqua (vedi “Installazione”).
• Lo scarico a muro non ha lo sfiato d’aria.
Se dopo queste verifiche il problema non si risolve, chiudere il rubinetto dell’ac-
qua, spegnere la lavabiancheria e chiamare l’Assistenza. Se l’abitazione si trova
agli ultimi piani di un edificio, è possibile che si verifichino fenomeni di sifonag-
gio, per cui la lavabiancheria carica e scarica acqua di continuo. Per eliminare
l’inconveniente sono disponibili in commercio apposite valvole anti-sifonaggio.
• Il programma non prevede lo scarico: con alcuni programmi occorre
avviarlo manualmente.
• Il tubo di scarico è piegato (vedi “Installazione”).
• La conduttura di scarico è ostruita.
• Il cestello, al momento dell’installazione, non è stato sbloccato
correttamente (vedi “Installazione”).
• La lavabiancheria non è in piano (vedi “Installazione”).
• La lavabiancheria è stretta tra mobili e muro (vedi “Installazione”).
• Il tubo di alimentazione dell’acqua non è ben avvitato (vedi “Installazione”).
• Il cassetto dei detersivi è intasato (per pulirlo vedi “Manutenzione e cura”).
• Il tubo di scarico non è fissato bene (vedi “Installazione”).
• Spegnere la macchina e togliere la spina dalla presa, attendere circa 1 minu-
to quindi riaccenderla.
Se l’anomalia persiste, chiamare l’Assistenza.
• Il detersivo non è specifico per lavabiancheria (deve esserci la dicitura “per
lavatrice”, “a mano e in lavatrice”, o simili).
• Il dosaggio è stato eccessivo.
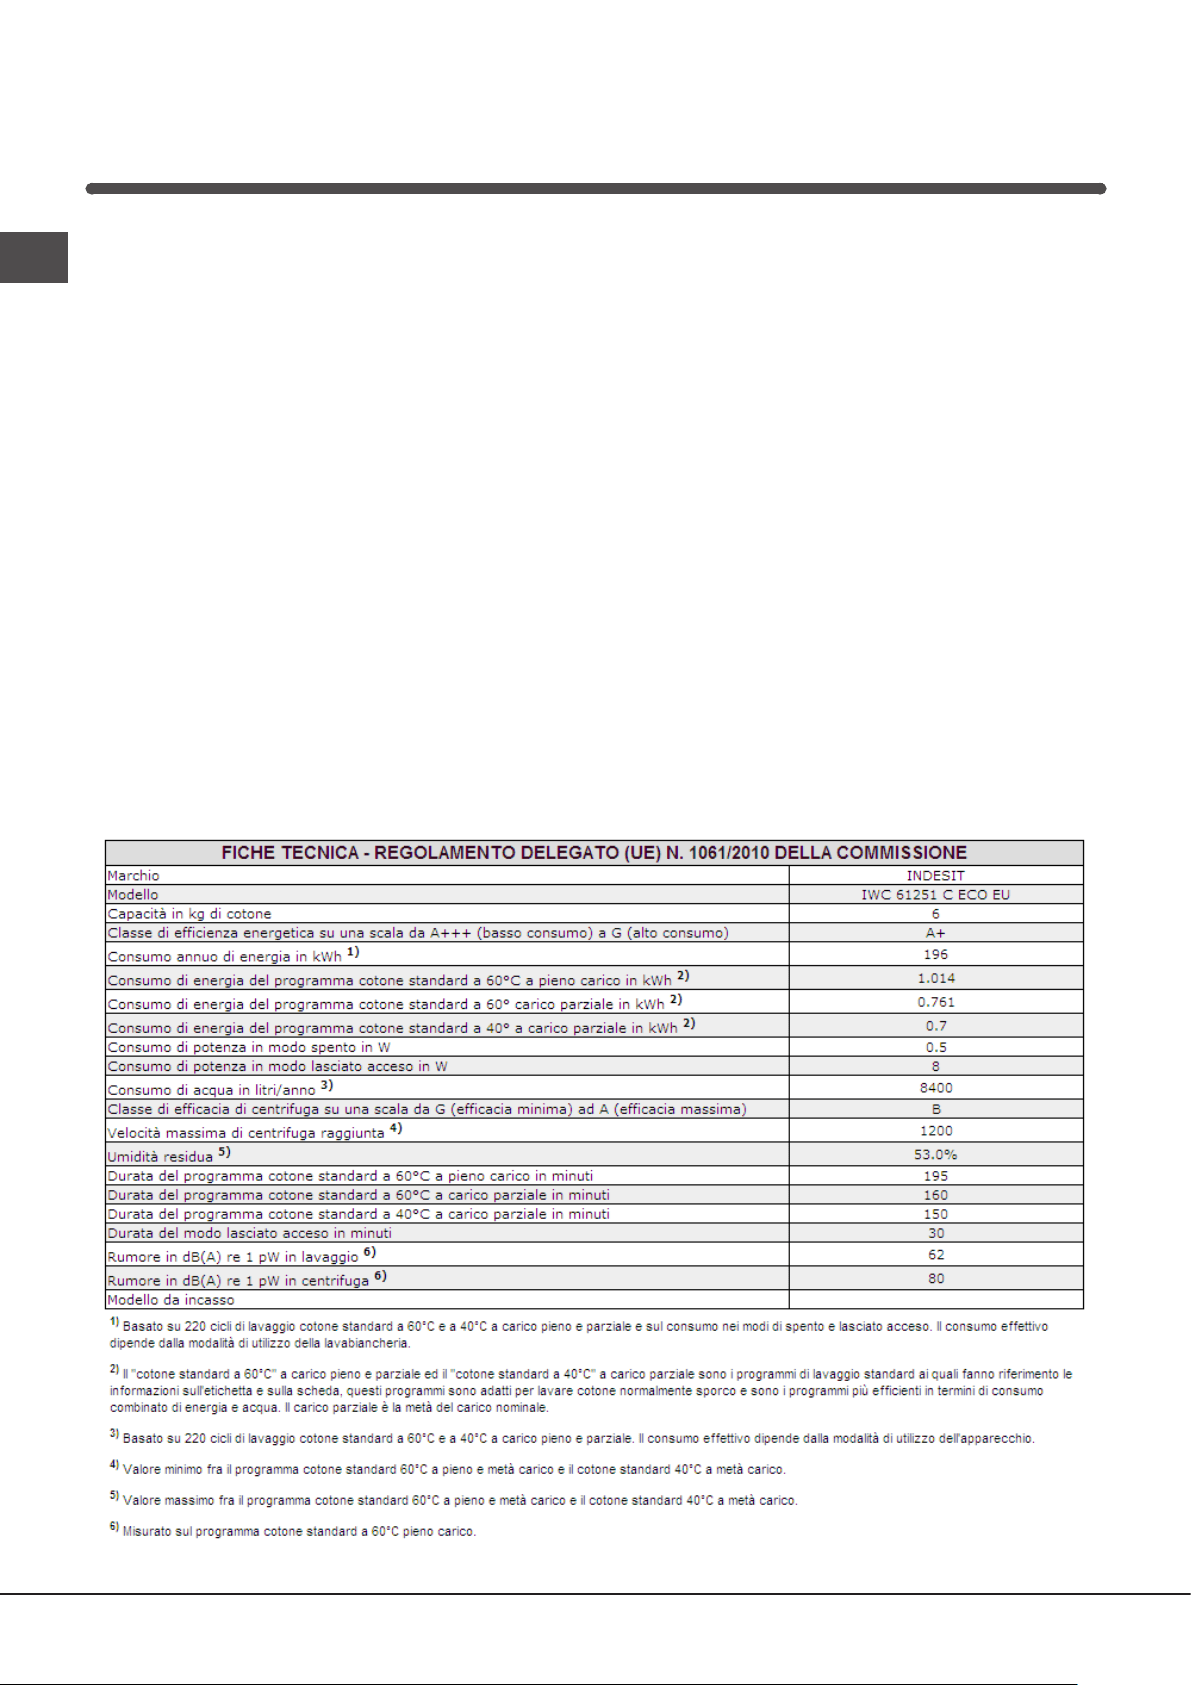
36
I
Assistenza
Prima di contattare l’Assistenza:
• Verificare se l’anomalia può essere risolta autonomamente (vedi “Anomalie e Rimedi);
• Riavviare il programma per controllare se l’inconveniente è stato ovviato;
• In caso negativo, contattare il Servizio Assistenza Tecnico Autorizzato.
! In caso di errata installazione o uso non corretto potrete essere chiamati al pagamento dell’intervento.
! Non ricorrere mai a tecnici non autorizzati.
Comunicare:
• il tipo di anomalia;
• il modello della macchina (Mod.);
• il numero di serie (S/N).
Queste ultime informazioni si trovano sulla targhetta caratteristiche posta sull’apparecchio.
Assistenza Attiva 7 giorni su 7
In caso di necessità d’intervento chiamare il Numero Unico Nazionale 02.20.30.
Un operatore sarà a completa disposizione per fissare un appuntamento con il Centro Assistenza Tecnico
Autorizzato più vicino al luogo da cui si chiama.
È attivo 7 giorni su 7, sabato e domenica compresi, e non lascia mai inascoltata una richiesta.

PT
37
Português
Sumário
Instalação, 38-39
Desembalar e nivelar
Ligações hidráulicas e eléctricas
Primeiro ciclo de lavagem
Dados técnicos
Manutenção e cuidados, 40
Interromper a alimentação de água e de corrente eléctrica
Limpar a máquina de lavar roupa
Limpar a gaveta dos detergentes
Cuidados com a porta de vidro e o tambor
Limpar a bomba
Verificar o tubo de alimentação de água
Precauções e conselhos, 41
Segurança geral
Eliminação
Descrição da máquina de lavar roupa e
como iniciar um programa, 42-43
Painel de comandos
Indicadores luminosos
Iniciar um programa
Programas, 44
Tabela dos programas
Personalizações, 45
Seleccione a temperatura
Seleccione a centrifugação
Funções
Detergentes e roupa, 46
Gaveta dos detergentes
Preparar a roupa
Peças especiais
Sistema de balanceamento da carga
Anomalias e soluções, 47
Assistência, 48
PT
IWC 61251
Instruções para utilização
MÁQUINA DE LAVAR ROUPA
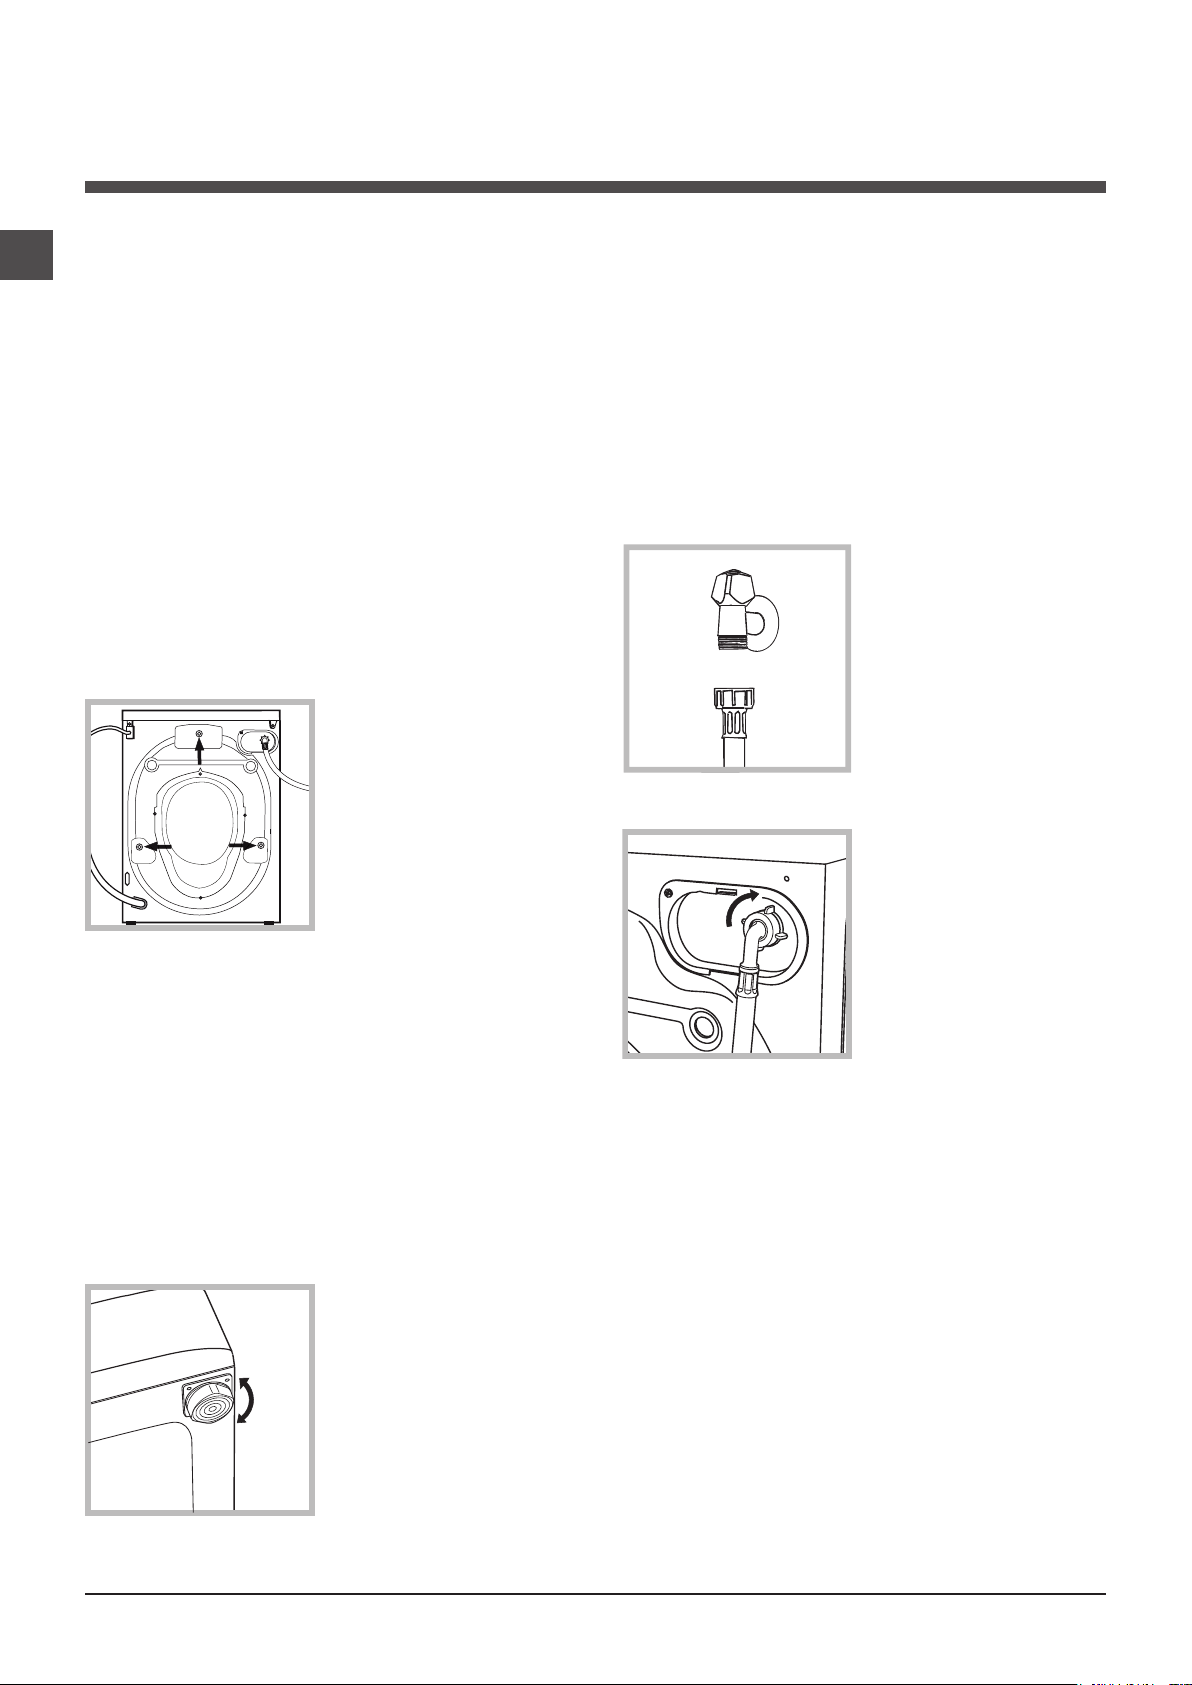
38
PT
Instalação
! É importante guardar este manual para
poder consultá-lo a qualquer momento. Se a
máquina for vendida, cedida ou transferida,
certifique-se que este manual permaneça com
a máquina para informar o novo proprietário
acerca do seu funcionamento e das respecti-
vas advertências.
! Leia com atenção estas instruções: há im-
portantes informações acerca da instalação,
da utilização e da segurança.
Desembalar e nivelar
Desembalar
1. Tire a máquina de lavar roupa da embalagem.
2. Verifique se a máquina de lavar roupa so-
freu danos no transporte. Se estiver danificada
não efectue a sua ligação e contacte o reven-
dedor.
3. Tire os 3 parafusos
de protecção para o
transporte e a borra-
chinha com o respec-
tivo calço, situados
na parte traseira (veja
a figura).
4. Tampe os furos com as tampas em plástico
fornecidas.
5. Guarde todas as peças: se for necessário
transportar a máquina de lavar roupa, terão de
ser montadas outra vez.
! Embalagens não são brinquedos para as
crianças!
Nivelamento
1. Instale a máquina de lavar roupa sobre um
pavimento plano e rígido, sem encostá-la em
paredes, móveis nem outro.
2. Se o pavimento
não for perfeitamen-
te horizontal, para
compensar qualquer
irregularidade, desa-
tarraxe ou atarraxe os
pés dianteiros (veja a
figura); o ângulo de
inclinação, medido
no plano de trabalho,
não deve ultrapassar
2°.
Um cuidadoso nivelamento dá estabilidade à
máquina e evita vibrações, ruídos e desloca-
mentos durante o funcionamento. Se houver
tapete ou alcatifa, regule os pés em modo que
embaixo da máquina de lavar roupa deixe um
espaço suficiente para ventilação.
Ligações hidráulicas e eléctricas
Ligação do tubo de alimentação da
água
1. Realize a ligação
do tubo de alimen-
tação parafusando-o
a uma torneira de
água fria com bocal
de rosca de 3/4 gás
(veja a figura).
Antes de realizar esta
ligação, deixe a água
escorrer até estar
límpida.
2. Ligue o tubo de ali-
mentação na máquina
de lavar roupa atarra-
xando-o no apropria-
do fornecimento da
água, na parte trasei-
ra, em cima à direita
(veja a figura).
3. Tome cuidado para o tubo não ser dobrado
nem esmagado.
! A pressão hídrica da torneira deve ser entre
os valores da tabela dos Dados técnicos (veja
a página ao lado).
! Se o comprimento do tubo de alimentação
não for suficiente, contacte uma oficina espe-
cializada ou um técnico autorizado.
! Nunca utilize tubos já usados.
! Utilize aqueles fornecidos com a máquina.
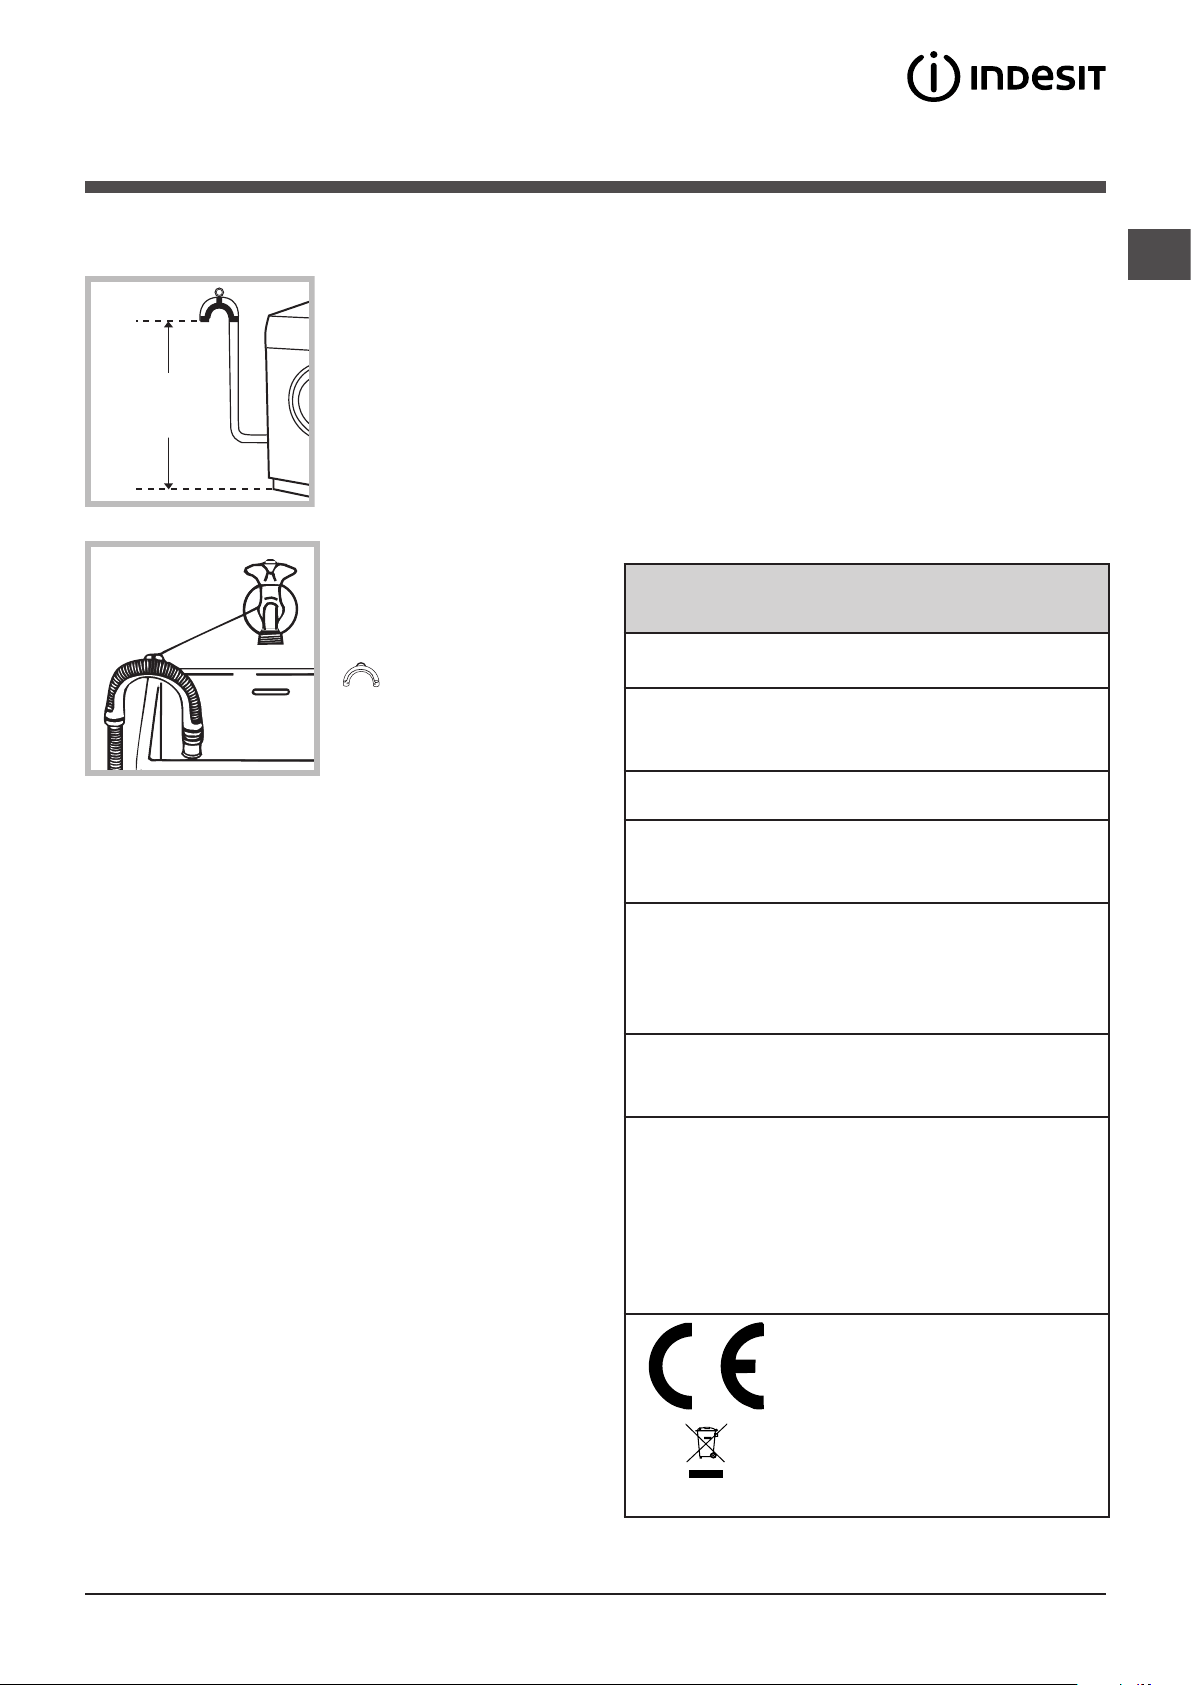
PT
39
Ligação do tubo de descarga
Ligue o tubo de de-
scarga, sem dobrá-
lo, a um conduto de
descarga ou a uma
descarga de parede
colocados entre 65 e
100 cm do chão.
Em alternativa, apoie
o tubo de descarga na
beira de um lavatório
ou de uma banhei-
ra, prendendo a guia
(disponível para
compra junto do ser-
viço de assistência) à
torneira (veja a figura).
A ponta solta do tubo
de descarga não deve
permanecer emergida na água.
! É desaconselhado empregar tubos de exten-
são; mas se for indispensável, a extensão deve
ter o mesmo diâmetro do tubo original e não
medir mais de 150 cm de comprimento.
Ligação eléctrica
Antes de ligar a ficha na tomada eléctrica,
certifique-se que:
•atomadatenhaumaligaçãoàterraesejanos
termos da legislação;
•atomadatenhaacapacidadeparasuportar
a carga máxima de potência da máquina, in-
dicada na tabela dos Dados técnicos (veja ao
lado);
•atensãodealimentaçãosejaentreosvalores
indicados na tabela dos Dados técnicos (veja
ao lado);
•a tomada seja compatível com a ficha da
máquina de lavar roupa. Se não for, substitua
a tomada ou a ficha.
! Esta máquina de lavar roupa não deve ser in-
stalada ao aberto, nem mesmo abrigada, porque
é muito perigoso deixá-la exposta à chuva e às
tempestades.
! Depois de ter instalado a máquina de lavar roupa,
o acesso à tomada eléctrica deve ser fácil.
65 - 100 cm
! Não empregue extensões nem fichas múltiplas.
! O cabo não deve ser dobrado nem apertado.
! O cabo de alimentação deve ser substituído
somente por técnicos autorizados.
Atenção! O fabricante declina toda a responsa-
bilidade se estas regras não forem respeitadas.
Primeiro ciclo de lavagem
Depois da instalação, antes de usar, efectue
um ciclo de lavagem com detergente mas sem
roupa, defina o programa 2.
Dados técnicos
Modelo
IWC 61251
Medidas
largura 59,5 cm.
altura 85 cm.
profundidade 51,7 cm.
Capacidade
de 1 a 6 kg.
Ligações
eléctricas
Veja a placa das caracterí-
sticas técnicas colocada na
máquina.
Ligações
hídricas
pressão máxima
1 MPa (10 bars)
pressão mínima
0,05 MPa (0,5 bar)
capacidade do tambor 46 litros
Velocidade
da centrifu-
gação
até 1200 rotações por minuto
Programas
de
controlo
conforme
as Regu-
lamentos
1061/2010 e
1015/2010
Programa 2: programa
normal de algodón a 60°C.
Programa 3: programa
normal de algodón a 40°C.
Esta aparelhagem é em confor-
midade com as seguintes Direc-
tivas Comunitárias:
- EMC 2014/30/EU (Compa-
tibilidade Electromagnética)
- 2012/19/EU - (WEEE)
- LVD 2014/35/EU (Baixa
Tensão)
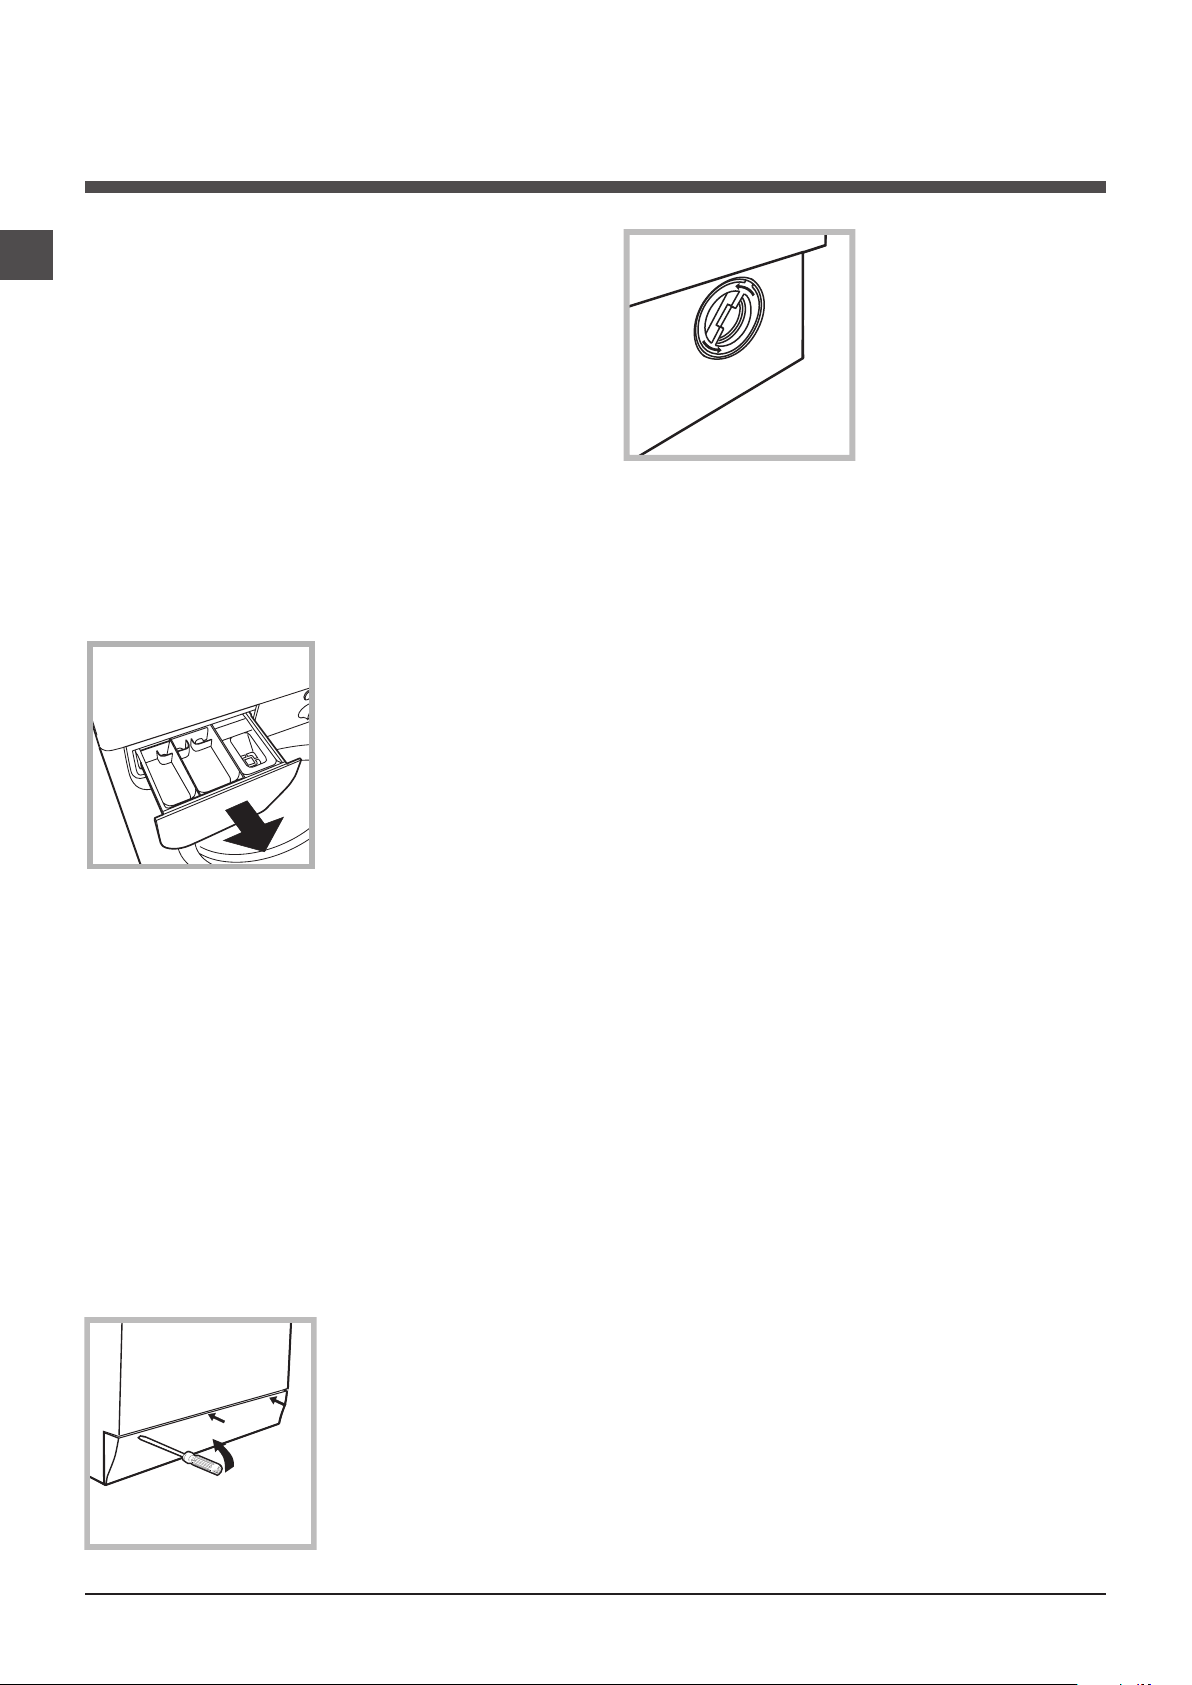
40
PT
Interromper a alimentação de
água e de corrente eléctrica
•Fecheatorneiradaáguadepoisdecada
lavagem. Desta maneira diminuiu-se o desga-
ste do sistema hidráulico da máquina de lavar
roupa e elimina-se o risco de inundação.
•Tireafichadatomadaeléctricaquandofor
limpar a máquina de lavar roupa e durante os
trabalhos de manutenção.
Limpar a máquina de lavar roupa
A parte externa e as peças em borracha po-
dem ser limpas com um pano molhado com
água morna e sabão. Não empregue solven-
tes nem abrasivos.
Limpar a gaveta dos detergentes
Para tirar a gaveta,
erga-a e puxe-a para
fora (veja a figura).
Lave-a com água
corrente; esta limpeza
deve ser efectuada
frequentemente.
Cuidados com a porta de vidro e o
tambor
•Deixeaportasempreentreabertaparaevitar
que se formem odores desagradáveis.
Limpar a bomba
Esta máquina de lavar roupa é equipada com
uma bomba com limpeza automática que não
precisa de operações de manutenção. Entre-
tanto pode acontecer que pequenos objectos
(moedinhas, botões) caiam na pré-câmara
que protege a bomba, situada na parte inferior
da mesma.
! Certifique-se que o ciclo de lavagem tenha
terminado e tire a ficha da tomada.
Para obter acesso à pré-câmara:
1. tire o painel de
cobertura da parte
dianteira da máquina
de lavar roupa com
ajuda de uma cha-
ve de fendas (veja a
figura);
Manutenção e cuidados
2. desenrosque a
tampa girando-a no
sentido anti-horário
(veja a figura). é
normal que perca um
pouco de água;
3. limpe o interior com cuidado;
4. enrosque outra vez a tampa;
5. monte outra vez o painel, certifique-se,
antes de empurrá-la na máquina, que os
ganchos foram colocados nas respectivas
ranhuras.
Verificar o tubo de alimentação
de água
Verifique o tubo de alimentação pelo menos
uma vez por ano. Se houver rachaduras ou
fendas, será necessário substitui-lo: durante
as lavagens as fortes pressões podem provo-
car repentinas quebras.
! Nunca utilize tubos já usados.

PT
41
Precauções e conselhos
o correcto desmantelamento dos electrodomésticos,
contacte o serviço público especializado ou os revende-
dores.
! Esta máquina de lavar roupa foi projectada e fabricada
em conformidade com os regulamentos internacionais de
segurança. Estas advertências são fornecidas por razões
de segurança e devem ser lidas com atenção.
Segurança geral
• Esteaparelhofoiprojectadoexclusivamenteparaum
uso doméstico.
• Este aparelho pode ser utilizado por crianças com
mais de 8 anos e por pessoas com capacidades
físicas, sensoriais ou mentais reduzidas ou com
experiência e conhecimentos insuficientes, caso
sejam supervisionadas ou caso tenham rece-
bido instruções adequadas em relação ao uso
do aparelho de forma segura, compreendendo
os perigos associados. As crianças não devem
brincar com o aparelho. A manutenção e limpe-
za não devem ser efectuadas por crianças sem
supervisão.
• Nãotoquenamáquinacomospésdescalçosnem
com as mãos ou os pés molhados ou húmidos.
• Nãopuxeocaboeléctricoparatirarafichadatomada,
pegue a ficha mesmo.
• Nãoabraagavetadosdetergentesenquantoamáqui-
na estiver a funcionar.
• Nãotoqueaáguadedescarga,quepoderáchegara
temperaturas altas.
• Emnenhumcasoforceaportaparaabri-la:poderáda-
nificar o mecanismo de segurança que a protege contra
aberturas acidentais.
• Sehouveravarias,emnenhumcasomexanosmecani-
smos internos para tentar reparar.
• Verifiquesemprequecriançanãoseaproximemda
máquina a funcionar.
• Durantealavagemaportadevidrotendeaaquecer-se.
• Seforprecisodeslocá-la,sãoprecisaspelomenos
duas ou três pessoas, com a máxima atenção. Nunca
sozinho porque a máquina é muito pesada.
• Antesdecolocararoupacontrolequeotamboresteja
vazio.
Eliminação
• Eliminaçãodomaterialdeembalagem:
obedeça os regulamentos locais, de maneira que as
embalagens possam ser reutilizadas.
• AdirectivaEuropeia2012/19/EU(WEEE)relativaaosre-
síduos de equipamentos eléctricos e electrónicos prevê
que os electrodomésticos não devem ser eliminados no
normal fluxo dos resíduos sólidos urbanos. Os aparel-
hos que deixaram de ser utilizados devem ser recolhi-
dos separadamente para optimizar a taxa de recupe-
ração e reciclagem dos materiais que os compõem e
impedir potenciais danos à saúde e ao meio ambiente.
O símbolo do contentor de lixo barrado com uma cruz
está presente em todos os produtos para lembrar o de-
ver de recolha selectiva. Para mais informações sobre
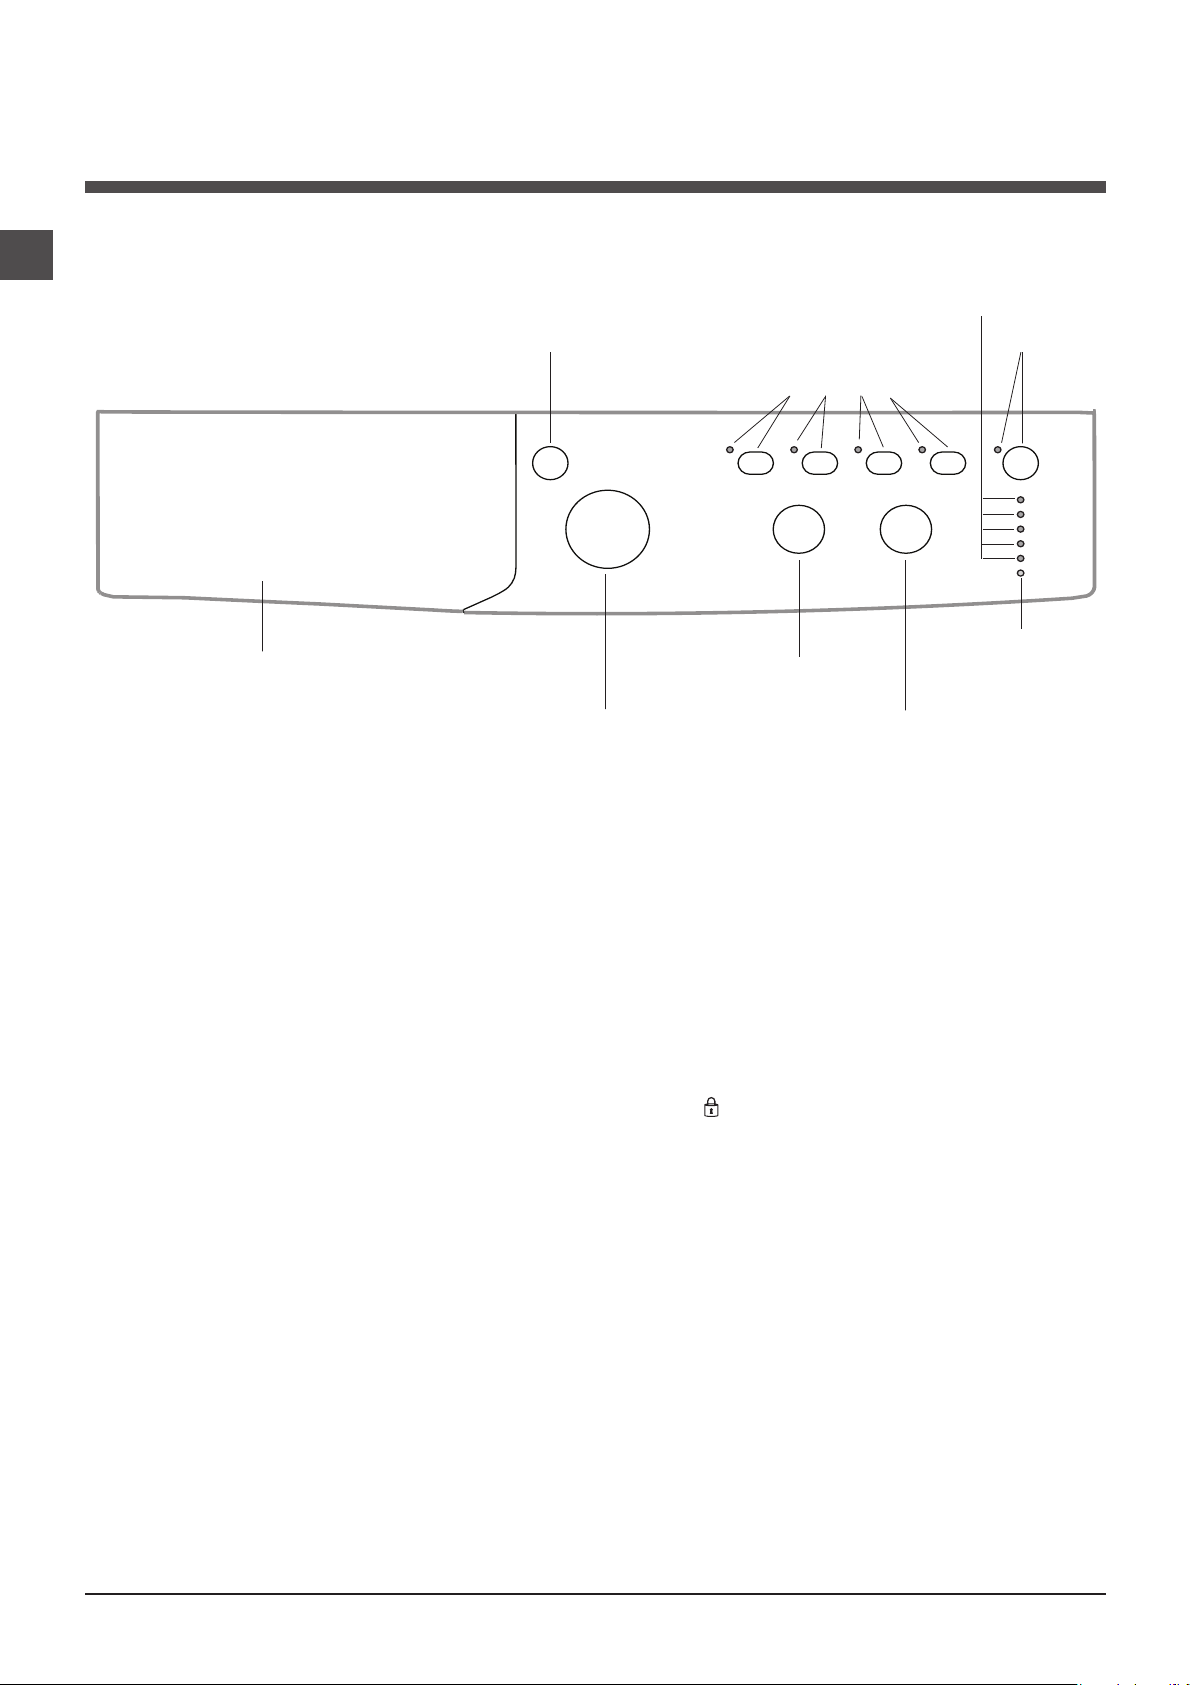
42
PT
Gaveta dos detergentes: para colocar detergentes e
aditivos (veja “Detergentes e roupa”).
Tecla de ON/OFF: para ligar e desligar a máquina de lavar
roupa.
Selector de PROGRAMAS: para programar os progra-
mas. Durante o programa o selector permanece parado.
Teclas com indicadores luminosos de FUNÇÕES: para
seleccionar as funções disponíveis. O indicador lumino-
so correspondente à função seleccionada permanecerá
aceso.
Selector de CENTRIFUGAÇÃO: para seleccionar a cen-
trifugação ou desactivá-la (veja “Personalizações”).
Selector da TEMPERATURA: para definir a temperatura
ou a lavagem a frio (veja “Personalizações”).
Indicadores LUMINOSOS DE AVANÇO DO CICLO/
INÍCIO POSTERIOR: para seguir o estado do avanço do
programa de lavagem.
O indicador luminoso aceso indica a fase em curso.
Se tiver sido seleccionada a função “Início posterior”,
indicarão o tempo que falta para iniciar o programa (veja a
página ao lado).
Indicador luminoso PORTA BLOQUEADA: para saber se
a porta de vidro pode ser aberta (veja a página ao lado).
Tecla com indicador luminoso START/PAUSE: para acti-
var os programas ou interrompê-los momentaneamente.
Obs.: para colocar em pausa a lavagem em curso, car-
regar nesta tecla, o respectivo indicador luminoso ficará
intermitente com uma luz laranja enquanto aquele da fase
em curso ficará aceso fixo. Se o indicador PORTA BLO-
QUEADA estiver apagado, será possível abrir a porta de
vidro (aguarde aproximadamente 3 minutos).
Para fazer iniciar a lavagem do ponto em que foi interrom-
pida, carregar novamente nesta tecla.
Modalidade de Stand by
Esta máquina de lavar e secar roupa , em conformida-
de com as novas normas sobre a economia energética,
dispõe de um sistema de desligação automática (stand
by) que entra em função aproximadamente 30 minutos
depois, no caso de inutilização. Carregue brevemente no
botão ON-OFF e aguarde até a reactivação da máquina.
Descrição da máquina de lavar
roupa e como iniciar um programa
Indicadores LUMINOSOS DE
AVANÇO DO CICLO/ INÍCIO
POSTERIOR
Indicador luminoso
PORTA
BLOQUEADA
Tecla com
indicador luminoso
START/PAUSE
Painel de comandos
Gaveta dos detergentes
Tecla de ON/OFF
Selector de
PROGRAMAS
Selector da
TEMPERATURA
Selector de
CENTRIFUGAÇÃO
Teclas com indicadores
luminosos de
FUNÇÕES
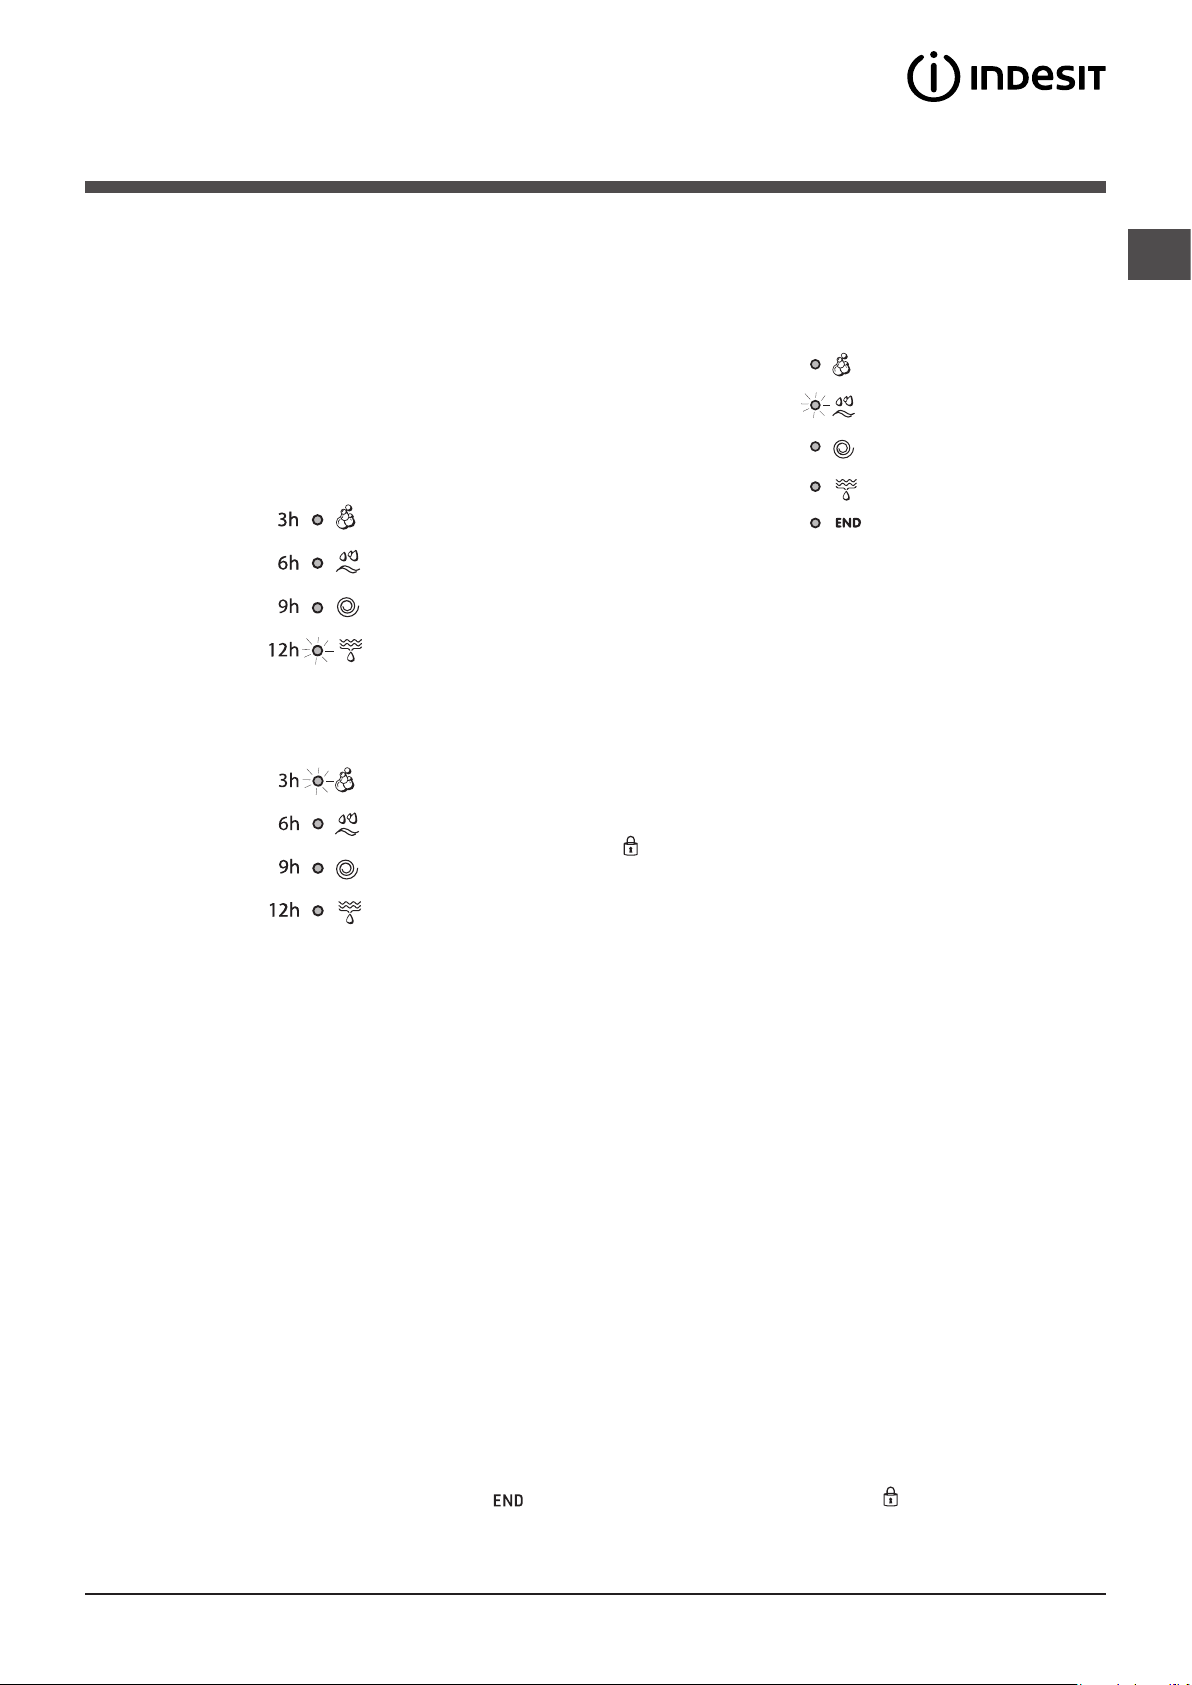
PT
43
Indicadores luminosos
Os indicadores luminosos fornecem informações impor-
tantes.
Vejamos o que significam:
Início posterior
Se tiver sido activada a função “Início posterior” (veja “Perso-
nalizações”) depois de ter iniciado o programa, começará
a lampejar o indicador luminoso relativo ao atraso selec-
cionado.
Com o passar do tempo será mostrado a atraso restante,
mediante o respectivo indicador luminoso aceso intermi-
tente:
Depois de ter passado o tempo de atraso seleccionado,
começará o programa estabelecido.
Indicadores luminosos fase em curso
Uma vez seleccionado e iniciado o ciclo de lavagem de-
sejado, os indicadores luminosos se acenderão progressi-
vamente para indicar o estado de avanço:
Teclas função e respectivos indicadores luminosos
Ao seleccionar uma função o respectivo indicador lumino-
so se acenderá.
Se a função seleccionada não for compatível com o pro-
grama definido, o indicador luminoso se acenderá intermi-
tente e a função não será activada.
Se a função seleccionada não for compatível com uma
outra programada anteriormente, o indicador luminoso
relativo à primeira função seleccionada irá piscar e será
activada somente a segunda, o indicador luminoso da
função activada acender-se-á.
Indicador luminoso porta bloqueada
O indicador luminoso aceso indica que a porta está tranca-
da para impedir a aberturas; para abrir a porta é necessário
que o indicador luminoso se apague (aguarde aproximada-
mente 3 minutos). Para abrir a porta durante a realização de
um ciclo, carregar no botão START/PAUSE; se o indicador
luminoso PORTA BLOQUEADA estiver apagado será pos-
sível abrir a porta.
Iniciar um programa
1. Para ligar a máquina de lavar roupa, mete na tecla de ON/OFF. Todos os indicadores luminosos se acenderão por alguns
segundos, em seguida apagam-se e ficará intermitente o indicador luminoso START/PAUSE.
2. Coloque a roupa dentro da máquina e feche a porta.
3. Seleccione mediante o selector de PROGRAMAS o programa que desejar.
4. Seleccione a temperatura de lavagem (veja as “Personalizações”).
5. Seleccione a velocidade de centrifugação (veja as “Personalizações”).
6. Colocar detergentes e aditivos (veja “Detergentes e roupa”).
7. Seleccionar as funções desejadas.
8. Iniciar o programa carregando na tecla START/PAUSE e o respectivo indicador luminoso permanecerá aceso fixo de cor
verde. Para anular o ciclo programado, colocar a máquina em pausa carregando na tecla START/PAUSE e escolher um
novo ciclo.
9. No fim do programa, irá iluminar-se o indicador . Quando o indicador PORTA BLOQUEADA estiver apagado, será
possível abrir a porta de vidro (aguarde aproximadamente 3 minutos). Retire a roupa lavada de dentro e deixe a porta entrea-
berta para deixar o tambor enxugar-se.
Para desligar a máquina de lavar roupa, mete na tecla de ON/OFF.
Lavagem
Enxaguamento
Centrifugação
Descarga
Final da Lavagem
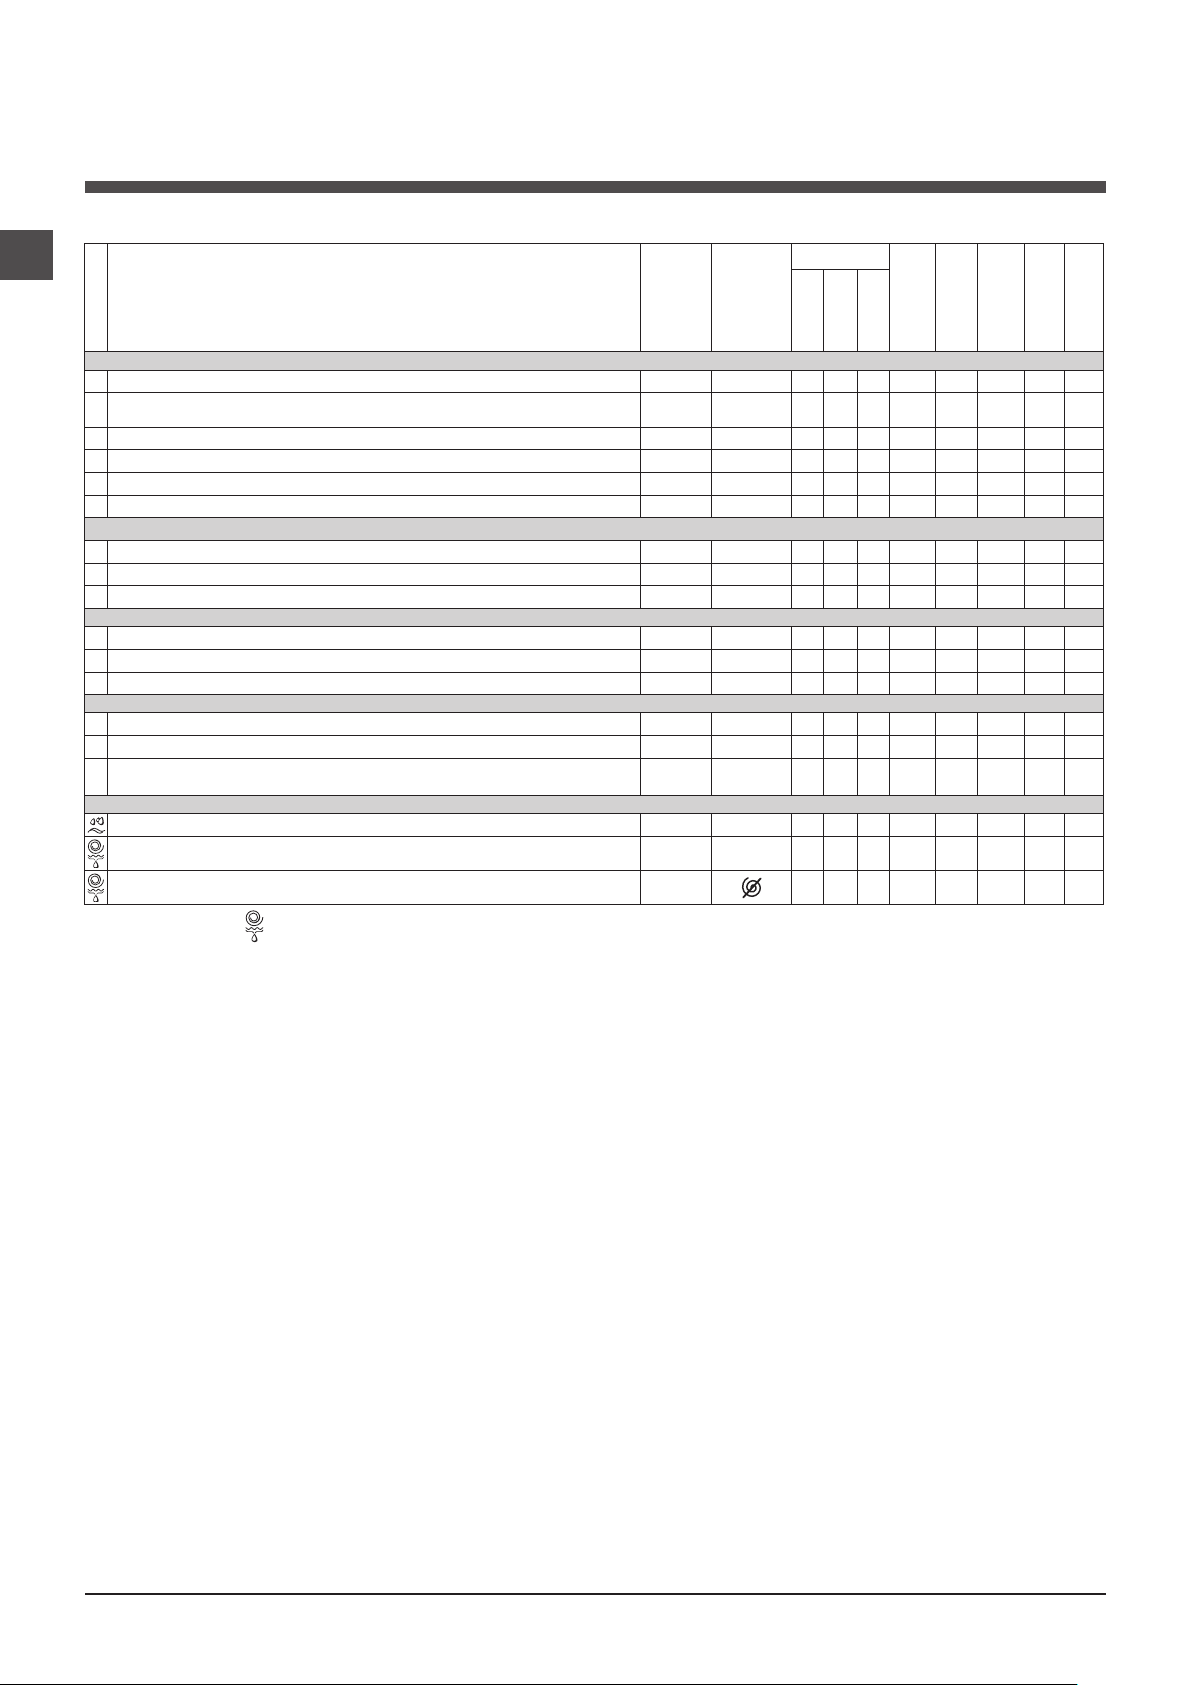
44
PT
Sport Intensive (programa 12) foi estudado para lavar tecidos para vestuário desportivo (fatos de treino, calções, etc.) muito
sujos; para obter os melhores resultados, recomenda-se não superar a carga máxima indicada na “Tabela dos programas”.
Sport Light (programa 13) foi estudado para lavar tecidos para vestuário desportivo (fatos de treino, calções, etc.) pouco
sujos; para obter os melhores resultados, recomenda-se não superar a carga máxima indicada na “Tabela dos programas”.
Recomenda-se o uso de detergente líquido, na dose adequada para a meia carga.
Special Shoes (programa 14) foi estudado para lavar calçados desportivos; para obter os melhores resultados não lave mais
de 2 pares por ciclo.
Os programas a 20º (20° Zone) oferecem bons desempenhos de lavagem a baixas temperaturas, proporcionando uma
menor utilização de energia eléctrica com maior poupança económica e vantagens para o ambiente.
Os programas a 20º respondem a todas as exigências:
Programa normal de algodón a 20 °C (programa 6) ideal para cargas de algodão sujas. Os bons desempenhos mesmo a
frio, comparáveis a uma lavagem a 40º, são garantidos por uma acção mecânica que trabalha com alterações de velocidade
em picos repetidos e aproximados.
Mix Light (programa 7) ideal para cargas mistas (algodão e sintéticos) de sujidade média. Os bons desempenhos de lavagem
mesmo a frio são garantidos por uma acção mecânica que trabalha com alterações de velocidade em intervalos médios e
determinados.
20’ Refresh (programa 8) ciclo ideal para refrescar e lavar peças pouco sujas em poucos minutos. Dura apenas 20 minutos e
poupa tempo e energia. É possível lavar em conjunto tecidos diferentes (excepto lã e seda) com uma carga máxima de 1,5 kg.
Programas
Tabela dos programas
1) Programa de controlo segundo a Regulamentos 1061/2010: configurar o programa 2 com uma temperatura de 60ºC.
Este ciclo é adapto para lavar uma carga de algodão normalmente suja e é o mais eficiente em termos de consumo combinado de energia e de
água, para lavar a 60ºC. A temperatura efectiva de lavagem pode ser diferente daquela indicada.
2) Programa de controlo segundo a Regulamentos 1061/2010: configurar o programa 3 com uma temperatura de 40ºC.
Este ciclo é adapto para lavar uma carga de algodão normalmente suja e é o mais eficiente em termos de consumo combinado de energia e de
água, para lavar a 40ºC. A temperatura efectiva de lavagem pode ser diferente daquela indicada.
Para todos Test Institutes:
2) Programa longo para algodão: configurar o programa 3 com uma temperatura de 40ºC.
3) Sintético programa junto: configurar o programa 4 com uma temperatura de 40ºC.
A duração do ciclo indicada no visor ou no manual é uma estima calculada com base nas condições padrão. O tempo efectivo poderá variar a depender de vários factores, tais como a temperatura
e a pressão da água em entrada, a temperatura ambiental, a quantidade de detergente, a quantidade e o tipo de carga, o balanceamento da carga e as opções adicionais seleccionadas.
Programas
Descrição do Programa
Temp.
max.
(°C)
Velocità
max.
(rotações
por minuto)
Detergentes
Carga max. (Kg)
Humedad
residual %
Consumo de
energía kWh
Agua total lt
Duração ciclo
Prélavagem
Lavagem
Amaciador
Quotidiano (Daily)
1
Algodão Pré-lavagem 90°C: peças brancas extremamente sujas. 90°
1200
6
53 1,90 68 155’
2
Programa normal de algodón a 60°C
(1)
: brancos e coloridos resistentes muito sujos.
60°
(Max. 90°)
1200
-
6
53 1,01 49,8 195’
3
Programa normal de algodón a 40°C (2): brancos e coloridos delicados pouco sujos. 40°
1200
-
6
53 0,86 52 185’
4
Sintéticos: coloridos resistentes muito sujos. 60°
800
-
3
44 0,78 33 105’
4
Sintéticos (3): coloridos resistentes pouco sujos. 40°
800
-
3
44 0,49 38 95’
5
Algodão Coloridos: brancos pouco sujos e cores delicadas. 40°
1200
-
6
53 0,86 56 95’
20° Zone
6
Programa normal de algodón a 20°C: brancos e coloridos delicados pouco sujos. 20°
1200
-
6
- - - 170’
7
Mix Light
20°
800
-
6
- - - 120’
8
20’ Refresh
20°
800
-
1,5
- - - 20’
Programas Especiais (Special)
9
Seda/Cortinas: para roupas de seda, viscosa, lingerie. 30°
0
-
1
- - - 55’
10
Lã: para lã, cashmere, etc. 40°
800
-
1,5
- - - 70’
11 Jeans
40°
800
-
3
- - - 75’
Sport
12 Sport Intensive
30° 600 -
3
- - - 85’
13 Sport Light
30° 600 -
3
- - - 60’
14 Special Shoes
30° 600 -
Max.2
pares
- - - 55’
Programas Parciais
Enxaguamentos - 1200 - -
6
- - - 36’
Centrifugação + Descarga - 1200 - - - 6
- - - 10’
Apenas descarga *
-
- - -
6
- - - 3’
* Ao seleccionar o programa e excluindo a centrifugação, a máquina efectuará apenas a descarga.

PT
45
Seleccione a temperatura
Gire o selector da TEMPERATURA para seleccionar a temperatura de lavagem (veja a Tabela dos programas).
A temperatura pode ser diminuída até a lavagem a frio ( ).
A máquina impedirá automaticamente a configuração de uma temperatura superior à máxima prevista para cada um dos
programas.
! Excepção: seleccionando o programa
2
a temperatura pode ser aumentada até a 90º.
Seleccione a centrifugação
Gire o selector da CENTRIFUGAÇÃO para seleccionar a velocidade de centrifugação do programa seleccionado.
As velocidades máximas que há para os programas são:
Programas Velocidade máxima
Algodão 1200 rotações por minuto
Sintéticos 800 rotações por minuto
Lã 800 rotações por minuto
A velocidade de centrifugação pode ser diminuída, ou excluída se seleccionar o símbolo . A máquina impedirá automati-
camente a realização de uma centrifugação superior à máxima de cada um dos programas.
Funções
As várias funções de lavagem da máquina de lavar roupa possibilitam obter-se a limpeza e o branco que desejar.
Para activar as funções:
1. mete na tecla relativa à função desejada;
2. o respectivo indicador luminoso acende-se para avisar que a função está activada.
Observação:
- Se a função seleccionada não for compatível com o programa definido, o indicador luminoso se acenderá intermitente e
a função não será activada.
- Se a função seleccionada não for compatível com uma outra programada anteriormente, o indicador luminoso relativo
à primeira função seleccionada irá piscar e será activada somente a segunda, o indicador luminoso da função activada
acender-se-á.
Ao seleccionar esta opção, a movimentação mecânica, a temperatura e a água serão optimizados para uma carga reduzida
de tecidos de algodão e sintéticos pouco sujos (veja a “Tabela dos programas”). Com “ ” é possível lavar em pouco
tempo, economizando água e energia eléctrica. Aconselha-se usar uma dose de detergente líquido adequada para a
quantidade de carga.
A função contribui com a economia energética não aquecendo a água utilizada para lavar a roupa - uma vantagem
tanto para o ambiente, quanto para a factura da energia eléctrica. Com efeito, a acção reforçada e o consumo óptimo da
água garantem excelentes resultados na mesma duração média de um ciclo padrão.
Para obter os melhores resultados de lavagem, aconselha-se o uso de detergente líquido.
Enxaguamento Extra
Seleccionando esta opção aumenta-se a eficácia do enxaguamento, e garante-se a máxima remoção do detergente. É útil
para quem tem a pele particularmente sensível.
Início posterior
Atrasa o início da máquina de até 12 horas.
Mete várias vezes na tecla até acender-se o indicador luminoso correspondente ao atraso desejado. A quinta vez que car-
regar na tecla, a função se desactivará.
Obs.: depois de ter carregado na tecla START/PAUSE, será possível mudar o valor do atraso somente para diminui-lo até
iniciar o programa configurado.
Personalizações
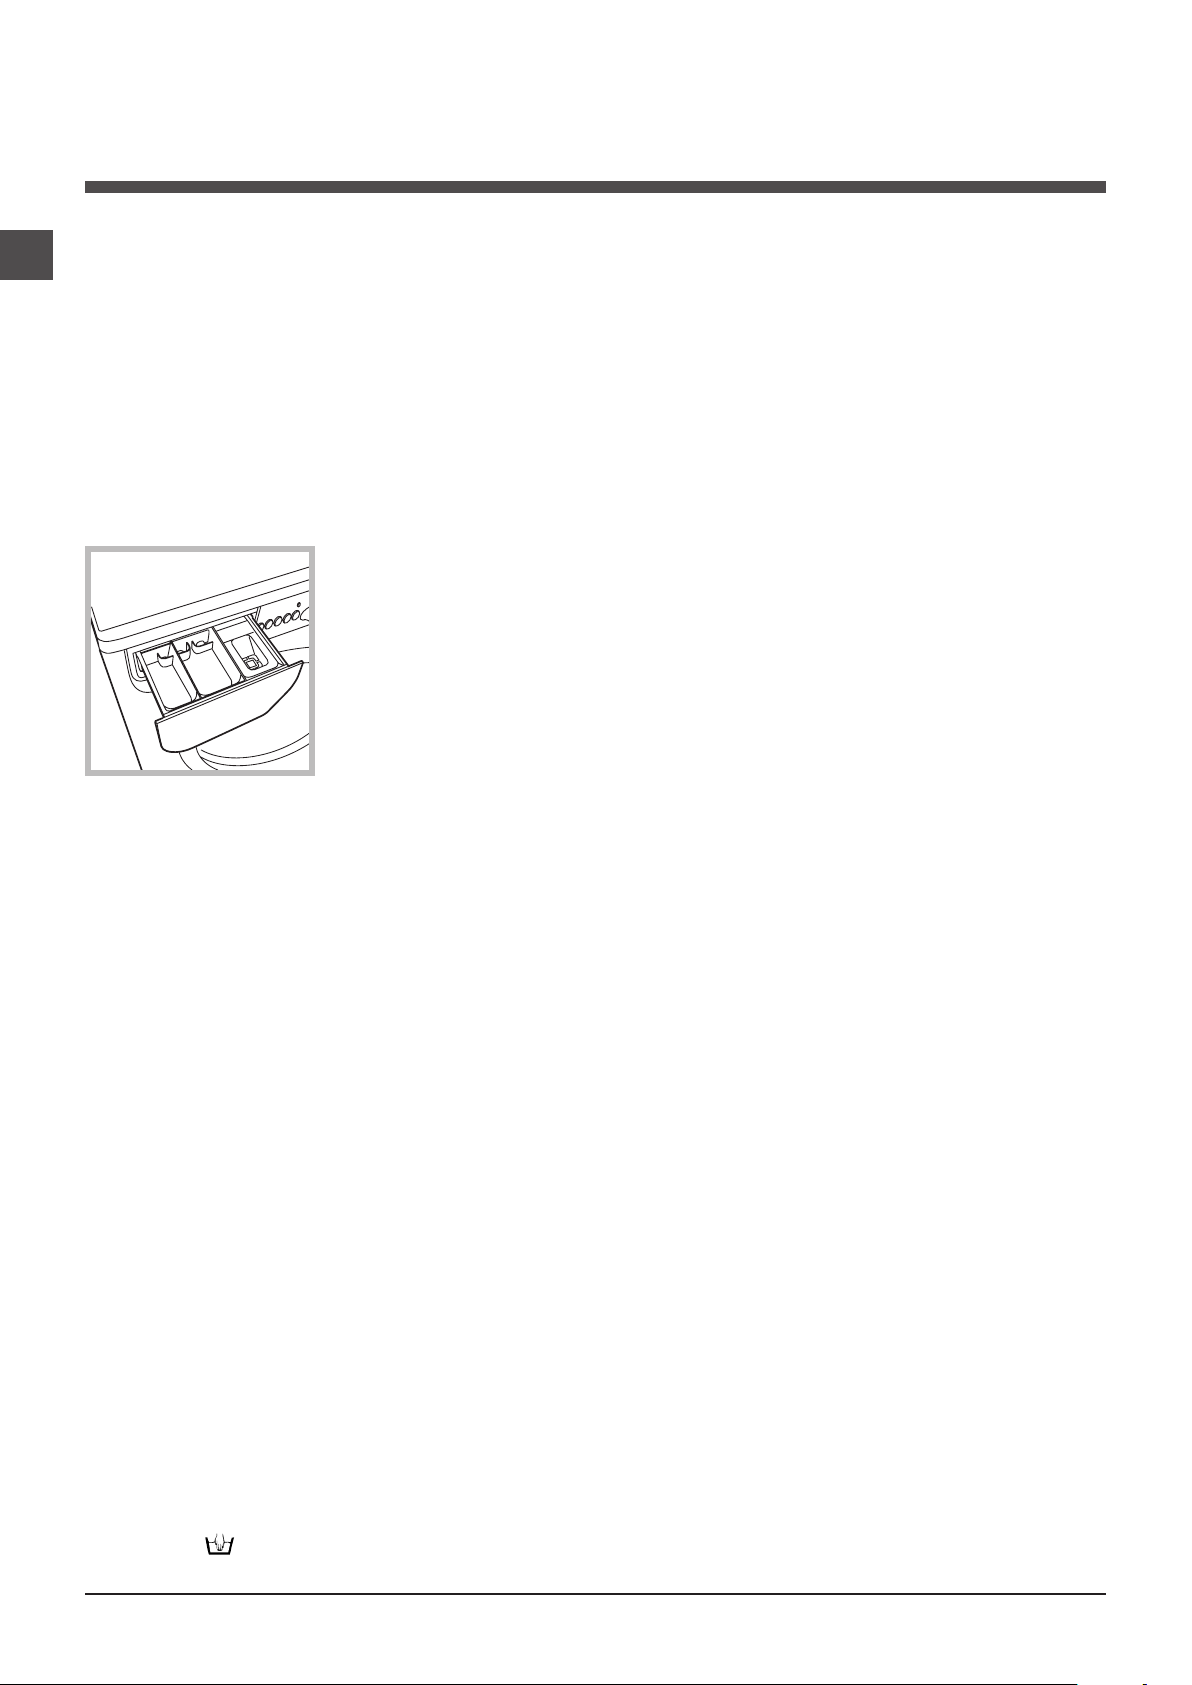
46
PT
Detergentes e roupa
Gaveta dos detergentes
O bom resultado da lavagem depende também do em-
prego da dose certa de detergente: com excessos não se
lava de maneira mais eficaz, mas contribui-se para formar
crostas nas peças internas da máquina de lavar roupa e
poluir o meio ambiente.
! Não use detergentes para lavagem à mão, porque for-
mam espuma demais.
! Usar detergentes em pó para roupas de algodão bran-
cas e para a pré-lavagem e para lavagens com temperatu-
ra superior aos 60ºC.
! Seguir as indicações fornecidas pelo produtor na emba-
lagem do detergente.
Tire a gaveta dos deter-
gentes e deite o detergente
ou o aditivo da seguinte
maneira:
gaveta 1: Detergente para pré-lavagem (em pó)
gaveta 2: Detergente para lavagem (em pó ou
líquido)
O detergente líquido deve ser deitado somente depois da
máquina ter arrancado.
gaveta 3: Aditivos (amaciador etc.)
O aditivo amaciador não deve ultrapassar a grade.
Preparar a roupa
•Dividaaroupaemfunção:
- do tipo de tecido / do símbolo na etiqueta.
- das cores: separe as peças coloridas das brancas.
•Esvazieasalgibeiraseverifiquesehábotõessoltos.
• NãoultrapasseosvaloresindicadosnaTabela dos
Programas que se referem ao peso da roupa enxuta.
Quanto pesa a roupa?
1 lençol 400 - 500 g.
1 fronha 150 - 200 g.
1 toalha de mesa 400 - 500 g.
1 roupão 900 - 1200 g.
1 toalha de rosto 150 - 250 g.
Programas especiais
Seda: utilize o programa específico 9 para lavar todas as
roupas de seda. Aconselha-se o uso de um detergente
específico para tecidos delicados.
Cortinas: dobre-as bem e coloque-as dentro de uma
fronha ou de um saquinho de rede. Utilize o programa 9.
Lã: com o programa 10 é possível lavar na máquina todas
as roupas de lã, mesmo aquelas com a etiqueta “lavar so-
mente à mão” . Para obter os melhores resultados, use
um detergente específico e não supere 1,5 kg de peso.
1
2
3
Jeans: vire do avesso as roupas antes de lavar e use um
detergente líquido. Utilize o programa 11.
Sistema de balanceamento da carga
Antes de cada centrigfugação, para evitar vibrações
excessivas e para distribuir a carga em modo uniforme, o
tambor efectua algumas rotações a uma velocidade leve-
mente superior àquela de lavagem. Se no fim de repeti-
das tentativas a carga ainda não estiver correctamente
balanceada, a máquina efectuará a centrifugação com
uma velocidade inferior àquela prevista. No caso de um
excessivo desbalanceamento, a máquina de lavar roupa
efectuará a distribuição ao invés da centrifugação. Para fa-
vorecer uma melhor distribuição da carga e o seu correcto
balanceamento, aconselha-se misturar peças grandes
com peças pequenas.

PT
47
Anomalias e soluções
Pode acontecer que a máquina de lavar roupa não funcione. Antes de telefonar para a Assistência Técnica (veja “Assistên-
cia”), verifique se não se trata de um problema fácil de resolver com ajuda da seguinte lista.
Anomalias:
A máquina de lavar roupa não liga.
O ciclo de lavagem não inicia.
A máquina de lavar roupa não car-
rega a água (o indicador luminoso
da primeira fase de lavagem pisca
rapidamente).
A máquina de lavar roupa carrega e
descarrega água continuamente.
A máquina de lavar roupa não
descarrega ou nem realiza centri-
fugação.
A máquina de lavar roupa vibra
muito durante a centrifugação.
Da máquina de lavar roupa está a
perder água.
Os indicadores luminosos das
“funções” e o indicador luminiso de
“START/PAUSE” piscam e um dos
indicadores da “fase em curso” e
de “porta bloqueada” ficam acesos
fixos.
Está a formar-se demasiada espu-
ma.
Possíveis causas / Solução:
•Afichanãoestácolocadanatomadaeléctrica,ounãoosuficienteparahaver
contacto.
•Emcasanãohácorrente.
•Aportadevidronãoestábemfechada.
•ObotãoON/OFFnãofoipressionado.
•ObotãoSTART/PAUSEnãofoipressionado.
•Atorneiradaáguanãoestáaberta.
• Foiprogramadouminícioposterior(veja as “Personalizações”).
•Otubodealimentaçãodeáguanãoestáligadonatorneira.
•Otuboestádobrado.
•Atorneiradaáguanãoestáaberta.
•Estáafaltaráguaemcasa.
•Nãohásuficientepressão.
•ObotãoSTART/PAUSEnãofoipressionado.
•Otubodedescarganãoestáinstaladoentre65e100cmdealturadochão
(veja “Instalação”).
•Apontadotubodedescargaestáimersanaágua(veja “Instalação”).
•Dadescarganaparedenãofoisangradooar.
Se depois destas verificações o problema não for resolvido, feche a torneira
da água, desligue a máquina de lavar roupa e chame a assistência técnica.
Se a morada encontrar-se nos últimos andares de um edifício, é possível que
aconteçam fenómenos de sifão por causa dos quais a máquina de lavar roupa
carrega e descarrega água continuamente. Para eliminar este inconveniente, há
a disposição no comércio apropriadas válvulas contra o efeito sifão.
•Noprogramanãohádescarga:comalgunsprogramasseránecessárioiniciar
a descarga manualmente.
•Otubodedescargaestádobrado(veja “Instalação”).
•Acondutadedescargaestáentupida.
•Otambor,nomomentodainstalação,nãofoiliberadocorrectamente(veja
“Instalação”).
•Amáquinanãoestánivelada(veja “Instalação”).
•Amáquinaestáapertadaentremóveiseparede(veja “Instalação”).
• Otubodealimentaçãodaáguanãoestábemenroscado(veja “Instalação”).
•Ogavetadosdetergentesestáentupida(paralimpá-laveja “Manutenção e
cuidados”).
•Otubodedescarganãoestáfixadocorrectamente(veja “Instalação”).
•Desligueamáquinaetireafichadatomada,aguardeaproximadamente
1 minuto e volte a ligá-la.
Se a anomalia persistir, contacte a Assistência Técnica.
•Odetergentenãoéespecíficoparamáquinadelavarroupa(devehaveraescri-
ta “para máquina de lavar”, “à mão e para máquina de lavar” ou similares).
•Adosefoiexcessiva.
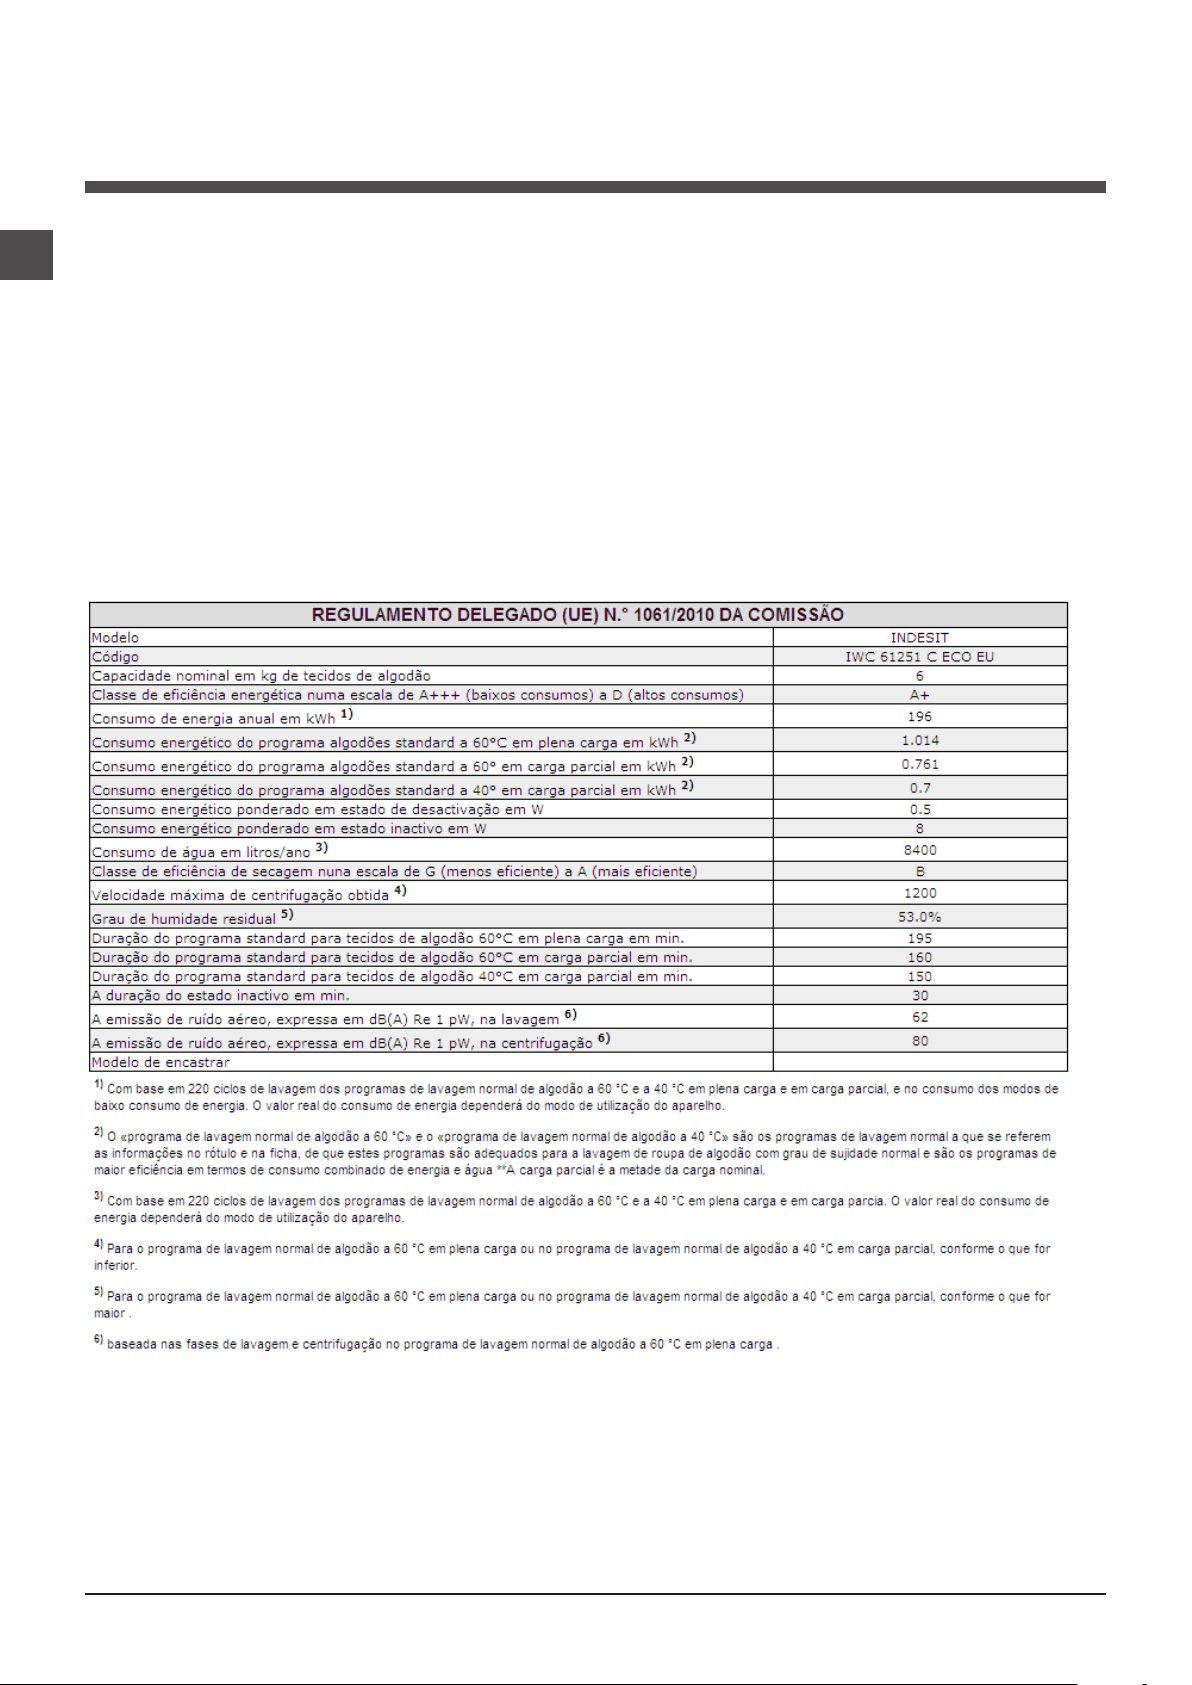
48
PT
Assistência
Antes de contactar a Assistência Técnica:
•Verifiqueseconsegueresolveraanomaliasozinho(veja “Anomalias e soluções”);
•Reinicieoprogramaparaverificarseoinconvenientefoiresolvido;
•Emcasonegativo,contacteaoCentrodeAssistênciatécnicaautorizadanonúmerodetelefoneindicadonocertificadode
garantia.
! Nunca recorra a técnicos não autorizados.
Comunique:
• otipodeanomalia;
• omodelodamáquina(Mod.);
• onúmerodesérie(S/N).
Estas informações encontram-se na placa colocada na parte traseira da máquina de lavar roupa e na parte anterior abrindo
a porta de vidro.

49
SR
српски
Садржај
Постављање, 50-51
Распакивање и нивелисање
Повезивање на водоводну и електричну мрежу
Први циклус прања
Технички подаци
Одржавање и нега, 52
Искључивање воде и електричне енергије
Чишћење машине за прање веша
Чишћење посуде за детерџент
Нега врата и бубња
Чишћење пумпе
Провера црева за довод воде
Упозорења и савети, 53
Општа сигурност
Одлагање на отпад
Опис машине за прање веша и
покретање програма, 54-55
Командна табла
Контролне лампице
Покретање програма
Програми, 56
Табела програма
Персонализације, 57
Подешавање температуре
Подешавање центрифуге
Опције
Детерџенти и веш, 58
Посуда за детерџент
Припрема веша
Посебне тканине
Систем балансирања терета
Неправилности и решења, 59
Техничка подршка, 60
Активна помоћ сваког дана
SR
МАШИНА ЗА ПРАЊЕ ВЕША
IWC 61251
Упутство за употребу
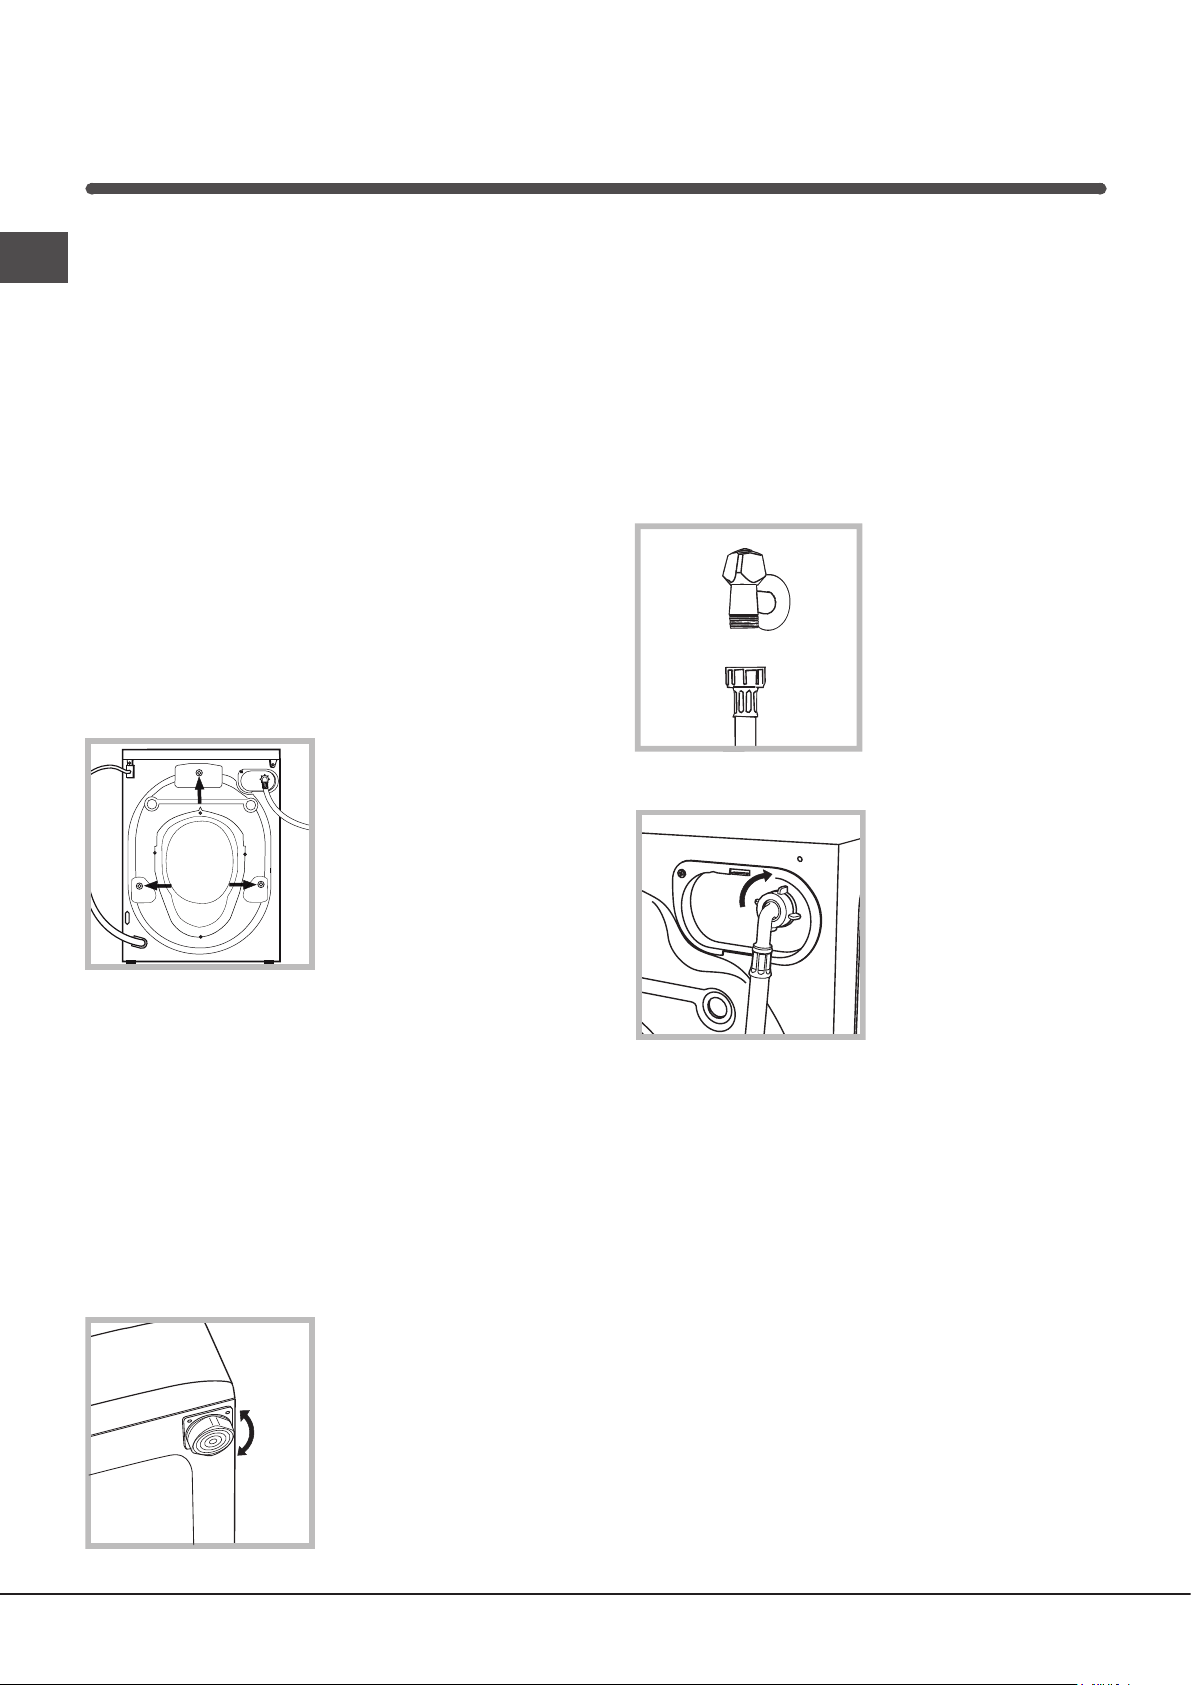
50
SR
Постављање
! Важно је сачувати ову књижицу како бисте је
могли консултовати у сваком тренутку. У случају
продаје, уступања или селидбе, обезбедите да
остане уз машину за прање веша како би нови
власник могао да се упозна са функционисањем
и одговарајућим упозорењима.
! Пажљиво прочитајте упутства: Ту се налазе
важне информације о постављању, употреби
и безбедности.
Распакивање и нивелисање
Распакивање
1. Распакујте машину за веш.
2. Проверите да машина није претрпела
оштећења
у транспорту. Уколико је оштећена,
немојте је повезивати и обратите се продавцу.
3 . С к и н и т е 3
завртња постављена
к а о з а ш т и т а у
транспорту и гумицу
са одговарајућим
о д с т о ј н и к о м ,
п о с т а в љ е н е н а
задњем делу машине
(погледајте слику).
4. Затворите отворе приложеним пластичним
затварачима.
5. Сачувајте све делове: Уколико машину
треба транспортовати, биће потребно поново
их поставити.
! Амбалажа није играчка за децу.
Нивелисање
1. Поставите машину на равну и чврсту
површину, не наслањајте је на зид, намештај
или друге површине.
2. Уколико под није
са вр ш ен о р ава н ,
н а д о к н а д и т е
н е п р а в и л н о с т
от п у ш т а њ е м и л и
затезањем предњих
стопица (погледајте
слику); угао нагиба,
измерен на радној
површини не сме
прелазити 2°.
Прецизно нивелисање даје стабилност
и спречава вибрације, буку и померање
током рада машине. У случају да машину
постављате на итисон или тепих, подесите
стопице тако да испод машине оставите
довољно простора за вентилацију.
Повезивање на водоводну и
електричну мрежу
Повезивање црева за довод воде
1. Повежите црево
за довод воде са
славином за хладну
воду са навојем на
излазном отвору од
¾ цола (погледајте
слику).
Пре повезивања
пустите воду да тече
све док не постане
чиста.
2. Повежите црево
за довод воде са
машином
за вр ћу ћ и га на
о д г о в а р а ј у ћ и
прикључак за воду,
на задњем делу
машине, горе десно
(погледајте слику).
3. Обратите пажњу да црево не буде
преломљено или пригњечено.
! Притисак воде у славини треба да се
креће у границама вредности датим
у табели са Техничким подацима
(погледајте страницу поред).
! Уколико дужина црева за довод воде није
довољна, обратите се специјализованој
продавници или овлашћеном сервисеру.
! Никада не користите већ коришћена
црева.
! Користите црева испоручена уз машину.

51
SR
Повезивање црева за одвод воде
Повежите црево
за одвод воде,
без савијања, на
одводну цев или
на одвод у зиду
постављене на
65 до 100 цм од
земље;
Можете и да
пребаците одводно
црево преко ивице
лавабоа или каде
и да га навијете на
славину (погледајте
слику) помоћу
вођице (која
се може купити у
центру техничке
помоћи). Слободни
крај одводног црева не сме да буде уроњен
у воду.
! Не препоручујемо употребу продужних
црева; ако је неопходно, продужетак треба
да буде истог пречника као и оригинално
црево и да не прелази 150 цм.
Повезивање на електричну мрежу
Пре него што гурнете утикач у утичницу,
проверите да ли:
• је утичница повезана са уземљењем
изведеним у складу са прописима;
• је утичница у могућности да издржи
максимално оптерећење снаге машине,
наведено у табели са Техничким
подацима (погледајте поред);
• се напон напајања креће у границама
вредности наведеним у табели са
Техничким подацима (погледајте поред);
• је утичница компатибилна са утикачем
машине. У случају да не одговара,
промените утичницу или утикач.
! Не постављајте машину на отворено,
чак ни ако је простор преправљен, јер
је веома опасно остављати је изложену
киши и временским непогодама.
! Код постављене машине утичница мора да
буде лако доступна.
! Не употребљавајте продужне каблове нити
разделнике.
! Кабл не сме да буде изложен савијању или
притискању.
! Замену напојног кабла треба да обавља
само овлашћени сервисер.
Пажња! Произвођач се ограђује од сваке
одговорности у случају непоштовања ових норми.
Први циклус прања
Након постављања, пре употребе, обавите
циклус прања са детерџентом и без веша
подешавајући програм 2.
65 - 100 cm
Технички подаци
Модел IWC 61251
Димензије
ширина 59,5 цм
висина 85 цм
дубина 51,7 цм
Капацитет од 1 до 6 кг
Електрично
повезивање
Pогледајте плочицу
са техничким
карактеристикама
постављену на машину
Повезивање
на
водоводну
мрежу
максималан притисак 1
MPa (10 бара)
минималан притисак 0,05
MPa (0,5 бара)
капацитет бубња 46 литара
Брзина
центрифуге
до 1200 обртаја у минути
Контролни
програми
према
регулација
1061/2010 и
1015/2010
програм 2; Стандардни
програм за памук на 60°C;
програм 3; Стандардни
програм за памук на 40°C;
Ова опрема је усклађена
са следећим Директивама
заједнице:
– EMC 2014/30/EU
(електромагнетна
компатибилност)
– 2012/19/EU - (WEEE)
– LVD 2014/35/EU (Ниски
напон)
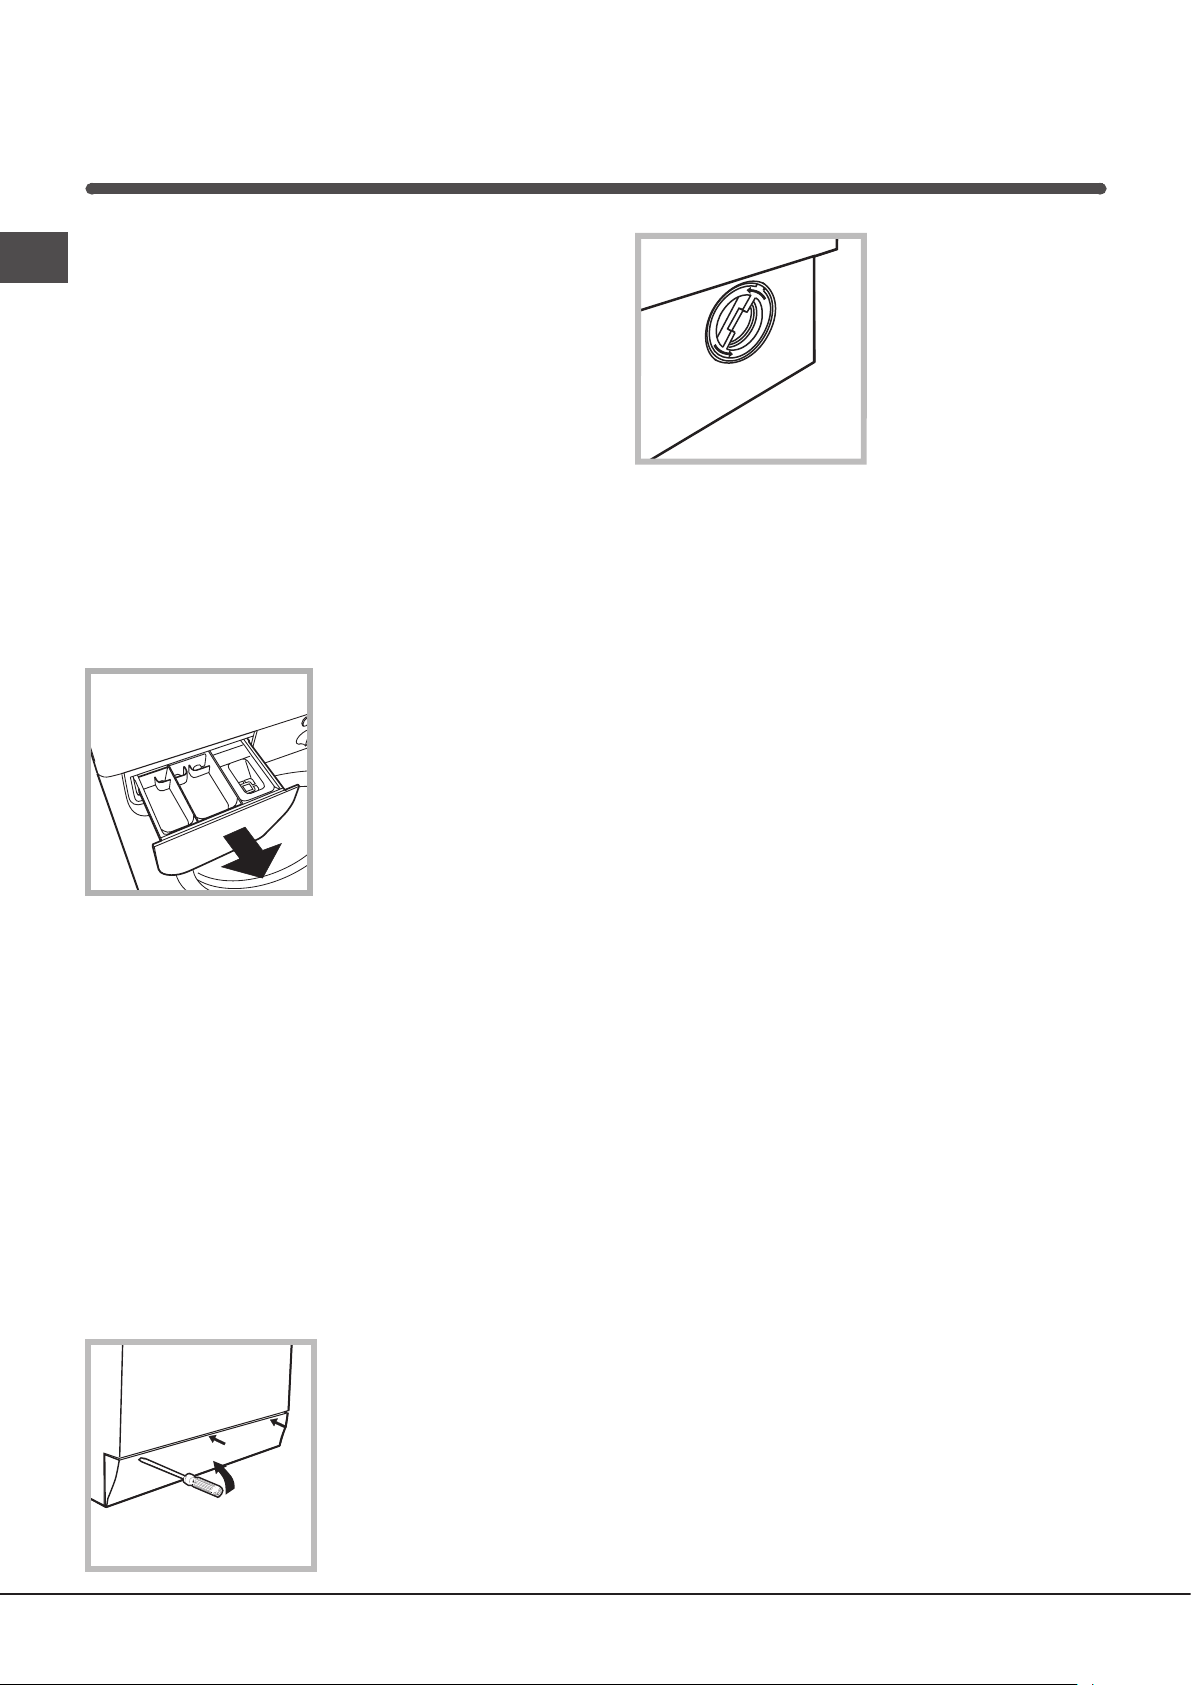
52
SR
Искључивање воде и електричне
енергије
• Затворите славину за воду после сваког
прања. Овим се спречава хабање
водоводних инсталација машине и уклања
опасност од цурења.
• Електрични кабл уклоните када чистите
машину и током поправки.
Чишћење машине за прање веша
Спољни и гумени делови се могу чистити крпом
натопљеном млаком водом и сапуном. Не
користите растворе или абразивна средства.
Чишћење посуде за детерџент
Ослободите фиоку
тако што ћете је подићи
и повући према себи
(погледајте слику).
И с п е р и т е ј е п од
млазом воде; ово
треба често
радити.
Нега врата и бубња
• Врата увек остављајте одшкринута да би
се избегло стварање непријатних мириса.
Чишћење пумпе
Машина је опремљена самочистећом пумпом
која не захтева посебно одржавање. Ипак,
може се десити да мали предмети (метални
новац, дугмад) упадну у предкомору која штити
пумпу, а која се налази у њеном доњем делу.
! Уверите се да је циклус прања завршен и
извуците утикач.
За приступ преткомори:
1. Скин и те п л оч у
на предњем делу
м а ш и н е п о м о ћ у
одвијача (погледајте
слику);
2. Одврните
поклопац окрећући
га у супротно од
смера кретања
казаљке на сату
(погледајте
слику): Излазак
воде је нормалан;
3. Очистите унутрашњост пажљиво;
4. Вратите поклопац;
5. Вратите плочу, водећи рачуна да су
шарке убачене у одговарајуће осовине, пре
него што га притиснете према машини.
Провера црева за довод воде
Црево за довод воде проверите барем
једном годишње. Уколико има напрслина и
пукотина треба га заменити: Јаки притисци
током прања могли би изазвати изненадна
пуцања.
! Никада не користите већ коришћена
црева.
Одржавање и нега

53
SR
Упозорења и савети
! Машина је пројектована и направљена да
задовољи све међународне безбедносне норме.
Ова упозорења су дата из безбедносних разлога
и треба их пажљиво прочитати.
Општа сигурност
• Овај уређај је направљен искључиво за кућну
употребу.
• Овај уређај могу да користе деца од 8
година старости и особе са смањеним
физичким, сензорним и менталним
могућностима и са недовољним искуством
и знањем ако их неко надгледа или ако су
добили адектватне информације у вези
са коришћењем уређаја на сигуран начин
и разумели опасне спојеве. Деца не смеју
да се играју са уређајем. Одржавање и
чишћење не смеју да обављају деца без
надгледања.
Децу треба надгледати како би се обезбедило да
се не играју са уређајем.
• Машину смеју да користе само одрасле особе
према упутствима из ове књижице.
• Машину не додирујте босим ногама или влажних
руку или ногу.
• Утикач из утичнице не извлачите повлачењем за
кабл, него чврсто ухватите утикач.
• Не отварајте посуду за детерџенте док машина
ради.
• Не дирајте воду коју машина испушта, пошто
може бити врућа.
• Ни у ком случају не отварати врата силом: Могао
би се оштетити сигурносни механизам који
спречава случајно отварање.
• У случају квара, нипошто не приступати
унутрашњим механизмима у покушају
поправљања.
• Проверавајте стално да се деца не приближавају
машини док ради.
• Током прања врата машине могу се могу загрејати.
• Уколико треба померити машину, то треба да
раде две или три особе уз максималну пажњу.
Ово немојте никада радити сами, јер је машина
веома тешка.
• Пре убацивања веша проверите да ли је бубањ
празан.
Одлагање на отпад
• Одлагање амбалаже на отпад:
Придржавајте се локалних прописа, тако да
амбалажа може бити поново употребљена.
• Европска директива 2012/19/EU (WEEE) о отпаду
електричних и електронских уређаја, прописује да
кућни уређаји не смеју бити одлагани у редовном
промету чврстог градског отпада.
Одбачене уређаје треба посебно сакупити чиме се
побољшава стопа прикупљања корисног отпада
и рециклаже материјала од којих су сачињени
и спречава потенцијално нарушавање здравља
и животне средине. Симбол прецртане канте за
отпатке налази се на свим производима да би
подсетио на обавезу одвојеног сакупљања.
За детаљније информације о правилном одлагању
кућних уређаја власници се могу обратити
предвиђеној јавној служби или продавцима.
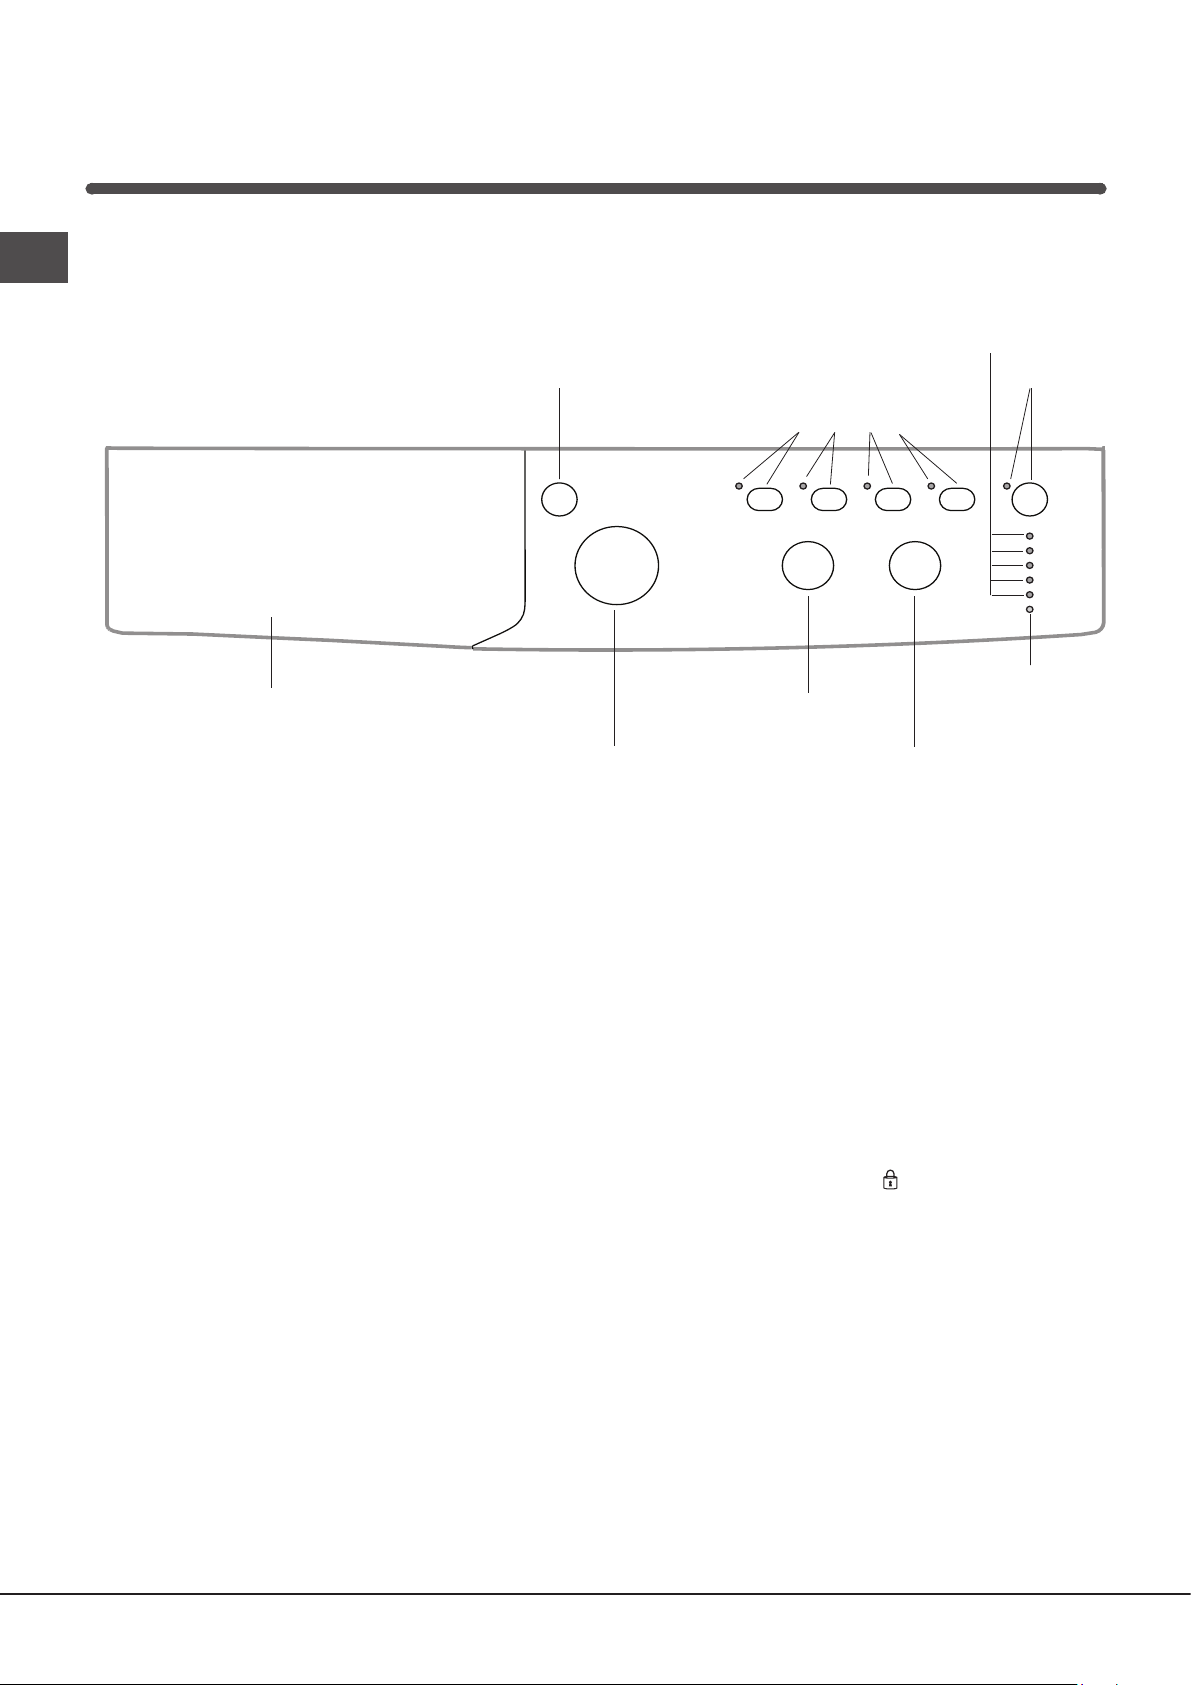
54
SR
Командна табла
Опис машине за прање веша и
покретање програма
Дугме
ТЕМПЕРАТУРА
Дугме
ПРОГРАМИ
Посуда за детерџент
ЛАМПИЦЕ ЗА
НАПРЕДОВАЊЕ ЦИКЛУСА/
ОДЛОЖЕНО ПОКРЕТАЊЕ
Тастери
и лампице
ОПЦИЈА
Тастер ON/OFF
Дугме
ЦЕНТРИФУГА
Контролна
лампица
ВРАТА
БЛОКИРАНА
Посуда за детерџент: за сипање детерџената и
адитива (погледајте „Детерџенти и веш“).
Тастер ON/OFF: Притисните га за укључивање или
искључивање машине.
Дугме ПРОГРАМИ: за задавање програма. Током трајања
програма дугме се не помера.
Тастери и лампице ОПЦИЈЕ: за избор опција на
располагању. Контролна лампица која одговара
одабраној опцији остаће упаљена.
Дугме ЦЕНТРИФУГА: за задавање или искључивање
центрифуге (погледајте „Персонализације“).
Дугме ТЕМПЕРАТУРА: за задавање температуре или
прање на хладно (погледајте „Персонализације“).
ЛАМПИЦЕ ЗА НАПРЕДОВАЊЕ ЦИКЛУСА/ОДЛОЖЕНО
ПОКРЕТАЊЕ: за праћење статуса напредовања
програма прања. Упаљена контролна лампица показује
фазу у току.
Ако је активирана опција „Одложено покретање“,
показиваће време преостало до покретања програма
(погледајте страну поред).
Контролна лампица ВРАТА БЛОКИРАНА: за
обавештавање да ли се врата могу отворити
(погледајте страну поред).
Тастер и лампица START/PAUSE: за покретање или
моментално прекидање програма.
НАПОМЕНА: За покретање паузе прања које је у
току притисните овај тастер, одговарајућа контролна
лампица ће треперити наранџастом бојом а лампица
фазе у току ће светлети константно. Када се контролна
лампица БЛОКАДА ВРАТА угаси, врата је могуће
отворити (сачекајте око 3 минута).
За повратак прања на део у којем је прекинуто
притиснути поново овај тастер.
Стање приправности
Ова машина за прање испуњава све нове стандарде
везане за уштеду електричне енергије и опремљена је
системом за аутоматско гашење (приправност) који се
активира након око 30 минута у случају да се машина
не користи. Накратко притисните тастер ON/OFF и
машина ће се поново активирати.
Тастер и
лампица
START/PAUSE
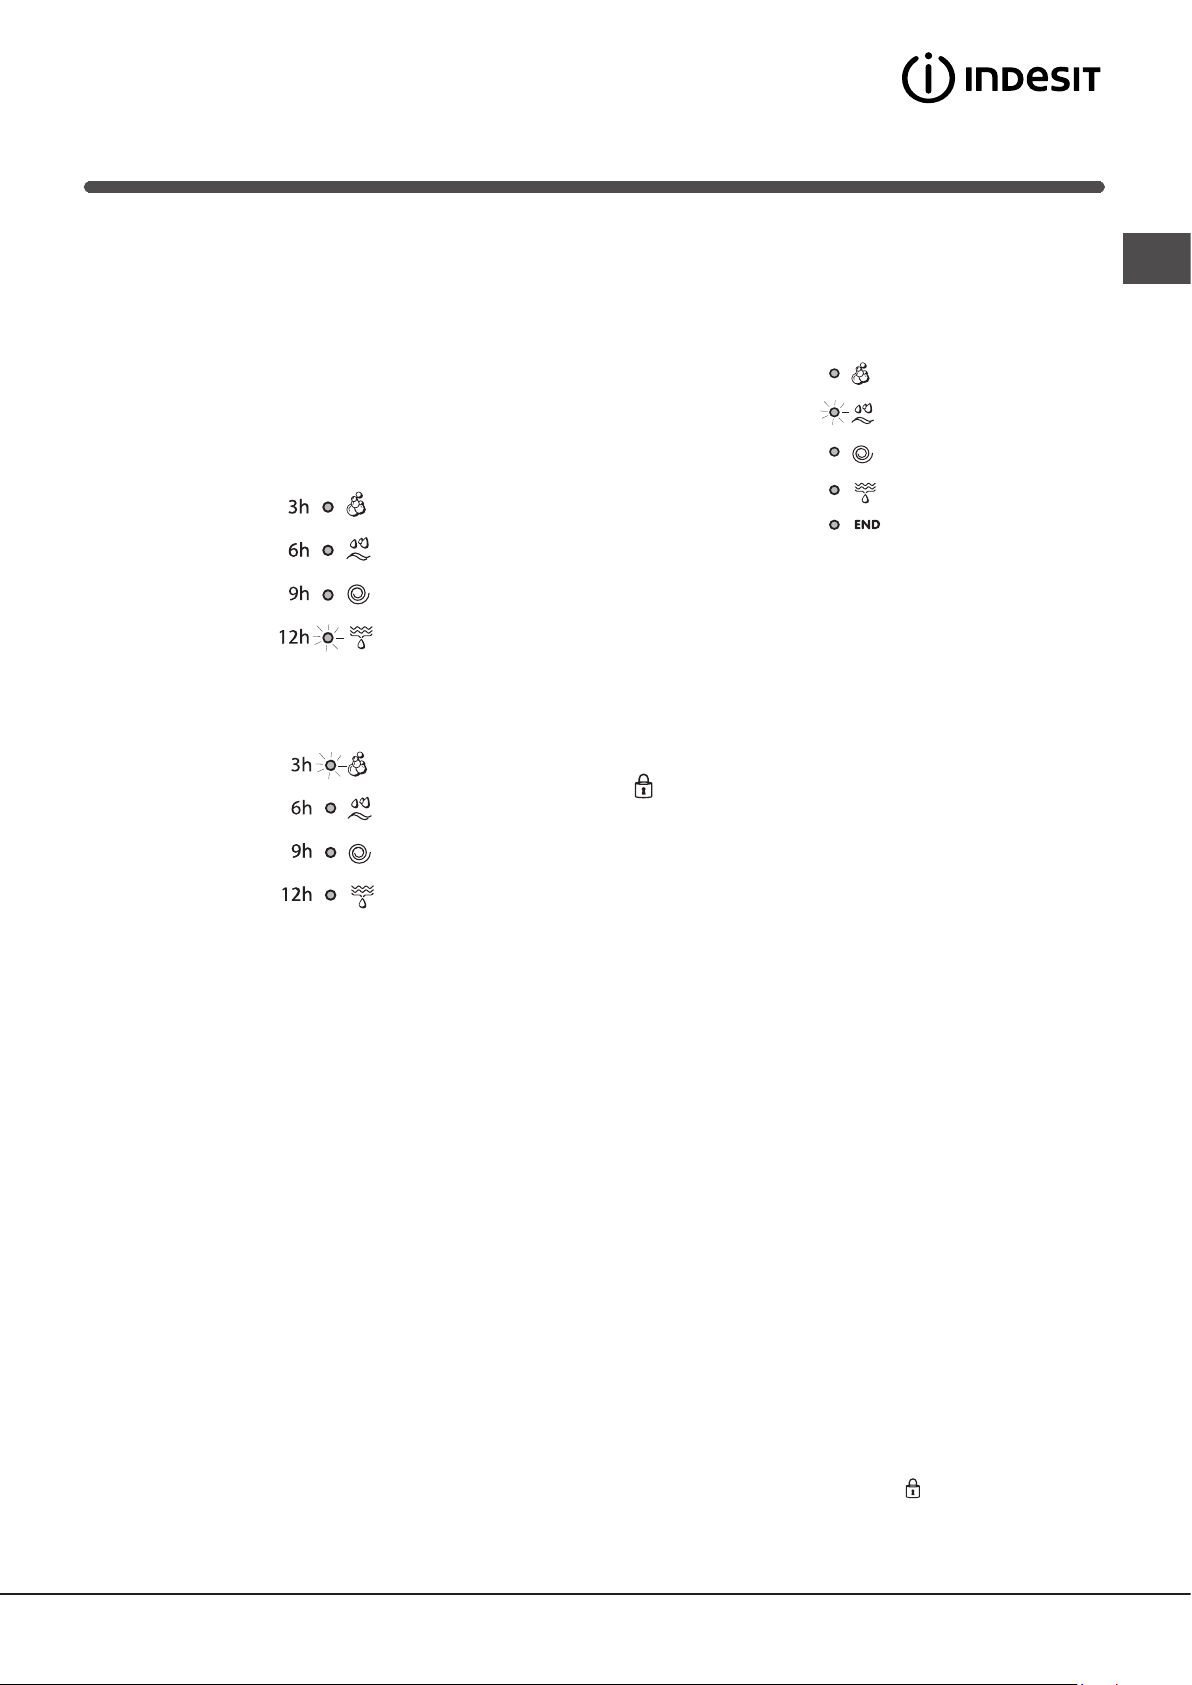
55
SR
Контролне лампице
Контролне лампице пружају важне информације.
Ево шта оне значе:
Одложено покретање
Ако је активирана опција „Одложено покретање“
(погледајте „Персонализације“), после покретања
програма, почеће да трепери контролна лампица
одабраног одлагања:
Како време протиче, треперењем одговарајуће
контролне лампице показиваће се преостало време
одлагања:
Када протекне одабрано време одлагања, започеће
подешени програм.
Прање
Испирање
Центрифуга
Избацивање
Крај прања
Контролне лампице фазе у току
По избору и покретању жељеног циклуса прања,
лампице ће се прогресивно палити указујући на
статус напредовања:
Тастери опција и одговарајуће контролне лампице
Избором опцијеодговарајућа лампица ће се упалити.
Ако одабрана опција није компатибилна са задатим
програмом, одговарајућа лампица ће треперити, а
опција се неће активирати.
Ако одабрана опција није у складу са неком другом
претходно подешеном, одговарајућа лампица прве
одабране функције ће треперити, а активираће се
само друга, лампица активиране опције се пали.
Контролна лампица за блокирана врата
Упаљена лампица указује да су врата блокирана како
би се спречило отварање; да би се отворила врата,
лампица треба бити угашена (сачекајте око 3 минута).
За отварање врата током текућег циклуса притисните
тастер START/PAUSE; ако је лампица ВРАТА
БЛОКИРАНА угашена, биће могуће отворити врата.
Покретање програма
1. Укључите машину притиском на тастер ON/OFF. Све контролне лампице ће се укључити на неколико секунди,
затим ће се угасити а наставиће да пулсира лампица START/PAUSE.
2. Убаците рубље и затворите врата.
3. Помоћу дугмета ПРОГРАМИ одаберите жељени програм.
4. Подесите температуру прања (погледајте „Персонализације“).
5. Подесите брзину центрифуге (погледајте „Персонализације“).
6. Сипајте детерџент и адитиве (погледајте „Детерџенти и веш“).
7. Изаберите жељене опције.
8. Покрените програм притиском на тастер START/PAUSE и одговарајућа лампица ће остати да светли константно
зеленом бојом.
За поништавање задатог циклуса укључите паузу машине притиском на тастер START/PAUSE и одаберите нови циклус.
9. По завршетку програма упалиће се лампица КРАЈ. Када се лампица ВРАТА БЛОКИРАНА угаси, врата је
могуће отворити (сачекајте око 3 минута). Извуците веш и оставите врата одшкринута да би се осушио бубањ.
Угасите машину притиском на тастер ON/OFF.
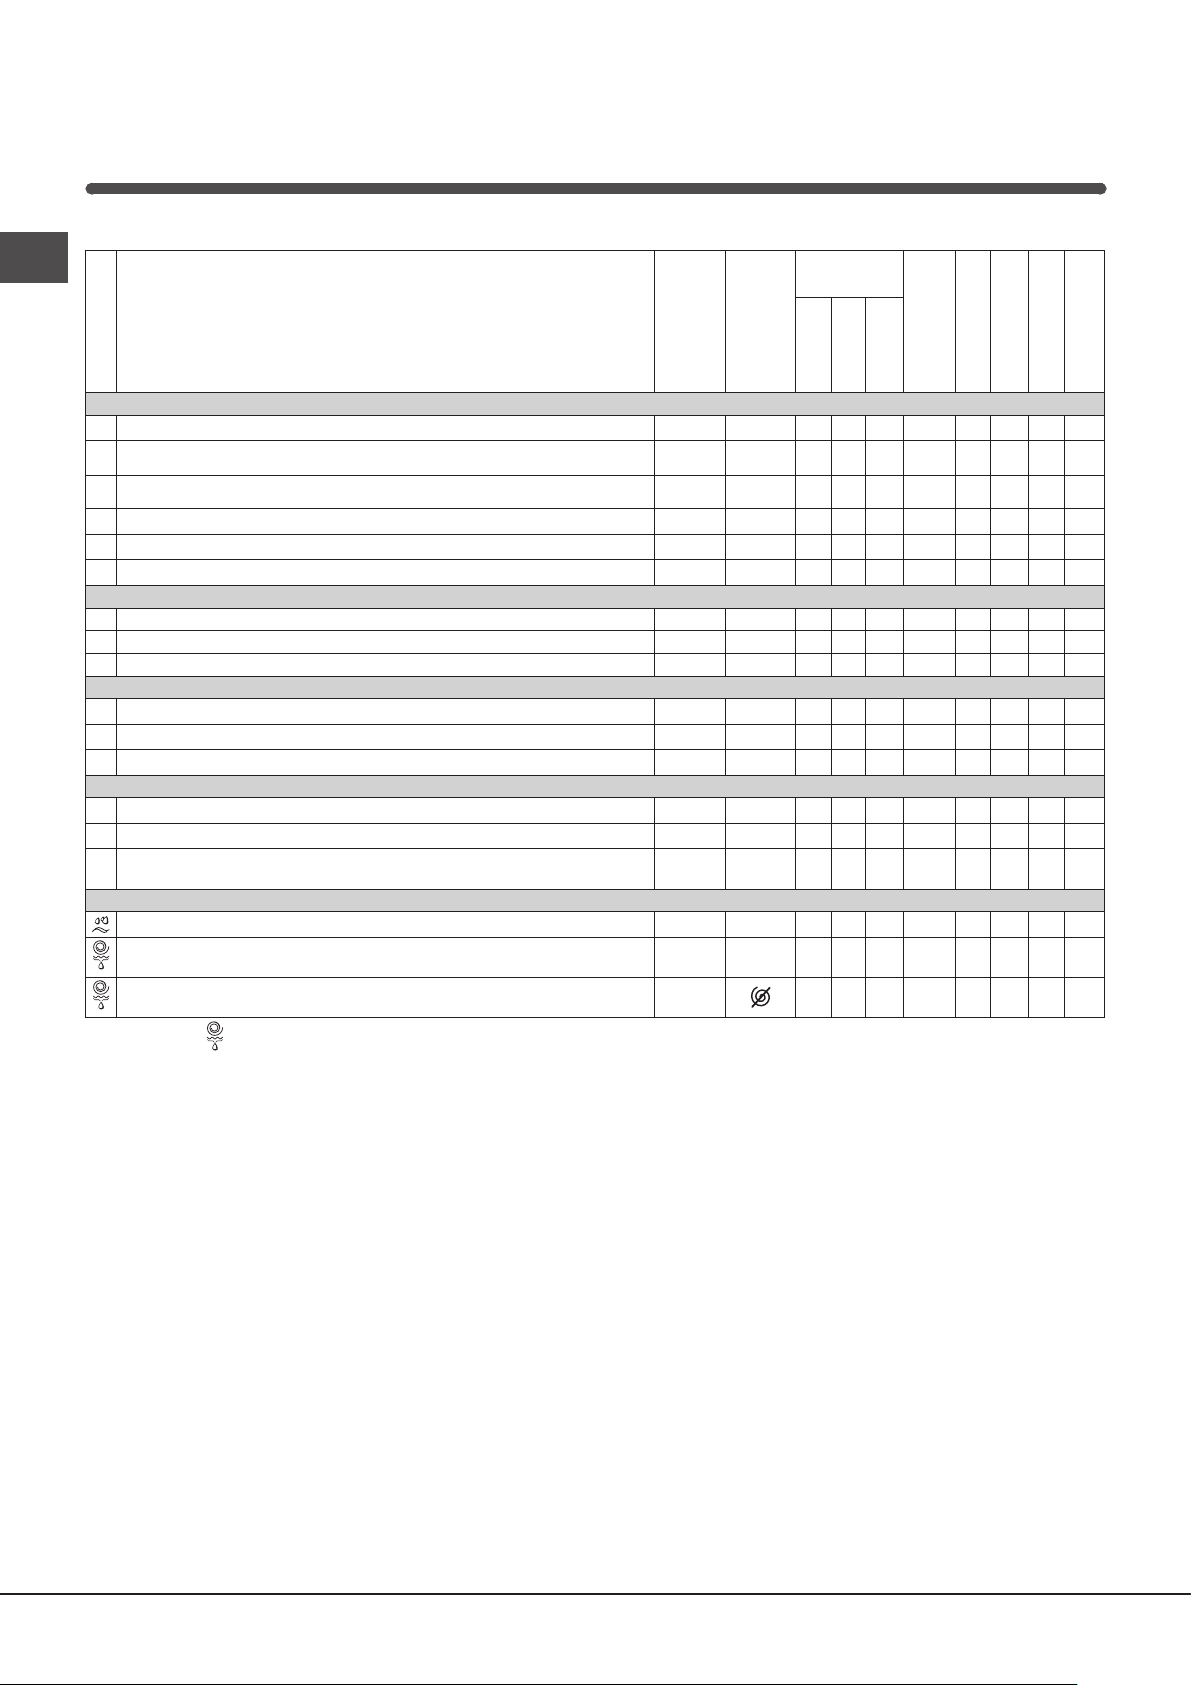
56
SR
Програми
Табела програма
Sport Intensive (програм 12) је предвиђен за прање пуно запрљане спортске одеће (комбинезони, кратке панталоне итд.); за
добијање најбољих резултата препоручује се да се не премаши максимални терет наведен у „Табели програма“.
Sport Light (програм 13) је предвиђен за прање мало запрљане спортске одеће (комбинезони, кратке панталоне итд.);
за добијање најбољих резултата препоручује се да се не премаши максимални терет наведен у „Табели програма“.
Препоручује се употреба течног детерџента, користите једну дозу предвиђену за пола пуњења.
Sport Shoes (програм 14) је предвиђен за прање спортске обуће; за добијање најбољих резултата не перите више од 2 пара.
Програми 20° нуде добре перформансе прања на основу ниске температуре са малим утрошком енергије ради
заштите животне средине и уштеде. Програми 20° одговарају свим потребама:
Стандардни програм за памук на 20 °C (програм 6) идеалан за прљав памучни веш. Добре перформансе, такође
са хладном водом, упоредне са прањем на 40°, гарантоване су механичком радњом која функционише варирањем
брзине поновљеним и приближеним ударцима.
Mix Light (програм 7) мешовит је идеалан за умерено прљав мешовит веш (памучни и синтетички). Добре перформансе,
такође са хладном водом гарантоване су механичком радњом која функционише варирањем брзине средњим и
одређеним интервалима.
20' Refresh (програм 8) је идеалан циклус за освежавање и прање умерено прљавог веша за кратко време.
Траје само 20 минута и на овај начин се штеди време и енергија. Могуће је истовремено прање тканина различитог
порекла (осим вуне и свиле) у максималној тежини од 1,5 кг.
Програми
Опис програма
Макс.
темп.
(°C)
Макс.
брзина
(обртаја
у
минути)
Детерџенти
Макс. оптерећење
(кг)
Преостала влага %
Потрошња струје
kWh
Укупна потрошња
воде л
Трајање циклуса
Претпрање
Прање
Омекшивач
Свакодневно (Daily)
1
Памук са претпрањем: јако прљав бели веш.
90°
1200
6
53 1,90 68 155’
2
Стандардни програм за памук на 60°C (1): веома запрљан бели и шарени веш
постојаних боја.
60°
(Max. 90°)
1200
-
6
53 1,01 49,8 195’
3
Стандардни програм за памук на 40°C (2): мало запрљан бели и осетљиви
шарени веш.
40°
1200
-
6
53 0,86 52 185’
4
Синтетика: веома прљав отпоран шарени веш.
60°
800
-
3
44 0,78 33 105’
4
Синтетика (3): мало запрљан осетљив шарени веш.
40°
800
-
3
44 0,49 38 95’
5
Шарени памук: мало запрљан бели и осетљиви шарени веш.
40°
1200
-
6
53 0,86 56 95’
20° Zone
6
Стандардни програм за памук на 20°C: мало запрљан бели и осетљиви шарени веш.
20°
1200
-
6
- - - 170’
7
Mix Light
20°
800
-
6
- - - 120’
8
20' Refresh
20°
800
-
1,5
- - - 20’
Посебни програми (Special)
9
Свила и завесе: за веш од свиле, вискозе, фин доњи веш.
30°
0
-
1
- - - 55’
10
Вуна: за вуну, кашмир, итд.
40°
800
-
1,5
- - - 70’
11
Jeans
40°
800
-
3
- - - 75’
Спорт (Sport)
12
Sport Intensive
30° 600 -
3
- - - 85’
13
Sport Light
30° 600 -
3
- - - 60’
14
Sport Shoes
30° 600 -
Макс.
2 пара
- - - 55’
Делимично
Испирање
- 1200 - -
6
- - - 36’
Центрифуга + Пражњење
- 1200 - - - 6
- - - 10’
Само Избацивање воде *
-
- - -
6
- - - 3’
Трајање циклуса приказано на екрану или наведено у упутству је процена заснована на стандардним условима. Стварно време може да зависи од више бројних фактора, као што
су температура и притисак воде на улазу, температура околине, количина детерџента, количина и тип рубља, уравнотеженост рубља, додатне изабране опције.
1) Контролни програм према норми 1061/2010: Подесите програм 2 са температуром од 60°C.
Овај циклус је погодан за прање памучног рубља које је уобичајено запрљано и најефикаснији је у погледу комбиноване потрошње
струје и воде за рубље које може да се пере на 60 °C. Ефективна температура прања може да се разликује од оне која је назначена.
2) Контролни програм према норми 1061/2010: Подесите програм 3 са температуром од 40°C.
Овај циклус је погодан за прање памучног рубља које је уобичајено запрљано и најефикаснији је у погледу комбиноване потрошње
струје и воде за рубље које може да се пере на 40 °C. Ефективна температура прања може да се разликује од оне која је назначена.
За све Тест институте:
2) Дуги програм за памук: Подесите програм 3 са температуром од 40°C.
3) Дуги програм за синтетику: Подесите програм 4 са температуром од 40°C.
* Избором програма и искључивањем циклуса центрифуге, машина ћити само пражњење.

57
SR
Персонализације
Подешавање температуре
Окретањем дугмета ТЕМПЕРАТУРА подешава се температура прања (погледајте Табелу програма).
Температура се може смањити све до хладног прања .
Машина аутоматски спречава задавање температуре веће од предвиђеног максимума за сваки програм.
Напомена: Избором програма
2
температуру можете повећати све до 90°.
Подешавање центрифуге
Окретањем дугмета ЦЕНТРИФУГА подешава се брзина центрифуге одабраног програма.
Максималне предвиђене брзине за програме су:
Програми Максимална брзина
Памук 1200 обртаја у минути
Синтетика 800 обртаја у минути
Вуна 800 обртаја у минути
Свила само пражњење
Брзина центрифуге се може смањити или искључити избором симбола .
Машина аутоматски спречава центрифугу јачу од максимума предвиђеног за сваки програм.
Опције
Различите предвиђене функције прања омогућавају жељену чистоћу и белину.
За активирање опција:
1. Притисните тастер који одговара жељеној опцији;
2. Одговарајућа лампица се пали и показује да је функција активна.
Напомена:
- Ако одабрана опција није компатибилна са задатим програмом, одговарајућа лампица ће треперити, а опција
се неће активирати.
- Ако одабрана опција није у складу са неком другом претходно подешеном, одговарајућа лампица прве одабране
функције ће треперити, а активираће се само друга, лампица активиране опције се пали.
Избором ове опције механички покрети, температура и вода се оптимизују за мали терет од памука и синтетике,
који није много прљав (погледајте „Табелу програма“).
Са режимом „ “ се може прати са смањеним временом, уз уштеду воде и енергије. Препоручује се употреба
једне дозе течног детерџента прилагођене количини веша.
Опција штеди енергију тако што се не греје воду која се користи за прање рубља, а то је предност за
животну средину и рачун за струју. Насупрот, појачани механички рад и оптимизована потрошња воде гарантују
оптималне резултате у истом просечном трајању стандардног циклуса.
Да бисте добили најбоље резултате прања, препоручујемо употребу течног детерџента.
Додатно испирање
Избором ове функције повећава се ефикасност испирања и осигурава са максимално уклањање детерџента.
Корисно је за нарочито осетљиву кожу.
Одложено покретање
Одлаже време почетка рада машине до 12 часова.
Притискајте тастер све док се не упали лампица која одговара жељеном времену одлагања. На пети притисак
дугмета опција се деактивира.
НAПОМЕНА: После притиска на тастер START/PAUSE време одлагања је могуће само смањити до почетка
одабраног програма.
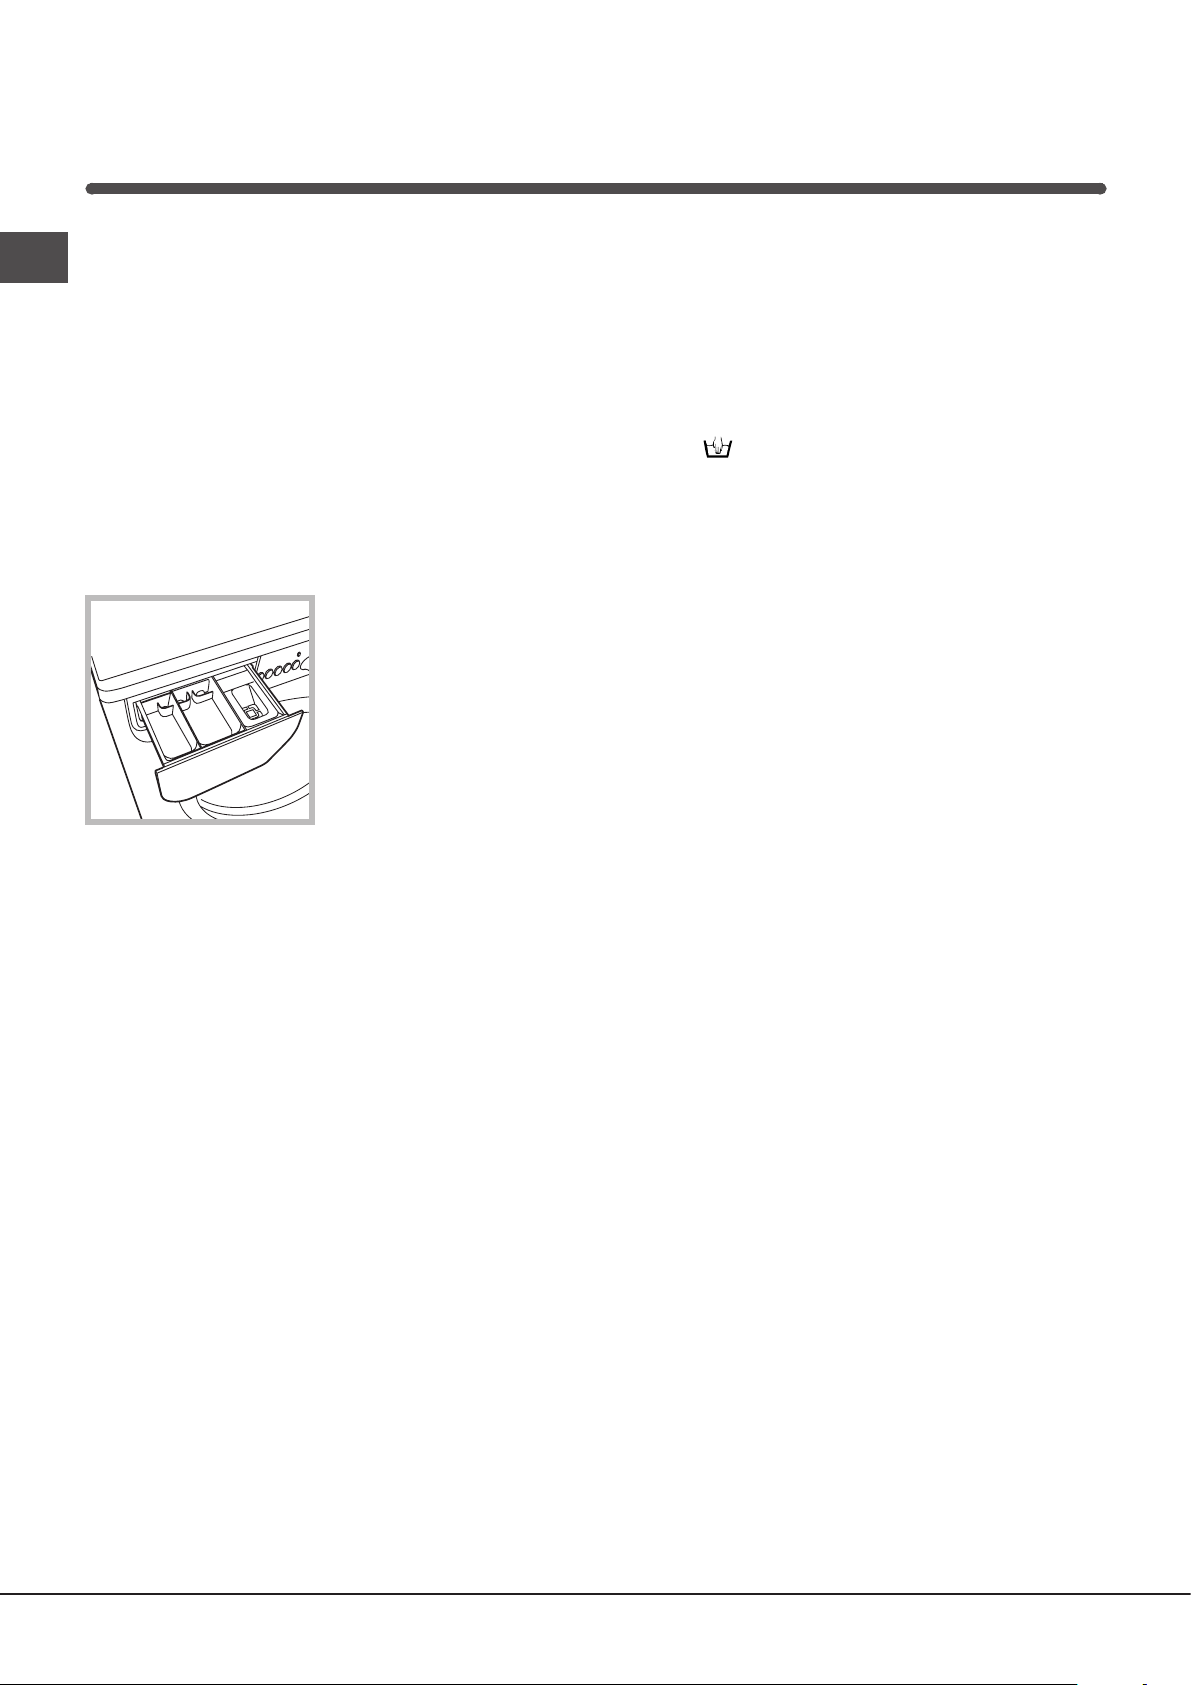
58
SR
Посуда за детерџент
Добар резултат прања зависи чак и од исправног дозирања
детерџента: Повећаном дозом прање није ефикасније а
доприноси се стварању наслага на унутрашњим деловима
машине и загађењу животне средине.
! Не користите детерџенте за ручно прање, пошто
стварају много пене.
! Користите детерџент у праху за бело памучно рубље
и за претпрање или за прање рубља на температури
већој од 60°C.
! Пратите упутства на паковању детерџента.
Извуците посуду за
детерџенте и сипајте
детерџент или адитив
прању на следећи начин.
посуда 1: Детерџент за претпрање (у праху)
посуда 2: Детерџент за прање (у праху или течни)
Течни детерџент убацити тек пред почетак.
посуда 3: Адитиви (омекшивач, итд.)
Омекшивач не сме да цури кроз решетку.
Припрема веша
• Веш поделите према:
– врсти тканине/симболу на етикети.
– бојама: одвојите шарени од белог веша.
• Испразните џепове и проверите дугмад.
• Немојте прелазити вредности наведене у „Табели са
програмима“ које се односе на тежину сувог веша.
Колико је тежак веш?
1 чаршав 400–500 гр.
1 јастучница 150–200 гр.
1 столњак 400–500 гр.
1 баде-мантил 900–1.200 гр.
1 пешкир 150–250 гр.
Посебне тканине
Свила: овај програм користите 9 за прање свиленог
веша. Препоручујемо употребу детерџента
одређеног за осетљиву гардеробу.
Завесе: Склопите их и сложите у јастучницу или
мрежасту кесу. Користите програм 9.
Вуна: Програмом 10 је могуће прати у машини сву
вунену одећу, такође и ону са етикетом „само ручно
прање“ . За најбоље резултате користите посебан
детерџент и не прелазите терет од 1,5 кг.
Jeans: Преврните одећу пре прања и користите
течан детерџент. Користите програм 11
Систем балансирања терета
Пре сваке центрифуге, да би се избегле претеране
вибрације и терет равномерно распоредио, бубањ
се окреће брзином мало већом од оне током прања.
Ако се после неколико поновљених покушаја
терет још увек није равномерно распоредио,
машина ће извршити центрифугу брзином мањом
од предвиђене. У случају великог дисбаланса,
распоређивање врши машина уместо центрифуге.
Да би се побољшало распоређивање терета и
правилно балансирање, препоручује се мешање
великих и малих комада веша.
Детерџенти и веш
1
2
3

59
SR
Може се догодити да машина не ради. Пре позивања Техничке службе (погледајте „Техничка служба”), проверите
да се не ради о проблему лако решивом уз помоћ следећег списка.
Неправилности и решења
Неправилности:
Машина се не укључује.
Циклус прања не почиње.
Машина не убацује воду (лампица
прве фазе прања трепће брзо).
Машина наизменично прима и
испушта воду.
Машина не испушта воду или не
центрифугира.
Машина јако вибрира током
центрифуге.
Машина губи воду.
Лампице „опција“ и лампица
„START/PAUSE“ трепере, а једна од
лампица „фазе у току“ и „блокаде
врата“ се пали и остаје упаљена.
Настаје много пене.
Могући узроци/Решење:
• Утикач није увучен у утичницу или није увучен довољно да би имао контакт.
• У кући нема струје.
• Врата нису добро затворена.
• Дугме ON/OFF није притиснуто.
• Дугме START/PAUSE није притиснуто.
• Славина за воду није отворена.
• Подешено је одложено покретање (ОДЛОЖЕНО ПОКРЕТАЊЕ,
погледајте „Персонализације“).
• Црево за довод воде није повезано на славину.
• Црево је савијено.
• Славина за воду није отворена.
• У кући нема воде.
• Притисак није задовољавајући.
• Дугме START/PAUSE није притиснуто.
• Одводно црево није постављено између 65 и 100 цм од земље (погледајте
„Постављање”).
• Крај одводног црева је потопљен у воду (погледајте „Постављање“).
• Цев у зиду пропушта ваздух.
Ако се и после ових провера проблем не реши, затворите славину за воду,
искључите машину и позовите Техничку службу. Ако се стан налази на
последњим спратовима зграде, могуће је да се јавља феномен сифона,
због чега машина стално убацује и избацује воду. Да бисте избегли ову
неправилност, у продаји се налазе одговарајући анти-сифон вентили.
• Програмом није предвиђено избацивање воде: Са одређеним
програмима потребно је ручно избацити воду.
• Одводно црево је савијено (погледајте „Постављање“).
• Испусни вод је зачепљен.
• Бубањ у тренутку инсталације није био правилно деблокиран
(погледајте „Постављање“).
• Машина не стоји равно (погледајте „Постављање“).
• Машина је притиснута између намештаја и зида (погледајте
„Постављање“).
• Црево за довод воде није добро затегнуто (погледајте „Постављање“).
• Фиока за детерџенте је блокирана (за чишћење погледајте
„Одржавање и нега”).
• Одводно црево није добро причвршћено (погледајте „Постављање“)..
• Искључите машину и извуците утикач из утичнице, сачекајте око 1
минут а затим је поново укључите.
Уколико неправилност остане, позовите Техничку службу.
• Детерџент није одређен за машинско прање (треба да носи натпис „за
машинско прање“, „за ручно и машинско прање“, или слично).
• Претерано дозирање.
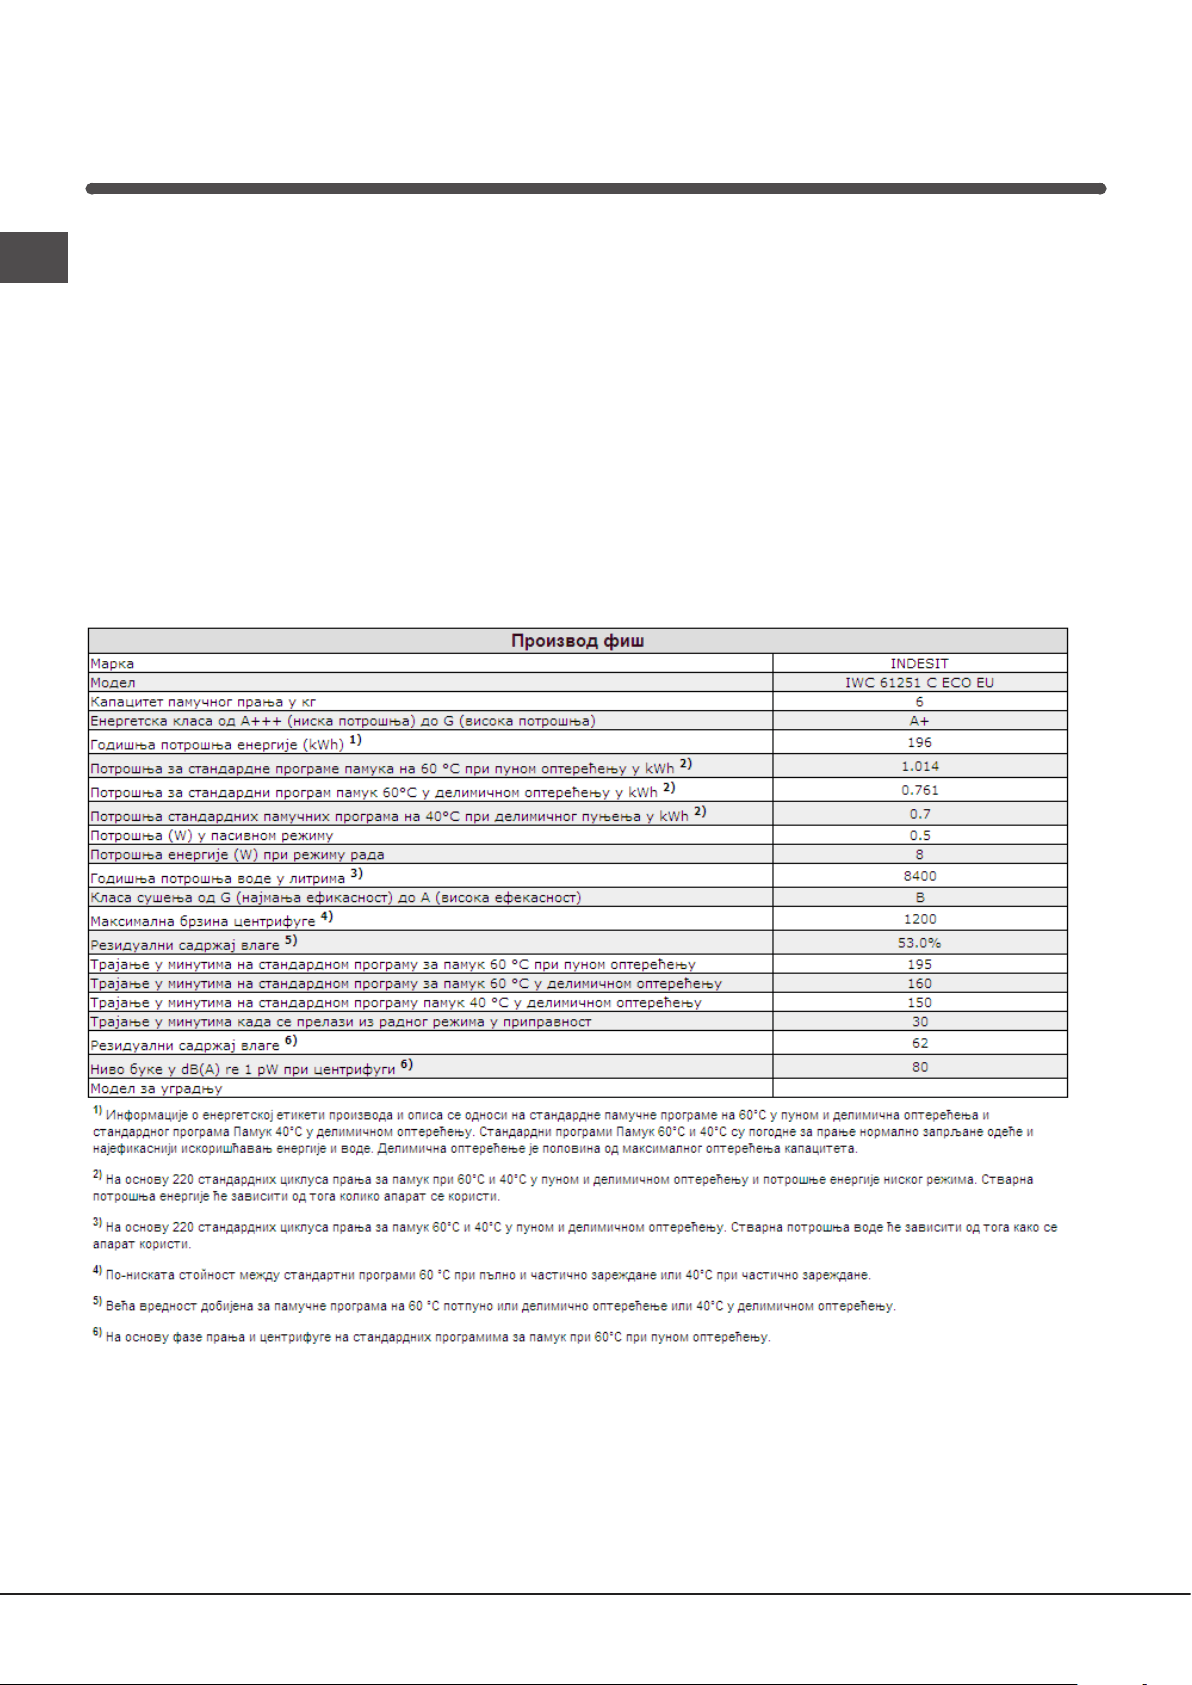
60
SR
Техничка служба
Пре него што позовете Техничку службу:
• Проверите да ли неправилност можете решити сами (види “Неправилности и решења”);
• Поново започните програм да видите да ли је проблем отклоњен;
• У супротном контактирајте овлаштени Центар техничке службе на број телефона назначен на гарантном листу.
! Никада не користите неовлашћене сервисе.
Јавите:
• врсту неисправности;
• модел машине (Мо.);
• серијски број (S/N).
Ове информације се налазе на плочици постављеној на задњем делу машине и у предњем делу отвора.

DE
61
Deutsch
INHALTSVERZEICHNIS
Installation 62-63
Auspacken und Aufstellen
Wasser- und Elektroanschlüsse
Erster Waschgang
Technische Daten
Reinigung und Pflege 64
Abstellen der Wasser- und Stromversorgung
Reinigung des Gerätes
Reinigung der Waschmittelschublade
Pflege der Gerätetür und Trommel
Reinigung der Pumpe
Kontrolle des Wasserzulaufschlauchs
Vorsichtsmaßregeln und Hinweise 65
Allgemeine Sicherheit
Entsorgung
Beschreibung des Waschvollautomaten und
Starten eines Waschprogramms 66-67
Bedienblende
Kontrollleuchten
Starten eines Waschprogramms
Waschprogramme, 68
Programmtabelle
Personalisierungen 69
Temperatureinstellung
Schleudereinstellung
Funktionen
Waschmittel und Wäsche 70
Waschmittelschublade
Vorsortieren der Wäsche
Besondere Wäscheteile
Unwuchtkontrollsystem
Störungen und Abhilfe 71
Kundendienst 72
DE
IWC 61251
Bedienungsanleitungen
WASCHVOLLAUTOMAT
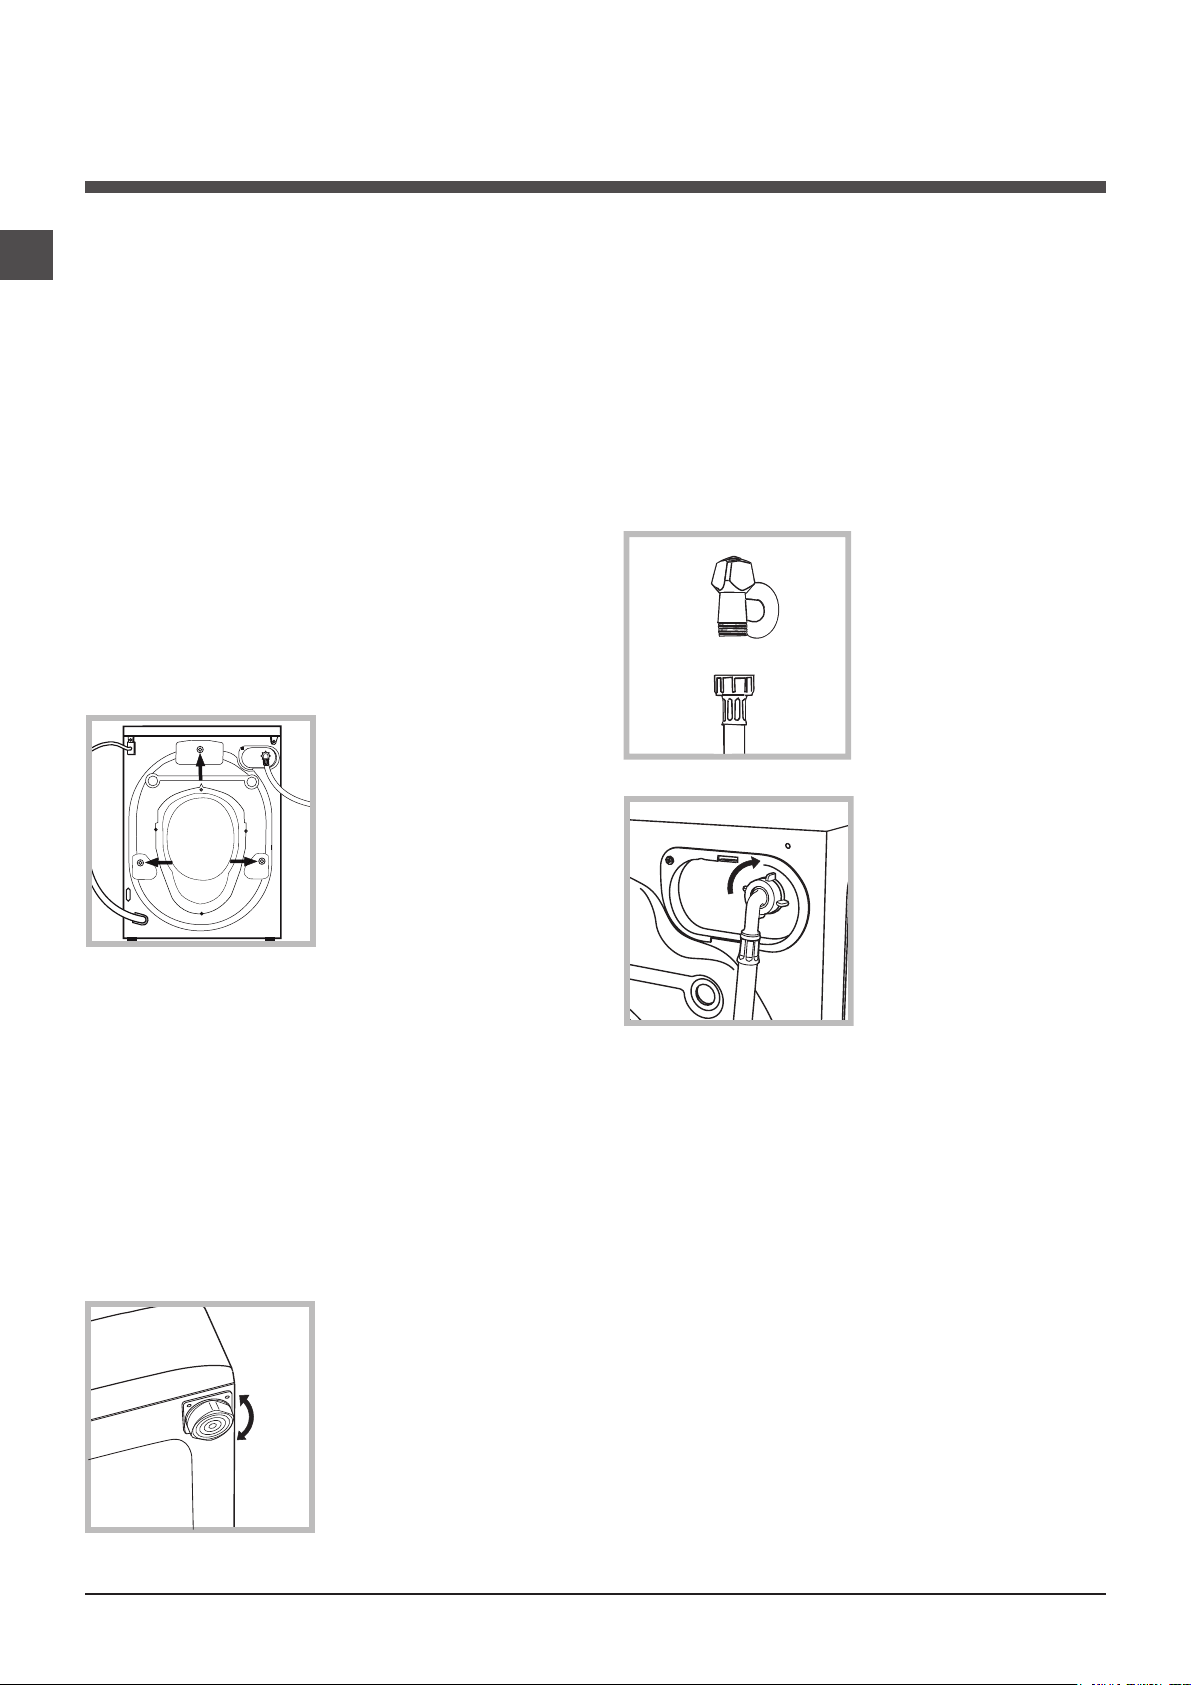
62
DE
! Es ist äußerst wichtig, diese Bedienungsanlei-
tung sorgfältig aufzubewahren, um sie jederzeit
zu Rate ziehen zu können. Sorgen Sie dafür,
dass sie im Falle eines Umzugs oder einer Über-
gabe an einen anderen Benutzer das Gerät
stets begleitet, damit auch der neue Inhaber die
Möglichkeit hat, diese zu Rate zu ziehen.
! Lesen Sie die Hinweise bitte aufmerksam
durch, sie liefern wichtige Informationen hin-
sichtlich der Installation, des Gebrauchs und
der Sicherheit.
Auspacken und Aufstellen
Auspacken
1. Gerät auspacken.
2. Sicherstellen, dass der Waschvollautomat
keine Transportschäden erlitten hat. Im Falle ei-
ner Beschädigung Gerät bitte nicht anschließen,
sondern den Kundendienst anfordern.
3. Die 3 Tran-
sportschutz-schrau-
ben herausschrau-
ben und die an der
Geräterückwand
befindlichen Distan-
zstücke aus Gummi
entfernen (siehe Ab-
bildung).
4. Die Öffnungen mittels der mitgelieferten
Abdeckungen verschliessen.
5. Sämtliche Teile aufbewahren: Sollte der
Waschautomat erneut transportiert werden,
müssen diese Teile wieder eingesetzt werden.
! Verpackungsmaterial ist kein Spielzeug für
Kinder.
Nivellierung
1. Der Waschvollautomat muss auf einem
ebenen, festen, schwingungsfreien Untergrund
aufgestellt werden ohne diesen an Wände, Mö-
bel etc. direkt anzulehnen.
2. Sollte der Boden
nicht perfekt eben
sein, müssen die
Unebenheiten durch
An- bzw. Ausdrehen
der vorderen Stellfüße
ausgeglichen werden
(siehe Abbildung), der
auf der Arbeitsfläche
zu ermittelnde Nei-
gungsgrad darf 2°
nicht überschreiten.
Eine präzise Nivellierung verleiht dem Gerät die
erforderliche Stabilität, durch die Vibrationen,
Betriebsgeräusche und ein Verrücken des
Gerätes vermieden werden. Bei Teppichböden
müssen die Stellfüße so reguliert werden, dass
ein ausreichender Freiraum zur Belüftung unter
dem Waschvollautomaten gewährleistet ist.
Wasser- und Elektroanschlüsse
Anschluss des Zulaufschlauches
1. Schrauben Sie den
Wasserschlauch an
einen Kaltwasserhahn
mit ¾-Gewindean-
schluss an (siehe
Abb.). Lassen Sie
das Wasser vor dem
Anschluss so lange
auslaufen, bis klares
Wasser austritt.
2. Das andere Ende
des Schlauches an
den oben rechts am
Rückteil des Wasch-
vollautomaten befin-
dlichen Wasseran-
schluss anschließen
(siehe Abbildung).
3. Der Schlauch darf hierbei nicht eingeklemmt
oder abgeknickt werden.
! Der Wasserdruck muss innerhalb der Wer-
te liegen, die in der Tabelle der technischen
Daten angegeben sind (siehe nebenstehende
Seite).
! Sollte der Zulaufschlauch nicht lang genug
sein, dann wenden Sie sich bitte an einen
Fachhändler oder an einen autorisierten Fach-
mann.
! Verwenden Sie niemals bereits gebrauchte
Schläuche.
! Verwenden Sie die Schläuche, die mit dem
Gerät geliefert wurden.
Installation
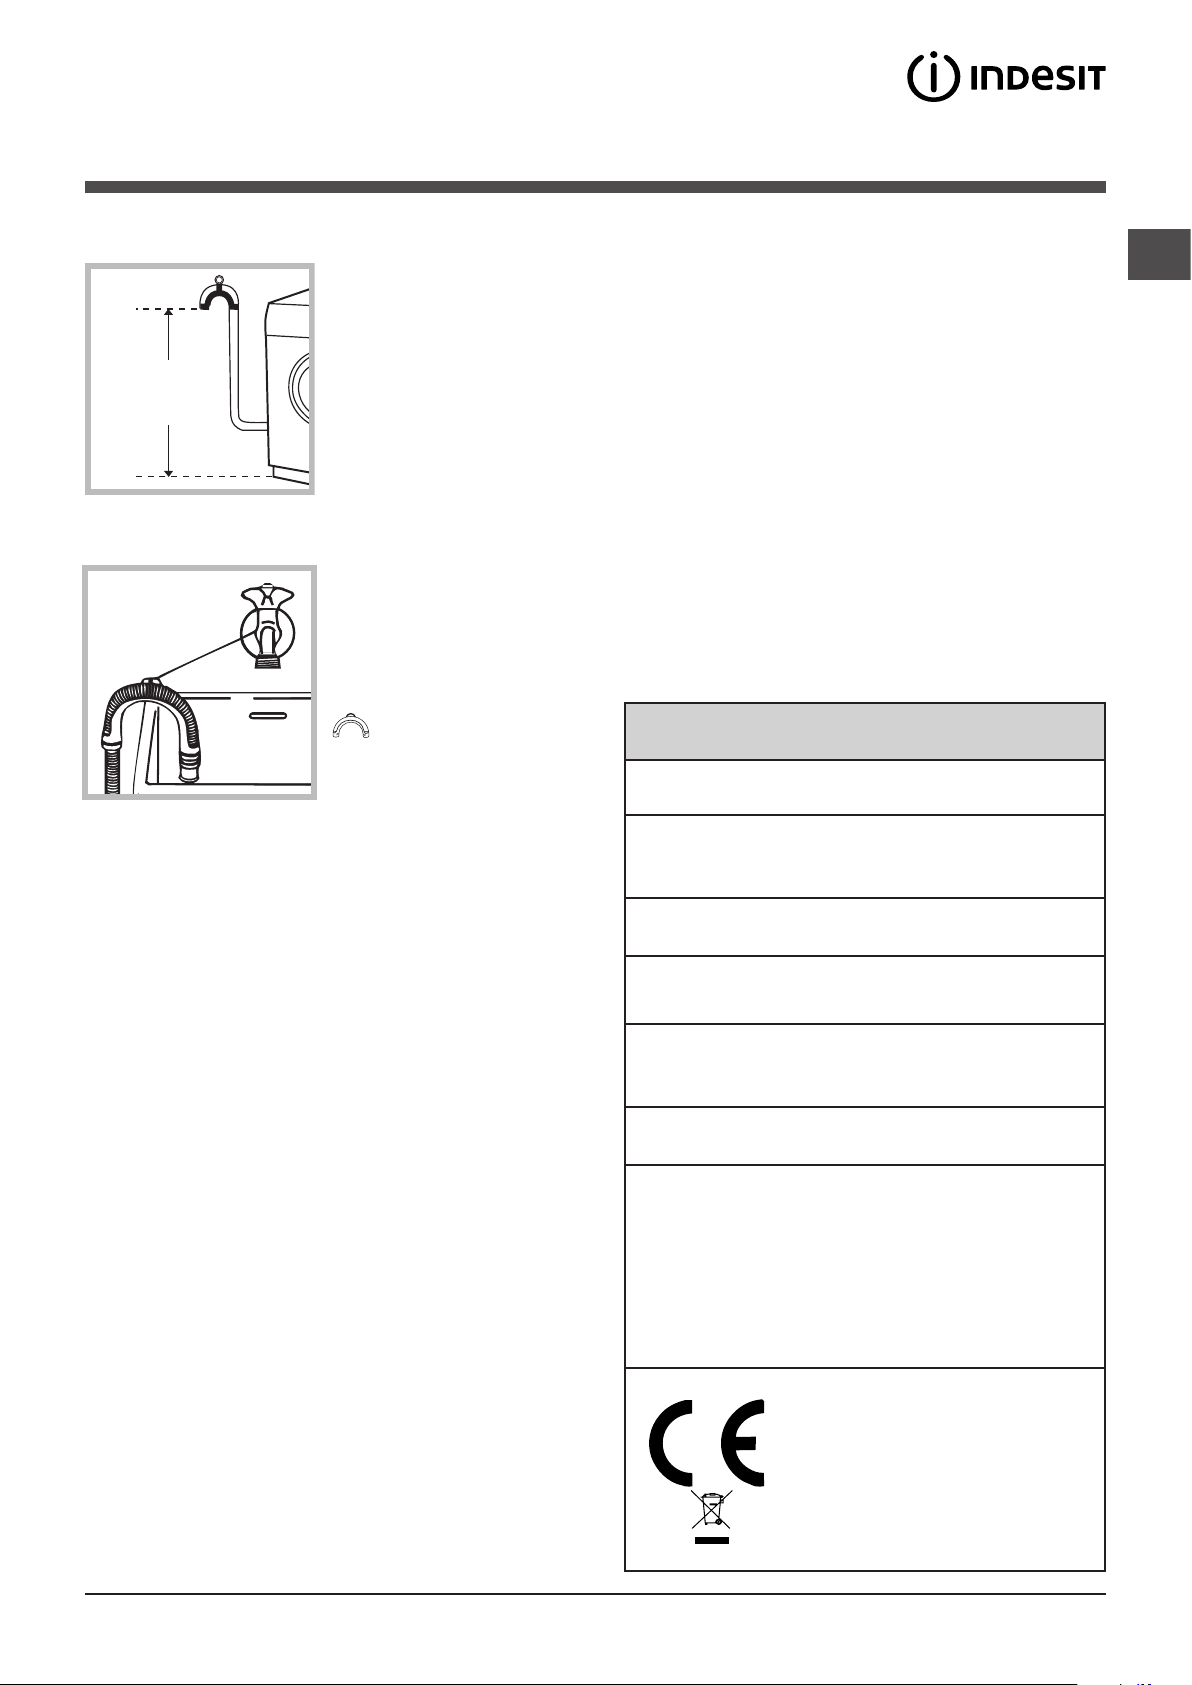
DE
63
Anschluss des Ablaufschlauches
Schließen Sie den
Ablaufschlauch ohne
ihn dabei abzuknicken
an einen geeigneten
Abfluss an. Die Minde-
stablaufhöhe beträgt
65 - 100 cm (gemes-
sen vom Boden), oder
hängen Sie diesen
mittels des Schlau-
chhalters gesichert in
ein Becken oder Wanne ein;
Oder hängen Sie den
Ablaufschlauch in ein
Becken oder eine
Wanne ein; befestigen
Sie ihn in diesem Falle
mittels der Führung
(beim Kunden-
dienst erhältlich) an
dem Wasserhahn
(siehe Abbildung).
Das freie Ablaufschlauchende darf nicht unter
Wasser bleiben.
! Verlängerungsschläuche sollten nicht einge-
setzt werden. Sollte dies unvermeidlich sein,
muss die Verlängerung denselben Durchmes-
ser des Originalschlauchs aufweisen und darf
eine Länge von 150 cm nicht überschreiten.
Stromanschluss
Vor Einfügen des Netzsteckers in die Steckdo-
se ist sicherzustellen, dass:
• die Steckdose über eine normgerechte Erdung
verfügt;
• die Steckdose die in den Technischen Daten
angegebenen Höchstlast des Gerätes trägt
(siehe nebenstehende Tabelle);
• die Stromspannung den in den Technischen
Daten angegebenen Werten entspricht (siehe
nebentehende Tabelle);
• die Steckdose mit dem Netzstecker des
Waschvollautomaten kompatibel ist. An-
dernfalls muss der Netzstecker (oder die
Steckdose) ersetzt werden.
! Der Waschvollautomat darf nicht im Freien
installiert werden, auch nicht, wenn es sich
um einen geschützten Platz handelt. Es ist
gefährlich, das Gerät Gewittern und Unwettern
auszusetzen.
! Die Steckdose sollte nach installiertem Gerät
leicht zugänglich sein.
! Verwenden Sie bitte keine Verlängerungen
oder Mehrfachstecker.
! Das Netzkabel darf nicht gebogen bzw. ein-
geklemmt werden.
! Das Versorgungskabel darf nur durch autori-
sierte Fachkräfte ausgetauscht werden.
Achtung! Der Hersteller übernimmt keinerlei
Haftung, sollten diese Vorschriften nicht genau
beachtet werden.
Erster Waschgang
Lassen Sie nach der Installation bzw. vor
erstmaligem Gebrauch erst einen Waschgang
(mit Waschmittel) ohne Wäsche durchlaufen.
Stellen Sie hierzu das Waschprogramm 2 ein.
65 - 100 cm
Technische Daten
Modell
IWC 61251
Abmessun-
ge
Breite 59,5 cm
Höhe 85 cm
Tiefe 51,7 cm
Fassung-
svermögen
1 bis 6 kg
Elektroan-
schlüsse
siehe das am Gerät befindli-
che Typenschild
Wasseran-
schlüsse
Höchstdruck 1 MPa (10 bar)
Mindestdruck 0,05 MPa (0,5 bar)
Trommelvolumen 46 Liter
Schleuder-
touren
bis zu 1200 U/min.
Prüfpro-
gramme
gemäß
der Vor-
schriften
1061/2010
und
1015/2010
Programm 2:
Baumwolle Standard 60°C.
Programm 3:
Baumwolle Standard 40°C.
Dieses Gerät entspricht den
folgenden EG-Richtlinien:
- EMC 2014/30/EU (elektroma-
gnetische Verträglichkeit) und
nachfolgenden Änderungen
- 2012/19/EU (WEEE)
- LVD 2014/35/EU (Nieder-
spannung)
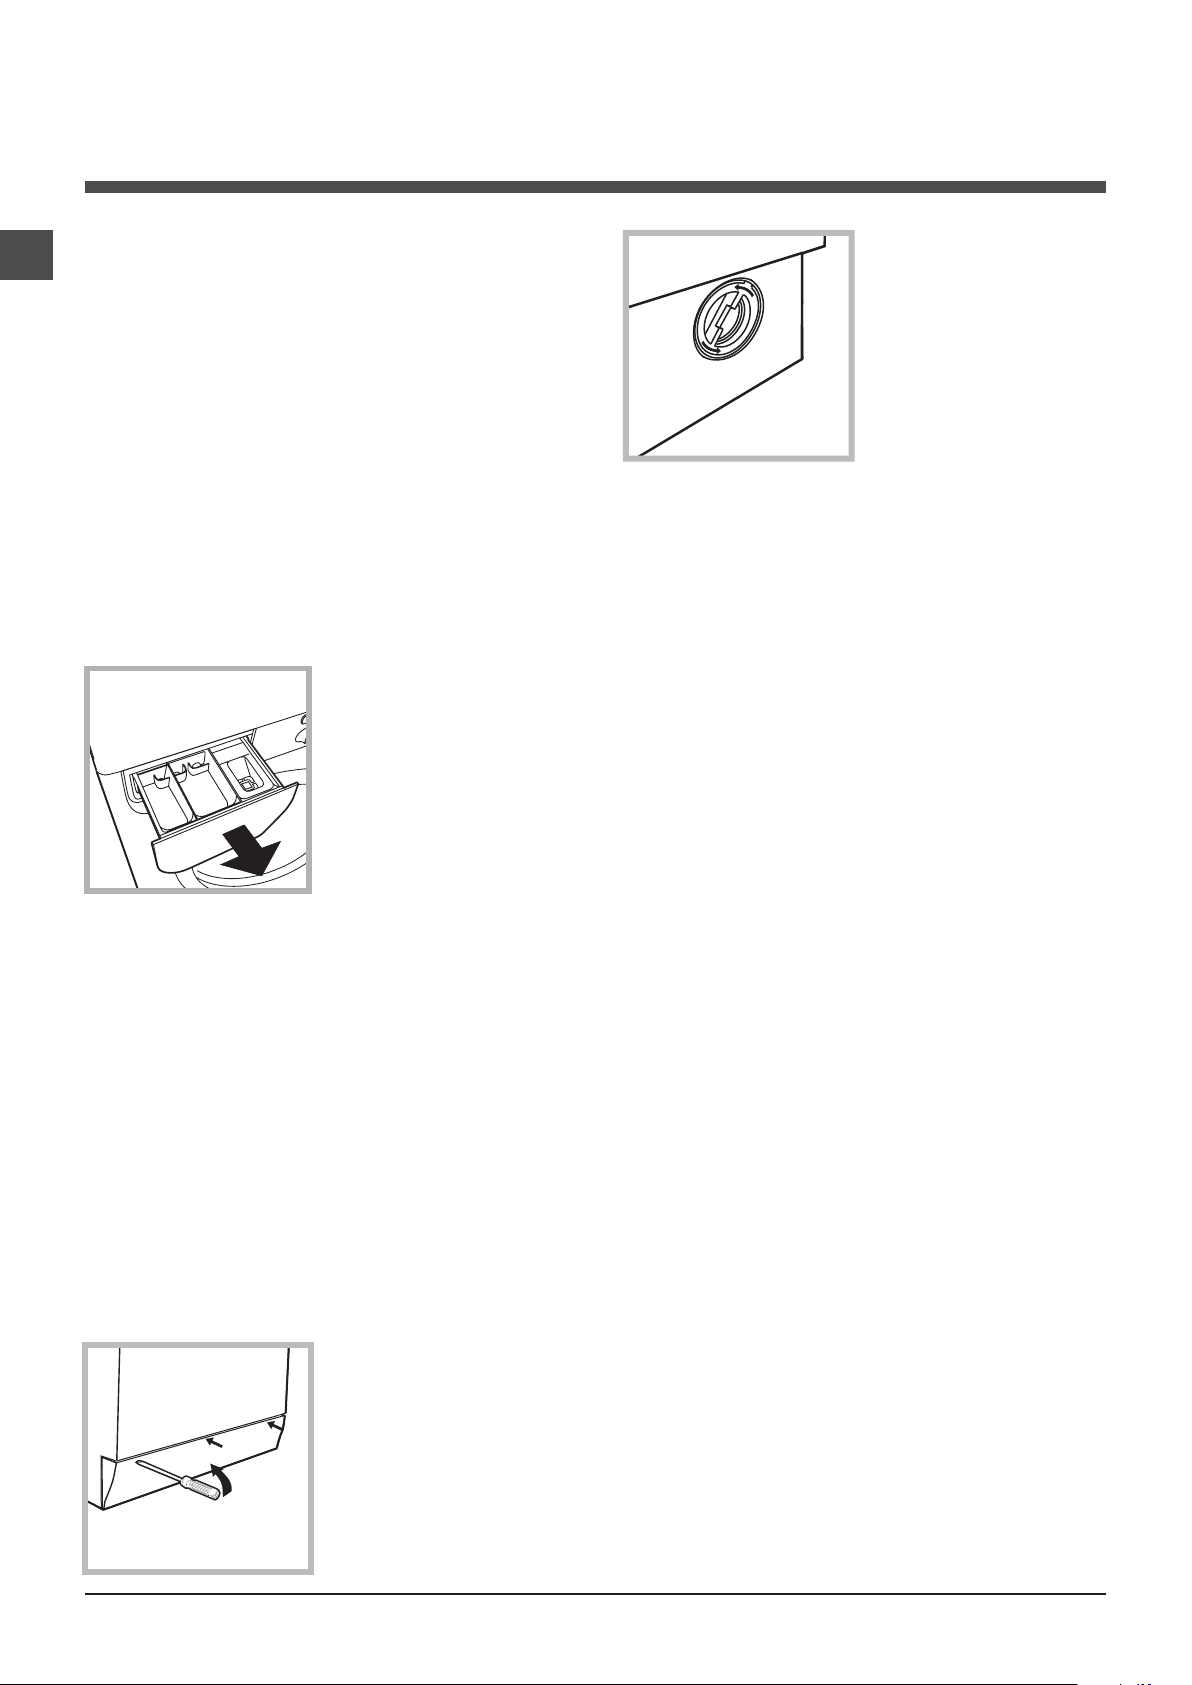
64
DE
Reinigung und Pflege
Abstellen der Wasser- und Strom-
versorgung
• Drehen Sie den Wasserhahn nach jedem
Waschvorgang zu. Hierdurch wird der Ver-
schleiß der Wasseranlage verringert und
Wasserlecks vorgebeugt.
• Ziehen Sie den Netzstecker aus der
Steckdose, bevor Sie Ihren Waschvollauto-
maten reinigen.
Reinigung des Gerätes
Die Gehäuseteile und die Teile aus Gummi
können mit einem mit warmer Spülmittellauge
angefeuchteten Tuch gereinigt werden. Ver-
meiden Sie Löse- und Scheuermittel
Reinigung der Waschmittelschu-
blade
Heben Sie die Schu-
blade leicht an und
ziehen Sie sie nach
vorne hin heraus (sie-
he Abbildung).
Spülen Sie sie regel-
mäßig unter fließen-
dem Wasser gründlich
aus.
Pflege der Gerätetür und Trommel
• Lassen Sie die Gerätetür stets leicht offen
stehen, um die Bildung unangenehmer
Gerüche zu vermeiden.
Reinigung der Pumpe
Ihr Gerät ist mit einer selbstreinigenden Pumpe
ausgerüstet, eine Wartung ist demnach nicht
erforderlich. Es könnte jedoch vorkommen,
dass kleine Gegenstände (Münzen, Knöpfe) in
die zum Schutz der Pumpe dienende Vorkam-
mer (befindlich unter der Pumpe) fallen.
! Vergewissern Sie sich, dass der Waschgang
abgeschlossen ist und ziehen Sie den Netz-
stecker heraus.
Zugang zur Vorkammer:
1. Nehmen Sie die
Abdeckung (befin-
dlich an der Geräte-
front) mit Hilfe eines
Schraubenziehers ab
(siehe Abbildung);
2. Drehen Sie den
Deckel gegen den
Uhrzeigersinn ab
(siehe Abbildung):
es ist ganz normal,
wenn etwas Wasser
austritt;
3. Reinigen Sie das Innere gründlich;
4. Schrauben Sie den Deckel wieder auf;
5. Bringen Sie die Abdeckung wieder an. Stel-
len Sie hierbei sicher, dass die Haken in die
Schlitze eingreifen, bevor Sie die Abdeckung
fest andrücken.
Kontrolle des Wasserzulau-
fschlauchs
Kontrollieren Sie den Zulaufschlauch min-
destens einmal im Jahr. Weist er Risse bzw.
Brüche auf, muss er ausgetauscht werden.
Der starke Druck während des Waschpro-
gramms könnte zu plötzlichem Platzen führen.
! Verwenden Sie niemals bereits gebrauchte
Schläuche.

DE
65
Vorsichtsmaßregeln und
Hinweise
! Der Waschvollautomat wurde nach den strengsten internationa-
len Sicherheitsvorschriften entworfen und gebaut. Nachstehende
Hinweise werden aus Sicherheitsgründen geliefert und sollten
aufmerksam gelesen werden.
Allgemeine Sicherheit
• Dieses Gerät wurde ausschließlich für den Einsatz im privaten
Haushalt konzipiert.
• Dieses Gerät darf von Kindern ab 8 Jahren
und von Personen mit eingeschränkten kör-
perlichen, sensorischen oder geistigen Fähi-
gkeiten oder mit unzureichender Erfahrung und
Kenntnis verwendet werden, vorausgesetzt,
sie werden überwacht oder sie haben eine
ausreichende Einweisung in die sichere Nut-
zung des Geräts erhalten und haben die damit
verbundenen Gefahren verstanden. Erlauben
Sie Kindern nicht, mit dem Gerät zu spielen.
Wartung und Reinigung dürfen nicht von un-
beaufsichtigten Kindern ausgeführt werden.
• Berühren Sie das Gerät nicht, wenn Sie barfuß sind, und auch
nicht mit nassen oder feuchten Händen oder Füßen.
• Ziehen Sie den Gerätestecker nicht am Kabel aus der Steckdo-
se, sondern nur am Netzstecker selbst.
• Öffnen Sie die Waschmittelschublade nicht, wenn das Gerät
in Betrieb ist.
• Berühren Sie nicht das Ablaufwasser, es könnte sehr heiß sein.
• Öffnen Sie die Gerätetür nicht mit Gewalt: Der Sicherheits-
Schließmechanismus könnte hierdurch beschädigt werden.
• Bei etwaigen Störungen versuchen Sie bitte nicht, Innenteile
selbst zu reparieren.
• Halten Sie Kinder stets von dem in Betrieb befindlichen Gerät
fern.
• Während des Waschgangs kann die Gerätetür sehr heiß
werden.
• Muss das Gerät versetzt werden, sollten hierfür zwei oder drei
Personen verfügbar sein. Versetzen Sie es niemals allein, das
Gerät ist äußerst schwer.
• Bevor Sie die Wäsche einfüllen, stellen Sie bitte sicher, dass
die Wäschetrommel leer ist.
Entsorgung
• Entsorgung des Verpackungsmaterials: Befolgen Sie die loka-
len Vorschriften, Verpackungsmaterial kann wiederverwertet
werden.
• Gemäß der Europäischen Richtlinie 2012/19/EU (WEEE) über
Elektro- und Elektronik-Altgeräte dürfen Elektrohaushalts-
Altgeräte nicht über den herkömmlichen Haushaltsmüllkrei-
slauf entsorgt werden. Altgeräte müssen separat gesammelt
werden, um die Wiederverwertung und das Recycling der
beinhalteten Materialien zu optimieren und die Einflüsse auf
die Umwelt und die Gesundheit zu reduzieren.
Das Symbol „durchgestrichene Mülltonne“ auf jedem
Produkt erinnert Sie an Ihre Verpflichtung, dass Elektrohau-
shaltsgeräte gesondert entsorgt werden müssen. Endver-
braucher können sich an Abfallämter der Gemeinden wen-
den, um mehr Informationen über die korrekte Entsorgung
ihrer Elektrohaushaltsgeräte zu erhalten.
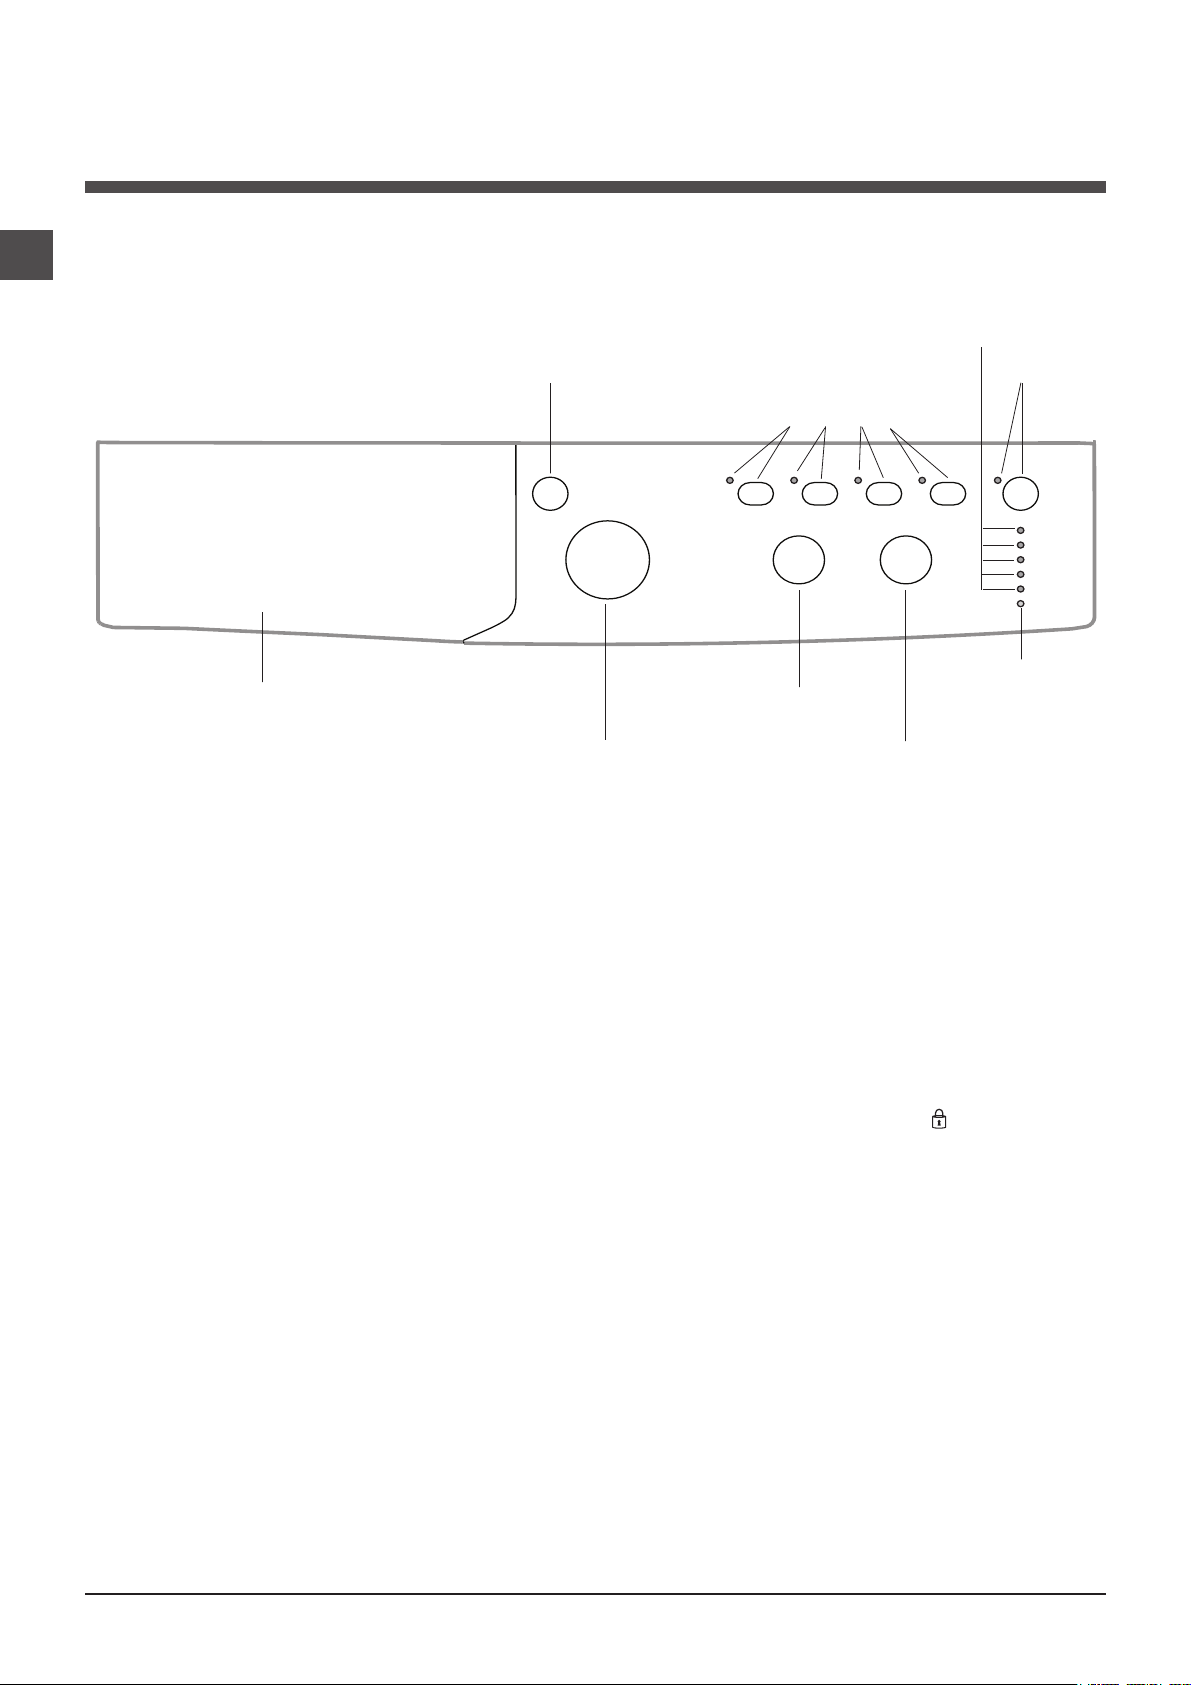
66
DE
Waschmittelschublade: für Waschmittel und Zusätze
(siehe „Waschmittel und Wäsche“).
Taste ON/OFF: Zum Ein- und Ausschalten Ihres Wasch-
vollautomaten.
Wählschalter PROGRAMME: Zur Wahl der Waschpro-
gramme. Während des Programmablaufs bleibt der Schal-
ter feststehend.
Tasten mit Kontrollleuchten FUNKTIONEN: Zur Ein-
stellung der verfügbaren Funktionen. Die der gewählten
Einstellung entsprechende Kontrollleuchte bleibt einge-
schaltet.
Wählschalter SCHLEUDERN: oder um das Schleudern
auszuschliessen (siehe „Personalisierungen“).
Wählschalter TEMPERATUREN: Zur Einstellung der
Waschtemperatur oder einer Kaltwäsche (siehe „Persona-
lisierungen“).
Kontrollleuchten PROGRAMMABLAUF/STARTZEI-
TVORWAHL: Zur Kontrolle des Waschprogrammablaufs.
Die eingeschaltete Kontrollleuchte zeigt die laufende Pro-
grammphase an.
Wurde die Funktion “Startzeitvorwahl” eingestellt, zeigen
sie die bis zum Start noch verbleibende Zeit an (siehe
Nebenseite).
Kontrollleuchte GERÄTETÜR GESPERRT: Diese Taste
zeigt an, ob die Gerätetür geöffnet werden kann oder nicht
(siehe Nebenseite).
Taste mit Kontrollleuchte START/PAUSE: Mittels dieser
Taste werden die Waschprogramme gestartet oder kurz
unterbrochen.
NB: Durch Drücken dieser Taste, kann das Waschpro-
gramm zeitweilig unterbrochen werden (Pause). Die
entsprechende Kontrollleuchte schaltet auf orangefarbenes
Blinklicht, die Kontrollleuchte der bestehenden Programm-
phase dagegen schaltet auf Dauerlicht. Sobald die Kon-
trollleuchte GERÄTETÜR GESPERRT erlischt, kann die
Gerätetür geöffnet werden (etwa 3 Minuten).
Um das Programm an der Stelle, an der es unterbrochen
wurde, wieder in Gang zu setzen, drücken Sie diese Taste
erneut.
Funktion Standby
Zur Erfüllung der neuen Richtlinien zum Energieverbrauch
ist diese Waschmaschine mit einem automatischen Aus-
schaltsystem (Standby) ausgestattet, das nach 30 Minuten
des Nichtgebrauchs in Funktion tritt. Drücken Sie kurz die
Taste ON/OFF und warten Sie, bis sich die Maschine wieder
einschaltet.
Beschreibung des Waschvollautomaten
und Starten eines Waschprogramms
Kontrollleuchten
PROGRAMMABLAUF/
STARTZEITVORWAHL
Kontrollleuchte
GERÄTETÜR
GESPERRT
Taste mit
Kontrollleuchte
START/
PAUSE
Bedienblende
Waschmittelschublade
Taste ON/OFF
Wählschalter
PROGRAMME
Tasten mit
Kontrollleuchten
FUNKTIONEN
Wählschalter
TEMPERATUREN
Wählschalter
SCHLEUDERN
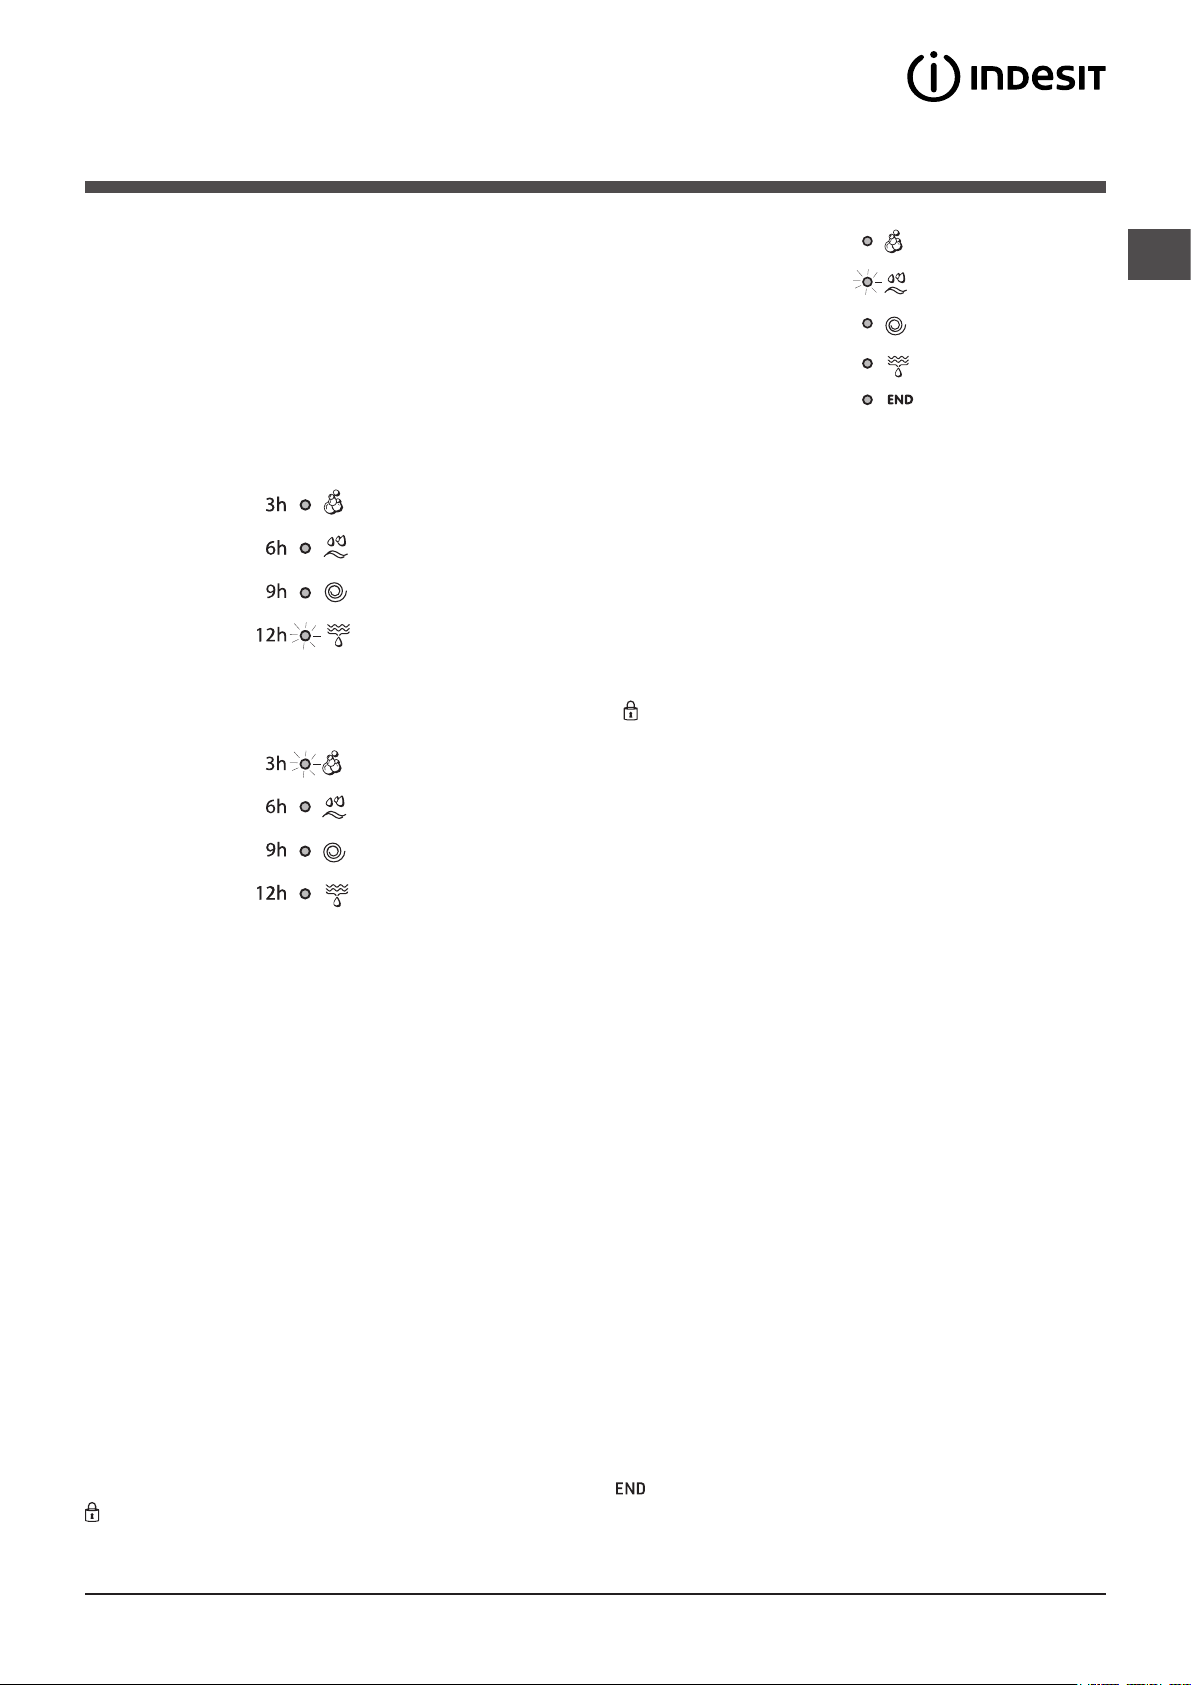
DE
67
Kontrollleuchten
Die Kontrollleuchten liefern wichtige Hinweise.
Sie signalisieren:
Startzeitvorwahl
Wurde die Funktion „Startzeitvorwahl” (siehe „Personalisierun-
gen“) aktiviert, und das Programm in Gang gesetzt, schaltet
die Kontrollleuchte, die der eingestellten Zeitverschiebung
entspricht, auf Blinklicht:
Nach und nach wird die bis zum effektiven Start noch
verbleibende Zeit eingeblendet, die entsprechende Kon-
trollleuchte blinkt:
Nach Ablauf der eingestellten Verzögerungszeit startet das
ausgewählte Programm.
Laufende Programmphase
Wurde das Waschprogramm gewählt und gestartet,
leuchten die Kontrollleuchten nach und nach auf, und
zeigen so den jeweiligen Programmstand an.
Funktionstasten und entsprechende Kontroll-
leuchten
Nach der Wahl einer Funktion leuchtet die entsprechen-
deTaste auf. Ist die gewählte Funktion nicht vereinbar mit
dem eingestellten Programm, schaltet die entsprechende
Kontrollleuchte auf Blinklicht und die Funktion wird nicht
aktiviert. Ist die gewählte Funktion mit einer anderen bereits
eingestellten nicht kompatibel, schaltet die der ersten
Funktion entsprechende Kontrollleuchte auf Blinklicht und
nur die zweite Funktion wird aktiviert, die Kontrollleuchte der
aktivierten Funktion schaltet auf Dauerlicht.
Kontrollleuchte Gerätetür gesperrt:
Ist diese Kontrollleuchte eingeschaltet, bedeutet dies,
dass das Bullauge gesperrt ist; warten Sie, bis die Leuchte
erlischt, um das Bullauge zu öffnen (etwa 3 Minuten). Um
während eines laufenden Programms das Bullauge zu
öffnen, drücken Sie die Taste START/PAUSE; ist die der
GERÄTETÜR GESPERRT entsprechende Kontrollleuchte
ausgeschaltet, kann das Bullauge geöffnet werden.
Starten eines Waschprogramms
1. Schalten Sie den Waschvollautomaten durch Drücken der ON/OFF-Taste ein. Sämtliche Kontrollleuchten leuchten für einige
Sekunden auf, und erlöschen wieder. Die Kontrollleuchte START/PAUSE schaltet auf Blinklicht.
2. Füllen Sie die Wäsche ein, und schließen Sie die Gerätetür.
3. Stellen Sie mittels des Wählschalters PROGRAMME das gewünschte Programm ein.
4. Stellen Sie die Waschtemperatur ein (siehe „Personalisierungen“).
5. Stellen Sie die Schleuderstufe ein (siehe „Personalisierungen“).
6. Füllen Sie Waschmittel und Zusätze ein (siehe „Waschmittel und Wäsche“).
7. Wählen Sie die gewünschten Funktionen.
8. Setzen Sie das Programm in Gang. Drücken Sie hierzu die Taste START/PAUSE. Die entsprechende Kontrollleuchte bleibt
eingeschaltet (grünes Dauerlicht).
Um die Waschprogramm-Einstellung rückgängig zu machen, muss das Gerät auf Pause geschaltet werden. Drücken Sie hierzu
die Taste START/PAUSE. Wählen Sie daraufhin das neue Programm.
9. Nach Ablauf des Waschprogramms leuchtet die Kontrollleuchte auf. Sobald die Kontrollleuchte GERÄTETÜR GESPERRT
erlischt, kann das Bullauge geöffnet werden (etwa 3 Minuten). Nehmen Sie die Wäsche aus der Maschine und lassen Sie die
Gerätetür leicht offen stehen, damit die Trommel trocknen kann.
Schalten Sie den Waschvollautomaten durch Drücken der ON/OFF-Taste aus.
Hauptwäsche
Spülen
Schleudern
Abpumpen
Ende des Waschgangs

68
DE
Waschprogramme
Programmtabelle
Wasch-programme
Beschreibung des Programms
Max.
Temp.
(C°)
Max.
Schleuder
Geschwin-
digkeit
(U/min)
Waschmittel
Max.
Beladungsmenge (kg)
Restfeuchtigkeit %
Energieverbrauch
kWh
Wasser gesamt lt
Programmdauer
Vorwäsche
Hauptwä-
sche
Weich-
spüler
Täglich (Daily)
1
Baumwolle vorwäsche: stark verschmutzte Kochwäsche.
90°
1200
6
53 1,90 68 155’
2
Baumwolle standard 60° (1): stark verschmutzte Weiß- und farbechte Buntwäsche.
60°
(Max. 90°)
1200
-
6
53 1,01 49,8 195’
3
Baumwolle standard 40° (2): leicht verschmutzte Weiß- und empfindliche Buntwäsche.
40°
1200
-
6
53 0,86 52 185’
4
Synthetik: stark verschmutzte, farbechte Buntwäsche.
60°
800
-
3
44 0,78 33 105’
4
Synthetik (3): leicht verschmutzte, farbechte Buntwäsche.
40°
800
-
3
44 0,49 38 95’
5
Buntwäsche: leicht verschmutzte Weißwäsche und empfindliche Buntwäsche.
40°
1200
-
6
53 0,86 56 95’
20° Zone
6
Baumwolle standard 20°: leicht verschmutzte Weiß- und empfindliche Buntwäsche.
20°
1200
-
6
- - - 170’
7
Mix light
20°
800
-
6
- - - 120’
8
20’ Refresh
20°
800
-
1,5
- - - 20’
Spezial (Special)
9
Seide/Gardinen
30°
0
-
1
- - - 55’
10
Wolle: wolle, Kaschmir usw.
40°
800
-
1,5
- - - 70’
11
Jeans
40°
800
-
3
- - - 75’
Sport
12
Sport Intensive
30° 600 -
3
- - - 85’
13
Sport Light
30° 600 -
3
- - - 60’
14
Sport Shoes
30° 600 -
Max.
2 Paar
- - - 55’
Teilprogramme (Partial)
Spülen
- 1200 - -
6
- - - 36’
Schleudern + Abpumpen
- 1200 - - - 6
- - - 10’
Nur Abpumpen *
-
- - -
6
- - - 3’
Sport Intensive (Programm 12) ist speziell für stark verschmutzte Sportkleidung (Trainingsanzüge, Sporthosen; für beste
Resultate empfehlen wir, die in der “Programmtabelle” angezeigte maximale Füllmenge nicht zu übersteigen.
Sport Light (Programm 13) ist speziell für wenig verschmutzte Sportkleidung (Trainingsanzüge, Sporthosen; für beste
Resultate empfehlen wir, die in der “Programmtabelle” angezeigte maximale Füllmenge nicht zu übersteigen. Verwenden Sie
ein Flüssigwaschmittel und nur die Menge für eine halbe Gerätefüllung.
Sport Shoes (Programm 14) ist speziell für das Waschen von Sportschuhen; für beste Resultate waschen Sie nicht mehr als 2 Paar.
20 Programme bieten gute Waschleistungen bei niedrigen Temperaturen und damit einem geringeren Energieverbrauch, was
einerseits die Kosten senkt und andererseits der Umwelt zu Gute kommt. Die 20-Grad-Programme erfüllen alle Anforderungen:
Baumwolle standard 20° (programme 6) ideal für normalverschmutze Baumwolle. Die auch mit kaltem Wasser erreichten
Leistungen, vergleichbar mit einer Wäsche bei 40°, werden mechanisch erzielt. Die Trommel arbeitet mit wiederholten, kurz auf
einander folgenden Beschleunigungen.
Mix Light (programme 7) ideal für durchschnittlich verschmutze Mischwäsche (Baumwolle und Synthetik). Die guten
Waschleistungen auch mit kaltem Wasser werden mechanisch erzielt. Die Trommel arbeitet mit wiederholten, gleichmäßigen
Geschwindigkeitsänderungen.
20’ Refresh (programme 8) ideales Waschprogramm zum Auffrischen und Waschen von wenig verschmutzter Wäsche in kurzer
Zeit. Das Programm dauert nur 20 Minuten und spart Zeit und Energie. Es können Gewebe unterschiedlicher Art (mit Ausnahme
von Wolle und Seide) bei einer maximalen Füllmenge von 1,5 kg zusammen gewaschen werden.
Die auf dem Display und in der Bedienungsanleitung genannte Zyklusdauer wird ausgehend von Standardbedingungen berechnet. Die effektiv benötigte Zeit kann aufgrund zahlreicher Faktoren wie Tempe-
ratur und Druck des Zulaufwassers, Raumtemperatur, Waschmittelmenge, Art, Menge und Verteilung der Waschladung sowie der gewählten Zusatzfunktionen variieren.
1) Prüfprogramm gemäß 1061/2010: Programm 2 und eine Temperatur von 60°C einstellen.
Dieser Zyklus ist für den Waschvorgang von normal schmutziger Baumwollwäsche geeignet; es ist der wirksamste in Bezug auf den kombinierten Energie-Wasser-Ver-
brauch; für bei 60°C zu waschende Wäsche zu verwenden. Die effektive Waschtemperatur kann von der angegebenen abweichen.
2) Prüfprogramm gemäß 1061/2010: Programm 3 und eine Temperatur von 40°C einstellen.
Dieser Zyklus ist für den Waschvorgang von normal schmutziger Baumwollwäsche geeignet; es ist der wirksamste in Bezug auf den kombinierten Energie-Wasser-Ver-
brauch; für bei 40°C zu waschende Wäsche zu verwenden. Die effektive Waschtemperatur kann von der angegebenen abweichen.
Für alle Testinstitute:
2) Langes Baumwollprogramm: Programm 3 und eine Temperatur von 40°C einstellen.
3) Langes Kunstfaserprogramm: Programm 4 und eine Temperatur von 40°C einstellen.
* Bei Auswahl des Programms und Ausschluss der Schleuder, führt die Maschine nur den abpumpen aus.
DE
69
Temperatureinstellung
Drehen Sie den Wählschalter „TEMPERATUREN“, um die Waschtemperatur einzustellen (siehe Programmtabelle).
Die Temperatur kann bis auf Kaltwäsche herabgesetzt werden.
Der Waschvollautomat verhindert automatisch die Einstellung einer höheren Schleuderstufe, sollte diese die für das jeweilige
Programm vorgeschriebene Höchstgeschwindigkeit übersteigen.
! Ausnahme: Wird das Waschprogramm 2 eingestellt, kann die Temperatur bis auf 90° erhöht werden.
Schleudereinstellung
Durch Drehen des Wählschalters SCHLEUDER wird die Schleudergeschwindigkeit des gewählten Waschprogramms einge-
stellt.
Folgende Höchstgeschwindigkeiten sind für die einzelnen Programme vorgesehen:
Waschprogramme Höchstgeschwindigkeit
Baumwolle 1200 U/min
Kunstfasern 800 U/min
Wolle 800 U/min
Seide nur Wasserablauf
Die Schleudergeschwindigkeit kann herabgesetzt werden. Durch Wahl des Symbols kann die Schleuder gänzlich ausge-
schlossen werden.
Der Waschvollautomat verhindert automatisch ein stärkeres Schleudern, sollte dieses die für das jeweilige Programm vorge-
schriebene Höchstgeschwindigkeit übersteigen.
Funktionen
Die verschiedenen Waschfunktionen, die Ihnen Ihr Waschvollautomat bietet, ermöglichen es Ihnen, hygienisch saubere und
weiße Wäsche zu erhalten, die Ihren Wünschen entspricht.
Aktivierung der Funktionen:
1. Drücken Sie die Taste, die der gewünschten Funktion entspricht.
2. Das Aufleuchten der entsprechenden Kontrollleuchte zeigt an, dass die Funktion aktiviert wurde.
Anmerkung:
- Ist die gewählte Funktion nicht vereinbar mit dem eingestellten Programm, schaltet die entsprechende Kontrollleuchte auf
Blinklicht und die Funktion wird nicht aktiviert.
- Ist die gewählte Funktion mit einer anderen bereits eingestellten nicht kompatibel, schaltet die der ersten Funktion
entsprechende Kontrollleuchte auf Blinklicht und nur die zweite Funktion wird aktiviert, die Kontrollleuchte der aktivierten
Funktion schaltet auf Dauerlicht.
Durch Auswahl dieser Option werden die mechanische Bewegung, die Temperatur und das Wasser für eine verminderte Füllmenge mit
wenig verschmutzten Baumwoll- und Synthetikstoffen optimiert (siehe “Programmtabelle”).
Mit werden die Waschzeiten verkürzt, was Wasser und Energie spart. Wir empfehlen, die für die Füllmenge geeignete
Menge Flüssigwaschmittel zu verwenden.
Die Funktion trägt dazu bei, Energie zu sparen, indem das Wasser für die Wäsche nicht aufgeheizt wird – ein Vorteil
sowohl für die Umwelt als auch für die Stromrechnung. Tatsächlich sichern die verstärkte Waschaktion und der optimierte
Wasserverbrauch hervorragende Ergebnisse bei gleicher durchschnittlicher Dauer eines Standardzyklusses zu. Für maximale
Waschergebnisse empfehlen wir den Einsatz eines Flüssigwaschmittels.
Extra Spülen
Wählen Sie diese Zusatzfunktion, wird die Spülwirkung erhöht und somit ein optimales Ausspülen des Waschmittels garantiert.
Dies ist besonders angezeigt bei sehr empfindlicher Haut bzw. Waschmittelallergien.
Startzeitvorwahl
Der Start des Waschprogramms kann bis zu 12 Stunden verschoben werden.
Drücken Sie die Taste mehrmals, bis die der gewünschten Zeitverschiebung entsprechende Kontrollleuchte aufleuchtet. Ein
fünfter Tastendruck deaktiviert die Funktion.
NB: Ist die Taste START/PAUSE einmal gedrückt, kann der gewählte Zeitverschiebungswert nur noch herabgesetzt werden bis
zum Start des eingestellten Programms.
Personalisierungen
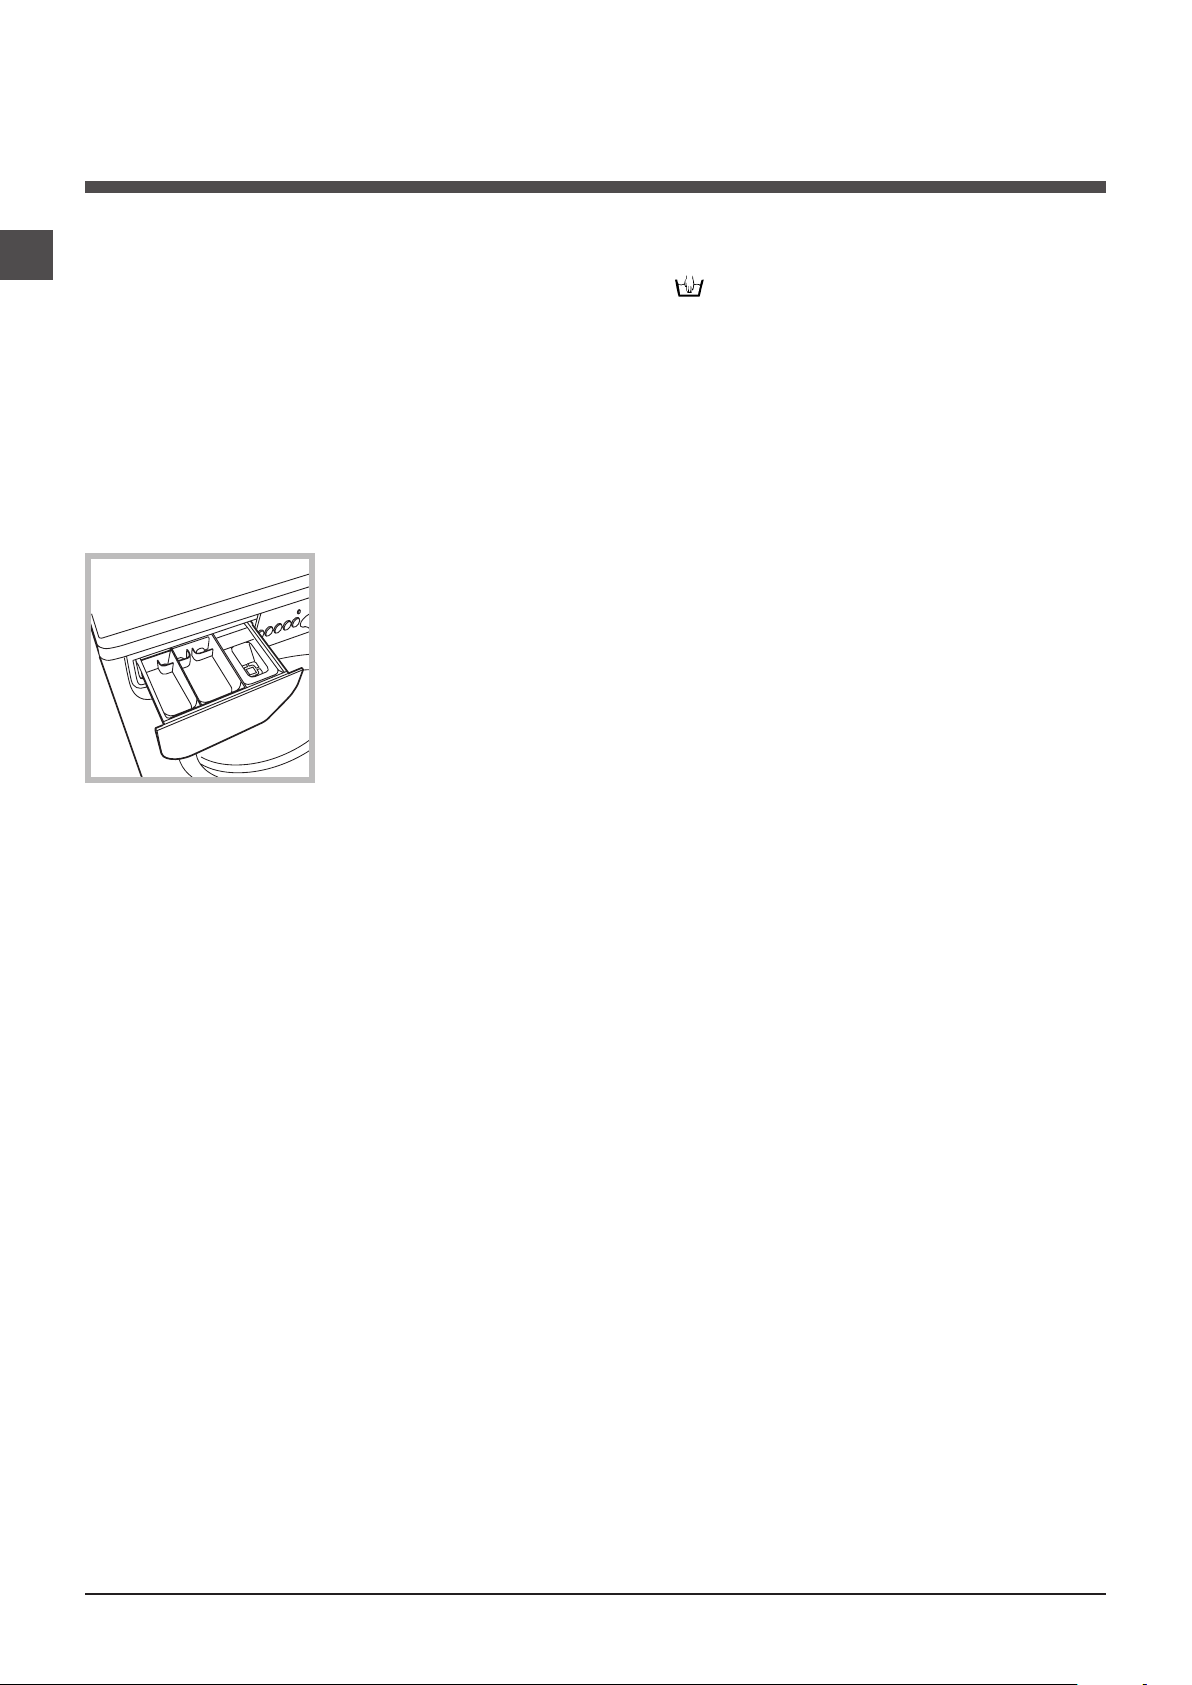
70
DE
Waschmittel und Wäsche
Waschmittel und Wäsche
Ein gutes Waschergebnis hängt auch von einer korrekten
Waschmitteldosierung ab: Eine zu hohe Dosierung bedeu-
tet nicht unbedingt reinere Wäsche, sie trägt nur dazu bei,
die Maschineninnenteile zu verkrusten und die Umwelt zu
belasten.
! Verwenden Sie keine Handwaschmittel, sie verursachen
eine zu hohe Schaumbildung.
! Waschmittel in Pulverform für Baumwollweißwäsche, für
die Vorwäsche und für Waschprogramme bei Temperatu-
ren über 60°C verwenden.
! Bitte befolgen Sie den auf der Waschmittelverpackung
angegebenen Anweisungen.
Schublade herausziehen
und Waschmittel oder Zu-
sätze wie folgt einfüllen:
In Kammer 1: Waschpulver für die Vorwäsche
(Waschpulver)
In Kammer 2: Waschmittel für die Hauptwäsche
(Waschpulver oder Flüssigwaschmittel)
Flüssigwaschmittel nur kurz vor dem Start einfüllen.
In Kammer 3: Zusätze (Weichspüler usw.)
Der Weichspüler darf das Gitter nicht übersteigen.
Vorsortieren der Wäsche
• Sortieren Sie die Wäsche nach:
- Gewebeart / Waschetikettensymbol.
- und Farben: Buntwäsche von Weißwäsche trennen.
• Entleeren Sie alle Taschen.
• Das in der „Programmtabelle“ angegebene Gewicht,
beschreibt die maximale Ladung Trockenwäsche und
darf nicht überschritten werden.
Wie schwer ist Wäsche?
1 Betttuch 400-500 gr
1 Kissenbezug 150-200 gr
1 Tischdecke 400-500 gr
1 Bademantel 900-1.200 gr
1 Handtuch 150-250 gr
Besondere Wäscheteile
Seide: Wählen Sie das Spezialprogramm 9 zum Waschen
aller Kleidungs- bzw. Wäschestücke aus Seide. Es empfie-
hlt sich der Einsatz von Feinwaschmittel.
Gardinen: Sie sollten zusammengelegt und in ein Wäsche-
netz gegeben werden. Stellen Sie das Programma 9 ein.
Wolle: Mit dem Programm 10 können alle Wollsachen
gewaschen werden, auch wenn das Etikett “nur Handwä-
sche” zeigt. Für beste Ergebnisse verwenden Sie ein
spezifisches Waschmittel und waschen Sie maximal 1,5 kg
Wäsche.
Jeans: Drehen Sie die Wäschestücke vor der Wäsche auf
links und verwenden Sie ein Flüssigwaschmittel. Stellen Sie
das Programm 11 ein.
Unwuchtkontrollsystem
Um starke Vibrationen oder eine Unwucht beim Schleu-
dern zu vermeiden, verfügt das Gerät über ein Schleu-
derunwuchtsystem. Die Waschladung wird durch eine
erhöhte Rotation der Trommel als die des WAschgangs au-
sbalanciert. Sollte die Wäscheladung nach Ablauf mehrerer
Versuche immer noch nicht korrekt verteilt sein, schleudert
das Gerät die Wäsche bei einer niedrigeren Geschwindi-
gkeit als die der vorgesehenen Schleudergeschwindigkeit.
Sollte die Wäsche extrem ungleichmäßig verteilt sein, führt
das Gerät anstelle des Schleudergangs einen Wäsche-
verteilungs-Zyklus durch. Um eine optimale Verteilung der
Wäscheladung und somit eine korrekte Auswuchtung zu
fördern, sollten große und kleine Wäscheteile gemischt
eingefüllt werden.
1
2
3

DE
71
Störungen und Abhilfe
Bei Funktionsstörung: Bevor Sie sich an den Technischen Kundendienst wenden (siehe „Kundendienst“), vergewissern Sie
sich zuerst, ob es sich nicht um eine Kleinigkeit handelt, die Sie selbst beheben können. Ziehen Sie hierzu nachstehendes
Verzeichnis zu Rate.
Störungen:
Der Waschvollautomat schaltet sich
nicht ein.
Der Waschgang startet nicht.
Der Waschvollautomat lädt kein
Wasser. Die Kontrollleuchte der
ersten Waschphase blinkt (rasches
Blinklicht).
Der Waschvollautomat lädt laufend
Wasser und pumpt es laufend ab.
Der Waschvollautomat pumpt nicht
ab und schleudert nicht.
Der Waschvollautomat vibriert zu
stark während des Schleuderns.
Der Waschvollautomat ist undicht.
Die Kontrollleuchten “Funktionen” und
“START/PAUSE” blinken und eine der
Kontrollleuchten der “laufenden Pro-
grammphase” sowie die für “Gerätetür
gesperrt” bleiben eingeschaltet.
Es bildet sich zu viel Schaum.
Mögliche Ursachen / Lösungen:
• Der Stecker steckt nicht in der Steckdose, oder nicht so, dass der Kontakt herge-
stellt wird.
• Der Strom ist ausgefallen.
• Die Gerätetür wurde nicht vorschriftsmäßig geschlossen.
• Die ON/OFF-Taste wurde nicht gedrückt.
• Die Taste START/PAUSE wurde nicht gedrückt.
• Der Wasserhahn ist nicht aufgedreht.
• Es wurde ein verzögerter Start gewählt (siehe „Personalisierungen“).
• Der Zufuhrschlauch ist nicht am Wasserhahn angeschlossen.
• Der Schlauch ist geknickt.
• Der Wasserhahn ist nicht aufgedreht.
• Es ist kein Wasser da.
• Der Druck ist unzureichend.
• Die Taste START/PAUSE wurde nicht gedrückt.
• Der Ablaufschlauch befindet sich nicht auf der vorgeschriebenen Höhe, d.h. 65 – 100 cm
vom Boden (siehe „Installation“).
• Das Schlauchende liegt unter Wasser (siehe „Installation”).
• Der Abfluss der Hausinstallation wurde nicht mit einer Entlüftungsöffnung versehen.
Konnte die Störung durch diese Kontrollen nicht behoben werden, dann drehen Sie den
Wasserhahn zu, schalten das Gerät aus und fordern den Kundendienst an. Falls Sie in
einer der obersten Etagen eines Gebäudes wohnen, kann es vorkommen, dass sich
im Syphon ein Vakuum bildet, und der Waschvollautomat ständig Wasser ansaugt und
wieder abpumpt. Zur Lösung dieser Probleme bietet der Handel spezielle Syphonventile.
• Das Programm siehe kein Abpumpen vor: Bei einigen Programmen muss es von
Hand eingestellt werden (siehe „Starten eines Waschprogramms“).
• Der Ablaufschlauch ist geknickt (siehe „Installation“).
• Die Ablaufleitung ist verstopft.
• Die Trommel wurde bei der Installation nicht korrekt befreit (siehe „Installation“).
• Der Waschvollautomat steht nicht eben (siehe „Installation“).
• Der Waschvollautomat steht zu eng zwischen der Wand und einem Möbel (siehe
„Installation“).
• Der Zulaufschlauch wurde nicht ordnungsgemäß aufgeschraubt (siehe „Installation“).
• Die Waschmittelschublade ist verstopft (zur Reinigung siehe „Wartung und Pflege“).
• Der Ablaufschlauch ist nicht korrekt befestigt (siehe „Installation“).
• Schalten Sie das Gerät aus und ziehen Sie den Netzstecker; warten Sie daraufhin
ca. 1 Minute und schalten Sie es wieder ein.
Bleibt die Störung bestehen, kontaktieren Sie bitte den Kundendienst.
• Das Waschmittel ist für Waschmaschinen nicht geeignet (es muss mit der Aufschrift
„Für Waschmaschinen“, „Für Handwäsche und Waschmaschinen“ usw. versehen sein.
• Es wurde zu hoch dosiert.
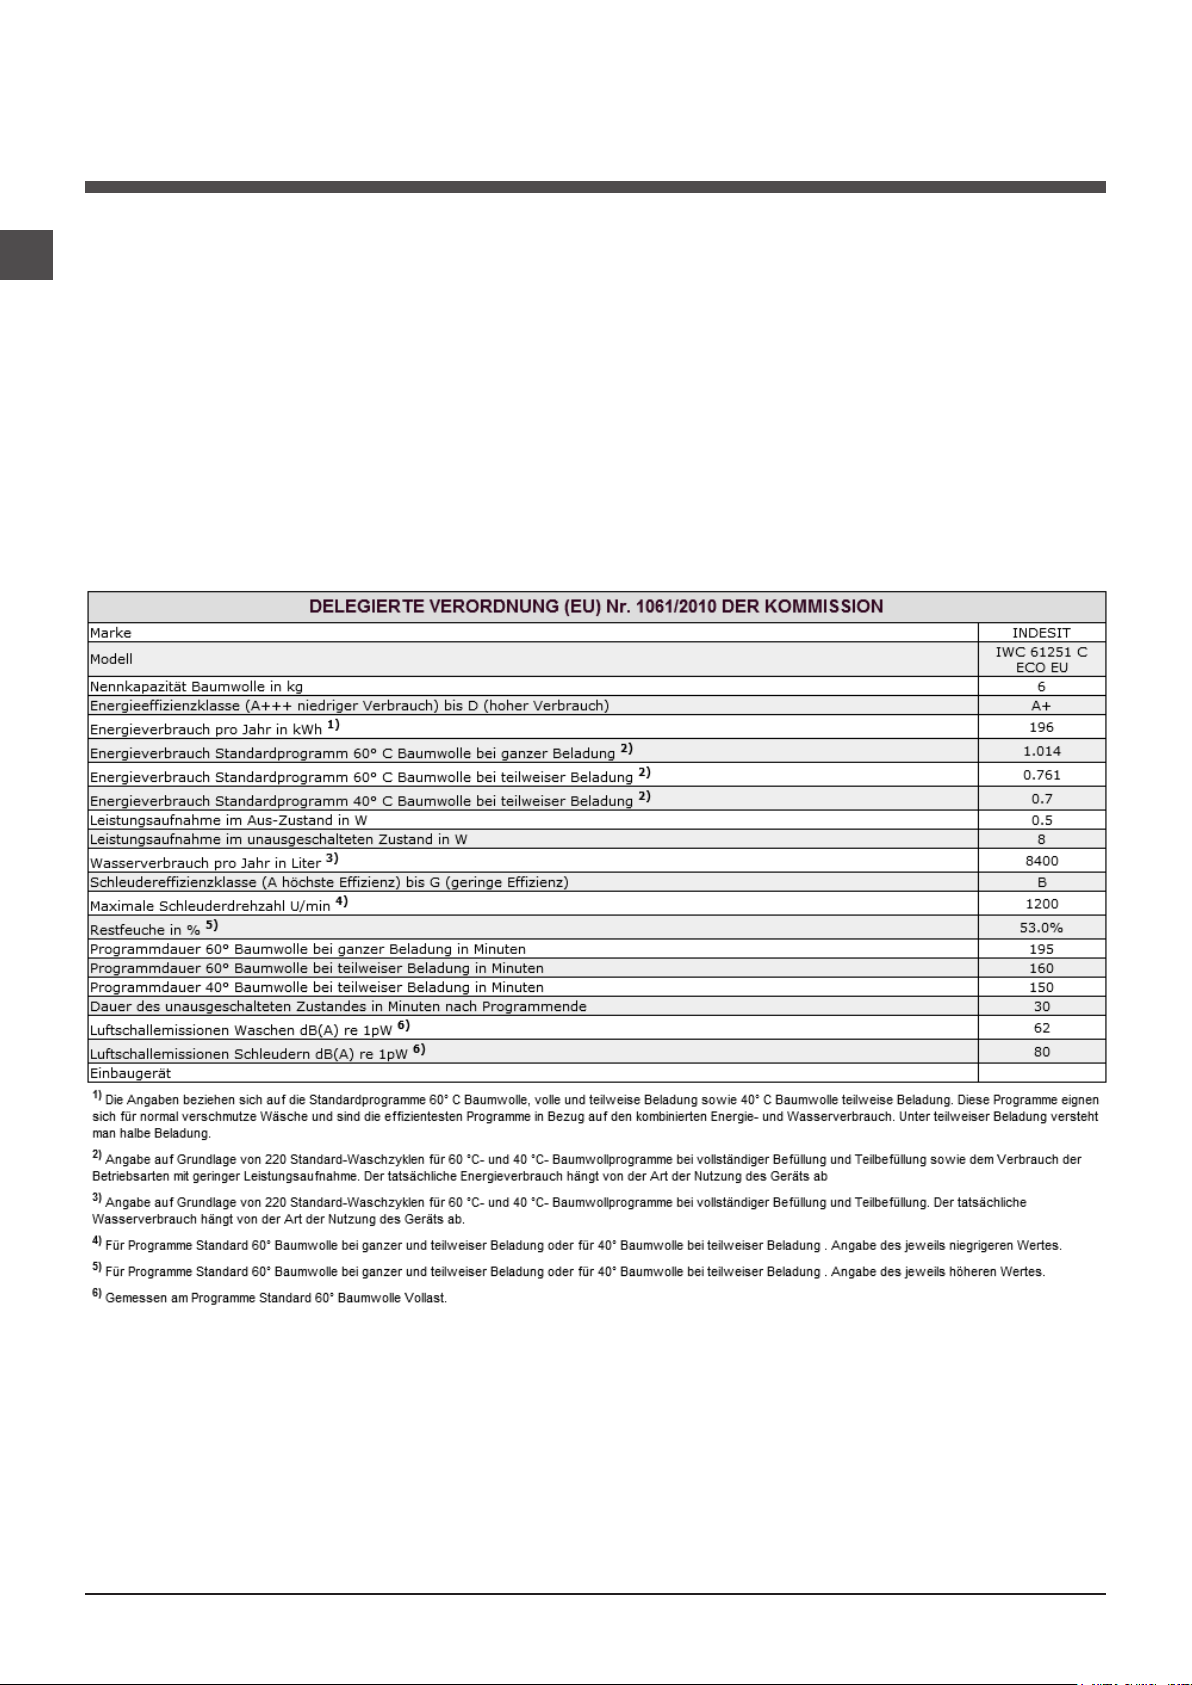
72
DE
Kundendienst
Bevor Sie sich an den Kundendienst wenden:
• Sollten einige Kontrollen vorab selbst durchgeführt werden (siehe „Störungen und Abhilfe“);
• Starten Sie daraufhin das Programm erneut, um sicherzustellen, dass die Störung auch wirklich behoben wurde;
• Ist dies nicht der Fall, dann kontaktieren Sie den autorisierten Kundendienst unter der auf dem Garantieschein befindlichen
Telefonnummer.
! Wenden Sie sich auf keinen Fall an nicht autorisierte Techniker.
Geben Sie bitte Folgendes an:
• die Art der Störung;
• das Maschinenmodell (Mod.);
• die Seriennummer (S/N).
Diese Daten entnehmen Sie bitte dem auf der Rückseite des Waschvollautomaten und auf der Vorderseite (Gerätetür öffnen)
befindlichen Typenschild.
195126288.02
07/2017
Üretici Firma:
Indesit Company Beyaz Eşya
PAZARLAMA A.Ş.
Balmumcu Cad. Karahasan Sok.
No: 11, 34349– Balmumcu
Beşiktaş – İstanbul
Tel: (0212) 355 53 00
Üretici Firma:
Whirlpool EMEA S.p.A.
Socio Unico
via Carlo Pisacane n.1,
20016 Pero (MI) Italy