
CAGH32
OPERATION MANUAL
APPLIANCES
FOR LIVING

Congratulations, you are now the proud owner of an ARTUSI cooking appliance. Thank you for purchasing ARTUSI
and welcome to the ARTUSI Family.
This instruction manual has been specially created to inform you of the full range of features your ARTUSI appliance
has to offer and serves as an introduction to getting the very best out of your ARTUSI appliance.
We present detailed information on each of the features your ARTUSI appliance consists of. Once you have read
this section you will be able to choose the most appropriate settings for your appliance when cooking different
types of food.
We ask you to read the instructions in this booklet very carefully as this will allow you to get the best results from
using your appliance. KEEP THE DOCUMENTATION OF THIS PRODUCT FOR FUTURE REFERENCE.
TO REGISTER YOUR PRODUCT WITH ARTUSI, PLEASE FILL OUT THE WARRANTY CARD AT THE END OF
THIS BOOKLET AND POST IT TO: REPLY PAID 83617
LEICHHARDT NSW 2040
Dear Artusi Customer, please read this user manual carefully before using the product and, keep it permanently at
your disposal.
Note: This user manual is prepared for more than one model. Some of the features specified in this Manual may not
be available on your appliance.
All our appliances are only for domestic use, not for commercial use. Products marked with (*) are optional.
“THIS APPLIANCE SHALL BE INSTALLED IN ACCORDANCE WITH THE REGULA TIONS FORCE AND ONLY USED
IN A WELL VENTILATED SPACE. READ THE INSTRUCTIONS BEFORE INSTALLING OR USING THIS APPLIANCE”
“Conforms with the WEEE Regulations.”

Preface
Thank you for choosing our gas cooktop.
To use this appliance correctly and prevent any potential risk, read these instructions
before using the appliance.
Keep these instructions in a place where you can find them easily.
If you are unsure of any of the information contained in these instructions, please contact
our customer care centre.
The manufacturer shall not be responsible for any damages to persons or property caused
by incorrect installation or use of the appliance.
The appliance has been certified for use in countries other than those marked on the
appliance.
The manufacturer also reserves the right to make any modifications to the products as may
be considered necessary or useful, also in the interests of the user, without jeopardising
the main functional and safety features of the products themselves.
The appliance is designed for a domestic environment and not a commercial one.

contents
Preface
Instructions for use and maintenance
Safety Warning
Safety Instructions
Installation
Child and People Safety
During Use
Cleaning and Service
8
Environmental Information
Description of the appliance
How to Use the appliance
Safety and Energy saving advice
Cleaning and Maintenance
Technical instructions
1
1
1
2
1
1
1
2
Using instructions
Positioning
Installing the appliance
Gas Connection
Gas Specifition
Electrical Connection
Gas adjustment
Trouble shooting
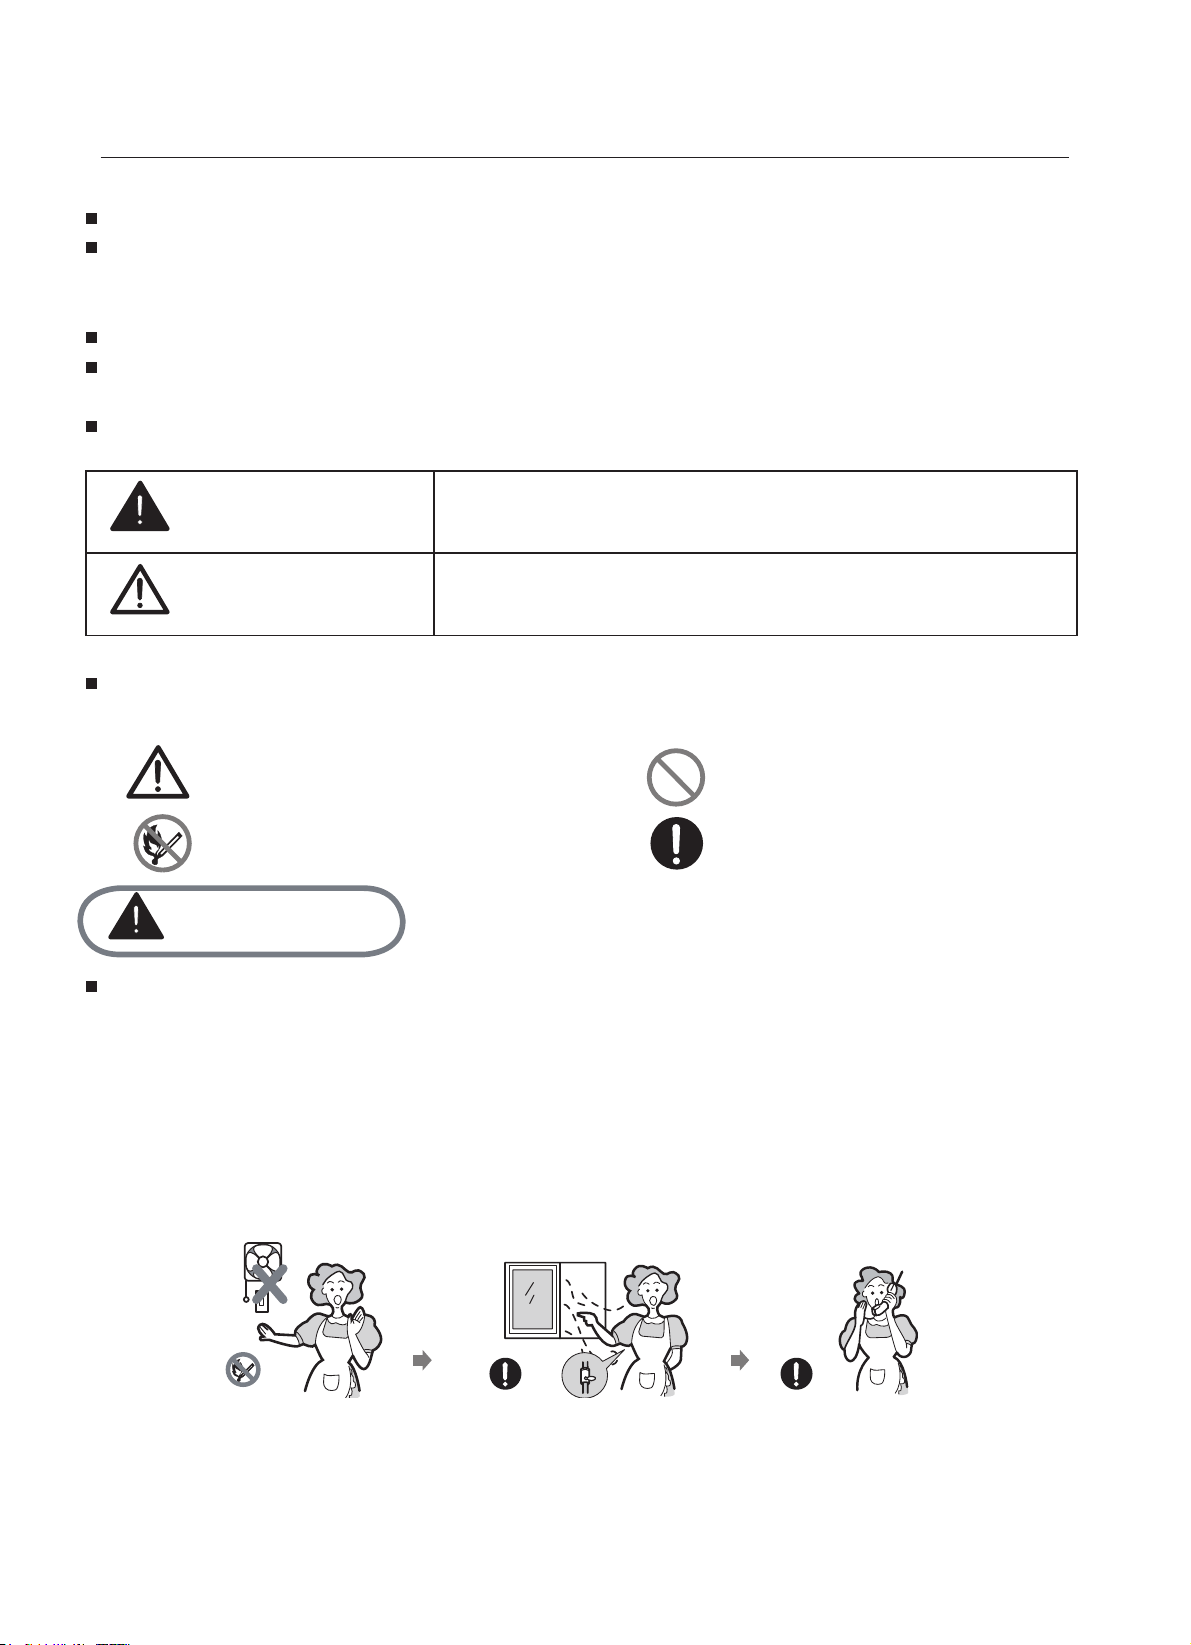
afety nstructions
Danger/Warning
Caution
Neglect of this mark may result in minor personal injury
or property damage.
Caution No Access
No Fire Tool
Must Do
Danger
- Do not turn on the light.
- Do not switch on/off any electrical appliance and do not touch any electric plug.
- Do not use a telephone.
1 Stop using the product and close the middle valve.
2 Open the window to ventilate.
Contact our service centre by using a phone outside.
ci l rag net tor fo l lems( kael sag eht l lems nac uoy taht os ,natpacrem sniatnoc sag leuf eh T *
or egg) even where only 1/1000 of the gas is in the air.
The following marks are used
in the Instruction Manual
as follows
If gas seems to leaktake the actions as follow
Please take the time to read this Instruction anual before installing or
using the
appliance.
7KLVLQVWUXFWLRQERRNOHWPXVWEHNHSWZLWKWKHDSSOLDQFHIRUDQ\IXWXUHUHIHUHQFH
,
7KHPDQXIDFWXUHUGHFOLQHVDQ\OLDELOLW\VKRXOGWKHVHVDIHW\PHDVXUHVQRWEHREVHUYHG
KHIROORZLQJPDUNVDUHPDGHWREHHDVLO\XQGHUVWRRGVRWKDW\RXFDQSUHYHQWDQ\
accident caused by misuse in advance, and use the appliance more conveniently.
HDGWKHIROORZLQJFRQWHQWVWKRURXJKO\DQGHQVXUH\RXXQGHUVWDQGWKHP
.
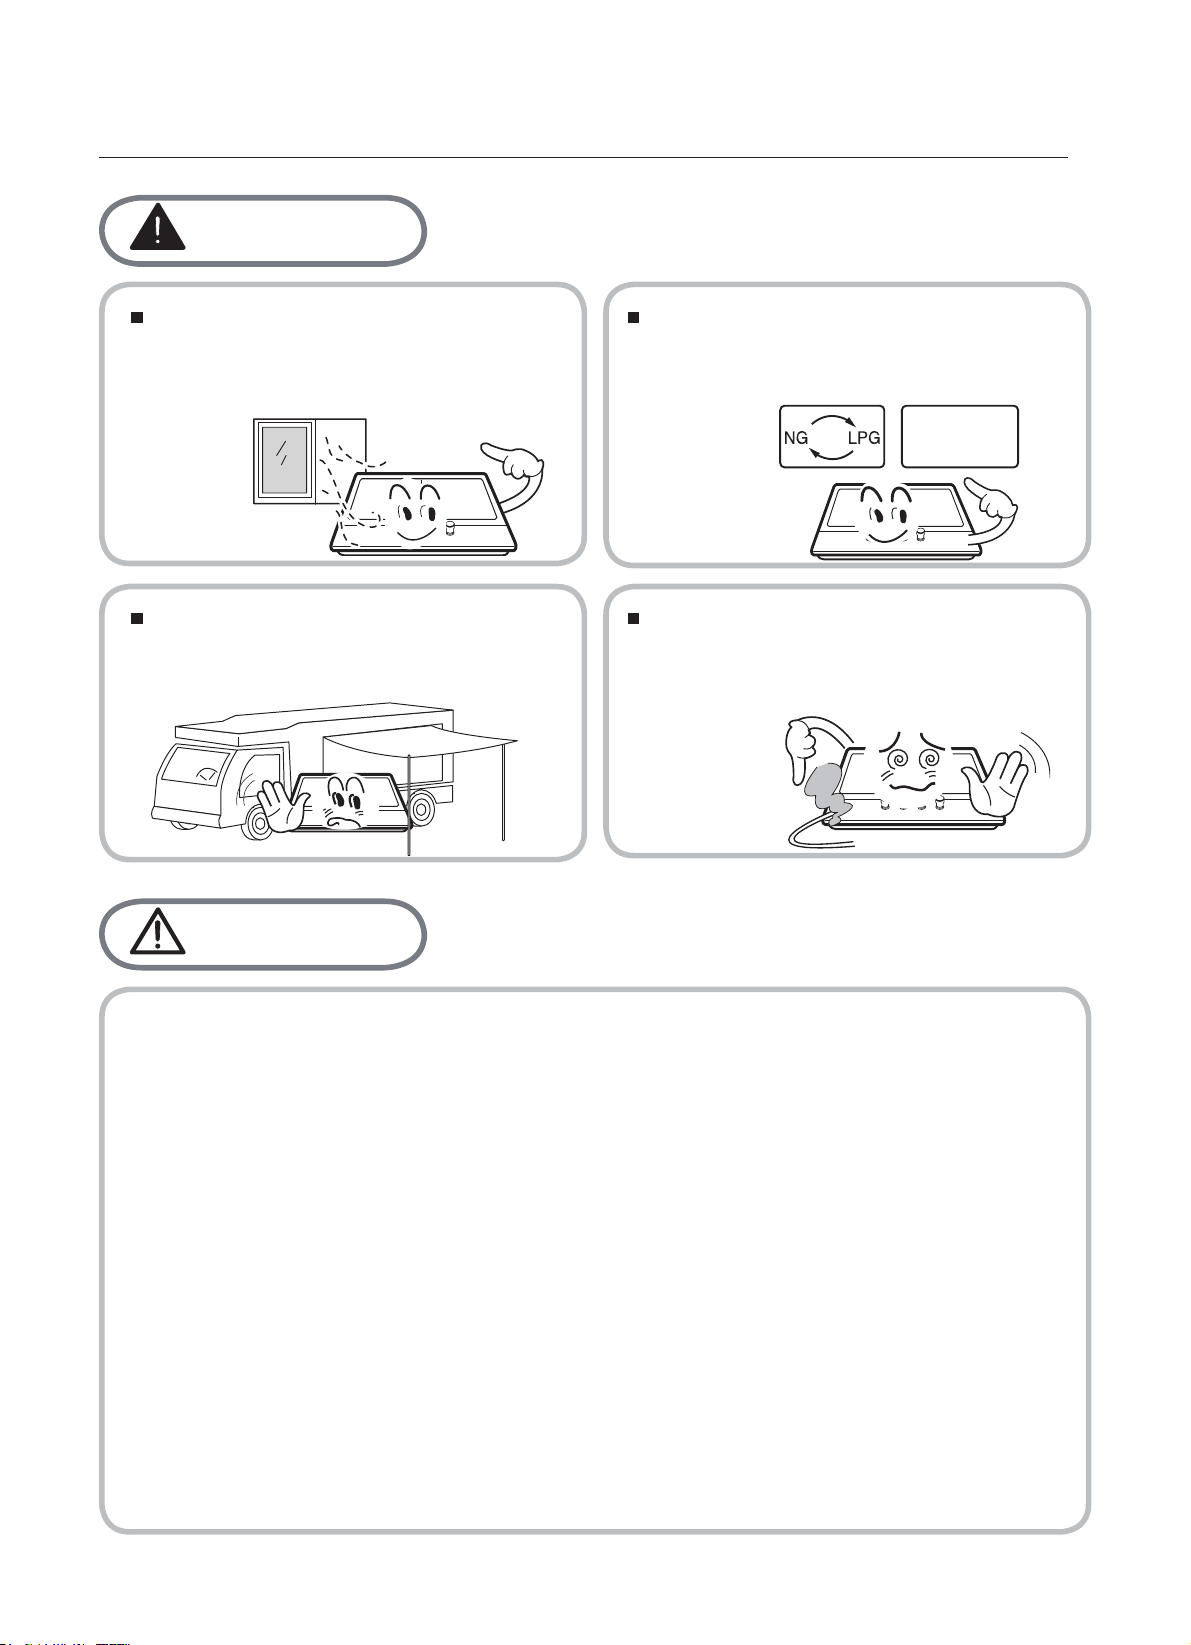
nstallation
Warning
accordance with regulations in force
and only used in a well ventilated
space.
gas and electrical supply complies
with the type stated on the rating
plate.
o not use this appliance as a
space heater.
must be installed in such a way that
they do not touch any parts or the
appliance.
Caution
Ŷ7KLVDSSOLDQFHVKRXOGEHLQVWDOOHGE\DTXDOL¿HGWHFKQLFLDQRULQVWDOOHU
Ŷ7KHDGMXVWPHQWFRQGLWLRQVIRUWKLVDSSOLDQFHDUHVWDWHGRQWKHODEHORUGDWDSODWH
Ŷ5HPRYHDOOSDFNDJLQJEHIRUHXVLQJWKHDSSOLDQFH
Ŷ$IWHUXQSDFNLQJWKHDSSOLDQFHPDNHVXUHWKHSURGXFWLVQRWGDPDJHGDQGWKDWWKH
connection cord is in perfect condition. Otherwise, contact the dealer before
installing the appliance.
Ŷ7KHDGMDFHQWIXUQLWXUHDQGDOOPDWHULDOVXVHGLQWKHLQVWDOODWLRQPXVWEHDEOHWR
ZLWKVWDQGDPLQLPXPWHPSHUDWXUHRIÛ&DERYHWKHDPELHQWWHPSHUDWXUHRIWKH
room it is located in, whilst in use.
Ŷ,QWKHHYHQWRIEXUQHUÀDPHVEHLQJDFFLGHQWDOO\H[WLQJXLVKHGWXUQRIIWKHEXUQHU
control and do not attempt to re-ignite the burner for at least one minute.
Ŷ
The use of a gas cooking appliance results in the production of heat and moisture in the
room in which it is installed. Ensure that the kitchen is well ventilated: keep natural
YHQWLODWLRQKROHVRSHQRULQVWDOODPHFKDQLFDOYHQWLODWLRQGHYLFHPHFKDQLFDOH[WUDFWRUKRRG
Ŷ3URORQJHGLQWHQVLYHXVHRIWKHDSSOLDQFHPD\FDOOIRUDGGLWLRQDOYHQWLODWLRQIRU
H[DPSOHRSHQLQJRIDZLQGRZRUPRUHHIIHFWLYHYHQWLODWLRQIRUH[DPSOHLQFUHDVLQJ
the level of mechanical ventilation where present.
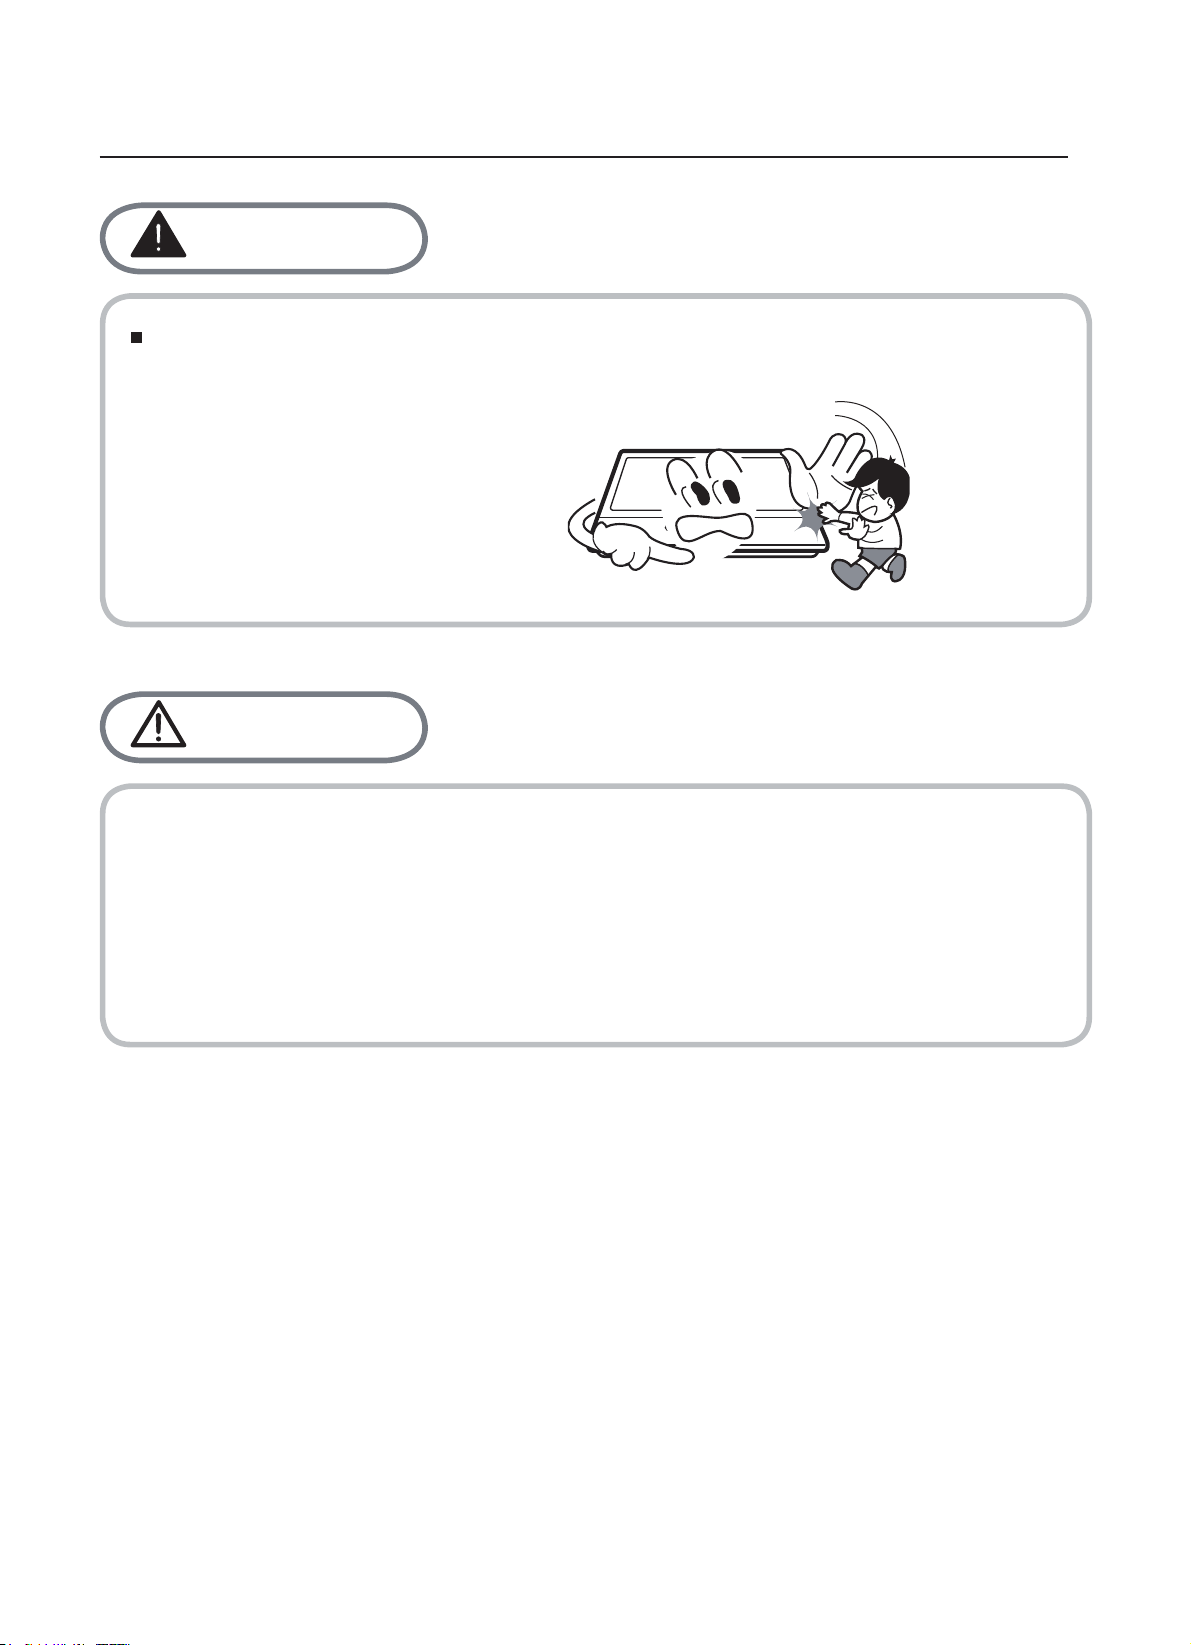
hild and People afety
The appliance gets hot when it is in use.
Children should be kept away until it has cooled.
Warning
Caution
Ŷ7KLVDSSOLDQFHLVGHVLJQHGWREHRSHUDWHGE\DGXOWV
Ŷ&KLOGUHQFDQDOVRLQMXUHWKHPVHOYHVE\SXOOLQJSDQVRUSRWVRIIWKHDSSOLDQFH
Ŷ7KLVDSSOLDQFHLVQRWLQWHQGHGIRUXVHE\FKLOGUHQRURWKHUSHUVRQVZKRVHSK\VLFDO
VHQVRU\RUPHQWDOFDSDELOLWLHVRUODFNRIH[SHULHQFHDQGNQRZOHGJHSUHYHQWVWKHP
from using the appliance safety without supervision or instruction by a responsible
person to ensure that they can use the appliance safety.

uring se
Warning
Never leave the appliance unattended
when cooking.
Burner
panel is not designed to operate from
an external timer or separate remote
control system.
Ŷ2QO\XVHWKHDSSOLDQFHIRUSUHSDULQJ
food.
LQ
contact with water. Do not operate
this appliance with wet hands.
Ŷ'RQRWXVHWKLVDSSOLDQFHLILW
comes
Ŷ7KHKHDWLQJDQGFRRNLQJVXUIDFHVRI
the appliance become hot when they
are in use, take all due precautions.
Ŷ'RQRWXVHODUJHFORWKVWHDWRZHOVRU
similar as the ends could touch the
ÀDPHVDQGFDWFK¿UH
Ŷ8QVWDEOHRUPLVVKDSHQSDQVVKRXOG
not be used on the appliance as they
can cause an accident by tipping or
spillage.
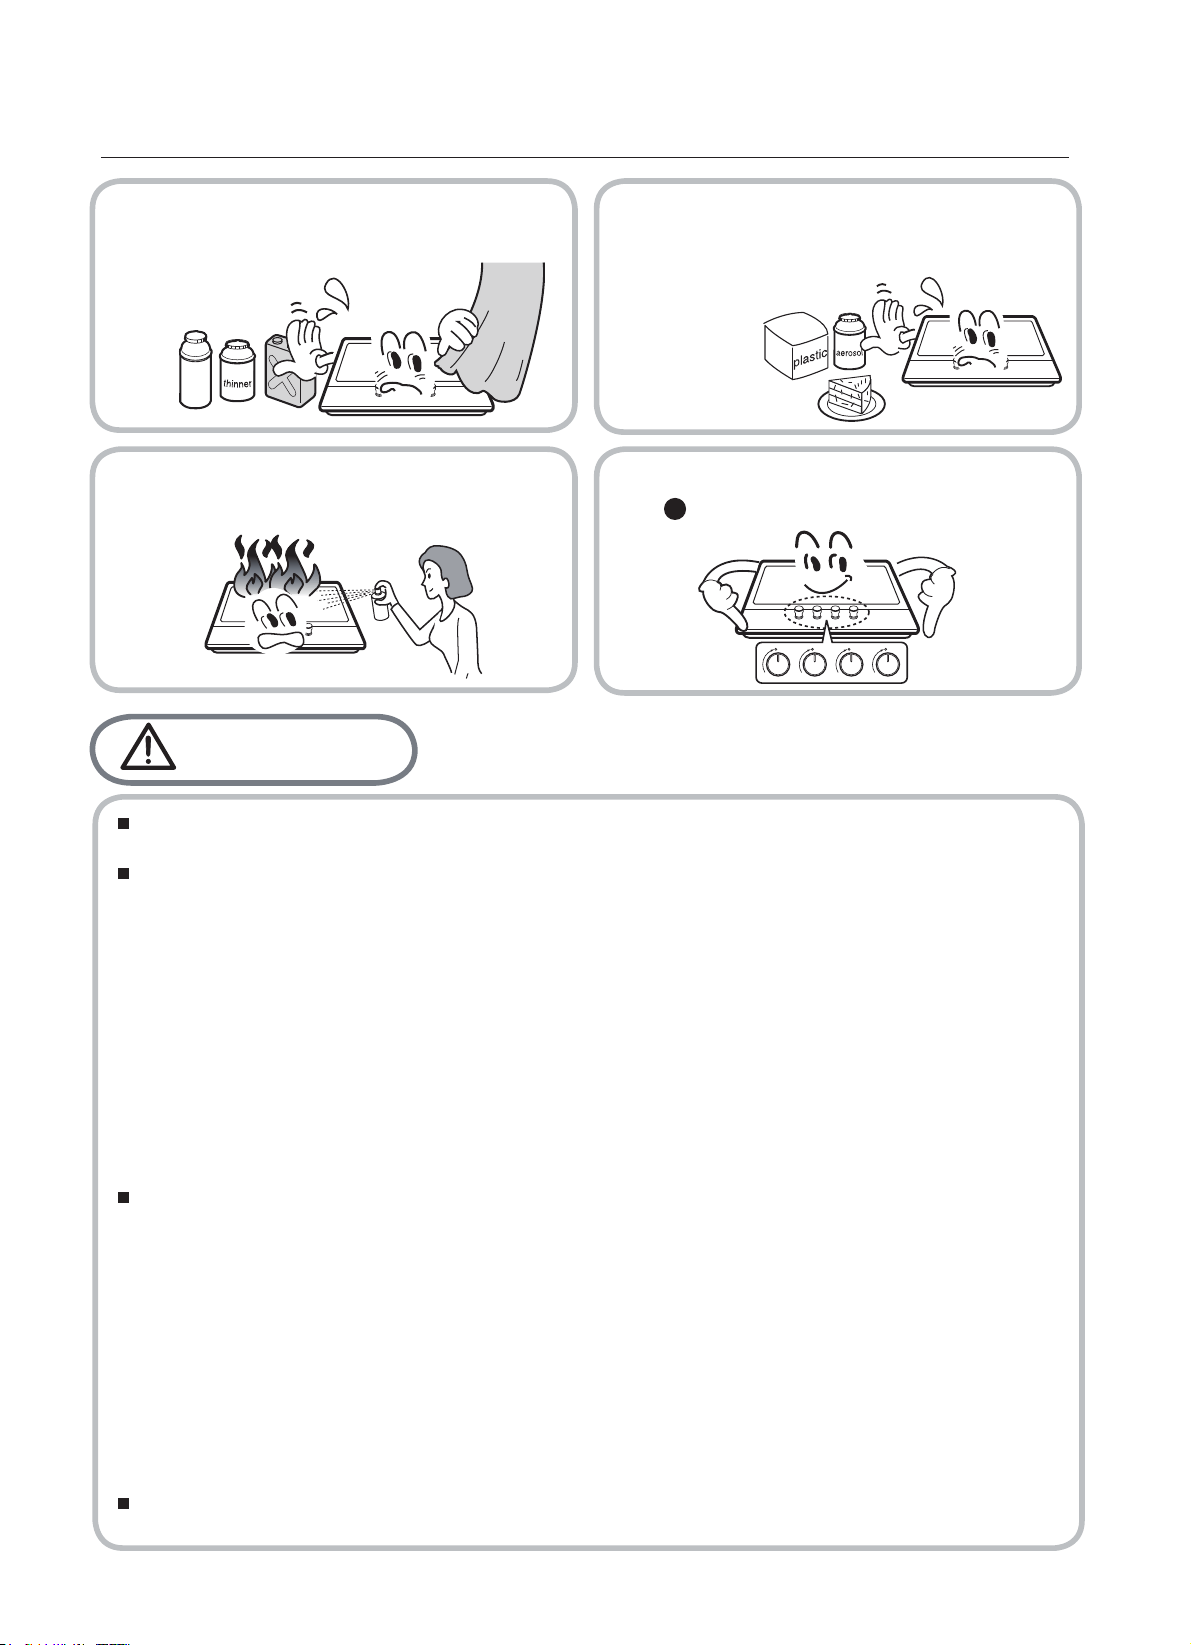
uring se
Ŷ'RQRWVSUD\DHURVROVLQWKHYLFLQLW\RI
this appliance while it is in operaiton.
‘ ’ position when not in use.
Caution
Ŷ 'RQRWXVHRUVWRUHÀDPPDEOH materials
in the storage drawer near this
appliance.
Ŷ3HULVKDEOHIRRGSODVWLFLWHPVDQG
aerosols may be affected by heat and
should not stored above or below the
appliance.
Ŷ(QVXUHWKHFRQWURONQREVDUHLQWKH
Ŷ8VHKHDWUHVLVWDQWSRWKROGHUVRUJORYHVZKHQKDQGOLQJKRWSRWVDQGSDQV
Ŷ'RQRWOHWSRWKROGHUVFRPHQHDURSHQÀDPHVZKHQOLIWLQJFRRNZDUH
Ŷ7DNHFDUHQRWWROHWSRWKROGHUVRUJORYHVJHWGDPSRUZHW DVWKLVFDXVHVKHDWWRWUDQVIHU
WKURXJKWKHPDWHULDOTXLFNHUZLWKWKHULVNRIEXUQLQJ\RXUVHOI
ŶQO\HYHUXVHWKHEXUQHUVDIWHUSODFLQJSRWVDQGSDQVRQWKHP'RQRWKHDWXSDQ\HPSW\
is made of glass-cracked, switch off the appliance to avoid defeat electrocution.
Ŷ 7RPLQLPLVHWKHSRVVLELOLW\RIEXUQVLJQLWLRQRIÀDPPDEOHPDWHULDOVDQGVSLOODJHWXUQ
FRRNZDUHKDQGOHVWRZDUGWKHVLGHRUFHQWHURIWKHWRSSODWHZLWKRXWH[WHQGLQJRYHU
adjacent burners.
Ŷ$OZD\VWXUQEXUQHUFRQWUROVRIIEHIRUHUHPRYLQJFRRNZDUH
Ŷ&DUHIXOO\ZDWFKIRRGVEHLQJIULHGDWDKLJKÀDPHVHWWLQJ
Ŷ$OZD\VKHDWIDWVORZO\DQGZDWFKDVLWKHDWV
Ŷ)RRGVIRUIU\LQJVKRXOGEHDVGU\DVSRVVLEOH)URVWRQIUR]HQIRRGVRUPRLVWXUHRQIUHVK
Ŷ:KHQXVLQJJODVVFRRNZDUH PDNHVXUHLWLVGHVLJQHGIRUWRSSODWHFRRNLQJ
If the surface
Do not use a tea towel or similar materials in place of a pot holder.Such cloths can
catch fire on a hot burner.
pots or pans.
Ŷ1HYHUXVHSODVWLFRUDOXPLQLXPIRLOGLVKHVRQWKHDSSOLDQFH
Ŷ:KHQXVLQJ RWKHUHOHFWULFDODSSOLDQFHV HQVXUHWKHFDEOHGRHVQRWFRPHLQWRFRQWDFWZLWK
the appliance surfaces of the cooking appliance.
Ŷ,I\RXKDYHDQ\PHFKDQLFDOSDUWVHJDQDUWL¿FDOKHDUWLQ\RXUERG\FRQVXOWDGRFWRUEHIRUH
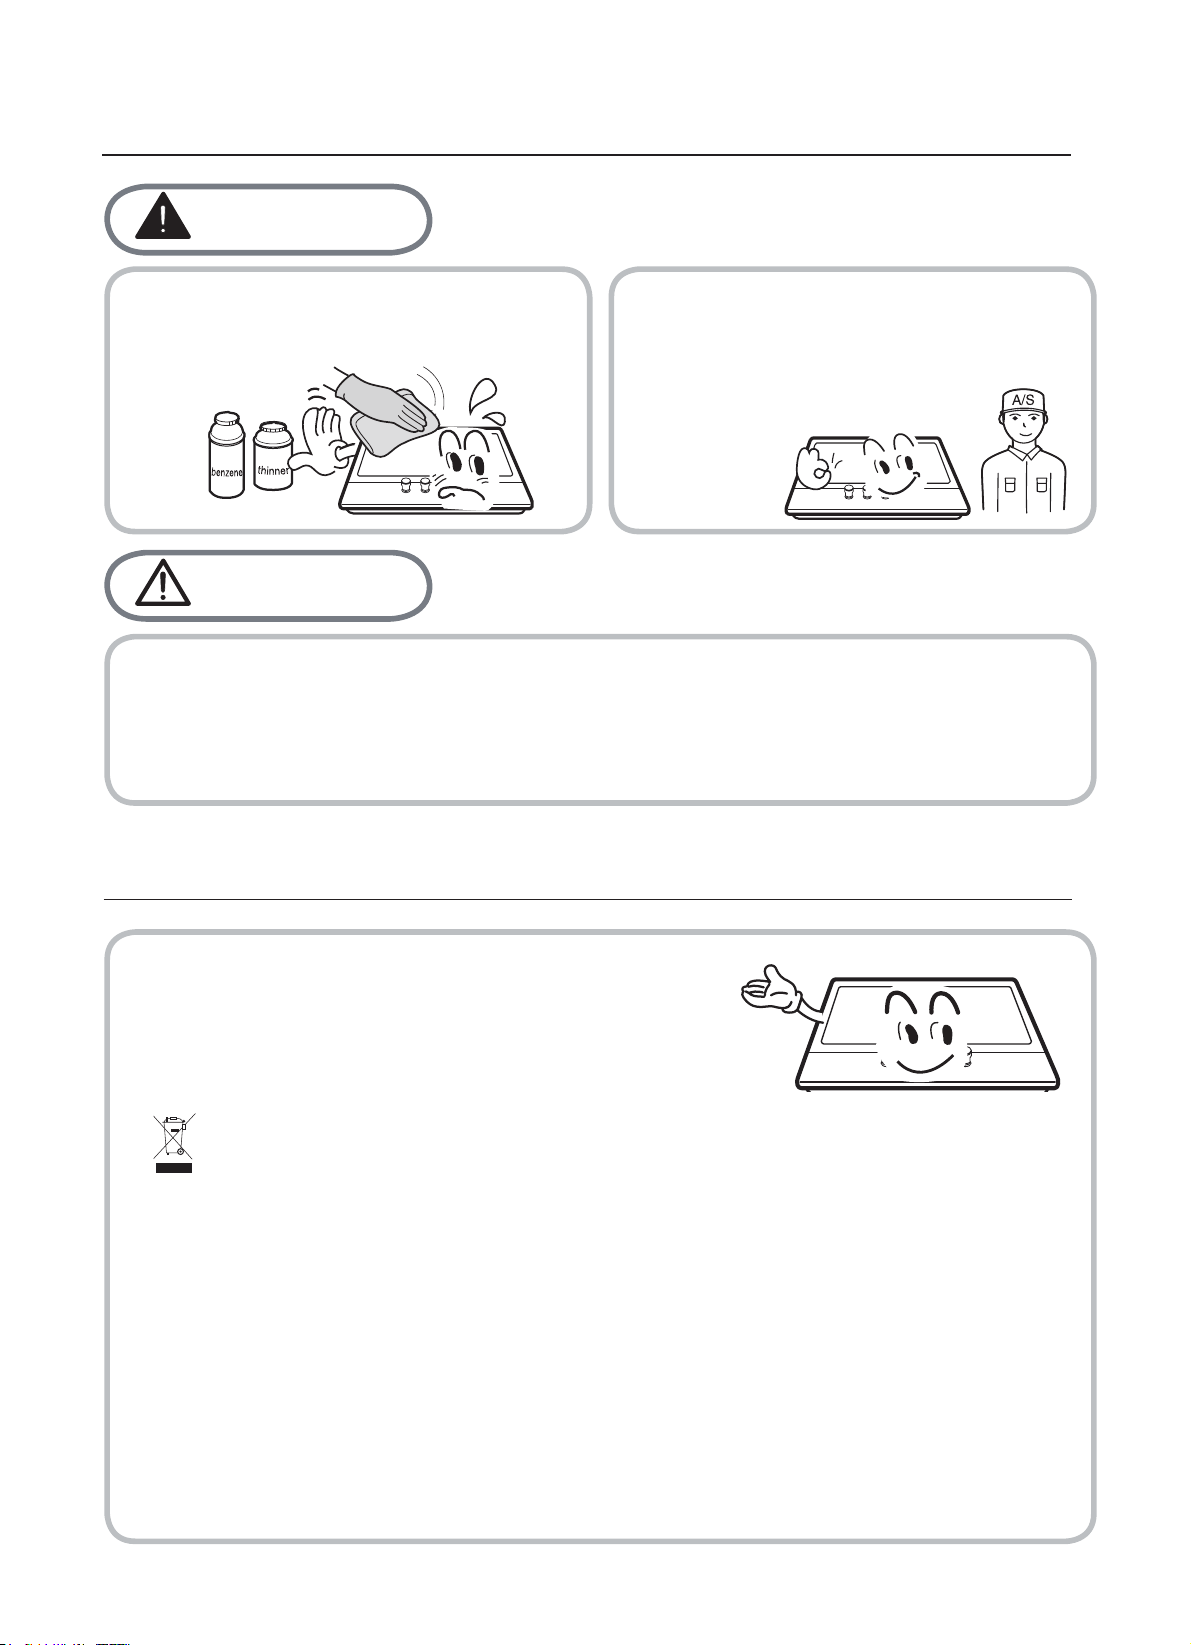
leaning and ervice
Environmental Information
unusable, by cutting off the cable.
disposed with other household wastes at the end of its working life. To prevent
possible harm to the environment or human health from uncontrolled waste disposal,
please separate this from other types of wastes and recycle it responsibly to promote
the sustainable reuse of material resources.
agents.
Warning
and cooled.
clean the appliance.
or serviced by an authorised Service
Engineer and only genuine approved
spare parts should be used.
Caution
Ŷ1HYHUXVHDEUDVLYHRUFDXVWLFcleaning
Ŷ 7KLVDSSOLDQFHVKRXOGRQO\EHrepaired
Ŷ%HIRUHDWWHPSWLQJWRFOHDQWKHDSSOLDQFHLWVKRXOGEHGLVFRQQHFWHGIURPWKHPDLQV
Ŷ<RXVKRXOGQRWXVHDVWHDPMHWRUDQ\RWKHUKLJKSUHVVXUHFOHDQLQJHTXLSPHQWWR
Ŷ$IWHULQVWDOODWLRQSOHDVHGLVSRVHRIWKHSDFNDJLQJ
with due regard to safety and the environment.
Ŷ:KHQGLVSRVLQJRIDQROGDSSOLDQFHPDNHLW
Ŷ7KLVPDUNLQJVKRZQRQWKHSURGXFWRULWVOLWHUDWXUHLQGLFDWHVWKDWLWVKRXOGQRWEH
Ŷ+RXVHKROGXVHUVVKRXOGFRQWDFWHLWKHUWKHUHWDLOHUZKHUHWKH\SXUFKDVHGWKLVSURGXFW
RUWKHLUORFDOJRYHUQPHQWRI¿FHIRUGHWDLOVRIZKHUHDQGKRZWKH\FDQWDNHWKLVLWHP
for environmentally safe recycling.
Ŷ%XVLQHVVXVHUVVKRXOGFRQWDFWWKHLUVXSSOLHUDQGFKHFNWKHWHUPVDQGFRQGLWLRQVRI
WKHSXUFKDVHFRQWUDFW7KLVSURGXFWVKRXOGQRWEHPL[HGZLWKRWKHUFRPPHUFLDO
wastes for disposal.
orrect isosal of This roduct
aste lectrical lectronic uiment

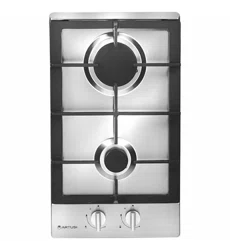
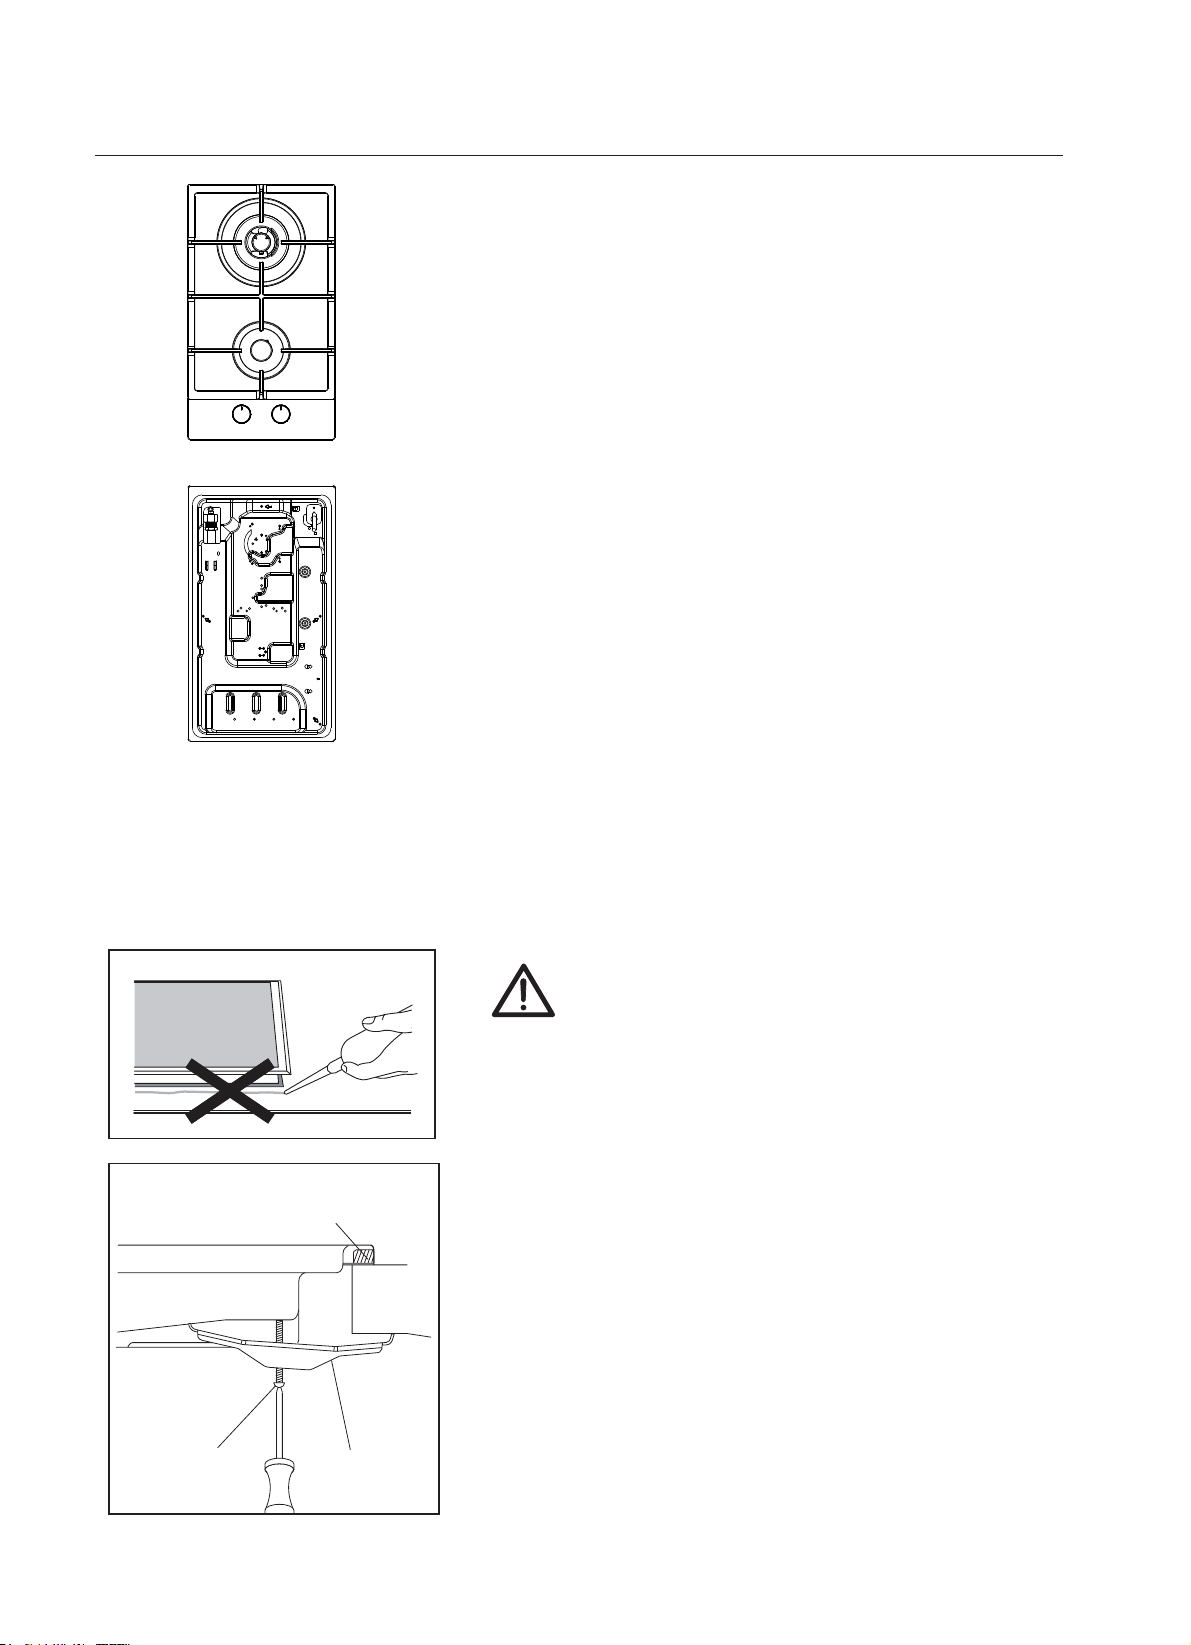
escription of the appliance
Model
n
520*300*90
Dimension
(W*D*H)
Ignition
device
Gas
Connection
Electric
supply
Burner
Feature
Continuous
Ignition
Type
220-240Vac,
2W
Top Plate
Glass
50Hz-60Hz,
G1/2 thread
tianless
teel
.
h
Mini Wok (1),
Auxiliary (1)
CAGH32B
CAGH32X
A
ow to se the appliance
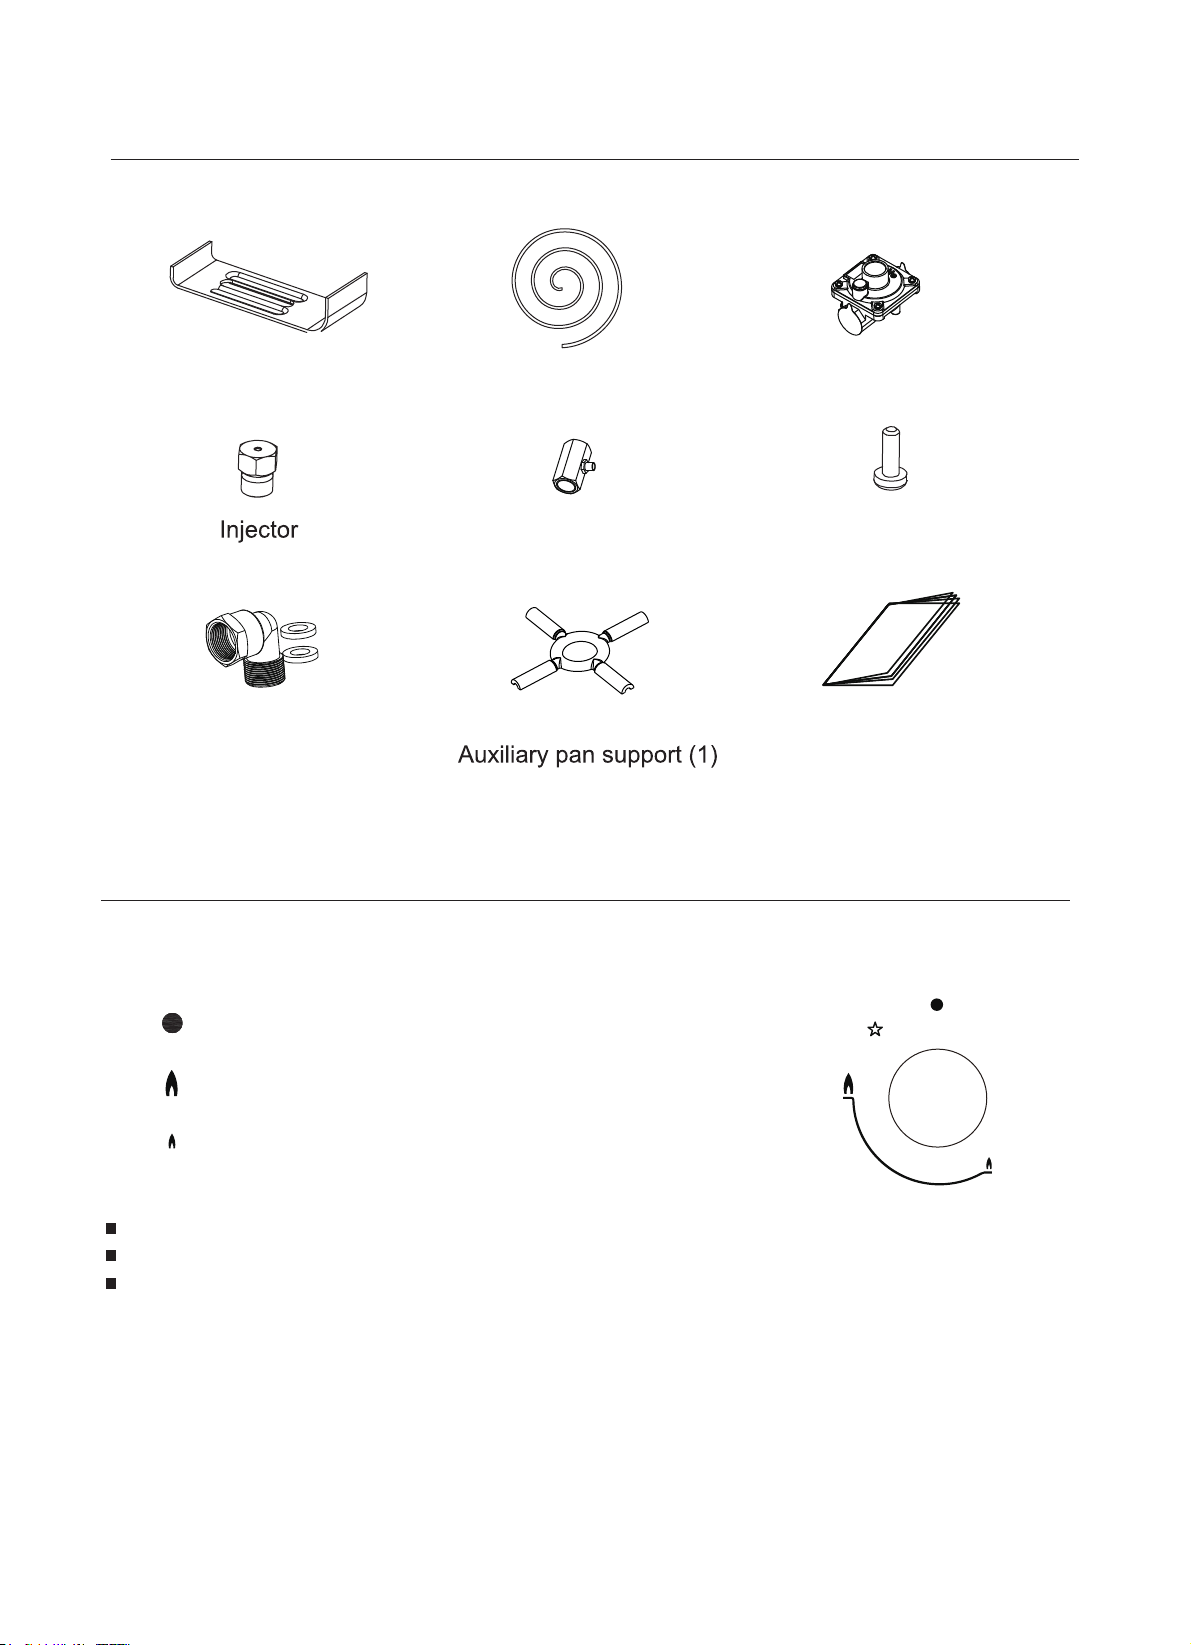
ccessories
escription of the appliance
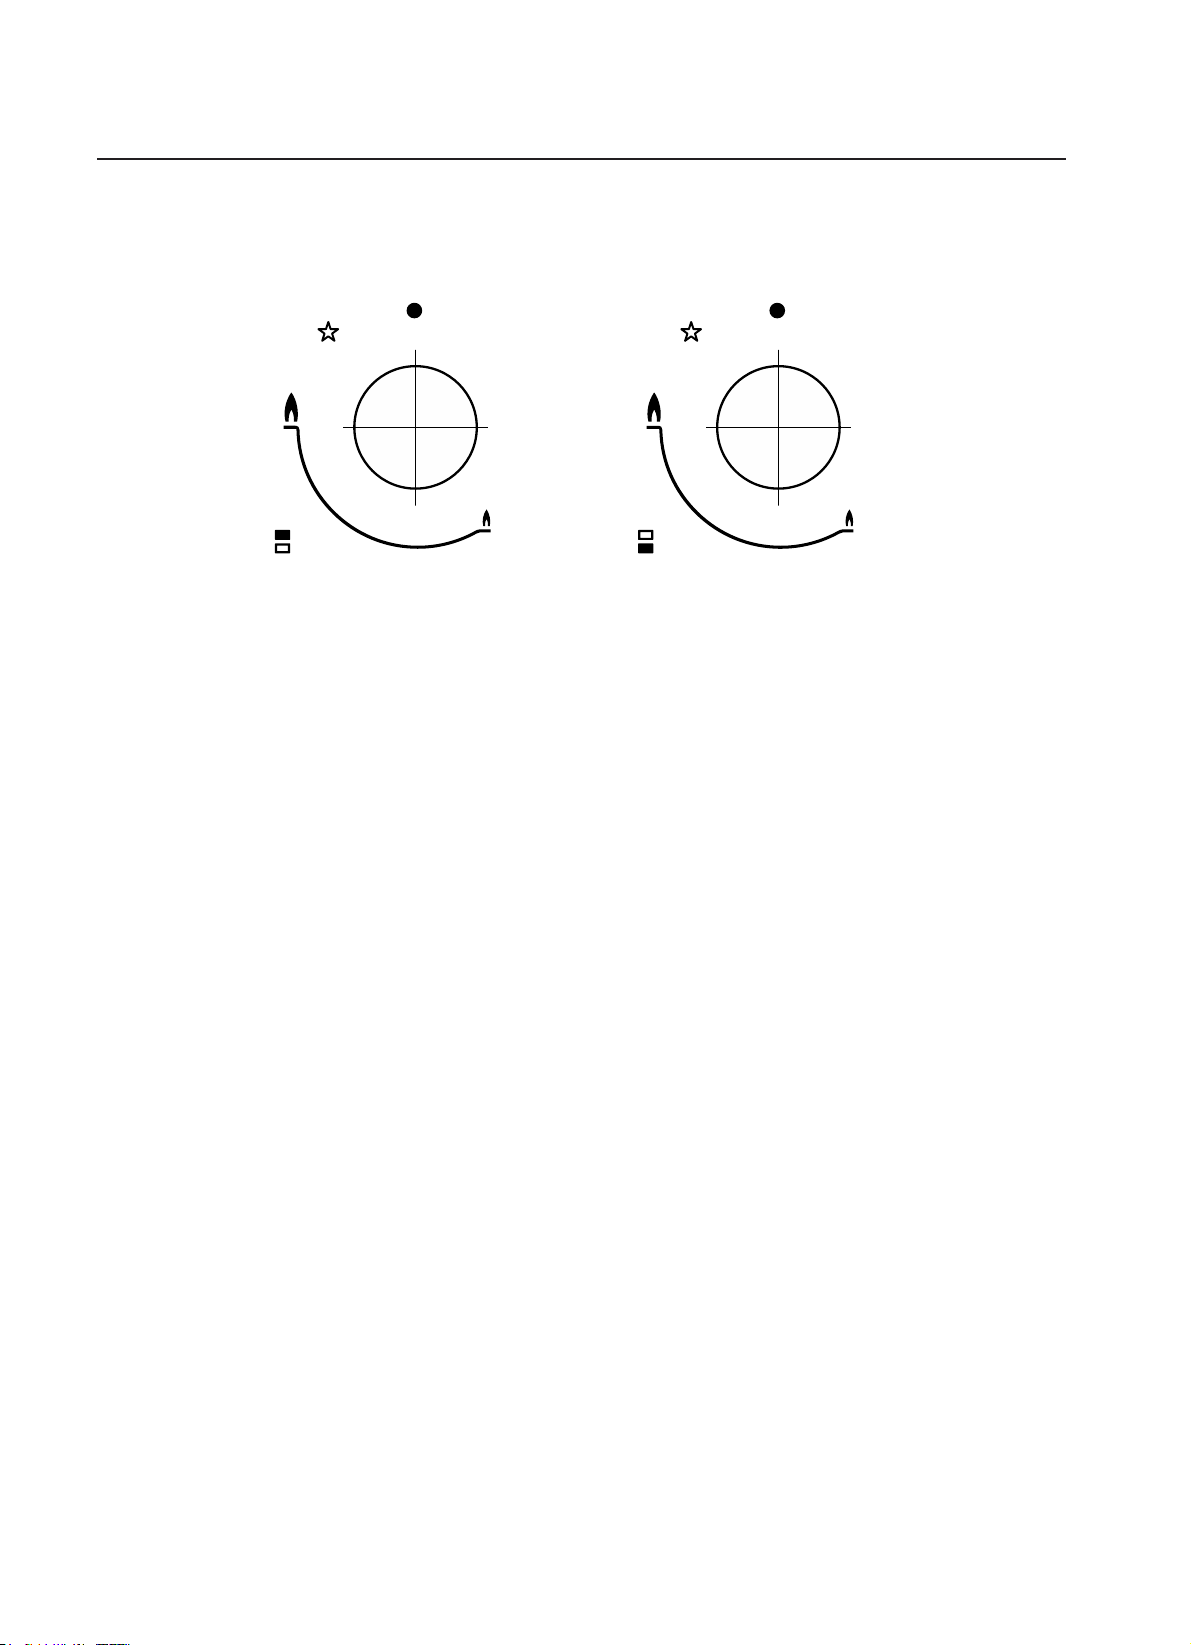
Black circle: gas off
Large flame: maximum setting
Small flame: minimum setting
Automatic ignition with flame failure safety device
1
Bracket
(2 )
Sponge
(2 )
Pressure regulator (1)
(2 )
Pressure joint(1)
Screw
(2 )
Elbow
(1)
Instruction
Manual (1)
The minimum setting is at the end of the anticlockwise rotation of the control handle.
ll operation positions must be selected between the maimum and minimum position.
The symbol on the control panel,net to the control handle will indicate which burner it
operates.
7KHIROORZLQJV\PEROVZLOODSSHDURQWKHFRQWUROSDQHOQH[WWRHDFKFRQWUROKDQGOH
ow to se the appliance
Automatic ignition with flame failure safety device
The appliance is fitted with a flame failure safety device on each burner, which
is designed to stop the flow of gas to the burner head in the event of the flame
going out.
To ignite a burner:
o Press in the control knob of the burner that you wish to light and turnit
anti-clockwise to the maximum position.
o If you keep the control knob depressed, the automatic ignition forthe
burner will operate.
o
o After this 15-second interval, to regulate the flame you should continue
turning the control knob anti-clockwise until the flame is at a suitable level.
The operating position MUST be at a position between the maximum and
minimum position.
o
To switch the burner off, turn the control knob fully clockwise to the gas
offposition.
o In case of power failure, the burners can be lit by carefully using a match.
11
ou should hold down the control knob for seconds after the flame on
the burner has lit. If after s the burner has not lit stop operating the
device and open the compartment door andor wait at least min before
attempting a further ignition of the burner.
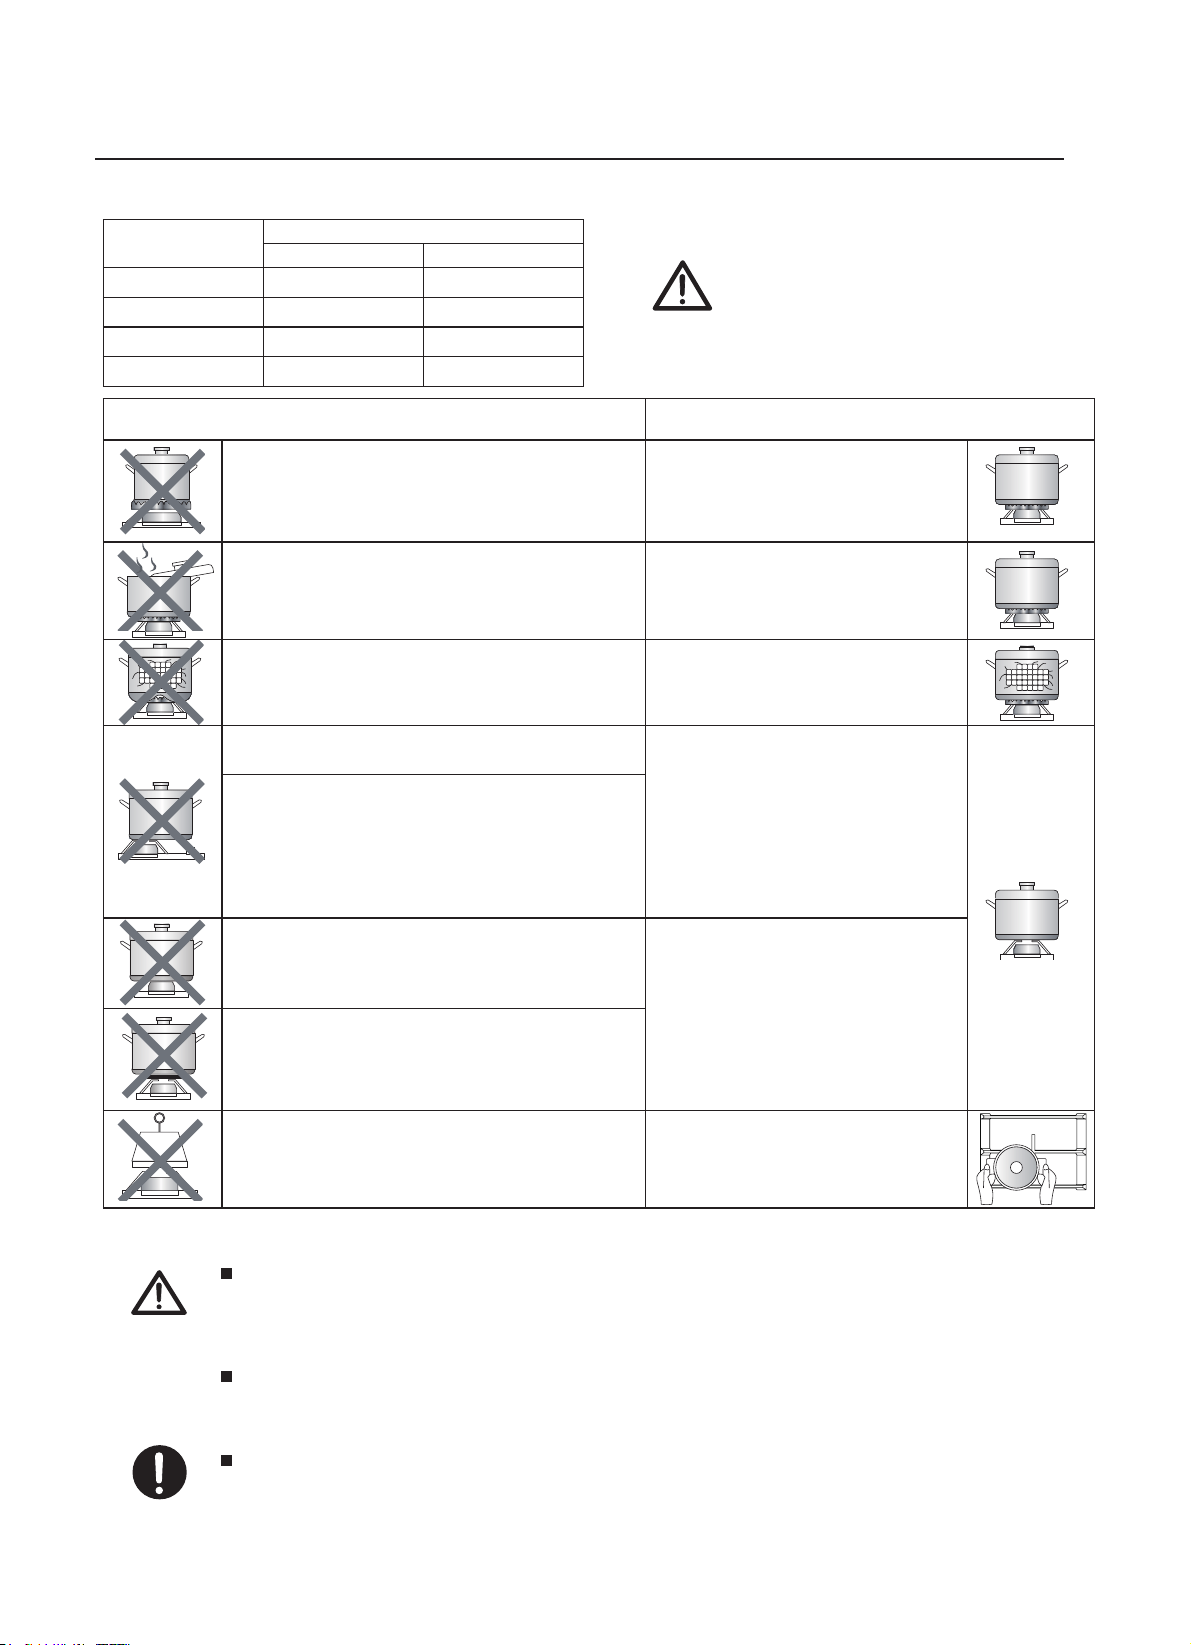
afety and Energy saving advice
- The diameter of the bottom of the pan should correspond to that of the burner.
2
2
2 2
1
NO YES
12
1
1
o not use small diameter cookware on large
burners.
The flame should never come up the sides of
the cookware.
void cooking without a lid or with the
lid half off
as this wastes energy
o not use a pan with a conve or
concave bottom.
o not place cookware on one side of a
burner,as it could tip over.
o not use cookware with a large diameter
on the burners near the controls,which when
placed on the middle of the burner may
touch the controls or be so close to them
that they increase the temperature in this
area and may cause damage.
ever place cookware directly on top of the
burner.
o not place anything,eg.flame
tamer,asbestos mat,between pan and pan
support as serious damage to the appliance
may result.
o not use ecessive weight and do not
hit the cooktop with heavy objects.
lways use cookware that is
suitable for each burner, to avoid
wasting gas and discolouring the
cookware.
Place a lid on the cookware.
nly use pots,saucepans and
frying pans with a thick,flat
bottom.
lways place the cookware right
over the burners,not to one
side.
Place the cookware on top of
the trivet.
andle cookware carefully when
they are on the burner.
Ŷ'RQRWXVHFRRNZDUH
WKDW
RYHUODSVWKH
HGJH
of the
burner.
It is not recommended to use roasting ansfrying ans or grill stones
heated simultaneously on seeral urners ecause the resulting heat
uildu may damage the aliance
o not touch the to late and triet hilst in use for a certain eriod
after use
s soon as a liuid starts oilingturn don the flame so that it ill
arely ee the liuid simmering
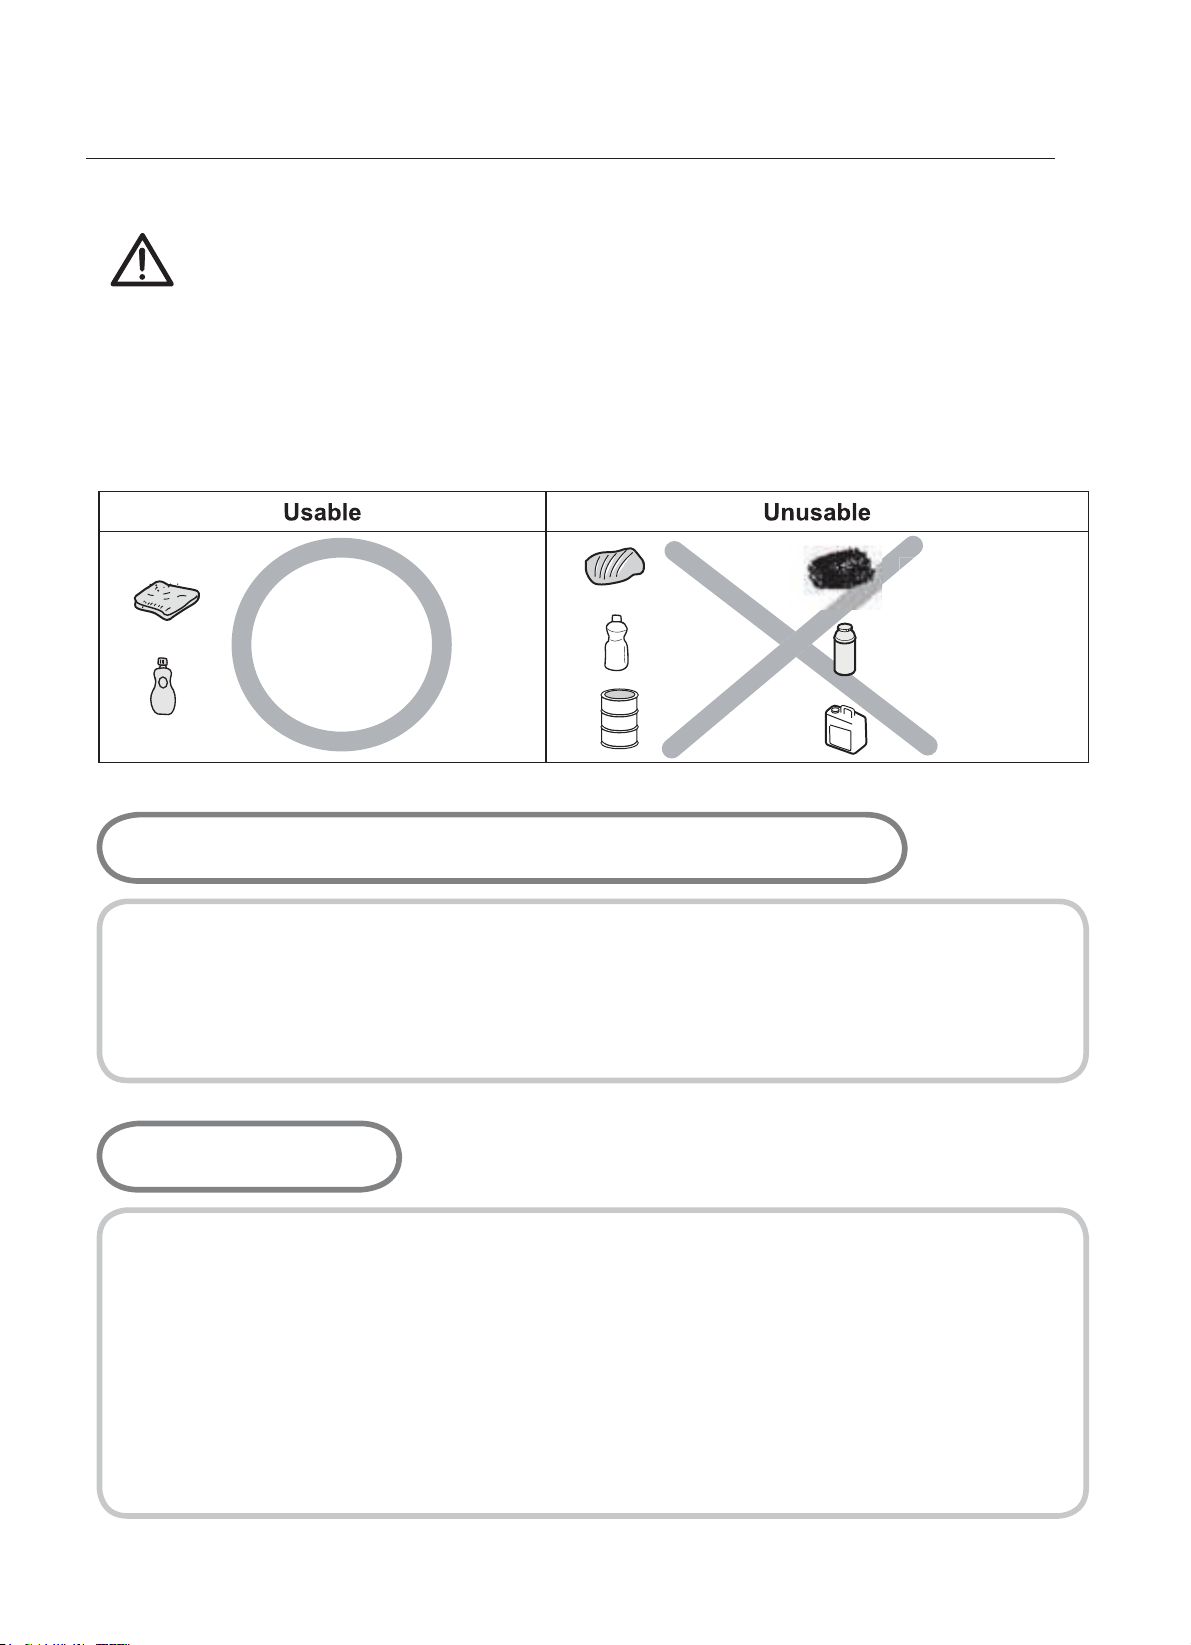
leaning and aintenance
oft cloth
eutral etergent
ylon rush
Edible il
brasive
etergent
Thinnerenene
etal rush
cidiclkali
Ŷ7DNHRIIWKH3DQVXSSRUW
Ŷ&OHDQWKHVHDQGWKHFRQWUROKDQGOHVZLWKDGDPSFORWKZDVKLQJXSOLTXLGDQGZDUP
water. For stubbon soiling, soak beforehand.
Ŷ'U\HYHU\WKLQJZLWKDFOHDQVRIWFORWK
3DQVXSSRUW&RQWUROKDQGOHV
Ŷ5HJXODUO\ZLSHRYHUWKHWRSSODWHXVLQJDVRIWFORWKZHOO
LQZDUPZDWHUWR
ZKLFKDOLWWOHZDVKLQJXSOLTXLGKDVEHHQDGGHG
Ŷ'U\WKHWRSSODWHWKRURXJKO\DIWHUFOHDQLQJ
Ŷ7KRURXJKO\UHPRYHVDOW\IRRGVRUOLTXLGVIURPWKHKREDVVRRQDVSRVVLEOHWRDYRLG
the risk of corrosion.
Ŷ6WDLQOHVVVWHHOSDUWVRIWKHDSSOLDQFHPD\EHFRPHGLVFRORXUHGRYHUWLPH7KLVLV
normal because of the high temperatures. Each time the appliance is used these
parts should be cleaned with a product that is suitable for stainless steel.
7RSSODWH
Ŷ &OHDQLQJRSHUDWLRQVPXVWRQO\EHFDUULHGRXWZKHQWKHDSSOLDQFH is
comletely cool
Ŷ7KHDSSOLDQFHVKRXOGEHGLVFRQQHFWHGIURP\RXUPDLQVVXSSO\EHIRUH
FRPPHQFLQJDQ\FOHDQLQJSURFHVV
Ŷ&OHDQWKHDSSOLDQFHUHJXODUO\SUHIHUDEO\DIWHUHDFKXVH
Ŷ$EUDVLYHFOHDQHUVRUVKDUSREMHFWVZLOOGDPDJHWKHDSSOLDQFHVXUIDFH
\RXVKRXOGFOHDQLWXVLQJZDWHUDQGDOLWWOHZDVKLQJXSOLTXLG
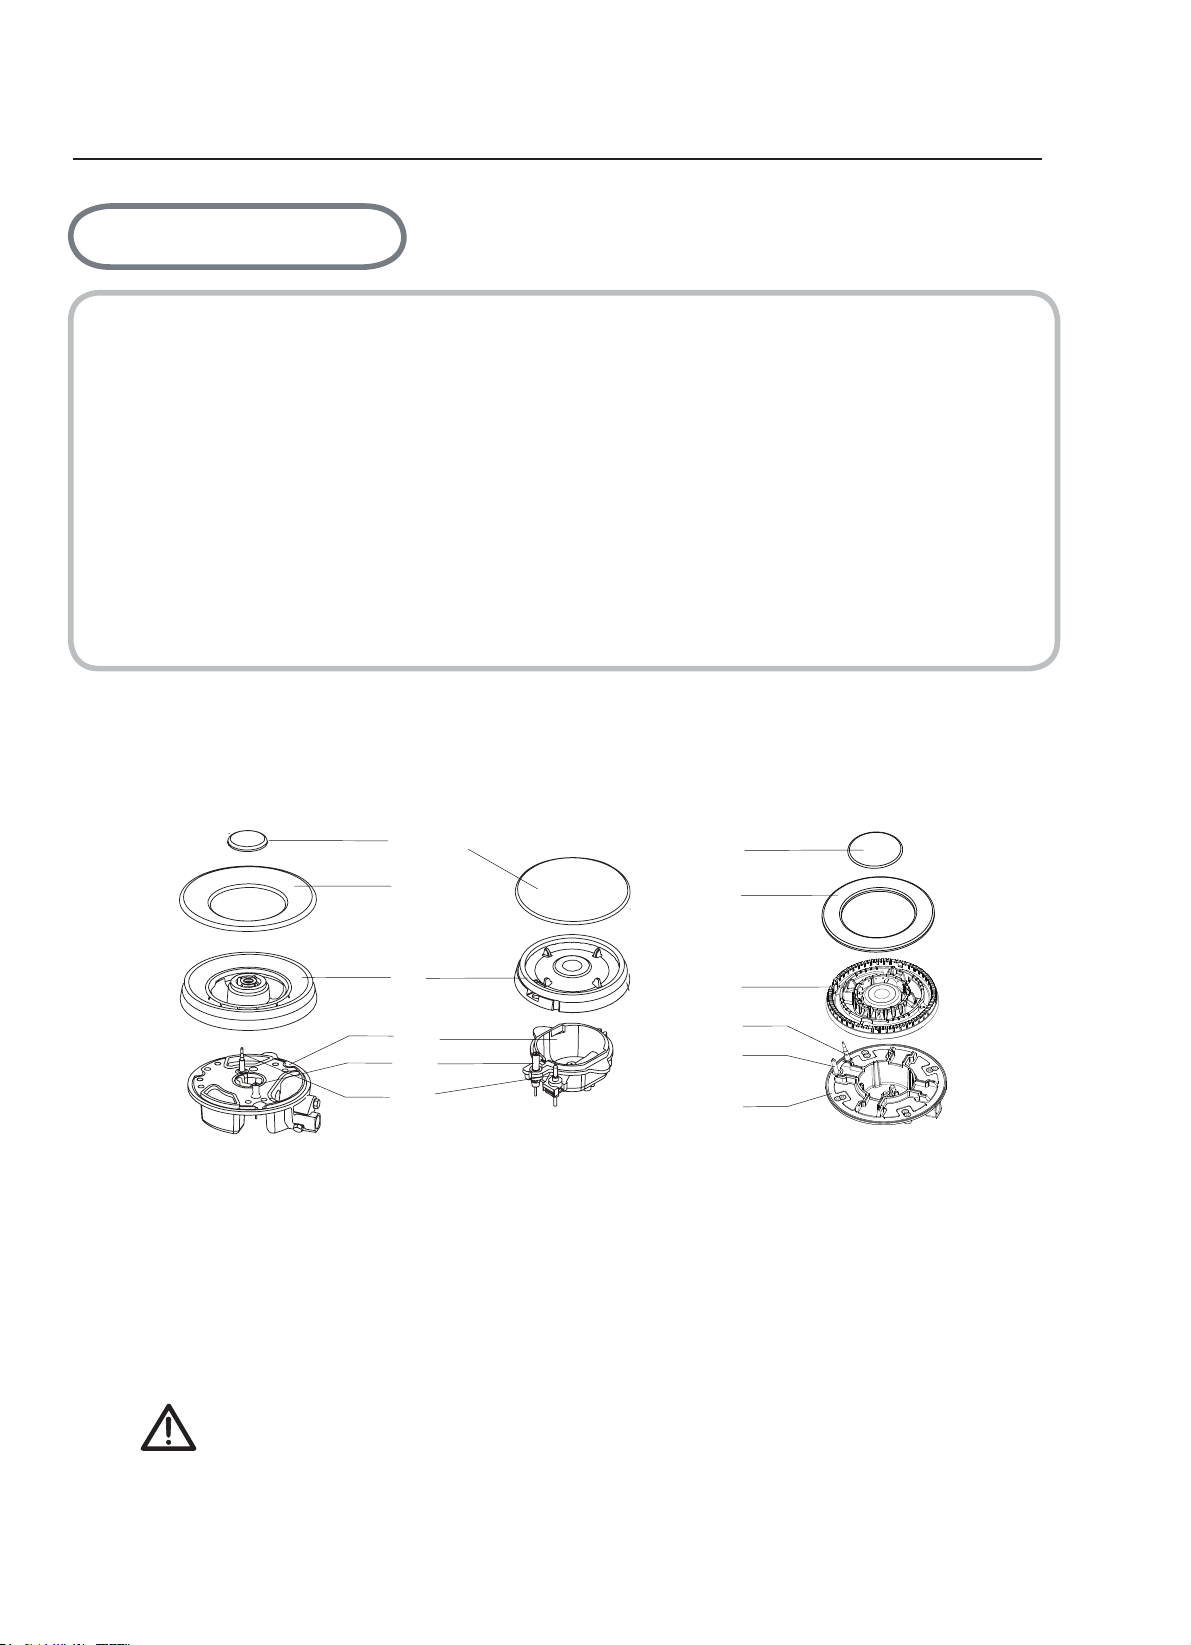
leaning and aintenance
2
1
2
3
3
4
4
5
7
6
6
7
5
.
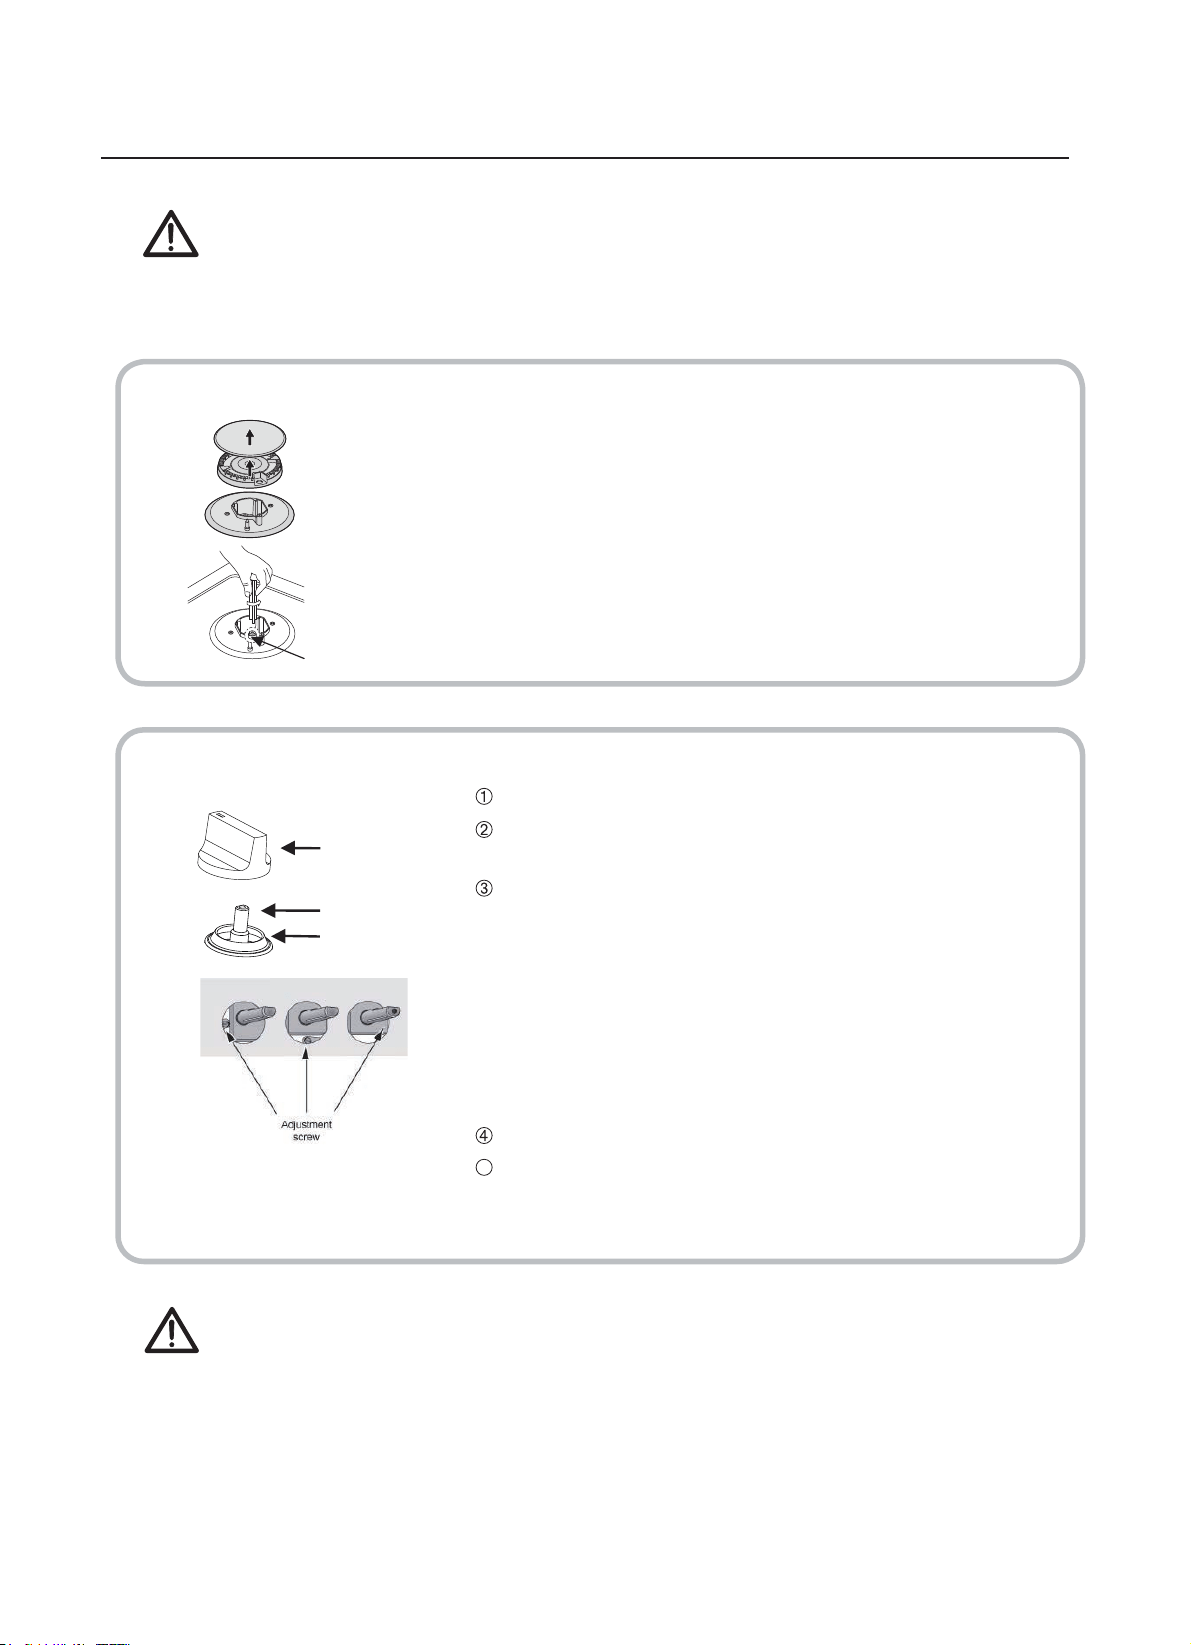
Place the flame spreader on to the burner cup so that the ignition device
and the flame supervision device etend through their respective holes in the flame
spreader.The flame spreader must click into place correctly.
.Position the burner lid ,, onto the flame speader so that the retaining pins
fit into their respective recesses.
Ŷ5HPRYHWKHEXUQHUOLGVDQG)ODPH6SUHDGHUVE\SXOOLQJWKHPXSZDUGVDQGDZD\
from the top plate.
Ŷ6RDNWKHPLQKRWZDWHUDQGDOLWWOH
Ŷ$IWHUFOHDQLQJDQGZDVKLQJWKHPZLSHDQGGU\WKHPFDUHIXOO\0DNHVXUHWKDWWKH
ÀDPHKROHVDUHFOHDQDQGFRPSOHWHO\GU\
Ŷ:LSHWKH¿[HGSDUWVRIWKHEXUQHUFXSZLWKDGDPSFORWKDQGGU\DIWHUZDUGV
Ŷ*HQWO\ZLSHWKH
L
JQLWLRQGHYLFHDQGÀDPHVXSHUYLVLRQGHYLFHZLWKDZHOOZUXQJRXW
cloth and wipe dry with a clean cloth.
Ŷ%HIRUHSODFLQJWKHEXUQHUVEDFNRQWKHWRSSODWHPDNHVXUHWKDWWKHLQMHFWRULVQRW
blocked.
%851(56
ʄ5HDVVHPEOHWKH$X[LOLDU\6HPL5DSLG5DSLGDQG
7ULSOH&URZQEXUQHUVDVIROORZV
5HSODFHSDUWVLQWKHFRUUHFWRUGHUDIWHUFOHDQLQJ
'RQRWPL[XSWKHWRSDQGERWWRP
7KHORFDWLQJSLQVPXVW¿WH[DFWO\LQWRWKHQRWFKHV

Warnings
sing instructions
Ŷ'RQRWPRGLI\WKLVDSSOLDQFH
Ŷ7KLVDSSOLDQFHPXVWEHLQVWDOOHGE\DQDXWKRULVHGWHFKQLFLDQRU
LQVWDOOHU
Ŷ3ULRUWRLQVWDOODWLRQHQVXUHWKDWWKHORFDOGLVWULEXWLRQFRQGLWLRQV
QDWXUHRIWKHJDVDQGJDVSUHVVXUHDQGWKHDGMXVWPHQWRIWKH
DSSOLDQFHDUHFRPSDWLEOH
Ŷ7KHDGMXVWPHQWFRQGLWLRQVIRUWKLVDSSOLDQFHDUHVWDWHGRQWKHODEHO
RUGDWDSODWH
Ŷ7KLVDSSOLDQFHLVQRWFRQQHFWHGWRDFRPEXVWLRQSURGXFWVHYDFXDWLRQ
LQVWDOODWLRQUHJXODWLRQV3DUWLFXODUDWWHQWLRQ
VKRXOG
EHJLYHQWRWKH
UHOHYDQWUHTXLUHPHQWVUHJDUGLQJYHQWLODWRQ
Ŷ%HIRUHLQVWDOOLQJWXUQRIIWKHJDVDQGHOHFWULFLW\VXSSO\WRWKH
DSSOLDQFH
Ŷ$OODSSOLDQFHVFRQWDLQLQJDQ\HOHFWULFDOFRPSRQHQWVPXVWEHHDUWKHG
Ŷ(QVXUHWKDWWKHJDVSLSHDQGHOHFWULFDOFDEOHDUHLQVWDOOHGLQVXFKD
ZD\WKDWWKH\GRQRWWRXFKDQ\SDUWVRIWKHaianceZKLFK
may
EHFRPH
KRW
Ŷ*DVSLSHRUFRQQHFWRUVKRXOGQ¶WEHEHQWRUEORFNHGE\DQ\RWKHU
DSSOLDQFHV
Ŷ&KHFNWKHGLPHQVLRQVRIWKHDSSOLDQFHDVZHOODVWKHGLPHQVLRQVRI
WKHJDSWREHFXWLQWKHNLWFKHQXQLW
Ŷ7KHSDQHOVORFDWHGDERYHWKHZRUNVXUIDFHGLUHFWO\QH[WWRWKH
DSSOLDQFHPXVWEHPDGHRIQRQÀDPPDEOHPDWHULDO%RWKWKHVWUDWL
¿HGVXUIDFLQJDQGWKHJOXHXVHGWRVHFXUHLWVKRXOGEHKHDWUHVLVWDQW
WRSUHYHQWGHWHULRUDWLRQ
Ŷ7XUQRQDSSOLDQFHWDSDQGOLJKWHDFKEXUQHUV
&KHFNIRUDFOHDUEOXHÀDPHZLWKRXW\HOORZWLSSLQJ
,IEXUQHUVVKRZVDQ\DEQRUPDO
L
WLHVFKHFNWKHIROORZLQJ
%XUQHUOLGRQFRUUHFWO\
)ODPHVSUHDGHUSRVLWLRQHGFRUUHFWO\
%XUQHUYHUWLFDOO\DOLJQHGZLWKLQMHFWRUQLSSOH
Ŷ$IXOORSHUDWLRQDOWHVWDQGDWHVWIRUSRVVLEOHOHDNDJHVPXVWEHFDUULHG
RXWE\WKH¿WWHUDIWHUinstaation
Ŷ7KHÀH[LEOHKRVHVKDOOEH¿WWHGLQVXFKDZD\WKDWLWFDQQRWFRPHLQWR
FRQWDFWZLWKDPRYHDEOHSDUWRIWKHKRXVLQJXQLWDQGGRHVQRWSDVV
WKURXJKDQ\VSDFHVXVFHSWLEOHRIEHFRPLQJFRQJHVWHG
GHYLFH,WVKRXOG e installed and connected in accordance ith current
rease cranes roduced at the factory to meet the reuirement of all
life hob.
Ŷ
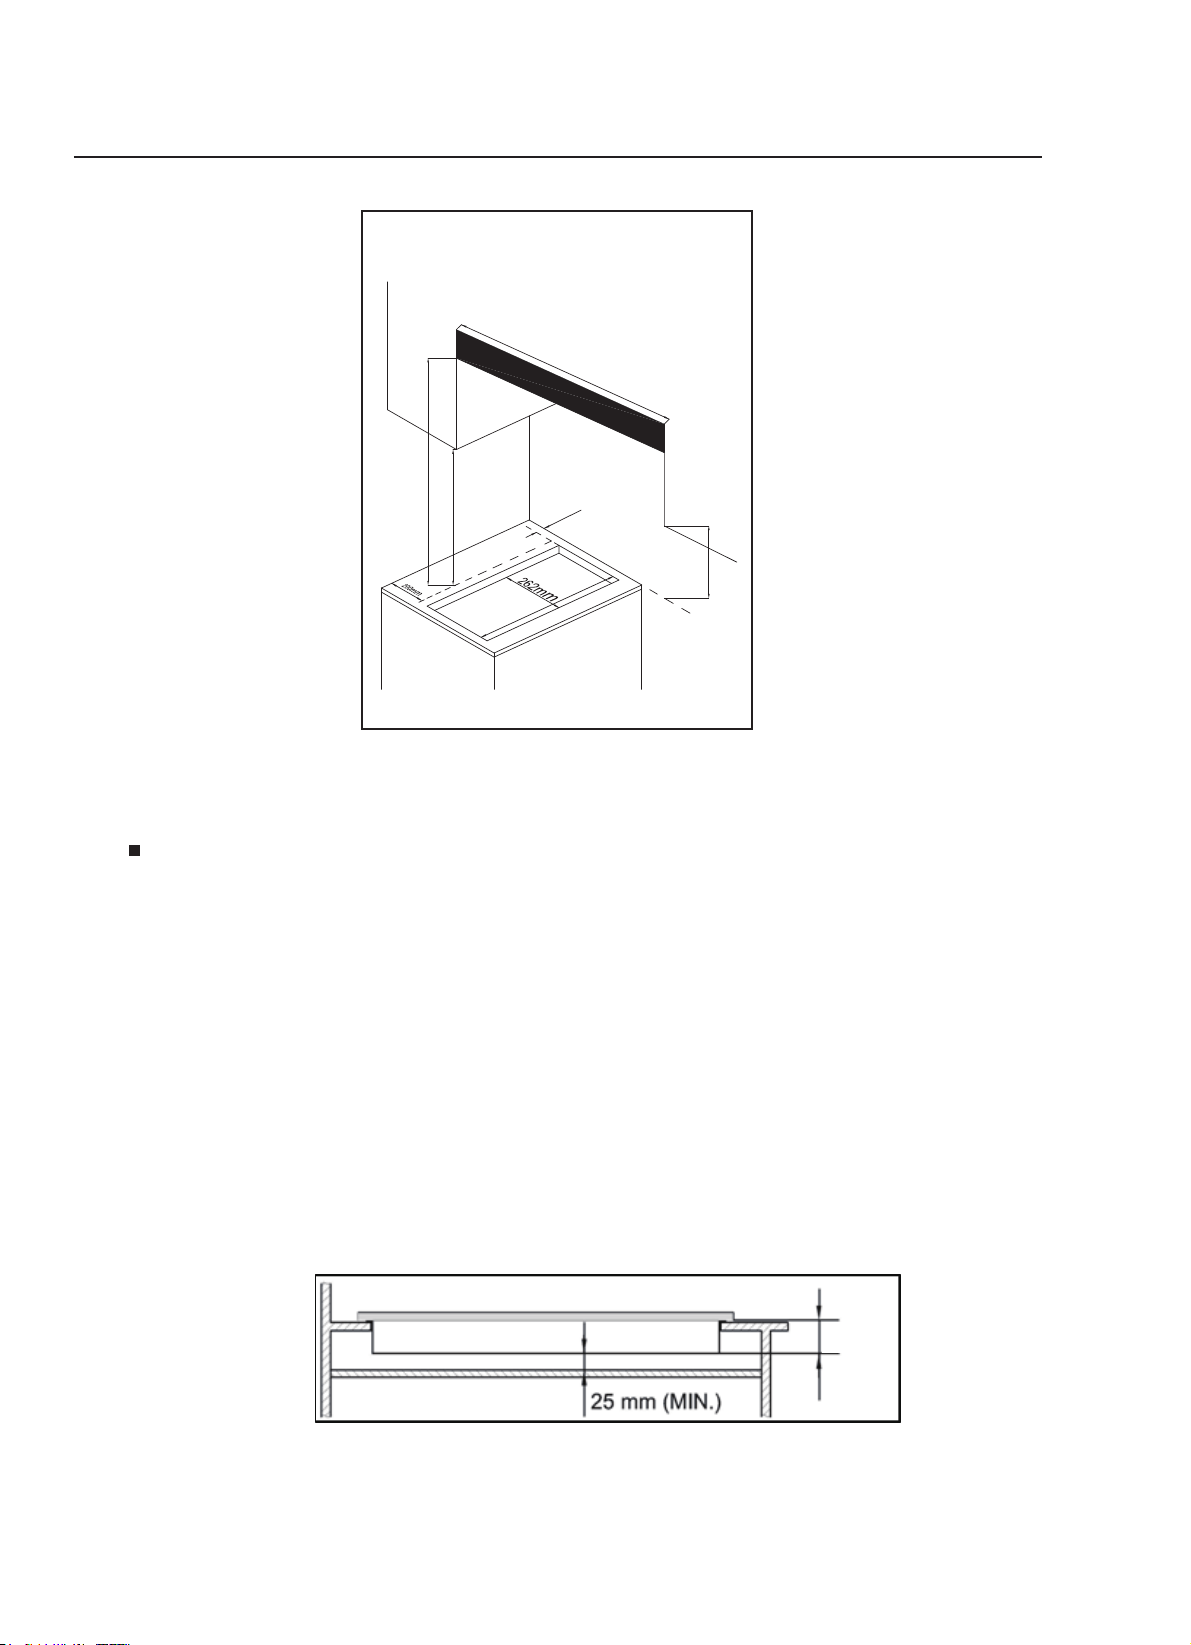
Positioning
The edges of the hob must be a minimum distance of mm from side walls
and mm from rear wall.
700 mm between the highest point of the hob surface (including the burners)
and the underside of any horizontal surface directly above it.
mm between the hob surfaces, providing that the underside of the
horizontal surface is in line with the outer edge of the hob. If the underside of
the horizontal surface is lower than 400 mm, then it must be at least 50 mm
away from the outer edges of the hob.
50 mm clearance around the appliance and between the hob surface and any
combustible materials.
45 mm
You must have a gap of at least 25 mm and at most 74 mm between
the underneath of the appliance and any surface that is below it.
o
o
o
o
o
This aliance is to e uilt into a itchen unit or mm ortoroiding
the folloing minium distances are alloed
CLEARANCES REQUIRED
WHEN FITTING WITH A
COOKER HOOD
300mm cooker hood
700mm
400mm
400mm
60mm
480mm
Installing the appliance
Songe
Bottom view
The thickness of the sponge is
The width of the sponge is
of the screws.There are one set of screw holes in each
corner of the hob(H).
Slightly tighten a screw(C) through the bracket(B) so
that the bracket is attached to the hob, but so that you
can still adjust the position
.
.2
Carefully turn the hob back over and then gently lower
it into the aperture hole that you have cut out.
.3 On the underneath of the hob, adjust the brackets into
a position that is suitable for your worktop.
Then fully tighten the screws(C) to secure the hob into
position.
3 mm.
6 mm.
appliance upside down and place it on a
cushioned mat.
supervision devices are not damaged
in this operation.
2.
Apply the sponge provided around the
edge ofthe appliance.
3.
1
3ODFHWKHEUDFNHW%RYHUWKHKROHVWKDWPDWFKWKHVL]H
7KLVZLOOPDNHLWGLI¿FXOWWRUHPRYHWKH
DSSOLDQFHIURPWKHDSHUWXUHLQIXWXUH
SDUWLFXODUO\LILWQHHGVWREHVHUYLFHG
o not use a siicon seaant to sea te
aiance aainst te aerture
IPTNT dditional to the sponge
around the edge of the appliance ensure
an additional strip is applied on each side
as per the diagram.
.
as onnection
Keep away from inflammable materials around appliance.
Before work, put on gloves.
CAUTION
Cool off the appliance for a while right after using appliance for your safety
because you can get burners by high temperature from the appliances.
c
Turn off power for safety and appliance protection. Close middle valve to
prevent gas leakage.
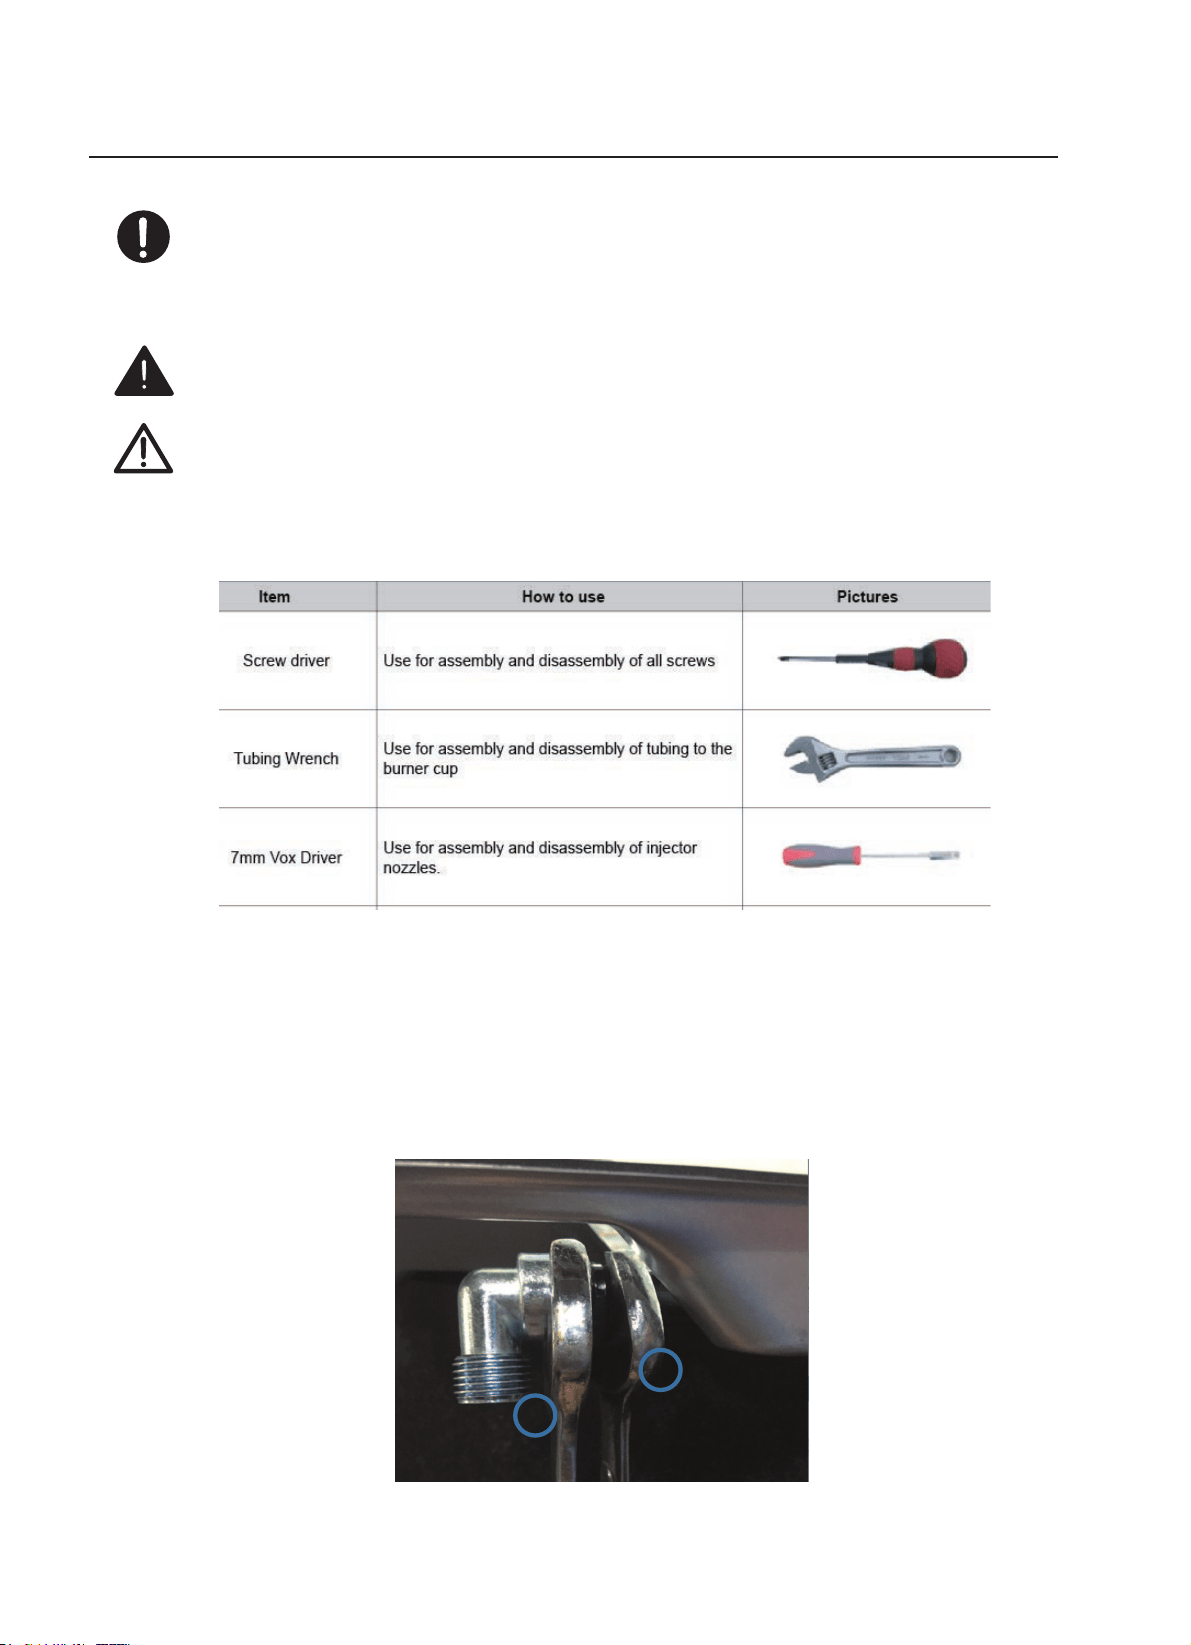
Most of the tools that you might need are shown below. Some are optional.
Replacement of gas-type fitting
Tool: Open-end wrench
Steps for operation:
A: Disassemble with a wrench the gas-type fittings from main gas tube.
When you disassemble/assemble gas connection, use 2 spanners. One for fixing gas
connection elbow, the other for tightening gas hose.
Ŷ7KLVDSSOLDQFHPXVWEHLQVWDOOHGDQGFRQQHFWHGLQDFFRUGDQFHZLWKLQVWDOOD
WLRQUHJXODWLRQVLQIRUFHLQWKHFRXQWU\LQZKLFKWKHDSSOLDQFHLVWREHXVHG
Ŷ7KLVDSSOLDQFHLVVXSSOLHGWRUXQRQQDWXUDOJDVRQO\DQGFDQQRWEHXVHGRQ
DQ\RWKHUW\SHRIJDVZLWKRXWPRGL¿FDWLRQ&RQYHUVLRQIRUXVHRQ/3*DQG
RWKHUJDVHVPXVWRQO\EHXQGHUWDNHQE\DTXDOL¿HGSHUVRQ
1
2
as onnection
4UBUVUPSZSFRVJSFNFOUT
This installation must conform with the following:
■ Manufacturer’s Installation instructions
■ Local Gas Fitting Regulations
■ Municipal Building Codes
■ Refer to AS/NZS 5601.1 for Gas Installations
■ S.A.A. Wiring Code
■ Local Electrical Regulations
■ Any other statutory regulations
rearin to insta
efer to . for piping sie details. These builtin
cooktops are intended to
be inserted in a benchtop cutout. nly an officially authorised technician should
connect the
appliance.
efore you begin, turn off the gas and electricity supply.
fu oerationa test and a test for ossie eaaes must e
carried out te fitter after instaation
ccess to te oe ent of te connection ose must e ossie
and te as ose must e reaced efore its use efore te end of
serice ife indicated on te ose
efore eainec a connections for as eas it soa and
ater
use a naed fame for detectin eas Inite a urners ot
indiidua and concurrent to ensure correct oeration of as
aes urners and inition urn as tas to o fame osition and
osere staiit of te fame for eac urner indiidua and a
toeter dere te duicate data ate to an accessie ocation
near te otate en satisfied it te otate ease instruct
te user on te correct metod of oeration In case te aiance
fais to oerate correct after a cecs ae een carried out refer
to te aut orised serice roider in our area
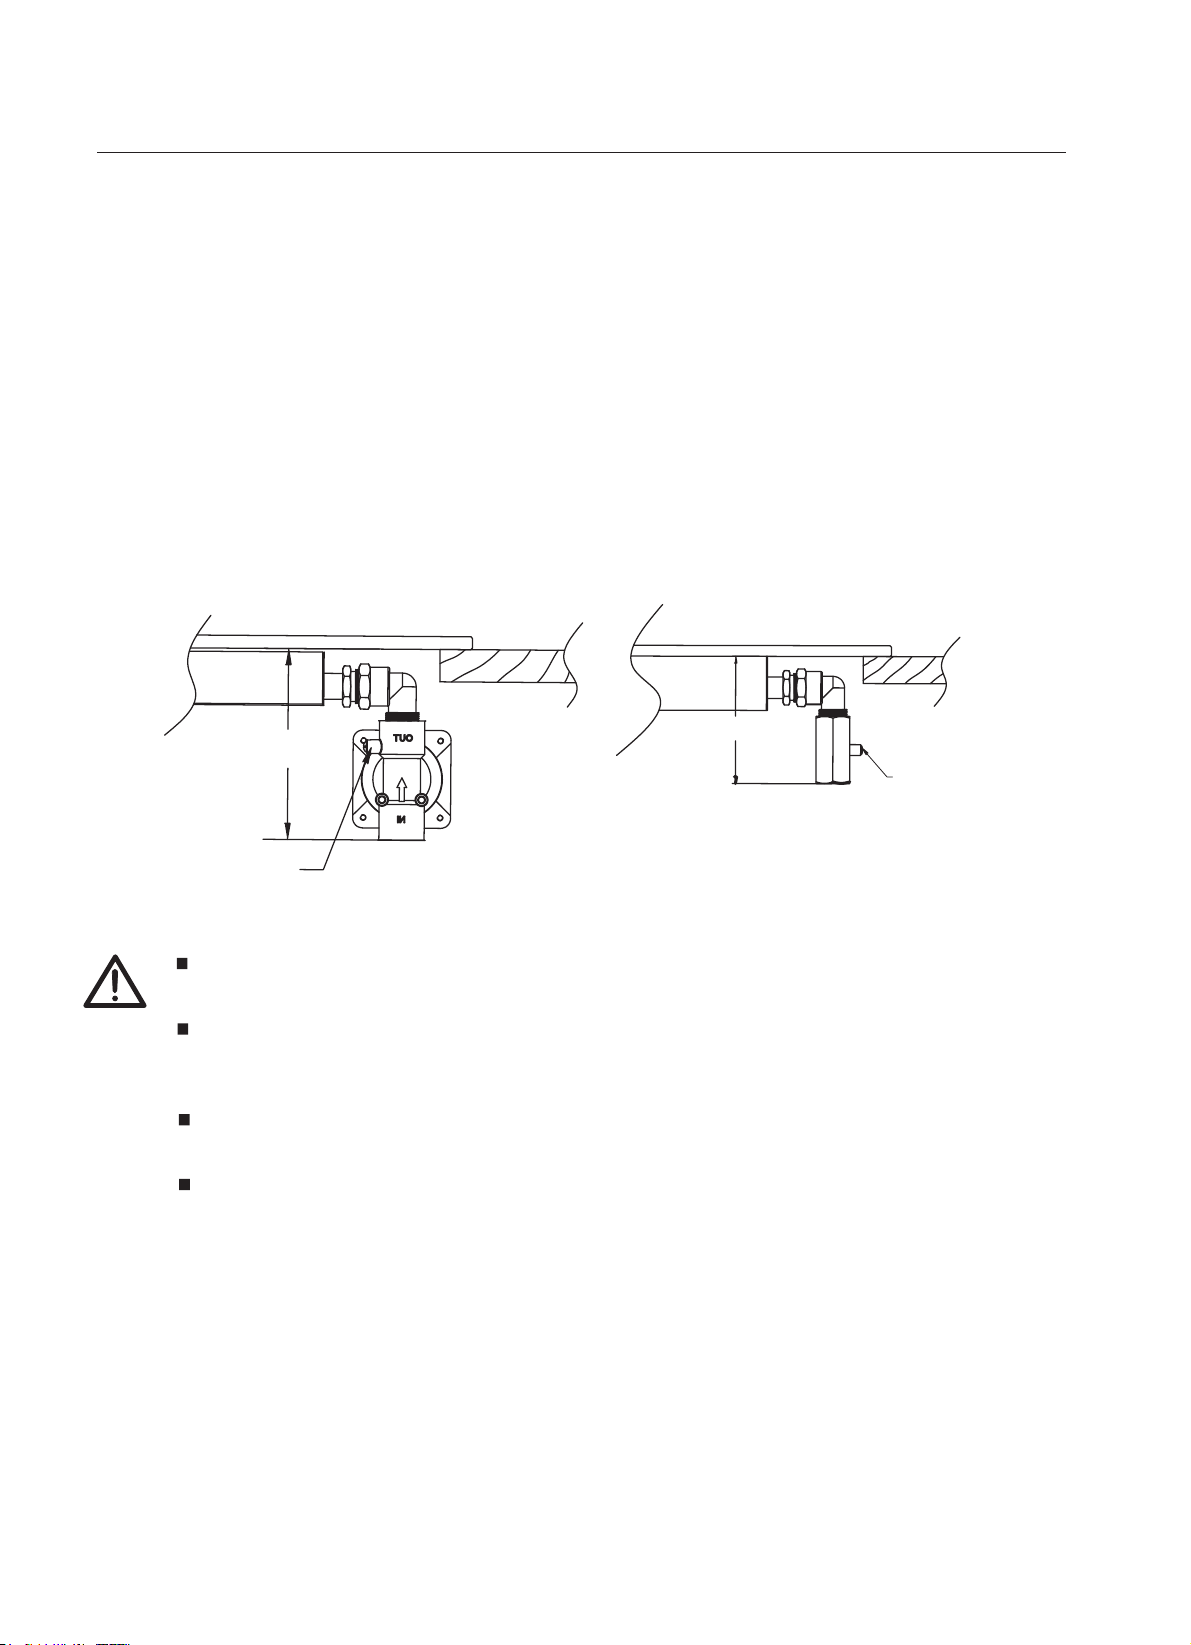
Natural gas connection
95
115
P gas connection
pressure test point
pressure test point
Where a flexible hose assembly is used, ensure it is
approved to AS/NZS 1869, Class B. Any hose assembly
used must be restrained from accidental contact with
the flue outlet of an under bench oven.
This hose assembly shall be suitable for connection to a
fixed consumer piping outlet located as follows:
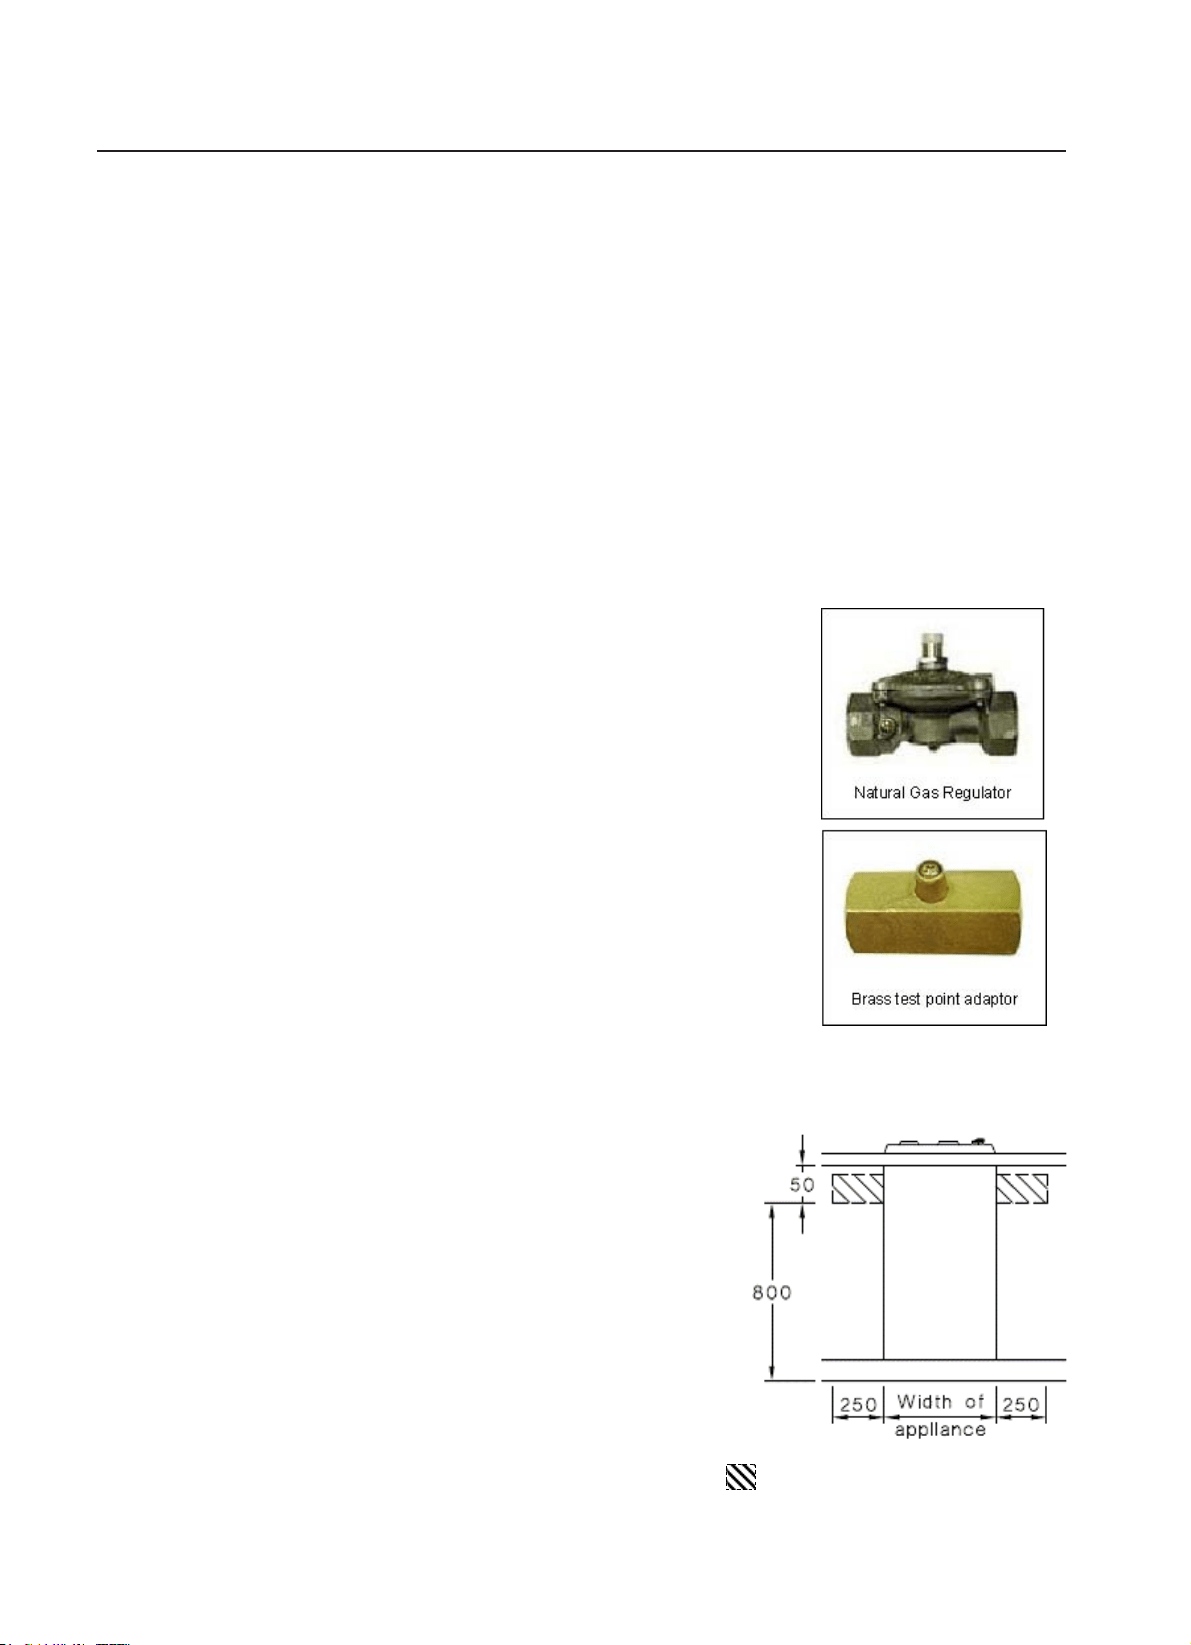
Hotplates at a point 800 mm to 850 mm above the floor
and in the region outside the width of the appliance to a
distance of 250 mm.
After connecting to gas, check for leaks using soapy
solution, never a naked flame.
Inlet connection region for flexible hose
Gas Connection
Install in accordance with relev
ant gas standards and/or codes of
practice
applicable.
Connect the elbow fitting to the appliance gas manifold
connection, and check that seals between the elbow and
manifold connection are in plac
e
and in good
condition.
z
For Natural gas: connect the natural gas appliance
regulator (pictured opposite) with integral test point using
approved gas thread tape or compound to the elbow
fitting.
z
For Universal LPG: connect the brass test point adaptor
(pictured opposite) using approved gas thread tape or
compound to the elbow fitting.
Ensure the supply connection point, test point and natural gas
regulator adjustment screw (for Natural gas installation) are
accessible for testing and/or adjustment with the hotplate in
the installed position.
■
■
■
1112
11
as onnection
as pecification
11.8MJ/h 4.3MJ/h
0.97 /
/
0.58
1.60
/
/
0.93
Universal
LP Gas
2.75kPa
1
1
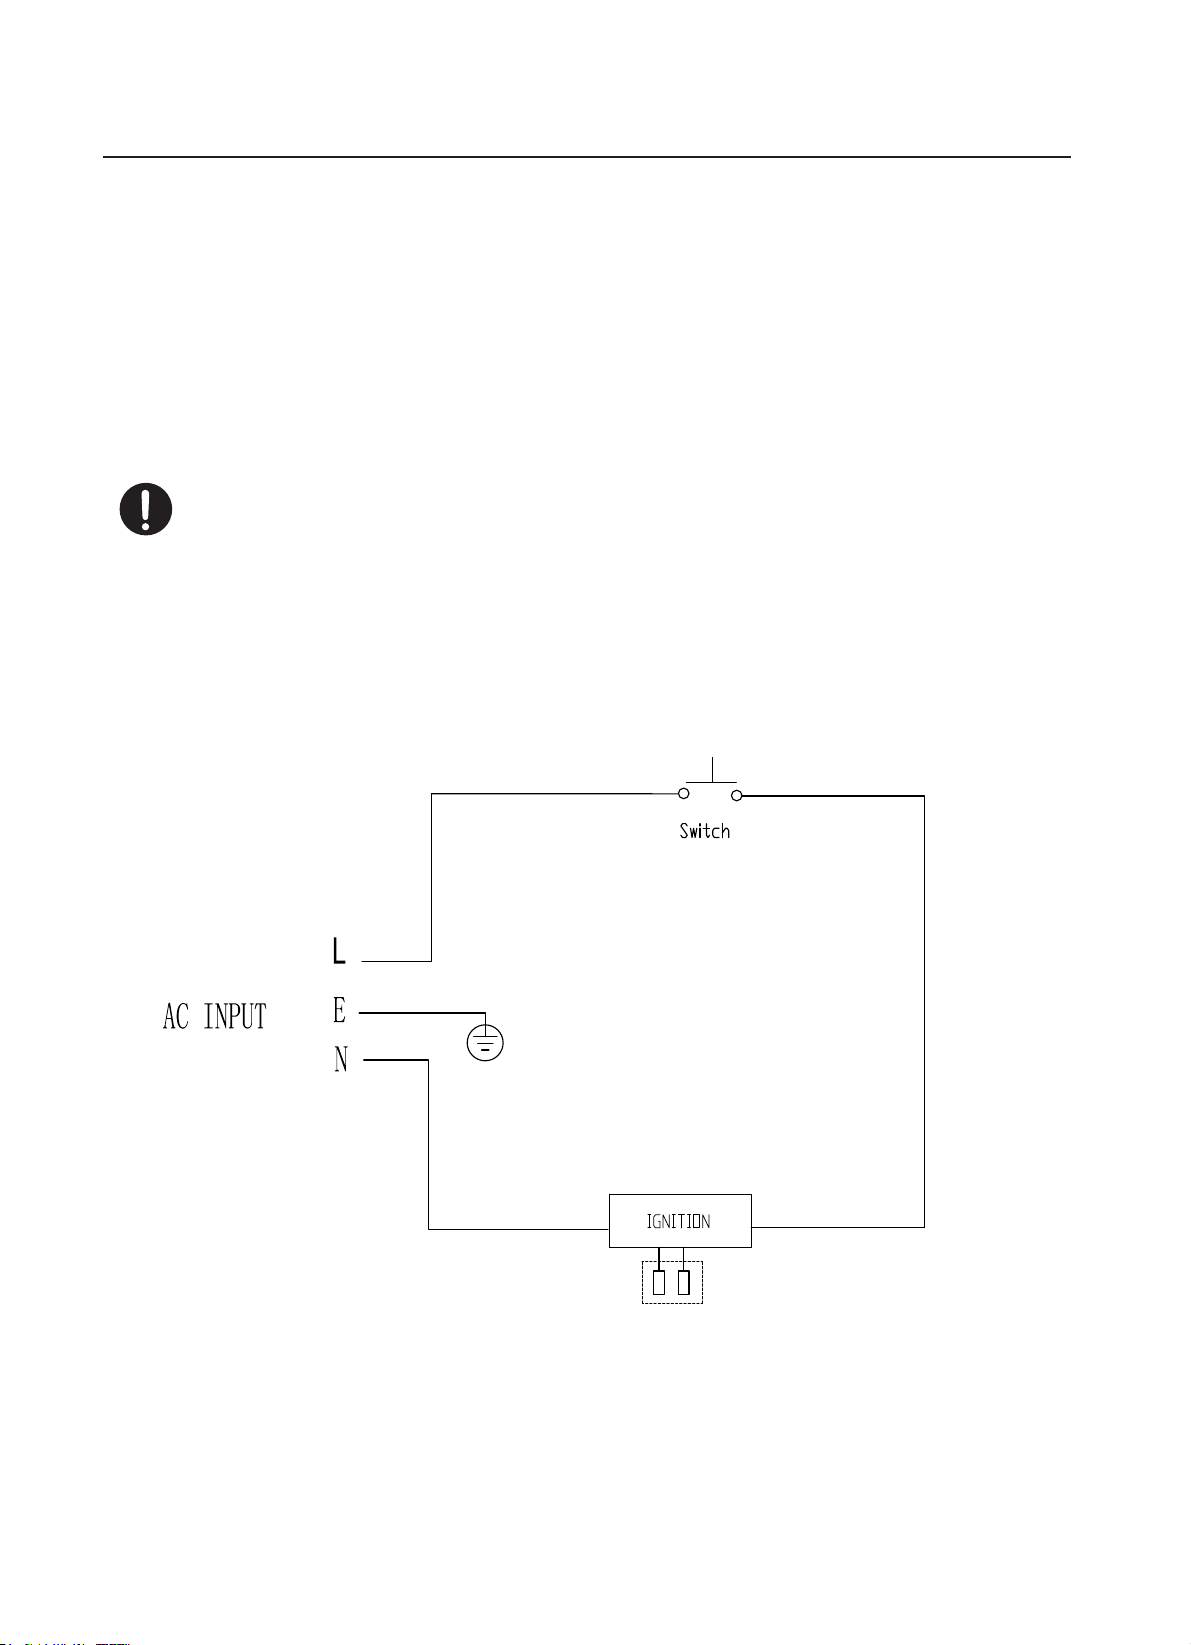
Electrical onnection
- Green/yellow = Earth
- Blue = Neutral
- Brown = Live
This appliance is designed to be connected to a electricity supply.
Ŷ7KHZLUHZKLFKLVFRORXUHGJUHHQDQG\HOORZPXVWEHFRQQHFWHG
WRWKHWHUPLQDOZKLFKLVPDUNHGZLWKWKHOHWWHU(RUE\WKHHDUWK
V\PERO
ʄ:,5
When the power cord is damaged it must be replaced by the manufacturer to produce,
customer service agent or similarly qualified personnel.
,1*',$*5$0
Ŷ7KLVDSSOLDQFHPXVWEHHDUWKHG
Ŷ7KHZLUHVLQWKHPDLQVOHDGDUHFRORXUHGLQDFFRUGDQFHZLWKWKHIROORZLQJFRGH
as adjustment
1
2
Injector
Control handle
Tap
Sealing ring
Remove the pan support, Burner lid and Flame spreader.
Unscrew the injector using a 7mm box spanner and
replace it with the stipulated injector for new gas
supply. Carefully reassemble the all components.
After injectors are replaced, it is advisable to strongly
tighten
dustment of minimum leel of the flame.
Ŷ7DNHSUHFDXWLRQVRQWKHRSHUDWLRQVDQGDGMXVWPHQWVWREHFDUULHGRXWZKHQ
FRQYHUWLQJIURPRQHJDVWRDQRWKHU
Ŷ$OOZRUNPXVWEHFDUULHGRXWE\DTXDOL¿HGWHFKQLFLDQ
Ŷ%HIRUH\RXEHJLQWXUQRIIWKHJDVDQGHOHFWULFLW\VXSSO\WRWKHDSSOLDQFH
Ŷ
%HIRUHSODFLQJWKHEXUQHUV
EDFNRQWKHWRSSODFHPDNHVXUH
WKDWWKHLQMHFWRULV
QRWEORFNHG
FDUULHGRXWDIWHU
JDVFRQYHUVLRQ
VXFKDVVRDSZDWHURUJDV
DTXDOL¿HGWHFKQLFLDQRULQVWDOOHU
KDVWRPDUN³9´
RQWKHULJKWJDV
FDWHJRU\
WRPDWFKZLWKWKH
VHWWLQJ
LQUDWLQJSODWH
5HPRYHWKHSUHYLRXV
VHWWLQJ³9´PDUN
LQWKHHYHQWRIDPDOIXQFWLRQ
FKDQJHWKHZKROHWDS
Ŷ
$IXOORSHUDWLRQDOWHVWDQGDWHVW
IRUSRVVLEOHOHDNDJHVPXVWEH
Ŷ
$IWHUFRPSOHWLQJFRQYHUVLRQ
GHWHFWRU
hange the inector of the urners.
Ŷ
o not dismante te ta safU
5
Trouble shooting
ot ignited
o park.
heck the electricity supply.
adly ignited
The gas supply is closed.
The ignition plug is contaminated
with alien substance.
oise made when
combusted and ignited
lame goes out
when in use.
ellow lame
ifferent gas is used.
heck the gas used.
nstable lame
as mell
ipe alien substance with a
dry cloth.
as leakage
top using the product and
close the
middle valve.
pen
the window to ventilate.
ontact our service centre
by
using a phone outside.
The burner lid is badly assembled. ssemble the lid correctly.
The gas supply is not completely
open.
pen the gas supply
completely.
The burners are wet.
ry the burners lids carefully.
The holes in the flame spreader
are clogged.
lean the flame spreader.
The burner lid is badly assembled.
ssemble the burner lid
correctly.
The flame supervision device is
contaminated with alien substance.
pen the gas supply
completely.
The burner lid is badly assembled.
ssemble the lid correctly.
lean the flame supervision
device.
Product being cooked has boiled
over and etinguished the flame.
Turn off burner knob.ait one
minute and reignite one.
strong draught may have blown
the flame out.
Please turn off one and check
cooking area for draught such
as open windows.ait one
minute and reignite one
The holes in the flame spreader
are clogged.
lean the flame spreader.
The burner lid is badly assembled.
ssemble the burner lid
correctly.
Ŷ+RZHYHUVRPHPLQRUSUREOHPVFDQEHUHVROYHGDVIROORZV
Prolem
Proale cause
Solution
Ŷ,ISUREOHPLVQRWVROYHGSOHDVHFRQWDFWFXVWRPHUFDUH centre

Warranty Card
Worldwide Appliances Pty Limited
A.B.N. 45868077422
Office:
48-50 Moore Street, Leichhardt N.S.W 2040
Post:
Locked Bag 3000, Annandale, N.S.W 2038
P: 1300 694 583
WARRANTY REGISTRATION
Your ongoing satisfaction with your artusi
product is important to us. We ask that you
complete the enclosed Warranty Registration
Card and return it to us so that we have a record
of the artusi product purchased by you.
PRIVACY
Worldwide Appliances respects your
privacy and is committed to handling your
personal information in accordance with the
National Privacy Principles and the Privacy
Act 1988 (Cth). A copy of the Worldwide
Appliances Privacy Policy is available at
www.artusi.com.au. Worldwide Appliances will
not disclose any personal information set out
in the Warranty Registration Card (“Personal
Information”) without your consent unless
required by:
1. law;
2. any Worldwide Appliances related company;
3. any service provider which provide services
to artusi or assist artusi in providing services
(including repair and warranty services) to
customers. Our purpose in collecting the
Personal Information is
to keep a record of the artusi product purchased
by you, in order to provide a better warranty
service to you in the unlikely event that there is
a problem with your artusi product. Worldwide
Appliances may contact you at any one or more
of the address, email address or telephone
numbers set out in the Warranty Registration
Card. Please contact artusi on 1300 694
583 should you not wish to be contacted by
Worldwide Appliances.
WARRANTY
1. Warranty
Worldwide Appliances warrants that each artusi
product will remain, for a period of either 12
months or 24 months of warranty. All Warranties
are valid from the original date of purchase, And
warranty claims must be accompanied by the
proof of purchase.
24 months warranty products:
All Built-in Appliances – Limited to Ovens,
Gas, Induction and Electric Cooktops, and All
Rangehoods
Freestanding Cookers - Gas and Electric Models
(900mm Width)
artusi.com.au
Dishwashers - Freestanding, Fully Integrated,
Semi Integrated and built-in
12 months warranty products:
Freestanding Cookers - Gas and Electric Models
in 50cm, 54cm and 60cm Widths
Portable Appliances* – Benchtop Models and
Portable Gas Models
2. What is not Covered by the Warranty.
The Warranty does not apply if an artusi product
is defective by a factor other than a defect arising
in the manufacture of the artusi product, including
but not limited to:
(a) damage through misuse (including failure
to maintain, service or use with proper care),
neglect, accident or ordinary wear and tear
(including deterioration of parts and accessories
and glass breakage);
(b) use for purpose for which the artusi product
was not sold or designed;
(c) use or installation which is not in accordance
with any specied instructions for use or
installation;
(d) use or operation after a defect has occurred or
been discovered;
(e) damage through freight, transportation or
handling in transit (other than when Worldwide
Appliances is responsible);
(f) damage through exposure to chemicals, dusts,
residues, excessive voltage, heat, atmospheric
conditions or other forces or environmental
factors outside the control or Worldwide
Appliances;
(g) repair, modication or tampering by the
purchaser or any person other than Worldwide
Appliances, an employee of Worldwide
Appliances or an authorised artusi service
contractor*;
(h) use of parts, components or accessories
which have not been supplied or specically
approved by artusi.
(i) damage to surface coatings caused by cleaning
or maintenance using products not recommended
in the artusi product handbook provided to the
purchaser upon purchase of the artusi product;
(j) damage to the base of an electric oven due to
items having been placed on the base of the oven
cavity or covering the base, such as aluminium
foil (this impedes the transfer of heat from the
element to the oven cavity and can result in
irreparable damage); or
(k) damages, dents or other cosmetic
imperfections not aecting the performance of the
artusi in respect of an artusi product purchased
as a “factory second” or from display
The Warranty does not extend to light globes
used in artusi products.
3. Domestic Use
Each artusi product is made for domestic use.
This Warranty may not extend to artusi products
used for commercial purposes.
Continued over...
4
Please complete and send to ARTUSI at: REPLY PAID 83617
LEICHHARDT NSW 2040
Last Name: First Name:
Address:
State: Postcode: Email:
Home Phone: Mobile:
Purchase Date: / / (Please attach proof of purchase to validate warranty)
MODEL NUMBER
SERIAL NUMBER
(if you cannot locate the serial number please call ARTUSI on 1300 694 583)
1
2
3
4
WARRANTY REGISTRATION CARD
01052013
01032014
4. Time for Claim under the Warranty
You must make any claim under this Warranty
within twenty eight (28) days after the occurrence
of an event which gives rise to a claim pursuant
to the Warranty, by booking a service call on the
telephone number below.
5. Proof of Purchase
Customers must retain proof of purchase in order
to be eligible to make a warranty claim in respect
of an artusi product.
6. Claiming under the Warranty
Customers will bear the cost of claiming under
this Warranty unless Worldwide Appliances
determines the expenses are reasonable, in which
case the customer must claim those expenses
by providing written evidence of each expense
to Worldwide Appliances at the address on the
Warranty Registration Card.
7. Statutory Rights
(a) These terms and conditions do not aect your
statutory rights.
(b) The limitations on the Warranty set out in this
document do not exclude or limit the application
of the consumer guarantees set out in the Act or
any other equivalent or corresponding legislation
in the relevant jurisdiction where to do so would:
(i) contravene the law of the relevant jurisdiction;
or
(ii) cause any part of the Warranty to be void.
(c) Worldwide Appliances excludes indirect or
consequential loss of any kind (including, without
limitation, loss of use of the artusi product) and
(other than expressly provided for in these terms
and conditions) subject to all terms,
conditions and warranties implied by custom, the
general law, the Act or other statute.
(d) The liability of Worldwide Appliances to you
for a breach of any express or non-excludable
implied term, condition or warranty is limited at
the option of Worldwide Appliances to:
(i) replacing or repairing the defective part of the
artusi product;
(ii) paying the cost of replacing or repairing the
defective part of the artusi product;
(iii) replacing the artusi product; or
(iv) paying the cost of replacing the artusi
product.
(e) Our goods come with guarantees that cannot
be excluded under the Australian Consumer
Law. You are entitled to a replacement or refund
for a major failure and for compensation for any
other reasonably foreseeable loss or damage.
You are also entitled to have the goods repaired
or replaced if the goods fail to be of acceptable
quality and the failure does not amount to a
major failure.
8. Defects
Any part of an artusi product deemed to be
defective and replaced by Worldwide Appliances
is the property of Worldwide Appliances.
Worldwide Appliances reserves the right to
inspect and test artusi products in order to
determine the extent of any defect and the
validity of a claim under the Warranty.
*To locate your closest artusi authorised service
agent please contact us on 1300 652 100 or visit
www.artusi.com.au
ALL SERVICE CALLS MUST BE BOOKED
THROUGH AN AUTHORISED DEALER OR
WARRANTY DEPARTMENT ON 1300 652 100
OR stokesaps.com.au/artusi-service
01032014
Warranty Card continued
artusi.com.au
Warranty Card tear off


ARTUSI.COM.AUP: 1300 649 583
NSW & ACT (HEAD OFFICE)
48-50 MOORE STREET
LEICHHARDT
F 02 8569 4699
QLD
1/42 CAVENDISH ROAD
COORPAROO
F 07 3397 0850
VIC, TAS & SA
1211 TOORAK ROAD
CAMBERWELL
F 03 9809 2155
WA & NT
UNIT 10/55 HOWE STREET
OSBORNE PARK
F 08 9201 9188
NZ
PO BOX 11.160
SOCKBURN CHRISTCHURCH
F 03 344 5906
ARTUSI OFFICES ARE OPEN DAILY FROM 9AM–5PM AND SATURDAYS 10AM–4PM
DISCLAIMER
Worldwide Appliances PTY LTD, trading as ARTUSI, is continually seeking ways to improve the design specifications, aesthetics and production
techniques of its products. As a result alterations to our products and designs take place continually. Whilst every effort is made to produce
information and literature that is up to date, this brochure should not be regarded as an infallible guide to the current specifications, nor does it
constitute an offer for the sale of any particular product. Product dimensions indicated in our literature is indicative only. Actual product only
should be used to define dimension cutouts. Distributors, and retailers are not agents of ARTUSI and are not authorised to bind ARTUSI by any
express or implied undertaking or representation.