K_nmore
ELECTRIC RANGE
OWNER'S MANUAL
models 93781 93788
nNSTALLATION
CARE AND USE
Important Safety Instructions
Features of Your Range
Surface Cooking:
Surface Cooking Guide
Canning Tips
Oven;
Clock/Timer
Control Settings
Baking, Baking Guide
Roasting, Roasting Guide
Broiling, Broiling Guide
Self-Cleaning Instructions
Care & Cleaning
Thermostat Adjustment
!
PROBLEM SOLVER
The Problem Solver lists causes of
minor operating problems that you can
correct yourself,,
!
WARRANTY
3
MNSTALLATIONHNSTFIUC3:aON$
JMPOFtTANT:SAVE FOR THE LOCAL ELECTRICAL iNSPECTOR'S USE
Electrical Requirements
CAUTION, FOR PERSONAL SAFETY:
DO NOT USE AN EXTENSION CORD WITH THIS
APPLIANCE.
REMOVE HOUSE FUSE OR OPEN CIRCUIT
BREAKER BEFORE BEGINNING INSTALLATION,
This appliance must be supplied with the proper
voltage and frequency, and connected to an individual
properly grounded branch circuit, protected by a cir-
cuit breaker or time delay fuse, as noted on the rating
plate (Rating plate is located on door frame,)
Wiring must conform to National Electric Codes.
If the electric service provided does not meet the above
specifications, it is recommended that a licensed elec-
trician install an approved outlet.
Because range terminals are not accessible after range
is in position, use flexible service conduit or cord.
$lie :1
Prepare the Opening
11/2" spacing is recommended from the range to adja-
cent vertical walls above the cooktop surface.
Allow 30" minimum clearance between surface units
and bottom of unprotected wood or metal top cabinet,
and t5" minimum between countertop and adjacent
cabinet bottom°
Your range, like many other household items, is
heavy and can settle into soft floor coverings such
as cushioned vinyl or carpeting. When moving the
range on this type of flooring, use care, and it is recom-
mended that these simple and inexpensive instructions
be followe&
The range should be installed on a sheet of plywood
(or similar material) as follows: When the floor cover.
ing ends at the front of the range, the area that the
range will rest on should be built up with plywood to
the same level or higher than the floor covering. This
will allow range to be moved for cleaning or servicing.
$tl!!p 2
Prepare for Electricaa Connection
Use a 3-conductor, or if required, a 4-conductor range
cord set as noted below,.
For Ranges Less than or Equal to 12.1 KW
9-5255 3 condo 4' 50A-125!250V
9-5237 4 cond. 4' 50A-125/250V
OUTLET BOX INSTALLED LEFT OF _ OF RANGE
1_OF RANGE
CORD _
$ttep
1. Locate connector block at the bottom rear of range
and remove rear wiring coven
2, Directly below the connector block is a hole with a
knockout ring for accommodating conduit fittings°
Brackets provided are used to support the flexible cord
strain relief, which must be securely attached to the
cord set.
WIRING (3OVER _ r,
STRAIN RELIEF // _ \,_\a_C K
(PROVlOEOW:TH 6"_11(I_(ll
RANGEconoSET, rr_lt II I_ilt.JlL4f_rTI
NOT PART OF RANGE} 1tt'-4.II_il<'><_tlIHNJ I I
The following procedures
should be used for copper or
aluminum wire connection:
1. Copper Wiring
Connect the neutral or grounded
wire of the supply circuit to the
neutral terminal of the connec-
tor block, located in the center_
The power leads must be con-
nected to the outside (brass
colored) terminals.
Power Cord Installation--
Insert screw through power
cord terminal so that the screw
passes through connector block
terminal and engages nuL
Tighten screw securely.
Cable Direct Installation--
Clamp bare wires between the
connector block terminal and
movable nuts with screws
tightened securely°
NEUTRAL
_TERMINAL
GROUNDING STRAP
{GROUNDED TO RANGE)
_ POWER CORO
COt_NECTOR ._ CORD
_LOCK
CREW
CONNECTOR
BARE _r TERMINAL
WIRESr: _
MOVA8_.
NUT
WARNING: CONNECTOR BLOCK IS APPROVED
FOR COPPER WIRE CONNECTION ONLY.
2. Aluminum Wiring
A. Connect length of copper building wire to range ter-
minal block,
B. Splice copper wires to aluminum wiring using
special connectors designed and UoL. approved for
joining copper to aluminum, and follow the connector
manufacturer's recommended procedure closely.
NOTE: Wire used, location and enclosure of splices,
etc., must conform to good wiring practice and local
codes.
5
Speciaa Grounding instructions
WARNING:
1. If local codes do not permit
grounding through neutral,
disconnect the strap, located at
the bottom of connector block,
from the frame and cut off to pre-
vent contact with the range body.
To ground range frame, a 4th
grounding lead must be con-
nected to range frame in accord-
ance with local codes, using only
ground lug and screw°
_,UG
2. Mobile Home Installation--If this range is provided
with a 3-conductor cord or cable assembly, or if local
codes do not permit grounding through the neutral, the
grounding strap must be removed and the 3-conductor
cord or cable assembly must be replaced by a
4-conductor cord as follows:
A. Remove the 3-conductor cord by removing the strain
relief and terminal lugs from the connector block.
B. Attach the 4-conductor cord as described in STEP
5.1, except attach 4th wire to previous location of the
grounding strap.
6
Anti-Tip Bracket
Hnstallation
An ANTI-TIP bracket is
supplied with instruc-
tions for installation in a
variety of locations. The
instructions include a
template, a parts list and
• .F_ _ . ..... -_j:_'.t..
Bracket Installation Tempiate
a list of tools necessary to complete the installation.
Read the IMPORTANT SAFETY INSTRUCTIONS and
the instructions that fit your situation before beginning
installation.
WARNmNG
° RANGE MUST BE SECURED BY ANTI-TIP
BRACKET SUPPLIED.
o SEE INSTRUCTIONS TO INSTALL.
° UNLESS PROPERLY INSTALLED, RANGE
COULD BE TIPPED BY STEPPING OR SIT-
TING ON DOOR. INJURY MIGHT RESULT
FROM SPILLED HOT LIQUIDS OR FROM
RANGE ITSELF.
Attachment to wail
Bracket
Screw must enter wood or metal
Wail prate
t
Leveling the Range
The range must be leveled_ Leveling feet are located
on each corner of the base of the range. Remove the
storage drawer and rotate the leveling feet in or out as
require& To remove drawer, pull it out all the way, tilt
up the front and remove it. To replace, insert glides at
back of drawer beyond stop on range glide& Lift drawer
if necessary to insert easily.
One of the rear leveling feet will engage the ANTI-TIP
bracket (allow for some side to side adjustment)° Allow
a minimum clearance of 1/8" between the range and
the leveling foot that is to be installed into the ANTI-TIP
brackeL
Fina! Check
Be sure all switches are in the "off" position before leav-
ing the range_
5
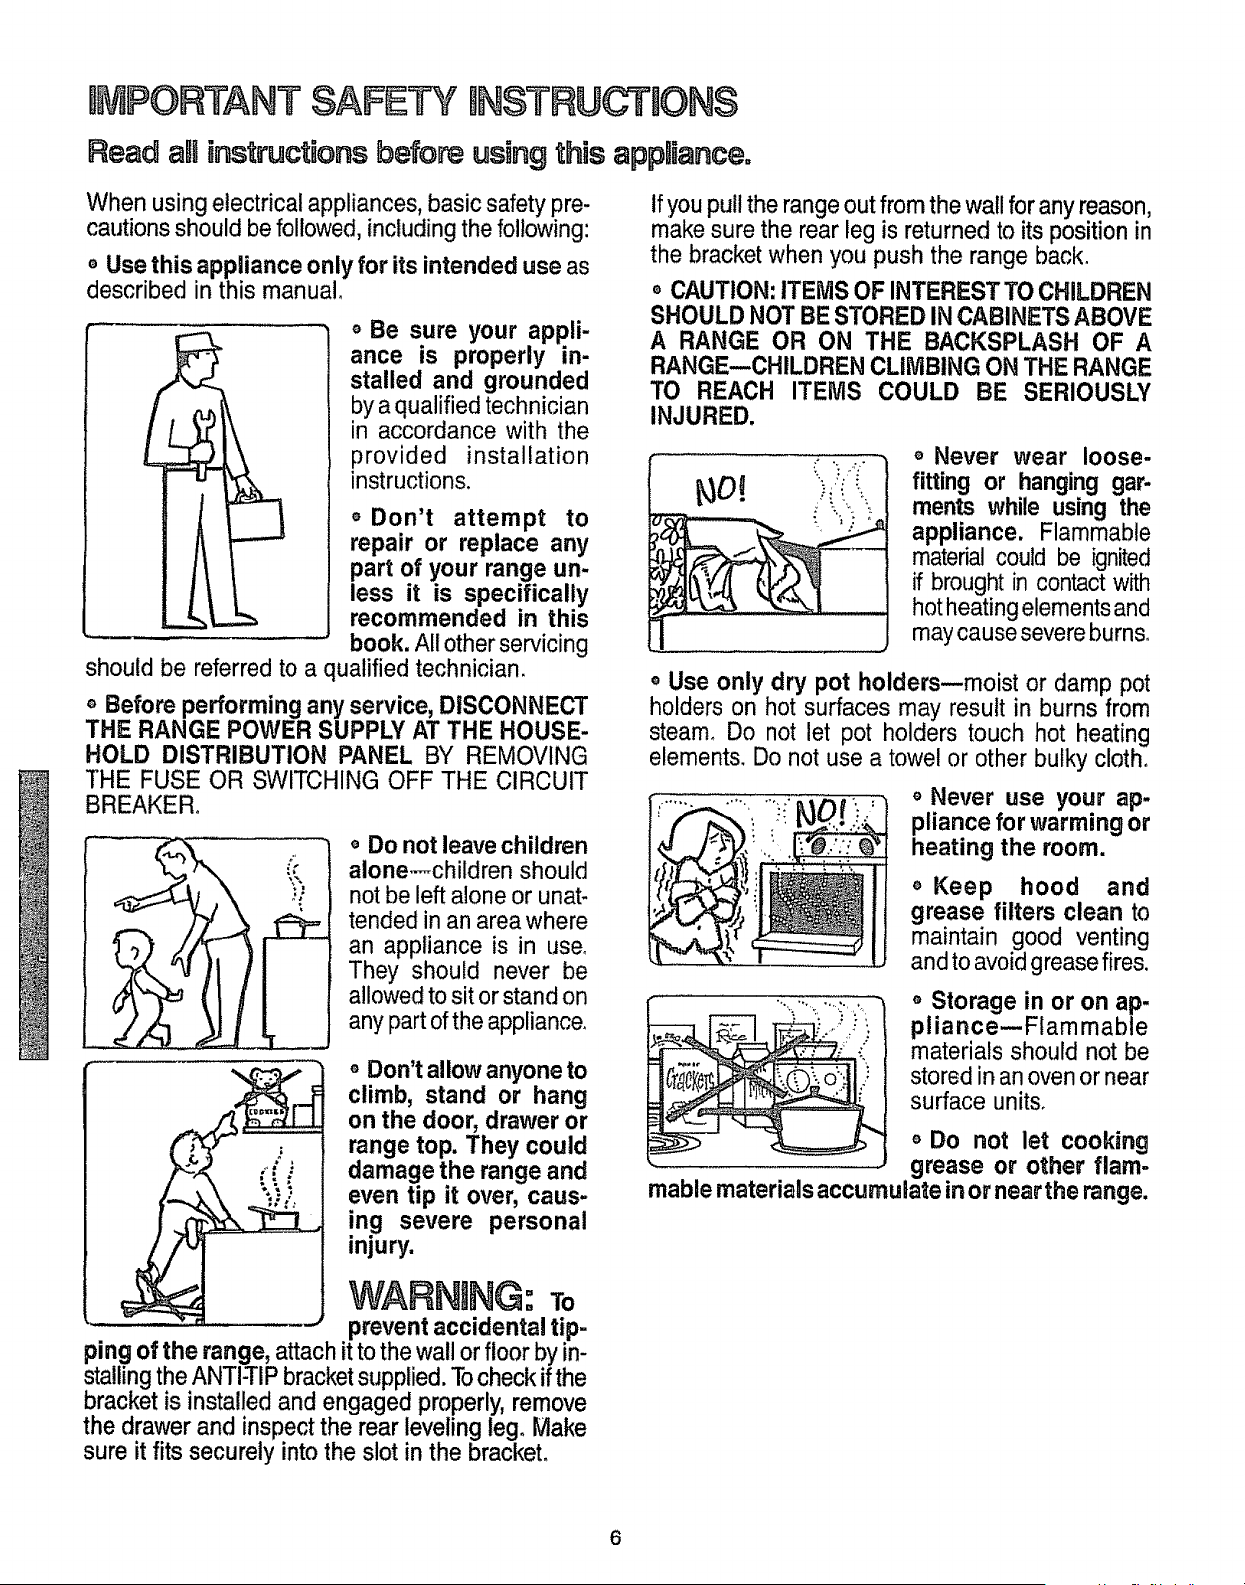
MPORTANT SAFETY BNSTRUCTION$
Read aHinstructions befe using this appliance=
When using electrical appliances, basic safety pre-
cautions should be followed, including the following:
o Use this appliance only for its intended use as
described in this manual_
o Be sure your appli-
ance is properly in-
stalled and grounded
by a qualified technician
in accordance with the
provided installation
instructions.
o Don't attempt to
repair or replace any
part of your range un-
less it is specifically
recommended in this
book. All other servicing
should be referred to a qualified technician.
o Before performing any service, DISCONNECT
THE RANGE POWER SUPPLY AT THE HOUSE-
HOLD DISTRIBUTION PANEL BY REMOVING
THE FUSE OR SWITCHING OFF THE CIRCUIT
BREAKER,
o Do not leave children
alone--children should
not be left alone or unat-
tended in an area where
an appliance is in use_
They should never be
allowed to sit or stand on
any part of the appliance.
o Don't allow anyone to
climb, stand or hang
on the door, drawer or
range top. They could
damage the range and
even tip it over, caus-
ing severe personal
injury.
WARNING: To
prevent accidental tip-
ping of the range, attach it to the wall or floor byin-
stallingtheANTI-TIPbracketsupplied. Tocheckifthe
bracketis installedand engaged properly,remove
the drawer and inspectthe rear leveling leg, Make
sure it fits securely intothe slot in the brackeL
If youpull the range out from the wall for any reason,
make sure the rear leg is returnedto itsposition in
the bracket when you push the range back°
= CAUTION: ITEMS OF INTEREST TO CHILDREN
SHOULD NOT BE STORED IN CABINETS ABOVE
A RANGE OR ON THE BACKSPLASH OF A
RANGE--CHILDREN CLIMBING ON THE RANGE
TO REACH ITEiVIS COULD BE SERIOUSLY
INJURED.
o Never wear loose-
fitting or hanging gar-
ments while using the
appliance. Flammable
material could be ignited
if brought incontact with
hotheating elements and
maycause severeburns.
,, Use only dry pot holders--moist or damp pot
holders on hot surfaces may result in burns from
steam_ Do not let pot holders touch hot heating
elements. Do not use a towel or other bulky cloth,
,, Never use your ap-
pliance for warming or
heating the room.
,, Keep hood and
grease filters clean to
maintain good venting
and to avoid grease fires.
,, Storage in or on ap-
pliance-Flammable
materials should not be
stored inanovenor near
surface units,
,, Do not let cooking
grease or other flare-
mable materials accumulate in or near the range.
6
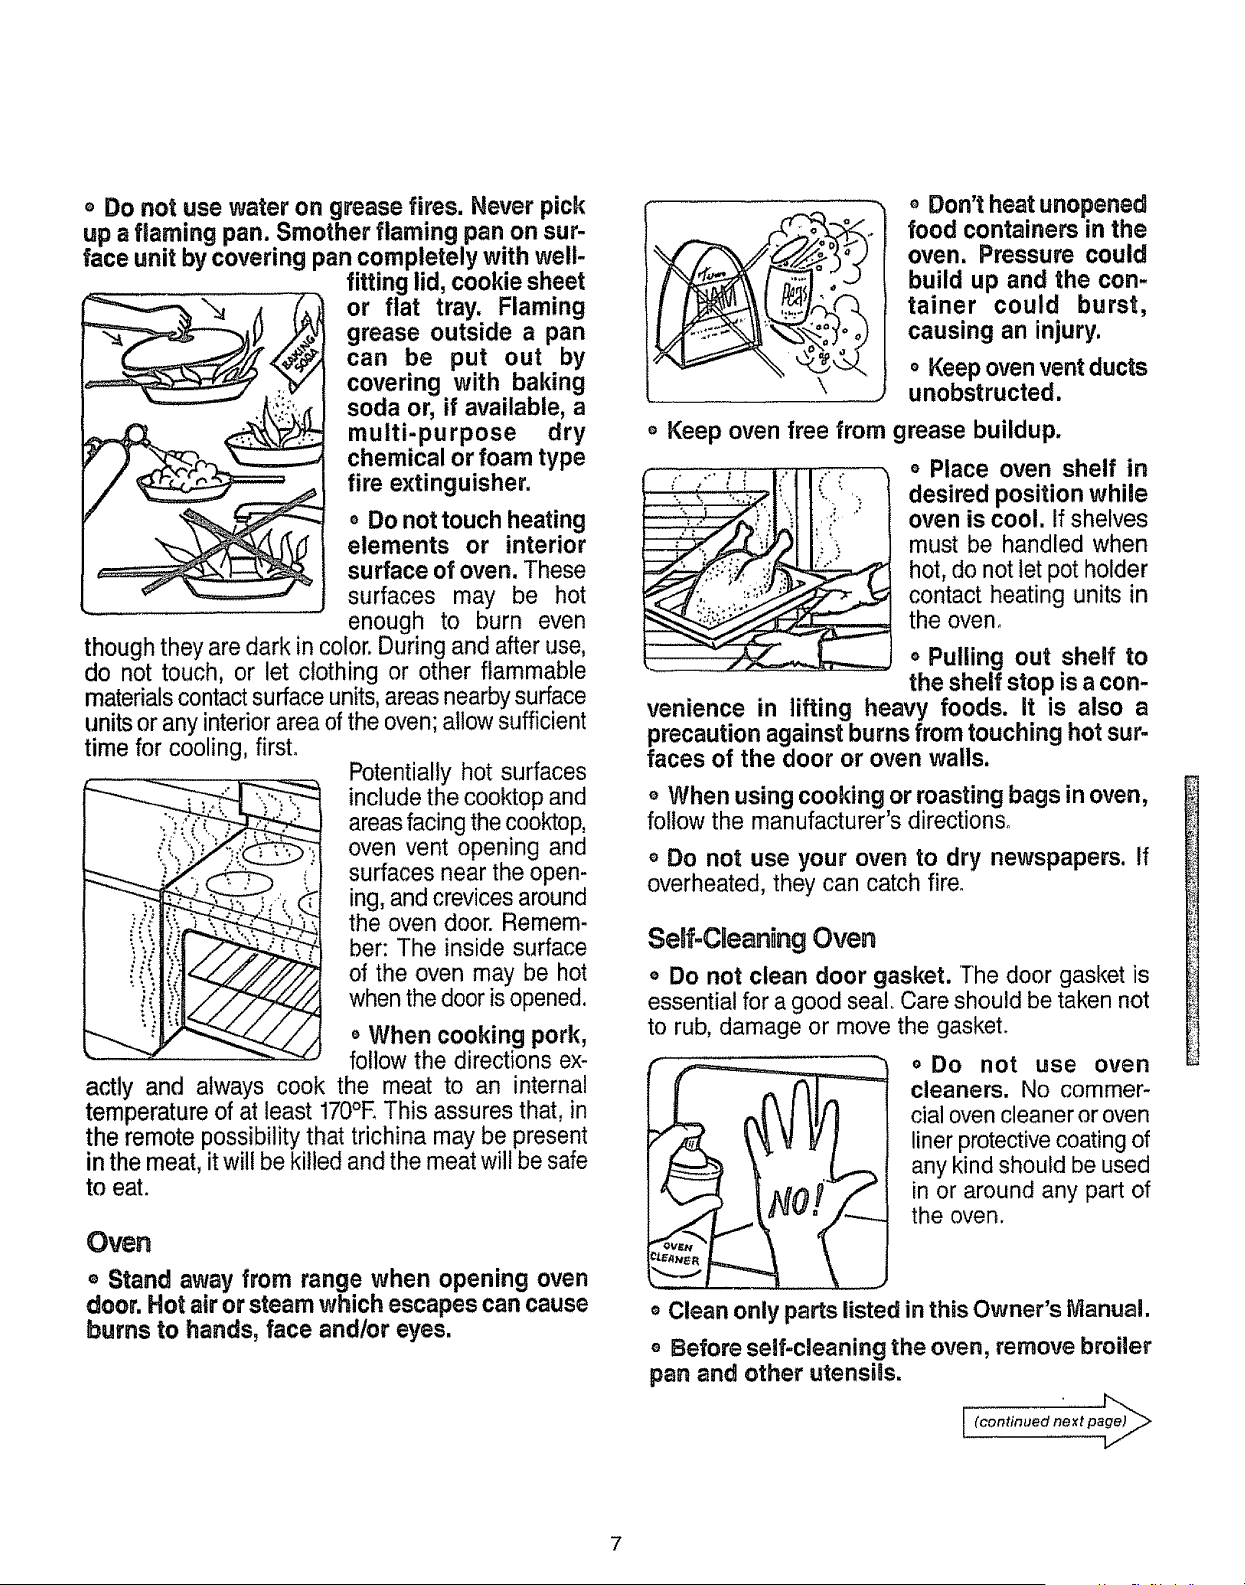
o Do not use water on grease fires. Never pick
up a flaming pan. Smother flaming pan on sur-
face unit by covering pan completely with welt-
fitting lid, cookie sheet
or flat tray. Flaming
grease outside a pan
can be put out by
covering with baking
soda or, if available, a
multi.purpose dry
chemical or foam type
fire extinguisher.
o Do not touch heating
elements or interior
surface of oven. These
surfaces may be hot
enough to burn even
though they are dark in color. During and after use,
do not touch, or let clothing or other flammable
materials contact surface units, areas nearby surface
units or any interior area of the oven; allow sufficient
time for cooling, firsL
Potentially hot surfaces
include the cooktop and
! areas facing the cooktop,
;_ oven vent opening and
*_ %
surfaces near the open-
ing, and crevices around
the oven door. Remem-
ber: The inside surface
of the oven may be hot
when the door isopened.
e When cooking pork,
follow the directions ex-
actly and always cook the meat to an internal
temperature of at least 170°EThis assures that, in
the remote possibility that trichina may be present
in the meat, it will be killed and the meat will be safe
to eat.
Oven
o Stand away from range when opening oven
door. Hot air or steam which escapes can cause
burns to hands, face and/or eyes.
a
,_Don't heat unopened
food containers in the
oven. Pressure could
build up and the con-
tainer could burst,
causing an injury.
o Keep oven vent ducts
unobstructed.
o Keep oven free from grease buildup,
: o Place oven shelf in
desired position while
oven is cool. If shelves
must be handled when
hot, do not let pot holder
contact heating units in
the oven,
o Pulling out shelf to
the shelf stop is a con-
venience in lifting heavy foods. It is also a
precaution against burns from touching hot sur-
faces of the door or oven walls,
o When using cooking or roasting bags in oven,
follow the manufacturer's directions_
o Do not use your oven to dry newspapers. If
overheated, they can catch fire°
Serf-Cleaning Oven
o Do not clean door gasket. The door gasket is
essential for a good seal. Care should be taken not
to rub, damage or move the gasket.
o Do not use oven
cleaners, No commer-
cial oven cleaner or oven
liner protective coating of
any kind should be used
in or around any part of
the oven.
_,Clean only parts listed in this Owner's Manual.
,, Before self-cleaning the oven, remove broiler
pan and other utensiBs.

MP©RTANT SAFETY UHSTRUCTJON$(continued)
Surface Cooking Units
i_'_ _"_ _:'ii........_": _ o Use proper pan size
--This appliance is equip-
_ : ...._ i i_ ped with oneormore sur-
face units of different
size. Select utensils hav-
ing flat bottoms large
enough to cover the
surface unit heating ete-
mento The use of under-
sized utensils wilt expose
a portion of the heating element to direct contact and
may result in ignition of clothing. Proper relationship
of utensil to burner will also improve efficiency (see
pages 12-t3).
o Never leave surface
units unattended at
high heat settings. Boil-
over causes smoking
and greasyspilloversthat
may catch on fire.
o Don't use aluminum
foil to line drip pans or
anywhere in the oven
-.. except as described in
this book. Misuse could
result in a shock, fire
hazard or damage to the
. _ range.
• Be sure drip pans
and vent ducts are not
covered and are in
"- place. Their absence
during cooking could damage range parts and
wiring.
o Only certain types of glass, glass/ceramic,
earthenware or other glazed containers are
suitable for range-top service; othersmay break
because ofthesudden changeintemperatureo(See
section on "Surface Cooking" for suggestions_)
To minimize burns,
ignition of flammable
materials, and spillage,
the handle of a container
should be turned toward
the center of the range
without extending over
nearby surface units.
,, Always turn surface
unit to OFF before re-
moving utensil.
o Keep an eye on foods being fried at HIGH or
MEDIUM HiGH heats.
° To avoid the possibility of a burn or electric
shock, always be certain that the controls for all
surface units are at OFF position and all coils are
cool before attempting to lift or remove the unit.
o Don't immerse or soak removable surface
units. Don't put them in adishwasher. Do not self-
clean the surface units in the oven.
,, When flaming foods under the hood, turn the
fan off. The fan, if operating, may spread the
flame.
,, Foods for frying should be as dry as possible.
Frost on frozen foods or moisture on fresh foods can
cause hot fat to bubble up and over sides of pan.
,, Use little fat for effective shallow or deep-fat
frying. Filling the pan too full of fat can cause
spil!overs when food is added_
o if a combination of oils or fats will be used in
frying, stir together before heating, or as fats melt
slowly.
o Always heat fat slowly, and watch as it heats.
o Use deep fatthermometer whenever possible
to preventoverheating fat beyond the smoking point.
SAVE THESE BNSTRUCTnON$
8
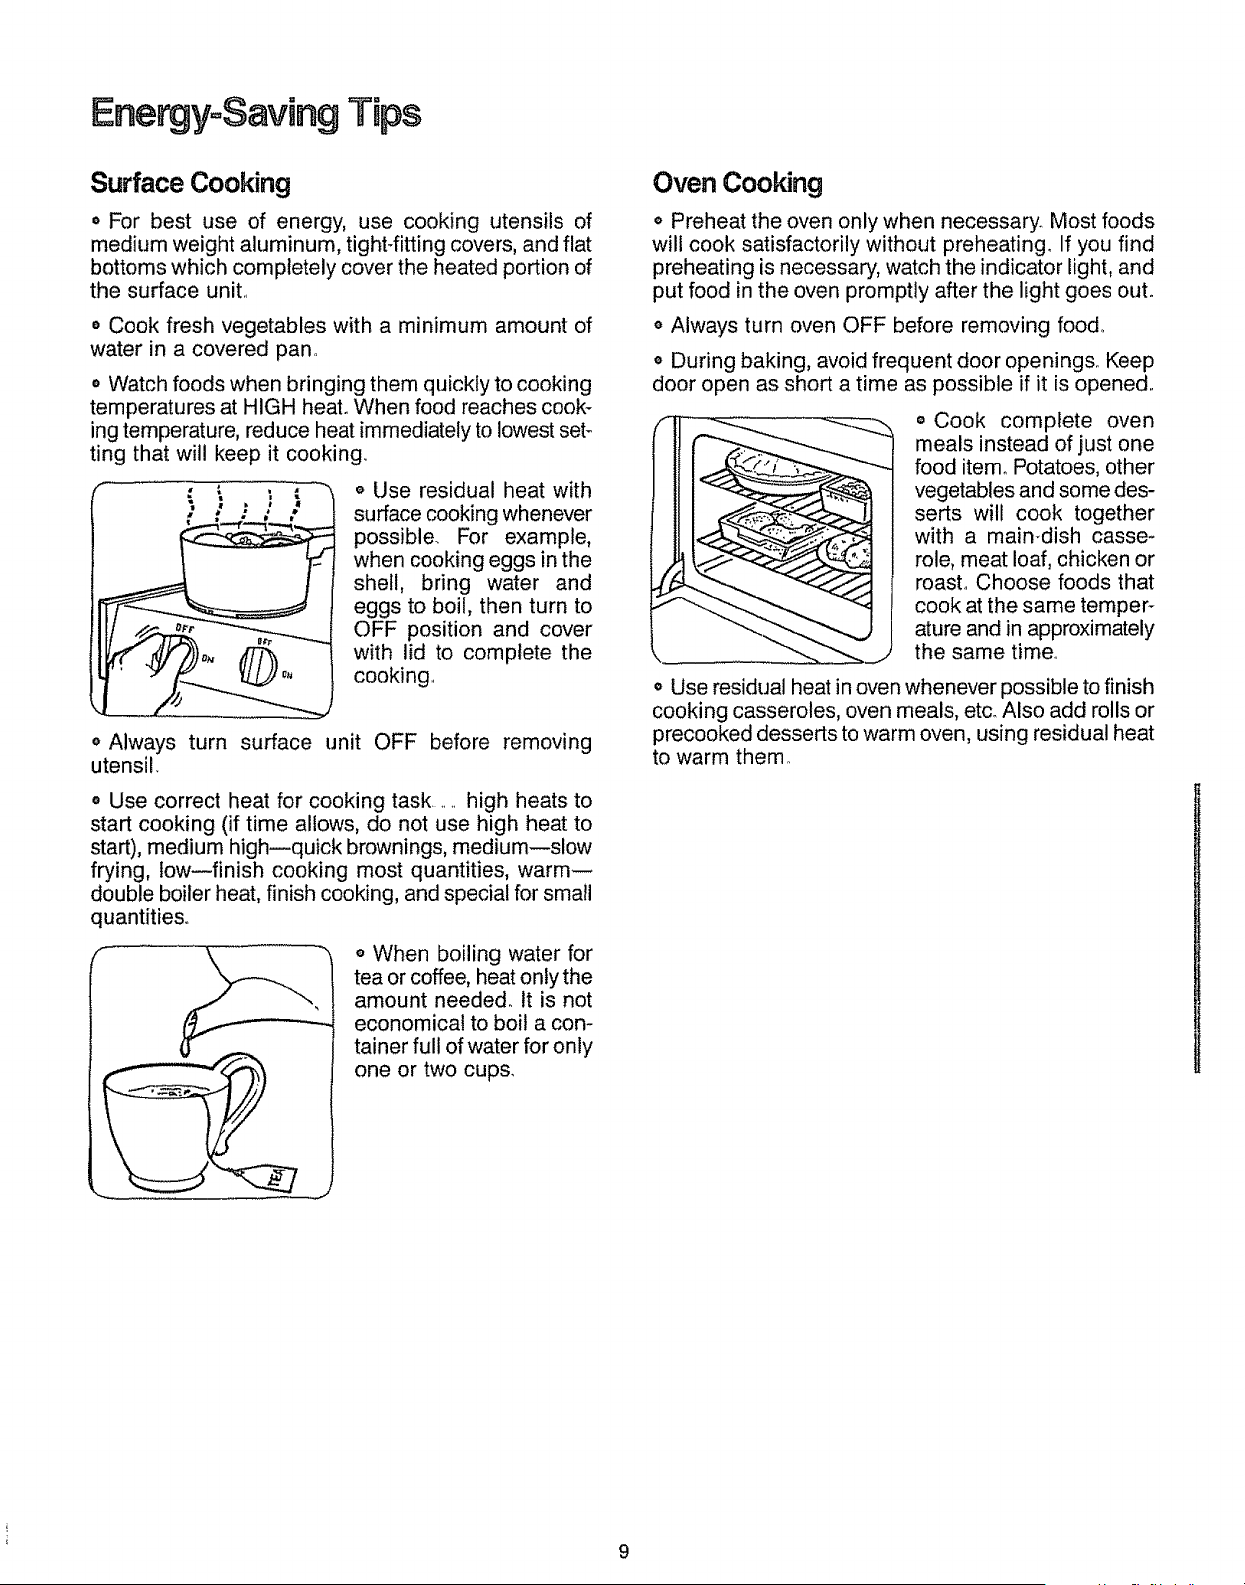
e yoSaving Tips
Surface Cooking
o For best use of energy, use cooking utensils of
medium weight aluminum, tight-fitting covers, and flat
bottoms which completely cover the heated portion of
the surface uniL
o Cook fresh vegetables with a minimum amount of
water in a covered pan.
o Watch foods when bringing them quickly to cooking
temperatures at HIGH heat° When food reaches cook_
ing temperature, reduce heat immediately to lowest set-
ting that wil! keep it cooking.
o Use residual heat with
surface cooking whenever
possible. For example,
when cooking eggs in the
shell, bring water and
eggs to boil, then turn to
OFF position and cover
with lid to complete the
cooking..
o Always turn surface unit OFF before removing
utensil.
o Use correct heat for cooking task ..... high heats to
start cooking (if time allows, do not use high heat to
start), medium high--quick brownings, medium--slow
frying, towMfinish cooking most quantities, warm--
double boiler heat, finish cooking, and special for small
quantities.,
o When boiling water for
tea or coffee, heat only the
amount needed. It is not
economical to boil a con-
tainer full of water for only
one or two cups.
Oven Cooking
e Preheat the oven only when necessary. Most foods
will cook satisfactorily without preheating. If you find
preheating is necessary, watch the indicator light, and
put food in the oven promptly after the light goes out°
e Always turn oven OFF before removing food.
. During baking, avoid frequent door openings° Keep
door open as short a time as possible if it is opened,.
= Cook complete oven
meals instead of just one
food item° Potatoes, other
vegetables and some des-
serts will cook together
with a main-dish casse-
role, meat loaf, chicken or
roast. Choose foods that
cook at the same temper-
ature and in approximately
the same time,.
o Use residual heat in oven whenever possible to finish
cooking casseroles, oven meals, etc. Also add rolls or
precooked desserts to warm oven, using residual heat
to warm them.
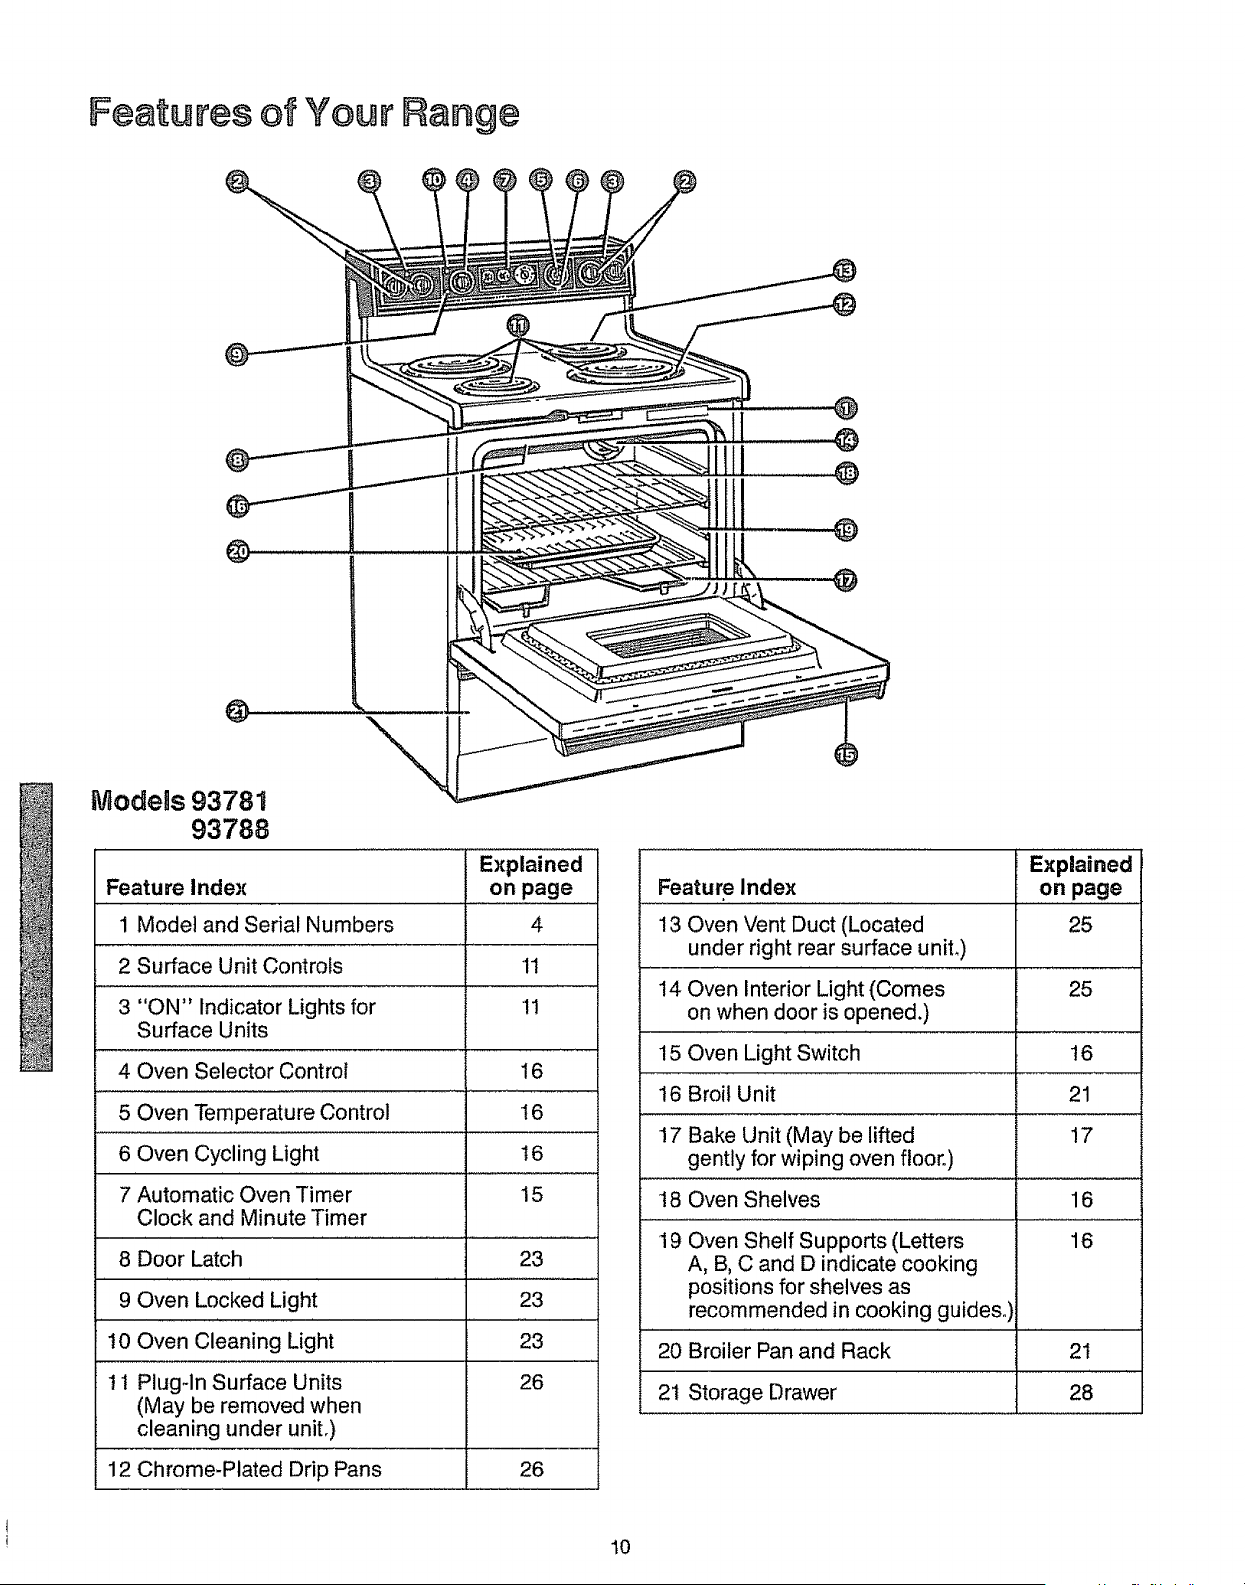
Features Your Range
@
@
Models 93781
93788
Explained
Feature index on page
1 Model and Serial Numbers 4
2 Surface Unit Controls 11
3 "ON" Indicator Lights for 1!
Surface Units
4 Oven Selector Control 16
5 Oven Temperature Control 16
6 Oven Cycling Light 16
7 Automatic Oven Timer 15
Clock and Minute Timer
8 Door Latch 23
9 Oven Locked Light 23
10 Oven Cleaning Light 23
t 1 Plug-In Surface Units 26
(May be removed when
cleaning under unit.)
12 Chrome-Plated Drip Pans 26
Explained
Feature Index on page
13 Oven Vent Duct (Located 25
under right rear surface uniL)
14 Oven Interior Light (Comes 25
on when door is opened.)
15 Oven Light Switch 16
16 Broil Unit 21
17 Bake Unit (May be lifted 17
gently for wiping oven floor.)
18 Oven Shelves 16
19 Oven Shelf Supports (Letters 16
A, B, C and D indicate cooking
positions for shelves as
recommended in cooking guides.)
20 Broiler Pan and Rack 21
21 Storage Drawer 28
10
Surface Cooking
See Surface Cooking Guide on pages 12 and 13.
SurfaceCookingwith gnfiniteHeatCont_ls
"Your surface units and controls are designed to give
you an infinite choice of heat settings for surface unit
cooking°
At both OFF and HI positions, there is a slight niche so
control "clicks" at those positions; "click" on HI marks
the highest setting; the lowest setting is between WM
and OFE In a quiet kitchen, you may hear slight
"clicking" sounds during cooking, indicating heat
settings selected are being maintained.
Switching heats to higher settings always shows a
quicker change than switching to lower settings.
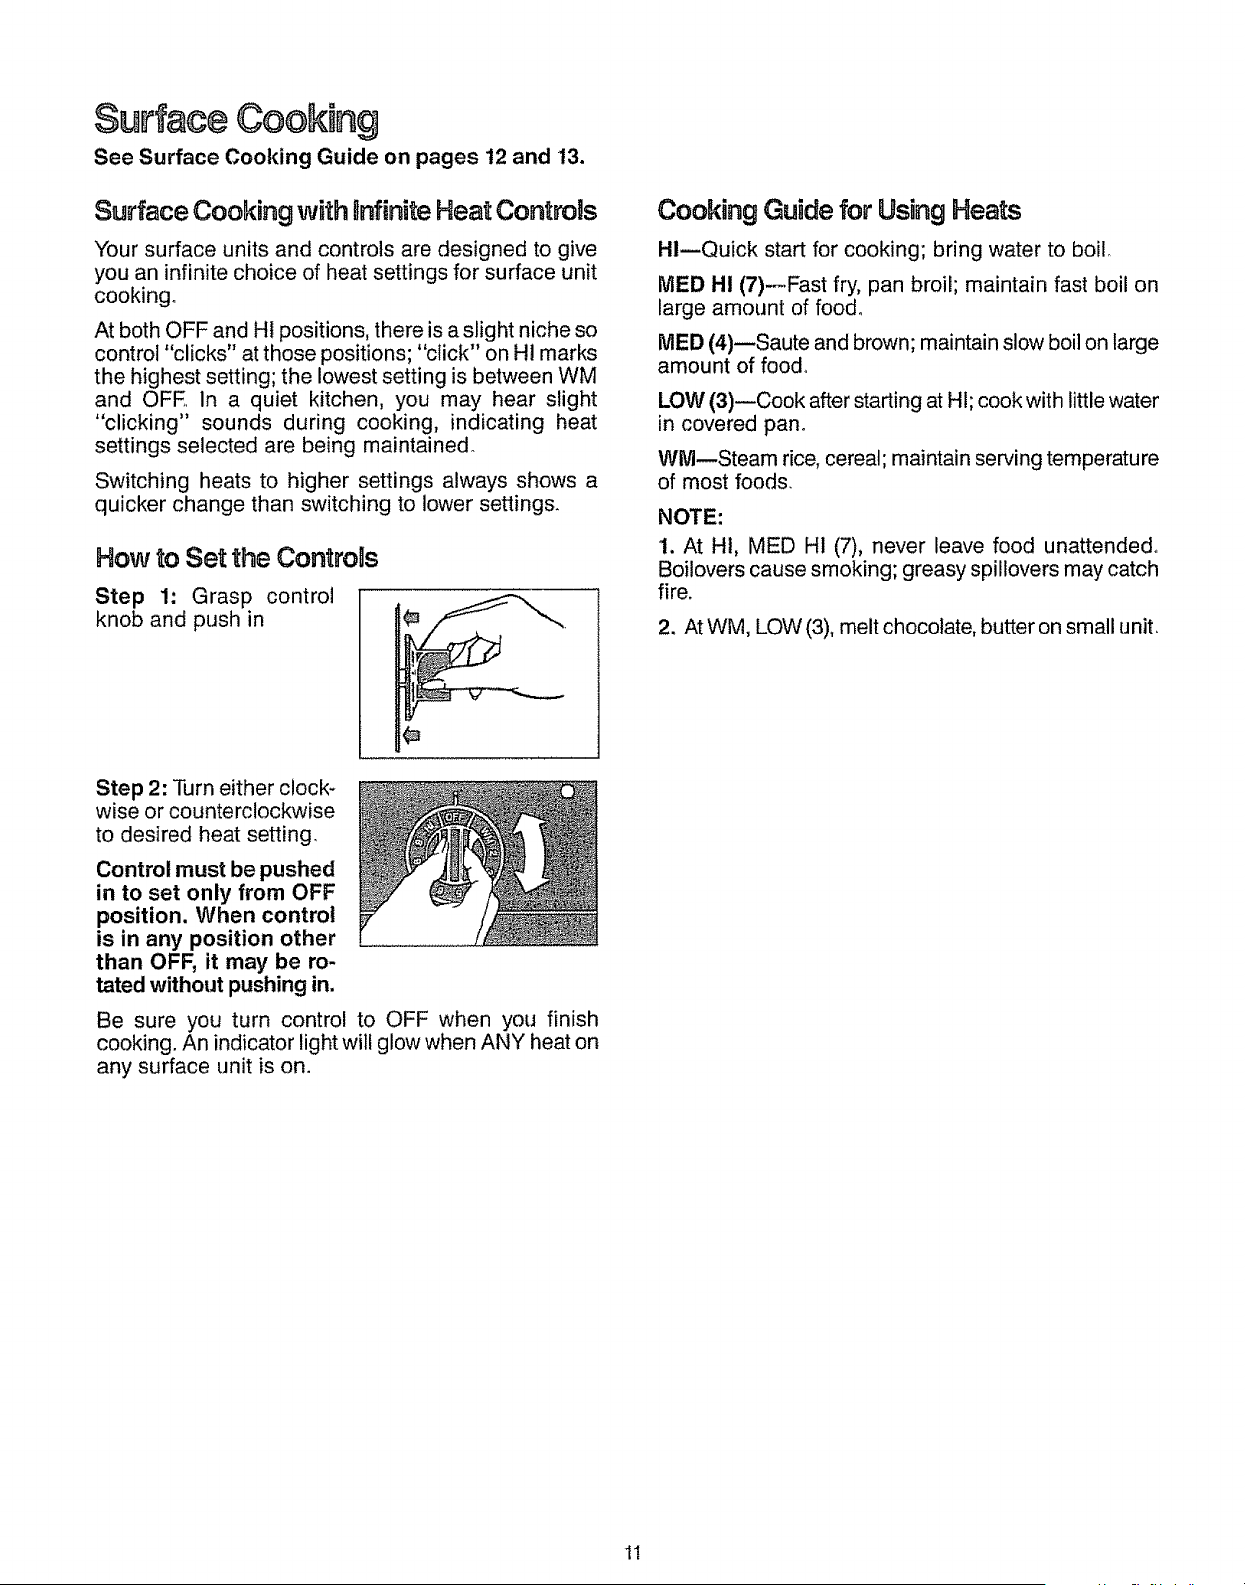
How to Set the Con_roUs
Step 1: Grasp control
knob and push in
Step 2: "rijrn either clock-
wise or counterclockwise
to desired heat setting.
Control must be pushed
in to set only from OFF
position. When control
is in any position other
than OFF, it may be ro-
tated without pushing in.
Be sure you turn control to OFF when you finish
cooking. An indicator light will glow when ANY heat on
any surface unit is on.
Cooking Guide for Using Heats
Hi--Quick start for cooking; bring water to boil,
MED H! (7)--Fast fry, pan broil; maintain fast boil on
large amount of food.
MED (4)--Saute and brown; maintain slow boil on large
amount of food°
LOW (3)mCook after starting at HI; cook with little water
in covered pan°
WiVl--Steam rice, cereal; maintain serving temperature
of most foods.
NOTE:
1. At HI, MED H1 (7), never leave food unattended°
Boilovers cause smoking; greasy spillovers may catch
fire.
2. AtWM, LOW (3), melt chocolate, butter on small unit.
11
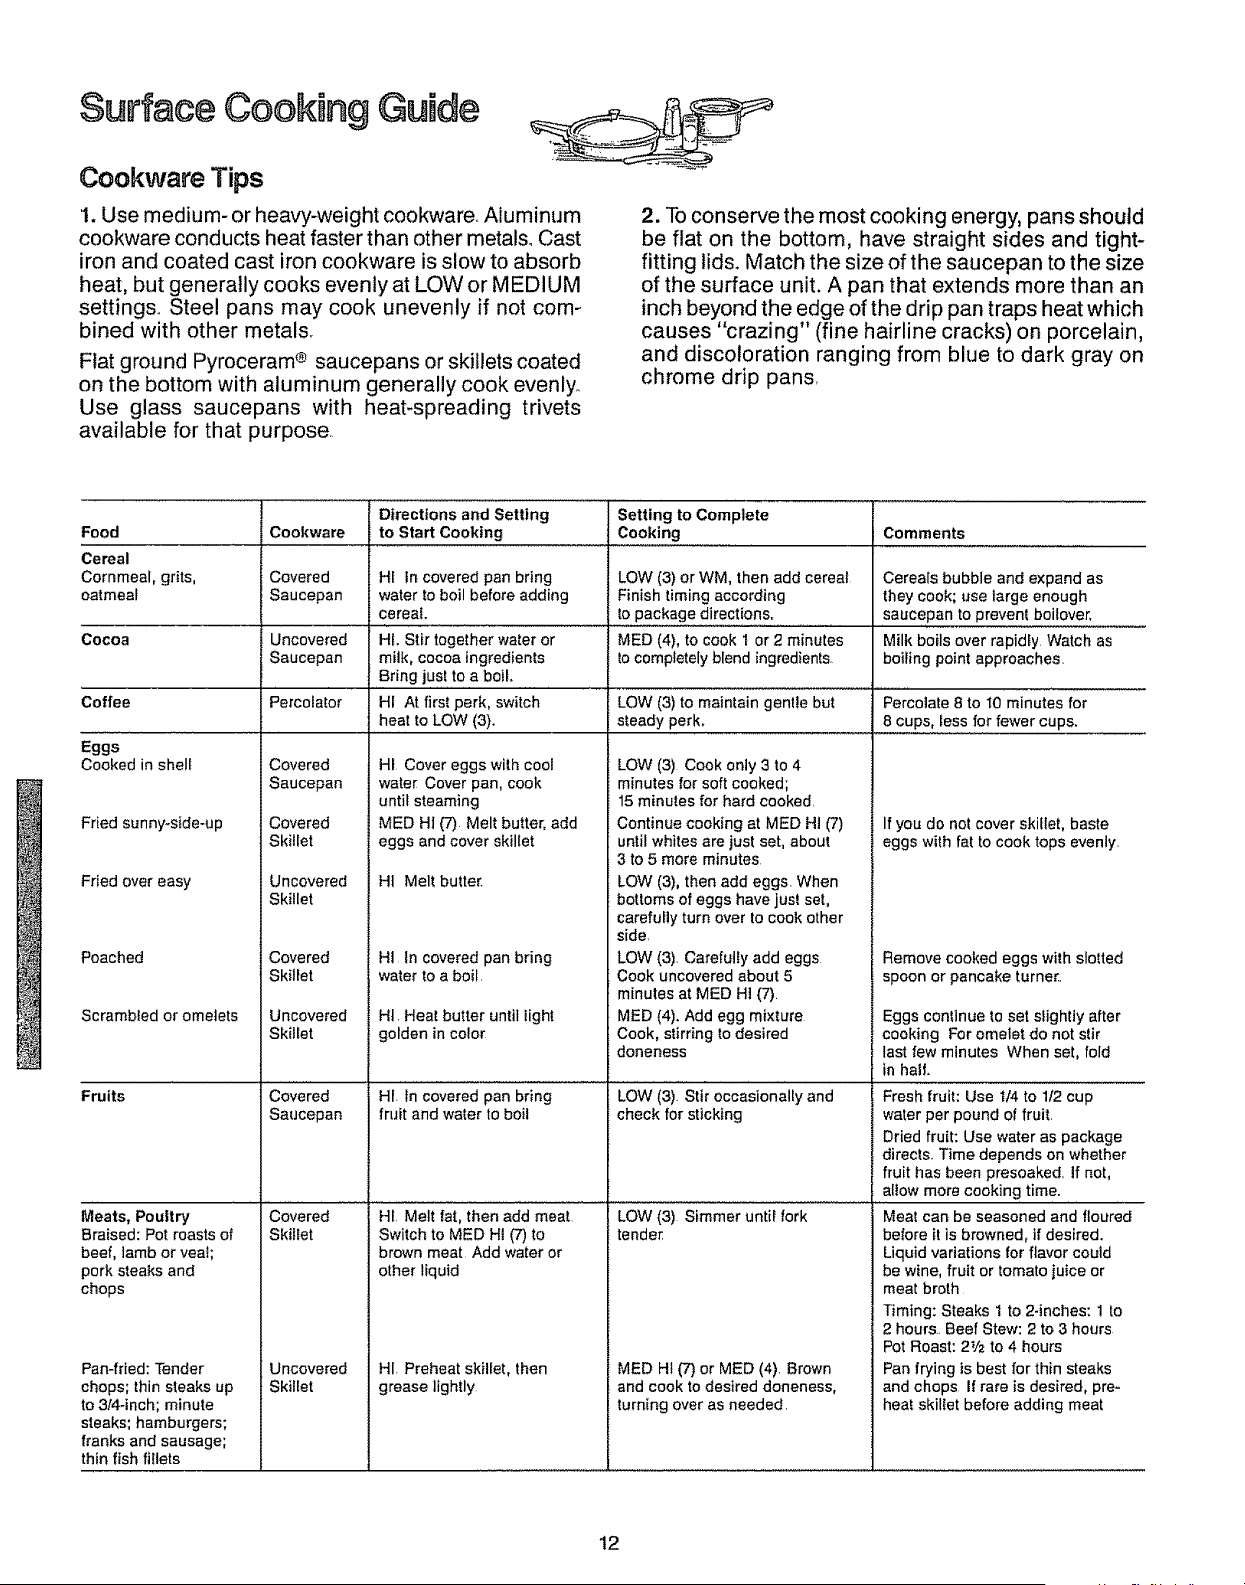
Surface Cooking GuRde
Ceokware Tips
1. Use medium- or heavy-weight cookware. Aluminum
cookware conducts heat faster than other metals. Cast
iron and coated cast iron cookware is slow to absorb
heat, but generally cooks evenly at LOW or MEDIUM
settings,, Steel pans may cook unevenly if not com-
bined with other metals,
Flat ground Pyroceram ® saucepans or skillets coated
on the bottom with aluminum generally cook evenly_
Use glass saucepans with heat-spreading trivets
available for that purpose,
2. To conserve the most cooking energy, pans should
be flat on the bottom, have straight sides and tight-
fitting lids. Match the size of the saucepan to the size
of the surface unit. A pan that extends more than an
inch beyond the edge of the drip pan traps heat which
causes "crazing" (fine hairline cracks) on porcelain,
and discoloration ranging from blue to dark gray on
chrome drip pans
Food
Cereal
Cornmeal, grits,
oatmeal
Cocoa
Coffee
Eggs
Cooked in shell
Fried sunny-side-up
Fried over easy
=oached
Scrambled or omelets
Fruits
Meats, Poultry
Braised: Pot roasts of
beef, lamb or veal;
_ork steaks and
chops
Pan-fried: Tender
chops; thin steaks up
to 314-inch; minute
steaks; hamburgers;
franks and sausage;
thin fish fi!lets
i Setting to Complete
Cookware Cooking Comments
Covered LOW (3) or WM, then add cereal Cereals bubble and expand as
Saucepan Finish timing according they cook; use large enough
.. to package d.irec!!.on.s............... saucepan to prevent believer,
Uncovered MED (4), to cook 1 or 2 minutes Milk boils over rapidly Watch as
Saucepan to completely blend ingredients, boiling point approaches.
Percolator LOW (3) to maintain gentle but Percolate 8 to t0 minutes for
steady perk. 8 cups, less for fewer cups.
Covered
Saucepan
Covered
Skillet
Uncovered
Skillet
Covered
Skillet
Uncovered
Skillet
Covered
Saucepan
Covered
Skillet
Uncovered
Skillet
Directions and Setting
to Start Cooking
HI In covered pan bring
water to boil before adding
cereal,
HL Stir together water or
milk, cocoa ingredients
Bring just to a boil.
HI At first perk, switch
heat to LOW (3).
HI Cover eggs with cool
water Cover pan, cook
until steaming
MED HI (7) Melt butter, add
eggs and cover skillet
Ht Melt butter.
HI In covered pan bring
water to a boil.
HI. Heat butter until light
golden in color
LOW (3) Cook only 3 to 4
minutes for soft cooked;
15 minutes for hard cooked.
Continue cooking at MED Ht (7)
until whites are just set, about
3 to 5 more minutes
LOW (3), then add eggs. When
bottoms of eggs have just set,
carefully turn over to cook other
side
LOW (3). Carefully add eggs
Cook uncovered about 5
minutes at MED H] (7).
MED (4). Add egg mixture
Cook, stirring to desired
doneness
HI. In covered pan bring LOW (3). Stir occasionally and
fruit and water to boil check for sticking
HI. Melt fat, then add meat
Switch to MED HI (7) to
brown meat Add water or
other liquid
LOW (3) Simmer until fork
tender
MED Ht (7) or MED (4) Brown
and cook to desired doneness,
turning over as needed.
HI. Preheat skillet, then
grease lightly
If you do not cover skillet, baste
eggs with fat to cook tops evenly.
Remove cooked eggs with slotted
spoon or pancake turner..
Eggs continue to set slightly after
cooking For omelet do not stir
last few minutes When set, fold
in halI,
Fresh fruit: Use t/4 to 1/2 cup
water per pound of fruit.
Dried fruit: Use water as package
direcls.. Time depends on whether
fruit has been presoaked. If not,
allow more cooking time.
Meat can be seasoned and floured
before it is browned, if desired.
Liquid variations for flavor could
be wine, fruit or tomato juice or
meat broth
Timing: Steaks 1 to 2-inches: 1 to
2 hours.. Beef Stew: 2 to 3 hours
Pot Roast: 2V2 to 4 hours
Pan frying is best for thin steaks
and chops If rare is desired, pre-
heat skittet before adding meat
12
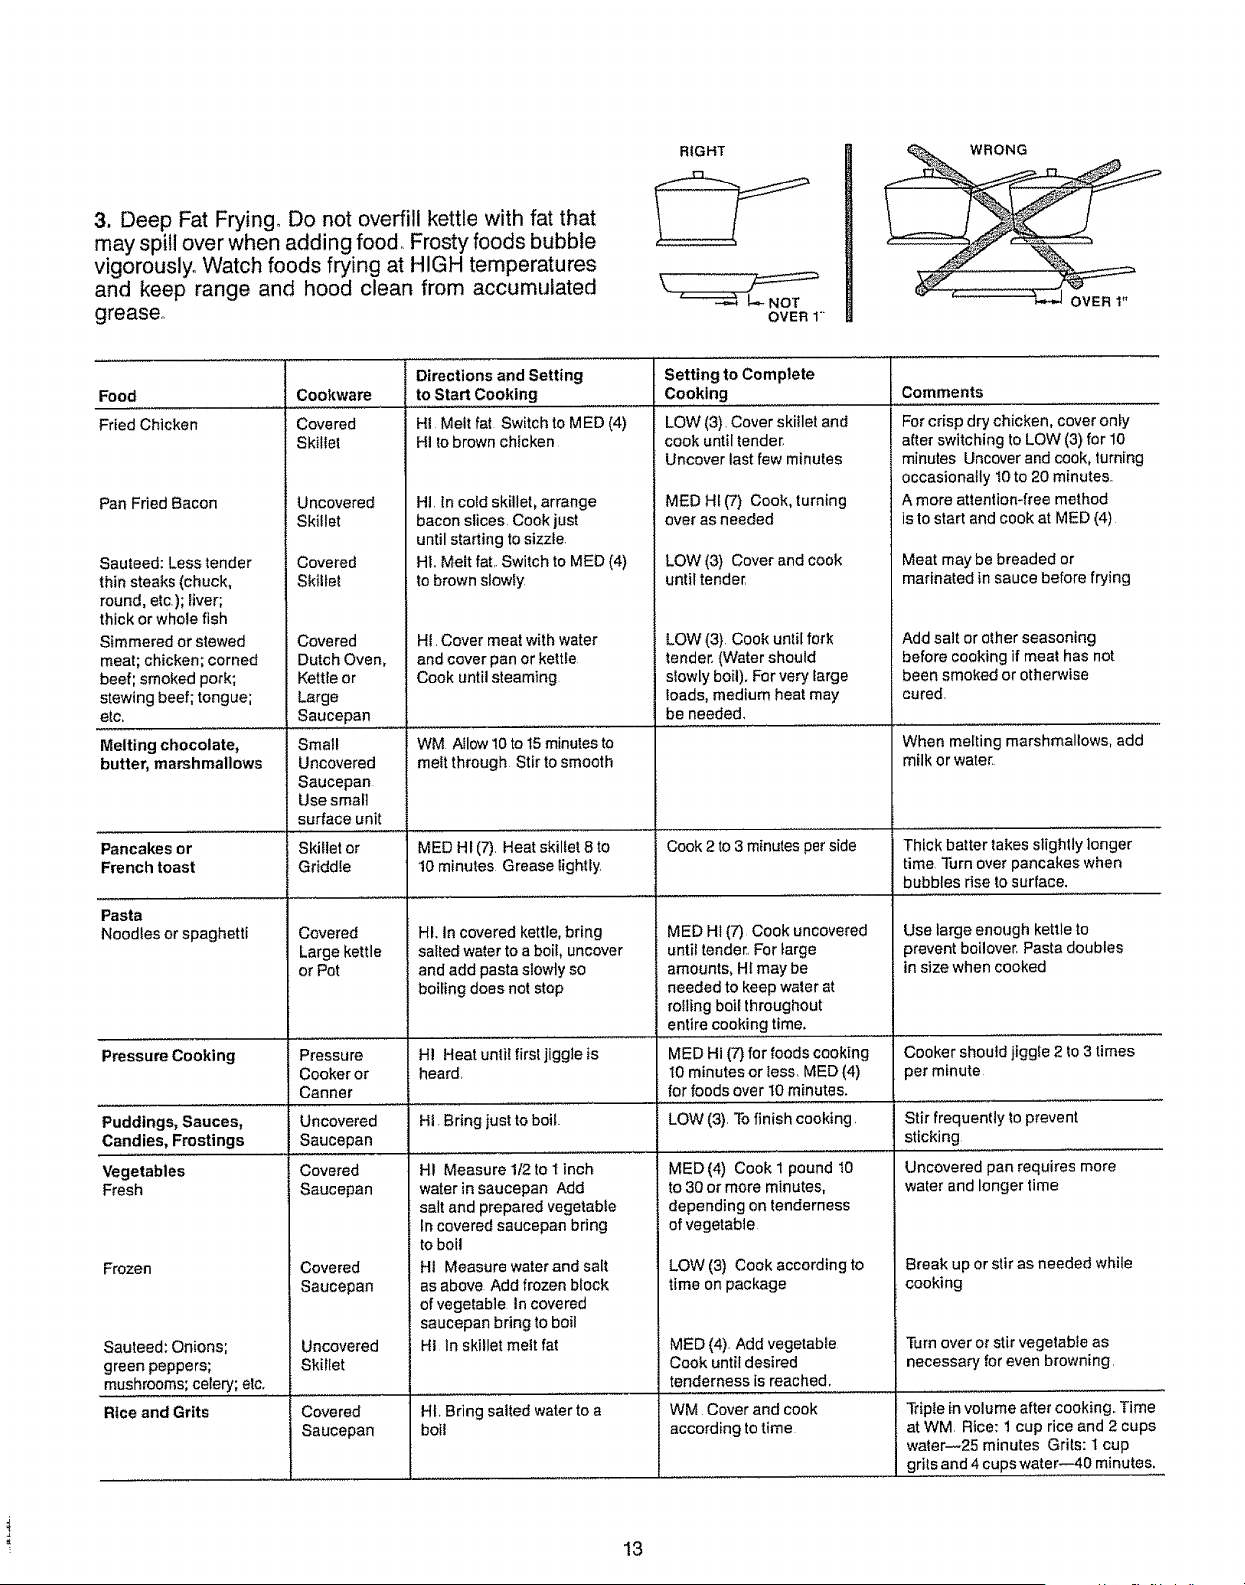
3. Deep Fat Frying° Do not overfill kettle with fat that
may spill over when adding food. Frosty foods bubble
vigorously° Watch foods frying at HIGH temperatures
and keep range and hood clean from accumulated
grease°
RIGHT
L_ NOT
OVER 1-
• _ OVER 1"
Food
Fried Chicken
Pan Fried Bacon
Sauteed: Less tender
thin steaks (chuck,
round, etc.); liver;
thick or whole fish
Simmered or stewed
meat; chicken; corned
beef; smoked pork;
stewing beef; tongue;
etc.
Melting chocolate,
butter, marshmallows
Directions and Setting
to Start Cooking
HI Melt fat Switch to MED (4)
HI to brown chicken
Cookware
Covered
Skiliet
Uncovered
Skillet
Covered
Skillel
Covered
Dutch Oven,
Kettle or
Large
Saucepan
Small
Uncovered
Saucepan
Use small
surface unit
Pancakes or Skillet or
French toast Griddle
.................. i .......
Pasta
Noodles or spaghetti Covered
Large kettle
or Pot
Pressure Cooking Pressure
Cooker or
Canner
Puddings, Sauces, Uncovered
Candies, Frostings Saucepan
Vegetables Covered
Fresh Saucepan
Frozen Covered
Saucepan
Sauteed: Onions; Uncovered
green peppers; Skillet
. mushrooms; celery; elc. ..................................
Rice and Grits Covered
Saucepan
HI. In cold skillet, arrange
bacon slices. Cook just
until starting to sizzle.
HI. Melt fat.. Switch to MED (4)
to brown slowly
HI. Cover meat with water
and cover pan or kettle
Cook until steaming
WM Allow 10 to t5 minutes to
melt through Stir to smooth
MED HI (7). Heat skillet 8 to
10 minutes Grease lightly.
HI. In covered kettle, bring
salted water to a boil, uncover
and add pasta slowly so
boiling does not stop
Setting to Complete
Cooking
LOW (3)_Cover skillet and
cook until tender,
Uncover last few minutes
MED Ht (7) Cook, turning
over as needed
LOW (3) Cover and cook
until tender.
LOW (3) Cook until fork
tender. (Water should
slowly boil). For very large
loads, medium heat may
be needed.
Cook 2 to 3 minutes per side
MED HI (7) Cook uncovered
until tender. For large
amounts, HI may be
needed to keep water at
roiling boil throughout
entire cooking time,
Comments
For crisp dry chicken, cover only
a_ter switching to LOW (3) for 10
minutes Uncover and cook, turning
occasionally t0 to 20 minutes..
A more attention-free method
is to start and cook at MED (4)
Meat may be breaded or
marinated in sauce before frying
Add salt or other seasoning
before cooking if meal has not
been smoked or otherwise
cured.
When melting marshmallows, add
milk or water
Thick batter takes slightly longer
time Turn over pancakes when
bubbles rise to surface.
Use large enough kettle to
prevent boilover, Pasta doubles
in size when cooked
HI Heat until first jiggle is MED HI (7) for foods cooking Cooker should jiggle 2 to 3 times
heard. I0 minutes or less. MED (4) per minute
for foods over t0 minutes.
Hi. Bring just to boil. LOW (3). To finish cooking, Stir frequently to prevent
sticking
................ . ........... i ..................
Uncovered pan requires more
water and longer time
HI Measure 1/2 to I inch
water in saucepan Add
salt and prepared vegetable
In covered saucepan bring
to boil
Ht Measure water and salt
as above Add frozen block
of vegetable In covered
saucepan bring to boil
Hi In skillet melt fat
HI. Bring salted water to a
boil
MED (4) Cook I pound I0
to 30 or more minutes,
depending on tenderness
of vegetable
LOW (3) Cook according to
time on package
MED (4). Add vegetable
Cook until desired
tenderness is reached.
Break up or stir as needed while
cooking
Turn over or stir vegetable as
necessary for even browning.
Triple in volume after cooking. Time
at WM. Rice: t cup rice and 2 cups
waler--25 minutes Grits: t cup
gri!s.and 4 cups w.a!er--40 minutes: .....
WM. Cover and cook
according to time
13
Questions & Answe
Q. May I can foods and preserves on my surface
units?
A. "Yes, but only use cookware designed for canning
purposes Check the manufacturer's instructions and
recipes for preserving foods° Be sure canner is flat-
bottomed and fits over the center of your surface uniL
Since canning generates large amounts of steam, be
careful to avoid burns from steam or heat. Canning
should only be done on surface units.
Q. Can I cover my drip pans with foil?
A. No. Clean as recommended in Cleaning Guide
Q. Can i use special cooking equipment, like an
oriental wok, on any surface units?
A. Cookware without flat surfaces is not recom-
mended° The life of your surface unit can be shortened
and the range top can be damaged from the high heat
needed for this type of cooking
Q. Why am I not getting the heat I need from my
units even though I have the knobs on the right
setting?
A. After turning surface unit off and making sure it is
cool, check to make sure that your plug-in units are
securely fastened into the surface connection.
Q. Why does my cookware tilt when i place them
on the surface unit?
A. Because the surface unit is not flaL Make sure that
the "feet" on your surface units are sitting tightly in the
range top indentation and the outer edge of the drip pan
is flat on the range surface.
Qo Why is the porcelain finish on my cookware
coming off?
A. If you set your surface unit higher than required for
the cookware material, and leave it, the finish may
smoke, crack, pop, or burn depending on the pot or
pan. Also, a too high heat for long periods, and small
amounts of dry food, may damage the finish.
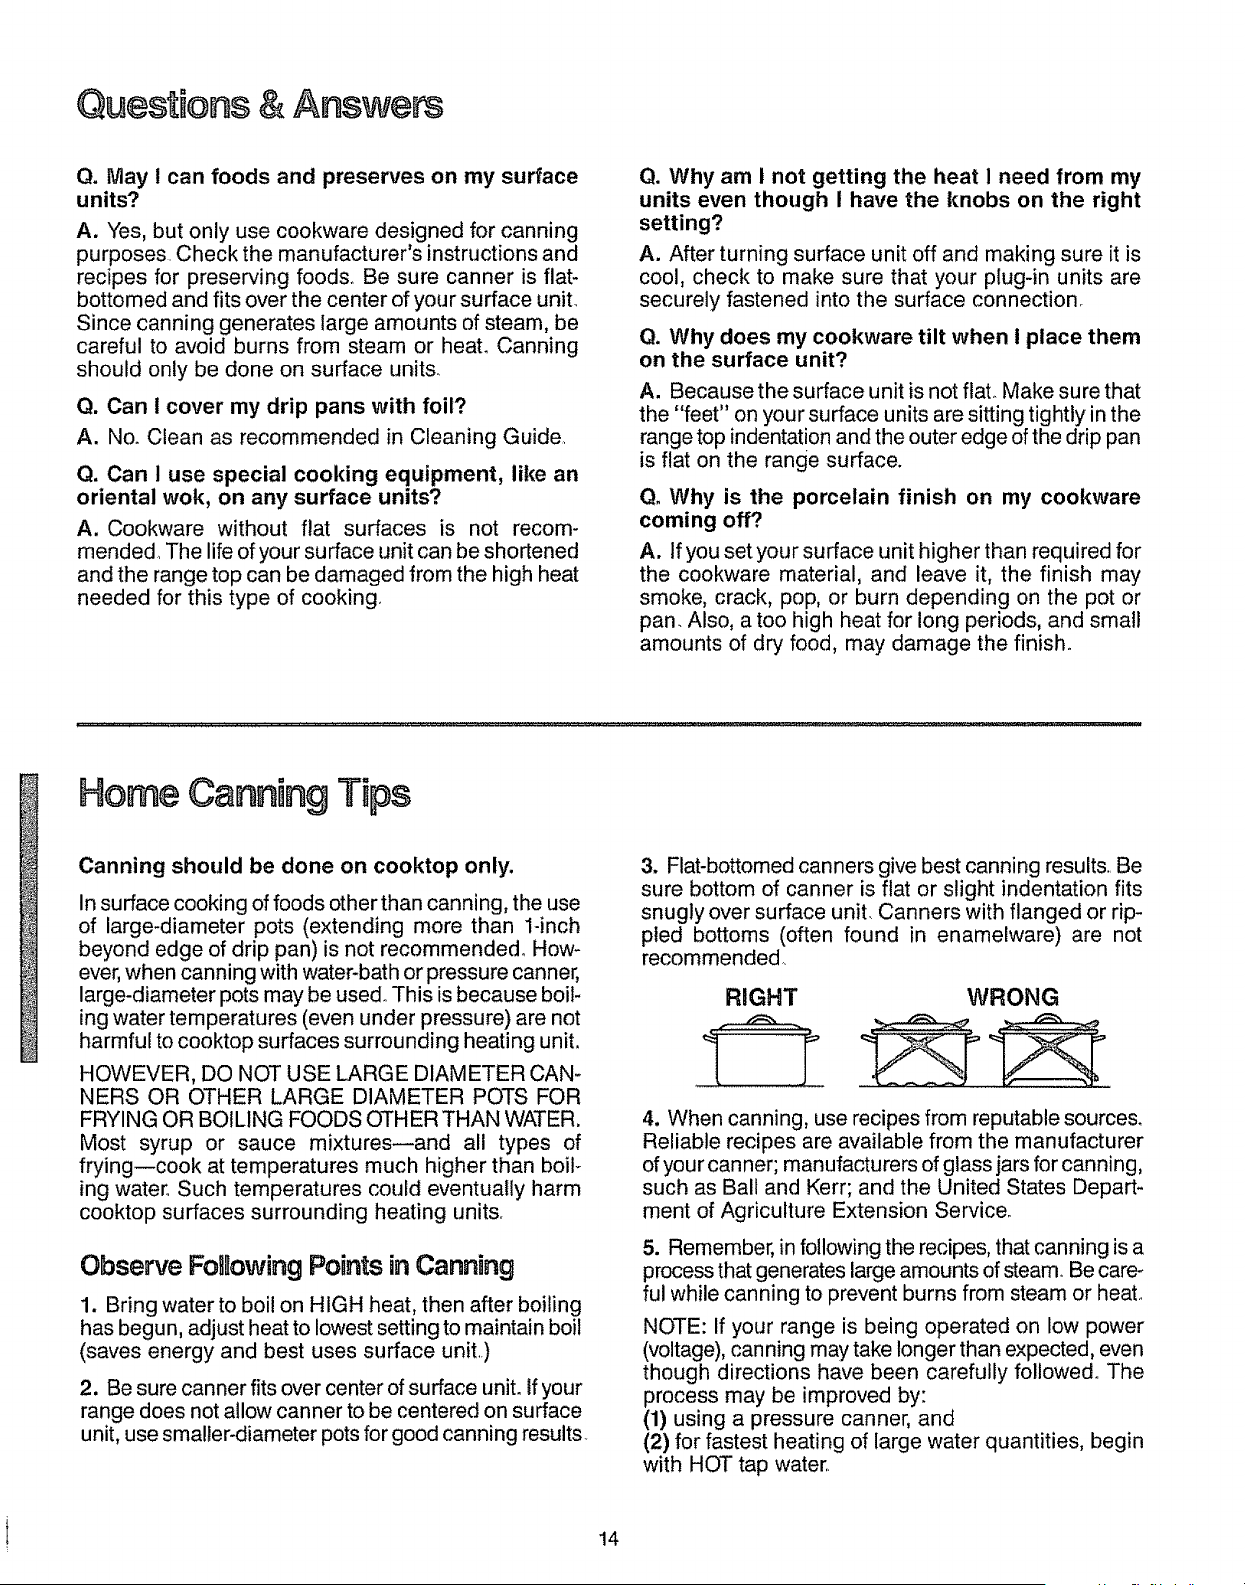
Home Canning Tips
Canning should be done on cooktop only.
In surface cooking of foods other than canning, the use
of large-diameter pots (extending more than 1-inch
beyond edge of drip pan) is not recommended. How-
ever, when canning with water-bath or pressure canner,
large-diameter pots may be used° This is because boil-
ing water temperatures (even under pressure) are not
harmful to cooktop surfaces surrounding heating unit,
HOWEVER, DO NOT USE LARGE DIAMETER CAN-
NERS OR OTHER LARGE DIAMETER POTS FOR
FRYING OR BOILING FOODS OTHER THAN WATER.
Most syrup or sauce mixtures--and all types of
frying--cook at temperatures much higher than boil-
ing water° Such temperatures could eventually harm
cooktop surfaces surrounding heating units.
Observe FoIRowing Points in Canning
1. Bring water to boil on HIGH heat, then after boiling
has begun, adjust heat to lowest setting to maintain boil
(saves energy and best uses surface unit..)
2. Be sure canner fits over center of surface unit. If your
range does not allow canner to be centered on surface
unit, use smaller-diameter pots for good canning results
3. Flat-bottomed canners give best canning results,, Be
sure bottom of canner is flat or slight indentation fits
snugly over surface unit. Canners with flanged or rip-
pied bottoms (often found in enamelware) are not
recommended,,
RIGHT
F
WRONG
4. When canning, use recipes from reputable sources.
Reliable recipes are available from the manufacturer
of your canner; manufacturers of glass jars for canning,
such as Ball and Kerr; and the United States Depart-
ment of Agriculture Extension Service_
5. Remember, in following the recipes, that canning is a
process that generates large amounts of steam° Be care-
ful while canning to prevent burns from steam or heat
NOTE: If your range is being operated on low power
(voltage), canning may take longer than expected, even
though directions have been carefully followed° The
process may be improved by:
(1) using a pressure canner, and
(2) for fastest heating of large water quantities, begin
with HOT tap water
14
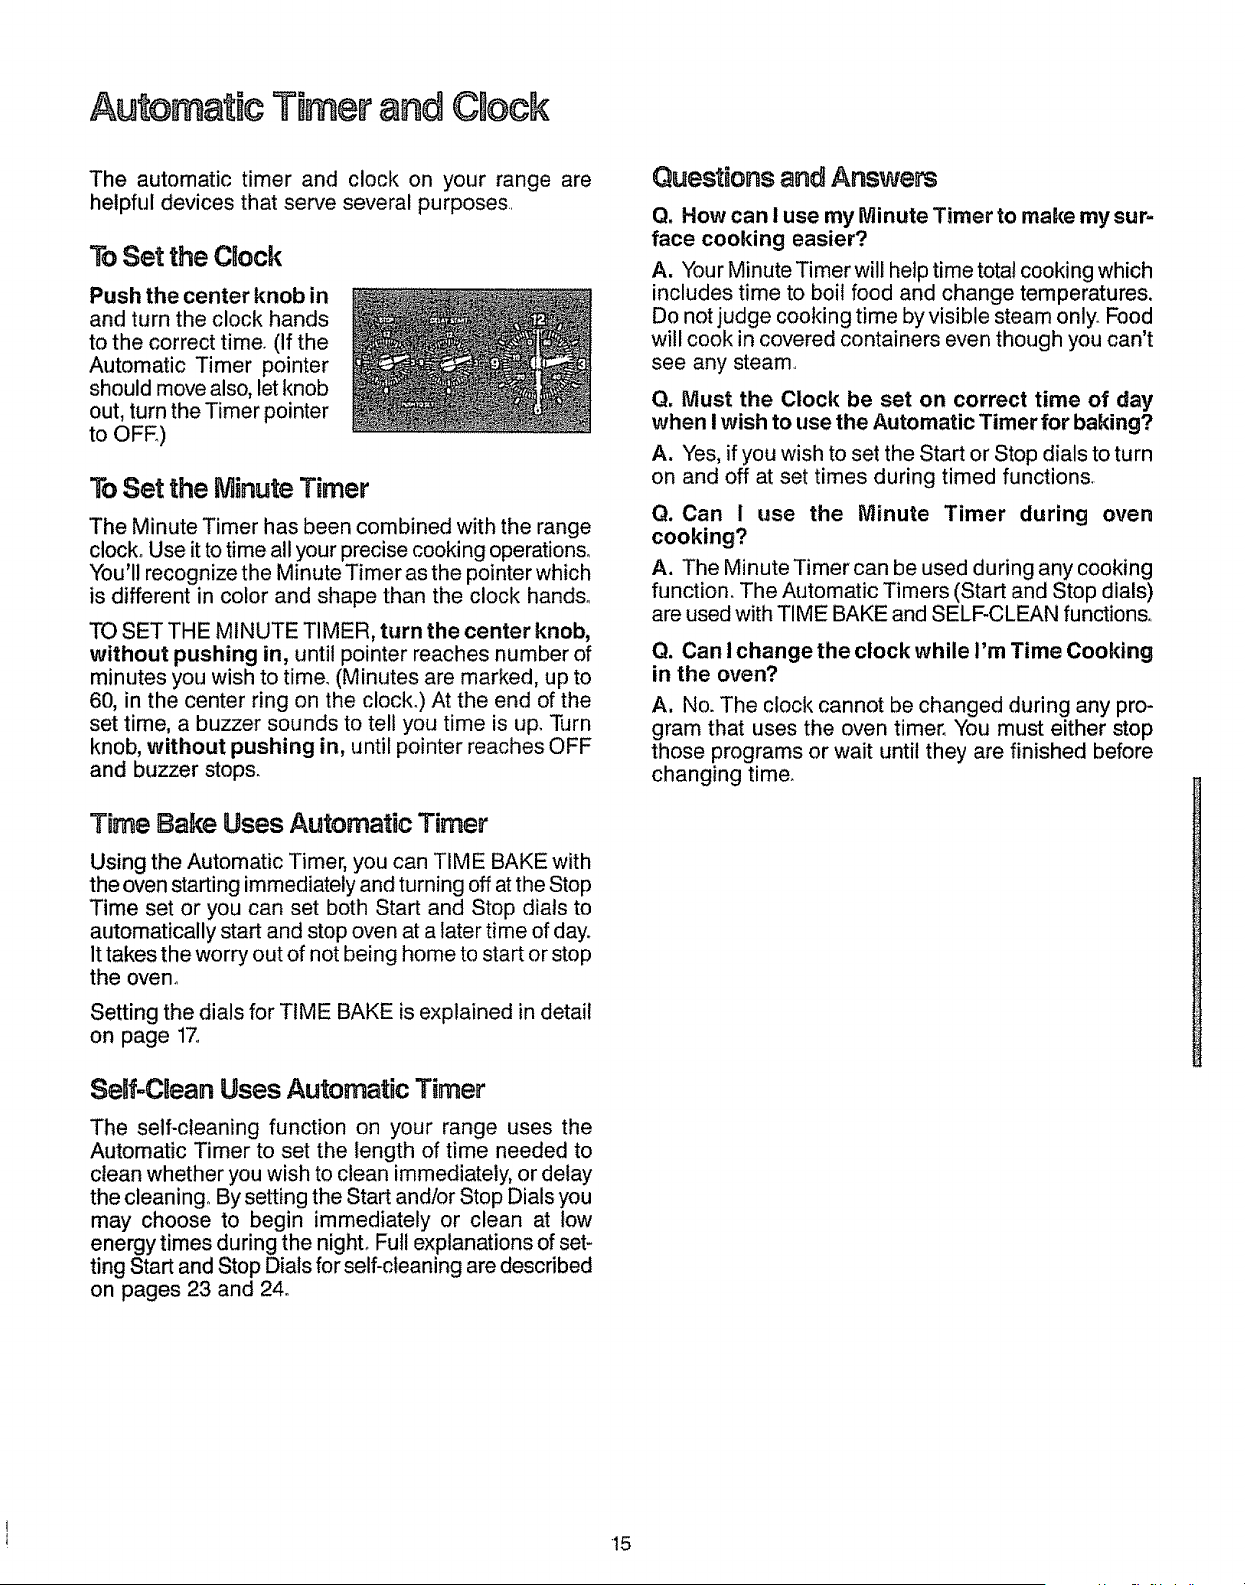
Automatic TRmerand CRock
The automatic timer and clock on your range are
helpful devices that serve several purposes
To Set the Chock
Push the center knob in
and turn the clock hands
to the correct time. (If the
Automatic Timer pointer
should move also, let knob
out, turn the Timer pointer
to OFE)
To Set the Minute Timer
The Minute Timer has been combined with the range
clock. Use it to time all your precise cooking operations°
You'll recognize the Minute Timer as the pointer which
is different in color and shape than the clock hands°
TO SET THE MINUTE TIMER, turn the center knob,
without pushing in, until pointer reaches number of
minutes you wish to time. (Minutes are marked, up to
60, in the center ring on the clock.) At the end of the
set time, a buzzer sounds to tell you time is up. Turn
knob, without pushing in, until pointer reaches OFF
and buzzer stops.
Time Bake Uses Automatic Timer
Using the Automatic Timer, you can TIME BAKE with
the oven starting immediately and turning off at the Stop
Time set or you can set both Start and Stop dials to
automatically start and stop oven at a later time of day.
It takes the worry out of not being home to start or stop
the oven.
Setting the dials for TIME BAKE is explained in detail
on page 17o
SemfoCReanUses Automatic Timer
The self-cleaning function on your range uses the
Automatic Timer to set the length of time needed to
clean whether you wish to clean immediately, or delay
the cleaning° By setting the Start and/or Stop Dials you
may choose to begin immediately or clean at low
energy times during the night° Full explanations of set-
ting Start and Stop Dials for self-cleaning are described
on pages 23 and 24.
Questions and Answers
Q. How can ! use my Minute Timer to make my sur-
face cooking easier?
A. Your Minute Timer will hetp time total cooking which
includes time to boil food and change temperatures.
Do not judge cooking time by visible steam only. Food
will cook in covered containers even though you can't
see any steam
Q, Must the Clock be set on correct time of day
when ! wish to use the Automatic Timer for baking?
A. Yes, if you wish to set the Start or Stop dials to turn
on and off at set times during timed functions
Q. Can ! use the Minute Timer during oven
cooking?
A. The Minute Timer can be used during any cooking
function. The Automatic Timers (Start and Stop dials)
are used with TIME BAKE and SELF-CLEAN functions
Q. Can I change the clock while I'm Time Cooking
in the oven?
A, No. The clock cannot be changed during any pro-
gram that uses the oven timer. You must either stop
those programs or wait until they are finished before
changing time°
15
UsingYour Oven
Before Using Your Oven
1. Look at the controls° Be sure you understand how
to set them properly° Read over the directions for the
Automatic Oven Timer so you understand its use with
the controls.
2. Check oven interior. Look at the shelves. Take a prac-
tice run at removing and replacing them properly, to
give sure, sturdy support_
3. Read over information and tips that follow.
4. Keep this book handy so you can refer to it, especi-
ally during the first weeks of getting acquainted with
your range..
Oven ContmUs
The controls for the
oven are marked OVEN
SELECTOR and OVEN
CONTROL. OVEN SE-
LECTOR has settings
for BAKE, TIME BAKE,
BROIL, CLEAN and OFE
When you turn the knob to the desired setting, the pro-
per heating units are then activated for that operation.
OVEN CONTROL maintains the temperature you set,
from WARM (150°E) to BROIL (550°E) to CLEAN
(880°E,)_
The Oven Cycling Light glows until the oven reaches
your selected temperature, then goes off and on with
the oven unit during cooking
PREHEATING the oven, even to high temperature set-
tings, is speedy--rarely more than about 10 minutes.
Preheat the oven only when necessary. Most foods will
cook satisfactorily without preheating_ If you find pre-
heating is necessary, keep an eye on the indicator light
and put food in the oven promptly after light goes ouL
Oven interior Shelves
The shelves are designed with stop-locks so that when
placed correctly on the shelf supports, they (a) will stop
before coming completely from the oven, and (b) will
not tilt when removing food from or placing food on
them°
TO REiVIOVE shelves from the oven, lift up rear of shelf,
pull forward with stop-locks along top of shelf supports.
Be certain that shelf is cool before touching.
TO REPLACE shelves in oven, insert shelf with stop-
locks resting on shelf supports. Push shelf toward rear
of oven; it will fall into place. When shelf is in proper
position, stop-locks on shelf will run under shelf sup-
port when shelf is pulled forward.
Sheff Positions
The oven has four shelf
supports marked A (bot-
tom), B, C and D (top).
Shelf positions for cook-
ing food are suggested on
Baking, Roasting and
Broiling pages.
Oven Light
The light comes on auto-
matically when the door is
opened,. Use switch to turn
light on and off when door
is closed. Switch is located
on front of door.
16
Whencookingafoodforthefirsttimeinyournewoven,
usetime givenon recipesas a guide.Oventhermo-
stats,overa periodofyears,may"drift"fromthefactory
settinganddifferencesin timingbetweenan old and
anewovenof5 to10minutesarenotunusualandyou
maybe inclinedtothinkthat thenewovenis notper-
formingcorrectly.However,your newovenhas been
set correctlyat the factory and is more apt to be
accuratethan theovenit replaced.
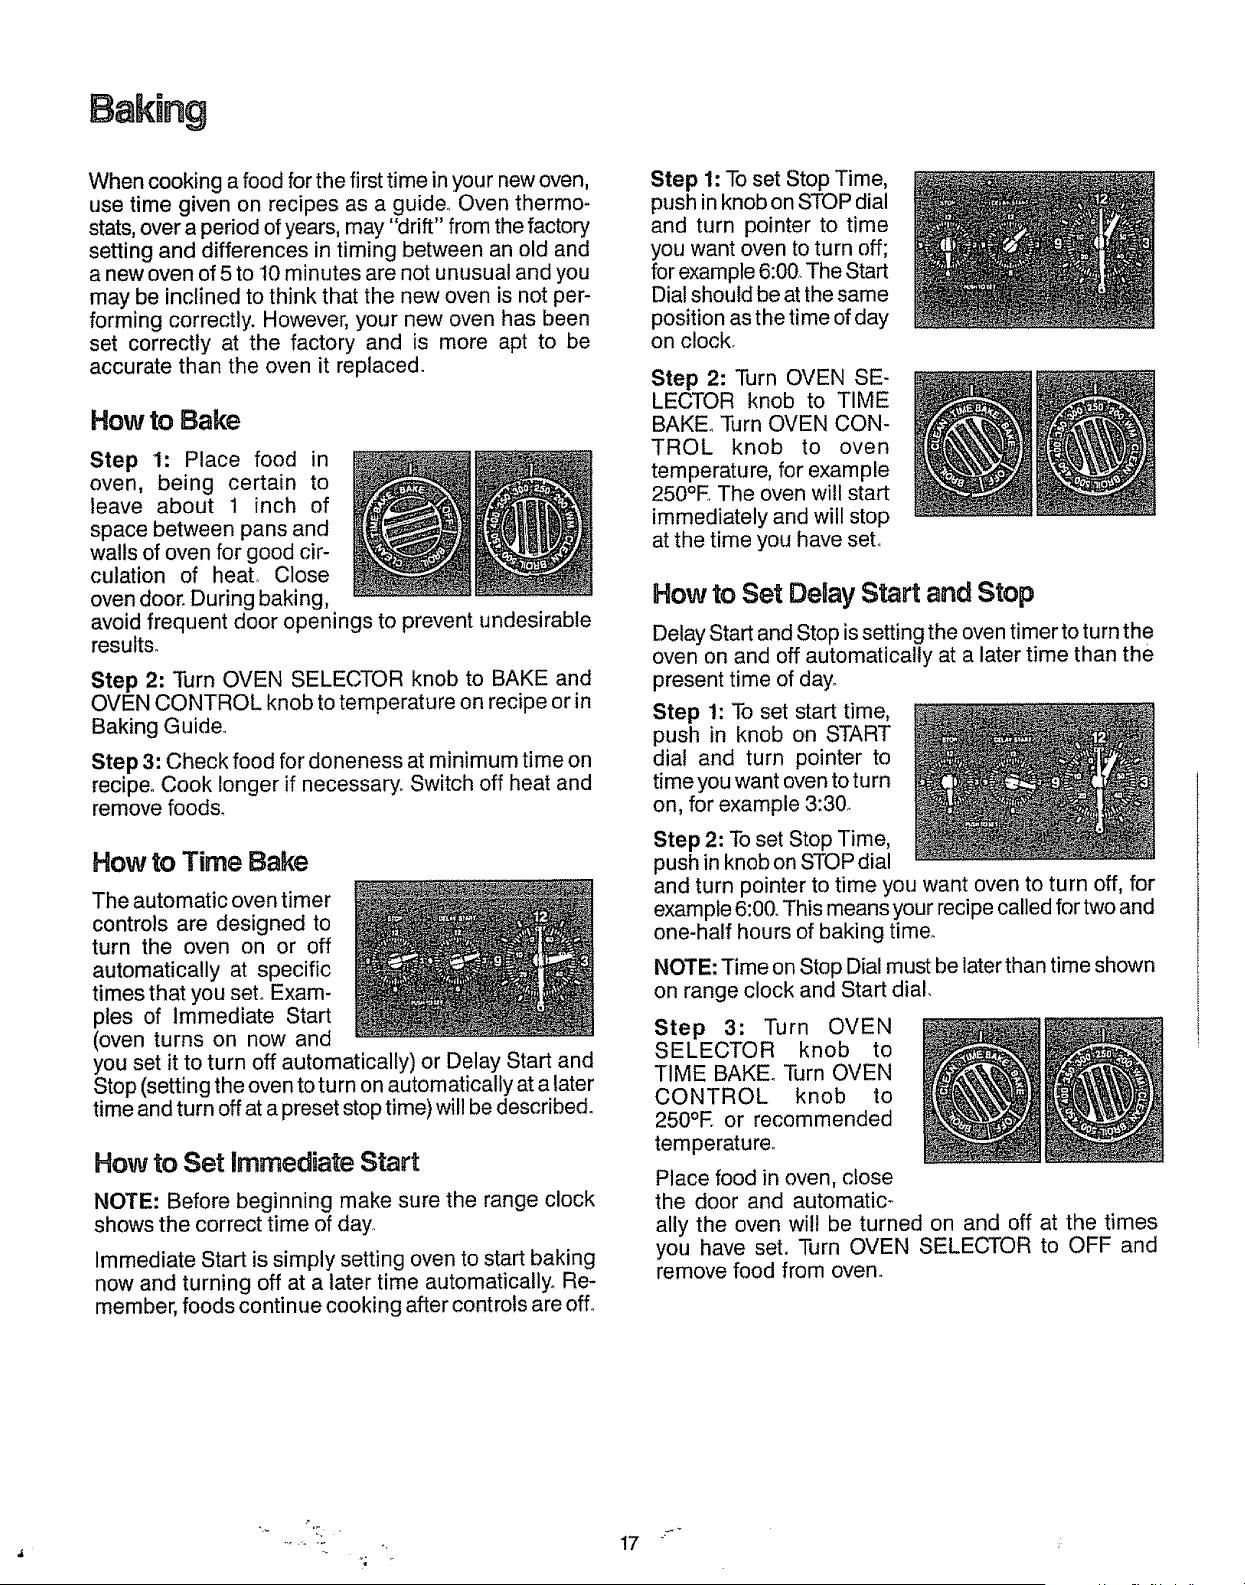
How to Bake
Step I: Place food in
oven, being certain to
leave about 1 inch of
space between pans and
walls of oven for good cir-
culation of heat° Close
oven door. During baking,
avoid frequent door openings to prevent undesirable
results.
Step 2: Turn OVEN SELECTOR knob to BAKE and
OVEN CONTROL knob to temperature on recipe or in
Baking Guide.
Step 3: Check food for doneness at minimum time on
recipe° Cook longer if necessary.. Switch off heat and
remove foods.
How to Time Bake
The automatic oven timer
controls are designed to
turn the oven on or off
automatically at specific
times that you set° Exam-
ples of immediate Start
(oven turns on now and
you set it to turn off automatically) or Delay Start and
Stop (setting the oven to turn on automatically at a later
time and turn off at a preset stop time) will be described.
How to Set Immediate Start
NOTE: Before beginning make sure the range clock
shows the correct time of day.
Immediate Start is simply setting oven to start baking
now and turning off at a later time automatically_ Re-
member, foods continue cooking after controls are off.
Step 1: To set Stop Time,
push in knob on STOP dial
and turn pointer to time
you want oven to turn off;
for example 6:00. The Start
Dial should be at the same
position as the time of day
on clock.
Step 2: Turn OVEN SE-
LECTOR knob to TIME
BAKE° Turn OVEN CON-
TROL knob to oven
temperature, for example
250°E The oven will start
immediately and will stop
at the time you have set.
How to Set DeUayStart and Stop
Delay Start and Stop is setting the oven timer to turn th e
oven on and off automatically at a later time than the
present time of day.
Step 1: To set start time,
push in knob on START
dial and turn pointer to
time you want oven to turn
on, for example 3:30_
Step 2: To set Stop Time,
push in knob on STOP dial
and turn pointer to time you want oven to turn off, for
example 6:0& This means your recipe called for two and
one-half hours of baking time.
NOTE: Time on Stop Dial must be later than time shown
on range clock and Start dial.
Step 3: Turn OVEN
SELECTOR knob to
TIME BAKE° Turn OVEN
CONTROL knob to
250°E or recommended
temperature.
Place food in oven, close
the door and automatic_
ally the oven will be turned on and off at the times
you have set, Turn OVEN SELECTOR to OFF and
remove food from oven°
........ 17
Baking Guide
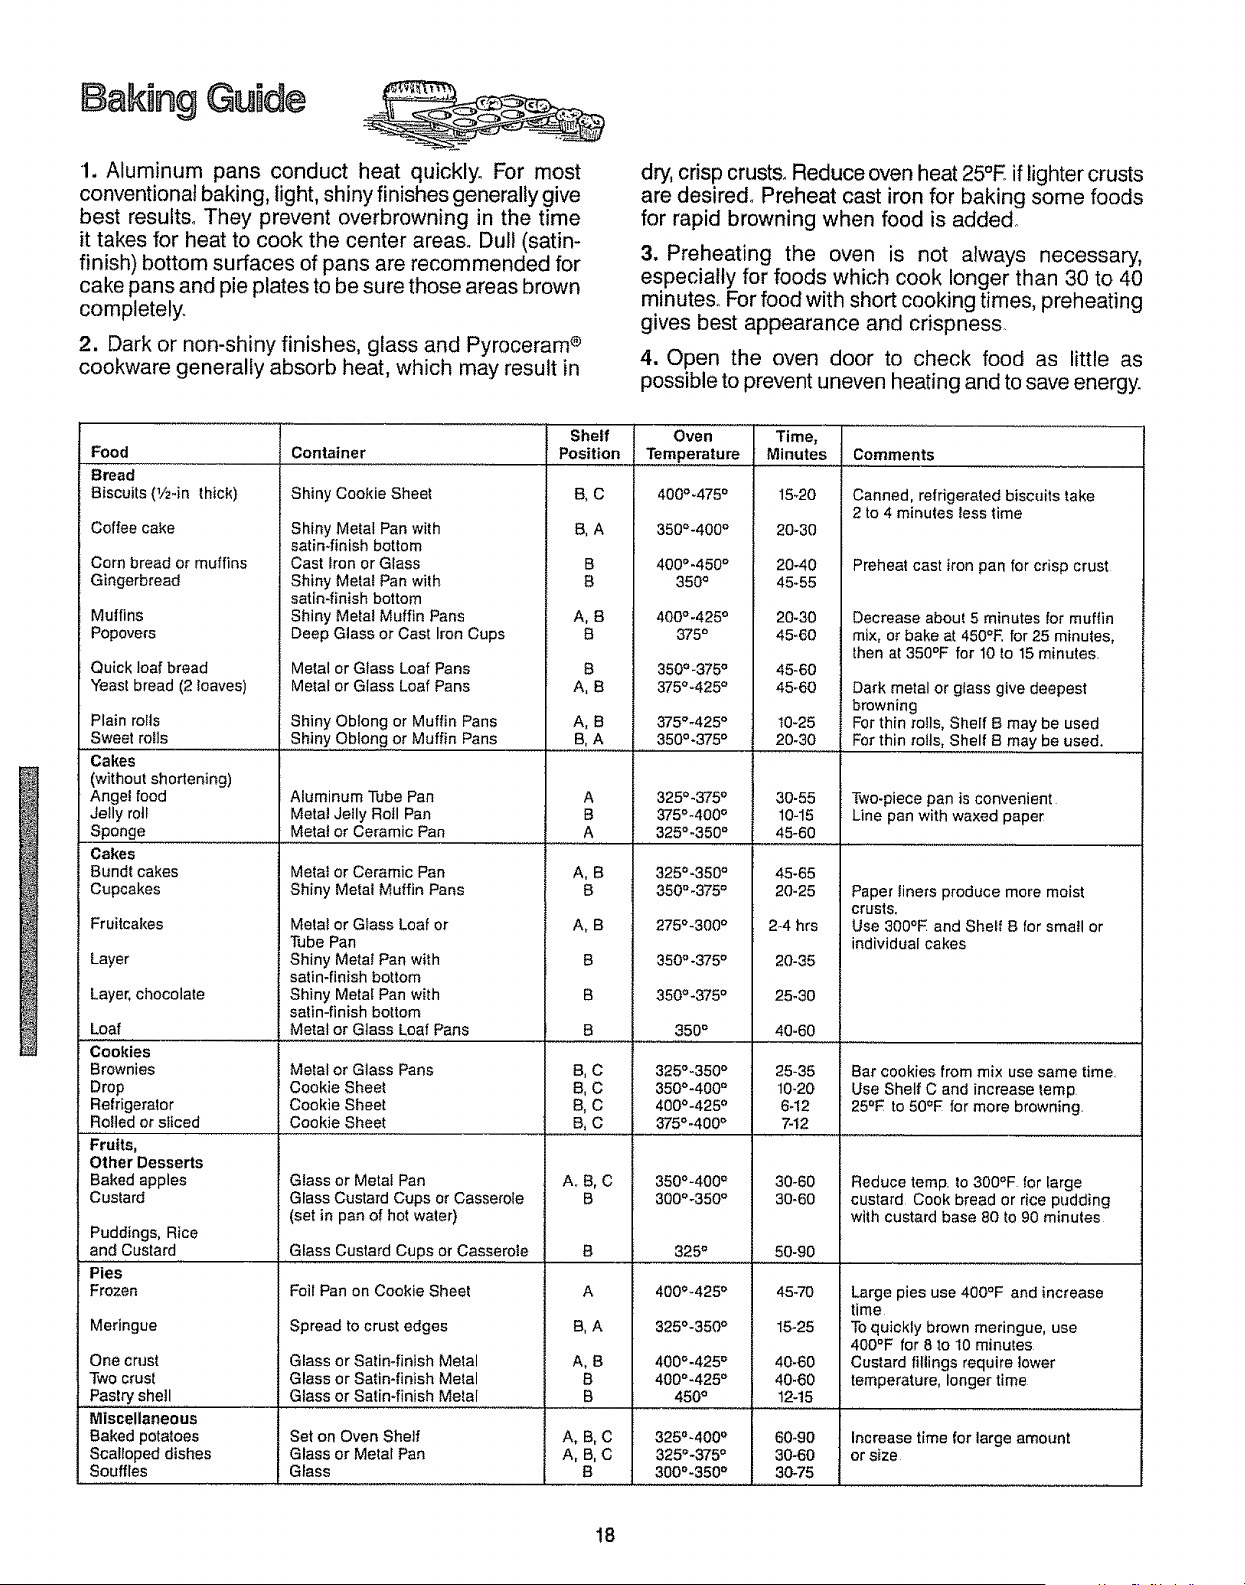
"1. Aluminum pans conduct heat quickly. For most
conventional baking, light, shiny finishes generally give
best results° They prevent overbrowning in the time
it takes for heat to cook the center area& Dull (satin-
finish) bottom surfaces of pans are recommended for
cake pans and pie plates to be sure those areas brown
completely.
2. Dark or non-shiny finishes, glass and Pyroceram ®
cookware generally absorb heat, which may result in
dry, crisp crusts. Reduce oven heat 25°E if lighter crusts
are desired° Preheat cast iron for baking some foods
for rapid browning when food is added°
3. Preheating the oven is not always necessary,
especially for foods which cook longer than 30 to 40
minutes° For food with short cooking times, preheating
gives best appearance and crispness,
4. Open the oven door to check food as little as
possible to prevent uneven heating and to save energy.
Food
Bread
Biscuits (1/24n thick)
Coffee cake
Corn bread or muffins
Gingerbread
Muffins
Popovers
Quick loaf bread
Yeast bread (2 loaves)
Container
Shiny Cookie Sheet
Shiny Metal Pan with
satin-finish bottom
Cast Iron or Glass
Shiny Metal Pan with
satin-finish bottom
Shiny Metal Muffin Pans
Deep Glass or Cast Iron Cups
Metal or Glass Loaf Pans
Metal or Glass Loaf Pans
Plain rolls
Sweet roils
Cakes
(without shortening)
Angel food
Jelly roll
Sponge ..........
Shiny Oblong or Muffin Pans
Shiny Oblong or Muffin Pans
Aluminum Tube Pan
Metal Jetly Roll Pan
Metat or Ceramic Pan
Shelf
Position
B,C
B,A
B
B
A,B
B
B
A,B
A,B
B,A
A
B
A
Oven Time,
Temperature
400o-475 °
350o-400 o
400o-425 o
375 °
350o-375 °
375o-425 °
375°-425 °
3500-375 °
325o-375 °
375°-400 o
325°-350 o
Minutes
15-20
20-30
20-40
45*55
20-30
45_60
45-60
45-60
t0-25
20-30
30-55
10-15
45-60
Comments
Canned, refrigerated biscuits take
2 to 4 minutes less time
Preheat cast iron pan for crisp crust
Decrease about 5 minutes for muffin
mix, or bake at 450°E for 25 minutes,
then at 350°F for 10 1o 15 minutes.
Dark metal or glass give deepest
browning
For thin rolls, Shelf B may be used
For thin roils, Shelf B may be used.
Two.piece pan is convenient
Line pan with waxed paper
Cakes
Bundt cakes
Cupcakes
Fruitcakes
Layer
Layer, chocolate
Loaf
Cookies
Brownies
Drop
Refrigerator
Rolled or s_fced
Fruits,
Other Desserts
Baked apples
Custard
Puddings, Rice
and Custard
Pies
Frozen
Meringue
One crust
Two crust
Pastry shell
Miscellaneous
Baked potatoes
Scal!oped dishes
Souffles
Metal or Ceramic Pan
Shiny Metal Muffin Pans
Metal or Glass Loaf or
Tube Pan
Shiny Metal Pan with
satin-finish bottom
Shiny Metaf Pan with
satin-finish bottom
Metal or Glass Loaf Pans
Metal or Glass Pans
Cookie Sheet
Cookie Sheet
Cookie Sheet
Gfass or Metal Pan
Glass Custard Cups or Casserole
(set in pan of hot water)
.Glass Custard Cups or Casserole
Foil Pan on Cookie Sheet
Spread to crust edges
Glass or Satin-finish Metal
Glass or Satin-finish Metal
Glass or Satin-finish Metal
Set on Oven Shelf
Glass or Metal Pan
Glass
A,B
B
3250-350°
350o-375o
275°-300 °
350o-375 o
3500-375 °
A,B
B
B
B
B,C
8, C
B,C
B, C
A,B,C
B
B
A
B,A
350 °
3250-350 °
350o-400 _
4000-425 °
375o-400 o
45-65
20-25
2-4 hrs
20-35
25-30
40-60
25-35
10-20
6-12
312
30-60
30-60
50-90
45-70
Paper Iiners produce more moist
crusts.
Use 300°E and Sheff B for small or
individual cakes
Bar cookies from mix use same time.
Use Shelf C and increase _emp
25°F to 50"F for more browning.
350o-4000
300o-350 o
A,B
B
B
A,B,C
A, B, C
B
325 °
400o-425 °
325o-350 o
400o-425 °
400o-425 o
450 °
15-25
40-60
40-60
12-15
Reduce temp. to 300'_F for large
custard Cook bread or rice pudding
with custard base 80 to 90 minu{es
Large pies use 400°F and increase
time
To quickly brown meringue, use
400°F for 8 to 10 minutes
Custard fillings require lower
temperature, longer time
325°-400 ° 60-90 Increase time for large amount
3250-375 ° 30-60 or size
300°-350 ° 30-75
18
Roasting
Roasting is cooking by dry heat, Tender meat or poultry
can be roasted uncovered in your oven.. Roasting
temperatures, which should be low and steady, keep
spattering to a minimum° When roasting, it is not nec-
essary to sear, baste, cover or add water to your meat.
Roasting is really a baking procedure used for meats.
Therefore, oven controls are set to BAKE or TIME
BAKE (You may hear a slight clicking sound, indicating
the oven is working properly.) Roasting is easy; just
follow these steps:
Step 1: Check weight of meat, and place, fat side up,
on roasting rack in a shallow pan. (Broiler pan with rack
is a good pan for thi&) Line broiler pan with aluminum
foil when using pan for marinating, cooking with fruits,
cooking heavily cured meats, or for basting food during
cooking. Avoid spilling these materials on oven liner
or door,.
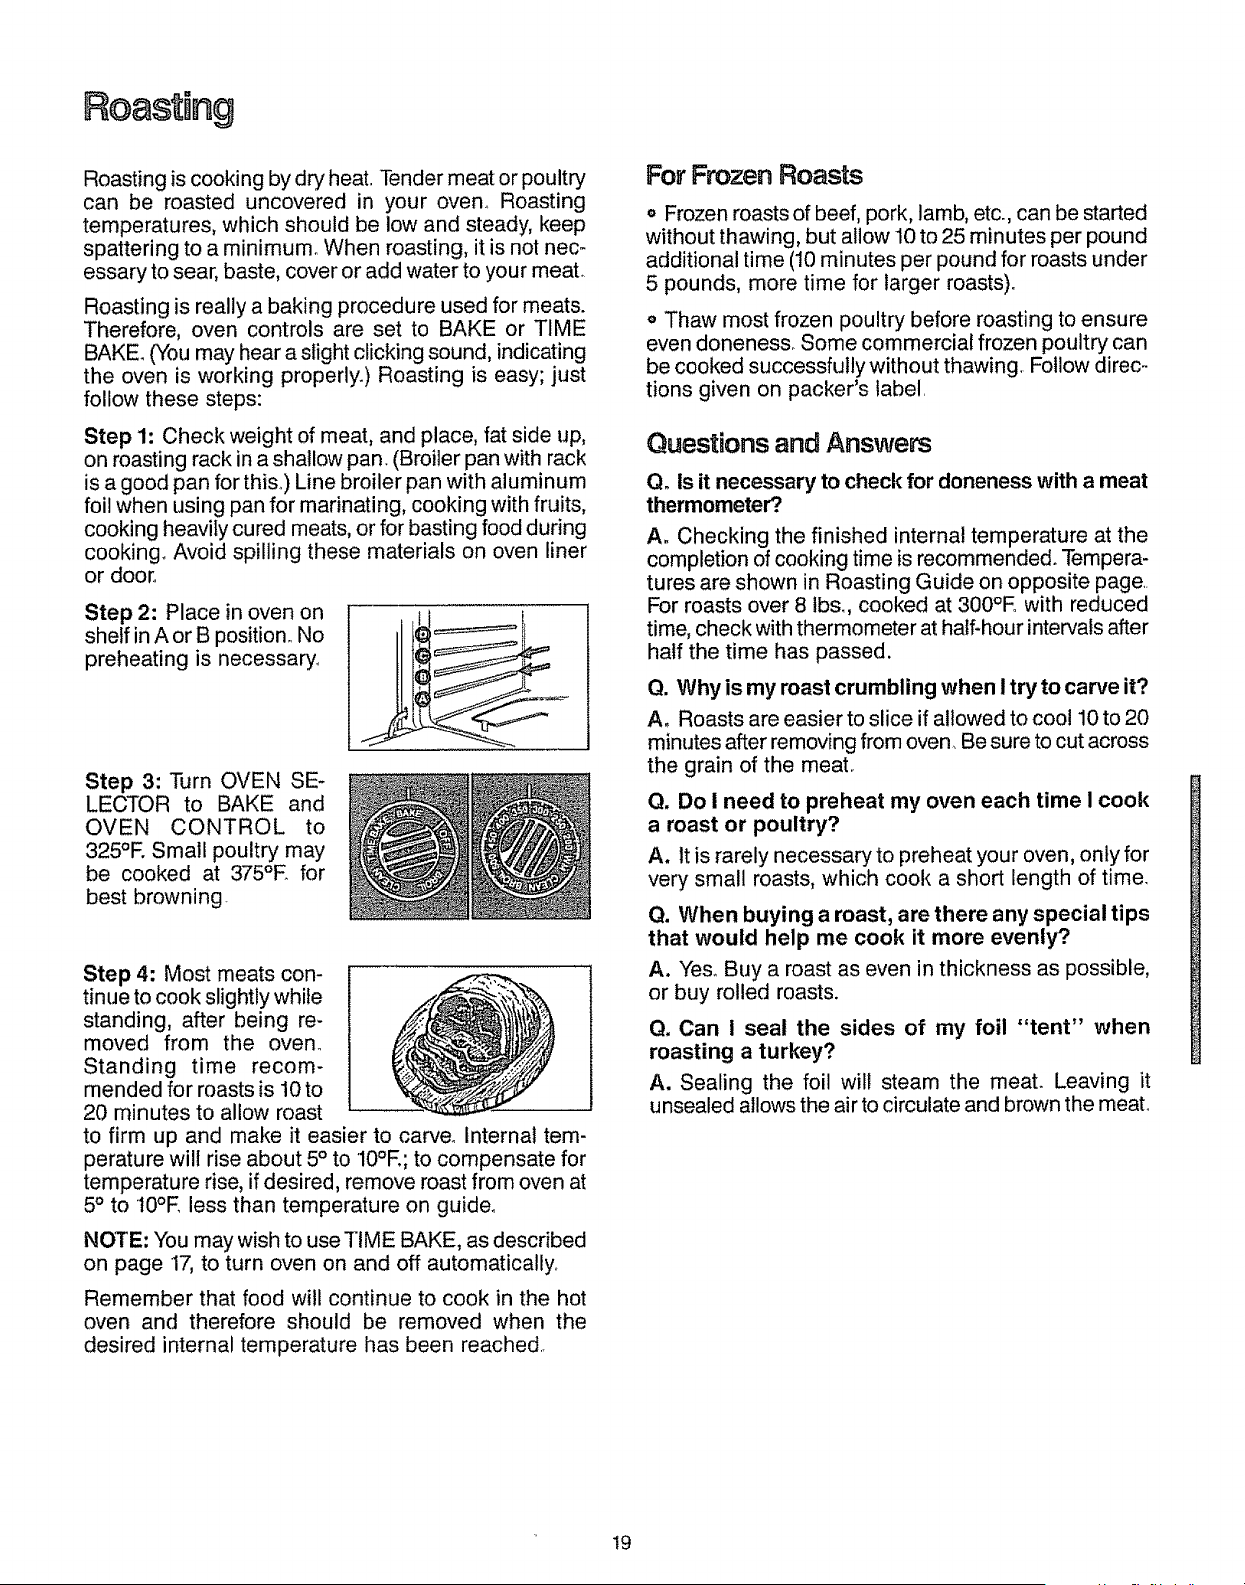
Step 2. Place in oven on
shelf in A or B position,, No
preheating is necessary,,
Step 3: Turn OVEN SE-
LECTOR to BAKE and
OVEN CONTROL to
325°R Small poultry may
be cooked at 375°E for
best browning.
Step 4: Most meats con-
tinue to cook slightly while
standing, after being re-
moved from the oven°
Standing time recom-
mended for roasts is 10 to
20 minutes to allow roast
to firm up and make it easier to carve_ Internal tem-
perature will rise about 5 ° to 10°E; to compensate for
temperature rise, if desired, remove roast from oven at
5° to t0°E less than temperature on guide.
NOTE: You may wish to use TIME BAKE, as described
on page 17, to turn oven on and off automatically,.
Remember that food will continue to cook in the hot
oven and therefore should be removed when the
desired internal temperature has been reached,
For Frozen Roasts
Q Frozen roasts of beef, pork, lamb, etc. can be started
without thawing, but allow 10 to 25 minutes per pound
additional time (10 minutes per pound for roasts under
5 pounds, more time for larger roasts)°
o Thaw most frozen poultry before roasting to ensure
even donenes& Some commerciaf frozen poultry can
be cooked successfully without thawing, Follow direc-
tions given on packer's label,
Questions and Answers
Q oIs it necessary to check for doneness with a meat
thermometer?.
A. Checking the finished internal temperature at the
completion of cooking time is recommended. Tempera-
tures are shown in Roasting Guide on opposite page,,
For roasts over 8 tbs., cooked at 300°E with reduced
time, check with thermometer at half-hour intervals after
half the time has passed.
Q. Why is my roast crumbling when I try to carve it?
Ao Roasts are easier to slice if allowed to cool 10 to 20
minutes after removing from oven. Be sure to cut across
the grain of the meat,
Q. Do I need to preheat my oven each time I cook
a roast or poultry?
A. It is rarely necessary to preheat your oven, only for
very small roasts, which cook a short length of time.
Q. When buying a roast, are there any special tips
that would help me cook it more evenly?
A. Ye& Buy a roast as even in thickness as possible,
or buy rolled roasts.
Q. Can i seal the sides of my foil "tent" when
roasting a turkey?
A. Sealing the foil wilt steam the meat. Leaving it
unsealed allows the air to circulate and brown the meal
19
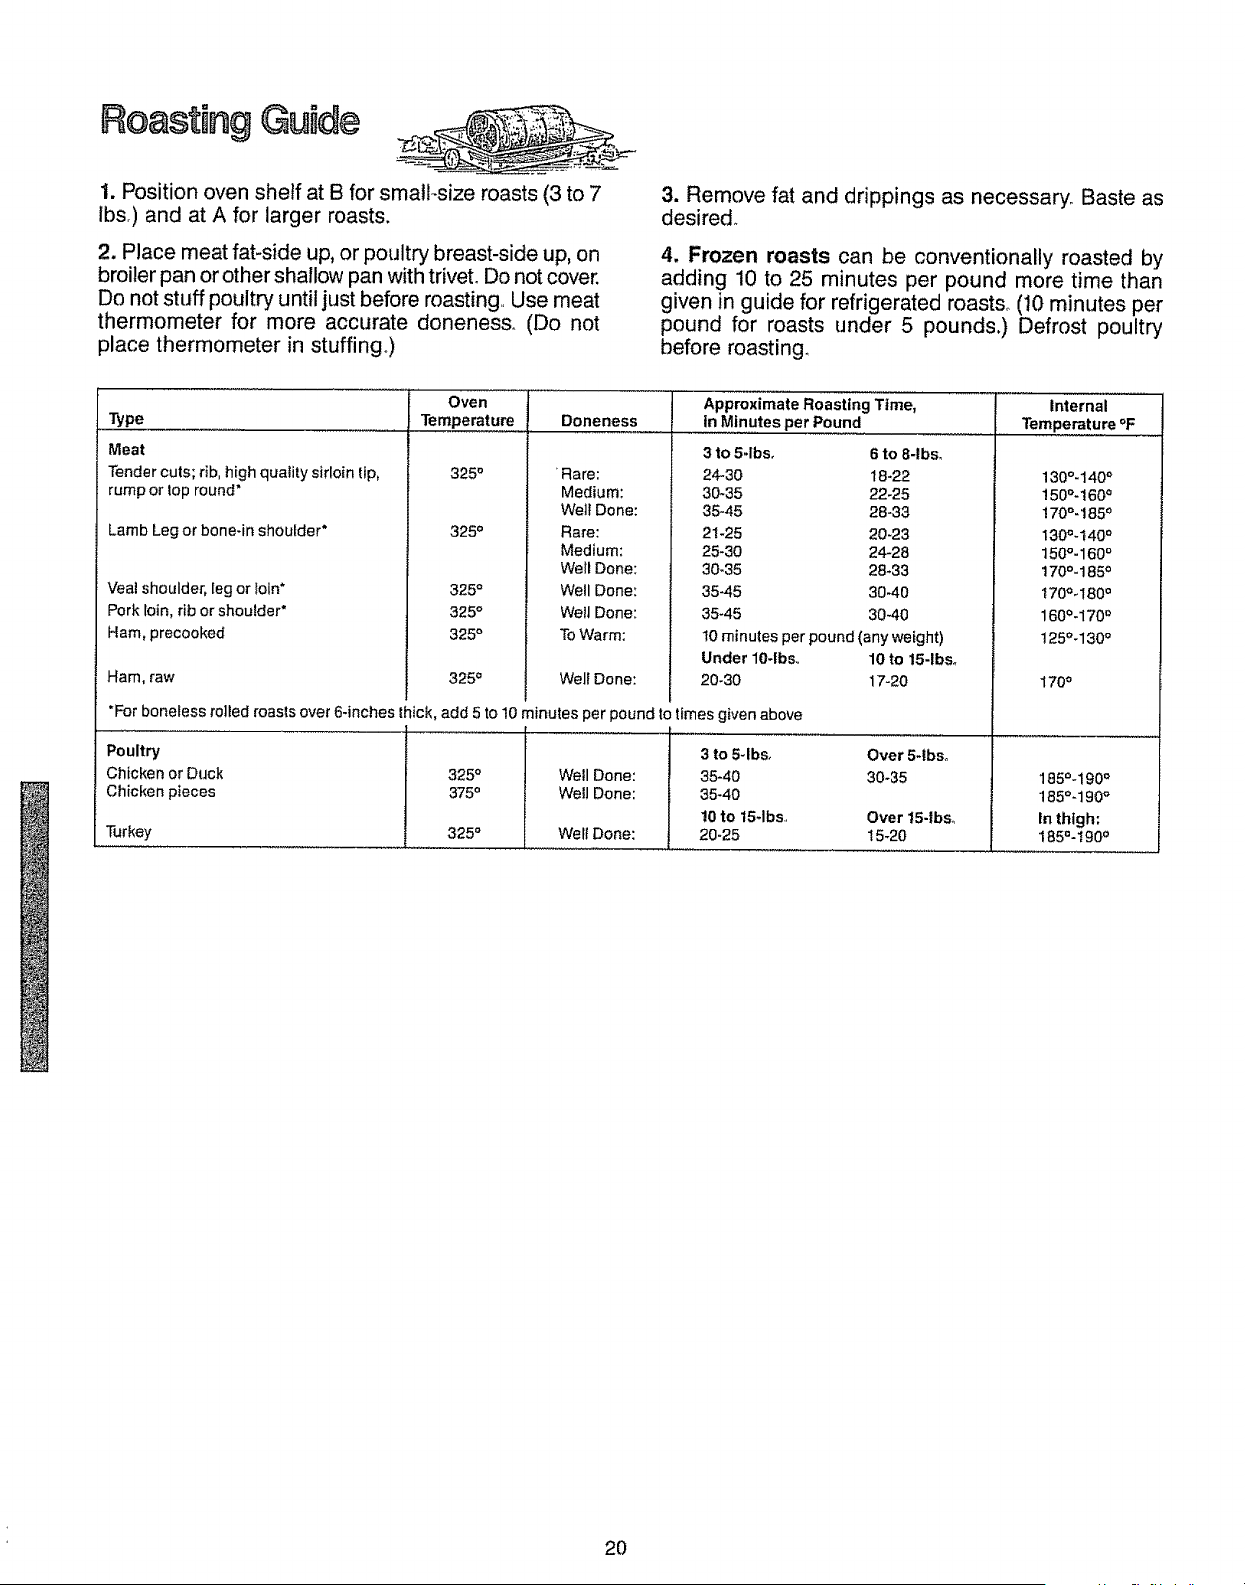
Roasting Guide
1. Position oven shelf at B for small-size roasts (3 to 7
ibs.) and at A for larger roasts.
2. Place meat fat-side up, or poultry breast-side up, on
broiler pan or other shallow pan with triveL Do not cover.
Do not stuff poultry until just before roasting.. Use meat
thermometer for more accurate donenesso (Do not
place thermometer in stuffing..)
3. Remove fat and drippings as necessary. Baste as
desired.
4. Frozen roasts can be conventionally roasted by
adding 10 to 25 minutes per pound more time than
given in guide for refrigerated roasts° (t0 minutes per
pound for roasts under 5 pounds.) Defrost poultry
before roasting,
Type ................
Meat
Tender cuts; rib, high quality sirloin tip,
rump or top round"
Lamb Leg or bone-in shoulder*
Vea! shoulder, leg or Ioin*
Pork loin, rib or shoulder*
Ham, precooked
Ham, raw
Oven
Temperatu_,
325 °
325 °
325 °
325 °
325 °
Doneness
•Rare:
Medium:
Well Done:
Rare:
Medium:
Well Done:
Well Done:
Well Done:
To Warm:
Approximaie Roasting T'ime'i......... Internal
in Minutesper Pound...................... Temperature°F
3 to 5-lbs. 6 to 8-1bs.
24-30 18*22
30_35 22-25
35-45 28-33
2!-25 20-23
25-30 24-28
30-35 28-33
35-45 30-40
35-45 30-40
325 a
130o_140_
150o-160 a
170o.185 o
130o-t40 o
150o-160 °
170o-185 o
I70O_180 o
160o-170 °
125o-130 o
170 °
Well Done:
t0 minutes per pound (any weight)
Under 10-1bs.. 10 to 15-1bs.
20-30 17-20
3to 5-1bs. OverS-tbso
35-40 30-35
35°40
!0to 15-1bs. Over15-1bs_
20-25 15-20
185°-190 '_
185°-190 °
in thigh:
185_-t90 °
"For boneless roiled roasts over 6-inches thick, add 5 to 10 minutes per pound to times given above
Poultry
Chicken or Duck 325 ° Well Done:
Chicken pieces 375° Weft Done:
Turkey 325 ° Well Done:
2O
Broiling
Broiling is cooking food by intense radiant heat from
the upper unit in the oven, Most fish and tender cuts
of meat can be broiled. Follow these steps to keep
spattering and smoking to a minimum°
Step 1: If meat has fat or gristle near edge, cut vertical
slashes through both about Z' apart If desired, fat may
be trimmed, leaving layer about 1/8" thick_
Step 2: Place meat on broiler rack in broiler pan which
comes with range° Always use rack so fat drips into
broiler pan; otherwise juices may become hot enough
to catch fire.
Step 3: Position shelf on recommended shelf position
as suggested in Broiling Guide on page 22. Most broil-
ing is done on C position, but if your range is connected
to 208 volts, you may wish to use higher position
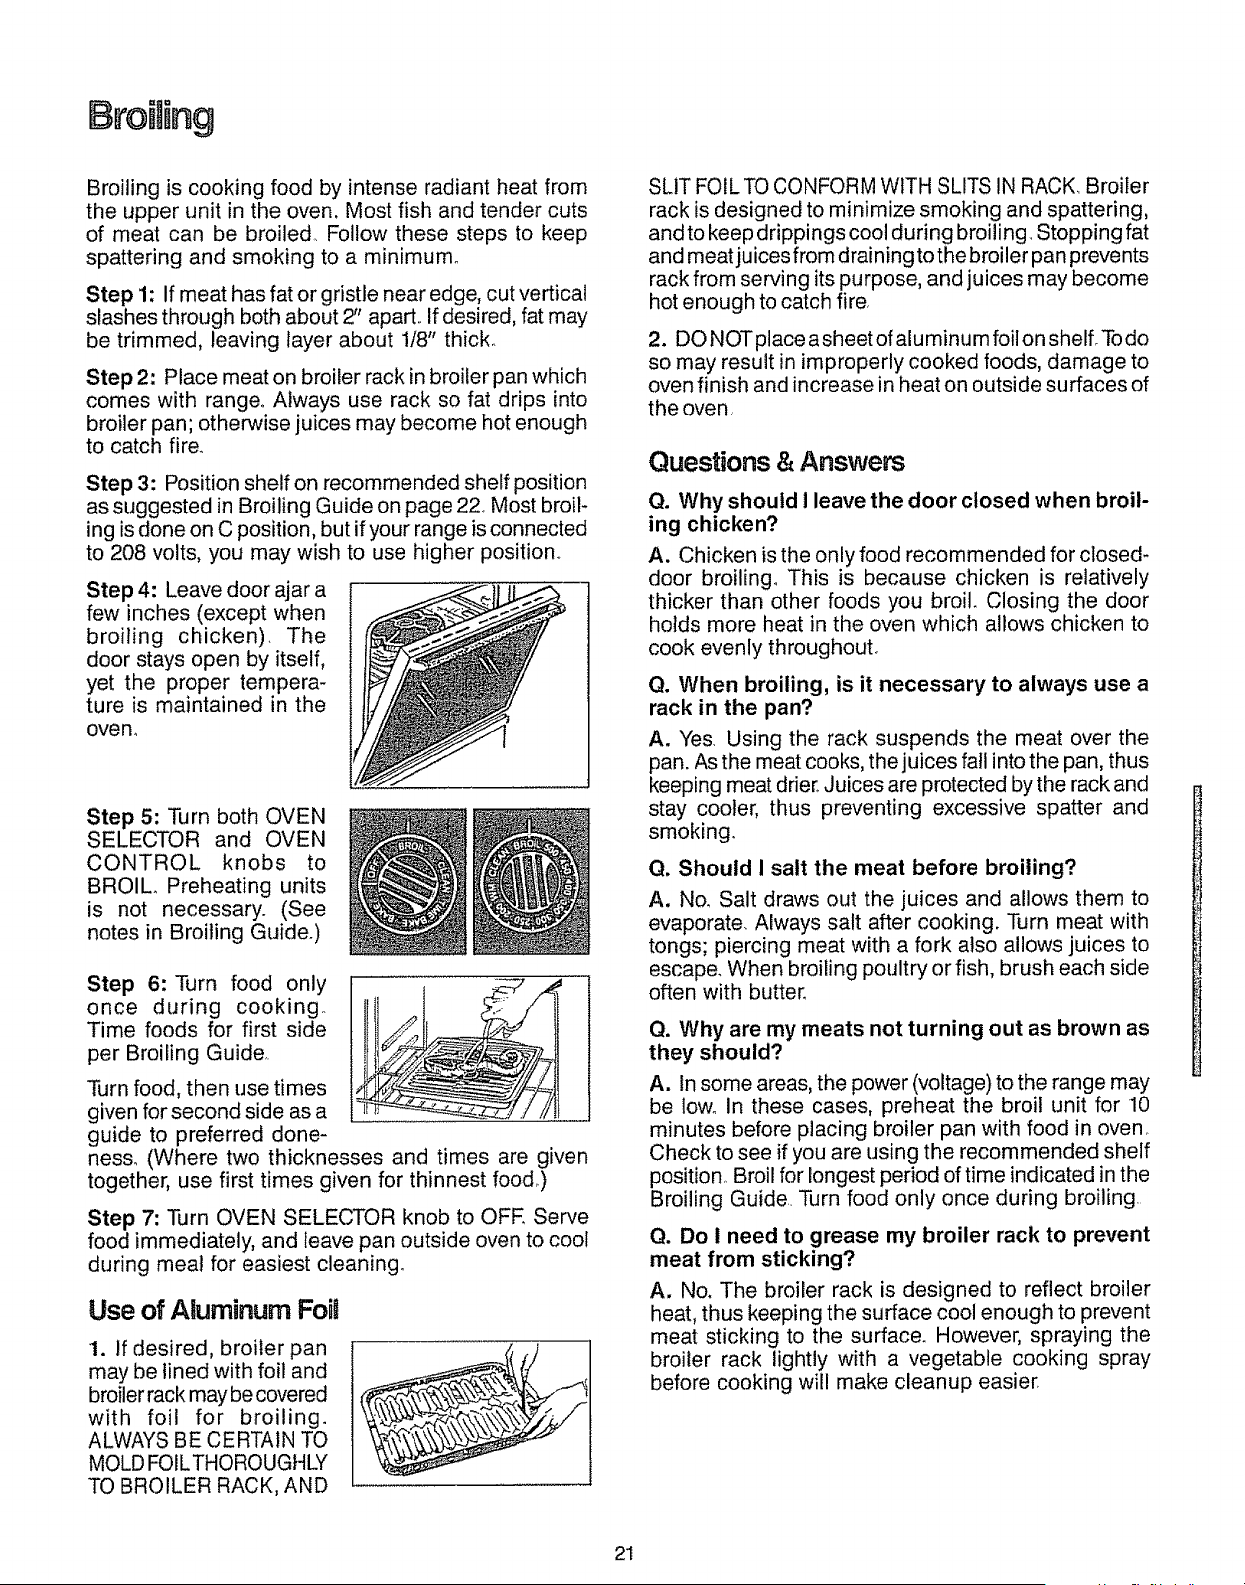
Step 4: Leave door ajar a
few inches (except when
broiling chicken). The
door stays open by itself,
yet the proper tempera-
ture is maintained in the
oven°
Step 5: Turn both OVEN
SELECTOR and OVEN
CONTROL knobs to
BROIL. Preheating units
is not necessary. (See
notes in Broiling Guide°)
Step 6: Turn food only
once during cooking_
Time foods for first side
per Broiling Guide,
Turn food, then use times
given for second side as a
guide to preferred done-
hess° (Where two thicknesses and times are given
together, use first times given for thinnest foo&)
Step 7: Turn OVEN SELECTOR knob to OFE Serve
food immediately, and leave pan outside oven to coot
during meal for easiest cleaning°
Use of Aluminum Foil
1. if desired, broiler pan
may be lined with foil and
broiler rack may be covered
with foil for broiling.
ALWAYS BE CERTAIN TO
MOLD FOILTHOROUGHLY
TO BROILER RACK, AND
SLIT FOIL TO CONFORM WITH SLITS IN RACK. Broiler
rack is designed to minimize smoking and spattering,
andto keep drippings cool during broiling. Stopping fat
and meat juices from draining to the broiler pan prevents
rack from serving its purpose, and juices may become
hot enough to catch fire,
2. DO NOT place asheet of alu min u m foil on shelf. To do
so may result in improperly cooked foods, damage to
oven finish and increase in heat on outside surfaces of
the oven
Questions & Answers
Q. Why should I leave the door closed when broil-
ing chicken?
A. Chicken is the only food recommended for closed-
door broiling, This is because chicken is relatively
thicker than other foods you broil. Closing the door
holds more heat in the oven which allows chicken to
cook evenly throughout.
Q. When broiling, is it necessary to always use a
rack in the pan?
A. Yes Using the rack suspends the meat over the
pan. As the meat cooks, the juices fall into the pan, thus
keeping meat drier, Juices are protected by the rack and
stay cooler, thus preventing excessive spatter and
smoking.
Q. Should I salt the meat before broiling?
A. No. Salt draws out the juices and allows them to
evaporate. Always salt after cooking. Turn meat with
tongs; piercing meat with a fork also allows juices to
escape. When broiling poultry or fish, brush each side
often with butter.
Q. Why are my meats not turning out as brown as
they should?
A. In some areas, the power (voltage) to the range may
be Iowo In these cases, preheat the broil unit for 10
minutes before placing broiler pan with food in oven,
Check to see if you are using the recommended shelf
position, Broil for longest period of time indicated in the
Broiling Guide Turn food only once during broiling
Q. Do I need to grease my broiler rack to prevent
meat from sticking?
A. No. The broiler rack is designed to reflect broiler
heat, thus keeping the surface cool enough to prevent
meat sticking to the surface. However, spraying the
broiler rack lightly with a vegetable cooking spray
before cooking will make cleanup easier
21
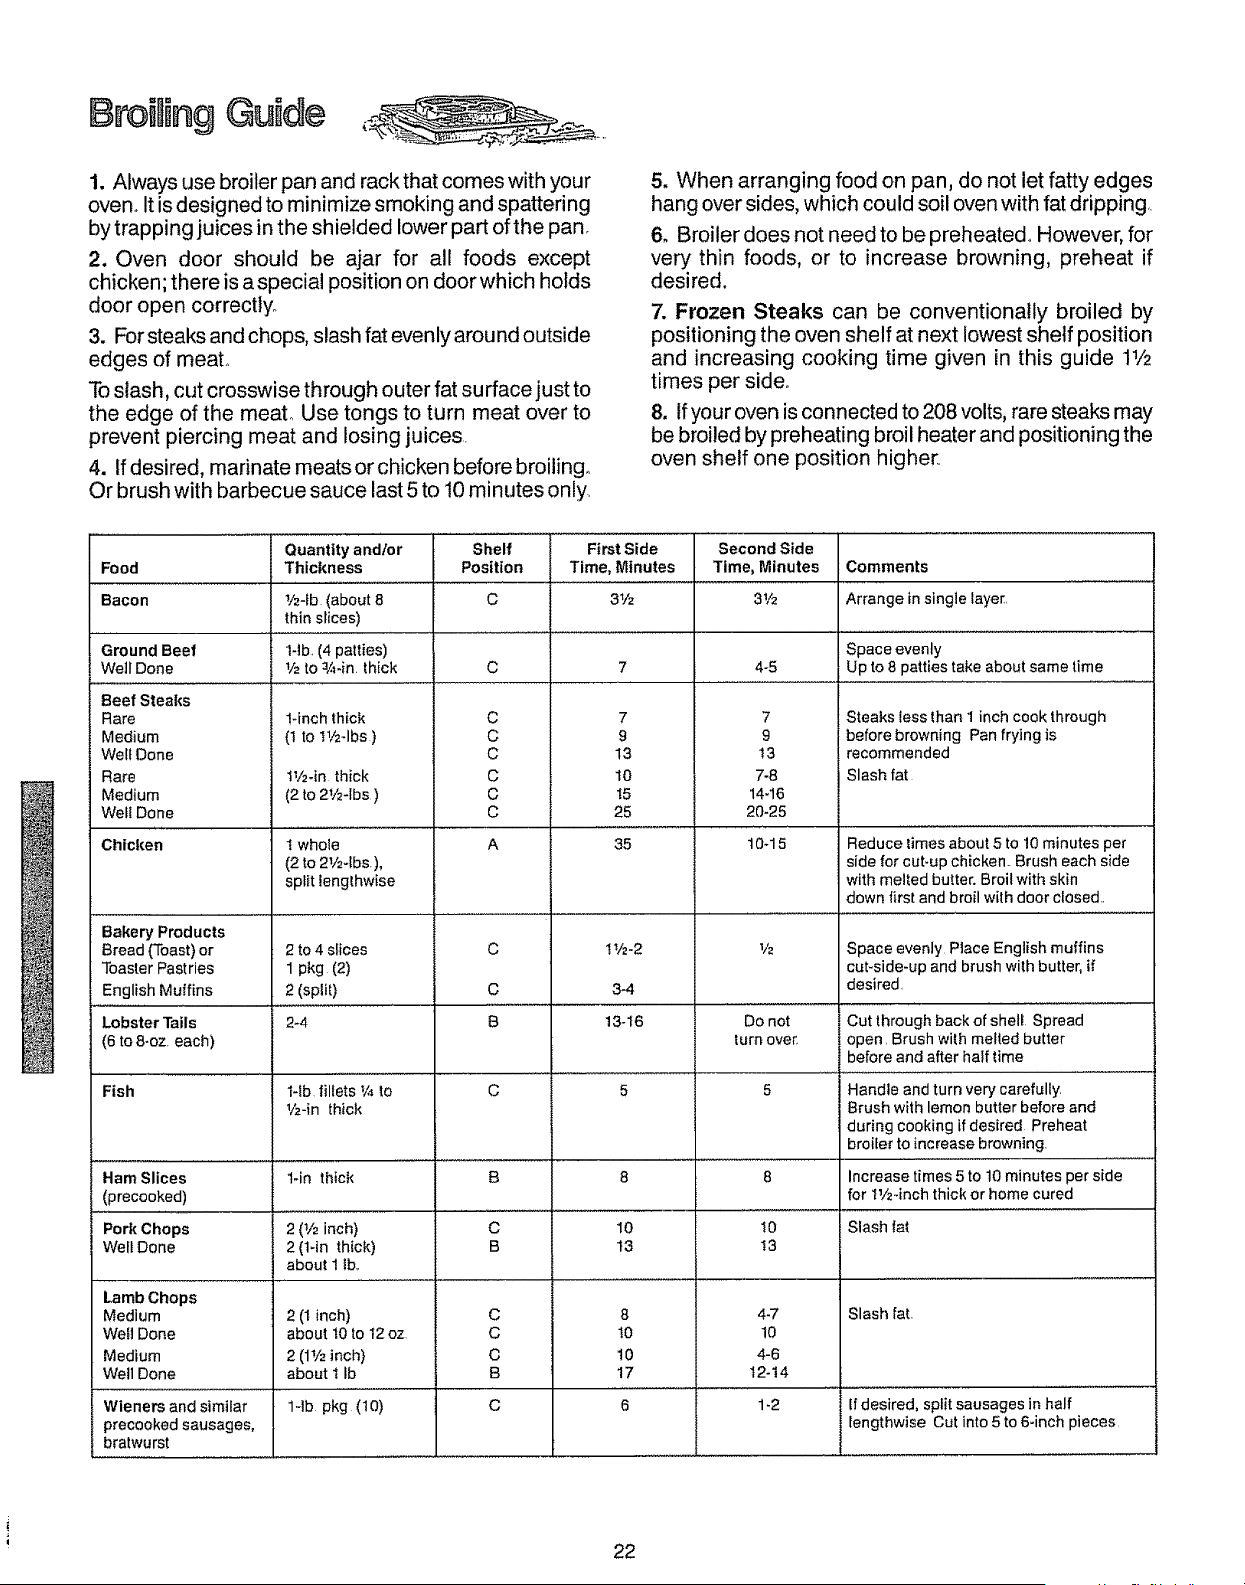
Broi ing Guide
1. Always use broiler pan and rack that comes with your
oven,, It is designed to minimize smoking and spattering
by trapping juices in the shielded lower part of the pan,
2. Oven door should be ajar for all foods except
chicken; there is aspecial position on door which holds
door open correctly.
3. For steaks and chops, slash fat evenly around outside
edges of meal
To slash, cut crosswise through outer fat surface just to
the edge of the meat, Use tongs to turn meat over to
prevent piercing meat and losing juices
4. If desired, marinate meats or chicken before broiling.
Or brush with barbecue sauce last 5 to 10 minutes only.
5. When arranging food on pan, do not let fatty edges
hang over sides, which could soil oven with fat dripping,
6o Broiler does not need to be preheated_ However, for
very thin foods, or to increase browning, preheat if
desired.
7. Frozen Steaks can be conventionally broiled by
positioning the oven shelf at next lowest shelf position
and increasing cooking time given in this guide 11/2
times per side
8. If your oven is connected to 208 volts, rare steaks may
be broiled by preheating broil heater and positioning the
oven shelf one position higher
Quantity and/or Shelf First Side Second Side
Food Thickness Position Time, Minutes Time, Minutes Comments
Bacon 1/24b (about 8 C 31/z 31/2 Arrange in single laye[
thin slices)
Ground Beet 14b (4 patties) Space evenly
Well Done 112to 3/44n thick C 7 4-5 Up to 8 patties take about same time
Beef Steaks
Rare
Medium
Well Done
Rare
Medium
Weft Done
Chicken
Bakery Products
Bread (Toast) or
Toaster Pastries
English Muffins
lqnch thick
(I to I1/2-1bs)
11/2-in thick
(2 to 2V2-lbs )
1 whole
(2 to 21/24bs),
split lengthwise
2 to 4 slices
1 pkg (2)
2 (split)
2-4
c
c
c
c
c
c
A
C
C
B
7
9
13
t0
t5
25
35
tt/2-2
3-4
13-t6
7
9
!3
7-8
14-16
20-25
10_15
Steaks less than I inch cook through
before browning Pan frying is
recommended
Slash fat
Reduce times about 5 to 10 minutes per
side for cut-up chicken. Brush each side
with melted butter. Broil with skin
down first and broil with door closed
Lobster Tails Do not
(6 to 8-oz each) turn over,
Fish 1-tb fillets V4to C 5
1!2-in thick
Lamb Chops
Medium
Weft Done
Medium
Well Done
Wieners and similar
precooked sausages,
bratwurst
Space evenly Place English muffins
cut-side-up and brush with butter, if
desired.
Cut through back of shell Spread
open Brush with melted butter
before and after half time
5 Handle and turn very carefully
Brush with lemon butter before and
during cooking if desired Preheat
breifer to increase browning
8 increase times 5 to 10 minutes per side
for 1V24nch thick or home cured
Ham Slices 1-in thick B 8
(precooked)
Pork Chops 2 (1/2 inch) Slash _al
Welt Done 2 0-in thick)
about 1 lb.
Slash fat
10
13
8 4_
t0 10
10 4-6
17 12q4
C 10
B t3
C
C
C
B
2 (I inch)
about t0 to 12 oz
2 (1t/2 inch)
about t Ib
1-1b pkg (10) If desired, split sausages in half
lengthwise Cut into 5 to 6-inch pieces
C 1-2
22
Operating the SeSf=CteaningOven
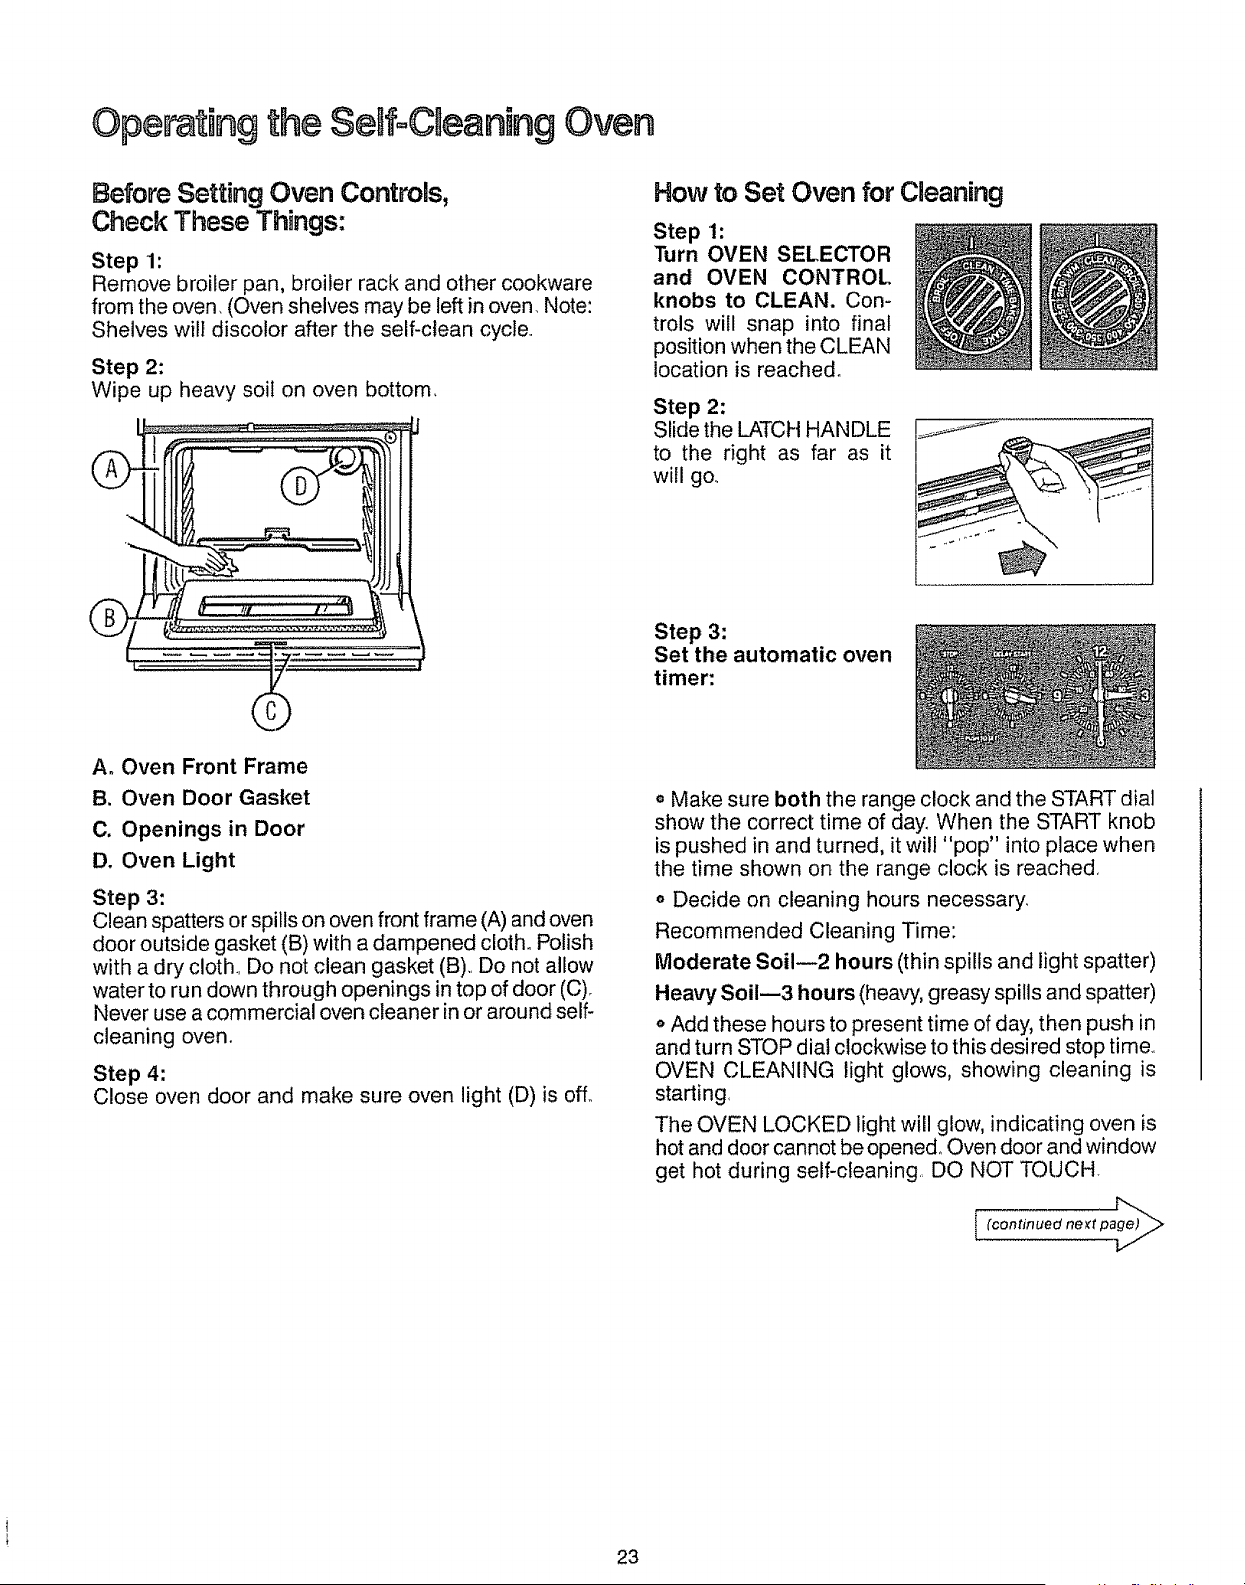
Before Setting Oven Controls,
Check These Things:
Step 1:
Remove broiler pan, broiler rack and other cookware
from the oven. (Oven shelves may be left in oven. Note:
Shelves will discolor after the self-clean cycle,,
Step 2:
Wipe up heavy soil on oven bottom.
A. Oven Front Frame
B. Oven Door Gasket
C. Openings in Door
D. Oven Light
Step 3:
Clean spatters or spills on oven front frame (A) and oven
door outside gasket (B) with a dampened cloth. Polish
with a dry cloth., Do not clean gasket (B),, Do not allow
water to run down through openings in top of door (C)_
Never use a commercial oven cleaner in or around self-
cleaning oven°
Step 4:
Close oven door and make sure oven light (D) is off.,
How to Set Oven for Cleaning
Step 1:
Turn OVEN SELECTOR
and OVEN CONTROL
knobs to CLEAN. Con-
trols will snap into final
position when the CLEAN
location is reached.
Step 2:
Slide the LATCH HANDLE
to the right as far as it
will go,,
Step 3:
Set the automatic oven
timer:
o Make sure both the range clock and the START dial
show the correct time of day. When the START knob
is pushed in and turned, it will "pop" into place when
the time shown on the range clock is reached,
Q Decide on cleaning hours necessary.
Recommended Cleaning Time:
Moderate Soil--2 hours (thin spills and light spatter)
Heavy Soil--3 hours (hearty, greasy spills and spatter)
o Add these hours to present time of day, then push in
and turn STOP dial clockwise to this desired stop time.,
OVEN CLEANING light glows, showing cleaning is
starting,
The OVEN LOCKED light will glow, indicating oven is
hot and door cannot be opened° Oven door and window
get hot during self-cleaning, DO NOT TOUCH.
I (continued newt page_
23
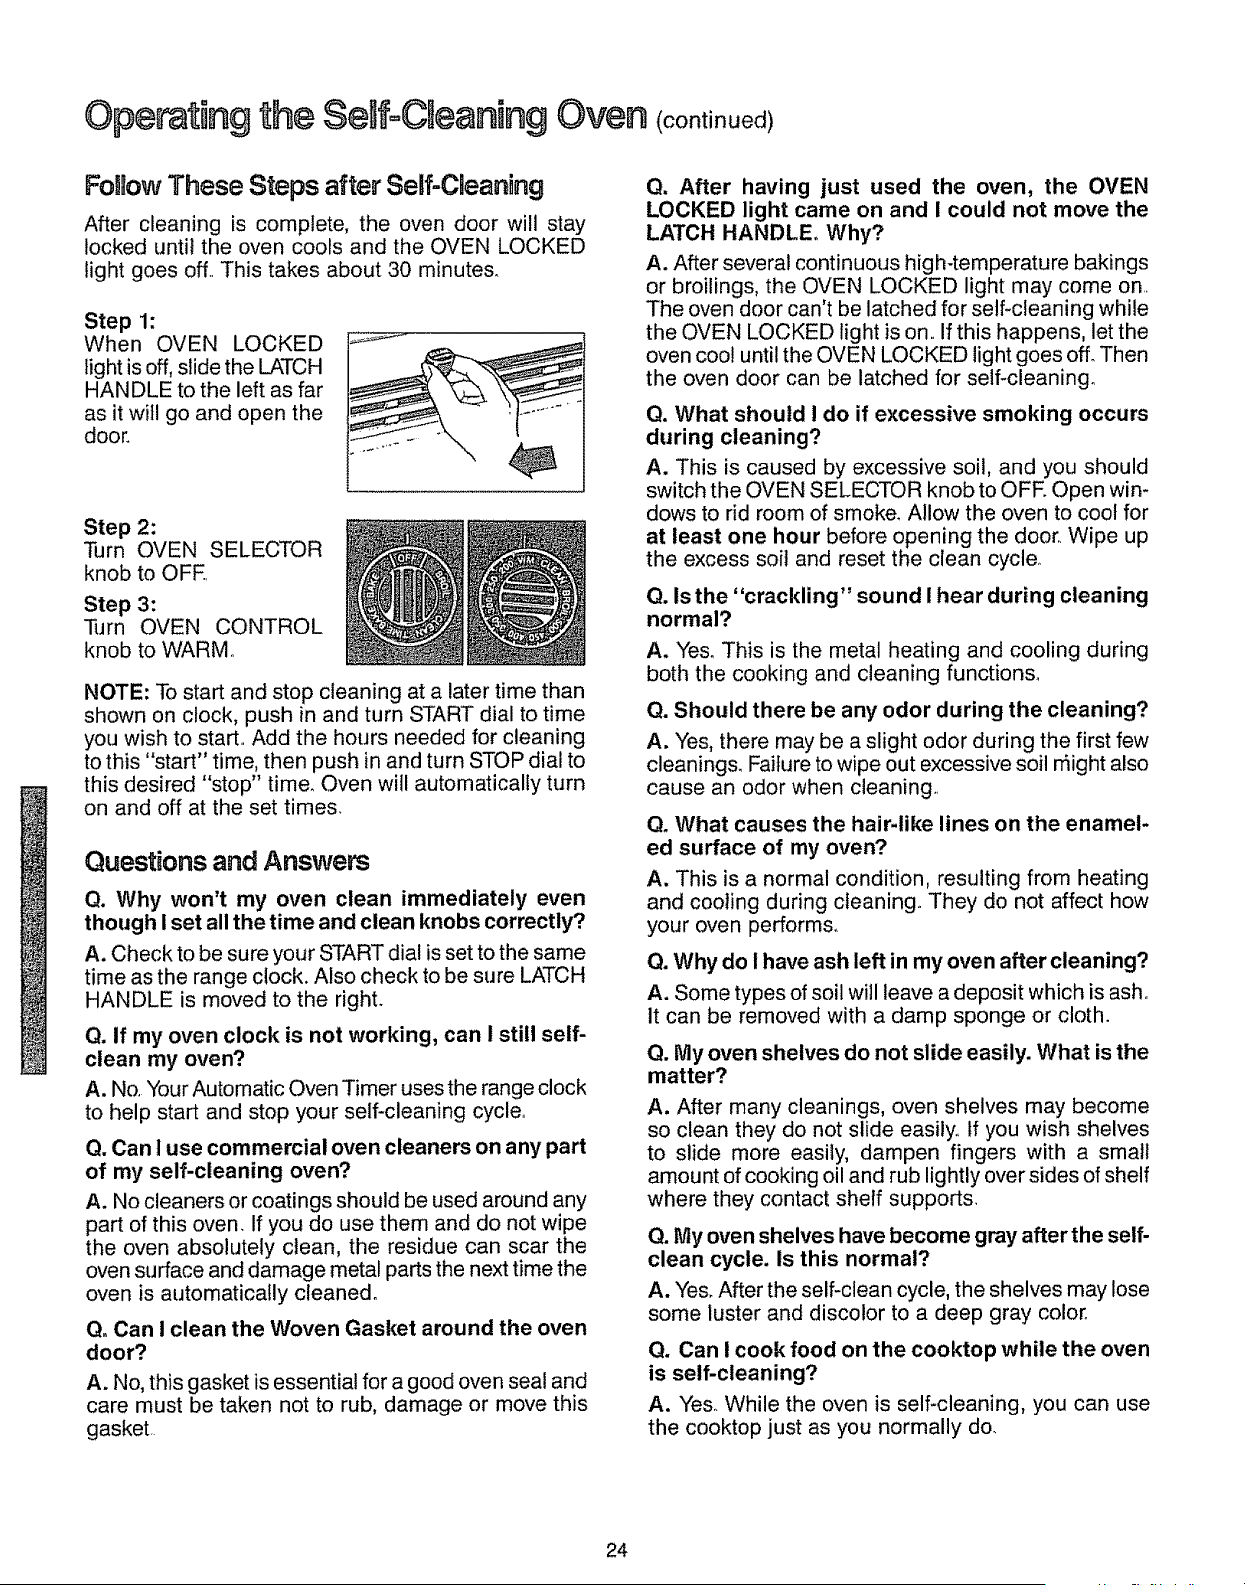
Operating the Self=Cleaning Oven (continued)
Fo! ow These Steps after Self=Cleaning
After cleaning is complete, the oven door will stay
locked until the oven cools and the OVEN LOCKED
light goes off This takes about 30 minutes.
Step 1:
When OVEN LOCKED
light is off, slide the LATCH
HANDLE to the left as far
as it will go and open the
door.
Step 2:
Turn OVEN SELECTOR
knob to OFE
Step 3:
Turn OVEN CONTROL
knob to WARM°
NOTE: To start and stop cleaning at a later time than
shown on clock, push in and turn START dial to time
you wish to start° Add the hours needed for cleaning
to this "start" time, then push in and turn STOP dial to
this desired "stop" time. Oven will automatically turn
on and off at the set times.
Questions and Answers
Q. Why won't my oven clean immediately even
though I set all the time and clean knobs correctly?
A. Check to be sure your START dial is set to the same
time as the range clock. Also check to be sure LATCH
HANDLE is moved to the right.
Q. If my oven clock is not working, can I still self-
clean my oven?
A. No Your Automatic Oven Timer uses the range clock
to help start and stop your self-cleaning cycle
Q. Can I use commercial oven cleaners on any part
of my self-cleaning oven?
A. No cleaners or coatings should be used around any
part of this oven. If you do use them and do not wipe
the oven absolutely ctean, the residue can scar the
oven surface and damage metal parts the next time the
oven is automatically cleaned.
QoCan ! clean the Woven Gasket around the oven
door?
A. No, this gasket is essential for a good oven seal and
care must be taken not to rub, damage or move this
gasket
Q. After having just used the oven, the OVEN
LOCKED light came on and I could not move the
LATCH HANDLE. Why?
A. After several continuous high-temperature bakings
or broilings, the OVEN LOCKED light may come on
The oven door can't be latched for self-cleaning while
the OVEN LOCKED light is on If this happens, let the
oven cool until the OVEN LOCKED light goes off. Then
the oven door can be latched for self-cleaningo
Q. What should I do if excessive smoking occurs
during cleaning?
A. This is caused by excessive soil, and you should
switch the OVEN SELECTOR knob to OFF. Open win-
dows to rid room of smoke. Allow the oven to cool for
at least one hour before opening the door Wipe up
the excess soil and reset the clean cycle°
Q. Is the "crackling" sound I hear during cleaning
normal?
A. Yes. This is the metal heating and cooling during
both the cooking and cleaning functions°
Q. Should there be any odor during the cleaning?
A. Yes, there may be a slight odor during the first few
cleanings. Failure to wipe out excessive soil rfiight also
cause an odor when cleaning
Q. What causes the hair-like lines on the enamel-
ed surface of my oven?
A. This is a normal condition, resulting from heating
and cooling during cteaning_ They do not affect how
your oven performs.
Q. Why do I have ash left in my oven after cleaning?
A. Some types of soil will leave a deposit which is ash
It can be removed with a damp sponge or cloth.
Q. My oven shelves do not slide easily. What is the
matter?
A, After many cleanings, oven shelves may become
so clean they do not slide easily tf you wish shelves
to slide more easily, dampen fingers with a small
amount of cooking oil and rub lightly over sides of shelf
where they contact shelf supports.
Q. My oven shelves have become gray after the self-
clean cycle. Is this normal?
A. Yes. After the self-clean cycle, the shelves may lose
some luster and discolor to a deep gray color°
Q. Can ! cook food on the cooktop while the oven
is self-cleaning?
A. Yes While the oven is self-cleaning, you can use
the cooktop just as you normally do.
24
Care and Cneaning!
Proper care and cleaning are important so your range
will give you efficient and satisfactory serviceo Follow
these directions carefully in caring for your range to
assure safe and proper maintenance,
PorceDainEnamel Finish
The porcelain enamel finish is sturdy but breakable if
misused. This finish is acid-resistanL However, any acid
foods spilled (such as fruit juices, tomato or vinegar)
should not be permitted to remain on the finish,.
Cleaning Under the Range
The area under the range can be reached easily for
cleaning by removing the bottom drawer. To remove,
pull drawer out all the way, tilt up the front and remove
ito To replace, insert glides at back of drawer beyond
stop on range glide& Lift drawer if necessary to insert
easily,. Let front of drawer down, then push in to close.
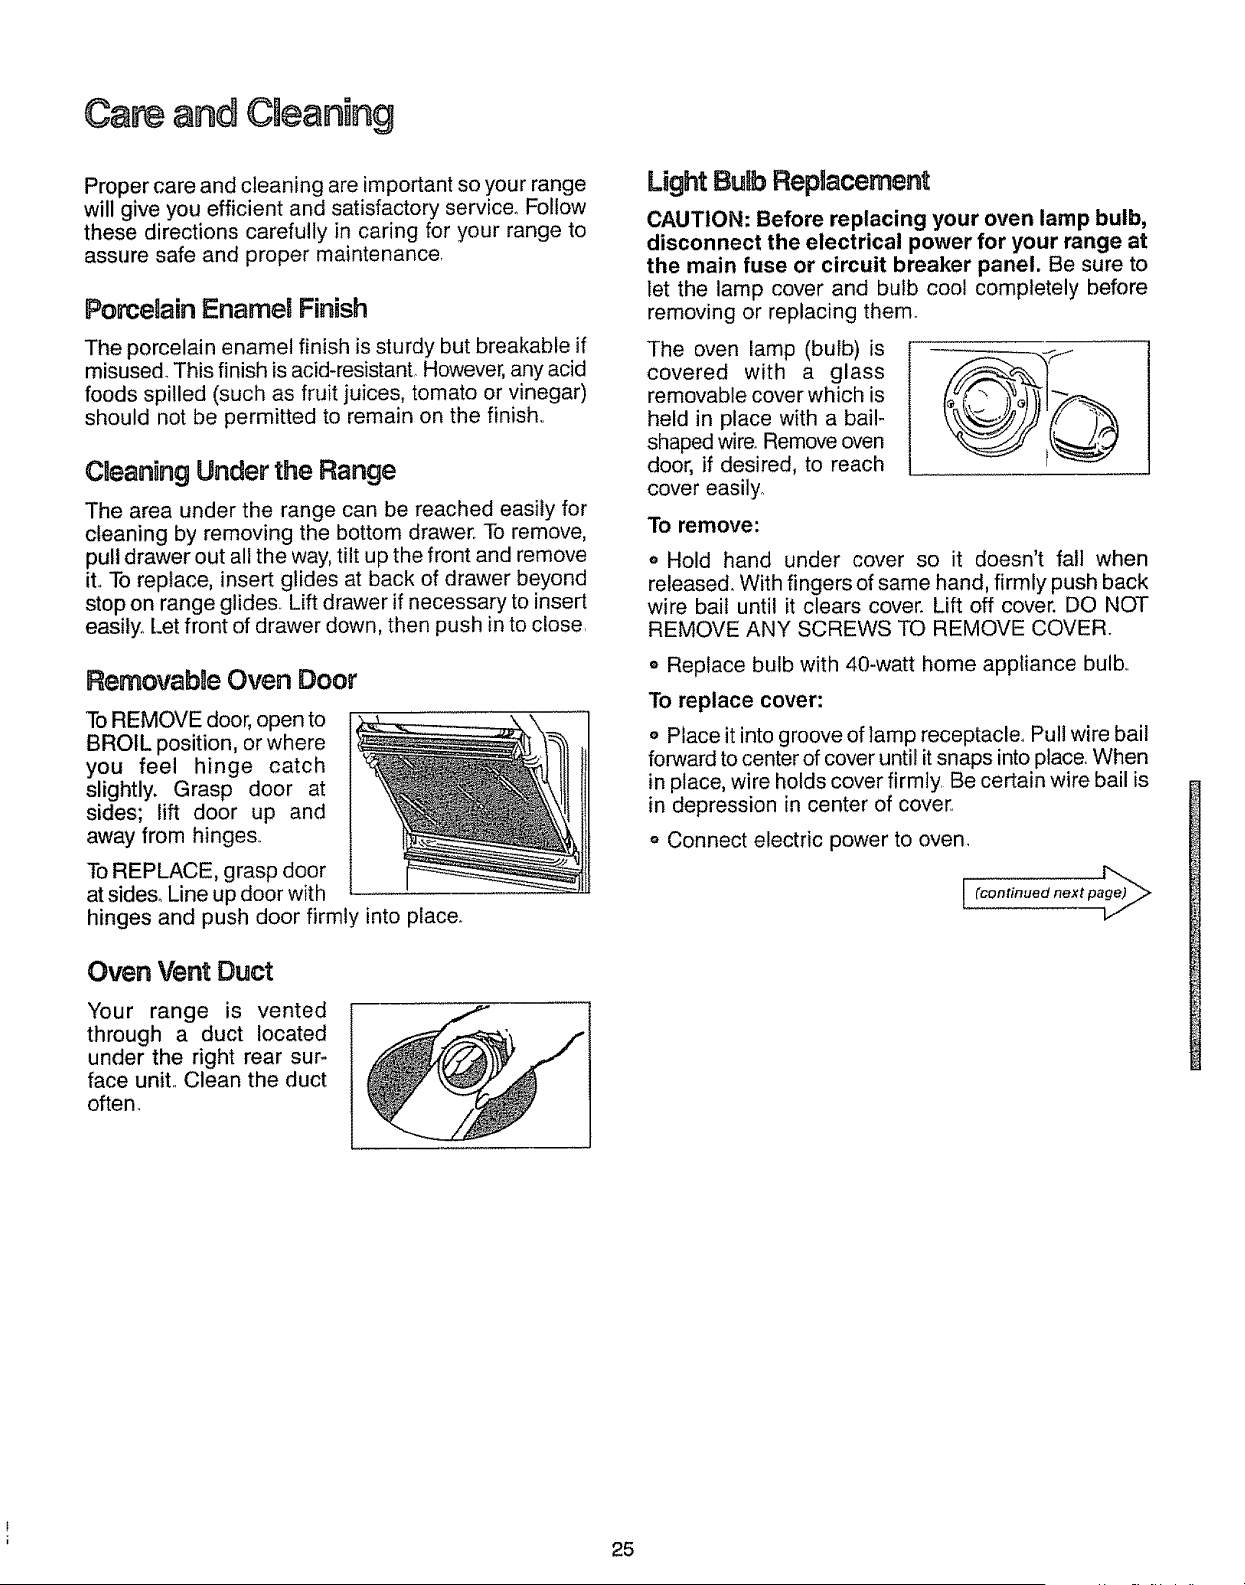
Removable Oven Door
To REMOVE door, open to
BROIL position, or where
you feel hinge catch
slightly. Grasp door at
sides; lift door up and
away from hinges,.
To REPLACE, grasp door
at side& Line up door with
hinges and push door firmly into place_
Oven Vent Duct
Your range is vented
through a duct located
under the right rear sur-
face unit,. Clean the duct
often.
Light Bulb Replacement
CAUTION: Before replacing your oven lamp bulb,
disconnect the electrical power for your range at
the main fuse or circuit breaker panel. Be sure to
let the lamp cover and bulb cool completely before
removing or replacing them.
The oven lamp (bulb)is
covered with a glass
removable cover which is
held in place with a bail-
shaped wire,. Remove oven
door, if desired, to reach
cover easily.
To remove:
o Hold hand under cover so it doesn't fall when
released. With fingers of same hand, firmly push back
wire bail until it clears cover. Lift off cover. DO NOT
REMOVE ANY SCREWS TO REMOVE COVER.
o Replace bulb with 40-watt home appliance bulb,.
To replace cover:
o Place it into groove of lamp receptacle_ Pull wire bail
forward to center of cover until it snaps into place,. When
in place, wire holds cover firmly Be certain wire bail is
in depression in center of cover.
o Connect electric power to oven.
(continued next page_
25
Cam and Cleaning (continued)
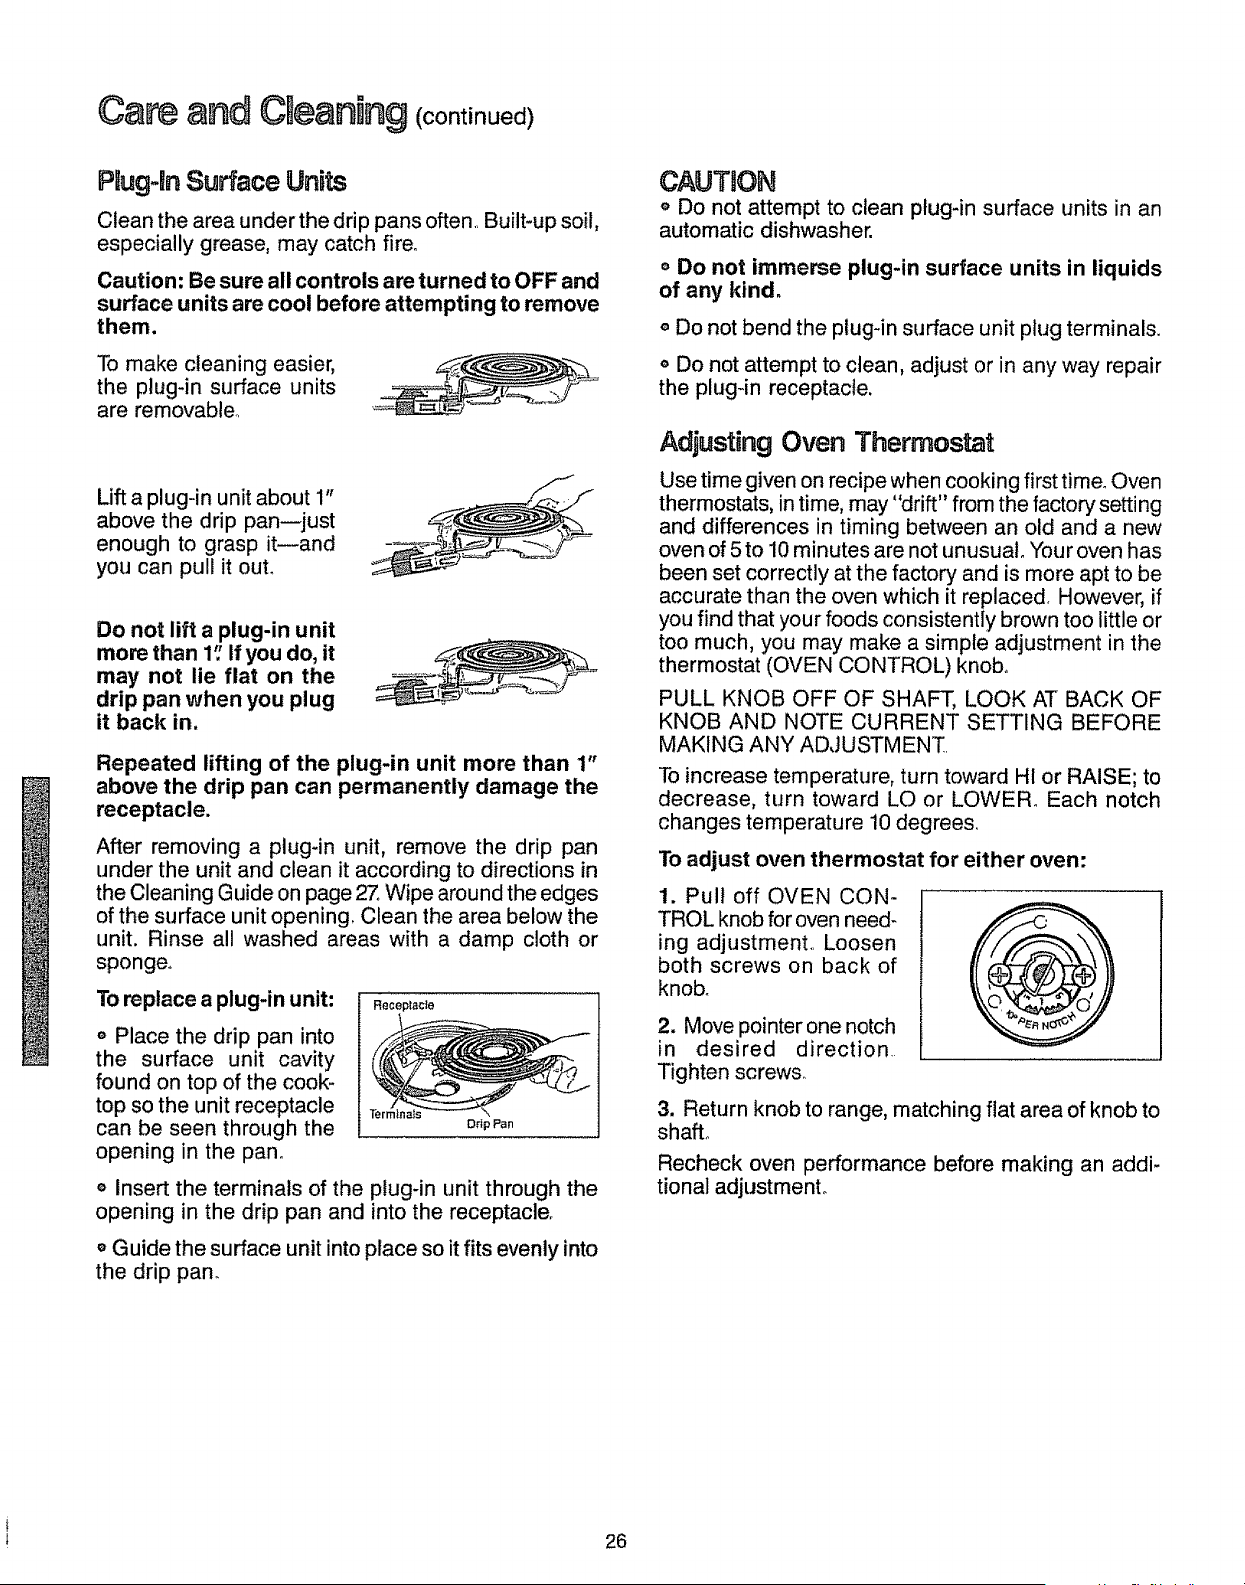
PKug-lnSurface Units
Clean the area under the drip pans often.. Built-up soil,
especially grease, may catch fire.
Caution: Be sure all controls are turned to OFF and
surface units are cool before attempting to remove
them.
To make cleaning easier,
the plug-in surface units
are removable°
Lift a plug-in unit about 1"
above the drip pan--just
enough to grasp it--and
you can pull it out.
Do not lift a plug-in unit
more than 1" If you do, it
may not lie flat on the
drip pan when you plug
it back in.
Repeated lifting of the plug-in unit more than 1"
above the drip pan can permanently damage the
receptacle.
After removing a plug-in unit, remove the drip pan
under the unit and clean it according to directions in
the Cleaning Guide on page 27, Wipe around the edges
of the surface unit opening, Clean the area below the
unit. Rinse all washed areas with a damp cloth or
sponge°
Toreplace a plug-in unit:
o Place the drip pan into
the surface unit cavity
found on top of the cook-
top so the unit receptacle
can be seen through the
opening in the pan.
Receptacle
Drip Pan
o Insert the terminals of the plug-in unit through the
opening in the drip pan and into the receptacle.
o Guide the surface unit into place so it fits evenly into
the drip pan.
CAUTION
o Do not attempt to clean plug-in surface units in an
automatic dishwasher.
o Do not immerse plug-in surface units in liquids
of any kind.
a Do not bend the plug-in surface unit plug terminals°
Do not attempt to clean, adjust or in any way repair
the plug-in receptacle.
Adjusting Oven Thermostat
Use time given on recipe when cooking first time. Oven
thermostats, in time, may "drift" from the factory setting
and differences in timing between an old and a new
oven of 5 to 10 minutes are not unusual° Your oven has
been set correctly at the factory and is more apt to be
accurate than the oven which it replaced. However, if
you find that your foods consistently brown too little or
too much, you may make a simple adjustment in the
thermostat (OVEN CONTROL) knob.
PULL KNOB OFF OF SHAFT, LOOK AT BACK OF
KNOB AND NOTE CURRENT SETTING BEFORE
MAKING ANY ADJUSTMENT.
To increase temperature, turn toward HI or RAISE; to
decrease, turn toward LO or LOWER. Each notch
changes temperature 10 degree&
To adjust oven thermostat for either oven:
1. Pull off OVEN CON-
TROL knob for oven need-
ing adjustment,, Loosen
both screws on back of
knob.
2. Move pointer one notch
in desired direction.
Tighten screw&
3. Return knob to range, matching flat area of knob to
shafL
Recheck oven performance before making an addi-
tional adjustment°
26
CHeaningGuide
NOTE: Let range/oven parts cool before touching or handling.
PART MATERIALS TO USE GENERAL DIRECTIONS
Bake Unit and Broil Do not clean the bake unit or broil unit Any soil will burn off when the unit is
Unit heated NOTE: The bake unit is hinged and can be gently lifted to clean the
oven floor. If spiHover, residue or ash accumulates around the bake unit,
gently wipe around the unit with warm water..
Broiler Pan and Rack o Soap and Water Drain fat, cool pan and rack slightly, (Do not let soiled pan and rack stand in
• Soap-Filled Scouring Pad oven to cool.) Sprinkle on detergent Fill pan with warm water and spread
o Plastic Scouring Pad cloth or paper towel over the rack, Let both stand for a few minutes. Wash;
scour if necessary.. Rinse and dry OPTION: The broiler pan and rack may
also be cleaned in a dishwasher
Control Knobs: + Mild Soap and Water Pull off knobs Wash gently but do not soak.. Dry and return controls to
Range Top and Oven range, making sure to match flat area on the knob and shaft.
Outside Glass Finish o Soap and Water Wash a_fglass with cloth dampened in soapy water.. Rinse and polish with a
dry cloth if knobs on the control panel are removed, do not allow water to
run down inside the surface of glass while cleaning,
Metal, including o Soap and Water Wash, rinse, and then potish with a dry cloth,. DO NOT USE steel wool,
Chrome Side Trims abrasives, ammonia, acids, or commercial oven cleaners which may
and Trim Strips damage the finish
Porcelain Enamel = Paper Towel Avoid cleaning powders or harsh abrasives which may scratch the enamel.
Surface* o Dry Cloth If acids should spiii on the range while it is hot, use a dry paper towel or
+ Soap and Water cloth to wipe up right away When the surface has cooled, wash and rinse
For other spills, such as fat spatterings, etc., wash with soap and water
when cooled and then rinse Polish with dry cloth+.
i ......................................................
Painted Surfaces + Soap and Water Use a mild solution of soap and water,. Do not use any harsh abrasives or
cleaning powders which may scratch or mar surface
Inside Oven Door* • Soap and Water On this oven, clean ONLY the door liner outside the gasket. The door is
automatically cleaned if the oven is in the self-cleaning cycle. If spillover or
spattering should occur in cooking function, wipe the door with soap and
water DO NOT rub or damage gasket Avoid getting soap and water on the
gasket or in the rectangufar flanges on the door+
Oven Gasket* Avoid getting ANY cleaning materials on the gasket
Oven Liner* o Soap and Water Cool before cteaning, Frequent wiping with soap and water will prolong the
time between major cleanings,. Be sure to rinse thoroughly For very heavy
soiling, use your self-cteaning cycle often
Oven Vent Duct = Soap and Water Remove the Oven Vent Duct found under the right rear surface unit. Wash
in hot, soapy water and dry and replace (opening should match opening in
drip pan)
• Spillage of marinades, fruit juices, and basting materials containing acids may cause discoloration. Spillovers should be wiped up
immediately, with care being taken to net touch any hot portion of the oven+ When the surface is cool, clean and rinse.
] (continued nextPage_
27
O_eaning Gui_ (continued)
PART MATERIALS TO USE
Shelves o Soap and Water
(See Self-Cleaning
Oven Directions..)
Storage Drawer QSoap and Water
Surface U nit Coils
GENERAL DIRECTIONS
Your shelves can be cleaned with the self-cleaning function in the oven, For
heavy soil, clean by hand, using any and all mentioned materials, Rinse
thoroughly to remove all materials after cleaning
For cleaning, remove drawer by pulling it all the way open, tilt up the front
and lift out.. Wipe with damp cloth or sponge and replace. Never use harsh
abrasives or scouring pads,
Spatters and spills burn away when the coils are heated. At the end of a
meal, remove all utensils from the surface unit and heat the soiled units at
HI. Let the soil burn off about a minute and switch the units to OFE Avoid
getting cleaning materials on the coils. Wipe off any cleaning materials with
a damp paper towedbefore heating the surface unit
DO NOT handle the unit before completely cooled
DO NOT attempt to clean the plug-in units in the self-cleaning oven.
DO NOT immerse plug-in units in any kind of liquid,.
Chrome-Plated
Drip Pans
o Soap and Water
° Stiff-Bristled Brush
° Soap-Filled Scouring Pad
(Non-metallic)
= Dishwasher
Clean as described below or in the dishwasher. DO NOT CLEAN ON THE
SELF-CLEANING FUNCTION° Pans will discolor
Wipe all pans after each cooking so unnoticed spatter will not "burn on"
next time you cook. To remove "burned-on" spatters, use any or all
cleaning materials mentioned.. Rub lightly with scouring pad to prevent
scratching of the surface.
28
Use This ProblemSolver
PROBLEM POSSIBLE CAUSE AND REMEDY
OVEN WILL NOT a Difficulty may be in the main distribution panel of your house by a blown oven
WORK circuit fuse, a tripped oven circuit breaker, the main fuse or the main circuit
breaker, depending on nature of the power supply. If a circuit breaker is involved,
reset iL If the control box uses fuses, the oven fuse (a cartridge-type) should be
changed BUT ONLY BY SOMEONE FAMILIAR WITH ELECTRICAL CIRCUITS°
If after doing one of these procedures, the fuse blows or circuit breaker trips
again, call for service.
NOTE: Apartment tenants or condominium owners should request their building
management to perform this check before calling for service,
o Oven controls not properly set.
o Door left in locked position after cleaning.
OVEN LIGHT o Light bulb is loose.
DOES NOT WORK o Bulb is defective,. Replace°
FOOD DOES NOT o OVEN SELECTOR knob not set at BROIL.
BROIL PROPERLY o OVEN CONTROL knob not set at BROIL.
o Door not left ajar as recommended
o Improper shelf position being use& Check Broiling Guide.
o Necessary preheating was not done
o Food is being cooked on hot pan,
e Utensils are not suited for broiling_
° Aluminum foil used on the broil pan rack has not been fitted properly and slit
as recommended.
FOOD DOES NOT e OVEN SELECTOR knob not set on BAKE.
ROAST OR BAKE ° OVEN CONTROL knob not set correctly.
PROPERLY
° Shelf position is incorrect. Check Roasting or Baking Guides°
e Oven shelf is not level.
o Incorrect cookware or cookware of improper size is being used,
,, A foil tent was not used when needed to slow down browning during roasting,
SURFACE UNITS ° Surface units are not plugged in solidly.
NOT FUNCTIONING e Drip pans are not set securely in the range top,.
PROPERLY
o Surface unit controls are not properly seL
OVEN WILL NOT o Automatic timer dials not set or not set properly. Clock must be set to time of day
SELF-CLEAN and the STOP dial must be set and advanced beyond the time noted on oven clock°
o The STOP dial was not advanced for long enough,
° Both OVEN SELECTOR and OVEN CONTROL knobs must be set at CLEAN
setting.
o A thick pile of spiHover when cleaned leaves a heavy layer of ash in spots
which could have insulated the area from further heat,
o Latch not moved to the right°
OVEN DOOR e "[iJrn OVEN SELECTOR knob to CLEAN. Glowing Locked Light after knob is
WON'T LATCH turned indicates oven is too hot from previous use and door won't latch° To cool
oven, open door wide, then Latch can be moved.
= OVEN SELECTOR knob must be at CLEAN or OFF before Latch can be moved.
29

Notes
30

Notes
31
KENMORE ELECTRaCRANGE WARIRANTY
FULL ONE YEAR WARRANTY ON THE FUNCTIONBNG OF
ALL PARTS EXCEPT GLASS PARTS
If, within one year from the date of installation, any part, other than a glass part, fails to function properly
due to a defect in material or workmanship, Sears will repair or replace it, free of charge°
FULL 30-DAY WARRANTY ON GLASS PARTS AND FINISH OF PORCELAIN ENAMEL,
PAINTED OR BRIGHT METAL FINISHED PARTS
If, within 30 days from the date of installation,any glass part or the finish on any porcelain enamel, painted
or bright metal part is defective in material or workmanship, Sears will replace the part, free of charge°
FULL 90-DAY WARRANTY ON MECHANICAL ADJUSTMENTS
For90 days from the date of installation, Sears will provide, free of charge, any mechanical adjustments
necessary for proper operation of the range, except for normal maintenance.
WARRANTY SERVICE iS AVAILABLE BY SIMPLY CONTACTING THE NEAREST
SEARS STORE OR SERVICE CENTER tN THE UNITED STATES.
THIS WARRANTY APPLIES ONLY WHILE THIS PRODUCT IS iN USE IN THE UNITED STATES,
THIS WARRANTY GIVES YOU SPECIFIC LEGAL RIGHTS, AND YOU MAY ALSO HAVE OTHER
.... RIGHTS WHICH VARY FROM STATE TO STATE°
• SEARS, ROEBUCK AND CO., DEPT. 698/731A, SEARS TOWER, CHICAGO, IL 60684
I Dear Customer: Our constant efforts are directed toward making sure your new Kenmore Range will arrive at your home in
perfect condition and will give you proper performance, As part of these efforts, we feel it is our responsibility to provide_you
with this warranty for your range° ,..............
WE SERVICE WHAT WE SELL
"We Service What We Sell" is our assurance to you that you can depend on Sears for service because Sears service is nationwid_
Your Kenmore Range has added value when you consider that Sears has a service unit near you staffed by Sears trained technicians
professional technicians specifically trained on Sears appliances, having the parts, tools and equipment to ensure that we meet ou
pledge to you-- "We Service What We Sell!"
TO FURTHER ADD TO THE VALUE OF YOUR RANGE
Kenmore Ranges are designed, manufactured and tested
for years of dependable operation. Yet, any modern appli-
ance may require service from time to time. The Sears
warranty plus the Sears Maintenance Agreement provides
protection from unexpected repair bills and assures you of
enjoying maximum range efficiency.
Here's a comparative warranty and Maintenance Agreement
chart showing you the benefits of a Sears Range Main-
tenance Agreement.
CONTACT YOUR SEARS SALESPERSON OR LOCAL SEARS
SERVICE CENTER TODAY AND PURCHASE A SEARS
MAINTENANCE AGREEMENT.
BUY A SEARS MAINTENANCE AGREEMENT°
Years of Ownership Cove_ge 1st Year 2nd Year
Replacemen_ of Defective
1 Parts other than
Porcelain or Glass
2 Mechanical Adjustment
3 Porcelain and Glass Parts
AnnuaJ Preventive
4. Maintenance Check
at your request
W - Warranty
W MA
90 Days
Futl
Warranty _J_A
MA
30 Days
FulJ
Wa_'ranty M A
MA
MA MA
3rd Year
NA
MA
MA
MA
MAo Maintenance A, reement
............... ,......... ......................... i
So_d by SEARS, ROEBUCK AND CO., Chicago, IL 60684
n.,
Part No,, $594003 ! _sB
Printed in USA
164Dt849P004
93781 937E


