Loading ...
Loading ...
Loading ...
INSTRUCTIONS PERTAINING TO A RISK OF FIRE, ELECTRICAL SHOCK, OR INJURY TO PERSONS.
IMPORTANT SAFETY INSTRUCTIONS
WARNING: When using electric appliances, basic
precautions should always be followed, including the
following:
1.Read all the instructions before using the
appliance.
t_.To reduce the risk of injury, close supervision is
necessary when an appliance is used near
children.
3. Do not put fingers or hands into a garbage
disposer.
4. Turn the power switch to the off position before
attempting to clear a jam or remove an object
from the disposer.
5,When attempting to loosen a jam in a garbage
disposer, use a self-service wrenchette as
described below.
6,When attempting to remove objects from
a garbage disposer use long-handled tongs or
pliers.
7, To reduce the risk of injury by materials that may
be expelled by a food waste disposer place the
stopper in the drain grind position. Use care
when feedine the food waste so that foreian
obiects do not enter the arind chamber that may
be exuelled. Reolace the anti-splash baffle when
it becomes worn to reduce sDlashina and election.
Do not put the following into a disposer:
a. Clam and oyster shells.
b. Drain cleaner.
c. Glass, china, plastic, plastic wrap or bags.
d. Large whole bones.
e. Metal, such as bottle caps, tin cans, aluminum
foil or eating utensils.
8.When not operating a disposer, leave the drain
cover in place to reduce the risk of objects falling
into the disposer.
9. Before pressing red reset button, (see Fig. 4),
be sure the wall switch is in the off position
and on batch feed models remove the stopper
from the run position.
10,a.GROUNDING INSTRUCTIONS FOR CORD
CONNECTED UNITS. This appliance must be
grounded. In the event of a malfunction or
breakdown, grounding provides a path of least
resistance for electric current to reduce the risk
of electric shock. If this appliance is equipped
with a cord having an equipment+grounding
conductor and a grounding plug, the plug must
be plugged into an appropriate outlet that is
properly installed and grounded in accordance
with all local codes and ordinances.
DANGER - Improper connection of the equip-
ment-grounding conductor can result in a risk of
electric shock. Check with a qualified electri-
cian or serviceman if you are in doubt as to
whether the appliance is properly grounded.
Do not modify the plug provided with the appli-
ance -- if it will not fit the outlet, have a proper
outlet installed by a qualified electrician.
b.GROUNDING INSTRUCTIONS FOR PERMA-
NENTLY CONNECTED UNITS: This appli-
ance must be connected to a grounded, metal,
permanent wiring system; or an equipment-
grounding conductor must be run with the
circuit conductors and connected to the
equipment-grounding terminal or lead on the
appliance.
SAVE THESE INSTRUCTIONS
USER MAINTENANCE INSTRUCTIONS
Trouble Shooting
Loud noises while your disposer is operating
are usually caused by dropping metal ob-
jects into the disposer. To correct this, turn
off the disposer switch and water. After
grinding disc has stopped turning, investi-
gate. Remove object by reaching into unit
with tongs.
Motor stops while your disposer is opera-
ting. This can be caused by overloading the
unit. First, check the cause of the over-
load - often some foreign material is in the
disposer. To avoid personal injury turn
off the disposer switch and water. Remove
the object as previously explained. TO
RESTART THE MOTOR: wait 3 to 5 min-
utes, then push in on the small red reset
button located on the bottom ofyour disposer
(Fig. 1). Ifmotor remains inoperative, check
your Service Panel and replace any blown
fuses, or look for a tripped circuit breaker.
NOTE: Ifwater does not drain as readily as
you think it should, and food waste tends to
float or take too long to grind, don't reduce
water flow to solve this problem. It is very
likely that the drain line is partially clogged
and should be cleaned with adrain auger. A
blocked drain may also cause food waste to
drain into the dishwasher. Like any precision
machine, your disposer was built to perform
aparticular job. Ifunusual demands are plac-
ed on it, service interruptions are possible.
These service interruptions, mentioned
below,, are usually not serious and in most
cases, can be remedied without calling a
service technician.
To Save The Cost of a Service Call to Free a Jam.
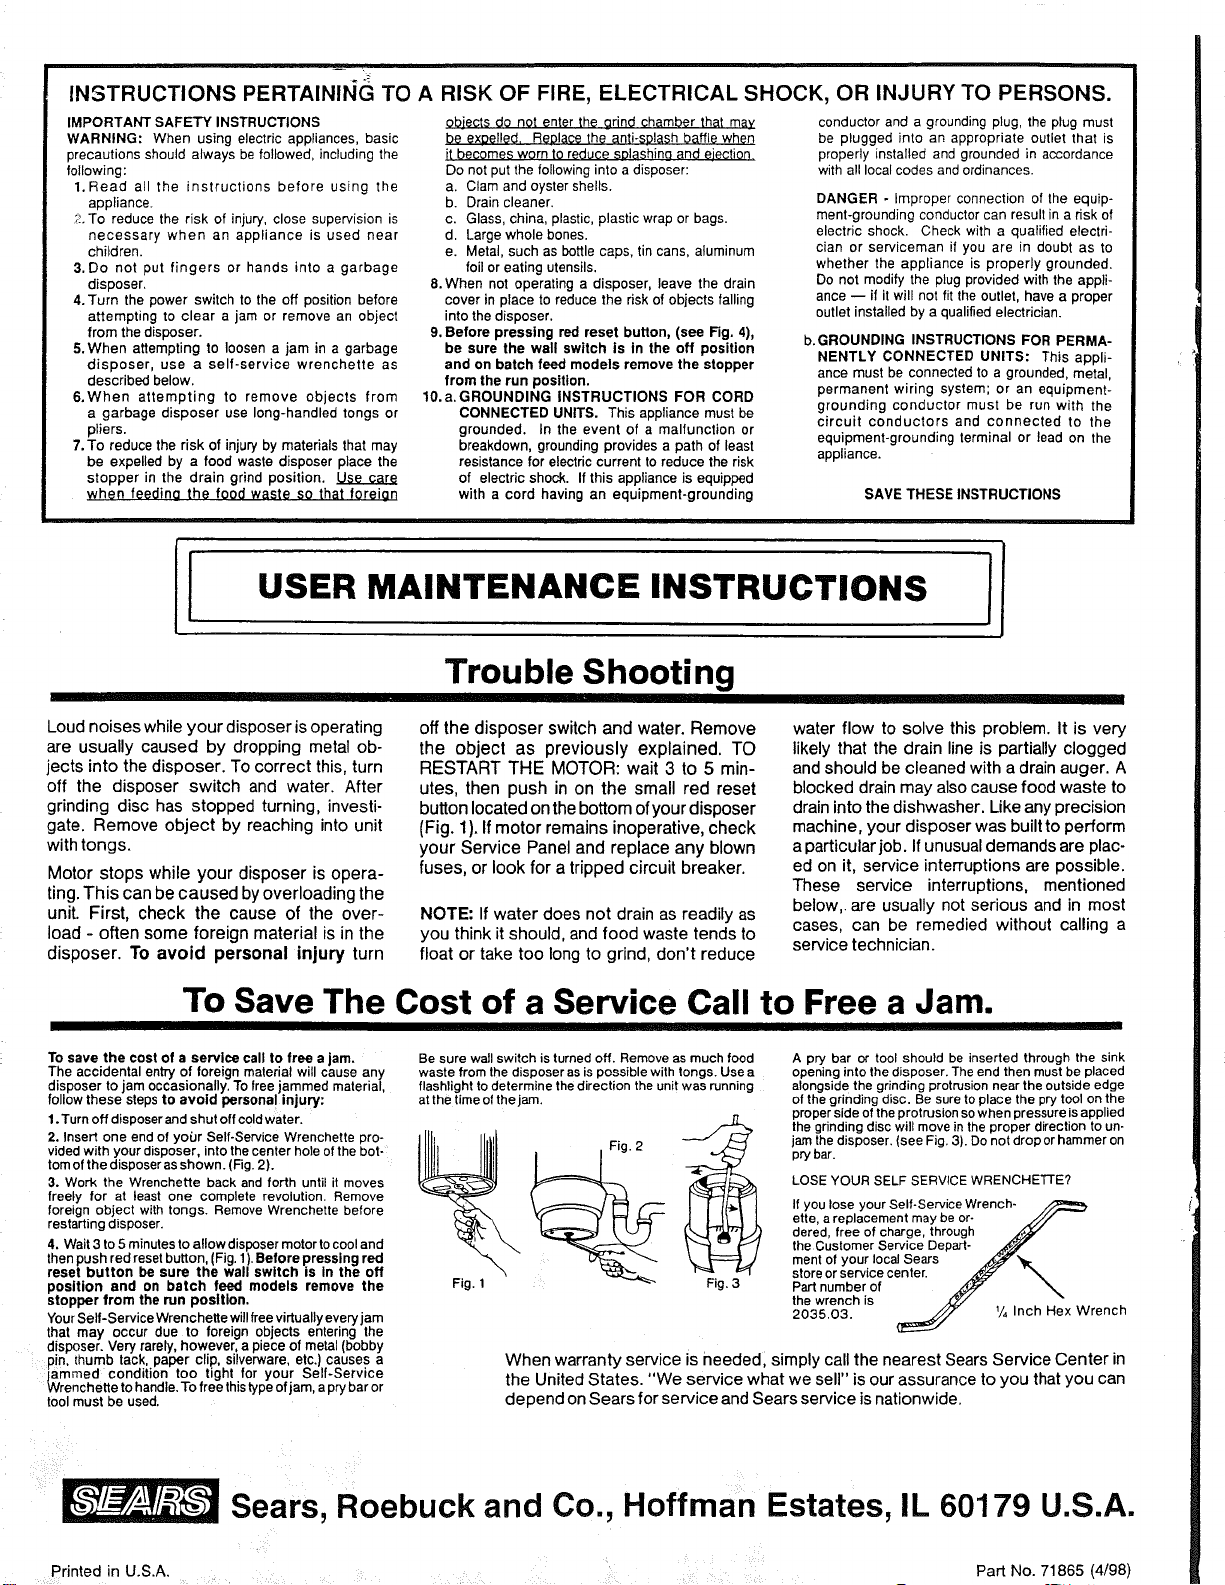
To save the cost of a service call to free a jam.
The accidental entry of foreign material will cause any
disposer to jam occasionally. To free jammed material,
follow these steps to avoid persona! injury:
1.Turn off disposer and shut off coldwater.
2. Insert one end of yo0r Self-Service Wrenchette pro-
vided with your disposer, into the center hole of the bot-
tom of the disposer as shown. (Fig. 2).
3. Work the Wrenchette back and forth until it moves
freely for at least one complete revolution. Remove
foreign object with tongs. Remove Wrenchette before
restarting disposer.
4, Wait 3 to 5 minutes to allow disposer motor to cool and
then push red reset button, (Fig. 1).Before pressing red
reset button be sure the wall switch is In the off
position and on batch feed models remove the
stopper from the run position.
Your Self-Service Wrenchette will free virtually every jam
that may occur due to foreign objects entering the
disposer. Very rarely, however, a piece of metal (bobby
pin, thumb tack, paper clip, silverware, etc.) causes a
jammed condition too tight for your Self-Service
Wrenchette to handle. To free this type of jam, apry bar or
tool must be used.
Be sure wall switch is turned off. Remove as much food A pry bar or tool should be inserted through the sink
waste from the disposer as is possible with tongs. Use a opening into the disposer. The end then must be placed
flashlight to determine the direction the unit was running alongside the grinding protrusion near the outside edge
at the time of the jam+ of the grinding disc. Be sure to place the pry tool on the
proper side of the protrusion so when pressure is applied
the grinding disc will move in the proper direction toun-
L__ 1 _ jam the disposer. (see Fig+3). Do not drop orhammerOnprybar.
LOSE YOUR SELF SERVICE WRENCHE'R'E?
If you lose your Self-Service Wrench-
otto, a replacement may be or- JJJ
dered, free of charge, through
the Customer Service Depart.
ment of your IocaJSears ._"_ _:
store or service center. Z_'_ "
• Fig 3 Part number of _
the wrench is XT!
2035.03. _ 1/4Inch Hex Wrench
When warranty service is neededl simply call the nearest Sears Service Center in
the United States. "We service what we sell" is our assurance to you that you can
depend on Sears for service and Sears service is nationwide.
Printed in U.S.A.
Sears, Roebuck and Co., Hoffman Estates, IL 60179 U.S.A.
' _i _
Part No. 71865 (4/98)