It’s time appliances had a personality. Yours.
BELLISSIMO- Café Semi Automatic Espresso Machine +Frother
OWNER’S MANUAL
ENGLISH/FRANÇAIS
ESPAÑOL - Para consultar una version en español de este manual de instrucciones, visite
nuestro sitio de internet cafeappliances.com.

2
THANK YOU FOR MAKING CAFÉ A PART OF YOUR HOME.
We take pride in the craftsmanship, innovation and design that goes into every Café
product, and we think you will too. Among other things, registration of your appliance
ensures that we can deliver important product information and warranty details when
you need them.
Register your Café appliance now online. Helpful websites are available in the
Consumer Support section of this Owner’s Manual. You may also mail in the pre-printed
registration card included in the packing material.

3
Table of Contents
Models: C7CESAS3RD3, C7CESAS4RW3, C7CESAS2RS3
SAFETY INFORMATION ............................................ 4
GETTING STARTED ................................................ 6
COMPONENTS .....................................................7
ACCESSORIES .................................................... 8
CONTROL PANEL .................................................. 8
FUNCTIONS ...................................................... 9
ALERTS ..........................................................10
USING YOUR ESPRESSO MACHINE ..................................11
CARE AND CLEANING ..............................................15
TIPS .............................................................17
TROUBLESHOOTING ...............................................18
WiFi CONNECT SMART HQ APP ....................................20
FCC STATEMENT ..................................................21
LIMITED WARRANTY ..............................................22
CONSUMER SUPPORT ............................................23
Product Registration
Write the model and serial numbers here:
Model # ___________________
Serial # ____________________
Find these numbers on a label on the back of the machine.
4
IMPORTANT SAFETY INFORMATION
READ ALL INSTRUCTIONS BEFORE USING THE APPLIANCE
SAVE THESE INSTRUCTIONS
WARNING
Read the instructions carefully before using the appliance for
the first time. Save these instructions for reference. The appliance is designed for
domestic use and may only be operated in accordance with these instructions for
use. Always handle with care and warn other users of potential danger.
IMPORTANT SAFEGUARDS
Always follow these safety precautions when using this appliance.
• Read all instructions before using
• Use only a 120 V, 60 Hz standard electrical supply that is properly grounded in
accordance with the National Electric Code and local codes and ordinances.
• Make sure the appliance is set up on a flat and steady surface.
• Turn the appliance OFF, then unplug from the outlet when not in use, before
assembling or disassembling parts and before cleaning. To unplug, grasp the plug and
pull from the outlet. Never pull from the power cord.
• Do not use outdoors. Household use only.
• Use this product only for its intended purpose as described in this user manual.
• Use of any accessories not recommended by the manufacturer can cause injuries.
• This appliance is not intended for use by persons (including children) with reduced
physical, sensory, or mental capabilities, or lack of experience and knowledge,
unless they are closely supervised and instructed concerning use of the appliance
by a person responsible for their safety. Close supervision is necessary when any
appliance is used by or near children. Children should be supervised to ensure
that they do not play with the appliance.
• Allow to cool before putting on or taking o parts, and before cleaning the
appliance. DO NOT touch the steam wand after use. Doing so can cause serious
burns.
• Make sure the drip tray is always present during use.
• Always use cold water to make coee in your espresso machine. Warm water or
other liquids could cause damage to the coee maker.
• DO NOT put any liquid other than water in the water tank.
• To reduce the risk of fire or electric shock, do not attempt to disassemble, repair,
modify, or replace any part of your product.
• If the power cord is damaged, it must be replaced by the manufacturer. DO NOT
replace the power cord on your own.
• Do not operate any appliance with a damaged cord or plug or after the appliance
malfunctions, or is dropped or damaged in any manner. Contact GE Appliances at
the website listed in the Contact Us section for information on examination, repair,
or adjustment.
5
IMPORTANT SAFETY INFORMATION
READ ALL INSTRUCTIONS BEFORE USING THE APPLIANCE
SAVE THESE INSTRUCTIONS
WARNING
Read the instructions carefully before using the appliance for
the first time. Save these instructions for reference. The appliance is designed for
domestic use and may only be operated in accordance with these instructions for
use. Always handle with care and warn other users of potential danger.
IMPORTANT SAFEGUARDS
Always follow these safety precautions when using this appliance.
• Use the coee grinder to grind coee beans only. DO NOT put coee grounds in
the espresso machine, only put whole coee beans in the coee bean container.
• Do not allow children to touch the appliance or the power cord during the
operation
• DO NOT use the espresso machine if the drip tray is out of position.
• DO NOT immerse the appliance in water or any other liquids. This will damage the
appliance and be a risk of an electric shock.
• Do not let cord hang over edge of table or counter.
• Do not let cord contact hot surface, including the stove.
• DO NOT use an extension power cord.
• The use of accessories not included in the box is not recommended. It might be
dangerous and should be avoided.
• Do not operate the hot water function continuously for more than one tank of
water.
• Check hopper for presence of foreign objects before usage.
• Avoid contacting moving parts. Do not attempt to defeat any safety interlock
mechanisms.
• Do not touch hot surfaces. Use handles or knobs.
• Do not place on or near a hot gas or electric burner, or in a heated oven.
• To disconnect, turn any control to "o," then remove plug from wall outlet.
WARNING
To avoid the risk of injury, do not open the brew chamber during
the brew process.
WARNING
RISK OF FIRE OR ELECTRIC SHOCK
■ TO REDUCE THE RISK OF FIRE OR ELECTRIC SHOCK, DO NOT REMOVE COVER
(OR BACK).
■ Do not attempt to repair or replace any part of your espresso machine unless it is
specifically recommended in this manual. All other servicing should be performed by
authorized service personnel.

6
Drip Tray
■ Remove the packaging from the drip tray before using the machine.
General Information
■ Espresso is sensitive to bean selection and grind size. We recommend
to start with a grind size of 7 to 9. Overly fine grounds may result in
clogging and short shots. See page 14 for instructions on dialing in
your perfect shot.
■ Place drip tray in place prior to powering the machine on. Machine
purges when powered on.
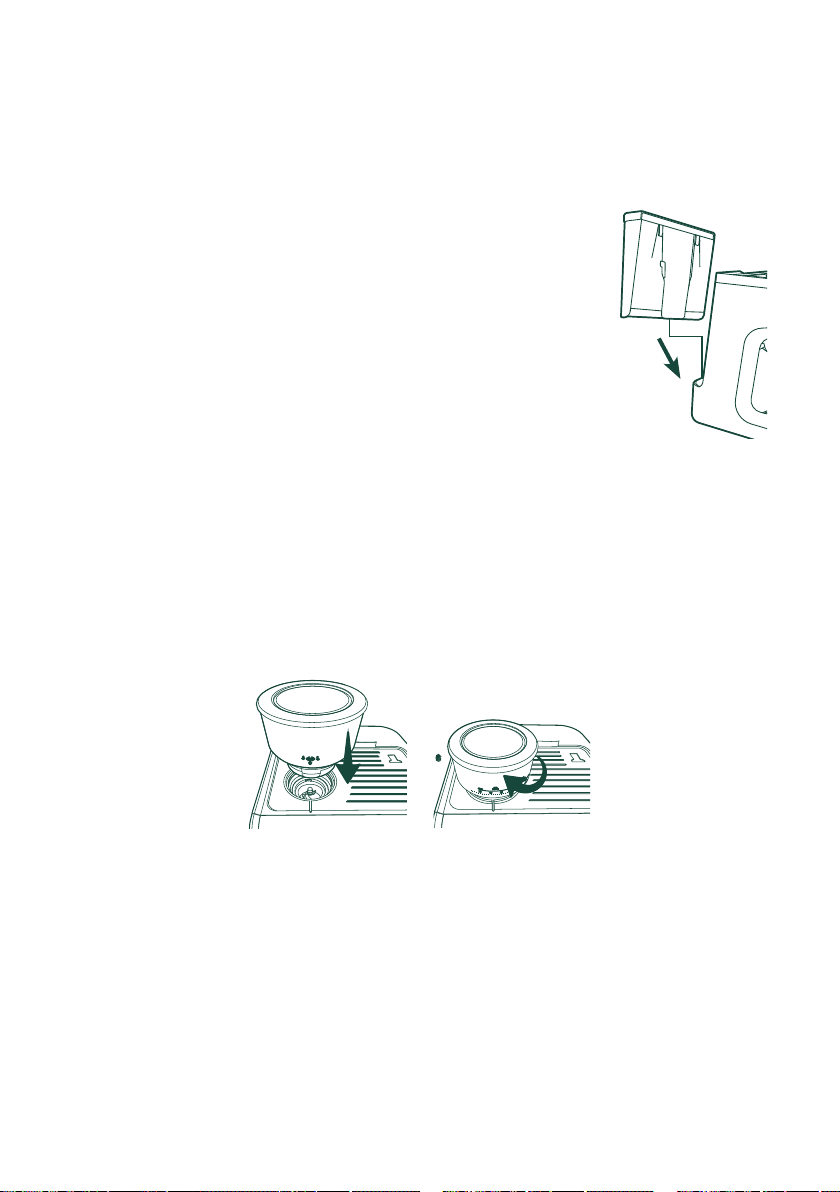
Water Tank
■ Remove the water tank and orange seal from the bottom of
the tank and fill it with water. Gently press down on the Water
Tank so it is secure in the machine before using any functions.
■ Make sure the water level is between the MIN and MAX lines in the Water Tank
before use.
Coee Bean Hopper
■ Remove the bean hopper from the packaging
■ Place the bean hopper into the machine by aligning the arrow with the
machine.
■ Turn the bean hopper clockwise to lock in place.
■ Turn the bean hopper to a grind size between 7 and 9.
NOTE: The hopper grind size setting ranges from 0-15, 0 is the finest and 15 is the
coarsest.
NOTE: It is recommended to use whole coffee beans instead of pre-ground coffee.
Pre-ground coffee loses its aroma and taste quickly.
NOTE: It may take several tries to get a grind size that best fits your taste.
Follow in dial instructions on page 14.
Ready to Use!
■ Plug in your espresso machine. The Power button will flash. Press the Power
button.
■ Choose your desired function and enjoy! See the "Using the Espresso
Machine" section for instructions of each function.
Getting Started

7
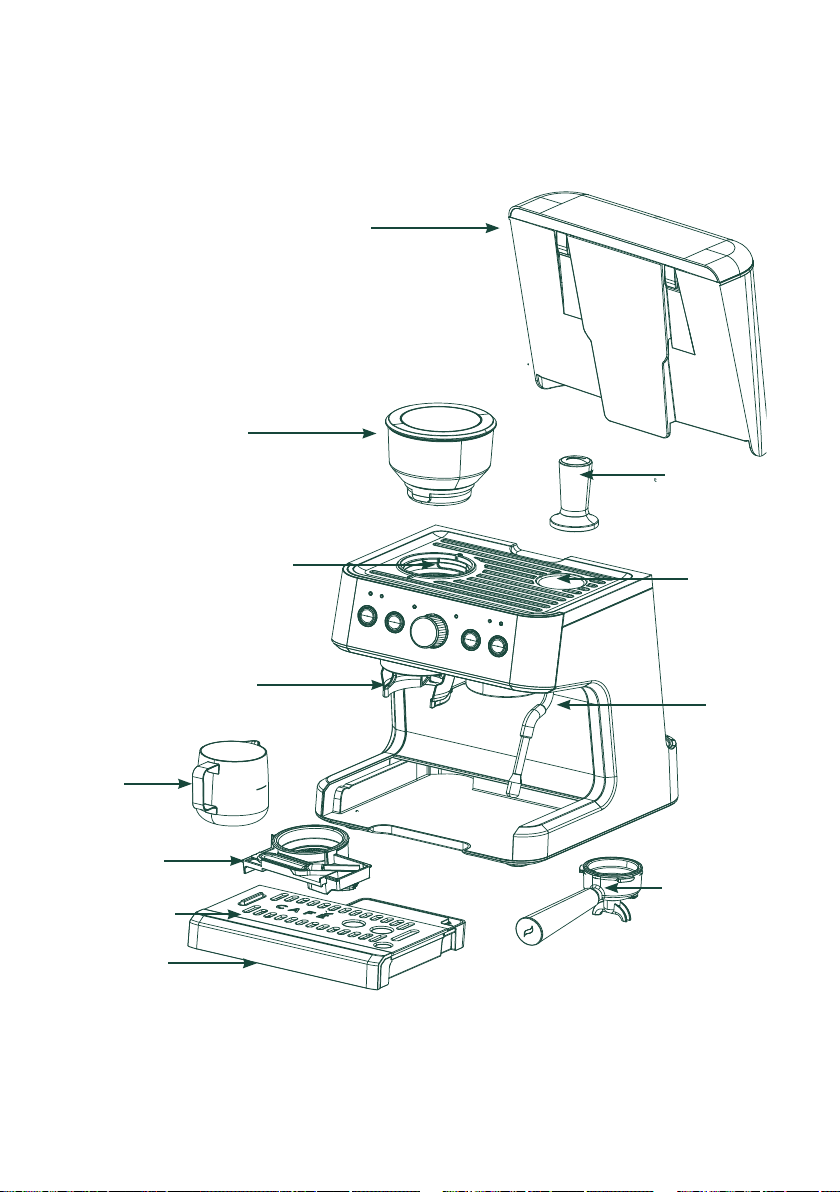
Components
Water Tank
Bean Hopper
Drip Tray
Water Level
Float
Portafilter
Tamper
Tamper
Holder
Steam
Wand
Milk
Pitcher
Cleaning Kit
Portafilter Cradle
Hopper Rotor and Burr
NOTE: When the water level float reaches the top of the drip tray, remove the
tray and dispose of the liquid. Replace back in the machine before next use.
Group-head
8
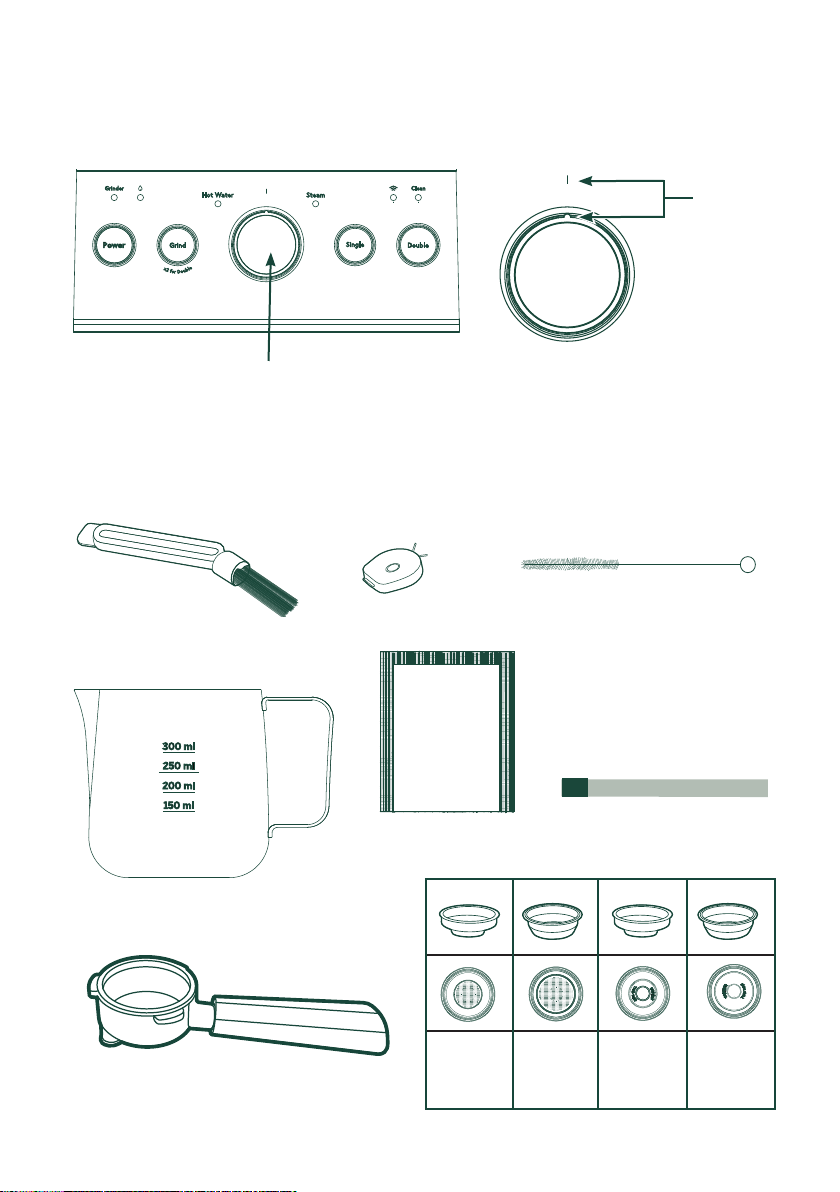
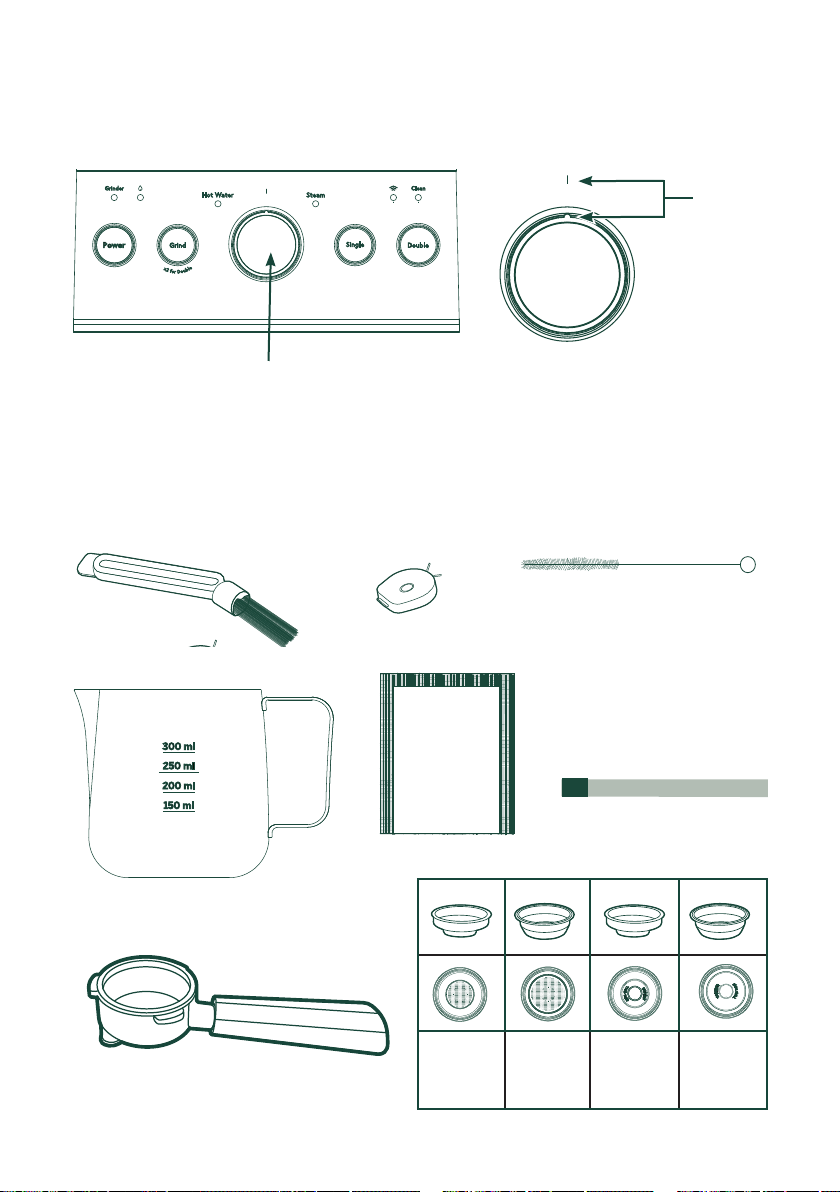
Control Panel
Control Knob
Neutral
position
Controls
Accessories
Cleaning Brush Cleaning Pin Cleaning Brush
Milk Pitcher
Portafilter
Cleaning Solution (3) Water Hardness Strip
To access the cleaning kit, remove the drip tray. The kit is located in the bottom left corner of the
machine.
NOTE: Ensure
knob is in neutral
position when
powering on the
machine. Brew
Function will
not be available
unless knob is in
neutral position
upon startup.
Single
Layer
Single Shot
Filter
Single
Layer
Double
Shot Filter
Double
Layer
Single Shot
Filter
Double
Layer
Double
Shot Filter

9
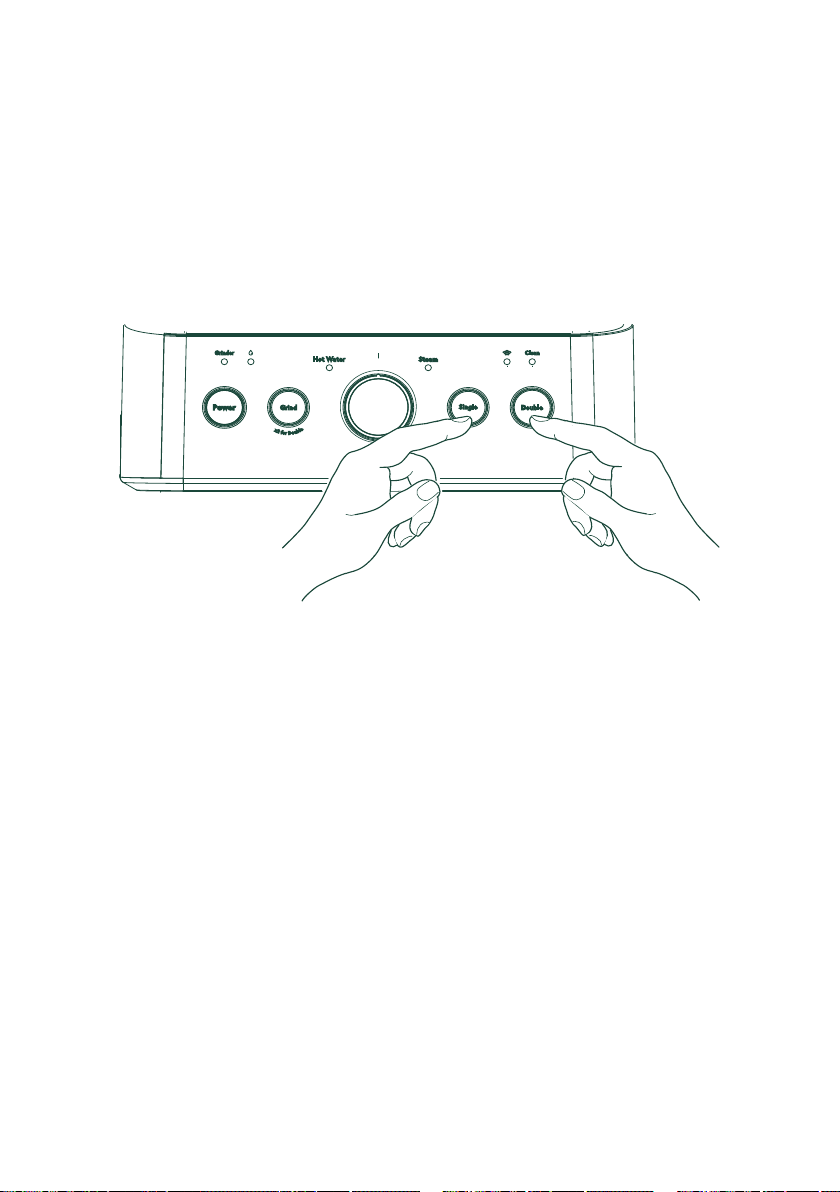
Buttons
Power
Press the Power button to turn on the espresso
machine.
Grind
Press the Grind button once for a single
espresso and twice quickly for a double
espresso.
Single (Espresso)
Espresso is a full-flavored coffee drink served
as a concentrated shot. Cappuccinos, Flat
Whites, and Lattes are all made with an
espresso shot.
Default setting:
~
13-15-grams of coffee yields
~
30 mL of espresso (1oz)
Double
This will create a cup that has double the water
and extraction time.
Default setting:
~
18-20 grams of coffee yields
~
60 mL of espresso (2oz).
NOTE: Coffee ground amounts and espresso
volumes may vary depending on bean type and
machine settings.
NOTE: Using an overly coarse grind will result
in an overflowing portafilter and weaker coffee.
Larger grind sizes can be used for other coffee
types.
NOTE: Using an overly fine grind size may result
in not enough grounds to fill the filter, as well as
overpressure. Finer grind settings are included
for user to adjust grind size as grinder dulls with
use.
To set Default Dispense Amount:
Press and hold Single, Double, or Grind until
the desired amount of liquid or grounds is
dispensed. Stop pressing the button to save the
new amount.
NOTE: Espresso volumes are inherently small,
and the range of volume adjustment is finite. If
the dispense is not stopped during changing the
default volume, the machine will default to the
maximum setting.
NOTE: Changes to volumes may affect the flavor
of the espresso.
NOTE: To return the machine to factory default
settings press and hold Single, Double, and
Grind buttons for 3 seconds.
NOTE: Only the Single shot grind amount can
be adjusted manually. To adjust Double grind
amount, refer to the SmartHQ app.
Control Knob
Steam
Steam is used to heat up liquids through the
steam wand.
CAUTION
To avoid possible burns
to body parts and/or other injury from hot
steam, do not touch liquids or steam wand
during or after steaming. Do not remove pitcher
until steaming is complete. Hold milk pitcher by
the handle.
Hot Water
The Hot Water function dispenses hot water
from the steam wand. No coffee is used during
this function.
Functions

10
Grinder
The Grinder indicator will appear for one of
three reasons.
Bean Hopper Removed: The Grinder indicator
will illuminate SOLID RED if the hopper is
removed or not locked into place. Place hopper
into the machine and rotate to locked position
to resolve.
Locked Rotor: The Grinder indicator will FLASH
RED when the grinder is locked up or blocked.
Clear grinder with provided brushes to resolve.
Locked rotor error can be removed after
the issue is resolved and grinding repeated,
machine times out or is powered down. Refer to
page 16.
Continuous Runtime: The Grinder indicator
will FLASH WHITE, meaning the grinder has
been running for at least 3 minutes and needs
to cool down for 6 minutes. Once the grinder
has cooled, the indicator will disappear and the
machine is ready to use again.
Add Water
Add water indicator appears when water tank
is low on water or water tank is missing.
WiFi
Your espresso machine is WiFi compatible.
See page 20 for how to connect and use the
SmartHQ app.
Clean
Clean alert will appear when it is time to run a
descale cycle for best operation and life span
of the machine. See page 15 for descaling
process.
Alerts
11
Using Your Espresso Machine
Single and Double
NOTE: Make sure you have a coee cup or container placed under the dispenser before
using the Single or Double function.
NOTE: Follow dial in instructions for correct grind size and
volume of grounds
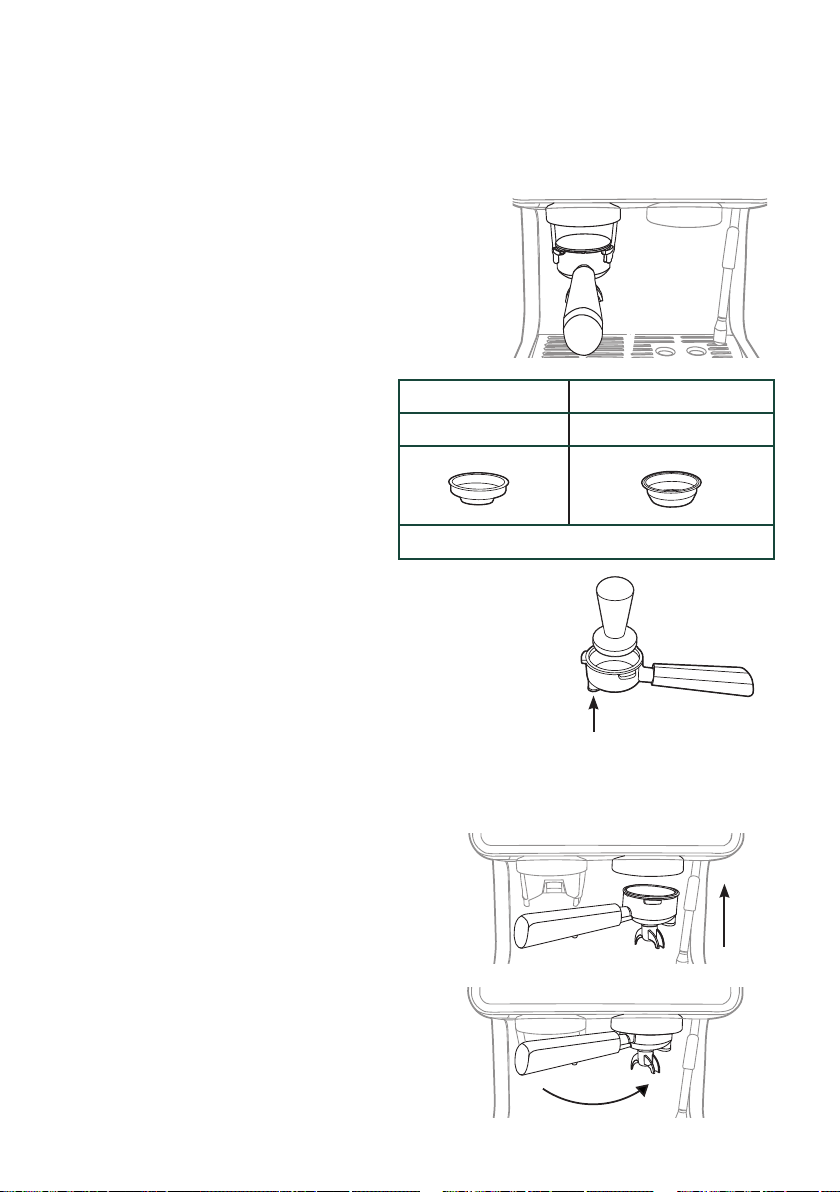
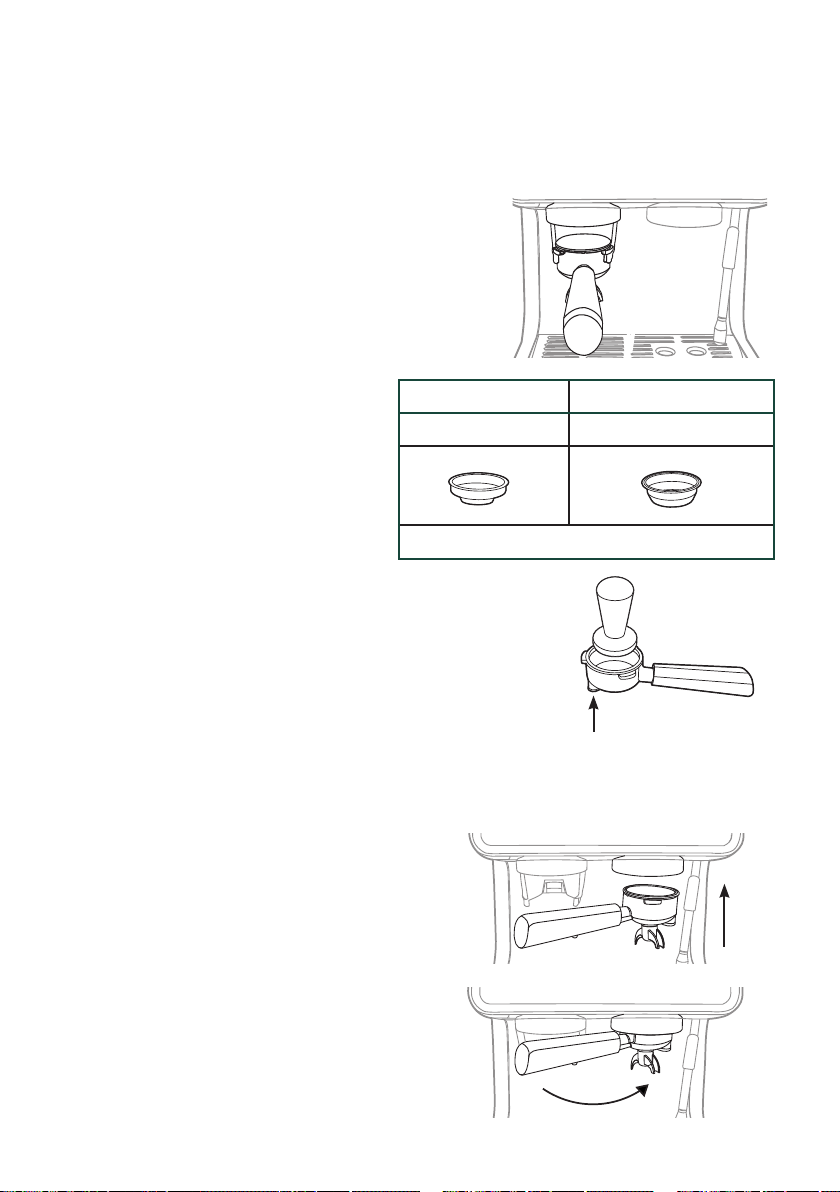
1. Push either the single shot or double shot filter into the
portafilter until it clicks into place.
2. Make sure there are coee beans in the bean hopper.
3. Place the portafilter within the grinder cradle.
4. Press the Grind button. Refer to table.
5. When grinding is complete, remove the
portafilter and gently tap to even out the
coee grounds.
6. Tamp down firmly using the tamper
provided. Consistent pressure will create
the best coee puck. Clear away any
excess grounds from the rim of the
portafilter. Refer to Tips on page 17 for
more information on tamping.
NOTE: Tamping clears out air pockets to avoid water
channeling through the grounds.
NOTE: User can run an empty shot first to heat the group-
head and/or clean out from previous shot.
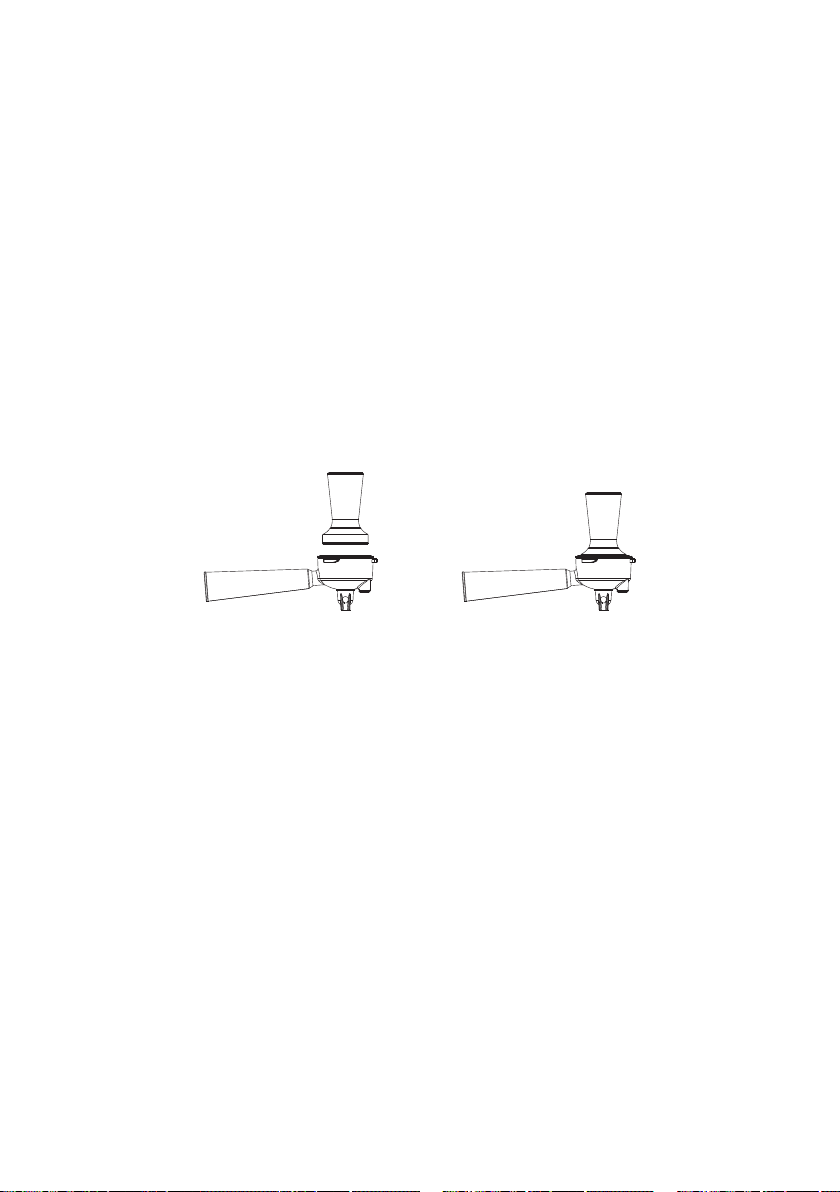
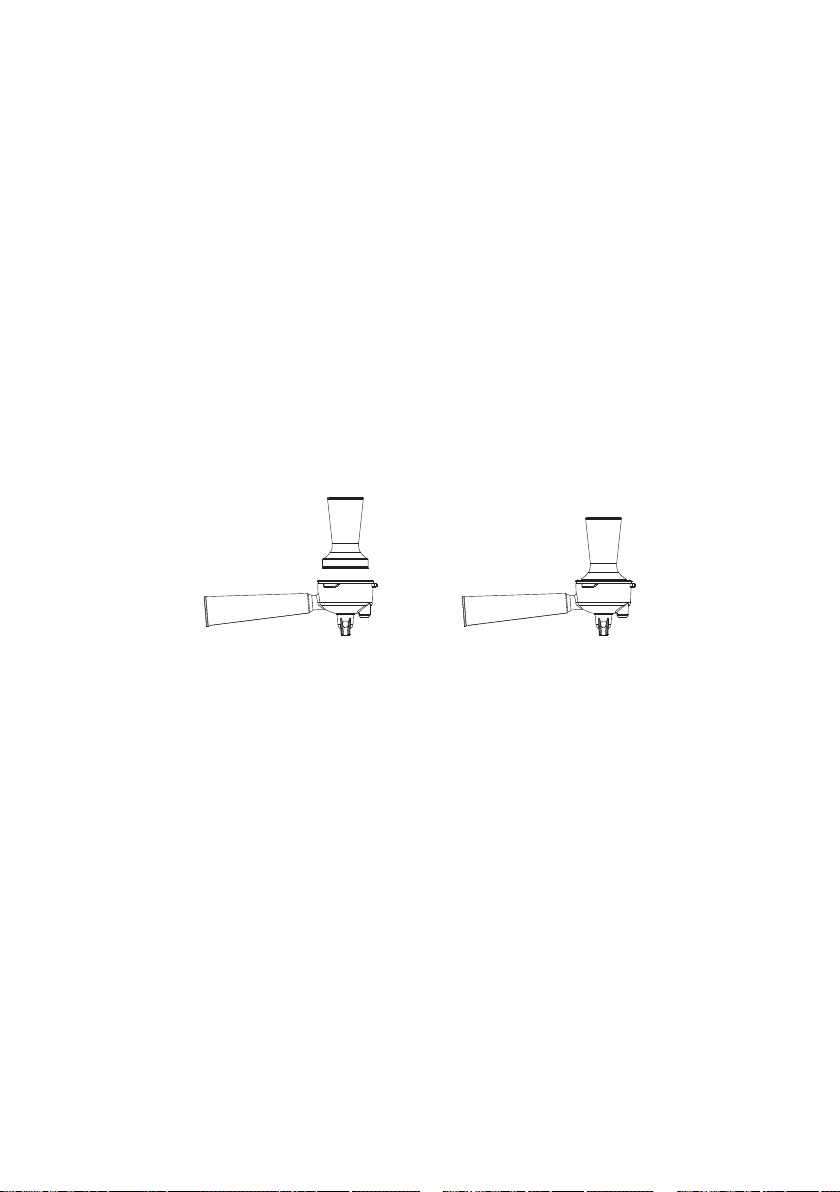
7. Place the portafilter with pressed coee puck into the
group-head at a 45° angle and rotate it to the right until it
locks into place as shown.
NOTE: Portafilter installation has some resistance. If it is too
hard to install, then there may be too much coee grounds.
Refer to Tips section on page 17.
8. Press the Single or Double button to begin
brewing.
9. When your function is complete, dispose of coee
grounds, rinse the portafilter, then dry. Follow
cleaning instructions for the portafilter in the Care
and Cleaning section.
NOTE: After every single/double cycle your machine
will release internal pressure as it is cooling down
by slowly releasing excess water into the back of
the drip tray. DO NOT remove the drip tray until the
process is complete.
NOTE: There may be excess hot water in the
portafilter. Be cautious when disposing of grounds.
Single Double
Press Grind 1 time Quickly press Grind 2x
See page 13 for the best filter to use for your taste.
NOTE: Use the rubber pad on
the bottom of the portafilter
to level on the edge of a flat
surface while tamping.
12
Using Your Espresso Machine
NOTE: Make sure the control knob is always in the neutral position when NOT using the
Steam and Hot Water functions.
NOTE: The steam wand swivels for easier use. DO NOT pull on steam wand.
CAUTION
To avoid possible burns to body parts and/or other injury from
hot steam, do not touch liquids or steam wand during or after steaming. Do not
remove pitcher until steaming is complete. Hold milk pitcher by the handle.
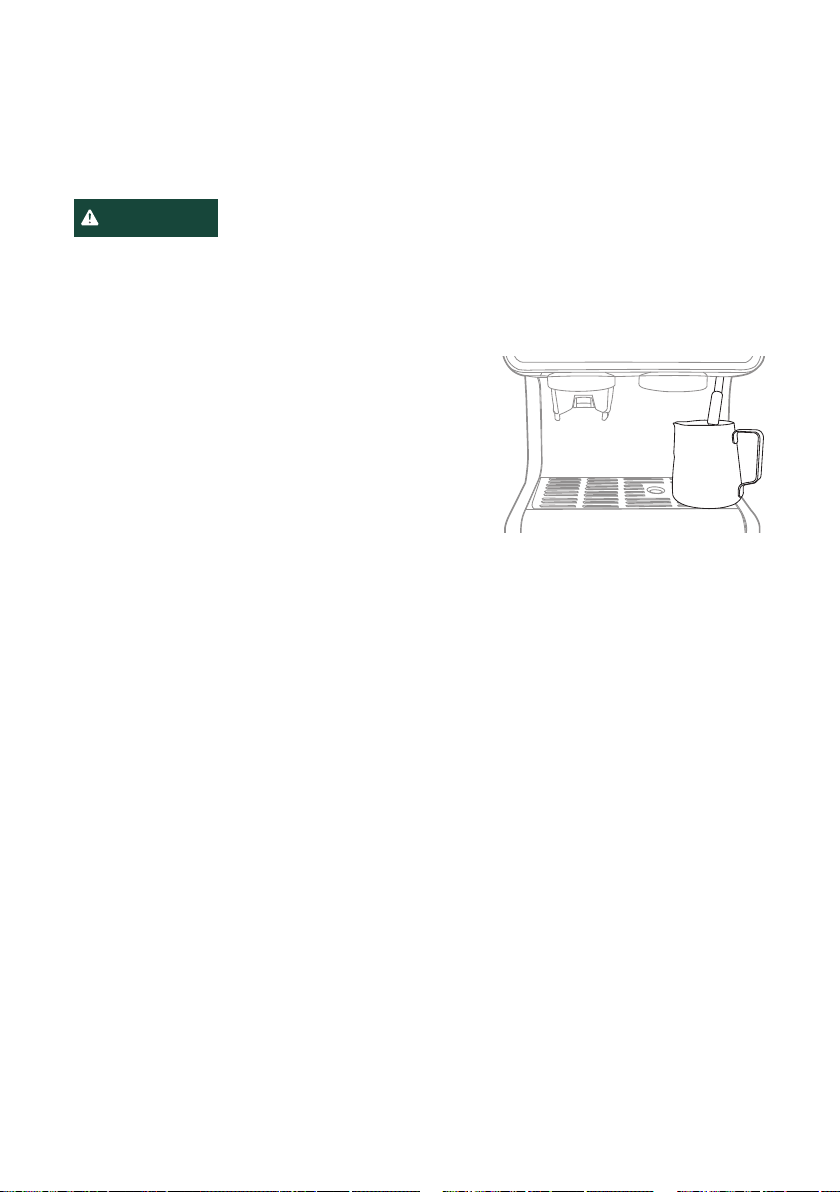
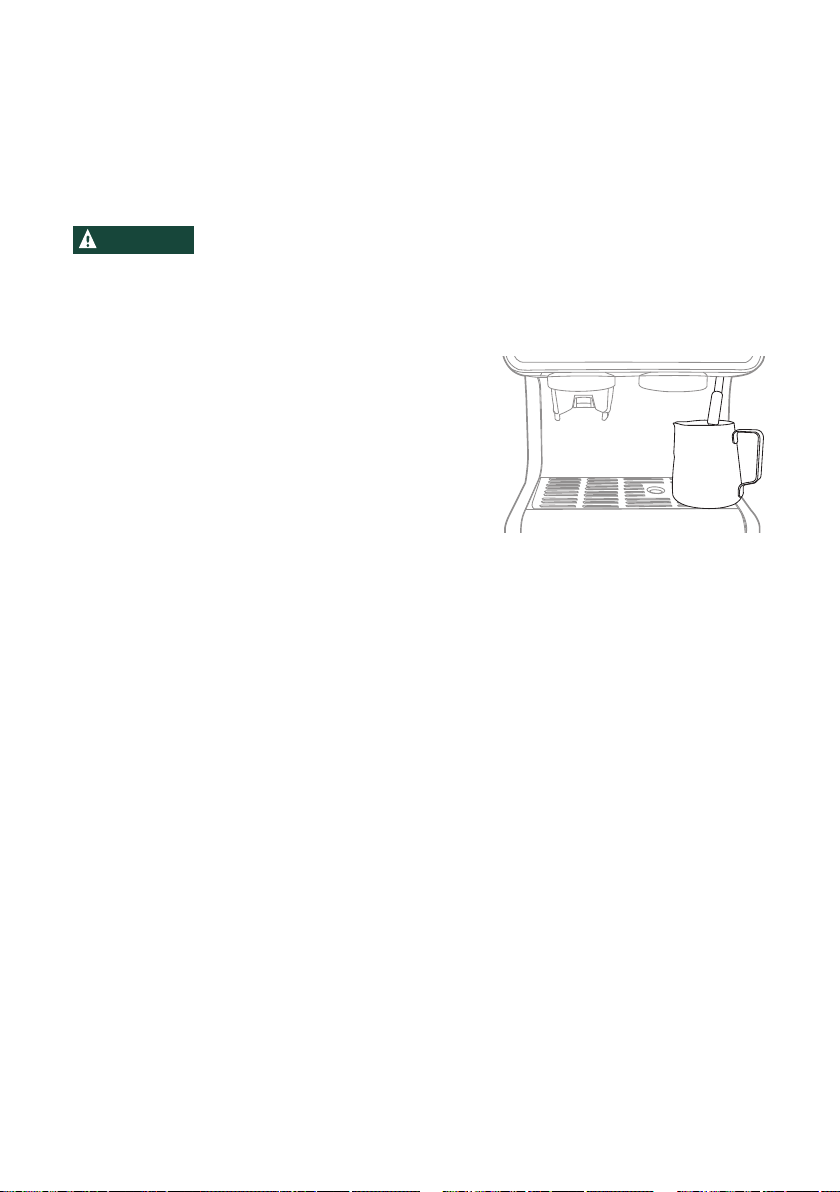
Steam
The Steam function can be used to steam milk and other liquids.
See the Tips section for techniques and recipes.
1. Turn the control knob on the front of the espresso
machine to Steam. Ensure the steam wand is
pointing towards the drip tray as it will clear out
some water during preheat. Once steam starts to
come out, switch the knob to neutral position and
quickly insert the wand into the milk. Proceed with
steaming process by turning the control knob back
to Steam.
NOTE: If there is a delay longer than a few seconds between heating and steaming, the
heating will shut o and need to be repeated.
2. Turn the control knob back to neutral when complete.
NOTE: Use a hot, wet cloth to wipe o steam wand after every use. It is also
recommended to purge the steam wand immediately after every use by quickly
turning Steam back on for a short time.
NOTE: After every steam cycle your machine will automatically release internal
pressure as it is cooling down by slowly pumping access water and steam into the
drip tray. Steam coming out of the drip tray is normal during this process. DO NOT
remove the drip tray until the process is complete.
Hot Water
NOTE: If using the Hot Water function after steam, allow the machine to dispense excess
steam before using this function per note above.
NOTE: Hot water volume and temperature can be adjusted via the SmartHQ app.
1. Place your desired cup or milk pitcher provided under the steam wand.
2. Turn the control knob on the front of the espresso machine to Hot Water.
3. Fill your cup to your desired amount. If the dispense is not stopped manually by user,
the machine will continue to dispense until a programmed volume is set.
4. Turn the control knob back to neutral when complete.
13
How to Wake the Machine
Make sure the control knob is in the neutral position. Press the Power button to wake
the machine.
Turn On/Off Sounds
Press and hold the Single and Grind buttons together for 3 seconds to turn off all
sounds.
Factory Reset
Press and hold the Grind, Single and Double buttons together for 3 seconds to turn
reset all programmable settings back to the factory settings.
Overpressure
This means the coee grounds are too small, there are too many grounds, or the
grounds are packed too tight in the portafilter. Overpressure is indicated by all functional
button lights FLASHING WHITE. To fix, dispose of grounds, and try again by increasing
the ground size, decreasing the dosage, or tamping the grounds with less pressure.
Overpressure may occur more often at first, especially with finer grind sizes.
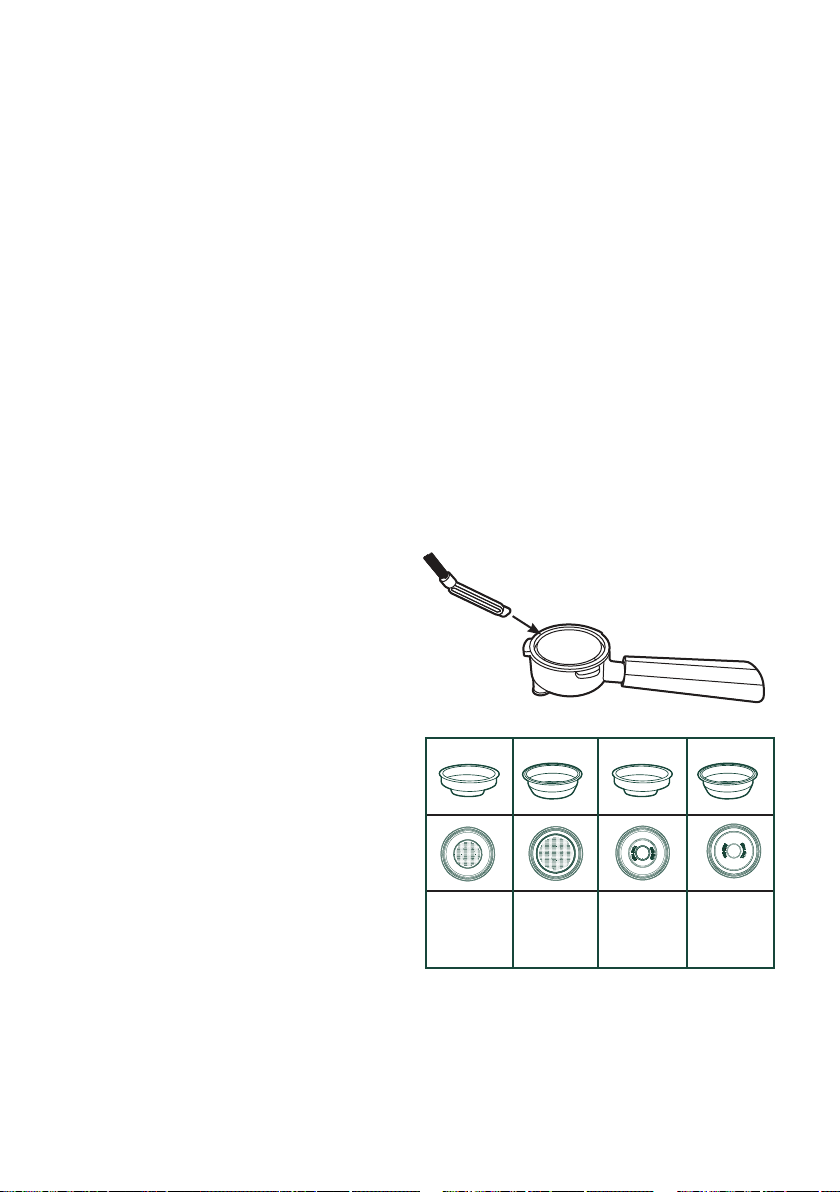
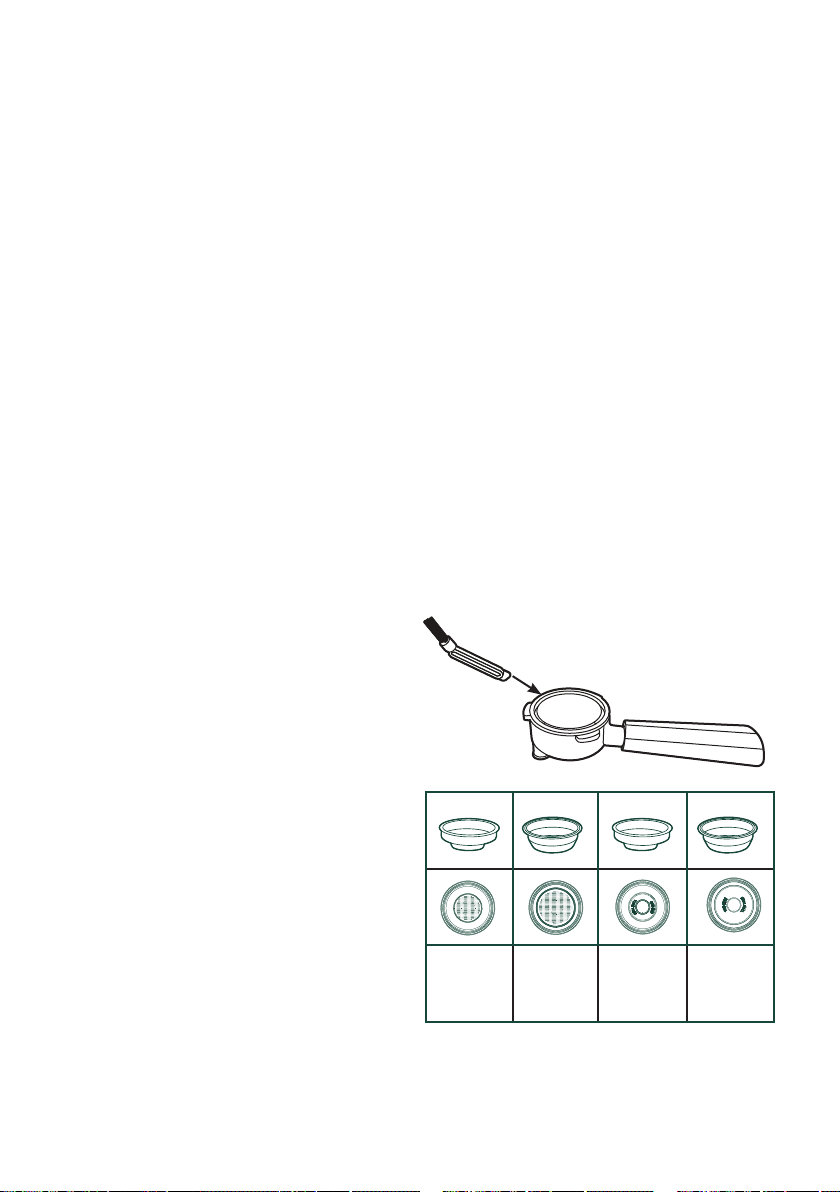
Portafilter and Filters
To remove filters from the portafilter, use the
flat end of the cleaning brush to lift the filter
out of the portafilter.
If there is too much resistance while
inserting the portafilter into the group-head,
there are too many coee grounds in the
filter. Remove some grounds and try again.
Ground puck may be dicult to remove from
the filter. Use an utensil to remove grounds.
Excessive impact to portafilter to remove
grounds may result in damage.
Single and Double Layer Filters
• Double Layer filters provide more
consistent results between varying grind
sizes and bean types and generally result
in more crema.
• Single Layer filters are more sensitive to
grind size adjustments and bean types but allow for more adjustability.
SmartHQ App
Use the SmartHQ app to view and change espresso machine settings.
See page 20 for how to connect your machine to WiFi.
Using Your Espresso Machine
Single
Layer
Single shot
Filter
Single
Layer
Double
shot Filter
Double
Layer
Single shot
Filter
Double
Layer
Double
shot Filter

14
Using Your Espresso Machine
Dial In Instructions
Dial in your machine by altering the different parameters to create the best tasting shot
for a particular coffee choice. Once the machine is “dialed-in”, you can create repeatable
results with ease.
1. Select a desired grind size. (Setting 7-9 is the recommended starting point)
2. Grind and weigh coffee for an espresso shot (18-20g worth of grounds for double, 13-15g
for single). Directions on how to change the grind function are on page 9.
3. Gently tap the sides of the portafilter to even out the coffee distribution.
4. Tamp firmly to create a level surface, wipe the excess coffee grounds from the edges of
the portafilter and brew your espresso.
5. Weigh the liquid espresso to find the brew ratio. Brew ratios are personal preference, but
can be used to guide your taste as well.
• Brew ratio is defined as the ratio of coffee grounds in the portafilter to liquid
espresso.
• Example: If 18g of coffee grounds yields 36g of liquid espresso, this is a 1:2 brew
ratio.
Ristretto 1:1 to 1:2
Espresso 1:2 to 1:3
Lungo 1:3 to 1:4
• The water volume can be increased or decreased to alter the brew ratio.
Directions on how to do so are on page 9 of the manual.
6. Aim for a brew time between 20-40 seconds for your shot.
• Time is recorded from when the function starts to when espresso stops
dispensing into cup.
• If time is below range, use a finer setting or larger water volume.
• If time is above range, use a coarser setting or lesser water volume.
7. If brew time is within range, taste the espresso.
Sour shot Use a finer setting or larger water volume.
Bitter shot Use a coarser setting or lesser water volume.
These are guidelines, adjust per preference.
Other Tips
• It is important to only change one parameter at a time, and keep other variables
constant through this process.
• If you prefer a milk-based espresso drink, taste the espresso with your milk
choice as it will affect the flavor profile.

15
WARNING
Allow heating element to completely cool to avoid risk of fire or
injury and disconnect power prior to cleaning or service.
CAUTION
To avoid possible burns to body parts and/or other injury from
hot steam, do not touch liquids or steam wand during or after frothing. Do not
remove pitcher until steaming is complete. Hold milk pitcher by the handle.
Cleaning your Espresso Machine
■ Unplug the espresso machine from the wall.
■ Pour out all water left in the water tank and drip tray. Wash and air or towel dry.
■ Wipe down appliance using a non-scratch cloth and non-abrasive cleaner.
■ DO NOT place any part of the espresso machine in the dishwasher. Hand wash only.
NOTE: When not in use for long periods of time, such as vacation, run System Empty
Cycle, dry water tank, and open water tank lid.
Clean / Descale
Descale process consists of 2 stages and will take approximately 30 minutes. Clean
alert will turn o after both stages are completed.
DO NOT use any cleaning agents not provided with the product or recommended in this
manual.
NOTE: If descale is not properly completed, unit may timeout and return to IDLE state.
This will aect the quality of the coee until all cleaning solution is removed as well as
the quality of descaling process. Run descale again.
NOTE: During descaling the unit will dispense continuously as well as pulse dispense for
a better cleaning.
STAGE 1:
1. Fill third of the water tank with water.
2. Add one pack of cleaning solution in the water tank (one tablet or packet). Mix well
until cleaning agent is fully dissolved.
3. Place a suciently large container under the brew head and steam wand.
4. Press and hold the Grind and Double buttons for 3 seconds to initiate. Clean alert
flashes.
5. Rotate the control knob to Steam. Water starts dispensing.
6. After Add Water LED turns on, rotate the control knob to the neutral position.
STAGE 2:
1. Remove, rinse , fully refill, and reinstall the water tank.
2. Repeat steps 3, 5, and 6 from STAGE 1.
3. Refill the water tank. Machine is ready for normal operation.
NOTE: As an alternative, a 1:1 ratio of water and white vinegar can be used as a cleaning
solution for the descaling process.
Care and Cleaning
16
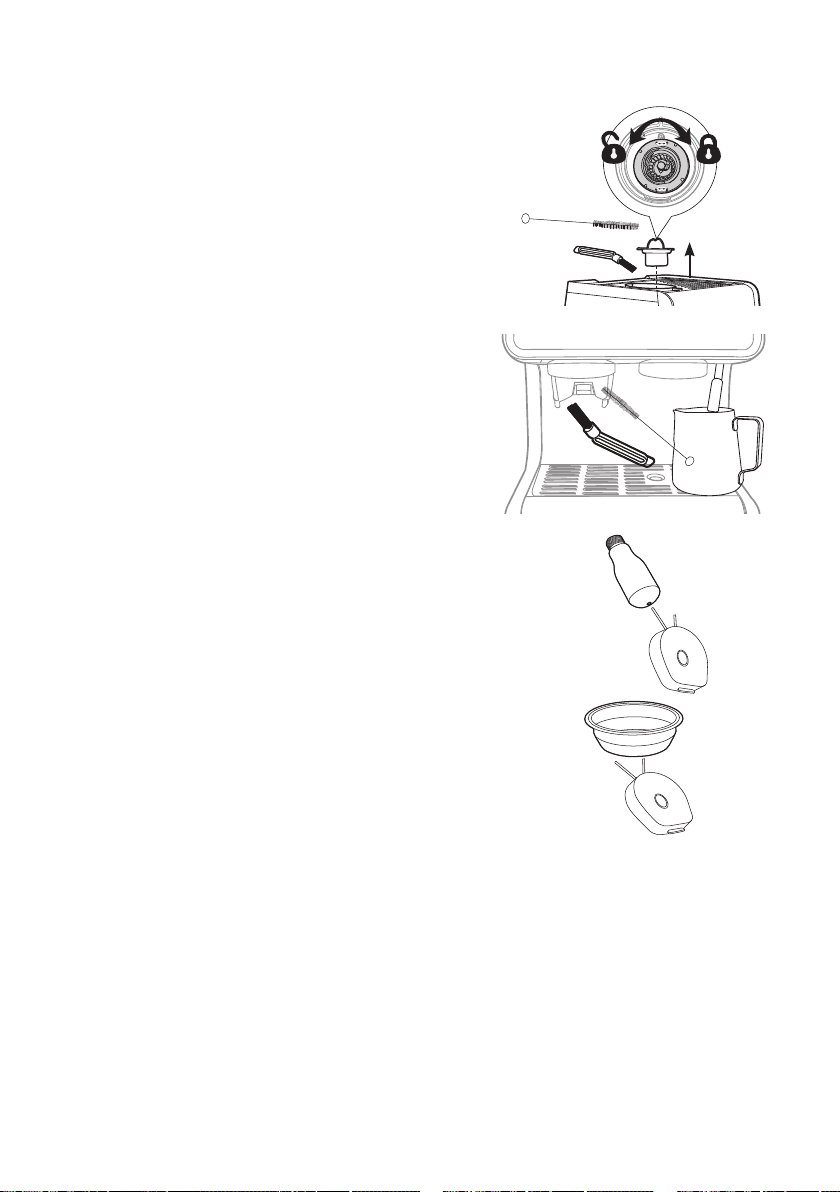
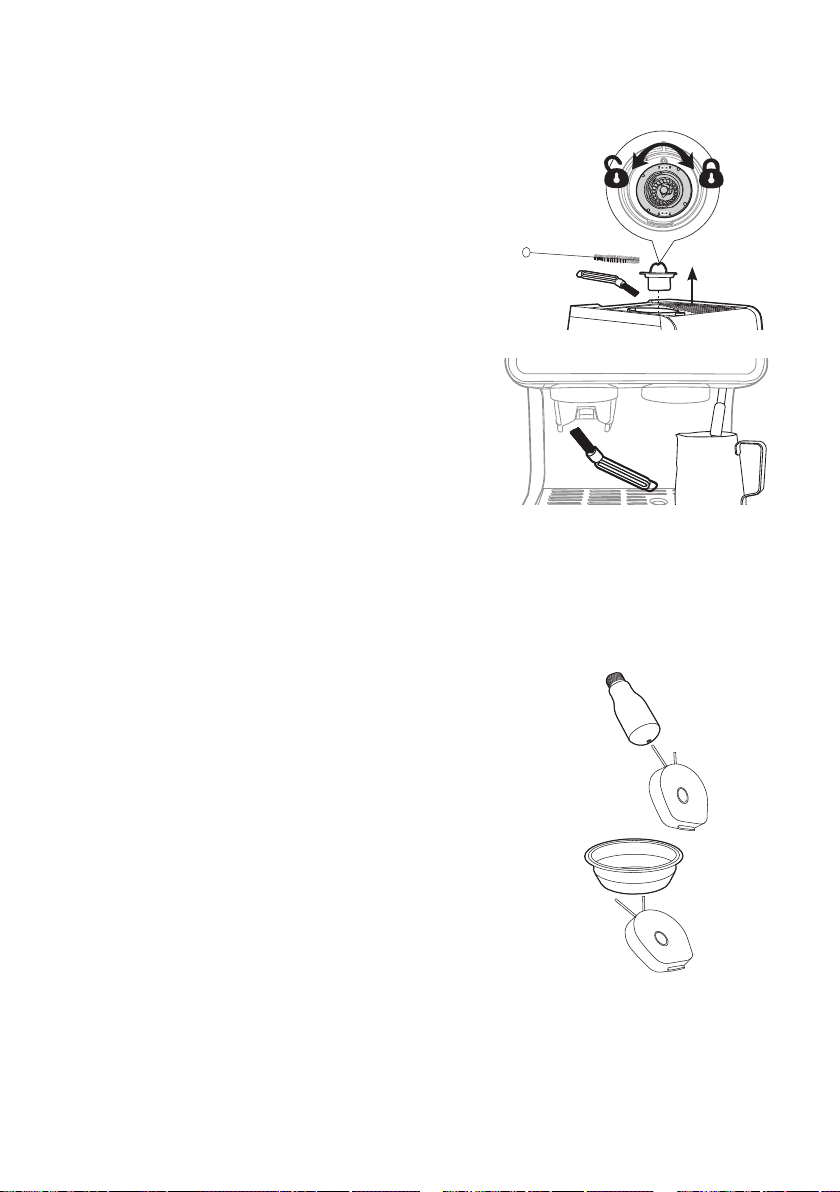
Cleaning the Grinder
Be sure to place a cup or container under the grinder when
completing this process to collect loose grounds of coee. It is
recommended to clean the grinder at least once a week.
■ Remove the bean hopper from the espresso machine.
■ Rotate to unlock and pull out the outer burr.
■ Use the brushes provided to wipe away any grounds from the
grinder. Make sure to clean the grinder from top and
bottom of the grinder chute.
■ Place the outer burr back into the machine.
■ Place the bean hopper back into place.
NOTE: Do not use hands to wipe away grounds, only use
the brushes provided.
Cleaning the Steam Wand
To clean the steam wand, remove the tip by unscrewing. Use
the cleaning pin provided to clear the tip of any debris.
Cleaning the Portafilter and Filters
To clean the portafilter and filters, dispose of coee grounds then rinse
with water. Allow the portafilter and filters to dry completely before using
again.
System Emptying
The System Emptying process empties the system of all water. Use this
function when storing the machine for long periods.
■ Empty the water tank.
■ Press and hold the Power and Double button together for 3 seconds
to put the machine into system emptying mode.
■ The machine will beep once and Power and Double will flash to
confirm the action.
■ The system will empty water into the drip tray and return to idle when complete.
Checking Your Water Hardness
Included with the machine is a Water Hardness Test Kit. Please follow the instructions on the
package using the same water that will be used to make espresso. Once results are gathered,
please refer to the SmartHQ app to set the water hardness level.
Care and Cleaning
Outer burr
Cleaning
brushes
C
Cleaning Brush
17
■ Espresso is often mistakenly thought of as a drink made with darker roast beans. Some coffee
roasters even mark their product as "Espresso Coffee". This is misleading because espresso is
mainly distinguished from other coffee drinks by the correct grind size and brew process, not
the type, origin, or roast of the coffee beans. Any coffee bean can be used in making your
espresso!
■ Use the hot water button to heat up your espresso cup before brewing. Espresso has a very
small volume and will cool quicker if brewed in a cold cup.
■ Some functions can be adjusted within the SmartHQ App to meet your specific preferences or
coee type. Reference the SmartHQ section on page 20.
■ The top of the espresso machine can act as a cup warmer if left on for an extended period of
time. If using the machine for longer than an hour, place your cups on the top of the machine to
heat them up before use.
■ Milks or Milk substitutes with higher fat contents are better at creating a creamier, thicker foam,
while Low/Non-fat Milk or Milk substitutes are better at creating a lighter foam with larger
bubbles.
■ It is recommended that the edge of the tamper is aligned with the edge of the portafilter when
tamping. Adjust the amount of grounds to achieve optimal coffee puck thickness.
Your espresso machine can be used to make an unlimited number of espresso based drinks.
Frothed milk drinks like Cappuccinos and Lattes are classics admired by many.
Make sure to brew espresso BEFORE using steam. Steam function requires higher temperatures
than espresso and brewing espresso immediately after steaming will affect the taste of espresso.
■ Cappuccino
This drink is made with espresso, milk, and large amount of microfoam. Do not fill the milk
pitcher above half way to avoid microfoam overflow during steaming. Frothed milk may be as
much as doubled in volume.
■ Latte
This drink uses espresso and steamed milk with a smaller head of foam.
■ How to steam milk:
NOTE: Steam wand may purge hot water while preheating. Introduce steam wand into milk after
preheating.
1. After steam is preheated and ready, place the tip of the steam wand right under the surface
of the milk at the edge of the milk pitcher at approximately a 45° angle to create a vortex.
Start steaming. The longer milk is steamed under the surface the more microfoam is created.
Once desired amount of microfoam is reached, dip the steam wand lower into the milk and
continue to steam until desired temperature is reached. Place a hand under the pitcher to feel
the change in temperature. Once the bottom is warm enough to feel uncomfortable, optimal
temperature is achieved.
2. Large bubbles can be broken into smaller bubbles by light tapping of the milk pitcher.
NOTE: To heat up milk, you want to position the steam wand lower into the pitcher to prevent
air from entering the milk and creating bubbles. This will result in a steamed milk with a smaller
head of foam.
Tips
18
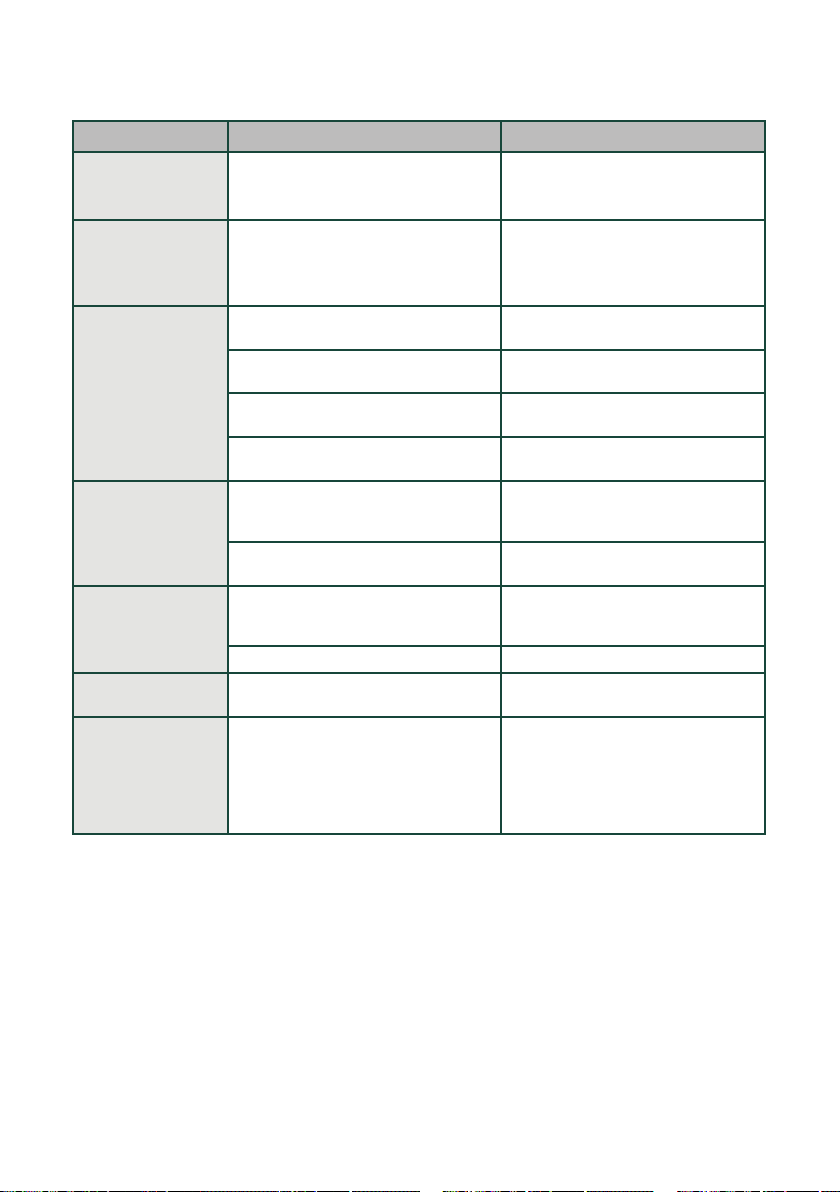
Troubleshooting
Problem Cause Solution
Appliance does not
work/does not turn
on
No power is connected to the appliance ■ Check cable and plug are connected
to power and press the "on" button
■ Check GFI plug
Coee is not hot
enough
Cup is not preheated Run hot water in the cup prior to
brewing to warm up.
Or place your cup on top of the machine
prior to use.
Water/Steam does
not come out of
steam wand
Excessive scale has built up Descale the appliance as directed on
page 15.
Empty system function may have been
used
Run the hot water function until water
starts dispensing
Pump airlock (air in the water pump) Run the hot water function until water
starts dispensing
Something is blocking the steam wand Run the hot water function until water
starts dispensing
Coee does not come
out of portafilter
Coee is tamped too tightly in the
portafilter or gounds are too fine.
Empty portafilter and try again with a
larger grind size or less force while
tamping.
The dose of coee is too high Use a coarser grind size or less dosage.
Espresso shot has no
crema
Coffee grounds are too coarse Adjust coffee bean grind size to a finer
setting during grinding operation or use
a double layer filter provided.
Coffee beans are not fresh Change or use appropriate coffee beans
Appliance takes too
long to heat up
Excessive scale has built Descale the appliance
Water tank is empty
but "Add Water" alert
does not show up
Water sensor is detecting water on the
outside of the water tank
■ Wipe the water tank and back area of
the machine completely dry.
■ Avoid pouring water directly into the
water tank. It is recommended to pull
out water tank, fill, then replace in the
machine.
19
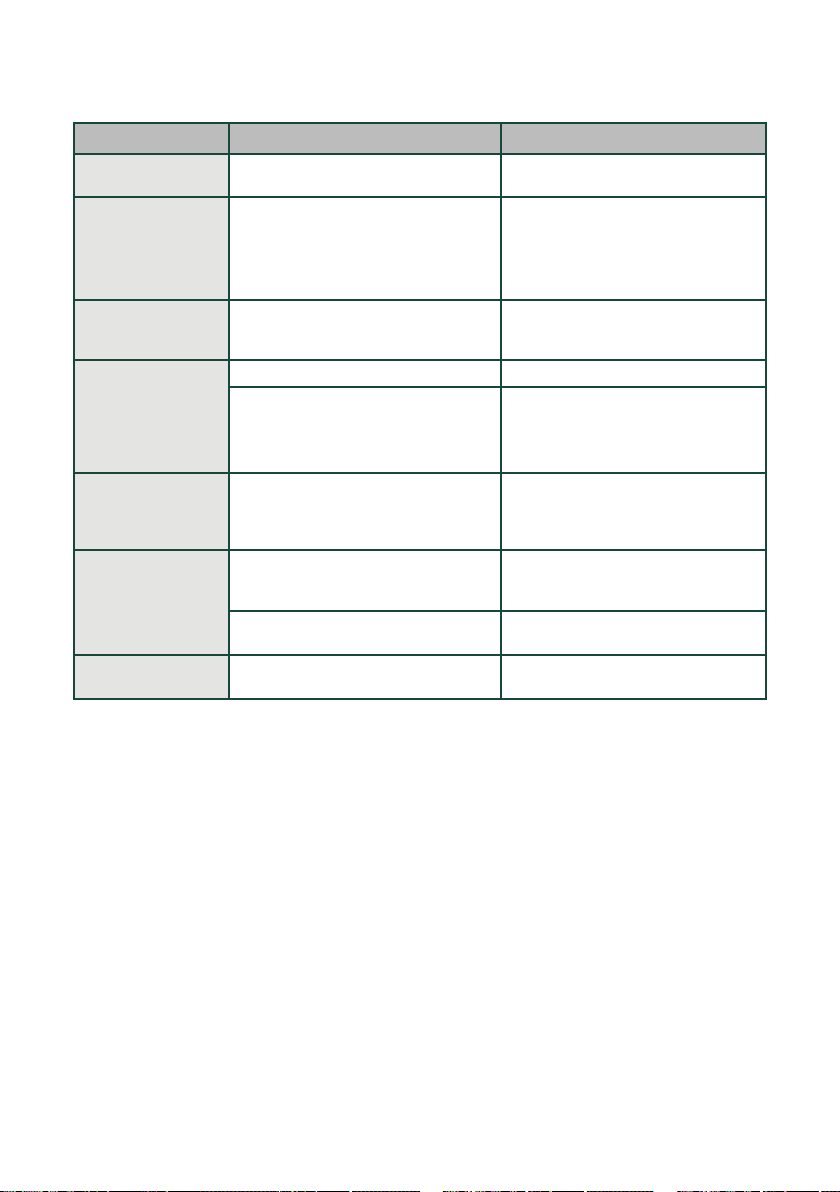
Troubleshooting
Problem Cause Solution
Grinder is making a
very loud sharp noise
There are foreign objects in the grinder. Clear the grinder per the directions in
the Care and Cleaning section.
Coee dispensed is
watery
Grinder setting is too coarse. ■ Adjust coffee bean grind size to
a finer setting during grinding
operation.
■ Go to the SmartHQ app and adjust
coffee settings.
No steam or hot
water is coming out
of the steam wand
The machine is not preheated yet. Wait for machine to preheat. Once water
is up to temperature, the process will
begin.
Steam or hot water
have stopped
dispensing
mid-process
Water tank is empty. Refill the water tank to continue process.
The function was cancelled early.
NOTE: Hot Water will stop automatically
once preset volume is dispensed. This
volume can be changed in SmartHQ.
Refill the water tank to continue process.
There is water
underneath the drip
tray
Residual water, steam, or condensation
may be present underneath the drip
tray. This is normal and should not be a
problem.
Wipe the area under the drip tray with a
cloth or towel.
The portafilter does
not turn and lock into
place in group-head
Portafilter is not level and/or not at the
correct angle to be inserted.
Ensure the portafilter is level and
inserted at a 45 degree angle before
twisting.
Dosage is too large and is coming in
contact with group-head.
Remove a small amount of coffee from
portafilter or use a lower dosage.
Poor crema formation
and weak espresso
High altitude aects boiling point and
extraction.
Adjustments may be made using the
SmartHQ app for high altitude settings.
20
WiFi Connect
Locate the WiFi connect sticker on the back of the espresso machine under the water
tank.
Press and hold the Single and Double buttons simultaneously for 3 seconds to turn on
the WiFi function. The espresso maker will beep to confirm the action and the WiFi LED
will start flashing. When the unit is successfully connected to WiFi the WiFi LED will go
solid.
Follow the directions in the SmartHQ app to continue WiFi setup.
NOTE: To disconnect from WiFi, follow the same steps. The WiFi icon will disappear.
NOTE: Connecting the unit may take multiple attempts.
NOTE: In case of loss of power or connection, the unit may take a up to five minutes to
reconnect to WiFi.
SmartHQ
Your Espresso Maker is WiFi Connect Enabled. A WiFi communication card is built into
the product allowing it to communicate with your Smart Phone for remote monitoring,
control, and notifications.
Please visit geappliances.com/ge/connected-appliances/ to learn more about
connected appliance features and to learn what connected appliance App's will work
with your Smart Phone.
WiFi Connect – SmartHQ

21
FCC/IC COMPLIANCE STATEMENT
FCC/IC COMPLIANCE STATEMENT:
This device complies with Part 15 of the FCC Rules. Operation is subject to the
following two conditions:
1. This device may not cause harmful interference, and
2. This device must accept any interference received, including interference that may
cause undesired operation.
Any changes or modifications not expressly approved by the party responsible for
compliance could void the user’s authority to operate the equipment.
NOTE: This equipment has been tested and found to comply with the limits for a
Class B digital device, pursuant to Part 15 of the FCC Rules. These limits are designed
to provide reasonable protection against harmful interference in a residential
installation. This equipment generates uses and can radiate radio frequency energy
and, if not installed and used in accordance with the instructions, may cause
harmful interference to radio communications. However, there is no guarantee that
interference will not occur in a particular installation. If this equipment does cause
harmful interference to radio or television reception, which can be determined
by turning the equipment off and on, the user is encouraged to try to correct the
interference by one or more of the following measures:
• Reorient or relocate the receiving antenna.
• Increase the separation between the equipment and receiver.
• Connect the equipment into an outlet on a circuit different from that to which the
receiver is connected.
• Consult the dealer or an experienced radio/television technician for help.
This device complies with Industry Canada licence-exempt RSS standard(s).
Operation is subject to the following two conditions: (1) This device may not cause
interference, and (2) This device must accept any interference, including interference
that may cause undesired operation of the device.
Labeling: Changes or modifications to this machine not expressly approved by the
manufacturer could void the user’s authority to operate the equipment.
ConnectPlus module only (or similar communication module)
RF Exposure - This device is only authorized for use in a mobile application. At least
20 cm of separation distance between the ConnectPlus device and the user’s body
must be maintained at all times.
FCC ID: ZKJ-WCATA006
IC ID: 10229A-WCATA006
22
Limited Warranty
■ Improper installation, delivery or maintenance.
■ Failure of the product if it is abused, misused,
or used for other than the intended purpose or
used commercially.
■ Damage caused after delivery.
■ Damage to the product caused by accident, fire,
floods or acts of God.
■ Incidental or consequential damage caused by
possible defects with this appliance.
■ Software bugs that can be corrected with an
update via the Café App.
■ Labor and other charges to install and/or remove
the product.
What Café Appliances Will Not Cover:
For the Period of: Café Appliances Covers
One Year
From the date
of the original
purchase
If the Coffee Maker fails due to a defect in materials or workmanship,
during the limited one-year warranty, GE Appliances will either replace or
refurbish your product with a new or remanufactured product, or refund
the purchase price of the product at GE Appliances sole discretion.
If your appliance fails to operate properly while in use under normal household conditions within the
warranty period, visit cafeappliances.com/support for product care/maintenance self-help.
In Canada, visit service.geappliances.ca/servicio/en_CA/.
To initiate a warranty claim, please visit cafeappliances.com/support/returns/, or call 1-800-430-
1757. Please have your model number and serial number available. Return and packing instruction
information will be provided at that time.
In Canada, contact us at cafeappliances.ca
EXCLUSION OF IMPLIED WARRANTIES
Your sole and exclusive remedies are product exchange or refund as provided in this Limited Warranty.
Any implied warranties, including the implied warranties of merchantability or fitness for a particular
purpose, are limited to one year or the shortest period allowed by law.
For sale in the 50 United States, District of Columbia, and Canada only:
This limited warranty is extended to the original purchaser for products purchased for home use within
the USA. In Alaska and Hawaii, the limited warranty does not include the costs of shipping units. California
residents may gave additional return options. Please ask call center for additional information.
Some states do not allow the exclusion or limitation of incidental or consequential damages. This warranty
gives you specific legal rights, and you may also have other rights which vary from state to state. To know
what your legal rights are, consult your local or state consumer affairs office or your state’s Attorney
General.
Warrantor: GE Appliances, a Haier company
Louisville, KY 40225
For Customers in Canada: This limited warranty is extended to the original purchaser and any succeeding
owner for products purchased in Canada for home use within Canada. In-home warrant service will
be provided in areas where it is available and deemed reasonable by Mabe to provide. For extended
warranty information, visit geappliances.ca/purchase-extended-warranty
Warrantor Canada: MC Commercial, Burlington, Ontario, L7R 5B6

23
49-9000028 Rev. 1 09-21 GEA
Consumer Support
CONTACT US
If you are not satisfied with the service you receive from Café Appliances, contact us on our
Website with all the details including your phone number, or write to: General Manager,
General Manager, Customer Relations | GE Appliances, Appliance Park | Louisville, KY 40225
cafeappliances.com/contact
In Canada: Director, Consumer Relations, Mabe Canada Inc. | Suite 310, 1 Factory Lane |
Moncton, N.B. E1C 9M3
cafeappliances.ca/support/contact-us
CAFÉ WEBSITE
Have a question or need assistance with your appliance? Try the Café Appliances Website 24
hours a day, any day of the year! You can also shop for more great Café Appliances products and
take advantage of all our on-line support services designed for your convenience. cafeappliances.
com
In Canada: cafeappliances.ca
REGISTER YOUR APPLIANCE
Register your new appliance on-line at your convenience! Timely product registration will allow
for enhanced communication and prompt service under the terms of your warranty, should the
need arise. You may also mail in the pre-printed registration card included in the packing material.
cafeappliances.com/register
In Canada,
service.geappliances.ca/servicio/en_CA/
PARTS AND ACCESSORIES
Individuals qualified to service their own appliances can have parts or accessories sent directly to
their homes
(VISA, MasterCard and Discover cards are accepted). Order on-line today 24 hours every day.
cafeappliances.com/parts
In Canada: geappliances.ca/parts-filters-accessories
Instructions contained in this manual cover procedures to be performed by any user. Other
servicing generally should be referred to qualified service personnel. Caution must be
exercised, since improper servicing may cause unsafe operation.

24
BELLISSIMO- Machine à expresso semi-automatique Café
+Mousse
MANUEL D’UTILISATION
FRANÇAIS
Il est temps que les électroménagers se dotent d’une personnalité. La vôtre.

2
NOUS VOUS REMERCIONS D’ACCUEILLIR CAFE CHEZ VOUS
Que vous ayez grandi avec Cafe ou qu’il s’agisse de votre première acquisition, nous sommes
heureux de vous accueillir dans notre famille.
Nous sommes fiers du savoir-faire, de l’innovation et de l’esthétique qui composent chaque
appareil Cafe, et nous pensons que vous le serez aussi. Dans cette optique, nous vous rappelons
que l’enregistrement de votre électroménager vous assure la communication de renseignements
importants sur le produit et la garantie lorsque vous en avez besoin.

3
Table des matières
Models: C7CESAS3RD3, C7CESAS4RW3, C7CESAS2RS3
CONSIGNES DE SÉCURITÉ IMPORTANTES ............................ 4
POUR COMMENCER ............................................... 6
COMPOSANTS .....................................................7
CONTRÔLES ...................................................... 8
ACCESSOIRES .................................................... 8
FONCTIONS ...................................................... 9
ALERTES .........................................................10
UTILISATION DE VOTRE MACHINE À EXPRESSO ......................11
ENTRETIEN ET NETTOYAGE ........................................15
TIPS CONSEILS ....................................................17
DÉPANNAGE ......................................................18
CONNEXION WI-FI ................................................20
CONFORMITÉ DE LA FCC/IC ........................................21
GARANTIE LIMITÉE ...............................................22
SOUTIEN AU CONSOMMATEUR .................................... 23
Enregistrement du produit
Inscrivez les numéros de modèle et de série ici :
No de modèle __________________
No de série ____________________
Vous trouverez ces numéros sur l’étiquette à l’arrière de l’appareil.

4
CONSERVEZ CES INSTRUCTIONS
CONSIGNES DE SÉCURITÉ IMPORTANTES
LISEZ TOUTES LES INSTRUCTIONS AVANT D'UTILISER L'APPAREIL
AVERTISSEMENT
Lisez les instructions attentivement avant d’utiliser cet appareil pour
la première fois. Conservez ces instructions pour référence. Cet appareil est destiné à un
usage domestique et il doit être utilisé conformément aux présentes instructions seulement.
Manipulez-le avec soin et avertissez les autres utilisateurs des risques potentiels.
MESURES DE SÉCURITÉ IMPORTANTES
Observez toujours les présentes consignes de sécurité lorsque vous utilisez cet appareil.
• Lisez toutes les instructions avant l'utilisation.
• Utilisez uniquement une alimentation électrique standard de 120 V, 60 Hz, correctement mise
à la terre conformément au code national de l'électricité et aux codes et règlements locaux
en vigueur.
• Assurez-vous que l’appareil est déposé sur une surface plane et stable.
• Mettez l’appareil en arrêt (OFF), puis débranchez-le de la prise électrique lorsqu’il n’est pas
utilisé, avant de monter ou démonter les pièces, et avant le nettoyage. Pour débrancher
l’appareil, agrippez la fiche du cordon et tirez. Ne tirez jamais par le cordon en tant que tel.
• N’utilisez pas l’appareil à l'extérieur. Il est prévu pour un usage domestique seulement.
• Utilisez ce produit uniquement aux fins auxquelles il est destiné et qui sont décrites dans ce
manuel d'utilisation.
• L’utilisation d’accessoires non recommandés par le fabricant peut occasionner des blessures.
• Cet appareil n’est pas destiné à être utilisé par des personnes (y compris les enfants)
dont les capacités physiques, sensorielles ou mentales sont réduites ou l’expérience et
les connaissances insusantes, sauf si elles sont étroitement surveillées et instruites sur
l’utilisation de l’appareil par une personne responsable de leur sécurité. Une surveillance
étroite est requise lorsque cet appareil est utilisé par des enfants ou à proximité de ceux-ci.
Les enfants doivent être surveillés afin de s’assurer qu’ils ne jouent pas avec l’appareil.
• Laissez-le refroidir avant de poser ou retirer des pièces, et avant de le nettoyer. NE touchez
PAS la buse de vapeur après l’utilisation. Sinon il y a risque de brûlures graves.
• Assurez-vous que le plateau d’égouttage est toujours présent lors de l’utilisation.
• Utilisez toujours de l'eau froide pour faire le café dans votre machine à expresso. De l’eau ou
d’autres liquides tièdes ou chauds peuvent endommager la machine.
• NE versez AUCUN liquide autre que de l'eau dans le réservoir.
• Afin de réduire le risque d’incendie ou de décharge électrique, ne tentez pas de démonter,
réparer, modifier ou remplacer une pièce quelconque de ce produit.
• Si le cordon électrique est endommagé, il doit être remplacé par le fabricant. NE le remplacez
PAS par vous-même.
• N’utilisez pas l’appareil s’il a été échappé, s’il est défectueux ou endommagé d’une manière
quelconque, ou encore si le cordon ou la fiche sont endommagés. Contactez GE Appliances
via le site Web inscrit dans la section Communiquez avec nous pour des renseignements sur
l’inspection, la réparation ou le réglage.
5
CONSERVEZ CES INSTRUCTIONS
CONSIGNES DE SÉCURITÉ IMPORTANTES
LISEZ TOUTES LES INSTRUCTIONS AVANT D'UTILISER L'APPAREIL
AVERTISSEMENT
Lisez les instructions attentivement avant d’utiliser cet appareil pour
la première fois. Conservez ces instructions pour référence. Cet appareil est destiné à un
usage domestique et il doit être utilisé conformément aux présentes instructions seulement.
Manipulez-le avec soin et avertissez les autres utilisateurs des risques potentiels.
MESURES DE SÉCURITÉ IMPORTANTES
Observez toujours les présentes consignes de sécurité lorsque vous utilisez cet appareil.
• Utilisez le moulin à café pour moudre des grains de café seulement. NE mettez PAS de café
moulu dans la machine à expresso, mettez uniquement des grains de café entiers dans le
compartiment des grains.
• Ne laissez pas les enfants toucher à l’appareil ou au cordon électrique pendant le
fonctionnement.
• N’utilisez PAS un cordon électrique de rallonge.
• N’utilisez PAS la machine à expresso si le plateau d’égouttement n’est pas à sa position.
• N’immergez PAS l’appareil dans l’eau ou dans tout autre liquide. Cela peut endommager le
cordon et poser un risque de choc électrique.
• Ne laissez pas le cordon pendre par-dessus le bord d’une table ou d’un comptoir.
• Ne laissez pas le cordon toucher une surface chaude, y compris la cuisinière.
• On ne recommande pas d’utiliser des accessoires qui ne sont pas inclus dans la boîte. Cela
pourrait s’avérer dangereux et doit être évité.
• N’utilisez pas la fonction d'eau chaude continuellement pour plus d’un réservoir d'eau.
• Vérifiez la trémie pour la présence de corps étrangers avant utilisation.
• Évitez tout contact avec les pièces mobiles. N'essayez pas de neutraliser les mécanismes de
verrouillage de sécurité.
• Ne touchez pas les surfaces chaudes. Utilisez des poignées ou des boutons.
• Ne pas placer sur ou à proximité d'un brûleur à gaz ou électrique chaud, ou dans un four
chaué.
• Pour déconnecter, mettez n'importe quelle commande sur « o », puis retirez la fiche de la
prise murale.
• N’utilisez pas l’appareil à d’autres fins que celles prévues.
AVERTISSEMENT
Pour éviter tout risque de blessure, n'ouvrez pas la chambre d'infusion
pendant le processus d'infusion.
AVERTISSEMENT
RISQUE D’INCENDIE OU DE CHOC ÉLECTRIQUE
■ POUR RÉDUIRE LE RISQUE D’INCENDIE OU DE CHOC ÉLECTRIQUE, NE RETIREZ
PAS LE COUVERCLE (OU L’ARRIÈRE).
■ Ne tentez pas de réparer ou de remplacer une pièce de la machine à expresso sauf
si cela est spécifiquement recommandé dans ce manuel. Toute réparation doit être
effectuée par un technicien en réparation autorisé.
■ Une rallonge courte (ou un cordon d’alimentation amovible) est fourni afin de réduire
les risques d’entremêlement ou de trébuchement occasionnés par un cordon long.
6
Plateau d’égouttage
■ Retirez l'emballage du plateau d’égouttage avant d’utiliser la machine.
Information générale
Ŷ/¶H[SUHVVLRQYDULHVHORQOHFKRL[GHVJUDLQVHWODPRXWXUH1RXV
UHFRPPDQGRQVGHFRPPHQFHUSDUXQHPRXWXUHj'HVJUDLQV
PRXOXVILQHPHQWSHXYHQWVHFROPDWHUHWSURGXLUHGHIDLEOHV
TXDQWLWpV&RQVXOWH]OHVLQVWUXFWLRQVGHODSDJHSRXUFRQQDvWUHOHV
LQGLFHVSRXUREWHQLUXQHTXDQWLWpSDUIDLWH
Ŷ0HWWH]OHSODWHDXG¶pJRXWWDJHHQSODFHDYDQWGHPHWWUHODPDFKLQH
HQPDUFKH/DPDFKLQHHIIHFWXHXQHSXUJHORUVGHODPLVHHQ
PDUFKH
Réservoir d'eau
■ Retirez le réservoir d'eau et le sceau orange dans le bas du réser-
voir, puis remplissez celui-ci avec de l'eau. Avant d’utiliser quelque
fonction que ce soit, installez solidement le réservoir d'eau dans la machine en le
poussant vers le bas avec précaution.
■ Assurez-vous que le niveau d’eau se situe entre les lignes MIN et MAX du réservoir
avant l’utilisation.
Trémie des grains de café
■ Retirez la trémie de l’emballage.
■ Insérez la trémie en alignant sa flèche avec l’appareil.
■ Tournez la trémie dans le sens des aiguilles pour la verrouiller en place.
■ Tournez la trémie jusqu’à la mouture de café désirée.
REMARQUE : La mouture de la trémie des grains de café se situe entre 0 à 15, 0 étant la
plus fine et 15 étant la plus grossière.
REMARQUE : Nous recommandons d’utiliser des grains de café entiers plutôt que du
café déjà moulu. Le café prémoulu perd rapidement son arôme et sa saveur.
REMARQUE : Vous devrez peut-être faire plusieurs essais pour obtenir la taille de
mouture qui correspond le mieux à votre goût.
Prêt à l’emploi!
■ Branchez votre machine à café expresso. Le bouton marche/arrêt va clignoter.
Pressez le bouton marche/arrêt.
■ Choisissez la fonction que vous désirez et dégustez! Voyez la section « Utilisation de
la machine à café expresso » pour les instructions relatives à chaque fonction.
Pour commencer
7
Composants
Réservoir d'eau
Trémie des grains
de café
Plateau
d’égouttage
Flotteur
de niveau
d’eau
Porte-filtre
Pres-
se-mouture
Support
du pres-
se-mou-
ture
Buse de
vapeur
Carafe à
lait
Trousse de
nettoyage
Berceau du
porte-filtre
Rotor et molette abra-
sive du moulin
REMARQUE : Lorsque le flotteur de niveau d’eau atteint le dessus du plateau
d’égouttage, retirez le plateau et jetez le liquide. Replacez-le dans l’appareil
avant la prochaine utilisation.
8
position
neutre
Contrôles
Accessoires
Filtre dose
simple,
couche
simple
Filtre dose
double,
couche
simple
Filtre dose
simple,
couche
double
Filtre dose
simple,
couche
double
Panneau de commande
Bouton de commande
Bouton de commande
REMARQUE :
Assurez-vous
que le bouton est
en position O
lors de la mise
sous tension
de la machine.
La fonction
d'infusion ne sera
disponible que si
le bouton est en
position neutre
au démarrage.
&DUDIHjODLW
Trousse de nettoyage
%URVVHGHQHWWR\DJH
%URVVHGHQHWWR\DJH%URFKHGHQHWWR\DJH
3RXUDFFpGHUjODWURXVVHGHQHWWR\DJHUHWLUH]OHSODWHDXG¶pJRXWWDJH/DWURXVVHHVWVLWXpHGDQV
OHFRLQLQIpULHXUJDXFKHGHODPDFKLQH
%DQGGHPHVXUHGHOD
GXUHWpGHOHDX
6ROXWLRQGHQHWWR\DJH
3RUWH¿OWUH

9
Boutons
Pouvoir
Appuyez sur le bouton d'alimentation pour
allumer la machine à expresso.
Moudre
Appuyez une fois sur le bouton de mouture
pour un seul expresso et deux fois rapidement
pour un double expresso.
Unique (Expresso)
L'espresso est une boisson au café pleine de
saveurs servie sous forme de shot concentré.
Les cappuccinos, les blancs plats et les lattes
sont tous préparés avec un espresso.
Réglage par défaut :
~
13-15 grammes de café
donnent
~
30 ml d'espresso (1 oz).
Double
Cela créera une tasse qui aura le double du
temps d'eau et d'extraction.
Réglage par défaut :
~
18-20 grammes de café
donnent
~
60 ml d'espresso (2 oz).
REMARQUE : Les quantités de café moulu
et les volumes d'espresso peuvent varier en
fonction du type de grain et des réglages de
la machine. Taille de mouture par défaut ~
7-9.
REMARQUE : L'utilisation d'une mouture
trop grossière entraînera un débordement
du porte-filtre et un café plus faible. Des
tailles de mouture plus grandes peuvent être
utilisées pour d'autres types de café.
REMARQUE : L'utilisation d'une taille de
mouture trop fine peut entraîner un manque
de mouture pour remplir le filtre, ainsi qu'une
surpression. Des réglages de mouture plus
fins sont inclus pour que l'utilisateur ajuste
la taille de mouture à mesure que le moulin
s'émousse avec l'utilisation.
Pour définir le montant de
distribution par défaut :
Appuyez et maintenez enfoncée la touche
Single, Double ou Grind jusqu'à ce que la
quantité souhaitée de liquide ou de marc soit
distribuée. Arrêtez d'appuyer sur le bouton
pour enregistrer le nouveau montant.
REMARQUE : Seule la quantité de mouture
à un coup peut être ajustée manuellement.
Pour régler la quantité de double mouture,
reportez-vous à l'application Smart HQ.
REMARQUE : Les changements de volume
peuvent affecter la saveur de l'espresso.
REMARQUE : Pour rétablir les paramètres
d'usine par défaut de la machine, appuyez
sur les boutons Simple, Double et Broyage et
maintenez-les enfoncés pendant 3 secondes.
REMARQUE : Seule la quantité de mouture
à un coup peut être ajustée manuellement.
Pour régler la quantité de double mouture,
reportez-vous à l'application SmartHQ.
Bouton de controle
Vapeur
La vapeur est utilisée pour chauffer des
liquides à travers la buse à vapeur.
ATTENTION
Pour éviter de vous brûler, ne
touchez pas aux liquides ni à la buse de vapeur
pendant ou après le moussage du lait. Attendez
que la projection de vapeur soit terminée avant
de retirer la carafe. Tenez la carafe de lait par la
poignée.
Eau chaude
La fonction Eau chaude distribue de l'eau
chaude à partir de la buse vapeur. Aucun café
n'est utilisé pendant cette fonction.
Fonctions

10
Broyeur
L'indicateur Grinder apparaîtra pour l'une des
trois raisons suivantes.
Trémie à grains retirée : L'indicateur du
broyeur s'allumera en rouge si la trémie est
retirée ou n'est pas verrouillée en place. Placez
la trémie dans la machine et tournez-la en
position verrouillée pour résoudre.
Rotor verrouillé : L'indicateur Grinder clignote
en rouge lorsque le grinder est verrouillé ou
bloqué. Broyeur clair avec brosse fournie pour
régler. L'erreur de rotor verrouillé peut être
supprimée une fois le problème résolu et le
broyage répété, la machine expire ou est hors
tension.
Durée d'exécution continue : l'indicateur du
moulin clignotera en blanc, ce qui signifie que
le moulin a fonctionné pendant au moins 3
minutes et doit refroidir pendant 6 minutes.
Une fois le broyeur refroidi, l'indicateur
disparaît et la machine est à nouveau prête à
être utilisée.
Ajoutez de l'eau
L'indicateur d'ajout d'eau apparaît lorsque le
réservoir d'eau est bas ou qu'il manque le
réservoir d'eau.
Wifi
Votre machine à expresso est compatible
WiFi. Voir page 20 pour savoir comment se
connecter et utiliser l'application SmartHQ.
Faire le ménage
Une alerte de nettoyage apparaîtra lorsqu'il
sera temps d'exécuter un cycle de détartrage
pour un fonctionnement et une durée de vie
optimaux de la machine. Voir page 15 pour le
processus de détartrage.
Alertes
11
Utilisation de votre machine à expresso
Fonctions Single et Double (dose simple et dose double)
REMARQUE : Assurez-vous de placer une tasse ou un récipient sous le distributeur avant d’utiliser
la fonction Single ou Double.
REMARQUE : Suivez le paramétrage dans ces instructions
pour obtenir la bonne grosseur de mouture et la quantité de
grains.
1. Insérez le filtre pour dose simple ou dose double dans le
porte-filtre jusqu’à ce qu’il s’enclenche en place.
2. Assurez-vous qu’il y a des grains de café dans la trémie des
grains de café.
3. Placez le porte-filtre dans le berceau du moulin à café.
4. Pressez le bouton Grind. Reportez-vous au
tableau.
5. Une fois le moulinage terminé, retirez le
porte-filtre et tapez-le délicatement pour
égaliser la mouture.
6. Tassez fermement à l’aide du presse-
mouture fourni. Une pression constante
produira la meilleure rondelle de café.
Nettoyez toute mouture excédentaire sur le
bord du porte-filtre. Consultez les conseils
de la page 17 pour en savoir plus sur le tassement.
REMARQUE : Le tassement expulse les poches d’air pour éviter
la canalisation de l'eau à travers la mouture.
REMARQUE : L’utilisateur peut eectuer une dose vierge afin de
chauer la tête supérieure ou nettoyer la dose précédente.
7. Placez le porte-filtre avec la rondelle de café pressé dans la
tête du groupe à un angle de 45° et tournez vers la droite
jusqu’à verrouiller en place.
REMARQUE : L’installation du porte-filtre est quelque peu
résistante. Une trop grande quantité de café moulu peut rendre
son installation très dicile. Consultez la section des conseils à la
page 17.
9. Pressez le bouton Single ou Double pour commencer
l’infusion.
10. Une fois la fonction terminée, jetez la mouture de
café, rincez le porte-filtre, puis séchez-le. Suivez les
instructions relatives au porte-filtre dans la section
Entretien et nettoyage.
REMARQUE : Après chaque cycle simple ou
double, votre machine libère la pression interne à
mesure qu’elle refroidit en évacuant lentement l'eau
excédentaire dans le plateau d’égouttage. Ne retirez
PAS le plateau d’égouttage avant que le processus ne
soit terminé.
REMARQUE : Il peut y avoir de l'eau chaude dans le
porte-filtre. Usez de prudence lorsque vous jetez la
mouture.
Single Double
Presser Grind 1x Presser rapidement Grind 2x
Voyez la page 13 pour le filtre qui correspond à votre goût.
REMARQUE : Utilisez le
coussinet en caoutchouc dans
le bas du porte-filtre pour
égaliser le bord tout en tassant
la mouture.
12
Utilisation de votre machine à expresso
REMARQUE : Assurez-vous que le bouton de commande est toujours dans la position
neutre lorsque vous n’utilisez PAS les fonction Steam et Hot Water.
REMARQUE : La buse de vapeur pivote pour faciliter l’utilisation. Ne tirez PAS sur la
buse de vapeur.
ATTENTION
Pour éviter de vous brûler, ne touchez pas aux liquides ni à la buse de vapeur
pendant ou après le moussage du lait. Attendez que la projection de vapeur soit terminée avant
de retirer la carafe. Tenez la carafe de lait par la poignée.
Steam (vapeur)
Vous pouvez utiliser la fonction Steam pour vaporiser le lait et d’autres liquides.
Voyez la section Conseils pour des techniques et des
recettes.
1. Tournez le bouton de commande situé sur le côté de la
machine à expresso jusqu’à la position Steam. Assurez-
vous que la buse de vapeur pointe vers le plateau
d’égouttage car elle va évacuer un peu d'eau lors du
préchauage. Lorsque la vapeur commence à sortir,
mettez le bouton à la position d’arrêt (O) et insérez
rapidement la buse dans le lait. Procédez à l’injection de
vapeur en remettant le bouton de commande à la position Steam.
REMARQUE : S’il s’écoule plus de quelques secondes entre le chauage et l’injection de
vapeur, le chauage va cesser et devra être répété.
2. Remettez le bouton de commande à la position O une fois l’opération terminée.
REMARQUE : Utilisez un linge imbibé d'eau chaude pour essuyer la buse de vapeur après
chaque utilisation. Nous recommandons aussi de purger la buse de vapeur immédiatement
après chaque utilisation en activant de nouveau la vapeur durant une courte période.
REMARQUE : Après chaque cycle de vapeur, votre machine libère automatiquement la pression
interne à mesure qu’elle refroidit en évacuant lentement l'eau excédentaire et la vapeur dans le
plateau d’égouttage. Il est donc normal de voir de la vapeur s'échapper du plateau d’égouttage
pendant ce processus. Ne retirez PAS le plateau d’égouttage avant que le processus ne soit
terminé.
Hot Water (eau chaude)
REMARQUE : Si vous utilisez la fonction Hot Water après la vapeur, laissez la machine évacuer la
vapeur excédentaire avant d’utiliser cette fonction (voir remarque ci-dessus).
REMARQUE : Vous pouvez régler le volume et la température de l'eau chaude au moyen de
l’application Smart HQ.
1. Placez votre tasse préférée ou la carafe à lait fournie sous la buse de vapeur.
2. Tournez le bouton de commande situé sur le côté de la machine à expresso jusqu’à la position
Hot Water.
3. Remplissez votre tasse de la quantité désirée. Si la distribution n’est pas arrêtée manuellement
par l’utilisateur, la machine va continuer de distribuer jusqu’à ce qu’un volume programmé soit
réglé.
4. Remettez le bouton de commande à la position O une fois l’opération terminée.
13
Mise en marche de la machine
REMARQUE : Assurez-vous que le bouton de commande se trouve dans la position OFF avant de
mettre la machine en marche. Au démarrage, aucune fonction ne sera disponible si le bouton n’est
pas à la position neutre.
Activation ou désactivation des sons
Maintenez une pression simultanément sur les boutons Double et Grind durant 3 secondes pour
éteindre tous les sons.
Réinitialisation d’usine
Maintenez une pression simultanément sur les boutons Single et Grind durant 3 secondes pour
remettre tous les réglages programmables dans l’état initial de l’usine.
Extinction de l’alerte de détartrage
Maintenez une pression simultanément sur les boutons Program et Double durant 3 secondes pour
éteindre l’alerte de détartrage. Pour détartrer la machine, voyez la section Entretien et nettoyage
de la page [15] pour plus de renseignements.
Surpression
Cela signifie que la mouture de café est trop fine, qu’elle est en trop grande quantité ou qu’elle est
trop comprimée dans le porte-filtre. Pour résoudre le problème, jetez la mouture et recommencez
avec une mouture moins fine, en diminuant la quantité ou en tassant la mouture avec moins de
force.
Porte-filtre et filtres
Pour retirer les filtres du porte-filtre, utilisez
l’extrémité plate de la brosse de nettoyage pour
soulever le filtre hors du porte-filtre.
Si une force excessive est nécessaire pour
insérer le porte-filtre dans la tête supérieure, c’est
qu’il y a une trop grande quantité de mouture
dans le filtre. Retirez un peu de mouture et
essayez de nouveau.
Un coup excessif sur le porte-filtre afin de retirer la
mouture risque de l’endommager.
Filtres à couche simple et
couche double
• Les filtres à couche double procurent davantage
de crème et des résultats plus constants lorsque
la taille de mouture et le type des grains varient.
• Les filtres à couche simple sont plus sensibles
aux changements de taille de mouture et de
type de grains mais ils permettent un ajustement
plus précis.
Application SmartHQ
Utilisez l’application SmartHQ pour voir et modifier les réglages de la machine à expresso.
Utilisation de votre machine à expresso
Filtre dose
simple,
couche
simple
Filtre dose
double,
couche
simple
Filtre dose
simple,
couche
double
Filtre dose
simple,
couche
double
14
Utilisation de votre machine à expresso
Instructions de paramétrage
Vous pouvez régler les différents paramètres de votre machine pour créer la dose la plus
savoureuse d’un choix de café particulier. Une fois votre machine paramétrée, vous pouvez
générer des résultats reproductibles avec facilité.
1. Sélectionnez la taille de grains désirée. (Nous recommandons le réglage 8 comme point de
départ.)
2. Moulinez et pesez le café pour un service d’expresso (18 à 20 g de mouture pour une dose
double, 13 à 15 g pour une dose simple). Voyez la page 11 pour les instructions sur le réglage de
la fonction de moulinage (Grind).
3. Tapotez délicatement les côtés du porte-filtre pour égaliser la distribution du café.
4. Tassez fermement pour créer une surface de niveau, essuyez la mouture excédentaire sur les
bords du porte-filtre puis infusez votre expresso.
5. Pesez l’expresso liquide pour trouver le ratio d’infusion. Les ratios d’infusion sont une affaire de
préférence mais ils peuvent aussi servir à guider votre goût.
• Le ratio d’infusion consiste dans le rapport entre la quantité de mouture dans le filtre et
la quantité d’expresso liquide.
• Exemple : Si 18 g de mouture de café procure 36 g d’expresso liquide, le rapport
d’infusion est de 1:2.
Ristretto 1:1 to 1:2
Espresso 1:2 to 1:3
Lungo 1:3 to 1:4
• La quantité d’eau peut être augmentée ou diminuée pour modifier le ratio d’infusion.
Voyez la page 11 pour la façon de procéder
6. Visez une durée d’infusion de 20 à 40 secondes pour votre dose.
• La durée s'enregistre depuis le démarrage de la fonction jusqu’au moment où la
distribution d’expresso dans la tasse cesse.
• Si la durée est inférieure à la limite basse, utilisez une mouture plus fine ou une plus
grande quantité d’eau.
• Si la durée est supérieure à la limite haute, utilisez une mouture plus grosse ou une
moins grande quantité d’eau.
7. Si la durée est dans les limites, goûtez l’expresso.
Dose aigre Utilisez une mouture plus fine ou une plus grande
quantité d’eau.
Dose amère Utilisez une mouture plus grosse ou une moins
grande quantité d’eau.
Il s’agit de lignes directrices, ajustez selon vos préférences.
Autres conseils
• Il est important de modifier un seul paramètre à la fois pour garder les autres variables
constantes à travers le processus.
• Si vous préférez un breuvage expresso à base de lait, goûtez l’expresso avec votre lait
préféré puisque celui-ci va impacter le profil de saveur.

15
AVERTISSEMENT
Pour éviter de vous brûler, ne touchez pas aux liquides ni à la buse
de vapeur pendant ou après le moussage du lait. Attendez que l’injection de vapeur
soit terminée avant de retirer la carafe. Tenez la carafe de lait par la poignée.
ATTENTION
Pour éviter de vous brûler, ne touchez pas aux liquides ni à la buse de
vapeur pendant ou après le moussage du lait. Attendez que la projection de vapeur
soit terminée avant de retirer la carafe. Tenez la carafe de lait par la poignée.
Nettoyage de votre machine à café expresso
■ Débranchez la machine à expresso de la prise murale.
■ Videz toute l'eau qui reste dans le réservoir et le plateau d’égouttage. Lavez et
séchez à l’air ou avec une serviette.
■ Essuyez l’appareil à l’aide d’un linge et d’un nettoyant non abrasifs.
■ Ne placez AUCUNE pièce de la machine à expresso dans le lave-vaisselle. Lavez à la
main seulement.
Détartrage
Le processus de détartrage se compose de 2 étapes et prendra environ 30 minutes.
L'alerte s'éteindra une fois les deux étapes terminées.
N'utilisez PAS d'agents de nettoyage non fournis avec le produit ou recommandés dans
ce manuel.
REMARQUE : Si le détartrage n'est pas correctement terminé, l'unité peut expirer et
revenir à l'état IDLE. Cela aectera la qualité du café jusqu'à ce que toute la solution
de nettoyage soit éliminée ainsi que la qualité du processus de détartrage. Exécutez à
nouveau le détartrage.
REMARQUE : Pendant le détartrage, l'unité eectuera une distribution continue ainsi
qu'une distribution par impulsion pour un meilleur nettoyage.
ÉTAPE 1:
1. Remplissez le tiers du réservoir d'eau avec de l'eau.
2. Ajoutez un paquet de solution de nettoyage dans le réservoir d'eau (un comprimé ou
un paquet). Bien mélanger.
3. Placez un récipient susamment grand sous la tête d'infusion et la buse vapeur.
4. Appuyez et maintenez enfoncés les boutons GRIND et DOUBLE pendant 3 secondes
pour lancer. L'alerte CLEAN clignote.
5. Tournez le bouton de commande sur Steam. L'eau commence à couler.
6. Une fois que le voyant Ajouter de l'eau s'allume, tournez le bouton de commande sur
la position neutre.
ÉTAPE 2 :
1. Retirez, rincez, remplissez complètement et réinstallez le réservoir d'eau.
2. Répétez les étapes 3, 5 et 6 de l'ÉTAPE 1.
3. Remplissez le réservoir d'eau. L'unité est prête à fonctionner normalement.
REMARQUE : Comme alternative, un rapport 1:1 d'eau et de vinaigre blanc peut être
utilisé comme solution de nettoyage pour le processus de détartrage.
Entretien et Nettoyage
16
Nettoyage du moulin à café
Assurez-vous de placer une tasse ou un récipient au-
dessous du moulin afin de recueillir les restes de mouture.
Nous recommandons de nettoyer le moulin à café au
moins une fois par semaine.
■ Retirez la trémie de la machine à expresso.
■ Tournez-la pour déverrouiller puis tirez-la hors de la
molette abrasive extérieure.
■ Utilisez la brosse fournie pour nettoyer la mouture dans
le moulin. Assurez-vous de nettoyer la chute du
moulin depuis le haut vers le bas.
■ Replacez la molette extérieure dans la machine.
■ Remettez la trémie en place.
REMARQUE : N’utilisez pas les mains pour nettoyer la
mouture, utilisez seulement la brosse fournie.
Nettoyage de la buse de vapeur
Pour nettoyer la buse de vapeur, retirez sa pointe en la
dévissant. Utilisez l’épingle de nettoyage fournie pour nettoyer la pointe.
Nettoyage du porte-filtre et des filtres
Pour nettoyer le porte-filtre et les filtres, jetez la mouture de café puis rincez avec de
l'eau. Laissez le porte-filtre et les filtres sécher complètement avant de les utiliser de
nouveau.
Utilisez l’épingle de nettoyage fournie pour nettoyer le bas des filtres s’ils sont obstrués
par de la mouture.
Vidage du système
La procédure de vidage du système élimine toute l’eau du
système. Utilisez cette fonction lorsque vous rangez la machine
pour une longue période.
■ Videz le réservoir d'eau.
■ Maintenez une pression simultanément sur les boutons Power
et Double durant 3 secondes pour mettre la machine dans le
mode de vidage du système.
■ La machine émettra un bip et les boutons Power et Double
vont clignoter pour valider l’action.
■ Le système se videra et retournera à l’état de repos une fois
l’opération terminée.
Vérification de la dureté de votre eau
Une trousse de vérification de la dureté de l’eau est incluse avec l’appareil. Veuillez
suivre les instructions sur l’emballage en utilisant la même eau que celle qui servira
à préparer vos expressos. Une fois les résultats recueillis, veuillez vous reporter à
l’application SmartHQ pour régler le degré de dureté de l’eau.
Entretien et Nettoyage
Bavure
extérieure
Brosse de
nettoyage
C
17
■ L'espresso est souvent considéré à tort comme une boisson à base de grains torréfiés plus
foncés. Certains torréfacteurs marquent même leur produit comme « Café Espresso ». Ceci est
trompeur car l'espresso se distingue principalement des autres boissons au café par la taille de
mouture et le processus d'infusion corrects, et non par le type, l'origine ou la torréfaction des
grains de café. N'importe quel grain de café peut être utilisé pour préparer votre expresso !
■ Préparez un shot vierge (pas de café) pour réchauffer votre tête d'infusion et votre tasse à
expresso avant l'infusion. L'espresso a un très petit volume et refroidira plus rapidement s'il est
infusé dans une tasse froide.
■ Certaines fonctions peuvent être ajustées dans l'application SmartHQ pour répondre à vos
préférences spécifiques ou à votre type de café. Consultez la section SmartHQ à la page 20.
■ Le dessus de la machine à expresso peut servir de chauffe-tasses s'il est laissé allumé pendant
une période prolongée. Si vous utilisez la machine pendant plus d'une heure, placez vos tasses
sur le dessus de la machine pour les réchauffer avant utilisation.
■ Les laits ou substituts de lait à teneur plus élevée en matières grasses sont meilleurs pour créer
une mousse plus crémeuse et plus épaisse, tandis que les laits ou substituts de lait à faible
teneur en matières grasses sont meilleurs pour créer une mousse plus légère avec des bulles
plus grosses.
■ Il est recommandé d'aligner le bord du bourroir avec le bord du porte-filtre lors du bourrage.
Ajustez la quantité de marc pour obtenir une épaisseur de rondelle de café optimale.
Votre machine à expresso peut être utilisée pour préparer un nombre illimité de boissons à base
d'espresso. Les boissons au lait mousseux comme les cappuccinos et les lattes sont des classiques
admirés par beaucoup.
Assurez-vous de préparer l'espresso AVANT d'utiliser de la vapeur. La fonction vapeur nécessite
des températures plus élevées que l'espresso et la préparation d'un expresso immédiatement
après la cuisson à la vapeur affectera le goût de l'espresso.
■ Cappuccino
Cette boisson est faite avec de l'espresso, du lait et une grande quantité de micromousse. Ne
remplissez pas le pot à lait au-dessus de la moitié pour éviter le débordement de la micromousse
pendant la cuisson à la vapeur. La mousse de lait peut être jusqu'à doubler de volume.
■ Latté
Cette boisson utilise de l'espresso et du lait cuit à la vapeur avec une tête de mousse plus petite.
■ Comment faire cuire du lait à la vapeur :
1. Une fois la vapeur préchauffée et prête, placez la pointe de la buse à vapeur juste sous la surface
du lait au bord du pichet à lait à un angle d'environ 45° pour créer un vortex. Commencez à cuire
à la vapeur. Plus le lait est cuit à la vapeur sous la surface, plus la micromousse est créée. Une
fois que la quantité désirée de micromousse est atteinte, plongez la buse à vapeur plus bas dans
le lait et continuez à cuire à la vapeur jusqu'à ce que la température désirée soit atteinte. Placez
une main sous le pichet pour sentir le changement de température. Une fois que le bas est
suffisamment chaud pour être inconfortable, la température optimale est atteinte.
2. Les grosses bulles peuvent être brisées en plus petites bulles en tapotant légèrement le pichet
à lait.
REMARQUE : Pour chauffer le lait, vous devez placer la buse à vapeur plus bas dans le pichet pour
empêcher l'air d'entrer dans le lait et de créer des bulles. Cela donnera un lait cuit à la vapeur avec
une tête de mousse plus petite.
Conseils
18
Dépannage
Problème Cause Solution
L’appareil ne
fonctionne pas ou
ne s’allume pas
/¶DSSDUHLOQ¶HVWSDVEUDQFKp Ŷ9pULILH]TXHOHFRUGRQpOHFWULTXHHW
VDILFKHVRQWELHQEUDQFKpVHWSUHVVH]
OHERXWRQPDUFKHDUUrW
Ŷ9pULILH]OHGLVMRQFWHXUGHODILFKH
Réponse absente
RXGLႇpUpHjOD
pression de boutons
sur le panneau de
commande
/HSDQQHDXHVWSHXWrWUHVDOHRX
PRXLOOp
1HWWR\H]OHSDQQHDXDYHFOHOLQJH
IRXUQLSXLVVpFKH]OHELHQ
Le café n'est pas
VXႈVDPPHQWFKDXG
/DWDVVHQHVWSDVSUpFKDXIIpH Ŷ9HUVH]GHOHDXFKDXGHGDQVODWDVVH
SRXUODUpFKDXIIHUDYDQWO¶LQIXVLRQ
Ŷ2XSODFH]YRWUHWDVVHVXUOHGHVVXV
GHO¶DSSDUHLODYDQWO¶XWLOLVDWLRQ
L’eau ou la vapeur
ne sortent pas de la
buse de vapeur
7URSGHWDUWUHVHVWDFFXPXOp 'pWDUWUH]ODPDFKLQHVHORQOHV
LQVWUXFWLRQVGHODSDJH
/DIRQFWLRQGHYLGDJHGXV\VWqPHDSHXW
rWUHpWpXWLOLVpH
$FWLYH]ODIRQFWLRQ+RW:DWHUHDX
FKDXGHMXVTX¶jFHTXHO¶HDXFRXOH
3RFKHG¶DLUGDQVODSRPSHG¶HDX $FWLYH]ODIRQFWLRQ+RW:DWHUHDX
FKDXGHMXVTX¶jFHTXHO¶HDXFRXOH
4XHOTXHFKRVHEORTXHODEXVH $FWLYH]ODIRQFWLRQ+RW:DWHUHDX
FKDXGHMXVTX¶jFHTXHO¶HDXFRXOH
Le café ne sort pas
GXSRUWH¿OWUH
/HFDIpHVWWDVVpWURSIHUPHPHQWGDQVOH
SRUWH¿OWUHRXODPRXWXUHHVWWURS¿QH
9LGH]OHSRUWHILOWUHHWUHFRPPHQFH]
DYHFXQHWDLOOHGHPRXWXUHSOXVJURVVH
RXXQWDVVHPHQWPRLQVVHUUp
/DGRVHGHFDIpHVWWURSpOHYpH 8WLOLVH]XQHWDLOOHGHPRXWXUHSOXV
JURVVHRXXQHTXDQWLWpPRLQGUH
La dose d’expresso
n’a pas de crème
/DPRXWXUHGHFDIpHVWWURSJURVVH 5pJOH]ODPRXWXUHGHVJUDLQVjXQH
WDLOOHSOXVSHWLWHSHQGDQWO¶RSpUDWLRQGH
PRXOLQDJH
/HVJUDLQVGHFDIpQHVRQWSDVIUDLV 8WLOLVH]GHVJUDLQVGHFDIpDSSURSULpV
/DPDFKLQHPHW
WURSGHWHPSVjVH
UpFKDXႇHU
7URSGHWDUWUHVHVWDFFXPXOp 'pWDUWUH]ODPDFKLQH
Le réservoir d'eau
est vide mais l’alerte
« Add Water »
(ajouter de l'eau) ne
s'est pas allumée
/HFDSWHXUGHDXDGpWHFWpGHOHDXVXU
O¶H[WpULHXUGXUpVHUYRLUGHDX
Ŷ(VVX\H]OHUpVHUYRLUGHDXHWOD]RQH
DUULqUHSRXUOHVVpFKHUFRPSOqWHPHQW
ŶeYLWH]OHYHUVHUGHOHDXGLUHFWHPHQW
GDQVOHUpVHUYRLU1RXVUHFRPPDQGRQV
GHUHWLUHUOHUpVHUYRLUGHDXGHOH
UHPSOLUSXLVGHOHUpLQVWDOOHUVXUOD
PDFKLQH
19
Dépannage
Problème Cause Solution
Le moulin fait
un son aigu très
bruyant
'HVREMHWVpWUDQJHUVVHWURXYHQWGDQV
OHPRXOLQ
1HWWR\H]OHPRXOLQHQVXLYDQWOHV
LQVWUXFWLRQVGHODVHFWLRQ(QWUHWLHQHW
QHWWR\DJH
Le café distribué
goûte l'eau
/HUpJODJHGHODPRXWXUHHVWWURS
JURVVLHU
$GMXVWFRIIHHEHDQJULQGVL]HWR
DVPDOOHUVHWWLQJGXULQJJULQGLQJ
RSHUDWLRQ
/DTXDQWLWpG¶HDXHVWWURSJUDQGH $OOH]GDQVO¶DSSOLFDWLRQ6PDUW+4HW
PRGLILH]OHVUpJODJHVGXFDIp
Aucune vapeur ni
HDXFKDXGHQHVRUW
de la buse de vapeur
/HSUpFKDXႇDJHGHODPDFKLQHQ¶HVWSDV
WHUPLQp
$WWHQGH]TXHODPDFKLQHVHUpFKDXႇH
8QHIRLVTXHOHDXDWWHLQWODWHPSpUDWXUH
QpFHVVDLUHO¶RSpUDWLRQYDFRPPHQFHU
La distribution de
vapeur ou d'eau
FKDXGHDFHVVpj
PLFKHPLQ
/HUpVHUYRLUGHDXHVWYLGH 5HPSOLVVH]OHUpVHUYRLUGHDXSRXU
SRXUVXLYUHO¶RSpUDWLRQ
/DIRQFWLRQDpWpDQQXOpHKkWLYHPHQW
REMARQUE :/DGLVWULEXWLRQG¶HDX
FKDXGHV¶DUUrWHUDDXWRPDWLTXHGqVTXH
ODTXDQWLWpSUpUpJOpHHVWGLVWULEXpH
/DTXDQWLWpSHXWrWUHPRGL¿pHSDU
O¶DSSOLFDWLRQ6PDUW+4
5HGpPDUUH]ODIRQFWLRQGpVLUpH
Il y a de l'eau en
dessous du plateau
d’égouttage
'HO¶HDXUpVLGXHOOHGHODYDSHXURXGHOD
FRQGHQVDWLRQSHXYHQWrWUHSUpVHQWVHQ
GHVVRXVGXSODWHDXG¶pJRXWWDJH,OV¶DJLW
G¶XQSKpQRPqQHQRUPDOHWQRQG¶XQ
SUREOqPH
(VVX\H]OD]RQHVRXVOHSODWHDX
G¶pJRXWWDJHDYHFXQOLQJHRXXQH
VHUYLHWWH
/HSRUWH¿OWUHQH
tourne pas et se
verrouille dans la
tête supérieure
/HSRUWH¿OWUHQ¶HVWSDVGHQLYHDXHWRX
GDQVOHERQDQJOHG¶LQVHUWLRQ
$VVXUH]YRXVTXHOHSRUWHILOWUHHVWGH
QLYHDXHWTX¶LOHVWLQVpUpjXQDQJOHGH
GHJUpVDYDQWGHOHWRXUQHU
/HGRVDJHHVWWURSYROXPLQHX[HWWRXFKH
jODWrWHVXSpULHXUH
5HWLUH]XQHSHWLWHTXDQWLWpGHFDIpGX
SRUWHILOWUHRXXWLOLVH]XQGRVDJHPRLQV
YROXPLQHX[
Faible formation de
créma et intensité
d’expresso trop
IDLEOH
/DKDXWHDOWLWXGHFRPSURPHWOHSRLQW
G¶pEXOOLWLRQHWO¶H[WUDFWLRQ
'HVDMXVWHPHQWVSHXYHQWrWUHIDLWVHQ
XWLOLVDQWOHVUpJODJHVSRXUKDXWHDOWLWXGH
GHO¶DSSOLFDWLRQ6PDUW+4
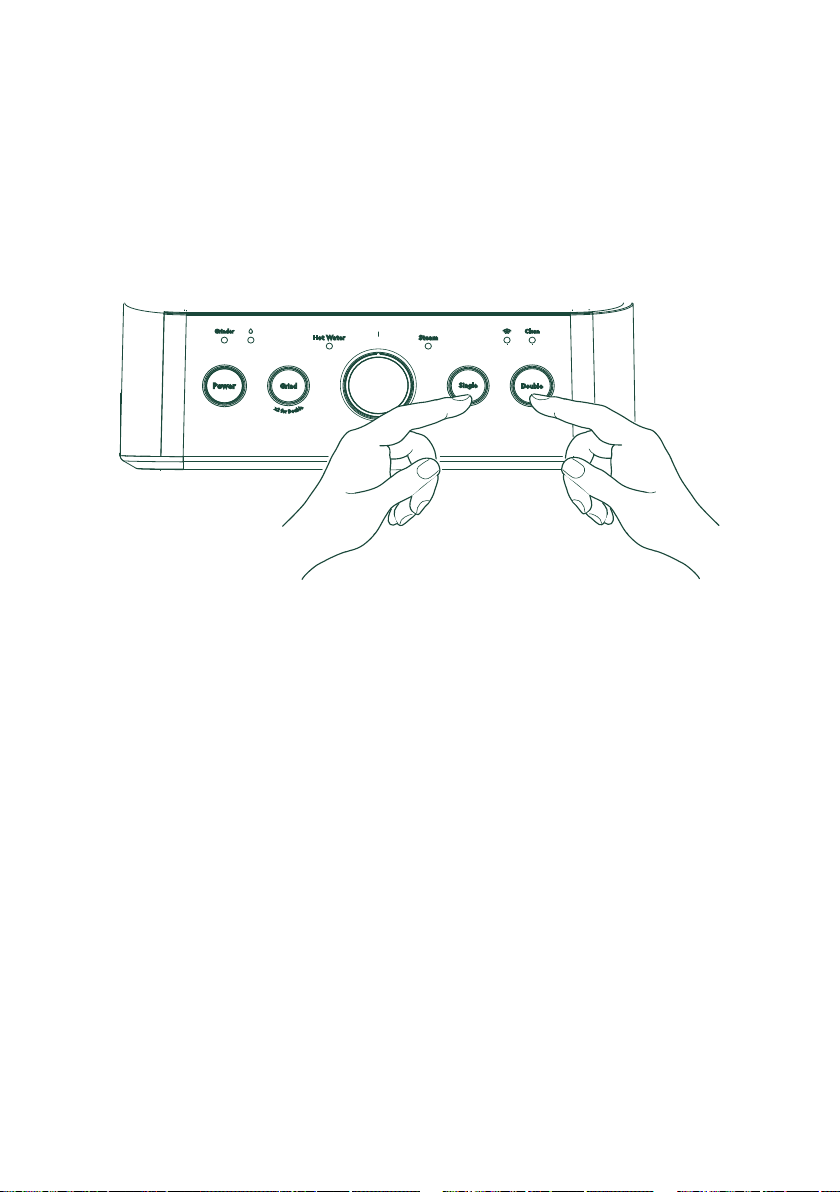
20
Connexion Wi-Fi
Repérez l’étiquette relative à la connexion Wi-Fi sur l’arrière de la machine à expresso,
au-dessous du réservoir d'eau.
Maintenez une pression simultanément sur les boutons Single et Double durant 3
secondes pour activer la fonction Wi-Fi. La machine à expresso fera entendre un bip
pour confirmer l’action et l’icône Wi-Fi apparaîtra sur l’écran.
Suivez les instructions de l’application SmartHQ pour poursuivre la configuration Wi-Fi.
REMARQUE : Pour désactiver le Wi-Fi, suivez les mêmes étapes. L’icône Wi-Fi
disparaîtra.
REMARQUE : La connexion de l’appareil peut nécessiter plusieurs tentatives.
REMARQUE : En cas de panne de courant ou de perte de connexion, l’appareil peut
prendre jusqu’à 5 minutes avant de se reconnecter au WIFI.
SmartHQ
Votre machine à expresso est compatible avec la connexion Wi-Fi. Une carte de
communication WiFi est intégrée au produit lui permettant de communiquer avec votre
téléphone intelligent pour la surveillance, le contrôle et les notifications à distance.
Veuillez visiter geappliances.com/ge/connected-appliances/ pour en savoir plus sur les
fonctionnalités des appareils connectés et pour savoir quelles applications d'appareils
connectés fonctionneront avec votre téléphone intelligent.
Connexion Wi-Fi – SmartHQ

21
Renseignements réglementaires
DÉCLARATION DE CONFORMITÉ DE LA FCC/IC :
Cet appareil est conforme aux prescriptions de la partie 15 des règles de la FCC. Le
fonctionnement de cet équipement est assujetti aux deux conditions suivantes :
1. Cet appareil ne doit pas causer de brouillage préjudiciable, et
2. Cet appareil doit accepter tout brouillage qu’il reçoit, y compris celui pouvant entraîner un
fonctionnement indésirable.
Cet équipement a été testé et déclaré conforme aux limites imposées pour un appareil numérique
de Classe B, conformément à la partie 15 de la réglementation FCC. Ces limites sont conçues pour
assurer une protection raisonnable contre le brouillage nuisible dans une installation résidentielle.
Cet équipement génère, utilise et émet des fréquences radio qui, en cas d’une installation erronée
ou d’une utilisation non-conforme aux instructions de ce manuel d’utilisation peuvent causer un
brouillage nuisible aux communications radio. Il n’y a cependant aucune garantie qu’un brouillage
nuisible ne se produira pas dans une installation donnée. Si cet équipement cause un brouillage
nuisible sur votre poste radio ou de télévision, ce que vous pouvez déterminer en éteignant et en
rallumant votre équipement, il est conseillé à l’utilisateur d’essayer de pallier ce brouillage nuisible
en prenant l’une ou l’autre des mesures suivantes :
• Réorienter ou repositionner l’antenne de réception.
• Augmenter la distance entre l’équipement et le récepteur.
• Brancher l’équipement dans une prise d’un circuit qui diffère de celui auquel le récepteur est
branché.
• Consulter le revendeur ou un technicien en radio-télévision expérimenté pour obtenir de l’aide.
Le présent appareil est conforme aux CNR d’Industrie Canada applicables aux appareils radio
exempts de licence. L’exploitation est autorisée aux deux conditions suivantes:
(1) l’appareil ne doit pas produire de brouillage, et
(2) l’utilisateur de l’appareil doit accepter tout brouillage radioélectrique subi, même si le
brouillage est susceptible d’en compromettre le fonctionnement.
Étiquetage: Les modifications non explicitement approuvées par le fabricant peuvent annuler le
droit de l’utilisateur de se servir de cet équipement.
FCC ID: ZKJ-WCATA006
IC ID: 10229A-WCATA006

22
Garantie limitée
■ Une installation, une livraison ou un entretien
inadéquats.
■ La défaillance du produit en raison d’un usage
abusif, d’une mauvaise utilisation, ou s’il est utilisé à
des fins commerciales ou autres que celles prévues.
■ Les dommages survenus après la livraison.
■ Tout dommage occasionné par un accident, un
incendie, une inondation ou une autre catastrophe
naturelle
■ Les dommages accessoires ou indirects causés par
d’éventuelles défectuosités de cet électroménager.
■ Les bogues logiciels qui ne peuvent pas être
corrigés par une mise à jour de l’application Café.
■ Les frais de main-d’œuvre ou les autres frais
encourus pour l’installation et/ou le retrait du produit.
Ce que Café Appliances ne garantit pas :
Durant la période de Café Appliances appliquera la garantie suivante
Un (1) an
À partir de la date
d’achat initial
Si la machine à expresso tombe en panne en raison d'un défaut de matériaux ou de
fabrication pendant la garantie limitée de un (1) an, GE Appliances procédera, à sa seule
discrétion, au remplacement de votre produit par un neuf, à sa remise à neuf, ou encore au
remboursement de son prix d’achat.
Si votre appareil ne fonctionne pas correctement pendant son utilisation dans des conditions domestiques normales
pendant la période de garantie, visitez cafeappliances.com/support pour une assistance / entretien du produit.
Au Canada, visitez service.geappliances.ca/servicio/fr_CA/.
Pour lancer une réclamation au titre de la garantie, veuillez visiter cafeappliances.com/support/returns/ ou appeler le
1-800-430-1757. Veuillez avoir votre numéro de modèle et votre numéro de série à portée de main. Les informations
relatives au retour et aux instructions d’emballage seront fournies à ce moment-là.
Au Canada, contactez-nous à cafeappliances.ca
EXCLUSION DES GARANTIES IMPLICITES
Votre seul recours exclusif consiste en l’échange du produit ou son remboursement en vertu de cette
garantie limitée. Toute garantie implicite, y compris les garanties implicites relatives à la qualité marchande
ou à l’adéquation à un usage particulier, se limitera à une période de un an ou à la période la plus courte
prescrite par la loi.
Pour la vente dans les 50 États et des États-Unis et le district de Columbia, et au Canada seulement :
Cette garantie limitée est étendue à l’acheteur d’origine pour les produits achetés relativement à une utilisation
domestique à l’intérieur des États-Unis. En Alaska et à Hawaii, la garantie limitée n’inclus pas les coûts relatifs à
l’expédition des appareils. Les résidents de la Californie peuvent fournir des options de retour supplémentaires.
Veuillez contacter le centre d’appels pour des renseignements supplémentaires.
Certains États ou provinces ne permettent pas l’exclusion ou la restriction des dommages accessoires ou indirects.
Certains droits particuliers vous sont dévolus en vertu de la présente garantie et peuvent s’accompagner d’autres
droits qui varient selon votre lieu de résidence. Pour connaître la nature exacte de vos droits, consultez l’organisme
de protection du consommateur de votre région, ou encore le bureau du procureur général de l’État.
Garantr: GE Appliances, a Haier company
Louisville, KY 40225
Pour les clients au Canada: Cette garantie limitée est étendue à l’acheteur original et à tout propriétaire suivant
pour les produits achetés au Canada pour un usage domestique au Canada. Le service de mandat à domicile
sera fourni dans les zones où il est disponible et jugé raisonnable par Mabe. Pour plus d’informations sur la
garantie prolongée, visitez geappliances.ca/purchase-extended-warranty
Garant Canada: MC Commercial, Burlington, Ontario, L7R 5B6

23
49-9000028 Rev. 1 09-21 GEA
Soutien au consommateur
COMMUNIQUEZ AVEC NOUS
Si vous n’êtes pas satisfait du service reçu de Café Appliances, contactez-nous sur notre site
Web avec tous les détails, y compris votre numéro de téléphone, ou encore écrivez à : General
Manager,
General Manager, Customer Relations | GE Appliances, Appliance Park | Louisville, KY 40225
CafeAppliances.com/contact
Au Canada: Directeur, Relations avec les consommateurs, Mabe Canada Inc. | Bureau 310, 1 allée
Factory | Moncton, Nouveau-Brunswick E1C 9M3
cafeappliances.ca/support/contact-us
SITE WEB CAFÉ
Vous avez une question ou avez besoin d’aide pour votre appareil électroménager? Visitez le
site Web de Café Appliances 24 heures par jour, tous les jours de l’année! Vous pouvez aussi
y trouver d’autres formidables produits Café Appliances et tirer avantage de tous nos services
d’assistance en ligne. cafeappliances.com
In Canada: cafeappliances.ca
ENREGISTREZ VOTRE ÉLECTROMÉNAGER
Enregistrez votre nouvel électroménager en ligne à votre convenance! L’enregistrement de votre
produit dans les plus brefs délais permet une meilleure communication et un service rapide en
vertu de votre garantie, le cas échéant. Vous pouvez également envoyer par courrier la carte
d’enregistrement pré-imprimée qui se trouve dans l’emballage de votre appareil. cafeappliances.
com/register
PIÈCES ET ACCESSOIRES
Les personnes ayant les compétences requises pour réparer elles-mêmes leurs appareils peuvent
recevoir directement à la maison des pièces ou des accessoires (les cartes VISA, MasterCard et
Discover sont acceptées) Commandez en ligne 24 heures par jour en tout temps.
cafeappliances.com/parts
Au Canada: geappliances.ca/parts-filters-accessories
Les instructions contenues dans le présent manuel comportent des procédures que tout
utilisateur peut effectuer. Les autres types de réparation doivent généralement être confiés
à un technicien qualifié. Usez de prudence : une réparation ou un entretien mal effectués
peuvent rendre l’utilisation de l’appareil dangereuse.

24

