Loading ...
Loading ...
Loading ...
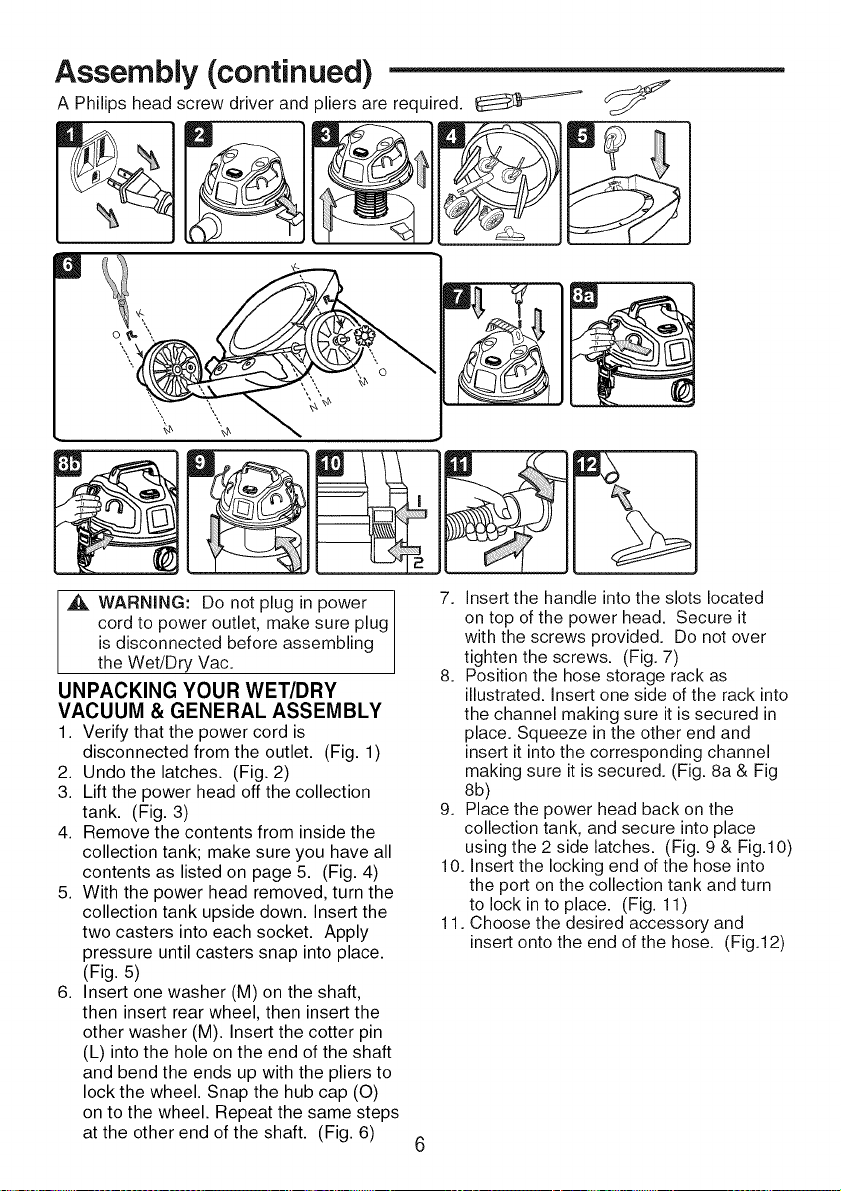
Assembly (continued)
A Philips head screw driver and pliers are required. _
o_
WARNING: Do not plug in power
cord to power outlet, make sure plug
is disconnected before assembling
the Wet/Dry Vac.
UNPACKING YOUR WET/DRY
VACUUM & GENERAL ASSEMBLY
1. Verify that the power cord is
disconnected from the outlet. (Fig. 1)
2. Undo the latches. (Fig. 2)
3. Lift the power head off the collection
tank. (Fig. 3)
4. Remove the contents from inside the
collection tank; make sure you have all
contents as listed on page 5. (Fig. 4)
5. With the power head removed, turn the
collection tank upside down. Insert the
two casters into each socket. Apply
pressure until casters snap into place.
(Fig. 5)
6. Insert one washer (M) on the shaft,
then insert rear wheel, then insert the
other washer (M). Insert the cotter pin
(L) into the hole on the end of the shaft
and bend the ends up with the pliers to
lock the wheel. Snap the hub cap (O)
on to the wheel. Repeat the same steps
at the other end of the shaft. (Fig. 6)
7. Insert the handle into the slots located
on top of the power head. Secure it
with the screws provided. Do not over
tighten the screws. (Fig. 7)
8. Position the hose storage rack as
illustrated. Insert one side of the rack into
the channel making sure it is secured in
place. Squeeze in the other end and
insert it into the corresponding channel
making sure it is secured. (Fig. 8a & Fig
8b)
9. Place the power head back on the
collection tank, and secure into place
using the 2 side latches. (Fig. 9 & Fig.10)
10. Insert the locking end of the hose into
the port on the collection tank and turn
to lock in to place. (Fig. 11)
11. Choose the desired accessory and
insert onto the end of the hose. (Fig.12)
Loading ...
Loading ...
Loading ...