Home Refrigerator
ModeM: PRCS25*****
RRCS25*****
Contents
About the Fresh Food Compartment !5_16
Precaution when Refrigerating Food 16
Tips and Hints in Using the Fresh Food Compartment .......................... 17
Use of the Ice Maker and the Cold Water Dispenser ....................... 18_19
Dismantling and Installing the Ice Container ........................................ 19
Usage of the Dispenser 20
Precautions in Using the Dispenser ................................................... 20
Defrosting, Cleaning ...................................................................... 21
Water Filter ............................................................................ 22-_24
Discontinuing or Breaking in Usage- ................................................... 25
Troubleshooting ...................................................................... 26_30
Limited Warranty 31
Safety Precautions
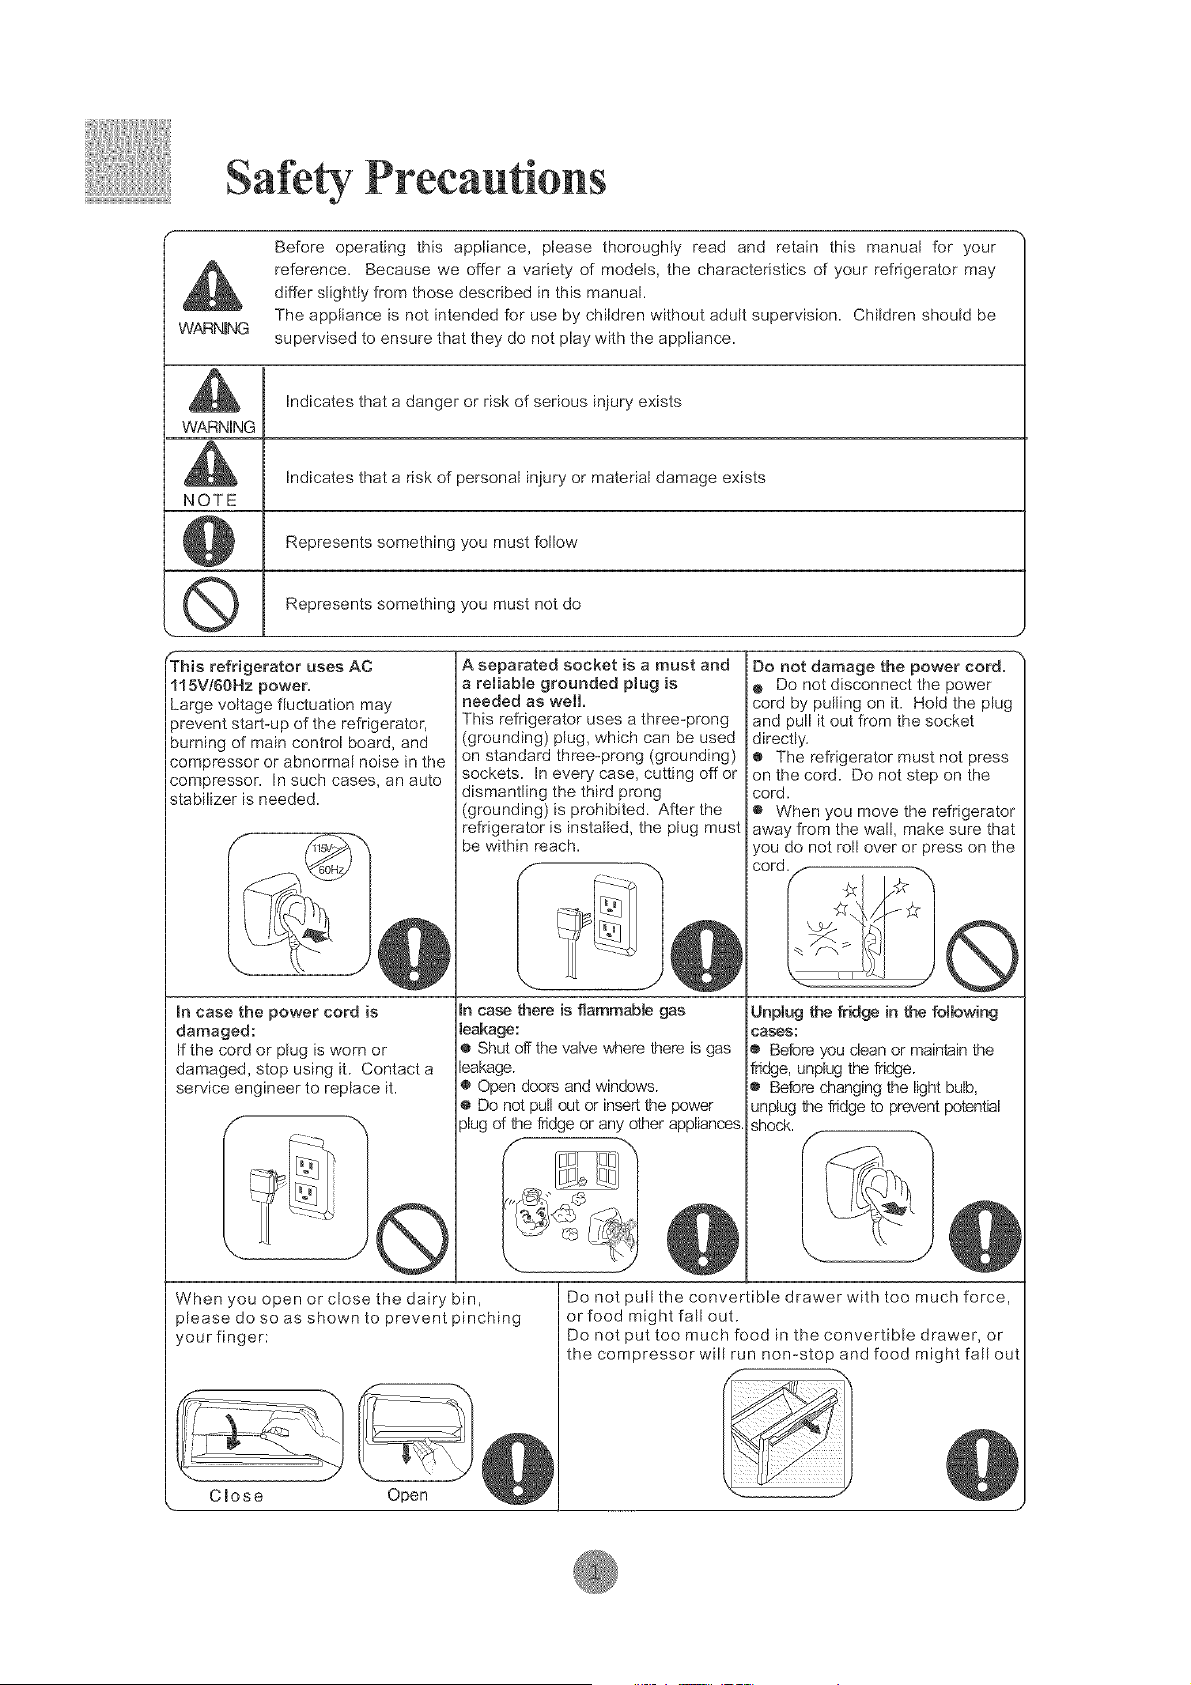
Before operating this appliance, please thoroughly read and retain this manual for your
reference. Because we offer a variety, of models, the characteristics of your refrigerator may
differ slightly from those described in this manual.
The appliance is net intended for use by children without adult supervision. Children should be
supervised to ensure that they' do not play with the appliance.
WARNING
indicates that a danger or risk of serious injury exists
WARNING
A Indicates that a risk of persona[ injury, or material damage exists
NOTE
Represents something you must follow
Q Represents something you must not do
f
TMs refrigerator uses AC
115Vi60Hz power,
Large voltage fluctuation may
)revent start-up of the refrigerator,
burning of main control board, and
compressor or abnormal noise in the
compressor, in such cases, an auto
stabilizer is needed.
In case the power cord is
damaged:
If the cord or plug is worn or
damaged, stop using it. Contact a
service engineer to replace it.
When you open or close the dairy bin,
)[ease do so as shown to prevent pinching
yourfinger:
A separated socket is a must and
a reliable grounded plug is
needed as well,
This refrigerator uses a three-prong
(grounding) plug, which can be used
on standard three-prong (grounding)
sockets. In every case, cutting off or
dismantling the third prong
(grounding) is prohibited. After the
refrigerator is installed, the plug must
be within reach.
In case there is flammable gas
leakage:
® Shut off the valve where there is gas
leakage.
• Open doors and windows.
® Do not pull out or insert the power-
plug d the fndge or any other appliances
[Do not damage the power cord,
e Do not disconnect the power
cord by pulling on it. Hold the plug
and pull it out from the socket
directly.
€ The refrigerator must not press
on the cord. Do not step on the
cord.
® When you move the refrigerator
away, from the wall, make sure that
you do not roll over or press on the
cord
Unplug the fridge in the foBowing
cases:
Before you clean or maintain the
fridge, unplug the fndge.
o Before changing the light bulb,
unplug the fridge to prevent potential
shock.
Do not pu[[ the convertible drawer with too much force,
or food might fall out.
Do not put too much food in the convertible drawer, or
the compressor will run non-stop and food might fall out
Safety Precautions
f
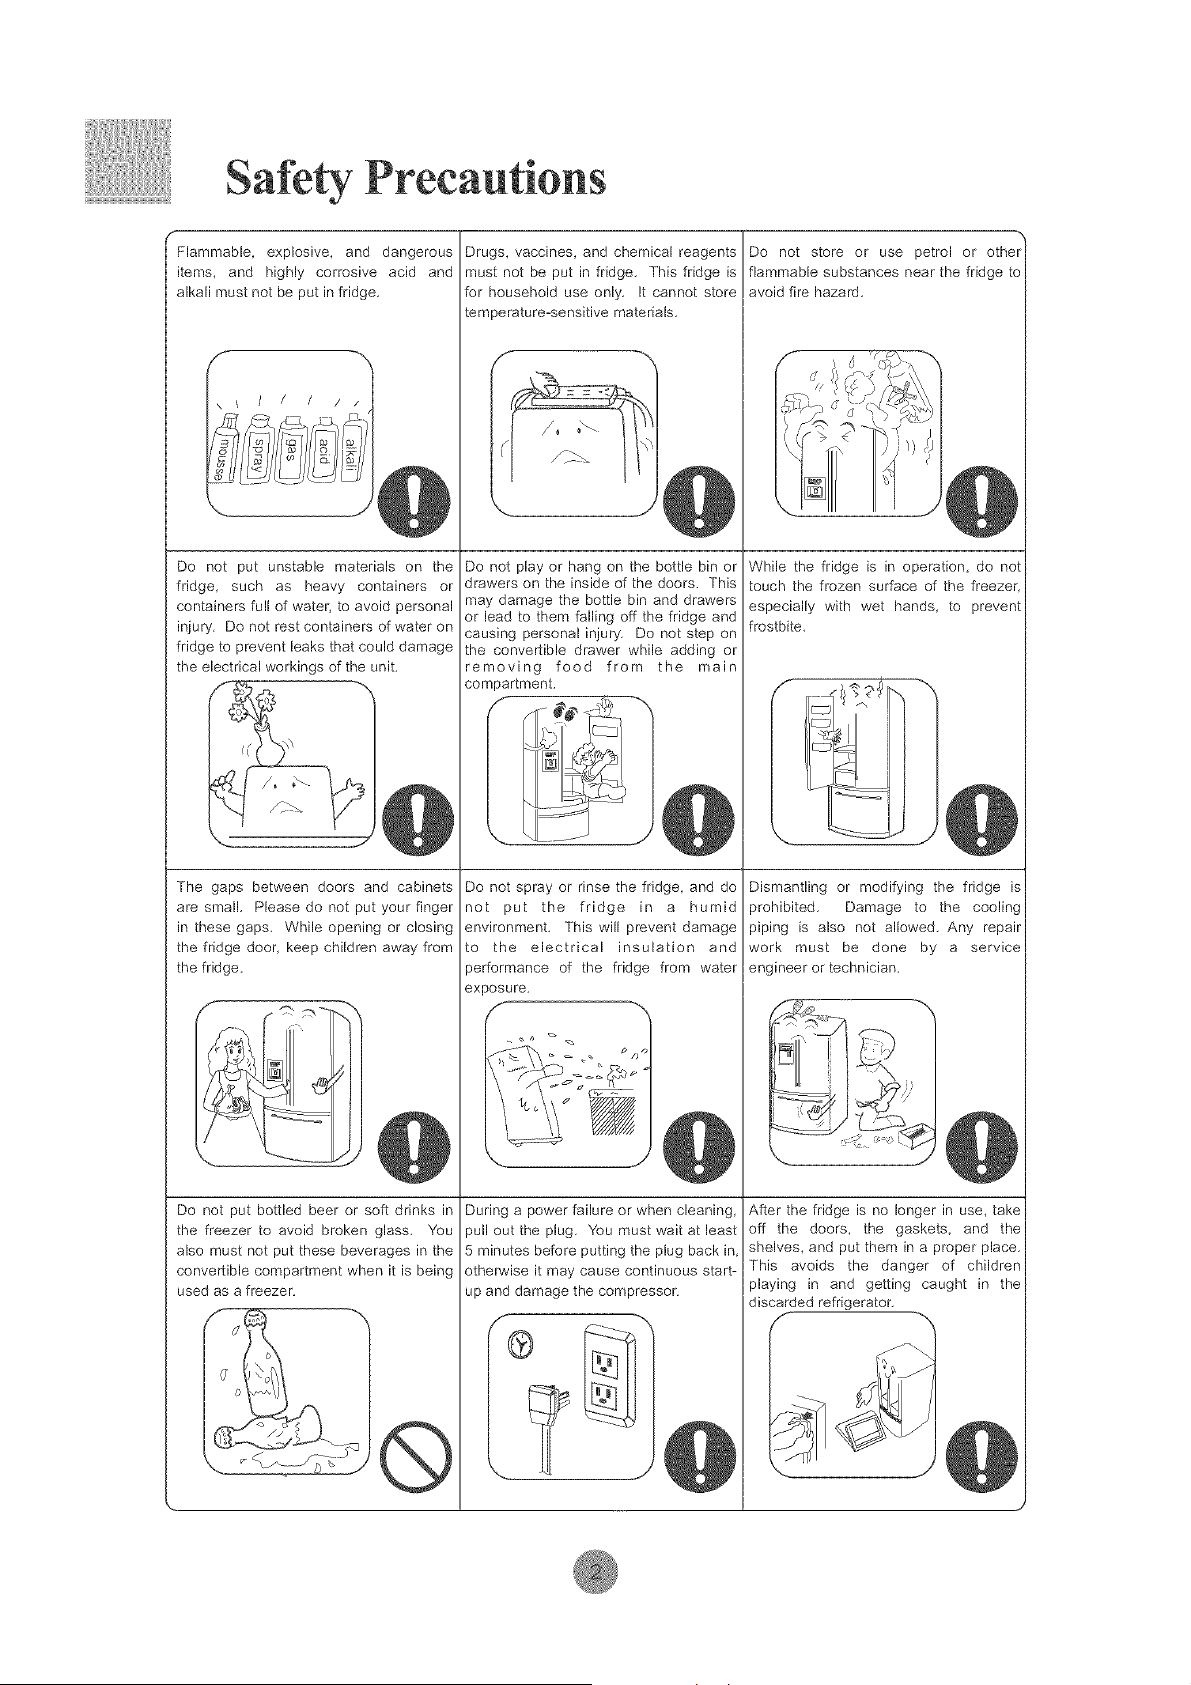
Flammable, explosive, and dangerous
items, and highly corrosive acid and
alkali must not be put in fridge.
Drugs, vaccines, and chemical reagents
must not be put in fridge. This fridge is
Do not put unstable materials on the
fridge, such as heavy containers or
containers full of water, to avoid personal
injury. Do not rest containers of water on
fridge to prevent leaks that could damage
the electrical workings of the unit.
for household use only. It cannot store
temperature-sensitive materials.
Do not store or use petrol or other
flammable substances near the fddge to
avoid fire hazard.
Do not play or hang on the bottle bin or
drawers on the inside of the doors. This
fir'>
N
While the fridge
touch the frozen
especially with
frostbite.
may damage the bottle bin and drawers
or lead to them falling off the fridge and
causing personal injury. Do not step on
the convertible drawer while adding or
removing food from the main
compartment.
is in operation, do not
surface of the freezer,
wet hands, to prevent
f
The gaps between doors and cabinets
are small. Please do not put your finger
in these gaps. While opening or closing
the fridge door, keep children away from
the fridge.
Do not spray or rinse the fridge, and do
not put the fridge in a humid
environment. This will prevent damage
to the electrical insulation and
performance of the fridge from water
exposure.
Dismantling or modifying the fridge is
)rohibited. Damage to the cooling
piping is also not allowed. Any repair
work must be done by a service
engineer or technician.
Do not put bottled beer or soft drinks in
the freezer to avoid broken glass. You
also must not put these beverages in the
convertible compartment when it is being
used as a freezer.
During a power failure or when cleaning,
pull out the plug. You must wait at least
5 minutes before putting the plug back in,
otherwise it may cause continuous start-
up and damage the compressor.
I
L.. ..... j
After the fridge is no longer in use, take
off the doors, the gaskets, and the
shelves, and put them in a proper place.
This avoids the danger of children
playing in and getting caught in the
discarded refrigerator.
S "
a _
f
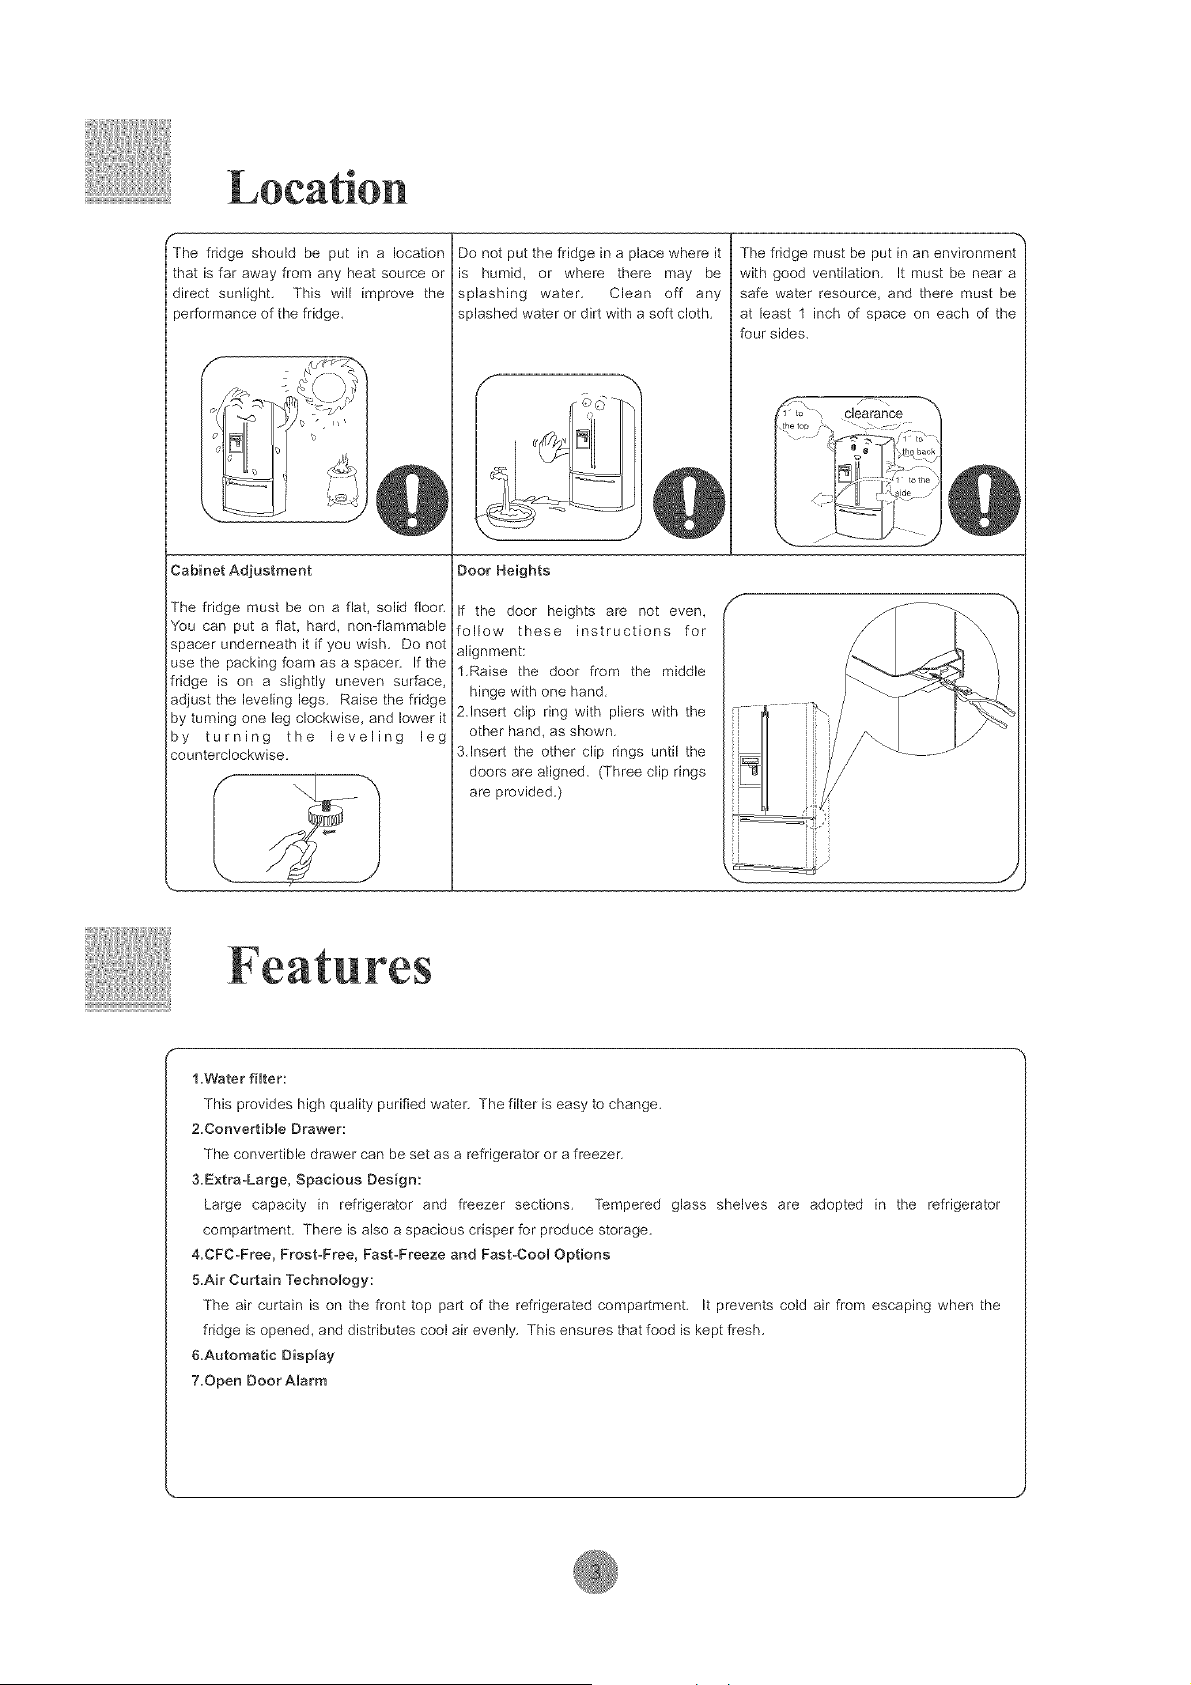
The fridge should be put in a location
that is far away from any heat source or
direct sunlight. This will improve the
3erformance of the fridge,
Cabinet Adjustment
The fridge must be on a flat, solid floor.
You can put a flat, hard, non-flammable
spacer underneath it if you wish. Do not
use the packing foam as a spacer. If the
fridge is on a slightly uneven surface,
adjust the leveling legs. Raise the fridge
by turning one leg clockwise, and lower it
by turning the leveling leg
counterclockwise.
Do not put the fridge in a place where it
is humid, or where there may be
splashing water. Clean off any
splashed water or dirt with a soft cloth.
Door Heights
The fridge must be put in an environment
with good ventilation. It must be near a
safe water resource, and there must be
at least 1 inch of space on each of the
If the door heights are not even,
follow these instructions for
alignment:
1,Raise the door from the middle
hinge with one hand.
2Jnsert clip ring with pliers with the
other hand, as shown.
&Insert the other clip rings until the
doors are aligned, (Three clip rings
are provided.)
four sides,
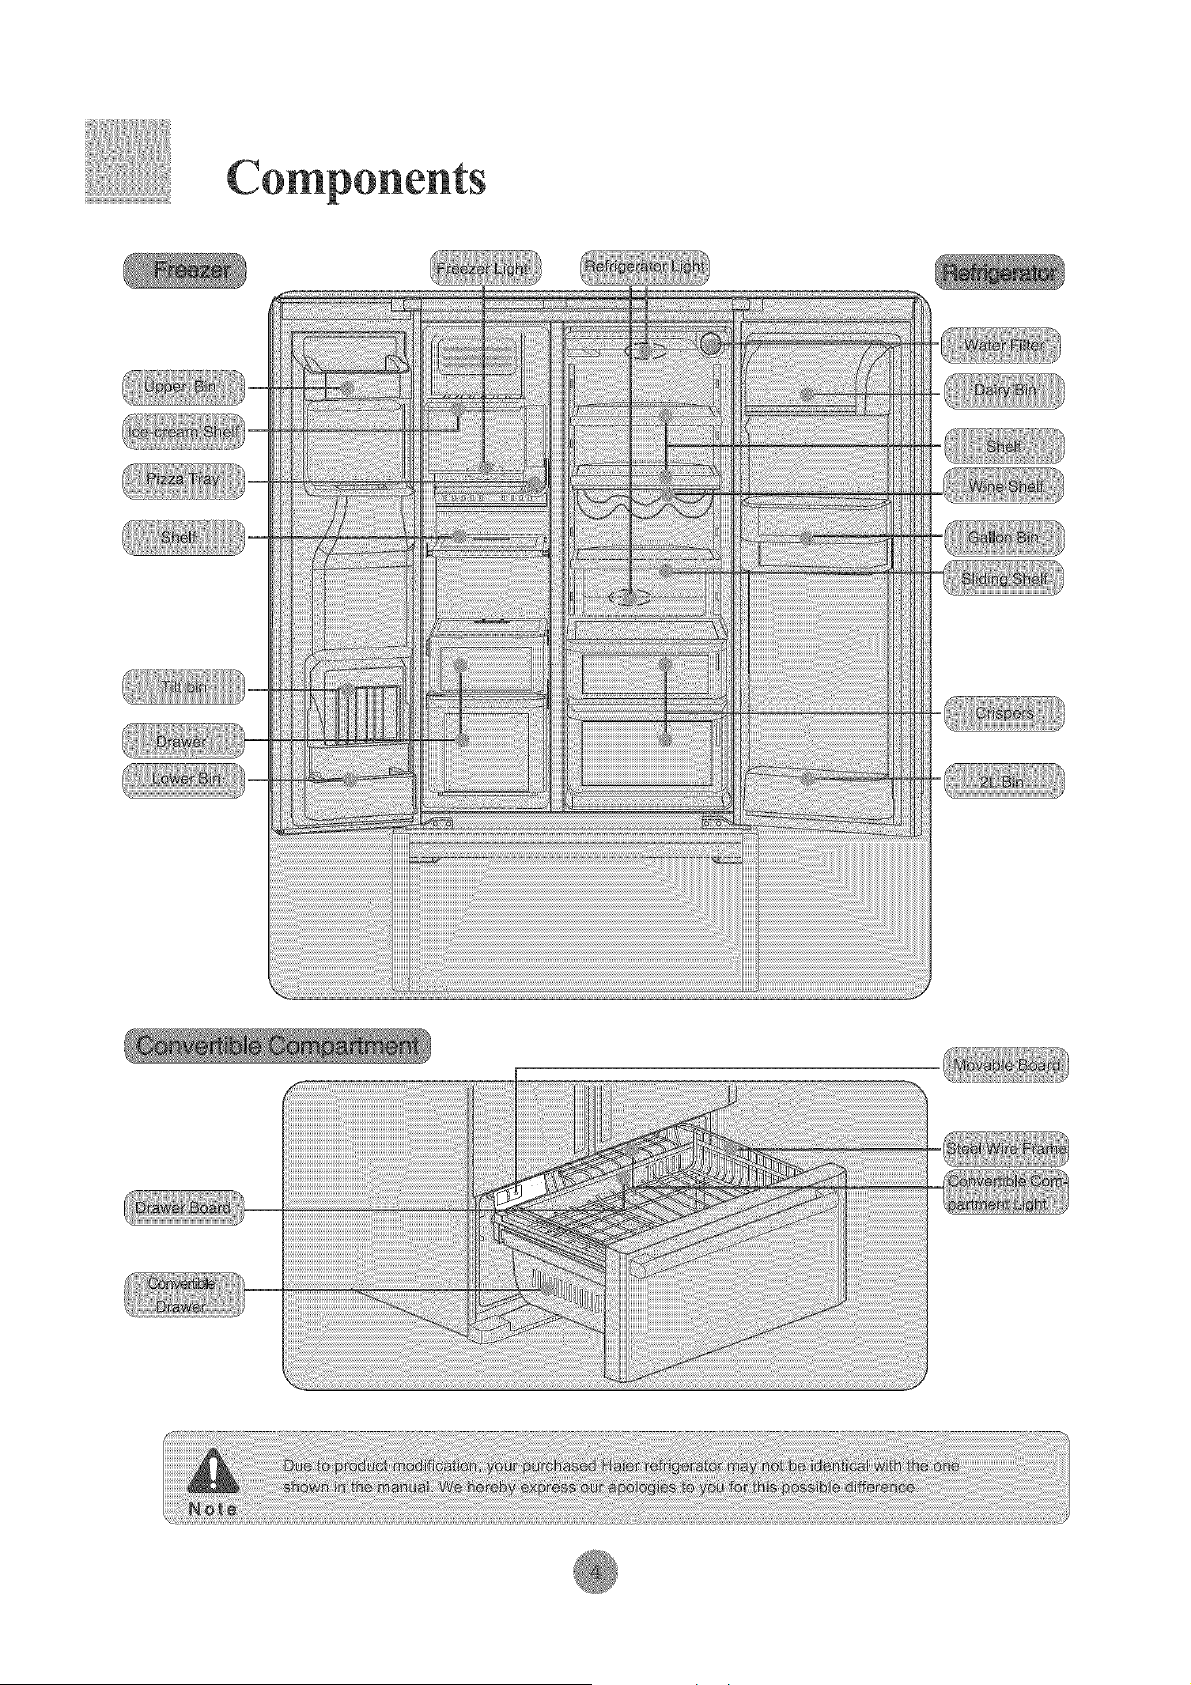
1.Water rioter:
This provides high quality purified water. The filter is easy to change.
2.Convertib0e Drawer:
The convertible drawer can be set as a refrigerator or a freezer.
&Extra-Large, Spacious Design:
Large capacity in refrigerator and freezer sections. Tempered glass shelves are adopted in the refrigerator
compartment. There is also a spacious crisper for produce storage.
4,CFC-Free, Frost-Free, Fast-Freeze and Fast-CooO Options
&Air Curtain Techno0ogy:
The air curtain is on the front top part of the refrigerated compartment. It prevents cold air from escaping when the
fridge is opened, and distributes cool air evenly. This ensures that food is kept fresh.
&Automatic Disp0ay
7,Open Door A0arm

_F
Dismount the screw on the decorating
........................strip with a screwdriver, and take the
decorating strip off of the cabinet,
Dismantming and Instamming the Fresh Feed Deer
Dismount the screw with a screwdriver and take off the top
. hinge, Then take off the fresh food door and put it in a safe
place,
'-. :' 7 J ,-. _ ::'J
_ill_:iili_o,nsta,ithefreshfeoddeor,fe,lewthesed,reot,eos,nreverse.
Dismantling and Installing the Freezer Deer
Perform Step 1 in"Dismantling and Disoonrleotthewirear_dthewaterpipe. Take outthesorewwitha
Installing the Fresh Food Door" screwdriver and dismantle the top hinge. Take down the freezer
above. ..................door and put it in a safe place.
o o
and
iii,,,,,_,_:_iiiii)_,nsta,lthofree_erdoor,fo,owthosod,roct,ons,nroverso.
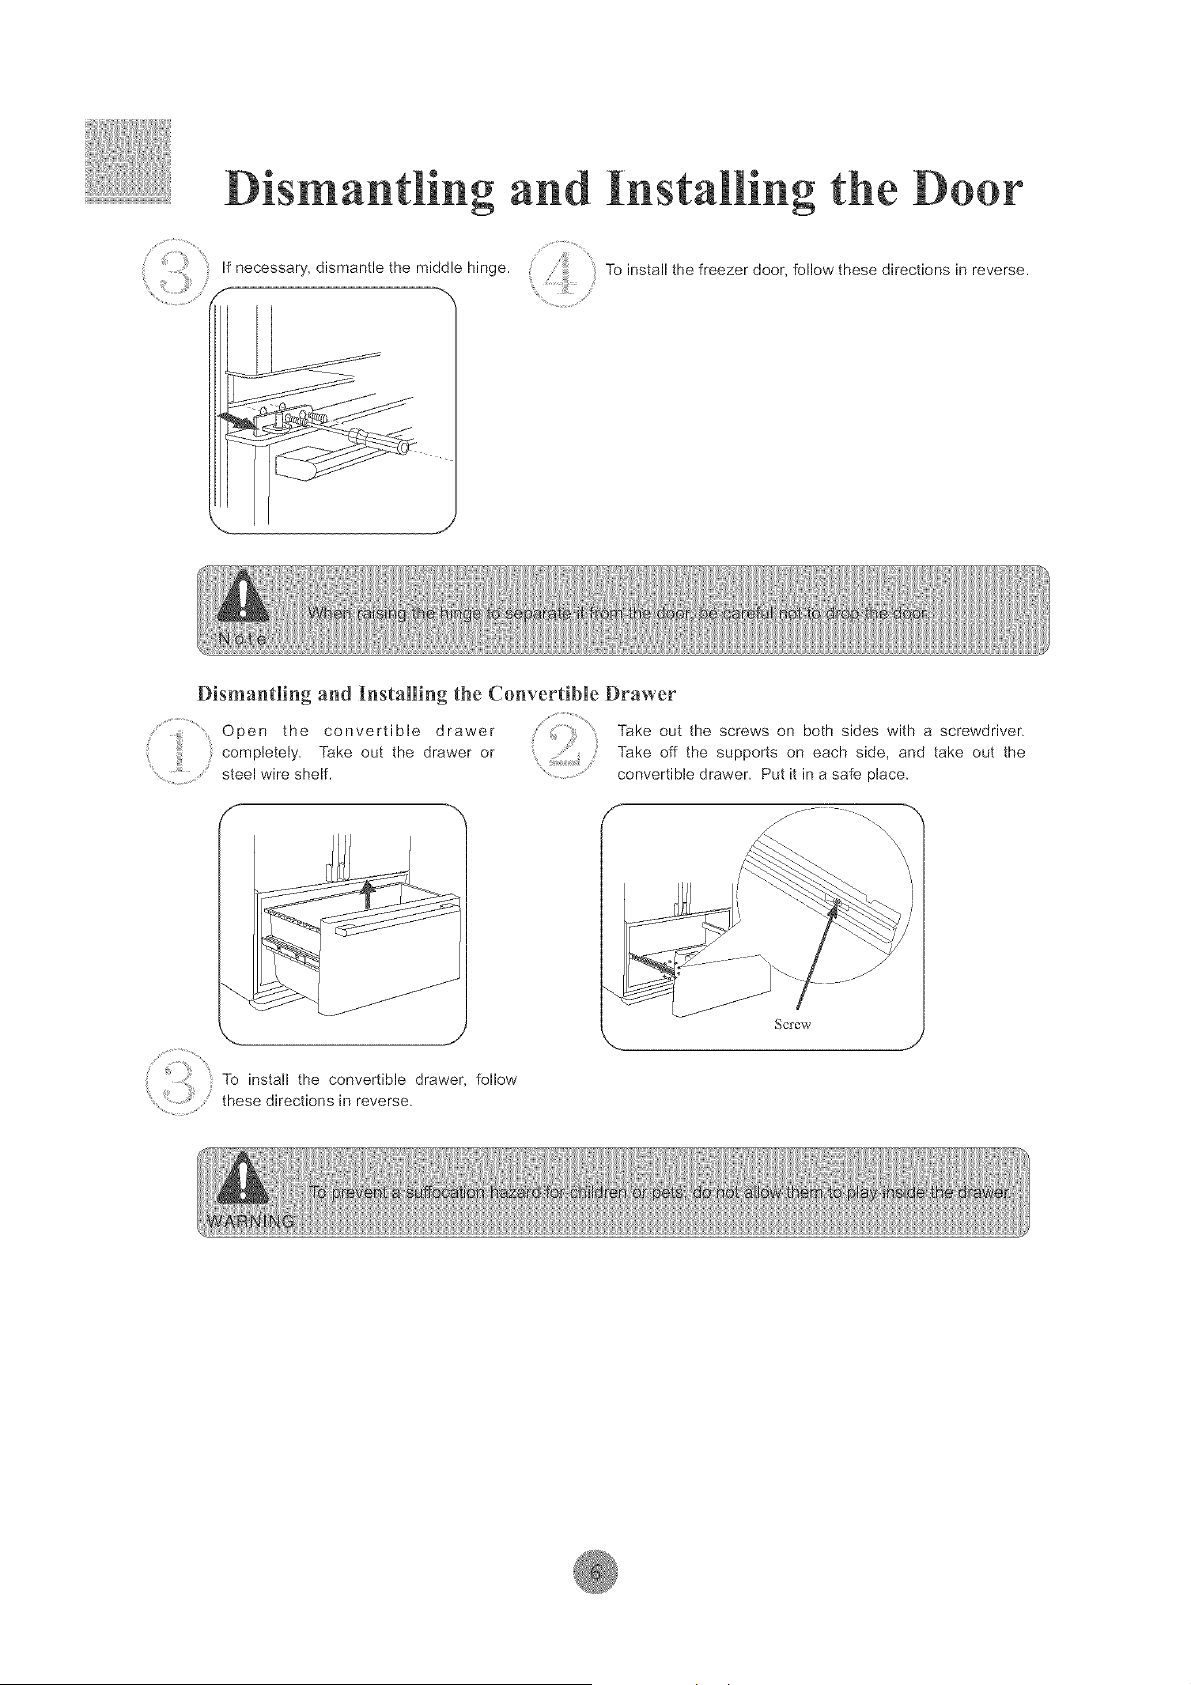
If necessary, dismantle the middle hinge.
Dismantling and Installing the Co_Jvertible Drawer
Open the convertible drawer Take out the screws on both sides with a screwdriver.
completely. Take out the drawer or Take off the supports on each side, and take out the
steel wire shelf, convertible drawer. Put it in a safe place.
To install the convertible drawer, follow
i
these directions in reverse.
Cennecting the Water
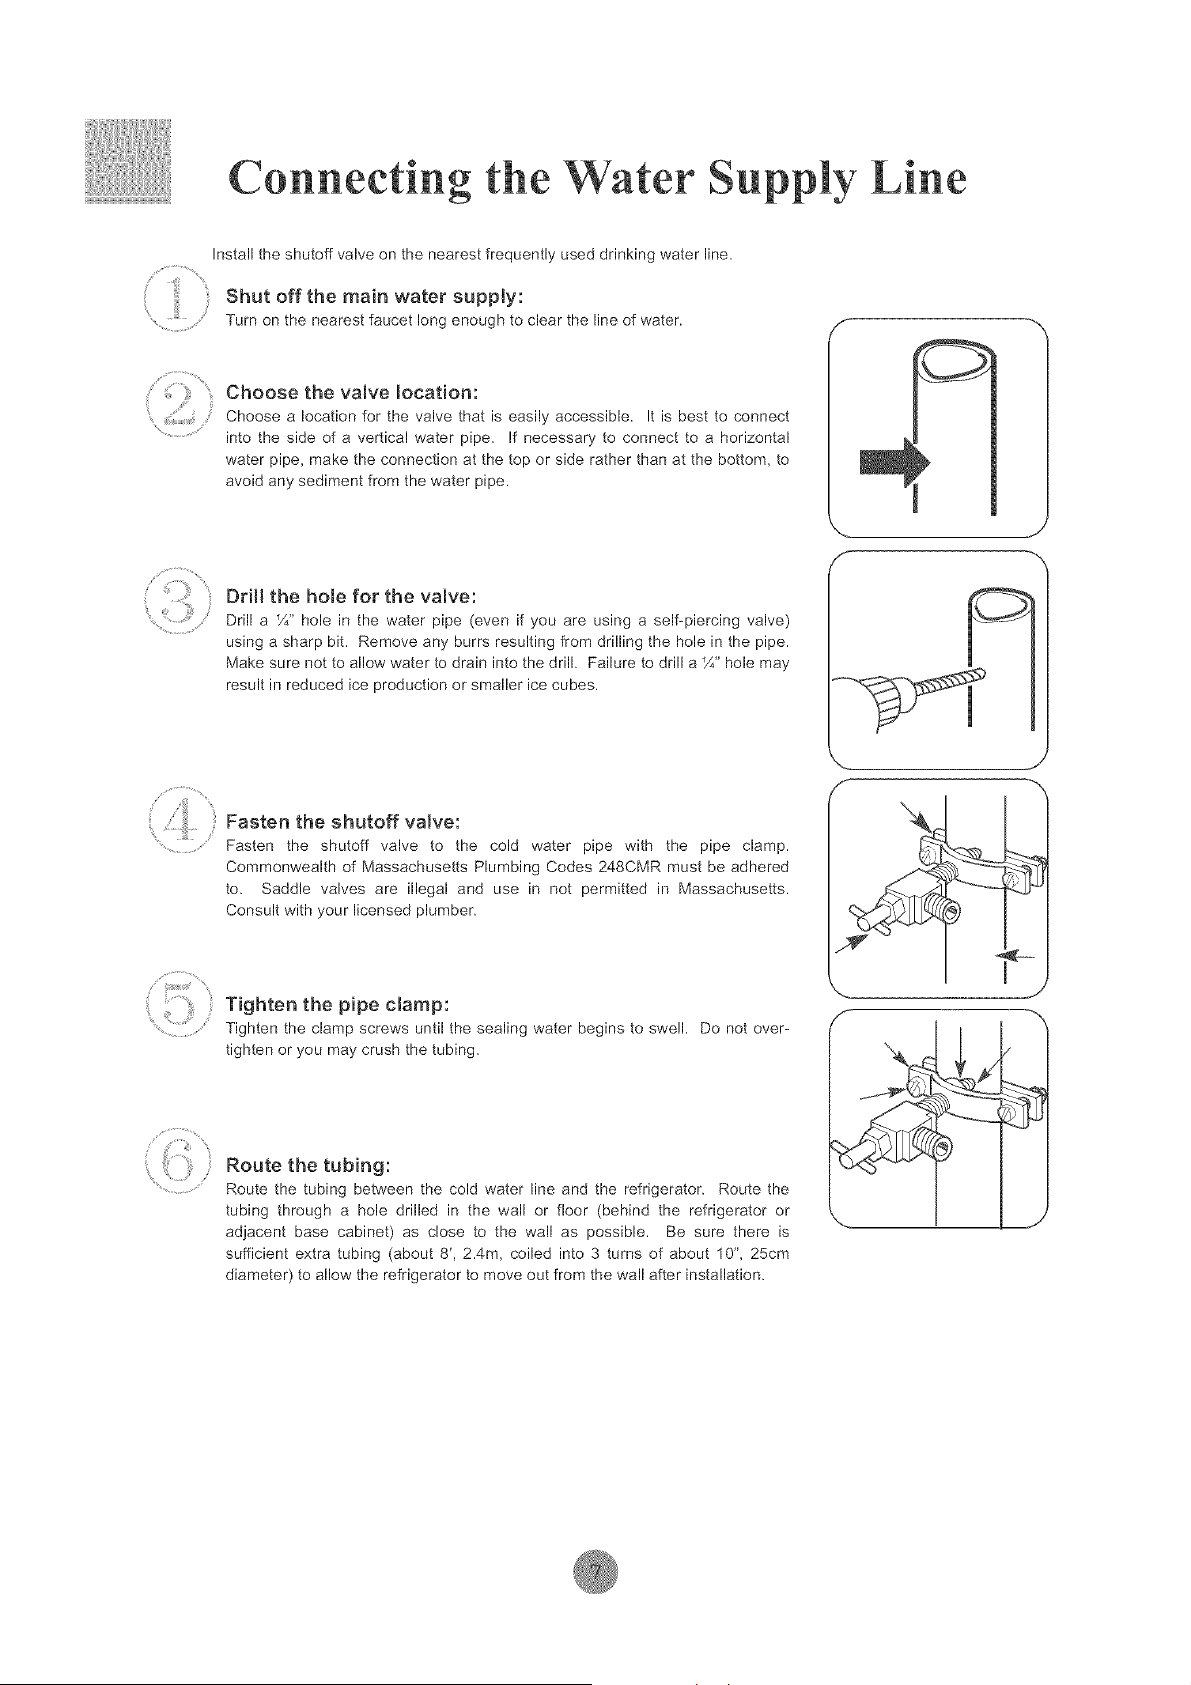
Install the shutoff valve on the nearest frequently used drinking water line.
: Shutoffthemainwatorsopply:
Turn on the nearest faucet long enough to clear the line of water.
+ %
i!'* iiiii !_ _i Choose the valve location:
Choose a location for the valve that is easily accessible. It is best to connect
into the side of a vertical water pipe. If necessary to connect to a horizontal
water pipe, make the connection at the top or side rather than at the bottom, to
avoid any sediment from the water pipe.
f
,,,i
¸/..-¸¸¸¸¸¸.¸%
Drill the homefor the valve:
Drill a ¼" hole in the water pipe (even if you are using a self+piercing valve)
using a sharp bit. Remove any burrs resulting from drilling the hole in the pipe.
Make sure not to allow water to drain into the drill. Failure to drill a %" hole may
result in reduced ice production or smaller ice cubes.
+ Fasten the shutoff valve:
.......................Fasten the shutoff valve to the cold water pipe with the pipe clamp.
Commonwealth of Massachusetts Plumbing Codes 248CMR must be adhered
to. Saddle valves are illegal and use in not permitted in Massachusetts.
Consult with your licensed plumber.
Tighten the pipe clamp:
Tighten the clamp screws until the sealing water begins to swell. Do not over-
tighten or you may crush the tubing.
Route the tubing:
Route the tubing between the cold water line and the refrigerator. Route the
tubing through a hole drilled in the wall or floor (behind the refrigerator or
adjacent base cabinet) as close to the wall as possible. Be sure there is
sufficient extra tubing (about 8', 2.4m, coiled into 3 turns of about 10", 25cm
diameter) to allow the refrigerator to move out from the wall after installation.
IF "
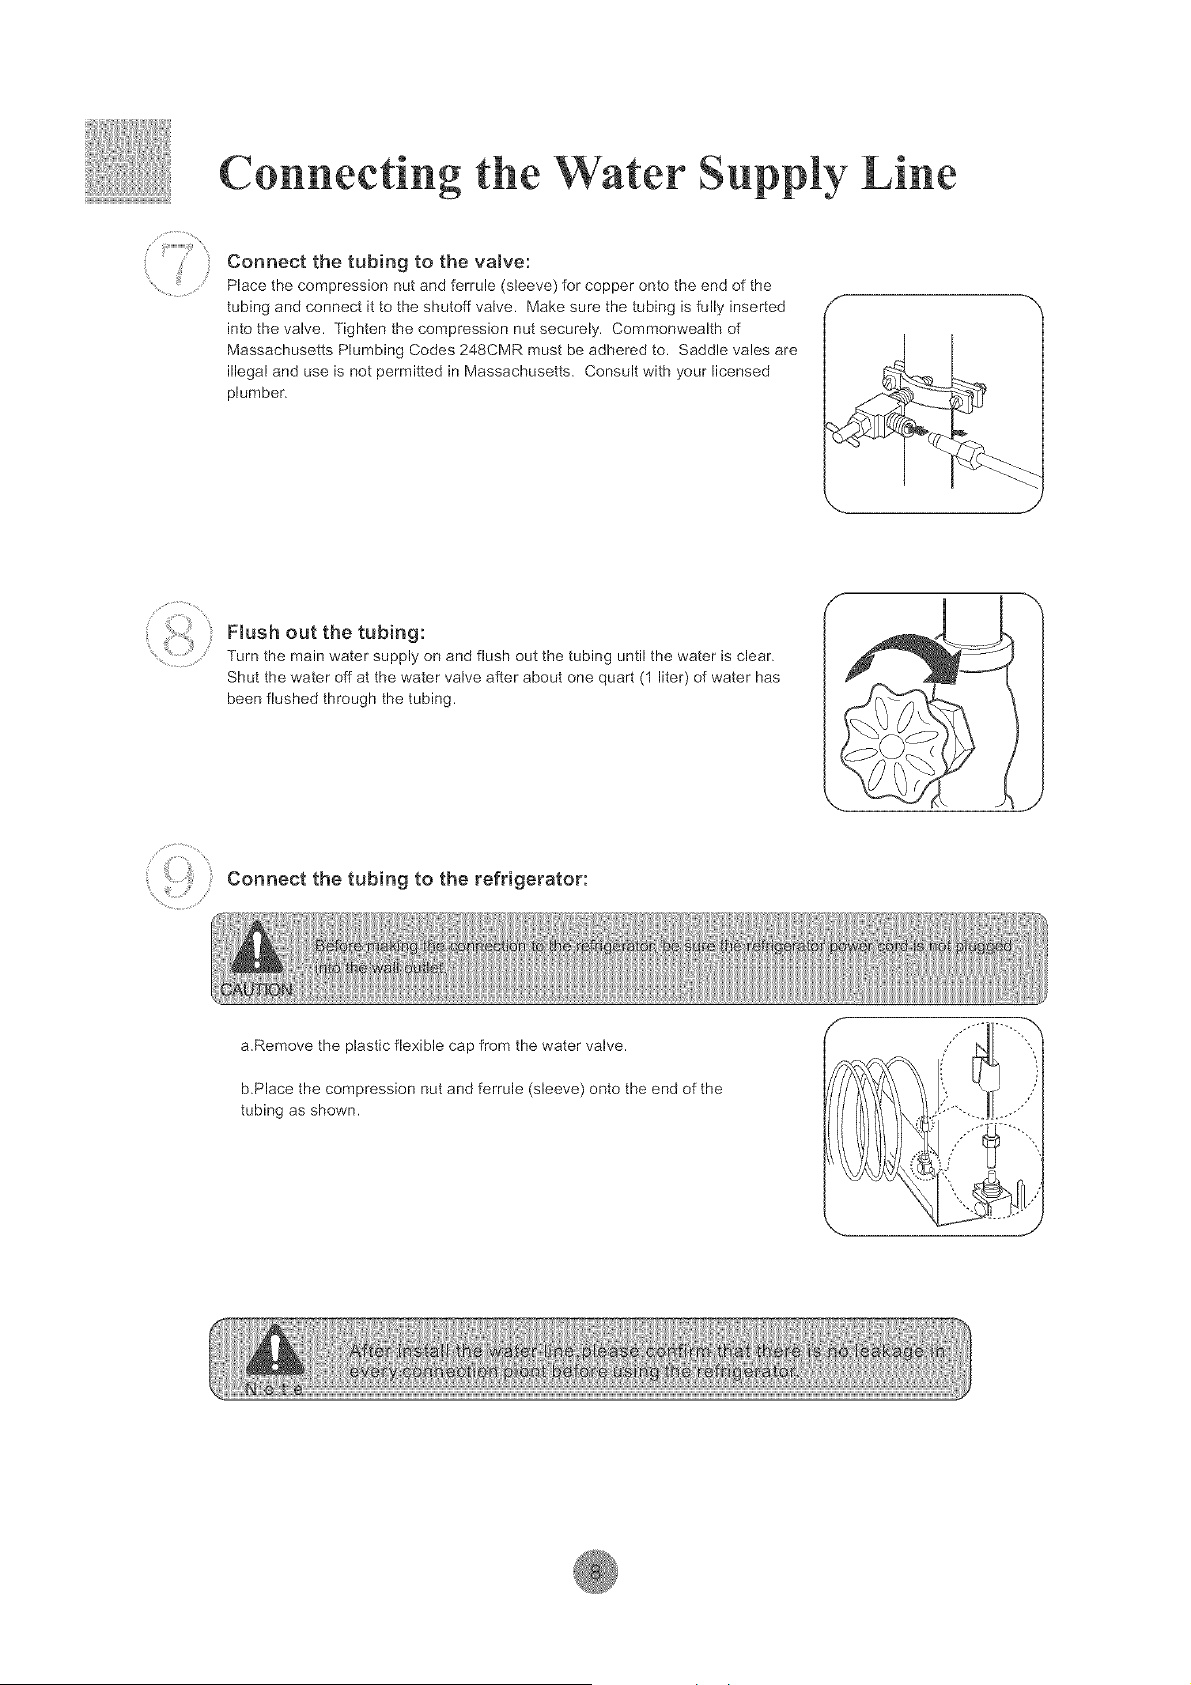
Connecting the Water
Connect the tubing to the valve:
Place the compression nut and ferrule (sleeve) for copper onto the end of the
tubing and connect it to the shutoff valve. Make sure the tubing is fully inserted
into the valve. Tighten the compression nut securely. Commonwealth of
Massachusetts Plumbing Codes 248CMR must be adhered to. Saddle vales are
illegal and use is not permitted in Massachusetts. Consult with your licensed
plumber.
Flush out the tubing:
Turn the main water supply on and flush out the tubing until the water is clear.
Shut the water off at the water valve after about one quart (1 liter) of water has
been flushed through the tubing.
co,,oeott.et,,bi, gto r frig rator:
a.Remove the plastic flexible cap from the water valve.
b.Place the compression nut and ferrule (sleeve) onto the end of the
tubing as shown.
Preparatien
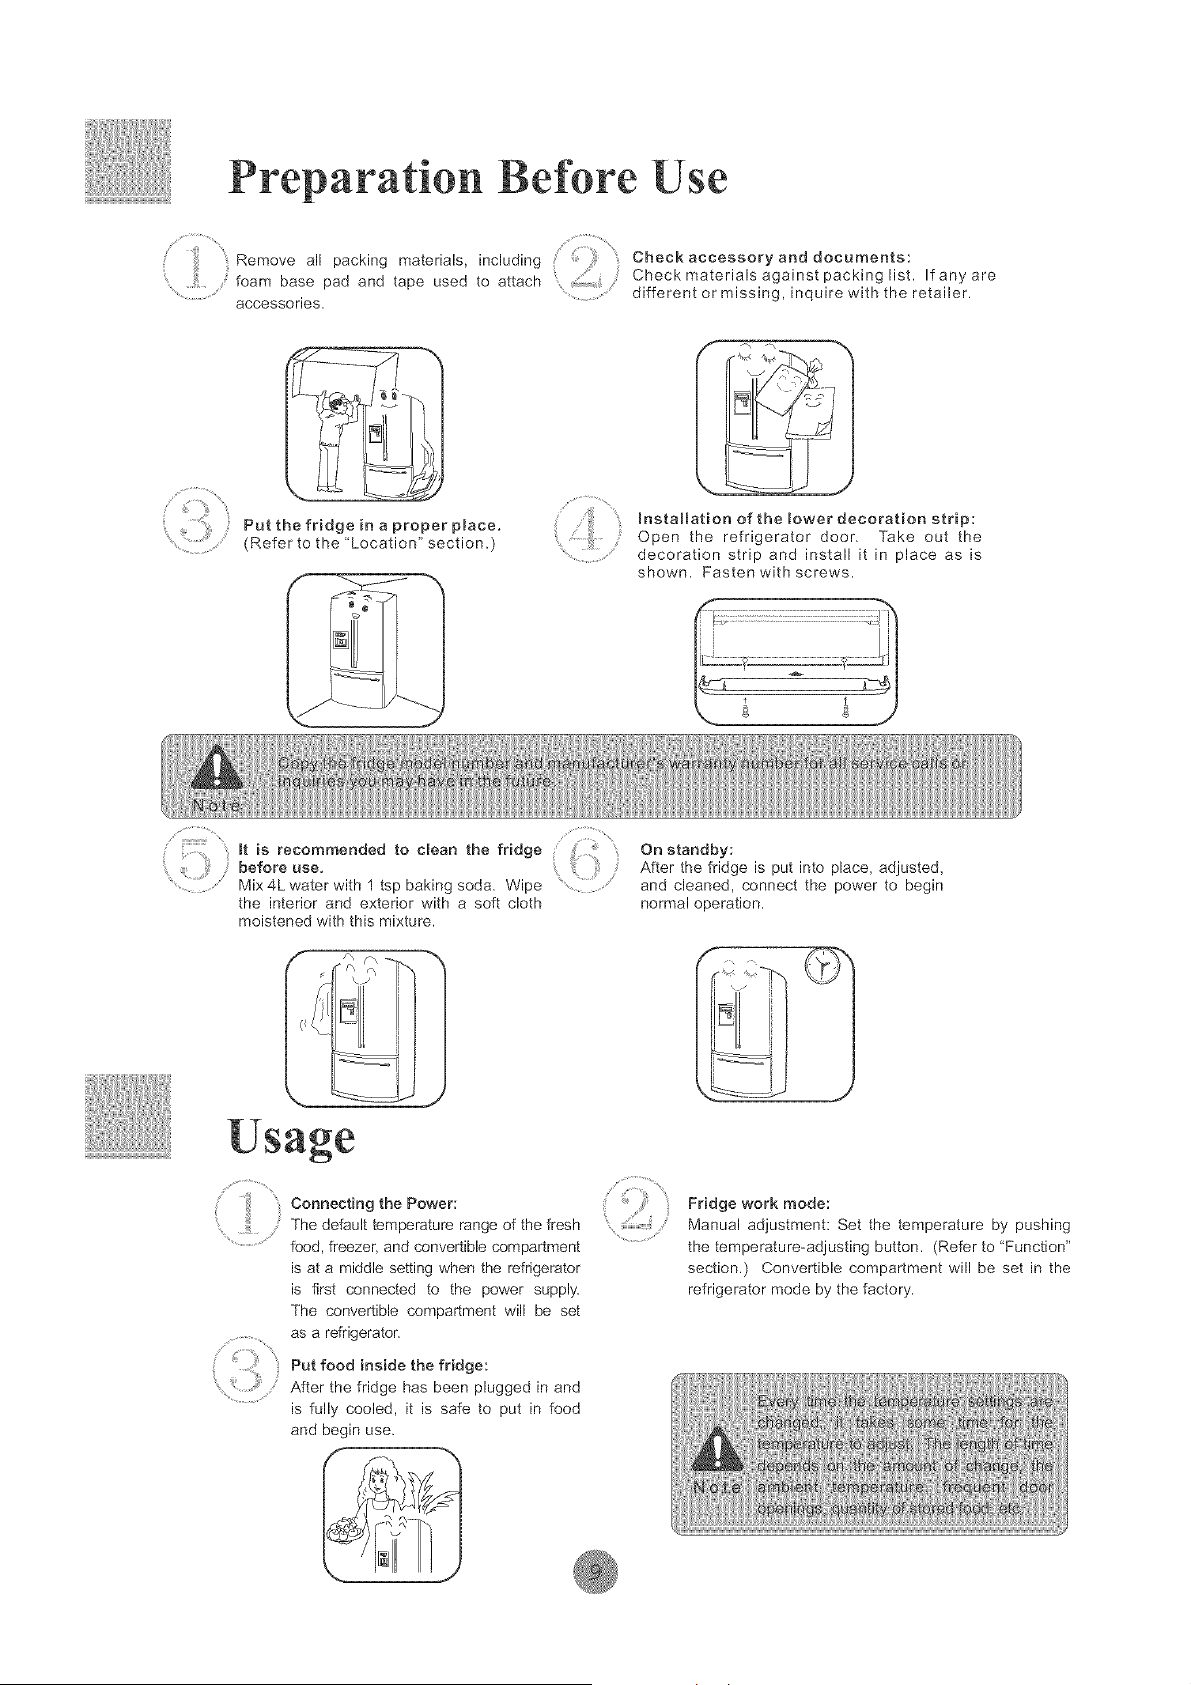
Remove all packing materials, including Check accessoryanddocuments:
......................foam base pad and tape used to attach ' Check materialsagainstpackinglist. If any are
accessories. ........................different or missing, inquire with the retailer.
_.,,_::::i:i!!!:/Putt,e,r,dge,naproperp,ace._Refertothe_'Location_'section_
//-"¸"¸¸%¸¸
!_::) ,nsta.at_ono.t.e,owerdecorat,onstr_p:
: ::: Open the refrigerator door. Take out the
...... decoration strip and install it in place as is
shown. Fasten with screws.
.......:::::::Z:::¸¸.............. :::::::.........
,(< )be,ore't,srecommen0edtoc,eant,e,r,dgeuse. '('i!_i::!::i_,_)
.........Mix 4L water with 1 tsp baking soda. Wipe .................
the interior and exterior with a soft cloth
moistened with this mixture.
On standby:
After the fridge is put into place, adjusted,
and cleaned, connect the power to begin
normal operation.
Connecting the Power:
The default temperature range of the fresh
food, freezer, and convertible compartment
is at a middle setting when the refrigerator
is first connected to the power supply.
The convertible compartment will be set
as a refrigerator.
Put food inside the fridge:
After the fridge has been plugged in and
is fully cooled, it is safe to put in food
and begin use.
Fridge work mode:
Manual adjustment: Set the temperature by pushing
the temperature-adjusting button. (Refer to "Function"
section.) Convertible compartment will be set in the
refrigerator mode by the factory.
F1
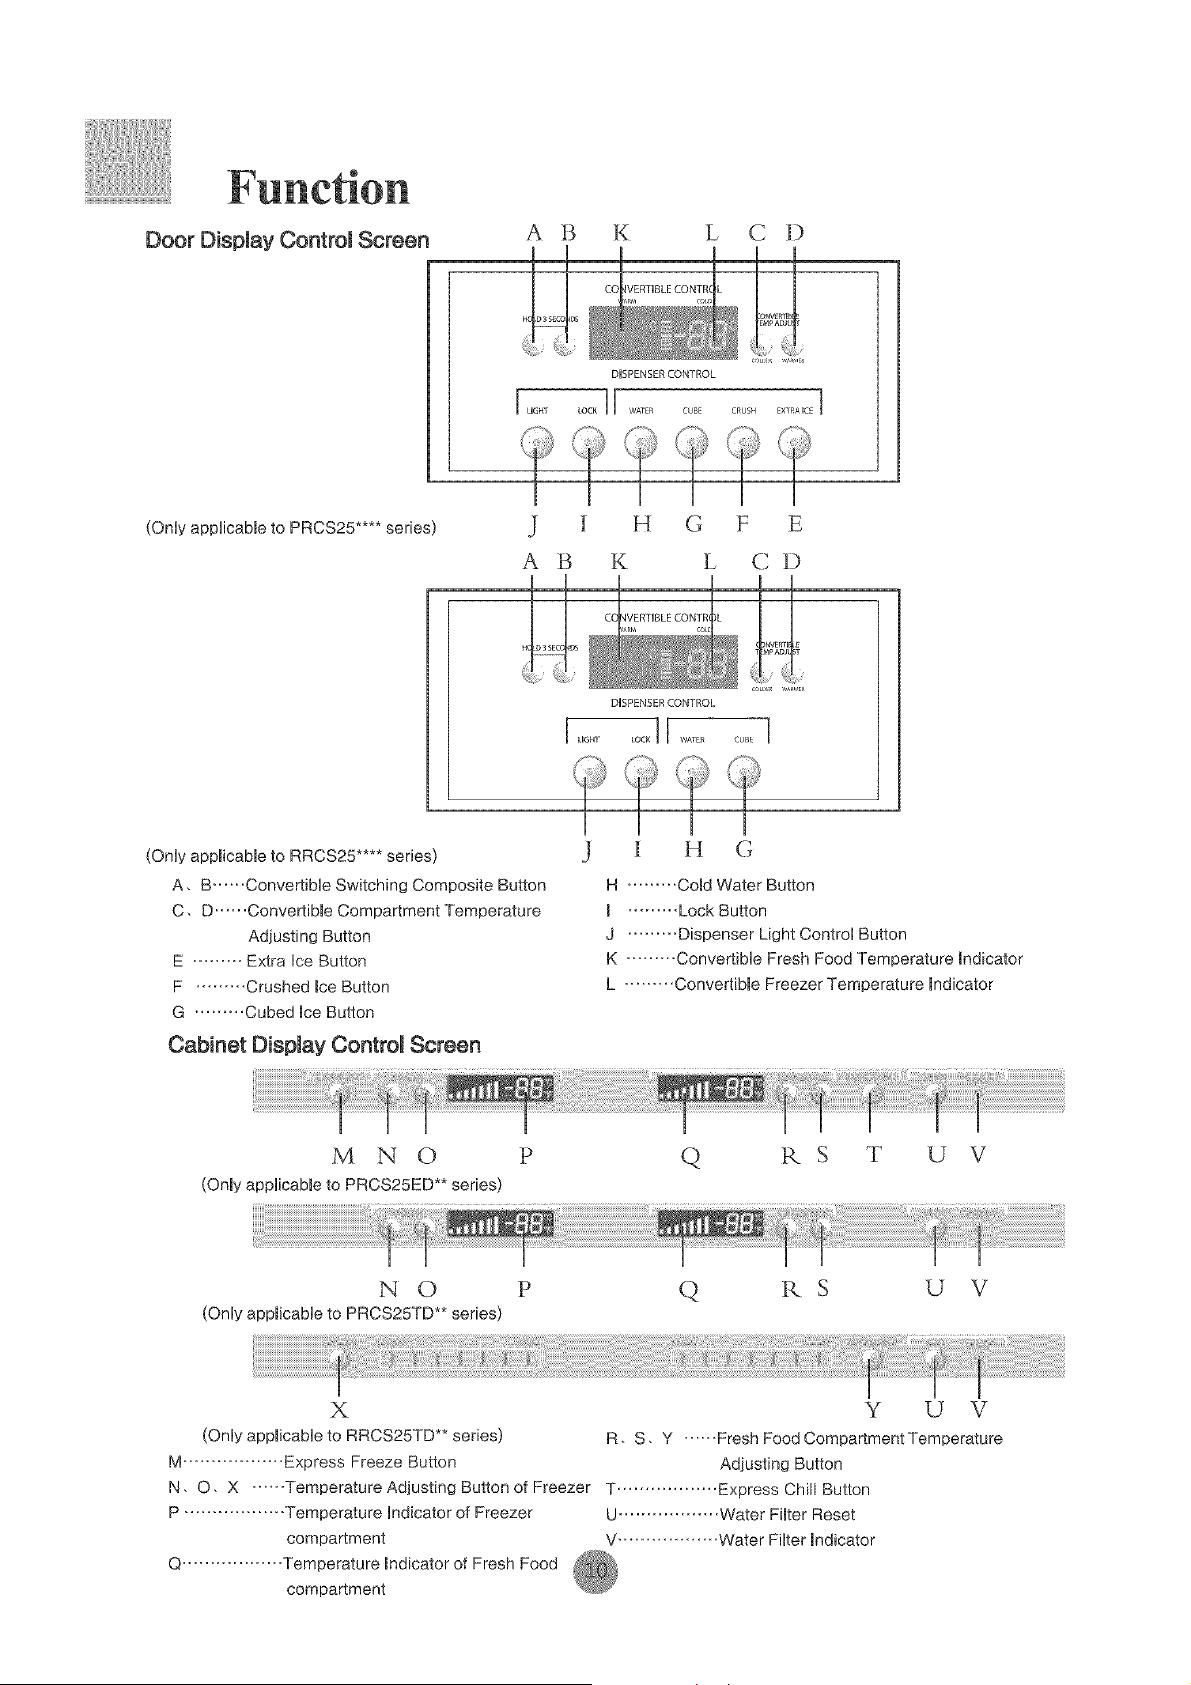
Door Dispmay Controm Screen
(OnUy appUicabmeto PRCS25 .... series)
A B K L C D
_3slc° t CO VERTUBLE CONTR k
Hc Ds o_w_rl_l
:M_ADJU_
DISPENSER CONTROL
I ........ I[ ...............
J [ H G F E
A B K L C I)
DUSPENSERCONTROL
I ....... ..... II ........... l
(Only appmicabmeto RRCS25 .... series)
A, B ...... Convertible Switching Composite Button
C, D ...... Convertibme Comportment Temperoture
Adjusting Button
E ......... Extra Ice Button
F ......... Crushed raceButton
G ......... Cubed Ice Button
Cabinet Display OontromScreen
U
J
U
I H G
H ......... Cored Water Button
m ......... Lock Button
J ......... Dispenser Light Control Button
K ......... Convertible Fresh Food Temperature Indicator
L ......... Convertible Freezer Temperature Indicator
M N O P Q RS T U V
(Onmy applicabRe to PBCS25ED** series)
N O P
(Only applicable to PRCS25TD** series)
Q RS U V
X Y U V
(Only appmicable to RRCS25TD** series) R, S, Y ...... Fresh Food CompartmentTemperature
M .................. Express Freeze Button Adiusfing Button
N, O, X ...... Temperature Adjusting Button of Freezer T .................. Express Chill Button
P .................. Temperature Indicator of Freezer U .................. Water Filter Reset
compartment V .................. Water Filter mndicotor
Q .................. Temperature mndicator of Fresh Food
compartment
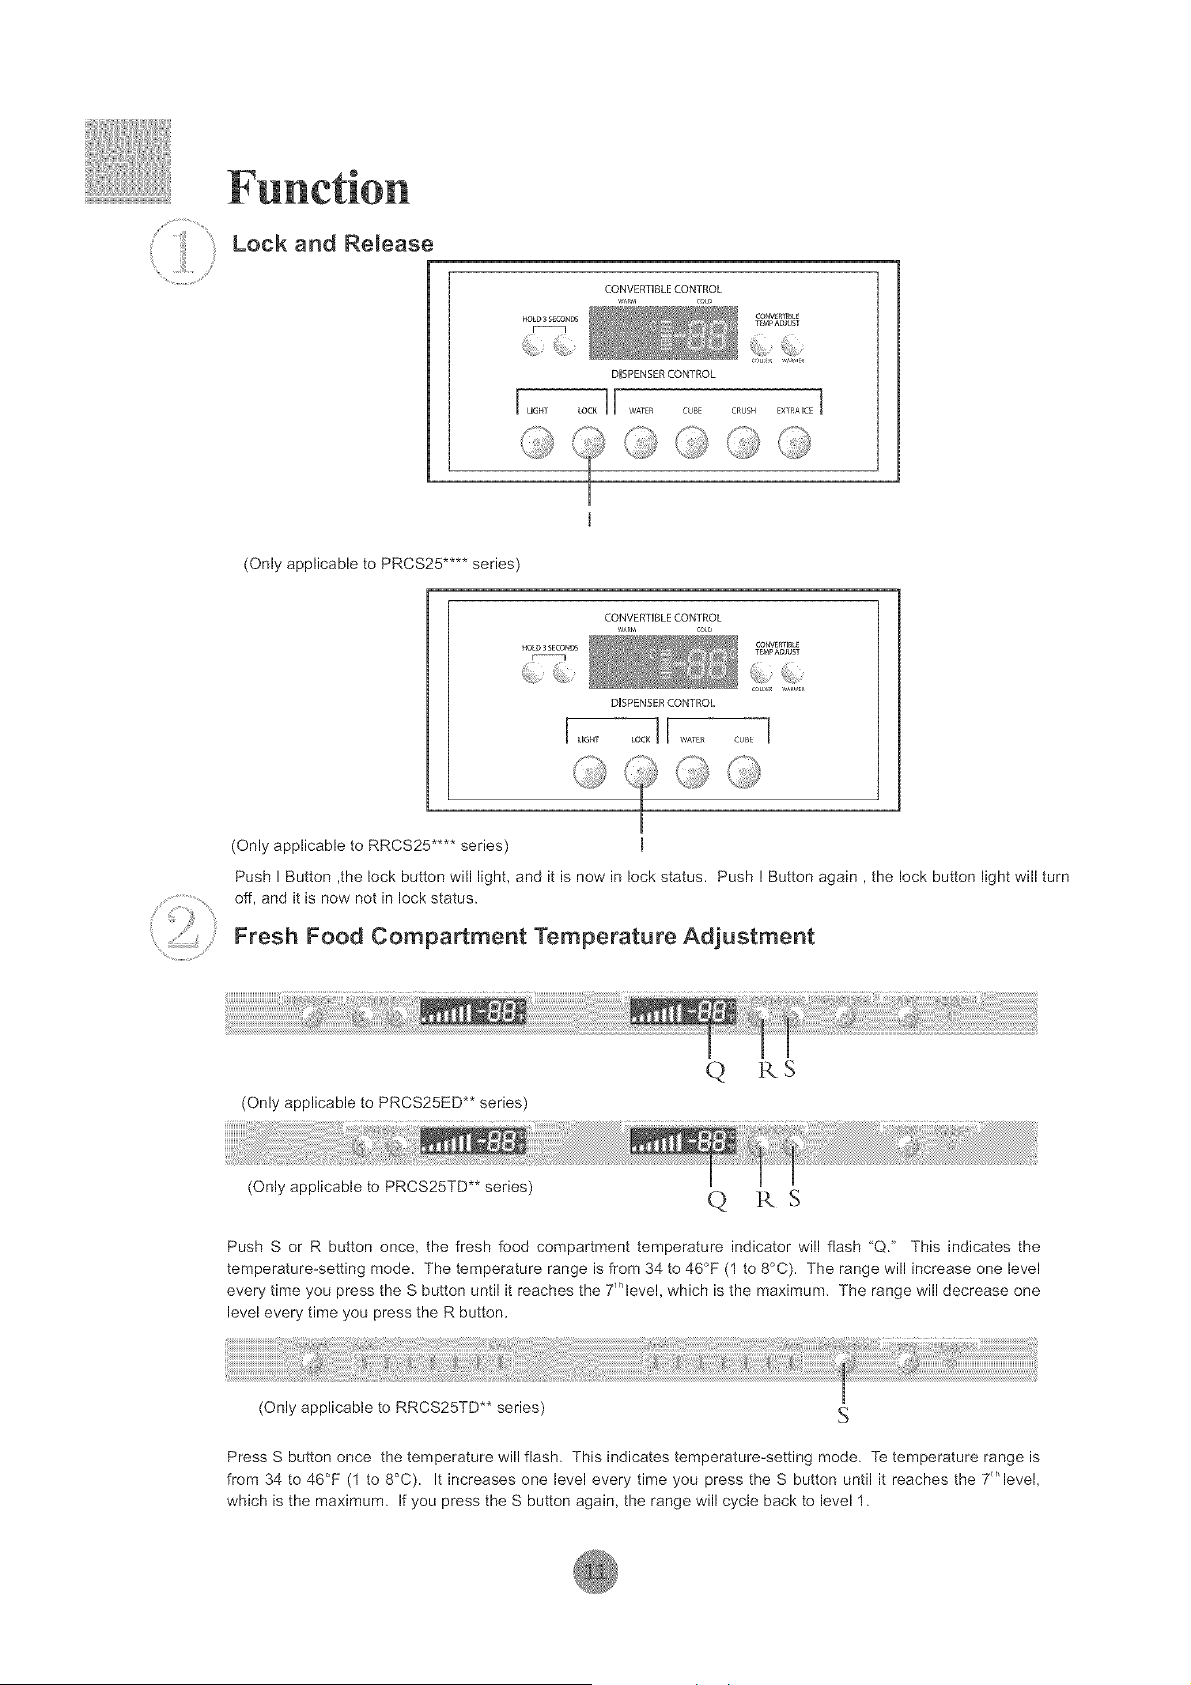
Lock and Release
(Only applicable to PRCS25 .... series)
(Only applicable to RRCS25 .... series)
HOLOSSECO_OS
%} ii{iS
I UGHT
Push I Button ,the lock button will light, and it is now in lock status. Push ! Button again, the lock button light will turn
off, and it is now not in lock status.
Fresh Food Compartment Temperature Adjustment
(Only applicable to PRCS25ED** series)
Q R$
(Only applicable to PRCS25TD** series)
Q RS
Push S or R button once, the fresh food compartment temperature indicator will flash "Q." This indicates the
temperature-setting mode. The temperature range is from 34 to 46°F (1 to 8°C). The range will increase one level
every time you press the S button until it reaches the 7t"leve!, which is the maximum_ The range will decrease one
level every time you press the R button.
(Only applicable to RRCS25TD** series)
Press S button once the temperature will flash. This indicates temperature-setting mode. Te temperature range is
from 34 to 46°F (1 to 8°C). It increases one level every time you press the S button until it reaches the 7"level,
which is the maximum. If you press the S button again, the range will cycle back to level 1.
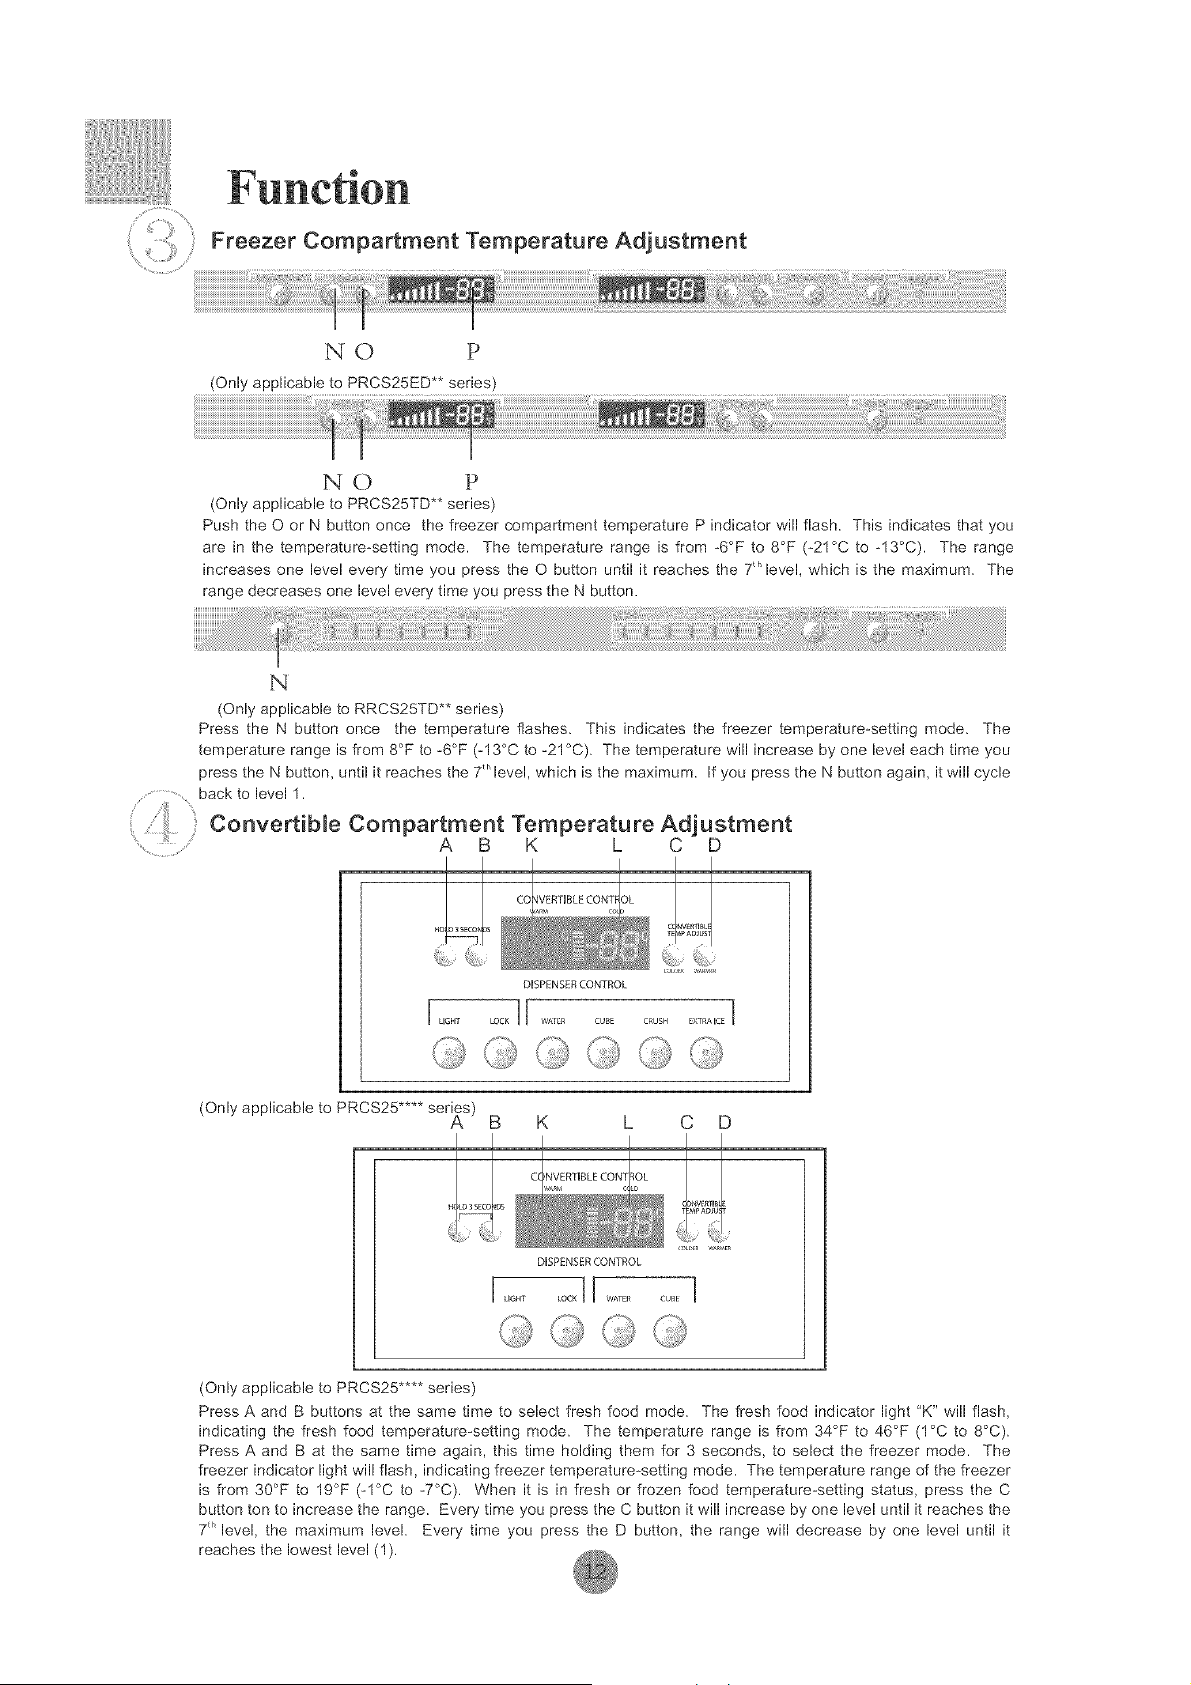
........................... roo,erCompa montTemperatureAdjustment
NO P
(Only applicable to PRCS25ED** series)
NO P
(Only applicable to PRCS25TD** series)
Push the O or N button once the freezer compartment temperature P indicator will flash. This indicates that you
are in the temperature_setting mode. The temperature range is from _6°F to 8°F (_21°C to N3°C). The range
increases one level every time you press the O button until it reaches the 7_"level, which is the maximum. The
range decreases one level every time you press the N button.
N
(Only applicable to RRCS25TD** series)
Press the N button once the temperature flashes. This indicates the freezer temperature_setting mode. The
temperature range is from 8°F to _6°F (N3°C to _21°C). The temperature will increase by one level each time you
press the N button, until it reaches the 7 t_'level, which is the maximum. If you press the N button again, it will cycle
......................back to level 1.
() :::' Convertible Compartment Temperature Adjustment
........... A B K L C D
I
(Only applicable to PRCS25 .... ser_s) B K
L C D
DISPENSER CONTROL
I ............ I[ .......... l
{
k,,.J k,...,_ \j
(Only applicable to PRCS25 .... series)
Press A and B buttons at the same time to select fresh food mode. The fresh food indicator light "K" will flash,
indicating the fresh food temperature_setting mode. The temperature range is from 34°F to 46°F (1°C to 8°C).
Press A and B at the same time again, this time holding them for 3 seconds, to select the freezer mode. The
freezer indicator light will flash, indicating freezer temperature_setting mode. The temperature range of the freezer
is from 30°F to 19°F (_1°C to _7°C). When it is in fresh or frozen food temperature_setting status, press the C
button ton to increase the range. Every time you press the C button it will increase by one level until it reaches the
7_ level, the maximum level. Every time you press the D button, the range will decrease by one level until it
reaches the lowest level (1).

i,ili iiiljiiiii i
Express Freeze Setting:
il i
M
This function is designed to preserve food's nutritional value by deeply freezing it in a short period of time. Press
the M button. The express freeze indicator will light up. This indicates that the express freeze mode is chosen,
and express freeze will function automatically. It will stop after 3 hours. If you want to turn off express freeze
before 3 hours is up, press the M button again. The express freeze will then turn off.
Express ChimmSetting:
("ii iili
..........................,Y
T
Press the T button. The express chill indicator will light up. This indicates that the express chill mode is chosen,
and express chill will function automatically. It will stop after 4 hours. If you want to turn off express chill before 4
hours is up, press the T button again. The express chill will then turn off.
Fast Cooling Function of Convertibme Compartment:
When the unit is in the locked status, press theA button for 3 seconds to enter the convertible compartment's fast
cooling mode. "K" displays the set range, and "L" displays "SC." Press the A button for 3 seconds again to stop
the fast cooling of the convertible compartment,
Fast Freezing Function of the Convertible Compartment:
When the unit is in the locked status, press the A button for 3 seconds to enter the convertible compartment's fast
freezing mode. "L" displays the set range, and "K" displays "SC." Press the A button for 3 seconds again to stop
the fast freezing of the convertible compartment.
Fresh Food Compartment Switch Function:
Press the R and S button at the same time and hold for 3 seconds, The indicator Q will turn off, indicating that
the fresh food compartment cooling is turned off. To turn the cooling in the fresh food compartment back on,
press the R and S buttons for 3 seconds again and cooling will turn back on. The Q indicator light will turn on
again when cooling begins. (Only applicable to RRCS25** series.)
Convertible Compartment Switch Function:
When the unit is in the locked status, press B and hold for 3 seconds. The temperature indicator for the
convertible compartment will turn off, indicating that the convertible compartment is no longer cooling and is off. To
turn back on, press the B button again for 3 seconds while the unit is in the locked status. The temperature
indicator for the convertible compartment will turn back on when cooling in the convertible compartment resumes.
¸¸..-¸-¸-••%¸
Switch Between Celsius and Fahrenheit:
When the unit is in the locked status, press C and D at the same time for 3 seconds. K, L, P, and Q on the display
will be switched to Celsius readings. Press C and D for 3 seconds again to switch back to Fahrenheit displays.
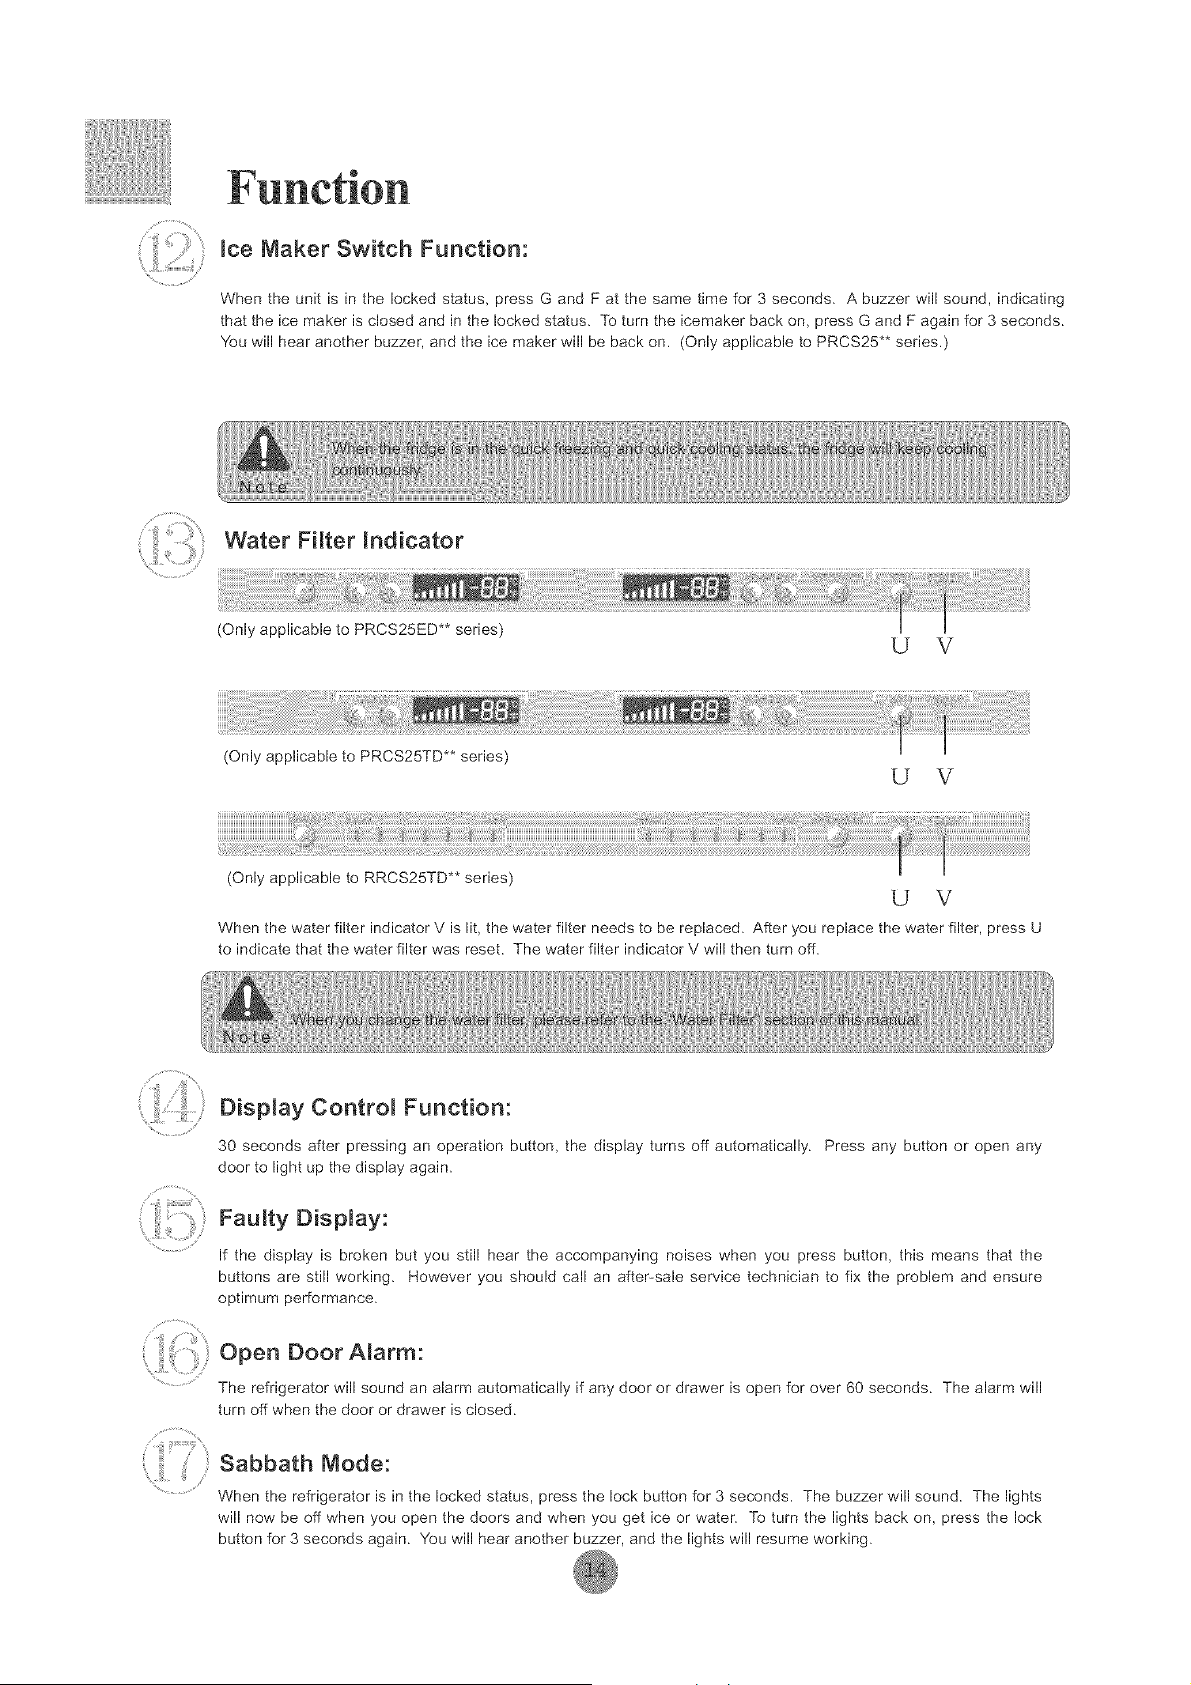
raceMaker Switch Function:
When the unit is in the locked status, press G and F at the same time for 3 seconds. A buzzer will sound, indicating
that the ice maker is closed and in the locked status, To turn the icemaker back on, press G and F again for 3 seconds,
You will hear another buzzer, and the ice maker will be back on. (Only applicable to PRCS25** series,)
Water Filter Indicator
(Only applicable to PRCS25ED** series
U V
(Only applicable to PRCS25TD** series)
U V
(Only applicable to RRCS25TD** series)
U V
When the water filter indicator V is lit, the water filter needs to be replaced. After you replace the water filter, press U
to indicate that the water filter was reset. The water filter indicator V will then turn off.
i""i;?
Display Control Function:
30 seconds after pressing an operation button, the display turns off automatically. Press any button or open any
door to light up the display again.
Faulty Display:
If the display is broken but you still hear the accompanying noises when you press button, this means that the
buttons are still working. However you should call an after-sale service technician to fix the problem and ensure
optimum performance.
Open Door Alarm:
The refrigerator will sound an alarm automatically if any door or drawer is open for over 60 seconds. The alarm will
turn off when the door or drawer is closed.
Sabbath Mode:
When the refrigerator is in the locked status, press the lock button for 3 seconds. The buzzer will sound. The lights
will now be off when you open the doors and when you get ice or water. To turn the lights back on, press the lock
button for 3 seconds again. You will hear another buzzer, and the lights will resume working.
the Fresh Feed
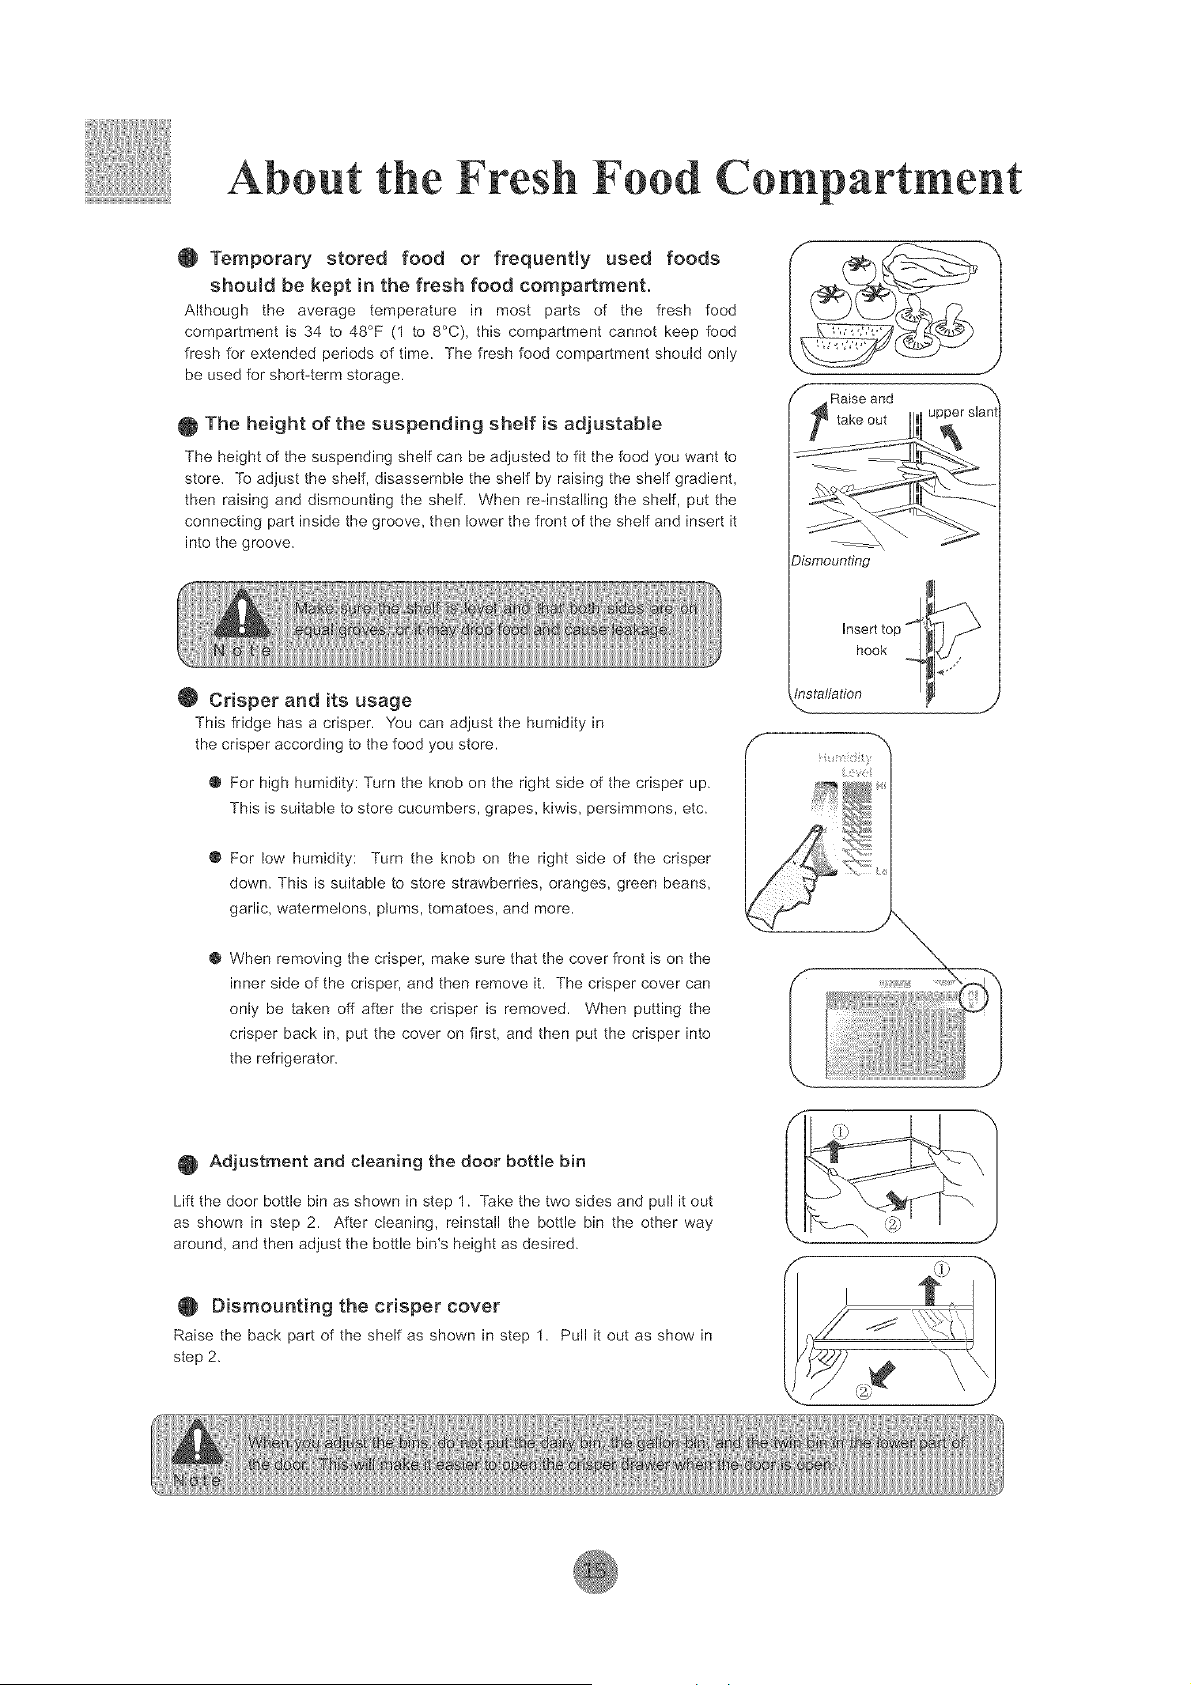
0 Temporary stored food or frequeatly used foods
shou{d be kept ia the fresh food compartment.
Although the average temperature in most parts of the fresh food
compartment is 34 to 48°F (1 to 8°C), this compartment cannot keep food
fresh for extended periods of time. The fresh food compartment should only
be used for short-term storage.
The height of the suspending shelf is adjustable
The height of the suspending shelf can be adjusted to fit the food you want to
store, To adjust the shelf, disassemble the shelf by raising the shelf gradient,
then raising and dismounting the shelf. When reqnstalling the shelf, put the
connecting part inside the groove, then lower the front of the shelf and insert it
into the groove.
Crisper and its usage
This fridge has a crisper. You can adjust the humidity in
the crisper according to the food you store.
@ For high humidity: Turn the knob on the right side of the crisper up.
This is suitable to store cucumbers, grapes, kiwis, persimmons, etc.
@ For low humidity: Turn the knob on the right side of the crisper
down. This is suitable to store strawberries, oranges, green beans,
garlic, watermelons, plums, tomatoes, and more.
When removing the crisper, make sure that the cover front is on the
inner side of the crisper, and then remove it. The crisper cover can
only be taken off after the crisper is removed. When putting the
crisper back in, put the cover on first, and then put the crisper into
the refrigerator.
%smounting
hook
/nstaflation
[
Adjustment and cleaning the door bottle bin
Lift the door bottle bin as shown in step 1. Take the two sides and pull it out
as shown in step 2. After cleaning, reinstall the bottle bin the other way
around, and then adjust the bottle bin's height as desired.
Dismounting the crisper cover
Raise the back part of the shelf as shown in step 1. Pull it out as show in
step 2.
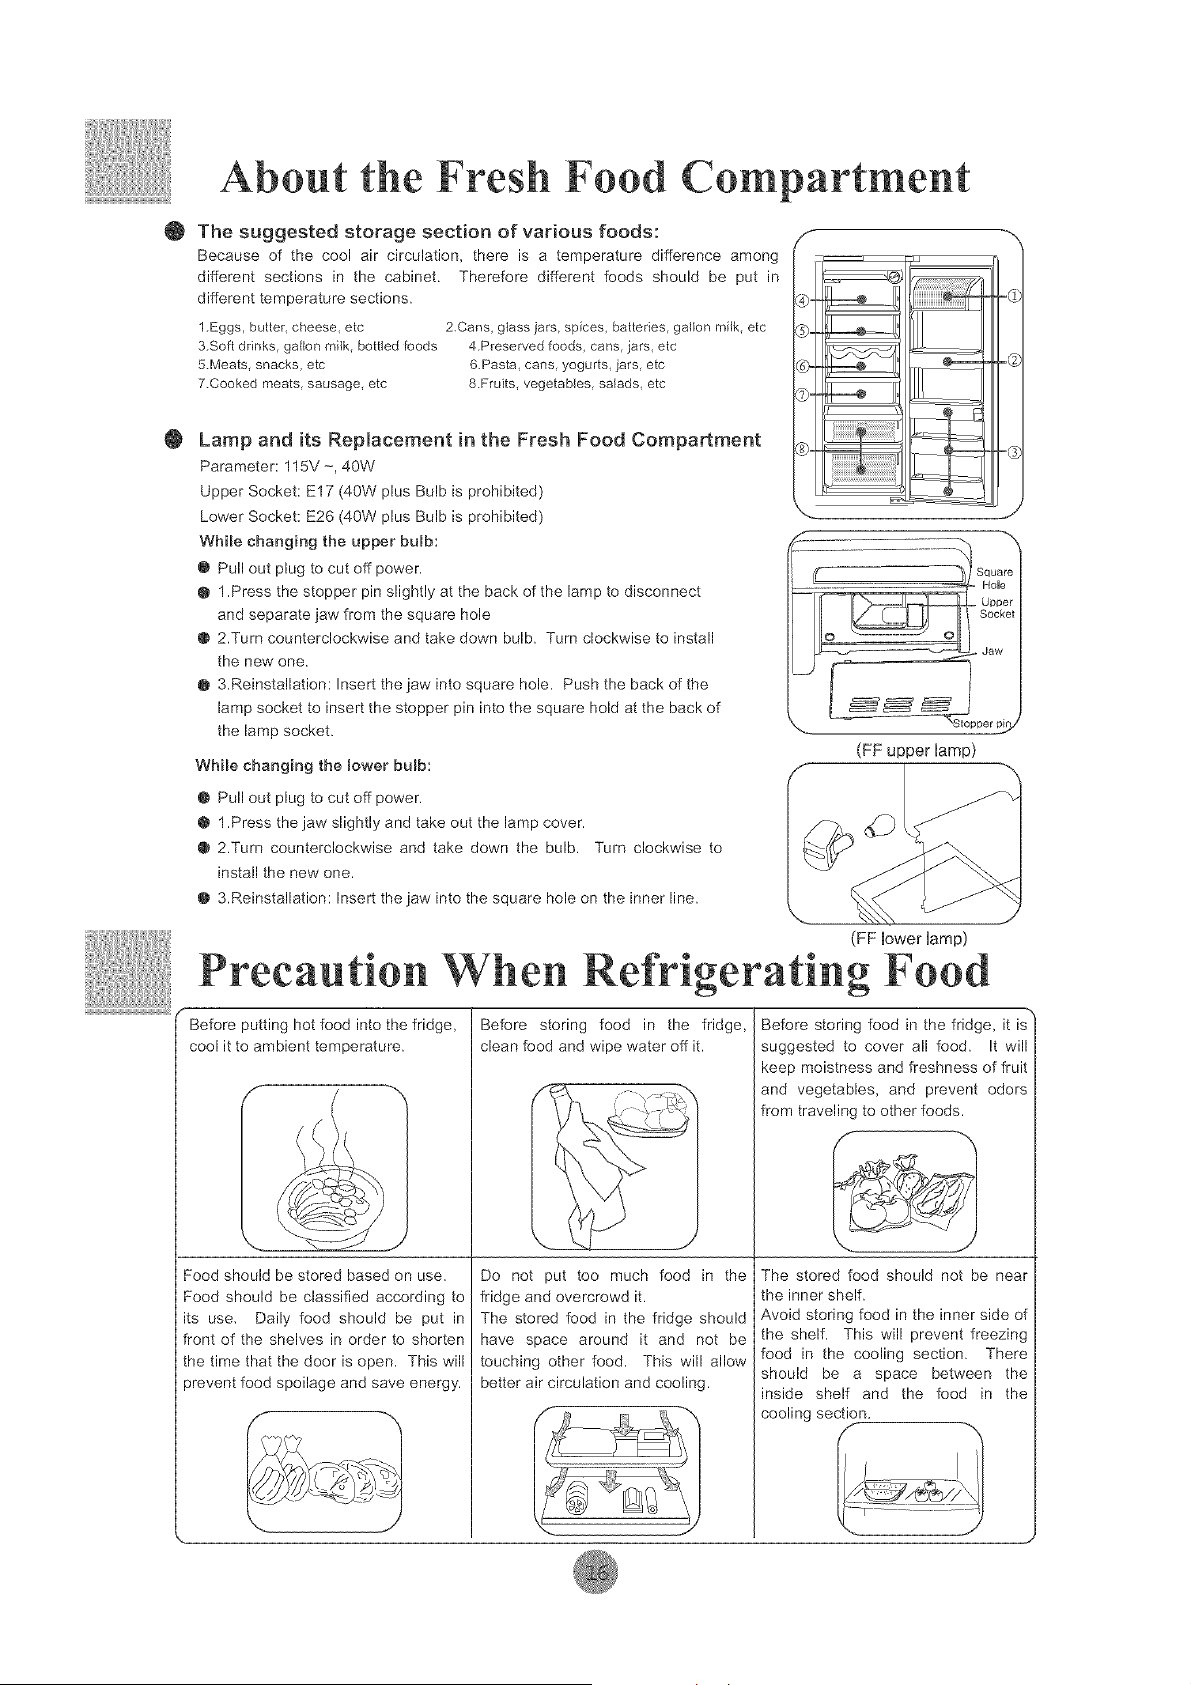
About the Fresh Food Compartment
0 The suggested storage section of various foods:
Because of the cool air circulation, there is a temperature difference among
different sections in the cabinet. Therefore different foods should be put in
different temperature sections.
1.Eggs, butter, cheese, etc 2.Cans, glass jars, spices, batteries, gallon milk, etc
3.Soft drinks, gallon milk, bottled leeds 4.Preserved foods, cans, jars, etc
5Meats, snacks, etc 6.Pasta, cans, yogurts, jars, etc
7.Cooked meats, sausage, etc 8.Fruits, vegetables, salads, etc
O
Lamp and its Replacement in the Fresh Food Compartment
Parameter: 115V -, 4OW
Upper Socket: E17 (40W plus Bulb is prohibited)
Lower Socket: E26 (40W plus Bulb is prohibited)
Whi_e changing the upper bulb:
@ Pull out plug to cut off power.
@ 1.Press the stopper pin slightly at the back of the lamp to disconnect
and separate jaw from the square hole
@ 2.Turn counterclockwise and take down bulb. Turn clockwise to install
the new one.
@ 3.Reinstallation: Insert the jaw into square hole. Push the back of the
lamp socket to insert the stopper pin into the square hold at the back of
the lamp socket.
Whi_e changing the lower bulb:
@ Pull out plug to cut off power.
@ 1.Press the jaw slightly and take out the lamp cover.
@ 2.Turn counterclockwise and take down the bulb. Turn clockwise to
install the new one.
@ 3.Reinstallation: Insert the jaw into the square hole on the inner line.
(FF upper lamp)
Precaution When
Before putting hot food into the fridge,
cool it to ambient temperature.
Food should be stored based on use.
Food should be classified according to
its use, Daily food should be put in
front of the shelves in order to shorten
the time that the door is open. This will
orevent food spoilage and save energy.
(FF mower [amp)
Refrigerating Feed
Before storing food in the fridge,
clean food and wipe water off it.
Do not put too much food in the
fridge and overcrowd it.
The stored food in the fridge should
have space around it and not be
touching other food. This will allow
better air circulation and cooling.
..... z
Before storing food in the fridge, it is
suggested to cover all food. It will
keep moistness and freshness of fruit
and vegetables, and prevent odors
from traveling to other foods.
The stored food should not be near
the inner shelf.
Avoid storing food in the inner side of
the shelf. This will prevent freezing
food in the cooling section. There
should be a space between the
inside shelf and the food in the
cooling section,
J
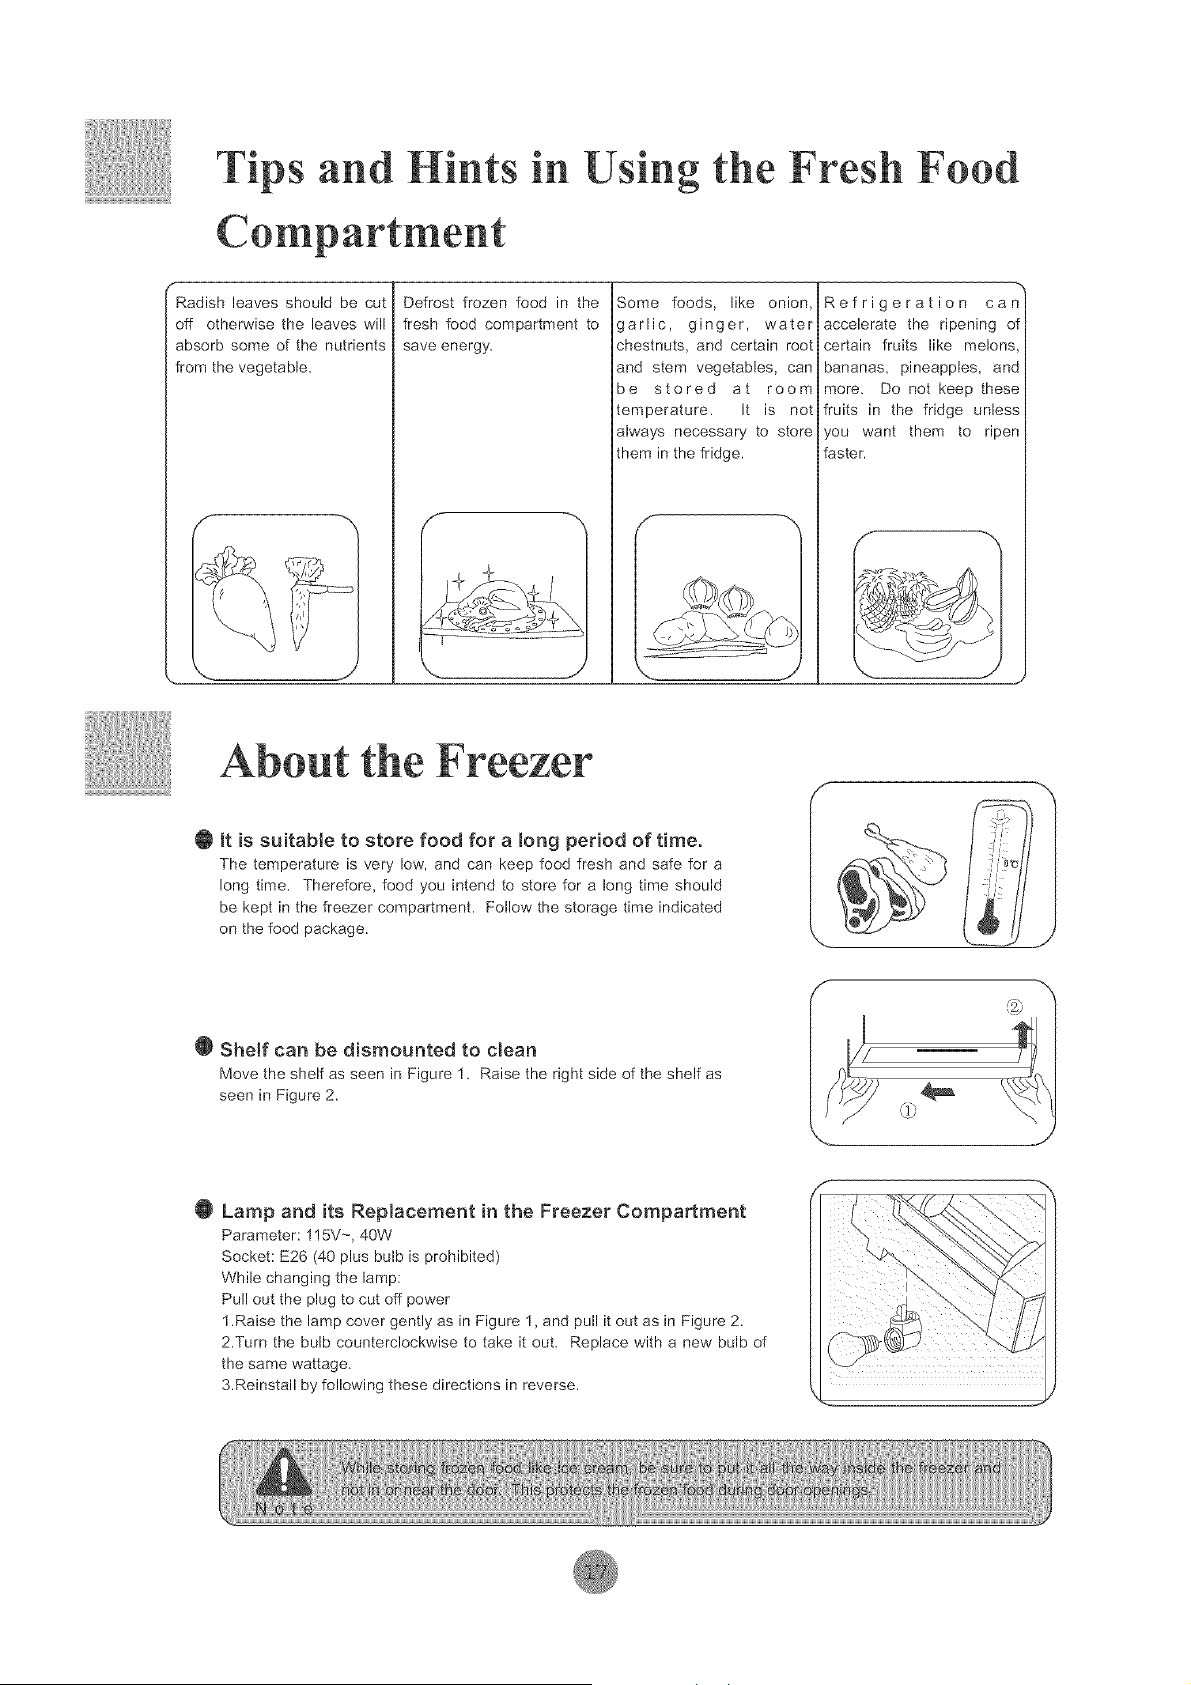
Tips and Hints in Using the Fresh Food
Radish leaves should be cut
off otherwise the leaves will
absorb some of the nutrients
from the vegetable.
Defrost frozen food in the
fresh food compartment to
save energy.
Some foods, like onion,
garlic, ginger, water
chestnuts, and certain root
and stem vegetables, can
be stored at room
temperature. It is not
always necessary to store
them in the fridge.
Refrigeration can
accelerate the ripening of
certain fruits like melons,
bananas, pineapples, and
more. Do not keep these
fruits in the fridge unless
you want them to ripen
faster.
the Freezer
O It is suitable to store food for a long period of time.
The temperature is very low, and can keep food fresh and safe for a
long time. Therefore, food you intend to store for a long time should
be kept in the freezer compartment. Follow the storage time indicated
on the food package.
Shelf can be dismounted to clean
Move the shelf as seen in Figure 1. Raise the right side of the shelf as
seen in Figure 2.
f
....J
Lamp and its Replacement in the Freezer Compartment
Parameter: 115V-, 40W
Socket: E26 (40 plus bulb is prohibited)
While changing the lamp:
Pull out the plug to cut off power
1.Raise the lamp cover gently as in Figure 1, and pull it out as in Figure 2.
2.Turn the bulb counterclockwise to take it out, Replace with a new bulb of
the same wattage.
3.Reinstall by following these directions in reverse.
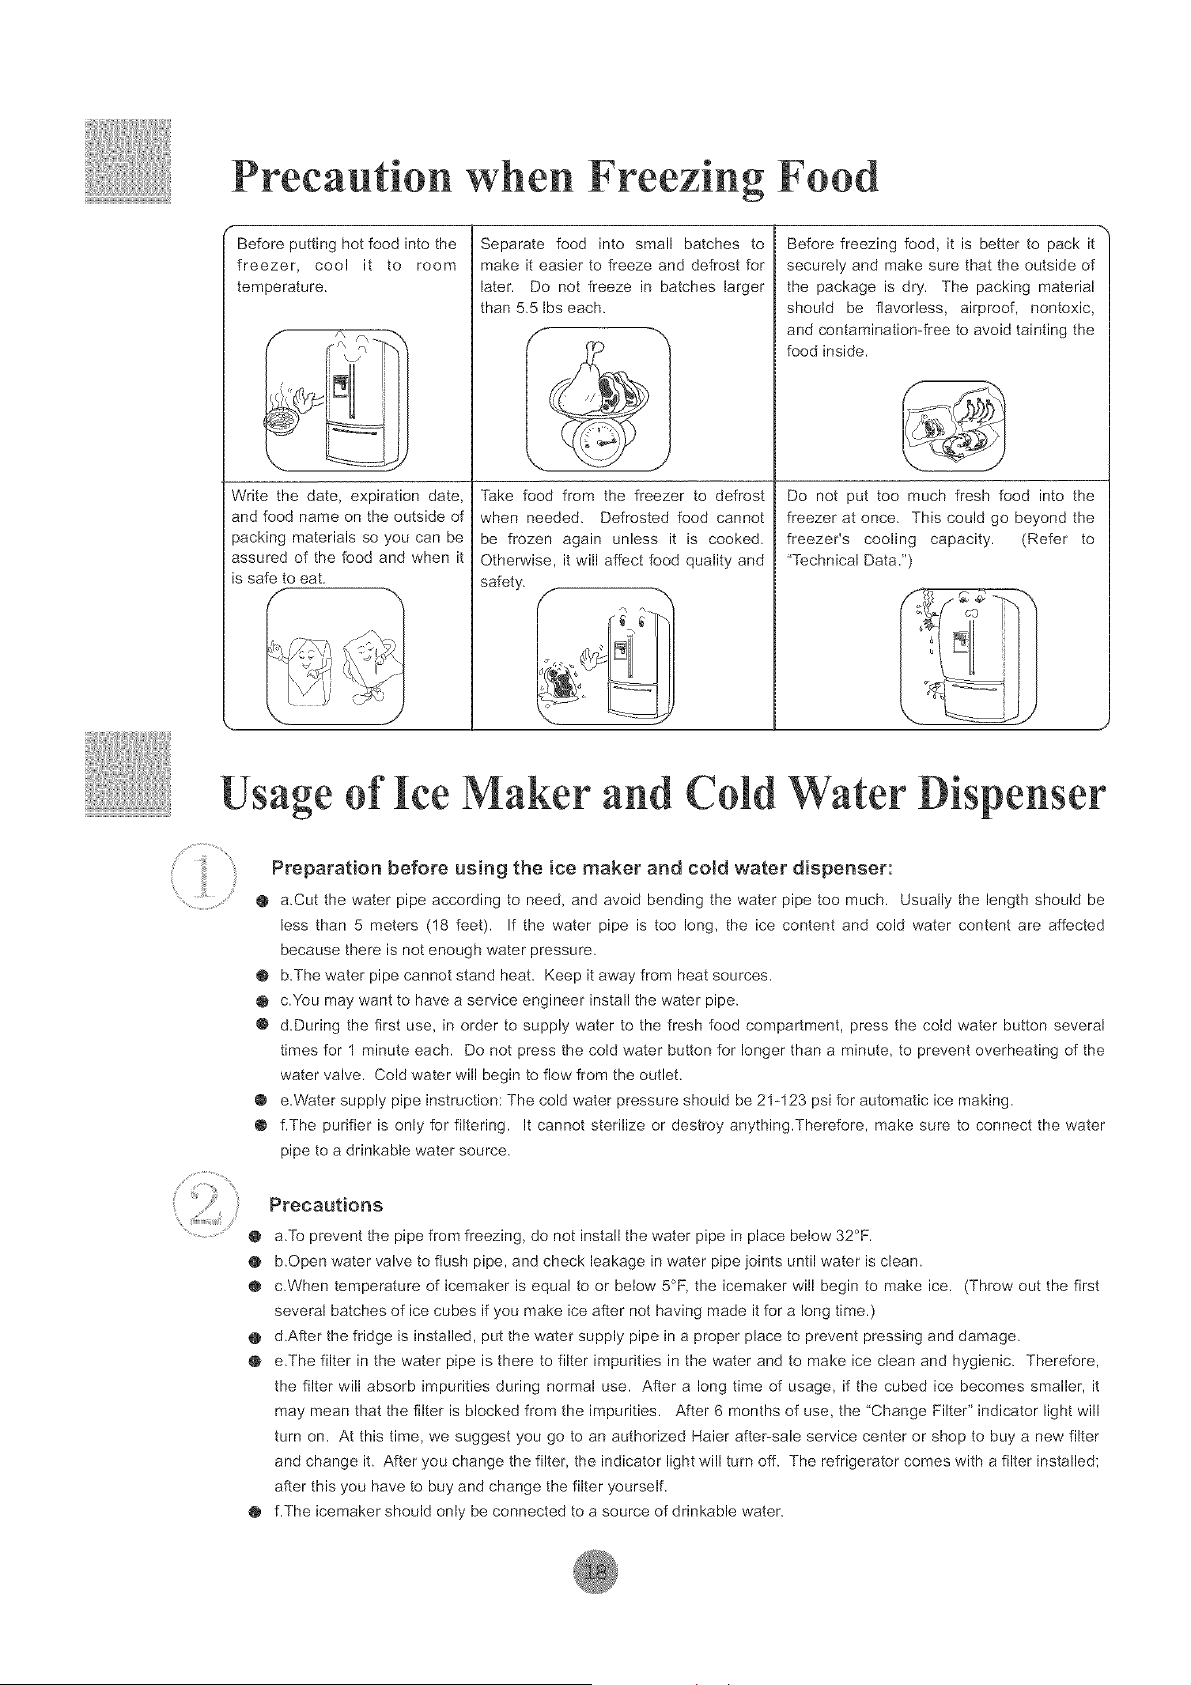
Precautien when Freezing Foed
Before putting hot food into the
freezer, cool it to room
temperature.
Write the date, expiration date,
and food name on the outside of
packing materials so you can be
assured of the food and when it
is safe to eat.
Separate food into small batches to
make it easier to freeze and defrost for
later. Do not freeze in batches larger
than 5.5 Ibs each.
Before freezing food, it is better to pack it
securely and make sure that the outside of
the package is dry. The packing material
should be flavorless, airproof, nontoxic,
and contamination-free to avoid tainting the
food inside.
Take food from the freezer to defrost
when needed. Defrosted food cannot
be frozen again unless it is cooked.
Otherwise, it will affect food quality and
safety.
Do not put too much fresh food into the
freezer at once. This could go beyond the
freezer's cooling capacity. (Refer to
'Technical Data.")
Usage Ice ']aker and Celd Water Dispenser
Preparation before using the ice maker and cold water dispenser:
@ a.Cut the water pipe according to need, and avoid bending the water pipe too much. Usually the length should be
less than 5 meters (18 feet). If the water pipe is too long, the ice content and cold water content are affected
because there is not enough water pressure.
@ b.The water pipe cannot stand heat. Keep it away from heat sources.
@ c.You may want to have a service engineer install the water pipe.
@ d.During the first use, in order to supply water to the fresh food compartment, press the cold water button several
times for 1 minute each. Do not press the cold water button for longer than a minute, to prevent overheating of the
water valve. Cold water will begin to flow from the outlet.
@ e.Water supply pipe instruction: The cold water pressure should be 21-123 psi for automatic ice making.
@ f.The purifier is only for filtering. It cannot sterilize or destroy anything.Therefore, make sure to connect the water
pipe to a drinkable water source.
Precautions
@ a.To prevent the pipe from freezing, do not install the water pipe in place below 32°F.
@ b.Open water valve to flush pipe, and check leakage in water pipe joints until water is clean.
@ c.When temperature of icemaker is equal to or below 5°F, the icemaker will begin to make ice. (Throw out the first
several batches of ice cubes if you make ice after not having made it for a long time.)
@ d.After the fridge is installed, put the water supply pipe in a proper place to prevent pressing and damage.
@ e.The filter in the water pipe is there to filter impurities in the water and to make ice clean and hygienic. Therefore,
the filter will absorb impurities during normal use. After a long time of usage, if the cubed ice becomes smaller, it
may mean that the filter is blocked from the impurities. After 6 months of use, the "Change Filter" indicator light will
turn on. At this time, we suggest you go to an authorized Haler after-sale service center or shop to buy a new filter
and change it. After you change the filter, the indicator light will turn off. The refrigerator comes with a filter installed;
after this you have to buy and change the filter yourself.
@ f.The icemaker should only be connected to a source of drinkable water.
Usage Ice Maker and Cold Water Dispenser
Working Principle:
The ice maker can make 8 ice cubes per cycle. The ice content will depend on room temperature, door
openings, water pressure, freezer temperature, etc. It is considered normal when ice cubes stick
together.
¸%¸¸¸¸¸¸¸¸ s ¸
if this is your first icemaker:
Occasionally you may hear some sounds, like water flowing or ice dropping. These sounds are normal.
Occasionally, in periods of infrequent ice use, cubes may stick together and clog the dispenser. Remove
the ice cream holder and lift up the ice bucket. Shake it from side to side to dislodge the cubes. Return
the ice bucket and ice cream holder. Cubes should dispense normally now.
if you do not use ice often:
Older ice cubes can get stale. Clean the ice container periodically and use warm water to clean. Before
putting it back, make sure to dry it so new ice does not stick to it,
When you do not use the ice container for an extended time:
If you will not be using the ice container for a long time (such as during the winter), throw out the
remaining ice cubes, wash the container with warm water, dry it with a towel, and put it back in the
refrigerator. Then close the valve between the water supply and the fridge.
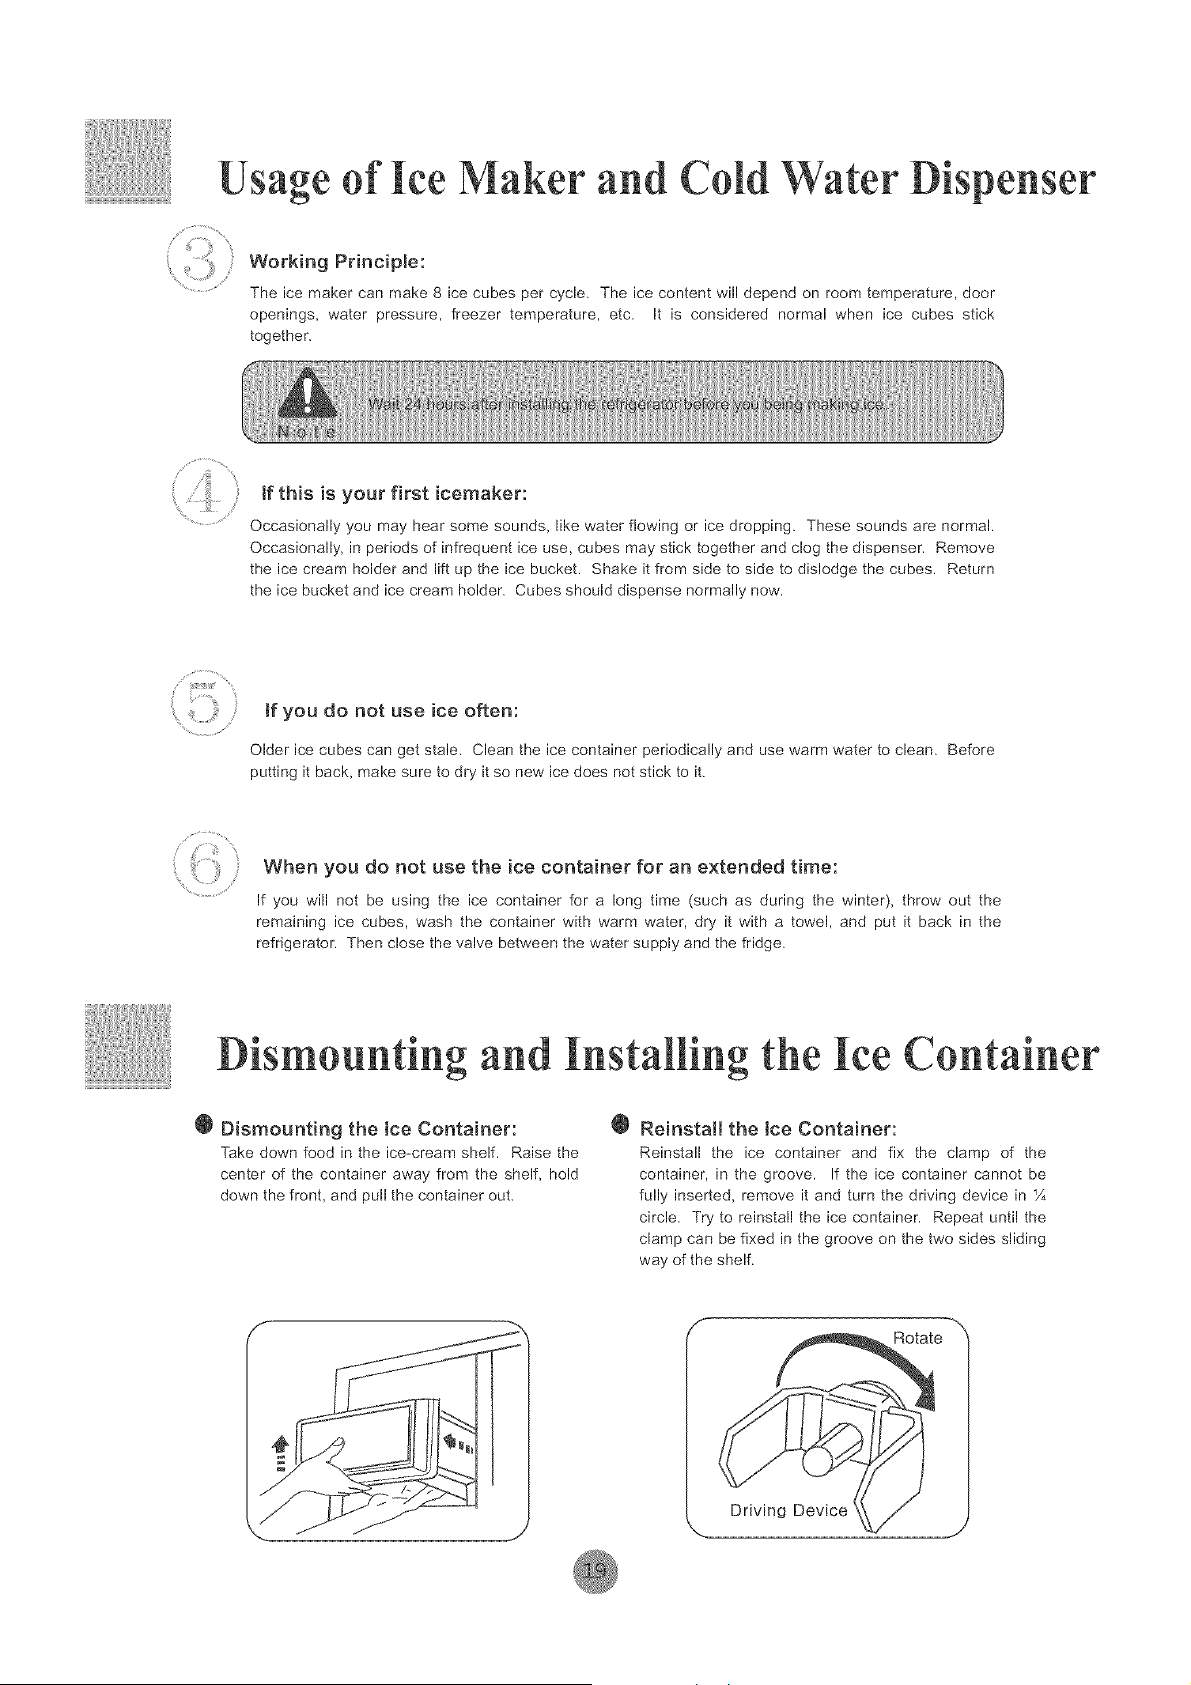
Dismounting and Instal g the ice Container
0 Dismounting the ice Container:
Take down food in the ice-cream shelf. Raise the
center of the container away from the shelf, hold
down the front, and pull the container out,
Reinstall the ice Container:
Reinstall the ice container and fix the clamp of the
container, in the groove. If the ice container cannot be
fully inserted, remove it and turn the driving device in %
circle. Try to reinstall the ice container. Repeat until the
clamp can be fixed in the groove on the two sides sliding
way of the shelf.
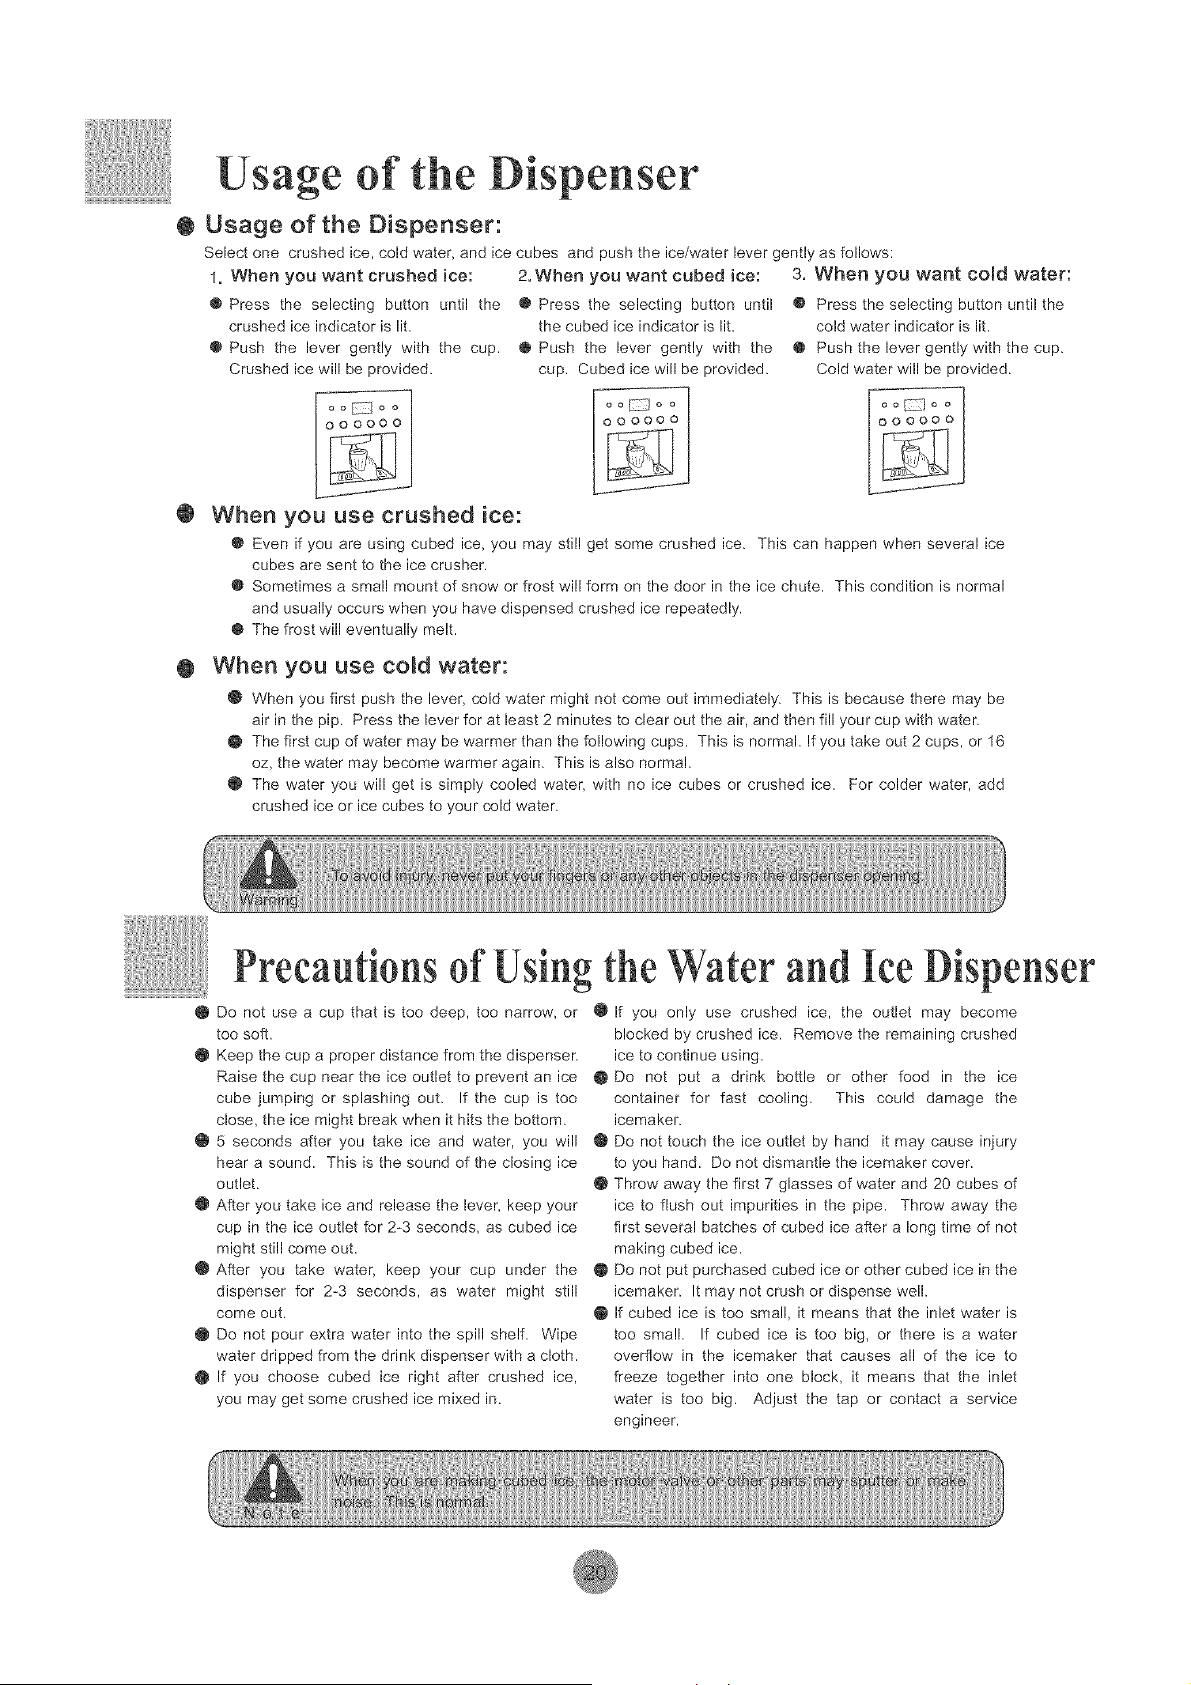
Usage of the Dispenser
• Usage of the Dispenser:
Select one crushed ice, cold water, and ice cubes and push the ice/water lever gently as follows:
!. When you want crushed ice: 2. When you want cubed ice: 3. When you want cold water:
0 Press the selecting button until the 0 Press the selecting button until
crushed ice indicator is lit, the cubed ice indicator is lit.
@ Push the lever gently with the cup. • Push the lever gently with the
Crushed ice will be provided, cup. Cubed ice will be provided,
When you use crushed ice:
O Even if you are using cubed ice, you may still get some crushed ice. This can happen when several ice
cubes are sent to the ice crusher.
@ Sometimes a small mount of snow or frost will form on the door in the ice chute. This condition is normal
and usually occurs when you have dispensed crushed ice repeatedly.
@ The frost will eventually melt.
@ Press the selecting button until the
cold water indicator is lit.
O Push the lever gently with the cup.
Cold water will be provided.
0 When you use cold water:
O When you first push the lever, cold water might not come out immediately. This is because there may be
air in the pip. Press the lever for at least 2 minutes to clear out the air, and then fill your cup with water.
• The first cup of water may be warmer than the following cups. This is normal. If you take out 2 cups, or 16
oz, the water may become warmer again. This is also normal.
@ The water you will get is simply cooled water, with no ice cubes or crushed ice. For colder water, add
crushed ice or ice cubes to your cold water.
Usingthe Water and Ice Dispenser
• Do not use a cup that is too deep, too narrow, or O If you only use crushed ice, the outlet may become
too soft.
• Keep the cup a proper distance from the dispenser.
Raise the cup near the ice outlet to prevent an ice
cube jumping or splashing out. If the cup is too
close, the ice might break when it hits the bottom.
@ 5 seconds after you take ice and water, you will
hear a sound. This is the sound of the closing ice
outlet.
@ After you take ice and release the lever, keep your
cup in the ice outlet for 2_3 seconds, as cubed ice
might still come out.
@ After you take water, keep your cup under the
dispenser for 2_3 seconds, as water might still
come out.
• Do not pour extra water into the spill shelf. Wipe
water dripped from the drink dispenser with a cloth.
@ If you choose cubed ice right after crushed ice,
you may get some crushed ice mixed in.
blocked by crushed ice. Remove the remaining crushed
ice to continue using.
@ Do not put a drink bottle or other food in the ice
container for fast cooling. This could damage the
icemaker.
@ Do not touch the ice outlet by hand it may cause injury
to you hand. Do not dismantle the icemaker cover.
@ Throw away the first 7 glasses of water and 20 cubes of
ice to flush out impurities in the pipe. Throw away the
first several batches of cubed ice after a long time of not
making cubed ice.
O Do not put purchased cubed ice or other cubed ice in the
icemaker. It may not crush or dispense well.
O If cubed ice is too small, it means that the inlet water is
too small. If cubed ice is too big, or there is a water
overflow in the icemaker that causes all of the ice to
freeze together into one block, it means that the inlet
water is too big. Adjust the tap or contact a service
engineer.
O
Abeut the
partment
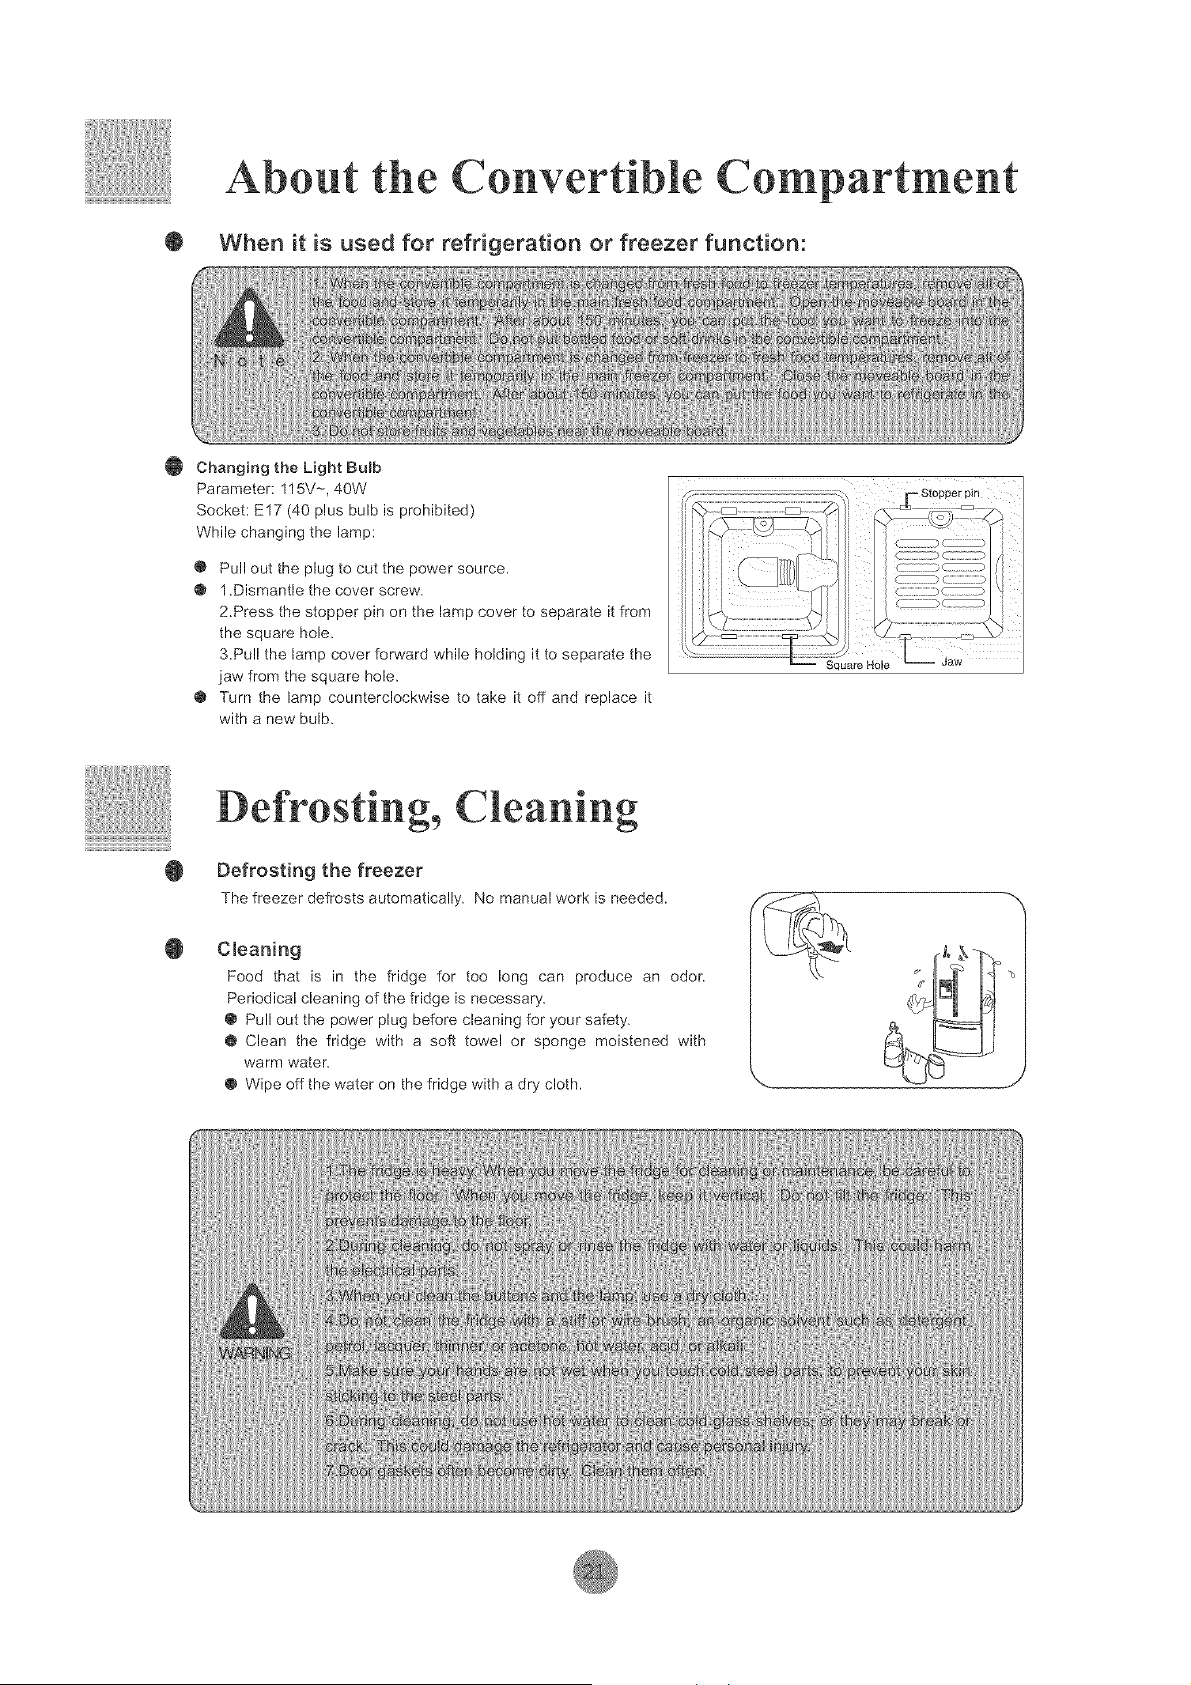
0 Changing the Light Bulb
Parameter: 115Vm 40W
Socket: E17 (40 plus bulb is prohibited)
While changing the lamp:
@ Pull out the plug to cut the power source.
@ 1.Dismantle the cover screw.
2.Press the stopper pin on the lamp cover to separate it from
the square hole.
3.Pull the lamp cover fop,,vard while holding it to separate the
jaw from the square hole.
@ Turn the lamp counterclockwise to take it off and replace it
with a new bulb.
Square Hole Jaw
O
O
Defresting Cleaning
Defrosting the freezer
The freezer defrosts automatically. No manual work is needed.
Cleaning
Food that is in the fridge for too long can produce an odor.
Periodical cleaning of the fridge is necessary.
@ Pull out the power plug before cleaning for your safety.
@ Clean the fridge with a soft towel or sponge moistened with
warm water.
@ Wipe off the water on the fridge with a dry cloth.
O
Water Filter
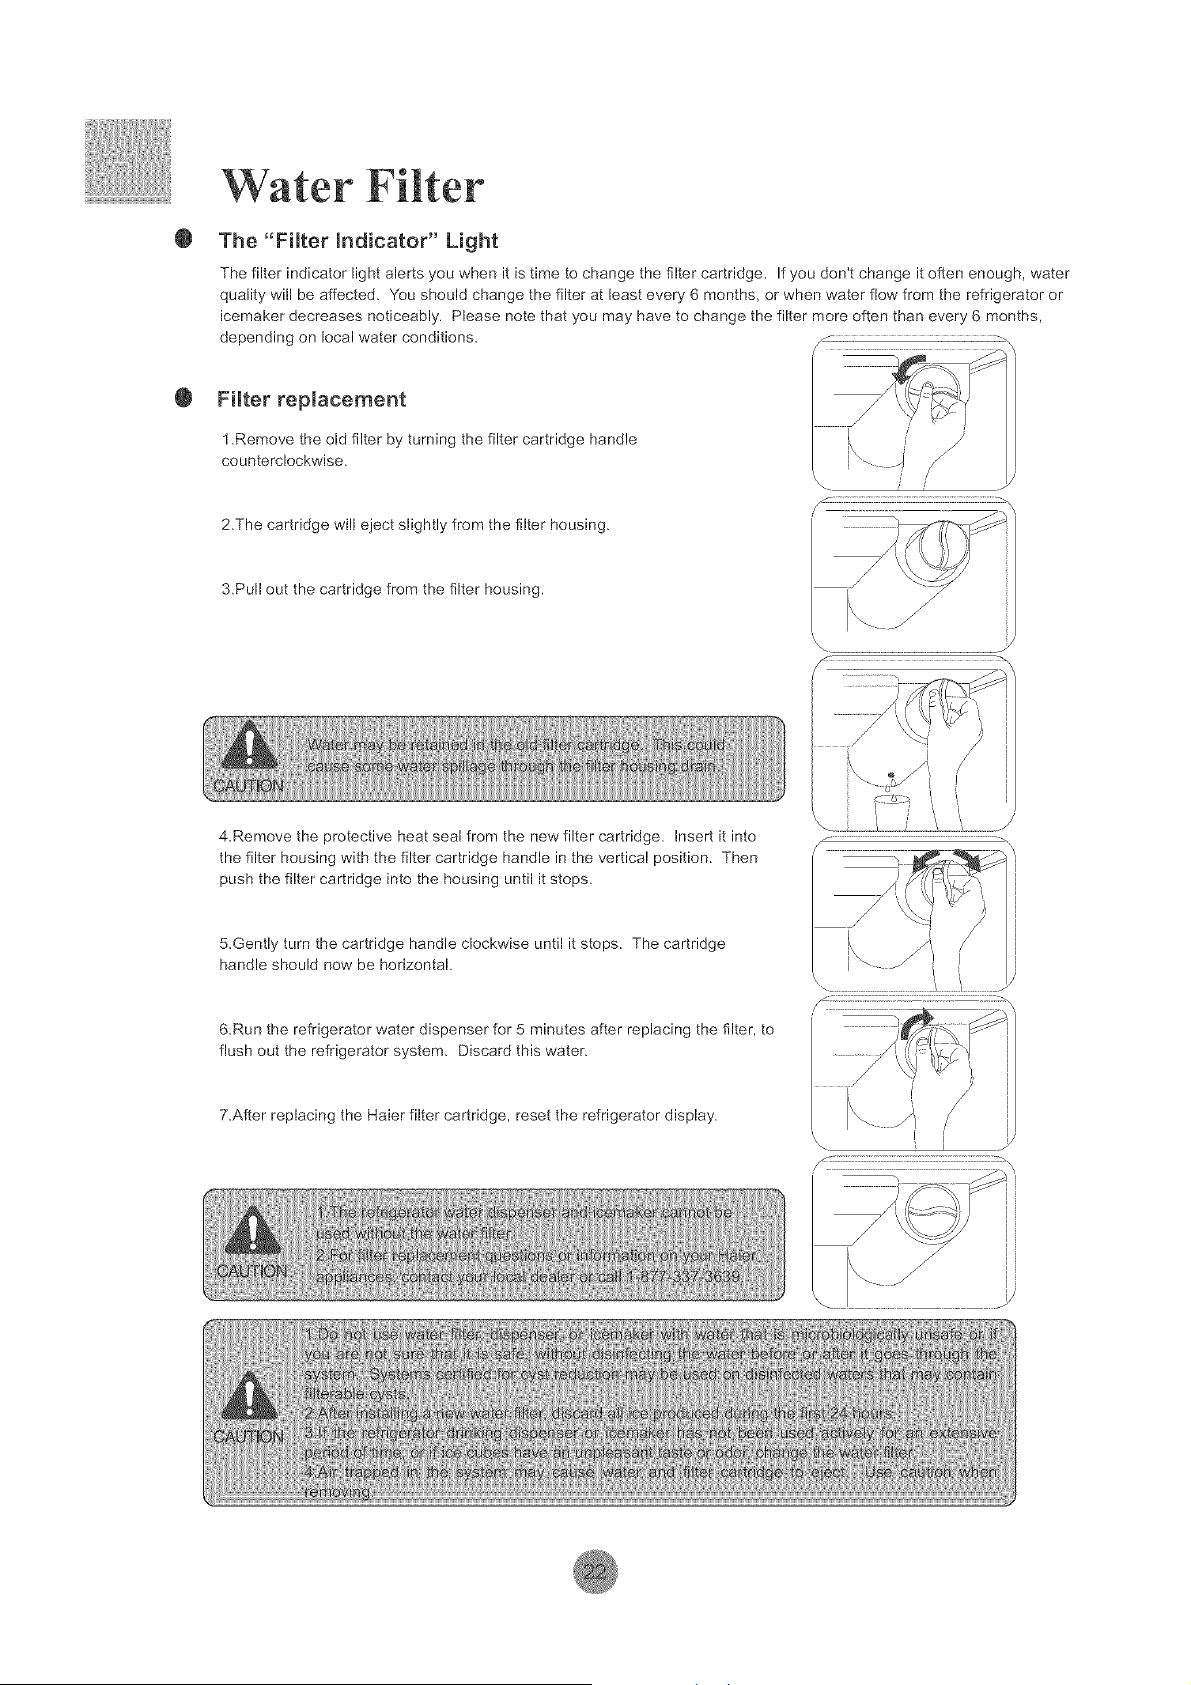
The "FHter mndicator" Light
The filter indicator light alerts you when it is time to change the filter cartridge. If you don't change it often enough, water
quality will be affected. You should change the filter at least every 6 months, or when water flow from the refrigerator or
icemaker decreases noticeably. Please note that you may have to change the filter more often than every 6 months,
depending on local water conditions.
@ Filter replacement
1 .Remove the old filter by turning the filter cartridge handle
counterclockwise.
2.The cartridge will eject slightly from the filter housing.
3.Pull out the cartridge from the filter housing.
\_ ........................... _/
4.Remove the protective heat seal from the new filter cartridge. Insert it into
the filter housing with the filter cartridge handle in the vertical position. Then
push the filter cartridge into the housing until it stops.
5.Gently turn the cartridge handle clockwise until it stops. The cartridge
handle should now be horizontal.
6.Run the refrigerator water dispenser for 5 minutes after replacing the filter, to
flush out the refrigerator system. Discard this water.
7.After replacing the Haler filter cartridge, reset the refrigerator display.
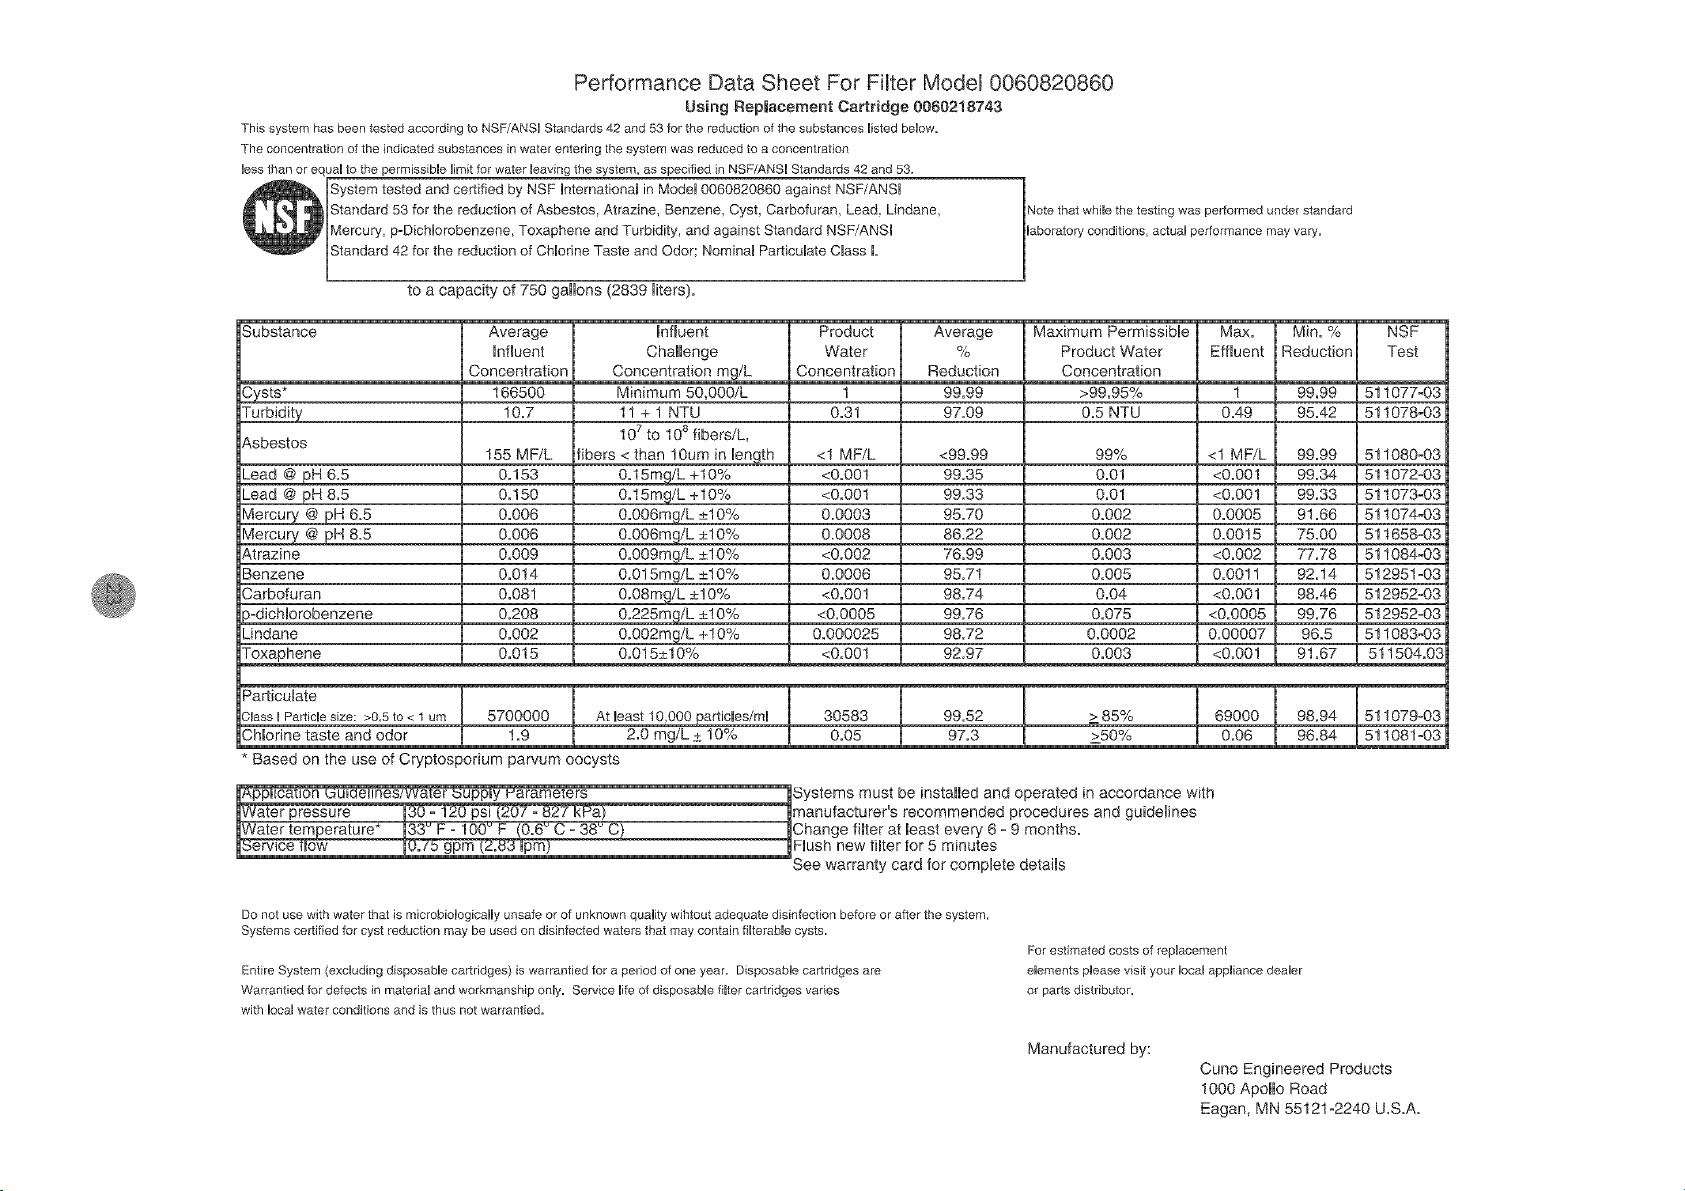
Performance Data Sheet For Filter Model 0060820860
Using Rep|acement Cartridge 0060218743
This system has been tested according to NSF/ANSl Standards 42 and 53 for the reduction of the substances bsted bdow=
The concentration of the indicated substances in water entering the system was reduced to a concentration
less than or equal to the permissibne limit for water leaving the system, as specified in NSF/ANSl Standards 42 and 53.
System tested and certified by NSF International in ModeU0060820860 against NSF/ANSI
Standard 53 for the reduction of Asbestos, Atrazine, Benzene, Cyst, Carbofuran, Lead, Lindane,
Mercury, p-Dichlorobenzene, Toxaphene and Turbidity, and against Standard NSF/ANSI
Standard 42 for the reduction of CNorine Taste and Odor; Nominal Particulate Class I.
to a capacity of 750 gallons (2839 liters)°
Note that while the testing was performed under standard
laboratory conditions, actual performance may vary.
3ubstance
Cysts*
_,sbestos
_H 6.5
_end @ pH 8.5
_2pH 8.5
_4ercurv @ pH 8.5
_trazine
3enzene
3arbofuran
)odicNorobenzene
Jndane
Foxaphene
Average
Influent
Concentration
166500
10,7
155 MF/L
0.153
0,150
0,006
0.006
0.009
0,014
0,081
0.208
0.002
0.015
lnfluent
Challenge
Concentration mg/L
Minimum 50,000/L
11 + I NTU
107 to 108 fibers/L,
fibers < than 10urn in len_.th
0,15m_./L +10%
0.15mg/L +10%
0.006mgjL _+10%
0.0O6mgz/L _+t0%
0.009mg/L ±10%
0.015m_/L _+10%
0.08mg/L ±10%
0.225m_/L _+10%
0.002m_/L +t 0%
0.015±10%
Product
Water
Concentration
t
0,31
<1MF/L
<0,001
<0,00!
0,0003
0.0008
<0.002
0.0006
<0,001
<0.0005
0,000025
<0,001
Average
%
Reduction
99,99
97.09
<99,99
99.35
99,33
95,70
86.22
76,99
95.71
98.74
99.76
98,72
92.97
Maximum Permissible Max, Min, %
Product Water Effluent Reduction
Concentration
>99,95% 1 99,99
0,5 NTU 0,49 95,42
99% <1MP/L 99,99
0.01 <0,001 99.34
0,01 <0.001 99.33
0,002 0,0005 91,86
0.002 0.0015 75.00
0,003 <0,002 77.78
0,005 0,0011 92,14
0.04 <0.001 98,46
0,075 <0,0005 99,76
0.0002 0.00007 96,5
0,003 <0,001 91,67
NSF
Test
511077-03
511078-03
511080°03
511072_03
511O73°O3
511074-03
511658°03
511084-03
512951°03
512952-03
512952_03
511083-03
511504,03
_articulate
3mass I Particle size: >0.5 to < 1 um 5700000 At Ieast 10,000 particles/ml
3Norine taste and odor 1,9 2.0 mg/L ± 10%
* Based on the use of Cryptosporium parvum oocysts
es/water _upply I_arameters
0-1_ ps]_207o8_7 a
30583
0,O5
99,52 _85% 69000 98,94
97,3 _50% 0.06 96.84
Systems must be installed and operated in accordance with
manufacturer"s recommended procedures and guidelines
Change filter at least every 6 _ 9 months.
]_Flush new tilter for 5 minutes
See warranty card for complete deta_ms
511079_03
511081°03
Do not use with water that is microbiologicaHy unsafe or of unknown quality wihtout adequate disinfection before or after the system.
Systems certified for cyst reduction may be used on disinfected waters that may contain filterable cysts,
Entire System (excluding disposable cartridges) is warrantied for a period of one year. DisposaNe cartridges are
Warrantied for defects in material and workmanship only. Service life of disposable filter cartridges varies
with local water conditions and is thus not warrantied.
For estimated costs of repnacement
enements please visit your local appliance deaner
or parts distributor,
Manufactured by:
Cuno Engineered Products
1000 ApoHo Road
Eagan, MN 5512t-2240 U.S,A.
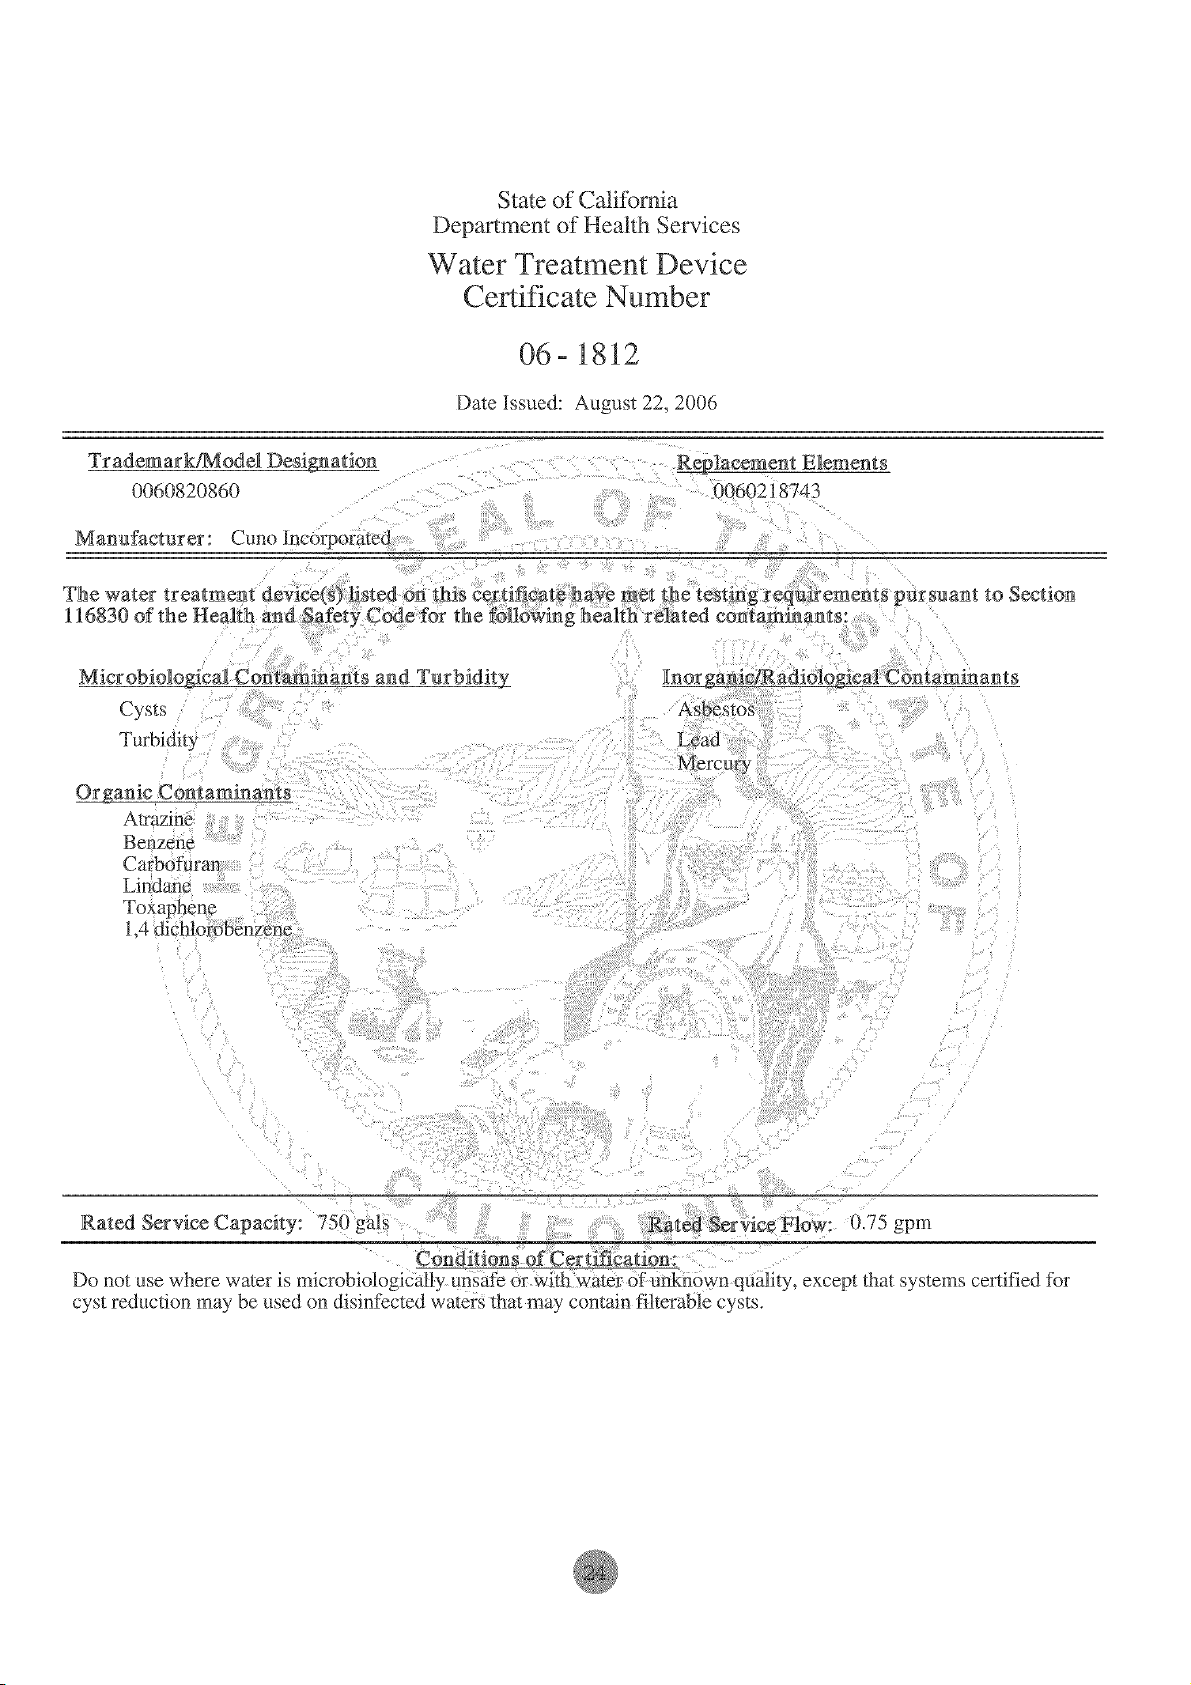
State of California
Department of Health Services
Water Treatment Device
Certificate Number
06-1812
Trademark/Model Designation
0060820860
Date Issued: August 22, 2006
_lacement E_ments
0060218743
Manufacturer: Cuno Incorporated
The water treatrnen_ de_'ice(s) hsted Dn this certificate _ave met the testing requirements pursuant to Section
116830 of the Health and Safety Code for the following health related co_tarmnants:
Microbiological Contaminants and Tnrbidit,L
Cysts
Turbidity
_anic Contaminants
A_razine
Benzene
Carbofuran
Lindane
Rated Service Capacity: 750 gals Rat_ :SerVice Flow: 0.75 gpm
conditions of Certification:
Do not use where water is microbiologicNly unsafe or wither of unknown quality, except that systems cerlified for
cyst reduction may be used on disinfected waters that may contain filterable cysts.
O
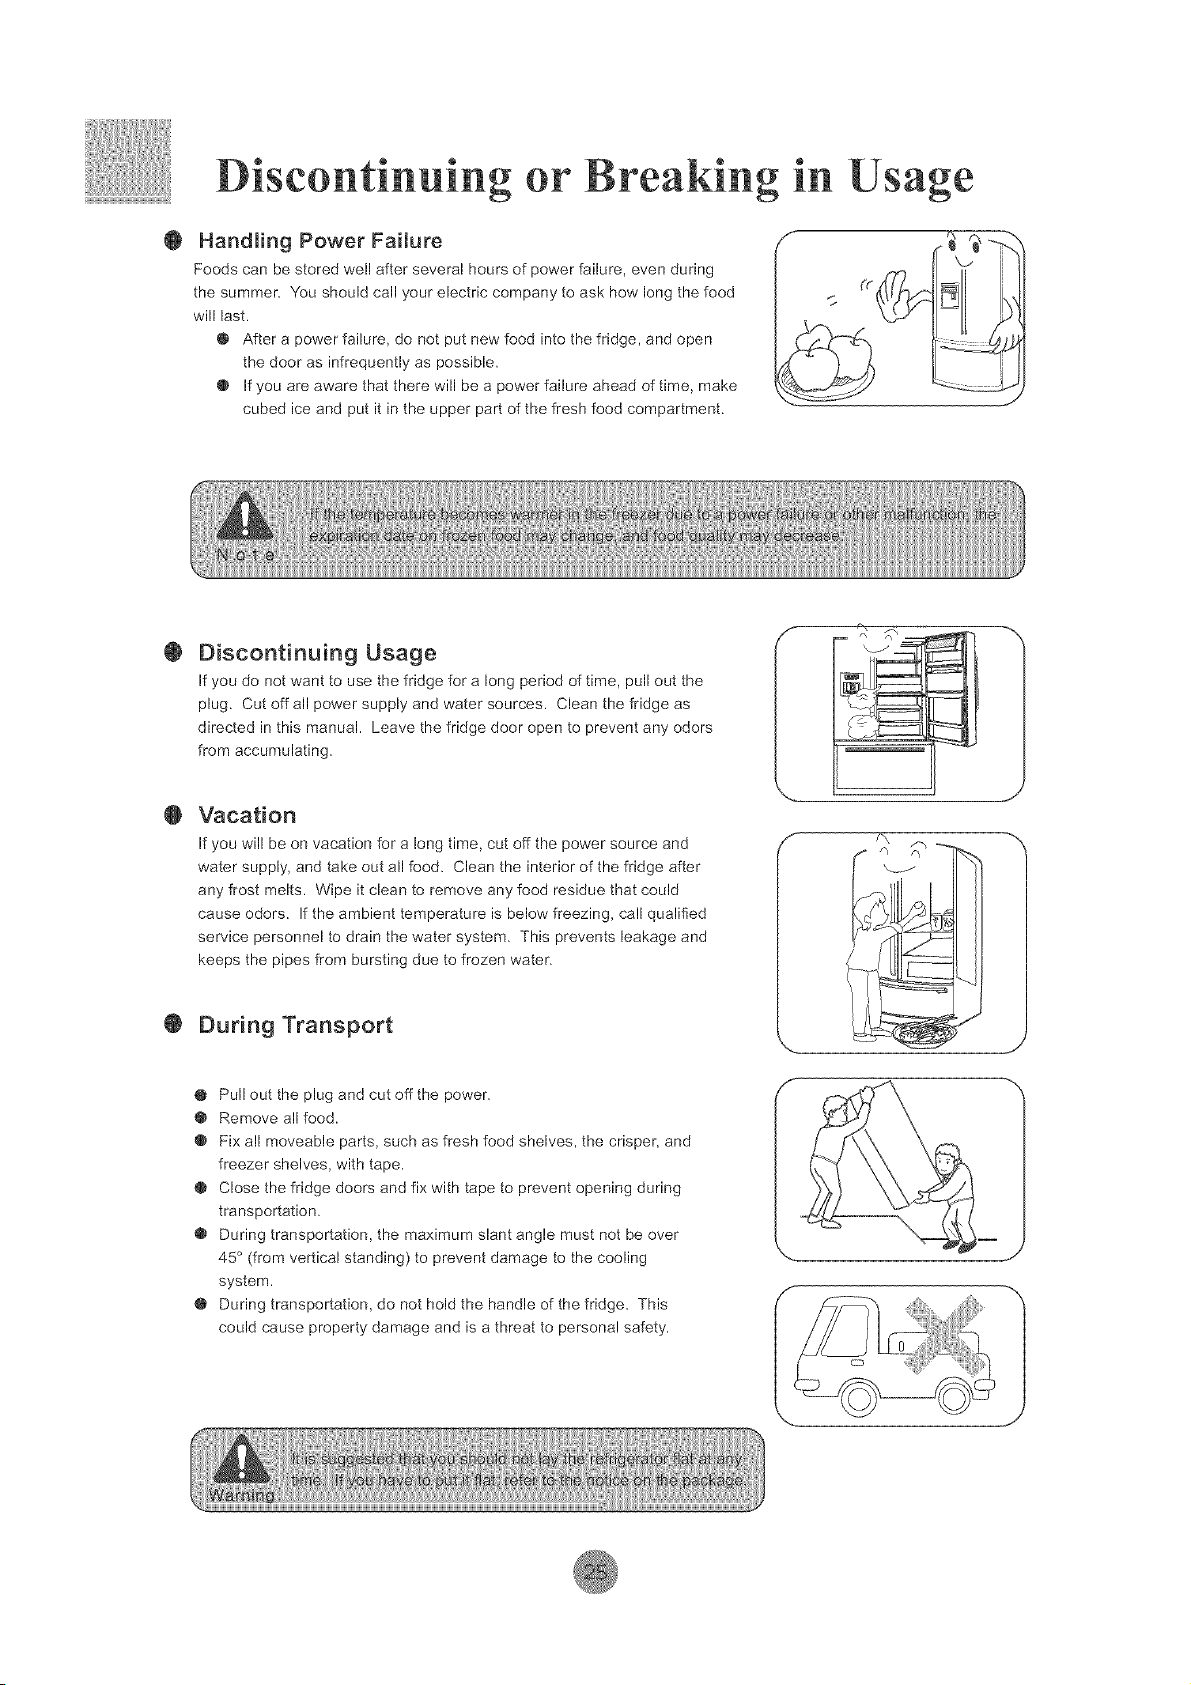
Discentinuing er Breaking
Handling Power Failure
Foods can be stored well after several hours of power failure, even during
the summer. You should call your electric company to ask how long the food
will last.
@ After a power failure, do not put new food into the fridge, and open
the door as infrequently as possible.
@ If you are aware that there will be a power failure ahead of time, make
cubed ice and put it in the upper part of the fresh food compartment.
J
0
O
Discontinuing Usage
If you do not want to use the fridge for a long period of time, pull out the
plug. Cut off all power supply and water sources. Clean the fridge as
directed in this manual. Leave the fridge door open to prevent any odors
from accumulating.
Vacation
If you will be on vacation for a long time, cut off the power source and
water supply, and take out all food. Clean the interior of the fridge after
any frost melts. Wipe it clean to remove any food residue that could
cause odors. If the ambient temperature is below freezing, call qualified
service personnel to drain the water system. This prevents leakage and
keeps the pipes from bursting due to frozen water.
@ During Transport
@ Pull out the plug and cut off the power.
@ Remove all food.
@ Fix all moveable parts, such as fresh food shelves, the crisper, and
freezer shelves, with tape.
@ Close the fridge doors and fix with tape to prevent opening during
transportation.
@ During transportation, the maximum slant angle must not be over
45 ° (from vertical standing) to prevent damage to the cooling
system.
@ During transportation, do not hold the handle of the fridge. This
could cause property damage and is a threat to personal safety.
!iiiiii i!iii!
J
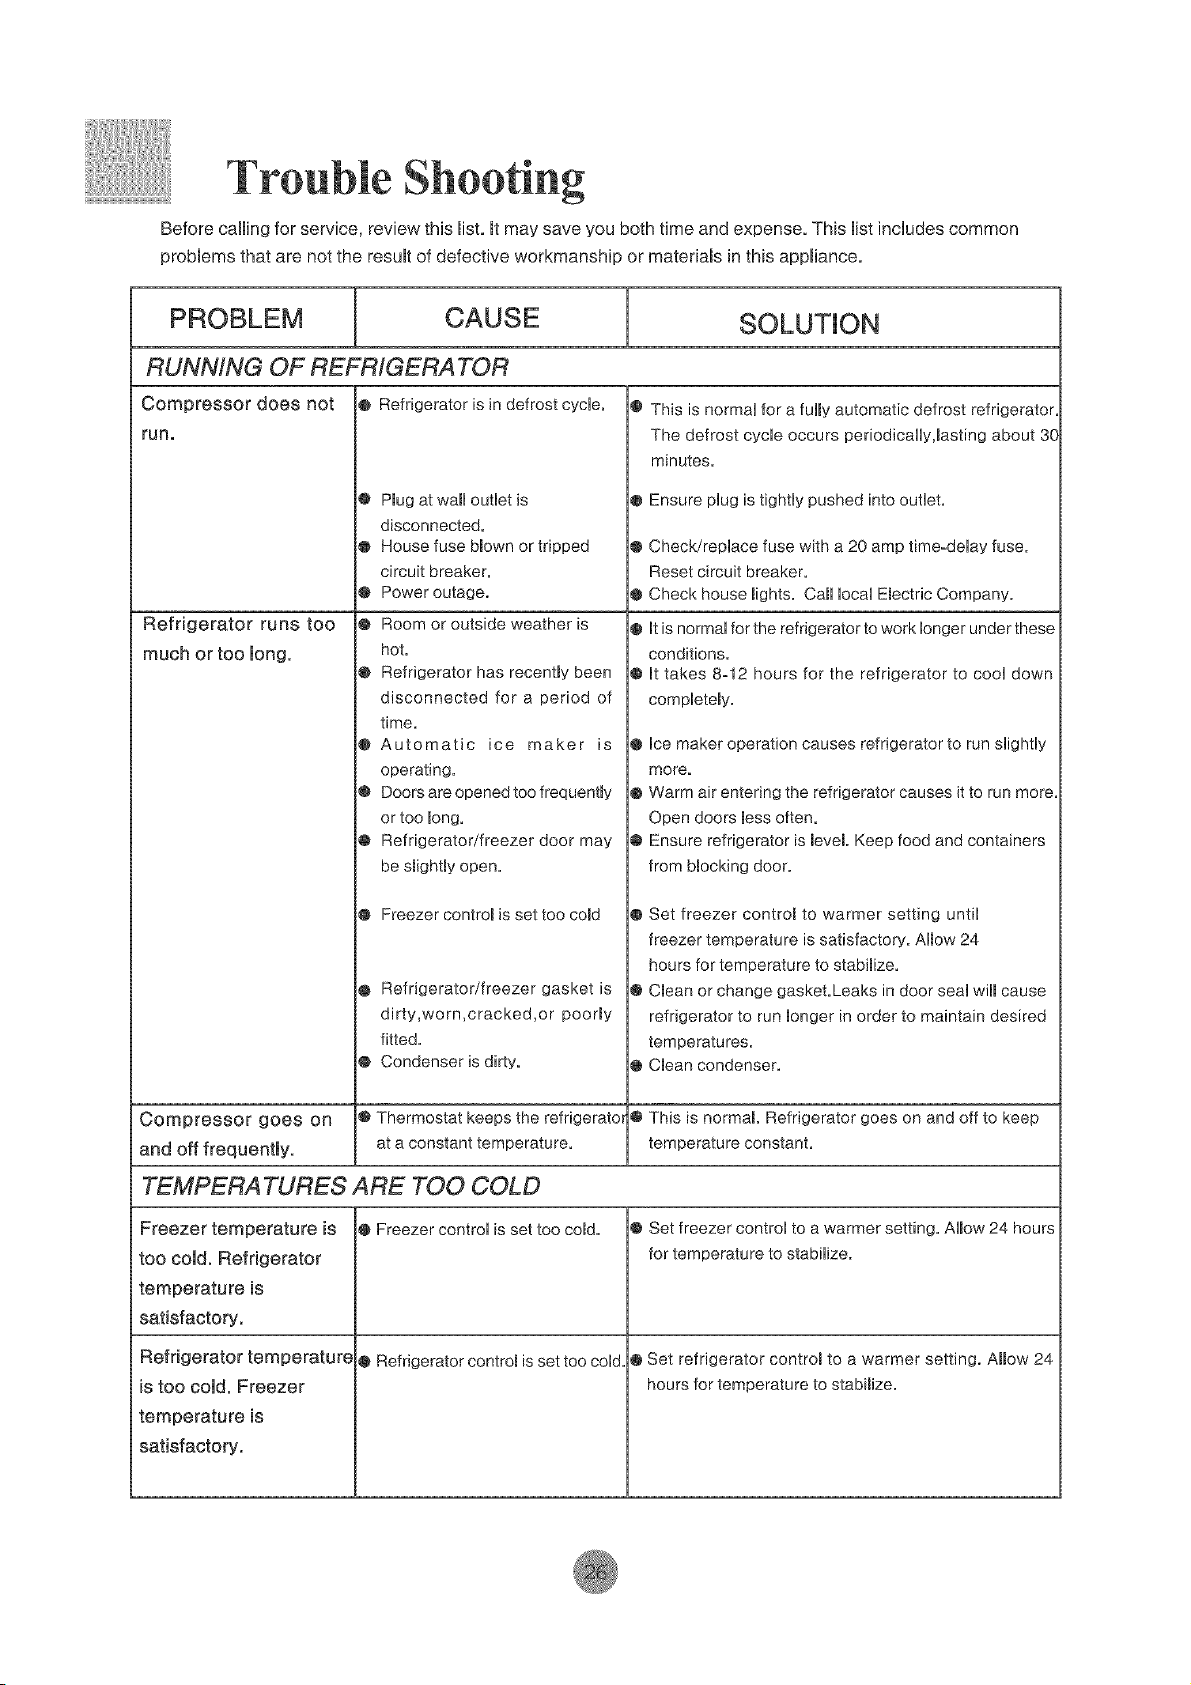
Before calling for service, review this Nist. Ntmay save you both time and expense. This mistincludes common
probmems that are not the result of defective workmanship or materiams in this appNiance.
PROBLEM I CAUSE
RUNN/NG OF REFRIGERATOR
Compressor does not o Refrigerator is in defrost cycle.
run,
Pmugat wamloutlet is
disconnected.
• House fuse Mown or tripped
circuit breaker.
Power outage.
Refrigerator runs too ® Room or outside weather is
much or too mong. hot.
I Refrigerator has recently been
disconnected for a period of
time.
I Automatic ice maker is
operating.
0 Doors are opened too frequently
or too Rong.
@ Refrigerator/freezer door may
be smightmyopen.
• Freezer controm is set too coBd
• Refrigerator/freezer gasket is
dirty,worn,cracked,or poody
fitted.
• Condenser is dirty.
Compressor goes on o Thermostatkeepsthe refrigerato
and off frequently, at a constant temperature.
TEMPERA TURES ARE TOO COLD
l SOLUTUON
Freezer temperature is
too cold. Refrigerator
temperature is
satisfactory.
Refrigerator temperature
is too cold. Freezer
temperature is
satisfactory.
D This is normal for a fulRy automatic defrost refrigerator
The defrost cycle occurs periodicallyjasting about 3C
minutes.
D Ensure plug is tightly pushed into outlet.
• Check/replace fuse with a 20 amp time-delay fuse.
Reset circuit breaker.
• Check house mights. Carollocal Emectric Company.
t It is normal for the refrigerator to work longer under these
conditions.
t It takes 8o12 hours for the refrigerator to cool down
completemy.
Ice maker operation causes refrigerator to run slightly
more.
I Warm air entering the refrigerator causes it to run more.
Open doors messoften.
@ Ensure refrigerator is _eveL Keep food and containers
from bmocking door.
0 Set freezer control to warmer setting until
freezer temperature is satisfactory. Almow 24
hours for temperature to stabilize.
D Clean or change gasket.Leaks in door seal will cause
refrigerator to run longer in order to maintain desired
temperatures.
• Clean condenser.
This is normal Refrigerator goes on and off to keep
temperature constant.
Freezer control is set too col
• Refrigerator controB is set too cold
• Set freezer control to a warmer setting. Almow 24 hours
for temperature to stabilize.
l Set refrigerator controm to a warmer setting. AHow 24
hours for temperature to stabimize.
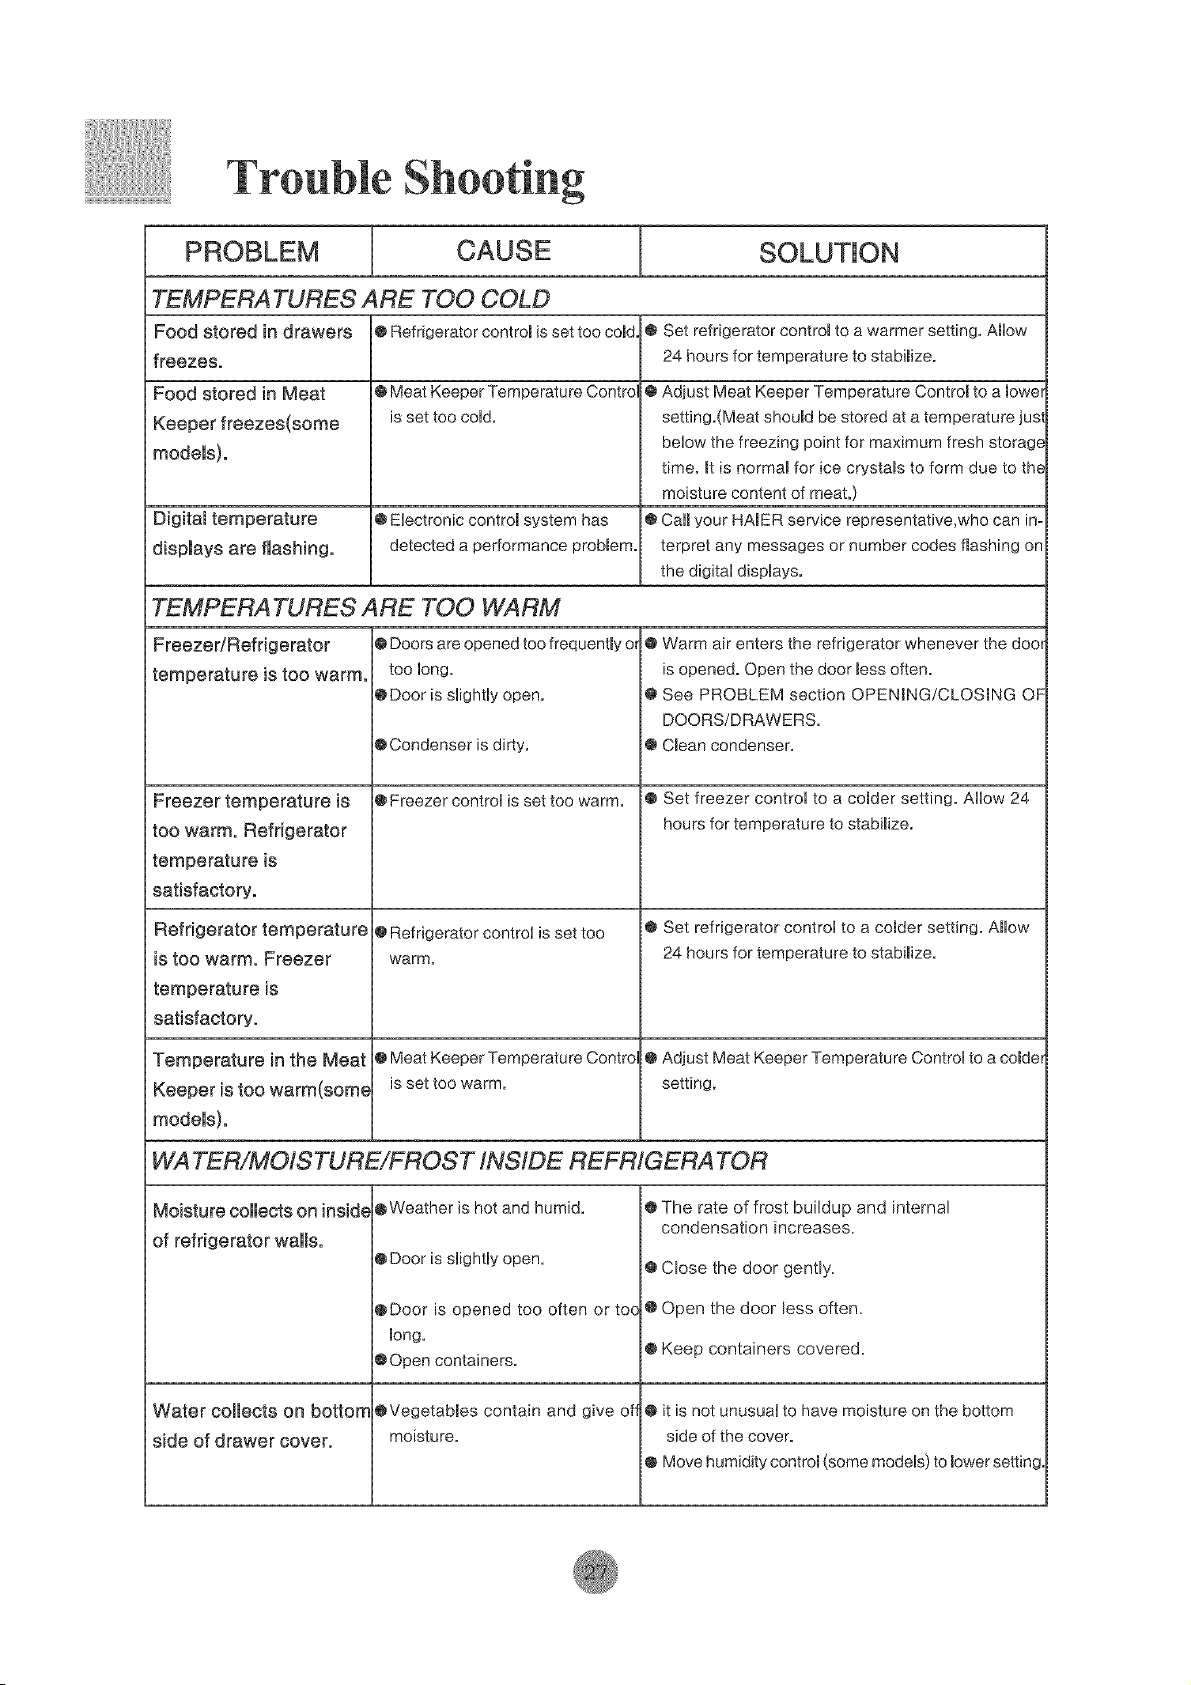
PROBLEM CAUSE SOLUTMON
TEMPERA TURFS ARE TOO COLD
Food stored in drawers @ Refrigerator controm is set too cored@ Set refrigerator controR to a warmer setting. AmUow
freezes. 24 hours for temperature to stabimize.
Food stored in Meat @ Meat Keeper Temperature Contro @ Adjust Meat Keeper Temperature ControR to a mowe_
Keeper freezes(some is set too coUd. setting.(Meat shouRd be stored at a temperature jus
models), beUow the freezing point for maximum fresh storag_
time. Rtis normam for ice crystams to form due to th_
moisture content of meat.)
Digital temperature @ EUectronic controm system has @ CaURyour HAER service representative,who can in-
dispmays are flashing, detected a performance probmem, terpret any messages or number codes flashing on
the digitaH dispmays.
TEMPERA TURES ARE TOO WARM
Freezer/Refrigerator
temperature is too warm.
Freezer temperature is
too warm. Refrigerator
temperature is
satisfactory.
Refrigerator temperature
is too warm. Freezer
temperature is
satisfactory.
Temperature in the Meat
Keeper is too warm(some
models).
@Doors are opened too frequently o_
too Uong.
@Door is sHightHyopen.
@Condenser is dirty.
@Freezer controU is set too warm.
@ Refrigerator controU is set too
warm.
@ Meat Keeper Temperature Contro
is set too warm.
@ Warm air enters the refrigerator whenever the doo_
is opened. Open the door messoften.
@ See PROBLEM section OPENmNG/CLOSmNG OF
DOORS/DRAWERS.
• Cmean condenser.
@ Set freezer control to a colder setting. Allow 24
hours for temperature to stabimize.
@ Set refrigerator control to a comder setting. Amlow
24 hours for temperature to stabimize.
@ Adjust Meat Keeper Temperature Control to a comde_
setting.
WA TER/MO/STURE/FROST INS/DE REFR/GERATOR
Moisture collects on inside
of refrigerator walls.
Water collects on bottom
side of drawer cover.
@Weather is hot and humid.
@Door is slightly open.
@Door is opened too often or toc
Rong.
@Open containers.
@VegetabRes contain and give of
moisture.
@ The rate of frost buildup and internal
condensation increases,
@ Close the door gently,
i@Open the door less often,
@ Keep containers covered,
@ it is not unusual to have moisture on the bottom
side of the cover.
@ Move humidity controm (some models) to mowersetting
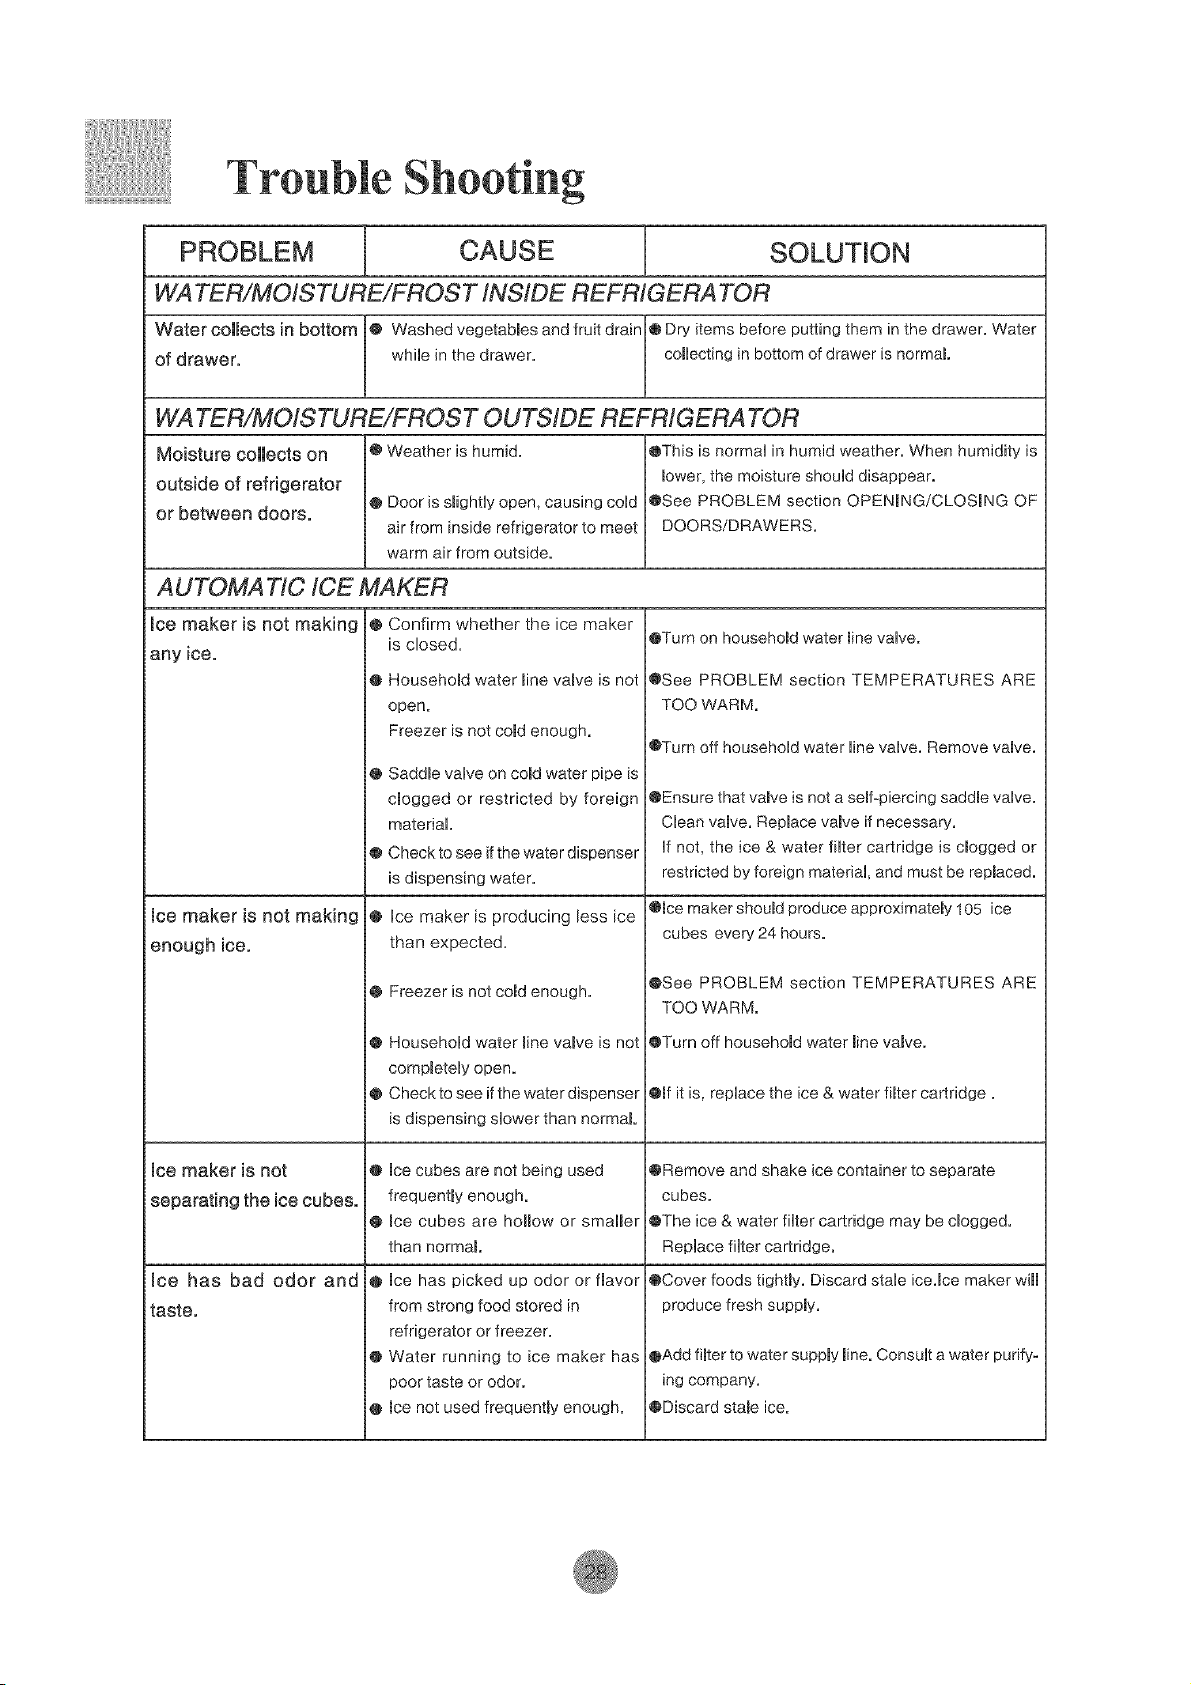
PROBLEM CAUSE SOLUTION
WA TER/MO/STURE/FROST iNS/DE REFR/GERATOR
Water collects in bottom o Washed vegetabmes and fruit drain • Dry items before putting them in the drawer. Water
of drawer, whiUe in the drawer, comUectingin bottom of drawer is normal.
WA TER/MOISTURE/FROST OUTSIDE
Moisture collects on
outside of refrigerator
or between doors,
Ice maker is not making
any ice.
@ Weather is humid. OThis is normal in humid weather. When humidity is
_ower, the moisture should disappear.
@ Door is smightUyopen, causing coUd OSee PROBLEM section OPENBNG/CLOSmNG OF
air from inside refrigerator to meet DOORS/DRAWERS.
warm air from outside.
A UTOMA 7"/0 iCE MAKER
0 Confirm whether the ice maker
is close&
O HousehoBd water mine vamve is not
open.
Freezer is not coredenough.
O Saddme valve on cord water pipe is
dogged or restricted by foreign
material.
@ Check to see if the water dispenser
is dispensing water.
Ice maker is producing less ice
than expected,
Freezer is not coredenough.
Household water minevamve is not
compRetely open.
Check to see if the water dispenser
is dispensing slower than normal
racecubes are not being used
frequently enough.
race cubes are hollow or smaller
than normal
race has picked up odor or flavor
from strong food stored in
refrigerator or freezer.
Water running to ice make[- has
poor taste or odor.
racenot used frequentmy enough.
Ice maker is not making @
enough ice.
@
®
@
ice maker is not o
separating the ice cubes.
®
Ice has bad odor and o
taste.
@
@
OTurn on household water _ine valve.
OSee PROBLEM section TEMPERATURES ARE
TOO WARM.
OTurn off household water line valve. Remove vamve.
CEnsure that valve is not a semfopiercing saddle valve.
Clean vamve. Repmace vamve if necessary.
If not, the ice & water filter cartridge is dogged or
restricted by foreign material, and must be repmaced.
Omcemaker shoumdproduce approximatemy 105 ice
cubes every 24 hours.
@See PROBLEM section TEMPERATURES ARE
TOO WARM.
OTurn off househomd water minevamve.
Omfit is, replace the ice & water fimter cartridge.
ORemove and shake ice container to separate
cubes.
OThe ice & water filter cartridge may be dogged.
Replace filter cartridge.
OCover foods tightly. Discard stale ice.race maker will
produce fresh supply.
@Add fimterto water suppmy mine.Consult a water purify-
ing company.
ODiscard statue ice.
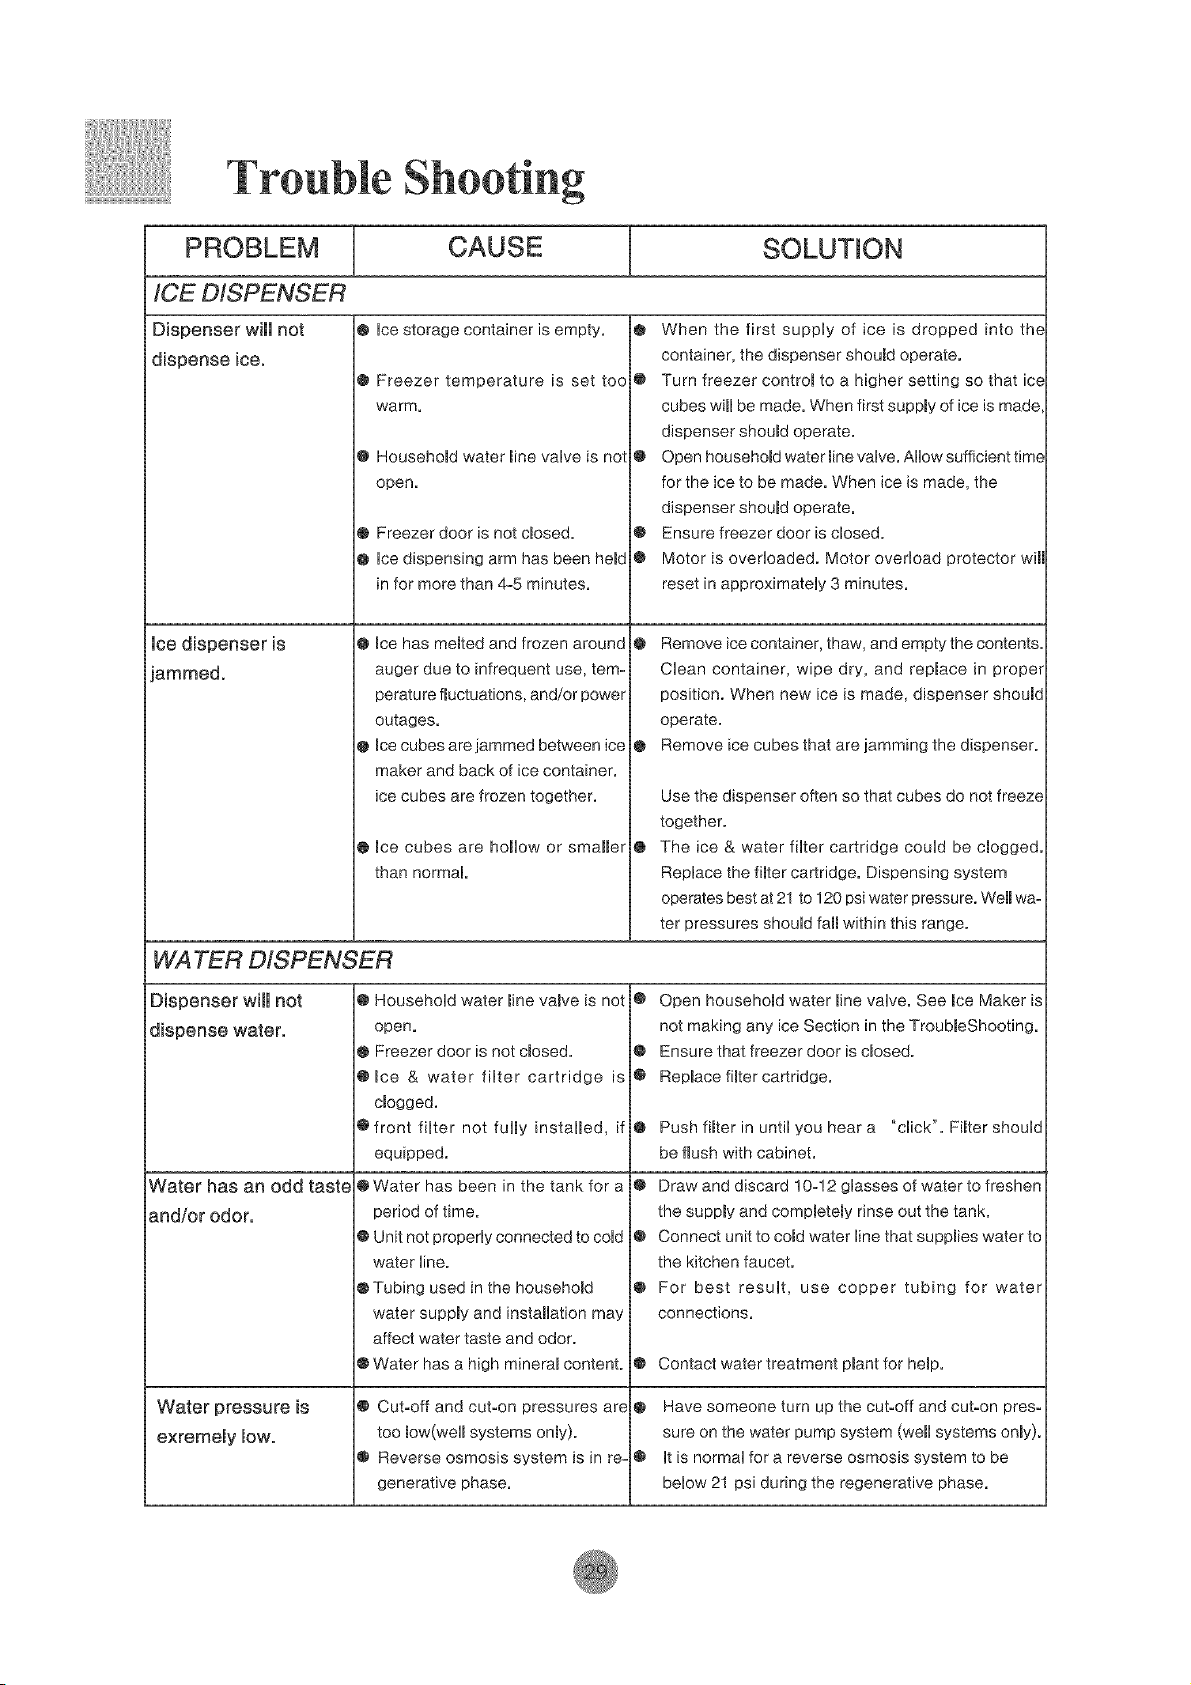
PROBLEM
ICE DiSPENSER
Dispenser will not
dispense ice.
Ice dispenser is
ammed.
l CAUSE SOLUTHON
@ Hoestorage container is empty.
@ Freezer temperature is set too
warm.
• Househomd water mine vaHve is not
open.
® Freezer door is not closed.
• Hoedispensing arm has been herod
in for more than 4-5 minutes.
@ Ice has memted and frozen around
auger due to infrequent use, tem-
perature fluctuations, and/or power
outages.
® racecubes are jammed between ice
maker and back of ice container.
ice cubes are frozen together.
Ice cubes are hoIHow or smaller
than normal
WATER D/SPENSER
Dispenser wilmnot • HousehoHd water minevamve is not
dispense water, open.
Water has an odd taste
and/or odor,
Water pressure is
exremely row.
@ Freezer door is not cmosed.
@ race & water fiHter cartridge is
dogged.
@ front fiHter not fuHmy instaHmed, if
equipped.
@ Water has been in the tank for a
period of time.
@ Unit not properHy connected to coHd
water Hine.
@Tubing used in the househomd
water suppmy and instamHation may
affect water taste and odor.
@ Water has a high mineraB content.
® Cut-off and cut-on pressures are
too Row(weHmsystems onRy).
@ Reverse osmosis system is in re-
generative phase.
@ When the first suppHy of ice is dropped into th_
container, the dispenser should operate.
@ Turn freezer controm to a higher setting so that ice
cubes wimHbe made. When first suppmy of ice is made
dispenser shoumd operate.
0 Open househomd water minevaHve. AHHowsufficient time
for the ice to be made. When ice is made, the
dispenser shoumd operate.
@ Ensure freezer door is cHosed.
• Motor is overHoaded. Motor overHoad protector wire
reset in approximateHy 3 minutes.
@ Remove ice container, thaw, and empty the contents.
CHean container, wipe dry, and replace in proper
position. When new ice is made, dispenser shoumd
operate.
0 Remove ice cubes that are jamming the dispenser.
0
®
0
0
®
0
0
0
0
0
Use the dispenser often so that cubes do not freeze
together.
The ice & water fiHter cartridge couHd be clogged,
RepHace the fimter cartridge. Dispensing system
operates best at 21 to 120 psi water pressure. Well wa-
ter pressures shouHd fall within this range.
Open househomd water Rine vaHve. See ice Maker is
not making any ice Section in the TroubBeShooting.
Ensure that freezer door is cmosed.
Repmace fimter cartridge.
Push fimter in untiH you hear a "cHick". Hter shouHd
be flush with cabinet.
Draw and discard 10-! 2 gHasses of water to freshen
the suppmy and compmetemy rinse out the tank.
Connect unit to coredwater Hinethat suppBies water to
the kitchen faucet.
For best resuHt, use copper tubing for water
connections.
Contact water treatment pmantfor hemp.
Have someone turn up the cut-off and cut-on pres-
sure on the water pump system (weIHsystems onmy).
Htis normaH for a reverse osmosis system to be
bellow 21 psi during the regenerative phase.
CAUSE SOLUTHON
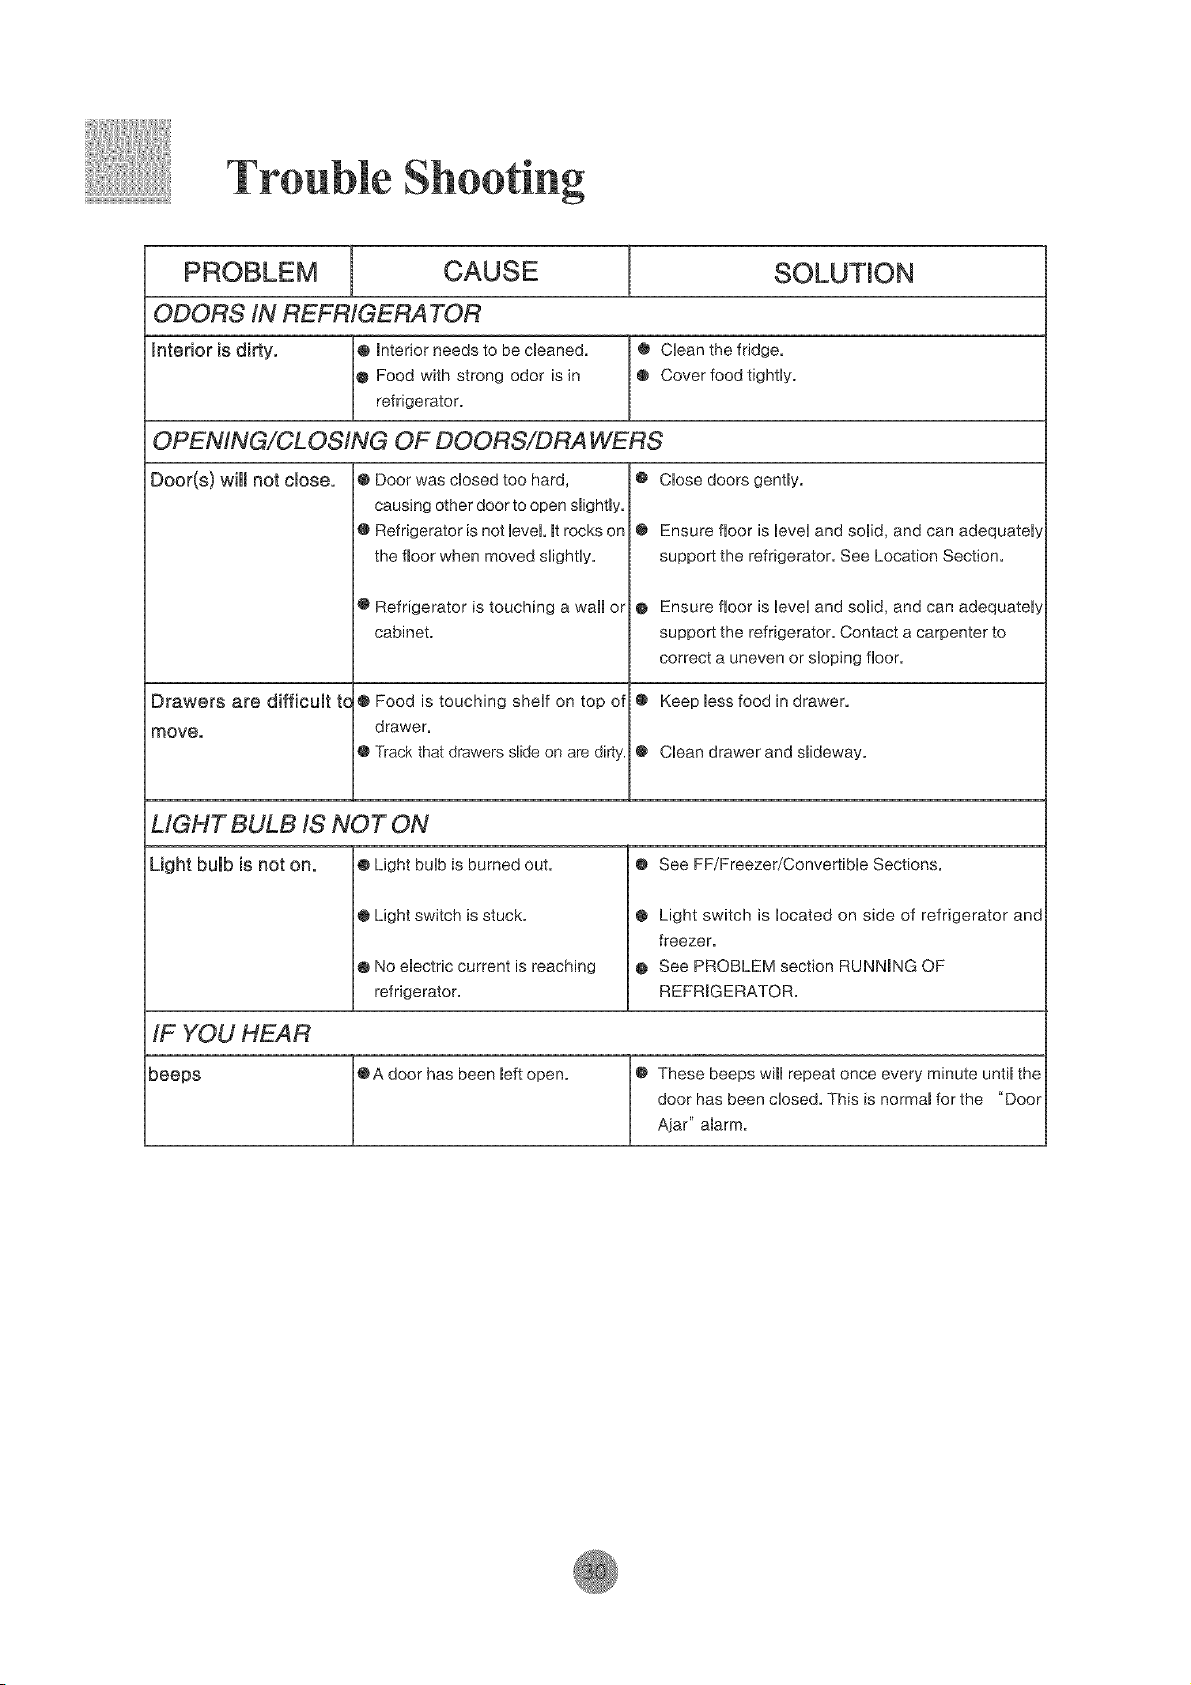
ODORS/N REFR/GERA TOR
Interior is dirty. • hterior needs to be cReaned. @ CUean the fridge.
I@ Food with strong odor is in @ Cover food tightly.
refrigerator.
OPEN/NG/CLOS/NG OF DOORS/DRA WERS
Door(s) will not close. • CUosedoors gently.
@ Door was dosed too hard,
causing other door to open smighfly.
@ Refrigerator is not UeveLmtrocks on
the floor when moved sUighfiy.
@ Refrigerator is touching a wall or
cabinet.
® Ensure floor is UeveUand somid, and can adequateUy
support the refrigerator. See Location Section.
@ Ensure floor is UeveUand soRid, and can adequateUy
support the refrigerator. Contact a carpenter to
correct a uneven or sUoping floor.
Drawers are difficult tc @ Food is touching sheUf on top of @ Keep messfood in drawer.
move. drawer.
@ Track that drawers slide on are dirty. @ Clean drawer and smideway.
LIGHT BULB/S NOT ON
Light bulb is not on. O Light bulb is burned out. @ See FF/Freezer/Convertible Sections.
@ Light switch is stuck.
@ No emeotric current is reaching
refrigerator.
@ Light switch is located on side of refrigerator and
freezer.
® See PROBLEM section RUNNmNG OF
REPRmGERATOR.
/F YOU HEAR
beeps @A door has been meftopen. ® These beeps wiml repeat once every minute untimthe
door has been closed. This is normam for the "Door
Ajar" amarm.
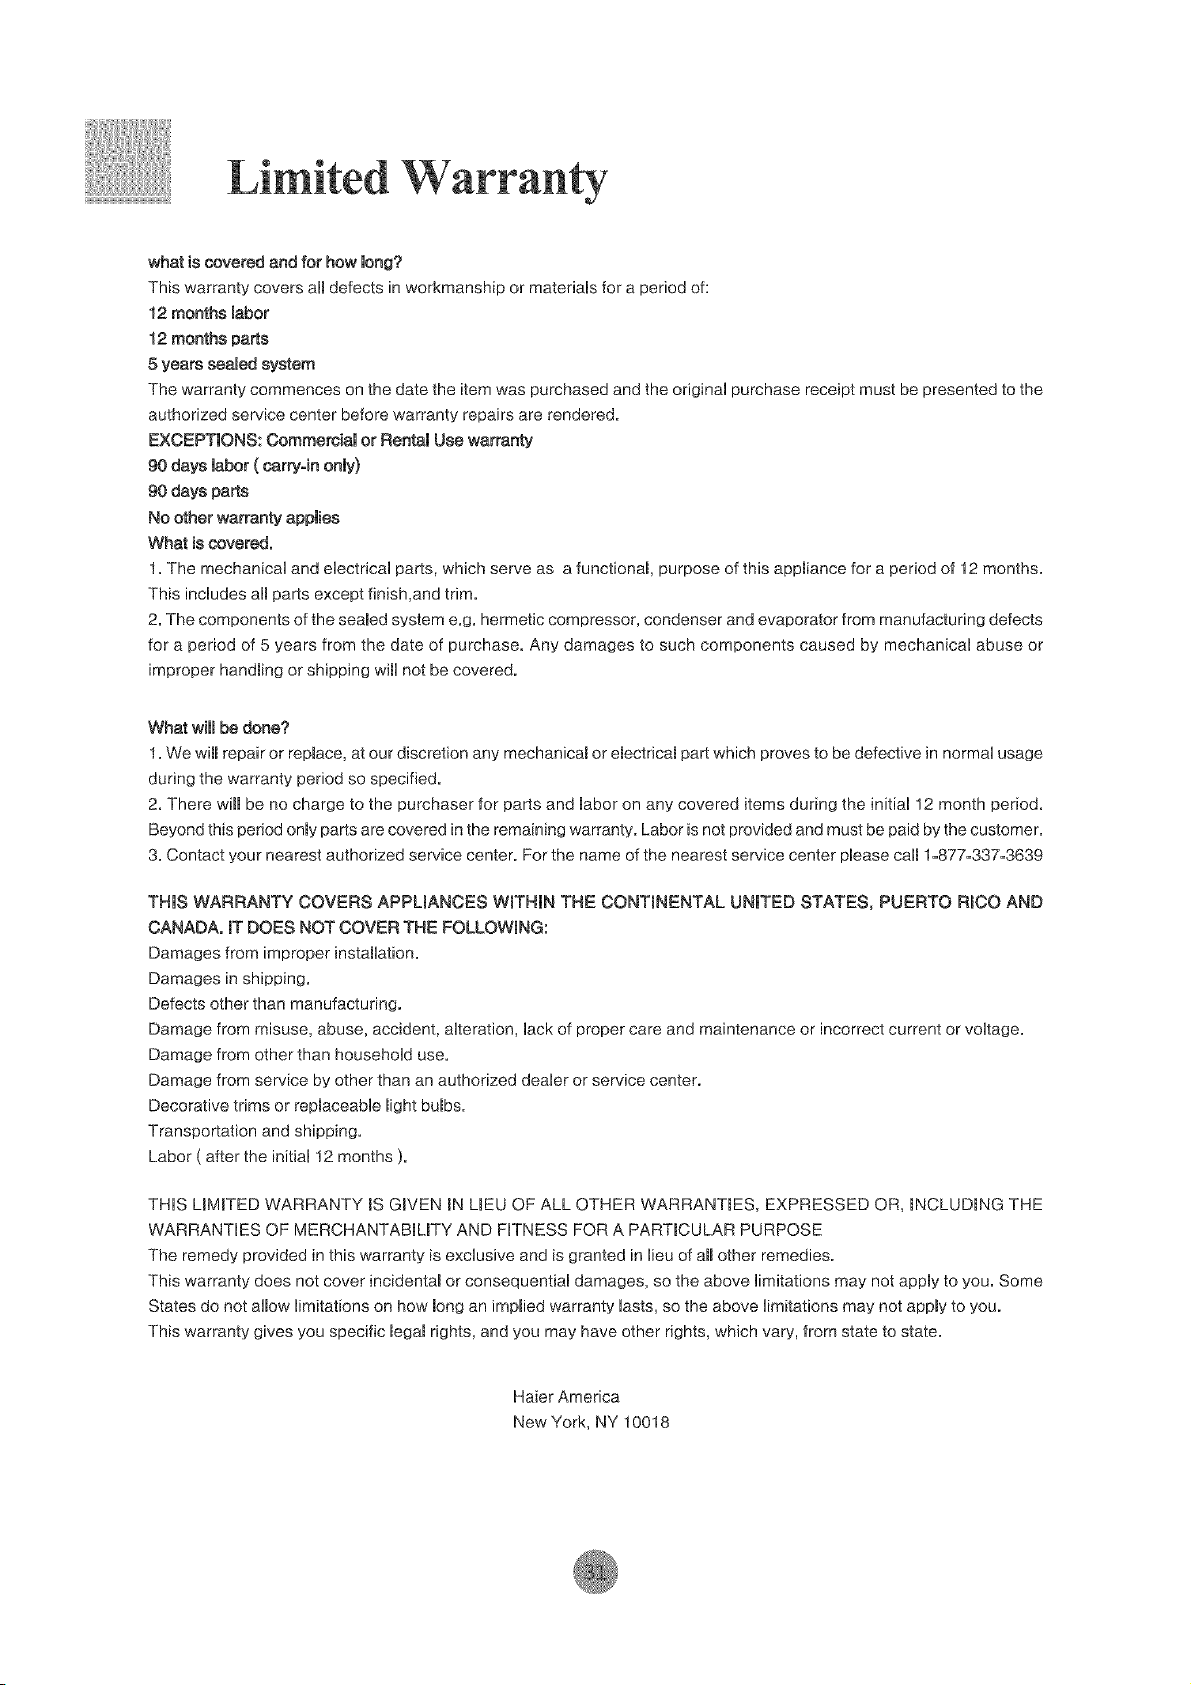
whatiscoveredandfor how long?
This warranty covers aimdefects in workmanship or materials for a period of:
12 months labor
12 months parts
5 years sealed system
The warranty commences on the date the item was purchased and the original purchase receipt must be presented to the
authorized service center before warranty repairs are rendered.
EXCEPTIONS: CommersiaI or Rental Use warranty
90 days labor ( carry=in only)
gO days parts
No other warranty applies
What is covered.
1. The mechanical and electrical parts, which serve as a functional purpose of this appmiance for a period of 12 months.
This includes aimparts except finish,and trim.
2. The components of the seamed system e.g. hermetic compressor, condenser and evaporator from manufacturing defects
for a period of 5 years from the date of purchase. Any damages to such components caused by mechanical abuse or
improper handming or shipping wimlnot be covered.
What wilmbe done?
1. We will repair or repmace, at our discretion any mechanicam or ebctricam part which proves to be defective in normal usage
during the warranty period so specified.
2. There will be no charge to the purchaser for parts and mabor on any covered items during the initial 12 month period.
Beyond this period onmyparts are covered in the remaining warranty. Labor is not provided and must be paid by the customer.
3. Contact your nearest authorized service center. For the name of the nearest service center please calm1=877=337=3639
THIS WARRANTY COVERS APPLIANCES WmTHIN THE CONTmNENTAL UNITED STATES, PUERTO RmCO AND
CANADA. mTDOES NOT COVER THE FOLLOWmNG:
Damages from improper instamlatiom
Damages in shipping.
Defects other than manufacturing.
Damage from misuse, abuse, accident, alteration, lack of proper care and maintenance or incorrect current or voltage.
Damage from other than household use.
Damage from service by other than an authorized dealer or service center.
Decorative trims or repmaceable might bumbs.
Transportation and shipping.
Labor ( after the initial 12 months ).
THiS LmMFED WARRANTY mSGraVEN mNUEU OF ALL OTHER WARRANTmES, EXPRESSED OR, mNCLUDmNG THE
WARRANTIES OF MERCHANTABmUTY AND FITNESS FOR A PARTmCULAR PURPOSE
The remedy provided in this warranty is exclusive and is granted in lieu of aH other remedies.
This warranty does not cover incidentam or consequential damages, so the above limitations may not appmy to you. Some
States do not albw limitations on how bng an impRied warranty lasts, so the above limitations may not appmy to you.
This warranty gives you specific megamrights, and you may have other rights, which vary, from state to state.
Haier America
New York, NY 10018

0060512118
02.25

