Loading ...
Loading ...
Loading ...
12/2016
- 5 -
Copyright © 2016, Fast ČR, a.s.
EN
Vita fryer
User'smanual
■ Prior to using this appliance, please read the user’smanual thoroughly, even
in cases, when one has already familiarised themselves with previous use of
similar types of appliances. Only use the appliance in the manner described
in this user’smanual. Keep this user’smanual in asafe place where it can be
easily retrieved for future use.
■ We recommend saving the original cardboard box, packaging material,
purchase receipt and responsibility statement of the vendor or warranty
card for at least the duration of the legal liability for unsatisfactory
performance or quality. In the event of transportation, we recommend that
you pack the appliance in the original box from the manufacturer.
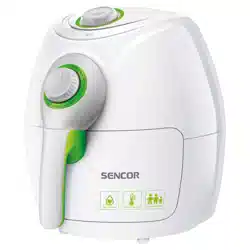
DESCRIPTION OF THE APPLIANCE
A1 Air supply ventilation openings
A2 Temperature control dial in the range 80–200 °C
A3 Power indicator
A4 30-minute timer
A5 Handle with abutton for releasing the removable basket from the pan
A6 Removable pan with anon-stick surface
A7 Removable basket with anon-stick surface (not shown)
is located inside the pan.
A8 Heating indicator
A9 Heating element and fan (not shown)
is located inside the appliance.
A10 Air exhaust ventilation openings (not shown)
Located at the rear of the appliance.
BEFORE FIRST USE
■ Before first use take the appliance and its accessories out of the packaging
material.
■ Wash the removable parts (pan A6 and basket A7) intended for coming into
contact with food under warm running water with an addition of kitchen
detergent. Then rinse under clean water, dry thoroughly, and put them back
in their place.
■ Connect the appliance to a power socket and start it empty by turning
the temperature control dial A2 to maximum and set the timer A4 to 10
minutes to remove any potential odours from manufacture.
Note:
When first turned on, asmall amount of smoke may be emitted. This
is an entirely normal event, which will disappear in ashort time.
■ At the end of the set time asound is made and the appliance will turn off
automatically.
■ Disconnect the power cord from the power socket and allow the appliance
to cool down.
OPERATING THE APPLIANCE
1. Place the appliance on astable, even and clean surface. Pull on the handle
A5 to slide the removable pan A6 with the basket A7 out of the appliance.
Place the food that you wish to process by heat into the basket A7. When
putting in the food, do not exceed the MAX mark on the removable basket
A7. To ensure optimal results, adhere to the minimum and maximum food
amount indicated in the table Recommended frying times.
Attention:
Never place the food directly in the pan A6.
2. Slide the removable pan A6 with the filled basket A7 back into the
appliance and connect the power cord to apower socket.
3. Set the temperature control dial A2 to the desired temperature and the
timer A4 to the operating time. Setting the timer A4 will start the appliance
and both indicator lights A3 and A8 will turn on. The lit indicator lights
show that the appliance is in operation and the heating element A9 is
heating up. When the set temperature is reached, the indicator light A8 will
turn off. During operation, the heating indicator light A3 will intermittently
turn on and off. This signalises that the set temperature is being maintained.
Excess fat from the food is drained into the pan A6.
Note:
To set the correct temperature and time, you may refer to the table
Recommended frying times.
4. Certain foods may require preheating the appliance. This takes
approximately 3 to 4 minutes. Set the temperature control dial A2 to the
desired temperature and set the timer A4 to 4 minutes. Wait until the
indicator light A8 turns off. This signalises that the desired temperature has
been reached. Then, carefully slide the pan A6 with the basket A7 out and
place it on aheat-resistant surface. Be especially careful not to touch the hot
surface. Fill the basket A7 with food. Slide the removable pan A6 with the
filled basket A7 back into the appliance and set the operating time.
5. It is appropriate to stir certain types of food during the cooking process.
Slide the pan A6 out of the appliance and place it on a heat-resistant
surface. For safety reasons, during this time, the heating element A9 is
turned off but the timer A4 continues to countdown to the end of the
operating time. Be especially careful not to touch the hot surface or not to
scald yourself on the steam that is released from the food. Press the button
on the handle A5 (see fig. B) to release the removable basket A7, lift it up
and hold above the pan A6. Be careful of hot fat or juices that may drip
off certain foods. Carefully shake it from side to side to stir the food and
then put it back into the pan A6. For the basket A7 to be properly seated
in the pan A6, it is necessary for the handle A5 to slide back into place. This
is indicated by aclick. Slide the pan A6 with the basket A7 back into the
appliance. This will resume the operation of the heating element A9.
6. To heat up food, set the temperature to 150 °C and the timer A4 to
10 minutes.
7. At the end of the set time a sound is made and the appliance stops
automatically. To stop the appliance prematurely, set the timer A4 to
position 0.
8. When the appliance has stopped, slide the pan A6 out. Press the button
on the handle A5 (see fig. B) to release the removable basket A7, lift it up
and empty out its contents. Silicone or wooden kitchen utensils may also be
used for removing food from the basket A7. To prevent damaging the non-
stick surface treatment of the removable basket A7, we do not recommend
using metal kitchen utensils
9. When you have finished using it, make sure that the appliance is turned
off. Disconnect it from the power socket, allow it to cool down, and clean
it out according to the instructions contained in the chapter Cleaning and
maintenance.
RECOMMENDED FRYING TIMES
Food type MIN and
MAX
amount
Temperature
Frying
time
Stirring
during
frying
Note
Frozen
French fries
7 × 7 mm
100–400 g 200 °C 9–16 min yes
Homemade
French fries
10 × 10 mm
100–400 g 200 °C 16–20 min yes Add half
ateaspoon
of oil
Home
potato
wedges
100–400 g 180 °C 18–22 min yes Add half
ateaspoon
of oil
Pork chops 100–400 g 180 °C 10–14 min no
Minced
hamburger
meat
100–400 g 180 °C 7–14 min no
Chicken
drumsticks
100–400 g 180 °C 18–22 min no
Spring rolls 100–400 g 200 °C 8–10 min yes Preheat
the
appliance
Frozen
chicken
nuggets
100–400 g 200 °C 6–10 min yes Preheat
the
appliance
Frozen fish
fingers
100–400 g 200 °C 6–10 min no Preheat
the
appliance
Baked
stuffed
vegetables
100–400 g 160 °C 10 min no
Cakes 300 g 160 °C 20–25 min no Use acake
pan
French
quiche
400 g 180 °C 20–22 min no Use
abaking
pan
Muffins 300 g 200 °C 15–18 min no Use muffin
moulds
Loading ...