Owner's Manual and
Installation Instructions
27-Inch Wide
GAS DRYERS
IMPORTANT:
Read and follow all safety
and operating instructions
before first use of this product.
Sears, Roebuck and Co., Hoffman Estates, IL 60179 U.S.A.
www, sears.corN
3405603B PRINTED IN U.SA 11/00
WARNING: For your safety the information in this manual
must be followed to minimize the risk of fire or explosion or
to prevent property damage, personal injury, or death.
-Do not store or use gasoline or other flammable vapors and
liquids in the vicinity of this or any other appliance.
-WHATTO DO iF YOU SMELL GAS:
* Do not try to light any appliance.
* Do not touch any electrical switch; do not use any phone in your
building.
, Clear the room, building, or area of all occupants.
, immediately call your gas supplier from a neighbor's phone.
Follow the gas supplier's instructions.
, if you cannot reach your gas supplier, call the fire department.
-installation and service must be performed by a qualified installer,
service agency, or the gas supplier.
BEFORE USING YOUR NEW DRYER
KENMORE GAS DRYER WARRANTY
DRYER SAFETY
INSTALLATIONINSTRUCTIONS
3
4
5
7
OPERATING YOUR DRYER
LAUNDRY TIPS
CARING FOR YOUR DRYER
TROUBLESHOOTING
WE SERVICE WHAT WE SELL
24
31
33
37
39
Please read this manual, it will help
you install and operate your new
Kenmore dryer in the most economical
way.
if you need more information about the
care and operation of Kenmore
appliances call your nearest Sears store.
You will need the complete model and
serial numbers when requesting
information. Your dryer's model and
serial numbers are located on the
Model and Serial Number Plate.
Use the space below to record the model
number and serial number of your new
Kenmore dryer.
Model No.
Serial No.
Date of Purchase
Keep this book and your Sears
Salescheck (receipt) in a safe
place for future reference.
Full One Year Warranty on
Mechanical and Electrical Parts
For one year from the date of purchase,
if this dryer is installed and operated
according to the instructions in this
manual, Sears will repair or replace any
of its mechanical or electrical parts if they
are defective in material or workmanship.
NOTE: Exhausting your dryer with
a plastic vent may void this warranty.
Pages 18-22 of this manual describe
the complete exhaust requirements
for this dryer.
Warranty Restriction
If the dryer is subjected to other than
private family use, all warranty coverage is
effective for only 90 days.
Warranty Service
Warranty service is available by contacting
your nearest Sears Service Center in the
United States.
This warranty applies only while this dryer
is in use in the United States.
This warranty gives you specific legal
rights, and you may also have other rights
which vary from state to state.
Sears, Roebuck and Co., Dept. 817WA,
Hoffman Estates, IL 60179
For Sears Warrantyinformationor to contact a
Sears ServiceCenter, call1-8OO-4-MY-HOMEs_
(1-800-469-4663).
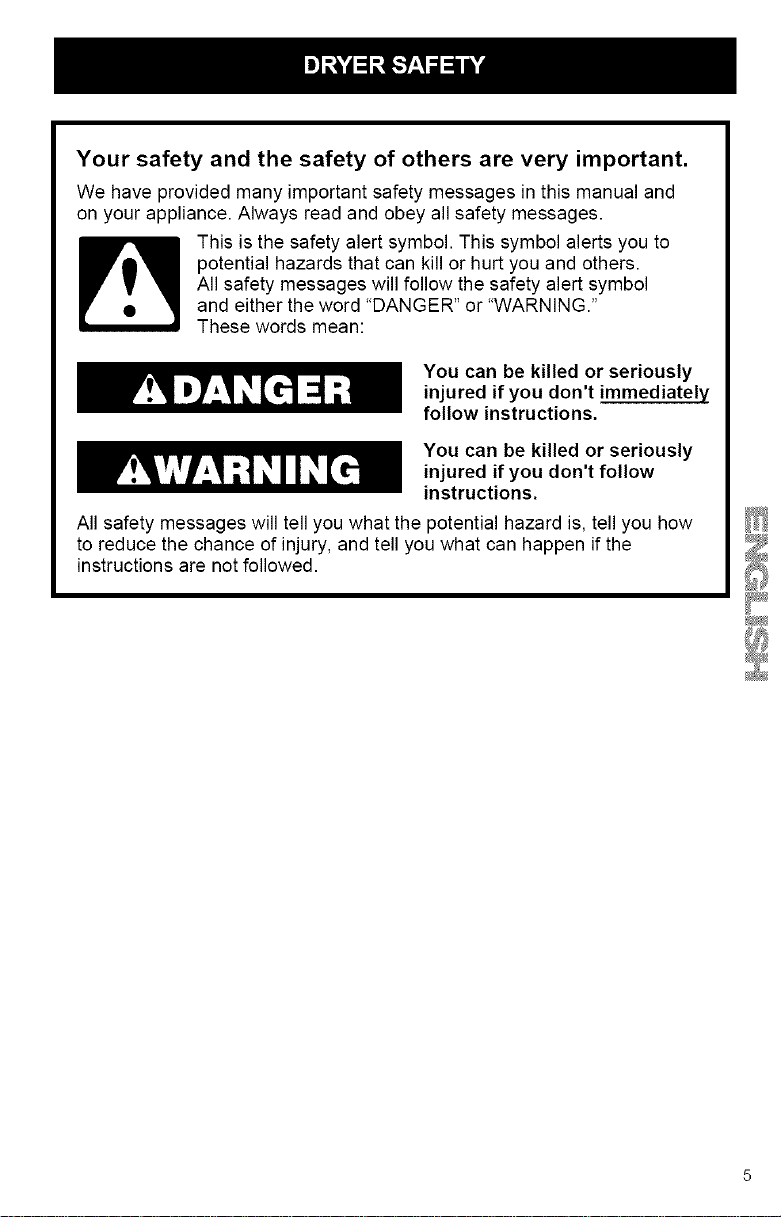
Your safety and the safety of others are very important.
We have provided many important safety messages in this manual and
on your appliance. Always read and obey all safety messages.
This is the safety alert symbol. This symbol alerts you to
potential hazards that can kill or hurt you and others.
All safety messages will follow the safety alert symbol
and either the word "DANGER" or "WARNING."
These words mean:
You can be killed or seriously
injured if you don't immediately
follow instructions.
You can be killed or seriously
injured if you don't follow
instructions.
All safety messages will tell you what the potential hazard is, tell you how
to reduce the chance of injury, and tell you what can happen if the
instructions are not followed.
IMPORTANT SAFETY INSTRUCTIONS
WARNING : To reduce the risk of fire, electric shock, or injury to persons
when using the dryer, follow basic precautions, including the following:
• Read all instructions before using
the dryer.
• Do not place items exposed to cook-
ing oils in your dryer. Items contami-
nated with cooking oils may contribute
to a chemical reaction that could
cause a load to catch fire.
• Do not dry articles that have been pre-
viously cleaned in, washed in, soaked
in, or spotted with gasoline, dry-
cleaning solvents, other flammable, or
explosive substances as they give off
vapors that could ignite or explode.
• Do not allow children to play on or in
the dryer. Close supervision of
children is necessary when the dryer
is used near children.
• Before the dryer is removed from
service or discarded, remove the door
to the drying compartment.
• Do not reach into the dryer if the drum
is moving.
• Do not install or store the dryer where
it will be exposed to the weather.
• Do not tamper with controls.
• Do not repair or replace any part of
the dryer or attempt any servicing
unless specifically recommended in
this Use and Care Guide or in
published user-repair instructions
that you understand and have the
skills to carry out.
• Do not use fabric softeners or
products to eliminate static unless
recommended by the manufacturer
of the fabric softener or product.
• Do not use heat to dry articles
containing foam rubber or similarly
textured rubber-like materials.
• Clean lint screen before or after
each load.
• Keep area around the exhaust
opening and adjacent surrounding
areas free from the accumulation
of lint, dust, and dirt.
• The interior of the dryer and
exhaust vent should be cleaned
periodically by qualified service
personnel.
• See Installation Instructions for
grounding requirements.
SAVE THESE INSTRUCTIONS
IMPORTANT: The gas installation must conform with local codes, or in the
absence of local codes, with the National Fuel Gas Code, ANSI Z223.1/NFPA 54.
The dryer must be electrically grounded in accordance with local codes, or in
the absence of local codes, with the National Electrical Code, ANSI/NFPA 70 or
Canadian Electrical Code, CSA C22.1.
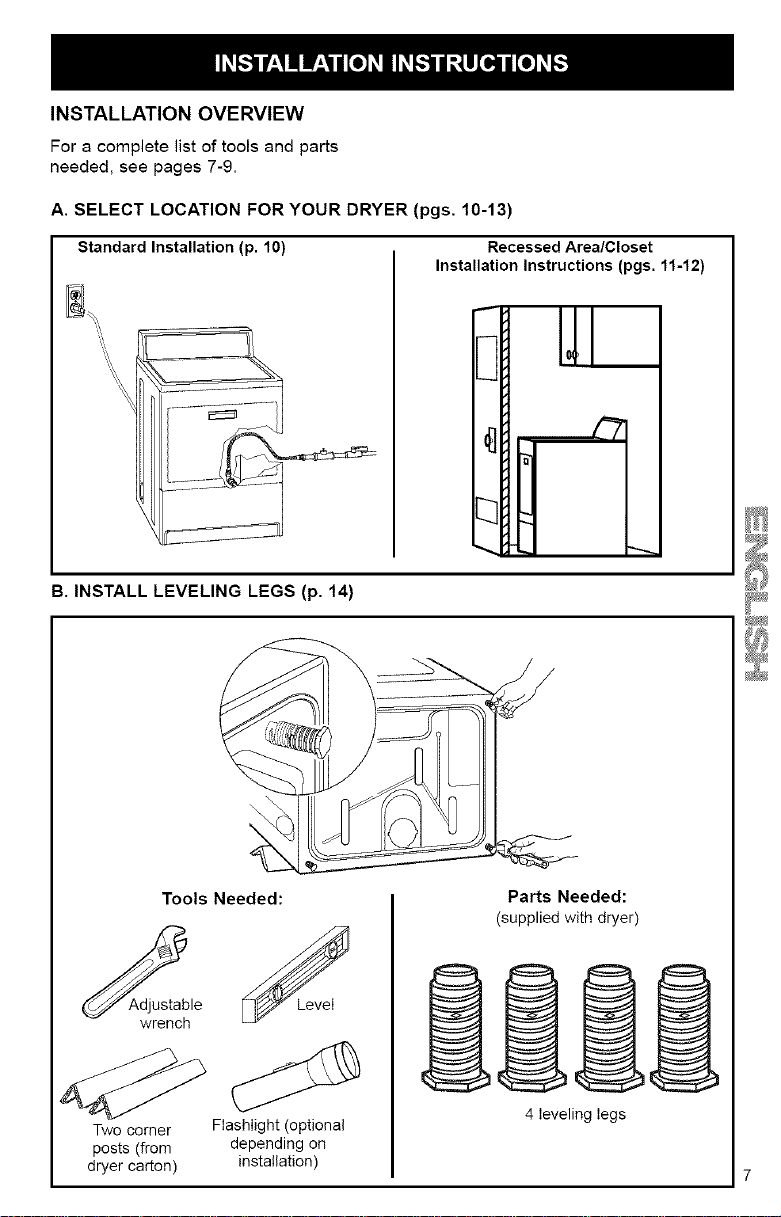
INSTALLATION OVERVIEW
For a complete list of tools and parts
needed, see pages 7-9.
A. SELECT LOCATION FOR YOUR DRYER (pgs. 10-13)
Standard Installation (p. 10) Recessed Area/Closet
Installation Instructions (pgs. 11-t2)
B. INSTALL LEVELING LEGS (p. 14)
Tools Needed:
_le
wrench
Two corner
posts (from
dryer carton)
Flashlight (optional
depending on
installation)
Parts Needed:
(supplied with dryer)
4 leveling legs
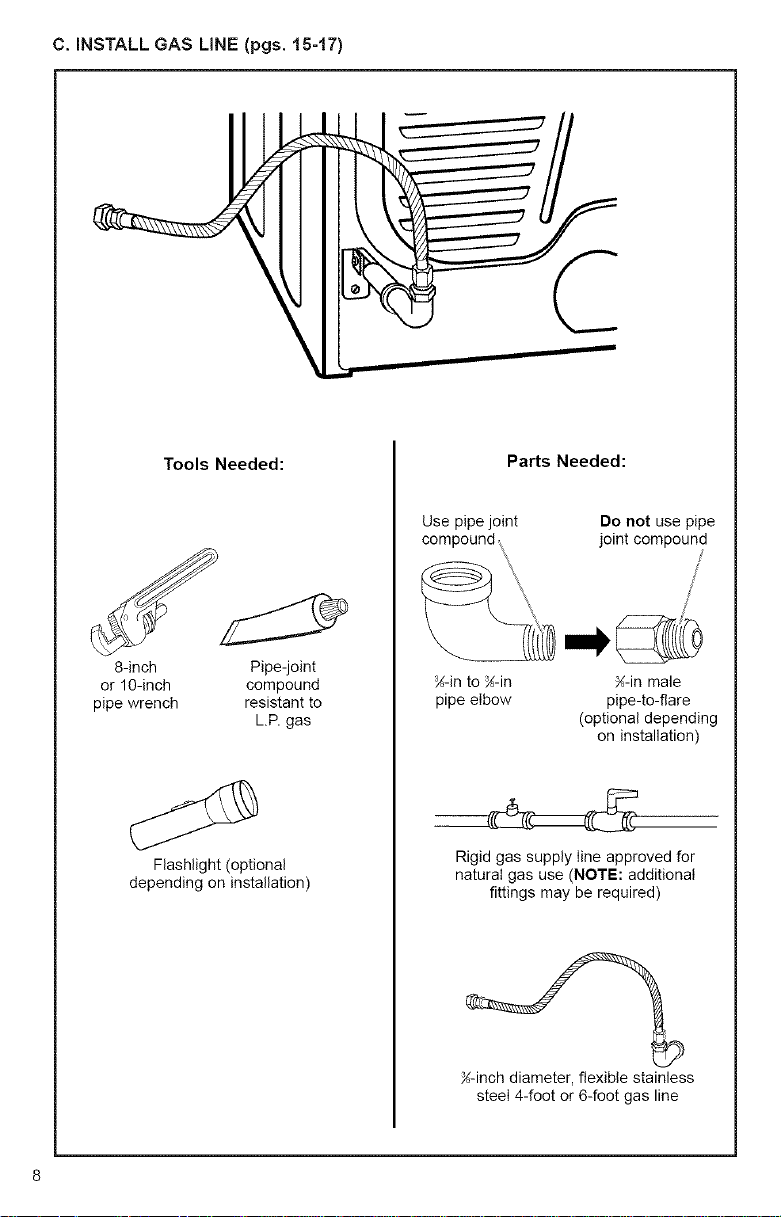
C, INSTALL GAS LINE (pgs. 15-17)
Tools Needed:
8-inch Pipe-joint
or 10-inch compound
pipe wrench resistant to
LP. gas
Flashlight (optional
depending on installation)
Parts Needed:
Use pipe joint Do not use pipe
compound joint compound
/
/
N-in to g-in K-in male
pipe elbow pipe-to-flare
(optional depending
on installation)
Rigid gas supply line approved for
natural gas use (NOTE: additional
fittings may be required)
K-inch diameter, flexible stainless
steel 4-foot or 6-foot gas line
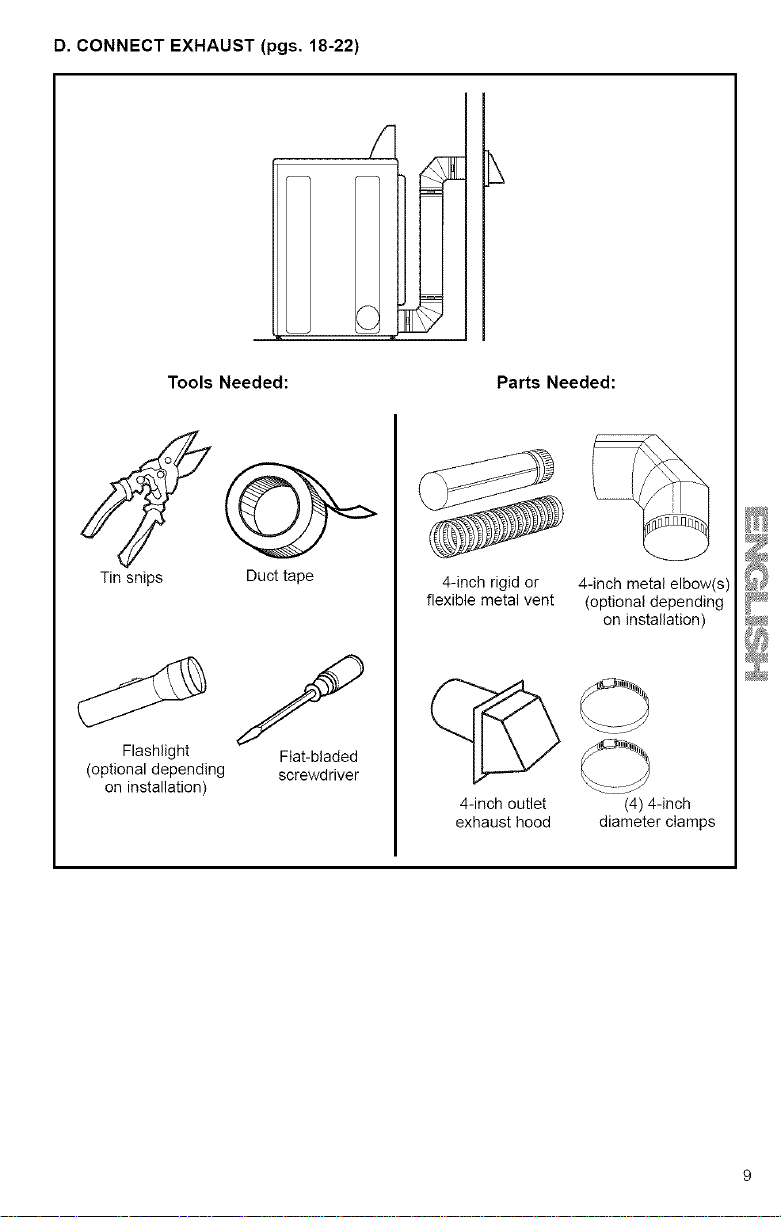
D. CONNECT EXHAUST (pgs. 18-22)
Tools Needed: Parts Needed:
Tin snips
Flashlight
(optional depending
on installation)
Duct tape
Fiat-bladed
screwdriver
4-inch rigid or
flexible metal vent
4-inch outlet
exhaust hood
4-inch metal elbow(s)
(optional depending
on installation)
(4) 4-inch
diameter clamps
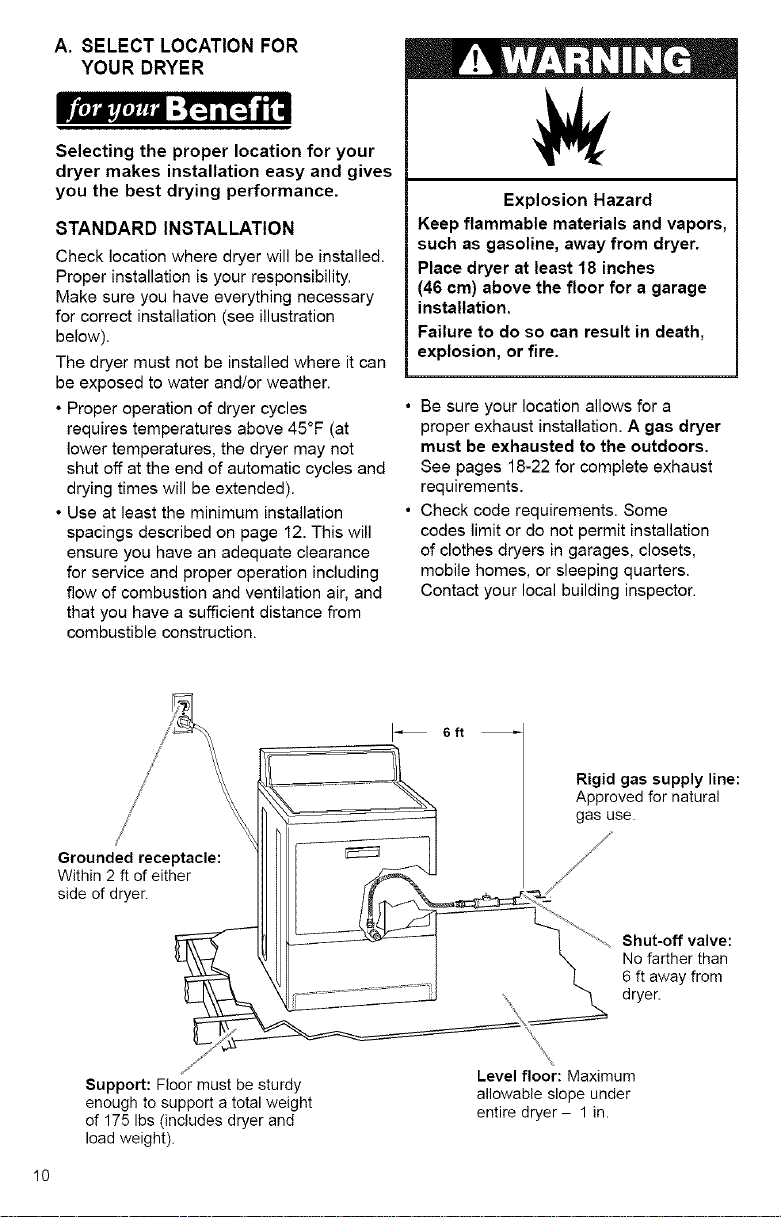
A. SELECT LOCATION FOR
YOUR DRYER
_i,J_i+,r,J+,_="-I_ i[;4 i'll
Selecting the proper location for your
dryer makes installation easy and gives
you the best drying performance.
STANDARD INSTALLATION
Check location whore dryer will be installed.
Proper installation is your responsibility,
Make sure you have everything necessary
for correct installation (see illustration
below).
The dryer must not be installed where it can
be exposed to water and/or weather.
• Proper operation of dryer cycles
requires temperatures above 45°F (at
lower temperatures, the dryer may not
shut off at the end of automatic cycles and
drying times will be extended).
• Use at least the minimum installation
spacings described on page 12. This will
ensure you have an adequate clearance
for service and proper operation including
flow of combustion and ventilation air, and
that you have a sufficient distance from
combustible construction.
Explosion Hazard
Keep flammable materials and vapors,
such as gasoline, away from dryer.
Place dryer at least 18 inches
(46 cm) above the floor for a garage
installation.
Failure to do so can result in death,
explosion, or fire.
• Be sure your location allows for a
proper exhaust installation. A gas dryer
must be exhausted to the outdoors.
See pages 18-22 for complete exhaust
requirements.
• Check code requirements. Some
codes limit or do not permit installation
of clothes dryers in garages, closets,
mobile homes, or sleeping quarters.
Contact your local building inspector.
I_ 6 ft
Grounded receptacle:
Within 2 ft of either
side of dryer.
Support: Floor must be sturdy
enough to support a total weight
d 175 Ibs (includes dryer and
load weight).
Level floor: Maximum
allowable slope under
entire dryer- 1 in.
10
RECESSED AREA/CLOSET
INSTALLATION INSTRUCTIONS
This dryer may be installed in a recessed
area or closet.
The dryer must not be installed where it
can be exposed to water and/or weather.
• Proper operation of dryer cycles
requires temperatures above 45°F (at
lower temperatures, the dryer may not
shut off at the end of automatic cycles
and drying times will be extended).
• Use at least the minimum installation
spacings described on page 12. This will
ensure you have an adequate clearance
for service and proper operation includ-
ing flow of combustion and ventilation
air, and that you have a sufficient dis-
tance from combustible construction.
• Be sure your location allows for a
proper exhaust installation. A gas dryer
must be exhausted to the outdoors.
See pages 18-22 for complete exhaust
requirements.
• Check code requirements. Some
codes limit or do not permit installation
of clothes dryers in garages, closets,
mobile homes, or sleeping quarters.
Contact your local building inspector.
WARN ING: To reduce the risk of fire,
this appliance MUST BE EXHAUSTED
OUTDOORS.
NOTE: No fuel-burning appliances may
be installed in the same closet as a dryer.
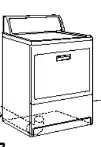
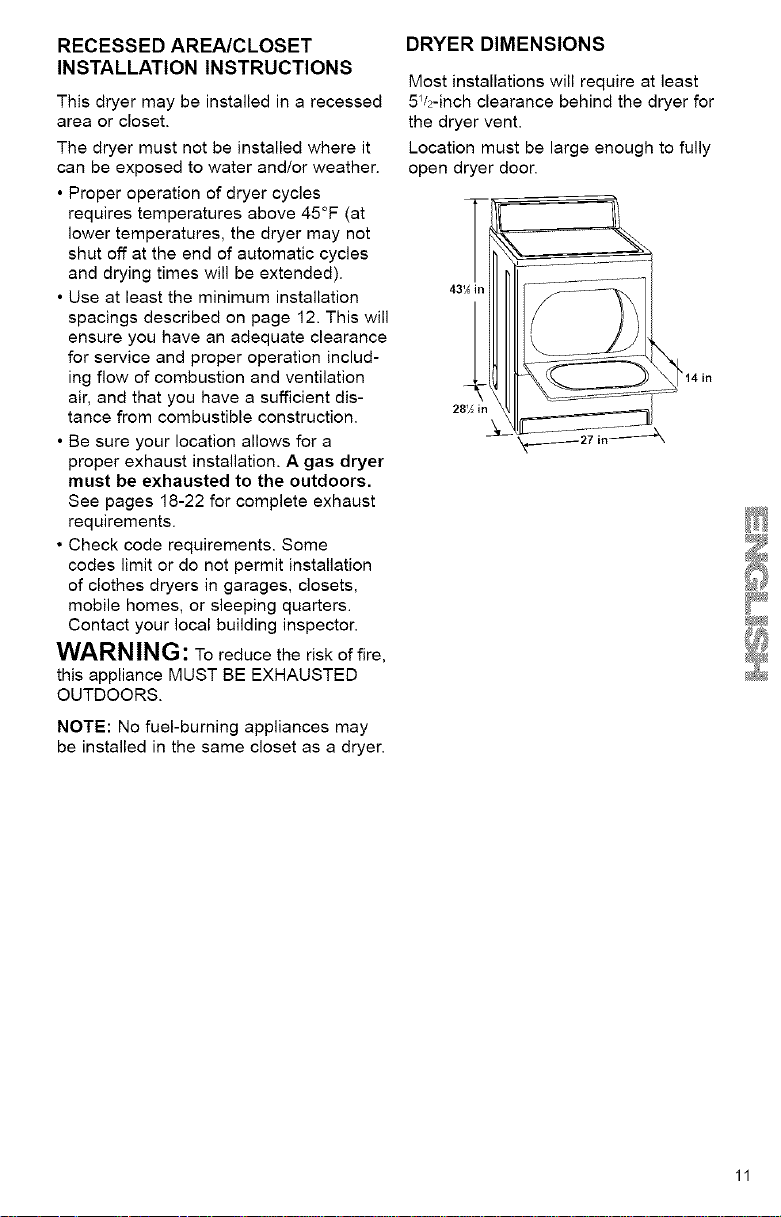
DRYER DIMENSIONS
Most installations will require at least
5_&-inch clearance behind the dryer for
the dryer vent.
Location must be large enough to fully
open dryer door.
43V_ in
28V_ in
_14in
11
MINIMUM INSTALLATION SPACING
18"
"1"'-'_
olo
**48 sq, in.
minimum"
ventilation
area
,D
h **24 sq, in.
minimum"
ventilation
area
2T'- ..---1" ''
FrontView SideView FrontView
(DoorNotShown) (DoorShown) (DoorWithVent)
3"
3"
;F
* Additional clearances for wall, doorandfloor moldings may be required. 0" clearance
is acceptablebutnotrecommended.
** Openingisminimum tor closet door.Loavered doorwith equivalent air
openings is acceptable.
*** Additional spaceis neededwhen externalexhaustelbow isused. Canbe O"clearance
when houseexhaustingislined up directlywith dryer exhaust.
• In the above illustration, the installation
spacing is in inches and is the minimum
allowable.
• Additional spacing should be considered
for ease of installation and servicing.
• If closet door is installed, the minimum air
openings in top and bottom are required.
Louvered doors with equivalent air open-
ings in top and bottom are acceptable.
• All installations must be exhausted
outside. Use at least the minimum
dimensions indicated.
I2
MOBILE HOME EXHAUST
REQUIREMENTS
• The dryer must not be installed where
it can be exposed to water and/or
weather. Proper operation of dryer
cycles requires temperatures above
45°F (at lower temperatures, the
dryer may not shut off at the end of
automatic cycles and drying times
will be extended).
• Use at least the minimum installation
spacings described on page 12. This will
ensure you have an adequate clearance
for service and proper operation
including flow of combustion and ventila-
tion air, and that you have a sufficient
distance from combustible construction.
• Special provisions must be made for the
introduction of outside air into the dryer
when installed in a mobile home. The
area of any opening for the introduction
of outside air (such as a nearby window)
should be at least twice as large as the
dryer exhaust opening.
This dryer is suitable for mobile home
installations. The installation must
conform to the Manufactured Home Con-
struction and Safety Standard, Title 24
CFR, Part 3280 (formerly the Federal
Standard for Mobile Homes Construction
and Safety, Title 24, HUD Part 280).
• Dryer exhaust vent must not
be connected or secured with
screws or other
devices which
extend into the
interior of the
vent.
• A gas dryer
must be
exhausted
outdoors. The
exhaust vent
k
must be securely fastened to a L_
noncombustible portion of the
mobile home structure and must not
terminate beneath the mobile home.
For mobile home use, gas dryers must
be securely fastened to the floor. Order
Mobile Home installation Kit 346764 from
your Sears store or Sears Service
Center. Kit includes the necessary
fastening hardware and detailed
installation instructions. Exhaust system
hardware is also available through your
Sears store or Sears Service Center.
13
B. INSTALL LEVELING LEGS
Leveling your dryer correctly will
reduce operating noise and provide
improved drying performance.
STEP 4. Start to screw the legs into the
holes by hand. Use a wrench to finish
turning the legs until diamond marking
is no longer visible. This is when we
recommend you start checking the dryer
for levelness. Further adjustment may
be necessary.
Excessive Weight Hazard
Use two or more people to move and
install dryer.
Failure to do so can result in back or
other injury.
STEP '1. Take two of the cardboard
corners from the carton. Place them
on the floor Jn back of the dryer.
STEP 2. Firmly grasp the body of the
dryer (not the top or console panel).
Gently lay dryer on the cardboard
corners.
STEP 3. With one of the legs in hand,
check the ridges for a diamond marking.
STEP 5. Stand the dryer up and move
it close to its final location. Leave enough
room to connect the exhaust vent.
STEP 6. Check levelness of dryer by
placing a level on top of the dryer, first
side-to-side; then front-to-back.
STEP 7. If dryer is not level, prop the dry-
er up using two stacked cardboard corner
posts. Use a wrench to adjust the legs up
or down.
I
I4
NOTE: It may be necessary to level the
dryer again after it is moved into its final
position.
C. INSTALL GAS LINE
The proper gas connection ensures
an installation that meets local code
requirements.
GAS REQUIREMENTS
Explosion Hazard
Use a new AGA or CSA approved
gas supply line.
Install a shut-off valve.
Securely tighten all gas
connections.
If connected to LP, have a qualified
person make sure gas pressure
does not exceed 13" (33 cm) water
column.
Examples of a qualified person
include:
licensed heating personnel, autho-
rized gas company personnel, and
authorized service personnel.
Failure to do so can result in death,
explosion, or fire.
is your responsibility to contact a
qualified gas line installer to ensure
you have natural gas.
• The design of this dryer has been certi-
fied by the CSA International for use at
altitudes up to 10,000 feet above sea
level at the B.T.U. rating indicated on the
model/serial number plate. Burner input
adjustments are not required when the
dryer is operated up to this level.
• When installed above 10,000 feet,
a four percent (4%) reduction of the
burner B.T.U. rating shown on the mod-
el/serial number plate is required for
each 1,000 foot increase in elevation.
For assistance when converting
to other gas types and/or installing
above 10,000 feet elevation contact your
local service company.
• Make certain your dryer has the correct
burner for the type of gas in your home.
Burner information is located on the
rating plate in the door well of your
dryer. If this information does not agree
with the type of gas available, contact
your local Sears store or Sears Service
Center. Any change to the burner must
be made by a certified technician.
• Provide a rigid gas supply line of
}S-inch pipe to your dryer.
• if you are using natural gas, do not use
copper tubing.
• if your dryer has been converted to use
L.P. gas, -_-inch L.R-compatible copper
tubing may be used. If the total length of
the supply line is more than 20 feet, use
larger pipe. Pipe joint compounds that
resist the action of L.R gas must be
used. Do not use TEFLON e>tape.
H-inchNPTgas
threadedsupplyline
¾-inchmale
threadedpipe
/d_J_
15

• If local codes permit, use flexible
stainless steel tubing (Design Certified
by the American Gas Association or
CSA International) to connect your dryer
to the gas supply line. To prevent kink-
ing, you may need an elbow and a con-
nector between the stainless steel tub-
ing and the dryer gas pipe. The gas pipe
that comes out through the rear of your
dryer has a _ in male pipe thread.
¾-inNPTmale
threadedconnection
-_!II,I ,I, ,_
_-in to _-in ¾-in male
pipe elbow pipe-to-flare
• A combination of pipe fittings must
be used to connect the dryer to the
existing gas line.
_-in NPT plugged
in male threaded tapping
connection /'
i
Reduce;or ½-in NPTgas
connector supply line
• An individual manual shut-off valve must
be installed within six (6) feet of the
dryer in accordance with the National
Fuel Gas Code, ANSI Z223 1. The valve
should be in the same room as the
dryer, within six feet. The location
should be easy to reach for opening and
closing the valve.
• A K-inch NPT plugged tapping, acces-
sible for test gauge connection, must be
installed immediately upstream of the
gas supply connection to the dryer.
• To ensure proper combustion and
ventilation, the dryer installation should
adhere to the minimum recommended
clearances. See page 12.
• For mobile home installation, see
page 13 for more instructions.
• The dryer must be disconnected from
the gas supply piping system during any
pressure testing of that system.
I6
CONNECT DRYER TO GAS LINE
STEP 1. Remove the red cap from
the gas pipe. Move the dryer to its
final position.
STEP 2. Connect gas supply to dryer.
Use a wrench to tighten. Apply pipe
joint compound to the non-flared male
threads only. If flexible metal tubing is
used, be sure there are no kinks.
NOTE: For L.P. gas connections you
must use pipe joint compound resistant to
the action of L.P. gas. Do not use
TEFLON ® tape.
Use pipe joint Do not use pipe
compound _ joint compound
/
STEP 3. Open the shut-off valve in the
supply line. The valve is open when the
handle is parallel to the gas pipe.
STEP 4. Test all the connections by
brushing on an approved non-corrosive
leak-detection solution. Bubbles will show
a leak. Correct any leak found.
ELECTRICAL REQUIREMENTS
It is your responsibility:
• To contact a qualified electrical installer.
• To assure that the electrical installation
is adequate and in conformance with
the National Electrical Code, ANSI/NFPA
70 - latest edition and all local codes
and ordinances.
Copies of the code standards listed above
may be obtained from:
National Fire Protection Association
Batterymarch Park
Quincy, MA 02269
_teP,,_,tmP, :_.I i[311 "
The proper electrical connection
ensures an installation that
meets local code requirements.
Electrical Shock Hazard
Plug into a grounded 3 prong outlet.
Do not remove ground prong.
Do not use an adapter.
Do not use an extension cord.
Failure to follow these instructions
can result in death, fire, or
electrical shock.
• A 120-Volt, 60-Hz., AC-only, 15- or
20-ampere fused electrical supply
is required.
• A time-delay fuse or circuit breaker is
recommended. Be sure fuse or circuit
breaker matches the rating of your line.
• Use a separate circuit serving only
your dryer.
• Do not use an extension cord.
17
18
GROUNDING INSTRUCTIONS
For a grounded, cord-connected dryer:
This appliance must be grounded. In
the event of malfunction or breakdown,
grounding win reduce the risk of elec-
tric shock by providing a path of least
resistance for electric current. This
dryer is equipped with a cord having
an equipment-grounding conductor
and a grounding plug. The plug must
be plugged into an appropriate outlet
that is properly installed and grounded
in accordance with all local codes and
ordinances.
WARNING: Improper connection of
the equipment grounding conductor
can result in a risk of electric shock.
Check with a qualified electrician or
service representative or personnel if
you are in doubt as to whether the
dryer is properly grounded. Do not
modify the plug provided with the
dryer: if it will not fit the outlet, have a
proper outlet installed by a qualified
electrician.
SAVE THESE INSTRUCTIONS
D. CONNECTEXHAUST
II'toiiilrt_i_tiil lI_t i[_ ilil
A properly exhausted dryer will give
you the shortest drying time, lower
your utility bills, and extend the life
of the dryer.
Fire Hazard
Use a heavy metal vent.
Do not use a plastic vent.
Do not use a metal foil vent.
Failure to follow these instructions
can result in death or fire.
WARNING: To reduce the risk of fire,
this dryer MUST BE EXHAUSTED
OUTDOORS.
• Do not exhaust the dryer into any gas
vent, chimney, wall, ceiling, or a con-
cealed space of a building.
• The diameter or the heavy metal vent
must be 4 inches.
• Do not use an exhaust hood with a
magnetic latch.
• Dryer exhaust vent must not be
connected or secured with screws or
other devices which extend into the
interior of the vent.
• If using an existing exhaust system,
disconnect vent from the dryer and
clean one section at a time until you
reach the exhaust hood. To clean out lint,
you can use the hose attachment
on your vacuum, or use a pole or wire
with a feather duster or rag attached.
• Make sure exhaust hood is not plugged
with lint. Follow the instructions in this
section to reinstall your vent system.
ROUTE THE VENT
Typical installations exhaust from the rear
of the dryer.
Avoid pushing the dryer tightly against
a wall. This can crush or kink the vent.
Use the straightest path you can, where
possible. Avoid 90 ° turns.
Rear exhaust installations for standard
offset connections - (see pgs. 20-21).
S
Rear exhaust installations for offset
connections with close clearances -
(see p. 22)
This dryer may be converted to exhaust
out the right or left side or through the
bottom. To convert the dryer, one of the
following kits must be used.
Exhaust Kit No. 279818 (white)
Exhaust Kit No. 279819 (almond)
Exhaust Kit No. 279915 (graphite)
Exhaust Kit No. 279925 (biscuit)
Fire Hazard
Cover unused exhaust holes with
one of the following kits:
279818 (white)
279819 (almond)
279915 (graphite)
279925 (biscuit)
Contact your local dealer.
Failure to follow these instructions
can result in death, fire,
electrical shock or serious injury.
Follow the instructions in the kit. These
kits are available at your local Sears
store or Sears Service Center.
Typical installations for left or right side
exhausting
Typical installations for bottom exhausting 19
DETERMINEVENTLENGTH
Maximum Exhaust Lengths:
• Rear Exhaust. The maximum length of
the rear exhaust system depends on the
type of vent, the number of elbows, and
the type of exhaust hood. Refer to the
chart below.
• Side or Bottom Exhaust. Side or bottom
exhaust adds a 90 ° turn inside the dryer.
To determine maximum exhaust length,
add one 90 ° turn to the chart.
EXHAUST HOOD TYPE
Number of
90° Turns
0
1
2
3
4
Number of
90° Turns
0
1
2
3
4
(Use 4-inch
if possible)
Maximum length of
4-inch diameter rigid
metal vent.
64 ft 58 ft
54 ft 48 ft
44 ft 38 ft
35 ft 29 ft
27 ft 21 ft
Maximum length of
4-inch diameter flexible
metal vent.
36 ft 28 ft
3I ft 23 ft
27ft 19ft
25ft 17ft
23ff 15ft
NOTE: If a combination of rigid metal
vent and flexible metal vent is used, use
instructions for flexible metal vent.
2O
STANDARD OFFSET CONNECTION8
Using 4-inch rigid metal vent:
NOTE: Do not secure exhaust vent
joints with screws. Screws can catch lint
and slow the drying process. Instead, use
clamps to secure exhaust vent joints.
STEP 1. Install a 4-inch metal elbow on
the hood and on the dryer exhaust outlet.
STEP 2. Measure the length of 4-inch
rigid metal vent needed to connect the
two elbows.
Rigidmetalvent
Elbow
Wall
Exhaust
hood
;_,.Duct
tape &
clamps
See
STEP2
........Elbow
Ducttape& clamps
The vent usually comes in 2-foot lengths.
Use tin snips to cut the vent 3 inches
longer than your measurement in order to
make a connection.
STEP 3. Place a clamp on each end
of vent elbow and connect elbow to your
dryer's exhaust outlet. Tape the joint
with duct tape. Tighten clamp.
Tape
Clamp
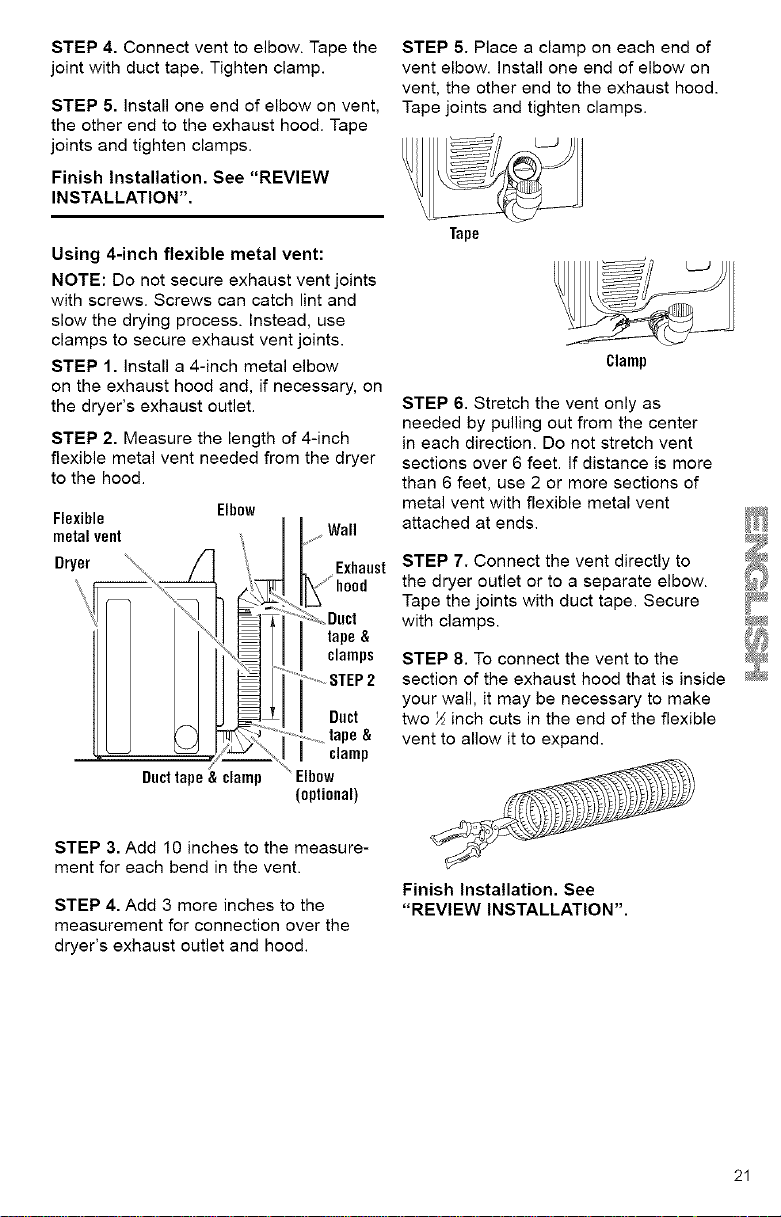
STEP 4. Connect vent to elbow. Tape the
joint with duct tape. Tighten clamp.
STEP 5. Install one end of elbow on vent,
the other end to the exhaust hood. Tape
joints and tighten clamps.
Finish Installation. See "REVIEW
INSTALLATION".
STEP 5. Place a clamp on each end of
vent elbow. Install one end of elbow on
vent, the other end to the exhaust hood.
Tape joints and tighten clamps.
Using 4-inch flexible metal vent:
NOTE: Do not secure exhaust vent joints
with screws. Screws can catch lint and
slow the drying process. Instead, use
clamps to secure exhaust vent joints.
STEP 1. install a 4-inch metal elbow
on the exhaust hood and, if necessary, on
the dryer's exhaust outlet.
STEP 2. Measure the length of 4-inch
flexible metal vent needed from the dryer
to the hood.
Flexible
metalvent
Dryer
Elbow
Ducttape & clamp
Wall
Exhaust
hood
_;_,,Duct
tape&
clamps
.......STEP2
Duct
..........tape&
clamp
(optional)
STEP 3. Add 10 inches to the measure-
ment for each bend in the vent.
STEP 4. Add 3 more inches to the
measurement for connection over the
dryer's exhaust outlet and hood.
Tape
Clamp
STEP 6. Stretch the vent only as
needed by pulling out from the center
in each direction. Do not stretch vent
sections over 6 feet. If distance is more
than 6 feet, use 2 or more sections of
metal vent with flexible metal vent
attached at ends.
STEP 7. Connect the vent directly to
the dryer outlet or to a separate elbow.
Tape the joints with duct tape. Secure
with clamps.
STEP 8. To connect the vent to the
section of the exhaust hood that is inside
your wall, it may be necessary to make
two ½ inch cuts in the end of the flexible
vent to allow it to expand.
Finish Installation. See
"REVIEW INSTALLATION".
21
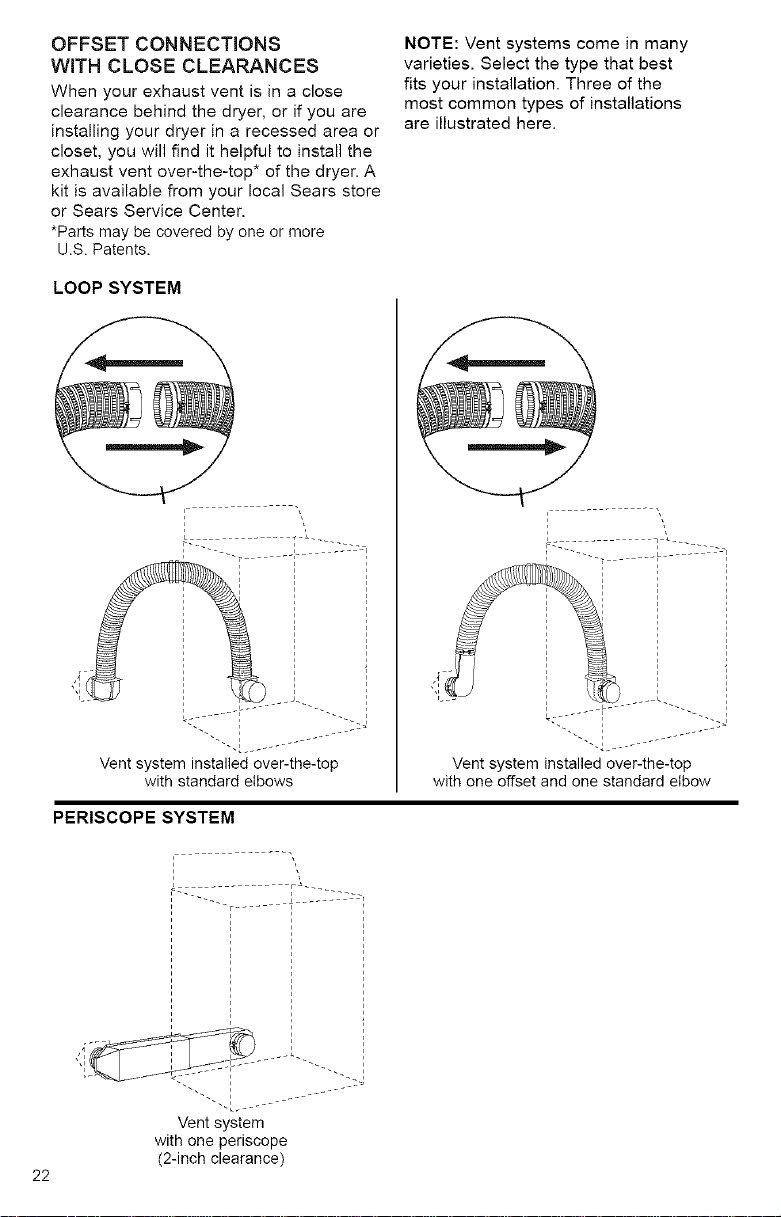
OFFSET CONNECTIONS
WiTH CLOSE CLEARANCES
When your exhaust vent is in a close
clearance behind the dryer, or if you are
installing your dryer in a recessed area or
closet, you will find it helpful to install the
exhaust vent over-the-top* of the dryer. A
kit is available from your local Sears store
or Sears Service Center.
*Parts may be covered by one or more
U.S. Patents.
LOOP SYSTEM
NOTE: Vent systems come in many
varieties. Select the type that best
fits your installation. Three of the
most common types of installations
are illustrated here.
I __
c ....
Vent system installed over-the-top
with standard elbows
I
Vent system installed over-the-top
with one offset and one standard elbow
PERISCOPE SYSTEM
-T .... i
22
Vent system
with one periscope
(2-inch clearance)
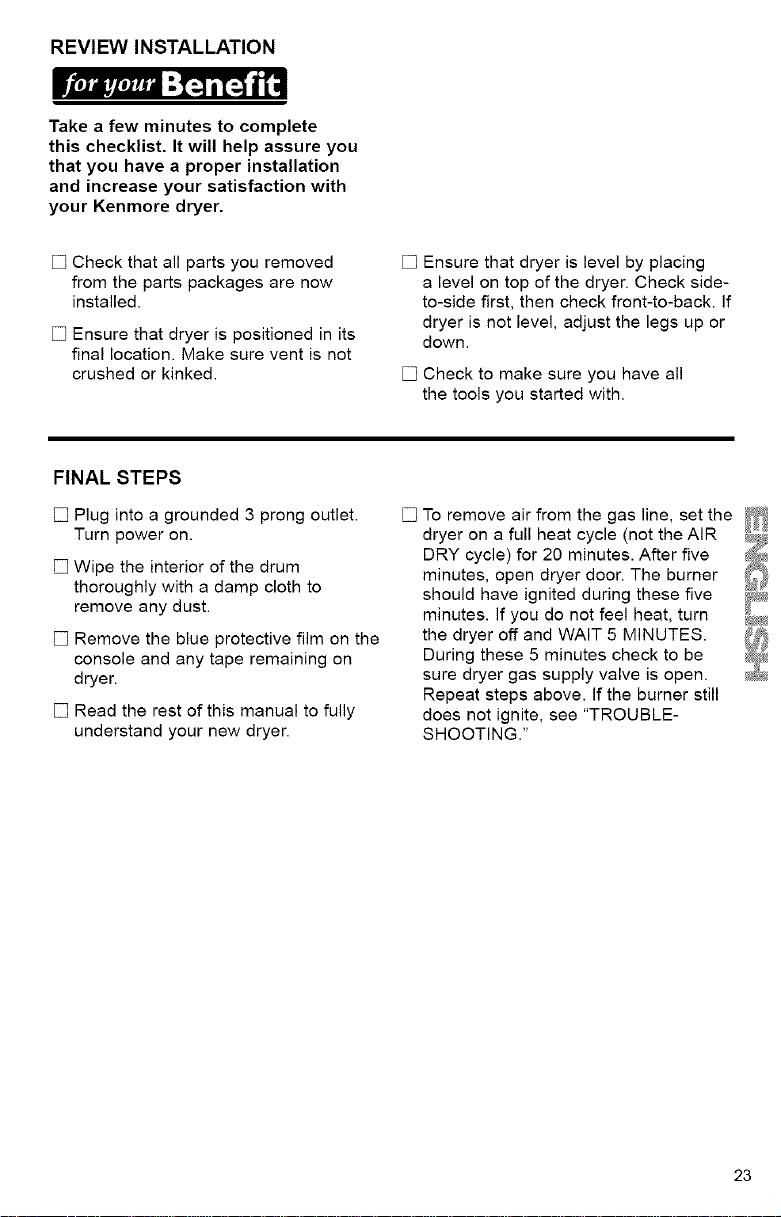
REVIEW INSTALLATION
Take a few minutes to complete
this checklist. It will help assure you
that you have a proper installation
and increase your satisfaction with
your Kenmore dryer.
[] Check that all parts you removed
from the parts packages are now
installed.
[] Ensure that dryer is positioned in its
final location. Make sure vent is not
crushed or kinked.
[] Ensure that dryer is level by placing
a level on top of the dryer. Check side-
to-side first, then check front-to-back. If
dryer is not level, adjust the legs up or
down.
[] Check to make sure you have all
the tools you started with.
FINAL STEPS
[] Plug into a grounded 3 prong outlet.
Turn power on.
[] Wipe the interior of the drum
thoroughly with a damp cloth to
remove any dust.
[] Remove the blue protective film on the
console and any tape remaining on
dryer.
[] Read the rest of this manual to fully
understand your new dryer.
[] To remove air from the gas line, set the
dryer on a full heat cycle (not the AIR
DRY cycle) for 20 minutes. After five
minutes, open dryer door. The burner
should have ignited during these five
minutes. If you do not feel heat, turn
the dryer off and WAIT 5 MINUTES.
During these 5 minutes check to be
sure dryer gas supply valve is open.
Repeat steps above. If the burner still
does not ignite, see "TROUBLE-
SHOOTING."
23
Explosion Hazard
Keep flammable materials and
vapors, such as gasoline, away
from dryer.
Do not dry anything that has ever had
anything flammable on it (even after
washing).
Failure to follow these instructions can
result in death, explosion,
or fire.
Fire Hazard
No washer can completely
remove oil.
Do not dry anything that has ever had
any type of oil on it (including cooking
oils).
Items containing foam, rubber,
or plastic must be dried on a
clothesline or by using anAir Cycle.
Failure to follow these instructions can
result in death or fire.
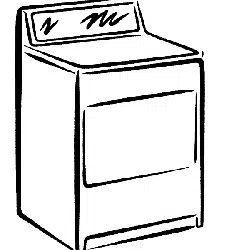
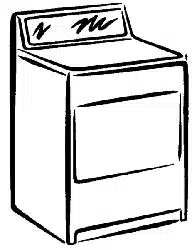
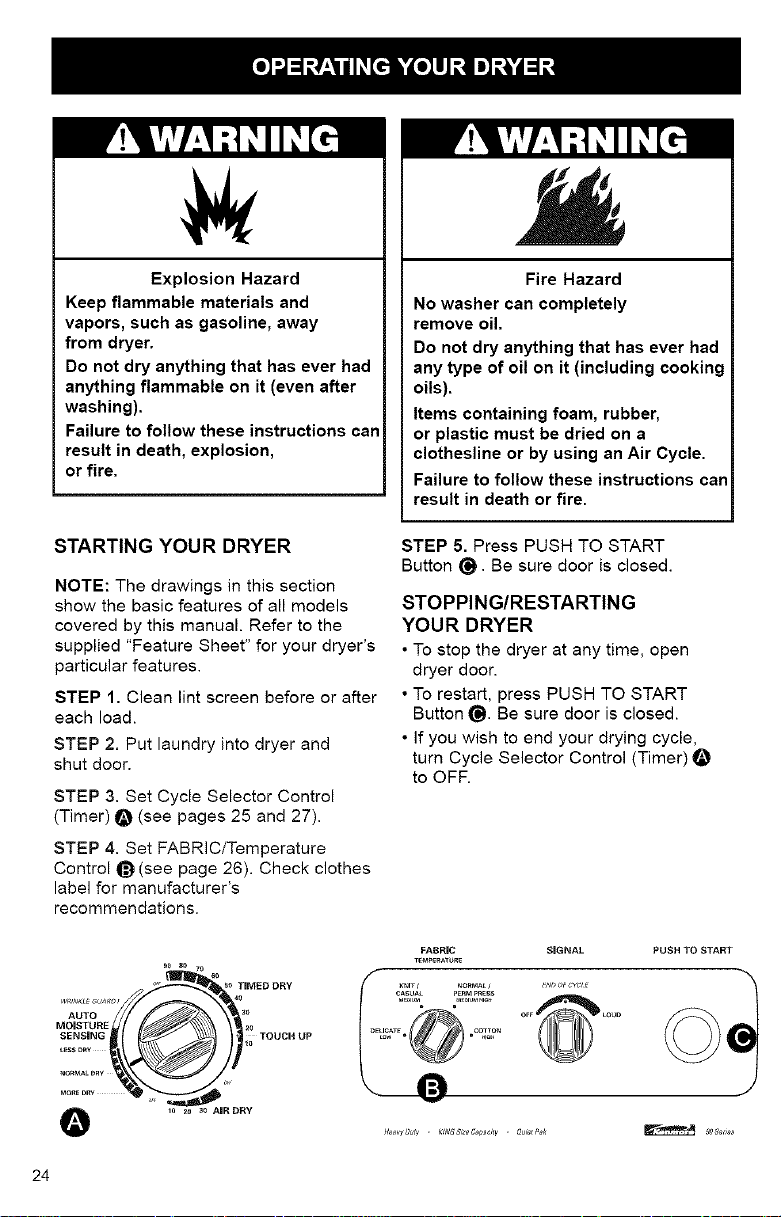
STARTING YOUR DRYER
NOTE: The drawings in this section
show the basic features of all models
covered by this manual. Refer to the
supplied "Feature Sheet" for your dryer's
particular features.
STEP 1. Clean lint screen before or after
each load.
STEP 2. Put laundry into dryer and
shut door.
STEP 3. Set Cycle Selector Control
(Timer) _ (see pages 25 and 27).
STEP 4. Set FABRiC/Temperature
Control _ (see page 26). Check clothes
label for manufacturer's
recommendations.
STEP 5. Press PUSH TO START
Button (_. Be sure door is closed.
STOPPING/RESTARTING
YOUR DRYER
• To stop the dryer at any time, open
dryer door.
• To restart, press PUSH TO START
Button _. Be sure door is closed.
• If you wish to end your drying cycle,
turn Cycle Selector Control (Timer)
to OFF.
FABRIC SIGNAL PUSH TO START
T_M_RAT_RE
_O SO 70
5OTiNtED DRY _NnT/ NORMALJ _N_O_CY"_
W_L_ GUA_ / 40 CASUA_ p_RMPRESS
AUTO _0 or_ LO_D
MOISTURE _0
SENSING " _ TOUCH UP c%_,o_
L_S DRY
O 10 Z0 30 AIR DRY
}le_vyg_t_, < K¢_gzeCap_it _ aute_Pak _ 9gSer_os
24
CYCLE DESCRIPTIONS
The automatic cycles save you time by
providing the best drying results in the
shortest time. This can help you save
money on utility bills and reduce the
risk of fabric damage.
AUTO MOISTURE SENSING OR
EVENHEAT TMwith AUTO MOISTURE
SENSING PLUS cycles
Depending on your model, your dryer's
automatic cycle is AUTO MOISTURE
SENSING or EVENHEAT TM with AUTO
MOISTURE SENSING PLUS. Use this
cycle for most loads. Drying time varies
according to type of fabric, size of load,
and dryness setting.
• Set the Cycle Selector Control (Timer)
to NORMAL DRY(*) which is good for
most fabrics.
• At the end of the cycle, feel the dried
clothes, if they are damp, select MORE
DRY the next time you do a similar load.
If they are overdried, select LESS DRY
or DAMP DRY (depending on model)
the next time you do a similar load.
• Dryness is determined by an electronic
sensor that "feels" the amount of
moisture in clothes as they pass over it.
When the dryness selected is reached,
the dryer goes into a Cool Down period
of up to 10 minutes.
• The END-OF-CYCLE SIGNAL sounds
(if selected) once the cycle is complet-
ed.
• if you do not unload the dryer, it goes
into WRINKLE GUARD ® automatically.
For an explanation of WRINKLE
GUARD ®, see page 29.
NOTE: On some models, WRINKLE
GUARD ® is selected by an option
switch.
TIMED DRY CYCLE
Use this cycle to get up to 80 or 90
minutes (depending on model) of heated
drying time.
• The heating cycle is followed by a 10-
minute (approx.) Cool Down period.
• The END-OF-CYCLE SIGNAL sounds (if
selected) once the cycle is completed.
NOTE: Dryers with a WRINKLE GUARD ®
Option control will go into WRINKLE
GUARD ® immediately following this cycle
(if selected).
TOUCH UP CYCLE
Use this cycle to smooth synthetic and
permanent press clothes that are clean
but wrinkled from being crowded in a
closet or suitcase.
• This setting provides about 15 minutes
of heated tumbling followed by a 10-
minute (approx.) Cool Down period.
• Remove clothes immediately when
tumbling stops.
OR
AUTO
MOISTURE
SENSING
lo 2o 30 AIR DRY
25
FABRIC/TEMPERATURE CONTROL
Proper use of this control helps
ensure that fabrics are dried at the
right temperature for maximum life.
Use this control to select the drying
temperature that matches the fabrics
in your load.
• Select LOW for delicate fabrics. Select
HiGH for durable fabrics such as sturdy
work clothes or bath towels.
• The FABRiC/Temperature Control
will not work when the Cycle Selector
Control (Timer) is in the AIR DRY Cycle.
FABRIC
TEMPERATURE
f
KNIT / NORMAL /
CASUAL PERM PRESS
MEDIUM MEDIUM HiGH
DELICATE 0 COTTON
LOW o w HIGg
The following chart lists suggested
dryer settings and drying times for
various loads. This is only a guide.
Settings may require adjustment
depending on the requirements of
your load.
Automatic Drying TIMED DRY
Type of Load Setting Temp Setting
COTTONS AND LINENS
Extra Heavy - Bedspreads, mattress MORE DRY HIGH 70-80 min.
pads, quilts
Heavyweight - Towels,jeans, corduroys, MORE DRY HIGH 50-60 min.
work clothes
Medium weight - Sheets, cotton underwear, NORMAL MEDIUM/HIGH 40-50 min.
diapers DRY or MEDIUM*
Lightweight - Batistes, organdies, lingerie NORMAL DRY LOW 30-40 min.
PERMANENT PRESS, SYNTHETICS AND BLENDS
Heavyweight - Work clothes, jackets, NORMAL HIGH 40-50 min.
raincoats DRY
Medium weight - Shirts, play clothes, NORMAL MEDIUM/HIGH 30-40 min.
sheets, slacks DRY or MEDIUM*
Lightweight - Lingerie, blouses, dresses LESS DRY MEDIUM or LOW* 20-30 min.
or DAMP DRY
KNITS
Heavyweight - Cottons, rayons, blends, NORMAL HIGH 40-50 min.
T-shirts, slacks, shirts DRY
Mediumweight - Synthetics (polyester, NORMAL MEDIUM/HIGH 30-40 min.
acrylic, etc.), dress slacks, skirts, sweaters DRY or MEDIUM*
Lightweight - Synthetics (polyester, acrylic, LESS DRY LOW 20-30 min.
etc.) and blends, lingerie, blouses, dresses or DAMP DRY
*Use the lowesttemperature setting available on your dryer.
26
USING AIR DRY/AIR FLUFF
Using these cycles gives you all the
benefits of hang drying with a shorter
drying time.
Use the AIR DRY Cycle to get up to
30 minutes of drying time in room tem-
perature air. Use this setting for items
that will not tolerate heat such as plastics
and foam rubber. Also use for airing and
fluffing items such as pillows.
The AIR FLUFF Setting operates exactly
like the AIR DRY Cycle. This setting is
available on models that do not have an
AIR DRY Cycle in the Cycle Selector
Control (Timer).
To use AIR FLUFF:
• Set Cycle Selector Control for the
number of minutes you want in the
TIMED DRY Cycle.
• Set FABRIC/Temperature Control to AIR
FLUFR
• Set other options, press PUSH TO
START Button.
Refer to the following chart for examples
of items that require drying without heat.
Use the AIR DRY Cycle or AIR FLUFF
Setting (depending on model), or place
the items on a line or rack to air dry.
OR
g0
so TIMED DRY
WRINKLE GUARD I 40
AUTO 3o
MOISTURE 20
SENSING TOUCH UP
lO
LESS DRY
NORMAL DRY
MORE DRY
FABRICCARE
TEMPERATURE
KNITJ
CASUAL
M_DlUM NORMAL /
ULTRA DELICATE_ PERM PRESS
AIR FLUFF • _ € COTTON
NO HEAT HIGH
10 20 30 AiR DRY
AIR DRY Cycle/
Type of Load AIR FLUFF Setting
DELICATE FABRICS
Sheer curtains (2 or 3 panels), gauze, lace, etc. 20-30 min.
(Use AIR DRY/AIR FLUFF if iow heat is not available.)
20-30 min.
RUBBER, PLASTIC, HEAT-SENSITIVE FABRICS
Foam rubber - Pillows, padded bras, stuffed toys
• Make sure coverings are securely stitched.
• Shake and fluff pillows by hand several times during the cycle.
• Make sure pillows are completely dry. Foam rubber piilows
take a long time to dry.*
Plastic - Shower curtains, tablecloths
Rubber-backed rugs
Olefin, Polypropylene, Sheer nylon
20-30 min.
40-50 min.
10-20 min.
*Reset time, as needed, to allow these items to dry completely.
/d_J_
27
END OF CYCLE SIGNAL CONTROL
Your dryer sounds a signal when
a drying cycle is finished. The signal
is helpful when you are drying
permanent press, synthetics, and
other items. These items should be
removed from the dryer as soon as
it stops in order to prevent wrinkles.
• The volume of the signal can be
adjusted.
SIGNAL
END OFCY('IE
SOFT
e
OFF_ LOUD
PUSH TO START BUTTON
Use this control to start the dryer.
Be sure the dryer door is closed.
Opening the door stops the dryer. It
will not start again until you close the
door and press the PUSH TO START
Button. Be sure the Cycle Selector
Control (Timer) is still on a drying cycle
or air setting.
PUSH TO START
• The variable control lets you select a
volume anywhere from OFF to
LOUD.
SIGNAL
END OF CYCLE
OFF,LOUD
28
EVENHEAT _MSYSTEM USING WRINKLE GUARD ®
EVENHEAT _MSystem guards against
overdrying. This helps your fabrics
retain the natural moisture they need,
prevents static, and reduces pilling -
the formation of small lint-like balls
on the surface of garments. Pilling
is the natural result of washing and
wearing of garments.
Kenmore dryers help prevent overdrying
so you get outstanding fabric care. In
the AUTO MOISTURE SENSING and
TIMED DRY Cycles, clothes are dried at
the temperature you selected until the last
few minutes of the cycle. The dryer then
switches to low heat.
COOL DOWN
Approximately ten minutes before the end
of the AUTO MOISTURE SENSING and
TIMED DRY Cycles, clothes are tumbled
without heat to help reduce wrinkles and
make clothes more comfortable to handle.
WRINKLE GUARD ® helps keep your
permanent press items wrinkle free
when you don't unload the dryer
promptly at the end of the automatic
cycle.
If you do not open the door at the end
of the automatic cycle, WRINKLE
GUARD ® will tumble the clothes without
heat for about 15 seconds periodically
throughout the cycle.
• On dryers with WRINKLE GUARD ® I,
the dryer will tumble the clothes
continuously for about 30 minutes
unless you open the dryer door.
• On dryers with WRINKLE GUARD ® II,
periodic tumbling will continue for
about 40 minutes unless you open
the dryer door.
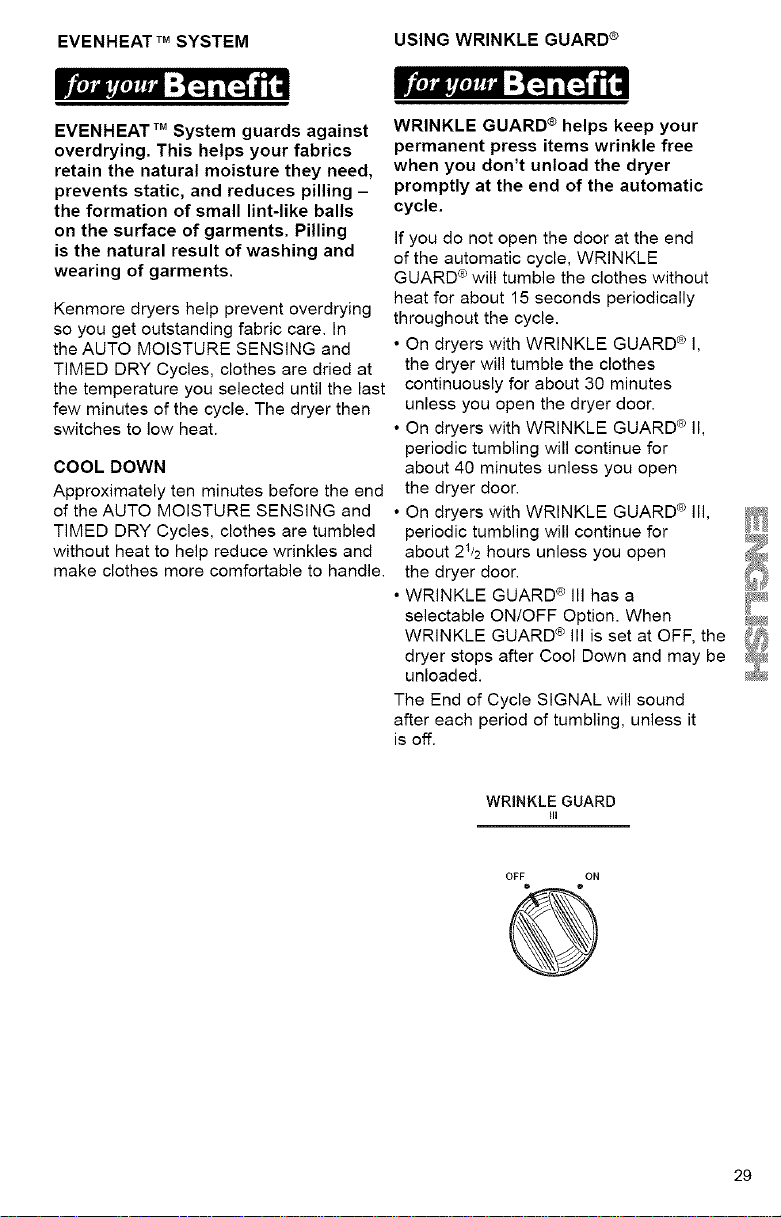
• On dryers with WRINKLE GUARD ® III,
periodic tumbling will continue for
about 21/2 hours unless you open
the dryer door.
• WRINKLE GUARD ® III has a
selectable ON/OFF Option. When
WRINKLE GUARD ® III is set at OFF, the
dryer stops after Cool Down and may be
unloaded.
The End of Cycle SIGNAL will sound
after each period of tumbling, unless it
is off.
WRINKLE GUARD
Ill
OFF ON
G
29

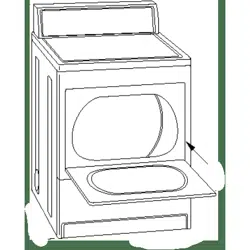
HEATED TUMBLE FREE DRYER RACK
Your dryer may include a dryer rack. If
your dryer does not have a dryer rack,
you can purchase one by calling Sears
(see back cover).
I l'ji_t'j_i :1:,] i[_ i'[J
Use the heated Tumble Free Dryer
Rack for items that you do not want to
tumble dry, such as sweaters. When
you use the heated dryer rack, the
heated air inside the dryer flows in a
concentrated pattern to allow efficient
and uniform drying.
To use the heated dryer rack:
Do not remove lint screen.
STEP 1. Open dryer door.
STEP 2. Slide Dryer Rack over the bot-
tom of the dryer door opening. Push
down to secure it on the frame.
STEP 3. Place wet items on top of the dry
rack. Allow space around items for air to
circulate. The rack does not move, but
the drum will rotate. Make sure items do
not hang over the edges or between rack
grill.
STEP 4. Close dryer door.
STEP 5. Use the TIMED DRY orAIR
DRY Cycle. items containing foam, rub-
ber, or plastic must be dried on a clothes-
line or by using an air cycle. Refer to the
chart below.
STEP 6. Set the FABRiC/Temperature
Control if available. Refer to the chart
below.
/
STEP 7. Start the dryer.
To remove the dryer rack, lift it straight up
and out of the dryer.
NOTE: Check the lint screen and
remove any lint accumulated from items
dried on the rack.
FABRIC/ Cycle Selector Suggested
Suggested Items Temperature (Timer) Time
for Rack Drying Setting Setting (minutes)*
Washable wool items (block to DELICATE TIMED DRY 20
shape and lay fiat on rack)
Stuffed toys (cotton or poiyester COTTON TIMED DRY 20
fiber filling)
Stuffed toys (foam rubber filling) AIR FLUFF - or- AIR DRY 50
Galoshes (rubber) AIR FLUFF - or- AIR DRY 20
Foam rubber pillows AIR FLUFF - or- AIR DRY 50
Tennis shoes AIR FLUFF - or- AIR DRY 20
*Reset time, as needed, to complete drying.
3O
ItullrreJ_Jim;_1 i[_ l_li
Follow these recommendations to help
save on utility bills and prolong the life
of your garments.
PREPARING CLOTHES
FOR DRYING
• Refer to your Washer Owner's Manual
for proper washing techniques and
additional laundry tips.
SORTING CLOTHES
CHOOSING LOAD SIZES
• Mix large items with small items.
Load the dryer by the amount of space
items take up, not by their weight. Do
not overload the dryer. Overcrowding
causes uneven drying and wrinkling,
and can cause items to wear out faster
(because of pilling).
• You may need to rearrange large items
(sheets, blankets, tablecloths) during
a cycle to reduce bailing or rolling up.
• For better tumbling action, when drying
only a few small items, add one or two
lint-free towels. This also prevents small
lightweight items from blocking airflow.
• Separate dark colors from light colors;
colorfast from non-colorfast. Items
properly sorted by color for washing
are usually properly sorted for drying.
• Separate heavy fabrics (denim,
towels) from light fabrics (synthetics,
permanent press).
• Separate lint givers (towels, chenille)
from lint takers (corduroy, synthetics,
permanent press). When possible,
turn lint takers inside out.
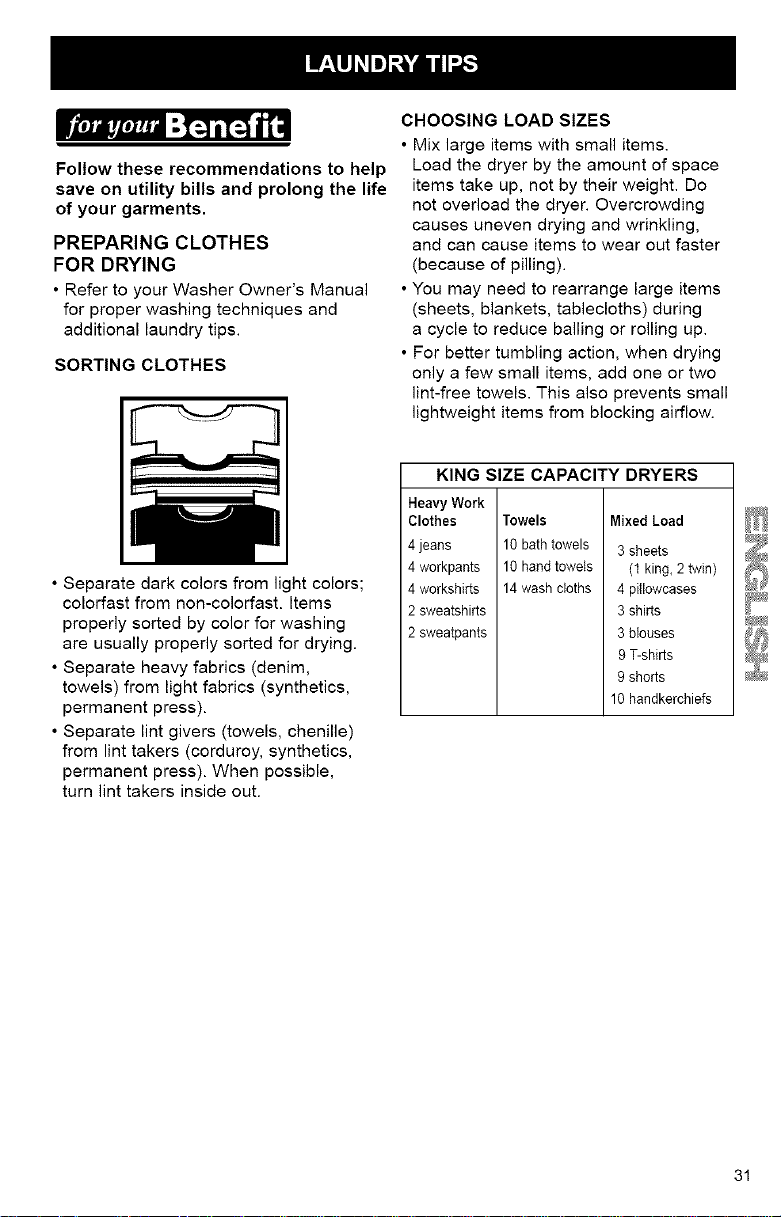
KING SIZE CAPACITY DRYERS
HeavyWork
Clothes
4jeans
4workpants
4workshirts
2sweatshirts
2sweatpants
Towels Mixed Load
10 bath towels 3 sheets
10 hand towels (1 king, 2 twin)
14 wash cloths 4 pillowcases
3 shirts
3 blouses
9 T-shirts
9 shorts
10 handkerchiefs
31
DRYING TIPS
• Close zippers, snaps, and hooks to
avoid snagging other items. Remove
heat-sensitive trim that can be damaged
by drying. Tie strings and sashes so
they will not tangle.
• Check garments for spots and stains left
after washing. Do not tumble these
items. Heat may permanently set stains.
• Check pockets before drying. Sharp or
metal objects can damage your dryer.
Do not lay these objects on your dryer,
they can damage the finish. Turn
pockets of heavy garments inside out for
even drying.
• Place small items such as baby socks
or hankies in laundry bag for easier
removal.
• Articles to be ironed should be
removed while still damp.
USING DRYER
FABRIC SOFTENERS
Dryer fabric softeners are recommended
for reducing static cling. Always follow
package instructions carefully.
• Put one fabric softener sheet on top
of the load before starting the dryer.
Do not add a fabric softener sheet after
the drying cycle has started. Instant heat
can cause the fabric softener to spot
fabrics.
• Remove fabric softener stains by
wetting the stains and rubbing them with
liquid detergent or bar soap and
rewash.
• Some fabric softeners can clog the lint
screen and slow drying. Use fabric
softeners labeled as dryer safe.
SAVING ENERGY
• Sort loads by fabric weight and type.
• Use the automatic cycle to dry
most loads.
• Dry full loads only. Do not overdry.
• Avoid overloading dryer, adding wet
items to a partly dried load, or opening
the door unnecessarily.
• Shorten drying times by exhausting
dryer properly and cleaning exhaust
vent and outside exhaust hood as
needed.
• Keep the lint screen clean.
• Use dryer where room air temperature
is above 45°F.
32
CLEANING YOUR DRYER
_t, Jii.,r,J,,_,."I_ i[,_ _d
Proper care of your dryer can extend
its life and help you avoid costly
service calls.
EXTERIOR
Use a soft, damp cloth to clean the
cabinet and console. Avoid using harsh
abrasives. Do not put sharp metal
objects on or in your dryer. They can
damage the finish.
INTERIOR
Explosion Hazard
Use nonflammable cleaner.
Failure to do so can result in death,
explosion, or fire.
Garments that contain unstable dyes,
such as denim blue jeans or brightly
colored cotton items, may discolor the
drum interior. These stains are not
harmful to your dryer and will not stain
future loads of clothes. It is helpful to dry
unstable dye items inside out to prevent
dye transfer.
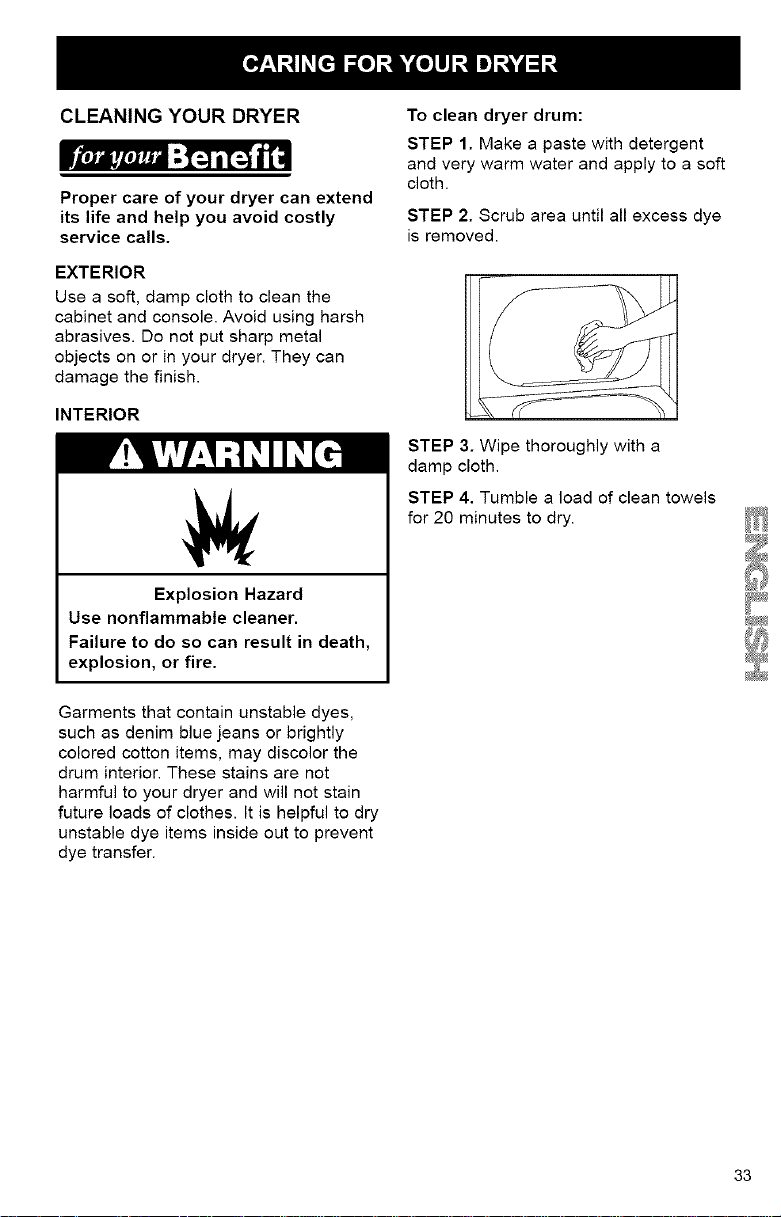
To clean dryer drum:
STEP 1. Make a paste with detergent
and very warm water and apply to a soft
cloth.
STEP 2. Scrub area until all excess dye
is removed.
STEP 3. Wipe thoroughly with a
damp cloth.
STEP 4. Tumble a load of clean towels
for 20 minutes to dry.
33
CLEANINGTHELINTSCREEN
RemoveLintBeforeEveryLoad
Thelintscreenislocatedinthedoor
opening.Removelintbeforestarting
every load. A screen blocked by lint can
increase drying time.
To clean:
STEP 1. Pull the lint screen straight up.
STEP 2. Roll lint off the screen with your
fingers. Do not rinse or wash screen to
remove lint. Wet lint is hard to remove.
STEP 3. Push the lint screen firmly back
into place.
IMPORTANT:
• Do not run the dryer with the lint screen
loose, damaged, blocked, or missing.
Doing so can cause overheating and
damage to both the dryer and fabrics.
• Some towels made of synthetic fibers
and natural fibers (polyester and cotton
blends) may shed more lint than other
towels, causing your dryer's lint screen
to fill up faster. Be sure to remove lint
from the lint screen before and after
drying new towels.
• If lint falls off the screen during removal
and into the dryer, periodically check the
exhaust hood and remove the accumu-
lated lint (see "Connect Exhaust").
Wash Lint Screen As Needed
Laundry detergents and fabric soft-
eners can cause a residue buildup on
the lint screen. This buildup can cause
longer drying times for your clothes, or
cause the dryer to stop before your
load is completely dry. The screen is
probably clogged if lint falls off the
screen.
Clean the lint screen with a nylon
brush every six months or more fre-
quently if it becomes clogged due to
residue buildup.
To wash:
STEP 1. Wet both sides of lint screen
with hot water.
STEP 2. Wet a nylon brush with hot
water and liquid detergent; scrub lint
screen with the brush to remove
residue buildup.
STEP 3. Rinse screen with hot water.
STEP 4. Thoroughly dry lint screen
with a clean towel; replace in dryer.
34
REMOVINGACCUMULATEDLINT
Toremoveaccumulatedlintfrom
exhaustvent:
STEP1.Disconnectexhaust vent from
the dryer.
STEP 2. Clean one section of vent at
a time until you reach the exhaust hood.
To clean out lint, you can use the hose
attachment on your vacuum, or use a
pole or wire with a feather duster or rag
attached.
STEP 3. Reconnect vent as described
in the "INSTALLATION INSTRUCTIONS"
of this Owner's Manual.
To remove accumulated lint from
inside the dryer:
Lint should be removed every 2 years, or
more often, depending on dryer usage.
Cleaning should be done by a qualified
person.
MOVING CARE
• Disconnect power.
• Close shut-off valve in gas supply line.
• Disconnect gas supply line pipe and
remove fittings attached to dryer pipe.
• Cap the open fuel supply line.
• Make sure leveling legs are secure
in dryer base.
• Use masking tape to secure dryer door.
VACATION CARE
• Disconnect power.
• Close shut-off valve in gas supply line.
• Wash lint screen.
35
CHANGING THE DRUM LIGHT
The dryer light automatically turns on
inside the dryer drum when you open the
door. Your dryer drum light may be one
of two types, as shown.
To change drum light type 1:
STEP 1. Unplug dryer or disconnect
power.
STEP 2. Open the dryer door. Remove
the screw that holds the lens in place.
STEP r_,.uw uJ_ E_,,_uy p'dlling it
down and away from drum.
STEP 4. Push tab to allow bulb to
swing out.
S!
STEP 5. Remove the light bulb by turning
it counterclockwise.
STEP 6. install light bulb by turning it
clockwise. Replace the bulb with a
15-watt, appliance bulb only.
STEP 7. Push bottom of light and socket
assembly in until tab locks.
STEP 8. Place the top of the lens onto
the top of the holder. Rotate the bottom
of the lens down until it is in place.
Replace screw.
NOTE: It is very important that the lens
is replaced properly.
STEP 9. Plug in dryer or reconnect
power.
To change drum light type 2:
STEP 1. Unplug dryer or disconnect
power.
STEP 2. Open the dryer door. Remove
the screw that holds the lens in place.
STEP ve the lens by ,ulling it
down and away from drum.
STEP 4. Remove the light bulb by turning
it counterclockwise.
STEP 5. Install light bulb by turning it
clockwise. Replace the bulb with a
15-watt, appliance bulb only.
STEP 6. Place the top of the lens onto
the top of the holder. Rotate the bottom
of the lens down until it is in place.
Replace screw.
NOTE: It is very important that the lens
is replaced properly.
STEP 7. Plug in dryer or reconnect
power.
36
It,_a_r, mo =I_ hT_ _ a
Most laundering problems are easily solved if you understand the cause. Using
the charts below will save you time and money by helping you avoid unneces-
sary service calls.
Problem
Not Drying
Satisfactorily
8olution
Clean tint screen.
Run dryer for 5-10 minutes. Hold
hand under outside exhaust hood to
check air movement, tf you do not feel
air moving, clean exhaust system of
tint or replace exhaust vent with rigid
metal or flexible metal vent (see
"installation Instructions," Section D).
Exhaust vent is crushed Replace with rigid metal or
or kinked, flexible metal vent (see "Installation
Instructions," Section D).
Gas valve on supply line Open alt valves.
is closed.
Timer or the temperature Select the right cycle for the types
control is set on AIR DRY of garments being dried (see
orAIR FLUFF. "Operating Your Dryer").
Load not contacting the Level dryer (see "Installation
sensor strips and automatic Instructions," Section B).
cycle ending early.
Fabric softener sheets Use only one softener sheet per toad
blocking outlet grill, and only use it once.
Dryer located in room with Move dryer where it can operate in
temperature below 45°R ambient air temperatures above 45°F.
Large amount of moisture Expect longer dry times with items
in the toad. that hold more moisture (cottons).
Cold rinse water used. Expect longer dry times, but you are
saving energy and reducing wrinkles.
Load too large and bulky Separate toad to tumble freely.
to dry quickly.
Dryer Will Power cord not firmly Plug into a grounded 3 prong outlet.
Not Run plugged in.
Fuse btown or circuit Replace fuse or reset breakers.
breaker tripped.
PossibleCause
Lint screen is clogged with tint.
Restricted air movement.
Exhaust vent or outside exhaust
hood is clogged with lint.
37
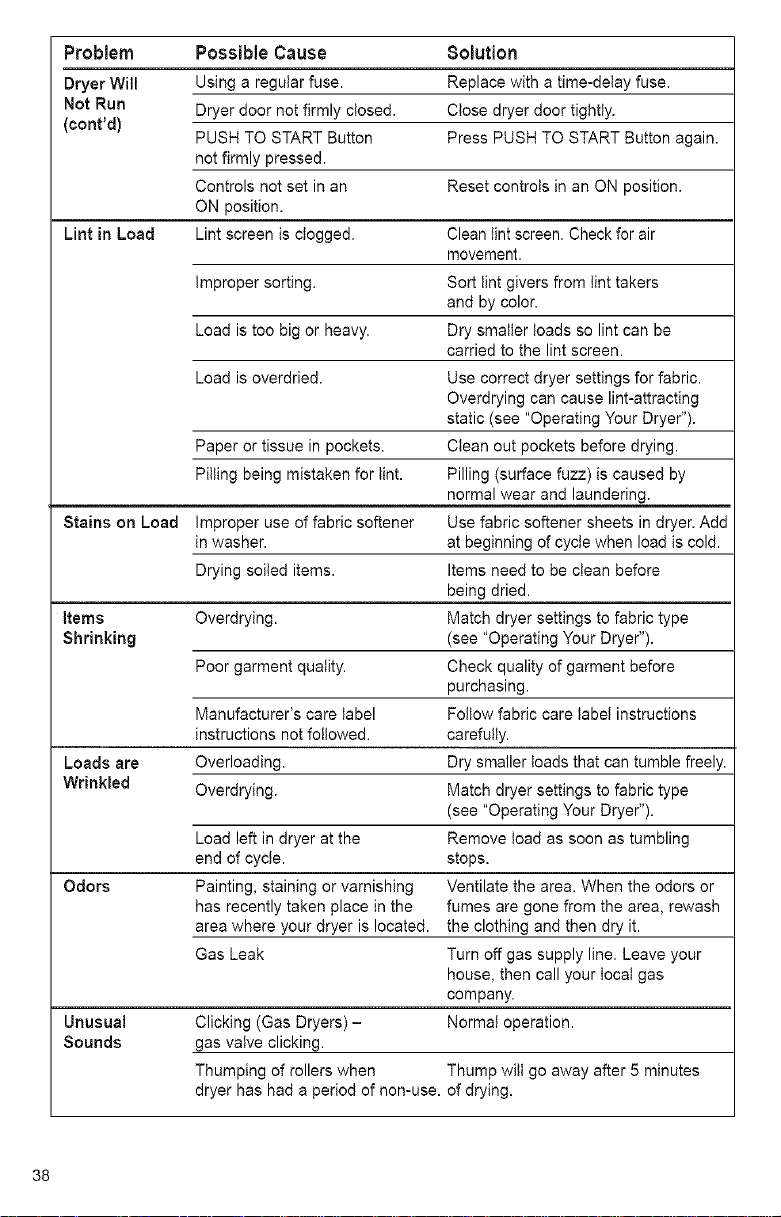
Problem Possible Cause Solution
Dryer Will Using a regular fuse. Replace with a time-delay fuse.
Not Run Dryer door not firmly closed. Close dryer door tightly.
(cont'd)
PUSH TO START Button Press PUSH TO START Button again.
not firmly pressed.
Controls not set in an Reset controls in an ON position.
ON position.
Lint in Load Lint screen is clogged. Clean lint screen. Check for air
movement.
Improper sorting. Sort lint givers from tint takers
and by color.
Load is too big or heavy. Dry smaller loads so lint can be
carried to the lint screen.
Load is overdried. Use correct dryer settings for fabric.
Overdrying can cause lint-attracting
static (see "Operating Your Dryer").
Paper or tissue in pockets. Clean out pockets before drying.
Pilling being mistaken for tint. Pilling (surface fuzz) is caused by
normal wear and laundering.
Stains on Load improper use of fabric softener Use fabric softener sheets in dryer. Add
in washer, at beginning of cycle when load is cold.
Drying soiled items. Items need to be clean before
being dried.
Items Overdrying. Match dryer settings to fabric type
Shrinking (see "Operating Your Dryer").
Poor garment quality. Check quality of garment before
purchasing.
Manufacturer's care label Follow fabric care label instructions
instructions not followed, carefully.
Loads are Overloading. Dry smaller loads that can tumble freely.
Wrinkled Overdrying. Match dryer settings to fabric type
(see "Operating Your Dryer").
Load left in dryer at the Remove toad as soon as tumbling
end of cycle, stops.
Odors Painting, staining or varnishing Ventilate the area. When the odors or
has recently taken place in the fumes are gone from the area, rewash
area where your dryer is located, the clothing and then dry it.
Gas Leak Turn off gas supply line. Leave your
house, then call your tocat gas
company.
Unusual Clicking (Gas Dryers) - Normal operation.
Sounds gas valve clicking.
Thumping of rollers when Thump wilt go away after 5 minutes
dryer has had a period of non-use, of drying.
38

YourpurchasehasaddedvaluebecauseyoucandependonSearsHomeCentral®
forservice.Withover12,000trainedrepairspecialistsandaccesstoover4.2million
partsandaccessories,wehavethetools,parts,knowledgeandskillstoensureour
pledge:WeServiceWhatWeSell.
SearsMaintenanceAgreements
YourKenmoreapplianceisdesigned,manufacturedandtestedtoprovideyearsof
dependableoperation.Yetanymajorappliancemayrequireservicefromtimetotime.
TheSearsMaintenanceAgreementoffersyouanoutstandingserviceprogram,
affordablypriced.
The Sears Maintenance Agreement
• Is your way to buy tomorrow's service at today's prices.
• Eliminates repair bills resulting from normal wear and tear.
• Provides for non-technical and instructional assistance.
• Even if you don't need repairs, provides an annual Preventive Maintenance Check,
at your request, to ensure that your appliance is in proper running condition.
Some limitations apply. For more information, call 1-800-827-6655
39

40
Manual del propietario e
instrucciones de instalacion
®
SECADORAS A GAS
27 pulgadas de ancho
IMPORTANTE:
Lea y siga todas las instrucciones de
seguridad y de modo de empleo
antes de usar este producto por
primera vez.
Sears, Roebuck and Co., Hoffman Estates, IL 60179 U.S.A.
www.sears.com
3405603B IMPRES© EN EE.UU 11/00
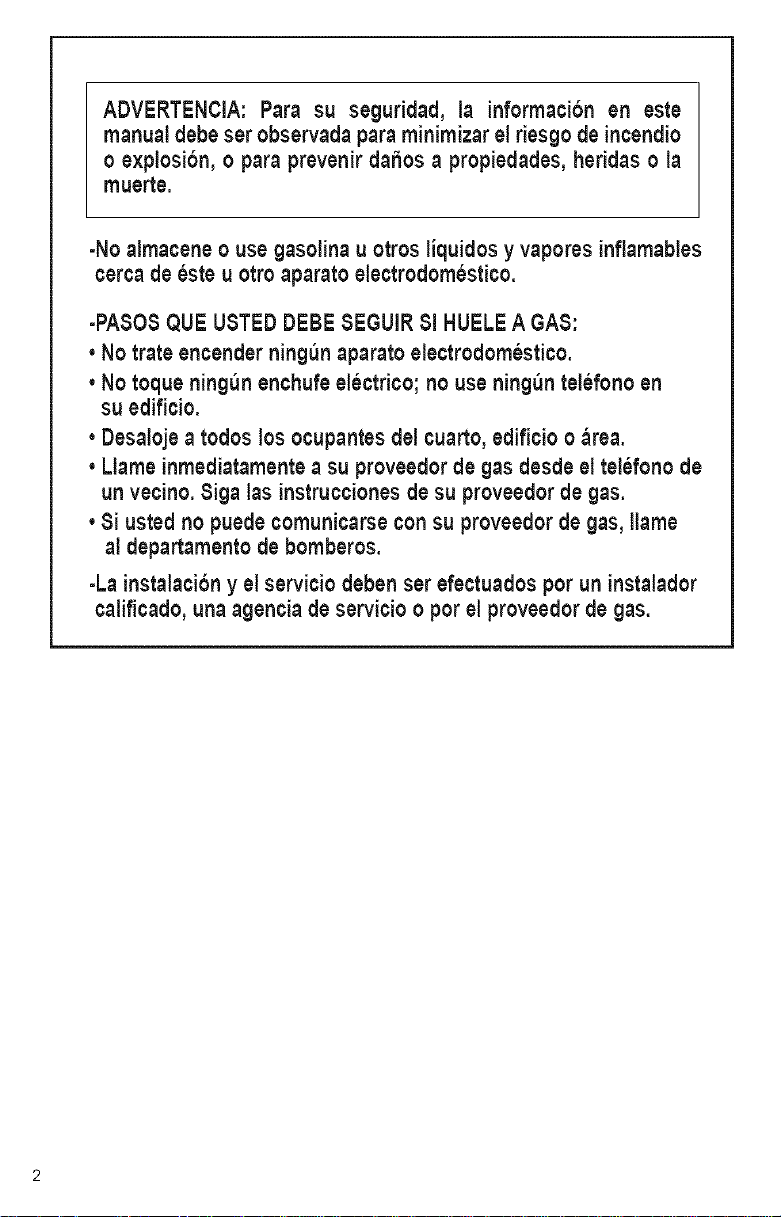
ADVERTENCIA: Para su seguridad, la informacion en este
manual debeserobservada para minimizar el riesgo de incendio
o explosi6n,o para prevenirda_os a propiedades,heridaso la
muerte.
-No almacene o use gasolinau otros liquidosy vaporesinflamables
cercadeeste u otto aparato electrodomestico.
-PASOSQUE USTEDDEBESEGUIR$1HUELEAGAS:
oNo trateencenderning_n aparato electrodomestico.
No toquening_n enchufeelectrico;no use ning_n telefonoen
su edificio.
, Desalojea todoslosocupantesdel cuarto,edificioo_rea.
, Llame inmediatamentea su proveedorde gasdesde eltelefonode
un vecino.Sigalas instruccionesde su proveedorde gas.
, Si usted no puedecomunicarsecon su proveedorde gas, llame
al departamentode bomberos.
-La instalaciony el serviciodebenset efectuadospot un instalador
calificado,una agencia deservicioo pot el proveedorde gas.
ANTES DE USAR SU NUEVA SECADORA
GARANTiA DE LA SECADORA A GAS KENMORE
SEGURIDAD DE LA SECADORA
INSTRUCCIONES DE INSTALACION
3
4
5
7
FUNCIONAMIENTO DE LA SECADORA
SUGERENCIAS DE LAVANDERIA
CUIDADO DE LA SECADORA
LOCALIZACION Y REPARACION DE AVERiAS
REPARAMOS LO QUE VENDEMOS
24
31
33
37
39
Por favor, lea este manual, pues le ayudara a
instalar y a usar su nueva secadora Kenmore
de la manera m_s econdmica.
Para obtener informaci6n adicional acerca
del cuidado y el funcionamiento de aparatos
electrodomesticos Kenmore, Ilame al estable-
cimiento Sears mas cercano. Necesitara tener
a mano los nQmeros completos del modelo y
de serie de su secadora, los cuales se
encuentran en la placa de NQmeros de modelo
y de serie en la secadora.
Utilice el espacio a continuacidn para escribir el
nQmero de modelo y el nQmero de serie de su
nueva secadora Kenmore.
No. det modelo
No. de serie
Fecha de compra
Guarde este manual y el comprobante de
venta de Sears en un lugar seguro para
consultar en el futuro.
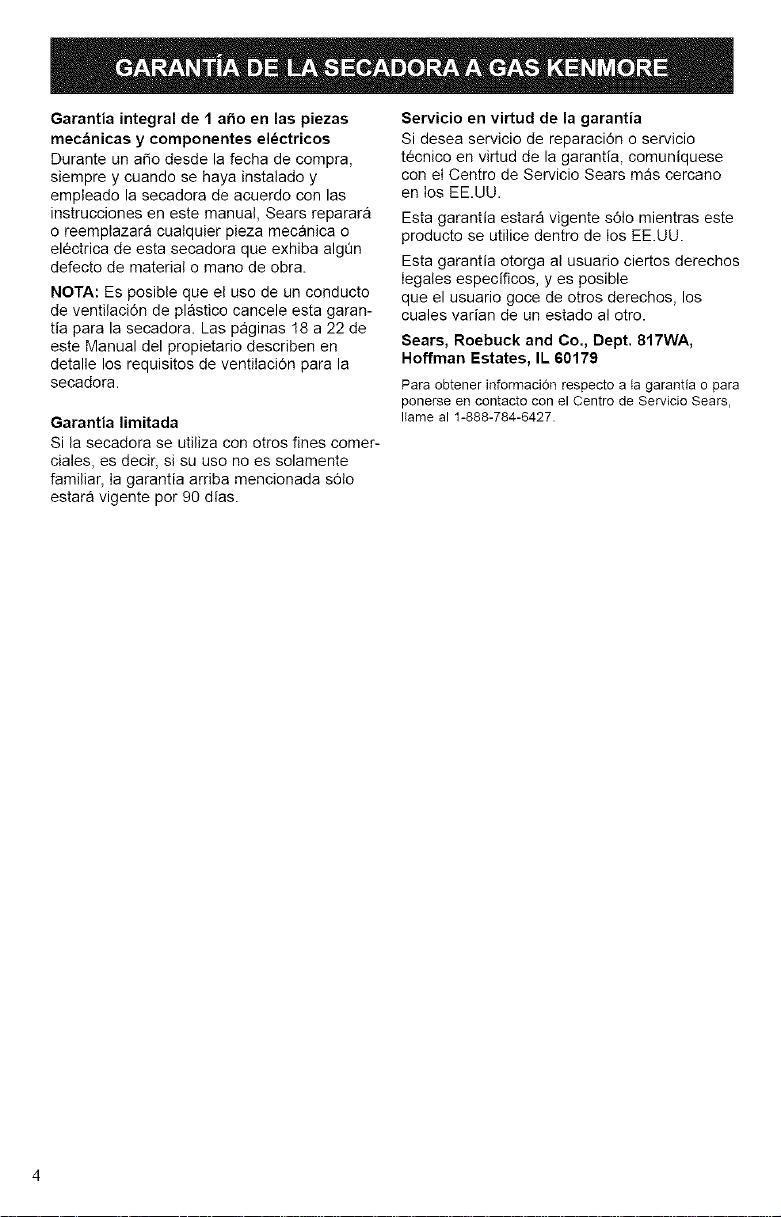
Garantiaintegralde1ahoenlaspiezas
mecdnicasycomponenteselectricos
Durante un a_o desde la fecha de compra,
siempre y cuando se haya instalado y
empleado la secadora de acuerdo con las
instrucciones en este manual, Sears reparara
o reemplazara cuatquier pieza mecanica o
el6ctrica de esta secadora que exhiba algQn
defecto de material o mano de obra.
NOTA: Es posible que el use de un conducto
de ventilaciOn de plastico cancele esta garan-
tia para la secadora. Las paginas 18 a 22 de
este Manual del propietario describen en
detalle los requisitos de ventiIaciOn para la
secadora.
Garantia limitada
Si la secadora se utiliza con otros fines comer-
ciales, es decir, si su uso no es solamente
familiar, Ia garantia arriba mencionada sOto
estara vigente por 90 dias.
Servicio en virtud de la garantia
Si desea servicio de reparaci6n o servicio
tecnico en virtud de la garantia, comuniquese
con el Centro de Servicio Sears m_s cercano
en los EE.UU.
Esta garantia estara vigente s61o mientras este
producto se utilice dentro de los EE.UU.
Esta garantia otorga al usuario ciertos derechos
legates especificos, yes posible
que el usuario goce de otros derechos, los
cuales varian de un estado al otro.
Sears, Roebuck and Co., Dept. 817WA,
Hoffman Estates, IL 60179
Para obtener informaci6e respecto a la garantia o para
ponerse en contacto con el Centro de Servicio Sears,
Ilame al 1-888-784-6427.

Su seguridad y la seguridad de los dem&s es muy importante.
Hemos incluido muchos mensajes importantes de seguridad en este manual yen su
electrodomestico. Lea y obedezca siempre todos los mensajes de seguridad.
Este es el simbolo de advertencia de seguridad.
Este simbolo le llama la atenci6n sobre peligros potenciales que
pueden ocasionar la muerte o una lesi6n a usted y a los demas.
Todos los mensajes de seguridad iran a continuaci6n del simbolo
de advertencia de seguridad y de la palabra "PELIGRO" o
"ADVERTENClA." Estas palabras significan:
Si no sigue las instrucciones,
de inmediato, usted puede morir
o sufrir una lesi6n grave,
Si no sigue las instrucciones,
usted puede morir o sufrir
una lesi6n grave,
Todos los mensajes de seguridad le diran el peligro potencial, le diran c6mo
reducir las posibilidades de sufrir una lesi6n y Io que puede suceder si no se
sigue las instrucciones.
INSTRUCCIONES IMPORTANTES DE SEGURIDAD
ADVERTENCIA: A fin de reducir el riesgo de incendio, descarga electrica
o de daSo alas personas que usen la secadora, deben seguirse las
precauciones b&sicas, incluyendo las siguientes:
• Lea todas instrucciones antes de
usar la secadora.
• No coloque los objetos expuestos a
aceites para cocinar en su secadora.
Los objetos expuestos a aceites para
cocinar pueden contribuir a una
reacci6n quimica que podria causar
que la ropa se inflame.
• No seque articulos que ya se hayan
limpiado, lavado, remojado o
manchado con gasolina, disolventes
de limpieza en seco, u otras
sustancias inflamables o explosivas,
ya que despiden vapores que pueden
encenderse o causar una explosi6n.
• No permita que los niSos jueguen
encima o dentro de la secadora. Es
necesario una supervisi6n cuidadosa
de los niSos toda vez que se use la
secadora cerca de ellos.
• Quite la puerta de la secadora antes
de ponerla fuera de funcionamiento o
de descartarla.
• No repare o reemplace ninguna pieza
de la secadora nitrate de repararla a
menos que esto se recomiende
especificamente en el Manual de Uso y
Cuidado o en instrucciones de
reparacion publicadas para el usuario
que usted comprenda y solo si cuenta
con la experiencia necesaria para Ilevar
a cabo dicha reparaci6n.
• No utilice suavizante de telas o
productos para eliminar la est&tica de
prendas a menos que Io recomiende el
fabricante del suavizante de telas o del
producto en uso.
• No utilice calor para secar prendas que
contengan hule espuma o materiales
con textura de hule similar.
• Limpie el filtro de pelusa antes o
despues de cada carga de ropa.
• Mantenga el area alrededor de la
abertura de ventilaci6n y las areas
adyacentes a esta abertura sin pelusa,
polvo o suciedad.
• No introduzca las manos en la secadora • La parte interior de la maquina y el
cuando el tambor esta en movimiento, conducto de ventilaci6n se deben
• No instale o almacene esta secadora limpiar periodicamente. Esta limpieza la
donde este expuesta al agua o a la debe Ilevar a cabo un reparador
intemperie, calificado.
• No trate de jugar con los controles. • Vea las instrucciones de instalacion
para los requisitos de conexion a tierra.
GUARDE ESTAS INSTRUCClONES
IMPORTANTE: La instalacion de gas debe hacerse de acuerdo con los codigos
locales, o si no los hay, con el Codigo nacional de gas combustible (National Fuel
Gas Code), ANSI Z223.1/NFPA 54.
El sistema electrico de la secadora debe estar conectado a tierra de acuerdo con
los codigos locales, o si no los hay, con el C6digo nacional electricidad (National
Electrical Code), ANSI/NFPA 70 o el Codigo canadiense de electricidad, CSA
C22.1.
RESUMEN DE LA INSTALACION
Si desea una lista completade Ias herramientasy
las piezas necesarias,consulte las paginas 7-9.
A. ESCOJA EL LUGAR DONDE DESEA INSTALAR LA SECADORA
(p_gs. 10-13)
Instalacibn est_ndar (pag. 10) Instrucciones para instalacion en espacios
empotrados/closet (pags. 1t-12)
B. INSTALACION DE PIES NIVELANTES (p_g. 14)
Herramientas necesarias:
ingiesa
(ajustable)
Dos postes de esquina
(de la caja de cart6n
de la secadora)
Linterna (opcional;
depende del tipo
de instataci6n)
Piezas necesarias:
(proporcionadas con lasecadora)
4 pies nivelantes
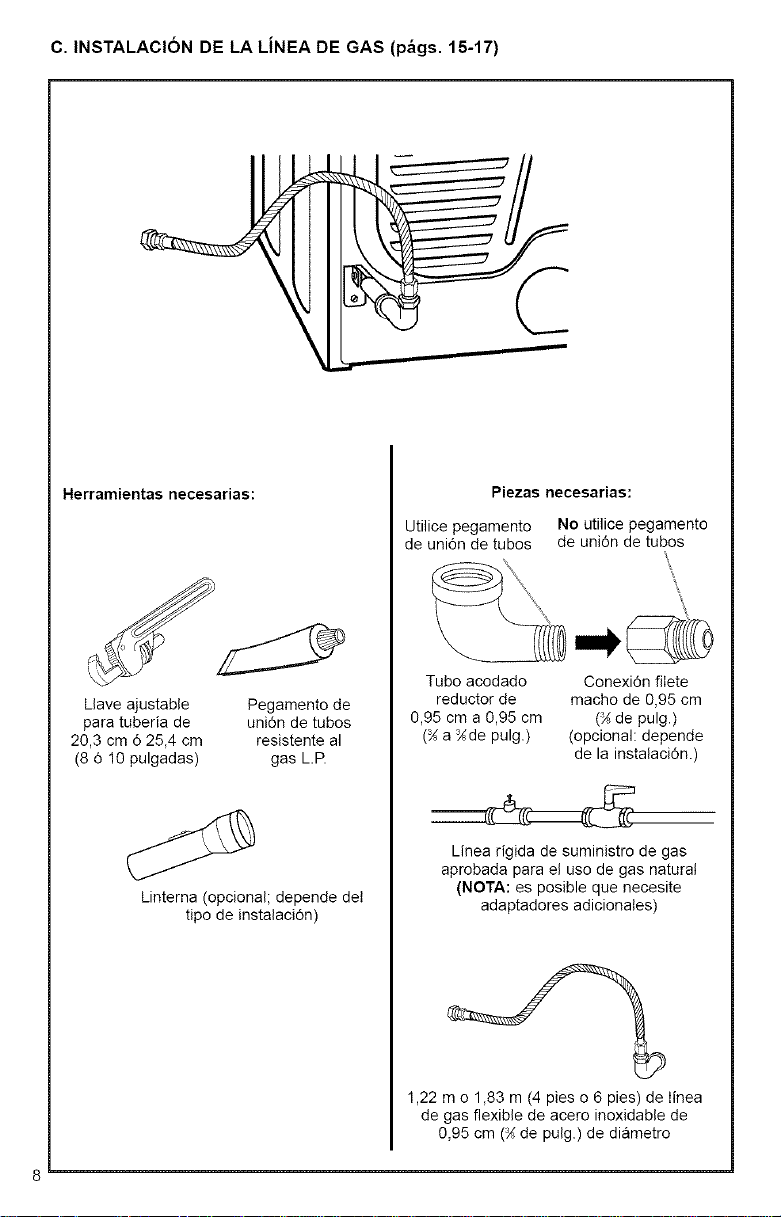
C. INSTALACION DE LA LiNEA DE GAS (p_lgs. 15-17)
Herramientas necesarias:
Llave ajustable Pegamento de
para tuberia de uni6n de tubos
20,3 cm 6 25,4 cm resistente al
(8 6 10 pulgadas) gas L.R
Linterna (opcional; depende det
tipo de instalaci6n)
Piezas necesarias:
Utilioe pegamento No utilice pegamento
de uni6n de tubes de unidn de tubos
Tubo acodado
reductor de
0,95 cm a 0,95 cm
(%a %de pulg.)
Conexi6n fllete
macho de 0,95 cm
(%de pulg.)
(opcional: depende
de la instalacidn.)
Linea rigida de suministro de gas
aprobada para el uso de gas natural
(NOTA: es posible que necesite
adaptadores adicionates)
1,22 m o 1,83 m (4 pies o 6 pies) de Iinea
de gas flexible de acero inoxidable de
0,95 cm (% de pulg.) de di_metro
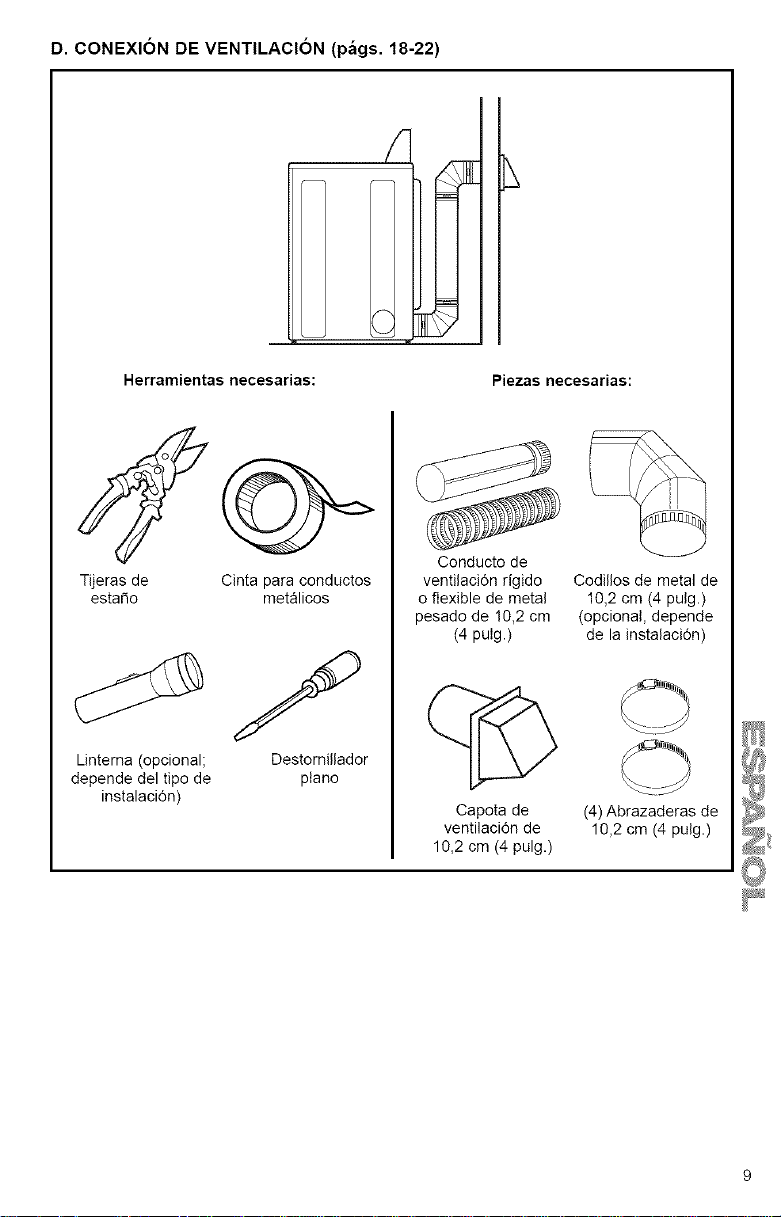
D. CONEXION DE VENTILACION (p_gs. 18-22)
v
Herramientas necesarias: Piezas necesarias:
Tijeras de
estai_o
Linterna (opcional;
depende del tipo de
instalaci6n)
Cinta para conductos
metalicos
Destornillador
piano
Conducto de
ventilacidn rigido
o flexible de metal
pesado de 10,2 cm
(4 puig.)
Capota de
ventilaci6n de
10,2 cm (4 pulg.)
Codillos de metal de
10,2 cm (4 pulg.)
(opcionai, depende
de la instalaci6n)
(4) Abrazaderas de
10,2 cm (4 pulg.)
A. ESCOJA EL LUGAR DONDE DESEA
INSTALAR LA SECADORA
Es importante seleccionar la ubicacion
adecuada de la secadora para facilitar la
instalacibn y obtener el mejor rendimiento
posible.
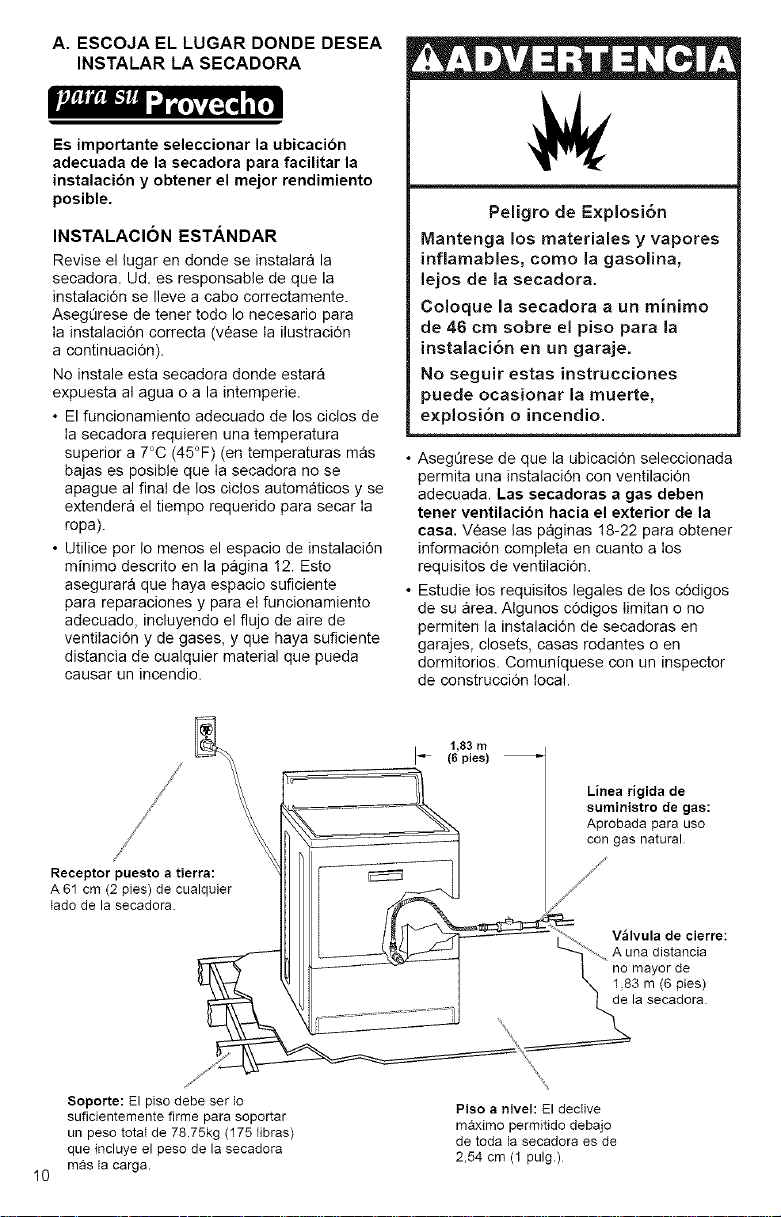
INSTALACION ESTANDAR
Revise el lugar en donde se instalara la
secadora. Ud. es responsable de que la
instalaci6n se Ileve a cabo correctamente.
AsegQrese de tener todo Io necesario para
Ia instalaci6n correcta (vease Ia ilustraci6n
a continuaciOn).
No instale esta secadora donde estara
expuesta al agua o a la intemperie.
• El funcionamiento adecuado de los ciclos de
Ia secadora requieren una temperatura
superior a 7°C (45°F) (en temperaturas mas
bajas es posible que Ia secadora no se
apague al final de los ciolos automaticos y se
extender_ el tiempo requerido para secar Ia
ropa).
• Utilice por Io menos el espacio de instalaci6n
minimo descrito en la pagina 12. Esto
asegurara que haya espacio suficiente
para reparaciones y para et funcionamiento
adecuado, incluyendo el flujo de aire de
ventiIaci6n y de gases, y que haya suficiente
distancia de cualquier material que pueda
causar un incendio.
Peligro de Explosi6n
Mantenga los materiales y vapores
inflamables, como la gasolina,
lejos de la secadora.
Coloque la secadora a un minimo
de 46 cm sobre el piso para la
instalaci6n en un garaje.
No seguir estas instrucciones
puede ocasionar la muerte,
explosi6n o incendio.
• AsegQrese de que la ubicaci6n seleccionada
permita una instalaci6n con ventilaci0n
adecuada. Las secadoras a gas deben
tener ventilacibn hacia el exterior de la
casa, V6ase las paginas 18-22 para obtener
informaci6n completa en cuanto a los
requisitos de ventilaci6n.
• Estudie los requisitos legales de los c6digos
de su area. AIgunos c6digos Iimitan o no
permiten la instalaci6n de secadoras en
garajes, closets, casas rodantes o en
dormitorios. Comuniquese con un inspector
de construcciOn local.
1,83 m
i
I_ (6 pies)
Receptor puesto a tierra:
A61 cm (2 pies) de cualquier
tado de la secadora.
10
soporte: El piso debeser Io
suficientemente firmepara soportar
un peso total de 78.75kg (175 libras)
que incluye el peso de la secadora
mas la carga.
\
Piso a nivel: El deciive
maximo permitido debajo
detoda lasecadoraes de
2,54cm (1 pulg.)
INSTRUCCIONESPARA LA
INSTALACION EN UN LUGAR
EMPOTRADO/CLOSET
Esta secadora se puede instalar en un
espacio empotrado o en un closet.
No instale esta secadora donde estara
expuesta al agua o a Ia intemperie.
• El funcionamiento adecuado de los ciclos de
la secadora requieren una temperatura
superior a 7°C (45°F) (en temperaturas mas
bajas es posible que la secadora no se
apague al final de los ciclos automaticos y
se extendera el tiempo requerido para secar
la ropa).
• Utilice per Io menos el espacio de insta-
laci6n minimo descrito en la pagina 12. Esto
asegurara que haya espacio suficiente
para reparaciones y para el funcionamiento
adecuado, incIuyendo el flujo de aire de
ventilaci6n y de gases, y que haya suficiente
distancia de cualquier material que pueda
causar un incendio.
• AsegQrese de que la ubicaci6n seleccionada
permita una instalaci6n con ventilaci6n
adecuada. Las secadoras a gas deben
tener ventilacibn hacia el exterior de la
casa. Vease las paginas 18-22 para obtener
informaoi6n completa en ouanto a los
requisites de ventilaci6n.
• Estudie los requisites legales de los c6digos
de su area. Algunos c6digos Iimitan o no
permiten la instalaei6n de secadoras en
garajes, closets, casas rodantes o en
dormitories. Comuniquese con un inspector
de construcci6n local.
ADVERTENCIA: Para reducir el
riesgo de incendios, este eIectrodomestico
DEBE TENER VENTILACION HACIA EL
EXTERIOR DE LA CASA.
NOTA: No instale aparatos electrodomesticos
que funcionen a base de quemado de gas en
et mismo closet con Ia secadora.
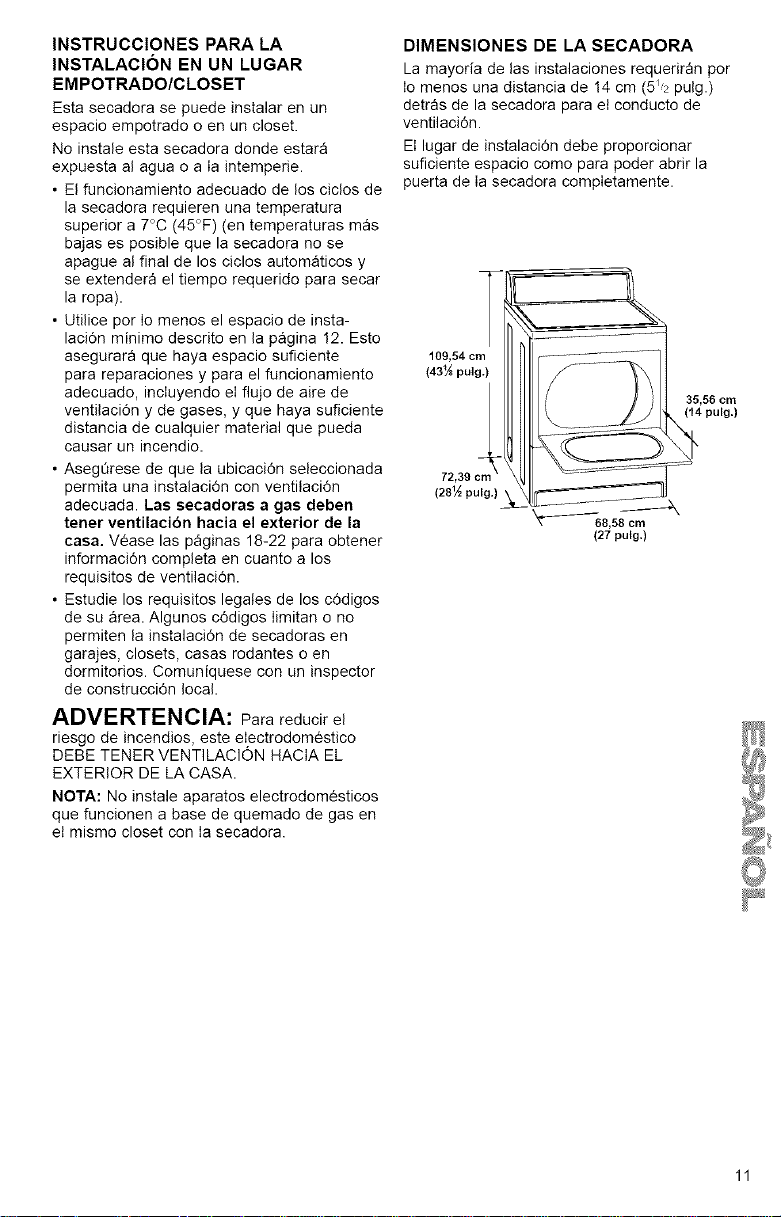
DIMENSIONES DE LA SECADORA
La mayoda de las instalaciones requeriran per
Io menos una distancia de 14 cm (5_2 pulg.)
detras de la secadora para et conducto de
ventilaci6n.
El lugar de instalaci6n debe proporcionar
suficiente espacio come para poder abrir la
puerta de Ia secadora compIetamente.
109,54 cm
(43_ pulg.)
72,39 cm_
(28'A pulg.)
35,55 cm
(14 pulg.)
(27 putg.)
11
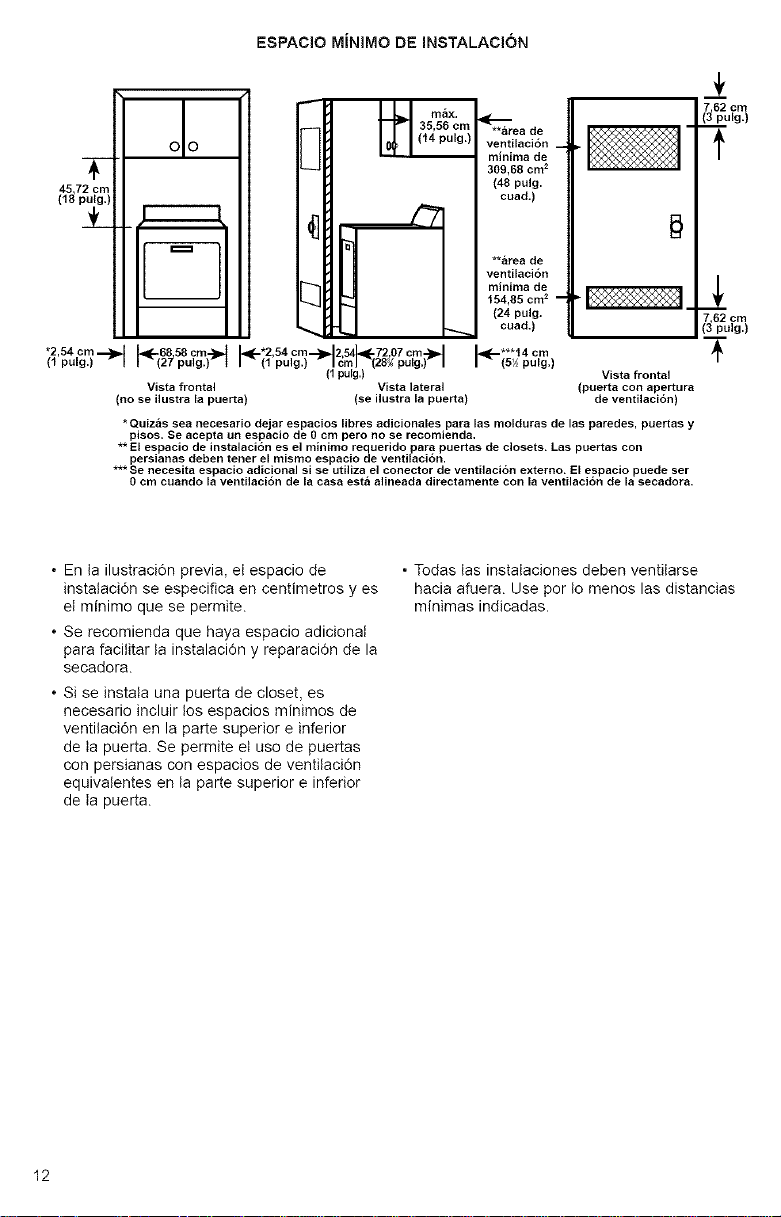
ESPACIOM{NIMO DE INSTALACION
45 72 cm
18 pu g.
"2 54 cm 68 58 cm "2 54 cm 2,54 7207 cm
I pug,
Vista frontal Vista lateral
(no se ilustra la puerta) (se ilustra la puerta)
**area de
ventilaci6n
minima de
309,68 cm _
(48 pulg.
cuad.)
B
_!
7 62 cm
(3_p. ulg.)
f
**area de
ventilaci6n
minima de
154,85 cm _ _ _1
(24 pulg. 7 62 cm
cuad.) (3_pulg.)
Vista frontal
(puerta con apertura
de ventilaci6n)
* Quizas sea necesario dejar espacios libres adicionales para las molduras de las paredes, puertas y
pisos. Se acepta un espacio de 0 cm pero no se recomienda.
** El espacio de instalaci6n es el minimo requerido para puertas de closets. Las puertas con
persianas deben tener el mismo espacio de ventilaci6n.
*** Se necesita espacio adicional si se utiliza el conector de ventilaci6n extemo. El espacio puede ser
0 cm cuando la ventilaci6n de la casa est& alineada directamente con la ventilaci6n de la secadora.
* En la ilustraci6n previa, el espacio de
instataci6n se especifica en centimetros yes
et minimo que se permite.
° Se recomienda que haya espacio adicionat
para facilitar ta instalacidn y reparacidn de la
secadora.
* Si se instata una puerta de closet, es
necesario incluir tos espacios minimos de
ventilaci6n en la parte superior e inferior
de ta puerta. Se permite et uso de puertas
con persianas con espacios de ventilaci6n
equivatentes en ta parte superior e inferior
de ta puerta.
• Todas las instalaciones deben ventilarse
hacia afuera. Use por to menos las distancias
minimas indicadas.
I2
REQUISITOS DE ESCAPES
DE CASAS RODANTES
• No instale esta secadora donde estara
expuesta aI agua o a la intemperie. El
funcionamiento adecuado de los ciclos de la
secadora requieren una temperatura superior
a 7°C (45°F) (en temperaturas mas bajas es
posible que la secadora no se apague al final
de los ciclos automaticos y se extendera el
tiempo requerido para secar la ropa).
• Utilice por Io menos el espacio de instalaci6n
minimo descrito en la pagina !2. Esto
asegurara que haya espacio suficiente para
reparaciones y para el funcionamiento
adecuado, incluyendo el flujo de aire de
ventiIaci6n y de gases, y que haya suficiente
distancia de cualquier material que pueda
causar un incendio.
• Se debe hacer una instalaciOn especial para
introducir aire del exterior de la casa a Ia
secadora cuando se instala dentro de una
casa rodante. El area de cualquier abertura
para la entrada de aire del exterior de la
casa (taI come una ventana cercana) debe
ser per Io menos el doble del tamale de Ia
abertura de ventilaci6n de la secadora.
Esta secadora puede instalarse en casas
rodantes. La instalaciOn debe ser de acuerdo
con el Est_ndar de seguridad y construcci6n
de casas manufacturadas (Manufactured
Home Construction and Safety Standard),
Titulo 24 CFR, Parte 3280 [anteriormente
conocido come Estandar federal para la
seguridad y construcci6n de casas rodantes
(Federal Standard for Mobile Homes
Construction and Safety), TituIo 24, HUD Parte
280].
• El conducto de ventilaci6n de Ia secadora no
se debe conectar
o asegurar con
torniIIos u otros
dispositivos que
se extiendan
at interior deI
conducto.
• has secadoras
de gas se deben
ventilar hacia
afuera de Ia casa.
El conducto de _ [_
ventilaci6n debe
sujetarse firme-
mente en un
Iugar que no sea
inflamable de
Ia estructura de la casa rodante
y no debe terminar en Ia parte subterr_nea
de Ia casa rodante.
Las secadoras a gas que se utilicen en casas
rodantes deben sujetarse de manera segura al
piso. Adquiera el Juego de instalaci6n para
casas rodantes No. 346764 en su tienda Sears
o Centro de Servicio Sears. Este juego incluye
las piezas de sujeci6n necesarias asi como
instrucciones detalladas de instalaci6n.
Tambien puede adquirir piezas para la
instalaciOn del sistema de escape por medio
de la tienda Sears o Centro de Servicio Sears.
13
B. INSTALACION DE PIES
NIVELANTES
mr_X_%_! _dh_o_'L_=li[o-
Aseg_rese de que su secadora este
nivelada correctamente para reducir el
ruido durante el secado y obtener mejor
funcionamiento.
Peligro de Peso Excesivo
Use dos o m_s personas para
mover e instalar la secadora.
No seguir esta instrucci6n puede
ocasionar una lesi6n en la espalda
u otro tipo de lesiones.
PASO 1. Saque dos de las esquinas de cartdn
incluidas con la secadora. Cotdquelas en
et piso atras de la secadora.
PASO 2. Tome el cuerpo de la secadora (no
la parte superior o tablero de controles)
firmemente con ambas manes. Acueste la
secadora en forma delicada sobre su parte
posterior sobre las esquinas de carton.
PASO 3. Tome uno de los pies nivelantes
y busque una marca con forma de diamante
entre las roscas.
PASO 4. Empiece a atornilIar Ios pies en los
agujeros con la mane. Utilice una Ilave ingtesa
para terminar de enroscar los pies nivelantes
hasta Ilegar a la marca del diamante y que
esta no se pueda ver. Este es el momento en
que recomendamos que revise si la secadora
esta nivelada. Es posible que sea necesario
hacer ajustes finales mas adelante.
PASO 5. Levante la secadora hacia arriba
y mu6vala cerca de su Iocalizaci0n final. Deje
suficiente espacio para conectar el escape
de ventilacidn.
PASO 6. Coteje el nivel de la secadora
colocando un nivel sobre la secadora, primero
de Iado a Iado, Iuego de atr_s hacia adelante.
PASO 7. Si la secadora no est_ nivelada,
eleve la secadora con dos esquinas de carton.
Utilice una Ilave inglesa para ajustar los pies
hacia arriba o hacia abajo.
I4
NOTA: Es posible que sea necesario
hacer ajustes finales despu6s de mover
Ia secadora a su posici6n final.
C.INSTALACION DE LA LiNEA
DE GAS
|++x++hr+_.-J++n_4h_o_'Z_.l l[o--
La conexi6n apropiada de gas asegura una
instalacibn que cumple con los requisitos
de cbdigos locales.
REQUISITOS DE GAS
Peligro de Explosi6n
Use una linea de suministro de gas
nueva con aprobaci6n AGA o CSA.
Conecte la secadora con el
suministro de gas regulado que
tenga una v_lvula de cierre.
Apriete firmemente todas las
conexiones de gas.
Si se conecta a un suministro de gas
L.P., la presi6n no debe exceder una
columna de agua de 33 cm (13 pulg.)
y debe ser verificada por una
_ersona calificada.
Ejemplos de una persona calificada
incluyen:
_ersonal de servicio del sistema de
calefacci6n con licencia, personal
autorizado de la compa_ia de gas, y
)ersonal autorizado para dar
servicio.
No seguir estas instrucciones puede
ocasionar la muerte, explosi6n
o incendio.
Es su responsabilidad comunicarse con
un instalador de lineas de gas calificado
para asegurarse de tener gas natural.
• El disei_o de esta secadora ha sido
certificado por la CSA International (CSA
Internacional) para el uso hasta 3,000 me-
tros (10,000 pies) de altura sobre el nivel deI
mar con et nivel de B.T.U. indicado en la
placa del nQmero de modelo/serie. No se
requiere el ajuste de entrada del quemador
cuando la secadora se usa a este nivet maxi-
mo sobre eI mar.
• Si Ia secadora se instala a un nivel superior
a 3,000 metros (10,000 pies) de altura sobre
el nivel del mar, se requiere una reducci6n
de categoria de cuatro por ciento (4%) del
quemador B.T.U. que se muestra en la placa
de nQmero de modelo/serie para cada
aumento de 300 metros (1,000 pies) de
altura. Para asistencia al convertir a otras
ciases de gas y/o instalaci6n a mas de 3,000
metros (10,000 pies) de aitura sobre el nivel
del mar comuniquese con su compa_ia local
de servicio.
• Asegt_rese de que su secadora tenga el
quemador correcto para la clase de gas
que usted tiene en su casa. La informacidn
del quemador se encuentra en Ia placa de
capacidad en la puerta de la secadora. Si
esta informacidn no coincide con la clase
de gas disponibie, comuniquese con su
tienda local de Sears o Centro de servicio
Sears. Cualquier modificaci6n aI quemador
debera efectuarla un t¢cnico autorizado.
• Proporcione una linea rigida de suministro
de gas por medio de un tubo de 1,27 cm
(_ puig.) para la secadora.
• Siva a utilizar gas natural, no use tuberia de
cobre.
• Si su secadora se ha convertido a gas L.R,
se puede utilizar tuberia de cobre
de 0,95 cm ('_ de pulg.) compatible con
gas L.R Si el tamaSo total de la linea de
suministro de gas es de mas de 6 metros
(20 pies), utilice tuberia mas grande. Se
debe utilizar pegamentos de tuberia que
resistan al gas L.R No use cinta de
TEFLON ®.
Tuberia macho con
Linea de suministro rosca de 0,95 cm
de gas con rosca de (_ de pulg.)
1,27 cm NPT (½ pulg.)
15
•Silosc6digoslocalesIopermiten,usetubos
deaceroinoxidabteflexible(dise_ocertifica-
doporlaasociaci6namericanadegas-
AmericanGasAssociationoCSA
Internacional-CSAInternational)para
conectarsusecadoraalalineadesumi-
nistrodegas.Quizanecesiteuncodilloy
unaconexiOnentreelconductodeacero
inoxidableyelconductodegasdela
secadoraparaevitarquesedoblen.Elcon-
ductodegasquesalehaciaafueraporla
partedeatrasdesusecadoratieneunfilete
deconductomachode0,95cm(%pulg.).
(SV,pulg.)
C
3,81 cm
pulg.)
Conexion filete
macho de 0,95 cm
NPT (_ pulg.)
Tubo acodado
reductor de
0,95 cm a 0,95 cm
(_ a _;de pulg.)
Conexion fllete
macho de 0,95 cm
(% de pulg.)
• Debe usarse una combinaciOn de cone-
xiones de tubo para conectar Ia secadora a
Ia linea de gas existente.
DerivaciOntapada
ConexiSn filete NPTde 0,31 cm
macho de 0,95 cm (_;pulg.)
(_ pulg.) ,/f
/
__!Felrar e
Linea de suministro de gas
Reducidor o
conector de gas de 1,27 cm
NPT (½pulg.)
• Se debera instalar una valvula de cierre indi-
vidual manual a una distancia no mayor a
seis ! ,83 m (6 pies) de la secadora, que este
de acuerdo con el COdigo Nacional de gas
combustible, ANSI Z223 1. La valvula debe
encontrarse en el mismo cuarto en donde
esta la secadora, a no mas de 1,83 m
(6 pies) de la secadora. La valvula debe
encontrarse en un lugar en donde se pueda
alcanzar facilmente para abrir y cerrar.
• Una derivaciOn tapada NPT de 0,31 cm
(_ pulg.), accesible para la conexi6n del
calibrador de prueba, debe instalarse
inmediatamente arriba de la conexiOn de
suministro de gas a la secadora.
• Para asegurar Ia combustion y ventilaciOn
adecuada, la secadora debe ser instalada
con las especificaciones minimas
recomendadas en la pagina 12.
• Si desea instalar la secadora en una
casa rodante, vease la pagina 13 para
obtener mas instrucciones.
• La secadora se debe desconectar del
sistema de tuberia de suministro de gas
durante cualquier prueba de presiOn de
ese sistema.
I6
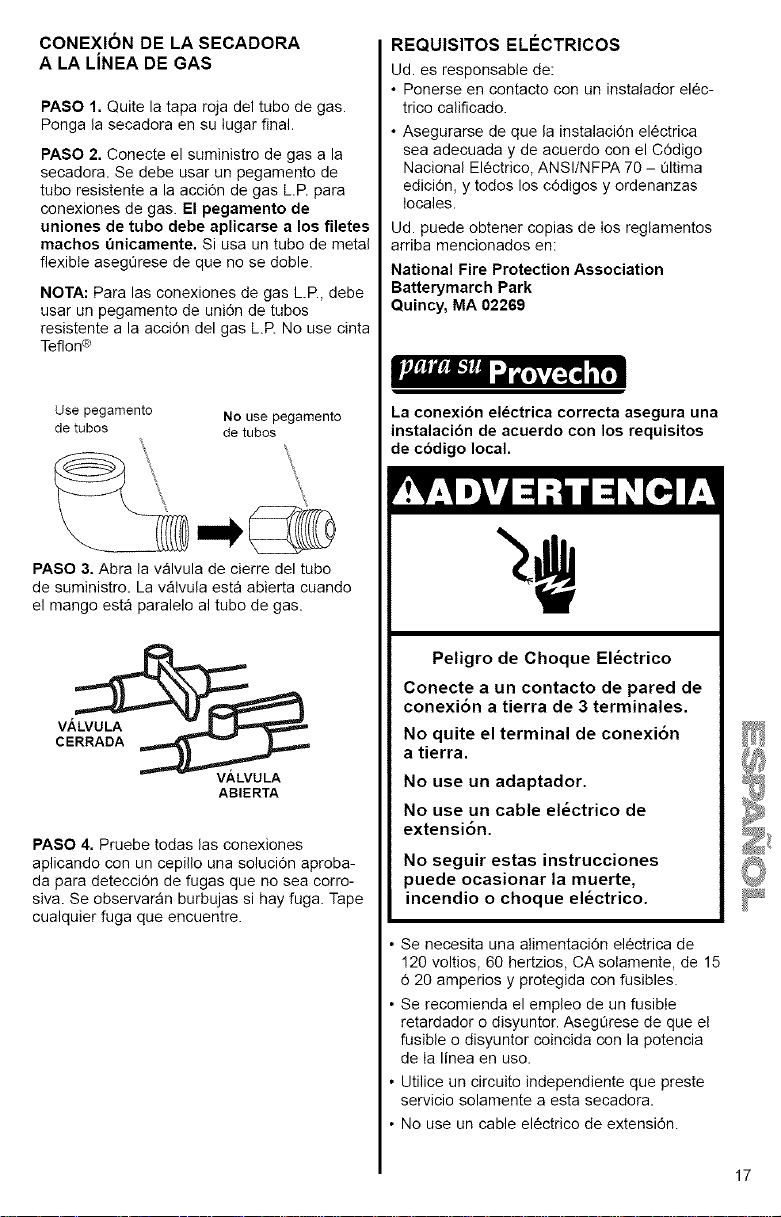
CONEXION DE LA SECADORA
A LA LiNEA DE GAS
PASO 1. Quite la tapa roja del tube de gas.
Ponga la secadora en su Iugar final.
PASO 2, Conecte el suministro de gas a la
secadora. Se debe usar un pegamento de
tube resistente a la acci6n de gas L.R para
conexiones de gas. El pegamento de
uniones de tube debe aplicarse a los filetes
roaches =3nicamente, Si usa un tube de metal
flexible asegOrese de que no se doble.
NOTA: Para las conexiones de gas L.R, debe
usar un pegamento de uni6n de tubes
resistente a la acci6n del gas LP. No use cinta
Teflon®
Use pegamento No use pegamento
de tubes de tubes
\
PASO 3. Abra la valvula de cierre del tube
de suministro. La vaIvula esta abierta cuando
el mango esta paralele al tube de gas.
VALVULA
ABIERTA
PASO 4, Pruebe todas las conexiones
aplicando con un cepillo una soluci6n aproba-
da para detecci6n de fugas que no sea corro-
siva. Se observaran burbujas si hay fuga. Tape
cualquier fuga que encuentre.
REQUISITES ELI_CTRICOS
Ud. es responsabte de:
• Ponerse en contacto con un instatador elec-
trico calificado.
• Asegurarse de que la instalaciOn electrica
sea adecuada y de acuerdo con el C6digo
Nacional El_ctrico, ANSItNFPA 70 - Qltima
ediciOn, y todos los c6digos y ordenanzas
locales.
Ud. puede obtener copias de los reglamentos
arriba mencionados en:
National Fire Protection Association
Batterymarch Park
Quincy, MA 02269
La conexion electrica correcta asegura una
instalacibn de acuerdo con los requisites
de cbdigo local.
Peligro de Cheque EI6ctrico
Conecte a un contacto de pared de
conexi6n a tierra de 3 terminales.
No quite el terminal de conexi6n
a tierra.
No use un adaptador.
No use un cable el6ctrico de
extensi6n.
No seguir estas instrucciones
puede ocasionar la muerte,
incendio o cheque el_ctrico.
• Se necesita una atimentaciOn el¢ctrica de
120 voltios, 60 hertzios, CA soIamente, de 15
6 20 amperios y protegida con fusibles.
• Se recomienda el empleo de un fusible
retardador o disyuntor. AsegQrese de que el
fusible o disyuntor coincida con la potencia
de Ia linea en uso.
• Utilice un circuito independiente que preste
servicio solamente a esta secadora.
• No use un cable electrico de extensi6n.
17
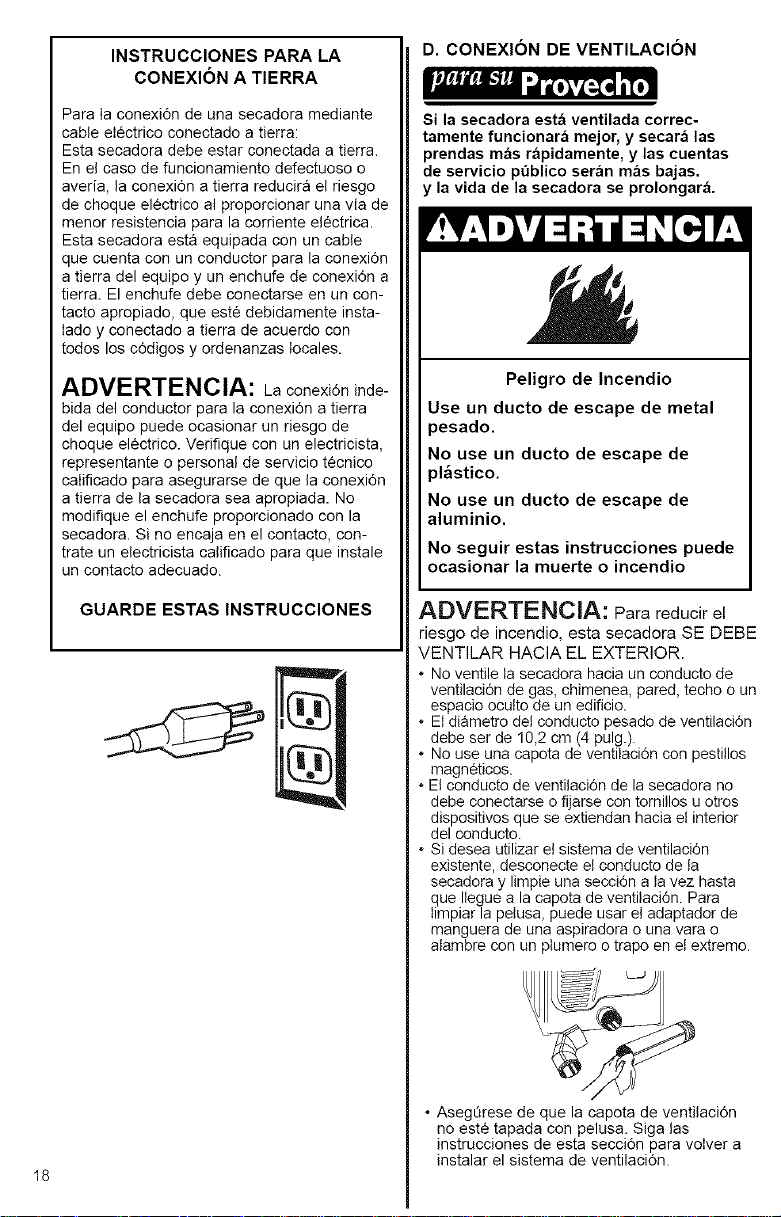
I8
INSTRUCCIONES PARA LA
CONEXION A TIERRA
Para Ia conexidn de una secadora mediante
cable eIectrico conectado a tierra:
Esta secadora debe estar conectada a tierra.
En el caso de funcionamiento defectuoso o
averia, la conexi0n a tierra reducira el riesgo
de cheque el¢ctrico al proporcionar una via de
menor resistencia para la corriente electrica.
Esta secadora esta equipada con un cable
que cuenta con un conductor para la conexi6n
a tierra del equipo y un enchufe de conexi6n a
tierra. El enchufe debe conectarse en un con-
tacto apropiado, que este debidamente insta-
Iado y conectado a tierra de acuerdo con
todos los c6digos y ordenanzas locales.
ADVERTENCIA: Laconexi6ninde-
bida del conductor para la conexi0n a tierra
del equipo puede ocasionar un riesgo de
choque el¢ctrico. Verifique con un electricista,
representante o personal de servicio t¢cnico
caIificado para asegurarse de que la conexidn
a tierra de la secadora sea apropiada. No
modifique el enchufe proporcionado con la
secadora. Si no encaja en el contacto, con-
trate un electricista catificado para que instale
un contacto adecuado.
GUARDE ESTAS INSTRUCCIONES
D. CONEXION DE VENTILACION
|++X++hr+_.'J+innn4h_o_'L_'I i[o-
Si la secadora est_ ventilada correc-
tamente funcionarb mejor, y secard las
prendas m_s rapidamente, y las cuentas
de servicio peblico seran mas bajas.
r la vida de la secadora se prolongar&
Peligro de Incendio
Use un ducto de escape de metal
pesado.
No use un ducto de escape de
pl_stico.
No use un ducto de escape de
aluminio.
No seguir estas instrucciones puede
ocasionar la muerte o incendio
ADVERTENCIA: Para reducir el
riesgo de incendio, esta secadora SE DEBE
VENTILAR HACIA EL EXTERIOR.
+ No ventile ta secadora hacia un conducto de
ventilaci6n de gas, chimenea, pared, techo e un
espacio oculto de un edificio.
* El diametro del conducto pesado de ventilaci6n
debe ser de 10,2 cm (4 pulg.).
* No use una capota de ventilaci6n con pestitlos
magneticos.
* Et conducto de ventilaci6n de la secadora no
debe conectarse o fijarse con tornillos u otros
dispositivos que se extiendan hacia el interior
del conducto.
* Si desea utilizar el sistema de ventilaci6n
existente, desconecte el conducto de la
secadora y limpie una secci6n a la vez hasta
que Ilegue a la capota de ventilaci6n. Para
timpiar la pelusa, puede usar el adaptador de
manguera de una aspiradora o una vara o
atambre con un ptumero o trapo en el extremo.
• AsegOrese de que la capota de ventilaci6n
no est¢ tapada con pelusa. Siga las
instrucciones de esta secci6n para voIver a
instalar el sistema de ventilaci6n.
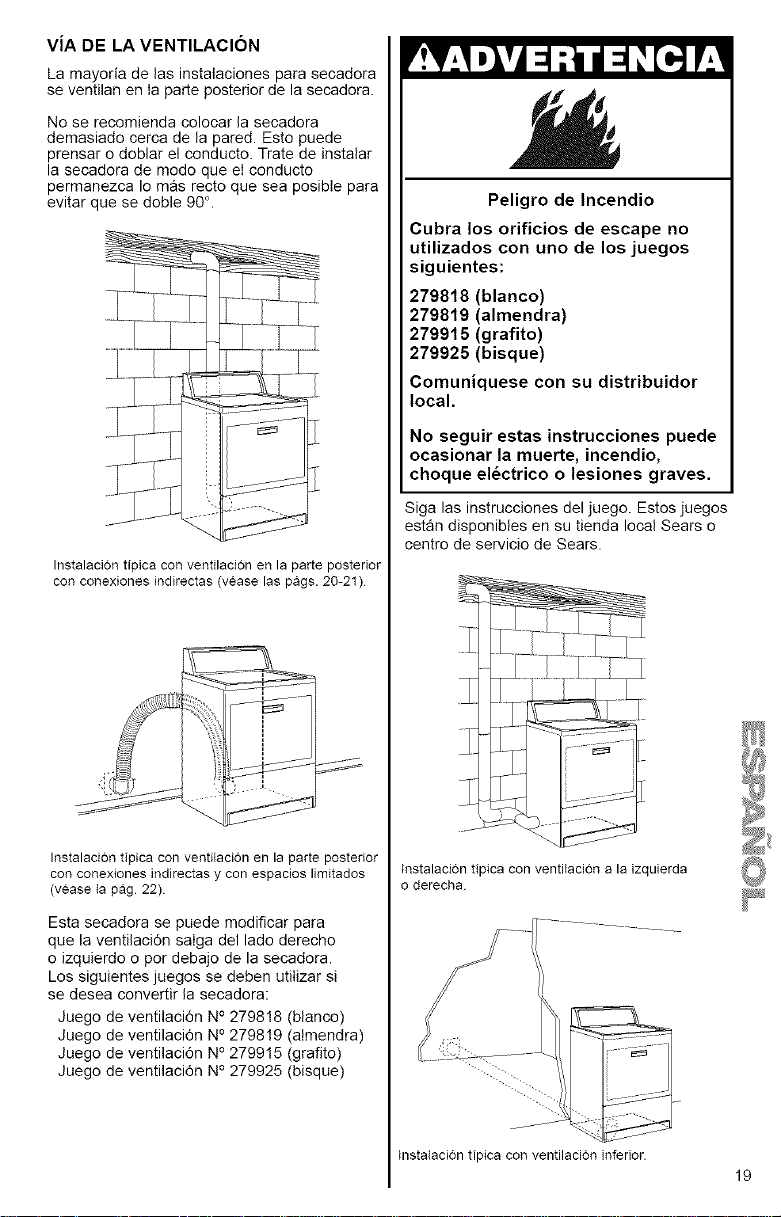
ViA DE LA VENTILACION
La mayoria de las instalaciones para secadora
se ventilan en Ia parte posterior de la secadora.
No se recomienda colocar la secadora
demasiado cerca de la pared. Esto puede
prensar o doblar el conducto. Trate de instalar
la secadora de modo que el conducto
permanezca Io mas recto que sea posibte para
evitar que se doble 90°.
Instalacion tipica con ventilacion en la parte posterior
con conexiones indirectas (vease las pags. 20-21 )
Instalacion tipica con ventitaci6n en la parte posterior
con conexiones indirectas y con espacios limitados
(vease ta pag 22)
Esta secadora se puede modificar para
que la ventilaci6n saIga del lado derecho
o izquierdo o por debajo de la secadora.
Los siguientes juegos se deben utiIizar si
se desea oonvertir la secadora:
Juego de ventilaciOn No 279818 (blanco)
Juego de ventilaciOn No279819 (atmendra)
Juego de ventilaci6n No279915 (grafito)
Juego de ventilaci6n No 279925 (bisque)
Peligro de Incendio
Cubra los orificios de escape no
utilizados con uno de los juegos
siguientes:
279818 (blanco)
279819 (almendra)
279915 (grafito)
279925 (bisque)
Comuniquese con su distribuidor
local.
No seguir estas instrucciones puede
ocasionar la rnuerte, incendio,
choque el_ctrico o lesiones graves.
Siga las instrucciones del juego. Estos juegos
estan disponibles en su tienda local Sears o
centro de servicio de Sears.
Instalaci6n tipica con ventilaci6n a la izquierda
o derecha
lnstalaciTn tipica con ventilacion inferior.
19

DETERMINE EL TAMAI_O DE LOS
CONDUCTOS DE VENTILACION
Longitud maxima de los conductoe
de ventilaciOn:
• VentilaciOn posterior. La Iongitud maxima deI
sistema de ventilaci0n posterior depende del
tipo de conducto, del nOmero de codilIos y
del tipo de capota de ventilaciOn. V¢ase
la tabla siguiente.
• Ventilacidn lateral o inferior: La ventilaciOn
lateral o inferior requiere un espacio adicional
para una vuelta de 90° dentro de la
secadora. Para determinar la Iongitud
maxima del conducto de ventilaci0n, a_ada
el espacio equivatente para una vuelta de 90°
a Ia siguiente tabla.
TIPO DE CAPOTA DE
VENTILACION
NOmerode
vueltas de 90°
0
1
2
3
4
Numerode
vueitas de 90°
0
1
2
3
4
10,2 cm
(49ulg }
64 cm
102 c _,_] 2 I 2 pulg
(4P_g"_ (de ser posibte
_,_ use de 10,2 cm
(4Pulg) (4 pulg.)
Longitud maxima del conducto
de metal rigido de 10,2 cm (4
pulg.) de di&metro
20,0 m (64 pi) 17,7 m (58 pi)
16,5 m (54 pi) 14,5 m (48 pi)
13,4 m (44 pi) 11,6 m (38 pi)
10,7 m (35 pi) 8,8 m (29 pi)
8,2 m (27 pi) 6,4 m (21 pi)
Longitud maxima deI conducto
de metal flexible de 10,2 cm
(4 putg.) de diametro
11,0 m (36 pi) 8,5 m (28 pi)
9,4 m (31 pi) 7,0 m (23 pi)
8,2 m (27 pi) 5,8 m (19 pi)
7,6 m (25 pi) 5,2 m (17 pi)
7,0m(23pi) 4,6m(15pi)
NOTA: Si se usa una combinaciOn de metal
rigido y flexible para el conducto de
ventilaciOn, use Ias instrucciones para el
conducto de ventilaciOn de metal flexible.
2O
CONEXIONES SEPARADAS TiPICAS
Uso de un conducto de metal rigido
de 10,2 cm (4 pulg.):
NOTA: No conecte las uniones del conducto
de ventilaciOn con tomillos. A los tornillos se
les puede pegar pelusa, Io cual demora el
3roceso de secado. Se recomienda el uso de
abrazaderas para unir y asegurar las uniones
de los conductos de ventilaciOn.
PASO 1. Instale un codilIo de metal de
10,2 cm (4 pulg.) sobre la capota y sobre
la salida de ventilaciOn de la secadora.
PASO 2. Mida un conducto de metal rigido de
10,2 cm (4 pulg.), el cuat sera necesario para
conectar los dos codillos.
Codillo
Conductode
metal rigido __
Secadora
Cinta de conducto
y abrazaderas
Pared
,jJ/
Capotade
_jventilacidn
¢inta de
conducto y
abrazaderas
\%
V_ase el
PASO2
Codillo
Generalmente et conducto viene en medidas
de 60,96 cm (2 pies). Use una tijeras de
esta_o para cortar el conducto 7,62 cm (3
pulg.) m_s de Io que indica Ia medida para
hacer la conexiOn.
PASO 3. Coloque una abrazadera en cada uno
de los extremos del codiIIo de ventilaciOn y
conecte el codillo a la salida de ventilaci0n de
la secadora. Conecte la union con cinta de
conducto. Apriete la abrazadera.
Cinta
Abrazadera
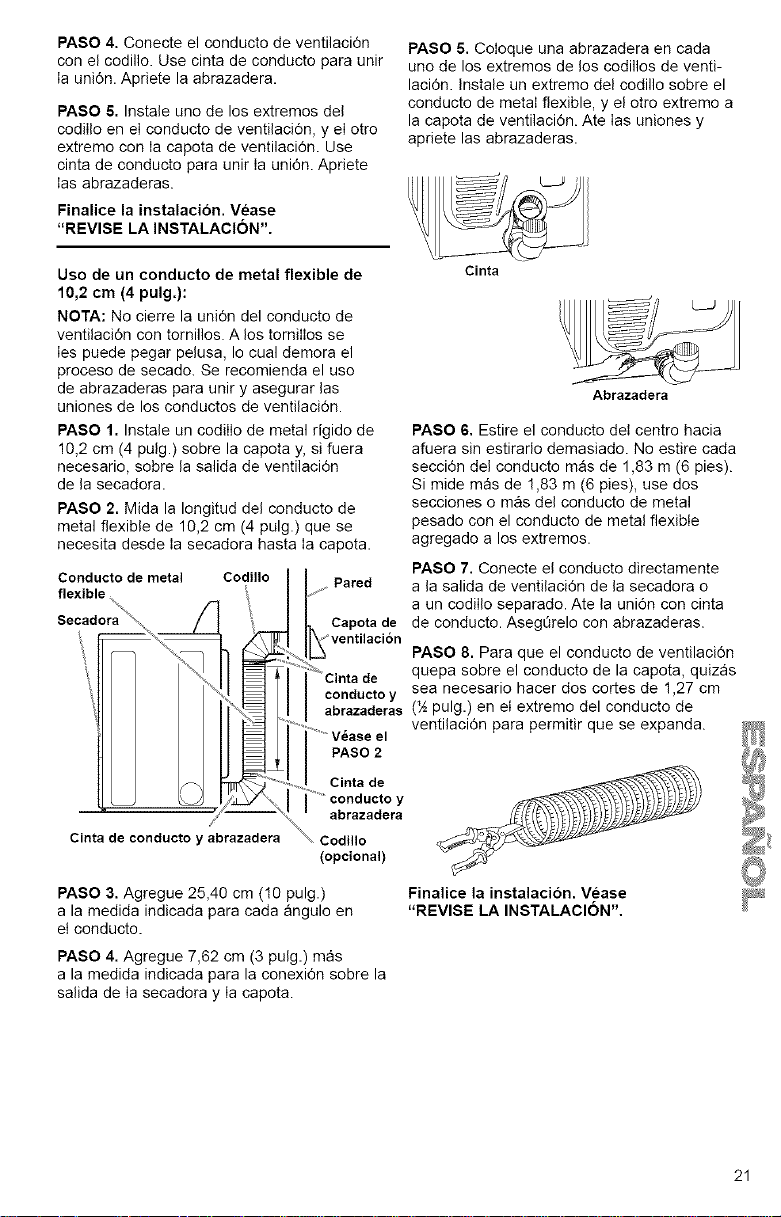
PASO 4. Conecte el conducto de ventilaci0n
con el codillo. Use cinta de conducto para unir
Ia union. Apriete la abrazadera.
PASO 8. Instale uno de los extremos del
codilIo en eI conducto de ventilaciOn, y eI otro
extremo con Ia capota de ventilaciOn. Use
cinta de conducto para unir Ia union. Apriete
Ias abrazaderas.
Finalice la instalacion. Vease
"REVISE LA INSTALACION".
Uso de un conducto de metal flexible de
10,2 cm (4 pulg.):
NOTA: No cierre la union del conducto de
ventilaciOn con tornillos. A los tornilIos se
Ies puede pegar pelusa, Io cual demora el
proceso de secado. Se recomienda el uso
de abrazaderas para unir y asegurar las
uniones de los conductos de ventilaciOn.
PASO 1. Instale un codilIo de metal rtgido de
10,2 cm (4 pulg.) sobre la capota y, si fuera
necesario, sobre la salida de ventilaciOn
de la secadora.
PASO 2. Mida la Iongitud del conducto de
metal flexible de 10,2 cm (4 pulg.) que se
necesita desde Ia secadora hasta Ia capota.
Conductode metal
flexible.
Secadora "-_ /
i%%Ti_
/ "
Codillo
Cinta de conducto y abrazadera
.....Pared
Capota de
,"ventilacibn
_' Cinta de
conducto y
abrazaderas
V_ase el
PASO 2
, Cinta de
Codillo
(opcional)
PASO 3, Agregue 25,40 cm (10 pulg.)
a la medida indicada para cada angulo en
eI conducto.
PASO 4. Agregue 7,62 cm (3 pulg.) mas
a la medida indicada para la conexi0n sobre la
salida de Ia secadora y Ia capota.
PASO 5,Coloque una abrazadera en cada
uno de los extremes de los codillos de venti-
laci0n. Instate un extremo del codillo sobre el
conducto de metal flexible, y el otro extreme a
la capota de ventilaciOn. Ate Ias uniones y
apriete las abrazaderas.
Cinta
Abrazadera
PASO 6. Estire el conducto dei centre hacia
afuera sin estirarlo demasiado. No estire cada
secci0n del conducto mas de 1,83 m (6 pies).
Si mide mas de ! ,83 m (6 pies), use dos
secciones o mas del conducto de metal
pesado con el conducto de metal flexible
agregado a los extremos.
PASO 7. Conecte el conducto directamente
a la salida de ventilaciOn de la secadora o
a un codilIo separado. Ate la union con cinta
de conducto. AsegQrelo con abrazaderas.
PASO 8. Para que el conducto de ventilaciOn
quepa sobre el conducto de la capota, quizas
sea necesario hacer dos cortes de 1,27 cm
(½ pulg.) en eI extreme del conducto de
ventilaciOn para permitir que se expanda.
Finalice la instalaciOn. Vease
"REVISE LA INSTALACION".
21
CONEXIONES SEPARADAS
CON ESPACIOS LIMITADOS
Cuando el conducto de ventilaci6n se
encuentra en un espacio limitado detras de
Ia secadora, o si se desea instalar la
secadora en un espacio limitado o en un
closet, se recomienda que instale el conducto
de ventilaci6n sobre la parte superior* de la
secadora. Se puede adquirir un juego de
adaptaci6n para este prop6sito en la tienda
Sears o en el Centro de servicio Sears.
*Estaspiezas pueden estar protegidaspor una
o mas pater_tesde EEUU.
SISTEMA DE BUCLE
NOTA: El sistema de ventilaci6n viene en
muchas variedades. Seleccione el tipo que
coincida mejor con su instaiaci6n. A contin-
uaci6n se ilustran tres de los tipos de insta-
Iaci6n mas comunes.
I
i - - T-_
....... i
i
Sistema deventilaci6n instaladopor la
parte superior con codifiesestandar
Sistema deventilaci6n instalado por la partesuperior
con unseparador y uo coditto estandar
SISTEMA PERISCOPIO
22
Sistema deventitacion
con un periscopio
(distancia de 5 cm [2puig ])
REVISELAINSTALAClON
|++x++hr+_.-J++n_4h_o_'L,_.li[o-
Tbmese unos cuantos minutos para
completar esta lista de revisibn.
Le ayudar_ a asegurarse de que se
ha Iogrado una instalacibn adecuada
y asi aumentar su satisfaccion con
su secadora Kenmore,
AsegOrese de que todas Ias piezas que
sac6 de los paquetes de piezas esten insta-
ladas.
AsegOrese de que la secadora se encuentre
en su ubicaciOn final. AsegOrese de que el
conducto de ventilaci6n no este doblado o
comprimido.
++ AsegQrese de que Ia secadora este
nivelada. Esto se puede Iograr colocando
un nivel sobre la secadora, primero de lado
a lade y luego del frente hacia la parte
posterior. Si Ia secadora no esta nivelada,
ajuste los pies hacia arriba o hacia abajo.
AsegQrese de que tenga todas las
herramientas con las que empez6.
PASOS FINALES
Conecte a un contacto de pared de
conexi6n a tierra de 3 terminales. Conecte
la energia.
Limpie el interior del tambor minuciosa-
mente con un trapo hQmedo para sacar
todo el polvo.
Quite la capa protectora azul que esta
en la consola y cualquier pieza de cinta que
haya quedado en la secadora.
Lea el resto de este manual para entender
a cabalidad el funcionamiento de su
secadora.
Para sacar el aire de la linea de gas, fije
la secadora en un ciclo de cater completo
(no el ciclo de secado al aire [AIR DRY])
per 20 minutes. Despues de 5 minutos
abra la puerta de la secadora. Se debe
prender el quemador durante estos 5 min-
utes. Si no siente el calor, apague la
secadora y ESPERE 5 MINUTOS.
Durante estos 5 minutos, revise las valvu-
las de la casa y de la secadora para
asegurarse de que esten abiertas. Repita
los pasos arriba mencionados. Si el
quemador no se enciende, vease la
secci6n de Localizaci6n y reparaci6n de
averias.
23
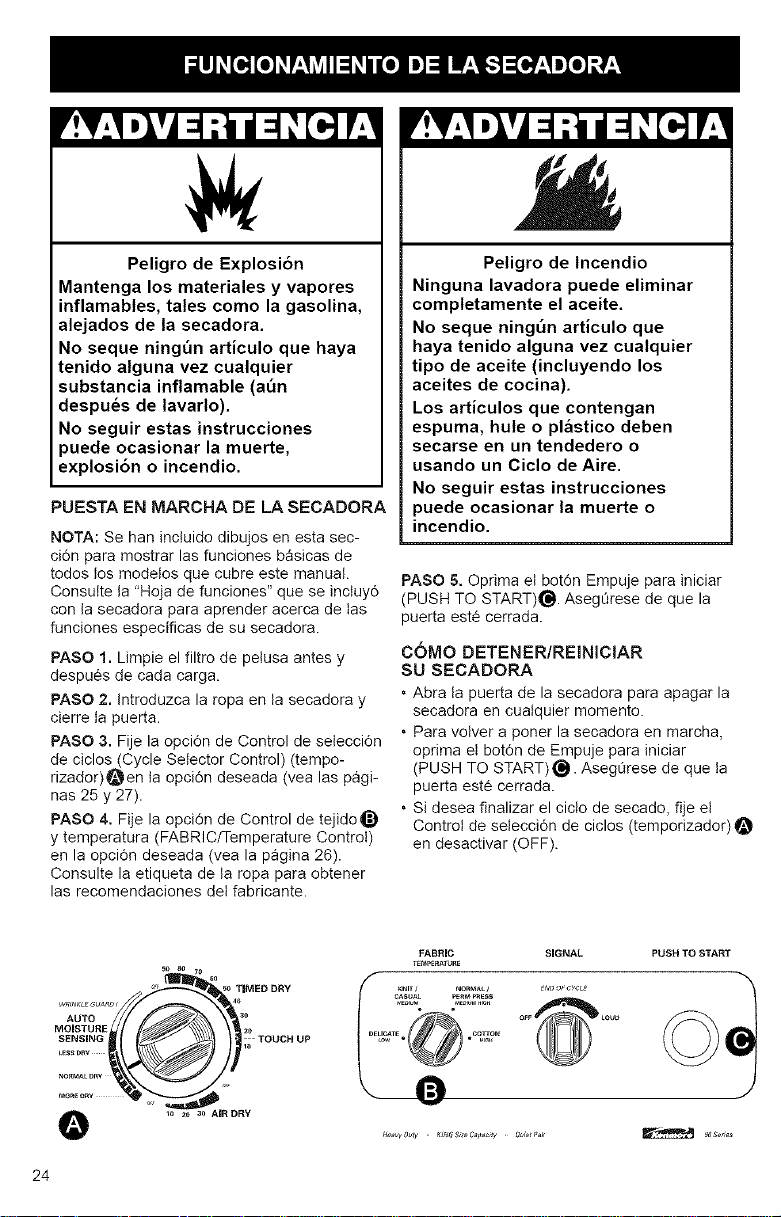
Peligro de Explosi6n
Mantenga los materiales y vapores
inflamables, tales como la gasolina,
alejados de la secadora.
No seque ningQn articulo que haya
tenido alguna vez cualquier
substancia inflamable (ann
despu_s de lavarlo).
No seguir estas instrucciones
puede ocasionar la muerte,
explosi6n o incendio.
PUESTA EN MARCHA DE LA SECADORA
NOTA: Se han inctuido dibujos en esta sec-
ci6n para mostrar las funciones bSsicas de
todos los modelos que cubre este manual.
Consulte ta "Hoja de funciones" que se inctuy6
con la secadora para aprender acerca de tas
funciones especificas de su secadora.
PASO 1. Limpie el filtro de petusa antes y
despues de cada carga.
PASO 2. Introduzca la ropa en ta secadora y
cierre la puerta.
PASO 3. Fije la opcidn de Control de seleccidn
de ciclos (Cycle Selector Control) (tempo-
rizador)_en ta opci6n deseada (vea las pagi-
nas 25 y 27).
PASO 4, Fije la opcidn de Control de tejido_
y temperatura (FABRIC/Temperature Control)
en la opcidn deseada (vea la pagina 26).
Consulte la etiqueta de ta ropa para obtener
las recomendaciones del fabricante.
Peligro de Incendio
Ninguna lavadora puede eliminar
completamente el aceite.
No seque ning_n articulo que
haya tenido alguna vez cualquier
tipo de aceite (incluyendo los
aceites de cocina).
Los articulos que contengan
espuma, hule o pl&stico deben
secarse ell Ull tendedero o
usando un Ciclo de Aire.
No seguir estas illstrucciones
puede ocasionar la muerte o
illcelldio.
PASO 5. Oprima el botdn Empuje para iniciar
(PUSH TO START)_. AsegL_rese de que la
puerta este cerrada.
COMO DETENER/REINICIAR
SU SECADORA
• Abra la puerta de la secadora para apagar la
secadora en cualquier memento.
• Para volver a poner la secadora en marcha,
oprima et botdn de Empuje para iniciar
(PUSH TO START)_. AsegOrese de que ta
puerta este cerrada.
• Si desea finalizar el cicto de secado, fije et
Control de selecci6n de ciclos (temporizador)
en desactivar (OFF).
FABRIC
T_MPEnATUR_
SO 80 70
0'_ 30 _ilIMES DRY K_IT/ _ORMA,/
CASUAL P_ P_ESS
WRINKLE_UA_OS 4O M_I_M _E_IU__I_H
AUTO 30
MOISTURE _0
SENSING " TOUCH UP c,.,_,:.._=_
LESS[_F_V
O _0 _e 30 AIR DRY
SIGNAL PUSH TO START
Ha_vyDuty Kl_JG_z/e_'s_t_ci_y Q_tPak
24
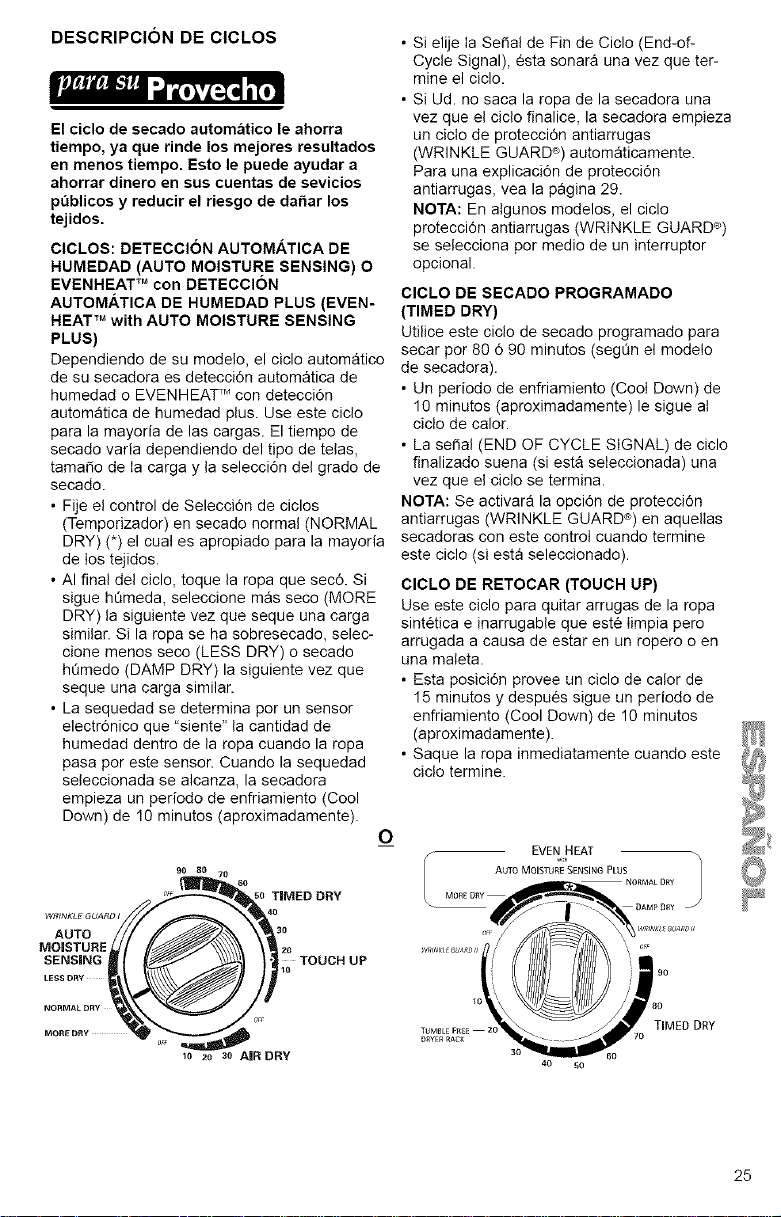
DESCRIPCION DE ClCLOS
El ciclo de secado automatico le ahorra
tiempo, ya que rinde los mejores resultados
en menos tiempo. Esto le puede ayudar a
ahorrar dinero en sus cuentas de sevicios
p_blicos y reducir el riesgo de dahar los
tejidos.
CICLOS: DETECCION AUTOM,_.TICA DE
HUMEDAD (AUTO MOISTURE SENSING) O
EVENHEAT TM con DETECCION
AUTOMATICA DE HUMEDAD PLUS (EVEN-
HEAT TM with AUTO MOISTURE SENSING
PLUS)
Dependiendo de su modelo, el ciclo automatico
de su secadora es deteccidn automatica de
humedad o EVENHEAT TM con deteccidn
automatica de humedad plus. Use este ciclo
para la mayoria de las cargas. El tiempo de
secado varia dependiendo del tipo de telas,
tamale de Ia carga y la selecciGn del grado de
secado.
• Fije el control de Seleccidn de ciclos
(Temporizador) en secado normal (NORMAL
DRY) (*) el cual es apropiado para la mayoria
de los tejidos.
• AI final del ciclo, toque la ropa que sec6. Si
sigue hQmeda, seleccione mas seco (MORE
DRY) la siguiente vez que seque una carga
similar. Si la ropa se ha sobresecado, selec-
clone menos seco (LESS DRY) o secado
hQmedo (DAMP DRY) la siguiente vez que
seque una carga similar.
• La sequedad se determina por un sensor
electrdnico que "siente" la cantidad de
humedad dentro de la ropa cuando la ropa
pasa por este sensor. Cuando la sequedad
seleccionada se alcanza, la secadora
empieza un periodo de enfriamiento (Cool
Down) de 10 minutos (aproximadamente).
O
_--90 80 70 60
- (_50 TBWiED DHV
AUTO _0
SENSINGm I R_/-<_ _ _0 TOUCHUP
OFF
10 20 30 AIR DRY
• Si elije Ia Sedat de Fin de Ciclo (End-of-
Cycle Signal), esta sonars una vez que ter-
mine el ciclo.
• Si Ud. no saca la ropa de la secadora una
vez que el ciclo finalice, la secadora empieza
un ciclo de protecciOn antiarrugas
(WRINKLE GUARD ®) automaticamente.
Para una explicaciGn de protecciGn
antiarrugas, vea la pagina 29.
NOTA: En atgunos modelos, el ciclo
protecciOn antiarrugas (WRINKLE GUARD ®)
se selecciona por medio de un interruptor
opcional.
CICLO DE SECADO PROGRAMADO
(TIMED DRY)
Utilice este ciclo de secado programado para
secar por 80 6 90 minutos (segQn el modeto
de secadora).
• Un periodo de enfriamiento (Cool Down) de
10 minutos (aproximadamente)le sigue at
ciclo de calor.
• La sedal (END OF CYCLE SIGNAL) de ciclo
finalizado suena (si esta seleccionada) una
vez que el ciclo se termina.
NOTA: Se activara la opciGn de protecciGn
antiarrugas (WRINKLE GUARD ®)en aquelIas
secadoras con este control cuando termine
este ciclo (si esta seleccionado).
CICLO DE RETOCAR (TOUCH UP)
Use este ciclo para quitar arrugas de la ropa
sint¢tica e inarrugable que est¢ Iimpia pere
arrugada a causa de estar en un ropero o en
una maleta.
• Esta posiciGn provee un ciclo de ca!or de
15 minutes y despues sigue un periodo de
enfriamiento (Cool Down) de 10 minutes
(aproximadamente).
• Saque la ropa inmediatamente cuando este
ciclo termine.
EVEN HEAT
25
CONTROL DE TEMPERATURA
Y DE TELAS
(FABRIC TEMPERATURE)
El uso adecuado de este control ayudara
a que las prendas se sequen con la
temperatura adecuada para prolongar
su vida Otim.
Utilice este control para seleccionar la tempe-
ratura adecuada para el tipo de ropa que se
desea secar.
• Seleccione bajo (LOW) para telas delicadas.
Seleccione alto (HIGH) para telas duraderas
tales como ta ropa fuerte de trabajo o toaltas
de bafio.
• El control de temperatura/tela
(FABRIC/Temperature) no funciona si e!
Control de selecciOn de ciclos (temporizador)
se encuentra en el cicto de secado con
aire (AIR DRY).
FABRIC
TEMPERATURE
F
KMT / NORMAL /
CASUAL PERM PRESS
MEDIUM MEDIUM HiGH
e e
DELICATE _ COTTON
tow e • HIGH
La siguiente tabla muestra las especifica-
clones recomendadas para la secadora y
ta cantidad de tiempo necesario para varias
cargas de ropa. Esta tabla es solamente una
guia. Las especificaciones pueden requerir
modificaciones de acuerdo con ta carga de
ropa que se desee secar.
Tipo de carga
PRENDAS DE ALGODON Y ROPA BLANCA
Peso Extra - Cubrecamas, rellenos de colch6n,
edredones
Peso pesado - toallas vaqueros, pantalones
de pana ropa de trabajo
Peso mediano - sabanas, ropa interior de algod6n,
_aSales
Especificaci6n de Especificaci6n
secado autom_tico Temperatura de tiempo
(Automatic) de eecado (TIMED DRY)
M_,S SECO ALTA (HIGH) 70-80 rain
(MORE DRY)
M_,S SECO ALTA (HIGH) 50-60 min
(MORE DRY)
SECADO NORMAL MEDIA/ALTA
(MEDIUM/HIGH) O 40-50 rain
(NORMAL DRY) MEDIA (MEDIUM)*
Pesa liviano - Batistas, organdis, ropa interior SECADO NORMAL BAJA (LOW) 30-40 rain
de mujer (NORMAL DRY)
INARRUGABLES, SINTETICOS Y MEZCLAS
Peso pesado - ropa de trabajo, chaquetas, SECADO NORMAL ALTA (HIGH) 40-50 rain
impermeables (NORMAL DRY)
Peso mediano - camisas, ropa de niSo, sabanas, SECADO NORMAL MEDIA/ALTA
(MEDIUM/HIGH) O 30-40 rain
3antalones (NORMAL DRY) MEDIA (MEDIUM)*
Peso liviano - ropa interior de mujer, blusas, MENOS SECO MEDIA (MEDIUM) O 20-30 rain
veetidos (LESS DF_Y)o BAJA (LOW)*
SECADO HUMEDO
(DAMP DRY)
TEJIDOS
Peso pesado - Prendas de algod6n, rayones, SECADO NORMAL ALTA (HIGH) 40-50 rain
mezclas, camisetas, pantalones, camisas (NORMAL DRY)
Peso mediano- Sinteticos (poliester, acrilico, etc.), SECADO NORMAL MEDIA/ALTA 30-40 min
3antalones de vestir, faldas, sucteres (NORMAL DRY) (MEDIUM/HIGH) O
MEDIA (MEDIUM)*
Peso liviano - Sinteticos (poliester, acrilico, etc.) MENOS SECO BAJA (LOW) 20-30 rain
y mezclas, ropa interior de mujer, blusae, vestidos (LESS DRY) o
SECADO HUMEDO
(DAMP DRY)
*Use la especificaci6n mas baja disponible en su secadora.
26
USO DEL CICLO DE SECADO CON
AIRE A TEMPERATURA AMBIENTE/
CICLO DE SECADO CON AIRE SUAVE
(AIR DRY/AIR FLUFF)
El uso de estos ciclos le proporcionar_
todos los beneficios obtenidos al colgar
la ropa para secarla, solo que Io Iogra
en menos tiempo.
Utilice el ciclo de secado con aire a temperatura
ambiente (AIR DRY) para obtener hasta
30 minutes de secado en aire de temperatura
ambiente. Use esta posici6n para articuIos que
no toleran el calor, tales come los articulos de
pIastico y de caucho. Tambien esta posici6n se
usa para secar articulos tales como atmohadas.
La posici6n de ciclo de secado con aire suave
(AIR FLUFF) funciona igual aI ciclo de secado
con aire a temperatura ambiente (AIR DRY).
Esta posici6n esta disponible en modelos de
secadora que no tienen ciclo de secado con
aire a temperatura ambiente (AIR DRY) en el
control de selecci6n de ciclos (Temporizador).
Uso del ciclo SECADO CON AIRE SUAVE
(AIR FLUFF)
• Fije el control de selecci6n de ciclos
(Cycle Selector Control) al n0mero de
minutes que Ud. desea en el ciclo de secado
programado (TIMED DRY).
• Fije el control de tejido y temperatura
(FABRICtTemperature) en el ciclo de secado
con aire suave (AIR FLUFF).
• Fije las otras opciones a su gusto. Oprima el
bot6n Empuje para iniciar (PUSH TO
START).
Refierase a la tabta siguiente para ejemplos de
articulos que requieren secarse sin calor. Use
et ciclo de secado con aire a temperatura
ambiente (AIR DRY) o la posici6n ciclo de
secado con aire suave (AIR FLUFF) (segQn el
modelo de secadora), o cueIgue estos articu-
los en una cuerda o p6ngalos en un estante
para que se sequen al aire libre.
WRINKLE GUARD I
AUTO
MOISTURE
SENSING
LESS DRY
NOSMALDRY
90 80
o
70
50 TIMED DRY
40
3O
20
TOUCH UP
10
FABRICCARE
TEMPERATURE
KNU 1
CASUAL
MEL_I[JM NORMAL /
UI1RA DRLICA1 _° PERM PRESS
£XTRA LOW O_ MEDIUM HIGh{
AIR FLUFF • _ ® COT[ON
MORE DRY
10 20 3o AIR DRY
ClCLO DESECADOCONAIRE
ATEMPERATURAAMBIENTE/
Posici6nde CICLODE
Clasede Cargade Ropa SECADOCONAIRE SUAVE
PRENDASFINAS
Cortinasdiafanas/sutiles(2 6 3 paneles),gasa,encaje,etc. 20a 30minutos
(Use el ciclodesecadocon aireatemperaturaambiente/
ciclo desecado conaire suave(AIRDRY/AIRFLUFF)si la
temperaturade catorminimono estadisponible)
GOMA,PL,&STICO,TEJIDOSSENSIBLESAL CALOR
Gomaespuma-AImohadas, sostenesretlenos,juguetes rellenos 20a 30minutos
• Asegt3resede quelostapices estenbien tejidos.
• Sacudalasalmohadasa mano variasvecesduranteel ciclo.
• Asegt3resedeque lasatmohadasestCncompletamentesecas.
Lasalmohadashechasde gomaespumademoran mastiempo
en secarse.*
Plastico- Cortinasde ducha,manteles
Alfombrascon goma
Olefina,Polipropileno,nil6ndiafano
*Cambieel tiempo, conforme sea necesario,para permitir que esta ropa se seque completamente
20 a 30 minutos
40 a 50 minutos
10 a 20 minutos
27
CONTROLDE SENAL DE FIN DE ClCLO
(END OF CYCLE SIGNAL)
Ai finalizar un cic!o, su secadora
ernite una se_a!. La sepal es muy Qtil al
secar prendae inarrugables, sint_ticas,
y otras prendas que se deben sacar de la
secadora una vez que se apaga para evitar
que se arruguen.
• Se puede aiustar el volumen de ta sepal.
SIGNAL
FMDOF CYCIE
SOFT
o
OFF_ LOUD
BOTON EMPUJE PARA INIClAR
(PUSH TO START)
Use este control para JnJcJarla secadora.
AsegQrese de que la puerta de la secadora
est6 cerrada.
El abrir la puerta apaga la secadora. La
secadora no se iniciara de nuevo hasta que
Ud. cierre la puerta y optima el bot6n de.
Empuje para iniciar (PUSH TO START).
Asegerese de que el control de selecci6n de
ciclos (Temporizador) todavia indique Ia posi-
ci6n del secado.
PUSH TO START
• El control variable le permite seleccionar
un volumen que va de APAGADO (OFF) a
FUERTE (LOUD).
SIGNAL
END OF CYCLE
28
CALOR UNIFORME (EVENHEAT TM) USO DE PROTECCION ANTIARRUGAS
(WRINKLE GUARD ®)
El sistema EVENHEAT TMprotege contra
el secado demasiado prolongado. Esto
ayuda a que las telas retengan la humedad
natural que necesitan, previene el est_tico
y reduce la formacion de pelotitas
peque_as de pelusa en la superficie de la
ropa. Esto es el resultado natural del
lavado y uso de la ropa.
Las secadoras Kenmore ayudan a prevenir el
secado excesivo para que usted obtenga un
cuidado superior para su ropa. Con el ciclo
detecci6n automatcia de humedad (AUTO
MOISTURE SENSING) y secado programado
(TIMED DRY) Ia ropa se seca a la temperatura
que usted eligi6 hasta los QItimos minutos del
ciclo. En ese momento Ia secadora cambia a
una tempertura mas baja.
ENFRIAMIENTO (COOL DOWN)
Aproximadamente diez minutos antes del final
de los ciclos detecci6n automatica de
humedad (AUTO MOISTURE SENSING) y
secado programado (TIMED DRY), Ia ropa se
seca sin calor para reducir las arrugas y hacer
eI manejo de Ia ropa m_s c6modo.
PROTECCION ANTIARRUGAS
(WRINKLE GUARD _) ayuda a que sus
prendas inarrugables se mantengan sin
arrugas cuando no se puede sacar la
ropa de la secadora a tiempo cuando se
termina el ciclo de secado autom_tico.
Si Ud. no abre la puerta cuando se termine
el ciclo de secado automatico el ciclo de
protecci6n antiarrugas (WRINKLE GUARD ®)
se activara y la ropa pasara por ciclos
peri6dicos de tambor sin calor de aproximada-
mente 15 segundos.
• En las secadoras con protecci6n antiarrugas
I (WRINKLE GUARD ® I), la secadora har_
dar vueltas continuamente a Ia ropa aproxi-
madamente 30 minutos, a menos que usted
abra la puerta de la secadora.
• En las secadoras con protecci6n antiarrugas
l! (WRINKLE GUARD <_I!), este proceso
peri6dico continuara por aproximadamente
40 minutos a menos que Ud. abra Ia puerta
de la secadora antes.
• En las secadoras con protecciOn antiarrugas
I!l (WRINKLE GUARD ® II!), este proceso
peri6dico continuara por aproximadamente 2
horas y media a menos que Ud. abra Ia
puerta de la secadora antes.
• La protecci6n antiarrugas II!
(WRINKLE GUARD ® III) tiene una opciOn
seleccionable de encendido y apagado
(ONIOFF). Cuando la protecci6n antiarrugas
I!l (WRINKLE GUARD ® II!) se fija en
apagado (OFF), la secadora se detiene
despues del enfriamiento (Cool Down) y se
puede descargar.
La sei_al de fin de ciclo (END OF CYCLE SIG-
NAL) sonara despues de cada ciclo de tambor
a menos que este desactivada.
WRINKLE GUARD
OFF ON
@
29
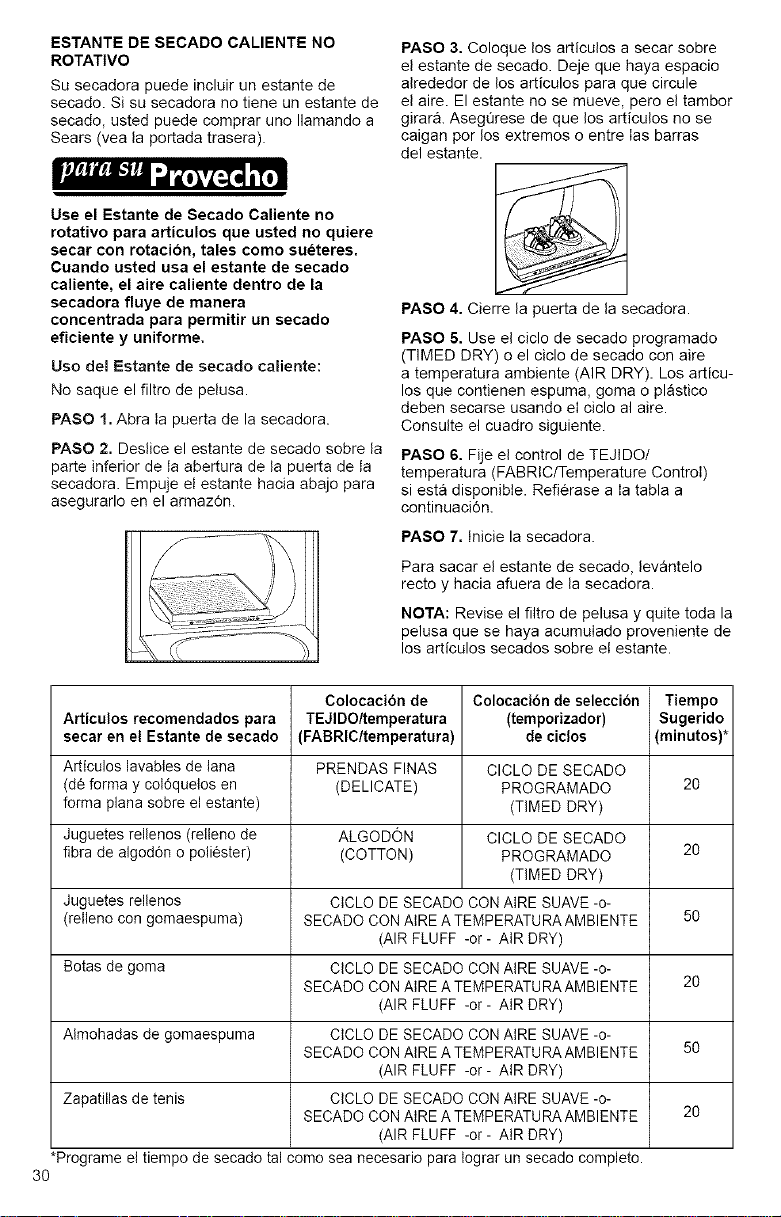
ESTANTE DE SECADO CALIENTE NO
ROTATIVO
Su secadora puede incluir un estante de
secado. Si su secadora no tiene un estante de
secado, usted puede comprar uno Ilamando a
Sears (vea la portada trasera).
Use el Estante de Secado Caliente no
rotativo para articulos que usted no quiere
secar con rotacion, tales como sueteres.
Cuando usted usa el estante de secado
caliente, el aire caliente dentro de la
secadora fluye de manera
concentrada para permitir un secado
eficiente y uniforme.
Uso del Estante de secado caliente:
No saque el filtro de pelusa.
PASO 1. Abra ta puerta de la secadora.
PASO 2. Deslice el estante de secado sobre la
parte inferior de la abertura de ta puerta de la
secadora. Empuje el estante hacia abajo para
asegurarlo en el armaz6n.
PASO 3. Coloque los articulos a secar sobre
el estante de secado. Deje que haya espacio
alrededor de los articulos para que circule
el aire. El estante no se mueve, pete el tambor
girar& AsegQrese de que los articulos no se
caigan por los extremos o entre Ias barras
del estante.
PASO 4. Cierre la puerta de la secadora.
PASO 5. Use el ciclo de secado programado
(TIMED DRY) o el ciclo de secado con aire
a temperatura ambiente (AIR DRY). Los articu-
los que contienen espuma, goma o plastico
deben secarse usando el ciclo al aire.
Consulte el cuadro siguiente.
PASO 6. Fije el control de TEJIDO/
temperatura (FABRIC/Temperature Control)
siesta disponibte. Refierase a Ia tabla a
continuaci6n.
PASO 7. Inicie la secadora.
Para sacar el estante de secado, levantelo
recto y hacia afuera de la secadora.
NOTA: Revise el filtro de pelusa y quite toda la
pelusa que se haya acumuIado proveniente de
los articulos secados sobre et estante.
Articulos recomendados para
secar en el Estante de secado
Articulos lavabtes de lana
(de forma y col6quetos en
forma plana sobre el estante)
Juguetes rellenos (relleno de
fibra de algod6n o poli6ster)
Colocacion de
TEJIDO/temperatura
(FABRIC/temperatura)
PRENDAS FINAS
(DELICATE)
ALGODON
(COTTON)
Colocacibn de seleccibn
(temporizador)
de ciclos
CICLO DE SECADO
PROGRAMADO
(TIMED DRY)
CICLO DE SECADO
PROGRAMADO
(TIMED DRY)
Juguetes rellenos CtCLO DE SECADO CON AtRE SUAVE -o-
(relIeno con gomaespuma) SECADO CON AtRE A TEMPERATURA AMBIENTE
(AIR FLUFF -or - AIR DRY)
Botas de goma CICLO DE SECADO CONAtRE SUAVE -o-
SECADO CON AtRE A TEMPERATURAAMBIENTE
(AIR FLUFF -or - AIR DRY)
AImohadas de gomaespuma CtCLO DE SECADO CON AtRE SUAVE -o-
SECADO CON AtRE A TEMPERATURAAMBIENTE
(AIR FLUFF -or - AIR DRY)
Zapatillas de tenis CtCLO DE SECADO CONAtRE SUAVE -o-
SECADO CON AtRE A TEMPERATURAAMBIENTE
(AIR FLUFF -or - AIR DRY)
*Programe el tiempo de secado tal come sea necesario para lograr un secado completo.
3O
Tiempo
Sugerido
(minutos)*
2O
2O
5O
20
50
20
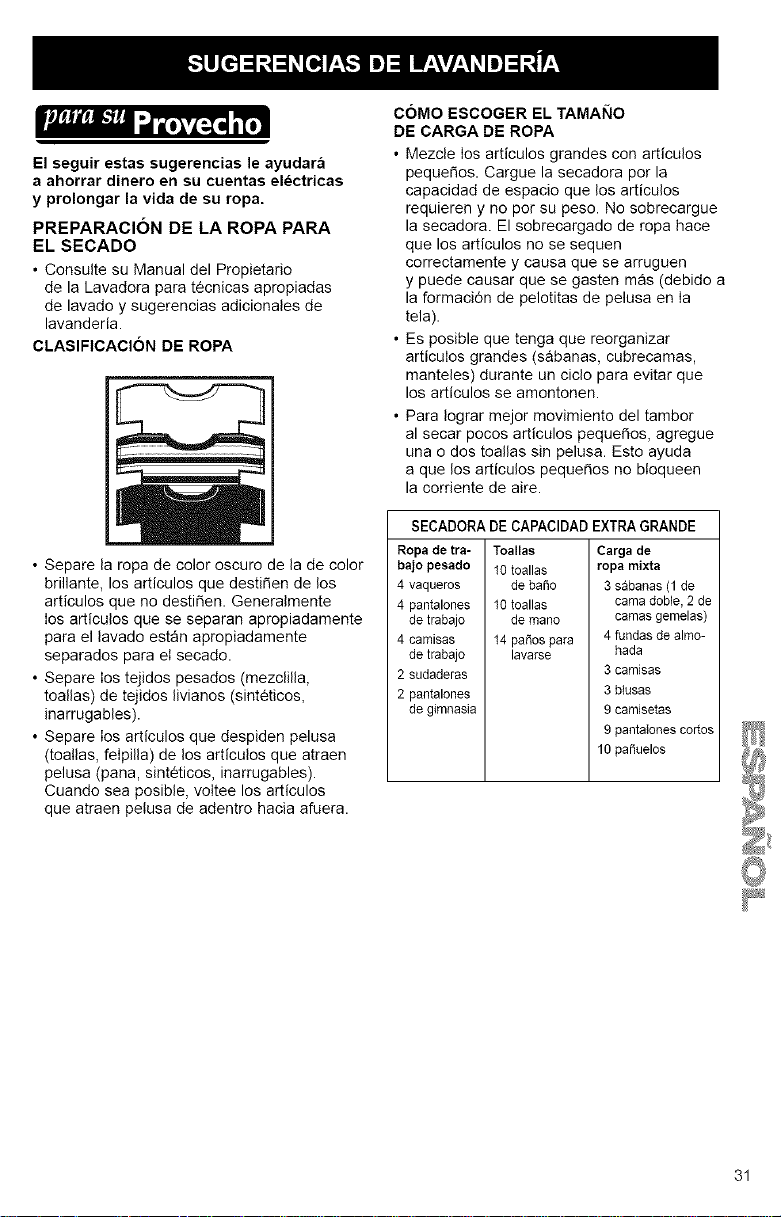
El seguir estas sugerencias le ayudara
a ahorrar dinero en su cuentas el_ctricas
y prolongar la vida de su ropa.
PREPARACION DE LA ROPA PARA
EL SECADO
• Consulte su Manual del Propietario
de la Lavadora para tecnicas apropiadas
de lavado y sugerencias adicionates de
lavanderia.
CLASIFICACION DE ROPA
• Separe la ropa de color oscuro de la de color
brillante, los articulos que desti_en de los
articulos que no desti_en. Generalmente
los articulos que se separan apropiadamente
para el lavado estan apropiadamente
separados para el secado.
• Separe los tejidos pesados (mezclilla,
toallas) de tejidos livianos (sinteticos,
inarrugables).
• Separe los articulos que despiden pelusa
(toa!las, felpilla) de los articulos que atraen
pelusa (pana, sinteticos, inarrugables).
Cuando sea posible, voltee los articulos
que atraen petusa de adentro hacia afuera.
COMO ESCOGER EL TAMAI_IO
DE CARGA DE ROPA
• Mezcle Ios articulos grandes con articulos
peque_os. Cargue la secadora por la
capacidad de espacio que los articulos
requieren y no por su peso. No sobrecargue
la secadora. El sobrecargado de ropa hace
que los articulos no se sequen
correotamente y causa que se arruguen
y puede causar que se gasten mas (debido a
la formaci6n de pelotitas de pelusa en Ia
tela).
• Es posible que tenga que reorganizar
articuIos grandes (sabanas, cubrecamas,
manteles) durante un ciclo para evitar que
los articulos se amontonen.
• Para Iograr mejor movimiento del tambor
al secar pocos articulos peque_os, agregue
una o dos toa!las sin pelusa. Esto ayuda
a que los articulos peque_os no btoqueen
la corriente de aire.
SECADORADE CAPACIDADEXTRAGRANDE
Ropa de tra-
bajo pesado
4 vaqueros
4 pantalones
de trabajo
4 camisas
de trabajo
2 sudaderas
2 pantalones
de gimnasia
Toallas
10 toallas
de baSo
10 toallas
de mano
14 paSospara
lavarse
Carga de
ropa mixta
3 sabanas (1 de
cama doble, 2 de
camas gemelas)
4 fundas de almo-
hada
3 camisas
3 btusas
9 camisetas
9 pantaIones cortos
10 paSuelos
31
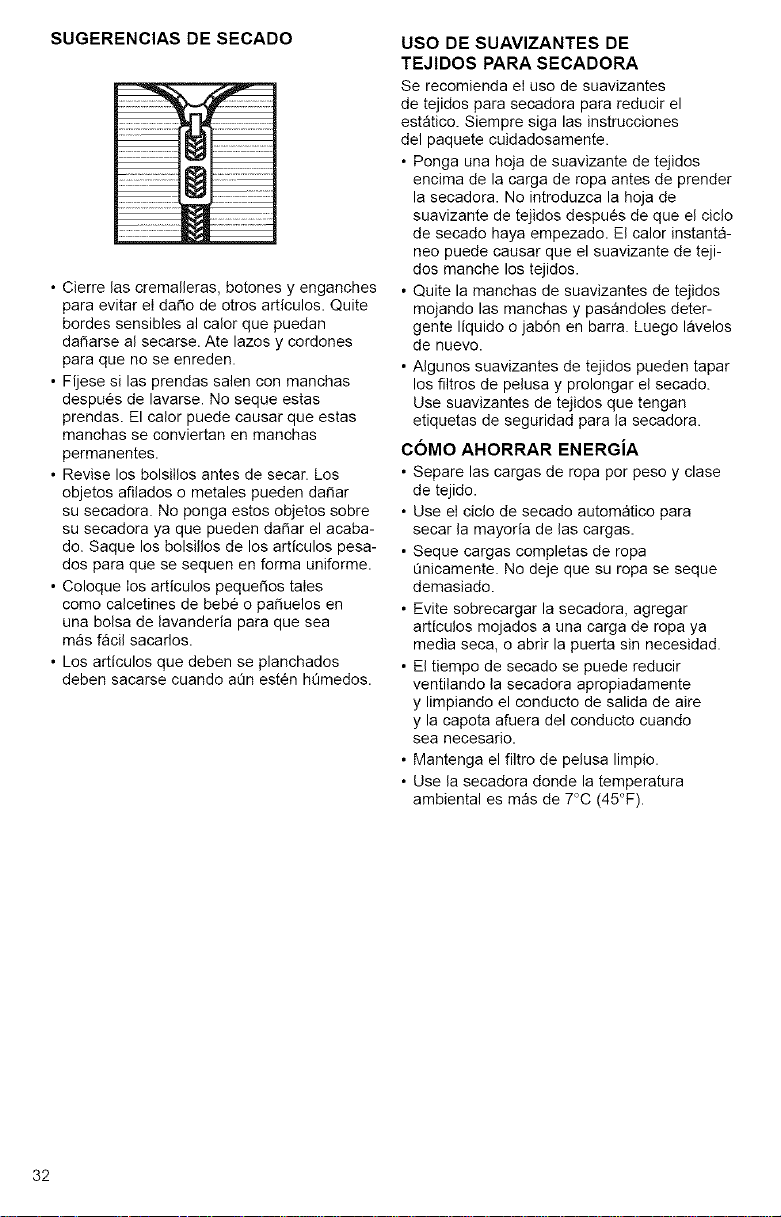
SUGERENCIAS DE SECADO
• Cierre las cremalleras, botones y enganches
para evitar el da_o de otros articulos. Quite
bordes sensibtes al calor que puedan
da_arse al secarse. Ate lazes y cordones
para que no se enreden.
• Fijese si las prendas salen con manchas
despues de lavarse. No seque estas
prendas. El calor puede causar que estas
manchas se conviertan en manchas
permanentes.
• Revise los bolsiIIos antes de secar. Los
objetos afilados o metales pueden da_ar
su secadora. No ponga estos objetos sobre
su secadora ya que pueden da_ar el acaba-
do. Saque los bolsillos de los articulos pesa-
dos para que se sequen en forma uniforme.
• Coloque los articulos peque_os tales
como calcetines de bebe o pa_uelos en
una bolsa de lavanderia para que sea
mas facil sacarlos.
• Los articulos que deben se planchados
deben sacarse cuando aOn est¢n hQmedos.
USO DE SUAVIZANTES DE
TEJIDOS PARA SECADORA
Se recomienda ei uso de suavizantes
de tejidos para secadora para reducir el
estatico. Siempre siga las instrucciones
del paquete cuidadosamente.
• Ponga una hoja de suavizante de tejidos
encima de la carga de ropa antes de prender
la secadora. No introduzca la hoja de
suavizante de tejidos despu_s de que el ciclo
de secado haya empezado. El calor instanta-
neo puede causar que el suavizante de teji-
dos manche los tejidos.
• Quite la manchas de suavizantes de tejidos
mojando las manchas y pasandoles deter-
gente liquido o jab6n en barra. Luego lavelos
de nuevo.
• AIgunos suavizantes de tejidos pueden tapar
los filtros de pelusa y prolongar el secado.
Use suavizantes de tejidos que tengan
etiquetas de seguridad para la secadora.
COMO AHORRAR ENERGiA
• Separe las cargas de ropa por peso y clase
de tejido.
• Use et ciclo de secado automatico para
secar la mayoria de las cargas.
• Seque cargas completas de ropa
Qnicamente. No deje que su ropa se seque
demasiado.
• Evite sobrecargar la secadora, agregar
articulos mojados a una carga de ropa ya
media seca, o abrir la puerta sin necesidad.
• El tiempo de secado se puede reducir
ventilando la secadora apropiadamente
y limpiando el conducto de salida de aire
y la capota afuera del conducto cuando
sea necesario.
• Mantenga el filtro de pelusa limpio.
• Use la secadora donde la temperatura
ambiental es mas de 7°C (45°F).
32
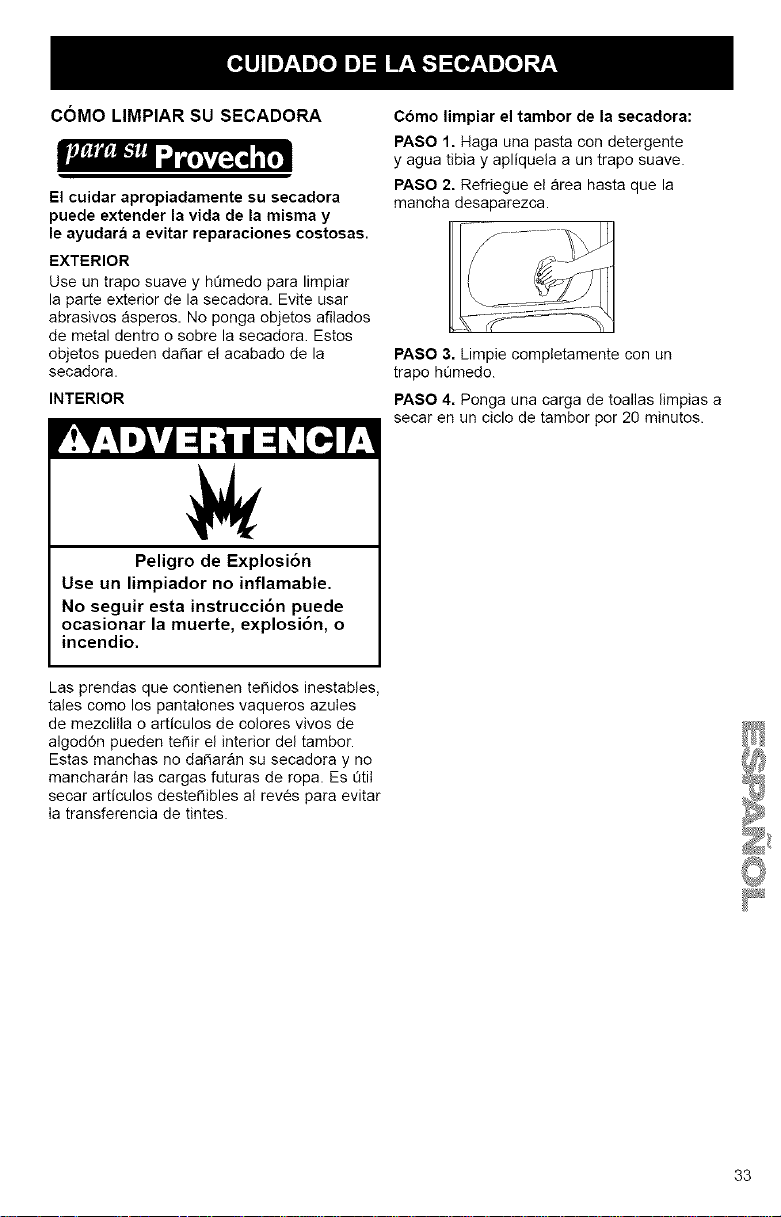
COMO LIMPIAR SU SECADORA
El cuidar apropiadamente su secadora
puede extender la vida de la misma y
le ayudara a evitar reparaciones costosas.
EXTERIOR
Use un trapo suave y hQmedo para limpiar
la parte exterior de la secadora. Evite usar
abrasivos asperos. No ponga objetos afilados
de metal dentro o sobre la secadora. Estos
objetos pueden da_ar eI acabado de la
secadora.
INTERIOR
Como limpiar el tambor de la secadora:
PASO 1. Haga una pasta con detergente
y agua tibia y apliquela a un trapo suave.
PASO 2, Refriegue el area hasta que la
mancha desaparezca.
PASO 3. Limpie comptetamente con un
trapo hQmedo.
PASO 4. Ponga una carga de toallas limpias a
secar en un ciclo de tambor por 20 minutos.
Peligro de Explosi6n
Use un limpiador no inflamable.
No seguir esta instrucci6n puede
ocasionar la muerte, explosi6n, o
incendio.
Las prendas que contienen te_idos inestables,
tales como los pantaIones vaqueros azuIes
de mezclilla o articulos de colores vivos de
algod6n pueden te_ir el interior del tambor.
Estas manchas no da_aran su secadora y no
mancharan las cargas futuras de ropa. Es Qtil
secar articulos deste_ibles al rev¢s para evitar
Ia transferencia de tintes.
33
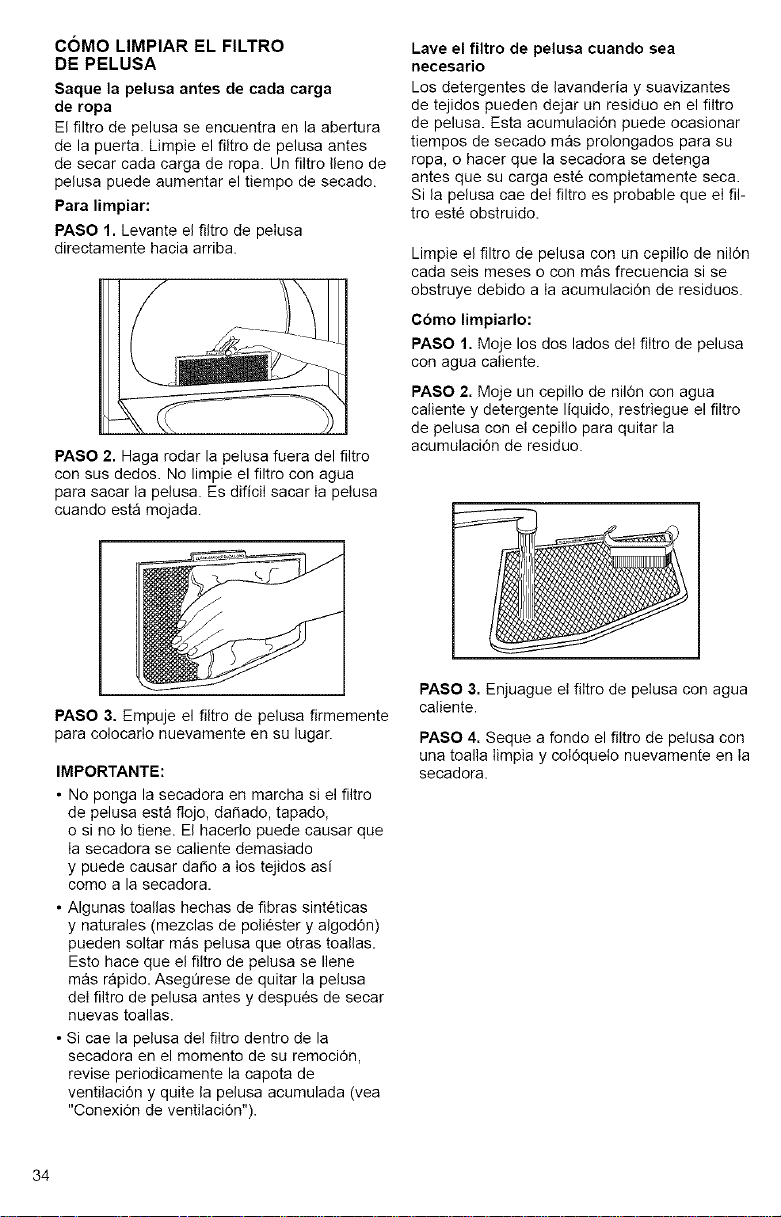
COMO LIMPIAR EL FILTRO
DE PELUSA
Saque la pelusa antes de cada carga
de ropa
El filtro de pelusa se encuentra en la abertura
de la puerta. Limpie el filtro de pelusa antes
de secar cada carga de ropa. Un filtro Ileno de
pelusa puede aumentar el tiempo de secado.
Para limpiar:
PASO 1. Levante el filtro de pelusa
directamente hacia arriba.
PASO 2. Haga rodar la pelusa fuera del filtro
con sus dedos. No limpie el filtro con agua
para sacar la pelusa. Es dificiI sacar Ia pelusa
cuando esta mojada.
Lave el filtro de pelusa cuando sea
necesario
Los detergentes de lavanderia y suavizantes
de tejidos pueden dejar un residuo en el filtro
de pelusa. Esta acumulaci6n puede ocasionar
tiempos de secado mas prolongados para su
ropa, o hacer que la secadora se detenga
antes que su carga este completamente seca.
Si la pelusa cae deI filtro es probable que el ill-
tro este obstruido.
Limpie el filtro de pelusa con un cepillo de nildn
cada seis meses o con mas frecuencia si se
obstruye debido a Ia acumulacidn de residuos.
Cbmo limpiarlo:
PASO 1, Moje los dos lados det filtro de pelusa
con agua catiente.
PASO 2. Moje un cepillo de nilOn con agua
catiente y detergente liquido, restriegue el filtro
de pelusa con et cepillo para quitar la
acumulaci6n de residuo.
PASO 3. Empuje el filtro de pelusa firmemente
para colocarlo nuevamente en su lugar.
IMPORTANTE:
• No ponga la secadora en marcha si el filtro
de pelusa esta flojo, da_ado, tapado,
o si no Io tiene. El hacerlo puede causar que
Ia secadora se caliente demasiado
y puede causar dado a los tejidos asi
como a la secadora.
• Algunas toallas hechas de fibras sint6ticas
y naturales (mezclas de poliester y algod6n)
pueden soltar mas pelusa que otras toallas.
Esto hace que el filtro de pelusa se Ilene
mas rapido. AsegQrese de quitar la pelusa
deI filtro de pelusa antes y despu¢s de secar
nuevas toallas.
• Si cae la pelusa del filtro dentro de la
seoadora en el momento de su remoci6n,
revise periodicamente la capota de
ventilaci6n y quite la pelusa acumulada (vea
"ConexiOn de ventilaci6n").
PASO 3. Enjuague el filtro de pelusa con agua
caliente.
PASO 4. Seque a fondo el filtro de pelusa con
una toalla iimpia y coidque[o nuevamente en ia
secadora.
34
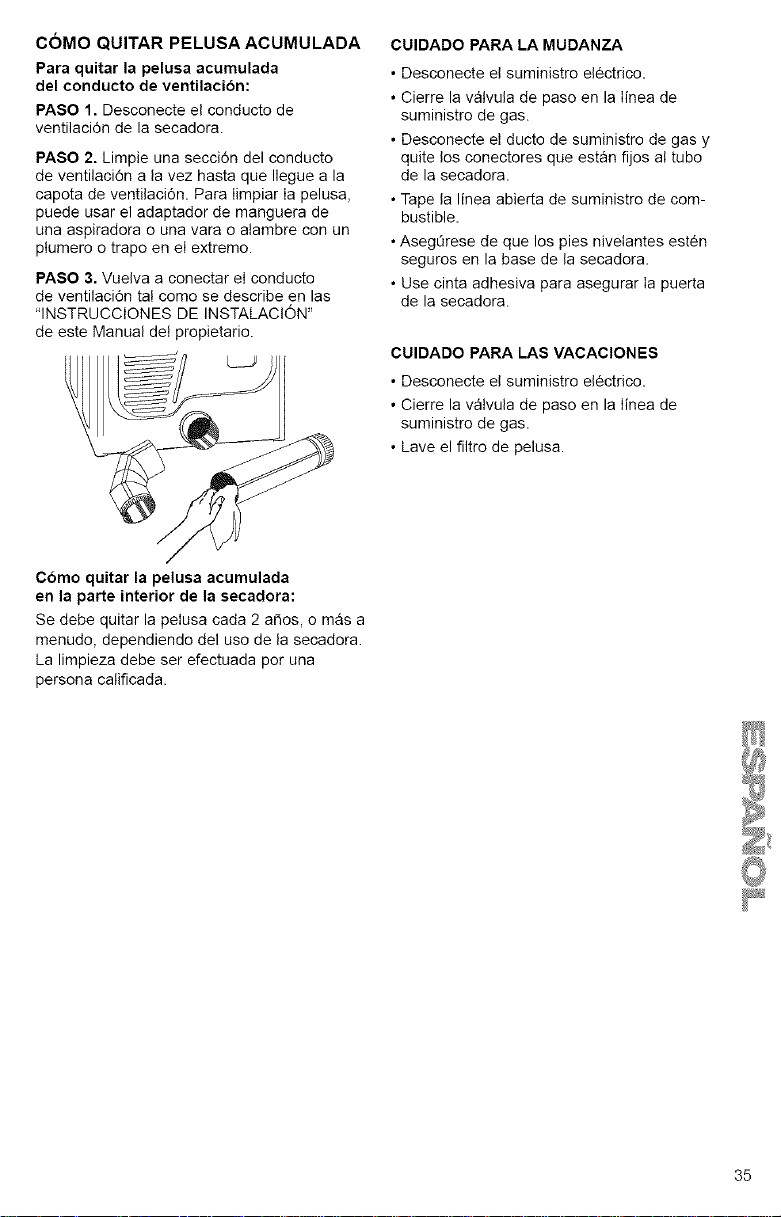
COMOQUITAR PELUSA ACUMULADA
Para quitar la pelusa acumulada
del conducto de ventilacibn:
PASO 1. Desconecte el conducto de
ventilaci6n de la secadora.
PASO 2. Limpie una seccidn del conducto
de ventilaci6n a la vez hasta que Ilegue a la
capota de ventilacidn. Para Iimpiar Ia pelusa,
puede usar el adaptador de manguera de
una aspiradora o una vara o atambre con un
ptumero o trapo en el extremo.
PASO 3, Vuelva a conectar eI conducto
de ventilaciOn ta! como se describe en las
"INSTRUCClONES DE INSTALAClON"
de este Manual det propietario.
Como quitar la pelusa acumulada
en la parte interior de la secadora:
Se debe quitar la pelusa cada 2 arSos, o mas a
menudo, dependiendo del uso de la secadora.
ka limpieza debe ser efectuada por una
persona catificada.
CUIDADO PARA LA MUDANZA
• Desconecte el suministro electrico.
• Cierre la vatvula de paso en la Iinea de
suministro de gas.
• Desconecte el ducto de suministro de gas y
quite los conectores que estan fijos at tubo
de la secadora.
• Tape la linea abierta de suministro de com-
bustible.
• AsegC_rese de que los pies niveIantes esten
seguros en la base de la secadora.
• Use cinta adhesiva para asegurar Ia puerta
de la secadora.
CUIDADO PARA LAS VACACIONES
• Desconecte el suministro el6ctrico.
• Cierre la vatvula de paso en la Iinea de
suministro de gas.
• Lave el filtro de pelusa.
35
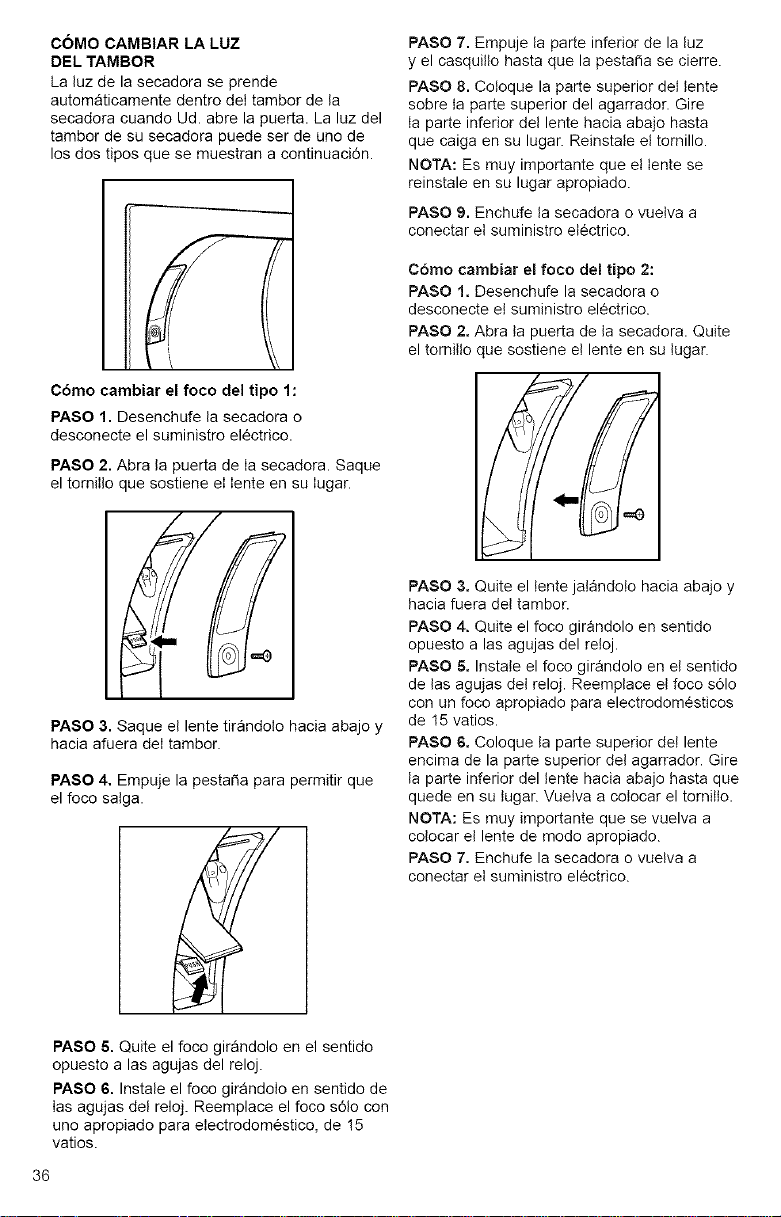
COMOCAMBIARLA LUZ
DEL TAMBOR
La luz de la secadora se prende
autematicamente dentro deI tambor de la
secadora cuando Ud. abre la puerta. La luz del
tamber de su secadora puede ser de uno de
los dos tipos que se muestran a continuaci6n.
PASO 7. Empuje la parte inferior de la luz
y el casquitto hasta que la pesta_a se cierre.
PASO 8. Coloque la parte superior del tente
sobre ta parte superior del agarrador. Gire
ta parte inferior del lente hacia abajo hasta
que caiga en su lugar. Reinstate el tomillo.
NOTA: Es muy importante que el tente se
reinstale en su lugar apropiado.
PASO 9. Enchufe ta secadora o vueiva a
conectar el suministro eiectrico.
Cdmo cambiar el foco del tipo 1:
PASO 1. Desenchufe la secadora o
desconecte el suministro el¢ctrico.
PASO 2. Abra la puerta de ia secadora. Saque
el torniilo que sostiene el iente en su iugar.
PASO 3. Saque el lente tirandolo hacia abajo y
hacia afuera deI tambor.
PASO 4, Empuje la pesta_a para permitir que
el foco saiga.
C6mo cambiar e! foco del tipo 2:
PASO 1. Desenchufe la secadora o
desconecte el suministro electrico.
PASO 2. Abra ta puerta de ta secadora. Quite
el tornitto que sostiene e! lente en su tugar.
PASO 3. Quite el tente ja!Sndolo hacia abajo y
hacia fuera de! tambor.
PASO 4. Quite el foco girandolo en sentido
opuesto a las agujas del reloj.
PASO 6. Instate el foco girandolo en el sentido
de tas agujas del reloj. Reemplace et foco s61o
con un foco apropiado para electrodom_sticos
de 15 vatios.
PASO 6. Coloque la parte superior de! lente
encima de la parte superior del agarrador. Gire
ta parte inferior del tente hacia abajo hasta que
quede en su tugar. Vuelva a colocar el tornitto.
NOTA: Es muy importante que se vuelva a
colocar et lente de mode apropiado.
PASO 7. Enchufe la secadora o vuelva a
conectar el suministro electrico.
PASO 6, Quite el foco girandolo en el sentido
opuesto a las agujas del reloj.
PASO 6, Instale el foco girandoio en sentido de
ias agujas del reloj. Reemplace el foco s61o con
uno apropiado para electrodom¢stico, de !5
vatios.
36
La mayoria de los problemas de lavanderia se pueden resolver facilmente si Ud.
entiende la causa. El uso de las tablas a continuacion le ahorrara tiempo y dinero, ya
que le ayudara a evitar Ilamadas innecesarias de servicio y reparacibn.
Problema Causa probable Soluci6n
No seca El filtro de pelusa esta tapado Limpie el filtro de peiusa.
correctamente con peiusa.
El movimiento de aire esta
restringido. El conducto de salida
de aire o la capota del escape
est9 tapada con pelusa.
Prenda lasecadora de 5 a 10 minutes.
Ponga su mano abajo de la capota del
escape de afuera y observe si hay
movimiento de aire. Si nosiente
movimiento de aire, timpie la peiusa del
sistema de escape o cambie el conducto
de salida de aire per un conducto rigido o
flexible de metat(vease 'lnstrucciones de
Instalaci6n," Secci0n D).
Cambieto per un conducto rigido o
flexible de metal (vease 'lnstrucciones de
Instalaci6n." Secci0n D).
Lavalvula de gas de ia Abra todas las valvulas.
secadora est_ cerrada.
El temporizador o el control de Seleccione el ciclo correcto para el
temperatura esta en secar con aire tipo de ropa que se esta secando
(AIR DRY) o en secar con aire (vease "Funcionamiento de la Secadora").
suave (AIR FLUFF).
Lacarga de ropa no hace Nivele la secadora (vease "lnstrucciones de
contacto con los contactos Instalaci6n," SecciOn B).
del sensor y el cicto automatico
se termina antes de tiempo.
Las hojas del suavizante Use L_nicamenteuna hoja de suavizante
de tejidos est_n tapando de tejidos per cada carga de ropa y
el filtro de afuera. Qselasoiamente unavez.
Lasecadora se encuentra en Ponga la secadora en un ambiente
uncuarto en donde la temperatura donde la temperatura del aire sea de
es mas baja de 7°0 (45°F). mas de 7°C (45°F).
Hay mucha humedad en ia Los articulos que mantienen m_s humedad
carga de ropa. (tales come las prendas de algod6n)
demoraran mas tiempo en secarse.
Se usa agua fria para enjuagar. El secado demora mas tiempo, pete esta
ahorrando energia y las prendas satdr_n
menos arrugadas.
Lacarga de ropa es demasiado Separe la carga de ropa para que el
grande para secarse rapido, tambor se pueda mover libremente.
El conducto de salida de aire
est9 trabado o retorcido.
La secadora El cable de suministro etectrico Conecte a un contacto de pared de
no funciona no est9 enchufado con firmeza, conexi6n a tierra de 3terminales.
Los fusible est_n quemados o el Cambie los fusible o prenda el
disyuntor esta apagado, disyuntor de nuevo.
37
Problerna Causa probable Soluci6n
La eecadora Seesta utitizando unfusible Cambie eI fusible per un fusible
no funciona regular, retardador.
(continuaci6n) La puerta de la secadora no Cierre la puerta de la secadora
esta bien cerrada, correctamente.
El botdn de poner en marcha Oprima el bot6n de poner en marcha
(PUSH TO START) no se ha (PUSH TO START) otra vez.
oprimido correctamente.
Los controtes no estan puestos Ajuste los controtes en la posioi6n de
en la posioi6n de prender (ON). prender (ON).
Pelusa en la El filtro de pelusa esta tapado. Limpie el filtro de pelusa. Compruebe si
carga de ropa hay movimiento de aire.
Separaci0n incorrecta. Separe las prendas que despiden pelusa
de las que ta atraen. Tambi6n separelas
per colores.
La carga de ropa es demasiado Seque cargas de ropa mas pequefias
grande o pesada, para que la pelusa pueda ser atraida al filtro
de pelusa.
La carga de ropa est9 demasiado Use la programaci6n de secado correcta
seca. para sus tejidos. El secar demasiado puede
causar que ta pelusa atraiga estatico
(vease "Funoionamiento de la Secadora").
Hay papel o pafiuelos de papel Limpie los bolsilIos antes del secado.
en los bolsillos.
Se confunde pelusa de superficie La pelusa de superficie es normal y la
con pelusa regular, causa del lavado y uso normal de la prenda.
Manchas en Ia El use inapropiado del suavizante Use hojas de suavizante de tejidos dentro
carga de ropa de tejidos en la lavadora, de la secadora.Agreguetas atprinciple
deIcicto cuando la carga de ropa todavia
est_ fria.
Ha secado articulos manchados. Es necesario limpiar los articuios antes
de secarlos.
Encogimiento Periodos de secado demasiado Aseg_rese de que la programaci6n de ta
de Articuloe prolongados, secadora coincida con la clase de tejido
(vease "Funoionamiento de la Secadora').
Calidad mala del tejido. Fijese en ta catidad del tejido antes de
comprarlo.
No se hart seguido las instrucciones Siga las instrucoiones de la etiqueta de
de taetiqueta de cuidado de las cuidado cuidadosamente.
prendas.
Las cargas de La carga de ropa es demasiado Seque cargas de ropa mas pequefias
ropa salen grande, que permitan que el tambor se mueva
arrugadas con facilidad.
Periodos de secado demasiado AsegOresede que ta programaci6n de la
prolongados, secadora coincida con Ia clase de tejido
(vease "Funcionamiento de laSecadora').
Sedeja la carga de ropa en la Saque la carga de ropa un vez que el
secadora despu6s de que termina ciclo de tambor termina.
el ciclo.
Olores Se ha pintado, te_ido o barnizado en Ventile el area. En cuanto los olores o
el area en donde se enouentra vapores se hayan ido del area, vuelva a
su secadora, lavar la ropa y luego sequela.
Fuga de gas. Cierre ta linea de suministro de gas. Satga
de la casa y Itame a la compa_ia local de
gas.
Sonidos poco Las valvulas (secadora de gas) Funcionamiento normal.
comunes emiten un sonido detic.
Golpes de rodilIos cuando la Los gotpes desapareceran despues de
secadora se coloc6 en su tugar. 5 minutes de uso de la secadora.
38
SucompraadquiereunnuevovaloryaqueustedpuedeconfiarenSearsHomeCentral®para
obtenerserviciodereparacidn.Conmasde12,000especialistascapacitadosenreparacionesy
accesoamasde4.2millonesdepiezasderepuestoyaccessorios,contamosconlas
herramientas,piezas,conocimientoyIadestrezaparaasegurarnosdecumplirnuestrapromesa
deque:ReparamosIoquevendemos.
Los Contratos de mantenimiento Sears
Su electrodom6stico KENMORE esta dise_ado, fabricado y sometido a prueba para
proporcionarle amos de funcionamiento confiable. No obstante, cualquier electrodom6stico mod-
erno puede necesitar servicio tecnico de vex en cuando. El contrato de servicio Sears Ie ofrece
un programa de servicio excepcional, a un precio accesibte.
El Contrato de mantenimiento Sears
• Es Ia manera de adquirir el servicio tecnico del manana a precios de hoy.
• Elimina las facturas de reparacidn producidas por et uso normal y el desgaste.
• Proporciona asistencia no tecnica y educativa.
• Ann cuando no necesite reparaciones, le proporciona una revisi6n anual de
mantenimiento preventivo a solicitud suya, para asegurarse de que su
etectrodomestcio esta en condiciones apropiadas de funcionamiento.
Se aplican cietas restricciones. Para obtener m_s informacion,
Ilame al 1-888-784-6427
39
Forrepairof major brand appliances in your own home...
no matter who madeit, no matter who sold it!
1-800"4"MY-HOME sMAnvtim_,d_Vo_.ig_
(1-800-4694663)
www.sears.ogln
To bring in products such asvacuums, lawn equipment and electronics
for repair,callfor the locationof your nearest Sears Parts & Repair Center
1-800488-1222 A_in_e,day or night
w_.sears,_Ollll
Forthe replacementparts,accessoriesand owner's manuals
that you needto do-it-yourself,callSearsPartsDireclSM!
1-800-366-PART6 a.m.-11p.m.CST,
(!-800-366-7278) 7days aweek
_.sears.com/partsdirect
To purchaseor inquire about a SearsServiceAgreement:
1-800-82 7-6655
7a.m.- 5p.m.CST,Mon.-Sat.
Parapedirserviciode reparaci6nadomidlio, AuCanadapour serviceenfranqais:
y paraordenarpiezascon entregaadomicilio: 1-877_4:OY1_ _
! "888"Su'IK311-_ (1-877-533-6937)
(1-888-784-6427)
[°,.°,]
HomeCentrar