Owner 's Manual for Window Air Conditioner
USING THE AIR CONDITIONER
Controls
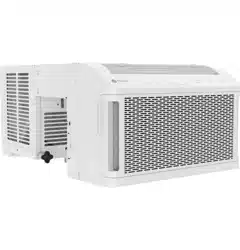
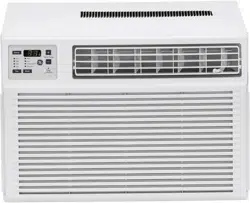
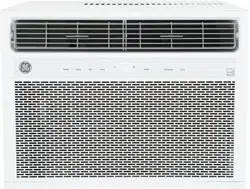
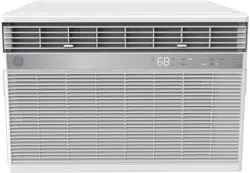
Features and appearance will vary.
Lights beside the touch pads on the air conditioner control panel indicate the selected settings.
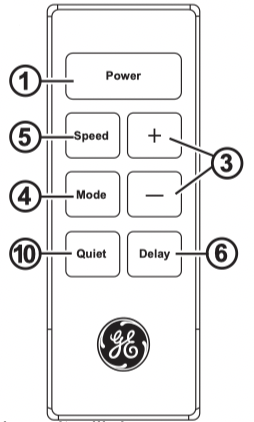
Remote Control
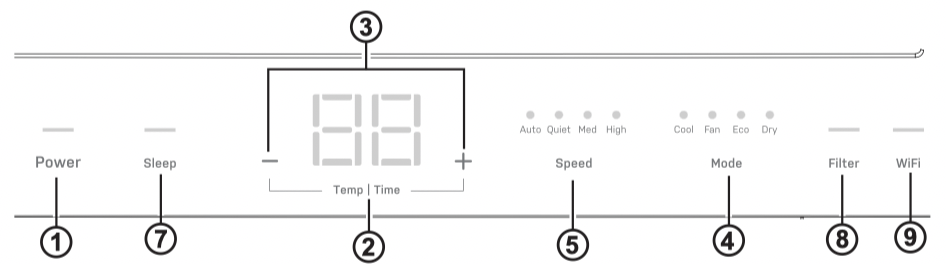
Air Conditioner Controls
1. Power Pad
Turns air conditioner on and off. When turned on, the display will show the set temperature and user settings.
2. Display
Shows the room temperature or time remaining on the Delay timer. Shows the Set temperature while setting the temperature in Cool, Dry or Eco modes.
3. Temp and Delay + /- Pads
Use to set temperature or delay time. Temperature can be set in Cool, Dry and Eco mode.
4. Mode Pad
Use to set the air conditioner to Fan Only, Cool, Dry or Eco mode.
5. Fan Speed Pad
In Cool, Eco or Dry mode: Use to set the fan speed to Auto, Quiet, Med, or High on the unit.
In Fan mode: Use to set the fan speed to High, Med, or Quiet on the unit.
6. Delay (set by remote control only)
With the Delay On feature the unit will operate in ECO mode at the set temperature and fan speed.
After pressing Delay pad the display will show “- -”. Pressing the Delay + button will increase the hours by 1 from 24. The Delay - button will decrease the hours by 1 from 24 to 1. When the set delay time has expired, the unit will turn on as if the POWER button was pressed.
To cancel the Delay function, press the POWER button.
7. Sleep Pad
The SLEEP mode sets the unit to gradually change settings over an 8 hour period to allow for some increased energy efficiency during sleep hours.
The SLEEP mode is available only in COOL, DRY and ECO mode.
Press the SLEEP mode pad and its light will illuminate. In SLEEP mode, the unit will automatically change and display the fan speed depending on the prior settings.
If fan speed was High or Med, the unit will decrease the fan speed by one setting.
If fan speed was Quiet or Auto, the unit will set the fan speed as Quiet.
The fan will stay the set speed setting for 8 hours from the time the SLEEP mode button was pressed. The air conditioner will then raise the set point by 2°F after 1 hour and 2°F more after another hour where it will remain for the next 6 hours. The display will not show the adjusted set points. During this time, the display will show “08” at the beginning, representing the 8 hour run time, and will decrease by 1 with each passing hour. After 8 hours, the air conditioner will resume the settings that were in place before the SLEEP mode button was pressed.
While in SLEEP mode, pressing the SLEEP or POWER button will exit SLEEP mode. The only other allowable button in sleep mode is SPEED. Any other button will result in a double beep, confirming an invalid operation.
8. Filter Reset Pad
This feature automatically notifies you that the filters must be cleaned. The indicator light will come on after 250 hours of operation. Clean the filters (REFER TO PAGE 7), place them back into the unit, and press the Filter Reset pad. The light will go off.
9. WiFi Connect Pad
Enables connection of the air conditioner to the home WiFi. Download App for details at
10. Quiet Mode
Sets fan speed to QUIET. Use with COOL, FAN, ECO, and DRY modes. Can be set on the unit or by remote control.
Using the Air Conditioner
Do Not Operate in Freezing Outdoor Conditions
This cool-only air conditioner was not designed for freezing outdoor conditions. It must not be used when the outdoor temperature is below 70°F.
Control Panel Lights On/Off Feature
This air conditioner has a control panel lights on/off feature where its lights will turn off when there is no activity with the controls for over one minute. To wake up the controls, press any pad on the controls and the lights will come on to show the previous settings.
To turn this feature off, press and hold the SLEEP pad, on the unit, for 3 seconds. The unit will beep to signal the successful toggle of the feature on and off.
Remote Control
- To ensure proper operation, aim the remote control at the signal receiver on the air conditioner.
- The remote control signal has a range of up to 20 feet.
- Make sure nothing is between the air conditioner and the remote control that could block the signal.
- Make sure batteries are fresh and installed correctly as indicated on the remote control.
Cool Mode
Use the Cool mode at Auto, Quiet, Med, and High fan modes for cooling. Use the Temperature + / - pads to set the desired temperature between 64°F and 86°F in 1°F increments.
An electronic thermostat is used to maintain the room temperature. The compressor will cycle on and off to keep the room at the set level of comfort. Set the thermostat at a lower number and the indoor air will become cooler. Set the thermostat at a higher number and the indoor air will become warmer.
NOTE: If the air conditioner is off and is then turned on while set to a Cool setting or if turned from a fan setting to a Cool setting, it may take approximately 3 minutes for the compressor to start and cooling to begin.
Cooling Descriptions
For Normal Cooling—Select the Cool mode and High or Med fan with a middle set temperature.
For Maximum Cooling—Select the Cool mode and High fan with a lower set temperature.
For Quieter and Nighttime Cooling—Select the Cool mode and Quiet fan with a middle set temperature.
Eco Mode
Controls the fan.
ON—The fan will cycle on and off with the compressor. This may result in wider variations of room temperature and humidity. When the unit first enters the operating ECO mode, either after the unit is turned on, by changing the operating mode, or after a power failure, the fan will run at the set fan speed for a minimum of about 3 minutes, independent on whether or not the compressor is on. After this 3 minute bellowing, the fan and compresor will cycle on together for 2 minutes at the set Fan speed, and then off for 10 minutes. This cycle will repeat until the mode is changed.
NOTE: the fan may continue to run for a short time or may pulse intermittently after the compressor cycles off to sample the room air.
OFF—The fan runs all the time, while the compressor cycles on and off.
Fan Only Mode
Use the Fan Only Mode at Quiet, Med or High fan speed to provide air circulation and filtering without cooling. Since fan-only settings do not provide cooling, a Set temperature cannot be entered. The room temperature will appear in the display. Compressor is always off.
Auto Fan Mode
Set to Auto for the fan speed to automatically set to the speed needed to provide optimum comfort settings with the set temperature. If the room needs more cooling, the fan speed will automatically increase. If the room needs less cooling, the fan speed will automatically decrease.
Dry Mode
Aids in removing humidity from the room.Dry mode cannot be used to cool room.
NOTE: In Dry mode, when the set temperature is close to ambient temperature, the compressor may stop and the fan will run in Quiet speed only.
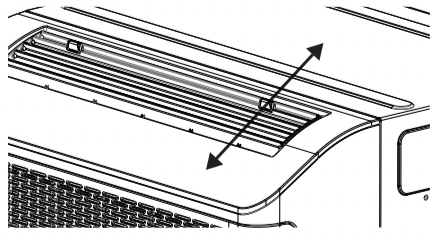
Air Direction
Use the levers to adjust the air direction up and down.
Sound ON/OFF
The Sound ON/OFF Mode will be able to turn On and Off the beep function by the user. Beep will be active when Sound ON. Beep will be unfunctional when Sound OFF.
Sound On/OFF
Pressing and holding Filter button for 3-5 seconds to switch Sound function. Beep will be unfunctional when Sound OFF. When Beep ON, it will beep one time. When Beep OFF active, it will beep three times.
Default Setting
The Default setting for this function was Sound ON. Unit should memorize latest setting for this function, will access to prior setting when power outage recovered.
Care and Cleaning
Grille and Case
Turn the air conditioner off and remove the plug from the wall outlet before cleaning.
To clean, use water and a mild detergent. Do not use bleach or abrasives.
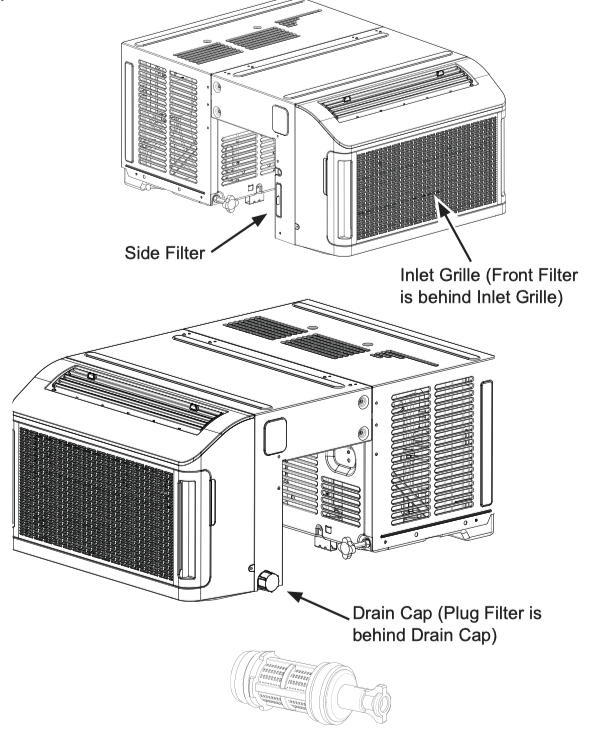
Filters
All filters should be checked and cleaned at least every 250 hours or more often if necessary. Clean the filters with warm, soapy water. Rinse and let filters dry before replacing it. Do not clean the filters in a dishwasher.
Front Filter:
Access the Front Filter by first opening the inlet grille. Pull the tabs on the top sides of the grille towards you and set it aside. From here, pull down on the top black tabs on the filter. Once the top of the filter has been popped out of place, lift upwards on the filter and remove it from the device.
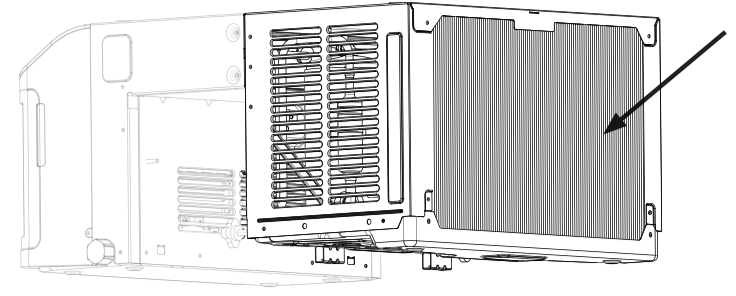
Side Filter:
Locate the tab on the left side of the unit and pull the filter straight out.
Plug Filter:
NOTE: Water will not come out after removing the cap, however it will begin to drain as soon as the Plug Filter is removed. Ensure to have the proper means of collecting water under the unit before removing the plug.
Locate the drain cap on the right side of the unit. Remove the cap, and pull the plug straight out.
CAUTION DO NOT operate the air conditioner without a filter because dirt and lint will clog it and reduce performance.
Outdoor Coils
The coils on the outdoor side of the air conditioner should be checked regularly. If they are clogged with dirt or soot, they may be professionally cleaned.
How to Insert the Batteries in the Remote Control
1. Remove the battery cover by sliding it according to the arrow direction.
2. Insert new batteries, making sure that the (+) and (-) of battery are installed correctly.
3. Reattach the cover by sliding it back into position.
NOTES:
■ Use 2 “AAA” (1.5 volt) batteries. Do not use rechargeable batteries.
■ Remove the batteries from the remote control if the system is not going to be used for a long time.
■ Do not mix old and new batteries. Do not mix standard (carbon-zinc) or rechargeable (ni-cad, ni-mh, etc) batteries.
Draining the Unit
Over time, the air conditioner will accumulate water on both the indoor and the outdoor sides. For various reasons, such as preparing for a cold season, this water will need to be removed from the unit.
NOTE: Before draining the Indoor side, ensure to have the proper means of collecting water under the unit. Locate the Drain Cap on the right side of the unit. Remove the Drain Cap and pull the Filter Plug straight out to drain the unit. Once the water stops, reinsert the Filter Plug and secure again with the Drain Cap.
NOTE: Only attempt to drain the Outdoor side if neccassary and you can safely access the unit from the outside. See Troubleshooting, Normal Operating Sounds section for more information on draining the Outdoor side.
Installation Instructions
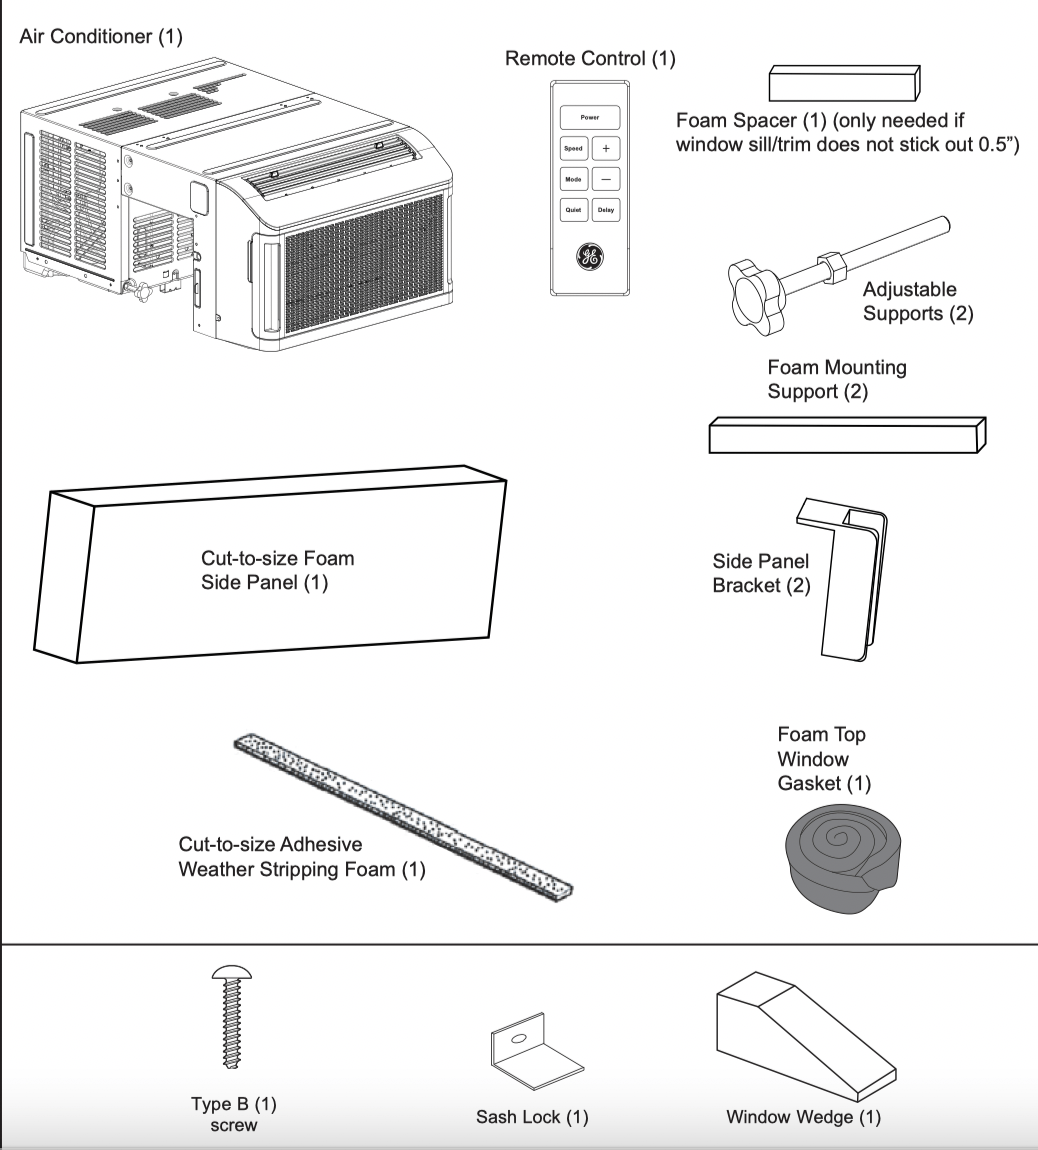
PARTS INCLUDED (Appearance may vary)
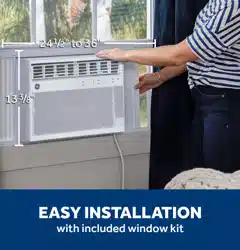
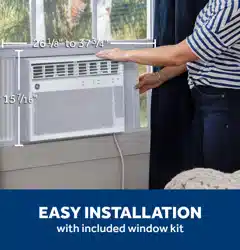
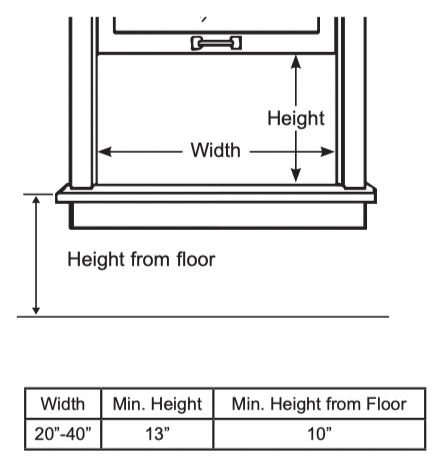
1. WINDOW REQUIREMENTS
• These instructions are for a standard double-hung window. You will need to modify them for other types of windows.
• The air conditioner can be installed without the side foam panels if needed to fit in a narrow window. See the window opening dimensions.
• All supporting parts must be secured to firm wood, masonry or metal.
• The electrical outlet must be within reach of the power cord.
• Follow the dimensions in the table and illustration for your model.
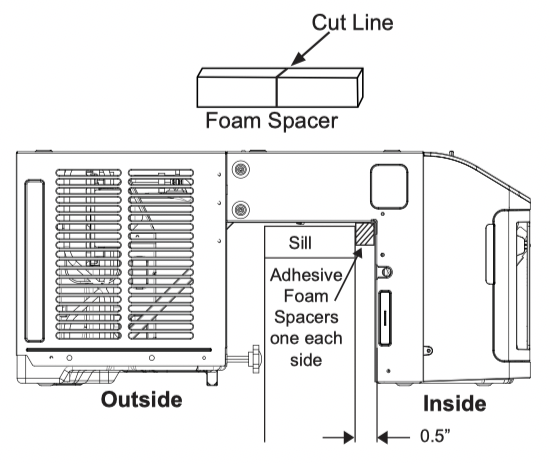
• Avoid blocking the vents on the back of the indoor side of the unit. There must be a MINIMUM gap of 0.5 inches between the interior wall and the back of the unit.
• Please follow the instructions below depending on your window.
IF your interior window sill/trim sticks out greater than 0.5” - no Foam Spacers are needed.
IF your interior window sill/trim DOES NOT stick out greater than 0.5” - two Foam Spacers are needed. Cut the provided Foam Spacer in half and attach each piece to the upper corners of the unit under the chase-way as seen below. This will create the neccasary gap.
Side view of Foam Spacer placement:
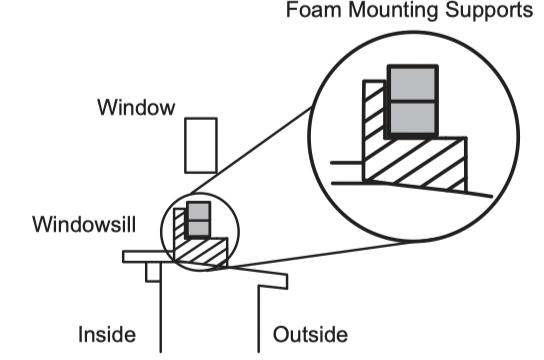
2. PREPARE THE AIR CONDITIONER
• Measure the width of the window opening and mark the center of the window opening.
• Center the Foam Mounting Support in the window opening, remove adhesive backing and install the necessary amount of Foam Mounting Supports needed to raise the unit above your window ledge.
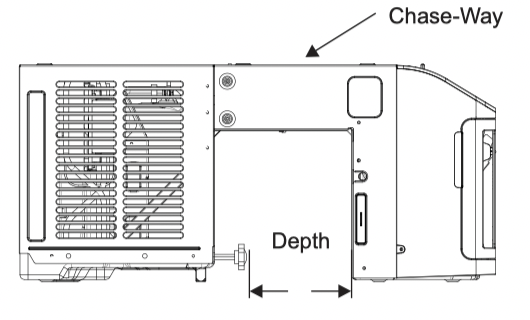
3. WALL REQUIREMENTS
• Measure your window depth and use the table below to determine the necessary chase-way position.
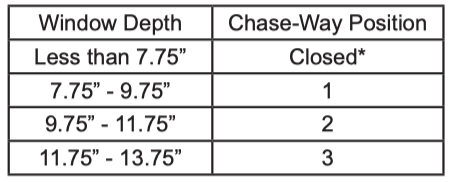

4. PREPARE THE AIR CONDITIONER
Adjusting the Chase-Way
• Measure window depth from interior to exterior. Use the table from Section 3 to determine the corresponding chase-way position.
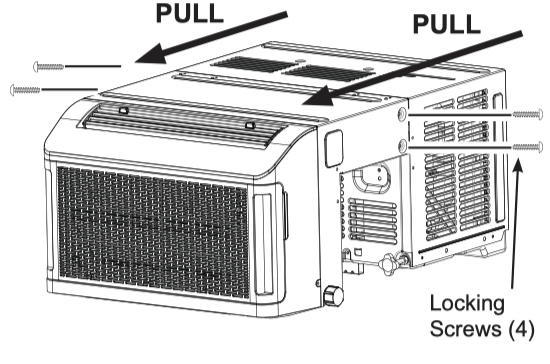
• Remove 4 locking screws that hold the chase-way in place.
• Pull chase-way to position needed based on your window depth.
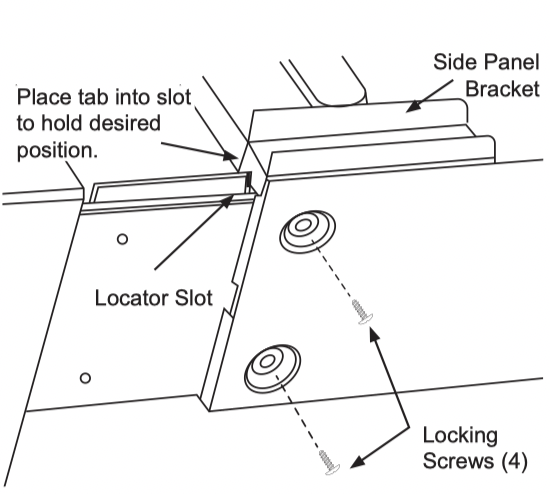
• Place tab of side panel bracket into slot on chase-way to hold position.
• Install the 4 screws (2 on each side) back into place to lock in chase-way.
5. INSTALL UNIT IN WINDOW
• Lift the unit into and over the window. Center the unit on the Foam Mounting Supports. *It is recommended that 2 people lift the unit and place into the window*.
Note: Be careful not to pinch fingers at the bottom of the chase-way.
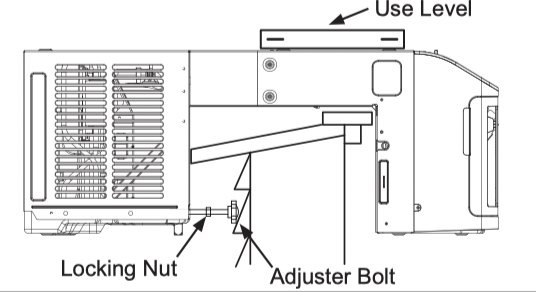
• Reach through the window opening and adjust the Adjustable Supports until the unit is secure against the outside wall. Using a level, check that the unit is level front to back and side to side. Once level and secure, reach back through the window and tighten the Locking Nut on the Adjustable Supports to secure everything in place.
6. INSTALLING SIDE FILLER PANELS
Attaching Side Panels
• Close the window and draw a line where the front edge of the window meets the top of the unit. Raise the window back up.
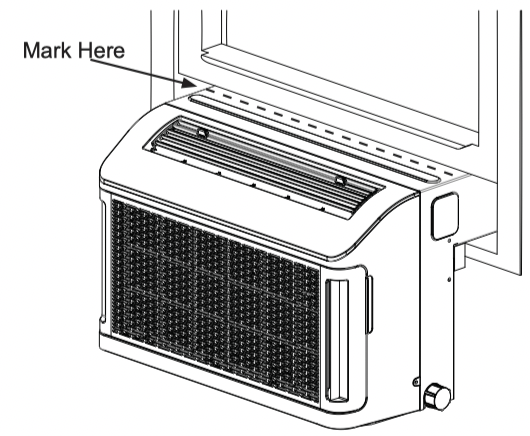
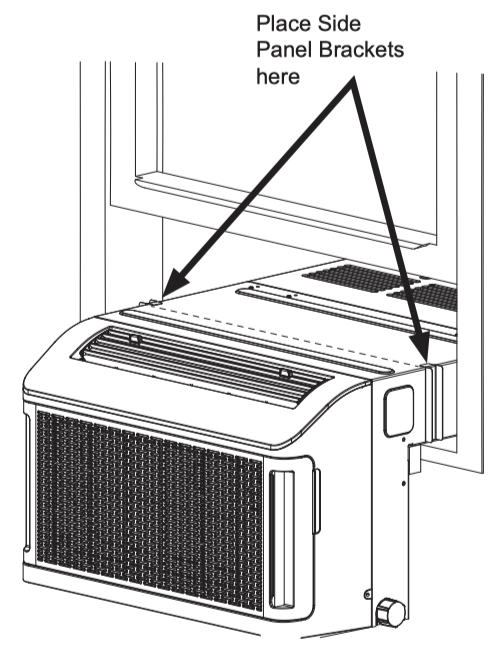
• Remove adhesive backing from the Side Panel Brackets. Place them onto unit so that the front edges are lined up with the drawn line as seen below.
• Measure the gaps from the side of the unit to the ends of the window and cut Foam Side Panels to size.
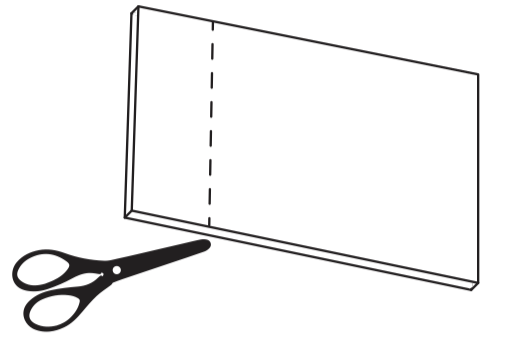
• Slide the Foam Side Panels into place within the Side Panel Brackets and ensure the gap to the end of the window is completely sealed.
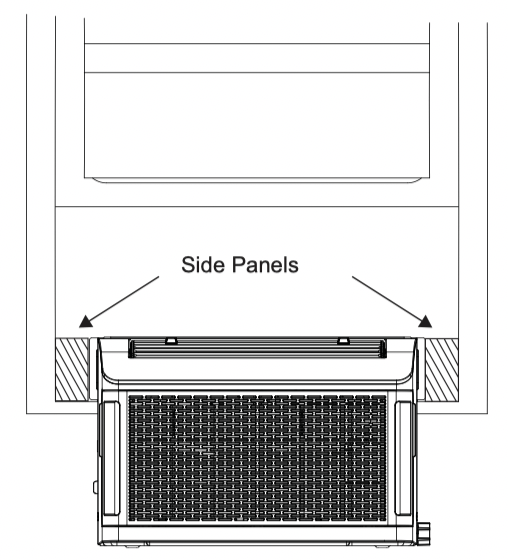
• Foam Side Panels must be flush with the top of the unit. If panel sticks above chase-way, mark and cut accordingly.
7. INSTALL WEATHER STRIPPING FOAM ADHESIVE
• Cut the Adhesive Weather Stripping Foam to the width of the window. Peel off the backing and lay the foam across the width of the window, over the unit and side panels (following the line drawn with the pencil). After laying the foam down, close the window on top of it.

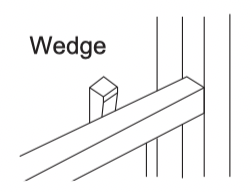
8. INSTALL WINDOW WEDGE, SASH LOCK, AND FOAM TOP WINDOW GASKET
A. A Window Wedge is supplied to provide easy access to open window when desired.
DISCLAIMER: The Window Wedge is primarily a convenience option and is not meant to be used for security. For something more secure, please consider the Sash Lock option below.
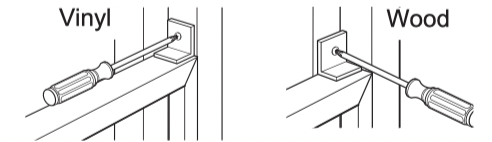
B. To provide additional security, a Sash Lock is provided. Attach the Sash Lock to the window side jamb with one Type B screw.
C. Stuff the Foam Top Window Gasket between the glass and the window to prevent air and insects from getting into the room.
The foam may need to be cut to fit depending on the window wedge position.
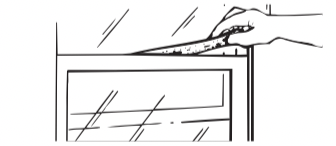
NOTE: If the gasket supplied does not fit your window, obtain appropriate material locally to provide a proper installation seal.
Troubleshooting
|
Problem
|
Possible Causes
|
What To Do
|
|
Unit displays error code “P1” and shuts unit off
|
The pump has had a problem or failed.
|
Drain indoor side of unit per instructions in the Care and Cleaning, Draining the Unit section. Hold down the SLEEP button for 3 seconds to clear error message. If the error code persists, the pump will need to be serviced.
|
|
Unit displays error code “FL” and shuts unit off
|
Internal tray is full.
|
Drain indoor side of unit per instructions in the Care and Cleaning, Draining the Unit section. Hold down the SLEEP button for 3 seconds to clear error message if still showing. If the error code persists, the pump will need to be serviced.
|
|
Air conditioner does not start
|
The air conditioner is unplugged.
|
Make sure the air conditioner plug is pushed completely into the outlet.
|
|
The fuse is blown/circuit breaker is tripped.
|
Check the house fuse/circuit breaker box and replace the fuse or reset the breaker.
|
|
Power failure.
|
The unit will automatically restart in the settings last used after the power is restored.
|
|
There is a protective time delay (approximately 3 minutes) to prevent tripping of the compressor overload. For this reason, the unit may not start normal cooling for 3 minutes after it is turned back on.
|
|
The current interrupter device is tripped.
|
Press the RESET button located on the power cord plug.
|
|
If the RESET button will not stay engaged, discontinue use of the air conditioner and contact a qualified service technician.
|
|
Air conditioner does not cool as it should
|
Airflow is restricted.
|
Make sure there are no curtains, blinds or furniture blocking the vents on the front, bottom, and back of the air conditioner.
|
|
The temp control may not be set correctly.
|
On models with touch pads: In the Cool mode, press the Decrease – pad.
|
|
On models with control knobs, turn the temperature knob to a higher number.
|
|
The air filter is dirty.
|
Clean the filter at least every 250 hours. See the Care and Cleaning section.
|
|
The room may have been hot.
|
When the air conditioner is first turned on, you need to allow time for the room to cool down.
|
|
Cold air is escaping.
|
Check for open furnace registers and cold air returns.
|
|
Cooling coils have iced up.
|
See “Air conditioner freezing up” below.
|
|
Air conditioner freezing up
|
Ice blocks the air flow and stops the air conditioner from cooling the room.
|
On models with control knobs, set the mode control at High Fan or High Cool with the Temp at 1 or 2.
|
|
On models with touch pads, set the controls at High Fan or High Cool and set the thermostat to a higher temperature.
|
|
The remote control is not working
|
The batteries are inserted incorrectly.
|
Check the position of the batteries. They should be inserted in the opposite (+) and (–) direction.
|
|
The batteries may be dead.
|
Replace the batteries.
|
|
Water drips outside
|
Hot, humid weather.
|
This is normal.
|
|
Water drips indoors
|
The air conditioner is not tilted to the outside.
|
For proper water disposal, make sure the air conditioner slants slightly from the case front to the rear.
|
|
Drain plug is unplugged
|
Make sure plug is pressed all the way into the unit.
|
|
The air conditioner is not level from left to right
|
Ensure that the unit is level.
|
|
Water collects in base pan
|
Moisture removed from air and drains into base pan.
|
This is normal for a short period in areas with little humidity; normal for a longer period in very humid areas.
|
Normal Operating Sounds
■ You may hear a pinging noise caused by water being picked up and thrown against the condenser on rainy days or when the humidity is high. This design feature helps remove moisture and improve efficiency.
■ You may hear the thermostat click when the compressor cycles on and off.
■ Water will collect in the base pan during high humidity or on rainy days. The water may overflow and drip from the outdoor side of the unit.
■ The fan may run even when the compressor does not.
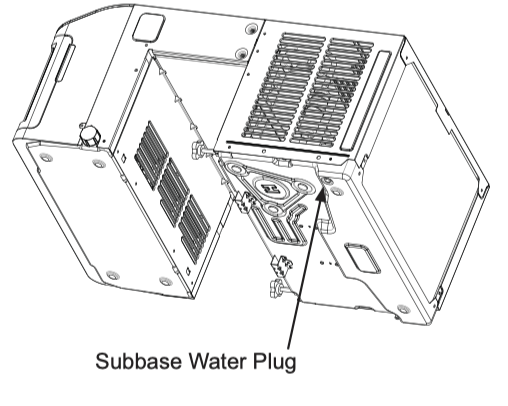
■ To ensure maximum efficiency, it is recommended to check and see that the rubber Subbase Water Plug is properly inserted. This plug may be removed during operation to minimize water in the back of the unit; however, removing it will lower the efficiency of your unit.
■ Water droplets being thrown against the outside coils can make a pinging noise. This helps cool the condenser. You can reduce this noise by opening the water hole seal located on the lower right side of the unit. Opening this seal will lower the Energy Efficiency of your unit.
NOTE: Do not drill hole in the base pan.
WiFi Setup
GE Appliances SmartHQ (for customers in the United States)
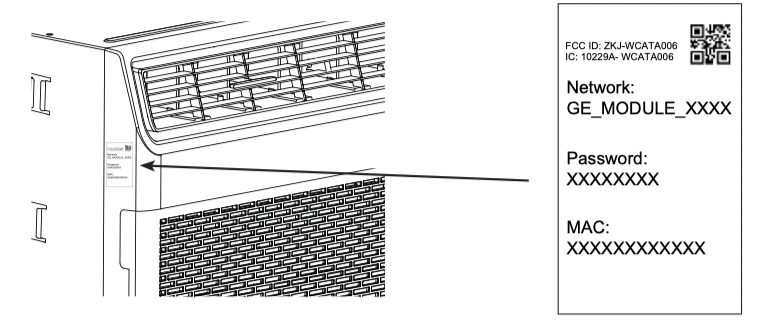
GE Appliances SmartHQ Enabled*. If your Air Conditioner (AC) has a Connected Appliance Information label located on the outside as shown below, your AC is GE Appliances SmartHQ Enabled. A WiFi communication card is built into the product allowing it to communicate with your smart phone for remote monitoring, control and notifications. Please visit GEAppliances/connect to learn more about connected appliance features, and to learn what connected appliance apps will work with your smart phone.
WiFi Connectivity: For assistance with the appliance or the ConnectPlus network connectivity (for models that are WiFi enabled or WiFi optional), please call 1-800-220-6899.
How it Works
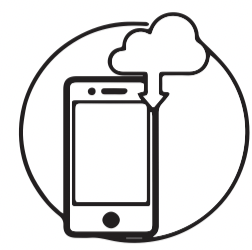
Download the GE Appliances App
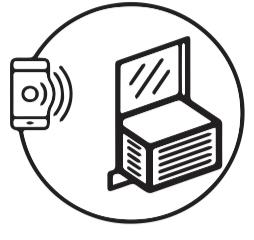
Use the app to connect your room air conditioner to WiFi
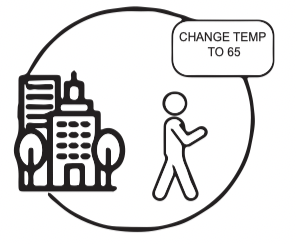
Once connected, use the app to turn down your air conditioner as you leave work.
Getting Started
To connect your room air conditioner, you’ll need the GE Appliances App. The app will walk you through the connection process. Download the app from iTunes or Google Play.
REGULATORY INFORMATION FCC/IC Compliance Statement:
This device complies with Part 15 of the FCC Rules. Operation is subject to the following two conditions:
1. This device may not cause harmful interference.
2. This device must accept any interference received, including interference that may cause undesired operation.
This equipment has been tested and found to comply with the limits for a Class B digital device, pursuant to Part 15 of the FCC Rules. These limits are designed to provide reasonable protection against harmful interference in a residential installation. This equipment generates uses and can radiate radio frequency energy and, if not installed and used in accordance with the instructions, may cause harmful interference to radio communications. However, there is no guarantee that interference will not occur in a particular installation. If this equipment does cause harmful interference to radio or television reception, which can be determined by turning the equipment off and on, the user is encouraged to try to correct the interference by one or more of the following measures:
• Reorient or relocate the receiving antenna.
• Increase the separation between the equipment and receiver.
• Connect the equipment into an outlet on a circuit different from that to which the receiver is connected.
• Consult the dealer or an experienced radio/television technician for help.
Labelling: Changes or modifications to this unit not expressly approved by the manufacturer could void the user’s authority to operate the equipment.
*Select Models Only
This product has Wi-Fi capability and requires Internet connectivity and a wireless router to enable interconnection with an Energy Management System, and/or with other external devices, systems or applications.